

Sage Scraper Mixer Pro BEM800UK Instruction Book
the Scraper Mixer Pro
™
Instruction Book / Betjeningsvejledning / Instruksjonsbok
Ohjekirja / Instruktionsbok
BEM800UK
EN User manual
DK Brugermanual
NO Bruksanvisning
FI Käyttöopas
SE Bruksanvisning
COMPONENTS / KOMPONENTER / DELER / RAKENNEOSAT / DELAR
2
1
3
4
5
6
7 10
8
9
12 13 14 15
11
2

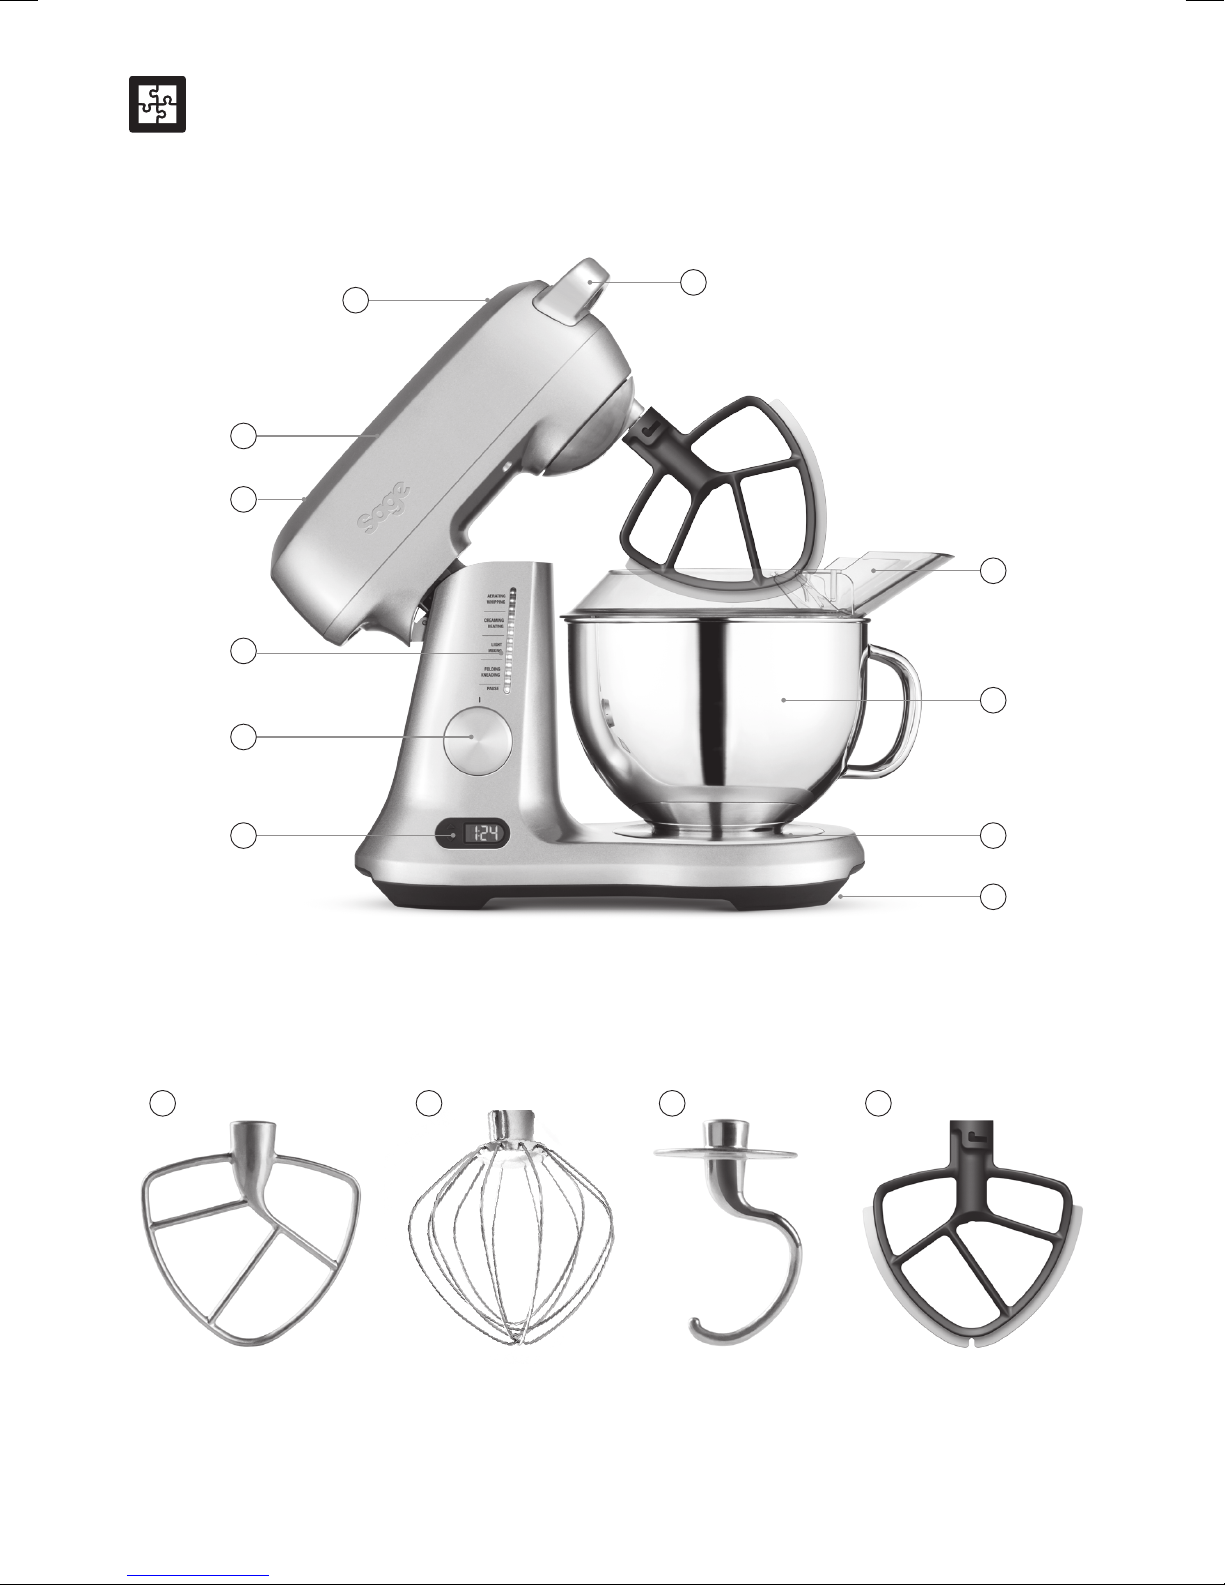
Sage Assist™ handles / Sage Assist™ håndtag / Sage Assist™ håndtak / Sage Assist™ -kahvat / Sage Assist™ Handtag
1
Motor head / Motorhoved / Motor / Moottoripää / Motorhuvud
2
Load Sensing Technology / Teknologi til vægtbestemmelse / Vektsensor / Kuormituksen tunnistusteknologia / Belastningsavkännande teknologi
3
Tilt back and lock down hinge button / Vippe- og lukkeknap / Utløserknapp / Kallistus- ja saranan lukituspainike / Knapp för att fälla upp och ned
4
motorhuvudet
Illuminated LED speed indicator band / Oplyst LED-hastighedsindikator / LED-lys som viser hastighet / LED-valaistu nopeusilmaisin / Upplyst
5
LED hastighetsmätarband
Speed control dial with pause function / Hastighedskontrol med pausefunktion / Hastighetshjul med pausefunksjon / Nopeudensäädin
6
taukotoiminnolla / Hastighetskontroll med pausfunktion
LCD screen with count up & down timer / LCD-skærm med timer, der tæller op og ned / LCD-skjerm med tidsmåler / LCD-näyttö, jossa ylös- ja
7
alaslaskeva ajastin / LCD-skärm med upp- och nedräknande tidur
Splash guard / Stænkskærm / Bollekant / Roiskesuoja / Stänkskydd
8
4.7L stainless steel mixing bowl with handle / 4.7 l skål i rustfrit stål med håndtag / 4,7 l rustfritt stålbolle med håndtak / 4,7 l kahvallinen kulho
9
ruostumatonta terästä / 4,7 l bunke i rostfritt stål med handtag
Bowl locking recess / Fastsikring af skål / Bollefeste / Kulhon lukitusalusta / Fördjupning där bunken låses fast
10
Internal Cord Storage / Indvendig opbevaring af ledning / Lagring av ledning / Johdon säilytys laitteen sisällä / Inbyggd sladdförvaring
11
Flat beater / Fladt piskeris / Flat rørespade / Lapavatkain / Flatblandare /platt visp
12
13
Wire whisk / Ballonpiskeris / Visp / Lankavispilä / Ballongvisp
Dough hook / Dejkrog / Deigkrok / Taikinakoukku / Degkrok
14
Scraper beater / Fladt piskeris med skraber / Skrapespade / Kaapiva vatkain / Skrapblandare
15
3
ASSEMBLY & DISASSEMBLY / MONTERING OG AFMONTERING /
MONTERING OG DEMONTERING / KOKOAMINEN & PURKAMINEN /
MONTERING OCH DEMONTERING
1
3
2
4
OPERATION / ANVENDELSE / BRUK / KÄYTTÖ / DRIFT
5
4

ENGLISH
At Sage™ by Heston Blumenthal® we are very safety conscious. We design
and manufacture consumer products with the safety of you, our valued
customer, foremost in mind. In addition we ask that you exercise a degree
of care when using any electrical appliance and adhere to the following
precautions.
IMPORTANT SAFEGUARDS
READ ALL INSTRUCTIONS BEFORE USE AND SAVE FOR FUTURE
REFERENCE
• Remove and safely discard any packaging material and promotional
labels before using the bench mixer for the rst time.
• Do not attempt to operate the bench mixer by any method other than that
it is intended and described in this booklet.
• Before using for the rst time please ensure that your electricity supply is
the same as shown on the rating label on the underside of the appliance.
If you have any concerns please contact your local electricity company.
• Do not place the bench mixer near the edge of a bench or table during
operation. Ensure the surface is level, clean and free of water, our, etc.
Vibration during operation may cause the appliance to move.
• Do not use the bench mixer on a sink drain board.
• Do not place this appliance on or near a hot gas or electric burner, or
where it could touch a heated oven.
• Always make sure the bench mixer is completely assembled before
operating. Follow the instructions provided in this book.
• Ensure the motor, blades or discs have completely stopped before
disassembling. Ensure the OFF button has been pressed and the
appliance is switched off at the power outlet and unplugged when not
in use, if left unattended and before assembling and disassembling,
cleaning or storing.
• Switch off the appliance and disconnect from power supply before
changing accessories or approaching parts that move in use. Motor must
be fully stopped before unlocking the motor head and moving into the
upright position.
• Do not use attachments other than those provided with the bench mixer.
Use only the beater whisk and dough hook supplied with the mixer.
• Handle the bench mixer and attachments with care. Keep hands, hair,
clothing, as well as, spatulas and other utensils away from moving beater,
whisk or dough hook during operation.
• Should an object such as a spoon or spatula fall into the bowl while
mixing, immediately ensure the speed control dial is in the OFF position,
turn the bench mixer off, unplug at the power outlet and remove
the object.
• Motor head should be locked into the horizontal (closed) position when
not in use and before storing.
• Do not move the bench mixer whilst in operation.
• Do not place any part of the bench mixer in the dishwasher other than the
bowl, splash guard, beater, dough hook and whisk.
• Do not place any part of the bench mixer in the microwave oven.
• Keep the bench mixer clean. Follow the cleaning instructions provided
in this book.
• Under heavy load, the mixer shall not be operated for more than
10 minutes. Heavy load is dened as per the appliance safety standard
specied load (800g bread our and 375g water for 10 minutes). Any load
equivalent or heavier should not be operated for more than 10 minutes.
IMPORTANT SAFEGUARDS FOR ALL ELECTRICAL APPLIANCES
• Unwind power cord fully before use.
• Do not let the power cord hang over the edge of a table, counter, touch
hot surfaces or become knotted.
• To protect against electric shock do not immerse the power cord, power
plug or appliance in water or any other liquid.
• This appliance is for household use only. Do not use this appliance for
anything other than its intended use. Misuse may cause injury.
• In order to avoid a hazard due to inadvertent resetting of the thermal cut
out this appliance must not be supplied through an external switching
device such as a timer or connected to a circuit that it regularly switched
on and off by the utility.
• Children shall not play with the appliance.
• This appliance is not intended for use by persons with reduced physical,
sensory or mental capabilities, lack of experience and knowledge,
or children unless they have been given supervision or instruction
concerning use of the appliance by a person responsible for their safety.
Keep the appliance and its cord out of the reach of children.
• Do not use the appliance if power cord, power plug or appliance
becomes damaged in any way. If damaged or maintenance other than
cleaning is required, please contact Sage™ by Heston Blumenthal
Customer Service.
The symbol shown indicates that this appliance should not
be disposed of in normal household waste. It should be taken
to a local authority waste collection centre designated for
this purpose or to a dealer providing this service. For more
information, please contact your local council ofce.
®
5

ASSEMBLY &
DISASSEMBLY
BEFORE FIRST USE
• Wash bowl and mixing tools in warm soapy water with a soft cloth. Rinse
and dry thoroughly.
• The bowl and the attachments may be washed in the dishwasher.
• When rst using your bench mixer, you may notice an odour coming from
the motor. This is normal and will dissipate with use.
OPERATION
USING THE SCRAPER BEATER
The Scraper Beater can be used for a variety of mixing tasks.
Due to the efcient mixing action of the Scraper Beater, the mixing time
of many recipes will be reduced. Refer to the chart below for approximate
mixing times. These are a guide only. Longer mixing times may be required
for larger or double quantities (see table 1).
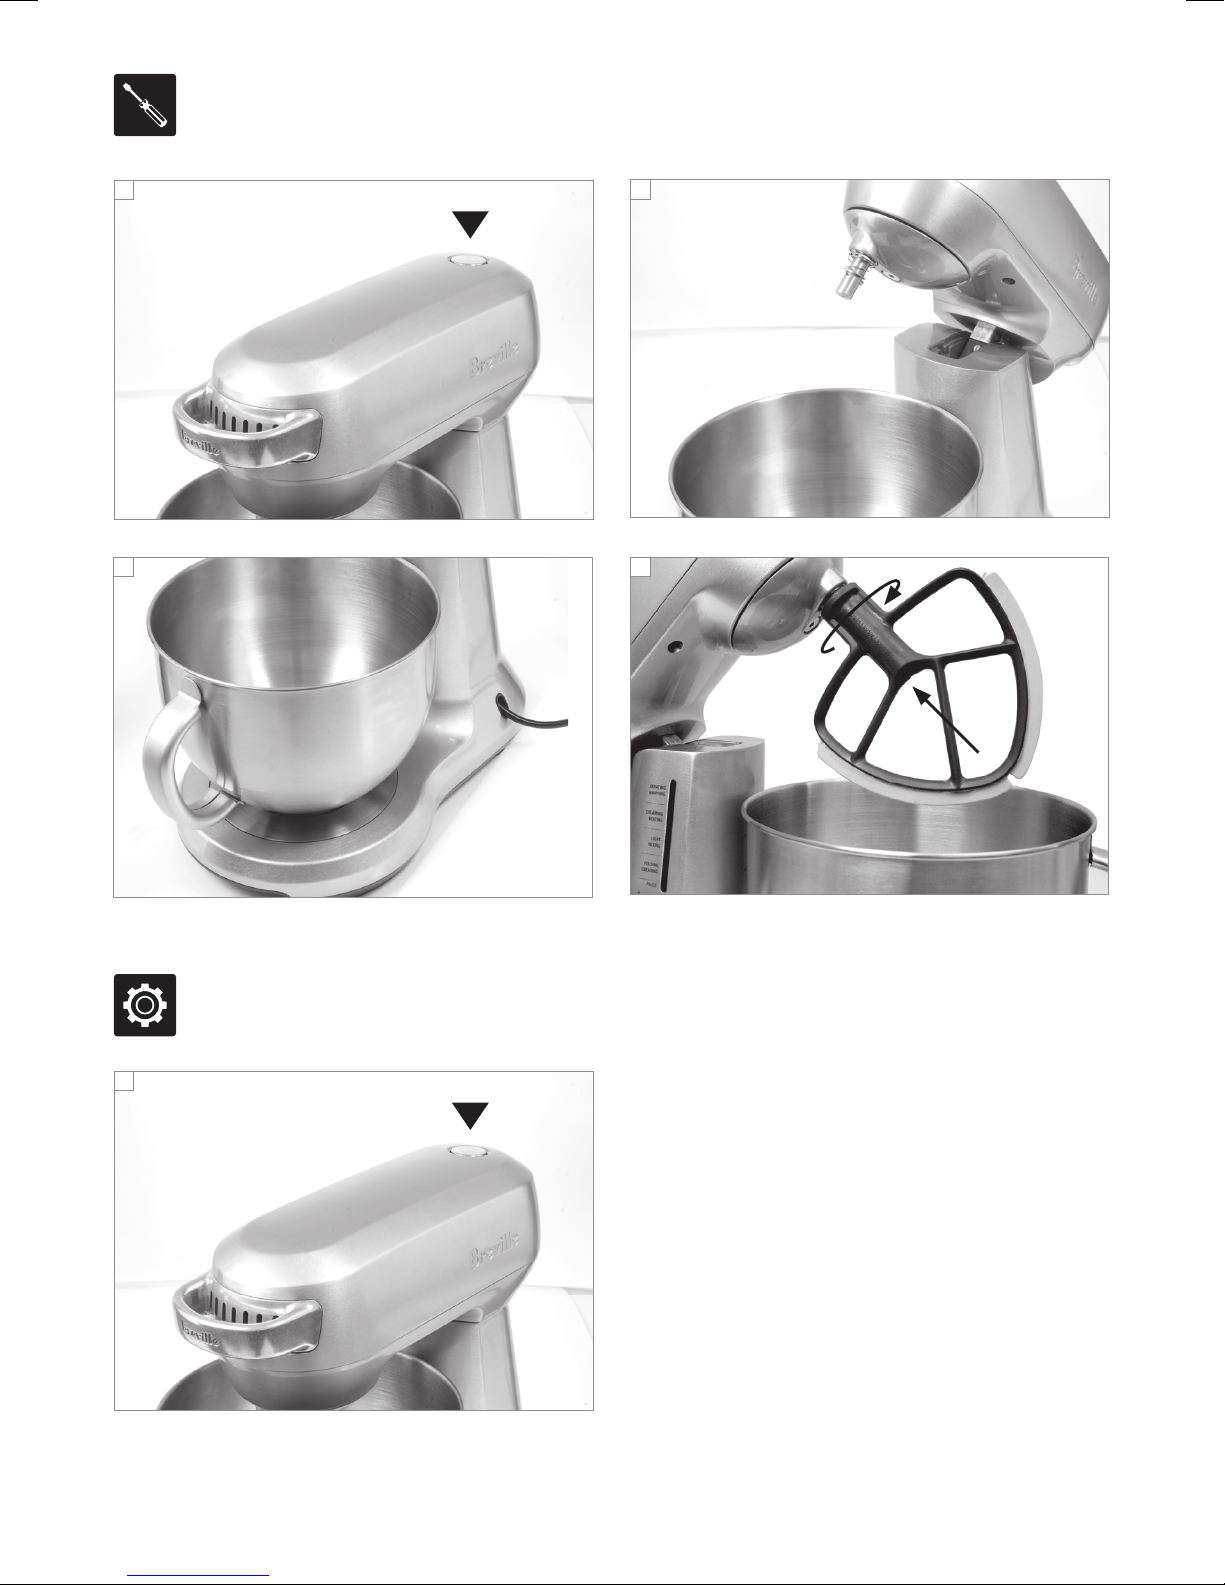
ATTACHING THE BOWL
1. The mixer motor head should be in the horizontal (closed) position
when moving.
2. To remove or insert the mixing bowl, the mixer motor head must be
raised and locked into the open position. Raise the mixer motor head
by pressing the TILT RELEASE button (see g.
3. Lift the motor head up until it tilts back and locks into the open position
(see g.
4. Insert the bowl into the bowl locking recess and turn clockwise until the
bowl locks securely into place (see g.
ATTACHING MIXING AND WHISKING TOOLS
1. Raise the motor head by pressing the TILT RELEASE button.
2. Align the groove in the top of the mixing attachment with the locking pin
on the spindle extending down from the mixer motor head.
3. Push the attachment upwards and turn clockwise until it locks securely
onto the locking pin on the spindle (see g.
4. Lower the motor head by pressing the TILT RELEASE button and
gently lowering until it locks into the closed position.
5. The splatter guard can now be assembled if required. Slide the main
ring into position on top of bowl, then assemble the pour spout.
DISASSEMBLING THE MIXER
1. When mixing is complete, turn the speed control dial to the
OFF|STANDBY position, switch the appliance off at the power outlet
and unplug the cord.
2. To remove splash guard, separate the pour spout, then slide main ring
out of position.
3. Raise the mixer motor head by pressing the TILT RELEASE button.
Lift the motor head up until it locks into the open position.
4. Remove the mixing or whisking tool by holding the mixer motor
head and pressing the tool upwards on the spindle. Then turn the
attachment anti-clockwise to TILT RELEASE it from the pin on
the spindle.
5. TILT RELEASE and remove the mixing bowl from locking recess on
mixer base by turning anti-clockwise.
6. Lower the mixer motor head by pressing the TILT RELEASE button
and lowering the mixer motor head down until it locks into the
horizontal position.
When lowering or lifting the mixer, always support the motor head with your
other hand to prevent from free-falling.
TIP
2
).
1
).
3
).
4
).
NOTE
Do not use the Scraper Beater for mixing heavy batters, doughs, whisking
egg whites or whipping potatoes.
TIP
• When adding our to the mixing bowl, always use the pouring shield and
ensure the mixer is on the FOLD/KNEAD setting. This will prevent our
from escaping the mixing bowl.
• The Scraper Beater can also be used as a spatula when removing
mixtures from the mixing bowl.
FUNCTIONS
OPERATING THE MIXER
1. Ensure the power cord is unplugged and the speed control dial is in
the OFF position.
2. Assemble the bowl and mixing / whisking tool, as noted in the previous
section.
3. Press the TILT RELEASE button and lower the mixer head until it locks
into the closed position (see g.
4. Attach the pouring shield, if desired.
5. The LED’s on the speed indicator will illuminate one-by-one all the way
to the top, then turn off one-by-one. The LCD screen will display 0:00.
6. Always begin mixing by selecting a low speed setting on the speed
control dial. Increase the speed as suited to the mixing task. If
necessary, stop the mixer during operation and scrape any food
mixture down the sides of the mixing bowl with a spatula.
7. If the mixer has not been used for 5 minutes it will automatically
change from STANDBY mode to a power saving OFF mode and the
illuminated LED will switch off. To exit OFF mode and begin mixing,
turn the dial to the selected speed or press one of the count up/down
timer buttons.
8. Do not turn the mixer on with the scraper beater in place if the mixing
bowl is empty. This will cause the scraper beater to make a loud noise
as it scrapes the bowl.
9. When ingredients are in the mixing bowl, the scraper beater may make
a slight noise as it scrapes the sides and bottom of the bowl. This is
normal and should not cause concern.
10. Under heavier loads or extended mixing time, the motor head may
become warm. This is normal and should not cause concern.
5
).
6
COUNT-UP TIMER
• The count-up timer is for gauging mixing time, making it easier to repeat
the results.
• Set the count-up timer using the arrow buttons beside the LCD. The timer
will automatically begin counting up as soon as the dial is turned to one
of the speed settings.
• When the dial is turned to PAUSE, the current mixing time will ash
on the display. When the dial is turned to OFF, the LCD will reset back
to 0:00.
• The maximum count up time is 1 hour. When the timer goes beyond
9:59, it counts in whole minutes. Turn the speed control dial back to OFF
to reset.
COUNT-DOWN TIMER
• The count-down timer is for any recipe that species the length of time
ingredients should be mixed.
• To set the count-down timer, press the up or down arrows until the
desired mixing time is displayed on the LCD screen. Press and hold to
scroll more quickly.
• Rotate the dial to select the desired speed, and begin mixing. When the
timer has nished counting down, it will beep. The motor will automatically
turn off and the timer will ash OFF.
• The control dial must to be rotated to the OFF position to reset the timer
and to continue mixing.
• Turn the speed control dial back to OFF to reset.
PAUSE MODE
• At any stage during mixing (either count-up or count-down mode), rotate
the speed control dial to PAUSE. This will turn the mixer off and hold the
current time on the LCD.
• Add additional ingredients as needed, and turn the dial back to a speed
setting to continue as before.
• Turn the dial to OFF to reset the timer.
WARNING
Avoid contact with beater/dough hook/ whisk during operation. Keep hands,
hair, clothing, spatulas and other utensils out of the way to prevent personal
injury or damage to the mixer.
CARE & CLEANING
MOTOR HEAD AND MIXER BASE
• Do not wash or immerse the mixer motor head or mixer base in water.
Do not allow water or other liquids to enter the gear system, as this may
result in damage.
• Wipe clean with a soft, damp cloth then dry thoroughly. Wipe any excess
food particles from the power cord.
CLEANING AGENTS
• Do not use abrasive scouring pads or cleaners on the mixing bowl, at
beater, dough hook or whisk, as they may scratch the surface. Use only
warm soapy water with a soft cloth.
• Also do not soak attachments for extended periods of time, for example
several hours or overnight, as this may damage the nish.
BOWL AND ATTACHMENTS
Wash the bowl and attachments (beater, scraper beater, whisk and dough
hook) with warm soapy water and a soft cloth or a soft bristled brush. Rinse
and dry thoroughly.
DISHWASHER
The bowl and attachments (beater, scraper beater, whisk and dough hook)
can also be washed in the dishwasher on a standard wash cycle.
Place scraper beater on the top shelf only.
STORAGE
• Store your mixer on the kitchen bench, or upright in an accessible
cupboard.
• Store the mixing bowl locked into the bowl recess.
• Place the attachments inside the mixing bowl and lower the mixer head
into the horizontal (closed) position.
• Do not take off the motor head for any purpose.
Mixture Mixing task Approx. mixing time
Butter & sugar Creaming
Cake, mufn batter Incorporating wet and dry ingredients 30–40 seconds (or until all ingredients are combined)
Biscuits & cookie mixtures Incorporating wet and dry ingredients 30–40 seconds (or until all ingredients are well
Thin/light batters (ie. Pancakes) Incorporating wet and dry ingredients 30–40 seconds (or until all ingredients are combined)
Icing Incorporating wet and dry ingredients 40–50 seconds (or until all icing is smooth)
Frosting Creaming butter
Combining icing sugar, butter & liquid ingredients
Table 1: Using the Scraper Beater
1–4 minutes (or until mixture is pale and creamy)
combined)
1–2 minutes (or until butter is smooth & creamy)
50–60 seconds (or until mixture is light and uffy)
7

TROUBLESHOOTING
Motor head safety cut-off • The mixer is equipped with a motor head safety cut-off. If the mixer head is lifted up at any time while the
mixer motor is switched on, the safety cut-off will automatically switch the motor off and set the mixer into
standby mode.
• To restart the motor within 5 minutes, lower the mixer head into the horizontal (closed) position, and turn the dial
away then back to the required speed setting. This will resume mixing and the timer will resume counting.
• To restart the motor after 5 minutes or more, lower the mixer head and turn the dial to OFF then back to the
required speed. The timer will start from 0.
• To turn the mixer off (instead of restarting), turn the dial to OFF, and unplug from the wall.
Electronic protection cut-off
(current overload)
Thermo protection cut-off
(temperature overload)
Machine will
not work when switched ON
Cannot set the time on the
count-down timer
Mixer suddenly switches off
during mixing
• The mixer is equipped with an electric protection cut-off and will automatically stop operating if the motor is
stalled or overloaded. This is normally due to excessive quantity in the mixing bowl.
• Should the mixer go into this mode, the LED indicator band will ash and the error message “E1” will ash on the
LCD screen and the buzzer will beep 3 times.
• If this error occurs, turn the speed control dial to the OFF position, switch the appliance off at the power outlet
and unplug the cord. Remove some of the ingredients in the mixing bowl and then restart the mixer.
• The mixer is equipped with a self-resetting safety device which safeguards against overheating the motor with
excessive loads. If overheating occurs, the mixer will automatically activate the overheating protection device
and the motor will switch itself off. If this error occurs, turn the speed control dial to the ‘OFF’ position, switch the
appliance off at the power outlet and unplug the cord. Wait at least 15 minutes before restarting the mixer.
• Should the mixer go into this mode, the LED indicator band will ash and the error message “E2” will ash on the
LCD screen and the buzzer will “beep” 3 times.
• If this error occurs, turn the speed control dial to the ‘OFF’ position, switch the appliance off at the power outlet
and unplug the cord. Wait at least 15 minutes before restarting the mixer.
• Always ensure the speed control dial is in the OFF position before start.
• The temperature overload protection (thermo cut-off) device has not been activated automatically, allow more
time for the motor to cool down.
• Always ensure the speed control dial is in the OFF position before trying to set the count-down time.
• The mixer has been stressed by overloading or stalling. The mixer will automatically activate the overload
protection button and the unit will switch itself off. If this happens, switch the mixer off at the outlet and unplug
it for at least 15 minutes. The overload protection device will reset, and the mixer will be ready to use again
when it powers back into standby mode.
“E1” error message is ashing
on the count-up/down timer
display
“E2” error message is ashing
on the count-up/down timer
display
Noise is heard
when scraper beater is mixing
• The mixer will automatically stop operating if the motor is stalled. If this occurs, the ‘E1’ error message will ash
on the count-up/down timer display. This is an electronic safety feature. This is normally a result of too much
ingredients being processed at one time. Try removing some of the ingredients from the bowl. To continue
mixing, turn the speed control dial to the off position and unplug the mixer from the power outlet. Then plug the
mixer into the power outlet and use as normal.
• This may indicate that the motor has been stressed by overheating with excessive load. The mixer is tted with
a self-resetting safety device which safeguards against overheating on the motor with excessive loads.
If overheating occurs, the mixer will automatically activate the overheating protection device and the motor
will switch itself off. When the overheating protection is activated, unplug the mixer from the power outlet for at
least 15 minutes to allow the unit to cool. Turn the speed control dial to the OFF position then plug the mixer
into the power outlet and use as normal.
• When ingredients are in the mixing bowl, the scraper beater may make a slight noise as it scrapes the sides
and bottom of the bowl. This is normal and should not cause concern. Do not turn the mixer on with the
scraper beater in place if the mixing bowl is empty. This will cause the scraper beater to make a loud noise as
it scrapes the bowl.
8

DANSK
Hos Sage™ by Heston Blumenthal® er vi meget sikkerhedsbevidste.
Vi designer og fremstiller først og fremmest produkter med vores kunders
sikkerhed i tankerne. Derudover beder vi om, at du udviser varsomhed, når
du bruger et elektrisk apparat og overholder de følgende forholdsregler.
VIGTIGE SIKKERHEDSFORANSTALTNINGER
LÆS HELE BRUGSANVISNINGEN FØR APPARATET TAGES I BRUG
OG GEM DEN TIL SENERE BRUG
• Fjern al emballage og mærkater før røremaskinen tages i brug første
gang.
• Røremaskinen må ikke betjenes på anden måde end den tilsigtede og
beskrevne i denne folder.
• Før maskinen tages i brug første gang, skal du sikre, at din elforsyning er
den samme som vist i bunden af apparatet.
• Hvis du har spørgsmål i den forbindelse, skal du kontakte dit lokale
elselskab.
• Placer ikke røremaskinen nær kanten af en bordplade under brug.
Sørg for at overaden er jævn, ren og fri for vand, mel osv.
• Rystelser under brug kan få apparatet til at ytte sig.
• Brug ikke røremaskinen hvis den er placeret på en aøbsbakke.
• Placer ikke apparatet på eller i nærheden af et varmt gasblus,
en kogeplade eller med kontakt til en varm ovn.
• Sørg altid for, at røremaskinen er korrekt samlet før brug.
Følg anvisningerne i denne folder.
• Motor, klinge eller lign. skal være helt stoppet, før maskindelene
afmonteres. Røremaskinen slukkes på OFF og ledningen tages ud
af stikkontakten, når maskinen er uden opsyn, ikke er i brug - og før
samling, adskillelse, rengøring og opbevaring.
• Sluk for apparatet og tag stikket ud af stikkontakten, før du fjerner
de bevægelige dele. Motoren skal være fuldstændig stoppet, før
motorhovedet løftes op i den opretstående position.
• Brug ikke andet tilbehør end det, der følger med røremaskinen.
Brug kun det piskeris og den dejkrog, der følger med.
• Betjen røremaskinen og brug tilbehøret med omhu. Hold hænder, hår,
tøj, spartler og andre redskaber væk fra røremaskinen, piskeriset eller
dejkrogen under brug.
• Hvis en genstand – som eksempelvis en ske eller en spartel - falder
ned i skålen, mens maskinen er i brug, skal du straks sørge for, at
hastighedsknappen står på OFF og slukke for røremaskinen, tage stikket
ud af stikkontakten og derefter fjerne genstanden.
• Motorhovedet placeres i den vandrette (lukkede) position, når maskinen
ikke er i brug og når den skal opbevares.
• Flyt ikke røremaskinen, mens den er i drift.
• Placer kun følgende dele i opvaskemaskinen: Skål, dejkrog,
stænkskærm og piskeris.
• Røremaskinens dele må ikke placeres i en mikrobølgeovnen.
• Hold røremaskinen ren. Følg rengøringsvejledningen.
• Røremaskinen må ikke bruges i mere end 10 minutter, hvis der er tale
om et tungt indhold. Det er deneret efter følgende sikkerhedsstandarder:
800 gram mel og 375 gram vand i 10 minutter. Hvis indholdet vejer dette
eller er tungere, bør apparatet ikke betjenes i mere end 10 minutter.
VIGTIGE SIKKERHEDSFORANSTALTNINGER FOR ALLE
ELEKTRISKE APPARATER
• Ledningen skal være viklet helt ud før brug.
• Sørg for, at ledningen ikke hænger ud over bordkanten, berører varme
overader eller vikles sammen.
• For at undgå elektrisk stød må hverken ledning, stik eller maskinen
sænkes i vand eller anden væske.
• Apparatet er kun til husholdningsbrug. Brug ikke maskinen til andet end
det tiltænkte formål. Forkert brug kan medføre skader.
• For at undgå fare på grund af utilsigtede nulstillinger må apparatet ikke
tilsluttes en ekstern skifteenhed - såsom en timer eller forbindes til et
kredsløb, der jævnligt tændes og slukkes.
• Børn må ikke lege med maskinen.
• Maskinen er ikke beregnet til brug af personer med nedsatte fysiske,
sensoriske eller mentale evner, manglende erfaring og viden, eller af
børn - medmindre de er blevet vejledt og instrueret i brugen af apparatet
af en person med ansvar for deres sikkerhed.
• Apparatet og ledningen skal opbevares et sted, der er utilgængeligt
for børn.
• Brug ikke maskinen, hvis ledningen, stikket eller maskinen er
beskadiget på nogen måde. Kontakt da Sage™ by Heston Blumenthal
Kundeservice.
Symbolet betyder, at produktet ikke bør smides ud sammen
med almindeligt husholdningsaffald. Det bør i stedet aeveres
på en autoriseret affaldsplads, der er beregnet til formålet, eller
til en forhandler med en sådan service. Har du brug for mere
information, skal du kontakte din kommune.
®
9
 Loading...