

Page 1
1
Sage Water Dispenser
Instruction Manual
SAGE WATER COOLERS
Please read this manual carefully before using!
CONTENTS
1. Brief Introduction of The Machine
(1) Brief Introduction of the Appearance
(2) Touch panel Introduction
2. Technical Parameter
3. Installation
(1) Overview
(2) Water supply connection
4. Operation
(1) Initially connected to electrical source
(2) First time Operation
(3) Operating the dispenser
(4) Setting parameter options
5. Machine maintenance and parts replacement
1. Replacing parts
2. Clear airframe
6. FAQ
7. Trouble Shooting
Page 2
2
1. Brief Introduction of the Machine
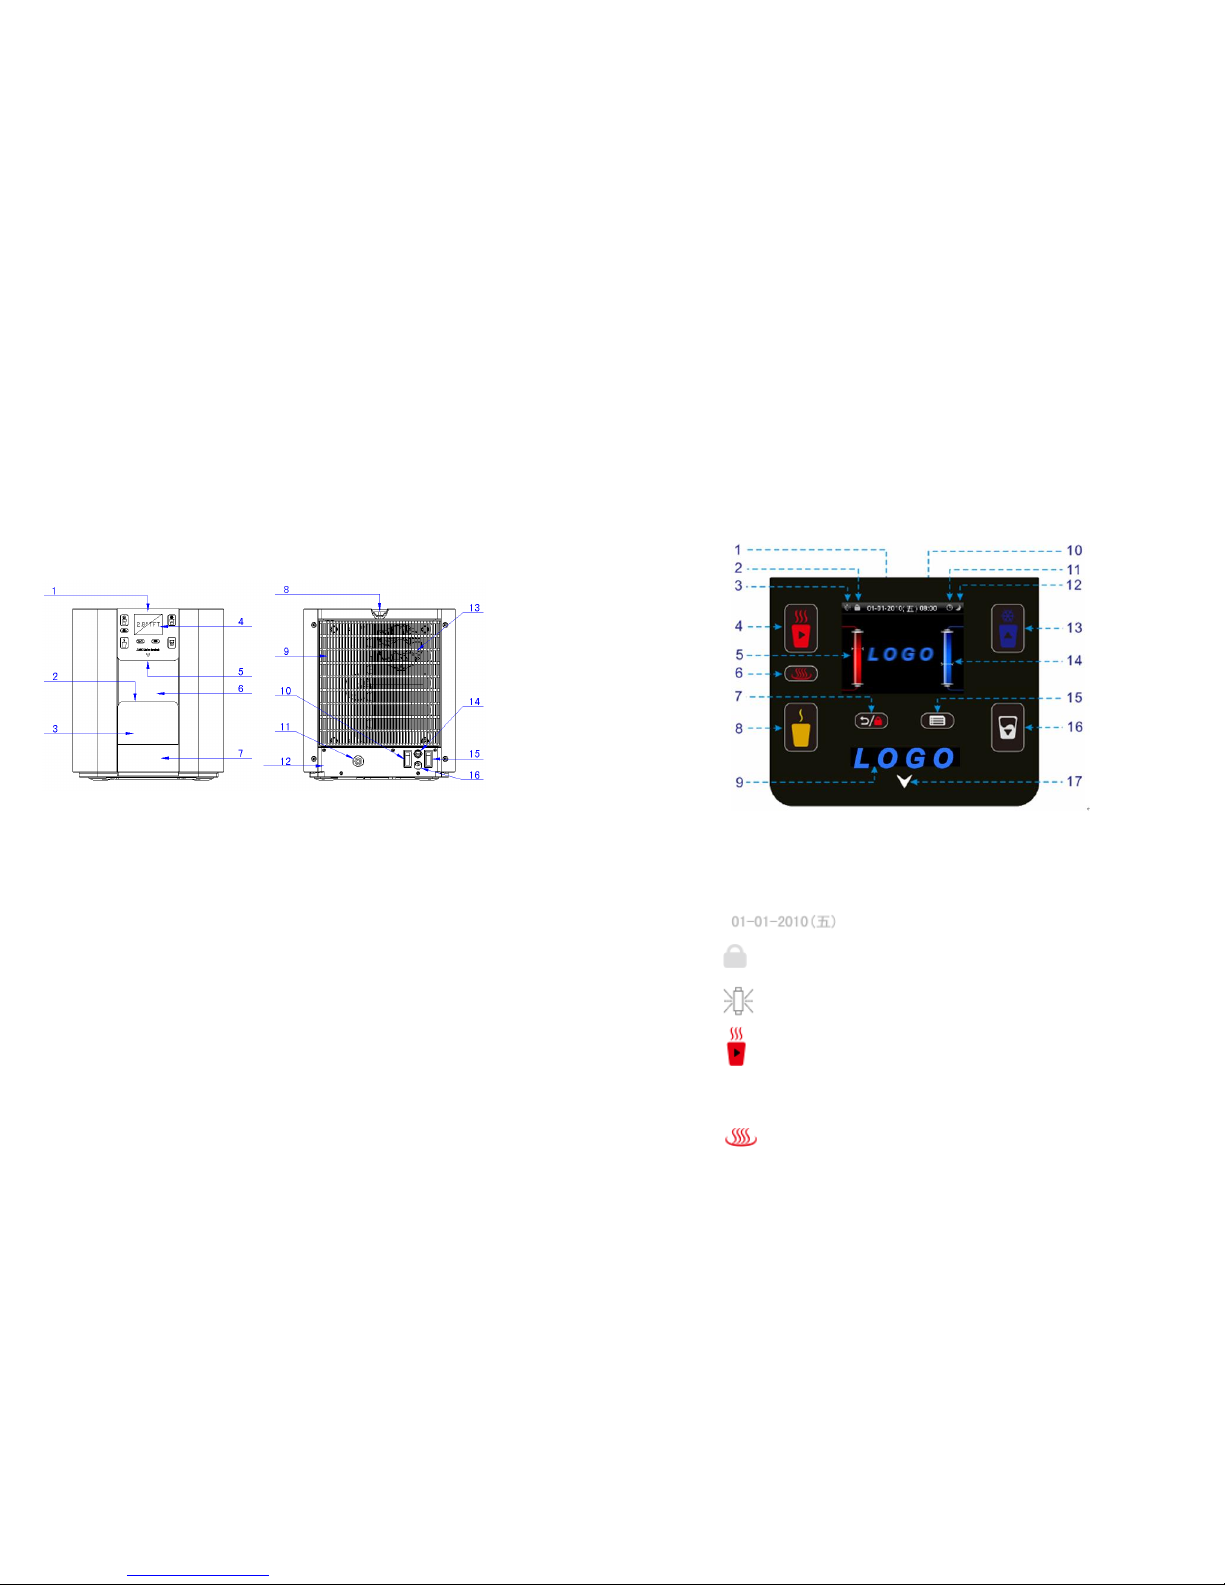
(1) Brief Introduction of the Appearance
1. Touch Panel 9. Condenser
2. Cover of the Drip Tray 10. Heating Switch
3. Drip tray 11. Water Inlet Whole
4. 2.8”TFT LCD screen 12. Switch Panel
5. Faucet 13. Fan
6. Panel 14. Fuse
7. Drain tray 15. Power Switch
8. Decorative Panel 16. Power Cord
(2).Touch Panel Introduction
1. Day - Month - Year
2. Child Lock status icon
3. UV light status icon
4. Hot key and select key
5. Heating and hot water temperature icon
6. Extra-hot Key
Page 3
3
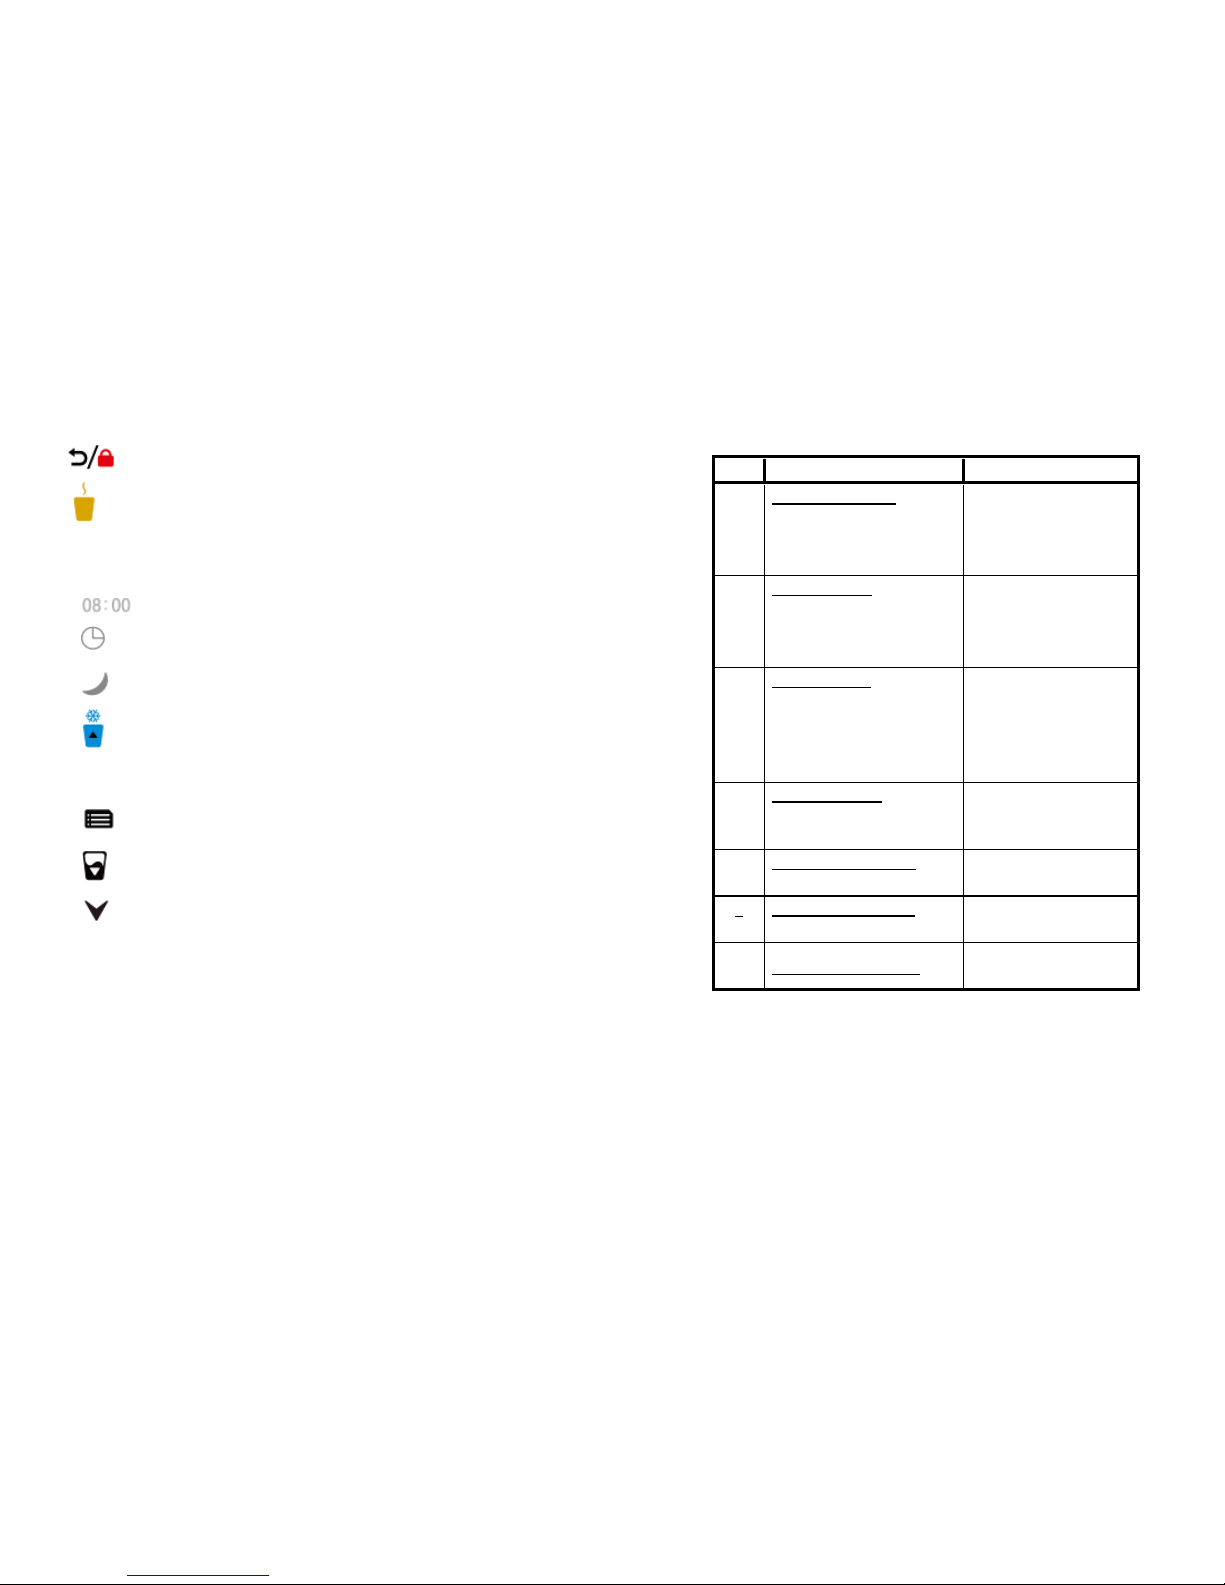
7 Return key and child lock button
8. Mixed water keys
9. Logo
10. Clock
11. Automatic Switcher icon
12. Power-saving mode icon
13. Cold water key and Select key
14. Cooling and cold water temp icon
15. Set key and Enter key
16. One cup of water key and select key
17. Water outlet indicator light
Maximum working temperature: 38 degrees
The capacity is calculated under ambient temperature of 25 degrees and the
water inlet temperature of 25 degrees.
Note: Sage Water reserves the right to change any product specifications and
parameters without notice and without incurring any obligations or liabilities
for such changes.
Item
Specification
Parameter
1
Electricity features
Rated Voltage/Frequency
Rated Power*
Rated Current*
110 VAC/60 Hz
620 W
6A
2
Heating system
Rated Heating Power
Heating Capability
Hot Water Temperature
500 W
5L/H
194-205° F (Adjustable)
3
Cooling system
Rated Cooling Power
Rated Cooling Current
Cooling Capability
Cold Water Temperature
110 W
1.4 A
3 L/H
41-51° F (Adjustable)
4
Purifying system
Filtering Rate of Carbon filter
Power of UV sterilizer lamp
0.5 micron
11W
5
Inlet Water Pressure
Minimum-Maximum
0.1MPa—0.6MPa
6
Dimension of the Unit
Width*Depth*Height*
11.8 x 13.56 x 13.4
7
Weight(Net weight)
34.17 lbs
Page 4
4
2. Technical parameter
(1). Machine parameter
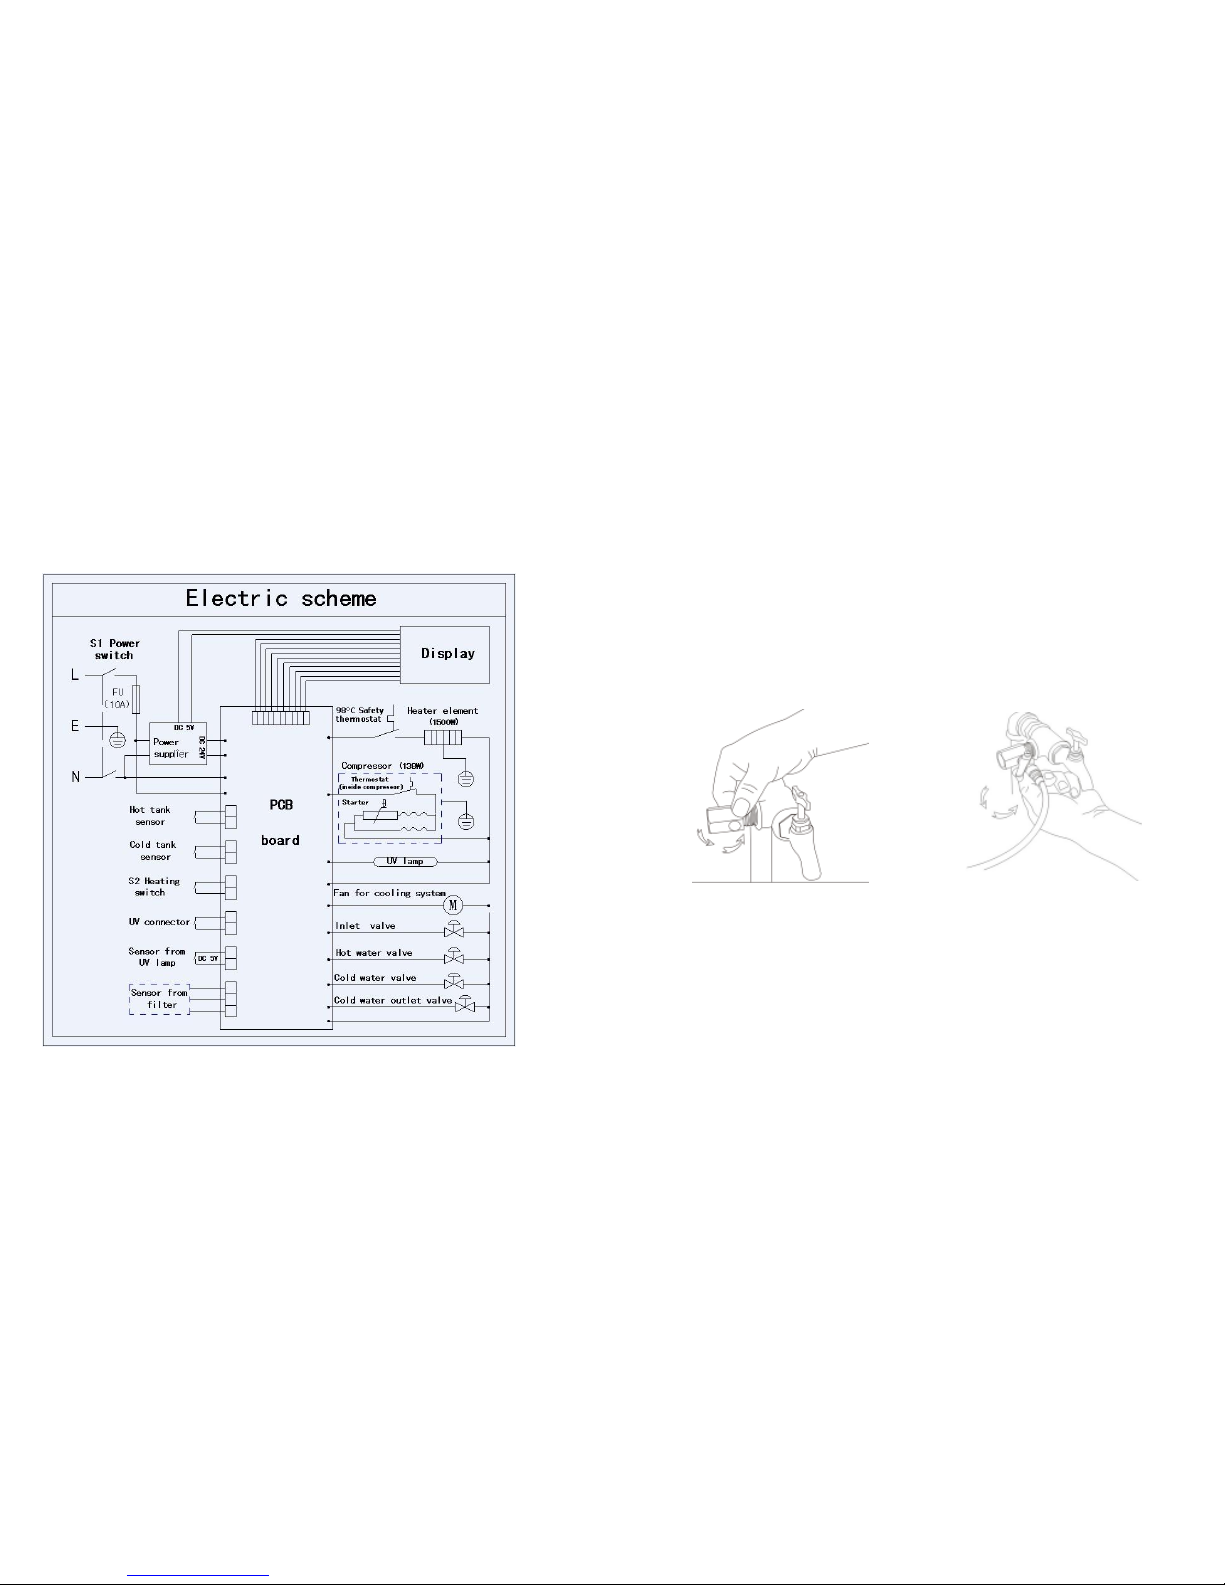
(2).Theoretical sketch:
3.Installation
(1). Overview
Please install the machine in a place of cool, ventilation and soundness, but away from hot
objects. Keep the unit 10cm(4") away from the wall and leave enough space for both sides
of the unit. In order to insure the water quality, please use our company original settings.
(2).Water Supply Connection:
Please keep the machine in a place nearby the water supply (not more than 3 Meters, water
pressure should be configured with between 0.1 MPa. and 0.6MPa.
A. Connect the inlet (Picture 1), to be sure there is no leakage.
(Picture 1) (Picture 2)
B. Twist the valve to ensure air tightness when connecting.
C. Please remove the cover of the inlet water connector and block head(firstly
remove the Claw)(Picture 3),then insert the water pipe to inlet (insert
water pipe and install the claw. See(Picture 4)(Picture 5)
Page 5

5
(Picture 3) (Picture 4) (Picture 5)
4. Operation
(1) Initially Connect with Electric Supply
Once connected to power, the screen display will appear, means it is testing the
unit. Interface should appear as shown below. After entering into initial adding water
interface, follow the instructions to add water to both hot tank and cold tank. (You
need to check if the water reservoir was filled by touching the cold and hot button and
that there is water flowing out of hot and cold water outlet).
(2). Attentions Before Using
First time using the unit, please check all water pipe fittings and valve connections making
sure they are well connected. After tuning on the unit, please release 10-15L of water out
of both the hot and cold reservoirs.
Safety Warning
: For first time to use, please ensure that there is water flowing out from
the faucet in hot and cold water outlet. Only after this should you start to use the heating
function! The heating system will not work if there is not enough water in hot tank and you
can void your warranty by not following the instructions clearly.
(3) Water Operation:
Page 6

6
A. Hot Water
① When setting with the child lock, first touch ,then touch . You
can get hot water after 3 seconds. Touch any button to stop the water flow.
② When setting the child lock prevention,first touch ,then touch for
hot water flow. Touch any Key to stop the water。
◎ At this time, turn the heating switch at back of the machine to the "ON" position,
the heating system will begin to work, then hot water icon will be dynamically displayed in
the screen accordingly
◎ Touch for 0.5second and it will enter into the re-boiling condition
B. Cold water
① Touch will produce cold water,touch any key to stop the water flow.
C. Warm Water:
Touch for mixed hot/cold water, touch any key to stop the water flow.
D. Get One Cup of Water
First touch , then touch or for a cup of hot or cold water.
(4). Parameter Settings
Page 7

7
A. Enter the Setting Interface
① Press to enter the setting interface and follow to the interface
prompts.
Setting interface includes temperature settings, water settings, time
and date settings, energy saving mode, child lock settings, filters and
UV change settings, language settings, ring settings and restore
factory settings.
② Press to toggle and press to enter the selected interface.
Press to go back to last interface, press and select specific
parameters.
B. Temperature Settings
Select the temperature setting item, enter into temperature control interface,
then follow the prompts to set parameters, as follows:
C. Water Quantity Settings
Select water quantity setting, enter into the water regulation interface, and
follow the prompts to set parameters, as follows:
Page 8

8
D. Time Settings (year - month - day)
Select Calendar settings, enter into the time adjustment interface and follow
the prompts to set the parameters, as follows:
Then press to save parameters
E. Energy Saving Mode
Select energy-saving mode, enter into power saving mode adjustment
Interface and follow the prompts to set parameters as follows:
① Sleep Mode
When the machine goes into sleep mode, it appears as:
② Automatic On/Off Switch
Standby mode, will appear similar to screen below:
Press any key
Page 9

9
F. Child Lock Settings
Select the Child Lock setting and enter into the child lock adjustment
Interface. Follow the prompts to set parameters, as follows:
G. Filter / UV Maintenance Settings
Select Filter / UV maintenance setting item, enter into the filter / UV
maintenance adjustment interface, and follow the prompts to set
parameters, as follows:
① Maintain the Filter Mode
② Maintain the UV Mode
H. Language Settings
I. Ring Settings
J. Restore Factory Settings
Page 10

10
5. Maintenance And Replacement of Machine Parts
(1). Replacement
A. Filter maintenance
Filter should be replaced approximately every 6 months (about 2,000 liters of
water), when the filter is reaches its lifetime, the unit will remind you to replace
the filter.
Remove the decoration tray
OPEN-rotation to replace the filter (anticlockwise change)
CLOSE-install the filter (clockwise installation)
Enter into the setting mode after replacing the filter - filter / UV maintenance filters - filter replacement and press Confirm
B. UV Maintenance
UV should be replaced once a year. When the UV lamp is reaches its lifetime,
the unit will remind you to replace the UV lamp
Check the accessory of the unit, you will find a UV replacement instrument,
put it into the UV hole, latch release and rotation UV counter clockwise and
remove the UV light
Page 11

11
When finished replacing the UV lamp, please enter into setting mode –
Filter / UV-UV-replace maintenance of UV-recognized.
(2) Cleaning Panels
Clean unit with a soft cloth dipped in warm water or soap
water and other neutral detergents. Touch panel, tray can be
cleaned using a dry soft cloth.Do not use harsh detergents,
concentrated washing liquid, solvent or anything that may scratch
the machine's materials (such as steel brushes, etc.)
6. Attention
◎ This machine is for indoor use, Please avoid it from direct
sunlight. Placing it next to flammable materials is prohibited,
please stay away from expensive high-end appliances (in case
splashing water), do not wash the unit or immerse the unit into
water.
◎ The unit uses 110 voltage, it should be used with a 10A fuse
in the socket. use and maintenance during the operation and
use the safety of electrical equipment.
◎ When using the unit for the first time (or cleaned), please
ensure there is water flowing out, and then open the heating
function to avoid equipment damage!
◎ The system provides safe and reliable drinking water. Since
the tank is not pressurized and hot tank with outlet of hot
water is directly connected (no valves), it is normal if a drop of
water results after water flow.
◎ Because the unit can produce high temperature hot water,
please refrain from child use and use child safety feaure in the
event of unattended use of the machine.
◎ The unit is not designed for people with disabilities or
children.
◎ The machine should be serviced by professionals,
the company and dealers are not liable for any improper
use or neglect as a result of direct or indirect responsibility
for the loss.
◎ It is advised to turn unit off if the machine will not be
in use for an extended period to avoid any issues.
Once powered on, please ensure water quantity of 10-15L
Notes on the operation and detailed explanation, please
contact your local dealer! Warning: The unit must be
used with a good grounding in the three-pin socket,
and leakage protection switch!
Page 12

12
Please note: If the unit is connected with electricity, do not get
the back of the machine wet.
7. Troubleshooting
Problems can be quickly determined by the fault type, and can help
you or service personnel to resolve problems and minimize the workload of
service.
If the machine is not working not properly, please follow the methods
listed in the table
Failures
Possible Reason
Solution
No water
flow
·Machine power is not
connected
·Socket Failure
·inlet valve close
·water tap blockage or low
water pressure
·Be sure that the machine has been
unplugged
·Check the socket
·Check the water inlet valve is open
·Check the water supply system
No hot
water
·Heating system is not open
·excessive water use
·The machine is in power
saving mode
·Turn the heating switch
·Test again after 10 minutes
·Follow the prompts to open the system
restore function within 3 minutes
No cold
water
·Chilled water temperature
set too high
·Excessive cold water use
·Check the water temperature settings
·Test again after 30 minutes
·Turn off the power, wait 2 hours before
·Long-term of not using,
cold water tank frozen
turning on power use
Machine
leaking
·Drip tray is full
·Leakage inside of the
machine
·Empty water drip tray
·Turn off the power and water, please
contact the company
Odor in
water
·New machine
·Unit not used for a long
time
·Lack of Replacing of filters
·10-15L Drainage 10-15L
·10-15L Drainage 10-15L
·Replace the filter, please contact the
company and our maintenance
department
electric
leakage
and body
with the
induction
Poor ground water dispenser
Power cord or mouse bites
bad break
·Must use a reliable three-hole grounded
outlet
·Leakage protection installed
·
No Screen
Display
·Hardware damage
·System crashes
· Turn power off, unplug wait 1-2
minutes, then reboot.
 Loading...