

Saeco 15000993, 21000050, 21000403, Milk Island Operation And Maintenance Manual
Milk Island
Manuale uso e manutenzione
Prima di utilizzare la macchina consultare le presenti istruzioni. Leggere attentamente le norme di sicurezza
Operation and maintenance manual
Before using the machine, please read the attached operating instructions. Carefully read the safety rules
Bedienungsanleitung
Bitte lesen Sie diese Bedienungsanleitung und die Sicherheitsvorschriften vor Verwendung
des Milk Island aufmerksam durch.
Mode d'emploi
Veuillez lire attentivement le mode d'emploi (notamment les consignes de sécurité) avant d'utiliser l'appareil.
Manual de uso y mantenimiento
Consultar las siguientes instrucciones antes de utilizar la máquina. Leer con atención las normas de seguridad.
Manual de uso e manutenção
Antes de utilizar a máquina consulte estas instruções. Leia atentamente as normas de segurança.
Handleiding voor gebruik en onderhoud
Raadpleeg deze aanwijzingen alvorens de machine in gebruik te nemen. Lees aandachtig de veiligheidsvoorschriften.
Instrukcja obsługi i konserwacji
Przed użyciem urządzenia należy zapoznać się z niniejszą instrukcją obsługi.
Przeczytać uważnie normy dotyczące bezpieczeństwa
2
INDICE - GENERALITÀ
GENERALITÀ
Il Milk Island è un dispositivo studiato e creato appositamente per emulsionare il latte e per riscaldare l’acqua,
in modo semplice e veloce. Il Milk Island può essere utilizzato solo per un uso domestico; non è indicato per un
funzionamento continuo di tipo professionale.
Attenzione. Non si assumono responsabilità per eventuali danni in caso di:
• Impiego errato e non conforme agli scopi previsti;
• Riparazioni non eseguite presso centri d’assistenza autorizzati;
• Manomissione di qualsiasi componente della macchina;
• Impiego di pezzi di ricambio e accessori non originali;
• Stoccaggio in locali al di sotto di 15°C e mancata manutenzione;
• Riscaldamento di tè o tisane eseguito direttamente nella caraffa.
In questi casi viene a decadere la garanzia.
Il triangolo di avvertimento indica tutte le istruzioni importanti per la sicurezza dell’utente.
Attenersi scrupolosamente a tali indicazioni per evitare ferimenti gravi!
Questo simbolo evidenzia le informazioni da tenere in maggiore considerazione, per un migliore
utilizzo della macchina.
Conservare queste istruzioni per l’uso in un luogo sicuro e allegarle al dispositivo qualora un’altra persona dovesse utilizzarla.
Per ulteriori informazioni o nel caso di problemi rivolgetevi ai centri d’assistenza autorizzati.
GENERALITÀ . . . . . . . . . . . . . . . . . . . . . . . . . . . . . . . . . . . . . . . . . . . . . . . . . . . . . . . 2
DATI TECNICI. . . . . . . . . . . . . . . . . . . . . . . . . . . . . . . . . . . . . . . . . . . . . . . . . . . . . . . 3
INSTALLAZIONE MILK ISLAND . . . . . . . . . . . . . . . . . . . . . . . . . . . . . . . . . . . . . . . . . 4
USO MILK ISLAND . . . . . . . . . . . . . . . . . . . . . . . . . . . . . . . . . . . . . . . . . . . . . . . . . . . 5
PULIZIA MILK ISLAND . . . . . . . . . . . . . . . . . . . . . . . . . . . . . . . . . . . . . . . . . . . . . . . . 6
DISINSTALLAZIONE MILK ISLAND . . . . . . . . . . . . . . . . . . . . . . . . . . . . . . . . . . . . . . 8
RISOLUZIONE PROBLEMI . . . . . . . . . . . . . . . . . . . . . . . . . . . . . . . . . . . . . . . . . . . . 9
NORME DI SICUREZZA . . . . . . . . . . . . . . . . . . . . . . . . . . . . . . . . . . . . . . . . . . . . . . . 9
3
COMPONENTI - DATI TECNICI
DATI TECNICI
Alimentazione Il Milk Island viene alimentato direttamente dalla macchina da caffè
Materiale corpo Termoplastico
Materiale caraffa Termoplastico - Vetro
Dimensioni (l x a x p) (mm) 215 x 156 x 95
Peso 0,450 kg
Capacità caraffa 0,2 lt di latte da emulsionare - 0,4lt di acqua da riscaldare
Dispositivi di sicurezza Interblocco elettro-idraulico di erogazione vapore in assenza della caraffa
sia in fase di lavoro sia in fase di stand-by.
Compatibilità Per l’utilizzo con macchie da caffè
type SUP 032OR, SUP 032NR, SUP 032BR, SUP 032AR
Nota tecnica importante: il Milk Island deve essere collegato, tramite il connettore speciale, alla macchina
da caffè predisposta. Il Milk Island non può essere inserito in una spina di corrente convenzionale.
Con riserva di modifi che di costruzione ed esecuzione dovute al progresso tecnologico.
Macchina conforme alla Direttiva Europea 89/336/CEE (Decreto legislativo 476 del 04/12/92), relativa all’eliminazione dei disturbi radiotelevisivi.
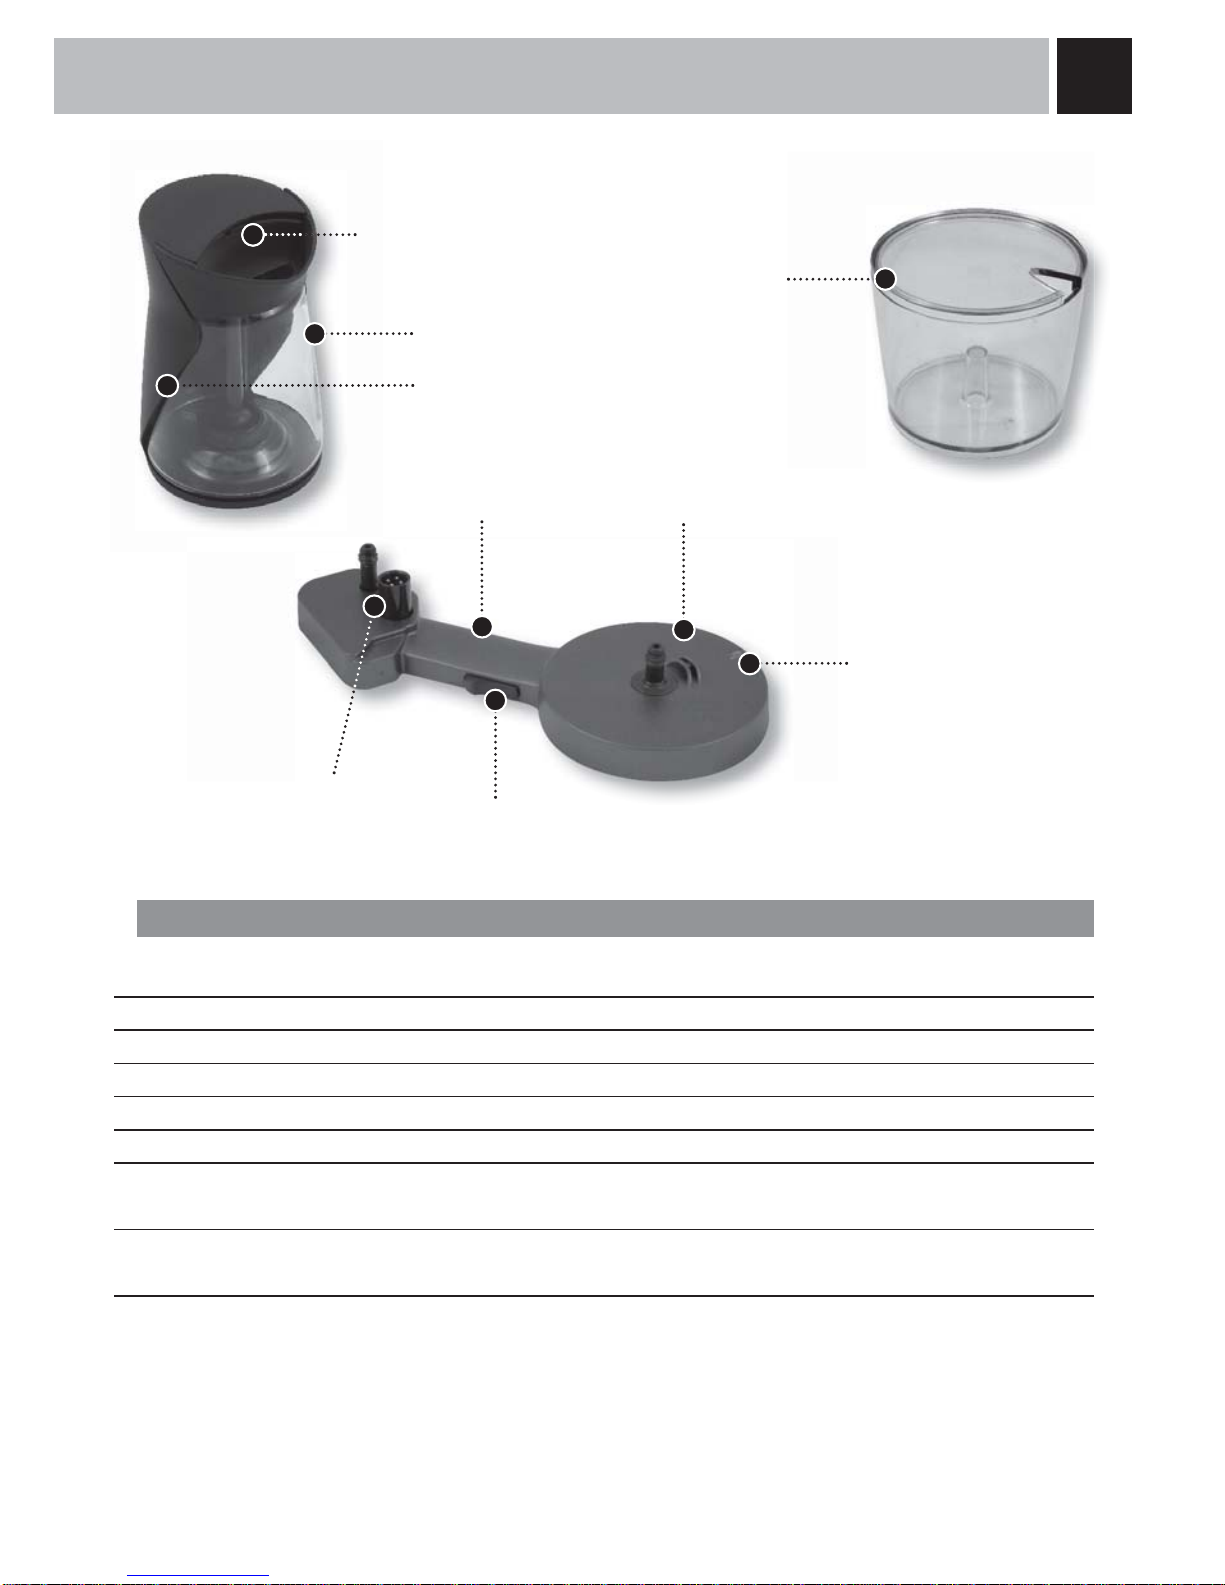
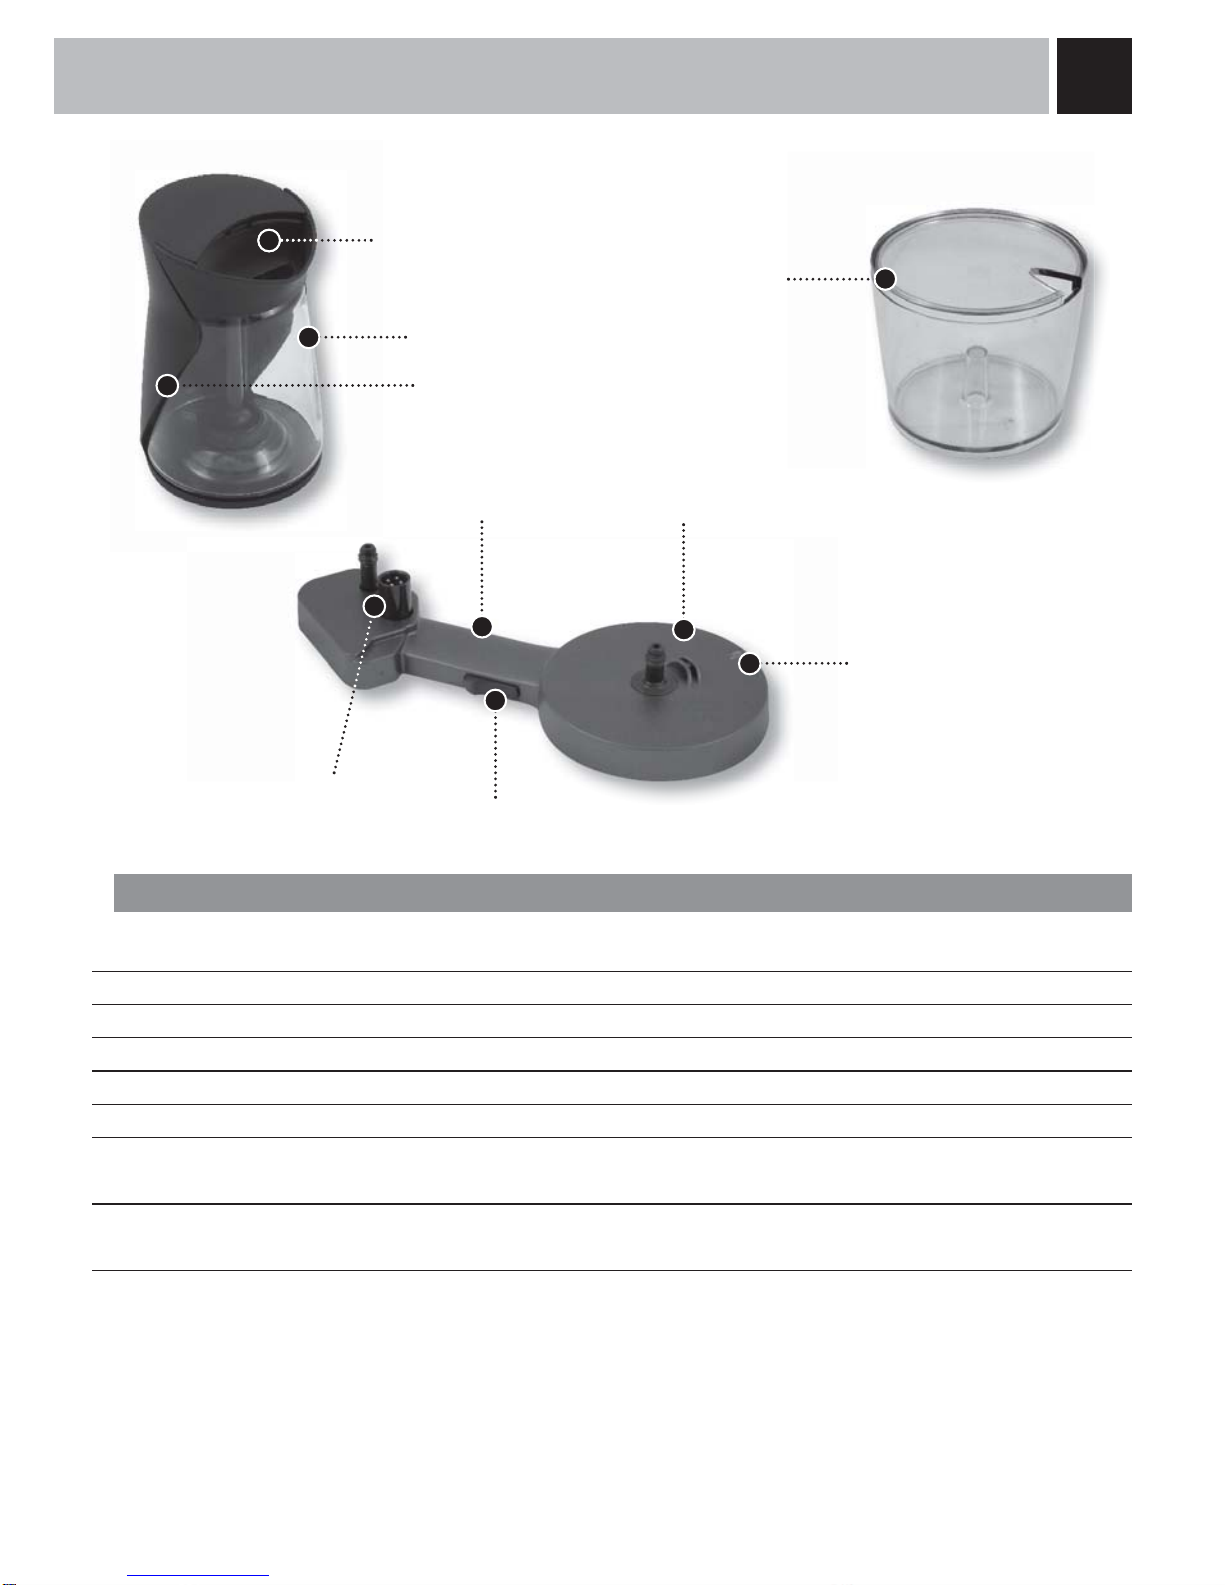
Caraffa
Contenitore zucchero
Connessione alla caffettiera di tipo elettro-idraulico
Pulsante di aggancio e
sgancio
Supporto caraffa
Led (indica lo stato di
funzionamento del Milk
Island)
Base di supporto/collegamento
Gruppo emulsione
Impugnatura
4
INSTALLAZIONE
INSTALLAZIONE MILK ISLAND
Attenzione: per collegare il Milk Island si deve posizionare su di un lato la macchina da caffè;
prima d’eseguire questa operazione rimuovere il serbatoio dell'acqua, la vasca raccogli gocce,
il contenitore raccogli fondi e vuotare il contenitore caffè in grani della macchina da caffè. Spegnere la
macchina da caffè e staccare la spina dalla presa di corrente.
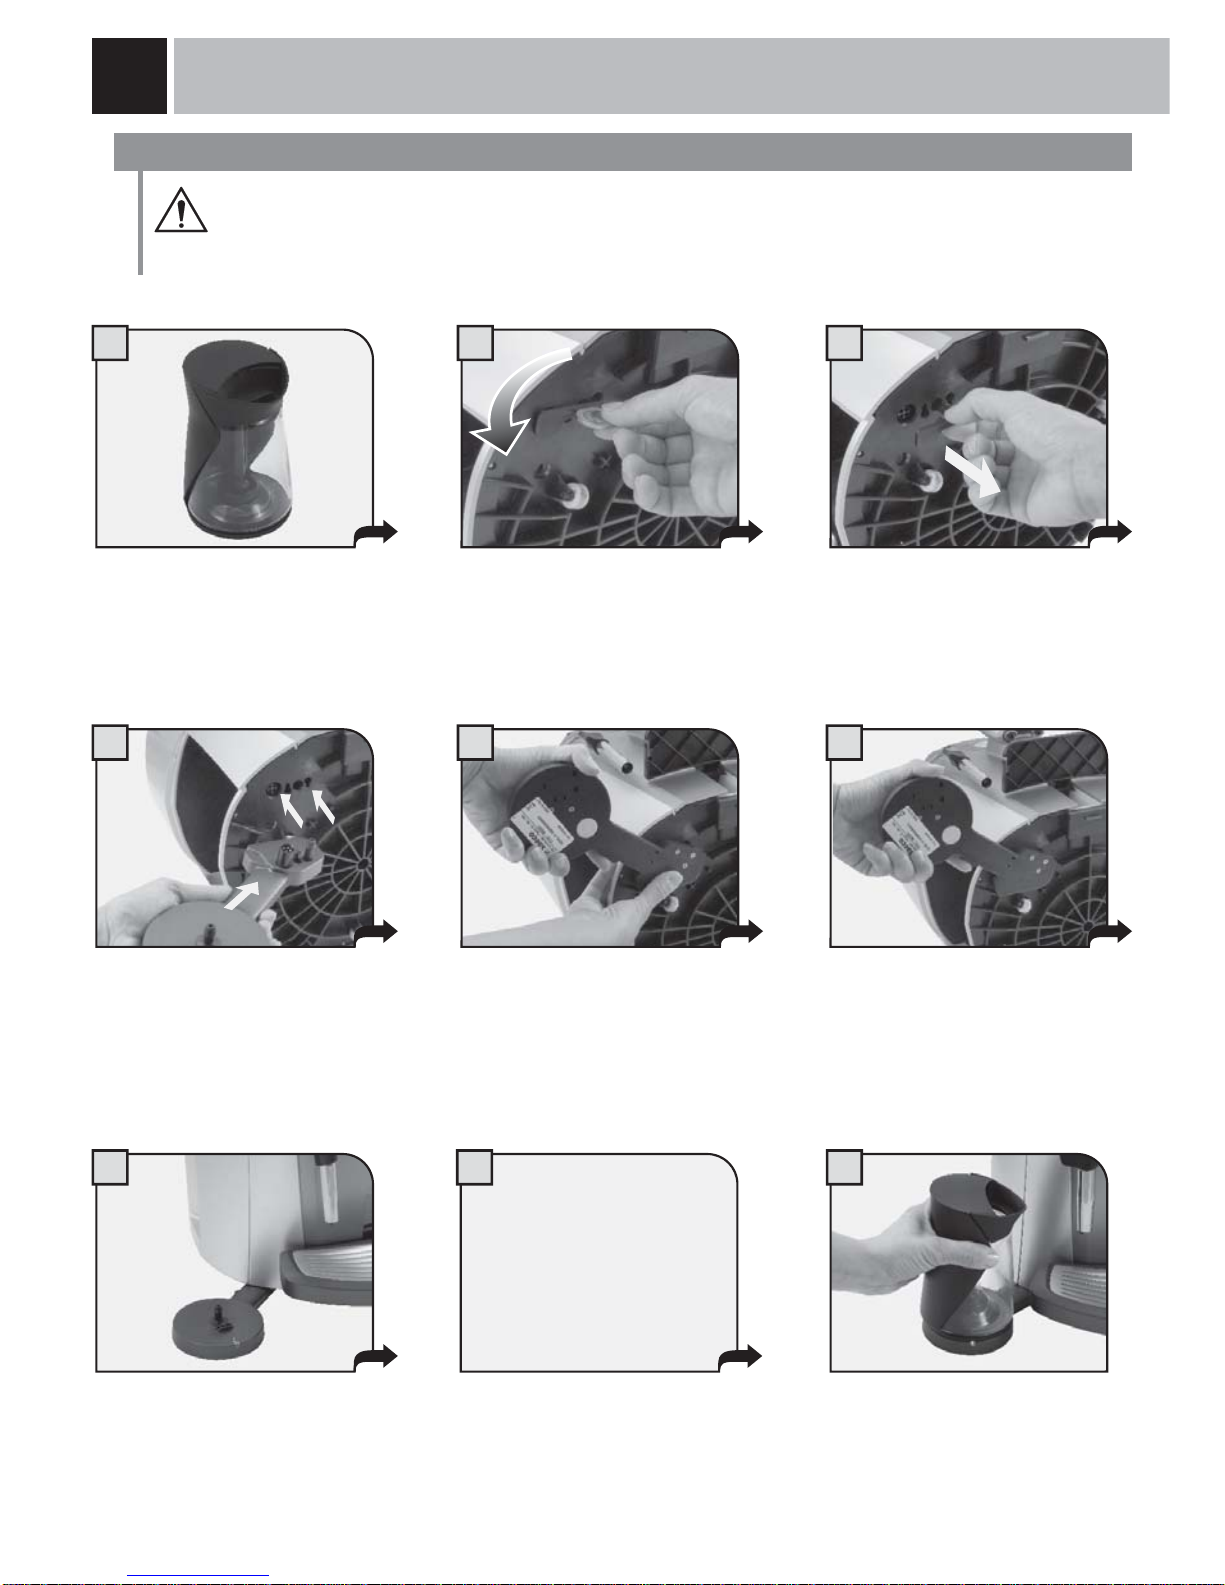
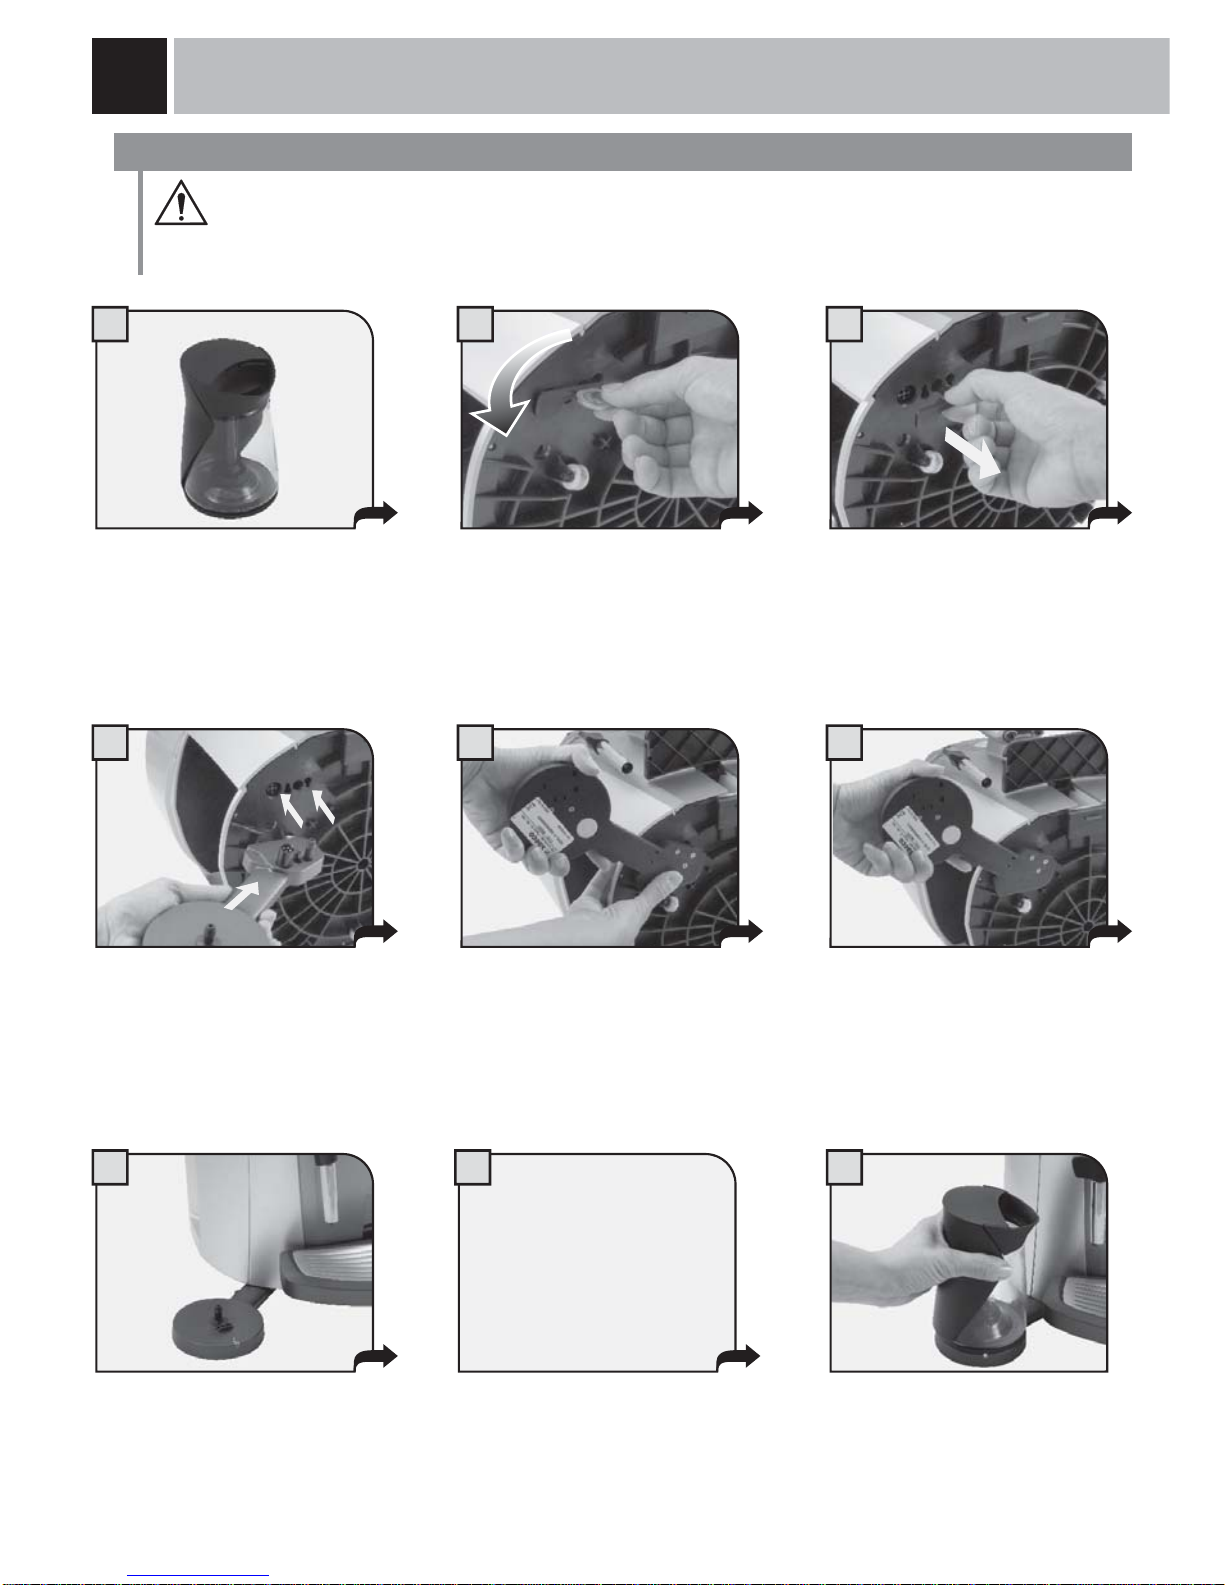
1 2 3
Estrarre dalla confezione il Milk
Island; assicurarsi che la caraffa
sia integra. Vi consigliamo di
conservare l’imballo.
Sfi lare il coperchio e conservar-
lo con cura.
Dopo aver vuotato i contenitori, adagiare delicatamente la macchina su
di un lato. Rimuovere il coperchio di
protezione. Con l’aiuto di una moneta, sbloccare il coperchio ruotandolo
come mostrato in fi gura.
4 5 6
Premere nella direzione indicata
il pulsante di aggancio;
Quando la base è stata inserita
a fondo rilasciare il tasto.
Verifi care che la base sia
collegata in modo stabile con la
macchina.
Mantenendo premuto il pulsante,
agganciare il Milk Island nella
macchina da caffè facendo combaciare i relativi connettori.
97
A questo punto riposizionare
correttamente la macchina
da caffè e procedere ad
un ripristino di tutti i suoi
contenitori.
Inserire la caraffa sulla base.
Verifi care il colore del led sulla
base. Quando il led è di colore
verde, il Milk Island è inserito
correttamente ed è pronto per
essere utilizzato.
Accendendo la caffettiera
viene eseguita la confi gu-
razione automatica del Milk
Island.
8
5
USO MILK ISLAND
Attenzione: prima d’utilizzare il Milk Island si deve procedere alla pulizia della caraffa e degli altri
componenti. Verifi care che tutti i componenti siano installati correttamente. Il vetro della caraffa
può raggiungere temperature elevate: pericolo di scottature! Utilizzare il Milk Island solo con acqua e
latte. E' vietato utilizzarlo con altri liquidi di qualsiasi natura o composizione chimica.
Nota importante: la quantità di latte nella caraffa non deve essere inferiore al livello minimo
“MIN” e non deve mai superare il livello massimo “MAX”. Dopo aver utilizzato il Milk Island
procedere ad un’accurata pulizia di tutti i suoi componenti.
Per garantire un miglior risultato nella preparazione del cappuccino, consigliamo d'utilizzare latte
parzialmente scremato e freddo (0-8°C)
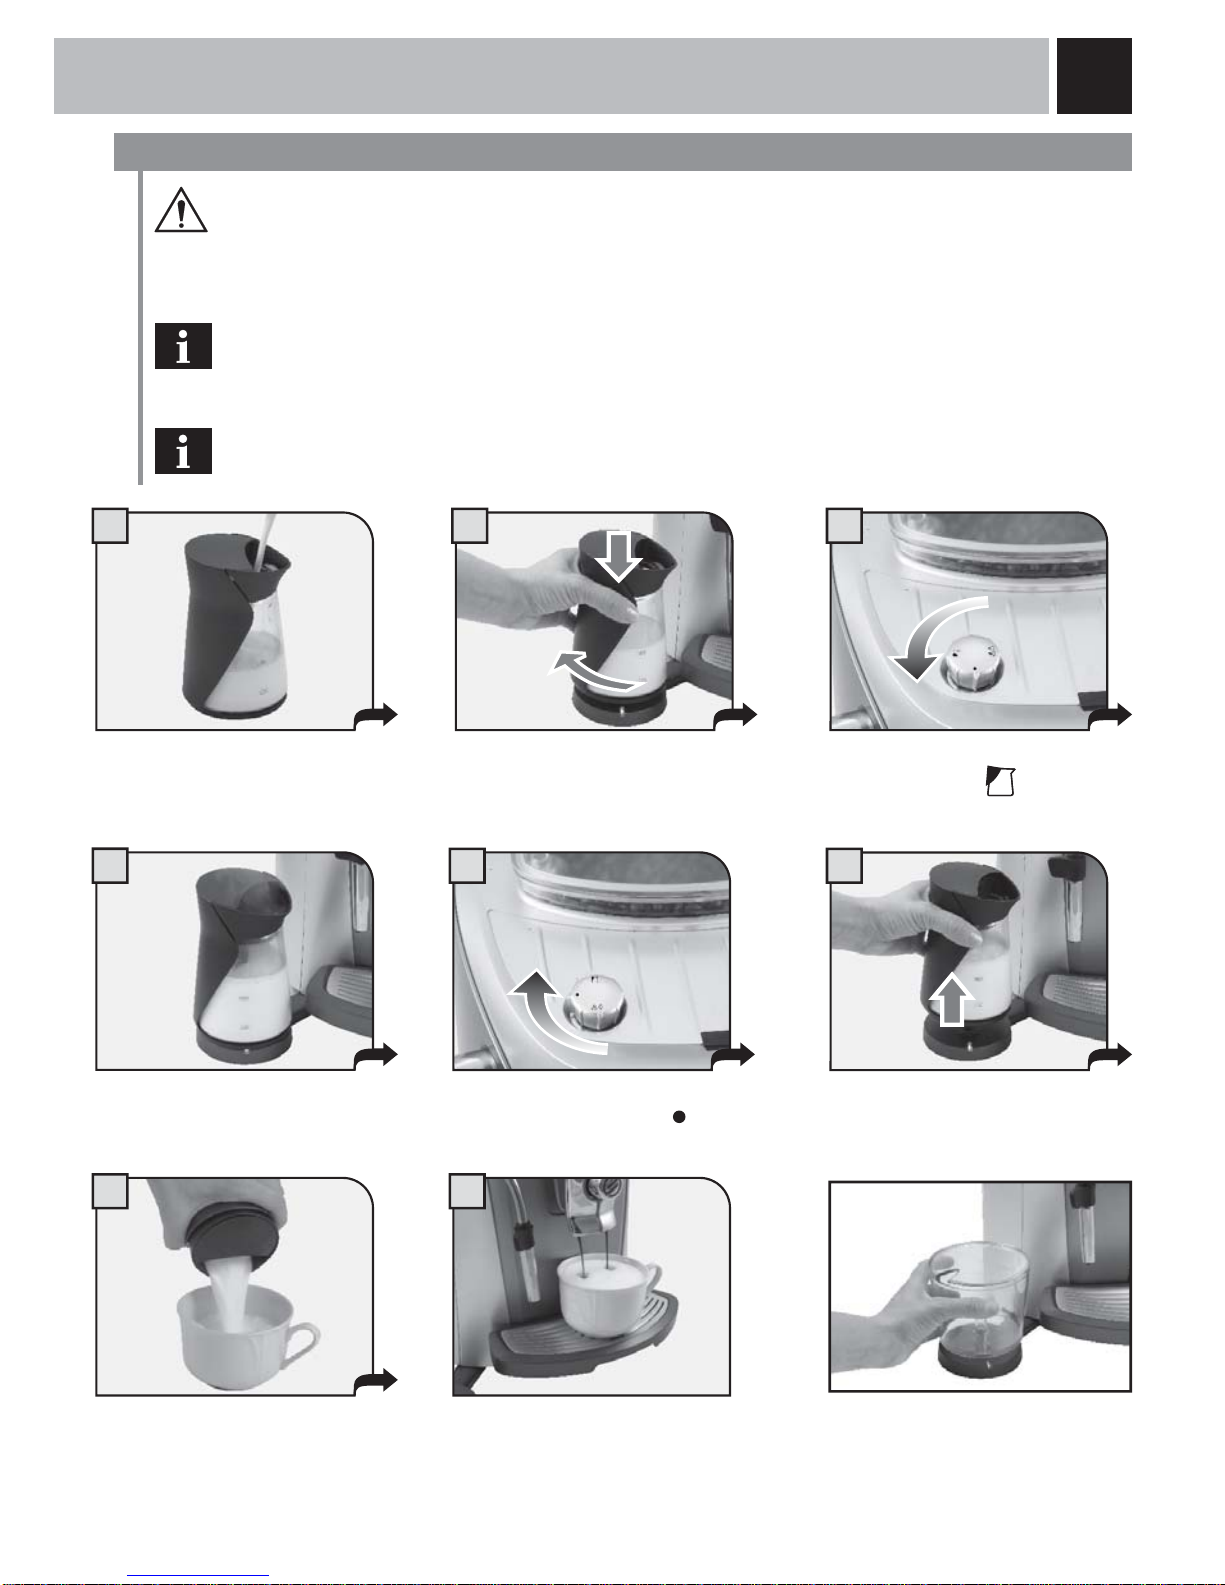
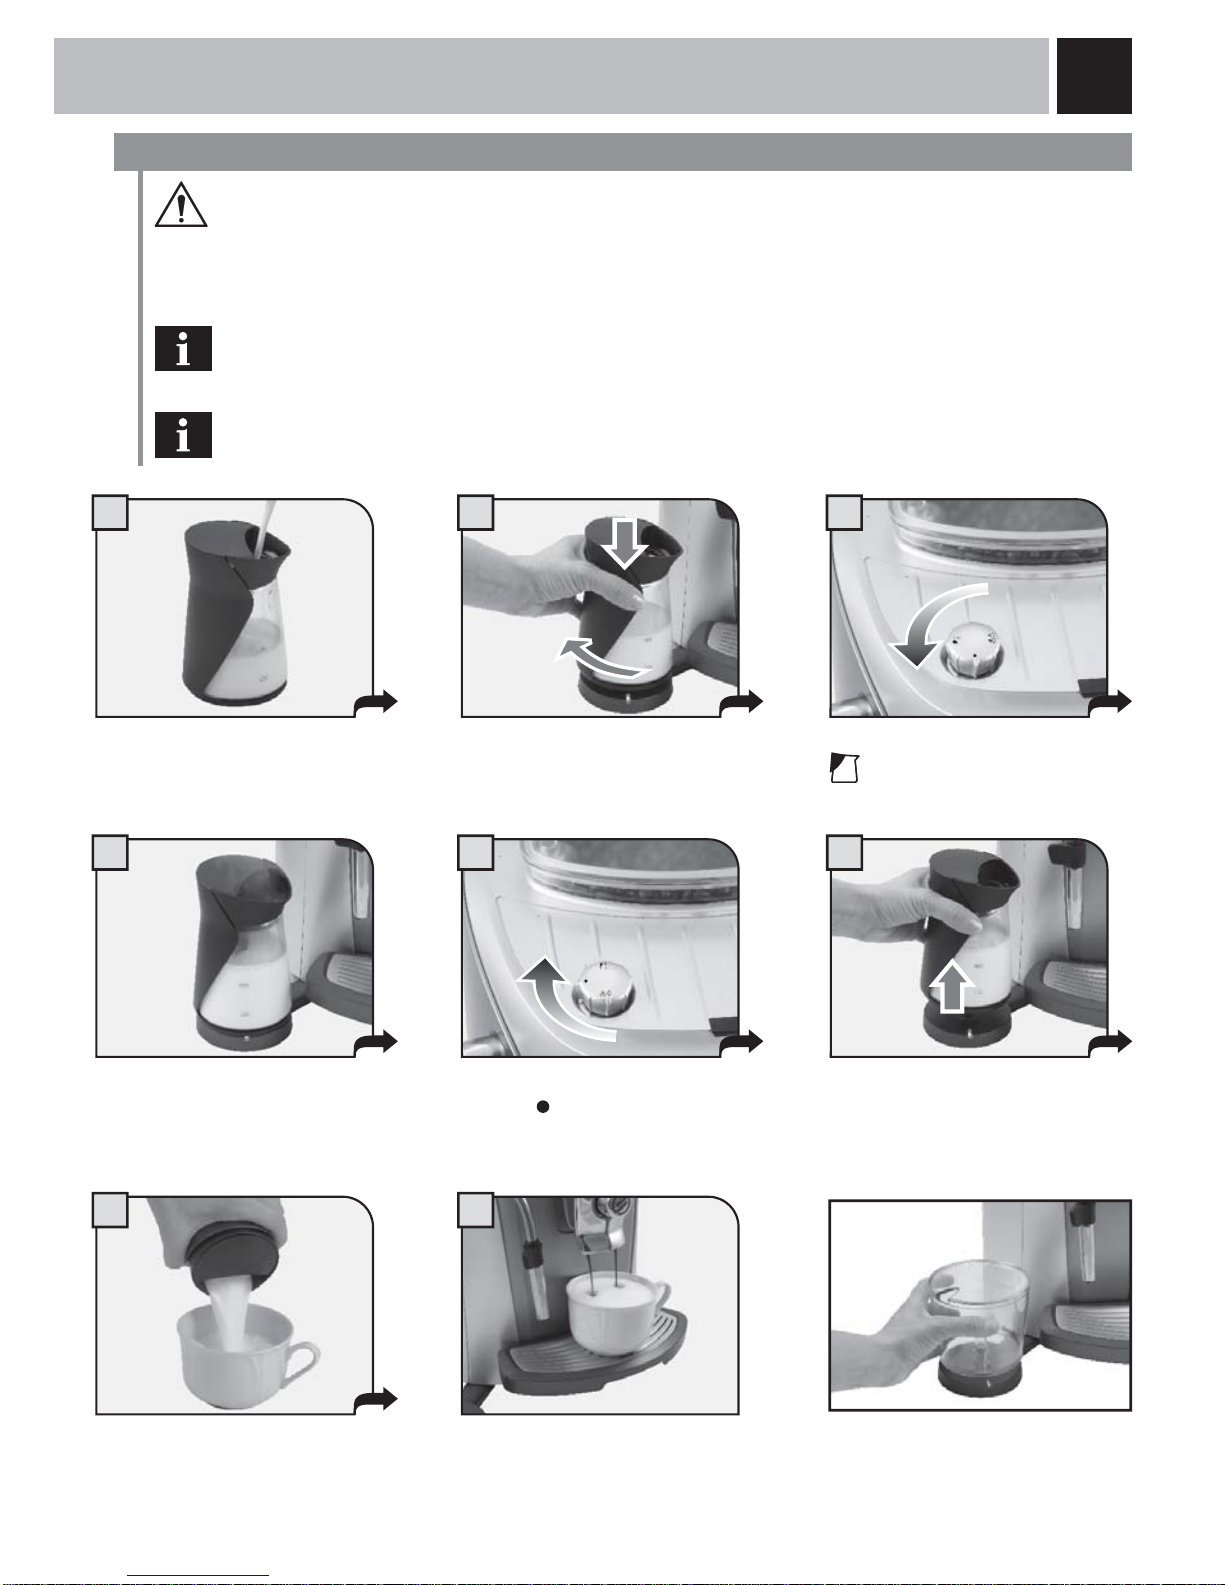
Riempire la caraffa con la quantità di latte desiderato.
Premere e ruotare per posizionare
la caraffa sulla base del Milk Island.
Verifi care che il led posto sulla base
sia di colore verde.
Dopo aver emulsionato il latte,
prelevare la caraffa dall’impugnatura.
Dopo aver eseguito dei leggeri
movimenti circolari, versare il
latte nella tazza.
Posizionare la tazza con il latte
montato sotto all'erogatore.
Erogare il caffè nella tazza (vedi
manuale istruzione della caffettiera).
USO
1 2 3
6
7 8
Ruotare il pomello fi no a portar-
lo nella posizione
.
4
Attendere che il latte venga
montato.
5
Ruotare il pomello fi no a portarlo
nella posizione di riposo ( ).
Nota: quando la caraffa del latte
non viene utilizzata, sulla base
si può inserire il contenitore
dello zucchero.
6
PULIZIA
PULIZIA MILK ISLAND
Attenzione: non immergere la base del Milk Island in alcun liquido. La manutenzione e la pulizia
della base possono essere effettuate soltanto quando la macchina è fredda e scollegata dalla rete
elettrica. Tutti i componenti descritti in questo paragrafo possono essere lavati in una lavastoviglie per
uso domestico.
Non utilizzare oggetti acuminati o prodotti chimici aggressivi (solventi) per la pulizia. Per la pulizia della
base utilizzare un panno morbido. Non asciugare il Milk Island e/o i suoi componenti utilizzando un
forno a microonde e/o un forno convenzionale.
1
3
4
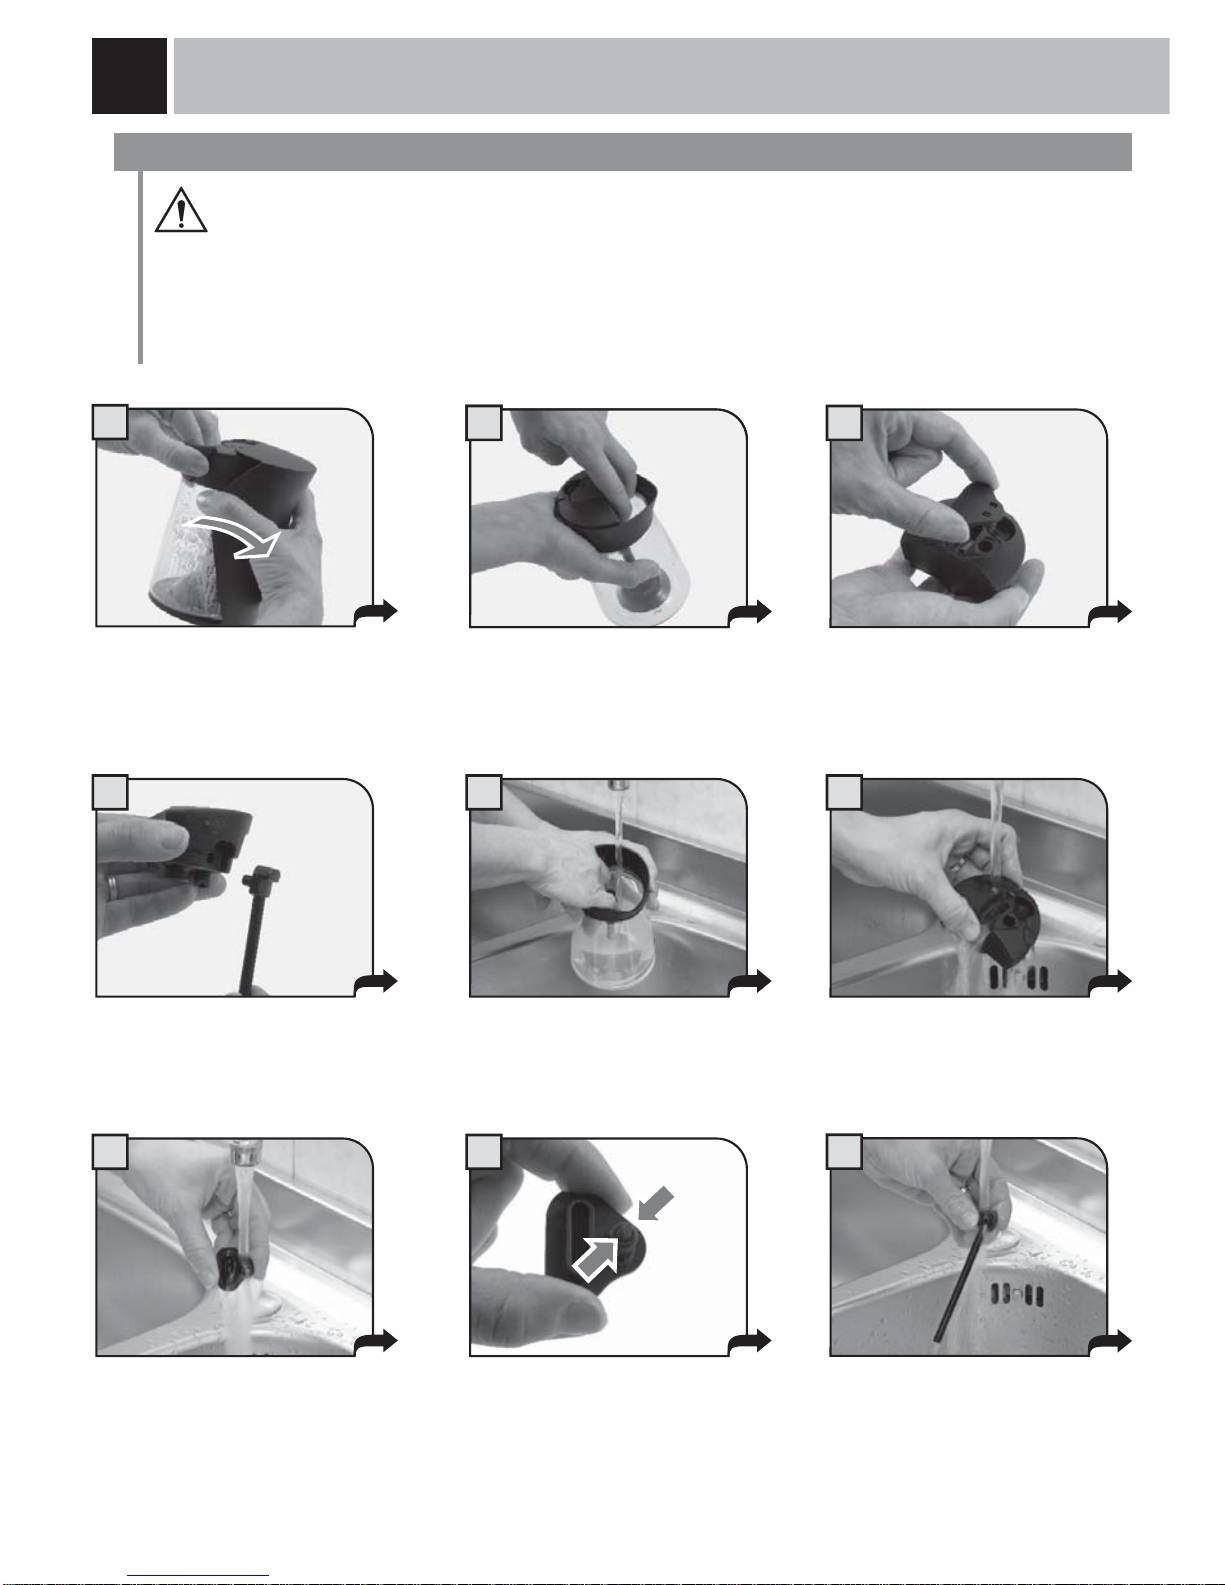
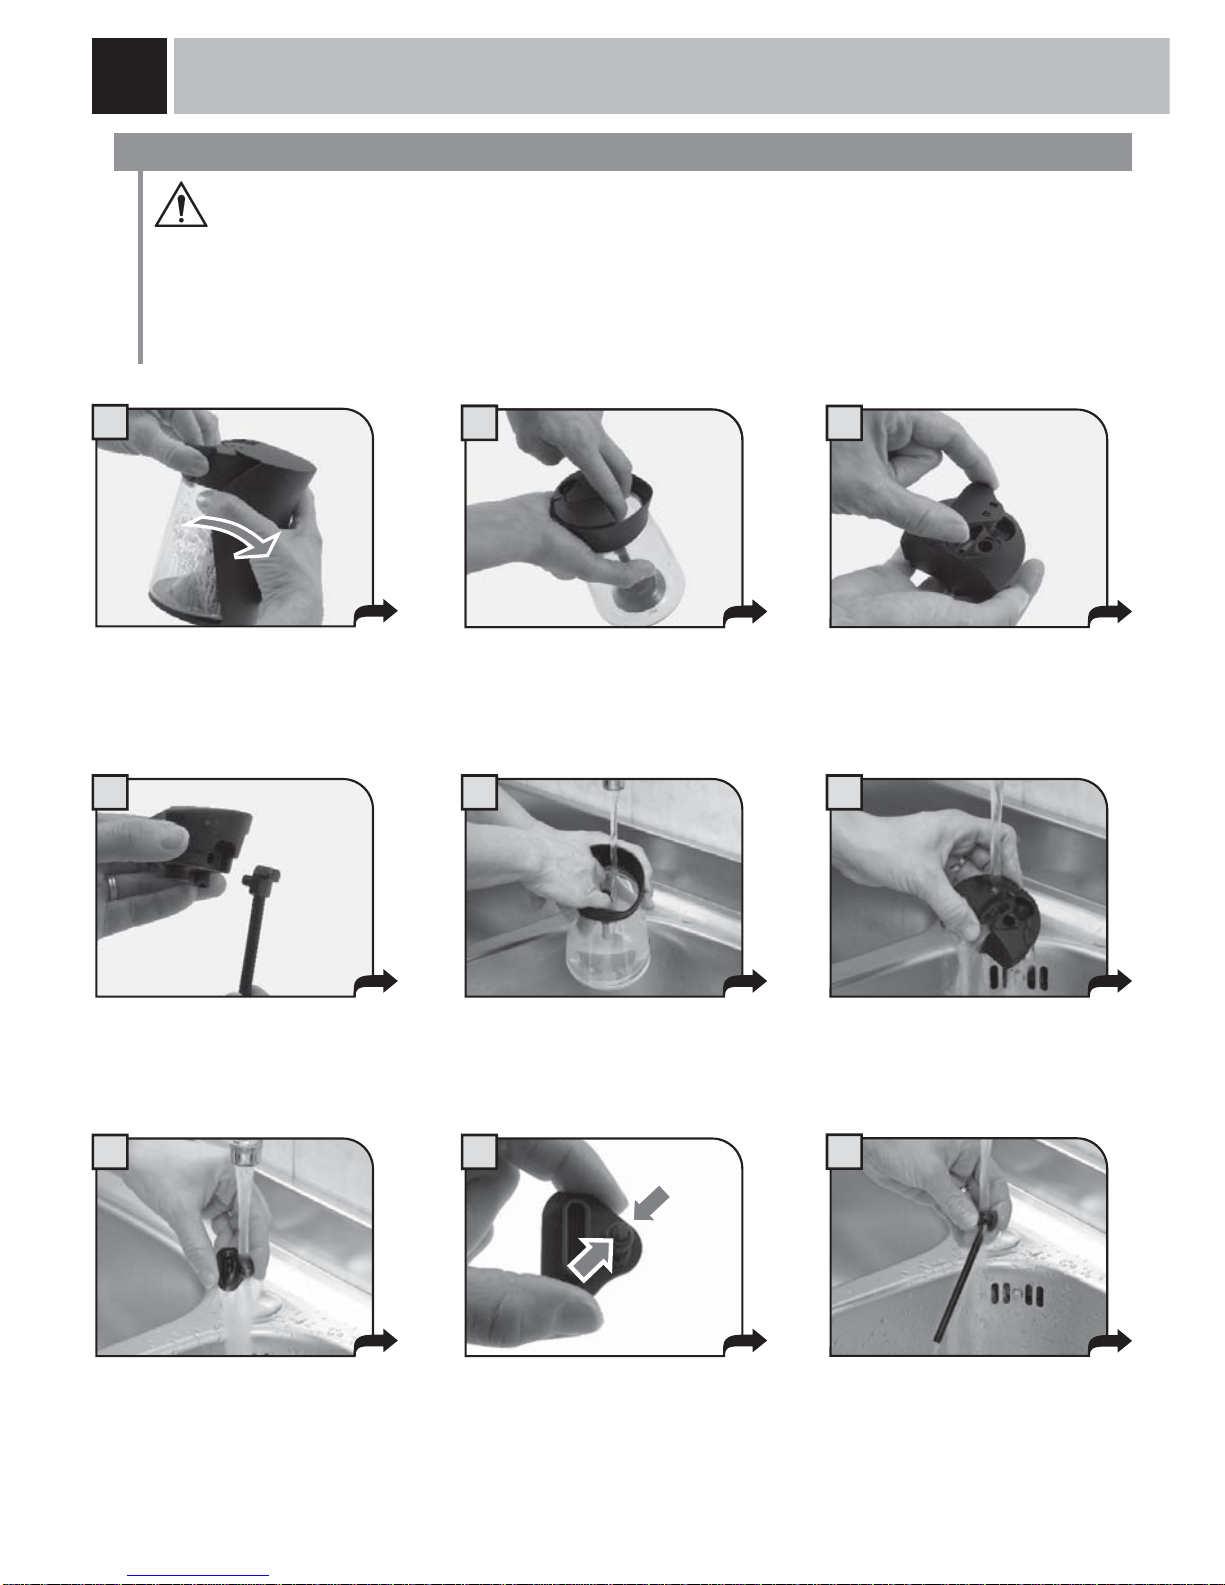
Togliere la caraffa dalla base.
Estrarre l’impugnatura tenendo la
caraffa per il beccuccio.
Estrarre la valvola dal gruppo
emulsione.
Estrarre il tubo d’aspirazione dal
gruppo emulsione.
Lavare il tubo con acqua calda.
9
Togliere il gruppo emulsione dalla
caraffa.
Lavare la caraffa con acqua
calda.
Lavare il gruppo emulsione con
acqua calda.
Lavare accuratamente la
valvola con acqua
5 6
7
22
Verifi care che la valvola sia pulita
correttamente schiacciandola
leggermente sui lati.
Utilizzare solo con la valvola
pulita e ben asciutta.
8
7
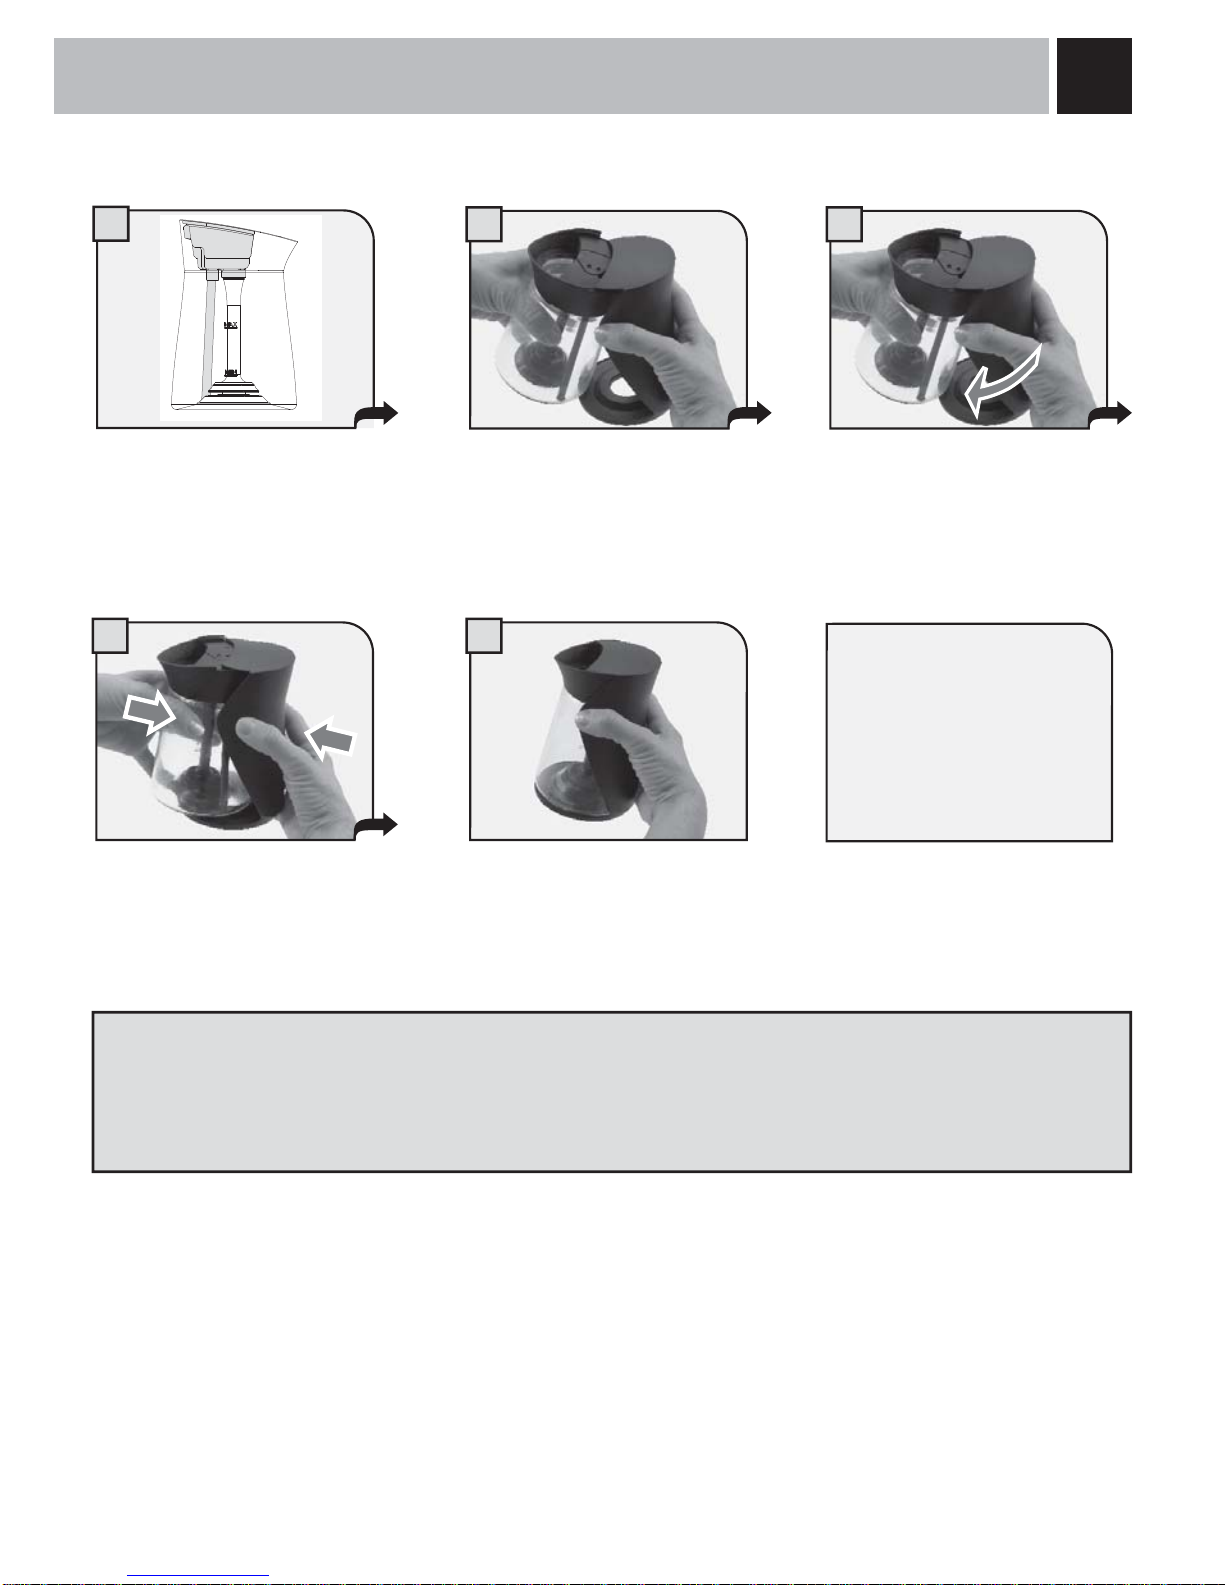
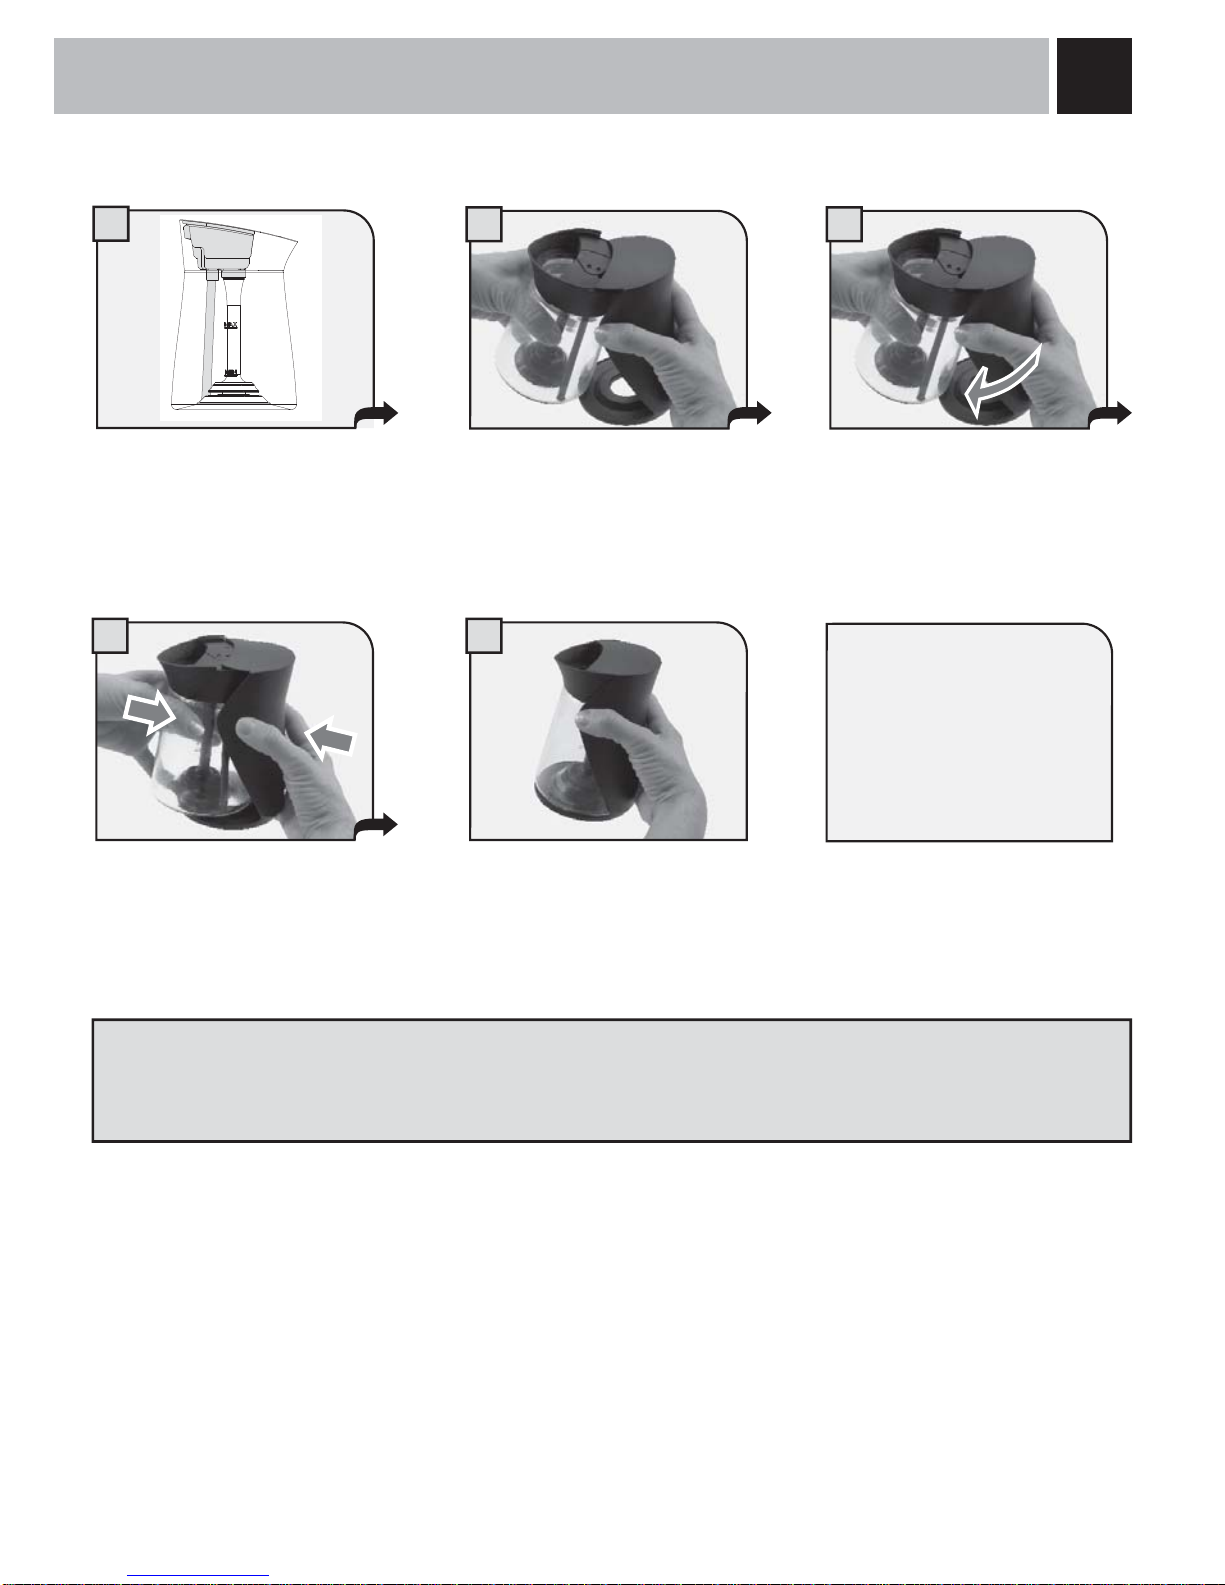
Pulire il raccordo con un panno umido. Per eseguire una pulizia più accurata, riempire la caraffa pulita di acqua ed
erogare vapore (seguire le istruzioni dal punto 2 al punto 6 di pag.5). La caraffa ed i componenti presenti nel gruppo
emulsionatore possono essere lavati con una lavastoviglie per uso domestico.
Rimontare il gruppo emulsione ed
inserirlo sulla caraffa.
Attenzione: il gruppo
emulsione deve essere inserito
correttamente nel tubo presente
all’interno della caraffa.
10
11
Montare l’impugnatura.
Appoggiare la parte superiore
come mostrato in fi gura.
13
Premere con decisione per unire
le due parti.
12
Mantenendo a contatto la parte
superiore, inserire la parte
inferiore dell’impugnatura.
14
Ora la caraffa è montata è pronta
per l’utilizzo
Attenzione: la caraffa può
essere utilizzata solo se è
integra e se tutti i suoi componenti sono correttamente
installati.
8
DISINSTALLAZIONE
DISINSTALLAZIONE MILK ISLAND
Attenzione: per scollegare il Milk Island si deve posizionare su di un lato la macchina da caffè;
prima d’eseguire questa operazione rimuovere il serbatoio dell'acqua, la vasca raccogli gocce, il
contenitore raccogli fondi e vuotare il contenitore caffè in grani della macchina da caffè.
Spegnere la macchina da caffè e staccare la spina dalla presa di corrente
1 2 3
4
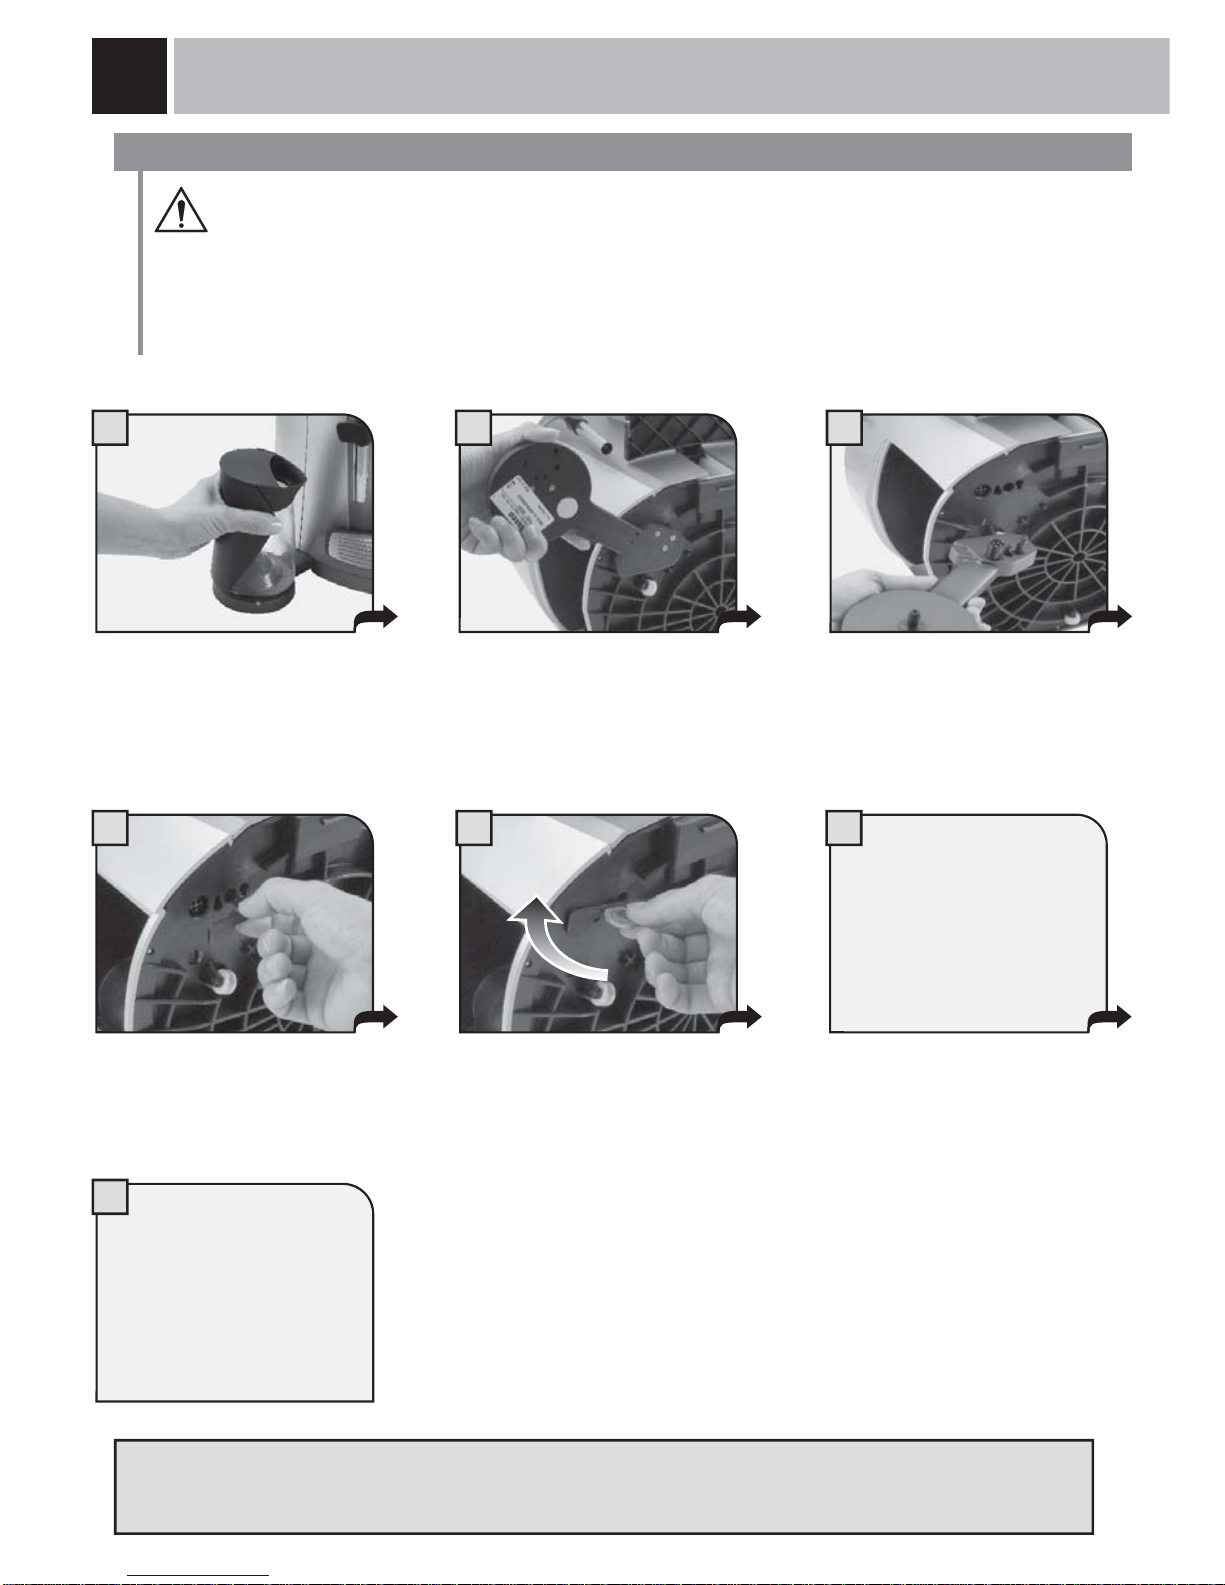
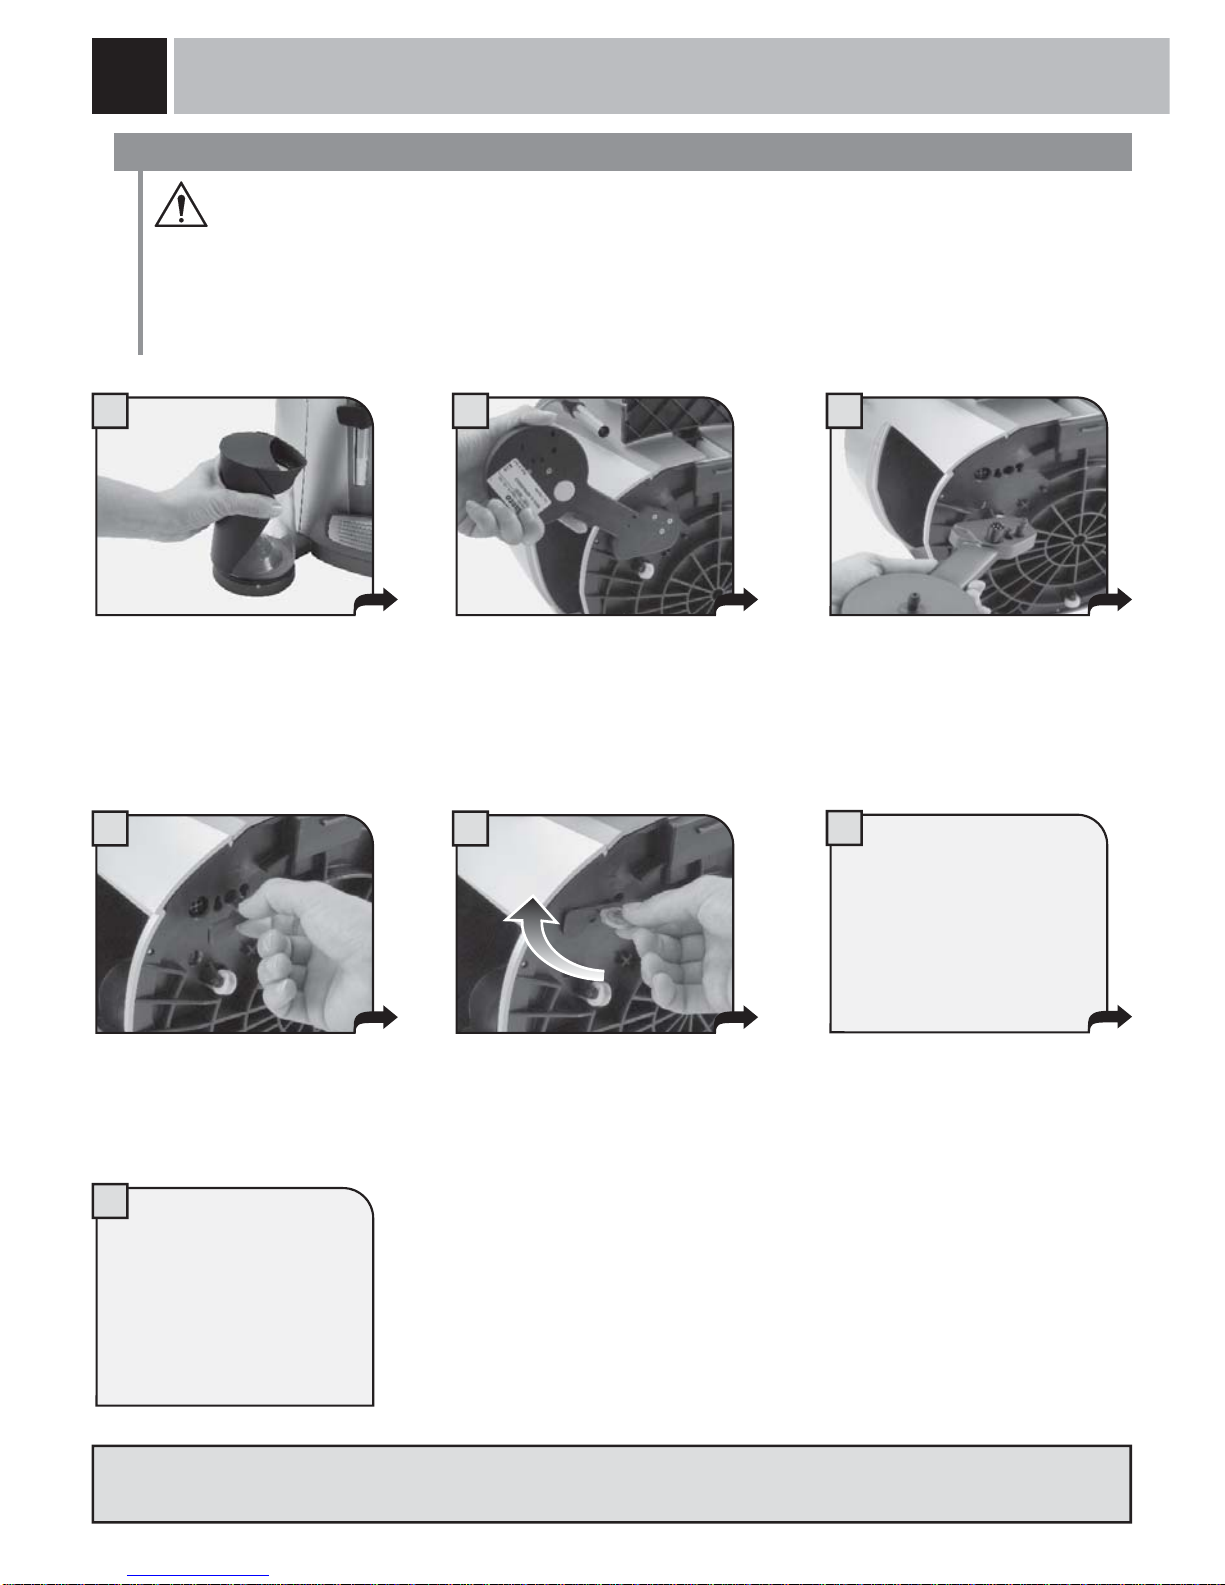
A questo punto riposizionare
correttamente la macchina
da caffè e procedere ad
un ripristino di tutti i suoi
componenti.
6
Accendere la macchina
da caffè ed eseguire la
procedura di messa in
funzione come descritto
nel manuale istruzioni della
macchina stessa.
7
Estrarre dalla base la caraffa
del latte.
Mantenendo premuto il
pulsante, estrarre la base dalla
macchina da caffè.
Dopo aver svuotato i contenitori della macchina adagiare
delicatamente la macchina su
di un lato.
Inserire il coperchio di protezione nella sua sede.
Successivamente lavare tutti i componenti del Milk Island e riporli in un luogo sicuro per una successiva
installazione; si consiglia d’utilizzare l’imballo originale.
5
Con l’aiuto di una moneta,
bloccare il coperchio ruotandolo
come mostrato in fi gura.
9
RISOLUZIONE PROBLEMI - NORME DI SICUREZZA
Problemi Cause Rimedi
La macchina non monta il latte. Latte con tenore di grasso non adatto. Cambiare il tipo di latte utilizzato.
La valvola posta nel coperchio è sporca Lavare la valvola.
La spia nella base del Milk Island è
rossa.
Premere a fondo la caraffa del latte.
Componenti del coperchio non installati correttamente.
Verifi care il montaggio del coperchio.
La macchina da caffè non pronta per
erogare vapore.
Verifi care il funzionamento della
macchina.
Per i guasti non contemplati dalla suddetta tabella o in caso che i rimedi suggeriti non li risolvano, rivolgersi ad
un centro assistenza.
Mai mettere a contatto dell’acqua le parti sotto tensione: pericolo di cortocircuito! Il vapore surriscaldato e l’acqua calda possono provocare scottature!
DESTINAZIONE D’USO
Il Milk Island è previsto esclusivamente per l’impiego domestico.
Il Milk Island non può essere utilizzato singolarmente ma deve essere collegato ad una macchina da caffè predisposta.
È vietato apportare modifi che tecniche e ogni impiego illecito, a causa dei rischi che essi comportano!
Il Milk Island e la macchina per caffè devono essere utilizzati solo da adulti.
ALIMENTAZIONE DI CORRENTE
Il Milk Island viene alimentato in bassa tensione dalla macchina da caffè alla quale è collegato tramite lo speciale
connettore elettro-idraulico.
CONNETTORE D’ALIMENTAZIONE (ELETTRO-IDRAULICO)
Mai usare il Milk Island se il connettore elettro-idraulico d’alimentazione è difettoso.
Se il connettore elettro-idraulico è danneggiato, deve essere sostituito dal produttore o dal suo servizio assistenza
clienti.
Non mettere a contatto il connettore con liquidi, parti bagnate o altre sostanze che possano alterare l’effi cacia dei
contatti elettrici o provocare un corto circuito.
PROTEZIONE D’ALTRE PERSONE
Assicurarsi che nessun bambino abbia la possibilità d’utilizzare il Milk Island.
I bambini non si rendono conto del pericolo connesso agli elettrodomestici.
Non lasciare alla portata dei bambini i materiali utilizzati per imballare il Milk Island.
PERICOLO D’USTIONI
Evitare di dirigere contro se stessi e/o altri il getto di vapore e/o d’acqua calda.
Usare sempre l’apposita impugnatura posta sulla caraffa.
UBICAZIONE
Sistemare il Milk Island e la macchina per caffè in un posto sicuro, dove nessuno può rovesciarla o venirne ferito.
NORME DI SICUREZZA
10
NORME DI SICUREZZA
Acqua calda o vapore potrebbero fuoriuscire: pericolo di scottature!
Non usare il Milk Island e la macchina per caffè all’aperto.
Non tenere la macchina a temperatura inferiore a 0°C; c’è il pericolo che il gelo possa danneggiare la macchina.
Non posare la macchina su superfi ci molto calde e nelle vicinanze di fi amme libere per evitare che la carcassa fonda o
comunque si danneggi.
PULIZIA
Mai immergere la base del Milk Island nell’acqua!
È severamente vietato cercare d’intervenire all’interno della base del Milk Island.
Dopo aver utilizzato il Milk Island procedere ad un’accurata pulizia della caraffa del latte e del gruppo emulsione utilizzando acqua calda e mettendola in lavastoviglie
SPAZIO PER L’USO E LA MANUTENZIONE
Per il corretto e buon funzionamento del Milk Island e della macchina per caffè si consiglia quanto segue:
Scegliere un piano d’appoggio ben livellato;
Scegliere un ambiente suffi cientemente illuminato, igienico e con presa di corrente facilmente accessibile;
Prevedere una distanza minima dalle pareti della macchina come indicato nel relativo libretto.
CUSTODIA DELLA MACCHINA
Quando il Milk Island rimane inutilizzato per un periodo prolungato, disinserirlo dalla macchina. Custodirlo in luogo
asciutto e non accessibile ai bambini. Proteggerlo dalla polvere e dallo sporco. Dopo un periodo d’inutilizzo povvedere
alla pulizia del Milk Island prima d’utilizzarlo.
RIPARAZIONI / MANUTENZIONE
Nel caso di guasti, difetti o sospetto di difetto dopo una caduta, staccare subito il Milk Island dalla macchina (vedi disinstallazione). Mai mettere in funzione un Milk Island difettoso. Le riparazioni vanno eseguite unicamente da un centro
di assistenza autorizzato. Nel caso di interventi non eseguiti a regola d’arte, si declina ogni responsabilità per eventuali
danni.
ANTINCENDIO
In caso di incendio utilizzare estintori ad anidride carbonica (CO2). Non utilizzare acqua o estintori a polvere.
SMALTIMENTO
ai sensi dell’art. 13 del Decreto Legislativo 25 luglio 2005, n. 151”Attuazione delle Direttive 2002/95/CE, 2002/96/CE
e 2003/108/CE, relative alla riduzione dell’uso di sostanze pericolose nelle apparecchiature elettriche ed elettroniche,
nonché allo smaltimento dei rifi uti”
Il simbolo
del cassonetto barrato riportato sull’apparecchiatura o sulla sua confezione indica che il prodotto alla
fi ne della propria vita utile deve essere raccolto separatamente dagli altri rifi uti.
L’utente dovrà, pertanto, conferire l’apparecchiatura giunta a fi ne vita agli idonei centri di raccolta differenziata dei rifi uti
elettronici ed elettrotecnici, oppure riconsegnarla al rivenditore al momento dell’acquisto di una nuova apparecchiatura
di tipo equivalente, in ragione di uno a uno.
L’adeguata raccolta differenziata per l’avvio successivo dell’apparecchiatura dismessa al riciclaggio, al trattamento e
allo smaltimento ambientalmente compatibile contribuisce ad evitare possibili effetti negativi sull’ambiente e sulla salute
e favorisce il reimpiego e/o riciclo dei materiali di cui è composta l’apparecchiatura.
Lo smaltimento abusivo del prodotto da parte dell’utente comporta l’applicazione delle sanzioni amministrative previste
dalla normativa vigente.

11
12
GENERAL INFORMATION
The Milk Island is an appliance that has been specifi cally designed for frothing milk and heating water in the simplest
and fastest manner possible. The Milk Island has been designed for household use only and it is not suitable for
continuous, professional operation.
Warning. No liability is assumed for any damage caused by:
• Incorrect use not in accordance with the intended uses;
• Repairs carried out by un-authorized customer service centres;
• Tampering with any part of the machine;
• The use of non-original spare parts and accessories;
• Storage at temperatures below 15°C (60°F) and failure to maintain the machine;
• Heating tea directly in the carafe.
In these cases, the warranty is not valid.
The warning triangle indicates all important instructions for the user’s safety. Please follow these
instructions carefully to avoid serious injury!
This symbol is used to highlight information that is particularly important for ensuring optimal use of
the appliance.
Keep these operating instructions in a safe place and available to anyone who may use the appliance.
For further information or in case of problems, please refer to an authorized service centre.
For Saeco customer service, call 1-800-933-7876 in the U.S., or 1-514-385-5551 in Canada.
GENERAL INFORMATION . . . . . . . . . . . . . . . . . . . . . . . . . . . . . . . . . . . . . . . . . . . . 12
TECHNICAL SPECIFICATIONS . . . . . . . . . . . . . . . . . . . . . . . . . . . . . . . . . . . . . . . . 13
INSTALLATION . . . . . . . . . . . . . . . . . . . . . . . . . . . . . . . . . . . . . . . . . . . . . . . . . . . . . 14
OPERATION . . . . . . . . . . . . . . . . . . . . . . . . . . . . . . . . . . . . . . . . . . . . . . . . . . . . . . . 15
CLEANING . . . . . . . . . . . . . . . . . . . . . . . . . . . . . . . . . . . . . . . . . . . . . . . . . . . . . . . . 16
REMOVING THE MILK ISLAND . . . . . . . . . . . . . . . . . . . . . . . . . . . . . . . . . . . . . . . . 18
TROUBLE SHOOTING . . . . . . . . . . . . . . . . . . . . . . . . . . . . . . . . . . . . . . . . . . . . . . . 19
SAFETY RULES . . . . . . . . . . . . . . . . . . . . . . . . . . . . . . . . . . . . . . . . . . . . . . . . . . . . 19

13
Handle
COMPONENTS – TECHNICAL SPECIFICATIONS
TECHNICAL SPECIFICATIONS
Power supply Milk Island is directly powered by the coffee machine
Housing material Thermoplastic
Carafe material Thermoplastic - Glass
Size (w x h x d) 8.5 x 6.14 x 3.75 in / 215 x 156 x 95 mm
Weight (lbs/kg) 1 / .450kg
Carafe Removable
Capacity 6.8 oz / 0.2 lt litres of milk to be frothed – 13.5 oz / 0.4 lt of water to be heated
Safety devices Electro-hydraulic steam dispensing interlock in the absence of the carafe, both
during operating as well as stand-by phases.
Compatibility To be used with coffee machines
type SUP 032OR, SUP 032NR, SUP 032BR, SUP 032AR
PLEASE NOTE: The Milk Island must be connected to a Saeco Talea coffee machine using the special
connector. The Milk Island is not equipped with a connector suitable for connection to a conventional plug.
Subject to engineering and manufacturing changes due to technological developments.
This appliance conforms to European Directive 89/336/EEC (Italian Legislative Decree 476 dated 04/12/92) concerning
electromagnetic compatibility.
Carafe
Sugar container
Electro-hydraulic connection
to the coffee machine
Release button
Carafe support
LED (indicates the
operating status of the
Milk Island)
Connection/support base
Emulsifying group
14
INSTALLATION
INSTALLING THE MILK ISLAND
Warning: Before installing the Milk Island, remove the water tank, drip tray, dregs drawer and
empty the coffee bean hopper of the espresso machine. To connect the Milk Island, turn OFF the
coffee machine, and remove the water tank, drip tray, and coffee grounds drawer. Unplug the power
cord from the socket. Place the machine on its side.
Remove the Milk Island from
the packaging. Make sure that
the carafe is intact.
Remove the cover and keep it
in a safe place.
After removing the water tank and
drip tray from the machine, gently turn
the machine onto its right side, so the
left side is up. Remove the protection
cover. Using a coin, unlock the cover
by turning it as shown in the fi gure.
Push the release button in the
direction indicated.
Release the button when the
base has been completely
inserted.
Ensure that the base is fi rmly
connected to the machine.
Hold the release button and
connect the Milk Island to the
coffee machine by inserting both
connectors into the base of the
coffee machine.
Once the support base has been
inserted properly, re-position the
coffee machine to its upright position
and replace all components that were
previously removed.
Position the carafe onto the base
by slightly rotating. Check the
LED on the base, if the light is
green the Milk Island is operating
correctly.
Milk Island is automatically
confi gured when the coffee
machine is turned on.
8
1 2 3
4 5 6
97
15
OPERATING THE MILK ISLAND
Warning: Before using the Milk Island, clean the carafe and all components. Ensure that all
the components have been installed properly. The glass of the carafe can reach very high
temperatures: danger of scalding! Only use the Milk Island with milk or water. DO NOT USE any other
liquid (other than milk or water) or chemical compound in the Milk Island.
Important note: The milk in the carafe should never be below the “MIN” minimum level nor exceed
the “MAX” maximum level. After using the Milk Island thoroughly clean all the components.
To guarantee better results when preparing cappuccino, we recommend using cold (0-8°C / 3246°F), partially skimmed milk.
Fill the milk carafe with the quantity
of milk desired (between the min
and max level).
Press and turn so as to position
the carafe onto the base of the
Milk Island. Check that the light on
the base is green.
Once the milk is done frothing
remove milk carafe using the
handle. Be sure to grip the plastic
handle as the carafe will be hot.
To make a cappuccino, gently
swirl the carafe and pour the milk
into a cup.
Position the cup with the frothed milk
under the dispensing head. Then
brew coffee into the cup. (see coffee
machine operating instructions).
OPERATION
Turn the knob until it is in the
position.
Wait for the milk to be frothed and
the desired density is reached.
Turn the knob until it is in the rest
position (
).
Note: when the milk carafe is
not being used, place the sugar
container on the base.
3
5
7 8
1 2
64
16
CLEANING
CLEANING THE MILK ISLAND
Warning: Do not immerse the Milk Island base in any liquid. Maintenance and cleaning operations
of the base can only be carried out when the machine is cold and disconnected from the power
supply. All components described in this section may be washed in a dishwasher for home use.
Do not use sharp objects or harsh chemical products (solvents) for cleaning. Use a soft dry cloth to
wipe the base. Do not dry the machine and/or its components using a microwave and/or conventional
oven.
1
3
4
Remove the carafe from the base.
Remove the handle holding the
carafe by the spout.
Remove the valve from the
emulsifying group.
Remove the suction tube from
the emulsifying group.
Wash the tube with hot water.
9
Remove the emulsifying group
from the carafe.
Wash the carafe with hot water
and mild dish soap.
Wash the emulsifying group with
hot water and mild dish soap.
Carefully clean the valve with
water.
5 6
7
22
Check if the valve is correctly
cleaned by slightly squeezing it
on the sides.
It is advised to use a clean and
properly dried valve.
8
17
Clean the connector with a damp cloth. For thorough cleaning, fi ll the clean carafe with water and dispense steam
(follow the instructions from step 2 to 6 on page 15).The carafe and the emulsifying group’s components may be
washed in a dish-washer for home use.
Re-assemble all the covered
components. Replace the
emulsifying group onto the carafe.
Warning: make sure that the
cover is correctly inserted in the
tube located inside the carafe.
10
11
Assemble the handle.
Place the upper part onto the
carafe, as shown in the fi gure.
13
At this point, fi rmly press so as to
join both parts.
12
Keep the upper part angled onto
the carafe, and slide the lower
part of the handle underneath the
carafe.
14
The milk carafe is now assembled
and ready for use.
Warning: only use the milk
carafe if intact and if all
components are correctly
assembled.
18
REMOVING THE MILK ISLAND
REMOVING THE MILK ISLAND
Warning: Before removing the Milk Island, remove the water tank, drip tray and coffee grounds
drawer, and empty the coffee bean hopper. Turn the coffee machine off and unplug the machine.
To disconnect the Milk Island, gently position the coffee machine onto its right side, so the left side is
up.
Turn the coffee machine off and unplug the power cord from the socket.
Return the coffee machine
to its upright position, and
replace all components that
were previously removed.
6
Turn the coffee machine
on and follow the start-up
procedure as described in
the machine’s operating
instructions.
7
Remove the milk carafe from
the base.
Push the release button, and
remove the base from the
coffee machine.
After having emptied the
containers, delicately turn the
machine onto one side.
Insert the protection cover into
its place.
Once removed from the coffee machine, wash the Milk Island components and place them in a safe place for future
use. If possible we recommend using the original packaging for storage.
2 3
4 5
Using a coin, lock the cover by
turning it as shown in the fi gure.
1

19
TROUBLE SHOOTING - SAFETY RULES
Problems Causes Solutions
The machine does not froth milk. The valve located in the cover is dirty. Wash the valve.
The LED in the base of Milk Island is red. Firmly push down on the milk carafe.
Cover components not installed correctly. Check cover assembly.
The coffee machine is not ready to
dispense steam.
Check machine operation.
Please contact Saeco customer service for problems not covered in the above trouble shooting section or when
a problem cannot be resolved (1-800-933-7876 in the U.S., or 1-514-385-5551 in Canada).
Never place live parts in contact with water: danger of short circuit! Steam and hot water can cause scalding!
INTENDED USE
The Milk Island is exclusively intended for household use only.
The Milk Island cannot be used alone but must be connected to a preset coffee machine.
Do not make any technical changes or use the machine for unlawful purposes since this would create serious hazards!
The Milk Island and the coffee machine must only be operated by adults.
POWER SUPPLY
The Milk Island is powered by low voltage from the coffee machine to which it is connected by a special electrohydraulic connector.
POWER CONNECTOR (ELECTRO-HYDRAULIC)
Never use the Milk Island if the electro-hydraulic power connector is faulty.
If damaged, the electro-hydraulic connector must be replaced by the manufacturer or its customer service department.
The connector must not come into contact with liquids, wet parts or other substances that could alter the effectiveness
of the electrical contacts or cause a short circuit.
PROTECTING OTHERS
Be sure that no children operate the Milk Island.
Children are not aware of the risks linked with electrical appliances.
Do not leave the Milk Island packaging within the reach of children.
DANGER OF BURNING
Never direct the jet of hot steam and/or hot water towards yourself or others.
Always use the appropriate handgrip on the carafe.
LOCATION
Place the Milk Island and the coffee machine in a safe place, where it cannot be overturned or cause injury.
SAFETY RULES
20
SAFETY RULES
Hot water or steam may spill out: danger of scalding!
Do not use the Milk Island and the coffee machine outdoors.
Do not keep the machine at a temperature below 0°C (32°F); freezing may damage the machine.
Do not place the machine or the Milk Island on hot surfaces or close to open fl ames to prevent the housing from melting
or being damaged.
CLEANING
Never immerse the Milk Island base in water!
It is strictly forbidden to tamper inside the inside of the base of the Milk Island.
After having used the Milk Island, thoroughly clean the milk carafe and the emulsifying group with hot water or in the
dishwasher.
SPACE FOR USE AND MAINTENANCE
To ensure that the Milk Island and the coffee machine work properly and effi ciently, we recommend the following:
Choose a level surface;
Select a location that is suffi ciently well-lit, clean and near an easily reachable socket;
Allow for a minimum distance from the sides of the machine, as shown in the appropriate booklet.
STORING THE MACHINE
When the Milk Island remains inactive for a long period of time, disconnect it from the machine. Store it in a dry place
out of the reach of children. Keep it protected from dust and dirt. After a long period of inactivation, wash the Milk Island
before using it.
SERVICING / MAINTENANCE
In case of failure, faults or a suspected fault after a fall, immediately unplug the Milk Island from the machine (see
removing the Milk Island). Never operate a faulty Milk Island. Repairs must only be carried out by an Authorized
Service Centre. All liability for damages caused by works not carried out in a professional manner, is declined.
FIRE SAFETY
In the event of fi re, use carbon dioxide extinguishers (CO2). Do not use water or dry-powder extinguishers.
DISPOSAL
This product complies with EU Directive 2002/96/EC.
The symbol
on the product or on its packaging indicates that this product may not be treated as household
waste. Instead it shall be handed over to the applicable collection point for the recycling of electrical and electronic
equipment.
By ensuring this product is disposed of correctly, you will help prevent potential negative consequences for the
environment and human health, which could otherwise be caused by inappropriate waste handling of this product. For
more detailed information about recycling of this product, please contact your local city offi ce, your household waste
disposal service or the retailer where you purchased the product.
21
22
INHALT - ALLGEMEINES
ALLGEMEINES
Das Milk Island wurde eigens zum einfachen und schnellen Aufschäumen von Milch und zum Wärmen von Wasser
entwickelt und hergestellt. Das Milk Island wurde für den Einsatz im Haushalt entwickelt; es eignet sich daher nicht für
den Dauerbetrieb im gewerblichen Einsatz.
Achtung. In folgenden Fällen wird für eventuelle Schäden keine Haftung übernommen:
• Falsche und nicht den vorgesehenen Verwendungszwecken entsprechende Verwendung;
• Reparaturen, die nicht in autorisierten Kundendienststellen durchgeführt wurden;
• Veränderungen an beliebigen Bestandteilen der Vorrichtung;
• Verwendung von anderen als originalen Ersatz- und Zubehörteilen;
• Lagerung in Räumen bei Temperaturen unter 15°C und fehlende Wartung;
• Wärmen von Tees direkt in der Karaffe.
In diesen Fällen erlischt die Garantie.
Das Warndreieck deutet auf alle Informationen hin, die für die Sicherheit des Benutzers wichtig sind.
Diese Hinweise sind strikt zu beachten, um schwere Verletzungen zu vermeiden!
Mit diesem Symbol werden Informationen gekennzeichnet, auf die besonders geachtet werden muss,
um den Betrieb der Vorrichtung zu optimieren.
Diese Bedienungsanleitung an einem sicheren Ort aufbewahren und sie der Vorrichtung immer beilegen, wenn
diese von anderen Personen benutzt wird.
Für weitere Informationen oder bei Problemen wenden Sie sich bitte an die autorisierten Kundendienststellen.
ALLGEMEINES . . . . . . . . . . . . . . . . . . . . . . . . . . . . . . . . . . . . . . . . . . . . . . . . . . . . 22
TECHNISCHE DATEN . . . . . . . . . . . . . . . . . . . . . . . . . . . . . . . . . . . . . . . . . . . . . . . 23
ANSCHLUSS DES MILK ISLAND . . . . . . . . . . . . . . . . . . . . . . . . . . . . . . . . . . . . . . 24
GEBRAUCH DES MILK ISLAND . . . . . . . . . . . . . . . . . . . . . . . . . . . . . . . . . . . . . . . 25
REINIGUNG DES MILK ISLAND . . . . . . . . . . . . . . . . . . . . . . . . . . . . . . . . . . . . . . . 26
DEINSTALLATION DES MILK ISLAND . . . . . . . . . . . . . . . . . . . . . . . . . . . . . . . . . . 26
PROBLEMLÖSUNG . . . . . . . . . . . . . . . . . . . . . . . . . . . . . . . . . . . . . . . . . . . . . . . . . 29
SICHERHEITSVORSCHRIFTEN . . . . . . . . . . . . . . . . . . . . . . . . . . . . . . . . . . . . . . . 29
23
Griff
BESTANDTEILE – TECHNISCHE DATEN
TECHNISCHE DATEN
Versorgung Das Milk Island wird direkt über die Kaffeemaschine versorgt
Material des Gerätekörpers Thermoplastisches Material
Material der Karaffe Thermoplastisches Material - Glas
Abmessungen (L x H x T) (mm) 215 x 156 x 95
Gewicht 0,450 kg
Füllmenge der Karaffe 0.2 Liter aufzuschäumende Milch - 0.4 Liter aufzuwärmendes Wasser
Sicherheitsvorrichtungen Elektrohydraulische Sperre der Dampfausgabe, wenn während der
Betriebsphase oder im Standby die Karaffe nicht vorhanden ist.
Kompatibilität Zur Verwendung mit Kaffeemaschinen
Type SUP 032OR, SUP 032NR, SUP 032BR, SUP 032AR
Wichtiger technischer Hinweis: Das Milk Island muss über den speziellen Stecker direkt an einen entsprechend
ausgelegten Kaffeevollautomaten angeschlossen werden. Das Milk Island ist nicht mit einem Stecker ausgestattet, der in eine herkömmliche Steckdose eingesteckt werden kann.
Änderungen der Konstruktion und Ausführung sind aufgrund von technologischen Weiterentwicklungen vorbehalten.
Die Vorrichtung entspricht der europäischen Richtlinie 89/336/EWG (Gesetzesverordnung 476 vom 04.12.92)
hinsichtlich der Funkentstörung.
Karaffe
Zuckerbehälter
Elektrohydraulischer Anschluss
an die Kaffeemaschine
Taste zum Ein- und Aushängen der
Basis an den Kaffeevollautomaten.
Karaffenhalterung
LED (Anzeige des
Betriebsstatus des Milk Island)
Basis für die Aufstellung
und den Anschluss
Aufschäumer

24
ANSCHLUSS
ANSCHLUSS DES MILK ISLAND
Achtung: Das Milk Island für den Anschluss neben eine Kaffeemaschine stellen; zuvor den
Wassertank, die Abtropfschale und den Kaffeesatzbehälter entfernen und den Bohnenbehälter der
Kaffeemaschine leeren. Die Kaffeemaschine ausschalten und den Stecker von der Steckdose abziehen.
Das Milk Island aus der
Verpackung nehmen und
sicherstellen, dass die Karaffe
unbeschädigt ist. Die Verpackung
sollte aufbewahrt werden.
Die Schutzabdeckung
abnehmen und sorgfältig
aufbewahren.
Nachdem die Behälter geleert wurden,
die Kaffeemaschine vorsichtig zur
Seite legen. Die Schutzabdeckung
abnehmen, indem Sie die Abdeckung
mit einer Münze wie abgebildet
entriegeln.
Die Taste zum Einsetzen der
Basis in die Unterseite der
Maschine in die angegebene
Richtung drücken.
Nach dem Einsetzen der Basis
die Taste loslassen.
Überprüfen, ob die Basis fest
mit der Maschine verbunden ist.
Die Taste gedrückt halten und das
Milk Island in den Gehäuseboden
des Kaffeevollautomaten einsetzen,
wobei die entsprechenden Stecker
in Übereinstimmung gebracht
werden müssen.
Nun den Kaffeevollautomaten
wieder aufstellen und alle seine
Behälter einsetzen und füllen.
Die Karaffe auf die Basis stellen.
Die Farbe der LED auf der Basis
beachten. Wenn die LED grün
leuchtet, ist das Milk Island korrekt
eingesetzt und betriebsbereit.
Beim Einschalten des
Kaffeevollautomaten
erfolgt die automatische
Konfi guration des Milk
Island.
8
1 2 3
4 5 6
97

25
GEBRAUCH DES MILK ISLAND
Achtung: vor dem Gebrauch des Milk Island müssen die Karaffe und die anderen Bestandteile
gereinigt werden. Überprüfen, ob alle Bestandteile korrekt installiert wurden. Das Glas der Karaffe
kann hohe Temperaturen erreichen: Verbrennungsgefahr! Das Milk Island nur mit Wasser und Milch
verwenden. Die Benutzung mit anderen Flüssigkeiten jeder Art oder chemischen Zusammensetzungen
ist verboten.
Wichtiger Hinweis: die Milchmenge in der Karaffe darf nicht unter der Markierung der
Mindestfüllhöhe “MIN” liegen und sie darf die Markierung der maximalen Füllmenge “MAX”
nicht überschreiten. Nach der Benutzung des Milk Island müssen alle Bestandteile sorgfältig gereinigt
werden.
Für die Zubereitung eines optimalen Cappuccinos ist es empfohlen, teilentrahmte, kalte (0-8°C)
Milch zu verwenden.
Die Karaffe mit der gewünschten
Milchmenge füllen.
Drücken und drehen, um die Karaffe
auf die Basis der Milk Island zu
stellen. Überprüfen, ob die LED auf
der Basis grün aufl euchtet.
Die Karaffe am Griff anfassen und
abnehmen.
Leichte Kreisbewegungen
ausführen und die Milch in die
Tasse gießen.
Die Tasse mit der aufgeschäumten
Milch unter den Kaffeeauslauf stellen.
Den Kaffee in die Tasse ausgeben
(siehe Bedienungsanleitung des
Kaffeevollautomaten).
GEBRAUCH
Hinweis: Wenn die Milchkaraffe
nicht benutzt wird, den
Zuckerbehälter auf die Basis
setzen.
Den Regler bis in die Position
drehen.
Abwarten, bis die Milch
aufgeschäumt ist.
Den Regler bis in die Ruheposition
( ) drehen.
1 2 3
6
7 8
4
5

26
REINIGUNG
REINIGUNG DES MILK ISLAND
Achtung: die Basis des Milk Island nicht in Flüssigkeiten jeder Art tauchen. Die Wartung und die
Reinigung der Basis dürfen erst dann durchgeführt werden, wenn die Maschine vom Stromnetz
getrennt wurde und abgekühlt ist. Alle im vorliegenden Abschnitt beschriebenen Bestandteile dürfen in
einem Haushalts-Geschirrspüler gewaschen werden.
Für die Reinigung dürfen keine spitzen Gegenstände oder chemisch aggressive Produkte
(Lösungsmittel) verwendet werden. Die Basis mit einem weichen Tuch reinigen. Das Milk Island und
seine Bestandteile nicht unter Verwendung eines Mikrowellen- oder herkömmlichen Backofens trocknen.
1
3
4
Die Karaffe von der Basis
abnehmen.
Den Griff abnehmen, indem die
Karaffe am Ausguss gehalten wird.
Das Ventil aus dem
Aufschäumer herausziehen.
Den Ansaugschlauch aus dem
Aufschäumer herausziehen.
Den Schlauch mit Wasser
waschen.
9
Den Aufschäumer von der Karaffe
abnehmen.
Die Karaffe mit warmem
Wasser waschen.
Den Aufschäumer mit warmem
Wasser waschen.
Das Ventil sorgfältig mit Wasser
waschen.
5 6
7
22
Überprüfen, ob das Ventil korrekt
gereinigt ist, indem es leicht auf
den Seiten zusammengedrückt
wird. Das Ventil sollte für den
Betrieb sauber und trocken sein.
8
 Loading...