

Page 1

courtesy of
TYPE
com006 - com006L
ISTRUZIONI PER L'USO
COD. 165931500 REV . 02 DEL 21/03/00
FÜR IHRE SICHERHEIT LESEN SIE BITTE SORGFÄLTIG DIE BEDIENUNGSANLEITUNG, BEVOR SIE DAS
OPERATING INSTRUCTIONS
INSTRUCTIONS DEMPLOI
BEDIENUNGSANLEITUNG
INSTRUCCIONES DE USO
INSTRUÇÕES PARA USO
GEBRUIKSAANWIJZING
PER LA VOSTRA SICUREZZA LEGGERE ATTENTAMENTE LE ISTRUZIONI PER L'USO.
FOR YOUR SAFETY CAREFULLY READ THE OPERATING INSTRUCTIONS.
POUR VOTRE SÉCURITÉ, LISEZ SOIGNEUSEMENT LES INSTRUCTIONS D’EMPLOI.
GERÄT IN BETRIEB SETZEN.
PARA SU SEGURIDAD, LÉALAS ATENTAMENTE.
PARA A SUA SEGURANÇA DEVE LER ATENTAMENTE ESTAS INSTRUÇÕES.
LEES DEZE GEBRUIKSAANWIJZING ZORGVULDIG VOORDAT U DE MACHINE GEBRUIKT.
Page 2
3
courtesy of
2
10
15
5 2
3 14
6
9
8
4
12
1
11
A 13 7
F
Page 3
19
courtesy of
TABLE OF CONTENTS
18
CONTROLS
Table of Contents
Controls page 18
Technical data page 18
Warranty page 19
1. Machine description page 20
2. Safety norms page 20
2.1 Indications page 20
2.2 Précaution page 20
3. Installation page 22
3.1 Mains voltage check page 22
3.2 Water tank filling page 22
3.3 Coffee bean hopper filling page 23
3.4 Grinding adjustment page 23
3.5 Power supply connection page 23
3.6 System loading page 23
4. Coffee dispensing page 24
4.1 Dispensing with coffee beans page 24
4.2 Grinder adjustment page 25
4.3 Pre-ground coffee dispensing page 25
5. Hot water dispensing page 26
6. Steam dispensing page 26
7. Maintainance and cleaning page 27
8. Decalcification page 28
9. Regular service page 30
10. Coffee type choice page 30
11. Legal aspects page 30
Warranty
For the whole duration of the 1-year
warranty period starting from the
purchase date, the manufacturer
agrees to repair defective machines
free of charge due to construction,
manufacturing, finishing and
material defects.
Damage due to normal wear and
tear, misuse, inadequate treatment,
improper handling, insufficient care
and cleaning, transportation
damages or repairs by unauthorized
persons void this warranty. This cer-
tificate of warranty has to be
delivered, together with the machine,
to an Authorized Service Centre.
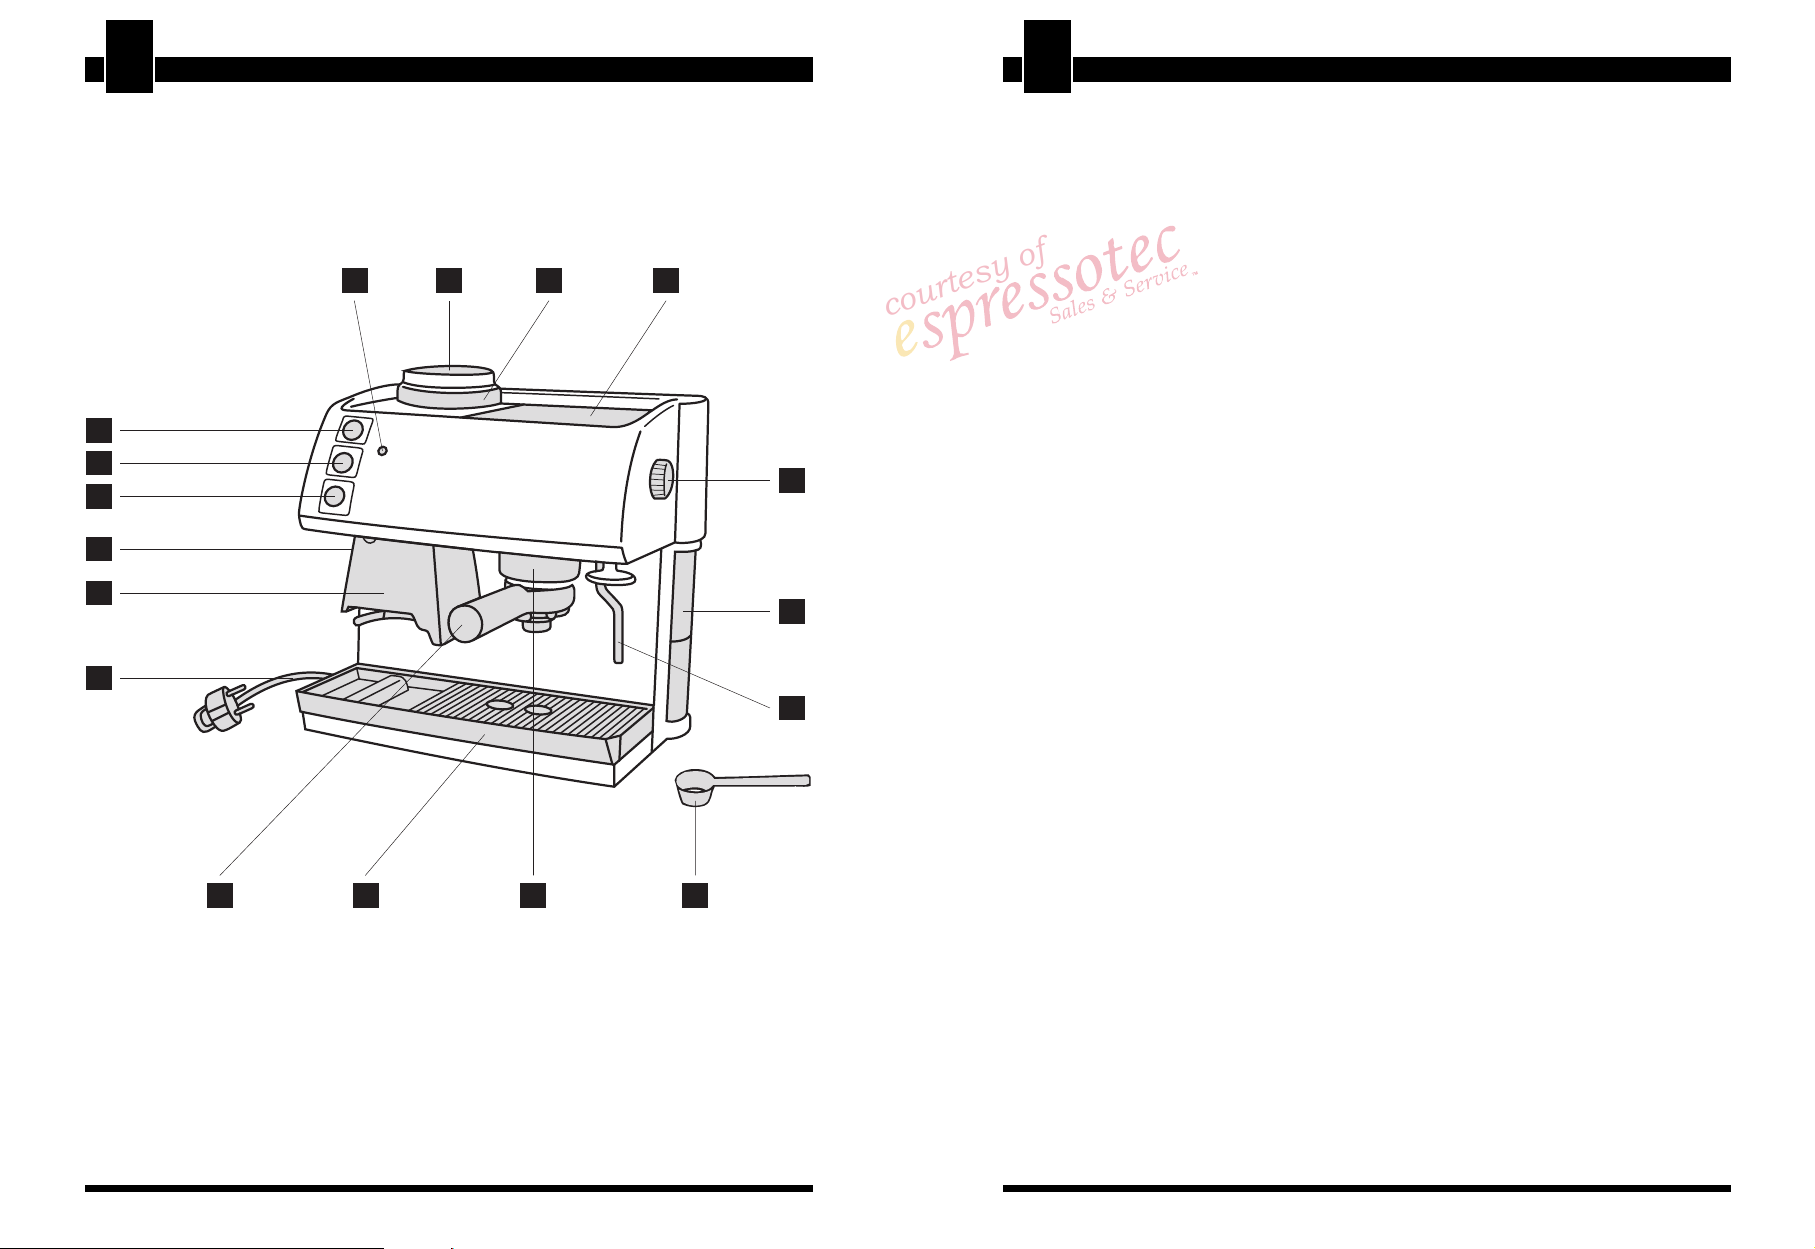
Controls
1 Water tank
2 Coffee bean hopper
3 Grinder adjustment
4 Automatic dispenser
5 Green LED: machine ready for use
6 Main switch
7 Filter holder coupling
8 Coffee grinder button
Do not discard this instruction manual. Keep it for future reference. Always
keep it whit the machine.
9 Coffee button
10 Steam button
11 Adjustable hot water/steam dispensing tube
12 Hot water/steam knob
13 Drip tray and grille
14 Cup-holder plate
15 Power cord
Accessories: A 1 filter holder with
1/2 cup filter
F 1 doser
Technical data
Voltage: Refer to rating plate underneath machine
Power: Refer to rating plate underneath machine
Pump power/flow rate: 48 W/15 bar
Cable: 2P + E/1,5 m
Weight: 8,6 kg
Sizes (lxhxp) 330/330/350
Tank capacity: 2,2 l
Boiler: Com006 Stainless steel
Com006L Aluminium
Safety checks:
This machine is in conformity with the 89/336 CEE directive (Bodies involved with the
legislation and regulation of suppression of radio interference).
Page 4

20
courtesy of
MACHINE DESCRIPTION - SAFETY NORMS
21
SAFETY NORMS
1 Machine description
The machine serves 1 or 2 cups of freshly
ground espresso by means of the built-in
coffee grinder. The automatic dispenser
provides the adequate powder dose for
each cup of coffee. It is also fitted with an
adjustable tube for dispensing steam and
hot water. The top of the machine includes
an active cup-heater plate (optional) to
preheat the cups in order to taste a coffee
always at the right temperature. The
transparent water tank is equipped with a
device which automatically controls the
suction pipe. Controls on the machine front
are marked with easy-reading symbols. The
machine body with its elegant design has
been devised for domestic use and is not
indicated for continuous commercial use.
Never operate a defective machine or
one with a damaged power cord.
Never place the machine in water.
The machine is connected to the power
supply by means of a cord. Be careful not
to let anyone stumble over the power
cord. Keep children and animals away.
During use, some components get very
hot. Avoid direct contact with hot
components.
(or in their immediate proximity) (for
example, cooking plates). Install it in a
place unreachable to children and
animals.
Before cleaning, unplug the machine.
2 Safety norms
2. 1 Indications
Children are not able to understand the
dangers of handling electrical equipment;
it is therefore advisable not to leave them
alone and unattended with such
equipment.
The machine shall only be used by adults
and properly instructed persons.
2.2 Precautions
Never expose the machine to outside
weather conditions (rain, snow, frost).
Do not unplug the machine by pulling the
power supply cord or the machine.
Place the machine on a flat and stable
surface. Never place it on hot surfaces
Page 5

22
courtesy of
INSTALLATION
23
INSTALLATION
Do not repair or disassemble the machine
on your own. Repair works and service
are reserved to Authorized Service Centres
which use original spare parts and
accessories.
Dont use the machine in rooms where
there are explosive materials. In case of
a fire, use a carbon dioxide (CO
), based
2
extinguisher. Do not use water or powder
extinguisher.
The original packaging has been devised
and realized to protect the machine during
transportation. We recommend you save
it for any future transportation.
Rinse the tank with clear water without
using any detergent. Fill in the tank with
fresh water.
Caution: The tank must be filled with
water only. Never use milk, sparkling mineral
water or other liquids.
Operation without water may cause damage
to the machine.
3.3 Coffee hopper filling
Remove the cover, be certain the hopper
is clean and fill with coffee beans. Close
cover.
the coffee hopper to the following settings:
Italy: 6
All other countries: 9
1
2
1
1
1
0
3
9
4
5
8
6
7
For further grinding adjustment see
indications in paragraph 4 Coffee
dispensing.
3.5 Power supply connection
3 Installation
3.1 Main voltage check
The machine voltage has been set at the
factory. Be certain the voltage corresponds
to indications of the data plate on the
machine bottom.
3.2 Water tank filling
Remove the tank from the machine.
Reinsert the tank in its appropriate seat.
An automatic device provides for the
insertion of the suction pipe.
Caution: The hopper must be filled with
coffee beans only. Never fill with preground
coffee, instant coffee or other products.
3.4 Grinding adjustment
The machine is factory set for a medium
grind. However, we recommend adjusting
Be certain that the main switch is OFF
before connecting the machine to the
power supply.
Plug the machine into an outlet with
adequate voltage.
3.6 System loading
Before any operation, after the machine
has not been used for a while, and after
emptying the water reservoir and
dispensing steam, the machine system
has to be loaded.
Page 6

1
2
1
1
1
0
9
8
7
6
5
4
3
24
courtesy of
COFFEE DISPENSING
25
COFFEE DISPENSING
Position the steam dispensing tube above
the drip tray and turn on the hot water/
steam knob until a regular water stream
comes out. Turn the knob OFF.
4 Coffee dispensing
4.1 Dispensing with coffee beans
Turn on the machine by means of the
main switch. Wait until the green LED is
on to indicate that the machine has
reached the proper temperature.
Place the filter holder under the doser.
Press firmly A switch is activated to open
the automatic dispenser which discharges
one dose into the filter holder. The coffee
grinder automatically starts again to
prepare the next dose.
Introduce the filter holder into its seat until
it is blocked. To prepare two cups of
coffee at the same time, take two doses
from the automatic doser.
Note: The machine is equipped with a
special filter holder which doesnt require a
filter change to serve a second cup of
coffee.
Press the coffee button. The corresponding
LED turns on.
Wait until the cups are filled and press the
coffee button again. The corresponding
LED turns off.
Remove and empty the filter holder.
On the contrary, if coffee flows out of the
filter holder very slowly, adjust the hopper
to a higher setting (7-12).
Note: The coffee hopper can be rotated
only when the coffee grinder is working and
the new grinding adjustment will be achieved
only after dispensing 3 doses, since the
doser needs to discharge the previously
ground powder.
4.3 Preground coffee dispensing
For coffee dispensing with preground
coffee mixtures, follow the same
instructions as in par. 4.1, using the
supplied doser to fill the filter holder with
1 or 2 powder doses.
Turn on the coffee grinder by means of
the corresponding button. The engine
starts and automatically stops when
adequate coffee quantity has been
ground. The doser is now ready to
distribute the first dose of coffee powder.
Insert the filter holder into the, brew head,
turning from left to right until it locks into
place. Release the handle of the filter
holder. The filter holder will automatically
move slightly to the left. This movement
guarantees the perfect operation of the
filter holder.
Take 1 or 2 cups from the cup-holder
plate and place them under the filter
holder. Be certain the cups are properly
positioned under the coffee dispensing
holes.
4.2 Grinding adjustment
The coffee quality and taste depend on
the quality of beans and the grinding
adjustment. If the grinding is adjusted too
high, coffee tends to have a watery
content, less cream and flows out very
quickly from the filter holder. In this case
its necessary to rotate the coffee hopper
towards lower settings (1-5).
Note: When the coffee grinder is not in
use, turn it off by the switch.
Page 7

26
courtesy of
HOT WATER DISPENSING - STEAM DISPENSING
27
MAINTENANCE AND CLEANING
5 Hot water dispensing
Place a cup or a glass under the adjustable
tube.
Open the hot water/steam knob and
close it after having obtained the desired
hot water quantity.
Caution: Danger of burning! Upon initial
dispensing some jets of hot water could
come out. The dispensing tube may reach a
high temperature. Do not touch it directly
with your hands.
Open the hot water/steam knob to release
water residue from the dispensing tube.
After a few seconds, steam alone starts
coming out.
Place the adjustable tube into the liquid
to be warmed. Slightly rotate the container
to obtain an even heating.
Caution: Danger of burning! The steam
dispensing tube may reach high
temperatures. Do not touch it directly with
your hands.
To dispense coffee after steam operation,
it is necessary to reload the machine
system. To accomplish this, place the
adjustable tube above the drip tray and
open the hot water/steam knob until a
regular water jet flows out. Then close the
knob. The machine is now ready to di-
spense coffee.
7 Maintenance and cleaning
Maintenance and cleaning operations
can be performed only when the machine
is cold and disconnected from power
.
supply
The adjustable hot water/steam
dispensing tube should be cleaned on
the outside with a moist cloth after each
use.
After warming the milk, you can dispense
some hot water to clean the tube.
6 Steam dispensing
To warm milk for cappuccino or other
beverages.
Press the steam button. Wait until the
green LED is on to indicate that the machine
has reached the proper temperature.
After dispensing the desired steam, close
the hot water/steam knob.
Reset the steam button to its initial position.
The corresponding LED turns off.
Never immerse the machine into water.
Never use any sharp objects or abrasive
chemical products for cleaning.
Clean the machine, with a moist soft
cloth.
Clean and fill the water tank daily.
Page 8

28 29
courtesy of
DECALCIFICATION DECALCIFICATION
Never attempt to repair or open the
machine. Repair and maintenance work
can be performed only by Authorized
Service Centres which use original spare
parts.
Attention: whenever the machine shouldnt
be used for a long period (indicatively over
20 months) it is advisable to empty the bean
hopper as the product could deteriorate. It
is also necessary to empty the automatic
doser by activating it until there is no coffee
left. This operation can be carried out also
in advance, before leaving for a longer
period of time.
8 Descaling
Scale normally forms while the machine is
being used; descaling is necessary every
4-6 months of use or whenever you observe
a decrease in water flow. If you wish to
descale the machine yourself, you
may use any commercially available
non-toxic and/or non-harmful
descaling agent for coffee machines.
Warning! Never use vinegar as a
descaling agent.
Mix the descaling agent with water as
directed on the package and pour the
solution into the water container; place
the water container inside the machine.
Turn on the machine by pressing the
main power switch.
Position the steam tube over the drip tray.
Empty the entire contents from the water
container at intervals (one cup at a time),
by turning the steam knob
counterclockwise; to cut off flow turn the
knob (12) clockwise.
During each interval, allow the descaling
agent to act for about 10-15 minutes.
When all the descaling agent has been
used up, take out the water container, rinse
it out and fill it with fresh drinking water.
Place the container back inside the
machine; empty out 2/3 of the water in
the container by turning the steam knob
counterclockwise; to cut off floe turn the
knob clockwise.
Let the machine heat up and empty out
the water remaining in the container by
turning the steam knob
counterclockwise; to cut off flow turn the
knob clockwise.
Should you use a descaling agent other
than the one recommended you are
advised in any case to follow the
manufacturers directions on the
package.
Page 9
30 31
courtesy of
COFFEE TYPE CHOICE - LEGAL ASPECTS
9 Regular service
Regular service from an Authorized Service
Centre guarantees a longlasting machine
life and reliability. Preserve the original
packaging to protect the machine during
transportation.
10 Coffee type choice
As a general rule, you may use all kinds of
coffee available on the market. However,
coffee is a natural product and its taste may
vary according to its origin, mixture, bean
size and roasting. It is advisable to test
different types to find the one which satisfies
your personal taste. To obtain the best
results in espresso coffee dispensing, we
recommend using mixtures expressly
prepared for this purpose.
11 Legal aspects
These instructions contain the necessary
information for proper operation and
maintenance of the machine.
also contains the complete and exclusive
rules concerning warranty performances.
Contractual warranty norms are neither
limited nor extended by these
explanations.
These instructions contain information
protected by copyright. Any copy or
translation into another language of the
same is not allowed without the prior
written agreement by the manufacturer.
These instructions present the conditions
for safely operating and maintaining the
machine.
For further information or questions
concerning specific situations or problems,
please contact the local dealer or
manufacturer directly. The manufacturer is
indicated in the warranty certificate.
Moreover, these instructions are not part
of any previous or existing agreement or
legal contract. All obligations of the
manufacturer are based on the
corresponding purchase contract which
 Loading...