

Saeco aulika SUP040 Operating Instructions Manual
ENGLISH
OPERATING INSTRUCTIONS
Read these operating instructions carefully before using the machine.
Type SUP040
EN
02
02
• 2 •
MENU OK ESC
17
1
14
15
123
10
11
12
13
5
6
78
9
19 2420 2521 2622 2723
16
18
4
• 3 •
2
5
8
11
3
6
9
12
4
7
10
13

• 4 •
SAFETY REGULATIONS
Never allow water to come into contact
with any of the electrical parts of the machine: danger of short circuit! Hot water
and steam may cause scalding!
Intended Use
The machine is intended to be used in small of ces/organisations only.
The appliance is not to be used by persons
(including children) with reduced physical,
mental or sensory abilities or with scarce experience and/or expertise, unless they are supervised by a person responsible for their safety,
or they are instructed by this person on how to
properly use the machine.
Power Supply
The machine must be connected to the power
supply by the service provider, in accordance
with its speci cations.
Power Cord
Never use the machine if the power cord is defective.
Report any defects in the cord and/or plug to
the service provider immediately. Do not pass
the power cord around corners, over sharp
edges or over hot objects and keep it away
from oil. Do not use the power cord to carry
or pull the machine. Do not pull out the plug
by the power cord or touch it with wet hands
or feet. Do not let the power cord hang freely
from tables or shelves.
For the Safety of Others
Ensure that children cannot play with the machine and/or the packaging materials. Never
direct the jet of hot water and/or steam towards yourself or others. Do not touch the hot
water wand with bare hands. Always use the
handles or knobs provided.
Danger of Burns
Do not touch the hot water wand and/or the
co ee/beverage dispensing spout.
Fire Safety Precautions
In case of re, use carbon dioxide (CO2) extinguishers. Do not use water or dry powder extinguishers.
Suitable Location for Operation
and Maintenance
The machine should be installed by the service
provider in accordance with the safety regulations in force at the time of installation.
The machine may only be moved by the service
provider.
Do not use the machine outdoors.
Avoid placing open ames and/or incandescent objects near the machine so as not to
damage or melt the machine housing. Do not
use in places where the temperature may drop
to a level equal to and/or lower than 0°C. If the
machine has been exposed to such conditions,

• 5 •
alert the service provider, who will carry out a
safety check.
Cleaning
Before cleaning the machine, the power button
must be switched to OFF (0) and the plug must
be removed from the power socket. Wait for the
machine to cool down. Never immerse the machine in water! It is strictly forbidden to tamper
with the internal parts of the machine. Do not
clean the machine using a jet of water.
The appliance and its components must be
cleaned and washed following a period of inactivity.
Using Milk
Milk must be used and stored in accordance
with the instructions given on the manufacturer's original packaging.
We accept no liability for use of milk unsuitable
for human consumption.
Milk must be kept cold, as high temperatures
will make it turn sour - this is a natural characteristic of milk. For this reason, the Cappuccinatore must be cleaned after each use, as
described in the manual.
For thorough cleaning, the Cappuccinatore can
be detached and disassembled, and its parts
can be put into a dishwasher (not of professional type).
Washing component parts in the dishwasher
may cause Cappuccinatore surfaces to tarnish
or the graphics to fade, especially if harsh detergents are used.
This circumstance is normal and does not affect the correct operation of the milk brewing
system.
Storing the Machine
If the machine is to remain inactive for a long
time, turn it o and unplug it. Store the machine in a dry place, out of the reach of children. Keep it protected from dust and dirt.
Repairs / Maintenance
In case of breakdown, defect or a suspected
fault resulting from a fall, immediately remove
the plug from the power socket and alert the
service provider or specialised technician.
Never attempt to operate the machine if it is
faulty. Only the service provider and/or technician may service or repair the machine.

• 6 •
Machine Use - User Manual
CONTENTS
1 GENERAL INFORMATION ...................................... 7
1.1 Intended Use of the Machine .......................................7
1.2 How to Read the Manual..............................................7
1.3 How to Use these Operating Instructions .....................7
1.4 Machine Identi cation .................................................7
1.5 Technical Speci cations ...............................................8
1.6 Residual Risks ..............................................................8
2 MACHINE COMPONENTS ...................................... 8
2.1 Control Panel Description ............................................9
3 USING THE MACHINE .......................................... 9
3.1 Filling the Water Tank...................................................9
3.2 Filling the Co ee Bean Hopper ...................................10
3.3 Turning on the Machine .............................................10
3.4 Warm-up and Rinsing ................................................11
3.5 Rinse/Self-Cleaning Cycle...........................................11
3.6 Eco-friendly: Stand-by ...............................................11
3.7 Adjusting the Dispensing Spout .................................12
3.8 Co ee Brewing ..........................................................12
3.8.1. Co ee with co ee beans ......................................12
3.8.2. Co ee with pre-ground co ee .............................12
3.9 Emptying the Co ee Grounds Drawer .......................14
3.10 Brewing a Cappuccino ...............................................14
3.11 Latte Macchiato .........................................................15
3.12 "SPECIAL" Products ....................................................15
4 ADJUSTING THE MACHINE ................................. 17
5 CLEANING AND MAINTENANCE ........................... 18
5.1 Cleaning the Hot Water/Steam Wand .........................18
5.2 Cleaning the Co ee Grounds Drawer ..........................18
5.3 Cleaning the Drip Tray ................................................18
5.4 Cleaning the Cappuccinatore (After Each Use) ............19
5.5 Cleaning the Water Tank ............................................20
5.6 Brew Group - Weekly Cleaning ...................................20
6 MACHINE WARNINGS ........................................ 23
7 HANDLING AND STORAGE .................................. 25
7.1 Handling ....................................................................25
7.2 Storage ......................................................................25
8 INSTALLATION .................................................. 25
8.1 Safety Regulations ....................................................25
8.2 Stop Functions ...........................................................26
8.3 List of Accessories ......................................................26
8.3.1 List of accessories supplied ...................................26
8.3.2 List of optional accessories ...................................26
8.4 Assembly-Siting .........................................................27
8.5 Disposal of Packaging ................................................27
8.6 Filling the Water Tank.................................................27
8.7 Filling the Co ee Bean Hopper ...................................27
8.8 Electrical Connection..................................................27
8.9 Setting the Language (Upon First Use) ......................28
8.10 First Use - Use After a Long Period of Inactivity ..........28
8.11 Measuring and Adjusting Water Hardness .................29
8.12 "INTENZA+" Water Filter ...........................................30
8.13 Adjusting the Co ee Grinder ......................................32
8.14 Adjusting the "Aroma" - Amount of Ground Co ee ....32
8.15 Adjusting Brewed Products ........................................32
9 MACHINE PROGRAMMING ................................. 35
9.1 Programming Controls ...............................................35
9.2 Beverage Menu ..........................................................36
9.3 Machine Menu ...........................................................38
9.4 "STEAM" Function Activation .....................................42
9.5 "WARNING CLEANING" Function Activation................42
10 CLEANING AND MAINTENANCE ........................... 44
10.1 Cleaning Intervals ......................................................44
10.2 Cleaning the Water Tank ............................................44
10.3 Thorough Cleaning of the Cappuccinatore .................44
10.4 Brew Group Cleaning with the
“Co ee Oil Remover System” ......................................46
10.5 Brew Group Lubrication .............................................47
10.6 Descaling ...................................................................48
11 MACHINE DISPOSAL .......................................... 51
12 TROUBLESHOOTING .......................................... 52
• 7 •
Machine Use - User Manual
1 GENERAL INFORMATION
1.1 Intended Use of the Machine
This machine automatically brews:
- Co ee and espresso co ee using co ee beans;
- Hot beverages using hot water dispensed via the dispensing
spout;
- Milk-based beverages using the supplied Cappuccinatore.
The elegant machine housing has been designed for use in small
o ces, businesses and institutions.
Important.
Misuse voids all forms of warranty, releasing the
Manufacturer from any responsibility for damage to property or personal injury.
The following are considered misuse:
- any use other than the intended use and/or employ-
ing methods other than those described in this manual;
- any operation on the machine in breach of the instruc-
tions provided in this manual;
- any use following tampering with machine compo-
nents and/or alteration of its safety mechanisms;
- use of the machine outdoors.
In such cases the user shall bear the costs of repair.
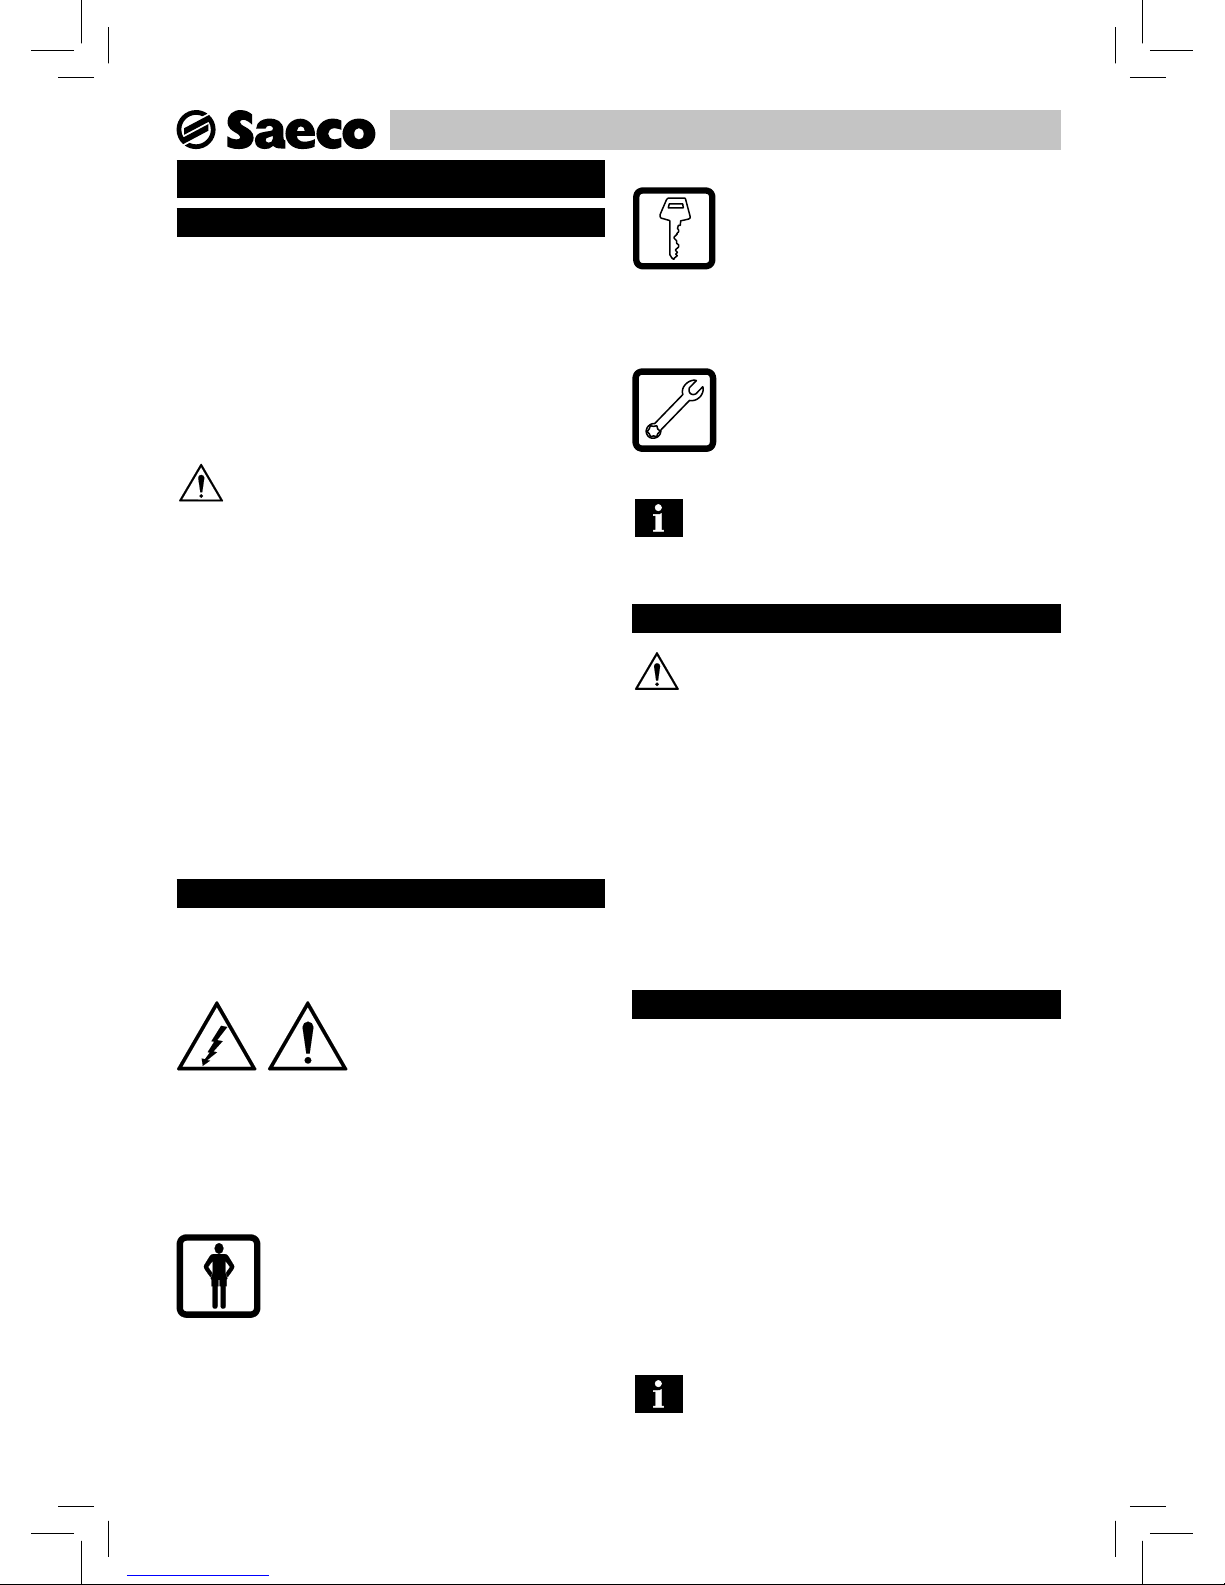
1.2 How to Read the Manual
Various kinds of warning signs are used in this manual to highlight the di erent hazard or competence levels.
The warning triangle indicates
important instructions for the
safety of the machine's users.
Carefully follow these instructions to avoid serious injury!
Various warning signs are used in this manual to indicate the
competences of each user.
User: A person who uses the machine to brew beverages
and who can clean the machine, where instructed
to do so in the manual. Users are NOT allowed to
perform operations which are the competence of
the Service Provider/Supply Operator or Technician. On detecting machine failures and/or faults,
users should contact the Service Provider only.
Service Provider/Supply Operator:
Company or person responsible for normal ma-
chine installation, start-up and suspension of
service. On detecting machine failures, the Service Provider should request the assistance of the
maintenance technician.
Technician: Personnel quali ed to perform unscheduled
maintenance and to service the machine.
Technicians may carry out all operations described
in this manual without requiring explicit authorisation.
This warning sign is used to highlight information
that is particularly important in order to guaran-
tee the best performance of the machine.
1.3 How to Use these Operating Instructions
This manual constitutes an integral part of the
machine and should be read carefully. It contains
information regarding installation, maintenance and
proper use of the machine.
Always refer to this manual before any operation.
Keep these operating instructions in a safe place and make them
available to anyone who may use the co ee machine. If this
manual is lost or damaged, a copy should be requested from the
service provider immediately. For further information or if you
experience problems not completely or su ciently covered in
these instructions, please contact the service provider.
1.4 Machine Identi cation
The machine is identi ed by the model name and serial number
shown on the special plate.
The plate contains the following information:
• Name of the Manufacturer
• CE marking
• Machine model
• Serial number
• Year of manufacture
• Some technical speci cations:
- Power supply voltage (V);
- Power supply frequency (Hz);
- Electrical power consumption (W).
Note: When contacting the Service Provider, always refer to this plate, and to the machine's spe-
ci c data shown on it.

• 8 •
Machine Use - User Manual
1.5 Technical Speci cations
Technical Speci cations
Power Supply and Nominal Voltage-Power Rating
See plate attached to the back of the appliance
Machine Housing Material
Metal - Thermoplastic Material
Size (w x h x d)
336 x 380 x 450 (mm)
Weight
15 kg (approx.)
Power Cord Length
1.2 m
Water Tank Capacity
2.2 litres
Co ee Grounds Drawer Capacity
19 grounds
Control Panel
On the front
A-weighted Sound Pressure Level
Less than 70 dB
Pump Pressure
Max. 1.5 MPa (15.0 bar)
Operating Conditions
Minimum temperature: above 10°C
Maximum temperature: below 40°C
Maximum humidity: below 95%
Safety Devices
Boiler pressure safety valve
Safety thermostat
Subject to engineering and manufacturing changes due
to technological improvements.
1.6 Residual Risks
The dispensing outlet has no guards to prevent accidental hand
contact with co ee, hot beverages and/or steam.
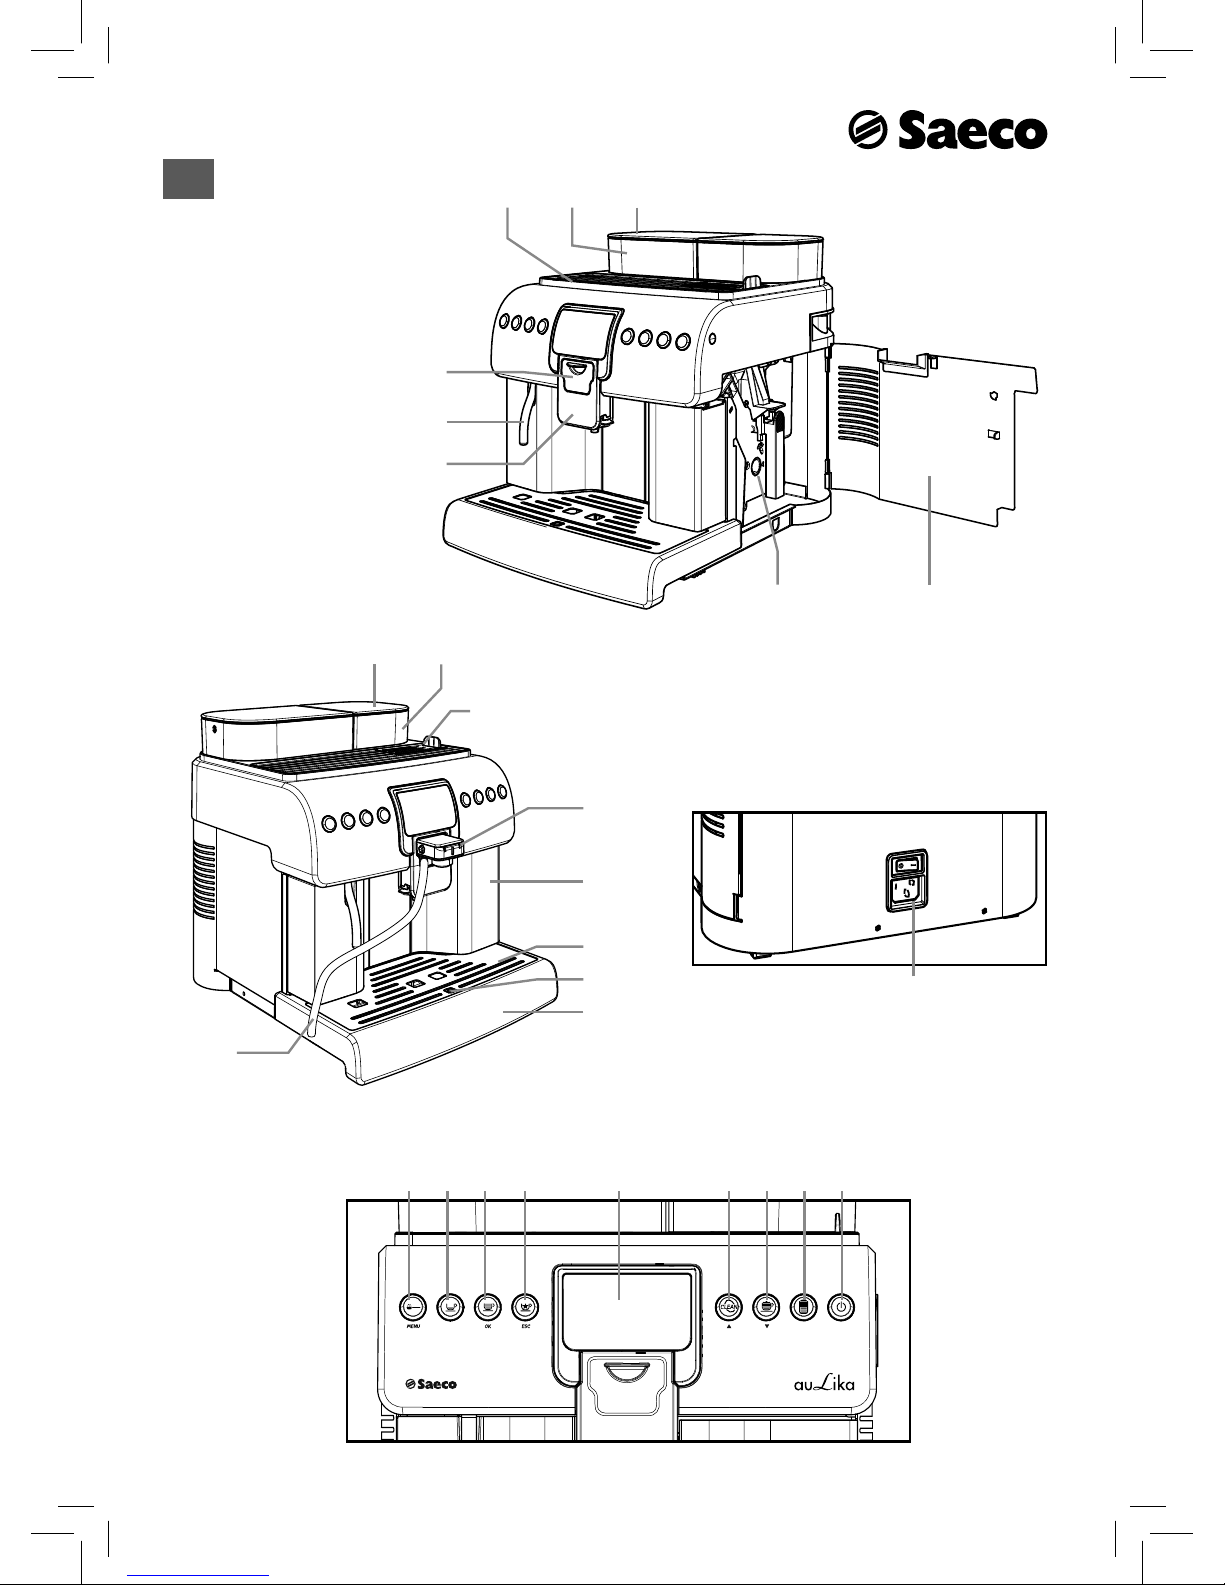
2 MACHINE COMPONENTS
Note: The “key to components” includes all machine models; check which one matches your ma-
chine. Certain functions may not be available.
1 Cup-warming surface
2 Water tank
3 Water tank lid
4 Cappuccinatore cover
5 Hot water wand
6 Co ee dispensing spout
7 Brew group
8 Service door
9 Co ee bean hopper lid
10 Co ee bean hopper
11 Pre-ground co ee compartment + lid
12 Cappuccinatore (removable type)
13 Co ee grounds drawer
14 Cup holder grill
15 Full drip tray indicator
16 Drip tray + (inner) tray cover
17 Power cord socket
18 Suction tube for Cappuccinatore
19 Pre-ground co ee selection button
20 "Espresso" button
21 "Brew" button
22 "Special Beverages" button
23 Display
24 "Cappuccinatore Cleaning Cycle" button
25 "Cappuccino" button
26 "Latte Macchiato" button
27 "Stand-by" button
• 9 •
Machine Use - User Manual
2.1 Control Panel Description
Note: All possible controls are described here.
Refer to the following sections for the operating
modes.
Some buttons on the control panel have a double
function. The double function is only activated in
certain moments during the machine operation or when
accessing the programming mode. The additional function is indicated by the icon under the machine button.
Button - Description
19 "Pre-ground co ee" button
Use this button to select the co ee brew mode with pre-ground
co ee.
20 "Espresso" button
When this button is pressed an espresso co ee is brewed.
21 "Brew" button - 2
nd
Function (OK)
When this button is pressed a cup of co ee is brewed.
2
nd
Function - Press to select the displayed option.
22 "Special Beverages" button - 2
nd
Function (ESC)
When this button is pressed, the menu for preparing other
types of beverages is accessed.
2
nd
Function - Press to exit the selected page and/or to stop
the beverage brewing procedure.
23 LCD Display
Displays the machine status and alarm signals, and guides the
user through the steps required to operate the machine.
24 "Clean" button - 2
nd
Function ( )
When this button is pressed, the machine starts an automatic
quick cleaning cycle of the Cappuccinatore.
2
nd
Function - Press to scroll up the current page selection.
25 "Cappuccino" button - 2
nd
Function ( )
When this button is pressed a cappuccino is brewed.
2
nd
Function - Press to scroll down the current page selection.
26 "Latte Macchiato" button
When this button is pressed a latte macchiato is brewed.
27 "Stand-by" button
When this button is pressed, the machine Stand-by mode is
activated.
3 USING THE MACHINE
Before using the machine, check that the water tank and the coffee bean hopper are lled and that the machine is properly clean.
3.1 Filling the Water Tank
Before turning on the machine, the water tank should be lled
with fresh drinking water.
Warning! Before using the machine for the rst
time, wash the water tank carefully. Fill the water
tank with fresh drinking water only. Hot or carbonated
water, as well as other liquids, will damage the machine.
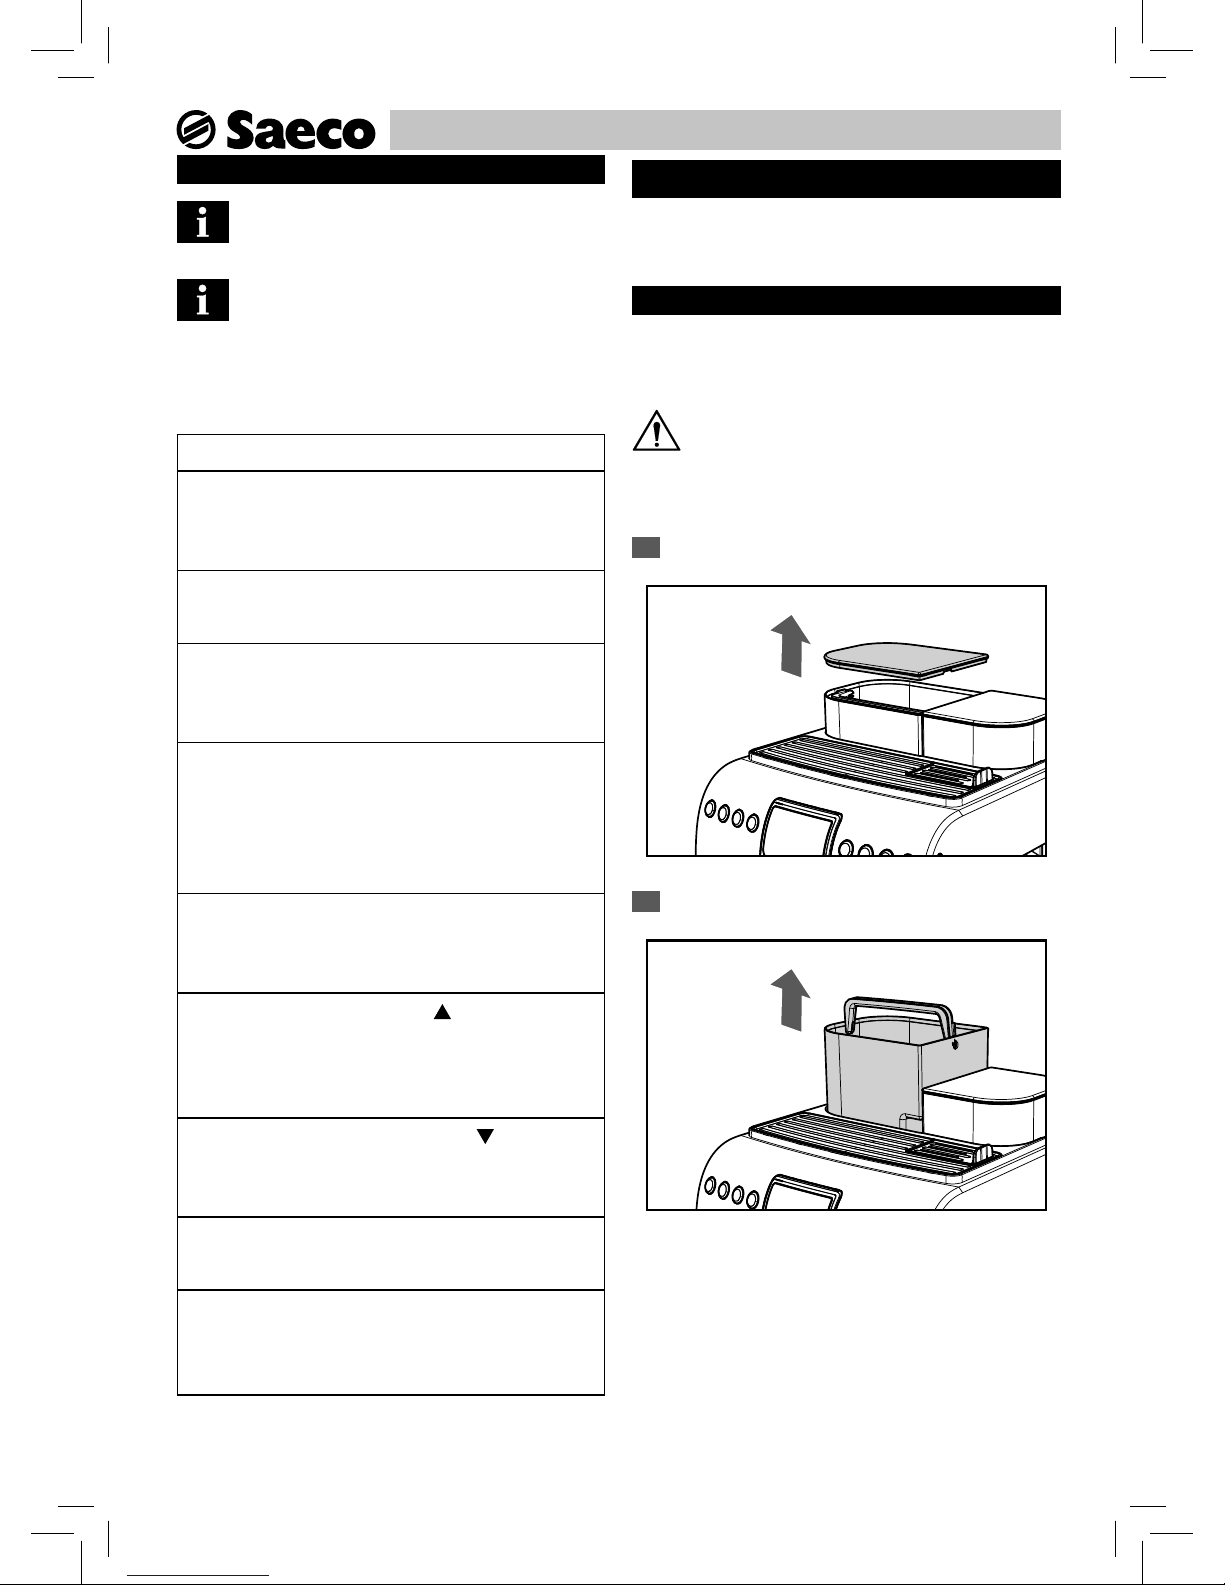
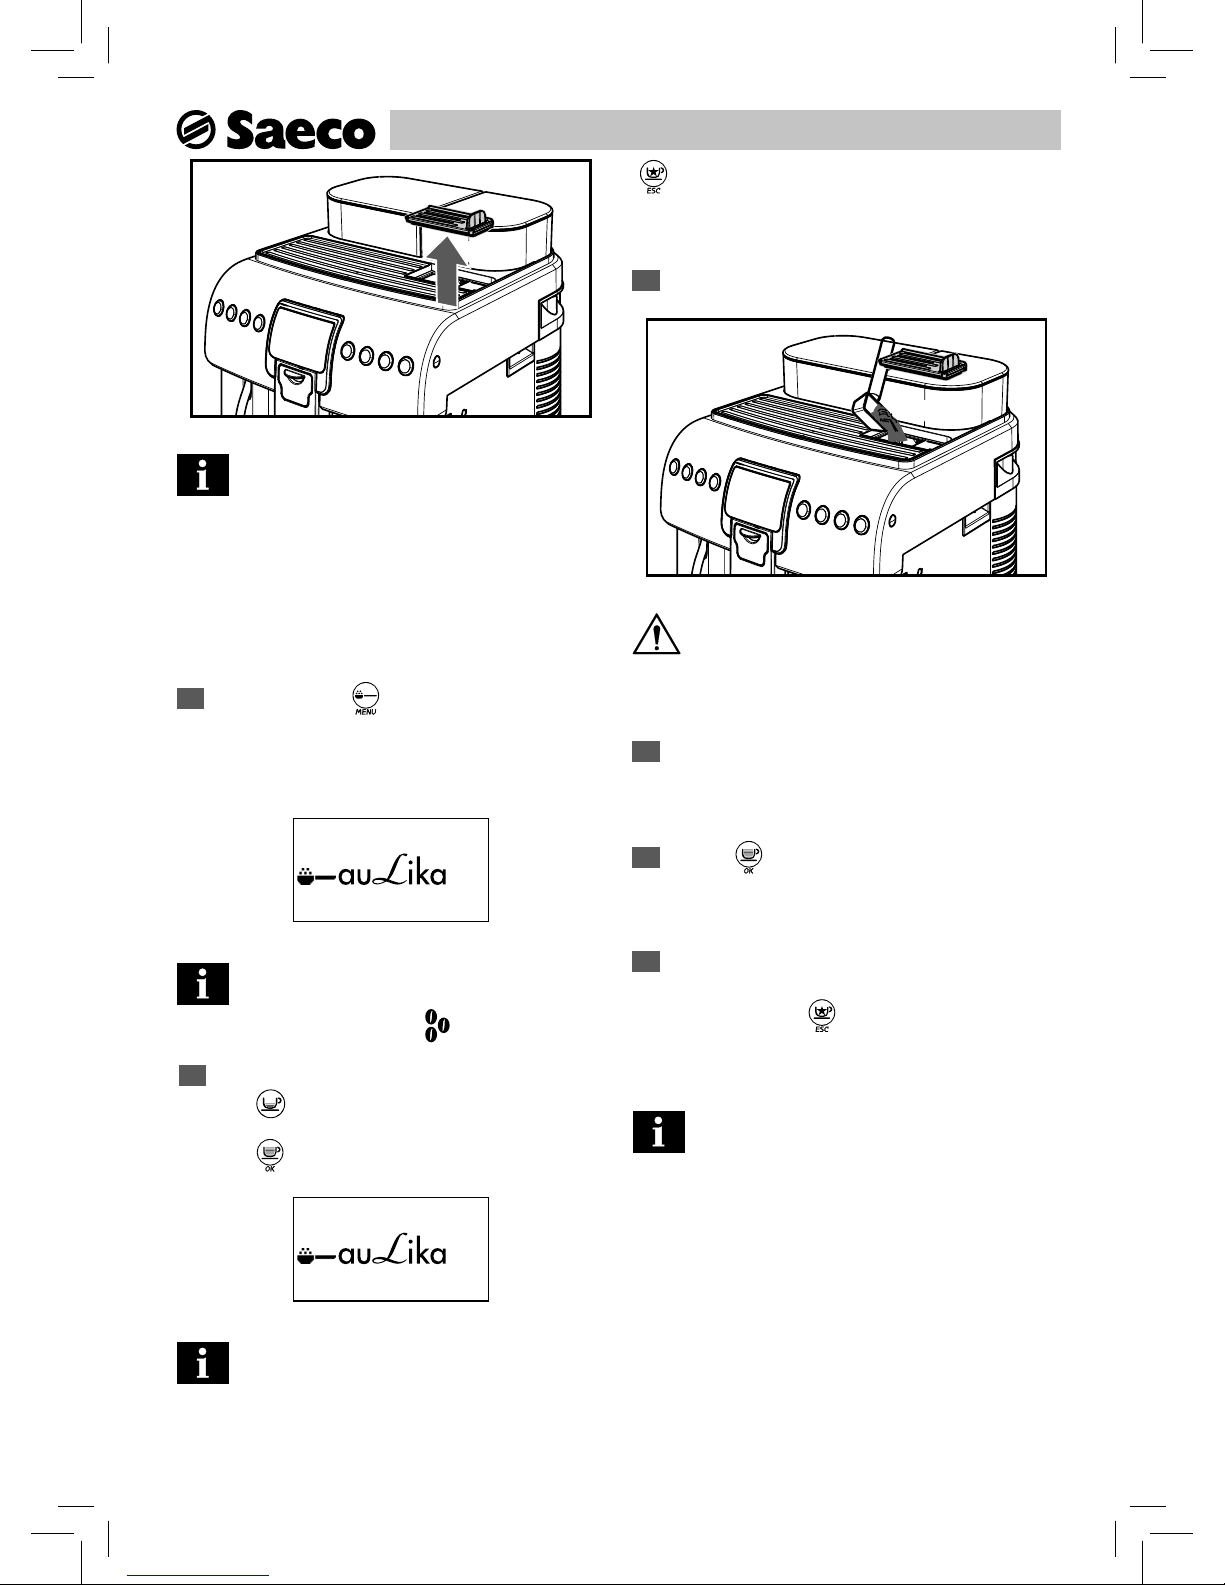
1
Remove the lid from the water tank.
2
Remove the tank; lift it using the inside handle.
• 10 •
Machine Use - User Manual
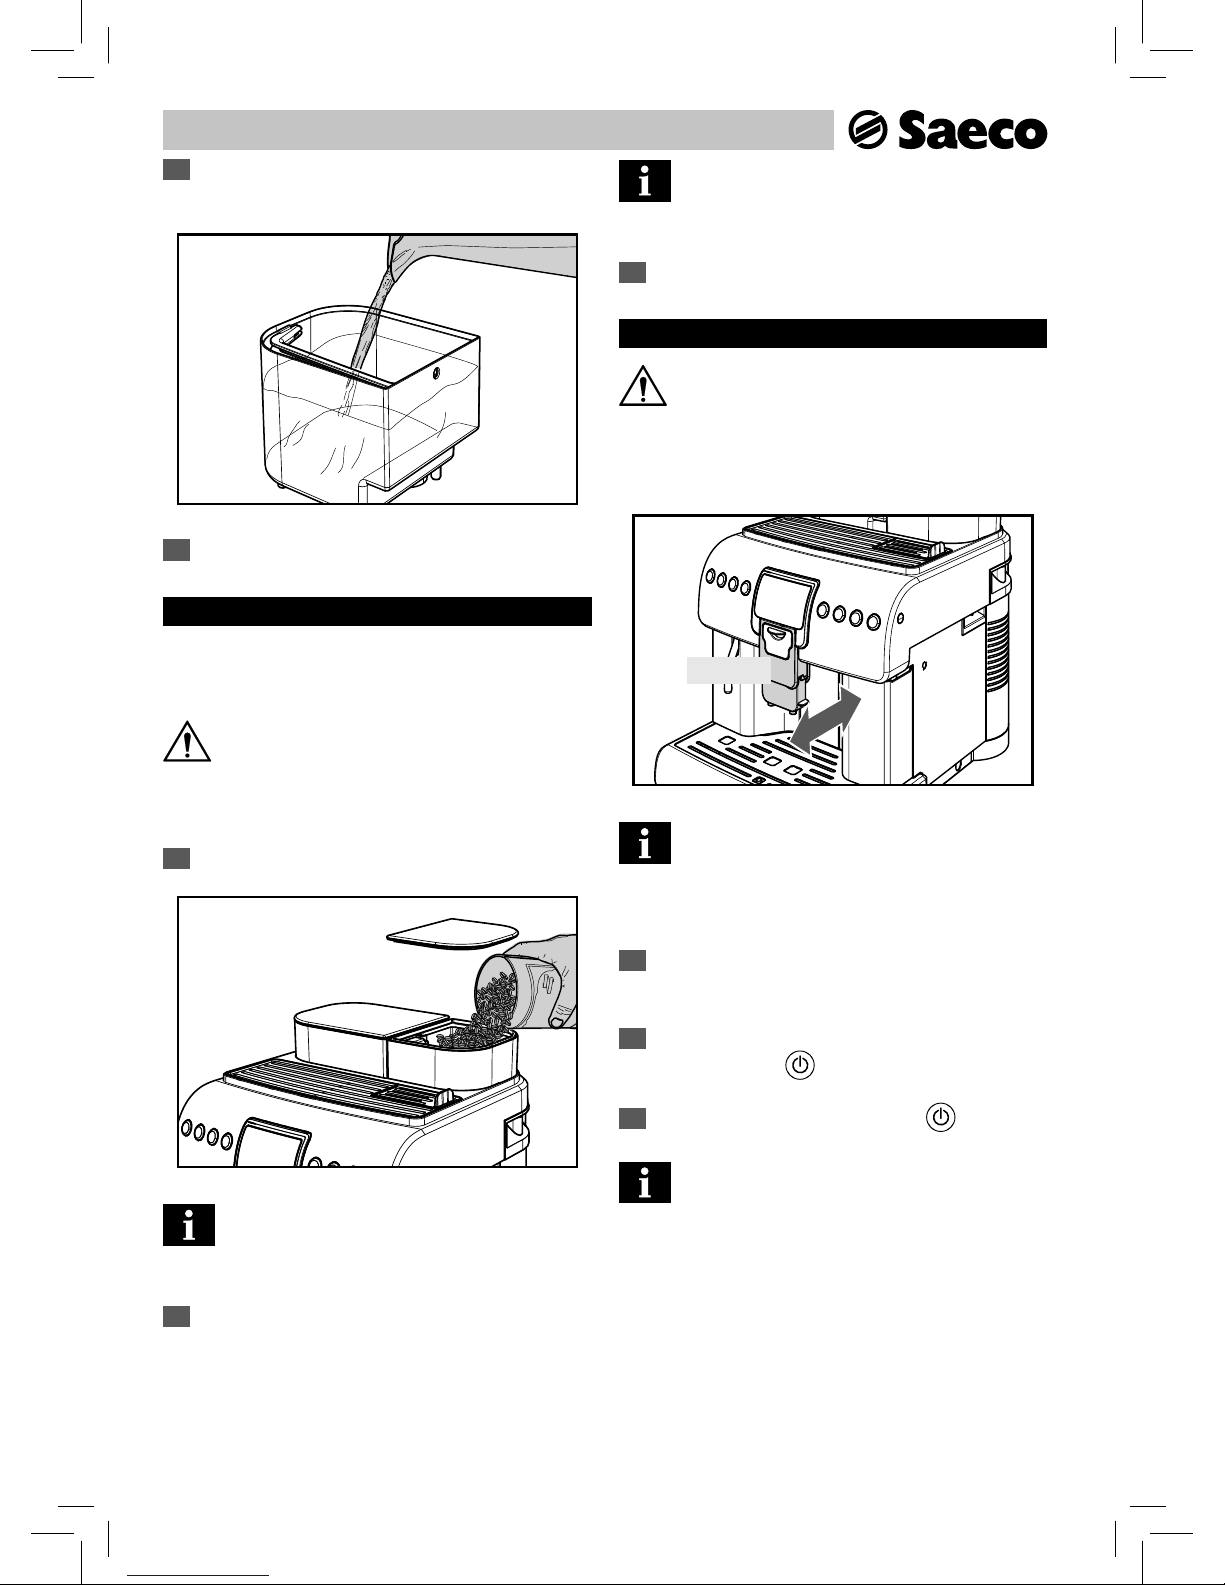
3
Rinse and ll it with fresh water, making sure that the (MAX)
level indicated in the tank is not exceeded.
4
Insert the water tank back into its seat and re t the lid.
3.2 Filling the Co ee Bean Hopper
Before turning on the machine, check that the hopper contains a
su cient quantity of co ee beans.
Warning! Only co ee beans must be put into the
co ee bean hopper. Ground co ee, instant co ee
or any other object may damage the machine.
1
Remove the co ee bean hopper lid.
Note: The hopper may feature a di erent safety
system according to the regulations applicable in
the country of use of the machine.
2
Slowly pour the co ee beans into the hopper.
If the water tank is not inserted, check that no coffee beans fall into the tank compartment. If this
happens, remove them to avoid any malfunctions.
3
Re t the co ee bean hopper lid.
3.3 Turning on the Machine
Warning! Connection to the power supply should
be carried out exclusively by the service provider!
Before turning on the machine, ensure that the plug is correctly
inserted in the power socket.
CLICK!
Ensure that the dispensing spout is in the correct
position. Move it horizontally until you hear the
CLICK indicating correct positioning. Otherwise, some
product might leak out of the dispensing spout.
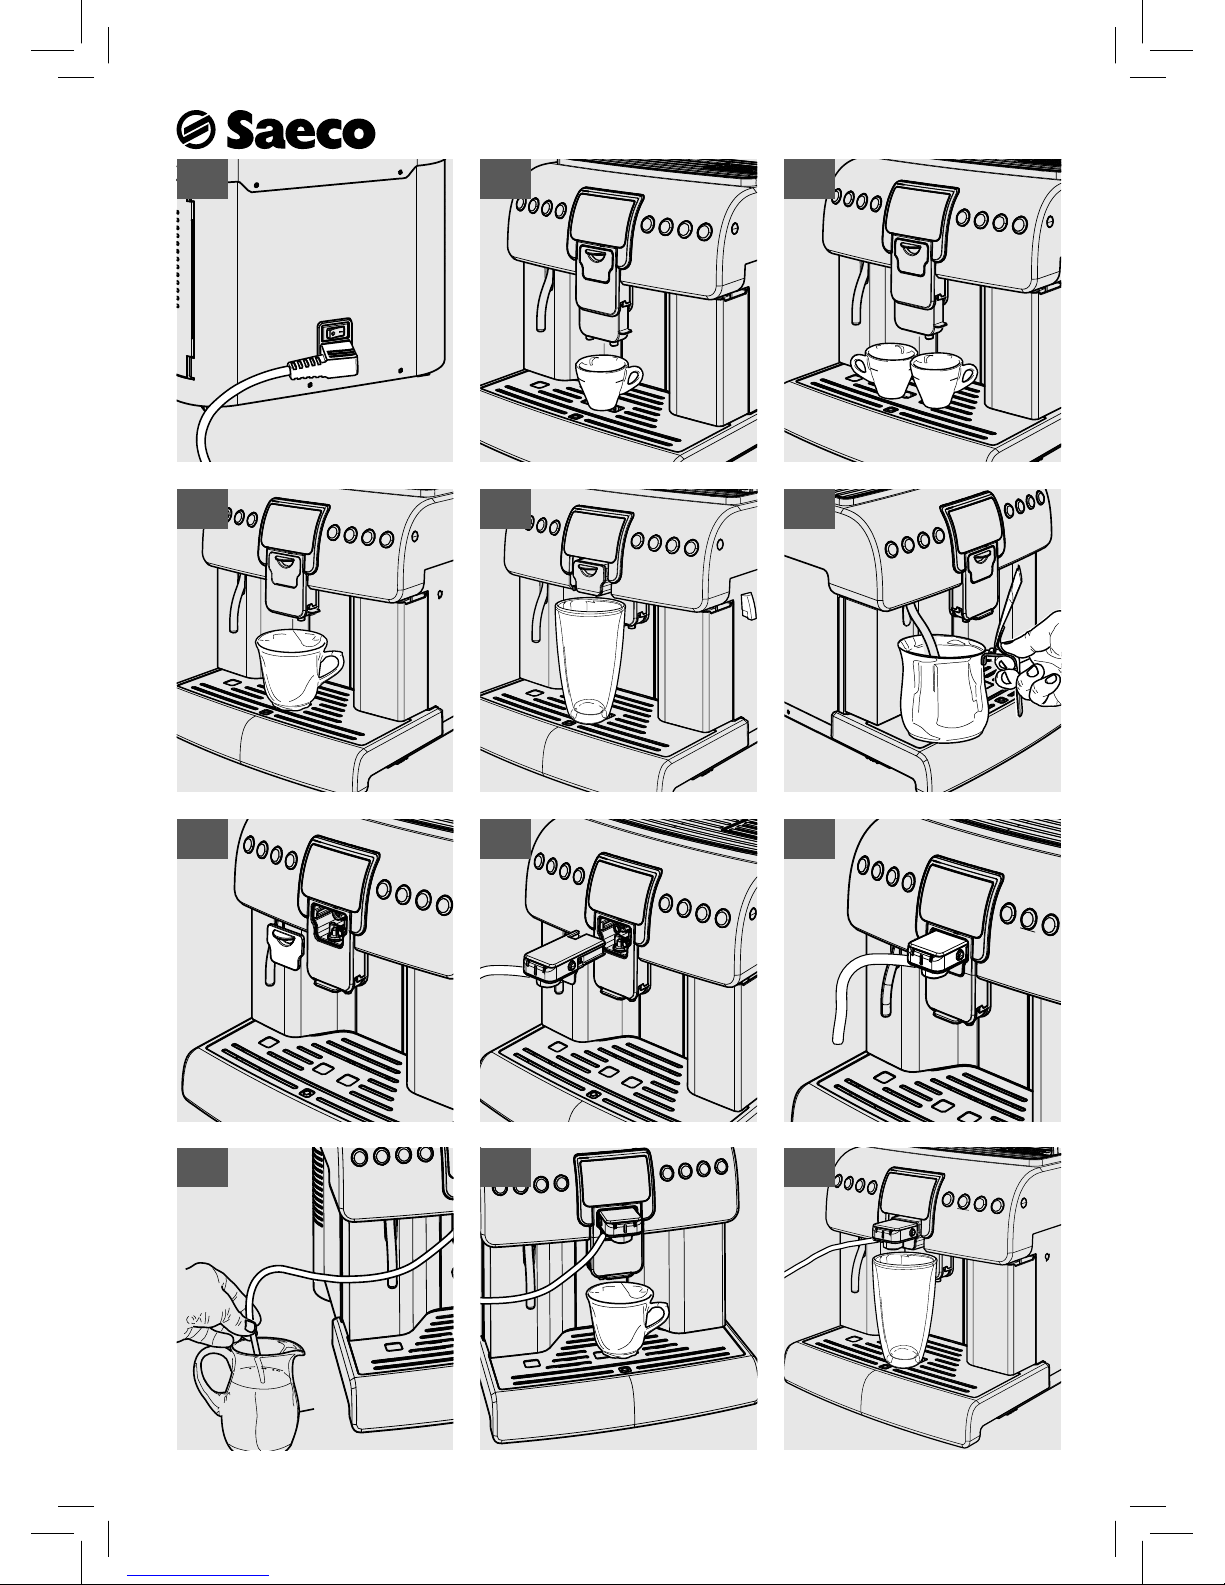
1
To turn on the machine, move the power button on the back
of the machine to "I" (Fig.02, page 3).
2
After carrying out a check cycle, the machine goes into
Stand-by mode and the "
" button (27) blinks.
3
To turn on the machine simply press the “ ” button (27).
Note: Once the warm-up is complete, the machine
performs a rinse cycle of the internal circuits. A
small amount of water is dispensed during this process.
Wait for this cycle to be completed.
• 11 •
Machine Use - User Manual
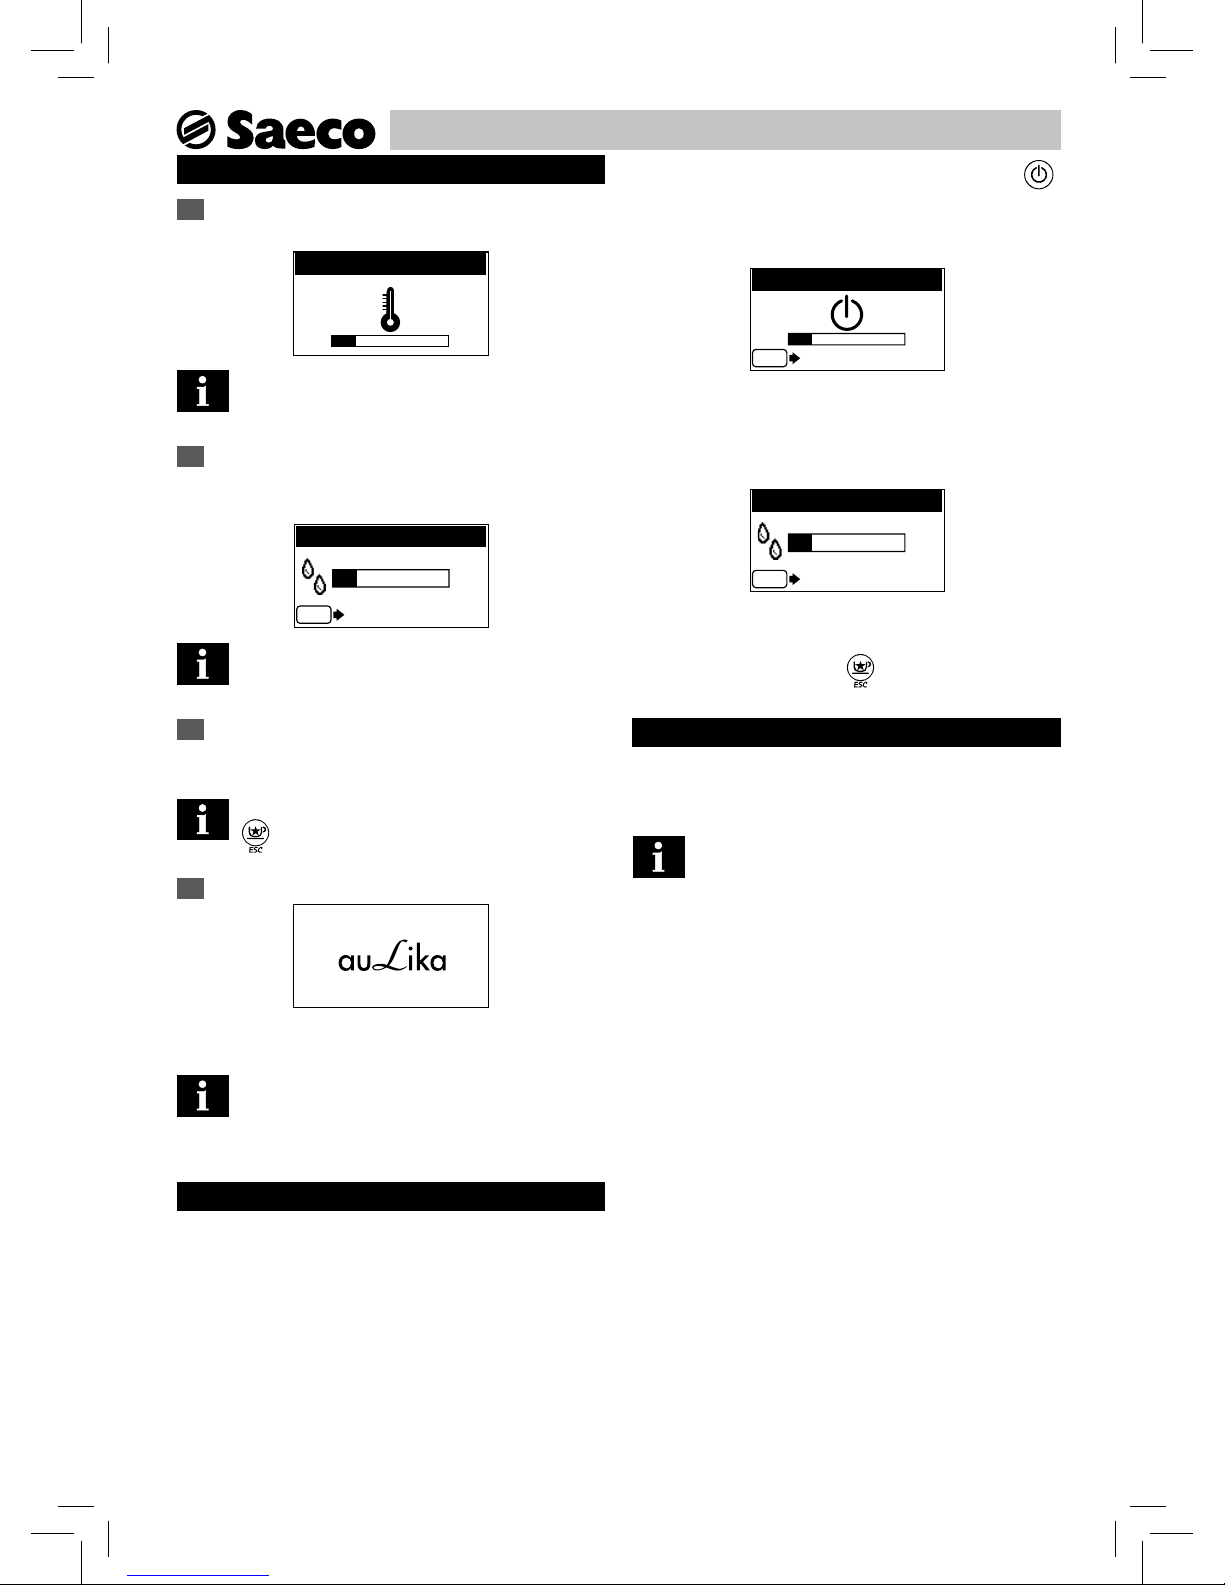
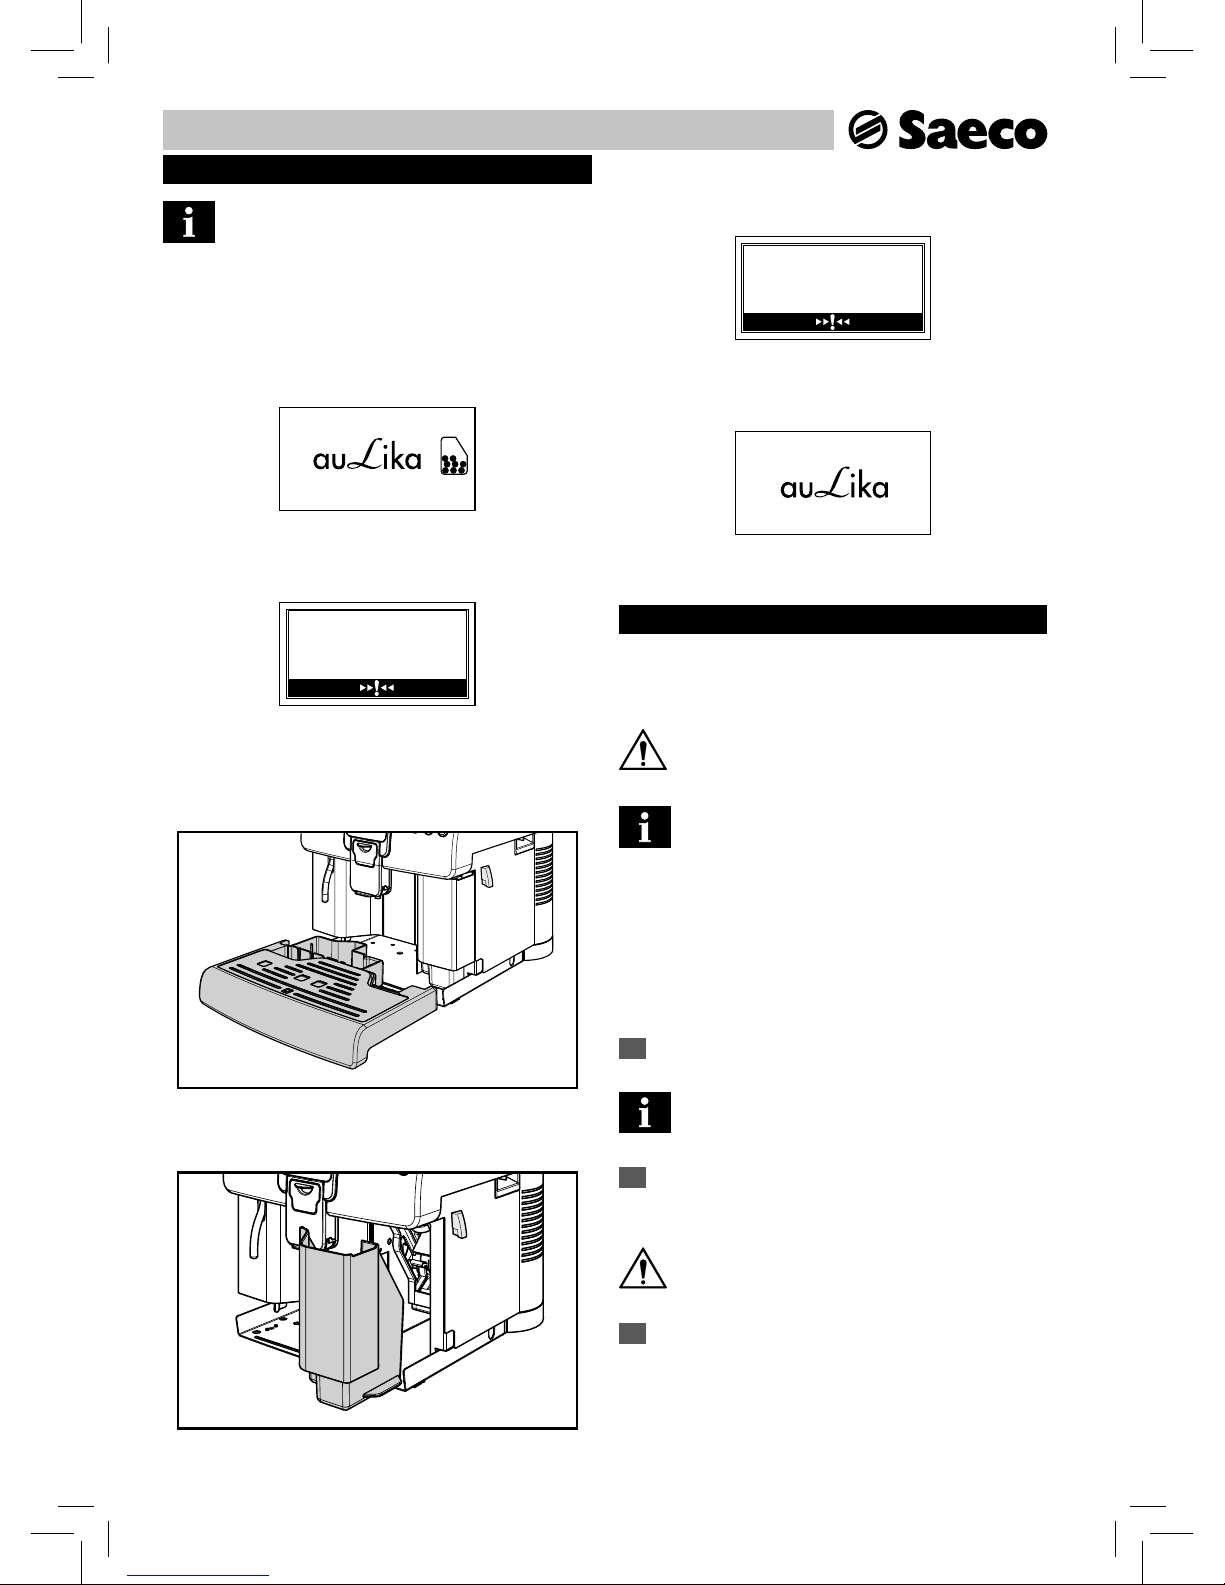
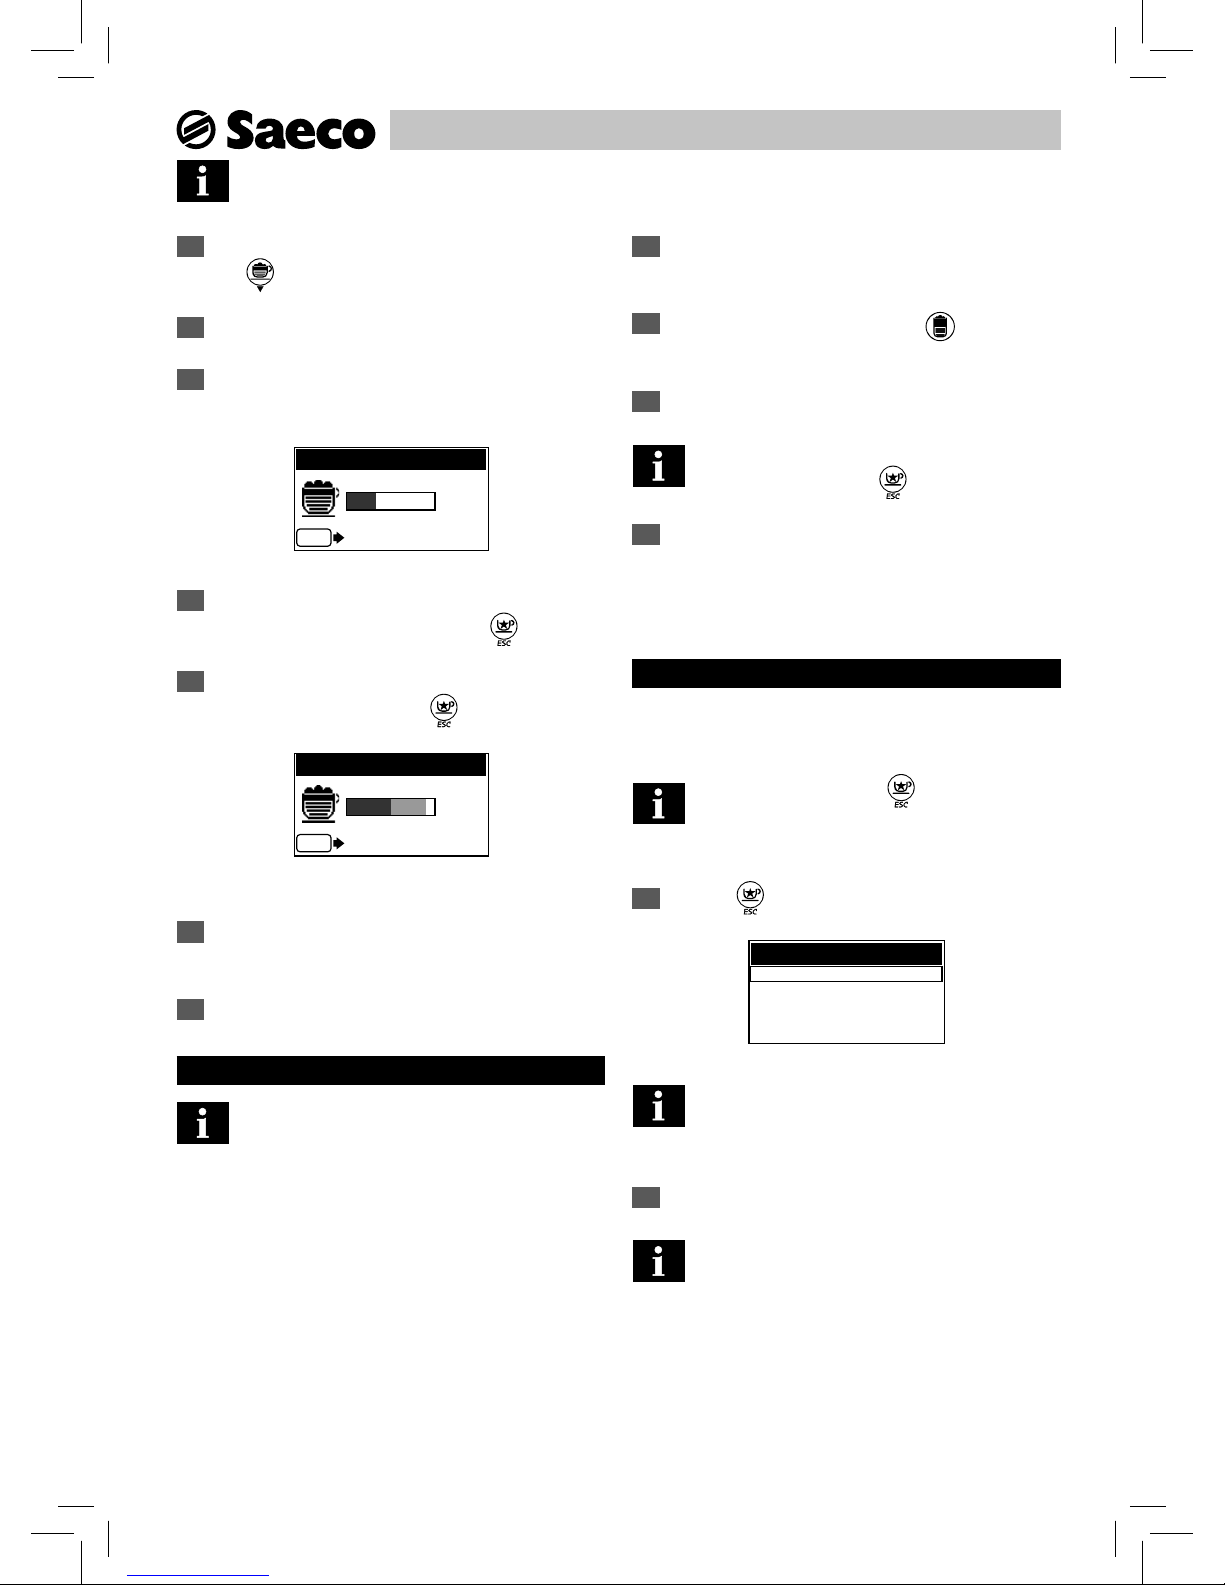
3.4 Warm-up and Rinsing
1
Upon start-up, the machine activates the warm-up phase.
Wait until it is completed.
HEATING UP…
Note: The progress bar indicates that the machine
is warming up the system.
2
Once the warm-up is complete, the machine performs a rinse
cycle of the internal circuits.
RINSING
ESC
STOP RINSING
Note: The progress bar indicates that the machine
is performing the rinse cycle of the system.
3
A small amount of water is dispensed. Wait for the cycle to
end.
Note: The cycle can be stopped by pressing the
"
" button (22).
4
Then, the machine is ready for use.
The logo is displayed indicating that the machine is ready for use.
Note: If the machine is being used for the rst
time or after a long period of inactivity, contact
the Service Provider to start it up.
3.5 Rinse/Self-Cleaning Cycle
This cycle allows the internal co ee circuits to be rinsed with fresh
water. The cycle is carried out:
• At machine start-up (with cold boiler);
• After priming the circuit (with cold boiler);
• During the Stand-by preparation phase (if at least one co eebased product has been brewed);
• When turning o the machine, after pressing the " "
button (27) (if at least one co ee-based product has been
brewed). The following icon will be displayed.
STAND-BY
ESC
STOP RINSING
A small amount of water will be dispensed to rinse and heat all
the machine parts; in this phase this icon is displayed.
RINSING
ESC
STOP RINSING
Wait for the cycle to nish automatically. The dispensing process
can be stopped by pressing the "
" button (22).
3.6 Eco-friendly: Stand-by
The machine is designed for energy saving. The machine automatically turns o after 30 minutes of inactivity.
Note:
- During the turning o phase, the machine will perform a rinse cycle if a co ee product has been brewed.
- Time can be programmed according to your needs
(contact the service provider).
To turn the machine on again, simply press a button on the
control panel (if the power button is set to "I"). In this case the
machine will go through the rinse cycle only if the boiler is cold.
• 12 •
Machine Use - User Manual
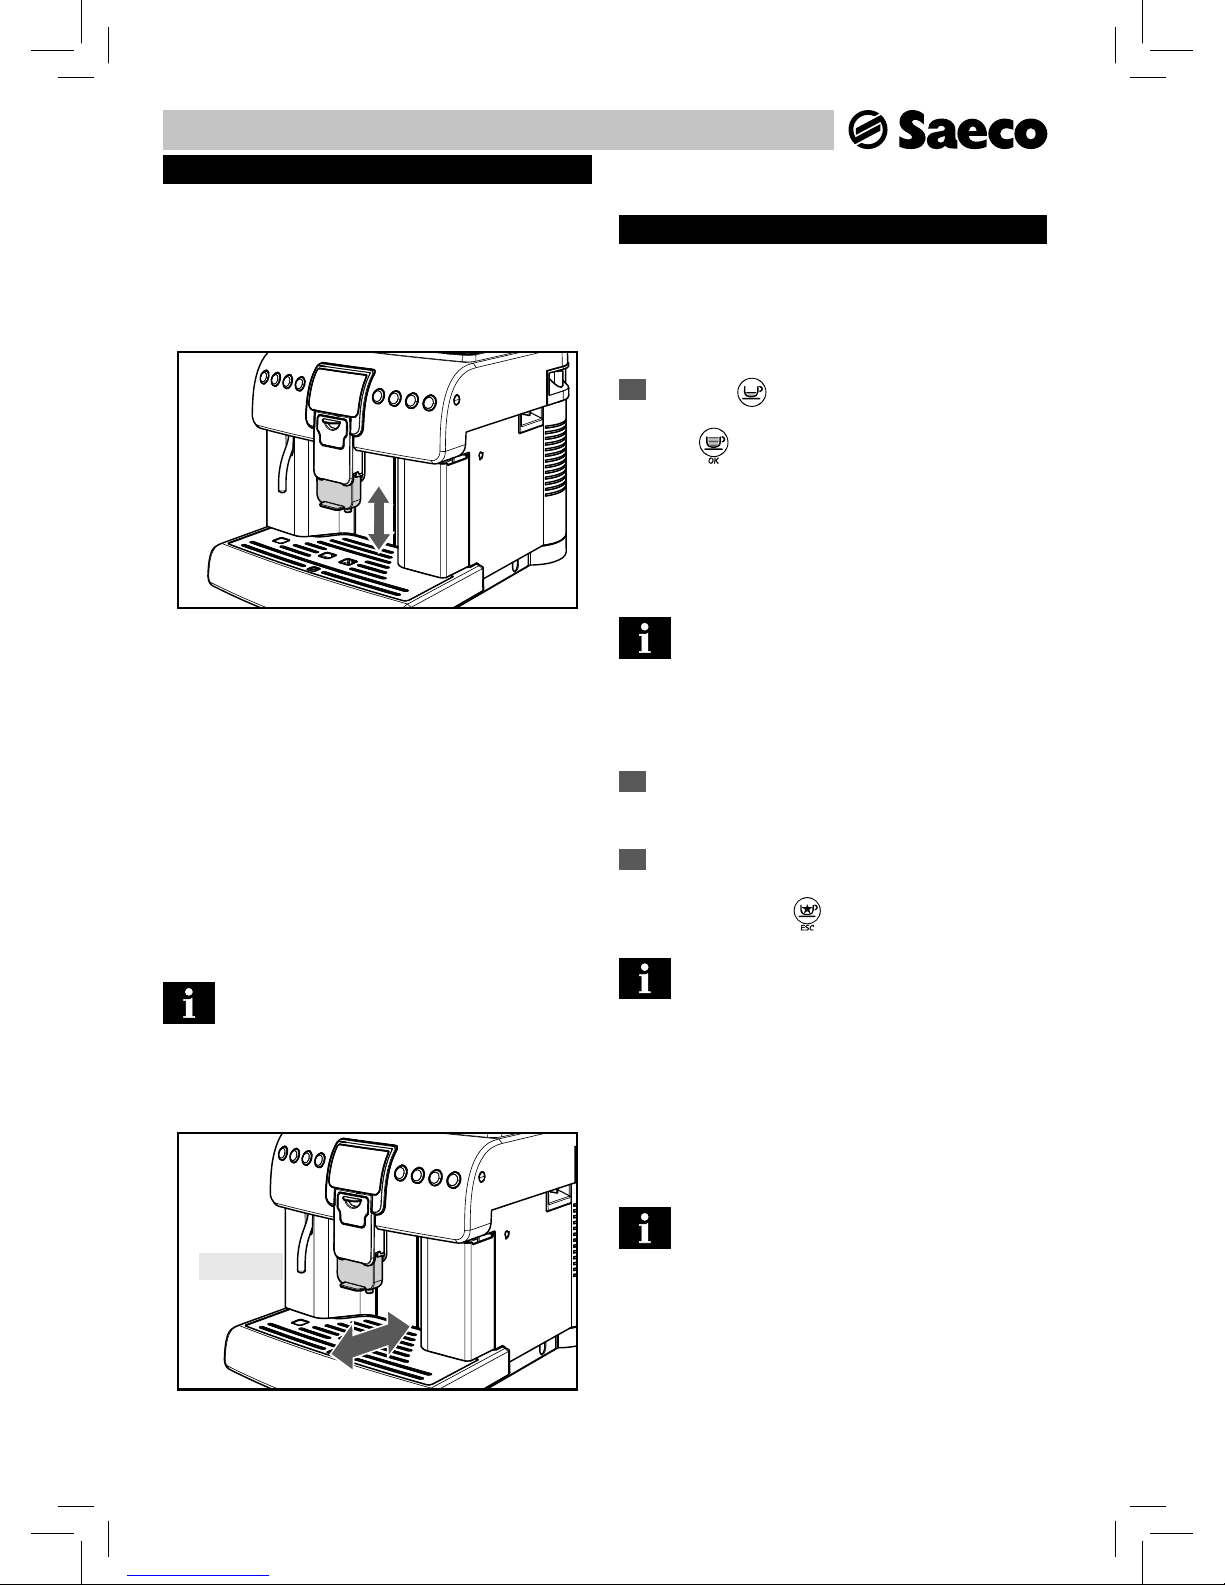
3.7 Adjusting the Dispensing Spout
Most of the cups on the market can be used with this co ee machine.
The height of the dispensing spout may be adjusted to better t the
dimensions of the cups that you wish to use.
Manually move the dispensing spout up or down to adjust its
height.
The recommended positions are:
- When using small cups
(Fig.03, page 3)
;
- When using large cups
(Fig.05, page 3)
.
Two cups can be placed under the dispensing spout to brew two
cups of co ee at the same time
(Fig.04, page 3)
.
If you want to use tall glasses or mugs, push the dispensing spout to
its limit stop. In this case, you can only brew one product at a time
(Fig.06, page 3)
.
Note: Before brewing any product and/or when
bringing the dispensing spout back to its normal
brewing position, ensure that it is correctly positioned.
This can be noted through the CLICK indicating correct
positioning.
CLICK!
Otherwise, some product might leak out of the dispensing spout.
3.8 Co ee Brewing
3.8.1. Co ee with co ee beans
To brew co ee, press and release:
1
the " " button (20) for a cup of espresso co ee;
or
the "
" button (21) for a cup of co ee.
Then the brewing cycle starts:
Press the desired button once to brew 1 cup of co ee.
Press the desired button twice consecutively to brew 2 cups of
co ee.
Note: To brew 2 cups of co ee, the machine auto-
matically grinds and doses the correct amount of
co ee. Brewing two cups of co ee requires two grinding
cycles and two brewing cycles, which the machine carries
out automatically.
2
Once the prebrewing cycle is complete, co ee begins to come
out of the dispensing spout.
3
Co ee dispensing stops automatically when the set level is
reached. However, the co ee dispensing process can be stopped
manually by pressing the “
” button (22).
Note: The machine is set to brew a true Italian es-
presso co ee. This feature may slightly lengthen
the brewing time, allowing the intense co ee avour to
develop fully.
3.8.2. Co ee with pre-ground co ee
This function allows pre-ground co ee to be used.
Pre-ground co ee must be poured into the rel-
evant compartment positioned next to the co ee
bean hopper. Only use ground co ee for espresso machines and never co ee beans or instant co ee.
• 13 •
Machine Use - User Manual
Note: If no pre-ground co ee is poured into the
compartment, only water will be dispensed;
If the dose is excessive and 2 or more measuring scoops
of co ee are used, the machine will not brew the product. Also in this case, the machine will run an empty cycle
and discharge any ground co ee into the co ee grounds
drawer.
To brew co ee:
1
Press and release the “ ” button (19) to select and activate
the pre-ground co ee function.
This screen indicates that the function has been activated.
Note: If the brewing is not started within 10 sec-
onds, the machine goes back to the co ee beans
operating mode and displays the icon.
2
Press and release:
the " " button (20) for a cup of espresso co ee;
or
the "
" button (21) for a long espresso co ee.
Note: If the brewing is not started within 30 seconds after the screen is displayed or in case the
“
” button (22) is pressed, the machine returns to the
main menu and discharges any inserted co ee into the coffee grounds drawer.
3
Lift the pre-ground co ee compartment lid.
Warning: Add only pre-ground co ee to the com-
partment. Other substances and objects may
cause severe damage to the machine. Such damage will
not be covered by warranty.
4
Add only 1 scoop of pre-ground co ee to the compartment.
Use only the measuring scoop supplied with the machine. Then,
close the lid.
5
Press the “ ” button (21). Then the brewing cycle starts.
Once the prebrewing cycle is complete, co ee begins to come out
of the dispensing spout.
6
Co ee dispensing stops automatically when the set level is
reached. However, the co ee dispensing process can be stopped
manually by pressing the "
" button (22).
After brewing the product, the co ee beans con guration of the
machine is restored.
Note: Repeat the steps described above to brew
other cups of co ee.
• 14 •
Machine Use - User Manual
3.9 Emptying the Co ee Grounds Drawer
Note: This operation must be performed with the
machine turned on and/or in stand-by mode.
The machine will indicate when the co ee grounds drawer has
reached its maximum capacity.
The rst warning alerts the user that the co ee grounds drawer
must be emptied, but the machine can still be used to brew coffee. The display will show:
If the drawer is not emptied after several brewing cycles, the machine will stop and the display will show:
EMPTY COFFEE
GROUNDS DRAWER
In this case the machine does not allow co ee to be brewed.
In order to continue to brew co ee, the co ee grounds drawer
must be emptied of used co ee.
Remove the drip tray and empty it.
Remove the drawer and empty out the co ee grounds in a suitable container. Only when the display shows:
INSERT COFFEE
GROUNDS DRAWER
may the co ee grounds drawer be inserted into the machine.
Having inserted the drawer, the display will show:
The machine is now ready to brew co ee.
3.10 Brewing a Cappuccino
The machine allows a cappuccino to be brewed quickly and easily
with the touch of a button.
Danger of scalding! Dispensing may be preceded
by small jets of hot water.
Important note: Clean the Cappuccinatore immediately after using it to froth milk (see section
5.4). Clean the suction hose externally with a damp cloth.
This way, all parts will be perfectly clean and free of any
milk residue. The service provider can activate a function
to set a cleaning cycle 10 minutes after the last beverage
was brewed, in the event that the cycle is not manually
started by the user.
1
Remove the cover from the front side (Fig.08, page 3).
Note: The cover can be placed on the machine side
using the integrated magnet.
2
Insert the Cappuccinatore into its seat until it locks into place
(Fig.09-10, page 3). Check that it cannot be pulled out.
Warning: Before using the Cappuccinatore, clean
it as described in section 5.4.
3
Insert the clean pipe directly into the milk container (Fig.11,
page 3).
• 15 •
Machine Use - User Manual
Note: To ensure better results when preparing a
cappuccino, use cold milk.
4
Place the cup under the dispensing spout (Fig.12, page 3).
Press the "
" button (25).
5
The machine needs time to preheat.
6
After preheating, the machine starts brewing the cappuc-
cino.
CAPPUCCINO
ESC
STOP MILK
7
At this stage, the machine dispenses frothed milk. The dis-
pensing process can be stopped by pressing the “
” button (22).
8
After dispensing milk, the machine brews co ee. The brewing
process can be stopped by pressing the
“ ”
button (22).
CAPPUCCINO
ESC
STOP COFFEE
Enjoy your cappuccino as if straight from the co ee shop.
9
After using the Cappuccinatore, clean it as described in sec-
tion 5.4.
10
Remove the container and clean it if necessary.
3.11 Latte Macchiato
Important note: Clean the Cappuccinatore immediately after using it to froth milk (see section
5.4). Clean the suction hose externally with a damp cloth.
This way, all parts will be perfectly clean and free of any
milk residue. The service provider can activate a function
to set a cleaning cycle 10 minutes after the last beverage
was brewed, in the event that the cycle is not manually
started by the user.
The machine allows a cup of latte macchiato to be brewed quickly
and easily with the touch of a button.
To dispense a cup of latte macchiato, perform all the steps described in section 3.10 up to step 3.
1
We recommend using tall glasses for this type of preparation,
thus moving the dispensing spout accordingly (Fig.13, page 3).
2
When the machine is ready, press the " " button (26) to
start brewing the latte macchiato.
3
The machine prepares the latte macchiato automatically.
Note: The milk and co ee brewing process can be
stopped by pressing the "
" button (22).
4
After using the Cappuccinatore, clean it as described in sec-
tion 5.4.
Remove the container and clean it if necessary.
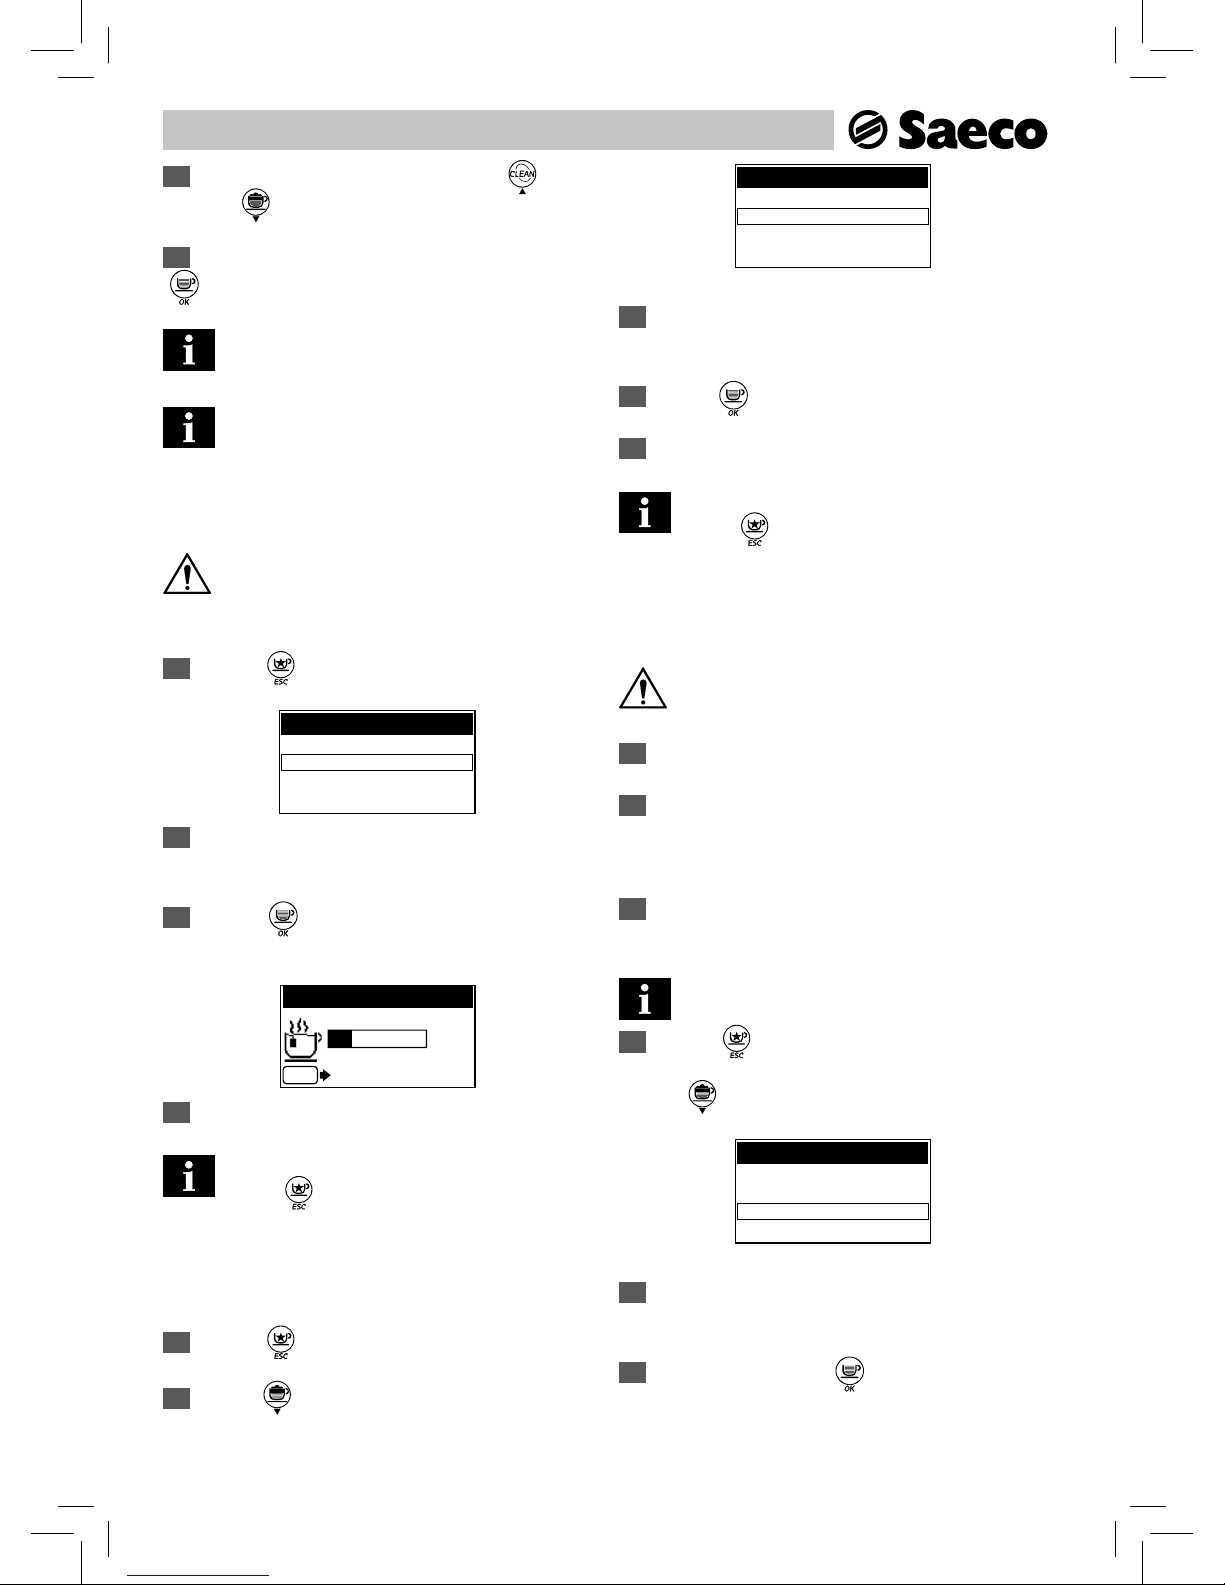
3.12 "SPECIAL" Products
The machine is designed to also brew products other than those
displayed on the control panel.
Note: After pressing the " " button (22), if no
product is selected, the machine goes back to the
main menu after 10 seconds.
1
Press the “ ” button (22) to access the menu.
SPECIAL BEVERAGES
HOT WATER
LONG COFFEE
HOT MILK
AMERICAN COFFEE
Note: The "STEAM" function is displayed and can be
selected only if it has been previously activated by
the service provider; otherwise, it is not available.
2
The display shows the page for "special" beverages.
Note: This menu enables only a single brewing
process at a time. To brew more products repeat
the described procedures.
• 16 •
Machine Use - User Manual
3
Select the desired beverage by pressing the
“ ” button
(24) or the “
” button (25)
.
4
When the desired beverage has been selected, press the
"
" button (21) to start the preparation.
Refer to the section describing the brewing procedure for the desired beverage.
For the preparation of milk-based beverages,
install the Cappuccinatore after washing it as de-
scribed in section 5.4.
Hot Water Dispensing
Dispensing may be preceded by short spurts of hot
water. Danger of scalding. The hot water wand
may reach high temperatures.
1
Press the “ ” button (22) to access the menu.
SPECIAL BEVERAGES
HOT WATER
LONG COFFEE
HOT MILK
AMERICAN COFFEE
2
Place a container under the hot water wand (Fig.07, page
3).
3
Press the " " button (21) to start dispensing hot water
through the wand.
HOT WATER
ESC
STOP HOT WATER
4
After dispensing, remove the container with hot water.
Note: You can stop the brewing process by pressing the "
" button (22).
Long Co ee
This programme allows you to prepare a long co ee.
1
Press the “ ” button (22) to access the menu.
2
Press the " " button (25) to select "LONG COFFEE".
SPECIAL BEVERAGES
HOT WATER
LONG COFFEE
HOT MILK
AMERICAN COFFEE
3
Place a suitable cup under the dispensing spout (Fig.05,
page 3).
4
Press the " " button (21) to start the preparation.
5
After brewing, remove the co ee cup.
Note: You can stop the brewing process by pressing the "
" button (22).
Hot Milk
This programme allows you to prepare a hot milk.
Danger of scalding! Dispensing may be preceded
by small jets of hot water.
1
Remove the cover from the front side (Fig.08, page 3).
2
Insert the complete Cappuccinatore into its seat until it locks
into place (Fig.09-10, page 3). Check that it cannot be pulled
out.
3
Insert the clean pipe directly into the milk container (Fig.11,
page 3).
Note: To ensure better results, use cold milk.
4
Press the “ ” button (22) to access the menu.
Press the "
" button (25) to select "HOT MILK".
SPECIAL BEVERAGES
HOT WATER
LONG COFFEE
HOT MILK
AMERICAN COFFEE
5
Place a suitable cup under the dispensing spout (Fig.13,
page 3).
6
Con rm by pressing the " " button (21) to start the
preparation.
 Loading...