


INSTRUCTION
MANUAL
FOR
BLUED |
CALIBERS |
STEEL |
9MM &. 40 Auto |
RUGER® CARBINE
PC9, PC4, PC9GR & PC4GR
READ THE INSTRUCTIONS AND
!WARNINGS IN THIS MANUAL CAREFULLY BEFORE USING THIS FIREARM
For Product Service on This Model Please Call: (520) 778-6555 (See p. 23)
STURM, RUGER & Company, Inc.
Southport, Connecticut 06490 U.S.A.
THIS INSTRUCTION MANUAL SHOULD ALWAYS ACCOMPANY THIS FIREARM AND BE TRANSFERRED WITH IT UPON CHANGE OF OWNERSHIP, OR WHEN THE FIREARM IS LOANED OR PRESENTED TO ANOTHER PERSON.
G 4/01 R2
!WARNING – LOCKING DEVICES
DO NOT INSTALL
INSIDE TRIGGER GUARD
|
|
|
|
UT |
|
|
|
G |
EO |
|
|
|
IN |
|
|
|
|
IN |
AZ |
|
|
|
D |
AG |
|
|
OA |
M |
|
|
|
NL |
ITH |
|
|
-U |
EW |
|
|
|
G |
|
FIR |
|
|
NIN |
ILL |
|
|
AR |
NW |
|
|
|
W |
GU |
|
|
|
! |
|
|
|
|
INSTALL LOCK
AS SHOWN HERE
This firearm was originally sold with a key-operated locking device. While it can help provide secure storage for your unloaded firearm, any locking device can fail. All guns are designed to fire if they are loaded and the trigger is pulled. Therefore, never install the locking device inside the trigger guard or in any way that it can possibly pull the trigger! Do not leave the keys in the lock.
The ultimate responsibility for secure storage of any firearm must depend upon its owner and his or her individual circumstances.
Guns should be securely stored unloaded, in a secure location, separate from their ammunition.
See “Storage Warning”, page 20.
NEVER INSTALL
LOCKING DEVICE
INSIDE TRIGGER GUARD
2
FIREARMS SAFETY-YOUR RESPONSIBILITY
SAFETY MUST BE THE FIRST AND CONSTANT CONSIDERATION OF EVERY PERSON WHO HANDLES FIREARMS AND AMMUNITION.
This Instruction Manual is designed to assist you in learning how to use and care for your RUGER® CARBINE properly. Please contact us if you have any questions about it.
Only when you are certain you fully understand the Manual and can properly carry out its instructions should you practice loading, etc. with live ammunition. If you have any doubts about your ability to handle or use a particular type of gun safely, then you should seek supervised instruction. Such personalized instruction is often available from gun dealers, gun clubs or police departments. If none of these sources can help you, write to the National Rifle Association, 11250 Waples Mill Rd., Fairfax, VA 22030-7400. They will assist you.
The person possessing a gun has a full-time job. You cannot guess; you cannot forget. You must know how to use your firearm safely. Do not use any firearm without having a complete understanding of its particular characteristics and safe use. Remember: There is no such thing as a foolproof gun.
TABLE OF CONTENTS
Page General Information . . . . . . . . . . . . . . . . . . . . . . . . . . . . . . . . . . . . . . . . . .4 Operation of Safety . . . . . . . . . . . . . . . . . . . . . . . . . . . . . . . . . . . . . . . . . . .6 The Slide Stop . . . . . . . . . . . . . . . . . . . . . . . . . . . . . . . . . . . . . . . . . . . . . . 7 Ammunition . . . . . . . . . . . . . . . . . . . . . . . . . . . . . . . . . . . . . . . . . . . . . . . . 8 To Load and Fire (With Magazine) . . . . . . . . . . . . . . . . . . . . . . . . . . . . . . 9 To Load and Fire (Without Magazine) . . . . . . . . . . . . . . . . . . . . . . . . . . 11 To Unload . . . . . . . . . . . . . . . . . . . . . . . . . . . . . . . . . . . . . . . . . . . . . . . . . 11 To Extract and Eject a Chambered Cartridge . . . . . . . . . . . . . . . . . . . . . 13 To Clear a Malfunction (“Jam”) . . . . . . . . . . . . . . . . . . . . . . . . . . . . . . . 13 To Minimize Malfunctions (“Jams”) . . . . . . . . . . . . . . . . . . . . . . . . . . . .13 To Disassemble . . . . . . . . . . . . . . . . . . . . . . . . . . . . . . . . . . . . . . . . . . . . .15 Reassembly . . . . . . . . . . . . . . . . . . . . . . . . . . . . . . . . . . . . . . . . . . . . . . . .16 Magazine Inspection and Care . . . . . . . . . . . . . . . . . . . . . . . . . . . . . . . . .18 Care and Cleaning . . . . . . . . . . . . . . . . . . . . . . . . . . . . . . . . . . . . . . . . . . .18 Storage . . . . . . . . . . . . . . . . . . . . . . . . . . . . . . . . . . . . . . . . . . . . . . . . . . .19 Attaching Ruger Scope Rings . . . . . . . . . . . . . . . . . . . . . . . . . . . . . . . . .21 Sight Adjustment . . . . . . . . . . . . . . . . . . . . . . . . . . . . . . . . . . . . . . . . . . . 21 Ghost Ring Sight Adjustment . . . . . . . . . . . . . . . . . . . . . . . . . . . . . . . . .22 Service and Parts Policy . . . . . . . . . . . . . . . . . . . . . . . . . . . . . . . . . . . . . 23 Parts Drawing . . . . . . . . . . . . . . . . . . . . . . . . . . . . . . . . . . . . . . . . . . . . . 30 The Basic Rules of Safe Firearms Handling . . . . . . . . . . . . . . . . . . . . . . 31 Warranty Information . . . . . . . . . . . . . . . . . . . . . . . . . . . . . . . . . . . . . . . 36
“RUGER®” is a registered U.S. trademark.
3
|
! |
WARNINGS OF GREAT IMPORTANCE ARE |
|||
|
FOUND ON THE FOLLOWING PAGES: |
|
|||
|
Locking Devices |
2 |
Unloading |
11 |
|
|
Alterations |
|
4 |
Malfunctions |
14 |
|
Manual Safety |
|
6 |
Disassembly |
15 |
|
Lead Exposure |
8 |
Lubrication |
19 |
|
|
Ammunition |
|
8 |
Storage |
20 |
|
Firing |
|
10 |
Parts Purchasers |
24 |
|
Handling |
|
11 |
|
|
OTHER CAUTIONS AND WARNINGS APPEAR
THROUGHOUT THE MANUAL.
FIREARMS ARE DANGEROUS WEAPONS–
READ THE INSTRUCTIONS AND WARNINGS IN THIS MANUAL THOROUGHLY AND CAREFULLY BEFORE USING.
! WARNING–ALTERATIONS
This product was designed to function properly in its original condition. Alterations can make it unsafe. Do not alter any part or add or substitute parts or accessories not made by Sturm, Ruger & Co. Inc.
DO NOT ALTER ANY GUN
GENERAL INFORMATION
AND MECHANICAL CHARACTERISTICS
The RUGER® CARBINE is an autoloading rifle chambered for either the 9mm Luger (Parabellum) or .40 Auto cartridges. The correct caliber of each rifle is rollmarked on its receiver. Use only ammunition of the correct caliber for that rifle. It is “blowback” operated and uses standard Ruger P-Series pistol magazines of the same caliber. Retracting the cocking handle cocks the internal hammer and compresses the guide rod/recoil spring assembly. When the slide is manually released, it moves forward (driven by the recoil spring), strips a cartridge from the magazine, if a loaded magazine is in place, and chambers the cartridge. The slide is held against the chambered cartridge by the recoil spring.
When the trigger is pulled, the hammer is released and strikes the firing pin. The firing pin indents the cartridge primer and ignites the priming compound. This ignites the powder in the cartridge case and a great volume of gas is instantly generated, which acts on the interior of the cartridge case in all directions.
4
Because the bullet offers the least resistance, it moves out of the cartridge case and exits the muzzle. The bolt then moves rearward automatically, extracting and ejecting the fired cartridge case, and at the same time cocking the hammer and compressing the guide rod/recoil spring assembly, etc., as described above. Once the trigger is released, the rifle is ready to fire again.
Each time the trigger is pulled and released, the same cycle is repeated until there are no more cartridges in the magazine or in the chamber.
The rifle will fire if there is a cartridge in the chamber and the trigger is pulled, whether or not there is a magazine in place! Removing the magazine does not unload the rifle. Never assume the rifle is unloaded. Visually inspect the chamber and the magazine each time the rifle is handled to be certain there are no cartridges in either.
All models have the same basic operating mechanism and include the following features with which the gun user should be thoroughly familiar.
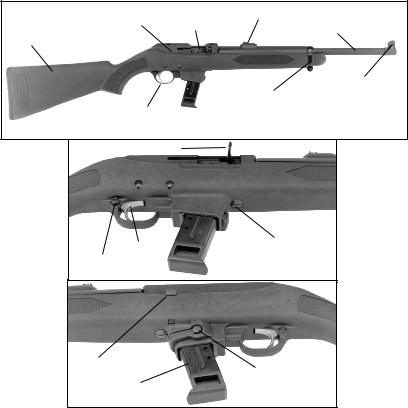
NOMENCLATURE
|
|
|
|
Rear Sight |
|
Receiver |
|
|
|||
|
Slide |
|
|
Barrel |
|
|
|
|
|||
|
|
|
|
|
|
|
|
|
Stock
Front Sight
Barrel Band
Trigger Guard
Cocking Handle
Trigger |
Take Down Screw |
Safety |
|
(shown “on”) |
|
Slide Stop
Magazine Latch
Magazine
Figure 1. In these illustrations the frequently used operating components are identified. Note that the safety is protruding fully from the right side of the trigger guard and is therefore in its “on” (safe) position.
5
OPERATION OF SAFETY
The RUGER® CARBINE has a cross-button safety which is located in the rear portion of the trigger guard (Figure 1, p. 5).
The safety is “on” when it protrudes fully from the right side (the cocking handle side) of the trigger guard, as shown in Figure 1, p. 5. In this position, the gun cannot be fired from a normal pull on the trigger.
The safety should always be in the “on” (safe) position except when the shooter is actually firing the gun. The safety should be moved to the “on” position whenever the shooter ceases firing, even temporarily.
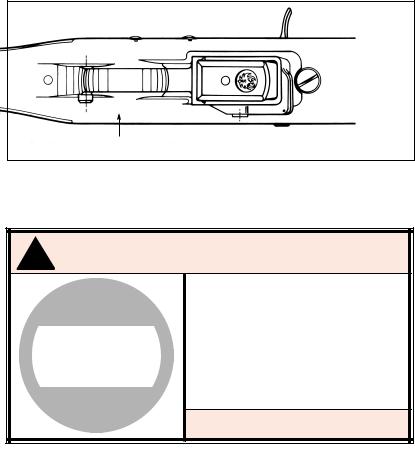
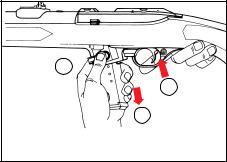
The safety is “off” (fire) when it protrudes from the left side of the trigger guard, as shown in Figure 2. When the safety is off, the red band shows on the safety button, but do not totally rely on the appearance of the red band to indicate that the safety is off. In poor light or if dirt is present, the red band may not be visible. If the safety is “off” and the trigger is pulled, the rifle will fire if a cartridge is in the chamber.
SAFETY IN “OFF” (FIRE) POSITION
Figure 2. The underside of the trigger guard section of the rifle. In this illustration the safety is shown in the “off” (fire) position. The position of the safety and red band indicate the safety is “off.”
!WARNING – MANUAL SAFETY
Keep the safety on unless actually firing. Always move the safety fully to its intended position and check it. The safety is not “ON” unless it is completely “ON”. Never depend on a safety mechanism or any other mechanical device to justify careless handling or permitting the rifle to point in an unsafe direction. The only “safe” rifle is one in which the bolt is open, the chamber is empty, and there is no magazine in the gun.
KNOW HOW TO USE THE SAFETY
6
The safety is held in its “on” or “off” position by a plunger that is under spring tension. When the safety is moved to either the “on” or “off” position, a distinct “click” should be heard. Frequently check the position of the safety to be certain the safety has not been inadvertently moved. If the safety seems to move too easily, or if the click is not heard when the safety is moved, the rifle should be discontinued from use and returned to the Prescott Product Service Department for repair (See page 23).
THE SLIDE STOP
The slide stop is located on the left side of the receiver (see Figure 1, p. 5). The slide stop is the manually operated means of retaining the slide in the rearward (open) position. When the slide of an empty rifle is held open, the rifle is in an inoperative safe condition for inspection of the chamber, cleaning, etc.
To hold the slide open: Retract the cocking handle to its extreme rearward position and, while holding it there, press the slide stop upward. Release pressure on the cocking handle and the slide will move forward a fraction of an inch, and then be held in its open position.
2
3
1
Press Up to Lock Slide Open |
Push Down to Close Slide |
To release the slide: The slide can be released by drawing back slightly on the cocking handle and depressing the slide stop thumbpiece. When the slide is released, it will move forward under pressure from the recoil spring. The safety of the rifle should always be in the “on” position except when the user is actually firing at a selected target.
When the last shot has been fired and the magazine is empty, the slide stop automatically holds the slide open. When there is an empty magazine in the rifle and the slide is retracted manually, the slide stop will have to be manually actuated to hold the slide open. If a loaded magazine is inserted in the rifle when the slide is closed and the slide is then retracted fully, the slide stop will not automatically hold open the slide. The user can actuate the slide stop mechanism to hold the slide open at any time by retracting the slide and pushing up the slide stop.
7
AMMUNITION
The RUGER® CARBINE is chambered for, and designed to properly function with, only factory loaded 9mm Luger (Parabellum) or .40 Auto ammunition (standard, high velocity, +P, or +P+ ammunition) manufactured to U.S. industry standards.
SPECIAL NOTE: The higher pressures produced by the .40 auto cartridge make the use of aluminum-cased .40 auto ammunition inadvisable in the Ruger Carbine or any other “blowback” -operated firearm. Occasional case separations and jamming of the mechanism may occur. This does not apply to locked-breech firearms such as the Ruger P-94 pistols.
Use only such factory ammunition in good condition that exactly matches the caliber of your rifle that is rollmarked on the receiver.
!WARNING – AMMUNITION
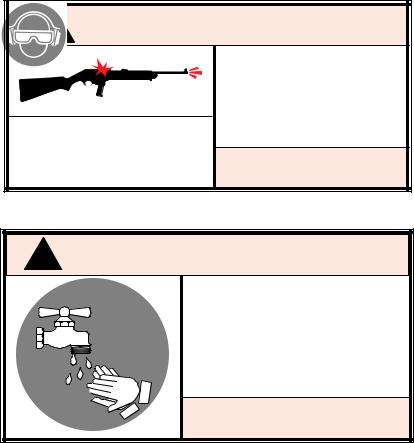
Death, serious injury, and damage can result from the use of wrong ammunition, bore obstructions, powder overloads, or incorrect cartridge components. Always wear shooting glasses and hearing protectors.
IMPROPER AMMUNITION
DESTROYS GUNS
! WARNING – LEAD EXPOSURE
Discharging firearms in poorly ventilated areas, cleaning firearms, or handling ammunition may result in exposure to lead and other substances known to the state of California to cause birth defects, reproductive harm, and other serious physical injury. Have adequate ventilation at all times. Wash hands thoroughly after exposure.
SHOOTING OR CLEANING GUNS
MAY EXPOSE YOU TO LEAD
8
TO LOAD AND FIRE (WITH MAGAZINE)
Practice this important aspect of gun handling (with an unloaded rifle) until you can perform each of the steps – described below – with skill and confidence. But before you do anything with the rifle, please first read completely through this manual. Keep your finger off the trigger until you are ready to immediately shoot at a target!
1.Keep the muzzle pointed in a safe direction. (See Rule 2, p. 31).
2.Put the safety “on” (fully protruding from the right side of the trigger guard). See Figure 1, p. 5.
3.Pull the cocking handle rearward. Engage the slide stop so that the slide is held open. Check the chamber to be certain it is empty.
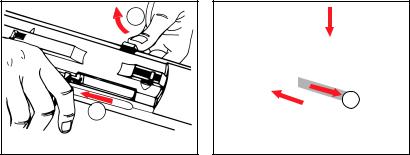
4.To remove the magazine, use thumb to depress magazine latch button on the left side of the magazine well and at the same time grasp the magazine between the fingers of the same hand to draw it out of the magazine well. (See Figure 3). Do not drop the magazine out of the rifle onto a hard or dirty surface -- you may damage it or otherwise induce malfunctions.
2 
1
3
Removing Magazine (Safety “On”)
Figure 3. The safety should be “on” when the magazine is being removed or inserted. When the magazine latch button is pushed in, the magazine is released. Depress the latch with the thumb and at the same time grasp the magazine between your fingers and draw it downward out of the gun. REMEMBER to check to be sure the chamber is empty after removing the magazine!
5.Load the magazine by sliding up to 15* 9mm or 11* .40 Auto cartridges of the same caliber as that marked on the receiver of your rifle into the magazine. The Ruger CARBINE is designed to function properly only with correct Ruger magazines loaded with factory ammunition of the correct type and caliber loaded to U.S. industry specifications.
6.Insert magazine fully into the firearm, with bullet end of the cartridges toward the muzzle, until it is locked in place by the magazine latch. (Magazine cannot be seated if reversed).
*By Federal Law, newly manufactured magazines with a capacity of greater than 10 (ten) cartridges are designated “For Law Enforcement Use Only” and are only sold to law enforcement and government agencies. Commercially sold rifles are supplied with 10 round magazines only.
9
7.Load a cartridge into the chamber by fully retracting the cocking handle, pushing down the slide stop, and then releasing the cocking handle. The slide will forcibly move forward, chambering a cartridge from the magazine. Don’t touch the trigger. Do not ‘ride’ the cocking handle as it moves forward. Do not apply force to the cocking handle to chamber a cartridge. If a cartridge does not readily chamber, eject it from the rifle, hold the slide open with the slide stop, remove the magazine and see MALFUNCTION WARNING, p. 14.
8.The rifle is now fully loaded. If the rifle is not to be fired immediately, the safety should remain “ON” (See Figure 1, p. 5). When the safety is moved to the “off” position, the rifle will fire a cartridge each time the trigger is pulled until all the cartridges in the magazine, and the one in the chamber, have been fired. Firing will automatically reload and recock the rifle. Note that every time the trigger is pulled, if a cartridge is in the chamber and the safety is “off”, the rifle will fire – be careful!
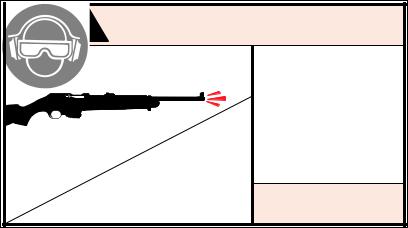
!WARNING – FIRING
The slide automatically opens and shuts quickly while firing. Keep face and hands away from it. Hot brass and powder gas is ejected quickly and can burn you. The rifle should be fired from the right shoulder. Always wear shooting glasses and hearing protectors.
SLIDE OPENS FAST–
HOT BRASS EJECTED
9.Immediately following the firing of a shot, if a subsequent shot is not to be fired at once, put the safety “ON” while the rifle is still pointing in a safe direction down range. The safety should be moved to the “on” position as soon as firing is completed, and it should be “on” at all times except when the rifle is on target and being fired.
10.If all cartridges are fired from the magazine, the slide remains open after the last shot has been fired. When firing is completed, if the slide is shut, manually retract the slide, hold it open by pushing the slide stop up, and visually check the chamber to be sure it is empty. If the slide is shut, the shooter should always assume that there is a cartridge in the chamber. Don’t rely on your memory to know if a gun or magazine is loaded. Visually inspect the magazine and the chamber area.
10

!WARNING – HANDLING
SAFETY IN THE“OFF” (FIRE) POSITION
If dropped or struck with the safety “off”, the rifle may fire. Keep chamber empty unless actually firing! Keep safety “on” unless actually firing!
ANY GUN MAY FIRE IF DROPPED
TO LOAD AND FIRE (WITHOUT MAGAZINE)
The rifle can be used as a single shot rifle in the absence of a magazine or for safety or training purposes. To do so, follow steps 1 and 2, p. 9. Then load a cartridge into the chamber, and follow steps 7 and 8, p. 10, disregarding the magazine. Engage the safety between shots.
! WARNING – UNLOADING
So that the rifle can be used as a single loader, it will fire whether or not a magazine is in the gun if a cartridge is chambered. Removing magazine does not unload rifle! To unload, first remove magazine, then pull slide to rear, eject chambered cartridge, and visually inspect chamber. The safety should always be in the “on” (safe) position when loading or unloading the rifle.
GUN WILL FIRE WITH
MAGAZINE OUT
TO UNLOAD
NOTE: This sequence must be followed exactly as spelled out. Failure to do so can result in the rifle’s chamber becoming unintentionally loaded with a cartridge!
11
 Loading...