


BLUED & STAINLESS STEEL
INSTRUCTION
MANUAL
FOR
12, 20 & 28 GAUGE
RUGER®
OVER & UNDER SHOTGUNS
Red Label Model
Woodside Model
READ THE INSTRUCTIONS AND
WARNINGS IN THIS MANUAL CAREFULLY
BEFORE USING THIS FIREARM
For Product Service on This Model Please Call: (603) 865-2442 (See p. 21)
STURM, RUGER & Company, Inc.
Southport, Connecticut 06490 U.S.A.
THIS INSTRUCTION MANUAL SHOULD ALWAYS ACCOMPANY THIS FIREARM AND BE TRANSFERRED WITH IT UPON CHANGE OF OWNERSHIP, OR WHEN THE FIREARM IS LOANED OR PRESENTED TO ANOTHER PERSON.
OU1 & OU3/5-00 R3
FIREARMS SAFETY-YOUR RESPONSIBILITY
SAFETY MUST BE THE FIRST AND CONSTANT CONSIDERATION OF EVERY PERSON WHO HANDLES FIREARMS AND AMMUNITION.
This Instruction Manual is designed to assist you in learning how to use and care for your RUGER® OVER AND UNDER SHOTGUN properly. Please contact us if you have any questions about it.
Only when you are certain you fully understand the Manual and can properly carry out its instructions should you practice loading, etc. with live ammunition. If you have any doubts about your ability to handle or use a particular type of gun safely, then you should seek supervised instruction. Such personalized instruction is often available from gun dealers, gun clubs or police departments. If none of these sources can help you, write to the National Rifle Association, 11250 Waples Mill Rd., Fairfax, VA 22030-7400. They will assist you.
The person possessing a gun has a full-time job. You cannot guess; you cannot forget. You must know how to use your firearm safely. Do not use any firearm without having a complete understanding of its particular characteristics and safe use. Remember: There is no such thing as a foolproof gun.
TABLE OF CONTENTS |
|
|
Page |
Mechanical Characteristics . . . . . . . . . . . . . . . . . . . . . . . . . . . . . . . . |
. . .5 |
Nomenclature . . . . . . . . . . . . . . . . . . . . . . . . . . . . . . . . . . . . . . . . . . . |
. .7 |
Operation of Safety . . . . . . . . . . . . . . . . . . . . . . . . . . . . . . . . . . . . . . . |
. .8 |
Safety/Barrel Selector Positions . . . . . . . . . . . . . . . . . . . . . . . . . . . . |
. . 9 |
Ammunition . . . . . . . . . . . . . . . . . . . . . . . . . . . . . . . . . . . . . . . . . . . |
. 10 |
Steel Shot . . . . . . . . . . . . . . . . . . . . . . . . . . . . . . . . . . . . . . . . . . . . . |
. 11 |
Assembling the Shotgun . . . . . . . . . . . . . . . . . . . . . . . . . . . . . . . . . . |
. 12 |
Installation of Screw-In Choke Inserts . . . . . . . . . . . . . . . . . . . . . . . |
. 14 |
Operation of the Shotgun . . . . . . . . . . . . . . . . . . . . . . . . . . . . . . . . . |
. 15 |
To Load and Fire . . . . . . . . . . . . . . . . . . . . . . . . . . . . . . . . . . . . . . . . |
. 16 |
To Unload . . . . . . . . . . . . . . . . . . . . . . . . . . . . . . . . . . . . . . . . . . . . . . |
.17 |
Disassembly Procedure . . . . . . . . . . . . . . . . . . . . . . . . . . . . . . . . . . . |
. 19 |
Care and Cleaning . . . . . . . . . . . . . . . . . . . . . . . . . . . . . . . . . . . . . . . . |
.20 |
Maintenance of Stainless Steel Components . . . . . . . . . . . . . . . . . . . . |
.21 |
Service and Parts Policy . . . . . . . . . . . . . . . . . . . . . . . . . . . . . . . . . . |
. 21 |
Parts Drawing . . . . . . . . . . . . . . . . . . . . . . . . . . . . . . . . . . . . . . . . . . |
. 32 |
The Basic Rules of Safe Firearms Handling . . . . . . . . . . . . . . . . . . . |
. 33 |
Warranty Information . . . . . . . . . . . . . . . . . . . . . . . . . . . . . . . . . . . . |
. 40 |
“RUGER®”and the Ruger Logo are registered U.S. trademarks.
3
NOTE: The following warning applies to
RUGER® OVER & UNDER SHOTGUNS only:
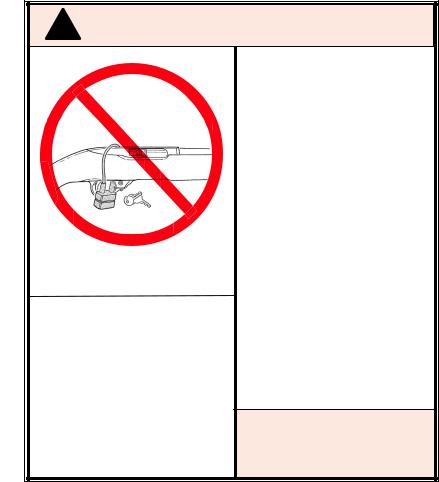
! WARNING – LOCKING DEVICES
DO NOT INSTALL
INSIDE TRIGGER GUARD
INSTALL LOCK
AS SHOWN HERE
This firearm was originally sold with a key-operated locking device. While it can help provide secure storage for your unloaded firearm, any locking device can fail. All guns are designed to fire if they are loaded and the trigger is pulled. Therefore, never install the locking device inside the trigger guard or in any way that it can possibly pull the trigger!
Do not leave the keys in the lock.
The ultimate responsibility for secure storage of any firearm must depend upon its owner and his or her individual circumstances. Guns should be securely stored unloaded, in a secure location, separate from their ammunition.
See “Storage Warning”, page 21.
NEVER INSTALL
LOCKING DEVICE
INSIDE TRIGGER GUARD
4
WARNINGS OF GREAT IMPORTANCE ARE
FOUND ON THE FOLLOWING PAGES:
Locking Devices |
4 |
Unloading |
17 |
Alterations |
5 |
Handling |
18 |
Safety Selector |
10 |
Disassembly |
19 |
Ammunition |
11 |
Lubrication |
20 |
Lead Exposure |
12 |
Storage |
21 |
Screw-In Chokes |
15 |
Parts Purchasers |
23 |
Firing |
17 |
|
|
OTHER CAUTIONS AND WARNINGS APPEAR
THROUGHOUT THE MANUAL.
FIREARMS ARE DANGEROUS WEAPONS–
READ THE INSTRUCTIONS AND WARNINGS
IN THIS MANUAL THOROUGHLY AND
CAREFULLY BEFORE USING.
 WARNING–ALTERATIONS
This product was designed to function properly in its original condition. Alterations can make it unsafe. Do not alter any part or add or substitute parts or accessories not made by Sturm, Ruger & Co. Inc.
DO NOT ALTER ANY GUN
GENERAL INFORMATION
AND MECHANICAL CHARACTERISTICS
The RUGER® RED LABEL OVER & UNDER SHOTGUN is a twoshot, double barreled shotgun that comes in a variety of gauges, stock configurations and barrel lengths. All current models come with “screw-in” choke tubes of various degrees of choke.
The SPORTING CLAYS model has 30” barrels, no barrel spacer and a twobead sighting system.
The WOODSIDE model comes in a variety of barrel lengths and features graceful wooden side panels precision inlet into specially designed cutouts in the side of the receiver.
The ALL-WEATHER model comes in three barrel lengths. It features a stainless-steel mechanism, action, and barrels. The stock and forend are a synthetic polymer.
THE SAFETY MECHANISMS
The trigger mechanism includes a hammer interrupter which directly blocks the hammers if either or both are cocked and the safety is engaged. With the safety off, the hammer interrupter can be lifted clear of the hammers only by a
5
deliberate pull of the trigger. A complete release of the trigger is necessary to set the gun for firing the second shot. The automatic safety mounted on top of the receiver also serves as the barrel selector that determines which of the two barrels is to be fired first. The conical pointed firing pins are strongly proportioned and will not be damaged by dry-firing.
The sliding safety thumbpiece, in addition to its fore and aft motion, pivots to swing from side to side and thus incorporates the function of barrel selector in association with the single trigger mechanism. In its rear, or “safe” position, the safety mechanism locks the hammer interrupter – a unique characteristic of this gun. In this position, it is impossible for the hammers to reach the firing pins. The hammer interrupter, in turn, locks the trigger against being pulled. The sequence of firing is set with the safety in its rearmost “safe” position. If the thumbpiece is swung to its left side position and pushed forward, the selector allows the top barrel to be fired first. If the thumbpiece is swung to the right side and pushed forward, the selector allows the bottom barrel to be fired first.
Under recoil, an inertia weight swings to the rear and pulls the sear selector out of engagement with the sears. The sear selector is inoperative until the inertia weight returns to its forward position, so the gun is thus made safe from “doubling” (firing both barrels with a single pull of the trigger). This mechanism has the desirable feature of permitting the second barrel to be discharged even if the first pull of the trigger results in a misfire. The second shot can be fired whether the gun has recoiled or not.
The hammers are of the rebounding type. After firing, they move back from the firing pins enough to clear then and are held in this position by the mainspring. The rebound position of the hammers means that their cocking motion is not started until after the barrels are partially opened, and this contributes materially to the easy opening of the gun. The hammers cannot fall completely forward to reach the firing pins unless the locking bolt, which lies directly ahead of them, is in its forward position when the barrels are locked shut in the frame.
THE BARREL ASSEMBLY
The barrels are silver brazed to the monobloc at the chamber portion of the barrel. The ventilated rib is securely silver brazed to the top barrel and machinecut cross serrations in the top surface of the rib provide a matte, glare-free sighting plane. The front sight is a standard gold bead. Patented barrel side fillers can be removed if desired. (Sporting clays models do not have these fillers and also feature a two gold bead sighting system).
The trunnions (on which the barrels pivot) are mounted high, close to the centerline of the lower barrel, and are integral with the receiver. This is the only gun in the world of which this is true.
In addition to trunnions, a massive square lug at the bottom rear of the monobloc locks into the thick bottom wall of the receiver to provide extra security for the barrel-to-frame lock-up.
Projecting from the rear end of the barrel assembly, one on either side, are two heavy, integral heat-treated lugs which are engaged by the locking bolt as it slides forward when the gun is closed. The locking bolt is, in effect, a wedge, due to the angle of the locking faces. These faces have more than adequate area and are hardened and precision-ground.
6
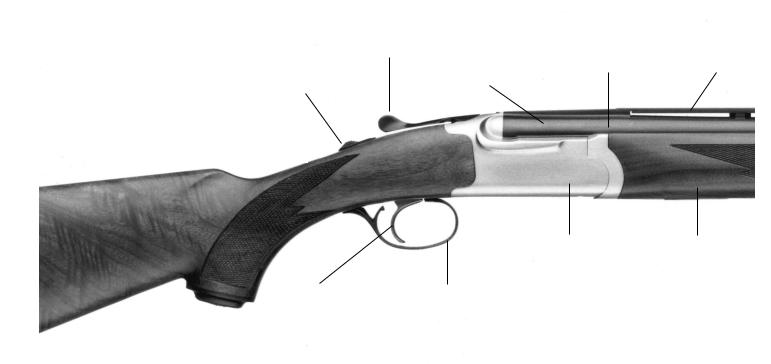
NOMENCLATURE
The SAFETY, in addition to its fore and aft motion, pivots to swing from side to side when on “safe” (S) and incorporates the function of barrel selector. If the selector is swung to its left side position the top barrel fires first. If the selector is to the right, the bottom barrel fires first. In its rearmost “safe” position, the safety locks the hammer interrupter. In this position it is impossible for the hammer to reach the firing pin and the trigger cannot be pulled.
7
The TOP LEVER and its massive pivot are one integral component directly engaged with the locking bolt on both opening and closing motions.
TOP BARREL VENT RIB
MONOBLOC
RECEIVER FOREND
TRIGGER TRIGGER GUARD
The BUTTSTOCK is held on the gun by a
long through-bolt, which is accessible only Figure 1. after the recoil pad on the end of the
buttstock is removed.
The automatic ejectors assemble to the monobloc simply, without retaining pins or screws. The ejector sears are pivoted on integral studs in the forend iron.
THE WOOD
The stock and forearm are made from first quality straight grain American walnut, fully seasoned, with deep-cut checkering of 20 lines to the inch. A pistol grip and rubber recoil pad are standard on the 12 and 20 ga. models (the 28 ga. has a plastic butt plate). All wood surfaces are sealed with a satin weather resistant finish. Woodside models feature select Circassian walnut stocks.
Provision is made in the stock for the through-bolt system of attachment which is strong and simple. The rear ends of the tangs interlock with the wood and the forward end of the stock is tenoned into recesses in the receiver to provide maximum strength and resistance to splitting or loosening.
SPECIAL FEATURES
The RUGER® 12, 20, & 28 GAUGE RED LABEL over and under shotguns are offered with stainless steel receivers correctly proportioned for each gauge. The trigger and forend iron are made of stainless steel with an attractive brushed finish. The trigger guard, top lever, and safety thumbpiece, as well as barrels, are of heat-treated chrome-molybdenum steel, polished overall and blued.
The top lever and its massive pivot are one integral component directly engaged with the locking bolt both on opening and closing motions. The lever and the locking bolt are driven to the closed position by the top lever spring which, through its strut, retains the top lever in the gun. The Ruger shotgun has been engineered to minimize the force required for cocking through a patented “easy opening” system.
OPERATION OF SAFETY
The RUGER® OVER AND UNDER SHOTGUN has a safety selector combined with a barrel selector for convenient use. The safety selector is located at the top rear of the receiver.
The safety selector can be moved from the “Fire” position to its “Safe” position whether or not the mechanism is cocked. Fully opening the shotgun cocks the mechanism. The action can be opened with the safety “on.”
Whenever the action is opened, the safety automatically moves rearward to its “on,” or “Safe” position (the letter ‘S’ visible forward of the safety thumbpiece on the top surface of the receiver). If the safety thumbpiece is moved forward to cover the letter ‘S’, the safety is in its “off” or “Fire” position and remains in that position until moved back to the “Safe” position manually, or until the action is opened again. Keep the safety “on” unless actually firing!
NON-AUTOMATIC SAFETY AVAILABLE – The automatic safety in the Ruger shotgun is generally desired for field guns. However, the automatic safety can be replaced by a non-automatic safety upon request if the shotgun is returned to our factory as outlined in the “Service and Parts Policy” section of this manual, page 21.
8

BARREL SELECTION
The letters ‘T’ and ‘B’ appear to the right and left of the safety thumbpiece, and indicate which barrel is to fire first. NOTE: The safety must be “on” (letter ‘S’ visible, safety moved to rearmost position) before the barrel selector feature can be used. You cannot change the barrel firing sequence while the safety is “off.” If the thumbpiece is then moved to the right so that the letter ‘B’ appears, the bottom barrel will fire first when the safety is pushed forward and the trigger is pulled. If the thumbpiece is moved to the left when the safety is on so that the letter ‘T’ appears, the top barrel will fire first when the safety is pushed forward and the trigger is pulled.
Practice (with an unloaded shotgun) moving the safety/barrel selector to the three positions until you know the position of the safety selector for the three modes – Safe (S), Fire top barrel first (T), and Fire bottom barrel first (B). WARNING: When manipulating the safety selector, DO NOT HAVE ANY FINGER INSIDE THE TRIGGER GUARD! Whenever the safety selector is in the “Fire” position and the trigger is pulled, the shotgun will fire.
The safety selector should always be in the “Safe” (S) position except when the gun user is actually firing or unloading the shotgun. The safety selector should unfailingly by moved to the “Safe” (S) position when the gun user ceases firing, even for a moment.
SAFETY/BARREL SELECTOR POSITIONS
“Safe” (and Barrel Selecting) Position |
Figure 2. Safety selector in “Safe” (S) full |
|
rearward position. The safety selector must be |
||
|
||
|
in this position to select position ‘T’ or ‘B’ |
|
|
described below. In this position, the trigger |
|
|
cannot be pulled to fire the gun. Either ‘T’ or |
|
|
‘B’ may be partially visible, but the shotgun is |
|
|
only on “Safe” when the ‘S’ is fully exposed. If |
|
|
the ‘S’ is not visible, the shotgun is ready to |
|
|
fire! |
|
|
|
Figure 3. Safety selector is forward “Fire Top
Barrel (T) First” position. Pulling the trigger “Fire” — Top Barrel First will cause the top barrel to fire – a second
pull of the trigger fires the bottom barrel. The safety selector should be moved to this position only when the gun user is actually firing. When the safety is in either fire position, it is referred to as being “off.” (When the safety is in the “Safe” (S) position, it is referred to as being “on”).
9
“Fire” — Bottom Barrel First |
Figure 4. Safety selector in forward “Fire |
|
Bottom Barrel (B) First” position. Pulling the |
||
|
||
|
trigger will fire the bottom barrel – a second |
|
|
pull will then fire the top barrel. The safety |
|
|
selector should be in this position only when |
|
|
the gun is being fired. The safety selector |
|
|
should be moved to the “Safe” (S) position and |
|
|
kept there unless the gun is to be fired |
|
|
immediately. |
|
|
|
 WARNING – SAFETY SELECTOR
“SAFE” |
“FIRE” |
“FIRE” |
|
TOP BBL. |
BOTTOM BBL. |
|
FIRST |
FIRST |
Keep the safety on unless actually firing. Always move the safety fully to its intended position and check it. The safety has three positions – “SAFE” (S), “FIRE (T) TOP BarrelFIRST” and “FIRE (B) BOTTOM Barrel - FIRST”. Never depend on a safety mechanism or any other mechanical device to justify careless handling or permitting the shotgun to point in an unsafe direction. The only “safe” gun is one in which the action is open and the chambers are empty.
KNOW HOW TO USE THE SAFETY
This safety selector is held in each of its three positions by a plunger that is under spring tension. Therefore, the gun user should frequently check the position of the safety selector to be certain it has not been inadvertently moved. If the safety selector seems to move too easily, or if the safety selector does not seem firmly positioned in any of its three positions, the shotgun should be discontinued from use and returned to our Newport, New Hampshire Service Department for repair.
AMMUNITION
The Ruger 12 and 20 gauge Over and Under Shotguns of current manufacture have 3” chambers and may be used with all standard commercially manufactured 2 3/4” and 3” shot shells. The 28 gauge shotguns have 2 3/4” chambers and should be used with all standard commercially manufactured 2 3/4” shot shells. This gun has been tested with special proof test ammunition which conforms to U.S. industry practice. It is intended for use only with standard ammunition of the proper gauge and loading. Use of incorrect ammunition can destroy any gun and result in serious injury to the shooter or bystanders. (See “Ammunition Warning,” p. 11)
10
STEEL SHOT
All steel shot loads loaded to current U.S. industry specifications can be used in currently manufactured Ruger shotguns equipped with screw-in chokes. Some older Ruger “Red Label” shotguns were manufactured with conventional fixed chokes. In conventionally choked full choke barrels without screw-in choke tubes, the use of large size (F, T, BB and larger) steel shot can result in a very slight ring near the muzzle. It must be emphasized that this ring should have no adverse effect on pattern or shot velocity. As we have no control over the manufacture of ammunition which may be introduced in the future, we cannot be responsible for damage caused by steel shot loads.
Since steel shot generally patterns tighter than conventional lead shot loads, it would be wise to avoid the use of steel shot altogether in conventionally choked “full choke” barrels. Modified choke barrels generally deliver “full choke” patterns when used with steel shot.
We do not recommend any of our shotguns for use with reloads, steel shot or otherwise.
WARNING – AMMUNITION
Death, serious injury, and damage can result from the use of wrong ammunition, bore obstructions, powder overloads, or incorrect cartridge components. Always wear shooting glasses and hearing protectors.
IMPROPER AMMUNITION
DESTROYS GUNS
AMMUNITION (CARTRIDGES) NOTICE
WE SPECIFICALLY DISCLAIM RESPONSIBILITY FOR ANY DAMAGE OR INJURY WHATSOEVER OCCURING IN CONNECTION WITH, OR AS A RESULT OF, THE USE IN ANY RUGER FIREARMS OF FAULTY, OR NON-STANDARD, OR “REMANUFACTURED” OR HAND-LOADED (RELOADED) AMMUNITION, OR OF CARTRIDGES OTHER THAN THOSE FOR WHICH THE FIREARM WAS ORIGINALLY CHAMBERED.
11

WARNING – LEAD EXPOSURE
Discharging firearms in poorly ventilated areas, cleaning firearms, or handling ammunition may result in exposure to lead and other substances known to the state of California to cause birth defects, reproductive harm, and other serious physical injury. Have adequate ventilation at all times. Wash hands thoroughly after exposure.
SHOOTING OR CLEANING GUNS
MAY EXPOSE YOU TO LEAD
ASSEMBLING THE SHOTGUN
The Ruger Over and Under Shotgun is shipped partially disassembled. To assemble, proceed as follows:
1.After unwrapping the barrel/forearm assembly and receiver/stock assembly, wipe excess rust preventative oil from the monobloc and inside surfaces of the receiver. Swab the bores with a clean cloth patch on a cleaning rod to remove any excess oil.
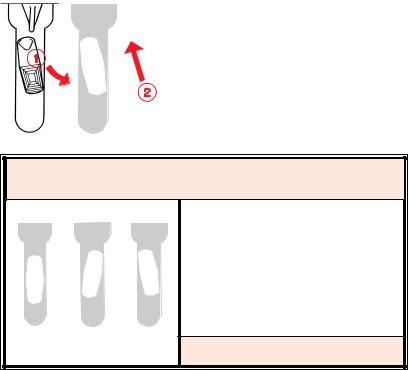
2.To Correctly Remove Forearm (See Figure 5):
a.Unlatch forearm by pulling down on latch lever.
b.Carefully pull down on tip of forearm until slight resistance is felt - APPLICATION OF EXCESSIVE FORCE AT THIS POINT CAN RESULT IN BREAKAGE.
c.While holding forearm tip away from barrels, carefully pull forearm toward
the muzzle and remove forearm from barrels.
Do not attempt to attach barrel assembly to receiver with the forend attached!
2 |
3 |
1 |
Figure 5 |
12
3. To attach the barrel assembly to the receiver, hold the stock by the pistol grip in one hand as shown in Figure
6. Make sure the top lever is opened to the right in order to accept the
barrel assembly. Hold the barrel assembly in the other hand and
engage the integral trunnions in the receiver with the corresponding recesses at the front end of the monobloc. Be sure the small lugs (indicated by the arrow in “A” in Figure 6.) on the outer surfaces of
the ejectors engage their corresponding slots inside the front end of the receiver BEFORE CLOSING THE GUN! The foregoing caution must be followed otherwise the receiver will be damaged by the ejectors as the gun is closed.
4.Swing the muzzle end of the barrels upward, pivoting the rear end of the monobloc downward to seat in the receiver as shown in Figure 7. The barrel assembly is seated and locked into the receiver when the top lever snaps to its centered position.
Figure 7 |
Figure 8 |
|
5.Place the rear end of the forend iron over the ends of the ejectors as shown in Figure 8, and swing the front end of the forearm upward until the forend latch lever catches the forend latch hook on the underside of the lower barrel, and the forend assembly snaps into its locked position.
13
 Loading...