


I N S T R U C T I O N
M A N U A L
F O R
BLUED & |
CALIBER |
STAINLESS |
.223 (5.56mm) |
STEEL |
|
R U G E R®
M I N I - 1 4® R I F L E
AUTOLOADING RIFLE
NOT FOR USE WITH MINI THIRTY RIFLES (cal. 7.62 x 39mm)
For Product Service on This Model Please Call: (603) 865-2442 (See p. 33)
STURM, RUGER & C o m p a n y, Inc.
S o u t h p o rt, Connecticut 06890 U.S.A.
THIS INSTRUCTION MANUAL SHOULD A LWAYS A C C O M PA N Y THIS FIREARM AND BE TRANSFERRED WITH IT UPON CHANGE OF OWNERSHIP, OR WHEN THE FIREARM IS LOANED OR PRESENTED TO ANOTHER PERSON.
KMS1 & MS1/6-03 R17

State-By-State Warnings
Certain states require by law that their own specified warning notices in larger-than-normal type be conspicuously included by the manufacturer, distributor, or retail dealer with firearms sold in that state. Sturm, Ruger sells its products in compliance with applicable laws and regulations. Because our products may be sold in these states, we include the following:
California:
Connecticut:
“UNLAWFUL STORAGE OF A LOADED FIREARM MAY RESULT IN IMPRISONMENT OR FINE.”
Florida:
“IT IS UNLAWFUL, AND PUNISHABLE BY IMPRISONMENT AND FINE, FOR ANY ADULT TO STORE OR LEAVE A FIREARM IN ANY PLACE WITHIN THE REACH OR EASY ACCESS OF A MINOR UNDER 18 YEARS OF AGE OR TO KNOWINGLY SELL OR OTHERWISE TRANSFER OWNERSHIP OR POSSESSION OF A FIREARM TO A MINOR OR A PERSON OF UNSOUND MIND.”
3
Maine:
“ENDANGERING THE WELFARE OF A CHILD IS A CRIME. IF YOU LEAVE A FIREARM AND AMMUNITION WITHIN EASY ACCESS OF A CHILD, YOU MAY BE SUBJECT TO FINE, IMPRISONMENT OR BOTH. KEEP FIREARMS AND AMMUNITION SEPARATE. KEEP FIREARMS AND AMMUNITION LOCKED UP. USE TRIGGER LOCKS.”
Maryland:
“WARNING: Children can operate firearms which may cause death or serious injury. It is a crime to store or leave a loaded firearm in any location where an individual knew or should have known that an unsupervised minor would gain access to the firearm. Store your firearm responsibly!”
Massachusetts:
“WARNING FROM THE MASSACHUSETTS ATTORNEY GENERAL: This handgun is not equipped with a device that fully blocks use by unauthorized users. More than 200,000 firearms like this one are stolen from their owners every year in the United States. In addition, there are more than a thousand suicides each year by younger children and teenagers who get access to firearms. Hundreds more die from accidental discharge. It is likely that many more children sustain serious wounds, or inflict such wounds accidentally on others. In order to limit the chance of such misuse, it is imperative that you keep this weapon locked in a secure place and take other steps necessary to limit the possibility of theft or accident. Failure to take reasonable preventive steps may result in innocent lives being lost, and in some circumstances may result in your liability for these deaths.”
“IT IS UNLAWFUL TO STORE OR KEEP A FIREARM, RIFLE, SHOTGUN OR MACHINE GUN IN ANY PLACE UNLESS THAT WEAPON IS EQUIPPED WITH A TAMPER-RESISTANT SAFETY DEVICE OR IS STORED OR KEPT IN A SECURELY LOCKED CONTAINER.”
4
New Jersey:
“IT IS A CRIMINAL OFFENSE TO LEAVE A LOADED FIREARM WITHIN EASY ACCESS OF A MINOR.”
New York City:
“THE USE OF A LOCKING DEVICE OR SAFETY LOCK IS ONLY ONE ASPECT OF RESPONSIBLE WEAPONS STORAGE. ALL WEAPONS SHOULD BE STORED UNLOADED AND LOCKED IN A LOCATION THAT IS BOTH SEPARATE FROM THEIR AMMUNITION AND INACCESSIBLE TO CHILDREN AND ANY OTHER UNAUTHORIZED PERSONS.”
North Carolina:
“IT IS UNLAWFUL TO STORE OR LEAVE A FIREARM THAT CAN BE DISCHARGED IN A MANNER THAT A REASONABLE PERSON SHOULD KNOW IS ACCESSIBLE TO A MINOR.”
Texas:
“IT IS UNLAWFUL TO STORE, TRANSPORT, OR ABANDON AN UNSECURED FIREARM IN A PLACE WHERE CHILDREN ARE LIKELY TO BE AND CAN OBTAIN ACCESS TO THE FIREARM.”
Wisconsin:
“IF YOU LEAVE A LOADED FIREARM WITHIN THE REACH OR EASY ACCESS OF A CHILD YOU MAY BE FINED OR IMPRISONED OR BOTH IF THE CHILD IMPROPERLY DISCHARGES, POSSESSES, OR EXHIBITS THE FIREARM.”
* * * * * * * * * * * * * * * * * * * * * *
Please check with your licensed retailer or state police for additional warnings which may be required by local law or regulation. Such regulations change constantly, and local authorities are in the best position to advise you on such legal matters.
5
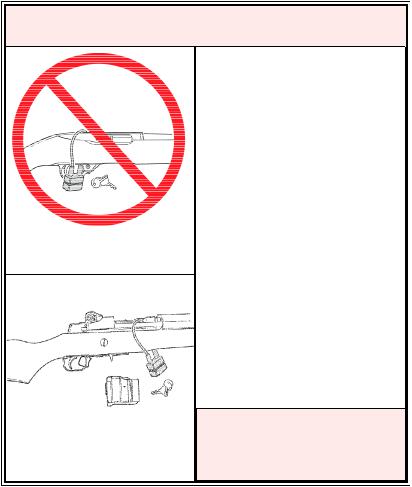
 WARNING – LOCKING DEVICES
DO NOT INSTALL
INSIDE TRIGGER GUARD
INSTALL LOCK
AS SHOWN HERE
6
FIREARMS SAFETY-YOUR RESPONSIBILITY
SAFETY MUST BE THE FIRST AND CONSTANT CONSIDERATION OF EVERY PERSON WHO HANDLES FIREARMS AND AMMUNITION.
This Instruction Manual is designed to assist you in learning how to use and care for your RUGER® MINI-14® RIFLE properly. Please contact us if you have any questions about it.
Only when you are certain you fully understand the Manual and can properly carry out its instructions should you practice loading, etc. with live ammunition. If you have any doubts about your ability to handle or use a particular type of gun safely, then you should seek supervised instruction. Such personalized instruction is often available from gun dealers, gun clubs or police departments. If none of these sources can help you, write to the National Rifle Association, 11250 Waples Mill Road, Fairfax, VA 22030-7400. They will assist you.
The person possessing a gun has a full-time job. You cannot guess; you cannot forget. You must know how to use your firearm safely. Do not use any firearm without having a complete understanding of its particular characteristics and safe use.
Remember: There is no such thing as a foolproof gun.
TABLE OF CONTENTS
Page
General Information . . . . . . . . . . . . . . . . . . . . . . . . . . . . . . . . . . . . . . . . . . . . . . . . .8
Operation of Safety . . . . . . . . . . . . . . . . . . . . . . . . . . . . . . . . . . . . . . . . . . . . . . . . . .9
The Bolt Lock . . . . . . . . . . . . . . . . . . . . . . . . . . . . . . . . . . . . . . . . . . . . . . . . . . . . 10
Ammunition . . . . . . . . . . . . . . . . . . . . . . . . . . . . . . . . . . . . . . . . . . . . . . . . . . . . . 11
Magazines . . . . . . . . . . . . . . . . . . . . . . . . . . . . . . . . . . . . . . . . . . . . . . . . . . . . . . . .12
To Load and Fire (With Magazine) . . . . . . . . . . . . . . . . . . . . . . . . . . . . . . . . . . . 14
To Load and Fire (Without Magazine) . . . . . . . . . . . . . . . . . . . . . . . . . . . . . . . . . 16
To Unload . . . . . . . . . . . . . . . . . . . . . . . . . . . . . . . . . . . . . . . . . . . . . . . . . . . . . . . 16
To Reload the Rifle . . . . . . . . . . . . . . . . . . . . . . . . . . . . . . . . . . . . . . . . . . . . . . . . .18
To Extract and Eject a Chambered Cartridge . . . . . . . . . . . . . . . . . . . . . . . . . . . 18
To Remove a Bore Obstruction . . . . . . . . . . . . . . . . . . . . . . . . . . . . . . . . . . . . . . .18
To Clear a Malfunction (“Jam”) . . . . . . . . . . . . . . . . . . . . . . . . . . . . . . . . . . . . . . 20
To Minimize Malfunctions (“Jams”) . . . . . . . . . . . . . . . . . . . . . . . . . . . . . . . . . . .21
Disassembly . . . . . . . . . . . . . . . . . . . . . . . . . . . . . . . . . . . . . . . . . . . . . . . . . . . . . .23
Reassembly . . . . . . . . . . . . . . . . . . . . . . . . . . . . . . . . . . . . . . . . . . . . . . . . . . . . . . .26
Removal and Replacement of Fiberglass Handguard . . . . . . . . . . . . . . . . . . . . . .27
Magazine Inspection and Care . . . . . . . . . . . . . . . . . . . . . . . . . . . . . . . . . . . . . . . .27
Care and Cleaning . . . . . . . . . . . . . . . . . . . . . . . . . . . . . . . . . . . . . . . . . . . . . . . . .29
Storage . . . . . . . . . . . . . . . . . . . . . . . . . . . . . . . . . . . . . . . . . . . . . . . . . . . . . . . . . .30
Maintenance of Stainless Steel Rifles . . . . . . . . . . . . . . . . . . . . . . . . . . . . . . . . . . 31
Sight Adjustment . . . . . . . . . . . . . . . . . . . . . . . . . . . . . . . . . . . . . . . . . . . . . . . . . 31
Service and Parts Policy . . . . . . . . . . . . . . . . . . . . . . . . . . . . . . . . . . . . . . . . . . . . 33
Parts Drawing . . . . . . . . . . . . . . . . . . . . . . . . . . . . . . . . . . . . . . . . . . . . . . . . . . . . 41
The Basic Rules of Safe Firearms Handling . . . . . . . . . . . . . . . . . . . . . . . . . . . . 42
Warranty Information . . . . . . . . . . . . . . . . . . . . . . . . . . . . . . . . . . . . . . . . . . . . . . 48
“RUGER” and “Mini-14”, are registered U.S. trademarks.
7
FIREARMS ARE DANGEROUS WEAPONS–
READ THE INSTRUCTIONS AND WARNINGS IN THIS MANUAL THOROUGHLY AND CAREFULLY BEFORE USING.
GENERAL INFORMATION
AND MECHANICAL CHARACTERISTICS
The RUGER® MINI-14® RIFLE is a gas operated, box magazine fed, autoloading rifle. It is simple, reliable, and consists of a relatively few rugged components. The mechanism employs the Ruger fixed piston/moving cylinder gas system in conjunction with a simplified Garand-type rotating bolt. The Mini-14 Rifle can be field stripped for cleaning to its basic subassemblies in seconds without the use of tools.
Music wire coil springs are used throughout the mechanism. The safety, located in front of the trigger guard, blocks both the hammer and sear and permits the slide to be cycled with the safety “ON”. A bolt lock mechanism is provided for
8
convenience in holding the bolt open for loading and inspection. The firing pin is retracted mechanically as the bolt starts to unlock and the rifle will fire only when the bolt is locked. The one-piece American hardwood stock is reinforced with steel liners in stressed and high temperature areas. The “All-Weather” model features a synthetic stock and stainless steel construction.
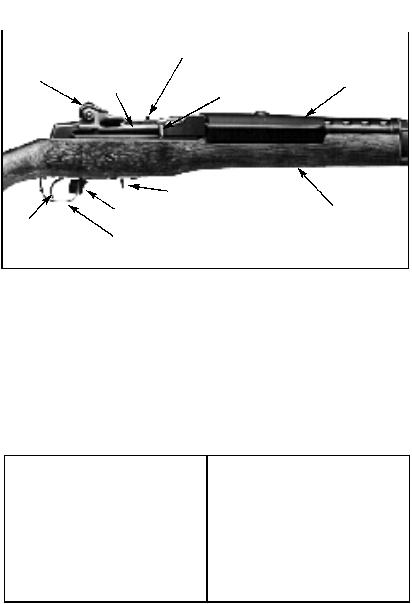
NOMENCLATURE
|
|
|
BOLT LOCK PLUNGER |
|
|
|
|
|
|
|
|
|
|
|
|
REAR SIGHT |
|
|
|
|
|
||
|
|
|
|
|
|
HANDGUARD |
|
|
|
BOLT |
|
|
|
|
|
|
|
|
SLIDE HANDLE |
|
|
||
|
|||||||
|
|
|
|
|
|||
|
|
|
|
|
|
|
|
|
|
|
|
MAGAZINE LATCH |
|
|
||
|
|
|
|
|
|
|
|
|
|
|
|
|
|
|
|
|
STOCK |
|
|
|
SAFETY SHOWN “ON” |
|||||
TRIGGER |
|
|||||||
|
|
|
|
|
|
|
|
|
|
|
|
|
|
|
|
|
|
|
|
|
|
|
|
|
|
|
|
|
TRIGGER GUARD |
|
|
||||
Figure 1. In this illustration the frequently used operating components are identified. Note that the safety is rearward of the trigger guard and is therefore in its “ON” (safe) position.
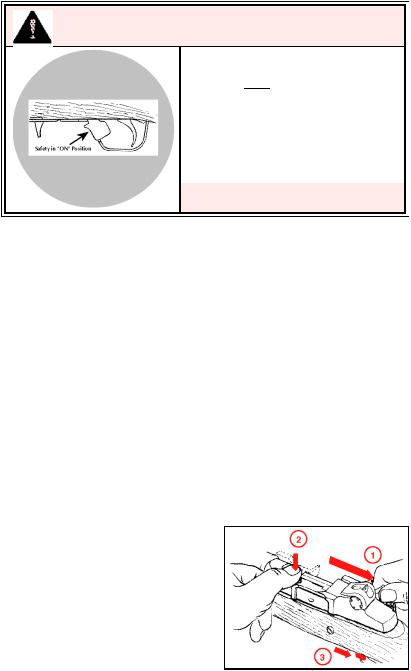
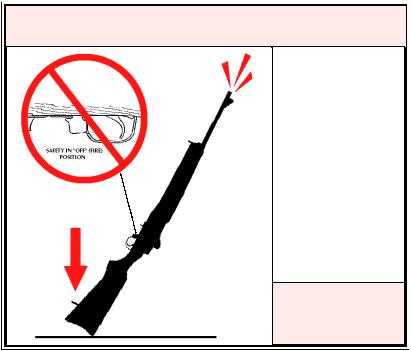
OPERATION OF SAFETY
The manual safety mechanism is located forward of the trigger for convenient operation and is “ON” when in its fully rearward position intruding into the trigger guard. (See Fig. 2) The safety can be moved to “ON” (extreme rearward position) only when the hammer is cocked. When the safety is “ON”, it blocks both the hammer and sear. The safety should always be placed “ON” before loading or unloading the rifle and should be kept “ON” at all times except when actually firing.
|
|
|
SAFETY “ON” |
|
SAFETY “OFF” |
|
|
(ready to fire) |
|
|
|
|
|
|
Figure 2.
9
THE BOLT LOCK
The Mini-14 Rifle is designed so that the bolt remains open after the last shot has been fired, provided there is a magazine in the rifle. When the magazine is empty, the magazine follower actuates the bolt lock which is designed to retain the bolt and slide in their rearward position.
WARNING: The bolt lock is not a safety device. It should not be used to hold the bolt back when there are cartridges in the magazine. A slight jar to the butt end of the rifle will cause the bolt lock to disengage and to feed a cartridge into the chamber.
The bolt lock should be relied on only to hold the bolt in its rearward position when the chamber is empty and an empty magazine is in place. The only purpose of the bolt lock is for convenience in the rapid changing of magazines and for holding the bolt in its rearward position when the rifle is unloaded for the purpose of cleaning or inspection.
OPERATION OF BOLT LOCK
To manually engage the bolt lock to keep the bolt open: (See Figure 3)
1.Pull the slide handle all the way to the rear.
2.Depress the bolt lock plunger and allow the slide to move forward until it stops.
3.Put safety “ON” (push fully
rearward). |
Figure 3 |
10

To release the slide (which allows the bolt to go forward) keep safety “ON” and either:
1.Remove the magazine, draw the slide handle to the rear and release, or;
Closing The Bolt
2.With an empty magazine in place, draw the slide handle fully to the rear and hold it there. Then, while
holding the slide handle, depress
the magazine follower slightly with the thumb, remove the thumb, and
then allow the slide to go forward. (See Figure 4)
CAUTION: Slide is under heavy spring tension and can injure fingers when it slams shut.
AMMUNITION
The RUGER® MINI-14® RIFLES are chambered for the .223 Remington (5.56mm) cartridge. The Mini-14 Rifle is designed to use either standardized U.S. military, or factory loaded sporting .223 (5.56mm) cartridges manufactured in accordance with U.S. industry practice. See “Ammunition Notice” & “Ammunition Warning”, below.
USE ONLY FACTORY AMMUNITION LOADED
TO U.S. INDUSTRY STANDARDS
11
MAGAZINES
RUGER® MINI-14® magazines are identified by having three vertical creases in the side of the magazine versus one vertical crease in the Ruger Mini Thirty magazine. The bottom of the Mini-14 magazine is more rectangular than the generally tapered bottom of the Mini Thirty magazine, and the follower, visible from the top of the magazine, is distinctly more pointed on the Mini Thirty (see illustrations below). DO NOT ATTEMPT TO USE MINI THIRTY MAGAZINES IN RUGER MINI-14 RIFLES.
Ruger Mini-14 Magazine |
Ruger Mini Thirty Magazine |
(Correct) |
(Incorrect) |
For Caliber .223 |
For Caliber 7.62 x 39mm |
Ammunition Only |
Ammunition Only |
|
Do not use in Mini-14 |
Bottom |
Top |
Side |
Bottom |
Top |
Side |
Never attempt to use 7.62 x 39mm ammunition in Ruger Mini-14 rifles, as it will not chamber correctly and will “jam” the action. As with any firearm, always wear safety shooting glasses and adequate hearing protection.
12
LOADING THE MAGAZINE
Use only clean ammunition of the proper caliber manufactured to U. S. Industry specifications, in good condition. (See Notice and Warnings in other sections of this manual pertaining to Ammunition).
To load the magazine, align each cartridge with the bullet forward (pointing toward the hole in the front of the magazine body) and push downward until the cartridge snaps into place. Do not attempt to load more than the designated number of cartridges for which the magazine has been designed. RUGER® MINI-14® RIFLES are sold with 5 round Ruger magazines.
The RUGER® MINI-14® magazine is not interchangeable with the Ruger Mini Thirty magazines. Do not use non-Ruger magazines -- they may cause malfunctions.
DAMAGED, NON-STANDARD, OR IMPROPERLY ASSEMBLED MAGAZINES SHOULD NOT BE USED. THEY CAN CAUSE THE RIFLE TO MALFUNCTION.
INSERTING THE MAGAZINE
See Figure 5. The magazine may be inserted with the bolt either in the closed or open position (See “Bolt Lock” section p. 10).
1.Hold the magazine at an angle as shown and insert all the way up into the magazine well. NOTE: There is a hole in the top-front portion of the magazine that mates with a stud on the inside of the receiver.
2.Pull the bottom of the magazine toward the trigger guard until the magazine latch at the rear of the
magazine well engages. Check to
be sure that the magazine is Figure 5 securely latched into place.
REMOVING THE MAGAZINE
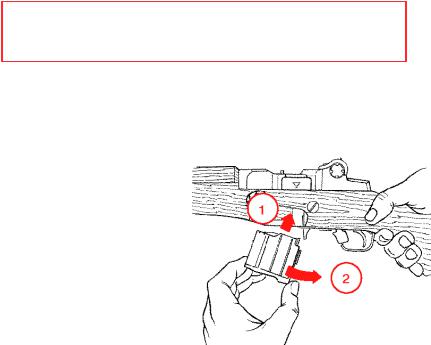
To remove the magazine, simply push the magazine latch forward until the rear end of the magazine drops out of the magazine well. The magazine can then be withdrawn from the rifle. To minimize the possibility of damage and malfunctions, do not let the magazine drop to the ground (See Figure 6, p. 23).
13
TO LOAD AND FIRE (WITH MAGAZINE)
Practice this important aspect of gun handling (with an unloaded rifle) until you can perform each of the steps - described below - with skill and confidence. But before you do anything with the rifle, please first read completely through this manual. This procedure begins with an empty rifle with its magazine out.
1.Be certain the muzzle is pointing in a safe direction. (See Rule 2, p. 42).
2.Before inserting loaded magazine, engage the bolt lock so the bolt is held open. Check the chamber to be certain it is empty. MOVE THE SAFETY TO THE “ON” POSITION. (See Figure 3, p. 10).
3.Load a magazine with the desired number of cartridges.
4.Insert the loaded magazine into the magazine well, and immediately...
5.Draw the slide handle all the way to the rear and release it, allowing the slide to snap forward under full spring force. A cartridge will be stripped from the magazine and chambered by the motion of the bolt.
WARNING: If cartridges do not feed smoothly from the magazine into the chamber then do not use the rifle until the problem is corrected. (See “Malfunction Warning” p. 22)
6.The rifle is now cocked and a loaded cartridge is chambered. Visually check to be certain the safety is in the “ON” position.
7.When you are ready to fire the rifle, move the safety to the “OFF” position.
WARNING: DO NOT TOUCH THE TRIGGER UNTIL YOU ARE ACTUALLY READY TO FIRE. KEEP THE SAFETY “ON” UNLESS ACTUALLY FIRING.
8.The rifle will fire one shot each time the trigger is pulled until the magazine is empty. Some of the gas produced by the combustion of the powder is used to push the slide and bolt to the rear, which extracts and ejects the fired cartridge case, recocks the gun, and reloads a new cartridge from the magazine into the firing chamber.
14
9.Immediately following the firing of a shot, and if a subsequent shot is not to be fired at once, put the safety “ON” while the rifle is still pointing in a safe direction down range. The safety should be moved to the “ON” position as soon as firing is completed, and it should be “ON” at all times except when the rifle is on target and being fired.
10.When the last cartridge in the magazine has been fired, the bolt lock will automatically engage and hold the bolt and slide in the rearward, open position. CAUTION: Autoloading firearms have reciprocating bolts and slides. Do not position your fingers or face so these components can strike you when the gun is fired.
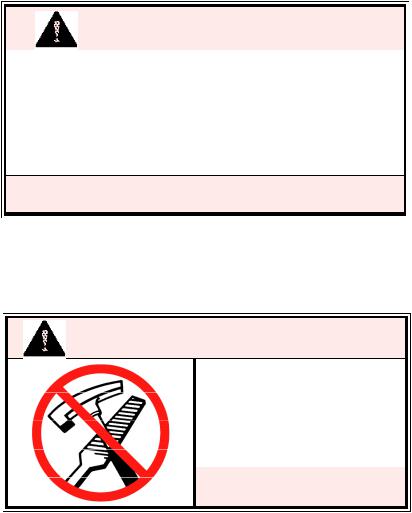
 WARNING – HANDLING
15
 Loading...