


INSTRUCTION
MANUAL
FOR
BLUED & |
CALIBER |
STAINLESS |
9mm |
STEEL |
|
RUGER®
P95
MANUAL SAFETY MODEL PISTOLS*
*DO NOT USE THIS MANUAL FOR DECOCKER MODEL PISTOLS
OR “DOUBLE ACTION ONLY” PISTOLS
READ THE INSTRUCTIONS AND
!WARNINGS IN THIS MANUAL CAREFULLY BEFORE USING THIS FIREARM
For Product Service on This Model Please Call: (520) 778-6555 (See p. 24)
STURM, RUGER & Company, Inc.
Southport, Connecticut 06490 U.S.A.
THIS INSTRUCTION MANUAL SHOULD ALWAYS ACCOMPANY THIS FIREARM AND BE TRANSFERRED WITH IT UPON CHANGE OF OWNERSHIP, OR WHEN THE FIREARM IS LOANED OR PRESENTED TO ANOTHER PERSON
V & KV (P95) 4/01 C
WHY ARE WE INCLUDING A FIRED CARTRIDGE CASE WITH EVERY RUGER PISTOL AND REVOLVER?
Certain states and jurisdictions now require that all newly manufactured pistols and revolvers must be accompanied by a cartridge case, which has been test fired from that gun at the factory. The case must be placed in a sealed container bearing certain information concerning this test cartridge.
At the time of retail sale in those jurisdictions, firearms dealers must forward such test cartridge to a designated destination such as their State Police Laboratory. As independent Ruger Distributors have nationwide markets without territorial restrictions, we have decided to include a fired cartridge case with all new Ruger pistols and revolvers, to minimize the possibility of inadvertent noncompliance with these laws.
Retail customers located in other states, where laws or regulations do not require the dealer to so act, may be assured that the fired cartridge case they receive with the firearm at the time of retail purchase is proof that your new Ruger firearm has undergone our normal test firing procedures during manufacture.
! WARNING – LOCKING DEVICES
DO NOT INSTALL
INSIDE TRIGGER GUARD
INSTALL LOCK
AS SHOWN HERE
This firearm was originally sold with a key-operated locking device. While it can help provide secure storage for your unloaded firearm, any locking device can fail. All guns are designed to fire if they are loaded and the trigger is pulled. Therefore, never install the locking device inside the trigger guard or in any way that it can possibly pull the trigger! Do not leave the keys in the lock.
The ultimate responsibility for secure storage of any firearm must depend upon its owner and his or her individual circumstances. Guns should be securely stored unloaded, in a secure location, separate from their ammunition.
See “Storage Warning”, page 23.
NEVER INSTALL
LOCKING DEVICE
INSIDE TRIGGER GUARD
3

FIREARMS SAFETY - YOUR RESPONSIBILITY
SAFETY MUST BE THE FIRST AND CONSTANT CONSIDERATION OF EVERY PERSON WHO HANDLES FIREARMS AND AMMUNITION.
This Instruction Manual is designed to assist you in learning how to use and care for your RUGER® P95 Manual Safety Model Pistols properly. Please contact us if you have any questions.
Only when you are certain you fully understand the Manual and can properly carry out its instructions should you practice loading, unloading, etc. with live ammunition. If you have any doubts about your ability to handle or use a particular type of gun safely, you should seek supervised instruction. Such personalized instruction is often available from gun dealers, gun clubs or police departments. If none of these sources can help you, write to the National Rifle Association, 11250 Waples Mill, Fairfax, VA 22030-7400. They will assist you.
The person possessing a gun has a full-time job. You cannot guess; you cannot forget. You must know how to use your firearm safely. Do not use any firearm without having a complete understanding of its particular characteristics and safe use. Remember: There is no such thing as a foolproof gun.
TABLE OF CONTENTS
General Information and Mechanical Characteristics . . . . . . . . . . . . . . .5 Operation of Manual Safety . . . . . . . . . . . . . . . . . . . . . . . . . . . . . . . . . . .8 Ammunition . . . . . . . . . . . . . . . . . . . . . . . . . . . . . . . . . . . . . . . . . . . . .10 To Load and Fire (with magazine) . . . . . . . . . . . . . . . . . . . . . . . . . . . .11 To Uncock (Decock) The Pistol . . . . . . . . . . . . . . . . . . . . . . . . . . . . . . .13 To Load and Fire (without magazine) . . . . . . . . . . . . . . . . . . . . . . . . . .13 To Unload . . . . . . . . . . . . . . . . . . . . . . . . . . . . . . . . . . . . . . . . . . . . . . .14 To Reload The Pistol . . . . . . . . . . . . . . . . . . . . . . . . . . . . . . . . . . . . . . .16 To Extract and Eject a Chambered Cartridge . . . . . . . . . . . . . . . . . . . .16 To Clear a Malfunction (“Jam”) . . . . . . . . . . . . . . . . . . . . . . . . . . . . . . .17 To Minimize Malfunctions (“Jams”) . . . . . . . . . . . . . . . . . . . . . . . . . . .18 To Disassemble . . . . . . . . . . . . . . . . . . . . . . . . . . . . . . . . . . . . . . . . . . .18 To Reassemble . . . . . . . . . . . . . . . . . . . . . . . . . . . . . . . . . . . . . . . . . . . .20 Magazine Inspection and Care . . . . . . . . . . . . . . . . . . . . . . . . . . . . . . . .20 Care and Cleaning . . . . . . . . . . . . . . . . . . . . . . . . . . . . . . . . . . . . . . . . .21 Storage . . . . . . . . . . . . . . . . . . . . . . . . . . . . . . . . . . . . . . . . . . . . . . . . .22 Sight Adjustment . . . . . . . . . . . . . . . . . . . . . . . . . . . . . . . . . . . . . . . . .24 Service and Parts Policy . . . . . . . . . . . . . . . . . . . . . . . . . . . . . . . . . . . .24 Parts Drawings . . . . . . . . . . . . . . . . . . . . . . . . . . . . . . . . . . . . . . . . . . .29 The Basic Rules of Safe Firearms Handling . . . . . . . . . . . . . . . . . . . . .30 Warranty Information . . . . . . . . . . . . . . . . . . . . . . . . . . . . . . . . . . . . . .36
“Ruger” is a registered U.S. trademark.
4
WARNINGS OF GREAT IMPORTANCE ARE
!FOUND ON THE FOLLOWING PAGES:
Locking Devices |
3 |
Unloading |
14 |
Alterations |
5 |
Slide Retraction |
15 |
Manual Safety |
9 |
Malfunctions |
17 |
Lead Exposure |
9 |
Disassembly |
20 |
Ammunition |
10 |
Lubrication |
22 |
Firing |
12 |
Storage |
23 |
Handling |
13 |
Parts Purchasers |
25 |
OTHER CAUTIONS AND WARNINGS APPEAR
THROUGHOUT THE MANUAL.
FIREARMS ARE DANGEROUS WEAPONS - READ THE INSTRUCTIONS AND WARNINGS IN THIS MANUAL THOROUGHLY AND CAREFULLY BEFORE USING.
!WARNING - ALTERATIONS
This product was designed to function properly in its original condition. Alterations can make it unsafe. Do not alter any part or add or substitute parts or accessories not made by Sturm, Ruger & Co. Inc.
DO NOT ALTER ANY GUN
GENERAL INFORMATION
AND MECHANICAL CHARACTERISTICS
The RUGER® P95 pistols are centerfire, compact, double action, magazinefed, autoloading, recoil-operated pistols chambered for the caliber 9mm Parabellum (9mm x19) cartridge. They incorporate a different “link-less” design in the barrel locking/unlocking system than earlier Ruger P-Series pistols, and feature a streamlined slide and Isoplast® polymer grip frame construction. They comply with the requirements of the National Institute of Justice Standard - 0112.00. They include the following features with which users should be thoroughly familiar:
5
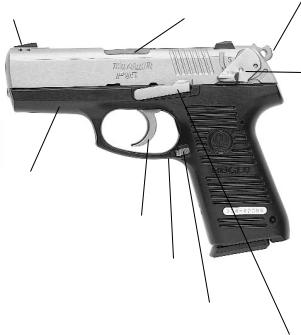
NOMENCLATURE
Sights have high-visibility |
Slide’s open top design minimizes possi- |
Grooved, exposed hammer |
white dots both front and |
bility of jamming, enables shooter to |
spur enables the shooter to |
rear. Rear sights can be |
clear any malfunction easily by hand. |
cock the hammer easily for |
adjusted for windage. |
Cartridges can be loaded singly if desired. |
accurate single-action fir- |
|
|
ing if desired. |
|
|
When ambidextrous manual |
|
|
safety is in “safe” position, |
|
|
the firing pin is cammed |
|
|
forward into the slide. This |
|
|
simultaneously places the |
|
|
firing pin out of reach of |
|
|
the hammer and locks the |
|
|
firing pin in a neutral posi- |
|
|
tion, preventing the firing |
|
|
pin from movement toward |
Frame is a rigid one piece |
|
the cartridge. Further, the |
|
entire firing mechanism is |
|
polyurethane grip frame rein- |
|
completely disengaged from |
forced with long glass fiber. |
|
trigger. |
Double-action mechanism and strongly curved trigger provide that cocking and firing can be accomplished with a single pull of the trigger.
Oversize trigger guard permits shooting with gloved hand. Recurved trigger guard bow accommodates nonshooting hand in two-hand hold.
The ambidextrous magazine latch permits positive retention and quick removal of magazine.
Slide stop holds the slide open and is activated automatically when last shot is fired (if magazine is in pistol), or can be manually operated.
Action: The action of the Ruger P95 manual safety model pistols is of the U.S. M1911 type that utilizes a tilting barrel design in which the barrel and slide are locked together at the moment of firing. After firing, the barrel and slide recoil to the rear a short distance while still locked together. After this initial movement, the barrel is cammed downward from its locked position, permitting full recoil of the slide and the extraction and ejection of the spent cartridge case. Upon return of the slide to its forward position by the recoil spring, the barrel is cammed back upward into its locked position in the slide.
The user of this or any autoloading pistol must always remember that when fired, it automatically reloads and recocks itself, so that simply pulling the trigger will fire the pistol again. Therefore, an autoloading pistol user must be particularly conscious to always keep the pistol pointed in a safe direction.
6

Slide Stop: When the last shot has been fired and the magazine is empty, the slide stop automatically holds the slide open. When there is an empty magazine in the pistol and the slide is retracted manually, the slide stop will also automatically hold the slide open. If a loaded magazine is inserted in the pistol when the slide is closed and the slide is then retracted fully, the slide stop will not automatically hold open the slide. The user can actuate the slide stop mechanism to hold the slide open at any time by retracting the slide and pushing the slide stop up.
The slide stop can be released by drawing back slightly on the slide and depressing the slide stop thumbpiece. When the slide is released, it will move forward under pressure from the recoil spring.
The slide stop is held in place by a spring detent. Therefore, when there is a loaded magazine in place and the pistol is jarred, the slide can fly forward and chamber a cartridge. For this reason and as an essential safety practice, the user should always be careful to keep fingers away from the trigger, keep the safety on, and always keep the pistol pointed in a safe direction.
Magazines: The Ruger 9mm magazines are not interchangeable with Ruger pistol magazines of any other caliber even though they may appear similar and may hold other cartridges. Use of incorrect magazines in any pistol will result in malfunctions. Ruger 9mm magazines are either unmarked as to caliber or are marked “9mm cal. only”. All other Ruger centerfire pistol magazines, which are similar in appearance, are marked as to caliber (“.40 Auto Cal.,” etc.).
DAMAGED, NON-STANDARD, OR IMPROPERLY ASSEMBLED MAGAZINES SHOULD NOT BE USED. THEY CAN CAUSE THE PISTOL TO MALFUNCTION.
7
OPERATION OF MANUAL SAFETY
The model you have selected is equipped with special manual ambidextrous safety levers that also allow you to decock (uncock) a cocked pistol without manipulating the trigger. Conventional thumb decocking procedures are therefore not necessary and should not be employed with this pistol.
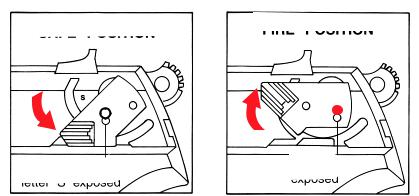
To apply the manual safety and decock the pistol, point the pistol in a safe direction. Move either the rightor left-hand safety lever fully to the “safe” position. When the safety is moved fully downward to the “safe” position, the white dot is exposed through the hole in the side of the safety and the letter “S” is completely visible. In this position (1) the firing pin is blocked from moving forward, (2) the hammer is blocked from contacting the firing pin, and (3) the entire firing mechanism is completely disengaged from the trigger. At this point, the hammer will fall to its forward (decocked) position.
The safety mechanism provides that the hammer cannot contact the firing pin unless the safety is disengaged. With the hammer cocked, actuating the safety mechanism automatically drops the hammer onto the slide without contacting the firing pin. Thus, the safety also serves as a decocking lever.
Additionally, the pistol has a separate internal firing pin block which will not allow the firing pin to move forward and contact the cartridge until the operator pulls the trigger with the safety off (in its “fire” position).
The pistol can and should be loaded and unloaded with the safety engaged in its “safe” position (lever fully down, white dot and the letter “S” exposed). The safety should be in its “safe” position at all times except when the user is deliberately positioned to fire at a selected target. See Figures 1 and 2, below, which illustrate the two positions of the safety.
"SAFE" POSITION |
"FIRE" POSITION |
White dot and |
Red dot |
letter "S" exposed |
exposed |
FIGURE 1 |
FIGURE 2 |
8

!WARNING - MANUAL SAFETY
Placing the safety in an intermediate position between “safe” and “fire” can result in the user thinking the pistol is in a safe or fire position when it is not. Pulling the trigger with the safety in an intermediate position may cause the pistol to fire. Therefore, always move the safety fully to its intended position and then check to be sure it is where you want it to be. Unless the white dot and the letter “S” are both fully visible, the safety is not on. Unless the red dot is fully visible, the pistol is not absolutely ready to fire.
NEVER PUT SAFETY 1/2 ON
!WARNING - LEAD EXPOSURE
Discharging firearms in poorly ventilated areas, cleaning firearms, or handling ammunition may result in exposure to lead and other substances known to the state of California to cause birth defects, reproductive harm, and other serious physical injury. Have adequate ventilation at all times. Wash hands thoroughly after exposure.
SHOOTING OR CLEANING GUNS
MAY EXPOSE YOU TO LEAD
9
AMMUNITION
The RUGER® P95 pistols are chambered for the 9mm x 19 Parabellum (9mm Luger) cartridge. Do not attempt to load any other 9mm cartridges (examples: 9mm short [.380], 9mm Steyr, 9mm Bergmann, etc.) into the magazine or chamber of the pistol. Never attempt to use caliber .40 S & W cartridges in a 9mm pistol. The .40 S & W cartridges will jam the pistol.
The Ruger P-Series pistols are compatible with all factory ammunition loaded to U.S. Industry Standards, including high-velocity and hollow-point loads, loaded in brass, aluminum, or steel cartridge cases. No 9mm x 19 ammunition manufactured in accordance with NATO, U.S., SAAMI, or CIP standards is known to be beyond the design limits or known not to function in these pistols.
USE ONLY FACTORY AMMUNITION LOADED
TO U.S. INDUSTRY STANDARDS
! WARNING - AMMUNITION
Death, serious injury, and damage can result from the use of the wrong ammunition, bore obstructions, powder overloads, or incorrect cartridge components. Even the strongest gun can be “blown up” as a result of excess pressure. Always wear shooting glasses and hearing protection.
IMPROPER AMMUNITION
DESTROYS GUNS
AMMUNITION (CARTRIDGES) NOTICE
WE SPECIFICALLY DISCLAIM RESPONSIBILITY FOR ANY DAMAGE OR INJURY WHATSOEVER OCCURRING IN CONNECTION WITH, OR AS A RESULT OF, THE USE IN RUGER FIREARMS OF FAULTY, OR NON-STANDARD, OR “RE-MANUFACTURED”, OR HANDLOADED (RELOADED) AMMUNITION, OR OF CARTRIDGES OTHER THAN THOSE FOR WHICH THE FIREARM WAS ORIGINALLY CHAMBERED.
10
TO LOAD AND FIRE (WITH MAGAZINE)
Practice this important aspect of safe gun handling with an unloaded pistol until you can perform each of the steps described below with skill and confidence. But before you do anything with the pistol, first read completely through this manual.
1.Be certain the muzzle is pointed in a safe direction. (See “The Basic Rules of Safe Firearms Handling,” page 30)
2.Move either the rightor left-hand safety lever fully downward to its “safe” position so that the letter “S” and the white dot are fully exposed. (See Figures 1 and 2 on page 8).
3.Press either magazine latch forward and remove the magazine from the frame. NOTE: The magazine is designed to fall free of the frame of its own weight when unloaded and the pistol is held in the normal firing position, but you should always prevent possible damage to the magazine by not letting it drop to the ground unless rapid reloading is absolutely necessary.
4.For the 9mm P95 pistols, place ten (10) or fewer 9mm x 19 Parabellum cartridges into the magazine from the top.
5.Insert the magazine into the frame, taking care that the magazine is locked in place by the magazine latch. Slamming the magazine into the frame forcibly is not necessary.
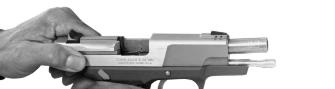
6.Hold the pistol firmly in the shooting hand but do not touch the trigger. Keep the pistol pointed in a safe direction and the safety “on”. With the thumb and forefinger of the other hand grasp the rear of the slide and pull the slide to the rear as far as it will go (See Figure 3, below and “Slide Retraction Warning”, p. 15). When released, the slide will fly forward to strip the top cartridge from the magazine and chamber it. The safety mechanism drops the hammer automatically as the slide moves forward while simultaneously blocking the firing pin.
The trigger is inoperable when the safety is fully engaged in its “safe” position (lever fully down, white dot and letter “S” exposed; see Figure 1 on page 8). WARNING: The pistol is ready for instant use in the single-action mode once the slide moves forward if the safety is in the “fire” position. Be careful!
FIGURE 3
Slide in Retracted Position
11
7.If the pistol is not to be fired immediately, the safety should remain in its “safe” position (see Figure 1, p. 8).
8.If the pistol is to be fired immediately, the manual safety can be rotated upward to its “fire” position (see Figure 2, p. 8). The firing pin is still blocked at all times by the internal firing pin block unless the trigger is pulled all the way to the rear.
9.The pistol is ready for instant use once the safety is disengaged. When the pistol is in the “uncocked” mode (hammer forward), the first shot can be fired double-action by pulling the trigger all the way to the rear, which cocks the hammer and then fires the pistol. Subsequent shots are fired single-action until the magazine is empty, the hammer being cocked by the slide as it recoils from each shot. Note that the trigger pull is much lighter for these subsequent shots.
! WARNING - FIRING
The slide automatically opens and shuts quickly while firing. Keep face and hands away from rear. Hot brass is ejected quickly and can burn you. Always wear shooting glasses and hearing protection.
SLIDE OPENS FAST -
HOT BRASS EJECTED
10.For greater accuracy and consistent trigger pull, the hammer may be manually cocked by the shooter before the first shot is fired once the safety is “off”. Keep your finger off the trigger while cocking the hammer! The hammer will be automatically cocked as described above for subsequent shots.
11.Immediately following the firing of a shot, and if a subsequent shot is not to be fired at once, put the safety in its “safe” position (lever fully down, white dot and letter “S” exposed) while the pistol is still pointing in a safe direction downrange. This will also uncock (decock) the pistol.
12.When the last cartridge loaded into the pistol has been fired, the magazine follower presses the slide stop upward to engage the slide automatically holding the action open. If the slide is shut, the shooter should always assume that there is a cartridge in the chamber!
Don’t rely on your memory to know if a gun or magazine is loaded. Visually inspect the magazine and chamber.
12
 Loading...