

Page 1
Ownerʼs Manual
Manuel dʼutilisation
Bedienungsanleitung
Manual de Instrucciones
Gebruiksaanwijzing
RB-1562 / RB-1572
Stereo Power Amplifi ers
Amplifi cateurs de puissance stéréophoniques
Stereo-Endstufe
Spanish Translation
Dutch Translation
Italian Translation
Swedish Translation
Russian Translation
Manuale di istruzioni
Instruktionsbok
àÌÒÚÛ͈Ëfl ÔÓθÁÓ‚‡ÚÂÎfl
Register your product at
www.Rotel.com/register
Page 2
2
Important Safety Instructions
RB-1562 / RB-1572 Stereo Power Amplifi ers
WARNING: There are no user serviceable parts inside. Refer
all servicing to qualified service personnel.
WARNING: To reduce the risk of fire or electric shock, do
not expose the unit to moisture or water. Do not expose the
unit to dripping or splashing. Do not place objects filled with
liquids, such as vases, on the unit. Do not allow foreign objects
to get into the enclosure. If the unit is exposed to moisture, or
a foreign object gets into the enclosure, immediately disconnect
the power cord from the wall. Take the unit to a qualified service
person for inspection and necessary repairs.
Read all the instructions before connecting or operating the
component.
Keep this manual so you can refer to these safety instructions.
Heed all warnings and safety information in these instructions
and on the product itself. Follow all operating instructions.
Clean the enclosure only with a dry cloth or a vacuum cleaner.
Do not use this unit near water.
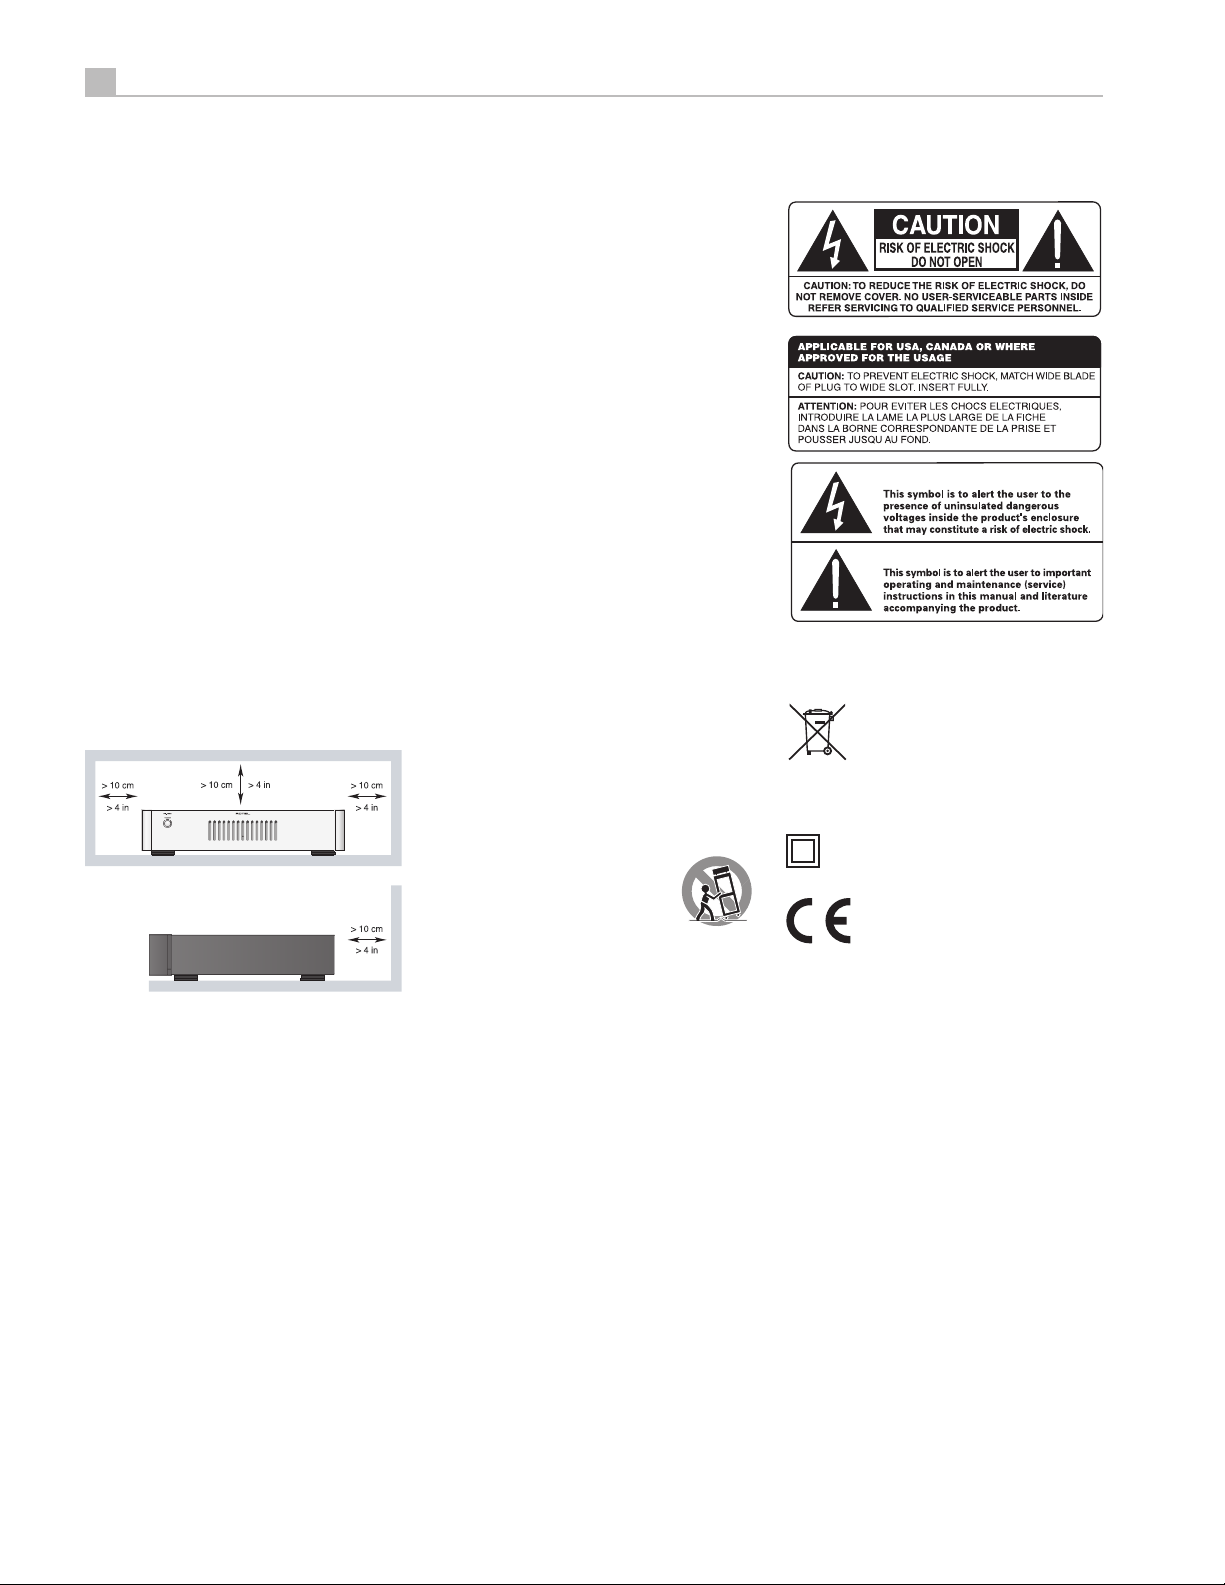
You must allow a minimum 10 cm or 4 inches of
unobstructed clearance around the unit. Do not place the
unit on a bed, sofa, rug, or similar surface that could block the
ventilation openings. If the unit is placed in a bookcase or
cabinet, there must be ventilation of the cabinet to allow proper
cooling.
Keep the component away from radiators, heat registers, stoves,
or any other appliance that produces heat.
WARNING: The rear panel power cord connector is the mains
power disconnect device. The apparatus must be located in an
open area that allows access to the cord connector.
The unit must be connected to a power supply only of the type
and voltage specified on the rear panel. (USA: 120 V/60Hz, EC:
230V/50Hz)
Connect the component to the power outlet only with the
supplied power supply cable or an exact equivalent. Do not
modify the supplied cable. A polarized plug has two blades, with
one wider than the other. A grounding plug has two blades plus
a third grounding prong. These are provided for your safety.
Do not defeat grounding and/or polarization safety provisions.
If the supplied plug does not fit your outlet, please consult an
electrician for replacement of the obsolete outlet. Do not use
extension cords.
The main plug of the power cordset is a disconnect device of the
apparatus. In order to completely disconnect the apparatus from
the supply mains, the main plug of the power cordset should
be unplugged from the mains (AC) outlet. The standby LED
indicator will not be lit up to show the power cord is unplugged.
The disconnect device shall remain readily operable.
Do not route the power cord where it will be crushed, pinched,
bent, exposed to heat, or damaged in any way. Pay particular
attention to the power cord at the plug and where the cord exits
the back of the unit.
The power cord should be unplugged from the wall outlet during
a lightning storm or if the unit is to be left unused for a long
period of time.
Use only accessories specified by the manufacturer.
Use only with a cart, stand, rack, bracket
or shelf system recommended by Rotel. Use
caution when moving the unit in a stand or
rack to avoid injury from a tip-over.
Use Class 2 wiring for speaker connections to ensure proper
installation and minimize the risk of electrical shock.
Immediately stop using the component and have it inspected
and/or serviced by a qualified service agency if:
• The power supply cord or plug has been damaged.
• Objects have fallen or liquid has been spilled into the unit.
• The unit has been exposed to rain.
• The unit shows signs of improper operation
• The unit has been dropped or damaged in any way
Rotel products are designed to comply with
international directives on the Restriction of
Hazardous Substances (RoHS) in electrical and
electronic equipment and the disposal of Waste
Electrical and Electronic Equipment (WEEE). The
crossed wheelie bin symbol indicates compliance
and that the products must be appropriately
recycled or processed in accordance with these
directives.
This symbol means that this unit is double insulated.
An earth connection is not required.
Page 3

English
Figure 1: Controls and Connections
Commandes et branchements
Bedienelemente und Anschlüsse
3
Page 4
4
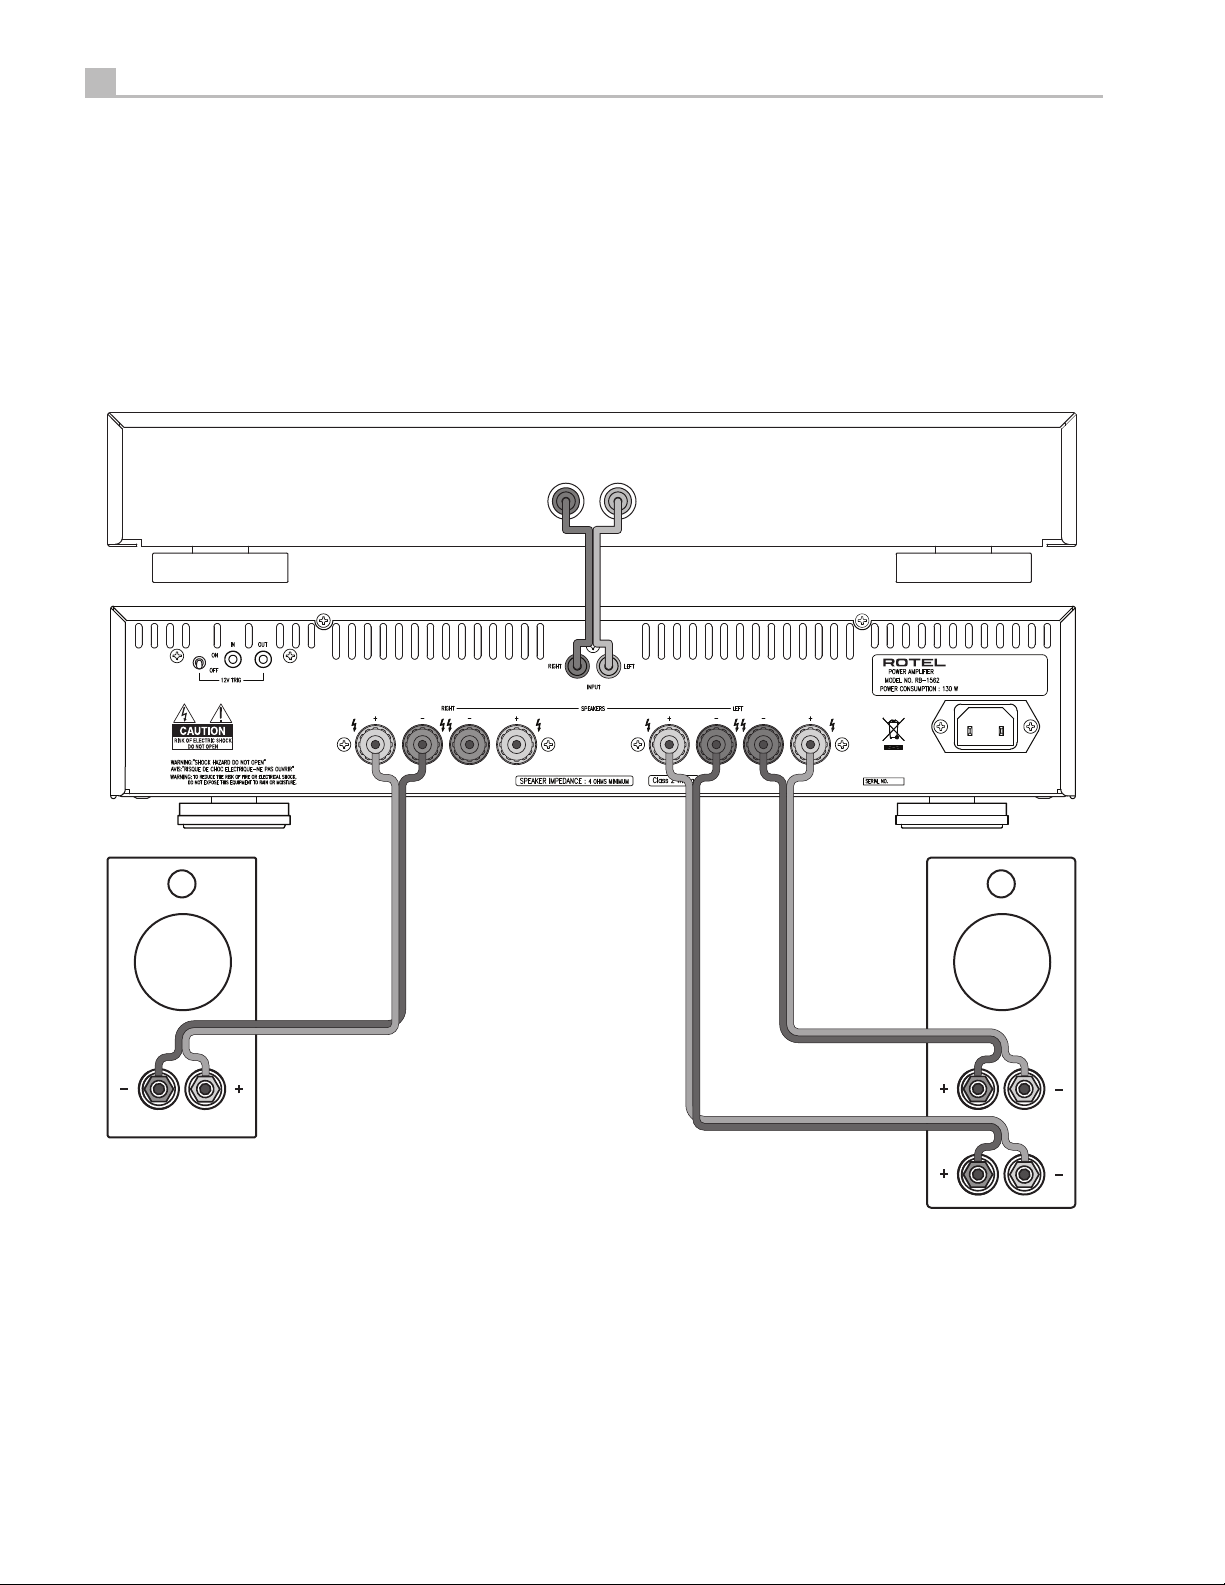
Figure 2: Input and Output Connections
Branchements en entrées et sorties
Anschlussdiagramm
Conexiones de Entrada y de Salida
De in- en uitgangsverbindingen
Collegamenti ingresso ed uscita
In- och utgångar
иУ‰ТУВ‰ЛМВМЛВ ЛТЪУ˜МЛНУ‚ ТЛ„М‡О‡ Л ‡НЫТЪЛ˜ВТНЛı ТЛТЪВП
RB-1562 / RB-1572 Stereo Power Amplifi ers
Preamp or Sound Processor
1
RIGHT
LEFT
OUTPUT
OUTPUT
Single Wire Connection
1
Préampli ou Processeur de son
Vorverstärker oder Surround-Prozessor
Preamplifi cador o Procesador de Sonido
Preamp or Sound Processor
Preamplifi catore o Processore
Förförstärkare eller surroundprocessor
иВ‰ЫТЛОЛЪВО¸ ЛОЛ Б‚ЫНУ‚УИ ФУˆВТТУ
2
2
Branchement avec câble unique
Normaler Anschluss des Lautsprechers
Conexión en Monocableado
Single Wire Connection
Collegamento singolo
Anslutning med single-wire
иУ‰ТУВ‰ЛМВМЛВ У‰МУИ Ф‡УИ ФУ‚У‰У‚
Biwire Connection
3
Branchement en bi-câblage
Bi-Wiring
Conexión en Bicableado
Bi-wire Connection
Collegamento in Biwiring
Anslutning med bi-wire
иУ‰ТУВ‰ЛМВМЛВ ·Л-‚‡ВЛМ„УП (‰‚ЫПfl
Ф‡‡ПЛ)
HF
LF
3
Page 5

English
Important Notes
When making connections be sure to:
✔ Turn off all the components in the system before hooking up any components, including loudspeakers.
✔ Turn off all components in the system before changing any of the connections to the system.
It is also recommended that you:
✔ Turn the volume control of the amplifi er all the way down before the amplifi er is turned on or off.
Remarques importantes
Pendant les branchements, assurez-vous que :
✔ Tous les maillons sont éteints avant leur branchement, quels qu’ils soient, y compris les enceintes acoustiques.
✔ Éteignez tous les maillons avant de modifi er quoi que ce soit au niveau de leurs branchements, quels qu’ils soient.
Il est également recommandé de :
✔ Toujours baissez le niveau sonore via le contrôle de volume, avant d’allumer ou d’éteindre l’amplifi cateur.
Wichtige Hinweise
Achten Sie beim Herstellen der Verbindungen auf Folgendes:
✔ Schalten Sie alle Komponenten im System ab, bevor Sie Geräte (einschließlich Lautsprecher) anschließen.
✔ Schalten Sie alle Komponenten im System ab, bevor Sie Anschlüsse im System verändern.
Ferner empfehlen wir, dass
✔ Sie die Lautstärke herunterdrehen, bevor Sie die Endstufe ein- oder abschalten.
5
Notas Importantes
Cuando realice las conexiones, asegúrese de que:
✔ Desactiva todos los componentes del equipo, cajas acústicas incluidas, antes de conectar cualquier nuevo componente en el mismo.
✔ Desactiva todos los componentes del equipo antes de cambiar cualquier conexión del mismo.
También le recomendamos que:
✔ Reduzca el nivel de volumen de su amplifi cador a cero antes de activarlo o desactivarlo.
Héél belangrijk:
✔ Zorg dat niet alleen de RB-1072, maar de gehele installatie uitstaat, als nog niet alle verbindingen gemaakt zijn.
✔ Zorg dat niet alleen de RB-1072, maar de gehele installatie ook uitstaat, als u verbindingen gaat wijzigen.
Wij raden u ook aan om
✔ de volumeregelaar van de voorversterker geheel dicht te draaien (volkomen naar links) wanneer u uw eindversterker aan- of uitzet.
Note importanti
Quando effettuate i collegamenti assicuratevi di:
✔ Spegnere tutti i componenti del sistema prima di collegare qualsiasi componente, inclusi i diffusori.
✔ Spegnere tutti i componenti del sistema prima di modifi care qualsiasi connessione nel sistema.
Vi raccomandiamo inoltre di:
✔ Portare il volume a zero prima di accendere o spegnere l’amplifi catore.
Viktigt
Tänk på följande när du gör anslutningar:
✔ Stäng av alla apparater i anläggningen innan du ansluter nya apparater eller högtalare.
✔ Stäng av alla apparater i anläggningen innan du ändrar någon anslutning.
Vi rekommenderar också att du:
✔ Vrider ner volymen på förförstärkaren helt och hållet innan förstärkaren slås på eller av.
иВВ‰ ФУ‰ТУВ‰ЛМВМЛВП:
✔ Ç˚Íβ˜ËÚ ‚Ò НУПФУМВМЪ˚, ‚НО˛˜‡fl НУОУМНЛ.
✔ Ç˚Íβ˜ËÚ ‚Ò НУПФУМВМЪ˚ ‚ ‚‡¯ВИ ТЛТЪВПВ, ФВК‰В ˜ВП ˜ЪУ-ЪУ ‚ МВИ ÏÂÌflÚ¸.
кВНУПВМ‰ЫВЪТfl Ъ‡НКВ:
✔ З˚‚ВТЪЛ „УПНУТЪ¸ ЫТЛОЛЪВОfl М‡ ПЛМЛПЫП, Ô‰ ÚÂÏ Í‡Í ‚Íβ˜‡Ú¸ ËÎË ‚˚Íβ˜‡Ú¸ „Ó.
Page 6

6
RB-1562 / RB-1572 Stereo Power Amplifi ers
Contents
Important Safety Instructions . . . . . . . . . . . . . . . . . . . . . . . . . . . . . . . . . . . . . . . 2
Figure 1: Controls and Connections 3
Figure 2: Input and Output Connections 4
Important Notes 5
About Rotel . . . . . . . . . . . . . . . . . . . . . . . . . . . . . . . . . . . . . . . . . . . . . . . . . . . . 6
A Word About Watts . . . . . . . . . . . . . . . . . . . . . . . . . . . . . . . . . . . . . . . . . . . . . 6
Getting Started . . . . . . . . . . . . . . . . . . . . . . . . . . . . . . . . . . . . . . . . . . . . . . . . . 7
Operating Features 7
A Few Precautions 7
Placement 7
AC Power and Control . . . . . . . . . . . . . . . . . . . . . . . . . . . . . . . . . . . . . . . . . . . . 7
AC Power Input 7 7
Power Switch and Indicator 1 7
Protection Mode LED 2 7
Turn On/Off Mode Selector 3 8
+12V Trigger Input and Output 4 8
Protection Indicator 2 . . . . . . . . . . . . . . . . . . . . . . . . . . . . . . . . . . . . . . . . . . 8
Input Signal Connections 6 . . . . . . . . . . . . . . . . . . . . . . . . . . . . . . . . . . . . . . . . 8
Speaker Connections. . . . . . . . . . . . . . . . . . . . . . . . . . . . . . . . . . . . . . . . . . . . . . 8
Speaker Selection 8
Speaker Wire Selection 8
Polarity and Phasing 8
Speaker Wire Connections 5 8
Troubleshooting 9
Front Panel Power Indicator Is Not Lit 9
No Sound 9
Protection Indicator Is Lit 9
Specifi cations . . . . . . . . . . . . . . . . . . . . . . . . . . . . . . . . . . . . . . . . . . . . . . . . . . . 9
At Rotel, we are proud to do our part. We have reduced the lead
content in our electronics by using special ROHS solder, while our new
Class D (not digital) amplifi ers are up to fi ve times more effi cient than
our legacy designs and still deliver power and performance. These
products run cool, give minimum wasted energy, are good for the
environment and give better sound too.
Finally, we have printed this brochure on recycled paper stock.
While we understand that these are small fi rst steps, they are still
important ones. And we continue to pursue new methods and
materials for a cleaner and greener manufacturing process.
All of us at Rotel thank you for buying this product. We are sure it will
bring you many years of enjoyment.
A Word About Watts
The power output of the RB-1562 and RB-1572 are quoted as 100
and 250 watts, respectively, for each channel, when both channels
are operating together at full power.
Rotel has chosen to specify the power output in this way because, in
Rotel’s experience, it gives the truest value of the receiver or amplifi er’s
power capability.
When comparing specifi cations for different products, you should be
aware that power output is often specifi ed in other ways, so you may
not be comparing like with like.
About Rotel
Our story began nearly 50 years ago. Over the decades, we have
received hundreds of awards for our products and satisfi ed hundreds
of thousands of people who take their entertainment seriously - like
you!
Rotel was founded by a family whose passionate interest in music
led them to manufacture high-fi delity components of uncompromising
quality. Through the years, that passion has remained undiminished
and the family goal of providing exceptional value for audiophiles
and music lovers, regardless of their budget, is shared by all Rotel
employees.
Rotel’s engineers work as a close team, listening to, and fi ne tuning,
each new product until it reaches their exacting musical standards.
They are free to choose components from around the world in order to
make that product the best they can. You are likely to fi nd capacitors
from the United Kingdom and Germany, semiconductors from Japan or
the United States, while toroidal power transformers are manufactured
in Rotel’s own factory.
We all have concerns about our environment. And, as more and more
electronics are produced and later discarded, it is especially important
for a manufacturer to do all it can to engineer products that have a
minimum negative impact on landfi ll sites and water tables.
For example, the power output may be quoted with only one channel
operating, giving a higher maximum fi gure. If Rotel chose to quote
the RB-1562 or RB-1572 power output this way the specifi ed wattage
would be 25-30% higher for the same distortion limit and loudspeaker
impedance.
A loudspeaker’s impedance rating indicates the electrical resistance
or load it offers when connected to the amplifi er, usually 8 ohms or
4 ohms. The lower the impedance, the more power the speaker will
need. In effect, a 4 ohm speaker will require twice as much power as
an 8 ohm speaker.
So ideally, the amplifi er should be give double the power into a 4 ohm
load – a rating of 100 watts into an 8 ohm load should become 200
watts into 4 ohms. Using lower impedance speakers makes greater
demands on the amplifi er’s power supply, because it will be drawing
more current and giving off more heat.
However, Rotel amplifi ers are designed to work into any speaker
impedance between 8 and 4 ohms, and with all the channels working
up to their full power. Because the Rotel design is optimized for use
with all channels operating together, Rotel is able to specify the true
power output for both channels.
This can be important for your enjoyment, too. When watching
movies, it’s nice to have the amplifi er able to reproduce full power into
all the channels at the same time, especially in the case of a volcano
exploding!
Page 7

English
7
Getting Started
Thank you for purchasing the Rotel RB-1562 or RB-1572 Stereo Power
Amplifi er. When used in a high-quality music or home theater system,
your Rotel amplifi er will provide years of musical enjoyment.
The RB-1562 and RB-1572 are sophisticated two-channel power
amplifi ers. Their digital amplifi er circuitry, switching power supply,
premium components, and Rotel’s Balanced Design ensure superb
sound quality. High current capability allows the RB-1562 and
RB-1572 to drive diffi cult speaker loads with ease.
The RB-1562 and RB-1572 are essentially identical units. They
differ only in power output. In this manual the RB-1562 is most often
depicted, but the RB-1572 operates in the same way.
Operating Features
• Two amplifier channels.
• User selectable power on/off configuration: manual or controlled
by remote 12 volt trigger signal.
• Protection circuitry with front panel indicators.
• Dual binding post speaker outputs.
A Few Precautions
Please read this manual carefully. In addition to installation and
operating instructions, it provides information on various RB-1072
system confi gurations. Please contact your authorized Rotel dealer for
answers to any questions you might have. In addition, all of us at Rotel
welcome your questions and comments.
Save the RB-1072 amplifi er shipping carton and packing material for
future use. Shipping or moving the RB-1072 amplifi er in anything other
than the original packing material may result in severe damage to
your amplifi er.
Be sure to keep the original sales receipt. It is your best record of the
date of purchase, which you will need in the event warranty service is
ever required.
Placement
The RB-1072 amplifi er generates heat as part of its normal operation.
The heat sinks and ventilation openings in the amplifi er are designed
to disperse this heat. The ventilation slots in the top cover must be
unobstructed. There should be 10 cm (4 inches) of clearance around
the chassis, and reasonable airfl ow through the installation location, to
prevent the amplifi er from overheating. Likewise, remember the weight
of the amplifi er when you select an installation location. Make sure
that the shelf or cabinet can support its weight.
Be sure the Power Switch 1 on the front panel of the RB-1072
amplifi er is turned off. Then, plug one end of the cord into the AC
power connector 7 on the back panel of the amplifi er. Plug the other
end into an appropriate AC outlet.
Your RB-1072 amplifi er is confi gured at the factory for the proper AC
line voltage in the country where you purchased it (USA: 120 volts/60
Hz, Europe: 230 volts/50 Hz). The AC line confi guration is noted on
a label on the back panel.
NOTE: Should you move your RB-1072 amplifi er to another
country, it is possible to configure your amplifier for use on a
different line voltage. Do not attempt to perform this conversion
yourself. Opening the enclosure of the
you to dangerous voltages. Consult a qualified technician or the
Rotel factory service department for information.
If you are going to be away from home for an extended period of
time, it is a sensible precaution to unplug your amplifi er.
RB-1072 amplifi er exposes
Power Switch and Indicator 1
The Power Switch is located on the front panel. To turn the amplifi er
on (or to activate either of the optional automatic power-on modes),
push the switch in. The LED indicator above ring around the switch will
light [COLOR?], indicating that the amplifi er is turned on. To turn the
amplifi er off, push the button again and return it to the out position.
Protection Indicator 2
Thermal and protection circuits protect the amplifi er against potential
damage in the event of extreme or faulty operating conditions. Unlike
many designs, the protection circuit of the RB-1562 and RB-1572
is independent of the audio signal and has no impact on sonic
performance. Instead, the protection circuit monitors the temperature
of the output devices and shuts down the amplifi er if safe limits are
exceeded.
In addition, the RB-1510 includes over-current protection which
operates only when load impedances drop too low. This protection
is independent for each channel and is indicated by the front panel
Protection LED.
Should a faulty condition arise, the amplifi er channel at fault will stop
playing and the Protection LED on the front panel will light.
If this happens, turn the amplifi er off, let it cool down for several
minutes, and attempt to identify and correct the problem. When you
turn the amplifi er back on, the protection circuit will automatically reset
and the PROTECTION LED should go out.
Text taken from RMB-1076 Manual
- approved -
AC Power and Control
AC Power Input 7
The RB-1072 amplifi er is supplied with the proper AC power cord.
Use only this cord or an exact equivalent. Do not use an extension
cord. A heavy duty multi-tap power outlet strip may be used, but only
if it is rated to handle the current demand of the RB-1072 amplifi er.
In most cases, the protection circuitry activates because of a fault
condition such as shorted speaker wires, or inadequate ventilation
leading to an overheating condition. In very rare cases, highly reactive
or extremely low impedance speaker loads could cause the protection
circuit to engage.
Note: The Protection Mode LED also lights when the 12V Trigger
system is being used and the amplifier is in Standby mode.
Page 8

8
3
3
RB-1562 / RB-1572 Stereo Power Amplifi ers
Turn On/Off Mode Selector
The RB-1072 amplifi er can be turned on and off automatically by
using its “12V Trigger” system. The Turn On/Off Mode Selector switch
is used to select which method is used.
• With the switch in the OFF position, the amplifier is turned on or off
manually using the front panel power switch.
• With the switch in the 12V TRIG. position, the amplifier is turned
on automatically when a 12 volt trigger signal is applied to
the 3.5mm Jack labeled IN. The front panel POWER SWITCH
overrides this function. It must be ON for the +12V trigger to work.
Turning the switch OFF cuts power to the amplifier, regardless of
whether or not a trigger signal is present.
+12V Trigger Input and Output 4
The jack labeled IN is for connecting the 3.5mm Plug/Cable carrying
a +12 volt trigger signal to turn the amplifi er on and off. To use this
feature the adjacent switch
(see previous section). This input accepts any control signal (AC or DC)
ranging from 3 volts to 30 volts.
The jack labeled OUT is for connecting another 3.5mm plug/cable
to provide a 12V trigger signal to other components. The 12V output
signal is available whenever a +12 volt trigger signal is applied to the
IN connector.
must be set in the 12V TRIG position
Input Signal Connections 6
See Figure 2
The RB-1072 RB-1062 and RB-1072 have standard unbalanced RCAtype input connectors, the type used on nearly all audio equipment.
There is an RCA input for each of the two amplifi er channels. These
RCA inputs accept audio signals from preamplifi ers or surround
sound processors. Use high quality audio interconnect cables for best
performance.
Speaker Connections
See Figure 2
The RB-1072 RB-1562 and RB-1572 have two sets of dual binding
post speaker connection terminals, one set for each amplifi er channel.
Polarity and Phasing
The polarity – the positive/negative orientation of the connections
– for every speaker and amplifi er connection must be consistent so
all the speakers will be in phase. If the polarity of one connection is
mistakenly reversed, bass output will be very weak and stereo imaging
degraded. All wire is marked so you can identify the two conductors.
There may be ribs or a stripe on the insulation of one conductor. The
wire may have clear insulation with different color conductors (copper
and silver). There may be polarity indications printed on the insulation.
Identify the positive and negative conductors and be consistent with
every speaker and amplifi er connection.
Speaker Wire Connections 5
The RB-1072 amplifi er has two sets of color coded terminals for each
amplifi er channel. Having two sets of terminals for each channel
makes it easy to bi-wire the speakers. The speaker terminals accept
bare wire, connector lugs, or “banana” type connectors (except in the
European Community countries where their use is not permitted).
Route the wires from the RB-1072 amplifi er to the speakers. Give
yourself enough slack so you can move the components to allow
access to the speaker connectors.
NOTE: Be sure to notice the location of the LEFT and RIGHT
speaker terminals and connect your LEFT and RIGHT speakers to
the correct outputs. Take extra care if using two sets of wires to biwire your speakers.
If you are using banana plugs, connect them to the wires and then
plug into the backs of the speaker connectors. When using banana
plugs, the collars of the binding post terminals should be screwed in
all the way (clockwise).
If you are using terminal lugs, connect them to the wires. If you are
attaching bare wires directly to the speaker connectors, separate the
wire conductors and strip back the insulation from the end of each
conductor. Be careful not to cut into the wire strands. Unscrew (turn
counterclockwise) the binding post collar. Place the connector lug
around the shaft, or insert the bundled wire into the hole in the shaft.
Turn the collars clockwise to clamp the connector lug or wire fi rmly in
place.
NOTE: Be sure there are no loose wire strands that could touch
adjacent wires or connectors.
Speaker Selection
The nominal impedance of the loudspeaker(s) connected to each
channel of the RB-1072 amplifi er should be no lower than 4 ohms.
Speaker Wire Selection
Use insulated two-conductor stranded wire to connect the RB-1072
amplifi er to the speakers. The size and quality of the wire can have
an audible effect on the performance of the system. Standard speaker
wire will work, but can result in lower output or diminished bass
response, particularly over longer distances. In general, heavier
wire will improve the sound. For best performance, you may want to
consider special high-quality speaker cables. Your authorized Rotel
dealer can help in the selection of appropriate cables for your system.
Page 9

English
Continuous Power Output
Total Harmonic Distortion
Intermodulation Distortion
Frequency Response
Damping Factor
Speaker Impedance
Signal to Noise Ratio
Input Impedance/Sensitivity
Gain
Power Requirements
Power Consumption
Dimensions
Troubleshooting
Most diffi culties in audio systems are the result of poor or wrong
connections, or improper control settings. If you encounter problems,
isolate the area of the diffi culty, check the control settings, determine
the cause of the fault and make the necessary changes. If you are
unable to get sound from the RB-1072 your amplifi er, refer to the
suggestions for the following conditions:
Front Panel Power Indicator Is Not Lit
No main power to the RB-1072 amplifi er. Check AC power
connections at the amplifi er and the AC outlet. Check the front panel
power switch. Make sure that it is set to the ON position. If using 12V
trigger power-on, make sure that a trigger signal is present at rear
panel 12V TRIG IN jack.
No Sound
If the amp is getting AC power, but is producing no sound, check
the Protection Indicator 2 on the front panel. If lit, see below. If
not, check all of your connections and control settings on associated
components. Make sure that your input connections and speaker
connections match your system confi guration.
Protection Indicator Is Lit
The front panel Protection Indicator 2 will light when the RB-1072
amplifi er protection circuits have shut off the amplifi er. Typically, this
occurs only when the amplifi er has overheated, when there is faulty
speaker wiring, or after a period of extreme use. Turn off the system
and wait for the amplifi er to cool. Then push the front panel power
switch in and out to reset the protection devices. If the problem is
not corrected or reoccurs, there is a problem with the system or the
amplifi er itself.
9
Specifi cations
Continuous Power Output (20-20 kHz, < 0.03%, 8 ohms)
RB-1562 100 watts/canal
RB-1572 250 watts/canal
Total Harmonic Distortion (20Hz-20kHz, 8 ohms)
RB-1562 < 0,02 %
RB-1572 < 0,03 %
Intermodulation Distortion (60 Hz : 7 kHz, 4 :1)
RB-1562 < 0,02 %
RB-1572 < 0,03 %
Frequency Response (± 1 dB)
RB-1562 10 Hz – 40 kHz
RB-1572 10 Hz – 80 kHz
Damping Factor (20 – 20 000 Hz, 8 ohms)
RB-1562 200
RB-1572 400
Speaker Impedance 4 ohms minimum
Signal to Noise Ratio (IHF A network) 116 dB
Input Impedance/Sensitivity
RB-1562 8.3 k ohms / 1.2V
RB-1572 9.9 k ohms / 1.25V
Gain 27.9 dB
Power Requirements
U.S. Version 115 volts, 60 Hz
European Version 230 volts, 50 Hz
Power Consumption
RB-1562 130 watts
RB-1572 280 watts
Dimensions (W x H x D)
RB-1562 430 x 98 x 324 mm
17 x 3
RB-1572 430 x 98 x 324 mm
17 x 3
Front Panel Height
RB-1562 2U
RB-1572 3U
Weight
(net)
RB-1562 6,5 kg
RB-1572 7,8 kg
7
/8 x 123/4 ins.
7
/8 x 123/4 ins.
All specifications are accurate at the time of printing.
Rotel reserves the right to make improvements without notice.
Page 10

10
RB-1562 / RB-1572 Amplifi cateurs de puissance stéréophoniques
Remarques importantes concernant la sécurité
ATTENTION :Il n’y a à l’intérieur aucune pièce susceptible
d’être modifiée par l’utilisateur. Adressez-vous impérativement
à une personne qualifiée.
ATTENTION : Pour réduire tout risque d’électrisation ou
d’incendie, ne pas exposer l’appareil à une source humide,
ou à tout type de risque d’éclaboussure ou de renversement
de liquide. Ne pas poser dessus d’objet contenant un liquide,
comme un verre, un vase, etc. Prenez garde à ce qu’aucun objet
ou liquide ne tombe à l’intérieur de l’appareil par ses orifices
de ventilation. Si l’appareil est exposé à l’humidité ou si un
objet tombe à l’intérieur, débranchez-le immédiatement de
son alimentation secteur, et adressez-vous immédiatement et
uniquement à une personne qualifiée et agréée.
Tous les conseils de sécurité et d’installation doivent être lus
avant de faire fonctionner l’appareil. Conservez soigneusement
ce livret pour le consulter à nouveau pour de futures références.
Tous les conseils de sécurité doivent être soigneusement
respectés. Suivez les instructions. Respectez les procédures
d’installation et de fonctionnement indiquées dans ce manuel.
L’appareil doit être nettoyé uniquement avec un chiffon sec ou
un aspirateur.
Do not use near water.
L’appareil doit être placé de telle manière que sa propre
ventilation puisse fonctionner, c’est-à-dire avec un espace libre
d’une dizaine de centimètres minimum autour de lui. Il ne doit
pas être posé sur un fauteuil, un canapé, une couverture ou
toute autre surface susceptible de boucher ses ouïes d’aération ;
ou placé dans un meuble empêchant la bonne circulation d’air
autour des orifices d’aération.
Cet appareil doit être placé loin de toute source de chaleur, tels
que radiateurs, chaudières, bouches de chaleur ou d’autres
appareils (y compris amplificateurs de puissance) produisant
de la chaleur.
ATTENTION : La prise secteur en face arrière constitue le
moyen principal pour connecter/déconnecter l’appareil de
son alimentation secteur. L’appareil doit donc être installé de
telle manière que ce câble d’alimentation soit accessible en
permanence.
Cet appareil doit être branché sur une prise d’alimentation
secteur, d’une tension et d’un type conformes à ceux qui sont
indiqués sur la face arrière de l’appareil (USA : 120 V/60 Hz,
CE : 230 V/50 Hz)
Brancher l’appareil uniquement grâce au cordon secteur
fourni, ou à un modèle équivalent. Ne pas tenter de modifier
ou changer la prise. Notamment, ne pas tenter de supprimer
la prise de terre (troisième broche de la prise) si celle-ci est
présente. Si la prise n’est pas conforme à celles utilisées dans
votre installation électrique, consultez un électricien agréé. Ne
pas utiliser de cordon rallonge.
Prendre garde à ce que ce cordon d’alimentation ne soit pas
pincé, écrasé ou détérioré sur tout son trajet, et à ce qu’il ne
soit pas mis en contact avec une source de chaleur. Vérifiez
soigneusement la bonne qualité des contacts, à l’arrière de
l’appareil comme dans la prise murale.
La prise d’alimentation secteur constitue le moyen radical de
déconnexion de l’appareil. Elle doit donc rester en permanence
accessible, car sa déconnexion constitue la seule assurance
que l’appareil n’est plus alimenté par le secteur. La diode LED
de mise en veille Standby ne s’allume plus lorsque ce cordon
d’alimentation est débranché.
Prendre garde à ce que ce cordon d’alimentation ne soit pas
pincé, écrasé ou détérioré sur tout son trajet, et à ce qu’il ne
soit pas mis en contact avec une source de chaleur. Vérifiez
soigneusement la bonne qualité des contacts, à l’arrière de
l’appareil comme dans la prise murale.
Débranchez le câble d’alimentation en cas d’orage, ou si
l’appareil ne doit pas être utilisé pendant une longue période.
N’utilisez que des accessoires préconisés par le constructeur.
N’utilisez que des meubles, supports, systèmes
de transport recommandés par Rotel. Procédez
toujours avec la plus extrême précaution
lorsque vous déplacez l’appareil, afin d’éviter
tout risque de blessure.
Utilisez un câble de type Classe 2 pour la liaison avec les
enceintes acoustiques, afin de garantir une installation correcte
et de minimiser les risques d’électrocution.
Si l’appareil ne doit pas être utilisé pendant une longue période,
la prise secteur sera débranchée.
L’appareil doit être immédiatement éteint, débranché puis
retourné au service après-vente agréé dans les cas suivants :
• Le câble d’alimentation secteur ou sa prise est endommagé.
• Un objet est tombé, ou du liquide a coulé à l’intérieur de
l’appareil.
• L’appareil a été exposé à la pluie.
• L’appareil ne fonctionne manifestement pas normalement.
• L’appareil est tombé, ou le coffret est endommagé.
Tous les appareils Rotel sont conçus en totale
conformité avec les directives internationales
concernant les restrictions d’utilisation
de substances dangereuses (RoHS) pour
l’environnement, dans les équipements
électriques et électroniques, ainsi que pour le
recyclage des matériaux utilisés (WEEE, pour
Waste Electrical and Electronic Equipment). Le
symbole du conteneur à ordures barré par une
croix indique la compatibilité avec ces directives,
et le fait que les appareils peuvent être
correctement recyclés ou traités dans le respect
total de ces normes.
Ce symbole signifie que cet appareil bénéficie
d’une double isolation électrique. Sa prise
d’alimentation n’a pas besoin d’être reliée à la
terre ou à une masse particulière.
Page 11

Français
11
Sommaire
Figure 1: Commandes et branchements 3
Figure 2: Branchements en entrées et sorties 4
Remarques importantes 5
Remarques importantes concernant la sécurité . . . . . . . . . . . . . . . . . . . . . . . . . . 10
Au sujet de Rotel . . . . . . . . . . . . . . . . . . . . . . . . . . . . . . . . . . . . . . . . . . . . . . . 11
Un mot au sujet de la notion de watts . . . . . . . . . . . . . . . . . . . . . . . . . . . . . . . . 11
Pour démarrer . . . . . . . . . . . . . . . . . . . . . . . . . . . . . . . . . . . . . . . . . . . . . . . . . 12
Caractéristiques principales 12
Quelques précautions 12
Installation 12
Alimentation secteur et fonctionnement . . . . . . . . . . . . . . . . . . . . . . . . . . . . . . . 12
Prise d’alimentation secteur 7 12
Interrupteur de mise sous tension et indicateur LED 1 12
Indicateur de protection LED 2 12
Sélecteur de mode de mise sous tension ON/OFF 3 13
Entrée et sortie Trigger 12 volts 4 13
Branchements des signaux en entrée 6 . . . . . . . . . . . . . . . . . . . . . . . . . . . . . 13
Branchement des enceintes acoustiques . . . . . . . . . . . . . . . . . . . . . . . . . . . . . . . 13
Sélection des enceintes 13
Choix des câbles d’enceintes 13
Polarité et mise en phase 13
Branchement des câbles d’enceintes 5 14
Problèmes de fonctionnement . . . . . . . . . . . . . . . . . . . . . . . . . . . . . . . . . . . . . . 14
L’indicateur Power de mise sous tension ne s’allume pas 14
Pas de son 14
Diode de protection allumée 14
Spécifi cations . . . . . . . . . . . . . . . . . . . . . . . . . . . . . . . . . . . . . . . . . . . . . . . . . . 14
Chez Rotel, nous sommes très fi ers d’apporter notre pierre à ce nouvel
édifi ce. Nous avons réduit la teneur en plomb de nos électroniques,
en utilisant notamment une soudure spéciale ROHS, tandis que notre
nouvelle gamme d’amplifi cateurs fonctionnant en classe D (non
numérique) présente un rendement cinq fois supérieur aux générations
conventionnelles précédentes, délivrant pourtant encore plus de
puissance, avec une qualité encore supérieure. Ces appareils ne
chauffent pas, dépensent beaucoup moins d’énergie, sont donc très
bons pour l’environnement tout en étant encore plus musicaux.
En plus, nous imprimons tous nos catalogues et manuels sur papier
recyclé.
Ce ne sont certes que de petites étapes. Mais ne sont-ce pas justement
les plus importantes ? Nous continuons activement la recherche et
la mise au point de nouvelles méthodes, et l’utilisation de nouveaux
matériaux pour aboutir à un processus de fabrication général plus
écologique et plus propre.
Tous les membres de l’équipe Rotel vous remercient pour l’achat de cet
appareil. Nous sommes persuadés qu’il vous offrira de nombreuses
années d’intense plaisir musical.
Un mot au sujet de la notion de watts
La puissance de sortie de ces amplifi cateurs RB-1562 et RB-1572 est
de respectivement 100 et 250 watts par canal, les deux canaux étant
en service et fonctionnant au maximum de leur puissance.
Au sujet de Rotel
Notre histoire commence il y a environ 50 ans. Depuis, au fi l des
années, nous avons reçu des centaines de prix et de récompenses, et
satisfait des centaines de milliers de personnes – comme vous !
Rotel a été fondée par une famille passionnée de musique, qui a
décidé de fabriquer des maillons Haute Fidélité sans compromis
aucun. Depuis sa création, cette passion est restée intacte, et cette
famille s’est fi xée comme objectif de proposer à tous les audiophiles et
mélomanes les meilleurs appareils possibles, quel que soit leur budget.
Une volonté partagée par tous les employés de Rotel.
Les ingénieurs Rotel travaillent selon une équipe très soudée, écoutant,
peaufi nant chaque nouveau modèle jusqu’à ce qu’il atteigne
exactement leurs standards – très élevés – de musicalité. Ils sont
libres de choisir des composants en provenance du monde entier,
afi n de concevoir le produit le meilleur possible. C’est ainsi que vous
trouverez dans nos appareils des condensateurs d’origine britannique
ou allemande, des transistors japonais ou américains, tandis que les
transformateurs toriques sont toujours fabriqués dans nos propres
usines Rotel.
Nous sommes tous concernés par la qualité de l’environnement. Et,
comme de plus en plus de produits électroniques sont fabriqués puis
éliminés quelques années plus tard, il est désormais essentiel qu’un
constructeur fabrique tous ses produits en veillant à ce qu’ils aient un
impact minimum sur la terre et les nappes phréatiques.
Rotel a choisi d’indiquer la puissance de sortie de cette manière
parce que l’expérience de Rotel prouve que c’est la seule valeur de
puissance réellement valable pour un amplifi cateur ou un ampli-tuner.
Lorsque l’on compare les spécifi cations de différents appareils, il
convient de se méfi er car la puissance est souvent indiquée sous
d’autres conditions de fonctionnement, les résultats étant alors en fait
incomparables.
Par exemple, la puissance de sortie peut être indiquée avec seulement
deux canaux réellement en service, ce qui donne évidemment un
résultat plus élevé. Si Rotel avait choisi cette méthode de mesure pour
la puissance de sortie du RB-1562 ou du RB-1572, pour un seul canal
uniquement, nous aurions obtenu une puissance 20-30 % supérieure
par canal, pour la même limite de distorsion et la même impédance
de charge.
L’impédance d’une enceinte acoustique indique la résistance électrique
ou charge qu’elle représente, lorsque branchée sur un amplifi cateur,
généralement 8 ohms ou 4 ohms. Plus l’impédance est faible, plus
l’enceinte a besoin de puissance. En effet, une enceinte de 4 ohms
nécessite près de deux fois la puissance d’une enceinte de 8 ohms.
Ainsi, idéalement, un amplifi cateur doit être capable de doubler sa
puissance de sortie sur charge de 4 ohms – et une valeur de XX???
watts sur charge de 8 ohms doit se transformer en une valeur de
XX??? watts sur 4 ohms. L’utilisation d’enceintes acoustiques de
faible impédance demande à l’amplifi cateur une alimentation de
meilleure qualité, car elle doit pouvoir fournir plus de courants tout en
dégageant plus de chaleur.
Page 12

12
RB-1562 / RB-1572 Amplifi cateurs de puissance stéréophoniques
Cependant, les amplifi cateurs Rotel sont conçus pour fonctionner avec
des enceintes acoustiques de n’importe quelle impédance comprise
entre 4 et 8 ohms, tous les canaux fonctionnant simultanément au
maximum de leur puissance. Parce que la conception des circuits Rotel
est optimisée pour le fonctionnement simultané de tous les canaux,
Rotel peut se permettre de spécifi er la puissance effi cace maximum
réelle disponible simultanément sur les deux canaux.
Ceci est également primordial pour votre plaisir d’écoute. Lorsque
vous regardez un fi lm, il est rassurant de savoir que l’on possède un
amplifi cateur capable de reproduire parfaitement tous les canaux
ensemble, notamment sur une explosion volcanique !
Pour démarrer
Merci d’avoir acheté cet amplifi cateur de puissance stéréophonique
Rotel RB-1562 ou RB-1572. Il a été spécialement conçu pour
contribuer à des heures et des heures de plaisir musical, que vous
l’utilisiez dans une chaîne haute fi délité ou au sein d’un système Home
Cinema.
Les RB-1562 et RB-1572 sont des amplifi cateurs de puissance deux
canaux particulièrement sophistiqués. Ce sont des amplifi cateurs
à circuit numérique, avec alimentation à découpage, utilisant des
composants de très haute qualité, et bien sûr la superbe qualité
sonore chère à notre philosophie « Balanced Design ». Les capacités
en courant très élevées du RB-1562 et du RB-1572 leur permettent
d’alimenter sans aucune diffi culté les enceintes présentant les charges
les plus complexes.
Installation
Le RB-1562 génère de la chaleur pendant son fonctionnement normal.
Ne bloquez donc pas ses ouïes de refroidissement. Il doit y avoir
environ 10 cm de dégagement tout autour lui pour permettre le bon
fonctionnement de sa ventilation, et une bonne circulation d’air tout
autour du meuble qui le supporte. Ne négligez non plus jamais le
poids de l’amplifi cateur au moment du choix de son installation.
Vérifi ez la solidité de l’étagère ou du meuble chargés de le recevoir.
Alimentation secteur et fonctionnement
Prise d’alimentation secteur 7
Le RB-1562 est livré avec son propre câble d’alimentation secteur.
N’utilisez que ce câble, ou sont équivalent exactement semblable.
Ne tentez pas de modifi er ce câble. N’utilisez pas de câble rallonge.
Une prise multiple d’alimentation peut être utilisée, mais uniquement
si elle est réellement calibrée pour supporter les demandes en courant
des appareils qui y sont branchés et notamment celle, particulièrement
élevée, du RB-1562.
Assurez-vous que l’interrupteur de mise sous tension Power Switch 1,
en face avant, est bien en position « éteint » (OFF). Branchez alors le
cordon secteur en face arrière dans la prise correspondante 7, puis
l’autre extrémité dans la prise murale d’alimentation.
Votre RB-1562 est confi guré en usine pour s’adapter à l’installation
électrique en vigueur dans votre pays d’utilisation (USA : 120 volts/60
Hz ; Europe : 230 volts/50 Hz). Cette confi guration est indiquée sur
une étiquette, visible sur la face arrière de l’appareil.
Les RB-1562 et RB-1572 sont, fondamentalement, deux appareils
identiques. Ils ne diffèrent que par leur puissance de sortie. Dans ce
manuel, c’est le RB-1562 qui est le plus souvent cité, mais le RB-1572
fonctionne exactement de la même manière.
Caractéristiques principales
• Deux canaux d’amplification.
• Configuration de mise sous tension « on/off » sélectionnée par
l’utilisateur : manuelle ou contrôlée par l’envoi d’une tension de
commutation « trigger » 12 volts.
• Circuit de protection totale, avec indicateurs en face avant.
• Double paire de sorties enceintes par canal.
Quelques précautions
Veuillez lire ce manuel d’utilisation très soigneusement. Il vous
donne toutes les informations nécessaires aux branchements et
fonctionnement du RB-1562. Si vous vous posez encore des questions,
n’hésitez pas à contacter immédiatement votre revendeur agréé Rotel.
Conservez soigneusement l’emballage du RB-1562. Il constitue le
meilleur et le plus sûr moyen pour le transport futur de votre nouvel
appareil. Tout autre emballage pourrait en effet entraîner des
détériorations irréversibles à l’appareil.
Conservez la facture de votre appareil : c’est la meilleure preuve de
votre propriété et de la date réelle d’achat. Elle vous sera utile en cas
de nécessité de retour au service après-vente.
Note : Si vous devez déménager dans un autre pays, il est
possible de reconfigurer votre amplificateur RB-1562 pour une
installation électrique de caractéristiques différentes. Ne tentez
jamais cette modification vous-même. L’ouverture du capot du RB1562 vous expose à des tensions électriques très dangereuses.
Consultez obligatoirement un technicien qualifié ou l’usine/
distributeur Rotel afin qu’il vous donne toutes les informations
nécessaires à ce sujet.
Si vous vous absentez pendant une longue période, nous vous
conseillons de débrancher la prise murale d’alimentation.
Interrupteur de mise sous tension et indicateur LED 1
L’interrupteur de mise sous tension Power Switch se trouve sur la
face avant. Il suffi t d’appuyer dessus pour mettre l’amplifi cateur sous
tension (ou pour rendre actives une des options de mise en marche
automatique). La diode LED placée juste au-dessus s’allume alors. Une
nouvelle pression sur l’interrupteur éteint l’appareil.
Indicateur de protection LED 2
Des circuits de protection générale et thermique protègent
l’amplifi cateur contre tout dommage éventuel dû à des conditions de
fonctionnement anormales ou extrêmes. Contrairement à la majorité
des autres amplifi cateurs de puissance, le circuit de protection du
RB-1562 ou RB-1572 est totalement indépendant du trajet du signal
audio, et n’a donc aucune infl uence sur les performances musicales.
Ce circuit contrôle aussi en permanence la température des étages de
sortie, et coupe automatiquement l’amplifi cateur si celle-ci dépasse une
valeur de fonctionnement normale.
Page 13

Français
3
13
De plus, le RB-1562 intègre une protection contre les surcharges qui se
met en service si l’impédance de charge en sortie devient trop basse.
Si un fonctionnement anormal survient, l’amplifi cateur s’arrête de
fonctionner et la diode LED « PROTECTION » 2 de la face avant
s’allume.
Si cela se produit, éteignez l’amplifi cateur, et laissez-le se refroidir
naturellement pendant plusieurs minutes. Profi tez-en pour tenter
d’identifi er et de corriger le problème. Lorsque vous rallumerez
l’amplifi cateur, le circuit de protection doit normalement se réinitialiser
automatiquement, et la diode PROTECTION s’éteindre.
Dans la plupart des cas, la mise en service de la protection est due à
un court-circuit dans les câbles des enceintes acoustiques, ou à cause
d’un mauvais respect de la ventilation correcte de l’amplifi cateur. Dans
de très rares cas, la charge à très faible impédance ou très réactive de
certaines enceintes acoustiques peut entraîner la mise en service de la
protection.
Note : La diode de protection LED s’allume également lorsque le
mode d’allumage de l’amplificateur par tension de commutation
Trigger 12 V est sélectionné, et que l’amplificateur est en mode de
veille Standby.
Sélecteur de mode de mise sous tension ON/OFF 3
Le RB-1562 et RB-1572 vous propose sa mise sous tension
automatique en utilisant le système de commutation par présence de
tension continue 12 volts dit « 12 V Trigger ». Le sélecteur en face
arrière repéré « Turn On/Off Mode Selector » permet de choisir la
méthode d’allumage de l’amplifi cateur.
• Avec le sélecteur en position repérée « OFF », l’amplificateur est
mis sous ou hors tension manuellement, via sa touche Power en
face avant.
• Lorsque le sélecteur est placé sur la position repérée « 12V TRIG »,
l’amplificateur s’allume automatiquement lorsqu’une tension de 12
volts est envoyée sur sa prise jack 3,5 mm placée à gauche du
sélecteur et repérée « IN ». Il se remet en mode de veille Standby
dès que cette tension disparaît sur la prise. L’interrupteur POWER
SWITCH en face avant est placé avant ce sélecteur : il doit être
pressé (ON) pour que la commutation TRIGGER 12 V soit effective
et efficace. Couper l’alimentation avec cet interrupteur (OFF) éteint
l’amplificateur, qu’il y ait ou non une tension de 12 volts sur la
prise Trigger IN.
Entrée et sortie Trigger 12 volts 4
La prise jack 3,5 mm repérée IN est prévue pour transporter la tension
de 12 volts nécessaire au fonctionnement de la commutation TRIGGER
que nous venons de décrire. Pour être effi cace, le sélecteur contigu
doit être sur sa position repérée « 12 V TRIG » (voir le paragraphe
précédent). Cette entrée accepte en fait une tension continue ou
alternative, d’une valeur comprise entre 3 et 30 volts.
Branchements des signaux en entrée 6
Voir Figure 2
Les RB-1562 et RB-1572 possèdent des entrées asymétriques de
type RCA, standard traditionnel que l’on trouve sur la quasi-totalité
des maillons audio complémentaires. Il y a une prise RCA pour
chacun des deux canaux d’amplifi cation. Ces prises RCA acceptent
des signaux audio en provenance d’un préamplifi cateur ou d’un
processeur sonore. N’utilisez que des câbles de liaison de la meilleure
qualité possible, pour être certains de bénéfi cier d’une qualité sonore
optimale.
Branchement des enceintes acoustiques
Voir Figure 2
Les RB-1562 et RB-1572 possèdent deux paires de prises pour
enceintes acoustiques pour chaque canal d’amplifi cation.
Sélection des enceintes
L’impédance nominale de chaque enceinte branchée sur le RB-1562/
RB-1572, suivant le mode de fonctionnement choisi, doit être au
minimum de 4 ohms.
Choix des câbles d’enceintes
Utilisez du câble deux conducteurs isolés pour relier le RB-1562/
RB-1572 aux enceintes. La taille et la qualité du câble peuvent avoir
de l’infl uence sur les performances musicales. Un câble standard
fonctionnera, mais il peut présenter des limitations quant à la
dynamique réellement reproduite ou à la qualité du grave, surtout
sur de grandes longueurs. En général, un câble de plus fort diamètre
entraîne une amélioration du son. Pour des performances optimales,
penchez-vous sur l’offre en terme de câbles spécialisés, de très haute
qualité. Votre revendeur agréé Rotel est en mesure de vous renseigner
effi cacement à ce sujet.
Polarité et mise en phase
La polarité – autrement dit l’orientation correcte du « + » et du
« – » pour chaque branchement des enceintes acoustiques doit être
respectée pour toutes les enceintes, afi n que celles-ci soient toutes en
phase. Si la phase d’une seule enceinte est inversée, il en résultera un
manque de grave sensible et une dégradation importante de l’image
stéréophonique. Tous les câbles sont repérés afi n que vous puissiez
identifi er clairement leurs deux conducteurs. Soit les câbles sont
différents (un cuivré, un argenté), soit la gaine est de couleur différente
(fi let de couleur), soit elle est gravée. Assurez-vous que vous repérez
bien le conducteur pour toutes les liaisons, et que vous respectez
parfaitement la phase sur toutes les enceintes acoustiques, par rapport
à l’entrée.
La prise jack 3,5 mm repérée OUT permet de brancher une autre prise
jack 3,5 mm pour renvoyer la tension de commutation 12 volts vers
un autre appareil. La tension 12 volts n’est toutefois présente que si la
prise IN est réellement alimentée par une telle tension.
Page 14

14
Puissance de sortie continue
Distorsion harmonique totale
Distorsion d’intermodulation
Réponse en fréquence
Facteur d’amortissement
Impédance des enceintes
Rapport signal/bruit
Impédance/sensibilité d’entrée
Gain
Alimentation
Consommation
Dimensions
RB-1562 / RB-1572 Amplifi cateurs de puissance stéréophoniques
Branchement des câbles d’enceintes 5
Le RB-1562/RB-1572 est équipé de deux paires de bornes vissantes
par canal, cette double paire permettant un bi-câblage très facile. Ces
prises acceptent indifféremment du câble nu, des cosses ou fourches
spéciales, ou encore des fi ches banane (sauf en Europe, où les
nouvelles normes CE l’interdisent).
Tirez les câbles de l’amplifi cateur RB-1562/RB-1572 vers les enceintes
acoustiques. Prévoyez suffi samment de longueur pour qu’ils ne
subissent aucune contrainte sur toute leur longueur et que vous puissiez
déplacer les éléments sans qu’ils soient tendus.
Note : Vérifiez bien la position respective des prises GAUCHE
(LEFT) et DROITE (RIGHT), et branchez-les aux enceintes
correspondantes respectives. Prenez un soin particulier aux
branchements si vous utilisez le bi-câblage.
Si vous utilisez des fi ches dites « banane », connectez-les d’abord
aux câbles, puis branchez-les à l’arrière des prises des enceintes
acoustiques. Les bornes des enceintes doivent rester totalement vissées
(sens des aiguilles d’une montre) avant leur insertion.
Si vous utilisez des fourches, commencez par les relier/souder sur
les câbles. Si vous utilisez du fi l nu, dénudez tous les câbles sur une
longueur suffi sante, et torsadez les brins de chaque conducteur de telle
manière qu’aucun brin ne puisse venir en contact avec un autre d’un
autre conducteur (court-circuit). Suivant la taille des torsades, insérezles dans les trous centraux des prises ou entourez-le autour des axes
de celles-ci (sens des aiguilles d’une montre), de la même manière que
pour les fourches. Dans tous les cas, serrez fermement à la main les
bornes vissantes.
Note : Vérifiez bien qu’il n’y ait aucun brin qui vienne en contact
avec des brins ou la prise adjacente.
Problèmes de fonctionnement
La majorité des problèmes survenant dans une installation haute
fi délité est due à de mauvais branchements, ou à une mauvaise
utilisation d’un ou de plusieurs maillons. Si le problème est bien lié
à votre amplifi cateur de puissance, il s’agit très certainement d’un
mauvais branchement. Voici quelques vérifi cations de base qui
résolvent la majorité des problèmes rencontrés :
L’indicateur Power de mise sous tension ne s’allume pas
L’amplifi cateur RB-1562 n’est pas alimenté par le secteur. Vérifi ez la
position de l’interrupteur de mise sous tension Power (position ON). Si
vous avez choisi l’option d’allumage via la prise 12 V TRIG, assurezvous qu’une tension de commutation soit bien présente sur la prise
jack correspondante 12 V TRIG IN.
Pas de son
Si l’amplifi cateur est bien sous tension mais qu’aucun son n’en sort,
regardez la diode PROTECTION INDICATOR 2 sur la face avant. Si
elle est allumée, voir le paragraphe suivant. Si elle est éteinte, vérifi ez
tous les maillons du système, la qualité des branchements et la position
des diverses commandes.
Diode de protection allumée
La diode LED PROTECTION INDICATOR 2 s’allume si le circuit de
protection est activé, et éteint alors automatiquement l’amplifi cateur.
Cela arrive principalement quand les ouïes d’aération ont été
obstruées, quand il y a un court-circuit dans les sorties enceintes, ou
si l’amplifi cateur a fonctionné très longtemps à puissance maximum.
Éteignez l’amplifi cateur et attendez qu’il refroidisse. Le fait d’appuyer
à nouveau sur l’interrupteur de mise sous tension pour rallumer
l’appareil entraînera la réinitialisation automatique des circuits de
protection. Si la protection se remet à fonctionner, il y a un problème
dans le système ou l’amplifi cateur lui-même.
Spécifi cations
Puissance de sortie continue (20 – 20 000 Hz, DHT < 0,03 %, 8 ohms)
RB-1562 100 watts/canal
RB-1572 250 watts/canal
Distorsion harmonique totale (20 – 20 000 Hz, 8 ohms)
RB-1562 < 0,02 %
RB-1572 < 0,03 %
Distorsion d’intermodulation (60 Hz : 7 kHz, 4 :1)
RB-1562 < 0,02 %
RB-1572 < 0,03 %
Réponse en fréquence (± 1 dB)
RB-1562 10 Hz – 40 kHz
RB-1572 10 Hz – 80 kHz
Facteur d’amortissement (20 – 20 000 Hz, 8 ohms)
RB-1562 200
RB-1572 400
Impédance des enceintes 4 ohms minimum
Rapport signal/bruit (pondéré A IHF) 116 dB
Impédance/sensibilité d’entrée
RB-1562 8.3 k ohms / 1.2V
RB-1572 9.9 k ohms / 1.25V
Gain 27.9 dB
Alimentation
Version U.S. 115 volts, 60 Hz
Version européenne 230 volts, 50 Hz
Consommation
RB-1562 130 watts
RB-1572 280 watts
Dimensions (L x H x P)
RB-1562 430 x 98 x 324 mm
17 x 3
RB-1572 430 x 98 x 324 mm
17 x 3
Front Panel Height
RB-1562 2U
RB-1572 3U
Poids (net)
RB-1562 6,5 kg
RB-1572 7,8 kg
Toutes les spécifications sont certifiées exactes au moment de l’impression.
Rotel se réserve le droit d’apporter des améliorations sans préavis.
7
/8 x 123/4 ins.
7
/8 x 123/4 ins.
Page 15

Deutsch
Wichtige Sicherheitshinweise
15
WARNUNG: Im Innern des Gerätes befinden sich keine vom
Bediener zu wartenden Teile. Alle Servicearbeiten müssen von
qualifiziertem Servicepersonal durchgeführt werden.
VORSICHT: Zum Schutz vor Feuer oder einem elektrischen
Schlag darf das Gerät weder Feuchtigkeit noch Wasser
ausgesetzt werden. Achten Sie darauf, dass keine Spritzer in
das Gerät gelangen. Stellen Sie keine mit Flüssigkeit gefüllten
Gegenstände (z. B. Vasen) auf das Gerät. Das Eindringen von
Gegenständen in das Gehäuse ist zu vermeiden. Sollte das
Gerät trotzdem einmal Feuchtigkeit ausgesetzt sein oder ein
Gegenstand in das Gehäuse gelangen, so trennen Sie es sofort
vom Netz. Lassen Sie es von einem Fachmann prüfen und die
notwendigen Reparaturarbeiten durchführen.
Lesen Sie sich alle Hinweise vor dem Anschließen und dem
Betrieb des Gerätes genau durch.
Bewahren Sie die Bedienungsanleitung so auf, dass sie jederzeit
Zugriff auf diese Sicherheitshinweise haben.
Alle Warn- und Sicherheitshinweise in dieser
Bedienungsanleitung und auf dem Gerät müssen genau beachtet
werden. Außer den beschriebenen Handgriffen sind vom
Bediener keine Arbeiten am Gerät vorzunehmen.
Reinigen Sie das Gehäuse nur mit einem weichen, trockenen
Tuch oder einem Staubsauger.
Nutzen Sie das Gerät nicht in der Nähe von Wasser.
Stellen Sie sicher, dass um das Gerät ein Freiraum von
10 cm gewährleistet ist. Stellen Sie das Gerät weder
auf ein Bett, Sofa, Teppich oder ähnliche Oberflächen,
damit die Ventilationsöffnungen nicht verdeckt werden.
Das Gerät sollte nur dann in einem Regal oder in einem
Schrank untergebracht werden, wenn eine ausreichende
Luftzirkulation gewährleistet ist.
WARNUNG: Die Verbindung mit den Netz kann nur über den
Netzeingang an der Geräterückseite unterbrochen werden. Das
Gerät muss so aufgestellt werden, dass Sie freien Zugriff auf
den Netzeingang haben.
Bevor Sie das Gerät in Betrieb nehmen, prüfen Sie, ob die
Betriebsspannung mit der örtlichen Netzspannung (Europa:
230 V/50 Hz) übereinstimmt. Die Betriebsspannung ist an der
Rückseite des Gerätes angegeben.
Schließen Sie das Gerät nur mit dem dazugehörigen zweipoligen
Netzkabel an die Wandsteckdose an. Modifizieren Sie das
Netzkabel auf keinen Fall. Versuchen Sie nicht, die Erdungsund/oder Polarisationsvorschriften zu umgehen. Das Netzkabel
sollte an eine zweipolige Wandsteckdose angeschlossen werden.
Verwenden Sie keine Verlängerungskabel.
Netzkabel sind so zu verlegen, dass sie nicht beschädigt
werden können (z.B. durch Trittbelastung, Möbelstücke oder
Erwärmung). Besondere Vorsicht ist dabei an den Steckern,
Verteilern und den Anschlussstellen des Gerätes geboten.
Bei Gewitter oder wenn Sie das Gerät für eine längere Zeit
nicht in Betrieb nehmen ziehen Sie den Netzstecker aus der
Steckdose.
Dieses Gerät sollte, wie andere Elektrogeräte auch, nicht
unbeaufsichtigt betrieben werden.
Benutzen Sie nur vom Hersteller empfohlenes Zubehör.
Verwenden Sie nur von Rotel empfohlene
Transportmittel, Racks, Halterungen oder
Regalsysteme. Seien Sie vorsichtig, wenn
Sie das Gerät in einem Ständer oder Rack
bewegen, um Verletzungen durch Umkippen
vorzubeugen.
Verwenden Sie gemäß Class 2 isolierte Lautsprecherkabel, um
eine ordnungsgemäße Installation zu gewährleisten und die
Gefahr eines elektrischen Schlages zu minimieren.
Schalten Sie das Gerät sofort aus und ziehen Sie geschultes
Fachpersonal zu Rate, wenn:
• das Netzkabel oder der Stecker beschädigt sind,
• Gegenstände bzw. Flüssigkeit in das Gerät gelangt sind,
• das Gerät Regen ausgesetzt war,
• das Gerät nicht ordnungsgemäß funktioniert bzw. eine
deutliche Leistungsminderung aufweist,
• das Gerät hingefallen ist bzw. beschädigt wurde.
Rotel-Produkte entsprechen den internationalen
Richtlinien über die Beschränkung der
Verwendung bestimmter gefährlicher Stoffe in
Elektro- und Elektronikgeräten (Restriction of
Hazardous Substances (kurz RoHS genannt)) und
über Elektro- und Elektronik-Altgeräte (Waste
Electrical and Electronic Equipment (WEEE)).
Die durchgestrichene Mülltonne steht für deren
Einhaltung und besagt, dass die Produkte
ordnungsgemäß recycelt oder diesen Richtlinien
entsprechend entsorgt werden müssen.
Dieses Symbol bedeutet, dass das Gerät doppelt
isoliert ist. Es muss daher nicht geerdet werden.
Stellen Sie das Gerät nicht in die Nähe von Wärmequellen
(Heizkörper, Wärmespeicher, Öfen oder sonstige
wärmeerzeugende Geräte).
Page 16

16
RB-1562 / RB-1572 Stereo-Endstufe
Inhaltsverzeichnis
Important Safety Instructions . . . . . . . . . . . . . . . . . . . . . . . . . . . . . . . . . . . . . . . 2
Figure 1: Bedienelemente und Anschlüsse 3
Figure 2: Anschlussdiagramm 4
Wichtige Hinweise 5
Wichtige Sicherheitshinweise . . . . . . . . . . . . . . . . . . . . . . . . . . . . . . . . . . . . . . 15
Die Firma Rotel . . . . . . . . . . . . . . . . . . . . . . . . . . . . . . . . . . . . . . . . . . . . . . . . 16
Ein Wort zur Leistungsangabe . . . . . . . . . . . . . . . . . . . . . . . . . . . . . . . . . . . . . . 16
Zu dieser Anleitung . . . . . . . . . . . . . . . . . . . . . . . . . . . . . . . . . . . . . . . . . . . . . 17
Features 17
Einige Vorsichtsmaßnahmen 17
Aufstellung des Gerätes 17
Netzspannung und Bedienung . . . . . . . . . . . . . . . . . . . . . . . . . . . . . . . . . . . . . . 17
Netzaneingang 8 17
Netzschalter und Betriebsanzeige 1 17
Protection-LED 2 . . . . . . . . . . . . . . . . . . . . . . . . . . . . . . . . . . . . . . . . . . . . . 17
ON/OFF-Kippschalter 3 18
12-V-Trigger-Ein- und -Ausgang 4 18
Eingangssignalanschlüsse 6 . . . . . . . . . . . . . . . . . . . . . . . . . . . . . . . . . . . . . 18
Anschließen der Lautsprecher . . . . . . . . . . . . . . . . . . . . . . . . . . . . . . . . . . . . . . 18
Auswahl der Lautsprecher 18
Auswahl der Lautsprecherkabel 18
Polarität und Phasenabgleich 18
Anschluss der Lautsprecher 5 18
Bei Störungen . . . . . . . . . . . . . . . . . . . . . . . . . . . . . . . . . . . . . . . . . . . . . . . . . 19
Die Betriebsanzeige leuchtet nicht 19
Kein Ton 19
Protection-LED leuchtet 19
Technische Daten . . . . . . . . . . . . . . . . . . . . . . . . . . . . . . . . . . . . . . . . . . . . . . . 19
effi zienter als ältere Verstärker-Designs, ohne dabei an Leistung und
Performance zu verlieren. Mit ihren geringeren Wärmeverlusten
schonen diese Produkte nicht nur die Umwelt, sie überzeugen auch
klanglich.
Last, not least ist diese Anleitung auf Recyclingpapier gedruckt.
Dies sind zwar kleine, aber wichtige Schritte. Und wir forschen
weiter nach Verfahren und Materialien für einen saubereren und
umweltfreundlicheren Herstellungsprozess.
Vielen Dank, dass Sie sich für dieses Rotel-Produkt entschieden haben.
Wir sind sicher, dass Sie in den nächsten Jahren viel Freude daran
haben werden.
Ein Wort zur Leistungsangabe
The power output of the RB-1562 and RB-1572 are quoted as 100
and 250 watts, respectively, for each channel, when both channels
are operating together at full power.
Rotel spezifi ziert die Ausgangsleistung auf diese Weise, da nach
unserer Erfahrung hiermit das tatsächliche Leistungspotenzial des
Receivers oder Verstärkers widergespiegelt wird.
Beim Vergleich der technischen Daten verschiedener Hersteller sollten
Sie sich darüber im Klaren sein, dass die Ausgangsleistung oftmals
auf unterschiedliche Weise angegeben wird, so dass kein direkter
Vergleich möglich ist.
Die Firma Rotel
Unsere Geschichte begann vor ungefähr 50 Jahren. In den folgenden
Jahrzehnten haben wir Hunderte von Auszeichnungen für unsere
Produkte erhalten und unzähligen Menschen echten Hörgenuss
bereitet, denen gute Unterhaltung wichtig ist.
Rotel wurde von einer Familie gegründet, deren Interesse an Musik
so groß war, dass sie beschloss, hochwertigste HiFi-Produkte
herzustellen und Musikliebhabern ungeachtet ihres Geldbeutels einen
außergewöhnlichen Wert zukommen zu lassen. Ein Ziel, das von allen
Rotel-Mitarbeitern verfolgt wird.
Die Ingenieure arbeiten als Team eng zusammen. Sie hören sich jedes
neue Produkt an und stimmen es klanglich ab, bis es den gewünschten
Musikstandards entspricht. Die eingesetzten Bauteile stammen aus
verschiedenen Ländern und wurden ausgewählt, um das jeweilige
Produkt zu optimieren. So fi nden Sie in Rotel-Geräten Kondensatoren
aus Großbritannien und Deutschland, Halbleiter aus Japan oder den
USA und direkt bei Rotel gefertigte Ringkerntransformatoren.
Wir fühlen uns unserer Umwelt gegenüber verpfl ichtet. Und da immer
mehr Elektronik produziert wird und später entsorgt werden muss, ist
es von Herstellerseite besonders wichtig, Produkte zu entwickeln, die
unsere Mülldeponien und Gewässer möglichst wenig belasten.
Rotel ist stolz darauf, seinen Beitrag zu leisten. So konnten wir den
Bleianteil in unserer Elektronik durch bleifreies Löten reduzieren.
Unsere neuen Class-D-Verstärker (nicht digital) arbeiten bis zu 5-mal
Wird die Ausgangsleistung beispielsweise bei einem aktiven Kanal
gemessen, so liegt der Maximalwert höher. Für die Ausgangsleistung
der RB-1562/RB-1572 bedeutet dies, dass die angegebene Wattzahl
bei gleicher Lautsprecherimpedanz 25 – 30 % höher liegt.
Die Impedanz eines Lautsprechers steht für den elektrischen
Widerstand oder die Last, die er für den Verstärker darstellt. Sie liegt
in der Regel bei 8 oder 4 Ohm. Je geringer die Impedanz, desto
höher ist die vom Lautsprecher benötigte Leistung. So ist für den
Antrieb eines 4-Ohm-Lautsprechers die doppelte Leistung erforderlich
wie für einen 8-Ohm-Lautsprecher.
Idealerweise sollte der Verstärker also an 4-Ohm-Lasten die doppelte
Leistung abgeben – 100 Watt an 8 Ohm bedeuten also 200 Watt
an 4 Ohm. Grundsätzlich stellen Lautsprecher mit einer niedrigeren
Impedanz höhere Ansprüche an das Netzteil des Verstärkers, da sie
mehr Strom ziehen und mehr Wärme abgeben.
Daher sind Rotel-Verstärker so ausgelegt, dass sie mit jedem
Lautsprecher mit einer Impedanz zwischen 8 und 4 Ohm arbeiten
können, wobei alle Kanäle dabei die angegebene Ausgangsleistung
liefern. Da das Rotel-Design so optimiert wurde, dass der gleichzeitige
Betrieb aller Kanäle möglich ist, kann Rotel die tatsächliche
Ausgangsleistung für beide Kanäle angeben.
Und das kann auch für Ihr Hörvergnügen von entscheidender
Bedeutung sein. Beim Ansehen eines Filmes ist es immer von Vorteil,
wenn der Verstärker in der Lage ist, auf allen Kanälen gleichzeitig die
volle Ausgangsleistung zu gewährleisten. Das gilt besonders, wenn im
Film ein Vulkan ausbricht!
Page 17

Deutsch
17
Zu dieser Anleitung
Vielen Dank, dass Sie sich für die Rotel-RB-1562/RB-1572 entschieden
haben. Diese leistungsstarken Rotel-Endstufen können optimal in jedem
qualitativ hochwertigen HiFi- oder Heimkinosystem eingesetzt werden.
Die RB-1562/RB und die RB-1572 sind erstklassige Stereo-Endstufen.
Ihr digitaler Verstärkerschaltkreis, das Schaltnetzteil, erstklassige
Bauteile und Rotels Balanced-Design-Konzept gewährleisten eine
herausragende Klangqualität. Aufgrund der hohen Stromlieferfähigkeit
können sie problemlos anspruchsvolle Lautsprecher kontrollieren.
Die RB-1562 und die RB-1572 sind im Wesentlichen gleiche Geräte.
Sie unterscheiden sich nur in ihrer Ausgangsleistung.
Features
• Zwei Verstärkerkanäle.
• Power on/off-Konfiguration: manuell oder über 12-V-Trigger-Signal.
• Schutzschaltung mit LED-Anzeige an der Gerätefront.
• Anschluss der Lautsprecher über Schraubklemmen.
Einige Vorsichtsmaßnahmen
Lesen Sie sich die Bedienungsanleitung bitte vor der Inbetriebnahme
genau durch. Neben grundsätzlichen Installations- und
Bedienungshinweisen (bitte beachten Sie auch die Sicherheitshinweise
am Anfang der Bedienungsanleitung) enthält sie allgemeine
Informationen, die Ihnen helfen werden, Ihr System mit seiner
maximalen Leistungsfähigkeit zu betreiben. Bitte setzen Sie sich
bei etwaigen Fragen mit Ihrem autorisierten Rotel-Fachhändler in
Verbindung.
Bewahren Sie den Versandkarton und das übrige Verpackungsmaterial
der
Endstufe für einen eventuellen späteren Einsatz auf. Der Versand oder
Transport der Endstufe in einer anderen als der Originalverpackung
kann zu erheblichen Beschädigungen Ihrer Endstufe führen.
Schicken Sie die Ihrer Endstufe beiliegende Garantieanforderungskarte
ausgefüllt an den Rotel-Distributor in Ihrem Land. Bewahren Sie bitte
die Original-Kaufquittung auf. Sie belegt am besten das Kaufdatum,
das für Sie wichtig wird, sobald Sie eine Garantieleistung in Anspruch
nehmen.
Aufstellung des Gerätes
Die Endstufe erwärmt sich während des normalen Betriebes. Diese
Wärme kann unter normalen Bedingungen über die Kühlrippen
und Ventilationsöffnungen der Endstufe problemlos abgeführt
werden. Die Ventilationsöffnungen an der Oberseite dürfen nicht
blockiert werden. Jedoch ist das Gerät an einem Ort aufzustellen,
an dem rund um das Gehäuse ein Freiraum von 10 cm und eine
ausreichende Luftzirkulation gewährleistet ist. Beachten Sie dies beim
Einbau in einen Schrank oder beim Aufeinanderstellen mehrerer
Systemkomponenten. Berücksichtigen Sie beim Aufbau das Gewicht
der Endstufe. Stellen Sie sicher, dass das Regal oder der Schrank auf
das vergleichsweise hohe Gewicht der RB-1562/RB-1572 ausgelegt
ist.
Netzspannung und Bedienung
Netzaneingang 8
Die Endstufe wird mit dem passenden Netzkabel geliefert. Verwenden
Sie kein Verlängerungskabel. Eine hochbelastbare Mehrfachsteckdose
kann eingesetzt werden, wenn sie (ebenso wie die Wandsteckdose)
ausreichende Strommengen für die Endstufe sowie die anderen an sie
angeschlossenen Komponenten liefern kann.
Stellen Sie sicher, dass die Endstufe vor dem Anschließen an das Netz
abgeschaltet ist, sich der Netzschalter 1 also in der AUS-Position
befi ndet. Verbinden Sie nun das beiliegende Netzkabel mit dem
Netzeingang 7 an der Geräterückseite und stecken Sie das andere
Ende des Kabels in die Wandsteckdose.
Ihre Endstufe wird von Rotel so eingestellt, dass sie mit der
in Ihrem Land üblichen Wechselspannung (Europa: 230 Volt
Wechselspannung/50 Hz; USA: 120 Volt Wechselspannung/60 Hz)
arbeitet. Die Einstellung ist an der Geräterückseite angegeben.
Hinweis: Sollten Sie mit Ihrer Endstufe in ein anderes Land
umziehen, kann die Einstellung der Endstufe geändert werden,
so dass sie mit einer anderen Netzspannung betrieben werden
kann. Versuchen Sie auf keinen Fall, diese Änderung selber
vorzunehmen. Durch Öffnen des Endstufengehäuses setzen
Sie sich gefährlichen Spannungen aus. Ziehen Sie hierzu stets
qualifiziertes Servicepersonal zu Rate.
Sind Sie für längere Zeit nicht zu Hause wie z.B. während einer
mehrwöchigen Urlaubsreise, sollten Sie Ihre Endstufe (ebenso wie alle
anderen Audio- und Videokomponenten) während Ihrer Abwesenheit
vom Netz trennen.
Netzschalter und Betriebsanzeige 1
Der Netzschalter ist in die Gerätefront integriert. Zum Einschalten
(oder zum Aktivieren der optionalen, automatischen Power on-Modi
drücken Sie den Netzschalter. Dring um den Schalter beginnt zu
leuchten und zeigt an, dass die Endstufe eingeschaltet ist. Drücken Sie
zum Ausschalten der Endstufe erneut den Netzschalter.
Protection-LED 2
Die RB-1562 und die RB-1572 verfügen über eine thermische
Schutzschaltung. Hierdurch werden die Endstufen vor möglichen
Schäden durch extreme oder fehlerhafte Betriebsbedingungen
geschützt. Im Gegensatz zu vielen anderen Konstruktionen ist die
Schutzschaltung der Endstufen unabhängig vom Audiosignal und
beeinfl usst den Klang nicht. Stattdessen überwacht sie die Temperatur
an den Leistungstransistoren und schaltet die Endstufe ab, sobald
bestimmte Temperaturgrenzen überschritten werden.
Darüber hinaus besitzt die RB-1562/RB-1572 einen Überstromschutz,
der nur dann anspricht, wenn die Lastimpedanz zu stark abnimmt.
Dieser Überstromschutz ist für jeden der beiden Kanäle getrennt
ausgeführt.
Page 18

18
3
RB-1562 / RB-1572 Stereo-Endstufe
Es ist unwahrscheinlich, dass es jemals zu einer Überlastung kommt.
Sollte dennoch eine Störung auftreten, funktioniert die Endstufe nicht
mehr. Die Protection-LED 2 an der Gerätefront beginnt zu leuchten.
Schalten Sie die Endstufe aus und lassen Sie sie einige Minuten
abkühlen. Versuchen Sie, den Grund für die Störung herauszufi nden
und zu beheben. Beim erneuten Einschalten der Endstufe setzt sich die
Schutzschaltung automatisch zurück, und die LED erlischt.
In den meisten Fällen wird die Schutzschaltung durch eine
Fehlfunktion, wie z.B. durch kurzgeschlossene Lautsprecherkabel oder
eine unzureichende Belüftung, die schließlich zu einer Überhitzung
führt, aktiviert. In sehr seltenen Fällen können Lautsprecher mit einer
extrem niedrigen Impedanz die Schutzschaltung aktivieren.
Hinweis: Die Schutzmodus- LED leuchtet auch, wenn das
12-V-Trigger-System genutzt wird und sich die Endstufe im
Standby-Modus befindet.
ON/OFF-Kippschalter 3
Die Endstufe kann über ihr “12-V-Trigger”-System automatisch ein- und
ausgeschaltet werden. Über den ON/OFF-Kippschalter können Sie
den gewünschten Modus auswählen.
• Befindet sich der Kippschalter in der OFF-Position, wird die
Endstufe manuell über den Netzschalter an der Gerätefront einund ausgeschaltet.
• Befindet sich der Kippschalter in der ON-Position, wird die
Endstufe automatisch eingeschaltet, wenn an der 3,5-mm- und mit
IN gekennzeichneten 12V TRIGGER IN-Buchse ein 12-V-TriggerSignal anliegt. Über den Netzschalter an der Gerätefront können
Sie diese Funktion übergehen. Diese Funktion kann nur genutzt
werden, wenn dieser vorher eingeschaltet wurde.
12-V-Trigger-Ein- und -Ausgang 4
An die mit IN gekennzeichnete Anschlussbuchse kann zum Einund Ausschalten der Endstufe ein Anschlusskabel mit 3,5-mmKlinkensteckern zur Übertragung eines +12-V-Trigger-Signals
angeschlossen werden. Dazu ist der oben beschrieben Kippschalter
in die ON-Position zu setzen. Dieser Eingang reagiert auf Gleich-
oder Wechselspannungssignale von 3 bis 30 Volt.
An die mit OUT gekennzeichnete Buchse kann ein weiteres
Anschlusskabel mit 3,5-mm-Klinkensteckern angeschlossen werden,
über das ein 12-V-Trigger-Signal zu anderen Komponenten geleitet
werden kann. Das 12-V-Ausgangssignal steht bereit, sobald ein
+12-V-Trigger-Signal an der mit IN gekennnzeichneten Buchse anliegt.
Anschließen der Lautsprecher
Siehe Figure 2
An der RB-1562 und der RB-1572 befi nden sich für jeden
Verstärkerkanal je vier Schraubklemmen.
Auswahl der Lautsprecher
Die nominale Impedanz des(der) an die Endstufe angeschlossenen
Lautsprechers(Lautsprecher) sollte mindestens 4 Ohm betragen.
Auswahl der Lautsprecherkabel
Verbinden Sie die Endstufe und die Lautsprecher über ein isoliertes,
zweiadriges Lautsprecherkabel. Aufbau und Qualität des Kabels
können hörbare Effekte auf die Musikwiedergabe haben. Standard„Klingeldraht“ wird funktionieren, jedoch können vor allem bei
größeren Kabellängen Leistungsverluste und eine ungleichmäßige
Wiedergabe des Frequenzspektrums das Ergebnis sein. Allgemein
gilt, dass Kabel mit größerem Querschnitt eine verbesserte
Wiedergabequalität gewährleisten. Für höchste Wiedergabequalität
sollten Sie die Benutzung von speziellen, hochwertigen
Lautsprecherkabeln erwägen. Ihr autorisierter Rotel-Fachhändler wird
Ihnen bei der Auswahl dieser Lautsprecherkabel gerne weiterhelfen.
Polarität und Phasenabgleich
Die Polarität – die positive/negative Ausrichtung der Anschlüsse –
muss für jede Lautsprecher-/Verstärkerverbindung phasengleich sein.
Wird die Polarität einer Verbindung irrtümlicherweise umgekehrt, führt
dies zu einem unausgewogenen Klangbild mit schwachen Bässen.
Die Kabel sind zur Identifi zierung gekennzeichnet. So kann die
Isolationsschicht eines Leiters gerippt oder ein Leiter mit einem Streifen
markiert sein. Das Kabel kann verschiedenfarbige Leiter (Kupfer
und Silber) besitzen und von einer transparenten Isolationsschicht
umgeben sein. Bei anderen Kabeln wird die Polaritätsangabe auf die
Isolationsschicht gedruckt. Unterscheiden Sie zwischen positiven und
negativen Leitern und achten Sie beim Anschluss an Lautsprecher und
Verstärker auf die gleiche Polung.
Anschluss der Lautsprecher 5
Die Endstufe verfügt an der Rückseite über vier farbig gekennzeichnete
Schraubklemmen für jeden Verstärkerkanal. Damit ist auch
ein Bi-Wiring der Lautsprecher problemlos möglich. An diese
Schraubklemmen können blanke Drähte oder Kabelschuhe
angeschlossen werden.
Führen Sie die Kabel von der Endstufe zu den Lautsprechern. Lassen
Sie sich genügend Raum, damit Sie die Komponenten bewegen
können und so einen freien Zugang zu den Lautsprecheranschlüssen
sicherstellen.
Eingangssignalanschlüsse 6
Siehe Figure 2
An der Rückseite der RB-1562 und der RB-1572 befi nden sich
unsymmetrische Cinch-Eingänge, wie sie an jedem hochwertigen
Audiogerät zu fi nden sind. Für jeden der beiden Verstärkerkanäle steht
ein Cinch-Eingang zur Verfügung. An diese Cinch-Eingänge können
Vorverstärker oder Surround-Prozessoren angeschlossen werden.
Verwenden Sie hochwertige Verbindungskabel, um eine optimale
Klangqualität zu gewährleisten.
Hinweis: Stellen Sie sicher, dass die LINKEN und RECHTEN
Lautsprecher an die richtigen Schraubklemmen angeschlossen
werden. Besondere Aufmerksamkeit ist beim Bi-Wiring geboten.
Bei der Verwendung von Kabelschuhen verbinden Sie diese mit den
Kabeln, stecken die Kabelschuhe hinten unter die Schraubklemmen
und drehen die Klemmen im Uhrzeigersinn fest.
Page 19

Deutsch
Ausgangsleistung
Gesamtklirrfaktor
Intermodulationsverzerrung
Frequenzgang
Dämpfungsfaktor
Lautsprecherimpedanz
Geräuschspannungsabstand
Eingangsimpedant/-empfindlichkeit
Gain
Spannungsversorgung
Leistungsaufnahme
Abmessungen
Front Panel Height
Nettogewicht
Sollten die Lautsprecherkabel direkt (ohne Kabelschuhe) an die
Lautsprecherklemmen angeschlossen werden, so entfernen Sie an den
Kabelenden ca. 15 mm der Isolation. Lösen Sie die Schraubklemmen
durch Drehen gegen den Uhrzeigersinn. Verdrillen Sie die blanken
Kabelenden, um ein Zerfasern zu vermeiden, und stecken Sie das
verdrillte Kabel hinter die Schraubklemmen. Anschließend drehen Sie
diese im Uhrzeigersinn fest.
Hinweis: Achten Sie bitte darauf, dass die blanken Kabelenden
vollständig an den Schraubklemmen untergebracht sind und somit das
Berühren benachbarter Drähte oder Anschlüsse ausgeschlossen ist.
Bei Störungen
Tritt eine scheinbare Fehlfunktion auf, sollten zuerst die nachstehend
aufgeführten Punkte überprüft werden. Viele Probleme beruhen auf
einfachen Bedienungsfehlern oder fehlerhaften Anschlüssen. Lässt
sich das Problem nicht beheben, wenden Sie sich bitte an Ihren
autorisierten Rotel-Fachhändler.
Die Betriebsanzeige leuchtet nicht
Die Endstufe bekommt keinen Strom. Prüfen Sie, ob der Netzschalter
an der Gerätefront gedrückt wurde. Prüfen Sie die Netzanschlüsse
an der Endstufe und der Wandsteckdose. Stellen Sie sicher, dass der
Netzschalter eingeschaltet ist. Befi ndet sich der Kippschalter an der
Geräterückseite in der ON-Position, so prüfen Sie, ob ein TriggerSignal an der 12V-TRIG IN-Buchse anliegt.
Kein Ton
Bekommt die Endstufe Strom und ist trotzdem kein Ton zu hören,
prüfen Sie, ob die Protection-LED 2 an der Frontseite leuchtet. Falls
ja, beachten Sie bitte die Hinweise unten. Falls nicht, prüfen Sie,
ob alle Geräte richtig angeschlossen sind und die Einstellungen
an den angeschlossenen Geräten richtig vorgenommen wurden.
Stellen Sie sicher, dass die Eingangs- und Lautsprecherverbindungen
entsprechend der Systemkonfi guration hergestellt worden sind.
Protection-LED leuchtet
Wurde die Endstufe von der Schutzschaltung abgeschaltet, beginnt
die Protection-LED zu leuchten. Normalerweise passiert dies nur, wenn
die Endstufe überhitzt ist, die Lautsprecher nicht richtig angeschlossen
wurden oder die Endstufe überlastet wurde. Schalten Sie das System
ab und warten Sie, bis sich die Endstufe abgekühlt hat. Drücken
Sie den Netzschalter anschließend einmal ein und aus, um die
Schutzschaltung zurückzusetzen. Ist die Störung nicht beseitigt oder tritt
sie erneut auf, liegt das Problem im System oder in der Endstufe selber.
19
Technische Daten
Ausgangsleistung (20 – 20.000 Hz, < 0,03 %, 8 Ohm)
RB-1562 100 watt
RB-1572 250 watt
Gesamtklirrfaktor (20 – 20.000 Hz, 8 Ohm)
RB-1562 < 0,02 %
RB-1572 < 0,03 %
Intermodulationsverzerrung (60 Hz : 7 kHz, 4 :1)
RB-1562 < 0,02 %
RB-1572 < 0,03 %
Frequenzgang (± 1 dB)
RB-1562 10 Hz – 40 kHz
RB-1572 10 Hz – 80 kHz
Dämpfungsfaktor (20 – 20 000 Hz, 8 Ohm)
RB-1562 200
RB-1572 400
Lautsprecherimpedanz 4 Ohm Minimum
Geräuschspannungsabstand (IHF A) 116 dB
Eingangsimpedant/-empfindlichkeit
RB-1562 8.3 k ohms / 1.2V
RB-1572 9.9 k ohms / 1.25V
Gain 27.9 dB
Spannungsversorgung 230 volt/50 Hz
Leistungsaufnahme
RB-1562 130 watts
RB-1572 280 watts
Abmessungen (B x H x T)
RB-1562 430 x 98 x 324 mm
17 x 3
RB-1572 430 x 98 x 324 mm
17 x 3
Front Panel Height
RB-1562 2U
RB-1572 3U
Nettogewicht
RB-1562 6,5 kg
RB-1572 7,8 kg
7
/8 x 123/4 ins.
7
/8 x 123/4 ins.
Diese Bedienungsanleitung entspricht dem technischen Stand bei Drucklegung.
Änderungen in Technik und Ausstattung vorbehalten.
Page 20

The Rotel Co. Ltd.
10-10 Shinsen-Cho
Shibuya-Ku
Tokyo 150-0045
Japan
Phone: +81 3-5458-5325
Fax: +81 3-5458-5310
Rotel of America
54 Concord Street
North Reading, MA 01864-2699
USA
Phone: +1 978-664-3820
Fax: +1 978-664-4109
Rotel Europe
Dale Road
Worthing, West Sussex BN11 2BH
England
Phone: + 44 (0)1903 221 761
Fax: +44 (0)1903 221 525
Rotel Deutschland
Vertrieb: B&W Group Germany GmbH
Kleine Heide 12
D-33790 Halle/Westf., Deutschland
Tel.: 05201 / 87170
Fax: 05201 / 73370
E-Mail: info@bwgroup.de
www.rotel-hifi .de
www.rotel.com
082 OMRB1562-72 072808
English • Français • Deutsch
 Loading...