

Page 1
Rollei Prego 70
Hinweise zum Gebrauch
Instructions for use
Istruzíoní per l’uso
Page 2

2
GBD
Thank you for buying a Rollei Prego
70. Please read these instructions carefully before using the camera so that
you will be able to make full use of all its
functions.
Excerpt from preventive police
recommendations:
Marking, photographing and listing
your valuables will make it difficult for
thieves to sell them should they ever
be stolen – and save you a lot of
trouble.
Gratulation zum Kauf der Rollei Prego
70. Um die vielfältigen Möglichkeiten
dieser Kamera optimal nutzen zu können, empfiehlt es sich, diese Anleitung
vor Gebrauch sorgfältig zu lesen.
Empfehlung aus dem Vorbeugungsprogramm der Kriminalpolizei:
Wer seine Wertsachen dauerhaft kennzeichnet, fotografiert und auflistet, verdirbt Hehlern den Absatz und erspart
sich unnötigen Ärger.
Bitte beachten
Die Rollei Prego 70 löst nicht aus,
›
wenn keine Batterie eingelegt oder
die Batterie leer ist.
›
wenn die Kamera ausgeschaltet
ist.
›
während des Zoomens oder Filmrückspulens.
(Das Rückspulen stoppt, wenn die
Kamera ausgeschaltet wird.)
›
wenn der zurückgespulte Film noch
in der Kamera ist.
›
solange der Blitz noch nicht aufge-
laden ist.
Ein integrierter Mikrocomputer steuert
die Prego 70 elektronisch. In seltenen
Fällen kann es durch starke elektrische oder magnetische Felder zu Störungen kommen. Nach Entfernen der
Batterien für 2 – 3 Minuten und erneutem Einsetzen sollten die Störungen
behoben sein.
Page 3

3
I
Grazie per aver acquistato una Rollei
Prego 70. Vi preghiamo di leggere
attentamente queste istruzioni prima
di utilizzare la fotocamera, per poterne
sfruttare tutte le funzioni.
Estratto delle raccomandazioni
preventive di polizia
Contrassegnare, fotografare ed
elencare i propri oggetti di valore
renderà più difficile per i ladri
rivenderli, evitando al derubato un
mucchio di complicazioni.
Note
L’otturatore della Rollei Prego 70 non
funziona…
›
se nella fotocamera non ci sono le
batterie oppure se queste ultime
sono esaurite;
›
se è chiuso il copriobiettivo;
›
quando è attivato il tasto zoom
oppure durante il riavvolgimento
della pellicola (il riavvolgimento si
arresta quando viene chiuso il
copriobiettivo);
›
se la pellicola non viene tolta
dall’apparecchio dopo il riavvolgimento;
›
se il lampeggiatore è in fase di
carica.
La vostra Prego 70 è comandata elettronicamente da un microcomputer
incorporato. Pur trattandosi di una
evenienza improbabile, essa potrebbe
non funzionare in presenza di forti
campi elettrici o magnetici. In tal caso
togliere le batterie dalla fotocamera e
rimetterle nel relativo vano dopo 2 o 3
minuti. Ciò dovrebbe eliminare il
problema.
Please note
The shutter of your Rollei Prego 70 will
not work...
›
if no batteries are loaded or if the
batteries are exhausted;
›
if the camera is switched off;
›
during zooming or film
rewinding (rewinding stops when
the camera is switched off);
›
if the rewound film is left in the
camera;
›
during charging of the flash unit.
Your Prego 70 is electronically
controlled by an integral microcomputer. Very strong electrical or magnetic fields may, in rare cases, cause
problems. Should this happen, remove
the batteries for 2 – 3 minutes and
replace them. This should correct the
problem.
Page 4

4
GBD
Getting ready
General
›
2
Components
›
8
LCD panel
›
12
Eyesight correction
›
14
Attaching the wrist strap
›
15
Loading the battery
›
16
Checking battery power
›
17
Loading film
›
18
Brief instructions
›
20
Taking pictures
Holding the camera properly
›
22
Shooting procedure
›
24
Locking focus
›
28
Viewfinder display
›
30
Rewinding the film
›
32
Imprinting the date or a caption
›
34
Selecting a flash mode
›
38
Selecting a self-timer function
›
40
CONTENTS INHALTSVERZEICHNIS
Spezielle Aufnahmefunktionen
Anti-Rotaugen-Blitz
›
42
Blitz aus
›
44
Tageslicht-Aufhellblitz
›
46
Aufhellblitz u. Gegenlichtkorr.
›
48
Aufhellblitz u.
Rotaugenreduzierung
›
50
Selbstauslöser
›
52
Doppel-Selbstauslöser
›
54
2 s Auslöseverzögerung
›
56
Intervallbelichtung
›
58
Nahaufnahmen
›
60
Panorama-Aufnahmen
›
62
„Unendlich“-Einstellung
›
64
IR-Fernauslöser (Zubehör)
›
64
Sonstiges
Pflege und Aufbewahrung
›
66
Allgemeine Hinweise
›
68
Fehlersuche
›
70
Technische Daten
›
72
Vorbereitung
Allgemeines
›
2
Bezeichnung der Teile
›
6
LCD-Monitor
›
12
Dioptrienkorrektur
›
14
Anbringen d. Trageschlaufe
›
14
Batterieeinlegen
›
16
Batteriekontrolle
›
16
Filmeinlegen
›
18
Kurzanleitung
›
20
Fotografieren
Kamerahaltung
›
22
Fotografieren
›
24
Schärfespeicher
›
28
Sucherinformationen
›
30
Filmrückspulen
›
32
Datums-/Titeleinbelichtung
›
34
Wahl der Blitzfunktion
›
38
Wahl der
Selbstauslöserfunktionen
›
40
Page 5

5
I
Preparazione
Cenni generali
›
3
Componenti
›
10
Display LCD
›
13
Correzione diottrica
›
15
Attacco della cinghia
›
15
Inserimento delle batterie
›
17
Controllo della carica
delle batteria
›
17
Caricamento della pellicola
›
19
Brevi istruzioni
›
21
Ripresa
Come deve essere
tenuta la fotocamera
›
23
Come si scattano le foto
›
25
Blocco della messa a fuoco
›
29
Display nel mirino
›
31
Riavvolgimento della pellicola
›
33
Stampa della data o di
un sottotitolo
›
35
Selezione di un modo flash
›
39
Selezione di una
funzione autoscatto
›
41
Advanced functions
Anti-red-eye flash
›
42
Flash OFF
›
44
Daylight fill flash
›
46
Fill-in/Backlight compensation
›
48
Fill-in/Anti-red-eye preflash
›
50
Self-timer
›
52
Double self-timer
›
54
2-second delay
›
56
Interval timer
›
58
Close-ups
›
60
Panoramic pictures
›
62
Infinity focus
›
64
IR remote control
(optional accessory)
›
65
Miscellaneous
Camera care and storage
›
66
General information
›
68
Troubleshooting
›
70
Specifications
›
72
Funzioni Avanzate
Preflash per riduzione effetto
“occhi rossi”
›
43
Flash escluso
›
45
Flash di rischiaramento luce diurna
›
47
Fill-in/Compensazione
del controluce
›
49
Fill-in/Flash per riduzione
effetto “occhi rossi”
›
51
Autoscatto
›
53
Doppio autoscatto
›
55
Ritardo di 2 secondi
›
57
Riprese intervallate
›
59
Macro-opnamen
›
61
Riprese panoramiche
›
63
Messa a fuoco all’infinito
›
65
Telecomando IR
(accessorio opzionale)
›
65
Varie
Cura della fotocamera
›
67
Precauzioni
›
69
Ricerca ed eliminazione
dei guasti
›
71
Specifiche
›
73
INDICE
Page 6

6
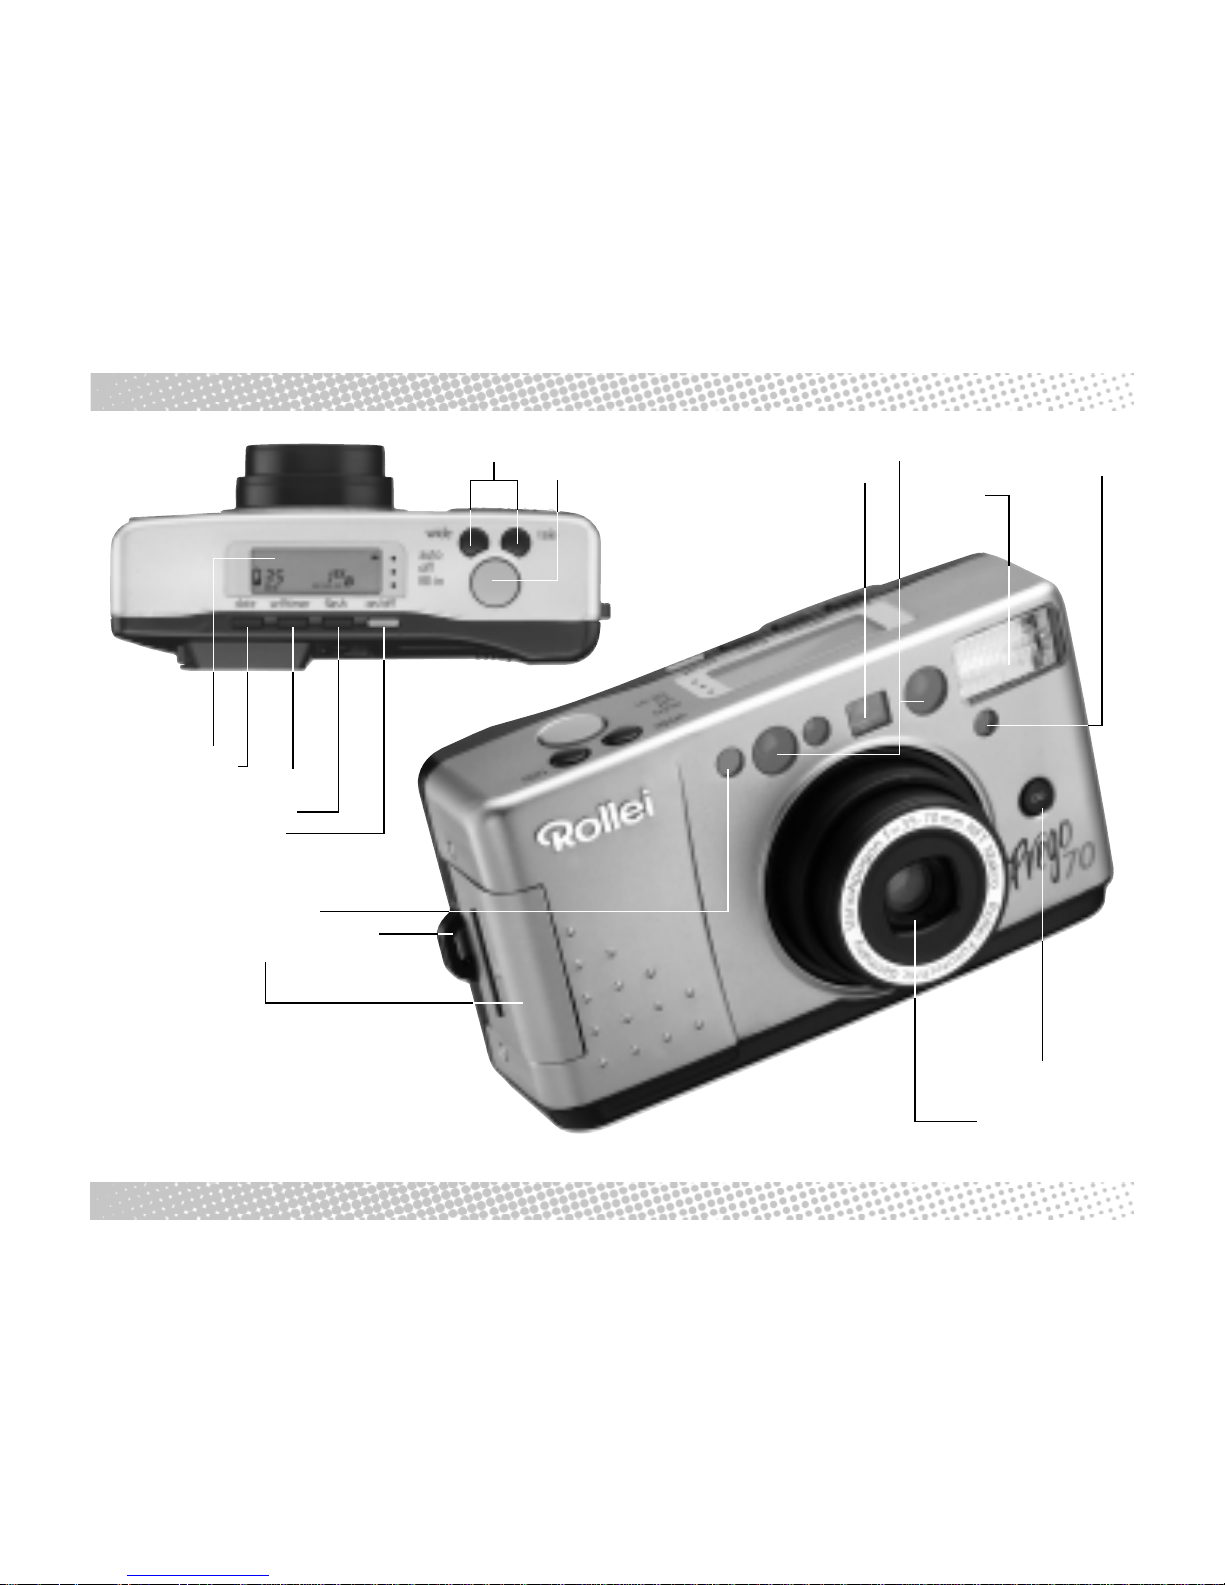
BEZEICHNUNG DER TEILE
LCD-Monitor
Datentaste date
Selbstauslösertaste selftimer
Blitzfunktionstaste flash
Kameraschalter on/off
Auslöser
IR-Fernauslösesensor
Trageschlaufenöse
Batteriefachdeckel
Zoom-Tasten (Tele/Wide)
Autofokusfenster
Sucherfenster
Unendlich-Taste
Objektiv
Selbstauslöser-/
Anti-Rotaugen-LED
Blitz
Belichtungssensor
D
Page 7

7
BEZEICHNUNG DER TEILE
D
Rückspultaste
Stativgewinde
Filmfenster
Rückwandentriegelung
Dioptrienkorrektur
Suchereinblick
Autofokus-Kontroll-LED (grün)
Blitz-Kontroll-LED (rot)
Panorama-Schalter
Page 8

8
GB
COMPONENTS
LCD-panel
date button
selftimer button
flash button
Master switch on/off
Shutter release
IR remote-control sensor
Wrist-strip eyelet
Battery-chambercover
Zoom-buttons (Tele/Wide)
Autofocus window
Viewfinder window
Infinity button
Lens
Self-timer-LED
Anti-red-eye-LED
Built-in-flash
Exposure sensor
Page 9

9
GB
COMPONENTS
Rewind button
Tripod socket
Film gate
Back cover latch
Eyesight correction
Viewfinder window
Autofocus indicator (green)
Flash indicator (red)
Panorama switch
Page 10
10
Display-LCD
Tasto per date
Tasto dell’ autoscatto selftimer
Tasto del modo flash
Copriobiettivo on/off
Pulsante di scatto
dell’otturatore
Sensore dell’ esposimetro
Occhiello per cinghia di trasporto
Coperchio del vano batterie
Tasto-zoom (Tele/Wide)
Finestrella dell’ aotofocus
Finestra dell’ mirino
Tasto per messa
a fuoco all’infinito
Obiettivo
LED dell’ autoscatto/
“occhi rossi”
Flash
I
COMPONENTI
Page 11

11
Tasto di riavvolgimento
Attaco per stativo
Finestra della pellicola
Sblocco del dorso
Correzione diottrica
Oculare del mirino
Spia autofocus (verde)
Spia flash (rosso)
Interruttore per
modo panoramico
I
COMPONENTI
Page 12
12
GBD
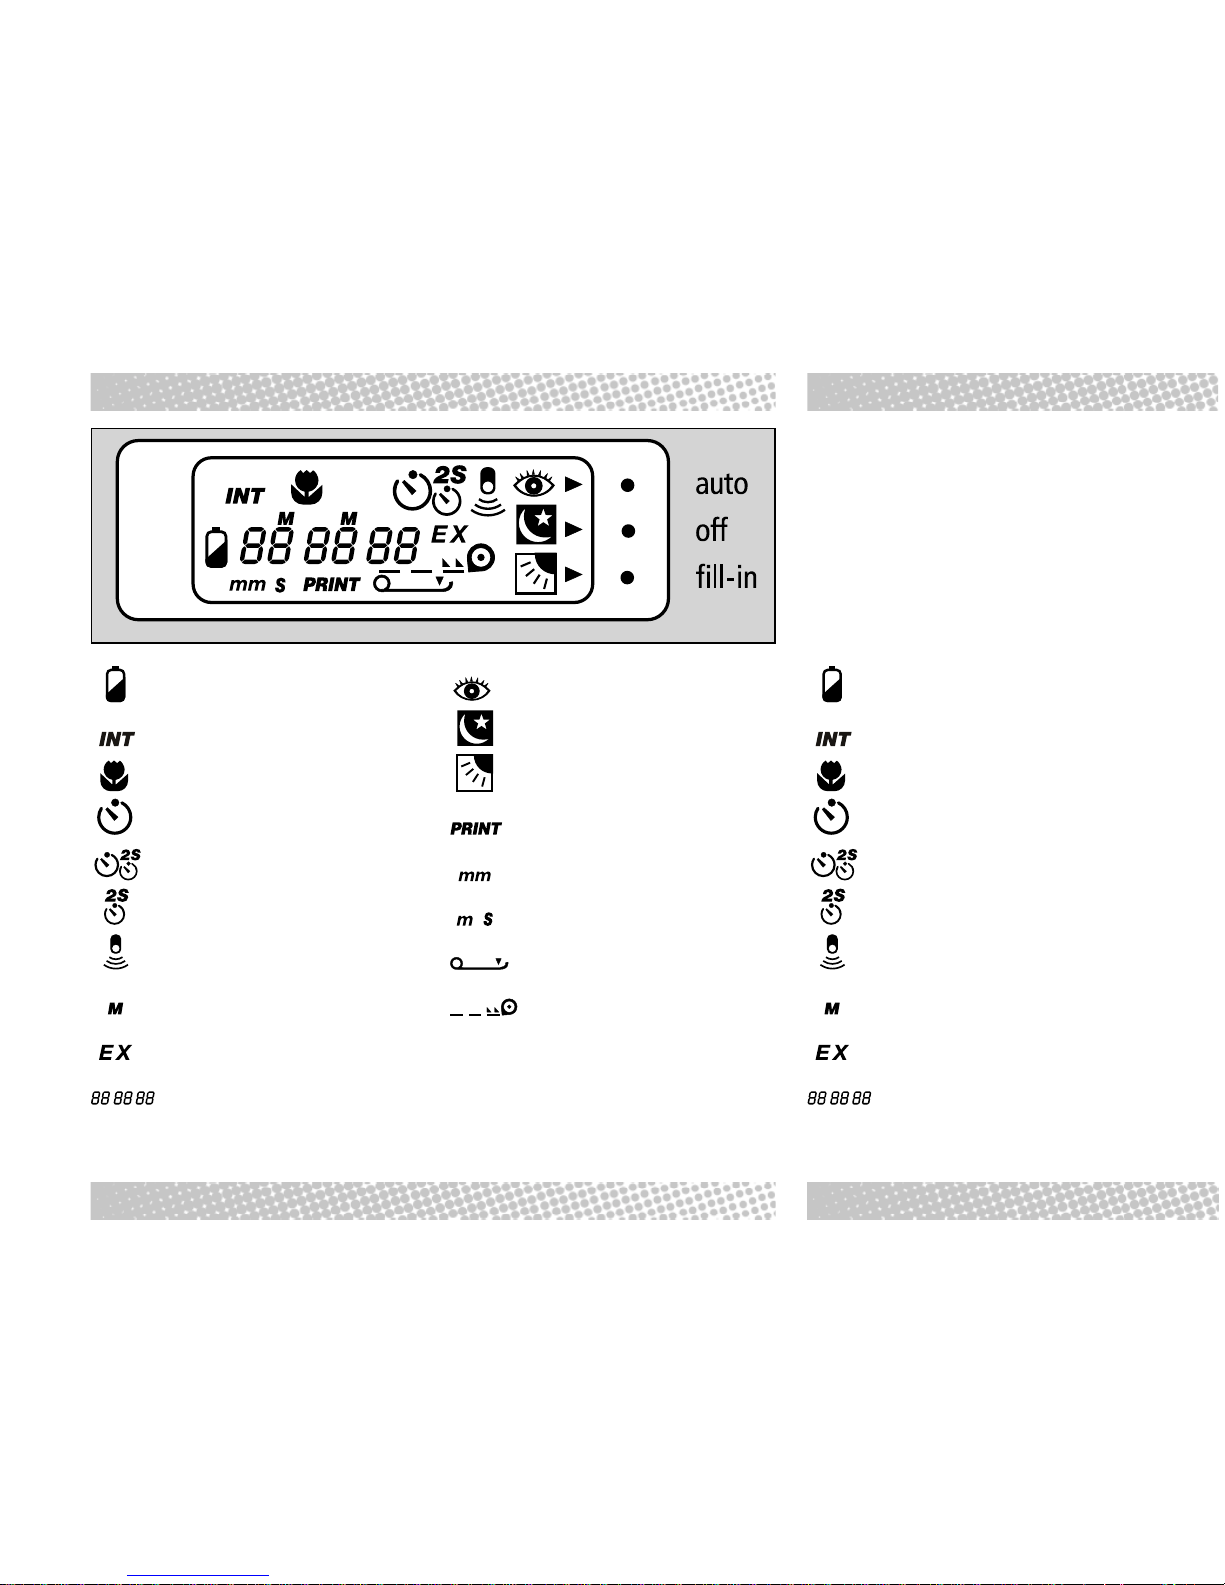
LCD-MONITOR LCD-MONITOR
Batteriekontrolle
Intervallbelichtung INT
Makrofunktion
Selbstauslöser
Doppel-Selbstauslöser
2s-Auslöseverzögerung
Fernauslöserfunktion
Monat
Bildzählwerk
Brennweitenanzeiger /
Daten (Jahr/Monat/Tag/Zeit)
Anti-Rotaugen-Funktion
Langzeitbelichtung/Flash off
Gegenlichtkorrektur
Datum/Titel-Einbelichtung
Brennweiteneinheit (mm)
Minuten (m), Sekunden (s)
Rückwand offen-Symbol
Filmtransportsymbol /
Rückspulanzeige /
Filmladekontrolle
Battery check
Interval timer
Macro mode
Self-timer
Double self-timer
2-sec-delay
Remote-control function
Month
Exp. compensation display
Exposure counter/Focal length
(year/month/day/time)
Page 13

13
I
LCD-MONITOR
Batterij-controle
Interval-opnamen
Makro-functie
Zelfontspanner
Dubbele-zelfontspanner
2s-ontspan-vertraging
Afstandsbedienings-functie
Maand
Beeldenteller
Aanduiding brandpuntafstand/
Data (Jaar/maand/dag/tijd)
Anti-red-eye-function
Time exposure/Flash off
Backlight compensation
Date / caption imprinting
Affichages des focales (mm)/
Minutes (m), Secondes (s)
„Back open“ icon
Film-advance icon /
Rewind indicator /
Film loading check
Anti-rode-ogen-funktie
Lange tijden/Flash off
Tegenlichtcorrectie
Datum/titel-meefotograferen
Aanduiding brandpuntafstand (mm)
Minuten (m), seconden (s)
Symbool Achterwand open
Filmtransport-symbool /
Terugspoel-aanduiding /
Controle aanweezigheid film
Page 14
14
GBD
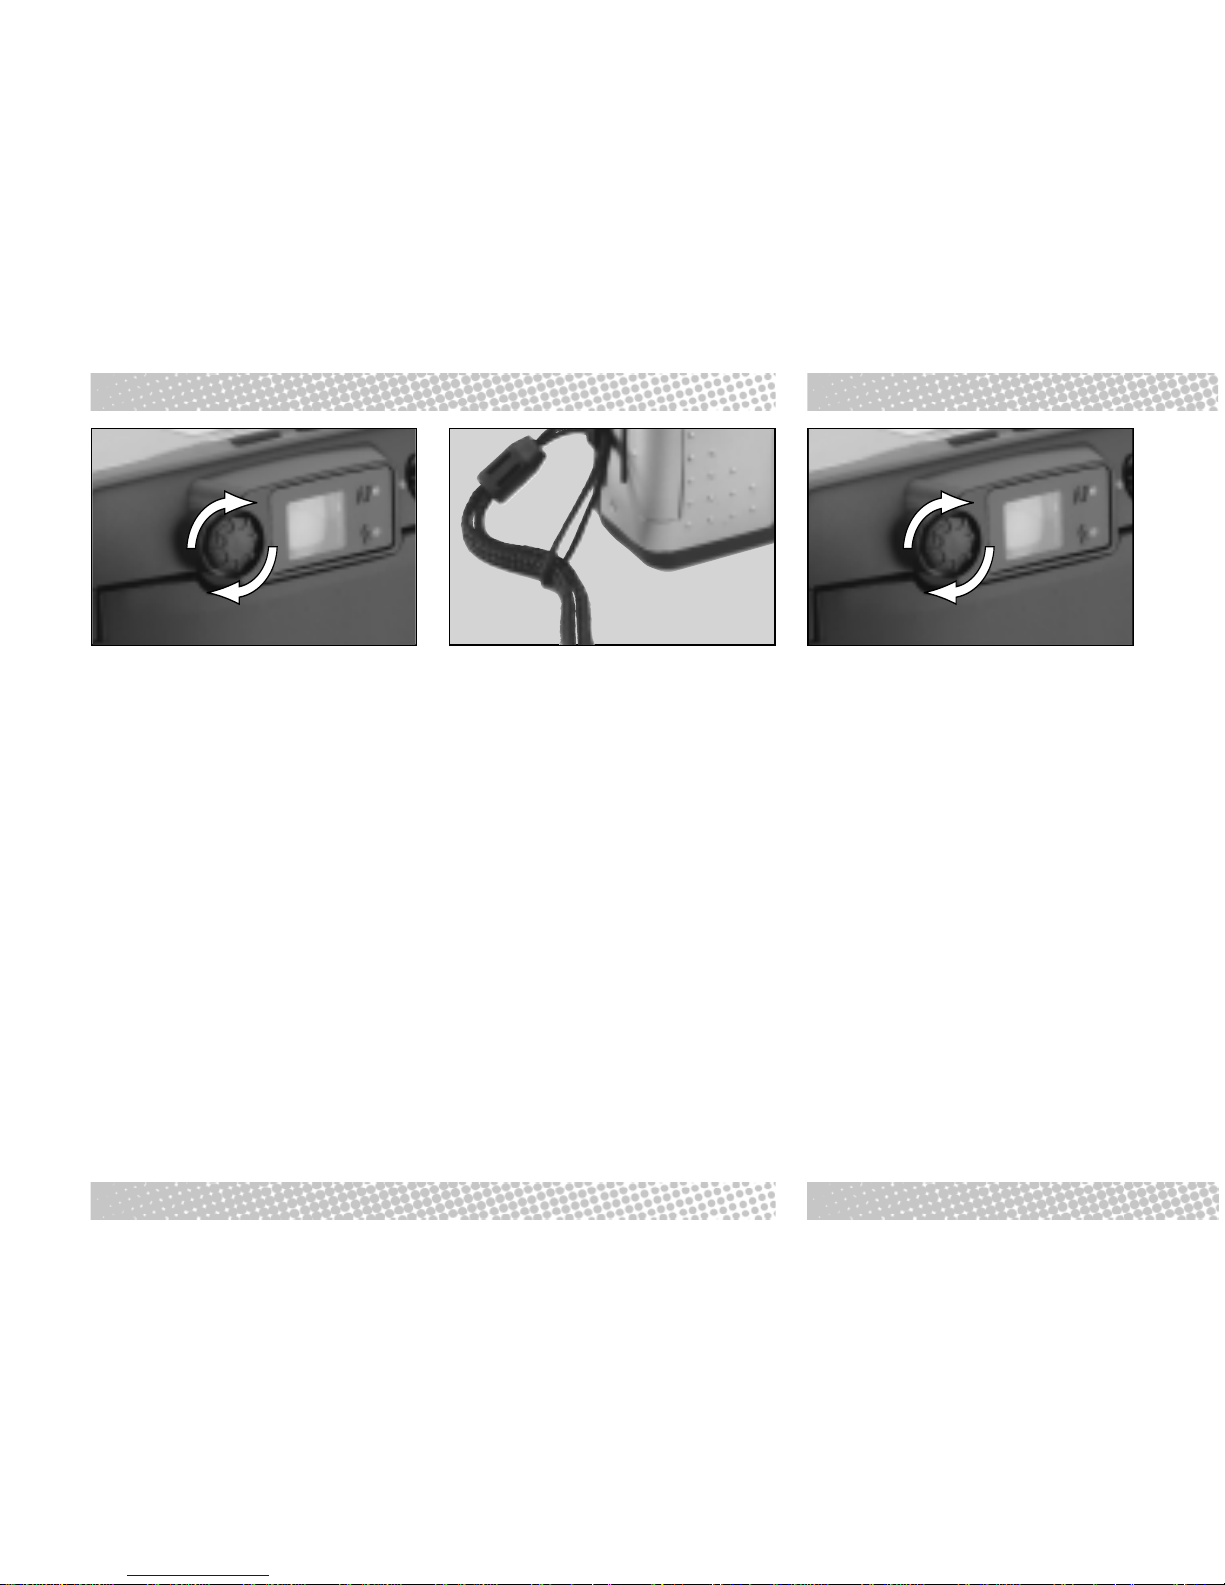
EYESIGHT CORRECTION
DIOPTRIENKORREKTUR
Dioptrienkorrektur
Zur Anpassung das Suchers bei Kurzoder Weitsichtigkeit.
»
Am Rädchen drehen, bis das
Sucherbild scharf erscheint.
Anbringen der Trageschlaufe
Eyesight correction
To correct the eyepiece power for
short- or far-sightedness.
»
Turn dial until viewfinder image
appears sharp.
Page 15

15
I
CORREZIONE DIOTTRICA
Correzione diottrica
Correzione diottrica per adattamento
alla capacità visiva.
»
Girare la ghiera finchè l’immagine
nel mirino non appare nitida.
Attaco della cinghia di trasporto
Attaching the wrist strap
Page 16
16
GBD
Loading the batteries
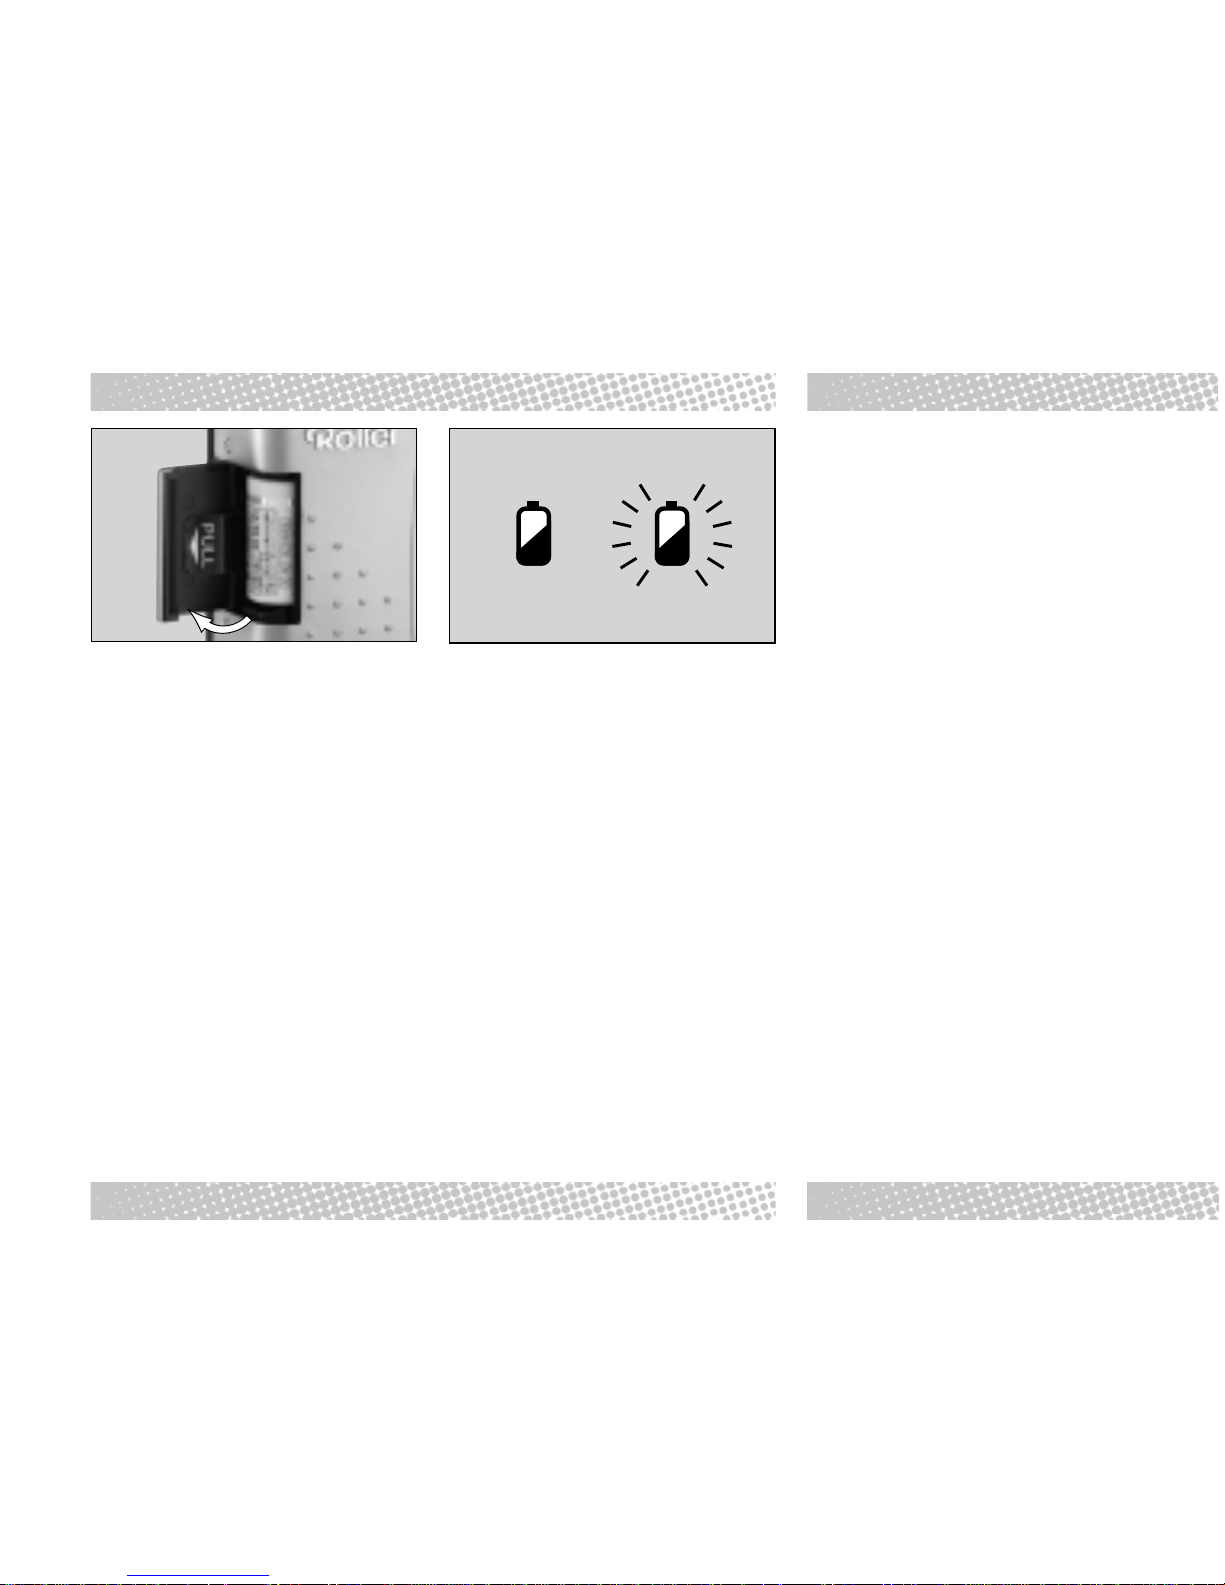
»
Open the battery chamber.
»
Insert new battery with positive and
negative poles correctly positioned.
»
Close battery-camber cover until it
clicks into place.
Please note
»
Use only type CR 2 lithium batteries.
The camera will shut off automatically
3 min after use to conserve power.
›
If you are planning not to use the
camera for some time, remove the
batteries and store them separately.
LOADING THE BATTERIES BATTERIE EINLEGEN
Batterie Einlegen
»
Batteriefach öffnen.
»
Neue Batterie einlegen und auf die
richtige Polung achten.
»
Batteriefachdeckel zudrücken, bis
er mit einem Klicken einrastet.
Bitte beachten
»
Nur Lithium-Batterien des Typs
CR 2 verwenden.
Nach 3 Min. ohne Betätigung schaltet
die Rollei Prego automatisch ab, um
Energie zu sparen.
›
Bei längerem Nichtgebrauch der
Kamera empfiehlt es sich, die Bat-
terie zu entnehmen und separat
aufzubewahren.
Batteriekontrolle
1. Kein Symbol – Batterie in Ordnung
2. Symbol erscheint – Batterie geht zu
Ende. Ersatz-Batterie bereithalten.
3. Symbol blinkt – Batterie leer, Auslö-
sen nicht mehr möglich. Neue Batterie einsetzen.
»
Das LCD-Symbol zeigt den
Batteriezustand.
Bitte beachten
»
Batterie nur bei ausgeschalteter Kamera wechseln.
»
Bei Kälte oder auf Reisen
Ersatzbatterien mitnehmen.
Bei niedrigen Temperaturen läßt die
Batterieleistung nach. Mit normaler
Temperatur erreicht die Batterie wieder ihre alte Leistung.
Page 17

17
I
Inserimento delle batterie
»
Aprire il vano batterie.
»
Inserire nuove batterie rispettandone la polarità.
»
Chiudere il coperchio del vano
batterie facendolo scattare in
posizione.
Note
»
Usare solo batterie al litio CR 2.
La fotocamera si spegnerà automaticamente se non sarà stata utilizzata
per oltre 3 minuti, per non far scaricare
le batterie.
›
Se la fotocamera non dovrà essere
utilizzata per un certo periodo,
togliere le batterie e conservarle a
parte
Checking battery power
1. No symbol / sufficient battery power.
2. Symbol appears/battery weak.
Keep spares ready.
3.
Symbol blinks/ battery exhausted,
shutter locked. Insert a fresh battery.
»
The LCD symbol shows the current
battery status.
Please note
»
Change battery only with the
camera switched off.
»
Always keep spare batteries ready
on trips or in cold weather.
Battery power declines at low
temperatures. However, the batteries
will recover as the temperature goes
back to normal.
Controllo della carica delle
batterie
1. Nessun simbolo – la carica è sufficiente
2. Appare il simbolo – batterie deboli.
Tenere pronte batterie di scorta.
3. Il simbolo lampeggia – batterie esaurite, l’otturatore risulta bloccato.
Inserire due batterie nuove.
»
Il simbolo su LCD indica lo stato di
carica delle batterie.
Note
»
La fotocamera deve essere spenta
quando si sostituiscono le batterie
»
Avere sempre a disposizione
batterie nuove quando si è in viaggio
oppure quando si lavora a
temperature molto rigide.
La potenza delle batterie si riduce se le
temperatura sono basse, ma si
ripristina quando la temperatura torna
a livelli normali.
INSERIMENTO DELLE BATTERIE
Page 18

18
GBD
Loading film
1. Push release button down and open
camera back.
2. Gently place film cartridge in film
compartment.
3. Extend the film leader up to the
mark “film tip” – perforation in front
of the sensor. The film should be
flat on the film guides.
4. Close camera back until it clicks
into place. The camera will now
advance the film to the first frame.
5. The display shown appears in the
LCD panel.
LOADING FILM FILMEINLEGEN
Filmeinlegen
1. Entriegelungsknopf nach unten
schieben, Rückwand aufklappen.
2. Filmpatrone in das Filmfach legen.
3. Führen Sie den Filmanfang bis zur
Markierung „Filmtip“ – Perforation
liegt vor dem Sensor. Der Film muß
flach auf der Führung liegen.
4. Rückwand zudrücken, bis sie mit
einem Klicken einrastet. Dann spult
die Kamera den Film automatisch
bis Bild 1 vor.
5. Danach erscheint im LCD-Monitor
die abgebildete Anzeige.
Bitte beachten
›
Mit DX-codierten Filmen stellt die
Kamera die Empfindlichkeit im Bereich von ISO 50–3200 automatisch ein.
›
Filme ohne DX-Code werden wie
ISO 100 belichtet.
»
Film nie im direkten Sonnenlicht
wechseln.
›
Bei falsch eingelegten Film erscheint
im LCD-Monitor das E-Symbol und
der Auslöser wird blockiert. In diesem Fall Film erneut einlegen.
Page 19

19
I
Caricamente della pellicola
1. Premere il pulsante di sblocco e
aprire il dorso della fotocamera.
2. Inserire con cautela il caricatore
nell’apposito vano.
3. Tirare la testa della pellicola fino
all‘indicazione „Filmtip“ – la
perforazione è situata prima del
sensore. La pellicola deve essere
ben distesa sulla guida.
4. Chiudere il dorso facendolo scattare
in posizione. La pellicola avanzerà
automaticamente fino al primo fotogramma.
5. Sul display LCD appare il segno
indicato.
Please note
›
If DX-coded film is used, the camera
will automatically set the film speed
within a range of ISO 50/18° to
3200/36°.
»
Never change film in direct sunlight.
›
In the case of a loading error, E
appears in the LCD, and the shutter
remains locked. Repeat the loading
procedure.
Note
›
Con pellicole a codifica DX la
fotocamera regola automaticamente la sensibilità della pellicola
nell’ambito di ISO 50/18° – 3200/
36°.
›
Mai caricare la pellicola alla luce
diretta del sole.
»
Mai caricare la pellicola alla luce
diretta del sole.
›
In caso di caricamento non corretto,
sul display LCD appare E e
l’otturatore risulta bloccato.
Ripetere la procedura di
caricamento.
CARICAMENTE DELLA PELLICOLA
Page 20
20
GBD
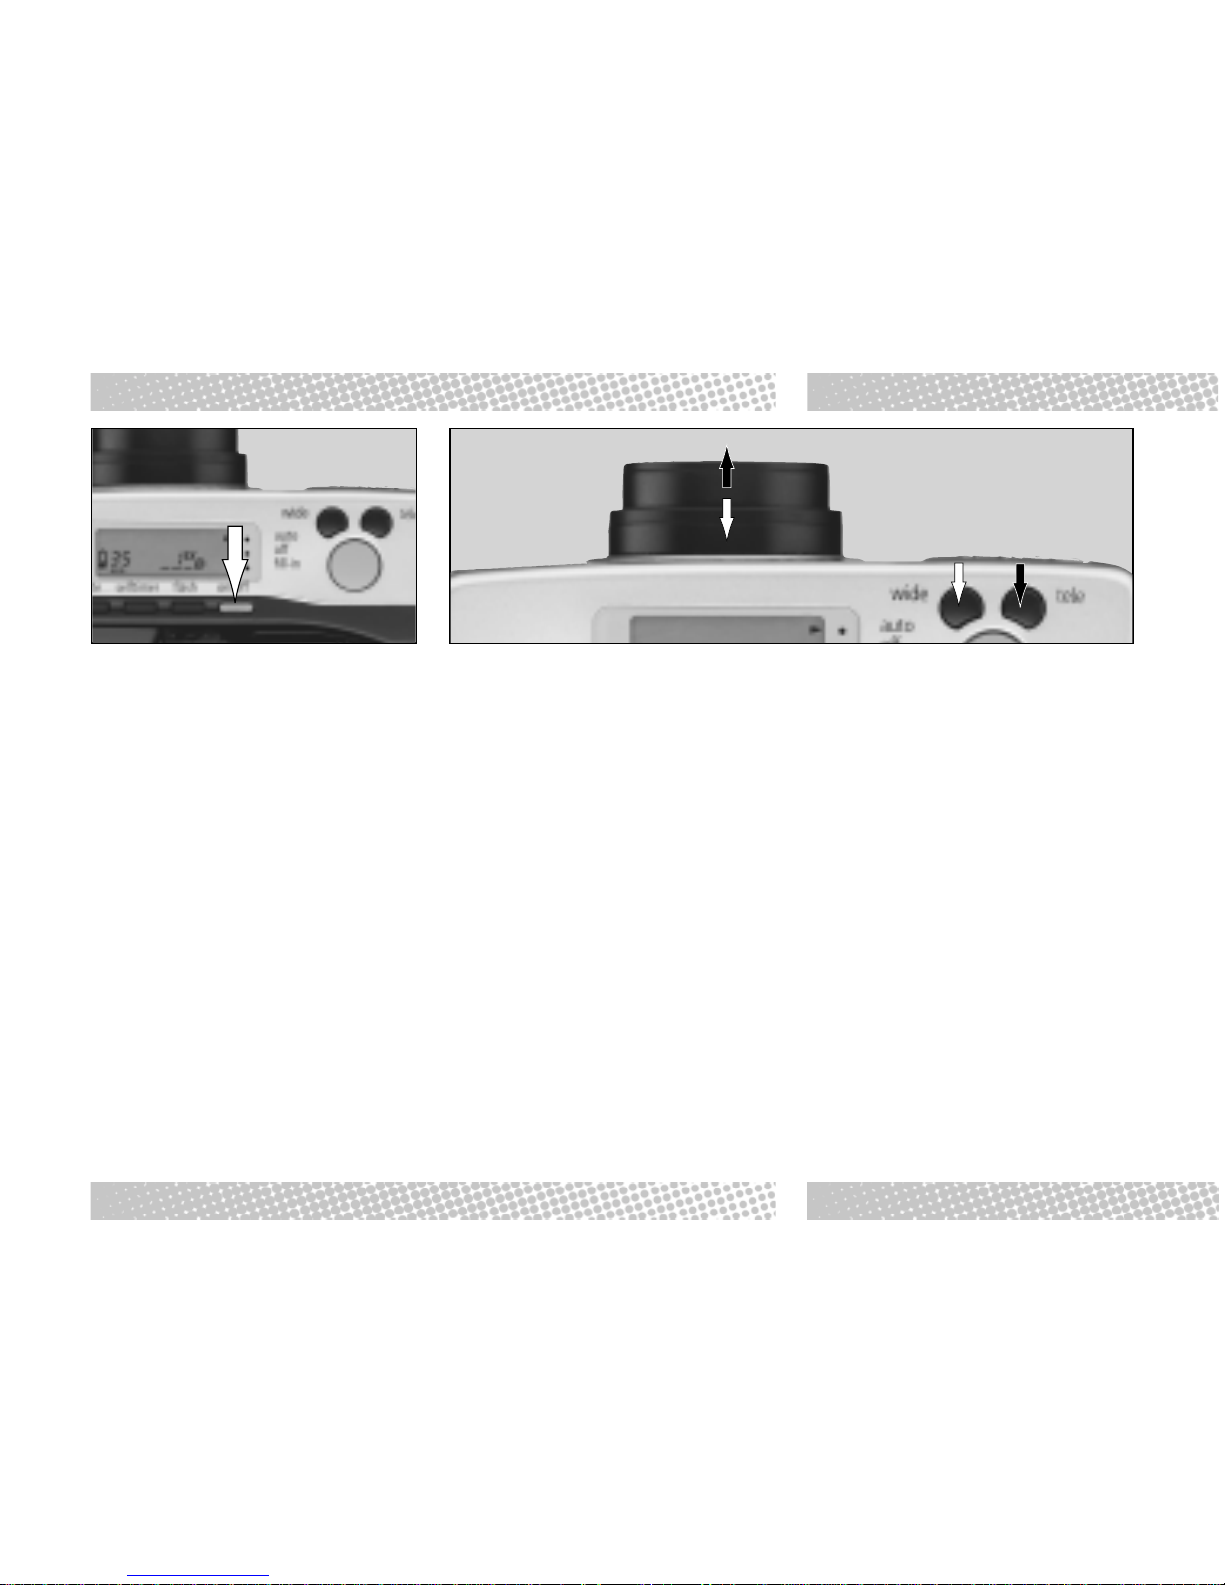
Brief instruction
»
Set master switch to ON. The lens
moves to its 38mm wide-angle position, and the LCD appears.
»
To turn the camera off, return master
switch to OFF .
›
The lens and the flash will then
automatically return to their rest
positions.
›
The camera automatically shuts off
3 min after use.
BRIEF INSTRUCTION KURZANLEITUNG
Kurzanleitung
»
ON/OFF Taste betätigen, das Ob-
jektiv fährt in seine 35mm-Weitwinkelstellung und die LCD-Anzeige erscheint.
»
Zum Ausschalten wieder Taste ON/
OFF drücken.
›
Das Objektiv bewegt sich dann automatisch in die Ruhestellung.
›
Wenn die Kamera länger als 3 Minuten nicht benutzt wird, schaltet
sie sich automatisch aus.
»
Durch den Sucher Motiv anvisieren
und mit den Zoomtasten den gewünschten Bildausschnitt wählen.
»
Für größere Abbildung entfernter
Motive oder Nahaufnahmen auf T
(Tele) (1) drücken, für Weitwinkelaufnahmen auf W (Weitwinkel) (2).
›
Während des Zoomens zeigt der
LCD-Monitor folgende Brennweiten: 35, 40, 45, 50, 55, 60, 65,
70mm.
Page 21

21
I
Brevi istruzioni
»
Aprire il copriobiettivo facendolo
scattare. L’obiettivo assume la
configurazione grandangolare 38
mm ed appare il display LCD.
»
Per spegnere l’apparecchio,
chiudere lentamente il copriobiettivo.
›
L’obiettivo e il flash rientreranno
automaticamente.
›
La fotocamera si spegnerà
automaticamente se non sarà stata
utilizzata per oltre tre minuti; il copriobiettivo però rimarrà aperto.
»
Guardare nel mirino e traguardare il
soggetto usando il tasto zoom.
»
Per aumentare l’ingrandimento con
soggetti lontani o in riprese
ravvicinate, premere T (teleobiettivo)
(1), oppure W (grandangolare) (2).
›
Durante la regolazione zoom
appariranno sul display LCD le
seguenti focali: 35, 40, 45, 50, 55,
60, 65, 70mm.
»
Look through the viewfinder and
frame your picture using the zoom
button.
»
To zoom in on far subjects or for
close-ups press T (Telephoto) (1),
for wide angles W (2).
»
During zooming, the following focal
lengths appear in the LCD panel:
35, 40, 45, 50, 55, 60, 65, 70mm.
BREVI ISTRUZIONI
Page 22
22
GBD
Holding the camera properly
»
Hold the camera steady with both
hands to avoid camera shake,
above all at longer focal lengths.
»
Press shutter release gently and
slowly. Do not jerk.
»
Try to support both elbows against
your body.
»
Keep your eye close to the
viewfinder eyepiece for optimum
coverage of the viewfinder area.
HOLDING THE CAMERA PROPERLY KAMERAHALTUNG
Kamerahaltung
»
Kamera ruhig und fest mit beiden
Händen halten, besonders bei Tele,
um nicht zu verwackeln.
»
Langsam, nicht ruckartig den Auslöser drücken.
»
Ellbogen möglichst am Körper abstützen.
»
Kamera nahe ans Auge halten, damit das ganze Bild zu überblicken
ist.
Bitte beachten
»
Objektiv, Autofokus- und Belichtungssensor-Fenster sowie den
Blitz nicht durch Finger, herabhängende Haare oder der Trageschlaufe verdecken.
»
Bei Hochformataufnahmen sollte
der Blitz oben sein.
Page 23
23
I
Please note
»
Make sure not to cover up the lens,
autofocus and exposure-meter
windows nor the flash with your
fingers, hair or the wrist strap.
»
For vertical pictures, the flash should
be at the top.
Come deve essere tenuta la
fotocamera
»
Tenere la fotocamera ben ferma
con entrambe le mani per evitare
immagini mosse, soprattutto
quando si riprende con focali
lunghe.
»
Premere leggermente e lentamente il pulsante di scatto.
»
Cercare di tenere entrambi i gomiti
aderenti al corpo.
»
Traguardare il soggetto attraverso
il mirino.
Note
»
Bisogna fare attenzione che
l’obiettivo, le finestrelle
dell’esposimetro e dell’autofocus,
nonché il flash non vengano accidentalmente ostruiti da dita, capelli
o cinghia della fotocamera.
»
Per le immagini in formato verticale,
il flash deve trovarsi nella parte
superiore.
COME DEVE ESSERE TENUTA LA FOTOCAMERA
Page 24

24
GBD
Shooting procedure
»
Look through the viewfinder and
place AF area in the center on your
main subject.
»
Lightly press the shutter release.
The focus has been set when the
green LED lights.
If your subject is less than 1 m away,
the green AF-LED will blink. At
distances between 1.0 and 0.5 m, the
camera automatically switches to
MACRO, and the close-up icon
appears in the LCD panel.
»
Press the shutter release fully down
for exposure.
»
Squeeze the shutter release gently
to avoid camera shake.
After exposure, the film is automatically advanced by one frame, and the
frame counter advances to the next
frame number.
SHOOTING PROCEDURE FOTOGRAFIEREN
Fotografieren
»
Motiv mit dem Autofokus-Meßfeld
in der Mitte des Sucherbildes anvisieren.
»
Den Auslöser leicht drücken. Wenn
die grüne LED aufleuchtet, ist die
Entfernung eingestellt.
Bei Entfernungen von weniger als 1 m
blinkt die grüne AF-LED. Bei Entfernungen zwischen 1,0 und 0,55 m blinkt
die AF-LED langsam. Die Rollei Prego
70 schaltet automatisch auf MAKRO.
Das Nahaufnahme-Symbol
er-
scheint im LCD-Monitor
»
Zum Fotografieren den Auslöser
ganz herunterdrücken.
»
Den Auslöser vorsichtig drücken,
um nicht zu verwackeln.
Nach der Aufnahmen wird der Film
automatisch um ein Bild weitertransportiert, und die Anzeige im Bildzählwerk ändert sich.
Bitte beachten
»
Bei Nichtgebrauch Kamera ausschalten. Dies verhindert versehentliches Auslösen.
›
Die Rollei Prego 70 ist mit einer
Dioptrienkorrektur zur individuellen
Okulareinstellung für Fehlsichtige
ausgestattet.
»
Zur Einstellung am Dioptrienrädchen drehen, bis das Sucherbild
optimal scharf erscheint.
›
Die Kamera kann auf Motive zwischen 0,55 m und unendlich scharfstellen.
›
Aufnahmen mit Entfernungen zwischen 0,55 m und 1 m sind mit der
automatischen MAKRO-Funktion
möglich.
›
Bei zu wenig Licht blitzt die Rollei
Prego 90 automatisch.
›
Blitzbereich (ISO 100)
Weitwinkel Tele
(35mm) (70mm)
0,55
–
4,0 m 0,65 – 2,1 m
Page 25

25
I
Please note
»
Always switch the camera offs after
use to prevent accidental expo-
sure.
›
The viewfinder eyepiece can be
adjusted to compensate for a
certain degree of near or farsight-
edness. Turn the eyesight-
adjustment dial until the viewfinder
image appears sharp.
›
The focusing range of the camera is
from 0.5 m to infinity.
›
Close-ups in the range from 0.5 m
to 1 m are also possible: The camera
automatically switches to MACRO
mode.
›
When the light is low, the camera
automatically fires the built-in flash.
›
Flash range (ISO 100/21°)
Procedura di ripresa
»
Guardando attraverso il mirino,
dirigere il campo di misurazione AF
sul centro del soggetto.
»
Premere leggermente il tasto di
scatto. L’avvenuta regolazione della
messa a fuoco è segnalata
dall’accensione del LED verde.
Se il soggetto si trova ad una distanza
inferiore al metro, il LED verde
dell’autofocus lampeggia.
A distanze comprese tra 1.0 e 0.5 m,
la fotocamera passa automaticamente a MACRO e nel display LCD appare
l’icona che segnala le riprese
ravvicinate.
»
Premere a fondo il pulsante di scatto
avendo cura di tenere ferma la
fotocamera per evitare immagini
mosse.
Dopo l’esposizione, la pellicola viene
automaticamente avanzata di un
fotogramma e il contapose scatta al
successivo numero di fotogramma.
Note
»
Dopo l’uso, chiudere sempre il
copriobiettivo per evitare esposizioni
accidentali e per salvaguardare
l’obiettivo.
›
L’oculare del mirino prevede la
compensazione diottrica entro certi
limiti di miopia e di presbiopia.
Ruotare la relativa ghiera di
regolazione finché l’immagine nel
mirino non appare nitida.
»
La gamma di messa a fuoco della
fotocamera va da 0.5 m all’infinito.
›
Sono possibili anche riprese
ravvicinate a distanze comprese
tra 0.5 m e 1 m: la fotocamera
passa automaticamente al modo
MACRO.
›
Se la luce è scarsa, la fotocamera
attiva automaticamente il flash
incorporato.
›
Gamma flash (ISO 100/21°)
Wide-angle Telephoto
(35mm) (70mm)
0,55
–
4,0 m 0,65 – 2,1 m
Grandangolare Telefoto
(35mm) (70mm)
0,55
–
4,0 m 0,65 – 2,1 m
PROCEDURA DI RIPRESA
Page 26

26
GBD
›
Lightly press the shutter release
and wait for the red LED to light; the
flash is then ready to fire.
1. Rapid flashing of the red LED signals
that the flash is still charging. The
shutter remains locked.
2. If the red LED blinks slowly with the
flash switched off, use a tripod or
place the camera on some other
firm support to prevent camera
shake.
›
Nach leichtem Drücken des Auslö-
sers leuchtet die rote LED auf, wenn
der Blitz bereit ist.
1. Solange die rote LED schnell blinkt,
wird der Blitz noch aufgeladen. Auslösen ist nicht möglich.
2. Wenn die rote LED bei abgeschaltetem Blitz langsam blinkt, ein Stativ oder eine andere feste Unterlage
benutzen, um nicht zu verwackeln.
Bitte beachten
»
Besonders mit längeren Brennweiten (Tele) darauf achten, die Kamera ruhig zu halten und vorsichtig
auszulösen, um nicht zu verwakkeln.
»
Angegebene Blitzreichweiten beachten, um Fehlbelichtungen zu
vermeiden.
Page 27

27
I
›
Premere leggermente il pulsante di
scatto e attendere che il LED rosso
si accenda; il flash è allora pronto a
scattare.
1. Il lampeggiamento rapido del LED
rosso segnala che il flash è ancora
in fase di ricarica. L’otturatore risulta
bloccato.
2. Se il LED rosso lampeggia
lentamente, ed il flash è escluso,
usare uno stativo oppure mettere
l’apparecchio fotografico su altra
base stabile per evitare movimenti
dello stesso.
Please note
»
Hold the camera very steady and
squeeze the shutter release very
gently above all when using a long
focal length to avoid camera shake.
»
Carefully check flash range to avoid
over or underexposure.
Note
»
Tenere la fotocamera ben ferma e
premere delicatamente il pulsante
di scatto, soprattutto se si usano
focali lunghe, per evitare di ottenere
immagini mosse.
»
Controllare accuratamente la
gamma flash per evitare sovra o
sottoesposizioni.
Page 28

28
GBD
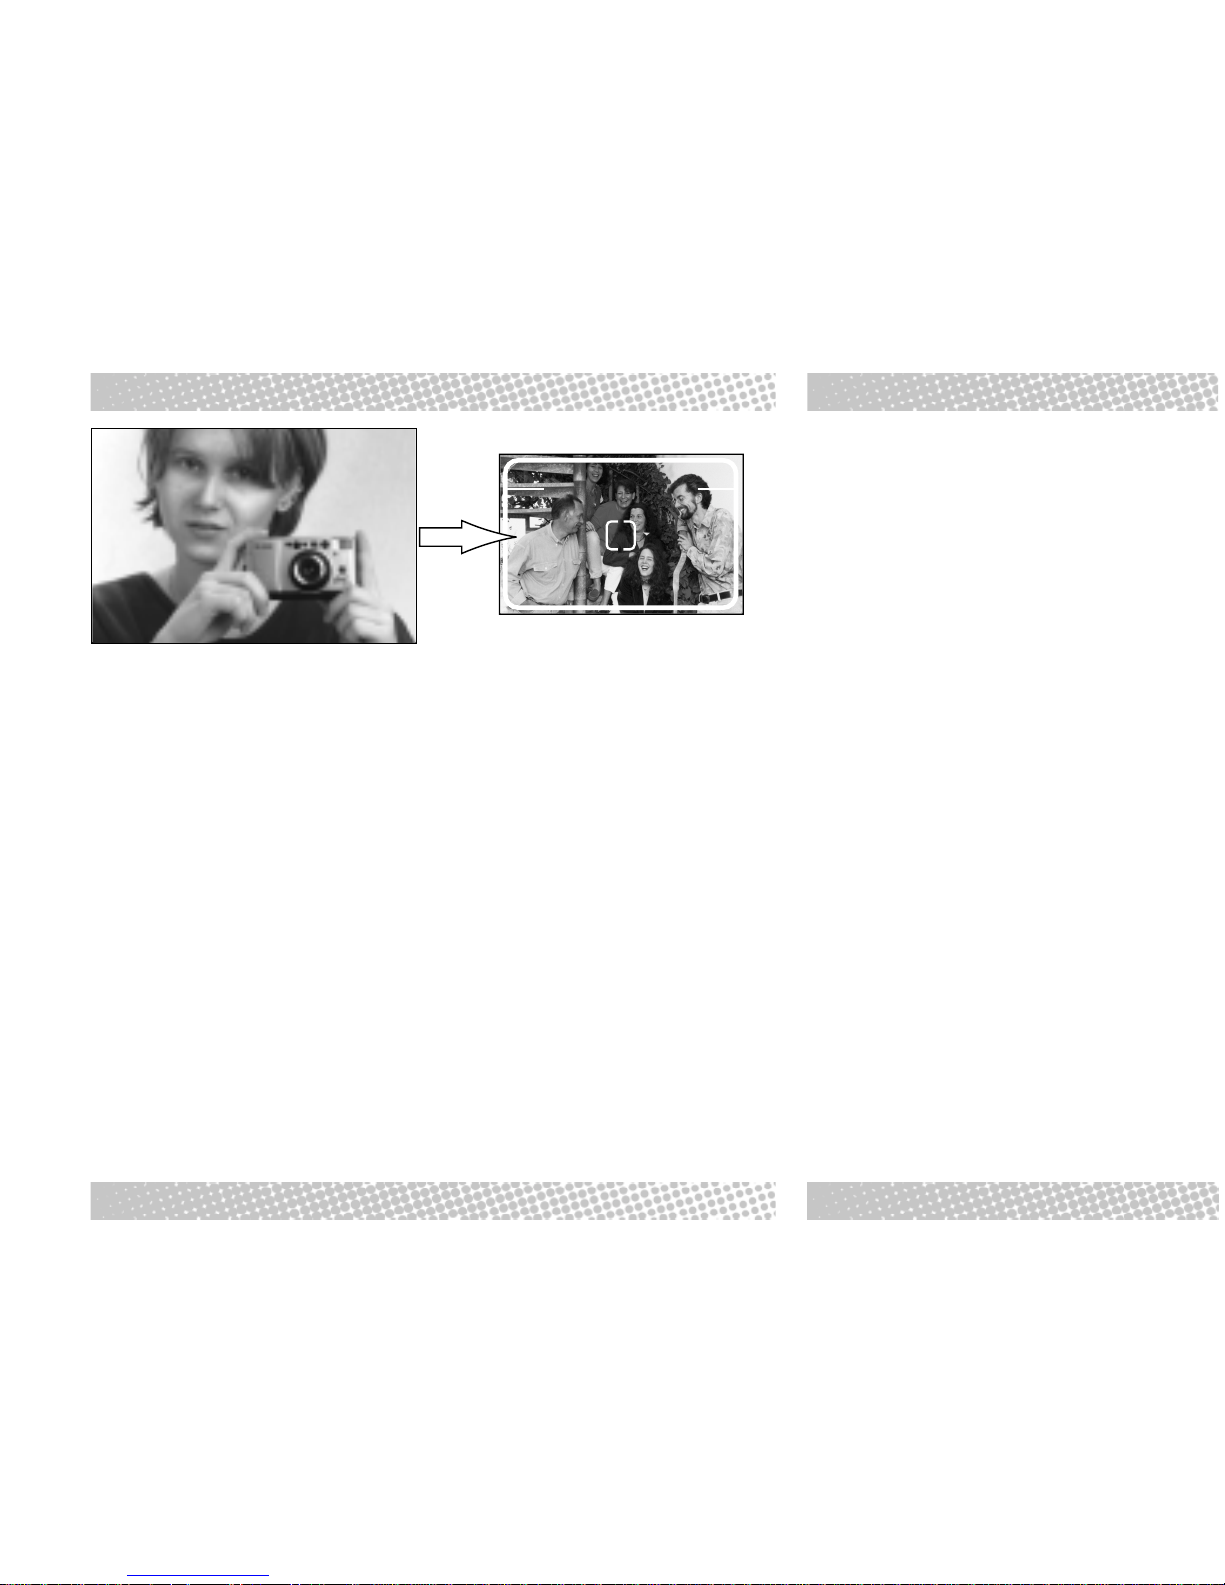
Focus lock
With this function you may focus on
off-center subjects (A). Proceed as
follows:
1. Place AF area on your main subject
(B).
2. Lightly press shutter release (green
LED lights).
»
Do not press too hard to avoid
releasing the shutter!
C
FOCUS LOCK SCHÄRFESPEICHER
Schärfespeicher
Der Schärfespeicher erlaubt es, auf
Objekte scharfzustellen, die nicht in
der Bildmitte liegen (A). Das funktioniert wie folgt:
1. AF-Meßfeld auf das Hauptmotiv
richten. (B)
2. Auslöser leicht antippen (grüne LED
leuchtet).
»
Nicht zu fest drücken, um unbeabsichtigtes Auslösen zu vermeiden.
3. Auslöser leicht gedrückt halten und
gewünschten Bildausschnitt bestimmen. (C)
»
Kamera ruhig halten und dann Auslöser ganz herunterdrücken.
›
Loslassen des Auslösers hebt die
Schärfespeicherung wieder auf.
B
A
Page 29

29
I
3. Keep shutter release lightly
depressed and recompose (C).
»
Hold camera steady and press
shutter release down fully.
›
Releasing the shutter button
cancels focus lock.
Blocco della messa a fuoco
Grazie a questa funzione è possibile
mettere a fuoco soggetti che non si
trovano al centro dell’immagine (A).
Procedere come segue:
1. Puntare il campo di misurazione AF
sul soggetto principale (B).
2. Premere leggermente il pulsante di
scatto (si accende il LED verde).
»
Non premere troppo il pulsante per
non far scattare l’otturatore!
3. Mantenere leggermente premuto il
pulsante di scatto e stabilire
l’inquadratura definitiva ( C ).
»
Tenendo ben fermo l’apparecchio,
premere a fondo il pulsante di scatto.
›
Il blocco della messa a fuoco si
annulla automaticamente al rilascio
del pulsante di scatto.
BLOCCO DELLA MESSA A FUOCO
ABC
Page 30

30
GBD
Viewfinder display
Two LEDs light up when the shutter
release is lightly pressed.
! Parallax marks for close-ups
" Autofocus area for close-ups
Autofocus LED (green)
›
The green LED lights at subject
distances between 0.5 m and
infinity.
›
The green LED blinks rapidly when
the subject is too close. The shutter
remains locked.
›
The green LED blinks slowly at
subject distances between 0.5 and
1 m. The camera automatically
switches to MACRO mode.
VIEWFINDER DISPLAY SUCHERINFORMATIONEN
Sucherinformationen
Bei leicht gedrücktem Auslöser leuchten zwei Kontroll-LEDs auf.
! Nahaufnahme-Bildfeldgrenze
(Makro)
" Autofokus-Meßfeld
Autofokus-LED (grün)
›
Die grüne LED leuchtet stetig bei
Motiventfernungen zwischen 1 m
und unendlich.
›
Die grüne LED blinkt schnell bei zu
kurzer Motiventfernung. Der Auslö-
ser ist blockiert.
›
Die grüne LED blinkt langsam bei
Motiventfernung von 0,55 bis 1 m.
Die Kamera schaltet automatisch
auf MAKRO-Funktion.
grün / green/ verde
!
"
Blitz-LED (rot)
›
Die rote LED leuchtet, wenn der
Blitz auslösebereit ist und fotografiert werden kann.
›
Die rote LED blinkt langsam, wenn
bei Funktionen ohne Blitz
Verwacklungsgefahr besteht.
›
Die rote LED blinkt schnell während
der Blitzaufladung. Bei Funktionen
mit Blitz ist solange der Auslöser
blockiert.
rot / red/ rosso
Page 31

31
I
Display nel mirino
Due LED si accendono quando si
preme leggermente il pulsante di
scatto.
! Parallasse per riprese ravvicinate
"
Area AF per riprese ravvicinate
LED flash (rosso)
›
Il LED rosso si accende quando il
flash è pronto a scattare.
›
Con flash escluso, il LED rosso
lampeggia lentamente se c’è il
rischio di realizzare immagini mosse.
›
Il LED rosso lampeggia rapidamente durante la ricarica del flash.
L’otturatore risulta bloccato finchè
il flash non è pronto a scattare.
Flash LED (red)
›
The red LED lights when the flash is
ready to fire and you may press the
shutter release for exposure.
›
The red LED blinks slowly if there is
a risk of camera shake when the
flash has been turned off.
›
The red LED blinks rapidly during
flash recycling. The shutter remains
locked until the flash is ready to fire.
LED Autofocus (verde)
›
Il LED verde si accende quando la
distanza del soggetto si colloca tra
0.5 m e infinito.
›
Il LED verde lampeggia rapidamente quando il soggetto è troppo
vicino. L’otturatore risulta bloccato.
›
Il LED verde lampeggia lentamente
quando la distanza del soggetto è
compresa tra 0.5 e 1 m. La fotocamera
passa automaticamente al modo
MACRO.
DISPLAY NEL MIRINO
Page 32

32
GBD
Automatic rewind
›
After the last frame, the film is
rewound automatically.
›
The motor stops when rewinding is
complete.
›
The camera-back and film icons
blink simultaneously in the LCD
panel.
REWINDING THE FILM FILMRÜCKSPULEN
Automatisches Rückspulen
›
Der voll belichtete Film wird automatisch zurückgespult.
›
Wenn der Film vollständig zurückgespult ist, stoppt der Motor.
›
Dann blinken zugleich die Symbole
für Rückwand und Film im LCDMonitor.
Bitte beachten
»
Kamera während des Filmrückspulens nicht ausschalten.
»
Teilbelichtete Filme können durch
Drücken des manuellen Rückspulknopfes im Kameraboden jederzeit
zurückgespult werden.
»
Wenn der Motor stoppt, bevor die
0 erscheint, neue Batterie einlegen.
»
Rückwand nicht öffnen, bevor der
Film mit neuer Batterie vollständig
zurückgespult worden ist.
Page 33

33
I
Please note
»
Do not switch the camera off during
rewinding.
»
Partially exposed films may be
rewound at any time by pressing
the rewind button.
»
Should the motor stop before 0
appears in the frame counter,
replace the battery.
»
Do not open the camera back
before having completed rewinding with the new battery.
Riavvolgimente automatico
›
Una volta impressionato l’ultimo
fotogramma, la pellicola si riavvolge
automaticamente
›
Il motore si arresta quando il
riavvolgimento è stato completato.
›
Sul display LCD lampeggiano
simultaneamente le icone del dorso
e della pellicola.
Note
»
Non chiudere il copriobiettivo durante il riavvolgimento.
»
Volendo riavvolgere una pellicola
solo parzialmente impressionata,
basta premere il tasto di
riavvolgimento.
»
Se il motore si arresta prima che
appaia 0 sul contapose, sostituire
le batterie.
»
Non aprire il dorso prima che sia
stato completato il riavvolgimento
con le nuove batterie.
RIAVVOLGIMENTE AUTOMATICO
Page 34

34
GBD
Imprinting the date or a caption
»
To activate the imprint function,
press the DATE button.
Selecting the date format
»
Press the DATE button to select the
date format.
The hyphens
-- -- --
stand for No
imprint.
›
After activating date/title imprinting,
is displayed.
IMPRINTING DATE / CAPTION
DATUM-/TITELEINBELICHTUNG
Datum-/Titeleinbelichtung
Mit der DATE-Taste wird die Datums/Titeleinbelichtung aktiviert.
Wahl der Datumsform
»
DATE-Taste drücken, um
die Form der Einbelichtung zu wählen.
Die Striche
-- -- --
stehen für
keine Einbelichtung
›
Nach Aktivierung der Datums-/Titeleinbelichtung wird
angezeigt.
Änderung der Datums-/Zeiteinstellung
»
DATE-Taste 2 Sekunden lang drük-
ken, bis Datenanzeige blinkt. Blinkender Wert kann jetzt durch Drükken der Zoomtasten verändert
werden. Bei langem Drücken wechseln die Werte in schneller Folge.
»
Erneuter Druck der DATE-Taste
speichert den so eingestellten Wert,
und der nächste beginnt zu blinken.
»
Wenn gewünschte Werte eingestellt sind, DATE-Taste drücken,
bis keine Anzeige mehr blinkt
Keine Einbelichtung
No Imprinting
Uit
Jahr Monat Tag
Year month day
anno mese giorno
Monat Tag Jahr
Month day year
mese giorno anno
Page 35

35
I
Changing the date or time
»
Press DATE button over 2 s until
date display blinks. The blinking
digits can now be varied by pressing
the zoom button. Holding the button down will cause the display to
change rapidly.
»
Renewed depression of the DATE
button puts the display in memory,
and the next digits begin to blink.
»
After the setting, press the DATE
button until all blinking stops.
Stampa della data o di un titolo
Per attivare la funzione, premere il
tasto DATE.
Selezione della configurazione
della data
»
Premere il tasto DATE. I trattini
stanno
-- -- --
ad indicare nessuna
stampa
Cambio della data o dell’ora
»
Premere il tasto DATE per oltre 2
secondi finchè il display della data
non lampeggia. Le cifre
lampeggianti possono ora essere
modificate premendo il tasto zoom.
Tenendo premuto il tasto si attiva lo
scorrimento veloce delle cifre.
»
Ripremendo il tasto DATE , si
memorizza il display e le cifre
successive iniziano a lampeggiare.
»
A regolazione effettuata, premere il
tasto DATE finchè cessa ogni
lampeggiamento.
STAMPA DELLA DATA O DI UN TITOLO
Bildtitel
Caption
Titulo
Tag Stunde Minute
Day hour minute
giorno ora minuto
Tag Monat Jahr
Day month year
giorno mese anno
Page 36

36
GBD
Selecting a caption
When CP appears in the display, press
the zoom button to select one of seven
captions.
SELECTING A CAPTION WAHL EINES BILDTITELS
Wahl eines Bildtitels
Bei Anzeige CP durch Betätigen der
Zoomtaste einen der sieben Titel wählen.
Bitte beachten
›
Datum/Uhrzeit oder Titel können
nur alternativ, nicht zugleich einbelichtet werden.
›
Die Einbelichtung erfolgt in die untere rechte Bildecke. Die Einbelichtung kann vor hellem Hintergrund evtl. schlecht lesbar sein.
›
Nach einem Batteriewechsel Datum und Zeit gegebenenfalls neu
einstellen.
I LOVE YOU
TITEL
CP-1 I LOVE YOU
CP-2 A HAPPY BIRTHDAY
CP-3 THANK YOU
CP-4 CONGRATULATIONS
CP-5 A HAPPY NEW YEAR
CP-6 MERRY X-MAS
CP-7 HELLO!
Page 37

37
I
Please note
›
Date/time or caption can only be
imprinted separately.
›
The selected data are imprinted in
the lower right-hand corner of
thepicture and may be difficult to
read against a bright background.
›
Reset date and time after changing
batteries.
Selezione di un titolo
Quando nel display appare CP,
premere il tasto zoom per selezionare
uno dei sette titoli.
Note
›
Possono essere stampati solo data,
ora oppure titolo.
›
Data, ora o titolo selezionati
vengono stampati sull’angolo
inferiore destro della foto e sono
difficilmente leggibili su uno sfondo
molto chiaro.
›
Regolare nuovamente data e ora
dopo il cambio delle batterie.
SELEZIONE DI UN TITOLO
MERRY X-MAS
Page 38

38
GBD
Selecting a flash mode
»
Press the FLASH button to select
a flash mode.
SELECTING A FLASH MODE WAHL DER BLITZFUNKTION
Wahl der Blitzfunktion
Mit der FLASH-Taste wird die Blitzfunktion gewählt.
Bitte beachten
›
Nach einer Aufnahme mit der Blitzfunktion Fill-in & Gegenlichtkorrektur
kehrt die Rollei Prego 70 zur Normal-Funktion zurück
›
Bei länger gedrückter FLASH-Taste wechseln die Blitzfunktionen
schnell in obiger Folge.
BLITZAUTOMATIK
AUTOFLASH
FLASH AUTOMATICO
ANTI-ROTAUGEN-BLITZ
ANTI RED-EYE FLASH
FLASH AUTOMATICO PER RIDURRE
L’EFFETTO “OCCHI ROSSI”
BLITZ AUS
FLASH OFF
FLASH SPENTO
Page 39

39
I
Please note
›
After an exposure with one of the
special flash functions, the camera
reverts to standard mode.
›
Holding the FLASH button down
will cause the above functions to
cycle rapidly.
Selezione di un modo flash
Premere il tasto FLASH per selezionare un modo flash.
Note
›
Dopo un’esposizione tramite una
delle speciali funzioni flash, la
fotocamera ritorna al modo
standard.
›
Tenendo premuto il tasto FLASH
si fanno scorrere rapidamente le
suddette funzioni.
SELEZIONE DI UN MODO FLASH
FILL-IN / GEGENLICHTKORREKTUR
FILL-IN / EXPOSURE COMPENSATION
FILL-IN / CORREZIONE AUTOMATICA DEL
CONTROLUCE
AUFHELLBLITZ
FILL FLASH
LAMPO DI RISCHIARAMENTO
AUFHELLBLITZ / ROT- AUGEN-REDUZ.
FILL-IN / ANTI RED-EYE PREFLASH
FILL-IN / FLASH AUTOMATICO PER
RIDURRE L’EFFETTO “OCCHI ROSSI”
Page 40

40
GBD
Selecting a self-timer mode
»
Press the SELF button to select a
self-timer mode.
›
After an exposure with one of the
self-timer modes, the camera
reverts to standard mode.
Wahl der Selbstauslöserfunktion
Mit der SELF-Taste wird die
Selbstauslöserfunktion gewählt.
›
Nach einer Aufnahme mit einer speziellen Selbstauslöserfunktion kehrt
die Kamera zur Normal-Funktion
zurück.
(Ausnahmen: 2 S Auslöseverzögerung,
IR-Fernauslösung)
AUS(NORMAL)
OFF
(DEFAULT)
OFF (VALORE STANDARD)
SELBSTAUSLÖSER
SELF-TIMER
AUTOSCATTO
DOPPEL-SELBSTAUSLÖSER
DOUBLE SELF-TIMER
DOPPIO AUTOSCATTO
Bitte beachten
›
IR-Fernauslöser als Zubehör im
Fotofachhandel erhältlich.
SELECTING A SELF-TIMER MODE WAHL DER SELBSTAUSLÖSERFUNKTION
Page 41

41
I
Please note
›
The IR remote control is available
as an optional accessory.
Selezione di un modo autoscatto
Premere il tasto SELF per selezionare
un modo autoscatto.
›
Dopo un’esposizione con uno dei
modi autoscatto, la fotocamera
ritorna al modo standard.
2 S AUSLÖSEVERZÖGERUNG
2 SEC. DELAY
RITARDO DELLO SCATTO DI 2 SEC.
IR-FERNAUSLÖSUNG
IR-REMOTE CONTROL
SCATTO IR A DISTANZA
INTERVALLAUFNAHMEN
INTERVAL TIMER
RIPRESE INTERVALLATE
Nota
›
Il telecomando IR è disponibile
come accessorio opzionale.
SELEZIONE DI UN MODO AUTOSCATTO
Page 42

42
GBD
AUTO Anti-red-eye flash
"Red-eye" occurs primarily in
portraiture at low light levels.
AUTO ANTI-RED-EYE FLASH
AUTO ANTI-ROTAUGEN-BLITZ
AUTO Anti-Rotaugen-Blitz
Der „Rotaugen“-Effekt tritt vor allem
bei Portraitaufnahmen mit wenig
Umgebungslicht auf.
»
Durch das Aufleuchten der AntiRotaugen-LED wird der RotaugenEffekt deutlich reduziert, weil die
LED ein Schließen der Pupillen bewirkt, bevor die Aufnahme erfolgt.
Kamera bis zur Auslösung des Blitzes ruhig halten.
»
Blitz-Taste 1x drücken.
flash
1x
Page 43

43
I
AUTO Flash automatico per ri-
durre l’effetto “occhi rossi”
L’effetto “occhi rossi” si riscontra
soprattutto nella fotografia di ritratto
con basso livello di luce.
»
Il pre-flash riduce effettivamente
l’effetto “occhi rossi”, in quanto
costringe la pupilla a contrarsi prima che scatti il flash principale.
Bisogna aver cura di non muovere
l’apparecchio fotografico tra il preflash e il flash.
»
You can noticeably reduce red-eye
with the anti-red-eye LED. The LED
causes the pupils to close before
the picture is taken.
Keep the camera still until the main
flash is fired.
»
Press Flash button once.
FLASH AUTOMATICO PER RIDURRE L’EFFETTO “OCCHI ROSSI”
Page 44

44
GBD
OFF Flash off
Switching the flash off may come in
handy if you wish to shoot with available
light only or in places where picturetaking is not allowed, etc.
OFF FLASH OFF
OFF Blitz ausgeschaltet
Zum Fotografieren nur mit vorhandenem Licht oder wenn Blitzen verboten
oder störend ist, kann der Blitz abgeschaltet werden.
OFF BLITZ AUSGESCHALTET
flash
2x
Auch in diesem Fall die Kamera auf
einer festen Unterlage abstützen oder
ein Stativ benutzen, um nicht zu verwackeln. Blitz-Taste dazu 2x betätigen.
Page 45

45
I
Flash escluso OFF
L’esclusione del flash può essere utile
quando si desidera riprendere
sfruttando solo la luce disponibile
oppure in luoghi dove non è permesso
effettuare riprese con il flash.
FLASH ESCLUSO OFF
Here also, use a tripod or other firm
support to avoid camera shake. Press
flash button twice.
Anche in questo caso è bene usare
uno stativo o una base stabile per
evitare immagini mosse.
Page 46

46
GBD
FILL-IN Forced daylight flash
When your main subject is in the shade
and the ambient light too
bright for the flash to fire automatically,
this mode will force the flash and thus
fill the shadows for balanced overall
exposure. Press flash-button 3 times.
FILL-IN Tageslicht-Aufhellblitz
Wenn das Hauptmotiv im Schatten
liegt und die Umgebungshelligkeit zu
stark für die automatische Blitzzuschaltung ist, sorgt die FILL-IN-Funktion für eine Aufhellung der Schattenpartien und somit eine ausgewogene
Belichtung, dazu Blitztaste 3 x betätigen.
Bitte beachten
Bei aktiviertem Aufhellblitz wird der
Blitz unabhängig von Motiv- und Hintergrundhelligkeit immer ausgelöst.
FILL-IN FORCED DAYLIGHT FLASH FILL-IN TAGESLICHT-AUFHELLBLITZ
flash
3x
Page 47

47
I
FILL-IN Flash di rischiaramento
in luce diurna
Quando il soggetto è in ombra e la luce
ambiente è troppo forte per far scattare
il flash automati-camente, questo
modo attiva il flash che rischiarerà le
ombre, facendo sì che l’immagine risulti
correttamente esposta.
Nota
Se è attivato il modo flash di
rischiaramento, il flash scatta sempre
indipendentemente dalla luminosità del
soggetto e dello sfondo.
Please note
With the fill-flash mode activated, the
flash will always fire, regardless of
subject and background brightness.
FLASH DI RISCHIARAMENTO IN LUCE DIURNA
Page 48

48
GBD
FILL-flash with backlight
compensation
Backlight compensation will improve
your picture if your subject is in the
shade, against a bright background,
but too far away for fill flash (see flash
range).
›
Overexposure by +1.5 EV prevents
the shadows from blocking up.
FILL-IN AUFHELLBLITZ u.
Gegenlichtkorrektur
Wenn das Hauptmotiv vor hellem Hintergrund im Schatten liegt, für den
Aufhellblitz aber zu weit entfernt ist
(siehe Blitzreichweite), hilft eine
Gegenlichtkorrektur.
›
Die um +1,5 LW reichlichere Be-
lichtung verhindert, daß die
Schattenpartien zu dunkel werden.
Bitte beachten
»
Darauf achten, daß die Sonne nicht
direkt in das Objektiv scheint.
»
Direkte Sonneneinstrahlung und
auch helle Lichtreflexe können zu
Streulichtflecken im Bild führen.
Möglichst aus dem Schatten heraus fotografieren.
»
Blitz-Taste 4x betätigen.
FILL-FLASH / BACKLIGHT COMPENSATION
FILL-IN AUFHELLBLITZ U. GEGENLICHTKORREKTUR
flash
4x
Page 49

49
I
Please note
»
Make sure direct sunlight does not
strike the front lens.
»
Direct sunlight reaching the lens or
bright reflections may give rise to
ghosts in your picture. Always try to
keep the camera in the shade.
»
Press flash-button 4 times.
FILL-IN Correzione automatica
del controluce
La correzione del controluce migliora
le immagini nelle quali il soggetto è in
ombra contro uno sfondo luminoso,
ma è nel contempo troppo distante
perché scatti il flash di rischiaramento
(vedere gamma flash).
›
L’aumento di 1.5 EV del valore di
esposizione impedisce alle ombre
di chiudersi.
Note
»
Evitare che la luce del sole colpisca
direttamente l’obiettivo.
»
La luce diretta del sole sull’obiettivo
oppure i riflessi possono causare
aloni sulle vostre immagini. Cercare
di tenere sempre all’ombra la
fotocamera.
FILL-IN CORREZIONE AUTOMATICA DEL CONTROLUCE
Page 50

50
GBD
Fill-in Aufhellblitz und Rotaugenreduzierung
Für Portraitaufnahmen bei dunkler
Umgebung.
Bitte beachten
»
Bei wenig Umgebungslicht Stativ
verwenden.
»
Blitz-Taste 5x betätigen.
Fill-in flash and redeye reduction
This mode is recommended for
portraiture in dim light for balanced
exposure of fore and background.
FILL-IN AUFHELLBLITZ UND ROTAUGENREDUZIERUNG
flash
5x
FILL-IN FLASH AND REDEYE REDUCTION
Page 51

51
I
Please note
»
Use a tripod to avoid camera shake
»
Press flash-button 5 times.
Page 52

52
GBD
Self-timer
This lets you get into the picture
yourself.
»
To activate this mode, press the
SELF button, then the shutter
release.
SELF-TIMER SELBSTAUSLÖSER
Selbstauslöser
Mit Hilfe des Selbstauslöser kommt
der Fotograf selbst ins Bild.
»
Mit SELF-Taste Funktion aktivie-
ren und auslösen.
›
Der Selbstauslöser läuft 10 s, die
Selbstauslöser-LED blinkt erst 7 s
lang und blinkt dann schnell die
letzten 3 s vor dem Auslösen.
»
Beim Auslösen sollte das AFMeßfeld auf das Hauptmotiv oder
ein anderes Detail in gleicher Entfernung zielen.
»
Kamera auf einer festen Unterlage
abstützen oder ein Stativ benutzen, um nicht zu verwackeln.
selftimer
Page 53

53
I
Autoscatto
Permette al fotografo di riprendere se
stesso.
»
Per attivare questo modo, premere
il tasto SELF e poi il pulsante di
scatto.
›
Il ritardo è di 10 sec; il LED
dell’autoscatto si accende per 7
sec e lampeggia nei restanti 3
secondi che precedono l’esposizione.
»
Esser certi che l’area AF coincida
con il soggetto principale o con
altro dettaglio a idonea distanza
quando si preme il pulsante di
scatto.
»
Porre la fotocamera su uno stativo
o su una base stabile per evitare di
realizzare immagini mosse.
›
The delay is 10 s; the self-timer LED
lights for 7 s and blinks the remaining
3 s before exposure.
»
Make sure the AF area coincides
with your main subject or another
detail at a suitable distance when
you press the shutter release.
»
Place the camera on a tripod or a
firm support to avoid camera shake.
AUTOSCATTO
Page 54

54
GBD
Double self-timer
In this mode, a second self-timed shot
will be taken two seconds after the
first.
»
To activate the double self-timer,
press the SELF button twice, then
the shutter release.
›
The delay is 10 s; the self-timer LED
lights for 7 s and blinks the remaining
3 s before the exposure.
›
2 s after the first exposure a second
one will be taken.
DOUBLE SELF-TIMER DOPPEL-SELBSTAUSLÖSER
Doppel-Selbstauslöser
Der Doppel-Selbstauslöser macht 2
Sekunden nach der ersten Selbstauslöseraufnahme noch eine zweite.
»
Doppel-Selbstauslöser-Funktion
mit zweimaligem Druck der SELF-
Taste aktivieren und auslösen.
›
Der Selbstauslöser läuft 10 s, die
Selbstauslöser-LED blinkt 7 s lang
und blinkt dann schnell die letzten
3 s vor dem Auslösen.
›
2 s nach der ersten Aufnahme er-
folgt die zweite Belichtung.
Bitte beachten
›
Beim Auslösen sollte das AFMeßfeld auf das Hauptmotiv oder
ein anderes Detail in gleicher Entfernung zielen.
»
Rollei Prego 70 auf einer festen
Unterlage abstützen oder ein Stativ
benutzen, um nicht zu verwackeln.
›
Wenn geblitzt wird, erfolgt die zweite Aufnahme ca. 3 s nach der ersten.
selftimer
2x
1. 2.
Page 55

55
I
Please note
›
Make sure the AF area coincides
with your main subject or another
detail at a suitable distance when
you press the shutter release.
»
Place the camera on a tripod or a
firm support to avoid camera shake.
›
When flash is used, the second
exposure will be made about 3 s
after the first.
Doppio autoscatto
In questo modo, una seconda ripresa
automatica avrà luogo dopo 2 secondi
dalla prima.
»
Per attivare il doppio autoscatto,
premere il tasto SELF e poi il pulsante di scatto.
›
Il ritardo è di 10 sec; il LED
dell’autoscatto si accende per 7
secondi e lampeggia nei restanti tre
che precedono l’esposizione.
›
Due secondi dopo la prima
esposizione avrà luogo una
seconda esposizione.
Note
›
Accertarsi che l’area AF coincida
con il soggetto principale o con
altro dettaglio a idonea distanza
quando si preme il tasto di scatto.
»
Porre la fotocamera su uno stativo
o su una base stabile per evitare
immagini mosse.
›
Quando si usa il flash, la seconda
esposizione avviene dopo circa 3
secondi dalla prima.
DOPPIO AUTOSCATTO
1. 2.
Page 56

56
GBD
2-second-delay
This mode will help you avoid camera
shake with time exposure or close-ups
from a tripod because vibrations
caused by depression of the shutter
release have faded out.
»
Press SELF-button 3-times.
2-SECOND-DELAY 2 SEKUNDEN AUSLÖSEVERZÖGERUNG
2 Sekunden Auslöseverzögerung
Auslösen mit 2 s Verzögerung verringert die Verwacklungsgefahr bei Langzeit- oder Nahaufnahmen vom Stativ.
Dazu SELF-Taste 3x drücken
Eventuelle Kameravibrationen durch
Drücken des Auslösers sind dann wieder abgeklungen.
selftimer
3x
Page 57

57
I
Scatto ritardato di due secondi
Questo modo è utile per le esposizioni
prolungate o per le riprese ravvicinate,
con fotocamera su stativo, dato che
permette che si esaurisca l’effetto delle
vibrazioni causate dall’azionamento del
pulsante di scatto.
SCATTO RITARDATO DI DUE SECONDI
Page 58

58
GBD
INT Interval timer
In this mode, a preset number of
exposures will be taken at preset
intervals from 10 seconds to 60
minutes.
»
Press the SELF button 5 times until
the INT symbol appears in the
display panel. Release button and
wait until INT stops blinking. Press
MODE button again and keep it
depressed, then use Zoom button
to set desired interval while INT
symbol is blinking.
INT INTERVAL TIMER INTERVALLBELICHTUNG
INT Intervallbelichtung
In dieser Funktion steuert ein IntervallTimer eine bestimmte Zahl von Belichtungen in vorwählbaren, festen Zeitabständen von 10 Sekunden bis 60
Minuten.
»
SELF-Taste 5x drücken, bis das
INT-Symbol im Monitor erscheint.
Taste loslassen und warten, bis
INT zu blinken aufhört. SELF-Ta-
ste erneut drücken und gedrückt
halten, bei blinkendem INT-Sym-
bol mit den Zoomtasten Intervall-
Zeit vorgeben.
»
Die erste Aufnahme erfolgt durch
normales Auslösen. Nach der Aufnahme fährt das Objektiv in seine
Grundstellung zurück. Dann beginnt
der Countdown bis zur nächsten
Aufnahme.
»
Erneutes Drücken der SELF-Taste
unterbricht eine laufende Intervallserie.
Bitte beachten
›
Die Intervallbelichtungsserie endet
automatisch mit dem 5. Bild, wenn
sie nicht vorher manuell abgebrochen wird.
selftimer
5x
1. 2.
Page 59

59
I
»
The first picture is taken as you
press the shutter release. After
exposure, the lens resets to its rest
position, and the countdown for
the next exposure begins.
»
Renewed depression of the MODE
button interrupts an interval series
in progress.
Please note
›
The interval series automatically
ends after the fifth exposure unless
it is interrupted earlier.
INT Riprese intervallate
In questo modo, un determinato
numero di esposizioni viene realizzato
a intervalli preselezionati che possono
andare da 10 secondi a 60 minuti.
»
Premere il tasto SELF finchè non
appare nel display il simbolo INT.
Rilasciare il tasto e attendere che il
simbolo INT cessi di lampeggiare.
Ripremere il tasto SELF e tenerlo
premuto, quindi usare il tasto zoom
per impostare l’intervallo desiderato
mentre il simbolo INT lampeggia.
»
La prima ripresa avviene quando si
preme il pulsante di scatto. Dopo
l’esposizione, l’obiettivo rientra ed
inizia il conteggio alla rovescia per la
successiva esposizione.
»
Se si ripreme il tasto SELF, si
interrompe una sequenza intervallata in corso.
Nota
›
La sequenza intervallata cessa automaticamente dopo la quinta
esposizione, a meno che non la si
interrompa prima.
INT RIPRESE INTERVALLATE
3…
Page 60

60
GBD
Close-ups (Macro mode)
If your subject is 0.55 m to 1 m away
(wide-angle) or 0.65 m to 1 m
(telephoto), the green LED will blink
slowly. As you press the shutter release,
the camera automatically switches to
MACRO mode, and the green symbol
appears in the LCD.
»
Be sure to focus with the close-up
AF area (see page 30) to make up
for parallax.
CLOSE-UPS (MACRO MODE) NAHAUFNAHMEN (MAKRO-FUNKTION)
Nahaufnahmen (Makro-funktion)
Wenn ein Motiv in einer Entfernung
zwischen 0,55 m – 1 m bei Weitwinkel
oder 0,65 m – 1 m bei Tele liegt, blinkt
die grüne LED langsam. Mit Drücken
des Auslösers schaltet die Rollei Prego
70 automatisch auf MAKRO-Funktion
und das
-Symbol erscheint in der
LCD-Anzeige.
»
Bei Nahaufnahmen verschobenes
Makro-Bildfeld beachten (s. S. 30),
Bitte beachten
›
Wenn der Abstand zum Motiv weniger als 0,55 m beträgt, blinkt die
grüne LED schnell und der Auslö-
ser ist blockiert.
Page 61

61
I
Please note
›
If your subject is less than 0.55 m
away, the green LED will blink
rapidly, and the shutter stays locked.
Riprese ravvicinate
(Modo MACRO)
Se il soggetto si trova a distanze
comprese tra 0.55 m e 1 m (grandangolare) oppure tra 0.65 e 1 m(telefoto),
il LED verde lampeggia lentamente.
Quando si preme il pulsante di scatto,
la fotocamera passa automaticamente al modo MACRO e appare nel display
LCD il simbolo
.
»
Esser certi di mettere a fuoco
puntando il riquadro AF per primi
piani (vedere pagina 30), per
correggere la parallasse.
Nota
›
Se il soggetto si trova a una distanza
inferiore a 0.55 m, il LED verde
lampeggia rapidamente e
l’otturatore risulta bloccato.
RIPRESE RAVVICINATE
(MODO MACRO)
Page 62

62
GBD
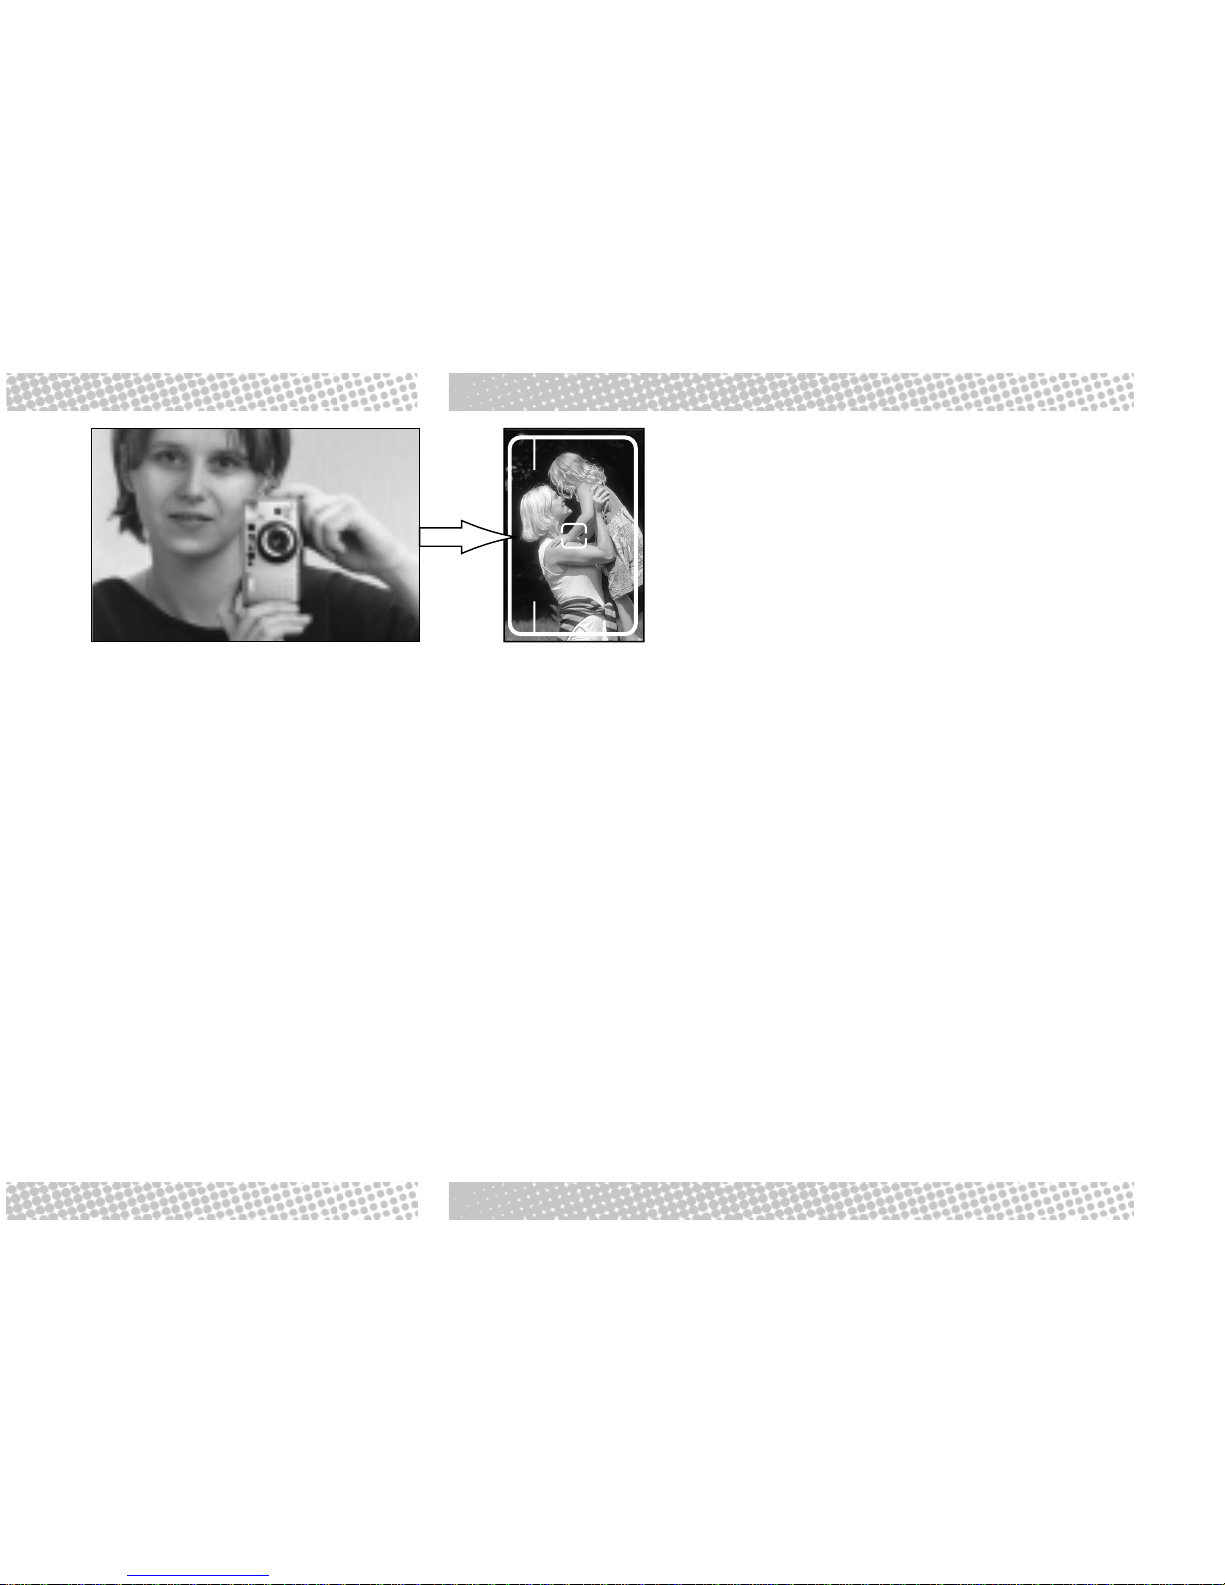
Panoramic pictures
Panoramic pictures with an aspect
ratio of about 1:3 are especially suitable
for very horizontal or very vertical
subjects, such as groups, scenery or
buildings. You may switch to
panoramic mode at any time before
taking a picture.
»
Simply slide the switch to PANO-
RAMA. Compose your picture
within the panorama frame within
the viewfinder.
PANORAMIC PICTURES
PANORAMA-AUFNAHMEN
Panorama-Aufnahmen
Für Motive mit besonders ausgeprägter horizontaler oder vertikaler Ausdehnung, z.B. bei Gruppen-,
Landschafts- oder Architekturfotos,
eignet sich das Panoramaformat
(Seitenverhältnis ca. 1:3). Umschalten
ist jederzeit möglich.
»
Schalter auf PANORAMA stellen.
Panorama-Bildfeldbegrenzungen
im Sucher beachten.
Bitte beachten
»
Bei der Abgabe des Films auf Panorama-Aufnahmen hinweisen.
›
Bei Panorama-Aufnahmen erfolgt
keine Dateneinbelichtung.
Page 63

63
I
Please note
»
When taking your film to be
processed, inform the lab that it
contains panoramic pictures.
›
Imprinting date in panoramic
pictures is not possible.
Immagini panoramiche
Le riprese panoramiche con rapporto
di circa 1:3 sono particolarmente
indicate per soggetti con accentuato
sviluppo orizzontale o verticale quali
gruppi, paesaggi, edifici. Si può com mutare in qualsiasi momento al modo
panoramico.
»
Basta spostare l’interruttore su
PANORAMA. Comporre l’imma-
gine entro il riquadro panorama nel
mirino.
Note
»
Quando si consegna la pellicola al
laboratorio di sviluppo, bisogna far
presente che essa contiene riprese
panoramiche.
›
La stampa della data non può
essere fatta sulle foto panoramiche.
IMMAGINI PANORAMICHE
Page 64

64
GBD
Infinity focus
Use this mode to photograph distant
or featureless subjects, such as clouds,
fire, smoke, or through window panes
or lattice.
›
The green LED will not light up in
this mode when the shutter release
is pressed. The flash is automatically switched off.
»
In low light and especially when
using a long focal length, be sure to
mount the camera on a tripod or
another firm support to avoid
camera shake.
INFINITY FOCUS UNENDLICH-EINSTELLUNG (LANDSCHAFT)
Unendlich-Einstellung (Landschaft)
Die Unendlich-Einstellung eignet sich
besonders, um entfernte bzw. konturlose Motive wie Wolken, Feuer, oder
Rauch durch Fensterscheiben oder
Gitter zu fotografieren. Kamera mit
gedrückt gehaltener Unendlich-Taste
auslösen.
›
In der Unendlich-Einstellung leuch-
tet die grüne LED bei gedrücktem
Auslöser nicht auf. Auch der Blitz ist
abgeschaltet.
»
Kamera bei schlechten Lichtver-
hältnissen, besonders mit Tele, auf
einer festen Unterlage abstützen
oder ein Stativ benutzen, um nicht
zu verwackeln.
IR-Fernauslöser (Zubehör)
Der separat erhältliche IR-Fernauslöser
erlaubt Brennweiteneinstellung und
Auslösen aus bis zu 5 m Entfernung.
Zur Einstellung Self-Taste 4x drükken. Die Belichtung erfolgt mit 2 s
Verzögerung.
Bitte beachten
»
Zur möglichst genauen Kontrolle
des Bildausschnitts die Zoomeinstellung mit Blick durch den Sucher vor der Aufnahme vornehmen.
»
Der IR-Fernauslöser kann bei Nichtgebrauch am Kamerariemen befestigt werden.
selftimer
4x
Page 65

65
I
IR Remote control
(optional accessory)
The optional IR remote control permits
zooming and releasing the shutter from
a distance of up to 5 m. The exposure
is delayed by two seconds.
»
Press Self-button 4 times.
Please note
»
For precise composition it is
advisable to zoom the lens before
the shot while looking through the
viewfinder.
»
When not in use, the remote control
can be attached to the wrist strap.
Messa a fuoco all’infinito
Utilizzare questo modo per riprendere
soggetti lontani o indefiniti quali nuvole,
fuoco, fumo o per riprendere attraverso
vetri.
›
Il LED verde non si accende quando
si preme il pulsante di scatto. Il flash
risulta automaticamente escluso.
»
Con scarsa luce oppure quando si
adotta una lunga focale, porre la
fotocamera su uno stativo o su una
base stabile per evitare di ottenere
immagini mosse.
Telecomando IR (accessario
opzionale)
Il telecomando IR permette regolazioni
zoom e scatti da una distanza che può
arrivare a 5 m. L’esposizione avviene
con un ritardo di due secondi.
Note
»
Per una accurata composizione è
consigliabile zoomare l’obiettivo
prima della scatto guardando
attraverso il mirino.
»
Se non viene utilizzato, il telecomando può essere fissato alla
tracolla.
MESSA A FUOCO ALL’INFINITO
Page 66

66
GBD
Camera care and storage
»
The camera should preferably be
cleaned with a soft, fluffless cloth,
without any alcohol or other chemical solvent.
»
To dust the lens, use a blower
brush. To remove obstinate stains,
carefully wipe with lens-cleaning
tissue or cloth, using special lenscleaning fluid.
»
Protect the camera from sand, dust
and water.
CAMERA CARE AND STORAGE
Pflege und Aufbewahrung
»
Die Kamera wird am besten mit
einem weichen, fusselfreien Tuch
gereinigt. Dazu keinen Alkohol oder
andere chemische Lösungsmittel
verwenden.
»
Zum Reinigen des Objektivs Staub
mit Pustepinsel entfernen. Hartnäk-
kige Verschmutzung nur mit
Objektivreinigungspapier oder -tuch
und spezieller Reinigungsflüssigkeit
vorsichtig abwischen.
»
Die Kamera vor Sand, Staub und
Wasser schützen.
»
Kamera an einem trockenen, kühlen und staubfreien Ort aufbewahren, keinesfalls in der Hitze liegenlassen, z.B. einem geparkten Auto
oder direktem Sonnenlicht.
›
Die Rollei Prego 70 funktioniert in
einem Temperaturbereich von 10°C – +50°C einwandfrei.
PFLEGE UND AUFBEWAHRUNG
Page 67

67
I
»
Store the camera in a dry, cool and
dustfree space. Never leave it
exposed to heat, for example in a
parked vehicle or in direct sunlight.
›
Your Rollei Prego 70 will function
perfectly in temperatures from 10°C
– +50°C.
Cura dell’apparecchio fotografico
»
L’apparecchio dovrebbe essere
pulito con un panno morbido ed
esente da peluria, senza ricorrere
ad alcool o altri solventi chimici
»
Per rimuovere la polvere dall’obiettivo, usare un pennello munito di
pompetta. Per eliminare macchie o
impronte, servirsi delle apposite cartine e dell’apposito liquido di pulitura.
»
Proteggere l’apparecchio da
sabbia, polvere e acqua.
»
Riporre l’apparecchio in un luogo
fresco, asciutto ed esente da
polvere. Mai lasciarlo esposto al
calore, per esempio, dentro una
vettura parcheggiata oppure alla
luce diretta del sole.
›
La vostra Rollei Prego 70 funzionerà
perfettamente a temperature
comprese tra -10° e +50°
CURA DELL’APPARECCHIO FOTOGRAFICO
Page 68

68
GBD
General information
»
Keep lens and meter window clean.
»
Should you encounter any problem,
please consult your photo dealer.
Never dismantle the camera! Its
high-voltage circuits could pose a
health hazard.
»
Protect your camera from impact,
shock and vibrations. Check its
functions after an impact or drop.
»
Prolonged shooting at low
temperature may result in a drop of
battery power. Try to keep camera
and spare batteries warm, for instance in an inside pocket of your
clothing.
GENERAL INFORMATION ALLGEMEINE HINWEISE
Allgemeine Hinweise
»
Darauf achten, daß Objektiv und
Meßfenster nicht verschmutzt wer-
den.
»
Bei einem Problem mit der Kamera
an den Fotohändler wenden. Ka-
mera nicht selbst demontieren. Sie
enthält Hochspannungs-
schaltkreise, die gefährlich werden
können.
»
Kamera vor Schlägen, Stößen und
Vibrationen schützen. Nach Fall
oder Schlag einwandfreie Funktion
kontrollieren.
»
Beim längerem Fotografieren in der
Kälte kann nachlassende Batterie-
leistung die Funktion der Kamera be-
einträchtigen. Kamera bzw. Reserve
-
Batterien möglichst warm halten,
z.B. in einer Tasche am Körper.
»
Kamera nicht direkt aus extremer
Kälte in starke Hitze bringen. Dabei
kann sich im Inneren Kondenswasser niederschlagen und zu
Funktionsstörungen führen.
»
Bei Temperaturen über 40°C längeren, intensiven Blitzgebrauch vermeiden.
»
Leere Batterien gehören nicht in
den Hausmüll. Beim Händler oder
einer Sondermüll-Sammelstelle
Page 69

69
I
»
Do not take the camera from the
cold directly into a heated room.
Condensation might form inside he
camera and cause malfunctioning.
»
Avoid excessive and prolonged use
of flash at temperatures above
40°C.
»
Do not dispose of empty batteries
with your household waste, but
return them to your dealer or to a
special collection site.
Informazioni generali
»
Mantenere puliti l’obiettivo e la
finestrella dell’esposimetro.
Chiudere sempre l’obiettivo quando
non si sta usando la fotocamera.
»
Se ci sono problemi di funzionamento, rivolgersi al proprio
fotonegoziante. Mai smontare la
fotocamera ! I suoi circuiti elettrici
ad alta tensione potrebbero essere
pericolosi.
»
Evitare alla fotocamera urti, cadute
e vibrazioni. Controllarne la
funzionalità dopo un urto o una
caduta.
»
Riprese prolungate a bassa
temperatura possono esaurire le
batterie. Cercare di tenere al caldo
la fotocamera e le batterie di scorta,
ad esempio in una tasca interna del
giaccone o del cappotto.
»
Se si passa bruscamente dal freddo
al caldo, può formarsi condensa
all’interno dell’apparecchio con
conseguente cattivo
funzionamento.
»
Evitare l’uso eccessivo e prolungato del flash a temperature superiori
ai 40°.
»
Non gettare le batterie esaurite nella
normale spazzatura, ma portarle
negli appositi punti
INFORMAZIONI GENERALI
Page 70

70
GBD
Troubleshooting
If you do encounter problems, first
check the following points:
Shutter remains locked.
›
Have the batteries been inserted
properly?
»
Correct position of positive and
negative poles. 16
›
Has the camera been left unused
for a long period?
»
Change batteries. 16
Photos are blurred.
›
Did AF area coincide with main
subject?
»
Read VIEWFINDER section again.
30
›
Was autofocus window blocked?
»
Take care not to block window with
fingers, hair or strap. 22
TROUBLESHOOTING FEHLERSUCHE
Fehlersuche
Wenn es Probleme gibt, zuerst folgende Punkte kontrollieren:
Motiv und Bildausschnitt stimmen nicht überein
›
Bildfeldbegrenzungen im Sucher
beachtet ?
»
Den Abschnitt „SUCHER“ noch einmal lesen. 30
Die Kamera löst nicht aus.
›
Ist die Batterie richtig eingelegt?
»
Beim Einlegen die Polung beach-
ten. 16
›
Wurde die Kamera lange nicht be-
nutzt?
»
Batterie wechseln. 16
Die Fotos sind unscharf.
›
Das Motiv mit dem AF-Meßfeld rich-
tig anvisiert?
»
Den Abschnitt „SUCHER“ noch ein-
mal lesen. 30
›
Autofokusfenster verdeckt?
»
Darauf achten, daß Finger, Haare
oder Trageschlaufe
nicht davor hängen. 22
Page 71

71
I
Ricerca ed eliminazione dei
guasti
Se si incontrano dei problemi,
controllare in primo luogo i seguenti
punti:
Picture shows different
composition than viewfinder.
›
Did you compose using parallax
marks in viewfinder?
»
Read VIEWFINDER section again. 30
L’otturatore risulta bloccato.
›
Le batterie sono state inserite
correttamente?
»
Installare le batterie rispettandone
la polarità 17
›
La fotocamera è rimasta inutilizzata
per lungo tempo?
»
Sostituire le batterie 17
Le foto sono mosse
›
Il riquadro AF coincideva con il
soggetto principale?
»
Rileggere il paragrafo riguardante Il
MIRINO 31
›
La finestrella Autofocus era ostruita?
»
Let erop dat geen vingers, haren of
Evitare di ostruirla con dita, capelli o
cinghia 23
La composizione dell’immagine
si presenta diversa da quella nel
mirino
›
Avete composto l’immagine
rispettando i segni di parallasse
presenti nel mirino?
»
Rileggere il paragrafo riguardante il
MIRINO 31
RICERCA ED ELIMINAZIONE DEI GUASTI
Page 72

72
GBD
Type:
Fully automatic 35mm leaf-shutter
camera
Film:
35mm film with DX code, negative
size 24 mm x 36 mm
(panorama 12 mm x 36 mm)
Lens:
35mm-70mm f/4,5-8,5 power zoom;
five elements in six components
Shutter:
Programmed between-the-lens
shutter;
speeds from 1/400 s to 1/3 s
Focusing:
Active IR spot AF system with focus
lock;
Focusing range: 0.5 m to infinity
Macro range: 0.55 m to 1.0 m
Exposure control:
Programmed AE;
Operating range (ISO 100/21°):
Wide-angle (35 mm): EV 5.9 - 17.6
Telephoto (70 mm): EV 7.8 - 17.6
SPECIFICATIONS TECHNISCHE DATEN
Typ
vollautomatische 35mm-Zentralverschlußkamera
Film
35mm-Kleinbildfilm mit DX-Code,
Format 24 x 36 mm
(Panorama 12 x 36mm)
Objektiv
4,5/35 – 8,5/70 mm-Motor-Zoom,
6 Linsen/6 Gruppen
Verschluss
programmgesteuerter Zentralverschluß
Verschlußzeiten 1/400 – 1/3 s
Fokussierung
aktives IR-Spot-AF-System mit
Fokusspeicher
Fokussierbereich: 0,5 m – unendlich
Makro-Bereich: 0,55 – 1,0 m
Belichtung
Programmautomatik
Arbeitsbereich (ISO 100)
Weitwinkel (35mm): EV 5,9 – 17,6
Tele (70mm): EV 7,8 – 17,6
Sucher
Realbild-Zoomsucher mit AutofokusFeld
Bildfeld: 83%
Vergrößerung: 0,39x – 0,78x;
Dioptrienkorrektur
Filmempfindlichkeit
automatisch mit DX-Code
von ISO 50/18° – 3200/36°
Filmeinspulen
automatisch mit Vorspulen bis Bild 1
Filmtransport
automatisch vor und zurück, manueller Rückspulstart möglich
Blitz
integriert
Blitzbereich (ISO 100-Film)
Weitw. (35mm): 0,55 – 4,00 m
Tele (70mm): 0,65 – 2,10 m
Makro: 0,50 – 1,00 m
Blitzfolgezeit: ca. 0,5 – 5 s
Page 73

73
I
Tipo:
Fotocamera 35 mm completamente
automatica con otturatore a tendina.
Pellicola :
35 mm con codifica DX,
formato del negativo 24x36 mm
(panorama 12x36 mm)
Obiettivo:
zoom f/4,5-8,5 35-70 mm;
sei elementi in sei gruppi.
Otturatore:
otturatore centrale programmato;
velocità di otturazione da 1/400 s a
1/3 s
Messa a fuoco:
sistema AF spot IR attivo con blocco
della messa a fuoco;
Gamma di messa a fuoco
0.5 m – infinito
Gamma macro
0.55 m – 1.0 m
Controllo dell’esposizione:
programma AE,Gamma di
funzionamento (ISO 100/21°)
Grandangolare (35 mm):
EV 5,9 – 17,6
Telefoto (70 mm): EV 7,8 – 17,6
Viewfinder:
Real-image zoom viewfinder with
autofocus area
Coverage: 83 %
Magnification: 0,39x – 0,78x ;
eyesight correction
Film-speed setting:
Automatic by DX code from ISO 50/
18° to 3200/36°
Film threading:
Automatic with advance to frame 1
Film advance:
Automatic, including rewind; manual
starting of rewinding possible
Flash unit:
Integral;Flash range (ISO 100/21°)
Wide-angle (35 mm): 0.55 - 4.00 m
Telephoto (70 m): 0.65 - 2.10 m
Macro: 0.50 - 1.00 m
Recycling time: approx. 0.5 - 5 s
Mirino:
mirino zoom ad “immagine reale”
con riquadro AF
Copertura: 83%
Ingrandimento; da 0,39x a 0,78x;
correzione diottrica
Regolazione della sensibilità
delle pellicola:
automatica con pellicole a codifica
DX da ISO 50/18° a 3200/36°
Avvolgimento della pellicola:
automatico fino al primo
fotogramma.
Avanzamento della pellicola:
automatico, incluso riavvolgimento;
è possibile il riavvolgimento manuale
Lampeggiatore:
incorporato, Gamma flash
(ISO 100/21°)
Grandangolare
(35 mm): 0,55 – 4,00 m
Telefoto (70 mm): 0,65 – 2,10 m
Macro: 0,50 – 1,00 m
Tempo di ricarica: ca. 0,5 – 5 sec.
SPECIFICHE
Page 74

74
GBD
Flash:
Anti-red-eye flash, Flash off, Fill flash,
Fill-flash with backlight compensation
(+1,5 EV), Fill-flash with red-eyereduction
Shooting modes:
Interval timer
Infinity focus
Self-timer:
Single/double self-timer
2-sec. delay
IR remote control:
(optional accessory)
Cue light:
Self-timer LED lights during exposure
LCD panel:
Automatic calendar quartz clock;
front imprinting of date or time;
Automatic shutoff:
3 min after use
DONNÉES TECHNIQUES / FONCTIONS
Blitzfunktionen
Anti-Rotaugen-Blitz,
Blitz aus, Aufhellblitz, Aufhellblitz m.
Gegenlichtkorrektur (+1,5 EV),
Aufhellblitz m. Rotaugen-Reduzierung
Aufnahmefunktionen:
Intervallbelichtung
Unendlich-Einstellung
Selbstauslöserfunktion:
Einzel-/DoppelselbstauslöserFunktion,
2 s Auslöseverzögerung
IR-Fernauslöser:
(Sonderzubehör)
Funktions-LED:
Die Selbstauslöser-LED leuchtet bei
Auslösung zur Kontrolle auf.
Abschaltautomatik:
nach 3 Minuten ohne Kamerabetätigung.
Data back:
Einbelichtung von Zeit,Datum oder
Bildtitel
TECHNISCHE DATEN / SPEZIELLE FUNKTIONEN
Stromquelle:
1 x 3-Volt-Lithium-Batterie (CR 2)
Abmessungen:
111 x 61 x 34 mm (B X H X T)
Gewicht:
180 g (ohne Batterie)
Technische Änderungen vorbehalten.
Alle Angaben entsprechend RolleiStandard-Tests.
Page 75

75
I
Flash
flash con riduzione effetto “occhi rossi”
flash OFF, Fill-in/flash di rischiaramento
(+1,5 EV), Fill-in/flash con riduzione
effetto “occhi rossi”
Modi di ripresa:
Riprese a intervalli
Messa a fuoco all’infinito
Autoscatto:
singulo/doppio
Ritardo di 2 secondi
Telecomando IR (opzionale)
Luce spia:
il LED dell’autoscatto si accende durante l’esposizione
Spegnimento automatico:
dopo 3 minuti di non utilizzo della
fotocamera.
Dorso datario:
calendario automatico/orologio al
quarzo stampa di data od ora
alimentato da una batteria CR2025 da
3V
Alimentazione:
1 batterie al litio da 3V (CR 2)
Dimensioni:
111 x 61 x 34 mm
Peso (senza batterie):
180 g.
Ci si riserva il diritto di apportare
modifiche tecniche senza preavviso.
Tutti i dati sono conformi agli standard
di collaudo Rollei
Power source:
3V lithium battery (CR 2)
Dimensions:
111 x 61 x 34 mm (B X H X T)
Weight:
180 g (without batteries)
Subject to change without notice.
All data according to Rollei test
standards.
TECHNISCHE GEGEVENS / SPECIALE FUNCTIES
Page 76

D, GB, • PA / 3-99
Rollei Fototechnic GmbH
P.O Box 3245
D-38022 Braunschweig
http://www.rollei.de
Germany
 Loading...