

Page 1

QUICK START
Thank you, and congratulations on your choice of the Roland .
Before using this unit, carefully read the sections entitled: “IMPORTANT SAFETY
INSTRUCTIONS” (Owner’s Manual p. 2), “USING THE UNIT SAFELY” (Owner’s Manual p.
3), and “IMPORTANT NOTES” (Owner’s Manual p. 4). These sections provide important
information concerning the proper operation of the unit. Additionally, in order to feel
assured that you have gained a good grasp of every feature provided by your new unit,
Quick Start, Owner’s Manual, andSound/Parameter List should be read in their entirety.
These manuals should be saved and kept on hand as a convenient reference.
/
How to Read This Manual
The Fantom-S comes with four manuals: Quick Start, Owner’s Manual, Parameter List. The manual
you’re reading now, Quick Start, offers a basic introduction to the Fantom-S, and provides simple,
easy-to-understand explanations, allowing the beginner to quickly experience many of the FantomS’s exciting features. As you read the Quick Start, we recommend actually performing the described
operations on your Fantom-S. For feature details, and for explanations of advanced uses, read the
separate Owner’s Manual. Sound/Parameter List contains sound lists and parameter and
information on the Fantom-S’s MIDI implementation. This Owner's Manual applies to both the
Fantom-S and the Fantom-S88. The manual uses the term "Fantom-S" to indicate both models. If you
have the Fantom-S88, please read “Fantom-S” as “Fantom-S88.”
Copyright © 2003 ROLAND CORPORATION
All rights reserved. No part of this publication may be reproduced in any form
without the written permission of ROLAND CORPORATION.
Page 2

Contents
Getting Ready.........................................................................................................................3
Connecting an Amp and Speaker System ................................................................................................................. 3
Placing the Fantom-S88 on a Stand (For Fantom-S88 user) .................................................................................... 4
Turning On the Power.................................................................................................................................................. 4
Adjusting the Display Contrast (LCD Contrast).......................................................................................... 5
Turning Off the Power..................................................................................................................................... 5
Listen to the Demo Song....................................................................................................... 6
Try Out the Sounds................................................................................................................7
Playing the Sounds ....................................................................................................................................................... 7
Selecting Patches by Category ........................................................................................................................ 8
Selecting Patches by Group............................................................................................................................. 9
Auditioning Patches with Phrases (Phrase Preview)................................................................................ 10
Changing the Patch Settings ......................................................................................................................... 10
Playing Percussion Sounds with the Pad (Rhythm Set)........................................................................................ 11
Changing the Rhythm Set Settings .............................................................................................................. 12
Layering Two or More Patches (Layer) ................................................................................................................... 12
Changing the Performance Settings............................................................................................................. 13
Splitting the Keyboard to Play an Ensemble (Split)............................................................................................... 13
Changing the Performance Settings............................................................................................................. 14
Try Out the Various Performance Features.......................................................................15
Moving Your Hand Above the D Beam Controller to Apply Effects (D Beam Controller)............................. 15
Changing D Beam Controller Settings ........................................................................................................ 16
Using Knobs and Buttons to Modify the Sound in Realtime (Realtime Controller) ......................................... 17
Changing Realtime Controller Settings....................................................................................................... 19
Playing Arpeggios(Arpeggio/Rhythm function)................................................................................................... 20
Changing Arpeggio Settings......................................................................................................................... 21
Performing Rhythms while a Rhythm Pattern Plays............................................................................................. 22
Changing Rhythm Group Settings............................................................................................................... 23
Other Performance Features...................................................................................................................................... 25
Velocity/Aftertouch....................................................................................................................................... 25
Pitch Bend/Modulation Lever ..................................................................................................................... 25
Octave Shift (Oct)............................................................................................................................................ 25
Hold Pedal ....................................................................................................................................................... 25
Control Pedal................................................................................................................................................... 26
Transpose (Trans) ........................................................................................................................................... 26
Using the RPS Function.............................................................................................................................................. 27
Using Skip Back Sampling to Sample a Favorite Phrase (Skip Back Sampling)...........29
Assigning a Sample to a Pad (Assign to Pad) ......................................................................................................... 30
Creating a Song.................................................................................................................... 31
Erasing a Song From Internal Memory (Song Clear)............................................................................................. 32
Selecting a Performance ............................................................................................................................................. 33
Selecting a Part................................................................................................................................................ 34
Assigning a Vocal Phrase to a Part as a Patch ........................................................................................................ 35
Assigning the Selected Sample to a Part as a Patch (Assign to Keyboard)............................................ 36
Recording the Rhythm Part ....................................................................................................................................... 38
Selecting the Part to Record .......................................................................................................................... 38
Selecting the Recording Method .................................................................................................................. 38
Playing and Recording Rhythm Part........................................................................................................... 39
Recording the Bass Part.............................................................................................................................................. 42
Recording the Piano Part ........................................................................................................................................... 43
Recording the Vocal Part............................................................................................................................................ 44
Mixing in the MIXER Screen ..................................................................................................................................... 45
Loop the Song ................................................................................................................................................. 45
Making Fine Adjustments in the MIXER Screen ....................................................................................... 46
Using Effects ................................................................................................................................................................ 48
Switching the Effects On/Off ....................................................................................................................... 48
Editing the Effect Settings ............................................................................................................................. 49
Saving the Song You Recorded ................................................................................................................................. 50
2
Page 3

Getting Ready
Monitor speakers
(powered)
Power amp
Mixer etc.
Stereo headphones
to Power outlet
In order to fully experience the
Fantom-S’s sound, we
recommend using a stereo
amp/speaker system. If you’re
using a mono system,
however, make your
connections to the Fantom-S’s
OUTPUT A (MIX) jack L
(MONO).
Connecting an Amp and Speaker System
Since the Fantom-S contains no amplifier or speakers, you’ll need to connect it to audio
equipment such as a keyboard amplifier, monitor speaker system or home stereo, or use
headphones to hear its sound.
Before hooking anything up, make sure that the power on all of your gear is
1.
turned OFF.
Connect one end of the supplied power cable to the Fantom-S, and the other
2.
end to a power outlet.
Connect the Fantom-S to your amp/speaker system as shown in the diagram.
3.
fig.Q-01.e_80
To prevent malfunction and/
or damage to speakers or other
devices, always turn down the
volume, and turn off the
power on all devices before
making any connections.
Use audio cables to connect audio equipment such as an amp or speakers. If you’re using
headphones, plug them into the PHONES jack.
Audio cables are not included
with the Fantom-S. You’ll need
to provide them.
For details on how to install a
Wave Expansion Board (sold
separately), refer to “Installing
the Wave Expansion Board”
(Owner’s Manual; p. 203).
3
Page 4

Getting Ready
To ensure proper operation of
the pitch bend lever, make
sure not to touch the lever
when turning the Fantom-S’s
power on.
Placing the Fantom-S88 on a Stand (For Fantom-S88 user)
If you want to place the Fantom-S88 on a stand, we recommend that you use the Roland KS-17.
Place the instrument on the stand as follows.
fig.88 stand.e
Place so that it is immediately above
Place so that the "a" of Roland is at the center of the stand
Rubber feet of the Fantom-S88
Stand screws
Turning On the Power
* Once the connections have been completed (previous page), turn on power to your various
devices in the order specified. By turning on devices in the wrong order, you risk causing
malfunction and/or damage to speakers and other devices.
Before turning on the Fantom’s power, consider these two questions:
1.
• Are all peripheral devices connected correctly?
• Have the volume controls of the Fantom-S and all connected audio devices been turned to
their lowest settings?
Turn on the POWER ON switch located on the rear panel of the Fantom-S.
2.
fig.Q-02
Center
Do not touch!
* This unit is equipped with a protection circuit. A brief interval (a few seconds) after power
up is required before the unit will operate normally.
4
Page 5

3.
Turn on the power for any connected amplifiers or speakers.
4.
Play the Fantom-S’s keyboard, gradually increasing the setting of its volume
control, and then carefully raise the volume of your connected amplifiers or
speakers to the desired listening level.
fig.Q-03
Adjusting the Display Contrast (LCD Contrast)
The characters in the display may be difficult to view immediately after turning on the FantomS’s power or after extended use. Your viewing angle or the current lighting conditions can also
affect the appearance of the display. In such situations, you can turn the CONTRAST knob
(located on the rear panel) to adjust the contrast of the display.
fig.Q-04
Getting Ready
Be careful not to set your
listening volume too high to
avoid damage to your amp/
speaker system or your
hearing.
Turning Off the Power
Before you turn off the power, consider these two questions:
1.
• Have the volume controls for the Fantom-S and all connected audio devices been turned to
their lowest settings?
• Have you saved your Fantom-S sounds or other data you’ve created?
2.
Turn off the power for all connected audio devices.
3.
Turn off the POWER ON switch of the Fantom-S.
5
Page 6

Listen to the Demo Song
2, 53, 4
b
The Fantom-S contains a demonstration (“demo”) song that you can listen to using the FantomS’s Demo Play feature. The demo will introduce you to the Fantom-S’s exceptional sounds and
effects.
Press [MENU].
1.
The pull-down menu appears.
fig.Q-05
2.
Press to select a “Demo Play,” and then press [ENTER].
There are four demo songs.
fig.Q-05a
3.
Press [1 (SONG1)]–[5 (SONG5)] to start demo song playback.
Otherwise, playback will stop automatically when the song ends.
If you press [7 (All Songs)] , the songs will playback successively, beginning from the first.
Demo Song Title
Something About
1
Your Soul
2 Dregs Roland ©Roland Corporation
3 Boxing Clever MJ Cole ©BMG Music Publishing
4 Kappa Roland ©Roland Corporation
5 Isn't That Grand? Scott Wilkie ©2003 Scott Wilkie Media (ASCAP)
4.
Press [8 (Exit)] to return to the Demo Menu screen.
5.
Press [EXIT] to return to the previous screen.
Composer Copyright
Shinichiro
Murayama,
Scott Tibbs
©Roland Corporation
When you perform demo
playback, any patch or
performance you may have
een editing will be lost.
All rights reserived.
Unauthorized use of this
material for purposes other
than private, personal
enjoyment is a violation of
applicable laws.
No data for the music that is
played will be output from
MIDI OUT.
6
Page 7

Try Out the Sounds
b
What is a Tone? On the
Fantom-S, the tones are the
smallest unit of sound.
However, it is not possible to
play a tone by itself. The patch
is the unit of sound which can
be played, and the tones are
the basic building blocks
which make up the patch.
Playing the Sounds
The Fantom-S comes with a wide range of onboard sounds, including single tones called
Let’s select a few patches to get an idea of the variety of sounds available with the Fantom-S.
1.
Press [PATCH/RHYTHM].
The Patch Play screen appears.
On the Fantom-S you can play patches and rhythm sets from both the keyboard and the pads.
Play the keyboard and pads to hear the sound.
On the Fantom-S, a “part” is something to which you assign a patch or rhythm set. Patch mode
has two parts, the
to each of these parts.
fig.Q-07.e
Patch Group
Patch Type
To select the Keyboard part, press [1 (Kbd Part)].
2.
Keyboard part
Patch Number
and the
Pad part
, and you can assign a patch or rhythm set
patches
.
What is a Patch? Patches are
the basic sound configurations
that you play during a
performance. Each patch can
e configured by combining
up to four tones.
3.
To select the Pad part, press [2 (Pad Part)].
fig.Q-07b
4.
If you want to switch the patch of the Keyboard part to another patch, press [1
(Kbd Part)] to move the cursor to the patch number, and then turn the VALUE
dial or use [INC] [DEC].
When the patch number is highlighted, you can select a patch. When the patch group is highlighted,
you can select a group. On the Fantom-S, the patches are organized into five groups; user, preset,
GM, card, and expansion board. Use to move the highlighted cursor.
5.
If you want to switch the patch of the Pad part to another patch, press [2 (Pad
Part)] to move the cursor to the patch number, and then turn the VALUE dial
or use [INC] [DEC].
6.
To switch between playing a patch or a rhythm set, use [CURSOR] to move
the cursor to the patch type, and then use [INC] [DEC] to select either patch
(Patch) or rhythm set (Rhythm).
For more information about
factory patches and rhythm
sets, refer to “Patch List,”
“Rhythm Set List”.
Patches and Rhythm sets XP-
A–D can be selected only if a
Wave Expansion Board (sold
separately) has been installed
in the corresponding slot.
7
Page 8

Try Out the Sounds
7.
Press [7] to switch the Patch Play screen.
This screen simultaneously displays the settings of the Keyboard part and
the Pad part.
You can use [CURSOR] to move the cursor to a parameter, and turn the VALUE dial or use
[INC] [DEC] to select the patch type, patch group, or patch number from this screen as well.
fig.Q-07a.e
Patch Number
Patch Group
Patch Type
Keyboard Part
Pad Part
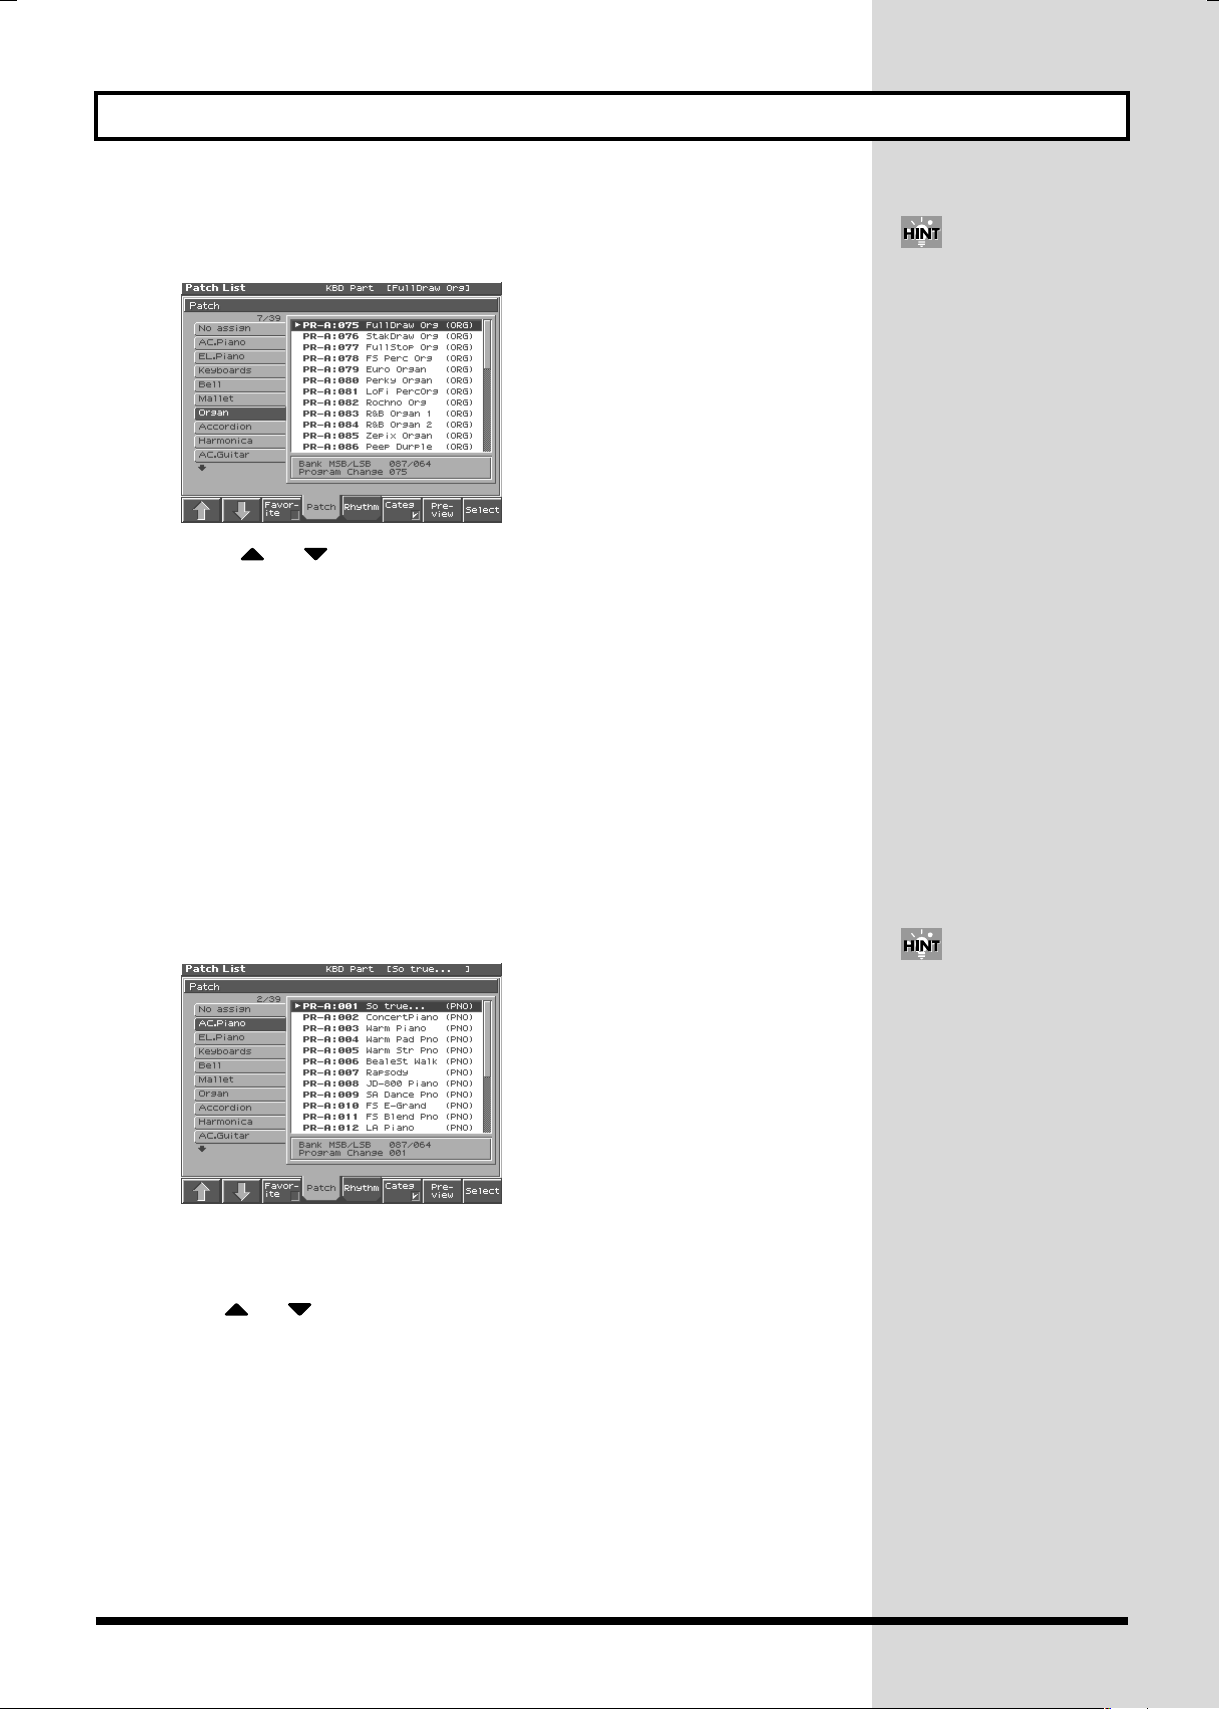
Selecting Patches by Category
You can quickly find any patch by first choosing the type of patch you’re looking for.
1.
Press [PATCH/RHYTHM] to access the Patch Play screen.
2.
Press [1 (Kbd Part)] to select the keyboard part.
Press [3 (Patch List)].
3.
The Patch List window appears.
4.
Make sure that [6 (Categ)] has a check mark (✔).
The display shows a list of patches organized by category.
fig.Q-09_50
The display screens printed in
this owner's manual are based
on the factory settings.
However, please be aware that
in some cases they may differ
from the actual factory
settings.
For details on the categories
you can select, refer to the
Owner’s Manual (p. 30).
8
Page 9
5.
Press [1 (↑)] or [2 (↓)] to select the categories.
The Patch List window shows a list of patches in the categories.
fig.Q-09a_50
Press or to select a patch.
6.
Play the patch to hear how it sounds.
When you press [8 (Select)] the Patch List screen will close automatically.
7.
Selecting Patches by Group
You can view a group of patches and select a patch from this group.
Try Out the Sounds
By pressing [7 (Preview)] you
can audition the sound of the
patch being played by a preset
phrase suitable for each type of
patch (Phrase Preview
function) (p. 10).
Press [PATCH/RHYTHM] to access the Patch Play screen.
1.
Press [1 (Kbd Part)] to select the keyboard part.
2.
3.
Press [3 (Patch List)].
The Patch List window appears.
4.
Press [6 (Categ)] to remove the check mark (✔)
The list will show the patch groups.
fig.Q-08_50
5.
To select a different patch group, press [1 (↑)] or [2 (↓)].
Use or to select a patch.
6.
When you have made your selection, play the keyboard to hear the patch.
By pressing [7 (Preview)] you
can audition the sound of the
patch being played by a preset
phrase suitable for each type of
patch (Phrase Preview
function) (p. 10).
7.
When you press [8 (Select)] the Patch List screen will close automatically.
9
Page 10

Try Out the Sounds
What is a Tone? On the
Fantom-S, the tones are the
smallest unit of sound.
However, it is not possible to
play a tone by itself. The patch
is the unit of sound which can
be played, and the tones are
the basic building blocks
which make up the patch.
Auditioning Patches with Phrases (Phrase Preview)
The Fantom-S allows you to preview a patch by listening to a short musical phrase appropriate
to the patch.
1.
Access the Patch List window (p. 8)
fig.Q-08_50
2.
Press and hold [7 (Preview)].
The currently selected patch plays a short preview phrase.
Release your finger from [7 (Preview)] to stop playback of the preview phrase.
3.
4.
To select a different patch, Press or .
5.
Press [EXIT] to close the Patch List window.
Changing the Patch Settings
For details on the most important settings of a patch, refer to the following pages of the
Owner’s Manual.
• Changing how a patch tone is sounded → (Owner’s Manual; p. 46)
• Adjusting the pitch of a patch tone → (Owner’s Manual; p. 49)
• Using the filter to change the brightness of the patch tone sound → (Owner’s Manual; p. 50)
• Setting the volume of a patch → (Owner’s Manual; p. 53)
• Applying modulation to the sound → (Owner’s Manual; p. 56)
• Applying effects to a patch → (Owner’s Manual; p. 175)
• Saving a patch you’ve modified → (Owner’s Manual; p. 42)
10
Page 11

Playing Percussion Sounds with the Pad
Rhythm Set Name/Numbar
Rhythm Set Group
Patch Type
(Rhythm Set)
The Fantom-S has rhythm sets that contain a variety of percussion instruments and specialeffects sounds. In the same way as for patches, a rhythm set can be played from either the
keyboard or the pads. Here’s how to play the sounds in a rhythm set.
Press [PATCH/RHYTHM] to access the Patch Play screen.
1.
Press [2 (Pad Part)] to select a Pad part.
2.
Make sure that a rhythm set is assigned to a pad part.
If a rhythm set is not assigned, use [CURSOR] to move the cursor to the patch type, and press
[DEC] to set “Patch” to “Rhythm.”
Use [CURSOR] to move the cursor to the rhythm set group or rhythm set number, and turn the
VALUE dial or use [INC] [DEC] to make your selection.
fig.Q-12.e
Try Out the Sounds
If you press [7], you can switch
the Patch Play screen.
3.
Play the pads to hear the percussion instrument sounds.
4.
Press different pads to play the percussion instruments in the rhythm set.
5.
To select another rhythm set, turn the VALUE dial or press [INC]/[DEC].
When the rhythm set group is highlighted, you can select a new rhythm set group. Press
to move the highlight cursor, turn the VALUE dial or press [INC]/[DEC]
When the rhythm set number is highlighted, you can select a rhythm set. When the rhythm set
group is highlighted, you can select a group. The rhythm sets of the Fantom-S are organized
into five groups: User, Preset, GM, Card, and Expansion Board. Use to move the
highlight cursor.
* You can also assign a rhythm set to the Pad part. To switch between playing a patch or a
rhythm set, use [CURSOR] to move the cursor to the patch type, and turn the VALUE dial,
or use [INC] [DEC] to select either patch (Patch) or rhythm set (Rhythm).
Playing Percussion Instruments From the Keyboard
1. From the Patch Play screen, press [1 (Kbd Part)] to select the keyboard
part.
2. Use [CURSOR] to move the cursor to “Patch.”
3. Turn the VALUE dial or press [INC] to select “Rhythm.”
Play the keyboard. Different percussion instruments will sound depending on the note you
play.
For more information about
factory rhythm sets, please
refer to “Rhythm Set List”
(Parameter List).
Rhythm sets XP-A–D can be
selected only if a Wave
Expansion Board (sold
separately) is installed in the
corresponding slot (Owner’s
Manual; p. 203.
11
Page 12

Try Out the Sounds
b
Performance Number
Performance Group
Changing the Rhythm Set Settings
For details on how to adjust the most important settings for a rhythm set, refer to the following
pages of the owner’s manual.
• Changing how a rhythm tone is sounded → (Owner's Manual; p. 70)
• Adjusting the pitch of a rhythm tone → (Owner’s Manual; p. 71)
• Using the filter to modify the brightness of the rhythm tone sound → (Owner’s Manual; p. 72)
• Setting the volume of a rhythm set → (Owner’s Manual; p. 73)
• Applying effects to a rhythm set → (Owner’s Manual; p. 184)
• Saving a rhythm set whose settings you’ve modified → (Owner’s Manual; p. 66)
Layering Two or More Patches (Layer)
What is a Rhythm Tone? On
the Fantom-S, the rhythm
tones are the smallest unit of
sound. However, it is not
possible to play a tone by itself.
The rhythm set is the unit of
sound which can be played,
and the tones are the basic
uilding blocks which make
up the rhythm set.
When you wish to play multiple patches or rhythm sets at the same time, use a
In Performance mode, you can play up to 16 different patches or rhythm sets simultaneously.
A performance in which two or more patches are played together is referred to as a
Let’s select Performance “PRST: 61 Piano&Str,” which layers two patches.
Press [LAYER/SPLIT].
1.
The Performance Layer screen will appear.
fig.Q-13.e
2.
Press [CURSOR] to move the cursor to the performance group.
3.
Turn the VALUE dial or use [DEC]/[INC] to select “PRST.”
Press to move the cursor to the performance number.
4.
Turn the VALUE dial or use [DEC]/[INC] to choose “61.”
5.
Performance “PRST: 61 Piano&Str” is now selected.
fig.Q-14.e
Key Range
performance
layer
.
.
What is a Performance? A
performance has a patch or
rhythm set assigned to each of
the 16 parts, and can
simultaneously handle 16
sounds. The Fantom-S’s
performance has two screens; a
Layer screen (press [LAYER/
SPLIT]) and a Mixer screen
(press [MIXER]). Use the Layer
screen if you want to play two or
more patches together (Layer) or
play different patches in
separate areas of the keyboard
(Split). Use the Mixer screen if
you want to “mix” by
individually adjusting the pan
and level settings for each of the
sixteen parts.
The parts for which “KBD” is checked (✔) in the screen are the parts that will sound.
The part indicated by is the currently selected part. The selected part will sound
regardless of the setting of the keyboard switch.
The bar above the keyboard for each part indicates the range of notes that will sound.
12
Similarly to patches and rhythm
sets, performances are also
organized into groups. There are
three performance groups: User,
Preset, and Memory Card.
Page 13

Try Out the Sounds
In Performance mode, the
arpeggiator can be applied to
one part. To select the part to
which the arpeggiator will
apply, press ARPEGGIO/
RHYTHM [SELECT/EDIT]/[3
(Arp)] to display the
Arpeggiator screen, and check
the “Arp Part” setting. Press
[EXIT] to return to the previous
screen.
6.
Play the keyboard.
The two patches assigned to Parts 1 and 2 sound together. If you uncheck “KBD,” that part will
no longer sound.
Use [CURSOR] to move the cursor to “KBD,” press [DEC] to remove the check mark from “KBD,”
and move the cursor away from that part; you will no longer hear the sound of that part.
Use [CURSOR] to move the to part 1 or part 2 and play just one of the parts to hear which
sounds are being layered.
Changing the Performance Settings
For details about how you can adjust the most important settings for a performance, refer to
the following pages of the owner’s manual.
• Selecting the parts that’ll sound → (Owner’s Manual; p. 79)
• Switching the patch assigned to a part → (Owner’s Manual; p. 79)
• Adjusting volume/pan/pitch → (Owner’s Manual; p. 85)
• Applying effects to the performance → (Owner’s Manual; p. 178)
• Saving a performance whose settings you’ve modified → (Owner’s Manual; p. 96)
Splitting the Keyboard to Play an Ensemble (Split)
Performances in which different patches play in different parts of the keyboard are called
A split performance is actually a type of layer in which each sound is assigned to a specified
keyboard part.
Here we will explain how to select the “PRST: 62 Ensemble Pfm” performance, which contains
settings for a divided keyboard range, and use the arpeggiator and rhythm patterns to produce
a guitar and drum ensemble.
Press [LAYER/SPLIT] to select the performance “PRST: 62 Ensemble Pfm.”
1.
(p. 12)
fig.Q-15.e
Key range for part
In this performance, the key range settings are shown below.
Part1: C2–B3 (backing part)
Part2: F6–C7 (rhythm part)
Part3: C4–E6 (solo part)
fig.Q-05-09.e
split
.
Part 1: Backing part
The arpeggiator is assigned to part 1, and the rhythm patterns are assigned to part 2.
You may notice that “PAD” is shown below the part number; this means that part 2 is the part
that will sound when you play the pads.
Part 3: Solo part
Part 2: Rhythm part
13
Page 14

Try Out the Sounds
If you press ARPEGGIO/
RHYTHM [HOLD] to make
the button light, the rhythm
pattern or arpeggiator will
continue playing even after
you take your hand off the
keys (the Hold function).
2.
First, we will use rhythm patterns to play the drum part. Press ARPEGGIO/
RHYTHM [ON/OFF] located at the left of the display so the button’s indicator
is lit.
Rhythm tones are assigned to pads 1–8, and rhythm pattern numbers are assigned to pads 9–16.
fig.Q-15a.e
Part 1: Backing part
3.
Press a pad 9–16 to which a rhythm pattern number is assigned.
The force with which you strike the pads will vary the dynamics (velocity) of the sound.
The rhythm pattern assigned to the pad you pressed will sound.
4.
Next, use the arpeggiator to play the backing part. Verify that the ARPEGGIO/
RHYTHM [ON/OFF] indicator is blinking, and press a note in the key range of
part 1 (C3–B3).
The bar displayed above the keyboard for part 1 is the range of notes that will sound.Hold
down a chord in the appropriate area. According to the keys you press, an arpeggiated guitar
backing will begin playing.
Part 3: Solo part
On the Fantom-S, a set of rhythm
pattern numbers or percussion
instrument sounds assigned to the
sixteen pads is stored as a Rhythm
Group (p. 22).
Rhythm Pattern Number
Rhythm Tone
Part 2: Rhythm part
Finally, let’s play a guitar solo along with the drum part and backing part that
5.
are currently sounding.
The guitar solo part has the key range of part 3 (C4–E6). The location of the bar in the screen
indicates the range in which you should play.
6.
To stop the rhythm pattern and arpeggiator, press [ON/OFF] to make the
respective indicator go dark.
How did it go? Most likely, you now see how easy it is to play ensembles like this on your
own—by specifying the keyboard range for each part (as in the performance you selected here),
and using rhythm patterns and the arpeggiator.
Changing the Performance Settings
For details about how you can adjust the most important settings for a split performance, refer
to the following pages of the owner’s manual.
• Changing arpeggiator settings→ (Owner’s Manual; p. 105)
• Changing rhythm pattern settings→ (Owner’s Manual; p. 113)
• Changing the key range → (Owner’s Manual; p. 80)
• Selecting the parts that will sound → (Owner’s Manual; p. 79)
• Switching the patch assigned to a part → (Owner’s Manual; p. 79)
• Adjusting volume/pan/pitch → (Owner’s Manual; p. 85)
• Applying effects to the performance →(Owner’s Manual; p. 178)
• Saving a performance whose settings you’ve modified → (Owner’s Manual; p. 96)
You can also stop playback by
pressing the blinking pad.
14
Page 15

Try Out the Various Performance Features
D Beam controller is turned OFF
for the Pad part
D Beam controlleris turned ON
for the Keyboard part
b
b
The Fantom-S is equipped with a variety of powerful performance features that can raise your
musical expressiveness to new levels. These include the D Beam controller and the Arpeggio
function. Take a moment to try out some of the Fantom-S’s performance features.
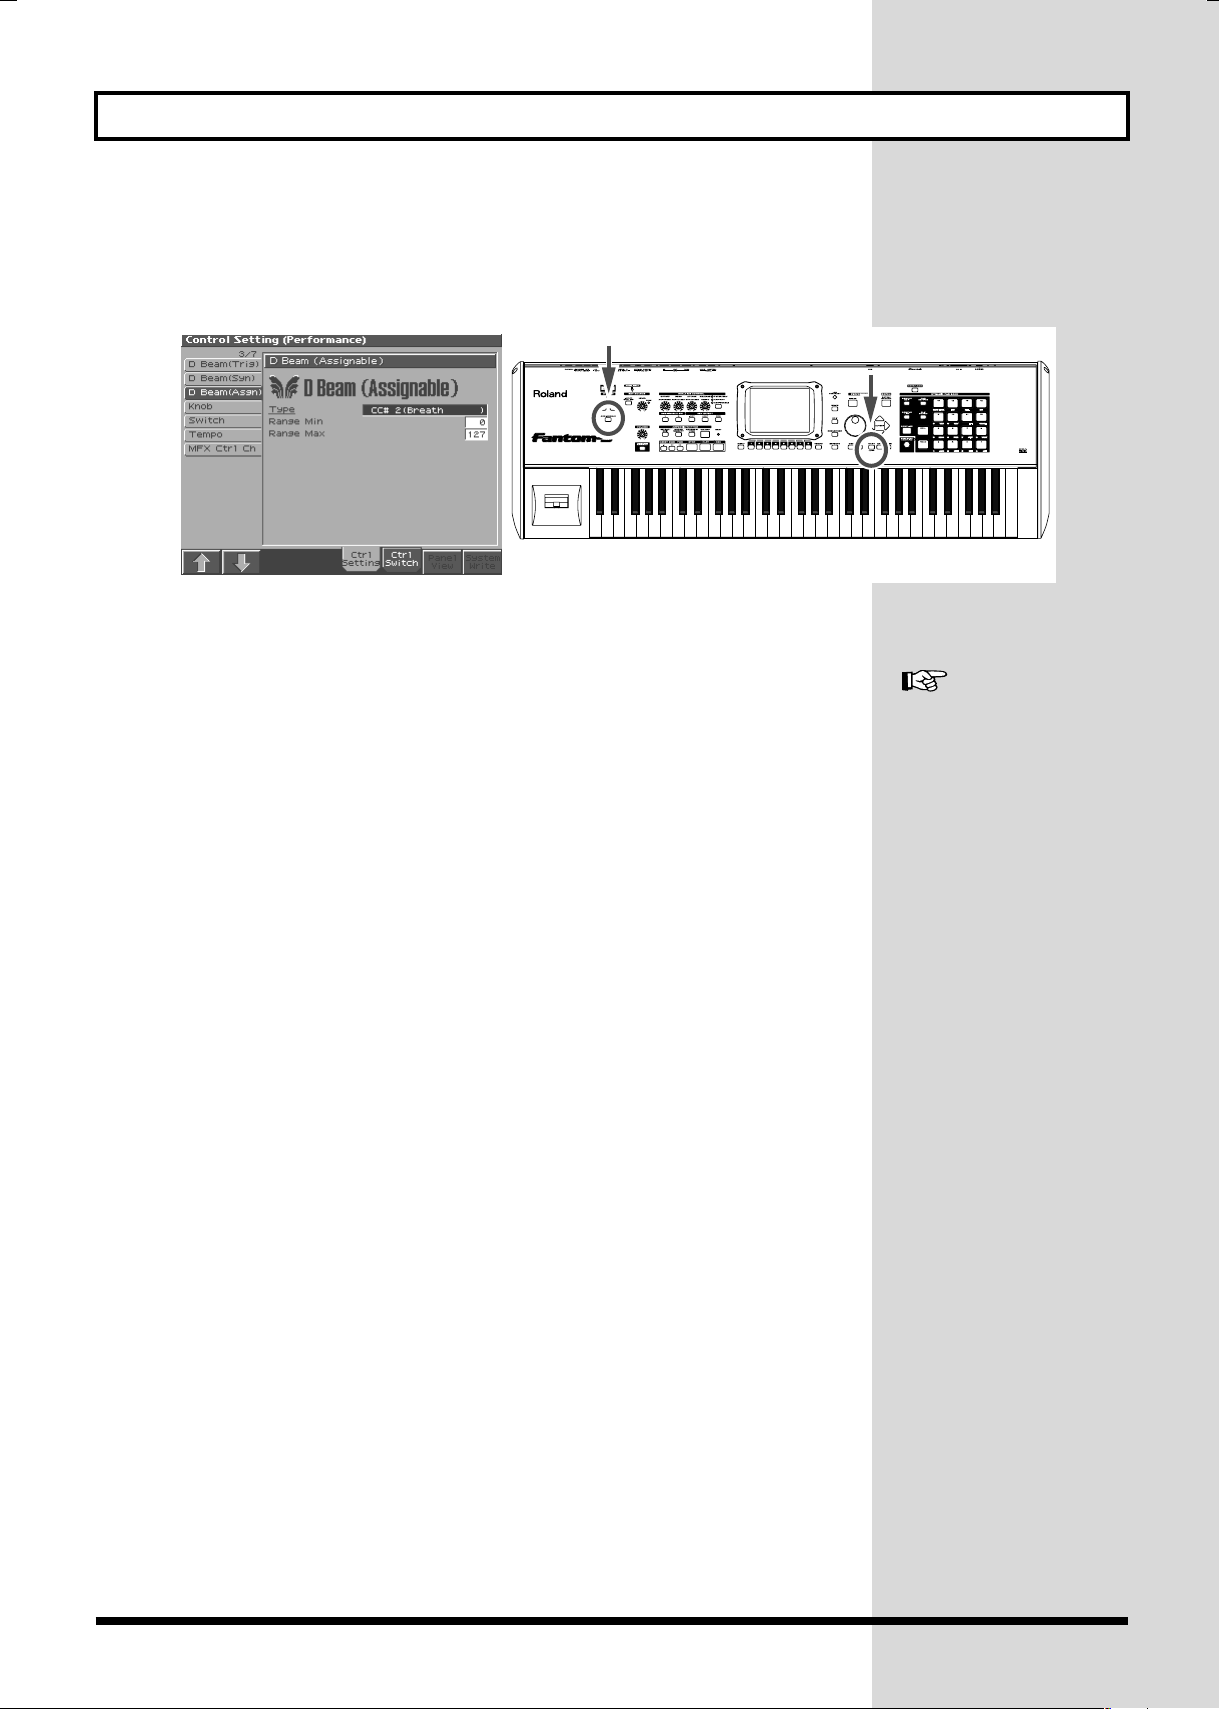
Moving Your Hand Above the D Beam Controller to Apply Effects (D Beam Controller)
You can apply various effects to the currently selected patch by simply moving your hand over
the D Beam controller on the Fantom-S’s panel.
Let’s select a patch that makes use of the D Beam controller, and try it out.
Press [PATCH/RHYTHM] to access the Patch Play screen.
1.
Press [1 (Kbd Part)] to select a patch "PR-E: 032 SynthForce." (p. 7)
2.
3.
Press [7] to switch the Patch Play screen.
fig.Q-17.e
With the factory settings, “Breath” is assigned to the D Beam controller.
When the D BEAM [ASSIGNABLE] indicator is dark, press [ASSIGNABLE], so
4.
that its indicator lights.
fig.Q-18
The D Beam controller is now active.
Move your hand up and down slowly over the D Beam controller as you play
5.
the keyboard.
fig.Q-19
When the D Beam controller is
responding, the
[ASSIGNABLE] button will
link. Once you leave the
usable range of the D Beam
controller, the [ASSIGNABLE]
utton stops blinking, and
lights solidly instead.
6.
To turn off the D Beam controller, press [ASSIGNABLE] once again so that its
indicator light goes out.
15
Page 16
Try Out the Various Performance Features
Changing D Beam Controller Settings
1.
Hold down [SHIFT] and press D BEAM [ASSIGNABLE].
The D Beam Assignable screen appears.
fig.Q-20
In this window you can modify the settings for the D Beam controller. Let’s change what the D
Beam controls.
2.
Press [CURSOR] to move the cursor to “Type,” and then turn the VALUE dial.
For example, if you specify “Bend Up,” press [ASSIGNABLE], and the pitch will rise if you
move your hand near the D Beam controller while playing the keyboard to produce sound.
3.
When you have made setting, press [EXIT].
For details on using the D
Beam controller, refer to
“Modifying the Sound in Real
Time” (Owner’s Manual; p. 34,
P. 98).
16
Page 17

Try Out the Various Performance Features
REALTIME CONTROL knob
ASSIGNABLE switch
Parameters that will change when you press an assignable switch
Parameters that will change when you turn a realtime controller knob
Using Knobs and Buttons to Modify the Sound in Realtime (Realtime Controller)
By using the REALTIME CONTROL knobs and ASSIGNABLE switches while you play, you
can control the various functions that’ve been assigned to them.
Let’s select Patch “PR-E: 031 ShapeURMusic” and try out the realtime controllers.
Press [PATCH/RHYTHM] to access the Patch Play screen.
1.
Press [1 (Kbd Part] to select Patch “PR-E: 031 ShapeURMusic” (p. 11).
2.
Press [7] to switch the Patch Play screen.
3.
fig.Q-22.e
State of the controller settings
The controller applies to the part
whose display is visible
The parameter that will change when you operate the realtime controller is
4.
displayed at the bottom of the screen.
fig.Q-knob01.e
17
Page 18

Try Out the Various Performance Features
5.
You can select the function of the knobs by pressing the button located at the
right of the realtime control knobs. The parameter display at the bottom of the
screen will also change. In this example, get the FILTER/RHY indicator to
light.
fig.Q-knob02
• If the FILTER/ENV indicator is lit
Turning the knobs will control Cutoff, Resonance, Attack, and Release.
•
If the ARP/RHY indicator is lit
Turning the knobs will control the arpeggio parameters Range and Accent, and the rhythm
parameters Accent Rate and Tempo.
•
If the ASSIGNABLE indicator is lit
Turning the knobs will control the assigned parameters. You can freely assign parameters.
* If the indicators are unlit, turning the knobs will not control any parameters.
While playing the keyboard, play with the REALTIME CONTROL knobs and
6.
ASSIGNABLE switches. For example, try turning the knob.
Turning the knob at the far left clockwise will open the filter, brightening the sound.
fig.Q-22a
Try playing with the other knobs and buttons to hear what they do.
7.
18
Page 19

Try Out the Various Performance Features
For details on using the
realtime controllers, refer to
“Modifying the Sound in Real
Time” (Owner’s Manual; p. 33,
P. 98).
Changing Realtime Controller Settings
1.
Hold down [SHIFT] and press the ASSIGNABLE switch or the button located
at the right of the REALTIME CONTROL knobs.
The Assignable Knob window or Assignable Switch window will appear.
fig.Q-23
In these windows you can change the parameters controlled by the REALTIME CONTROL
knobs or ASSIGNABLE switches.
Turn the VALUE dial to assign various functions.
2.
As you select each parameter, play the keyboard and turn or press the corresponding realtime
controller and assignable switches. Listen to the changes the controller makes to the sound of
the patch.
3.
Press [EXIT] to return to the previous screen.
19
Page 20

Try Out the Various Performance Features
Playing Arpeggios (Arpeggio/Rhythm function)
You can create a broken chord (arpeggio) automatically by simply playing the chord.
For example, if you press the keys of a C major chord, the Fantom-S arpeggiates the chord as
C → E → G → C → E → G → C...
fig.Q-24
C3E3G3
C3
1.
Press [PATCH/RHYTHM] to access the Patch Play screen, and then press [1
(Kbd Part] to select Patch “PR-A: 001 So true...” (p. 7).
fig.Q-25_50
2.
Press ARPEGGIO/RHYTHM [ON/OFF] so its indicator lights.
fig.Q-26
C3
E3 G3 E3E3
C3G3
For a list of arpeggio styles,
refer to “Arpeggio styles” in
the parameter list.
20
The Arpeggio function is turned on.
3.
Play a chord on the keyboard.
The Fantom-S plays the notes of the chord as an arpeggio.
If you hold down ARPEGGIO/RHYTHM [ARPEGGIO HOLD] so the button lights, the
arpeggio will continue playing even after you take your finger off the keyboard.
4.
To finish listening to the arpeggio, press ARPEGGIO/RHYTHM [ON/OFF]
again so its indicator turns off.
Page 21

Changing Arpeggio Settings
In arpeggio settings, Style
(Arpeggio Style) is particularly
important. The arpeggio’s
playback pattern is determined
primarily by the value selected
for this parameter. For details,
refer to “Arpeggio Settings
(Arpeggio)” (Owner’s Manual;
p. 107).
1.
Press ARPEGGIO/RHYTHM [SELECT/EDIT], and the press [3 (Arp)].
The Arpeggiator screen appears.
fig.Q-27
In this window you can adjust various arpeggio-related settings.
2.
Press or to select a parameter, and then turn the VALUE dial to
change the settings for the various parameters.
These settings determine how the arpeggiator plays its notes.
Try Out the Various Performance Features
Switching to Another Arpeggio Style
You can switch to another arpeggio style by moving the cursor to “Style” and turning the
VALUE dial to change the number.
3.
Press [EXIT] to close the Arpeggio window.
Using the Chord Memory Function with the Arpeggio
Chord Memory is a function that sounds a specified chord form when you press a single key.
For example you can register the chord form “C,” “E,” and “G” so that the chord “C-E-G” will
sound when you press the C key.
When the arpeggiator is on, you can recall a chord form to easily create complex arpeggio
sounds.
Press ARPEGGIO/RHYTHM [CHORD MEMORY] to make the button light, and the Chord
Memory function will be turned on.
If you want to make more
detailed settings, press [EDIT].
For details, refer to p. 105 in
the Owner’s Manual.
In Performance mode,
Arpeggio/Rhythm function
settings can be saved as
performance settings for each
individual performance. This
allows you to create a
performance that contains the
desired arpeggiator settings. In
addition, when you use the
Fantom-S’s sequencer to create
a song, the Fantom-S offers
you the convenience of using
the Arpeggio function to
perform bass and other parts
during recording (p. 42).
21
Page 22

Try Out the Various Performance Features
Performing Rhythms while a Rhythm Pattern Plays
The Fantom-S contains various Rhythm patterns. Simply by pressing a single key or pad, you
can play the Rhythm patterns. The Fantom-S contains various rhythm patterns. You can play
these rhythm patterns simply by pressing a single key or pad. You can also use a
group
, in which rhythm patterns, percussion instruments from the rhythm set, and fill-ins are
assigned to the pads. Here’s how to use a rhythm group to play additional rhythm sounds and
fills while a rhythm pattern plays back.
Make sure that a rhythm set is assigned to a pad part (p. 11).
1.
If a rhythm set is not assigned, use [CURSOR] to move the cursor to the patch type, and press
[DEC] to set “Patch” to “Rhythm.”
Use [CURSOR] to move the cursor to the rhythm set group or rhythm set number, and turn the
VALUE dial or use [INC] [DEC] to make your selection.
2.
Press ARPEGGIO/RHYTHM [ON/OFF].
Pads 9–16 will go out, and you will be able to play rhythms.
fig.Q-28
rhythm
Rhythm groups have rhythm pattern numbers and percussion instruments (rhythm tones)
assigned to the pads as follows.
fig.Q-30.e
Rhythm Pattern Number
Rhythm Tone
Press a pad (9–16) to which a rhythm pattern number is assigned.
3.
The force with which you strike the pads will vary the dynamics (velocity) of the sound.
According to the pad you pressed, the assigned rhythm pattern will play.
4.
In time with the pattern that is playing, try adding your own rhythm
performance.
Pads 1–8 will play percussion sounds.
5.
To finish listening to the rhythm, press ARPEGGIO/RHYTHM [ON/OFF] again
so its indicator turns off.
You can also stop playback by
pressing the blinking pad.
For details on using the
Arpeggio, refer to “Playing
Rhythms (Arpeggio/Rhythm
Function)” (Owner’s Manual;
p. 104), “Playing Rhythm”
(Owner’s Manual; p.112)
22
Page 23

Switching to Another Rhythm Group
Press ARPEGGIO/RHYTHM [SETUP/EDIT] and then press [1 (Rhythm Group)].
1.
The Rhythm Group window appears.
fig.Q-30a_50
2.
Use to select “Rhythm Group,” then turn the VALUE dial to change
the value.
3.
Verify that the ARPEGGIO/RHYTHM [ON/OFF] indicator is lit, and strike the
pads to play rhythms.
Try Out the Various Performance Features
Changing Rhythm Group Settings
1.
Press ARPEGGIO/RHYTHM [SELECT/EDIT].
2.
Press [1 (Rhythm Group)], and then press [EDIT].
The Rhythm Group Edit window appears.
fig.Q-31
In this window you can make various settings for a rhythm group, such as assigning a rhythm
pattern number or percussion instrument to each pad.
3.
Use [CURSOR] and the VALUE dial to edit the parameters.
In this window you can adjust various settings for rhythm groups.
• Pad
Select the pad 1–16 for which you will make settings. You can also select a pad by pressing it
directly.
•
Pad Mode
Specifies whether a rhythm tone (Note) or a rhythm pattern (Pattern) number will be assigned
to the pad.
•
Pad Note
If Pad Mode is set to Note, specifies the note number (C-1–G9) that will sound when you press
the pad.
•
Pad Velocity
Specifies the strength of the sound (REAL, 1–127) heard when you strike the pad. If this is set
to REAL, you can add dynamics by varying the strength of your strike.
23
Page 24

Try Out the Various Performance Features
Rhythm Group settings can be
saved independently with each
performance. This allows you
to create a performance that
uses rhythm group settings of
your choice. When you use the
sequencer to create a song, you
can use rhythm group to
perform your drum part.
• Rhythm Pattern Number
If Pad Mode is set to Pattern, specifies the pattern number that will sound when you press the
pad.
• Rhythm Pattern Velocity
If Pad Mode is set to Pattern, specifies the strength of the rhythm pattern (REAL, 1–127) heard
when you strike the pad. If this is set to REAL, you can add dynamics by varying the strength
of your strike.
4.
Press [7 (Exit)] to close the Rhythm Group Edit window.
Press [EXIT] to close the Rhythm Group window.
5.
For details on using rhythm
groups, refer to “Playing
Rhythms” (Owner’s Manual;
p. 112).
You can also edit the settings
of the rhythm pattern. For
details, refer to “Rhythm
Pattern Settings” (Owner’s
Manual; p. 113).
24
Page 25

Other Performance Features
Velocity/Aftertouch
The force with which you play the keyboard, or the “velocity” with which you play, can affect
the volume or timbre of a sound. Aftertouch—downward pressure you apply to a key after
playing a note—can also affect the sound.
fig.Q-32
Pitch Bend/Modulation Lever
While playing the keyboard, move the lever to the left to lower the pitch of the currently
selected patch, or to the right to raise its pitch. This is known as
vibrato by gently pushing the lever away from you. This is known as
If you push the lever away from you and at the same time move it to the right or left, you can
apply both effects at once.
fig.Q-33.e
Try Out the Various Performance Features
pitch bend
. You can also apply
modulation
.
Octave Shift (Oct)
On the Patch Play, Performance Layer and Performance Mixer screen, you can shift the pitch
of the keyboard in one-octave units over a range of +/-3 octaves by adjusting the value of the
Octave Shift parameter.
Use KEY EFFECT [-OCT] or [+OCT] at the left of the screen to make the desired setting.
To return to the original setting, press both buttons simultaneously.
Hold Pedal
If an optional pedal switch (DP series) is connected to the rear panel PEDAL HOLD jack, you
can press the pedal switch to cause notes to sustain or “hold” even after their keys have been
released.
fig.Q-36
ModulationPitch Bend
25
Page 26

Try Out the Various Performance Features
Control Pedal
If an optional expression pedal (EV-5, etc.) is connected to the rear panel PEDAL CONTROL
jack, you can use the pedal to control the volume or timbre of sounds you play.
fig.Q-37
Roland
Transpose (Trans)
On the Patch Play, Performance Layer and Performance Mixer screen, you can transpose the
pitch of the keyboard in semitone steps, over a range of G–F# (-5– +6 semitones) by adjusting
the Transpose parameter’s value.
Press [CURSOR] to move the cursor to “Trans” in the upper part of the screen, and turn the
VALUE dial or press [INC] or [DEC] to change its setting.
fig.Q-34
The way in which the sound
changes will depend on the
settings. For details on settings
for parameters controlled by
the pedal, refer to “Making
Control Pedal Settings”
(Owner’s Manual; p. 102).
Use only the specified
expression pedal (EV-5; sold
separately). By connecting any
other expression pedals, you
risk causing malfunction and/
or damage to the unit.
For details, refer to
“Transposing the Keyboard in
Octave Units (Octave Shift)”
(Owner’s Manual; p. 32).
26
Page 27

Using the RPS Function
Try Out the Various Performance Features
RPS (Realtime Phrase Sequence)
to the keyboard and play them back them by pressing a single key or pad. Since different
phrases can be played back by pressing different keys or pads, this feature can be especially
useful in live performance.
fig.Q-12-01.e
Song
Phrase track 2
Phrase track 1
Pattern track
Pattern
Using RPS is a three-step procedure.
1. Create a pattern (i.e., record into a pattern).
2. Assign the pattern to a note of the keyboard or to a pad.
3. Turn on the RPS button, and press the key or pad to which you assigned the
pattern.
As an example, here’s how a phrase recorded in pattern 1 can be played from a pad or key.
Pattern
1
2
is a function that lets you freely assign single-part patterns
Phrase track 16
Phrase track 15
Pattern99Pattern
100
Create the Pattern
1.
Press [PATCH/RHYTHM] to access the Patch Play screen.
2.
Press [1 (Kbd Part)] to select the keyboard part.
3.
Press [SEQUENCER] to access the Song Play screen, and then press [2 (Ptn)]
to add a check mark (✔). The screen switches to the Pattern Play screen.
4.
Press [REC].
The Realtime Rec Standby window appears.
fig.Q-38
Make sure that the cursor is located at “Rec Track,” and turn the VALUE dial
5.
to select “PTN001.”
This lets us record a phrase on pattern 1.
Press [8 (Start)].
6.
Recording will begin after a one-measure count. Play a phrase on the keyboard.
7.
Press [STOP] to stop recording.
A phrase has now been recorded in pattern 1. Press [RESET] to return to the beginning, and
press [PLAY] to hear the pattern.
8.
Press [SEQUENCER], and in the Pattern Play screen that appears, press [2
(Ptn)] to remove the check mark.
4
3
In this example, you played
the phrase manually and
recorded it in real time. For
more about recording
methods, refer to “Recording
Songs” (p. 141) in the Owner’s
Manual.
27
Page 28

Try Out the Various Performance Features
Assign the Pattern to a Key or Pad
Hold down [SHIFT] and press [RPS].
1.
The RPS Setup screen appears.
fig.Q-40
2.
If you want to play the pattern from a pad, press the pad to which the pattern
is to be assigned. If you want to play the pattern from a key, press the key to
which the pattern is to be assigned.
The cursor will move to “Pattern.”
3.
Turn the VALUE dial to select “PTN001.”
With these settings, pressing the pad or key you selected in step 2 will play pattern 1, which
you recorded earlier.
4.
Press [7 (RPS Sw)] to turn on the RPS function.
The RPS button at the left of the screen will also light.
fig.Q-41
Press [8 (Exit)] to return to the previous screen.
5.
This completes the preparations.
Use the RPS Function
Keep pressing the key or pad that you selected in step 2 of “Assign the
1.
pattern to a key or pad.”
While you are pressing the key or pad, the pattern will play once.
For example, a complex phrase that would be difficult to play manually could be assigned to a
key or pad, and played with one finger during a live performance.
28
Press the RPS button to turn off the RPS function.
2.
Page 29

Using Skip Back Sampling to Sample a Favorite Phrase (Skip Back Sampling)
Sometimes you may want to preserve a nice phrase that you happened to play a bit earlier. In
such cases, you can use the
earlier in time.
When you execute
a sample. You can assign this sample to a pad and play it from the pad.
fig.Q-SMPL08
Button lit:
Button unlit:
Button blinking:
Press [PATCH/RHYTHM] to access the patch play screen.
1.
Perform by playing phrases on the keyboard or striking the pads.
2.
3.
Press [SKIP BACK SAMPLING] located at the left of the pads.
The following screen will appear, and Skip Back sampling will be executed.
Sampling will stop automatically, and the Sample Edit screen will appear.
fig.Q-SMPL01_50
Skip Back Sampling
Skip Back Sampling
, the phrase you played previously will be captured as
Skip Back Sampling is possible.
Skip Back Sampling is not possible.
After sampling, the sample is being edited by adjusting the loop point, etc.
function to sample sounds that were played
What is a sample? A sample
contains the waveform data
sampled by the Fantom-S. In
addition to the actual
waveform data itself, a sample
also contains parameters such
as start point, loop start, and
loop end.
With the factory settings, Skip
Back Sampling will capture the
previous ten seconds of your
performance. You can change
the setting so that Skip Back
Sampling will capture as much
as the previous forty seconds
of your performance.
4.
Press [8 (Preview)] to listen to the sample.
It will continue playing while you hold down the button.
The sampled phrase will be added as a sample to the sample list in a dedicated storage location
called “sample memory.”
5.
Press [SAMPLE LIST] to display the Sample List screen.
fig.Q-SMPL02_50
The highlighted sample is the sample that was captured by Skip Back Sampling.
29
Page 30

Using Skip Back Sampling to Sample a Favorite Phrase (Skip Back Sampling)
Assigning a Sample to a Pad (Assign to Pad)
Here’s how you can assign a sample as a rhythm tone to a pad. This operation is called
To Pad
.
Before you begin this procedure, make sure that a rhythm set is assigned to the Pad part (p. 11).
In the Sample List screen, make sure that the sample you recorded is
1.
highlighted, and then press [7 (Load Util)].
The Load Utility Menu window appears.
fig.Q-SMPL03_50
2.
Press [2 (Assgin to Pad)].
The Assign to Pad screen appears.
fig.Q-SMPL20_50
Assign
Press the pad that you want to assign.
3.
The pad shown in the screen will be highlighted.
Press [8 (Exec)].
4.
A message will ask you confirmation.
5.
Press [8 (Exec)] to assign the sample to the pad.
To cancel, press [7 (Cancel)].
Strike the pad to hear the sample you assigned.
30
Page 31

Creating a Song
What is a Performance?
A performance is a set patches and/or rhythm sets assigned to each of the sixteen parts,
allowing you to use sixteen sounds simultaneously.
fig.Q-01-05.e
To create a song, you will use the Fantom-S’s Performance mode to create a set of sounds for
your song, and then record the song data into the sequencer.
Performance
Layer/Split
Mixer
Part 16
Part 1
Patch/
Rhythm Set
What is a Part? A part is a
location or “slot” to which you
can assign a patch or rhythm
set. In Performance mode, each
performance has 16 parts, and
you can assign a patch or
rhythm set to each part.
The Fantom-S has a Layer screen (press [LAYER/SPLIT]) and a Mixer screen (press [MIXER]).
Use the Layer screen when you want to make settings for playing multiple patches together
(layered) or separately in different regions of the keyboard (split).
Use the Mixer screen when you want to make mixing settings such as adjusting the level and
pan for each of the sixteen parts.
Here’s how you can easily create a song by using rhythm patterns or the sampling function to
record into the sequencer.
This chapter explains how to create a song like the following.
fig.score1
Vocal part
Piano part
Bass part
Rhythm part
1. Play the rhythm part on the pads, and mix-record it while looping
2. Recording the bass part as arpeggios
3. Realtime-record the piano part
4. Record the vocal part
There's something about you, baby
Mix recording A method of
recording in which you can
listen to the previously-
recorded sounds while you
continue recording additional
material.
Realtime recording A method
of recording in which your
keyboard or pad playing and
controller operations are
recorded exactly as you
perform them.
31
Page 32

Creating a Song
Erasing a Song From Internal Memory (Song Clear)
When you record a song, the performance data is temporarily held in internal memory. If you
want to record a new song, you must first erase all of the recorded performance data from
internal memory.
Press [SEQUENCER] to access the Song Play screen.
1.
fig.Q-42
The area in which patch and
performance settings are kept
is called memory.
If internal memory contains a
song that you want to keep,
you must first save that song
to disk (p. 50).
2.
Press [3 (Song Clear)].
A message will ask for confirmation.
fig.Q-42a(10-01)
3.
Press [8 (Exec)] to execute.
When the operation has been completed, the display will briefly indicate “Song Clear
Completed!”
* If you decide to cancel, press [7 (Cancel)].
32
Page 33

Selecting a Performance
Now we will begin creating our song, but we must first select a performance. In this example,
we will use the performance “PRST: 63 SongMake Tmp” to create our song, so select “PRST: 63
SongMake Tmp”.
Press [LAYER/SPLIT].
1.
The performance Layer screen will appear.
fig.Q-43.e
Performance Group
Perfomance Number
Creating a Song
Use [CURSOR] to move the cursor to the performance group.
2.
3.
Either turn the VALUE dial or use [INC] [DEC] to select “PRST.”
Press to move the cursor to the performance number.
4.
5.
Either turn the VALUE dial or use [INC] [DEC] to select “63”.
Performance “PRST: 63 SongMake Tmp” will be selected.
fig.Q-44_50
33
Page 34

Creating a Song
The Mixer screen is ideal when
you want to mix or make
settings for the sixteen parts.
Selecting a Part
Selecting a Part from the Layer screen
When you press or in the Layer screen, which appears when you
1.
press [LAYER/SPLIT], appears at the left side of "PART." This is the
currently selected part.
Below the performance name, the screen shows the patch name of the selected part.
fig.Q-CP00_50
The currently selected part is
called the current part.
Selecting a Part from the Mixer screen
In the Mixer screen, which appears when you press [MIXER], use [CURSOR]
1.
to move the cursor to the part number.
It displays the part numbers and the name of the patch assigned to each part.
fig.Q-CP00_50
Turn the VALUE dial or use [INC] [DEC] to select a part.
2.
Now we will be recording the parts in the order of the rhythm part → bass part → piano part →
vocal part. At each step, we will select the part as described here for the Layer screen.
About the Keyboard Switch
The “KBD” indication in the screen is the Keyboard Switch. As the result of turning this switch
on (by assigning a check mark (✔) in the Layer screen, or by getting “KBD” to be displayed in
the Mixer screen), you will hear all parts for which it has been turned on. The currently selected
part will always sound, regardless of the keyboard switch. In other words, you will hear the
currently selected part and the parts for which the keyboard switch is on.
3.
In this recording, we will hear the sound of each individual part as we record
it. If the keyboard switch is on, use the VALUE dial or press [DEC] to switch it
off for all parts.
The parts in this performance have been assigned patches and a rhythm set that are suitable for
recording, but if you want to select different patches or rhythm sets you can press [1 (Patch
List)] and make your choice.
34
Page 35

Assigning a Vocal Phrase to a Part as a Patch
To part 1 we will assign a vocal phrase as a patch. We will use sample data that the Fantom-S
already contains.
Press [SAMPLE LIST].
1.
The Sample List screen will appear.
fig.Q-CP01
Creating a Song
What is a sample? This term
indicates waveform data
sampled by the Fantom-S. A
sample consists of the actual
waveform data together with
sample parameters such as
loop start and loop end points.
2.
Press [1 (Preset)].
“Preset” shows the preset samples. In this example we will use “P0001 R&B Vocal F1.”
3.
Press or to select “P0001 R&B Vocal F1.”
You can audition the sample by pressing [8 (Preview)].
Next we will create a patch from this sample, and assign it to a part.
fig.Q-CP02_50
35
Page 36

Creating a Song
If you decide to cancel, press [7
(Cancel)].
Assigning the Selected Sample to a Part as a Patch (Assign to Keyboard)
The selected sample can be assigned to a part as a patch.
We will use the Assign to Keyboard function to create a patch from the selected sample.
4.
Press [7 (Load Utility)] to access the Load Utility window, and then press[1
(Assign to Kbd)].
The Assign to Keyboard window will appear. Here you can specify the part to which the newly
created patch will be assigned. In this example we will assign the patch to part 1.
fig.Q-CP03_50
Either turn the VALUE dial or use [INC] [DEC] to set the setting to “1”.
5.
In the Load Utility window
you can execute various
operations on a sample.
Press [8 (Select)], and a message will ask you for confirmation.
6.
Press [8 (Exec)].
7.
A message will ask you for confirmation.
Press [8 (Exec)] once again.
8.
The vocal phrase has now been assigned to part 1.
Play the C4 key of the keyboard.
9.
The vocal phrase will sound.
fig.Q-CP04
Press [EXIT] to return to the previous screen.
10.
36
Page 37

Sample Key and Original BPM
If you play the patch created by Assign To Keyboard from a note other than C4 of the keyboard,
it will sound differently. This is because the “Original Key” parameter of this sample has been
set to “C4”. The original key is the note number (a number assigned to each key) that will play
the sample at the pitch at which it was sampled. To view this setting, use the following steps.
1.
Press [SAMPLE LIST], and then press [1 (Preset)].
2. Press or to select “P0001 R&B Vocal F1.”
3. Press [SAMPLE EDIT], and then press [2 (Sample Param)].
The Sample Parameter screen will appear.
fig.Q-CP06
Creating a Song
“Original Key” is set to “60 (C4)”.
Also notice that “BPM” is set to “92”. This is the original tempo of the sample. You should set
the tempo of the song we will be recording to “92” so that it will match the tempo of this phrase.
4. Press [7 (Exit)].
5. Press [EXIT] to return to the previous screen.
37
Page 38

Creating a Song
Recording the Rhythm Part
We will begin by recording the rhythm part as a rhythmic guide.
First we will record the bass drum and snare drum, and then add the hi-hat.
Selecting the Part to Record
* Press [LAYER/SPLIT] to access the Performance Layer screen, and verify that the
performance “PRST: 63 SongMake Tmp” is selected.
Press to move to “PART10.”
1.
An indication of “PAD” will appear below the part number. This indicates that “part 10” is
specified for playing from the pads.
fig.Q-45_50
Selecting the Recording Method
Press [TEMPO] to set the tempo for recording. Turn the VALUE dial to specify
1.
“92.”
fig.Q-45a
Press [8 (Close)] to close the window.
When you have finished setting, press [8 (Close)].
2.
Press [REC].
3.
The [REC] indicator will blink, and the Realtime Rec Standby window will appear.
fig.Q-46
38
In this window you can edit various settings related to realtime recording.
Page 39

4.
Set the parameters of the Realtime Rec Standby window as shown below.
Press or to move the cursor to each parameter, and turn the VALUE
dial or use [INC] [DEC] to set the value.
•
Rec Track: AUTO
A location where recording occurs is called a “track.” Specify the recording-destination phrase
track. If you select “Auto,” a location where recording occurs is called a “track.” This setting
specifies the recording-destination phrase track. If this is set to “Auto,” the phrase track of the
same number as the part currently selected for the keyboard will be chosen automatically.
•
Rec Mode (recording mode): MIX
Selects how recording will occur. If you specify “MIX,” the newly-recorded material will be
added to any performance that is already recorded on the recording-destination track without
erasing it.
•
Count In: WAITE NOTE
Selects how recording will begin. If you select “WAITE NOTE,” recording will begin when you
play the keyboard or press the Hold pedal.
•
Loop/Punch: LOOP (2 MEAS)
When repeatedly recording over a specified region, this specifies the length of that region. If
you specify “2 MEAS,” you will be able to repeatedly record over a two-measure region
without stopping.
•
Input Quantize: GRID
This function automatically corrects the timing at which you play keys or pads, so that they will
be aligned to precise intervals of time. You can quantize while recording. If you set this to
“GRID,” the notes will be recorded at precise timing intervals.
fig.Q-46a_50
Creating a Song
•
Grid Resolution: 1/16 ( )
This setting is used by grid quantization. Set this to the shortest of the note values that you will
be inputting.
* Parameters other than the above will not be used in this example, so you do not need to set
them.
Playing and Recording Rhythm Part
* Make sure that the parameters of the Realtime Rec Standby window are set correctly.
1.
In the Realtime Rec Standby window, press [8 (Start)], and then press [7
(Rehearsal)].
In the Realtime Recording window, a check mark (✔) will be applied to [7 (Rehearsal)],
indicating that the Rehearsal function is on. The
recording during realtime recording. This is convenient when you want to check the sound that
you will record next during loop recording, or when you want to practice the phrase that you
will record next.
When the Rehearsal function is on, the [REC] indicator will blink.
fig.Q-46b_50
Rehearsal function
temporarily disables
39
Page 40

Creating a Song
If You Make a Mistake (Realtime Erase)
Realtime Erase is a function that erases unwanted data while you are still recording. This
function is convenient during Loop recording since you can erase data without halting
recording.
1.
2.
In time with the metronome, practice playing the rhythm part on the pads.
First practice the bass drum and snare drum.
fig.score2
Rhythm part
Snare Drum
Bass Drum
When you have finished practicing, press [REC] to begin recording.
3.
The [REC] indicator will change from blinking to lit, and recording will begin. The measure is
shown in the Realtime Recording window. Since we are using Mix recording, it is not necessary
for you to record the full two measures completely. Even if you record one measure at a time,
each recording pass will be added to the previously recorded material.
4.
When you have finished recording, press [7 (Rehearsal)].
The [REC] indicator will change from lit to blinking, and the Rehearsal function will be turned
back on, temporarily disabling recording.
Bass Drum
In the Realtime Recording window, press [6 (Erase)].
If this window is not displayed, press [PLAY] during recording to access it. Each time you press
[PLAY], the Realtime Recording window will alternately be hidden or displayed.
fig.Q-47b_50
Snare Drum
2. If you press [7 (Erase All)], all data will be erased. To erase notes of a
specific pad, press that pad. Data will be erased while you continue
pressing that pad.
40
Page 41

5.
Next practice the open hi-hat and closed hi-hat. Since you are in Rehearsal
mode, practice the hi-hat while you listen to the previously-recorded bass
drum and snare drum.
fig.score3
Closed Hi-Hat
Rhythm part
Open Hi-Hat
Creating a Song
6.
When you are able to play the hi-hat correctly, press [7 (Rehearsal)]
(Rehearsal mode is defeated), and use the pads to record the hi-hat.
The measure is shown in the Realtime Recording window for your reference.
When you have recorded the hi-hat, press [STOP].
7.
This completes the rhythm part.
Press [RESET] to return to the beginning of the measures, and press [PLAY]
8.
to hear the playback.
Press [RESET] to return to the beginning of the measures.
Closed Hi-Hat
Open Hi-Hat
41
Page 42

Creating a Song
Bass part
-OCT
Bb2
The “8va” indication in the
score means that you are to
play one octave lower than
written.
Recording the Bass Part
When you have successfully recorded the drum track, let’s proceed to recording the bass part.
We will explain how to record the bass using the arpeggiator function.
1.
Make sure that the Performance Layer screen is displayed, and that
performance “PRST: 63 SongMake Tmp” is selected.
2.
Press to move to “PART2.”
This selects the bass part. Play the keyboard and verify that you hear the bass sound.
3.
Press ARPEGGIO/RHYTHM [ON/OFF] so its indicator is lit.
In this performance, the arpeggiator is set to operate on part 2.
4.
Press [REC], and then press [8 (Start)] to begin recording.
fig.Q-47
Press [7 (Rehearsal)].
5.
The Rehearsal function is on.
fig.score5
If you want to select a different
sound, press [1 (Patch List)].
If you also hear the sound of
other parts, make sure that
“KBD” does not have a check
mark (✔).
In Performance mode, the
arpeggiator can be applied to
one part. To see the part to
which the arpeggiator is
applied, press ARPEGGIO/
RHYTHM [SELECT/
EDIT]→[3 (Arp)] to access the
Arpeggio screen and check the
“Arp Part” setting.
6.
Press the Bb1 key of the keyboard (on the Fantom-S, the Bb2 key).
If you are using the Fantom-S, the keyboard does not have a Bb1 key, so press [-OCT] once.
Now, when you press the Bb2 key the Bb1 note will sound (Octave Shift).
Arpeggios will begin playing according to the keys you press.
Press [7 (Rehearsal)] once again (this defeats Rehearsal mode), and record
7.
for two measures.
The measure is shown in the Realtime Recording window for your reference.
8.
When you have finished recording, press [STOP].
Press [RESET] to return to the beginning of the measures, and press [PLAY] to hear the
playback.
9.
Once again press ARPEGGIO/RHYTHM [ON/OFF] so its indicator goes out,
and the Arpeggio/Rhythm function is turned off.
If you are using the Fantom-S, press [+OCT] once to return the Octave Shift setting to normal.
42
If you are using the Fantom-
S88, pressing the Bb1 key will
sound the pitch as written.
Page 43

Recording the Piano Part
Next we will record the piano part. Use the keyboard to record the piano part in realtime.
1.
From the Performance Layer screen, press to move to “PART3.”
Play the keyboard, and verify that you hear the piano sound.
2.
Press [REC] to access the Realtime Rec Standby window.
3.
In the Realtime Rec Standby window, press [8 (Start)] and then press [7
(Rehearsal)] to make the indicator blink.
You will hear the rhythm part and bass part. Since the rehearsal function is on, nothing will be
recorded when you play the keyboard. Play the keyboard to practice the piano part. The “8va”
indication in the score indicates that you are to play one octave lower than written.
fig.score4
Piano part
Creating a Song
Realtime recording This is a
method in which your
performance on the keyboard
or pads and your controller
operations are recorded
exactly as you play them.
If you also hear the sound of
other parts, make sure that
“KBD” does not have a check
mark (✔).
If you want to choose a
different sound, press [1 (Patch
List)].
When you have finished practicing, press [7 (Rehearsal)] to start recording
4.
(this defeats Rehearsal mode).
The [REC] indicator will change from blinking to lit, and recording will begin. The measure is
shown in the Realtime Recording window. Since you are using Mix recording, it is not
necessary for you to input both measures completely. Even if you record one measure at a time,
your recording will be added to the previously-recorded material.
If You Make a Mistake (Realtime Erase)
Realtime Erase is a function that erases unwanted data while you are still recording. This
function is convenient during Loop recording sine you can erase data without halting
recording.
1. In the Realtime Recording window, press [6 (Erase)].
If this window is not displayed, press [PLAY] during recording to access it. Each time you press
[PLAY], the Realtime Recording window will alternately be hidden or displayed.
fig.Q-47b_50
2. If you press [7 (Erase All)], all data will be erased. To erase notes of a
specific pad, press that pad. Data will be erased while you continue
pressing that pad.
When you have finished recording, press [STOP].
3.
This completes recording of the piano part.
Press [RESET] to return to the beginning of the measures, and press [PLAY] to hear the
playback.
43
Page 44

Creating a Song
Recording the Vocal Part
Last we will record the vocal part. We will record the vocal part in the same way as the piano
part.
1.
From the Performance Layer screen, press to move to “PART1.”
Play the C4 key and verify that you hear the vocal phrase.
2.
Press [REC] to access the Realtime Rec Standby window.
In the Realtime Rec Standby window, press [8 (Start)] and then press [7
3.
(Rehearsal)].
You will hear the rhythm part, bass part, and piano part. Since the rehearsal function is on,
nothing will be recorded when you play the keyboard. Practice the part. Hold down the C4 key
until you no longer hear the vocal phrase (approximately one measure).
fig.Q-CP04
If you also hear the sound of
other parts, make sure that
“KBD” does not have a check
mark (✔).
When you have finished practicing, press [7 (Rehearsal)] to begin recording
4.
(this defeats Rehearsal mode).
The [REC] indicator will change from blinking to lit, and recording will begin. The measure is
shown in the Realtime Recording window.
5.
When you have finished recording, press [STOP] to stop recording.
You have now finished recording the song. Press [RESET] to return to the beginning of the
measures, and press [PLAY] to listen to the playback. When the playback ends, press [RESET]
to return to the beginning of the measures.
44
Page 45

Mixing in the MIXER Screen
The Fantom-S’s performance mode has a Layer screen (press [LAYER/SPLIT]) and a Mixer
screen (press [MIXER]).
The Layer screen is convenient when you want to make settings for playing multiple patches
together (layered) or separately in different regions of the keyboard (split). In contrast, the
Mixer screen lets you make mixing settings such as adjusting the level and pan for each of the
sixteen parts. In this example we will use the MIXER screen to make fine adjustments to the
song that you just recorded.
Loop the Song
Since the song you recorded is just two measures long, let’s loop the song so that it will play
back repeatedly.
1.
Press [SEQUENCER].
The Song Play screen will appear.
fig.Q-49
Creating a Song
2.
Press [4 (Loop)].
The Loop window will appear.
fig.Q-50_50
3.
Press to move the cursor to “Repeat Times,” and either turn the VALUE
dial or use [INC] [DEC] to set this to “INF.”
“Repeat Times” specifies the number of times that the song will repeat. With the “INF
(INFINITE)” setting, playback will repeat until you press [STOP].
Press to move the cursor “End Point,” and turn the VALUE dial or use
4.
[INC] [DEC] to set the end point of the song.
In this example the song is two measures long, so set this to “003-01-000”.
5.
Press [7 (Loop)] to assign a check mark (✔).
Make sure that “LOOP” is displayed in the upper right of the screen to indicate that the loop
setting is turned on.
fig.Q-51
6.
Press [8 (Close)] to close the window, and then press [EXIT].
45
Page 46

Creating a Song
Making Fine Adjustments in the MIXER Screen
1.
Press [MIXER].
The Performance Mixer screen will appear.
fig.Q-52
Press [PLAY] to play back the song.
2.
The song will play repeatedly.
3.
Press the button located at the right of the realtime control knobs to go dark
the indicator.
4.
Use [7 (←)] [8 (→)] and press or to move the frame in the screen to
the “LEVEL” of parts 1 through 4.
fig.Q-53
The levels of the four enclosed parts correspond to the four knobs at the left of the display.
Turning the far left knob will adjust the volume of the vocal part. In this way, adjust the volume
balance of the four parts 1, 2, 3, and 10.
You can set the value either by
turning the VALUE dial or by
using [INC] [DEC].
46
Page 47

5.
Use [7 (←)] [8 (→)] and press or to move the frame in the screen, and
set the panning (PAN: stereo location of the sound) in the same way.
fig.Q-54_50
6.
By pressing [6] to switch screens, you can also adjust the reverb send level
and chorus send level.
fig.Q-55_50
Creating a Song
When you have finished making settings, press [STOP] to stop playback.
7.
47
Page 48

Creating a Song
Using Effects
The Fantom-S provides the following four types of effects. Each of these effects can be set
independently.
•
Multi effect
This multi-effect unit provides 78 types (77 types on the Fantom-S) of effects such as distortion
and rotary.
•
Chorus
This is an effect that adds depth and spaciousness to the sound.
•
Reverb
This effect adds the reverberation that is characteristic of a performance heard in acoustical
spaces such as a hall.
•
Mastering effect
This is a stereo compressor (limiter) that can be applied to the final output.
Switching the Effects On/Off
Press [EFFECTS].
1.
The Effects Routing screen will appear.
fig.Q-56
Effect on/off settings are
common to the entire Fantom-
S. These settings are not for
individual patches or
performances.
2.
Press [8 (Effect Sw)].
The Effects Sw window will appear.
fig.Q-57_50(14-00)
3.
Press [1 (MFX1)]–[6 (Master)] to turn each effect switch on/off. Each time you
press a button the setting will alternate between on and off.
4.
When you have finished making settings, press [8 (Close)].
5.
Press [EXIT] to return to the previous screen.
When you return to the Performance screen, the effect on/off settings will be displayed in the
following area.
fig.Q-58(14-01)
48
Page 49

Editing the Effect Settings
For details on effect settings,
refer to “Adding Effects”
(p.175) in the Owner’s Manual.
1.
Press [EFFECTS] to access the Effects screen.
fig.Q-59_50(14-01a)
2.
Press the [1 (Routing)]–[7 (Mastering)] to select the effect that you want to
edit.
[3 (MFX1/2/3)] will alternate between 1, 2, and 3 each time you press the button.
• Specify how effects are connected and applied → [1 (Routing)]
• Edit the multi-effect settings → [3 (MFX1/2/3)]
• Edit the chorus settings → [5 (Chorus)]
• Edit the reverb settings → [6 (Reverb)]
Creating a Song
3.
Press [CURSOR] to select a parameter.
4.
Turn the VALUE dial or press [INC]/[DEC] to specify the value.
When you have finished editing, press [EXIT] to return to the previous screen.
49
Page 50

Creating a Song
Saving the Song You Recorded
The song you created is temporarily held in a location called “internal memory,” but all data in
internal memory is lost when you turn off the power. If you want to keep your song, you must
save it in the Fantom-S’s user memory.
Press [SAVE/LOAD].
1.
The Save/Load Menu screen will appear.
fig.Q-60_50
Press [2 (Save Song)].
2.
The Song File Name screen will appear.
fig.Q-61_50
Samples you record will be held in sample memory, but the data in sample memory will be lost
when you turn off the power. If you want to save the samples as well, choose [1 (S+S)].
3.
Assigning a file name (up to 8 characters). Turn the VALUE dial or press [INC]/
[DEC] to select the character that you want to input.
To change the type of character, press [1 (Change Type)]. The type will alternate each time you
press this.
To insert a space at the cursor location, press [3 (Insert)].
To delete the character at the cursor location, press [2 (Delete)].
Press or to move the corsor (the location at which to enter / edit a character).
50
Page 51

4.
Press [8 (Write)] to finalize the file name.
The Song Save screen will appear.
fig.Q-62_50
Press [1 (User)] (user memory) to select the destination of the save.
5.
6.
Press [8 (Save)].
A message will ask you confirmation.
Press [8 (Exec)] to save the file.
7.
When the file has been saved, the display will indicate “Completed !”
Creating a Song
For details on saving, refer to
“Saving / Loading a Song”
(p.168) in the Owner’s Manual.
* The display screens printed in this owner's manual are based on the factory settings.
However, please be aware that in some cases they may differ from the actual factory settings.
51
Page 52

03122001 ’03-6-4N
 Loading...