

Page 1
Owner’s Manual
Before using this unit, carefully read “USING THE UNIT SAFELY” and
“IMPORTANT NOTES” (the leaet “USING THE UNIT SAFELY” and the
Owner’s Manual (p. 25)). After reading, keep the document(s) where it
will be available for immediate reference.
© 2020 Roland Corporation
Owner’s Manual (this document)
Read this rst. It explains the basic things you need to know in order to use the RD-88.
PDF Manual (download from the Web)
5 Parameter Guide
This explains all parameters of the RD-88.
5 Sound List
This is a list of the sounds built into the RD-88.
5 MIDI Implementation
This is detailed information about MIDI messages.
1. Enter the following URL in your computer.
2. Choose “RD-88” as the product name.
To obtain the PDF manual
http://www.roland.com/manuals/
I
Page 2
Contents
Introduction ............................................ 3
Placing the RD-88 on a Stand .............................. 3
Turning the Power On and O ............................. 3
Panel Descriptions ...................................... 4
Top Panel ................................................. 4
List of Shortcut Keys ..................................... 5
Rear Panel (Connecting Your Equipment) .................. 6
Overview of the RD-88 .................................. 8
Basic Organization of the RD-88 ........................... 8
About Scenes ............................................ 8
Basic Operation ........................................... 9
Main Screens ............................................ 9
About the Cursor Buttons ................................ 9
Editing a Value ........................................... 9
Performance ............................................ 10
Listening to the Demo (DEMO PLAY) ...................... 10
Piano Performances ...................................... 10
Performing with a Variety of Scenes ....................... 11
Playing Multiple Tones with the Keyboard ................. 11
Performing with Layered Tones (Dual Mode) ............... 11
Playing Dierent Tones in Two Dierent Sections of the
Keyboard (Split Mode) ................................... 12
Changing the Tone for a ZONE ............................ 12
Adjusting the Volume Level for Individual Zones ........... 13
Changing the Key Touch .................................. 13
Transposing the Key of the Keyboard (TRANSPOSE) ........ 14
Adding Reverberation to the Sound (REVERB) ............. 14
Adding Breadth to the Sound (CHORUS/DELAY) ........... 15
Modifying the Sound in Real Time (WHEEL1/2) ............. 15
Adding Liveliness to the Sound (COMPRESSOR) ............ 15
Adjusting the Character of the Sound (TONE COLOR) ....... 16
Applying Various Eects to the Sound (MFX) ............... 16
Adjusting the Levels of Each Frequency Range (EQUALIZER) 17
Disabling the Buttons (Panel Lock) ........................ 17
Editing the System Eects ................................. 22
Saving the System Eects (Write) ......................... 22
Other Functions ......................................... 23
Convenient Functions (UTILITY) .......................... 23
Backing Up Data to USB Flash Drive (BACKUP) ............. 23
Restoring Backup Data (RESTORE) ......................... 23
Returning to the Factory Settings (FACTORY RESET) ........ 23
Formatting a USB Flash Drive (FORMAT USB MEMORY) ..... 24
Editing the System Settings (SYSTEM) ..................... 24
Saving the System Settings (System Write) ................. 24
Viewing the Program Version (INFORMATION) ............. 24
USING THE UNIT SAFELY ................................ 25
IMPORTANT NOTES ..................................... 25
Main Specications ..................................... 26
Using the Convenient Functions in Performances ...... 18
Registering Frequently-Used Sounds (Scenes) to Buttons
(FAVORITE)
Registering a Favorite .................................... 18
Recalling a Favorite ...................................... 18
Switching the Favorite Bank .............................. 18
Viewing the Favorite List ................................. 18
Playing Rhythm ........................................... 19
Changing Rhythm Tempos ............................... 19
Changing the Rhythm Pattern ............................ 19
Playing Songs ............................................ 20
Assigning the Function of Each Controller ................. 20
Using the [ONE TOUCH PIANO] Button ..................... 20
Using the RD-88 as a Master Keyboard ..................... 21
What’s MIDI? ............................................ 21
Settings for Controlling an External Sound Module ......... 21
............................................... 18
Making Detailed Settings for Tones .................... 22
Editing a Scene ........................................... 22
Saving a Scene (Write) ................................... 22
2
Page 3
Introduction
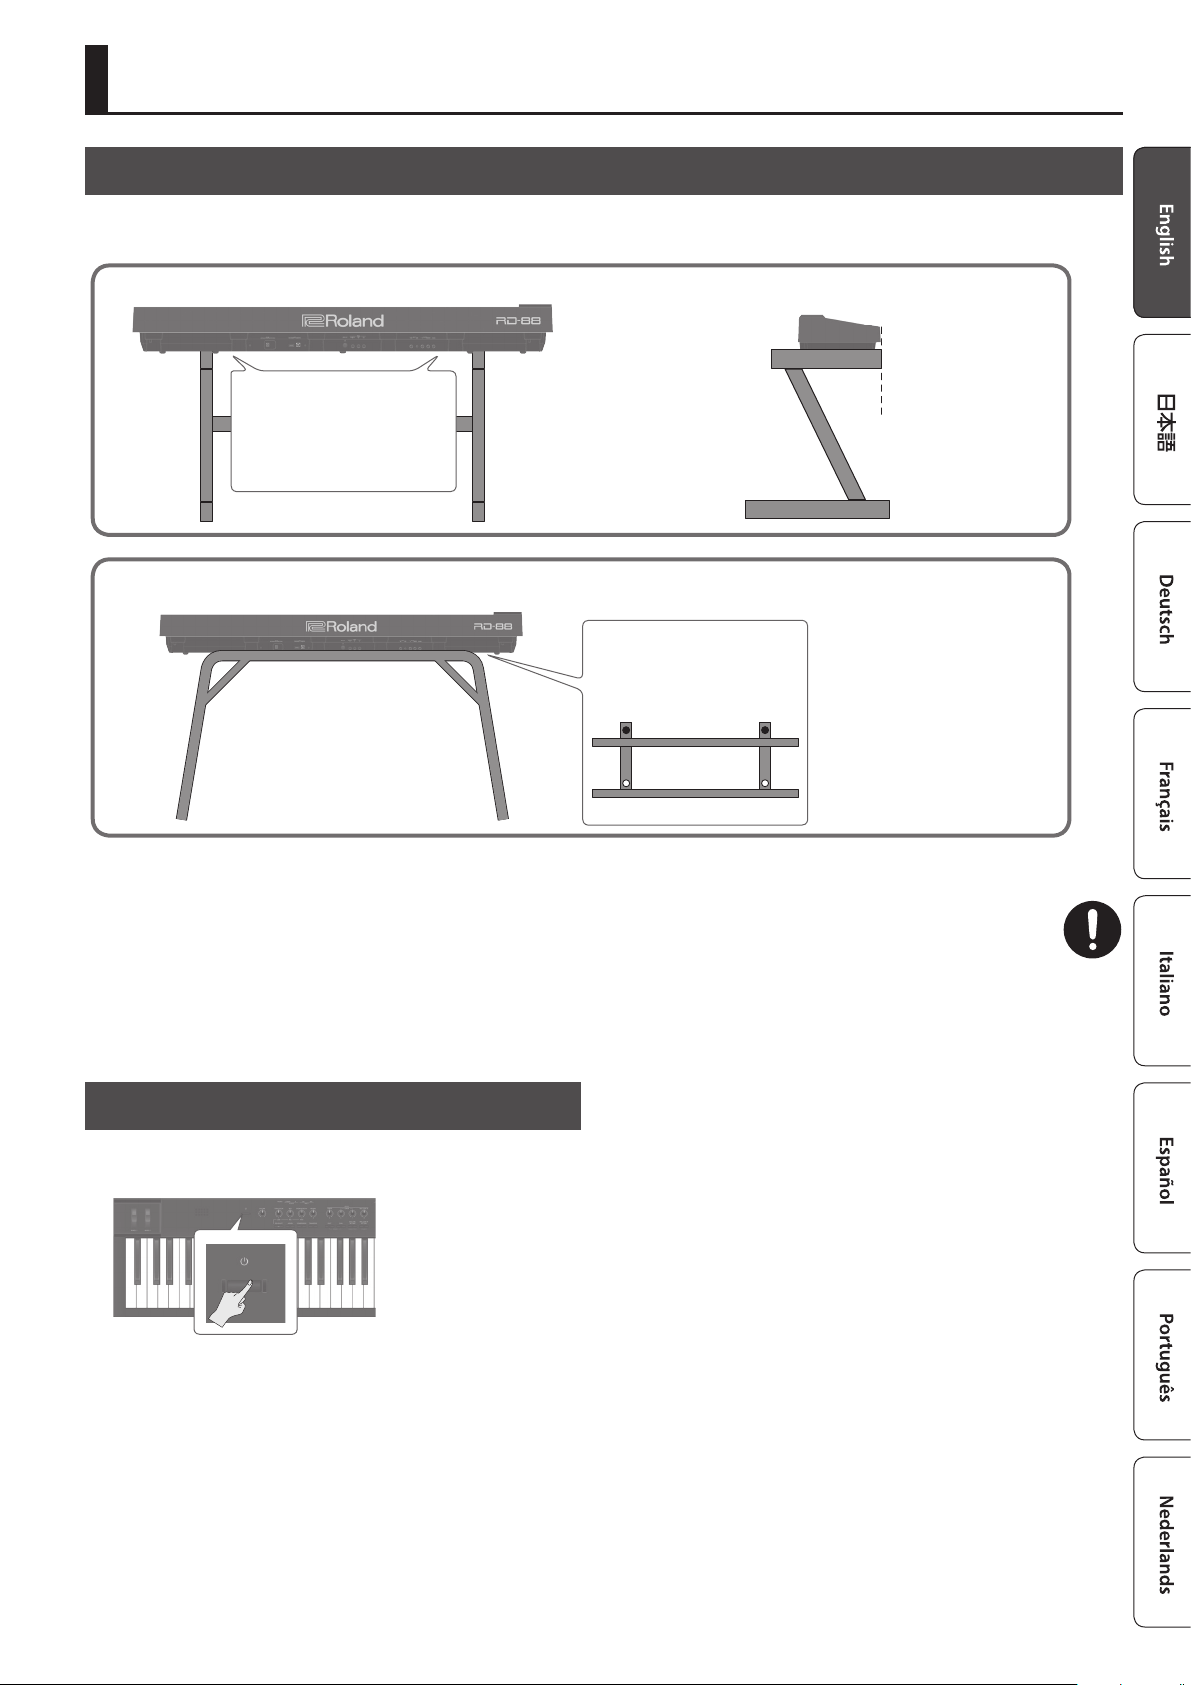
Placing the RD-88 on a Stand
If you want to place the RD-88 on a stand, use the Roland KS-10Z or KS-12.
Be careful not to pinch your ngers when setting up the stand.
KS-10Z
Align the horizontal centers of the
RD-88 and of the stand.
Adjust the width of the stand to the
second stage or wider. It cannot be
used in the narrowest screw hole
position.
KS-12
Adjust the width of the stand
so that the rubber feet on the
keyboard side of the bottom of
the keyboard t into the holes
provided for the rubber.
Align the front of the RD-88
with the front of the stand.
Top view
Note when placing the RD-88 on a stand
Be sure to follow the instructions in the Owner’s Manual carefully when placing this unit on a stand.
If it is not set up properly, you risk creating an unstable situation which could lead to the unit falling or the stand toppling, and may
result in injury.
Be careful not to pinch your ngers when setting up the stand.
Beware of overturning!
To prevent the RD-88 from overturning, do not apply excessive force to it, and never sit or stand on it.
Turning the Power On and O
Press the [L] (power) button to turn the power on.
Long-press the [L] (power) button to turn the power o.
* The power to this unit will be turned o automatically after a
predetermined amount of time has passed since it was last used
for playing music, or its buttons or controls were operated (Auto
O function). If you do not want the power to be turned o
automatically, disengage the Auto O function. For detail, refer to
“Parameter Guide” (PDF).
* Unsaved data is lost when the power turns o. Before turning the
power o, save the data that you want to keep (p. 22).
* Before turning the unit on/o, always be sure to turn the volume
down. Even with the volume turned down, you might hear some
sound when switching the unit on/o. However, this is normal
and does not indicate a malfunction.
3
Page 4
Panel Descriptions
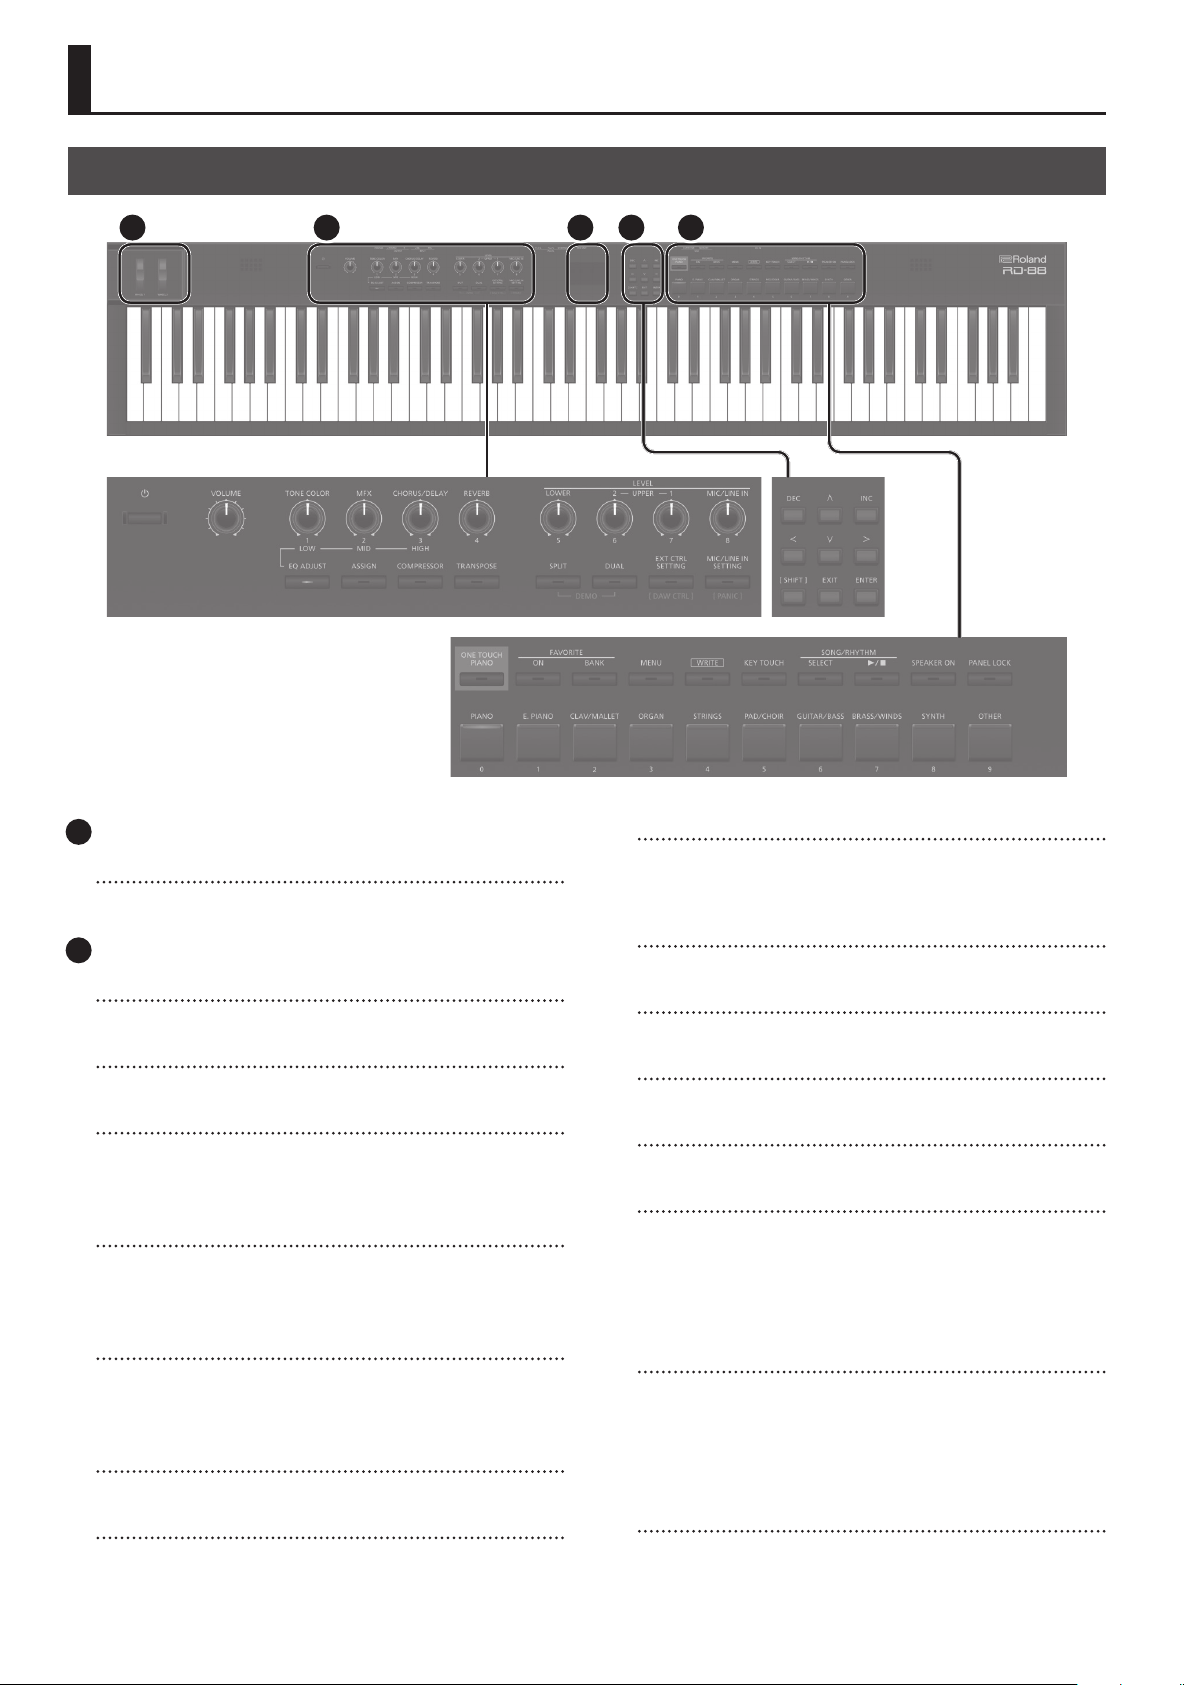
Top Panel
1 3 4 5 2
1
WHEEL 1/2
Turn the wheels to modify the sound. You can specify the type of
change that occurs (p. 15).
2
[L] switch
Turns the power on/o.
[VOLUME] knob
Adjust the overall volume of the RD-88.
[TONE COLOR] knob
Varies the tonal character or sound image (p. 16).
If the [EQ ADJUST] button is lit, this operates as the EQ [LOW]
knob (p. 17).
[MFX] knob
Adjust the depth of the eect (p. 16).
If the [EQ ADJUST] button is lit, this operates as the EQ [MID] knob
(p. 17).
[CHORUS/DELAY] knob
Adjust the chorus/delay depth (p. 15).
If the [EQ ADJUST] button is lit, this operates as the EQ [HIGH]
knob (p. 17).
[REVERB] knob
Adjusts the reverb depth (p. 14).
[EQ ADJUST] button
Turn this on when you want to adjust the EQ. When this button
is on (lit), you can use the above three knobs to adjust the EQ
(p. 17).
[ASSIGN] button
You can assign desired parameters to the knobs for adjustment.
When this button is on (lit), the knobs adjust the values of the
assigned parameters (p. 20).
[COMPRESSOR] button
Turns the compressor on/o (p. 15).
[TRANSPOSE] button
Lets you transpose your performance (p. 14).
LEVEL [LOWER], [UPPER2], [UPPER1] knobs
Adjust the volume of each zone (p. 13).
LEVEL [MIC/LINE IN] knob
Adjusts the input level of MIC/LINE.
[SPLIT] button
Turns the Split Mode on/o (p. 11).
This lets you divide the keyboard into left and right regions and
play a dierent sound in each.
By pressing this button and the [DUAL] button simultaneously,
you can l
[DUAL] button
Turns the Dual Mode on/o (p. 11).
This layers UPPER 1 and UPPER 2 tones together across the entire
keyboard.
By pressing this button and the [SPLIT] button simultaneously,
you can listen to demo songs (p. 10).
[EXTERNAL CTRL SETTING] button
Accesses a screen where you can make settings for controlling an
external MIDI sound module (p. 21).
isten to demo songs (p. 10).
4
Page 5

Panel Descriptions
[MIC/LINE IN SETTING] button
Accesses the MIC/LINE input setting screen. You can apply EQ and
reverb to the MIC/LINE input (p. 7).
3
Display
Shows the Scene names and the values of various settings, etc.
4
[<] [>] [ ] [ ] buttons
Press these to switch pages and to move the cursor.
[INC] [DEC] buttons
Modify values. If you keep on holding down one button while
pressing the other, the value change accelerates.
[SHIFT] button
You can easily call up Edit screens for related parameters by
holding down this button while pressing buttons, turning knobs,
or operating other controllers (refer to “List of Shortcut Keys” ). If
you edit a parameter value while holding down this button, the
value will change more greatly.
[EXIT] button
Press to return to a previous screen or to cancel a procedure that
is in progress.
[ENTER] button
Press this to conrm a value or execute an operation.
5
[ONE TOUCH PIANO] button
Recalls a piano sound (Scene).
You can also make settings so that a favorite sound is recalled
instead of a piano sound (p. 11).
[SPEAKER ON] button
Turns the internal speakers on/o.
The internal speakers turn o when headphones are plugged
into the headphone jack, but pressing this button turns on the
speakers even if headphones are connected. You can also turn o
the speakers even if headphones are not connected.
[PANEL LOCK] button
Long-press this button to turn panel lock on/o (a function that
disables panel operations)(p. 17).
[PIANO]–[OTHER] buttons/[0]–[9] buttons
Select Tone (Scene) categories (p. 11).
If the [FAVORITE] button or the [BANK] button are lit, these
buttons operate as [0]–[9] buttons (p. 18).
List of Shortcut Keys
* “[A]+[B]” indicates the operation of “holding down the [A] button
and pressing the [B] button.”
Shortcut Explanation
[SHIFT] + [DEC]
[SHIFT] + [INC]
[SHIFT] + Favorite [BANK], or
[SHIFT] + Favorite [ON]
[SHIFT] + operate a knob 1–4
[SHIFT] + operate a knob 1–8
[SHIFT] + operate a WHEEL 1/2 Jumps to the wheel assignment screen.
[SHIFT] + operate a pedal Jumps to the pedal assignment screen.
Changes the value in steps of 10. When the
Scene screen is shown, this changes the Scene
category.
Accesses the Favorite list.
Jumps to the parameter edit screen for the
corresponding knob.
* If the [ASSIGN] button is on
Jumps to the knob assignment edit screen.
NOTE
Note that when you press this button to recall a piano sound, the
settings you’re editing are lost.
FAVORITE [ON] button
Turns on/o the function (FAVORITE function) that recalls favorite
sounds you’ve registered (p. 18).
FAVORITE [BANK] button
Selects the bank of FAVORITE memories (p. 18) in which you can
register your favorite sounds.
[MENU] button
The MENU screen appears.
[WRITE] button
The WRITE screen appears.
[KEY TOUCH] button
Accesses a screen where you can make keyboard touch settings
(p. 13).
SONG/RHYTHM [SELECT] button
Accesses a screen where you can select songs or rhythms
(p. 19, p. 20).
SONG/RHYTHM [s] button
Starts/stops playback of the song or rhythm (p. 19, p. 20).
5
Page 6
Panel Descriptions
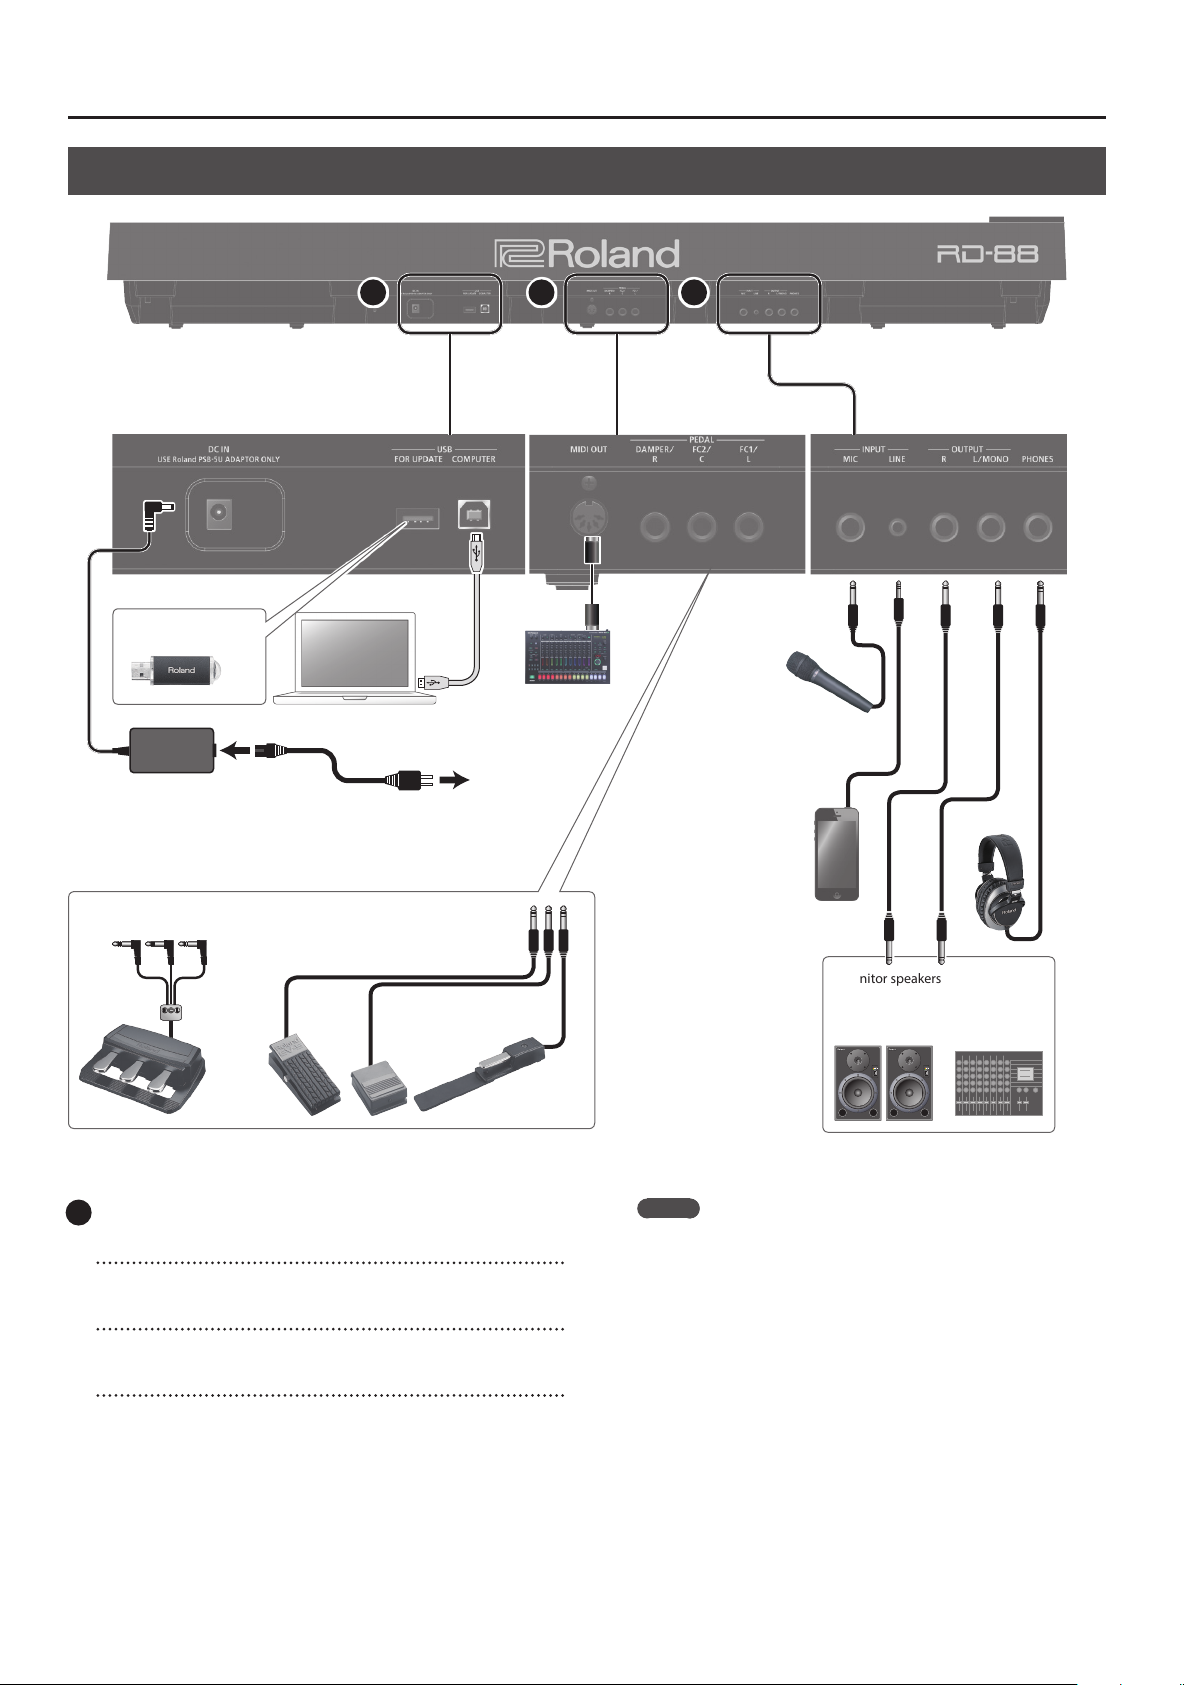
Rear Panel (Connecting Your Equipment)
6 7 8
USB ash drive
External MIDI Device
AC Adaptor
Pedal unit (RPU-3) Expression pedal (EV Series)
* To prevent malfunction and equipment failure, always turn down the volume, and turn o all the units before making any connections.
6
DC IN jack
Connect the included AC adaptor here.
USB MEMORY port
You can connect a USB ash drive here.
USB COMPUTER port
You can connect this to your computer so that it can exchange
performance data and audio signal with the RD-88.
Power Cord
AC Outlet
or
Pedal switch (DP Series)
MEMO
5 The RD-88 supports USB MIDI and USB Audio. In order to use
USB Audio, the dedicated USB driver must be installed on
your computer. You can download the driver from the Roland
website.
5 For details on USB driver settings and USB MIDI/Audio settings,
refer to “Parameter Guide” (PDF).
5 You can use a dedicated plugin to control software on your
computer in more sophisticated ways. For details, refer to the
Roland website.
Mic
Audio player
Monitor speakers
(powered)
headphones
Mixer etc.
6
Page 7
7
MIDI OUT connector
Transmits MIDI messages to an external MIDI device connected
here.
PEDAL jacks (DAMPER/R, FC2/C, FC1/L)
Connecting the pedal switch provided with the RD-88 to the
DAMPER jack allows you to use the switch as a damper pedal.
With a pedal connected to the FC1 or FC2 jack, you can then
assign a variety of functions to the pedal (p. 20).
* Use only the specied expression pedal. By connecting any other
expression pedals, you risk causing malfunction and/or damage
to the unit.
8
INPUT jacks (MIC, LINE)
You can connect a mic or external audio device, and use the mic
to sing while you perform, or perform along with a song that plays
back from your external audio device
Jack Explanation
MIC Connect a mic (sold separately) to this jack.
LINE
This is an audio input jack. You can connect your audio player or
other audio source here.
Panel Descriptions
MEMO
5 Use the [MIC/LINE IN] knob to adjust the volume.
5 The RD-88 supports dynamic mics. Condenser mics are not
supported.
5 You can apply EQ and reverb to the input audio. Press the [MIC/
LINE IN SETTING] button to access the setting screen. You can
also access the same screen via [MENU]0[INPUT SETTING]. For
details on the parameters that can be set, refer to “Parameter
Guide” (PDF).
OUTPUT jacks (L/MONO, R)
These are connected to an amp or other device. For mono output,
use the L/MONO jack.
PHONES jack
You can connect a set of headphones here.
7
Page 8
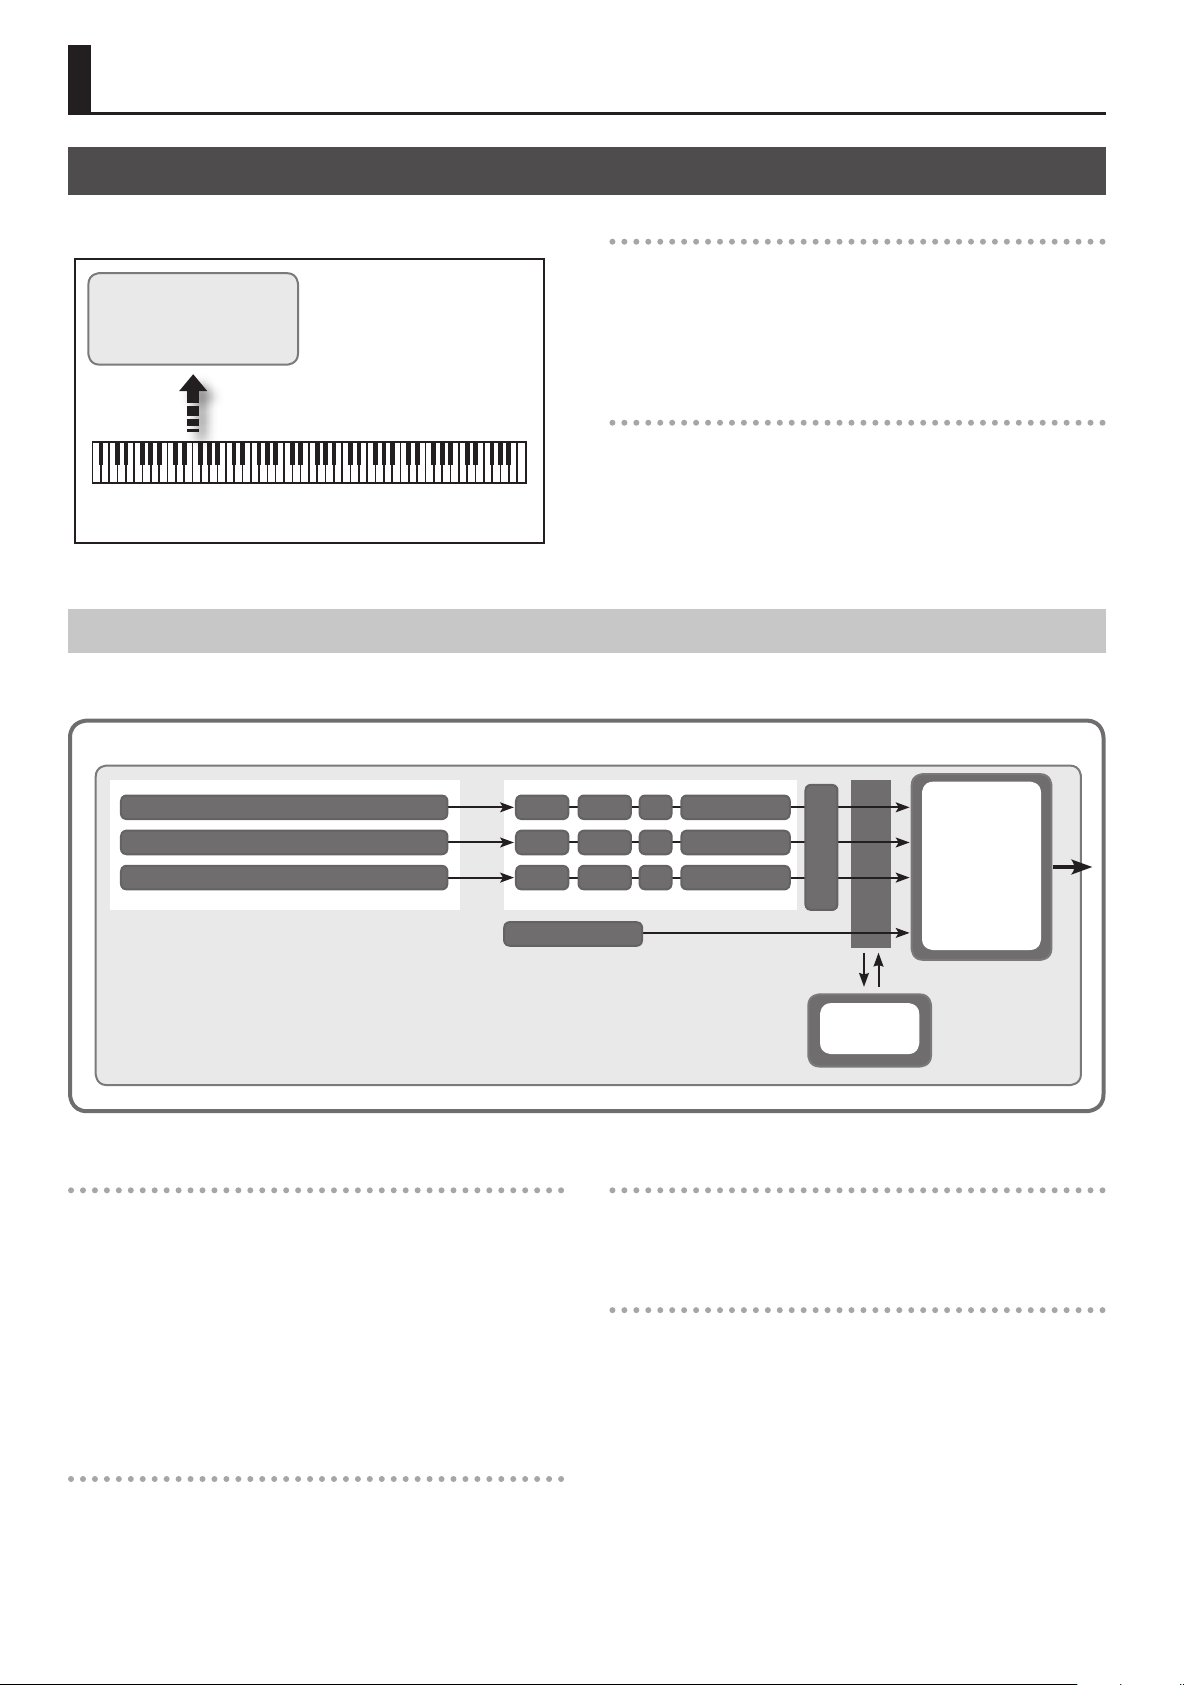
Overview of the RD-88
Basic Organization of the RD-88
RD-88 can be divided into two sections: a controller section and a
sound generator section.
Sound Generator Section
Play
Controller Section
(controllers such as keyboard, modulation wheels, etc.)
Controller Section
This section includes the keyboard, the modulation wheels, the panel
knobs, the sliders, and any pedal connected to the rear panel. Actions
such as pressing and releasing of keys on the keyboard, depressing a
damper pedal, and so forth, are converted to MIDI messages and sent
to the sound generator section, or to an external MIDI device.
Sound Generator Section
The sound generator section produces the sound. Here, MIDI
messages received from the controller section or external MIDI
device are converted to musical signals, which are then output as
analog signals from the OUTPUT and PHONES jacks.
About Scenes
RD-88 lets you store the sounds that you create.
A sound you create is called a “Scene”; you can use the buttons to recall a Scene and then play it.
Scene
Zone (UPPER 1)
Tone
MFXEQEQ
Tone Color
Resonance
IFX/Sympathetic
Zone (UPPER 2)
Zone (UPPER 3)
Tone
Tone
Zone
The RD-88 features three parts (UPPER 1, UPPER 2, and LOWER) that
you can use for freely controlling the internal parts with the RD-88’s
buttons and keyboard. These three parts that are used for controlling
the internal parts are collectively known as the “Zone.”
Furthermore, you can freely control external MIDI sound generators
with the RD-88 in the same manner as with the Zone. You can
likewise control the external MIDI sound generator with the three
parts (UPPER 1, UPPER 2, and LOWER), with this group of three parts
being referred to as the “EXTERNAL Zone.” The external MIDI sound
generator is assigned to these three parts for control.
Rhythm
MFX
MFX
EQ
Tone Color
Tone Color
Compressor
Equalizer
Reverb
Chorus
Rhythm
Drum patterns for a variety of musical genres such as jazz and rock
are built in. You can play back these patterns.
Eects
Each zone 1–3 provides a MFX, EQ, and Tone Color that can be set
independently for each zone.
There are also reverb, Chorus, and IFX/Sympathetic Resonance that
can be used in common by all zones.
Tone
The individual sounds used when playing the RD-88 are referred to as
“Tones.” Tones are assigned to each zone.
8
Page 9

Overview of the RD-88
Basic Operation
Main Screens
Scene screen (Basic Screen)
The currently selected Scene is displayed (p. 11).
You can edit this Scene.
Song/Rhythm screen
When the SONG/RHYTHM [SELECT] button is pressed, this screen is
displayed.
You can change Rhythm patterns, the tempo and the volume
(p. 20).
About the Cursor Buttons
The cursor buttons are used for switching screens, and for moving to
an item whose setting you want to change (by moving the cursor).
Moving between display pages
When arrow symbols (“ ” and “ ”) appear at the upper right of the
display screen, it indicates that there are additional pages in the
directions shown by the arrows.
You can switch screens with the Cursor [<] and [>] buttons.
You can also connect USB ash drive (sold separately) to the USB
MEMORY connector and play audio les that you’ve saved in the USB
ash drive.
Press the [EXIT] button to return to the Scene screen.
Navigating among items to be set (cursor)
When more than one parameter is present in a screen, the name and
value of the parameter to be changed is shown with a box around
it. This box is referred to as the “cursor.” The cursor is moved with the
cursor buttons.
Cursor
Editing a Value
When changing settings values, you can use the [DEC] and [INC]
buttons.
Purpose Panel operation
To continuously
change the value
To rapidly increase
the value
Hold down the [DEC] button or [INC] button.
While holding down the [INC] button, press the [DEC]
button.
Conversely, you can rapidly decrease the value by holding
down the [DEC] button and pressing the [INC] button.
9
Page 10

Performance
Listening to the Demo (DEMO PLAY)
Here’s how to listen to the demo songs.
NOTE
5 No data for the music that is played will be output from MIDI OUT
connectors.
5 The RD-88’s keyboard will not produce sound while the demo
songs are playing.
2
2
1
MEMO
When you enter demo mode, any unsaved settings are lost.
Store any arrangements of settings that you want to keep in Scene or
System (p. 22).
1. Hold down the [SPLIT] button and press the [DUAL]
button.
The RD-88 enters the demo mode. The Demo screen appears.
3
54
Piano Performances
Now, try performing with the piano.
The RD-88 lets you call up the ideal settings for piano performance
at any time simply by pressing a button. You can also select your
preferred tones and settings and store them to the RD-88’s buttons.
2
1
1. Press the [PIANO] button or the [E. PIANO] button.
Pressing the [PIANO] button sets the entire keyboard to play with
the piano tone.
Pressing the [E. PIANO] button sets the entire keyboard to play
with the electric piano tone.
2. Use the Cursor [ ] [ ] buttons or the [DEC] [INC]
buttons to select a demo song.
3. Press the [ENTER] button to start playback of the
demo song.
4. Press the [EXIT] button to stop a demo song during
playback.
5. Press the [EXIT] button while the song is stopped to
nish with the Demo mode.
You will return to the previous screen.
2. Use the [DEC] [INC] buttons to select a Scene.
MEMO
In the Scene screen, when the cursor is at the Scene number, you
can press the [ENTER] button to access a list of Scenes. You can use
the cursor buttons to select a Scene. After selecting a Scene, press
the [EXIT] or [ENTER] button to return to the Scene screen.
Making Detailed Settings
With the RD-88, you can also make more detailed settings
to make the sound even better match your favorite piano
performances. Congurations can be stored for each Scene.
For details on the Scene parameter settings, refer to“Making
Detailed Settings for Tones” (p. 22).
NOTE
When you edit a setting, an “*” will appear.
If you turn o the power or select a One Touch tone or a Scene while
the “*” is shown, the changes you made will be discarded. If you want
to keep the settings, save the Scene (p. 22).
10
Page 11

Performance
Performing with a Variety of Scenes
The RD-88 comes with a many built-in Sounds.
Each one of these individual sounds is called a “Scene.”
Scenes are assigned to the Scene category buttons according to the
tone category selected.
Each category has several Scenes.
Try selecting and performing with a number of dierent Scenes.
1
2
1. Press any of the Scene category buttons to select
the category.
The indicator of the selected Scene category button will light.
Playing Multiple Tones with the Keyboard
The RD-88 features three Internal zones (UPPER 1, UPPER 2, and
LOWER), and one tone can be assigned to each of these zones.
You can perform using combinations of tones by turning each zone
on or o. You can have multiple tones layered together at the same
time, and even have dierent tones played in the left and right parts
of the keyboard.
UPPER 1
UPPER 2
LOWER
Performing with Layered Tones (Dual Mode)
This mode lets you play the UPPER 1 and UPPER 2 tones layered
across the entire keyboard.
21
2. Use the [DEC] [INC] buttons to select the Scene.
Play the keyboard, and you will hear the selected Scene.
NOTE
If you turn o the power or select a dierent Scene when an “*”
is shown in the display, the setting changes you’ve made will be
discarded. If you want to keep the settings, save the Scene (p. 22).
1. Press the [DUAL] button, getting the indicators to
light.
Try ngering the keyboard.
The Tones for UPPER 1 and UPPER 2 are layered and played.
The screen shows the UPPER 2 tone.
2. To nish the DUAL MODE, press the [DUAL] button
once again, to make the indicator light goes out.
The Tones for UPPER 1 played.
MEMO
You can also layer three tones by adding the LOWER tone. For details,
refer to “Making Detailed Settings for Tones” (p. 22).
11
Page 12

Performance
Playing Dierent Tones in Two Dierent
Sections of the Keyboard (Split Mode)
Such a division of the keyboard into right- and left-hand sections is
called a “Split,” and the key where the division takes place is called the
“Split Point.”
While in Split mode, a sound played in the right side is called an
“UPPER part,” and the sound played in the left side is called a “LOWER
part.” The split-point key is included in the LOWER section.
The Split Point has been set at the factory to “F#3.”
MEMO
You can change the split point. Please refer to “Changing the
Keyboard’s Split Point” (p. 12).
21
1. Press the [SPLIT] button, getting the indicator to
light.
Split Point (F#3)
When you specify the split point, each zone’s key range will be
divided to left and right at the split point, and will be set to the
values shown in the table.
MEMO
5 You can change the split point, adjusting it in semitone
increments, by holding down the [SPLIT] button and pressing the
[DEC] [INC] buttons.
5 You can freely set whatever key ranges you like to each zone. For
details, refer to “Parameter Guide” (PDF).
UPPER 1
UPPER 2
LOWER
Changing the Tone for a ZONE
2
LOWER UPPER 1
Try ngering the keyboard.
The UPPER 1 tone plays in the right-hand section of the keyboard,
and the LOWER tone plays in the left-hand section.
The screen shows the LOWER tone.
2. To exit Split mode, press the [SPLIT] button once
more, and the indicator light goes out.
Changing the Keyboard’s Split Point
You can change the point at which the keyboard is divided
(the Split Point) in Split mode.
1. Hold down the [SPLIT] button for several seconds.
Current value of the setting is displayed.
1
1. In the Scene screen, use the cursor buttons to select
the zone whose tone you want to change.
2. Use the [DEC] [INC] buttons to select a tone.
You can use [SHIFT] + [<] [>] buttons to select the tone bank.
MEMO
When the cursor is located at the tone, you can press the [ENTER]
button to access a list of tones. Use the cursor [
select a tone. You can also use the [<] [>] buttons to change the
tone bank. After selecting a tone, press the [EXIT] or [ENTER]
button to return to the Scene screen.
] [ ] buttons to
2. While holding down the [SPLIT] button, press the
key that is to become the new split point.
When you release the [SPLIT] button, the previous display will
reappear.
The split-point key is included in the LOWER section.
Zone Range
UPPER 1, UPPER 2 Split Point +1–C8
LOWER A0–Split Point
12
Page 13

Performance
Adjusting the Volume Level for Individual Zones
You can use the LEVEL [LOWER], [UPPER2], and [UPPER1] knobs to
adjust the volume of each zone.
MEMO
Use the [VOLUME] knob when adjusting the overall volume level
(p. 4).
Changing the Key Touch
You can make advanced settings for the touch used for the keys.
2
3
1. Press the [KEY TOUCH] button.
The keyboard touch settings screen appears.
2. Use the cursor [ ] [ ] buttons to select a parameter,
and use the [DEC] [INC] buttons to change its value.
3. Press [EXIT] to return to the previous screen.
MEMO
The key touch settings can be saved individually for each Scene. To
save the settings, refer to “Saving a Scene (Write)” (p. 22).
1
Parameter Value Explanation
The key touch settings specied by the
Scene are enabled.
The key touch settings specied for the
system are enabled.
MEMO
If you want the key touch to be the same
for multiple Scenes, set Source to “SYS.”
You can access the shared key touch
settings via [MENU]0[SYSTEM]0[KEY
TOUCH]. To save the settings, execute the
system write operation (p. 24).
If you’ve selected a Scene whose Source is
set to “SYS,” you can press the [KEY TOUCH]
button to access the SYSTEM Key Touch
setting screen.
This sets the keyboard to a light touch. You
can achieve fortissimo () play with a less
forceful touch than usual, so the keyboard
feels lighter. This setting makes it easy to
play, even for children.
This sets the keyboard to the standard
touch. You can play with the most natural
touch. This is the closest to the touch of an
acoustic piano.
This sets the keyboard to a heavy touch.
You have to nger the keyboard more
forcefully than usual in order to play
fortissimo (), so the keyboard touch feels
heavier. Dynamic ngering adds even
more feeling to what you play.
This setting provides even more precise
adjustment of the key touch than available
with the Velocity Curve setting alone.
This allows you to achieve a more precise
setting for the Velocity Curve by specifying
an intermediate value between Key Touch
settings. The touch sensitivity becomes
heavier as the value increases.
When this parameter is set to a value
that exceeds the upper or lower limit,
the setting for Velocity Curve (one of ve
possible values) is automatically changed
to accommodate the value you’ve
specied.
Volume levels and the way sounds are
played change in response to the velocity.
The xed velocity value you specify here
will determine the volume and the way
the sound is produced, regardless of your
keyboard playing strength.
This sets the interval from the time the key
is played to when the sound is produced.
As the value is decreased, the timing of
the sound is delayed more when more
force is used to play the keys. As the value
is increased, the timing of the sound is
delayed more when less force is used to
play the keys.
This setting changes the touch sensitivity
according to the key range being used.
As the value is increased, the touch
becomes heavier in the upper registers,
and lighter in the lower keys.
Note-o will occur at the depth of a
conventional piano.
Note-o will occur at a deeper position.
This is suitable for electric piano sounds.
Source
Velo Crv
(Velocity Curve)
Velo Oset
(Velocity Oset)
Velocity
Velo Dly Sens
(Velocity Delay
Sensitivity)
Velo Keyfollow
(Velocity Keyfollow
Sensitivity)
Key O Pos (Key O
Position)
SCENE
SYS
SPR LIGHT An even lighter setting than LIGHT.
LIGHT
MEDIUM
HEAVY
SPR HEAVY An even heavier setting than HEAVY.
-10–+9
REAL
1–127
-63–+63
-63–+63
STND
(STANDARD)
DEEP
13
Page 14

Performance
Transposing the Key of the Keyboard (TRANSPOSE)
You can transpose performances without changing the keys you are
playing, as well as change the pitch by an octave. This feature is called
“Transpose.”
This is a convenient feature to use when you want to match the pitch
of the keyboard performance to a vocalist’s pitch, or perform using
the printed music for trumpets or other transposed instruments.
You can adjust the transpose setting in semitone steps over a range
of -5–0–+6 relative to C4. The Transpose has been set at the factory
to “0.”
1 2 3
1. Hold down the [TRANSPOSE] button for several
seconds.
The Transpose screen appears, and the current value of the setting
is displayed.
3. To turn o Transpose, press the [TRANSPOSE]
button so that its indicator goes o.
The next time [TRANSPOSE] button is pressed, the sound is
transposed by an amount corresponding to the value set here.
MEMO
You can set the degree of transposition for each of the Zone
individually. For details, refer to “Making Detailed Settings for Tones”
(p. 22).
NOTE
5 If the transpose amount is 0, the [TRANSPOSE] button will not turn
on even if you press it.
5 When you turn the power o, the transpose amount returns to 0.
Adding Reverberation to the Sound (REVERB)
The RD-88 can apply a reverb eect to the notes you play on the
keyboard.
Applying reverb adds pleasing reverberation to what you play, so it
sounds almost as if you were playing in a concert hall.
1
2. Hold down the [TRANSPOSE] button and press a
key.
If you press the C4 (middle C) key, the transpose amount will be
set to “0.”
For example, to have “E” sound when you play “C” on the
keyboard, hold down the [TRANSPOSE] button and press the E4
key. The degree of transposition then becomes “+4.”
When you release the [TRANSPOSE] button, the previous display
will reappear.
When the amount of transposition is set, the Transpose function
switches on, and the [TRANSPOSE] button lights up.
MEMO
5 You can also transpose by holding down the [TRANSPOSE] button
and using the [DEC] [INC] buttons.
5 If you hold down the [TRANSPOSE] button and press F#4 or a
higher key, the transpose amount is set to [+6].
5 If you hold down the [TRANSPOSE] button and press G3 or a lower
key, the transpose amount is set to [-5].
1. Turn the [REVERB] knob.
The depth of the reverb eect changes.
You can adjust the reverb depth in a range of 0–127.
MEMO
You can select the type of reverb in the MENU screen 0 “SYSTEM
EFFECTS” 0 “Sys Reverb” page.
NOTE
In the [MENU] 0 [SCENE EDIT] 0 [ZONE EDIT] 0 “INTERNAL”
page, if the “Rev Send (reverb send)” value is set to “0,” no reverb
eect is applied. Also, depending on the settings of the Scene, there
might be cases in which turning the knob does not apply an eect.
For details, refer to “Making Detailed Settings for Tones” (p. 22).
14
Page 15

Performance
Adding Breadth to the Sound (CHORUS/DELAY)
You can apply a chorus and delay eect to the notes you play on the
keyboard.
By adding the chorus and delay eect, you can give the sound
greater dimension, with more fatness and breadth.
1
1. Turn the [CHORUS/DELAY] knob.
The depth of the chorus/delay eect changes.
You can adjust chorus/delay depth in a range of 0–127.
MEMO
You can select the type of chorus/delay in the MENU screen 0
“SYSTEM EFFECTS” 0 “Sys Chorus” page.
NOTE
In the [MENU] 0 [SCENE EDIT] 0 [ZONE EDIT] 0 “INTERNAL”
page, if the “Cho Send (chorus send)” value is set to “0,” no chorus/
delay eect is applied. Also, depending on the settings of the Scene,
there might be cases in which turning the knob does not apply
an eect. For details, refer to “Making Detailed Settings for Tones”
(p. 22).
Adding Liveliness to the Sound (COMPRESSOR)
Switching on the Compressor suppresses dierences in volume for a
more consistent sound.
21
1. Press the [COMPRESSOR] button, getting its
indicator to light.
Compressor will alternately turn on/o each time you press the
[COMPRESSOR] button.
2. To cancel this function, press the [COMPRESSOR]
button once more, extinguishing the indicator.
NOTE
Sounds may become distorted with certain tones.
MEMO
5 You are free to edit the compressor settings. For details, refer to
“Making Detailed Settings for Tones” (p. 22).
5 If you press the [SHIFT]+[COMPRESSOR] buttons, the compressor
settings screen appears.
Modifying the Sound in Real Time (WHEEL1/2)
By turning wheel 1 or 2 while playing the keyboard you can modify
the sound in real time. By default, wheel 1 applies a pitch bend eect
(pitch change) and wheel 2 applies a modulation eect (vibrato).
You can freely change the eects that are applied by wheels 1/2. For
details, refer to “Assigning the Function of Each Controller” (p. 20).
15
Page 16

Performance
Adjusting the Character of the Sound (TONE COLOR)
Turning the [TONE COLOR] knob will modify an aspect of the sound,
such as its character or acoustic image.
1
1. Turn the [TONE COLOR] knob.
The eect assigned to the knob is applied.
You can assign one or the other of the following eects to the
[TONE COLOR] knob.
Parameter Explanation
If the sound is being output in stereo, turning the knob to
Stereo Width
EQ
the left gradually transforms the audio output to mono,
and turning the knob to the right transforms it to stereo.
Depending on your performing situation, the mono sound
might be better for listening.
This lets you adjust the EQ using a single knob. Turning
the knob to the left boosts the mid-frequency region, and
turning the knob to the right boosts the high-frequency
and low-frequency regions. Adjusting this appropriately for
your performing situation might make the sound better for
listening.
Applying Various Eects to the Sound
(MFX)
In addition to chorus (p. 15) and reverb (p. 14), the RD-88 lets
you apply a “multi-eect.” The multi-eect lets you choose from a
variety of eect types including distortion and rotary.
With the factory settings, an eect appropriate for each tone is
assigned.
1
1. Turn the [MFX] knob to adjust the eect.
The multi-eect specied for the selected tone is applied.
MEMO
The eect is applied to the MFX of the currently selected zone.
The value that changes when you turn the knob is pre-specied
according to the type. For some eect types, it might be dicult to
notice the eect.
If the tone’s MFX setting is set to “Thru,” no eect is applied.
MFX settings can also be specied for individual Scenes. For details,
refer to “Parameter Guide” (PDF).
MEMO
The Tone Color assignment is specied in [MENU] 0 [SCENE EDIT]
0 [ZONE SOUND] 0 TONE COLOR. If you want to save the setting,
save the Scene (p. 22).
16
Page 17

Performance
Adjusting the Levels of Each Frequency Range (EQUALIZER)
The RD-88 is equipped with an equalizer.
You can use the EQ [LOW] knob, [MID] knob, and [HIGH] knob to
adjust the level of each frequency range.
NOTE
Equalization is applied to the overall sound output from the OUTPUT
jacks.
1. Press the [EQ ADJUST] button.
1
The button is lit, and the knob functions change as follows.
5 [TONE COLOR] knob 0 EQ [LOW ] knob
5 [MFX] knob 0 EQ [MID] knob
5 [CHORUS/DELAY] knob 0 EQ [HIGH] knob
2. Turn the knobs to adjust the levels in each range.
Turning the EQUALIZER [LOW], [MID], or [HIGH] knobs toward the
left will decrease the level of the corresponding range; turning the
knobs toward the right will increase the level.
Disabling the Buttons (Panel Lock)
The panel lock function allows you to temporarily disable the buttons
so that their settings will not be accidentally changed, for example
while you’re on stage.
1
1. Long press the [PANEL LOCK] button.
The panel will be locked, and the screen shown below will appear.
When you once again long-press the [PANEL LOCK] button, panel
lock is defeated.
MEMO
You can operate the knobs and wheels even when the panel is
locked.
MEMO
In MENU 0 SYSTEM EFFECTS 0 Master EQ you can make detailed
EQ settings.
NOTE
5 Sounds may be distorted with certain knob settings. If this occurs,
adjust the Input Gain on the “Master EQ” screen.
5 EQ settings are preserved even if you change Scenes, but are lost if
you turn the power o. If you want to save the EQ settings, execute
“Saving the System Eects (Write)” (p. 22).
17
Page 18

Using the Convenient Functions in Performances
Registering Frequently-Used Sounds (Scenes) to Buttons (FAVORITE)
“Favorite” is a function that lets you register frequently-used sounds
(Scenes) so that they can be recalled by a single button.
The Favorite registers the number of the Scene.
Favorite Bank 9
Favorite Bank 0
Favorite 0–9
MEMO
5 With Favorites 0–9 as one set, you can register a total of ten sets in
the Favorite banks.
5 Use the ten buttons [0]–[9] to recall or register Scenes.
NOTE
If you’re editing a Scene, save that Scene rst before you register it as
a Favorite.
Registering a Favorite
1. Select the Scene that you want to register.
2. Press the FAVORITE [BANK] button to make the
indicator light.
3. Press a [0]–[9] button to select the registration-
destination bank.
4. Hold down the FAVORITE [ON] button and press
the [0]–[9] button in which you want to register the
Scene.
The currently selected Scene is registered to that button.
Recalling a Favorite
1. Press the FAVORITE [ON] button to make the
indicator light.
The [0]–[9] buttons act as Favorite select buttons.
2. Press a [0]–[9] button to select a Favorite.
If you press a button in which a Favorite has not yet been
registered, the screen indicates “Unregistered!”
Switching the Favorite Bank
1. Press the FAVORITE [BANK] button to make the
indicator light.
The button ([0]–[9]) corresponding to the currently selected bank
blinks.
2. Press a [0]–[9] button to select a bank.
Viewing the Favorite List
1. Hold down the [SHIFT] button and press the
FAVORITE [ON] button.
The Favorite function turns on, and a list of the Scenes registered
as favorites is displayed.
MEMO
Use the cursor [
cursor [<] [>] buttons to switch banks. You can also use the [0]–[9]
buttons to switch Scenes.
2. Press the [EXIT] button to return to the previous
screen.
] [ ] buttons to switch Scenes, and use the
18
Page 19

Using the Convenient Functions in Performances
Playing Rhythm
The RD-88 features internal drum patterns complementing Jazz,
Rock, and other various musical genres. These drum patterns are
referred to as “Rhythms.”
1
1. Press the [SELECT] button to make the button
indicator light.
The SONG/RHYTHM screen will appear.
2. Press the [SELECT] button once again to access the
SONG screen.
Each time you press the [SELECT] button, you’ll alternate between
the SONG screen and the RHYTHM screen.
Changing Rhythm Tempos
1. In the RHYTHM screen, press the cursor button to
move the cursor to the tempo indication in the top
line of the screen.
2. Use the [DEC] [INC] buttons to change the tempo.
The Rhythm are played at the selected tempo.
Changing the Rhythm Pattern
You can select the way a Rhythm is played (the pattern) to match a
variety of dierent musical genres.
1. In the RHYTHM screen, use the cursor buttons to
move the cursor to the rhythm number shown in
the screen.
3. Press the [ ] button so it’s lit.
The rhythm will begin sounding.
When you press the [
light, the rhythm will stop.
MEMO
If you press the [SELECT] button to switch to the SONG screen while a
rhythm is playing, the rhythm will stop.
] button once again to turn o its
2. Use the [DEC] [INC] buttons to change the patterns.
The rhythm’s pattern will change.
3. To stop the rhythm, press the [ ] button so its
indicator is o.
19
Page 20

Using the Convenient Functions in Performances
Playing Songs
You can copy an audio le (MP3 or WAV) from your computer to a
USB ash drive, and perform on the RD-88 while that audio le plays
back.
1. Format your USB ash drive on the RD-88.
“Formatting a USB Flash Drive (FORMAT USB MEMORY)” (p. 24)
MEMO
5 Use a commercially available USB ash drive. However, we cannot
guarantee operation with all commercially available ash drives.
5 We recommend that you use single-byte alphanumeric characters
for the le name. If you use double-byte characters, the le name
will not be shown correctly in the display.
2. Copy the audio le into the “SONG LIST” folder.
Audio les that can be played
MP3
Format MPEG-1 audio layer 3
Sampling Frequency 48 kHz
Bit rate
WAV
Sampling Frequency 48 kHz
Bit Depth 16/24-bit
* For both MP3 and WAV, the only sampling frequency supported
is 48 kHz. If your le has a sampling frequency of other than
48 kHz, use software on your computer to convert it to 48 kHz
beforehand.
32/40/48/56/64/80/96/112/128/160/
192/224/256/320 kbps, VBR (Variable Bit Rate)
Assigning the Function of Each Controller
You can change the parameters that are controlled by the [1]–[8]
knobs, WHEEL 1/2, and pedals FC1/FC2.
1. Press the [MENU] button.
2. Use the cursor [ ] [ ] buttons to select “SYSTEM,”
and then press the [ENTER] button.
3. Use the cursor [ ] [ ] buttons to select “ASSIGN” and
then press the [ENTER] button.
4. Use the cursor [<] [>] buttons to select the
controller whose assignment you want to change.
5. Use the cursor [ ] [ ] buttons to select a parameter,
and use the [DEC] [INC] buttons to change its value.
For details, refer to “Parameter Guide” (PDF).
6. If you want to save the setting, execute the System
Write operation.
“Saving the System Settings (System Write)” (p. 24)
MEMO
The settings of these controllers can be specied and remembered
individually for each Scene. This is convenient when you want to
switch the controller assignments for each sound (Scene). In the
Scene edit parameters, change each controller’s Source from System
to Scene. For details, refer to “Parameter Guide” (PDF).
3. Connect the USB ash drive to the USB MEMORY
port of the RD-88.
4. Press the [SELECT] button to make the button
indicator light.
The SONG/RHYTHM screen will appear.
5. Press the [SELECT] button to access the SONG
screen.
Each time you press the [SELECT] button, you’ll alternate between
the SONG screen and the RHYTHM screen.
6. Move the cursor to the song number and use the
[DEC] [INC] buttons to select a song.
7. To play the song, press the [ ] button to make
it light.
When you press the [ ] button to turn o its light, the song
will stop playing.
MEMO
Move the cursor to “Volume” and use the [DEC] [INC] buttons to
adjust the volume of the song.
If you want to save the volume setting, execute the System Write
operation (p. 24).
Using the [ONE TOUCH PIANO] Button
With the factory settings, pressing the [ONE TOUCH PIANO] button
recalls the piano sound of Scene 001.
Alternatively, you can assign a favorite Scene to the [ONE TOUCH
PIANO] button by using the following procedure. The Scene assigned
to the [ONE TOUCH PIANO] button is the Scene that is rst selected at
start-up.
1. Select a favorite Scene.
2. Hold down the [WRITE] button and press the [ONE
TOUCH PIANO] button.
The current settings are saved to the [ONE TOUCH PIANO] button.
20
Page 21

Using the Convenient Functions in Performances
Using the RD-88 as a Master Keyboard
You can control the external MIDI device from the RD-88.
The RD-88 normally transmits note messages from the MIDI OUT
connector, but you can make settings to control an external device
so that not only note messages, but a variety of settings can be
controlled on your external MIDI device.
You can control internal and external sound generators
independently.
What’s MIDI?
MIDI (Musical Instrument Digital Interface) is a standard specication
that allows musical data to be exchanged between electronic musical
instruments and computers. By using a MIDI cable to connect devices
that have MIDI connectors, you can create an ensemble in which
a single MIDI keyboard can play multiple instruments, or change
settings automatically as the song progresses.
MIDI OUT connector
MIDI messages are transmitted from these connectors to external
MIDI devices. The RD-88’s MIDI OUT connectors are used for sending
the performance data of the controller section.
External MIDI device
Settings for Controlling an External Sound
Button Zone
0 UP1
1 UP2
2 LOW
NOTE
If the zone you’re editing is not enabled (on), control messages are
not output. Use Scene category buttons [3], [4], and [5] to turn on
the zones that you want to use.
Button Zone
3 UP1
4 UP2
5 LOW
3. Use the cursor [ ] [ ] buttons to select the
parameter that you want to edit, and use the [DEC]
[INC] buttons to edit the value.
Parameter Value Explanation
Normally, this setting is used. The same
MIDI messages are transmitted to the
RD-88’s internal sound generator and
ON
TxMode
INT
EXT
Ext Port ALL, MIDI, USB
Ext Ch 1–16 Species the MIDI transmit channel.
Ext MSB
Ext LSB
Ext PC OFF, 1–128
OFF, 0–127
to the external MIDI device. Messages
that select tones and switch banks
(bank select, program change) use the
settings of the tone that is selected for
that zone.
Use this setting if you don’t want MIDI
messages of a specic zone to be
transmitted to an external MIDI device.
Choose this INT setting if you want to
play only the internal sounds of the
RD-88.
Choose this setting if you want to use
the RD-88 as a master keyboard to
control an external MIDI device.
Species the connector that transmits
control messages. If this is “ALL,”
messages are transmitted both from
the MIDI OUT connector and from the
USB port.
Species the numerical value of the
program number and the bank select
MSB/LSB messages that select sounds
on an external MIDI device.
Module
Settings for controlling an external MIDI sound module can be made
for each zone (UP1/UP2/LOW) of the Scene. From one RD-88 you
can layer the internal sounds with the sounds of an external sound
module, or control them separately.
Since these settings can be individually saved for each Scene, you can
instantly recall control settings for the internal sound generator and
an external sound module simply by switching Scenes.
1. Press the [EXT CTRL SETTING] button.
A screen for editing the external sound module control settings
appears.
MEMO
You can access the same screen from the MENU 0 SCENE EDIT
0 ZONE EDIT screen by pressing the cursor [>] button.
2. Use Scene category buttons [0], [1], and [2] to select
the zone whose settings you want to edit.
The button is lit, and the selected zone is shown in the upper right
of the screen.
MEMO
For details on the parameters, refer to “Parameter Guide” (PDF).
4. To save the settings, execute the Scene write
operation.
Master keyboard settings are saved individually for each Scene.
&“Saving a Scene (Write)” (p. 22)
21
Page 22

Making Detailed Settings for Tones
The RD-88 has two types of sound-related editing.
Scene edit
Here you can edit parameters for a Scene. These parameters include
the on/o setting and level adjustment of each zone, eect settings
for each Scene.
System eect edit
Here you can edit settings for the eects that apply to the overall
output sound (system eects).
The system eects provide chorus/delay, reverb, EQ, and compressor.
NOTE
5 The edited settings will disappear unless you save (write) them. If
you want to keep the settings, save them as follows.
5 A Scene that you’re editing is indicated by an edit symbol (*) beside
the Scene number.
Editing a Scene
1. Press the [MENU] button.
2. Use the cursor [ ] [ ] buttons to select “SCENE EDIT,”
and press the [ENTER] button.
3. Use the cursor [ ] [ ] buttons to select the item that
you want to edit, and press the [ENTER] button.
4. Use the cursor [ ] [ ] buttons to select a parameter,
and use the [DEC] [INC] buttons to edit the value.
For details, refer to “Parameter Guide” (PDF).
MEMO
If there are multiple pages within an item, “
at the upper right of the screen. Use the cursor [<] [>] buttons to
move between pages.
Saving a Scene (Write)
5. To save the changes, press the [WRITE] button.
MEMO
If you edit the Scene, an “*” symbol appears beside “SCENE.”
” “ ” symbols are shown
NOTE
When you save, the Scene of the selected save-destination is
overwritten, and the previous data is lost.
10.
To execute, use the cursor [<] [>] buttons to select
“WRITE,” and then press the [ENTER] button.
If you decide to cancel, press the [EXIT] button.
NOTE
The changes in the Scene you’re editing are lost if you turn the power
o or select another Scene. If you want to keep the settings, save the
Scene.
Editing the System Eects
1. Press the [MENU] button.
2. Use the cursor [ ] [ ] buttons to select “SYSTEM
EFFECT,” and then press the [ENTER] button.
3. Use the cursor [<] [>] buttons to select the eect
that you want to edit, use the cursor [ ] [ ] buttons
to select a parameter, and use the [DEC] [INC]
buttons to edit the value.
For details, refer to “Parameter Guide” (PDF).
Saving the System Eects (Write)
4. If you want to save the changes, press the [WRITE]
button.
MEMO
If you edit the system settings, an “*” symbol appears beside
“SYSTEM.”
5. Use the cursor [ ] [ ] buttons to select “SYSTEM”
and then press the [ENTER] button.
The SYSTEM WRITE conrmation screen appears.
6. To execute, use the cursor [<] [>] buttons to select
“WRITE,” and then press the [ENTER] button.
If you decide to cancel, press the [EXIT] button.
6. Use the cursor [ ] [ ] buttons to select “SCENE,” and
then press the [ENTER] button.
A screen appears where you can select the save-destination
Scene.
7. Use the cursor [ ] [ ] buttons to select the save-
destination Scene, and then press the [ENTER]
button.
The Scene name entry screen appears.
8. Use the cursor [<] [>] buttons to move the cursor,
and use the [DEC] [INC] buttons to change the
character.
9. When you’ve nished editing the name, press the
[ENTER] button.
The SCENE WRITE conrmation screen appears.
22
Page 23

Other Functions
Convenient Functions (UTILITY)
Here you can back up the RD-88’s data to a USB ash drive, or restore
data from a USB ash drive back into the RD-88. You can also use the
“UTILITY” functions to return the RD-88 to its factory-set condition, or
format a USB ash drive.
UTILITY Explanation
BACKUP Backs-up user data to a USB ash drive.
RESTORE
FACTORY RESET
FORMAT USB MEMORY Initializes a USB ash drive.
Backing Up Data to USB Flash Drive (BACKUP)
Here’s how to back up user data to a USB ash drive.
Data that is backed up
5 All Scene data
5 Favorites
5 System settings (including system eects)
NOTE
Never turn o the power or remove the USB ash drives while the
screen indicates “Executing....”
Restores backup data from a USB ash drive into the
RD-88.
Resets the RD-88’s settings to their factory-set
condition.
Restoring Backup Data (RESTORE)
Here’s how user data that you backed-up on a USB ash drive can be
returned to the RD-88. This operation is called “restore.”
NOTE
5 All user data are rewritten when you execute the restore operation.
If your RD-88 contains important data, assign it a dierent name
and back it up to an USB ash drive before you restore.
5 Never turn o the power or remove the USB ash drives while the
screen indicates “Executing....”
1. Press the [MENU] button.
2. Use the cursor [ ] [ ] buttons to select “UTILITY,”
and then press the [ENTER] button.
3. Use the cursor [ ] [ ] buttons to select “RESTORE,”
and then press the [ENTER] button.
4. Use the cursor [ ] [ ] buttons to select the le that
you want to restore.
5. Press the [ENTER] button.
A conrmation message appears.
If you decide to cancel, press the [EXIT] button.
6. To execute, press the [ENTER] button.
When the restore operation is nished, the screen indicates
“Completed. Turn o power.”
1. Press the [MENU] button.
2. Use the cursor [ ] [ ] buttons to select “UTILITY,”
and then press the [ENTER] button.
3. Use the cursor [ ] [ ] buttons to select “BACKUP,”
and then press the [ENTER] button.
The BACKUP NAME screen appears.
4. Use the cursor [<] [>] buttons to move the
cursor, and use the [DEC] [INC] buttons to select
characters.
5. When you’ve specied the le name, press the
[ENTER] button.
A conrmation message appears.
If you decide to cancel, press the [EXIT] button.
6. To execute, press the [ENTER] button.
When the backup is nished, the screen indicates “Completed!”
If a le of the same name exists, a conrmation screen
(Overwrite?) asks whether you want to overwrite the existing le.
7. Turn the power of the RD-88 o and then on again.
Returning to the Factory Settings (FACTORY RESET)
Here’s how the settings that you edited and saved on the RD-88 can
be returned to their factory-set condition.
* When you execute this operation, all the settings that you modied
after purchasing the RD-88, including the sound parameters, are
lost.
* If you will later need the current settings, be sure to use the backup
function (p. 23) to save the current settings before you restore
the factory settings.
1. Press the [MENU] button.
2. Use the cursor [ ] [ ] buttons to select “UTILITY,”
and then press the [ENTER] button.
3. Use the cursor [ ] [ ] buttons to select “FACTORY
RESET,” and then press the [ENTER] button.
A conrmation message appears.
If you decide to cancel, press the [EXIT] button.
4. To execute, use the cursor [<] [>] buttons to select
“OK,” and then press the [ENTER] button.
5. When the screen indicates “Completed.” turn the
RD-88’s power o and on again.
23
Page 24

Other Functions
Formatting a USB Flash Drive (FORMAT USB MEMORY)
NOTE
5 If the USB ash drive contains important data, be aware that this
operation erases all data from the drive.
5 Never turn o the power or remove the USB ash drives while the
screen indicates “Executing....”
1. Press the [MENU] button.
2. Use the cursor [ ] [ ] buttons to select “UTILITY,”
and then press the [ENTER] button.
3. Use the cursor [ ] [ ] buttons to select “FORMAT
USB MEMORY,” and then press the [ENTER] button.
A conrmation message appears.
If you decide to cancel, press the [EXIT] button.
4. To execute, move the cursor to “OK” and press the
[ENTER] button.
When formatting is complete, the screen indicates “Completed!”
The folder structure of a USB ash drive
The backed-up data is saved in the
ROLAND
RD-88
BACKUP folder.
BACKUP
Editing the System Settings (SYSTEM)
Here’s how to edit system parameters.
1. Press the [MENU] button.
2. Use the cursor [ ] [ ] buttons to select “SYSTEM,”
and then press the [ENTER] button.
3. Use the cursor [ ] [ ] buttons to select the item that
you want to edit, and press the [ENTER] button.
4. Use the cursor [ ] [ ] buttons to select the
parameter that you want to edit, and use the [DEC]
[INC] buttons to edit the value.
For details, refer to “Parameter Guide” (PDF).
Saving the System Settings (System Write)
5. To save the changes, press the [WRITE] button.
MEMO
If you edit the system settings, an “*” symbol appears beside
“SYSTEM.”
6. Use the cursor [ ] [ ] buttons to select “SYSTEM”
and then press the [ENTER] button.
The SYSTEM WRITE conrmation screen appears.
7. To execute, use the cursor [<] [>] buttons to select
“WRITE,” and then press the [ENTER] button.
If you decide to cancel, press the [EXIT] button.
SONG LIST
To play songs from a USB ash drive,
place them in the SONG LIST folder.
Viewing the Program Version (INFORMATION)
Here’s how to view the version of the RD-88’s system program.
1. Press the [MENU] button.
2. Use the cursor [ ] [ ] buttons to select
“INFORMATION,” and then press the [ENTER]
button.
24
Page 25

USING THE UNIT SAFELY
WARNING
Concerning the Auto O function
The power to this unit will be
turned o automatically after a
predetermined amount of time
has passed since it was last used
for playing music, or its buttons or controls
were operated (Auto O function). If you
do not want the power to be turned o
automatically, disengage the Auto O
function (p. 3).
Use only the stand that is recommended
This unit should be used only with
a stand that is recommended by
Roland.
Do not place in a location that is unstable
When using the unit with a stand
recommended by Roland, the
stand must be carefully placed so
it is level and sure to remain stable.
If not using a stand, you still need to make
sure that any location you choose for placing
the unit provides a level surface that will
properly support the unit, and keep it from
wobbling.
WARNING
Precautions regarding placement of this unit on a
stand
Be sure to follow the instructions
in the Owner’s Manual carefully
when placing this unit on a stand
(p. 3).
If it is not set up properly, you risk creating
an unstable situation which could lead to the
unit falling or the stand toppling, and may
result in injury.
Use only the supplied AC adaptor and the correct
voltage
Be sure to use only the AC adaptor
supplied with the unit. Also,
make sure the line voltage at the
installation matches the input
voltage specied on the AC adaptor’s body.
Other AC adaptors may use a dierent
polarity, or be designed for a dierent
voltage, so their use could result in damage,
malfunction, or electric shock.
Use only the supplied power cord
Use only the attached power cord.
Also, the supplied power cord must
not be used with any other device.
CAUTION
Use only the specied stand(s)
This unit is designed to be used in
combination with specic stands
(KS-12, KS-10Z) manufactured by
Roland. If used in combination with
other stands, you risk sustaining injuries as
the result of this product dropping down or
toppling over due to a lack of stability.
Evaluate safety issues before using stands
Even if you observe the cautions
given in the owner’s manual,
certain types of handling may
allow this product to fall from the
stand, or cause the stand to overturn. Please
be mindful of any safety issues before using
this product.
IMPORTANT NOTES
Power Supply
• Place the AC adaptor so that the side with text is
downward.
Placement
• Do not allow objects to remain on top of the
keyboard. This can be the cause of malfunction, such
as keys ceasing to produce sound.
• Depending on the material and temperature of the
surface on which you place the unit, its rubber feet
may discolor or mar the surface.
Care of the Keyboard
• Do not write on the keyboard with any pen or other
implement, and do not stamp or place any marking
on the instrument. Ink will seep into the surface lines
and become unremovable.
• Do not ax stickers on the keyboard. You may be
unable to remove stickers that use strong adhesives,
and the adhesive may cause discoloration.
• To remove stubborn dirt, use a commercially
available keyboard cleaner that does not contain
abrasives. Start by wiping lightly. If the dirt does not
come o, wipe using gradually increasing amounts
of pressure while taking care not to scratch the keys.
Repairs and Data
• Before sending the unit away for repairs, be sure to
make a backup of the data stored within it; or you
may prefer to write down the needed information.
Although we will do our utmost to preserve the
data stored in your unit when we carry out repairs,
in some cases, such as when the memory section
is physically damaged, restoration of the stored
content may be impossible. Roland assumes no
liability concerning the restoration of any stored
content that has been lost.
Additional Precautions
• Any data stored within the unit can be lost as the
result of equipment failure, incorrect operation, etc.
To protect yourself against the irretrievable loss of
data, try to make a habit of creating regular backups
of the data you’ve stored in the unit.
• Roland assumes no liability concerning the
restoration of any stored content that has been lost.
• Never strike or apply strong pressure to the display.
• The sound of keys being struck and vibrations
produced by playing an instrument can be
transmitted through a oor or wall to an unexpected
extent. Please take care not to cause annoyance to
others nearby.
• Use only the specied expression pedal. By
connecting any other expression pedals, you risk
causing malfunction and/or damage to the unit.
• Do not use connection cables that contain a built-in
resistor.
Using External Memories
• Please observe the following precautions when
handling external memory devices. Also, make sure
to carefully observe all the precautions that were
supplied with the external memory device.
• Do not remove the device while reading/writing
is in progress.
• To prevent damage from static electricity,
discharge all static electricity from your person
before handling the device.
Intellectual Property Right
• Roland is either a registered trademark or a
trademark of Roland Corporation in the United
States and/or other countries.
• Company names and product names appearing
in this document are registered trademarks or
trademarks of their respective owners.
• It is forbidden by law to make an audio recording,
video recording, copy or revision of a third party’s
copyrighted work (musical work, video work,
broadcast, live performance, or other work),
whether in whole or in part, and distribute,
sell, lease, perform or broadcast it without the
permission of the copyright owner.
• Do not use this product for purposes that could
infringe on a copyright held by a third party. We
assume no responsibility whatsoever with regard to
any infringements of third-party copyrights arising
through your use of this product.
• The copyright of content in this product (the
sound waveform data, style data, accompaniment
patterns, phrase data, audio loops and image data)
is reserved by Roland Corporation.
• Purchasers of this product are permitted to utilize
said content (except song data such as Demo
Songs) for the creating, performing, recording and
distributing original musical works.
• Purchasers of this product are NOT permitted to
extract said content in original or modied form,
for the purpose of distributing recorded medium
of said content or making them available on a
computer network.
• This product contains eParts integrated software
platform of eSOL Co.,Ltd. eParts is a trademark of
eSOL Co., Ltd. in Japan.
• This Product uses the Source Code of μT-Kernel
under T-License 2.0 granted by the T-Engine Forum
(www.tron.org).
25
Page 26

Main Specications
Roland RD-88: Digital Piano
Keyboard
Power Supply AC Adaptor
Current Draw 1,500 mA
Dimensions 1,284 (W) x 258 (D) x 159 (H) mm
Weight
Accessories
Options (sold
separately)
* This document explains the specications of the product at the
time that the document was issued. For the latest information,
refer to the Roland website.
88 keys (PHA-4 Standard Keyboard: with Escapement
and Ivory Feel)
50-9/16 (W) x 10-3/16 (D) x 6-5/16 (H) inches
13.5 kg
29 lbs 13 oz
Owner’s Manual, Leaet “USING THE UNIT SAFELY,” AC
Adaptor, Power cord
Keyboard stand (KS-12, KS-10Z), pedals (DP-2, DP-10,
EV-5, RPU-3),
Carrying bag: CB-88RL, CB-76RL
Headphones, USB Flash drive
 Loading...