

Page 1
User Manual
RHYTHM DESIGNER RD-8
Classic Analog Drum Machine with 16 Drum Sounds, 64 Step Sequencer,
Wave Designer and Dual-Mode Filter
Page 2

2 RHYTHM DESIGNER RD-8 User Manual 3 RHYTHM DESIGNER RD-8 User Manual
9. Do not defeat the safety purpose of the polarized
20. Please keep the environmental aspects of battery
Table of Contents
Thank you .......................................................................2
Important Safety Instructions ...................................... 3
Legal Disclaimer ............................................................. 3
Limited warranty ............................................................ 3
1. Introduction ............................................................... 4
2. Features ...................................................................... 4
3. Front and Rear Panel Control Layout ....................... 5
4. Overview ....................................................................8
5. Creating a Pattern (Step Mode) ................................ 9
6. Playing a Pattern (Pattern Mode) ........................... 11
7. Creating a Song (Pattern Chaining Mode) ............. 11
8. Creating a Song Chain (Song Mode) ...................... 11
9. Wave Designer ......................................................... 12
10. Analog Filter........................................................... 12
11. Settings ................................................................... 13
12. Software Updates .................................................. 16
13. Parameters ............................................................. 16
14. SysEx information .................................................20
15. RD-8 Set-up Example ........................................... 23
16. Specications .........................................................25
17. Glossary .................................................................. 26
Thank you
Thank you very much for expressing your condence in Behringer by purchasing
the RD-8 Rhythm Designer with 16 original drum sounds, 64-step sequencer,
integrated Wave Designer, integrated dual-mode lter, 11 independent analog
outputs plus a mono mix, 16 authentic step pads, 16 pattern changes per song
and an easily readable 7-segment 4-character LED display for tempo.
Important Safety Instructions
Terminals marked with this symbol carry
electrical current of sucient magnitude
to constitute risk of electric shock.
Use only high-quality professional speaker cables with
¼" TS or twist-locking plugs pre-installed. Allother
installation or modication should be performed only
by qualiedpersonnel.
This symbol, wherever it appears,
alertsyou to the presence of uninsulated
dangerous voltage inside the
enclosure-voltage that may be sucient to constitute a
risk ofshock.
This symbol, wherever it appears,
alertsyou to important operating and
maintenance instructions in the
accompanying literature. Please read the manual.
Caution
To reduce the risk of electric shock, donot
remove the top cover (or the rear section).
No user serviceable parts inside. Refer servicing to
qualied personnel.
Caution
To reduce the risk of re or electric shock,
do not expose this appliance to rain and
moisture. The apparatus shall not be exposed to dripping
or splashing liquids and no objects lled with liquids,
suchas vases, shall be placed on the apparatus.
Caution
These service instructions are for use
by qualied service personnel only.
Toreduce the risk of electric shock do not perform any
servicing other than that contained in the operation
instructions. Repairs have to be performed by qualied
servicepersonnel.
1. Read these instructions.
2. Keep these instructions.
3. Heed all warnings.
4. Follow all instructions.
5. Do not use this apparatus near water.
6. Clean only with dry cloth.
7. Do not block any ventilation openings. Install in
accordance with the manufacturer’s instructions.
8. Do not install near any heat sources such as
radiators, heat registers, stoves, or other apparatus
(including ampliers) that produce heat.
or grounding-type plug. A polarized plug has two blades
with one wider than the other. A grounding-type plug
has two blades and a third grounding prong. The wide
blade or the third prong are provided for your safety. Ifthe
provided plug does not t into your outlet, consult an
electrician for replacement of the obsolete outlet.
10. Protect the power cord from being walked on or
pinched particularly at plugs, convenience receptacles,
and the point where they exit from the apparatus.
11. Use only attachments/accessories specied by
themanufacturer.
12. Use only with the
cart, stand, tripod, bracket,
or table specied by the
manufacturer, orsold with
the apparatus. When a cart
is used, use caution when
moving the cart/apparatus
combination to avoid
injury from tip-over.
13. Unplug this apparatus during lightning storms or
when unused for long periods of time.
14. Refer all servicing to qualied service personnel.
Servicing is required when the apparatus has been
damaged in any way, such as power supply cord or plug
is damaged, liquid has been spilled or objects have fallen
into the apparatus, the apparatus has been exposed
to rain or moisture, does not operate normally, or has
beendropped.
15. The apparatus shall be connected to a MAINS socket
outlet with a protective earthing connection.
16. Where the MAINS plug or an appliance coupler is
used as the disconnect device, the disconnect device shall
remain readily operable.
17. Correct disposal of this
product: This symbol indicates
that this product must not be
disposed of with household
waste, according to the WEEE
Directive (2012/19/EU) and
your national law. This product
should be taken to a collection center licensed for the
recycling of waste electrical and electronic equipment
(EEE). The mishandling of this type of waste could have
a possible negative impact on the environment and
human health due to potentially hazardous substances
that are generally associated with EEE. At the same time,
your cooperation in the correct disposal of this product
will contribute to the ecient use of natural resources.
For more information about where you can take your
waste equipment for recycling, please contact your local
city oce, or your household waste collection service.
18. Do not install in a conned space, such as a book
case or similar unit.
19. Do not place naked ame sources, such as lighted
candles, on the apparatus.
disposal in mind. Batteries must be disposed-of at a
battery collection point.
21. Use this apparatus in tropical and/or
moderate climates.
LEGAL DISCLAIMER
Music Tribe accepts no liability for any loss which may
be suered by any person who relies either wholly or in
part upon any description, photograph, or statement
contained herein. Technical specications, appearances
and other information are subject to change without
notice. All trademarks are the property of their
respective owners. Midas, Klark Teknik, Lab Gruppen,
Lake, Tannoy, Turbosound, TC Electronic, TC Helicon,
Behringer, Bugera, Auratone and Coolaudio are
trademarks or registered trademarks of Music Tribe
Global Brands Ltd. © Music Tribe Global Brands
Ltd. 2019 All rights reserved.
LIMITED WARRANTY
For the applicable warranty terms and conditions
and additional information regarding Music Tribe’s
Limited Warranty, please see complete details online at
musictribe.com/warranty.
Zhongshan Eurotec Electronics Limited
No. 10 Wanmei Road, South China Modern Chinese
Medicine Park, Nanlang Town, 528451, Zhongshan City,
Guangdong Province, China
Page 3
4 RHYTHM DESIGNER RD-8 User Manual 5 RHYTHM DESIGNER RD-8 User Manual
About the RD-8
• Authentic recreation of the inuential and highly sought after legendary
analog drum machine
• 16 original drum sounds with additional parameters and
global Accent capability
• Modern and versatile workow provides enhanced playability, enabling you
to create captivating live performances
• Powerful 64-step drum sequencer supports poly-meter, step-repeat,
note-repeat, Real-Time Triggering, track-mute and track-solo
• Integrated FX bus features Wave Designer and dual-mode Analog Filter with
per voice assignment
• Live recording, editing and playback of Analog Filter cuto via automation
• Storage of up to 16 songs and 256 patterns, all of which can be imported/
exported during playback for unlimited songs and patterns
• Pattern Mode allows arrangement of patterns into full songs and setting
number of repeats per song part
• Song Mode allows chaining songs together for live sets and
expanded compositions
• Unique Auto Scroll feature enables improvisation in all modes
• Comprehensive MIDI In/Out/Thru and USB implementation for
synchronization and connection to external devices
• Sync options include USB, MIDI, Clock and Internal for maximum versatility
• 11 independent analog outputs for external processing or recording your
rhythms as multi-track audio
1. Introduction
An ultra-aordable leap into the warm world of analog drum beats, the
Behringer RD-8 gives you the power to create fascinating rhythms with incredible
power and ease. The RD-8’s pure analog signal uses legendary analog circuits
with some additional pots for more parameters.
The RD-8 is ideal for the studio and/or the road. Owning an RD-8 gives you all the
power of a classic drum machine in a exible package with the ability to create
bewildering beats.
1.1 Before you get started
The RD-8 was carefully packed in the factory to guarantee safe transport.
Nevertheless, we recommend that you carefully examine the packaging and its
contents for any signs of physical damage that may have occurred during transit.
If the unit is damaged, please do NOT return it to us, but notify your dealer and
the shipping company immediately, otherwise claims for damage or replacement
may not be granted.
1.1.1 Initial operation
Be sure that there is enough space around the unit for cooling purposes and, to
avoid over-heating, please do not place the RD-8 on high temperature devices
such as radiators or power amps.
WARNING: The RD-8 is supplied with a DC power adapter that
meets the required safety standards. Do not use any other power adapter.
Powerful and Feature Rich Sequencer
The RD-8 features what we believe to be one of the most power ful step
sequencers ever created. Improved workows increase productivity making
complex song creation simple. The 64-step sequencer with storage of up to 256
patterns and 16 songs allows complicated song arrangements.
A Design for Life
Designed for life and live performance, including all new features for live use in
each of the sequencer modes: Step Repeat, Note Repeat, Real-Time Triggering
and live Step-Overdubbing. Enable recording in Pattern Launch Mode to build up
song structures on the y, switch back to Manual Mode at the touch of a button,
and then use Autoll to introduce more variations. Cue up another song from
memory, without interrupting playback, so you can literally perform entire sets
straight from the one machine.
Advanced Dual-Mode Filter
To add new possibilities to the RD-8 it has a highly-exible 12 dB lter, which lets
you freely experiment with the cuto frequency and resonance to create out-ofthis-world beats. RD-8’s HPF button toggles between LPF (lo-pass lter) and HPF
(hi-pass lter). Fluid sweeps of the lter’s CUTOFF knob can be recorded straight
into the sequencer and can be further tweaked in the Step Editor.
Wave Shaping Goodness
The integrated Wave Designer has individual ATTACK and SUSTAIN controls for
adding another dimension to drum beats. Sounds can be controlled in new ways
to provide exciting new tones.
Polymeter Mode
Trigger Happy Controls and Connectivity
The RD-8 has 29 knobs, 5 switches and 59 buttons, all laid out in a highlyintuitive format that puts the fun back into your drum beat creation. Input and
output connections include: audio input/output, MIDI input, output and thru
over USB and 5 pin MIDI din ports. With 3 trigger outs the RD-8 lets you control
external synths and hardware sequencers to create songs without a digital audio
workstation (DAW) in sight. Full live performances can be made using these
extra outputs by controlling other units. The RD-8 can also send and receive clock
information with highly accurate timing to sync it to the outside world.
You are covered
We always strive to provide the best possible customer experience. Our products
are made in our own Music Tribe factor y using state-of-the-art automation,
enhanced production workows and quality assurance labs with the most
sophisticated test equipment available in the world. As a result, we have one of
the lowest product failure rates in the industry, and we condently back it up
with a generous warranty program.
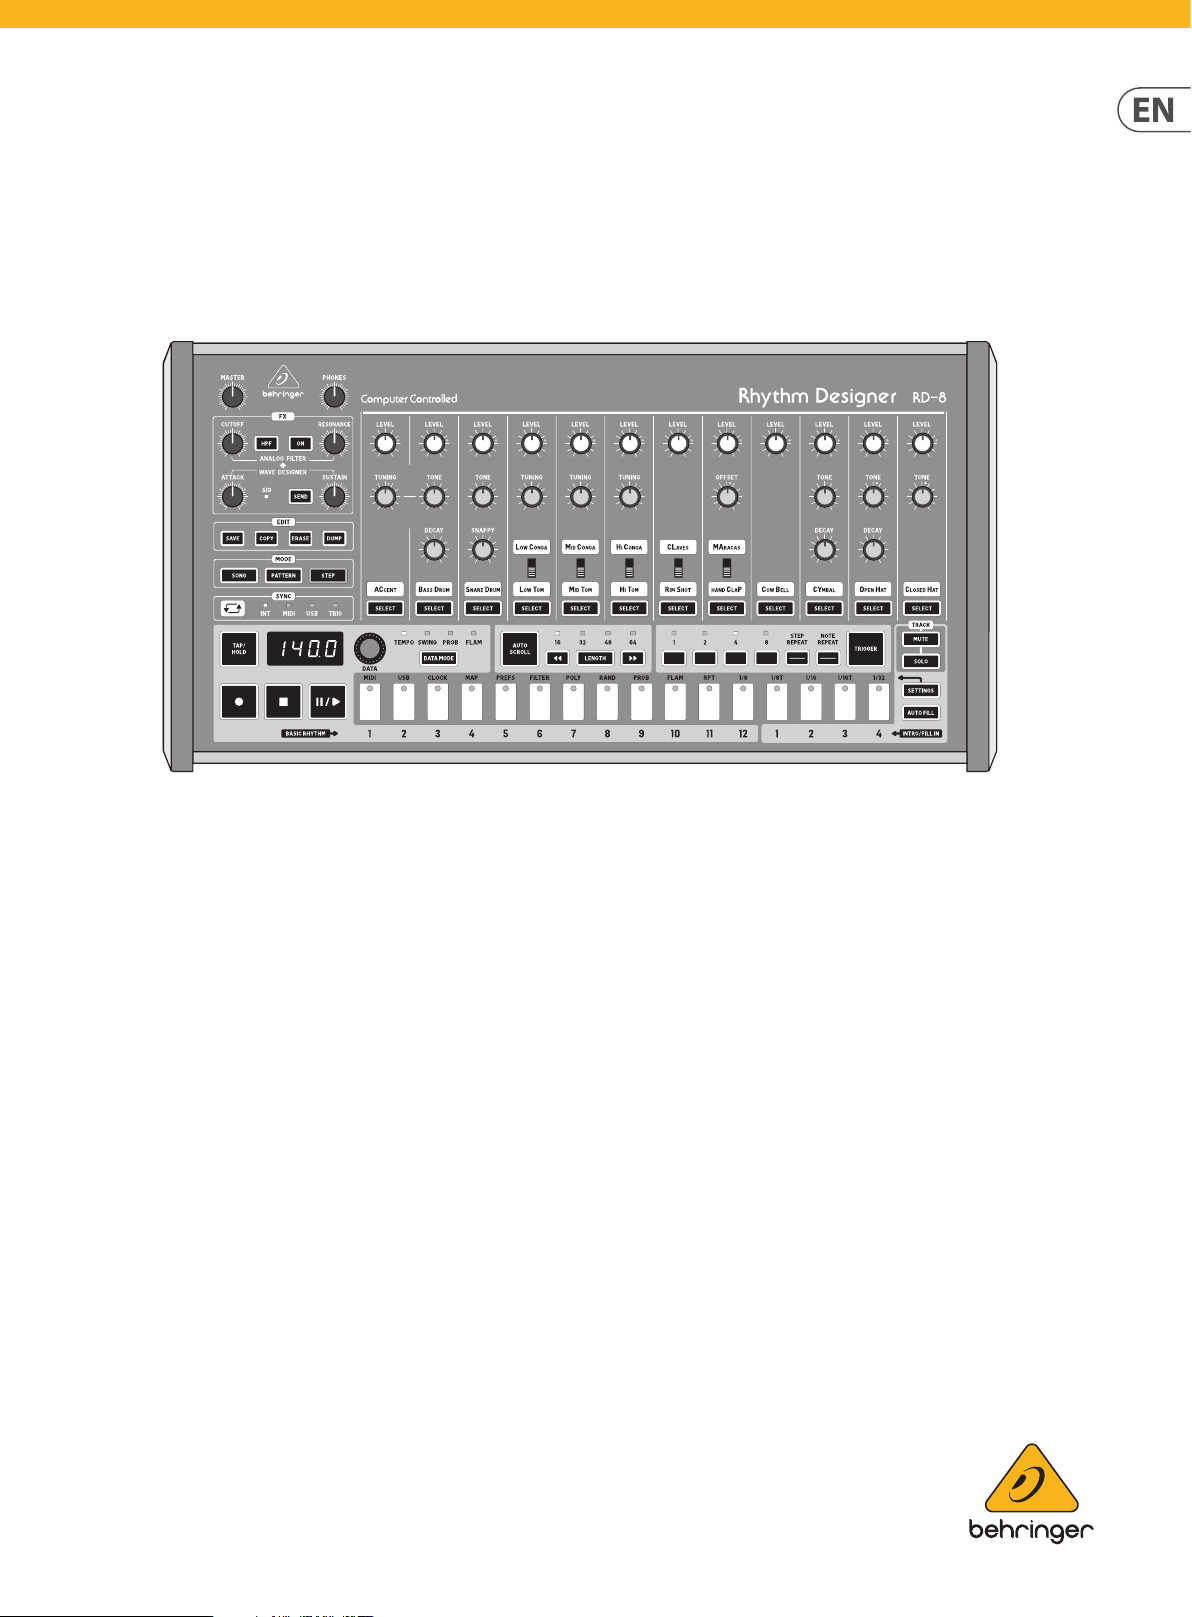
3. Front and Rear Panel Control Layout
3.1 Top Controls
3.1.1 Volume Section
• Powerful headphone and main outputs with ¼" (6.35 mm) connectors
• High-visibility LED display makes it easy to verif y program parameters
• Robust encoder for editing parameters such as Tempo, Swing, Probability,
Flam and Random
• 16 authentic-style step buttons with bold LED indicators for easy
pattern creation
• 3-Year Warranty Program*
• Designed and engineered in the U.K.
*Warrant y details can be fou nd at www.musict ribe.com
WARNING: Please make sure that all units have a proper ground
connection. For your own safety, never remove or disable the ground conductor
from any units.
1.2 The product manual
This product manual is designed to give you both an overview of the RD-8, as well
as detailed information on each of the controls and parameters. The manual is
based on the initial software release, V1.1.8. Further features and updates will
be added later so please regularly check for sof tware updates. You will nd an
overview of the physical control elements in the next chapter.
1.3 Preparation
CAUTION: Remember to turn your monitors/loudspeakers on last
when powering up your system. Turn your monitors/loudspeakers o rst when
powering down your system.
2. Features
A Past Masterpiece Rejuvenated
Great care has been taken in designing the RD-8 to achieve new possibilities in
beat creation by reviving a timeless analog design from one of the best classic
drum machines of yester year. By creating a fresh modern take on a characteristic
drum machine, the RD-8 gives you the power to harness the phenomenal
sound of the original. Colossal bass drums through to sizzling hi-hats can be
manipulated to take your rhythm conception to the next level. This is no digital
clone, it’s an analog beat making monster.
RD-8 gives you the power to control loops in new ways with the Loop Overlay
function, which generates continual variations and Polymetric to add spice
to your beats. With the Loop Overlay function, you can set dierent sequence
lengths for each of the drum tracks independently to create complex overlapping
rhythms and make your song structures really evolve.
Parameter Chaining
Set separate chain preferences for each of your parameters, allowing them to
persist globally or to switch on song or pattern changes. Parameters include
Tempo, Swing, Flam, Probability, independent track mutes/solos, FX bus
assignments, Filter Modes and sweeps for enhanced real-time control. Patterns
can be changed on the y for further creative control when using the RD-8 as the
heart of your live setup.
Creative Auto Fill
The auto ll function lets you make on the y changes and gives that extra touch
to your compositions by adding lls at any point in a song. This gives the RD-8 a
musical edge when it comes to bringing songs to life.
USB Control
To bring the RD-8 into the modern world USB has been added for sync and midi
triggering. The RD-8 can be controlled by a DAW if required. Songs and patterns
exchanged, or individual sounds triggered by the DAW sequencer.
(1) (2)
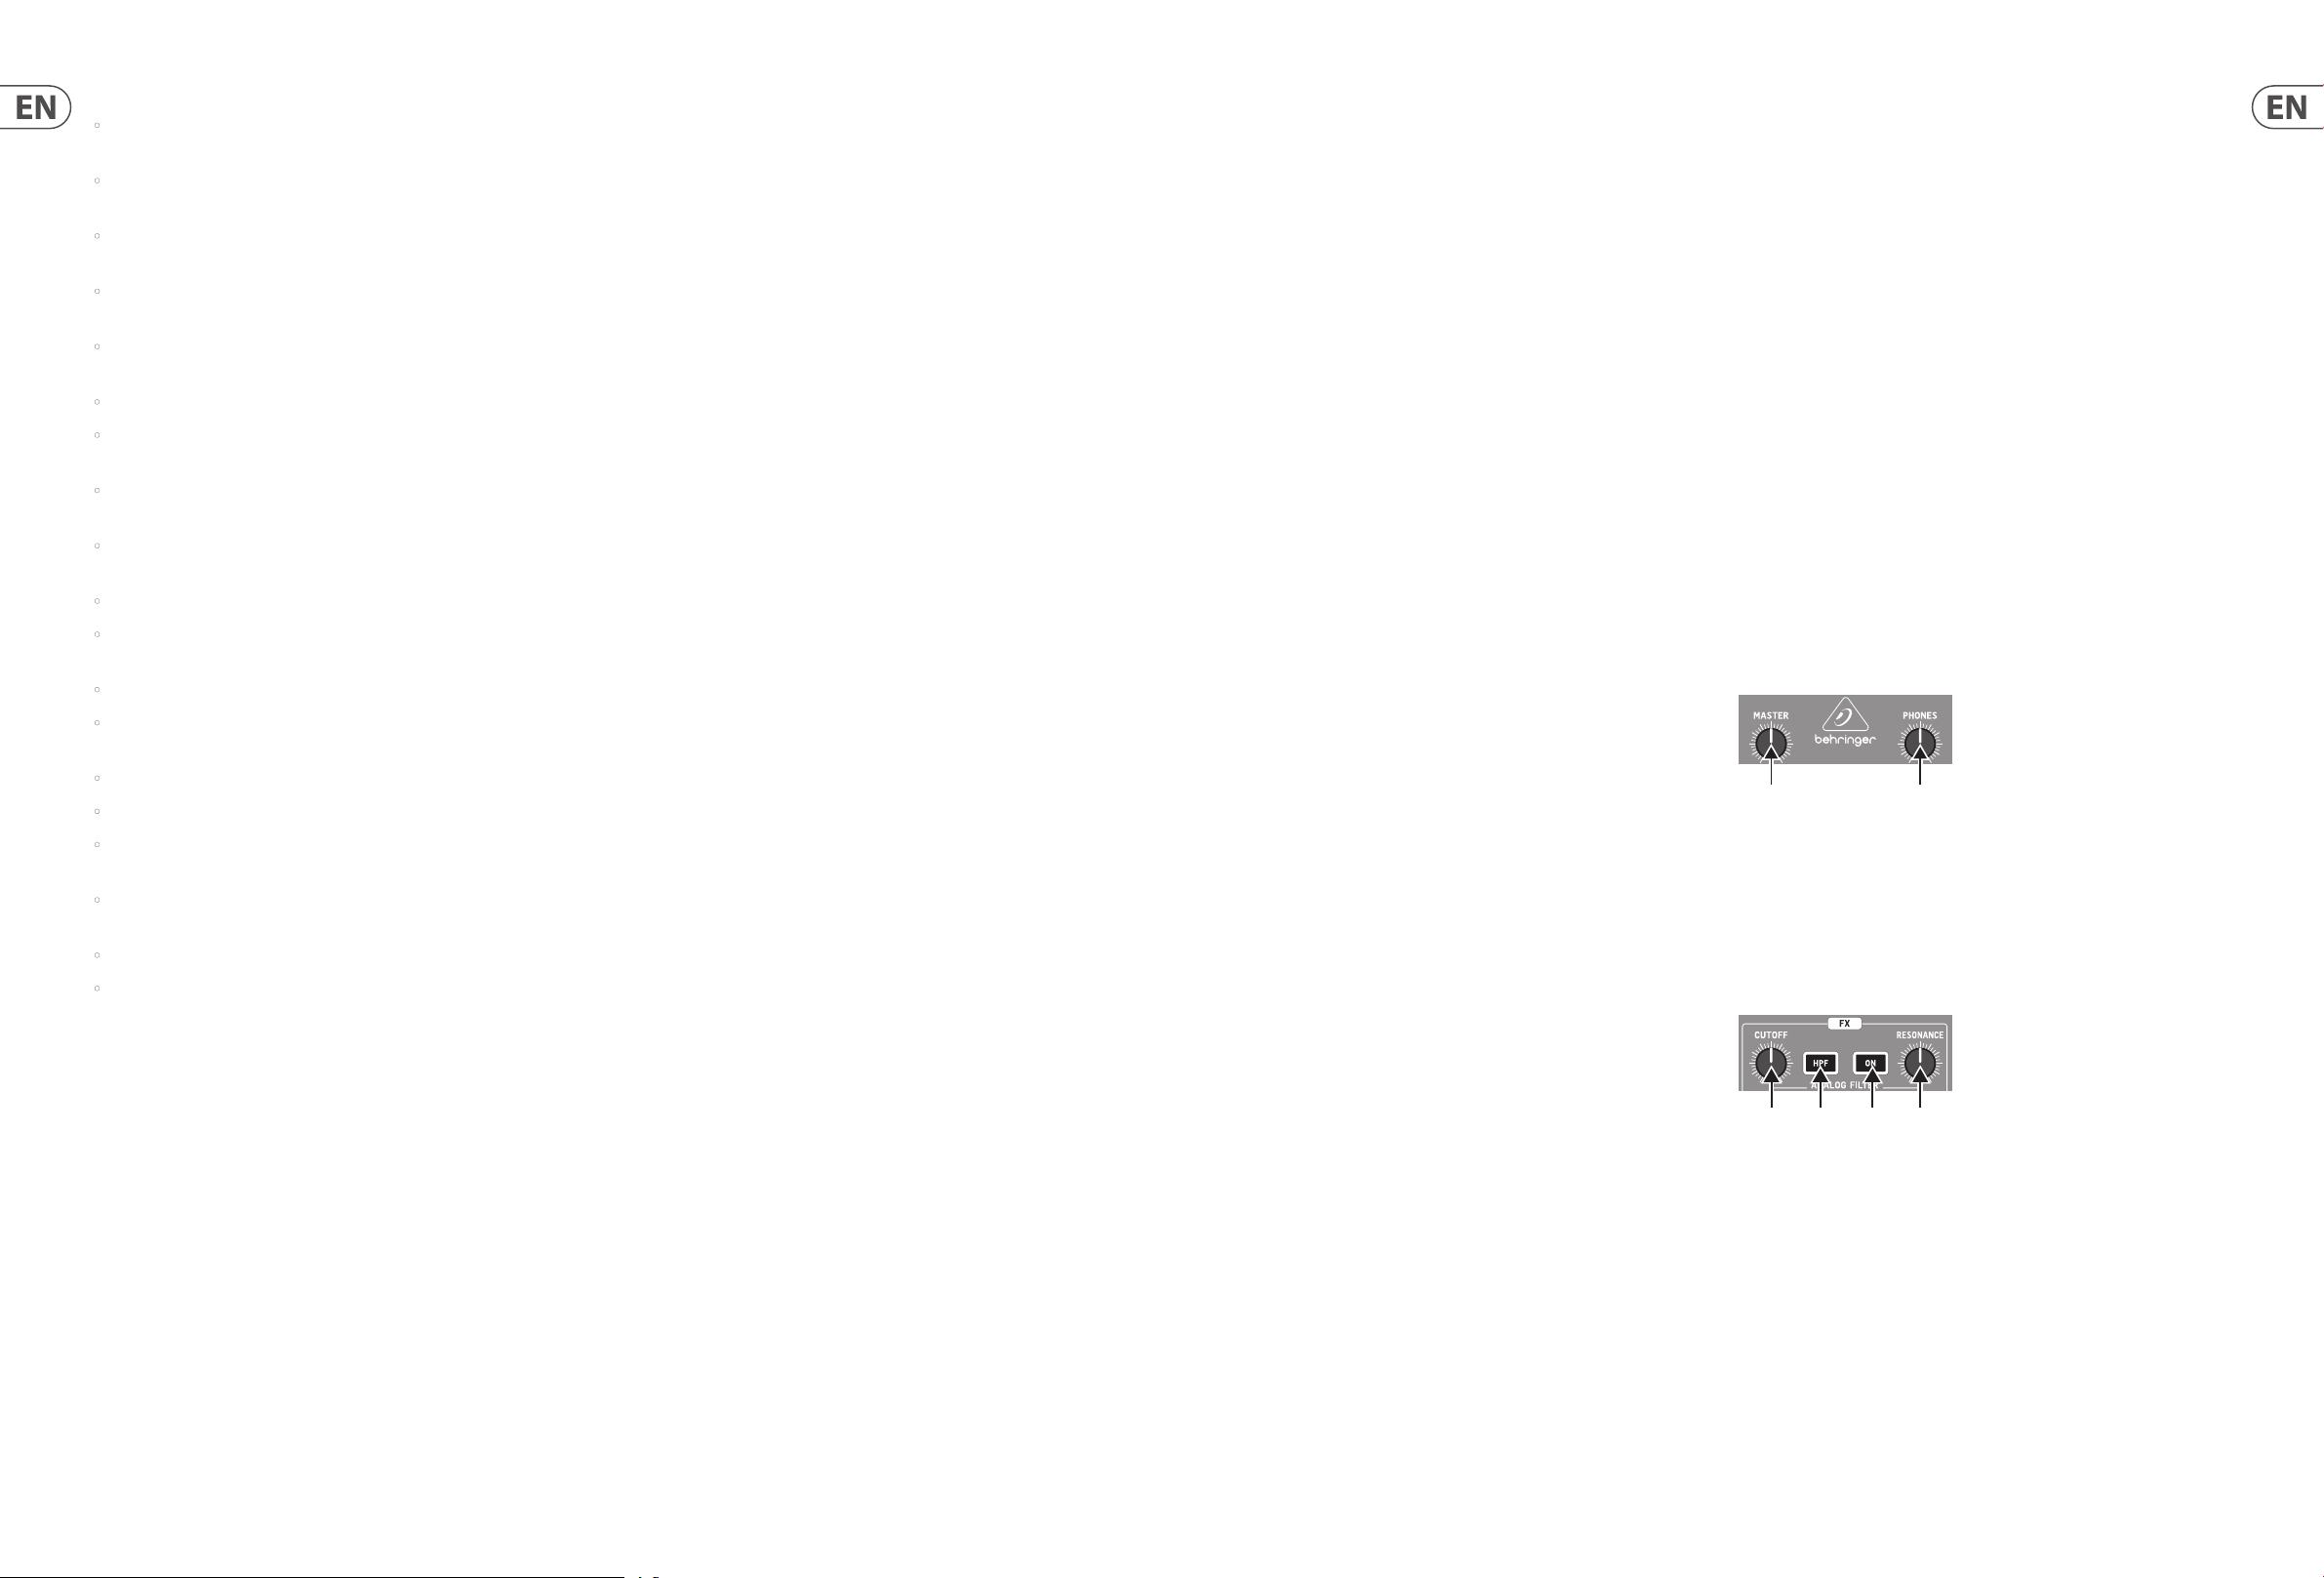
(1) MASTER – Controls the main output level.
(2) PHONES – Adjusts the headphones level. NOTE: The headphones
signal is taken before the Wave Designer and Filter for monitoring
purposes. This means the Wave Designer and Filter are not audible
in the headphones.
3.1.2 Analog Filter Section
(4)(3) (5) (6)
(3) CUTOFF – Adjusts the cuto frequency of the lter.
(4) HPF – Toggle the lter between HPF (hi-pass lter) and
LPF (lo-pass lter, default).
(5) ON – Engages the lter into circuit when illuminated.
(6) RESONANCE – Adjusts the resonance of the lter. This emphasizes the
frequencies around the cuto point.
Page 4

6 RHYTHM DESIGNER RD-8 User Manual 7 RHYTHM DESIGNER RD-8 User Manual
3.1.3 Wave Designer
(7) (8) (10)(9)
(7) ATTACK – Controls the attack portion of the Wave Designer circuit.
Turn counter clockwise (CCW) to reduce the at tack portion of the signal and
clockwise (CW) to enhance the attack por tion of the selected signal.
(8) SIG – Shows that signal is present in the Wave Designer circuit.
(9) SEND – Activates the Wave Designer assignment menu. The button is
illuminated when one or more voices are assigned to this bus.
(10) SUSTAIN – Controls the sustain portion of the Wave Designer circuit.
Turn CCW to reduce the sustain portion of the signal and turn CW to lengthen
the sustain.
3.1.4 Edit Section
(11) (12) (14)(13)
(11) SAVE – Save a song or pattern to a memory slot.
(12) COPY – Copy pattern from one location to another memory location.
3.1.7 Playback Controls
(30)(28)(23) (24) (31) (32)
(33)
(29)
(25) (26) (27)
(23) TAP/HOLD – Set the tempo of the unit with 5 taps. Hold for quick
macro control.
(24) DISPL AY – Multi function 4-character display.
(25) RECORD – Enable/disable record mode.
(26) STOP – Stops the currently playing song or pattern.
(27) PLAY/ PAUSE – Play or pause the current song or pattern.
(28) DATA – Encoder for data editing.
(29) DATA MODE – Cycles through the various Data Modes. Tempo, Swing,
Probability and Flam.
(30) TEMPO – Adjust the Tempo parameter when selected with the
DATA encoder.
3.1.9 Step & Note Repeat Section
(46)
(39) (40) (41)
(39) 1 – Step or Note repeat of a value of 1.
(40) 2 – Step or Note repeat of a value of 2.
(41) 4 – Step or Note repeat of a value of 4.
(42) 8 – Step or Note repeat of a value of 8.
(43) STEP REPEAT – Repeats the step by the selec ted value.
(44) NOTE REPEAT – Repeats the note played with the trigger button by the
selected value.
(45) TRIGGER – Trigger repeats when engaged.
(46) 1/2/4/8 – Indication of number of repeats selected.
3.1.11 Voice Control
(42) (43) (44)
(45)
(52)
3.1.10 Track Control and Settings
(47)
(48)
(50)
(51)
(47) MUTE – Activates mute menu.
(48) SOLO – Activates solo menu.
(49) STEP BUTTONS – Used to input step information into patterns and is
also used for various system tasks when used in conjunction with the
(50) SETTINGS button or for deeper editing.
(50) SETTINGS – Used in combination with the (49) STEP BUTTONS to select
dierent operational modes.
(51) AUTOFILL – Select and add a ll pattern.
(13) ERASE – Delete the selected song, pattern or settings.
(14) DUMP – Performs a MIDI SysEx Dump of pattern, song or settings.
3.1.5 Mode Section
(15) (16) (17)
(15) SONG – Enter Song Mode. Cue 1 of 16 songs.
(16) PATTERN – Enter Pattern Mode. Use the 16 available patterns to build
your song.
(17) STEP – Shows each available step for the selected voice (up to 64 steps
per pattern).
3.1.6 Sync Section
(18) (19) (20) (21) (22)
(18) CYCLE – Cycles through the various SYNC options when the sequencer is
stopped. Internal, MIDI, USB or TRIG (External Clock) options.
(19) INTERNAL – The unit is the sync master.
(20) MIDI – Sync is taken from MIDI in port.
(21) USB – Sync is taken from the USB port.
(31) SWING – Adjust the Swing parameter or shue feeling when selected with
the DATA encoder (50% straight to 75% full swing).
(32) PROB – Adjust the probability factor of steps triggering.
(33) FLAM – Adjust the FLAM width.
3.1.8 Auto Scroll Section
(34)
(35)
(36) (37) (38)
(34) AUTO SCROLL – Step Mode: Keep Playhead visible. Pattern Mode: Advance
song when loop expires. If Auto Scroll is enabled for a pattern that has more
than 16 steps, when the Playhead advances beyond a 16-step boundary,
the steps will automatically switch pages to stay in sync with the Playhead.
(35) BANKS 16/32/48/64 – White shows bank position of Playhead in current
pattern. Red shows currently-viewed bank position.
(36) << (POSITION MOVE LEFT) - Step Mode: Choose viewed bank position.
Pattern Mode: Choose Playhead position within selected song.
(37) LENGTH – Step mode: Set the length of the selected pattern. Pattern Mode:
Set number of repeats for selected part within the song.
(38) >> (POSITION MOVE RIGHT) - Step Mode: Choose viewed bank position.
Pattern Mode: Choose Playhead position within selected song.
(53)
(54)
(55)
(56)
(58)
(52) LEVEL – Level of the 11 voices, plus Accent.
(53) TUNING – Relative tuning of associated voice.
(54) TONE – Applies a lter to the voice reducing the high frequencies as you
turn CCW.
(55) DECAY – Changes the decay time of the voice. Turn CCW for shorter,
CW for longer.
(59)
(57)
(56) SNAPPY – Adjust the amount of snap sound to the snare sound. Turning CW
increases snap.
(57) VOICE SWITCH – Switch between the two voices available.
(58) VOICE SELECT – Selects the voice for editing patterns, Wave Designer,
soloing or mute.
(59) OFFSET – Changes the length of the Hand Clap sound.
(22) TRIG – Sync is taken from the External Clock input.
Page 5
8 RHYTHM DESIGNER RD-8 User Manual 9 RHYTHM DESIGNER RD-8 User Manual
(68) (69) (70) (71) (72) (73) (74)
(75)
(76) (77) (78) (79) (80) (81) (82) (83)
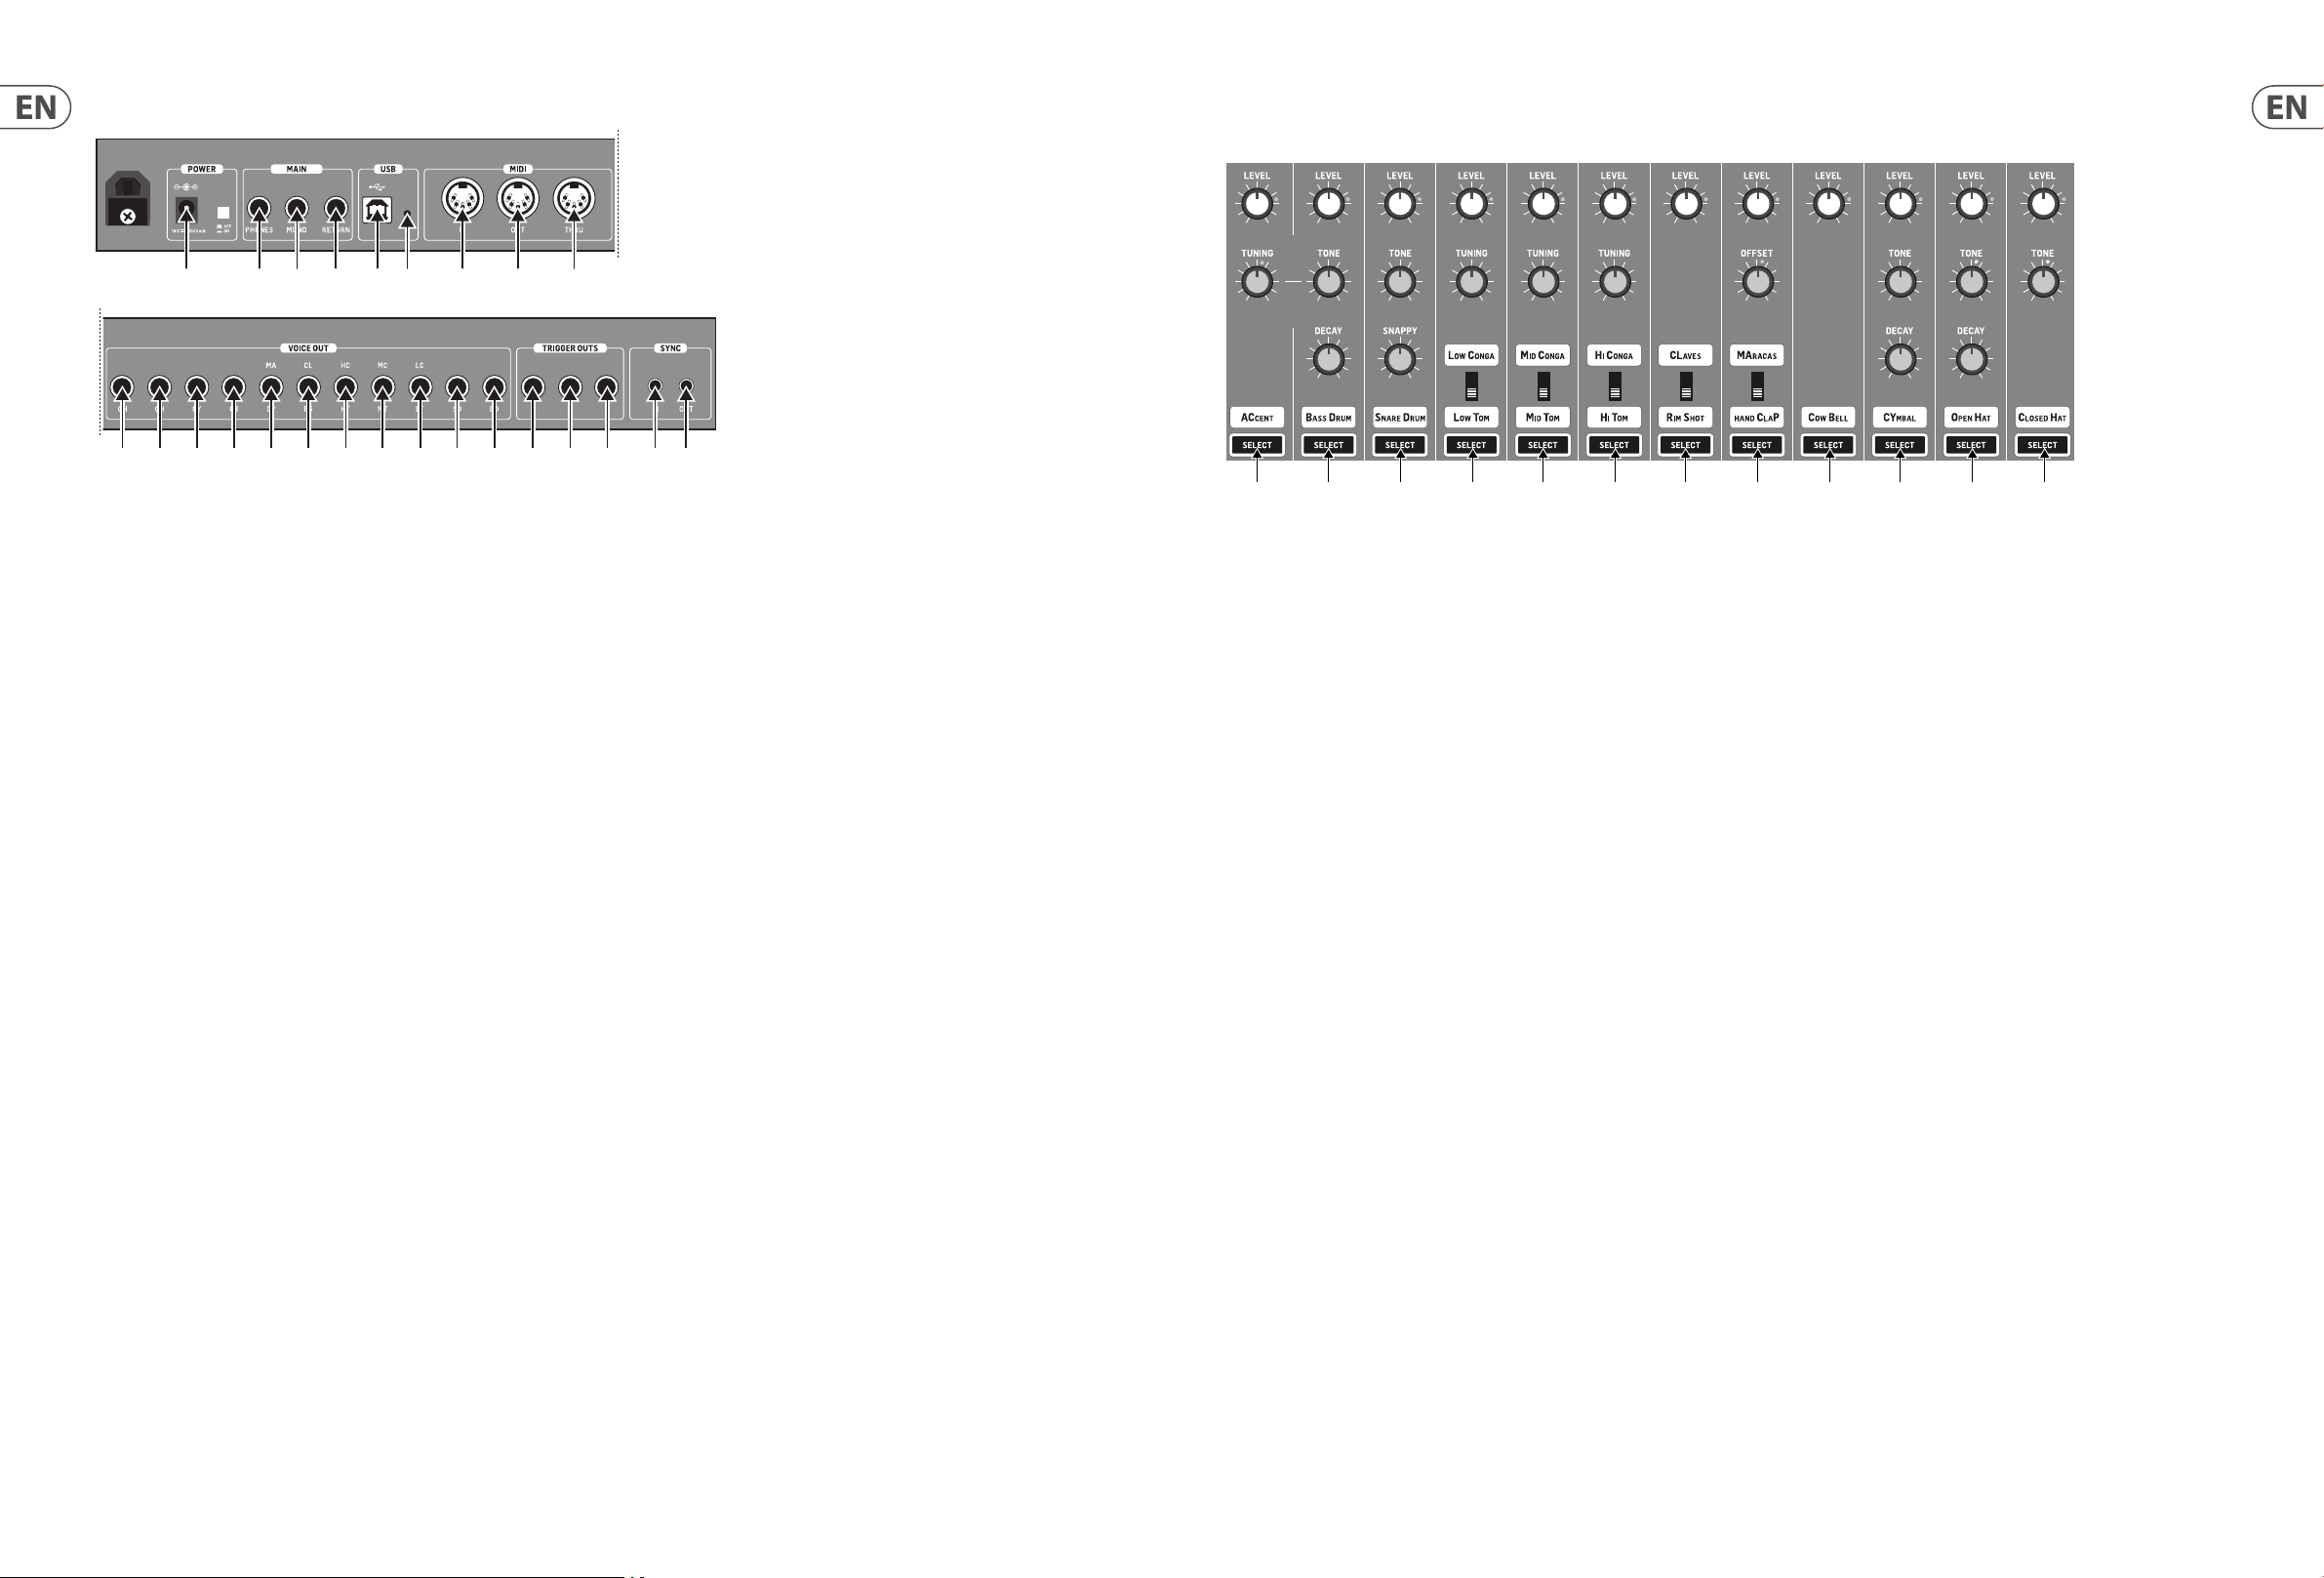
3.2 Rear Panel connections
(60) (61) (62) (63) (64) (65) (66) (67)
(68) (69) (70) (71) (72) (73) (74)
(60) POWER – Connect the supplied PSU here and engage power switch to
turn on.
(61) PHONES - Connect headphones via a ¼" (6.35 mm) TRS connector.
(62) MONO – Main output via a ¼" (6.35 mm) TRS connector.
(63) RETURN – Sums audio post lter bus. ¼" (6.35 mm) Unbalanced connector.
(64) USB – Connect to a computer for updates and DAW control.
(65) MIDI IN – To input MIDI from an external MIDI device such as a sequencer
or DAW.
(66) MIDI OUT – Output of MIDI data to an external MIDI device.
(67) MIDI THRU – A direct output of the MIDI in to chain to other devices.
(68) CH INDIVIDUAL OUTPUT – ¼" (6.35 mm) Unbalanced output of the
Closed Hat.
(84)
(75)
(76) (77) (78) (79) (80) (81) (82) (83)
(81) TRIGGER OUT 3 – +5 v 1ms pulse to trigger ex ternal devices. ¼" (6.35 mm)
unbalanced output.
(82) SYNC IN – SYNC to external device transmitting clock information using a
1/8” (3.5 mm) TRS jack. Start/stop signal on ring and clock on tip.
(83) SYNC OUT – SYNC external devices to the Rhythm Designer using an
unbalanced ⁄" (3.5 mm) jack.
(84) BOOT – Enter boot mode for software updates.
4. Overview
This overview will help you set up the RD-8 analog rhythm designer and briey
introduce its capabilities.
4.1 Connections
4.4 Voice Section
In this section the sounds and controls are described to help you achieve the most from the RD-8 which has 16 sounds, plus Accent.
(1) (2) (3) (4) (5) (6) (7) (8) (9) (10) (11) (12)
(1) ACCENT – This function is used to give emphasis to any voice programmed
on the same step. The LEVEL control determines the amount of emphasis
given to the selected voices. Turn Counter Clockwise (CCW) to reduce the
amount of global Accent. Turn Clockwise (CW) to increase the global Accent
level. Accent can also be programmed via MIDI or USB by using a velocity
value of 110 or higher. When a note is programmed above the 110 velocity
level, all other sounds triggered at the same time will be accented too.
(2) BASS DRUM – This classic sound dened a generation. The LEVEL control
adjusts the level compared to the other voices. TONE applies a lter to the
sound, CCW to remove high frequency information. Turning CW brightens
the sound. DECAY controls how long the drum will ring. Turn CW for longer
tones. The TUNING function (placed in the Accent section but controls the
bass drum only) changes the pitch of the bass drum, turn CCW for low
sounds, turn CW to raise the pitch.
5. Creating a Pattern (Step Mode)
Patterns can use up to 64 steps which gives a great deal of exibility.
How to record a basic 16-step pattern:
1. Selec t a SONG.
2. Press PATTERN.
3. Select desired pattern number via step keys 1-16.
4. Press STEP.
5. Select desired tempo with Data control.
6. Press RECORD.
7. Select the VOICE you wish to use.
(69) OH INDIVIDUAL OUTPUT – ¼" (6.35 mm) Unbalanced output of the
Open Hat.
(70) CY INDIVIDUAL OUTPUT – ¼" (6.35 mm) Unbalanced output of the Cymbal.
(71) CB INDIVIDUAL OUTPUT – ¼" (6.35 mm) Unbalanced output of the
Cow Bell.
(72) CP/MA INDIVIDUAL OUTPUT – ¼" (6.35 mm) Unbalanced output of the
Hand Clap or Maracas.
(73) RS/CL INDIVIDUAL OUTPUT – ¼" (6.35 mm) Unbalanced output of the
Rim Shot or Claves.
(74) HT/HC INDIVIDUAL OUTPUT – ¼" (6.35 mm) Unbalanced output of the
High Tom or High Conga.
(75) MT/MC INDIVIDUAL OUTPUT – ¼" (6.35 mm) Unbalanced output of the
Mid Tom or Mid Conga.
(76) LT/LC INDIVIDUAL OUTPUT – ¼" (6.35 mm) Unbalanced output of the
Low Tom or Low Conga.
(77) SD INDIVIDUAL OUTPUT – ¼" (6.35 mm) Unbalanced output of the
Snare Drum.
(78) BD INDIVIDUAL OUTPUT – ¼" (6.35 mm) Unbalanced output of the
Bass Drum.
(79) TRIGGER OUT 1 – +5 v 1ms pulse to trigger external devices. ¼" (6.35 mm)
unbalanced output.
(80) TRIGGER OUT 2 – +5 v 1ms pulse to trigger external devices. ¼" (6.35 mm)
unbalanced output.
The RD-8 has a ¼" (6.35 mm) mono jack output on the rear of the unit plus
11 independent voice ¼" (6.35 mm) jacks. When the individual voice outputs
are used and connected, they cut that voice from the MAIN MONO output. This is
useful for adding eects or external processing to individual sounds.
Audio return is via the ¼" (6.35 mm) mono RETURN jack on the rear panel.
This input can be used to process an individual voice or voices via external
processing (mixer, compressor or reverb, etc.), then return the signal back into
the main output of the RD-8. Please consult the connection set-up guide for
examples (8.1).
The CLOCK IN/OUT connections use ⁄" (3.5mm) TRS jacks.
CAUTION: Do not overload the ⁄" (3.5 mm) CLOCK IN input. This jack can only
accept voltages up to a maximum of +15 V. The 3.5 mm CLOCK OUT outputs
should only be connected to inputs capable of receiving the output voltages.
Failure to follow these instructions may damage the RD-8 or external units.
4.2 Software Setup
The RD-8 is a USB Class Compliant MIDI device, and so no driver installation
is required. The RD-8 does not require any additional drivers to work with
Windows and MacOS.
4.3 Hardware Setup
First make all the audio and power connections to your system. Connect a DAW,
external sequencer or keyboard with MIDI output directly to the RD-8 MIDI IN
5-pin DIN type input or via MIDI over USB if desired. Apply power to the RD-8
using the supplied power adapter only. Ensure your sound system is turned
down. Turn on the RD-8 rear power switch. Use the MIDI page in the settings
function to set the RD-8 to a unique MIDI channel within your system.
(3) SNARE DRUM – The SNAPPY control simulates the sound of the snares
microphone moving closer to and from the bottom drum head. LEVEL and
TONE control as the bass drum voice.
(4) LOW TOM/LOW CONGA – The switch determines which sound is in use.
TUNING adjusts the pitch of the sound. Turn CCW for low sounds and CCW to
raise the pitch. LEVEL control is the same as the bass drum voice.
(5) MID TOM/MID CONGA – Same functions as (4) LOW TOM/LOW CONGA.
(6) HI TOM/HI CONGA – Same functions as (4) LOW TOM/LOW CONGA.
(7) RIM SHOT/CLAVES – The switch determines which sound is in use.
The LEVEL control adjusts the level compared to the other voices.
(8) HAND CLAP/MARACAS – The switch determines which sound is in use.
The LEVEL control adjusts the level compared to the other voices. OFFSET
adjusts the length of the hand clap only, from short (CCW) to long (CW).
(9) COW BELL – The level control gives you more cow bell, if desired.
(10) CYMBAL – LEVEL and TONE control as the bass drum voice. DECAY controls
how long the cymbal rings.
(11) OPEN HAT – The controls are the same as the CYMBAL voice.
(12) CLOSED HAT – LEVEL and TONE control as the bass drum voice. When the
closed hat is programmed on a step immediately after an OPEN HAT, the
closed hat voice cuts the OPEN HAT voice, which is a classic drum machine
trick to simulate a real hi-hat.
8. Steps can be programmed either with the unit playing (press PLAY) or in the
stopped position. The moving white LED is the play head which shows the
current play position. The TRIGGER pad can also be used to play and record
the currently-selected voice.
9. Select dierent voices to add into the current pattern.
10. Press stop and record to exit record step mode.
How to save a pattern:
1. Once you have created your masterpiece of a pattern press PATTERN.
2. Press SAVE.
3. Press PATTERN again.
4. Select the Step number of the Pattern you wish to save, current pattern will
be displayed in white after which SAVE will ash.
5. Press the ashing SAVE button to execute the operation.
Page 6

10 RHYTHM DESIGNER RD-8 User Manual 11 RHYTHM DESIGNER RD-8 User Manual
How to copy a pattern:
1. Press COPY.
2. Next select the source song with the pattern you wish to copy.
3. Then press PATTERN.
4. Next select the pattern you wish to copy from the source song via the
step keys.
5. Press COPY.
6. Select destination pattern to copy to via step keys, this copies the source into
this pattern in the current song.
7. Press COPY to execute the operation.
How to erase a pattern:
1. Press ERASE.
2. The SONG and PATTERN buttons will ash. Press PATTERN.
3. Select the pattern you wish to delete via one of the 16 step keys.
4. Press the now ashing ERASE but ton to execute the delete process. This is a
permanent process and can’t be undone.
How to dump a pattern:
The DUMP control works in the same way as the SAVE control. Instead of saving,
the DUMP control will output the selection as a SysEx message. This action sends
the pattern/song data as SysEx. This information can be saved and loaded by a
third-party program or sent to another RD-8.
Auto Fill
The Auto Fill function is used to insert ll rhythms into the live play mode of
the RD-8. Fills are created in the same way a pattern is created and stored.
The dierence between Auto Fill and normal pattern playback is that once an
Auto Fill has nished playing, the func tion will return you to the previously
played pattern unless you have selected a dierent pattern while the Auto Fill
function is ac tive. If a dierent pattern is selected, the new pattern will play after
the Auto Fill pattern has ended.
How to use Auto Fill
Once you have programmed the Auto Fill pat terns use them by pressing the
AUTO FILL button and selecting one of the 4 ashing Auto Fill step keys.
If you are recording a pattern with more than 16 steps, press the Autoscroll
button in Step Record to alternate between blocks. For example, when recording
a 24 step pattern you will alternate between block one (LED above 16 is lit) with
16 steps and block two (LED above 32 is let) with 8 steps
Patter n
Range
16 1 1 48 1 33
16 2 2 48 2 34
16 3 3 48 3 35
16 4 4 48 4 36
16 5 5 48 5 37
16 6 6 48 6 38
16 7 7 48 7 39
16 8 8 48 8 40
16 9 9 48 9 41
16 10 10 48 10 42
16 11 11 48 11 43
16 12 12 48 12 44
16 13 13 48 13 45
16 14 14 48 14 46
16 15 15 48 15 47
16 16 16 48 16 48
32 1 17 64 1 49
32 2 18 64 2 50
32 3 19 64 3 51
32 4 20 64 4 52
32 5 21 64 5 53
32 6 22 64 6 54
32 7 23 64 7 55
32 8 24 64 8 56
32 9 25 64 9 57
32 10 26 64 10 58
32 11 27 64 11 59
32 12 28 64 12 60
32 13 29 64 13 61
32 14 30 64 14 62
32 15 31 64 15 63
32 16 32 64 16 64
Step
Number
Patter n
Length
Patter n
Range
Step
Number
Patter n
Length
6. Playing a Pattern (Pattern Mode)
Press the PATTERN button and select the pattern that you wish to play.
Step Repeat
This function can be used for changing patterns during a live performance.
When STEP REPEAT is triggered the current step or steps (depending on the step
settings) will be repeated until the TRIGGER button is released. The number
of steps repeated are 1,2, 4 or 8. This is a very powerful feature that can, for
example be used to loop the end of a pattern creating a ll.
To use:
1. Press STEP REPEAT.
2. Select how many repeats you require (1,2,4 or 8)
3. While a pattern is playing press and hold the TRIGGER button to repeat steps.
4. The step number can be changed while the TRIGGER button is held to create
dierent loops eects.
5. Press STEP REPEAT to exit.
Note Repeat
This feature can be used for transforming patterns during a live performance.
When Note Repeat is triggered the currently selected voice will be repeated until
the TRIGGER button is released. The number of notes repeated are 1,2, 4 or 8. This
creative feature can be used to create drum roll and ratchet style eects on the
y by repeating the current note while the rhythm continues to run.
To use:
1. Press NOTE REPEAT.
2. Select how many repeats you require (1,2,4 or 8).
3. While a pattern is playing press and hold the TRIGGER button to
repeat notes.
4. The note number can be changed while the TRIGGER button is held to create
dierent ll eects.
5. Press NOTE REPEAT to exit.
Track Mute
This function lets you mute any voice(s) within a pattern, song or globally.
7. Creating a Song (Pattern Chaining Mode)
Pattern mode can be used to trigger any of the 16 patterns available when
playing back. Patterns can be chained together to form a song by the
following steps:
1. Selec t song via 16 step keys.
2. In Pattern Mode press the RECORD button.
3. With the AUTO SCROLL button unlit and the LENGTH button ashing, press
the STEP BUTTONS to open the rst pattern.
4. Press the LENGTH button (lights solid), use the DATA knob to select number
of repeats.
5. Press AUTO SCROLL (control lights), and then press any of the STEP BUTTONS
to add next step.
6. Switch o the AUTO SCROLL button.
7. Repeat steps 3 – 6 until all desired patterns have been entered
8. At any time use the << />> keys with the AUTO SCROLL button lit to move
forward and backward through the song to check programming. If the
LENGTH button is lit, the display will show number of repeats; if the LENGTH
button is ashing, the display will show the pattern number of that step.
To save the song that you have just created:
1. Press SAVE.
2. Press SONG.
3. Select destination via step key (current song highlighted with a white LED)
4. Press SAVE to execute operation.
8. Creating a Song Chain
(Song Mode)
Songs are a collection of up to 16 patterns which can be played and interacted
with in a live playing format. Pattern Record mode is used to arrange the
patterns into the structure of a song (described in section 7).
A total of 16 songs can be created with up to 16 patterns in each. That makes 256
possible patterns in the unit at any one time.
Tip: 4 or 8 steps are recommended for drum lls, but any size can be used up to
64 steps.
Pattern length
Pattern length can be changed from 1 to 64 steps on a pattern by pat tern
basis. This adjustable length can be used to create dierent time signatures.
For example, selecting a pattern length of 12 steps with a step size using 1/16th
will create a 3/4 (waltz style) time signature.
To change the number of steps in a pattern:
1. Press the STEP and RECORD buttons.
2. Press LENGTH.
3. Use the <</>> keys either side of the LENGTH button to choose either 16,
32, 48 or 64 range as the starting point.
4. Press <</>> keys to change to the desired pattern length. For example,
if length 64 is selected, choosing step key 12 will make the pattern 60
steps long.
To mute a voice(s):
1. While a pattern is playing select track MUTE.
2. Select the voice(s) you wish to mute.
3. The muted voice(s) will be illuminated solid, other voices will ash.
4. Press track MUTE to exit.
Solo functions.
This function gives you the ability to solo a voice or voices within a pattern,
song or globally.
To Solo a voice(s):
1. While a pattern is playing select track SOLO.
2. Select the voice(s) you wish to solo.
3. The soloed voice(s) will be illuminated solid, other voices will ash.
4. Press track SOLO to exit.
NOTE: SOLO will always take priority over MUTE. Soloing a voice that is muted
will cause that voice to sound.
To change the current song:
1. Press the SONG button to enter Song Mode.
2. Use the STEP BUTTONS 1-16 to choose the song you wish to record,
play or edit.
To chain songs:
1. Press the SONG button to enter Song Mode.
USE the STEP BUTTONS 1-16 to choose the song that you want to play rst.
2. Press the RECORD button. You can now select the next song in the chain.
When the AUTO SCROLL button is selected in Song play the songs will chain as
indicated. You can still manually override this default setting by selecting a
dierent song while the rst is playing.
Please note that this feature over-rides the Chain Songs function in Settings
(see below). Deselecting the AUTO SCROLL button while a song is playing reverts
to the original Chain Songs setting.
Page 7

12 RHY THM DESIGNER RD-8 User Manual 13 RHYTHM DESIGNER RD-8 User Manual
9. Wave Designer
Wave Designer is a powerful tool for adjusting signal transients and dynamics,
such as attack and sustain. Use the Wave Designer to make a snare drum really
“crack” in the mix, or to expand the bass drum to be even more devastating.
With both ATTACK and SUSTAIN controls set to 12 o’clock the Wave Designer
is essentially in bypass and will not aect any voices being sent to the Wave
Designer via the bus.
Adjusting the ATTACK knob will make the opening transient of the voice sound
punchier. Increasing the SUSTAIN control acts in a similar way as a compressor,
allowing the peaks to carry on longer before decay. The eect can also be used to
reduce the sustain for a more staccato sound.
NOTE: Using a long sustain on naturally staccato sounds (e.g. Rim Shot)
may cause noise. Dial this noise out by reducing the sustain amount.
All voices sent to the Wave Designer as described will then pass into the Analog
Filter section to be processed.
The SIG LED shows that a signal is present in the Analog Filter/Wave Designer bus.
The SEND button activates the Wave Designer circuit.
How to assign voices to the FX bus:
1. Press SEND in the FX section.
2. Use SELECT to assign which voices go to the bus (solid red LED is bus send on).
3. Press SEND in the FX sec tion to return to playback.
The diagram below shows the audio routing of the voices as they pass through
the RD-8. Only one voice is shown in this example, but the same process applies
to all voices.
11. Settings
The Settings functions are listed below. All features are accessed by pressing the SETTINGS button and selecting the associated step key.
11.1 MIDI
To enter the MIDI settings page press SETTINGS, select MIDI (STEP BUTTON 1) and
use the TAP/HOLD key to access the various pages described below:
1. Choose the MIDI channel from 1-16, All or Out (The Output setting follows
the MIDI OUT setting in the next step below) for the incoming MIDI IN port.
2. Select the MIDI OUT channel from 1-16.
3. Turn on FORWARD TO USB to send the MIDI output of the unit to the USB OUT.
4. SOFT THRU on/o turns the MIDI OUT jack into a 2nd MIDI THRU port by
sending the data from the MIDI IN to the MIDI OUT port.
5. DEVICE ID sets the units ID from 1-16. This is helpful when dealing with
multiple units via SysEx.
11. 2 USB
To enter the USB MIDI settings page press SETTINGS, select USB MIDI
(STEP BUTTON 2) and use the TAP/HOLD key to access the various pages
described below:
Swing Preference Options:
1. Global, where all patterns Swing settings, even if a dierent Swing setting is
stored within a pattern or song.
2. Song, where all patterns Swing settings will follow the setting a within that
song, even if a dierent Swing setting is stored within a pattern.
3. Pattern, where all pat terns will play with the Swing settings they have been
saved with and not be aected by global or song Swing changes.
Probability Preference Options:
1. Global, where all the patterns probability settings, even if a dierent
probability setting is stored within a pattern or song.
2. Song, where all patterns probability settings will follow the probability
setting within that song, even if a dierent probability setting is stored
within a pattern.
3. Pattern, where all pat terns will play with the probability settings they have
been saved with and not be aected by global or song probability changes.
10. Analog Filter
The Analog Filter section works on selected sounds routed via an audio bus fed
from the Wave Designer circuit.
The CUTOFF control sets the frequency where the lter is applied. The lter cut o
can be programmed and automated (when the ON button is ashing, automation
is active).
When the HPF (High Pass Filter) button is engaged the lter cuts the the low
frequency cuto point as you turn the control CW. When the HPF button is not
engaged, the CUTOFF knob defaults to a lo-pass lter (LPF), which gradually cuts
the high frequencies as you turn the control CCW.
Press the ON button to activate the lter circuit.
The RESONANCE control adjusts the resonance of the lter. Turning CW adds a
peak at the cuto frequency that accents the surrounding frequencies.
The lter CUTOFF control setting can be recorded as automation. After
programming a pattern, add the voice or voices you wish to be processed by the
Analog Filter and Wave Designer bus as described earlier in this manual. Next,
while the pattern is playing and in Record Mode, rotate the CUTOFF knob and
listen to the results. Once you are happy with your lter sweep exit Record Mode.
Next time you play the pattern, the recorded lter sweep will play back.
Live Filter Mode can be toggled on and o, and this toggling action gives you
either manual control of the lter frequency or automated Filter Mode, which
uses the stored lter automation data. The live Filter Mode can be toggled on and
o by holding the TAP/HOLD button and pressing the lter ON button to activate
dierent states:
• Flashing lter ON button= Filter plays stored automation data
• Solid lter ON button = Filter in live control mode
At any time, you can drop into Record Mode and adjust the lter settings that will
be stored with the current pattern, as long as the lter settings are set to Pattern
(see SETTINGS 11.5 below).
It is also possible to manually program the lter per step or to edit a recorded
lter sweep.
1. Press SETTINGS.
2. Press FILTER (STEP BUTTON 6).
3. Pressing dierent step keys (1-64) will display the current lter position from
0, turn the DATA control counter clockwise (CCW) to 255 turn clockwise (CW).
Depending on which lter setting is in use, HPF or LPF, the lter will be fully
open or closed. Up to 64 steps can be programmed using the <</>> keys in
the LENGTH section to navigate step position.
4. Press SETTINGS twice to exit.
5. Save PATTERN.
1. Choose the USB MIDI channel from 1-16, All or Out (The Output setting
follows the USB MIDI OUT setting in the next step below) for the incoming
USB MIDI IN port.
2. Select the USB MIDI OUT channel from 1-16.
3. Turn on FORWARD TO MIDI sends the USB MIDI output of the unit to the
MIDI OUT.
NOTE: Care should be taken with Forward to MIDI/USB settings when both MIDI
and USB interfaces are connected to the same computer, as there is a possibility
of data loops occurring.
11. 3 CLOCK
To enter the CLOCK settings page press SETTINGS, select CLOCK (Step key 3) and
use the TAP/HOLD key to access the various pages described below:
Tempo Preference
Swing Preference
Probability Preference
Flam Preference
Analog Clock Mode
Tempo Preference Options:
1. Global, where all patterns play at the set tempo, even if a dierent tempo is
stored within a pattern or song.
2. Song, where all patterns within in a song will follow the tempo set within
that song, even if a dierent tempo is stored within a pattern.
3. Pattern, where all pat terns will play at the tempo they have been saved with
and not be aected by global or song tempo changes.
Flam Preference Options:
1. Song, where all patterns am settings will follow the am setting within
that song, even if a dierent am setting is stored within a pattern.
2. Pattern, where all patterns will play with the am settings they have been
saved with and not be aected by song am changes.
Analog Clock Modes
PPQ (Pulses Per Quarter) is the smallest unit of time used for sequencing note
and automation events, both by step sequencers and in the MIDI standard. Most
MIDI sequencers allow the number of PPQ to be varied for more or less temporal
resolution depending on the needs of the performer. The default is 24 PPQ, as
this is the most commonly used setting.
This function allows communication with various analogue clock types as
listed below:
Clock Settings
1 PPQ
2 PPQ
4 PPQ
24 PP Q
48 PPQ
Page 8

14 RHY THM DESIGNER RD-8 User Manual 15 RHYTHM DESIGNER RD-8 User Manual
11. 4 MAP
The map function allows you to change the MIDI notes that trigger the RD-8
voices either via the USB or MIDI ports.
The default numbers are listed in the table below.
Voice MIDI Note No.
Bass Dru m 36
Snare Drum 40
Low Tom/Low Conga 45
Mid Tom/Mid Conga 47
Hi Tom/Hi Conga 50
Rim Shot/Claves 37
Clap/Maracas 39
Cowbell 56
Cymb al 51
Open Hat 46
Closed Ha t 42
To enter the MAP settings page press SETTINGS, select MAP (STEP BUTTON 4) and
use the SELECT key for each voice to view the current MIDI note number. The DATA
knob can be used to adjust the number from 0-127.
The MIDI map is set globally and is the same for all songs and patterns.
11. 5 PREFS
To enter the PREFS settings page press SETTINGS, select PREFS (Step key 6) and
use the DATA knob to adjust the various settings.
Chain Songs
The Chain function allows you to link together songs. PREFS has three options:
• Loop – Causes selected song to loop from beginning to end until the STOP
button is pressed. Pressing the PLAY/PAUSE button will cause the next
selected song to start from the beginning.
• Hold – Causes the last bar of the selec ted song to repeat until stop is
pressed. Pressing the PLAY/PAUSE button will cause the next selected song
to start from the beginning.
• Stop – The selected song will run from beginning to end, then stop at the
end of the last bar. Pressing the PLAY/PAUSE will cause the next selected
song to start from the beginning.
Note that the above preferences are over-ridden when chaining songs
(see section 8).
Filter HPF Preference
Set the HPF on/o state Globally, by Song or by Pattern.
Filter Io Preference
Set the Filters on/o state Globally, by Song or by Pattern.
Filter Auto Preference
Set the lters Automation state Globally, by Song or by Pattern. This determines
how the lter uses recorded lter automation information.
Poly Preference
Set the Poly loop function to be controlled Globally, by Song or by Pattern (See
section 11.7 for more information on polymetric patterns).
Step Size Preference
Set the Step Size to be controlled Globally, by Song or by Pattern.
Auto Advance Preference
Set the Auto Advance Globally or by Song.
Auto Scroll Preference
Set the Auto Scroll function Globally or by Pattern.
Bus Send Preference
Set the bus send to Filter and Wave Designer Globally, by Song or by Pattern
Mute Preference
Set the mute control preference Globally, by Song or by Pattern
Solo Preference
Set the solo control preference Globally, by Song or by Pattern
11. 6 FILTER
The lter CUTOFF knob setting can be recorded as automation and programmed
into a pattern to create sweeping textures and eects as described in section 10.
11. 7 POLY (Polymetric)
Polymeter (poly) is the simultaneous use of two or more conicting rhythms. In
this unit, it is possible to change the number of steps played back per voice to
create interesting overlapping rhythms. For example, 16 steps of Bass Drum can
be played while 15 steps of Snare which will make the pattern evolve over time.
It really must be experimented with to hear its full potential.
Each of the 12 voices can be set to a dierent Polymeter which will work across all
64 steps of a pattern. This lets you create large evolving percussive patterns that
can evolve over time.
To enter Poly Mode:
1. Press SETTINGS.
2. Press POLY (STEP BUTTON 7).
3. Use the DATA control to activate Poly Mode.
4. Select the voice you wish to reduce the number of steps (this is none
destructive).
5. All the step LED’s will illuminate to show the current status of the selected
voices Polymeter settings.
6. Select the step key you wish to use to reduce the pattern playback. If a
pattern is 32, 48, or 64 steps long use the <</>> keys to navigate to the
step you wish to use.
7. Flashing LEDs indicate any steps that will not be triggered.
8. Press SETTINGS twice to exit.
To return to normal pattern playback turn poly mode o or press the step key
which is the end of the chosen pattern length i.e. 16, 32, 48 or 64 steps.
If you are using Poly mode with a pat tern containing more than 16 steps then
all voices which are playing every step, including accent, must have all the used
steps selected with poly mode on in order that the pattern plays correctly.
For example, if you have a pattern programmed of 32 steps. Setting poly mode
“On” a voice, then setting the range to 48 steps, then setting all the other
voices to “poly mode on” and to the length of the pattern (in this case 32) will
result in the last 16 steps of the voice set to 48 steps being silent if nothing has
been programmed there (you could also ll the last 16 steps for more sonic
interest). If you don't set your non-Poly voices to the nominal pattern length the
pattern will only loop the rst 16 steps.
Please note that individual voices can have Poly lengths that are longer than the
nominal pattern length, for extra rhythmic variation.
11. 8 RAND (Random)
This function allows randomly played sounds to trigger on a pre-selected group
of voices on any pre-programmed step that you wish to have the ability to hear
random voices triggering. This can be used to create indiscriminate variations
into patterns, for example, random tom lls.
To add to a pattern:
1. Press SETTINGS.
2. Press RAND (STEP BUTTON 8).
3. Pick the voices you want with the SELECT buttons.
4. Use the step keys (1-64 via length navigation) to apply the random action on
the steps you require.
5. Press SETTINGS twice to exit.
NOTE: Random step settings are stored on a per pattern basis.
11. 9 PROB (Probability)
The PROB setting allows you to adjust the probability of predened steps playing
as programmed. This Probability function is great for adding a human feel to
patterns by settings how likely a programmed note will play. This simulates how
a drummer could miss playing a drum.
The range can be set from 0% to 100%. As a guide 0% means a programmed
voice won’t trigger, 50% allows voices to be played around half of the time,
while 100% will trigger the voice as programmed.
By default, all steps in a pattern are enabled to be controlled by the PROB setting.
Probability can be turned on and o per step as described below:
1. Press SETTINGS.
2. Press PROB (STEP BUTTON 9).
3. Select the voice you wish to give probability to.
4. Use the step keys and length navigation arrows to enable probability on the
steps (up to 64 steps) you require.
5. Adjust the probability range with the DATA control to taste (0% causes
the voice to not trigger where as 100% signies the voice will trigger
as programmed).
6. Press SETTINGS twice to exit.
Probability step settings are stored per pattern, but the amount (0%-100%)
is controlled globally.
11.10 FLAM
Flam is the simulated eect of a drummer hitting a note with 2 sticks.
The amount of am dictates the length of time between the next hit after the
rst. Range from 0-24 adjusts the width of the am and is set globally.
By default, all steps in a pattern are enabled to be controlled by the FLAM setting.
Flam can be turned on and o per step as described below:
1. Press SETTINGS.
2. Press FLAM (STEP BUTTON 10).
3. Select the voice you wish to add am on.
4. Use the step keys (1-64 via length navigation arrows) to enable am on the
steps you require.
5. Adjust the am range with the DATA control to taste
(0 = No Flam. 24 = Longest am length).
6. Press SETTINGS twice to exit.
The global setting can also be changed by selecting FLAM with the DATA MODE
button and using the DATA knob to adjust the am length between hits.
11.11 RPT (Note repeat)
Note repeat lets you program a step to repeat either 1,2,4 or 8 times. This can
be used to add extra ratchet style rolls to voices on a pre-dened step (1-64)
by completing the following:
1. Press SETTINGS.
2. Press RPT (step key 11).
3. Select the voice to which you wish to add repeats.
4. Select the step key (1-64 via length navigation arrows) to enable repeat on
that step. Each step in a pattern can have a dierent repeat value.
5. Select the number of repeats (1,2,4 or 8).
6. Turn on the repeat with the NOTE REPEAT button.
7. Select the next step to add more repeats or press SETTINGS twice to exit.
11.12 Step Size Preference
The step size of a rhythm pattern refers to the note duration of a step.
When composing rhythms, the basic unit of duration (in time) is a 'bar'. The step
sizes you can choose on your RD-8 are 1/8, 1/8T, 1/16. 1/16T, and 1/32.
If you choose the step size 1/16, the duration of a single step is 1/16th of a bar.
This means that a 16 step pattern has a duration of exactly one bar.
The durations are as follows:
• 1/8 = 1/8
• 1/8T = 1/ 12
• 1/16 = 1//16
• 1/16T = 1/24
• 1/32 = 1/32
To change the step size preference:
1. Press SETTINGS
2. Press the STEP BUTTON associated with the step size you require
(1/8, 1/8T, 1/16, 1/16T or 1/ 32).
3. Press SETTINGS twice to exit.
th
bar.
th
bar
th
bar (default)
th
bar
th
bar
Page 9

16 RHYTHM DESIGNER RD-8 User Manual 17 RHYTHM DESIGNER RD-8 User Manual
11.13 SYNC
Pressing the SYNC button multiple times scrolls through the 4 Sync
option available.
1. INT (internal) – The sync is set by the unit’s internal clock.
2. MIDI – The sync is taken from the MIDI IN port. A MIDI star t message is
required in order for playback to start.
3. USB – The sync is taken from the USB port. A message is required in order
for playback to start.
4. TRIG (clock) – The sync is taken from the SYNC IN port. Clock start signal is
required or playback can be started manually. (Sync In jack has start / stop
signal on ring and clock on tip).
11.14 DATA MODE
The DATA MODE button toggles between the four available parameters and uses
the DATA control to adjust parameters:
(1) (2) (3) (4)
1. TEMPO – sets the speed of the current pattern or song. Depending on how
the RD-8 is congured will result in how tempo is aected. For example,
if the Tempo parameter is set to global, all songs and patterns will be forced
to the tempo set by the DATA control. See the TEMPO section for more
information.
2. SWING – changes pattern step timings by quantizing each drum beat to
the nearest step and then delaying the playback of every other step in the
pattern. The DATA control adjusts the Swing range from 50% (straight)
to 75% (Full Swing).
3. PROB (probability) – In PROB settings menu you can select the steps as
described earlier in this manual. The global settings allow you to adjust
the probability that these steps will play programmed note events. This is
a number can be set anywhere in between 0%-100% range to simulate a
human element to patterns.
4. FLAM – Par t of a pattern of RD-8, consisting of a stroke preceded by a grace
note. Range 0-24 adjust the width of the am. Flam is the simulated eect
of a drummer hitting a note with 2 sticks. The amount of am dictates the
length of time between the next hit af ter the rst and can be programmed
per step.
12. Software Updates
The RD-8 updater can be downloaded by going to ww w.musictribe.com.
Please follow the steps on the website and updater to update your RD-8.
To check the current rmware version:
1. Press SETTINGS.
2. While holding the TAP/HOLD button press CHAIN/PREFS (STEP BUTTON 5).
3. The LCD will display the rmware version.
4. Press SETTINGS to exit.
13. Parameters
There are three dierent types of data les used by the RD-8. The contents of
these le types are described herein.
Global Settings File
All of the RD-8’s Settings and Preferences are stored in the Global Settings le.
This le is loaded from Storage Memory when the unit is powered on. The exact
contents of the le are described below:
Settings
Settings in the Global Settings le are automatically saved back to Storage
Memory whenever they are changed.
Setting Name Description Value
From time to t ime, new versions of th e RD-8
rmware w ill be released. Thi s rmware will
contain bo th bug xes and new fea tures.
Data Version
Product Variant
Last Loaded Song
Last Loa ded Pattern
Device ID
Clock Source
Analog Clock Mode
MIDI RX Cha nnel Set the MIDI i n receive channel. 1 – 16
MIDI TX Chan nel Se t the MIDI out transmi t channel. 1 – 16
MIDI to USB Thru Set MID I in to send to USB Thru. On/O
MIDI Sof t Thru Send a ll MIDI in Data to the MIDI ou t port. On/O
USB RX Channe l Set th e USB MIDI receive channe l. 1 – 16
USB TX Channe l Set the USB MID I transmit channel. 1 – 16
USB to MIDI Thru Send th e USB MIDI in to the MIDI thru p ort. On/O
Voice Note Mappings
Song Chain Mode Chain song s together for live p erformance. O n/O
Addition al parameters may b e added to the
Global Se ttings Data le to s upport those
new featur es. The Global Se ttings Data le is
therefore versioned to guarantee compatibility
between rmware releases.
The RD-8 i s one of a number of Behr inger
produc ts that sequenc e songs. This param eter
is used to di stinguish bet ween RD-8 Song Dat a
les and oth er song data les.
Each time a s ong is loaded into th e sequencer it
is logged . When you power on the uni t, the last
song to be lo gged before the un it was powered
o will be lo aded back into the se quencer.
Each time a p attern is loade d in the sequencer
it is logge d. When you power on the un it,
the last pa ttern to be logge d before the unit
was powere d of will be loaded ba ck into the
sequencer.
Each RD uni t in a system can have it s own
unique ID number.
Press Sync to c ycle through th e 4 clock
source options.
Choose th e type of clock t hat the clock input
follows.
Voice MIDI note ma p. Can be changes fro m the
default if desired.
1 – 16
1 – 16
1 – 16
INT, MIDI, USB or TRIG
1, 2, 4, 24 and 48PP
various
Preferences
In addition to the Settings described above, there are a number of Preferences
that can be used to specify whether certain sequencer parameters will persist
on a Global, Song or Pattern basis. Just like the Settings, the Preferences in the
Global Settings le are automatically saved back to Storage Memory whenever
they are changed.
Preference Name Description Value
Tempo Preference
Swing Preference
Probability
Preference
Flam Preference
Filter Mode
Preference
Filter Enable
Preference
Filter Automation
Preference
Polymeter Preference
Step Size Preference
Auto-Advance
Preference
Auto-Scroll
Preference
FX Bus Preference
Mute Preference
Solo Preference
This preference selects which Tempo
paramet er is used by the seque ncer;
Global Tempo, Song Temp o or Pattern Tempo.
This preference selects which Swing parameter
is used by th e sequencer; Glob al Swing,
Song Swing or Pattern Swing.
This preference selects which Probabilit y
paramet er is used by the seque ncer;
Global Probability, Song Probability or
Pattern Probabilit y.
This preference selects which Flam parameter
is used by th e sequencer; Glob al Flam,
Song Flam or Pa ttern Flam.
This pref erence select s which Filter Mod e
paramet er is used to set the mo de RD-8’s
Analog Filter.
This preference selects which Filter Enable
paramet er is used to enable or di sable by the
Analog Fil ter on the RD-8’s FX bus ..
This preference selects which Filter
Automatio n parameter is use d by the
sequenc er. It also sel ects which se t of Filter
Step Values are u sed when the automa tion
is activ e.
This preference selects which Polymeter
paramet er is used by the seque ncer.
This pref erence select s which Step Size
paramet er is used by the seque ncer.
This preference selects which Auto-Advance
paramet er is used by the seque ncer.
Auto-Adv ance is a functio n of a Song but not of
a Patter n. This preference i s therefore limi ted
to Song and G lobal.
This preference selects which Auto-Scroll
paramet er is used by the seque ncer.
Auto-Scro ll is a function o f a Pattern but
not of a Song. T his preference is t herefore
limited to Pa ttern and Globa l.
This pref erence select s which set FX Bus
assignme nts are used to send t o voices to
the FX Bus .
This pref erence select s which set of Mute
Bus assign ments are used to mu te the
RD-8’s voices.
This pref erence select s which set of Solo B us
assignme nts are used to solo t he RD-8’s voices.
0 = Song,
1 = Global,
2 = Patter n
0 = Song,
1 = Global,
2 = Patter n
0 = Song,
1 = Global,
2 = Patter n
0 = Song,
1 = Global,
2 = Patter n
0 = Song,
1 = Global,
2 = Patter n
0 = Song,
1 = Global,
2 = Patter n
0 = Song,
1 = Global,
2 = Patter n
0 = Song,
1 = Global,
2 = Patter n
0 = Song,
1 = Global,
2 = Patter n
0 = Song,
1 = Global
1 = Global,
2 = Patter n
0 = Song,
1 = Global,
2 = Patter n
0 = Song,
1 = Global,
2 = Patter n
0 = Song,
1 = Global,
2 = Patter n
Global Parameters
The RD-8 has many parameters that can be tweaked to make your rhythm’s more
interesting. The Global Settings le contains the following list of parameters.
When these parameters are in use (i.e. the corresponding Preference is set to
Global), they remain xed, even when new Songs and Patterns are loaded into
the sequencer. As is the case for the Settings and Preference, Global Parameters
are automatically saved back to Storage Memory whenever they are changed.
Preference Name Description Value
Global Tempo
Global Swing
Global Probability
Global Flam
Global Filter Mode
Global Filter Enable
Global Filter
Automation
Global Filter Step
Values (1 - 64)
Global Polymeter
Global Step S ize
Global Auto-Advance
Global Auto-Scroll
Global F X
Assignments
Global Mute
Assignments
Global Solo
Assignments
Sets the t empo globally if glo bal mode
preference is selected.
Sets the Sw ing value globally i f global mode
preference is selected.
Sets the p robability a s ound will play global ly
if global m ode preference is s elected.
Sets the am length globally i f global mode
preference is selected.
Sets the lter to LPF or HPF globall y if global
mode pre ference is selec ted.
Sets the lter on/o globally if g lobal mode
preference is selected.
Turns lter auto mation on/o globall y if global
mode pre ference is selec ted.
Sets the lter level per step gl obally if global
mode pre ference is selec ted.
Turn polymeter on/o globally if global mode
preference is selected.
Sets the St ep size globally if glo bal mode
preference is selected.
Sets whe ther a song will adv ance to the next
song or not g lobally if global mo de preference
is selected.
Sets whe ther Auto Scroll is o n/o globally if
global mode preference is selected.
Sets whi ch voices are assign ed to the FX bus
globally if global mode preference is selected.
Sets which voices are muted globally if global
mode pre ference is selec ted.
Sets which voices are soloed globally if global
mode pre ference is selec ted.
20 – 240 BPM
50 – 75 %
0 – 100 %
0 - 24
0 = LPF,
1 = HPF
0 = O,
1 = On
0 = Inacti ve,
1 = Active
0 – 255
0 = O,
1 = On
0 = 1/8th,
1 = 1/8th Tr,
2 = 1/16th,
3 = 1/16th Tr,
4 = 1/32ndth
0 = O,
1 = On
0 = O,
1 = On
0 = Inacti ve,
1 = Active
0 = Inacti ve,
1 = Active
0 = Inacti ve,
1 = Active
Song Data Files
Each of the 16 songs stored in the RD-8’s Storage Memory has a Song Data le.
When a song is loaded into the sequencer from Storage Memor y, this is the le
that is loaded. The song loaded into the sequencer at any given time is called
the Live Song. Changes the user makes to the Live Song Data le do not persist,
the le must be saved back to the Storage Memory before another Song Data le
is loaded.
Page 10

18 RHYTHM DESIGNER RD-8 User Manual 19 RHY THM DESIGNER RD-8 User Manual
Song Arrangement
All of the data in a song arrangement is contained in its Song Data le. These data
is shown below:
Parameter Name Description Values
From time to t ime, new versions of th e RD-8
rmware w ill be released. Thi s rmware will
contain bo th bug xes and new fea tures.
Song Data Version
Product Variant
Song Sec tions
(1 – 16)
Patter n Repeats
(1 – 16)
Next Song
Addition al parameters may b e added to
the Song Dat a le to support th ose new
feature s. The Song Data le is t herefore
versioned to guarantee compatibility between
rmware releases.
The RD-8 i s part of a series o f Behringer
produc ts that sequenc e songs. This param eter
is used to di stinguish bet ween RD-8 Song Dat a
les and oth er song data les.
A song arr angement can have up to 16 Son g
Secti ons. Any of the 16 associa ted patterns c an
be loaded i nto a section. Th ere is a parameter
for each se ction.
When a pat tern is loaded into a S ong Section it
can be rep eated a number of time s. There is a
parameter for each section.
When Song Chaining is turned on, another
song can b e automatically cu ed to play after
the Live So ng has nished.
Pattern Number
(0 – 15)
No. of Repeat s
(1 - 100)
Song No. (0 – 15)
Song Parameters
Some of the parameters in the Song Data le are comparable to the Global
Parameters. When these parameters are in use (i.e. the corresponding Preference
is set to Song), loading a new song will trigger the corresponding change in the
sequencer. A tempo change is one such example.
Parameter Name Description Values
Tempo The temp o of the song is store d. 20 – 240 BPM
Swing The Swing leve l is stored. 50 – 75 %
Probability
Flam The am level i s stored per song 0 - 24
Filter Mode
Filter Enable Whether the lter is on/o per song.
Filter Automation Automation o f the lter is stored p er song.
Filter Step Values
(1 - 64)
Polymeter Polymeter is either on/o per song.
Step Size Step size is s tored for the song .
Auto Advance
FX Bus Sen ds
Mute Voices Which voi ces are muted, stor ed by song.
Solo Voices Which voice s are soloed, stor ed by song.
The proba bility of a step be ing heard is
stored p er song.
Filter Mod e is stored per song ,
either LPF o r HPF.
Filter step values per song are stored. 0 – 255
Whether o r not the song will auto a dvance to
the nex t or not is stored per s ong.
Whether o r not the FX bus send is a ctive or not,
stored p er song.
0 – 100 %
0 = LPF,
1 = HPF
0 = O,
1 = On
0 = Inacti ve,
1 = Active
0 = O,
1 = On
0 = 1/8th,
1 = 1/8th Tr,
2 = 1/16th,
3 = 1/16th Tr,
4 = 1/32ndth
0 = O,
1 = On
0 = Inacti ve,
1 = Active
0 = Inacti ve,
1 = Active
0 = Inacti ve,
1 = Active
Pattern Data Files
Each of the 16 patterns associated with a song has its own Pattern Data le.
When a song is loaded from Storage Memory, these 16 Pattern Data les
are loaded in addition to the Song Data le. These 16 patterns are called the
Live Patterns. Changes made to the Live Pattern Data les do not persist. The
les must be saved back to the Storage Memory before another song and its
associated patterns are loaded.
Pattern Data
All of the data in a pattern are contained in its Pattern Data le. The data is
shown below:
Parameter Name Description Values
From time to t ime, new versions of th e RD-8
rmware w ill be released. Thi s rmware will
contain bo th bug xes and new fea tures.
Pattern Data Version
Product Variant
Accent Step Values
(1 - 64)
Bass Dru m Step
Values (1 - 64)
Snare Drum St ep
Values (1 - 64)
Low Tom Step Values
(1 - 64)
Mid Tom Step Values
(1 - 64)
Hi Tom Step Values
(1 - 64)
Rim Shot Step Valu es
(1 - 64)
Hand Clap Step
Values (1 - 64)
Cow Bell Step Value s
(1 - 64)
Cymbal Step Values
(1 - 64)
Open Hat Step Valu es
(1 - 64)
Addition al parameters may b e added to
the Patte rn Data le to suppor t those new
feature s. The Pattern Dat a le is therefore
versioned to guarantee compatibility between
rmware releases.
The RD-8 i s part of a series o f Behringer
produc ts that sequenc e songs. This param eter
is used to di stinguish bet ween RD-8 Patte rn
Data les an d other pattern d ata les.
The sequencer events triggered on the 64 steps
of the Accent t rack: Events inc lude Step On/O,
Step Prob on/o, st ep am on/o, Step Repeat
on/o. Step repeat si ze.
The sequencer events triggered on the 64 steps
of the Bass D rum track: Event s include Step
On/O, Step Pro b on/o, step am on/o, Step
Repeat on/o. Step r epeat size.
The sequencer events triggered on the 64 steps
of the Snare D rum track: Event s include Step
On/O, Step Pro b on/o, step am on/o, Step
Repeat on/o. Step r epeat size.
The sequencer events triggered on the 64 steps
of the Low Tom trac k: Events include St ep On/
O, Step Prob on /o, step am o n/o, Step
Repeat on/o. Step r epeat size.
The sequencer events triggered on the 64 steps
of the Mid Tom tra ck: Events includ e Step On/
O, Step Prob on /o, step am o n/o, Step
Repeat on/o an d Step repeat size.
The sequencer events triggered on the 64 steps
of the Hi Tom trac k: Events include Ste p On/O,
Step Prob on/o, st ep am on/o, Step Repeat
on/o and Step rep eat size.
The sequencer events triggered on the 64 steps
of the Rim Sho t track: Events inc lude Step On/
O, Step Prob on /o, step am o n/o, Step
Repeat on/o an d Step repeat size.
The sequencer events triggered on the 64 steps
of the Hand Cla p track: Events in clude Step On/
O, Step Prob on /o, step am o n/o, Step
Repeat on/o an d Step repeat size.
The sequencer events triggered on the 64 steps
of the Cow Bel l track: Events inc lude Step On/
O, Step Prob on /o, step am o n/o, Step
Repeat on/o an d Step repeat size.
The sequencer events triggered on the 64 steps
of the Cymbal tr ack: Events inclu de Step On/
O, Step Prob on /o, step am o n/o, Step
Repeat on/o an d Step repeat size.
The sequencer events triggered on the 64 steps
of the Open H at track: Events in clude Step On/
O, Step Prob on /o, step am o n/o, Step
Repeat on/o an d Step repeat size.
*See description
below
*See description
below
*See description
below
*See description
below
*See description
below
*See description
below
*See description
below
*See description
below
*See description
below
*See description
below
*See description
below
Parameter Name Description Values
Closed Ha t Step
Values(1 - 64)
Pattern Length
Accent Poly Length
Bass Dru m Poly
Length
Snare Drum Po ly
Length
Low Tom Poly Lengt h
Mid Tom Poly Length
Hi Tom Poly Length
Rim Shot Poly Length
Hand Clap Poly
Length
Cow Bell Poly Le ngth
Cymbal Poly Length
Open Hat Poly Length
Closed Ha t Poly
Length
Random On /O
Random Track s
(Accent – Hand Cla p)
Random Track s (Cow
Bell – Clos ed Hat)
Random Step s
(1 – 64)
The sequencer events triggered on the 64 steps
of the Clos ed Hat track: Event s include Step
On/O, Step Pro b on/o, step am on/o, Step
Repeat on/o an d Step repeat size.
The seque ncer events trigg ered on the 1 to 64
steps. Eve nts include Step On/O , Step Prob
on/o, step am on /o, Step Repeat o n/o.
Step repeat si ze.
The sequencer events triggered on the 64 steps
of the Accent Po ly track: Events i nclude Step
On/O, Step Pro b on/o, step am on/o, Step
Repeat on/o an d Step repeat size.
The sequencer events triggered on the 64 steps
of the Bass D rum Poly track: Eve nts include
Step On/O, Step P rob on/o, step am on/o,
Step Repeat on /o and Step repeat size.
The sequencer events triggered on the 64 steps
of the Snare D rum Poly track: Even ts include
Step On/O, Step P rob on/o, step am on/o,
Step Repeat on /o and Step repeat size.
The sequencer events triggered on the 64 steps
of the Low Tom Poly tr ack: Events inclu de Step
On/O, Step Pro b on/o, step am on/o, Step
Repeat on/o an d Step repeat size.
The sequencer events triggered on the 64 steps
of the Mid Tom Poly t rack: Events incl ude Step
On/O, Step Pro b on/o, step am on/o, Step
Repeat on/o an d Step repeat size.
The sequencer events triggered on the 64 steps
of the Hi Tom Poly tr ack: Events inclu de Step
On/O, Step Pro b on/o, step am on/o, Step
Repeat on/o an d Step repeat size.
The sequencer events triggered on the 64 steps
of the Rim Sho t Poly track: Event s include Step
On/O, Step Pro b on/o, step am on/o, Step
Repeat on/o an d Step repeat size.
The sequencer events triggered on the 64 steps
of the Hand Cla p Poly track: Event s include Step
On/O, Step Pro b on/o, step am on/o, Step
Repeat on/o an d Step repeat size.
The sequencer events triggered on the 64 steps
of the Cow Bel l Poly track: Event s include Step
On/O, Step Pro b on/o, step am on/o, Step
Repeat on/o an d Step repeat size.
The sequencer events triggered on the 64 steps
of the Cymbal Pol y track: Events in clude Step
On/O, Step Pro b on/o, step am on/o, Step
Repeat on/o an d Step repeat size.
The sequencer events triggered on the 64 steps
of the Open h at Poly track: Event s include Step
On/O, Step Pro b on/o, step am on/o, Step
Repeat on/o an d Step repeat size.
The sequencer events triggered on the 64 steps
of the Clos ed Hat Poly track: Eve nts include
Step On/O, Step P rob on/o, step am on/o,
Step Repeat on /o and Step repeat size.
The sequencer events triggered on the 64 steps
of the Rand om track: Events in clude Step On/
O, Step Prob on /o, step am o n/o, Step
Repeat on/o an d Step repeat size.
The sequencer events triggered on the 64 steps
of the Rand om for the Accent – Hand Cla p
track: Ev ents include Step On /O, Step Prob
on/o, step am on /o, Step Repeat o n/o and
Step repeat si ze.
The sequencer events triggered on the 64 steps
of the Rand om for the Cow Bell - Clos ed Hat
track: Ev ents include Step On /O, Step Prob
on/o, step am on /o, Step Repeat o n/o and
Step repeat si ze.
The sequencer events triggered on the 64 steps
of the Rand om Steps track: Event s include Step
On/O, Step Pro b on/o, step am on/o, Step
Repeat on/o an d Step repeat size.
*See description
below
*See description
below
*See description
below
*See description
below
*See description
below
*See description
below
*See description
below
*See description
below
*See description
below
*See description
below
*See description
below
*See description
below
*See description
below
*See description
below
*See description
below
*See description
below
*See description
below
*See description
below
* Informat ion useful for p ower users wishing to i mplement their own ed itors. Each of the 6 4 bytes in a trac k has
its bit s set/cleared as foll ows:
Bit 0 STEP_BYTE _MASK_O N_OFF_BIT – 1=Step On, 0=Step Of f
Bit 1 RESERV ED – Reserved / No t used
Bit 2 STEP_BYTE _MASK_ PROBABILITY_BIT – 1=Step On, 0 =Step Off
Bit 3 STEP_BYTE _MASK_ FLAM_BIT – 1=Step On, 0 =Step Off
Bit 4 STEP_BYTE_MASK_NOTE_ REPEAT_ON_OFF_BIT – 1=Step On, 0=Step Off
Bit 5 STEP_BYTE _MASK_ NOTE_REPEAT_LS _BIT 00 = Repeat 1, 01 = Repeat 2 , 10 = Repeat 4,
11 = Repeat 8
Bit 6 STEP_BYTE _MASK_ NOTE_REPEAT_MS _BIT 00 = Repeat 1, 01 = Repeat 2, 10 = Re peat 4,
11 = Repeat 8
Bit 7 RESERVED
Pattern Parameters
Some of the parameters in the Pattern Data le are comparable to the Global
Parameters. When these parameters are in use (i.e. the corresponding
Preference is set to Pattern), selecting a new pattern for playback will trigger
the corresponding change in the sequencer. A change to the Step Size is one
such example.
Parameter Name Description Values
Tempo The temp o of the song is store d. 20 – 240 BPM
Swing The Swing leve l is stored. 50 – 75 %
Probability
Flam The am level i s stored per song 0 - 24
Filter Mode
Filter Enable Whether the lter is on/o per song.
Filter Automation Automation o f the lter is stored p er song.
Filter Step Values
(1 - 64)
Polymeter Polymeter is either on/o per song.
Step Size Step size is s tored for the song .
Auto Advance
FX Bus Sen ds
Mute Voices Which voi ces are muted, stor ed by song.
Solo Voices Which voice s are soloed, stor ed by song.
The proba bility of a step be ing heard is
stored p er song.
Filter Mod e is stored per song ,
either LPF o r HPF.
Filter step values per song are stored. 0 – 255
Whether o r not the song will auto a dvance to
the nex t or not is stored per s ong.
Whether o r not the FX bus send is a ctive or not,
stored p er song.
0 – 100 %
0 = LPF,
1 = HPF
0 = O,
1 = On
0 = Inacti ve,
1 = Active
0 = O,
1 = On
0 = 1/8th,
1 = 1/8th Tr,
2 = 1/16th,
3 = 1/16th Tr,
4 = 1/32ndth
0 = O,
1 = On
0 = Inacti ve,
1 = Active
0 = Inacti ve,
1 = Active
0 = Inacti ve,
1 = Active
Page 11

20 RHY THM DESIGNER RD-8 User Manual 21 RHY THM DESIGNER RD-8 User Manual
14. SysEx information
Supported System Exclusive Messages
It is possible to import/export your Rhythm Designer data to/from the RD-8 using
the supported System Exclusive Messages. This section describes the messaging
protocol used for that purpose.
Stored Data
As described in section 13, the Storage Memory in the RD-8 stores three dierent
le types containing:
1. <<Song Data>>
2. <<Pattern Data>>
3. <<Global Settings Data>>
Data Stung
In order to transmit these les over MIDI, the data contained within them must
be stued. Details of the exact stung technique used go beyond the scope
of this document. It should be noted however, that the stream of bytes in the
<<Data>> sections of the messages described herein, are not interchangeable
with the streams of bytes in their corresponding le types, as they are described
in section.
Denitions
The following symbols appear in the message contents.
Symbol Denition
<DD> D evice ID: This is 0 base d – value 0 correspon ds to Device ID 1 on the RD -8 unit.
<RS> Reser ved for future u se
<MJ> S oftware Major Version Number
<MN> Software Minor Version Number
<P T> Software Patch Number
<SS>
<PP>
Supported Messages
Firmware Version Request Message
Description:
This mess age is used to reque st the Firmware Ver sion installed on t he RD-8 unit.
Expected Response from RD-8:
Upon recei pt of this message, t he RD-8 will respo nd with a Firmware Ver sion Response
Messag e (descr ibed below). The Firmwar e Version Response M essage will conta in
Firmware Version number.
Message Content:
The mess age takes the follow ing form:
An exampl e message is:
Note: This ex ample message re quests Firmwa re Version of RD-8 un it whose Device ID is s et to 1.
Song-sl ot Number: This is 0 ba sed – value 0 corresp onds to Song-slot 1
on the RD- 8 unit.
Patter n-slot Number: Th is is 0 based – value 0 cor responds to Patt ern-slot 1
on the RD- 8 unit.
F0 00 20 32 30 <DD> 06 01 F7
F0 00 20 32 30 00 06 01 F7
Firmware Version Response Message
Description:
This message simply contains the Firmware Version installed on the RD-8 unit. The RD-8 does
not per form any internal ac tion upon recei pt of this message.
Expected Response from RD-8:
The RD-8 d oes not respond af ter receipt of thi s message.
Message Content:
The mess age takes the follow ing form:
F0 00 20 32 30 <DD> 06 02 <RS> <RS> <RS> <RS> <MJ> <MN> <PT> F7
An exampl e message is:
F0 00 20 32 30 00 06 02 30 00 0 0 00 01 01 08 F7
Note: This ex ample message re quests Firmwa re Version of RD-8 un it whose Device ID is s et to 1.
Stored So ng Request Mess age
Description:
This mess age is used to reque st the Song data st ored in one of the 16 song sl ots in the
RD-8’s memo ry storage.
Expected Response from RD-8:
Upon recei pt of this message, t he RD-8 will respo nd with a Stored Song R esponse Messa ge
(describ ed below). The data sec tion of the Stored So ng Response Mess age will contain the S ong
data the us er requested.
Message Content:
The mess age takes the follow ing form:
F0 00 20 32 30 <DD> 10 03 30 00 00 00 <M J> <MN> <PT> <SS> F7
An exampl e message is:
F0 00 20 32 30 00 10 03 30 00 00 00 01 01 08 0 0 F7
Note: This ex ample message re quests Song dat a from Song-slo t 1 on the RD-8 unit wh ose
Device ID is s et to 1.
Stored Song Response Message
Description:
This mess age is used to overw rite the Song data s tored in one of the 16 son g slots in the RD-8 ’s
memory storage.
Expected Response from RD-8:
The RD-8 d oes not respond up on receipt of this me ssage. If the mess age is received corr ectly,
the store d Song data will be ove rwritten. I f not, the message w ill be ignored.
Note: Given that the data contained in the message does not include any pattern information,
none of the s ong’s 16 constituent pat terns will be ae cted.
The song currently loaded in the sequencer will not be aected until the song is reloaded. This
also means t hat the new Song data c an be further ove rwritten wi th the data loaded i n the
sequenc er, by followi ng the normal Save So ng procedure.
Message Content:
The mess age takes the follow ing form:
F0 00 20 32 30 <DD> 10 04 30 00 0 0 00 <MJ> <MN> <PT> <SS> << Song Data>> F7
An exampl e message is:
F0 00 20 32 30 00 10 04 30 00 0 0 00 01 01 08 00 <<Song Data>> F7
Note: This ex ample message co ntains the Song dat a from Song-slot 1 o n the RD-8 unit who se
Device ID is s et to 1.
Stored Pat tern Request M essage
Description:
This mess age is used to reque st the Pattern da ta stored in one of th e 256 pattern slot s in the
RD-8’s memo ry storage.
Expected Response from RD-8:
Upon recei pt of this message, t he RD-8 will respo nd with a Stored Pat tern Response Me ssage
(describ ed below). The data sec tion of the Stored Pat tern Response M essage will conta in the
Patter n data the user reque sted.
Message Content:
The mess age takes the follow ing form:
F0 00 20 32 30 <DD> 10 01 30 00 00 00 <M J> <MN> <PT> <SS> <PP> F7
An exampl e message is:
F0 00 20 32 30 00 10 01 30 00 00 00 01 01 08 0 0 00 F7
Note: This ex ample message re quests Patte rn data from Song -slot 1, Pattern-sl ot 1 on the
RD-8 uni t whose Device ID is se t to 1.
Stored Pattern Response Message
Description:
This mess age is used to overw rite the Patter n data stored in one o f the 256 pattern sl ots in the
RD-8’s memo ry storage.
Expected Response from RD-8:
The RD-8 d oes not respond up on receipt of this me ssage. If the mess age is received corr ectly,
the store d Pattern data wi ll be overwrit ten. If not, the mess age will be ignore d.
Message Content:
The mess age takes the follow ing form:
F0 00 20 32 30 <DD> 10 02 30 00 00 00 <M J> <MN> <PT> <SS> <PP>
<<Patter n Data>> F 7
An exampl e message is:
F0 00 20 32 30 00 10 02 30 00 00 00 01 01 08 0 0 00 <<Pattern Data>> F7
Note: This ex ample message co ntains the Patter n data from Song -slot 1, Pattern-slo t 1 on the
RD-8 uni t whose Device ID is se t to 1.
Live Song R equest Messag e
Description:
This mess age is used to reque st the ‘Live’ Song d ata that is current ly loaded into the
RD-8’s sequencer.
Expected Response from RD-8:
Upon recei pt of this message, t he RD-8 will respo nd with a Live Song Re sponse Message
(describ ed below). The data sec tion of the Live Song R esponse Messag e will contain the So ng
data the us er requested.
Note: The dat a does not include any o f the song’s 16 constitue nt patterns. It on ly includes
Song information.
Message Content:
The mess age takes the follow ing form:
F0 00 20 32 30 <DD> 10 07 30 00 00 00 <M J> <MN> <PT> F7
An exampl e message is:
F0 00 20 32 30 00 10 07 30 00 00 0 0 01 01 08 F7
Note: This ex ample message re quests ‘Live’ S ong data from the R D-8 unit whose
Device ID is s et to 1.
Live Song Response Message
Description:
This mess age is used to over write the ‘Live’ S ong data current ly loaded into the R D-8’s sequencer.
Expected Response from RD-8:
The RD-8 d oes not respond up on receipt of this me ssage. If the mess age is received corr ectly, the
‘Live’ So ng data will be overw ritten. If not, t he message will be i gnored.
Note: Given that the data contained in the message does not include any pattern information,
none of the 16 pat terns loaded in to the sequencer wi ll be aected.
Message Content:
The mess age takes the follow ing form:
F0 00 20 32 30 <DD> 10 08 30 00 00 0 0 <MJ> <MN> <PT> << Song Data>> F7
An exampl e message is:
F0 00 20 32 30 00 10 08 30 00 00 0 0 01 01 08 <<So ng Data>> F7
Note: This ex ample message co ntains the ‘Live’ S ong data destine d for RD-8 unit who se
Device ID is s et to 1.
Live Patt ern Request Mes sage
Description:
This mess age is used to reque st the ‘Live’ Pat tern data curren tly loaded into one of t he
16 pattern slots in the RD-8’s sequencer.
Expected Response from RD-8:
Upon recei pt of this message, t he RD-8 will respo nd with a Live Patte rn Response Mess age
(describ ed below). The data sec tion of the Live Pat tern Response Mes sage will contai n the
Patter n data the user reque sted.
Message Content:
The mess age takes the follow ing form:
F0 00 20 32 30 <DD> 10 05 30 00 00 0 0 <MJ> <MN> <PT> <PP> F7
An exampl e message is:
F0 00 20 32 30 00 10 05 30 00 00 0 0 01 01 08 00 F7
Note: This ex ample message re quests Patte rn data from seq uencer pattern -slot 1 on the
RD-8 uni t whose Device ID is se t to 1.
Live Pattern Response Message
Description:
This mess age is used to overw rite the ‘Live’ Pat tern data curr ently loaded into on e of the
16 pattern slots in the RD-8’s sequencer.
Expected Response from RD-8:
The RD-8 d oes not respond up on receipt of this me ssage. If the mess age is received corr ectly,
the ‘Live’ P attern data will b e overwritte n. If not, the messa ge will be ignored.
Message Content:
The mess age takes the follow ing form:
F0 00 20 32 30 <DD> 10 06 30 00 00 0 0 <MJ> <MN> <PT> <PP> <<Pattern Da ta>> F7
An exampl e message is:
F0 00 20 32 30 00 10 06 30 00 00 0 0 01 01 08 00 <<Pattern Data>> F7
Note: This ex ample message co ntains the ‘Live’ Pat tern data from s equencer patt ern-slot 1
on the RD- 8 unit whose Device I D is set to 1.
Global Settings Request Message
Description:
This mess age is used to reque st the Global Set tings data stor ed in the RD-8’s memor y storage.
Expected Response from RD-8:
Upon recei pt of this message, t he RD-8 will respo nd with a Global Se ttings Respons e Message
(describ ed below). The data sec tion of the Global S ettings Respo nse Message will co ntain the
Global Settings data the user requested.
Message Content:
The mess age takes the follow ing form:
F0 00 20 32 30 <DD> 10 09 30 00 00 0 0 <MJ> <MN> <PT> F7
An exampl e message is:
F0 00 20 32 30 00 10 09 30 00 00 0 0 01 01 08 F7
Note: This ex ample message re quests Globa l Settings data f rom the RD-8 uni t whose
Device ID is s et to 1.
Global Settings Response Message
Description:
This mess age is used to overw rite the Global S ettings data st ored in the RD-8's me mory storage.
Expected Response from RD-8:
The RD-8 d oes not respond up on receipt of this me ssage. If the mess age is received corr ectly,
the store d Pattern data wi ll be overwrit ten. If not, the mess age will be ignore d.
Message Content:
The mess age takes the follow ing form:
F0 00 20 32 30 <DD> 10 0A 30 00 00 0 0 <MJ> <MN> <PT> <<Global Se ttings Data>> F7
An exampl e message is:
F0 00 20 32 30 00 10 0A 30 00 00 0 0 01 01 08 <<Global Settings Data>> F7
Note: This ex ample message co ntains the Global S ettings data f rom the RD-8 unit w hose
Device ID is s et to 1.
Restor e Factor y Setting s Request Messa ge
Description:
Upon recei pt of this message t he Global Sett ings Data le and all Son g Data les and Patte rn
Data les in t he RD-8 Storage Mem ory will be res tored to their fac tory states . All stored songs,
patterns and settings will be permanently lost. Following the factory restore, the unit will shut
down. It wil l be necessary t o switch the unit o an d on again.
Message Content:
The mess age takes the follow ing form:
F0 00 20 32 30 <DD> 10 7F 30 00 00 0 0 <MJ> <MN> <PT> F7
An exampl e message is:
F0 00 20 32 30 00 10 7F 30 00 00 0 0 01 01 08 F7
Note: This ex ample message re quests that the R D-8 unit whose D evice ID is set to 1 should
restor e all settings to it s factory d efaults.
Page 12

22 RHY THM DESIGNER RD-8 User Manual 23 RHYTHM DESIGNER RD-8 User Manual
MIDI OUT
15. RD-8 Set-up Example
Connect a MIDI Device
Mono Audio Output
USB Out
USB In
Audio Input
BD Audio Output
Studio Monitors
Mixer
Trigger Output
Power
Adaptor
Headphones
Synthesizer
Trigger Input
Audio Output
Page 13

24 RHY THM DESIGNER RD-8 User Manual 25 RHYTHM DESIGNER RD-8 User Manual
16. Specications
Power
Adaptor
Studio Monitors
Audio Input
Mixer
Mono Output To Return Input
Audio
Output
Audio
Input
Individual Voice Output
Voices
Number of sounds 16
Type Analog
Number of simultaneous voices 11 (12 including global accent)
Sound Controls
Accent Level
Bass drum Level, tone, decay, tuning
Snare drum Level, tone, snappy
Low, mid, hi conga / Level, tuning, voice selection
low, mid, hi tom
Claves / rim shot Level, voice selection
Maracas / hand clap Level, oset, voice selection
Cow bell Level
Cymbal Level, tone, decay
Open hat Level, tone, decay
Closed hat Level, tone
Select buttons 16 Voice select buttons
Connectivity
Outputs
Phones 1 x ¼" TRS, stereo, 8 impedance
Mono 1 x ¼" TRS, servo-balanced
Voice out 11 x ¼" TS, unbalanced
MIDI In, Out & Thru 3 x 5-pin DIN
Trigger outs 3 x +5 V,1 ms pulse
Sync in / out 2 x ⁄" TS
USB Class compliant USB 2.0, type B
Supported operating systems Windows 7 or higher
Mac OS X 10.6.8 or higher
Volume controls Master, phones
Return (Input) 1 x ¼" TRS, balanced
Analog Filter
Type State variable, 12 dB slope
Cuto 10 Hz - 15 kHz, adjustable
Resonance 0 - 10, adjustable
HPF button LPF / HPF mode, switchable
On button On / o, switchable
Sync Section
Mode selector Internal / MIDI / USB / TRIG, selectable
Sequencer Section
Edit buttons Save, copy, erase and dump
Mode buttons Song, pattern and step
Control Encoder for data editing
Playback controls Tap / hold, record, stop, play / pause
Data mode Tempo / swing / prob / am, selectable
Auto scroll On / o, rewind, length (16 / 32 / 48 /
64, selectable), fast forward
Trigger On / o, repeat division (1 / 2 / 4 / 8,
selectable), step repeat, note repeat
Track Mute / solo, selectable
Step buttons 16 step enter buttons
Settings
Settings Enter settings mode, use step buttons
to select operation.
Autoll
Autoll Enter autoll selection mode
Songs / Storage
Song mode Chain any of the 16 songs together
for full sets
Wave Designer
Bus 11 voices, independently assignable
Controls
Attack -15 to +15 dB, adjustable
Sustain -24 to +24 dB, adjustable
Send button On/o, switchable
Sig LED Red
Pattern / Storage
Capacity 16 songs, 16 patterns each
Pattern mode Up to 99 iterations per pattern/par t
Steps 64 steps
Power Supply
External power adapter 18 V DC, 1000 mA
Power consumption 15 W typical
Environmental
Operating temperature range 5°C to 40°C (41°F to 104°F)
Physical
Dimensions (H x W x D) 77 x 498 x 265 mm (3.0 x 19.6 x 10.4")
Weight 3.0 kg (6.6 lbs)
Page 14

26 RHY THM DESIGNER RD-8 User Manual 27 RHYTHM DESIGNER RD-8 User Manual
17. Glossary
RD-8 GLOSSARY
This glossary provides an explanation of useful symbols, terms and abbreviations.
AC: Alternating Current
Analog: Something which is proportional or similar to something else. In
the case of the drum machine, audio electronic circuits are another form of
air pressure waves. Analog signals contain distortions from the components,
topology, circuits and designs which are often perceived as warmer and more
natural than their digitally generated counterparts.
Attack: Increase or decrease the initial transient of the signal.
Auto Scroll: Follows the Playhead to show current step position.
Balanced Audio: A type of audio connection that uses the three wires in a cable
as part of a phase-cancelling arrangement to boost the signal and reduce noise.
Bass: Lower frequencies in a signal ranging from 60 Hz to 250 Hz (Approximately
B1 to B3).
Beats Per Minute (BPM): Used to describe the tempo of a composition by
specifying the number of beats which should occur in every minute.
Cent: Unit of measurement for pitch tuning. There are one hundred cents in a
semitone.
Chain: A function to link songs or pattern information together.
Control Voltage (CV): A voltage signal used to control any parameter. This was
common on drum machines before the advent of MIDI.
Cut-O Frequency: The frequency which a lter is set to. Beyond this frequency
(in a low-pass lter, the most common), the sound is cut o (attenuated) at a rate
set by the slope of the lter response curve.
dB: Symbol for “decibel”. A unit of measurement of the loudness of sound. See
dBu.
Default: An initial value for parameter, i.e., the value before any changes have
been made.
Digital Audio Workstation (DAW): A computer-based recording system. More
commonly used to describe the software package used to record, process and
mix.
Dip Switch: A manual electric switch that is packaged with others in a group.
Dump: To send (dump) the contents of the memory of the device over the MIDI
cables as "SysEx" information.
Flam: The simulated eect of a drummer hitting a note with 2 sticks. The
amount of am dictates the length of time between the next hit af ter the rst.
Filter: A device that attenuates certain frequencies while letting other
frequencies through. Using a lter to reduce harmonics, changes the timbre or
colour of the sound.
Gain: The amount of signal level increase provided by an amplier stage.
Gate (Synthesizer): A signal used to trigger an event, such as a note or an
envelope.
Gate (Dynamics): A device used to cut o the level of a signal when it falls
below a specied threshold. Can be used to cut background noise, control reverb
tails, or creatively to produce chopping type eects.
Global: The settings and parameters which govern the general operation of the
drum machine and are not directly associated with the voice engines.
Harmonics: A series of integer-related sine waves at var ying levels creating
dierent timbres. Waveforms (other than a pure sinusoidal) generate various
harmonics which help dene the character of the sound.
Hertz (Hz): A unit of frequency equal to one cycle of a wave per second.
High Pass Filter (HPF): A lter that attenuates lower frequencies from a signal,
leaving the higher frequencies unaected.
Hum: Undesirable low-frequency tone (typically 50 or 60 Hz) present in a signal
due to grounding problems or proximity to a power source or power cables.
Impedance (Z): Opposition to the ow of alternating current in a circuit,
measured in Ohms.
Kilohertz (kHz): A unit of frequency equal to one thousand cycles of a wave per
second.
Latency: A delay introduced by processing. Measured by the time it takes to
produce a signal after a request has been made. In a synthesizer, it is the time
taken to produce a note after a key has been played. In an audio interface, it is
used to measure the time it takes for an input signal to reach the processor, or for
a signal from the processor to reach the output.
Level: Used to describe the magnitude of a sound, often relative to an arbitrary
reference.
Length: Denes the number of steps in a pattern.
Line Level: A nominal operating level used by audio equipment. Professional
line level is normally +4 dBu and consumer line level is -10 dBu.
Looping: Automatically restarting a function at the end of a period of time or
dened cycle, to create a continuous loop.
Low Pass Filter (LPF): A lter that attenuates higher frequencies from a signal,
leaving the lower frequencies unaected.
Map: How MIDI note numbers are assigned to voices.
Master: Overall volume control.
Meter: Visual device to indicate the level of a signal.
MIDI (Musical Instrument Digital Interface): A technical standard that
describes a protocol, digital interface and connectors and allows a wide variety of
electronic musical instruments, computers and other related hardware/software
devices to connect and communicate.
MIDI Clock: A clock signal which is broadcast over MIDI to ensure that devices are
synchronized. Also known as MIDI Beat Clock or MIDI Timing Clock.
MIDI Message: Data or information transmitted from one MIDI device to
another. Each MIDI message contains at least two numbers: one that identies
the type of message being sent, and another which represents a value for the
selected type of message.
Midrange: Frequencies in a signal ranging from 250 Hz to 5 kHz (Approximately
B3 to D#8).
Mix: The balance of level between one signal and another.
Mixer: A device that blends input signals into composite signals for output.
Mode: The selection of song, pattern or step edit.
Monitors: Studio quality loudspeakers, providing an accurate representation of
the audio signals.
Mono: A single signal.
Mute: Function that allows a signal to be silenced.
N/A: Abbreviation for "not applicable" or "not available".
Output: The signal sent out by a device or process. Also used to describe the
physical socket where a signal leaves a device.
Parameter: A setting whose value can be changed. The result is a sweeping
eect similar to a anger but smoother and often more natural sounding.
Pattern: A rhythmic pattern, or repeated rhythm establishing the meter and
groove through the pulse and subdivision
Pitch: A quality of sound that makes it possible to judge if a sound is higher or
lower than another.
Playhead: A moving white LED in the step timeline that represents the position
in the pattern.
Polymeter (Poly): The simultaneous use of two or more conicting rhythms.
Post: The point for accessing audio just after it leaves a specic component or
stage. For example, Post-Fader audio is aec ted by the fader.
Power Supply Unit (PSU): The component in a system which is responsible for
supplying and managing power.
PPQ: The smallest unit of time used for sequencing note and automation events,
both by step sequencers and in the MIDI standard.
Pre: The point for accessing audio just before it reaches a specic component or
stage. For example, Pre-Fader audio is not aected by the fader.
Probability (Prob): The extent to which a programmed step is likely to happen.
Random: Does not follow a denite plan or pattern.
Resonance: The emphasis/boost of frequencies around the cut-o point just
before attenuation starts to occur. As resonance increases, it will reach a point
where the lter will star t to self-oscillate, producing a signal even when there is
no input.
Return: A way to add audio into the signal path af ter the FX bus.
Send: Select which sounds are sent to the FX bus for further processing.
Sequencer: A programmable device or module used to arrange/sequence timed
events into musical patterns and songs.
Sig (Signal): Shows presence of audio.
Step: A step is one stage in a sequence or pattern.
Solo: To isolate a chosen voice in playback.
Song: A collection of patterns played back in a predened order.
Sub-Bass: Frequencies in a signal ranging from 10 Hz to 60 Hz (lower than C0 to
approximately B1).
Sustain: acts in a similar way to a compressor, allowing the peaks to carry
longer before decay. The eect can also be used to reduce the sustain for a more
staccato sound.
Swing: The Swing function as we now know it – originally known as ‘shue’, a
term still used to approximate the eect of a human drummer playing in swing
timing by quantizing each drum beat to the nearest step and then delaying the
playback of every other step in the pattern.
Synchronization (Sync): Coordination of timing between devices.
Sync (Tempo): A function where a cyclical event such as an LFO is synchronized
to a tempo value.
Tap: A way to enter step information.
Tempo: The speed at which a composition is played, usually expressed in beats
per minute (BPM).
Timbre: The tone, character, or aesthetic qualities of a sound.
Treble: Frequencies in a signal ranging from 5 kHz to 20 kHz (approximately D#8
to above C10).
Trigger: Activation of a function, such as the Note Repeat or Step Repeat.
Unbalanced Audio: A type of audio connection that uses two wires in a cable
and does not oer the noise rejection qualities of a balanced system.
Universal Serial Bus (USB): A "plug and play" interface that provides a fast
connection between a computer and peripherals.
Volt (V): A unit of electrical potential dierential or electromotive force. A
dierence in charge between two points in a circuit. This dierence, when
combined with the rate of the charge (current) allows for the control of many
analog circuits that “synthesize” sound.
Voice: A sound which can play a single note at a time.
Ohm (Ω): Unit of electrical resistance.
Page 15

28 RHY THM DESIGNER RD-8 User Manual 29 RHYTHM DESIGNER RD-8 User Manual
FEDERAL COMMUNICATIONS
COMMISSION COMPLIANCE
INFORMATION
RHYTHM DESIGNER RD-8
Responsible Party Name: Music Tribe Commercial NV Inc.
Address: 5270 Procyon Street
Las Vegas, NV 89118
USA
Phone Number: +1 702 800 8290
RHYTHM DESIGNER RD-8
complies with the FCC rules as mentioned in the followingparagraph:
This equipment has been tested and found to comply with the limits for a ClassB
digital device, pur suant to part 15 of the FCC Rules. These limits are designed
to provide reasonable protection against harmful interference in a residential
installation. This equipment generates, uses and can radiate radio frequency
energy and, if not installed and used in accordance with the instructions, may cause
harmful interference to radio communications. However, there is no guarantee that
interference will not occur in a par ticular installation. If this equipment does cause
harmful interference to radio or television reception, which can be determined
by turning the equipment o and on, the user is encouraged to try to correct the
interference by one or more of the following measures:
• Reorient or relocate the receiving antenna.
• Increase the separation between the equipment and receiver.
• Connect the equipment into an outlet on a circuit dierent from that to which the
receiver is connected.
• Consult the dealer or an experienced radio/TV technician for help.
This equipment complies with Part 15 of the FCC Rules. Operation is subject to the
following two conditions:
(1) This device may not cause harmful interference, and
(2) This device must accept any inter ference received, including inter ference that may
cause undesired operation.
Caution!
Any changes or modifications not expressly approved by the party responsible
for compliance could void the user's authorit y to operate the equipment.
Page 16

We Hear You
 Loading...