

Page 1
Deutsch Français Italiano Español Português NederlandsEnglish
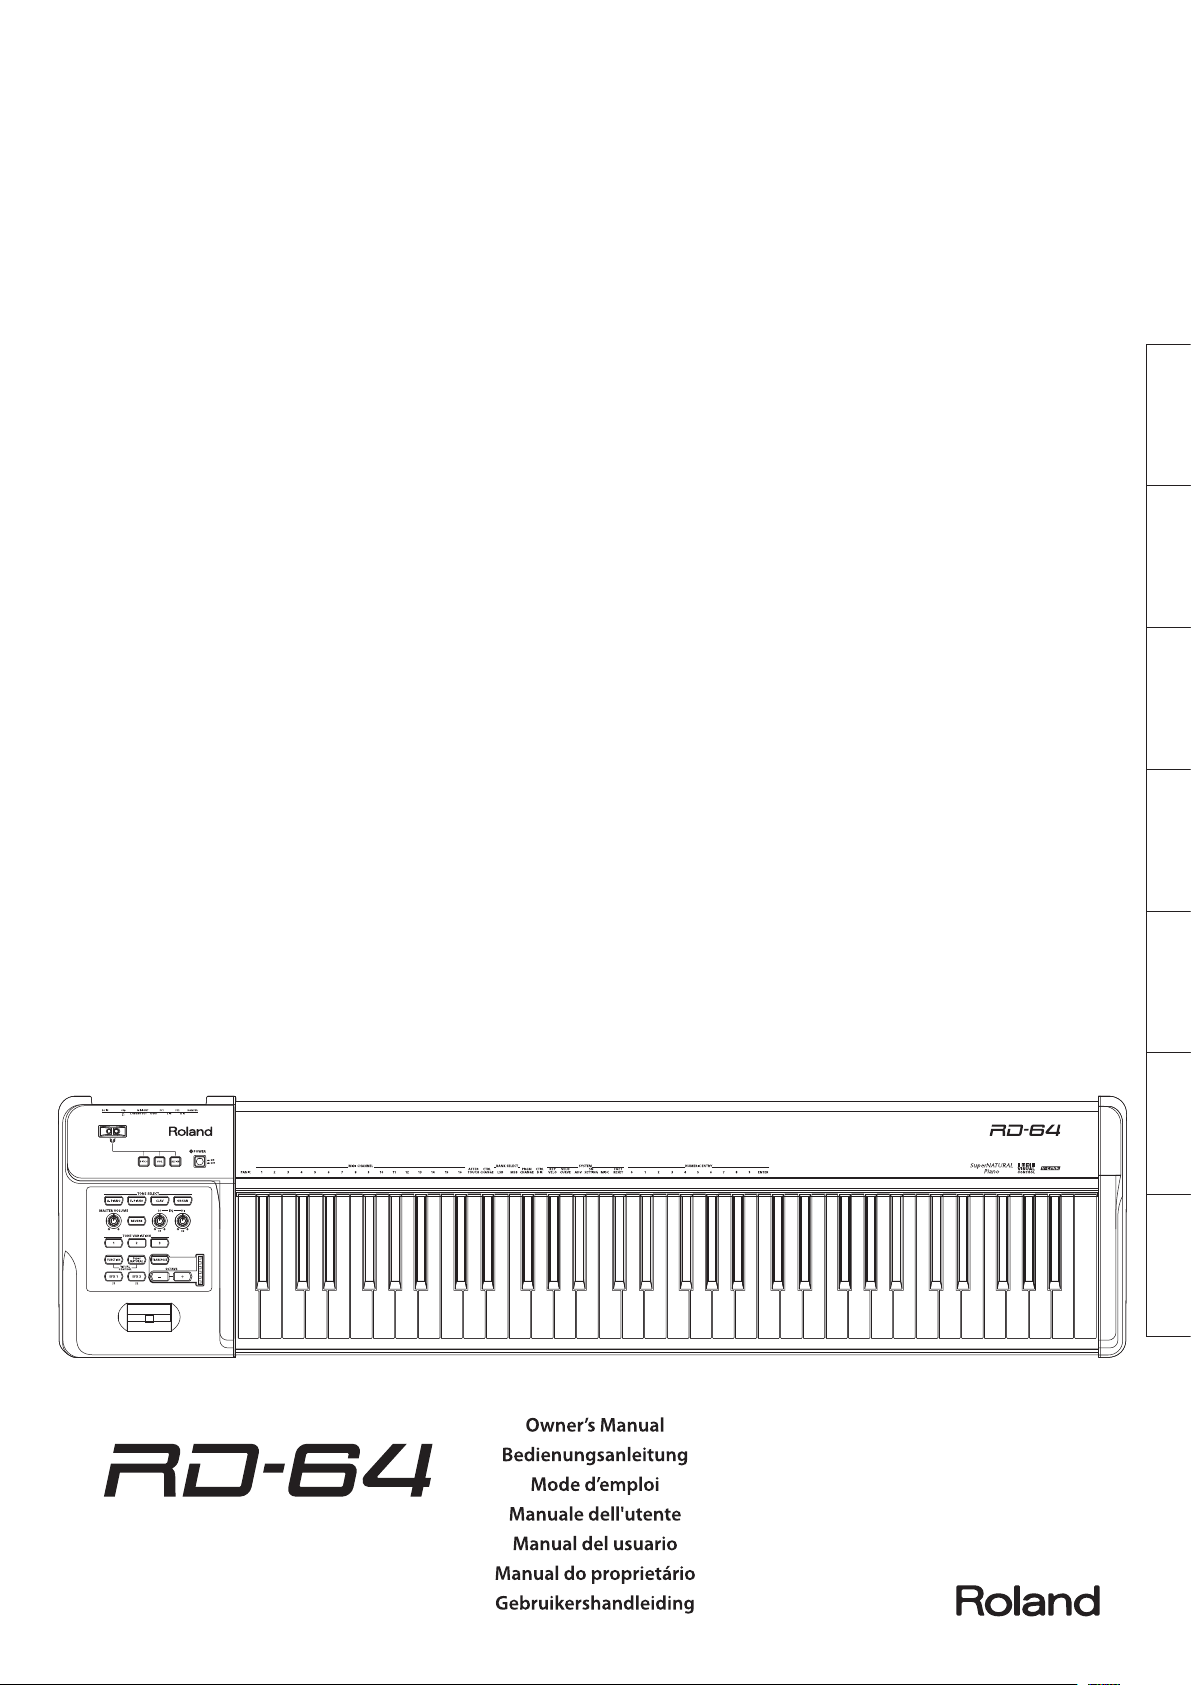
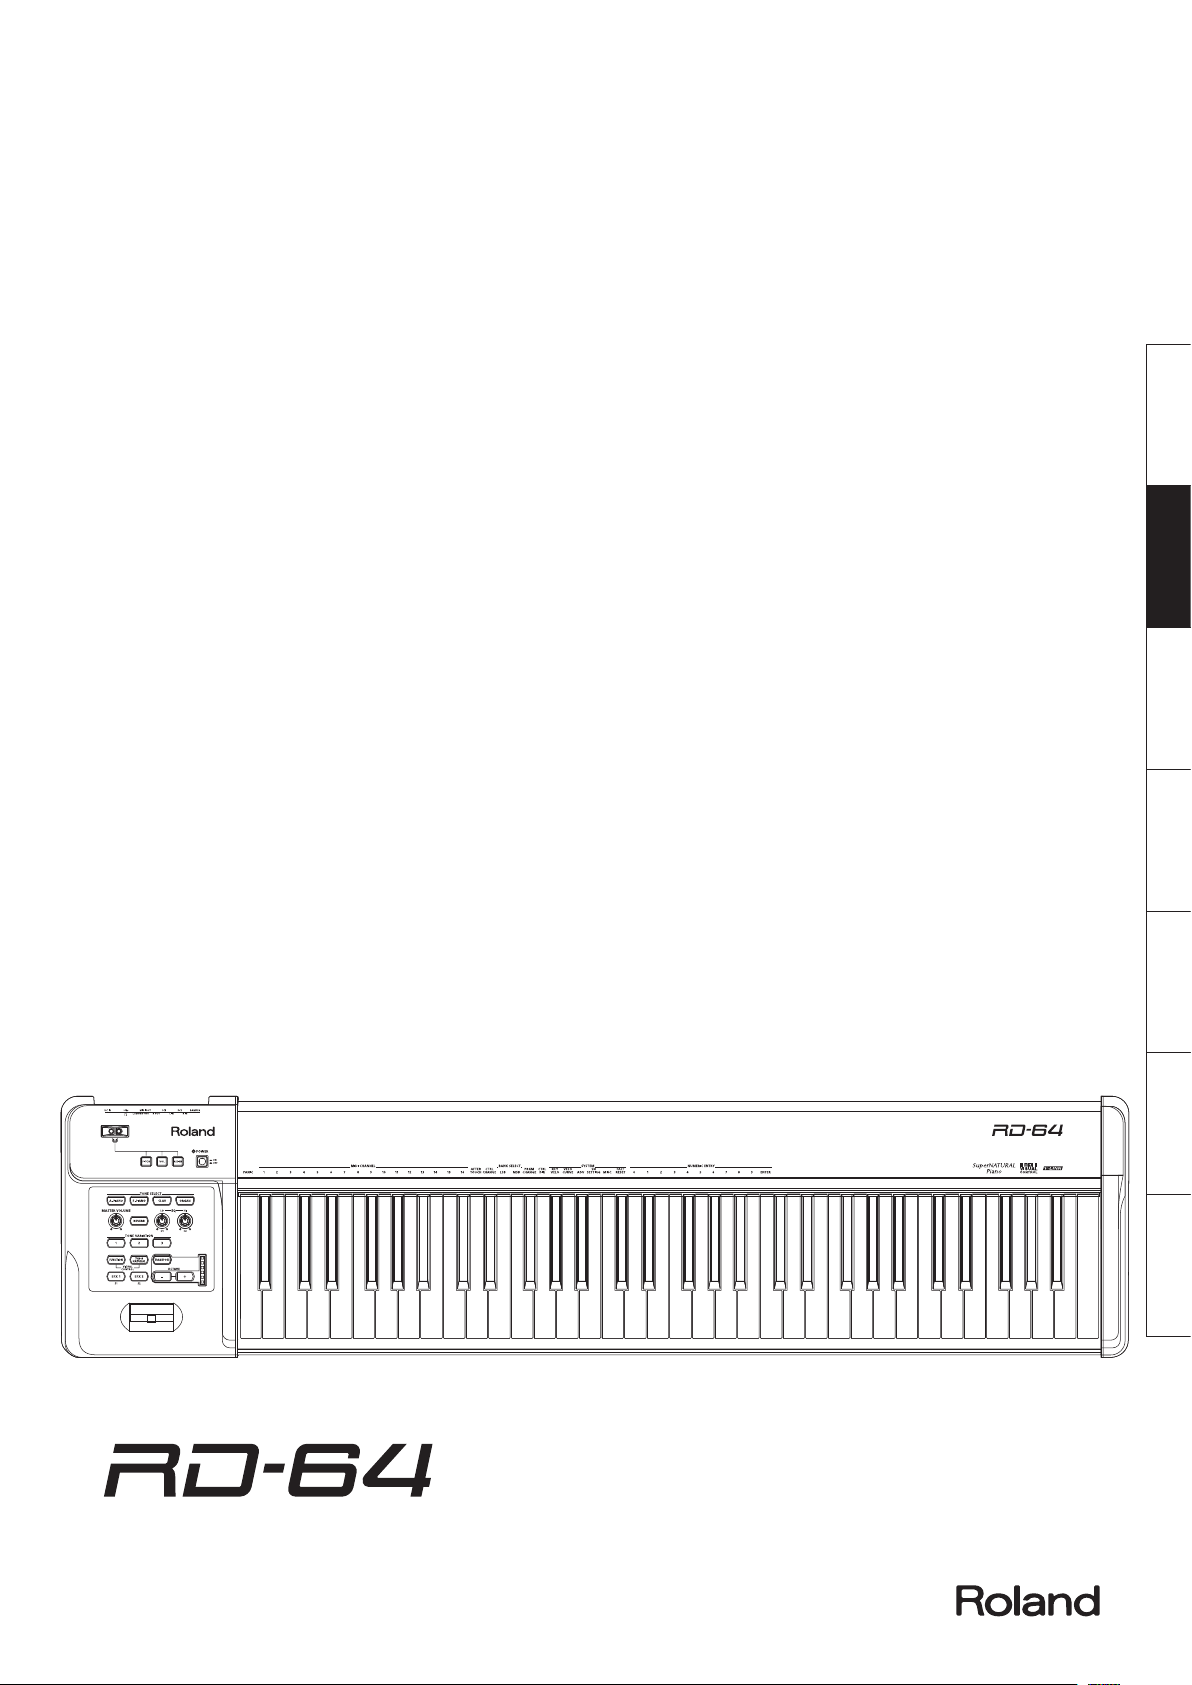
Digital Piano
Page 2

Page 3

Deutsch Français Italiano Español Português NederlandsEnglish
Digital Piano
Owner’s Manual
Page 4
The RD-64’s Two Modes
Using the RD-64 as a Piano (Piano Mode)
The RD-64 inherits the SuperNATURAL Piano sounds from the immensely popular RD series of stage pianos. Carefully
selected acoustic and electric sounds are built-in, allowing richly expressive performances. Also featured is the RD
series’ acclaimed ivory-feel keyboard. With an expressive key action and excellent response to rapidly repeated strikes,
the RD-64 is nonetheless lightweight and compact.
The RD-64 is highly portable, and can easily be carried to the studio or your performance venue.
Using the RD-64 in Piano mode
When you turn on the power, the RD-64 will start up in Piano mode.
About the owner’s manual
Read this document.
Using the RD-64 as a MIDI Controller Keyboard (Controller Mode)
If you hold down the [A. PIANO] button while turning the power on, the RD-64 will operate as a MIDI controller keyboard
with the same functionality*1 as the A-88. Connect it to your computer using a commercially available USB cable, and use it
with your DAW software for music production.
* In Controller mode, no sound is produced from the RD-64’s internal sound generator. Also, nothing will happen when
you press the [TONE SELECT], [TONE VARIATION], or [REVERB] buttons.
Using the RD-64 in Controller mode
Hold down the [A. PIANO] button and turn on the power; the RD-64 will start up in Controller mode.
About the owner’s manual
For details on using the RD-64 as a MIDI controller keyboard, refer to the PDF manual for the A-88.
To obtain the PDF manual
Enter the following URL in your computer.
1.
http://www.roland.com/manuals/
2. Choose “A-88” as the product name.
*1
Dierences between the RD-64’s Controller mode and the A-88
The RD-64’s Controller mode diers from the A-88 in the following ways. When reading the A-88 Owner’s Manual (PDF manual), please be
aware of the following points.
• Since the RD-64 uses the USB driver provided by the computer (GENERIC), you don’t need to install the USB driver (the chapter
“Installing the Driver” in the A-88 Owner’s Manual). Simply connect it to your computer using a commercially available USB cable, and
it’s ready to use. “Roland Digital Piano” will be displayed for the MIDI port name.
• The RD-64 does not have the A-88’s “UPPER,” “LOWER,” “DUAL” and “SPLIT” functionality (the chapter “Layering Two Parts” in the A-88
Owner’s Manual).
Before using this unit, carefully read the sections entitled: “USING THE UNIT SAFELY” (p. 10) and “IMPORTANT NOTES” (p. 12). These sections provide important information
concerning the proper operation of the unit. Additionally, in order to feel assured that you have gained a good grasp of every feature provided by your new unit, Owner’s
manual should be read in its entirety. The manual should be saved and kept on hand as a convenient reference.
2
Page 5
Contents
The RD-64’s Two Modes . . . . . . . . . . . . . . . . . . . . . . . . . . . . . . . . . . . . . . . . . . . . . . . . . . . . . . . . . . . . .2
Using the RD-64 as a Piano (Piano Mode) . . . . . . . . . . . . . . . . . . . . . . . . . . . . . . . . . . . . . . . . . . . . .2
Using the RD-64 as a MIDI Controller Keyboard (Controller Mode) . . . . . . . . . . . . . . . . . . . . .2
Placing the RD-64 on a Stand . . . . . . . . . . . . . . . . . . . . . . . . . . . . . . . . . . . . . . . . . . . . . . . . . . . . . . . .3
Panel Descriptions . . . . . . . . . . . . . . . . . . . . . . . . . . . . . . . . . . . . . . . . . . . . . . . . . . . . . . . . . . . . . . . . . .4
Connecting . . . . . . . . . . . . . . . . . . . . . . . . . . . . . . . . . . . . . . . . . . . . . . . . . . . . . . . . . . . . . . . . . . . . . . . . .6
Changing Settings (FUNCTION Mode) . . . . . . . . . . . . . . . . . . . . . . . . . . . . . . . . . . . . . . . . . . . . . . . .7
Restoring the Factory Settings (FACT RESET) . . . . . . . . . . . . . . . . . . . . . . . . . . . . . . . . . . . . . . . . .7
Changing the Key Touch (VELO CURVE) . . . . . . . . . . . . . . . . . . . . . . . . . . . . . . . . . . . . . . . . . . . . . .7
Specifying the Keyboard Velocity Value (KEY VELO) . . . . . . . . . . . . . . . . . . . . . . . . . . . . . . . . . . .7
Tuning to Other Instruments’ Pitches (Master Tune) . . . . . . . . . . . . . . . . . . . . . . . . . . . . . . . . . . .8
Making the Power Automatically Turn O After a Time (Auto O) . . . . . . . . . . . . . . . . . . . . . 8
Selecting the Dedicated Driver (ADVANCED) or the GENERIC Driver . . . . . . . . . . . . . . . . . . .8
Troubleshooting . . . . . . . . . . . . . . . . . . . . . . . . . . . . . . . . . . . . . . . . . . . . . . . . . . . . . . . . . . . . . . . . . . . .9
USING THE UNIT SAFELY . . . . . . . . . . . . . . . . . . . . . . . . . . . . . . . . . . . . . . . . . . . . . . . . . . . . . . . . . . . 10
IMPORTANT NOTES . . . . . . . . . . . . . . . . . . . . . . . . . . . . . . . . . . . . . . . . . . . . . . . . . . . . . . . . . . . . . . . 12
About the Ivory Feel Keyboard. . . . . . . . . . . . . . . . . . . . . . . . . . . . . . . . . . . . . . . . . . . . . . . . . . . . . 13
Controlling an External MIDI Sound Module in Piano Mode . . . . . . . . . . . . . . . . . . . . . . . . . 13
Eect List . . . . . . . . . . . . . . . . . . . . . . . . . . . . . . . . . . . . . . . . . . . . . . . . . . . . . . . . . . . . . . . . . . . . . . . . . 13
Main Specications . . . . . . . . . . . . . . . . . . . . . . . . . . . . . . . . . . . . . . . . . . . . . . . . . . . . . . . . . . . . . . . 14
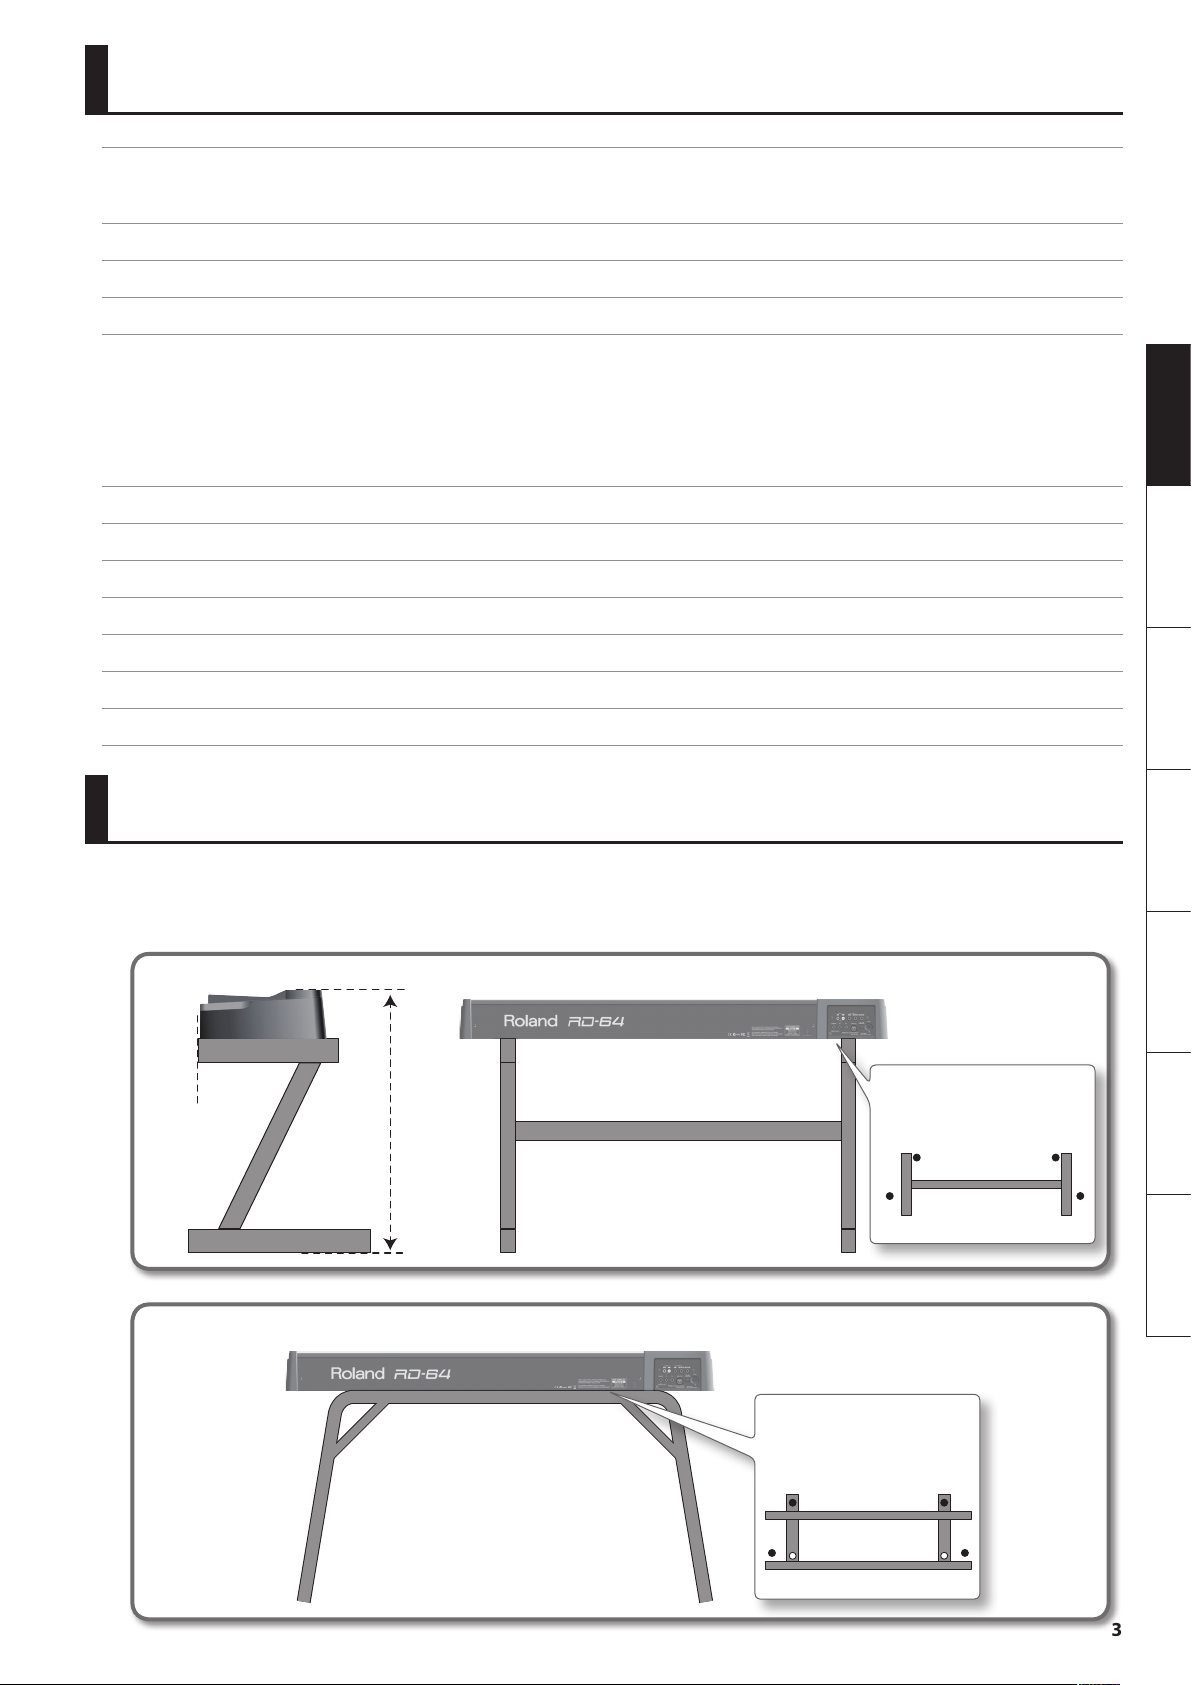
Placing the RD-64 on a Stand
If you want to place the RD-64 on a stand, use the Roland KS-18Z or KS-12.
Place the instrument on the stand as follows.
Be careful not to pinch your ngers when setting up the stand.
KS-18Z
Deutsch Français Italiano Español Português NederlandsEnglish
Align the front of the
RD-64 with the front
of the stand.
KS-12
Adjust so that
the height does
not exceed 1
meter (Adjust
the stand to a
level no higher
than the fourth
level from the
bottom).
Adjust the width of the stand so
that the rubber feet of the RD-64
straddle the stand.
Top view
Adjust the width of the stand
so that the rubber feet on the
keyboard side of the bottom of
the keyboard t into the holes
provided for the rubber feet.
Top view
3
Page 6
Panel Descriptions
[POWER] switch
Turning the power on
* Once everything is properly connected (p. 6), be sure to follow the procedure below to turn
on their power. If you turn on equipment in the wrong order, you risk causing malfunction or
equipment failure.
* This unit is equipped with a protection circuit. A brief interval (a few seconds) after turning the
unit on is required before it will operate normally.
* Before turning the unit on/o, always be sure to turn the volume down. Even with the volume
turned down, you might hear some sound when switching the unit on/o. However, this is
normal and does not indicate a malfunction.
1. Use the [MASTER VOLUME] knob to minimize the volume.
Also completely turn down the volume of any connected audio
device and other equipment.
2. Turn on the [POWER] switch.
3. Turn on the power to connected external devices.
4. Adjust the volume of the RD-64 and connected external devices.
[MASTER VOLUME] knob
Adjusting the volume
Turn the knob right to increase the volume, or left to lower it.
[TONE SELECT], [TONE VARIATION] button
Selecting tones
1.
Press the [TONE SELECT] buttons to select the tone group.
Turning o the power
Use the [MASTER VOLUME] knob to minimize the volume.
1.
2. Turn o the power to connected external devices.
3. Turn o the [POWER] switch.
* With the factory settings, the RD-64 will automatically be switched o
four hours after you stop playing or operating the unit.
If you don’t want the unit to turn o automatically, change the “AUTO OFF”
setting to “OFF” as described on p. 8.
2. Press the [TONE VARIATION] buttons to select a variation.
Group Variation 1 Variation 2 Variation 3
A. PIANO CONCERT GRAND BRIGHT PIANO CONCERT MONO
E. PIANO PURE VINTAGE TINE EP WURLY
CLAV COMBINATION MEDIUM BRILLIANT
ORGAN JAZZ ORGAN ROCK ORGAN FULL DRAW
[FUNCTION] button
Changing settings
Use this button when you want to adjust the keyboard touch, or to make pedal
assignments. For details, refer to “Changing Settings (FUNCTION Mode)” (p. 7).
[SuperNATURAL] button
In Piano mode this will remain lit, and pressing it will not do anything.
This button is used only when you’ve connected a “SuperNATURAL compatible sound
module” in Controller mode. For details, refer to “Using the RD-64 as a MIDI Controller
Keyboard (Controller Mode)” (p. 2)
[Pitch Bend/Modulation] lever
Changing the pitch of a sounding note (Pitch Bend)
Moving the lever toward the left while you play will lower the pitch, and moving it toward the right will raise the pitch. This
eect is called “pitch bend.”
Applying modulation to a sounding note (Modulation)
Moving the lever away from yourself will apply vibrato. This eect is called “modulation.”
* The eect obtained when you move the lever may dier according to the tone being used. Additionally, the eect applied by moving the lever
is predetermined for each tone, and cannot be changed.
4
Pitch bend eect
Modulation eect
Page 7
Panel Descriptions
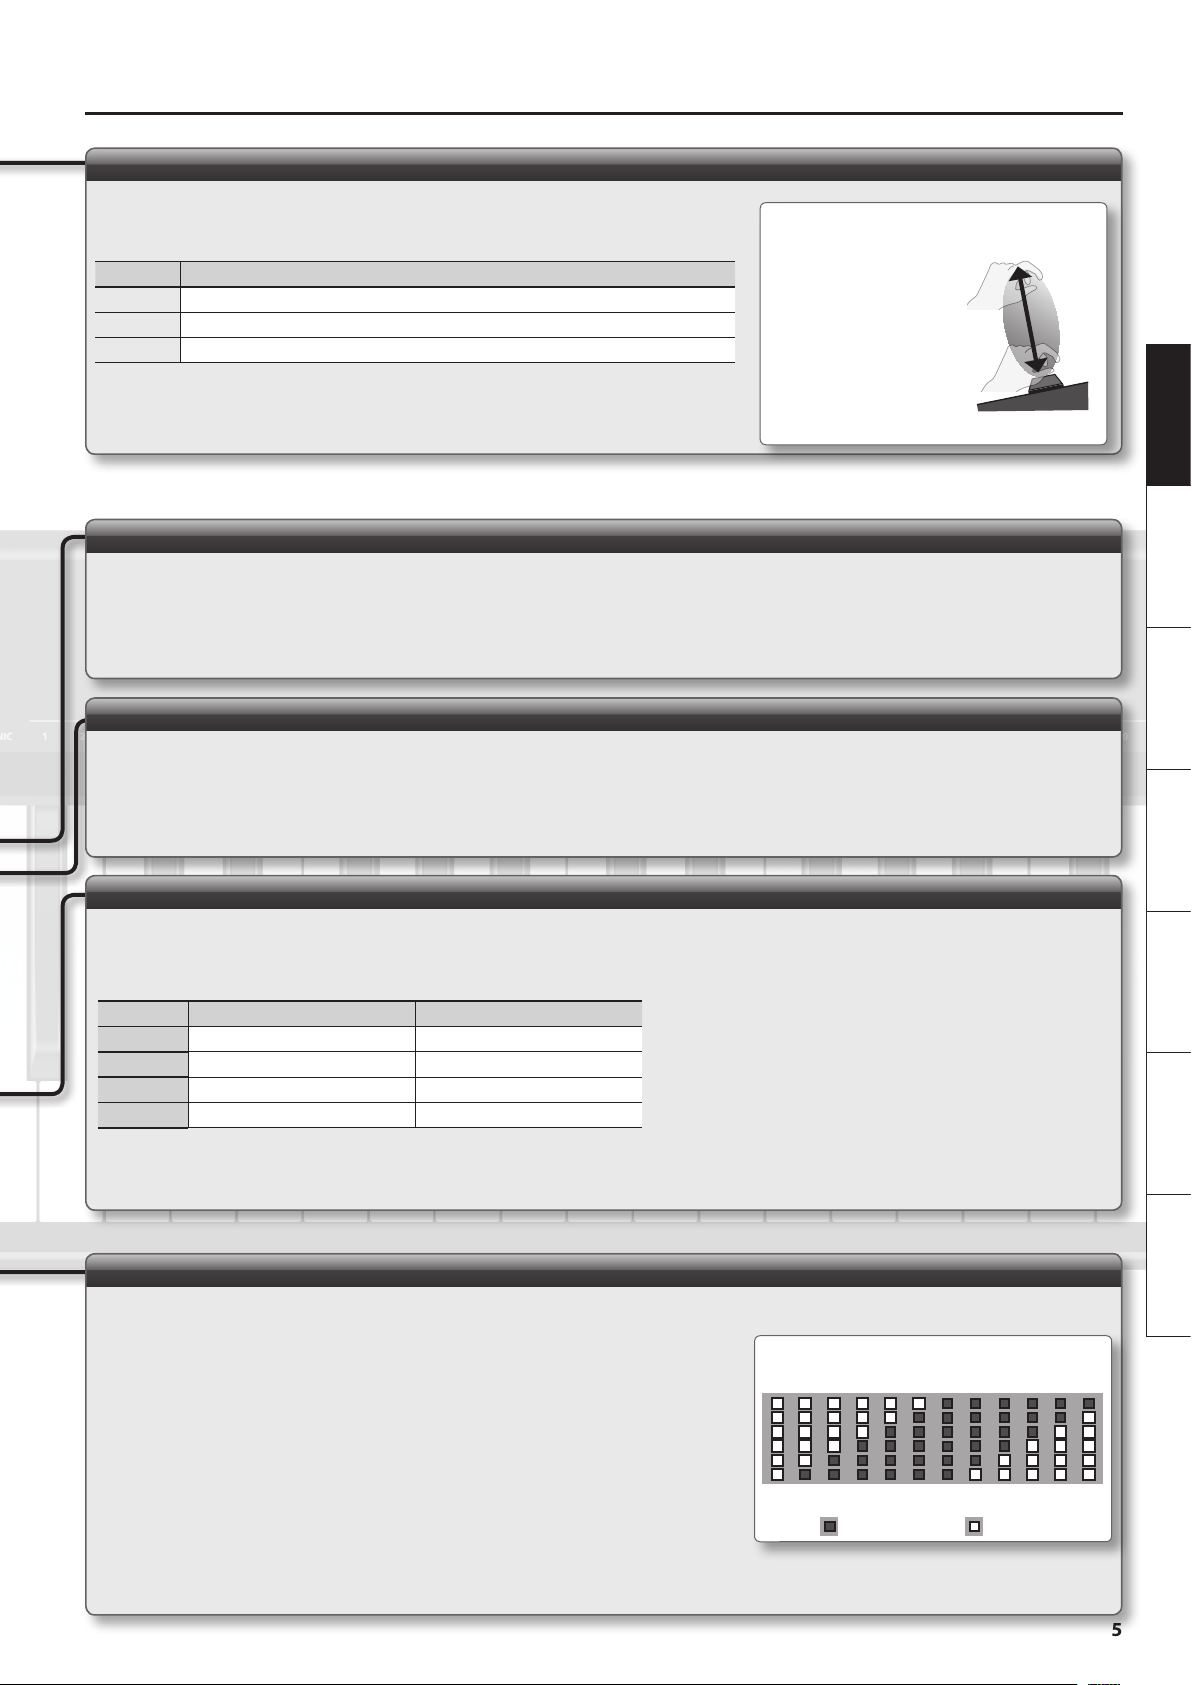
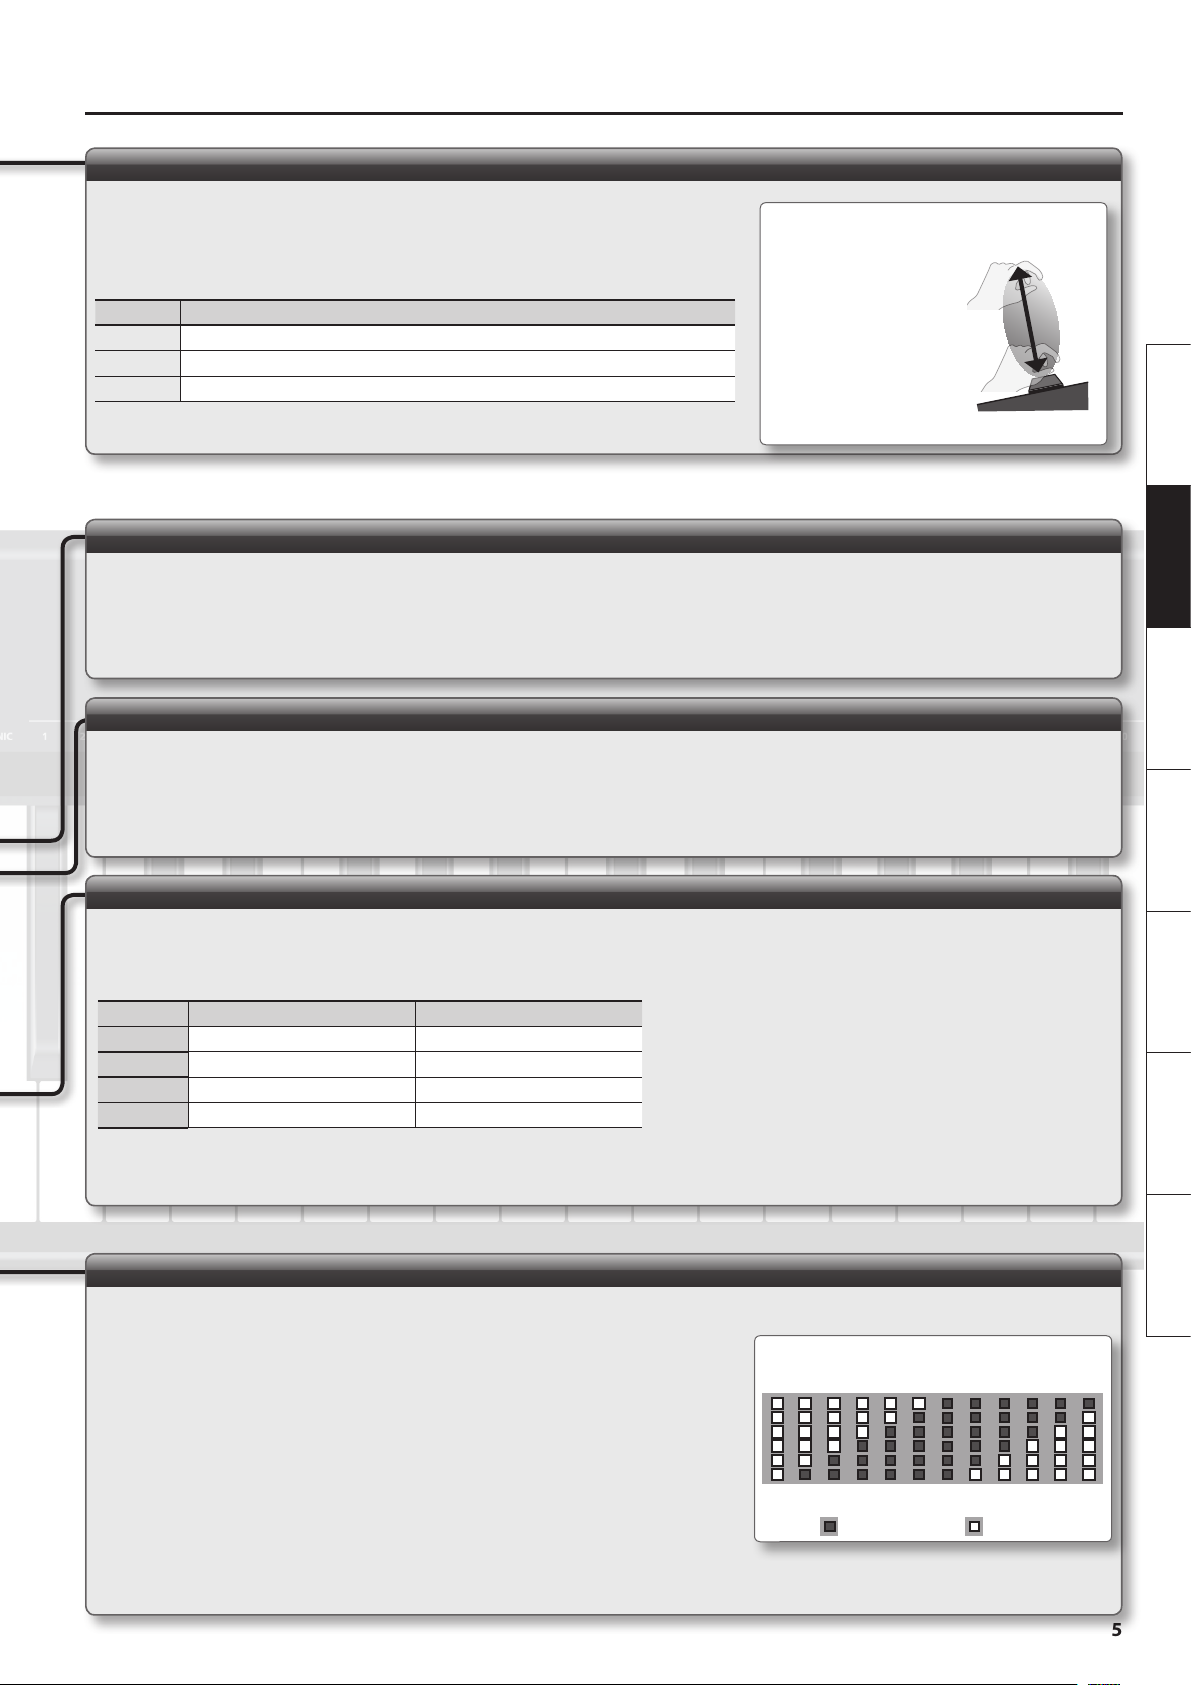
D-BEAM controller
Moving your hand to apply various eects to the sound
To turn on the D-BEAM controller, press the button so it’s lit.
Button Function
[PITCH] The pitch will change as you move your hand above the D-BEAM controller.
[VOL] The volume will change, allowing you to add expression to your performance.
[ASSIGN] The aftertouch eect will be applied.
Eective range of the D-BEAM
controller
This illustration shows the
eective range of the D-BEAM
controller. No eect will be
obtained if you position your
hand outside the eective
range.
* The eective range of the
D-BEAM controller will
change depending on the lighting conditions.
[REVERB] button
Adding reverberation to the sound (Reverb)
By pressing the [REVERB] button so it’s lit, you can apply a reverb eect (reverberation) to the sound you’re playing from the keyboard.
Applying the reverb eect will produce the spacious ambience that is typically heard when performing in a concert hall.
* You cannot adjust the amount of the reverb eect.
Deutsch Français Italiano Español Português NederlandsEnglish
EQ [LOW], [HIGH] knob
Adjusting the upper and lower ranges (Equalizer)
The RD-64 is equipped with a two-band equalizer.
You can adjust the level of the low-frequency range and high-frequency range for each tone.
* The equalizer settings are stored (Hold down the [SuperNATURAL] button, and press [A. PIANO] and [ORGAN] buttons simultaneously to store all 12 tones).
[EFX 1], [EFX 2] button
Applying eects to the sound
By pressing the [EFX 1] or [EFX 2] button so it’s lit, you can apply an eect to the sound you’re playing from the keyboard.
The following eects are applied for each tone group.
Group EFX 1 EFX 2
A. PIANO ENHANCER DAMPER RESONANCE
E. PIANO TREMOLO PHASER
CLAV AUTO WAH OVERDRIVE
ORGAN ROTARY SPEED
For details of each eects, refer to “Eect List” (p. 13)
* The on/o statuses of [EFX 1] and [EFX 2] are stored (Hold down the [SuperNATURAL] button, and press [A. PIANO] and [ORGAN] buttons simultaneously to store all 12
tones).
OCTAVE [−], [+], [TRANSPOSE] button
Changing the octave (Octave Shift)
You can raise or lower the pitch range of the keyboard (Octave Shift) by using the [+] [–] buttons.
• You can change this setting in the range of -4 to 5 octaves.
• If you press the [+] button and [–] button simultaneously, this setting will be reset to 0.
Indicator and the setting it shows
Changing the pitch (Transpose)
You can transpose the pitch in semitone step by using the [+] [–] buttons while holding down the
[TRANSPOSE] button.
• You can change this setting in the range of -6 to 5.
• When the [TRANSPOSE] button is turned on, the transposition setting is enabled. When the [TRANSPOSE]
button is turned o, the transposition setting is disabled.
• If you press the [TRANSPOSE] button, the [+] button, and the [–] button simultaneously, this setting will be
reset to 0.
-6
-5 -4 -3 -2 -1 0 1 2 3 4 5
Unlit Lit
5
Page 8

Connecting
INPUT jacks
If you connect a audio player or
similar device, the sound of the
connected device will be outputted
from the OUTPUT and PHONES
jacks.
* Use the controls of the connected
device (audio player) to adjust
the volume.
OUTPUT jacks
If you connect these jacks to amplied speakers, the
sound of this unit will be heard through them.
PHONES jack
Connect headphones (sold separately)
here.
DC IN jack
Connect the included AC adaptor here.
Place the AC adaptor so the side with the
indicator faces upwards and the side with
textual information faces downwards. The
indicator will light when you plug the AC
adaptor into an AC outlet.
To AC Outlet
Included Damper
Pedal
Set the switch on the included damper pedal to “Continuous”
when the pedal is connected.
or Pedal Switch (sold separately; DP Series)
or
Pedal Unit
(sold separately;
RPU-3)
Pedal (DAMPER, FC2, FC1) jacks
Connecting the included pedal to the DAMPER jack, the pedal can be used as a
damper pedal.
The pedals connected to the pedal jacks will operate as follows (with the factory
settings).
Jack Explanation
Use this pedal to sustain the sound. While this
DAMPER Damper Pedal
FC2 Sostenuto Pedal
FC1 Soft Pedal This pedal is used to make the sound softer.
pedal is held down, notes will be sustained
for an extended time even if you release your
ngers from the keyboard.
This pedal sustains only the notes of the keys
that were already pressed when you pressed
the pedal.
Power Cord
USB COMPUTER port
If the RD-64 is connected to your
computer using a commercially available
USB cable, you can use MIDI-compatible
software to record and play back the
RD-64’s performance (MIDI data).
* USB audio is not supported.
MIDI OUT connector
You can connect a MIDI sound module and play it.
NOTE
* To prevent malfunction and equipment failure, always turn down the
volume, and turn o all the units before making any connections.
* Use only the specied expression pedal (EV-5, EV-7; sold separately).
By connecting any other expression pedals, you risk causing
malfunction and/or damage to the unit (Only controller mode).
6
Page 9
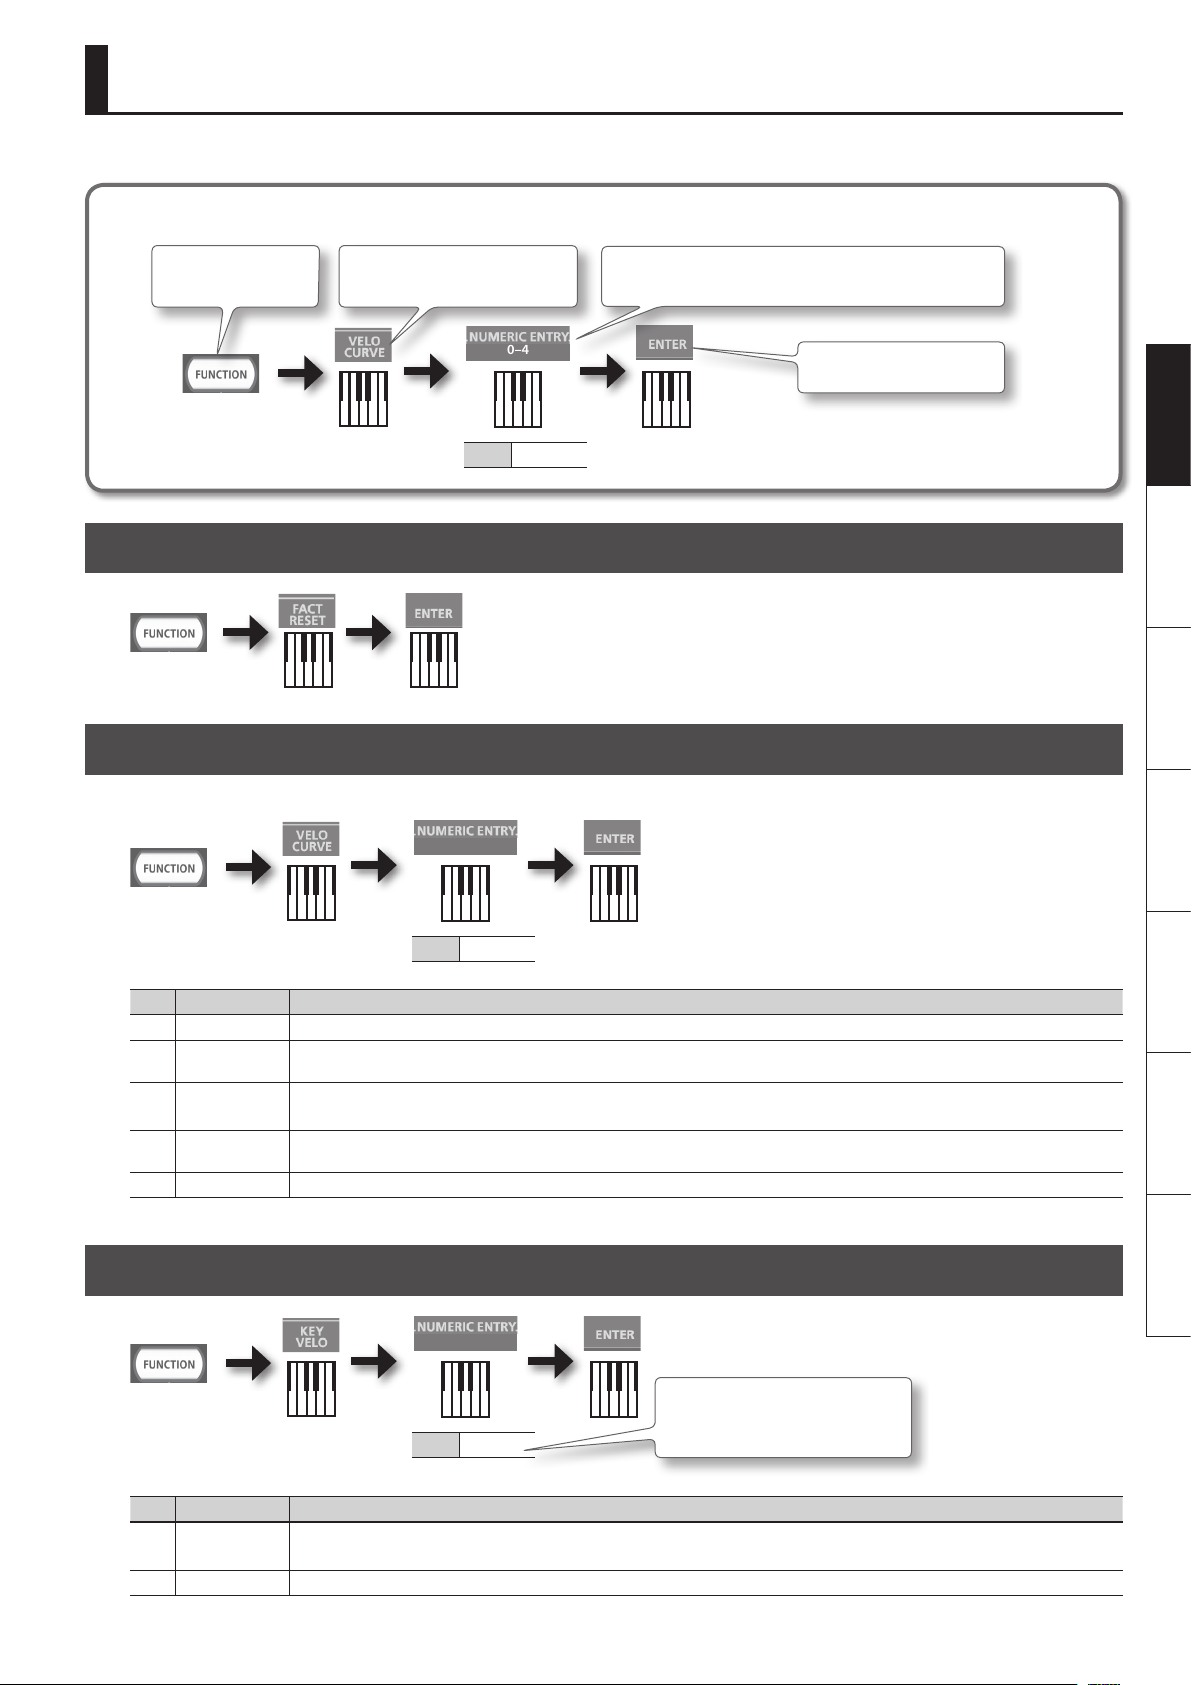
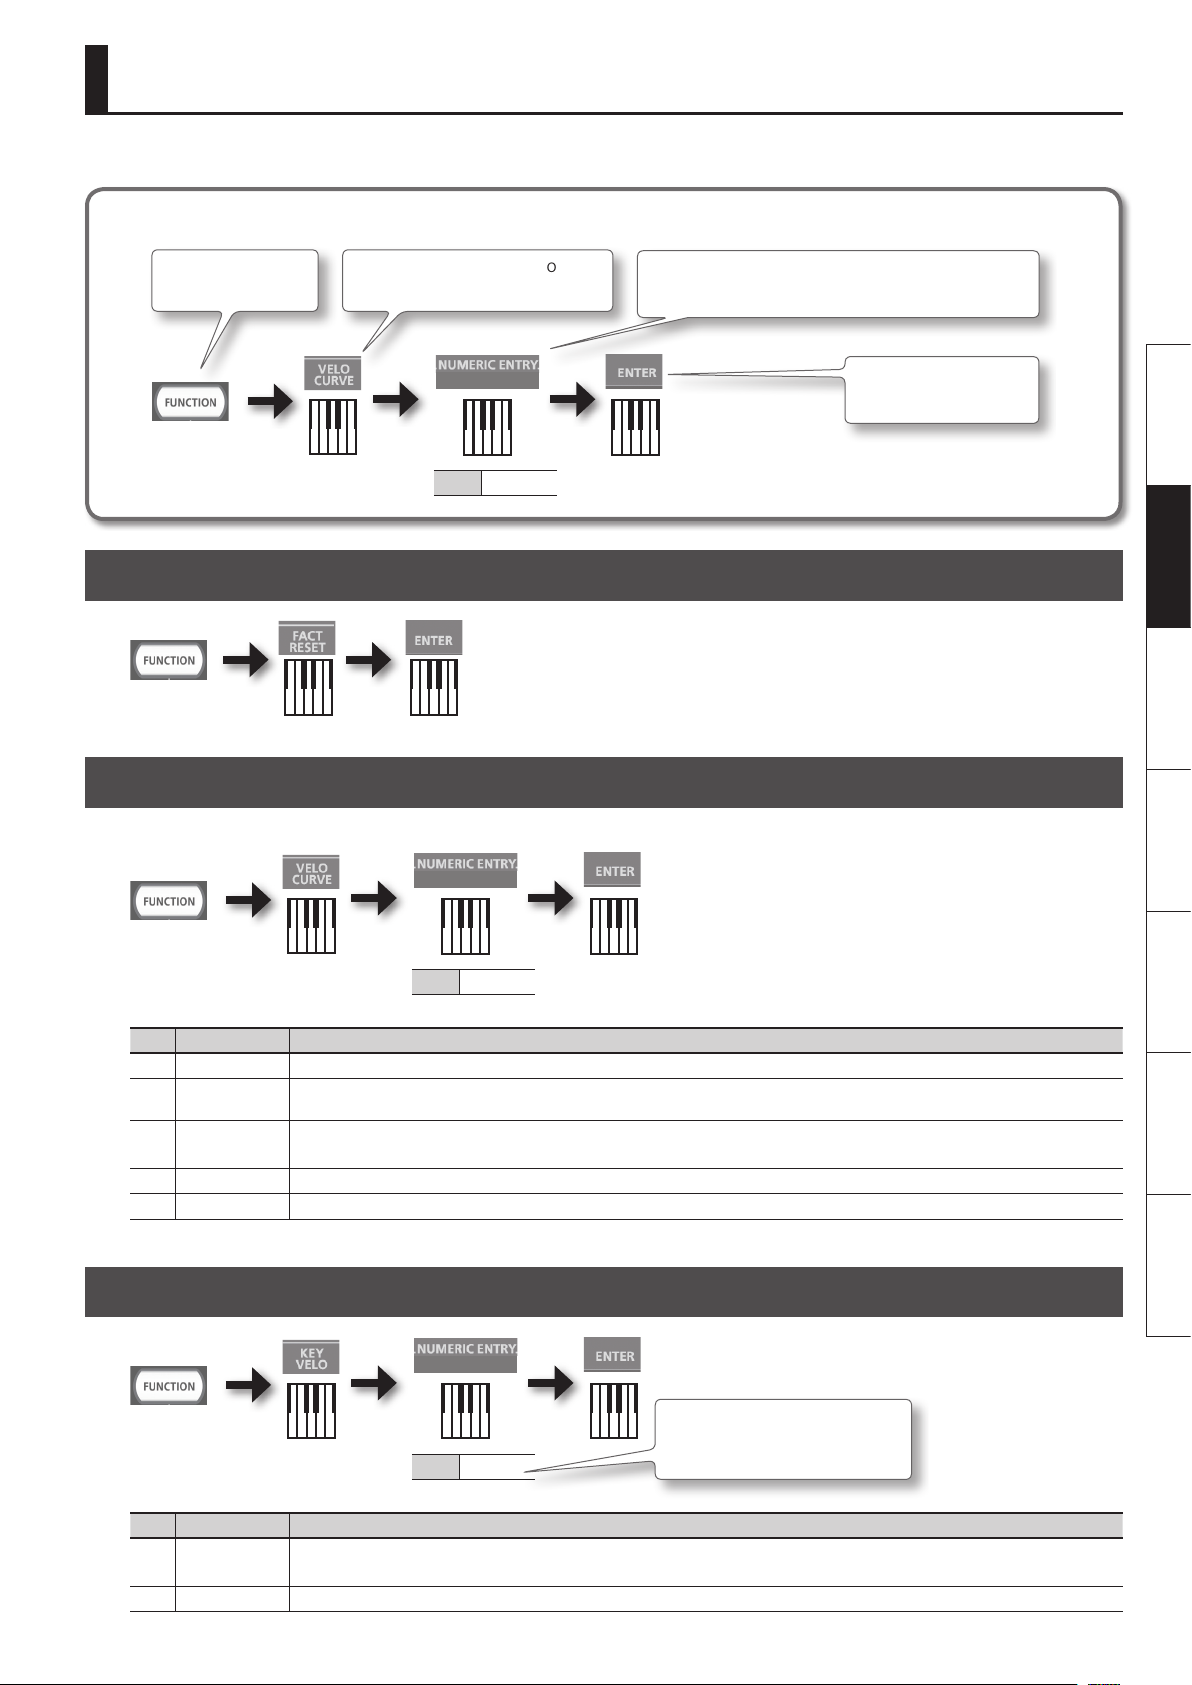
Changing Settings (FUNCTION Mode)
In FUNCTION mode, you can adjust the keyboard touch.
How to read the procedural explanations
Press the [FUNCTION]
button.
Press the key that has “VELO CURVE”
printed above it.
0–4
Value 0–4
Press the keys that have “NUMERIC ENTRY” printed above them.
* Values outside the acceptable range will not be entered.
Restoring the Factory Settings (FACT RESET)
Changing the Key Touch (VELO CURVE)
You can adjust the touch sensitivity of the keyboard.
Press the key that has “ENTER”
printed above it.
Deutsch Français Italiano Español Português NederlandsEnglish
0–4
Value 0–4
Value Setting Explanation
0 SUPER LIGHT An even lighter setting than LIGHT.
1 LIGHT
MEDIUM
2
(default)
3 HEAVY
4 SUPER HEAVY An even heavier setting than HEAVY.
This sets the keyboard to a light touch. You can achieve fortissimo ( ) play with a less forceful touch than usual, so the keyboard feels lighter.
This setting makes it easy to play, even for children.
This sets the keyboard to the standard touch. You can play with the most natural touch. This is the closest to the touch of an acoustic piano.
This sets the keyboard to a heavy touch. You have to nger the keyboard more forcefully than usual in order to play fortissimo (), so the
keyboard touch feels heavier. Dynamic ngering adds even more feeling to what you play.
Specifying the Keyboard Velocity Value (KEY VELO)
0–9
* If you attempt to enter a value that’s
outside the acceptable range, the two
or three numbers pressed immedi-
Value 0–127
ately before ENTER will be used.
Value Setting Explanation
TOUCH
0
(default)
1 FIXED VALUE The velocity value you specify here will be transmitted regardless of how strongly you play the keyboard.
The velocity value that’s transmitted will depend on the keyboard sensitivity and change curve you specify in “Changing the Key Touch (VELO
CURVE)” (p. 7).
7
Page 10
Changing Settings (FUNCTION Mode)
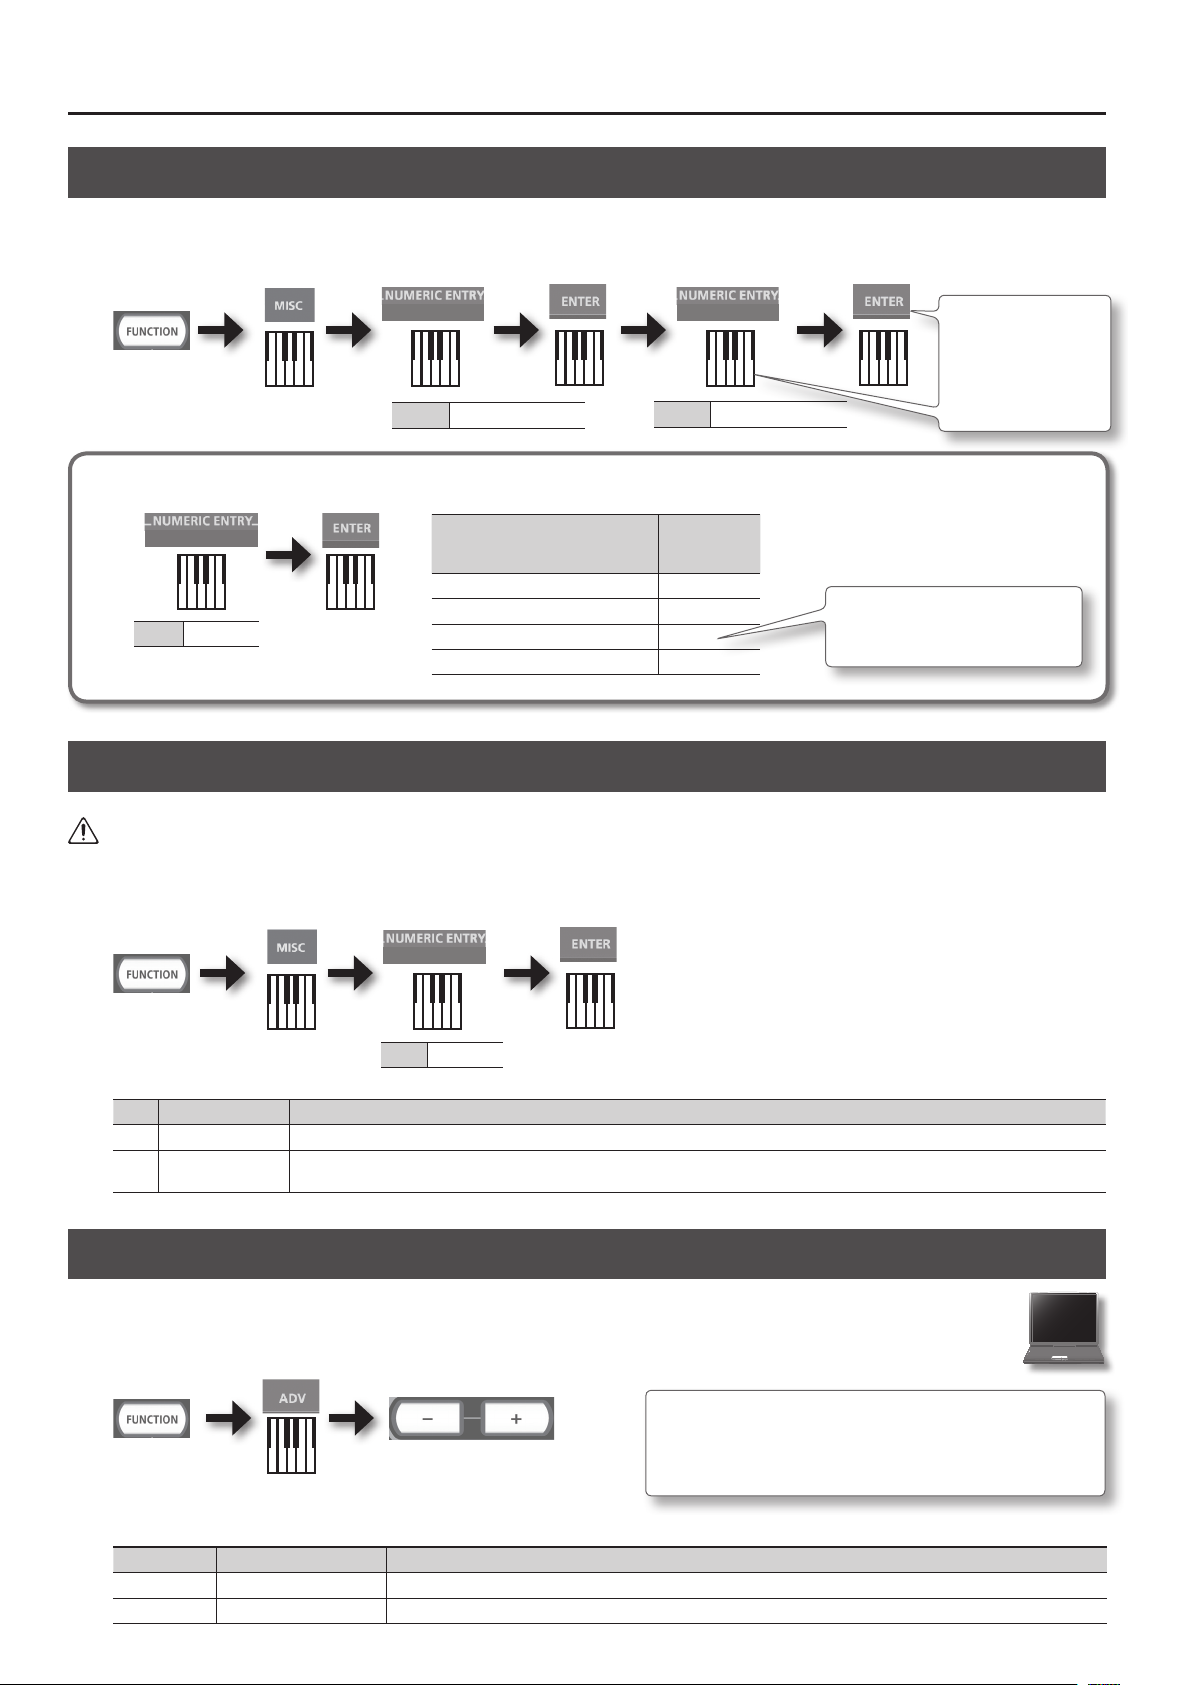
Tuning to Other Instruments’ Pitches (Master Tune)
For a cleaner ensemble sound while performing with one or more other instruments, ensure that each instrument’s basic pitch is in tune with that of
the other instruments. In general, the tuning of an instrument is indicated by the pitch in Hertz (Hz) of the middle “A” note.
The range of the pitch is 415.3–440.0–466.2 Hz (default: 440.0 Hz).
3 0–9
Value 3
Value 4153–4662
Enter 4 digits
Example: If 440.0 Hz,
press the keys in the
order of 4, 4, 0, 0, and
ENTER.
Using NUMERIC ENTRY to enter a value
0–9
Value 4153–4662
NUMERIC ENTRY keys pressed in
this order
4, 4, 0, 0, ENTER 440.0
1, 2, 3, 4, ENTER —
1, 4, 3, 8, 0, ENTER 438.0
8, 4, 4, 6, 6, 3, ENTER —
This value is
entered
* If you attempt to enter a value that’s
outside the acceptable range, the four
numbers pressed immediately before
ENTER will be used.
Making the Power Automatically Turn O After a Time (Auto O)
WARNING
With the factory settings, the RD-64 will automatically be switched o four hours after you stop playing or operating the unit. If you don’t want the
unit to turn o automatically, change the “AUTO OFF” setting to “OFF” as described below.
0–1
Value 0–1
Value Setting Explanation
0 OFF The power will not turn o automatically.
1 ON (default) The power will automatically turn o when 240 minutes (four hours) have passed since you last played or operated the unit.
Selecting the Dedicated Driver (ADVANCED) or the GENERIC Driver
Normally, you don’t need to install a driver in order to connect the RD-64 to your computer. However, if some problem occurs, or if the
performance is poor, using the Roland original driver may solve the problem.
In this case, setting the USB Driver to “ADVANCED” on the RD-64 as described below, then install the USB driver on your computer.
How to install the USB driver
For details on downloading and installing the Roland original driver, refer
to the Roland website.
After changing this setting, you need to turn o the RD-64, then turn it back
on again.
Normally, you can leave this set to “GENERIC.”
Roland Website
http://www.roland.com/support/
Button Setting Explanation
[+] button ADVANCED Choose this if you want to use a USB driver downloaded from the Roland website.
[–] button GENERIC (default) Choose this if you want to use the generic USB driver that was included with your computer. Normally, you should use this mode.
8
Page 11
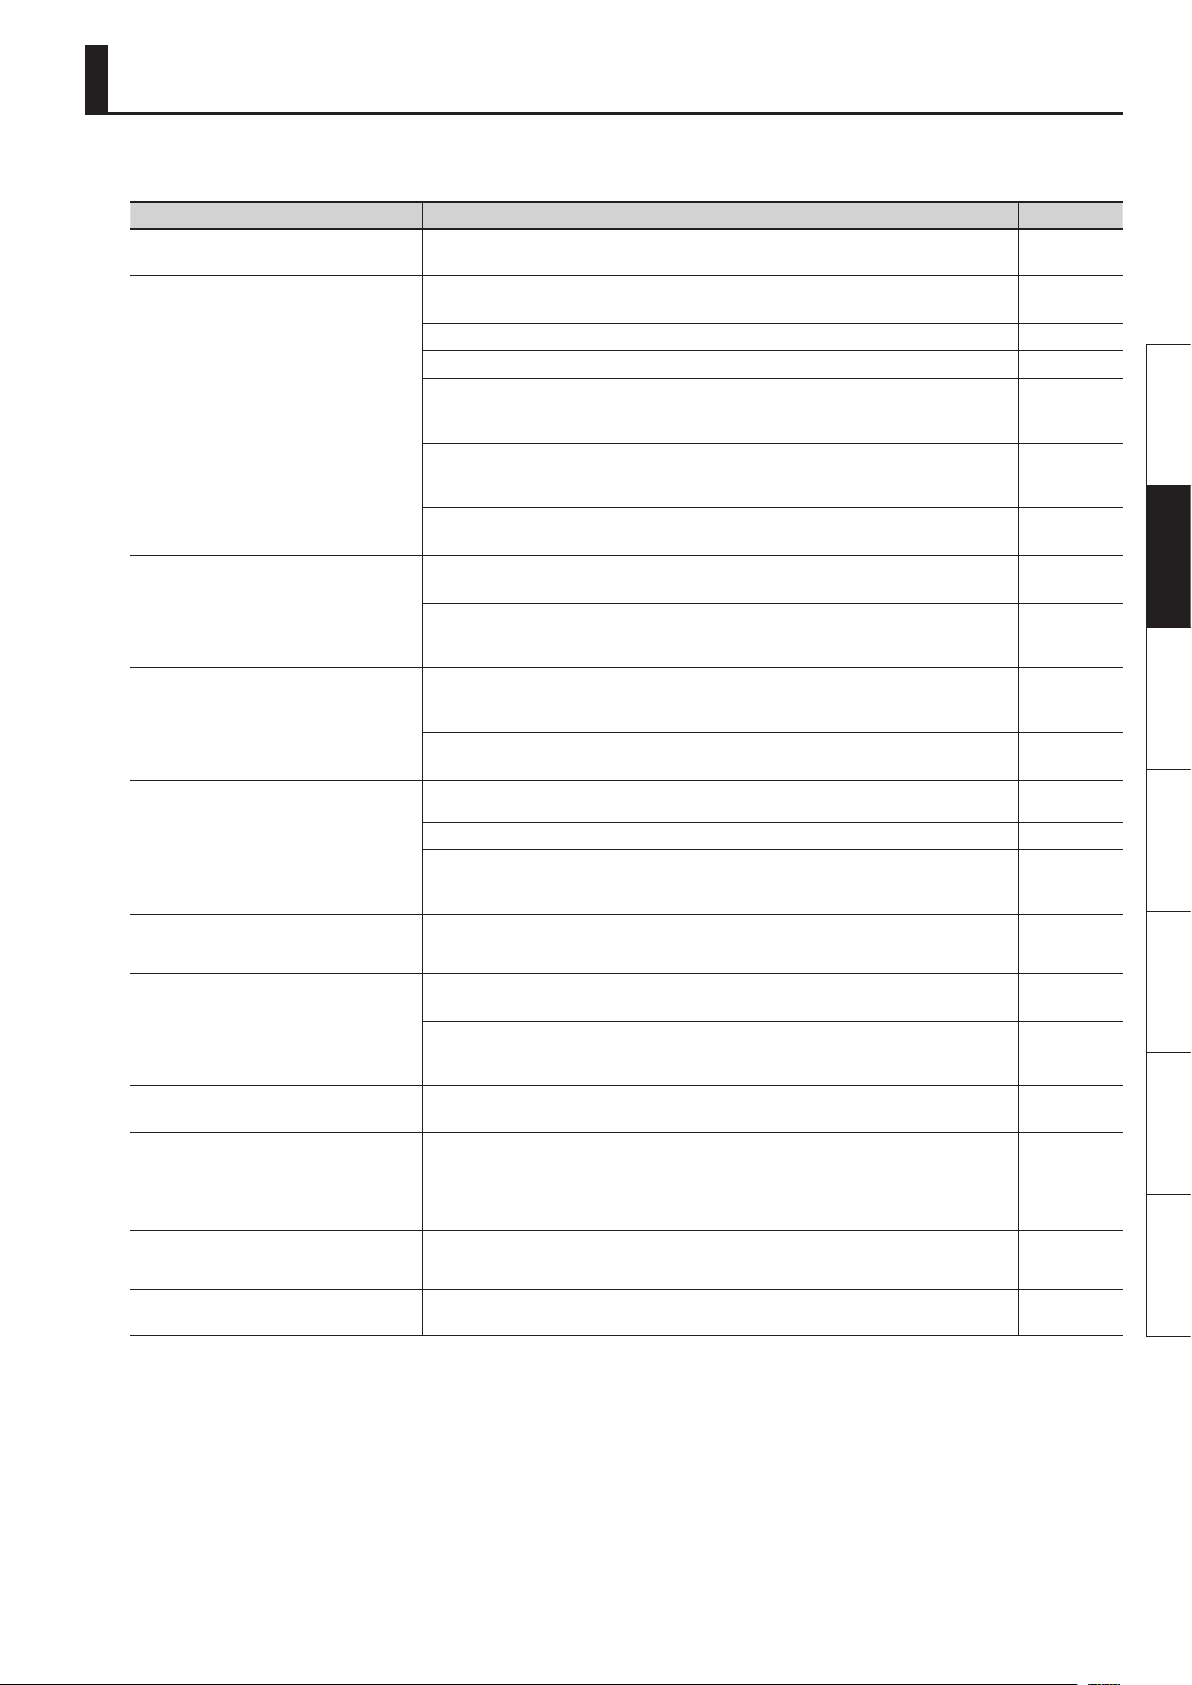
Troubleshooting
If the RD-64 does not function in the way you expect, rst check the following points. If this does not resolve the problem, consult your dealer or a
nearby Roland Service Station.
Problem Check/Solution Page
Power won’t turn on
No sound
The volume level of the instrument
connected to INPUT jack is too low.
Tones are altered
Pitch is odd
Sound is cut o
Duplicate notes sound
Pedal does not work, or is “stuck”/Pedal
does not operate correctly
Reverberation remains even if you
defeat the Reverb eect
The sound of the higher notes suddenly
changes from a certain key
High-pitched ringing is heard
Low notes sound wrong, or are buzzy
Are the RD-64’s AC adaptor and power cord properly plugged into a power source as well as
connected to the RD-64?
Is the power for connected amps and speakers turned on?
Is the volume turned all the way down?
Is the [MASTER VOLUME] knob turned all the way down? p. 4
Are speakers correctly connected?
Connect amplied speakers or headphones.
Are sounds audible with headphones connected?
If sounds are audible through headphones, it may indicate that there is a short in an audio cable or
some sort of amp or mixer problem. Check the cables and equipment once again.
Could the volume have been lowered by operating a pedal or the D-BEAM controller?
Depress the pedal or position your hand above the D-BEAM controller.
Could the RD-64 have been started up in Controller mode (by turning on the power while holding
down the [A. PIANO] button)?
The RD-64 will not produce sound in Controller mode.
Could the volume of the connected device have been turned down?
Adjust the volume of the connected device.
Could you be using a connection cable that contains a resistor?
Use a connection cable that does not contain a resistor.
Could the pitch have been changed by operating a pedal or the D-BEAM controller?
Depress the pedal or position your hand above the D-BEAM controller.
When a mono connection is used, the tone quality can vary depending on the tone selected and the
register in which it is used.
For optimal listening quality, connecting in stereo is recommended.
Depending on the Tone selected, pitches played in certain registers will be changed and played at
other pitches.
Have you set Octave/Transpose? p. 5
Could the pitch have been changed by operating a pedal or the D-BEAM controller?
Depress the pedal or position your hand above the D-BEAM controller.
When you try playing more than the maximum 128 voices simultaneously, sounds currently being
played may be cut out.
Is the unit connected to the computer and the DAW software’s THRU function turned on?
Turn o the DAW software’s THRU function.
Is the pedal connected correctly?
Plug the cord rmly into the pedal jack.
Are you using a pedal made by another manufacturer?
Use the included damper pedal or an optional RPU-3, DP, EV Series or similar pedal.
The RD-64’s piano sound faithfully simulates the depth and resonance of an acoustic piano, and this
may give the impression of reverberation even if you’ve defeated the Reverb eect.
On an acoustic piano, the top of the keyboard will continue sounding regardless of the damper
pedal. These notes also have a somewhat dierent tonal character. RD-64 faithfully simulate this
characteristic of acoustic pianos. On the RD-64, the range that is unaected by the damper pedal will
change according to the Octave/Transpose setting.
Piano sounds that have a brilliant and crisp character contain substantial high-frequency components that may sound as though a metallic ringing has been added. This is because the character of
an actual piano is being faithfully reproduced, and is not a malfunction.
With certain tones, the sounds may seem to be distorted.
Turn down the volume. Alternatively, lower the master gain setting.
p. 6
p. 4
p. 6
−
−
p. 2
−
−
−
−
−
−
−
−
p. 6
p. 6
−
−
−
−
Deutsch Français Italiano Español Português NederlandsEnglish
9
Page 12
USING THE UNIT SAFELY
About WARNING and CAUTION Notices
Used for instructions intended to alert the
user to the risk of death or severe injury
should the unit be used improperly.
Used for instructions intended to alert the
user to the risk of injury or material
damage should the unit be used
improperly.
* Material damage refers to damage or
other adverse effects caused with
respect to the home and all its
furnishings, as well to domestic animals
or pets.
WARNING
Do not disassemble or modify by yourself
Do not open (or modify in any way) the unit
or its AC adaptor.
Do not repair or replace parts by yourself
Do not attempt to repair the unit, or replace
parts within it (except when this manual
provides specic instructions directing you
to do so). Refer all servicing to your retailer,
the nearest Roland Service Center, or an
authorized Roland distributor, as listed on
the “Information” page.
Do not use or store in the following types of locations
• Subject to temperature extremes (e.g.,
direct sunlight in an enclosed vehicle,
near a heating duct, on top of heatgenerating equipment); or are
• Damp (e.g., baths, washrooms, on wet
oors); or are
• Exposed to steam or smoke; or are
• Subject to salt exposure; or are
• Humid; or are
• Exposed to rain; or are
• Dusty or sandy; or are
• Subject to high levels of vibration and
shakiness.
Use only the stand that is recommended
This unit should be used only with a stand
that is recommended by Roland.
Do not place in an unstable location
When using the unit with a rack or stand
recommended by Roland, the rack or
stand must be carefully placed so it is level
and sure to remain stable. If not using a
rack or stand, you still need to make sure
that any location you choose for placing
the unit provides a level surface that will
properly support the unit, and keep it from
wobbling.
Precautions regarding placement of this unit on a
stand
Be sure to follow the instructions in the
Owner’s Manual carefully when placing this
unit on a stand (p. 3).
If it is not set up properly, you risk creating
an unstable situation which could lead to
the unit falling or the stand toppling, and
may result in injury.
About the Symbols
The symbol alerts the user to important instructions or
warnings.The specific meaning of the symbol is
determined by the design contained within the triangle. In
the case of the symbol at left, it is used for general
cautions, warnings, or alerts to danger.
The symbol alerts the user to items that must never be
carried out (are forbidden). The specific thing that must
not be done is indicated by the design contained within
the circle. In the case of the symbol at left, it means that
the unit must never be disassembled.
The symbol alerts the user to things that must be
carried out. The specific thing that must be done is
indicated by the design contained within the circle. In the
case of the symbol at left, it means that the power-cord
plug must be unplugged from the outlet.
ALWAYS OBSERVE THE FOLLOWING
WARNING
Use only the supplied AC adaptor and the correct
voltage
Be sure to use only the AC adaptor supplied
with the unit. Also, make sure the line
voltage at the installation matches the
input voltage specied on the AC adaptor’s
body. Other AC adaptors may use a dierent
polarity, or be designed for a dierent
voltage, so their use could result in damage,
malfunction, or electric shock.
Use only the included power cord
Use only the attached power-supply cord.
Also, the supplied power cord must not be
used with any other device.
Do not bend the power cord or place heavy objects
on it
Do not excessively twist or bend the power
cord, nor place heavy objects on it. Doing
so can damage the cord, producing severed
elements and short circuits. Damaged cords
are re and shock hazards!
Avoid extended use at high volume
This unit, either alone or in combination
with an amplier and headphones or
speakers, may be capable of producing
sound levels that could cause permanent
hearing loss. Do not operate for a long
period of time at a high volume level, or
at a level that is uncomfortable. If you
experience any hearing loss or ringing in
the ears, you should immediately stop using
the unit, and consult an audiologist.
Don’t allow foreign objects or liquids to enter unit;
never place containers with liquid on unit
Do not place containers containing liquid
on this product. Never allow foreign objects
(e.g., ammable objects, coins, wires) or
liquids (e.g., water or juice) to enter this
product. Doing so may cause short circuits,
faulty operation, or other malfunctions.
WARNING
Turn o the unit if an abnormality or malfunction
occurs
Immediately turn the unit o, remove the
AC adaptor from the outlet, and request
servicing by your retailer, the nearest
Roland Service Center, or an authorized
Roland distributor, as listed on the
“Information” page when:
• The AC adaptor, the power-supply cord,
or the plug has been damaged; or
• If smoke or unusual odor occurs; or
• Objects have fallen into, or liquid has
been spilled onto the unit; or
• The unit has been exposed to rain (or
otherwise has become wet); or
• The unit does not appear to operate
normally or exhibits a marked change in
performance.
Adults must provide supervision in places where
children are present
When using the unit in locations where
children are present, be careful so no
mishandling of the unit can take place. An
adult should always be on hand to provide
supervision and guidance.
Do not drop or subject to strong impact
Protect the unit from strong impact.
(Do not drop it!)
Do not share an outlet with an unreasonable number
of other devices
Do not force the unit’s power-supply cord
to share an outlet with an unreasonable
number of other devices. Be especially
careful when using extension cords—the
total power used by all devices you have
connected to the extension cord’s outlet
must never exceed the power rating (watts/
amperes) for the extension cord. Excessive
loads can cause the insulation on the cord
to heat up and eventually melt through.
Do not use overseas
Before using the unit in a foreign country,
consult with your retailer, the nearest
Roland Service Center, or an authorized
Roland distributor, as listed on the
“Information” page.
10
Page 13
USING THE UNIT SAFELY
CAUTION
Place in a well ventilated location
The unit and the AC adaptor should be
located so their location or position does
not interfere with their proper ventilation.
Use only the specied stand (s)
This unit is designed to be used in
combination with specic stands (KS-12,
KS-18Z) manufactured by Roland. If used
in combination with other stands, you
risk sustaining injuries as the result of this
product dropping down or toppling over
due to a lack of stability.
Evaluate safety issues before using stands
Even if you observe the cautions given
in the owner’s manual, certain types of
handling may allow this product to fall from
the stand, or cause the stand to overturn.
Please be mindful of any safety issues
before using this product.
Grasp the plug when connecting or disconnecting the
AC adaptor
Always grasp only the plug on the AC
adaptor cord when plugging into, or
unplugging from, an outlet or this unit.
Periodically clean the AC adaptor’s plug
At regular intervals, you should unplug the
AC adaptor and clean it by using a dry cloth
to wipe all dust and other accumulations
away from its prongs. Also, disconnect
the power plug from the power outlet
whenever the unit is to remain unused
for an extended period of time. Any
accumulation of dust between the power
plug and the power outlet can result in
poor insulation and lead to re.
CAUTION
If there is a possibility of lightning strike, disconnect
the AC adaptor from the outlet
Whenever you suspect the possibility of
lightning in your area, disconnect the AC
adaptor from the outlet.
Deutsch Français Italiano Español Português NederlandsEnglish
Manage cables for safety
Try to prevent cords and cables from
becoming entangled. Also, all cords and
cables should be placed so they are out of
the reach of children.
Avoid climbing on top of the unit, or placing heavy
objects on it
Never climb on top of, nor place heavy
objects on the unit.
Do not connect or disconnect the AC adaptor with
wet hands
Never handle the AC adaptor or its plugs
with wet hands when plugging into, or
unplugging from, an outlet or this unit.
Disconnect everything before moving the unit
Before moving the unit, disconnect the AC
adaptor and all cords coming from external
devices.
Unplug the AC adaptor from the outlet before
cleaning
Before cleaning the unit, turn it o and
unplug the AC adaptor from the outlet (p. 6).
11
Page 14

IMPORTANT NOTES
Power Supply
• Do not connect this unit to same electrical outlet
that is being used by an electrical appliance that
is controlled by an inverter or a motor (such as a
refrigerator, washing machine, microwave oven, or
air conditioner). Depending on the way in which
the electrical appliance is used, power supply noise
may cause this unit to malfunction or may produce
audible noise. If it is not practical to use a separate
electrical outlet, connect a power supply noise lter
between this unit and the electrical outlet.
• The AC adaptor will begin to generate heat after
long hours of consecutive use. This is normal, and is
not a cause for concern.
• To prevent malfunction and equipment failure,
always make sure to turn o the power on all your
equipment before you make any connections.
• With the factory settings, the RD-64 will
automatically be switched o four hours after you
stop playing or operating the unit. If you don’t want
the unit to turn o automatically, change the “AUTO
OFF” setting to “OFF” as described on p. 8.
Placement
• Using the unit near power ampliers (or other
equipment containing large power transformers)
may induce hum. To alleviate the problem, change
the orientation of this unit; or move it farther away
from the source of interference.
• This device may interfere with radio and television
reception. Do not use this device in the vicinity of
such receivers.
• Noise may be produced if wireless communications
devices, such as cell phones, are operated in the
vicinity of this unit. Such noise could occur when
receiving or initiating a call, or while conversing.
Should you experience such problems, you should
relocate such wireless devices so they are at a
greater distance from this unit, or switch them o.
• Do not expose the unit to direct sunlight, place
it near devices that radiate heat, leave it inside
an enclosed vehicle, or otherwise subject it to
temperature extremes. Also, do not allow lighting
devices that normally are used while their light
source is very close to the unit (such as a piano
light), or powerful spotlights to shine upon the
same area of the unit for extended periods of time.
Excessive heat can deform or discolor the unit.
• When moved from one location to another where
the temperature and/or humidity is very dierent,
water droplets (condensation) may form inside
the unit. Damage or malfunction may result if you
attempt to use the unit in this condition. Therefore,
before using the unit, you must allow it to stand
for several hours, until the condensation has
completely evaporated.
• Do not allow rubber, vinyl, or similar materials to
remain on this unit for long periods of time. Such
objects can discolor or otherwise harmfully aect
the nish.
• Do not allow objects to remain on top of the
keyboard. This can be the cause of malfunction,
such as keys ceasing to produce sound.
• Do not paste stickers, decals, or the like to this
instrument. Peeling such matter o the instrument
may damage the exterior nish.
• Depending on the material and temperature of the
surface on which you place the unit, its rubber feet
may discolor or mar the surface.
You can place a piece of felt or cloth under the
rubber feet to prevent this from happening. If you
do so, please make sure that the unit will not slip or
move accidentally.
• Do not put anything that contains water on this
unit. Also, avoid the use of insecticides, perfumes,
alcohol, nail polish, spray cans, etc., near the unit.
Swiftly wipe away any liquid that spills on the unit
using a dry, soft cloth.
Maintenance
• To clean the unit, use a dry, soft cloth; or one
that is slightly dampened. Try to wipe the entire
surface using an equal amount of strength moving
the cloth. Rubbing too hard in the same area can
damage the nish.
• Never use benzine, thinners, alcohol or solvents of
any kind, to avoid the possibility of discoloration
and/or deformation.
Repairs and Data
• Please be aware that all data contained in this unit’s
memory may be initialized to the factory settings
when it is sent for repairs.
Additional Precautions
• Roland assumes no liability concerning such loss of
data, nor any obligation to recover it.
• Use a reasonable amount of care when using the
unit’s buttons, sliders, or other controls; and when
using its jacks and connectors. Rough handling can
lead to malfunctions.
• When disconnecting all cables, grasp the connector
itself—never pull on the cable. This way you will
avoid causing shorts, or damage to the cable’s
internal elements.
• To avoid disturbing others nearby, try to keep the
unit’s volume at reasonable levels. You may prefer
to use headphones, so you do not need to be
concerned about those around you.
• The sound of keys being struck and vibrations
produced by playing an instrument can be
transmitted through a oor or wall to an
unexpected extent. Please take care not to cause
annoyance to others nearby.
• When you need to transport the unit, package it
in the box (including padding) that it came in, if
possible. Otherwise, you will need to use equivalent
packaging materials.
• Use only the specied expression pedal (EV-5,
EV-7; sold separately). By connecting any other
expression pedals, you risk causing malfunction
and/or damage to the unit.
• Some connection cables contain resistors. Do not
use cables that incorporate resistors for connecting
to this unit. The use of such cables can cause the
sound level to be extremely low, or impossible
to hear. For information on cable specications,
contact the manufacturer of the cable.
• The usable range of D-BEAM controller will become
extremely small when used under strong direct
sunlight. Please be aware of this when using the
D-BEAM controller outside.
Copyrights/Licences/Trademarks
• The copyright of content in this product (the
sound waveform data, style data, accompaniment
patterns, phrase data, audio loops and image data)
is reserved by Roland Corporation.
• Purchasers of this product are permitted to utilize
said content for the creating, performing, recording
and distributing original musical works.
• Purchasers of this product are NOT permitted to
extract said content in original or modied form,
for the purpose of distributing recorded medium
of said content or making them available on a
computer network.
• MMP (Moore Microprocessor Portfolio) refers to a
patent portfolio concerned with microprocessor
architecture, which was developed by Technology
Properties Limited (TPL). Roland has licensed this
technology from the TPL Group.
• Roland, SuperNATURAL are either registered
trademarks or trademarks of Roland Corporation in
the United States and/or other countries.
• Company names and product names appearing
in this document are registered trademarks or
trademarks of their respective owners.
12
Page 15
About the Ivory Feel Keyboard
Features of an ivory feel keyboard
Traditional piano keys are made from the best materials-ivory (for white keys) and ebony (for black keys). The Ivory Feel keyboard uses the latest in
technology to reproduce the touch and feel of these materials.
An Ivory Feel keyboard oers the following features.
• We’re sure you’ll develop a fondness for the distinctive texture of these keys, which feels better the more you play them.
• Surfaces incorporate stripes of moisture-absorbing material for improved touch and playability.
• The keys feature subtle gloss and understated coloring, enhancing the look and elegance.
• The white keys are nished with a slight yellowish tinge for the look of real ivory.
Handling
• Do not write on the keyboard with any pen or other implement, and do not stamp or place any marking on the instrument. Ink will seep into the
surface lines and become unremovable.
• Do not ax stickers on the keyboard. You may be unable to remove stickers that use strong adhesives, and the adhesive may cause discoloration.
Care and maintenance
Please note the following points. Failure to do so may result in scratches on the surface nish, damaged gloss, or other discoloration or deformation.
• To remove dirt, use a soft cloth.
Using a moistened and tightly wrung-out cloth, gently wipe o any dirt.
Do not rub the surface vigorously.
• To remove stubborn dirt, use a commercially available keyboard cleaner that does not contain abrasives.
Start by wiping lightly. If the dirt does not come o, wipe using gradually increasing amounts of pressure while taking care not to scratch the keys.
• Do not use benzene, paint thinner, or alcohol on the instrument.
Controlling an External MIDI Sound Module in Piano Mode
In the RD-64’s Piano mode you can specify the MIDI channel and transmit MIDI messages such as bank select, program change, and aftertouch to an
external MIDI sound module. For details, refer to the A-88 owner’s manual sections “Setting the MIDI Transmit Channel (MIDI CHANNEL),” “Switching
Sounds,” and “Using the D-BEAM to Modify the Sound.”
If you experience problems such as stuck notes or unexpected sound on your external MIDI sound module, you can send a reset message to solve the
problem. For details, refer to the A-88 owner’s manual section “Halting Stuck Notes (PANIC).”
Eect List
Group EFX 1 EFX 2
A. PIANO
E. PIANO
CLAV
ORGAN
ENHANCER:
Controls the overtone structure of the high frequencies, adding sparkle
and tightness to the sound.
TREMOLO:
Cyclically modulates the volume to add tremolo eect to the sound.
AUTO WAH:
Cyclically controls a lter to create cyclic change in timbre.
ROTARY:
The Rotary eect simulates the sound of the rotary speakers often used
with the electric organs of the past.
DAMPER RESONANCE:
On an acoustic piano, holding down the damper pedal allows other
strings to resonate in sympathy with the notes you play, creating rich
and spacious resonances. This eect simulates these sympathetic
resonances.
PHASER:
A phase-shifted sound is added to the original sound and modulated.
OVERDRIVE:
Creates a soft distortion similar to that produced by vacuum tube
ampliers.
SPEED:
Simultaneously switch the rotational speed of the low frequency rotor
and high frequency rotor.
Deutsch Français Italiano Español Português NederlandsEnglish
13
Page 16
Main Specications
Roland RD-64: Digital Piano
Keyboard
Keyboard 64 keys (Ivory Feel-G keyboard with Escapement)
Touch Sensitivity Key Touch: 5 types
Sound Generator
SuperNATURAL Piano
Sound Generator
Max. Polyphony 128 voices
Tones 12 tones
Master Tuning 415.3 Hz–466.2 Hz (adjustable in increments of 0.1 Hz)
Transpose Key Transpose: -6–+5 (in semitones)
Eects EFX 1, EFX 2, REVERB
Equalizer 2-band Digital Equalizer
Others
Controllers
Buttons
Switches [POWER] switch
Display Power indicator LED, Octave indicator LED
Connectors
Power Supply AC adaptor
Power Consumption 4 W
Dimensions
Weight 12.8 kg/28 lbs 4 oz
Accessories
Options (sold separately)
SuperNATURAL (E. Piano)
Virtual Tone Wheel Organ
Knobs: [MASTER VOLUME], EQ [LOW], [HIGH]
[Pitch Bend/Modulation] lever
D-BEAM Controller
[A. PIANO] button, [E. PIANO] button, [CLAV] button, [ORGAN] button,
TONE VARIATION [1] [2] [3] buttons,
[FUNCTION] button, [SuperNATURAL] button,
OCTAVE [+] [−] buttons, [TRANSPOSE] button
[EFX 1], [EFX 2] buttons, [REVERB] button
DAMPER jack: 1/4-inch TRS phone type
FC1, FC2 jacks: 1/4-inch TRS phone type
MIDI OUT connector
USB COMPUTER port (USB Type B)
OUTPUT jacks (L/MONO, R) : 1/4-inch phone type
INPUT jacks (L, R): RCA Phono type
PHONES jack: Stereo 1/4-inch phone type
DC IN jack
1,114 (W) x 273 (D) x 116 (H) mm
43-7/8 (W) x 10-3/4 (D) x 4-5/8 (H) inches
Owner’s Manual
Damper Pedal (capable of continuous detection)
AC Adaptor, Power Cord (for AC Adaptor)
Headphones
Keyboard Stand (KS-18Z, KS-12)
Pedal Unit (RPU-3)
Damper Pedal (DP-10)
Pedal Switch (DP-2)
Expression Pedal (EV-5, EV-7)
* In the interest of product improvement, the specications and/or appearance of this unit are subject to change without prior notice.
Copyright © 2013 ROLAND CORPORATION
All rights reserved. No part of this publication may be reproduced in any form without the written permission of ROLAND CORPORATION.
14
Page 17
Deutsch Français Italiano Español Português NederlandsEnglish
Digital Piano
Bedienungsanleitung
Page 18
Die Betriebsarten des RD-64
Das RD-64 als Piano (Piano Mode)
Das RD-64 ist ein sehr kompaktes Piano-Instrument und besitzt SuperNATURAL Pianoklänge und weitere Sounds der
Roland RD Stage Pianos. Als Klaviatur wurde im RD-64 eine Ivory-Feel-Klaviatur eingebaut, welche eine exzellente
Tastaturdynamik besitzt und sowohl im Studio als auch für Live-Performances ein sehr gutes Spielgefühl vermittelt.
Der Piano-Modus des RD-64
Wenn Sie das RD-64 einschalten, ist automatisch der Piano-Modus aktiviert.
Sie nden alle Beschreibungen des Piano-Modus in dieser Anleitung.
Das RD-64 als MIDI Controller-Keyboard (Controller Mode)
Wenn Sie bei Einschalten des RD-64 den [A. PIANO]-Taster gedrückt halten, wird der “Controller Mode” aktiviert, und das
RD-64 arbeitet dann als MIDI Controller-Keyboard mit der gleichen Funktionalität (siehe Abschnitt *1 unten auf dieser
Seite) wie das A-88. Verbinden Sie das RD-64 mithilfe eines USB-Kabels mit dem Rechner, auf dem Ihre DAW/MusikSoftware installiert ist.
* Im Controller Mode erzeugt die interne Klangerzeugung des RD-64 keinen Sound, und die Taster [TONE SELECT], [TONE
VARIATION] und [REVERB] haben keine Funktion.
Der Controller-Modus des RD-64
Halten Sie den [A. PIANO]-Taster gedrückt, und schalten Sie das RD-64 ein. Der Controller-Modus ist
damit aktiviert.
Sie nden die Beschreibungen des RD-64 Controller-Modus in der PDF-Anleitung des Roland A-88.
Herunterladen der A-88 Anleitung
Gehen Sie auf die folgende Internetseite:
1.
http://www.roland.com/manuals/
2. Wählen Sie den Produktnamen “A-88” aus.
*1
Die Unterschiede zwischen RD-64 Controller Mode und dem A-88
Der RD-64 Controller Mode und das A-88 unterscheiden sich wie folgt:
• Das RD-64 verwendet den vom Rechner bereit gestellten USB-Treiber (GENERIC), daher muss kein spezieller Treiber auf dem Rechner
installiert werden. Verbinden Sie das RD-64 und den Rechner einfach mithilfe eines handelsüblichen USB-Kabels. Als MIDI Port-Name
wird “Roland Digital Piano” angezeigt.
• Das RD-64 besitzt nicht die Funktionen “UPPER,” “LOWER,“ “DUAL” und “SPLIT” des A-88.
Lesen Sie zuerst die Abschnitte: “SICHERHEITSHINWEISE” (S. 10) und “WICHTIGE HINWEISE” (S. 12). Lesen Sie dann diese Anleitung ganz durch, um sich mit allen Funktionen des
Instrumentes vertraut zu machen. Bewahren Sie die Anleitung zu Referenzzwecken auf.
2
Page 19

Inhalt
Die Betriebsarten des RD-64 . . . . . . . . . . . . . . . . . . . . . . . . . . . . . . . . . . . . . . . . . . . . . . . . . . . . . . . . .2
Das RD-64 als Piano (Piano Mode). . . . . . . . . . . . . . . . . . . . . . . . . . . . . . . . . . . . . . . . . . . . . . . . . . . .2
Das RD-64 als MIDI Controller-Keyboard (Controller Mode) . . . . . . . . . . . . . . . . . . . . . . . . . . .2
Aufstellen des RD-64 auf einem Ständer . . . . . . . . . . . . . . . . . . . . . . . . . . . . . . . . . . . . . . . . . . . . . .3
Die Bedienoberäche und Anschlüsse . . . . . . . . . . . . . . . . . . . . . . . . . . . . . . . . . . . . . . . . . . . . . . .4
Die Anschlüsse . . . . . . . . . . . . . . . . . . . . . . . . . . . . . . . . . . . . . . . . . . . . . . . . . . . . . . . . . . . . . . . . . . . . .6
Verändern von Einstellungen (FUNCTION-Modus) . . . . . . . . . . . . . . . . . . . . . . . . . . . . . . . . . . . . 7
Abrufen der Werksvoreinstellungen (FACT RESET) . . . . . . . . . . . . . . . . . . . . . . . . . . . . . . . . . . . . 7
Verändern der Tastaturdynamik (VELO CURVE) . . . . . . . . . . . . . . . . . . . . . . . . . . . . . . . . . . . . . . . 7
Einstellen der Anschlagdynamik (KEY VELO) . . . . . . . . . . . . . . . . . . . . . . . . . . . . . . . . . . . . . . . . . .7
Einstellen der Gesamtstimmung (Master Tune) . . . . . . . . . . . . . . . . . . . . . . . . . . . . . . . . . . . . . . .8
Die automatische Abschaltfunktion (Auto O) . . . . . . . . . . . . . . . . . . . . . . . . . . . . . . . . . . . . . . .8
Auswahl des USB-Treibers (ADVANCED, GENERIC) . . . . . . . . . . . . . . . . . . . . . . . . . . . . . . . . . . . .8
Mögliche Fehlerursachen . . . . . . . . . . . . . . . . . . . . . . . . . . . . . . . . . . . . . . . . . . . . . . . . . . . . . . . . . . . .9
SICHERHEITSHINWEISE . . . . . . . . . . . . . . . . . . . . . . . . . . . . . . . . . . . . . . . . . . . . . . . . . . . . . . . . . . . . 10
WICHTIGE HINWEISE . . . . . . . . . . . . . . . . . . . . . . . . . . . . . . . . . . . . . . . . . . . . . . . . . . . . . . . . . . . . . . 12
Die Ivory Feel-Klaviatur . . . . . . . . . . . . . . . . . . . . . . . . . . . . . . . . . . . . . . . . . . . . . . . . . . . . . . . . . . . 13
Steuern eines externen MIDI-Soundmoduls im Piano Mode . . . . . . . . . . . . . . . . . . . . . . . . . 13
Technische Daten . . . . . . . . . . . . . . . . . . . . . . . . . . . . . . . . . . . . . . . . . . . . . . . . . . . . . . . . . . . . . . . . . 14
Aufstellen des RD-64 auf einem Ständer
Verwenden Sie für das RD-64 vorzugsweise die Roland-Ständer KS-18Z oder KS-12.
Achten Sie darauf, sich beim Aufbauen des Ständers bzw. Aufstellen des RD-64 sich nicht die Hände zu verletzen.
KS-18Z
Die Höhe des
Die Vorderseite
des RD-64 muss
mit der Vorderseite
des Ständers
abschließen.
Ständers darf
1 Meter nicht
überschreiten.
Deutsch Français Italiano Español Português NederlandsEnglish
Stellen Sie die Breite des Ständers
so ein, dass die Gummifüße an
der Unterseite des RD-64 sowohl
innerhalb als auch außerhalb der
Ständerauage liegen.
Ansicht von oben
KS-12
Stellen Sie die Breite des
Ständers so ein, dass die
Gummifüße an der Unterseite
des RD-64 in den Aussparungen
des Ständers liegen.
Ansicht von oben
3
Page 20

Die Bedienoberäche und Anschlüsse
Der [POWER]-Schalter
Einschalten des Instrumentes
* Nachdem alle Anschlüsse korrekt vorgenommen wurden (S. 6), schalten Sie die Insturmente/
Geräte immer in der vorgeschriebenen Reihenfolge ein, um eventuellen Fehlfunktionen bzw.
Beschädigungen vorzubeugen.
* Dieses I nstrument besitzt einen Schutzschaltkreis, der nach Einschalten überbrückt wird, daher
dauert es einen kurzen Moment, bis das Instrument betriebsbereit ist.
* Regeln Sie immer die Lautstär ke auf Minimum, bevor Sie das Instrument ein- bzw. ausschalten.
Auch bei minimaler Lautstärke ist bei Einschalten ein leises Geräusch hörbar, dieses ist aber
normal und keine Fehlfunktion.
1. Drehen Sie den [MASTER VOLUME]-Regler ganz nach links.
Regeln Sie auch die Lautstärke der anderen Geräte auf Minimum.
2. Drücken Sie den [POWER]-Schalter des
RD-64.
Ausschalten des Instrumentes
1. Drehen Sie den [MASTER VOLUME]-Regler ganz nach links.
2. Schalten Sie die externen Geräte aus.
3. Drücken Sie den [POWER]-Schalter des
* In der Werksvoreinstellung wird das RD-64 nach ca. 4 Stunden
3. Schalten Sie die anderen Geräte ein.
4. Regeln Sie die Lautstärke am RD-64 und den anderen Geräten.
Der [MASTER VOLUME]-Regler
Einstellen der Lautstärke
Drehen nach rechts erhöht die Lautstärke, Drehen nach links verringert die Lautstärke.
Die [TONE SELECT], [TONE VARIATION]-Taster
Auswahl der Klänge
1.
Drücken Sie einen der [TONE SELECT]-Taster.
RD-64.
automatisch ausgeschaltet, wenn es in der Zwischenzeit nicht gespielt
bzw. die Bedienregler nicht betätigt wurden.
Wenn Sie die automatische Abschaltung deaktivieren möchten, setzen Sie
den Parameter “AUTO OFF” auf “OFF” (siehe S. 8).
2. Drücken Sie einen der [TONE VARIATION]-Taster.
Group Variation 1 Variation 2 Variation 3
A. PIANO CONCERT GRAND BRIGHT PIANO CONCERT MONO
E. PIANO PURE VINTAGE TINE EP WURLY
CLAV COMBINATION MEDIUM BRILLIANT
ORGAN JAZZ ORGAN ROCK ORGAN FULL DRAW
[FUNCTION]-Taster
Verändern von Einstellungen
Sie können im Function-Modus verschiedene Einstellungen verändern. Siehe “Verändern
von Einstellungen (FUNCTION-Modus)” (S. 7).
[SuperNATURAL]-Taster
Im Piano Mode leuchtet dieser Taster konstant, und Drücken dieses Tasters erzeugt
keinen Eekt, sondern nur, wenn am RD-64 ein “SuperNATURAL”-kompatibles
Soundmodul bzw. Instrument angeschlossen ist. Siehe “Das RD-64 als MIDI ControllerKeyboard (Controller Mode)” (S. 2).
[Pitch Bend/Modulation]-Hebel
Verändern der Tonhöhe (Pitch Bend)
Bewegen des Reglers nach links erniedrigt die Tonhöhe, Bewegen des Reglers nach rechts erhöht die Tonhöhe.
Hinzufügen einer Modulation
Das Drücken des Reglers nach vorn erzeugt einen Vibrato- bzw. Modulationseekt.
* Der erzeugte Eekt ist abhängig vom ausgewählten Klang. Der Eekt ist für jeden internen Klang fest voreingestellt und nicht veränderbar.
4
Pitch Bend-Eekt
Modulation-Eekt
Page 21
Die Bedienoberäche und Anschlüsse
Der D-BEAM Controller
Erzeugen von Klangeekten durch Bewegungen der Hand
Um den D-BEAM Controller zu aktivieren, drücken Sie einen der nachfolgend aufgeführten Taster,
so dass die entsprechende Anzeige leuchtet. Der Klangeekt wird erzeugt, indem Sie die Hand
oberhalb des D-BEAM Controllers auf und ab bewegen.
Taster Funktion
[PITCH] Verändert die Tonhöhe.
[VOL] Verändert die Lautstärke.
[ASSIGN] Ein Aftertouch-Eekt wird erzeugt.
Wirkungsbereich des D-BEAM
Controllers
Der D-BEAM Controller
reagiert nur in dem rechts
dargestellten Bereich auf
Handbewegungen.
* Der tatsächliche Wirkungs-
bereich ist auch abhängig
von den Lichtverhältnissen.
Der [REVERB]-Taster
Hinzufügen eines Halleektes (Reverb)
Wenn Sie den [REVERB]-Taster drücken, so dass dessen Anzeige leuchtet, wird dem ausgewählten Klang ein Hall- bzw. Raumklangeekt hinzugefügt.
* Der Hallanteil ist für jeden Klang fest voreingestellt und nicht veränderbar.
Deutsch Français Italiano Español Português NederlandsEnglish
Die EQ [LOW], [HIGH]-Regler
Einstellen der tiefen und hohen Frequenzen (Equalizer)
Das RD-64 besitzt einen 2-Band Equalizer, welcher die Anpassung der tiefen und hohen Frequenzen des jeweiligen Klangs ermöglicht.
* Die Equalizer-Einstellungen werden wie folgt gespeichert: Halten Sie den [SuperNATURAL]-Taster gedrückt, und drücken Sie gleichzeitig die Taster [PIANO] und [ORGAN], um
die Einstellungen für alle 12 Tones zu sichern.
Die [EFX 1], [EFX 2]-Taster
Ein- und Ausschalten von Eekten
Wenn Sie den [EFX 1]- bzw. [EFX 2]-Taster drücken, so dass die Anzeige leuchtet, wird dem ausgewählten Klang ein Eekt hinzugefügt.
Die folgenden Eekte stehen für die verschiedenen Klanggruppen zur Verfügung.
Group EFX 1 EFX 2
A. PIANO ENHANCER DAMPER RESONANCE
E. PIANO TREMOLO PHASER
CLAV AUTO WAH OVERDRIVE
ORGAN ROTARY SPEED
* Der Ein/Aus-Status für [EFX 1] und [EFX 2] wird wie folgt gespeichert: Halten Sie den [SuperNATURAL]-Taster gedrückt, und drücken Sie gleichzeitig die Taster [PIANO] und
[ORGAN], um die Einstellungen für alle 12 Tones zu sichern.
Die OCTAVE [−], [+], [TRANSPOSE]-Taster
Verändern der Oktavlage (Octave Shift)
Sie können mit den [+] [–]-Tastern die Oktavlage der Tastatur verschieben.
• Der Einstellbereich ist [-4] bis [5] Oktaven.
• Wenn Sie beide Taster ([+] und [–]( gleichzeitig drücken, wird wieder der Wert “0” ausgewählt.
Anzeige für die Transponierung
Verändern der Transponierung (Transpose)
Sie können durch Halten des [TRANSPOSE]-Tasters und Drücken der [+] [–]-Taster die Tonlage der
Tastatur in Halbtonschritten verschieben.
• Der Einstellbereich ist [-6] bis [5] Halbtöne.
• Die Transponierung ist aktiv, wenn die Anzeige des [TRANSPOSE]-Tasters leuchtet. Wenn die Anzeige
erloschen ist, ist die Transponierung ausgeschaltet.
• Wenn Sie den [TRANSPOSE]-Taster und die Taster ([+] und [–]( gleichzeitig drücken, wird wieder der Wert “0”
ausgewählt.
-6
-5 -4 -3 -2 -1 0 1 2 3 4 5
Anzeige aus Anzeige ein
5
Page 22
Die Anschlüsse
Die INPUT-Buchsen
Hier können Sie einen Gerät wie
z.B. einen Audio Player anschließen.
Dessen Signal wird über die
OUTPUT- und PHONES-Buchsen
ausgegeben.
* Die Lautstärke des externen
Gerätes muss am externen Gerät
selbst eingestellt werden.
Die OUTPUT-Buchsen
Über diese Buchsen wird das Audiosignal des RD-64
ausgegeben.
Die PHONES-Buchse
Hier können Sie einen Stereo-Kopfhörer
anschließen (Roland RH-Serie).
Die DC IN-Buchse
Hier wird der beigefügte AC-Adapter
angeschlossen.
Der AC-Adapter besitzt eine LeuchtAnzeige, die aueuchtet, wenn die
verwendete Steckdose Strom führt.
zur Stromversorgung
Dämpfungs-Pedal
Setzen Sie den Schalter am Pedal auf “Continuous”.
Alternative: Pedalschalter (DP-Serie,
zusätzliches Zubehör)
oder
Pedaleinheit
(RPU-3, zusätzliches
Zubehör)
Die Pedal (DAMPER, FC2, FC1)-Buchsen
Sie können an das RD-64 mehrere Pedale anschließen, welche die folgenden
Funktionen ausführen können.
Anschluss Beschreibung
DAMPER
FC2 Sostenuto-Pedal
FC1 Leise-Pedal
DämpfungsPedal
Der gespielte Klang wird gehalten, auch wenn
die Tasten losgelassen werden.
Nur die bei Drücken des Pedals gespielten
Noten werden gehalten, wenn die Tasten
losgelassen werden.
Der Klang wird bei Drücken des Pedals
gedämpft.
Netzkabel
Der USB COMPUTER-Anschluss
Sie können das RD-64 über USB mit
einem Rechner verbinden und die
MIDI-Spieldaten mithilfe einer ComputerSequenzer-Software aufzeichnen.
* Der Austausch von Audiodaten über
USB ist nicht möglich.
Der MIDI OUT-Anschluss
Sie können ein MIDI-Soundmodul ansteuern.
HINWEIS
* Regeln Sie die Lautstärke auf Minimum und schalten Sie alle Geräte
aus, bevor Sie neue Kabelverbindungen vornehmen, um eventuellen
Fehlfunktionen bzw. Beschädigungen vorzubeugen.
* Verwenden Sie nur das empfohlene Expression-Pedal (EV-5, EV-7,
zusätzliches Zubehör). Bei Verwendung eines Expression-Pedals
eines anderen Herstellers können Fehlfunktionen auftreten
(Controller Mode).
6
Page 23
Verändern von Einstellungen (FUNCTION-Modus)
Im FUNCTION-Modus können Sie verschiedene Einstellungen verändern, z.B. die Tastaturdynamik.
Der Bedienvorgang
Drücken Sie den
[FUNCTION]-Taster.
Spielen Sie die Note, die mit “VELO
CURVE” bezeichnet ist.
0–4
Wert 0–4
Spielen Sie die Note, die mit “NUMERIC ENTRY” bezeichnet ist.
* Werte außerhalb dieses Bereiches werden nicht eingegeben.
Abrufen der Werksvoreinstellungen (FACT RESET)
Verändern der Tastaturdynamik (VELO CURVE)
Sie können die Dynamik der Tastatur anpassen.
Spielen Sie die Note, die mit
“ENTER” bezeichnet ist.
Deutsch Français Italiano Español Português NederlandsEnglish
0–4
Wert 0–4
Wert Einstellung Beschreibung
0 SUPER LIGHT Eine noch leichtere Spieldynamik als LIGHT.
1 LIGHT
MEDIUM
2
(Voreinstellung)
3 HEAVY Erst bei sehr hartem Anschlag werden laute Noten gespielt. Bei dieser Einstellung besitzen Sie einen sehr hohen Dynamikbereich.
4 SUPER HEAVY Eine noch größere Spieldynamik als HEAVY.
Sie können mit vergleichsweise geringer Spieldynamik die Klänge relativ laut ( - fortissimo) spielen. Diese Einstellung ist sehr gut geeignet
für Kinder.
Standard-Einstellung. Dieses entspricht am ehesten der Tastaturdynamik eines akustischen Pianos.
Einstellen der Anschlagdynamik (KEY VELO)
0–9
* Wenn ein Wert außerhalb des gültigen
Bereiches ausgewählt wird, wird
wieder der vor Drücken des ENTER-
Wert 0–127
Tasters gültige Wert ausgewählt.
Wert Einstellung Beschreibung
TOUCH
0
(Voreinstellung)
1 Fester Wert Die Anschlagsdynamik wird als eingegebener fester Wert übertragen, egal wie kräftig Sie anschlagen.
Die Anschlagsdynamik-Werte werden entsprechend der Keyboard- Empndlichkeit und der Kurve übertragen, die Sie unter”Verändern der
Tastaturdynamik (VELO CURVE)” (S. 7) gewählt haben.
7
Page 24
Verändern von Einstellungen (FUNCTION-Modus)
Einstellen der Gesamtstimmung (Master Tune)
Sie können die Gesamtstimmung des RD-64 an die Stimmung akustischer Instrumente anpassen. Der Wert wird in Hertz (Hz) angegeben und
entspricht der Tonhöhe des mittleren “A”.
Der Einstellbereich ist 415.3–440.0–466.2 Hz (Voreinstellung: 440.0 Hz).
3 0–9
Wert 3
Wert 4153–4662
Geben Sie vier Ziern
ein.
Beispiel für 440.0 Hz:
Drücken Sie die Tasten
4, 4, 0, 0, ENTER.
Eingabe eines nummerischen Wertes
0–9
Wert 4153–4662
Die NUMERIC ENTRY-Taster in der
folgenden Reihenfolge drücken:
4, 4, 0, 0, ENTER 440.0
1, 2, 3, 4, ENTER —
1, 4, 3, 8, 0, ENTER 438.0
8, 4, 4, 6, 6, 3, ENTER —
Dieser Wert
wird eingebeben:
* Wenn ein Wert außerhalb des gültigen
Bereiches ausgewählt wird, wird
wieder der vor Drücken des ENTERTasters gültige Wert ausgewählt.
Die automatische Abschaltfunktion (Auto O)
WARNUNG
In der Werksvoreinstellung wird das RD-64 nach ca. 4 Stunden automatisch ausgeschaltet, wenn das Instrument in der Zwischenzeit nicht gespielt
bzw. die Bedienregler nicht betätigt wurden. Wenn Sie die automatische Abschaltung deaktivieren möchten, gehen Sie wie nachfolgend beschrieben
vor, um die Einstellung “OFF” zu wählen.
0–1
Wert 0–1
Wert Einstellung Beschreibung
0 OFF Das Instrument wird nicht automatisch ausgeschaltet.
1 ON (Voreinstellung)
Das Instrument wird nach ca. 240 Minuten (4 Stunden) automatisch ausgeschaltet, wenn das Instrument in der Zwischenzeit nicht gespielt
bzw. die Bedienregler nicht betätigt wurden.
Auswahl des USB-Treibers (ADVANCED, GENERIC)
Normalerweise ist es nicht notwendig, für das RD-64 den speziellen Roland USB-Treiber zu verwenden, sondern die Einstellung
“GENERIC” zu belassen. Sollten allerdings Probleme bei der Datenübertragung auftreten, kann es sinnvoll sein, den speziellen
USB-Treiber auf dem Rechner zu installieren. Stellen Sie in diesem Fall im RD-64 den USB-Treiber auf “ADVANCED”, und installieren
Sie danach den speziellen Roland-Treiber auf Ihrem Rechner.
Installieren des USB-Treibers
Den Roland USB-Treiber können Sie von folgender Internetseite herunter
laden:
http://www.roland.com/support/
Sie müssen nach Ändern der Einstellung das RD-64 aus- und wieder
einschalten, damit die neue Einstellung gültig ist.
Taster Einstellung Beschreibung
[+]-Taster ADVANCED Der Roland USB-Treiber wird verwendet.
[–]-Taster GENERIC (Voreinstellung) Der vom Rechner bereit gestellte USB-Treiber wird verwendet.
8
Page 25
Mögliche Fehlerursachen
Wenn das RD-64 nicht so funktioniert wie erwartet, versuchen Sie zunächst, den Fehler anhand der nachfolgend beschriebenen möglichen
Fehlerursachen zu ermitteln. Gelingt dieses nicht, kontaktieren Sie Ihren Roland-Vertragspartner bzw. Ihr Roland Service Center.
Problem Prüfung/Abhilfe Seite
Das Instrument lässt sich nicht
einschalten.
Es ist kein Sound hörbar.
Die Lautstärke des an den INPUTBuchsen angeschlossenen Gerätes ist zu
gering.
Die Sounds erklingen fremdartig.
Die Tonhöhe ist falsch.
Der Klang wird abgeschnitten.
Die Pedale funktionieren nicht korrekt.
Es ist ein Hall-Eekt zu hören, obwohl
das Reverb abgeschaltet ist.
Im oberen Tastaturbereich ist der Klang
ab einer bestimmten Note ungewöhnlich
verändert.
Ein hochfrequentes Nebengeräusch ist
zu hören.
Die Bass-Frequenzen erklingen
fremdartig.
Sind der RD-64 AC-Adapter und das Netzkabel korrekt angeschlossen? Ist das Netzkabel korrekt an
einer Steckdose angeschlossen, die auch Strom führt?
Ist das angeschlossene Verstärkersystem bzw. die Lautsprecher eingeschaltet?
Ist die Lautstärke des Verstärkersystems zu niedrig eingestellt?
Ist der [MASTER VOLUME]-Regler zu niedrig eingestellt? S. 4
Ist das Verstärkersystem bzw. der Kopfhörer korrekt angeschlossen? S. 6
Ist der Klang über den angeschlossenen Kopfhörer hörbar?
Falls ja, liegt das Problem beim externen Verstärkersystem bzw. dem Mischpult. Überprüfen Sie die
Kabelverbindungen bzw. das externe Verstärkersystem oder Mischpult,
Wurde die Lautstärke durch ein Fußpedal bzw. den D-BEAM Controller herab gesetzt?
Betätigen Sie das entsprechende Pedal bzw. bewegen Sie Ihre Hand oberhalb des D-BEAM
Controllers.
Wurde das RD-64 im Controller Mode gestartet ([A. PIANO]-Taster gedrückt halten und einschalten)?
Im Controller Mode können die Klänge des RD-64 nicht gespielt werden.
Ist die Lautstärke des externen Gerätes zu niedrig eingestellt?
Erhöhen Sie die Lautstärke am externen Gerät.
Verwenden Sie eventuell Kabel mit integriertem Widerstand? Falls ja, wird durch diese die Lautstärke
deutlich herabgesetzt.
Verwenden Sie nur Audiokabel ohne eingebauten Widerstand.
Wurde die Tonhöhe durch ein Fußpedal bzw. den D-BEAM Controller verändert?
Betätigen Sie das entsprechende Pedal bzw. bewegen Sie Ihre Hand oberhalb des D-BEAM
Controllers.
Ist das RD-64 nur mono verkabelt?
Die volle Soundqualität wird nur erreicht, wenn Sie das RD-64 stereo verkabeln.
Abhängig vom ausgewählten Klang wird die Tonhöhe in bestimmten Tonlagen automatisch
konvertiert.
Ist die Oktavierung/Transponierung eingeschaltet? S. 5
Wurde die Tonhöhe durch ein Fußpedal bzw. den D-BEAM Controller verändert?
Betätigen Sie das entsprechende Pedal bzw. bewegen Sie Ihre Hand oberhalb des D-BEAM
Controllers..
Das RD-64 kann maximal 128 Stimmen gleichzeitig erzeugen. Bei Nutzung des Haltepedals und
Spielen vieler Noten kann diese max. Stimmenanzahl überschritten werden, und einige Noten
werden abgeschnitten.
Ist das Pedalkabel korrekt angeschlossen?
Überprüfen Sie dieses.
Verwenden Sie ein Pedal eines anderen Herstellers als Roland?
Benutzen Sie nur das dem RD-64 beigefügte Pedal bzw. das Roland RPU-3, bzw. die Pedale der
Roland DP- oder EV-Serie bzw. eines der BOSS-Fußpedale.
Bei akustischen Pianos erklingen die Noten mit einem natürlichen Raum. Dieser Eekt wird vom
RD-64 naturgetreu nachgebildet.
Die hohen Noten des RD-64 klingen auch nach Loslassen der Taste weiter und danach automatisch
aus, unabhängig davon, ob das Haltepedal gedrückt wird. Dieser Eekt existiert auch bei akustischen
Pianos und wird vom RD-64 naturgetreu nachgebildet.
Dieser Bereich, der nicht vom Haltepedal kontrolliert werden kann, ist abhängig von der Octave/
Transpose-Einstellung.
Einige Piano-Klänge besitzen einen hohen Anteil an hohen Frequenzen, die je nach Spieldynamik
einen metallischen Klang erzeugen. Dieses ist der Charakter des jeweiligen Klangs und keine
Fehlfunktion.
Wenn der Klang verzerrt, versuchen Sie, die Lautstärke bzw. die Einstellung für “Master Gain” zu
verringern.
S. 6
S. 4
S. 2
S. 6
S. 6
−
−
Deutsch Français Italiano Español Português NederlandsEnglish
−
−
−
−
−
−
−
−
−
−
−
9
Page 26
SICHERHEITSHINWEISE
ANWEISUNGEN ZUR VERMEIDUNG VON FEUER, ELEKTRISCHEM SCHLAG ODER PERSONENSCHÄDEN
Über die Hinweise WARNUNG und ACHTUNG
Wird für Anweisungen verwendet, die
WARNUNG
ACHTUNG
den Anwender vor Lebensgefahr oder der
Möglichkeit schwerer Verletzungen bei falscher
Anwendung des Geräts warnen sollen.
Wird für Anweisungen verwendet, die den
Anwender vor Verletzungsgefahr oder der
Möglichkeit von Sachbeschädigung bei falscher
Anwendung des Gerätes warnen sollen.
* Als Sachbeschädigung werden Schäden
oder andere unerwünschte Auswirkungen
bezeichnet, die sich auf Haus/Wohnung und
die darin enthaltene Einrichtung sowie
Nutz- oder Haustiere beziehen.
BEACHTEN SIE IMMER FOLGENDES
Über die Symbole
Das Symbol weist den Anwender auf wichtige Anweisungen
oder Warnungen hin. Die genaue Bedeutung des Symbols ist an
der Abbildung innerhalb des Dreiecks zu erkennen. Im Falle des
links abgebildeten Symbols sind dies allgemeine Vorsichtsmaßnahmen, Warnungen oder Gefahrenhinweise.
Das Symbol weist den Anwender auf Vorgänge hin, die niemals
ausgeführt werden dürfen (verboten sind). Welcher Vorgang nicht
ausgeführt werden soll, ist an der Abbildung innerhalb des
zu erkennen. Im Falle des links abgebildeten Symbols bedeutet
dass das Gerät niemals auseinander genommen werden darf.
Das Symbol weist den Anwender auf Vorgänge hin, die
ausgeführt werden müssen. Welcher Vorgang genau ausgeführt
werden soll, ist an der Abbildung innerhalb des Kreises zu
erkennen. Im Falle des links abgebildeten Symbols bedeutet es
hier, dass das Netzkabel aus der Steckdose gezogen werden muss.
Kreises
es hier,
WARNUNG
Gerät und Netzadapter nicht modizieren
Das Instrument und der Netzadapter dürfen
nicht geönet oder in irgendeiner Weise
verändert werden.
Reparaturen nicht selbst ausführen
Nehmen Sie keine eigenen
Reparaturversuche vor. Überlassen Sie
dieses einem qualizierten Techniker Ihres
Roland-Vertragspartners bzw. Ihres Roland
Service Centers (siehe Seite “Information”
am Ende dieser Anleitung).
Keine unverträglichen Umgebungen
Vermeiden Sie Umgebungen mit:
• extremen Temperaturen (z.B. direkte
Sonneneinstrahlung, direkte Nähe zu
einem Heizkörper)
• zu hoher Luftfeuchtigkeit
• Rauchentwicklung
• zu hohem Salzgehalt in der Luft
• Regen
• starker Staubentwicklung
• starker Vibration.
Nur ein empfohlenes Stativ verwenden
Verwenden Sie ausschließlich ein von
Roland empfohlenes Stativ.
WARNUNG
Nur das beigefügte Netzkabel benutzen
Verwenden Sie nur das dem Gerät
beigefügte Netzkabel. Benutzen Sie das
Netzkabel nicht mit anderen Geräten.
Netzkabel nicht belasten bzw. beschädigen
Vermeiden Sie Beschädigungen des
Netzkabels. Knicken Sie es nicht, treten Sie
nicht darauf und stellen Sie keine schweren
Gegenstände auf das Kabel.
Keine zu hohen Lautstärken
Dieses Instrument kann in Verbindung
mit Lautsprechern bzw. Kopfhörern hohe
Lautstärkepegel erzeugen. Achten Sie
darauf, hohe Pegel nicht über einen zu
hohen Zeitraum zu erzeugen. Falls Sie eine
Beeinträchtigung Ihres Gehörs feststellen,
suchen Sie sofort einen Gehörspezialisten
auf.
Keine kleinen Gegenstände bzw. Flüssigkeiten in der
Nähe des Gerätes
Achten Sie darauf, dass keine Gegenstände
bzw. Flüssigkeit in das Gehäuse gelangen,
ansonsten kann ein Kurzschluss entstehen
bzw. Fehlfunktionen auftreten. Stellen Sie
keine Gegenstände mit Flüssigkeit (z.B.
Blumenvasen) auf das Instrument.
WARNUNG
Beschädigungen vermeiden
Bewahren Sie das Instrument vor heftigen
Stößen und lassen Sie es nicht fallen.
Nicht zu viele Geräte an einer Steckdose
Vermeiden Sie es, das Gerät mit vielen
anderen Geräten zusammen an
derselben Steckdose zu betreiben. Ganz
besonders vorsichtig sollten Sie bei
der Verwendung von Verlängerungen
mit Mehrfachsteckdosen sein:
der Gesamtverbrauch aller an sie
angeschlossenen Geräte darf niemals die in
Watt oder Ampère angegebene zulässige
Höchstbelastung überschreiten!
Einsatz des Gerätes im Ausland
Bevor Sie das Gerät im Ausland benutzen,
sollten Sie Ihren Roland-Vertragspartner
oder Ihr Roland Service Center (siehe Seite
“Information” am Ende dieser Anleitung) zu
Rate ziehen.
Keine instabilen Flächen
Sorgen Sie dafür, dass das Instrument auf
einer ebenen, stabilen Unterlage aufgestellt
wird, auf der es nicht wackeln kann.
Sicherheitshinweise bei Verwendung eines Stativs
Lesen Sie sorgfältig den Abschnitt auf
SeiteS. 3 dieser Anleitung, bevor Sie das
Instrument auf ein Stativ stellen, um
mögliche Risiken bzw. Schäden durch
Instabilität des Stativs vorzubeugen.
Nur den beigefügten Netzadapter benutzen und auf
die korrekte Spannung achten
Verwenden Sie nur den dem Gerät
beigefügten Netzadapter. Stellen Sie sicher,
dass die Spannung des Stromnetzes mit der
vom Netzadapter geforderten Spannung
übereinstimmt. Die Verwendung von
anderen Netzadaptern kann zu Schäden
bzw. zu einem Kurzschluss führen. Benutzen
Sie den Netzadapter nicht mit anderen
Geräten.
10
Ausschalten bei Fehlfunktionen
Schalten Sie das Gerät sofort aus, trennen
Sie es von der Stromversorgung, und
benachrichtigen Sie Ihren RolandVertragspartner bzw. Ihr Roland Service
Center, wenn
• das Netzteil bzw. das Netzkabel
beschädigt ist
• sich Rauch entwickelt (Netzteilschaden)
• Gegenstände bzw. Flüssigkeit in das
Instrument gelangt sind
• das Instrument nass geworden ist
• das Instrument nicht wie gewohnt
funktioniert
• der Sound unnormal klingt.
Aufsichtspicht von Erwachsenen
In Haushalten mit Kindern sollte ein
Erwachsener solange für Aufsicht
sorgen, bis das betreende Kind das
Instrument unter Beachtung aller
Sicherheitsvorschriften zu bedienen weiß.
Page 27
VORSICHT
Für ausreichende Belüftung sorgen
Achten Sie darauf, dass das Instrument
und der Netzadapter ausreichend belüftet
werden.
Nur ein empfohlenes Stativ verwenden
Verwenden Sie ausschließlich ein von
Roland empfohlenes Stativ, z.B. den Roland
KS-12 oder KS-18Z. Für die Stabilität bzw.
Sicherheit von Stativen anderer Hersteller
kann keine Gewährleistung übernommen
werden.
Vorsicht bei Verwendung eines Stativs
Achten Sie immer darauf, dass das
Instrument sicher auf dem Ständer
aufgestellt wird und nicht herunterfallen
bzw. der Ständer umkippen kann.
Nur am Stecker ziehen, nicht am Kabel
Ziehen Sie nie am Kabel, sondern fassen Sie
beim Aus- und Einstöpseln des Netzkabels
immer nur den Stecker.
SICHERHEITSHINWEISE
Deutsch Français Italiano Español Português NederlandsEnglish
Staubpartikel entfernen
Achten Sie darauf, dass sich am Netzkabel,
Netzstecker bzw. Netzadapter kein Staub
bendet. Entfernen Sie Staubpartikel
regelmäßig. Trennen Sie das Netzkabel
von der Stromversorgung, wenn Sie das
Instrument längere Zeit nicht benutzen.
Sicherheitsmaßnahmen bei Kabeln
Achten Sie darauf, dass die Kabel nicht
durcheinandergeraten. Verlegen Sie die
Kabel außerdem so, dass Kinder nicht an sie
herankommen.
Gerät nicht belasten
Stellen Sie sich nicht auf das Gerät,
und belasten Sie es nicht mit schweren
Gegenständen.
Netzteil/Netzkabel nicht mit nassen Händen anfassen
Fassen Sie das Netzkabel bzw. den
Netzadapter niemals mit nassen Händen
an.
Hinweise für den Transport
Wenn Sie das Instrument bewegen bzw.
transportieren möchten, trennen Sie nicht
nur das Netzkabel vom Gerät, sondern auch
alle zu externen Geräten führenden Kabel.
Achten Sie darauf, dass das Instrument
waagerecht tranportiert wird.
Vor der Reinigung vom Stromnetz trennen
Wenn Sie das Instrument reinigen wollen,
schalten Sie es vorher aus und trennen es
vom Stromnetz (S. 6).
Maßnahmen bei Gewitter
Bei Gewitter sollten Sie das Gerät vom
Stromnetz trennen.
11
Page 28

WICHTIGE HINWEISE
Stromversorgung
• Verwenden Sie keine Stromkreise, durch die auch
Geräte gespeist werden, die störende Geräusche
erzeugen bzw. Fehlfunktionen auslösen können
(z.B. Motoren, Lichtsysteme, Waschmaschinen,
Mikrowellen-Herd etc.). Benutzen Sie bei Bedarf ein
Geräuschlter-System.
• Der AC-Adapter erwärmt sich bei Dauerbetrieb.
Dieses ist normal und keine Fehlfunktion.
• Schalten Sie alle beteiligten Geräte aus, bevor
Sie neue Kabelverbindungen vornehmen, um
eventuellen Beschädigungen oder Fehlfunktionen
vorzubeugen.
• In der Werksvoreinstellung wird das RD-64 nach
4 Stunden automatisch ausgeschaltet, wenn das
Instrument in der Zwischenzeit nicht gespielt bzw.
betätigt wurde. Um die automatische Abschaltung
zu verhindern, stellen Sie den Parameter “AUTO
OFF” auf “OFF” (siehe S. 8).
Positionierung
• Die Positionierung in der Nähe von großen
Verstärkern kann Brummgeräusche zur Folge
haben. Vergrößern Sie in diesem Fall den Abstand
zwischen Instrument und Verstärker.
• Stellen Sie dieses Instrument nicht in der direkten
Nähe von Fernsehern oder Radiogeräten auf, da
ansonsten deren Empfang beeinträchtigt werden
kann.
• Schnurlose Telefone und Funktelefone können,
sobald Sie in der Nähe des Gerätes betrieben
werden, Störgeräusche verursachen. Betreiben Sie
daher Telefone nicht in der Nähe des Instrumentes
bzw. schalten Sie das Telefon aus.
• Setzen Sie das Gerät keinen extremen Temperaturen
aus, z.B. durch direkte Sonneneinstrahlung,
Aufstellung direkt neben einem Heizkörper oder
direkte Bestrahlung durch eine starke Lichtquelle. In
diesem Fall kann die Oberäche abfärben bzw. das
Gehäuse verformt werden.
• Wenn das Gerät Temperatur-Unterschieden
ausgesetzt war (z.B. nach einem Transport), warten
Sie, bis sich das Instrument der Raumtemperatur
angepasst hat, bevor Sie es einschalten, ansonsten
können durch Kondensierungs-Flüssigkeit Schäden
verursacht werden.
• Legen bzw. stellen Sie keine Gegenstände auf das
Piano, welche die Oberäche beschädigen können
(z.B. einen Schlüsselbund).
• Legen Sie keine Gegenstände wie z.B. Notenbücher
auf der Klaviatur ab, da ansonsten die Tasten nach
unten gedrückt werden und unerwartet einen
Sound erzeugen können.
• Befestigen Sie keine Aufkleber auf dem Instrument.
Dadurch kann die Gehäuseoberäche beschädigt
werden.
• Auf der Unterseite des Instrumentes sind
Gummifüße befestigt, welche die Oberäche z.B.
eines Tisches verunreinigen bzw. beschädigen
können. Legen Sie ggf. ein Tuch zwischen
Instrument und Tischoberäche. Achten Sie aber
gleichzeitig darauf, dass das Instrument nicht
verrutscht.
• Stellen Sie keine Gefäße mit Flüssigkeit auf das
Instrument (z.B. Blumenvasen). Vermeiden Sie, dass
das Instrument mit Spray, Parfüm etc. in Berührung
kommt, da ansonsten die Oberäche beschädigt
werden kann. Wischen Sie feuchte Stellen mit
einem weichen, trockenen Tuch ab.
Reinigung
• Verwenden Sie ein trockenes Tuch, welches bei
Bedarf mit Wasser leicht angefeuchtet werden
darf. Drücken Sie das Tuch nicht zu fest auf die
Oberäche.
• Verwenden Sie kein Benzin, Verdünner, Alkohol o.ä.,
da ansonsten die Oberäche abfärben bzw. das
Gehäuse verformt werden kann.
Reparaturen und Datensicherung
• Bei einer Reparatur kann vorkommen, dass die
Daten im internen Speicher gelöscht werden, weil
eine Initialisierung des Instrumentes erforderlich ist.
• Roland übernimmt keine Haftung für jegliche Art
von Datenverlusten.
Zusätzliche Hinweise
• Behandeln Sie die Bedienelemente des
Instrumentes mit der notwendigen Sorgfalt.
• Wenn Sie Kabelverbindungen trennen, fassen Sie
das Kabel immer am Stecker, und ziehen Sie nie am
Kabel selbst. Dadurch beugen Sie Beschädigungen
der Kabel vor.
• Spielen Sie das Instrument immer mit einer
angemessenen Lautstärke. Verwenden Sie bei
Bedarf einen Kopfhörer.
• Beachten Sie, dass die vom Instrument
ausgehenden Spielgeräusche bzw. Schallwellen
auch über Wände, Boden und Decke in benachbarte
Räume übertragen werden können.
• Wenn Sie das Instrument transportieren möchten,
achten Sie darauf, dass das Instrument ausreichend
geschützt und nicht beschädigt wird. Verwenden
Sie entweder die Originalverpackung oder ein
stabiles Hard- oder Softcase.
• Verwenden Sie nur das empfohlene ExpressionPedal (EV-5, EV-7; zusätzliches Zubehör). Die
Benutzung von Expression-Pedalen anderer
Hersteller kann zu Fehlfunktionen führen.
• Verwenden Sie nur Audiokabel ohne eingebauten
Widerstand. Bei der Benutzung von Kabeln mit
integriertem Widerstand wird die Lautstärke
deutlich herabgesetzt.
• Die Bandbreite des D-BEAM Controllers wird bei
direkter Sonneneintrahlung sehr klein. Beachten Sie
dieses, wenn Sie das Instrument im Freien spielen.
Hinweise zum Copyright, zu
Lizenzvereinbarungen und zu
Warenzeichen
• Das Copyright auf den Inhalt dieses Instrumentes
(Sound-Wellenformen, Styledaten, Patterns,
Phrasen, Audio Loops, Bilddaten) liegt bei der
Roland Corporation.
• Als Besitzer dieses Instrumentes sind Sie
Lizenznehmer für die Nutzung der Inhalte dieses
Instrumentes für Ihre eigene Arbeit.
• Es ist nicht gestattet, das im Insturment bereit
gestellte Klangmaterial in originaler oder
veränderter Form zu verkaufen, z.B. über ein
Computer-Netzwerk.
• MMP (Moore Microprocessor Portfolio) ist ein
Patent für die Architektur von Mikroprozessoren,
entwickelt von der Technology Properties Limited
(TPL). Roland ist ein Lizenznehmer der TPL-Gruppe.
• Roland und SuperNATURAL sind Warenzeichen bzw.
eingetragene Warenzeichen der Roland Corporation
in den USA und/oder anderen Ländern.
• Alle anderen Produktbezeichnungen sind
Warenzeichen bzw. eingetragene Warenzeichen des
jeweiligen Herstellers.
12
Page 29
Die Ivory Feel-Klaviatur
Eigenschaften der Ivory Feel-Klaviatur
Hochwertige akustische Klaviere besitzen weiße Tasten aus Elfenbein und schwarze Tasten aus Ebenholz. Die “Ivory Feel”- Klaviatur von Roland nutzt
die neuesten Technologien der Klaviatur-Produktion, um das Spielgefühl akustischer Klaviere naturgetreu zu reproduzieren und besitzt u.a. die
folgenden Eigenschaften:
• Die Tasten besitzen eine grige Oberäche und ein sehr gutes Spielgefühl.
• Die Oberäche der Tasten absorbiert die Feuchtigkeit der Finger beim Spiel.
• Die weißen Tasten haben einen leicht gelblichen Ton und sind der originalen Elfenbein-Färbung sehr ähnlich.
Hinweise zur Behandlung und Reinigung der Klaviatur
Bitte beachten Sie die folgenden Hinweise, um Beschädigungen bzw. Verfärbungen der Klaviatur vorzubeugen.
• Beschreiben Sie nicht die Tasten mit einem Kugelschreiber o.ä.. Es können nicht mehr zu entfernende Flecke auftreten.
• Befestigen Sie keine Aufkleber auf den Tasten. Die Rückstände der Aufkleber sind eventuell nicht entfernbar, und es können Verfärbungen an den
Klebestellen auftreten.
• Entfernen Sie Schmutz mit einem weichen, trockenen oder leicht feuchtem Tuch. Drücken Sie das Tuch nicht zu fest auf die Tasten.
• Entfernen Sie hartnäckigen Schmutz mit einem milden Reinigungsmittel für Klaviaturen. Drücken Sie das Tuch nicht zu fest auf die Tasten.
• Verwenden Sie kein Benzin, Verdünner bzw. Alkohol, da dadurch die Oberäche der Tasten beschädigt wird.
Steuern eines externen MIDI-Soundmoduls im Piano Mode
Deutsch Français Italiano Español Português NederlandsEnglish
Im Piano Mode können Sie im RD-64 den MIDI-Kanal einstellen und verschiedene MIDI-Einstellungen vornehmen wie z.B. Bank Select- und
Programmwechsel-Meldungen, Aftertouch usw.. Weitere Informationen nden Sie in der Anleitung des Roland A-88 in den Abschnitten “Einstellen
des MIDI-Sendekanals (MIDI CHANNEL)”, “Umschalten von Sounds” und “Der D-BEAM Controller”.
Bei Problemen wie z.B. Notenhängern oder falsch gespielten Sounds können Sie vom RD-64 eine Reset-Meldung senden, um das Problem zu lösen.
Weitere Informationen nden Sie in der Anleitung des Roland A-88 im Abschnitt “Die PANIC-Funktion”.
13
Page 30

Technische Daten
Roland RD-64: Digital Piano
Klaviatur
Tastatur 64 Tasten (Ivory Feel-G-Klaviatur mit Druckpunkt-Simulation)
Anschlagempndlichkeit Key Touch: 5 Typen
Klangerzeugung
SuperNATURAL Piano
Klanggruppen
Maximale Polyphonie 128 Stimmen
Anzahl der Klänge (Tones) 12
Master Tuning (Gesamtstimmung) 415.3 Hz–466.2 Hz (einstellbar in Schritten von 0,1 Hz)
Transponierung Key Transpose: -6–+5 (Halbtöne)
Eekte EFX 1, EFX 2, REVERB
Equalizer 2-Band Digital Equalizer
Andere
Controller
Taster
Schalter [POWER]-Schalter
Display Power-Anzeige (LED), Oktav-Anzeige (LED)
Anschlüsse
Stromversorgung AC-Adapter
Stromverbrauch 4 W
Abmessungen 1,114 (W ) x 273 (D) x 116 (H) mm
Gewicht ca. 12.8 kg
Beigefügtes Zubehör
Zusätzliches Zubehör
SuperNATURAL (E. Piano)
Virtual Tone Wheel Organ
Regler: [MASTER VOLUME], EQ [LOW], [HIGH]
[Pitch Bend/Modulation]-Hebel
D-BEAM Controller
[A. PIANO]-Taster, [E. PIANO]-Taster, [CLAV]-Taster, [ORGAN]-Taster,
TONE VARIATION [1] [2] [3]-Taster,
[FUNCTION]-Taster, [SuperNATURAL]-Taster,
OCTAVE [+] [−]-Taster, [TRANSPOSE]-Taster
[EFX 1], [EFX 2]-Taster, [REVERB]-Taster
DAMPER-Buchse: Klinke (TRS)
FC1, FC2-Buchsen: Klinke (TRS)
MIDI OUT-Anschluss
USB COMPUTER-Anschluss (USB-Typ B)
OUTPUT-Buchsen (L/MONO, R) : Klinke
INPUT-Buchsen (L, R): Cinch
PHONES-Buchse (Kopfhörer): Stereoklinke
DC IN-Buchse
Bedienungsanleitung
Damper Pedal (halbpedal-fähig)
AC-Adapter, Netzkabel für den AC-Adapter
Kopfhörer (Roland RH-Serie)
Keyboardständer (KS-18Z, KS-12)
Pedaleinheit mit drei Pedalen (RPU-3)
Haltepedal (DP-10)
Pedalschalter (DP-2)
Expression Pedal (EV-5, EV-7)
* Änderungen der technischen Daten und des Designs sind möglich. Für Druckfehler wird keine Haftung übernommen.
Copyright © 2013 ROLAND CORPORATION
Alle Rechte vorbehalten,
Vervielfältigung, als Druck oder Datei, als Ganzes oder in Teilen, bedarf einer schriftlichen Genehmigung der ROLAND CORPORATION.
14
Page 31

Deutsch Français Italiano Español Português NederlandsEnglish
Piano numérique
Mode d'emploi
Page 32

Les deux modes du RD-64
Utilisation du RD-64 comme piano (mode Piano)
Le RD-64 bénécie du son SuperNATURAL Piano caractéristique de la gamme RD, qui est l'un des eurons des pianos de
scène. Des sons acoustiques et électriques soigneusement sélectionnés sont intégrés dans l'instrument pour permettre
un jeu expressif. Le clavier Ivory Feel réputé de la gamme RD est également inclus. S'il permet un jeu de touches
expressif et ore une excellente réponse à des touchers rapides répétés, le RD-64 n'en est pas moins léger et compact.
Le RD-64 est extrêmement portable et peut facilement être transporté jusqu'à un studio ou une salle de concert.
Utilisation du RD-64 en mode Piano
À la mise sous tension, le RD-64 démarre en mode Piano.
À propos du mode d'emploi
Lisez ce document.
Utilisation du RD-64 comme clavier contrôleur MIDI (mode Contrôleur)
Si vous maintenez enfoncé le bouton [A. PIANO] tout en mettant l'instrument sous tension, le RD-64 fonctionnera comme
clavier contrôleur MIDI avec les mêmes fonctionnalités*1 que le modèle A-88. Connectez-le à votre ordinateur en utilisant
un câble USB disponible dans le commerce, et utilisez-le avec votre logiciel DAW de production musicale.
* En mode Contrôleur, le générateur de son interne du RD-64 ne produit aucun son. De même, il ne se passe rien lorsque
vous appuyez sur les boutons [TONE SELECT], [ TONE VARIATION] ou [REVERB].
Utilisation du RD-64 en mode Contrôleur
Maintenez enfoncé le bouton [A. PIANO] et mettez l'instrument sous tension ; le RD-64 démarre en mode Contrôleur.
À propos du mode d'emploi
Pour plus de détails sur l'utilisation du RD-64 comme clavier contrôleur MIDI, reportez-vous au manuel PDF du modèle A-88.
Pour obtenir le manuel PDF
Entrez l'URL suivante dans votre ordinateur.
1.
http://www.rolandce.com/fr/fr/support/manuels
2. Choisissez « A-88 Mode d'emploi » de la liste.
*1
Diérences entre le mode Contrôleur du RD-64 et de l'A-88
Le mode Contrôleur du RD-64 dière de celui de l'A-88 des manières suivantes. Lorsque vous consultez le Mode d'emploi de l'A-88
(manuel PDF), tenez compte des points suivants.
• Étant donné que le RD-64 utilise le pilote USB fourni par l'ordinateur (GENERIC), vous n'avez pas besoin d'installer le pilote USB (voir le
chapitre «Installing the Driver » dans le Mode d'emploi de l'A-88). Connectez simplement l'instrument à votre ordinateur au moyen d'un
câble USB disponible dans le commerce. L'instrument est prêt à être utilisé. «Roland Digital Piano » s'ache comme nom du port MIDI.
• Le RD-64 n'est pas équipé de la fonction «UPPER,» «LOWER,» «DUAL»et «SPLIT» de l'A-88 (voir le chapitre «Layering Two Parts»
dans le Mode d'emploi de l'A-88).
Avant d'utiliser cet appareil, veuillez lire attentivement les sections intitulées : «CONSIGNES DE SÉCURITÉ» (p.10) et «REMARQUES IMPORTANTES» (p.12). Ces sections
fournissent d'importantes informations relatives au bon fonctionnement de l'appareil. En outre, pour être sûr de bien maîtriser chacune des fonctionnalités de votre nouvel
appareil, il est nécessaire de lire le Mode d'emploi dans son intégralité. Vous devez conserver ce manuel à portée de main an de pouvoir vous y reporter si besoin.
2
Page 33

Sommaire
Les deux modes du RD-64 . . . . . . . . . . . . . . . . . . . . . . . . . . . . . . . . . . . . . . . . . . . . . . . . . . . . . . . . . . .2
Utilisation du RD-64 comme piano (mode Piano) . . . . . . . . . . . . . . . . . . . . . . . . . . . . . . . . . . . . .2
Utilisation du RD-64 comme clavier contrôleur MIDI (mode Contrôleur) . . . . . . . . . . . . . . .2
Installation du RD-64 sur un support . . . . . . . . . . . . . . . . . . . . . . . . . . . . . . . . . . . . . . . . . . . . . . . . .3
Description du panneau . . . . . . . . . . . . . . . . . . . . . . . . . . . . . . . . . . . . . . . . . . . . . . . . . . . . . . . . . . . . . 4
Connexion . . . . . . . . . . . . . . . . . . . . . . . . . . . . . . . . . . . . . . . . . . . . . . . . . . . . . . . . . . . . . . . . . . . . . . . . . .6
Modication des réglages (mode FUNCTION) . . . . . . . . . . . . . . . . . . . . . . . . . . . . . . . . . . . . . . . . .7
Rétablissement des paramètres d'usine (FACT RESET) . . . . . . . . . . . . . . . . . . . . . . . . . . . . . . . . 7
Modication du toucher du clavier (VELO CURVE) . . . . . . . . . . . . . . . . . . . . . . . . . . . . . . . . . . . . 7
Spécication de la Valeur de Vélocité du Clavier (KEY VELO) . . . . . . . . . . . . . . . . . . . . . . . . . . .7
Accordage sur la hauteur de son d'autres instruments (diapason) . . . . . . . . . . . . . . . . . . . . .8
Mise hors tension automatique à l'expiration d'un délai (AUTO OFF) . . . . . . . . . . . . . . . . . .8
Sélection du pilote dédié (ADVANCED) ou du pilote générique (GENERIC) . . . . . . . . . . . . .8
Guide de dépannage . . . . . . . . . . . . . . . . . . . . . . . . . . . . . . . . . . . . . . . . . . . . . . . . . . . . . . . . . . . . . . . . 9
CONSIGNES DE SÉCURITÉ . . . . . . . . . . . . . . . . . . . . . . . . . . . . . . . . . . . . . . . . . . . . . . . . . . . . . . . . . . 10
REMARQUES IMPORTANTES . . . . . . . . . . . . . . . . . . . . . . . . . . . . . . . . . . . . . . . . . . . . . . . . . . . . . . . 12
À propos du clavier Ivory Feel . . . . . . . . . . . . . . . . . . . . . . . . . . . . . . . . . . . . . . . . . . . . . . . . . . . . . 13
Contrôle d'un Générateur de Son MIDI Externe en Mode Piano . . . . . . . . . . . . . . . . . . . . . . 13
Spécications principales . . . . . . . . . . . . . . . . . . . . . . . . . . . . . . . . . . . . . . . . . . . . . . . . . . . . . . . . . 14
Installation du RD-64 sur un support
Si vous souhaitez installer le RD-64 sur un support, utilisez la référence Roland KS-18Z ou KS-12.
Placez l'instrument sur le support comme suit.
Faites attention à ne pas pincer vos doigts lorsque vous installez le support.
KS-18Z
Deutsch Français Italiano Español Português NederlandsEnglish
Alignez l'avant du
RD-64 avec l'avant
du support.
KS-12
Réglez le support
de manière à ce
que la hauteur ne
dépasse pas 1 mètre
(réglez le support
sur un niveau ne
dépassant pas le
quatrième niveau à
partir du bas).
Réglez la largeur du support de
manière à ce que les pieds en
caoutchouc du RD-64 viennent se
placer de part et d'autre du support.
Vue de dessus
Ajustez la largeur du support
de manière à ce que les pieds
en caoutchouc sur le côté du
clavier dans sa partie inférieure
s'ajustent dans les orices prévus.
Vue de dessus
3
Page 34

Description du panneau
Commutateur [POWER]
Mise sous tension
* Une fois que l'équipement est correctement connecté (p. 6), suivez la procédure de mise
sous tension décrite ci-après. Si vous n'allumez pas l'équipement dans le bon ordre, vous
risquez de provoquer des dysfonctionnements ou une panne de l'équipement.
* Cet appareil est équipé d'un circuit de protection. Un bref délai (quelques secondes) après la
mise hors tension de l'appareil est nécessaire avant que ce dernier fonctionne correctement.
* Avant la mise sous/hors tension, veillez toujours à régler le volume au minimum. Même si le
volume est réglé au minimum, il se peut que vous entendiez du son en mettant l'appareil sous/hors
tension. Ce phénomène est tout à fait normal et n'indique aucunement un dysfonctionnement.
1. Baissez le volume à l'aide du bouton [MASTER VOLUME].
Réglez également au minimum le volume de tout dispositif audio connecté ou autre équipement.
2. Mettez le commutateur [POWER] sur la position ON.
3. Mettez sous tension les périphériques externes connectés.
4. Réglez le volume du RD-64 et des appareils externes
connectés.
Mise hors tension
Baissez le volume à l'aide du bouton [MASTER VOLUME].
1.
2. Mettez hors tension les périphériques externes connectés.
3. Mettez le commutateur [POWER] sur la position OFF.
* Le RD-64 est réglé en usine pour s'éteindre automatiquement quatre
heures après que vous ayez arrêté de jouer ou d'utiliser l'appareil.
Si vous préférez désactiver la mise hors tension automatique, dénissez
le réglage «AUTO OFF» sur «OFF» (Désactivé) en suivant les instructions
données à la section p. 8.
Bouton [MASTER VOLUME]
Réglage du volume
Tournez le bouton vers la droite pour augmenter le volume, ou vers la gauche pour le baisser.
Bouton [TONE SELECT], [TONE VARIATION]
Sélection de sons
1. Appuyez sur les boutons [TONE SELECT] pour sélectionner le groupe de sons.
2. Appuyez sur les boutons [TONE VARIATION] pour sélectionner une variation.
Groupe Variation 1 Variation 2 Variation 3
A. PIANO CONCERT GRAND BRIGHT PIANO CONCERT MONO
E. PIANO PURE VINTAGE TINE EP WURLY
CLAV COMBINATION MEDIUM BRILLIANT
ORGAN JAZZ ORGAN ROCK ORGAN FULL DRAW
Bouton [FUNCTION]
Modication des réglages
Utilisez ce bouton pour ajuster le toucher du clavier ou procéder à des aectations de
pédale. Pour en savoir plus, reportez-vous à la section «Modication des réglages (mode
FUNCTION)» (p.7).
Bouton [SuperNATURAL]
En mode Piano, ce bouton reste allumé et il ne se passe rien lorsque vous appuyez dessus.
Il est uniquement utilisé lorsque vous avez connecté un «générateur de son compatible
SuperNATURAL» en mode Contrôleur. Pour en savoir plus, reportez-vous à la section
«Utilisation du RD-64 comme clavier contrôleur MIDI (mode Contrôleur)» (p.2).
Levier [Pitch Bend/Modulation]
Modication de la hauteur de la note jouée (Pitch Bend)
Vous pouvez actionner le levier vers la gauche pour diminuer la note, ou vers la droite pour l'augmenter. C'est ce qu'on appelle
un eet de «pitch bend ».
Application d'une modulation à la note jouée (Modulation)
Si vous éloignez le levier de vous, vous appliquez alors un vibrato. C'est ce qu'on appelle un eet de «modulation ».
* L'eet obtenu lorsque vous déplacez le levier peut varier selon le son utilisé. Par ailleurs, l'eet appliqué en déplaçant le levier est prédéterminé
pour chaque son et ne peut pas être modié.
4
Eet Pitch bend
Eet de modulation
Page 35

Description du panneau
Contrôleur D-BEAM
Application de divers eets au son en déplaçant la main
Pour activer le contrôleur D-BEAM, appuyez sur le bouton de manière à ce qu'il s'allume.
Bouton Fonction
[PITCH] La note change lorsque vous déplacez votre main au-dessus du contrôleur D-BEAM.
[VOL] Le volume change, ce qui vous permet d'ajouter de l'expression à votre jeu.
[ASSIGN] L'eet aftertouch est appliqué.
Plage opérationnelle du
contrôleur D-BEAM
Cette illustration montre la plage
opérationnelle du contrôleur
D-BEAM. Vous n'obtiendrez
aucun eet si vous positionnez
votre main en-dehors de la
plage opérationnelle.
* La plage opérationnelle du
contrôleur D-BEAM change
suivant les conditions d'éclairage.
Bouton [REVERB]
Ajout de réverbération au son (Reverb)
En appuyant sur le bouton [REVERB] pour l'allumer, vous pouvez appliquer un eet de réverbération (Reverb) au son que vous jouez au clavier.
L'application de l'eet de réverbération reproduit l'ambiance spacieuse caractéristique des salles de concert.
* Vous ne pouvez pas régler la quantité d'eet de réverbération.
Deutsch Français Italiano Español Português NederlandsEnglish
Bouton EQ [LOW], [HIGH]
Réglage des plages supérieures et inférieures (Égaliseur)
Le RD-64 est équipé d'un égaliseur à deux bandes.
Vous pouvez régler le niveau de la plage basses fréquences et de la plage hautes fréquences pour chaque son.
* Les réglages de l'égaliseur sont stockés individuellement pour chaque son (Maintenez le bouton [SuperNATURAL] enfoncé et appuyez sur les boutons [A. PIANO] et [ORGAN]
simultanément pour sauvegarder les 12 sons).
Bouton [EFX 1], [EFX 2]
Application d'eets au son
En appuyant sur le bouton [EFX 1] ou [EFX 2] jusqu'à ce qu'il s'allume, vous pouvez appliquer un eet au son que vous jouez au clavier.
Les eets suivants sont appliqués pour chaque groupe de sons.
Groupe EFX 1 EFX 2
A. PIANO ENHANCER DAMPER RESONANCE
E. PIANO TREMOLO PHASER
CLAV AUTO WAH OVERDRIVE
ORGAN ROTARY SPEED
* Les statuts activé/désactivé des boutons [EFX 1] et [EFX 2] sont mémorisés individuellement pour chaque son (Maintenez le bouton [SuperNATURAL] enfoncé et appuyez sur
les boutons [A. PIANO] et [ORGAN] simultanément pour sauvegarder les 12 sons).
Bouton OCTAVE [−], [+], [TRANSPOSE]
Changement d'octave (Octave Shift)
Vous pouvez utiliser les boutons [+] [–] pour augmenter ou diminuer la note du clavier
(déplacement d'octave).
• Vous pouvez modier ce réglage dans une plage de -4 à 5 octaves.
• Si vous appuyez simultanément sur le bouton [+] et le bouton [–], ce réglage sera réinitialisé à 0.
Voyant et réglage indiqué
Modication de la note (Transpose)
En maintenant enfoncé le bouton [TRANSPOSE], vous pouvez utiliser les boutons [+] [–] pour
transposer la note par demi-tons.
• Vous pouvez modier ce réglage dans une plage de -6 à 5.
• Lorsque le bouton [TRANSPOSE] est activé, le réglage de transposition est activé. Lorsque le bouton
[TRANSPOSE] est désactivé, le réglage de transposition est désactivé.
• Si vous appuyez simultanément sur le bouton [TRANSPOSE], le bouton [+] et le bouton [–], ce réglage sera
réinitialisé à 0.
-6
-5 -4 -3 -2 -1 0 1 2 3 4 5
Éteint Allumé
5
Page 36

Connexion
Prises INPUT
Si vous connectez un lecteur
audio ou dispositif similaire, la
sortie audio du dispositif branché
s'eectue depuis les prises OUTPUT
et PHONES.
* Utilisez les commandes du
dispositif branché (lecteur audio)
pour régler le volume.
Prises OUTPUT
Si vous branchez ces prises à des haut-parleurs
ampliés, ils produiront le son de cet appareil.
Prise PHONES
Connectez le casque (vendu séparément)
ici.
Prise DC IN
Connectez ici l'adaptateur secteur fourni.
Installez l'adaptateur secteur de sorte
que le témoin soit orienté vers le haut et
le texte vers le bas. Le témoin s'allume
lorsque vous branchez l'adaptateur
secteur à une prise secteur.
Vers une prise secteur
Pédale forte
fournie
Réglez le commutateur de la pédale forte fournie sur
«Continuous » lorsque la pédale est connectée.
ou commutateur à pédale (vendu séparément
; série DP)
ou
Pédale (vendue
séparément ; RPU-3)
Prises pédale (DAMPER, FC2, FC1)
Lorsque vous connectez la pédale fournie à la prise DAMPER, la pédale peut être
utilisée comme pédale forte.
Les pédales connectées aux prises pédale fonctionnent comme suit (avec les
paramètres d'usine).
Prise Explication
Cette pédale maintient le son. Tant que cette
DAMPER Pédale forte
FC2 Pédale sostenuto
FC1 Pédale douce Cette pédale adoucit le son.
pédale est enfoncée, les notes sont maintenues
de façon prolongée même si vous relâchez les
touches.
Cette pédale maintient uniquement les notes
des touches que vous avez actionnées juste
avant d'enfoncer la pédale.
Cordon
d'alimentation
Port USB COMPUTER
Si le RD-64 est connecté à votre
ordinateur au moyen d'un câble USB
disponible dans le commerce, vous
pouvez utiliser le logiciel compatible
MIDI pour enregistrer et écouter vos
performances au RD-64 (données MIDI).
* L'audio USB n'est pas pris en charge.
Connecteur MIDI OUT
Vous pouvez connecter et jouer un générateur de son MIDI.
REMARQUE
* Pour éviter un dysfonctionnement ou une panne de l'équipement,
veillez à toujours baisser le volume et à couper l'alimentation de
tous les appareils avant de les connecter.
* Utilisez exclusivement la pédale d'expression spéciée (EV-5, EV-7 ;
vendue séparément). La connexion d'autres types de pédales
d'expression risque d'endommager l'appareil ou de provoquer des
dysfonctionnements (mode Contrôleur).
6
Page 37

Modication des réglages (mode FUNCTION)
En mode FUNCTION, vous pouvez régler la sensibilité du clavier.
Comprendre les explications des procédures
Appuyez sur le bouton
[FUNCTION].
Appuyez sur la touche avec
«VELO CURVE » imprimé au-dessus.
Appuyez sur les touches avec «NUMERIC ENTRY» imprimé au-dessus.
* Les valeurs non comprises dans la plage acceptable ne seront pas entrées.
0–4
Valeur 0–4
Rétablissement des paramètres d'usine (FACT RESET)
Modication du toucher du clavier (VELO CURVE)
Vous pouvez régler la sensibilité tactile du clavier.
0–4
Appuyez sur la touche avec «ENTER »
imprimé au-dessus.
Deutsch Français Italiano Español Português NederlandsEnglish
Valeur 0–4
Valeur
Réglage Explication
0 SUPER LIGHT Un réglage encore plus léger que LIGHT.
1 LIGHT
MEDIUM (valeur
2
par défaut)
3 HEAVY
4 SUPER HEAVY Un réglage encore plus lourd que HEAVY.
Avec ce réglage, le piano réagit à un toucher léger. Vous pouvez jouer fortissimo ( ) en exerçant moins de force sur les touches que pour le
réglage «normal». Ce réglage facilite le jeu, notamment pour les enfants.
Avec ce réglage, le piano réagit à un toucher standard. Vous pouvez ainsi jouer en bénéciant d'un toucher le plus naturel possible, le plus
proche du toucher d'un piano acoustique.
Avec ce réglage, le piano réagit à un toucher lourd. Il faut exercer une force plus importante qu'avec le réglage «normal» pour jouer
fortissimo (); le clavier semble plus dur. Un toucher dynamique rend votre jeu plus expressif.
Spécication de la Valeur de Vélocité du Clavier (KEY VELO)
0–9
* Si vous tentez d'entrer une valeur non
comprise dans la plage acceptable, les deux
ou trois numéros appuyés immédiatement
Valeur 0–127
Valeur
Réglage Explication
TOUCH (valeur
0
par défaut)
1 Valeur xe La valeur de vélocité émise est xe, quelle que soit la force avec laquelle on appuie sur les touches du clavier.
Les valeurs de vélocité émises sont fonction de la sensibilité clavier/courbe de vélocité sélectionnées par le biais du paramètre «Modication
du toucher du clavier (VELO CURVE)» (p.7).
avant ENTER seront utilisés.
7
Page 38

Modication des réglages (mode FUNCTION)
Accordage sur la hauteur de son d'autres instruments (diapason)
Pour obtenir un son d'ensemble harmonieux avec un ou plusieurs instruments, il faut veiller à ce que la hauteur de son de référence de chaque
instrument soit accordée en fonction de celle des autres instruments. En règle générale, l'accordage d'un instrument est indiqué par la hauteur de son
en Hertz (Hz) de la note centrale «La».
La plage de hauteur de son est comprise entre 415,3–440,0–466,2 Hz (par défaut : 440,0 Hz).
3 0–9
Valeur 3
Valeur 4153–4662
Entrez 4 chires
Exemple : Si la valeur est
440,0 Hz, appuyez sur les
touches dans l'ordre
4, 4, 0, 0 et ENTER.
Utilisation de NUMERIC ENTRY pour saisir une valeur
0–9
Valeur 4153–4662
Touches NUMERIC ENTRY appuyées
dans cet ordre
4, 4, 0, 0, ENTER 440.0
1, 2, 3, 4, ENTER —
1, 4, 3, 8, 0, ENTER 438.0
8, 4, 4, 6, 6, 3, ENTER —
Cette valeur
est entrée
* Si vous tentez d'entrer une valeur non
comprise dans la plage acceptable, les
quatre numéros appuyés immédiatement avant ENTER seront utilisés.
Mise hors tension automatique à l'expiration d'un délai (AUTO OFF)
AVERTISSEMENT
Le RD-64 est réglé en usine pour s'éteindre automatiquement quatre heures après que vous ayez arrêté de jouer ou d'utiliser l'appareil. Si vous
préférez désactiver la mise hors tension automatique, dénissez le réglage «AUTO OFF» sur «OFF» (Désactivé) en suivant les instructions données
ci-dessous.
0–1
Valeur 0–1
Valeur
Réglage Explication
0 OFF La mise hors tension automatique de l'appareil est désactivée.
1 ON (valeur par défaut) L'appareil est mis automatiquement hors tension 240minutes (quatreheures) après que vous ayez arrêté de jouer ou d'utiliser l'appareil.
Sélection du pilote dédié (ADVANCED) ou du pilote générique (GENERIC)
En règle générale, vous n'avez pas besoin d'installer un pilote pour connecter le RD-64 à votre ordinateur. Toutefois, si un problème se
produit ou si la performance n'est pas satisfaisante, vous pouvez utiliser le pilote Roland d'origine an de résoudre le problème.
Dans ce cas, réglez le pilote USB sur «ADVANCED» sur le RD-64 comme décrit ci-dessous, puis installez le pilote USB sur votre
ordinateur.
Procédure d'installation du pilote USB
Pour plus de détails sur le téléchargement et l'installation du pilote
Roland d'origine, reportez-vous au site Web de Roland.
Site Web de Roland
Après avoir modié ce réglage, vous devez éteindre le RD-64, puis le rallumer.
En règle générale, vous pouvez laisser ce réglage sur « GENERIC ».
http://www.roland.com/support/
Bouton Réglage Explication
Bouton [+] ADVANCED Choisissez ce réglage si vous souhaitez utiliser un pilote USB que vous avez téléchargé sur le site Web de Roland.
Bouton [–]
GENERIC
(valeur par défaut)
Choisissez ce réglage si vous souhaitez utiliser le pilote USB générique fourni avec votre ordinateur. En règle générale, il est
recommandé d'utiliser ce mode.
8
Page 39

Guide de dépannage
Si le RD-64 ne fonctionne pas de la manière attendue, commencez par vérier les points suivants. Si le problème n'est toujours pas résolu, consultez
votre revendeur ou la Roland Service Station la plus proche.
Problème Vérication/Solution Page
Impossible d'allumer l'appareil
Aucun son
L'instrument branché à la prise INPUT a
un volume insusant.
Les tons sont altérés
La hauteur de son est bizarre
Le son est coupé
La pédale ne fonctionne pas ou est
bloquée/la pédale ne fonctionne pas
correctement
La réverbération continue même après
coupure de l'eet
Le son des notes les plus hautes change
subitement à partir d'une certaine
touche
Un signal très haut est audible
Les notes graves sonnent faux ou
bourdonnent
L'adaptateur secteur et le cordon d'alimentation du RD-64 sont-ils correctement branchés sur une
source d'alimentation et connectés au RD-64?
Les amplicateurs et les haut-parleurs connectés sont-ils allumés ?
Le volume est-il réglé au minimum ?
Le bouton [MASTER VOLUME] est-il réglé au minimum ? p. 4
Les haut-parleurs sont-ils correctement connectés ?
Connectez des haut-parleurs ampliés ou un casque.
Des sons sont-ils audibles lorsque le casque est connecté ?
Des sons audibles via le casque peuvent indiquer un court-circuit dans un câble audio ou un
problème d'amplicateur ou de console de mixage. Vériez à nouveau les câbles et l'équipement.
Est-il possible que le volume ait été baissé en utilisant une pédale ou le contrôleur D-BEAM ?
Enfoncez la pédale ou positionnez votre main au-dessus du contrôleur D-BEAM.
Le RD-64 a-t-il été démarré en mode Contrôleur (en mettant l'instrument sous tension tout en
maintenant le bouton [A. PIANO] enfoncé)?
Le RD-64 ne produira pas de son en mode Contrôleur.
Le volume du dispositif connecté a-t-il été baissé ?
Réglez le volume du dispositif connecté.
Utilisez-vous un câble contenant une résistance ?
Servez-vous d'un câble qui ne contient pas de résistance.
La hauteur de son a-t-elle été modiée en utilisant une pédale ou le contrôleur D-BEAM ?
Enfoncez la pédale ou positionnez votre main au-dessus du contrôleur D-BEAM.
En cas de connexion mono, la qualité sonore peut varier selon le son sélectionné et le registre dans
lequel il est utilisé.
Pour une qualité d'écoute optimale, une connexion en stéréo est recommandée.
Selon le son sélectionné, les hauteurs de son jouées dans certains registres seront modiées et
jouées à d'autres hauteurs.
Avez-vous activé Octave/Transpose? p. 5
La hauteur de son a-t-elle été modiée en utilisant une pédale ou le contrôleur D-BEAM ?
Enfoncez la pédale ou positionnez votre main au-dessus du contrôleur D-BEAM.
Lorsque vous tentez de jouer simultanément plus des 128 voix maximum, le son en cours d'émission
peut être coupé.
Le pédale est-elle correctement branchée?
Enfoncez correctement la che du câble dans la prise Pedal.
Utilisez-vous une pédale d'un autre fabricant ?
Utilisez la pédale fournie ou une pédale en option de la série RPU-3, DP, EV, ou pédale similaire.
Le son de piano du RD-64 reproduit dèlement la profondeur et la résonance d'un piano acoustique.
Cela peut donner l'impression que l'eet de réverbération n'a pas été coupé.
Sur un piano acoustique, les touches à droite du clavier continuent de résonner indépendamment
de la pédale forte. Ces notes ont aussi un timbre légèrement diérent. Le RD-64 simule dèlement
cette caractéristique des pianos acoustiques. Sur le RD-64, la plage de notes qui n'est pas aectée
par la pédale forte change en fonction du réglage Octave/Transpose.
Les sons de piano aigus et brillants contiennent des hautes fréquences pouvant évoquer une
sonnerie métallique. Ce phénomène reproduit dèlement le son d'un piano et n'est pas un
dysfonctionnement.
Dans le cas de certains sons, il peut y avoir une impression de distorsion.
Baissez le volume. Vous pouvez sinon diminuer le paramètre Master gain.
p. 6
p. 4
p. 6
−
−
p. 2
−
−
−
−
−
−
−
p. 6
p. 6
−
−
−
−
Deutsch Français Italiano Español Português NederlandsEnglish
9
Page 40

CONSIGNES DE SÉCURITÉ
CONSIGNES DE SÉCURITÉ
CONSIGNES À RESPECTER POUR ÉVITER TOUT RISQUE D’ÉLECTROCUTION, D’INCENDIE ET DE BLESSURE
À propos des messages de type AVERTISSEMENT et ATTENTION
Utilisé pour les instructions destinées à
AVERTISSEMENT
ATTENTION
prévenir les utilisateurs d’un danger de
mort ou d’un risque de blessure grave en
cas d’utilisation incorrecte de l’appareil.
Utilisé pour les instructions destinées
à prévenir les utilisateurs d’un risque de
blessure ou de dommages matériels en
cas d’utilisation incorrecte de l’appareil.
* Les dommages matériels font référence
aux dommages ou autres conséquences
préjudiciables relatifs au domicile et
à son ameublement, ainsi qu’aux
animaux de compagnie.
VEUILLEZ TOUJOURS RESPECTER LES CONSIGNES SUIVANTES
À propos des symboles
Le symbole attire l’attention des utilisateurs sur des
instructions ou des avertissements importants. La signification
de chaque symbole est déterminée par l’image représentée
dans le triangle. Le symbole présenté à gauche est utilisé
pour des précautions, des avertissements ou des alertes
à caractère général signalant des dangers.
Le symbole attire l’attention des utilisateurs sur des
manipulations interdites. La manipulation interdite est indiquée
par l’image représentée dans le cercle. Le symbole présenté
à gauche indique une interdiction de démonter l’appareil.
Le symbole attire l’attention des utilisateurs sur des
actions obligatoires. L’action spécifique à effectuer est indiquée
par l’image représentée dans le cercle. Le symbole présenté
à gauche indique que le cordon d’alimentation doit
être débranché de la prise.
AVERTISSEMENT
N'eectuez aucun démontage ou modication
vous-même
N'ouvrez pas (ou ne modiez pas d'une
quelconque manière) l'appareil ou son
adaptateur secteur.
Ne réparez pas ou ne remplacez pas les pièces vous-même
N'essayez pas de réparer l'appareil ou
d'en remplacer des pièces (sauf si le
présent manuel fournit des instructions
spéciques dans ce sens). Pour toute
opération de maintenance, prenez contact
avec votre revendeur, avec le centre de
maintenance Roland le plus proche, ou avec
un distributeur Roland agréé (voir la page
«Information»).
N'utilisez pas l'instrument et ne le rangez pas dans les
types d'emplacement suivants :
• exposés à des températures extrêmes (par
exemple, exposition directe à la lumière
du soleil dans un véhicule fermé, près
d'un conduit de chauage, ou sur un
équipement produisant de la chaleur) ;
• embués (par exemple, salle de bains,
cabinet de toilettes, sol mouillé) ;
• exposés à la vapeur ou à la fumée ;
• exposés au sel ;
• humides ;
• exposés à la pluie ;
• poussiéreux ou sableux ;
• soumis à de fortes vibrations et secousses.
Utilisez uniquement le support recommandé
Cet appareil doit uniquement être utilisé
avec un support recommandé par Roland.
Ne le placez pas sur une surface instable
Lorsque vous utilisez l'appareil avec un rack ou
un support recommandé par Roland, placez
le rack ou le support avec précaution sur une
surface plane et stable. Si vous n'utilisez pas de
rack ou de support, vous devez toutefois vous
assurer que l'emplacement d'installation de
l'appareil ore une surface plane capable de
supporter l'appareil et de l'empêcher d'osciller.
Précautions lors de l'installation de l'appareil sur un
support
Veuillez vous conformer aux instructions
fournies dans le Mode d'emploi lorsque vous
installez l'appareil sur un support (p. 3).
S'il n'est pas correctement installé, il peut en
résulter une instabilité susceptible d'entraîner
la chute de l'appareil ou le basculement du
support et de provoquer des blessures.
AVERTISSEMENT
Utilisez uniquement l'adaptateur secteur fourni et la
tension correcte
Servez-vous exclusivement de l'adaptateur
secteur fourni avec l'appareil. En outre,
assurez-vous que la tension à l'installation
correspond à la tension en entrée indiquée
sur l'adaptateur secteur. Les autres
adaptateurs secteur pouvant utiliser une
polarité diérente ou être conçus pour
une tension diérente, leur utilisation
risque de provoquer des dommages, des
dysfonctionnements ou une décharge
électrique.
Utilisez uniquement le cordon d'alimentation fourni
Utilisez uniquement le cordon
d'alimentation inclus. Par ailleurs, le cordon
d'alimentation fourni ne doit pas être utilisé
avec un autre appareil.
Ne pliez pas le cordon d'alimentation et ne placez pas
d'objets lourds dessus
Évitez de tordre ou de plier le cordon
d'alimentation de manière excessive, et
ne placez pas d'objets lourds dessus. Vous
risqueriez d'endommager le cordon et de
provoquer de graves dommages ou des
courts-circuits. Les cordons endommagés
entraînent un risque d'incendie et
d'électrocution!
Évitez une utilisation prolongée à volume élevé
Utilisé seul ou en association avec un
amplicateur et des casques stéréo ou
des haut-parleurs, cet appareil peut
produire des niveaux sonores susceptibles
d'entraîner une perte auditive dénitive.
Ne l'utilisez pas longtemps à un niveau
de volume élevé ou inconfortable. Si
vous constatez une perte auditive ou
des bourdonnements d'oreille, cessez
immédiatement d'utiliser l'appareil et
consultez un audiologiste.
Veillez à ce qu'aucun corps étranger ou liquide ne
pénètre dans l'appareil. Ne placez jamais de récipients
contenant des liquides sur l'appareil
Ne placez pas de récipients contenant des
liquides sur ce produit. Veillez à ce qu'aucun
corps étranger (par exemple objets
inammables, pièces de monnaie, ls) ou
liquide (par exemple eau ou jus de fruits) ne
pénètre dans le produit. Le non-respect de
cette consigne peut provoquer des
courts-circuits, un fonctionnement
défectueux ou autres dysfonctionnements.
AVERTISSEMENT
Mettez l'appareil hors tension en cas d'anomalie ou de
dysfonctionnement
Mettez immédiatement l'appareil hors
tension, débranchez l'adaptateur secteur
de la prise de courant et demandez
une opération de maintenance à votre
revendeur, au centre de maintenance
Roland le plus proche ou à un distributeur
Roland agréé (voir la page «Information»),
dans les situations suivantes:
• l'adaptateur secteur, le cordon
d'alimentation ou la prise est
endommagé(e) ;
• en cas de fumée ou d'odeur inhabituelle ;
• des objets ou du liquide se sont
introduits dans l'appareil ;
• l'appareil a été exposé à la pluie (ou à
l'humidité de quelque autre façon) ;
• l'appareil ne semble pas fonctionner
normalement ou vous notez une
modication notable des performances.
Les adultes doivent exercer une surveillance dans les
endroits où il y a des enfants
Lorsque vous utilisez l'appareil dans des
endroits où des enfants sont présents, faites
attention à ce que l'appareil ne soit pas
endommagé. Un adulte doit toujours assurer
une surveillance et un accompagnement.
Ne laissez pas tomber l'appareil et ne le soumettez
pas à de forts impacts
Protégez l'appareil des forts impacts.
(Ne pas le laisser tomber !)
Ne branchez pas l'appareil sur une prise à laquelle
sont raccordés de nombreux appareils
Ne branchez pas le cordon d'alimentation
de l'appareil sur une prise à laquelle sont
raccordés de nombreux appareils. Soyez
particulièrement vigilant lorsque vous
utilisez des cordons prolongateurs: la
puissance totale utilisée par l'ensemble des
appareils reliés à la prise murale du cordon
prolongateur ne doit jamais dépasser
la puissance nominale (watts/ampères)
du cordon prolongateur. Des charges
excessives peuvent provoquer la surchaue
de l'isolation du cordon, voire sa fonte.
N'utilisez pas l'appareil à l'étranger
Avant d'utiliser l'appareil dans un pays
étranger, prenez contact avec votre
revendeur, avec le centre de maintenance
Roland le plus proche ou avec un distributeur
Roland agréé (voir la page «Information»).
10
Page 41

CONSIGNES DE SÉCURITÉ
ATTENTION
Placez l'instrument dans un endroit bien aéré
L'appareil et l'adaptateur secteur doivent
être placés de sorte que leur position ne
nuise pas à une ventilation adéquate.
Utilisez uniquement le(s) support(s) spécié(s)
Cet appareil est conçu pour être utilisé en
combinaison avec des supports spéciques
(KS-12, KS-18Z) fabriqués par Roland. S'il
est utilisé en association avec d'autres
supports, vous risquez de vous blesser suite
à la chute ou au basculement du produit en
raison d'un manque de stabilité.
Évaluez les risques de sécurité avant d'utiliser des supports
Même si vous tenez compte des avertissements
mentionnés dans le mode d'emploi, il peut
arriver que le produit tombe du support
ou que le support bascule suite à certaines
manipulations. Prenez en considération tous les
risques de sécurité avant d'utiliser ce produit.
Lorsque vous connectez ou déconnectez l'adaptateur
secteur, saisissez-le par la che
Saisissez toujours le cordon de l'adaptateur
secteur par la che lorsque vous branchez
à une prise murale ou à l'appareil, ou que
vous l'en débranchez.
Nettoyez régulièrement la che de l'adaptateur secteur
Vous devez régulièrement débrancher
l'adaptateur secteur et le nettoyer à l'aide
d'un chion sec an de débarrasser les
broches de toute la poussière et d'autres
dépôts accumulés. Débranchez également
la prise de courant de la prise murale chaque
fois que l'appareil n'est pas utilisé pendant
une longue période. L'accumulation de
poussière entre la prise de courant et la prise
murale peut entraîner un défaut d'isolation
et provoquer un incendie.
ATTENTION
S'il y a un risque d'orage, débranchez l'adaptateur
secteur de la prise
Chaque fois qu'il y a un risque de foudre
dans votre zone, débranchez l'adaptateur
secteur de la prise murale.
Deutsch Français Italiano Español Português NederlandsEnglish
Respectez les consignes de sécurité pour la
manipulation des câbles
Essayez d'éviter que les cordons et les
câbles ne s'entremêlent. Les cordons et les
câbles doivent également être placés hors
de portée des enfants.
Ne montez pas sur l'appareil et ne déposez pas
d'objets lourds dessus
Ne montez jamais sur l'appareil et ne
déposez jamais d'objets lourds dessus.
Ne branchez/débranchez jamais l'adaptateur secteur
lorsque vous avez les mains mouillées
Ne manipulez jamais l'adaptateur secteur
ou ses prises avec les mains mouillées
lorsque vous procédez au branchement ou
au débranchement d'une prise murale ou
de l'appareil.
Débranchez l'ensemble avant de déplacer l'appareil
Avant de déplacer l'instrument, débranchez
l'adaptateur secteur et tous les cordons
provenant d'appareils externes.
Débranchez l'adaptateur secteur de la prise avant de
le nettoyer
Avant de nettoyer l'appareil, mettez-le hors
tension et débranchez l'adaptateur secteur
de la prise murale (p. 6).
11
Page 42

REMARQUES IMPORTANTES
Alimentation électrique
• Ne branchez pas cet appareil sur une prise électrique
déjà utilisée par un appareil électrique contrôlé
par un onduleur ou qui comporte un moteur (par
exemple, un réfrigérateur, un lave-linge, un four
micro-ondes ou un climatiseur). Suivant le mode
d'utilisation de l'appareil électrique, le bruit induit
peut provoquer un dysfonctionnement de l'appareil
ou produire un bruit audible. Si, pour des raisons
pratiques, vous ne pouvez pas utiliser une prise
électrique distincte, branchez un ltre de bruit induit
entre cet appareil et la prise électrique.
• Au bout de longues heures consécutives d'utilisation,
l'adaptateur secteur commence à dégager de la chaleur.
Ceci est normal et ne devrait pas vous inquiéter.
• Pour éviter tout dysfonctionnement ou panne de
l'appareil, veillez à mettre hors tension l'ensemble de
votre équipement avant de connecter un appareil.
• Le RD-64 est réglé en usine pour s'éteindre
automatiquement quatre heures après que vous ayez
arrêté de jouer ou d'utiliser l'appareil. Si vous préférez
désactiver la mise hors tension automatique, dénissez
le réglage «AUTO OFF» sur «OFF» (Désactivé) en
suivant les instructions données à la section p. 8.
Emplacement
• Lorsque l'appareil est utilisé à proximité
d'amplicateurs de puissance (ou de tout autre
équipement contenant d'importants transformateurs
de puissance), un bourdonnement peut être émis.
Pour contourner ce problème, modiez l'orientation
de l'appareil ou éloignez-le de la source d'interférence.
• Cet appareil peut interférer avec la réception radio
et télévision. N'utilisez pas cet appareil à proximité
de tels récepteurs.
• Il peut y avoir production de bruit si des appareils de
communication sans l (par exemple, des téléphones
portables) sont utilisés à proximité de l'appareil.
Ce bruit peut se produire lors de la réception ou
de l'émission d'un appel, ou encore pendant une
conversation. Si vous rencontrez ces problèmes, vous
devez soit éloigner les appareils sans l concernés à
une plus grande distance de l'appareil, soit les éteindre.
• N'exposez pas l'appareil à la lumière directe du soleil,
ne le placez pas à proximité d'appareils produisant
de la chaleur, ne le laissez pas à l'intérieur d'un
véhicule fermé, et ne le soumettez pas de quelque
manière que ce soit à des températures extrêmes.
Par ailleurs, évitez de laisser des luminaires utilisés
normalement à proximité immédiate de l'appareil
(comme une lampe de piano), ou des projecteurs
puissants illuminer la même zone de l'appareil
pendant une période prolongée. Une chaleur
excessive peut déformer ou décolorer l'appareil.
• En cas de déplacement d'un endroit vers un autre où
la température et/ou l'humidité sont très diérentes,
des gouttelettes d'eau (de la condensation) peuvent se
former à l'intérieur de l'appareil. L'appareil peut alors
présenter des dysfonctionnements ou des dommages
si vous essayez de l'utiliser dans ces conditions. Par
conséquent, avant d'utiliser l'appareil, vous devez le
laisser reposer pendant quelques heures, jusqu'à ce
que la condensation se soit complètement évaporée.
• Évitez de déposer du caoutchouc, du vinyle ou des
matériaux similaires sur l'appareil pour une période
prolongée. Ces matières peuvent décolorer ou
endommager la nition.
• Ne laissez pas d'objets sur le clavier. Ceci peut
provoquer un dysfonctionnement (les touches du
clavier peuvent par exemple cesser de produire du
son).
• Ne collez pas d'autocollants, de décalcomanies ou
d'autres objets similaires sur cet instrument. Vous
risqueriez d'endommager la nition de l'instrument
en les décollant.
• Suivant le matériau et la température de la surface
sur laquelle vous placez l'appareil, il est possible
que ses pieds en caoutchouc décolorent ou
détériorent la surface.
Pour éviter cela, vous pouvez disposer un bout de
feutre ou de chion sous les pieds en caoutchouc.
Ce faisant, assurez-vous que l'appareil ne risque pas
de glisser ou d'être déplacé accidentellement.
• Ne posez aucun objet contenant de l'eau sur
cet appareil. Évitez également toute utilisation
d'insecticide, parfum, alcool, vernis à ongle,
atomiseur et autre à proximité de l'appareil. Essuyez
rapidement tout liquide qui s'est répandu sur
l'appareil en utilisant un chion sec et doux.
Entretien
• Pour nettoyer l'appareil, utilisez un chion doux
et sec, ou un chion légèrement imbibé d'eau.
Eorcez-vous d'exercer une pression égale lorsque
vous passez le chion sur toute la surface pour la
nettoyer. Un frottement excessif à un même endroit
peut endommager la nition.
• N'utilisez jamais de benzine, de diluant, d'alcool ou
de solvants de quelque sorte que ce soit, an d'éviter
tout risque de décoloration et/ou de déformation.
Réparations et données
• Vous devez savoir que toutes les données se
trouvant dans la mémoire de l'appareil seront
réinitialisées aux paramètres d'usine lorsque vous
donnez l'appareil à réparer.
Précautions supplémentaires
• Roland décline toute responsabilité quant à
l'éventuelle perte de données et toute obligation
relative à leur récupération.
• Manipulez avec susamment de précautions
les boutons, curseurs et autres commandes de
l'appareil, ainsi que les prises et les connecteurs.
Une manipulation brutale peut entraîner des
dysfonctionnements.
• Lors du débranchement de tous les câbles,
saisissez le connecteur et ne tirez jamais sur le
câble. Vous éviterez ainsi les courts-circuits ou une
détérioration des éléments internes du câble.
• Pour éviter de déranger vos voisins, eorcez-vous
de maintenir le volume de l'appareil à des niveaux
de volume raisonnables. Vous pouvez également
utiliser un casque d'écoute an de ne pas déranger
votre entourage.
• Le son produit en appuyant sur les touches et
les vibrations émises en jouant d'un instrument
peuvent se transmettre au sol ou aux murs de façon
insoupçonnée. Veillez à ne pas déranger vos voisins.
• Lorsque vous devez transporter l'appareil, utilisez
si possible l'emballage d'origine (y compris ses
rembourrages). Sinon, utilisez un emballage équivalent.
• Utilisez exclusivement la pédale d'expression
spéciée (EV-5, EV-7 ; vendue séparément). La
connexion d'autres types de pédales d'expression
risque d'endommager l'appareil ou de provoquer
des dysfonctionnements.
• Certains câbles de connexion contiennent des
résistances. Ne branchez pas de câbles qui
comportent des résistances à cet appareil. Avec
ce type de câble, le niveau sonore peut être
extrêmement faible, voire inaudible. Pour plus
d'informations sur les spécications de câble,
prenez contact avec le fabricant du câble.
• La plage utilisable du contrôleur D-BEAM deviendra
extrêmement réduite en cas d'utilisation sous
une lumière directe forte du soleil. Gardez ceci à
l'esprit lorsque vous utilisez le contrôleur D-BEAM
à l'extérieur.
Droits d'auteur/Licences/Marques
commerciales
• Les droits d'auteurs relatifs au contenu de ce produit
(les données de formes d'ondes sonores, les données
de style, les motifs d'accompagnement, les données
de phrase, les boucles audio et les données d'image)
sont réservés par Roland Corporation.
• Les acquéreurs de ce produit sont autorisés à
utiliser le contenu susmentionné pour la création,
l'exécution, l'enregistrement et la distribution
d'œuvres musicales originales.
• Les acquéreurs de ce produit ne sont PAS autorisés
à extraire le contenu susmentionné sous sa forme
d'origine ou une forme modiée, dans le but de
distribuer le support enregistré dudit contenu ou de
le mettre à disposition sur un réseau informatique.
• MMP (Moore Microprocessor Portfolio) fait référence
à un portefeuille de brevets en rapport avec
l'architecture des microprocesseurs, développé
par Technology Properties Limited (TPL). Roland a
obtenu la licence de cette technologie du TPL Group.
• Roland, SuperNATURAL sont des marques
déposées ou des marques commerciales de Roland
Corporation aux États-Unis et/ou dans d'autres pays.
• Les noms de sociétés et les noms de produits
mentionnés dans ce document sont des marques
déposées ou des marques de leurs propriétaires
respectifs.
12
Page 43

À propos du clavier Ivory Feel
Caractéristiques d'un clavier Ivory Feel
Les touches des pianos traditionnelles sont fabriquées à partir d'un matériaux précieux : l'ivoire pour les touches blanches, et l'ébène pour les touches
noires. Le clavier Ivory Feel utilise la technologie la plus récente pour reproduire le toucher et la sensation de ces matériaux.
Un clavier Ivory Feel présente les caractéristiques suivantes.
• Nous sommes convaincus que vous serez séduit par la texture spéciale de ces touches qui s'améliore à mesure que vous jouez.
• La surface des touches intègre des bandes d'un matériau absorbeur d'humidité pour améliorer le toucher et la facilité de jeu.
• Les touches se distinguent par un coloris brillant et rané qui met en valeur l'élégance de l'instrument.
• La nition des touches blanches présente une teinte légèrement jaune qui simule l'aspect du véritable ivoire.
Manipulation
• N'écrivez pas sur le clavier avec un stylo ou autre instrument, et n'eectuez aucun marquage ou poinçonnage sur l'instrument. De l'encre
s'introduirait de manière indélébile dans les lignes de la surface.
• N'apposez pas d'étiquettes sur le clavier. Vous risquez de ne plus pouvoir retirer les étiquettes qui utilisent des colles fortes, lesquelles sont
susceptibles de décolorer l'instrument.
Précautions et entretien
Veuillez tenir compte des consignes suivantes. Si ces consignes ne sont pas respectées, il peut en résulter des rayures sur la nition de la surface, une
dégradation de la brillance ou autres phénomènes de décoloration ou de déformation.
• Utilisez un chion doux pour retirer les saletés.
Éliminez soigneusement toutes les saletés à l'aide d'un chion humidié bien essoré.
Ne frottez pas vigoureusement la surface.
• Pour retirer les saletés tenaces, utilisez un nettoyant pour clavier disponible dans le commerce et ne contenant pas de produits abrasifs.
Commencez par frotter en douceur l'appareil. Si cela ne sut pas pour éliminer les saletés, exercez peu à peu davantage de pression en prenant
soin de ne pas rayer les touches.
• N'appliquez pas de benzène, de diluant ou d'alcool sur l'instrument.
Deutsch Français Italiano Español Português NederlandsEnglish
Contrôle d'un Générateur de Son MIDI Externe en Mode Piano
Lorsque vous utilisez le mode Piano du RD-64, vous pouvez spécier le canal MIDI et transmettre des messages MIDI (par exemple des messages bank
select, program change et aftertouch) à un générateur de son MIDI externe. Pour en savoir plus, reportez-vous aux sections du mode d'emploi
de l'A-88, «Setting the MIDI Transmit Channel (MIDI CHANNEL)», «Switching Sounds » et «Using the D-BEAM to Modify the Sound».
Si vous rencontrez des problèmes tels que des notes coincées ou un son inattendu sur votre générateur de son MIDI externe, vous pouvez envoyer un
message de réinitialisation pour résoudre le problème. Pour plus de détails, reportez-vous à la section du mode d'emploi de l'A-88 intitulée «Halting
Stuck Notes (PANIC)».
13
Page 44

Spécications principales
Roland RD-64 : Piano numérique
Clavier
Clavier 64touches (clavier «Ivory Feel-G» avec échappement)
Sensibilité au toucher Toucher du clavier : 5 types
Générateur de sons
SuperNATURAL Piano
Générateur de sons
Polyphonie maximale 128voix
Sons 12sons
Diapason 415,3Hz–466,2Hz (réglable par pas de 0,1Hz)
Transposition Transposition clavier : -6–+5 (par demi-tons)
Eets EFX 1, EFX 2, REVERB
Égaliseur Égaliseur numérique 2 bandes
Autres
Contrôleurs
Boutons
Commutateurs Commutateur [POWER]
Écran Témoin DEL d'alimentation, témoin DEL d'octave
Connecteurs
Alimentation électrique Adaptateur secteur
Consommation 4 W
Dimensions 1114 (L) x 273 (P) x 116 (H) mm
Poids 12,8 kg
Accessoires
Options (vendues séparément)
SuperNATURAL (E. Piano)
Virtual Tone Wheel Organ
Boutons de réglage : [MASTER VOLUME], EQ [LOW ], [HIGH]
Levier [Pitch Bend/Modulation]
Contrôleur D-BEAM
Bouton [A. PIANO], bouton [E. PIANO], bouton [CLAV], bouton [ORGAN],
boutons TONE VARIATION [1] [2] [3],
bouton [FUNCTION], bouton [SuperNATURAL],
boutons OCTAVE [+] [−], bouton [TRANSPOSE]
Boutons [EFX 1], [EFX 2], bouton [REVERB]
Prise DAMPER : type jack TRS 6,35 mm
Prises FC1, FC2 : type jack TRS 6,35 mm
Connecteur MIDI OUT
Port USB COMPUTER (USB de type B)
Prises OUTPUT (L/MONO, R) : type jack 6,35 mm
Prises INPUT (L, R) : type phono RCA
Prises PHONES : type jack stéréo 6,35 mm
Prise DC IN
Mode d'emploi
Pédale forte (détection continue)
Adaptateur secteur, cordon d'alimentation (pour adaptateur secteur)
Casque
Support clavier (KS-18Z, KS-12)
Pédale (RPU-3)
Pédale forte (DP-10)
Commutateur à pédale (DP-2)
Pédale d'expression (EV-5, EV-7)
* Dans l'intérêt de l'amélioration du produit, les caractéristiques, l'aspect et/ou le contenu de cet appareil sont sujets à des modications sans
préavis.
Copyright © 2013 ROLAND CORPORATION
Tous droits réservés. La reproduction intégrale ou partielle de cette publication est interdite sous quelque forme que ce soit sans l'autorisation écrite de ROLAND CORPORATION.
14
Page 45

Deutsch Français Italiano Español Português NederlandsEnglish
Pianoforte digitale
Manuale dell'utente
Page 46

Le due modalità dell'unità RD-64
Utilizzo dell'unità RD-64 come pianoforte (modalità Piano)
L'unità RD-64 eredita i suoni SuperNATURAL Piano dalla famosissima serie di pianoforti da palco RD. Lo strumento si
distingue per un'attenta selezione di timbri acustici ed elettrici, che consentono una performance altamente espressiva.
Inoltre, il pianoforte è dotato dell'acclamata tastiera Ivory-Feel della serie RD. Dotata di un'action dei tasti espressiva
e una risposta al tocco eccellente anche nei ribattuti, l'unità RD-64 è contraddistinta inoltre da un peso ridotto e
dimensioni contenute.
L'unità RD-64 è estremamente portatile e può essere trasportata facilmente in studio o sul luogo del concerto.
Utilizzo dell'unità RD-64 in modalità Piano
All'accensione, l'unità RD-64 richiama sempre la modalità Piano.
Note sul manuale dell'utente
Leggere il presente documento.
Utilizzo dell'unità RD-64 come tastiera controller MIDI (modalità Controller)
Tenendo premuto il pulsante [A. PIANO] mentre si accende lo strumento, l'unità RD-64 opererà come tastiera controller MIDI, con le stesse
funzioni*1 dell'unità A-88. Collegandola al computer con un cavo USB generico, sarà possibile utilizzarla insieme a un
software DAW per la produzione musicale.
* In modalità Controller, il generatore interno dell'unità RD-64 non produce alcun suono. Inoltre, alla pressione dei pulsanti
[TONE SELECT], [TONE VARIATION] o [REVERB], l'unità non eseguirà alcuna operazione.
Utilizzo dell'unità RD-64 in modalità Controller
Tenere premuto il pulsante [A. PIANO] e accendere lo strumento; l'unità RD-64 verrà avviata in modalità Controller.
Note sul manuale dell'utente
Per maggiori dettagli su come utilizzare l'unità RD-64 come tastiera controller MIDI, fare riferimento al
manuale in versione PDF dell'unità A-88.
Per ottenere il manuale in formato PDF
1. Immettere il seguente indirizzo URL nel browser del computer ed autenticarsi.
http://www.roland.it/supporto/manuali.asp
2. Scegliere "A-88" come nome del prodotto.
*1
Dierenze tra la modalità Controller dell'unità RD-64 e l'unità A-88
La modalità Controller dell'unità RD-64 dierisce da quella dell'unità A-88 in diversi modi. Tenere a mente tali dierenze quando si prende
come riferimento il Manuale dell'utente in formato PDF dell'unità A-88.
• Dato che l'unità RD-64 utilizza il driver USB già presente sul computer (GENERIC), non è necessario installare il driver USB specico
(capitolo "Installing the Driver" nel Manuale dell'utente dell'unità A-88). Per utilizzare l'unità è suciente collegarla al computer
mediante un cavo USB reperibile in commercio. Il nome della porta MIDI visualizzato sarà "Roland Digital Piano".
• L'unità RD-64 non è dotata delle funzionalità "UPPER," "LOWER," "DUAL" e "SPLIT" dell'unità A-88 (capitolo "Layering Two Parts" nel
Manuale dell'utente dell'unità A-88).
Prima di usare l'unità, leggere attentamente i capitoli "UTILIZZO SICURO DELL'UNITÀ" (p. 10) e "NOTE IMPORTANTI" (p. 12). In questi capitoli vengono fornite informazioni
importanti sul corretto impiego dell'unità. Inoltre, per essere sicuri di aver acquisito una buona conoscenza di tutte le funzioni oerte dalla nuova unità, è necessario
leggere per intero il Manuale dell'utente. Conservare il manuale e tenerlo a portata di mano per usarlo come riferimento.
2
Page 47

Sommario
Le due modalità dell'unità RD-64 . . . . . . . . . . . . . . . . . . . . . . . . . . . . . . . . . . . . . . . . . . . . . . . . . . . .2
Utilizzo dell'unità RD-64 come pianoforte (modalità Piano) . . . . . . . . . . . . . . . . . . . . . . . . . . . 2
Utilizzo dell'unità RD-64 come tastiera controller MIDI (modalità Controller) . . . . . . . . . . .2
Posizionamento dell'unità RD-64 su un supporto . . . . . . . . . . . . . . . . . . . . . . . . . . . . . . . . . . . . .3
Descrizione del pannello . . . . . . . . . . . . . . . . . . . . . . . . . . . . . . . . . . . . . . . . . . . . . . . . . . . . . . . . . . . . 4
Collegamenti . . . . . . . . . . . . . . . . . . . . . . . . . . . . . . . . . . . . . . . . . . . . . . . . . . . . . . . . . . . . . . . . . . . . . . .6
Modica delle impostazioni (modalità FUNCTION) . . . . . . . . . . . . . . . . . . . . . . . . . . . . . . . . . . . .7
Ripristino delle impostazioni di fabbrica (FACT RESET) . . . . . . . . . . . . . . . . . . . . . . . . . . . . . . . .7
Selezione della curva di velocity (VELO CURVE) . . . . . . . . . . . . . . . . . . . . . . . . . . . . . . . . . . . . . . .7
Selezione del Valore di Velocità della Tastiera (KEY VELO) . . . . . . . . . . . . . . . . . . . . . . . . . . . . . .7
Accordatura rispetto ad altri strumenti (Master Tune) . . . . . . . . . . . . . . . . . . . . . . . . . . . . . . . . .8
Spegnimento automatico dopo un determinato periodo di tempo (Auto O) . . . . . . . . . 8
Selezione del driver dedicato (ADVANCED) o generico (GENERIC) . . . . . . . . . . . . . . . . . . . . . 8
Risoluzione dei problemi . . . . . . . . . . . . . . . . . . . . . . . . . . . . . . . . . . . . . . . . . . . . . . . . . . . . . . . . . . . .9
UTILIZZO SICURO DELL'UNITÀ . . . . . . . . . . . . . . . . . . . . . . . . . . . . . . . . . . . . . . . . . . . . . . . . . . . . . 10
NOTE IMPORTANTI . . . . . . . . . . . . . . . . . . . . . . . . . . . . . . . . . . . . . . . . . . . . . . . . . . . . . . . . . . . . . . . . 12
Note sulla tastiera Ivory Feel . . . . . . . . . . . . . . . . . . . . . . . . . . . . . . . . . . . . . . . . . . . . . . . . . . . . . . . 13
Controllo di un Modulo Sonoro MIDI Esterno in Modalità Piano . . . . . . . . . . . . . . . . . . . . . . 13
Speciche principali . . . . . . . . . . . . . . . . . . . . . . . . . . . . . . . . . . . . . . . . . . . . . . . . . . . . . . . . . . . . . . 14
Posizionamento dell'unità RD-64 su un supporto
Se si desidera appoggiare l'unità RD-64 su un supporto, utilizzare i modelli Roland KS-18Z o KS-12.
Posizionare lo strumento sul supporto come di seguito descritto.
Prestare attenzione a non procurarsi lo schiacciamento delle dita mentre si monta il supporto.
KS-18Z
Deutsch Français Italiano Español Português NederlandsEnglish
Allineare la parte
frontale dell'unità
RD-64 con la
parte frontale del
supporto.
KS-12
Non superare il
metro di altezza
(regolare il
supporto a un
livello non
maggiore
del quarto
partendo dal
basso).
Regolare la larghezza di appoggio del
supporto in maniera che ogni coppia di piedini
in gomma dell'unità RD-64 venga a trovarsi sui
due lati di ciascun asse perpendicolare.
Vista dall'alto
Regolare la larghezza di appoggio
del supporto in maniera che i piedini
in gomma sul fondo della tastiera
coincidano coi fori predisposti ad
accoglierli sul supporto.
Vista dall'alto
3
Page 48

Descrizione del pannello
Interruttore [POWER]
Accensione dell'unità
* Dopo aver eettuato tutti i collegamenti (p. 6), procedere con l'accensione delle
unità come di seguito indicato. Accendendo le unità nell'ordine sbagliato è
possibile causare guasti e malfunzionamenti ai dispositivi.
* Questa unità è provvista di un circuito di protezione. Per completare interamente la
fase di avvio, l'unità impiega un breve intervallo di tempo (pochi secondi).
* Prima di accendere/spegnere l'unità, accertarsi sempre di aver abbassato il volume. Anche
con il volume al minimo, si potrebbero percepire alcuni suoni durante l'accensione/
spegnimento. Tuttavia, si tratta di una condizione normale e non di un malfunzionamento.
1.
Utilizzare la manopola [MASTER VOLUME] per abbassare il volume al minimo.
Abbassare al minimo anche il volume di tutte le unità o i dispositivi audio collegati.
2.
Premere l'interruttore di accensione [POWER].
3.
Accendere le unità esterne collegate.
4.
Regolare il volume dell'unità RD-64 e di tutte le unità esterne collegate.
Spegnimento dell'unità
1.
2. Spegnere le unità esterne collegate.
3. Premere l'interruttore di spegnimento [POWER].
* Con le impostazioni di fabbrica, l'unità RD-64 si spegne
automaticamente dopo quattro ore dall'ultima operazione compiuta.
Se non si desidera far spegnere l'unità automaticamente, modicare
l'impostazione "AUTO OFF" su "OFF", come descritto in p. 8. .
Manopola [MASTER VOLUME]
Regolazione del volume
Ruotare la manopola verso destra per aumentare il volume, o verso sinistra per diminuirlo.
Pulsanti [TONE SELECT], [TONE VARIATION]
Selezione dei timbri
1. Premere uno dei pulsanti [TONE SELECT] per selezionare il gruppo di timbri.
2. Premere uno dei pulsanti [TONE VARIATION] per selezionare una variazione.
Utilizzare la manopola [MASTER VOLUME] per abbassare il
volume al minimo.
Gruppo Variazione 1 Variazione 2 Variazione 3
A. PIANO CONCERT GRAND BRIGHT PIANO CONCERT MONO
E. PIANO PURE VINTAGE TINE EP WURLY
CLAV COMBINATION MEDIUM BRILLIANT
ORGAN JAZZ ORGAN ROCK ORGAN FULL DRAW
Pulsante [FUNCTION]
Modica delle impostazioni
Questo pulsante può essere utilizzato quando si desidera cambiare la sensibilità al
tocco della tastiera, oppure per assegnare una funzione al pedale. Per maggiori dettagli,
consultare il capitolo "Modica delle impostazioni (modalità FUNCTION)" (p. 7).
Pulsante [SuperNATURAL]
In modalità Piano questo pulsante rimane acceso, ma la sua pressione non produrrà alcun
risultato.
Questo pulsante è utilizzabile solo se si è collegato un "modulo audio SuperNATURAL
compatibile" in modalità Controller. Per maggiori dettagli, consultare il capitolo "Utilizzo
dell'unità RD-64 come tastiera controller MIDI (modalità Controller)" (p. 2).
Leva [Pitch bend/Modulazione]
Modica della nota riprodotta (Pitch bend)
Muovendo la leva verso sinistra mentre si suona, le note subiranno un'alterazione calante del tono; muovendo la leva verso
destra, l'alterazione sarà crescente. Questo tipo di eetto è chiamato "pitch bend".
Modulazione della nota riprodotta (Modulazione)
Muovendo la leva in avanti è possibile produrre del vibrato. Questo tipo di eetto è chiamato "modulazione".
* L'eetto ottenuto muovendo la leva può dierire in base al timbro selezionato. Inoltre, l'eetto applicato muovendo la leva è predeterminato
per ciascun timbro, e non può essere cambiato.
4
Eetto di pitch bend
Eetto di modulazione
Page 49

Descrizione del pannello
Controller D-BEAM
Muovendo la mano sopra questo controller è possibile elaborare il suono con diversi eetti.
Per attivare il controller D-BEAM, premere il pulsante in modo che si illumini.
Pulsante Funzione
[PITCH] Muovendo la mano sopra il controller D-BEAM è possibile controllare il tono del suono.
[VOL] Cambia il volume, permettendo di aggiungere espressione all'esecuzione strumentale.
[ASSIGN] Viene applicato l'eetto di aftertouch.
Distanza di funzionamento del
controller D-BEAM
La gura mostra la distanza
massima entro la quale il controller
D-BEAM può operare. Posizionando
la mano al di fuori di tale spazio
non si otterrà alcun eetto.
* Lo spazio eettivo del
controller D-BEAM può
cambiare in base alle
condizioni di luminosità ambientali.
Pulsante [REVERB]
Aggiunta del riverbero al suono (Reverb)
Premendo il pulsante [REVERB] in modo che si illumini, è possibile applicare l'eetto di riverbero al suono generato dallo strumento.
Con l'aggiunta dell'eetto di riverbero è possibile ricreare la spazialità ambientale tipica delle sale da concerto.
* Non è possibile specicare la quantità dell'eetto di riverbero.
Deutsch Français Italiano Español Português NederlandsEnglish
Manopole EQ [LOW], [HIGH]
Regolano l'incremento o il taglio degli acuti e dei bassi (Equalizzatore)
L'unità RD-64 è dotata di un equalizzatore a due bande.
È possibile regolare il livello delle basse e alte frequenze per ciascun timbro.
* Le impostazioni di equalizzazione sono memorizzate individualmente per ciascun timbro (Tenete premuto il tasto [SuperNATURAL] e premete i tasti [A. PIANO] e [ORGAN]
per memorizzare tutti i 12 suoni).
Pulsanti [EFX 1], [EFX 2]
Elaborazione del suono con gli eetti
Premendo e accendendo il pulsante [EFX 1] o [EFX 2], è possibile elaborare con un eetto il suono generato dallo strumento.
Per ciascun gruppo di timbri è possibile utilizzare i seguenti eetti.
Gruppo EFX 1 EFX 2
A. PIANO ENHANCER DAMPER RESONANCE
E. PIANO TREMOLO PHASER
CLAV AUTO WAH OVERDRIVE
ORGAN ROTARY SPEED
* Lo stato di attivazione dei pulsanti [EFX 1] e [EFX 2] è memorizzato individualmente per ciascun timbro (Tenete premuto il tasto [SuperNATURAL] e premete i tasti [A. PIANO]
e [ORGAN] per memorizzare tutti i 12 suoni).
Pulsanti OCTAVE [+] [−], pulsante [TRANSPOSE]
Modica dell'ottava (Octave shift)
È possibile utilizzare i pulsanti [+] [–] per alzare o abbassare l'intervallo di ottava della tastiera
(Octave shift).
• Il parametro può essere impostato da -4 a +5 ottave.
• Premendo simultaneamente il pulsante [+] e il pulsante [–], l'impostazione viene riportata a 0.
Indicatore e impostazione mostrata
Modica del tono (Trasposizione)
Tenendo premuto il pulsante [TRANSPOSE], è possibile utilizzare i pulsanti [+] [–] per trasporre il
tono in intervalli di semitoni.
• Il parametro può essere impostato da -6 a +5 semitoni.
• Quando il pulsante [TRANSPOSE] viene attivato, l'impostazione di trasposizione viene abilitata. Quando il
pulsante [TRANSPOSE] viene disattivato, l'impostazione di trasposizione viene disabilitata.
• Premendo simultaneamente il pulsante [TRANSPOSE], il pulsante [+] e il pulsante [–], l'impostazione viene
riportata a 0.
-6
-5 -4 -3 -2 -1 0 1 2 3 4 5
Spento Acceso
5
Page 50

Collegamenti
Jack INPUT
Il suono di un eventuale lettore
audio (o dispositivo simile) collegato
allo strumento viene inviato alle
uscite OUTPUT e PHONES.
* Per regolare il volume, utilizzare
i controlli dispositivo collegato
(lettore audio).
Jack OUTPUT
Se si collegano questi jack agli altoparlanti amplicati,
il suono dell'unità verrà riprodotto attraverso di essi.
Jack PHONES
Per il collegamento di un paio di cue
(vendute separatamente).
Jack DC IN
Per il collegamento dell'adattatore CA in
dotazione.
Posizionare l'adattatore CA in modo che il
lato con l'indicatore sia rivolto verso l'alto e
il lato con le informazioni di testo sia rivolto
verso il basso. L'indicatore si illumina quando
l'adattatore CA viene inserito in una presa CA.
Alla presa CA
Pedale damper
incluso
Impostare l'interruttore del pedale damper incluso su
"Continuous" dopo averlo collegato.
o Interruttore a pedale (venduto
separatamente; serie DP)
oppure
Pedaliera (venduta
separatamente;
RPU-3)
Jack Pedale (DAMPER, FC2, FC1)
Collegare il pedale incluso al jack DAMPER per utilizzarlo come pedale damper.
Il funzionamento dei vari pedali collegati ai corrispondenti jack è il seguente (con
le impostazioni di fabbrica).
Jack Spiegazione
Utilizzare questo pedale per sostenere il suono.
DAMPER Pedale damper
FC2 Pedale sostenuto
FC1 Pedale soft
Quando si preme il pedale, le note vengono
sostenute più a lungo, anche dopo aver
rilasciato i tasti premuti.
Permette di sostenere solo le note dei tasti già
premuti nel momento in cui si utilizza il pedale.
Permette di addolcire il volume delle note
suonate.
Cavo di
alimentazione
Porta USB COMPUTER
Collegando l'unità RD-64 a un computer
mediante un cavo USB reperibile in
commercio, è possibile utilizzare software
compatibile con lo standard MIDI per
registrare e riprodurre la note suonate
con lo strumento (dati MIDI).
* L'audio via USB non è supportato.
Connettore MIDI OUT
Per il collegamento e la riproduzione di un modulo audio MIDI.
NOTA
* Per prevenire guasti e danni ai dispositivi, abbassare sempre il
volume e assicurarsi che tutte le unità siano spente prima di
eettuare qualsiasi collegamento.
* Utilizzare esclusivamente il pedale di espressione indicato (EV-5 o
EV-7; venduti separatamente). Collegando un pedale di espressione
dierente si rischia di provocare guasti e/o danni all'unità (modalità
Controller).
6
Page 51

Modica delle impostazioni (modalità FUNCTION)
In modalità FUNCTION, è possibile regolare la sensibilità al tocco della tastiera.
Come leggere le istruzioni sulle diverse procedure
Premere il pulsante
[FUNCTION].
Premere il tasto in corrispondenza del
quale è indicato "VELO CURVE".
0–4
Valore 0–4
Premere i tasti in corrispondenza dei quali è indicato "NUMERIC ENTRY".
* Valori al di fuori dell'intervallo consentito non saranno considerati.
Ripristino delle impostazioni di fabbrica (FACT RESET)
Selezione della curva di velocity (VELO CURVE)
È possibile modicare la sensibilità al tocco della tastiera.
Premere il tasto in corrispondenza
del quale è indicato "ENTER".
Deutsch Français Italiano Español Português NederlandsEnglish
0–4
Valore 0–4
Valore
Impostazione Spiegazione
0 SUPER LIGHT Impostazione ancora più leggera rispetto a LIGHT.
1 LIGHT
MEDIUM
2
(predenita)
3 HEAVY
4 SUPER HEAVY Impostazione ancora più pesante rispetto a HEAVY.
Permette di specicare un tocco più leggero per la tastiera. È possibile ottenere un suono fortissimo ( ) esercitando una pressione inferiore a
quella solita, facendo apparire la tastiera più leggera. Quest'impostazione semplica l'esecuzione, specialmente per i bambini.
Si tratta dell'impostazione standard di tocco della tastiera. Permette di suonare con il tocco più naturale possibile. Si tratta del tocco più vicino
a quello tipico di un pianoforte acustico.
Permette di specicare un tocco più pesante per la tastiera. Per suonare in modalità fortissimo (), è necessario esercitare una pressione
maggiore rispetto al solito, rendendo la tastiera più pesante. Il movimento dinamico delle dita aggiunge più sensibilità all'esecuzione.
Selezione del Valore di Velocità della Tastiera (KEY VELO)
0–9
* Se si tenta di immettere un valore al di
fuori dell'intervallo consentito, l'unità
utilizzerà gli ultimi due o tre numeri
Valore 0–127
specicati prima dell'uso di ENTER.
Valore
Impostazione Spiegazione
TOUCH
0
(predenita)
1 Valore sso La velocity verrà trasmessa in base a un valore specicato indipendentemente dalla forza con cui si premono le note sulla tastiera.
I valori di velocity verranno trasmessi a seconda della sensibilità della tastiera e della curva selezionata in "Selezione della curva di velocity
(VELO CURVE)" (p. 7).
7
Page 52

Modica delle impostazioni (modalità FUNCTION)
Accordatura rispetto ad altri strumenti (Master Tune)
Per ottenere un suono uniforme quando si suona insieme a uno o più strumenti, è necessario far coincidere l'intonazione base di ciascun strumento
rispetto agli altri. In genere, l'accordatura di uno strumento è indicata dall'altezza in Hertz (Hz) della nota "LA" centrale.
I valori possibili per tale nota possono essere 415,3 – 440,0 o 466,2 Hz (impostazione predenita: 440,0 Hz).
3 0–9
Valore 3
Valore 4153–4662
Immettere un valore a
quattro cifre
Esempio: per specicare
440,0 Hz, premere nell'ordine
i tasti 4, 4, 0, 0 ed ENTER.
Utilizzo dei tasti NUMERIC ENTRY per l'immissione di un valore
0–9
Valore 4153–4662
Tasti NUMERIC ENTRY premuti in
quest'ordine
4, 4, 0, 0, ENTER 440.0
1, 2, 3, 4, ENTER —
1, 4, 3, 8, 0, ENTER 438.0
8, 4, 4, 6, 6, 3, ENTER —
Il valore
immesso è
* Se si tenta di immettere un valore al di
fuori dell'intervallo consentito, l'unità
utilizzerà gli ultimi quattro numeri
specicati prima dell'uso di ENTER.
Spegnimento automatico dopo un determinato periodo di tempo (Auto O)
AVVISO
Con le impostazioni di fabbrica, l'unità RD-64 si spegne automaticamente dopo quattro ore dall'ultima operazione compiuta. Se non si desidera far
spegnere automaticamente l'unità, impostare il parametro "AUTO OFF" su "OFF", come di seguito descritto.
0–1
Valore 0–1
Valore
Impostazione Spiegazione
0 OFF L'unità non si spegne automaticamente.
ON (impostazione predenita)
1
L'unità si spegne automaticamente 240 minuti (4 ore) dopo che si è smesso di suonare o di utilizzare l'unità.
Selezione del driver dedicato (ADVANCED) o generico (GENERIC)
In genere, non è necessario installare un driver sul computer per fargli riconoscere l'unità RD-64. Tuttavia, nell'eventualità di problemi
o di un funzionamento al di sotto delle potenzialità, potrebbe rivelarsi utile installare il driver Roland originale.
In questo caso, impostare il parametro USB Driver dell'unità RD-64 su "ADVANCED" come descritto in basso, quindi installare il driver
USB sul computer.
Installazione del driver USB
Per i dettagli sul download e l'installazione del driver Roland originale,
fare riferimento al sito internet di Roland.
Dopo aver modicato l'impostazione, è necessario spegnere e riaccendere
l'unità RD-64.
Generalmente, può essere lasciato impostato su "GENERIC".
Sito internet Roland
http://www.roland.com/support/
Pulsante Impostazione Spiegazione
Pulsante [+] ADVANCED Scegliere quest'impostazione se si desidera utilizzare il driver USB scaricato dal sito internet di Roland.
Pulsante [–]
GENERIC (impostazione
predenita)
Scegliere quest'impostazione se si desidera utilizzare il driver USB generico già presente sul computer. È l'impostazione
consigliata.
8
Page 53

Risoluzione dei problemi
Se l'unità RD-64 non funziona nel modo previsto, controllare i seguenti punti. Se il problema persiste, consultare il rivenditore o il Centro di assistenza
Roland più vicino.
Problema Controllo/Soluzione Pagina
L'unità non si accende
Nessun suono in uscita
Il livello del volume dello strumento
collegato al jack INPUT è eccessivamente
basso.
I timbri sono alterati
Il tono delle note non è corretto
Il suono si interrompe
Il pedale non funziona, oppure è
"bloccato" / Il pedale non funziona
correttamente
Il riverbero rimane presente anche dopo
aver interrotto l'eetto
Il suono delle note più acute cambia
improvvisamente dopo un determinato
tasto
Si percepisce un tintinnio acuto
Le note basse suonano male, o si avverte
un ronzio
È stato correttamente eettuato il collegamento dell'unità RD-64 alla presa di corrente tramite
l'adattatore CA e il cavo di alimentazione?
Gli altoparlanti amplicati e l'amplicatore sono accesi?
Il volume è completamente abbassato?
La manopola [MASTER VOLUME] è abbassata al minimo? p. 4
Gli altoparlanti sono stati collegati in modo corretto?
Collegare gli altoparlanti amplicati o le cue.
È possibile ascoltare i suoni dalle cue collegate?
Se è possibile ascoltare i suoni in cua, è probabile che ci sia un cavo audio in corto, oppure che si
sia vericato un problema sull'amplicatore o sul mixer. Controllare nuovamente i cavi e i dispositivi.
Il volume è stato forse abbassato mediante l'uso di un pedale o del controller D-BEAM?
Provare a premere il pedale o porre la mano sopra il controller D-BEAM.
L'unità RD-64 è forse stata avviata in modalità Controller (accendendola mentre si teneva premuto il
pulsante [A. PIANO])?
In modalità Controller, l'unità RD-64 non produce alcun suono.
Il volume del dispositivo collegato è al minimo?
Regolare il volume del dispositivo collegato.
È possibile che si stia utilizzando un cavo di connessione contenente un resistore?
Utilizzare un cavo di connessione senza resistore.
Il tono delle note è stato forse modicato agendo su un pedale o sul controller D-BEAM?
Provare a premere il pedale o porre la mano sopra il controller D-BEAM.
Nei collegamenti in mono, la qualità timbrica può variare in base al suono selezionato e al registro di
utilizzo.
Per la migliore qualità di ascolto, si raccomanda di eettuare un collegamento in stereo.
In base al timbro selezionato, il tono delle note su alcuni registri può cambiare e raggiungere altre
frequenze.
È stato impostato il parametro Octave/Transpose? p. 5
Il tono delle note è stato forse modicato agendo su un pedale o sul controller D-BEAM?
Provare a premere il pedale o porre la mano sopra il controller D-BEAM.
Se si tenta di riprodurre simultaneamente più di 128 voci, i suoni vengono tagliati per rispettare il
limite della polifonia.
Il pedale è stato collegato correttamente?
Inserire no in fondo il cavo nel jack del pedale.
Si sta utilizzando un pedale di un'altra marca?
Utilizzare il pedale damper incluso, oppure i modelli opzionali delle serie RPU-3, DP, EV o simili.
Il suono dell'unità RD-64 simula fedelmente la profondità e la risonanza di un piano acustico e
questo potrebbe dare la sensazione di riverbero, sebbene l'eetto di Riverbero sia stato interrotto.
Su un pianoforte acustico, le note del registro acuto continuano a risuonare a prescindere
dall'utilizzo del pedale damper. Queste note si distinguono inoltre per una carattere timbrico diverso.
L'unità RD-64 riproduce fedelmente questa peculiarità, tipica dei pianoforti acustici. Sull'unità
RD-64, la gamma che non viene interessata dal pedale damper cambia in base all'impostazione del
parametro Octave/Transpose.
I suoni con carattere frizzante e brillante contengono molte frequenze alte, il che potrebbe produrre
un tintinnio metallico. Questo accade perché il carattere di un vero pianoforte viene riprodotto
fedelmente: non si tratta di un malfunzionamento.
Per alcuni timbri, il suono può sembrare distorto.
Abbassare il volume. In alternativa, abbassare il guadagno del volume master.
p. 6
p. 4
p. 6
−
−
p. 2
−
−
−
−
−
−
−
p. 6
p. 6
−
−
−
−
Deutsch Français Italiano Español Português NederlandsEnglish
9
Page 54

OSSERVARE SEMPRE QUANTO SEGUE
UTILIZZO SICURO DELL'UNITÀ
UTILIZZO SICURO DELL'UNITÀ
ISTRUZIONI PER LA PREVENZIONE DI INCENDI, SCOSSE ELETTRICHE O LESIONI PERSONALI
Informazioni sulle note AVVISO e ATTENZIONE
Utilizzato per istruzioni intese ad avvisare
AVVISO
ATTENZIONE
l'utente del rischio di morte o lesioni
gravi in caso di utilizzo improprio dell'unità.
Utilizzato per istruzioni intese ad
avvisare l'utente del rischio di lesioni
o danni materiali in caso di utilizzo
improprio dell'unità.
* L'espressione "danno materiale" si
riferisce a danni o altri effetti avversi
causati all'ambiente circostante e ai
mobili, nonché ad animali domestici.
Informazioni sui simboli
Il simbolo richiama l'attenzione dell'utente su istruzioni
o avvisi importanti. Il significato specifico del simbolo
è dall'immagine contenuta nel triangolo. Il simbolo
a sinistra è utilizzato per avvertenze o avvisi di presenza
di pericolo.
Il simbolo richiama l'attenzione dell'utente su
azioni che non devono mai essere eseguite (sono proibite).
L'azione specifica vietata è indicata dall'immagine
contenuta nel cerchio. Il simbolo a sinistra indica che
l'unità non deve mai essere smontata.
Il simbolo richiama l'attenzione dell'utente su azioni
che devono essere eseguite. L'azione specifica da eseguire
è indicata dall'immagine contenuta nel cerchio. Il simbolo
a sinistra indica che la spina del cavo di alimentazione deve
essere staccata dalla presa.
AVVISO
Non tentare di smontare o modicare l'unità
Non aprire (o modicare in alcun modo)
l'unità o l'adattatore CA.
Non tentare di riparare o sostituire qualsiasi parte
Non tentare di riparare l'unità o di sostituirne
parti interne, a eccezione dei casi in cui
il presente manuale fornisca istruzioni
speciche indicando all'utente le modalità
di esecuzione di tali operazioni. Per qualsiasi
tipo di assistenza, rivolgersi al proprio
rivenditore, al Roland Service Center più
vicino o a un distributore Roland autorizzato,
come indicato nella pagina "Information".
Evitare di utilizzare o riporre l'unità nelle seguenti
condizioni
• In ambienti soggetti a temperature
eccessive (ad esempio, la luce solare
diretta in un veicolo chiuso, vicino a una
fonte di calore, su apparecchiature che
generano calore).
• In luoghi umidi (ad esempio, bagni,
lavanderie, pavimenti bagnati);
• All'esposizione di vapore o fumo;
• In luoghi soggetti a esposizione salina;
• In ambienti umidi;
• All'esposizione della pioggia;
• In ambienti polverosi o sabbiosi;
• Su superci soggette a livelli elevati di
vibrazione e tremolio.
Utilizzare solo il supporto per tastiere consigliato
Questa unità dovrebbe essere utilizzata solo
con il supporto consigliato da Roland.
Non collocare su superci instabili
Per l'utilizzo dell'unità in rack o su
supporto consigliato da Roland,
posizionare accuratamente il rack o il
supporto in maniera che siano in piano
e rimangano stabili. In mancanza di
rack o supporto, assicurarsi di scegliere
una supercie di appoggio capace di
reggere adeguatamente il peso dell'unità,
impedendole di oscillare.
Precauzioni relative all'utilizzo di un supporto
Assicurarsi di seguire le istruzioni del
Manuale dell'utente relative all'installazione
dell'unità su un supporto (p. 3).
Se non installata correttamente, l'unità
potrebbe cadere o far rovesciare il supporto,
causando infortuni alle persone.
AVVISO
Utilizzare solo l'adattatore CA incluso e la corretta
tensione di rete
Utilizzare esclusivamente l'adattatore
CA fornito assieme a questa unità.
Assicurarsi inoltre che la tensione di
rete all'installazione corrisponda alla
tensione in ingresso specicata sul corpo
dell'adattatore CA. Altri adattatori CA
potrebbero utilizzare una polarità dierente
o essere indicati per una tensione di
corrente diversa, pertanto il loro utilizzo
potrebbe causare danni, malfunzionamenti
o produrre scosse elettriche.
Utilizzare solo il cavo di alimentazione incluso
Utilizzare esclusivamente il cavo
di alimentazione incluso. Il cavo di
alimentazione incluso, inoltre, non deve
essere utilizzato con nessun altro dispositivo.
Non piegare il cavo di alimentazione, né porre oggetti
pesanti su di esso
Non sottoporre a torsione e non piegare in
modo eccessivo il cavo di alimentazione;
non appoggiarci sopra oggetti pesanti. In
caso contrario il cavo potrebbe danneggiarsi,
provocare cortocircuiti e la rottura di
elementi. I cavi danneggiati possono
innescare incendi e indurre scosse elettriche.
Evitare di utilizzare l'unità ad alto volume per troppo
tempo
Questa unità, utilizzata da sola o in
abbinamento con amplicatore e cue o
altoparlanti, è in grado di produrre livelli
di suono che possono provocare la perdita
permanente dell'udito. Non lasciare in
funzione l'unità per periodi di tempo
prolungati a un livello di volume elevato
o fastidioso. Se si dovesse riscontrare la
riduzione dell'udito o ronzii alle orecchie,
interrompere immediatamente l'utilizzo
dell'unità e consultare un audiologo.
Evitare di far penetrare oggetti o liquidi all'interno
dell'unità; non collocare contenitori con liquidi
sull'unità
Non collocare contenitori con liquidi sul
prodotto. Evitare l'introduzione di qualsiasi
oggetto estraneo (ad esempio oggetti
inammabili, monete, cavi) o liquidi (ad
esempio acqua o bibite) nell'unità, poiché
potrebbero causare cortocircuiti, errori o
altri problemi di funzionamento.
AVVISO
Spegnere l'unità se si verica un'anomalia o un guasto
Spegnere immediatamente l'unità,
rimuovere l'adattatore CA dalla presa e
richiedere assistenza al proprio rivenditore,
al Centro di assistenza Roland più vicino
o a un distributore Roland autorizzato, in
base all'elenco nella pagina "Information"
quando:
• L'adattatore CA, il cavo di alimentazione
o la spina sono danneggiati;
• Si verica emissione di fumo o un odore
insolito;
• Sull'unità sono caduti oggetti o sono
stati versati liquidi;
• L'unità è stata esposta alla pioggia (o si è
bagnata in altro modo);
• L'unità non funziona normalmente o
manifesta un cambiamento evidente
nelle prestazioni.
In presenza di bambini, è necessario che un adulto
fornisca supervisione
Prestare attenzione a non far manipolare
l'unità in modo inappropriato da eventuali
bambini presenti. È consigliabile che un
adulto sia sempre nelle vicinanze per la
supervisione dei bambini.
Non far cadere l'unità o sottoporla a forti impatti
Proteggere l'unità da forti impatti.
(Non farla cadere!)
Non collegare l'unità a una presa di corrente insieme a
un numero eccessivo di altri apparati elettrici
Non collegare il cavo di alimentazione
dell'unità a una presa di corrente alla quale
sono già connessi numerosi altri dispositivi.
Prestare particolare attenzione in caso di
utilizzo di prolunghe; la potenza massima
di tutti i dispositivi collegati non deve
mai superare l'assorbimento massimo
(watt/ampere) previsto per la prolunga
stessa. Carichi eccessivi possono causare il
surriscaldamento del materiale isolante del
cavo e provocarne la fusione.
Non utilizzare l'unità all'estero
Prima di utilizzare l'unità in un paese
straniero, consultare il proprio rivenditore,
il Centro di assistenza Roland più vicino o
un distributore Roland autorizzato, in base
all'elenco della pagina "Information".
10
Page 55

UTILIZZO SICURO DELL'UNITÀ
ATTENZIONE
Collocare l'unità in un ambiente ben ventilato
Collocare l'unità e l'adattatore CA in modo
che la loro posizione non interferisca con la
corretta ventilazione.
Utilizzare solo il supporto o i supporti specicati
L'unità è stata progettata per essere
utilizzata in combinazione con supporti
specici (KS-12, KS-18Z), prodotti da
Roland. Se utilizzata con altri supporti, la
mancanza di stabilità potrebbe far cadere
l'unità o far rovesciare il supporto, causando
infortuni alle persone.
Valutare l'elemento sicurezza prima di utilizzare un
supporto
Anche rispettando tutte le avvertenze
fornite nel manuale dell'utente, alcuni
movimenti potrebbero far cadere l'unità dal
supporto o farlo rovesciare. Tenere a mente
tutte le avvertenze sulla sicurezza prima di
utilizzare il prodotto.
Scollegare/collegare l'adattatore CA aerrando la
spina del cavo di alimentazione
Quando si collega o scollega il cavo di
alimentazione dell'adattatore CA, aerrare
esclusivamente la spina del cavo.
Pulire periodicamente la spina dell'adattatore CA
A intervalli regolari è necessario scollegare
l'adattatore CA e pulirlo utilizzando un
panno asciutto per eliminare tutta la
polvere e altri accumuli dai poli di contatto
elettrici. Scollegare inoltre la spina dalla
presa di corrente ogni volta che l'unità deve
restare inutilizzata per un periodo di tempo
prolungato. Eventuali accumuli di polvere
tra la spina e la presa di corrente possono
diminuire l'isolamento e causare incendi.
ATTENZIONE
In previsione di un temporale, scollegare l'adattatore
CA dalla presa di corrente
Se si ritiene che nelle vicinanze possa
vericarsi la caduta di fulmini, scollegare
l'adattatore CA dalla presa di corrente.
Deutsch Français Italiano Español Português NederlandsEnglish
Utilizzo sicuro dei cavi
Evitare che cavi e li elettrici si aggroviglino.
Inoltre, è necessario posizionare tutti i cavi e
i li elettrici fuori dalla portata di bambini.
Evitare di salire o collocare oggetti pesanti sull'unità
Mai salire né collocare oggetti pesanti
sull'unità.
Non collegare o scollegare l'adattatore CA con le mani
bagnate
Non toccare l'adattatore CA o la spina con
mani bagnate quando si collega o scollega
l'unità da una presa di corrente.
Scollegare tutti i cavi prima di spostare l'unità
Prima di spostare l'unità, scollegare
l'adattatore CA e tutti i cavi di collegamento
ai dispositivi esterni.
Scollegare l'adattatore CA dalla presa di corrente
prima della pulizia
Prima di eettuarne la pulizia, spegnere
l'unità e scollegare l'adattatore CA dalla
presa di corrente (p. 6).
11
Page 56

NOTE IMPORTANTI
Alimentazione
• Non collegare l'unità alla stessa presa elettrica
utilizzata contemporaneamente da un altro
apparecchio elettrico controllato da un invertitore o
un motore (ad esempio un frigorifero, una lavatrice,
un forno a microonde o un condizionatore d'aria).
In base al modo in cui l'apparecchio elettrico viene
utilizzato, il rumore dell'alimentazione potrebbe
causare il malfunzionamento dell'unità o produrre
rumori sgradevoli. Se non è possibile utilizzare una
presa elettrica separata, collegare un ltro elettrico
antidisturbo tra l'unità e la presa di corrente.
• L'adattatore CA inizierà a generare calore dopo
molte ore di uso consecutivo. Questo è normale e
non deve destare preoccupazioni.
• Per prevenire guasti e danni ai dispositivi, assicurarsi
sempre che tutte le unità siano spente prima di
eettuare qualsiasi collegamento.
• Con le impostazioni di fabbrica, l'unità RD-64 si
spegne automaticamente dopo quattro ore dall'ultima
operazione compiuta. Se non si desidera far spegnere
l'unità automaticamente, modicare l'impostazione
"AUTO OFF" su "OFF", come descritto in p. 8.
Posizionamento
• L'utilizzo dell'unità vicino ad amplicatori di
potenza (o altri dispositivi contenenti trasformatori
di potenza di grandi dimensioni) potrebbe causare
un ronzio. Per ridurre il problema, modicare
l'orientamento dell'unità o allontanarla dall'origine
dell'interferenza.
• Questo dispositivo potrebbe interferire con la
ricezione di apparecchi radio e televisivi. Non utilizzare
questo dispositivo in prossimità di tali ricevitori.
• Utilizzando dispositivi di comunicazioni wireless, ad
esempio telefoni cellulari, in prossimità dell'unità,
è possibile che si produca del rumore. Tale rumore
potrebbe vericarsi quando si riceve o si inizia una
chiamata, o durante la conversazione telefonica. Se
si vericano tali problemi, riposizionare i dispositivi
wireless allontanandoli dall'unità, oppure spegnerli.
• Non esporre l'unità alla luce solare diretta, non
posizionarla in prossimità di dispositivi che
irradiano calore, non lasciarla all'interno di
un veicolo chiuso o sottoporla in altri modi a
temperature eccessive. Inoltre, non collocare fonti
di illuminazione troppo vicine all'unità (come ad
esempio una luce per pianoforte), né utilizzare
faretti molto luminosi sulla medesima area
dell'unità per periodi di tempo prolungati. Il calore
eccessivo può deformare o scolorire l'unità.
• Quando l'unità viene spostata da un luogo a un
altro in cui la temperatura e/o l'umidità sono molto
diverse, è possibile che si formino delle goccioline
d'acqua (condensa) all'interno della stessa. Se
si tenta di utilizzare l'unità in tali condizioni,
potrebbero vericarsi danni o guasti. Pertanto,
prima di utilizzare l'unità, è necessario lasciarla
spenta per alcune ore, nché la condensa non sia
completamente evaporata.
• Non lasciare gomma, plastica o materiali simili
sull'unità per prolungati periodi di tempo. Tali
oggetti possono scolorire o danneggiare in altro
modo la nitura.
• Non collocare oggetti sopra la tastiera. Il peso degli
oggetti potrebbe causare guasti, quali la rottura del
meccanismo che permette la produzione del suono.
• Non incollare adesivi, decalcomanie o simili sullo
strumento. La rimozione di tali elementi dallo
strumento potrebbe danneggiare la nitura esterna.
• A seconda della temperatura e del materiale sul
quale si posiziona l'unità, è possibile che i piedini in
gomma della tastiera possano scolorire o marcare la
supercie di appoggio.
Se si desidera impedire ciò, porre sotto i piedini in
gomma dell'unità dei feltrini o un panno. In tal caso,
assicurarsi che l'unità non scivoli o non si sposti in
modo accidentale.
• Evitare di appoggiare qualsiasi contenitore con
liquidi sull'unità. Evitare inoltre di utilizzare
insetticidi, profumi, alcool, smalto per unghie,
bombolette spray e così via nei pressi dell'unità.
Rimuovere tempestivamente qualunque traccia di
liquido dall'unità utilizzando un panno morbido e
asciutto.
Manutenzione
• Per pulire l'unità, utilizzare un panno asciutto e
morbido o uno leggermente inumidito. Cercare
di passare il panno uniformemente su tutta la
supercie. Stronare troppo la stessa area può
danneggiare la nitura.
• Non utilizzare mai benzina, diluenti, alcool o
solventi di alcun tipo, per evitare la possibilità di
scolorimento e/o deformazione.
Riparazione e dati
• I dati presenti nella memoria dell'unità potrebbero
andare persi nell'evenienza di una reinizializzazione
da parte del centro di assistenza.
Precauzioni aggiuntive
• Roland non si assume alcuna responsabilità per la
perdita di tali dati, né è obbligata al loro recupero.
• Usare un ragionevole grado di attenzione
nell'utilizzo di pulsanti, cursori e controlli dell'unità,
così come nel collegamento di jack e connettori.
Se l'unità viene maneggiata con disattenzione,
potrebbero vericarsi dei malfunzionamenti.
• Quando si scollegano tutti i cavi, tenere fermo il
connettore senza mai tirare il cavo. In tal modo si
eviterà di causare cortocircuiti o di danneggiare gli
elementi interni del cavo.
• Per evitare di disturbare il vicinato, tenere il volume
dell'unità a un livello ragionevole. Per non essere
interrotti, potrebbe essere preferibile utilizzare le
cue.
• Il suono dei tasti premuti e le vibrazioni prodotte
suonando uno strumento possono essere trasmessi
attraverso il pavimento o una parete in maniera
imprevedibile. Prestare attenzione a non disturbare
il vicinato.
• Per trasportare l'unità, imballarla nella scatola
originale, possibilmente includendo l'imbottitura.
In alternativa, utilizzare materiali di imballaggio
equivalenti.
• Utilizzare esclusivamente il pedale di espressione
indicato (EV-5 o EV-7, venduti separatamente).
Collegando un pedale di espressione dierente si
rischia di provocare guasti e/o danni all'unità.
• Alcuni cavi di collegamento contengono resistori.
Non utilizzare cavi con resistori incorporati per il
collegamento di questa unità. L'utilizzo di tali cavi
può causare una riduzione eccessiva del livello del
suono o la totale assenza. Per informazioni sulle
speciche dei cavi, contattare il produttore del cavo.
• La distanza di utilizzo del controller D-BEAM può
diminuire drasticamente in presenza di una forte
luce solare diretta. È necessario tener conto di
questa limitazione quando si intende utilizzare il
controller D-BEAM all'esterno.
Copyright/Licenze/Marchi di fabbrica
• Il copyright sul contenuto di questo prodotto (i dati
delle waveform, degli stili, i pattern di accompagnamento, le frasi, i loop audio e i dati immagine) è di
esclusiva proprietà di Roland Corporation.
• Gli acquirenti del presente prodotto possono
utilizzare tali contenuti per la creazione, l'esecuzione,
la registrazione e la distribuzione di opere musicali
originali.
• Gli acquirenti del presente prodotto NON sono
autorizzati all'estrazione di tali contenuti, originali
o in forma modicata, per scopi di distribuzione di
media registrati con tali mezzi, o per la divulgazione
su una rete di computer.
• MMP (Moore Microprocessor Portfolio) fa riferimento
a una serie di brevetti relativi all'architettura di
un microprocessore, sviluppata dalla Technology
Properties Limited (TPL). Roland ha ottenuto la
licenza di questa tecnologia da TPL Group.
• Roland e SuperNATURAL sono marchi o marchi
registrati di Roland Corporation negli Stati Uniti
d'America e/o in altri paesi.
• Tutti i nomi di società e prodotti citati in questo
documento sono marchi o marchi registrati dei
rispettivi proprietari.
12
Page 57

Note sulla tastiera Ivory Feel
Caratteristiche della tastiera Ivory Feel
I tasti dei pianoforti tradizionali sono in genere prodotti utilizzando avorio (per i tasti bianchi) ed ebano (per i tasti neri) della migliore qualità. La
tastiera Ivory Feel implementa un'esclusiva tecnologia che riproduce con assoluta fedeltà il tocco e le sensazioni di tali materiali.
Ogni tastiera Ivory Feel ore i seguenti vantaggi:
• Ottima consistenza al tatto, capace di aumentarne le sensazioni e la sensibilità man mano che la si suona.
• Una supercie che incorpora strisce di materiale assorbente per l'umidità, che ne migliora ulteriormente il tocco e la suonabilità.
• Tasti semilucidi e una ranata smaltatura, che ne esaltano il look e l'eleganza.
• Tasti bianchi riniti con una leggera tinta sfumata di giallo, che riprende l'aspetto del vero avorio.
Gestione
• Non scrivere sulla tastiera con pennarelli o altri marcatori, e non aggere né collocare oggetti che possano lasciare segni indelebili. L'inchiostro,
una volta penetrato nella supercie, non può più essere rimosso.
• Non aggere adesivi sulla tastiera. Una volta assi, potrebbe risultare impossibile rimuovere alcuni adesivi a causa della colla utilizzata, che può
tra l'altro scolorire la supercie.
Cura e manutenzione
Prestare attenzione ai seguenti punti. La mancata osservanza delle seguenti avvertenze può causare gra alla supercie, danni alla nitura lucida o
altri tipi di scoloritura o deformazione.
• Rimuovere la sporcizia utilizzando un panno morbido.
Utilizzando un panno inumidito e ben strizzato, rimuovere la sporcizia delicatamente.
Non stronare con troppa foga la supercie.
• Per rimuovere lo sporco ostinato, utilizzare un prodotto specico per tastiere (reperibile in commercio) che non contenga abrasivi.
Iniziare stronando leggermente. Se lo sporco non viene rimosso, stronare utilizzando una pressione sempre maggiore, facendo attenzione a
non graare i tasti.
• Non utilizzare benzene, diluenti o alcol sullo strumento.
Deutsch Français Italiano Español Português NederlandsEnglish
Controllo di un Modulo Sonoro MIDI Esterno in Modalità Piano
Con la modalità Piano dell'unità RD-64 è possibile specicare un canale MIDI e trasmettere attraverso di questo messaggi MIDI, come ad esempio
bank select, program change e aftertouch, a un modulo sonoro MIDI esterno. Per maggiori dettagli, fare riferimento ai capitoli "Setting the MIDI
Transmit Channel (MIDI CHANNEL)", "Switching Sounds" e "Using the D-BEAM to Modify the Sound" del manuale utente dell'unità A-88.
Nel caso in cui si verichino dei problemi, come ad esempio note bloccate o anomalie coi suoni del modulo sonoro MIDI esterno, trasmettere
un messaggio di reset per risolvere l'inconveniente. Per maggiori dettagli, fare riferimento al capitolo "Halting Stuck Notes (PANIC)" del manuale
dell'utente dell'unità A-88.
13
Page 58

Speciche principali
Roland RD-64: Pianoforte digitale
Tastiera
Tastiera 64 tasti (tastiera Ivory Feel-G con Escapement)
Sensibilità al tocco Curva di velocity: 5 tipi
Generatore sonoro
SuperNATURAL Piano
Generatore sonoro
Polifonia massima 128 voci
Timbri 12 timbri
Master Tuning 415,3 Hz – 466,2 Hz (regolabile con incrementi di 0,1 Hz)
Trasposizione Trasposizione di nota: -6 – +5 (in semitoni)
Eetti EFX 1, EFX 2, REVERB
Equalizzatore Equalizzatore digitale a due bande
Altro
Controller
Pulsanti
Interruttori Interruttore [POWER]
Display Indicatore a LED di accensione, indicatore a LED di ottava
Connettori
Alimentazione Adattatore CA
Consumo energetico 4 W
Dimensioni 1.114 (L) x 273 (P) x 116 (A) mm
Peso 12,8 kg
Accessori
Accessori opzionali (venduti
separatamente)
SuperNATURAL (E. Piano)
Virtual Tone Wheel Organ
Manopole: [MASTER VOLUME], EQ [LOW], [HIGH]
Leva [Pitch bend/Modulazione]
Controller D-BEAM
Pulsante [A. PIANO], pulsante [E. PIANO], pulsante [CLAV ], pulsante [ORGAN],
pulsanti TONE VARIATION [1] [2] [3],
pulsante [FUNCTION], pulsante [SuperNATURAL],
pulsanti OCTAVE [+] [−], pulsante [TRANSPOSE]
pulsanti [EFX 1], [EFX 2], pulsante [REVERB]
Jack DAMPER: 1/4" phone TRS
Jack FC1, FC2: 1/4" phone TRS
Connettore MIDI OUT
Porta USB COMPUTER (USB tipo B)
Jack OUTPUT (L/MONO, R): 1/4" phone
Jack INPUT (L, R): Phono RCA
Jack PHONES: 1/4" phone stereo
Jack DC IN
Manuale dell'utente
Pedale damper (compatibile con funzioni di rilevamento continuo)
Adattatore CA, cavo di alimentazione (per adattatore CA)
Cue
Supporto per tastiera (KS-18Z, KS-12)
Pedaliera (RPU-3)
Pedale damper (DP-10)
Interruttore a pedale (DP-2)
Pedale di espressione (EV-5, EV-7)
* Per garantire un costante miglioramento dei nostri prodotti, le speciche tecniche e/o l'aspetto dell'unità sono soggetti a variazioni senza ulteriore
preavviso.
Copyright © 2013 ROLAND CORPORATION
Tutti i diritti riservati. Nessuna parte di questa pubblicazione può essere riprodotta, in alcuna forma, senza autorizzazione scritta di ROLAND CORPORATION.
14
Page 59

Deutsch Français Italiano Español Português NederlandsEnglish
Piano digital
Manual de instrucciones
Page 60

Los dos modos del RD-64
Utilizando el RD-64 como Piano (Modo Piano)
El RD-64 hereda los sonidos de SuperNATURAL Piano de los inmensamente populares pianos de escenario de la serie
RD. La unidad integra sonidos acústicos y eléctricos cuidadosamente seleccionados que permiten alcanzar unos matices
expresivos de gran riqueza. También integra el aclamado teclado con tacto de marl de la serie RD. Con una acción de
tecla expresiva y una excelente respuesta a las pulsaciones repetidas con rapidez, el RD-64 resulta sin embargo ligero y
compacto.
El RD-64 es altamente portátil y puede llevarse con facilidad tanto al estudio como al lugar de la interpretación.
Utilizar el RD-64 en modo Piano
Al activarlo, el RD-64 se inicia automáticamente en modo Piano.
Acerca del manual de instrucciones
Lea este documento.
Utilizar el RD-64 como un Teclado Controlador MIDI (Modo Controlador)
Si se mantiene pulsado el botón [A. PIANO] mientras activa el instrumento, el RD-64 funcionará como un teclado controlador
MIDI con la misma funcionalidad*1 que el A-88. Conéctelo a su ordenador con un cable USB disponible en el mercado, y
úselo con el software DAW para la producción musical.
* En el modo Controlador, el generador de sonido interno del RD-64 no produce sonido alguno. Además, no sucederá nada
al pulsar los botones [TONE SELECT], [TONE VARIATION] o [REVERB].
Utilizar el RD-64 en modo Controlador
Si se mantiene pulsado el botón [A. PIANO] mientras se activa la unidad, el RD-64 se activará en el modo
Controlador.
Acerca del manual de instrucciones
Para obtener más información sobre el uso del RD-64 como un teclado controlador MIDI, consulte el
manual en formato PDF del A-88.
Para obtener el manual en formato PDF
1. Escriba la siguiente URL en su ordenador.
http://www.roland.com/manuals/
2. Seleccione “A-88” como nombre de producto.
*1
Diferencias entre el modo Controlador del RD-64 y del A-88
El modo de Controlador del RD-64 diere del A-88 en las formas siguientes. Al leer el Manual de instrucciones del A-88 (manual en formato
PDF), por favor, tenga en cuenta los siguientes puntos.
• Puesto que el RD-64 utiliza el controlador USB que viene con el ordenador (GENERIC), no es necesario instalar el controlador USB (el
capítulo “Installing the Driver” en el Manual de instrucciones del A-88). Basta con conectarlo al ordenador mediante un cable USB
disponible en el mercado, y está listo para utilizar. Como nombre de puerto MIDI se visualizará “Roland Digital Piano”.
• El RD-64 no dispone de las funcionalidades “UPPER,” “LOWER,” “SPLIT” y “DUAL” del A-88 (el capítulo “Layering Two Parts” en el Manual de
instrucciones del A-88).
Antes de utilizar el instrumento, lea con atención las secciones tituladas: “UTILIZAR LA UNIDAD DE FORMA SEGURA” (p. 10) y “NOTAS IMPORTANTES” (p. 12). En estas secciones
encontrará información importante acerca de la utilización correcta de la unidad. Además, para familiarizarse con todas las funciones que le ofrece esta nueva unidad, lea
con atención y por completo el Manual de instrucciones. Conserve este manual y téngalo a mano para consultarlo como referencia.
2
Page 61

Contenido
Los dos modos del RD-64 . . . . . . . . . . . . . . . . . . . . . . . . . . . . . . . . . . . . . . . . . . . . . . . . . . . . . . . . . . . . 2
Utilizando el RD-64 como Piano (Modo Piano) . . . . . . . . . . . . . . . . . . . . . . . . . . . . . . . . . . . . . . . .2
Utilizar el RD-64 como un Teclado Controlador MIDI (Modo Controlador) . . . . . . . . . . . . . .2
Colocar el RD-64 en un soporte . . . . . . . . . . . . . . . . . . . . . . . . . . . . . . . . . . . . . . . . . . . . . . . . . . . . . .3
Descripciones del panel . . . . . . . . . . . . . . . . . . . . . . . . . . . . . . . . . . . . . . . . . . . . . . . . . . . . . . . . . . . . .4
Conexiones . . . . . . . . . . . . . . . . . . . . . . . . . . . . . . . . . . . . . . . . . . . . . . . . . . . . . . . . . . . . . . . . . . . . . . . . . 6
Cambiar los ajustes (modo FUNCTION) . . . . . . . . . . . . . . . . . . . . . . . . . . . . . . . . . . . . . . . . . . . . . . .7
Restablecer los ajustes de fábrica (FACT RESET) . . . . . . . . . . . . . . . . . . . . . . . . . . . . . . . . . . . . . . .7
Cambiar el tacto del teclado (VELO CURVE) . . . . . . . . . . . . . . . . . . . . . . . . . . . . . . . . . . . . . . . . . . .7
Especicación del Valor de Velocidad del Teclado (KEY VELO) . . . . . . . . . . . . . . . . . . . . . . . . .7
Sintonizar con el tono de otros instrumentos (Master Tune) . . . . . . . . . . . . . . . . . . . . . . . . . . .8
Desactivación automática de la unidad transcurridos algunos minutos (Auto O) . . . . .8
Seleccionar el controlador especíco (ADVANCED) o el controlador GENERIC . . . . . . . . . .8
Solución de problemas . . . . . . . . . . . . . . . . . . . . . . . . . . . . . . . . . . . . . . . . . . . . . . . . . . . . . . . . . . . . . .9
UTILIZAR LA UNIDAD DE FORMA SEGURA . . . . . . . . . . . . . . . . . . . . . . . . . . . . . . . . . . . . . . . . . . 10
NOTAS IMPORTANTES . . . . . . . . . . . . . . . . . . . . . . . . . . . . . . . . . . . . . . . . . . . . . . . . . . . . . . . . . . . . . 12
Acerca del teclado con tacto de marl . . . . . . . . . . . . . . . . . . . . . . . . . . . . . . . . . . . . . . . . . . . . . . 13
Control de un Módulo de Sonido MIDI Externo en el Modo Piano . . . . . . . . . . . . . . . . . . . . 13
Especicaciones principales . . . . . . . . . . . . . . . . . . . . . . . . . . . . . . . . . . . . . . . . . . . . . . . . . . . . . . . 14
Colocar el RD-64 en un soporte
Si desea colocar el RD-64 en un soporte, use los Roland KS-18Z o KS-12.
Coloque el instrumento en el soporte de la forma siguiente.
Procure no pillarse los dedos al instalar el soporte.
KS-18Z
Deutsch Français Italiano Español Português NederlandsEnglish
Alinee la parte frontal
del RD-64 con la
parte delantera del
soporte.
KS-12
Ajuste de manera
que la altura no
sea superior a
1 metro (Ajuste
el soporte a un
nivel no superior
al cuarto nivel
desde la parte
inferior).
Ajuste la anchura del soporte de
modo que los pies de goma del
RD-64 queden a ambos lados del
soporte.
Vista superior
Ajuste la anchura del soporte
de modo que los pies de goma
la parte inferior del teclado
encajen en los oricios previstos
para los mismos.
Vista superior
3
Page 62

Descripciones del panel
Interruptor [Power]
Activar la unidad
* Una vez todo esté correctamente conectado (p. 6), asegúrese de seguir el
procedimiento siguiente para activar los dispositivos. Si los activa en un orden
incorrecto, puede provocar un funcionamiento anómalo o fallos de los dispositivos.
* Esta unidad incorpora un circuito de protección. Se requiere un breve espacio de tiempo
(unos segundos) después de activar la unidad para que funcione con total normalidad.
* Antes de activar o desactivar la unidad, asegúrese siempre de bajar el volumen. Incluso
con el volumen bajado, es posible que se pueda escuchar algún sonido al apagar o
encender la unidad. Sin embargo, es perfectamente normal y no indica ningún error.
1.
Utilice el mando [MASTER VOLUME] para minimizar el volumen.
Baje también al mínimo el volumen de cualquier otro dispositivo y
equipo audio conectado.
2. Active el conmutador [POWER].
3. Active los dispositivos externos conectados.
4.
Ajuste el volumen del RD-64 y de los dispositivos externos conectados.
Mando [MASTER VOLUME]
Ajustar el volumen
Gire el mando a la derecha para subir el volumen, o a la izquierda para bajarlo.
[TONE SELECT], botón [TONE VARIATION]
Seleccionar tonos
1.
Pulse los botones [TONE SELECT] para seleccionar el grupo de tonos.
Apagar la unidad
Utilice el mando [MASTER VOLUME] para minimizar el volumen.
1.
2. Desactive los dispositivos externos conectados.
3. Desactive el conmutador [POWER].
* Con los ajustes de fábrica, el RD-64 se desactivará automáticamente
cuatro horas después de que haya dejado de tocar o utilizar la unidad.
Si no desea que la unidad se desactive automáticamente, ajuste “AUTO
OFF” a “OFF” tal como se describe en p. 8.
2. Pulse los botones [TONE VARIATION] para seleccionar una variación.
Grupo Variación 1 Variación 2 Variación 3
A. PIANO CONCERT GRAND BRIGHT PIANO CONCERT MONO
E. PIANO PURE VINTAGE TINE EP WURLY
CLAV COMBINATION MEDIUM BRILLIANT
ORGAN JAZZ ORGAN ROCK ORGAN FULL DRAW
Botón [FUNCTION]
Cambiar los ajustes
Utilice este botón cuando desee ajustar el tacto del teclado, o para realizar las
asignaciones del pedal. Para obtener información detallada, consulte “Cambiar los ajustes
(modo FUNCTION)” (p. 7).
Botón [SuperNATURAL]
En el modo Piano, permanecerá encendido y no sucederá nada aunque se pulse.
Este botón se utiliza solo cuando se ha conectado un “módulo de sonido compatible
SuperNATURAL” en el modo Controlador. Para más información, consulte la sección
“Utilizar el RD-64 como un Teclado Controlador MIDI (Modo Controlador)” (p. 2).
Palanca [Inexión de tono/Modulación]
Cambiar el tono de la nota que suena (Inexión de tono)
Si mientras toca mueve la palanca hacia la izquierda, el tono disminuirá; mientras que si la mueve hacia la derecha, aumentará.
Este efecto se denomina “inexión de tono”.
Aplicar modulación a la nota que suena (Modulación)
Si aleja la palanca de su posición se aplicará vibrato. Este efecto se denomina “modulación”.
* El efecto que se obtiene al mover la palanca depende del tono que se utiliza. Además, el efecto aplicado al mover la palanca está predetermina-
do para cada tono, y no se puede cambiar.
4
Efecto de inexión de tono
Efecto de modulación
Page 63

Descripciones del panel
Controlador D-BEAM
Mueva la mano por encima para aplicar distintos efectos al sonido
Para activar el controlador D-BEAM, pulse el botón para que se ilumine.
Botón Función
[PITCH] El tono cambiará al mover la mano por encima del controlador D-BEAM.
[VOL] El volumen cambiará y podrá añadir expresión a su interpretación.
[ASSIGN] Se aplicará el efecto aftertouch.
Alcance operativo del controlador
D-BEAM
Esta ilustración muestra
el alcance operativo del
controlador D-BEAM. No
obtendrá ningún efecto si
coloca la mano fuera de dicho
alcance.
* El alcance operativo del
controlador D-BEAM
cambiará según las condiciones de iluminación.
Botón [REVERB]
Añadir reverberación al sonido (Reverb)
Pulsando el botón [REVERB] hasta que se ilumina, se puede aplicar un efecto de reverberación al sonido que esté tocando con el teclado.
Aplicar el efecto de reverberación producirá el ambiente espacioso que se suele escuchar cuando se toca en una sala de conciertos.
* No puede ajustar el valor del efecto de reverberación.
Deutsch Français Italiano Español Português NederlandsEnglish
Mando EQ [LOW], [HIGH]
Ajustar los rangos superior e inferior (ecualizador)
El RD-64 está equipado con un ecualizador de dos bandas.
Se puede ajustar el nivel de la gama de baja frecuencia y el rango de alta frecuencia para cada tono.
* Los ajustes del ecualizador se almacenan individualmente para cada tono (Mantenga pulsado el botón [SuperNATURAL] y pulse los botones [A. PIANO] y [ORGAN]
simultáneamente para guardar los 12 tonos).
Botón [EFX 1], [EFX 2]
Aplicar efectos al sonido
Pulsando el botón [EFX 1] o [EFX 2] hasta que se ilumine, se puede aplicar un efecto al sonido que esté tocando con el teclado.
Los efectos siguientes se aplican para cada grupo de tono.
Grupo EFX 1 EFX 2
A. PIANO ENHANCER DAMPER RESONANCE
E. PIANO TREMOLO PHASER
CLAV AUTO WAH OVERDRIVE
ORGAN ROTARY SPEED
* Los estados on/o de [EFX 1] y [EFX 2] se almacenan individualmente para cada tono (Mantenga pulsado el botón [SuperNATURAL] y pulse los botones [A. PIANO] y [ORGAN]
simultáneamente para guardar los 12 tonos).
OCTAVE [−], [+], botón [TRANSPOSE]
Cambiar la octava (Cambio de octava)
Puede utilizar los botones [+] [–] para aumentar o disminuir el rango de tono del teclado (Cambio
de octava).
• Puede cambiar este ajuste en el intervalo de -4 a 5 octavas.
• Si pulsa simultáneamente los botones [+] y [–], este ajuste se reiniciará a 0.
El indicador y los ajustes que muestra
Cambiar el tono (Transposición)
Mientras se mantiene pulsado el botón [TRANSPOSE], puede utilizar los botones [+] [–] para
transponer el tono en intervalos de semitonos.
• Puede cambiar este ajuste en el intervalo de -6 a 5.
• Si el botón [TRANSPOSE] está activado, el ajuste de transposición está activado. Si el botón [TRANSPOSE] está
desactivado, el ajuste de transposición está desactivado.
• Si pulsa simultáneamente el botón [TRANSPOSE] y los botones [+] y [–], este ajuste se reiniciará a 0.
-6
-5 -4 -3 -2 -1 0 1 2 3 4 5
Apagado Iluminado
5
Page 64

Conexiones
Conectores INPUT
Si conecta un reproductor de audio
o un dispositivo similar, el sonido
del dispositivo conectado se emitirá
desde los conectores OUTPUT y
PHONES.
* Utilice los controles del disposi-
tivo conectado (reproductor de
audio) para ajustar el volumen.
Conectores OUTPUT
Si conecta estos conectores a altavoces amplicados, el
sonido de esta unidad se escuchará a través de ellos.
Conector PHONES
Conecte los auriculares (se venden por
separado) aquí.
Conector DC IN
Conecte aquí el adaptador de CA que se incluye.
Coloque el adaptador de CA de manera que el lado
en el que se encuentra el indicador luminoso quede
hacia arriba y el lado que tiene la información de texto
quede hacia abajo. El indicador se iluminará cuando
se conecte el adaptador de CA a una salida de CA.
A la salida de CA
Pedal Damper
incluido
Ajuste el conmutador del pedal Damper incluido a “Continuous”
cuando el pedal esté desconectado.
o interruptor del pedal (se vende por
separado; serie DP)
o
Pedalera (se vende
por separado;
RPU-3)
Conector de pedal (DAMPER, FC2, FC1)
Si conecta el pedal incluido al conector DAMPER, podrá utilizar el pedal como un
pedal Damper.
Los pedales conectados a los conectores de pedal funcionarán de la siguiente
forma (con los ajustes de fábrica).
Conector Explicación
Utilice este pedal para sostener el sonido.
DAMPER Pedal Damper
FC2 Pedal Sostenuto
FC1 Pedal celeste Este pedal se utiliza para suavizar el sonido.
Mientras mantenga pisado este pedal, las
notas se sostendrán durante un periodo de
tiempo prolongado incluso si suelta las teclas
del teclado.
Este pedal sostiene solo las notas de las teclas
que ya están pulsadas al pisar el pedal.
Cable de
alimentación
Puerto USB COMPUTER
Si el RD-64 se ha conectado al ordenador
utilizando un cable USB disponible en
el mercado, podrá utilizar un software
compatible con MIDI para grabar y
reproducir la interpretación del RD-64
(datos MIDI).
* Audio USB no compatible.
Conector MIDI OUT
Puede conectar un módulo de sonido MIDI y reproducirlo.
NOTA
* Para evitar funcionamientos incorrectos y fallos de los equipos, baje
siempre el volumen y desactive todas las unidades antes de realizar
cualquier conexión.
* Utilice solo el pedal de expresión especicado (EV-5, EV-7; se venden
por separado). Si conecta otros pedales de expresión diferentes,
podrá causar anomalías en el funcionamiento o daños a la unidad
(Modo Controlador).
6
Page 65

Cambiar los ajustes (modo FUNCTION)
En el modo FUNCTION, puede ajustar el tacto del teclado.
Cómo deben entenderse las explicaciones de los procedimientos
Pulse el botón
[FUNCTION].
Pulse la tecla con “VELO CURVE” impreso
encima.
0–4
Valor 0–4
Pulse las teclas con “NUMERIC ENTRY” impreso encima.
* Los valores fuera del intervalo aceptable no se introducirán.
Restablecer los ajustes de fábrica (FACT RESET)
Cambiar el tacto del teclado (VELO CURVE)
Puede ajustar la sensibilidad táctil del teclado.
Pulse la tecla con “ENTER” impreso
encima.
Deutsch Français Italiano Español Português NederlandsEnglish
0–4
Valor 0–4
Valor Ajuste Explicación
0 SUPER LIGHT Un ajuste incluso más ligero que LIGHT.
1 LIGHT
MEDIUM
2
(predeterminado)
3 HEAVY
4 SUPER HEAVY Un ajuste incluso más duro que HEAVY.
Ajusta el teclado a un tacto ligero. Puede conseguir una reproducción fortissimo ( ) tocando con menos fuerza de la habitual, de modo
que el teclado tenga un tacto más suave. Con este ajuste interpretar es más fácil, incluso para los niños.
Ajusta el teclado a un tacto estándar. Puede tocar de la forma más natural. Es el tacto más parecido al de un piano acústico.
Ajusta el teclado a un tacto pesado. Debe tocar el teclado con más fuerza de la habitual para interpretar en fortissimo (), ya que el tacto
del teclado es más pesado. Tocando de un modo dinámico se añade más sentimiento a la interpretación.
Especicación del Valor de Velocidad del Teclado (KEY VELO)
0–9
* Si intenta introducir un valor fuera
del intervalo aceptable, se utilizarán
los dos o tres números pulsados
Valor 0–127
inmediatamente antes de ENTER.
Valor Ajuste Explicación
TOUCH
0
(predeterminado)
1 Valor jo La velocidad se transmitirá al valor especicado, independientemente de lo fuerte que toque el teclado.
Los valores de velocidad se transmitirán de acuerdo con la sensibilidad del teclado y la curva que seleccionó en “Cambiar el tacto del
teclado (VELO CURVE)” (p. 7).
7
Page 66

Cambiar los ajustes (modo FUNCTION)
Sintonizar con el tono de otros instrumentos (Master Tune)
Para conseguir un sonido de grupo más claro mientras toque con uno o más instrumentos, asegúrese de que el tono básico de cada instrumento está
sintonizado con el de los otros instrumentos. Normalmente, la sintonización de un instrumento se indica por el tono en Hercios (Hz) de la nota “A” media.
El intervalo del tono es 415,3–440,0–466,2 Hz (predeterminado: 440,0 Hz).
3 0–9
Valor 3
Valor 4153–4662
Entre 4 dígitos
Ejemplo: Para 440,0
Hz, pulse las teclas en
el orden 4, 4, 0, 0, y
ENTER.
Utilizar NUMERIC ENTRY para introducir un valor
0–9
Valor 4153–4662
Teclas NUMERIC ENTRY pulsadas en
este orden
4, 4, 0, 0, ENTER 440.0
1, 2, 3, 4, ENTER —
1, 4, 3, 8, 0, ENTER 438.0
8, 4, 4, 6, 6, 3, ENTER —
Se introduce
este valor
* Si intenta introducir un valor fuera del
intervalo aceptable, se utilizarán los
cuatro números pulsados inmediatamente antes de ENTER.
Desactivación automática de la unidad transcurridos algunos minutos (Auto O)
AVISO
Con los ajustes de fábrica, el RD-64 se desactivará automáticamente cuatro horas después de que haya dejado de tocar o utilizar la unidad. Si no
desea que la unidad se desactive automáticamente, ajuste “AUTO OFF” a “OFF” como se describe a continuación.
0–1
Valor 0–1
Valor Ajuste Explicación
0 OFF La unidad no se desactivará automáticamente.
1 ON (predeterminado) La unidad se apagará automáticamente 240 minutos (cuatro horas) después de que haya dejado de tocarla o de utilizarla.
Seleccionar el controlador especíco (ADVANCED) o el controlador GENERIC
En general, no es necesario instalar un controlador para conectar el RD-64 al ordenador. Sin embargo, si se produce algún problema o
si el rendimiento es bajo, puede solucionarlo utilizando el controlador Roland original.
En este caso, ajuste el controlador USB a “ADVANCED” en RD-64 como se describe a continuación e instale el controlador USB en su
ordenador.
Cómo instalar el controlador USB
Para más detalles acerca de la descarga e instalación del controlador
Roland original, consulte el sitio web de Roland.
Después de cambiar este ajuste, deberá desactivar el RD-64 y, a continuación,
volver a activarlo.
En general, se puede dejar ajustado a “GENERIC”.
Sitio web de Roland
http://www.roland.com/support/
Botón Ajuste Explicación
Botón [+] ADVANCED Selecciónelo si desea utilizar un controlador USB descargado desde el sitio web de Roland.
Botón [–] GENERIC (predeterminado) Selecciónelo si desea utilizar el controlador USB genérico incluido con el ordenador. En general, debe utilizar este modo.
8
Page 67

Solución de problemas
Si el RD-64 no funciona de la forma esperada, primero compruebe los puntos siguientes. Si después de estos pasos el problema aún persiste, póngase
en contacto con su distribuidor o con el distribuidor Roland más cercano.
Problema Comprobación/Solución Página
La unidad no se activa
No se emite sonido
El nivel del volumen del instrumento
conectado al conector INPUT es
demasiado bajo.
Los tonos están alterados
El tono es extraño
Se corta el sonido
El pedal no funciona, o está “atascado”/
El pedal no funciona correctamente
La reverberación se mantiene aunque
desactive el efecto Reverb
El sonido de las notas superiores cambia
de repente a partir de una tecla en
concreto
Se oye un timbre muy agudo
Las notas graves suenan mal, o con
zumbidos
¿El adaptador de CA y el cable de alimentación del RD-64 están correctamente conectados a una
fuente de alimentación y también al RD-64?
¿Los amplicadores y altavoces están conectados y activados?
¿El volumen está completamente bajado?
¿El mando [MASTER VOLUME] está completamente bajado? p. 4
¿Los altavoces se ha conectado correctamente?
Conecte unos auriculares o unos altavoces amplicados.
¿Se oyen sonidos con los auriculares conectados?
Si puede oír sonidos con los auriculares, quizá exista un cortocircuito en un cable de audio o algún
tipo de problema con el amplicador o el mezclador. Vuelva a comprobar los cables y la unidad.
¿Es posible que haya bajado el volumen al utilizar un pedal o el controlador D-BEAM?
Pise el pedal o mueva la mano por encima del controlador D-BEAM.
¿Es posible que haya iniciado el RD-64 en el modo Controller (ha activado la unidad con el botón
[A. PIANO] pulsado)?
El RD-64 no producirá ningún sonido en el modo Controller.
¿Es posible que haya desactivado el volumen del dispositivo conectado?
Ajuste el volumen del dispositivo conectado.
¿Es posible que esté utilizando un cable de conexión que incorpore una resistencia?
Utilice un cable de conexión que no tenga una resistencia.
¿Es posible que haya cambiado el tono al utilizar un pedal o el controlador D-BEAM?
Pise el pedal o mueva la mano por encima del controlador D-BEAM.
Cuando se utiliza una conexión mono, la calidad del tono puede variar dependiendo del tono
seleccionado y del registro en que se utiliza.
Para una calidad de audición óptima, se recomienda conectar en estéreo.
Según el tono seleccionado, los tonos que se toquen en determinados registros cambiarán y se
tocarán con otras anaciones.
¿Ha ajustado Octave/Transpose? p. 5
¿Es posible que haya cambiado el tono al utilizar un pedal o el controlador D-BEAM?
Pise el pedal o mueva la mano por encima del controlador D-BEAM.
Si intenta interpretar simultáneamente más de las 128 voces permitidas, se pueden cortar los
sonidos que se están reproduciendo.
¿El pedal está conectado correctamente?
Conecte el cable rmemente al conector de pedal.
¿Está utilizando un pedal de otro fabricante?
Utilice el pedal Damper incluido o un pedal opcional de la serie RPU-3, DP, EV o parecido.
El sonido de piano del RD-64 simula elmente la profundidad y la resonancia de un piano acústico, y
esto puede causar la impresión de reverberación incluso si ha desactivado el efecto Reverb.
En un piano acústico, la parte superior del teclado continuará sonando independientemente del
pedal Damper. Estas notas también tienen un carácter tonal algo diferente. El RD-64 simula elmente
esta característica de los pianos acústicos. En el RD-64, el intervalo que no queda afectado por el
pedal Damper cambiará dependiendo del ajuste de Octave/Transpose.
Los sonidos de piano con un carácter brillante y nítido contienen un número considerable de
componentes de alta frecuencia, con lo que pueden sonar como si se hubiera añadido un timbre
metálico. Esto es debido a que se está reproduciendo elmente la calidad de un piano real, y no se
trata de un funcionamiento incorrecto.
Con algunos tonos, los sonidos pueden parecer distorsionados.
Baje el volumen. También puede bajar el ajuste Master gain.
p. 6
p. 4
p. 6
−
−
p. 2
−
−
−
−
−
−
−
p. 6
p. 6
−
−
−
−
Deutsch Français Italiano Español Português NederlandsEnglish
9
Page 68

caso del símbolo de la izquierda, signica que el enchufe del cable
instrucciones o advertencias importantes. El signicado concreto
INSTRUCCIONES PARA LA PREVENCIÓN DE INCENDIOS, DESCARGAS ELÉCTRICAS O LESIONES PERSONALES
UTILIZAR LA UNIDAD DE FORMA SEGURA
Acerca de los avisos ADVERTENCIA y PRECAUCIÓN
Se utiliza para destacar las instrucciones
ADVERTENCIA
PRECAUCIÓN
cuyo objeto es advertir al usuario sobre
el riesgo de lesiones graves o mortales
si la unidad no se utiliza correctamente.
Se utiliza para destacar las instrucciones
cuyo objeto es advertir al usuario sobre
el riesgo de lesiones o daños materiales
si la unidad no se utiliza correctamente.
* Por daños materiales se entienden
los daños o efectos adversos causados
en el hogar y su contenido, así como
a los animales domésticos o mascotas.
Acerca de los símbolos
El símbolo tiene por objeto advertir al usuario sobre
del símbolo viene determinado por el dibujo que hay dentro
del triángulo. Por ejemplo, el símbolo de la izquierda se usa para
precauciones generales, advertencias o alertas de peligro.
El símbolo tiene por objeto advertir al usuario sobre
acciones que nunca deben realizarse (están prohibidas).
La acción concreta que no debe realizarse viene indicada por
el dibujo que hay dentro del círculo. En el caso del símbolo de
la izquierda, signica que la unidad nunca debe desmontarse.
El símbolo tiene por objeto advertir al usuario sobre acciones
que es necesario realizar. La acción concreta que debe realizarse
viene indicada por el dibujo que hay dentro del triángulo. En el
de alimentación debe desenchufarse de la toma de corriente.
TENGA SIEMPRE EN CUENTA LO SIGUIENTE
ADVERTENCIA
No desmonte ni modique la unidad usted mismo
No abra (ni modique de ningún modo) la
unidad o el adaptador de CA.
No repare ni sustituya las piezas usted mismo
No intente reparar la unidad ni sustituir
sus elementos internos (excepto cuando
el manual le proporcione instrucciones
especícas para hacerlo). Siempre que tenga
que realizar algún tipo de reparación, póngase
en contacto con su proveedor, con el Centro
de Servicio Roland más cercano o con un
distribuidor autorizado de Roland, mostrados
en la lista de la página “Information”.
No lo utilice ni lo guarde en los siguientes tipos de
ubicaciones
• Lugares expuestos a temperaturas
extremas (por ejemplo, bajo la luz directa
del sol en un vehículo cerrado, cerca de
un conducto de calefacción, encima de
algún equipo que genere calor, etc.); ni
• lugares húmedos (por ejemplo, cuartos
de baño o suelos mojados); ni
• lugares expuestos a vapor o a humos; ni
• lugares expuestos a entornos salinos; ni
• entornos húmedos; ni
• lugares expuestos a la lluvia; ni
• lugares polvorientos o arenosos; ni
• lugares expuestos a altos niveles de
vibraciones y sacudidas.
Utilice solo el soporte recomendado
Esta unidad solo se debe utilizar con el
soporte recomendado por Roland.
No lo coloque en un sitio inestable
Cuando utilice la unidad con el soporte
o estante recomendados por Roland,
deberán colocarse de forma que queden
nivelados y estables. Si no utiliza un estante
o soporte, debe asegurarse de que el lugar
donde coloca la unidad tiene una supercie
nivelada que la mantendrá en una posición
estable.
Precauciones referentes a la ubicación de esta unidad
sobre un soporte
Asegúrese de seguir las instrucciones del
Manual de instrucciones cuando coloque
esta unidad sobre un soporte (p. 3).
Si no se coloca correctamente, la unidad
o el soporte podrían caerse y provocar
lesiones.
Utilice solo el adaptador de CA incluido y el voltaje
correcto
Asegúrese de utilizar únicamente el
adaptador de CA que se incluye con la
unidad. Asimismo, compruebe que el
voltaje de la instalación eléctrica coincida
con el voltaje de entrada especicado
en la carcasa del adaptador de CA. Es
posible que otros adaptadores de CA
utilicen polaridades diferentes, o que estén
diseñados para un voltaje distinto, de modo
que al utilizarlos podría causar daños, un
funcionamiento anómalo, o descargas
eléctricas.
Utilice solo el cable de alimentación incluido
Utilice únicamente el cable de alimentación
incluido. Igualmente, el cable de
alimentación proporcionado no debe
emplearse con ningún otro dispositivo.
No doble el cable de alimentación ni coloque objetos
pesados sobre el mismo
No doble ni retuerza excesivamente el
cable de alimentación, ni coloque objetos
pesados sobre el mismo. De hacerlo podría
dañar el cable, provocando el corte de los
componentes y cortocircuitos. ¡Los cables
dañados son peligrosos y pueden producir
incendios y descargas eléctricas!
Evite el uso prolongado a un volumen alto
Esta unidad, utilizada de manera
independiente o junto con un amplicador
y auriculares o altavoces, puede generar
niveles de sonido susceptibles de provocar
una pérdida permanente de audición. No la
utilice durante períodos prolongados con
un nivel de volumen elevado o que resulte
molesto. Si experimenta cualquier pérdida
de audición u oye zumbidos en los oídos,
deje de utilizar la unidad inmediatamente y
consulte con un médico especialista.
No permita que penetre en el equipo ningún objeto
ni ningún tipo de líquido; no coloque nunca ningún
recipiente con líquido encima de la unidad
No coloque recipientes con líquido encima
de esta unidad. No introduzca nunca
objetos extraños (p.ej., objetos inamables,
monedas, alambres) o líquidos (p.ej., agua o
zumo) en esta unidad. Si lo hiciera podrían
producirse cortocircuitos, problemas de
funcionamiento u otros fallos.
ADVERTENCIA
ADVERTENCIA
Desactive la unidad si se producen irregularidades o
un funcionamiento incorrecto
Desactive inmediatamente la unidad,
desconecte el adaptador de CA de la
toma y solicite asistencia al distribuidor, al
Centro de Servicio Roland más cercano o
a un distribuidor Roland autorizado, que
aparecen en la página “Information”, en
estos casos:
• El adaptador de CA, el cable de
alimentación o el conector estén
dañados; o
• la unidad emite humo o un olor extraño; o
• haya caído algún objeto, o se haya
derramado algún líquido en el interior de
la unidad; o
• la unidad haya estado expuesta a la lluvia
(o se haya mojado por cualquier causa); o
• la unidad no funcione normalmente
o muestre cambios notables de
rendimiento.
Un adulto debe supervisar siempre el uso de la unidad
en lugares concurridos por niños
Si utiliza la unidad en lugares donde suela
haber niños, asegúrese de que no puedan
hacer un mal uso de la unidad. Un adulto
debería estar presente para supervisar el
uso y ayudar en todo momento.
No la deje caer ni la someta a impactos fuertes
Evite que el equipo sufra golpes fuertes.
(¡No la deje caer!)
No comparta una toma de corriente con un número
elevado de dispositivos
No conecte la unidad a una toma de
corriente donde haya conectados
un número excesivo de dispositivos.
Tenga especial cuidado si utiliza cables
alargadores. La corriente total consumida
por todos los dispositivos conectados
a la toma del cable alargador no debe
sobrepasar nunca la clasicación de
potencia (vatios/amperios) del cable.
Una carga excesiva podría hacer que se
calentara el material de aislamiento del
cable y llegara a fundirse.
No lo utilice en el extranjero
Antes de utilizar la unidad en otro país,
póngase en contacto con su distribuidor,
con el centro de servicio Roland más
cercano o con un distribuidor Roland
autorizado; encontrará una lista de los
mismos en la página “Information”
10
Page 69

UTILIZAR LA UNIDAD DE FORMA SEGURA
PRECAUCIÓN
Colóquela en un lugar bien ventilado
La unidad y el adaptador de CA deben
colocarse en un lugar o posición que
permita su ventilación adecuada.
Utilice solo el(los) soporte(s) especicado(s)
Esta unidad está diseñada para utilizarse
junto con soportes especícos (KS-12,
KS-18Z) fabricados por Roland. Si se utiliza
con otros soportes, la unidad podría caerse
y provocar lesiones debido a una falta de
estabilidad.
Evalúe la seguridad antes de utilizar los soportes
Aunque observe las precauciones
establecidas en el manual de instrucciones,
ciertos tipos de manejo pueden provocar
que el producto se caiga del soporte, o que
este se vuelque. Tenga en cuenta todos los
protocolos de seguridad antes de utilizar
este producto.
Sujete el conector al conectar o desconectar el
adaptador de CA
Sujete siempre solo el conector del
adaptador de CA al conectarlo o al
desconectarlo de una toma de corriente o
de la unidad.
Limpie periódicamente el conector del adaptador
de CA
De vez en cuando, debería desconectar
el adaptador de CA y limpiarlo utilizando
un paño seco para eliminar el polvo y la
suciedad de las clavijas. Si no va a utilizar
la unidad durante un largo periodo
de tiempo, desconecte el conector de
alimentación de la toma de corriente. Si
se acumula polvo entre el conector y la
toma de corriente se puede debilitar el
aislamiento y provocar un incendio.
PRECAUCIÓN
En caso de tormenta eléctrica, desconecte el
adaptador de CA de la toma de corriente
Si existe la posibilidad de que se produzcan
rayos en su zona, desconecte el adaptador
de CA de la toma de corriente.
Deutsch Français Italiano Español Português NederlandsEnglish
Organice los cables de forma segura
Trate de evitar que los cables se enreden.
Además, todos los cables deben estar fuera
del alcance de los niños.
No se suba nunca sobre la unidad ni coloque objetos
pesados encima
No se suba a la unidad ni coloque objetos
pesados encima.
No conecte ni desconecte el adaptador de CA con las
manos mojadas
Nunca debe manipular el adaptador de CA
ni sus conectores con las manos mojadas
al conectarlos o desconectarlos de la toma
de corriente o de la unidad.
Desconecte todos los cables antes de mover la unidad
Antes de mover la unidad, desconecte el
adaptador de CA y todos los cables de los
dispositivos externos.
Desconecte el adaptador de CA de la toma de
corriente antes de limpiar la unidad
Antes de limpiar la unidad, desactívela y
desconecte el adaptador de CA de la toma
de corriente (p. 6).
11
Page 70

NOTAS IMPORTANTES
Alimentación
• No conecte esta unidad a la misma toma de
corriente que esté utilizando un dispositivo
eléctrico controlado por un inversor o por un
motor (como por ejemplo, una nevera, una
lavadora, un microondas o un aparato de aire
acondicionado). Dependiendo de la forma en
que se utilice el electrodoméstico, el ruido en la
fuente de alimentación podría provocar fallos de
funcionamiento o ruidos audibles. Si no resulta
práctico utilizar una toma de corriente distinta,
conecte un ltro para las interferencias de la fuente
de alimentación entre esta unidad y la toma de
corriente.
• El adaptador de CA empezará a generar calor
después de unas horas de uso continuado. Esto es
completamente normal y no representa motivo
alguno de preocupación.
• Para evitar un funcionamiento anómalo o un
fallo de la unidad, desactive siempre todos los
dispositivos antes de realizar ninguna conexión.
• Con los ajustes de fábrica, el RD-64 se desactivará
automáticamente cuatro horas después de que
haya dejado de tocar o utilizar la unidad. Si no
desea que la unidad se desactive automáticamente,
ajuste “AUTO OFF” a “OFF” tal como se describe en
p. 8.
Ubicación
• La utilización de la unidad cerca de amplicadores
de potencia (u otros equipos con transformadores
de energía de gran tamaño) puede producir
zumbidos. Para solucionar este problema, cambie
la orientación de la unidad o aléjela de la fuente
emisora de las interferencias.
• Este dispositivo puede interferir en la recepción de
radio o televisión. No lo utilice en las proximidades
de este tipo de receptores.
• La utilización de dispositivos de comunicación
inalámbricos, como teléfonos móviles, en las
proximidades de la unidad puede originar ruidos.
Este tipo de ruido se puede producir al recibir o al
realizar una llamada, o durante la conversación.
Si experimenta este tipo de problemas, aleje los
dispositivos inalámbricos de la unidad o desactívelos.
• No exponga la unidad a la luz solar directa, ni la
coloque cerca de dispositivos que desprendan
calor, ni la deje dentro de un vehículo cerrado, ni
la someta a temperaturas extremas. Tampoco sitúe
cerca de la unidad equipos de iluminación muy
potentes, como luces de pianos o focos potentes,
ni permita que proyecten su luz sobre la unidad
durante períodos muy prolongados. El calor
excesivo puede deformar o decolorar la unidad.
• Si se traslada la unidad a un lugar cuyas condiciones
de temperatura o humedad sean extremadamente
diferentes, es posible que en su interior se origine
condensación. Si intenta hacer funcionar la unidad
en estas condiciones, podría dañarse o presentar
desperfectos. Por lo tanto, antes de utilizar la unidad,
deber dejarla en reposo varias horas hasta que la
condensación se haya evaporado por completo.
• No deje goma, vinilo o materiales similares sobre
la unidad durante largos períodos de tiempo. Estos
objetos pueden decolorar o dañar el acabado.
• No deje objetos encima del teclado. Podría provocar
fallos de funcionamiento, por ejemplo, que las
teclas dejaran de producir sonido.
• No pegue adhesivos, calcomanías, ni elementos
similares en este instrumento. Al despegarlos del
instrumento podría dañar el acabado exterior.
• Según el material y la temperatura de la supercie
en la que coloque la unidad, es posible que
los tacos de goma se decoloren o estropeen la
supercie.
Para evitarlo, puede colocar un trozo de eltro
o ropa debajo de los tacos de goma. Si lo hace,
asegúrese de que la unidad no pueda moverse ni
caerse accidentalmente.
• No coloque sobre esta unidad ningún objeto que
contenga agua. Evite también usar insecticidas,
perfumes, alcohol, laca de uñas, aerosoles, etc.,
cerca del equipo. Limpie rápidamente cualquier
líquido que se vierta sobre la unidad utilizando un
paño seco y suave.
Mantenimiento
• Para la limpieza de la unidad, utilice un paño suave
y seco o ligeramente humedecido. Limpie toda la
supercie utilizando la misma fuerza al mover el
paño. Si frota demasiado fuerte en la misma zona
puede dañar el acabado.
• No utilice alcohol o benceno, ni disolventes de
ningún tipo, para evitar que la unidad se deforme
o decolore.
Reparaciones y datos
• Tenga en cuenta que todos los datos contenidos
en la memoria de esta unidad se restaurarán a los
ajustes de fábrica cuando la envíe a reparar.
Otras precauciones
• Roland no asume ninguna responsabilidad
por dicha pérdida de datos, ni está obligada a
recuperarlos.
• Tenga cuidado al utilizar los botones, deslizadores
y demás controles de la unidad, así como los
conectores. Una utilización incorrecta puede
provocar desperfectos.
• Cuando desconecte todos los cables, sujételos
por el conector y nunca tire del cable. De este
modo evitará provocar cortocircuitos o daños a los
elementos internos del cable.
• Para no molestar a los que se encuentran cerca,
trate de mantener el volumen de la unidad a
unos niveles razonables. Puede optar por utilizar
auriculares y así no tendrá que preocuparse por los
que tenga a su alrededor.
• El sonido de las teclas y las vibraciones producidas
por un instrumento pueden transmitirse a través
de una pared o el suelo. Procure no molestar a los
demás.
• Cuando tenga que transportar la unidad, en la
media de lo posible, embálela dentro de su caja
original (incluido el material de relleno). En caso de
no ser posible, utilice otros materiales de embalaje
equivalentes.
• Utilice solo el pedal de expresión especicado
(EV-5, EV-7; se venden por separado). Si conecta
otros pedales de expresión diferentes, podrá
causar anomalías en el funcionamiento o daños a
la unidad.
• Algunos cables de conexión incorporan resistencias.
No utilice cables con resistencias para conectar
esta unidad. Este tipo de cables puede provocar
que el nivel de sonido sea demasiado bajo o
prácticamente inaudible. Para obtener más
información sobre las especicaciones de los cables,
póngase en contacto con el fabricante del cable en
cuestión.
• El intervalo utilizable del controlador D-BEAM se
reducirá notablemente cuando se use bajo la luz
directa del sol. Téngalo en cuenta cuando utilice el
controlador D-BEAM en exteriores.
Copyrights/Licencias/Marcas comerciales
• El copyright del contenido de este producto (datos
de forma de onda del sonido, datos de estilo,
patrones de acompañamiento, datos de frase, bucles
de audio y datos de imagen) es propiedad de Roland
Corporation.
• Los compradores de este producto tienen derecho a
utilizar este contenido para crear, interpretar, grabar
y distribuir obras musicales originales.
• Queda prohibido extraer dicho contenido de forma
original o modicada, con el objetivo de distribuir
soportes grabados de dicho contenido, o publicarlos
en una red informática.
• MMP (Moore Microprocessor Portfolio) hace
referencia a una serie de patentes relacionadas
con la arquitectura de microprocesador que ha
desarrollado Technology Properties Limited (TPL).
Roland tiene la licencia de esta tecnología del TPL
Group.
• Roland y SuperNATURAL son marcas comerciales
registradas o marcas comerciales de Roland
Corporation en los Estados Unidos o en otros países.
• Los nombres de empresas y de productos
mencionados en este documento son marcas
comerciales registradas o marcas comerciales de sus
respectivos propietarios.
12
Page 71

Acerca del teclado con tacto de marl
Características de un teclado con tacto de marl
Las teclas de los pianos tradicionales están fabricadas con los mejores materiales: marl (para las teclas blancas) y ébano (para las teclas negras). El
teclado con tacto de marl utiliza la tecnología más innovadora para reproducir el tacto y la sensación de estos materiales.
Un teclado de marl ofrece las siguientes características.
• Estamos seguros de que quedará satisfecho de la inconfundible textura de estas teclas, satisfacción que aumentará cuanto más las utilice.
• Las supercies incorporan líneas de materiales que absorben la humedad para mejorar el tacto y facilitar la interpretación.
• Las teclas exhiben un discreto color sutilmente satinado que realza su elegante diseño.
• A las teclas blancas se les ha dotado de un tono ligeramente amarillento para conseguir el aspecto del verdadero marl.
Utilización
• No escriba sobre el teclado con un bolígrafo u objeto similar, y no selle ni marque el instrumento de ninguna forma. La tinta podría ltrarse por las
líneas de la supercie y no podría eliminarse.
• No pegue pegatinas en el teclado. Podría resultar imposible quitar las pegatinas que utilizan adhesivos fuertes, y el adhesivo podría decolorar el
instrumento.
Cuidado y mantenimiento
Tenga en cuenta los siguientes puntos. Si no los tiene en cuenta, podría rayar el acabado de la supercie, dañar el satinado, o decolorar o deformar el
instrumento.
• Para eliminar la suciedad, utilice un paño suave.
Limpie la suciedad pasando suavemente un paño ligeramente húmedo y totalmente escurrido.
No frote la supercie con fuerza.
• Para eliminar la suciedad persistente, aplique uno de los productos especícos para limpiar teclados que no contenga abrasivos.
Empiece limpiándolo con suavidad. Si no consigue eliminar la suciedad, límpielo aplicando una presión cada vez mayor y procurando no rayar las
teclas.
• No utilice gasolina, disolventes, ni alcohol para limpiar el instrumento.
Deutsch Français Italiano Español Português NederlandsEnglish
Control de un Módulo de Sonido MIDI Externo en el Modo Piano
En el modo Piano del RD-64 puede especicar el canal MIDI y transmitir mensajes MIDI como la selección de banco, el cambio de programa y el
aftertouch a un módulo de sonido MIDI externo. Para obtener información detallada, consulte las secciones “Setting the MIDI Transmit Channel (MIDI
CHANNEL)”, “Switching Sounds” y “Using the D-BEAM to Modify the Sound” del manual de instrucciones del A-88.
Si tiene problemas como notas atascadas o sonidos inesperados en el módulo de sonido MIDI externo, puede solucionar el problema enviando un
mensaje de restablecimiento. Para obtener información detallada, consulte la sección “Halting Stuck Notes (PANIC)” en el manual de instrucciones.
13
Page 72

Especicaciones principales
Roland RD-64: Piano digital
Teclado
Teclado 64 teclas (Teclado Ivory Feel-G con escape)
Sensibilidad al tacto Tacto de las teclas: 5 tipos
Generador de sonido
SuperNATURAL Piano
Generador de sonido
Polifonía máxima 128 voces
Tonos 12 tonos
Anación principal 415,3 Hz–466,2 Hz (ajustable en incrementos de 0,1 Hz)
Transposición Transposición de tono: -6–+5 (en semitonos)
Efectos EFX 1, EFX 2, REVERB
Ecualizador Ecualizador digital de 2 bandas
Otros
Controladores
Botones
Interruptores Interruptor [Power]
Tecla Indicador LED de alimentación, el indicador LED de octava
Conectores
Alimentación Adaptador de CA
Consumo 4 W
Dimensiones 1.114 (Ancho) x 273 (Fondo) x 116 (Alto) mm
Peso 12,8 kg
Accesorios
Opciones (se venden por separado)
SuperNATURAL (E. Piano)
Virtual Tone Wheel Organ
Mandos: [MASTER VOLUME], EQ [LOW], [HIGH]
Palanca [Inexión de tono/Modulación]
Controlador D-BEAM
Botón [A. PIANO], botón [E. PIANO], botón [CLAV], botón [ORGAN],
botones TONE VARIATION [1] [2] [3],
botón [FUNCTION], botón [SuperNATURAL],
botones OCTAVE [+] [−], botón [TRANSPOSE]
botones [EFX 1], [EFX 2], botón [REVERB]
Conector DAMPER: Tipo TRS phone de 1/4 de pulgada
Conectores FC1, FC2: Tipo TRS phone de 1/4 de pulgada
Conector MIDI OUT
Puerto USB COMPUTER (USB tipo B)
Conectores OUTPUT (L/MONO, R) : Tipo phone de 1/4 de pulgada
Conectores INPUT (L, R): Tipo Phono RCA
Conector PHONES: Tipo phone de 1/4” estéreo
Conector DC IN
Manual de instrucciones
Adaptador de CA, cable de alimentación (para el adaptador de CA)
Auriculares
Soporte para teclado (KS-18Z, KS-12)
Unidad de pedal (RPU-3)
Pedal Damper (DP-10)
Interruptor del pedal (DP-2)
Pedal de expresión (EV-5/EV-7)
* Con el objetivo de mejorar el producto, las especicaciones y el acabado de la unidad están sujetos a cambios sin previo aviso.
Copyright © 2013 ROLAND CORPORATION
Todos los derechos reservados. Ninguna parte de esta publicación podrá reproducirse de ninguna forma sin el permiso escrito de ROLAND CORPORATION.
14
Page 73

Deutsch Français Italiano Español Português NederlandsEnglish
Piano Digital
Manual do Proprietário
Page 74

Os dois modos do RD-64
Uso do RD-64 como um piano (Modo Piano)
O RD-64 herda os sons do SuperNATURAL Piano da extremamente popular série RD de pianos de palco. Sons elétricos e
acústicos cuidadosamente selecionados foram incorporados, proporcionando apresentações expressivas e sosticadas.
Outro destaque é o aclamado teclado ivory-feel da série RD. Com ação de teclas expressiva e excelente resposta a
movimentos repetidos com rapidez, o RD-64 é, apesar disso, leve e compacto.
O RD-64 é altamente portátil, podendo ser transportado facilmente para o estúdio ou para o local da sua apresentação.
Uso do RD-64 em modo Piano
Ao ser ligado, o RD-64 será inicializado no modo Piano.
Sobre o manual do proprietário
Leia este documento.
Uso do RD-64 como um teclado controlador MIDI (Modo Controlador)
Se você mantiver o botão [A. PIANO] pressionado ao ligar o RD-64, ele funcionará como um teclado controlador MIDI com a
mesma funcionalidade*1 que o modelo A-88. Conecte-o ao computador usando um cabo USB disponível no varejo e use-o
com seu software DAW para produção musical.
* No modo Controlador, nenhum som é produzido pelo gerador de som interno do RD-64. Além disso, nada acontece
quando os botões [TONE SELECT], [TONE VARIATION] ou [REVERB] são pressionados.
Uso do RD-64 em modo Controlador
Mantenha o botão [A. PIANO] pressionado e ligue o RD-64; ele será inicializado no modo Controlador.
Sobre o manual do proprietário
Para obter detalhes sobre o uso do RD-64 como um teclado controlador MIDI, consulte o manual em PDF
do modelo A-88.
Para obter o manual em PDF
Insira a seguinte URL no computador:
1.
http://www.roland.com/manuals/
2. Escolha “A-88” como nome do produto.
*1
Diferenças entre o modo Controlador do RD-64 e o A-88
O modo Controlador do RD-64 difere do A-88 nos aspectos a seguir. Ao ler o Manual do Proprietário do A-88 (em PDF), esteja ciente destes
pontos.
• Como o RD-64 usa o driver USB fornecido pelo computador (GENERIC), não é necessário instalar o driver USB (tópico abordado no
capítulo “Installing the Driver” do Manual do Proprietário do A-88). Basta conectá-lo ao computador usando um cabo USB disponível no
varejo, e ele estará pronto para uso. “Roland Digital Piano” será exibido como nome da porta MIDI.
• O RD-64 não possui a funcionalidade “UPPER,” “LOWER,” “DUAL” e “SPLIT” do A-88 (tópico abordado no capítulo “Layering Two Parts” no
Manual do Proprietário do A-88).
Antes de usar esta unidade, leia com atenção as seguintes seções: “USO SEGURO DO EQUIPAMENTO” (p. 10) e “OBSERVAÇÕES IMPORTANTES” (p. 12). Essas seções oferecem
informações importantes sobre o uso correto da unidade. Além disso, para ter uma boa compreensão de todos os recursos da sua nova unidade, o Manual do Proprietário
deve ser lido por completo. O manual deverá ser guardado em um local de fácil acesso para consultas futuras.
2
Page 75

Sumário
Os dois modos do RD-64 . . . . . . . . . . . . . . . . . . . . . . . . . . . . . . . . . . . . . . . . . . . . . . . . . . . . . . . . . . . .2
Uso do RD-64 como um piano (Modo Piano) . . . . . . . . . . . . . . . . . . . . . . . . . . . . . . . . . . . . . . . . . 2
Uso do RD-64 como um teclado controlador MIDI (Modo Controlador) . . . . . . . . . . . . . . . .2
Posicionamento do RD-64 em um suporte . . . . . . . . . . . . . . . . . . . . . . . . . . . . . . . . . . . . . . . . . . . .3
Descrições do painel . . . . . . . . . . . . . . . . . . . . . . . . . . . . . . . . . . . . . . . . . . . . . . . . . . . . . . . . . . . . . . . . 4
Conexão . . . . . . . . . . . . . . . . . . . . . . . . . . . . . . . . . . . . . . . . . . . . . . . . . . . . . . . . . . . . . . . . . . . . . . . . . . . .6
Mudança de ajustes (Modo FUNCTION) . . . . . . . . . . . . . . . . . . . . . . . . . . . . . . . . . . . . . . . . . . . . . .7
Restauração dos ajustes de fábrica (FACT RESET) . . . . . . . . . . . . . . . . . . . . . . . . . . . . . . . . . . . . . 7
Mudança de resposta do teclado (VELO CURVE) . . . . . . . . . . . . . . . . . . . . . . . . . . . . . . . . . . . . . .7
Especicação do Valor de Velocidade do Teclado (KEY VELO) . . . . . . . . . . . . . . . . . . . . . . . . . .7
Ajuste de acordo com a anação de outros instrumentos (Master Tune) . . . . . . . . . . . . . . . 8
Desligamento automático após um tempo (Auto O) . . . . . . . . . . . . . . . . . . . . . . . . . . . . . . . .8
Seleção do driver dedicado (ADVANCED) ou do driver genérico (GENERIC) . . . . . . . . . . . . 8
Solução de problemas. . . . . . . . . . . . . . . . . . . . . . . . . . . . . . . . . . . . . . . . . . . . . . . . . . . . . . . . . . . . . . .9
USO SEGURO DO EQUIPAMENTO . . . . . . . . . . . . . . . . . . . . . . . . . . . . . . . . . . . . . . . . . . . . . . . . . . 10
OBSERVAÇÕES IMPORTANTES . . . . . . . . . . . . . . . . . . . . . . . . . . . . . . . . . . . . . . . . . . . . . . . . . . . . . 12
Sobre o Teclado Ivory Feel . . . . . . . . . . . . . . . . . . . . . . . . . . . . . . . . . . . . . . . . . . . . . . . . . . . . . . . . . 13
Controle de um Módulo de Som MIDI Externo no Modo Piano . . . . . . . . . . . . . . . . . . . . . . . 13
Especicações principais . . . . . . . . . . . . . . . . . . . . . . . . . . . . . . . . . . . . . . . . . . . . . . . . . . . . . . . . . . 14
Posicionamento do RD-64 em um suporte
Se quiser colocar o RD-64 sobre um suporte, use o Roland KS-18Z ou KS-12.
Posicione o instrumento sobre o suporte seguindo as instruções a seguir.
Ao preparar o suporte, tenha cuidado para não prender os dedos.
KS-18Z
Alinhe a parte frontal
do RD-64 com a
parte frontal do
suporte.
Ajuste de forma
que a altura
não exceda um
metro (ajuste o
suporte em um
nível que não
seja mais alto
do que o quarto
nível a partir da
parte inferior).
Ajuste a largura do suporte
para que os pés de borracha do
Variable se posicionem no meio
do suporte.
Deutsch Français Italiano Español Português NederlandsEnglish
Visão superior
KS-12
Ajuste a largura do suporte para
que os pés de borracha na parte
inferior do teclado se encaixem
nos orifícios próprios.
Visão superior
3
Page 76

Descrições do painel
Chave [POWER]
Ligar a energia da unidade
* Quando tudo estiver conectado corretamente (p. 6), siga o procedimento abaixo
para ligar a energia. Se o equipamento for ligado na ordem errada, haverá o risco
de provocar mau funcionamento ou falha do equipamento.
* Esta unidade está equipada com um circuito de proteção. É necessário um breve interva-
lo (alguns segundos) após ligar a unidade para que ela possa operar normalmente.
* Antes de ligar/desligar a unidade, lembre-se sempre de abaixar o volume. Mesmo
com o volume abaixado, você poderá ouvir algum som ao ligar/desligar a unidade.
Entretanto, isso é normal e não indica mau funcionamento.
1. Use o botão [MASTER VOLUME] para diminuir o volume.
Além disso, abaixe totalmente o volume de qualquer dispositivo de
áudio conectado e outros equipamentos.
2. Ligue a chave [POWER].
Desligar a energia da unidade
1.
2. Desligue a energia dos dispositivos externos conectados.
3. Desligue a chave [POWER].
* Com os ajustes de fábrica, o RD-64 desligará automaticamente quatro
horas depois que você parar de tocar ou operar a unidade.
Se você não quiser que a unidade seja desligada automaticamente, mude o
ajuste “AUTO OFF” para “OFF”, conforme descrito em p. 8.
3. Ligue a energia dos dispositivos externos conectados.
4.
Ajuste o volume do RD-64 e dos dispositivos externos conectados.
Botão [MASTER VOLUME]
Ajuste do volume
Gire o botão para a direita para aumentar o volume ou para a esquerda para abaixá-lo.
Botão [TONE SELECT], [TONE VARIATION]
Seleção de tons
1.
Pressione os botões [TONE SELECT] para selecionar o grupo de tons.
Use o botão [MASTER VOLUME] para diminuir o volume.
2. Pressione os botões [TONE VARIATION] para selecionar uma variação.
Grupo Variação 1 Variação 2 Variação 3
A. PIANO CONCERT GRAND BRIGHT PIANO CONCERT MONO
E. PIANO PURE VINTAGE TINE EP WURLY
CLAV COMBINATION MEDIUM BRILLIANT
ORGAN JAZZ ORGAN ROCK ORGAN FULL DRAW
Botão [FUNCTION]
Mudança de ajustes
Use este botão quando quiser ajustar o retorno do teclado ou fazer atribuições de pedais.
Para obter detalhes, consulte “Mudança de ajustes (Modo FUNCTION)” (p. 7).
Botão [SuperNATURAL]
No modo Piano, isso permanece aceso e, quando pressionado, nada acontece.
Ele é usado somente quando você conecta um “módulo de som compatível com
SuperNATURAL” no modo Controlador. Para obter detalhes, consulte “Uso do RD-64 como
um teclado controlador MIDI (Modo Controlador)” (p. 2).
Alavanca [Pitch Bend/Modulation]
Mudança de tom de uma nota soando (Pitch Bend)
Mova a alavanca para a esquerda durante a execução para abaixar o tom e para a direita para subir um tom. Esse efeito é
chamado “pitch bend”.
Aplicação de modulação em uma nota soando (Modulation)
Mova a alavanca para a frente para aplicar vibrato. Esse efeito é chamado “modulação”.
* O efeito obtido ao mover a alavanca pode variar de acordo com o tom que está sendo usado. Além disso, o efeito aplicado ao mover a alavanca
é predeterminado para cada tom e não pode ser alterado.
4
Efeito pitch bend
Efeito de modulação
Page 77

Descrições do painel
Controlador D-BEAM
Mova a mão para aplicar vários efeitos ao som
Para ligar o controlador D-BEAM, pressione o botão para que acenda.
Botão Função
[PITCH] O tom mudará conforme você mover a mão sobre o controlador D-BEAM.
[VOL] O volume mudará, permitindo acrescentar expressão à sua execução.
[ASSIGN] O efeito aftertouch será aplicado.
Faixa efetiva do controlador
D-BEAM
Esta ilustração mostra a
faixa efetiva do controlador
D-BEAM. Nenhum efeito será
obtido se você posicionar a
mão fora da faixa efetiva.
* A faixa efetiva do
controlador D-BEAM varia
dependendo das condições
de iluminação.
Botão [REVERB]
Adição de reverberação ao som (Reverb)
Ao pressionar o botão [REVERB] para que acenda, você pode aplicar um efeito de reverberação ao som que está tocando no teclado.
A aplicação do efeito de reverberação produzirá o efeito de amplitude na ambientação que se obtém geralmente em uma sala de concerto.
* Não é possível ajustar a intensidade do efeito de reverberação.
Deutsch Français Italiano Español Português NederlandsEnglish
Botão EQ [LOW], [HIGH]
Ajuste das faixas superior e inferior (Equalizer)
O RD-64 está equipado com um equalizador de duas bandas.
Você pode ajustar o nível das faixas de baixa e alta frequência para cada Tone.
* Os ajustes do equalizador são armazenados individualmente para cada Tone (Pressione e segure o botão [SuperNATURAL], e pressione em seguida os botões [A. PIANO] e
[ORGAN] simultaneamente para armazenar todos os 12 sons).
Botão [EFX 1], [EFX 2]
Aplicação de efeitos ao som
Ao pressionar o botão [EFX 1] ou [EFX 2] para que acenda, você pode aplicar um efeito ao som que está tocando no teclado.
Os efeitos a seguir são aplicados para cada grupo de Tones.
Grupo EFX 1 EFX 2
A. PIANO ENHANCER DAMPER RESONANCE
E. PIANO TREMOLO PHASER
CLAV AUTO WAH OVERDRIVE
ORGAN ROTARY SPEED
* Os status de ligado/desligado de [EFX 1] e [EFX 2] são armazenados individualmente para cada Tone (Pressione e segure o botão [SuperNATURAL], e pressione em seguida os
botões [A. PIANO] e [ORGAN] simultaneamente para armazenar todos os 12 sons).
Botão OCTAVE [−], [+], [TRANSPOSE]
Mudança de oitava (Octave Shift)
Você pode subir ou descer a oitava do teclado (Octave Shift) usando os botões [+] [–].
• Esse ajuste pode ser alterado na faixa de -4 a 5 oitavas.
• Se você pressionar os botões [+] e [–] simultaneamente, o ajuste será redenido para 0.
Indicador e o ajuste que ele mostra
Mudança de tonalidade (Transpose)
Você pode transpor a tonalidade em intervalos de semitons usando os botões [+] [–] enquanto
mantém pressionado o botão [TRANSPOSE].
• Esse ajuste pode ser alterado na faixa de -6 a 5.
• Quando o botão [TRANSPOSE] é ligado, o ajuste de transposição é ativado. Quando o botão [TRANSPOSE] é
desligado, o ajuste de transposição é desativado.
• Se você pressionar o botão [TRANSPOSE] e os botões [+] e [–] simultaneamente, esse ajuste será redenido
para 0.
-6
-5 -4 -3 -2 -1 0 1 2 3 4 5
Apagado Aceso
5
Page 78

Conexão
Entradas INPUT
Se você conectar um reprodutor
de áudio ou dispositivo similar, o
som do dispositivo conectado será
gerado a partir das saídas OUTPUT
e PHONES.
* Use os controles do dispositivo
conectado (reprodutor de áudio)
para ajustar o volume.
Saídas OUTPUT
Se você ligar estes conectores a alto-falantes
amplicados, o som dessa unidade será reproduzido
através deles.
Conector PHONES
Conecte fones de ouvido (vendidos
separadamente) aqui.
Conector DC IN
Conecte o adaptador CA incluído aqui.
Coloque o adaptador CA de modo que o
lado com o indicador que voltado para
cima e o lado com informações escritas
que voltado para baixo. O indicador
acenderá quando você conectar o
adaptador CA à tomada.
Na tomada elétrica
Pedal de Sustain
incluso
Ajuste a chave no pedal de sustain incluso para “Continuous”
quando o pedal for conectado.
ou Pedal (vendida separadamente; Série DP)
ou
Unidade de
Pedal (vendida
separadamente;
RPU-3)
Conectores para pedal (DAMPER, FC2, FC1)
Ligando o pedal incluso ao conector DAMPER, ele pode ser usado como pedal de
sustain.
Os pedais ligados aos conectores para pedal funcionarão da forma a seguir (com
os ajustes de fábrica).
Conector Explicação
Use este pedal para sustentar o som.
DAMPER Pedal de Sustain
FC2
FC1
Pedal de
Sostenuto
Pedal de
Abafamento
Quando esse pedal é pressionado, as notas
são sustentadas por um tempo prolongado,
mesmo se você tirar os dedos do teclado.
Este pedal sustenta apenas as notas das teclas
que já estavam pressionadas quando você
pressionou o pedal.
Este pedal é usado para gerar um som mais
suave.
Cabo de força
Porta USB COMPUTER
Se o RD-64 for conectado ao computador
por meio de um cabo USB disponível
no varejo, você poderá usar software
compatível com MIDI para gravar e
reproduzir a execução do RD-64 (dados
MIDI).
* Não há suporte para áudio por USB.
Conector MIDI OUT
Você pode conectar um módulo de som MIDI e tocá-lo.
OBSERVAÇÃO
* Para evitar mau funcionamento e falha do equipamento, sempre
diminua o volume e desligue todas as unidades antes de fazer
qualquer conexão.
* Use apenas o pedal de expressão especicado (EV-5 ou EV-7;
vendido separadamente). Se conectar outros pedais de expressão,
você correrá o risco de provocar mau funcionamento e/ou danos à
unidade (Modo Controlador).
6
Page 79

Mudança de ajustes (Modo FUNCTION)
No modo FUNCTION, você pode ajustar a resposta do teclado.
Como ler a explicações dos procedimentos
Pressione o botão
[FUNCTION].
Pressione a tecla que tem “VELO CURVE”
impresso logo acima.
0–4
Valor 0–4
Pressione as teclas que têm “NUMERIC ENTRY” impresso logo acima.
* Valores fora da faixa aceitável não serão inseridos.
Restauração dos ajustes de fábrica (FACT RESET)
Mudança de resposta do teclado (VELO CURVE)
Você pode alterar a sensibilidade da resposta do teclado.
Pressione a tecla que tem “ENTER”
impresso logo acima.
Deutsch Français Italiano Español Português NederlandsEnglish
0–4
Valor 0–4
Valor Ajuste Explicação
0 SUPER LIGHT Um ajuste ainda mais leve do que LIGHT.
1 LIGHT
MEDIUM
2
(padrão)
3 HEAVY
4 SUPER HEAVY Um ajuste ainda mais pesado do que HEAVY.
Ajusta o teclado com uma resposta leve. Você pode alcançar o fortíssimo () com menos força que o habitual; assim, o teclado parecerá mais
leve. Esse ajuste faz com que seja mais fácil tocar, mesmo para crianças.
Ajusta o teclado com a resposta padrão. Você pode tocar da forma mais natural. Esse é o toque mais próximo da resposta de um piano
acústico.
Ajusta o teclado com uma resposta pesada. Você precisa usar mais força no teclado do que o habitual para reproduzir o fortíssimo (); assim,
o teclado parecerá mais pesado. O toque dinâmico adiciona mais sensibilidade ao que você toca.
Especicação do Valor de Velocidade do Teclado (KEY VELO)
0–9
* Se você tentar inserir um valor fora da
faixa aceitável, serão usados os dois
ou três números pressionados por
Valor 0–127
último antes de ENTER.
Valor Ajuste Explicação
TOUCH
0
(padrão)
1 Valor xo A intensidade será transmitida no valor especicado, independentemente da força com que toque o teclado.
Os valores de intensidade serão transmitidos conforme a sensibilidade do teclado e a curva selecionada em “Mudança de resposta do teclado
(VELO CURVE)” (p. 7).
7
Page 80

Mudança de ajustes (Modo FUNCTION)
Ajuste de acordo com a anação de outros instrumentos (Master Tune)
Para um som em conjunto mais limpo durante a execução com um ou mais instrumentos, verique se a anação básica de cada instrumento está em
sintonia com a dos demais. Em geral, o ajuste de um instrumento é indicado pela altura em Hertz (Hz) da nota “A” intermediária.
A faixa da altura é de 415,3–440,0–466,2 Hz (padrão: 440,0 Hz).
3 0–9
Valor 3
Valor 4153–4662
Insira 4 dígitos
Exemplo: Se for 440,0
Hz, pressione as teclas
na ordem 4, 4, 0, 0 e
ENTER.
Uso de NUMERIC ENTRY para inserir um valor
0–9
Valor 4153–4662
Teclas NUMERIC ENTRY pressionadas nesta ordem
4, 4, 0, 0, ENTER 440.0
1, 2, 3, 4, ENTER —
1, 4, 3, 8, 0, ENTER 438.0
8, 4, 4, 6, 6, 3, ENTER —
Este valor é
inserido
* Se você tentar inserir um valor fora da
faixa aceitável, serão usados os quatro
números pressionados por último
antes de ENTER.
Desligamento automático após um tempo (Auto O)
AVISO
Com os ajustes de fábrica, o RD-64 desligará automaticamente quatro horas depois que você parar de tocar ou operar a unidade. Se você não quiser
que a unidade seja desligada automaticamente, mude o ajuste “AUTO OFF” para “OFF”, conforme descrito abaixo.
0–1
Valor 0–1
Valor Ajuste Explicação
0 OFF A unidade não será desligada automaticamente.
1 ON (padrão) A unidade será desligada automaticamente 240 minutos (quatro horas) após você ter tocado ou operado a unidade pela última vez.
Seleção do driver dedicado (ADVANCED) ou do driver genérico (GENERIC)
Normalmente, não é necessário instalar um driver para conectar o RD-64 ao computador. Entretanto, se ocorrer algum problema
ou se a execução for ruim, o uso do driver original da Roland poderá resolver o problema.
Nesse caso, ajuste o Driver USB para “ADVANCED” no RD-64 conforme descrito abaixo e depois instale o driver USB no computador.
Como instalar o driver USB
Para obter detalhes sobre o download e a instalação do driver original da
Roland, consulte o site da Roland.
Após mudar esse ajuste, é necessário desligar o RD-64 e depois ligá-lo
novamente.
Normalmente, isso pode car ajustado como “GENERIC”.
Site da Roland
http://www.roland.com/support/
Botão Ajuste Explicação
Botão [+] ADVANCED Escolha esta opção se desejar usar um driver USB baixado do site da Roland.
Botão [–] GENERIC (padrão) Escolha esta opção se desejar usar um driver USB genérico que veio com seu computador. Normalmente, você deve usar esse modo.
8
Page 81

Solução de problemas
Se o RD-64 não funcionar como o esperado, verique os pontos a seguir. Se isso não resolver o problema, consulte seu fornecedor ou a assistência
técnica da Roland mais próxima.
Problema Verique/Solução Página
A energia não quer ligar
Não há som
O nível do volume do instrumento ligado
à entrada INPUT está muito baixo.
Os Tones estão alterados
A anação está estranha
O som é cortado
O pedal não funciona ou está “preso”/
o pedal não funciona corretamente
A reverberação permanece mesmo com
o efeito Reverb desligado
O som das notas mais agudas muda de
repente a partir de uma certa tecla
Um ruído agudo é produzido
As notas graves apresentam som errado
ou com ruídos
O adaptador CA e o cabo de força do RD-64 estão ligados corretamente a uma fonte de energia e
conectados ao RD-64?
A energia dos amplicadores e alto-falantes conectados está ligada?
O volume está no ajuste mínimo?
O botão [MASTER VOLUME] está no ajuste mínimo? p. 4
Os alto-falantes estão conectados corretamente?
Conecte os alto-falantes amplicados ou fones de ouvido.
É possível ouvir som com os fones de ouvido conectados?
Se é possível ouvir som através dos fones de ouvido, isso pode indicar um curto-circuito em um
cabo de áudio ou algum tipo de problema com o amplicador ou o mixer. Verique os cabos e o
equipamento novamente.
O volume foi abaixado operando um pedal ou o controlador D-BEAM?
Solte o pedal ou posicione a mão acima do controlador D-BEAM.
O RD-64 foi inicializado em modo Controlador (ligando a energia e mantendo o botão [A. PIANO]
pressionado)?
O RD-64 não produzirá som no modo Controlador.
O volume do aparelho conectado foi abaixado?
Ajuste o volume do aparelho conectado.
Você está usando um cabo de conexão que contém um resistor?
Use um cabo de conexão que não contenha um resistor.
A altura foi alterada operando um pedal ou o controlador D-BEAM?
Solte o pedal ou posicione a mão acima do controlador D-BEAM.
Quando uma conexão mono é usada, a qualidade do Tone pode variar, dependendo do tom
selecionado e do registro em que é usado.
Para a obtenção de qualidade ideal para audição, recomenda-se conectar em estéreo.
Dependendo do Tone selecionado, alturas reproduzidas em determinados registros serão alteradas e
reproduzidas em outras alturas.
Você fez o ajuste de oitava/transposição? p. 5
O tom foi alterado operando um pedal ou o controlador D-BEAM?
Solte o pedal ou posicione a mão acima do controlador D-BEAM.
Quando você tenta tocar mais do que o máximo de 128 vozes simultaneamente, os sons que estão
sendo reproduzidos podem ser cortados.
O pedal está conectado corretamente?
Ligue o cabo com rmeza ao conector do pedal.
Você está usando um pedal de outro fabricante?
Use o pedal de sustain incluso ou um pedal RPU-3, DP, Série EV ou similar opcional.
O som de piano do RD-64 simula de maneira el a intensidade e a ressonância de um piano acústico,
e isso pode dar a impressão de reverberação, mesmo com o efeito Reverb desligado.
Em um piano acústico, o topo do teclado continuará produzindo som independentemente do pedal
de sustento. Essas notas também têm uma característica de timbre um pouco diferente. O RD-64
simula com delidade essa característica dos pianos acústicos. No RD-64, a extensão das notas que
não é afetada pelo pedal de sustain mudará de acordo com o ajuste de Octave/Transpose.
O som do piano tem características de brilho e nitidez com componentes substanciais de alta
frequência que podem criar um som metálico. Isso ocorre porque as características de um piano
verdadeiro estão sendo elmente reproduzidas, não se tratando de um defeito.
Com determinados Tones, os sons podem parecer distorcidos.
Abaixe o volume. Alternativamente, reduza o ajuste de potência geral.
p. 6
p. 4
p. 6
−
−
p. 2
−
−
−
−
−
−
−
p. 6
p. 6
−
−
−
−
Deutsch Français Italiano Español Português NederlandsEnglish
9
Page 82

SEMPRE OBSERVE O SEGUINTE
USO SEGURO DO EQUIPAMENTO
USO SEGURO DO EQUIPAMENTO
INSTRUÇÕES PARA A PREVENÇÃO DE INCÊNDIOS, CHOQUES ELÉTRICOS OU FERIMENTOS EM PESSOAS
Sobre alertas de AVISO e CUIDADO
Ele é usado para instruções com o objetivo
AVISO
CUIDADO
de alertar o usuário para o risco de morte
ou ferimento grave se o equipamento for
usado inadequadamente.
Ele é usado para instruções com o
objetivo de alertar o usuário para
o risco de ferimento ou dano material
se o equipamento for usado
inadequadamente.
* Dano material se refere a danos ou efeitos
adversos causados à residência e a todos
os móveis, assim como a animais
domésticos ou bichos de estimação.
Sobre os símbolos
O símbolo alerta o usuário sobre instruções e avisos
importantes. O significado específico do símbolo
é determinado pela figura dentro do triângulo.
No caso do símbolo à esquerda, ele é usado para cuidados
gerais, avisos ou alertas de perigo.
O símbolo alerta o usuário sobre as coisas que nunca
devem ser feitas (proibidas). A coisa específica que não
deve ser feita é indicada pela figura dentro do círculo.
No caso do símbolo à esquerda, ele significa que
o equipamento nunca deve ser desmontado.
O símbolo alerta o usuário sobre as coisas que devem
ser feitas. A coisa específica que deve ser feita é indicada
pela figura dentro do círculo. No caso do símbolo à
esquerda, ele significa que o plugue do cabo de força
tem que ser desligado da tomada.
AVISO
Não desmonte ou faça qualquer modicação por
conta própria
Não abra (nem modique de nenhuma
forma) a unidade ou seu adaptador CA.
Não repare ou substitua peças por conta própria
Não tente reparar a unidade nem substituir
peças internas (exceto quando este manual
fornecer instruções especícas para isso).
Para manutenção, entre em contato com o
revendedor, o Centro de Serviços da Roland
ou um distribuidor autorizado da Roland,
conforme listado na página “Information”.
Não use ou armazene nos seguintes tipos de locais
• Sujeitos a temperaturas extremas
(por exemplo, luz solar direta em
veículos fechados, próximo a um duto
de aquecimento, em cima de um
equipamento que gera calor);
• Molhados (por exemplo, banheiros,
lavatórios ou pisos molhados);
• Expostos ao vapor ou à fumaça;
• Sujeitos à exposição ao sal;
• Úmidos;
• Expostos à chuva;
• Empoeirados ou com areia;
• Sujeitos a altos níveis de vibração e
instabilidade.
Use somente o suporte recomendado.
Esta unidade deve ser usada somente com
um suporte recomendado pela Roland.
Não coloque em local instável
Quando estiver usando a unidade com
um rack ou suporte recomendado pela
Roland, este deverá ser cuidadosamente
posicionado de forma a manter-se nivelado
e garantir a estabilidade. Se você não estiver
usando um rack ou suporte, será necessário
vericar se o local escolhido para colocar a
unidade tem uma superfície nivelada capaz
de suportar a unidade sem balançar.
Precauções com relação ao posicionamento desta
unidade em um suporte
Siga cuidadosamente as instruções do
Manual do Proprietário ao posicionar esta
unidade sobre um suporte (p. 3).
Se ela não for colocada corretamente,
você correrá o risco de criar uma situação
instável, fazendo a unidade cair ou o
suporte tombar e resultando em ferimentos.
AVISO
Use somente o adaptador CA especicado e a
voltagem correta
Certique-se de usar somente o adaptador
CA fornecido com a unidade. Além
disso, verique se a voltagem de linha
na instalação corresponde à voltagem
de entrada especicada no corpo do
adaptador CA. Outros adaptadores CA
podem usar uma polaridade diferente ou
ter sido projetados para uma voltagem
diferente, portanto, o uso desses
adaptadores pode resultar em danos, mau
funcionamento ou choques elétricos.
Use somente o cabo de força incluído
Use somente o cabo de força que
acompanha a unidade. Além disso, o cabo
de força fornecido não deve ser usado em
outros aparelhos.
Não dobre o cabo de força, nem coloque objetos
pesados sobre ele
Não dobre nem torça excessivamente
o cabo de força, nem coloque objetos
pesados sobre ele. Isso pode danicar
o cabo, provocando rompimentos nos
componentes e curtos-circuitos. Cabos
danicados representam perigo de choque
e incêndio!
Evite o uso prolongado com volume alto
Esta unidade, sozinha ou combinada com
um amplicador e fones de ouvido ou
alto-falantes, pode produzir níveis de som
capazes de causar perda permanente de
audição. Não use por períodos longos com
volume alto ou em um nível desconfortável.
Se você perceber perda de audição ou
um chiado no ouvido, interrompa o uso
imediatamente e procure um audiologista.
Não permita que objetos estranhos ou líquidos
penetrem na unidade; nunca coloque recipientes com
líquido sobre a unidade
Não coloque recipientes que contenham
líquido sobre este produto. Nunca permita
que objetos estranhos (exemplo: objetos
inamáveis, moedas, os) ou líquidos
(exemplo: água ou suco) penetrem no
produto. Isso poderia causar curtoscircuitos, operação defeituosa ou outros
problemas.
AVISO
Desligue o equipamento se ocorrer alguma
anormalidade ou um mau funcionamento
Desligue a unidade imediatamente, remova
o adaptador CA da tomada e solicite
manutenção entrando em contato com o
revendedor, o Centro de Serviços da Roland
mais próximo ou um distribuidor autorizado
da Roland, conforme listado na página
“Information”, quando:
• O adaptador CA, o cabo de alimentação
de energia ou o plugue for danicado;
• Ocorrer fumaça ou odores incomuns;
• Objetos tiverem caído ou líquido for
derramado em cima da unidade;
• A unidade tiver sido exposta à chuva (ou
ter se molhado);
• A unidade não estiver operando
normalmente ou apresentar uma
mudança signicativa de desempenho.
Adultos devem realizar a supervisão em locais onde
houver crianças presentes
Ao usar a unidade em locais com presença
de crianças, tenha cuidado para que a
unidade não seja manuseada de forma
incorreta. Um adulto deve sempre estar
próximo para supervisionar e orientar.
Não derrube ou submeta a impactos fortes
Proteja a unidade contra impactos fortes.
(Não a derrube!)
Não ligue a unidade na mesma tomada junto com
uma quantidade excessiva de aparelhos
Não submeta o cabo de força ao
compartilhamento de uma tomada com
uma quantidade excessiva de aparelhos.
Tenha cuidado especial ao usar extensões
— a potência total usada por todos os
aparelhos conectados nunca deverá
ultrapassar a potência nominal (watts/
ampères) da extensão. Cargas excessivas
podem aquecer o isolamento do cabo, que
pode derreter.
Não use em outro país
Antes de usar a unidade em um país
estrangeiro, consulte seu revendedor, o
Centro de Serviços da Roland mais próximo
ou um distribuidor autorizado da Roland,
conforme listado na página “Information”.
10
Page 83

USO SEGURO DO EQUIPAMENTO
CUIDADO
Coloque em um local bem ventilado
A unidade e o adaptador CA devem ser
colocados em um local ou posição que não
interra em sua ventilação apropriada.
Use somente os suportes especicados
Esta unidade foi projetada para ser usada
especicamente com os suportes KS-12 e
KS-18Z fabricados pela Roland. Ao usá-la
com outros suportes, você correrá o risco
de se ferir se o produto cair ou tombar por
falta de estabilidade.
Avalie a segurança antes de usar suportes
Mesmo se você observar os avisos do
manual do proprietário, certas formas de
manuseio podem fazer o produto cair do
suporte ou o suporte virar. Fique atento a
qualquer problema de segurança antes de
usar o produto.
Segure pelo plugue ao conectar ou desconectar o
adaptador CA
Segure sempre apenas pelo plugue do
cabo do adaptador CA ao conectá-lo ou
desconectá-lo de uma tomada ou desta
unidade.
Limpe o plugue do adaptador CA periodicamente
Desconecte o adaptador CA e limpe-o
regularmente usando um pano seco para
remover toda a poeira e outros resíduos
de seus contatos. Além disso, desconecte
o cabo de força da tomada sempre que
a unidade permanecer sem uso por um
período prolongado. Qualquer acúmulo
de poeira entre o plugue e a tomada pode
resultar em deciência no isolamento e
causar um incêndio.
CUIDADO
Se houver possibilidade de raios, desconecte o
adaptador CA da tomada
Sempre que houver possibilidade de raios
na área, desconecte o adaptador CA da
tomada.
Deutsch Français Italiano Español Português NederlandsEnglish
Cuide dos cabos para oferecer segurança
Procure evitar que os e cabos quem
embaraçados. Além disso, todos os os e
cabos devem ser mantidos fora do alcance
de crianças.
Evite pisar na unidade ou colocar objetos pesados
sobre ela
Nunca suba na unidade ou coloque objetos
pesados sobre ela.
Não conecte ou desconecte o adaptador CA com as
mãos molhadas
Nunca manuseie o adaptador CA ou
seus plugues com as mãos molhadas ao
conectá-los ou desconectá-los de uma
tomada ou desta unidade.
Desconecte tudo antes de mover a unidade
Antes de mover a unidade, desconecte o
adaptador CA e todos os os provenientes
de aparelhos externos.
Desconecte o adaptador CA da tomada antes de
limpar
Antes de limpar a unidade, desligue-a e
desconecte o adaptador CA da tomada
(p. 6).
11
Page 84

OBSERVAÇÕES IMPORTANTES
Fonte de alimentação
• Não ligue esta unidade na mesma tomada elétrica
que esteja sendo usada por aparelhos domésticos
controlados por um inversor ou motor (como
geladeira, máquina de lavar, forno de micro-ondas
ou ar condicionado). Dependendo da forma como
o aparelho estiver sendo usado, o ruído da fonte de
alimentação poderá fazer com que a unidade não
funcione corretamente ou poderá produzir ruídos.
Se não for possível usar uma tomada separada,
conecte um ltro de ruído da fonte de alimentação
entre esta unidade e a tomada elétrica.
• O adaptador CA começará a gerar calor após muitas
horas consecutivas de uso. Isso é normal e não é
motivo de preocupação.
• Para evitar mau funcionamento e falha do
equipamento, lembre-se sempre de desligar a
energia de todo o equipamento antes de fazer
qualquer conexão.
• Com os ajustes de fábrica, o RD-64 desligará
automaticamente quatro horas depois que
você parar de tocar ou operar a unidade. Se
você não quiser que a unidade seja desligada
automaticamente, mude o ajuste “AUTO OFF” para
“OFF”, conforme descrito em p. 8.
Posicionamento
• O uso desta unidade perto de amplicadores de
potência (ou outros equipamentos com grandes
transformadores) pode provocar a geração de
zumbido. Para atenuar o problema, mude a direção
da unidade ou afaste-a da fonte de interferência.
• Este aparelho pode interferir na recepção de rádio
e televisão. Não deve, portanto, ser usado perto
desses tipos de receptores.
• Aparelhos de comunicação sem o, como telefones
celulares, podem produzir ruídos quando usados
próximos a esta unidade. Esse tipo de ruído pode
ocorrer ao fazer ou receber uma chamada, ou
durante uma conversa. Se esse tipo de problema
ocorrer, mude os dispositivos sem o de lugar,
afastando-os da unidade, ou desligue-os.
• Não exponha a unidade à luz solar direta, coloque-a
perto de dispositivos que irradiam calor, deixe-a
dentro de um veículo fechado ou sujeite-a a
temperaturas extremas em geral. Além disso,
não permita que dispositivos luminosos que
normalmente são usados tendo a sua fonte de luz
muito próxima da unidade (como uma luminária
para pianos) ou holofotes poderosos sejam
direcionados para a área onde está a unidade por
períodos prolongados. O calor excessivo pode
deformar ou descolorir a unidade.
• Ao mover a unidade de um local para outro onde a
temperatura e/ou umidade seja diferente, gotículas
de água (condensação) podem se formar no interior
da unidade. Se você tentar usar a unidade nessas
condições, isso poderá provocar danos ou mau
funcionamento. Portanto, antes de usar a unidade,
você deverá deixá-la em repouso por várias horas
até que a condensação evapore completamente.
• Não deixe que borracha, vinil ou materiais similares
permaneçam sobre esta unidade por períodos
prolongados. Tais objetos podem descolorir ou
afetar de maneira prejudicial o acabamento.
• Não deixe objetos sobre o teclado. Isso pode causar
mau funcionamento, como as teclas pararem de
produzir som.
• Não cole adesivos, decalques ou similares neste
instrumento. A remoção de tais materiais do
instrumento pode danicar o acabamento exterior.
• Dependendo do material e da temperatura da
superfície sobre a qual você colocar a unidade, os
pés de borracha poderão perder a cor ou marcar a
superfície.
Você pode colocar um pedaço de feltro ou pano sob
os pés de borracha para evitar que isso aconteça. Se
zer isso, certique-se de que a unidade não possa
deslizar ou se mover acidentalmente.
• Não coloque nada que contenha água sobre esta
unidade. Além disso, evite o uso de inseticidas,
perfumes, álcool, esmalte de unhas, latas de spray
etc. próximo à unidade. Remova rapidamente
qualquer líquido derramado sobre a unidade
usando um pano seco e macio.
Manutenção
• Para limpar a unidade, utilize um pano seco e
macio, ou levemente umedecido. Tente limpar toda
a superfície aplicando força uniforme ao passar o
pano. Esfregar a mesma área com muita força pode
danicar o acabamento.
• Nunca use benzina, diluentes, álcool ou solventes
de nenhum tipo, para evitar descoloração e/ou
deformação.
Reparos e dados
• Observe que todos os dados contidos na
memória desta unidade serão apagados quando
o equipamento for enviado para reparos, pois a
memória será redenida com os ajustes de fábrica.
Precauções adicionais
• A Roland não assumirá responsabilidade por tal perda
de dados, nem terá a obrigação de recuperá-los.
• Seja cuidadoso ao usar os botões, os controles
deslizantes ou os demais controles da unidade,
e também ao usar os plugues e os conectores.
Manuseá-los de forma abrupta pode ocasionar mau
funcionamento.
• Ao desconectar todos os cabos, segure no próprio
conector — nunca puxe pelo cabo. Isso evitará
curtos-circuitos ou danos aos componentes
internos dos cabos.
• Para evitar incomodar as pessoas próximas,
mantenha o volume da unidade em níveis
razoáveis. Se preferir, use fones de ouvido, assim
não precisará se preocupar com as pessoas ao
redor.
• O som das teclas ao serem pressionadas e as
vibrações produzidas ao tocar um instrumento
pode ser transmitidos através do chão e da parede
até uma extensão inesperada. Tome cuidado para
não causar incômodo a outras pessoas perto de
você.
• Quando precisar transportar a unidade, use
a embalagem original completa (inclusive o
enchimento interno da embalagem), se possível.
Caso contrário, use materiais de embalagem
equivalentes.
• Use apenas o pedal de expressão especicado (EV-5
ou EV-7; vendido separadamente). Se conectar
outros pedais de expressão, você correrá o risco
de provocar mau funcionamento e/ou danos à
unidade.
• Alguns cabos de conexão contêm resistores. Não
use cabos com resistores para conectar a esta
unidade. O uso de tais cabos pode prejudicar o
nível do som, fazendo com que ele que baixo ou
impossível de ser ouvido. Para obter informações
sobre as especicações dos cabos, entre em contato
com o fabricante do cabo.
• A faixa utilizável do controlador D-BEAM cará
extremamente reduzida quando usada sob forte luz
solar direta. Observe isso ao utilizar o controlador
D-BEAM em ambientes externos.
Direitos autorais/licenças/marcas
comerciais
• Os direitos autorais de propriedade do conteúdo
deste produto (os dados da forma de onda sonora,
dados de estilo, modelos de acompanhamento,
dados de expressão, loops de áudio e dados de
imagem) são reservados pela Roland Corporation.
• Os compradores deste produto têm a permissão
de utilizar tal conteúdo para criação, execução,
gravação e distribuição de trabalhos musicais
originais.
• Os compradores deste produto NÃO têm a
permissão de extrair tal conteúdo na forma original
ou modicada com a nalidade de distribuir a parte
gravada de tal conteúdo ou disponibilizá-lo em uma
rede de computadores.
• MMP (Moore Microprocessor Portfolio) refere-se
a um portfólio de patentes relacionado a uma
arquitetura de microprocessadores, desenvolvida
pela Technology Properties Limited (TPL). A Roland
licenciou essa tecnologia do TPL Group.
• Roland e SuperNATURAL são marcas registradas
ou nomes comerciais da Roland Corporation nos
Estados Unidos e/ou em outros países.
• Os nomes de empresas que aparecem neste
documento são marcas registradas ou nomes
comerciais de seus respectivos proprietários.
12
Page 85

Sobre o Teclado Ivory Feel
Recursos de um teclado ivory feel
As teclas de um piano tradicional são feitas dos materiais mais nobres: marm para as teclas brancas e ébano para as pretas. O teclado Ivory Feel usa a
tecnologia mais avançada para reproduzir a sensação proporcionada por esses materiais.
Um teclado Ivory Feel oferece os recursos a seguir.
• Temos certeza de que você vai adorar a textura diferenciada dessas teclas, que ca melhor quanto mais você toca.
• As superfícies incorporam faixas de material que absorve a umidade, melhorando o toque e a capacidade de resposta.
• As teclas apresentam um brilho sutil e cores sóbrias, com um visual nobre e elegante.
• As teclas brancas têm um acabamento levemente amarelado, para reproduzir elmente a cor do marm verdadeiro.
Manuseio
• Não escreva no teclado com caneta ou outro instrumento e não estampe ou coloque nenhuma marcação no instrumento. A tinta se inltrará nas
linhas da superfície e se tornará irremovível.
• Não cole adesivos no teclado. Você pode não conseguir remover adesivos que utilizam colas fortes, e o adesivo pode provocar descoloração.
Cuidado e manutenção
Observe os pontos a seguir. Se estas recomendações não forem seguidas, isso poderá resultar em arranhões no acabamento da superfície, danos ao
brilho, descoloração ou deformação.
• Para remover sujeira, use um pano macio.
Usando um pano úmido e bem torcido, limpe toda a sujeira delicadamente.
Não esfregue a superfície vigorosamente.
• Para remover as sujeiras mais difíceis, utilize um limpador de teclado disponível para venda que não contenha abrasivos.
Comece limpando levemente. Se a sujeira não sair, limpe aumentando gradualmente a pressão e tomando cuidado para não arranhar as teclas.
• Não use benzina, tíner ou álcool no instrumento.
Controle de um Módulo de Som MIDI Externo no Modo Piano
No modo Piano do RD-64, você pode especicar o canal MIDI e transmitir mensagens MIDI como bank select, troca de programa e aftertouch a um
módulo de som MIDI externo. Para obter detalhes, consulte as seções “Setting the MIDI Transmit Channel (MIDI CHANNEL)”, “Switching Sounds” e
“Using the D-BEAM to Modify the Sound” do manual do proprietário do A-88.
Se ocorrerem problemas como notas travadas ou som inesperado em seu módulo de som MIDI externo, envie uma mensagem de reinicialização para
resolver o problema. Para obter detalhes, consulte a seção “Halting Stuck Notes (PANIC)” do manual do proprietário do A-88.
Deutsch Français Italiano Español Português NederlandsEnglish
13
Page 86

Especicações principais
Roland RD-64: Piano Digital
Teclado
Teclado 64 teclas (Teclado Ivory Feel-G com Escapament)
Sensibilidade de toque Resposta das teclas: 5 tipos
Gerador de som
SuperNATURAL Piano
Gerador de som
Polifonia máx. 128 vozes
Tones 12 tones
Master Tuning 415,3 Hz–466,2 Hz (ajustável em intervalos de 0,1 Hz)
Transposição Transposição de teclas: -6–+5 (em semitons)
Efeitos EFX 1, EFX 2, REVERB
Equalizador Equalizador digital de duas bandas
Outros
Controladores
Botões
Chaves Chave [POWER]
Display LEDs indicadores de energia e de oitava
Conectores
Fonte de alimentação Adaptador CA
Consumo de energia 4 W
Dimensões 1,114 (L) x 273 (P) x 116 (A) mm
Peso 12,8 kg
Acessórios
Opcionais (vendidos separadamente)
SuperNATURAL (E. Piano)
Virtual Tone Wheel Organ
Knobs: [MASTER VOLUME], EQ [LOW], [HIGH]
Alavanca [Pitch Bend/Modulation]
Controlador D-BEAM
Botões [A. PIANO], [E. PIANO], [CLAV], [ORGAN],
TONE VARIATION [1] [2] [3],
[FUNCTION], [SuperNATURAL],
OCTAVE [+] [−], [TRANSPOSE]
[EFX 1], [EFX 2], [REVERB]
Conector DAMPER: tipo P10 TRS de 1/4 de polegada
Conectores FC1, FC2: tipo P10 TRS de 1/4 de polegada
Conector MIDI OUT
Porta USB COMPUTER (USB tipo B)
Saídas OUTPUT (L/MONO, R): tipo P10 de 1/4 de polegada
Entradas INPUT (L, R): tipo RCA
Conector PHONES: tipo P10 de 1/4 de polegada estéreo
Conector DC IN
Manual do Proprietário
Pedal de Sustain (capaz de detecção contínua)
Adaptador CA, Cabo de Força (para o Adaptador CA)
Fones de ouvido
Suporte para Teclado (KS-18Z, KS-12)
Unidade de Pedal (RPU-3)
Pedal de Sustain (DP-10)
Pedal (DP-2)
Pedal de Expressão (EV-5, EV-7)
* Com a nalidade de aprimorar o produto, as especicações e/ou a aparência desta unidade estão sujeitas a alterações sem aviso prévio.
Copyright © 2013 ROLAND CORPORATION
Todos os direitos reservados. Nenhuma parte desta publicação poderá ser reproduzida em qualquer formato sem permissão por escrito da ROLAND CORPORATION.
14
Page 87

Deutsch Français Italiano Español Português NederlandsEnglish
Digitale piano
Gebruikershandleiding
Page 88

De twee modi van de RD-64
De RD-64 gebruiken als een piano (Piano-modus)
De RD-64 erft de SuperNATURAL Piano-geluiden van de immens populaire RD-reeks stage pianos. Zorgvuldig
geselecteerde akoestische en elektrische geluiden werden ingebouwd om bijzonder expressieve uitvoeringen toe te
laten. Ook werd het geprezen Ivory Feel-klavier van de RD-reeks ingebouwd. Ook al biedt hij een expressieve toetsactie
en uitstekende respons op snel herhaalde aanslagen, toch is de RD-64 licht en compact.
De RD-64 is bijzonder draagbaar en kan gemakkelijk meegenomen worden naar de studio of een concertzaal.
De RD-64 gebruiken in Piano-modus
Wanneer u de RD-64 inschakelt, start deze automatisch in Piano-modus.
Over de gebruikershandleiding
Lees dit document.
De RD-64 gebruiken als een MIDI-controller keyboard (Controller-modus)
Als u de [A. PIANO]-knop ingedrukt houdt tijdens het inschakelen, zal de RD-64 functioneren als een MIDI-controller
keyboard met dezelfde functionaliteit*1 als de A-88. Sluit het toestel aan op uw computer met een in de handel verkrijgbare
USB-kabel en gebruik het in combinatie met uw DAW-software voor muziekproductie.
* In de Controller-modus wordt er geen klank gegenereerd door de interne klankgenerator van de RD-64. Er zal ook niets
gebeuren als u op de knoppen [TONE SELECT], [TONE VARIATION], of [REVERB] drukt.
De RD-64 gebruiken in Controller-modus
Houd de [A. PIANO]-knop ingedrukt tijdens het inschakelen, de RD-64 zal opstarten in Controller-modus.
Over de gebruikershandleiding
Raadpleeg de PDF-handleiding van de A-88 voor meer details over het gebruiken van de RD-64 als een
MIDI-controller keyboard.
Om de PDF-handleiding te bekomen:
Voer de volgende URL in op uw computer.
1.
http://www.rolandce.com/nl/nl/roland/handleidingen
2. Kies “A-88 Handleiding” uit de lijst.
*1
Verschillen tussen de Controller-modus van de RD-64 en de A-88
De Controller-modus van de RD-64 verschilt in de volgende aspecten van de A-88. Besteed aandacht aan de volgende punten bij het lezen
van de Gebruikershandleiding van de A-88 (PDF-handleiding).
• Aangezien de RD-64 gebruik maakt van het USB-stuurprogramma dat met de computer (GENERIC) werd meegeleverd, moet u het
USB-stuurprogramma niet installeren (Het hoofdstuk “Installing the Driver” in de Gebruikershandleiding van de A-88). Sluit het apparaat
gewoon aan op uw computer met een in de handel verkrijgbare USB-kabel en het is klaar voor gebruik. “Roland Digital Piano” zal
worden weergegeven voor de MIDI-poortnaam.
• De RD-64 heeft niet de “UPPER,” “LOWER,” “DUAL”- en “SPLIT”-functionaliteit van de A-88 (het hoofdstuk “Layering Two Parts” in de
Gebruikershandleiding van de A-88).
Lees zorgvuldig onderstaande hoofdstukken voordat u dit apparaat gebruikt: “HET APPARAAT VEILIG GEBRUIKEN” (p. 10) en “BELANGRIJKE OPMERKINGEN” (p. 12). Deze
hoofdstukken bevatten belangrijke informatie over de juiste bediening van het apparaat. Om er bovendien zeker van te zijn dat u elke functie van uw nieuwe apparaat
goed begrijpt, leest u best de hele gebruikershandleiding. De handleiding moet als handige referentie worden bewaard en voorhanden zijn.
2
Page 89

Inhoudsopgave
De twee modi van de RD-64 . . . . . . . . . . . . . . . . . . . . . . . . . . . . . . . . . . . . . . . . . . . . . . . . . . . . . . . . . 2
De RD-64 gebruiken als een piano (Piano-modus) . . . . . . . . . . . . . . . . . . . . . . . . . . . . . . . . . . . .2
De RD-64 gebruiken als een MIDI-controller keyboard (Controller-modus) . . . . . . . . . . . .2
De RD-64 op een standaard plaatsen . . . . . . . . . . . . . . . . . . . . . . . . . . . . . . . . . . . . . . . . . . . . . . . . .3
Paneelbeschrijvingen . . . . . . . . . . . . . . . . . . . . . . . . . . . . . . . . . . . . . . . . . . . . . . . . . . . . . . . . . . . . . . .4
Aansluiten . . . . . . . . . . . . . . . . . . . . . . . . . . . . . . . . . . . . . . . . . . . . . . . . . . . . . . . . . . . . . . . . . . . . . . . . . .6
Instellingen wijzigen (FUNCTION-modus) . . . . . . . . . . . . . . . . . . . . . . . . . . . . . . . . . . . . . . . . . . . .7
De fabrieksinstellingen herstellen (FACT RESET) . . . . . . . . . . . . . . . . . . . . . . . . . . . . . . . . . . . . . .7
De toetsaanslag veranderen (VELO CURVE). . . . . . . . . . . . . . . . . . . . . . . . . . . . . . . . . . . . . . . . . . .7
De Snelheidswaarde Klavier speciceren (KEY VELO) . . . . . . . . . . . . . . . . . . . . . . . . . . . . . . . . . .7
Stemmen volgens de toonhoogte van andere instrumenten (Master Tune) . . . . . . . . . . . .8
Het apparaat na een bepaalde tijd automatisch laten uitschakelen (Auto O) . . . . . . . . .8
Het specieke stuurprogramma (ADVANCED) of het generieke stuurprogramma
(GENERIC) selecteren . . . . . . . . . . . . . . . . . . . . . . . . . . . . . . . . . . . . . . . . . . . . . . . . . . . . . . . . . . . . . . . .8
Problemen oplossen . . . . . . . . . . . . . . . . . . . . . . . . . . . . . . . . . . . . . . . . . . . . . . . . . . . . . . . . . . . . . . . . 9
HET APPARAAT VEILIG GEBRUIKEN . . . . . . . . . . . . . . . . . . . . . . . . . . . . . . . . . . . . . . . . . . . . . . . . . 10
BELANGRIJKE OPMERKINGEN . . . . . . . . . . . . . . . . . . . . . . . . . . . . . . . . . . . . . . . . . . . . . . . . . . . . . . 12
Over het Ivory Feel-klavier. . . . . . . . . . . . . . . . . . . . . . . . . . . . . . . . . . . . . . . . . . . . . . . . . . . . . . . . . 13
Een Externe MIDI-Klankmodule aansturen in de Piano-Modus . . . . . . . . . . . . . . . . . . . . . . . 13
Voornaamste specicaties . . . . . . . . . . . . . . . . . . . . . . . . . . . . . . . . . . . . . . . . . . . . . . . . . . . . . . . . . 14
De RD-64 op een standaard plaatsen
Als u de RD-64 op een standaard wilt plaatsen, gebruik dan de Roland KS-18Z of KS-12.
Plaats het instrument als volgt op de standaard.
Pas op dat u uw vingers niet knelt bij het opstellen van de standaard.
KS-18Z
Pas zodanig aan
dat de hoogte
niet meer is dan
Lijn de voorkant van
de RD-64 uit met
de voorkant van de
standaard.
1 meter (pas
de standaard
aan tot een
hoogte van niet
meer dan het
vierde niveau,
onderaan
beginnend).
Deutsch Français Italiano Español Português NederlandsEnglish
Pas de breedte van de standaard
aan zodat de rubberen voetstukken van de RD-64 schrijlings over
de standaard passen.
Bovenaanzicht
KS-12
Pas de breedte van de standaard
aan zodat de rubberen voetstukken aan de zijkant onderaan het
klavier in de voor de rubberen
voetstukken voorziene gaten
vallen.
Bovenaanzicht
3
Page 90

Paneelbeschrijvingen
[POWER]-schakelaar
De stroom inschakelen
* Zorg ervoor onderstaande procedure te volgen om alle apparaten in te schakelen
wanneer eenmaal alles correct is aangesloten (p. 6). Wanneer u apparatuur in de
verkeerde volgorde inschakelt, bestaat het risico op apparaatstoringen of -defecten.
* Dit apparaat is uitgerust met een beveiligingscircuit. Nadat u het apparaat heeft
ingeschakeld, duurt het even (enkele seconden) voordat het normaal werkt.
* Verlaag altijd eerst het volume voor u het apparaat in- of uitschakelt. Zelfs als u
het volume verlaagd heeft, hoort u mogelijk geluid wanneer u het apparaat in- of
uitschakelt. Dit is echter normaal en wijst niet op een defect.
De stroom uitschakelen
1.
2. Schakel de aangesloten externe apparaten uit.
3. Schakel de [POWER]-schakelaar uit.
1. Gebruik de [MASTER VOLUME]-knop om het volume te verlagen.
Verlaag het volume van alle aangesloten audio-apparaten en
andere apparatuur ook volledig.
2. Zet de [POWER]-schakelaar aan.
3. Schakel de aangesloten externe apparaten in.
4.
Pas het volume van de RD-64 en de aangesloten externe apparaten aan.
* Met de fabrieksinstellingen zal de RD-64 automatisch worden
uitgeschakeld vier uur nadat u het apparaat het laatst heeft bespeeld
of bediend.
Als u niet wilt dat het apparaat automatisch uitgeschakeld wordt, stelt u
“AUTO OFF” in op “OFF” zoals beschreven op p. 8.
[MASTER VOLUME]-knop
Het volume aanpassen
Draai de knop naar rechts om het volume te verhogen of naar links om het te verlagen.
[TONE SELECT], [TONE VARIATION]-knop
Klanken selecteren
1.
Druk op de [TONE SELECT]-knoppen om de klankgroep te selecteren.
Gebruik de [MASTER VOLUME]-knop om het volume te
verlagen.
2. Druk op de [TONE VARIATION]-knoppen om een variatie te selecteren.
Groep Variatie 1 Variatie 2 Variatie 3
A. PIANO CONCERT GRAND BRIGHT PIANO CONCERT MONO
E. PIANO PURE VINTAGE TINE EP WURLY
CLAV COMBINATION MEDIUM BRILLIANT
ORGAN JAZZ ORGAN ROCK ORGAN FULL DRAW
[FUNCTION]-knop
Instellingen wijzigen
Gebruik deze knop wanneer u de aanslaggevoeligheid van het klavier wilt aanpassen
of pedaaltoewijzingen wilt maken. Raadpleeg “Instellingen wijzigen (FUNCTION-modus)”
(p. 7) voor meer informatie.
[SuperNATURAL]-knop
In Piano-modus zal deze blijvend oplichten en erop drukken zal geen eect hebben.
Deze knop wordt alleen gebruikt wanneer u een “SuperNATURAL-compatibele
geluidsmodule” aangesloten heeft in Controller-modus. Raadpleeg “De RD-64 gebruiken
als een MIDI-controller keyboard (Controller-modus)” (p. 2) voor meer informatie.
[Pitch Bend/Modulation]-hendel
De toonhoogte van een weerklinkende noot wijzigen (Pitch Bend)
Door de benderhendel naar links te duwen terwijl u aan het spelen bent, verlaagt u de toonhoogte; door de hendel naar rechts
te duwen, verhoogt u de toonhoogte. Dat eect wordt “pitch bend” genoemd.
Een modulatie toepassen op een weerklinkende noot (Modulation)
Door de hendel van u weg te bewegen, wordt een vibrato-eect toegepast. Dat eect wordt “modulatie” genoemd.
* Het verkregen eect bij het bewegen van de hendel kan verschillen naargelang de gebruikte klank. Bovendien is het toegepaste eect voor
het bewegen van de hendel vastgelegd voor elke klank en kan niet worden gewijzigd.
4
Pitch bend-eect
Modulatie-eect
Page 91

Paneelbeschrijvingen
D-BEAM-controller
Beweeg uw hand om verschillende geluidseecten te bekomen
Druk op de knop zodat hij oplicht om de D-BEAM-controller in te schakelen.
Knop Functie
[PITCH] De toonhoogte verandert als u uw hand boven de D-BEAM-controller beweegt.
[VOL] Het volume verandert waardoor u een zekere expressie kunt geven aan uw spel.
[ASSIGN] Het aftertouch-eect zal worden toegepast.
Daadwerkelijk bereik van de
D-BEAM-controller
Deze afbeelding toont het
daadwerkelijke bereik van de
D-BEAM-controller. U bekomt
geen eect als u uw hand
buiten het daadwerkelijke
bereik plaatst.
* Het daadwerkelijke bereik
van de D-BEAM-controller
verandert afhankelijk van de belichting.
[REVERB]-knop
Galm toevoegen aan het geluid (Reverb)
Door de [REVERB]-knop in te drukken zodat hij oplicht, kunt u een galmeect (reverberation) toevoegen aan het keyboardgeluid dat u afspeelt.
Een reverb-eect toevoegen zal het ruimtelijk gevoel produceren dat u typisch hoort bij een uitvoering in een concertzaal.
* U kunt de hoeveelheid reverb-eect niet aanpassen.
Deutsch Français Italiano Español Português NederlandsEnglish
EQ [LOW], [HIGH]-knop
De hoge en lage toonbereiken aanpassen (Equalizer)
De RD-64 is uitgerust met een twee-bands equalizer.
U kunt het niveau van het lagefrequentiebereik en het hogefrequentiebereik voor elke klank instellen.
* De equalizerinstellingen worden afzonderlijk opgeslagen voor elke klank (Houd de [SuperNATURAL]-knop ingedrukt en druk gelijktijdig op te knoppen [A. PIANO] en
[ORGAN] om alle 12 klanken op te slaan).
[EFX 1], [EFX 2]-knop
Eecten toepassen op het geluid
Door de [EFX 1]-of [EFX 2]-knop in te drukken zodat hij oplicht, kunt u eecten toepassen op het geluid dat u afspeelt met het klavier.
De volgende eecten worden toegepast voor elke klankgroep.
Groep EFX 1 EFX 2
A. PIANO ENHANCER DAMPER RESONANCE
E. PIANO TREMOLO PHASER
CLAV AUTO WAH OVERDRIVE
ORGAN ROTARY SPEED
* De aan/uit-statussen van [EFX 1] en [EFX 2] worden afzonderlijk opgeslagen voor elke klank (Houd de [SuperNATURAL]-knop ingedrukt en druk gelijktijdig op te knoppen
[A. PIANO] en [ORGAN] om alle 12 klanken op te slaan).
OCTAVE [−], [+], [TRANSPOSE]-knop
Het octaaf wijzigen (Octave Shift)
U kunt de [+] [–]-knoppen gebruiken om de toonhoogte van het klavier te verhogen of verlagen
(Octave Shift).
• U kunt deze instelling aanpassen in een bereik van -4 tot 5 octaven.
• Als u de [+]-knop en de [–]-knop tegelijkertijd indrukt, wordt deze instelling gereset naar 0.
Indicator en de instellingen die hij weergeeft
De toonhoogte wijzigen (Transpose)
Terwijl u de [TRANSPOSE]-knop ingedrukt houdt, kunt u de [+] [–]-knoppen gebruiken om de
toonhoogte te transponeren in stappen van een halve toon.
• U kunt deze instelling aanpassen in een bereik van -6 tot 5.
• Wanneer de [TRANSPOSE]-knop is ingeschakeld, wordt de transpose-instelling ingeschakeld. Wanneer de
[TRANSPOSE]-knop is uitgeschakeld, wordt de transpose-instelling uitgeschakeld.
• Als u de [TRANSPOSE]-knop, de [+]-knop en de [–]-knop tegelijkertijd indrukt, wordt deze instelling gereset
naar 0.
-6
-5 -4 -3 -2 -1 0 1 2 3 4 5
Licht niet op Licht op
5
Page 92

Aansluiten
INPUT-aansluitingen
Wanneer u een audiospeler of
gelijkaardig apparaat aansluit, zal
het geluid van het aangesloten
apparaat uitgestuurd worden via de
OUTPUT- en PHONES-aansluitingen.
* Gebruik de bedieningselementen
van het aangesloten apparaat
(audiospeler) om het volume aan
te passen.
OUTPUT-aansluitingen
Als u deze aansluitingen verbindt met versterkte
luidsprekers, wordt het geluid van dit apparaat via
deze luidsprekers uitgestuurd.
PHONES-aansluiting
Sluit hier een hoofdtelefoon aan
(afzonderlijk verkocht).
DC IN-aansluiting
Sluit de bijgeleverde netstroomadapter aan op
deze aansluiting.
Plaats de netstroomadapter met de zijde
met het lampje naar boven en de zijde
met de tekstinformatie naar beneden. Het
lampje gaat branden als u de netstroomadapter aansluit op een stopcontact.
Naar het stopcontact
Bijgeleverd
demperpedaal
Zet de schakelaar op het bijgeleverde demperpedaal op
“Continuous” wanneer het pedaal is aangesloten.
of pedaalschakelaar (afzonderlijk verkocht;
DP-reeks)
of
Pedaaleenheid
(afzonderlijk
verkocht; RPU-3)
Pedaalaansluitingen (DAMPER, FC2, FC1)
Wanneer u het bijgeleverde pedaal aansluit op de DAMPER-aansluiting, kan het
pedaal gebruikt worden als demperpedaal.
De pedalen die aangesloten zijn op de pedaalaansluitingen zullen als volgt
werken (met de fabrieksinstellingen).
Aansluiting Uitleg
Gebruik dit pedaal om het geluid aan te
DAMPER Demperpedaal
FC2
FC1 Soft-pedaal
Sostenutopedaal
houden. Als u dit pedaal ingedrukt houdt,
worden de noten langer aangehouden, zelfs als
u de toetsen op het klavier loslaat.
Dit pedaal houdt uitsluitend de noten aan van
de toetsen die ingedrukt waren wanneer u op
het pedaal drukte.
Met dit pedaal kunt u het geluid zachter
maken.
Netsnoer
USB COMPUTER-poort
Wanneer de RD-64 wordt aangesloten
op uw computer met behulp van een in
de handel verkrijgbare USB-kabel, kunt
u MIDI-compatibele software gebruiken
om de uitvoering van uw RD-64 (MIDIdata) op te nemen en af te spelen.
* USB-audio wordt niet ondersteund.
MIDI OUT-aansluiting
U kunt een MIDI-klankmodule aansluiten en aansturen.
OPMERKING
* Zet het volume altijd lager en schakel alle apparaten uit voordat u
aansluitingen maakt om defecten en storingen van de apparatuur te
voorkomen.
* Gebruik enkel het in deze handleiding beschreven expressiepedaal
(EV-5 of EV-7; afzonderlijk verkocht). Het aansluiten van een
expressiepedaal van een ander type kan leiden tot defecten en/of
schade aan het apparaat (Controller-modus).
6
Page 93

Instellingen wijzigen (FUNCTION-modus)
In FUNCTION-modus kunt u de klavieraanslag wijzigen.
Hoe de uitleg bij een procedure te lezen
Druk op de
[FUNCTION]-knop.
Druk op de toets waarboven “VELO
CURVE” gedrukt staat.
0–4
Waarde 0–4
Druk op de toetsen waarboven “NUMERIC ENTRY” gedrukt staat.
* Waarden buiten het aanvaardbare bereik worden niet ingevoerd.
De fabrieksinstellingen herstellen (FACT RESET)
De toetsaanslag veranderen (VELO CURVE)
U kunt de aanslaggevoeligheid van het klavier aanpassen.
Druk op de toets waarboven
“ENTER” gedrukt staat.
Deutsch Français Italiano Español Português NederlandsEnglish
0–4
Waarde 0–4
Waarde Instelling Uitleg
0 SUPER LIGHT Een nog zachtere instelling dan LIGHT.
1 LIGHT
MEDIUM
2
(standaard)
3 HEAVY
4 SUPER HEAVY Een nog zwaardere instelling dan HEAVY.
Dit stelt het klavier in op een zachte aanslag. U kunt fortissimo () spelen met een minder sterke aanslag dan gewoonlijk. Het klavier voelt
dus lichter aan. Deze instelling maakt spelen makkelijker, zelfs voor kinderen.
Dit stelt het klavier in op de standaard aanslaggevoeligheid. Op deze manier kunt u met de meest natuurlijke aanslag spelen. Deze
instelling benadert de aanslag van een akoestische piano het meest.
Dit stelt het klavier in op een zware aanslag. U moet de toetsen harder aanslaan dan gewoonlijk om fortissimo () te spelen. Het klavier
voelt dus zwaarder aan. Dynamische aanslagen geven dat wat u speelt nog meer gevoel.
De Snelheidswaarde Klavier speciceren (KEY VELO)
0–9
* Als u een waarde probeert in te voeren
buiten het aanvaardbare bereik, dan worden
de twee of drie cijfers gebruikt die onmiddel-
Waarde 0–127
lijk voor ENTER ingedrukt werden.
Waarde Instelling Uitleg
TOUCH
0
(standaard)
1 Vaste waarde De snelheid wordt verzonden aan een specieke waarde ongeacht de kracht waarmee u de toetsen indrukt.
De aanslagwaarden worden verzonden al naargelang de aanslaggevoeligheid en de curve die u in de “De toetsaanslag veranderen (VELO
CURVE)” (p. 7) hebt geselecteerd.
7
Page 94

Instellingen wijzigen (FUNCTION-modus)
Stemmen volgens de toonhoogte van andere instrumenten (Master Tune)
Om een zuiverder ensemblegeluid te bekomen tijdens het samenspelen met een of meerdere andere instrumenten, dient u ervoor te zorgen dat de
standaardtoonhoogte van elk instrument gelijk is. In het algemeen wordt de stemming van een instrument aangegeven door de toonhoogte in Hertz
(Hz) van de middelste “A”-noot.
Het toonhoogtebereik is 415,3–440,0–466,2 Hz (standaard: 440,0 Hz).
3 0–9
Waarde 3
Waarde 4153–4662
Voer 4 cijfers in
Voorbeeld: Indien 440,0
Hz, druk dan de toetsen
in in de volgorde 4, 4, 0,
0 en ENTER.
NUMERIC ENTRY gebruiken om een waarde in te voeren
0–9
Waarde 4153–4662
NUMERIC ENTRY-toetsen ingedrukt
in deze volgorde
4, 4, 0, 0, ENTER 440.0
1, 2, 3, 4, ENTER —
1, 4, 3, 8, 0, ENTER 438.0
8, 4, 4, 6, 6, 3, ENTER —
Deze waarde
wordt ingevoerd
* Als u een waarde probeert in te
voeren buiten het aanvaardbare
bereik, dan worden de vier cijfers
gebruikt die onmiddellijk voor ENTER
ingedrukt werden.
Het apparaat na een bepaalde tijd automatisch laten uitschakelen (Auto O)
WAARSCHUWING
Met de fabrieksinstellingen zal de RD-64 automatisch worden uitgeschakeld vier uur nadat u bent gestopt met het bespelen of bedienen van het
apparaat. Als u niet wilt dat het apparaat automatisch uitgeschakeld wordt, stelt u “AUTO OFF” in op “OFF” zoals hieronder beschreven.
0–1
Waarde 0–1
Waarde Instelling Uitleg
0 OFF Het apparaat wordt niet automatisch uitgeschakeld.
1 ON (standaard) Het apparaat wordt 240 minuten (4 uur) na het uitvoeren van de laatste handeling automatisch uitgeschakeld.
Het specieke stuurprogramma (ADVANCED) of het generieke stuurprogramma
(GENERIC) selecteren
Normaal moet u geen stuurprogramma installeren om de RD-64 aan te sluiten op uw computer. Wanneer sommige problemen zich
echter voordoen of de prestatie slecht is, kan het gebruik van het originele stuurprogramma van Roland het probleem oplossen.
Stel in dit geval het USB-stuurprogramma op de RD-64 in op “ADVANCED” zoals hieronder beschreven en installeer dan het USBstuurprogramma op uw computer.
Hoe het USB-stuurprogramma installeren
Raadpleeg de Roland-website voor het downloaden en installeren van het
originele Roland-stuurprogramma.
Na het wijzigen van deze instelling moet u de RD-64 uit- en opnieuw
inschakelen.
Normaal gezien kunt u deze instelling op “GENERIC” laten staan.
Knop Instelling Uitleg
[+]-knop ADVANCED Selecteer deze optie wanneer u gebruik wilt maken van een USB-stuurprogramma dat u van de Roland-website gedownload heeft.
[–]-knop
GENERIC
(standaard)
Selecteer deze optie wanneer u gebruik wilt maken van het algemene USB-stuurprogramma dat met uw computer werd meegeleverd. Normaal zou u deze modus moeten gebruiken.
8
Roland-website
http://www.roland.com/support/
Page 95

Problemen oplossen
Wanneer de RD-64 niet naar behoren functioneert, controleer dan altijd eerst de volgende punten. Wanneer dit uw probleem niet oplost, neem dan
contact op met uw dealer of het dichtstbijzijnde Roland Service Station.
Probleem Controle/Oplossing Pagina
Het apparaat schakelt niet in
Geen geluid
Het volumeniveau van het instrument
dat aangesloten is op de INPUTaansluiting is te laag.
Tonen worden gewijzigd
De toonhoogte is vreemd
Geluiden worden afgebroken
Pedaal werkt niet of “zit vast”/Pedaal
werkt niet correct
Galm blijft weerklinken na het uitschakelen van het galmeect
Het geluid van de hogere noten wijzigt
plots vanaf een bepaalde toets
U hoort een hoge toon
Lage noten klinken niet goed of zoemen
Zijn de netstroomadapter en het netsnoer van de RD-64 correct in het stopcontact aangesloten op
de RD-64?
Zijn de aangesloten versterkers en luidsprekers ingeschakeld?
Staat het volume helemaal stil?
Is de [MASTER VOLUME]-knop helemaal dichtgedraaid? p. 4
Zijn de luidsprekers correct aangesloten?
Sluit versterkte luidsprekers of een hoofdtelefoon aan.
Zijn er geluiden hoorbaar door de hoofdtelefoon?
Wanneer er geluid hoorbaar is door de hoofdtelefoon, kan het zijn dat er een kortsluiting is in een
audiokabel, of een of ander probleem met een versterker of mengpaneel. Controleer de kabels en de
apparatuur nog eens.
Is het mogelijk dat het volume is verlaagd door een pedaal of de D-BEAM-controller?
Druk het pedaal opnieuw in of laat het omhoog komen, of houd uw hand boven de D-BEAM-
controller.
Is het mogelijk dat de RD-64 werd opgestart in Controller-modus (door het apparaat in te schakelen
terwijl u de [A. PIANO]-knop ingedrukt hield)?
De RD-64 zal geen geluid produceren in Controller-modus.
Is het mogelijk dat het volume van het aangesloten apparaat stil werd gezet?
Pas het volume van het aangesloten apparaat aan.
Gebruikt u een verbindingskabel met weerstand?
Gebruik een verbindingskabel zonder weerstand.
Is het mogelijk dat de toonhoogte werd gewijzigd door een pedaal of de D-BEAM-controller te
gebruiken?
Druk het pedaal opnieuw in of laat het omhoog komen, of plaats uw hand boven de D-BEAMcontroller.
Wanneer een mono-aansluiting wordt gebruikt, kan de toonkwaliteit variëren afhankelijk van de
geselecteerde toon en het register waarin hij gebruikt wordt.
Voor een optimale luisterkwaliteit is een aansluiting in stereo aanbevolen.
Afhankelijk van de geselecteerde toon worden toonhoogtes die in sommige registers worden
gespeeld, gewijzigd en op andere toonhoogtes afgespeeld.
Heeft u Octave/Transpose ingesteld? p. 5
Is het mogelijk dat de toonhoogte werd veranderd door een pedaal of de D-BEAM-controller te
bedienen?
Druk het pedaal opnieuw in of laat het omhoog komen, of houd uw hand boven de D-BEAMcontroller.
Wanneer u meer stemmen dan het maximumaantal van 128 simultaan probeert te spelen, kunnen
geluiden die momenteel worden afgespeeld afgebroken worden.
Is het pedaal correct aangesloten?
Plug de kabel stevig in de pedaalaansluiting.
Gebruikt u een pedaal van een andere fabrikant?
Gebruik het bijgeleverde demperpedaal of een optioneel pedaal uit de reeksen RPU-3, DP of EV, of
een gelijkaardig pedaal.
De pianoklank van de RD-64 is een getrouwe weergave van de diepte en resonantie van een
akoestische piano. Hierdoor lijkt het soms alsof het galmeect nog ingeschakeld is, ook al is dit niet
het geval.
Op een akoestische piano blijft het hoogste deel van het klavier klinken, ongeacht het demperpedaal. Deze noten hebben ook een iets ander toonkarakter. De RD-64 geeft een getrouwe weergave
van deze eigenschap van akoestische piano's. Op de RD-64 zal het bereik dat niet beïnvloed wordt
door het demperpedaal wijzigen in overeenstemming met de Octave/Transpose-instelling.
Pianoklanken die helder en scherp van aard zijn, bevatten componenten met een aanzienlijk hoge
frequentie die kunnen klinken alsof er een metaaltoon toegevoegd is. Dit komt doordat de klankkleur van een akoestische piano getrouw gereproduceerd wordt. Dit wijst dus niet op een defect.
Bij sommige tonen kan het lijken alsof het geluid vervormd is.
Zet het volumeniveau lager. Alternatief kunt u de master gain-instelling verlagen.
p. 6
p. 4
p. 6
−
−
p. 2
−
−
−
−
−
−
−
p. 6
p. 6
−
−
−
−
Deutsch Français Italiano Español Português NederlandsEnglish
9
Page 96

HET APPARAAT VEILIG GEBRUIKEN
HET APPARAAT VEILIG GEBRUIKEN
INSTRUCTIES TER VERMIJDING VAN BRAND, ELEKTRISCHE SCHOKKEN OF VERWONDING VAN PERSONEN
Over aanduidingen WAARSCHUWING en OPGELET
Gebruikt voor instructies die de gebruiker
WAARSCHUWING
OPGELET
waarschuwen voor levensgevaarlijke
risico’s of risico’s op verwondingen indien
het apparaat verkeerd wordt gebruikt.
Gebruikt voor instructies die de gebruiker
waarschuwen voor risico’s op verwondingen
of materiaalschade indien het apparaat
verkeerd wordt gebruikt.
* Materiaalschade verwijst naar schade
of negatieve effecten die veroorzaakt
worden met betrekking tot de woning
en de volledige inrichting, alsook
huisdieren.
LET STEEDS OP HET VOLGENDE
Over de symbolen
Het -symbool waarschuwt de gebruiker voor belangrijke
instructies of waarschuwingen. De specifieke betekenis van
het symbool wordt bepaald door het pictogram binnen de
driehoek. Het symbool links wordt gebruikt voor algemene
waarschuwingen voor gevaar.
Het -symbool waarschuwt de gebruiker voor items die
nooit mogen worden gebruikt (verboden). De specifieke
handeling die niet mag worden gedaan, wordt door het
pictogram binnen de cirkel aangeduid. Het symbool links
betekent dat het apparaat nooit gedemonteerd mag worden.
Het -symbool wijst de gebruiker op handelingen die
moeten worden uitgevoerd. De specifieke handeling die
moet worden uitgevoerd, wordt door het pictogram binnen
de cirkel aangeduid. Het symbool links geeft aan dat het
netsnoer uit het stopcontact moet worden getrokken.
WAARSCHUWING
Demonteer of wijzig het apparaat nooit zelf
Open het apparaat of zijn netstroomadapter
niet (en wijzig ze op geen enkele manier).
Herstel of vervang zelf geen onderdelen
Probeer het apparaat niet te herstellen of
onderdelen ervan te vervangen (behalve
als deze handleiding specieke instructies
geeft om dat te doen). Laat het onderhoud
over aan uw handelaar, het dichtstbijzijnde
Roland Service Center of een bevoegde
Roland-verdeler, zoals vermeld op het blad
“Information”.
Gebruik of bewaar het apparaat niet op de volgende
plaatsen die
• aan extreme temperaturen worden
blootgesteld (bv. rechtstreeks zonlicht in
een gesloten voertuig, in de buurt van
een verwarmingsleiding, op materiaal
dat warmte produceert); of die
• nat zijn (bv. badkamers, wasruimtes, op
natte vloeren); of die
• worden blootgesteld aan damp of rook;
of die
• worden blootgesteld aan zout; of die
• vochtig zijn; of die
• aan regen worden blootgesteld; of die
• stog of zanderig zijn; of die
• aan hoge trillingsniveaus en schokken
worden blootgesteld.
Gebruik alleen de aanbevolen standaard
Het apparaat mag alleen gebruikt worden
met een standaard die door Roland is
aanbevolen.
Plaats het apparaat niet op een onstabiele plaats
Wanneer het apparaat wordt gebruikt met
een rack of standaard aanbevolen door
Roland, dan moet het rack of de standaard
nog zorgvuldig horizontaal geplaatst
worden om de stabiliteit te garanderen.
Wanneer u geen gebruik maakt van een
rack of een standaard moet u er nog steeds
voor zorgen een plaats voor het apparaat te
kiezen met een horizontaal oppervlak dat
het apparaat voldoende ondersteunt en
waarbij het apparaat niet wiebelt.
Voorzorgen met betrekking tot de plaatsing op een
standaard van dit apparaat
Volg de instructies in de
Gebruikershandleiding zorgvuldig op als u
het apparaat op een standaard plaatst (p. 3).
Als u het geheel niet correct opstelt, loopt u
het risico een onstabiele situatie te creëren
waarbij het apparaat kan vallen of de standaard
kan omslaan, met mogelijk letsel als gevolg.
10
WAARSCHUWING
Gebruik alleen de meegeleverde netstroomadapter en
het correcte voltage
Gebruik alleen de netstroomadapter die
bij het apparaat wordt geleverd. Ga na of
het lijnvoltage van het elektriciteitsnet
overeenkomt met het ingangsvoltage
dat op de netstroomadapter wordt
weergegeven. Andere netstroomadapters
gebruiken mogelijk een andere polariteit
of zijn ontworpen voor een ander voltage.
Het gebruik van dergelijke adapters kan
resulteren in schade, defecten of elektrische
schokken.
Gebruik alleen het meegeleverde netsnoer
Gebruik alleen de bevestigde stroomkabel.
Sluit het meegeleverde netsnoer ook niet
aan op andere apparaten.
Buig het netsnoer niet en plaats er geen zware
voorwerpen op
Verdraai of buig het netsnoer niet
overmatig en plaats er geen zware
voorwerpen op. Daardoor kan de kabel
beschadigd raken en kan er kortsluiting
ontstaan. Beschadigde kabels kunnen
brand of elektrische schokken veroorzaken!
Vermijd langdurig gebruik op hoog volume
Dit apparaat kan, apart of in combinatie
met een versterker en een hoofdtelefoon
of luidsprekers, geluidsniveaus produceren
die permanente gehoorschade kunnen
veroorzaken. Gebruik het apparaat niet
langdurig op een hoog volumeniveau of
op een niveau dat oncomfortabel is. Als u
gehoorverlies of oorsuizingen ervaart, moet
u onmiddellijk stoppen met het gebruik van
het apparaat en een audioloog raadplegen.
Laat geen vreemde voorwerpen of vloeistoen in het
apparaat terechtkomen; plaats nooit recipiënten met
vloeistoen op het apparaat
Plaats geen recipiënten met vloeistoen
op dit product. Zie erop toe dat er nooit
vreemde voorwerpen (bv. brandbare
voorwerpen, muntstukken, draden) of
vloeistoen (bv. water of fruitsap) in het
apparaat terechtkomen. Dat kan immers
kortsluitingen, defecten of andere storingen
veroorzaken.
WAARSCHUWING
Schakel het apparaat uit als er een afwijking of
storing optreedt
Schakel het apparaat onmiddellijk uit, trek
de netstroomadapter uit het stopcontact en
vraag onderhoud aan bij uw handelaar, het
dichtstbijzijnde Roland Service Center of
een bevoegde Roland-verdeler, zoals wordt
vermeld op de pagina “Information”, indien:
• de netstroomadapter, stroomkabel of
stekker beschadigd zijn; of
• er rook of ongewone geuren uit het
apparaat komen; of
• er voorwerpen of vloeistof in het
apparaat zijn terechtgekomen; of
• het apparaat aan regen werd
blootgesteld (of op een andere manier
nat is geworden); of
• het apparaat niet normaal lijkt te werken
of opmerkelijk anders functioneert.
Volwassenen dienen toezicht te houden op plaatsen
waar kinderen aanwezig zijn
Zie erop toe dat het apparaat niet verkeerd
gehanteerd wordt wanneer u het gebruikt
op plaatsen waar kinderen aanwezig zijn. Er
moet altijd een volwassene aanwezig zijn
om toezicht te houden en in te staan voor
begeleiding.
Laat het apparaat niet vallen en stel het niet bloot
aan hevige schokken
Bescherm het apparaat tegen hevige
schokken.
(Laat het niet vallen!)
Deel geen stopcontact met een onredelijk aantal
andere apparaten
Laat het netsnoer van het apparaat geen
stopcontact delen met een onredelijk
aantal andere apparaten. Wees vooral
voorzichtig met verlengkabels - het totale
stroomverbruik van alle apparaten die
u op de verlengkabel hebt aangesloten
mag nooit het maximumvermogen
(watt/ampère) voor de verlengkabel
overschrijden. Buitensporige belasting
kan de isolatie van de kabel verhitten en
uiteindelijk doen smelten.
Gebruik het apparaat niet in het buitenland
Raadpleeg uw handelaar, het
dichtstbijzijnde Roland Service Center
of een bevoegde Roland-verdeler, zoals
wordt vermeld op de pagina “Information”,
voordat u het apparaat in het buitenland
gebruikt.
Page 97

HET APPARAAT VEILIG GEBRUIKEN
OPGELET
Plaats het apparaat op een goed geventileerde plaats
Het apparaat en de netstroomadapter
moeten zo worden geplaatst dat de
locatie of positie een goede ventilatie niet
belemmeren.
Gebruik alleen de specieke standaard(en)
Dit apparaat is ontworpen voor gebruik
in combinatie met specieke standaarden
(KS-12, KS-18Z), vervaardigd door Roland.
Wanneer u gebruik maakt van andere
standaarden, loopt u het risico letsels op te
lopen wanneer het apparaat valt of omslaat
als gevolg van een onvoldoende stabiliteit.
Beoordeel de veiligheidsaspecten vooraleer u
standaarden gebruikt
Zelfs wanneer u de voorzorgsmaatregelen
vermeld in de gebruikershandleiding
opvolgt, kunnen sommige manieren van
omgaan met het apparaat ervoor zorgen
dat het toch van de standaard valt, of
dat de standaard omslaat. Ga bewust om
met de veiligheidsaspecten vooraleer dit
apparaat te gebruiken.
Neem de stekker vast bij het aansluiten of
loskoppelen van de netstroomadapter
Neem altijd alleen de stekker van de
netstroomadapterkabel vast als u hem
aansluit op of verwijdert uit dit apparaat of
een stopcontact.
OPGELET
Koppel de netstroomadapter los van het stopcontact
wanneer er kans is op blikseminslagen
Koppel de netstroomadapter los van het
stopcontact als u bliksem verwacht in uw
omgeving.
Deutsch Français Italiano Español Português NederlandsEnglish
Reinig de stekker van de netstroomadapter af en toe
U moet de netstroomadapter regelmatig
uit het stopcontact verwijderen en reinigen
met een droge doek om al het stof en
ander aangeladen vuil te verwijderen van
de pennen. Trek de stekker ook uit het
stopcontact als het apparaat langere tijd
niet wordt gebruikt. Stofophoping tussen
de stekker en het stopcontact kan leiden
tot slechte isolatie en brand veroorzaken.
Zorg voor een veilige plaatsing van kabels
Zorg ervoor dat de snoeren en kabels niet
in de war raken. Plaats alle snoeren en
kabels ook buiten het bereik van kinderen.
Plaats uw gewicht niet op het apparaat en plaats er
geen zware voorwerpen op
Ga nooit op het apparaat staan en plaats er
geen zware voorwerpen op.
Sluit de netstroomadapter nooit aan en koppel hem
nooit los met natte handen
Pak de netstroomadapter of de stekkers
nooit met natte handen vast wanneer
u deze aansluit op of verwijdert uit een
stopcontact of dit apparaat.
Koppel alles los voordat u het apparaat verplaatst
Koppel de netstroomadapter en alle kabels
los van externe apparaten vooraleer het
apparaat te verplaatsen.
Koppel de netstroomadapter los van het stopcontact
vooraleer te reinigen
Schakel het apparaat uit en koppel de
netstroomadapter los van het stopcontact
voordat u het apparaat reinigt (p. 6).
11
Page 98

BELANGRIJKE OPMERKINGEN
Stroomtoevoer
• Sluit dit apparaat niet aan op een stopcontact dat
tegelijkertijd door een elektrisch apparaat wordt
gebruikt dat wordt gestuurd door een omvormer
(zoals een koelkast, wasmachine, magnetron of
airconditioner) of dat een motor bevat. Afhankelijk
van de manier waarop de andere elektrische
apparaten worden gebruikt, kan ruis afkomstig
van de stroomtoevoer ertoe leiden dat dit
apparaat niet correct functioneert of hoorbare ruis
produceert. Als het niet praktisch is om een apart
stopcontact te gebruiken, plaats dan een ruislter
voor de stroomtoevoer tussen dit apparaat en het
stopcontact.
• De netstroomadapter kan warm worden na enkele
uren ononderbroken gebruik. Dit is normaal en
geen reden tot bezorgdheid.
• Zorg er altijd voor dat u alle apparaten uitschakelt
voordat u aansluitingen maakt om defecten en
storingen van de apparatuur te voorkomen.
• Met de fabrieksinstellingen zal de RD-64
automatisch worden uitgeschakeld vier uur nadat u
het apparaat het laatst heeft bespeeld of bediend.
Als u niet wilt dat het apparaat automatisch
uitgeschakeld wordt, stelt u “AUTO OFF” in op “OF”
zoals beschreven op p. 8.
Plaatsing
• Als u het apparaat gebruikt in de buurt van
zware versterkers (of andere apparatuur met
grote stroomtransformatoren) kan dit gezoem
veroorzaken. Om dit probleem te verhelpen kunt
u de oriëntatie van het apparaat wijzigen, of het
apparaat verder van de storingsbron plaatsen.
• Dit apparaat kan de radio- en televisieontvangst
verstoren. Gebruik dit apparaat niet in de buurt van
dergelijke ontvangers.
• Er kunnen geluiden geproduceerd worden als
draadloze communicatieapparaten, zoals mobiele
telefoons, in de buurt van dit apparaat worden
gebruikt. Dergelijke geluiden kunnen ontstaan
als een oproep wordt ontvangen of gemaakt, of
tijdens gesprekken. Verplaats dergelijke apparaten
zodat ze zich op een grotere afstand van dit
apparaat bevinden of schakel ze uit als u dergelijke
problemen ervaart.
• Stel het apparaat niet bloot aan rechtstreeks
zonlicht, plaats het niet in de buurt van
warmtebronnen, laat het niet achter in een gesloten
voertuig en stel het niet anderszins bloot aan
extreme temperaturen. Laat ook geen verlichting
die in de buurt van het apparaat wordt gebruikt
(zoals een pianolamp) of sterke spots gedurende
langere tijd op dezelfde plaats op het apparaat
schijnen. Overmatige hitte kan het apparaat
vervormen of verkleuren.
• Bij de verplaatsing van de ene locatie naar een
andere waar de temperatuur en/of de vochtigheid
sterk verschilt, kunnen er waterdruppels (condens)
gevormd worden in het apparaat. Er kunnen schade
of defecten ontstaan als u het apparaat in deze
toestand gebruikt. Voordat u het apparaat gebruikt,
dient u het enkele uren te laten liggen tot de
condens volledig verdampt is.
• Laat geen rubber, vinyl of soortgelijke materialen
gedurende langere tijd achter op het apparaat.
Dergelijke voorwerpen kunnen de afwerking doen
verkleuren of op andere wijze beschadigen.
• Laat geen voorwerpen op het klavier liggen. Dat
kan leiden tot defecten, zoals toetsen die geen
signaal meer geven.
• Kleef geen etiketten of stickers op dit instrument.
Als dergelijke materialen van het instrument
verwijderd moeten worden, kan de afwerking
beschadigd raken.
• Afhankelijk van het materiaal en de temperatuur
van het oppervlak waarop u het apparaat plaatst,
kunnen de rubberen voetstukken mogelijk het
oppervlak verkleuren of ontsieren.
U kunt een stuk vilt of stof onder de rubberen
voetstukken plaatsen om dit te voorkomen. Zorg er
in dat geval voor dat het apparaat niet verschuift of
per ongeluk in beweging komt.
• Plaats geen recipiënten met water op dit apparaat.
Vermijd ook het gebruik van insecticiden, parfum,
alcohol, nagellak, spuitbussen enz. in de buurt
van het apparaat. Veeg op het apparaat gemorste
vloeistof snel af met een droge, zachte doek.
Onderhoud
• Gebruik voor het reinigen van dit apparaat een
droge, zachte doek of een licht bevochtigde doek.
Probeer om het volledige oppervlak af te vegen
terwijl u een gelijke kracht uitoefent bij het heen
en weer bewegen van de doek. Als u te hard op
eenzelfde plek wrijft, kan de afwerking beschadigd
raken.
• Gebruik geen benzine, verdunningsmiddelen,
alcohol of oplosmiddelen om verkleuring en/of
vervorming te voorkomen.
Reparatie en gegevens
• Wees u ervan bewust dat alle gegevens in het
geheugen van het apparaat verloren kunnen gaan
door een reset naar de fabrieksinstellingen wanneer
het apparaat voor reparatie wordt ingeleverd.
Extra voorzorgsmaatregelen
• Roland is niet aansprakelijk voor een dergelijk
verlies van gegevens, noch voor het herstellen
ervan.
• Ga voldoende zorgzaam tewerk bij het gebruik van
de knoppen, schuifknoppen of andere regelaars van
het apparaat en bij het gebruik van aansluitingen
en stekkers. Ruw omgaan met de apparatuur kan
storingen veroorzaken.
• Neem de stekker zelf vast als u kabels loskoppelt—
trek nooit aan de kabel. Op die manier vermijdt
u kortsluitingen of schade aan de inwendige
onderdelen van de kabel.
• Houd het volume van het apparaat op een
redelijk niveau om te vermijden dat u anderen in
uw buurt stoort. Mogelijk gebruikt u liever een
hoofdtelefoon, zodat u zich geen zorgen hoeft te
maken over uw omgeving.
• Het geluid van toetsen die worden aangeslagen en
trillingen die door het bespelen van een instrument
geproduceerd worden, kunnen via een vloer of
muur onverwacht ver worden doorgegeven. Let
erop geen hinder te veroorzaken voor andere
personen in de buurt.
• Verpak het apparaat indien mogelijk in de originele
doos (inclusief vulmateriaal) waarin het werd
geleverd als u het moet vervoeren. Zo niet, dient u
gelijkwaardig verpakkingsmateriaal te gebruiken.
• Gebruik enkel het in deze handleiding beschreven
expressiepedaal (EV-5 of EV-7; afzonderlijk
verkocht). Het aansluiten van een expressiepedaal
van een ander type kan leiden tot defecten en/of
schade aan het apparaat.
• Sommige kabels bevatten weerstanden. Gebruik
geen kabels met weerstanden om andere
apparaten op dit apparaat aan te sluiten. Het
gebruik van dergelijke kabels kan het geluidsniveau
extreem verlagen of zelfs onhoorbaar maken. Neem
contact op met de fabrikant van de kabel voor
informatie over kabelspecicaties.
• Het nuttig bereik van de D-BEAM-controller wordt
heel klein als hij gebruikt wordt bij sterk, direct
zonlicht. Wees u hiervan bewust wanneer u de
D-BEAM-controller buiten gebruikt.
Auteursrechten/Licenties/
Handelsmerken
• De auteursrechten op de inhoud van dit product
(golfvormgegevens van het geluid, stijlgegevens,
begeleidende patronen, frasegegevens, audioloops
en beeldgegevens) zijn voorbehouden door Roland
Corporation.
• Kopers van dit product hebben de toestemming
de betreende inhoud te gebruiken voor het
aanmaken, uitvoeren, opnemen en verdelen van
originele muziekuitvoeringen.
• Kopers van dit product hebben GEEN toestemming
om de betreende inhoud in de oorspronkelijke of
een gewijzigde vorm aan het apparaat te onttrekken
met als doel het verspreiden van een opgenomen
medium met de betreende inhoud of het ter
beschikking stellen van deze inhoud via een
computernetwerk.
• MMP (Moore Microprocessor Portfolio) verwijst naar
een octrooiportefeuille betreende microprocessorarchitecturen, ontworpen door Technology
Properties Limited (TPL). Roland heeft van de TPL
Group de licentie verkregen voor het gebruik van
deze technologie.
• Roland, SuperNATURAL zijn gedeponeerde
handelsmerken of handelsmerken van de Roland
Corporation in de Verenigde Staten en/of andere
landen.
• De bedrijfsnamen en productnamen in dit
document zijn gedeponeerde handelsmerken of
handelsmerken van hun respectievelijke eigenaars.
12
Page 99

Over het Ivory Feel-klavier
Kenmerken van een als ivoor aanvoelend “ivory feel”-klavier
Traditionele pianotoetsen zijn gemaakt van het beste materiaal — ivoor (voor de witte toetsen) en ebbenhout (voor de zwarte toetsen). Het Ivory
Feel-klavier maakt gebruik van de allernieuwste technologie om de aanslag en het gevoel van deze materialen na te bootsen.
Een Ivory Feel-klavier biedt de volgende kenmerken:
• We zijn ervan overtuigd dat u een voorliefde zal ontwikkelen voor de kenmerkende textuur van deze toetsen, die beter beginnen aanvoelen
naarmate u er meer op heeft gespeeld.
• Het oppervlak integreert stroken vochtabsorberend materiaal voor een verbeterd gevoel en een verbeterde bespeelbaarheid.
• De toetsen worden gekenmerkt door een subtiele glans en gematigde kleur, wat het uiterlijk en de elegantie ten goede komt.
• De witte toetsen zijn afgewerkt met een licht geelachtige tint voor het uitzicht van echt ivoor.
Hanteren
• Schrijf niet met een pen of enig ander materiaal op het klavier, en plaats geen stempels of andere markeringen op het instrument. De inkt zal in
het oppervlak doordringen en kan dan niet meer worden verwijderd.
• Plaats geen stickers op het klavier. U zult stickers met sterke lijm mogelijk niet meer kunnen verwijderen en de lijm kan bovendien verkleuring
veroorzaken.
Verzorging en onderhoud
Let op de volgende punten. Het niet naleven van deze instructies kan leiden tot krassen in de oppervlakafwerking, beschadigde glans, verkleuring of
vervorming.
• Gebruik een zachte doek om vuil te verwijderen.
Veeg vuil voorzichtig weg met een licht bevochtigde en goed uitgewrongen doek.
Wrijf niet hard over het oppervlak.
• Gebruik een in de handel verkrijgbare klavierreiniger die geen schuurmiddelen bevat om hardnekkig vuil te verwijderen.
Begin met zachtjes af te vegen. Wanneer het vuil niet meteen loskomt, oefen dan geleidelijk aan meer druk uit, maar let er hierbij op dat u geen
krassen maakt op de toetsen.
• Gebruik geen benzeen, verfverdunner of alcohol op het instrument.
Deutsch Français Italiano Español Português NederlandsEnglish
Een Externe MIDI-Klankmodule aansturen in de Piano-Modus
In de Piano-modus van de RD-64 kunt u het MIDI-kanaal speciceren en MIDI-berichten als bank select, program change en aftertouch naar een
externe MIDI-klankmodule sturen. Raadpleeg de hoofdstukken “Setting the MIDI Transmit Channel (MIDI CHANNEL)”, “Switching Sounds” en “Using
the D-BEAM to Modify the Sound” van de A-88-gebruikershandleiding.
Als u problemen ervaart als noten die blijven hangen of onverwachte klanken van uw externe MIDI-klankmodule, dan kunt u een reset-bericht
versturen om het probleem op te lossen. Raadpleeg het hoofdstuk “Halting Stuck Notes (PANIC)” in de A-88-gebruikershandleiding.
13
Page 100

Voornaamste specicaties
Roland RD-64: Digitale piano
Klavier
Klavier 64 toetsen (Ivory Feel-G-klavier met drukpunt)
Aanslaggevoeligheid Toetsaanslag: 5 types
Klankgenerator
SuperNATURAL Piano
Klankgenerator
Max. polyfonie 128 stemmen
Klanken 12 klanken
Master Tuning 415,3 Hz–466,2 Hz (regelbaar in stappen van 0,1 Hz)
Transponeren Toetstransponering: -6 tot +5 (in halftonen)
Eecten EFX 1, EFX 2, REVERB
Equalizer 2-bands digitale equalizer
Overige
Controllers
Knoppen
Schakelaars [POWER]-schakelaar
Display Aan/uit-led, Octaaf-led
Aansluitingen
Stroomtoevoer Netstroomadapter
Stroomverbruik 4 W
Afmetingen 1.114 (B) x 273 (D) x 116 (H) mm
Gewicht 12,8 kg
Accessoires
Opties (afzonderlijk verkocht)
SuperNATURAL (E. Piano)
Virtual Tone Wheel Organ
Regelaars: [MASTER VOLUME], EQ [LOW], [HIGH]
[Pitch Bend/Modulation]-hendel
D-BEAM-controller
[A. PIANO]-knop, [E. PIANO]-knop, [CLAV]-knop, [ORGAN]-knop,
TONE VARIATION [1] [2] [3]-knoppen,
[FUNCTION]-knop, [SuperNATURAL]-knop,
OCTAVE [+] [−]-knoppen, [TRANSPOSE]-knop
[EFX 1], [EFX 2]-knoppen, [REVERB]-knop
DAMPER-aansluiting: 1/4 inch TRS telefoontype
FC1-, FC2-aansluitingen: 1/4 inch TRS telefoontype
MIDI OUT-aansluiting
USB COMPUTER-poort (USB Type B)
OUTPUT-aansluitingen (L/MONO, R): 1/4 inch telefoontype
INPUT-aansluitingen (L, R): RCA Phono-type
PHONES-aansluiting: Stereo 1/4 inch telefoontype
DC IN-aansluiting
Gebruikershandleiding
Demperpedaal (continue detectie mogelijk)
Netstroomadapter, netsnoer (voor netstroomadapter)
Hoofdtelefoon
Keyboardstandaard (KS-18Z, KS-12)
Pedaaleenheid (RPU-3)
Demperpedaal (DP-10)
Pedaalschakelaar (DP-2)
Expressiepedaal (EV-5, EV-7)
* De specicaties en/of het uiterlijk van dit apparaat zijn, in het belang van productverbetering, onderhevig aan veranderingen zonder
voorafgaande kennisgeving.
Copyright © 2013 ROLAND CORPORATION
Alle rechten voorbehouden. Niets uit deze uitgave mag op enige wijze worden gereproduceerd zonder schriftelijke toestemming van ROLAND CORPORATION.
14
 Loading...