

Page 1
Setting Manual
07-02-1
201a
Before using this unit, carefully read the sections entitled: “USING THE UNIT SAFELY” and “IMPORTANT NOTES.”
These sections provide important information concerning the proper operation of the unit.
The manual should be saved and kept on hand as a convenient reference.
202
Copyright © 2007 ROLAND CORPORATION
All rights reserved. No part of this publication may be reproduced in any form without the written permission of ROLAND
CORPORATION.
USING THE UNIT SAFELY
001
• Before using this unit, make
sure to read the instructions
below, and the Setting
Manual.
.......................................................................
003
• Do not attempt to repair the
unit, or replace parts within it
(except when this manual
provides specific instructions
directing you to do so). Refer
all servicing to your retailer,
the nearest Roland Service
Center, or an authorized
Roland distributor, as listed
on the “Information” page.
.......................................................................
013
• In households with small
children, an adult should
provide supervision until the
child is capable of following
all the rules essential for the
safe operation of the unit.
.......................................................................
014
• Protect the unit from strong
impact.(Do not drop it!)
.......................................................................
106
• Never climb on top of, nor
place heavy objects on the
unit.
......................................................................
116
• When assembling, be careful
not to allow fingers or other
areas to get pinched.
......................................................................
118a
• Should you remove screws,
keep them in a safe place out
of children’s reach, so there is
no chance of them being swallowed
accidentally.
......................................................................
291a
In addition to the precautions given in
“Using the Unit Safely” in this
manual, please also read and observe
the following:
Maintenance
401a
• For everyday cleaning wipe the unit
with a soft, dry cloth or one that has
been slightly dampened with water.
To remove stubborn dirt, use a cloth
impregnated with a mild, nonabrasive detergent. Afterwards, be
sure to wipe the unit thoroughly with
a soft, dry cloth.
IMPORTANT NOTES
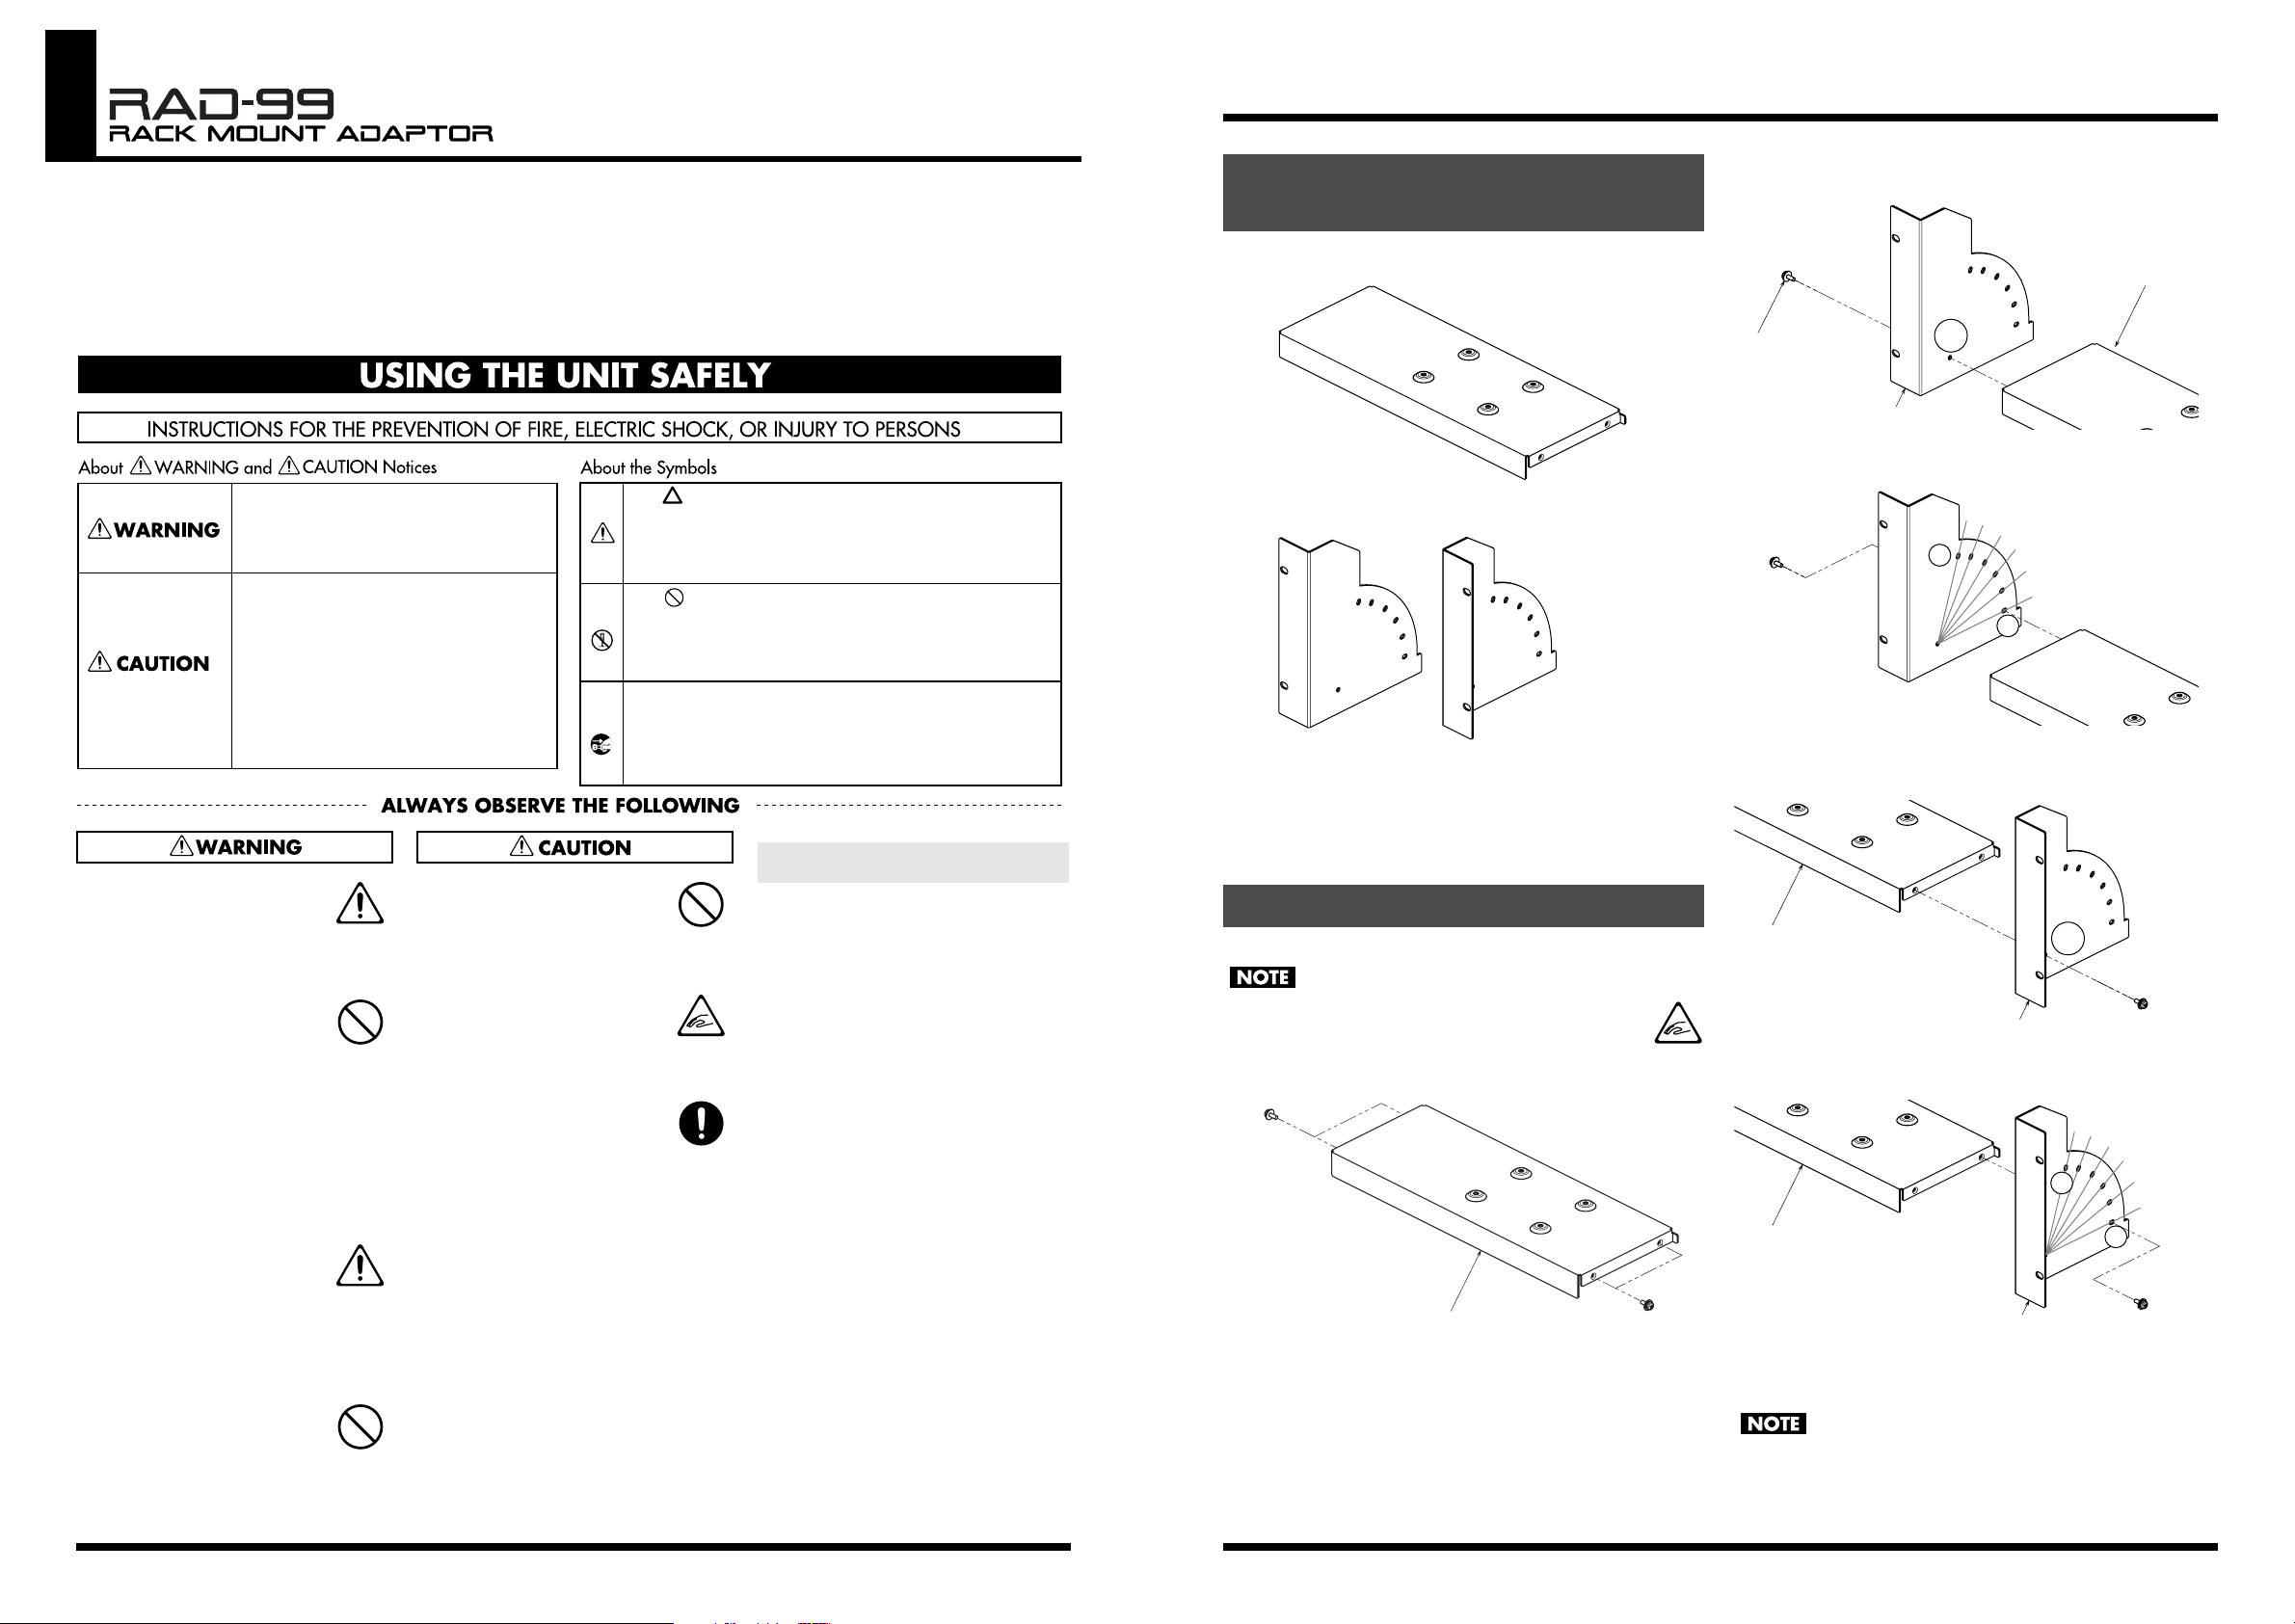
●
Device carrier (with 4 screws attached)
fig.mount.eps
●
Rack carrier (left/right)
fig.bracket-l.eps
* Assembly requires a Phillips screwdriver (not included).
962a
* In the interest of product improvement, the specifications and/
or appearance of this unit are subject to change without prior
notice.
116
When assembling, be careful not to allow fingers or
other areas to get pinched.
1.
Remove the 4 screws from the device carrier.
2.
Arrange the device carrier and the rack mounting
hardware (left) as shown in the figure, and attach at
mounting hole A using one of the screws you removed.
3.
Attach at mounting hole B using one of the removed
screws. You can attach at any desired angle from 1 to 6.
4.
Arrange the device carrier and the rack mounting
hardware (right) as shown in the figure, and attach at
mounting hole A using one of the screws you removed.
5.
Attach at the same angle as the mounting hole used for
attachment in step 3.
6.
Secure a compatible device to the device carrier. For
more information, read the owner’s manual that came
with your device.
When mounting a compatible device on the device carrier, be
sure to secure it in place using the specified screws. Using
screws other than those specified may cause internal damage
to the equipment or result in inadequate mounting.
Check That All Items Were
Received
How to Assemble
Used for instructions intended to alert
the user to the risk of death or severe
injury should the unit be used
improperly.
Used for instructions intended to alert
the user to the risk of injury or material
damage should the unit be used
improperly.
* Material damage refers to damage or
other adverse effects caused with
respect to the home and all its
furnishings, as well to domestic
animals or pets.
The symbol alerts the user to important instructions
or warnings.The specific meaning of the symbol is
determined by the design contained within the
triangle. In the case of the symbol at left, it is used for
general cautions, warnings, or alerts to danger.
The symbol alerts the user to items that must never
be carried out (are forbidden). The specific thing that
must not be done is indicated by the design contained
within the circle. In the case of the symbol at left, it
means that the unit must never be disassembled.
The ● symbol alerts the user to things that must be
carried out. The specific thing that must be done is
indicated by the design contained within the circle. In
the case of the symbol at left, it means that the powercord plug must be unplugged from the outlet.
Screw
Device carrier
Screw
Device carrier
Screw
Rack carrier (left)
Screw
Device carrier
Device carrier
A
6
5
4
B
Rack carrier (right)
Rack carrier (right)
3
B
2
1
A
Screw
6
5
4
3
B
2
1
B
Screw
Page 2
組立説明書
その他の注意について
559c
● この機器が入っていた梱包箱や緩衝材を廃棄する場合、各
市町村のゴミの分別基準に従ってください。
本体取付金具とラック取付金具(左)を図のように合
2.
わせて、取り外したねじで取付穴 A を固定します。
201a
この機器を正しくお使いいただくために、ご使用前に「安全上のご注意」と「使用上のご注意」をよくお読みください。
組立説明書は必要なときにすぐに見ることができるよう、手元に置いてください。
202
2007 ローランド株式会社 本書の一部、もしくは全部を無断で複写・転載することを禁じます。
©
安全上のご注意
安全上のご注意
火災・感電・傷害を防止するには
注意の意味について警告と
警告
注意
取扱いを誤った場合に、使用者が
死亡または重傷を負う可能性が想
定される内容を表わしています。
取扱いを誤った場合に、使用者が
傷害を負う危険が想定される場合
および物的損害のみの発生が想定
される内容を表わしています。
※物的損害とは、家屋・家財およ
び家畜・ペットにかかわる拡大
損害を表わしています。
以下の指示を必ず守ってください
図記号の例
は、注意(危険、警告を含む)を表わしていま
す。
具体的な注意内容は、 の中に描かれています。
左図の場合は、「一般的な注意、警告、危険」を
表わしています。
は、禁止(してはいけないこと)を表わしてい
ます。
具体的な禁止内容は、 の中に描かれています。
左図の場合は、「分解禁止」を表わしています。
●は、強制(必ずすること)を表わしています。
具体的な強制内容は、
左図の場合は、「電源プラグをコンセントから抜
くこと」を表わしています。
●の中に描かれています。
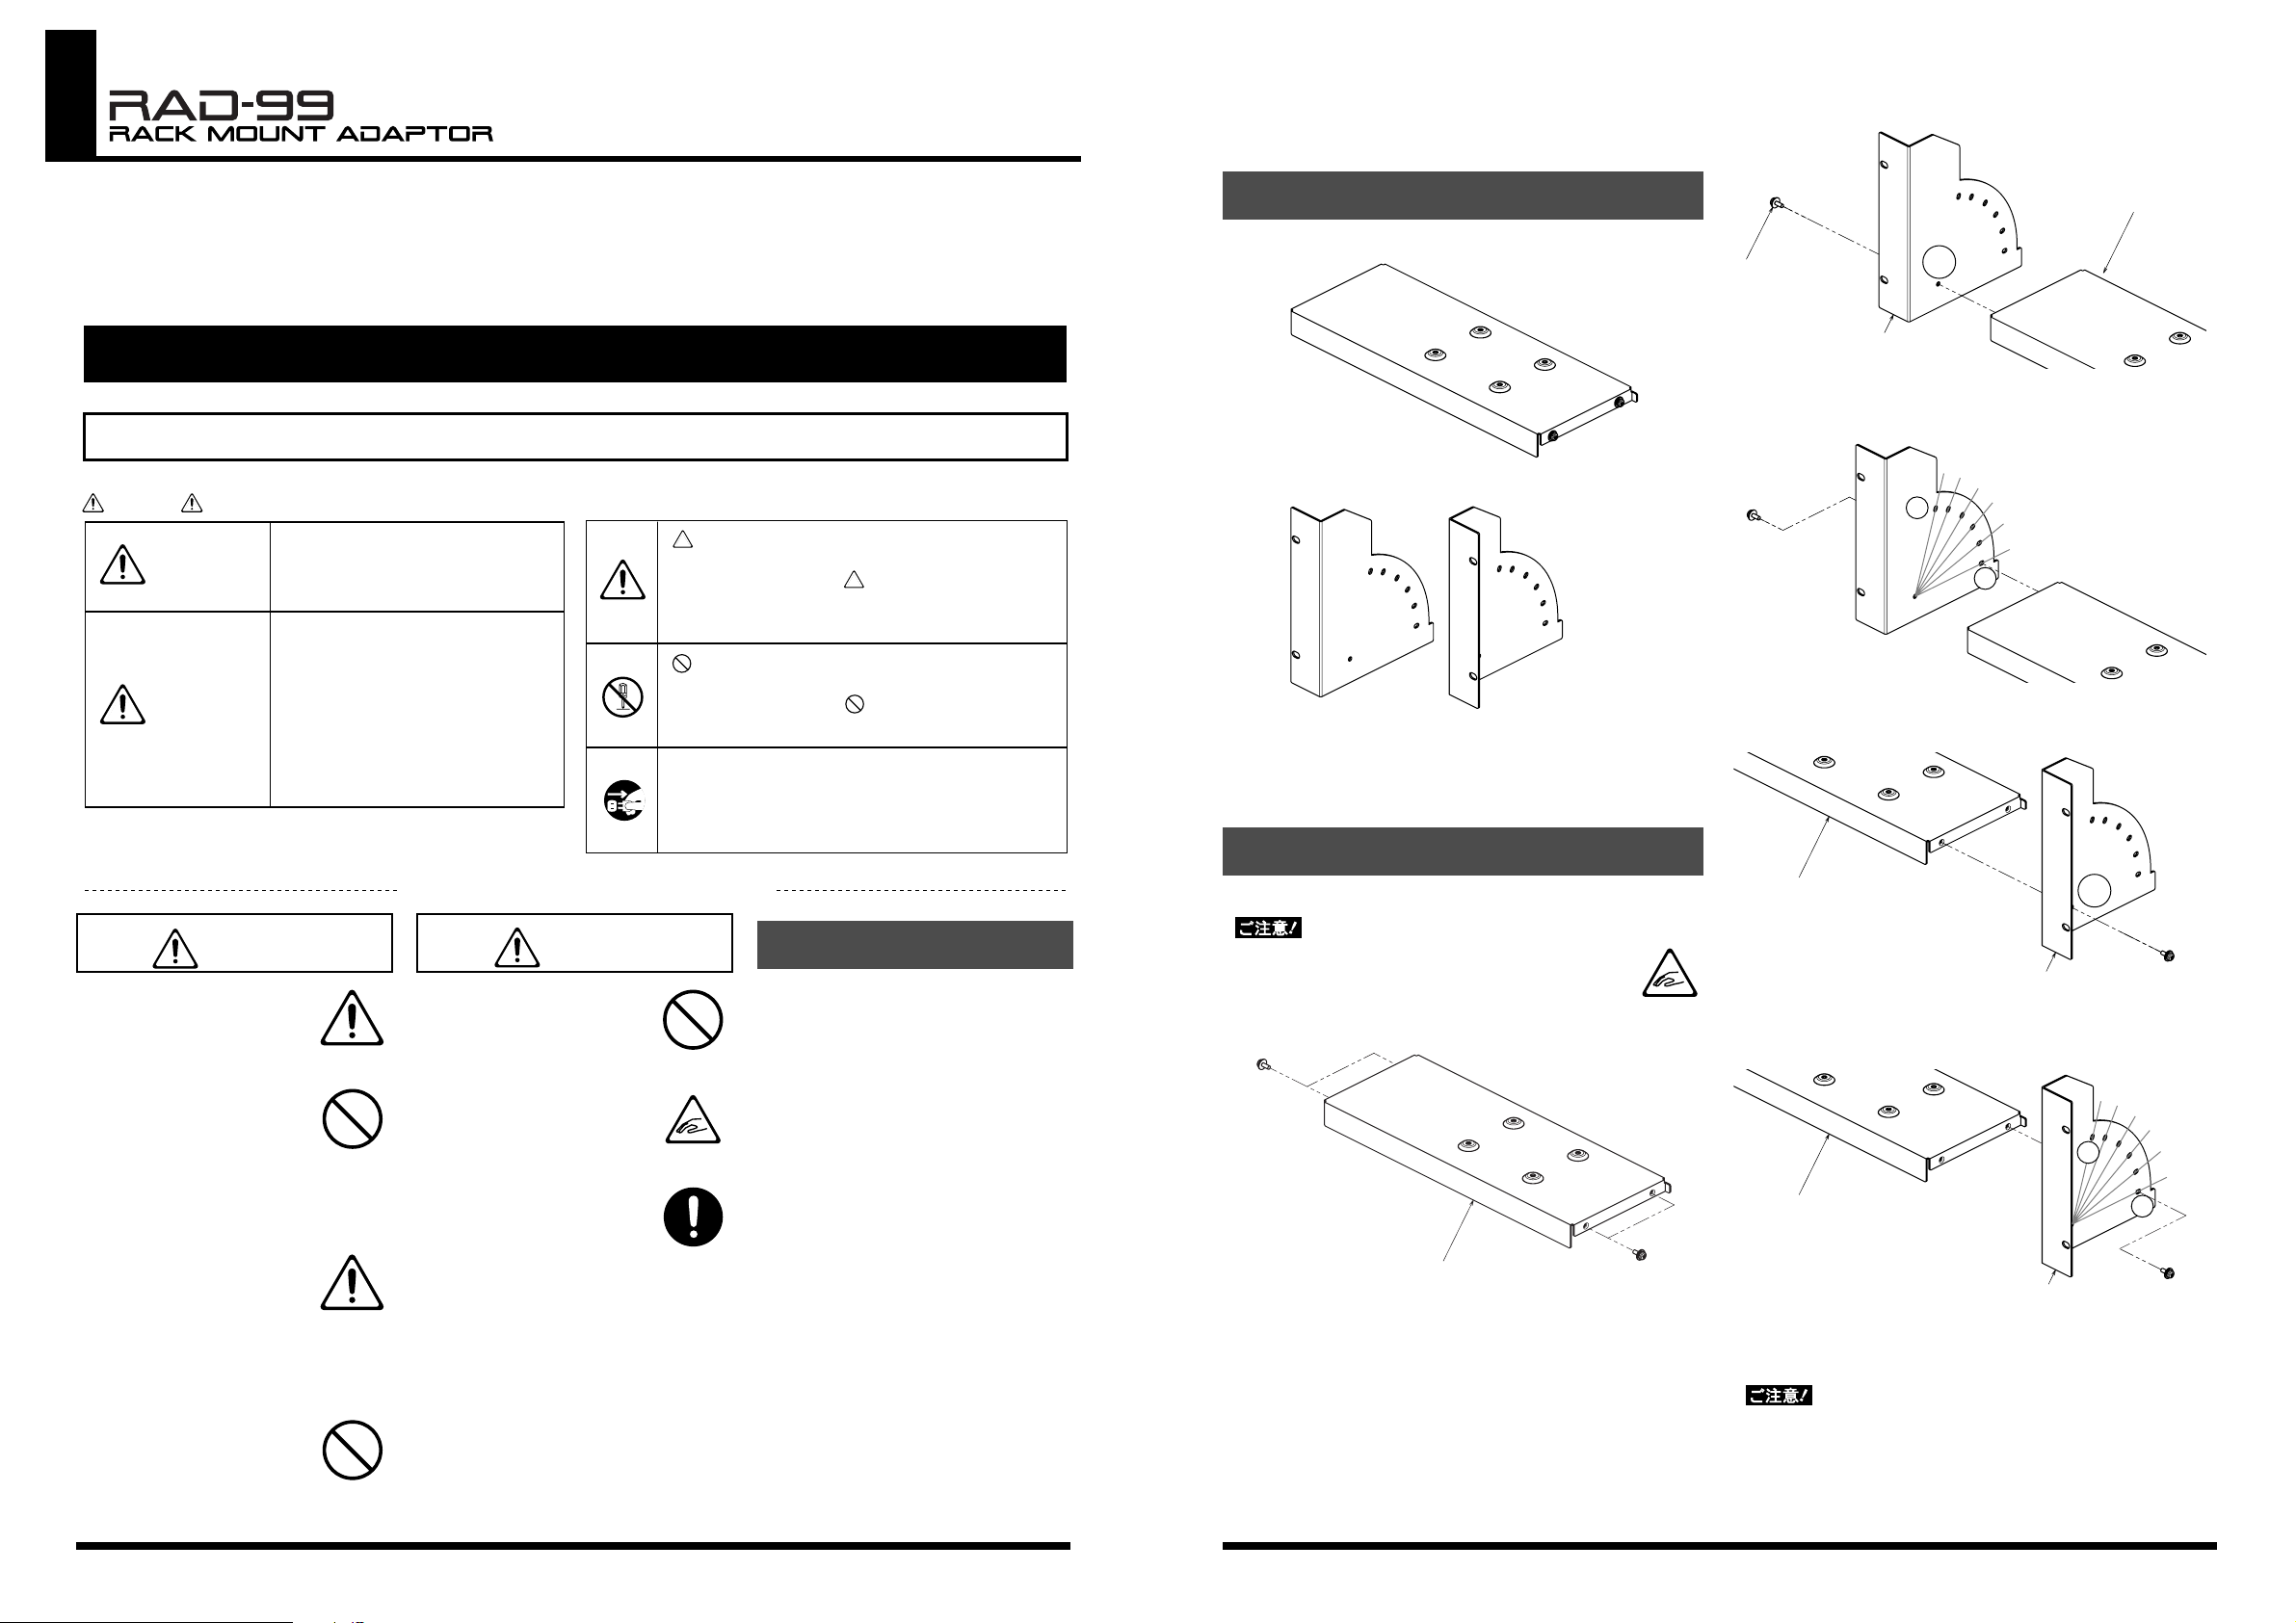
同梱品の確認
● 本体取付金具(ねじ 4 個取付済み)
● ラック取付金具(左/右)
※ 組み立てには、プラス・ドライバーをご用意ください。
962a
※ 製品の仕様および外観は、改良のため予告なく変更するこ
とがあります。
組み立て方
116
ねじ
3.
ねじ
4.
本体取付金具
本体取付金具
A
ラック取付金具(左)
取り外したねじで取付穴Bを固定します。1〜6までの
好きな角度で取り付けることができます。
6
5
4
B
本体取付金具とラック取付金具(右)を図のように合
わせて、取り外したねじで取付穴 A を固定します。
3
2
1
B
A
警告
001
● この製品を使用する前に、
以下の指示と組立説明書を
よく読んでください。
.........................................................................
003
● 修理/部品の交換などで、
組立説明書に書かれていな
いことは、絶対にしないで
ください。必ずお買い上げ
店またはローランド・サー
ビスに相談してください。
.........................................................................
013
● お子様のいるご家庭で使用
する場合、お子様の取り扱
いやいたずらに注意してく
ださい。必ず大人のかた
が、監視/指導してあげて
ください。
.........................................................................
014
● この製品を落としたり、こ
の製品に強い衝撃を与えな
いでください。
.........................................................................
注意
106
● この製品の上に乗ったり、
機器の上に重いものを置か
ないでください。
..........................................................................
116
● 組み立てるときは、指など
をはさまないように、注意
してください。
..........................................................................
118a
● 取り外したねじは、小さな
お子様が誤って飲み込んだ
りすることのないよう注意
してください。
..........................................................................
使用上のご注意
291a
本書に記載の「安全上のご注意」以外に、
次のことに注意してください。
お手入れについて
401a
● 通常のお手入れは、柔らかい布で乾
拭きするか、堅く絞った布で汚れを
拭き取ってください。汚れが激しい
ときは、中性洗剤を含んだ布で汚れ
を拭き取ってから、柔らかい布で乾
拭きしてください。
修理について
453a
● 当社では、この製品の補修用性能部
品(製品の機能を維持するために必
要な部品)を、製造打切後 6 年間保
有しています。この部品保有期間を
修理可能の期間とさせていただきま
す。なお、保有期間が経過した後
も、故障箇所によっては修理可能の
場合がありますので、お買い上げ
店、または最寄りのローランド・
サービスにご相談ください。
組み立てるときは、指などをはさまないように、注意
してください。
1.
本体取付金具からねじ(4 個)をはずします。
ねじ
本体取付金具
ねじ
ねじ
ラック取付金具(右)
取り外したねじで取付穴 B を固定します。手順 3 で固
5.
定した取付穴と同じ角度になるように取り付けます。
6
5
4
3
B
本体取付金具
ラック取付金具(右)
対応機器を本体取付金具に固定します。詳しくは各機
6.
器の取扱説明書をお読みください。
対応機器を本体取付金具に取り付けるときは、必ず指定されたね
じで固定してください。指定以外のねじを使用すると、機器内部
に損傷を与えたり、固定が不十分になる恐れがあります。
2
1
B
ねじ
07-02-1
 Loading...