

Page 1
Page 2

For the U.K.
IMPORTANT: THE WIRES IN THIS MAINS LEAD ARE COLOURED IN ACCORDANCE WITH THE FOLLOWING CODE.
BLUE:
BROWN:
As the colours of the wires in the mains lead of this apparatus may not correspond with the coloured markings identifying
the terminals in your plug, proceed as follows:
The wire which is coloured BLUE must be connected to the terminal which is marked with the letter N or coloured BLACK.
The wire which is coloured BROWN must be connected to the terminal which is marked with the letter L or coloured RED.
Under no circumstances must either of the above wires be connected to the earth terminal of a three pin plug.
NEUTRAL
LIVE
Page 3
Deutsch Français Italiano Español Português NederlandsEnglish
Page 4

Features
Sounds that you’ll enjoy playing!
• The total of 144 sounds covers all the bases, including not only synthesizer sounds but also
piano, organ, strings, brass, and guitar, all immediately playable for instant enjoyment.
• There are also six highly expressive “Special Tones” as well.
These six high-quality sounds were created specically for the Lucina AX-09 (synth lead, poly
synth, synth bass, jazz scat, violin and trombone).
Easy to use and handle!
• Operation is easy — simply turn on the power and choose a sound.
• With a lightweight, stylish body, and support for battery operation, you can play the Lucina
AX-09 anywhere, anytime. Since you can sling the Lucina AX-09 over your shoulder when playing
it, your performances can be more active and versatile.
Enjoy performing more than ever!
• All of the unique expressive capabilities of a traditional synthesizer are at your ngertips, thanks
to the Lucina AX-09’s D Beam controller, modulation bar, and touch controller.
• You can easily play along with your favorite songs, either by connecting your portable audio
player to the EXT IN jack, or by using the USB memory audio playback function.
How Letters are Shown on the Lucina AX-09
J KLLNMnNoOPPQQrRSStTUUuV WXXYYZZ
AABBCCDDEEFFGGhHiIJ
Copyright © 2010 ROLAND CORPORATION
All rights reserved. No part of this publication may be reproduced in any form without the written permission of ROLAND
CORPORATION.
Before using this unit, carefully read the sections entitled: “USING THE UNIT SAFELY” (p. 24) and “IMPORTANT NOTES” (p. 25). These sections provide
important information concerning the proper operation of the unit. Additionally, in order to feel assured that you have gained a good grasp
of every feature provided by your new unit, Owner’s Manual should be read in its entirety. The manual should be saved and kept on hand as a
convenient reference.
2
Page 5

Contents
Features . . . . . . . . . . . . . . . . . . . . . . . . . . . . . . . . . . .2
How Letters are Shown on the Lucina AX-09 . . . . . . . . . 2
Panel Descriptions . . . . . . . . . . . . . . . . . . . . . . . . .4
Front Panel . . . . . . . . . . . . . . . . . . . . . . . . . . . . . . . . . . . . . . . . . . 4
Bottom Panel . . . . . . . . . . . . . . . . . . . . . . . . . . . . . . . . . . . . . . . 5
Rear Panel . . . . . . . . . . . . . . . . . . . . . . . . . . . . . . . . . . . . . . . . . . 5
About Batteries . . . . . . . . . . . . . . . . . . . . . . . . . . . .6
Installing Batteries . . . . . . . . . . . . . . . . . . . . . . . . . . . . . . . . . . 6
Checking the Remaining Battery Power . . . . . . . . 6
Removing Batteries. . . . . . . . . . . . . . . . . . . . . . . . . . . . 6
Getting Ready . . . . . . . . . . . . . . . . . . . . . . . . . . . . .7
Connecting the AC Adaptor . . . . . . . . . . . . . . . . . . . . . . . . . 7
Attaching the Strap . . . . . . . . . . . . . . . . . . . . . . . . . . . . . . . . . 7
Connecting Your Speakers . . . . . . . . . . . . . . . . . . . . . . . . . . . 8
Connecting Your Headphones . . . . . . . . . . . . . . . . . . . . . . . 8
Turning the Power On . . . . . . . . . . . . . . . . . . . . . . . . . . . . . . . 8
Selecting Tones . . . . . . . . . . . . . . . . . . . . . . . . . . . .9
Selecting a Regular Tone . . . . . . . . . . . . . . . . . . . . . . . . . . . . 9
Selecting a Special Tone . . . . . . . . . . . . . . . . . . . . . . . . . . . . . 9
Previewing Tones. . . . . . . . . . . . . . . . . . . . . . . . . . . . . . . . . . . . 9
Registering Frequently Used Tones in Memory
(FAVORITE) . . . . . . . . . . . . . . . . . . . . . . . . . . . . . . . . . . . . . . . . . 10
Using the Performance Functions . . . . . . . . . .11
Raising or Lowering the Key Range by Octaves . . . . . . 11
Raising or Lowering the Key Range by Semitones . . . 11
Using the Touch Controller . . . . . . . . . . . . . . . . . . . . . . . . . 11
Setting the Pitch Range of the Touch
Controller . . . . . . . . . . . . . . . . . . . . . . . . . . . . . . . . . . . . 11
Using the Modulation Bar . . . . . . . . . . . . . . . . . . . . . . . . . . 11
Assigning the Modulation Bar’s Eect . . . . . . . . . 12
Using the D Beam Controller . . . . . . . . . . . . . . . . . . . . . . . . 12
Changing the ASSIGNABLE Setting . . . . . . . . . . . . 12
Using a Foot Pedal . . . . . . . . . . . . . . . . . . . . . . . . . . . . . . . . . 13
Preventing Tones from Changing During
Performance (Lock function) . . . . . . . . . . . . . . . . . . . . . . . . 14
Playing Along with a Portable Audio Player . . . . . . . . . 14
Playing Along with an Audio File from USB Memory . 14
Making Audio Player Settings . . . . . . . . . . . . . . . . . 15
Adjusting the Tuning . . . . . . . . . . . . . . . . . . . . . .17
Master Tune . . . . . . . . . . . . . . . . . . . . . . . . . . . . . . . . . . . . . . . . 17
Key Scale Tune . . . . . . . . . . . . . . . . . . . . . . . . . . . . . . . . . . . . . 17
Adjusting the Keyboard’s Touch Sensitivity . 17
Setting a Fixed Value for the Keyboard’s Velocity . . . . . 17
Count In / Metronome . . . . . . . . . . . . . . . . . . . .18
Count In Settings . . . . . . . . . . . . . . . . . . . . . . . . . . . . . . . . . . . 18
Various Settings (Utility) . . . . . . . . . . . . . . . . . .18
Checking the Lucina AX-09’s Version . . . . . . . . . . . . . . . . 18
USB Driver Settings . . . . . . . . . . . . . . . . . . . . . . . . . . . . . . . . . 18
Backing Up Lucina AX-09 Settings to USB Memory . . 19
Restoring Lucina AX-09 Settings from USB Memory . 19
Restoring the Factory Settings (Factory Reset) . . . . . . . 19
Connecting Other Equipment . . . . . . . . . . . . .20
Controlling MIDI Devices . . . . . . . . . . . . . . . . . . . . . . . . . . . 20
MIDI Messages that can be Transmitted and
Received . . . . . . . . . . . . . . . . . . . . . . . . . . . . . . . . . . . . . 20
Connecting a MIDI Sound Module . . . . . . . . . . . . 20
Making MIDI-related Settings . . . . . . . . . . . . . . . . . 20
Connecting to Your Computer via USB . . . . . . . . . . . . . . 21
Controlling Video (V-LINK) . . . . . . . . . . . . . . . . . . . . . . . . . . 21
Troubleshooting . . . . . . . . . . . . . . . . . . . . . . . . . .22
Specications . . . . . . . . . . . . . . . . . . . . . . . . . . . .23
Error Message List . . . . . . . . . . . . . . . . . . . . . . . .23
USING THE UNIT SAFELY . . . . . . . . . . . . . . . . . . .24
IMPORTANT NOTES . . . . . . . . . . . . . . . . . . . . . . .25
Index . . . . . . . . . . . . . . . . . . . . . . . . . . . . . . . . . . . .26
MIDI Implementation Chart . . . . . . . . . . . . . . .26
Deutsch Français Italiano Español Português NederlandsEnglish
Editing the Tone Settings . . . . . . . . . . . . . . . . . .16
Editing the Tone Parameters . . . . . . . . . . . . . . . . . . . . . . . . 16
3
Page 6

Panel Descriptions
Front Panel
11 12 13
14
1 1819
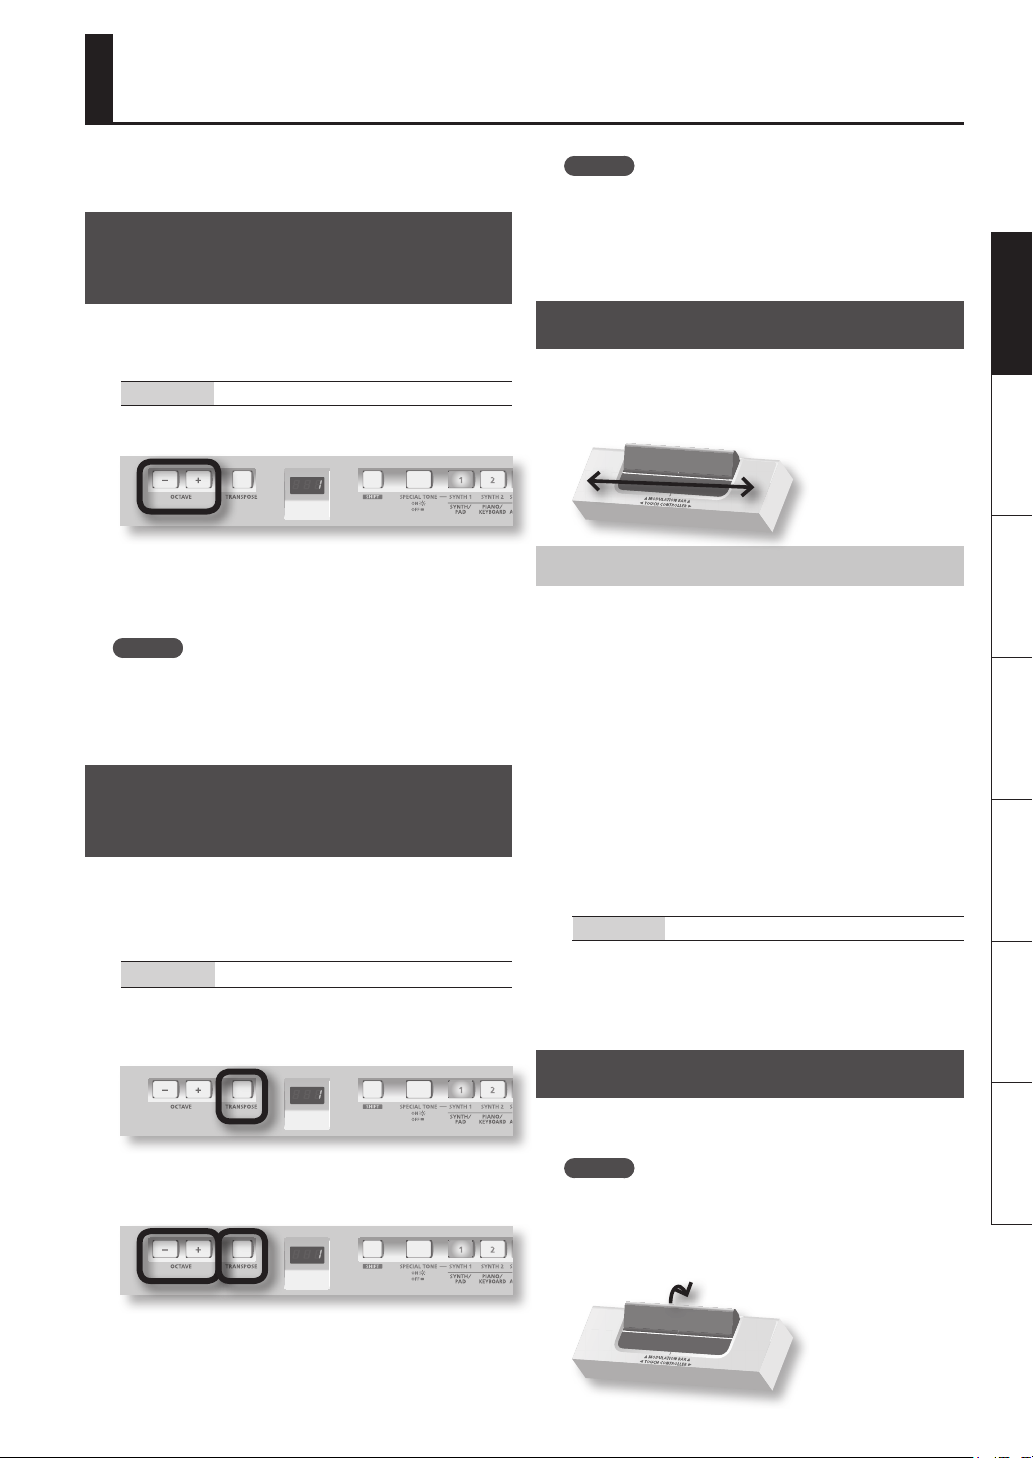
1. OCTAVE [+] / [–] Buttons
These buttons raise or lower the keyboard range in steps
of one octave (p. 11).
2. [TRANSPOSE] Button
By holding down this button and pressing the OCTAVE [+],
[–] buttons you can raise or lower the keyboard range in
steps of one semitone (p. 11).
3. Display
This shows the selected tone or mode, or the value of the
parameter you’re editing.
4. [SHIFT] Button
Use this button in conjunction with other buttons to
execute various functions.
5. [SPECIAL TONE] Button
Press this to select special tones.
6. TONE [1]–[6] Buttons
Use these buttons to select the tone group for regular
tones, or to select special tones.
7. [INC/+] / [DEC/–] Buttons
Use these buttons to select variations of the regular tones.
8. FAVORITE [A] / [B] Buttons
Use these buttons to select the FAVORITE memory bank
(p. 10) in which you want to register a favorite tone.
9. [WRITE] Button
This button stores the Lucina AX-09 settings you’ve edited,
or the tone you registered in FAVORITE (p. 10, p. 18).
7617 82153164 5 9 10
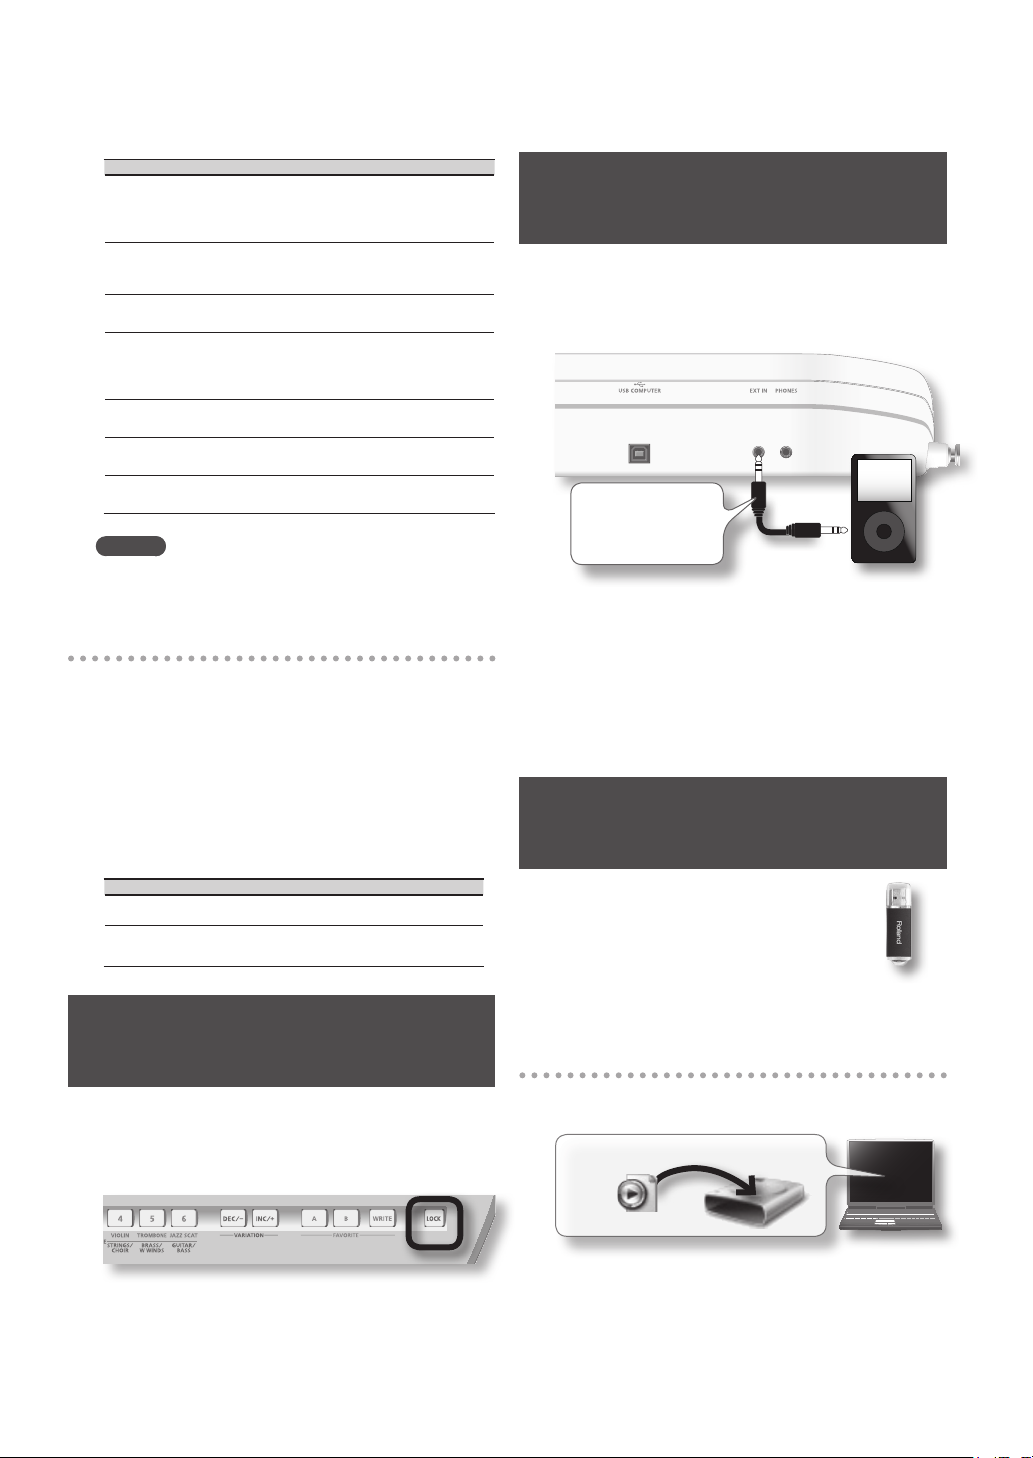
10. [LOCK] Button
If this button is turned on, you won’t be able to switch
tones. Use this to prevent the tone from being accidentally
switched during a performance (p. 14).
11. USB MEMORY Slot
You can insert USB memory (sold separately) here (p. 15).
12. [VOLUME] Knob
This knob adjusts the volume.
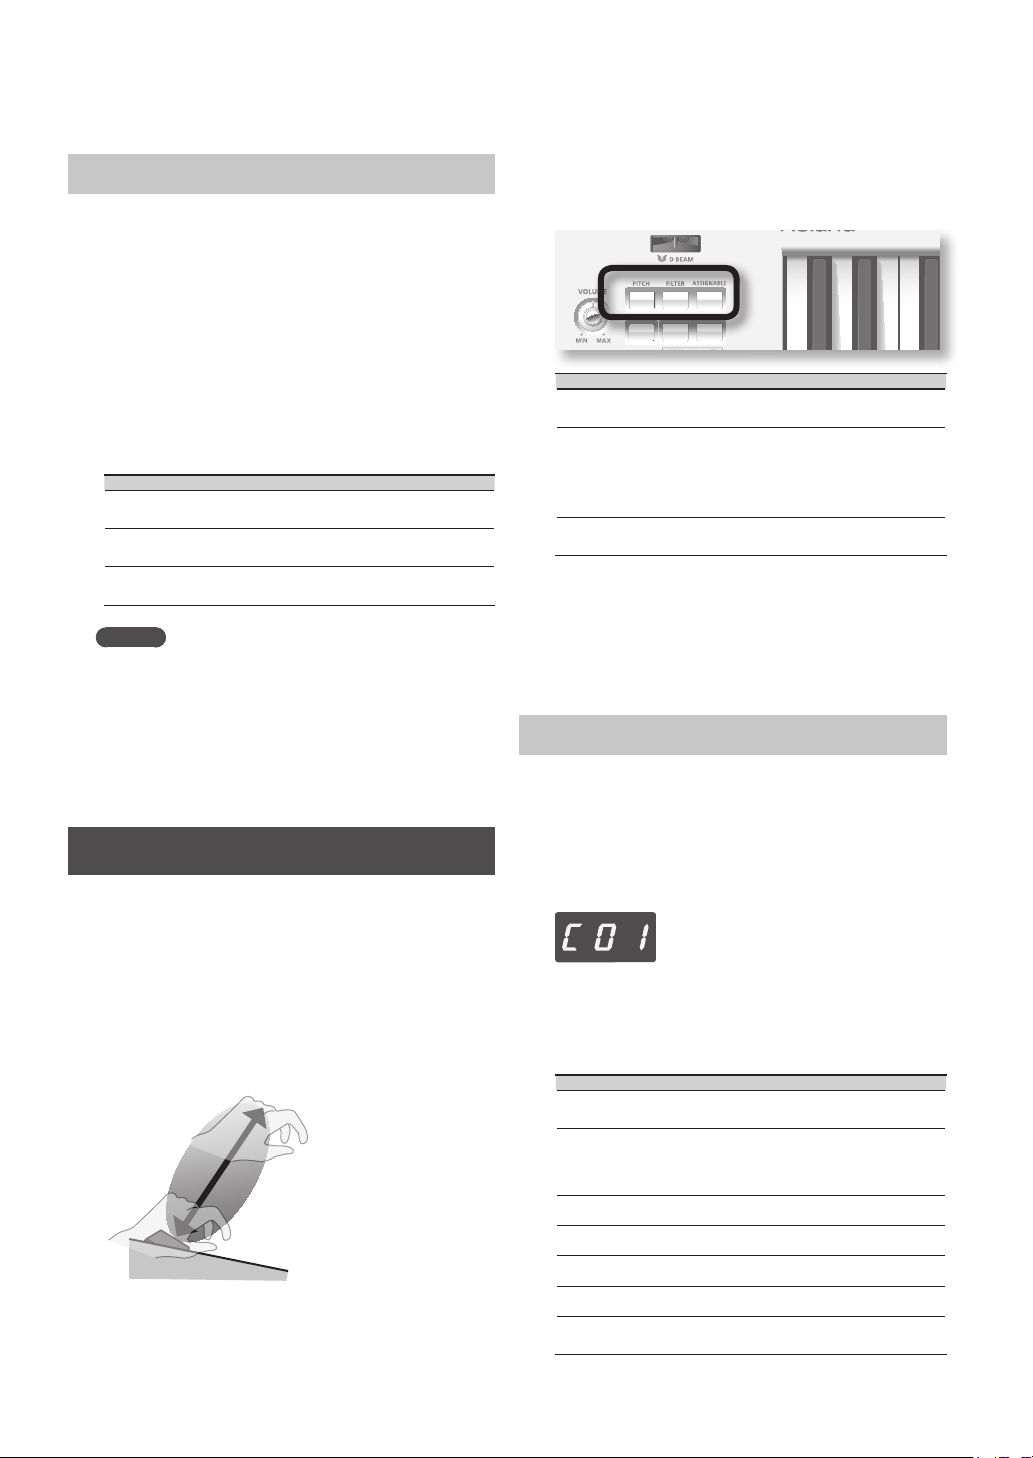
13. D Beam
[PITCH] / [FILTER] / [ASSIGNABLE] Buttons
These buttons turn the D Beam on/o.
By placing your hand above the D Beam you can apply
various eects to the sound (p. 12).
14. [V-LINK] Button
This button turns V-LINK on/o (p. 21).
15. [AUDIO PLAYER] Button
If you turn this on, you’ll be able to play back audio les
from USB memory (p. 14).
16. [ / PREVIEW] Button
When the [AUDIO PLAYER] button is lit, this button starts/
stops playback of audio les in USB memory.
When the [AUDIO PLAYER] button is unlit, this button
starts/stops a preview demo of the currently selected tone.
You can also get a count in to begin sounding by pressing
the modulation bar while you press the [PREVIEW] button.
4
Page 7
17. MODULATION BAR / TOUCH CONTROLLER
By pressing the modulation bar, you can apply vibrato. You
can also switch to a Hold eect that sustains the sound
you’re playing (p. 11).
If you hold your nger on the touch controller and move it
to left or right, the pitch will change (p. 11).
Bottom Panel
18. Strap Pin
Attach the included strap to this pin (p. 7).
19. Strap Pin (A)
Attach the included strap to this pin.
Depending on your playing style, you can use either this
pin or the strap pin (B) located on the rear of the Lucina
AX-09 (p. 7).
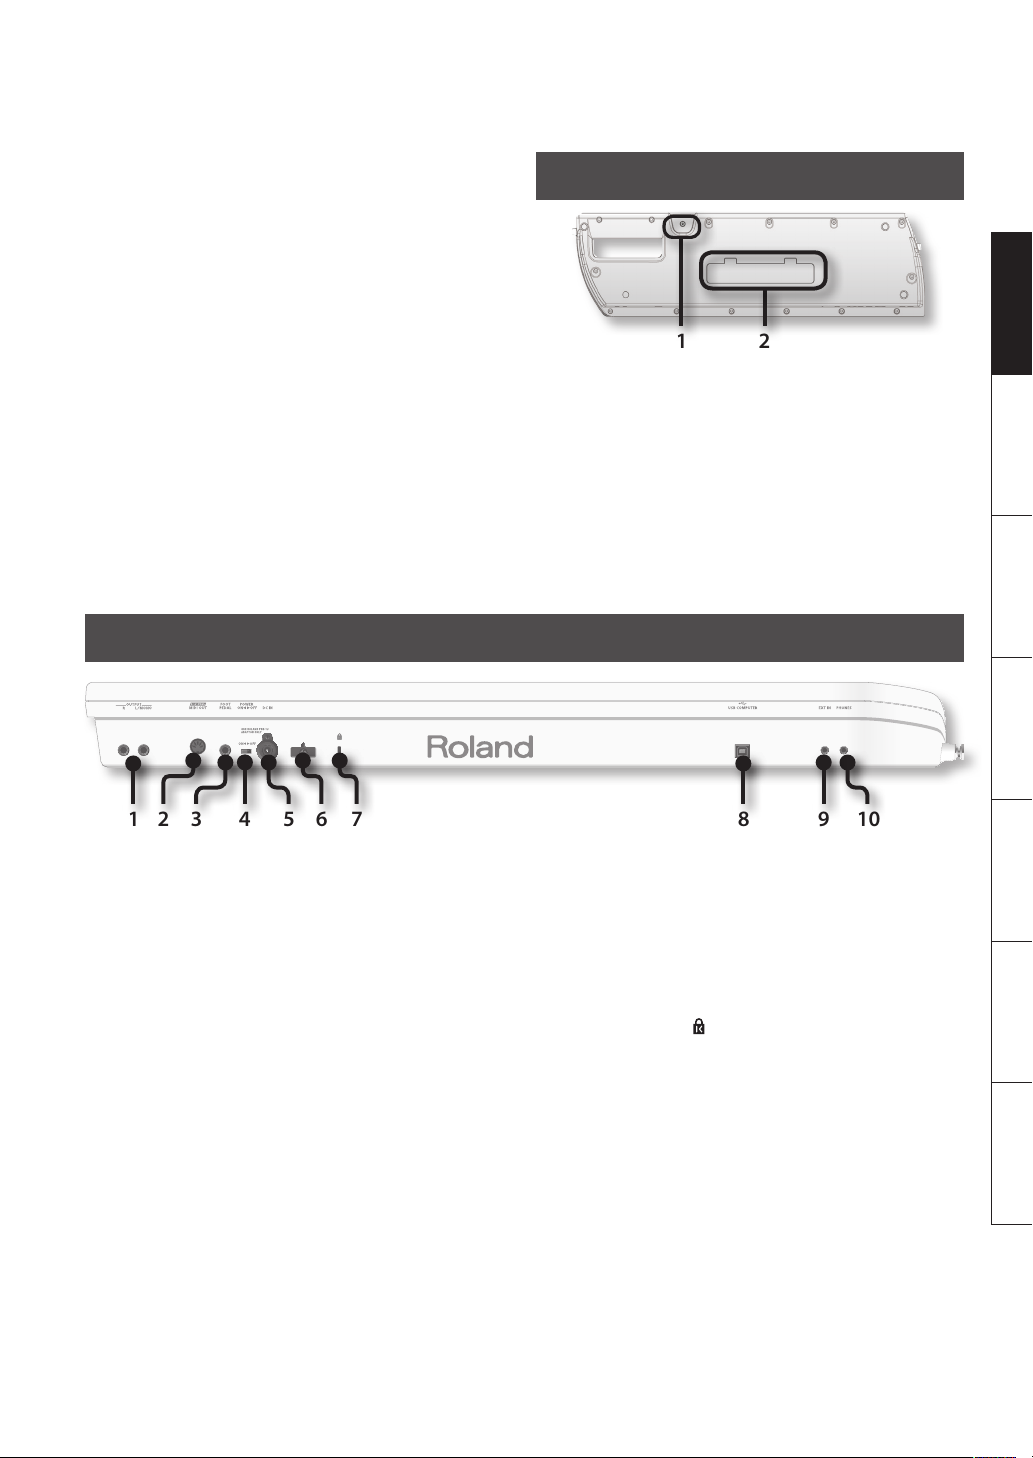
Rear Panel
1 82 3 4 95 106 7
1. OUTPUT Jacks (L/MONO, R)
The sound of the Lucina AX-09 is output from these jacks.
Connect them to your amplied speakers.
To employ monaural output, connect to only the L/MONO
jack.
2. MIDI OUT Connector
If you connect this to another MIDI device, MIDI messages
from the Lucina AX-09 will be transmitted to that device,
allowing you to play it remotely (p. 20).
3. FOOT PEDAL Jack
Connect a separately sold Roland DP-series pedal here.
Alternatively, you can connect an expression pedal (EV-5;
sold separately) (p. 13).
4. [POWER] Switch
This turns the power on/o (p. 8).
If you’re using the included AC adaptor and need to turn
o the power completely, turn o this POWER switch, and
then disconnect the AC adaptor from the outlet.
1 2
1. Strap Pin (B)
Attach the included strap to this pin.
Depending on your playing style, you can use either this
pin or the strap pin (A) located on the side of the Lucina
AX-09 (p. 7).
2. Battery Compartment
You can install Ni-MH AA rechargeable batteries here (p. 6).
5. DC IN Jack
Connect the included AC adaptor here (p. 7).
6. Cord Hook
Use this to secure the cord of the included AC adaptor
(p. 7).
7. Security Slot ( )
http://www.kensington.com/
8. USB COMPUTER Connector
Use a USB cable to connect the Lucina AX-09 to your
computer (p. 21).
9. EXT IN Jack
Connect your portable audio player or other audio source
here. The sound that’s input via this jack will be output
from the OUTPUT jacks and the PHONES jack (p. 14).
10. PHONES Jack
Headphones (sold separately) with a stereo mini plug (1/8”
jack) can be connected here (p. 8).
Deutsch Français Italiano Español Português NederlandsEnglish
5
Page 8
About Batteries
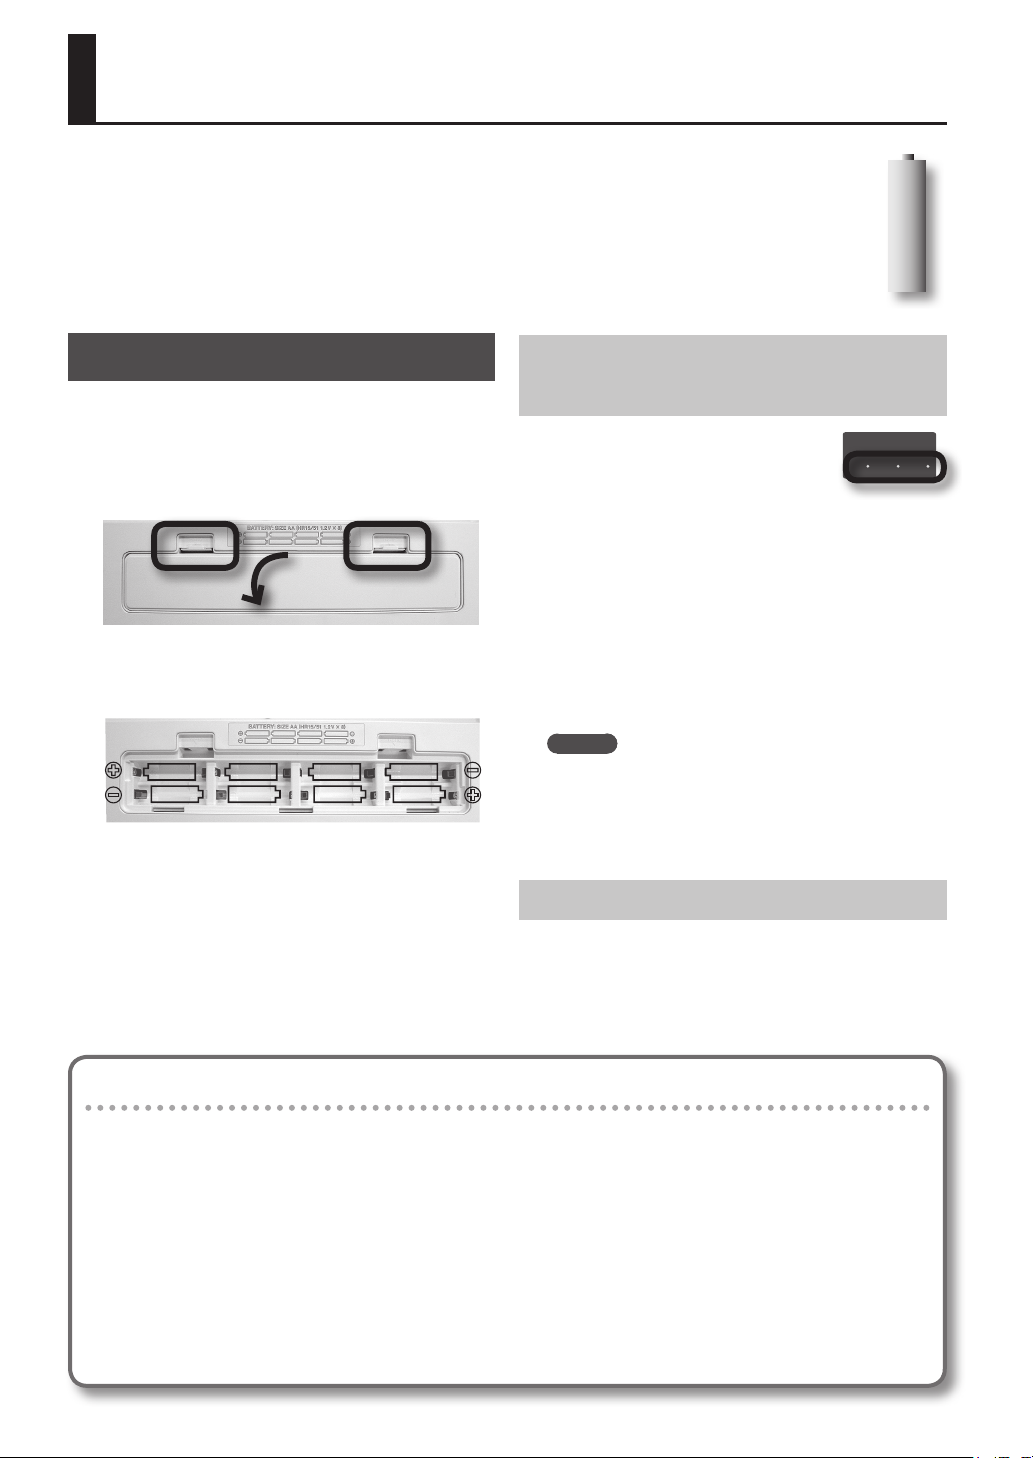
If you’re operating the Lucina AX-09 on batteries, you’ll need eight Ni-MH AA rechargeable batteries. The battery
life will dier depending on the conditions of use, but for continuous usage, it is approximately 4 hours.
About rechargeable batteries
When using rechargeable batteries, the battery lifespan will normally become shorter with each recharge cycle. If
the batteries run down soon after being recharged, it’s time to replace them.
Installing Batteries
1. Switch o the Lucina AX-09’s power (p. 8).
2. Remove the cover of the battery compartment
located on the Lucina AX-09’s bottom panel.
While pressing the tabs of the cover, lift the cover up and
remove it.
3. Insert the batteries into the battery compartment.
Make sure to observe the correct polarity (+/– orientation)
for each battery when inserting it.
4. Replace the battery compartment cover.
* When turning the unit upside-down, get a bunch of newspapers
or magazines, and place them under the four corners or at both
ends to prevent damage to the buttons and controls. Also,
you should try to orient the unit so no buttons or controls get
damaged.
* When turning the unit upside-down, handle with care to avoid
dropping it, or allowing it to fall or tip over.
Checking the Remaining Battery Power
When the remaining battery power runs
low, three dots will blink in the display.
If this indication appears, replace the
batteries as soon as possible.
A while after this indication, the display will indicate “
and it will no longer be possible to operate the Lucina
AX-09.
You can also check the remaining battery power in the
following way.
1. Hold down the [SHIFT] button and press the
[LOCK] button.
The display will indicate the remaining battery power as a
percentage (“0”–”100”).
MEMO
• The remaining battery power indication is an
approximation.
• If you check the remaining battery power when the AC
adaptor is connected, the display will always indicate
“100.”
Removing Batteries
To remove the batteries, power o the Lucina AX-09, open
the battery compartment cover, and remove the batteries.
L o,”
Note the following when using batteries
• Do not use alkaline batteries or zinc-carbon batteries.
• The Lucina AX-09 will not operate on batteries if the AC adaptor is connected.
• If batteries are installed, disconnecting or reconnecting the power cord at the AC outlet or disconnecting the DC plug from the Lucina AX-09’s rear panel while the
power is on will cause the power to turn o. You must turn o the power before you connect or disconnect the power cord or AC adaptor.
• Do not allow any objects (e.g., ammable material, coins, pins); or liquids of any kind (water, soft drinks, etc.) to penetrate the unit.
• If used improperly, batteries may explode or leak and cause damage or injury. In the interest of safety, please read and observe the following precautions.
• Carefully follow the installation instructions for batteries, and make sure you observe the correct polarity.
• Avoid using new batteries together with used ones. In addition, avoid mixing dierent types of batteries.
• Remove the batteries whenever the unit is to remain unused for an extended period of time.
• If a battery has leaked, use a soft piece of cloth or paper towel to wipe all remnants of the discharge from the battery compartment. Then install new batteries.
To avoid inammation of the skin, make sure that none of the battery discharge gets onto your hands or skin. Exercise the utmost caution so that none of the
discharge gets near your eyes. Immediately rinse the aected area with running water if any of the discharge has entered the eyes.
• Never keep batteries together with metallic objects such as ballpoint pens, necklaces, hairpins, etc.
6
Page 9
Getting Ready
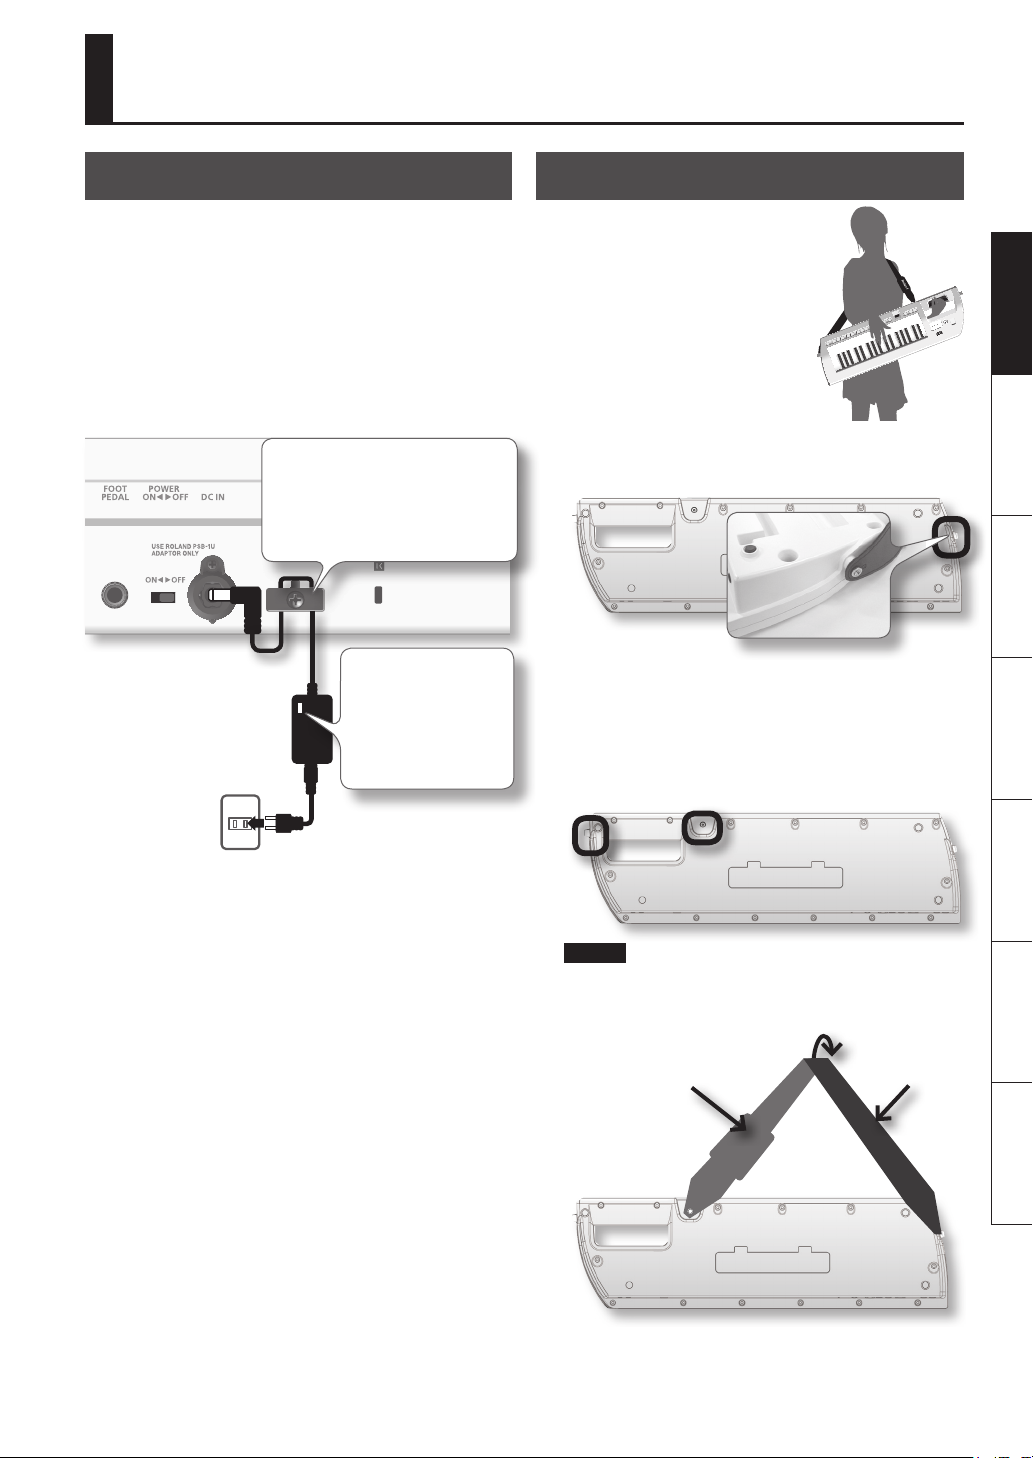
Connecting the AC Adaptor
The Lucina AX-09 can operate using the included AC
adaptor, or using Ni-MH AA rechargeable batteries.
1. Make sure that the Lucina AX-09’s power is turned
o (the [POWER] switch is in the OFF position).
2. Turn the [VOLUME] knob all the way to the left
(minimum).
3. Connect the AC adaptor to the Lucina AX-09’s
rear panel DC IN jack, and then plug it into an AC
outlet.
To prevent the inadvertent disruption
of power to your unit (should the plug
be pulled out accidentally), and to avoid
applying undue stress to the DC IN jack,
anchor the power cord using the cord hook,
as shown in the illustration.
Place the AC adaptor so
the side with the indicator
(see illustration) faces
upwards and the side with
textual information faces
downwards. The indicator
will light when you plug the
AC adaptor into an AC outlet.
Attaching the Strap
Attach the strap to the
Lucina AX-09 as shown in the
illustrations below.
Deutsch Français Italiano Español Português NederlandsEnglish
1. Attach one end of the included strap to the strap
pin shown in the illustration below.
2. Attach the other end of the included strap to one
of the other two strap pins.
A strap pin is provided in two locations; “A” and “B.” You
can use either one, whichever is more comfortable for you.
For a larger-bodied person, attaching the strap to pin “A”
will provide better stability.
A B
NOTE
If you use strap pin “B,” twist the strap as shown below.
If you attach the strap without twisting it, the strap may
come o of the Lucina AX-09.
Twist
Back of strap
Front of strap
7
Page 10
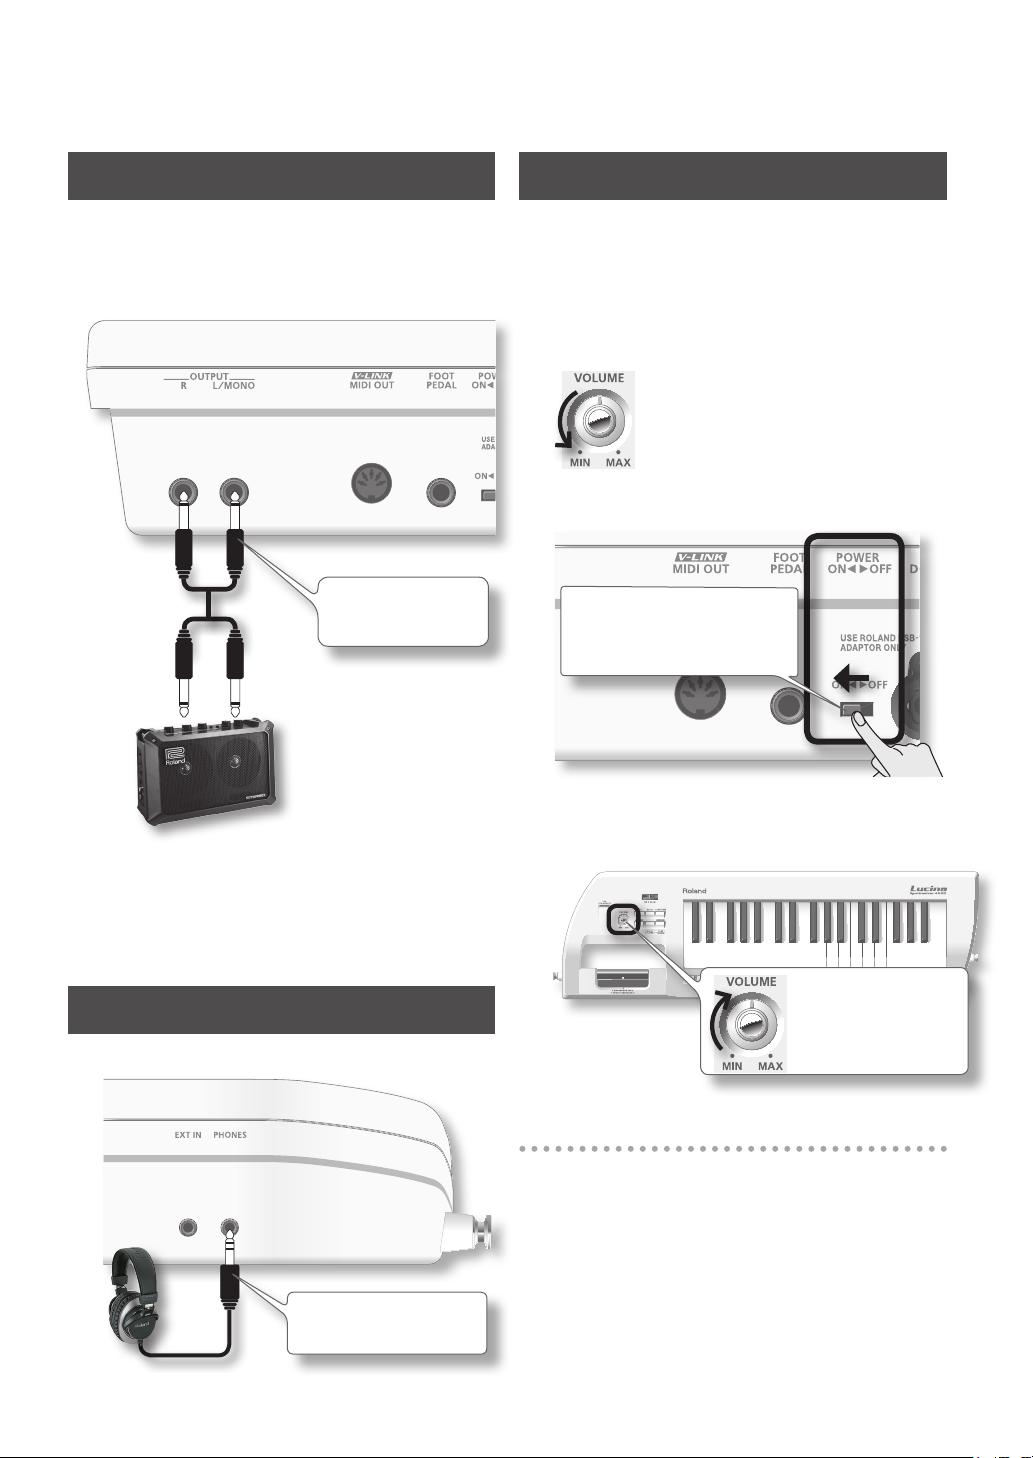
Connecting Your Speakers
Turning the Power On
The Lucina AX-09 does not contain an amp or speakers.
In order to produce sound, you’ll need to connect the
rear panel OUTPUT jacks to an audio device such as an
amplied speaker system (subsequently referred to as
“speakers”), or use headphones.
Use audio cables (PCS series;
sold separately) to make
connections.
If you’re outputting in monaural, connect only the L/
MONO jack.
* To prevent malfunction and/or damage to speakers or
other devices, always turn down the volume, and turn o
the power on all devices before making any connections.
Connecting Your Headphones
Connect headphones to the rear panel PHONES jack.
* Once the connections have been completed (p. 8), turn
on power to your various devices in the order specied.
By turning on devices in the wrong order, you risk
causing malfunction and/or damage to speakers and
other devices.
1. Minimize the volume of the Lucina AX-09 and your
speakers.
2. On the Lucina AX-09’s rear panel, turn the
[POWER] switch ON.
This unit is equipped with a protection
circuit. A brief interval (a few seconds)
after power up is required before the unit
will operate normally.
3. Turn on the power of your speakers.
4. Use the [VOLUME] knob to adjust the volume
appropriately.
While you play the keyboard
to produce sound, slowly turn
the [VOLUME] knob toward the
right, and adjust the volume
on the Lucina AX-09 and on
your speakers.
Turning the Power O
1. Minimize the volume of the Lucina AX-09 and your
speakers.
2. Turn o the power of your speakers.
3. Turn the Lucina AX-09’s [POWER] switch OFF.
You can connect headphones that
have a stereo mini (1/8”) plug.
8
Page 11
Selecting Tones
On the Lucina AX-09, each of the sounds you play is called
a “tone.” There are two types of tones: “regular tones” and
“special tones.”
Selecting a Regular Tone
The Lucina AX-09 contains 144 regular tones that bring
you the best sounds of Roland’s synthesizers.
The regular tones are organized into six tone groups, with
24 tones in each group.
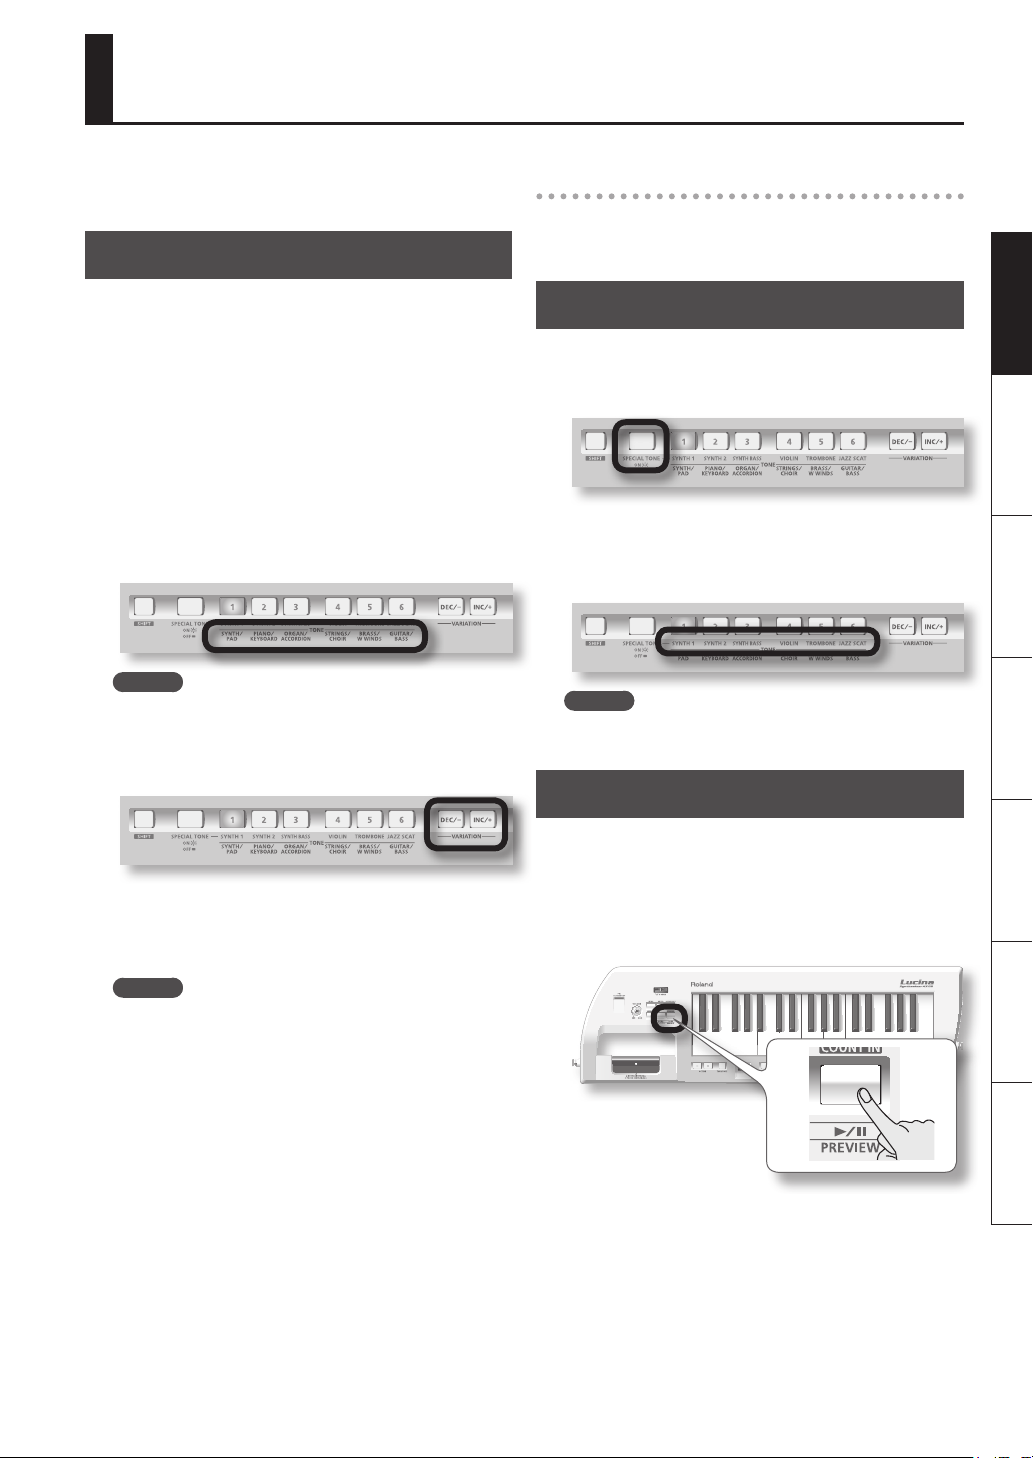
1. If the [SPECIAL TONE] button or FAVORITE [A] /
[B] button is lit, press the lit button to turn o its
illumination.
2. Press one of the TONE [1]–[6] buttons to select a
tone group.
The button will light, and that tone group will be selected.
The name of the tone group is printed in black below each
tone button.
MEMO
When you turn on the power, TONE [1] number 1 will
always be selected.
3. Use the [INC/+] / [DEC/–] buttons to select a tone
within the group.
Selecting the Rhythm Tone
No. 23–24 of the GUITAR/BASS group is the rhythm
tone. For details, refer to the “Tone List” at the end of this
manual.
Selecting a Special Tone
The Lucina AX-09 contains six “special tones” that were
created specically for it.
1. Press the [SPECIAL TONE] button so it’s lit.
2. Press one of the TONE [1]–[6] buttons to select the
desired special tone.
The names of the special tones are printed in blue
characters below each tone button.
MEMO
To return to the regular tones, press the [SPECIAL TONE]
button to turn it o.
Previewing Tones
Deutsch Français Italiano Español Português NederlandsEnglish
Each group contains tones 1–24, and the number of the
selected tone (1–24) is shown in the display.
Press the [INC/+] button to select the next tone, or press
the [DEC/–] button to select the preceding tone.
MEMO
• For a list of the tones, refer to the “Tone List” at the end
of this manual.
• As indicated by the black characters printed below the
TONE buttons, each tone group is subdivided into two
categories. (For example, the TONE [1] button group
contains the two categories “SYNTH” and “PAD.”)
Each time you hold down the TONE button of the
currently selected (lit) tone group and press the [INC/+]
/ [DEC/–] button, the rst tone of that category will be
selected.
• By holding down the [INC/+] / [DEC/–] button, you can
select tones rapidly. To select tones even more rapidly,
hold down one button and then press the other button
as well.
With the [AUDIO PLAYER] button o, press the [PREVIEW]
button; the button will light and the currently selected
tone will be played using a demo phrase that’s suitable for
that tone.
To stop the phrase before it has nished playing, press the
[PREVIEW] button once again to turn o its illumination.
9
Page 12
Registering Frequently Used Tones in Memory (FAVORITE)
The Lucina AX-09 provides “FAVORITE memory locations”
that allow you to register twelve of the tones. If you use
this to register the tones that you use frequently, you’ll be
able to select those tones quickly and easily at any time.
Your settings for volume and reverb can also be registered
along with the tone selections in the FAVORITE memory
locations (p. 16).
MEMO
Only regular tones can be registered in FAVORITE
memory.
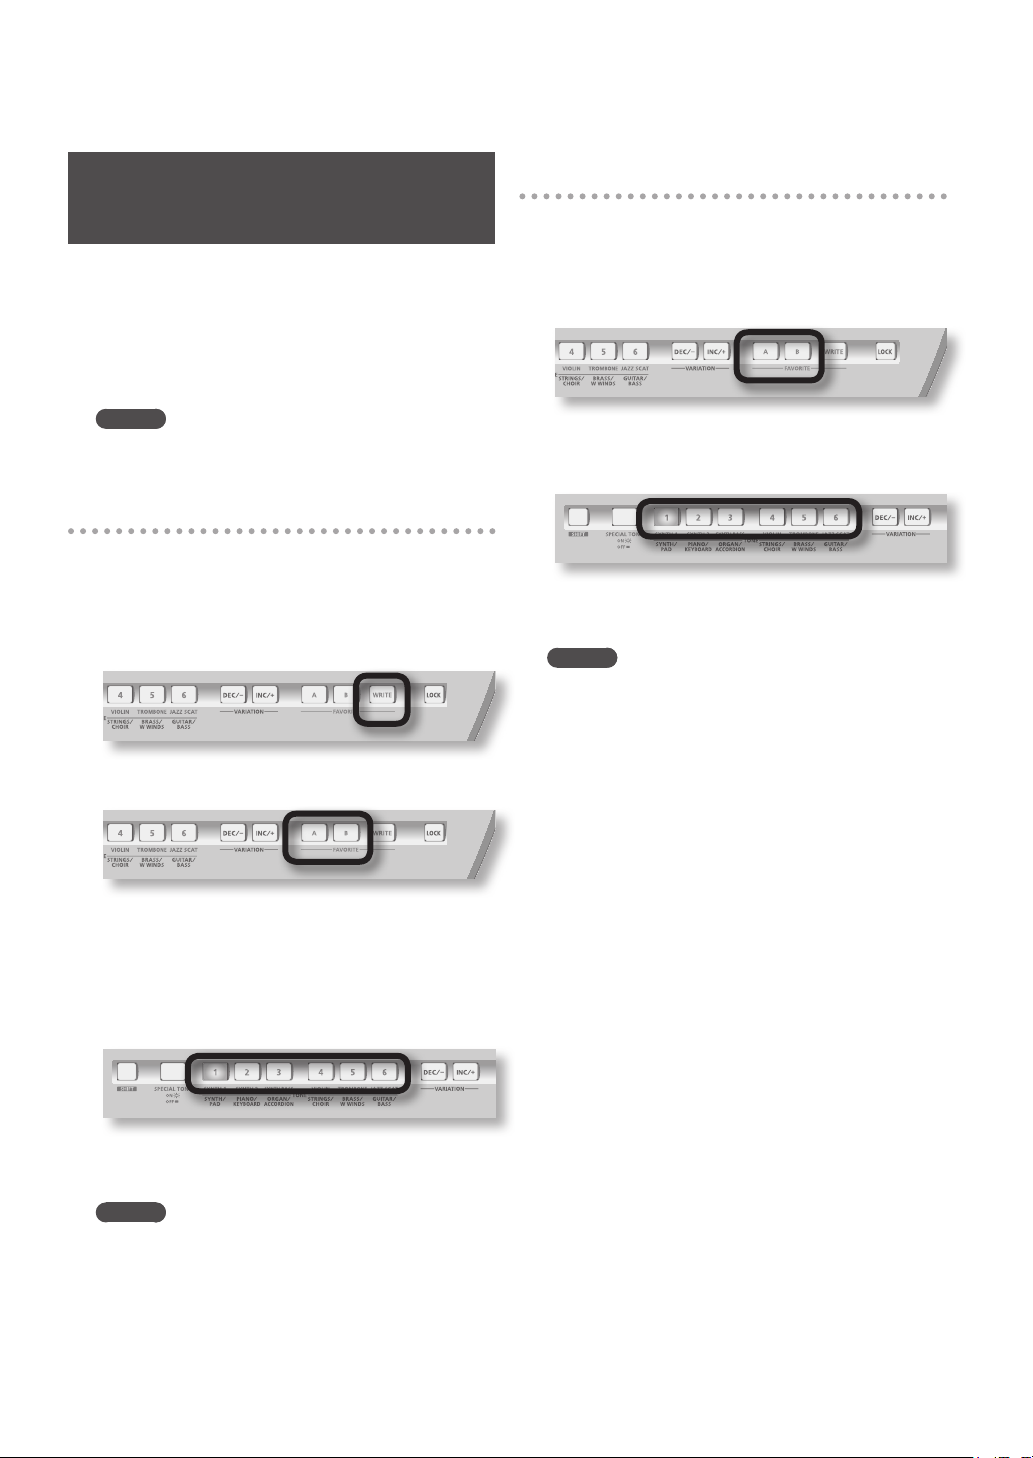
Registering a tone as a FAVORITE
FAVORITE memory contains two banks, A and B; you can
register six tones in each bank.
1. Select the tone that you want to register in a
FAVORITE memory location.
2. Press the [WRITE] button to make it light.
Recalling a FAVORITE tone
Here’s how to recall a tone you’ve registered in FAVORITE
memory.
1. Press the FAVORITE [A] / [B] button to select the
bank in which you registered the tone you want
to recall.
The FAVORITE button you pressed will light.
2. Press one of the TONE [1]–[6] buttons to select a
FAVORITE memory location from the current bank.
You can also use the [INC/+] / [DEC/–] buttons to
consecutively select FAVORITE memory locations in the
same bank.
MEMO
To return to regular tones, press the lit FAVORITE [A] /
[B] button to turn o its illumination.
3. Press the FAVORITE [A] / [B] button to select the
bank in which you want to register the favorite.
The FAVORITE button you pressed will light.
The display will indicate “
“B”).
4. Press one of the TONE [1]–[6] buttons to select the
memory location in which you want to register the
favorite tone.
The button you pressed will light, and the tone will be
registered in that FAVORITE memory location. The [WRITE]
button will go out.
MEMO
To return to regular tones, press the lit FAVORITE [A] /
[B] button to turn o its illumination.
A -” (bank “A”) or “b -” (bank
10
Page 13
Using the Performance Functions
The Lucina AX-09 provides various performance functions
that can make your performance more expressive.
Raising or Lowering the Key Range by Octaves
You can raise or lower the range of the keyboard in steps
of one octave, for a maximum of three octaves upward or
downward.
Value -3–3
1. Press an OCTAVE [+] / [–] button.
The display will indicate a value.
The OCTAVE [+] button will light if the octave setting is
in the “+” direction; the OCTAVE [–] button will light if the
octave setting is in the “–” direction.
MEMO
To return the octave setting to “0,” press the OCTAVE [+]
and [–] buttons simultaneously.
The OCTAVE [+] / [–] button will go out, and the
keyboard will return to its normal range of pitches.
Raising or Lowering the Key Range by Semitones
You can raise or lower the range of the keyboard in steps
of a semitone.
This function can be convenient when you need to play a
song in an unfamiliar key signature.
Value -5–6
1. Hold down the [TRANSPOSE] button.
The current setting will blink in the display.
MEMO
To return the setting to “0,” hold down the [TRANSPOSE]
button and press the OCTAVE [+] and [–] buttons
simultaneously.
The [TRANSPOSE] button will go out, and the keyboard
will return to its normal range of pitches.
Using the Touch Controller
By placing your nger on the touch controller and moving
it to left or right, you can vary the pitch of the sound you’re
playing. Touching the left side of the controller will lower
the pitch, and touching the right side will raise the pitch.
Setting the Pitch Range of the Touch Controller
By following the procedure below, you can set the range
of pitches within which the pitch can be changed when
you operate the Touch Controller. This setting is specied
in terms of a value in semitones. For example, if you specify
a value of “12,” the pitch will rise by a whole octave when
you touch the rightmost edge of the Touch Controller (12
semitones is equivalent to one octave).
1. While holding down [SHIFT], touch the Touch
Controller.
The value currently set for the pitch range will appear,
blinking, in the display.
2. Continue holding down the [SHIFT] button, and
use the [INC/+] / [DEC/–] (OCTAVE [+] / [–]) buttons
to change the setting.
Value 0–24
3. Release the [SHIFT] button.
4. To save this setting, hold down the [SHIFT] button
and press the [WRITE] button.
Deutsch Français Italiano Español Português NederlandsEnglish
2. Hold down the [TRANSPOSE] button, and press
the OCTAVE [+] / [–] button to set the desired
value.
3. The value will be applied when you release the
[TRANSPOSE] button.
The [TRANSPOSE] button will be lit if you’ve specied a
value other than “0.”
Using the Modulation Bar
You can apply vibrato by pressing the modulation bar
while you play the Lucina AX-09.
MEMO
The same eect is applied to all tones. However, if
you’ve selected 4 VIOLIN or 5 TROMBONE of the special
tones, the dynamics (expression) will change in a way
that’s distinctive of that instrument, allowing you to
play with highly realistic expressiveness.
11
Page 14
Assigning the Modulation Bar’s Eect
You can also change the assignment of the modulation
bar so that it will hold notes or hold notes while applying
vibrato.
1. Hold down the [SHIFT] button and press the
modulation bar.
The current setting will blink in the display.
2. Continue to hold down the [SHIFT] button, and
use the [INC/+] / [DEC/–] (OCTAVE [+] / [–]) buttons
to assign the desired eect.
This species the eect that will be applied when you
operate the modulation bar.
Value Explanation
N oD (MODULATION)
h LD (HOLD)
C NB (COMBINATION)
Vibrato will be applied to the sounds you’re
playing.
The sounds you’re playing will be sustained
while you press the modulation bar.
Vibrato and Hold will both be applied to the
sounds you’re playing.
MEMO
The same eect is applied to all tones. However, if
you’ve selected 4 VIOLIN or 5 TROMBONE of the special
tones, the dynamics (expression) of the instrument will
be modied instead of the vibrato eect.
3. Release the [SHIFT] button.
4. To save this setting, hold down the [SHIFT] button
and press the [WRITE] button.
Using the D Beam Controller
By moving your hand above the D Beam controller’s
sensor, you can modify the sound by applying the eect
you’ve assigned to the D Beam.
1. Press one of the following buttons to select the
function that you want to control using the
D Beam controller.
Button Explanation
PITCH
FILTER
ASSIGNABLE
Moving your hand above the D Beam controller
will vary the pitch of the sounds you play.
Moving your hand above the D Beam controller
will vary the tonal character of the sounds you
play.
* For some tones, the change in character
may be dicult to notice.
The D Beam controller will transmit the assigned
function or control change message.
2. While you play the keyboard, move your hand
slowly up and down above the D Beam controller.
The button you pressed in step 1 will blink.
3. To turn o the D Beam controller, once again press
the button you pressed in step 1; it will go out.
Changing the ASSIGNABLE Setting
You can assign a MIDI control change number (CC) or
function to the [ASSIGNABLE] button, and use the D Beam
controller to control that parameter in real time.
1. Hold down the [SHIFT] button and press
[ASSIGNABLE].
The currently assigned function will blink in the display.
The D Beam controller’s eective range
The illustration below shows the approximate eective
range of the D Beam controller.
No eect will be obtained if you position your hand
outside this eective range.
* The usable range of D Beam controller will become
extremely small when used under strong direct
sunlight. Please be aware of this when using the D Beam
controller outside.
12
2. Continue to hold down the [SHIFT] button, and
use the [INC/+] / [DEC/–] (OCTAVE [+] / [–]) button
to specify the desired function or parameter that
will be controlled by the D Beam controller.
Display Value Explanation
C 01
C 05
C 07
C 10
C 11
C 64
C 65
CC01
(MODULATION)
CC05
(PORTA TIME)
CC07 (VOLUME) Control the volume.
CC10 (PAN) Control the panning.
CC11 (EXPRESSION) Control the expression.
CC64 (HOLD) Sustain the notes.
CC65
(PORTAMENTO)
Apply vibrato.
Control the portamento time
over which the pitch changes
between notes when playing with
portamento.
Smoothly connect the pitch from one
note to the next.
Page 15

Display Value Explanation
C 66
C 71
C 72
C 73
C 74
A Ft
A db
S Lo
CC66 (SOSTENUTO)
CC71 (RESONANCE)
CC72 (RELEASE TIME)
CC73 (ATTACK TIME)
CC74 (CUTOFF)
AFTERTOUCH
(Default)
ADLIB
SOLO SYNTH
Sustain the notes that are currently
being held down.
Control the resonance. Increasing
the resonance value will produce
a distinctive tonal character that is
typical of a synthesizer.
Control the time from note-o (when
the key is released) until the sound
is no longer heard (i.e., the release
time).
Control the sharpness (attack speed)
with which the sound begins.
Control the cuto. Higher values will
make the sound harder (brighter);
lower values will make the sound
softer (more mellow).
Apply the most suitable eect for
each of the Lucina AX-09’s tones.
By ngering a chord and moving
your hand above the D Beam
controller, you can produce an
arpeggio of that chord.
The distance from the D Beam
controller will determine the octave
span of the chord that is played, and
the speed at which you move your
hand up and down will determine
the speed at which the chord is
arpeggiated.
For example if you use your right
hand to hold down the four notes
“C D E G” and move your left hand
above the D Beam controller, a
phrase such as “C D E G C D E G C D E
G...” will play.
The Lucina AX-09 will operate as a
monophonic synthesizer whose pitch
can be controlled by moving your
hand above the D Beam controller.
MEMO
By holding down the [INC/+] / [DEC/–] button you can
choose this setting rapidly. To choose even faster, hold
down the button and press the other button as well.
3. Release the [SHIFT] button.
4. To save this setting, hold down the [SHIFT] button
and press the [WRITE] button.
Using a Foot Pedal
If you connect a pedal switch (DP series; sold separately)
to the FOOT PEDAL jack, you can hold down the pedal to
make notes continue sustaining even after you release the
keyboard.
Alternatively, you can use the pedal to apply numerous
other eects.
Connecting a foot pedal
MEMO
Alternatively, you can connect an expression pedal
(EV-5) instead of a pedal switch (DP series).
NOTE
Use only the specied expression pedal (EV-5; sold
separately). By connecting any other expression pedals,
you risk causing malfunction and/or damage to the
unit.
Specifying the foot pedal assignment
Hold down the [SHIFT] button and press the [V-LINK]
button twice; the screen will indicate “
to assign the eect applied by the foot pedal.
You can assign the following functions to the pedal.
To save this setting, hold down the [SHIFT] button and
press the [WRITE] button.
Display Value Explanation
CC01 (MODULATION) Apply vibrato.
C 01
CC05 (PORTA TIME)
C 05
CC07 (VOLUME) Control the volume.
C 07
CC10 (PAN) Control the panning.
C 10
CC11 (EXPRESSION) Control the expression.
C 11
CC64 (HOLD) Sustain the notes.
C 64
CC65 (PORTAMENTO)
C 65
CC66 (SOSTENUTO)
C 66
Control the portamento time over
which the pitch changes between
notes when playing with portamento.
Smoothly connect the pitch from one
note to the next.
Sustain the notes that are currently
being held down.
,” allowing you
P DL
Deutsch Français Italiano Español Português NederlandsEnglish
13
Page 16
Display Value Explanation
CC71 (RESONANCE)
C 71
CC72
C 72
(RELEASE TIME)
CC73
C 73
(ATTACK TIME)
CC74 (CUTOFF)
C 74
AFTERTOUCH
A Ft
PEDAL UP
P UP
PEDAL DOWN
P Dn
Control the resonance. Increasing
the resonance value will produce
a distinctive tonal character that is
typical of a synthesizer.
Control the time from note-o (when
the key is released) until the sound is
no longer heard (i.e., the release time).
Control the sharpness (attack speed)
with which the sound begins.
Control the cuto. Higher values will
make the sound harder (brighter);
lower values will make the sound
softer (more mellow).
Apply the most suitable eect for each
of the Lucina AX-09’s tones.
Select the tone of the next tone
number.
Select the tone of the preceding tone
number.
MEMO
With the factory settings, the foot pedal is assigned to
C 64 (Hold).
If using a foot pedal not made by Roland
If you’re using a foot pedal that was made by a
manufacturer other than Roland, the pedal polarity might
be reversed, so that the operations that occur when you
press and release the pedal are the opposite of what you
expect. If so, hold down the [SHIFT] button and press the
[V-LINK] button three times to make the display indicate
“
.” Then use the [INC/+] / [DEC/–] (OCTAVE [+] / [–])
P oL
buttons to make the display indicate “
To save this setting, hold down the [SHIFT] button and
press the [WRITE] button.
Value Explanation
S td (STANDARD)
r Eu (REVERSE)
Pedals made by Roland
Pedals with a polarity opposite to that
of Roland pedals
r Eu
.”
Playing Along with a Portable Audio Player
You can connect your portable audio player, and play the
Lucina AX-09 along with your favorite songs.
1. Connect your portable audio player to the Lucina
AX-09’s EXT IN jack.
Use a stereo mini-plug
(1/8”) cable to connect
your player to the EXT
IN jack.
2. Play back a song on your portable audio player,
and play along on the Lucina AX-09.
Use the controls of your player to adjust the volume and
select songs.
* When connection cables with resistors are used, the
volume level of equipment connected to the inputs (EXT
IN) may be low. If this happens, use connection cables
that do not contain resistors.
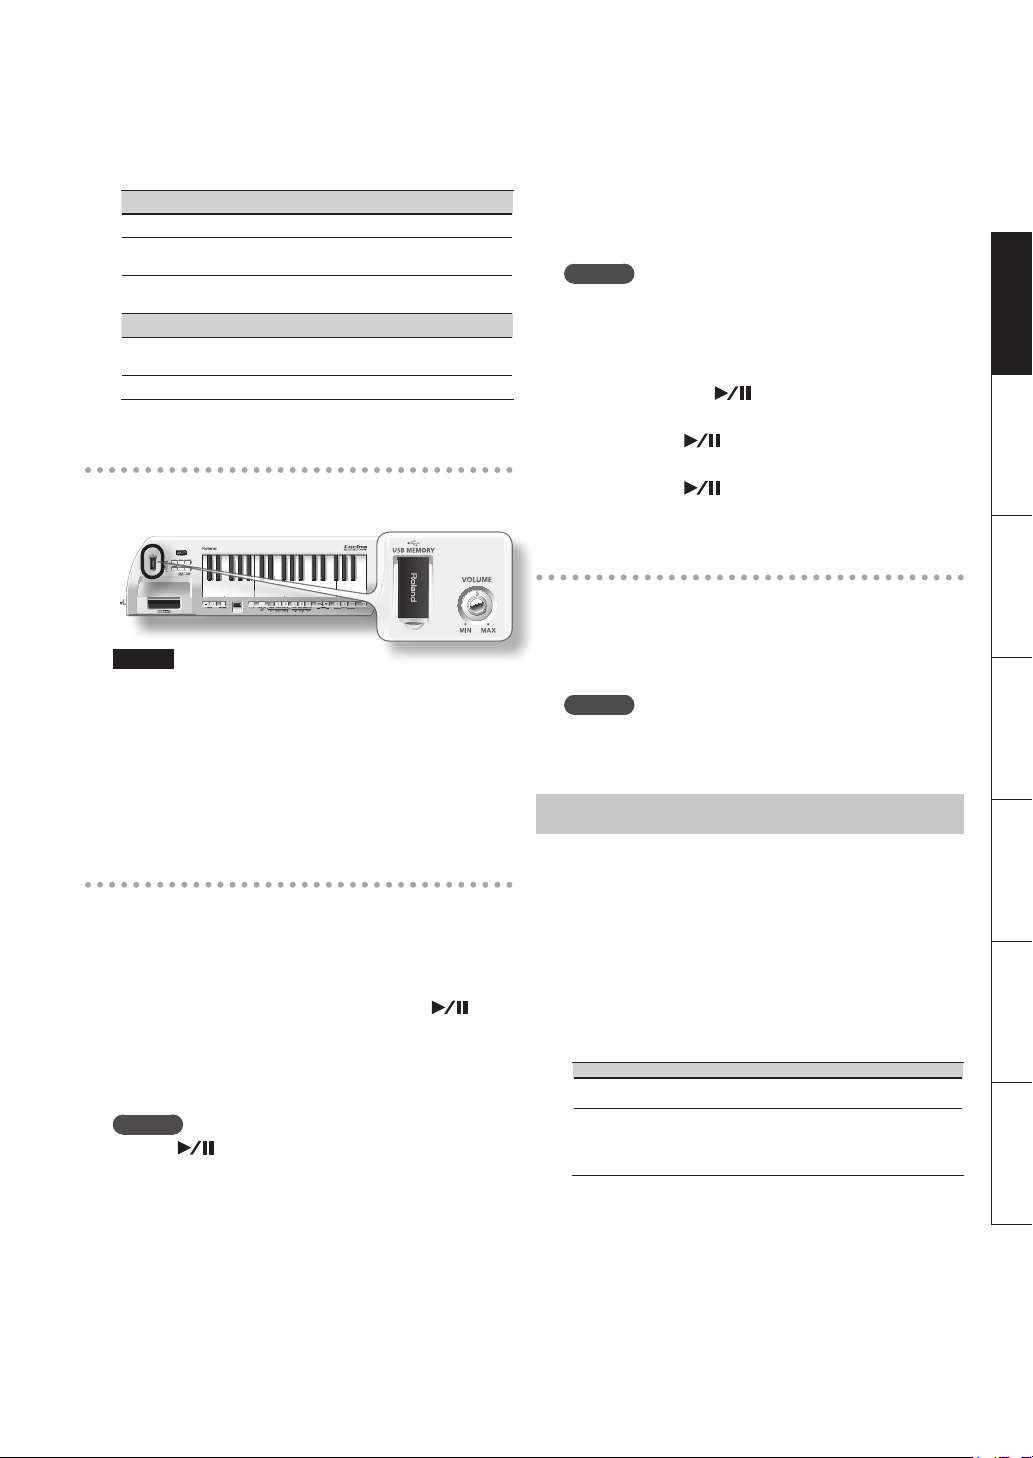
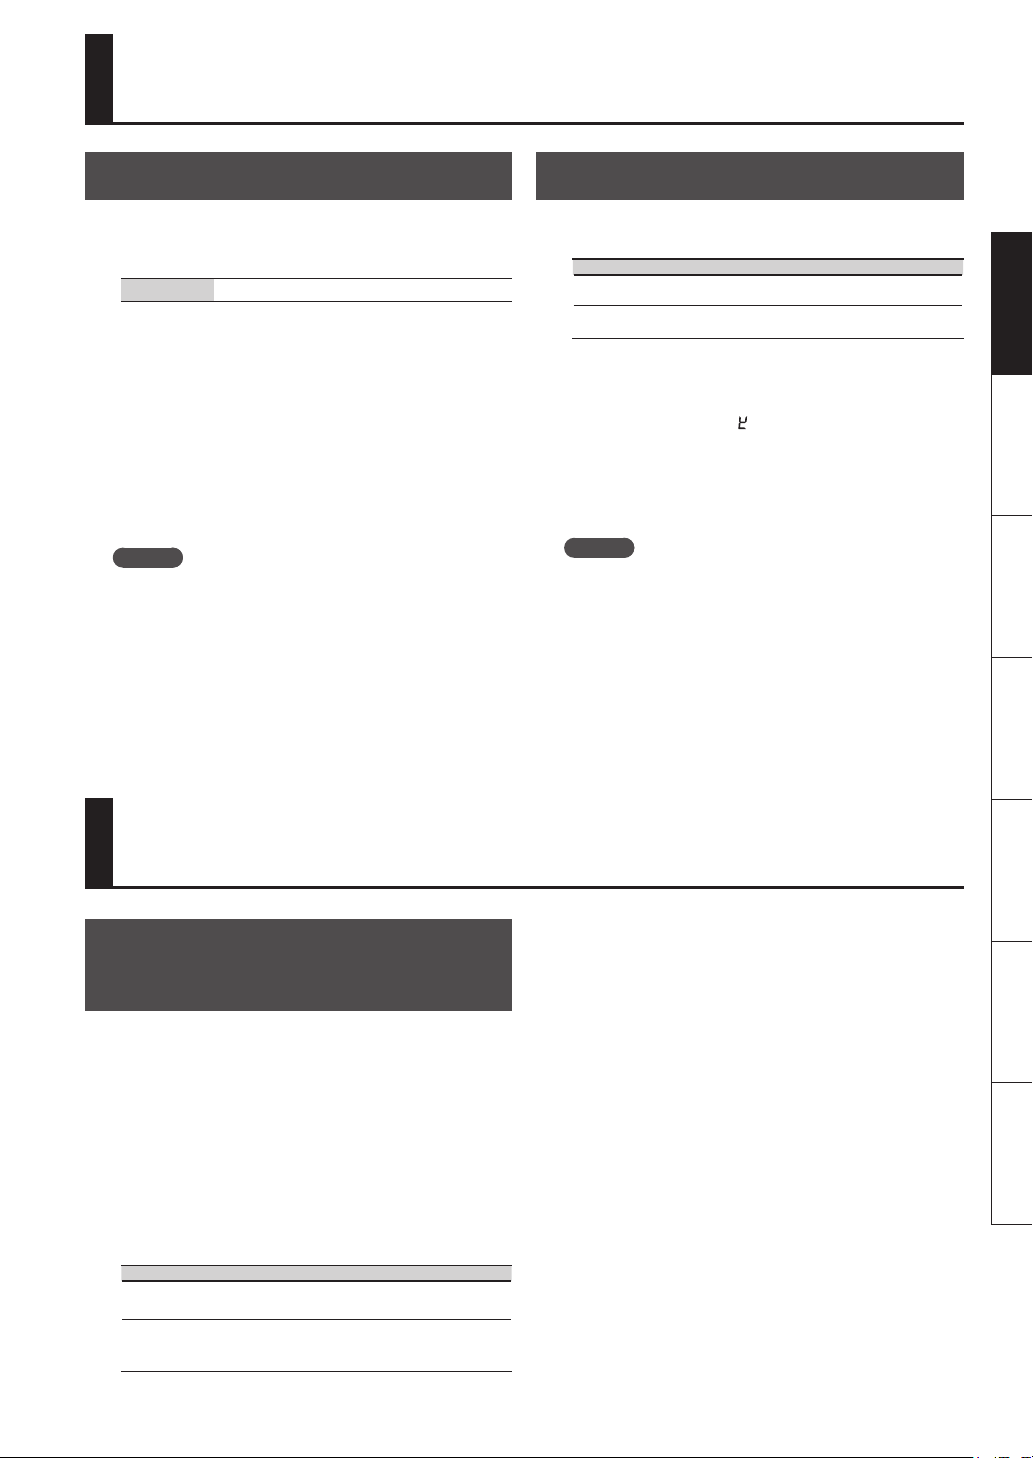
Playing Along with an Audio File from USB Memory
The Lucina AX-09 can play back audio
les (MP3, WAV, AIFF) that you’ve copied
to USB memory from your computer,
allowing you to play along with your
favorite songs.
Preventing Tones from Changing During Performance (Lock function)
You can lock the tone selected on the Lucina AX-09 to
prevent a dierent sound from being selected even if you
accidentally press a tone button while performing.
1. Hold down the [LOCK] button until it lights.
The Lock function will turn on; in this state, button
operations will not switch the tone.
To re-enable tone switching, hold down the button once
again until [LOCK] button goes out.
14
Copying audio les from your
computer to USB memory
You’ll need to copy the audio les from your computer to
the root level of your USB memory.
Copy to a USB drive
MP3, WAV, AIFF
Page 17
Audio les that can be played
MP3
Format MPEG-1 audio layer 3
Sampling
Frequency
Bit Rate
WAV, AIFF
Sampling
Frequency
Bit Rate 8/16/24 -bit
44.1 kHz
32/40/48/56/64/80/96/112/128/160/192/224/256/320 kbps,
VBR (Variable Bit Rate)
44.1 kHz
Insert the USB memory
1. Insert your USB memory into the USB MEMORY
slot as shown in the illustration below.
NOTE
• Never insert or remove a USB memory while this unit’s
power is on. Doing so may corrupt the unit’s data or the
data on the USB memory.
• Carefully insert the USB memory all the way in—until it
is rmly in place.
• Use USB memory sold by Roland. We cannot guarantee
operation if other products are used.
Continue holding down the [AUDIO PLAYER] button, and
press the [INC/+] button to jump to the next song, or press
the [DEC/–] button to jump to the beginning of the song
(or the preceding song if you’re already at the beginning
of the song).
MEMO
The songs will be ordered by their le name (in the
order of numerals, uppercase letters, and lowercase
letters).
4. Play or stop the song.
When you press the [ ] button, the button that was
blinking will light, and the selected audio le will play.
If you press the [
button will blink, and playback will stop.
If you press the [
resume from where it was stopped.
] button during playback, the lit
] button once again, playback will
Switching songs during playback
During playback, you can hold down the [AUDIO PLAYER]
button and press the [DEC/–] button to interrupt playback
and return to the beginning of the current song. Similarly,
pressing the [INC/+] button will move to the beginning of
the next song, and resume playback.
MEMO
If you hold down the [AUDIO PLAYER] button and press
the [DEC/–] button at the beginning of the song, you’ll
return to the beginning of the preceding song.
Making Audio Player Settings
Deutsch Français Italiano Español Português NederlandsEnglish
Play back audio les
1. Insert the USB memory containing the copied
audio les into the Lucina AX-09’s USB MEMORY
slot.
2. Press the [AUDIO PLAYER] button.
The [AUDIO PLAYER] button will light and the [ ]
button will blink; now you can play back audio les from
USB memory.
If you press the [AUDIO PLAYER] button once again, the
button will go out; now audio les will not be played.
MEMO
The [ ] button will not blink if USB memory is not
inserted, or if the USB memory contains no song that
can be played.
3. Select a song.
When you hold down the [AUDIO PLAYER] button, the
display will show the rst three characters of the le name
of the currently selected audio le.
1. Hold down the [SHIFT] button and press the
[AUDIO PLAYER] button; the current audio player
setting will blink in the display.
2. Continue holding down the [SHIFT] button, and
press the [AUDIO PLAYER] button once again to
switch parameters.
After a brief interval, the value will appear; continue
holding down the [SHIFT] button, and use the [INC/+] /
[DEC/–] (OCTAVE [+] / [–]) buttons to edit the value.
Parameter Value Explanation
L uL
P LY
0–127 Audio le playback volume level
1 P (SINGLE PLAY),
C P (CHAIN PLAY)
Choose whether playback will stop at
the end of the selected song (SINGLE
PLAY) or continue playing to the next
song (CHAIN PLAY).
3. To save this setting, hold down the [SHIFT] button
and press the [WRITE] button.
15
Page 18

Editing the Tone Settings
Editing the Tone Parameters
You can edit tone parameters such as the volume and
reverb for a regular tone, and save your settings in a
FAVORITE memory location (p. 10).
* You can’t edit the tone parameters of a special tone.
1. Select the regular tone whose tone parameters
you want to edit (p. 9).
2. Hold down the [SHIFT] button and press the TONE
button of the tone you selected in step 1 (i.e., the
TONE button that’s lit).
The parameter name (P S ) will blink in the display, and
then its value (o FF or o n ) will appear.
3. Continue holding down the [SHIFT] button, and
press the same TONE button to switch parameters.
The parameters will switch from top to bottom of the
“Parameter” column in the following table.
* Don’t release your nger from the [SHIFT] button while
making this setting.
Parameter Value Explanation
Portamento Switch
P S
P tN
u oL
r Eu
r EL
A t
C Ut
r ES
OFF, ON
0–127
0–127
0–127
-64–63
-64–63
-64–63
-64–63
Portamento is an eect that creates a
smooth change in pitch from one note
to the next.
Portamento Time
This species the time over which
the pitch will change when using
portamento. Higher values will lengthen
the time over which the pitch will reach
the next note.
Volume
This species the volume of the tone.
Reverb
This eect adds the reverberation that
is characteristic of a performance in a
large hall. Higher values produce deeper
reverberation.
Release Time (*1)
This adjusts the time from note-o
(i.e., when you release the key) until
the sound disappears. Higher values
produce a longer release time.
Attack Time (*1)
This adjusts the sharpness (speed) at
which the sound begins. Higher values
produce a more gentle attack.
Cuto (*1)
Increasing the cuto value will make
the sound harder (brighter); decreasing
it will make the sound more mellow
(darker). Use this parameter to make
adjustments if the sound is too mued
or too bright.
Resonance (*1)
Increasing the resonance value will
produce a distinctive tonal character
that is typical of a synthesizer. If you
want to emphasize the eect of
resonance, it’s a good idea to slightly
lower the cuto.
*1 The values you specify here are an adjustment relative to the value
assigned by each tone. If this value is set to 0, the parameter will be as
specied by the tone’s own settings.
4. When the parameter value appears, continue
holding down the [SHIFT] button and use the
[INC/+] / [DEC/–] (OCTAVE [+] / [–]) buttons to edit
the value.
MEMO
• You can make the value change more quickly by
holding down the [INC/+] / [DEC/–] button. If you want
the value to change even faster, hold down the button
and press the other button as well.
• Even while editing the value, you can play the keyboard
to hear the result.
5. Release the [SHIFT] button.
* If you select a dierent sound or turn o the Lucina
AX-09’s power in this state, the changes you made will
be lost. If you want to keep your changes, you must store
them in a FAVORITE memory location as follows.
6. Press the [WRITE] button.
The [WRITE] button will light.
7. Press the FAVORITE [A] button or [B] button to
select a bank.
8. Press one of the TONE [1]–[6] buttons to select the
memory location in which you’ll store the settings.
When the [WRITE] button goes out, the settings have been
stored.
16
Page 19
Adjusting the Tuning
Master Tune
This is the overall tuning setting for the entire Lucina
AX-09. With the factory settings, this is set to 440 Hz. The
displayed value is the frequency of the A4 key (middle “A”).
Value 415.3–466.2 Hz
1. Hold down the [SHIFT] button and press the
[TRANSPOSE] button.
The display will indicate “N tn,” and then the current value
of Master Tune will blink.
The display shows only the last three digits (the initial
numeral of “4” is omitted).
2. Continue holding down the [SHIFT] button, and
use the [INC/+] / [DEC/–] (OCTAVE [+] / [–]) buttons
to adjust the tuning value.
MEMO
• You can make the value change more quickly by
holding down the [INC/+] / [DEC/–] button. If you want
the value to change even faster, hold down the button
and press the other button as well.
• Even while editing the value, you can play the keyboard
to hear the result.
3. Release the [SHIFT] button.
4. To save this setting, hold down the [SHIFT] button
and press the [WRITE] button.
Key Scale Tune
You can choose either equal temperament or an Arabian
scale as the keyboard tuning.
Value Explanation
E QL (EQUAL)
A rB (ARABIC)
1. Hold down the [SHIFT] button and press the
[TRANSPOSE] button twice.
The display will indicate “ EY ”; then the current setting of
Key Scale Tune will blink.
2. Continue holding down the [SHIFT] button, and
use the [INC/+] / [DEC/–] (OCTAVE [+] / [–]) buttons
to choose the desired value for Key Scale Tune.
MEMO
Even while editing the value, you can play the keyboard
to hear the result.
3. Release the [SHIFT] button.
4. To save this setting, hold down the [SHIFT] button
and press the [WRITE] button.
Equal temperament
Arabian scale
Deutsch Français Italiano Español Português NederlandsEnglish
Adjusting the Keyboard’s Touch Sensitivity
Setting a Fixed Value for the Keyboard’s Velocity
In order to play using notes that all have a uniform level
(velocity), regardless of the amount of force you use when
pressing keys, carry out the following procedure.
1. Hold down the [SHIFT] button and press the
[V-LINK] button once.
The display will indicate “u EL,” and then the value of the
current setting will appear.
2. Continue holding down the [SHIFT] button, and
use the [INC/+] / [DEC/–] (OCTAVE [+] / [–]) buttons
to change the setting.
Value Explanation
r AL (REAL)
1–127
Notes reecting the actual amount of force you use
when pressing keys will be output.
Notes having the specied velocity value will be output,
regardless of the amount of force you use when pressing
keys.
3. Release the [SHIFT] button.
4. To save this setting, hold down the [SHIFT] button
and press the [WRITE] button.
17
Page 20

Count In / Metronome
“Count in” refers to a feature that counts you in to the
beginning of the performance. To have a two-measure
count in be sounded, press the modulation bar while you
press the [PREVIEW] button.
Note that, if you wish, you can have a metronome be
sounded instead—simply change the Count Mode to
(METRONOME) using the setting below. The metronome
will continue to sound until you press the [PREVIEW]
button a second time.
* A count in will not be sounded when the [AUDIO
PLAYER] button is lighted.
N tr
Count In Settings
1. Hold down the [SHIFT] button and press the
[PREVIEW] button; the current count in setting will
blink in the display.
2. Continue holding down the [SHIFT] button, and
press the [PREVIEW] button once again to switch
parameters.
After a brief interval, the value will appear; continue
holding down the [SHIFT] button, and use the [INC/+] /
[DEC/–] (OCTAVE [+] / [–]) buttons to edit the value.
Parameter Value Explanation
C nt
b PN
b At
L uL
t yP
o FF(OFF),
C in(COUNT IN),
N tr (METRONOME)
20–250 Tempo of count
0.4, 2.4, 3.4, 4.4, 5.4, 6.4, 7.4
0–10 Volume of count
1 (Electronic metronome)
2 (Mechanical metronome)
3 (Pulse)
4 (Beep)
5 (Cowbell)
6 (Stick)
Count mode
Determines whether count in
or metronome will sound
Time signature of count
(2.4 indicates 2/4 time)
Sound used for count
3. To save this setting, hold down the [SHIFT] button
and press the [WRITE] button.
MEMO
To have the tempo of the count be shown in the
display, hold down the [PREVIEW] button. While in this
state, you can set a new tempo by tapping the [SHIFT]
button at least four times at the desired tempo; or you
can set it using the [INC/+] and [DEC/-] buttons.
Various Settings (Utility)
Checking the Lucina AX-09’s Version
Here’s how to check the Lucina AX-09’s version.
1. While holding down the FAVORITE [A], [B], and
[WRITE] buttons simultaneously, turn on the
Lucina AX-09’s power.
The display will indicate “U tL”; the Lucina AX-09 will be in
Utility mode.
2. Press the TONE [1] button.
The display will indicate the version of your Lucina AX-09.
If you want to continue playing the Lucina AX-09, turn o
the power and wait several seconds before turning it on
again.
USB Driver Settings
When using a USB cable to connect the
Lucina AX-09 to your computer, you can
choose whether to use the standard USB
driver that’s provided by your computer
or the USB driver provided by Roland.
18
MEMO
For details on connecting the Lucina AX-09 to your
computer via USB, refer to “Connecting to Your
Computer via USB” (p. 21).
1. While holding down the FAVORITE [A], [B], and
[WRITE] buttons simultaneously, turn on the
Lucina AX-09’s power.
The display will indicate “U tL”; the Lucina AX-09 will be in
Utility mode.
2. Press the TONE [2] button.
The display will indicate “d ru”; then the current value is
shown and the [WRITE] button will blink.
3. Use the [INC/+] / [DEC/–] buttons to choose the
desired setting.
Value Explanation
G En (GENERIC)
(Default)
u nD ( VENDOR)
Choose this if you’re using the standard USB driver
provided by your computer.
Normally you’ll use this mode.
Choose this if you’re using the USB driver
downloaded from the Roland website.
4. Press the [WRITE] button to save the setting.
5. Turn the Lucina AX-09’s power o, then on again.
Now you’ll be able to use the USB driver you choose.
Page 21
Backing Up Lucina AX-09 Settings to USB Memory
Here’s how to back up your Lucina
AX-09 settings and the tone settings in
FAVORITE memory (p. 16) to USB memory
(sold separately).
5. When the display indicates “D nE,” turn the Lucina
AX-09’s power o, then on again.
MEMO
If USB memory is not inserted in the Lucina AX-09
when you press the [WRITE] button, or if backup data
does not exist in the appropriate location of the USB
memory, the display will indicate “Err .”
1. Insert your USB memory into the USB MEMORY
slot (p. 15).
2. While holding down the FAVORITE [A], [B], and
[WRITE] buttons simultaneously, turn on the
Lucina AX-09’s power.
The display will indicate “U tL”; the Lucina AX-09 will be in
Utility mode.
3. Press TONE [3] button.
The display will indicate “b Up” and the [WRITE] button will
blink.
4. Press the [WRITE] button.
The backup will begin.
5. When the display indicates “D nE ,” turn the Lucina
AX-09’s power o, then on again.
MEMO
If USB memory is not inserted in the Lucina AX-09 when
you press the [WRITE] button, the display will indicate
“E rr.”
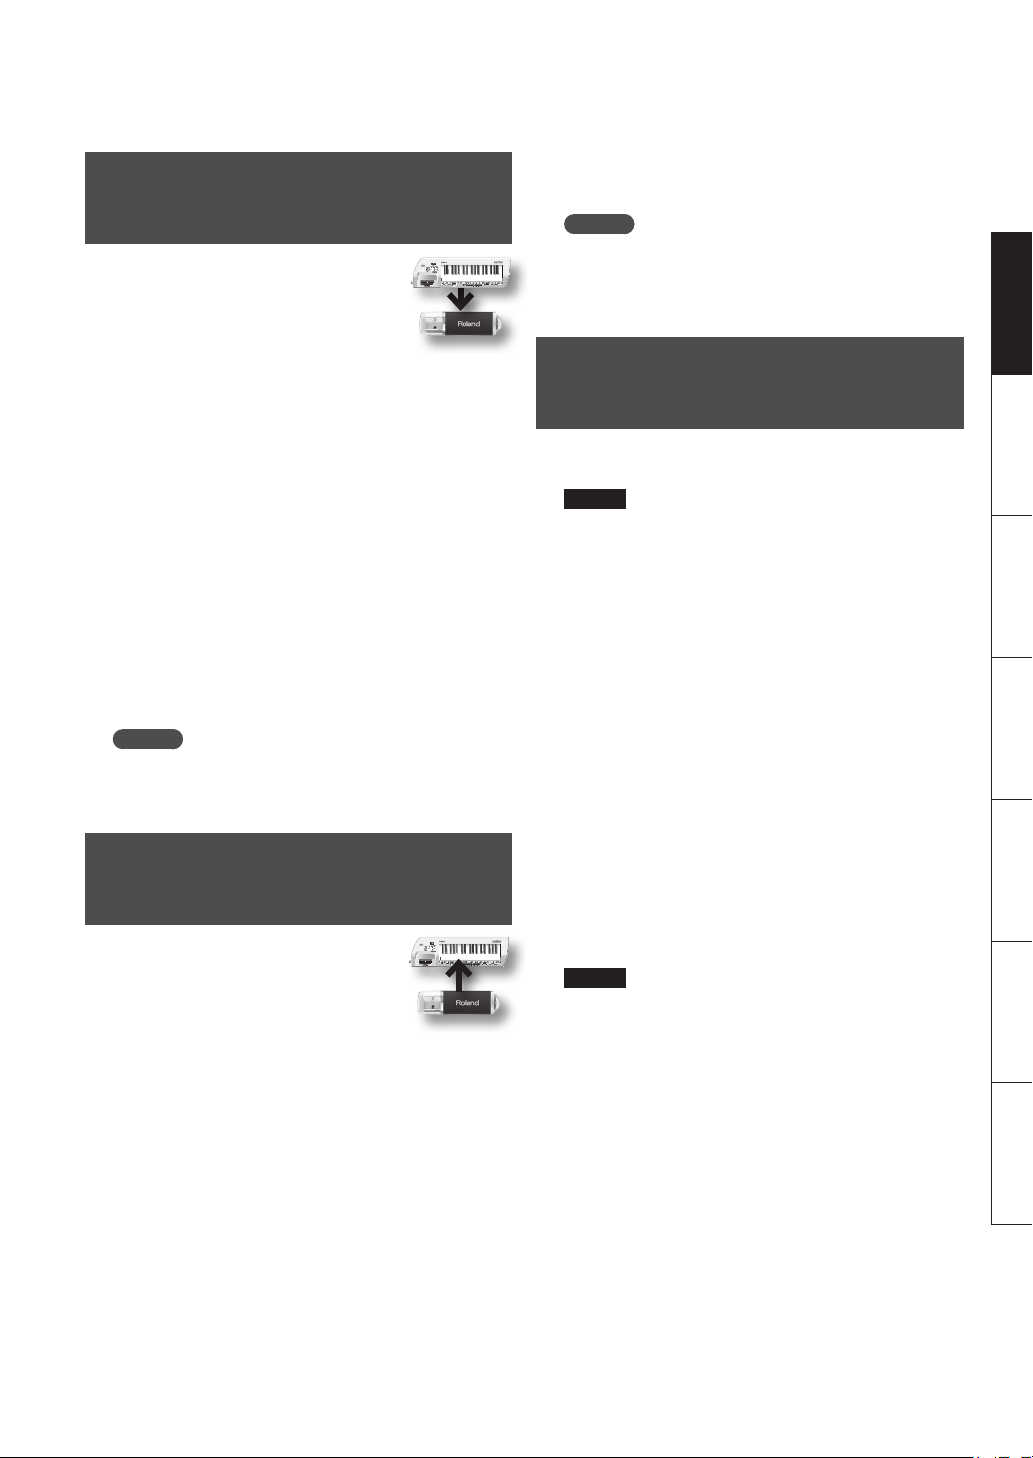
Restoring Lucina AX-09 Settings from USB Memory
Here’s how settings you saved as
described in “Backing Up Lucina AX-09
Settings to USB Memory” (p. 19) can be
restored to the Lucina AX-09.
1. Insert the USB memory containing the backed up
settings into the USB MEMORY slot (p. 15).
2. While holding down the FAVORITE [A], [B], and
[WRITE] buttons, turn on the Lucina AX-09’s power.
The display will indicate “U tL”; the Lucina AX-09 will be in
Utility mode.
3. Press the TONE [4] button.
The display will indicate “r St” and the [WRITE] button will
blink.
4. Press the [WRITE] button.
The [WRITE] button will light, and the restore operation
will begin.
Restoring the Factory Settings (Factory Reset)
Here’s how to return the Lucina AX-09 to its factory-set
state.
NOTE
• When you execute this operation, all settings you’ve
modied since purchasing the Lucina AX-09, including
the tone settings you’ve stored in FAVORITES, will be
lost.
• If you want to keep your settings, be sure to back them
up to USB memory before you execute the factory
reset.
“Backing Up Lucina AX-09 Settings to USB Memory” (p.
19)
1. While holding down the FAVORITE [A], [B], and
[WRITE] buttons, turn on the Lucina AX-09’s power.
The display will indicate “U tL”; the Lucina AX-09 will be in
Utility mode.
2. Press the TONE [5] button.
The display will indicate “F Ct,” and the [WRITE] button
will blink.
3. Press the [WRITE] button.
The [WRITE] button will light, and the factory reset will
begin.
NOTE
While the [WRITE] button is lit, the factory reset is being
executed. Never turn o the power during this time.
The Lucina AX-09 may malfunction if you do so.
4. When the display indicates “D nE,” turn the Lucina
AX-09’s power o, then on again.
Deutsch Français Italiano Español Português NederlandsEnglish
19
Page 22
Connecting Other Equipment
*1 Local control is always on. It cannot be turned o. If you want to control a
Controlling MIDI Devices
If you’re using the Lucina AX-09 by itself, there’s no need
for you to have a detailed understanding of MIDI. The
following explanation of MIDI is provided for those who
wish to connect the Lucina AX-09 to other MIDI devices
and control them.
MEMO
MIDI stands for Musical Instrument Digital Interface,
and is a global standard that allows electronic musical
instruments and computers to exchange performance
data.
“MIDI Implementation Chart” (p. 26) is a chart that
provides an easy way of checking which MIDI messages
the Lucina AX-09 is able to receive. By comparing the
MIDI implementation charts of the Lucina AX-09 and
some other MIDI device, you can see which messages
are compatible between the two devices.
MIDI Messages that can be Transmitted and Received
The Lucina AX-09 can transmit and receive the following
MIDI messages.
MEMO
The Lucina AX-09 always receives MIDI messages from
the USB COMPUTER connector.
MIDI message Explanation
Note On/O (*1) Transmission Key on/o messages
Velocity Transmission Strength with which you play the key
Channel aftertouch messages
Transmission
Aftertouch
Receive
Program Change Transmission
Bank Select (*2) Transmission
Modulation CC01, transmission: MODULATION BAR
CC01 (Modulation)
CC05 (Porta-Time)
CC07 (Volume)
CC10 (Panpot)
CC11 (Expression)
CC64 (Hold)
CC65 (Porta-Sw)
CC66 (Sostenute)
CC71 (Resonance)
CC72 (ReleaseTime)
CC73 (AttackTime)
CC74 (Cuto)
Transmission
transmitted by the D Beam [ASSIGNABLE]
button assigned to “
PEDAL. (This message is not transmitted
by the keyboard.)
Channel aftertouch, polyphonic
aftertouch.
Cannot be specied from the Lucina
AX-09
Cannot be specied from the Lucina
AX-09
Control change number assigned to
the D Beam [ASSIGNABLE] button or to
the PEDAL
A Ft
” or by the
connected external sound module without playing the Lucina AX-09’s own
sounds, you can either disconnect the Lucina AX-09’s OUTPUT jacks, lower the
Lucina AX-09’s volume, or lower the volume of the connected amp or mixer.
*2 The transmitted program change number and bank select data (CC00, CC32)
cannot be specied from the Lucina AX-09, but when you select an internal
tone, that tone’s program change number and bank select data (CC00, CC32;
see the “Tone List” at the end of this manual) will be transmitted according to
the MIDI settings (p. 20).
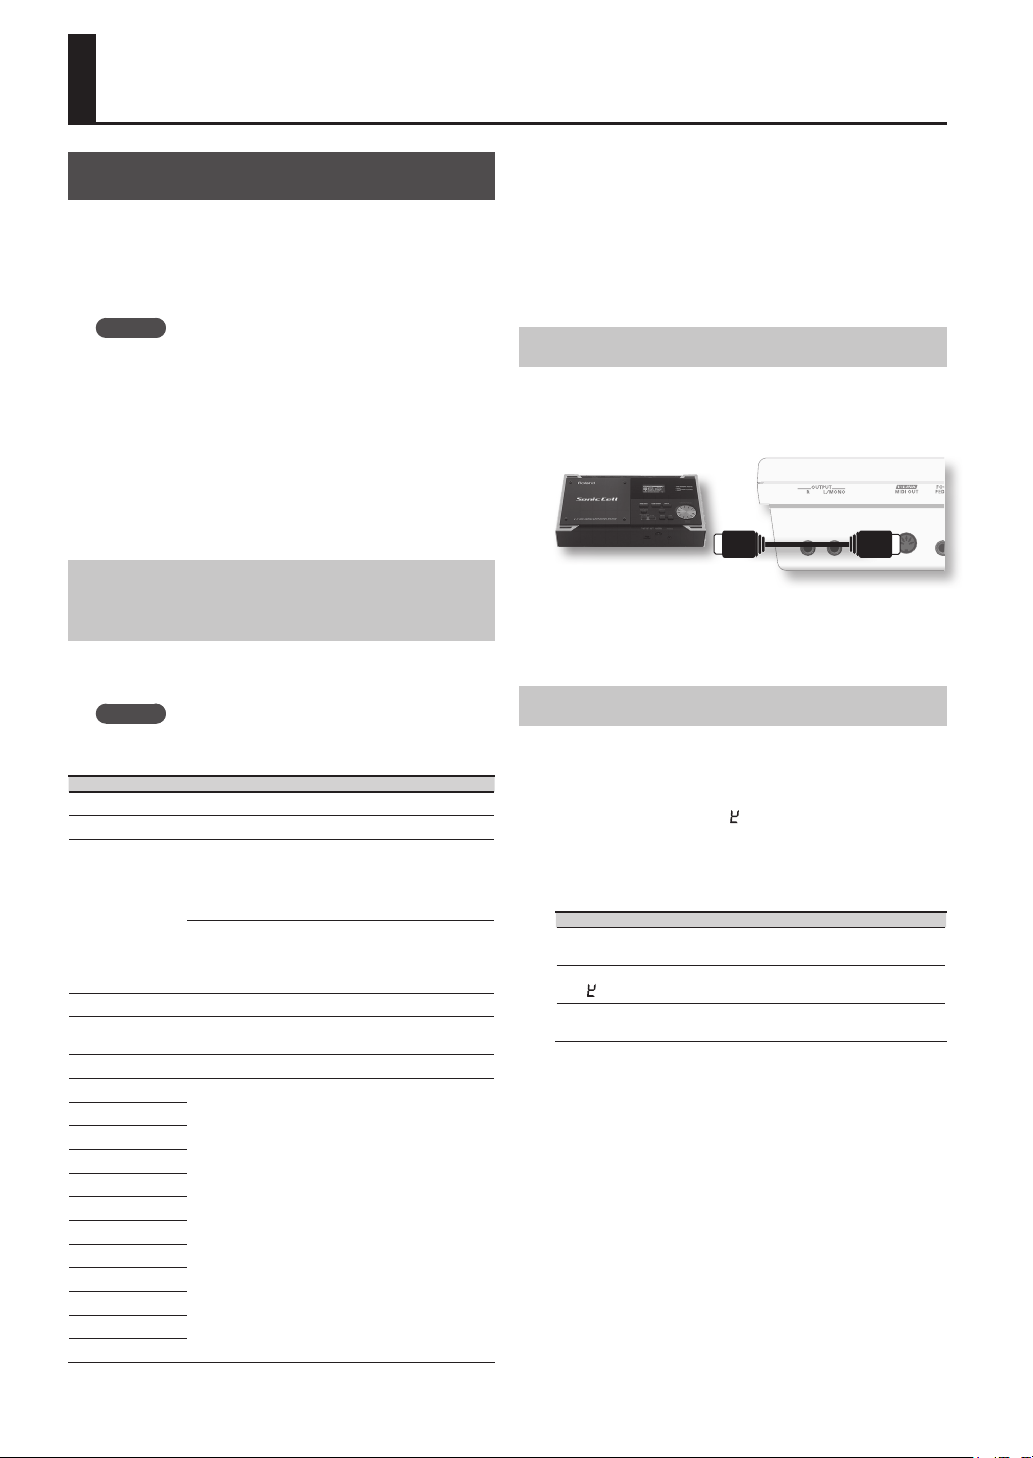
Connecting a MIDI Sound Module
1. Use a MIDI cable to connect the Lucina AX-09’s
MIDI OUT connector to the MIDI IN connector of
the MIDI sound module you want to control.
MIDI Sound Module
MIDI IN connector
As necessary, connect an amp or speakers to the MIDI
sound module or synthesizer you’re using. For details,
refer to the owner’s manual of the sound module (or other
device) you’re using.
Making MIDI-related Settings
1. Hold down the [SHIFT] button and press the
[V-LINK] button the appropriate number of times
to access the desired MIDI setting; four times for
“
C h,” ve times for “Bn ,” or six times for “PC.”
2. Continue holding down the [SHIFT] button, and
use the [INC/+] / [DEC/–] (OCTAVE [+] / [–]) buttons
to edit the setting.
Parameter Value Explanation
C h
B n
P C
3. Release the [SHIFT] button.
4. To save this setting, hold down the [SHIFT] button
and press the [WRITE] button.
1–16
(Default: 1)
OFF, ON
(Default: OFF)
OFF, ON
(Default: ON)
MIDI channel setting
Species whether MSB/LSB will be
transmitted
Species whether program change
data will be transmitted
20
Page 23
Connecting to Your Computer
Controlling Video (V-LINK)
via USB
If you use a commercially available USB cable to connect
the Lucina AX-09’s rear panel USB COMPUTER connector to
a USB connector of your computer, you’ll be able to do the
following things using MIDI.
• Play your software synthesizers by performing the
Lucina AX-09.
• Record into your sequencer software by performing the
Lucina AX-09.
• Use your sequencer software to play the Lucina AX-09.
USB cable (sold separately)
* For details on operating requirements, refer to the
Roland website.
Roland website
Here you can download the original driver, and view
installation instructions and operating requirements.
http://www.roland.com/
NOTE
• Only MIDI data can be transmitted or received via USB.
• Power-on the Lucina AX-09 before starting the MIDI
application on your computer. Do not turn the Lucina
AX-09’s power on or o while your MIDI application is
running.
USB driver settings
Normally it will not be necessary to install a USB driver in
your computer. However if you experience problems with
the computer connection (if a malfunction occurs, or if
the performance is poor), you may be able to solve the
problem by downloading and installing Roland’s original
driver as described below.
1. As described in “USB Driver Settings” (p. 18), change
the driver setting to “
2. Turn the Lucina AX-09’s power o, and then on
again.
3. Download and install the original Roland driver.
For details on downloading and installing the original
Roland driver, refer to the Roland website.
u nD” (Vendor).
V-LINK ( ) is a function that allows music
and images to be performed together. By using MIDI to
connect two or more V-LINK compatible devices, you can
easily enjoy performing a wide range of visual eects
that are linked to the expressive elements of a music
performance.
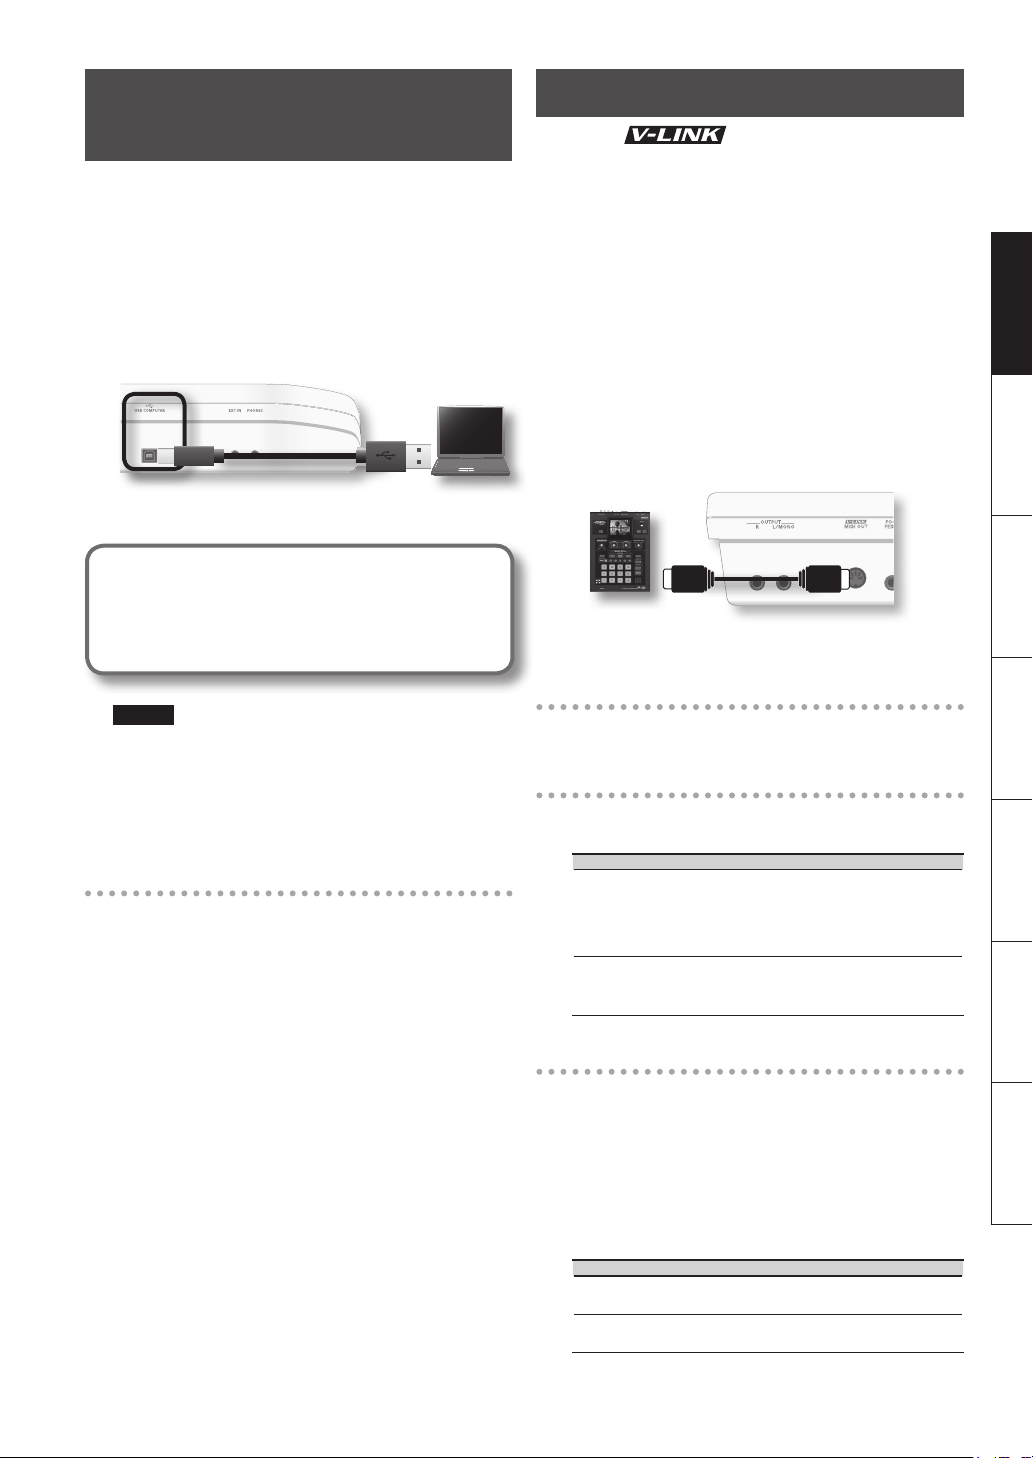
For example, if you use the Lucina AX-09 in conjunction
with the EDIROL P-10, you’ll be able to do the following.
• You can use the Lucina AX-09’s keyboard to switch
images on the P-10.
• You can use the Lucina AX-09’s touch controller to
control the speed of image playback.
This example shows the Lucina AX-09 connected to an
EDIROL P-10.
Use a MIDI cable to connect the Lucina AX-09’s MIDI OUT
connector to the EDIROL P-10’s MIDI IN connector.
EDIROL P-10
MIDI IN connector
* You can’t perform V-LINK communication via USB.
Turning V-LINK On
1. Press the [V-LINK] button to make it light.
Operations on the Lucina AX-09
V-LINK data is transmitted on MIDI channel 15. The following
functions can be controlled from the Lucina AX-09.
Controller Explanation
Keyboard
(the far-left octave)
Touch Controller
Switch images.
* Normally, the keyboard will sound at the same
time that the clip is switched. If you don’t want
the keyboard to sound, change the Local Switch
setting to “OFF.”
Control the playback speed.
* However, the touch controller will also transmit
pitch bend data at the same time.
Local switch settings
1. Hold down the [SHIFT] button and press the
[V-LINK] button seven times.
The display will indicate “L C L ,” and then the value of the
current setting will appear.
2. Continue holding down the [SHIFT] button, and
use the [INC/+] / [DEC/–] (OCTAVE [+] / [–]) buttons
to change the setting.
Value Explanation
o n
o FF
* This setting is not saved. It will always be ON when the
Lucina AX-09 starts up.
When V-LINK is on, the leftmost octave of the keyboard
will sound.
When V-LINK is on, the leftmost octave of the keyboard
will not sound.
Deutsch Français Italiano Español Português NederlandsEnglish
21
Page 24

Troubleshooting
Problem Items to check Action
Power won’t turn on
Three dots are blinking in the
display
No sound
No sound from an external MIDI
device
The volume level of the instrument
connected to EXT IN jack is too low
Something is wrong with the pitch
Can’t play back audio les from
USB memory
USB memory is not recognized/
Files are not shown
Can’t back up to USB memory
Are the included AC adaptor and power cord correctly
connected to an AC outlet and to the Lucina AX-09?
Could the batteries have run low? Check the remaining battery power (p. 6).
Are the batteries inserted in the correct orientation?
Battery power has run low. Replace the batteries as soon as possible (p. 6).
Is the connected amp or speaker turned on? Turn on the power of the connected amp or speaker.
Could the volume of the connected equipment be
lowered?
Could the [VOLUME] knob be set to the minimum
level?
Are the connections correct? Make the correct connections (p. 8).
Do you hear sound when you connect headphones?
Could the volume have been lowered by pedal
operations, D Beam controller operations, or by MIDI
messages (volume messages or expression messages)
received from an external MIDI device?
Could you have selected a FAVORITE memory location
whose volume level is set to “0”?
Could you be using a connection cable that has a
built-in resistor?
Does the Lucina AX-09’s MIDI transmit channel match
the connected device’s MIDI receive channel?
Could you be using a connection cable that contains
a resistor?
For some tones, pitches in a certain range may sound dierent than the pitch of other tones.
It may be that the pitch was changed when you touched the touch controller, or when pitch bend messages were received from an
external MIDI device.
Could the Lucina AX-09’s tuning be set inappropriately? Check the master tune setting and the key scale tune setting (p. 17).
Audio les of a sample rate other than 44.1 kHz cannot
be played by the Lucina AX-09.
It may be that the audio le is of a le type that cannot
be played by the Lucina AX-09.
It may be that the audio le is damaged. Check the audio le.
Check the format of the USB memory. The Lucina
AX-09 can use USB memory that is formatted as
FAT. (Normally, USB memory you purchase will
be formatted as FAT, and can be used without
reformatting.) USB memory that was formatted by
a computer with a le system other than FAT (for
example, as NTFS) will not be recognized by the Lucina
AX-09.
Could the USB memory be write protected? Turn o the write-protect setting.
Is there sucient free space on the USB memory? Use USB memory that has sucient free space.
Check the format of the USB memory. The Lucina AX-09
can use USB memory that is formatted as FAT.
Do not use any AC adaptor or power cord other than those supplied with
the Lucina AX-09. Doing so may cause malfunctions (p. 7).
Open the battery compartment, and verify that the batteries are oriented
correctly (p. 6).
Adjust the volume of the connected equipment.
Adjust the [VOLUME] knob.
If you hear sound in the headphones, it may be that the connection
cable is broken, or that your amp or mixer has malfunctioned. Check your
connection cable and equipment once again.
Press the pedal, move your hand above the D Beam controller, or check
the controller settings.
Increase the volume level (p. 16).
Use a connection cable that does not have a built-in resistor (such as one
from the Roland PCS series).
Set the Lucina AX-09’s transmit channel to match the connected device’s
receive channel (p. 20).
Use a connection cable that does not contain a resistor.
Please use audio les whose sample rate is 44.1 kHz.
Use an audio le of a type listed in “Audio les that can be played” (p. 15).
Use your computer to format the USB memory as FAT. (The Lucina AX-09
is not able to format USB memory.)
In Computer (or My Computer), right-click the USB drive, choose “Format,”
and choose “FAT” as the le system to format the drive as FAT. For more
about how to format USB memory, refer to your computer’s owner ’s
manual.
(Refer to the item “USB memory is not recognized/ Files are not shown.”)
22
Page 25
Specications
Lucina AX-09: Synthesizer
Keyboard 37 Keys (with velocity)
Sound Generator Section
Maximum Polyphony 128 Voices
Parts 1 Part
Tones 150 Tones (Regular Tones 144, Special Tones: 6)
Audio Player Section (playable formats)
Format MPEG-1 audio layer 3
MP3
WAV, AIFF
Others
Controllers
Connectors
Display 7 segments, 3 characters (LED)
Sampling Frequency 44.1 kHz
Bit Rate
Sampling Frequency 44.1 kHz
Bit Depth 8/16/24 -bit
D Beam Controller
Modulation Bar
Touch Controller
OUTPUT Jacks (L (MONO), R) (1/4 inch phone type)
PHONES Jack (Stereo 1/4 inch phone type)
EXT IN Jack (Stereo mini type)
FOOT PEDAL Jack (Assignable)
USB COMPUTER Connector (for USB MIDI)
USB MEMORY Slot
MIDI OUT Connector (V-LINK)
DC IN jack
32/40/48/56/64/80/96/112/128/
160/192/224/256/320 kbps,
VBR (Variable Bit Rate)
AC Adaptor
Power Supply
Current Draw 600 mA
Battery Life for
Continuous Use
Dimensions
Weight
Accessories
Options
* In the interest of product improvement, the specications and/or appearance of
this unit are subject to change without prior notice.
Ni-MH AA SIZE Rechargeable Battery x 8
* Batteries sold separately.
* Do not use alkaline batteries or zinc-carbon batteries.
Ni-MH Rechargeable batteries: approximately 4 hours
(This gure will vary depending on the actual conditions
of use.)
832 (W) x 245 (D) x 95 (H) mm
32-13/16 (W) x 9-11/16 (D) x 3-3/4 (H) inches
3.7 kg
8 lbs 3 oz
(Excluding AC Adaptor)
Owner’s Manual, Quick Guide
Tutorial DVD
Strap
Panel Sticker
USB MEMORY Connector Cap
AC adaptor (PSB-1U (S))
Pedal Switch: DP Series
Expression Pedal: EV-5
USB Memory
* Use USB memory sold by Roland. We cannot
guarantee operation if other products are used.
Deutsch Français Italiano Español Português NederlandsEnglish
Error Message List
Message Description
E NP
E rr
F UL
Empty The USB memory does not contain the necessary data.
Error Can’t access USB memory. Make sure that the USB memory is inserted.
Memory Full Processing could not be carried out because there is insucient free space on the USB memory.
23
Page 26
USING THE UNIT SAFELY
Used for instructions intended to alert the
user to the risk of death or severe injury
should the unit be used improperly.
Used for instructions intended to alert the
user to the risk of injury or material damage
should the unit be used improperly.
* Material dam age refer s to damage o r
other adverse eects caused with respect
to the home and all its furnishings, as well
to domestic animals or pets.
WARNING
Do not open (or modify in any way) the unit or
its AC adaptor.
Do not attempt to repair the unit, or replace
parts within it (except when this manual
provides specic instructions directing you to
do so). Refer all servicing to your retailer, the
nearest Roland Service Center, or an authorized
Roland distributor, as listed on the “I nformation” page.
Never install the unit in any of the following
locations.
• Subject to temperature extremes (e.g.,
direct sunlight in an enclosed vehicle, near
a heating duct, on top of heat-generating
equipment); or are
• Damp (e.g., baths, washrooms, on wet
oors); or are
• Exposed to steam or smoke; or are
• Subject to salt exposure; or are
• Humid; or are
• Exposed to rain; or are
• Dusty or sandy; or are
• Subject to high levels of vibration and
shakiness.
If you’re using the Lucina AX-09 without a
shoulder strap, make sure you always place it
so it’s level and sure to remain stable. Never
place it on stands that could wobble, or on
inclined surfaces.
Be sure to use only the AC adaptor supplied
with the unit. Also, make sure the line voltage
at the installation matches the input voltage
specied on the AC adaptor’s body. Other
AC adaptors may use a dierent polarity, or
be designed for a dierent voltage, so their
use could result in damage, malfunction, or
electric shock.
Use only the attached power-supply cord. Also,
the supplied power cord must not be used with
any other device.
Do not excessively twist or bend the power
cord, nor place heavy objects on it. Doing
so can damage the cord, producing severed
elements and short circuits. Damaged cords are
re and shock hazards!
This unit, either alone or in combination with
an amplier and headphones or speakers, may
be capable of producing sound levels that
could cause permanent hearing loss. Do not
operate for a long period of time at a high volume level, or at a level that is uncomfortable.
If you experience any hearing loss or ringing
in the ears, you should immediately stop using
the unit, and consult an audiologist.
Do not allow any objects (e.g., ammable material, coins, pins); or liquids of any kind (water,
soft drinks, etc.) to penetrate the unit.
24
The symbol alerts the user to important instructions or
warnings .The specic meaning of the s ymbol is
determined by the design contained within the triangle. In
the case of t he symbol at left, it is used for genera l
cautions, warnings, or alerts to danger.
The symbol alerts the user to items that must never be
carried out (are forbidden). The specic thing that must
not be done is indicated by the design contained within
the circle. In the case of the symbol at left, it means that
the unit must never be disassembled.
The symbol alerts the user to things that must be carried
out. The specic thing that must be done is indicated by
the design contained within the circle. In the case of the
symbol at left, it means that the power-cord plug must be
unplugged from the outlet.
WARNING
Immediately turn the power o, remove the AC
adaptor from the outlet, and request servicing
by your retailer, the nearest Roland Service
Center, or an authorized Roland distributor, as
listed on the “Information” page when:
• The AC adaptor, the power-supply cord, or
the plug has been damaged; or
• If smoke or unusual odor occurs
• Objects have fallen into, or liquid has been
spilled onto the unit; or
• The unit has been exposed to rain (or
otherwise has become wet); or
• The unit does not appear to operate
normally or exhibits a marked change in
performance.
In households with small children, an adult
should provide supervision until the child is
capable of following all the rules essential for
the safe operation of the unit.
Protect the unit from strong impact.
(Do not drop it!)
Do not force the unit’s power-supply cord to
share an outlet with an unreasonable number
of other devices. Be especially careful when
using extension cords—the total power used
by all devices you have connected to the extension cord’s outlet must never exceed the power
rating (watts/amperes) for the extension cord.
Excessive loads can cause the insulation on the
cord to heat up and eventually melt through.
Before using the unit in a foreign country,
consult with your retailer, the nearest Roland
Service Center, or an authorized Roland distributor, as listed on the “I nformation” page.
Batteries must never be recharged, heated,
taken apart, or thrown into re or water.
Never expose Battery to excessive heat such as
sunshine, re or the like.
CAUTION
The unit and the AC adaptor should be located
so their location or position does not interfere
with their proper ventilation.
Always grasp only the plug on the AC adaptor
cord when plugging into, or unplugging from,
an outlet or this unit.
At regular intervals, you should unplug the AC
adaptor and clean it by using a dry cloth to
wipe all dust and other accumulations away
from its prongs. Also, disconnect the power
plug from the power outlet whenever the unit
is to remain unused for an extended period of
time. Any accumulation of dust between the
power plug and the power outlet can result in
poor insulation and lead to re.
Try to prevent cords and cables from becoming
CAUTION
entangled. Also, all cords and cables should be
placed so they are out of the reach of children.
Never climb on top of, nor place heavy objects
on the unit.
Never handle the AC adaptor or its plugs with
wet hands when plugging into, or unplugging
from, an outlet or this unit.
Before moving the unit, disconnect the AC
adaptor and all cords coming from external
devices.
Before cleaning the unit, turn o the power and
unplug the AC adaptor from the outlet (p. 7).
Whenever you suspect the possibility of lightning in your area, disconnect the AC adaptor
from the outlet.
If used improperly, batteries may explode or
leak and cause damage or injury. In the interest
of safety, please read and observe the following
precautions (p. 6).
• Carefully follow the installation instructions
for batteries, and make sure you observe the
correct polarity.
• Avoid using new batteries together with
used ones. In addition, avoid mixing dierent
types of batteries.
• Remove the batteries whenever the unit is
to remain unused for an extended period
of time.
• If a battery has leaked, use a soft piece of
cloth or paper towel to wipe all remnants
of the discharge from the battery
compartment. Then install new batteries.
To avoid inammation of the skin, make
sure that none of the battery discharge
gets onto your hands or skin. Exercise the
utmost caution so that none of the discharge
gets near your eyes. Immediately rinse the
aected area with running water if any of the
discharge has entered the eyes.
• Never keep batteries together with metallic
objects such as ballpoint pens, necklaces,
hairpins, etc.
Used batteries must be disposed of in compliance with whatever regulations for their safe
disposal that may be observed in the region in
which you live.
Keep the USB MEMORY connector cap you
may remove and the included USB MEMORY
connector cap in a safe place out of children’s
reach, so there is no chance of them being
swallowed accidentally.
Page 27

IMPORTANT NOTES
Power Supply: Use of Batteries
• Do not connect this unit to same electrical outlet that is
being used by an electrical appliance that is controlled
by an inverter (such as a refrigerator, washing machine,
microwave oven, or air conditioner), or that contains a
motor. Depending on the way in which the electrical
appliance is used, power supply noise may cause this
unit to malfunction or may produce audible noise. If it is
not practical to use a separate electrical outlet, connect
a power supply noise lter between this unit and the
electrical outlet.
• The AC adaptor will begin to generate heat after long
hours of consecutive use. This is normal, and is not a cause
for concern.
• The use of an AC adaptor is recommended as the unit’s
power consumption is relatively high. Should you prefer
to use batteries, please use the nickel hydrogen type.
• When installing or replacing batteries, always turn o
the power on this unit and disconnect any other devices
you may have connected. This way, you can prevent
malfunction and/or damage to speakers or other devices.
• Before connecting this unit to other devices, turn o the
power to all units. This will help prevent malfunctions
and/or damage to speakers or other devices.
• If batteries are installed, disconnecting or reconnecting
the power cord at the AC outlet or disconnecting the DC
plug from the Lucina AX-09’s rear panel while the power is
on will cause the power to turn o. You must turn o the
power before you connect or disconnect the power cord
or AC adaptor.
Placement
• Using the unit near power ampliers (or other equipment
containing large power transformers) may induce hum. To
alleviate the problem, change the orientation of this unit;
or move it farther away from the source of interference.
• This device may interfere with radio and television
reception. Do not use this device in the vicinity of such
receivers.
• Noise may be produced if wireless communications
devices, such as cell phones, are operated in the vicinity
of this unit. Such noise could occur when receiving
or initiating a call, or while conversing. Should you
experience such problems, you should relocate such
wireless devices so they are at a greater distance from this
unit, or switch them o.
• Do not expose the unit to direct sunlight, place it near
devices that radiate heat, leave it inside an enclosed
vehicle, or otherwise subject it to temperature extremes.
Excessive heat can deform or discolor the unit.
• When moved from one location to another where the
temperature and/or humidity is very dierent, water
droplets (condensation) may form inside the unit.
Damage or malfunction may result if you attempt to use
the unit in this condition. Therefore, before using the
unit, you must allow it to stand for several hours, until the
condensation has completely evaporated.
• Do not allow objects to remain on top of the keyboard.
This can be the cause of malfunction, such as keys ceasing
to produce sound.
• Depending on the material and temperature of the
surface on which you place the unit, its rubber feet may
discolor or mar the surface.
You can place a piece of felt or cloth under the rubber feet
to prevent this from happening. If you do so, please make
sure that the unit will not slip or move accidentally.
Maintenance
• For everyday cleaning wipe the unit with a soft, dry cloth
or one that has been slightly dampened with water. To
remove stubborn dirt, use a cloth impregnated with a
mild, non-abrasive detergent. Afterwards, be sure to wipe
the unit thoroughly with a soft, dry cloth.
• Never use benzine, thinners, alcohol or solvents of any
kind, to avoid the possibility of discoloration and/or
deformation.
Repairs and Data
• Please be aware that all data contained in the unit’s
memory may be lost when the unit is sent for repairs.
Important data should always be backed up the USB
memory, or written down on paper (when possible).
During repairs, due care is taken to avoid the loss of data.
However, in certain cases (such as when circuitry related
to memory itself is out of order), we regret that it may not
be possible to restore the data, and Roland assumes no
liability concerning such loss of data.
Using USB Memories
• Carefully insert the USB memory all the way in-until it is
rmly in place.
• Never touch the terminals of the USB memory. Also, avoid
getting the terminals dirty.
• USB memories are constructed using precision
components; handle the cards carefully, paying particular
note to the following.
• To prevent damage to the cards from static
electricity, be sure to discharge any static electricity
from your own body before handling the cards.
• Do not touch or allow metal to come into contact
with the contact portion of the cards.
• Do not bend, drop, or subject cards to strong shock
or vibration.
• Do not keep cards in direct sunlight, in closed
vehicles, or other such locations.
• Do not allow cards to become wet.
• Do not disassemble or modify the cards.
Handling DVDs
• Avoid touching or scratching the shiny underside
(encoded surface) of the disc. Damaged or dirty DVD
discs may not be read properly. Keep your discs clean
using a commercially available disk cleaner.
Strap Holder Precautions
• Never unscrew the strap pins to avoid damaging
the Lucina AX-09’s plastic housing, which eventually
compromises overall stability and safety.
• To avoid dropping the unit and damaging it or causing
injuries to yourself or other people, be sure to doublecheck whether the supplied strap is securely attached to
the two pins before using the Lucina AX-09.
• Roland recommends installing commercially available
strap locks for guitar to guard against damage and
injuries caused by the strap coming loose while your are
playing.
Additional Precautions
• Please be aware that the contents of memory can be
irretrievably lost as a result of a malfunction, or the
improper operation of the unit. To protect yourself against
the risk of loosing important data, we recommend that
you periodically save a backup copy of important data
you have stored in the USB memory.
• Unfortunately, it may be impossible to restore the
contents of data that was stored on a USB memory
or the internal memory once it has been lost. Roland
Corporation assumes no liability concerning such loss
of data.
• Use a reasonable amount of care when using the unit’s
buttons, sliders, or other controls; and when using
its jacks and connectors. Rough handling can lead to
malfunctions.
• Never strike or apply strong pressure to the display.
• When connecting / disconnecting all cables, grasp the
connector itself-never pull on the cable. This way you will
avoid causing shorts, or damage to the cable’s internal
elements.
• To avoid disturbing your neighbors, try to keep the
unit’s volume at reasonable levels. You may prefer to use
headphones, so you do not need to be concerned about
those around you (especially when it is late at night).
• When you need to transport the unit, package it in the
box (including padding) that it came in, if possible.
Otherwise, you will need to use equivalent packaging
materials.
• Use only the specied expression pedal (EV-5; sold
separately). By connecting any other expression pedals,
you risk causing malfunction and/or damage to the unit.
• Some connection cables contain resistors. Do not use
cables that incorporate resistors for connecting to this
unit. The use of such cables can cause the sound level to
be extremely low, or impossible to hear. For information
on cable specications, contact the manufacturer of
the cable.
• The usable range of D Beam controller will become
extremely small when used under strong direct sunlight.
Please be aware of this when using the D Beam controller
outside.
• The explanations in this manual include illustrations that
depict what should typically be shown by the display.
Note, however, that your unit may incorporate a newer,
enhanced version of the system (e.g., includes newer
sounds), so what you actually see in the display may not
always match what appears in the manual.
• Microsoft and Windows are registered trademarks of
Microsoft Corporation.
• Windows® is known ocially as: “Microsoft® Windows®
operating system.”
• MMP (Moore Microprocessor Portfolio) refers to a patent
portfolio concerned with microprocessor architecture,
which was developed by Technology Properties Limited
(TPL). Roland has licensed this technology from the TPL
Group.
• MPEG Layer-3 audio compression technology is
licensed from Fraunhofer IIS Corporation and THOMSON
Multimedia Corporation.
• MatrixQuest™ 2010
TEPCO UQUEST, LTD. All
rights reserved.
The Lucina AX-09’s USB functionality uses MatrixQuest
middleware technology from TEPCO UQUEST, LTD.
• Featuring digital fonts by Yourname, Inc.
Digital font: Copyright © Yourname, Inc.
• Roland and Lucina are either registered trademarks or
trademarks of Roland Corporation in the United States
and/or other countries.
• All product names mentioned in this document are
trademarks or registered trademarks of their respective
owners.
Deutsch Français Italiano Español Português NederlandsEnglish
25
Page 28
Index
A
AC ADAPTOR . . . . . . . . . . . . . . . . . . . . . . . 7
ADLIB . . . . . . . . . . . . . . . . . . . . . . . . . . . . . 13
AFTERTO UCH. . . . . . . . . . . . . . . . . . 13, 14
AIFF . . . . . . . . . . . . . . . . . . . . . . . . . . . . . . . 15
ARABIA N SCALE . . . . . . . . . . . . . . . . . . . 17
ASSIGN ABLE. . . . . . . . . . . . . . . . . . . . . . . 12
ATTACK TIME . . . . . . . . . . . . . . 13, 14, 16
AUDIO FI LE . . . . . . . . . . . . . . . . . . . . . . . . 14
AUDIO PL AYER . . . . . . . . . . . . . . . . . . . . 15
AUDIO P LAYE R BUTTON . . . . . . . . . . 15
B
BACKING UP . . . . . . . . . . . . . . . . . . . . . . . 19
BATTERIE S . . . . . . . . . . . . . . . . . . . . . . . . . . 6
BATTERY COM PAR TMENT . . . . . . . . . . . 6
C
COMPUTE R . . . . . . . . . . . . . . . . . . . . . . . . 21
CORD HOO K . . . . . . . . . . . . . . . . . . . . . . . . 7
COUNT IN . . . . . . . . . . . . . . . . . . . . . . . . . 18
CUTOFF . . . . . . . . . . . . . . . . . . . 13, 14, 16
D
D BEAM CO NTROLLER . . . . . . . . . . . . . 12
DC IN JAC K . . . . . . . . . . . . . . . . . . . . . . . . . 7
E
EQUAL TEMPE RAMENT . . . . . . . . . . . . 17
ERROR M ESSAGE LIST . . . . . . . . . . . . . 23
EXPRES SION . . . . . . . . . . . . . . . . . . . 12, 13
EXPRES SION PEDAL . . . . . . . . . . . . . . . 13
EXT IN J ACK . . . . . . . . . . . . . . . . . . . . . . . 14
F
FACTORY RESE T . . . . . . . . . . . . . . . . . . . 19
FAVORITE . . . . . . . . . . . . . . . . . . . . . . . . . . 10
FAVORITE A / B BUTTON . . . . . . . . 10
FILTER . . . . . . . . . . . . . . . . . . . . . . . . . . . . . 12
FOOT PEDA L . . . . . . . . . . . . . . . . . . 13, 14
FOOT PEDA L JACK . . . . . . . . . . . . . . . . . 13
H
HEADPH ONES . . . . . . . . . . . . . . . . . . . . . . 8
HOLD . . . . . . . . . . . . . . . . . . . . . . . . . 12, 13
I
INC/+ / DEC/ BUTTO NS . . . . . . . . . 9
K
KEY SCA LE TUNE . . . . . . . . . . . . . . . . . . 17
L
LET TERS . . . . . . . . . . . . . . . . . . . . . . . . . . . . 2
L/MONO J ACK . . . . . . . . . . . . . . . . . . . . . . 8
LOCK BU TTON . . . . . . . . . . . . . . . . . . . 14
LOCK FUNC TION . . . . . . . . . . . . . . . . . . 14
M
MASTER TUN E . . . . . . . . . . . . . . . . . . . . . 17
METRO NOME . . . . . . . . . . . . . . . . . . . . . . 18
MIDI . . . . . . . . . . . . . . . . . . . . . . . . . . . . . . . 20
MIDI IM PLEMENTATION CHART . . . . 26
MODULATION . . . . . . . . . . . . . . . . . 12, 13
MODULATION BAR . . . . . . . . . . . . . . . . 11
MP3 . . . . . . . . . . . . . . . . . . . . . . . . . . . . . . . 15
N
NIMH A A RECHARGEAB LE BATTERIES
O
OCTAVE + / BUTTON . . . . . . . . . . 11
OUTPUT JACKS . . . . . . . . . . . . . . . . . . . . . 8
P
PAN . . . . . . . . . . . . . . . . . . . . . . . . . . . 12, 13
PEDAL DO WN . . . . . . . . . . . . . . . . . . . . . 14
PEDAL SW ITCH . . . . . . . . . . . . . . . . . . . . 13
PEDAL UP . . . . . . . . . . . . . . . . . . . . . . . . . 14
PHONES JACK . . . . . . . . . . . . . . . . . . . . . . 8
PITCH . . . . . . . . . . . . . . . . . . . . . . . . . . . . . 12
PORTABLE AUD IO PLAYER . . . . . . . . . 14
PORTAMENTO . . . . . . . . . . . . . 12, 13, 16
PORTAMENTO TIM E. . . . . . . . 12, 13, 16
POWER SWITCH . . . . . . . . . . . . . . . . . . . 8
PREVIE W . . . . . . . . . . . . . . . . . . . . . . . . . . . 9
PREVI EW BUTTON . . . . . . . . . . . . . . . . . 9
R
REGIST ERING A TONE . . . . . . . . . . . . . . 10
REGULA R TONE . . . . . . . . . . . . . . . . . . . . . 9
RELEAS E TIME . . . . . . . . . . . . . 13, 14, 16
RESET . . . . . . . . . . . . . . . . . . . . . . . . . . . . . 19
RESONA NCE . . . . . . . . . . . . . . . 13, 14, 16
RESTORI NG . . . . . . . . . . . . . . . . . . . . . . . . 19
REVERB . . . . . . . . . . . . . . . . . . . . . . . . . . . . 16
S
SECURI TY SLOT . . . . . . . . . . . . . . . . . . . . . 5
SOLO SYNT H . . . . . . . . . . . . . . . . . . . . . . 13
SOSTEN UTO . . . . . . . . . . . . . . . . . . . . . . . 13
MIDI Implementation Chart
SPEAKE RS . . . . . . . . . . . . . . . . . . . . . . . . . . 8
SPECIA L TONE . . . . . . . . . . . . . . . . . . . . . . 9
6
SPECI AL TONE BUTTON . . . . . . . . . . . 9
SPECIF ICATIONS . . . . . . . . . . . . . . . . . . . 23
STRAP . . . . . . . . . . . . . . . . . . . . . . . . . . . . . . 7
STRAP P IN . . . . . . . . . . . . . . . . . . . . . . . . . . 7
T
TONE . . . . . . . . . . . . . . . . . . . . . . . . . . . . . . . 9
TONE 1 6 BUTTONS . . . . . . . . . . . . . 9
TONE PARAMET ERS . . . . . . . . . . . . . . . . 16
TONE SET TINGS . . . . . . . . . . . . . . . . . . . 16
TOUCH CON TROLLER . . . . . . . . . . . . . . 11
TRANS POSE BUTTO N . . . . . . . . . . . . 11
TROUBL ESHOOTING . . . . . . . . . . . . . . . 22
TUNING . . . . . . . . . . . . . . . . . . . . . . . . . . . 17
U
USB COMP UTER CONNEC TOR . . . . . 21
USB DRI VER . . . . . . . . . . . . . . . . . . . 18, 21
USB MEM ORY . . . . . . . . . . . . . . . . . 15, 19
USB MEM ORY SLOT . . . . . . . . . . . . . . . . 15
UTILIT Y . . . . . . . . . . . . . . . . . . . . . . . . . . . . 18
V
VERSIO N . . . . . . . . . . . . . . . . . . . . . . . . . . 18
VLINK . . . . . . . . . . . . . . . . . . . . . . . . . . . . . 21
VOLUME . . . . . . . . . . . . . . . . . . . 12, 13, 16
VOLUME KNOB . . . . . . . . . . . . . . . . . . . . 8
W
WAV . . . . . . . . . . . . . . . . . . . . . . . . . . . . . . . 15
WRITE BUTTON . . . . . . . . . . . . . . 10, 18
26
Lucina AX-09
Basic
Channel
Mode
Note
Number
Velocity
After
Touch
Pitch Bend
Control
Change
Program
Change
System Exclusive
System
Common
System
Real Time
Aux
Messages
Notes
Mode 1: OMNI ON, POLY
Mode 3: OMNI OFF, POLY
Function...
Default
Changed
Default
Message
Altered
True Voice
Note ON
Note OFF
Key’s
Ch’s
True #
Song Position Pointer
Song Sel
Tune
Clock
Commands
All Sounds O
Reset All Controllers
Local On/O
All Notes O
Active Sensing
Reset
0, 32
6, 38
100, 101
Transmitted Recognized Remarks
1–16
1–16
Mode 3
Mono, Poly
**************
7–126
**************
O
O
X
O
O
O
1
O
5
O
X
7
O
10
O
11
O
64
O
65
O
66
O
71
O
72
O
73
O
74
O
75
X
84
X
91
X (Reverb)
93
X (Chorus)
X
O *1
**************
X X
X
X
X
X
X
X
X
X
X
O
X
*1 O X is selectable
*2 Recognized as M=1 even if M≠1
Mode 2: OMNI ON, MONO
Mode 4: OMNI OFF, MONO
*1 O
1–16
1–16
Mode 3
Mode 3, 4 (M=1)
X
0–127
0–127
O
O
O
O
O
O
O
O
O
O
O
O
O
O
O
O
O
O
O
O
O
O
O
O
0–127
X
X
X
X
X
O
O
X
O (123–127)
X
X
Memorized
*2
Bank Select
Modulation
Portamento Time
Data entry
Volume
Panpot
Expression
Hold 1
Portamento SW
Sostenuto
Resonance
Release Time
Attack Time
Cuto
Sound Control
Portamento Control
Eect 1 Depth
Eect 3 Depth
RPN LSB, MSB
Program No. 1–128
Date : Jan. 1, 2010Synthesizer
Version : 1.00
O: Yes
X: No
Page 29
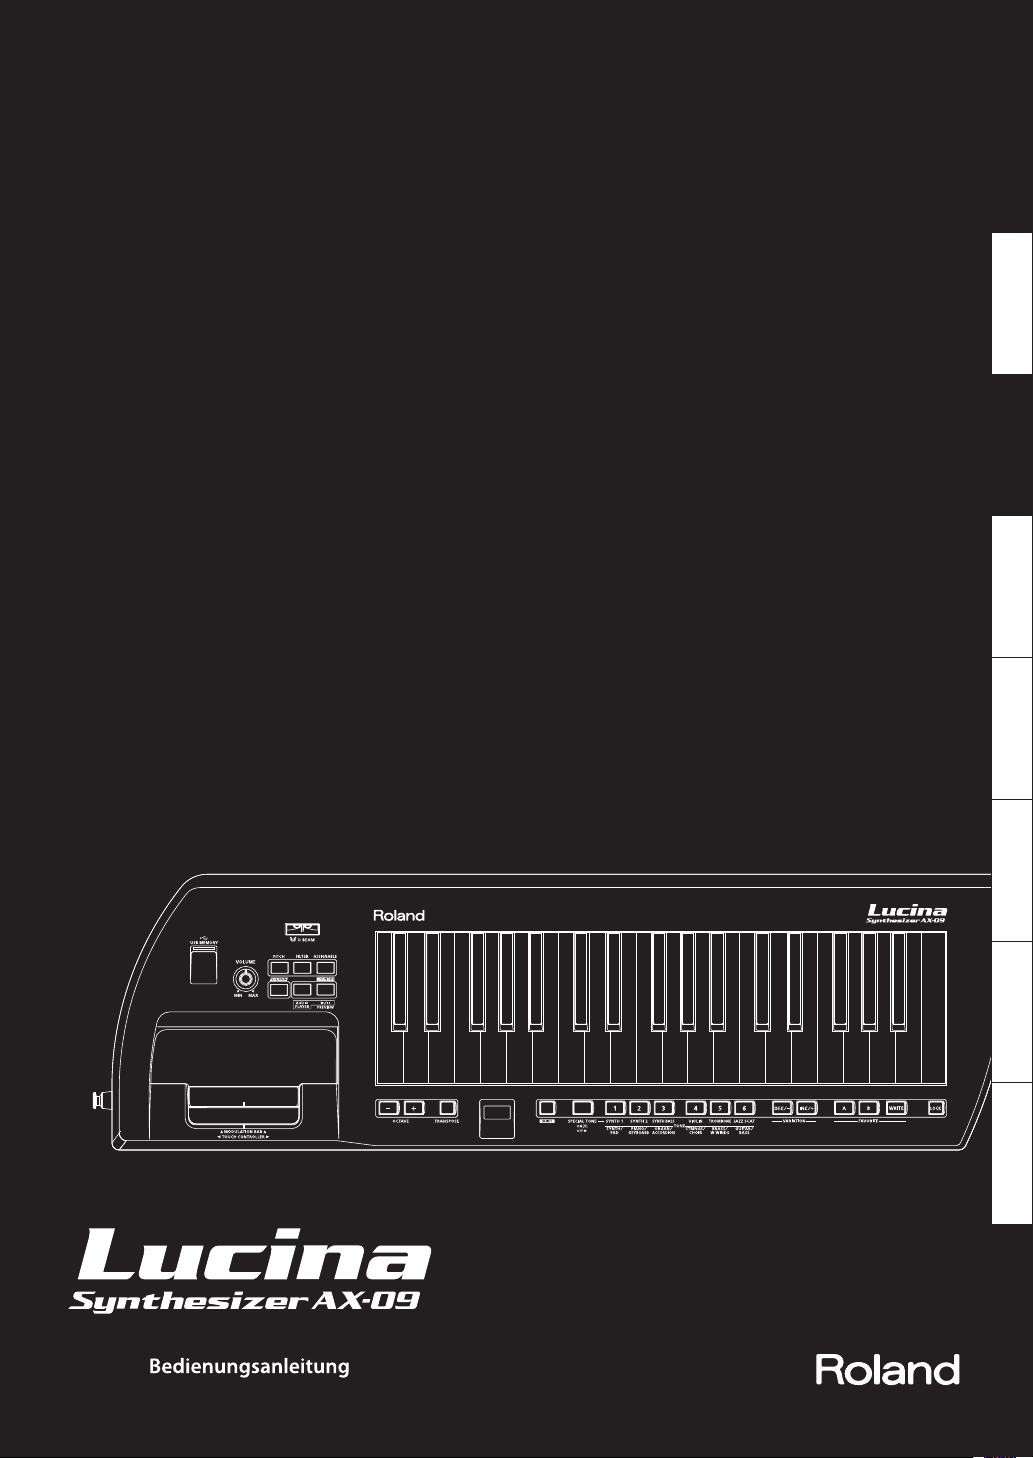
Deutsch Français Italiano Español Português NederlandsEnglish
Page 30

Funktionen
Sounds für garantierten Spielspaß
• Die insgesamt 144 Sounds decken viele Stilrichtungen ab und enthalten nicht nur
Synthesizersounds, sondern auch Klavier-, Orgel-, Streicher-, Blechblasinstrumten- und
Gitarrensounds.
• Darüber hinaus gibt es sechs sehr ausdrucksstarke „Spezielle Sounds“ (Special Tones).
Diese sechs hochwertigen Sounds („Synth Lead“, „Poly Synth“, „Synth Bass“, „Jazz Scat“, „Violin“ und
„Trombone“) wurden speziell für den Lucina AX-09 entwickelt.
Einfache Bedienung
• Die Bedienung ist sehr einfach. Schalten Sie einfach das Gerät ein, und wählen Sie einen Sound aus.
• Der Lucina AX-09 ist leicht, trendy und kann mit Batterien betrieben werden. Sie können deshalb
überall und jederzeit mit dem Instrument spielen. Den Lucina AX-09 können Sie beim Spielen mit
dem Gurt über die Schulter hängen, was ein aktiveres und vielseitigeres Spielen ermöglicht.
Mehr Spielspaß als je zuvor
• Dank des DBeam-Controllers, des Modulationshebels und des Touch-Controllers haben Sie die
einzigartigen, ausdrucksstarken Funktionen eines traditionellen Synthesizers zur Verfügung.
• Sie können auf einfache Weise zu Ihren Lieblingssongs spielen, indem Sie entweder Ihren
mobilen Audio-Player an die EXT IN-Buchse anschließen oder einen USB-Speicher anschließen
und von diesem direkt eine Audiodatei abspielen.
Anzeige der Buchstaben auf dem Lucina AX-09
J KLLNMnNoOPPQQrRSStTUUuV WXXYYZZ
AABBCCDDEEFFGGhHiIJ
Copyright © 2010 ROLAND CORPORATION
Alle Rechte vorbehalten. Diese Publikation darf weder ganz noch teilweise in keiner Form ohne schriftliche Genehmigung
durch die ROLAND CORPORATION reproduziert werden.
Lesen Sie vor der Verwendung dieses Geräts die folgenden Abschnitte aufmerksam durch: „SICHERER BETRIEB DES GERÄTS“ (S. 24) und „WICHTIGE
HINWEISE“ (S. 25). Diese Abschnitte liefern wichtige Hinweise zum ordnungsgemäßen Betrieb des Geräts. Damit Sie das Gefühl bekommen, die
gesamte Funktionalität Ihres neuen Geräts erfasst zu haben, sollten Sie sich die Bedienungsanleitung vollständig durchlesen. Die Bedienungsanleitung sollte an einer gut erreichbaren Stelle aufbewahrt werden, um darin nachschlagen zu können.
2
Page 31

Inhalt
Funktionen . . . . . . . . . . . . . . . . . . . . . . . . . . . . . . . .2
Anzeige der Buchstaben auf dem Lucina AX-09 . . . . . . 2
Inhalt . . . . . . . . . . . . . . . . . . . . . . . . . . . . . . . . . . . . .3
Beschreibung des Bedienfelds . . . . . . . . . . . . . .4
Das Bedienfeld . . . . . . . . . . . . . . . . . . . . . . . . . . . . . . . . . . . . . . 4
Die Unterseite . . . . . . . . . . . . . . . . . . . . . . . . . . . . . . . . . . . . . . . 5
Die Rückseite . . . . . . . . . . . . . . . . . . . . . . . . . . . . . . . . . . . . . . . 5
Informationen zu Batterien . . . . . . . . . . . . . . . . .6
Einsetzen der Batterien/Akkus . . . . . . . . . . . . . . . . . . . . . . . 6
Überprüfen der verbleibenden Batteriespannung
Entnehmen der Batterien . . . . . . . . . . . . . . . . . . . . . . 6
Vorbereitung . . . . . . . . . . . . . . . . . . . . . . . . . . . . . .7
Anschließen des Netzadapters . . . . . . . . . . . . . . . . . . . . . . . 7
Befestigen des Gurts . . . . . . . . . . . . . . . . . . . . . . . . . . . . . . . . 7
Anschließen an Lautsprecher . . . . . . . . . . . . . . . . . . . . . . . . 8
Anschließen eines Kopfhörers . . . . . . . . . . . . . . . . . . . . . . . 8
Einschalten des Geräts . . . . . . . . . . . . . . . . . . . . . . . . . . . . . . 8
Auswählen von Sounds . . . . . . . . . . . . . . . . . . . .9
Auswählen eines regulären Sounds . . . . . . . . . . . . . . . . . . 9
Auswählen eines speziellen Sounds . . . . . . . . . . . . . . . . . . 9
Demofunktion für Sounds . . . . . . . . . . . . . . . . . . . . . . . . . . . 9
Registrieren häug verwendeter Sounds im Speicher
(FAVORITE) . . . . . . . . . . . . . . . . . . . . . . . . . . . . . . . . . . . . . . . . . 10
Verwenden der Spielfunktionen . . . . . . . . . . .11
Verschieben der Tonhöhe um Oktaven . . . . . . . . . . . . . . 11
Verschieben der Tonhöhe um Halbtöne . . . . . . . . . . . . . 11
Verwenden des Touch-Controllers . . . . . . . . . . . . . . . . . . 11
Einstellen des Tonhöhenbereichs des
Touch-Controllers . . . . . . . . . . . . . . . . . . . . . . . . . . . . 11
Verwenden des Modulationshebels . . . . . . . . . . . . . . . . . 11
Zuweisen des Spieleekts für den
Modulationshebel . . . . . . . . . . . . . . . . . . . . . . . . . . . . 12
Verwenden des D Beam-Controllers . . . . . . . . . . . . . . . . 12
Ändern der Einstellung für den
ASSIGNABLE-Taster . . . . . . . . . . . . . . . . . . . . . . . . . . . 12
Verwenden eines Fußtasters . . . . . . . . . . . . . . . . . . . . . . . . 13
Verhindern des Wechselns von Sounds während des
Spielens (Lock-Funktion) . . . . . . . . . . . . . . . . . . . . . . . . . . . 14
Spielen zu Musik eines mobilen Audio-Players . . . . . . 14
Spielen zu Musik von einer Audiodatei eines
USB-Speichers . . . . . . . . . . . . . . . . . . . . . . . . . . . . . . . . . . . . . 14
Einstellungen für den Audio-Player . . . . . . . . . . . 15
Bearbeiten der Klang-Parameter . . . . . . . . . . .16
Die Klang-Parameter . . . . . . . . . . . . . . . . . . . . . . . . . . . . . . . 16
Einstellungen für das Stimmen . . . . . . . . . . . .17
Masterstimmung (Master Tune) . . . . . . . . . . . . . . . . . . . . . 17
Temperierung (Key Scale Tune) . . . . . . . . . . . . . . . . . . . . . 17
Einstellen der Anschlagsempndlichkeit der
Tastatur . . . . . . . . . . . . . . . . . . . . . . . . . . . . . . . . . .17
Einstellen eines festen Werts für die Anschlagstärke
der Tastatur . . . . . . . . . . . . . . . . . . . . . . . . . . . . . . . . . . . . . . . . 17
6
Count-in / Metronom . . . . . . . . . . . . . . . . . . . . .18
Einstellungen für Count-in . . . . . . . . . . . . . . . . . . . . . . . . . . 18
Deutsch Français Italiano Español Português NederlandsEnglish
Verschiedene Einstellungen . . . . . . . . . . . . . . .18
Überprüfen der Versionsnummer des Lucina AX-09 . . 18
Einstellungen für den USB-Treiber . . . . . . . . . . . . . . . . . . 18
Sichern der Lucina AX-09-Einstellungen auf einem
USB-Speicher . . . . . . . . . . . . . . . . . . . . . . . . . . . . . . . . . . . . . . 19
Zurückübertragen der Daten von einem USB-Speicher .
Zurücksetzen auf die Werkseinstellungen
(Factory Reset) . . . . . . . . . . . . . . . . . . . . . . . . . . . . . . . . . . . . . 19
19
Anschließen externer MIDI-Geräte . . . . . . . . .20
Spielen von externen
MIDI-Instrumenten . . . . . . . . . . . . . . . . . . . . . . . . . . . . . . . . . 20
MIDI-Meldungen, die übertragen und
empfangen werden können . . . . . . . . . . . . . . . . . . 20
Anschließen eines MIDI-Klangerzeugers. . . . . . . 20
Vornehmen von MIDI-Einstellungen . . . . . . . . . . 20
Anschließen eines Computers über USB . . . . . . . . . . . . . 21
Videosteuerung (V-LINK) . . . . . . . . . . . . . . . . . . . . . . . . . . . 21
Mögliche Fehlerursachen . . . . . . . . . . . . . . . . .22
Technische Daten . . . . . . . . . . . . . . . . . . . . . . . . .23
Liste der Fehlermeldungen . . . . . . . . . . . . . . . .23
SICHERER BETRIEB DES GERÄTS . . . . . . . . . . . .24
WICHTIGE HINWEISE . . . . . . . . . . . . . . . . . . . . . .25
Index . . . . . . . . . . . . . . . . . . . . . . . . . . . . . . . . . . . .26
MIDI-Implementationstabelle . . . . . . . . . . . . . 26
3
Page 32

Beschreibung des Bedienfelds
Das Bedienfeld
11 12 13
14
1 1819
1. OCTAVE-Taster [+] / [–]
Mit diesen Tastern wird der Tastaturbereich in Schritten
von einer Oktave nach oben bzw. unten verschoben (S. 11).
2. [TRANSPOSE]-Taster
Wenn Sie diesen Taster gedrückt halten und den OCTAVETaster [+] oder [–] drücken, können Sie den Tastaturbereich
in Schritten von einem Halbton nach oben bzw. unten
verschieben (S. 11).
3. Display
Hier wird der ausgewählte Sound oder Modus bzw. der
Wert des aktuell bearbeiteten Parameters angezeigt.
4. [SHIFT]-Taster
Verwenden Sie diesen Taster zusammen mit anderen
Tastern, um verschiedene Funktionen auszuführen.
5. [SPECIAL TONE]-Taster
Drücken Sie diesen Taster, um spezielle Sounds (Special
Tones) auszuwählen.
6. TONE-Taster [1]–[6]
Mit diesen Tastern wählen Sie die Soundgruppe für
reguläre Sounds oder spezielle Sounds aus.
7. [INC/+] / [DEC/–]-Taster
Mit diesen Tastern wählen Sie Variationen der regulären
Sounds aus.
8. FAVORITE [A] / [B]-Taster
Mit diesen Tastern wählen Sie den FAVORITE-Speicherplatz
aus (S. 10), in dem Sie einen bevorzugten Sound (FAVORITE)
registrieren möchten.
9. [WRITE]-Taster
Mit diesem Taster werden die von Ihnen bearbeiteten
Einstellungen oder der von Ihnen als FAVORITE (bevorzugter
Sound) registrierte Sound gespeichert (S. 10, S. 18).
7617 82153164 5 9 10
10. [LOCK]-Taster
Wenn dieser Taster eingeschaltet ist, können die Sounds
nicht gewechselt werden. Mit diesem Taster verhindern
Sie, dass der Sound versehentlich gewechselt wird (S. 14).
11. USB MEMORY-Steckplatz
Hier können Sie einen USB-Speicher anschließen (separat
erhältlich) (S. 15).
12. [VOLUME]-Regler
Mit diesem Regler wird die Lautstärke eingestellt.
13. D Beam [PITCH] / [FILTER] / [ASSIGNABLE]-Taster
Mit diesen Tastern wird der D Beam-Controller ein- und
ausgeschaltet.
Wenn Sie die Hand über dem D Beam-Controller halten
und auf- und abwärts bewegen, können Sie verschiedene
Klangeekte anwenden (S. 12).
14. [V-LINK]-Taster
Mit diesem Taster wird die V-LINK-Funktion ein- und
ausgeschaltet (S. 21).
15. [AUDIO PLAYER]-Taster
Wenn Sie diesen Taster aktivieren, können Sie
Audiodateien aus dem USB-Speicher wiedergeben (S. 14).
16. [ / PREVIEW]-Taster
Wenn der [AUDIO PLAYER]-Taster leuchtet, wird mit diesem
Taster die Wiedergabe von Audiodateien auf einem
USB-Speicher gestartet bzw. gestoppt.
Wenn der [AUDIO PLAYER]-Taster nicht leuchtet, wird
mit diesem Taster eine Klangdemonstration des aktuell
ausgewählten Sounds gestartet bzw. gestoppt.
Wenn Sie ein „Count-in“ wünschen, drücken Sie bei
gedrücktem [PREVIEW]-Taster den Modulationshebel.
4
Page 33

17. MODULATION BAR / TOUCH CONTROLLER
Durch Drücken des Modulationshebels (Modulation Bar)
wird ein Vibrato-Eekt ausgelöst. Sie können auch einen
Halteeekt (HOLD) für die Sounds aktivieren (S. 11).
Wenn Sie den Touch-Controller mit Ihrem Finger berühren
und diesen nach links oder rechts bewegen, wird die
Tonhöhe geändert (S. 11).
Die Unterseite
18. Gurthalterung
Befestigen Sie den mitgelieferten Gurt an dieser Halterung
(S. 7).
19. Gurthalterung (A)
Befestigen Sie den mitgelieferten Gurt an dieser Halterung.
In Abhängigkeit von Ihrem Spielstil können Sie entweder
diese Halterung oder die Gurthalterung (B) an der
Rückseite des Lucina AX-09 verwenden (S. 7).
Die Rückseite
1 82 3 4 95 106 7
1. OUTPUT-Buchsen (L/MONO, R)
Die Soundausgabe des Lucina AX-09 erfolgt über diese
Buchsen. Schließen Sie hier Ihr Lautsprechersystem an.
Für die Monowiedergabe verkabeln Sie nur die
L/MONO-Buchse.
2. MIDI OUT-Anschluss
Hier können Sie externe MIDI-Instrumente anschließen
und über den Lucina Lucina AX-09 spielen (fernsteuern)
(S. 20).
3. FOOT PEDAL-Buchse
Hier können Sie Sie einen separat erhältlichen Fußtaster
der DP-Serie von Roland anschließen.
Alternativ können Sie auch ein Expression-Pedal (EV-5;
separat erhältlich) anschließen (S. 13).
4. [POWER]-Schalter
Schaltet die Stromversorgung ein und aus (S. 8).
Wenn Sie den mitgelieferten Netzadapter verwenden und
die Stromversorgung vollständig unterbrechen möchten,
schalten Sie diesen POWER-Schalter (Netzschalter) auf die
Position OFF, und ziehen Sie dann den Netzadapter aus der
Steckdose.
1 2
1. Gurthalterung (B)
Befestigen Sie den mitgelieferten Gurt an dieser Halterung.
In Abhängigkeit von Ihrem Spielstil können Sie entweder
diese Halterung oder die Gurthalterung (A) seitlich des
Lucina AX-09 verwenden (S. 7).
2. Batteriefach
Hier können Sie wiederauadbare Nickel-MetallhydridBatterien der Größe AA einlegen (S. 6).
5. DC IN-Buchse
Schließen Sie hier den mitgelieferten Netzadapter an (S. 7).
6. Kabelklemme
Hiermit befestigen Sie das Kabel des mitgelieferten
Netzadapters (S. 7).
7. Security Slot (Sicherheitsschloss) ( )
http://www.kensington.com/
8. USB COMPUTER-Anschluss
Verwenden Sie ein USB-Kabel zum Anschließen des Lucina
AX-09 an Ihren Computer (S. 21).
9. EXT IN-Buchse
Schließen Sie hier Ihren mobilen Audio-Player oder
eine sonstige Klangquelle an. Das über diese Buchse
eingehende Signal wird über die OUTPUT-Buchsen und die
PHONES-Buchse ausgegeben (S. 14).
10. PHONES-Buchse
Hier kann ein Kopfhörer (Roland RH-Serie, separat
erhältlich) mit einem Stereo-Ministecker (3,5-mm-Buchse)
angeschlossen werden (S. 8).
Deutsch Français Italiano Español Português NederlandsEnglish
5
Page 34

Informationen zu Batterien
Wenn Sie den AX-09 mit Batterien betreiben, benötigen Sie acht Nickel-Metallhydridakkus der Größe AA.
Die Batterielebensdauer hängt von den Nutzungsbedingungen ab. Im Dauerbetrieb kann das Gerät etwa 4 Stunden
gespielt werden.
Informationen zu Akkus
Bei der Verwendung von Akkus verkürzt sich in der Regel die Lebensdauer der Akkus mit jedem Ladevorgang. Sie
müssen die Akkus ersetzen, wenn sie nach dem Auaden in kurzer Zeit wieder entladen sein sollten.
Einsetzen der Batterien/Akkus
1. Schalten Sie den Lucina AX-09 aus (S. 8).
2. Nehmen Sie die Abdeckung des Batteriefachs
ab, das sich auf der Unterseite des Lucina AX-09
bendet.
Drücken Sie die Laschen des Batteriefachs, nehmen Sie die
Abdeckung ab und legen diese beiseite.
3. Setzen Sie die Batterien in das Batteriefach ein.
Achten Sie dabei auf die richtige Polung (Ausrichtung der
Pole +/–) jeder Batterie.
4. Setzen Sie die Abdeckung des Batteriefachs
wieder auf.
* Wenn Sie das Gerät umdrehen, legen Sie es auf eine weiche
Unterlage (z.B. ein Kissen), um Schäden an den Tastern und
Reglern zu vermeiden.
* Gehen Sie vorsichtig mit dem Gerät um, während Sie es
umdrehen, damit es nicht herunterfällt oder umkippt.
Überprüfen der verbleibenden Batteriespannung
Wenn die verbleibende Batteriespannung
niedrig ist, blinken im Display drei LEDs.
Tauschen Sie in diesem Fall die Batterien
möglichst bald aus.
Kurz nach dieser Anzeige wird im Display „
und es sind keine weiteren Bedienvorgänge am Lucina
AX-09 mehr möglich.
Die verbleibende Batteriespannung können Sie auch wie
im Folgenden beschrieben überprüfen.
L o“ angezeigt,
1. Halten Sie den [SHIFT]-Taster gedrückt, und
drücken Sie den [LOCK]-Taster.
Im Display wird die verbleibende Batteriespannung als
Prozentsatz angezeigt (zwischen 0 und 100).
ANMERKUNG
• Die Anzeige für die verbleibende Batteriespannung ist
ein ungefährer Wert.
• Wenn beim Überprüfen der verbleibenden
Batteriespannung der Netzadapter angeschlossen ist,
wird im Display immer der Wert „100“ angezeigt.
Entnehmen der Batterien
Zum Entnehmen der Batterien schalten Sie den Lucina
AX-09 aus, önen Sie das Batteriefach, und entnehmen Sie
die Batterien.
Beachten Sie bei Verwendung von Batterien die folgenden Punkte
• Verwenden Sie keine Alkali-Batterien oder Zink-Kohle-Batterien.
• Der Lucina AX-09 wird nicht mit Batterien betrieben, wenn der Netzadapter angeschlossen ist.
• Falls Batterien eingelegt sind, wird das Gerät ausgeschaltet, wenn Sie bei eingeschaltetem Gerät das Netzkabel aus der Steckdose ziehen bzw. das Netzkabel
erneut an die Steckdose anschließen oder den Stecker des Netzadapters an der Rückseite des Lucina AX-09 herausziehen. Sie müssen das Gerät ausschalten, bevor
Sie das Netzkabel oder den Netzadapter anschließen oder trennen.
• Achten Sie darauf, dass weder Gegenstände (z.B. leicht entzündliches Material, Münzen, Nadeln) noch Flüssigkeiten jeglicher Art (Wasser, Getränke usw.) in das
Gerät gelangen.
• Bei falscher Handhabung können Batterien explodieren oder auslaufen und Schäden oder Verletzungen verursachen. Lesen und beachten Sie daher im Interesse
der Sicherheit die folgenden Vorsichtsmaßnahmen.
• Befolgen Sie sorgfältig die Anweisungen zum Einlegen der Batterien. Achten Sie dabei auf die richtige Polung.
• Vermeiden Sie es, neue Batterien zusammen mit alten bzw. gebrauchten Batterien zu verwenden. Vermeiden Sie außerdem die Verwendung unterschiedlicher
Batterietypen.
• Nehmen Sie die Batterien aus dem Gerät heraus, wenn dieses längere Zeit außer Betrieb ist.
• Wenn eine Batterie ausgelaufen ist, wischen Sie Rückstände der ausgelaufenen Flüssigkeit mit einem weichen Tuch oder einem Papiertaschentuch aus dem
Batteriefach. Legen Sie dann neue Batterien ein. Um Hautentzündungen zu vermeiden, achten Sie darauf, dass keine Batterieüssigkeit auf Ihre Hände oder
Haut gelangt. Achten Sie äußerst genau darauf, dass die Batterieüssigkeit nicht in die Nähe Ihrer Augen gelangt. Spülen Sie den betroenen Bereich sofort
unter ießendem Wasser aus, falls Batterieüssigkeit in die Augen gelangt sein sollte, und suchen Sie sofort einen Arzt auf.
• Bewahren Sie Batterien nicht zusammen mit metallischen Gegenständen wie Kugelschreibern, Halsketten, Haarnadeln usw. auf.
6
Page 35

Vorbereitung
Anschließen des Netzadapters
Der AX-09 kann mit dem mitgelieferten Netzadapter oder
mit Nickel-Metallhydridakkus der Größe AA betrieben
werden.
1. Stellen Sie sicher, dass der Lucina AX-09
ausgeschaltet ist (der [POWER]-Schalter bendet
sich in der Position OFF).
2. Drehen Sie den [VOLUME]-Regler
(Lautstärkeregler) ganz nach links (Minimum).
3. Schließen Sie den Netzadapter an die DC IN-
Buchse an der Rückseite des Lucina AX-09 und
anschließend an eine Steckdose an.
Befestigen Sie das Netzkabel wie in
der Abbildung dargestellt mithilfe der
Kabelklemme, um die versehentliche
Unterbrechung der Stromversorgung des
Geräts zu vermeiden (falls der Stecker
unbeabsichtigt herausgezogen wird) und um
die DC IN-Buchse nicht übermäßig zu belasten.
Platzieren Sie den
Netzadapter so, dass die
Seite mit der Leucht-Anzeige
(siehe Abbildung) nach
oben und die beschriftete
Seite nach unten weist. Die
Anzeige leuchtet auf, wenn
Sie den Netzadapter an eine
Netzsteckdose anschließen.
Befestigen des Gurts
Befestigen Sie den Gurt wie in
den folgenden Abbildungen
dargestellt am Lucina AX-09.
Deutsch Français Italiano Español Português NederlandsEnglish
1. Befestigen Sie ein Ende des mitgelieferten Gurts
an der in der folgenden Abbildung dargestellten
Gurthalterung.
2. Befestigen Sie das andere Ende des mitgelieferten
Gurts an einer der anderen beiden Gurthalterungen.
Gurthalterungen sind an den beiden Positionen „A“ und
„B“ vorhanden. Es spielt keine Rolle welche Gurthalterung
Sie verwenden. Verwenden Sie einfach die für Sie
bequemere Lösung. Für kräftigere Personen bietet die
Befestigung des Gurts an der Halterung „A“ mehr Stabilität.
A B
HINWEIS
Falls Sie die Gurthalterung „B“ verwenden, verdrehen
Sie den Gurt wie in der folgenden Abbildung
dargestellt. Sollten Sie den Gurt ohne ihn zu verdrehen
befestigen, kann dieser sich vom Instrument lösen.
Verdrehter Gurt
Rückseite des Gurts
Vorderseite des Gurts
7
Page 36

Anschließen an Lautsprecher
Einschalten des Geräts
Der Lucina AX-09 besitzt keinen Verstärker und keine
Lautsprecher. Sie müssen das Instrument über dessen OUTPUTBuchsen an der Rückseite an z.B. ein Aktivlautsprechersystem
(im Folgenden als „Lautsprecher“ bezeichnet) anschließen oder
aber einen Kopfhörer verwenden.
Verwenden Sie Audiokabel
(PCS-Serie; separat
erhältlich) zum Anschließen.
* Nachdem Sie alle Anschlüsse vorgenommen haben (S. 8),
schalten Sie Ihre Geräte in der angegebenen Reihenfolge
ein. Wenn Sie die Geräte in der falschen Reihenfolge
einschalten, besteht die Gefahr von Fehlfunktionen und/
oder Schäden an Lautsprechern und anderen Geräten.
1. Stellen Sie die Lautstärke des Lucina AX-09 und
der Lautsprecher auf Minimum.
2. Schalten Sie an der Rückseite des Lucina AX-09
den [POWER]-Schalter auf die Position ON.
Dieses Gerät ist mit einer
Schutzschaltung ausgestattet. Nach
dem Einschalten entsteht eine kurze
Betriebspause von einigen Sekunden, bis
das Gerät normal arbeitet.
Verwenden Sie bei der Ausgabe in Mono nur die
L/MONO-Buchse.
* Um Fehlfunktionen und/oder Schäden an Lautsprechern
oder anderen Geräten zu vermeiden, regeln Sie stets die
Lautstärke herunter, und schalten Sie alle Geräte aus,
bevor Sie eine Verbindung herstellen.
Anschließen eines Kopfhörers
Schließen Sie Ihren Kopfhörer an die PHONES-Buchse an
der Rückseite an.
Sie können einen Kopfhörer
mit einem Stereo-Ministecker
(3,5-mm) anschließen.
3. Schalten Sie die Lautsprecher ein.
4. Stellen Sie die Lautstärke des Instruments mit
dem [VOLUME]-Regler ein.
Drehen Sie während Sie auf
der Tastatur spielen den
[VOLUME]-Regler langsam
nach rechts.
Ausschalten des Geräts
1. Stellen Sie die Lautstärke des Lucina AX-09 und
der Lautsprecher auf ein Minimum ein.
2. Schalten Sie die Lautsprecher aus.
3. Schalten Sie den [POWER]-Schalter (Netzschalter)
des Lucina AX-09 auf "aus" (Position OFF).
8
Page 37

Auswählen von Sounds
Die Klänge, die Sie spielen, werden als „Sounds“
bezeichnet. Es gibt zwei Arten von Sounds: „Reguläre
Sounds“ und „Spezielle Sounds“ (Special Tones).
Auswählen eines regulären Sounds
Der Lucina AX-09 enthält 144 reguläre Sounds, zu denen
die besten Synthesizer-Sounds von Roland zählen.
Die regulären Sounds sind in sechs Soundgruppen mit
jeweils 24 Sounds unterteilt.
1. Wenn der [SPECIAL TONE]-Taster oder der
FAVORITE [A] / [B]-Taster leuchtet, drücken Sie
den beleuchteten Taster, um die Beleuchtung
auszuschalten.
2. Drücken Sie einen der TONE-Taster [1]–[6], um
eine Soundgruppe auszuwählen.
Der Taster leuchtet, und die betreende Soundgruppe
wird ausgewählt.
Der Name der Soundgruppe ist unter jedem TONE-Taster in
schwarzer Schrift angegeben.
ANMERKUNG
Wenn Sie das Gerät einschalten, wird immer die TONE
[1]-Nummer 1 ausgewählt.
3. Wählen Sie mit den [INC/+] / [DEC/–]-Tastern einen
Sound innerhalb der Gruppe aus.
Auswählen des Rhythmussounds
Nr. 23–24 der Gruppe GUITAR/BASS ist der Rhythmussound.
Weitere Informationen nden Sie in der „Liste der Sounds“
am Ende dieser Bedienungsanleitung.
Auswählen eines speziellen Sounds
Der Lucina AX-09 enthält sechs „spezielle Sounds“ (Special
Tones), die speziell für den Lucina AX-09 entwickelt
wurden.
1. Drücken Sie den [SPECIAL TONE]-Taster, sodass
dieser leuchtet.
2. Drücken Sie einen der TONE-Taster [1]–[6], um den
gewünschten speziellen Sound auszuwählen.
Die Namen der speziellen Sounds sind unter jedem
TONE-Taster in blauer Schrift angegeben.
ANMERKUNG
Um zu den regulären Sounds zurückzukehren, drücken
Sie den [SPECIAL TONE]-Taster, sodass die Funktion
ausgeschaltet wird.
Demofunktion für Sounds
Deutsch Français Italiano Español Português NederlandsEnglish
Jede Gruppe enthält die Sounds 1–24, und im Display wird
die Nummer des ausgewählten Sounds (1–24) angezeigt.
Drücken Sie den [INC/+]-Taster, um den nächsten Sound
auszuwählen, oder drücken Sie den [DEC/–]-Taster, um den
vorherigen Sound auszuwählen.
ANMERKUNG
• Eine Aufstellung der Sounds nden Sie unter „Liste der
Sounds“ am Ende dieser Bedienungsanleitung.
• Jede Soundgruppe ist in zwei Kategorien unterteilt,
wie durch die schwarze Beschriftung unterhalb der
TONE-Taster angegeben. (Beispielsweise enthält die
Gruppe des TONE [1]-Tasters die beiden Kategorien
SYNTH und PAD).
Jedes Mal, wenn Sie den TONE-Taster der aktuell
ausgewählten (beleuchteten) Soundgruppe gedrückt
halten und den [INC/+] / [DEC/–]-Taster drücken, wird
der erste Sound dieser Kategorie ausgewählt.
• Wenn Sie den [INC/+] / [DEC/–]-Taster gedrückt halten,
können Sie Sounds schnell auswählen. Um Sounds noch
schneller auszuwählen, halten Sie einen der Taster gedrückt,
und drücken Sie dann den jeweils anderen Taster.
Drücken Sie bei ausgeschaltetem [AUDIO PLAYER]-Taster
den [PREVIEW]-Taster. Der Taster leuchtet, und der aktuell
ausgewählte Sound wird mithilfe einer für diesen Klang
geeigneten Demosequenz wiedergegeben.
Um die Sequenz vorzeitig zu beenden, drücken Sie den [PREVIEW]Taster erneut, sodass die Beleuchtung des Tasters erlischt.
9
Page 38

Registrieren häug verwendeter
Abrufen eines bevorzugten Sounds
Sounds im Speicher (FAVORITE)
Der Lucina AX-09 bietet FAVORITE-Speicherpositionen, mit
denen Sie zwölf bevorzugte Sounds registrieren können. Wenn
Sie auf diese Weise die häug verwendeten Sounds registrieren,
können Sie diese Sounds jederzeit schnell auswählen.
Die Einstellungen für Lautstärke und Hall (Reverb) können
ebenfalls zusammen mit den ausgewählten Sounds in den
FAVORITE-Speicherpositionen registriert werden (S. 16).
ANMERKUNG
Nur reguläre Sounds können im FAVORITE-Speicher
registriert werden.
Registrieren eines Sounds als
bevorzugten Sound (FAVORITE)
Der FAVORITE-Speicher enthält die beiden Speicherplätze A
und B. Pro Speicherplatz können Sie sechs Sounds registrieren.
1. Wählen Sie den Sound aus, den Sie in einer
FAVORITE-Speicherposition registrieren möchten.
2. Drücken Sie den [WRITE]-Taster, sodass die
Taster-Anzeige leuchtet.
(FAVORITE)
Hier erfahren Sie, wie Sie einen im FAVORITE-Speicher
registrierten Sound abrufen.
1. Drücken Sie den FAVORITE [A] / [B]-Taster, um
den Speicherplatz auszuwählen, in dem Sie den
abzurufenden Sound registriert haben.
Der gedrückte FAVORITE-Taster leuchtet auf.
2. Drücken Sie einen der TONE-Taster [1]–[6], um
im aktuellen Speicherplatz eine FAVORITESpeicherposition auszuwählen.
Sie können auch mit den [INC/+] / [DEC/–]-Tastern
fortlaufend FAVORITE-Speicherpositionen im selben
Speicherplatz auswählen.
ANMERKUNG
Um zu den regulären Sounds zurückzukehren, drücken
Sie den beleuchteten FAVORITE [A] / [B]-Taster, sodass
die Funktion ausgeschaltet wird.
3. Drücken Sie den FAVORITE [A] / [B]-Taster, um
den Speicherplatz auszuwählen, in dem Sie den
bevorzugten Sound (FAVORITE) registrieren möchten.
Der gedrückte FAVORITE-Taster leuchtet auf.
Im Display wird „
(Speicherplatz „B“) angezeigt.
4. Drücken Sie einen der TONE-Taster [1]–[6], um
die Speicherposition auszuwählen, in der Sie den
bevorzugten Sound (FAVORITE) registrieren möchten.
A -“ (Speicherplatz „A“) oder „B - “
Der gedrückte Taster leuchtet auf, und der Sound wird
in dieser FAVORITE-Speicherposition registriert. Der
[WRITE]-Taster erlischt.
ANMERKUNG
Um zu den regulären Sounds zurückzukehren, drücken
Sie den beleuchteten FAVORITE [A] / [B]-Taster, sodass
die Funktion ausgeschaltet wird.
10
Page 39

Verwenden der Spielfunktionen
Der Lucina AX-09 besitzt verschiedene Spielfunktionen,
mit denen Sie Ihr Spiel variieren können.
Verschieben der Tonhöhe um Oktaven
Sie können den Tastaturbereich in Schritten von einer
Oktave nach oben bzw. unten verschieben, bis maximal
drei Oktaven nach oben oder unten.
Wert -3–3
1. Drücken Sie den OCTAVE-Taster [+] oder [–].
Im Display wird ein Wert angezeigt.
Der OCTAVE [+]-Taster leuchtet, wenn die Oktaveneinstellung
in Richtung „+“ erfolgt; der OCTAVE [–]-Taster leuchtet, wenn
die Oktaveneinstellung in Richtung „–“ erfolgt.
ANMERKUNG
Drücken Sie gleichzeitig die OCTAVE-Taster [+] und [–],
um die Oktaveneinstellung auf „0“ zurückzusetzen.
Der OCTAVE-Taster [+] oder [–] erlischt, und für die
Tastatur wird wieder die normale Oktavlage ausgewählt.
Verschieben der Tonhöhe um Halbtöne
Sie können den Tastaturbereich in Halbtonschritten nach
unten bzw. oben verschieben.
Diese Funktion ist hilfreich, wenn Sie einen Song in einer
nicht vertrauten Tonart spielen müssen.
Wert -5–6
ANMERKUNG
Halten Sie den [TRANSPOSE]-Taster gedrückt, und
drücken Sie gleichzeitig die OCTAVE-Taster [+] und [–],
um die ursprüngliche Einstellung „0“ wiederherzustellen.
Der [TRANSPOSE]-Taster erlischt, und für die Tastatur
wird der normale Tonhöhenbereich wiederhergestellt.
Verwenden des Touch-Controllers
Wenn Sie den Touch-Controller mit Ihrem Finger berühren
und diesen nach links oder rechts bewegen, wird die Tonhöhe
geändert. Wenn Sie die linke Seite des Controllers berühren,
wird die Tonhöhe angehoben, und wenn Sie die rechte Seite
des Controllers berühren, wird die Tonhöhe abgesenkt.
Einstellen des Tonhöhenbereichs des Touch-Controllers
Durch Ausführen der folgenden Schritte können Sie
den Tonhöhenbereich einstellen, innerhalb dessen die
Tonhöhe mit dem Touch-Controller geändert werden kann.
Diese Einstellung wird in Form von Halbtönen angegeben.
Beispiel: Sie geben den Wert „12“ an. In diesem Fall wird
die Tonhöhe um eine ganze Oktave angehoben, wenn
Sie den Touch-Controller ganz rechts außen berühren (12
Halbtöne entsprechen einer Oktave).
1. Halten Sie den [SHIFT]-Taster gedrückt, und
berühren Sie den Touch-Controller.
Der aktuell für den Tonhöhenbereich eingestellte Wert
blinkt im Display.
2. Halten Sie den [SHIFT]-Taster weiterhin gedrückt,
und ändern Sie die Einstellung mit den [INC/+] /
[DEC/–] (OCTAVE [+] / [–])-Tastern.
Wert 0–24
Deutsch Français Italiano Español Português NederlandsEnglish
1. Halten Sie den [TRANSPOSE]-Taster gedrückt.
Die aktuelle Einstellung blinkt im Display.
2. Halten Sie den [TRANSPOSE]-Taster gedrückt, und
drücken Sie den OCTAVE-Taster [+] oder [–], um
den gewünschten Wert einzustellen.
3. Der eingestellte Wert wird aktiviert, wenn Sie den
[TRANSPOSE]-Taster loslassen.
Der [TRANSPOSE]-Taster leuchtet, wenn Sie einen anderen
Wert als „0“ angegeben haben.
3. Lassen Sie den [SHIFT]-Taster los.
4. Um diese Einstellung zu speichern, halten Sie den
[SHIFT]-Taster gedrückt und drücken den [WRITE]-Taster.
Verwenden des Modulationshebels
Durch Drücken des Modulationshebels (Modulation Bar)
wird ein Vibrato-Eekt erzeugt.
ANMERKUNG
Dieser Eekt wird auf alle Sounds angewendet. Wenn Sie
allerdings 4 VIOLIN oder 5 TROMBONE der speziellen Sounds
ausgewählt haben, ändert sich die Dynamik (Ausdruck) in
einer für dieses Instrument charakteristischen Weise, was ein
sehr realistisches und ausdrucksstarkes Spiel ermöglicht.
11
Page 40

Zuweisen des Spieleekts für den
Modulationshebel
Sie können für den Modulationshebel (Modulation Bar)
eine Funktion auswählen.
1. Halten Sie den [SHIFT]-Taster gedrückt, und
drücken Sie den Modulationshebel.
Die aktuelle Einstellung blinkt im Display.
2. Halten Sie den [SHIFT]-Taster weiterhin gedrückt,
und weisen Sie mit den [INC/+] / [DEC/–] (OCTAVE
[+] / [–])-Tastern den gewünschten Eekt zu.
Die folgenden Einstellungen stehen zur Verfügung.
Wert Erklärung
N oD (MODULATION)
h LD (HOLD)
C NB (COMBINATION)
Auslösen eines Vibrato-Eekts.
Halten des gespielten Sounds.
Beide oben genannten Spieleekte werden
gleichzeitig ausgelöst.
ANMERKUNG
Dieser Eekt wird auf alle Sounds angewendet.
Wenn Sie allerdings 4 VIOLIN oder 5 TROMBONE der
speziellen Sounds ausgewählt haben, wird kein VibratoEekt ausgelöst, sondern es ändert sich die Dynamik
(Ausdruck) des Instruments.
3. Lassen Sie den [SHIFT]-Taster los.
4. Um diese Einstellung zu speichern, halten Sie den
[SHIFT]-Taster gedrückt und drücken den [WRITE]Taster.
Verwenden des D Beam-Controllers
Wenn Sie die Hand oberhalb des Sensors des D BeamControllers bewegen, können Sie den Klang verändern.
Wirkungsbereich des D Beam-Controllers
In der folgenden Abbildung ist der ungefähre
Wirkungsbereich des D Beam-Controllers dargestellt.
Wenn Sie die Hand außerhalb dieses Wirkungsbereichs
positionieren, bleibt der D Beam-Controller wirkungslos.
* Der Wirkungsbereich des D Beam-Controllers ist in
starkem direkten Sonnenlicht extrem gering. Beachten
Sie dies, wenn Sie den D Beam-Controller im Freien
verwenden.
1. Drücken Sie einen der folgenden Taster, um die
Funktion auszuwählen, die mit dem D BeamController gesteuert werden soll.
Taster Erklärung
PITCH
FILTER
ASSIGNABLE
2. Bewegen Sie die Hand beim Spielen auf der
Tastatur über dem D Beam-Controller langsam
nach oben und unten.
Der Taster, den Sie bei Schritt1 gedrückt haben, blinkt.
3. Drücken Sie erneut den Taster, den Sie bei Schritt1
gedrückt haben, um den D Beam-Controller
auszuschalten.
Wenn Sie die Hand über dem D Beam-Controller
bewegen, wird die Tonhöhe (Pitch) des Sounds geändert.
Wenn Sie die Hand über dem D Beam-Controller
bewegen, wird die Klangfarbe geändert.
* Für einige Sounds ist die Änderung der Klangfarbe
nicht immer deutlich zu erkennen.
Der D Beam-Controller überträgt die ihm zugewiesene
Funktion oder Kontrollmeldung.
Ändern der Einstellung für den ASSIGNABLE-Taster
Sie können dem [ASSIGNABLE]-Taster eine MIDIKontrollnummer (CC) oder eine Funktion zuweisen und
mithilfe des D Beam-Controllers diesen Parameter in
Echtzeit steuern.
1. Halten Sie den [SHIFT]-Taster gedrückt, und
drücken Sie den [ASSIGNABLE]-Taster.
Die aktuell zugewiesene Funktion blinkt im Display.
2. Halten Sie den [SHIFT]-Taster weiterhin gedrückt,
und geben Sie mit den [INC/+] / [DEC/–] (OCTAVE
[+] / [–])-Tastern die gewünschte Funktion oder
den gewünschten Parameter an, die bzw. der vom
D Beam-Controller gesteuert werden soll.
Display Wer t Erklärung
CC01 (MODULATION) Vibrato-Eekt auslösen.
C 01
CC05
C 05
(PORTA TIME)
CC07 (VOLUME) Steuert die Lautstärke.
C 07
CC10 (PAN) Steuert die Panorama-Position (Panning).
C 10
CC11 (EXPRESSION) Steuert den Klangausdruck.
C 11
CC64 (HOLD) Die Noten werden gehalten.
C 64
Steuert den Portamento-Zeitraum, in dem
die Tonhöhe zwischen Noten geändert
wird, wenn mit Portamento gespielt wird.
12
Page 41

Display Wer t Erklärung
C 65
C 66
C 71
C 72
C 73
C 74
A Ft
A db
S Lo
CC65
(PORTAMENTO)
CC66 (SOSTENUTO)
CC71 (RESONANCE)
CC72 (RELEASE TIME)
CC73 (ATTACK TIME)
CC74 (CUTOFF)
AFTERTOUCH
(Standardwert)
ADLIB
SOLO SYNTH
Gleitender Übergang der Tonhöhe
zwischen Noten.
Halten nur der Noten, die aktuell
gespielt werden.
Steuert die Resonanz. Durch
Erhöhen des Werts für die Resonanz
ergibt sich eine charakteristische
Klangeigenschaft, die typisch für einen
Synthesizer ist.
Steuert die Zeit zwischen „Note aus“
(wenn die Taste losgelassen wird) und
dem Zeitpunkt, an dem der Sound
nicht mehr zu hören ist.
Steuert die Härte
(Anschlaggeschwindigkeit), mit der der
Ton beginnt.
Steuert die Grenzfrequenz. Mit
höheren Werten wird der Klang härter
(brillanter); mit niedrigeren Werten wird
der Klang weicher (sanfter).
Für jeden Sound des Lucina AX-09 wird
der geeignetste Eekt verwendet.
Wenn Sie einen Akkord spielen und
die Hand über dem D Beam-Controller
bewegen, können Sie ein Arpeggio
dieses Akkords erzeugen.
Der Abstand zum D Beam-Controller
bestimmt den Oktavenbereich
des gespielten Akkords. Die
Geschwindigkeit, mit der Sie die Hand
nach oben und unten bewegen,
bestimmt die Geschwindigkeit, mit der
der Akkord arpeggiert wird.
Wenn Sie z.B. mit der rechten Hand
die vier Noten „C D E G“ halten
und die linke Hand über dem D
Beam-Controller bewegen, wird eine
Sequenz wie z.B. „C D E G C D E G C D E
G...“ gespielt.
Der Lucina AX-09 verhält sich wie ein
monophoner Synthesizer, dessen
Tonhöhe durch Bewegen der Hand
über dem D Beam-Controller gesteuert
werden kann.
Verwenden eines Fußtasters
Wenn Sie einen Fußtaster (DP-Serie; separat erhältlich)
an die FOOT PEDAL-Buchse anschließen, können Sie den
Fußtaster gedrückt halten, damit Noten gehalten werden,
selbst nachdem Sie die Taste losgelassen haben.
Alternativ können Sie mit dem Fußtaster auch andere
Eekte anwenden.
Anschließen eines Fußtasters
Deutsch Français Italiano Español Português NederlandsEnglish
ANMERKUNG
Alternativ können Sie auch ein Expression-Pedal (EV-5)
anstelle eines Fußtasters (DP-Serie) anschließen.
HINWEIS
Verwenden Sie nur das angegebene ExpressionPedal (EV-5; separat erhältlich). Wenn Sie andere
Expression-Pedale anschließen, besteht die Gefahr von
Fehlfunktionen und/oder Schäden am Gerät.
ANMERKUNG
Wenn Sie den [INC/+] / [DEC/–]-Taster gedrückt halten,
können Sie diese Einstellung schnell auswählen. Für
eine noch schnellere Auswahl halten Sie den Taster
gedrückt und drücken zusätzlich den anderen Taster.
3. Lassen Sie den [SHIFT]-Taster los.
4. Um diese Einstellung zu speichern, halten Sie den
[SHIFT]-Taster gedrückt und drücken den [WRITE]Taster.
Festlegen der Fußtaster-Funktion
Halten Sie den [SHIFT]-Taster gedrückt, und drücken
Sie den [V-LINK]-Taster zweimal. Im Display wird „
angezeigt, und Sie können dem Fußtaster einen der
nachfolgend aufgeführten Eekte zuweisen.
Um diese Einstellung zu speichern, halten Sie den [SHIFT]Taster gedrückt und drücken den [WRITE]-Taster.
Display Wert Erklärung
CC01
C 01
(MODULATION)
CC05
C 05
(PORTA TIME)
CC07 (VOLUME) Steuer t die Lautstärke.
C 07
CC10 (PAN) Steuert die Panorama-Position (Panning).
C 10
CC11
C 11
(EXPRESSION)
CC64 (HOLD) Die Noten werden gehalten.
C 64
CC65
C 65
(PORTAMENTO)
CC66
C 66
(SOSTENUTO)
Vibrato-Eekt auslösen.
Steuert den Portamento-Zeitraum, in dem
die Tonhöhe zwischen Noten geändert wird,
wenn mit Portamento gespielt wird.
Steuert den Klangausdruck.
Gleitender Übergang der Tonhöhe z wischen
Noten.
Halten nur der Noten, die aktuell gespielt
werden.
P DL
“
13
Page 42
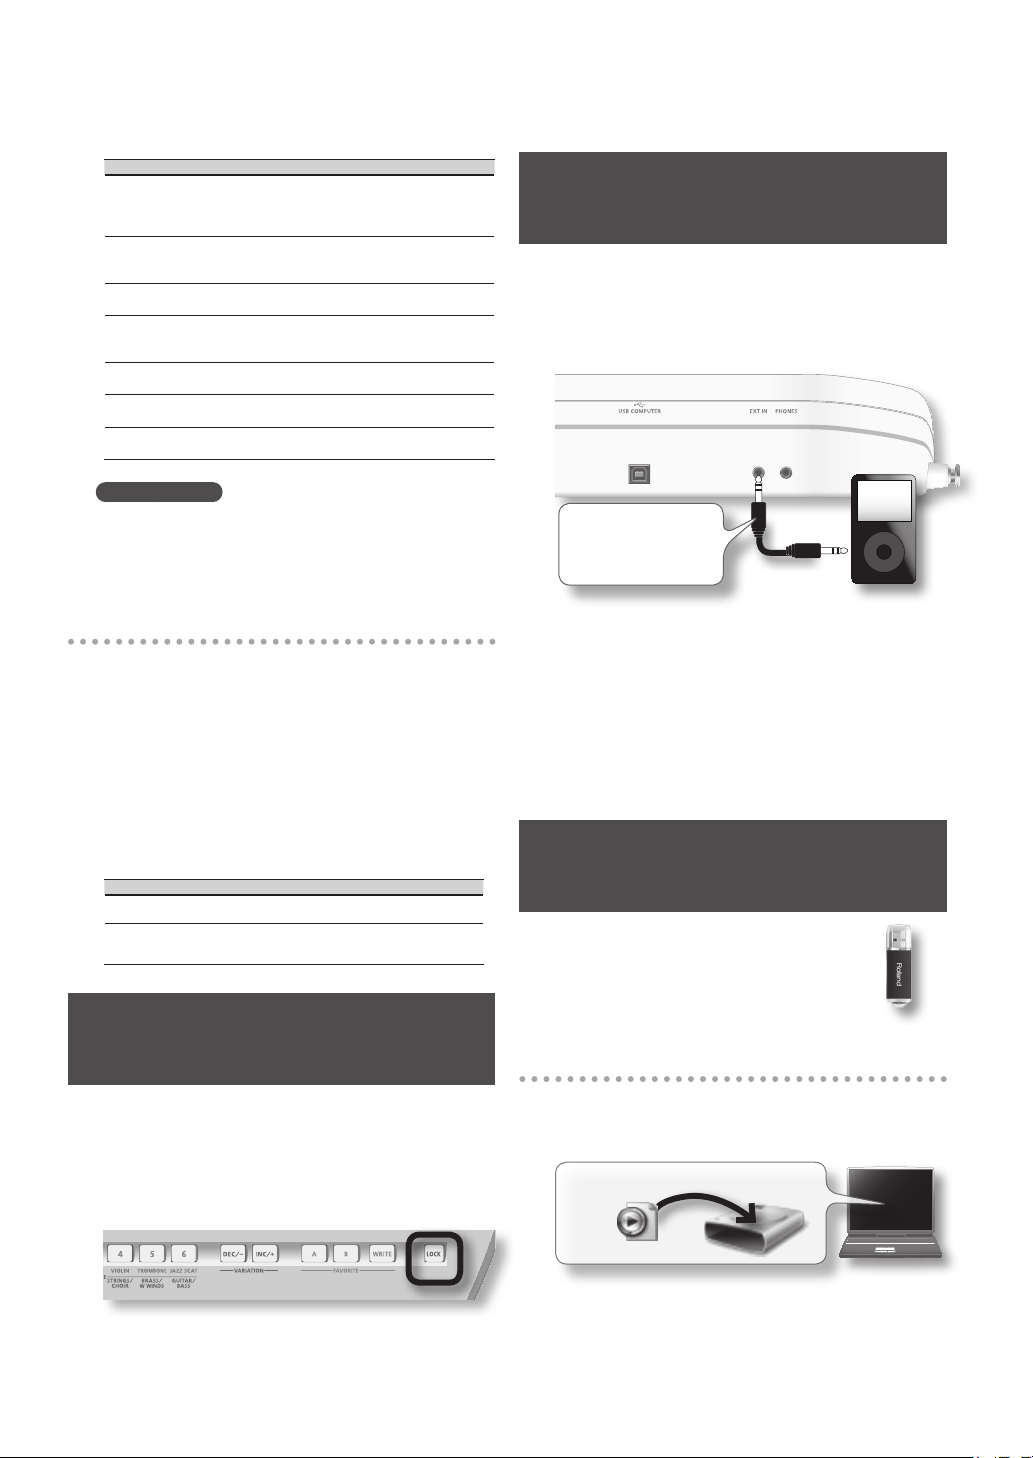
Display Wert Erklärung
CC71
C 71
(RESONANCE)
CC72
C 72
(RELEASE TIME)
CC73
C 73
(ATTACK TIME)
CC74 (CUTOFF)
C 74
AFTERTOUCH
A Ft
PEDAL UP
P UP
PEDAL DOWN
P Dn
Steuert die Resonanz. Durch Erhöhen des
Werts für die Resonanz ergibt sich eine
charakteristische Klangeigenschaft, die
typisch für einen Synthesizer ist.
Steuert die Zeit zwischen „Note aus“ (wenn die
Taste losgelassen wird) und dem Zeitpunkt, an
dem der Sound nicht mehr zu hören ist.
Steuert Anschlag-Geschwindigkeit, mit der
der Sound beginnt.
Steuert die Grenzfrequenz. Mit höheren Werten
wird der Klang heller (brillanter); mit niedrigeren
Werten wird der Klang dumpfer (sanfter).
Es wird der für den entsprechend ausgewählten Klang voreingestellte Eekt verwendet.
Wählt den Sound der nächsten
Programmnummer aus.
Wählt den Sound der vorherigen
Programmnummer aus.
ANMERKUNG
Mit den Werkseinstellungen ist dem Fußtaster C 64
(HOLD) zugewiesen.
Hinweis zur Einstellung der Polarität
des Fußtasters
Wenn Sie einen Fußtaster von einem anderen Hersteller
als Roland verwenden, kann es sein, dass die Polarität
des Fußtasters umgekehrt ist, sodass beim Drücken und
Loslassen des Fußtasters der Vorgang umgekehrt ausgeführt
wird. Halten Sie in diesem Fall den [SHIFT]-Taster gedrückt,
und drücken Sie den [V-LINK]-Taster dreimal, sodass im
Display „
die [INC/+] / [DEC/–] (OCTAVE [+] / [–])-Taster, bis im Display
„
rEu
Um diese Einstellung zu speichern, halten Sie den [SHIFT]Taster gedrückt und drücken den [WRITE]-Taster.
Wert Erklärung
S td (STANDARD)
r Eu (REVERSE)
“ angezeigt wird. Anschließend drücken Sie
PoL
“ angezeigt wird.
Fußtaster von Roland
Fußtaster mit umgekehrter Polarität im
Vergleich zu Fußtastern von Roland
Spielen zu Musik eines mobilen Audio-Players
Sie können Ihren mobilen Audio-Player an den Lucina
AX-09 anschließen und auf dem Instrument zu Ihren
Lieblingssongs spielen.
1. Schließen Sie Ihren mobilen Audio-Player an die
EXT IN-Buchse des Lucina AX-09 an.
Schließen Sie Ihren Player
mit einem StereoMinisteckerkabel (3,5-mm)
an die EXT IN-Buchse an.
2. Starten Sie die Wiedergabe eines Songs des
Audio-Players, und spielen Sie dazu auf dem
Lucina AX-09.
Stellen Sie die Lautstärke des Songs mit den Reglern des
Players ein.
* Wenn Anschlusskabel mit Widerständen verwendet
werden, kann der Lautstärkepegel der an den Eingängen
(EXT IN) angeschlossenen Geräte niedrig sein. Verwenden Sie in diesem Fall Kabel ohne Widerstände.
Spielen zu Musik von einer Audiodatei eines USB-Speichers
Sie können Audiodateien (MP3, WAV, AIFF)
wiedergeben, die Sie vom Computer auf
einen USB-Speicher kopiert haben.
Verhindern des Wechselns von Sounds während des Spielens (Lock-Funktion)
Sie können den aktuell ausgewählten Sound sperren,
um zu verhindern, dass ein anderer Sound ausgewählt
wird, selbst wenn Sie beim Spielen versehentlich einen
TONE-Taster drücken.
1. Halten Sie den [LOCK]-Taster gedrückt, bis dieser
aueuchtet.
Die Lock-Funktion (Sperren) wird eingeschaltet. Beim Drücken
von Tastern wird nun der Sound nicht mehr gewechselt.
Um das Wechseln des Sounds wieder zu aktivieren, halten
Sie den Taster erneut gedrückt, bis der [LOCK]-Taster erlischt.
14
Kopieren von Audiodateien vom
Computer auf einen USB-Speicher
Sie müssen die Audiodateien von Ihrem Computer in das
Stammverzeichnis des USB-Speichers kopieren.
Auf USB-Laufwerk kopieren
MP3, WAV, AIFF
Page 43

Abspielbare Audiodateien
MP3
Format MPEG-1 Audio Layer 3
SamplingFrequenz
Bitrate
WAV, AIFF
SamplingFrequenz
Bitrate 8/16/24-Bit
44,1kHz
32/40/48/56/64/80/96/112/128/160/192/224/256/
320 KBit/s, Variable Bitrate (VBR)
44,1kHz
Einstecken des USB-Speichersticks
1. Stecken Sie den USB-Speicherstick wie in der
folgenden Abbildung dargestellt in den USB
MEMORY-Speicherplatz.
HINWEIS
• Sie dürfen auf keinen Fall einen USB-Speicherstick
einstecken oder entfernen, wenn das Instrument
eingeschaltet ist. Dadurch könnten die Daten auf dem
Gerät oder im USB-Speicher beschädigt werden.
• Stecken Sie den USB-Speicherstick vorsichtig
vollständig ein.
• Verwenden Sie USB-Speicher von Roland. Für USB-
Speicher anderer Hersteller kann keine Gewährleistung
für einen problemlosen Betrieb übernommen werden.
Halten Sie den [AUDIO PLAYER]-Taster weiterhin gedrückt,
und drücken Sie den[INC/+]-Taster, um den jeweils
nachfolgenden Song auszuwählen. Oder drücken Sie den
[DEC/–]-Taster, um zum Anfang des aktuellen Songs zu
springen (oder den jeweils vorherigen Song auszuwählen,
falls Sie sich bereits am Anfang des Songs benden).
ANMERKUNG
Die Songs werden in alphabetischer Reihenfolge
wiedergegeben (in der Reihenfolge Zahlen,
Großbuchstaben, Kleinbuchstaben).
4. Geben Sie den Song wieder, oder halten Sie die
Wiedergabe an.
Wenn Sie den [ ]-Taster drücken, leuchtet der zuvor
blinkende Taster, und die ausgewählte Audiodatei wird
wiedergegeben.
Wenn Sie den [
drücken, blinkt der zuvor beleuchtete Taster, und die
Wiedergabe wird angehalten.
Wenn Sie den [
Wiedergabe an dem Punkt fortgesetzt, an dem sie
unterbrochen wurde.
]-Taster während der Wiedergabe
]-Taster erneut drücken, wird die
Wechseln der Songs während der Wiedergabe
Während der Wiedergabe können Sie den [AUDIO PLAYER]Taster gedrückt halten und den [DEC/–]-Taster drücken,
um die Wiedergabe zu unterbrechen und zum Anfang des
aktuellen Songs zu springen. Entsprechend wird durch
Drücken des [INC/+]-Tasters zum Anfang des nächsten
Songs gewechselt und die Wiedergabe fortgesetzt.
ANMERKUNG
Wenn Sie am Anfang des Songs den [AUDIO PLAYER]Taster gedrückt halten und den [DEC/–]-Taster drücken,
springen Sie zum Anfang des vorherigen Songs.
Deutsch Français Italiano Español Português NederlandsEnglish
Wiedergeben von Audiodateien
1. Stecken Sie den USB-Speicherstick, der die
kopierten Audiodateien enthält, in den USB
MEMORY-Steckplatz des Lucina AX-09.
2. Drücken Sie den [AUDIO PLAYER]-Taster.
Der [AUDIO PLAYER]-Taster leuchtet, und der [ ]Taster blinkt. Nun können Sie Audiodateien aus dem
USB-Speicher wiedergeben.
Wenn Sie den [AUDIO PLAYER]-Taster erneut drücken, wird
die Taster-Anzeige ausgeschaltet und es können keine
Audiodateien mehr wiedergegeben werden.
ANMERKUNG
Der Taster [ ] blinkt nicht, wenn kein USBSpeicherstick eingesteckt ist oder wenn auf dem
USB-Speicher kein abspielbarer Song vorhanden ist.
3. Wählen Sie einen Song aus.
Wenn Sie den [AUDIO PLAYER]-Taster gedrückt halten,
werden im Display die ersten drei Buchstaben des
Dateinamens der aktuell ausgewählten Audiodatei
angezeigt.
Einstellungen für den Audio-Player
1. Halten Sie den [SHIFT]-Taster gedrückt, und drücken
Sie den [AUDIO PLAYER]-Taster. Die aktuelle
Einstellung für den Audio-Player blinkt im Display.
2. Halten Sie den [SHIFT]-Taster weiterhin gedrückt,
und drücken Sie den [AUDIO PLAYER]-Taster
erneut, um die Parameter zu ändern.
Nach einem kurzen Intervall wird der Wert angezeigt.
Halten Sie den [SHIFT]-Taster weiterhin gedrückt, und
bearbeiten Sie den Wert mit den [INC/+] / [DEC/–] (OCTAVE
[+] / [–])-Tastern.
Parameter Wert Erk lärung
L uL
P LY
0–127
1 P (SINGLE PLAY ),
C P (CHAIN PLAY )
3. Um diese Einstellung zu speichern, halten Sie den
[SHIFT]-Taster gedrückt und drücken den [WRITE]Taster.
Wiedergabelautstärke für
Audiodateien
Wählen Sie, ob die Wiedergabe
am Ende des ausgewählten Songs
beendet wird (SINGLE PLAY) oder ob
die Wiedergabe mit dem nächsten
Song fortgesetzt wird (CHAIN PLAY).
15
Page 44

Bearbeiten der Klang-Parameter
*1 Die Veränderung dieser Werte sind relative Änderungen (Oets) im
Die Klang-Parameter
Sie können Sound-Parameter wie z.B. die Lautstärke und
den Hall (Reverb) für einen regulären Sound bearbeiten
und die Einstellungen in einer FAVORITE-Speicherposition
speichern (S. 10).
* Die Sound-Parameter eines speziellen Sounds (Special
Tone) können nicht bearbeitet werden.
1. Wählen Sie den regulären Sound aus, dessen
Parameter Sie bearbeiten möchten (S. 9).
2. Halten Sie den [SHIFT]-Taster gedrückt, und drücken
Sie den TONE-Taster des bei Schritt1 ausgewählten
Sounds (d.h., den beleuchteten TONE-Taster).
Der Parametername (PS ) blinkt im Display, und
anschließend wird dessen Wert (
3. Halten Sie den [SHIFT]-Taster weiterhin gedrückt,
und drücken Sie denselben TONE-Taster, um die
Parameter zu wechseln.
Die Parameter werden von oben nach unten gemäß der
Spalte „Parameter“ in der folgenden Tabelle gewechselt.
* Lassen Sie den [SHIFT]-Taster nicht los, währen Sie diese
Einstellung vornehmen.
Parameter Wert Erklärung
Portamento Switch
P S
P tN
u oL
r Eu
r EL
A t
C Ut
r ES
OFF, ON
0–127
0–127
0–127
-64–63
-64–63
-64–63
-64–63
Portamento ist ein Eekt, der einen gleitenden
Übergang der Tonhöhe zwischen Noten
ermöglicht.
Portamento Time
Gibt den Zeitraum an, in dem die Tonhöhe
geändert wird, wenn mit Portamento gespielt
wird. Mit höheren Werten verlängert sich der
Zeitraum, in dem die Tonhöhe die nächste
Note erreicht.
Volume
Gibt die Lautstärke des Sounds an.
Reverb
Dieser Eekt gibt den Nachhall an, der für
einen großen Saal charakteristisch ist. Höhere
Werte bedeuten einen stärkeren Nachhall.
Release Time (*1)
Bestimmt die Zeit zwischen „Note aus“
(wenn die Taste losgelassen wird) und dem
Zeitpunkt, an dem der Sound nicht mehr zu
hören ist. Mit höheren Werten verlängert sich
dieser Zeitraum.
Attack Time (*1)
Bestimmt die Anschlag-Geschwindigkeit,
mit der der Sound beginnt. Höhere Werte
bedeuten einen weicheren Anschlag.
Cuto (*1)
Mit einem höheren Grenzfrequenzwert
wird der Klang heller (brillanter); mit einem
niedrigeren Wert wird der Klang dumpfer
(dunkler). Verwenden Sie diesen Parameter,
um Einstellungen vorzunehmen, falls der
Klang zu gedämpft oder zu brillant ist.
Resonance (*1)
Durch Erhöhen des Werts für die Resonanz
ergibt sich eine charakteristische
Klangeigenschaft, die typisch für einen
Synthesizer ist. Wenn Sie den Resonanzeekt
betonen möchten, sollten Sie den
Grenzfrequenzwert vorsichtig reduzieren.
o FF oder o n ) angezeigt.
Vergleich zur Originaleinstellung des jeweiligen Klangs. Wenn Sie diesen
Wert auf „0“ einstellen, entspricht der Parameter den ursprünglichen
Einstellungen des Sounds.
4. Wenn der Parameterwert angezeigt wird, halten
Sie den [SHIFT]-Taster weiterhin gedrückt, und
bearbeiten Sie den Wert mit den [INC/+] / [DEC/–]
(OCTAVE [+] / [–])-Tastern.
ANMERKUNG
• Diesen Wert können Sie schneller ändern, indem Sie
den [INC/+] / [DEC/–]-Taster gedrückt halten. Für eine
noch schnellere Änderung dieses Werts halten Sie
einen dieser Taster gedrückt und drücken zusätzlich
den jeweils anderen Taster.
• Sie können während der Bearbeitung dieses Werts auf
der Tastatur spielen, um sich das Ergebnis anzuhören.
5. Lassen Sie den [SHIFT]-Taster los.
* Die vorgenommenen Änderungen gehen verloren,
wenn Sie einen anderen Sound auswählen oder den
Lucina AX-09 in dieser Situation ausschalten. Falls Sie die
Änderungen beibehalten möchten, müssen Sie diese wie
folgt in einer FAVORITE-Speicherposition speichern.
6. Drücken Sie den [WRITE]-Taster.
Der [WRITE]-Taster leuchtet.
7. Drücken Sie Sie den FAVORITE-Taster [A] oder [B],
um einen Speicherplatz auszuwählen.
8. Drücken Sie einen der TONE-Taster [1]–[6],
um die Speicherposition für die Einstellungen
auszuwählen.
Die Einstellungen sind gespeichert, wenn der [WRITE]Taster erlischt.
16
Page 45

Einstellungen für das Stimmen
Masterstimmung (Master Tune)
Dies ist die allgemeine Stimmungseinstellung für das
gesamte Instrument. Mit den Werkseinstellungen ist
dieser Wert auf 440Hz eingestellt. Der angezeigte Wert
entspricht der Frequenz der Note „A4“ (mittleres „A“).
Wert 415,3–466,2Hz
1. Halten Sie den [SHIFT]-Taster gedrückt, und
drücken Sie den [TRANSPOSE]-Taster.
Im Display wird „N t n “ angezeigt, und anschließend blinkt
der aktuelle Wert für die Masterstimmung (Master Tune).
Im Display werden nur die letzten drei Stellen angezeigt
(die erste Zahl „4“ wird unterdrückt).
2. Halten Sie den [SHIFT]-Taster weiterhin gedrückt,
und ändern Sie den Stimmungswert mit den
[INC/+] / [DEC/–] (OCTAVE [+] / [–])-Tastern.
ANMERKUNG
• Diesen Wert können Sie schneller ändern, indem Sie
den [INC/+] / [DEC/–]-Taster gedrückt halten. Für eine
noch schnellere Änderung dieses Werts halten Sie
einen dieser Taster gedrückt und drücken zusätzlich
den jeweils anderen Taster.
• Sie können während der Bearbeitung dieses Werts auf
der Tastatur spielen, um sich das Ergebnis anzuhören.
3. Lassen Sie den [SHIFT]-Taster los.
4. Um diese Einstellung zu speichern, halten Sie
den [SHIFT]-Taster gedrückt und drücken den
[WRITE]-Taster.
Temperierung (Key Scale Tune)
Sie können entweder „EQL“ (gleichmäßige Stimmung) oder
„ArB“ (arabische Skala) als Temperierung auswählen.
Wert Erklärung
E QL (EQUAL)
A rB (ARABIC)
1. Halten Sie den [SHIFT]-Taster gedrückt, und
drücken Sie den [TRANSPOSE]-Taster zweimal.
Im Display wird „ E Y “ angezeigt, und anschließend blinkt
der aktuelle Wert für die Temperierung (Key Scale Tune).
2. Halten Sie den [SHIFT]-Taster weiterhin gedrückt,
und wählen Sie mit den [INC/+] / [DEC/–] (OCTAVE
[+] / [–])-Tastern den gewünschten Wert für die
Tastaturstimmung.
ANMERKUNG
Sie können während der Bearbeitung dieses Werts auf
der Tastatur spielen, um sich das Ergebnis anzuhören.
3. Lassen Sie den [SHIFT]-Taster los.
4. Um diese Einstellung zu speichern, halten Sie
den [SHIFT]-Taster gedrückt und drücken den
[WRITE]-Taster.
Equal Temperament (gleichmäßige Stimmung)
Arabian Scale (arabische Skala)
Deutsch Français Italiano Español Português NederlandsEnglish
Einstellen der Anschlagsempndlichkeit der Tastatur
Einstellen eines festen Werts für die Anschlagstärke der Tastatur
Führen Sie die folgenden Schritte aus, um unabhängig
von der Anschlagdynamik die Noten mit einheitlicher
Anschlagstärke (Velocity) zu spielen.
1. Halten Sie den [SHIFT]-Taster gedrückt, und
drücken Sie den [V-LINK]-Taster einmal.
Im Display wird „u E L “ und anschließend der Wert der
aktuellen Einstellung angezeigt.
2. Halten Sie den [SHIFT]-Taster weiterhin gedrückt,
und ändern Sie die Einstellung mit den [INC/+] /
[DEC/–] (OCTAVE [+] / [–])-Tastern.
Wert Erklärung
r AL (REAL)
1–127
3. Lassen Sie den [SHIFT]-Taster los.
4. Um diese Einstellung zu speichern, halten Sie
den [SHIFT]-Taster gedrückt und drücken den
[WRITE]-Taster.
Die Noten werden entsprechend der tatsächlichen
Spieldynamik wiedergegeben.
Die Noten werden unabhängig von der Spieldynamik
immer mit dem hier eingestellten Lautstärkewert
ausgegeben.
17
Page 46

Count-in / Metronom
„Count-in“ bezeichnet ein Feature, mit dem bis zu dem
Punkt gezählt wird, an dem Sie mit dem Spielen beginnen.
Für ein aus zwei Takten bestehendes Count-in drücken Sie
bei gedrücktem [PREVIEW]-Taster den Modulationshebel.
Auf Wunsch kann stattdessen auch das Metronom
verwendet werden. Ändern Sie dazu einfach mithilfe
der Einstellung darunter den Zählmodus in „
(METRONOME)“. Das Metronom ist so lange hörbar, bis Sie
den [PREVIEW]-Taster erneut drücken.
* Es erfolgt kein Count-in, wenn der [AUDIO PLAYER]-Taster
leuchtet.
N tr
Einstellungen für Count-in
1. Halten Sie den [SHIFT]-Taster gedrückt, und
drücken Sie den [PREVIEW]-Taster. Die aktuelle
Einstellung für Count-in blinkt im Display.
2. Halten Sie den [SHIFT]-Taster weiterhin gedrückt,
und drücken Sie den [PREVIEW]-Taster erneut, um
die Parameter zu ändern.
Nach einem kurzen Intervall wird der Wert angezeigt.
Halten Sie den [SHIFT]-Taster weiterhin gedrückt, und
bearbeiten Sie den Wert mit den [INC/+] / [DEC/–] (OCTAVE
[+] / [–])-Tastern.
Parameter Wert Erklärung
C nt
b PN
b At
L uL
t yP
o FF(OFF),
C in(COUNT IN),
N tr(ME TRONOME)
20–250 Zähltempo
0.4, 2.4, 3.4, 4.4, 5.4, 6.4, 7.4
0–10 Zähllautstärke
1 (Electronic metronome)
2 (Mechanical metronome)
3 (Pulse)
4 (Beep)
5 (Cowbell)
6 (Stick)
Zählmodus
Bestimmt, ob Count-in oder
das Metronom verwendet wird
Zählzeitsignatur
(2.4 bedeutet 2/4 Zeit)
Zum Zählen verwendeter
Sound
3. Um diese Einstellung zu speichern, halten Sie
den [SHIFT]-Taster gedrückt und drücken den
[WRITE]-Taster.
ANMERKUNG
Halten Sie den [PREVIEW]-Taster gedrückt, um das
Zähltempo im Display anzuzeigen. In diesem Modus
können Sie ein neues Tempo einstellen, indem Sie den
[SHIFT]-Taster mindestens vier Mal drücken, um das
gewünschte Tempo auswählen. Sie können dazu aber
auch die [INC/+] / [DEC/-]-Taster verwenden.
Verschiedene Einstellungen
Überprüfen der Versionsnummer des Lucina AX-09
Hier erfahren Sie, wie Sie die Softwareversion des Lucina
AX-09 überprüfen.
1. Halten Sie die FAVORITE-Taster [A], [B] und den
[WRITE]-Taster gleichzeitig gedrückt, und schalten
Sie das Instrument ein.
Im Display wird „U t L “ angezeigt. Das Instrument bendet
sich nun im Dienstprogrammmodus.
2. Drücken Sie den TONE [1]-Taster.
Im Display wird die Version angezeigt.
Wenn Sie wieder auf dem Instrument spielen möchten,
schalten Sie es aus und nach ein paar Sekunden wieder ein.
Einstellungen für den USB-Treiber
Wenn Sie das Instrument über USB mit
einem Rechner verbunden haben, können
Sie auswählen, ob der standardmäßige
USB-Treiber Ihres Computers oder der USBTreiber von Roland verwendet werden soll.
18
1. Halten Sie die FAVORITE-Taster [A], [B] und den
2. Drücken Sie den TONE [2]-Taster.
3. Wählen Sie mit den [INC/+] / [DEC/–]-Tastern die
4. Drücken Sie den [WRITE]-Taster, um die
5. Schalten Sie den Lucina AX-09 aus und wieder ein.
ANMERKUNG
Weitere Informationen zum Anschließen des Lucina
AX-09 an Ihren Computer per USB nden Sie unter
„Anschließen eines Computers über USB“ (S. 21).
[WRITE]-Taster gleichzeitig gedrückt, und schalten
Sie den Lucina AX-09 ein.
Im Display wird „U t L “ angezeigt. Das Instrument bendet
sich nun im Dienstprogrammmodus.
Im Display wird „d r u “ angezeigt. Anschließend wird der
aktuelle Wert angezeigt, und der [WRITE]-Taster blinkt.
gewünschte Einstellung aus.
Wert Erklärung
G En (GENERIC)
(Standardwert)
u nD ( VENDOR)
Wählen Sie diese Option aus, wenn Sie den
standardmäßigen USB-Treiber Ihres Computers
verwenden.
Wählen Sie diese Option aus, wenn Sie den von der RolandWebsite heruntergeladenen USB-Treiber verwenden.
Einstellung zu speichern.
Nun können Sie den zuletzt gewählten USB-Treiber verwenden.
Page 47

Sichern der Lucina AX-09Einstellungen auf einem USB-Speicher
Hier erfahren Sie, wie Sie alle
Einstellungen des Instruments inkl. der
Einstellungen im FAVORITE-Speicher
(S. 16) auf einem USB-Speicher (separat
erhältlich) sichern.
1. Stecken Sie den USB-Speicherstick in den USB
MEMORY-Speicherplatz (S. 15).
2. Halten Sie die FAVORITE-Taster [A], [B] und den
[WRITE]-Taster gleichzeitig gedrückt, und schalten
Sie den Lucina AX-09 ein.
Im Display wird „U t L “ angezeigt. Das Instrument bendet
sich nun im Dienstprogrammmodus.
3. Drücken Sie den TONE [3]-Taster.
Im Display wird „b U p “ angezeigt, und der [WRITE]-Taster
blinkt.
4. Drücken Sie den [WRITE]-Taster.
Der Sicherungsvorgang beginnt.
5. Wenn im Display „Dn E “ angezeigt wird, schalten
Sie den Lucina AX-09 aus und wieder ein.
ANMERKUNG
Wenn Sie den [WRITE]-Taster drücken und der USBSpeicherstick nicht in den Lucina AX-09 eingesteckt
wurde, wird im Display „E r r“ angezeigt.
Zurückübertragen der Daten von einem USB-Speicher
Hier erfahren Sie, wie Sie Einstellungen,
die wie unter „Sichern der Lucina
AX-09-Einstellungen auf einem USBSpeicher“ (S. 19) beschrieben gespeichert
wurden, wieder in das Instrument
zurückübertragen.
1. Stecken Sie den USB-Speicherstick mit den
gesicherten Einstellungen in den USB MEMORYSteckplatz des Lucina AX-09 (S. 15).
2. Halten Sie die FAVORITE-Taster [A], [B] und den
[WRITE]-Taster gleichzeitig gedrückt, und schalten
Sie den Lucina AX-09 ein.
Im Display wird „U t L “ angezeigt. Das Instrument bendet
sich nun im Dienstprogrammmodus.
3. Drücken Sie den TONE [4]-Taster.
Im Display wird „r S t “ angezeigt, und der [WRITE]-Taster
blinkt.
4. Drücken Sie den [WRITE]-Taster.
Die [WRITE]-Anzeige leuchtet, und die Datenübertragung
vom USB-Stick wird gestartet.
5. Wenn im Display „Dn E “ angezeigt wird, schalten
Sie den Lucina AX-09 aus und wieder ein.
ANMERKUNG
Wenn Sie den [WRITE]-Taster drücken und der USBSpeicherstick nicht in den Lucina AX-09 eingesteckt ist,
oder wenn die Sicherungsdaten nicht im entsprechenden
Speicherort auf dem USB-Speicher vorhanden sind, wird
im Display „E r r “ angezeigt.
Zurücksetzen auf die
Deutsch Français Italiano Español Português NederlandsEnglish
Werkseinstellungen
(Factory Reset)
Hier erfahren Sie, wie Sie den Lucina AX-09 auf die
Werkseinstellungen zurücksetzen.
HINWEIS
• Beim Ausführen dieses Vorgangs werden alle eigenen
Einstellungen gelöscht, einschließlich der in FAVORITES
gespeicherten Toneinstellungen.
• Wenn Sie Ihre Einstellungen beibehalten möchten,
müssen Sie diese vorher auf einem USB-Speicher
sichern, bevor Sie das Instrument auf die
Werkseinstellungen zurücksetzen. “Sichern der Lucina
AX-09-Einstellungen auf einem USB-Speicher“ (S. 19).
1. Halten Sie die FAVORITE-Taster [A], [B] und den
[WRITE]-Taster gleichzeitig gedrückt, und schalten
Sie den Lucina AX-09 ein.
Im Display wird „U t L “ angezeigt. Das Instrument bendet
sich nun im Dienstprogrammmodus.
2. Drücken Sie den TONE [5]-Taster.
Im Display wird „F C t “ angezeigt, und der [WRITE]-Taster
blinkt.
3. Drücken Sie den [WRITE]-Taster.
Die [WRITE]-Anzeige leuchtet auf, und der Vorgang wird
gestartet.
HINWEIS
Unterbrechen Sie während dieses Vorgangs auf
keinen Fall die Stromversorgung. Andernfalls könnten
Fehlfunktionen auftreten.
4. Wenn im Display „Dn E “ angezeigt wird, schalten
Sie den Lucina AX-09 aus und wieder ein.
19
Page 48

Anschließen externer MIDI-Geräte
*1 „Local Control“ ist immer eingeschaltet. Diese Option kann nicht ausgeschaltet
Spielen von externen MIDI-Instrumenten
Wenn Sie nur den Lucina AX-09 verwenden, benötigen Sie
keine MIDI-Detailkenntnisse. Die folgende Beschreibung
von MIDI ist für Personen gedacht, die den Lucina AX-09 an
andere MIDI-Geräte anschließen und diese steuern möchten.
ANMERKUNG
MIDI (Musical Instrument Digital Interface) ist
ein weltweiter Standard, der den Austausch von
Performance-Daten zwischen elektronischen
Musikinstrumenten und Computern ermöglicht.
Mit dem “MIDI-Implementationstabelle“ (S. 26)
können Sie auf einfache Weise überprüfen, welche
MIDI-Meldungen der Lucina AX-09 senden und
empfangen kann. Durch Vergleichen der MIDIImplementationstabellen des Lucina AX-09 und anderer
MIDI-Geräte können Sie feststellen, welche Meldungen
zwischen den beiden Geräten kompatibel sind.
werden. Wenn Sie einen angeschlossenen externen Klangerzeuger steuern
möchten, ohne die eigenen Sounds des Lucina AX-09 zu spielen, können
Sie entweder die Audiokabel aus den OUTPUT-Buchsen herausziehen,
die Lautstärke des Lucina AX-09 reduzieren oder die Lautstärke des
angeschlossenen Verstärkers bzw. Mischpults reduzieren.
*2 Die übertragene Programmnummer und die Speicherplatzauswahldaten
(CC00, CC32) können auf dem Lucina AX-09 nicht eingestellt werden. Wenn Sie
jedoch einen internen Sound auswählen, werden die Programmnummer und
die Speicherplatzauswahldaten (CC00, CC32; siehe die „Liste der Sounds“ am
Ende dieser Bedienungsanleitung) des entsprechenden Sounds gemäß den
MIDI-Einstellungen übertragen (S. 20).
Anschließen eines MIDI-Klangerzeugers
1. Verwenden Sie ein MIDI-Kabel, um den MIDI
OUT-Anschluss des Lucina AX-09 mit dem MIDI
IN-Anschluss des MIDI-Klangerzeugers, den Sie
steuern möchten, zu verbinden.
MIDI-Klangerzeuger
MIDI-Meldungen, die übertragen und empfangen werden können
Der Lucina AX-09 kann die folgenden MIDI-Meldungen
übertragen und empfangen.
ANMERKUNG
Der Empfang von MIDI-Daten ist nur über den USB
COMPUTER-Anschluss möglich.
MIDI-Meldung Erklärung
Note On/O (*1) Übertragung Taste ein/Taste aus-Meldungen
Velocity Übertragung
Übertragung
Aftertouch
Empfang
Program Change Übertragung
Bank Select (*2) Übertragung
Modulation CC01, Übertragung: MODULATIONSHEBEL
CC01 (Modulation)
CC05 (Porta-Time)
CC07 (Volume)
CC10 (Panpot)
CC11 (Expression)
CC64 (Hold)
CC65 (Porta-Sw)
CC66 (Sostenute)
CC71 (Resonance)
CC72 (ReleaseTime)
CC73 (AttackTime)
CC74 (Cuto)
Übertragung
Die Anschlagstärke, mit der Sie eine Taste
drücken
Channel-Aftertouch-Meldungen, die vom
[ASSIGNABLE]-Taster des D BeamControllers, der „
oder durch den Fußtaster übertragen
wird. (Diese Meldung wird nicht über die
Tastatur übertragen).
Channel-Aftertouch, polyphoner Aftertouch.
Kann auf dem Lucina AX-09 nicht
eingestellt werden
Kann auf dem Lucina AX-09 nicht
eingestellt werden
Die Controller-Nummer, die dem
[ASSIGNABLE]-Taster des D BeamControllers oder dem Fußtaster
zugewiesen ist.
“ zugewiesen ist,
A Ft
MIDI IN-Anschluss
Schließen Sie bei Bedarf einen Verstärker oder
Lautsprecher an den verwendeten MIDI-Klangerzeuger
oder Synthesizer an. Weitere Informationen nden
Sie in der Bedienungsanleitung des verwendeten
Klangerzeugers (oder sonstigen Geräts).
Vornehmen von MIDI-Einstellungen
1. Halten Sie den [SHIFT]-Taster gedrückt, und
drücken Sie den [V-LINK]-Taster entsprechend
oft, um auf die gewünschte MIDI-Einstellung
zuzugreifen; viermal für „
oder sechsmal für „
2. Halten Sie den [SHIFT]-Taster weiterhin gedrückt,
und bearbeiten Sie die Einstellung mit den [INC/+] /
[DEC/–] (OCTAVE [+] / [–])-Tastern.
Parameter Wert Erklärung
C h
B n
P C
1–16
(Standardwert: 1)
OFF, ON
(Standardwert:
OFF)
OFF, ON
(Standardwert: ON)
3. Lassen Sie den [SHIFT]-Taster los.
4. Um diese Einstellung zu speichern, halten Sie
den [SHIFT]-Taster gedrückt und drücken den
[WRITE]-Taster.
C h“, fünfmal für „Bn “
P C“.
MIDI-Kanaleinstellung
Gibt an, ob MSB/LSB übertragen
wird
Gibt an, ob Programmänderungsdaten
übertragen werden
20
Page 49

Anschließen eines Computers
Videosteuerung (V-LINK)
über USB
Wenn Sie mit einem handelsüblichen USB-Kabel den USB
COMPUTER-Anschluss an der Rückseite des Lucina AX-09 mit
einem USB-Anschluss Ihres Computers verbinden, können Sie
mithilfe von MIDI die folgenden Schritte ausführen.
• Spielen von Softwaresynthesizern mit dem Lucina AX-09.
• Aufnehmen der Spieldaten des Lucina Lucina AX-09 mit
einem Sequenzer.
• Spielen der Sounds des Lucina AX-09 mithilfe der
Sequenzersoftware.
* Weitere Informationen zu den Systemvoraussetzungen
nden Sie auf der Roland-Website.
Roland-Website
USB-Kabel (separat erhältlich)
Hier können Sie den Originaltreiber herunterladen
sowie Installationsanweisungen und
Bedienungsanforderungen nachlesen.
http://www.roland.com/
Die V-LINK-Funktion ( ) ermöglicht dem
Musiker während des Spielens visuelle Darbietungen
mit Bildern. Wenn Sie mithilfe von MIDI zwei oder mehr
V-LINK-kompatible Geräte miteinander verbinden, können
Sie ein breites Spektrum an visuellen Eekten anbieten,
mit denen Sie die künstlerischen Aspekte Ihres Auftritts
untermauern können.
Beispielsweise ermöglicht die Verwendung des Lucina
AX-09 in Verbindung mit dem EDIROL P-10 Folgendes:
• Wechseln der Bilder auf dem P-10 mithilfe der Tastatur
des Lucina AX-09.
• Steuerung der Bildwiedergabe mithilfe des Touch-
Controllers des Lucina AX-09.
In diesem Beispiel ist der Lucina AX-09 an ein EDIROL P-10
angeschlossen.
Verwenden Sie ein MIDI-Kabel, um den MIDI OUTAnschluss des Lucina AX-09 mit dem MIDI IN-Anschluss
des EDIROL P-10 zu verbinden.
EDIROL P-10
MIDI IN-Anschluss
* Die V-LINK-Kommunikation per USB ist nicht möglich.
Einschalten von V-LINK
Deutsch Français Italiano Español Português NederlandsEnglish
HINWEIS
• Über USB können nur MIDI-Daten übertragen oder
empfangen werden.
• Schalten Sie den Lucina AX-09 ein, bevor Sie die MIDI-
Anwendung auf Ihrem Computer starten. Schalten
Sie den Lucina AX-09 nicht ein oder aus, während die
MIDI-Anwendung geönet ist.
Einstellungen für den USB-Treiber
Normalerweise ist es nicht erforderlich, einen USB-Treiber
auf dem Computer zu installieren. Wenn allerdings
Probleme bei der Computerverbindung auftreten
(Fehlfunktion oder mangelhafte Leistung), können Sie
das Problem möglicherweise lösen, indem Sie wie im
Folgenden beschrieben den Originaltreiber von Roland
herunterladen und installieren.
1. Ändern Sie die Treibereinstellung wie unter
„Einstellungen für den USB-Treiber“ (S. 18)
beschrieben in „
2. Schalten Sie den Lucina AX-09 aus und wieder ein.
3. Laden Sie den Originaltreiber von Roland herunter,
und installieren Sie diesen auf Ihrem Rechner.
Weitere Informationen zum Herunterladen und Installieren
des Originaltreibers von Roland nden Sie auf der
Roland-Website.
u nD“ (Vendor).
1. Drücken Sie den [V-LINK]-Taster, sodass die
Taster-Anzeige leuchtet.
Bedienung am Lucina AX-09
V-LINK-Daten werden über den MIDI-Kanal15 übertragen.
Die folgenden Funktionen können mit dem Lucina AX-09
gesteuert werden.
Controller Erklärung
Tastatur
(die Oktave ganz
links)
Touch-Controller
Wechselt die Bilder.
* Normalerweise erklingt beim Spielen einer Note
auch der Sound des Instruments. Wenn über die
Tastatur kein Sound erzeugt werden soll, müssen
Sie die Einstellung „Local O“ wählen (siehe unten).
Steuert die Wiedergabegeschwindigkeit.
* Der Touch-Controller überträgt jedoch gleichzeitig
auch Daten zur Verschiebung der Tonhöhe.
Einstellungen für den Local-Schalter (Local Switch)
1. Halten Sie den [SHIFT]-Taster gedrückt, und
drücken Sie den [V-LINK]-Taster siebenmal.
Im Display wird „L C L “ und anschließend der Wert der
aktuellen Einstellung angezeigt.
2. Halten Sie den [SHIFT]-Taster weiterhin gedrückt, und
ändern Sie die Einstellung mit den [INC/+] / [DEC/–] (OCTAVE
[+] / [–])-Tastern.
Wert Erklärung
o n
o FF
* Diese Einstellung wird nicht gespeichert, sondern wird immer
auf ON eingestellt, wenn der Lucina AX-09 eingeschaltet wird.
Wenn V-LINK eingeschaltet ist, erklingen beim Spielen der Noten
in der untersten Oktave die Sounds des Lucina Lucina AX-09.
Wenn V-LINK eingeschaltet ist, sind die Sounds beim
Spielen der Noten in der untersten Oktave ausgeschaltet.
21
Page 50

Mögliche Fehlerursachen
Problem Zu überprüfende Elemente Maßnahme
Keine Spannungsversorgung
Im Display blinken drei LEDs Die Batteriespannung ist niedrig. Tauschen Sie die Batterien möglichst schnell aus (S. 6).
Kein Ton
Kein Ton von einem externen
MIDI-Gerät
Der Lautstärkepegel des an die
EXT IN-Buchse angeschlossenen
Instruments ist zu niedrig
Fehler bei der Tonhöhe
Audiodateien von einem
USB-Speicher können nicht
wiedergegeben werden
Der USB-Speicher wird nicht
erkannt/Dateien werden nicht
angezeigt
Keine Sicherung auf dem
USB-Speicher möglich
Sind der mitgelieferte Netzadapter und das
mitgelieferte Netzkabel ordnungsgemäß an der
Steckdose und am Lucina AX-09 angeschlossen?
Sind die Batterien leer? Überprüfen Sie die verbleibende Batteriespannung (S. 6).
Stimmt die Polung der eingelegten Batterien?
Ist der angeschlossene Verstärker oder Lautsprecher
eingeschaltet?
Ist die Lautstärke des angeschlossenen Geräts auf ein
Minimum eingestellt?
Ist der [VOLUME]-Regler auf ein Minimum eingestellt? Stellen Sie den [VOLUME]-Regler ein.
Stimmen die Verbindungen? Nehmen Sie die richtigen Verbindungen vor (S. 8).
Hören Sie etwas über den Kopfhörer?
Wurde die Lautstärke über den Fußtaster, den
D Beam-Controller oder durch MIDI-Meldungen
(Lautstärke- oder Ausdrucksmeldungen), die von
einem externen MIDI-Gerät empfangen wurden, auf
ein Minimum reduziert?
Haben Sie eine FAVORITE-Speicherposition ausgewählt,
deren Lautstärkepegel auf „0“ eingestellt ist?
Verwenden Sie ein Verbindungskabel mit einem
integrierten Widerstand?
Ist der MIDI-Übertragungskanal des Lucina AX-09 mit
dem MIDI-Empfangskanal des angeschlossenen Geräts
kompatibel?
Verwenden Sie ein Verbindungskabel mit einem
Widerstand?
Bei manchen Tönen klingt die Tonhöhe in einem bestimmten Bereich anders als die Tonhöhe anderer Noten.
Möglicherweise wurde die Tonhöhe geändert, als Sie den Touch-Controller berührt haben, oder als
Tonhöhenverschiebungsmeldungen (Pitch Bend) von einem externen MIDI-Gerät empfangen wurden.
Ist der Lucina AX-09 falsch gestimmt?
Audiodateien mit einer einer anderen SamplingFrequenz als 44,1kHz können vom Lucina AX-09 nicht
wiedergegeben werden.
Möglicherweise kann dieser Audiodateityp vom Lucina
AX-09 nicht wiedergegeben werden.
Möglicherweise ist die Audiodatei beschädigt. Überprüfen Sie die Audiodatei.
Überprüfen Sie das Format des USB-Speichers. Der
Lucina AX-09 kann mit FAT formierte USB-Speicher
verwenden. (Normalerweise sind USB-Speicher mit
FAT formatiert und können ohne Neuformatierung
verwendet werden). Ein USB-Speicher, der von einem
Computer mit einem anderen Dateisystem als FAT
formatiert wurde (z.B. NTFS), wird vom Lucina AX-09
nicht erkannt.
Ist der USB-Speicher möglicherweise schreibgeschützt? Deaktivieren Sie den Schreibschutz.
Ist genügend freier Speicherplatz auf dem USBSpeicher vorhanden?
Überprüfen Sie das Format des USB-Speichers. Der
Lucina AX-09 kann mit FAT formierte USB-Speicher
verwenden.
Verwenden Sie nur den Netzadapter oder das Netzkabel, der bzw. das
im Lieferumfang des Lucina AX-09 enthalten ist. Andernfalls können
Fehlfunktionen auftreten (S. 7).
Önen Sie das Batteriefach, und überprüfen Sie die Polung der Batterien
(S. 6).
Schalten Sie den Verstärker oder den Lautsprecher ein.
Stellen Sie die Lautstärke des angeschlossenen Geräts ein.
Wenn Sie über den Kopfhörer etwas hören, ist möglicherweise das
Verbindungskabel beschädigt, oder beim Verstärker oder Mischpult liegt
eine Fehlfunktion vor. Überprüfen Sie das Verbindungskabel und die
Geräte erneut.
Betätigen Sie den Fußtaster, bewegen Sie Ihre Hand über dem
D Beam-Controller, oder überprüfen Sie die Controllereinstellungen.
Erhöhen Sie den Lautstärkepegel (S. 16).
Verwenden Sie ein Verbindungskabel ohne integrierten Widerstand.
Stellen Sie den Übertragungskanal des Lucina AX-09 und den
Empfangskanal des angeschlossenen Geräts auf den gleichen Wert ein
(S. 20).
Verwenden Sie ein Verbindungskabel ohne Widerstand.
Überprüfen Sie die Einstellungen für die Temper ierung (Master Tune) und
die Tastaturstimmung (Key Scale Tune) (S. 17).
Verwenden Sie Audiodateien mit einer Sampling-Frequenz von 44,1kHz.
Verwenden Sie einen der unter „Abspielbare Audiodateien“ (S. 15)
aufgeführten Audiodateitypen.
Verwenden Sie Ihren Computer zum Formatieren des USB-Speichers mit
FAT. (Der USB-Speicher kann vom Lucina AX-09 nicht formatiert werden).
Klicken Sie in „Arbeitsplatz“ mit der rechten Maustaste auf das
USB-Laufwerk, wählen Sie „Formatieren“ aus, und wählen Sie „FAT“
als Dateisystem zum Formatieren des Laufwerks mit FAT aus. Weitere
Informationen zum Formatieren von USB-Speicher nden Sie in der
Bedienungsanleitung Ihres Computers.
Verwenden Sie USB-Speicher mit genügend freiem Speicherplatz, oder
verwenden Sie einen anderen USB-Speicher.
(Weitere Informationen siehe „Der USB-Speicher wird nicht erkannt/
Dateien werden nicht angezeigt“).
22
Page 51

Technische Daten
Lucina AX-09: Synthesizer
Tastatur 37Tasten (mit Anschlagdynamik)
Klangerzeuger
Maximale
Polyphonie
Part 1Part
Sounds 150Sounds (144 reguläre Sounds, 6 spezielle Sounds)
Audio-Player (Wiedergabeformate)
MP3
WAV, AIFF
Sonstiges
Controller
Anschlüsse
Display 7Segmente, 3Zeichen (LED)
128Stimmen
Format MPEG-1 Audio Layer 3
Sampling-Frequenz 44,1 kHz
Bitrate
Sampling-Frequenz 44,1kHz
Bittiefe 8/16/24-Bit
D Beam-Controller
Modulationshebel (Modulation Bar)
Touch-Controller
OUTPUT-Buchsen (L (MONO), R) (6,3-mm-Klinkenstecker)
PHONES-Buchse (Miniklinke Stereo)
EXT IN-Buchse (Miniklinke Stereo)
FOOT PEDAL-Buchse (Funktion zuweisbar)
USB COMPUTER-Anschluss (für USB-MIDI)
USB MEMORY-Steckplatz
MIDI OUT-Anschluss
DC IN-Buchse
32/40/48/56/64/80/96/112/128/
160/192/224/256/320 KBit/s,
Variable Bitrate (VBR)
Netzadapter
Stromversorgung
Stromaufnahme 600mA
Batterielebensdauer
bei Dauernutzung
Abmessungen
Gewicht
Zubehör
Optionen
* Änderungen der technischen Daten und des Designs bleiben vorbehalten und
bedürfen keiner vorherigen Ankündigung. Für Druckfehler wird keine Haftung
übernommen.
Nickel-Metallhydridakkus der Größe AA x 8
* Batterien sind separat erhältlich.
* Verwenden Sie keine Alkali-Batterien oder
Zink-Kohle-Batterien.
Nickel-Metallhydridakkus: etwa 4Stunden
(Dieser Wert hängt von den tatsächlichen
Betriebsbedingungen ab.)
832 (B) x 245 (T) x 95 (H) mm
32-13/16 (B) x 9-11/16 (T) x 3-3/4 (H) Zoll
ca. 3,7 kg
8 lbs 3 oz
(ohne Netzadapter)
Bedienungsanleitung (dieses Handbuch), Kurzanleitung
DVD mit Lernprogramm (Tutorial)
Gurt
Bedienfeldaufkleber
USB MEMORY Anschluss-Abdeckung
Netzadapter (PSB-1U (S))
Fußtaster: DP-Serie
Expression-Fußtaster: EV-5
USB-Speicher
* Verwenden Sie USB-Speicher von Roland. Für
USB-Speicher anderer Hersteller kann keine
Gewährleistung für einen problemlosen Betrieb
übernommen werden.
Deutsch Français Italiano Español Português NederlandsEnglish
Liste der Fehlermeldungen
Meldung Beschreibung
E NP
E rr
F UL
Empty Der USB-Speicher enthält nicht die erforderlichen Daten.
Error Der Zugri auf den USB-Speicher ist nicht möglich. Stellen Sie sicher, dass der USB-Speicherstick eingesteckt ist.
Memory Full Der Vorgang konnte nicht ausgeführt werden, da nicht genügend freier Speicherplatz auf dem USB-Speicher vorhanden ist.
23
Page 52

SICHERER BETRIEB DES GERÄTS
Önen Sie weder das Gerät noch den Netzadap-
WARNUNG
ter, und nehmen Sie keine Änderungen daran vor.
Versuchen Sie nicht, das Gerät zu reparieren oder
darin enthaltene Teile zu ersetzen (außer in Fällen,
für die in dieser Anleitung genaue Anweisungen
gegeben sind). Wenden Sie sich bei allen
Reparaturen an Ihren Fachhändler, ein RolandService-Center in Ihrer Nähe oder an einen der
autorisierten Roland-Vertriebspartner, die auf der
Seite „Informationen“ aufgeführt sind.
Stellen Sie das Gerät niemals in Umgebungen mit
folgenden Bedingungen auf:
• Extreme Temperaturen (z.B. direktes Sonnenlicht
in einem geschlossenen Fahrzeug, in der Nähe
einer Heizungsleitung, auf Wärmequellen)
• Feuchtigkeit (z.B. Bäder, Waschräume, nasse
Fußböden)
• Dampf oder Rauch
• Hoher Salzgehalt in der Luft
• Hohe Luftfeuchtigkeit
• Regen
• Staub oder Sand
• Starke Vibrationen oder Erschütterungen
Wenn Sie den Lucina AX-09 ohne Gurt verwenden, achten Sie darauf, dass das Gerät immer
waagerecht und stabil steht. Platzieren Sie es
nicht auf wackeligen Ständern oder schiefen
Flächen.
Verwenden Sie ausschließlich den im Lieferumfang des Geräts enthaltenen Netzadapter.
Achten Sie darauf, dass die Netzspannung am
Aufstellungsort mit der auf dem Netzadapter
angegebenen Eingangsspannung übereinstimmt.
Andere Netzadapter haben möglicherweise
eine andere Polarität oder sind auf eine andere
Spannung ausgelegt. Ihre Verwendung kann
deshalb eine Beschädigung, Fehlfunktion oder
einen elektrischen Schlag zur Folge haben.
Verwenden Sie ausschließlich das angeschlossene Netzkabel. Außerdem darf das mitgelieferte
Netzkabel nicht für ein anderes Gerät eingesetzt
werden.
Verdrehen oder biegen Sie das Netzkabel
nicht zu stark, und stellen Sie keine schweren
Gegenstände auf das Kabel. Dadurch kann das
Kabel beschädigt werden, was zu Unterbrechungen und Kurzschlüssen führen kann. Schadhafte
Kabel können Brände und elektrische Schläge
verursachen!
Dieses Gerät kann einzeln oder in Kombination
mit einem Verstärker und Kopfhörern oder
Lautsprechern Schallpegel erzeugen, die zu dauerhaftem Gehörverlust führen können. Betreiben
Sie das Gerät nicht über längere Zeit mit hoher
oder unangenehmer Lautstärke. Sobald Sie eine
Beeinträchtigung Ihres Gehörs oder ein Klingeln
in den Ohren bemerken, sollten Sie den Betrieb
des Geräts sofort einstellen und sich an einen
HNO-Arzt wenden.
Achten Sie darauf, dass weder Gegenstände (z.B.
leicht entzündliches Material, Münzen, Nadeln)
noch Flüssigkeiten jeglicher Art (Wasser, Getränke
usw.) in das Gerät gelangen.
24
Wenn einer der folgenden Fälle eintritt, ziehen Sie
den Netzadapter aus der Steckdose, und wenden
Sie sich an Ihren Fachhändler, ein RolandService-Center in Ihrer Nähe oder an einen der
autorisierten Roland-Vertriebspartner, die auf der
Seite „Informationen“ aufgeführt sind:
• Der Netzadapter, das Netzkabel oder der
Stecker wurde beschädigt
• Rauch oder ein ungewöhnlicher Geruch
tritt auf
• Gegenstände oder Flüssigkeiten sind in das
Gerät gelangt
• Das Gerät war Regen (oder sonstiger
Feuchtigkeit) ausgesetzt
• Das Gerät scheint nicht normal zu
funktionieren oder seine Leistung weist eine
deutliche Änderung auf
In Haushalten mit Kleinkindern sollte ein
Erwachsener anwesend sein und den Betrieb
überwachen, bis das Kind alle wesentlichen Regeln beachten kann, die für den sicheren Betrieb
des Geräts unerlässlich sind.
Schützen Sie das Gerät vor starken Stößen.
(Lassen Sie es nicht fallen!)
Betreiben Sie den Netzadapter nicht zusammen
mit einer zu großen Anzahl von Geräten an einer
einzigen Netzsteckdose. Seien Sie besonders
vorsichtig beim Einsatz von Verlängerungskabeln.
Die Gesamtleistung aller an der Verlängerung betriebenen Geräte darf die für das Verlängerungskabel angegebene zulässige Leistung (Watt-/
Ampere-Zahl) nicht überschreiten. Übermäßige
Last kann dazu führen, dass sich die Isolierung
erhitzt und ggf. schmilzt.
Bevor Sie das Gerät in einem anderen Land
betreiben, wenden Sie sich an Ihren Fachhändler,
ein Roland-Service-Center in Ihrer Nähe oder an
einen der autorisierten Roland-Vertriebspartner,
die auf der Seite „Informationen“ aufgeführt sind.
Sie dürfen Batterien niemals neu auaden,
erhitzen, in ihre Einzelteile zerlegen oder in Feuer
oder Wasser werfen.
Setzen Sie eine Batterie niemals übermäßiger
Hitze aus, wie Sonnenlicht, Feuer oder ähnliches.
VORSICHT
Das Gerät und der Netzadapter sollten so
aufgestellt werden, dass deren Aufstellort oder
-position nicht die erforderliche Belüftung
beeinträchtigt.
Fassen Sie das Netzkabel des Netzadapters immer
am Stecker an, wenn Sie diesen in eine Steckdose
oder in das Gerät stecken oder herausziehen.
Sie sollten den Netzadapter in regelmäßigen Abständen aus der Steckdose herausziehen und die
Kontakte am Stecker mit einem trockenen Tuch
von Staub und anderen Ablagerungen befreien.
Ziehen Sie den Netzstecker auch dann aus der
Steckdose, wenn das Gerät längere Zeit außer
Betrieb ist. Jegliche Staubansammlung zwischen
Netzstecker und Steckdose kann die Isolierung
beeinträchtigen und zu Bränden führen.
WARNUNG
Sorgen Sie dafür, dass sich die Kabel und Leitun-
VORSICHT
gen nicht verdrehen oder verheddern. Achten Sie
zudem darauf, dass sich alle Kabel und Leitungen
außerhalb der Reichweite von Kindern benden.
Steigen Sie niemals auf das Gerät, und stellen Sie
keine schweren Gegenstände darauf ab.
Fassen Sie den Netzadapter niemals mit nassen
Händen an, wenn Sie ihn in eine Steckdose oder
das Gerät stecken oder herausziehen.
Bevor Sie das Gerät bewegen, trennen Sie die
Verbindung des Netzadapters mit der Steckdose
sowie aller weiteren Kabel mit externen Geräten.
Bevor Sie das Gerät reinigen, schalten Sie es
aus, und ziehen Sie den Netzadapter aus der
Steckdose (S. 7).
Bei angekündigtem oder heraufziehendem
Gewitter sollten Sie immer den Netzadapter aus
der Steckdose ziehen.
Bei falscher Handhabung können Batterien
explodieren oder auslaufen und Schäden oder
Verletzungen verursachen. Lesen und beachten
Sie daher im Interesse der Sicherheit die folgenden Vorsichtsmaßnahmen (S. 6).
• Befolgen Sie sorgfältig die Anweisungen zum
Einlegen der Batterien. Achten Sie dabei genau
auf die richtige Polung.
• Vermeiden Sie es, neue Batterien zusammen
mit alten bzw. gebrauchten Batterien zu
verwenden. Vermeiden Sie außerdem die
Verwendung unterschiedlicher Batterietypen.
• Nehmen Sie die Batterien aus dem Gerät
heraus, wenn dieses längere Zeit außer
Betrieb ist.
• Wenn eine Batterie ausgelaufen ist, wischen
Sie Rückstände der ausgelaufenen Flüssigkeit
mit einem weichen Tuch oder einem
Papiertaschentuch aus dem Batteriefach.
Legen Sie dann neue Batterien ein. Um
Hautentzündungen zu vermeiden, achten Sie
darauf, dass keine Batterieüssigkeit auf Ihre
Hände oder Haut gelangt. Achten Sie äußerst
genau darauf, dass die Batterieüssigkeit
nicht in die Nähe Ihrer Augen gelangt. Spülen
Sie den betroenen Bereich sofort unter
ießendem Wasser aus, falls Batterieüssigkeit
in die Augen gelangt sein sollte.
• Bewahren Sie Batterien nicht zusammen
mit metallischen Gegenständen wie
Kugelschreibern, Halsketten, Haarnadeln
usw. auf.
Gebrauchte Batterien müssen gemäß den Bestimmungen für die sichere Entsorgung entsorgt
werden, die in Ihrer Region gelten.
Wenn Sie die USB MEMORY Anschluss-Abdeckung entfernen, bewahren Sie sie an einem
sicheren Ort außerhalb der Reichweite von
Kindern auf, sodass diese sie nicht versehentlich
verschlucken können.
Page 53

WICHTIGE HINWEISE
Stromversorgung: Verwendung
von Batterien
• Schließen Sie dieses Gerät nicht an die gleiche
Netzsteckdose wie andere elektrische Geräte an, die
durch einen Wechselrichter gesteuert (z.B. Kühlschrank,
Waschmaschine, Mikrowellenherd oder Klimaanlage) oder
durch einen Motor betrieben werden. Je nach Art und Weise,
in der das elektrische Gerät verwendet wird, können die
von ihm erzeugten Interferenzen in der Netzversorgung
zu Fehlfunktionen oder hörbaren Störgeräuschen führen.
Wenn es nicht möglich ist, eine gesonderte Steckdose zu
verwenden, schalten Sie einen Netzentstörlter zwischen
dieses Gerät und die Netzsteckdose.
• Der Netzadapter wird nach andauerndem mehrstündigem
Gebrauch recht warm. Dies ist normal und kein Grund zur
Beunruhigung.
• Die Verwendung eines Netzadapters wird empfohlen, da der
Stromverbrauch des Geräts relativ hoch ist. Falls Sie lieber
Batterien verwenden, sollten Sie Nickel-Metallhydridakkus
verwenden.
• Beim Einlegen oder Austauschen der Batterien sollten Sie
das Gerät immer ausschalten und die Verbindungen zu
jeglichen anderen angeschlossenen Geräten trennen. Auf
diese Weise können Sie Fehlfunktionen und/oder Schäden
an Lautsprechern oder anderen Geräten vermeiden.
• Schalten Sie alle beteiligten Geräte aus, bevor Sie dieses
Gerät an andere Geräte anschließen. Auf diese Weise können
Sie Fehlfunktionen und/oder Schäden an den Lautsprechern
oder anderen Geräten vermeiden.
• Falls Batterien eingelegt sind, wird das Gerät ausgeschaltet,
wenn Sie bei eingeschaltetem Gerät das Netzkabel aus
der Steckdose ziehen bzw. das Netzkabel erneut an die
Steckdose anschließen oder den Stecker des Netzadapters
an der Rückseite des Lucina AX-09 ausstecken. Sie müssen
das Gerät ausschalten, bevor Sie das Netzkabel oder den
Netzadapter anschließen oder trennen.
Aufstellung
• Der Einsatz des Geräts in der Nähe von Leistungsverstärkern
(oder anderen Geräten mit großen Transformatoren) kann
ein Brummen verursachen. Um dieses Problem zu umgehen,
ändern Sie die Ausrichtung dieses Geräts, oder stellen Sie es
in größerer Entfernung zur Störquelle auf.
• Dieses Gerät kann den Empfang von Radio- und
Fernsehsignalen stören. Verwenden Sie es deshalb nicht in
der Nähe solcher Empfangsgeräte.
• Wenn Geräte zur drahtlosen Kommunikation wie
Mobiltelefone in der Umgebung dieses Geräts verwendet
werden, können Geräusche entstehen. Diese Geräusche
können bei abgehenden oder ankommenden Gesprächen
oder während der Verbindung entstehen. Sollten
Sie Probleme dieser Art haben, verwenden Sie die
Mobilfunkgeräte in größerer Entfernung zu diesem Gerät,
oder schalten Sie sie aus.
• Setzen Sie das Gerät keinem direkten Sonnenlicht aus,
stellen Sie es nicht neben Heizgeräten auf, lassen Sie es nicht
in einem geschlossenen Fahrzeug liegen, und setzen Sie es
auch sonst keinen extremen Temperaturen aus. Übermäßige
Hitze kann zu Verformungen oder Verfärbungen des Geräts
führen.
• Wenn das Gerät bei einem Transport aus kalter/
trockener Umgebung in eine feucht-warme Umgebung
gelangt, können sich Wassertröpfchen (Kondensation)
im Geräteinneren bilden. Es können Schäden oder
Fehlfunktionen auftreten, falls Sie versuchen, das Gerät
unter diesen Bedingungen zu betreiben. Bevor Sie das Gerät
verwenden, lassen Sie es mehrere Stunden lang stehen, bis
die Kondensation vollständig verdampft ist.
• Lassen Sie keine Objekte auf der Tastatur liegen. Dies kann
zu Fehlfunktionen führen, wie z.B. dass Tasten keine Töne
mehr erzeugen.
• Je nach Material und Temperatur der Oberäche, auf der Sie
das Gerät aufstellen, können die Gummifüße die Oberäche
verfärben oder beschädigen. Um dies zu vermeiden, legen
Sie ein Stück Filz oder Sto unter die Gummifüße. Achten
Sie in diesem Fall jedoch darauf, dass das Gerät nicht
wegrutschen kann.
Wartung
• Für die normale Reinigung wischen Sie das Gerät mit einem
weichen, trockenen oder leicht angefeuchteten Tuch ab. Um
hartnäckigen Schmutz zu entfernen, verwenden Sie ein mit
einer milden, nicht scheuernden Seifenlösung getränktes
Tuch. Wischen Sie sorgfältig mit einem weichen, trockenen
Tuch nach.
• Verwenden Sie kein Benzin oder Verdünnungsmittel, Alkohol
oder sonstige Lösemittel, um Verfärbungen und/oder
Verformungen zu vermeiden.
Reparaturen und
Datensicherung
• Beachten Sie, dass alle im Speicher des Geräts gespeicherten
Daten verloren gehen können, wenn das Gerät zur Reparatur
eingeschickt wird. Wichtige Daten sollten stets auf dem USBSpeicher gesichert oder auf Papier aufgeschrieben werden
(falls möglich). Bei Reparaturen wird sorgfältig darauf
geachtet, dass keine Daten verloren gehen. In bestimmten
Fällen jedoch (z.B. wenn Schaltkreise des Speichers selbst
defekt sind), können die Daten u.U. nicht wieder hergestellt
werden. Roland übernimmt in diesem Fall keine Haftung für
diesen Datenverlust.
Verwenden von USB-Speichern
• Führen Sie den USB-Speicherstick vorsichtig vollständig ein.
• Fassen Sie die Kontakte des USB-Speichersticks auf keinen
Fall an. Vermeiden Sie außerdem jegliche Verschmutzung
der Kontakte.
• USB-Speichersticks werden unter Verwendung von
Präzisionskomponenten produziert. Behandeln Sie
Speichersticks sorgfältig, und beachten Sie insbesondere die
folgenden Punkte.
• Um eine Beschädigung der Speichersticks durch
statische Elektrizität zu vermeiden, entladen Sie
etwaige statische Elektrizität von Ihrem Körper, bevor
Sie die Speichersticks anfassen.
• Achten Sie darauf, dass Sie die Kontakte der
Speichersticks nicht anfassen und dass Metall nicht
damit in Berührung kommt.
• Sie sollten die Speichersticks nicht biegen, fallen
lassen oder starken Erschütterungen und Vibrationen
aussetzen.
• Bewahren Sie die Speichersticks nicht in direktem
Sonnenlicht, in geschlossenen Fahrzeugen oder an
ähnlichen Orten auf.
• Achten Sie darauf, dass die Speichersticks nicht nass
werden.
• Die Speichersticks dürfen nicht auseinandergebaut
oder modiziert werden.
Umgang mit DVDs
• Vermeiden Sie es, die glänzende Unterseite (codierte
Oberäche) der DVD anzufassen oder zu verkratzen.
Beschädigte oder verschmutzte DVDs werden
möglicherweise nicht ordnungsgemäß gelesen. Reinigen Sie
Ihre DVDs mit einem handelsüblichen Diskreiniger.
Vorsichtsmaßnahmen für die
Gurthalterung
• Schrauben Sie die Gurthalterungen auf keinen Fall ab, um
eine Beschädigung des Plastikgehäuses des Lucina AX-09 zu
vermeiden, wodurch letztlich die Stabilität und Sicherheit
insgesamt gefährdet würde.
• Überprüfen Sie vor der Verwendung des Lucina AX-09
unbedingt, ob der mitgelieferte Gurt ordnungsgemäß an
den beiden Halterungen befestigt ist, um zu vermeiden, dass
das Gerät herunterfällt und beschädigt wird oder Sie und
andere Personen verletzt werden.
• Roland empehlt die Verwendung handelsüblicher
Gitarren-Gurtsicherungen, um Verletzungen zu vermeiden,
die dadurch entstehen können, dass sich der Gurt beim
Spielen lockert.
Zusätzliche
Vorsichtsmaßnahmen
• Beachten Sie, dass der Speicherinhalt aufgrund einer
Fehlfunktion oder des unsachgemäßen Betriebs des Geräts
unwiederbringlich verloren gehen kann. Als Schutz vor
dem Risiko des Verlusts wichtiger Daten wird empfohlen, in
bestimmten Abständen eine Sicherungskopie von wichtigen
Daten, die auf dem USB-Speicher enthalten sind, zu erstellen.
• Möglicherweise kann der Inhalt verloren gegangener Daten,
die auf einem USB-Speicher oder im internen Speicher
gespeichert waren, nicht wiederhergestellt werden. Die
Roland Corporation übernimmt in diesem Fall keine Haftung
für diesen Datenverlust.
• Seien Sie hinreichend vorsichtig beim Betätigen der
Taster, Regler und anderer Bedienelemente sowie beim
Anschließen von Kabeln an den Buchsen des Geräts. Eine
unachtsame Handhabung kann zu Fehlfunktionen führen.
• Schlagen Sie niemals auf das Display, und üben Sie keinen
starken Druck darauf aus.
• Wenn Sie Kabel anschließen oder abziehen, fassen Sie das
Kabel immer am Stecker an – ziehen Sie niemals am Kabel.
Auf diese Weise vermeiden Sie Kurzschlüsse oder Schäden
an inneren Kabelbestandteilen.
• Halten Sie die Lautstärke des Geräts auf einem vernünftigen
Maß, um die Nachbarschaft nicht unnötig zu stören. Sie
können z.B. auch Kopfhörer verwenden. Dann brauchen
Sie sich keine Gedanken mehr darüber machen, ob andere
Personen gestört werden (besonders nachts).
• Wenn Sie das Gerät transportieren müssen, verpacken
Sie es möglichst im Originalkarton (einschließlich des
Verpackungsmaterials), in dem es geliefert wurde.
Anderenfalls sollten Sie versuchen, ähnliches Packmaterial
zu verwenden.
• Verwenden Sie nur das angegebene Expression-Pedal (EV-5;
separat erhältlich). Wenn Sie andere Expression-Pedale
anschließen, besteht die Gefahr von Fehlfunktionen und/
oder Schäden am Gerät.
• Einige Anschlusskabel enthalten Widerstände. Verwenden
Sie für Anschlüsse an diesem Gerät keine Kabel mit
Widerständen. Die Verwendung solcher Kabel kann dazu
führen, dass der Signalpegel sehr niedrig oder sogar
unhörbar ist. Informationen zu den technischen Daten von
Kabeln erhalten Sie vom jeweiligen Hersteller.
• Der Wirkungsbereich des D Beam-Controllers ist in starkem
direkten Sonnenlicht extrem gering. Beachten Sie dies, wenn
Sie den D Beam-Controller im Freien verwenden.
• Die Erläuterungen in dieser Anleitung enthalten
Abbildungen typischer Displayinhalte. Beachten Sie
jedoch, dass Ihr Gerät unter Umständen mit einer neueren,
verbesserten Version des Systems ausgestattet ist (z.B.
neuere Sounds enthält). Dies kann dazu führen, dass im
Display nicht immer exakt das angezeigt wird, was in der
Bedienungsanleitung dargestellt ist.
• Microsoft und Windows sind eingetragene Marken der
Microsoft Corporation.
• Windows® ist oziell als „Microsoft® Windows®-
Betriebssystem“ bekannt.
• MMP (Moore Microprocessor Portfolio) bezeichnet ein
Patentportfolio, das sich mit der von Technology Properties
Limited (TPL) entwickelten Mikroprozessorarchitektur
befasst. Roland hat diese Technologie von der TPL Group
lizenziert.
• Die MPEG Audio Layer-3-Komprierungstechnologie ist
von der Fraunhofer IIS Corporation und der THOMSON
Multimedia Corporation lizenziert.
• MatrixQuest™ 2010
TEPCO UQUEST, LTD. Alle
Rechte vorbehalten.
Für die USB-Funktionalität des Lucina AX-09 wird
MatrixQuest-Middleware-Technologie von TEPCO UQUEST,
LTD verwendet.
• Die digitalen Schriftarten stammen von Yourname, Inc.
Digitale Schriftart: Copyright © Yourname, Inc.
• Roland und Lucina sind eingetragene Warenzeichen bzw.
Warenzeichen der Roland Corporation in den USA und/oder
anderen Ländern.
• Alle in diesem Dokument erwähnten Produktnamen
sind Marken oder eingetragene Marken der jeweiligen
Eigentümer.
Deutsch Français Italiano Español Português NederlandsEnglish
25
Page 54

Index
A
ADLIB . . . . . . . . . . . . . . . . . . . . . . . . . . . . . 13
AFTERTO UCH. . . . . . . . . . . . . . . . . . 13, 14
AIFF . . . . . . . . . . . . . . . . . . . . . . . . . . . . . . . 15
ARABIA N SCALE ARA BISCHE SKAL A . . 17
ASSIGN ABLE. . . . . . . . . . . . . . . . . . . . . . . 12
ATTACK TIME . . . . . . . . . . . . . . . 13, 14, 16
AUDIODATEI . . . . . . . . . . . . . . . . . . . . . . . 14
AUDIOP LAYE R . . . . . . . . . . . . . . . . . . . . 15
AUDIO P LAYE RTASTER . . . . . . . . . . . 15
B
BATTERIE FAC H . . . . . . . . . . . . . . . . . . . . . 6
BATTERIE N . . . . . . . . . . . . . . . . . . . . . . . . . 6
BUCHSTABEN . . . . . . . . . . . . . . . . . . . . . . . 2
C
COMPUTE R . . . . . . . . . . . . . . . . . . . . . . . . 21
COUNTI N . . . . . . . . . . . . . . . . . . . . . . . . . 18
CUTOFF . . . . . . . . . . . . . . . . . . . . 13, 14, 16
D
DBEAM CONTROLLER . . . . . . . . . . . . . 12
DC INB UCHSE. . . . . . . . . . . . . . . . . . . . . . 7
DEMOFU NKTION . . . . . . . . . . . . . . . . . . . 9
DIENST PROGRAMM . . . . . . . . . . . . . . . 18
E
EQUAL TEMPE RAMENT
GLEIC HMÄSSIGE STI MMUNG . . . . . 17
EXPRES SION . . . . . . . . . . . . . . . . . . . 12, 13
EXPRES SIONFUSSTASTE R . . . . . . . . . 13
EXT IN BUCHSE . . . . . . . . . . . . . . . . . . . . 14
F
FAVORITE . . . . . . . . . . . . . . . . . . . . . . . . . . 10
FAVORITE A / B TASTER . . . . . . . . . 10
FILTER . . . . . . . . . . . . . . . . . . . . . . . . . . . . . 12
FOOT PEDA LBUCHSE . . . . . . . . . . . . . 13
FUSSTASTER . . . . . . . . . . . . . . . . . . . 13, 14
G
GURT . . . . . . . . . . . . . . . . . . . . . . . . . . . . . . . 7
GURTHA LTE RUNG . . . . . . . . . . . . . . . . . . 7
H
HALL . . . . . . . . . . . . . . . . . . . . . . . . . . . . . . 16
HOLD . . . . . . . . . . . . . . . . . . . . . . . . . 12, 13
I
INC/+ / DEC/TASTER . . . . . . . . . . . 9
K
KABELK LEMME . . . . . . . . . . . . . . . . . . . . . 7
KLANG PAR AMETER . . . . . . . . . . . . . . . 16
KOPFHÖR ER . . . . . . . . . . . . . . . . . . . . . . . . 8
L
LAUTSPRE CHER . . . . . . . . . . . . . . . . . . . . 8
LISTE D ER FEHLERMEL DUNGEN . . . 23
L/MONO BUCHSE . . . . . . . . . . . . . . . . . . 8
LOCKTASTE R . . . . . . . . . . . . . . . . . . . . 14
M
MASTERS TIMMUNG MAS TER TUNE . . 17
METRO NOM . . . . . . . . . . . . . . . . . . . . . . . 18
MIDI . . . . . . . . . . . . . . . . . . . . . . . . . . . . . . . 20
MIDII MPLEMENTATIONSTABELLE . . 26
MOBILE R AUDIOPLAYER . . . . . . . . . . 14
MODULATION . . . . . . . . . . . . . . . . . 12, 13
MODULATION SHEBEL MODU LATION BA R . . 11
MÖGLIC HE FEHLERURS ACHEN . . . . 22
MP3 . . . . . . . . . . . . . . . . . . . . . . . . . . . . . . . 15
N
NETZA DAPTER . . . . . . . . . . . . . . . . . . . . . 7
O
OCTAVETASTER + / . . . . . . . . . . . 11
OUTPUT BUCHSEN . . . . . . . . . . . . . . . . . 8
P
PAN . . . . . . . . . . . . . . . . . . . . . . . . . . . 12, 13
PEDAL DO WN . . . . . . . . . . . . . . . . . . . . . 14
PEDAL UP . . . . . . . . . . . . . . . . . . . . . . . . . 14
PHONES BUCHSE . . . . . . . . . . . . . . . . . . . 8
PITCH . . . . . . . . . . . . . . . . . . . . . . . . . . . . . 12
PORTAMENTO . . . . . . . . . . . . . . . . . 13, 16
PORTAMENTO TIM E. . . . . . . . . 12, 13, 16
POWER SCHALTER . . . . . . . . . . . . . . . . 8
PREVI EWTASTER. . . . . . . . . . . . . . . . . . 9
R
REGIST RIEREN EINES SOUNDS . . . . . 10
REGULÄ RER SOUND . . . . . . . . . . . . . . . . 9
RELEAS E TIME . . . . . . . . . . . . . . 13, 14, 16
RESONA NCE . . . . . . . . . . . . . . . . 13, 14, 16
S
SECURI TY SLOT SICHE RHEITSSCHLOSS . . 5
SICHER N . . . . . . . . . . . . . . . . . . . . . . . . . . 19
SOLO SYNT H . . . . . . . . . . . . . . . . . . . . . . 13
SOSTEN UTO . . . . . . . . . . . . . . . . . . . . . . . 13
SOUND . . . . . . . . . . . . . . . . . . . . . . . . . . . . . 9
MIDI-Implementationstabelle
SPECI AL TONETASTER . . . . . . . . . . . . 9
SPERRF UNKTION . . . . . . . . . . . . . . . . . . 14
SPEZIE LLER SOUND S PECIAL TONE . . 9
STIMME N . . . . . . . . . . . . . . . . . . . . . . . . . . 17
T
TECHNI SCHE DATEN .. . . . . . . . . . . . . . 23
TEMPER IERUNG KEY S CALE TUNE . . 17
TONETASTER 16 . . . . . . . . . . . . . . . 9
TONPARAMETE R . . . . . . . . . . . . . . . . . . . 16
TOUCHCO NTROLLER . . . . . . . . . . . . . 11
TRANS POSETASTER . . . . . . . . . . . . . 11
U
USB COMP UTERANSCHLUS S . . . . . . 21
USB MEM ORYSTECKPL ATZ . . . . . . . . 15
USBSP EICHER . . . . . . . . . . . . . . . . . . . . . 15
USBTR EIBER . . . . . . . . . . . . . . . . . . . . . . 21
V
VERSIO N . . . . . . . . . . . . . . . . . . . . . . . . . . 18
VLINK . . . . . . . . . . . . . . . . . . . . . . . . . . . . . 21
VOLUME . . . . . . . . . . . . . . . . . . . . 12, 13, 16
VOLUME REGLER . . . . . . . . . . . . . . . . . 8
W
WAV . . . . . . . . . . . . . . . . . . . . . . . . . . . . . . . 15
WIEDER HERSTELLEN . . . . . . . . . . . . . . 19
WRITE TASTER . . . . . . . . . . . . . . . 10, 18
Z
ZURÜCK SETZEN . . . . . . . . . . . . . . . . . . . 19
ZURÜCK SETZEN AUF
WERKSE INSTELLUNGEN . . . . . . . . . . . 19
26
Lucina AX-09
Basic
Channel
Mode
Note
Number
Velocity
After
Touch
Pitch Bend
Control
Change
Program
Change
System Exclusive
System
Common
System
Real Time
Aux
Messages
Notes
Mode 1: OMNI ON, POLY
Mode 3: OMNI OFF, POLY
Function...
Default
Changed
Default
Message
Altered
True Voice
Note ON
Note OFF
Key’s
Ch’s
True #
Song Position Pointer
Song Sel
Tune
Clock
Commands
All Sounds O
Reset All Controllers
Local On/O
All Notes O
Active Sensing
Reset
0, 32
6, 38
100, 101
Transmitted Recognized Remarks
1–16
1–16
Mode 3
Mono, Poly
**************
7–126
**************
O
O
X
O
O
O
1
O
5
O
X
7
O
10
O
11
O
64
O
65
O
66
O
71
O
72
O
73
O
74
O
75
X
84
X
91
X (Reverb)
93
X (Chorus)
X
O *1
**************
X X
X
X
X
X
X
X
X
X
X
O
X
*1 O X is selectable
*2 Recognized as M=1 even if M≠1
Mode 2: OMNI ON, MONO
Mode 4: OMNI OFF, MONO
*1 O
1–16
1–16
Mode 3
Mode 3, 4 (M=1)
X
0–127
0–127
O
O
O
O
O
O
O
O
O
O
O
O
O
O
O
O
O
O
O
O
O
O
O
O
0–127
X
X
X
X
X
O
O
X
O (123–127)
X
X
Memorized
*2
Bank Select
Modulation
Portamento Time
Data entry
Volume
Panpot
Expression
Hold 1
Portamento SW
Sostenuto
Resonance
Release Time
Attack Time
Cuto
Sound Control
Portamento Control
Eect 1 Depth
Eect 3 Depth
RPN LSB, MSB
Program No. 1–128
Date : Jan. 1, 2010Synthesizer
Version : 1.00
O: Yes
X: No
Page 55

Deutsch Français Italiano Español Português NederlandsEnglish
Page 56

Caractéristiques
Un son pour le plus grand bonheur des musiciens!
• Les 144sons oerts couvrent toutes les bases, y compris les sons d’un synthétiseur mais
également ceux d’un piano, d’un orgue, d’un instrument à cordes, d’un instrument de cuivre et
d’une guitare, tous pouvant être joués pour votre plaisir immédiat.
• L’instrument fournit également six «sons spéciaux» très expressifs.
Ces six sons de haute qualité ont été créés spéciquement pour le Lucina AX-09 (synth lead, poly
synth, synth bass, jazz scat, violon et trombone).
Simplicité d’utilisation et de prise en main
• Un fonctionnement simple: mettez l’appareil sous tension et choisissez un son.
• Léger et élégant, l’appareil Lucina AX-09 fonctionne également sur piles, ce qui vous permet de
jouer n’importe où et à tout moment. Porté en bandoulière comme une guitare, le Lucina AX-09
permet de dynamiser et de libérer vos performances.
Un plaisir de jouer inégalé
• Toutes les fonctions expressives uniques d’un synthétiseur classique sont désormais au bout
de vos doigts, grâce au contrôleur D-Beam, à la barre de modulation et au contrôleur tactile du
Lucina AX-09.
• Accompagnez en toute facilité vos morceaux préférés, en connectant votre lecteur audio portatif
sur la prise EXT IN ou grâce à la fonction de lecture audio via une clé USB.
Achage des lettres sur l’appareil Lucina AX-09
J KLLNMnNoOPPQQrRSStTUUuV WXXYYZZ
AABBCCDDEEFFGGhHiIJ
Copyright © 2010 ROLAND CORPORATION
Tous droits réservés. Toute reproduction intégrale ou partielle de cette publication est interdite sous quelque forme que ce soit
sans l’autorisation écrite de ROLAND CORPORATION.
Avant d’utiliser cet appareil, veuillez lire attentivement les sections intitulées «CONSIGNES DE SÉCURITÉ» (p. 24) et «REMARQUES IMPORTANTES»
(p. 25). Ces sections fournissent d’importantes informations relatives au bon fonctionnement de l’appareil. En outre, pour maîtriser parfaitement
chaque fonction de votre nouvelle acquisition, lisez le mode d’emploi dans son intégralité. Conservez ensuite ce manuel à portée de main pour
toute référence ultérieure.
2
Page 57

Sommaire
Caractéristiques . . . . . . . . . . . . . . . . . . . . . . . . . . .2
Achage des lettres sur l’appareil Lucina AX-09 . . . . . . 2
Sommaire . . . . . . . . . . . . . . . . . . . . . . . . . . . . . . . . .3
Description de l’appareil . . . . . . . . . . . . . . . . . . .4
Face avant . . . . . . . . . . . . . . . . . . . . . . . . . . . . . . . . . . . . . . . . . . 4
Face inférieure . . . . . . . . . . . . . . . . . . . . . . . . . . . . . . . . . . . . . . 5
Face arrière . . . . . . . . . . . . . . . . . . . . . . . . . . . . . . . . . . . . . . . . . 5
À propos des piles . . . . . . . . . . . . . . . . . . . . . . . . .6
Insertion des piles . . . . . . . . . . . . . . . . . . . . . . . . . . . . . . . . . . . 6
Vérication du niveau de charge des piles . . . . . . 6
Retrait des piles . . . . . . . . . . . . . . . . . . . . . . . . . . . . . . . 6
Avant de commencer . . . . . . . . . . . . . . . . . . . . . .7
Connexion de l’adaptateur secteur . . . . . . . . . . . . . . . . . . . 7
Fixation de la bandoulière . . . . . . . . . . . . . . . . . . . . . . . . . . . 7
Connexion d’enceintes . . . . . . . . . . . . . . . . . . . . . . . . . . . . . . 8
Connexion d’un casque . . . . . . . . . . . . . . . . . . . . . . . . . . . . . 8
Mise sous tension . . . . . . . . . . . . . . . . . . . . . . . . . . . . . . . . . . . 8
Sélection de sons . . . . . . . . . . . . . . . . . . . . . . . . . .9
Sélection d’un son normal . . . . . . . . . . . . . . . . . . . . . . . . . . . 9
Sélection d’un son spécial . . . . . . . . . . . . . . . . . . . . . . . . . . . 9
Aperçu audio des sons . . . . . . . . . . . . . . . . . . . . . . . . . . . . . . 9
Enregistrement en mémoire de sons fréquemment
utilisés (FAVORITE). . . . . . . . . . . . . . . . . . . . . . . . . . . . . . . . . . 10
Utilisation des fonctions de jeu . . . . . . . . . . . .11
Élever ou abaisser la plage de notes par octaves . . . . . 11
Élever ou abaisser la plage de notes par demi-tons . . 11
Utilisation du contrôleur tactile . . . . . . . . . . . . . . . . . . . . . 11
Conguration de la tessiture du contrôleur tactile .
Utilisation de la barre de modulation . . . . . . . . . . . . . . . 11
Aectation de l’eet de la barre de modulation 12
Utilisation du contrôleur D Beam . . . . . . . . . . . . . . . . . . . 12
Modication du paramètre ASSIGNABLE . . . . . . 12
Utilisation d’une pédale de pied . . . . . . . . . . . . . . . . . . . . 13
Verrouillage des sons pendant une performance
(fonction «Lock») . . . . . . . . . . . . . . . . . . . . . . . . . . . . . . . . . . 14
Accompagner un morceau lu à partir de votre lecteur
audio portatif . . . . . . . . . . . . . . . . . . . . . . . . . . . . . . . . . . . . . . 14
Accompagner un chier audio lu à partir d’une clé USB
Conguration des paramètres de lecture audio 15
11
14
Accordage . . . . . . . . . . . . . . . . . . . . . . . . . . . . . . . .17
Accord global (diapason) . . . . . . . . . . . . . . . . . . . . . . . . . . . 17
Accordage de l’échelle des notes. . . . . . . . . . . . . . . . . . . . 17
Réglage de la sensibilité tactile du clavier . .17
Dénition d’une valeur xe pour la vélocité du clavier .
17
Compte / Métronome . . . . . . . . . . . . . . . . . . . . .18
Réglages de la fonctionnalité de compte . . . . . . . . . . . . 18
Paramètres divers (Utilitaire) . . . . . . . . . . . . . .18
Vérication de la version de l’instrument Lucina AX-09
Paramètres du pilote USB . . . . . . . . . . . . . . . . . . . . . . . . . . . 18
Sauvegarde des paramètres de l’appareil Lucina
AX-09 sur une carte mémoireUSB
Restauration des paramètres du Lucina
AX-09 à partir d’une carte mémoire(clé) USB . . . . . . . . 19
Rappel des réglages d'usine (Factory Reset) . . . . . . . . . 19
. . . . . . . . . . . . . . . . . . . . . . . .19
18
Connexion d’appareils supplémentaires . . .20
Contrôle de périphériques MIDI. . . . . . . . . . . . . . . . . . . . . 20
Messages MIDI pouvant être
transmis et reçus . . . . . . . . . . . . . . . . . . . . . . . . . . . . . 20
Connexion d’un module MIDI . . . . . . . . . . . . . . . . . 20
Réglages MIDI . . . . . . . . . . . . . . . . . . . . . . . . . . . . . . . . 20
Connexion d’un ordinateur
via USB . . . . . . . . . . . . . . . . . . . . . . . . . . . . . . . . . . . . . . . . . . . . 21
Contrôle de la vidéo (V-LINK) . . . . . . . . . . . . . . . . . . . . . . . 21
Dépannage . . . . . . . . . . . . . . . . . . . . . . . . . . . . . . .22
Fiche technique . . . . . . . . . . . . . . . . . . . . . . . . . .23
Liste des messages d’erreur . . . . . . . . . . . . . . .23
CONSIGNES DE SÉCURITÉ . . . . . . . . . . . . . . . . .24
REMARQUES IMPORTANTES . . . . . . . . . . . . . . .25
Index . . . . . . . . . . . . . . . . . . . . . . . . . . . . . . . . . . . .26
Tableau d’implémentation MIDI . . . . . . . . . . .26
Deutsch Français Italiano Español Português NederlandsEnglish
Modication des paramètres de son . . . . . . .16
Modication des paramètres de son . . . . . . . . . . . . . . . . 16
3
Page 58

Description de l’appareil
Face avant
11 12 13
14
1 1819
1. Boutons OCTAVE [+] / [–]
Ces boutons permettent d’élever ou d’abaisser la plage du
clavier par incréments d’une octave (p. 11).
2. Bouton [TRANSPOSE]
Maintenez ce bouton enfoncé et appuyez sur les boutons
OCTAVE [+] / [–] pour élever ou abaisser la plage du clavier
par incréments d’un demi-ton (p. 11).
3. Écran
Ache le son ou le mode sélectionné, ou la valeur du
paramètre en cours de modication.
4. Bouton [SHIFT]
Utiliser ce bouton simultanément avec d’autres boutons
permet d'exécuter diverses fonctions.
5. Bouton [SPECIAL TONE]
Appuyez sur ce bouton pour sélectionner des sons spéciaux.
6. Boutons TONE [1]à[6]
Utilisez ces boutons pour sélectionner le groupe de sons dans le
cas de sons normaux ou pour sélectionner des sons spéciaux.
7. Boutons [INC/+] / [DEC/–]
Utilisez ces boutons pour sélectionner des variations des
sons normaux.
8. Boutons FAVORITE [A] / [B]
Utilisez ces boutons pour sélectionner la banque de
mémoire FAVORITE (p. 10) dans laquelle vous souhaitez
enregistrer un son favori.
9. Bouton [WRITE]
Ce bouton permet de stocker les paramètres de l’appareil
Lucina AX-09 que vous avez modiés, ou le son enregistré
dans FAVORITE (p. 10, p. 18).
7617 82153164 5 9 10
10. Bouton [LOCK]
Lorsque ce bouton est activé, vous ne pouvez pas changer
de son. Cela permet notamment d’éviter de modier
accidentellement le son lorsque vous jouez (p. 14).
11. Emplacement USB MEMORY
Vous pouvez insérer une clé USB (vendue séparément)
à cet emplacement (p. 15).
12. Molette [VOLUME]
Cette molette permet de régler le volume.
13. Boutons
[PITCH] / [FILTER] / [ASSIGNABLE] du D Beam
Ces boutons permettent d’activer ou de désactiver le
D Beam.
En plaçant la main au-dessus du D Beam, vous pouvez
appliquer divers eets au son (p. 12).
14. Bouton [V-LINK]
Ce bouton active et désactive la fonction V-LINK (p. 21).
15. Bouton [AUDIO PLAYER]
Si ce bouton est activé, vous pouvez lire des chiers audio
à partir d’une clé USB (p. 14).
16. Bouton [ / PREVIEW ]
Lorsque le bouton [AUDIO PLAYER] est allumé, ce bouton
permet de lancer/d'interrompre la lecture des chiers
audio sur la clé USB.
Lorsque le bouton [AUDIO PLAYER] est éteint, ce bouton
permet de lancer/d'interrompre un aperçu du son
actuellement sélectionné.
Vous pouvez également faire retentir la fonction de
compte en appuyant simultanément sur la barre de
modulation et sur le bouton [PREVIEW].
4
Page 59

17. BARRE DE MODULATION / CONTRÔLEUR TACTILE
La barre de modulation permet d’appliquer un vibrato.
Vous pouvez également activer un eet Hold (Maintien)
qui maintient le son joué (p. 11).
En déplaçant vers la gauche et vers la droite votre doigt sur
le contrôleur tactile, vous modiez la hauteur du son (p. 11).
Face inférieure
18. Fixation de bandoulière
Attachez la bandoulière fournie à cette xation (p. 7).
19. Fixation de bandoulière (A)
Attachez la bandoulière fournie à cette xation.
Selon votre style de jeu, vous pouvez utiliser cette xation
ou la xation de bandoulière (B) située à l’arrière du Lucina
AX-09 (p. 7).
Face arrière
1 82 3 4 95 106 7
1. Prises OUTPUT (L/MONO, R)
Le son produit par le Lucina AX-09 sort de ces prises.
Branchez-les à des enceintes actives.
Pour utiliser la sortie mono, utilisez uniquement la prise
L/MONO.
2. Connecteur MIDI OUT
Si vous connectez cette prise à un autre périphérique MIDI,
des messages MIDI en provenance du Lucina AX-09 sont
transmis à ce périphérique, ce qui vous permet de jouer à
distance (p. 20).
3. Prise FOOT PEDAL
Connectez une pédale Roland sérieDP (vendue séparément).
Vous pouvez également connecter une pédale
d’expression (EV-5, vendue séparément) (p. 13).
4. Commutateur [POWER]
Permet de mettre l’appareil sous tension ou hors tension (p. 8).
Si vous utilisez l’adaptateur secteur fourni et que vous
souhaitez mettre complètement l’appareil hors tension,
mettez le commutateur POWER sur la position «o» et
débranchez l’adaptateur secteur de la prise de courant.
1 2
1. Fixation de bandoulière (B)
Attachez la bandoulière fournie à cette xation.
Selon votre style de jeu, vous pouvez utiliser cette xation
ou la xation de bandoulière (A) située sur le côté du
Lucina AX-09 (p. 7).
2. Compartiment à piles
Vous pouvez insérer ici des piles rechargeables Ni-MH
AA (p. 6).
5. Prise DC IN
Permet de connecter l’adaptateur secteur fourni (p. 7).
6. Crochet pour câble
Utilisez ce crochet pour attacher le cordon de l’adaptateur
secteur fourni (p. 7).
7. Emplacement de sécurité ( )
http://www.kensington.com/
8. Connecteur USB COMPUTER
Utilisez un câble USB pour connecter l’appareil Lucina
AX-09 à votre ordinateur (p. 21).
9. Prise EXT IN
Connectez votre lecteur audio portatif ou une autre source
audio sur cette prise. Le son entrant par cette prise ressort
par les prises OUTPUT et PHONES (p. 14).
10. Prise PHONES
Permet de brancher un casque (vendu séparément) doté
d’une mini-prise stéréo (1/8pouces) (p. 8).
Deutsch Français Italiano Español Português NederlandsEnglish
5
Page 60

À propos des piles
Si vous faites fonctionner l’appareil Lucina AX-09 sur piles, vous devez insérer huit piles rechargeables Ni-MH AA.
La durée de vie des piles dépend des conditions d’utilisation. Dans le cas d’une utilisation constante, l’autonomie
est d’environ 4 heures.
À propos des piles rechargeables
Lorsque vous utilisez des piles rechargeables, leur autonomie diminue après chaque recharge. Si les piles
s’épuisent peu après avoir été rechargées, il est temps de les changer.
Insertion des piles
1. Mettez l’appareil Lucina AX-09 hors tension (p. 8).
2. Retirez le couvercle du compartiment à piles situé
sur la face inférieure de l’instrument.
Appuyez sur les loquets du capot pour le soulever, puis
retirez-le.
3. Insérez les piles dans le compartiment à piles.
Veillez à respecter la polarité (orientation +/–) de chaque
pile lors de son insertion.
4. Repositionnez le couvercle du compartiment à piles.
* Lorsque vous retournez l’appareil, placez une pile de journaux
ou de magazines sous les quatre coins ou aux deux extrémités
an de ne pas endommager les boutons et les contrôles. Essayez
également d’orienter l’appareil de sorte à n'endommager aucune
touche ou aucun bouton.
* Manipulez l’appareil avec précaution et veillez à ne pas le laisser
tomber.
Vérication du niveau de charge des
piles
Lorsque les piles sont pratiquement
épuisées, trois points clignotent à l’écran.
Dans ce cas, remplacez les piles dès que
possible.
Quelque temps après, l’écran indique «
pouvez plus utiliser le Lucina AX-09.
Vous pouvez également vérier le niveau de charge des
piles en procédant comme suit.
Lo » et vous ne
1. Maintenez le bouton [SHIFT] enfoncé et appuyez
sur le bouton [LOCK].
L’écran indique le niveau de charge des piles sous forme de
pourcentage («0» à «100»).
MÉMO
• La charge des piles indiquée est approximative.
• Si vous vériez l’état des piles alors que l’adaptateur
secteur est branché, l’écran indique toujours la valeur
«100».
Retrait des piles
Pour retirer les piles, mettez l’appareil Lucina AX-09 hors
tension, ouvrez le couvercle du compartiment à piles et retirez
les piles.
Remarques concernant le fonctionnement sur piles
• N’utilisez pas de piles alcalines ni de piles au zinc-carbone.
• L’appareil Lucina AX-09 ne fonctionne pas sur piles si l’adaptateur secteur est branché.
• Si vous débranchez puis rebranchez le cordon d’alimentation de la prise secteur ou si vous débranchez la prise CC de la face arrière de l’appareil Lucina AX-09 alors
que celui-ci est allumé et fonctionne sur piles, l’instrument est mis hors tension. Vous devez mettre le système hors tension avant de connecter ou déconnecter le
cordon d’alimentation ou l’adaptateur secteur.
• Ne laissez aucun objet (matières inammables, pièces, épingles, par exemple) ni aucun liquide quel qu’il soit (eau, boissons, etc.) s’introduire dans l’appareil.
• Une utilisation incorrecte des piles peut provoquer une explosion ou des fuites, entraînant éventuellement un risque de blessure ou de dommages matériels. Par
mesure de sécurité, veuillez lire et observer les précautions suivantes.
• Suivez attentivement les instructions d’insertion des piles en veillant à respecter les principes de polarité.
• Ne mélangez pas des piles usagées et des piles neuves. Évitez en outre de mélanger des piles de types diérents.
• Si l’instrument ne doit pas être utilisé durant une période prolongée, retirez les piles.
• En cas de fuite d’une pile, utilisez un chion doux ou un essuie-tout pour absorber le liquide qui s’est écoulé dans le compar timent à piles. Insérez ensuite de
nouvelles piles. Pour éviter toute irritation de la peau, veillez à ne pas toucher le liquide qui s’est écoulé. Évitez également de vous frotter les yeux si vous avez
été en contact avec le liquide. En cas de contact avec les yeux, rincez immédiatement à l'eau la zone aectée.
• Ne conservez jamais les piles à proximité d’objets métalliques tels que des stylos à bille, des colliers, des épingles à cheveux, etc.
6
Page 61

Avant de commencer
Connexion de l’adaptateur secteur
L’appareil Lucina AX-09 peut fonctionner sur secteur (grâce
à l’adaptateur fourni) ou sur piles (rechargeables Ni-MH AA).
1. Vériez que l’appareil Lucina AX-09 est hors
tension (commutateur [POWER] en position
«OFF»).
2. Tournez la molette [VOLUME] complètement vers
la gauche (au minimum).
3. Branchez l’adaptateur secteur sur la prise DC IN de
la face arrière de l’instrument Lucina AX-09, puis
connectez-le à la prise secteur.
Pour éviter toute coupure d’alimentation
inopinée de votre appareil (par un
débranchement accidentel de la che), ainsi
que toute traction sur la prise DC IN, amarrez
le cordon d’alimentation au crochet prévu à
cet eet (voir illustration).
Installez l’adaptateur secteur
de sorte que le témoin (voir
illustration) soit orienté vers
le haut et le texte vers le bas.
Le témoin s’allume lorsque
vous branchez l’adaptateur
secteur à une prise murale.
Fixation de la bandoulière
Attachez la bandoulière à
l’appareil Lucina AX-09 comme
illustré ci-dessous.
Deutsch Français Italiano Español Português NederlandsEnglish
1. Attachez une extrémité de la bandoulière fournie
à la xation comme illustré ici.
2. Attachez l’autre extrémité de la bandoulière à une
des deux autres xations.
Deux xations de bandoulière sont disponibles sur
l’appareil: «A» et «B». Utilisez la xation qui convient le
mieux à votre jeu. Pour les personnes de grande carrure,
la xation «A» ore une meilleure stabilité.
A B
REMARQUE
Si vous utilisez la xation «B», pliez la bandoulière
comme illustré ci-dessous. Si vous attachez la
bandoulière sans la plier, elle risque de se détacher de
l’appareil Lucina AX-09.
Plier
Arrière de la bandoulière
Avant de la bandoulière
7
Page 62

Connexion d’enceintes
Mise sous tension
L’appareil Lucina AX-09 ne présente aucun amplicateur ni
enceinte. An de produire des sons, vous devez connecter
les prises OUTPUT de la face arrière à un périphérique
audio tel qu’un système d’enceintes actives (désignées
ci-après par le terme «enceintes») ou utiliser un casque.
Utilisez des câbles
audio (série PCS, vendus
séparément) pour eectuer
les connexions.
Si vous utilisez l’instrument en mode mono, connectez
uniquement la prise L/MONO.
* Pour éviter tout dysfonctionnement et/ou dommage
sur les enceintes ou autres appareils, baissez toujours le
volume et mettez tous les appareils hors tension avant
tout branchement.
Connexion d’un casque
Connectez le casque à la prise PHONES de la face arrière.
* Une fois les branchements eectués (p. 8), mettez sous
tension les diérents appareils reliés, dans l’ordre
indiqué. Si vous ne respectez pas cet ordre, vous
risquez de provoquer des dysfonctionnements et/ou
d’endommager certains éléments comme les enceintes.
1. Baissez le volume de l’appareil Lucina AX-09 et des
enceintes.
2. Sur la face arrière du Lucina AX-09, mettez le
commutateur [POWER] en position «ON».
Cet appareil est équipé d’un circuit de
protection. Après la mise sous tension, un
bref laps de temps (quelques secondes) doit
s'écouler avant que l’appareil ne fonctionne
correctement.
3. Mettez les enceintes sous tension.
4. Servez-vous de la molette [VOLUME] pour régler
le volume.
Pendant que vous jouez sur
le clavier pour produire des
sons, tournez légèrement
la molette [VOLUME] vers la
droite et réglez le volume de
l’instrument Lucina AX-09 et
des enceintes.
Mise hors tension
1. Baissez le volume de l’appareil Lucina AX-09 et des
enceintes.
2. Mettez les enceintes hors tension.
3. Mettez le commutateur [POWER] du Lucina AX-09
en position «OFF».
Vous pouvez raccorder un casque
doté d’une mini-prise stéréo
(1/8pouces).
8
Page 63

Sélection de sons
Sur l’appareil Lucina AX-09, vous pouvez sélectionner des
«sons». Il existe deux types de sons: les «sons normaux»
et les «sons spéciaux».
Sélection d’un son normal
Le système Lucina AX-09 propose 144sons normaux
qui font que cet appareil gure parmi les meilleurs des
synthétiseurs Roland.
Les sons normaux sont organisés en six groupes de
24sons chacun.
1. Si le bouton [SPECIAL TONE] ou FAVORITE [A] / [B]
est allumé, appuyez sur le bouton allumé pour
l’éteindre.
2. Appuyez sur un des boutons TONE [1]à[6] pour
sélectionner un groupe de sons.
Le bouton choisi s’allume et le groupe de sons
correspondant est sélectionné.
Le nom du groupe de sons est imprimé en noir sous
chacun des boutons.
MÉMO
Lorsque vous mettez le système sous tension, c’est
toujours le TONE [1] numéro 1 qui s’ache.
3. Utilisez les boutons [INC/+] / [DEC/–] pour
sélectionner un son au sein du groupe.
Sélection du son de rythme
Le n°
23–
24 du groupe GUITAR/BASS correspond au son de
rythme. Pour en savoir plus, reportez-vous à la « Liste des
sons » au dos de ce mode d’emploi.
Sélection d’un son spécial
L’instrument Lucina AX-09 comprend six «sons spéciaux»
créés spécialement.
1. Appuyez sur le bouton [SPECIAL TONE] pour
l’allumer.
2. Appuyez sur un des boutons TONE [1]à[6] pour
sélectionner le son spécial souhaité.
Le nom des sons spéciaux est imprimé en bleu sous
chaque bouton de son.
MÉMO
Pour revenir aux sons normaux, appuyez sur le bouton
[SPECIAL TONE] pour l’éteindre.
Aperçu audio des sons
Deutsch Français Italiano Español Português NederlandsEnglish
Chaque groupe comprend les sons 1à24et le numéro du
son sélectionné (1à24) s'ache à l’écran.
Appuyez sur le bouton [INC/+] pour sélectionner le son
suivant ou sur le bouton [DEC/–] pour choisir le son
précédent.
MÉMO
• Pour obtenir une liste des sons disponibles, reportez-
vous à la «Liste des sons» à la n de ce manuel.
• Comme indiqué par la mention imprimée sous les
boutons TONE, chaque groupe de sons est divisé en
deux catégories. (Par exemple, le groupe de boutons
TONE [1] comprend deux catégories, «SYNTH» et
«PAD».)
À chaque fois que vous maintenez enfoncé le bouton
TONE du groupe de sons sélectionné (allumé) et
appuyez sur le bouton [INC/+] / [DEC/–], le premier son
de cette catégorie est sélectionné.
• Maintenez le bouton [INC/+] / [DEC/–] enfoncé pour
sélectionner les sons rapidement. Pour accélérer
encore la sélection, maintenez un bouton enfoncé, puis
appuyez simultanément sur l’autre bouton.
Lorsque le bouton [AUDIO PLAYER] est éteint, appuyez
sur le bouton [PREVIEW]. Le bouton s’allume et le
son sélectionné est lu en utilisant une phrase de
démonstration qui lui est adaptée.
Pour arrêter la phrase avant la n de la lecture, appuyez
à nouveau sur le bouton [PREVIEW] pour l’éteindre.
9
Page 64

Enregistrement en mémoire de sons fréquemment utilisés (FAVORITE)
L’appareil Lucina AX-09 fournit des «emplacements
mémoire FAVORITE» qui vous permettent d’enregistrer
jusqu’à douze sons. Si vous utilisez cette fonction pour
enregistrer des sons fréquemment utilisés, vous pouvez
par la suite accéder rapidement et facilement à ces sons.
Les paramètres de volume et de réverbération peuvent
également être enregistrés avec les sélections de son dans
les emplacements mémoire FAVORITE (p. 16).
MÉMO
Seuls les sons normaux peuvent être enregistrés dans la
mémoire FAVORITE.
Enregistrement d’un son en tant que FAVORI
La mémoire FAVORITE comprend deux banques: A et B.
Vous pouvez enregistrer jusqu’à six sons par banque.
1. Sélectionnez le son à enregistrer dans un
emplacement mémoire FAVORITE.
2. Appuyez sur le bouton [WRITE] pour l’allumer.
Rappel d’un son favori (FAVORITE)
Voici comment rappeler un son enregistré dans la
mémoire FAVORITE.
1. Appuyez sur le bouton FAVORITE [A] / [B] pour
sélectionner la banque qui comporte le favori
à rappeler.
Le bouton FAVORITE actionné s’allume.
2. Appuyez sur un des boutons TONE [1]à[6] pour
sélectionner un emplacement mémoire FAVORITE
dans la banque en cours.
Vous pouvez également utiliser les boutons [INC/+] /
[DEC/–] pour acher l’un après l’autre les emplacements
mémoire FAVORITE de la banque.
MÉMO
Pour revenir aux sons normaux, appuyez sur le bouton
FAVORITE [A] / [B] allumé an de l’éteindre.
3. Appuyez sur le bouton FAVORITE [A] / [B] pour
sélectionner la banque dans laquelle vous
souhaitez enregistrer le favori.
Le bouton FAVORITE actionné s’allume.
L’écran ache «
«B»).
4. Appuyez sur un des boutons TONE [1]à[6] pour
sélectionner l’emplacement mémoire dans lequel
vous souhaitez enregistrer le son favori.
Le bouton actionné s’allume et le son est enregistré dans
l’emplacement mémoire FAVORITE spécié. Le bouton
[WRITE] s’éteint.
MÉMO
Pour revenir aux sons normaux, appuyez sur le bouton
FAVORITE [A] / [B] allumé an de l’éteindre.
A -» (banque «A») ou «b - » (banque
10
Page 65

Utilisation des fonctions de jeu
L’appareil Lucina AX-09 propose plusieurs fonctions de jeu
qui vous permettent de rendre votre jeu plus expressif.
Élever ou abaisser la plage de notes par octaves
Vous pouvez élever ou abaisser la plage du clavier par
incréments d’une octave, jusqu’à trois octaves vers le haut
ou vers le bas.
Valeur -3–3
1. Appuyez sur un bouton OCTAVE [+] / [–].
L’écran ache une valeur.
Le bouton OCTAVE [+] s’allume si le paramètre d’octave se
trouve sur la position «+», le bouton OCTAVE [–] s’allume
si le paramètre d’octave se trouve sur la position «–».
MÉMO
Pour restaurer le paramètre d’octave à la valeur «0», appuyez
simultanément sur les boutons OCTAVE [+] et [–].
Le bouton OCTAVE [+] / [–] s’éteint et la plage normale
de hauteurs de son du clavier est restaurée.
Élever ou abaisser la plage de notes par demi-tons
Vous pouvez élever ou abaisser la plage du clavier par
incréments de demi-tons.
Cette fonction est pratique si vous souhaitez jouer un
morceau en y apposant une signature originale.
Valeur -5–6
1. Maintenez le bouton [TRANSPOSE] enfoncé.
Le paramètre en cours clignote à l’écran.
MÉMO
Pour restaurer la valeur «0» du paramètre, maintenez
le bouton [TRANSPOSE] enfoncé et appuyez
simultanément sur les boutons OCTAVE [+] et [–].
Le bouton [TRANSPOSE] s’éteint et la plage normale de
hauteurs de son du clavier est restaurée.
Utilisation du contrôleur tactile
En déplaçant vers la gauche et vers la droite votre doigt
sur le contrôleur tactile, vous modiez la hauteur du son.
Touchez la partie gauche du contrôleur pour abaisser la
hauteur de son et la partie droite du contrôleur pour élever
la hauteur de son.
Conguration de la tessiture du contrôleur tactile
En procédant comme suit, vous pouvez dénir la tessiture
au sein de laquelle la hauteur de son peut être modiée
lorsque vous utilisez le contrôleur tactile. Ce paramètre
est exprimé sous forme d'une valeur en demi-tons. Par
exemple, si vous spéciez la valeur «12», la hauteur de son
augmente d’une octave entière lorsque vous touchez le
bord à l’extrême droite du contrôleur tactile (12 demi-tons
sont équivalents à une octave).
1. Tout en maintenant le bouton [SHIFT] enfoncé,
touchez le contrôleur tactile.
La valeur actuellement dénie pour la tessiture clignote à l’écran.
2. Tout en maintenant le bouton [SHIFT] enfoncé,
utilisez les boutons [INC/+] / [DEC/–] (OCTAVE [+] /
[–]) pour modier le paramètre.
Valeur 0–24
3. Relâchez le bouton [SHIFT].
4. Pour enregistrer ce paramètre, maintenez le
bouton [SHIFT] enfoncé et appuyez sur le bouton
[WRITE].
Utilisation de la barre de modulation
Deutsch Français Italiano Español Português NederlandsEnglish
2. Maintenez le bouton [TRANSPOSE] enfoncé et
appuyez sur le bouton OCTAVE [+] / [–] pour
dénir la valeur souhaitée.
3. Cette valeur est appliquée lorsque vous relâchez
le bouton [TRANSPOSE].
Si vous avez spécié une valeur diérente de «0»,
le bouton [TRANSPOSE] s’allume.
Vous pouvez appliquer un vibrato en appuyant sur la barre
de modulation lorsque vous jouez sur votre Lucina AX-09.
MÉMO
Le même eet est appliqué à tous les sons. Toutefois, si
vous avez sélectionné le son spécial 4 VIOLIN ou
5 TROMBONE, la dynamique (l’expression) adopte les
caractéristiques distinctives de l’instrument choisi,
vous permettant de reproduire des sons d’une réalité
surprenante.
11
Page 66

Aectation de l’eet de la barre de modulation
Vous pouvez également modier l’aectation de la barre
de modulation pour tenir des notes, notamment lors de
l’application d’un vibrato.
1. Maintenez le bouton [SHIFT] enfoncé et appuyez
sur la barre de modulation.
Le paramètre en cours clignote à l’écran.
2. Tout en maintenant le bouton [SHIFT] enfoncé,
utilisez les boutons [INC/+] / [DEC/–] (OCTAVE [+] /
[–]) pour aecter l’eet souhaité.
L’eet appliqué lors de l’utilisation de la barre de
modulation est ainsi déni.
Valeur Description
N oD (MODULATION)
h LD (HOLD)
C NB (COMBINATION)
Un vibrato est appliqué aux sons joués.
Les notes jouées sont maintenues lorsque vous
appuyez sur la barre de modulation.
Un vibrato et un eet Hold (Maintien) sont
appliqués aux notes jouées.
MÉMO
Le même eet est appliqué à tous les sons. Toutefois, si
vous avez sélectionné le son spécial 4 VIOLIN ou
5 TROMBONE, la dynamique (l’expression) de l’instrument
choisi est modiée et remplace l’eet de vibrato.
3. Relâchez le bouton [SHIFT].
4. Pour enregistrer ce paramètre, maintenez le bouton
[SHIFT] enfoncé et appuyez sur le bouton [WRITE].
Utilisation du contrôleur D Beam
En déplaçant la main au-dessus du capteur du contrôleur
D Beam, vous pouvez modier le son en appliquant l’eet
aecté au D Beam.
1. Pour sélectionner la fonction que vous souhaitez
modier avec le contrôleur D Beam, appuyez sur
un des boutons suivants.
Bouton Description
PITCH
FILTER
ASSIGNABLE
Déplacez la main au-dessus du contrôleur
D Beam pour changer la hauteur des notes jouées.
Déplacez la main au-dessus du contrôleur
D Beam pour changer le timbre des notes jouées.
* Avec certains sons, le changement de timbre
peut être dicile à détecter.
Le contrôleur D Beam transmet la fonction aectée ou le
message de changement de commande.
2. Tout en jouant au clavier, faites des mouvements lents et
verticaux de la main au-dessus du contrôleur D Beam.
Le bouton actionné à l’étape1 clignote.
3. Pour couper le contrôleur D Beam, appuyez à nouveau
sur le bouton actionné à l’étape1 an de l’éteindre.
Modication du paramètre ASSIGNABLE
Vous pouvez aecter un numéro de changement de
commande (Control Change) MIDI ou une fonction au
bouton [ASSIGNABLE], et utiliser le contrôleur D Beam
pour modier ce paramètre en temps réel.
1. Maintenez le bouton [SHIFT] enfoncé et appuyez
sur [ASSIGNABLE].
La fonction aectée clignote à l’écran.
Plage utile du contrôleur D Beam
Le schéma ci-dessous illustre la plage utile approximative
du contrôleur D Beam.
Les mouvements de la main hors de cette zone ne
produisent aucun eet.
* La plage utile du contrôleur D Beam est
considérablement réduite lorsque vous l’utilisez quand
l'appareil est exposé à la lumière directe du soleil.
Gardez cela à l’esprit lorsque vous utilisez le contrôleur
D Beam dans un environnement extérieur.
12
2. Tout en maintenant le bouton [SHIFT] enfoncé,
utilisez le bouton [INC/+] / [DEC/–] (OCTAVE [+]
/ [–]) pour spécier la fonction ou le paramètre
souhaité qui sera géré par le contrôleur D Beam.
Écran Valeur Description
C 01
C 05
C 07
C 10
C 11
C 64
C 65
CC01
(MODULATION)
CC05
(PORTA TIME)
CC07 (VOLUME) Permet de contrôler le volume.
CC10 (PAN) Permet de contrôler le panoramique.
CC11 (EXPRESSION) Permet de contrôler l’expression.
CC64 (HOLD) Permet de maintenir les notes.
CC65
(PORTAMENTO)
Permet d’appliquer un vibrato.
Contrôle la durée du portamento
pendant laquelle la hauteur de
son est modiée entre les notes
lors d’une performance avec un
portamento.
Permet de faire «glisser» la hauteur
de son entre les diérentes notes.
Page 67

Écran Valeur Description
C 66
C 71
C 72
C 73
C 74
A Ft
A db
S Lo
CC66 (SOSTENUTO)
CC71 (RESONANCE)
CC72 (RELEASE TIME)
CC73 (ATTACK TIME)
CC74 (CUTOFF)
AFTERTOUCH
(Valeur par défaut)
ADLIB
SOLO SYNTH
Permet de maintenir les notes
actionnées.
Permet de contrôler la résonance.
L’augmentation de la résonance
produit un timbre typique d’un
synthétiseur.
Permet de contrôler la durée qui
s’écoule entre le moment où une
touche est relâchée et celui où plus
aucun son n’est produit (c’est-à-dire
le temps de relâchement).
Permet de contrôler la netteté
(vitesse d’attaque) avec laquelle le
son commence.
Permet de contrôler la coupure. Plus
la valeur est élevée, plus le son est
net (clair). Plus la valeur est basse,
plus le son est doux (mélodieux).
Permet d’appliquer l’eet le plus
adapté à chaque son de l’appareil
Lucina AX-09.
Lorsque vous créez un accord par
doigté et déplacez votre main
au-dessus du contrôleur D Beam,
vous pouvez produire un arpège
avec cet accord.
La distance entre votre main et
le contrôleur D Beam détermine
l’étendue des octaves de l’accord
joué, et la vitesse à laquelle vous
déplacez verticalement votre main
détermine la vitesse à laquelle
l’accord est arpégé.
Par exemple, si à l’aide de la main
droite vous maintenez les quatre
notes «Do, Ré, Mi et Sol» et déplacez
votre main gauche au-dessus du
contrôleur D Beam, une phrase telle
que «Do Ré Mi Sol Do Ré Mi Sol Do
Ré Mi Sol» est lue.
L’appareil Lucina AX-09 fonctionne
en tant que synthétiseur
monophonique dont la hauteur de
son peut être contrôlée en déplaçant
votre main au-dessus du contrôleur
D Beam.
MÉMO
Maintenez le bouton [INC/+] / [DEC/–] enfoncé pour
sélectionner rapidement ce paramètre. Pour accélérer
la sélection, maintenez le bouton enfoncé et appuyez
sur l’autre bouton.
3. Relâchez le bouton [SHIFT].
4. Pour enregistrer ce paramètre, maintenez le
bouton [SHIFT] enfoncé et appuyez sur le bouton
[WRITE].
Utilisation d’une pédale de pied
Si vous connectez une pédale-interrupteur (sérieDP,
vendue séparément) à la prise FOOT PEDAL, vous pouvez
maintenir la pédale enfoncée pour créer des notes
continues même après avoir relâché le clavier.
Vous pouvez également utiliser la pédale pour appliquer
de nombreux autres eets.
Connexion d’une pédale de pied
MÉMO
Vous pouvez également connecter une pédale d’expression
(EV-5) plutôt qu’une pédale-interrupteur (série DP).
REMARQUE
Utilisez uniquement la pédale d’expression spéciée
(EV-5, vendue séparément). La connexion d’une
autre pédale d’expression peut entraîner des
dysfonctionnements et/ou dommages sur l’appareil.
Spécication de l’aectation de la pédale de pied
Maintenez le bouton [SHIFT] enfoncé et appuyez deux fois sur le
bouton [V-LINK]. L’écran ache la mention «
permet d’aecter l’eet appliqué par la pédale de pied.
Vous pouvez aecter les fonctions suivantes à la pédale.
Pour enregistrer ce paramètre, maintenez le bouton
[SHIFT] enfoncé et appuyez sur le bouton [WRITE].
Écran Valeur Description
CC01 (MODULATION) Permet d’appliquer un vibrato.
C 01
Contrôle la durée du portamento
CC05 (PORTA TIME)
C 05
CC07 (VOLUME) Permet de contrôler le volume.
C 07
CC10 (PAN) Permet de contrôler le panoramique.
C 10
CC11 (EXPRESSION) Permet de contrôler l’expression.
C 11
CC64 (HOLD) Permet de maintenir les notes.
C 64
CC65 (PORTAMENTO)
C 65
CC66 (SOSTENUTO)
C 66
pendant laquelle la hauteur de son
est modiée entre les notes lors d’une
performance avec un portamento.
Permet de faire «glisser» la hauteur
de son entre les diérentes notes.
Permet de maintenir les notes
actionnées.
», ce qui vous
PDL
Deutsch Français Italiano Español Português NederlandsEnglish
13
Page 68

Écran Valeur Description
CC71 (RESONANCE)
C 71
CC72
C 72
(RELEASE TIME)
CC73
C 73
(ATTACK TIME)
CC74 (CUTOFF)
C 74
AFTERTOUCH
A Ft
PEDAL UP
P UP
PEDAL DOWN
P Dn
Permet de contrôler la résonance.
L’augmentation de la résonance produit un
timbre typique d’un synthétiseur.
Permet de contrôler la durée qui
s’écoule entre le moment où une
touche est relâchée et celui où plus
aucun son n’est produit (c’est-à-dire le
temps de relâchement).
Permet de contrôler la netteté (vitesse
d’attaque) avec laquelle le son commence.
Permet de contrôler la coupure. Plus
la valeur est élevée, plus le son est net
(clair). Plus la valeur est basse, plus le
son est doux (mélodieux).
Permet d’appliquer l’eet le plus adapté à
chaque son de l’appareil Lucina AX-09.
Permet de sélectionner le son du
numéro de son suivant.
Permet de sélectionner le son du
numéro de son précédent.
MÉMO
Par défaut, la pédale de pied est aectée à la fonction
C 64 (Hold).
Utilisation d’une pédale de pied tierce
Si vous utilisez une pédale de pied d’un autre fabricant
que Roland, il est possible que la polarité de la pédale soit
inversée. Ainsi, lorsque vous appuyez sur la pédale et la
relâchez, l’eet inverse à celui attendu risque de se produire.
Le cas échéant, maintenez le bouton [SHIFT] enfoncé et
appuyez trois fois sur le bouton [V-LINK] pour que l’écran
ache la mention «
[INC/+] / [DEC/–] (OCTAVE [+] / [–]) pour acher la mention
«
».
rEu
Pour enregistrer ce paramètre, maintenez le bouton
[SHIFT] enfoncé et appuyez sur le bouton [WRITE].
Valeur Description
S td (STANDARD)
r Eu (REVERSE)
». Utilisez ensuite les boutons
PoL
Pédales Roland
Pédales dont la polarité est inversée
par rapport aux pédales Roland
Accompagner un morceau lu à partir de votre lecteur audio portatif
Vous pouvez connecter un lecteur audio portatif et
accompagner vos morceaux préférés sur le Lucina AX-09.
1. Connectez votre lecteur audio portatif à la prise
EXT IN du Lucina AX-09.
Utilisez un câble mini
stéréo (1/8pouces) pour
connecter votre lecteur
à la prise EXT IN.
2. Lisez un morceau sur votre lecteur audio portatif
et jouez simultanément sur votre Lucina AX-09.
Utilisez les commandes de votre lecteur pour régler le
volume et sélectionner des morceaux.
* Si des câbles de connexion dotés de résistance sont
utilisés, il est possible que le volume de l’appareil
connecté aux prises (EXT IN) soit relativement bas. Si
c’est le cas, utilisez des câbles de connexion qui ne
comportent pas de résistances.
Accompagner un chier audio
lu à partir d’une clé USB
L’appareil Lucina AX-09 peut lire des
chiers audio (MP3, WAV, AIFF) copiés à
partir de votre ordinateur sur une clé USB,
ce qui vous permet d’accompagner vos
morceaux préférés.
Verrouillage des sons pendant une
performance (fonction «Lock»)
Vous pouvez verrouiller le son sélectionné sur l’appareil
Lucina AX-09 pour empêcher qu’un autre son ne soit
sélectionné, notamment si vous appuyez accidentellement
sur un bouton de son pendant que vous jouez.
1. Maintenez le bouton [LOCK] enfoncé jusqu’à ce
qu’il s’allume.
La fonction Lock s’active. Dans cet état, le son ne peut pas
être modié.
Pour réactiver le changement de son, maintenez à nouveau le
bouton enfoncé jusqu’à ce que le bouton [LOCK] s’éteigne.
14
Copie de chiers audio à partir de
votre ordinateur sur une clé USB
Vous devez copier les chiers audio à partir de votre
ordinateur vers le niveau racine de votre clé USB.
Copie sur un lecteurUSB
MP3, WAV, AIFF
Page 69

Fichiers audio pris en charge
MP3
Format Audio MPEG-1 couche3
Fréquence
d’échantillonnage
Débit binaire
WAV, AIFF
Fréquence
d’échantillonnage
Débit binaire 8/16/24bits
44,1kHz
32/40/48/56/64/80/96/112/128/160/192/224/256/
320 Kbit/s, VBR (Variable Bit Rate)
44,1kHz
Insertion de la carte mémoire(clé) USB
1. Insérez votre clé USB dans l’emplacement USB
MEMORY comme illustré ci-dessous.
Maintenez le bouton [AUDIO PLAYER] enfoncé et appuyez
sur le bouton [INC/+] pour passer au morceau suivant, ou
sur le bouton [DEC/–] pour accéder au début du morceau
en cours de lecture (ou au morceau précédent si vous êtes
déjà au début du morceau).
MÉMO
Les morceaux sont classés en fonction de leur nom de
chier (par ordre numérique, puis lettres majuscules et
lettres minuscules).
4. Lancez la lecture du morceau ou arrêtez-la.
Lorsque vous appuyez sur le bouton [ ], le bouton
clignotant s’allume en continu et le chier audio
sélectionné est lu.
Si vous appuyez sur le bouton [
le bouton allumé se met à clignoter et la lecture s’arrête.
Si vous appuyez à nouveau sur le bouton [
lecture reprend à l’endroit où elle s’était arrêtée.
] en cours de lecture,
], la
Changement de morceaux en cours de lecture
Deutsch Français Italiano Español Português NederlandsEnglish
REMARQUE
• N’insérez ou ne retirez jamais une clé USB lorsque l’appareil est
sous tension. Vous risquez en eet d’endommager les données
de l’appareil ou de la clé USB.
• Insérez délicatement la clé USB, jusqu’à ce qu’elle soit
fermement en place.
• Utilisez la clé USB vendue par Roland. Nous ne pouvons
pas garantir le fonctionnement si d’autres produits sont
utilisés.
Lecture de chiers audio
1. Insérez la clé USB comprenant les chiers audio
copiés dans l’emplacement USB MEMORY de
l’appareil Lucina AX-09.
2. Appuyez sur le bouton [AUDIO PLAYER].
Le bouton [AUDIO PLAYER] s’allume et le bouton [ ]
clignote. Vous pouvez maintenant lire des chiers audio de
votre clé USB.
Si vous appuyez à nouveau sur le bouton [AUDIO PLAYER],
il s’éteint. Les chiers audio ne peuvent plus être lus.
MÉMO
Le bouton [ ] ne clignote pas si la clé USB n’est pas
insérée ou si elle ne contient aucun morceau pouvant
être lu.
3. Sélectionnez un morceau.
Lorsque vous maintenez le bouton [AUDIO PLAYER]
enfoncé, l’écran ache les trois premiers caractères du
nom du chier audio sélectionné.
En cours de lecture, maintenez le bouton [AUDIO PLAYER]
enfoncé et appuyez sur le bouton [DEC/–] pour interrompre
la lecture et revenir au début du morceau en cours. De
même, appuyez sur le bouton [INC/+] pour vous déplacer au
début du morceau suivant et reprendre la lecture.
MÉMO
Si vous maintenez le bouton [AUDIO PLAYER] enfoncé
et appuyez sur le bouton [DEC/–] au début du morceau,
vous êtes renvoyé au début du morceau précédent.
Conguration des paramètres de lecture audio
1. Maintenez le bouton [SHIFT] enfoncé et appuyez
sur le bouton [AUDIO PLAYER]. Le paramètre du
lecteur audio en cours clignote à l’écran.
2. Tout en maintenant le bouton [SHIFT] enfoncé,
appuyez à nouveau sur le bouton [AUDIO PLAYER]
pour modier les paramètres.
Après un bref intervalle, la valeur s’ache. Maintenez le
bouton [SHIFT] enfoncé et utilisez les boutons [INC/+] /
[DEC/–] (OCTAVE [+] / [–]) pour modier la valeur.
Paramètre Valeur Description
L uL
P LY
0–127
1 P (SINGLE PLAY ),
C P (CHAIN PLAY )
3. Pour enregistrer ce paramètre, maintenez le
bouton [SHIFT] enfoncé et appuyez sur le bouton
[WRITE].
Niveau de volume de lecture des
chiers audio
Choisissez si la lecture s’arrête à la
n du morceau sélectionné (SINGLE
PLAY) ou se poursuit avec le morceau
suivant (CHAIN PLAY).
15
Page 70

Modication des paramètres de son
*1 Les valeurs spéciées ici sont modiées par rapport à la valeur assignée
Modication des paramètres de son
Vous pouvez modier les paramètres de son tels que
le volume et la réverbération pour un son normal, puis
enregistrer vos paramètres dans un emplacement
mémoire FAVORITE (p. 10).
* Vous ne pouvez pas modier les paramètres de son pour
un son spécial.
1. Sélectionnez le son normal dont vous souhaitez
modier les paramètres de son (p. 9).
2. Maintenez le bouton [SHIFT] enfoncé et appuyez sur
le bouton TONE correspondant au son sélectionné à
l’étape1 (c’est-à-dire le bouton TONE allumé).
Le nom du paramètre (PS ) clignote à l’écran et sa valeur
(o FF ou o n ) s’ache.
3. Tout en maintenant le bouton [SHIFT] enfoncé,
appuyez sur le même bouton TONE pour modier
les paramètres.
Les paramètres de la colonne «Paramètre» du tableau
suivant s’achent successivement de haut en bas.
* Maintenez le bouton [SHIFT] enfoncé lors de la sélection
du paramètre.
Paramètre Valeur Description
P S
P tN
u oL
r Eu
r EL
A t
C Ut
r ES
OFF, ON
0–127
0–127
0–127
-64–63
-64–63
-64–63
-64–63
Commutateur Portamento
Portamento est un eet qui crée
un changement de hauteur de son
«inaudible» d’une note à l'autre.
Durée du portamento
Spécie la durée pendant laquelle la
hauteur de son est modiée lors de
l’application d’un portamento. Plus
la valeur est élevée, plus la durée
nécessaire à la hauteur de son pour
atteindre la note suivante est longue.
Volume
Permet de spécier le volume du son.
Réverbération
Cet eet ajoute la réverbération qui est
typique d’une performance dans une
grande salle. Plus la valeur est élevée,
plus la réverbération est profonde.
Temps de relâchement (*1)
Permet de régler la durée qui s’écoule
entre le moment où une touche est
relâchée et celui où plus aucun son
n’est produit (c’est-à-dire le temps de
relâchement). Plus la valeur est élevée,
plus de temps de relâchement est long.
Temps d’attaque (*1)
Permet de régler la netteté (vitesse) à
laquelle le son commence. Plus la valeur
est élevée, plus l’attaque est douce.
Coupure (*1)
Plus la valeur de coupure est élevée,
plus le son produit est dur (clair).
Plus la valeur est basse, plus le son
est mélodieux (sombre). Utilisez ce
paramètre pour eectuer des réglages
lorsque le son est étoué ou trop clair.
Résonance (*1)
L’augmentation de la résonance produit
un timbre typique d’un synthétiseur.
Si vous souhaitez faire ressortir l’eet
de résonance, il est utile de diminuer
légèrement la valeur de coupure.
à chaque son. Si la valeur est dénie sur 0, le paramètre est spécique au
son.
4. Lorsque la valeur du paramètre s’ache,
maintenez le bouton [SHIFT] enfoncé et utilisez les
boutons [INC/+] / [DEC/–] (OCTAVE [+] / [–]) pour
modier la valeur.
MÉMO
• Pour modier plus rapidement la valeur, maintenez
le bouton [INC/+] / [DEC/–] enfoncé. Pour accélérer
davantage la sélection, maintenez le bouton enfoncé
tout en appuyant sur l’autre bouton.
• Tout en modiant la valeur, vous pouvez jouer au
clavier pour entendre le résultat obtenu.
5. Relâchez le bouton [SHIFT].
* Si vous sélectionnez un autre son ou mettez l’appareil
Lucina AX-09 hors tension, les changements eectués
sont perdus. Pour les enregistrer, vous devez les stocker
dans un emplacement mémoire FAVORITE comme décrit
ci-dessous.
6. Appuyez sur le bouton [WRITE].
Le bouton [WRITE] s’allume.
7. Appuyez sur le bouton FAVORITE [A] ou sur le
bouton [B] pour sélectionner une banque.
8. Appuyez sur un des boutons TONE [1]à[6] pour
sélectionner l’emplacement mémoire dans lequel
vous souhaitez enregistrer les paramètres.
Une fois que le bouton [WRITE] est éteint, les paramètres
sont enregistrés.
16
Page 71

Accordage
Accord global (diapason)
Il s’agit du paramètre global d’accordage pour l’appareil
Lucina AX-09. Par défaut, il est déni à 440Hz. La valeur
achée correspond à la fréquence de la touche Do4 («Do»
moyen).
Valeur 415,3–466,2Hz
1. Maintenez le bouton [SHIFT] enfoncé et appuyez
sur le bouton [TRANSPOSE].
L’écran ache «N tn» et la valeur du diapason en cours
clignote.
L’écran ne reprend que les trois derniers chires (le «4»
initial est omis).
2. Tout en maintenant le bouton [SHIFT] enfoncé,
utilisez les boutons [INC/+] / [DEC/–] (OCTAVE [+] /
[–]) pour ajuster la valeur d’accordage.
MÉMO
• Pour modier plus rapidement la valeur, maintenez
le bouton [INC/+] / [DEC/–] enfoncé. Pour accélérer
davantage la sélection, maintenez le bouton enfoncé
tout en appuyant sur l’autre bouton.
• Tout en modiant la valeur, vous pouvez jouer au
clavier pour entendre le résultat obtenu.
3. Relâchez le bouton [SHIFT].
4. Pour enregistrer ce paramètre, maintenez le bouton
[SHIFT] enfoncé et appuyez sur le bouton [WRITE].
Accordage de l’échelle des notes
Vous pouvez choisir le tempérament égal ou une balance
arabe pour accorder le clavier.
Valeur Description
E QL (EQUAL)
A rB (ARABIC)
1. Maintenez le bouton [SHIFT] enfoncé et appuyez
deux fois sur le bouton [TRANSPOSE].
L’écran ache « E Y » et le paramètre en cours
d’accordage de l’échelle des notes clignote.
2. Tout en maintenant le bouton [SHIFT] enfoncé,
utilisez les boutons [INC/+] / [DEC/–] (OCTAVE [+] /
[–]) pour ajuster la valeur d’accordage de l'échelle
des notes.
MÉMO
Tout en modiant la valeur, vous pouvez jouer au
clavier pour entendre le résultat obtenu.
3. Relâchez le bouton [SHIFT].
4. Pour enregistrer ce paramètre, maintenez le
bouton [SHIFT] enfoncé et appuyez sur le bouton
[WRITE].
Tempérament égal
Balance arabe
Deutsch Français Italiano Español Português NederlandsEnglish
Réglage de la sensibilité tactile du clavier
Dénition d’une valeur xe pour la
vélocité du clavier
An de jouer des notes à un niveau uniforme (vélocité)
quelle que soit la force de frappe sur le clavier, suivez la
procédure ci-dessous.
1. Maintenez le bouton [SHIFT] enfoncé et appuyez
une fois sur le bouton [V-LINK].
L’écran ache la mention «u EL» et la valeur du
paramètre en cours s'ache.
2. Tout en maintenant le bouton [SHIFT] enfoncé,
utilisez les boutons [INC/+] / [DEC/–] (OCTAVE [+] /
[–]) pour modier le paramètre.
Valeur Description
r AL (REAL)
1–127
Les notes reétant la force de frappe réelle utilisée
lorsque vous appuyez sur les touches sont produites.
Les notes présentant la valeur de vélocité spéciée sont
produites, quelle que soit la force de frappe sur le clavier.
3. Relâchez le bouton [SHIFT].
4. Pour enregistrer ce paramètre, maintenez le
bouton [SHIFT] enfoncé et appuyez sur le bouton
[WRITE].
17
Page 72

Compte / Métronome
« Compte » fait référence à une fonctionnalité (« Count In ») qui
compte dès que vous commencez à jouer. Pour faire retentir
un compte de mesure à 2 temps, appuyez simultanément sur
la barre de modulation et sur le bouton [PREVIEW].
Remarquez que, si vous le souhaitez, vous pouvez faire
retentir un métronome à la place : il sut de donner à
la fonction Count Mode la valeur N tr (METRONOME)
à l’aide du réglage ci-dessous. Le métronome continue
à retentir jusqu’à ce que vous appuyiez sur le bouton
[PREVIEW] une deuxième fois.
* La fonctionnalité de compte ne retentit pas lorsque le
bouton [AUDIO PLAYER] est allumé.
Réglages de la fonctionnalité de compte
1. Lorsque vous maintenez le bouton [SHIFT]
enfoncé et appuyez sur le bouton [PREVIEW], le
réglage de compte en cours clignote à l’écran.
2. Continuez de maintenir le bouton [SHIFT] enfoncé
et appuyez une nouvelle fois sur le bouton
[PREVIEW] pour basculer entre les paramètres.
Après un bref intervalle, la valeur s’ache. Continuez de
maintenir le bouton [SHIFT] enfoncé et utilisez les boutons
[INC/+] / [DEC/–] (OCTAVE [+] / [–]) pour modier cette valeur.
Paramètre Valeur Description
Mode de compte
Permet de choisir entre faire
retentir le compte ou le
métronome.
Signature rythmique du
compte
(2.4 indique un rythme 2/4)
Son utilisé pour le compte
C nt
b PN
b At
L uL
t yP
o FF(OFF),
C in(COUNT IN),
N tr(ME TRONOME)
20–250 Tempo du compte
0.4, 2.4, 3.4, 4.4, 5.4, 6.4, 7.4
0–10 Volume de compte
1 (Electronic metronome)
2 (Mechanical metronome)
3 (Pulse)
4 (Beep)
5 (Cowbell)
6 (Stick)
3. Pour enregistrer ce réglage, maintenez le bouton
[SHIFT] enfoncé et appuyez sur le bouton [WRITE].
MÉMO
Pour acher le tempo du compte à l’écran, maintenez
le bouton [PREVIEW] enfoncé. Dans cet état, vous
pouvez dénir un nouveau tempo en frappant le
bouton [SHIFT] au moins quatre fois selon le tempo
souhaité, ou en utilisant les boutons [INC/+] et [DEC/-].
Paramètres divers (Utilitaire)
Vérication de la version de
l’instrument Lucina AX-09
Voici comment vérier la version de votre appareil Lucina
AX-09.
1. Tout en maintenant les boutons FAVORITE [A],
[B] et [WRITE] enfoncés simultanément, mettez
l’appareil Lucina AX-09 sous tension.
L’écran ache «U tL» pour indiquer que l’instrument
Lucina AX-09 est en mode Utilitaire.
2. Appuyez sur le bouton TONE [1].
L’écran ache la version de votre Lucina AX-09.
Pour continuer à jouer sur votre Lucina AX-09, mettez-le
hors tension et attendez quelques secondes avant de le
remettre sous tension.
Paramètres du pilote USB
Lorsque vous utilisez un câble USB pour
connecter l’appareil Lucina AX-09 à votre
ordinateur, vous pouvez choisir d’utiliser
le pilote USB standard fourni avec votre
ordinateur ou le pilote USB fourni par Roland.
18
MÉMO
1. Tout en maintenant les boutons FAVORITE [A],
[B] et [WRITE] enfoncés simultanément, mettez
l’appareil Lucina AX-09 sous tension.
L’écran ache «U tL» pour indiquer que l’instrument
Lucina AX-09 est en mode Utilitaire.
2. Appuyez sur le bouton TONE [2].
L’écran indique «d ru», puis la valeur en cours s’ache et
le bouton [WRITE] clignote.
3. Utilisez les boutons [INC/+] / [DEC/–] pour ajuster
le paramètre.
4. Appuyez sur le bouton [WRITE] pour enregistrer le
paramètre.
5. Mettez l’appareil Lucina AX-09 hors tension, puis à
nouveau sous tension.
Vous pouvez à présent utiliser le pilote USB de votre choix.
Pour en savoir plus sur la connexion de l’appareil Lucina
AX-09 à votre ordinateur via un câble USB, voir «Dénition
d’une valeur xe pour la vélocité du clavier» (p. 17).
Valeur Description
G En (GENERIC)
(Valeur par défaut)
u nD ( VENDOR)
Choisissez ce paramètre si vous utilisez le pilote
USB standard fourni avec votre ordinateur.
Ce mode est généralement utilisé.
Choisissez ce paramètre si vous utilisez le pilote
USB téléchargé depuis le site Web Roland.
Page 73

Sauvegarde des paramètres de l’appareil
Lucina AX-09 sur une carte mémoireUSB
Voici comment sauvegarder vos
paramètres Lucina AX-09 et les
paramètres de son enregistrés dans la
mémoire FAVORITE (p. 16) sur une carte
mémoire(clé) USB (vendue séparément).
5. Lorsque l’écran ache «D nE», mettez l’appareil
Lucina AX-09 hors tension, puis à nouveau sous
tension.
MÉMO
Si la cléUSB n’est pas insérée dans l’appareil Lucina AX-09
lorsque vous appuyez sur le bouton [WRITE], ou si aucune
donnée de sauvegarde n’est présente sur cette clé, l’écran
ache le message «E rr».
1. Insérez votre cléUSB dans l’emplacement
mémoire USB MEMORY (p. 15).
2. Tout en maintenant les boutons FAVORITE [A],
[B] et [WRITE] enfoncés simultanément, mettez
l’appareil Lucina AX-09 sous tension.
L’écran ache «U tL» pour indiquer que l’instrument
Lucina AX-09 est en mode Utilitaire.
3. Appuyez sur le bouton TONE [3].
L’écran ache «b Up» et le bouton [WRITE] clignote.
4. Appuyez sur le bouton [WRITE].
La sauvegarde commence.
5. Lorsque l’écran ache «D nE», mettez l’appareil
Lucina AX-09 hors tension, puis à nouveau sous
tension.
MÉMO
Si la cléUSB n’est pas insérée dans l’appareil Lucina
AX-09 lorsque vous appuyez sur le bouton [WRITE],
l’écran ache le message «Er r ».
Restauration des paramètres du Lucina
AX-09 à partir d’une carte mémoire(clé) USB
Voici comment restaurer les paramètres
du Lucina AX-09 enregistrés selon
la procédure indiquée à la section
«Sauvegarde des paramètres de
l’appareil Lucina AX-09 sur une carte
mémoireUSB» (p. 19).
1. Insérez la cléUSB comprenant les paramètres
sauvegardés dans l’emplacement USB MEMORY
(p. 15).
2. Tout en maintenant les boutons FAVORITE [A],
[B] et [WRITE] enfoncés, mettez l’appareil Lucina
AX-09 sous tension.
L’écran ache «U tL» pour indiquer que l’instrument
Lucina AX-09 est en mode Utilitaire.
3. Appuyez sur le bouton TONE [4].
L’écran ache «r St» et le bouton [WRITE] clignote.
4. Appuyez sur le bouton [WRITE].
Le bouton [WRITE] s’allume et l’opération de restauration
commence.
Rappel des réglages d'usine
Deutsch Français Italiano Español Português NederlandsEnglish
(Factory Reset)
Voici comment restaurer les réglages d’usine de
l’appareilLucina AX-09.
REMARQUE
• Lors de cette opération, tous les paramètres modiés
depuis l’acquisition de l’appareil Lucina AX-09, y
compris les paramètres de son stockés dans FAVORITES,
sont perdus.
• Pour conserver vos paramètres, veillez à les
sauvegarder sur une clé USB avant de restaurer les
réglages d’usine.
«Sauvegarde des paramètres de l’appareil Lucina AX-09
sur une carte mémoireUSB» (p. 19)
1. Tout en maintenant les boutons FAVORITE [A],
[B] et [WRITE] enfoncés, mettez l’appareil Lucina
AX-09 sous tension.
L’écran ache «U tL» pour indiquer que l’instrument
Lucina AX-09 est en mode Utilitaire.
2. Appuyez sur le bouton TONE [5].
L’écran ache «F Ct» et le bouton [WRITE] clignote.
3. Appuyez sur le bouton [WRITE].
Le bouton [WRITE] s’allume et l’opération de restauration
commence.
REMARQUE
Lorsque le bouton [WRITE] s’allume, la restauration
des réglages d’usine est exécutée. Ne mettez jamais
l’appareil hors tension pendant cette opération. Vous
risqueriez de provoquer des dysfonctionnements de
l’appareil Lucina AX-09.
4. Lorsque l’écran ache «D nE», mettez l’appareil
Lucina AX-09 hors tension, puis à nouveau sous
tension.
19
Page 74

Connexion d’appareils supplémentaires
*1 Le contrôle local est toujours activé. Il ne peut pas être désactivé. Pour
Contrôle de périphériques MIDI
Si vous utilisez l’appareil Lucina AX-09 de façon autonome, il
n’est pas nécessaire de disposer de connaissances approfondies
sur la technologie MIDI. Les explications qui suivent s’adressent
aux utilisateurs qui souhaitent connecter l’appareil Lucina
AX-09 à d’autres périphériques MIDI et contrôler ces appareils.
MÉMO
«MIDI» (Musical Instrument Digital Interface, soit interface
numérique pour instrument de musique) est une norme
standard qui permet l’échange des données (votre jeu) entre
instruments de musique électroniques et ordinateurs.
«Tableau d’implémentation MIDI» (p. 26) est un tableau
qui permet de vérier facilement les messages MIDI
que l’appareil Lucina AX-09 est capable de recevoir.
En comparant les tableaux d’implémentation MIDI de
l’appareil Lucina AX-09 à ceux d’autres périphériques
MIDI, vous pouvez voir quels messages sont compatibles
entre les deux périphériques.
contrôler un module de son externe connecté sans que l’appareil Lucina
AX-09 ne joue ses propres sons, vous pouvez déconnecter les prises OUTPUT
du Lucina AX-09, baisser le volume du Lucina AX-09 ou baisser le volume de
l’amplicateur ou de la console de mixage connecté(e).
*2 Le numéro de changement de programme transmis et les données de
sélection de banque (CC00, CC32) ne peuvent pas être spéciés à partir de
l’appareil Lucina AX-09. En revanche lorsque vous sélectionnez un son interne,
ces informations (CC00, CC32. Voir la «Liste des sons» à la n de ce manuel)
sont transmises en fonction des paramètresMIDI (p. 11).
Connexion d’un module MIDI
1. Utilisez un câble MIDI pour brancher le connecteur
MIDI OUT du Lucina AX-09 au connecteur MIDI IN
du module MIDI à contrôler.
Module MIDI
Messages MIDI pouvant être transmis et reçus
L’appareil Lucina AX-09 peut transmettre et recevoir les
messages MIDI suivants.
MÉMO
L’appareil Lucina AX-09 reçoit toujours des messages
MIDI du connecteur USB COMPUTER.
Message MIDI Description
Note enclenchée/
relâchée (*1)
Vélocité Transmission Force exercée sur les touches
Modication
ultérieure
(Aftertouch)
Changement de
programme
Sélection de
banque (*2)
Modulation CC01, transmission: MODULATION BAR
CC01 (Modulation)
CC05 (Durée du
portamento)
CC07 (Volume)
CC10
(Potentiomètre de
panoramique)
CC11 (Expression)
CC64 (Maintien)
CC65 (Rotation
portamento)
CC66 (Sostenuto)
CC71 (Résonance)
CC72 (Temps de
relâchement)
CC73 (Temps
d’attaque)
CC74 (Coupure)
Transmission Messages touche enclenchée/relâchée
Messages de modication ultérieure
Transmission
Réception
Transmission
Transmission
Transmission
de canal transmis par le bouton
[ASSIGNABLE] du D Beam aecté à
«
», ou par la PEDAL. (Ce message
A Ft
n’est pas transmis par le clavier.)
Modication ultérieure de canal,
modication ultérieure polyphonique.
Ne peut pas être spécié à partir de
l’appareil Lucina AX-09
Ne peut pas être spécié à partir de
l’appareil Lucina AX-09
Numéro du changement de commande
aecté au bouton [ASSIGNABLE] du
D Beam ou à la PEDAL
Connecteur MIDI IN
Si nécessaire, connectez un amplicateur ou des enceintes
au module MIDI ou au synthétiseur utilisé. Pour en savoir
plus, reportez-vous au mode d’emploi du module en
question (ou tout autre périphérique) utilisé.
Réglages MIDI
1. Maintenez le bouton [SHIFT] enfoncé et
appuyez sur le bouton [V-LINK] autant de fois
que nécessaire pour accéder au paramètre
MIDI souhaité. Par exemple, quatre fois pour le
paramètre «
«
B n » ou six fois pour le paramètre «P C ».
2. Tout en maintenant le bouton [SHIFT] enfoncé,
utilisez les boutons [INC/+] / [DEC/–] (OCTAVE [+] /
[–]) pour modier le paramètre.
Paramètre Valeur Description
C h
B n
P C
3. Relâchez le bouton [SHIFT].
4. Pour enregistrer ce paramètre, maintenez le
bouton [SHIFT] enfoncé et appuyez sur le bouton
[WRITE].
C h», cinq fois pour le paramètre
1–16
(Valeur par défaut: 1)
OFF, ON
(Valeur par défaut:
OFF)
OFF, ON
(Valeur par défaut:
ON)
Paramètre de canal MIDI
Spécie si des valeurs MSB/LSB sont
transmises.
Spécie si des données de
changement de programme sont
transmises.
20
Page 75

Connexion d’un ordinateur
Contrôle de la vidéo (V-LINK)
via USB
Si vous utilisez un câble USB disponible dans le commerce
pour brancher le connecteur USB COMPUTER de la face
arrière de l’appareil Lucina AX-09 à un connecteur USB de
votre ordinateur, vous pouvez eectuer ce qui suit avec MIDI.
• Jouer sur vos synthétiseurs logiciels en jouant sur le
Lucina AX-09.
• Enregistrer sur votre logiciel séquenceur en jouant sur
le Lucina AX-09.
• Utiliser votre logiciel séquenceur pour jouer sur le
Lucina AX-09.
Câble USB (vendu séparément)
* Pour des détails sur le fonctionnement, reportez-vous au
site Web Roland.
SiteWeb Roland
Sur ce site, vous pouvez télécharger le pilote d’origine
et acher les instructions d’installation et des
informations sur le fonctionnement.
http://www.roland.com/
V-LINK ( ) est une fonction qui permet de produire
de la musique et des images simultanément. En utilisant MIDI pour
connecter plusieurs appareils compatibles V-LINK, vous bénéciez
d’une vaste palette d’eets visuels liés aux éléments d’expression
d'un jeu musical.
Par exemple, si vous utilisez l’appareil Lucina AX-09
conjointement au mélangeur vidéo EDIROL P-10, vous
pouvez eectuer les opérations suivantes.
• Vous pouvez utiliser le clavier du Lucina AX-09 pour
parcourir les images sur le P-10.
• Vous pouvez utiliser le contrôleur tactile du Lucina
AX-09 pour modier la vitesse de lecture des images.
Dans l’exemple, l’appareil Lucina AX-09 est connecté à un
mélangeur vidéo EDIROL P-10.
Utilisez un câble MIDI pour raccorder le connecteur MIDI OUT de
l’instrument Lucina AX-09 au connecteur MIDI IN de l’EDIROL P-10.
EDIROL P-10
Connecteur MIDI IN
* Vous ne pouvez pas réaliser de communication V-LINK via USB.
Activation de V-LINK
1. Appuyez sur le bouton [V-LINK] pour l’allumer.
Deutsch Français Italiano Español Português NederlandsEnglish
REMARQUE
• Seules les données MIDI peuvent être transmises ou
reçues via USB.
• Mettez l’appareil Lucina AX-09 sous tension avant de
lancer l’application MIDI sur votre ordinateur. Ne mettez
pas l’appareil sous tension ou hors tension lorsque
votre application MIDI est en cours d’exécution.
Paramètres de pilote USB
Normalement, il n'est pas nécessaire d’installer un pilote
USB sur votre ordinateur. Cependant, si vous rencontrez
des problèmes avec la connexion à l’ordinateur (si un
dysfonctionnement se produit ou si les performances sont
médiocres), vous pouvez peut-être résoudre le problème
en téléchargeant et installant le pilote Roland d’origine en
suivant la procédure ci-dessous.
1. Comme décrit dans la section «Paramètres du
pilote USB» (p. 18), modiez le paramètre du pilote
sur «
u nD» (Fournisseur).
2. Mettez l’appareil Lucina AX-09 hors tension, puis à
nouveau sous tension.
3. Téléchargez et installez le pilote Roland d’origine.
Pour plus d'informations sur le téléchargement et
l’installation du pilote Roland d’origine, reportez-vous au
site Web Roland.
Fonctionnement sur l’instrument Lucina AX-09
Des données V-LINK sont transmises sur le canal MIDI15.
Les fonctions suivantes peuvent être contrôlées à partir du
Lucina AX-09.
Contrôleur Description
Clavier
(octave la plus à
gauche)
Contrôleur tactile
Permet de changer d’image.
* En principe, le clavier émet des sons en même
temps que le clip est activé. Si vous ne voulez pas
entendre les notes émises par le clavier, dénissez
le paramètre Commutateur local (Local Switch)
sur «OFF».
Permet de contrôler la vitesse de lecture.
* Cependant, le contrôleur tactile continue à
transmettre simultanément des données de
variation de ton.
Paramètres du commutateur local
1. Maintenez le bouton [SHIFT] enfoncé et appuyez
sept fois sur le bouton [V-LINK].
L’écran ache «L CL» et la valeur du paramètre en cours
s'ache.
2. Tout en maintenant le bouton [SHIFT] enfoncé,
utilisez les boutons [INC/+] / [DEC/–] (OCTAVE [+] /
[–]) pour modier le paramètre.
Valeur Description
o n
o FF
* Ce paramètre n’est pas enregistré. Il est toujours sur la position
ON au démarrage de l’appareil Lucina AX-09.
Lorsque V-LINK est activé, l’octave la plus à gauche du
clavier émet un son.
Lorsque V-LINK est activé, l’octave la plus à gauche du
clavier n’émet aucun son.
21
Page 76

Dépannage
Problème Éléments à vérier Action
Impossible de mettre l’instrument
sous tension.
Trois points clignotent à l’écran. Cela signie que les piles sont pratiquement épuisées. Remplacez les piles le plus rapidement possible (p. 6).
L’instrument ne produit aucun son.
Le périphérique MIDI externe
connecté ne produit aucun son.
Le niveau de volume de
l’instrument connecté à la prise EXT
IN est trop bas.
La hauteur de son est incorrecte.
Impossible de lire des chiers audio
de la clé USB.
La clé USB n’est pas reconnue/
Aucun chier ne s’ache.
Impossible d’eectuer une
sauvegarde sur la clé USB.
L’adaptateur secteur/le cordon d’alimentation est-il
correctement branché à la prise secteur et au Lucina
AX-09?
Êtes-vous certain que les piles ne sont pas épuisées? Vériez le niveau de charge des piles (p. 6).
Les piles sont-elles insérées correctement? Ouvrez le compartiment à piles et vériez leur orientation (p. 6).
L’amplicateur ou les enceintes connecté(es) sont-ils/
elles sous tension?
Le volume de l’appareil connecté est-il trop bas? Réglez le volume de l’appareil connecté.
La molette [VOLUME] est-elle réglée au minimum? Tournez la molette [VOLUME] comme souhaité.
L’appareil est-il correctement connecté? Vériez les connexions (p. 8).
Entendez-vous des sons lorsque vous connectez un
casque?
Le volume a-t-il été baissé par activation de la pédale,
du contrôleur D Beam ou via des messages MIDI
(messages de volume ou d’expression) envoyés par un
périphérique MIDI externe?
Avez-vous sélectionné un emplacement mémoire
FAVORITE dont le volume est déni sur «0»?
Utilisez-vous un câble de connexion contenant une
résistance intégrée?
Le canal de transmission MIDI de l’appareil Lucina
AX-09 correspond-il au canal de réception MIDI du
périphérique connecté?
Utilisez-vous un câble de connexion contenant une
résistance ?
Certains sons semblent avoir une hauteur diérente des autres dans certaines plages.
Avez-vous modié la hauteur de son avec le contrôleur tactile ou en transmettant des messages de variation de ton depuis un
périphérique MIDI externe?
L’accordage de l’appareil Lucina AX-09 est-il déni de
façon incorrecte?
Les chiers audio dont la fréquence d’échantillonnage
est diérente de 44,1kHz ne peuvent pas être lus par
l’appareil Lucina AX-09.
Il est possible que le type du chier audio ne puisse pas
être lu par l’appareil Lucina AX-09.
Le chier audio est peut-être endommagé. Vériez le chier audio.
Vériez le format de la clé USB. L’appareil Lucina AX-09
peut utiliser des clés USB au format FAT. (En général,
les clés USB disponibles dans le commerce sont au
format FAT et ne nécessitent aucun reformatage pour
être utilisées.) Les clés USB formatées sur un ordinateur
dont le système de chiers est autre que FAT (NTFS, par
exemple) ne sont pas reconnues par l’appareilLucina
AX-09.
La clé USB est-elle protégée en écriture? Désactivez le paramètre de protection en écriture.
L’espace disponible sur la clé USB est-il susant? Utilisez une clé USB présentant susamment d’espace disponible.
Vériez le format de la clé USB. L’appareil Lucina AX-09
peut utiliser des clés USB au format FAT.
N’utilisez pas d’autre adaptateur secteur ou câble d’alimentation
que l’adaptateur ou le câble d’alimentation fourni. Vous risqueriez de
provoquer des dysfonctionnements (p. 7).
Mettez l’amplicateur ou les enceintes connecté(es) sous tension.
Si du son est émis dans le casque, il est possible que le câble de
connexion soit défectueux ou que l’amplicateur ou la table de mixage
fonctionne mal. Vériez à nouveau le câble de connexion et l’équipement.
Appuyez sur la pédale, déplacez la main au-dessus du contrôleur D Beam
ou vériez les paramètres du contrôleur.
Augmentez le volume (p. 16).
Utilisez un câble de connexion qui ne contient pas de résistance intégrée
(par exemple, un câble Roland de la série PCS).
Dénissez le canal de transmission de l’appareil Lucina AX-09 en fonction
du canal de réception du périphérique connecté (p. 20).
Utilisez un câble de connexion ne contenant pas de résistance.
Vériez le paramètre d’accord global et l’accordage de l’échelle des notes
(p. 17).
Veuillez utiliser des chiers audio dont la fréquence d’échantillonnage
est 44,1kHz.
Utilisez un chier audio dont le type est répertorié dans la section
«Fichiers audio pris en charge» (p. 15).
Formatez la clé USB au format FAT sur votre ordinateur. (L’appareil Lucina
AX-09 n’est pas en mesure de formater une clé USB.)
Dans Poste de travail, cliquez avec le bouton droit de la souris sur le
lecteur USB, sélectionnez «Formater», puis le système de chiers «FAT»
pour formater le lecteur. Pour en savoir plus sur le formatage des clés
USB, reportez-vous au mode d’emploi de votre ordinateur.
(Reportez-vous au sujet «La clé USB n’est pas reconnue/Aucun chier ne
s’ache».)
22
Page 77

Fiche technique
Lucina AX-09: Synthesizer
Clavier 37touches (avec vélocité)
Section Générateur de sons
Polyphonie
maximale
Morceaux 1 morceau
Sons 150sons (144sons normaux, Sons spéciaux: 6)
Section Lecteur audio (formats compatibles)
MP3
WAV, AIFF
Autres
Contrôleurs
Connecteurs
Écran 7segments, 3caractères (DEL)
128voix
Format Audio MPEG-1 couche3
Fréquence
d’échantillonnage
Débit binaire
Fréquence
d’échantillonnage
Format
d’enregistrement
Contrôleur D Beam
Barre de modulation
Contrôleur tactile
Prises OUTPUT (L, (MONO), R) (type téléphonique 1/4 pouce)
Prise casque PHONES (type téléphonique stéréo 1/4 pouce)
Prise EXT IN (type mini stéréo)
Prise FOOT PEDAL (Assignable)
Connecteur USB COMPUTER (pour USB MIDI)
Emplacement USB MEMORY
Connecteur MIDI OUT (V-LINK)
Prise DC IN
44,1kHz
32/40/48/56/64/80/96/112/128/
160/192/224/256/320 Kbit/s,
VBR (Variable Bit Rate)
44,1kHz
8/16/24bits
Alimentation
électrique
Consommation 600mA
Durée de vie des
piles pour une
utilisation en continu
Dimensions
Poids
Accessoires
Options
* Dans le cadre des eorts constants d'amélioration du produit, ses caractéris-
tiques techniques et/ou son aspect peuvent être modiés sans préavis.
Adaptateur secteur
Piles rechargeables Ni-MH AA (x8)
* Piles vendues séparément.
*
N’utilisez pas de piles alcalines ni de piles au zinc-carbone.
Piles rechargeables Ni-MH: environ 4heures
(Cette valeur dépend des conditions d’utilisation de
l’appareil.)
832 (L) x 245 (P) x 95 (H) mm
32-13/16 (L) x 9-11/16 (P) x 3-3/4 (H) pouces
3,7kg
8livres 3onces
(sans l’adaptateur secteur)
Mode d’emploi, Guide de démarrage rapide
DVD Didacticiel
Bandoulière
Autocollant pour la face de l’appareil
Capuchon de connecteur USB MEMORY
Adaptateur secteur (PSB-1U (S))
Pédale-interrupteur: sérieDP
Pédale d’expression: EV-5
Clé USB
* Utilisez la clé USB vendue par Roland. Nous ne
pouvons pas garantir le fonctionnement si d’autres
produits sont utilisés.
Deutsch Français Italiano Español Português NederlandsEnglish
Liste des messages d’erreur
Message Description
E NP
E rr
F UL
Vide La clé USB ne contient pas les données requises.
Erreur Accès à la clé USB impossible. Vériez qu’elle est correctement insérée.
Mémoire pleine Traitement impossible, car l’espace disponible sur la clé USB est insusant.
23
Page 78

CONSIGNES DE SÉCURITÉ
AVERTISSEMENT
N’ouvrez pas (ni ne modiez d’aucune façon)
l’appareil ou son adaptateur secteur.
N’essayez pas de réparer l’appareil ou d’en
remplacer des pièces (sauf si le présent manuel
fournit des instructions spéciques dans ce
sens). Pour toute opération de maintenance,
prenez contact avec votre revendeur, avec le
centre de maintenance Roland le plus proche
ou avec un distributeur Roland agréé (voir la
page Information).
N’installez jamais l’appareil dans l’un des
emplacements suivants.
• Exposé à des températures élevées (par
exemple, emplacement exposé à la lumière
directe du soleil dans un véhicule fermé, près
d’un conduit chaué ou sur un dispositif
générateur de chaleur)
• Embué (par exemple, salle de bains, cabinets
de toilettes, sur sols mouillés)
• Exposé à la vapeur ou à la fumée
• Exposé au sel
• Humide
• Exposé à la pluie
• Poussiéreux ou sableux
• Soumis à de fortes vibrations et secousses
Si vous utilisez l’instrument Lucina AX-09 sans
bandoulière, veillez à placer l’instrument sur
une surface plane pour lui assurer une stabilité
optimale. Évitez les supports qui vacillent ou les
surfaces inclinées.
Servez-vous exclusivement de l’adaptateur
secteur fourni avec l'appareil. En outre, assurezvous que la tension à l’installation correspond
à la tension en entrée indiquée sur l’adaptateur
secteur. Les autres adaptateurs secteur pouvant
utiliser une polarité diérente ou être conçus
pour une tension diérente, leur utilisation
risque de provoquer des dommages,
dysfonctionnements ou une décharge électrique.
Utilisez uniquement le cordon d’alimentation
connecté. Par ailleurs, le cordon d’alimentation
fourni ne doit pas être utilisé avec un autre
appareil.
Ne tordez ni ne pliez le cordon d’alimentation
de manière excessive, et ne placez pas d’objets
lourds dessus. Vous risqueriez d’endommager
le cordon et de provoquer de graves
dommages ou des courts-circuits. Les cordons
endommagés présentent un risque d’incendie
et d’électrocution.
Utilisé seul ou en association avec un amplicateur
et des casques stéréo ou des haut-parleurs, cet
appareil peut produire des niveaux sonores
susceptibles d’entraîner une perte auditive dénitive.
Ne travaillez pas pendant longtemps à un niveau
de volume élevé ou à un niveau inconfortable.
Si vous constatez une perte auditive ou des
bourdonnements d’oreille, cessez immédiatement
d’utiliser l’appareil et consultez un audiologiste.
des
AVERTISSEMENT
Ne laissez aucun objet (matières inammables,
pièces, épingles, par exemple) ni aucun liquide
quel qu’il soit (eau, boissons, etc.) s’introduire
dans l’appareil.
Mettez immédiatement l’appareil hors tension,
débranchez l’adaptateur secteur de la prise
de courant et demandez une opération de
maintenance à votre revendeur, au centre
de maintenance Roland le plus proche ou à
un distributeur Roland agréé (voir la page
Information), dans les situations suivantes:
• L’adaptateur secteur, le cordon
d’alimentation ou la prise est endommagé.
• De la fumée ou une odeur inhabituellese
dégage de l'appareil.
• Des objets ou du liquide se sont introduits
dans l’appareil.
• L’appareil a été exposé à la pluie (ou s’est
embué de quelque autre façon).
• L’appareil ne semble pas fonctionner
normalement ou vous remarquez une
modication importante des performances.
Dans les environnements avec de jeunes
enfants, la supervision par un adulte est
nécessaire tant que l'enfant ne maîtrise pas
toute les règles essentielles à l'utilisation sans
risque de l’appareil.
Protégez l’appareil des forts impacts.
(Ne le laissez pas tomber.)
Ne forcez pas sur le cordon d’alimentation de
l’appareil an de partager une prise murale
avec un nombre déraisonnable d’appareils
supplémentaires. Soyez particulièrement
vigilant lorsque vous utilisez des cordons
prolongateurs: la puissance totale utilisée par
l’ensemble des appareils reliés à la prise murale
du cordon prolongateur ne doit jamais dépasser
la puissance nominale (watts/ampères) du
cordon prolongateur. Des charges excessives
peuvent provoquer un réchauement de
l’isolation du cordon, voire sa fonte.
Avant d’utiliser l’appareil dans un pays étranger,
prenez contact avec votre revendeur, avec le centre
de maintenance Roland le plus proche ou avec un
distributeur Roland agréé (voir la page Information).
Les piles ne doivent jamais être rechargées,
exposées à des températures excessives,
démontées ou jetées dans l’eau ou dans le feu.
N’exposez jamais les piles à une chaleur excessive,
notamment aux rayons du soleil, au feu, etc.
ATTENTION
L’appareil et l’adaptateur secteur doivent être
installés de telle sorte qu’ils n’interfèrent pas
avec leur propre ventilation.
Saisissez toujours uniquement la prise du cordon
de l’adaptateur secteur lorsque vous branchez ou
débranchez, une prise murale ou le présent appareil.
Vous devez régulièrement débrancher
ATTENTION
l’adaptateur secteur et le nettoyer à l’aide d’un
chion sec an de débarrasser les broches de
toute la poussière et d’autres dépôts accumulés.
Débranchez également la prise de courant
de la prise murale chaque fois que l’appareil
n’est pas utilisé pendant une longue période.
L’accumulation de poussière entre la prise de
courant et la prise murale peut entraîner une
faible isolation et provoquer un incendie.
Essayez d’éviter que les cordons et les câbles ne
s’entremêlent. Les cordons et les câbles doivent
également être placés hors de portée des enfants.
Ne montez jamais sur l’appareil et ne déposez
jamais d’objets lourds dessus.
Ne manipulez jamais l’adaptateur secteur ou
ses prises avec les mains mouillées lorsque
vous procédez au branchement ou au
débranchement d’une prise murale ou du
présent appareil.
Avant de déplacer l’appareil, débranchez
l’adaptateur secteur et tous les cordons
d’appareils externes.
Avant de nettoyer l’appareil, mettez-le hors
tension et débranchez l’adaptateur secteur de
la prise murale (p. 7).
Chaque fois qu’il y a un risque de foudre dans
votre zone, débranchez l’adaptateur secteur de
la prise murale.
Une utilisation incorrecte des piles peut
provoquer une explosion ou des fuites,
entraînant éventuellement un risque de blessure
ou de dommages matériels. Par mesure de
sécurité, veuillez lire et observer les précautions
suivantes (p. 6).
• Suivez attentivement les instructions
d’insertion des piles en veillant à respecter
les principes de polarité.
• Ne mélangez pas des piles usagées et des
piles neuves. Évitez en outre de mélanger
des piles de types diérents.
• Si l’instrument ne doit pas être utilisé durant
une période prolongée, retirez les piles.
• En cas de fuite d’une pile, utilisez un chion
doux ou un essuie-tout pour absorber le
liquide qui s’est écoulé dans le compartiment
à piles. Insérez ensuite de nouvelles piles.
Pour éviter toute irritation de la peau, veillez
à ne pas toucher le liquide qui s’est écoulé.
Évitez également de vous frotter les yeux
si vous avez été en contact avec le liquide.
En cas de contact avec les yeux, rincez
immédiatement à l'eau la zone aectée.
• Ne conservez jamais les piles à proximité
d’objets métalliques tels que des stylos à
bille, des colliers, des épingles à cheveux, etc.
Quand une pile ne fonctionne plus,
mettez-la au rebut en respectant les lois et
réglementations locales.
Veillez à conserver le capuchon de connecteur
USB MEMORY retiré ainsi que le capuchon
de connecteur USB MEMORY inclus dans un
endroit sûr et hors de portée des enfants, an
d’éviter qu’ils ne les avalent accidentellement.
24
Page 79

REMARQUES IMPORTANTES
Alimentation électrique:
fonctionnement sur piles
• Ne branchez pas cet appareil sur une prise électrique
déjà utilisée par un appareil électrique contrôlé
par un onduleur (par exemple, un réfrigérateur, un
lave-linge, un four micro-ondes ou un climatiseur) ou
qui comporte un moteur. Suivant le mode d’utilisation
de l’appareil électrique, le bruit induit peut provoquer
un dysfonctionnement de l’appareil ou produire un bruit
audible. Si pour des raisons pratiques, vous ne pouvez pas
utiliser une prise électrique distincte, branchez un ltre de
bruit induit entre cet appareil et la prise électrique.
• Au bout de longues heures consécutives d’utilisation,
l’adaptateur secteur va commencer à produire de la
chaleur. Cela est normal et ne pose aucun problème.
• Nous recommandons d’utiliser un adaptateur secteur, car
la consommation de cet appareil est relativement élevée.
Si vous préférez néanmoins utiliser des piles, choisissez
des piles Ni-MH.
• Pour installer ou remplacer les piles, coupez toujours
l’alimentation de l’appareil et débranchez tout
périphérique éventuellement connecté. Cela vous permet
d’éviter tout dysfonctionnement et/ou dommage des
enceintes ou d’autres appareils.
• Avant de connecter cet appareil à d’autres appareils,
mettez tous les appareils hors tension. Cela vous permet
d’éviter tout dysfonctionnement et/ou dommage des
enceintes ou d’autres appareils.
• Si vous débranchez puis rebranchez le cordon
d’alimentation de la prise secteur ou si vous débranchez
la prise CC de la face arrière de l’appareil Lucina AX-09
alors que celui-ci est allumé et fonctionne sur piles,
l’instrument est mis hors tension. Vous devez mettre le
système hors tension avant de connecter ou déconnecter
le cordon d’alimentation ou l’adaptateur secteur.
Emplacement
• Lorsque l’appareil est utilisé à proximité d’amplicateurs
de puissance (ou de tout autre équipement contenant
d’importants transformateurs de puissance), un
bourdonnement peut être émis. Pour contourner
ce problème, modiez l’orientation de l’appareil ou
éloignez-le de la source d’interférence.
• Cet appareil peut interférer avec la réception radio et télévision.
N’utilisez pas cet appareil à proximité de tels récepteurs.
• Il peut y avoir production de bruit si des appareils de
communication sans l (par exemple, des téléphones
portables) sont utilisés à proximité de l’appareil. Ce bruit
peut se produire lors de la réception ou de l’émission
d’un appel, ou encore pendant une conversation. Si vous
rencontrez ces problèmes, vous devez soit éloigner les
appareils sans l concernés à une plus grande distance de
l’appareil, soit les éteindre.
• N’exposez pas l’appareil à la lumière directe du soleil, ne
le placez pas à proximité d’appareils qui émettent de la
chaleur, ne le laissez pas à l’intérieur d’un véhicule fermé
ou ne le soumettez de quelque manière que ce soit à
des températures élevées. Une chaleur excessive peut
déformer ou décolorer l’appareil.
• En cas de déplacement d’un endroit vers un autre où la
température et/ou l’humidité sont très diérentes, des
gouttelettes d’eau (de la condensation) peuvent se former
à l’intérieur de l’appareil. L’appareil peut alors présenter
des dysfonctionnements ou des dommages si vous
essayez de l’utiliser dans ces conditions. Par conséquent,
avant d’utiliser l’appareil, vous devez le laisser reposer
pendant quelques heures, jusqu’à ce que la condensation
soit complètement évaporée.
• Ne posez jamais d’objet sur le clavier. Vous risqueriez de
provoquer des dysfonctionnements (certaines touches ne
produisant plus de son, par exemple).
• Selon la matière et la température de la surface sur laquelle vous
déposez l’appareil, ses pieds en caoutchouc peuvent décolorer ou
laisser des traces sur la surface.
Vous pouvez placer un morceau de feutre ou de tissu sous les
pieds en caoutchouc pour y remédier. Dans ce cas, veillez à ce que
le produit ne glisse ou ne se déplace pas accidentellement.
Entretien
• Pour le nettoyage quotidien de l’appareil, utilisez un chion doux
et sec ou un chion légèrement imbibé d’eau. Pour retirer les
saletés tenaces, utilisez un chion imprégné de détergent doux
et non abrasif. Essuyez ensuite méticuleusement l’appareil à l’aide
d’un chion doux et sec.
• N’utilisez jamais d’essence à nettoyer, de diluants, d’alcool
ou de solvants de quelque sorte que ce soit, an d’éviter
tout risque de décoloration et/ou de déformation.
Réparations et données
• Gardez à l’esprit que toutes les données contenues
dans la mémoire de l’appareil peuvent être perdues
lorsque ce dernier est envoyé en réparation. Vous devez
systématiquement sauvegarder les données sur la clé USB
ou les recopier sur une feuille de papier (si possible). Les
réparations sont eectuées avec une extrême prudence
an d’éviter toute perte de données. Cependant, il peut
arriver (par exemple, lorsque le circuit de la mémoire est
lui-même défectueux) que la restauration des données
ne soit pas possible. Dans ce cas-là, Roland décline toute
responsabilité relative à une telle perte de données.
Utilisation de clés USB
• Insérez délicatement la clé USB, jusqu’à ce qu’elle soit
fermement en place.
• Ne touchez jamais ses contacts. Veillez également à ce
qu’ils restent propres.
• Les clés USB sont constituées d’éléments de précision; maniez-les
avec précaution en respectant les points suivants.
• Pour éviter l'endommagement des clés par de l’électricité
statique, veillez à décharger toute électricité statique de
votre propre corps avant de les manier.
• Ne touchez pas les contacts des clés et évitez qu’ils
n’entrent en contact avec du métal.
• Évitez de plier, de laisser tomber ou de soumettre les
clés à des chocs violents ou de fortes vibrations.
• Ne gardez pas les clés exposées à la lumière directe
du soleil, dans des véhicules fermés ou d’autres
endroits de ce type.
• Les clés ne doivent pas être mouillées.
• Ne démontez et ne modiez pas les clés.
Manipulation de DVD
• Évitez de toucher ou de rayer la partie brillante
(surface codée) du disque. Les DVD sales ou
endommagés peuvent présenter des problèmes de
lecture. Nettoyez les disques à l’aide d’un nettoyant
pour disques disponible dans le commerce.
Précautions relatives aux
xations de la bandoulière
• Ne dévissez jamais les xations de la bandoulière pour éviter
d’endommager la protection plastique de l’instrument Lucina
AX-09. Cela risquerait à terme de compromettre la stabilité
globale de l’instrument et votre sécurité.
• Pour éviter de laisser tomber l’instrument et de
l’endommager ou de blesser quelqu’un, vériez bien que
la bandoulière est correctement xée de part et d’autre
avant d’utiliser le Lucina AX-09.
• Roland recommande d’installer des dispositifs de blocage
de sangle pour guitare, disponibles dans le commerce,
pour éviter tout dommage ou toute blessure suite à un
détachement accidentel de la bandoulière durant le jeu.
Précautions supplémentaires
• Soyez conscient que le contenu de la mémoire peut être
irrémédiablement perdu en cas de dysfonctionnement
ou d’une utilisation incorrecte de l’appareil. Pour vous
protéger contre la perte de données importantes, nous
vous recommandons d’eectuer périodiquement une
copie de sauvegarde des données importantes stockées
dans la clé USB.
• Malheureusement, il peut être impossible de restaurer
les données stockées sur une clé USB ou dans la mémoire
interne une fois qu’elles ont été perdues. Roland
Corporation décline toute responsabilité relative à une
telle perte de données.
• Manipulez avec susamment de précautions les boutons,
curseurs ou autres contrôles de l’appareil, ainsi que les
prises et les connecteurs. Une manipulation un peu
brutale peut entraîner des dysfonctionnements.
• Ne frappez jamais l’écran ou ne lui appliquez jamais de
fortes pressions.
• Lors du branchement/débranchement de tous les câbles,
saisissez le connecteur et ne tirez jamais sur le câble. Vous
éviterez ainsi les courts-circuits ou une détérioration des
éléments internes du câble.
• Pour éviter de déranger vos voisins, essayez de maintenir le
volume de l’appareil à des niveaux raisonnables. Vous pouvez
également utiliser un casque d’écoute an de ne pas déranger
votre entourage (en particulier à une heure tardive).
• Lorsque vous devez transporter l’appareil, utilisez
si possible l’emballage d’origine (y compris ses
rembourrages). Sinon, utilisez un emballage équivalent.
• Utilisez uniquement la pédale d’expression spéciée
(EV-5, vendue séparément). La connexion d’une
autre pédale d’expression peut entraîner des
dysfonctionnements et/ou dommages sur l’appareil.
• Certains câbles de connexion contiennent des résistances.
N’utilisez pas de câbles qui comportent des résistances
pour la connexion de cet appareil. Avec ce type de câble,
le niveau sonore peut être extrêmement faible, voire
inaudible. Pour plus d’informations sur les spécications
de câble, prenez contact avec le fabricant du câble.
• La plage utile du contrôleur D Beam est considérablement
réduite lorsque vous l’utilisez quand l'appareil est
exposé à la lumière directe du soleil. Gardez cela à l’esprit
lorsque vous utilisez le contrôleur D Beam dans un
environnement extérieur.
• Les explications fournies dans le présent manuel
comprennent des illustrations des messages qui
s'achent à l'écran. Notez toutefois que votre module
peut intégrer une version plus récente ou améliorée du
système (comme par exemple de nouveaux sons), auquel
cas les messages achés sur votre écran peuvent ne
pas toujours correspondre aux illustrations de ce mode
d'emploi.
• Microsoft et Windows sont des marques déposées de
Microsoft Corporation.
• Windows® est ociellement connu sous l’appellation:
«Système d’exploitation Microsoft® Windows®».
• MMP (Moore Microprocessor Portfolio) se réfère à
un portefeuille de brevets relatifs à l’architecture des
microprocesseurs, développés par TPL (Technology
Properties Limited). Roland détient une licence de cette
technologie du groupe TPL.
• La technologie de compression audio MPEG Layer-3 est
concédée sous licence par Fraunhofer IIS Corporation and
THOMSON Multimedia Corporation.
• MatrixQuest™ 2010
TEPCO UQUEST, LTD.
Tous droits réservés.
La fonctionnalité USB du Lucina AX-09 utilise la
technologie de logiciel intermédiaire MatrixQuest de
TEPCO UQUEST, LTD.
• Polices numériques de Yourname, Inc.
Police numérique: Copyright © Yourname, Inc.
• Roland et Lucina sont des marques déposées ou des
marques de Roland Corporation aux États-Unis et/ou dans
d’autres pays.
• Tous les noms de produit mentionnés dans ce document
sont des marques ou des marques déposées de leurs
propriétaires respectifs.
Deutsch Français Italiano Español Português NederlandsEnglish
25
Page 80

Index
A
ACCORDAGE . . . . . . . . . . . . . . . . . . . . . . 17
ACCORDAGE D E L’ÉC HELLE DES
NOTES . . . . . . . . . . . . . . . . . . . . . . . . . . . . . 17
ACCORD GLOBA L DIAPASON . . . . . 17
ADAPTATEUR SEC TEUR . . . . . . . . . . . . . 7
ADLIB . . . . . . . . . . . . . . . . . . . . . . . . . . . . . 13
AFTERTO UCH. . . . . . . . . . . . . . . . . . 13, 14
AIFF . . . . . . . . . . . . . . . . . . . . . . . . . . . . . . . 15
APERÇU . . . . . . . . . . . . . . . . . . . . . . . . . . . . 9
ASSIGN ABLE. . . . . . . . . . . . . . . . . . . . . . . 12
ATTACK TIME . . . . . . . . . . . . . . . 13, 14, 16
AUDIO P LAYE R, BOUTON . . . . . . . . . 15
B
BALANC E ARABE . . . . . . . . . . . . . . . . . . 17
BANDOU LIÈRE . . . . . . . . . . . . . . . . . . . . . . 7
BARRE D E MODULATION . . . . . . . . . . 11
C
CASQUE . . . . . . . . . . . . . . . . . . . . . . . . . . . . 8
CLÉ USB . . . . . . . . . . . . . . . . . . . . . . . . . . . 15
COMPARTIMEN T À PILES . . . . . . . . . . . . 6
COMPTE . . . . . . . . . . . . . . . . . . . . . . . . . . . 18
CONFIGU RATION DE SON . . . . . . . . . . 16
CONNEC TEUR USB COMP UTER . . . . 21
CONTRÔL EUR D BEAM . . . . . . . . . . . . . 12
CONTRÔL EUR TA CTILE . . . . . . . . . . . . . 11
CROCHE T POUR CÂBLE . . . . . . . . . . . . . 7
CUTOFF . . . . . . . . . . . . . . . . . . . . 13, 14, 16
D
DÉPANNAGE. . . . . . . . . . . . . . . . . . . . . . . 22
DURÉE D U PORTAMENTO . . . 12, 13, 16
E
EMPLACE MENT DE SÉCU RITÉ . . . . . . . 5
EMPLACE MENT USB MEM ORY . . . . . 15
ENCEIN TES . . . . . . . . . . . . . . . . . . . . . . . . . 8
ENREGI STRER UN SON . . . . . . . . . . . . . 10
EXPRES SION . . . . . . . . . . . . . . . . . . . 12, 13
F
FACTORY RESE T . . . . . . . . . . . . . . . . . . . 19
FAVORITE . . . . . . . . . . . . . . . . . . . . . . . . . . 10
FAVORITE A / B , BOUTON . . . . . . . 10
FICHE TEC HNIQUE . . . . . . . . . . . . . . . . . 23
FICHIE R AUDIO . . . . . . . . . . . . . . . . . . . . 14
FILTER . . . . . . . . . . . . . . . . . . . . . . . . . . . . . 12
FIXATION DE BANDOULIÈRE . . . . . . . . 7
FONCT ION DE VERROUI LLAGE . . . . . 14
H
HOLD . . . . . . . . . . . . . . . . . . . . . . . . . 12, 13
I
INC/+ / DEC/, BOUTONS . . . . . . . . 9
L
LECTE UR AUDIO . . . . . . . . . . . . . . . . . . . 15
LECTE UR AUDIO PORTATIF . . . . . . . . 14
LET TRES . . . . . . . . . . . . . . . . . . . . . . . . . . . . 2
LISTE D ES MESSAGES D ’ERREUR . . . 23
LOCK, BO UTON . . . . . . . . . . . . . . . . . . 14
M
MÉTRO NOME . . . . . . . . . . . . . . . . . . . . . . 18
MIDI . . . . . . . . . . . . . . . . . . . . . . . . . . . . . . . 20
MODULATION . . . . . . . . . . . . . . . . . 12, 13
MP3 . . . . . . . . . . . . . . . . . . . . . . . . . . . . . . . 15
O
OCTAVE + / , BOUTON . . . . . . . . . 11
ORDINATEUR . . . . . . . . . . . . . . . . . . . . . . 21
P
PAN . . . . . . . . . . . . . . . . . . . . . . . . . . . 12, 13
PARAMÈTRE S DE SON . . . . . . . . . . . . . 16
PEDAL DO WN . . . . . . . . . . . . . . . . . . . . . 14
PÉDALE D E PIED . . . . . . . . . . . . . . . . . . . 14
PÉDALE D ’EXPRESSION . . . . . . . . . . . . 13
PÉDALE INTERRUPTE UR . . . . . . . . . . . 13
PEDAL UP . . . . . . . . . . . . . . . . . . . . . . . . . 14
PILES . . . . . . . . . . . . . . . . . . . . . . . . . . . . . . . 6
PILES R ECHARGEABLE S NIMH AA . . 6
PILOTE USB . . . . . . . . . . . . . . . . . . . . . . . . 21
PITCH . . . . . . . . . . . . . . . . . . . . . . . . . . . . . 12
PORTAMENTO . . . . . . . . . . . . . . 12, 13, 16
POWER , COMMUTATEUR . . . . . . . . . . 8
PREVI EW, BOUTON . . . . . . . . . . . . . . . . 9
PRISE D C IN. . . . . . . . . . . . . . . . . . . . . . . . . 7
PRISE E XT IN . . . . . . . . . . . . . . . . . . . . . . . 14
PRISE F OOT PEDAL . . . . . . . . . . . . . . . . 13
PRISE L/ MONO . . . . . . . . . . . . . . . . . . . . . 8
PRISE P HONES . . . . . . . . . . . . . . . . . . . . . . 8
PRISES OUTPUT . . . . . . . . . . . . . . . . . . . . 8
R
RÉINIT IALISER . . . . . . . . . . . . . . . . . . . . . 19
RELEAS E TIME . . . . . . . . . . . . . . 13, 14, 16
RESONA NCE . . . . . . . . . . . . . . . . 13, 14, 16
RESTAURATION . . . . . . . . . . . . . . . . . . . . 19
RÉVERB ÉRATION . . . . . . . . . . . . . . . . . . . 16
Tableau d’implémentation MIDI
S
SAUVEGA RDE . . . . . . . . . . . . . . . . . . . . . 19
SOLO SYNT H . . . . . . . . . . . . . . . . . . . . . . 13
SON . . . . . . . . . . . . . . . . . . . . . . . . . . . . . . . . 9
SON NOR MAL . . . . . . . . . . . . . . . . . . . . . . 9
SON SPÉ CIAL . . . . . . . . . . . . . . . . . . . . . . . 9
SOSTEN UTO . . . . . . . . . . . . . . . . . . . . . . . 13
SPECI AL TONE, BOUTON . . . . . . . . . . 9
T
TABLEAU D’IMP LÉMENTATION MIDI 26
TEMPÉR AMENT ÉGAL . . . . . . . . . . . . . . 17
TONE 1À 6, BOUTONS . . . . . . . . . . . 9
TRANS POSE, BOUTON . . . . . . . . . . . . 11
U
UTILITAIRE . . . . . . . . . . . . . . . . . . . . . . . . . 18
V
VERSIO N . . . . . . . . . . . . . . . . . . . . . . . . . . 18
VLINK . . . . . . . . . . . . . . . . . . . . . . . . . . . . . 21
VOLUME . . . . . . . . . . . . . . . . . . . . 12, 13, 16
VOLUME , MOLETTE . . . . . . . . . . . . . . . 8
W
WAV . . . . . . . . . . . . . . . . . . . . . . . . . . . . . . . 15
WRITE , BOUTON. . . . . . . . . . . . . . 10, 18
26
Lucina AX-09
Basic
Channel
Mode
Note
Number
Velocity
After
Touch
Pitch Bend
Control
Change
Program
Change
System Exclusive
System
Common
System
Real Time
Aux
Messages
Notes
Mode 1: OMNI ON, POLY
Mode 3: OMNI OFF, POLY
Function...
Default
Changed
Default
Message
Altered
True Voice
Note ON
Note OFF
Key’s
Ch’s
True #
Song Position Pointer
Song Sel
Tune
Clock
Commands
All Sounds O
Reset All Controllers
Local On/O
All Notes O
Active Sensing
Reset
0, 32
6, 38
100, 101
Transmitted Recognized Remarks
1–16
1–16
Mode 3
Mono, Poly
**************
7–126
**************
O
O
X
O
O
O
1
O
5
O
X
7
O
10
O
11
O
64
O
65
O
66
O
71
O
72
O
73
O
74
O
75
X
84
X
91
X (Reverb)
93
X (Chorus)
X
O *1
**************
X X
X
X
X
X
X
X
X
X
X
O
X
*1 O X is selectable
*2 Recognized as M=1 even if M≠1
Mode 2: OMNI ON, MONO
Mode 4: OMNI OFF, MONO
*1 O
1–16
1–16
Mode 3
Mode 3, 4 (M=1)
X
0–127
0–127
O
O
O
O
O
O
O
O
O
O
O
O
O
O
O
O
O
O
O
O
O
O
O
O
0–127
X
X
X
X
X
O
O
X
O (123–127)
X
X
Memorized
*2
Bank Select
Modulation
Portamento Time
Data entry
Volume
Panpot
Expression
Hold 1
Portamento SW
Sostenuto
Resonance
Release Time
Attack Time
Cuto
Sound Control
Portamento Control
Eect 1 Depth
Eect 3 Depth
RPN LSB, MSB
Program No. 1–128
Date : Jan. 1, 2010Synthesizer
Version : 1.00
O: Yes
X: No
Page 81

Deutsch Français Italiano Español Português NederlandsEnglish
Page 82

Caratteristiche
Un suono a cui non si può resistere!
• 144 suoni relativi a tutte le famiglie di strumenti: non solo i sintetizzatori, ma anche il piano, l'organo,
gli archi, gli ottoni e la chitarra, tutti subito riproducibili per un'esperienza di divertimento immediata.
• E potete scegliere anche sei "Toni speciali" estremamente espressivi.
Questi sei suoni di qualità elevata sono stati creati specicatamente per il modello Lucina AX-09
(sintetizzatore, sintetizzatore polifonico, basso polifonico, jazz scat, violino e trombone).
Semplice da suonare e da maneggiare!
• Il funzionamento è davvero semplice: vi basta accendere il Lucina AX-09 e scegliere un suono.
• Grazie alla leggerezza, al design gradevole e all'alimentazione a batteria, il Lucina AX-09 può
essere davvero utilizzato ovunque e in qualsiasi momento. E potete anche appoggiarlo sulla
spalla durante l'esibizione, per prestazioni più dinamiche e versatili.
Suonare sarà più bello che mai!
• Il modello Lucina AX-09 mette a vostra disposizione tutte le capacità espressive di un sintetizzatore
tradizionale, grazie al controller D Beam, alla barra di modulazione e al controller a tocco.
• Potete eseguire facilmente tutti i vostri brani preferiti, collegando il vostro lettore audio portatile
al jack EXT IN oppure utilizzando la funzione di riproduzione audio dalla memoria USB.
Modalità di visualizzazione delle lettere sul Lucina AX-09
J KLLNMnNoOPPQQrRSStTUUuV WXXYYZZ
AABBCCDDEEFFGGhHiIJ
Copyright © 2010 ROLAND CORPORATION
Tutti i diritti riservati. Nessuna parte di questo documento può essere in alcun modo riprodotta senza l'autorizzazione scritta di
ROLAND CORPORATION.
Prima di usare questa unità leggete attentamente le sezioni "UTILIZZO SICURO DELL'UNITÀ" (pag. 24) e "NOTE IMPORTANTI" (pag. 25) che contengono
importanti informazioni sul corretto impiego dell'unità. Per essere certi di aver acquisito una buona conoscenza di tutte le funzioni oerte dalla
nuova unità, inoltre, leggete per intero il Manuale dell'utente. Conservate il manuale e tenetelo a portata di mano per poterlo consultare.
2
Page 83

Sommario
Caratteristiche . . . . . . . . . . . . . . . . . . . . . . . . . . . . .2
Modalità di visualizzazione delle lettere sul Lucina
AX-09 . . . . . . . . . . . . . . . . . . . . . . . . . . . . . . . . . . . . . . . . . . . . . . . 2
Sommario . . . . . . . . . . . . . . . . . . . . . . . . . . . . . . . . .3
Descrizioni del pannello . . . . . . . . . . . . . . . . . . . .4
Pannello anteriore . . . . . . . . . . . . . . . . . . . . . . . . . . . . . . . . . . . 4
Pannello inferiore . . . . . . . . . . . . . . . . . . . . . . . . . . . . . . . . . . . 5
Pannello posteriore . . . . . . . . . . . . . . . . . . . . . . . . . . . . . . . . . 5
Informazioni sulle batterie . . . . . . . . . . . . . . . . .6
Installazione delle batterie . . . . . . . . . . . . . . . . . . . . . . . . . . . 6
Vericate la carica rimasta delle batterie . . . . . . . . 6
Rimozione delle batterie . . . . . . . . . . . . . . . . . . . . . . . 6
Per iniziare . . . . . . . . . . . . . . . . . . . . . . . . . . . . . . . .7
Connessione dell'adattatore CA . . . . . . . . . . . . . . . . . . . . . . 7
Collegamento della tracolla. . . . . . . . . . . . . . . . . . . . . . . . . . 7
Connessione degli altoparlanti . . . . . . . . . . . . . . . . . . . . . . 8
Connessione delle cue . . . . . . . . . . . . . . . . . . . . . . . . . . . . . 8
Accensione dell'unità . . . . . . . . . . . . . . . . . . . . . . . . . . . . . . . . 8
Selezione dei toni . . . . . . . . . . . . . . . . . . . . . . . . . .9
Selezione di un tono normale . . . . . . . . . . . . . . . . . . . . . . . . 9
Selezione di un tono speciale . . . . . . . . . . . . . . . . . . . . . . . . 9
Anteprima dei toni . . . . . . . . . . . . . . . . . . . . . . . . . . . . . . . . . . 9
Memorizzazione dei toni utilizzati di frequente
(FAVORITE) . . . . . . . . . . . . . . . . . . . . . . . . . . . . . . . . . . . . . . . . . 10
Utilizzo delle funzioni per le prestazioni . . . .11
Trasposizione della tastiera a intervalli di un'ottava . . 11
Trasposizione della tastiera a intervalli di un semitono .
Utilizzo del controller a tocco . . . . . . . . . . . . . . . . . . . . . . . 11
Impostazione della variazione di intonazione
del controller a tocco . . . . . . . . . . . . . . . . . . . . . . . . . 11
Utilizzo della barra di modulazione . . . . . . . . . . . . . . . . . 11
Assegnazione dell'eetto alla barra di
modulazione . . . . . . . . . . . . . . . . . . . . . . . . . . . . . . . . . 12
Utilizzo del controller D Beam . . . . . . . . . . . . . . . . . . . . . . 12
Modica dell'impostazione di ASSIGNABLE . . . . 12
Utilizzo di un pedale . . . . . . . . . . . . . . . . . . . . . . . . . . . . . . . . 13
Evitare il cambio dei toni durante la prestazione
(funzione Lock) . . . . . . . . . . . . . . . . . . . . . . . . . . . . . . . . . . . . . 14
Suonare insieme alla musica riprodotta da un
lettore audio portatile . . . . . . . . . . . . . . . . . . . . . . . . . . . . . . 14
Suonare insieme a un le audio dalla memoria USB . 14
Impostazione del lettore audio . . . . . . . . . . . . . . . 15
11
Modica delle impostazioni del tono . . . . . .16
Modica dei parametri del tono . . . . . . . . . . . . . . . . . . . . 16
Regolazione dell'accordatura . . . . . . . . . . . . . .17
Accordatura generale . . . . . . . . . . . . . . . . . . . . . . . . . . . . . . 17
Key Scale Tune . . . . . . . . . . . . . . . . . . . . . . . . . . . . . . . . . . . . . 17
Regolazione della sensibilità al tocco della
tastiera . . . . . . . . . . . . . . . . . . . . . . . . . . . . . . . . . . .17
Impostazione di un valore sso per la velocity della
tastiera . . . . . . . . . . . . . . . . . . . . . . . . . . . . . . . . . . . . . . . . . . . . 17
Conteggio per l'attacco / Metronomo . . . . . .18
Impostazioni del conteggio per l'attacco . . . . . . . . . . . . 18
Impostazioni varie (Utility) . . . . . . . . . . . . . . . .18
Controllo della versione del Lucina AX-09 . . . . . . . . . . . 18
Impostazioni del driver USB . . . . . . . . . . . . . . . . . . . . . . . . 18
Registrazione delle impostazioni del Lucina AX-09
nella memoria USB . . . . . . . . . . . . . . . . . . . . . . . . . . . . . . . . . 19
Ripristino delle impostazioni del Lucina AX-09 dalla
memoria USB . . . . . . . . . . . . . . . . . . . . . . . . . . . . . . . . . . . . . . 19
Ripristino delle impostazioni di fabbrica
(Factory Reset) . . . . . . . . . . . . . . . . . . . . . . . . . . . . . . . . . . . . . 19
Connessione di altri dispositivi . . . . . . . . . . . .20
Controllo dei dispositivi MIDI . . . . . . . . . . . . . . . . . . . . . . . 20
Messaggi MIDI trasmissibili e ricevibili . . . . . . . . . 20
Connessione del modulo di suono MIDI . . . . . . . 20
Impostazioni relative al MIDI . . . . . . . . . . . . . . . . . . 20
Connessione del computer tramite USB . . . . . . . . . . . . . 21
Controllo dei video (V-LINK) . . . . . . . . . . . . . . . . . . . . . . . . 21
Risoluzione dei problemi . . . . . . . . . . . . . . . . . .22
Speciche . . . . . . . . . . . . . . . . . . . . . . . . . . . . . . . .23
Elenco dei messaggi d'errore . . . . . . . . . . . . . .23
UTILIZZO SICURO DELL'UNITÀ . . . . . . . . . . . . . 24
NOTE IMPORTANTI . . . . . . . . . . . . . . . . . . . . . . . .25
Indice . . . . . . . . . . . . . . . . . . . . . . . . . . . . . . . . . . . .26
Diagramma di implementazione MIDI . . . . .26
Deutsch Français Italiano Español Português NederlandsEnglish
3
Page 84

Descrizioni del pannello
Pannello anteriore
11 12 13
14
1 1819
1. Pulsanti OCTAVE [+] / [–]
Questi pulsanti incrementano o riducono la gamma di
suoni della tastiera in intervalli di un'ottava (pag. 11).
2. Pulsante [TRANSPOSE]
Tenendo premuto questo pulsante contemporaneamente
ai pulsanti OCTAVE [+], [–] potete incrementare o ridurre la
gamma della tastiera a intervalli di un semitono (pag. 11).
3. Schermo
Mostra il tono o la modalità selezionata oppure il valore
del parametro in fase di modica.
4. Pulsante [SHIFT]
Questo pulsante, utilizzato congiuntamente ad altri,
vi permette di eseguire diverse funzioni.
5. Pulsante [SPECIAL TONE]
Premete questo pulsante per selezionare toni speciali.
6. Pulsanti TONE [1]–[6]
Questi pulsanti consentono di selezionare il gruppo di toni
per i toni normali oppure di selezionare toni speciali.
7. Pulsanti [INC/+] / [DEC/–]
Questi pulsanti consentono di selezionare variazioni dei
toni normali.
8. Pulsanti FAVORITE [A] / [B]
Questi pulsanti consentono di selezionare il banco di
memoria FAVORITE (pag. 10) in cui registrare un tono preferito.
9. Pulsante [WRITE]
Questo pulsante consente di memorizzare le impostazioni
Lucina AX-09 modicate oppure il tono registrato in
FAVORITE (pag. 10, pag. 18).
7617 82153164 5 9 10
10. Pulsante [LOCK]
Attivando questo pulsante non potrete passare da un tono
all'altro. Utilizzatelo per evitare il cambio indesiderato di
tono durante un'esibizione (pag. 14).
11. Slot USB MEMORY
Inserite qui la memoria USB (venduta a parte) (pag. 15).
12. Manopola [VOLUME]
Consente di regolare il volume.
13. D Beam Pulsanti [PITCH] / [FILTER] /
[ASSIGNABLE]
Questi pulsanti consentono di attivare o disattivare la
funzionalità D Beam.
Passando la mano su D Beam potete applicare diversi
eetti di suono (pag. 12).
14. Pulsante [V-LINK]
Questo pulsante consente di attivare/disattivare V-LINK
(pag. 21).
15. Pulsante [AUDIO PLAYER]
Attivando questo pulsante potrete riprodurre le audio
dalla memoria USB (pag. 14).
16. [ Pulsante / PREVIEW]
Una volta acceso il pulsante [AUDIO PLAYER], potete
avviare o fermare la riproduzione dei le audio contenuti
nella memoria USB.
Quando invece il pulsante [AUDIO PLAYER] è spento,
questo pulsante avvia o arresta una demo in anteprima del
tono correntemente selezionato.
È anche possibile ottenere il conteggio per l'attacco
del suono premendo contemporaneamente la barra di
modulazione e il pulsante [PREVIEW].
4
Page 85

17. BARRA DI MODULAZIONE/CONTROLLER A
TOCCO
È possibile premere la barra di modulazione per ottenere
dei vibrati. Potete anche passare a un eetto Hold per
sostenere il suono riprodotto (pag. 11).
Per cambiare l'intonazione appoggiate il dito sul controller
a tocco e spostatelo a destra o a sinistra (pag. 11).
18. Perno della tracolla
Collegate a questo perno la tracolla in dotazione (pag. 7).
19. Perno della tracolla (A)
Collegate a questo perno la tracolla in dotazione.
A seconda del vostro stile di esecuzione, utilizzate questo
perno oppure l'altro elemento (B) situato nel pannello
posteriore del Lucina AX-09 (pag. 7).
Pannello posteriore
Pannello inferiore
1. Perno della tracolla (B)
Collegate a questo perno la tracolla in dotazione.
A seconda del vostro stile di esecuzione, utilizzate questo
perno oppure l'altro elemento (A) situato nel pannello
laterale del Lucina AX-09 (pag. 7).
2. Alloggiamento batterie
Installate in questo punto le batterie ricaricabili AA NiMH
(pag. 6).
1 2
Deutsch Français Italiano Español Português NederlandsEnglish
1 82 3 4 95 106 7
1. Jack OUTPUT (L/MONO, R)
Il suono del Lucina AX-09 fuoriesce da questi jack.
Collegateli ai vostri altoparlanti amplicati.
Per utilizzare l'uscita mono collegate solo il jack L/MONO.
2. Connettore MIDI OUT
Collegando questo dispositivo a un altro dispositivo MIDI
potete trasmettere a quest'ultimo dal Lucina AX-09 dei
messaggi MIDI per la riproduzione in remoto (pag. 20).
3. Jack FOOT PEDAL
In questo punto collegate un pedale Roland serie DP
venduto a parte.
Potete anche collegare un pedale di espressione
(EV-5, venduto a parte) (pag. 13).
4. Interruttore [POWER]
Consente di accendere/spegnere l'unità (pag. 8).
Se utilizzate l'adattatore CA incluso e volete spegnere
completamente l'unità spegnete l'interruttore POWER e
scollegate l'adattatore CA dalla presa.
5. Jack DC IN
Collegate qui l'adattatore CA in dotazione (pag. 7).
6. Gancio portacavi
Consente di ssare il cavo dell'adattatore CA in dotazione
(pag. 7).
7. Slot di sicurezza ( )
http://www.kensington.com/
8. Connettore USB COMPUTER
Per collegare il Lucina AX-09 al computer utilizzate un cavo
USB (pag. 21).
9. Jack EXT IN
Collegate qui il lettore audio portatile oppure un'altra
sorgente audio. Il suono in ingresso da questo jack viene
indirizzato verso i jack OUTPUT e PHONES (pag. 14).
10. Jack PHONES
In questo punto potete collegare le cue (vendute a
parte) con un jack stereo mini (da 1/8") (pag. 8).
5
Page 86

Informazioni sulle batterie
Se utilizzate il Lucina AX-09 alimentandolo a batterie, saranno necessarie 8 batterie AA NiMH ricaricabili. Se
l’apparecchio viene utilizzato in modo continuativo la durata delle batterie è all’incirca di 4 ore, con variazioni a
seconda delle condizioni di utilizzo.
Informazioni sulle batterie ricaricabili
La durata delle batterie ricaricabili si riduce a ogni ricarica. Se le batterie si esauriscono subito dopo la ricarica è ora
di sostituirle.
Installazione delle batterie
1. Spegnete l'alimentazione del Lucina AX-09 (pag. 8).
2. Rimuovete il coperchio dell'alloggiamento batterie
situato nel pannello inferiore del Lucina AX-09.
Sollevate e rimuovete il coperchio premendone le
linguette.
3. Inserite le batterie nell'alloggiamento appropriato.
Durante l'inserimento, vericate di rispettare la polarità
corretta (orientamento +/–) di ciascuna batteria.
4. Richiudete il coperchio dell'alloggiamento batterie.
* Quando capovolgete l'unità posizionate dei giornali o delle
riviste sotto i quattro angoli o a entrambe le estremità per
evitare che i pulsanti e i controlli vengano danneggiati. Cercate
inoltre di orientare l'unità in modo che nessun pulsante o
controllo possa essere danneggiato.
* Quando capovolgete l'unità, maneggiatela con cura per evitare
di farla cadere o ribaltare.
Vericate la carica rimasta delle
batterie
Quando la carica rimasta si esaurisce, lo
schermo riporta tre punti lampeggianti.
In questo caso sostituite le batterie non
appena possibile.
Poco dopo questa indicazione, il display indica "
potrete più utilizzare l'Lucina AX-09.
Potete anche controllare la carica restante come segue.
Lo" e non
1. Tenete premuto il pulsante [SHIFT] e premete il
pulsante [LOCK].
Il display indica la carica restante delle batterie in forma
percentuale ("0"-"100").
MEMO
• L'indicazione della carica restante delle batterie è
approssimativa.
• Se si verica la carica restante delle batterie quando
l'adattatore CA è collegato, il display riporta sempre "100".
Rimozione delle batterie
Per rimuovere le batterie spegnete il Lucina AX-09, aprite
il coperchio dell'alloggiamento appropriato ed estraete le
batterie.
Quando utilizzate le batterie tenete presenti i seguenti punti
• Non utilizzate batterie alcaline o allo zinco-carbonio.
• Se l'adattatore CA è collegato, il Lucina AX-09 non viene alimentato a batterie.
• Se vengono installate le batterie, scollegando o ricollegando il cavo di alimentazione alla presa CA oppure scollegando la presa CC dal pannello posteriore del
Lucina AX-09 mentre l'alimentazione è accesa si provoca lo spegnimento dell'alimentazione. Prima di collegare o scollegare il cavo di alimentazione o l'adattatore
CA spegnete l'alimentazione.
• Evitate di far entrare nell'unità di qualsiasi tipo di oggetto (ad esempio materiale inammabile, monete, spilli) o liquido (acqua, bevande, ecc.).
• Se utilizzate in modo non corretto, le batterie possono esplodere o perdere liquido e provocare ferimenti o danni. Per una maggior sicurezza leggete e osservate le
seguenti precauzioni.
• Seguite attentamente le istruzioni di installazione relative alle batterie e vericate di osservare la polarità corretta.
• Evitate di utilizzare insieme batterie nuove e usate. Non utilizzate insieme tipi diversi di batterie.
• Se l'unità deve restare inutilizzata per lungo tempo rimuovete le batterie.
• Se una batteria perde utilizzate un panno morbido o un tovagliolo di carta per pulire ogni traccia di liquido dall'alloggiamento batterie. Installate quindi
batterie nuove. Per evitare inammazioni della pelle e delle mani prestate attenzione a non entrare in contatto diretto con il liquido. Il liquido fuoriuscito non
deve venire a contatto con l'area degli occhi. Se il liquido fuoriuscito dovesse entrare negli occhi, sciacquateli immediatamente con acqua corrente.
• Non unite mai le batterie con oggetti metallici come penne a sfera, collanine, fermagli per capelli, ecc.
6
Page 87

Per iniziare
Connessione dell'adattatore CA
Il Lucina AX-09 può essere utilizzato con l’adattatore CA in
dotazione oppure con batterie ricaricabili AA NiMH.
1. Vericate che l'alimentazione del modello Lucina
AX-09 sia spenta (l'interruttore [POWER] si trova in
posizione OFF).
2. Ruotare la manopola [VOLUME] completamente a
sinistra (minimo).
3. Collegate l'adattatore CA al jack DC IN del
pannello posteriore del Lucina AX-09, quindi
collegatelo a una presa elettrica CA.
Per evitare che l'unità si spenga in modo
imprevisto, ad esempio se la spina si
stacca inavvertitamente, e per non forzare
eccessivamente il jack DC IN, bloccate il cavo
di alimentazione con l'apposito gancio come
indicato nella gura.
Posizionate l'adattatore
CA in modo che il lato
con l'indicatore sia rivolto
verso l'alto e il lato con
le informazioni di testo
sia rivolto verso il basso,
come indicato nella gura.
L'indicatore si illumina
quando l'adattatore CA viene
inserito in una presa CA.
Collegamento della tracolla
Collegate la tracolla al Lucina
AX-09 come mostrato nelle
illustrazioni.
Deutsch Français Italiano Español Português NederlandsEnglish
1. Collegate un'estremità della tracolla in dotazione
al perno indicato nell'illustrazione seguente.
2. Collegate l'altra estremità della tracolla in
dotazione a uno degli altri due perni appositi.
Vi sono due perni in due posizioni diverse, "A" e "B". Potete
utilizzare quello che vi è più comodo. Il perno "A" ore
maggiore stabilità alle persone di corporatura più robusta.
A B
NOTA
Se utilizzate il perno "B" avvolgete la tracolla come
illustrato qui di seguito. Se non la avvolgete, la tracolla
può sganciarsi dal Lucina AX-09.
Arrotolamento
Parte posteriore della tracolla
Parte anteriore
della tracolla
7
Page 88

Connessione degli altoparlanti
Accensione dell'unità
Il modello Lucina AX-09 non contiene amplicatori né
altoparlanti. Per riprodurre il suono dovete collegare i jack
OUTPUT del pannello posteriore a un dispositivo audio
come un sistema di amplicazione (d'ora innanzi indicato
come "altoparlanti"), oppure usare le cue.
Per eettuare le connessioni
utilizzate cavi audio (serie
PCS, venduti a parte).
* Dopo aver completato i collegamenti (pag. 8), accendete
i vari dispositivi nell'ordine specicato. Se accendete
i dispositivi nell'ordine errato rischiate di provocare il
malfunzionamento e/o di danneggiare gli altoparlanti e
gli altri dispositivi.
1. Abbassate al minimo il volume del Lucina AX-09 e
degli altoparlanti.
2. Nel pannello posteriore del Lucina AX-09
accendete l'interruttore [POWER].
Questa unità è dotata di un circuito di
protezione. Dopo l'accensione occorrono
alcuni secondi prima che l'unità cominci a
funzionare normalmente.
Se scegliete la modalità mono utilizzare solo il jack
L/MONO.
* Per evitare malfunzionamenti e/o danni agli altopar-
lanti o ad altri dispositivi, prima di eseguire qualsiasi
collegamento abbassate sempre il volume e spegnete
tutti i dispositivi.
Connessione delle cue
Le cue vanno collegate al jack PHONES del pannello
posteriore.
Potete collegare cue con
spinotto stereo mini (1/8").
3. Accendete gli altoparlanti.
4. Per regolare il volume utilizzate la manopola
[VOLUME].
Mentre utilizzate la tastiera per
suonare, riducete lentamente
la manopola [VOLUME] verso
destra e regolate il volume
del Lucina AX-09 e degli
altoparlanti.
Spegnimento dell'unità
1. Abbassate al minimo il volume del Lucina AX-09 e
degli altoparlanti.
2. Spegnete gli altoparlanti.
3. Spegnete l'interruttore [POWER] del Lucina AX-09.
8
Page 89

Selezione dei toni
Nel Lucina AX-09 ciascuno dei suoni riprodotti viene
denito un "tono". Vi sono due tipi di toni: "toni normali" e
"toni speciali".
Selezione di un tono normale
Il Lucina AX-09 include 144 toni normali che orono il
meglio dei sintetizzatori Roland.
I toni normali sono organizzati in sei gruppi di 24 tonalità
ciascuno.
1. Se il pulsante [SPECIAL TONE] o FAVORITE
[A] / [B] è acceso, premetelo per disattivarne
l'illuminazione.
2. Premete uno dei pulsanti TONE [1]–[6] per
selezionare un gruppo di toni.
Il pulsante si illumina per indicare che questo è il gruppo di
toni selezionato.
Il nome del gruppo di toni è stampato in nero sotto a
ciascun pulsante.
MEMO
Quando si accende l'alimentazione viene sempre
selezionato il numero 1 del tono 1 (TONE [1]).
3. Utilizzare i pulsanti [INC/+] / [DEC/–] per
selezionare un tono del gruppo.
Selezione del tono del ritmo
Il gruppo n. 23–24 del gruppo GUITAR/BASS corrisponde al
tono del ritmo. Per informazioni consultate la sezione "Tone
List" alla ne di questo manuale.
Selezione di un tono speciale
Il Lucina AX-09 contiene sei "toni speciali" appositamente
creati.
1. Premete il pulsante [SPECIAL TONE] per accenderlo.
2. Premete uno dei pulsanti TONE [1]–[6] per
selezionare il tono speciale desiderato.
I nomi dei toni speciali sono riportati in blu sotto ciascun
pulsante.
MEMO
Per tornare ai toni normali premete il pulsante [SPECIAL
TONE] per spegnerlo.
Anteprima dei toni
Deutsch Français Italiano Español Português NederlandsEnglish
Ogni gruppo contiene i toni 1-24 e il numero dei toni
selezionati (1–24) appare nello schermo.
Premete il pulsante [INC/+] per selezionare il tono
successivo oppure [DEC/–] per selezionare il tono
precedente.
MEMO
• Per un elenco dei toni consultate la relativa sezione alla
ne di questo manuale.
• Come indicato dai caratteri in nero riportati sotto i
pulsanti TONE, ogni gruppo di toni è suddiviso in due
categorie (ad esempio il gruppo di pulsanti TONE [1]
contiene le due categorie "SYNTH" e "PAD").
Quando tenete premuto il pulsante TONE del gruppo
correntemente selezionato, cioè quello illuminato, e
premete il pulsante [INC/+] / [DEC/–], selezionate il
primo tono della categoria.
• Tenete premuti i pulsanti [INC/+] / [DEC/–] per
selezionare rapidamente i toni. Per velocizzare
ulteriormente la procedura tenete premuto un pulsante
e quindi premete anche l'altro.
Quando il pulsante [AUDIO PLAYER] è spento premete il
pulsante [PREVIEW] per accenderlo e riprodurre il tono
correntemente selezionato con una frase demo appropriata.
Per arrestare la frase prima del termine della riproduzione
premete nuovamente il pulsante [PREVIEW] per spegnerne
l'illuminazione.
9
Page 90

Memorizzazione dei toni utilizzati di frequente (FAVORITE)
Il Lucina AX-09 presenta "posizioni di memoria FAVORITE"
(preferite) che consentono di registrare 12 toni. Se
registrate i toni frequentemente utilizzati con questa
funzione, potrete accedervi in modo semplice e rapido in
qualsiasi momento.
Con le selezioni dei toni potete registrare anche le
impostazioni di volume e reverb nelle posizioni di
memoria FAVORITE (pag. 16).
MEMO
Nella memoria FAVORITE possono essere registrati solo
toni normali.
Registrazione di un tono come FAVORITE
La memoria FAVORITE contiene due banchi, il banco A e il
banco B, ciascuno dei quali può contenere 6 toni.
1. Selezionate il tono da registrare nella posizione di
memoria FAVORITE.
2. Premete il pulsante [WRITE] per accenderlo.
Richiamo di un tono FAVORITE
Ecco come richiamare un tono registrato nella memoria
FAVORITE.
1. Premete il pulsante FAVORITE [A] / [B] per
selezionare il banco da cui richiamare il brano
registrato.
Il pulsante FAVORITE che viene premuto si illumina.
2. Premete uno dei pulsanti TONE [1]–[6] per
selezionare la posizione di memoria FAVORITE dal
banco corrente.
Potete anche utilizzare i pulsanti [INC/+] / [DEC/–] di
seguito per selezionare le posizioni di memoria FAVORITE
nello stesso banco.
MEMO
Per tornare ai toni normali premete il pulsante
FAVORITE [A] / [B], che risulta acceso, per spegnerlo.
3. Premete il pulsante FAVORITE [A] / [B] per
selezionare il banco in cui registrare il brano
preferito.
Il pulsante FAVORITE che viene premuto si illumina.
Lo schermo indica "
4. Premete uno dei pulsanti TONE [1]–[6] per
selezionare la posizione in memoria in cui
registrare il tono preferito.
A -" (banco "A") o "B - " (banco "B").
Il pulsante premuto si accende e il tono viene registrato
nella posizione di memoria FAVORITE. Il pulsante [WRITE]
si spegne.
MEMO
Per tornare ai toni normali premete il pulsante
FAVORITE [A] / [B], che risulta acceso, per spegnerlo.
10
Page 91

Utilizzo delle funzioni per le prestazioni
Il Lucina AX-09 ore diverse funzioni per rendere più
espressive le vostre prestazioni.
Trasposizione della tastiera a intervalli di un'ottava
È possibile trasporre la tastiera a intervalli di un'ottava, per
un massimo di 3 ottave verso l'alto o il basso.
Valore -3–3
1. Premete il pulsante OCTAVE [+] / [–].
Lo schermo riporta un valore.
Se l'impostazione delle ottave è in direzione "+" si illumina
il pulsante OCTAVE [+]; se l'impostazione delle ottave è in
direzione "-" si illumina il pulsante OCTAVE [-].
MEMO
Per riportare l'impostazione delle ottave a "0" premete
contemporaneamente i pulsanti OCTAVE [+] e [–].
Il pulsante OCTAVE [+] / [–] si spegne e la tastiera torna
alla gamma normale di intonazioni.
Trasposizione della tastiera a intervalli di un semitono
Potete trasporre la tastiera a intervalli di un semitono.
Si tratta di una funzione comoda per suonare un brano in
un numero di battute non familiare.
Valore -5–6
1. Tenete premuto il pulsante [TRANSPOSE].
L'impostazione corrente lampeggia nello schermo.
MEMO
Per riportare l'impostazione a "0" tenete premuti i pulsanti
[TRANSPOSE] e contemporaneamente OCTAVE [+] e [–].
Il pulsante [TRANSPOSE] si spegne e la tastiera torna
alla gamma normale di battute.
Utilizzo del controller a tocco
Appoggiando il dito sul controller a tocco e spostandolo
a destra o a sinistra potete variare l'intonazione della nota
in esecuzione. Toccate il lato sinistro del controller per
scendere di intonazione, toccate verso destra per salire.
Impostazione della variazione di intonazione del controller a tocco
Seguendo la procedura sotto riportata potete impostare
la variazione di intonazione applicata alle note quando
utilizzate il controller a tocco. Questa impostazione viene
specicata in termini di un valore in semitoni. Ad esempio,
specicando il valore "12", la battuta sale di un'intera
ottava quando toccate il bordo più a destra del controller a
tocco (12 semitoni equivalgono a un'ottava).
1. Toccate il controller a tocco mentre tenete
premuto [SHIFT].
Il valore correntemente impostato per la gamma delle
battute lampeggia nello schermo.
2. Continuate a tenere premuto il pulsante [SHIFT] e
utilizzate i pulsanti [INC/+] / [DEC/–] (OCTAVE [+] /
[–]) per modicare l'impostazione.
Valore 0–24
3. Rilasciate il pulsante [SHIFT].
4. Per salvare queste impostazioni tenete premuto il
pulsante [SHIFT] e premete il pulsante [WRITE].
Deutsch Français Italiano Español Português NederlandsEnglish
2. Tenete premuto il pulsante [TRANSPOSE], quindi
premete il pulsante OCTAVE [+] / [–] per impostare
il valore desiderato.
3. Il valore viene applicato quando rilasciate il
pulsante [TRANSPOSE].
Il pulsante [TRANSPOSE] si accende se si specica un
valore diverso da "0".
Utilizzo della barra di modulazione
Potete applicare l'eetto di vibrato premendo la barra di
modulazione mentre suonate il Lucina AX-09.
MEMO
Lo stesso eetto viene applicato a tutti i toni. Se
invece avete selezionato un tono speciale 4 VIOLIN o
5 TROMBONE, le dinamiche (espressione) cambiano
in modo specico per lo strumento e consentono di
suonare con espressività estremamente realistica.
11
Page 92

Assegnazione dell'eetto alla barra di
modulazione
Potete anche modicare l'assegnazione della barra di
modulazione per consentire il sustain delle note o il
sustain delle note durante l'eetto di vibrato.
1. Tenete premuto il pulsante [SHIFT] e premete la
barra di modulazione.
L'impostazione corrente lampeggia nello schermo.
2. Continuate a tenere premuto il pulsante [SHIFT] e
utilizzate i pulsanti [INC/+] / [DEC/–] (OCTAVE [+] /
[–]) per assegnare l'eetto desiderato.
In questo modo specicate l'eetto da applicare quando
utilizzate la barra di modulazione.
Valore Spiegazione
N oD (MODULATION)
h LD (HOLD)
C NB (COMBINATION)
Viene applicato l'eetto di vibrato ai suoni che
state riproducendo.
I suoni riprodotti vengono sostenuti mentre
premete la barra di modulazione.
Viene applicato l'eetto di vibrato e i suoni che
state riproducendo vengono sostenuti.
MEMO
Lo stesso eetto viene applicato a tutti i toni. Se
invece avete selezionato un tono speciale 4 VIOLIN
o 5 TROMBONE, invece dell'eetto vibrato vengono
modicate le dinamiche (espressione) dello strumento.
3. Rilasciate il pulsante [SHIFT].
4. Per salvare queste impostazioni tenete premuto il
pulsante [SHIFT] e premete il pulsante [WRITE].
Utilizzo del controller D Beam
Spostando la mano sul sensore del controller D
Beam potete modicare il suono applicando l'eetto
precedentemente assegnato al D Beam.
La gamma di applicazione del controller D Beam
L'illustrazione seguente indica la gamma approssimativa di
applicazione del controller D Beam.
Posizionando la mano oltre questa gamma di applicazione
non si ottiene nessun eetto.
* La gamma utilizzabile del controller D Beam risulta
estremamente ridotta quando l'apparecchio si trova sotto
la luce diretta del sole. Ricordatevi di questo particolare
quando utilizzate il controller D Beam all'esterno.
1. Per selezionare la funzione che desiderate
controllare con il controller D Beam premete uno
dei seguenti pulsanti.
Pulsante Spiegazione
PITCH
FILTER
ASSIGNABLE
2. Mentre suonate sulla tastiera spostate lentamente
le mani lungo il controller D Beam.
Il pulsante premuto nel punto 1 lampeggia.
3. Per spegnere il controller D Beam premete ancora
una volta il pulsante utilizzato nel punto 1 per
spegnerlo.
Spostando la mano sul controller D Beam si varia
l'intonazione dei suoni riprodotti.
Spostando la mano sul controller D Beam si varia
il carattere tonale dei suoni riprodotti.
* Per alcuni toni la dierenza di carattere
potrebbe essere dicilmente rilevabile.
Il controller D Beam trasmette la funzione assegnata
oppure il messaggio di modica del controllo.
Modica dell'impostazione di
ASSIGNABLE
Potete assegnare un numero di modica del controllo
MIDI (CC) oppure una funzione al pulsante [ASSIGNABLE],
quindi utilizzare il controller D Beam per controllare questo
parametro in tempo reale.
1. Tenete premuto il pulsante [SHIFT] e premete
[ASSIGNABLE].
La funzione correntemente assegnata lampeggia nello
schermo.
2. Continuate a tenere premuto il pulsante [SHIFT]
e utilizzate il pulsante [INC/+] / [DEC/–] (OCTAVE
[+] / [–]) per specicare la funzione o il parametro
desiderati, che saranno controllati dal controller
D Beam.
Schermo Valore Spiegazione
C 01
C 05
C 07
C 10
CC01
(MODULATION)
CC05
(PORTA TIME)
CC07 (VOLUME) Controlla il volume.
CC10 (PAN) Controlla il panning.
Applica le vibrazioni.
Controlla il tempo di portamento
in cui cambia l'intonazione tra le
note durante la riproduzione con
portamento.
12
Page 93

Schermo Valore Spiegazione
C 11
C 64
C 65
C 66
C 71
C 72
C 73
C 74
A Ft
A db
S Lo
CC11 (EXPRESSION) Controlla l'espressione.
CC64 (HOLD) Sostiene le note.
CC65
(PORTAMENTO)
CC66 (SOSTENUTO)
CC71 (RESONANCE)
CC72 (RELEASE TIME)
CC73 (ATTACK TIME)
CC74 (CUTOFF)
AFTERTOUCH
(impostazione
predenita)
ADLIB
SOLO SYNTH
Collega un modo uniforme l'intensità
tra le note.
Sostiene le note correntemente
trattenute.
Controlla la risonanza. Aumentando
la risonanza si produce un carattere
tonale specico, tipico dei
sintetizzatore.
Controlla il tempo dal rilascio della
nota no a quando la nota non
viene più avvertita (ad es., il tempo
di rilascio).
Controlla l'acutezza (velocità di
attacco) di inizio del suono.
Controlla il cuto. Valori più
elevati rendono il suono più duro
(squillante); valori inferiori rendono il
suono più morbido (pastoso).
Applica l'eetto più appropriato per
ciascun tono del Lucina AX-09.
Pizzicando una corda e spostando la
mano sul controller D Beam potete
produrre un arpeggio.
La distanza dal controller D Beam
determinerà la gamma di ottave di
esecuzione della corda e la velocità
con cui spostate la mano verso l'alto
e il basso imposta la velocità di
arpeggio della corda.
Ad esempio, utilizzando la mano
destra per riprodurre le quattro
note "Mi Fa Sol Si" e spostando la
sinistra sul controller D Beam potete
ottenere una frase del tipo "Mi Fa Sol
Si Mi Fa Sol Si Mi Fa Sol Si...".
Il Lucina AX-09 funziona come
sintetizzatore monofonico con
intensità controllata dallo spostamento
della mano sul controller D Beam.
MEMO
Tenete premuti i pulsanti [INC/+] / [DEC/–] per scegliere
rapidamente questa impostazione. Per velocizzare
ulteriormente la scelta tenete premuto il pulsante e
premete anche l'altro.
3. Rilasciate il pulsante [SHIFT].
4. Per salvare queste impostazioni tenete premuto il
pulsante [SHIFT] e premete il pulsante [WRITE].
Utilizzo di un pedale
Collegando un interruttore a pedale (serie DP venduta
a parte) al jack FOOT PEDAL potete tenere premuto il
pedale per riprodurre note continue anche dopo che avete
rilasciato il tasto.
Potete utilizzare il pedale anche per applicare diversi altri
eetti.
Connessione di un pedale
MEMO
Potete anche collegare un pedale d'espressione (EV-5)
invece di un interruttore a pedale (serie DP).
NOTA
Utilizzate solo il pedale d'espressione specicato
(EV-5, venduto a parte). Collegando altri tipi di pedale
d'espressione potreste causare il malfunzionamento
e/o danneggiare l'unità.
Specica dell'eetto assegnato al pedale
Tenete premuto il pulsante [SHIFT] e premete due volte il
pulsante [V-LINK]; lo schermo indica "
assegnare l'eetto applicato al pedale.
Al pedale potete assegnare le seguenti funzioni.
Per salvare queste impostazioni tenete premuto il pulsante
[SHIFT] e premete il pulsante [WRITE].
Schermo Valore Spiegazione
C 01
C 05
C 07
C 10
C 11
C 64
C 65
C 66
CC01 (MODULATION) Applica le vibrazioni.
Controlla il tempo di portamento
CC05 (PORTA TIME)
CC07 (VOLUME) Controlla il volume.
CC10 (PAN) Controlla il panning.
CC11 (EXPRESSION) Controlla l'espressione.
CC64 (HOLD) Sostiene le note.
CC65 (PORTAMENTO)
CC66 (SOSTENUTO)
in cui cambia l'intonazione tra le
note durante la riproduzione con
portamento.
Collega un modo uniforme
l'intensità tra le note.
Sostiene le note correntemente
trattenute.
" ed è possibile
P DL
Deutsch Français Italiano Español Português NederlandsEnglish
13
Page 94

Schermo Valore Spiegazione
C 71
C 72
C 73
C 74
A Ft
P UP
P Dn
CC71 (RESONANCE)
CC72
(RELEASE TIME)
CC73
(ATTACK TIME)
CC74 (CUTOFF)
AFTERTOUCH
PEDAL UP
PEDAL DOWN
Controlla la risonanza. Aumentando la
risonanza si produce un carattere tonale
specico, tipico dei sintetizzatore.
Controlla il tempo dal rilascio della nota
no a quando la nota non viene più
avvertita (ad es., il tempo di rilascio).
Controlla l'acutezza (velocità di
attacco) di inizio del suono.
Controlla il cuto. Valori più
elevati rendono il suono più duro
(squillante); valori inferiori rendono
il suono più morbido (pastoso).
Applica l'eetto più appropriato per
ciascun tono del Lucina AX-09.
Seleziona il tono del numero di tono
successivo.
Seleziona il tono del numero di tono
precedente.
Suonare insieme alla musica riprodotta da un lettore audio portatile
Potete collegare il vostro lettore audio portatile e suonare
il Lucina AX-09 sui vostri brani preferiti.
1. Collegate il vostro lettore audio portatile al jack
EXT IN del Lucina AX-09.
MEMO
In base alle impostazioni predenite di fabbrica, il
pedale è assegnato a C 64 (Hold).
Se utilizzate un pedale non Roland
Se utilizzate un pedale realizzato da un produttore non
Roland, la polarità potrebbe risultare inversa e quindi le
operazioni da eseguire quando si preme e si rilascia il
pedale sono l'opposto di quanto ci si attende. In questo
caso tenete premuto il pulsante [SHIFT] e premete 3
volte il pulsante [V-LINK] no a visualizzare "
schermo. Utilizzate quindi i pulsanti [INC/+] / [DEC/–]
(OCTAVE [+] / [–]) no a visualizzare "
Per salvare queste impostazioni tenete premuto il pulsante
[SHIFT] e premete il pulsante [WRITE].
Valore Spiegazione
S td (STANDARD)
r Eu (REVERSE)
Pedali realizzati da Roland
Pedali con polarità opposta a quella dei pedali Roland
r Eu
" sullo
P oL
" sullo schermo.
Evitare il cambio dei toni durante la prestazione (funzione Lock)
Potete bloccare il tono selezionato sul Lucina AX-09 per
evitare la selezione accidentale di un suono diverso se
inavvertitamente premete il pulsante di un tono durante
l'esibizione.
1. Tenete premuto il pulsante [LOCK] no a quando
si illumina.
Per collegare il vostro
lettore al jack EXT IN
utilizzate uno spinotto
stereo mini (1/8").
2. Rieseguite un brano sul vostro lettore audio
portatile e riproducetelo sul Lucina AX-09.
Per regolare il volume e selezionare i brani utilizzate i
controlli del lettore.
* Se utilizzate cavi di collegamento con resistori è
possibile che il livello del volume delle apparecchiature
connesse alle uscite (EXT IN) risulti basso. In tal caso
utilizzate cavi di collegamento privi di resistori.
Suonare insieme a un le
audio dalla memoria USB
Il Lucina AX-09 è in grado di riprodurre
le audio (MP3, WAV, AIFF) memorizzati
su una memoria USB dal vostro computer,
per consentirvi di suonare i vostri brani
preferiti.
Copia di le audio dal computer alla
memoria USB
È necessario copiare i le audio dal vostro computer al
livello root alla memoria USB.
Copia su un'unità USB
La funzione Lock si attiva per evitare il cambio del tono con
la pressione dei pulsanti.
Per riattivare il cambio dei toni tenete nuovamente
premuto il pulsante no a spegnere [LOCK].
14
MP3, WAV, AIFF
Page 95

File audio supportati
MP3
Formato MPEG-1 audio layer 3
Frequenza di
campionatura
Velocità
(bit rate)
WAV, AIFF
Frequenza di
campionatura
Velocità
(bit rate)
44,1 kHz
32/40/48/56/64/80/96/112/128/160/192/224/256/320 kbps,
VBR (Variable Bit Rate)
44,1 kHz
8/16/24 -bit
Inserimento della memoria USB
1. Inserite la memoria USB nello slot di memoria
USB MEMORY come mostrato nell'illustrazione
seguente.
NOTA
• Non inserite né rimuovete la memoria USB mentre
l'unità è accesa per non danneggiare i dati dell'unità o
della memoria USB.
• Inserite con attenzione la memoria USB spingendola
no in fondo, sino a quando è posizionata
correttamente.
• Utilizzate memorie USB prodotte da Roland. Roland
non garantisce il corretto funzionamento dell'unità con
altri prodotti.
Riproduzione dei le audio
1. Inserite nello slot USB MEMORY del Lucina AX-09
la memoria USB con i le audio copiati.
2. Premete il pulsante [AUDIO PLAYER].
Il pulsante [AUDIO PLAYER] si accende e il pulsante
] lampeggia. Ora potete riprodurre le audio dalla
[
memoria USB.
Premete un'altra volta il pulsante [AUDIO PLAYER] per
spegnerlo. Ora non sarà possibile riprodurre i le audio.
MEMO
Il pulsante [ ] non lampeggia quando la memoria
USB non è inserita o non contiene brani riproducibili.
3. Consente di selezionare un brano.
Quando tenete premuto il pulsante [AUDIO PLAYER]
lo schermo mostra i primi 3 caratteri del le audio
correntemente selezionato.
Continuate a tenere premuto il pulsante [AUDIO PLAYER]
e premete il pulsante [INC/+] per passare al brano
successivo, oppure premete il pulsante [DEC/–] per
passare all'inizio del brano; se siete già all'inizio del brano,
premendo il pulsante tornerete al brano precedente.
MEMO
I brani saranno ordinati in base al nome le con i
seguenti criteri: numeri, maiuscole e minuscole.
4. Riproducete o fermate il brano.
Quando premete il pulsante [ ] il pulsante che
lampeggiava si accende e viene riprodotto il le audio
selezionato.
Quando premete il pulsante [
riproduzione il pulsante acceso lampeggia e la
riproduzione si arresta.
Premete ancora una volta il pulsante [
riprendere la riproduzione dal punto in cui si è arrestata.
] durante la
] per
Cambio di brani durante la riproduzione
Nel corso della riproduzione, premendo il pulsante [AUDIO
PLAYER] e il pulsante [DEC/–] si interrompe la riproduzione
e si torna all'inizio del brano corrente. È anche possibile
premere il pulsante [INC/+] per passare all'inizio del brano
successivo e riprendere la riproduzione.
MEMO
Se tenete premuto il pulsante [AUDIO PLAYER] e
premete il pulsante [DEC/–] all'inizio del brano tornate
all'inizio del brano precedente.
Impostazione del lettore audio
1. Tenete premuto il pulsante [SHIFT] e il
pulsante [AUDIO PLAYER] per far lampeggiare
l'impostazione corrente del lettore audio nello
schermo.
2. Continuate a premere il pulsante [SHIFT] e
premete il pulsante [AUDIO PLAYER] ancora una
volta per navigare tra i parametri.
Dopo un breve intervallo appare il relativo valore:
continuate a tenere premuto il pulsante [SHIFT] e utilizzate
i pulsanti [INC/+] / [DEC/–] (OCTAVE [+] / [–]) per modicare
l'impostazione.
Parametro Valore Spiegazione
L uL
P LY
0–127
1 P (SINGLE PLAY ),
C P (CHAIN PLAY )
3. Per salvare queste impostazioni tenete premuto il
pulsante [SHIFT] e premete il pulsante [WRITE].
Livello del volume di riproduzione del
le audio
Consente di scegliere se arrestare
la riproduzione alla ne del brano
selezionato (SINGLE PLAY) o se
continuare a riprodurre il brano
successivo (CHAIN PLAY).
Deutsch Français Italiano Español Português NederlandsEnglish
15
Page 96

Modica delle impostazioni del tono
*1 I valori specicati in questo punto rappresentano una regolazione relativa
Modica dei parametri del tono
Potete modicare i parametri dei toni regolari, come
il volume e il riverbero, e salvare le impostazioni
personalizzate in una posizione FAVORITE della memoria
(pag. 10).
* Non è invece possibile modicare i parametri dei toni
speciali.
1. Selezionate i toni regolari di cui desiderate
modicare i parametri (pag. 9).
2. Tenete premuto il pulsante [SHIFT] e premete il
pulsante TONE del tono selezionato al punto 1
(ad es. il pulsante TONE illuminato).
Il nome del parametro (P S
quindi appare il relativo valore (oF F o o n ).
3. Continuate a tenere premuto il pulsante [SHIFT] e
premete lo stesso pulsante TONE ancora una volta
per navigare tra i parametri.
I parametri passano dalla parte superiore a quella inferiore
della colonna "Parametro" riportati nella seguente tabella.
* Mentre eettuate questa impostazione dovete tenere
premuto il pulsante [SHIFT].
Parametro Valore Spiegazione
P S
P tN
u oL
r Eu
r EL
A t
C Ut
r ES
OFF, ON
0–127
0–127
0–127
-64–63
-64–63
-64–63
-64–63
) lampeggia nello schermo e
Cambio del portamento
Il portamento è un eetto che consente
di passare da una nota alla successiva con
un'intonazione uniforme.
Tempo del portamento
Questo specica il tempo in cui cambia
l'intensità quando si utilizza il portamento.
Valori superiori prolungano il tempo in cui
l'intensità raggiunge la nota successiva.
Volume
Questo valore specica il volume del tono.
Reverb
Questo eetto aggiunge la riverberazione,
che è la caratteristica delle esibizioni in grandi
ambienti. Valori superiori producono una
riverberazione più profonda.
Tempo di rilascio (*1)
Questo parametro regola il tempo da quando
rilasciate il tasto no al momento in cui il
suono non è più avvertibile. Valori più elevati
producono un tempo di rilascio superiore.
Tempo di attacco (*1)
Questo regola la velocità a cui inizia la
riproduzione del suono. Valori più elevati
producono un attacco più morbido.
Cuto (*1)
Incrementando il valore del cuto il suono
diventa più duro (squillante); valori inferiori
rendono il suono più morbido (pastoso).
Utilizzate questo parametro per eettuare
regolazioni se il suono fosse poco nitido o
troppo squillante.
Resonance (*1)
Aumentando la risonanza si produce un carattere
tonale specico, tipico dei sintetizzatori. Per
enfatizzare l'eetto della risonanza è consigliabile
ridurre leggermente il cuto.
al valore assegnato da ciascun tono. Se questo valore è impostato su 0, il
parametro corrisponderà a quanto specicato nelle impostazioni del tono.
4. Quando appare il valore del parametro,
continuate a tenere premuto il pulsante [SHIFT] e
utilizzate i pulsanti [INC/+] / [DEC/–] (OCTAVE [+] /
[–]) per modicare l'impostazione.
MEMO
• Tenendo premuto il pulsante [INC/+] / [DEC/–] potete
modicare il valore più rapidamente. Per velocizzare
ulteriormente l'operazione tenete premuto il pulsante e
premete anche l'altro pulsante.
• Anche mentre modicate il valore potete suonare la
tastiera per vericare il risultato ottenuto.
5. Rilasciate il pulsante [SHIFT].
* Se selezionate un altro suono oppure spegnete l'alimen-
tazione del Lucina AX-09 in questa fase, le modiche
eettuate andranno perse. Per memorizzare le modiche
registratele in una posizione FAVORITE della memoria.
6. Premere il pulsante [WRITE].
Il pulsante [WRITE] illumina.
7. Premete il pulsante FAVORITE [A] o [B] per
selezionare un banco.
8. Premete uno dei pulsanti TONE [1]–[6] per
selezionare la posizione in memoria in cui
registrare le impostazioni.
Quando il pulsante [WRITE] si spegne, le impostazioni sono
state registrate.
16
Page 97

Regolazione dell'accordatura
Accordatura generale
Si tratta dell'impostazione generale di accordatura
per tutto il Lucina AX-09. L'impostazione predenita di
fabbrica è di 440 Hz. Il valore visualizzato corrisponde alla
frequenza del tasto A4 ("Do" medio).
Valore 415,3–466,2 Hz
1. Tenete premuto il pulsante [SHIFT] e premete il
pulsante [TRANSPOSE].
Lo schermo indica "N tn" e il valore corrente di Master
Tune lampeggia.
Lo schermo mostra solo le ultime 3 cifre (il numero iniziale
"4" viene omesso".
2. Continuate a tenere premuto il pulsante [SHIFT] e
utilizzate i pulsanti [INC/+] / [DEC/–] (OCTAVE [+] /
[–]) per regolare il valore di accordatura.
MEMO
• Tenendo premuto il pulsante [INC/+] / [DEC/–] potete
modicare il valore più rapidamente. Per velocizzare
ulteriormente l'operazione tenete premuto il pulsante e
premete anche l'altro pulsante.
• Anche mentre modicate il valore potete suonare la
tastiera per vericare il risultato ottenuto.
3. Rilasciate il pulsante [SHIFT].
4. Per salvare queste impostazioni tenete premuto il
pulsante [SHIFT] e premete il pulsante [WRITE].
Key Scale Tune
Per l'accordatura potete scegliere tra il temperamento
equabile e l'accordatura araba.
Valore Spiegazione
E QL (EQUAL)
A rB (ARABIC)
1. Tenete premuto il pulsante [SHIFT] e premete due
volte il pulsante [TRANSPOSE].
Lo schermo indica " E Y " e il valore corrente di Key Scale
Tune lampeggia.
2. Continuate a tenere premuto il pulsante [SHIFT] e
utilizzate i pulsanti [INC/+] / [DEC/–] (OCTAVE [+] /
[–]) per scegliere il valore desiderato per Key Scale
Tune.
MEMO
Anche mentre modicate il valore potete suonare la
tastiera per vericare il risultato ottenuto.
3. Rilasciate il pulsante [SHIFT].
4. Per salvare queste impostazioni tenete premuto il
pulsante [SHIFT] e premete il pulsante [WRITE].
Temperamento equabile
Accordatura araba
Deutsch Français Italiano Español Português NederlandsEnglish
Regolazione della sensibilità al tocco della tastiera
Impostazione di un valore sso per la
velocity della tastiera
Eseguite la procedura descritta qui di seguito per suonare
note con livello (velocità) uniforme, indipendentemente
dalla quantità di forza utilizzata per premere i tasti.
1. Tenete premuto il pulsante [SHIFT] e premete una
volta il pulsante [V-LINK].
Lo schermo indica "u EL" e riporta il valore
dell'impostazione corrente.
2. Continuate a tenere premuto il pulsante [SHIFT] e
utilizzate i pulsanti [INC/+] / [DEC/–] (OCTAVE [+] /
[–]) per modicare l'impostazione.
Valore Spiegazione
r AL (REAL)
1–127
Verranno emesse note che riettono la quantità eettiva
di forza utilizzata per premere i tasti.
Verranno emesse note che riettono la velocity
specicata, indipendentemente dalla quantità di forza
utilizzata per premere i tasti.
3. Rilasciate il pulsante [SHIFT].
4. Per salvare queste impostazioni tenete premuto il
pulsante [SHIFT] e premete il pulsante [WRITE].
17
Page 98

Conteggio per l'attacco / Metronomo
Il "Conteggio per l'attacco" è una caratteristica che
consente di eettuare automaticamente il conteggio
prima dell'attacco dell'esecuzione musicale. Per ottenere
un conteggio a due misure premete contemporaneamente
la barra di modulazione e il pulsante [PREVIEW].
Notate che, se preferite, potete scegliere il suono del
metronomo; basta semplicemente cambiare la modalità di
conteggio su
sotto riportata. Il metronomo continua a suonare no a
quando premete nuovamente il pulsante [PREVIEW].
* Quando il pulsante [AUDIO PLAYER] è acceso, il
conteggio non viene eettuato.
Ntr(METRONOME) utilizzando l'impostazione
Impostazioni del conteggio per l'attacco
1. Tenete premuto il pulsante [SHIFT] e il pulsante
[PREVIEW] per far lampeggiare l'impostazione
corrente del conteggio per l'attacco nello schermo.
2. Continuate a premere il pulsante [SHIFT] e
premete nuovamente il pulsante [PREVIEW] per
navigare tra i parametri.
Dopo un breve intervallo appare il relativo valore:
continuate a tenere premuto il pulsante [SHIFT] e utilizzate
i pulsanti [INC/+] / [DEC/–] (OCTAVE [+] / [–]) per modicare
l'impostazione.
Parametro Valore Spiegazione
o FF(OFF),
C nt
C in(COUNT IN),
N tr(ME TRONOME)
b PN
b At
L uL
t yP
20–250 Tempo del conteggio per l'attacco
0.4, 2.4, 3.4, 4.4, 5.4, 6.4, 7.4
0–10
1 (metronomo elettronico)
2 (metronomo meccanico)
3 (impulsi)
4 (bip)
5 (campanaccio)
6 (bastone)
Modalità del conteggio per
l'attacco
Determina se attivare il
conteggio per l'attacco o il
metronomo
Tempo del conteggio per l'attacco
(2.4 indica un tempo da 2/4)
Volume del conteggio per l'attacco
Suono emesso per il conteggio
per l'attacco
3. Per salvare queste impostazioni tenete premuto il
pulsante [SHIFT] e premete il pulsante [WRITE].
MEMO
Per visualizzare nello schermo il tempo del conteggio
per l'attacco tenete premuto il pulsante [PREVIEW].
Da questo punto potete impostare il nuovo temo
premendo il pulsante [SHIFT] almeno quattro volte
seguendo il tempo desiderato. Potete impostare questo
valore anche utilizzando i pulsanti [INC/+] e [DEC/-].
Impostazioni varie (Utility)
Controllo della versione del Lucina AX-09
Questa è la procedura da seguire per vericare la versione
del Lucina AX-09 utilizzata.
1. Tenete premuti contemporaneamente i pulsanti
FAVORITE [A], [B] e [WRITE] e accendete il Lucina
AX-09.
Lo schermo indica "U tL "; il Lucina AX-09 attiva la modalità
Utility.
2. Premete il pulsante TONE [1].
Lo schermo riporta la versione del Lucina AX-09 utilizzato.
Per continuare a suonare il Lucina AX-09 spegnete
l'alimentazione e attendete diversi secondi prima di
riaccenderlo.
Impostazioni del driver USB
Se utilizzate un cavo USB per il
collegamento del Lucina AX-09 al computer
potete scegliere e utilizzare il driver USB
standard fornito con il computer oppure il
driver USB fornito da Roland.
1. Tenete premuti contemporaneamente i pulsanti
2. Premete il pulsante TONE [2].
3. Utilizzare i pulsanti [INC/+] / [DEC/–] per
4. Premete il pulsante [WRITE] per salvare l'impostazione.
5. Spegnete l'alimentazione del Lucina AX-09 e
MEMO
Per informazioni sul collegamento del Lucina AX-09 al
vostro computer tramite porta USB consultate la sezione
"Connessione del computer tramite USB" (pag. 21).
FAVORITE [A], [B] e [WRITE] e accendete il Lucina
AX-09.
Lo schermo indica "U tL "; il Lucina AX-09 attiva la modalità
Utility.
Lo schermo indica "d ru"; a questo punto viene riportato il
valore corrente e il pulsante [WRITE] lampeggia.
selezionare l'impostazione desiderata.
Valore Spiegazione
G En (GENERIC)
(impostazione
predenita)
u nD ( VENDOR)
Scegliete questa impostazione se utilizzate il driver
USB standard fornito con il vostro computer.
Questa è l'impostazione utilizzata abitualmente.
Scegliete questa impostazione se utilizzate il driver
USB scaricato dal sito web Roland.
quindi riaccendetela.
Ora potrete utilizzare il driver USB da voi scelto.
18
Page 99

Registrazione delle impostazioni del Lucina AX-09 nella memoria USB
Ecco come eettuare il backup delle
impostazioni personalizzate del Lucina
AX-09 e delle impostazioni dei toni dalla
posizione FAVORITE (pag. 16) alla memoria
USB (venduta a parte).
1. Inserite la memoria USB nello slot USB MEMORY
(pag. 15).
2. Tenete premuti contemporaneamente i pulsanti
FAVORITE [A], [B] e [WRITE] e accendete il Lucina
AX-09.
Lo schermo indica "U tL "; il Lucina AX-09 attiva la modalità
Utility.
3. Premete il pulsante TONE [3].
Lo schermo riporta "b U p" e il pulsante [WRITE] lampeggia.
4. Premete il pulsante [WRITE].
Viene avviato il backup.
5. Quando lo schermo indica "Dn E ", spegnete e
riaccendete il Lucina AX-09.
MEMO
Se la memoria USB non è inserita nel Lucina AX-09,
quando premete il pulsante [WRITE] lo schermo indica
"E rr".
Ripristino delle impostazioni del Lucina AX-09 dalla memoria USB
Ecco come ripristinare nel Lucina
AX-09 le impostazioni salvate in base alla
procedura descritta in "Registrazione
delle impostazioni del Lucina AX-09 nella
memoria USB" (pag. 19).
1. Inserite la memoria USB con le impostazioni
salvate nello slot USB MEMORY (pag. 15).
2. Tenete premuti i pulsanti FAVORITE [A], [B] e
[WRITE] e accendete il Lucina AX-09.
Lo schermo indica "U tL "; il Lucina AX-09 attiva la modalità
Utility.
3. Premete il pulsante TONE [4].
Lo schermo riporta "r S t" e il pulsante [WRITE] lampeggia.
4. Premete il pulsante [WRITE].
Il pulsante [WRITE] si illumina e l'operazione di ripristino
viene avviata.
5. Quando lo schermo indica "Dn E ", spegnete e
riaccendete il Lucina AX-09.
MEMO
Se, quando premete il pulsante [WRITE], la memoria USB
non è inserita nel Lucina AX-09 o se esistono dati di backup
nella posizione appropriata della memoria USB, lo schermo
riporta "E r r".
Ripristino delle impostazioni di fabbrica (Factory Reset)
Ecco come riportare il Lucina AX-09 allo stato impostato
dal produttore.
NOTA
• Quando eettuate questa operazione, tutte le
impostazioni modicate dall'acquisto del Lucina AX-09,
incluse le impostazioni memorizzate in FAVORITES,
andranno perse.
• Per conservare le vostre impostazioni ricordate di
eettuare un backup su memoria USB prima di
procedere al ripristino dello stato originale.
"Registrazione delle impostazioni del Lucina AX-09 nella
memoria USB" (pag. 19).
1. Tenete premuti i pulsanti FAVORITE [A], [B] e
[WRITE] e accendete il Lucina AX-09.
Lo schermo indica "U tL "; il Lucina AX-09 attiva la modalità
Utility.
2. Premete il pulsante TONE [5].
Lo schermo riporta "F C t" e il pulsante [WRITE] lampeggia.
3. Premete il pulsante [WRITE].
Il pulsante [WRITE] si illumina e l'operazione di ripristino
viene avviata.
NOTA
Il ripristino avviene mentre il pulsante [WRITE] è
illuminato. Non spegnete mai l'unità durante questa
fase per evitare malfunzionamenti del Lucina AX-09.
4. Quando lo schermo indica "Dn E ", spegnete e
riaccendete il Lucina AX-09.
Deutsch Français Italiano Español Português NederlandsEnglish
19
Page 100

Connessione di altri dispositivi
*1 Il controllo locale è sempre attivo e non può essere disattivato. Per controllare
Controllo dei dispositivi MIDI
Se utilizzate il Lucina AX-09 senza altri dispositivi non è
necessario che disponiate di una conoscenza approfondita
della tecnologia MIDI. La seguente spiegazione della
tecnologia MIDI viene fornita per chi desidera collegare il
Lucina AX-09 ad altri dispositivi MIDI e controllarli.
MEMO
MIDI sta per "Musical Instrument Digital Interface" e
indica uno standard globale che consente lo scambio di
dati tra strumenti musicali elettronici e computer.
"Diagramma di implementazione MIDI" (pag. 26)
riepiloga in modo semplice i messaggi MIDI ricevibili
dal Lucina AX-09. Mettendo a confronto le tabelle di
implementazione MIDI del Lucina AX-09 e alcuni altri
dispositivi MIDI potete notare quali sono i messaggi
compatibili tra i due dispositivi.
un modulo di suono esterno collegato all'unità senza riprodurre i suoni del
Lucina AX-09 potete scollegare i jack OUTPUT del Lucina AX-09 oppure ridurre
il volume del Lucina AX-09 o dell'amplicatore o del mixer collegato.
*2 Non è possibile specicare dal Lucina AX-09 il numero di modica del
programma e i dati di selezione del banco (CC00, CC32) trasmessi, ma quando
si seleziona un tono interno, il numero di modica del programma e i dati
di selezione del banco (CC00, CC32; consultate la sezione "Elenco dei toni"
alla ne di questo manuale) relativi al tono vengono trasmessi in base alle
impostazioni MIDI (pag. 20).
Connessione del modulo di suono MIDI
1. Utilizzate un cavo MIDI per collegare il connettore
MIDI OUT del Lucina AX-09 al connettore del
modulo di suono MIDI che desiderate controllare.
Modulo audio MIDI
Messaggi MIDI trasmissibili e ricevibili
Il Lucina AX-09 può trasmettere e ricevere i seguenti
messaggi MIDI.
MEMO
Il Lucina AX-09 riceve sempre messaggi MIDI dal
connettore USB COMPUTER.
Messaggio MIDI Spiegazione
Nota attiva/inattiva
(*1)
Velocità Trasmissione Forza esercitata sul tasto
Aftertouch
Cambio
programma
Selezione del
banco (*2)
Modulazione CC01, trasmissione: MODULATION BAR
CC01
(modulazione)
CC05
(Porta-tempo)
CC07 (Volume)
CC10 (Panpot)
CC11 (Espressione)
CC64 (Tenuta)
CC65 (Porta-Sw)
CC66 (Sostenuto)
CC71 (Risonanza)
CC72
(tempo di rilascio)
CC73
(tempo di attacco)
CC74 (Cuto)
Trasmissione Messaggi tasto attivo/inattivo
Messaggi aftertouch di canale trasmessi
Trasmissione
Ricezione
Trasmissione
Trasmissione Non specicabile dal Lucina AX-09
Trasmissione
dal pulsante D Beam [ASSIGNABLE]
assegnato a "
(questo messaggio non è trasmesso dalla
tastiera).
Aftertouch del canale e aftertouch
polifonico.
Non specicabile dal Lucina AX-09
Numero di modica del controllo
assegnato al pulsante D Beam
[ASSIGNABLE] o a PEDAL.
" oppure da PEDAL
A Ft
Connettore MIDI IN
In base alle vostre esigenze, collegate un amplicatore
o degli altoparlanti al modulo di suono MIDI o al
sintetizzatore che state utilizzando. Per informazioni
dettagliate consultate il manuale dell'utente del modulo di
suono (o dell'eventuale altro dispositivo) in uso.
Impostazioni relative al MIDI
1. Tenete premuto il pulsante [SHIFT] e premete il
pulsante [V-LINK] un numero appropriato di volte
per accedere all'impostazione MIDI desiderata:
4 volte per "
per "
2. Continuate a tenere premuto il pulsante [SHIFT] e
utilizzate i pulsanti [INC/+] / [DEC/–] (OCTAVE [+] /
[–]) per modicare l'impostazione.
Parametro Valore Spiegazione
C h
B n
P C
3. Rilasciate il pulsante [SHIFT].
4. Per salvare queste impostazioni tenete premuto il
pulsante [SHIFT] e premete il pulsante [WRITE].
C h", 5 volte per "B n " oppure 6 volte
P C".
1–16
(Impostazione
predenita: 1)
OFF, ON
(impostazione
predenita: OFF)
OFF, ON
(Impostazione
predenita: ON)
Impostazioni del canale MIDI
Specica se trasmettere MSB/LSB
Specica se trasmettere i dati del
cambiamento del programma
20
 Loading...