

Page 1
r®
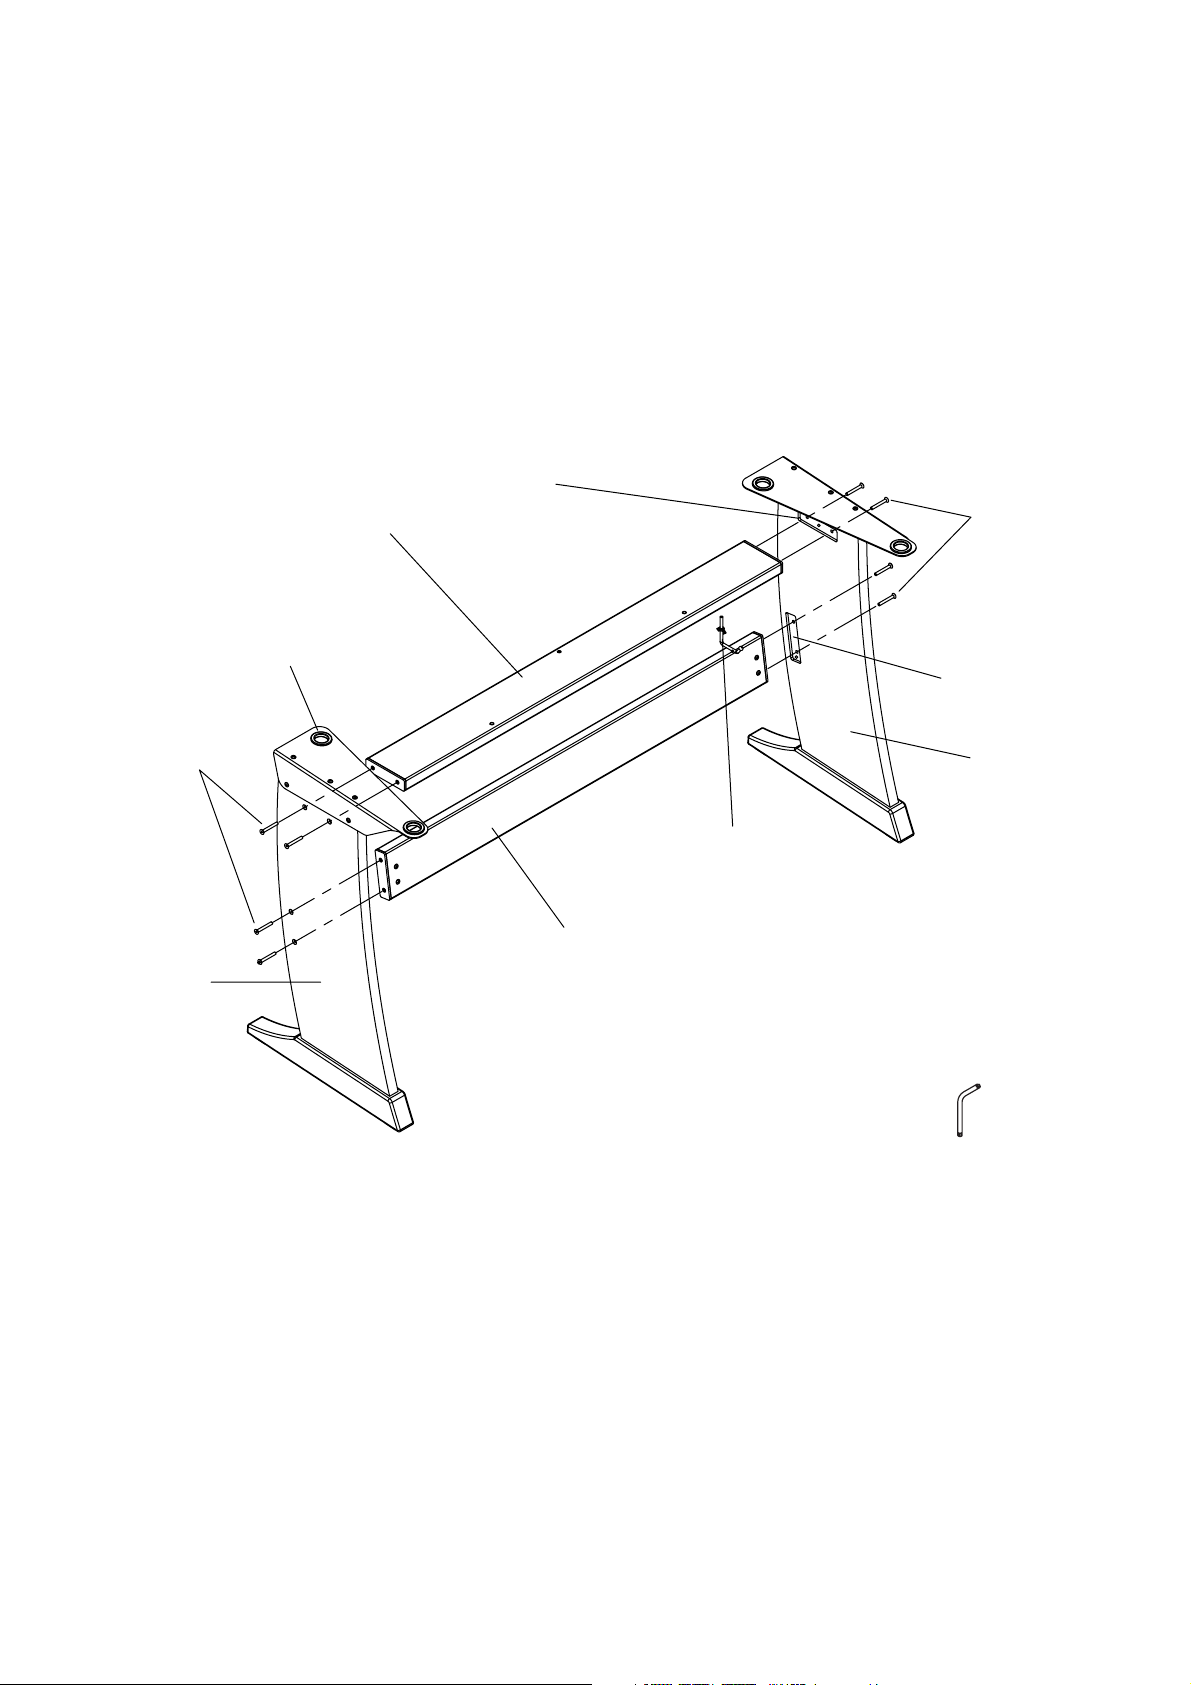
KS E-80 Keyboard Stand
[b2]
[A]
[H]
[F]
[b1]
[F]
[E]
[D]
[C]
[B]
[G]
RES 551-06 602.00.0177 E/D/F/It/Sp/Ol
Page 2
KS E-80
KS E-80 Stand (English)
Thank you for purchasing a KS E-80 stand for your Roland E-80 Music Workstation.
To assemble the KS E-80 stand, two persons
are required. Do not try to do it by yourself
but ask someone to help you.
While assembling the stand or removing
screws, be sure to put them in a safe place
out of children's reach, so there is no chance
of them being swallowed accidentally.
Supplied items
[A]
Horizontal slat 1
[B]
Right side panel 1
[C]
Left side panel 1
[D]
Cross slat 1
[E]
Headphone hook 1
[F]
M5x40 screws 8
[G]
Hexagonal wrench (3mm) 1
[H]
Rubber protection ring 2
KS E-80 Ständer (Deutsch)
Vielen Dank für Ihre Entscheidung zu einem KS E-80
Ständer für die E-80 Music Workstation von Roland.
Der Zusammenbau des KS E-80 Ständers
sollte von zwei Personen vorgenommen
werden. Versuchen Sie es niemals alleine.
Bitten Sie jemanden, Ihnen dabei zu helfen.
Wenn Sie Schrauben anbringen oder lösen,
müssen Sie sie an einem sicheren Ort –außerhalb der Reichweite von Kindern– verwahren, damit niemand sie verlegt bzw.
verschluckt.
Lieferumfang
[A]
Horizontale Platte 1
[B]
Rechtes Seitenteil 1
[C]
Linkes Seitenteil 1
[D]
Querleiste 1
[E]
Kopfhörerhaken 1
[F]
M5x40-Schrauben 8
[G]
Inbusschlüssel (3mm) 1
[H]
Gummischutzringe 2
Assembly procedure:
1. Hold the right side panel
bly sockets and the metal keyboard support facing
your body (see the illustration).
2. Hold the cross slat
you, and slide it onto the lower assembly socket (b1).
3. Secure the cross slat
screws
use the hexagonal wrench
4. Hold the horizontal slat
three drilling holes form an upward pointing triangle (see the illustration) and slide it onto the upper
assembly socket (b2).
5. Secure the horizontal slat
screws
wrench
6. Carefully slide the left side panel
ends of the horizontal
cure them using two screws
7. Tighten all screws
8. Attach the headphone hook [E] to the horizontal slat
[A] using its wing nut. Use the drilling hole on the
right side.
9. Put the instrument onto the stand, taking care to insert its feet into the four big holes (the ones with the
rubber protection rings).
Be sure to keep the two spare rubber protection rings
[H] in a safe place, and use them if one of the pre-in-
stalled rings is damaged.
[F]
you insert into the right side panel, then
[F]
, and tighten them with the hexagonal
[G]
.
[B]
upright with the assem-
[D]
with the four screws facing
[D]
to the socket using two
[G]
to tighten the screws.
[A]
in such a way that the
[A]
to the socket using two
[C]
onto the loose
[A]
and cross
[F]
[F]
using the hexagonal wrench
each.
[D]
slats, and se-
[G]
Zusammenbau:
1. Halten Sie das rechte Seitenteil
terungen und die Metallstütze müssen zu Ihnen hin
weisen (siehe die Abbildung).
2. Halten Sie die Querleiste
ben zu Ihnen hin weisen und schieben Sie sie in die
untere Halterung (b1).
3. Befestigen Sie die Querleiste
[F]
, die Sie durch das rechte Seitenteil hindurchführen, an der Halterung. Drehen Sie die Schrauben anschließend mit dem Inbusschlüssel
4. Halten Sie die horizontale Platte
Bohrungen ein nach oben weisendes Dreieck bilden
(siehe die Abbildung) und schieben Sie sie in die
obere Halterung (b2).
5. Befestigen Sie die horizontale Platte
Schrauben
die Schrauben mit dem Inbusschlüssel
6. Schieben Sie das linke Seitenteil
.
offenen Enden der horizontalen Platte
leiste
7. Drehen Sie alle Schrauben
[G]
fest.
8. Befestigen Sie den Kopfhörerhaken
gelmutter an der horizontalen Platte
die Bohrung an der rechten Seite.
9. Stellen Sie das Instrument auf die Ständereinheit.
Achten Sie darauf, dass sich seine Füße in den vier
großen Öffnungen (mit den Gummischutzringen)
befinden.
Bewahren Sie die beiden Reserveringe
sicheren Ort auf und verwenden Sie sie, wenn einer
der vorinstallierten Ringe beschädigt ist.
[F]
an der Halterung und drehen Sie sie
[D]
. Arretieren Sie sie mit je zwei Schrauben
[B]
aufrecht. Die Hal-
[D]
so, dass die vier Schrau-
[D]
mit zwei Schrauben
[G]
fest.
[A]
so, dass die drei
[A]
mit zwei
[G]
fest.
[C]
behutsam auf die
[A]
und Quer-
[F]
mit dem Inbusschlüssel
[E]
mit seiner Flü-
[A]
. Wählen Sie
[H]
an einem
[F]
.
Page 3

KS E-80
Pied KS E-80 (Français)
Nous vous remercions d’avoir acheté un pied KS E-80
pour votre clavier Roland E-80 Music Workstation.
Pour monter le pied KS E-80, il faut deux
personnes. N’essayez pas de le monter seul;
demandez de l’aide à quelqu’un.
Lors de l’assemblage du pied ou quand vous
devez retirer des vis, gardez-les en lieu sûr
et hors de portée des enfants, pour éviter
que ces derniers ne les avalent accidentellement.
Éléments fournis
[A]
Latte horizontale 1
[B]
Panneau latéral droit 1
[C]
Panneau latéral gauche 1
[D]
Latte transversale 1
[E]
Crochet pour casque 1
[F]
Vis M5x40 8
[G]
Clé hexagonale (3mm) 1
[H]
Anneau de protection en caoutchouc 2
Supporto KS E-80 (Italiano)
Grazie per aver acquistato il supporto KS E-80 per la vostra Workstation Roland E-80.
Per montare il KS E-80 servono due persone.
Non cercate di montarlo da soli, chiedete a
qualcuno di aiutarvi.
Quando montate il supporto o togliete le viti, assicuratevi di mettere queste ultime in
un posto che sia al di fuori della portata dei
bambini, in modo che non possano ingoiarle
accidentalmente.
Elementi in dotazione
[A]
Staffa orizzontale 1
[B]
Pannello laterale destro 1
[C]
Pannello laterale sinistro 1
[D]
Staffa trasversale 1
[E]
Gancio per la cuffia 1
[F]
Viti M5x40 8
[G]
Chiave esagonale (3mm) 1
[H]
Anelli di protezione in gomma 2
Procédure d’assemblage:
1. Maintenez le panneau latéral droit
orientant les découpes de montage et le support métallique du clavier vers vous (voyez l’illustration).
2. Maintenez la latte transversale
vers vous et insérez-la dans la découpe d’assemblage inférieure (b1).
3. Fixez la latte transversale
deux vis
Serrez-les avec la clé hexagonale
4. Maintenez la latte horizontale
les orifices forment un triangle pointant vers le haut
(voyez l’illustration) et insérez-la dans la découpe de
montage supérieure (b2).
5. Fixez la latte horizontale
deux vis
6. Amenez prudemment le panneau latéral gauche
sur les extrémités des lattes horizontale
versale
7. Serrez toutes les vis
8. Attachez le crochet du casque [E] à la latte horizontale
[A] avec son papillon. Utilisez l’orifice situé du côté
droit.
9. Placez l’instrument sur le pied en veillant à insérer
ses pieds dans les quatre grands orifices (protégés
par des anneaux en caoutchouc).
Conservez les anneaux en caoutchouc de réserve [H]
dans un endroit sûr pour pouvoir remplacer un anneau préinstallé si nécessaire.
[F]
que vous insérez dans le panneau droit.
[F]
et serrez-les avec la clé hexagonale
[D]
et fixez-les avec deux vis
[D]
dans la découpe avec
[A]
dans la découpe avec
[F]
avec la clé hexagonale
[B]
vertical en
[D]
avec les quatre vis
[G]
.
[A]
de façon à ce que
[A]
et trans-
[F]
chacune.
[G]
[G]
Procedura di montaggio:
1. Tenete il pannello laterale destro
ticale con i fori di assemblaggio e il supporto metallico per la tastiera rivolto verso di voi (vedi
illustrazione).
2. Tenete la staffa trasversale
volte verso di voi, posizionandola nella sede più bassa con i due fori di fissaggio (b1).
3. Fissate la staffa trasversale
avrete infilato dal lato esterno della fiancata destra,
poi usate la chiave esagonale
4. Tenete la staffa orizzontale
fori formino un triangolo con il vertice rivolto verso
l’alto (vedi illustrazione) e infilatela posizionandola
nella sede con i due fori di fissaggio superiori (b2).
.
[C]
.
5. Con due viti
esterno della fiancata destra, e stringete le viti con la
chiave esagonale
6. Con cura, mettete la fiancata laterale sinistra
rendo le estremità libere delle staffe orizzontale
trasversale
due viti
7. Stringete tutte le viti
8. Avvitare il gancio per la cuffia
tale
[A]
che trovate nella parte inferiore destra.
9. Mettete lo strumento sul supporto facendo attenzione ad infilarne i piedini nei quattro fori appositi
(quelli con gli anelli di protezione in gomma).
Ricordate di conservare i due anelli di gomma di riserva
degli anelli già installato dovesse danneggiarsi.
[F]
, fissate la staffa orizzontale dal lato
[G]
.
[D]
nelle rispettive sedi, e fissatela usando
[F]
per ogni staffa.
[F]
con la chiave esagonale
e serrare con il dado a farfalla. Usate il foro
[H]
in un posto sicuro, che potrete usare se uno
[B]
in posizione ver-
[D]
con le quattro viti ri-
[D]
con due viti
[G]
per stringere le viti.
[A]
in modo tale che i tre
[C]
[E]
alla staffa orizzon-
[F]
che
inse-
[A]
[G]
e
.
Page 4

KS E-80
KS E-80 Soporte (Español)
Gracias por adquirir un soporte KS E-80 para la
workstation musical E-80 de Roland.
Para instalar el soporte KS E-80, se necesitan
dos personas. No intente hacerlo solo, pida
ayuda a alguien.
Mientras instale el soporte o extraiga los
tornillos, asegúrese de ponerlos en un lugar
seguro fuera del alcance de los niños, para
que no puedan tragárselos por accidente.
Elementos incluidos
[A] Listón horizontal 1
[B] Panel lateral derecho 1
[C] Panel lateral izquierdo 1
[D] Listón transversal 1
[E] Gancho para auriculares 1
[F] Tornillos M5x40 8
[G] Llave hexagonal (3 mm) 1
[H] Aro protector de goma 2
Procedimiento de instalación:
1. Mantenga el panel lateral derecho
vertical con los zócalos de instalación y el soporte del
teclado de metal hacia usted (consulte la ilustración).
2. Mantenga el listón transversal
tornillos hacia usted, y encájelo en el zócalo de
instalación inferior (b1).
3. Ponga el listón transversal
dos tornillos
derecho. A continuación, utilice la llave hexagonal
[G]
para fijar los tornillos.
4. Mantenga el listón horizontal
tres orificios perforados formen un triángulo
apuntando hacia arriba (consulte la ilustración) y
encájelo en el zócalo de instalación superior (b2).
5. Coloque el listón horizontal
utilizando dos tornillos
hexagonal
6. Encaje el panel lateral izquierdo con cuidado
los extremos que aún no se han fijado de los listones
horizontal [A] y transversal [D], y fíjelos utilizando dos
tornillos [F] para cada uno.
7. Fije todos los tornillos [F] utilizando la llave
hexagonal [G].
8. Coloque el gancho para los auriculares [E] en el listón
horizontal [A] utilizando su palomilla. Utilice el
orificio perforado de la parte derecha.
9. Coloque el instrumento en el soporte, procurando
insertar los pies en los cuatro orificios más grandes
(los que incluyen los aros protectores de goma).
Asegúrese de guardar los dos aros protectores de
goma adicionales [H] en un lugar seguro, y utilícelos
si se daña alguno de los aros preinstalados.
[F]
que insertará en el panel lateral
[G]
.
[D]
en el zócalo utilizando
[F]
, y fíjelos con la llave
[B]
en posición
[D]
con los cuatro
[A]
de forma que los
[A]
en el zócalo
[C] en
KS E-80 stand (Nederlands)
Bedankt voor uw aankoop van een KS E-80 stand voor
uw Roland E-80 Music Workstation van Roland.
De KS E-80 stand moet door minstens twee
personen geassembleerd worden. Probeer
dit nooit alleen te doen: vraag iemand om u
hierbij te helpen.
Als u ooit schroeven moet verwijderen, legt
u ze het best op een veilige plaats (buiten het
bereik van kinderen). Zo is het vrijwel onmogelijk dat kleine kinderen ze inslikken.
Geleverde accessoires
[A] Horizontale lat 1
[B] Rechter zijpaneel 1
[C] Linker zijpaneel 1
[D] Dwarslat 1
[E] Hoofdtelefoonhaak 1
[F] M5x40-schroeven 8
[G] Inbussleutel (3mm) 1
[H] Rubberen beschermingsring 2
Werkwijze voor de assemblage:
1. Houd het rechter zijpaneel [B] recht. De assemblage-
vakken en de metalen keyboardsteun moeten naar
uw lichaam wijzen (zie de afbeelding).
2. Houd de dwarslat [D] zo dat de vier schroeven naar u
wijzen en schuif de lat in het onderste assemblagevak (b1).
3. Bevestig de dwarslat [D] met behulp van twee schroeven [F], die u in het rechter zijpaneel schuift, aan de
houder en draai de schroeven met de inbussleutel [G]
vast.
4. Houd de horizontale lat [A] op zo’n manier dat de
drie boorgaten een opwaarts wijzende driehoek vormen (zie de afbeelding). Schuif hem vervolgens in
het bovenste assemblagevak (b2).
5. Bevestig de horizontale lat [A] met twee schroeven [F]
aan de houder en draai ze met de inbussleutel [G]
vast.
6. Schuif het linker paneel [C] in de open houders van
de horizontale [A] en dwarslat [D] en bevestig beide
met telkens twee schroeven [F].
7. Draai alle schroeven [F] stevig vast met de inbussleutel [G].
8. Bevestig de hoofdtelefoonhaak [E] met behulp van
zijn vleugelmoer aan de horizontale lat [A]. Kies hiervoor het boorgat aan de rechterkant.
9. Leg het instrument op de stand. De poten moeten
zich in de vier grote gaten (met de rubberen beschermingsringen) bevinden.
Bewaar de bijgeleverde rubberen beschermingsringen [H] op een veilige plaats en gebruik ze, als één
van de voorgeïnstalleerde ringen het begeeft.
R
 Loading...