

Page 1
Record a song using Roland’s versatile JUNO-G —
the “all-in-one” synth that gives you a synth, rhythm
machine, eect unit, sequencer, recorder,
and mixer in one package!
Page 2

S
.
g
day, b
h.
T
T
d!
hat it means to create a son
g.
Play the piano. Create drum grooves. Wail away on the guitar.
ing your heart out
Put all of this into a “song.”
Creatin
I’m going to create a song to
he Roland JUNO-G is an excellent keyboard for live performance,
ut it also has sophisticated recording features that rival studio equipment.
his book will lead you through the process of using the Roland JUNO-G
o create a song, and then turning your song into a CD.
a song is like magic.
ecause there’s someone I want to reac
et’s get starte
Page 3
n
tents
T
fe
d
k
bass
l
g
D
G
.
-
g.
-
.
ecord it on an audio track.
.
.
P. 4
P. 6
P. 8
P. 10
P. 12
he JUNO-G will change your
ical li
Get your equipment together
Get ready to recor
Create a rhythm trac
ecord your piano performance
rd the
ntroducing the features of the JUNO-G
heck the equipment you’ll need for
ecording on the JUNO-G.
lear the demo song and make prepara
tions for recording a new son
se the rhythm pattern-function to cre
te a track as if you were using a rhythm
achine
se realtime recording to record the
iano performance you play on the
eyboard.
se step recording to step-record the
P. 14
P. 16
P. 18
P. 20
P. 22
P. 27
ecord your guitar playing
ecord a voca
Mix your son
Make your song into a C
Main speci cations of the JUNO-
onnect your guitar to the JUNO-G
nd r
ecord your vocal on an audio track.
se the JUNO-G’s mixer and e ects
to add nishing touches to your
ong
ave your song, transfer the WAV le to
your computer, and burn it to a CD
ntroduces the main speci cations
the JUNO-G.
Page 4
The JUNO-G will change your musical life
A synth you
can carry
At a mere 6.2 kg (13 lbs. 11
oz.), this is one of the lightest
61-key synthesizers available.
You can easily carry it to live
performances or to the studio.
If you’ve been using the equipment provided by the studio
because your own synth is too
heavy to carry, it’s time for a
change. With the JUNO-G, you
can take it anywhere.
Your very own studio
The JUNO-G gives you all the equipment you need for
music production. The multi-e ect unit provides 78 e ect
types that cover all your instrumental or studio needs.
There’s rhythm machine-like functionality for creating
and playing rhythm patterns, so you can start grooving
immediately. The “song recorder” gives you step-recording capability as well as realtime-recording that’s as easy
as using a multi-track tape recorder, letting you create an
entire song — complete with vocals! — on just the JUNOG without needing any other equipment. The instant you
get your hands on the JUNO-G, you’ve got your own very
powerful studio.
Page 5
A whole world of instruments
The JUNO-G is powered by a high-quality synth engine. It contains
1,024 di erent sounds, ranging from standards such as piano, electric piano, organ, and strings, to unusual ethnic instruments and rare
large instruments. There are also 45 drum sets, letting you generate
beats of any style. With the JUNO-G, a whole world of musical instruments is at your ngertips.
IntroIntro
Computer
connection
The JUNO-G’s USB connector gives
you a single-cable connection to your
computer, allowing you to transfer
song data that you created on the
JUNO-G. After transferring the data
to your computer, you can use it to
easily burn your own CD. The “JUNO-G
Editor” software that’s included with
the JUNO-G lets you edit the JUNO-G’s
sounds on the screen of your computer, further expanding the potential
of this versatile instrument.
Page 6
J
y
y.
-
.
y
J
.
Get your equipment together
for recording on the JUNO-G
The JUNO-G is a powerful synthesizer that lets you create a full- edged song simply by step-recording with its built-in synth sounds.
ut the JUNO-G doesn’t stop there — it’s also a powerful audio recorder that lets you edit, process, and mix your songs like a pro.
et’s check that we have the equipment needed for recording.
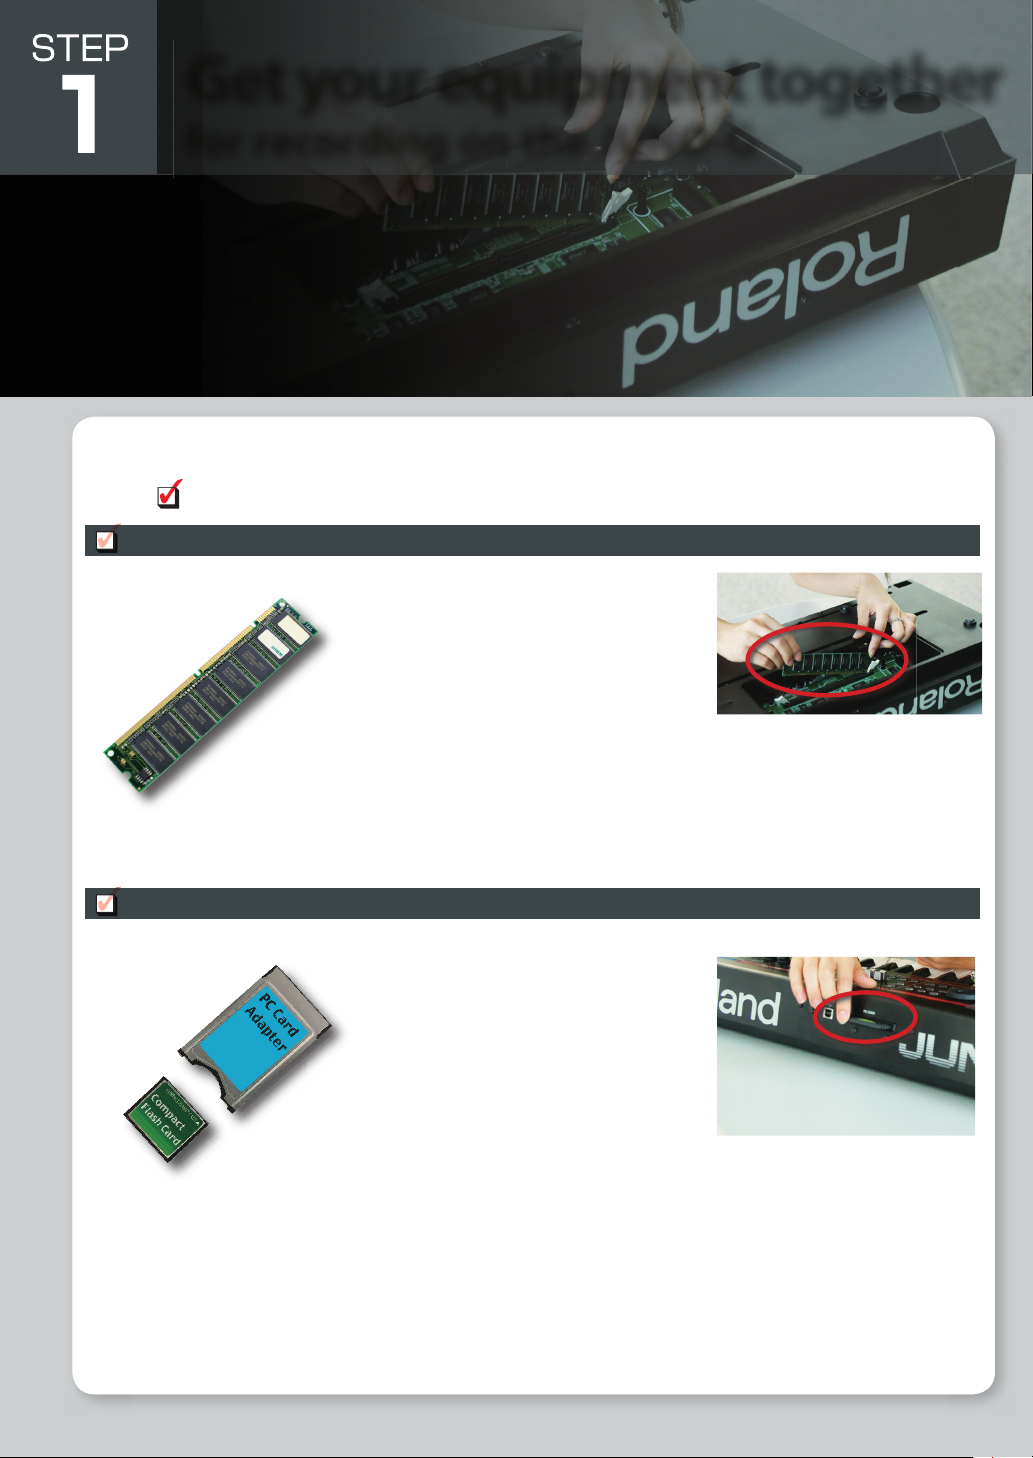
Memory (DIMM)
When you connect your guitar or mic to the
UNO-G and record, your performance is captured
as audio data in this memory. The more memory
ou’ve installed, the longer recording time will be
available.
The JUNO-G lets you install up to 512 Mbytes of
emory (DIMM). (For details, refer to
DVICE”on the next page.)
Memory is easily damaged by static electricity
from your hand, so handle it with care. When you
nstall memory, read and observe the manual
carefull
For details, refer to “Expanding the Memory” (p. 176) in the owner’s manual.
☞
CompactFlash and PC card adaptor
The content that you record into memory will
e lost when you turn o the power. In order to
reserve your song data, you’ll need a Compact
Flash card. When you’re ready to send a nished
song to your computer, you’ll also write the data
o a CompactFlash card and then copy it from the
card into your computer
The JUNO-G can use CompactFlash cards up to 1
Gbyte in size. It’s a good idea to get a CompactFlash card that’s larger than the size of memor
DIMM) you’re using.
To use a CompactFlash card, you insert it in a PC
card adaptor and then insert the adaptor into the
PC CARD” slot located on the rear panel of the
UNO-G
A NOTE OF
Page 7

Computer
.
Th
.
-
e
s
s
)
s
y
!
ost of today’s computers are able to burn a CD. If your computer can’t, you may be able
to attach an external CD burner. Check the owner’s manual that came with your computer.
Intro
USB cable
CD-R
Mic
Headphones
ou’ll need this in order to connect the JUNO-G to your computer. There are several types
f USB cable, but you need the “AB type.” The “A” type connector goes to your computer,
nd the “B” type connector goes to the JUNO-G. Make sure you have the right kind of
able
is is a blank CD. These days you can even buy them at convenience stores.
ou’ll need this if you want to record vocals, or if you’ll be recording an instrument via a
mic. The type of microphone called a “dynamic” mic is the type that can be connected
irectly to the JUNO-G
(The photo shows a Roland “DR-50” dynamic mic.)
If you’re recording via a mic, you should use a “sealed” or “in-ear” sealed-type of head
ones that does not allow sound to escape outside.
(The photo shows Roland “RH-300” sealed-type monitoring headphones.)
ment
ration
Rhythm Piano Bass Guitar Vocal Mixing CD Spec
Equip-
Prepa-
F
A
O
D
E
T
O
N
A
With 256 Mbytes of memory, the JUNO-G’s four stereo audio tracks would ll up the memory in just six minutes. We recommend that
ou go for 512 Mbytes, so you’ll be able to record a song more than ten minutes long even when using all tracks in stereo
V
I
C
E
512 Mbytes is the recommended size of memory (DIMM)!
The JUNO-G can accept 64, 128, 256, or 512 Mbytes of memory (DIMM). The following table shows the
ecording times available with each amount of memory.
emory (DIMM) siz
128 Mbyte
56 Mbyte
12 Mbyte
ecording time *Total of all tracks
rox. 25 minutes mono (12 minutes stereo)
rox. 50 minutes mono (25 minutes stereo
pprox. 100 minutes mono (50 minutes stereo)
Page 8
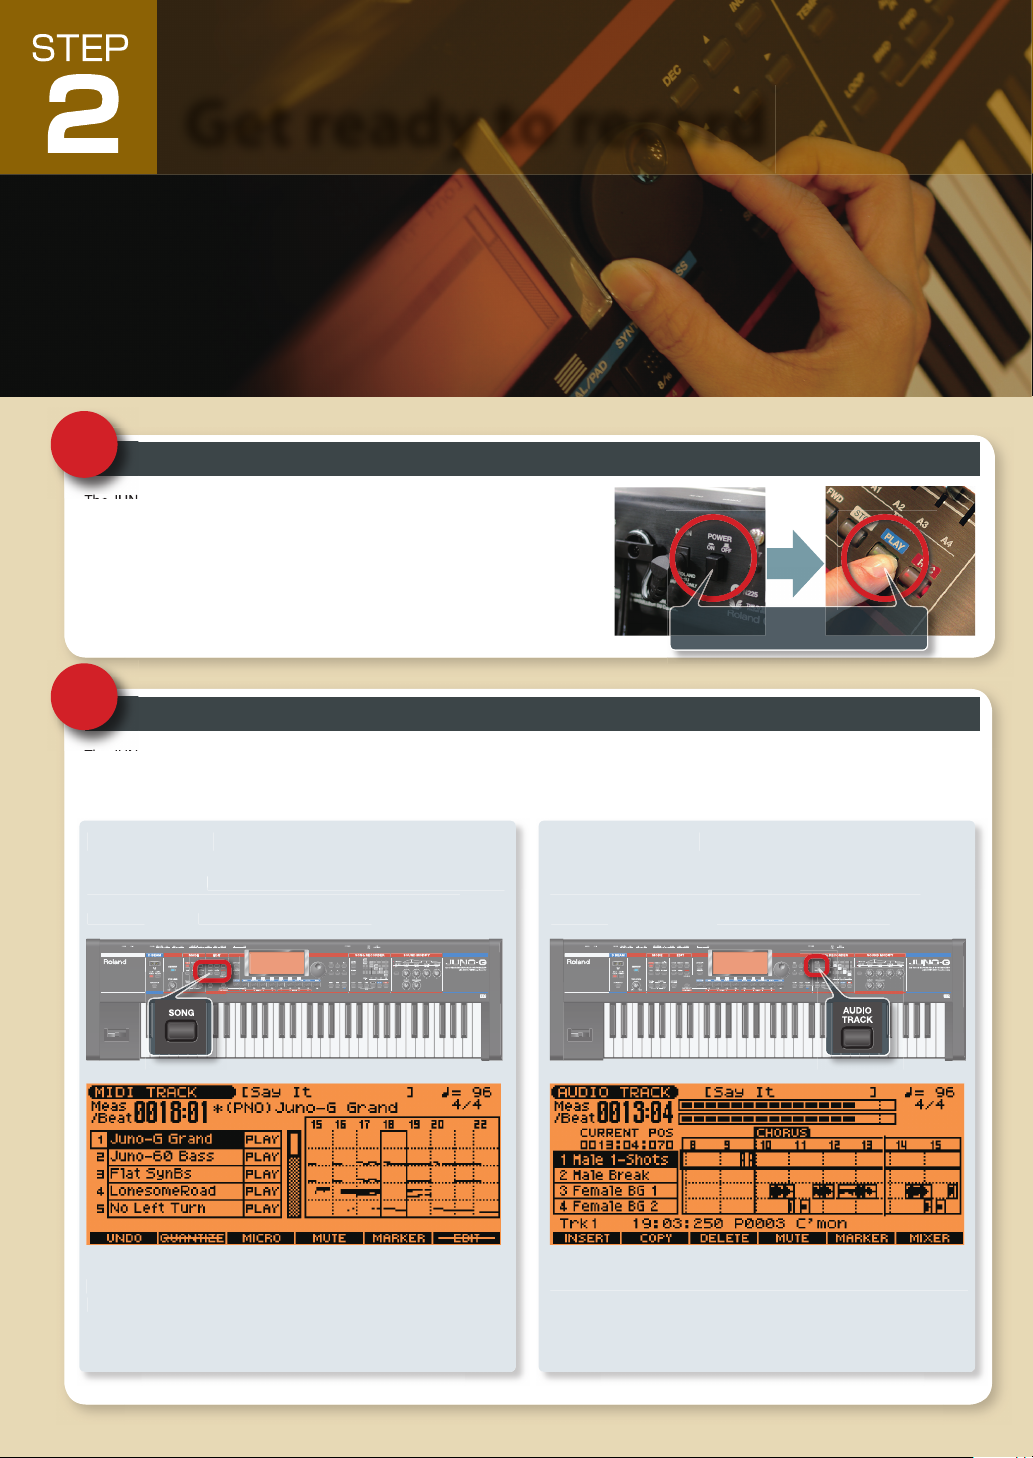
The JUNO-G contains a demo song that you can use as a model for your own
]
button to hear the demo. Be careful of the volume.
The JUNO-G has a function called the “song recorder.” The song recorder contains
acks”
Get ready to record
acks
ess the
button to see these tracks.
s
acks
.
ess the
]
button to see these tracks.
acks.
1
2
Listen to the demo song
roductions. It’s an example of what a pro musician can do with the JUNO-G.
et’s start by listening to this demo song.
Turn on the JUNO-G’s power, wait for it to start up, and then simply press the
PLAY
Take a look at the song recorder
e JUNO-G’s own sounds, and
ecorder. Let’s take a look at these two types of tracks.
audio tracks” that let you record sounds from a connected mic etc., just as though you were using an audio
MIDI tracks
The“MIDI tr
data that plays the JUNO-G’s synthesizer sound generator.
r
” record the note data and other performance
SONG]
Turn on the power, and press the
[PLAY] button.
“MIDI tr
that let you record note data that will play
AUDIO track
Audio tr
rom a mic or other audio source connected to the JUNO-G
Pr
”are the other type of track; they record actual “sound”
AUDIO TRACK
The instrumental parts of the demo song are all recorded on
hese MIDI tracks. The screen makes it easy to see which instru-
ent is assigned to each of the 16 tracks.
The vocal parts of the demo song are recorded on the audio
racks. Notice that the audio waveforms are shown on the four
r
Page 9
t.
.
]
button.
Th
-
.
ess the
button to access the basic screen o
-
.
d
g.
3 4
.
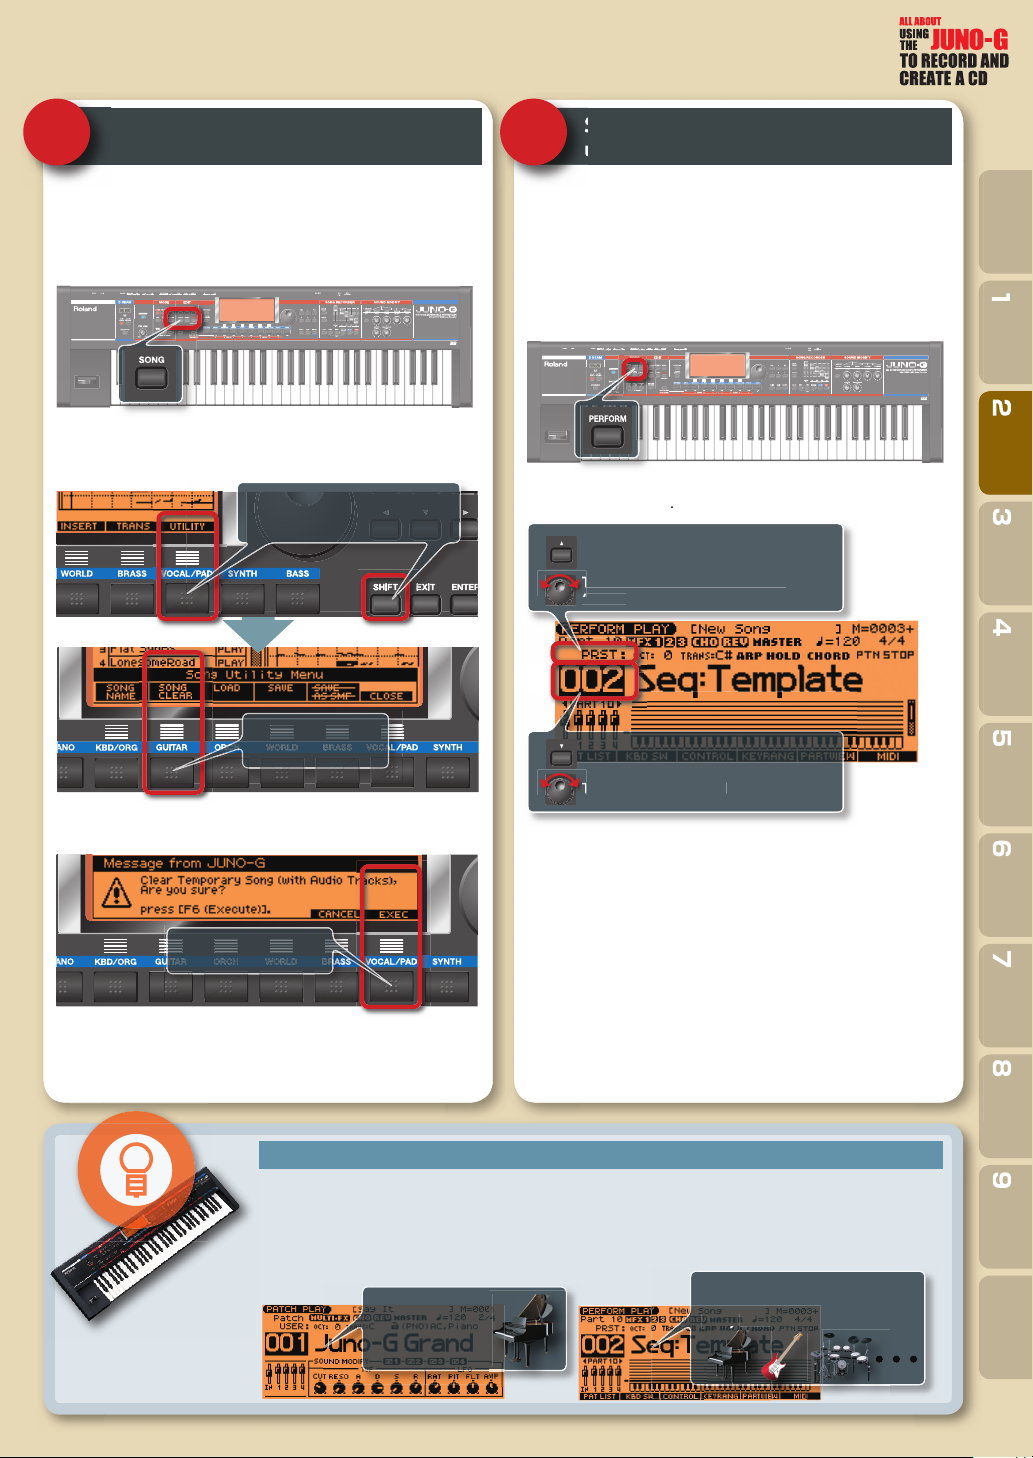
Clear the demo song
Select Performance mode so you can
use multiple instruments
Now it’s time to clear the demo song so that you can record a new
song. Don’t worry — when you turn on the power of the JUNO-G,
the demo song will be back ready to play, so just go ahead and
r i
Press the
Hold down the [SHIFT]button and press the [UTILITY]button;
the utility menu will appear in the bottom of the screen. Press the
song, so press the
SONG]button; the MIDI TRACK screen appears
SONG CLEAR
Hold down the [SHIFT] button and press the [UTILITY]
button.
Press the [SONG
CLEAR] button.
e JUNO-G will ask whether you’re sure you want to clear the
EXEC]button.
When you’re creating a song on the JUNO-G, you’ll want multiple
instruments such as piano, bass, and drums etc. to be playing to
gether. “Performance mode” lets the JUNO-G’s synthesizer operate
in this way. In Performance mode you can produce an ensemble
consisting of as many as 16 di erent instruments
Pr
mance mode
From this screen, we’ll select a performance called
– “002 Seq: Template
starting out to create a son
[PERFORM]
Use the [Up cursor] button to move
the cursor.
Turn the dial to make this read
“PRST.”
Use the [Down cursor] button to
move the cursor.
Turn the dial to select “002.”
Seq: Template” sets each instrument to the same volume, an
lso initializes the e ect settings. It’s an ideal group of settings for
f Perfor
PRST (preset)”
Intro
ment
ration
Rhythm Piano Bass Guitar Vocal Mixing CD Spec
Equip-
Prepa-
Press the [EXEC]
button.
Now the song recorder is empty.
F
A
O
D
E
T
O
N
A
V
I
C
E
Patch mode is great for live performance!
f you’re playing live, you’ll be using the JUNO-G as a simple “keyboard.” In such cases, it’s convenient to use
“Patch mode.” In Patch mode, the name of the sound you’re playing is shown in big letters in the screen, so
t’s easy to read even when you’re on stage
For more about Patch mode, refer to “Playing in Patch Mode” (p. 25) in the owner’s manual.
☞
In Performance mode, up to 16
In Patch mode
you use the
JUNO-G as one
single keyboard.
instruments can play simultane-
ously.
Page 10

popular rhythm machine: the BOSS DR-880
d!
.
y
.
bly
y
button to access
Create a rhythm track
with the rhythm pattern function
1 2
machine!
The JUNO-G can play patterns just like a rhythm machine. It’s
easier to come up with ideas for your song when you’ve got a
hythm going.
The rhythm machine inside the JUNO-G doesn’t look anything like
he DR-880, but it’s de nitely a powerful tool for song production.
et’s get starte
F
A
O
D
E
T
O
N
A
V
I
C
E
Try changing the tempo!
he tempo is an important element of
song. You’ll proba
e tempo even during the process of
reating a song. On the JUNO-G, simpl
ress the [TEMPO]
e tempo screen, and turn the dial.
hen you’ve speci ed the tempo you
ant, press the
o close the tempo screen.
want to adjust
TEMPO] button again
appears
to the di erent patterns, and choose the one that’s closest to what
☞
The JUNO-G contains a rhythm
Use the rhythm pattern function
to play patterns
ress the
RHYTHM PATTERN]button; the rhythm pattern screen
n this screen you can select a pattern to use in your song. Listen
ou have in mind
Turn the dial to
select a style.
Press these buttons to start the
pattern! Within the style you
select, there are six variations,
assigned to PAD 1–6.
For more details, refer to “Playing Rhythms” (p. 79) in the
owner’s manual.
You can also
set the tempo
by pressing the
[TAP] button
at quarter-note
intervals of the
desired tempo.
Turn the dial to
change the tempo.
Page 11

k.
]
button to move the curso
.
]
.
y
3 4
track
Record the rhythm on a MIDI
Listen to what you recorded
en you’ve selected a rhythm, you can record it on a MIDI track.
nce again, press the button for the selected pattern to stop the
playback. Then press the
y to record the pattern on a MIDI trac
For this example, let’s turn
ting, there would be a one-measure count-in, meaning that the
pattern would be recorded from the second measure.)
In this state, you can press the
to start recording. After you’ve recorded as
many measures as you want (i.e., the length
your song), press the
stop recording.
REC] button, and the JUNO-G will stand
Press this button to stop
the pattern you selected;
then press the [REC]
button.
ount In “OFF(With the default set-
Press the [Down cursor] button
to move the cursor to Count In.
Turn the dial toward the left
to set Count IN “OFF.”
PLAY] button
STOP] button to
Let’s take a look at what you just recorded in the MIDI track. Press
he
SONG] button, and the MIDI TRACK screen will appear. In
his screen, press the
“10” and you’ll see the rhythm you just recorded. The JUNO-G
lways records the rhythm on track 10
The MIDI TRACK screen is an excellent way to view your song as
whole; for example, you might notice that “this section looks
busier’, so it’s probably right before the break.”
Now let’s play back the rhythm that was
recorded in the MIDI track. Hold down
he
STOP] button and press the
utton; the playback position will return
o the beginning of the MIDI track
Then press the
back from the beginning.
Down cursor
This shows an overview of the recorded
performance.
BWD
PLAY] button to play
Intro
r
Equip-
ment
Prepa-
ration
Rhythm
Piano Bass Guitar Vocal Mixing CD Spec
F
O
E
T
O
N
A
You can edit the rhythm track recorded in the song!
ter you’ve recorded the rhythm in a MIDI track, there might be times when you decide that it would be nice to have a ll here, or a
reak there. No problem! Just use the edit function to modify the MIDI track. One of the great things about MIDI tracks is that after
ou’re nished recording the rhythm track, you can freely edit each individual note with incredible detail to create absolutely any
thm you can imagine.
For more details, refer to “Editing a Song (MIDI Track)” (p. 94) in the owner’s manual.
☞
A
D
V
I
C
E
You can switch rhythm patterns while recording!
u can switch between the six pattern variations while you record on the MIDI track.
ress the
PLAY]button to start recording the rhythm pattern, and
en press the
reen; now you can switch between the six pattern variations. The
atterns will be recorded on the MIDI track exactly as you switch
etween them. If you use this cleverly, you can create a very cool
ythm track that’s shifting dynamically, and doesn’t sound simply
CLOSE] button to return to the rhythm pattern
Return to the
Rhythm Pattern
screen.
Page 12

ealtime
-
.
.
.
The JUNO-G contains 21 types of acoustic pianos and 36 types of
.
button to
esomeRoad”
.
Record your piano performance
using realtime recording
1 2
Access the recording screen
ow that you’ve created your rhythm track on track 10, let’s record
e piano part on track 1. To record the piano, we’ll use
ecording” the method in which your keyboard playing is cap
ured just as you actually play it
n the MIDI TRACK screen, press the
cursor to
Track 1 is selected for
recording the piano
part.
n the screen shown above, the name of the instrument at “
highlighted, meaning that you’ll be recording track 1.
Up cursor] button to move
r
”is
Select the piano sound you want
ENTER] button
ow a screen will appear where you can select an instrument to
se for track 1
Use the [UP]/[DOWN] buttons to select the
piano category (AC.Piano or EL.Piano).
Turn the dial to
choose the sound
you want.
lectric pianos. These provide sounds that are suitable for a wide
ange of styles, so play the keyboard to try them out, and select
ne that you like
en you’ve selected a sound, press the [ENTER]
ze your choice.
nal-
F
A
O
D
E
T
O
N
A
V
I
C
E
Here are the piano sounds we recommend!
he JUNO-G gives you 21 acoustic piano sounds and 36 electric piano sounds. PR-A:001 “Juno-G Grand” is
articularly recommended. It’s recorded in stereo, so it delivers amazing presence. If you’re playing a piano
olo, this is the one to use. If you need a crisp-sounding piano, we suggest
ound of an electric grand piano, and should be a good choice for hammering out rock piano parts. For an
ectric piano, you should check out
ou need for ’70s pop or AOR, or for the R&B styles of today.
ound that was fashionable during the ’80s. It’s the perfect match for the pop songs of that era
R-A: 015 “Lon
R-A: 007 “E-Grand This is the
for that classic wavering feel — just what
R-A:028 “FM EP ” is the brilliant electric piano
Page 13

3
ess the
button so that the drums
y
T
button to
y
.
.
g
ll
.
.
3 4
Record your piano performance
Look at what you recorded
Pr
play, and then start playing your piano part.
Having the rhythm playing makes it easier
to get into a nice groove with your own
performance. Play several times until your
ou want to play, you can start record-
ing. Return to the beginning of the song
ou can record your keyboard playing
In this example, let’s set
the metronome will sound for one measure before recording actu-
timing
Recording will start when you press the
PLAY] button. When you’re nished play-
ing, press the
PLAY]
ands have absorbed the rhythm.
hen you’ve got a good idea of the phrases
STOP]BWD]buttons). Then in the MIDI
RACK screen, press the [REC]
ccess the recording standby screen so that
ount In to
lly begins, so it will be easy for you to start playing at the right
Use the [Down cursor] button
to move the cursor to Count In.
Turn the dial to change
Count In to “1 MEAS.”
STOP]button.
1 MEAS
With this setting,
When you’ve nished recording, let’s take a look at the data that
as recorded. In the MIDI TRACK screen, go back to the beginnin
of the song.
Your piano performance
is recorded on track 1.
The phrases you recorded are shown in the screen.
For now, simply take a glance at this to check the result of your
recording. But this screen is also a great way to view the overa
structure of a song and to help you edit it
For more about realtime recording, refer to “Recording Your
☞
Performance as You Play It (Realtime Recording)” (p. 88).
Intro
ment
ration
Rhythm Bass Guitar Vocal Mixing CD Spec
Piano
Equip-
Prepa-
F
O
E
T
O
N
A
A
D
V
I
C
E
Press the [UNDO] button
in the MIDI TRACK screen.
If you’ve made a mistake, you can backtrack!
’s common to make slight mistakes when recording. If you do, you can take advantage of a useful function
at lets you cancel your mistake. In the MIDI TRACK screen, press the [UNDO] button, and then press
e
EXEC]button in the con rmation screen that appears. This will instantly erase the recording you just
ade. It’s as easy as that, so don’t be afraid to make mistakes, since you can easily undo them until you’re
tis ed with your performance
In the con rmation screen,
press the [EXEC] (Execute)
1
Page 14

-
.
y
.
ass”
category contains 27 acoustic and electric bass sounds,
the
]
but
Record the bass
Ult
ass”
stand
:050 “S
using step recording
1 2
Access the recording screen
ext we’ll record the bass. This will complete the essential en
emble, so all of a sudden your song will sound more coherent
Unlike the way in which you recorded the piano (by playing the
eyboard while you listened to the other parts), we’re going to
ecord the bass using a method called
ou enter the notes one by one
To record the bass, we’ll select track 2 in the MIDI TRACK screen.
Use the [Cursor] buttons to move
between tracks. We’ll record the
bass on track 2.
step recording in which
want to use in track 2.
The
analog synths).
ton to con rm your selection.
Select the bass sound you want
to use
hen you’ve selected track 2, press the
Use the [UP]/[DOWN] buttons to select a bass
category (Bass or Synth Bass).
B
nd
Synth Bass” category contains 74 bass sounds (mainly
en you’ve selected the sound you want, press the
ENTER]button.
Turn the dial to
select the sound
you want.
ENTER
-
F
A
O
D
E
T
O
N
A
V
I
C
E
Here are some bass sounds we recommend!
he JUNO-G has a rich array of bass sounds.
up bass that sounds so “woody” it will have you playing jazz ri s right away.
:023 “FingerMaster” is a nger-plucked electric bass; a nicely robust sound
hat’s a good choice for songs that need solid anchoring.
R-B:105 “TBasic” reproduces the sound of the famous Roland TB-303, and is
very “synth-like” bass sound that’s typical of techno styles. Another tasteful
ynth bass is
variety of styles. You can use the knobs shown at right to modify the sound in
R-B
H-101 Bs 1
R-B:020 “
not a ashy sound, but highly usable in
i Ac B
is a
-
-
Page 15

-
?
.
The procedure until this point has been the same as when you
g.
dby
is1-01-000”
button to move the cursor to
.
E
.
O
y
ote.
.
button.
3 4
Access the step recording screen
Enter the data
recorded the piano, but now we’ll shift to a procedure that is distinctive of step recordin
In the MIDI TRACK screen, the metronome will begin sounding
when you press the
utton once again you’ll enter the step record stan
In this screen, notice that
inning of the rst beat of measure one). If it’s not, use the
cursor]
the dial to set it.
en you press the
REC]button once, but if you press the
In the MIDI TRACK screen, press
[REC] twice to access the step
record standby screen.
rt Point”
rt Point and then use
Use the [Down cursor] button to move the cursor. Turn
the dial to change the Start
Point to “0001-01-0000”.
START] button, you’ll see the step recording
REC]
screen.
(the be-
Down
e want to enter. Set the note length and volume as shown in the
screen below.
Use the [Left/Right cursor]
buttons to move.
Turn the dial to change the
value.
Setting
NOTE TYPE
AT
VEL
When you’ve nished making these settings, press a key to enter
he rst n
Speci es the note length (time value)
Speci es the duration of the actual sound relative to
the note length. For example even if NOTE TYPE is set to
1/8th notes, this GATE setting will determine whether
the notes are legato or staccato
Speci es the velocity (loudness) of the notes. If you set
his to
each key will be entered as the velocity. If you specify
value of
entered; the force at which you actually strike the ke
will be ignored.
When you press
a key, the rst
note will be
entered.
xplanation
the force at which you actually strike
–127, that’s the velocity value that will be
You can use the [STEP]
buttons to move the
location at which your
note will be entered.
(You’ll move in steps of
the length selected by
“NOTE TYPE.”)
Intro
ment
ration
Rhythm Piano Guitar Vocal Mixing CD Spec
Bass
Equip-
Prepa-
F
A
O
D
E
T
O
N
A
V
I
C
E
Some phrases are just made for step recording!
t goes without saying that keyboard instruments are fundamentally di erent than other types of instru
ents. For example, what will happen when you play the following bass phrase from the keyboard
t looks easy, but at this rapid tempo it’s not easy to play consistent repeated notes at the same pitch. It
akes a moment to move your nger o the key, so it’s rather di cult to avoid a staccato feeling. Even
hrases like this that might be di cult to play from a keyboard are easy if you use step recording. If you’re
rying for high-precision patterns, you’ll want to take advantage of step recording
When you press a key, a horizontal bar will appear, indicating the pitch
of the note you entered. Simply repeat this step to enter the notes
When you’ve nished, press the
For more details on step recording, refer to “Inputting Data
☞
One Step at a Time (Step Recording)” (p. 92) in the owner’s
manual.
STOP]
Page 16

-
.
choose
.
button.
Record your guitar playing
on an audio track
1 2
JUNO-G
Connect your guitar to the AUDIO INPUT “L (MONO)/MIC”jack
located on the rear panel of the JUNO-G. You can use the same
ype of “phone” cable that you would use when connecting your
guitar to an amp. If you’re using a stereo output (such as when
outing your guitar through an e ect processor), make connec
ions in stereo (to both
Connect your guitar to
the “AUDIO INPUT”
jack on the JUNO-G’s
rear panel.
and
jacks)
and then press the
Connect your guitar to the
Adjust the JUNO-G’s input settings
appropriately for your guitar
ress the
nd
n the screen that appears, choose Input Select as shown below,
PERFORM”button, then press the
6. Input Setting” from the menu that appears
AUDIO TRACK]
Turn the dial to select “LINE
IN L” if you’re using monau-
ral input, or “LINE IN L/R” if
you’re using stereo input.
MENU”button,
Turn the dial to
select “6. Input
Setting” and press
the [ENTER] button.
F
A
O
D
E
T
O
N
A
V
I
C
E
An effect processor with built-in amp simulator is great!
hen you connect your guitar to the JUNO-G, it’s especially nice to use a
ulti-e ect unit that contains an amp simulator, such as the BOSS GT-8.
imply connect this between the JUNO-G and your guitar, and you’ll get
hat powerful “studio-recorded” sound.
Page 17

.
To b
-
.
.
d
ode
“SOLO
button to start re-
button.
.
-
button. You’ll be
y
]
butto
.
ecorders don’t have!
3 4
Check the recording level
Start recording!
etting the level is the most important thing when recording. If
the level is too low, you’ll lose dynamic range, and the audio quality will su er. If the level is too high, you’ll get distortion (crackling
r grinding noise)
egin, set the
ocated on the JUNO-G’s panel to
the maximum position (all the way
up). Then, while playing your gui
tar, use the
panel to adjust the recording level
Adjust the level so that when you play your guitar the loudest,
the JUNO-G’s level meter does not quite reach all the way to the
maximum point. You should also make sure that the level is not
low
DIO IN slider
knob on the rear
Set the AUDIO IN
slider to the maximum
position.
Use the LEVEL knob to
adjust the recording
level.
First you’ll need to return to the beginning
of the song (STOP]BWD]button). Press
he
REC]button to enter standby mode.
This time you’ll be recording only the soun
rom an external audio source, so set
Rec M
Next, press the
cording. Go ahead and play your guitar like
rock star! When you’ve nished recording,
ress the
Take a look at the AUDIO TRACK screen at this time, and you’ll
notice that there’s a blinking graphic indicating the region you
recorded
When you press the [STOP]
button, the recorded region
will blink.
Turn the dial to select
“SOLO.”
PLAY]
STOP]
udio
Intro
ment
ration
Rhythm Piano Bass Vocal Mixing CD Spec
Equip-
Prepa-
Ideally, the loudest passages should make the
level meter reach almost all
the way to the right. If the
level reaches all the way to
the right edge, however,
the sound will be distorted.
F
A
O
D
E
T
O
N
A
V
I
C
E
Totally cool! You can change the tempo of the recording!
If you’re not con dent of being able to play at the necessary tempo, you can drop the song tempo a little (see
age 10 of this booklet) when you record. If you think this will make you look uncool, you’re wrong — you can
change the tempo back when you’re nished recording! This is an absolutely great feature that most other
rd-disk r
Press “ASSIGN” if you’re sat-
is ed, or press “UNLOAD”
if you’re not satis ed.
If you’re happy with your performance,
ress the
ed, press the [UNLOAD]
sked whether you really want to discard
our performance; press the
o discard it
☞
ASSIGN] button. If you’re unsatis
EXEC
For more about audio recording, refer to “Recording a Song
(Audio Track)” (p. 104) in the owner’s manual.
n
Guitar
Page 18

]
button.
the menu that
g
]
button.
Record a vocal
The photo shows Roland
on an audio track
1 2
Connect your mic to the JUNO-G
Connect your mic to the AUDIO INPUT jack
e JUNO-G’s rear panel.
e aware that the
on’t give you the correct volume.
jack doesn’t support microphones, and
Connect your mic to
this jack.
L (MONO)/MIC”on
Just as you did when you played your guitar, press the
appears, select “6. Input Settin
Then press the
Adjust the JUNO-G’s input settings appropriately for a mic
utton and then press the
n the screen that appears, make the settings shown in the screen
hot below.
Turn the dial to make this
read “MICROPHONE.”
AUDIO TRACK
MENU]
From
Turn the dial to
select “6. Input
Setting,” and press
the [ENTER] button.
PERFORM
F
A
O
D
E
T
O
N
A
V
I
C
E
Watch out for background noise when recording from a mic!
hen recording from a mic, it’s important to watch out for background
oise. If you’re recording at home, the mic could accidentally pick up all
orts of noises from everyday life. If possible, you should try to record at
a rehearsal studio or soundproof room. If you’re using headphones of a
type that can leak sound, your mic will also be picking up leakage from
the headphones. It’s best to use sealed-type headphones that completely
over your ear, or “in-ear” types that t tightly into your ear canal.
H-300 sealed headphones
Page 19

9
T
l
T
ould.
]
]
dby
-
.
d
O
ess the
-
y
lly
lly
!
3 4
Check the recording level
Start recording!
As when recording your guitar, adjusting the level is important
or vocals as well. The di erence is that in the case of vocals, it’s
i cult to maintain a consistent distance to the mic, meaning that
the volume will change every time you face the mic. The volume is
lso a ected by the condition of the person who is singing. These
actors make it hard to get a consistent vocal recording.
he process of adjusting the level
is the same as when recording your
uitar; set the AUDIO INslider to
the maximum position, and use the
rear pane
the recording level.
he volume of a vocal will tend to change signi cantly, so it’s best
to be cautious, and set the level a bit lower than you otherwise
w
slider to adjust
Set the AUDIO IN slider
the maximum position.
Use the LEVEL knob to
adjust the recording
level.
to
Down cursor] button to select track
Return to the beginning of the song ([STOP
BWD] button), and then press the
utton to enter stan
nome will begin sounding
s when recording the guitar, we’ll be recording just the soun
rom an external source, so set
ince we’re recording the mic in mono, set
“MONO”
Turn the dial to select
“SOLO.”
Pr
When you’ve nished singing, press the
STOP] button to stop.
PLAY] button to start recording.
mode; the metro
”
REC
udio Rec Mode to
Use the [Down cursor]
button to move the cursor.
Turn the dial to set Audio Rec
Channel to “MONO.”
SOL
udio Rec Channel
Intro
ment
ration
Rhythm Piano Bass Guitar Mixing CD Spec
Equip-
Prepa-
In the same way as when you nished recording the guitar part,
The vocal volume will change
widely, so set the level comfortably below the maximum
at the right edge.
F
A
O
D
E
T
O
N
A
V
I
C
E
If you’re not recording, keep the AUDIO IN slider lowered!
When recording a guitar or vocal, you should set the
o the maximum position in order to get the best sound. But if the
DIO IN slider is raised, any noise from the mic or guitar connected
o the JUNO-G will always be mixed into the output of the JUNO-G,
o it’s best to keep the
ecording. If you notice unwanted noise coming from the JUNO-G,
check the AUDIO IN slider rst
DIO IN slider lowered unless you’re actua
ress the [ASSIGN] button if you’re satis ed with your perfor
mance. If you’re not satis ed, press the
ou’ll be asked whether you rea
press the
☞
EXEC] button to discard your performance.
For more about audio recording, refer to “Recording a Song
(Audio Track)” (p. 104) in the owner’s manual.
UDIO IN slider
UNLOAD] button, and
want to erase the recording;
Keep this lowered
unless you’re recording.
Voc al
1
Page 20

-
o.
o
.
The JUNO-G has dedicated mixers for the MIDI tracks and the
!
acks.
r
y
t.
Mix your song to a final polish
1 2
Why “mixing” is necessary
on which you’ve recorded the instruments and vocals, and adding
everberation and/or other e ects to give your song the nishing
ouches. The mixing console is the heart of every recording stu
i
A mixer in a recording studi
The JUNO-G has its own mixer built in. Since it also contains a full
ange of e ects, it’s not too much to say that the JUNO-G gives you
an entire recording studio! Here’s how to use it to bring your song
o a nal state of completion
tionality as a stand-alone mixer, they’re conveniently built right
The
There are 16 sliders for the MIDI tracks, and four sliders for the
The JUNO-G has a built-in mixer
UDIO tracks. Even though these have essentially the same func-
nto the JUNO-G
sliders control the volume of each instrument (track).
DIO tr
MIDI TRACK mixer
AUDIO TRACK mixe
F
A
O
D
E
T
O
N
A
V
I
C
E
Use the sliders to adjust the AUDIO TRACK volumes!
You can use the sliders on the front panel of the JUNO-G to adjust the AUDIO TRACK volumes. In fact, you
an simultaneously adjust the MIDI TRACK mixer in the screen while you use the sliders to adjust the AUDIO
volumes. The volume of each part is something you’ll want to keep an eye on, so this feature is incredibl
nvenien
Adjust the
MIDI TRACK
volumes
Adjust the AUDIO
TRACK volumes
Page 21

ess the
]
b
]
select
button and the
]
b
.
g
ess the
d
the
]
buttons to move the cursor to
ack 1
.
.
3 4
Adjust the volume balance
Use reverb to add space to the
sound
Now let’s adjust the volume of the instruments you’ve recorded up
to this point. The volume balance is the basis of mixing, so make
sure you get this right.
Press the
you make adjustments.
se the [Left/Right cursor] buttons to select the instrument
(track) volume you want to adjust; then use the
Piano volume
For the AUDIO TRACK, press the
ress the [MIXER
make adjustments in the same way
PART MIXER]button to access the MIDI TRACK mixer
reen. Pr
n to
PLAY
utton so you can hear the song while
LEVEL” and use the dial to adjust the volume.
Bass volume Drum volume
utton to access the mixer screen. Here you can
AUDIO TRACK]
Press the [MIXER]
button to access the
mixer screen.
Down cursor
The reverberation in a church or concert hall is relatively long,
nd this can add a beautiful character to the sound. In a recordin
studio, this is simulated by a “reverb” processor. Let’s add reverb to
e piano to give the sound some spatial character.
Pr
n
The vocal will also sound better if you add an appropriate amount
of reverb. You can use similar steps to add reverb to an AUDIO
TRACK. Go ahead and try it.
☞
PART MIXER] button to access the mixer screen, an
en press the
ill appear.
Reverb for the piano
nd use the dial to adjust it
For details on the MIDI TRACK mixer refer to “Using the
MIXER Screen” (p. 61) in the owner’s manual, and for details
on the AUDIO TRACK mixer refer to “Controlling Audio
Tracks (AUDIO MIXER screen)” (p. 111).
CHO&REV]button. The e ect adjustment screen
Press the [CHO&REV]
button to access the
e ect screen.
Cursor
“REV” for
Intro
Equip-
ment
Prepa-
ration
Rhythm Piano Bass Guitar Vocal CD Spec
r
Guitar volume
Vocal volume
F
A
O
D
E
T
O
N
A
V
I
C
E
Some sounds shouldn’t have reverb!
dding reverb to piano and vocal can make the sound very beautiful. You might think of adding reverb to
other instruments as well, but slow down! There are some sounds that are best without reverb. As a rule, for
example, the kick drum and bass should have no reverb at all. If reverb is applied to low-frequency sounds,
he result can be mush. Even worse, the sense of rhythm gets blurred. A straight-ahead rock band will sound
etter and more direct if you don’t overdo the reverb. The appropriate amount of reverb will depend on the
tyle of music, so be aware of what you’re doing, and use reverb wisely
Mixing
Page 22

y
.
e
AUDIO TRACK
]
b
dby
.
]
button.
Make your song into a CD
Part 1: Create a WAV le on the JUNO-G
1
into a single WAV file
n order to create a CD, the song you created on the JUNO-G has to
e rendered into a WAV le. Since WAV les can be played back on
our computer, you can use them to make a CD
endering all tracks into a single WAV l
Piano
Bass
Drums
Guitar
Vocal
the
utton and press the
creen will appear. Follow the steps shown below, and the region
of measures you specify will be rendered into a WAV le.
screen displayed, hold down the
MIXDOWN
utton; the mixdown stan
Hold down the [SHIFT] button
and press the [MIXDOWN]
button.
Mix down your completed song
In this example, press [CANCEL]
so that the mixdown le won’t
be assigned to a track.
Save the song data on a card
2
a card. If you don’t do this, all your hard work up to this point will
e lost forever when you turn o the power
hat you’re saving here is the data for “the entire song.” This single
Save operation will save the “MIDI tracks,” “AUDIO tracks,” and the
“mixed-down WAV le” to the card all at once.
ith the AUDIO TRACK or MIDI TRACK screen displayed, press the
WRITE
Use the [Down cursor]
button to move the cursor.
Turn the dial to specify the
last measure.
Page 23

A screen like the following will appear, so use the dial to select
data of the
]
b
.
]
]
.
ess the
d
”
use the
but
]
button to hear the sound. No
.
Save Song+Smpls
AUDIO tracks.
Next, press the
name (shown below). You can enter a name of up to eight characters, so assign a name that will help you recognize the le later
This will save all
If you select this, all data of the
MIDI tracks and AUDIO tracks
will be saved.
ENTER
When you’ve speci ed the
name, press the [WRITE]
button.
utton and a screen will let you enter a
Use the [Left/Right] to move
the cursor.
Use the dial to select a
character.
MIDI tracks and
1.
message will ask if you want to save the data, so press the
n
While the display indicates “Now Saving...” or “Now Writing...”, the
data is being saved; never turn o the power while these messages
re displayed. When these messages disappear and you return to
e AUDIO TRACK screen, the data has been saved.
3
Check the WAV files you’ll be
transferring to your computer
Pr
racks you’ve recorded.
AUDIO] button twice, and the screen will list the AUDIO
Press twice.
EXEC
Intro
ment
ration
Rhythm Piano Bass Guitar Vocal Mixing Spec
Equip-
Prepa-
Next, a screen where you can specify the save-destination of the
le will appear. The data size will be large if you’ve recorded audio
tracks, so be sure to save the data on a card. Press the
utton and the screen will show the songs currently saved on the
ard.
If the card contains no data, this
will indicate “EMPTY.” If you’ve
saved songs, the song names
will be listed.
Next press the
SAVE] button.
CARD
From the top, these are the “guitar sound,” the “vocal sound,” a n
he “mixdown sound.
Guitar sound (stereo)
Vocal sound (mono)
Mixdown sound (stereo)
can
ons to select a le and press the
VIEW
ould be a good time to check this
If you’ve been following along with the procedure we’ve described
in this booklet, the nal “mixdown of all tracks (WAV le)” will be
smpl0004.WAV”
ou’re going to transfer this WAV le to your computer and use it to
create a CD, so make a note of the name.
Up/Down cursor]
4
On your computer, this will appear as a le named
-
PRE-
w
CD
Page 24

Turn your song into a CD
.
.
button.
d.
T
n
Part 2: Use your computer to burn a CD
The process of creating a CD
ou’ve nished creating your song on the JUNO-G! Now you’re going to transfer the WAV le created on the
NO-G to your computer, and burn it to a CD. In order to create a CD, your computer needs to have a drive
at can write a CD, and software such as “Windows Media Player” (if you’re using Windows) or “iTunes” (if
ou’re using Mac OSX). Any recent computer should satisfy these conditions, so you’re probably ready to burn
Ds right away. Just be aware that some versions of these programs may be unable to burn a CD. For details,
fer to the owner’s manual or Help le of your software.
ransfer the WAV le created by the JUNO-G
to your computer via the USB connection.
Connect the JUNO-G to your
1
computer
uter can see the contents of the JUNO-G’s card
Use a USB cable to connect the JUNO-G to your computer
ext, press the JUNO-G’s
USB]
Use “Windows Media Player” or “iTu
software on your computer to burn a CD.
The screen shown below will appear. Press the
and a screen that indicates “USB Access...” to show the connection
will appear. Now your computer can see the contents of the PC
r
PC CARD] button,
Page 25

.
t
]
b.
the
]
button.
-
2
Copy the WAV file to your computer
3
Use Windows Media Player to
burn a CD
Copy to the
desktop
dure will be similar for any program, but here we’ll use the example
of Windows Media Player 10. If you’re using a di erent version or a
di erent program, refer to its Help le or owner’s manual
Beginning with the
menu, click [All Programs]-
[Windows Media Player
In Windows Media Player, click the
Drag and drop the WAV le you created on the JUNO-G into the
Burn List
Drag and drop
r
Burn] ta
Intro
ment
ration
Rhythm Piano Bass Guitar Vocal Mixing Spec
Equip-
Prepa-
Insert a blank CD-R into your computer.
ick
Start Burn
When burning is nished, the CD-R will be ejected from your com
puter — you’ve just created your CD!
CD
Page 26

Page 27

y
)
s
y
)
y
)
ces: 64
y
2
4
ects
s
s
r
Tracks
6
stereo tracks
ack:
h
Tempo
300
ack
QN
g
p
:
pp
)
)
o
8
8
n
)
)
4
64
s
er
r
6
y
)
t
e
g
)
)
)
)
)
)
old Pedal Jack
k
)
)
aw
s
4
s
Weigh
g
z
ual
)
otecto
r
W
s
2
edal Switch:
es
U
Specifications
J
)
ater
UNO-G: Synthesizer Keyboard (Conforms to General MIDI 2 System
Keyboard
61 keys (velocity sensitive)
Sound Generator Section
Maximum Polyphon
●
128 voices (shared with audio track section
art
●
16 parts
ave Memor
●
64 M bytes (16-bit linear equivalent
reset Memor
●
atches: 768 + 256 (GM2
thm Sets: 36 + 9 (GM2)
rforman
ser Memor
●
atches: 256
thm Sets: 3
erformances: 6
E
●
Multi-E ects: 3 systems, 78 types
horus: 3 type
everb: 5 types
nput E ects: 6 type
Mastering E ects: 3-band compresso
Song Recorder Section
●
MIDI tracks: 1
io tracks: 4
Tempo track: 1
tr
1
ong Lengt
●
998 measures
●
–
MIDI Tr
●
esolution: 480 TP
ote Capacity: approx. 400,000 notes
ecording Method: Realtime recording, Step recordin
io Track
●
ata Format: 16-bit linear
Sam
le Rate: 44.1 kHz
ecording Time
Memory not expanded (4 M bytes)
rox. mono 47 seconds (stereo 23.5 seconds
a
Memory fully expanded (516 M bytes
approx. mono 102 minutes (stereo 51 minutes)
Others
Arpeggi
●
Preset: 12
r: 12
Rhythm Patter
●
Preset: 256 (32 groups
User: 256 (32 groups
hord Memory
●
reset: 6
r:
ntroller
●
D Beam Controll
Pitch Bend/Modulation Leve
ound Modify Knob x
Displa
●
40 x 92 dots graphic LCD (with backlit
Expansion Slots
●
RX expansion board: 1 slo
DIMM: 1 slot (memory expansion for audio recording)
External Storage Devic
●
PC Card: 1 slot
(supports SmartMedia and CompactFlash usin
onnectors
●
Headphones Jack (Stereo 1/4 inch phone type
(MIX) Output Jacks (L (MONO), R) (1/4 inch phone type
B Output Jacks (L, R) (1/4 inch phone type
Input Jacks (L (MONO)/MIC, R) (1/4 inch phone type
IDI Connectors (IN, OUT
H
ontrol Pedal Jac
USB Connector (supports le transfer and MIDI
Power Supply
●
DC 9 V (AC Adaptor
rrent Dr
●
000 mA
Dimension
●
022.8 (W) x 298.4 (D) x 101.7 (H) mm
0-5/16 (W) x 11-3/4 (D) x 4-1/16 (H) inche
t
●
.2 k
3 lbs 11 o
(excluding AC Adaptor)
Accessories
wner’s Man
D-ROM x 2 (Editor/Librarian/USB MIDI driver, SONAR LE
PC Card Pr
C Adapto
r
a PC card adaptor
Intro
ment
ration
Rhythm Piano Bass Guitar Vocal Mixing CD
Equip-
Prepa-
System requirements
Windows
Microsoft® Windows® XP / 2000
Options
ave Expansion Board: SRX Serie
Keyboard Stand: KS-1
P
Foot Switch: BOSS FS-5
Expression Pedal: EV-5
*
DP Seri
In the interest of product improvement, the speci cations and/or appearance of
this unit are subject to change without prior notice.
Macintosh
Mac OS X: 10.2 or l
Spec
Page 28

Visit us online at www.Roland.com
56690
N
68
Microsoft and Windows are registered trademarks of Microsoft Corporation.
Windows® is known ocially as: “Microsoft® Windows® operating system.”
Mac OS is a trademark of Apple Computer, Inc.
All product names mentioned in this document are trademarks or registered
trademarks of their respective owners.
Copyright © 2006 ROLAND CORPORATION
All rights reserved. No part of this publication may be reproduced in any
form without the written permission of ROLAND CORPORATION.
*04566901 - 01 *
RAM-41
4
1 06-12-I
 Loading...