

Page 1

Page 2

Options
PM-01
Personal Drum Monitor
The perfect home amplifier for the HD-1
V-Drums Lite.
2
DAP-1
V-Drums Accessory Package
Essential Accessories for V-Drummers
• Drum Throne
• Drum Sticks
• Inner Earphones
• Stereo Mini-Cable
TDM-1
V-Drums Mat
Secure-Performance Mat for HD-1
Page 3

Introduction
Drumming is for everybody and the Roland HD-1 V-Drums Lite
is the best way to add rhythm and music to your life!
The Roland HD-1 V-Drums Lite is for anyone who wants to enjoy playing drums.
It is portable, durable and loaded with professional sounds.
It is perfect for home, office, project studio or live performance,
everywhere you want to play.
Whether you are just starting out or have experience playing the drums,
the HD-1 is a great way to have fun playing and get involved in music.
3
Page 4

Contents
201a
Before using this unit, carefully read the sections entitled: “USING THE UNIT SAFELY” and “IMPORTANT NOTES” (Set-up Guide). These sections
provide important information concerning the proper operation of the unit. Additionally, in order to feel assured that you have gained a good
grasp of every feature provided by your new unit, Owner’s manual should be read in its entirety. The manual should be saved and kept on
hand as a convenient reference.
Options............................................ 2
Introduction ..................................... 3
Features........................................... 5
Drum Set Elements .......................................................6
Panel and Parts Descriptions ........................................8
Getting Ready to Perform .............. 10
Getting Connected .....................................................10
Turning On the Power................................................11
Adjusting the Head Tension on the Snare....................12
Replacing a Pad............................. 17
Replacing the Snare Head ......................................... 17
Detaching/Mounting a Tom Pad ................................ 18
Detaching a Tom Pad .................................. 18
Mounting a Tom Pad ................................... 18
Troubleshooting ............................. 19
Drum Kit Sound List........................ 20
About MIDI .................................... 21
Conversion for Left-Handed use ..... 22
Playing the Kit ............................... 13
Holding the Sticks ........................................13
Selecting a Kit .............................................14
Listening to Patterns.....................................14
Pad Sensitivity ...........................................................15
Metronome Operations ..............................................16
4
Specifications ................................. 23
Notation ........................................ 24
202
Copyright © 2007 ROLAND CORPORATION
All rights reserved. No part of this publication may be reproduced in any form
without the written permission of ROLAND CORPORATION.
Page 5

Features
Sounds
70 high quality Drum, Percussion and special effects sounds are
ready to play with the 10 different drum kits.
It’s Quiet!
Specially developed kick and hi-hat pedals are mounted on the
support pipes, minimizing direct vibration to the floor.
Lightweight and Compact
The HD-1 requires very little space, and by simply folding in the pad
support pipes, it can be transported easily.
Simple to Use
Easy operation with just 2 knobs and 7 buttons.
Built-in Metronome
The built-in metronome is a valuable practice tool.
Play with External Audio Sources
The Mix in jack allows one to connect external audio sources, ideal
for playing along with CDs, MP3 players, etc.
Outputs
2 pairs of headphones can be used by plugging them into the
headphone and output jacks at the same time.
For details on drum kits, refer to
“About the Drum Kits”
(p. 15).
5
Page 6
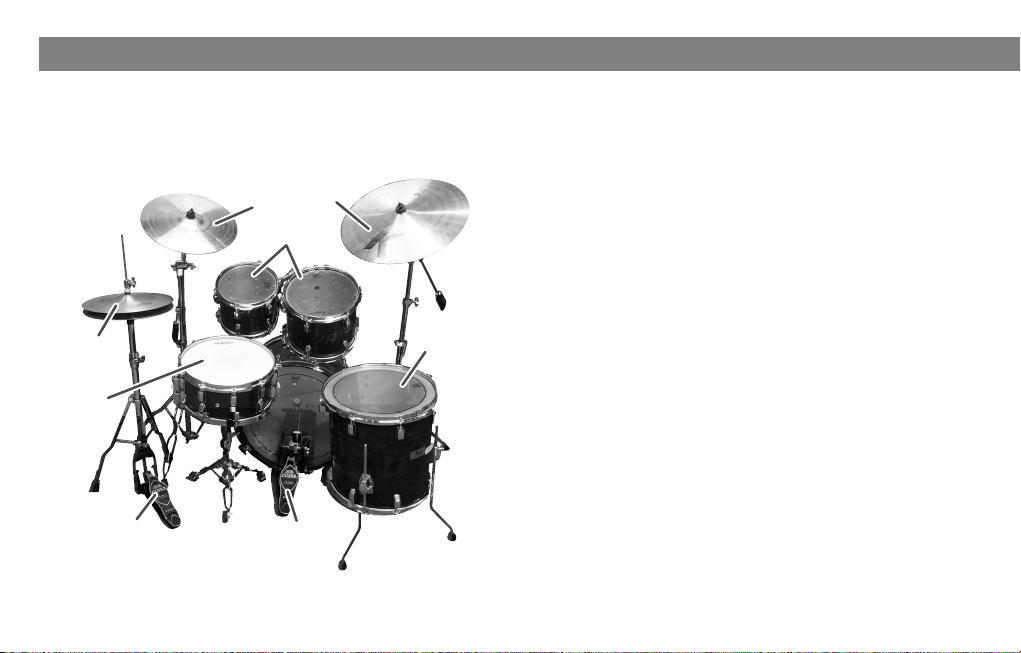
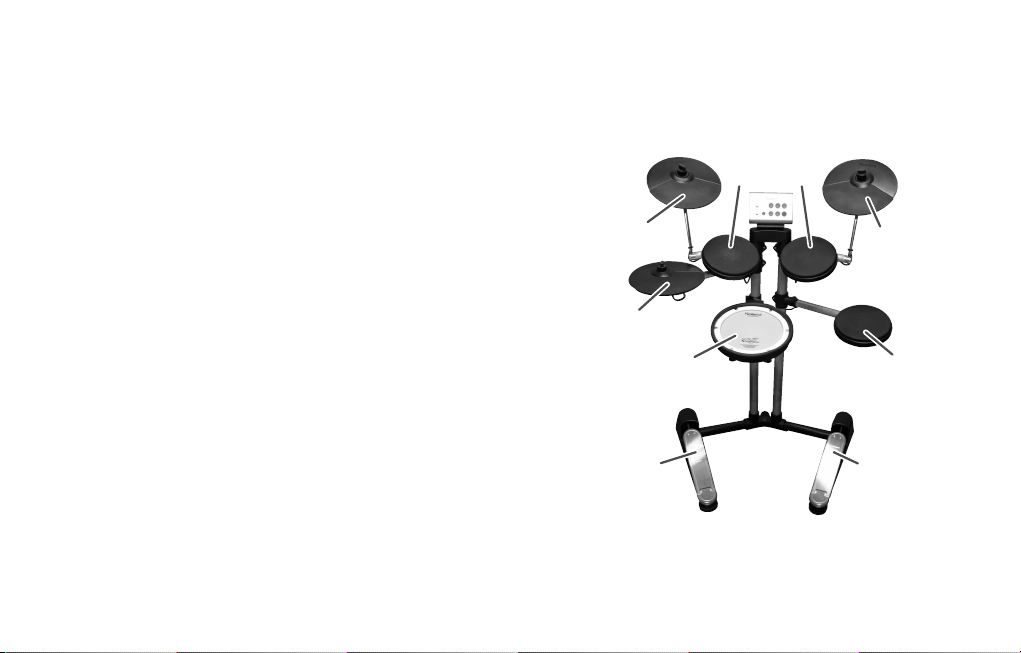
Drum Set Elements
Tom
Ride
Crash
Floor Tom
Here are some basic terms related to drum sets.
Acoustic Drum
fig.DrumSet-e
Hi-Hat
Snare
Hi-Hat Pedal
6
Crash
Ride
Tom
Kick Pedal
Floor Tom
Kick (Bass Drum)
Played with a kick pedal, it’s the largest drum in the kit.
Snare Drum
The snare drum is the main “voice” of a drum kit.
Hi-Hat
An acoustic hi-hat uses 2 cymbals mounted on a hi-hat stand.
* The HD-1 uses a single pad.
Hi-Hat Pedal
Pressing the hi-hat pedal opens and closes it.
Tom Toms
These are usually mounted on the bass drum, or separate stands.
Page 7
Floor Tom (Tom 3)
Sometimes called a bass tom, it either stands on it’s own legs or is
mounted on a stand.
Ride Cymbal
Usually mounted on the right side of the kit, the ride cymbal is
principle elements in keeping time.
Crash Cymbal
Smaller than the ride, the crash cymbal is mainly used for accents.
* The indications in parentheses ( ) show the names used on the
HD-1.
HD-1
fig.PadDescription-e
Tom 1
Tom 2
(T1)
(T2)
Crash (CR)
Hi-Hat (HH)
Snare (SNR)
Letters and numbers in parentheses ( ) relate to the cable labeling.
Ride (RD)
Tom 3 (T3)
Kick Pedal (KIK)Hi-Hat Pedal (HHC)
7
Page 8
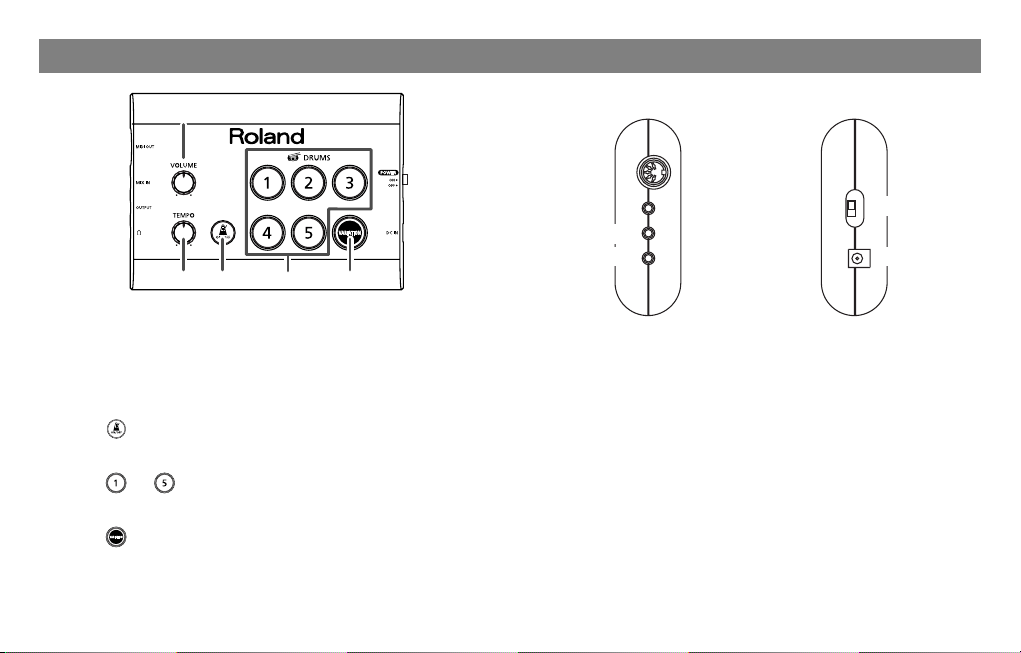
Panel and Parts Descriptions
fig.PanelDescription
1
fig.PanelDescription
Left Side Right Side
8
9
6
10
7
3 52
1.
[VOLUME] Knob
Adjusts the sound level (p. 11).
2.
[TEMPO] Knob
For setting the speed of the metronome or patterns (p. 15, p. 16).
3.
[ ] Button
For starting and stopping the metronome (p. 16).
4.
[ ]–[ ] Buttons
For selecting drum kits (p. 14).
5.
[ ] Button
For selecting a kit variation (p. 14).
4
11
6.
POWER Switch
Turns the power on or off (p. 11).
7.
AC Adaptor Jack
For connecting the power supply (p. 10).
8.
MIDI OUT Connector
Use when playing sounds on an external sound module or for
recording to a sequencer.
8
Page 9

9.
MIX IN Jack
For connecting an external audio source (CD or MP3 player).
Sound input here will also be heard through the main and
headphone outputs. The balance between those sounds and the
HD-1 is determined by the level of the external audio player.
10.
OUTPUT Jack
For connecting an optional amplifier (PM-01) or headphones.
11.
Headphone Jack
For connecting headphones (when headphones are connected,
the OUTPUT jack will still be active).
fig.PanelDescription
12.
Cord Hook
fig.cordhook
For securing the power adaptor cord. This helps
prevent accidental power outage and relieves
undue stress to the AC adaptor jack.
13.
Trigger Cable Connector
This connects the pads to the sound module.
9
Page 10

Getting Ready to Perform
For details on assembling the stand, refer to the separate leaflet “Set-Up Guide.”
Getting Connected
As a security measure to prevent damage to speakers or other devices, be sure the power is off on the HD-1 before making any connections.
fig.setsuzoku-e
Personal audio player etc.
(when you want to play the HD-1 along with music)
10
Audio Cable
Stereo mini plug
Speaker etc.
Stereo mini
plug
Headphones
Place the AC adaptor so that its lamp light is
on the top side.
(it lights up when connected to an AC outlet)
Lamp
AC Adaptor
Anchor the power cord using the cord
hook, as shown in the illustration.
2 headphones can be used by using the OUTPUT jack and the headphone jack at the same time. Perfect for drum lessons!
Page 11

Turning On the Power
Once connections have been made (p. 10), turn on the power to all
connected devices in the order as specified below. Doing otherwise
raises the risk of damage or malfunction to the connected devices.
fig.powerOn
1.
Make sure that the HD-1s [VOLUME] knob, and that of
any connected amp, is set to the minimum level.
2.
Turn on the HD-1.
3.
Turn on the power of the connected amp/speaker.
4.
Then raise the volume of both to get the sound level
required.
* As there is a built-in protection circuit, it takes a few seconds
before the HD-1 is ready to play.
11
Page 12

Adjusting the Head Tension on the Snare
Before playing the snare pad, you must tighten the
head. If it is too loose, problems such as faulty
triggering may occur.
1.
Use the included drum key, and tighten each tuning bolt
slightly, in the order shown in the diagram. This
guarantees even tension and a correct head response.
fig.Adjust-e
12
Loosen Tighten
2.
While hitting the pad, make final adjustments to have
the best feel and response from the head.
6
4
25
1
• Adjusting the tension of the snare head will not change the
sound as it would on an acoustic drum.
• Head tuning should be checked on a regular basis, as constant
playing may slacken the tension.
• Synthetic rubber is used on the pads and cymbals. Should the
smell of rubber bother you, make sure there is good air
circulation in the room. NEVER place the HD-1 near a heater or
source of high temperature.
The drum key can be
conveniently mounted on the
3
hook of the arm pipe.
Page 13

Playing the Kit
Holding the Sticks
The most common way to hold the sticks is called the “matched grip”
as shown in the photos below.
fig.holdingStick
(Left hand)
(Right hand)
Playing the Cymbal Pads
Play ONLY on the rubber surface. Playing on the plastic part will
produce sound, but you can damage the pad.
fig.SymbalShot-e
Pad Face
13
Page 14

Selecting a Kit
A drum kit consists of sounds assigned to each pad. In some cases,
the sound will change depending upon your playing dynamics.
1.
Buttons from [ ] through [ ]
Pressing these buttons will call up different kits.
2.
Variation [ ]
When you press this button, you can access the variation kits.
Example:
Play the kit [ ] (Accorstic).
Press [ ] and you play the variation kit (Jazz).
14
Before playing back a pattern, lower the volume of the HD-1. The
volume of these patterns may be louder than when you play the kit
normally, and you do not want to risk damage to your ears or connected
equipment.
Also, when patterns are playing, hitting the pads will not produce
sound.
1.
Press and hold one of the [ ]–[ ] buttons for a few
seconds.
A pattern using this current kit will play.
If you press the [ ] button, the pattern for that variation kit will
play.
You can change the tempo of the pattern by adjusting the
[TEMPO] knob.
Each pattern will play at it’s default tempo (set at the factory).
To change the tempo of the pattern, adjust the TEMPO knob AFTER
playback has started.
2.
Playback will stop if you press any one of the kit buttons
during playback.
Page 15

About the Drum Kits
Here is an explanation about the sounds used in each kit.
Button
1
2
3
4
5
More details about the individual sounds in each kit can be found
in the
“Drum Kit Sound List”
Normal Kit Variation Kit
Acoustic
This is a basic acoustic type
of drum set.
Power
A rock kit featuring a deep
reverb sound, similar to a
large concert hall.
Drums & Percussion
Features a combination of
drum and percussion sounds.
Electronic
Features sounds from a Roland TR-808.
Voices
Features voices, human beat
box and chorus sounds.
(p. 20).
Jazz
Jazz kit featuring a sizzle
ride cymbal.
Double Bass
A rock kit where the hi-hat
pedal becomes a 2nd bass
drum.
World
Features world percussion
sounds.
Dance
Perfect for club, house and
dance music.
Droid
This is a kit featuring special
effects sounds.
Pad Sensitivity
The HD-1 can be adjusted to accommodate any dynamic level of
playing, allowing even children with a very light touch, to get a
good response from the drum kit.
To adjust the pad/pedals sensitivity do the following:
Note: This is a “global” function, meaning the sensitivity of all pads
with change together.
1.
Hold down [ ] for a few seconds until the button
starts to blink.
2.
Keep pressing the [ ] button, and then press a button
from [ ] to [ ] to change the sensitivity.
(the factory setting is 3)
Button
5
Loud volume can produced playing very lightly
4 Loud volume can produced playing lightly
3 Normal (factory setting)
2 Loud volume requires fairly strong playing
1 Loud volume requires VERY strong playing
3.
When you’ve finished making the setting, release [ ].
Sensitivity
15
Page 16

Metronome Operations
The HD-1’s built-in metronome is a valuable practice aid.
Adjusting the Metronome Volume
1.
While the metronome is playing, press and continue to
hold down the [ ] button.
2.
While pressing [ ], touch a button from [ ]
through [ ] to adjust the volume. Three levels are
provided, “soft -medium-loud.”
3.
When satisfied, release [ ].
16
1
2
1.
Press [ ].
[ ] lights up and the metronome starts.
2.
Turn the [TEMPO] knob to adjust the tempo.
(Range: 40–220 BPM)
Changing the Metronome Sound
1.
While the metronome is playing, press and continue to
hold down the [ ] button.
2.
While pressing [ ], touch [ ], [ ] or the [ ]
button to choose the desired sound.
The choices are:
4: Click
5: Cowbell
6: Maraca
3.
When satisfied, release [ ].
The above settings are memorised by the HD-1, even if the power
is turned off.
Page 17

Replacing a Pad
Replacing the Snare Head
If it’s necessary to replace the head on the snare, follow these
instructions:
Optional replacement head: MH-8 Mesh Head
fig.replace-snare-e
Hoop’s Rubber
Portion
The sensor and cushion under the head are very sensitive. Put no
pressure on these parts as it may disrupt the proper functioning of
the pad.
Tuning Bolt
Hoop
Head
Loosen
Tighten
Drum Key
Sensor
Shell
1.
Remove all the tuning bolts.
2.
Remove the hoop.
3.
Take off the old head.
4.
Place the new head on the shell.
5.
Mount the hoop.
6.
Re-attatch the tuning bolds and adjust the tension (p.
12).
• Do not firmly tighten a single tuning bolt by itself. Doing so will
make it impossible to tension the head evenly, and will cause
malfunctions.
• Due to the nature of the materials used in the sensor, changes
in room temperature may affect the sensitivity of the sensor.
• The rubber portion of the striking surface is treated with a
preservative to maintain its performance. With the passage of
time, this preservative may appear on the surface as a white
stain, or reveal how the pads were struck during product
testing. This does not affect the performance or functionality of
the product, and you may continue using it with confidence.
17
Page 18

Detaching/Mounting a Tom Pad
Please remember that the pads designed for the HD-1 will not fit on
any other brand of stand.
Detaching a Tom Pad
1.
Unplug the tom and cymbal cables.
fig.replace-tam3-j
2.
Use a drum key to remove bolt
securing the cymbal rod from
the pipe.
fig.replace-tam1-j
3.
Remove the plastic end-cap
from the pipe.
* Do not insert your finger into the
pipe while the cap is removed.
fig.replace-tam2-j
4.
Use a drum key to loosen the
bolt securing the pad to the
pipe.
18
end-cap
fig.replace-tam4-j
5.
Remove the tom pad from the
pipe.
Mounting a Tom Pad
This is basically a reverse operation of the detaching process. But
when re-fitting the pads to the pipes, be careful to align the grooves
in the pipe with the triangular protrusions of the pad. The pads can
be fitted to three pitch(angle) positions.
Tom1, Tom2 Tom3
fig.tom1-2
Page 19

Troubleshooting
If you suspect a malfunction, please read this page first.
Power does not turn on
AC adaptor is connected properly? (p. 10)
No sound
• Check the volume knob.
• Are all pad cables connected correctly?
If using an amp/audio system
• Volume settings and input/output connections are correct?
• If using headphones, are they correctly connected to the
headphones or OUTPUT jack?
Sound is too soft/loud when playing
Check the sensitivity adjustments.
Double triggering occurs
• Check the bolts that secure the tom pads to the pipe.
• Be sure no cables are touching the pads.
• Use cable ties to secure any excess slack.
• Verify that the cymbal pad movement does not pull on the
cable.
No Sound from external audio source
connected to the MIX IN jack
• If you are using a connection cable that contains a resistor, this
will reduce the volume. Use a cable with no resistor.
• Faulty cable? If so, replace it.
• Volume setting is correct on the connected audio source?
• Amp or audio system settings and connections are correct?
Sound is distorted in headphones
• Adjust the volume.
• Headphones are working correctly?
To check them, connect them to another audio source to verify.
Output sound is distorted
Lower the volume on the HD-1.
Or, if the connected amp has an input level adjustment, adjust
accordingly.
19
Page 20

Drum Kit Sound List
No. Kit Name Kick Snare Tom 1 Tom 2 Tom 3 Hi-Hat Ride Crash
Normal
Variation
Normal
Variation
Normal
Variation
Normal
Variation
Normal
Variation
Acoustic
Jazz
Power
Double Bass
Drums &
Percussion
World
Electronic
Dance
Voices
Droid
Wood Kick
Jazz Kick
Heavy Kick
Heavy Kick
Jazz Kick Jazz Snare Timbales Conga Djembe Heavy Hi-Hat Pop Ride Splash
Cajon Stomp
TR-808 Kick
House Kick House Snare House Clap Scratch Super Low House Hi-Hat Reverse Ride
Voice Kick
Boing Kick
Bright Snare Wood Tom Hi Wood Tom Mid Wood Tom Low Heavy Hi-Hat Pop Ride Fast Crash
Jazz Snare Jazz Tom Hi Cross Stick Jazz Tom Low Jazz Hi-Hat Sizzle Ride
Rock Snare Power Tom Hi Power Tom Mid Power Tom Low Dark Hi-Hat Medium Ride Thin Crash
Rock Snare Power Tom Hi Rock Cowbell Power Tom Low
Cajon Snare
TR-808 Snare Hex Tom1 Hex Tom2 Hex Tom3 House Hi-Hat
Voice Snare Voice-Bang Voice-Dooit Voice-Boom Voice Hi-Hat Voice-Tun
Industrial
Snare
Heavy Kick/
Open Hi-Hat
Qujada/
Caxixi
Ratchet Tom Droid Voice Jet Tom Droid Hi-Hat Ba-Da-Bit
Berimbau Pot Drum
Pandeiro
Crasher
China/Ride Thin Crash
Agogo Crotale
TR-808
Cowbell
Fast “Tip”
Crash
DR-110
Crash
Space
Crash
VoiceHarmony
Chemical
Crash
20
Page 21

About MIDI
By connecting an external sound module to the HD-1’s MIDI OUT
connector you can play sounds on that external module.
If you connect the MIDI OUT to a sequencer, you can record your
performance.
MIDI transmit channel
Hi-Hat Pedal
Note number
produced
when you
strike a pad
Program
Change
Position data is transmitted using control change number
4 (foot controller).
Pad Note Number Pad Note Number
Kick Pedal
36 Crash 49
Snare 38 Ride 51
Tom1 48 Hi-Hat (Open) 46
Tom2 45 Hi-Hat (Closed) 42
Tom3 43 Foot Close 44
The following program change numbers are transmitted
when you switch drum kits.
Drum Kit PC Drum Kit PC
Normal 1
1
Variation 6 Variation 9
Normal 2
2
Variation 7 Variation 10
Normal 3
3
Variation 8
10
Normal 4
4
Normal 5
5
ELECTRONIC DRUM
Basic
Channel
Mode
Note
Number :
Velocity
After
Touch
Pitch Bend
Control
Change
Prog
Change
System Exclusive
System
Common
System
Real Time
Aux
Message
Notes
Mode 1 : OMNI ON, POLY
Mode 3 : OMNI OFF, POLY
Function...
Default
Changed
Default
Messages
Altered
True Voice
Note ON
Note OFF
Key’s
Ch’s
: True Number
: Song Pos
: Song Sel
: Tune
: Clock
: Commands
: All sound off
Reset all controllers
:
: Local Control
: All Notes OFF
: Active Sense
: Reset
MIDI Implementation Chart
Model HD-1
Transmitted
10
x
Mode 3
x
**************
36, 38, 42–46, 48 49, 51
**************
O 99H, V=1–127
x 89H, V=64
x
x
x
4
Ox
O (0...9)
**************
x
x
x
x
x
x
x
x
x
x
O
x
*1 Transmits the position of the hi-hat pedal.
Mode 2 : OMNI ON, MONO
Mode 4 : OMNI OFF, MONO
Date : Mar. 1, 2007
Recognized
x
x
x
x
x
x
x
x
x
x
x
x
x
x
x
x
x
x
x
x
x
x
x
Version : 1.00
Remarks
Cannot be changed
Cannot be changed
Foot Control*1
Cannot be changed
Prog. 1–10
O : Yes
X : No
21
Page 22

Conversion for Left-Handed Use
If you are left handed, it is possible to configure the HD-1 for you.
Follow these instructions:
* You will need two 50 cm extension cables.
1. Remove both the crash and ride cables from the cymbal
rod, then connect an extension cable to each of them.
Next, switch the connections for these two cables.
2. Switch the cable connections to the Tom1 and Tom2 pads.
3. Remove and switch the positions and connections of the
Tom3 and Hi-Hat pads.
* Pay attention to the angle when attaching tom 3 (p. 18).
4. Switch the cable connections to the KICK and Hi-Hat
CONTROL pedals.
(refer to the set-up instruction sheet if necessary)
22
Page 23

Specifications
HD-1 V-Drums Lite
●
Kit Configuration
Kick Pedal, Snare, Hi-Hat, Hi-Hat Pedal, Tom x 3, Crash, Ride
●
Drum Kits:
10
●
Patterns:
10
●
Controls:
Drum Kit button x 5
Variation button
Metronome button
Volume knob
Tempo knob
●
Metronome:
Tempo (40--220)
Sounds (3 types)
Volume (3 levels)
●
Connectors:
Output jack (Stereo miniature phone type) (*1)
Headphone jack (Stereo miniature phone type)
Mix In jack (Stereo miniature phone type)
MIDI Out connector (5-pin DIN type)
Trigger Cable connector (DB-25 type)
Output Jack can be connected with headphones.
(*1): Output Jack can be connected with headphones.
●
Output Impedance:
Output jack: 100
Headphone jack: 100
Ω
Ω
●
Power Supply:
DC 9 V (AC Adaptor)
●
Current Draw:
300 mA
●
Dimensions:
850 (W) x 560 (D) x 1170 (H) mm
33-1/2 (W) x 22-1/16 (D) x 46-1/16 (H) inches
●
Weight:
15 kg / 33 lbs 2 oz (Excluding AC Adaptor)
●
Accessories:
Owner’s Manual
Set-up Guide
Video Manual (DVD)
AC Adaptor (PSB-1U)
Trigger Cable (Prepositioned in Drum Stand)
Drum Key
Screwdriver
Screws for Sound Module x 4
Screws for Foot Pipe x 4
Roland Sticker
●
Options
Personal Drum Monitor: PM-01
V-Drums Accessory Package: DAP-1
V-Drums Mat: TDM-1
* In the interest of product improvement, the specifications and/or
appearance of this unit are subject to change without prior notice.
23
Page 24

Notation
This is the music notation for the basic 8-beat practice provided on the DVD.
fig.gakufu-trace-2-e
Performers Profile
Crash
Hi-Hat
R : Right hand
L : Left hand
Snare
Kick Pedal
Johnny’s Profile:
Composition performed on the DVD:
DVD- performance/ explanations by Johnny Rabb
Resides in Nashville, TN/USA, is an author, producer, and touring/recording
drummer, performing with top artists worldwide. He has been contributing for
Roland since 2004 as an international V-Drums clinician and product demonstrator.
In the House (copyright © 2007 Johnny Rabb)
24
Page 25

For the U.K.
IMPORTANT: THE WIRES IN THIS MAINS LEAD ARE COLOURED IN ACCORDANCE WITH THE FOLLOWING CODE.
BLUE:
BROWN:
As the colours of the wires in the mains lead of this apparatus may not correspond with the coloured markings identifying
the terminals in your plug, proceed as follows:
The wire which is coloured BLUE must be connected to the terminal which is marked with the letter N or coloured BLACK.
The wire which is coloured BROWN must be connected to the terminal which is marked with the letter L or coloured RED.
Under no circumstances must either of the above wires be connected to the earth terminal of a three pin plug.
NEUTRAL
LIVE
25
Page 26

GR
For EU Countries
26
Page 27

For EU Countries
This product complies with the requirements of European Directive 89/336/EEC.
For the USA
FEDERAL COMMUNICATIONS COMMISSION
RADIO FREQUENCY INTERFERENCE STATEMENT
This equipment has been tested and found to comply with the limits for a Class B digital device, pursuant to Part 15 of the
FCC Rules. These limits are designed to provide reasonable protection against harmful interference in a residential
installation. This equipment generates, uses, and can radiate radio frequency energy and, if not installed and used in
accordance with the instructions, may cause harmful interference to radio communications. However, there is no guarantee
that interference will not occur in a particular installation. If this equipment does cause harmful interference to radio or
television reception, which can be determined by turning the equipment off and on, the user is encouraged to try to correct the
interference by one or more of the following measures:
– Reorient or relocate the receiving antenna.
– Increase the separation between the equipment and receiver.
– Connect the equipment into an outlet on a circuit different from that to which the receiver is connected.
– Consult the dealer or an experienced radio/TV technician for help.
This device complies with Part 15 of the FCC Rules. Operation is subject to the following two conditions:
(1) This device may not cause harmful interference, and
(2) This device must accept any interference received, including interference that may cause undesired operation.
Unauthorized changes or modification to this system can void the users authority to operate this equipment.
This equipment requires shielded interface cables in order to meet FCC class B Limit.
For Canada
NOTICE
This Class B digital apparatus meets all requirements of the Canadian Interference-Causing Equipment Regulations.
AVIS
Cet appareil numérique de la classe B respecte toutes les exigences du Règlement sur le matériel brouilleur du Canada.
Page 28

 Loading...