

Page 1

r
This document contains all information about additions and changes introduced with system versions 2
and 3. Depending on the system version you are currently using, you may only need to read part of this
document.
ENGLISH ENGLISH
OS Version 2. . . . . . . . . . . . . . . . . . . . . . . . . . .2
Playing realistic guitar parts (Guitar mode). . . . . . . . . . . .3
Style Converter . . . . . . . . . . . . . . . . . . . . . . . . . . . . . . . . . . .7
Recording Harmonist and Guitar parts (16-track
Sequencer). . . . . . . . . . . . . . . . . . . . . . . . . . . . . . . . . . . . . .11
Preparations . . . . . . . . . . . . . . . . . . . . . . . . . . . . . . . . . . . . . . . . 11
Melody Intelligence . . . . . . . . . . . . . . . . . . . . . . . . . . . . . .12
Linking MELODY INTELL type selection to the Styles
(Style Melody Intell Link) . . . . . . . . . . . . . . . . . . . . . . . . . . . . . 13
Using the Style Cover function . . . . . . . . . . . . . . . . . . . . .13
Freeze Data . . . . . . . . . . . . . . . . . . . . . . . . . . . . . . . . . . . . . . . . . 13
Volume and status of the Style parts . . . . . . . . . . . . . . . .13
Editing song data using Microscope Edit. . . . . . . . . . . . .14
Song and Style Makeup Tools . . . . . . . . . . . . . . . . . . . . . .14
Before saving your settings . . . . . . . . . . . . . . . . . . . . . . . . . . . 14
Recording Styles from scratch . . . . . . . . . . . . . . . . . . . . . 15
Getting ready for the first track . . . . . . . . . . . . . . . . . . . . . . . 15
Style Track Edit functions . . . . . . . . . . . . . . . . . . . . . . . . .15
Editing individual Style events (Style Micro Edit) . . . . . .15
General notes about STYLE MICRO EDIT . . . . . . . . . . . . . . . . 15
Editing events . . . . . . . . . . . . . . . . . . . . . . . . . . . . . . . . . . . . . . . 15
Other edit operations . . . . . . . . . . . . . . . . . . . . . . . . . . . . . . . . 16
Disk/Media functions . . . . . . . . . . . . . . . . . . . . . . . . . . . . .16
Copying User Program sets to floppy disk. . . . . . . . . . . . . . . 16
Delete. . . . . . . . . . . . . . . . . . . . . . . . . . . . . . . . . . . . . . . . . . . . . . 16
MIDI . . . . . . . . . . . . . . . . . . . . . . . . . . . . . . . . . . . . . . . . . . .17
Miscellaneous . . . . . . . . . . . . . . . . . . . . . . . . . . . . . . . . . . .17
Measure indication in the display. . . . . . . . . . . . . . . . . . . . . . 17
Break Mute function for the ASSIGN SW buttons . . . . . . . . 17
Scale Tuning for Style parts . . . . . . . . . . . . . . . . . . . . . . . . . . . 17
Song/Arranger Start Priority . . . . . . . . . . . . . . . . . . . . . . . . . . 17
OS Version 3. . . . . . . . . . . . . . . . . . . . . . . . . .18
About the G-70’s effects. . . . . . . . . . . . . . . . . . . . . . . . . . 18
Equalizers for the Keyboard parts. . . . . . . . . . . . . . . . . . . . . . .18
Using the Makeup Tools . . . . . . . . . . . . . . . . . . . . . . . . . . . . . . .19
One Touch. . . . . . . . . . . . . . . . . . . . . . . . . . . . . . . . . . . . . . 21
Patches of SRX-series expansion boards . . . . . . . . . . . . . 23
Miscellaneous. . . . . . . . . . . . . . . . . . . . . . . . . . . . . . . . . . . 23
ENGLISH ENGLISH
Page 2

G-70
Music Workstation
OS Version 2
OS Version 2
OS version 2.0 of the G-70 introduces the following enhancements and additions. Some explanations in
this document need to be supplemented with the information in the Version 1.x owner’s manual.
r
2
Page 3
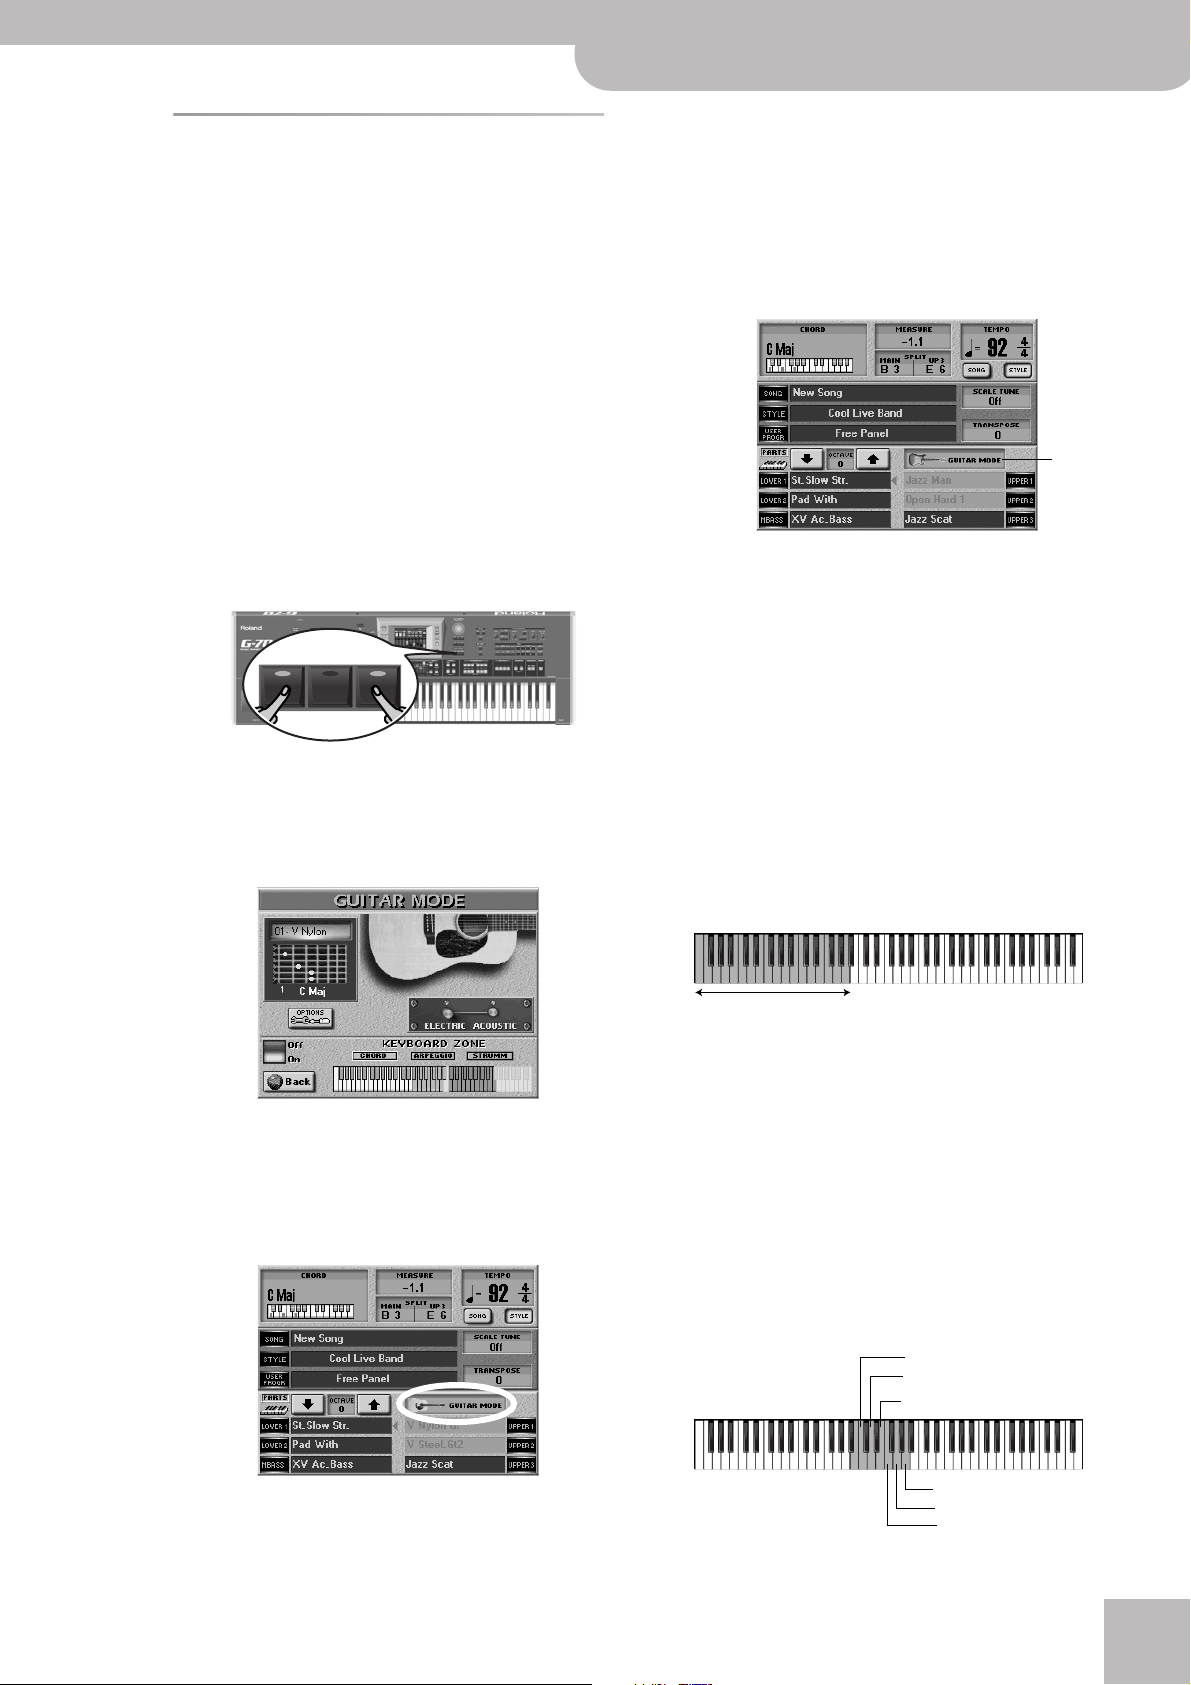
Playing realistic guitar parts
(Guitar mode)
Your G-70 provides a Guitar mode that allows you to
play extremely realistic guitar parts via the keyboard.
As you will see, this mode relies on a special approach,
which is nevertheless very musical and surprisingly logical once you have come to grips with the underlying
principle.
When you activate the Guitar mode, the UP1 part acts
as main guitar, while the UP2 part is used as additional
guitar that doubles the notes of the main guitar part.
This means that, while the Guitar mode is active, UP1
and UP2 cannot be used for other melodic purposes.
Though, with a little practice, you can also use it in
realtime, the Guitar mode will prove invaluable for song
and Style recording.
(1) Simultaneously press the EASY SETTING
[PIANO]
buttons.
ARR ORGAN PIANO
[ARR]
and
G-70 Music Workstation
r
OS Version 2
The UPPER1 field below “GUITAR MODE” shows the
name of the currently selected guitar sound. You
cannot select other guitar sound for UPPER 1 simply
by pressing this field: press the “GUITAR MODE” field
to jump to the page shown above, then change the
settings you don’t like. (UPPER2’s guitar sound is
assigned automatically and can never be changed.)
A
Pressing the A field on the main page takes you to
the GUITAR MODE page. Note that this field can
either contain an electric guitar or an acoustic one to
indicate the kind of instrument you selected.
This field duplicates the function of the EASY SETTING
[ARR]
+
[PIANO]
buttons. (See also below.)
ENGLISH ENGLISH
Note:
You can also select this page by pressing
→ [GUITAR¥MODE]
Guitar mode on using the
. In that case, you may need to switch the
[Off/On]
switch icon (see below).
[MENU]
button
The indicators of these two buttons light and the display changes to:
The
[Off÷On]
switch icon allows you switch the Guitar
mode on or off. If you selected this page by pressing
EASY SETTING
[ARR]
+
[PIANO]
, it is already set to on.
If you now return to the main page by pressing the
[EXIT]
button, the display changes:
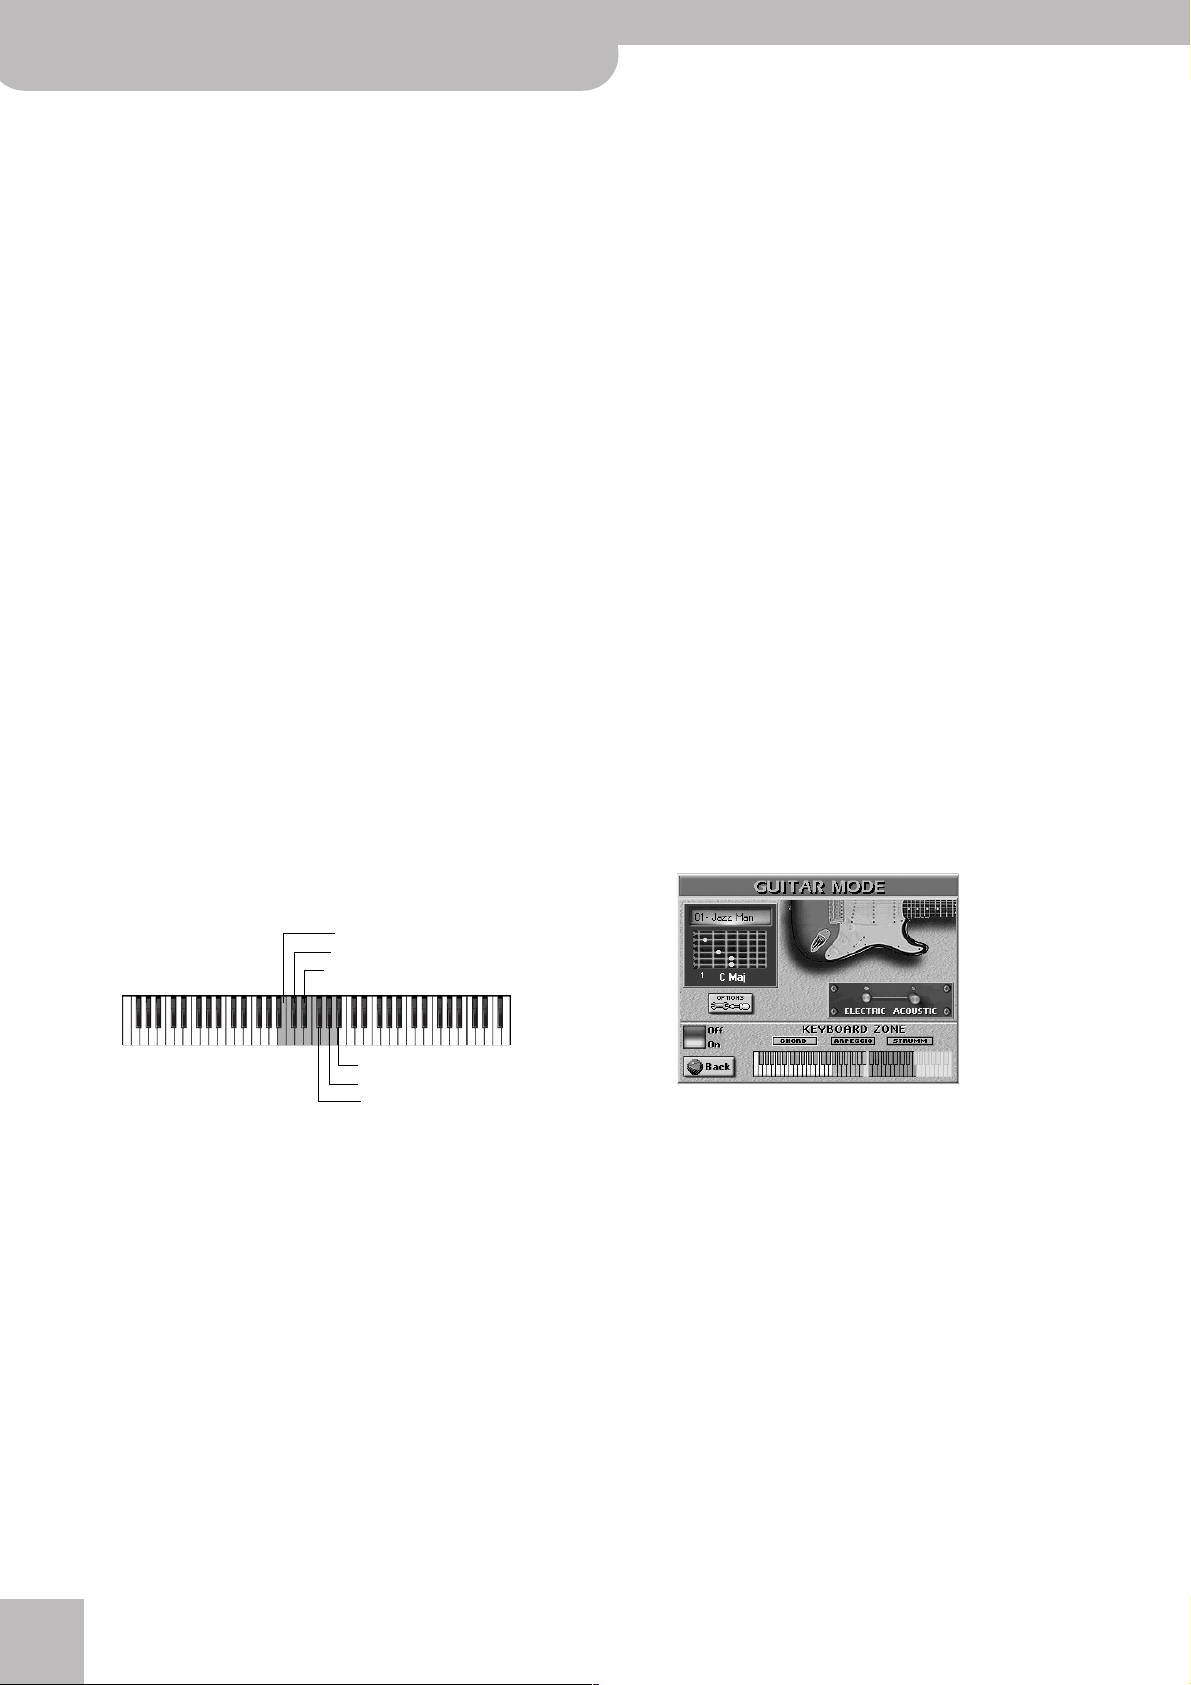
First steps
(2) Press the
specify whether you need an electric or an acoustic
guitar.
Your choice is reflected by the big guitar picture in
the upper right part of the display.
(3) Play a chord in the keyboard area called “CHORD”
in the display.
(You can release those keys right away if you like.)
Note:
“ARPEGGIO” and “STRUMM” areas, see below) also trigger
other Keyboard parts you may have switched on. Depending
on the Keyboard parts you switch on, those keys may play the
MBS, LW2, LW1 (left half) and the UP3 part (right side, in the
Upper3 Split area). Even the Arranger’s chord recognition
remains active.
The notes you play in the “CHORD” area are not
played by the G-70’s Guitar section. They only specify
what you will hear when you…
(4) Press the first “C” key to the right of the “CHORD”
area.
[ELECTRIC]
Play chords here
The keys in the “CHORD” area (unlike the ones of the
or
[ACOUSTIC]
switch icon to
Low E string
A string
D string
ENGLISH ENGLISH
High E string
B string
G string
3
Page 4
G-70
Music Workstation
OS Version 2
This sounds the note a guitarist would play on the
low E string. The key you are pressing now belongs to
the “ARPEGGIO” section.
(5) Now press the “D” to the right of the “C” you used
above.
This sounds the note a guitarist would play on the A
string.
(6) Continue with the “E”, “F”, “G” and “A” keys to
sound the remaining guitar notes for the chord
you specified.
Let us summarize all this: the six keys you have
pressed so far are assigned to the virtual guitar
strings. This allows you to play guitar arpeggios that
use the chord information you supplied in the
“CHORD” area. The exact phrasing of your arpeggios
depends on the order in which you press the keys.
If you start pressing these “string” keys right after
switching on the G-70 (and before specifying a
chord), the Guitar mode sounds the basic pitches of
the six strings (i.e. E-A-D-G-B-E). As soon as you play
a chord in the “CHORD” area, however, the G-70
memorizes and uses it until you play a different
chord.
(7) Play a different chord in the “CHORD” area and
again use the “string” keys (in the “ARPEGGIO”
area) to sound the constituent notes.
Additional ARPEGGIO functions
The keys indicated in the previous illustration correspond to the natural behavior of a guitar. But there are
other things you can do in the “ARPEGGIO” area (most
of these functions involve the black keys of the
“ARPEGGIO” area):
Lowest chord note
Strum down slow (6 strings)
Strum down slow (4 strings)
●
Fifth of the chord (Ab4)—
last chord you specified (the G of a “C” chord, for example). Consider combining it with the next function for
popular guitar licks based on the alternation between
the root and the fifth. (You can also play them together,
of course.)
●
Root of the chord (Bb4)—
key always sounds the root note of the last chord you
specified, i.e. a C for a “C” chord, an E for an “E” chord,
etc.
This key plays the fifth of the
Unlike the B3 or the F#4, this
Leaving the G-70’s Guitar mode
To leave the Guitar mode, press any EASY SETTING
(
[ARR], [ORGAN]
(
[SPLIT]
or
or
[WHOLE]
[PIANO]
) or KBD MODE button
), or the
[Off÷On]
switch icon on the
GUITAR MODE page (to select “Off”).
Alternatively, you can select a User Program that
doesn’t use the Guitar mode.
Selecting guitar sounds
Now that you know how to use some of the Guitar
functions, let’s try these techniques with different
sounds. Additional playing techniques are discussed
under “Using the available STRUMM techniques” on
p. 5.
(1) Simultaneously press the EASY SETTING
[PIANO]
buttons.
Note:
You can also select this page by pressing
→ [GUITAR¥MODE]
Guitar mode on using the
. In that case, you may need to switch the
[Off/On]
switch icon (see below).
The indicators of these two buttons light and the display changes to:
[ARR]
[MENU]
and
button
Root of the chord
Fifth of the chord
Lowest chord note
(1) Play a chord in the keyboard area called “CHORD”
in the display.
(2) Press one of the following keys to use the “effect”
assigned to it:
●
Lowest chord note (B3 & F#4)—
sound the lowest note of the chords you play in the
“CHORD” area. Here’s an example: if you play a “C” chord
using the C-E-G keys, this function sounds a C. If you
play that same chord using G-C-E, this function sounds
a G.
●
Strum down slow (6 strings) (C#4)—
six strings to sound more or less at the same time. Later
on, you will discover there is also a “fast” variety where
all strings are hit almost simultaneously. “Down”, by the
way, means that the simulated plectrum (or thumb/finger) moves from the upper part of the guitar (the low E
string) towards the floor.
●
Strum down slow (4 strings) (Eb4)—
the above, except that only four notes are played.
These keys allow you to
This key causes all
This is similar to
r
4
The
[Off÷On]
switch icon allows you switch the Guitar
mode on or off. If you selected this page by pressing
EASY SETTING
(2) Press the
[ARR]
[ELECTRIC]
+
[PIANO]
or
[ACOUSTIC]
, it is already set to on.
switch icon to
specify whether you need an electric or an acoustic
guitar.
This is an important choice to make, because it determines which guitar sounds can be selected (electric
or acoustic ones).
(3) Select the desired sound (see the upper left corner)
with the
[DATA÷ENTRY]
dial or the
[DEC]/[INC]
but-
tons.
Page 5

G-70 Music Workstation
r
OS Version 2
The possibilities are:
ELECTRIC
01: Jazz Man
02: Open Hard
03: O.H. DstFX
04: Open Hard2
05: O.H.2 OvdFX
06: V Jazz Gtr
07: V Cln Half
08: V Dist. 3
09: V Warm Drv
10: V Power 3
11 Dist Guitar
ACOUSTIC
01: V Nylon
02: V Steel 2
03: V Steel 3
04: V Steel 4
05: V Steel 5
06: V 2 Guitars
07: V Nyl+Steel
08: V Nyl+Stee2
About the chord indications
The GUITAR MODE page contains a
“window” that shows you how the
chords you play on the keyboard are
transformed into guitar chords. The
small numbers refer to the lowest fret
being used. An “x” means that the string in question
doesn’t sound (guitarists sometimes use only four or
three strings for their chords). And finally: the strings
are shown from high E (top) to low E (bottom) – that’s
how guitar tablatures are usually printed. The guitar
neck has therefore been turned upside down.
Using the available STRUMM techniques
While the “ARPEGGIO” area essentially provides functions that allow you to “compose” your own guitar
parts in realtime, the “STRUMM” area contains a series
of presets for various strumming techniques. “Strumming”, as you may know, means that all guitar strings
are played more or less simultaneously using a plectrum or one’s fingers.
All functions discussed below use the chords you specify in the “CHORD” area (see above). Here are the keys
that make up the “STRUMM” section:
C5 F6
Play chords here Select strumming patterns
The keys to the right of the “STRUMM” area can be used
to play the UP3 part. This allows you to alternate
between a guitar part and another instrument. (The
LW1, LW2, and MBS parts can always be played via the
“CHORD” area. The only thing you need to do is to
switch them on.)
Note:
As stated earlier, UP1 and UP2 are not available in Guitar
mode, because they are used as guitar parts.
Note:
The G-70’s Arranger can also be used and controlled while
Guitar mode is active, so that the chords you play with your left
hand are used both by the G-70’s Arranger and its Guitar mode
functionality.
(1) Select the required guitar type (ELECTRIC or
ACOUSTIC) and the desired sound.
See “Selecting guitar sounds”.
(2) Play a chord in the keyboard area called “CHORD”
in the display.
(3) Press one of the following keys to specify how your
virtual guitar should be played.
here
The lowest “STRUMM” key is called “C5”, the black key
next to it “C#5”, etc.
Some of the keys mentioned below produce two
effects: one when you press (“e”) them, another
when you release (“a”) them. Entries without those
symbols are “one-way” and therefore only trigger an
effect when you press them.
● Down fast (C5)—This key causes all six strings to sound
at the same time. This is the fast version of the strumming pattern mentioned earlier. (The slow version can
also be played using the F#5 key.)
● e Down fast/a up fast (C#5)—Pressing this key trig-
gers a fast downward strum. “Down” means that the
simulated plectrum (or thumb/finger) moves from the
lowest to the highest string (i.e. towards the lower part
of the guitar). Releasing this key will trigger an upward
strum (in the opposite direction).
● Up fast (D5)—This key causes all six strings to sound at
the same time, this time from the highest to the lowest
string.
● e Down fast mute/a up fast (Eb5)—Here is another
downward strum that is muted almost instantly when
you press this key. Guitarists achieve this effect by putting their hand on all strings. When you release this key,
your virtual guitar plays an upward strum, which is not
muted.
● e Down fast/a up fast mute (E5)—This is the oppo-
site of the previous pattern: the upward strum is muted,
while the downward is not.
● Down fast mute (F5)—This key triggers a downward
strum that is muted almost instantly.
● Down slow (F#5)—This key yields the same effect as the
C#4 (in the “ARPEGGIO” area).
● Down fast mute + knock (G5)—Here is a more elabo-
rate technique, especially suited for acoustic guitars: a
downward strum that is muted almost instantly and
accompanied by a “knocking” sound.
● Up slow (Ab5)—This is a slow upward strum.
● Down slow mute (A5)—Here’s a slightly slower down-
ward strum that is muted.
● e Down fast 4/a up fast mute 4 (Bb5)—Here again is
a two-way technique. This one, however, only uses the
highest 4 strings.
● Power chords 3 (B5)—This pattern is intended for elec-
tric guitar sounds, usually also with some distortion.
Only the lowest 3 strings are “played”.
● Down fast 4 (C6)—Here’s another downward strum that
only uses the highest 4 strings.
● e Down fast 4/a up fast 4 (C#6)—Again a combined
strumming pattern. Here, too, only the highest 4 strings
are used.
● Up fast 4 (D6)—An upward strum based on 4 strings.
● e Down fast mute 4/a up fast 4 (Eb6)—Again 4 sim-
ulated strings that are strummed in two directions. The
downward strum is muted.
● e Down fast 4/a up fast mute 4 (E6)—This is the
opposite of the previous pattern: here, the fast upward
strum is muted.
● Down fast mute (F6)—And finally a “one-way” pattern
that produces a fast downward strum, which is muted.
ENGLISH ENGLISH
ENGLISH ENGLISH
5
Page 6
G-70 Music Workstation
OS Version 2
Playing question and answer phrases
It is also possible to temporarily “remove” the Guitar
function from the keyboard and to play the UP3 in the
entire right half (i.e. to temporarily deactivate the
ARPEGGIO and STRUMM areas). After some practice,
this should allow you to alternate between a guitar and
another melodic instrument part.
(1) Use the PART ON/OFF buttons to switch on the
part you want to play instead of the Guitar section.
UP3 would be an obvious choice.
(2) While the Guitar mode is active, switch off the
PART ON/OFF [UP1] button.
KEYBOARD PART
TONE ASSIGN
MBS LW 2 LW 1
The EASY SETTING [ARR] and [PIANO] indicators flash
to signal that the Guitar mode is being bypassed.
(3) Play on the keyboard.
Now, the UP3 part sounds (UP1 and UP2 are not
available).
(4) Switch on the PART ON/OFF [UP1] button to restore
the G-70’s Guitar mode and play the next guitar
bit.
To leave the Guitar mode, press any EASY SETTING
([ARR], [ORGAN] or [PIANO]) or KBD MODE button
([SPLIT] or ([WHOLE]), or the [Off÷On] switch icon on
the GUITAR MODE page (to select “Off”).
Alternatively, you can select a User Program that
doesn’t use the Guitar mode.
UP 3 UP 2 UP 1
PART ON/OFF
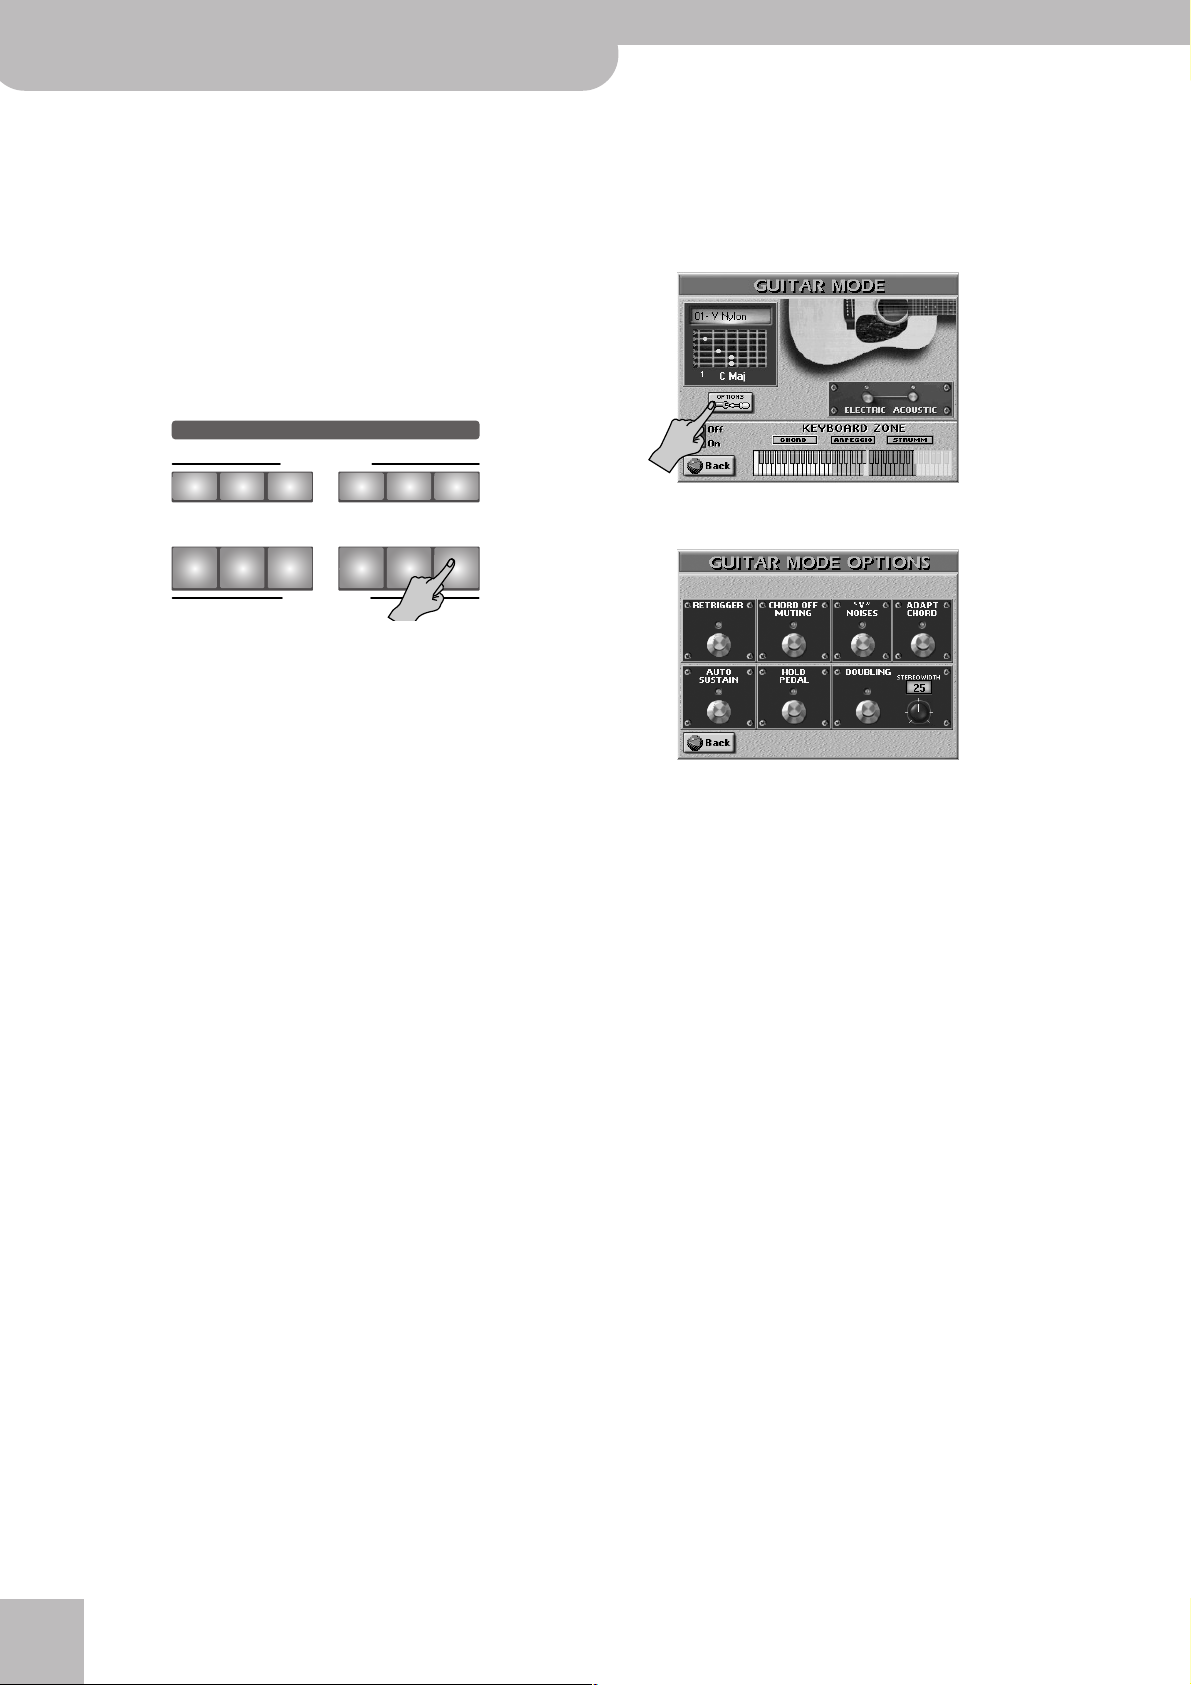
Guitar Mode Options
There are additional functions you can set to fine-tune
your virtual guitar’s behavior. Using the DOUBLING section, you can even add a second guitar sound.
(1) On the “GUITAR MODE” page, press the [OPTIONS]
field.
The display changes to:
(2) Press the switch icon of the parameter you want to
switch on or off. Use the [DATA÷ENTRY] dial (or
[DEC]/[INC] buttons) to set the STEREO WIDTH
parameter.
Here is what the parameters mean and do:
● RETRIGGER—This parameter allows you to specify
whether the arpeggio notes of the key(s) you are pressing in the “ARPEGGIO” or “STRUMM” area are replayed
again when you play another chord in the “CHORD” area.
This function is on by default.
● CHORD OFF MUTING—Switch this function on when
you want to mute the virtual guitar strings by releasing
all keys in the “CHORD” area. That way, your left hand
can be used for occasional “mute” instances whose
effect is similar to the one obtained with any of the
“mute” patterns in the “STRUMM” area.
● “V” NOISES—Guitar parts usually also contain gentle
squeaking and sliding noises. Use this function to add
such noises to your virtual guitar parts (or to switch
them off if you don’t like them).
● ADAPT CHORD—Switch this parameter on if your virtual
guitar should adapt its chord voicings to the inversions
you play in the “CHORD” area. As you know, each chord
can be played in a variety of ways on a keyboard and a
guitar. Though the Guitar mode always voices its chord
in a typical guitar fashion (even when this parameter is
off), you may need even more flexibility than this basic
system can provide. In that case, switch on this parameter and try out different inversions to discover how that
affects your guitar.
● AUTO SUSTAIN—When this function is on (default set-
ting), all guitar notes you trigger using the “ARPEGGIO”
keys have a longer decay. If you switch it off, the notes
are a lot shorter.
r
6
Page 7

● HOLD PEDAL—This function only works if you connect
an optional DP-2, DP-6, or BOSS FS-5U footswitch to the
HOLD FOOTSWITCH socket. The pedal’s behavior depends
on whether [AUTO¥SUSTAIN] is on or off.
When [AUTO¥SUSTAIN] is on, while [HOLD¥PEDAL] is also
on, pressing the Hold pedal temporarily bypasses the
[AUTO¥SUSTAIN] setting, and thus causes the guitar
notes to have a short decay.
If [AUTO¥SUSTAIN] is off, while [HOLD¥PEDAL] is on,
pressing the Hold pedal temporarily produces a normal
Hold/damper effect.
Note: This Hold function is added to the one that allows
you to hold notes played by the active Keyboard parts (MBS,
LW2, LW1 and/or UP3), if they have been assigned to that
footswitch.
● DOUBLING—This section allows you to add a second
guitar to the main guitar part. That added guitar uses
the same sound as your main guitar. The purpose of this
added guitar is to create the impression that the guitar
part is played by two musicians.
● STEREO WIDTH—(0~50) This parameter allows you to
specify the distance between the two guitars in the stereo sound field. The higher the value, the further they
are panned to the left and right sides respectively.
(3) Press the [Back] field to return to the “GUITAR
MODE” page, or the [EXIT] button to return to the
main page.
Note: All GUITAR MODE settings can be written to a User Program and recalled at a later stage.
G-70 Music Workstation
r
OS Version 2
Style Converter
The G-70’s Style Converter is an easy and intuitive tool
for creating your own Music Styles based on one of
your own songs or a Standard MIDI File created by
someone else. In either case, it is enough to play back
the Standard MIDI File once to transfer its data into the
G-70’s song RAM memory where you can use the Style
Converter. You may want to edit the song before converting parts of it into a Music Style.
General considerations
Here are a few guidelines for converting song parts to a
Music Style:
• The Music Style created using the Style Converter can
be used in Arranger mode (not in 16-track Sequencer
mode).
• Music Styles are accompaniment patterns. If the new
Style should be generally usable (i.e. for any song of a
given genre), try avoid chord changes in the “basic”
patterns (MAIN [1]~[4]). Remember that you can
transpose your Styles in realtime by playing different
chords in the chord recognition area. Also, it is usually wiser not to include the melody in your conversion.
• Try to isolate the passages and parts that are really
typical of the song.
• Transitions, rolls, etc., should be converted to Fill-Ins.
The intro should be converted to an Intro pattern.
• For a really professional result, you will also have to
take advantage of the G-70’s Style Composer to
ensure that your new Style also “works” for minor
and seventh chords.
• Though pattern length (and memory capacity) is no
issue, try to work in small but meaningful units.
Here’s an example: most songs rely on a structure
based on 4-measure blocks. Converting 6 measures is
thus a bit odd (though perfectly possible).
• Prepare a simple pattern for MAIN [1] and increasingly complex accompaniments for the remaining
patterns.
• Always set the correct KEY (page 9). Only then will
the Style really work as expected when used with the
G-70’s Arranger.
• Your new Style resides in the G-70 Style RAM memory. Do not forget to save it before selecting another
Style (in Arranger mode) or switching off the G-70.
ENGLISH ENGLISH
ENGLISH ENGLISH
Commercially available Standard MIDI Files are protected by a copyright. Please note that the Style
Converter should only be used to create Music Styles
for private use. Roland assumes no responsibility for
copyright infringements that may result from the
use of the Style Converter.
7
Page 8

G-70 Music Workstation
OS Version 2
Using the Style Converter
(1) Select and load a (different) song.
This is not necessary if you want to use the song you
have just recorded or played back.
In any case, you should listen to it and try to isolate
the eight tracks whose parts should be included in
your new Music Style.
(2) Press the RECORDER [16-TRACK¥SEQUENCER] but-
ton.
16-TRACK
SEQUENCER
The display changes to:
Note: If you assign several song tracks to the same Style track,
a bullet (“●”) appears next to the Style track name in the table
to indicate that the Style track in question is already assigned
to another song track. (Though this is perfectly possible, the
result is usually not convincing.)
If necessary, press the [INIT¥VALUE] field to return to
the default assignments if that produces the best
result after all.
Auditioning the tracks
Press the [Jump≈to≈1st≈note] field to jump to the first
note of the selected song track (the one that appears
on a blue background). Playback starts automatically
from that point and you will hear all song tracks.
Press the RECORDER [PLAY÷STOP¥®÷ª] button to stop
playback (or to start it again).
Note: If the selected track contains no data at all, playback is
started from the very first song measure.
■Muting tracks
Sometimes, it may be necessary to mute certain parts
so as to concentrate on what the other tracks do, and
to decide which tracks should be converted into a
Music Style. To do so, press the [MUTE] field and then
the lines of the song tracks you don’t want to hear.
Such tracks are flagged with an “M”.
Press the [MUTE] field again to switch off the function of the same name.
(3) Press the [STYLE¥CONVERTER] field in the right col-
umn.
(4) You may also have to press the [SETUP] button icon
to select the page shown above (if “CONVERT” is
currently active).
This page allows you to select the song tracks that
should become Style tracks. Remember that a song
may contain up to 16 tracks, while a Music Style
“only” provides eight.
The default assignments of song tracks to the Style
tracks (see the illustration above, last column in the
list) are made automatically. Though based on common sense, they may not yield the desired accompaniment pattern. As a rule, you should always listen
carefully.
(5) To correct one or several of the default assign-
ments, proceed as follows:
• Press one of the green fields to select the Style track.
Those are the tracks that make up your Music style to
be.
• Next, use the [DATA÷ENTRY] dial or the [DEC]/[INC]
buttons to select a song track in the list to the left.
r
■Solo
To listen to one track in isolation, press the [SOLO]
field and the field of the track you want to solo, then
start playback. This mutes all other tracks, while the
selected track is flagged with an “S”.
Press the [SOLO] field again to switch off the function of the same name.
(6) Press the [CONVERT] field to jump to the following
page.
Here, you can listen to the selected tracks, specify
which excerpt should be extracted and set the patterns that should contain the selected data. The most
logical order for proceeding is as follows:
(7) Press the RECORDER [TOP¥|√] button, followed by
[PLAY÷STOP¥®÷ª] to start song playback.
[FWD] and [BWD] are also available for rewinding and
fast-forwarding.
(8) While listening to the song, press the [MARK¥A]
field at the beginning of first measure to be converted, and [MARK¥B] when the G-70 reaches the
last measure you need.
8
Page 9

G-70 Music Workstation
r
OS Version 2
Alternatively, you can stop playback, press the FROM
[A] or [B] “display” field and enter the measure number with the [DATA÷ENTRY] dial or the [DEC]/[INC]
buttons.
(9) Stop playback by pressing [PLAY÷STOP¥®÷ª].
(10) Switch on the [LOOP] button icon.
This function allows you to listen to the selected
excerpt (between [A] and [B]) repeatedly.
That way, you can check whether the last notes of
your pattern-to-be allow for a smooth transition to
other Music Style patterns, or sound natural when
the pattern is repeated. Sometimes, quantizing the
last few notes of an excerpt may be helpful to avoid
including notes that were played a little ahead of the
beat (and therefore sound on the last beat you convert).
(11) Press the RECORDER [PLAY÷STOP¥®÷ª] button to
start playback.
The selected passage is repeated over and over until
you stop playback.
(12) If necessary, use the [MUTE] and [SOLO] fields to
temporarily switch off or isolate certain tracks.
This is only for checking purposes. The on/off status
does not affect the selection that will be converted.
Initializing the Style RAM memory
The [INITIALIZE¥STYLE] field on this page is usually
used only once: before converting the first song
tracks. If you don’t use this field, the tracks you convert are added to the Style data already present in
the G-70’s Style RAM area. If you need to start from
scratch, however (to create an entirely new Style)…
• Press the [INITIALIZE¥STYLE] field.
• Press the [TEMPO] and use the [DATA÷ENTRY] dial or
the [DEC]/[INC] buttons to enter the desired value.
• Press the two TIME SIGNATURE fields (one after the
other) and use the [DATA÷ENTRY] dial or the [DEC]/
[INC] buttons to enter the desired value.
Note: This is your first and last chance to specify the new
Style’s time signature. The only way you can do this is by initializing the Style RAM area. So be sure to set this value before
your very first conversion. (The Style’s time signature can also
be changed using the Style Composer, however, but that forces
you to change modes.)
• After setting everything to your liking, press the
[EXECUTE] field to initialize the Style RAM area.
(Press [CLOSE] to leave this page without initializing
the data in RAM.)
This takes you back to the “CONVERT” page:
(13) Now select the destination pattern, i.e. specify
whether the selected excerpt should become a
MAIN pattern, an Intro, etc.
(14) Press the available “display” fields and use the
[DATA÷ENTRY] dial or the [DEC]/[INC] buttons to
enter the desired value.
The parameters discussed below can be set for each
track and pattern individually. Though flexible, this
system also means that you need to be careful so as
to achieve usable results.
● Key—(C, C#, D, Eb, F, F#, G, Ab, A, Bb, B) Use this parame-
ter to tell your G-70 what key the track (or tracks) is (or
are) in. Specifying the right key before converting the
data is crucial for realtime use of a pattern. The chord
recognition system of the Arranger is indeed based on
the assumption that all patterns are in the key of C.
Thus, whenever you play a C (in INTELLIGENT mode) or a
C chord in the chord recognition area, the G-70 uses the
original notes of the pattern (no realtime transposition).
If that pattern is in F# and if you forgot to tell the G-70
that it is, F# is what you will hear when you play a C or C
chord.
Note: There is no need to specify the key for ADR tracks.
● Tempo (20~250)—Allows you to specify the default
tempo of the Music Style.
● Track (ADrum, ABass, ACC1~6, ALL)—This is where you
can specify the tracks that should be extracted and
turned into a Music Style phrase. In most instances, you
will probably select “ALL”. You could, however, also
extract each track separately.
● Mode—Allows you to select the mode of your pattern:
“Major” (major), “m” (minor) or “7th” (seventh). Choose
the mode that matches the chord being used in the
excerpt. You can also decide to use the same phrase for
all three modes. The G-70 then attempts to transform
them in a musically useful way for the chords you play in
realtime. By selecting an option indicated by “=”, you
create several patterns at once.
● Division—Allows you to specify the pattern type that
should be created: Main 1, Main 2, Main 3, Main 4, Main
ALL, Fill Up1, Fill Up2, Fill Up3, Fill Up ALL, Fill Dw1, Fill
Dw 2, Fill Dw 3, Fill Dw ALL, Intro 1, Intro 2, Intro 3, Intro
4, Intro ALL, End 1, End 2, End 3, End 4 or Ending ALL.
ENGLISH ENGLISH
ENGLISH ENGLISH
9
Page 10

G-70 Music Workstation
OS Version 2
■EXECUTE
(15) After setting everything to your liking, press this
field to launch the conversion.
If you don’t want to convert the Standard MIDI File
phrases into a Music Style, press the [Back] field to
return to the 16-track Sequencer’s main page.
(16) Now save your Music Style:
• Press the [DISK&MEDIA] button.
DISK & MEDIA
The display changes to:
If the selected memory area already contains a Music
Style of that name, you are asked whether it is OK to
overwrite it.
• Press the [YES] field to overwrite the file. This replaces
the Music Style in question with the new version.
• Press the [NO] field to return to the SAVE STYLE page,
change the name, then press [EXECUTE] again.
(18) Press the [EXIT] button to return to the main page.
EXIT
• Press [SAVE], followed by [STYLE].
This page allows you to save the current Style to the
internal memory, a memory card or a floppy disk.
• Press the [INTERNAL¥MEMORY],
[EXTERNAL¥MEMORY], or [FLOPPY] field to select the
area where you want to save the Music Style.
• Enter the name for the file.
If necessary, you can also supply the required COUNTRY and GENRE information for use with the STYLE
FINDER function.
Note: The G-70 supports both upper- and lower-case letters
for file names. Choose whichever is more convenient (or
clearer).
(17) Press the [EXECUTE] field to save the data.
r
10
Page 11

Recording Harmonist and Guitar
parts (16-track Sequencer)
Several new functions have been added to the 16-track
Sequencer environment, the most important being the
possibility to record Vocal Harmonist and Guitar-mode
data.
(1) Press the RECORDER [16¥TRK¥SEQUENCER] button.
(2) Press the [INITIALIZE¥SONG] field.
The display changes to:
■Assigning the Vocal Harmonist to track 16 by
initializing the song RAM memory
The [VOCAL¥HARMONIST…¥ON¥TRACK¥16] field
allows you to decide whether or not the Vocal Harmonist’s settings should be used in your new song.
Switch this button icon on if you want to assign the
Vocal Harmonist to track 16 (in which case track 16
can no longer be used as “regular” track). Otherwise,
leave this parameter in the “Off” position.
To record changes to the Vocal Harmonist (like
switching [ENSEMBLE] on/off), and/or the notes for
the AUTO PITCH part, the VOCODER, etc., select track
16, start recording and do everything you normally
do when you operate the Vocal Harmonist in real
time.
Preparations
(3) Press the RECORDER [REC¥∏] button.
REC
●
The display changes to:
G-70 Music Workstation
r
OS Version 2
(4) Press the [REC¥TRK] field and use the [DATA÷ENTRY]
dial or the [DEC]/[INC] buttons to select the track
you want to record to.
(5) Press the [REC¥TYPE] field and use the
[DATA÷ENTRY] dial or the [DEC]/[INC] buttons to
specify how the track should behave (some are
always “GS tracks”):
Sound (and tone
g
Song parts
Track Track
If you select “GS” (or if
there is no
alternative).
Track REC TYPE
1~3 GS (cannot be changed)
*
4GS
5 GS (cannot be changed)
6 GS*, UP2
7~10 GS (cannot be changed)
11 GS*, LW1**
12 GS*, MBS**
13 GS*, UP3**
14 GS*, LW2**
15 GS*, MELODY INTELL**
16 GS or “VH” (see below)
[*] The track uses a “normal” sound (that is not produced by the
HARMONIC BARS section). This can be an internal sound or a
sound of the SRX-series expansion board you installed.
[**] The track uses the same sound as the Keyboard part it is
linked to. In the case of the UP1, LW1 and MBS parts, this can
also be the corresponding Harmonic Bar part. The important
thing to remember is that whenever you assign a different sound
to the connected Keyboard part, the track in question automatically switches to that sound as well.
● VH—Sets “REC TRK” to “16” and allows you to record
setting changes (including Pitch Bend) as well as the
notes used for generating Vocal Harmonist voicings. This
would allow you to “automate” the Vocal Harmonist’s
behavior.
Note: Your singing is not recorded (because the sequencer
only handles MIDI data).
UP1
generator) of the
selected part.
If you select the corre-
sponding part.
**
KEYBOARD PART/
MELODY INTELL
(6) To record a guitar part onto the selected track (not
available for track 10):
• Press the [GUITAR¥MODE] “display” and use the
[DATA÷ENTRY] dial to select “Acoustic” or “Electric”.
(Select “Off” if you want to use the track for something else.)
• Press the [SETTINGS] field to jump to the GUITAR
MODE page and set up your “guitar”. See page 3 for
details.
• Press the [EXIT] button to return to the REALTIME REC
STANDBY page.
• Skip to step (8).
ENGLISH ENGLISH
ENGLISH ENGLISH
11
Page 12

G-70 Music Workstation
OS Version 2
Note: The “DOUBLING” function (Guitar Mode Options) is not
available here, because only one track can be recorded at any
one time.
(7) Assign the desired sound to the recording track
you selected.
You can play on the keyboard to check whether the
sound matches the mood of the part you wish to
record.
You can select sounds of an SRX-series expansion
board for any track you like. Some boards contain
loops (or grooves) whose tempo is automatically synchronized to the song tempo.
(8) Specify how the data will be added to the track
during recording (REC MODE):
(See the Owner’s Manual for the rest of the procedure.)
Melody Intelligence
This function has become more flexible:
Selecting a Harmony Type also means that the G-70
automatically assigns a suitable sound to the
MELODY INTELL part (e.g. a trumpet and sax sounds
for Big Band, etc.). More specifically, the following
sounds are added to the UP1 part (which also plays
certain “intelligent” melody notes):
Type UP1 sound MEL INT sound
DUET Trumpet Brass 1
ORGAN Chorus Or Chorus Or
COMBO Clarinet Trombone
STRINGS Strings St Slow Str
CHOIR St. Choir Aahs St. Choir Aahs
BLOCK Vibraphone w Piano 1w
BIG BAND Trumpet St.Tenor Sax
COUNTRY Jazz Gt. JC Chorus Gt.
TRADITIONAL The Grand X —
BROADWAY Celesta Theater Org.
GOSPEL Trem. Organ St.Choir Aahs
ROMANCE Strings Nylon StrGt
LATIN The Grand X —
COUNTRY GUITAR Jazz Gt. Nylon StrGt
COUNTRY BALLAD The Grand X —
WALTZ ORGAN Theater Org. Trem.Organ
OCTAVE TYPE 1 The Grand X —
OCTAVE TYPE 2 The Grand X —
If a second sound is available (this depends on the
selected TYPE), the display looks as follows:
(9) If the desired option is not displayed, use the
[PAGE¥1]~[PAGE¥3] fields to select another page.
Note: For “Traditional”, “Latin”, “CntryBallad”, “OctaveType1”
and “OctaveType2”, only the UP1 part is used. All other Melody
Intelligence types use both the UP1 and the MELODY INTELL
part, however.
As shown in the table above, selecting a different
TYPE also means that the sound assigned to the UP1
part changes. Most TYPEs add a second sound to it
(called “2ND TONE”).
(10) Press the blue [2ND¥TONE] field and use the G-70’s
standard procedure to select a different sound for
the additional harmony notes.
Note: This function is not available for TYPEs that provide no
(“—”) MELODY INTELL sound.
Note: While the
panel is off, the 2ND TONE name appears on a gray background (if available). In this state, you cannot select a different
sound. Switch on the
function of the same name) if you need to select another
sound for 2ND TONE.
Note: All MELODY INTELL settings can be written to a User
Program and recalled at a later stage.
[MELODY¥INTELL] button on the front
[MELODY¥INTELL] button (and the
r
12
Page 13

Linking MELODY INTELL type selection to the
Styles (Style Melody Intell Link)
By default, the G-70 automatically loads the MELODY
INTELL type that is suited for the Styles you select. If
you don’t need this automatic selection, here is how to
switch it off:
(1) Press the [MENU] button.
MENU
The display changes to:
G-70 Music Workstation
r
OS Version 2
Using the Style Cover function
A new field has been added to most pages that has the
following function:
Freeze Data
Press this field to “commit” your orchestration changes
and change them to MIDI messages the Style Composer
can read. Changes you don’t commit are ignored by the
Style Composer. Note that “freezing” data is only necessary if you intend to edit a Style using the Style Composer, or to ensure that the settings can no longer be
modified by accident.
ENGLISH ENGLISH
(2) Press the [UTILITY], then the [GLOBAL] field.
(3) Press the [STYLE¥MELODY¥INTELL¥LINK] field to
switch it off. If it is on, the G-70 assigns a suitable
MELODY INTELLIGENCE type to each Style you
select.
(4) Press the [EXIT] button to return to the main page.
Volume and status of the Style
parts
When you press the [STYLE] button below the display,
the following page appears:
• Start Arranger playback (don’t forget to select the
desired pattern), then press the [SOLO] field of the
Style part you want to listen to in isolation.
Only one Style part can be soloed. Pressing another
[SOLO] field causes the corresponding part to be
played back in isolation. This setting cannot be saved:
it is merely meant to help you find the part whose
volume you want to change or that you want to
switch off (see below).
Note: If the Solo function is on while you save a User Program,
all tracks except the soloed one will be set to off, so that only
the soloed track will be audible when you recall the User Program.
ENGLISH ENGLISH
13
Page 14

G-70 Music Workstation
OS Version 2
Editing song data using Microscope
Edit
■Graphic representation of your data (piano roll)
To get a better idea of where your data are located
and how they are distributed, press the field.
The display then changes to:
Except for a (perhaps) clearer representation of the
data on the selected track, all other operations are
the same as in standard view. Press again to
see more values again.
■About the “Note” messages
After selecting the Gate Time entry, pressing the
[DATA÷ENTRY] dial calls up the following pop-up:
Adding notes
If you press the [NOTE] field, the display changes to:
This pop-up window allows you to enter up to 10
notes for each position (see the [BAR], [BEAT] [CPT]
fields). The velocity values of the keys you press are
also adopted.
• To enter chords: press and hold the key of at least
one constituent note, then press the remaining keys.
Any key you press after releasing the keys of notes
already entered in the “table” replaces the “old”
notes.
• Press one of the note icons to specify the duration of
the note(s) shown in the “table”. This is possible both
before and after playing the required note(s) on the
keyboard.
• Press the [EXECUTE] field to confirm your settings
and add the new note (or chord).
Here, you can either set the required length as a CPT
value (q = 120CPT) or use the note icons to avoid
lengthy calculations. The maximum duration a note
event can have is 65,535 clocks.
■CREATE EVENT
Press this button icon to add a new event to the
selected track. The following pop-up appears:
Song and Style Makeup Tools
Changes made to a song or Style using the Makeup
Tools can now be “computed” into that file and therefore become “regular” song or Style data:
Before saving your settings
Before saving your “made-up” song or Style to the
internal memory, a card or a floppy disk, you can (but
you don’t have to) “commit” your changes, thereby
turning them into “regular” song or Style data.
(MAKEUP TOOLS settings are SysEx data only the G-70
understands.)
This may come in handy for two reasons:
• To be able to edit the “final” version of your song or
Style with the 16-track Sequencer, Style Converter or
Style Composer. Those functions ignore the “cosmetic” SysEx data you add using the MAKEUP TOOLS.
• To play back your new song version on another
sequencer or your computer. (The Styles can only be
read by the G-70 anyway.)
To commit your changes, press the [FREEZE¥DATA]
field on any of the pages discussed so far:
r
14
Page 15

G-70 Music Workstation
r
OS Version 2
The display responds with “Operation Complete”
when the data have been converted. Careful: this
operation cannot be undone.
Note: This operation is unnecessary for files you only want to
use with the G-70.
Recording Styles from scratch
The G-70’s Guitar mode also allows you to record guitar
parts for your Music Styles:
Getting ready for the first track
Recording a guitar part
To record a guitar part onto the selected track (only
available for the Accomp tracks):
• Press the [GUITAR¥MODE] “display” and use the
[DATA÷ENTRY] dial to select “Acoustic” or “Electric”.
(Select “Off” if you want to use the track for something else.)
• Press the [SETTINGS] field to jump to the GUITAR
MODE page and set up your “guitar”. See page 3 for
details.
• Press the [EXIT] button to return to the STL
COMPOSER REC STANDBY page.
Note: The “DOUBLING” function (Guitar Mode Options) is not
available here, because only one track can be recorded at any
one time.
● Alteration Mode (Nearest, Degree, ---)—This message
type is only available for melodic Style tracks (i.e. not for
ADrums or ABass tracks). Style tracks you only just
recorded do not contain it. It allows you to use a revolutionary system for adapting the recorded notes to a
more natural behavior (also known as “voicing”). There
are two options:
Degree: This setting refers to the “old” system for realtime conversion of track information during Style playback. Based on the fundamentals of the chords you play
during Arranger playback, it often leads to odd jumps of
certain parts.
Nearest: Refers to a new, more musical, system for realtime shifts of the recorded Style notes during Arranger
playback.
Select “---” if the selected pattern should ignore this setting.
Note: This parameter is not available for: ADrums and ABass
tracks, Intro3 & 4 and End3 & 4 patterns.
Editing individual Style events
(Style Micro Edit)
General notes about STYLE MICRO EDIT
■Graphic representation of your data (piano roll)
To getter a better idea of where your data are located
and how they are distributed, press the field.
The display then changes to:
ENGLISH ENGLISH
ENGLISH ENGLISH
Style Track Edit functions
This section has been expanded:
GLOBAL CHANGE
■INC/DEC
Use these fields to increase or decrease the existing values
for the entire selected track(s).
Except for a (perhaps) clearer representation of the
data on the selected track, all other operations are
the same as in standard view. Press again to
see more values again.
Editing events
■About the “Note” messages
After selecting a Gate Time entry, pressing the
[DATA÷ENTRY] dial calls up the following pop-up:
Here, you can either set the required length as a CPT
value (q = 120CPT) or use the note fields to avoid
lengthy calculations. Use the numeric pad to enter
15
Page 16

G-70 Music Workstation
OS Version 2
the desired duration. Drum parts usually use the Gate
Time value “1” for all notes. Increasing it to “20”, for
example, has no audible effect on the sound durations. The maximum duration a note event can have
is 99,999 clocks, which corresponds to roughly 208
bars.
About “Alteration Mode” messages
Disk/Media functions
Copying User Program sets to floppy disk
It is now also possible to copy User Program sets to
floppy disk (in addition to the internal memory and a
memory card). This applies to the “Copy” function in
Disk/Media mode.
This message type is only available for melodic Style
tracks (i.e. not for ADrums or ABass tracks) and needs
to be inserted by hand (using CREATE EVENT). Style
tracks you only just recorded do not contain it.
Other edit operations
■CREATE EVENT
Press this button icon to add a new event to the
selected track. The following pop-up appears:
Adding notes
If you press the [NOTE] field, the display changes to:
Other changes to this environment are:
Delete
Use these functions to delete the selected User Program Set, MIDI Set “set”, song or Music Style from the
internal memory, a memory card or floppy disk.
(1) If available and necessary, use the sorting func-
tions and/or the Finder.
These functions are only available for songs and
Styles – and only if you select [INTERNAL¥MEMORY]
or [EXTERNAL¥MEMORY].
If you like, you can select several songs or Styles for
deletion by pressing the corresponding lines. Use the
PAGE [√][®] fields to changes pages.
To delete all songs or Styles on the selected media,
press the [ALL¥FILES] field. This disposes of all files on
all pages.
(2) Press the field of the file you want to delete.
(3) Press the [EXECUTE] field.
The display changes to:
This pop-up window allows you to enter up to 10
notes for each position (see the [BAR], [BEAT] [CPT]
fields). The velocity values of the keys you press are
also adopted.
• To enter chords: press and hold the key of at least
one constituent note, then press the remaining keys.
Any key you press after releasing the keys of notes
already entered in the “table” replaces the “old”
notes.
• Press one of the note icons to specify the duration of
the note(s) shown in the “table”. This is possible both
before and after playing the required note(s) on the
keyboard.
• Press the [EXECUTE] field to confirm your settings
and add the new note(s).
r
16
If you selected the DELETE page by accident, press
[NO]. This takes you back to the previously selected
page.
(4) Check again whether you really selected the file
you wanted to delete (if possible), then press the
[YES] field to delete the selected file.
Page 17

G-70 Music Workstation
r
OS Version 2
MIDI
The transmit and receive channels of the Keyboard
parts are set as follows:
Keyboard part Recorder track
UP1 4
UP2 6
UP3 13
LW1 11
LW2 14
MBS 12
MELODY INT 15
VOCAL HARMONIST 16
Note: The VOCAL HARMONIST only transmits and receives setting changes and MIDI note messages. The audio signals it
receives and generates are not converted into pitch information.
MIDI System parameters
V-Harm parameters
The V-HARM parameters allow you to specify
whether or not the Vocal Harmonist should send and/
or receive MIDI messages. If you need this, be sure to
also set the correct MIDI channel.
Miscellaneous
Measure indication in the display
When you press the [INTRO] button…
The Arranger plays the introduction of the currently
selected Music Style. The “MEASURE” field on the
main page now counts backwards (“–4”, “–3”, etc.) to
indicate the Intro’s duration.
When you press the [ENDING] button…
While the Ending phrase is playing, the “MEASURE”
field on the main page counts backwards (“–4”, “–3”,
etc.) to indicate the pattern’s duration.
Break Mute function for the ASSIGN SW buttons
● Break Mute—This function can only be accessed via the
ASSIGN SW button you assign it to. When you press that
button, Arranger playback is muted for the remainder of
the current measure. This is great for rock’n’roll songs.
Scale Tuning for Style parts
On the MENU→ TUNING → SCALE TUNE page…
Press the [STYLE¥PARTS] field if the parts played by
the Arranger should be affected by your Scale Tune
settings.
Song/Arranger Start Priority
ENGLISH ENGLISH
■MIDI TX
● CHANNEL—Use this parameter to assign a MIDI transmit
channel to the Vocal Harmonist part (1~16). If you don’t
want these messages to be transmitted, switch off the
[TX¥ON÷OFF] field. The Vocal Harmonist sends (and
receives) only setting changes and note messages that
serve as harmony indications. The note data of your
singing are not transmitted or received.
■MIDI RX
● CHANNEL—Use this parameter to assign a MIDI receive
channel to the Vocal Harmonist part (1~16). If you don’t
want these messages to be received, switch off the
[RX¥ON÷OFF] field.
ENGLISH ENGLISH
Normally, when you attempt to start Arranger playback
while a song is being played back, the Arranger does
not respond. The same is true when you try to start
song playback while the Arranger is running. That’s
because the [SONG÷ARRANGER¥START¥PRIORITY] function is on and gives priority to the section that is
already running. You can, however, switch this system
off.
In that case, starting Arranger playback while a song is
running will stop the song and launch Style playback. If
the Arranger is running while you press
[PLAY÷STOP¥®÷ª], the song starts and the Arranger
stops.
Note: This switch does not apply when you record using Arranger
backing: there, both sections can work simultaneously.
Note: START PRIORITY also applies to situations where you (try
to) start Arranger playback using the SYNC [START] function.
Sounds on an (optional) SRX-series
wave expansion board
Some boards contain loops (or grooves) whose tempo is
automatically synchronized to the Arranger or song
tempo.
17
Page 18

G-70 Music Workstation
OS Version 3
OS Version 3
OS version 3 of the G-70 introduces the following enhancements and additions. Some explanations need to
be supplemented with the information in the Version 1.x owner’s manual.
(2) Press the [EFFECTS] button to call up the following
About the G-70’s effects
The G-70 contains the following effects processors, not
all of which are available for all sections. Please carefully study the following table:
Section Effects processors Remarks
Keyboard Effects Reverb, Chorus Separate, editable processors.
MFX Only for the Keyboard parts.
EQ Separate for each Keyboard
Style/Song Effects Reverb, Chorus Shared by these two sections,
EQ Separate for each Style/Song
Mastering Tools Equalizer, Compressor Affect all signals transmitted to
Audio Effects IFX Affects the signals received via
Harmonic Bars Overdrive, Vibrato, Rotary
Speaker
VOICE Reverb, Delay, Compres-
sor, Gate
HARMONY Reverb, Delay, Chorus Vocoder, Small, Ensemble
part
but separate from Keyboard
effects.
instrument and each drum
instrument
the MAIN outputs.
the AUDIO IN sockets.
Exclusive to this section.
Talk, Singer, Auto Pitch, Voice
FX
Equalizers for the Keyboard parts
The G-70 provides a set of 3-band equalizers that can
be set for each Keyboard part individually.
The equalizers can be used to refine the sound image by
avoiding unpleasant overlaps in certain frequency
ranges. In other words: the equalizers should mainly be
used to reduce the level of certain frequencies. Conversely, increasing the level of certain frequencies can
be used as an effect.
(1) Press the TONE ASSIGN button (it must light) of
the part whose equalizer you want to set.
KEYBOARD PART
TONE ASSIGN
MBS LW 2 LW 1
● MID FREQ HZ (200~8000Hz)—This parameter allows
you to set the cutoff frequency of the middle band (this
UP 3 UP 2 UP 1
PART ON/OFF
page.
(3) Press the [EQ¥PART¥EDIT] field.
The display changes to:
If you like, you can still switch parts while this page is
displayed. The name of the currently selected Keyboard part is displayed in the upper left corner. The
name of the sound assigned to that part appears
below it. (You can use the TONE ASSIGN buttons to
select a different part if you like.)
(4) Press the [OFF/ON] button icon to the right of the
“display” to switch the equalizer on or off for the
selected part.
(The [EDIT] field indicates that you can change the
parameters on this page. It cannot be switched off.)
(5) Press the field of the parameter you wish to
change.
(6) Set the desired value with the [DATA÷ENTRY] dial or
the [DEC]/[INC] buttons.
● PART VOLUME—This parameter duplicates the VOLUME
parameter on the mixer page. The reason why it’s also
available here is that some equalizer settings may lead to
rather noticeable level drops or hikes.
● HI FREQ HZ (1500, 2000, 3000, 4000, 6000, 8000,
12000)—This parameter allows you to set the cutoff fre-
quency of the high band (this is a shelving filter).
● HI GAIN DB (–15~15dB)—Use this parameter to set the
level of the selected HI frequency. Positive values boost
(increase the volume of) that frequency, negative values
cut (attenuate) it.
is a peaking filter).
r
18
Page 19

G-70 Music Workstation
r
OS Version 3
● MID Q (0.5, 1, 2, 4, 8)—Use this parameter to specify
the width of the MID FREQ band that you want to boost
or cut. Smaller values mean that neighboring frequencies above/below that value are also affected.
● MID GAIN DB (–15~15dB)—Use this parameter to set
the level of the selected MID frequency. Positive values
boost (increase the volume of) that frequency, negative
values cut (attenuate) it.
● LO FREQ HZ (90, 150, 180, 300, 360, 600)—This
parameter allows you to set the cutoff frequency of the
low band (this is a shelving filter).
● LO GAIN DB (–15~15dB)—Use this parameter to set the
level of the selected LO frequency. Positive values boost
(increase the volume of) that frequency, negative values
cut (attenuate) it.
(7) If you like your equalizer settings so much that you
also want to use them for other Keyboard parts,
proceed as follows:
• Set the EQ parameters to your liking.
• Press the [COPY¥VALUES] field.
• Press the TONE ASSIGN button of the Keyboard part
that should use the same settings.
• Press the [PASTE¥VALUES] field to assign the equalizer settings to the newly selected part.
(8) Press the [Back] field to return to the previous
page, or the [EXIT] button to return to the main
page.
Note: Do not forget to save your settings to a User Program if
you want to keep them.
PALETTE
Pressing the [PALETTE] field on any of the MAKEUP
TOOLS pages takes you to the following page where
you can set the most fundamental parameters of the
instruments used by the selected song or Style.
ENGLISH ENGLISH
■Equalizer
• Press the EQUALIZER [ON÷OFF] field to switch the
equalizer on or off for this instrument.
The equalizer can be used to refine the sound image
by avoiding unpleasant overlaps in certain frequency
ranges. Conversely, increasing the level of certain frequencies can be used as an effect.
• Press the EQUALIZER [EDIT] field to change the equal-
izer settings. The display changes to:
ENGLISH ENGLISH
Using the Makeup Tools
General procedure
Here’s how to access the Song and Style instruments’
equalizer. See the owner’s manual for the remaining
functions.
(1) Press the [MAKEUP¥TOOLS] button once or twice.
MAKEUP
TOOLS
SONG
STYLE
This depends on whether you want to change the
settings of the selected song or Style.
(2) Use the [ø][˚] fields in the lower right corner to
select the instrument you want to edit.
The name of the currently selected instrument is displayed in the upper left corner. You cannot select different instruments here, though.
• Press the [OFF/ON] button icon to the right of the
“display” to switch the equalizer on or off for the
selected instrument.
(The [EDIT] field indicates that you can change the
parameters on this page. It cannot be switched off.)
• Press the field of the parameter you wish to change.
• Set the desired value with the [DATA÷ENTRY] dial or
the [DEC]/[INC] buttons.
● INSTR VOLUME—This parameter duplicates the VOLUME
parameter on the PALETTE page. The reason why it’s also
available here is that some equalizer settings may lead to
rather noticeable level drops or hikes.
● HI FREQ HZ (1500, 2000, 3000, 4000, 6000, 8000,
12000)—This parameter allows you to set the cutoff fre-
quency of the high band (this is a shelving filter).
● HI GAIN DB (–15~15dB)—Use this parameter to set the
level of the selected HI frequency. Positive values boost
(increase the volume of) that frequency, negative values
cut (attenuate) it.
● MID FREQ HZ (200~8000Hz)—This parameter allows
you to set the cutoff frequency of the middle band (this
is a peaking filter).
19
Page 20

G-70 Music Workstation
OS Version 3
● MID Q (0.5, 1, 2, 4, 8)—Use this parameter to specify
the width of the MID FREQ band that you want to boost
or cut. Smaller values mean that neighboring frequencies above/below that value are also affected.
● MID GAIN DB (–15~15dB)—Use this parameter to set
the level of the selected MID frequency. Positive values
boost (increase the volume of) that frequency, negative
values cut (attenuate) it.
● LO FREQ HZ (90, 150, 180, 300, 360, 600)—This
parameter allows you to set the cutoff frequency of the
low band (this is a shelving filter).
● LO GAIN DB (–15~15dB)—Use this parameter to set the
level of the selected LO frequency. Positive values boost
(increase the volume of) that frequency, negative values
cut (attenuate) it.
If you like your equalizer settings so much that you
also want to use them for other instruments, proceed
as follows:
• Set the EQ parameters to your liking.
• Press the [COPY¥VALUES] field.
• Press the [Back] field and use the [ø][˚] buttons to
select the instrument that should use the same settings.
• Press the EQUALIZER [EDIT] field to call up the
INSTRUMENT EQUALIZER page.
• Press the [PASTE¥VALUES] field to assign the equal-
izer settings to the newly selected instrument.
• Press the [Back] field to return to the previously
selected page.
■Equalizer
The equalizer on the DRUM INSTR EDIT page applies
to the selected drum instrument only. The little INSTR
EQUALIZER display allows you to select one of the
following options:
Instr The drum instrument uses its own equalizer. Press
the [EDIT] field to set it to your liking.
Global The drum instrument uses the equalizer settings
of the Drum Set it belongs to. See page 19.
Off The drum instrument is not equalized.
This selection can also be made on the “DRUM INSTR.
EQUALIZER” page (see below). There may be times
when you want to compare the version “with” drum
instrument EQ with the version “without” to check
whether you are making any progress.
The G-70 provides two “without” versions: one where
the Drum Set’s equalizer is used (“Global”), and a second where the Drum Set’s equalizer is also bypassed
(“Off”). If you select “Glbl” or “Off”, the [EDIT] field
next to the INSTR EQUALIZER display disappears:
DRUM INSTR EDIT
If the instrument icon to the left of the sound name
depicts a drum kit, you can also press the
[DRUM¥INSTR¥EDIT] field. Doing so takes you to the
following page where you can make more refined
settings for specific instruments of the selected Drum
Set:
This page effectively allows you to reconfigure your
Drum Set (but you cannot select sounds from
another Set).
In this state, you cannot edit the drum instrument’s
equalizer, because you chose to bypass it. Careful,
though: this setting is saved along with the other
song or Style data when you press the [SAVE] field
here.
Note: If you hear no difference between “Glbl” and “Off”, the
Drum Set’s equalizer (on the PALETTE page) is set to [OFF].
If you want to take advantage of the drum instrument’s equalizer and edit it to your liking…
• Press the [Instr.¥Equalizer] display and use the
[DATA÷ENTRY] dial or the [DEC]/[INC] buttons to select
“Instr”.
r
20
Page 21

G-70 Music Workstation
r
OS Version 3
• Press the [EDIT] field to change the equalizer settings.
The display changes to:
The name of the currently selected drum instrument
is displayed in the upper left corner. You cannot
select different instruments here, though.
(The [EDIT] field indicates that you can change the
parameters on this page. It cannot be switched off.)
• Press the field of the parameter you wish to change.
• Set the desired value with the [DATA÷ENTRY] dial or
the [DEC]/[INC] buttons.
● INSTR VOL—This parameter duplicates the VOLUME
parameter on the DRUM INSTR EDIT page. The reason
why it’s also available here is that some equalizer settings may lead to rather noticeable level drops or hikes.
● INSTR EQ—This parameter duplicates the little display in
the INSTR EQUALIZER section of the DRUM INSTR EDIT
page. It allows you to make comparisons and to specify
which equalizer (if any) should be applied to the selected
drum instrument. The various parameter fields (HI FREQ
HZ, etc.) always show the “Instr” settings. They are not
updated when you select “Glbl” (and thus don’t show the
Global equalizer settings), nor do they disappear when
you select “Off”.
● HI FREQ HZ (1500, 2000, 3000, 4000, 6000, 8000,
12000)—This parameter allows you to set the cutoff fre-
quency of the high band (this is a shelving filter).
● HI GAIN DB (–15~15dB)—Use this parameter to set the
level of the selected HI frequency. Positive values boost
(increase the volume of) that frequency, negative values
cut (attenuate) it.
● MID FREQ HZ (200~8000Hz)—This parameter allows
you to set the cutoff frequency of the middle band (this
is a peaking filter).
● MID Q (0.5, 1, 2, 4, 8)—Use this parameter to specify
the width of the MID FREQ band that you want to boost
or cut. Smaller values mean that neighboring frequencies above/below that value are also affected.
● MID GAIN DB (–15~15dB)—Use this parameter to set
the level of the selected MID frequency. Positive values
boost (increase the volume of) that frequency, negative
values cut (attenuate) it.
● LO FREQ HZ (90, 150, 180, 300, 360, 600)—This
parameter allows you to set the cutoff frequency of the
low band (this is a shelving filter).
● LO GAIN DB (–15~15dB)—Use this parameter to set the
level of the selected LO frequency. Positive values boost
(increase the volume of) that frequency, negative values
cut (attenuate) it.
• Set the EQ parameters to your liking.
• Press the [COPY¥VALUES] field.
• Press the [Back] field and use the [ø][˚] buttons to
select the drum instrument that should use the same
settings.
• Press the EQUALIZER [EDIT] field to call up the
INSTRUMENT EQUALIZER page.
• Press the [PASTE¥VALUES] field to assign the equal-
izer settings to the newly selected drum instrument.
• Press the [Back] field to return to the previously
selected page.
If necessary, press the [SAVE] field to save your settings.
One Touch
The easiest way to select suitable Tones for the Keyboard parts while working with the Arranger is by
using the ONE TOUCH feature. The One Touch memories are in fact small User Programs.
(1) Press the desired ONE TOUCH button.
1
There are four One Touch memories per Music Style.
Their settings are included in the Style data themselves and can thus be copied to other G-70 units
simply by copying the Music Style files.
Note: System version 3 no longer recognizes One Touch settings created with earlier versions (2.xx or 1.xx). Such settings
are not loaded along with other data, and discarded when you
update your G-70 to version 3.
Note: One Touch memories usually switch on the SYNC START
function. If you don’t want the Arranger to start as soon as you
play a note or chord, switch off the [SYNC¥START] button.
(2) Select a Music Style and start Arranger playback by
pressing the [START÷STOP] button.
Start playing to the accompaniment. You will notice
that the sounds of all Keyboard parts match the
mood of the selected Style.
(3) Select a different Style and again play a solo line.
The active Keyboard part (probably UP1) now uses a
different sound (even Keyboard parts that are off
change sounds).
(4) Press another ONE TOUCH button to use that reg-
istration.
(5) Press the same button again if you no longer need
the One Touch setting.
ENGLISH ENGLISH
ENGLISH ENGLISH
If you like your equalizer settings so much that you
also want to use them for other drum instruments,
proceed as follows:
21
Page 22

G-70 Music Workstation
OS Version 3
One Touch (details)
You may find yourself using the One Touch function at
regular intervals, because it automates quite a few
tasks. The G-70’s One Touch memories are actually
“miniature User Programs” that go way beyond anything you may know from other arranger instruments.
(1) Press a ONE TOUCH button.
1
There are four One Touch memories per Music Style.
Their settings are included in the Style data themselves and can thus be copied to other G-70 units
simply by copying the Music Style files.
(2) Select a Style and start Arranger playback.
(3) Play a melody to the accompaniment.
You will notice that the sound of the UP1 (or any
other Keyboard part) matches the style and mood of
the selected Style.
(4) Select a different Style and again play a solo line:
the active Keyboard parts now use different
sounds.
(5) Press another ONE TOUCH button.
(6) Press the same button again if you no longer need
the One Touch setting.
As you see, the One Touch memories apply to all Key-
board parts.
Note: If a One Touch memory is active while you recall a User
Program, the One Touch function is switched off.
(2) Press the [WRITE] field (it lights in red).
(3) Press the [1]~[4] field that should contain your new
One Touch settings.
The display now shows the following message:
The target One Touch memory you chose for writing
is automatically selected.
(4) Press the [EXIT] button to return to the main page.
■If you select a One Touch memory while another
one is already active
In that case, the G-70 immediately selects of the settings of that memory and thus changes the registration.
Programming your own One Touch settings
(WRITE)
The G-70 allows you to save your own ONE TOUCH settings for the selected Style. This may come in handy for
CUSTOM Styles for which there are no “presets”.
These customized One Touch settings are stored within
the Styles themselves.
(1) Press and hold a ONE TOUCH [1]~[4] button.
The display changes to:
r
22
Page 23

G-70 Music Workstation
r
OS Version 3
Accessing the ‘Patches’ of SRXseries expansion boards via MIDI
As you will notice, the CC00 value is always “93”. The
CC32 value, on the other hand, depends on (a) the
board you installed and (b) the number of sounds it
contains.
Note: Drum Sets of the SRX-series expansion board use the CC00
value “92”. The CC32 value to use can be found in the documentation that came with the expansion board you installed.
The MIDI standard can only handle 128 program
change numbers, which is why boards with more than
128 Patches use several consecutive CC32 values.
Patches CC00 CC32
SRX-1 1~41 93 00
SRX-2 1~50 93 01
SRX-3 1~128 93 02
SRX-4 1~128 93 03
SRX-5 1~128 93 04
SRX-5 129~256 93 05
SRX-5 257~312 93 06
SRX-6 1~128 93 07
SRX-6 129~256 93 08
SRX-6 257~384 93 09
SRX-6 384~448 93 10
SRX-7 1~128 93 11
SRX-7 129~256 93 12
SRX-7 257~384 93 13
SRX-7 385~475 93 14
SRX-8 1~128 93 15
SRX-8 129~256 93 16
SRX-8 257~384 93 17
SRX-8 385~448 93 18
SRX-9 1~128 93 19
SRX-9 129~256 93 20
SRX-9 257~384 93 21
SRX-9 385~414 93 22
SRX-10 1~100 93 23
SRX-11 1~30 93 24
SRX-12 1~50 93 26
SR-G01 1~76 93 25
Miscellaneous
Electromagnetic radiations
Electromagnetic radiations may cause a deterioration
of audio performances. Such possible deterioration
consists in an audio signal being emitted. On ceasing
the electromagnetic noise, the emission of the audio
signal will simultaneously stop.
Switching the G-70 on/off
After switching off the G-70, be sure to wait 2~3 seconds before switching it back on.
Improved ACV management
Starting with version 3, the G-70 uses an updated version of Roland’s ACV (“Adaptive Chord Voicing”) system.
This version corresponds to the one employed in the
E-80.
Additional Music Assistant registrations
Version 3 now provides more internal Music Assistant
registrations (in excess of 650).
Note: The Styles, Music Assistant registrations, User Programs
and other musical data contained in this instrument or distributed on other media, or in any other electronic way, are the intellectual property of Roland Europe S.p.A. Their use is allowed for
private purposes in combination with Roland Europe S.p.A.’s
products only.
Any use, copying and/or modification for other purposes than the
above is forbidden without prior written consent.
ENGLISH ENGLISH
ENGLISH ENGLISH
Note: If you are using the leaflet supplied with the board to
locate sounds, please see the “Patch List” and “Rhythm Set Key
Assign” lists labeled “For RD-700…”, “RD-series”, or “G-70”.
Note: You can select sounds of an SRX-series expansion board
for any track you like. Some boards contain loops (or grooves)
whose tempo is automatically synchronized to the Arranger or
song tempo.
23
Page 24

G-70 Music Workstation
OS Version 3
r
24
602.00.0202 RES 561-06 Printed in Italy 10-06 G-70 – Addendum Ver. 3.0/2.0 E
 Loading...