

Page 1
The Fantom-X Experience
®ÂØÒňÎ
™
Workshop
© 2005 Roland Corporation U.S.
All rights reserved. No part of this publication may be reproduced in
any form without the written permission of Roland Corporation U.S.
FXWS01
1
1
Page 2
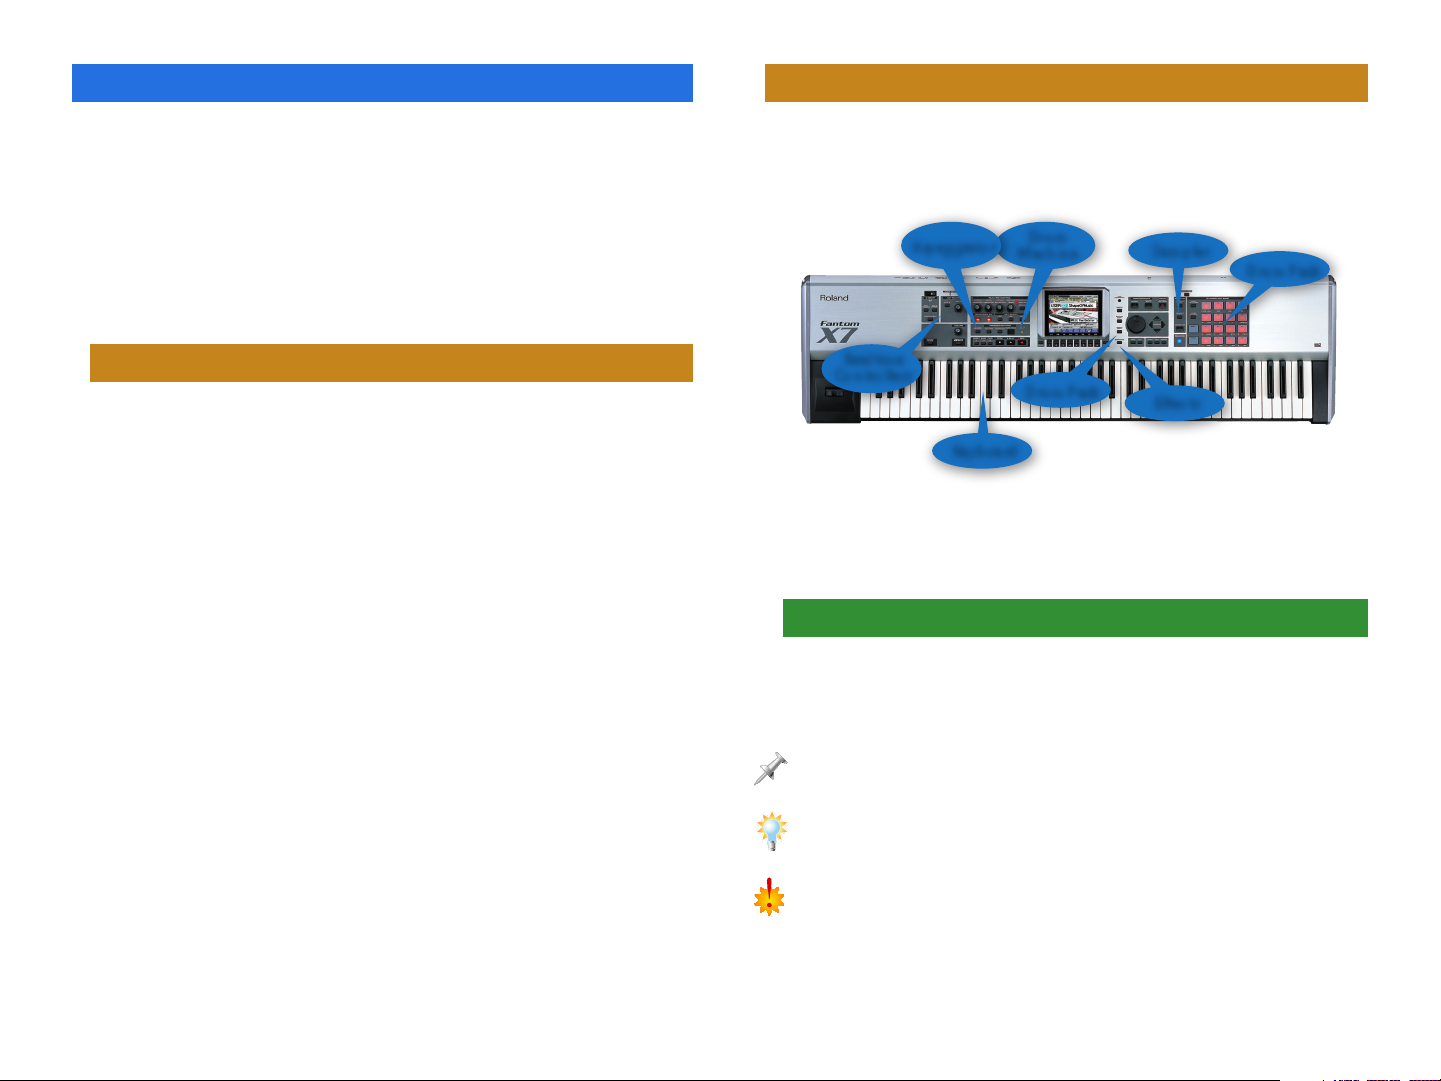
About the Fantom-X Workshop Booklets
%SVN1BET
4BNQMFS
&õFDUT
,FZCPBSE
%SVN
.BDIJOF
"SQFHHJBUPS
3FBMUJNF
$POUSPMMFST
4FRVFODFS
About This Booklet
The Fantom-X Workshop booklets explain some of the exciting
features of Roland’s Fantom-X family of products. Each
Workshop booklet covers a single topic, and is intended as a
companion to the Fantom-X manuals.
This booklet requires Fantom-X O.S. Version 2 or higher. To
learn about the latest Fantom-X software, visit www.RolandUS.
com, or call Roland U.S. Product Support at 323-890-3745.
Other Fantom-X Workshop Booklets
• The Sounds of the Fantom-X—A tour of the Fantom-X
sounds and Patch mode.
• The Rhythms of the Fantom-X—Exploring the pads, drum
sounds, and rhythms of the Fantom-X.
• The Fantom-X Effects—This booklet helps you get the most
out the powerful effects processing in the Fantom-X.
• Sequencing on the Fantom-X—Learn how to record using
the Fantom-X sounds and its full-featured sequencer.
• Sampling on the Fantom-X—Capture loops, vocals, or any
other sound with the Fantom-X’s built-in sampler.
• Smart Storage in the Fantom-X—Learn all about the
Fantom-X’s storage options for samples and other data.
• Performing with the Fantom-X—Splits, layers, realtime
controllers, and more make the Fantom-X hot onstage.
• Making a CD of Your Fantom-X Music—Learn how to turn
your Fantom-X music into a final audio CD.
• Advanced Fantom-X Sequencing Techniques—Learn how
to use time-based effects, create arpeggios, work with
mastering effects, and record realtime patch tweaks.
• Audio Tracks—This booklet explains how to record live
vocals and instruments in your Fantom-X songs.
One of the best things about the Fantom-X is the inspiring way
in which all of its elements come together to make the creative
process such a complete musical experience.
While each of the other Fantom-X Workshop booklets covers
one area in depth, we felt there had to be one that brought all
of the pieces together. That’s what this booklet is about.
Understanding the Symbols in This Booklet
Throughout this booklet, you’ll come across information that
deserves special attention—that’s the reason it includes one
of the following symbols.
A note is something that adds information about the topic at hand.
A tip offers suggestions for using the feature being discussed.
Warnings contain important information that can help you avoid possible
damage to your equipment, your data, or yourself.
Page 3
Getting Ready
You’ll want to listen to the Fantom-X as you go through this
booklet, so plug a pair of headphones into the Fantom-X’s
rear-panel PHONES jack—you’ll need headphones with a 1/4”
plug—or connect the Fantom-X‘s A (MIX) L (MONO) and R
outputs to the left and right inputs, respectively, of your mixer
or other monitoring system.
For more about connecting the Fantom-X to headphones or your audio
system, see your Fantom-X Owner ’s Manual.
You’ll also need to connect the Fantom-X to a grounded AC
power source using the supplied power cord, and then turn
the Fantom-X on, of course.
We’re referring to a patch as simply a “sound” here so we don’t get too
caught up in technical details for now. However, a patch can actually be
an amazingly complex, multi-faceted thing. To learn more about patches,
check out The Sounds of the Fantom-X Workshop booklet.
The Fantom-X also has a Performance mode, designed for working with
multiple patches at the same time, onstage and during recording.
If you’ve already stored some of your own patches in the Fantom-X, the
patch names you see may be different that the ones shown here.
The Basic Fantom-X Tools
Let’s take a moment to get comfortable with the display and
the controls you’ll use to get around on the Fantom-X.
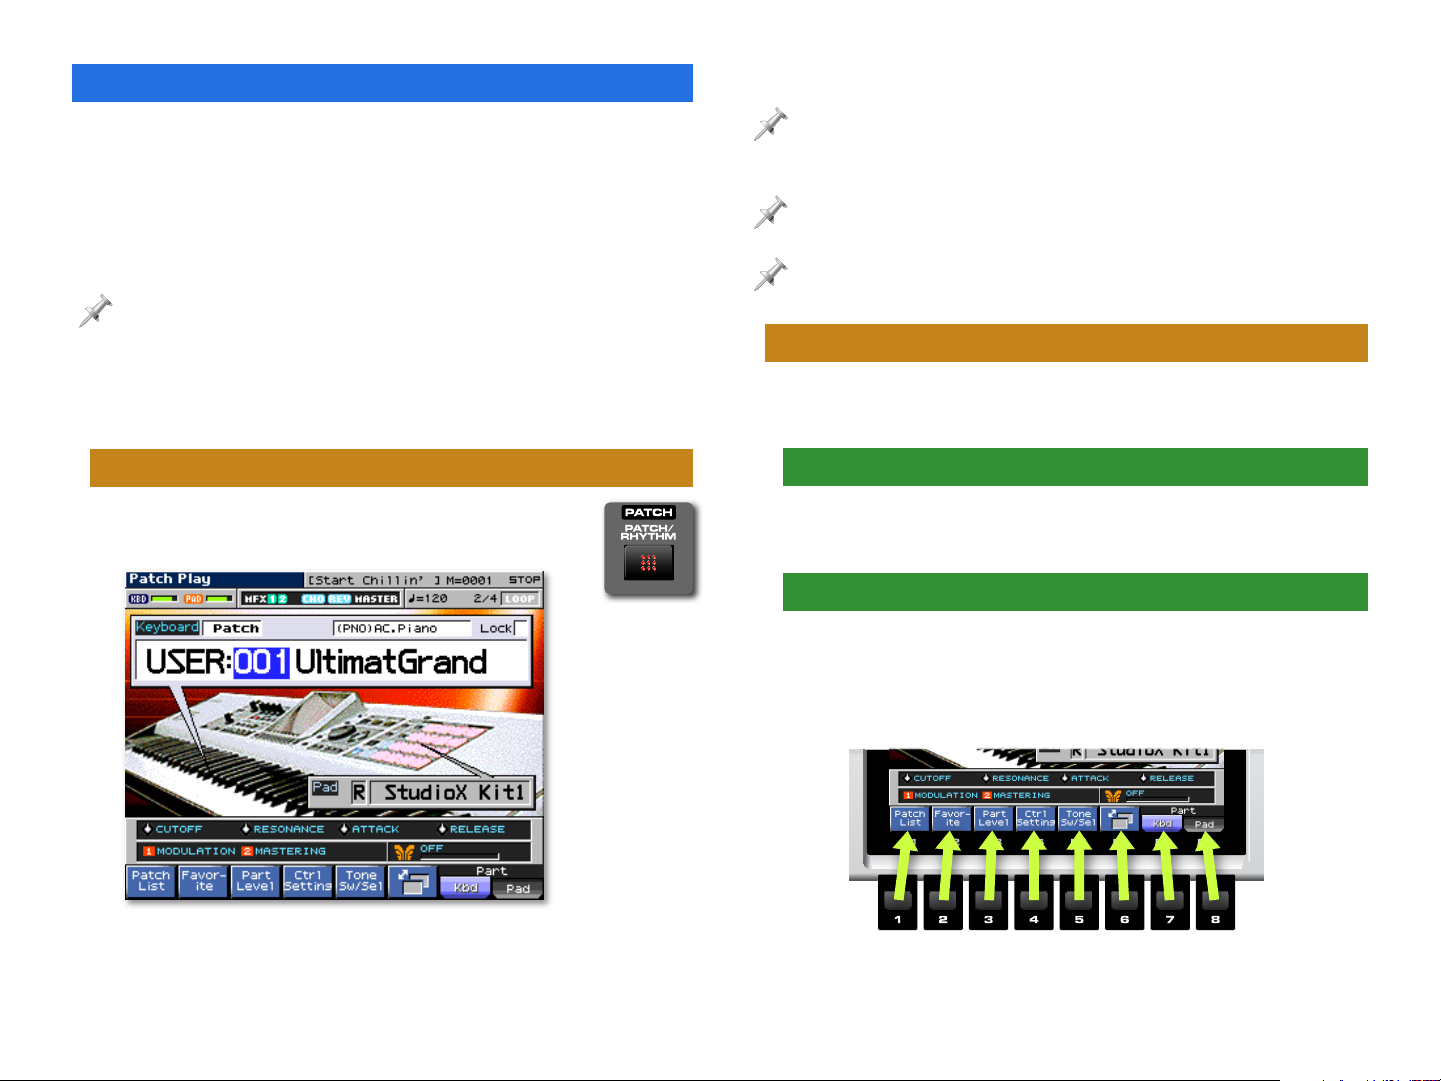
Patch Mode
Press PATCH/RHYTHM. The Fantom-X display
looks like this:
When you press PATCH/RHYTHM, you put the Fantom-X in
“Patch mode,” where you can select and play single patches. A
patch is a Fantom-X sound.
The Fantom-X’s Color Display
The display is your window into all Fantom-X operations,
providing information and constant visual feedback.
The F Buttons
Beneath the display are eight “F buttons,” labeled “F1-F8.” The
buttons interact with what’s on the display, so their functions
change depending on what you’re up to. Each F button’s
current job is shown on the display above the button.
In the Workshop booklets, when we refer to an F button, we
put its current function in parentheses, as in “F1 (Patch List).”
Page 4
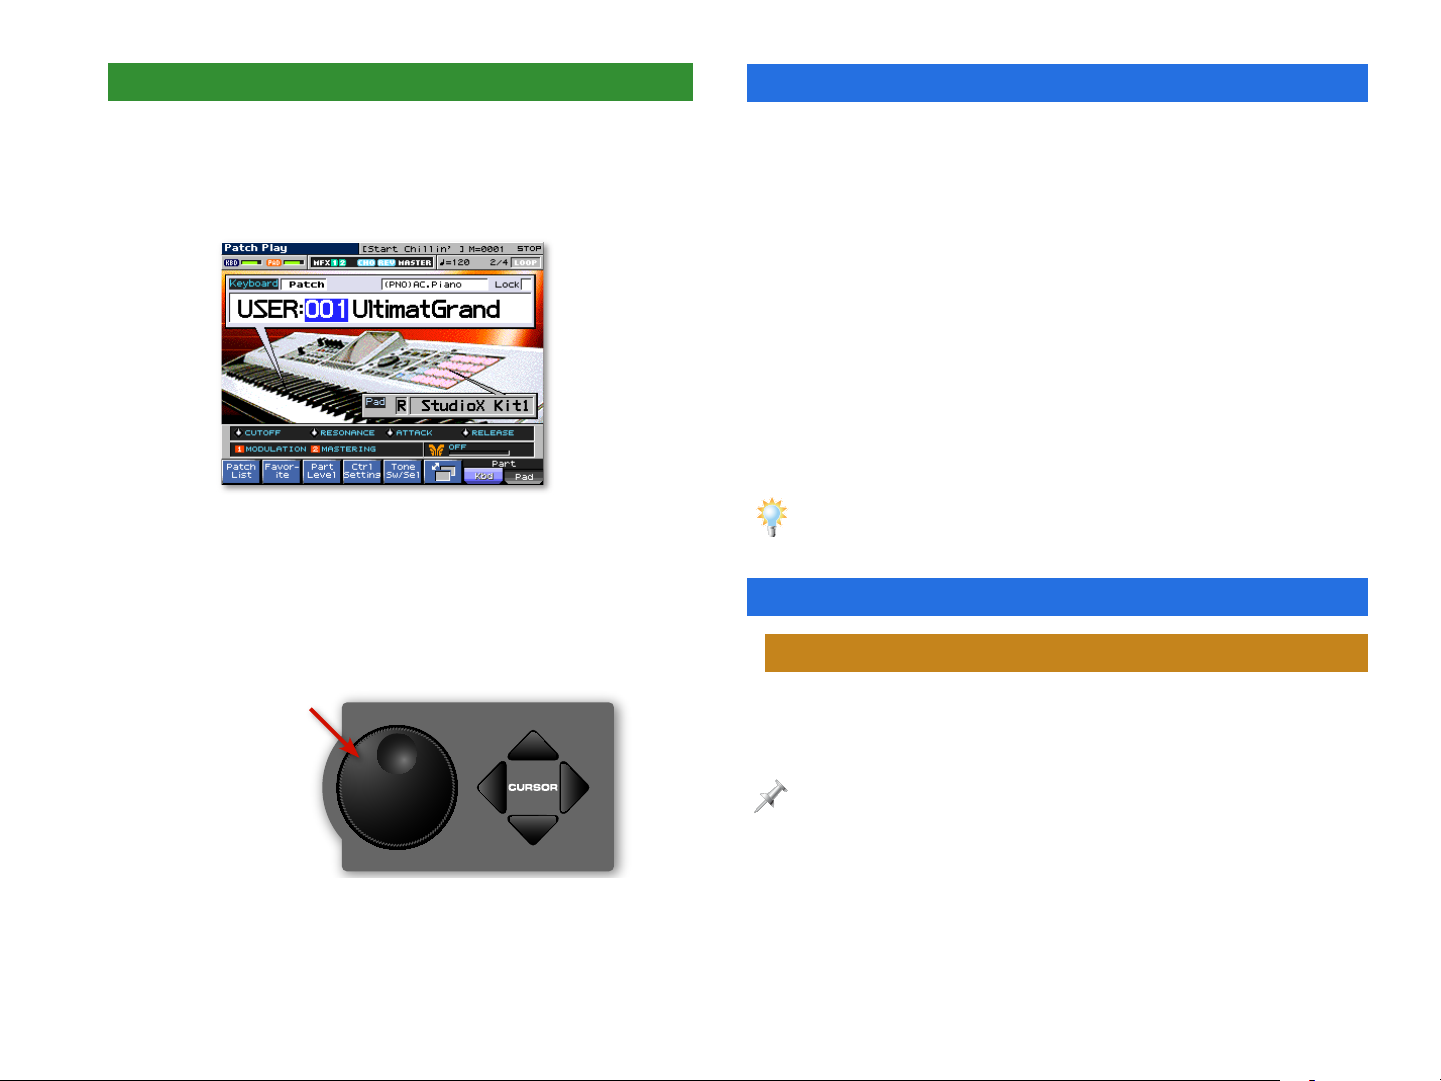
The Cursor Buttons and the VALUE Dial
The Keyboard and Pads
Many Fantom-X displays contain multiple settings, each
of which is called a “parameter.” Before you can change a
parameter’s value, you must select it. When a parameter’s
value is selected, it’s highlighted, as shown here.
Right now, the patch number “001” is highlighted in blue, and therefore selected.
To select a parameter and change its value:
1. Press the appropriate CURSOR 3, 4, 5 and/or 6 button
until the parameter is highlighted.
2. Turn the VALUE dial to choose the desired setting.
The VALUE dial
In a sense, the Fantom-X is like two instruments in one: a
synthesizer and a drum machine, and both of these instruments
are always available. At any time you can:
• play a patch on the keys.
• play a rhythm set on the drum pads.
(If you’ve had your Fantom-X for much more than a few
seconds, you’ve probably already discovered this.)
In Patch mode, the keyboard typically plays a single patch
up and down its entire length. The pads, on the other hand,
typically play a “rhythm set.” A rhythm set is a special type of
patch in which each pad plays its own sound.
If you want, you can play a rhythm set on the keyboard—so that each key
plays a different drum or percussion sound—or play a normal patch on the
pads—so that the same sound plays on all pads, at different pitches.
Selecting Patches and Rhythm Sets
To Select a Patch for the Fantom-X Keyboard
1. Press F7 (Part Kbd) so “Kbd”—in the lower-right-hand
corner—turns light blue on the display if it isn’t already.
We’ll see how these controls work together in a little while.
Nothing changes when you press F7 if the keyboard part was already
selected. In real-world keyboard patch selection, though, the process
begins with this button-press.
2. Press F1 (Patch List). The Patch List display appears, as
shown on the next page.
Page 5

3. Press F2 (↓) and/or F1 (↑) to display the type of patch
you’d like to select.
4. Turn the VALUE dial to select the desired patch.
5. Press F8 (Select) to confirm your choice.
You can also select patches according to the memor y locations in which
they ’re stored. See the Fantom-X Owner’s Manual to learn more.
For the purposes of this booklet, select the Soft Pad category and Patch
USER: 022, named “Motion Pad,” before proceeding.
To Select a Rhythm Set for the Fantom-X Pads
1. Press F8 (Part Pad) so “Pad” turns light blue on the display.
2. Press F1 (Patch List). The Patch List display appears.
3. Press F2 (↓) and/or F1 (↑) to display the desired rhythm
set bank.
The Fantom-X stores factory “preset” patches and rhythm sets—as well
as your own “user” patches and rhythm sets—in groups called “banks.” To
learn more about banks, see the Fantom-X Owner’s Manual.
4. Turn the VALUE dial to select the desired rhythm set.
5. Press F8 (Select) to confirm your choice.
For the purposes of this booklet, select the User bank and Rhythm Set
USER: 001, named “StudioX Kit1,” before proceeding.
A Brief Realtime Detour
The current keyboard patch, “Motion Pad,” responds in
interesting ways to the Fantom-X’s realtime controllers. Press
F7 (Kbd), and then play the keyboard:
• Push the modulation lever located to the left of the
keyboard forward, and then release it to hear how vibrato
can be added to the sound, and then removed.
• Press ASSIGNABLE beneath the D Beam so it lights, and
move your hand up and down over the D Beam to hear
what it does to the pitch of the patch’s various elements.
• In the REALTIME CONTROLLERS area, press the button
beneath “ASSIGNABLE” repeatedly until the ASSIGNABLE
LED lights. Turn the four REALTIME CONTROL knobs as you
play—hear how each changes the sound in some way.
The Fantom-X offers extensive realtime manipulation of its sounds. For
more, see your Fantom-X Owner’s Manual and the Performing with the
Fantom-X Workshop booklet.
Just above the F-button labels, the display shows you what the realtime
controls are currently programmed to do when you light the ASSIGNABLE
buttons for the D Beam and in the REALTIME CONTROL area.
Page 6

Meet the Beats
6. Hit Pad 9 to play its pattern.
The Fantom-X contains a full-featured drum
machine, perfect for jamming and songwriting.
1. Press RHYTHM so it lights.
You’ve turned on the Fantom-X’s built-in beat box.
2. Notice how the top two rows of pads are now dark, while
the other pads remain lit.
When a pad is lit, it plays a drum or percussion sound.
So, why have Pads 9-16 gone dark? When a pad goes dark,
it’s set to play a rhythm pattern.
3. Hit Pad 9—its pattern plays and Pad 9 flashes.
You can press the TEMPO button and turn the VALUE dial to change the
rhythm pattern’s tempo if you like. Set it to 120, and then press F8 (Close)
when you’re done.
7. Press F7 (Part Kbd), and then turn the VALUE dial to select
USER: 001 UltimatGrand.
8. Play along with the pattern on the keyboard. This isn’t just
fun—it’s also often a great way to start writing a song.
9. Jam a bit to find something brief you’d like to record.
10. When you’ve figured out something to record, press Pad 9
to turn off the rhythm.
You can turn off the drum machine altogether by pressing the RHYTHM
button again so it’s not lit.
Clearing the Demo Song
By default, the Fantom-X loads its demo song automatically
when you power up. (If you’d like to hear it now, press the
RESET button to make sure you’re at the top of the song, and
then press PLAY. Press STOP when you’re done listening.)
To record your own song, though, you’ve got to unload the
demo song by clearing it from song memory. Here’s how:
The harder you strike a pad, the louder its rhythm plays.
4. Now strike other unlit pads to hear different patterns.
“Rhythm groups” allow you to assemble collections of rhythm patterns.
There are built-in rhythm groups and you can create your own, as described
in the Workshop booklet The Rhythms of the Fantom-X.
5. Mix and match patterns to create your own rhythm
arrangement—note how the Fantom-X switches between
patterns without losing the beat.
1. Press SONG EDIT to display the Song Edit screen.
2. Press F4 (Song Utility)—the Song Utility menu pops
open.
3. Since Song Clear is already highlighted, press F8 (Select).
4. When the Fantom-X asks if you’re sure you want to
proceed, press F8 (Exec).
You can set the Fantom-X so it doesn’t automatically load the demo at
star tup. See Page 234 of the Fantom-X Owner’s Manual.
Page 7

Recording a New Idea
The Fantom-X is always ready to record when inspiration
strikes. It’s designed to let you record a new idea fast.
1. Press REC, for “RECORD.”
All of the recording-related buttons are grouped together on the Fantom-X panel.
The Realtime Rec Standby window pops open and the
Fantom-X metronome starts playing.
The metronome’s especially handy when you’re not playing along with
a rhythm. (You can also disable it if you prefer, as described in the
Sequencing on the Fantom-X Owner’s Workshop booklet.)
3. Play your keyboard part whenever you feel ready.
4. Once you’ve finished playing, press STOP. That’s it—you’ve
just made a new recording.
5. Press RHYTHM to turn off the rhythm pattern.
6. Press RESET, and then PLAY to hear your new recording.
We didn’t want to distract you earlier, but when the Realtime Recording
window is open, you can rehearse without recording. Once you’ve made
a recording, tools in this window also allow you to erase notes and other
things in realtime, and re-record, or “punch in,” anything you’d like to
fix. These tools are described in the Workshop booklet Sequencing on the
Fantom-X.
Undoing Your Work
If you’d like to start over again, you can “undo” your recording.
1. Press MENU—a menu pops open in which UNDO/REDO is
already selected.
The parameters in the Realtime Rec Standby window allow you to
customize your recording session in a variety of ways. These parameters are
explained in the Workshop booklet Sequencing on the Fantom-X.
Set the Count In parameter to WAIT NOTE so recording
doesn’t begin until we start our rhythm again. Ready?
2. Strike Pad 9—the rhythm starts playing and recording
begins. The Realtime Recording window opens.
Page 8

2. Press ENTER.
Got a Mic, Guitar, or Bass?
For this section, you’ll need a mic—with a 1/4” plug or an XLRto-1/4” line-matching transformer—an electric guitar, or bass.
3. Press F8 (Exec) to complete the Undo procedure.
4. Now that you’re back to Square One, press RHYTHM and
hit Pad 9 to resume playback of your rhythm pattern, and
then repeat the steps in “Recording a New Idea.”
About What You’ve Just Recorded
The Fantom-X recorded your playing in its “sequencer.” A
sequencer captures MIDI data that the keyboard and rhythm
section produce. When it plays back this data, your performance
is reproduced. You haven’t yet actually recorded any audio.
You can do all sorts of things to refine your music by editing
this captured MIDI data. You can fix the timing of your
performances, add or remove notes, and much more.
Once you’ve recorded something, you can move over to the
PERFORMANCE area to add more tracks. See the Sequencing on
the Fantom-X Workshop booklet to learn more about recording
sequence tracks.
Recording an Audio Track
The Fantom-X—as of its Version Two software—can also record
audio tracks into its sequencer. An audio track may capture:
If you don’t have a mic, guitar, or bass handy, you can just read along or
skip to the next section.
1. On the Song Edit screen, press F3 (Audio Track) to display
the Audio Track Edit screen—this is where you record
audio tracks.
Audio tracks also have their own mixer screen, which you can see by
pressing F1 (Audio Mixer). Press F2 (Audio Edit) to return to the Audio Edit
screen before proceeding.
2. Plug your mic or instrument into the
Fantom-X’s L/MONO/MIC input.
Now we’ve got to let the Fantom-X
know the input you’re using.
• singing—into a microphone (or “mic”) plugged into the
Fantom-X.
• an instrument—connected to the Fantom-X.
• any other sound—played into a mic.
Let’s add an audio track to our sequenced recording.
3. Hold down SHIFT and press the MIX
IN button.
Page 9

The Input Setting screen appears.
This screen has lots of input options, but for now, we’re just
interested in one of its parameters.
9. Press F8 (Start) to begin the two-measure countoff.
10. After the countoff, starting singing or playing your guitar
or bass.
11. When you’re done, press STOP—the Audio Rec Sample
Assign window pops open.
12. Press F8 (Assign) to complete the audio track recording
process.
13. Press RESET and then PLAY to hear your new recording.
4. Set Input Select to MICROPHONE, and then press the EXIT
button.
5. Press the MIX IN button once more so it lights to turn on
your input.
6. Make some noise—sing into the mic or play
your instrument—and turn the EXT SOURCE
LEVEL knob up as high as possible without
causing its red PEAK indicator to light.
7. Press the RESET button to return to the top of your song.
Now we’re ready to record.
8. Press REC—the Audio Rec Standby window opens.
It’s pre-set to give you a two-measure—or eight-beat—
countoff before recording begins. Ready?
To learn about audio recording in detail, see the Fantom-X Audio Tracks
Workshop booklet.
The Arpeggiator
The Fantom-X’s built-in arpeggiator produces repeating note
patterns called “arpeggios.” These repeating lines can provide
the basis for dance grooves, or supply texturing to any other
kind of music. The arpeggiator is also great for producing
automatically-generated, smart bass lines for any chord.
Before we check out the arpeggiator, turn VALUE to select
User: 001 UltimateGrand again.
1. Press ARPEGGIO so it lights.
Page 10

2. Hold down a handful of notes on the keyboard—listen to
how the arpeggiator takes the notes you’re playing and
uses them in the currently selected arpeggio.
3. Let go of the keys.
4. Hold down SHIFT and press ARPEGGIO to display the
Arpeggiator editing screen.
On this screen, you can select a different arpeggio—
referred to as a “style”—or even create your own.
5. If the Style parameter isn’t highlighted, press 5 until it is.
6. Hold down some notes on the keyboard with one hand.
7. While you’re holding down the notes, turn the VALUE dial
to select different arpeggio styles. Listen to how they can
do many different things with the same notes.
8. When you’re done experimenting, press ARPEGGIO once
more to turn off the arpeggiator.
Skip Back Sampling
As you probably know, the Fantom-X contains a powerful
sampler. What you may not know is that it’s always listening to
what you do on the Fantom-X.
This means that you never need lose a sudden flash of
musical brilliance again. When you’ve just played something
unexpected and great, the Skip Back Sampling can easily
retrieve it for you as a new sample.
1. Select a patch you’d like to play.
2. Play anything you like on the keyboard, for about 10
seconds.
3. Press the blue SKIP BACK SAMPLING
button. The Fantom-X goes back in
time and creates a new sample from
the last 10 seconds of your playing.
The arpeggiator uses the same tempo as the Fantom-X rhythm patterns and
sequencer, so when you use the sequencer, rhythms, and the arpeggiator
together, they automatically stay perfectly in time with each other.
To learn about using the arpeggiator with the Fantom-X sequencer, check
out the Advanced Fantom-X Sequencing Techniques Workshop booklet.
Skip Back Sampling can be pre-set to grab anywhere from the last 5 to 40
seconds of music. 10 seconds is the default setting.
4. When the Fantom-X has captured your sample, it displays
the Skip Back Preview screen where you can see the newly
captured sample.
Page 11

5. Press F8 (Preview) to hear your new sample.
6. Use the F1 and F2 Start Beat buttons to find the front of
the music you played, pressing F8 (Preview) to hear where
you are.
This is especially easy if you played along with a rhythm.
7. Use the F3 and F4 End Beat to find the end of your idea.
The Skip Back Preview screen’s F6 (Assign KB/Pad) and F7
(Assign Audio) buttons offer you the option of sending your
Skip Back sample to:
The End
We hope you’ve enjoyed this brief tour of the Fantom-X.
Check out its other Workshop booklets, as well your
Fantom-X Handbook, Owner’s Manual, and the Audio Track
Expansion guide. We’re confident you’ll have a great time with
the powerful, inspiring Fantom-X.
For the latest Fantom-X updates and support tools, visit the Roland U.S.
Web site at www.RolandUS.com. If you need personal assistance, call our
amazing Product Suppor t team at 323-890-3745.
• the keyboard—to play it in a patch.
• a pad—to play it as part of a rhythm set.
• an audio track—to add it to your current song.
You can trim your Skip Back sample to save space in the Fantom-X’s sample
memory. To learn how to edit samples, see the Sampling on the Fantom-X
Workshop booklet.
Skip Back sampling captures not only the sound produced by keyboard, but
your rhythms and arpeggios as well.
To avoid losing a sample when you turn off the Fantom-X, you must save it.
To learn how to save a sample, see the Sampling on the Fantom-X Workshop
booklet.
 Loading...