

Roland F120R Owner’s Manual
r
Owner‘s Manual
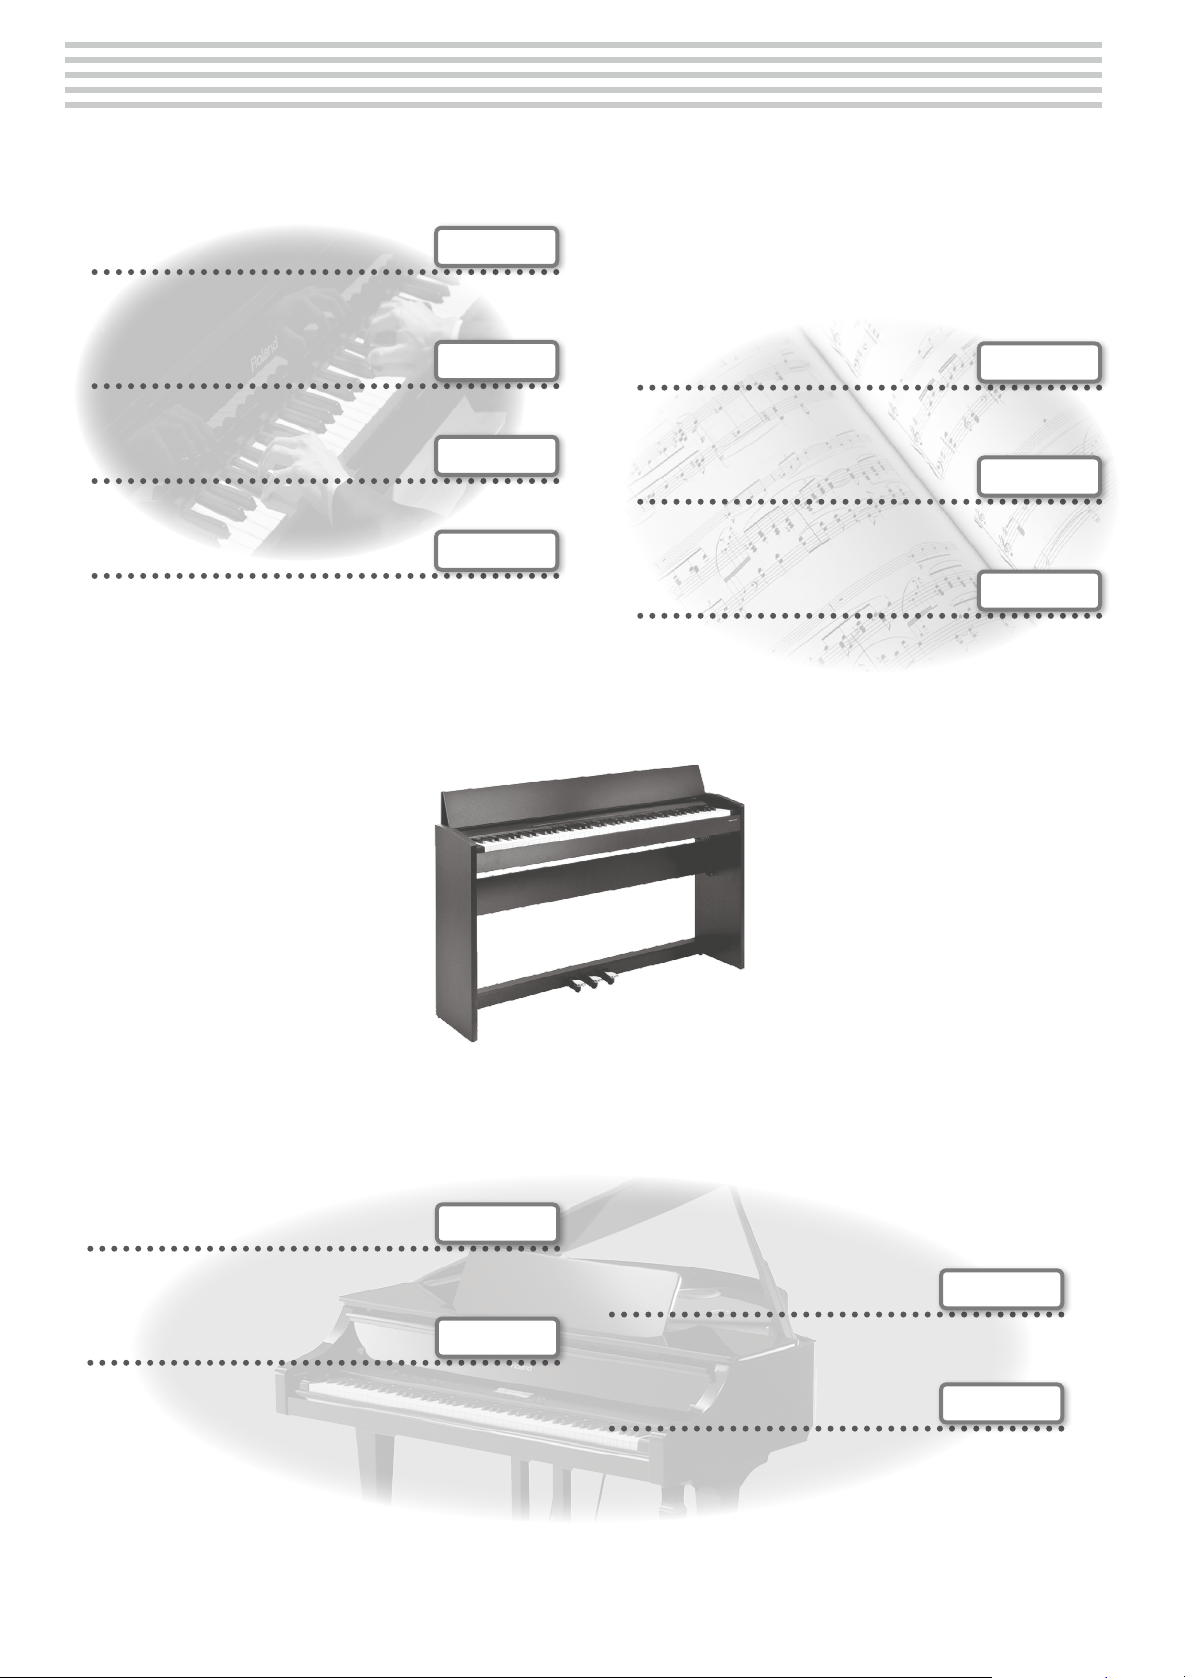
Look What You Can Do!
Play the Piano
Play using various sounds
This unit contains a wide variety of tones (sounds).
You can freely select and perform using these tones.
Play with an accompaniment
The F-120R can supply accompaniments for the music you play.
Sound a metronome
You can sound a metronome.
Play duets
You can divide the keyboard into left and right halves, playing
it as though it were two pianos.
g p. 9
g p. 15
g p. 9
g p. 10
Play and Record Songs
Play the built-in songs
This unit contains numerous built-in songs.
For the song titles, refer to “Internal Song list” (p. 33).
Play back individual parts
You can practice along with a song while listening to only the
right-hand or left-hand part play back.
Record your performance
You can record your own performances.
g p. 13
g p. 14
g p. 19
Personalize your Piano
Adjust the keyboard touch
You can adjust the touch sensitivity of the keyboard to match
your own playing style.
Add reverberation
You can add reverberation (reverb) to create the sensation of
performing in a concert hall.
Copyright © 2012 ROLAND CORPORATION
All rights reserved. No part of this publication may be reproduced in any form without the written permission of ROLAND CORPORATION.
2
g p. 12
g p. 12
Adjust the brightness
You can adjust the tone quality of the sound, ranging from a
brilliant timbre to a mellow tone.
Shift the keyboard pitch
You can use the Transpose function to transpose the
keyboard in semitone steps.
g p. 12
g p. 10
Contents
Look What You Can Do! . . . . . . . . . . . . . . . . . . . . . . . . . . . . . . . . . . . . . . . . . . .2
Panel descriptions . . . . . . . . . . . . . . . . . . . . . . . . . . . . . . . . . . . . . . . . . . . . . . .4
Front Panel . . . . . . . . . . . . . . . . . . . . . . . . . . . . . . . . . . . . . . . . . . . . . . . . . . . . . .4
Rear panel connections. . . . . . . . . . . . . . . . . . . . . . . . . . . . . . . . . . . . . . . . . .7
Before You Play . . . . . . . . . . . . . . . . . . . . . . . . . . . . . . . . . . . . . . . . . . . . . . . . . .8
Opening/closing the lid . . . . . . . . . . . . . . . . . . . . . . . . . . . . . . . . . . . . . . . . .8
Turning the power on/o . . . . . . . . . . . . . . . . . . . . . . . . . . . . . . . . . . . . . . . .8
Performing . . . . . . . . . . . . . . . . . . . . . . . . . . . . . . . . . . . . . . . . . . . . . . . . . . . . . .9
Selecting tones . . . . . . . . . . . . . . . . . . . . . . . . . . . . . . . . . . . . . . . . . . . . . . . . .9
Using the metronome . . . . . . . . . . . . . . . . . . . . . . . . . . . . . . . . . . . . . . . . . . .9
Changing the tempo . . . . . . . . . . . . . . . . . . . . . . . . . . . . . . . . . . . . . .9
Changing the Beat . . . . . . . . . . . . . . . . . . . . . . . . . . . . . . . . . . . . . . . .9
Changing the key of the keyboard (Transpose) . . . . . . . . . . . . . . . . . 10
Dividing the keyboard into two instruments (TwinPiano) . . . . . . . 10
Disabling the Buttons (Panel Lock) . . . . . . . . . . . . . . . . . . . . . . . . . . . . . 11
Adjusting the keyboard sensitivity and the sound . . . . . . . . . . . . . . . 12
Adjusting the Keyboard Sensitivity (Key Touch) . . . . . . . . . . . . . . . . . 12
Adding Reverberation to Sounds (Reverb Eect) . . . . . . . . . . . . . . . 12
Adjusting the Brilliance of the Sound . . . . . . . . . . . . . . . . . . . . . . . . . . 12
Playing back songs . . . . . . . . . . . . . . . . . . . . . . . . . . . . . . . . . . . . . . . . . . . . . 13
Playing parts (left/right hand) separately . . . . . . . . . . . . . . . . . . . . . . . 14
Playing back an audio le with its central sound minimized
(Center Cancel) . . . . . . . . . . . . . . . . . . . . . . . . . . . . . . . . . . . . . . . . . . . . . . . . 14
Sounding a count before playback . . . . . . . . . . . . . . . . . . . . . . . . . . . . . 14
Copying song les . . . . . . . . . . . . . . . . . . . . . . . . . . . . . . . . . . . . . . . . . . . . . 26
Deleting Song les . . . . . . . . . . . . . . . . . . . . . . . . . . . . . . . . . . . . . . . . . . . . . 26
Initializing the memory (Format Media) . . . . . . . . . . . . . . . . . . . . . . . . . 27
Making the power automatically turn o after a time (Auto O) . . 27
Restoring the settings to the factory condition (Factory) . . . . . . . . . 28
Troubleshooting . . . . . . . . . . . . . . . . . . . . . . . . . . . . . . . . . . . . . . . . . . . . . . . 29
Message list . . . . . . . . . . . . . . . . . . . . . . . . . . . . . . . . . . . . . . . . . . . . . . . . . . . 30
Main specications . . . . . . . . . . . . . . . . . . . . . . . . . . . . . . . . . . . . . . . . . . . . 31
Tone List . . . . . . . . . . . . . . . . . . . . . . . . . . . . . . . . . . . . . . . . . . . . . . . . . . . . . . 32
Internal Song list . . . . . . . . . . . . . . . . . . . . . . . . . . . . . . . . . . . . . . . . . . . . . . . 33
Internal Rhythm list . . . . . . . . . . . . . . . . . . . . . . . . . . . . . . . . . . . . . . . . . . . . 34
Using the unit safely . . . . . . . . . . . . . . . . . . . . . . . . . . . . . . . . . . . . . . . . . . . 35
Important notes . . . . . . . . . . . . . . . . . . . . . . . . . . . . . . . . . . . . . . . . . . . . . . . 36
Assembling the F-120R . . . . . . . . . . . . . . . . . . . . . . . . . . . . . . . . . . . . . . . . . 38
1. Stand assembly . . . . . . . . . . . . . . . . . . . . . . . . . . . . . . . . . . . . . . . . . . . . . 38
2. Assembling the Piano . . . . . . . . . . . . . . . . . . . . . . . . . . . . . . . . . . . . . . . 39
Index . . . . . . . . . . . . . . . . . . . . . . . . . . . . . . . . . . . . . . . . . . . . . . . . . . . . . . . . . . 40
Using the Rhythm function . . . . . . . . . . . . . . . . . . . . . . . . . . . . . . . . . . . . . 15
Structure of the Rhythm accompaniments . . . . . . . . . . . . . . . . . . . . . 15
Playing back a rhythm . . . . . . . . . . . . . . . . . . . . . . . . . . . . . . . . . . . . . . . . . 15
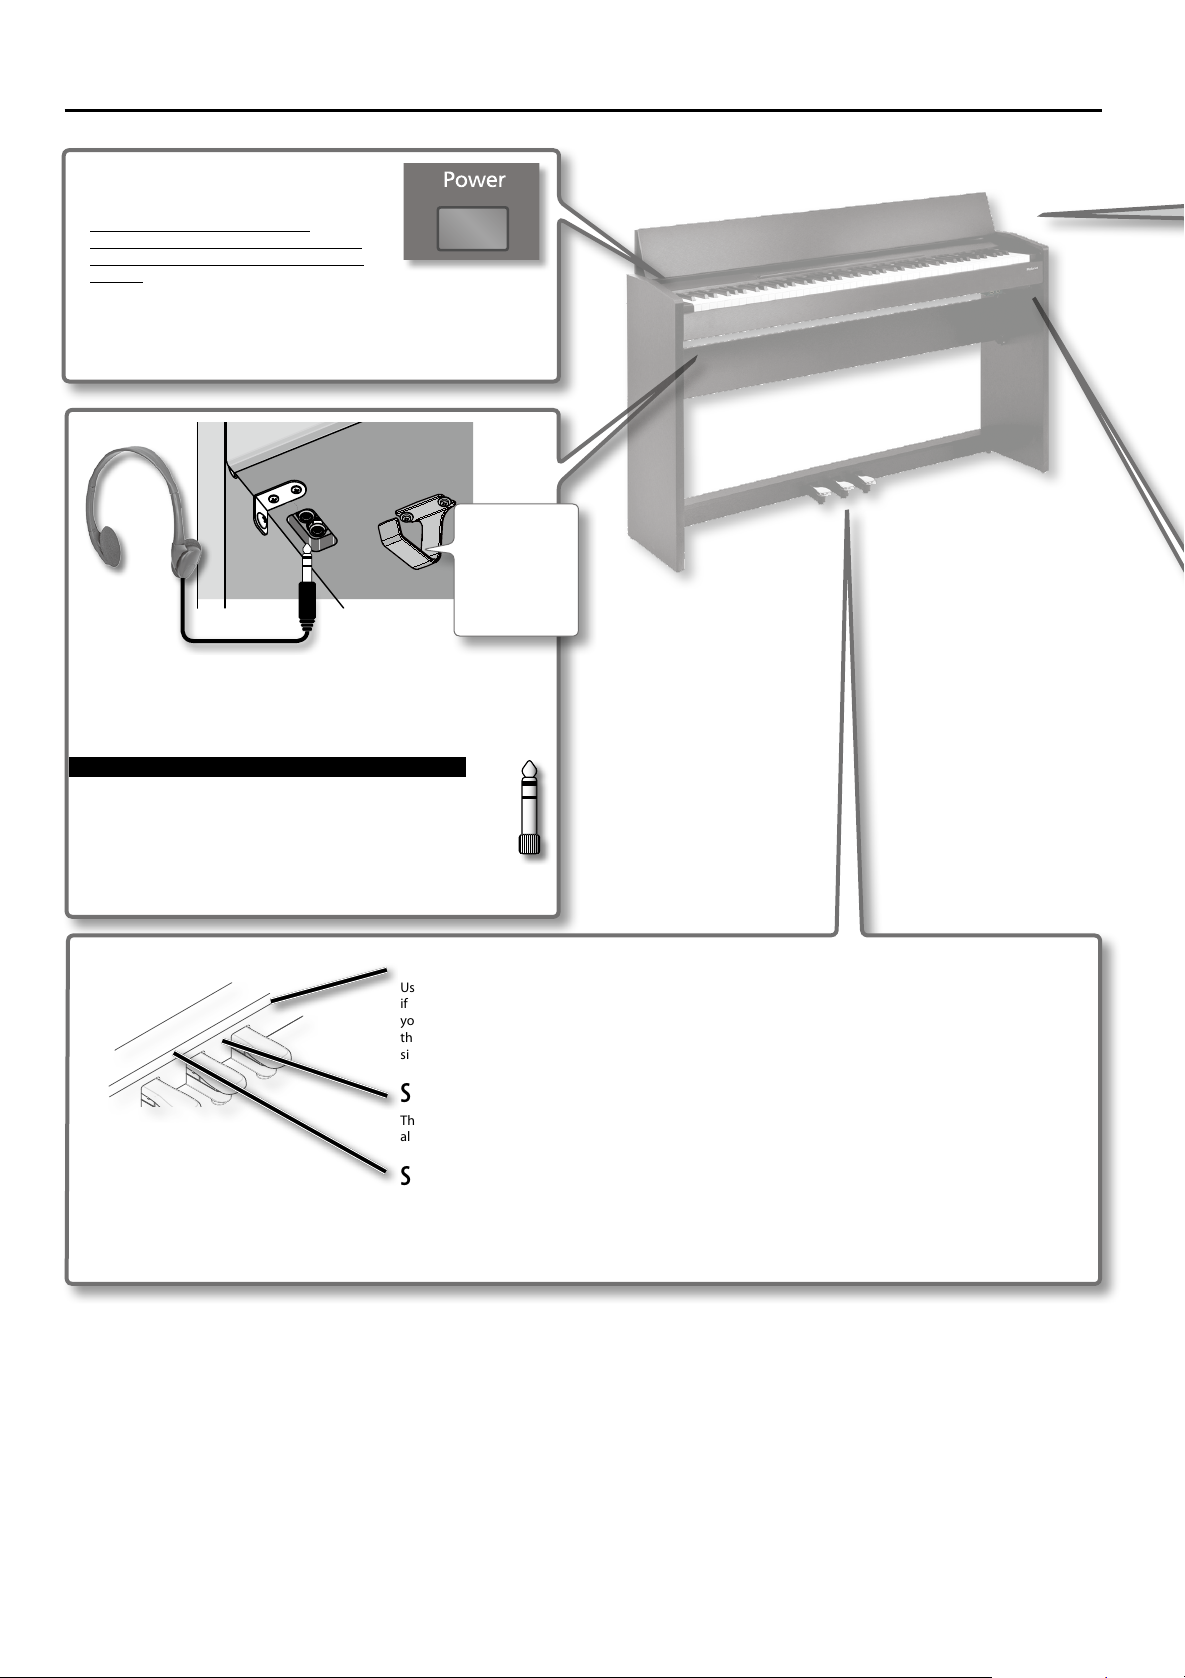
S
plit: Dierent functions for the left/right keyboard halves . . . . . . . . . . .17
Splitting the keyboard . . . . . . . . . . . . . . . . . . . . . . . . . . . . . . . . . . . . . . . . . 17
Recording . . . . . . . . . . . . . . . . . . . . . . . . . . . . . . . . . . . . . . . . . . . . . . . . . . . . . 19
Playing back Songs or Rhythms on a USB memory . . . . . . . . . . . . . . . 20
Various settings (Function mode) . . . . . . . . . . . . . . . . . . . . . . . . . . . . . . . 21
Song or Rhythm playback from a USB memory (sold
separately) . . . . . . . . . . . . . . . . . . . . . . . . . . . . . . . . . . . . . . . . . . . . . . 20
Navigating the contents of a USB memory . . . . . . . . . . . . . . . 20
Basic Operation in Function Mode . . . . . . . . . . . . . . . . . . . . . . . . . . . . . 21
Saving the Settings (Memory Backup) . . . . . . . . . . . . . . . . . . . . . . . . . . 21
Function settings . . . . . . . . . . . . . . . . . . . . . . . . . . . . . . . . . . . . . . . . . . . . . . 22
Before using the F-120R, carefully read the sections entitled: “Using the unit safely” (p. 35) and “Important notes” (p. 36). These sections provide important
information concerning the proper operation of the F-120R. Additionally, in order to feel assured that you have gained a good grasp of every feature
provided by your new unit, Owner’s Manual should be read in its entirety. The manual should be saved and kept on hand as a convenient reference.
3
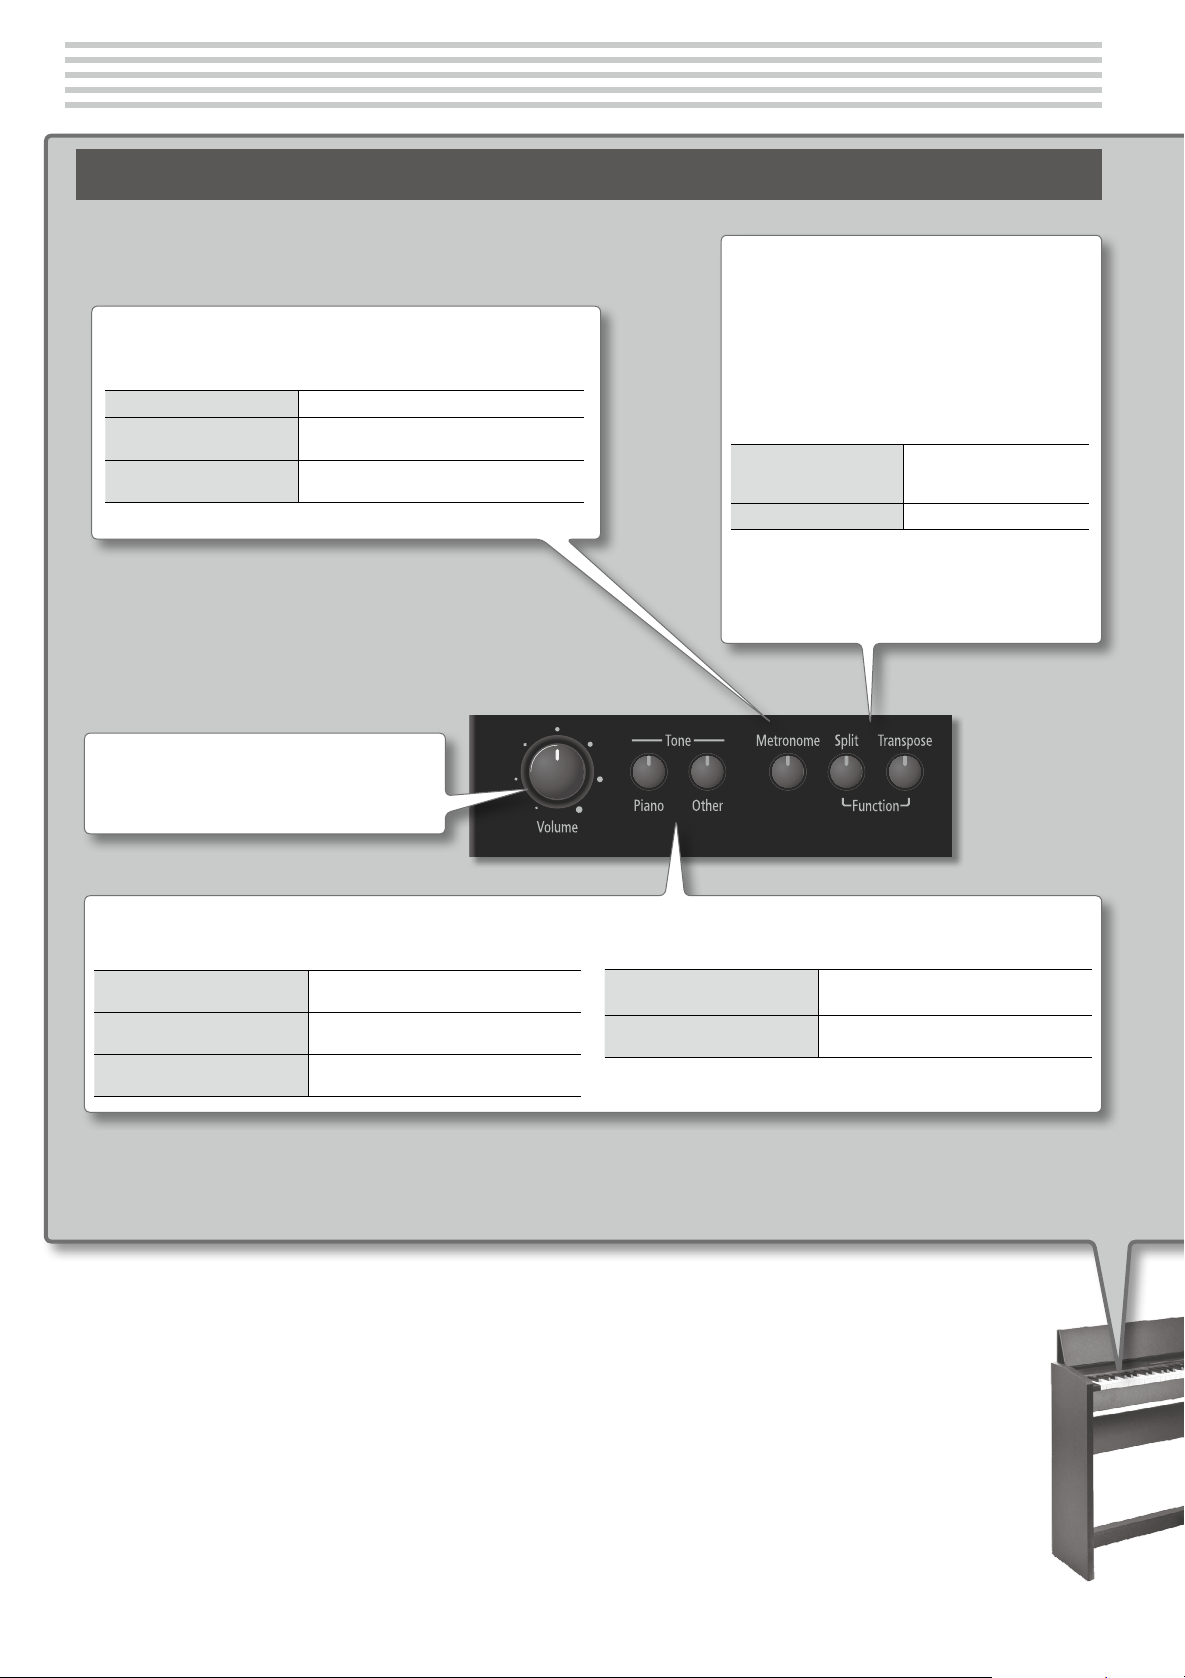
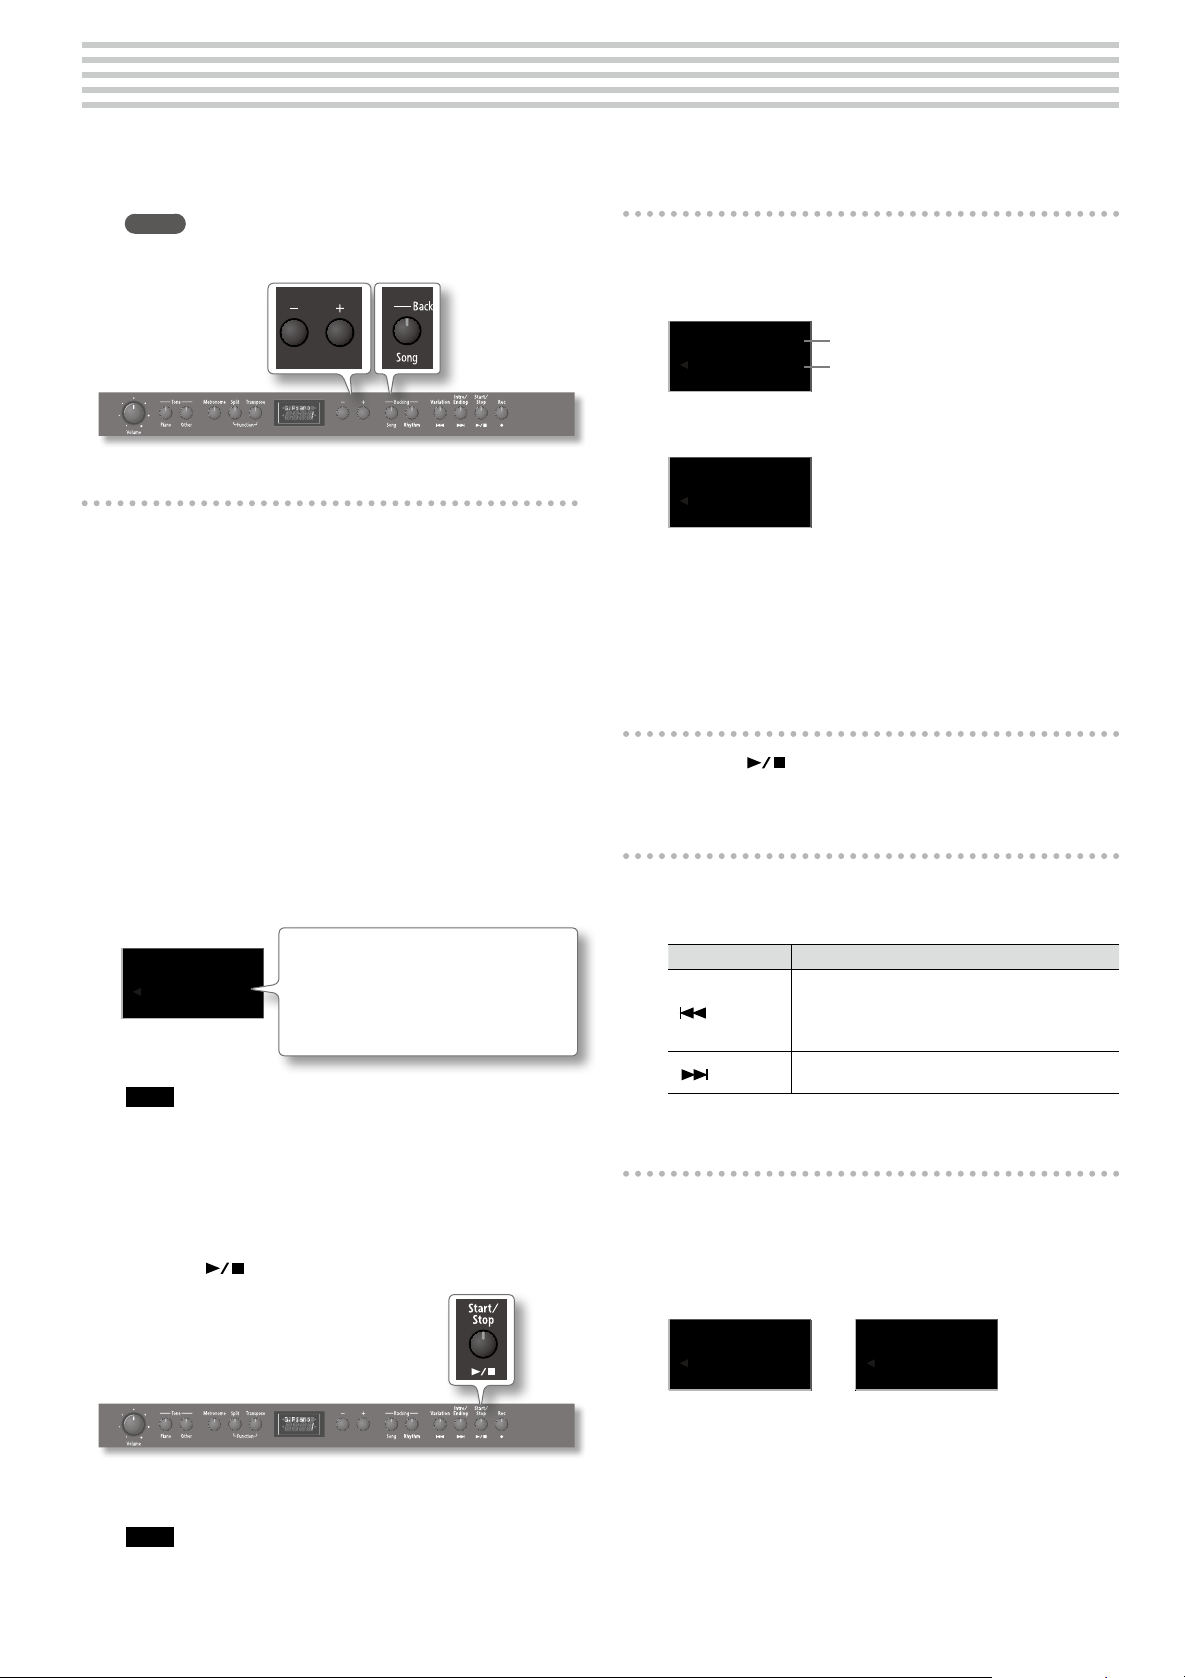
Panel descriptions
Front Panel
[Metronome] button
This sounds the metronome (p. 9).
To sound the metronome Turn on the [Metronome] button.
To change the tempo
To change the time signature
Turn on the [Metronome] button to display the
tempo, and then press the [–] [+] buttons.
Hold down the [Metronome] button and press
the [–] [+] buttons.
[Split] button
This button allows you to split the keyboard in two halves:
the left half is then used to provide the Rhythm function with
chord information, while the right half allows you to play
melodies (p. 17).
[Transpose] button
This button is used to changed the pitch of the notes you
play on the keyboard and of the songs you play back (p. 10).
To change the key of
the keyboard and song
playback
To switch transpose o/on Press the [Transpose] button.
[Split] + [Transpose] button: Function mode
Holding down [Split] while pressing [Transpose] allows you to
select the F-120R’s Function mode (p. 21).
Hold down the [Transpose]
button and press [–] [+] to set
the transpose interval.
[Volume] knob
This adjusts the volume.
Tone [Piano] and [Other] buttons
Use these buttons to select tones (p. 9) or adjust the manner in which they are sounded (p. 12).
To select grand piano and
ensemble tones
To select other tones
To enable or disable Twin Piano
mode
Press the [Piano] button. Press the [–] [+]
buttons to list and select them.
Press the [Other] button. Press the [–] [+]
buttons to list end select them.
Hold down [Piano] and press the [Other]
button.
To adjust the reverberation
To adjust the brightness
Hold down the [Piano] button and press the
[–] [+] buttons.
Hold down the [Other] button and press the
[–] [+] buttons.
4
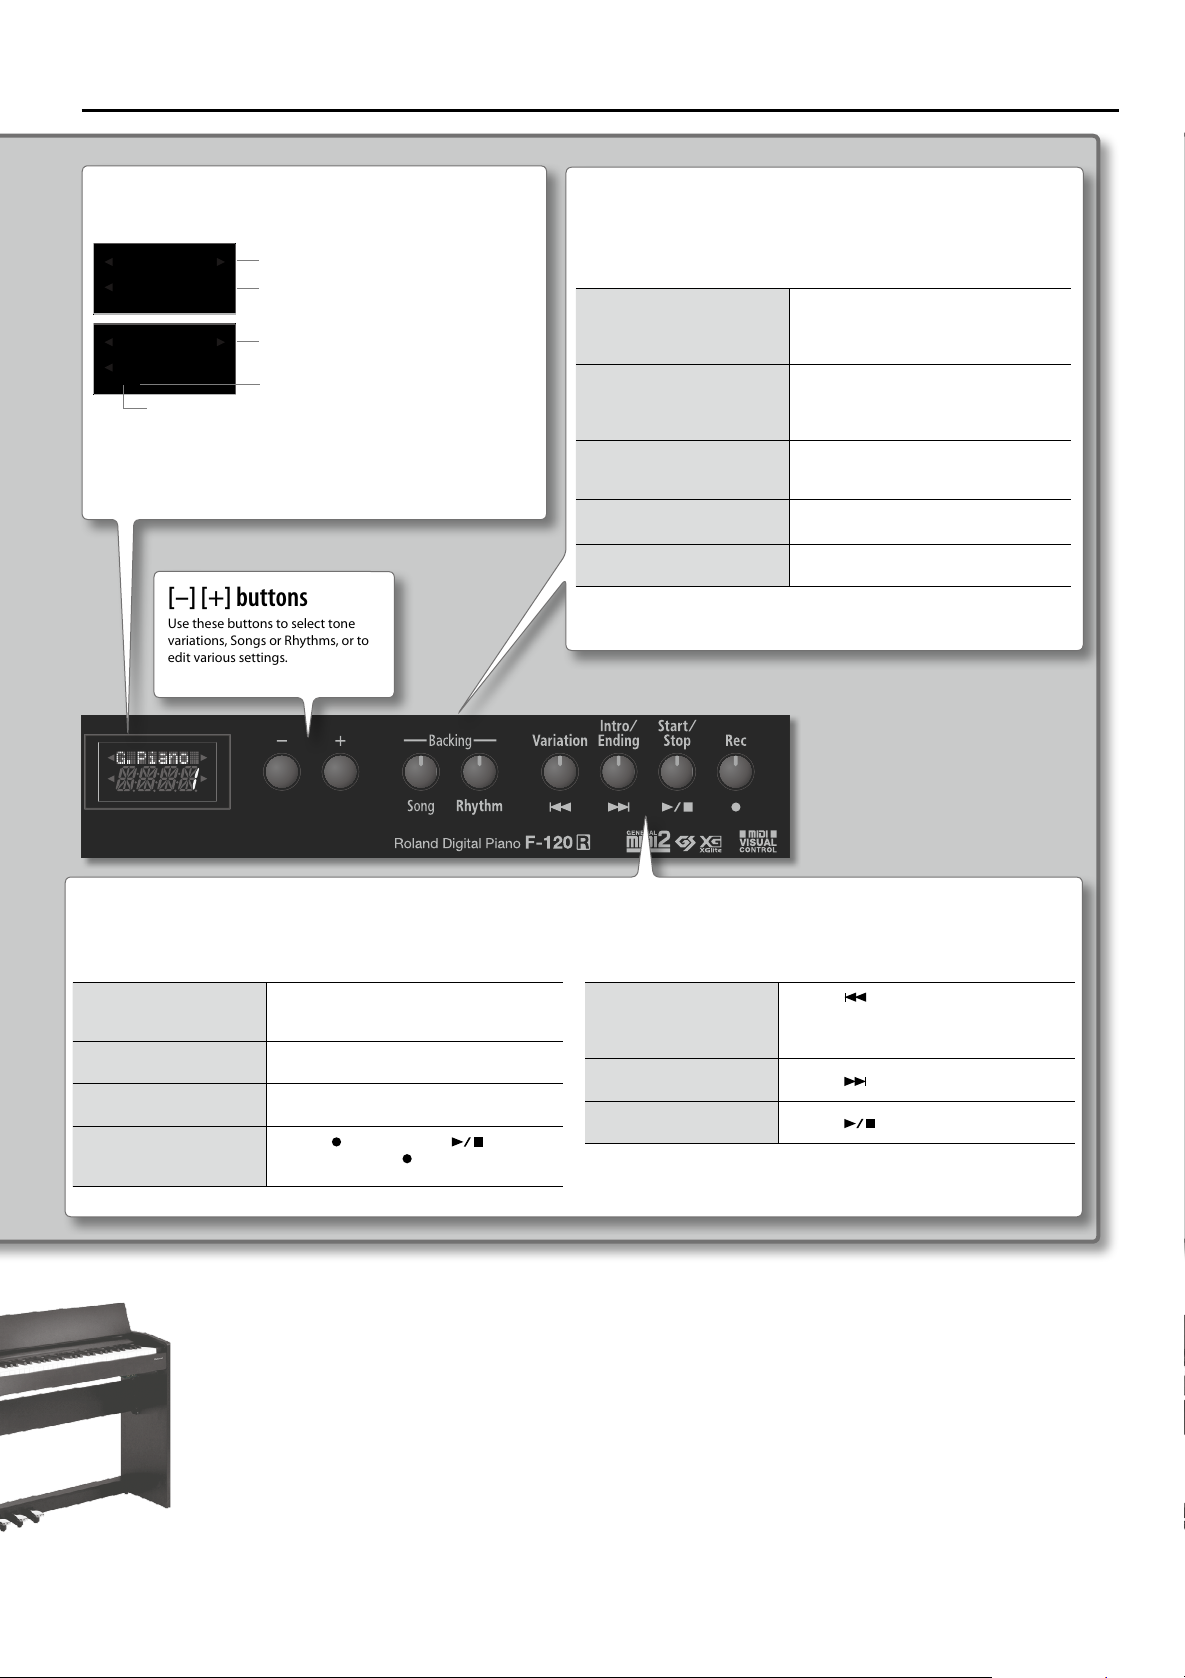
Display
This shows various kinds of information, such as tone names, Song names,
Rhythm names and the values of settings.
G.Piano1
1
Polonais
ä001
Categories
A~C: Internal songs
A~K: Internal rhythms
U: User song you recorded yourself
S: A song or Rhythm on a connected USB memory
(sold separately)
Tone name
Tone number
Song or Rhythm name
Song or Rhythm number
[–] [+] buttons
Use these buttons to select tone
variations, Songs or Rhythms, or to
edit various settings.
Panel descriptions
Backing [Song], [Rhythm] buttons
Use these buttons to select Songs (p. 13) or Rhythms (p. 15), to change measures, to adjust
the playback tempo and volume.
Press the [Song] or [Rhythm] button to select
To select Songs or Rhythms
To change, or display, the Song or
Rhythm measure during playback
To adjust the playback tempo
To adjust the Song volume
To adjust the Rhythm volume
the corresponding mode. Use the [–] [+]
buttons to select a song from the list (while
song playback is stopped).
Press [Song] or [Rhythm] several times until
the measure number is displayed. Then, use
the [–] [+] buttons to select a measure (only
for songs).
Press [Song] or [Rhythm] several times until
the tempo value is displayed. Then, use [–] [+]
to set the desired tempo.
Hold down the [Song] button while using [–]
[+] to set the Song volume.
Hold down the [Rhythm] button while using
[–] [+] to set the Rhythm volume.
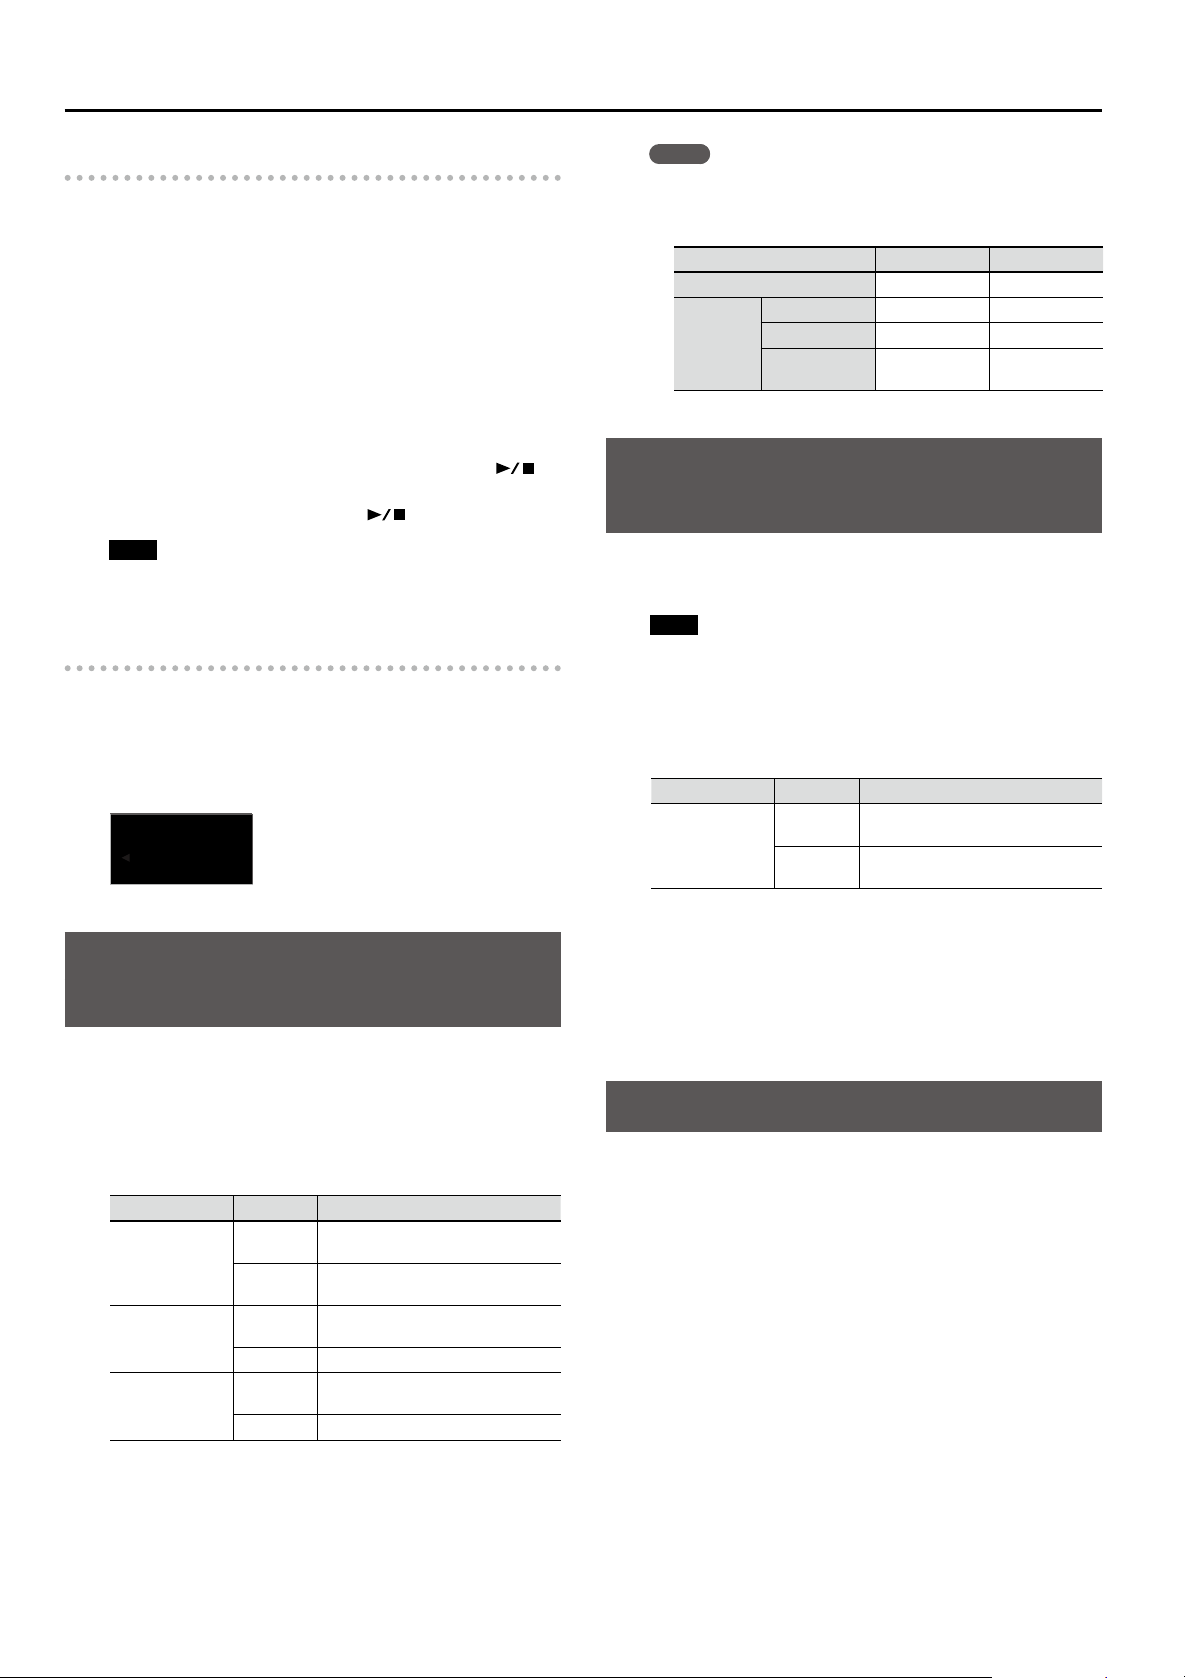
Playback buttons: [Variation], [Intro/Ending], [Start/Stop] and [Rec]
These buttons are used to control Song (p. 13) or Rhtyhm playback (p. 15). The [Rec] button allows you to record songs (p. 19).
In Rhythm mode (while [Rhythm] lights):
To select a simpler or more
complex Rhythm arrangement (while [Rhythm] is on)
To play back a musical
introduction or ending
To start or stop the selected
Rhythm
To record your own
performance into the F-120R
Switch o the [Variation] button to select a simpler arrangement (“Basic”). Switch it on to select
a more complex arrangement (“Advanced”).
Press the [Intro/Ending] button.
Press the [Start/Stop] button.
Press the [
Alternative: press the [ ] button and then a key
on the F-120R’s keyboard.
] button, then the [ ] button.
In Song mode (while [Song] lights):
To return to the beginning
of current song or of the
previous song
To jump to the beginning of
next song
To start or stop the selected
Song
Press the [
you to the beginning of the currect song (if song
playback is stopped). Press it again to jump to
the beginning of the preceding song.
Press the [
Press the [
] button. The rst press returns
] button.
] button.
5
Panel descriptions
[Power] switch
This turns the power on/o (p. 8).
* With the factory settings, the unit’s
power will automatically be switched o 30
minutes after you stop playing or operating
the unit.
If the unit’s power has been turned o automatically, you can use the
[Power] switch to turn the unit back on again.
If you don’t want the power to turn o automatically, change the “Auto O”
setting to “OFF” as described on “Making the power automatically turn o
after a time (Auto O)” (p. 27).
Whenever you
are not using the
headphones, you
can hang them on
the headphone
hook.
Headphone jacks
Since this unit has two headphone jacks, two people can also use headphones
simultaneously.
If you’re using only one set of headphones, you may connect them to either of
the two headphone jacks.
Don’t forget to remove your headphone adaptor plug!
If you leave a headphone adaptor plug inserted in the headphone jack,
no sound will be heard from the piano. If you don’t hear sound from the
piano, check the headphone jacks.
Rear side
* Do not hang anything other than headphones on the headphone
hook. Do not apply undue force to the hook. Otherwise, you risk
damaging the hook.
Damper Pedal
Use this pedal to sustain the sound. While this pedal is held down, notes will be sustained for an extended time even
if you release your ngers from the keyboard. The length of the sustain will change subtly depending on how deeply
you press the pedal. On an acoustic piano, holding down the damper pedal will cause the strings for notes other
than the ones you actually play to vibrate in sympathy with what you’ve played, producing a rich resonance. This unit
simulates this sympathetic vibration (damper resonance).
Sostenuto Pedal
This pedal sustains only the notes of the keys that were already pressed when you pressed the pedal. This pedal can
also be used to control other functions (p. 23).
Soft Pedal
This pedal is used to make the sound softer. Playing with the soft pedal depressed produces a sound that is not
as strong as when otherwise played with the equivalent strength. This is the same function as the left pedal of an
acoustic piano. The softness of the tone can be varied subtly by the depth to which you press the pedal. This pedal
can also be used to control other functions (p. 23).
6
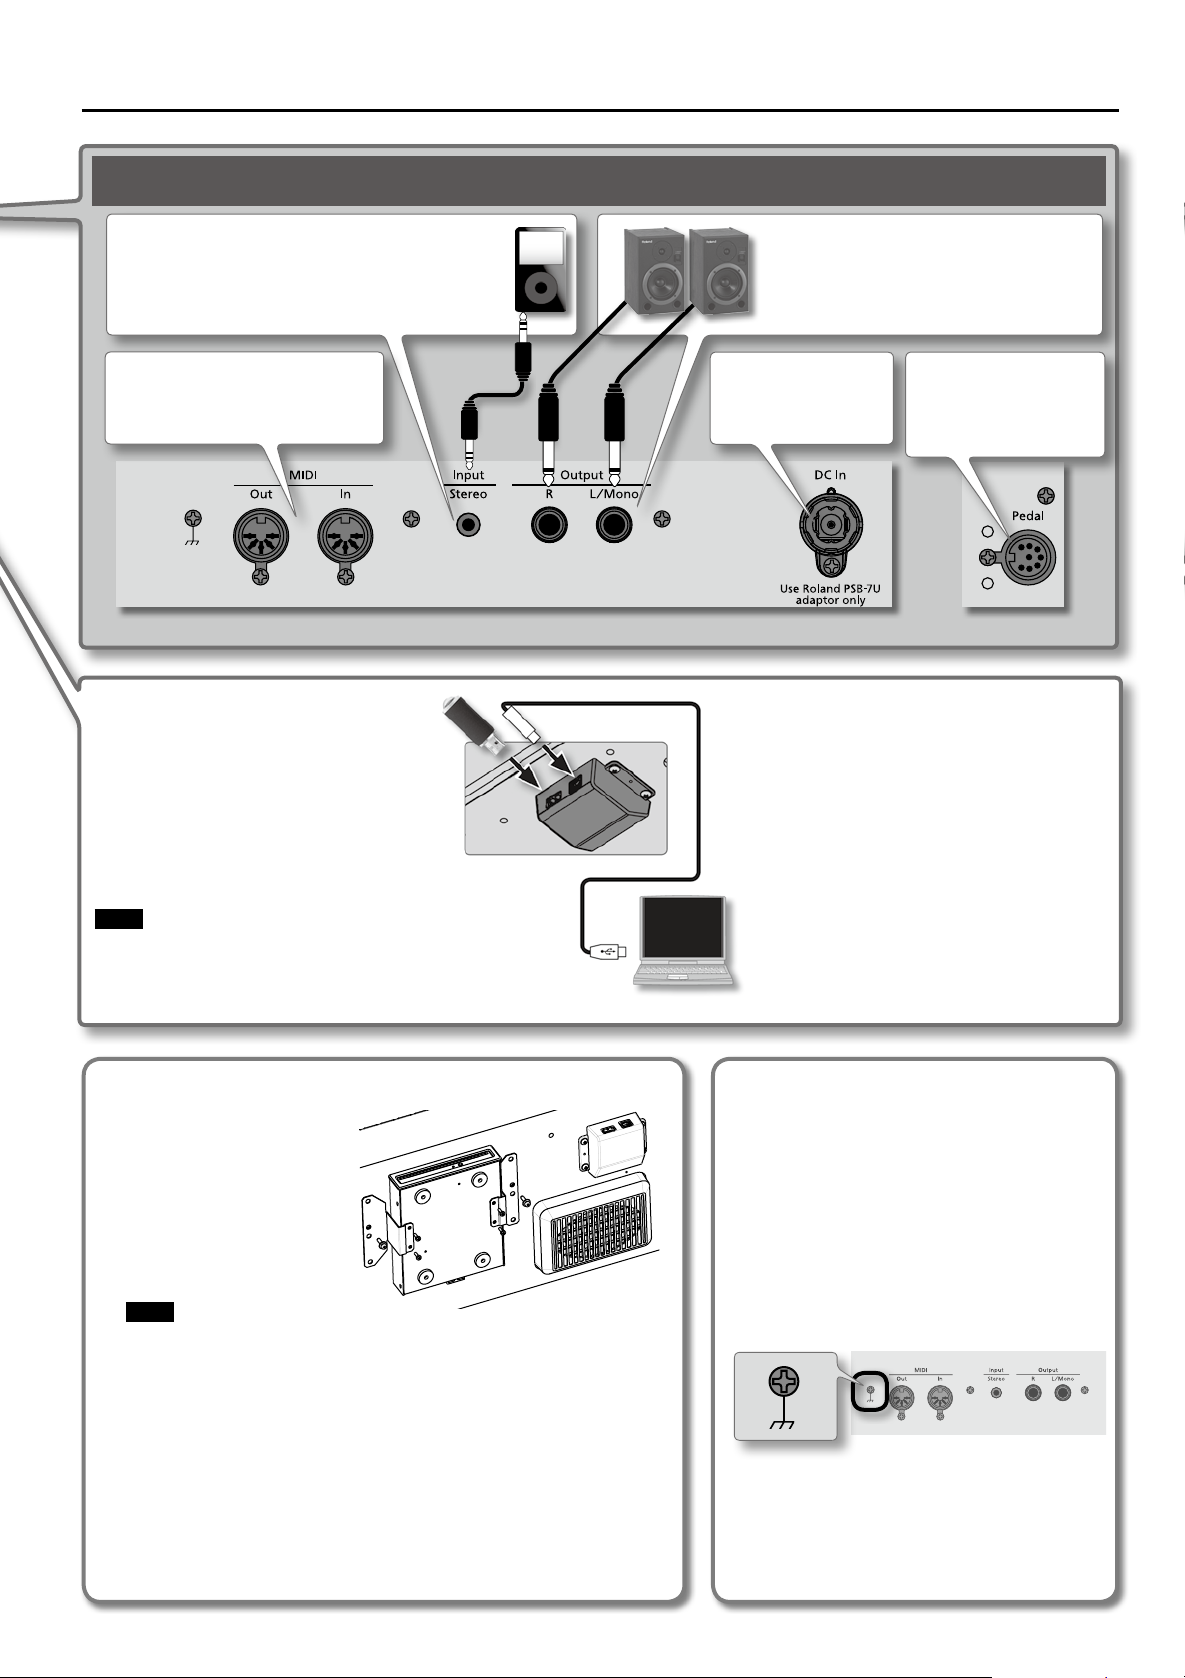
Rear panel connections
Panel descriptions
Input jack
If you use a cord with a stereo mini-plug to connect a audio
player or similar device, the sound of the connected device will
be heard through this unit. Use the controls of the connected
device (audio player) to adjust the volume.
MIDI connectors
For connecting MIDI device (p. 24).
* To prevent malfunction and/or damage to speakers or other devices, always turn down the volume, and turn o the power on all devices before making any connections.
USB memory connector
If a USB memory is connected, you can do the following
things:
• You can use it to save and play back songs (SMF).
• WAV les (audio) or MIDI les (SMF) copied from your
computer to the USB memory can be played back by
the F-120R.
• You can connect an optional CD drive to the USB
MEMORY connector. You can use a CD drive to play back
songs from a CD.
Output jacks
If you connect these jacks to amplied speakers, the
sound of this unit will be heard through them.
DC In jack
Connect the included AC
adaptor here (p. 38).
Pedal connector
Connect the pedal cord of
the dedicated stand here
(p. 38).
USB connector
If you use a commercially available USB cable to connect the
unit’s USB connector to your computer’s USB connector, you’ll
be able to do the following things.
• SMF data played back by MIDI-compatible software can be
sounded by the unit.
• MIDI data can be transferred between the F-120R and your
sequencer software (sold separately), opening up a wide
range of possibilities for music production and editing.
Note
• Carefully insert the USB ash drive all the way in-until it
is rmly in place.
• Use a USB memory sold by Roland. We cannot
guarantee operation if any other USB memory is used.
Installing a CD drive (sold separately)
Attach the CD drive as shown the
gure, using the mounting holes on
the F-120R’s bottom panel.
* For details of the attachment or
connecting, refer to the owner’s
manual of the CD drive.
* Use a CD drive sold by Roland.
We cannot guarantee operation
if any other CD drive is used.
Note
• You cannot play back CD-R/RW disks to which audio tracks have been added or
CDs containing both audio tracks and data (CD Extra).
• The F-120R is capable of playing back only commercial CDs that conform the
ocial standards-those that carry the “COMPACT DISC DIGITAL AUDIO” logo.
• The usability and sound quality of audio discs that incorporate copyright
protection technology and other non-standard CDs cannot be guaranteed.
• For more detailed information on audio discs featuring copyright protection
technology and other non-standard CDs, please consult the disc vendor.
• You cannot save songs and styles to CDs, and you cannot delete songs or styles
recorded to CDs. Furthermore, you cannot format CDs.
About the ground terminal
Depending on the circumstances of a particular setup, you
may experience a discomforting sensation, or perceive that
the surface feels gritty to the touch when you touch this
device. This is due to an innitesimal electrical charge, which
is absolutely harmless. However, if you are concerned about
this, connect the ground terminal (see gure) with an external
ground. When the unit is grounded, a slight hum may occur,
depending on the particulars of your installation. If you are
unsure of the connection method, contact the nearest Roland
Service Center, or an authorized Roland distributor, as listed
on the “Information” page.
Unsuitable places for connection
• Water pipes (may result in shock or electrocution)
• Gas pipes (may result in re or explosion)
• Telephone-line ground or lightning rod (may be dangerous
in the event of lightning)
7
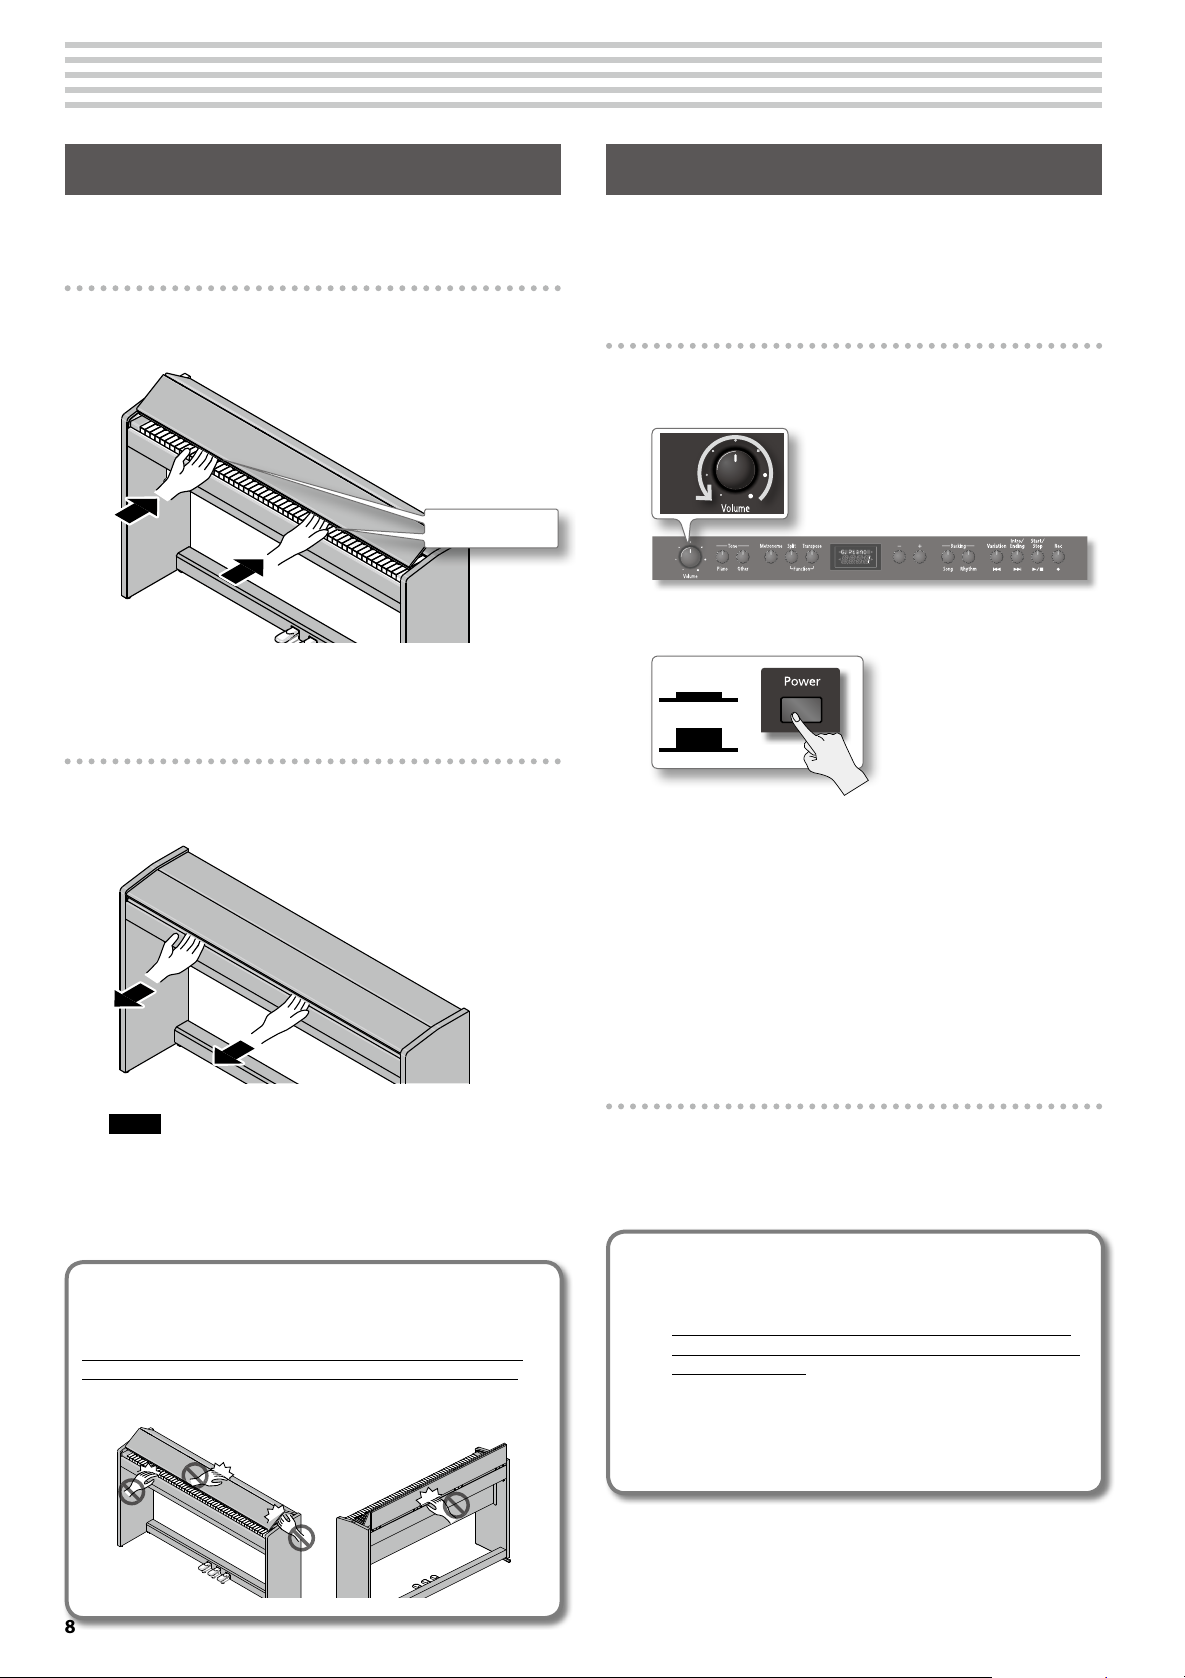
Before You Play
Opening/closing the lid
First, open the lid. You must use both hands to open or close the lid.
Opening the Lid
1. Use both hands to lift the edge of the lid, and push it away
from yourself.
Edge of lid
2. Push the lid away from yourself until it stops
Closing the Lid
Turning the power on/o
Once the connections have been completed (p. 38), turn on power to
your various devices in the order specied. By turning on devices in the
wrong order, you risk causing malfunction and/or damage to speakers
and other devices.
Turning the power on
1. Turn the [Volume] knob all the way toward the left to
minimize the volume.
2. Turn the [Power] switch ON.
On
O
1. Grasp and gently lower the edge of the lid with both
hands.
Note!
• When opening and closing the lid, be careful not to let your
ngers get caught. If small children will be using the piano, adult
supervision should be provided.
• If you need to move the piano, make sure the lid is closed rst to
prevent accidents.
When opening or closing the lid, take care not to
pinch your ngers between the folding sections.
It is dangerous to close the lid by pressing it from above, since
you risk pinching your ngers between the sections of the lid.
Opening the lid by pushing it may cause this unit to fall over. You
must grasp the edge of the lid when opening or closing the lid.
After a brief interval, you’ll be able to produce sounds by playing
the keyboard.
3. Use the [Volume] knob to adjust the volume.
* The F-120R is equipped with a protection circuit. A brief interval
(a few seconds) after power up is required before the F-120R will
operate normally.
* Before switching the power on/o, always be sure to turn the
volume down. Even with the volume turned down, you might
hear some sound when switching the power on/o. However,
this is normal and does not indicate a malfunction.
Turning the power o
1. Turn the [Volume] knob all the way toward the left to
minimize the volume.
2. Turn the [Power] switch OFF.
If you don’t want the power to turn o
automatically, turn the “Auto O” setting o !
With the factory settings, the unit’s power will automatically be switched o 30 minutes after you stop playing or
operating the unit.
If the unit’s power has been turned o automatically, you can
use the [Power] switch to turn the unit back on again.
If you don’t want the power to turn o automatically, change
the “Auto O” setting to “OFF” as described on “Making the
power automatically turn o after a time (Auto O)” (p. 27).
8
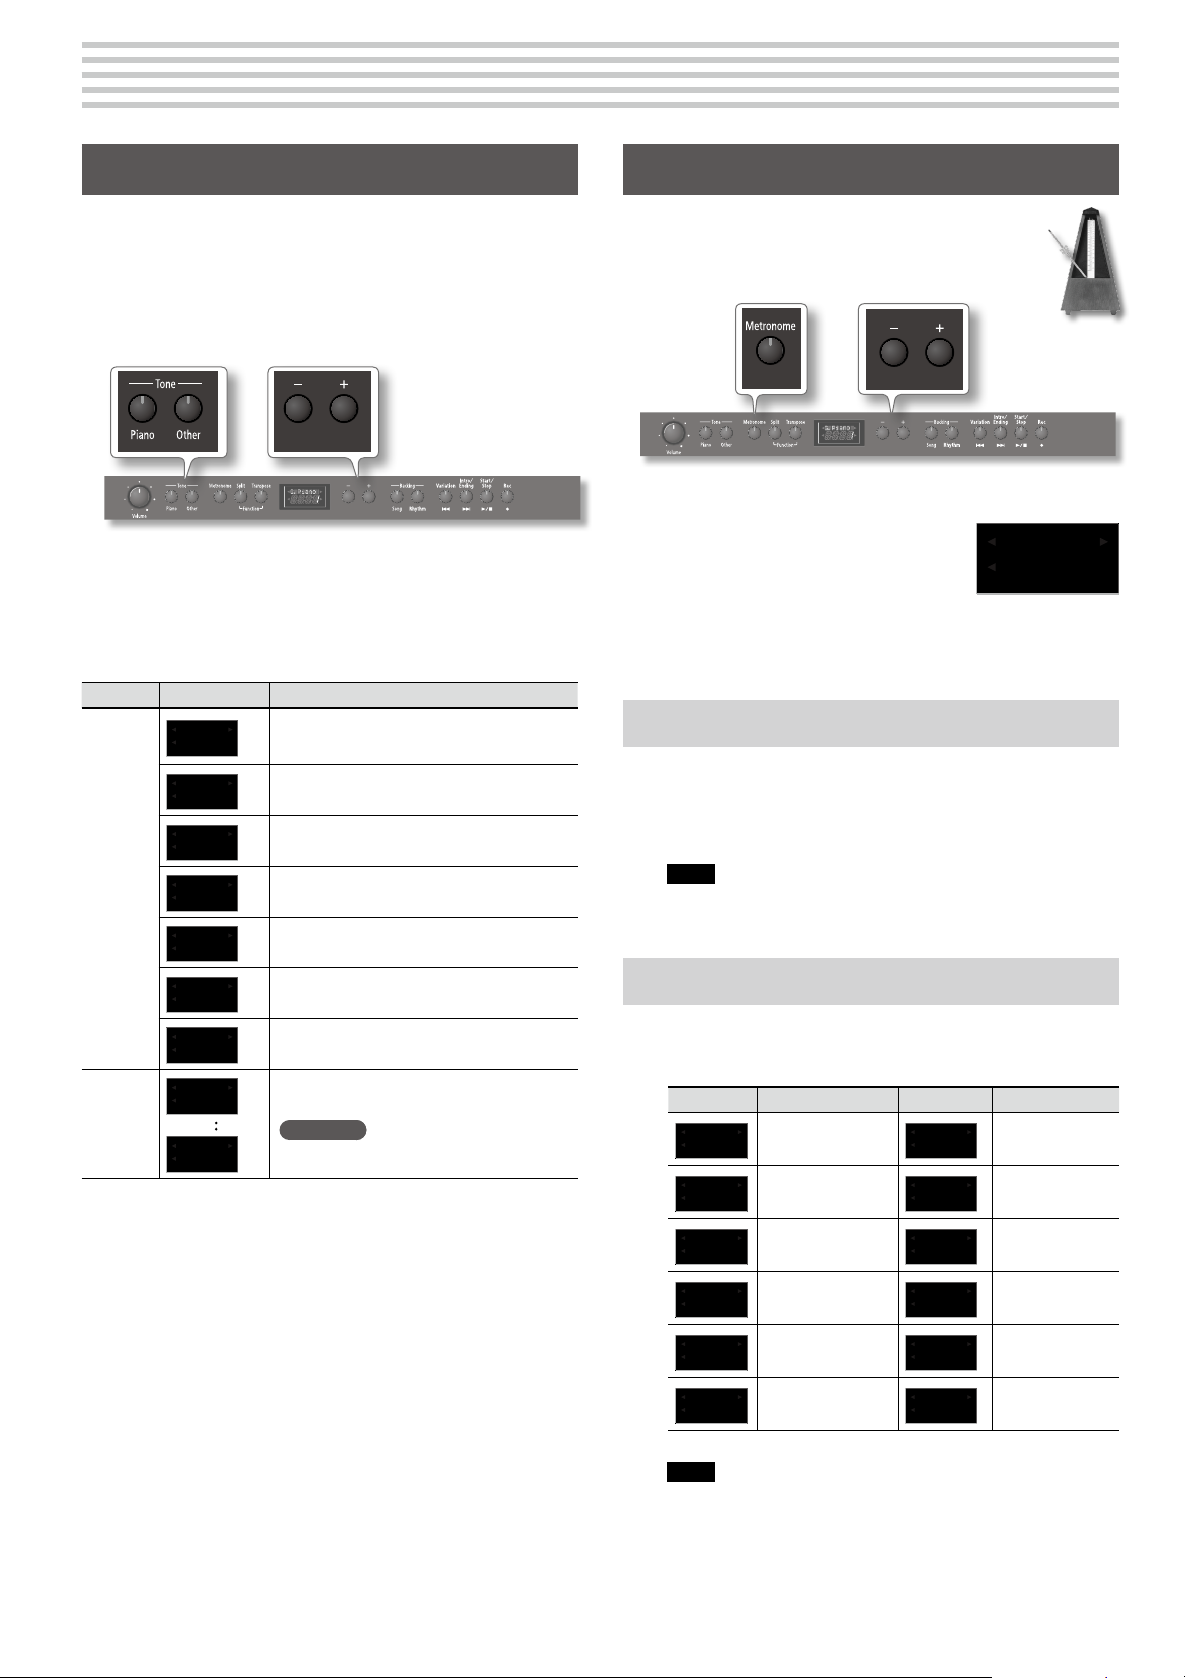
Performing
Selecting tones
The F-120R contains numerous tones (sounds). The tones are organized
into two groups. The [Piano] button is used for the grand piano tone
group and for group that combines piano sounds with other tones such
as strings, choir or bell.
The [Other] button is for various tones other than piano.
The Tone “G.Piano 1” (Grand Piano1) is selected when the instrument’s
power is turned on.
1. Press the [Piano] or [Other] button to select a tone group.
2. Press the [–] [+] buttons to select the desired tone
variation from within the tone group.
The display shows the tone number.
Button Display Explanation
A splendid concert grand piano sound. This is the
most highly recommended tone; it can be used for
1
any style of music.
A more mellow grand piano sound. Appropriate for
2
quiet songs.
A brilliant grand piano sound. Appropriate when
3
you want the piano to stand out in the band.
A honky-tonk piano. Ideal for ragtime.
4
Grand Piano1 layered with strings.
5
[Piano]
button
G.Piano1
G.Piano2
G.Piano3
HonkyTon
P+String
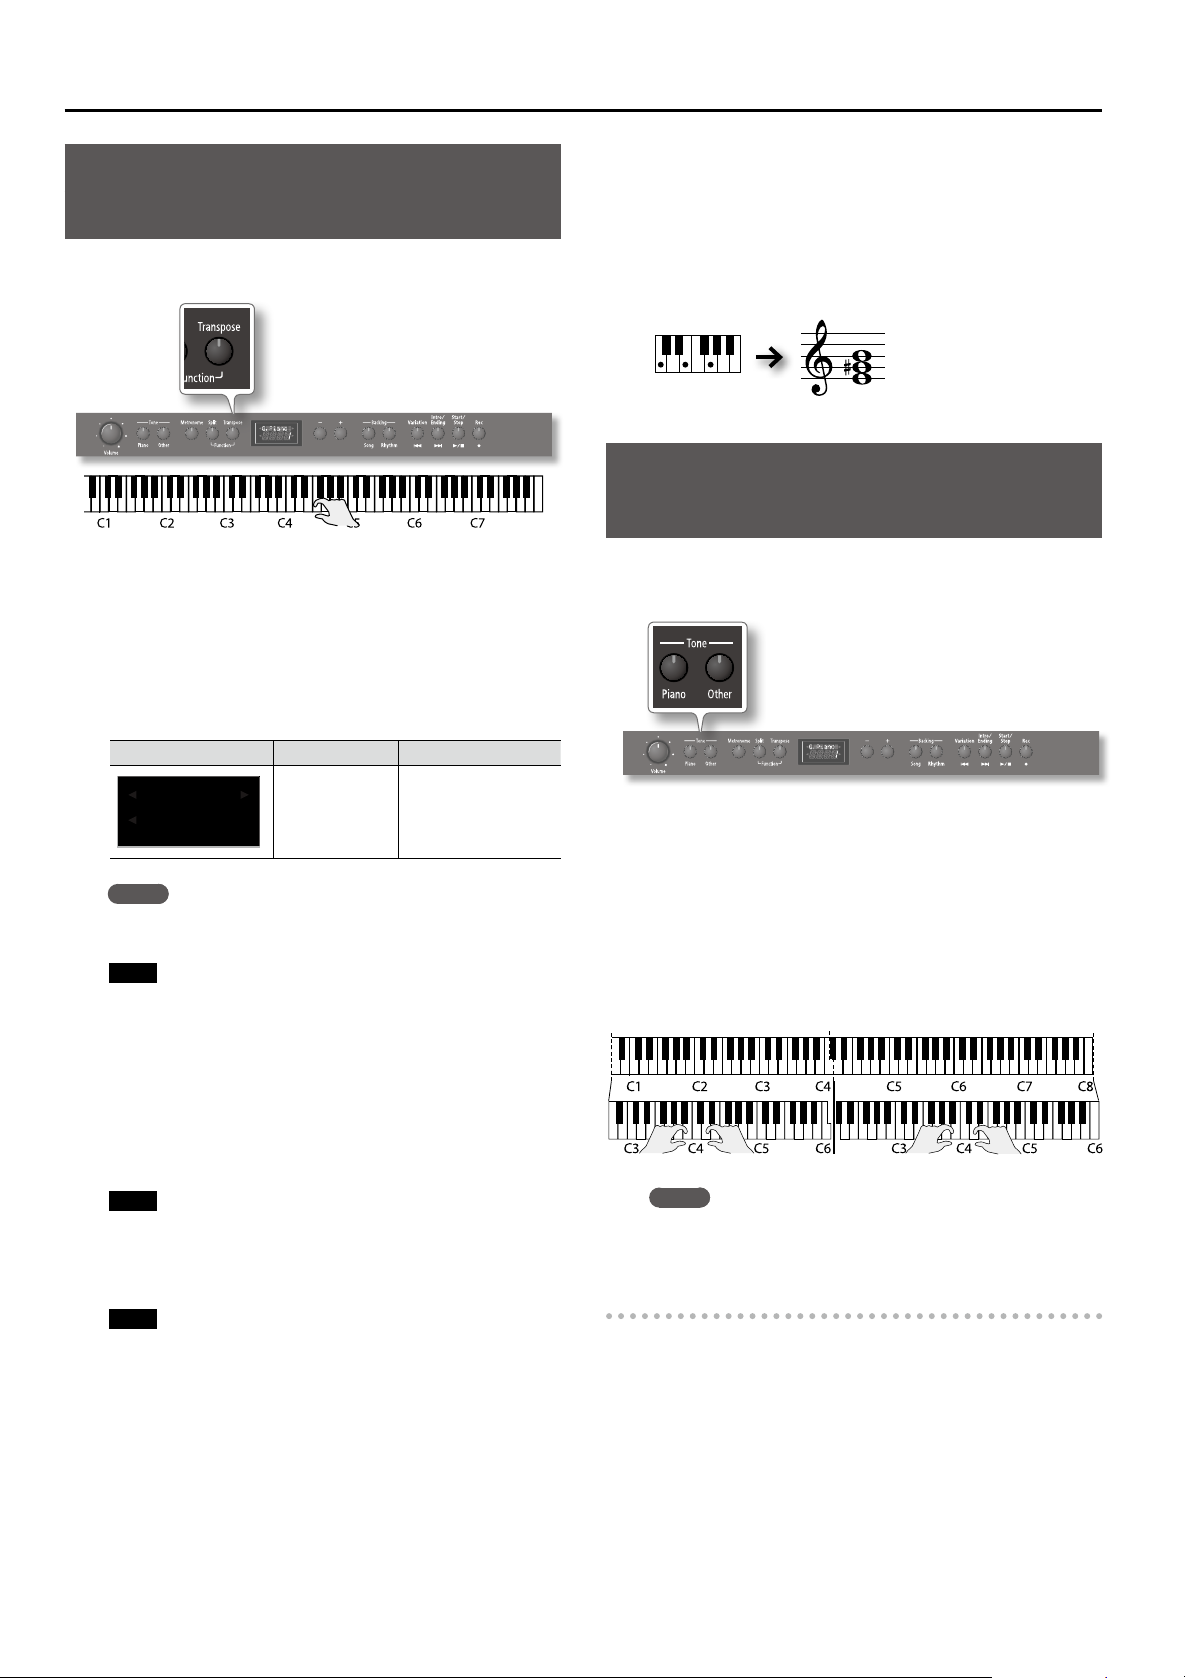
Using the metronome
You can perform while the metronome sounds. You can
adjust the tempo or beat of the metronome.
If an SMF song or Rhythm is playing, the metronome will
sound at the tempo and beat of that song.
1. Press the [Metronome] button so it’s lit.
The metronome will begin sounding and
the currently selected tempo value will be
displayed.
The [Metronome] button will blink in synchronization with the time
signature, or the tempo of the selected song or rhythm.
To stop the metronome, press the [Metronome] button once again.
Changing the tempo
1. Press the [Metronome] button to get the display to
indicate the current tempo.
2. Press the [–] [+] buttons to adjust the tempo.
Note
Any change you set using this procedure also aects the
playback tempo of the currently selected song or rhythm.
Tempo ¯=
120
[Other]
button
P+Choir
6
P+Bell
7
VintgEP1
1
Brush
47
Grand Piano1 layered with choir.
Grand Piano1 layered with bell.
These are various tones other than piano.
Reference
For details, refer to “Tone List” (p. 32).
Changing the Beat
1. Hold down the [Metronome] button and press the [–] [+]
buttons to select the beat.
Display Beat Display Beat
Beat
2/2
Beat
0/4
Beat
2/4
Beat
3/4
Beat
4/4
Beat
5/4
Note
• You can’t change the metronome’s time signature while a
• If you record using 0/4, the song time signature will be set to
2/2
Only weak beats will
be sounded.
2/4
3/4
4/4 (default)
5/4
song or rhythm is playing.
4/4 when you save it.
Beat
6/4
Beat
7/4
Beat
3/8
Beat
6/8
Beat
9/8
Beat
12/8
6/4
7/4
3/8
6/8
9/8
12/8
9
Performing
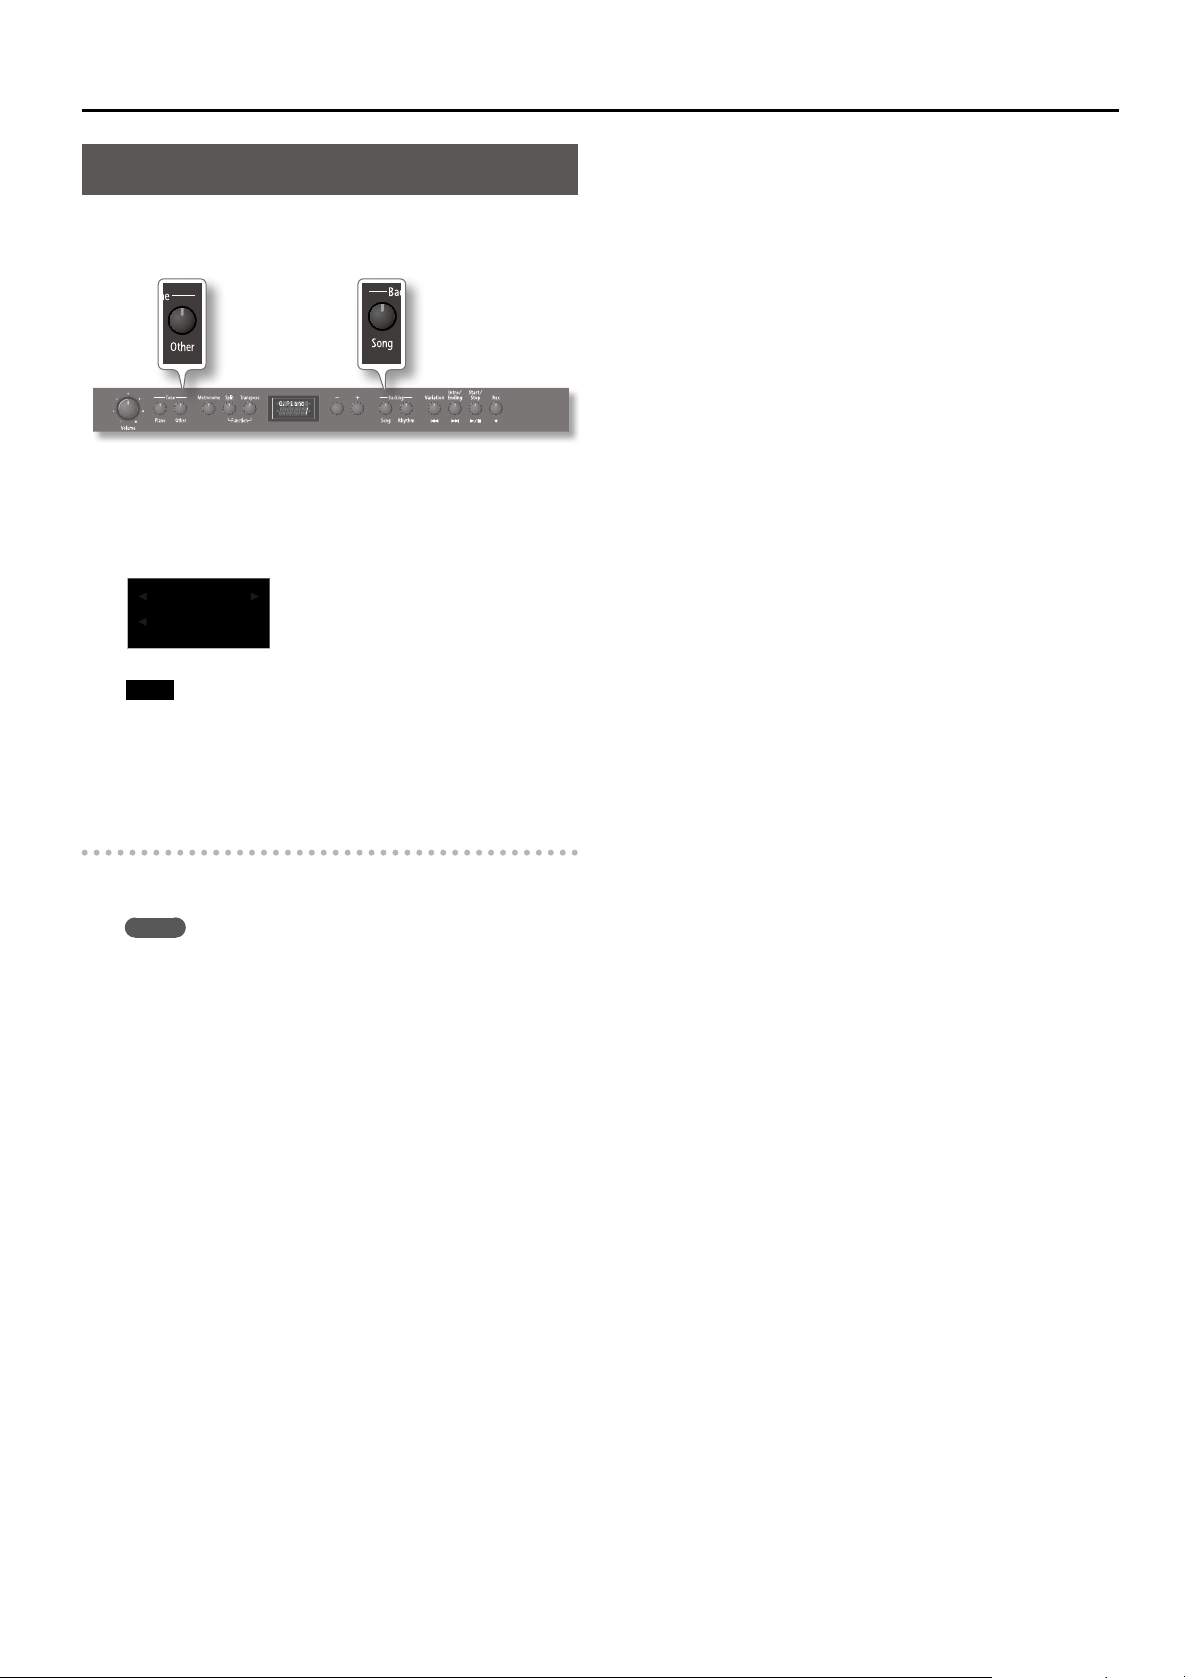
Changing the key of the keyboard (Transpose)
This function allows you to transpose the F-120R’s pitch in semi-tone
steps. This transposition also applies to Song playback.
1. Press the [Transpose] button (it lights).
2. Hold down the [Transpose] button and press the key
corresponding to the tonic of the desired key.
(In this case, the note will not sound.)
The Transpose setting continues to appear in the display while the
[Transpose] button is held down.
Example: Playing a Song in the Key of E Major while
using the C-major ngering
Hold down the [Transpose] button and press the E key (since E is
the tonic).
Counting from C as a reference point, one moves up four keys,
including the black keys, to reach E, thus “4” appears in the display.
If you play C E G g It will sound E G# B
Dividing the keyboard into two
instruments (TwinPiano)
You can divide the keyboard into left and right sections so that two
persons can play the same pitch ranges. This function lets you use the
F-120R as though it were two pianos.
Screen Value Explanation
Trnspose
+1
Memo
You can also adjust this setting by holding down the [Transpose]
button and using the [–] [+] buttons.
Note
While the transpose interval is set to “0”, the [Transpose] button
cannot be switched on.
When you release the [Transpose] button, you return to the
previous screen.
-6–0–5
(semitone units)
(default: +1)
Positive (+) values raise
the pitch in semitone
steps, and negative (-)
values lower the pitch in
semitone steps.
3. To cancel the transposition, press the [Transpose] button
once again.
The [Transpose] button will go out.
Note
With the factory settings, both the song and the keyboard will
be transposed. If you want to transpose only the keyboard or
only the song, make the appropriate setting as described in
“Specifying what the transpose function will aect” (p. 22).
Note
The transposition setting is deactivated (the [Transpose]
indicator goes dark) when you select another song.
1. Hold down the [Piano] button and press the [Other]
button so both of them are lit.
Twin Piano will turn on, and the following settings will be applied.
• The keyboard will be divided into left and right sections, with
“middle C” located in the center of each section.
• The left and right sections use the same tone (Grand Piano 1).
• The right pedal (damper pedal) will be the damper pedal for the
right section, and the left pedal (soft pedal) will be the damper
pedal for the left section.
Memo
Twin Piano mode can also be selected via the F-120R’s Function
mode (see p.22).
Canceling Twin Piano
Hold down the [Piano] button and press the [Other] button once
again.
Select a dierent sound to leave Twin Piano mode.
10
Disabling the Buttons (Panel Lock)
When you activate Panel Lock, all buttons will be disabled. This prevents
the tones or settings from being changed if you inadvertently press a
button.
1. Hold down the [Other] button and press the [Song]
button.
Panel Lock will be activated. All buttons will be disabled.
The display will show the following.
Lock
Performing
Note
• If you activate Panel Lock while a song is playing, playback
will stop.
• You can’t activate Panel Lock during recording or while in
Function mode (see p.21).
Canceling the Panel Lock function
Once again hold down the [Other] button and press the [Song]
button.
Memo
Panel Lock will be cancelled when you turn o the power.
11
Adjusting the keyboard sensitivity and the sound
Adjusting the Keyboard Sensitivity (Key Touch)
Here’s how to change the way in which the sound responds to your
keyboard dynamics. You can adjust the response as appropriate for your
playing strength.
1. Press and hold the [Split] button and press the
[Transpose] button.
The display looks more or less as follows (this depends on the last
function you selected since switching the F-120R on).
Depending on which function is displayed, there may be one or two
white arrows in the top line. If the arrows appear in the bottom line,
press the [Metronome] button once.
2. Use the [–] or [+] button to select the “KeyTouch” function.
3. Press the [Metronome] button to activate value selection.
Now, the bottom line contains one or two white arrows:
KeyTouch
L2
Adding Reverberation to Sounds
(Reverb Eect)
You can apply a reverb eect to the notes you play on the keyboard.
With the reverb eect, you obtain a pleasant reverberation, making it
sound as if you were performing in a concert hall or similar space.
1. Hold down the [Piano] button and press the [–] [+]
buttons to adjust the depth for the reverb eect.
Value Explanation
Reverb
OFF
1~10
(default: 5)
Memo
When the power is turned o, the F-120R’s settings will return
to their default state. However, you can save this setting so that
it will still be available the next time the power is turned on. To
save the setting, proceed as described in “Saving the Settings
(Memory Backup)” (p. 21).
Reverb will not be applied.
Adjust the reverb depth over ten levels. Higher values
produce deeper reverb.
4. Press the [–] [+] buttons to adjust the keyboard touch.
Display/Value Explanation
KeyTouch
FIX
KeyTouch
L2
KeyTouch
L1
KeyTouch
M
KeyTouch
H1
KeyTouch
H2
Fixed
Super Light
Light
Medium
(default)
Heavy
Super Heavy
The sound plays at one set volume, regardless of the force used to play the keys.
This setting produces the lightest keyboard
touch.
You can achieve fortissimo ( ) play with a
less forceful touch than “medium,” so the
keyboard feels lighter. This setting makes it
easy to play, even for children.
This sets the standard keyboard touch. You
can play with the most natural touch. This is
the closest to the touch of an acoustic piano.
You have to nger the keyboard more
forcefully than “medium” in order to play
fortissimo (), so the keyboard touch feels
heavier. Dynamic ngering adds even more
feeling to what you play.
This setting produces the heaviest keyboard
touch.
5. Again press and hold the [Split] button and press the
[Transpose] button to leave Function mode.
Memo
When the power is turned o, the F-120R’s settings will return
to their default state. However, you can save this setting so that
it will still be available the next time the power is turned on. To
save the setting, proceed as described in “Saving the Settings
(Memory Backup)” (p. 21).
Adjusting the Brilliance of the Sound
Here’s how to adjust the brilliance of the sound.
1. Hold down the [Other] button and press the [–] [+]
buttons to adjust the brightness of the sound.
Value Explanation
-10~0~+10
(default: 0)
Memo
When the power is turned o, the F-120R’s settings will return
to their default state. However, you can save this setting so that
it will still be available the next time the power is turned on. To
save the setting, proceed as described in “Saving the Settings
(Memory Backup)” (p. 21).
Adjust the brilliance of the sound. Positive (+) settings
brighten the tone, and negative (–) settings make it
more mellow.
12
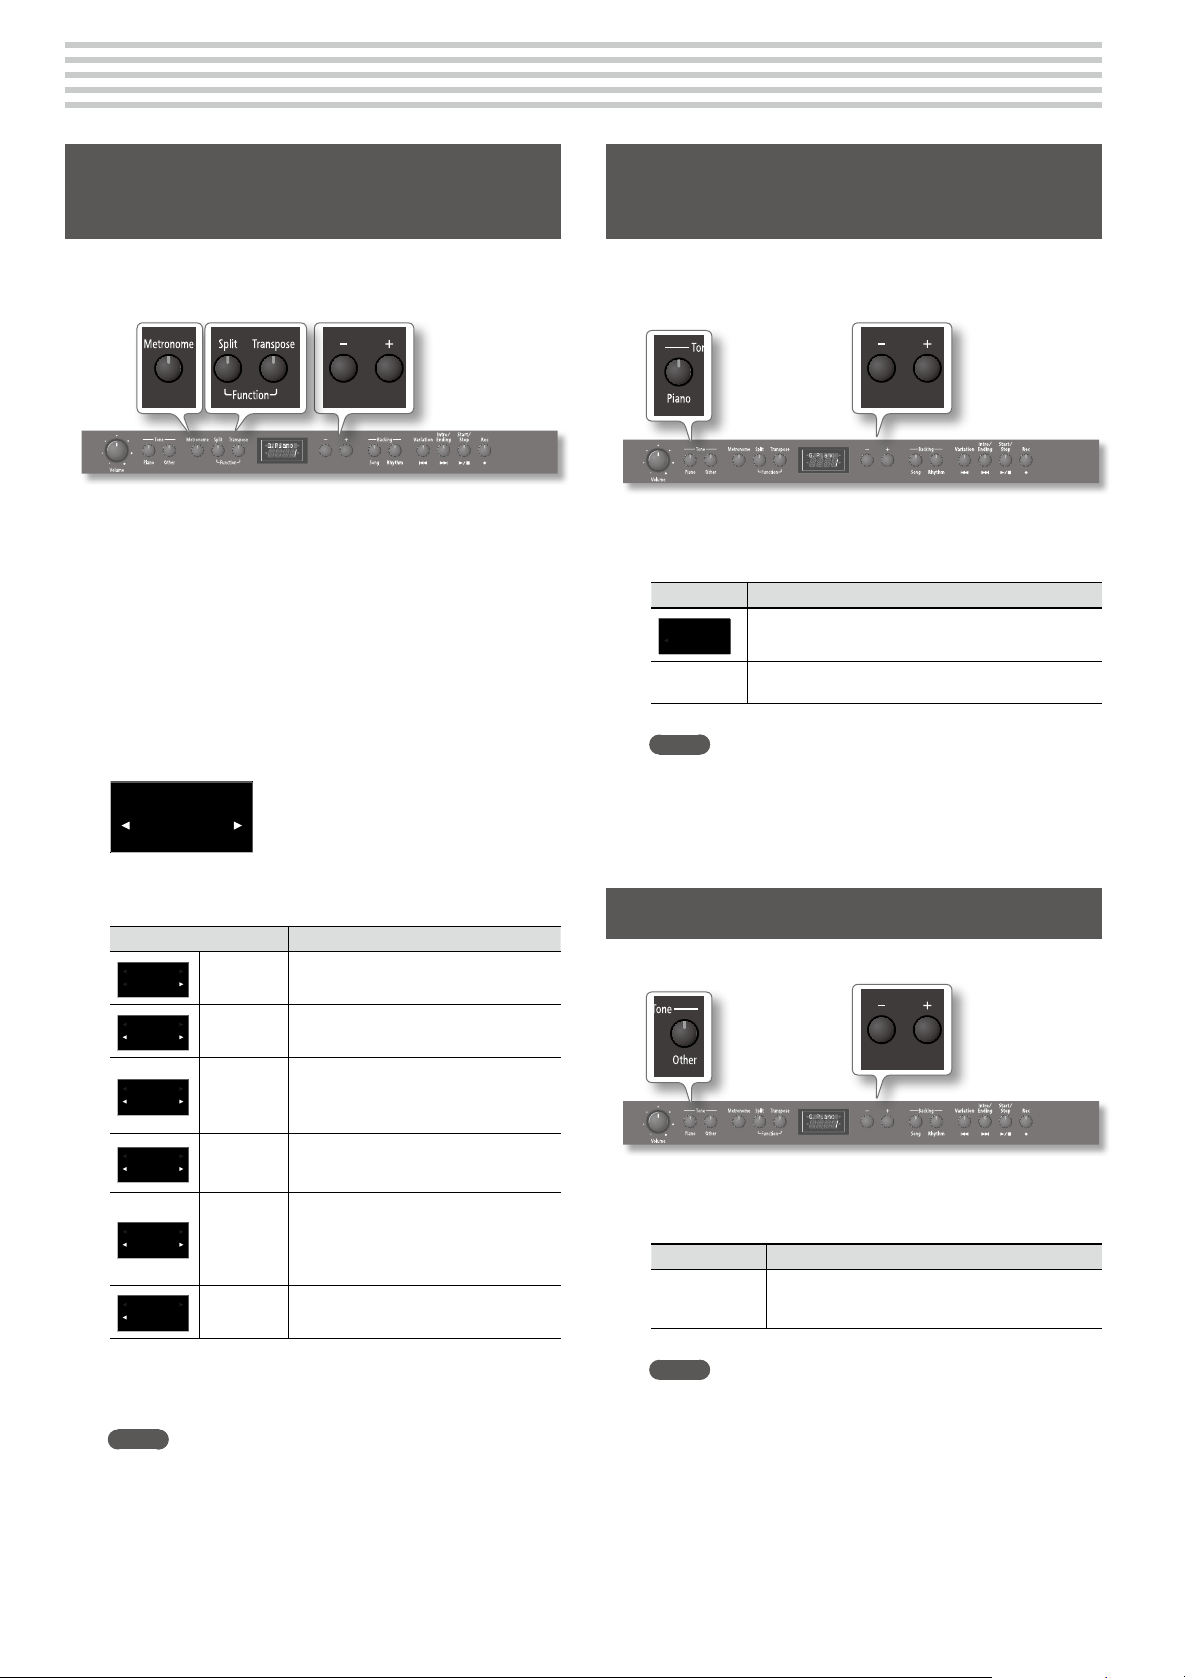
Playing back songs
Let’s try listening to the internal songs and the songs recorded in
internal memory. For the titles of the internal songs, refer to “Internal
Song list” (p. 33).
Memo
If you want to connect a CD drive (sold separately) and play back
songs from a CD, refer to the CD drive’s owner’s manual.
Playing back a song
1. Press the [Song] button once or twice so the display will
indicate song name and song number.
2. Use the [–] [+] buttons to select the song you want to
listen to.
The F-120R’s internal memory already contains a number of songs
when it leaves the factory. These songs reside in three banks (a,
b and c). There is also a “U” bank where you can save your own
recordings (p. 26). (And if you connect a USB memory, you will also
be able to play back songs of the “S” bank. “S” refers to the USB
memory. See “Playing back Songs or Rhythms on a USB memory”
(p. 20).)
3. To quickly jump to the next bank, hold down the [+]
button and press [–].
To jump to the rst song of the previous bank, hold down
[–] and press [+].
Depending on the bank you select, the display now looks as
follows:
• Categories beginning with “A”, “B”, “C” are
Polonais
ä001
Note
* If the name of the selected song does not t in the top line, it
will scroll through the display.
* The songs in internal memory (Ü01~Ü10) will not be shown if
they have not been recorded.
* For the titles of the internal songs, refer to “Internal Song list”
(p. 33).
internal songs.
• “U” and a number refers to songs you’ve
recorded in internal memory.
• “S” and a number refers to songs on a
connected USB memory.
Viewing the measure number/selecting a
dierent measure
1. To see the measure numbers while the F-120R plays back
the selected song, press the [Song] button once or twice.
The display then changes to:
Polonais
M:3
In the case of an audio le, the display shows the elapsed playing
time.
Amazing
Song name
Measure number
0‚01
2. You can now press [–] to rewind (jump to an earlier
measure) or [+] to fast-forward.
The measure indication in the display will increase or decrease each
time you press the button.
By holding down a button, you can rapidly increase or decrease the
measure number.
Stopping the song
1. Press the [ ] button to stop playback.
The song will stop.
Song navigation functions
The F-120R also allows you to quickly return to the beginning of the
current song, to jump to the beginning of the previous song, and to
select subsequent songs.
Button Explanation
Press this button to return to the beginning of the
]
[
[
]
Changing the tempo of the current song
Each song contains a default tempo setting that is used each time
you select a song and start playback. You can, however, slow it
down or speed it up by proceeding as follows:
current song.
Press it again to jump to the beginning of the
preceding song.
This button allows you to jump to the beginning of
the next song in the list.
4. Press the [ ] button to start playback.
The song will begin playing. When the song has nished playing to
the end, it will stop.
Note
The F-120R can also play back songs directly from a USB
memory. This includes audio song les (.WAV). See “Playing back
Songs or Rhythms on a USB memory” (p. 20) for details.
1. After selecting the desired song, press the [Song] button
several times until the display looks as follows:
Tempo ¯=
112
(for an SMF song) (for an audio song)
Tempo %=
100
2. Use the [–] [+] buttons to set the desired tempo.
To return to the song’s default tempo, simultaneously press the [–]
and [+] buttons.
13
Playing back songs
Playing songs consecutively (All Song Play)
You can consecutively play back the built-in songs or the songs
saved in the internal memory or on the USB ash drive repetitively.
This function is called “All Song Play.”
1. Press the [Song] button once or twice so the display will
indicate song name and song number.
2. Use the [–] [+] buttons to select the bank.
To quickly jump to the next bank, hold down the [+] button and
press [–].
To jump to the rst song of the previous bank, hold down [–] and
press [+].
3. While holding down the [Song] button, press the [ ]
button.
All Song Play will be selected, and the [ ] button will blink.
Note
All Song Play will be cancelled if you stop playback or turn o
the power.
Changing the song volume
If you use the selected song as an accompaniment for your solo
playing, you may nd it too loud or too soft with respect to your
own part. In that case, you can change the song’s playback level:
1. Press and hold the [Song] button and use the [–] and [+]
buttons to set the desired level.
Song Vol
10
Memo
The parts (left-hand/right-hand) are indicated as follows for the
internal songs (A, B, C) and the songs you’ve recorded (U). Song
you record yourself may also contain a Rhythm accompaniment.
Songs Left-Hand Part Right-Hand Part
Internal Songs (A, B, C) Left-hand part Right-hand part
Twin Piano (p. 10) Left-hand piano Right-hand piano
Recorded
Songs (U)
Split Tones (p. 32) Left-hand tone Right-hand tone
Others
No performance
data
All parts (both
hands)
Playing back an audio le with its
central sound minimized (Center Cancel)
You can minimize the sounds that are heard from the center when
playing back an audio le. For example, you can minimize the melody or
vocal, and then play or sing that part yourself.
Note
For some songs, sounds located at the center might not
disappear completely, or the tone quality of the sound might be
aected.
1. Hold down the [Song] button and press the [Intro/Ending]
button.
Button Lit/Unlit Explanation
Unlit
[Intro/Ending]
Lit
The sound at the center is reduced
during playback.
No attenuation of the vocal or
instrumental part at the center.
Playing parts (left/right hand) separately
For SMF songs, you can select and play back the parts (left-hand,
right-hand or accompaniment) separately. This is a convenient way to
practice by playing along with a song one hand at a time.
1. Hold down the [Song] button and press one of the
following buttons to select the part that you want to play
back.
Button Lit/Unlit Explanation
Unlit
[Rhythm]
Lit
[Variation]
(left-hand part)
[Intro/Ending]
(right-hand part)
Unlit
Lit Left-hand part will sound
Unlit
Lit Right-hand part will sound
2. Press [Rhythm], [Variation] or [Intro/Ending] again to
switch the omitted part back on.
The accompaniment part will not sound
(its mute function is on).
The accompaniment part will sound (its
mute function is o).
Left-hand part is muted
(or contains no performance data)
Right-hand part is muted
(or contains no performance data)
2. Keep holding the [Song] button while pressing [Intro/
Ending] again to select the desired status ([Intro/Ending]
lit or unlit).
3. Release the [Song] button.
* This setting will be cancelled if you select another song.
Sounding a count before playback
If you’re playing along with a song, it will be easier to synchronize your
playing with the song if a count is sounded before playback begins.
1. Press the [Metronome] button to turn on the metronome
(p. 9).
2. Proceed with “Playing back a song” (p. 13).
Now, a two-measure count will sound before song playback starts.
During the count, measure numbers “-2” and then “-1” will
appear in the display.
3. Release the [Song] button.
* This setting will be cancelled if you select another song.
14
 Loading...