

Page 1
r®
Owner’s Manual
Page 2
WARNING
– To reduce the risk of fire or electric shock, do not expose this device to rain or moisture.
CAUTION
RISK OF ELECTRIC SHOCK
DO NOT OPEN
ATTENTION
CAUTION: TO REDUCE THE RISK OF ELECTRIC SHOCK,
NO USER-SERVICEABLE PARTS INSIDE.
REFER SERVICING TO QUALIFIED SERVICE PERSONNEL.
: RISQUE DE CHOC ELECTRIQUE NE PAS OUVRIR
DO NOT REMOVE COVER (OR BACK).
The lightning flash with arrowhead symbol, within an equilateral triangle, is intended to alert the user to the presence of uninsulated
“dangerous voltage” within the product’s enclosure that may be of
sufficient magnitude to constitute a risk of electric shock to persons.
The exclamation point within an equilateral triangle is intended to
alert the user to the presence of important operating and maintenance (servicing) instructions in the literature accompanying the
product.
INSTRUCTIONS PERTAINING TO A RISK OF FIRE, ELECTRIC SHOCK, OR INJURY TO PERSONS.
IMPORTANT SAFETY INSTRUCTIONS
SAVE THESE INSTRUCTIONS
WARNING
1. Read these instructions.
2. Keep these instructions.
3. Heed all warnings.
4. Follow all instructions.
5. Do not use this apparatus near water.
6. Clean only with a dry cloth.
7. Do not block any of the ventilation openings. Install in accordance with the manufacturers instructions.
8. Do not install near any heat sources such as radiators, heat registers, stoves, or other apparatus (including amplifiers) that produce heat.
9. Do not defeat safety purpose of the polarized or grounding-type
plug. A polarized plug has two blades with one wider than the
other.
A grounding type plug has two blades and third grounding
prong. The wide blade or the third prong are provided for your
safety. If the provided plug does not fit into your outlet, consult
an electrician for replacement of the obsolete outlet.
– When using electric products, basic precautions should always be followed, including the following:
10. Protect the power cord from being walked on or pinched particularly at plugs, convenience receptacles, and the point where
they exit from the apparatus.
11. Only use attachments/accessories specified by the manufacturer.
12. Use only with a cart, stand, tripod, bracket, or table specified by the manufacturer, or sold with
the apparatus. When a cart is used, use caution
when moving the cart/apparatus combination to
avoid injury from tip-over.
13. Unplug this apparatus during lightning storms or when unused
for long periods of time.
14. Refer all servicing to qualified service personnel. Servicing is required when the apparatus has been damaged in any way, such
as power-supply cord or plug is damaged, liquid has been
spilled or objects have fallen into the apparatus, the apparatus
has been exposed to rain or moisture, does not operate normally, or has been dropped.
This product must be disposed of separately at
your local waste recycling centre.
Do not dispose of in household waste bin.
The technology used in the E-80 is covered by patents pending in certain countries throughout the world.
For the U.K.
Page 3
r
Owner’s Manual
ENGLISH ENGLISH
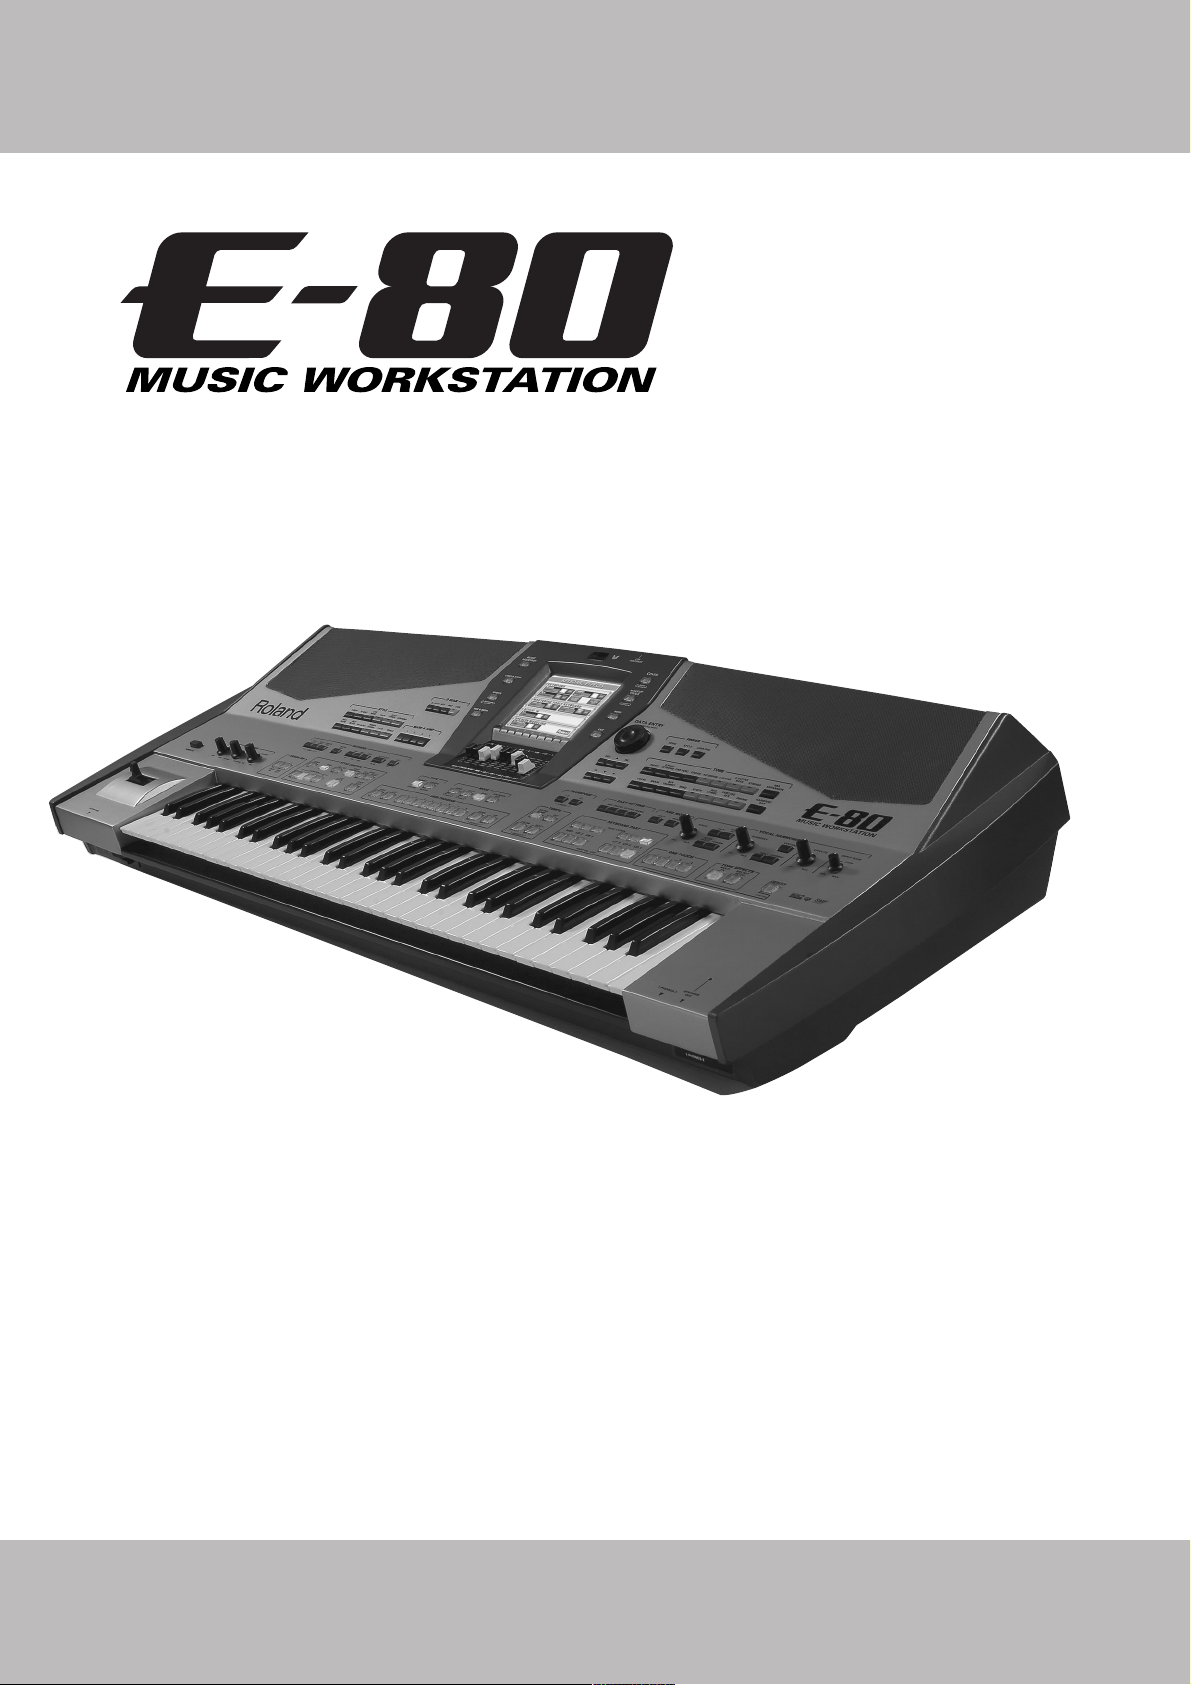
Thank you for purchasing the Roland E-80 Music Workstation. The E-80 is Roland’s most complete arranger keyboard
yet, a collection of all major advantages a Roland instrument can offer: perfect accompaniments, high-class sounds,
the possibility to expand the number of sounds via two optional expansion boards (SRX series), a D Beam controller,
virtual harmonic organ bars, professional effects, a Vocal Harmonist, the Cover functions first introduced on Roland’s
unique DisCover 5 keyboard, a Guitar mode… There’s simply too much to mention in this introduction.
Much care has been taken to facilitate access to all those countless functions, which is why the E-80 comes with a fullcolor touch screen and a user interface that walks you through anything you may want to do with your E-80.
To get the most out of the E-80 and to ensure many years of trouble-free service, we urge you to read through this
Owner’s Manual thoroughly.
To avoid confusion, let’s agree to use the word “button” for all keys on the front panel, and use “key” only when referring to the E-80’s keyboard.
To save space (and time), let us agree to use the word “song” when referring to Standard MIDI Files.
Before using this instrument, carefully read the “Important notes” on p. 11. They provide information concerning the
proper operation of the E-80. Be sure to keep this manual in a safe place for future reference.
ENGLISH ENGLISH
Copyright © 2006 ROLAND EUROPE. All rights reserved. No part of this publication may be reproduced in any form without the written permission of Roland Europe S.p.a.
Page 4

E-80
Music Workstation
Features
Features
A comprehensive arranger instrument
The E-80 is quite simply a superlative instrument with
the most advanced and best sound generation technology Roland has to offer. It combines Roland’s Virtual
ToneWheel technology (derived from our successful VK
series) with a superb internal sound source (based on
the acclaimed Fantom-X series) and the possibility to
expand your sound arsenal using one or two wave
expansion boards of Roland’s SRX series.
New interface concept
The E-80 was designed from the ground up to put its
massive array of functions at your fingertips. The fullcolor touch-sensitive screen and the large number of
front-panel buttons usually provide direct access to the
available functions, thus doing away with the need to
wade through countless menus.
Parameters that belong together from a musician’s
point of view are usually located on the same or adjacent display pages, while setting them has been greatly
simplified with respect to earlier arranger instruments.
Cover functions and Makeup Tools for Standard
MIDI Files and Music Styles
Reorchestrating existing Standard MIDI Files and Music
Styles has become a breeze thanks to high-quality Song
and Style Cover presets and an intuitive, instrumentbased, set of MAKEUP TOOLS parameters that allow you
to “revoice” your songs and Styles without spending
hours editing single events.
The structure of Standard MIDI Files can be changed in
real-time thanks to four programmable MARK & JUMP
memories, which allows you to play extended versions
of prerecorded songs.
Adaptive Chord Voicing technology
The E-80’s Arranger not only boasts a new structure
(with 4 accompaniment levels, 4 Intros and 4 Ending
phrases) but also relies on a more musical real-time
conversion of the chords you play into meaningful
accompaniment phrases. Roland’s patent-applied-for
ACV technology can indeed transpose Music Style parts
in such a way as to eliminate unnatural jumps of
strings lines, piano chords, etc.
Guitar mode
The E-80 features a Guitar mode that allows you to play
super-realistic electric and acoustic guitar parts. Those
parts can be used both alongside the Arranger (live
applications) and recorded using the E-80’s 16-track
Sequencer/Recorder and the Style Composer.
A multitude of effects
The E-80 provides a host of effects processors for all
parts and sections. There are three separate multieffects processors (MFX A~C) for songs and Styles that
can be set independently from the MFX that is available
for the Keyboard parts. Furthermore, each part and
instrument has its own 3-band equalizer. Even the
drum instruments of Standard MIDI Files and Music
Styles (i.e. the kick, snare, HiHat, toms, etc.) can use
their own individual equalizer.
Viewer
The E-80 incorporates a VIEWER function you can use
to display texts (e.g. song lyrics) or BMP picture files on
the internal display or an external screen. There is even
a PAGE TURNER function that turns the “pages” of the
selected text file or creates a slideshow of several pictures.
2 slots for SRX-series expansion boards
The E-80’s sonic arsenal can be expanded with two
optional SRX-series wave expansion boards (the same
boards that can be installed in the synthesizers of
Roland’s Fantom-X series). Some boards contain audio
loops (“grooves”) that are automatically synchronized
to the song or Style tempo, allowing you to add audio
to your sequencer or style data.
Amplification
The E-80 is fitted with the finest amplification system
Roland has ever developed for its arranger keyboards.
On top of that, the Keyboard and Song/Style sections
have their own set of Mastering Tools effects, while
there are also a Speaker Simulation and an adjustable
Digital Bass Enhancer function for minute fine-tuning
of the E-80’s overall sound.
A convenient switch allows you to switch off the internal speakers when you don’t need them.
Professional Vocal Harmonist
Another highlight of the E-80 is its Vocal Harmonist
that adds automatic harmonies to your singing, complete with several modes for transforming your (or
someone else’s) voice.
This implies, of course, that you can connect an
optional (Roland DR-10 or DR-20) microphone to the
E-80. Other signal sources (synthesizers, etc.) can also
be connected. Note that a separate EXTERNAL AUDIO IN
part with its own effect section is also provided, allowing you to add external line-level signals (of a sound
module, CD player, etc.) to your playing.
The signals generated by your singing and/or the Vocal
Harmonist can either be added to the signals of the
MAIN OUTPUT sockets, or transmitted directly to one or
two mixer channels (or additional amplifiers) via the
dedicated VOCAL HARMONIST OUTPUT sockets.
r
4
Page 5

E-80 Music Workstation
r
Features
Superfast Recorder and comprehensive 16-track
sequencer
The E-80 provides two approaches for recording new
song material: a Recorder function with a straightforward REC-START-STOP approach and a fully-featured
16-track sequencer with track-based and detailed
microscope editing functions.
Like many other functions on the E-80, the Recorder
interacts with other sections: you can link a song to
each User Program, you can cause any Standard MIDI
File to be transposed automatically to a range that
allows you to sing with ease, the chords of the songs
you play back are recognized automatically and displayed, etc.
Finder functions for songs, Music Styles and User
Programs
Another highlight of the E-80 is the fact that you can
work with an almost unlimited number of songs, Music
Styles and User Programs (in the internal memory, on
memory card or floppy disk). Though there are still factory Music Styles, you can also work with “CUSTOM”
links to accompaniments in the internal memory or on
memory card, and even select such “external” Styles on
the fly. The same high-speed access system is available
for Standard MIDI Files (songs) and User Programs.
Thanks to the clever Finder databases, the difference
between what’s internal and what resides in an “external” memory has become almost imperceptible.
…and so much more
Listing all of the E-80’s advantages and functions
would take another ten pages, while you must be dying
to put it through its paces. That is why we would like to
ask you to read this manual from cover to cover. You’ll
find that the E-80 is quite unlike any other instrument
you know.
Have fun!
Play List function
Thanks to the E-80’s Play List function, you can program set lists for your performances. The advantage of
such song chains is that you won’t have to look for the
desired songs on stage.
Furthermore, you can already prepare the next song
while the current one is still running (NEXT SONG function).
D Beam controller
The E-80 has the acclaimed D Beam Controller* for
intuitive song and Style playback control and additional
DJ-like effects via movements over an invisible beam of
infrared light. And, of course, the BENDER/MODULATION lever is also there, as are sockets for optional footswitches and an expression pedal.
(* D Beam technology licensed from Interactive Light, Inc.)
5
Page 6
E-80
Music Workstation
Using the unit safely
Using the unit safely
Used for instructions intended to alert
the user to the risk of death or severe
injury should the unit be used
improperly.
Used for instructions intended to alert
the user to the risk of injury or material
damage should the unit be used
improperly.
* Material damage refers to damage or
other adverse effects caused with
respect to the home and all its
furnishings, as well to domestic
animals or pets.
• Before using this instrument, be sure to read the instructions below, and the Owner’s Manual.
.................................................................................................
• Connect the mains plug of this model to a wall outlet
with a protective earthing connection.
.................................................................................................
• Do not open or perform any internal modifications on
the unit.
.................................................................................................
• Do not attempt to repair the E-80, or replace parts within
it (except when this manual provides specific instructions
directing you to do so). Refer all servicing to your retailer,
the nearest Roland Service Center, or an authorized
Roland distributor, as listed on the “Information” page.
.................................................................................................
• Never use or store the E-80 in places that are:
• Subject to temperature extremes (e.g., direct sunlight
in an enclosed vehicle, near a heating duct, on top of
heat-generating equipment); or are
• Damp (e.g., baths, washrooms, on wet floors); or are
• Humid; or are
• Exposed to rain; or are
• Dusty; or are
• Subject to high levels of vibration.
.................................................................................................
• This unit should be used only with a stand that is rec-
ommended by Roland, such as the KS-12.
.................................................................................................
• Make sure you always have the unit placed in such a way
that it is level and sure to remain stable. Never place it on
stands that could wobble, or on inclined surfaces.
.................................................................................................
• The instrument should only be connected to a power
supply of the type described in the operating instructions, or as marked on the E-80.
.................................................................................................
The symbol alerts the user to important instructions
or warnings.The specific meaning of the symbol is
determined by the design contained within the
triangle. In the case of the symbol at left, it is used for
general cautions, warnings, or alerts to danger.
The symbol alerts the user to items that must never
be carried out (are forbidden). The specific thing that
must not be done is indicated by the design contained
within the circle. In the case of the symbol at left, it
means that the unit must never be disassembled.
The ● symbol alerts the user to things that must be
carried out. The specific thing that must be done is
indicated by the design contained within the circle. In
the case of the symbol at left, it means that the powercord plug must be unplugged from the outlet.
• Do not excessively twist or bend the power cord, nor
place heavy objects on it. Doing so can damage the cord,
producing severed elements and short circuits. Damaged
cords are fire and shock hazards!
................................................................................................
• This instrument, either alone or in combination with an
amplifier and headphones or speakers, may be capable of
producing sound levels that could cause permanent
hearing loss. Do not operate for a long period of time at a
high volume level, or at a level that is uncomfortable. If
you experience any hearing loss or ringing in the ears,
you should immediately stop using the unit, and consult
an audiologist.
................................................................................................
• Do not allow any objects (e.g., flammable material, coins,
pins); or liquids of any kind (water, soft drinks, etc.) to
penetrate the unit.
................................................................................................
• In households with small children, an adult should provide supervision until the child is capable of following all
rules essential for the safe operation of the E-80.
................................................................................................
• Protect the unit from strong impact.
(Do not drop it!)
................................................................................................
• Do not force the E-80’s power cord to share an outlet
with an unreasonable number of other devices. Be especially careful when using extension cords—the total
power used by all devices you have connected to the
extension cord’s outlet must never exceed the power rating (watts/amperes) for the extension cord. Excessive
loads can cause the insulation on the cord to heat up and
eventually melt through.
................................................................................................
r
6
Page 7

• Before using the E-80 in a foreign country, consult with
your retailer, the nearest Roland Service Center, or an
authorized Roland distributor, as listed on the “Information” page.
.................................................................................................
• The E-80 should be located so that its location or position does not interfere with its proper ventilation.
.................................................................................................
• This unit for use only with Roland keyboard stand KS-12.
Use with other stands may result in instability and cause
possible injury.
.................................................................................................
• Always grasp only the plug on the power-supply cord
when plugging into, or unplugging from, an outlet or
this unit.
.................................................................................................
• Try to prevent cords and cables from becoming entangled. Also, all cords and cables should be placed out of
the reach of children.
.................................................................................................
• Never climb on top of, nor place heavy objects on the
unit.
E-80 Music Workstation
Using the unit safely
r
.................................................................................................
• Never handle the power cord or its plugs with wet hands
when plugging into, or unplugging from, an outlet or
this unit.
.................................................................................................
• If you need to move the instrument, take note of the precautions listed below. Make sure to have a firm grip, to
protect yourself from injury and the instrument from
damage.
• Disconnect the power cord.
• Disconnect all cords coming from external devices.
• Remove the music stand.
.................................................................................................
• Before cleaning the unit, turn off the power and unplug
the power cord from the outlet.
.................................................................................................
• Whenever you suspect the possibility of lightning in your
area, disconnect the power cord from the outlet.
.................................................................................................
• Should you remove screws, make sure to put them in a
safe place out of children’s reach, so there is no chance
of them being swallowed accidentally.
.................................................................................................
7
Page 8

E-80
Music Workstation
Contents
Contents
Features . . . . . . . . . . . . . . . . . . . . . . . . . . . . . . . . . . . 4
Important notes . . . . . . . . . . . . . . . . . . . . . . . . . . . 11
1. Panel descriptions. . . . . . . . . . . . . . . . . . . . . . . . . . 13
Front panel . . . . . . . . . . . . . . . . . . . . . . . . . . . . . . . . . . . 13
Rear panel . . . . . . . . . . . . . . . . . . . . . . . . . . . . . . . . . . . 18
2. Setting up and demo songs . . . . . . . . . . . . . . . . . . 20
Connections . . . . . . . . . . . . . . . . . . . . . . . . . . . . . . . . . . 20
Switching the E-80 on/off. . . . . . . . . . . . . . . . . . . . . . 21
Internal Memory Protect . . . . . . . . . . . . . . . . . . . . . . . . . . .21
Setting the display contrast . . . . . . . . . . . . . . . . . . . . . . . . 21
Switching off the E-80. . . . . . . . . . . . . . . . . . . . . . . . . . . . . 21
Interactive demo of the E-80 . . . . . . . . . . . . . . . . . . . 22
The main page . . . . . . . . . . . . . . . . . . . . . . . . . . . . . . . . 23
3. Quick Start. . . . . . . . . . . . . . . . . . . . . . . . . . . . . . . . 24
The general idea . . . . . . . . . . . . . . . . . . . . . . . . . . . . . . 24
Playing to an automatic accompaniment. . . . . . . . . 25
Professional transitions: Fill In . . . . . . . . . . . . . . . . . . . . . . 26
Intro & Ending . . . . . . . . . . . . . . . . . . . . . . . . . . . . . . . . . . . . 26
Selecting Music Styles . . . . . . . . . . . . . . . . . . . . . . . . . . . . . 27
Changing the tempo . . . . . . . . . . . . . . . . . . . . . . . . . . . . . .28
Using the Keyboard parts . . . . . . . . . . . . . . . . . . . . . . 28
Playing with an Upper and/or Lower part . . . . . . . . . . . .28
Alternating between sounds . . . . . . . . . . . . . . . . . . . . . . . . 29
Selecting sounds for the Keyboard parts . . . . . . . . . . . . . 29
Drumming on the keyboard . . . . . . . . . . . . . . . . . . . . . . . . 31
Selecting sounds from an SRX expansion board . . . . . . .32
Using the Harmonic Bars. . . . . . . . . . . . . . . . . . . . . . . 33
If you like a registration… . . . . . . . . . . . . . . . . . . . . . . . . . .34
About the MANUAL field . . . . . . . . . . . . . . . . . . . . . . . . . . .34
Using just one organ sound and bass pedals . . . . . . . . . . 34
Using effects . . . . . . . . . . . . . . . . . . . . . . . . . . . . . . . . . . . . . 34
Playing realistic guitar parts (Guitar mode) . . . . . . . 36
First steps . . . . . . . . . . . . . . . . . . . . . . . . . . . . . . . . . . . . . . . .36
Additional ARPEGGIO functions. . . . . . . . . . . . . . . . . . . . . 37
Leaving the E-80’s Guitar mode. . . . . . . . . . . . . . . . . . . . . 37
Selecting guitar sounds . . . . . . . . . . . . . . . . . . . . . . . . . . . .37
About the chord indications . . . . . . . . . . . . . . . . . . . . . . . .38
Using the available STRUMM techniques . . . . . . . . . . . . .38
Playing question and answer phrases . . . . . . . . . . . . . . . .38
Guitar Mode Options . . . . . . . . . . . . . . . . . . . . . . . . . . . . . . 39
Working with the Music Assistant . . . . . . . . . . . . . . . 40
If the desired registration is not displayed… . . . . . . . . . . 40
To save time… . . . . . . . . . . . . . . . . . . . . . . . . . . . . . . . . . . . . 40
Using the Finder . . . . . . . . . . . . . . . . . . . . . . . . . . . . . . . . . . 40
Playing back songs (Standard MIDI Files) . . . . . . . . . 41
Quick location of the song you need. . . . . . . . . . . . . . . . . 42
Starting playback . . . . . . . . . . . . . . . . . . . . . . . . . . . . . . . . . 42
Other practical playback functions . . . . . . . . . . . . . . . . . . 43
Using the Song Cover function . . . . . . . . . . . . . . . . . . . . . 44
Minus One . . . . . . . . . . . . . . . . . . . . . . . . . . . . . . . . . . . . . . . 45
Vocal Harmonist function. . . . . . . . . . . . . . . . . . . . . . 46
Setting up . . . . . . . . . . . . . . . . . . . . . . . . . . . . . . . . . . . . . . . .46
Adding harmonies to your singing. . . . . . . . . . . . . . . . . . .47
Who specifies the harmonies?. . . . . . . . . . . . . . . . . . . . . . .48
Not convinced so far?. . . . . . . . . . . . . . . . . . . . . . . . . . . . . .48
Voice-FX . . . . . . . . . . . . . . . . . . . . . . . . . . . . . . . . . . . . . . . . .49
Auto Pitch. . . . . . . . . . . . . . . . . . . . . . . . . . . . . . . . . . . . . . . .49
Using the Vocoder . . . . . . . . . . . . . . . . . . . . . . . . . . . . . . . . .50
Talk. . . . . . . . . . . . . . . . . . . . . . . . . . . . . . . . . . . . . . . . . . . . . .51
Automatic transposition (Singer Key) . . . . . . . . . . . . . . . .51
Displaying Lyrics and chord information . . . . . . . . . 53
Displaying scores . . . . . . . . . . . . . . . . . . . . . . . . . . . . . . . . . .54
Using the VIEWER function . . . . . . . . . . . . . . . . . . . . 56
Working with picture files (BMP Import) . . . . . . . . . . . . .56
Working with text files (TXT Import) . . . . . . . . . . . . . . . . .58
Recording your music . . . . . . . . . . . . . . . . . . . . . . . . . 60
Recording with Style backing . . . . . . . . . . . . . . . . . . . . . . .60
Listening to your song . . . . . . . . . . . . . . . . . . . . . . . . . . . . .60
Recording without accompaniment. . . . . . . . . . . . . . . . . .61
Adding more parts. . . . . . . . . . . . . . . . . . . . . . . . . . . . . . . . .61
Saving your song. . . . . . . . . . . . . . . . . . . . . . . . . . . . . . . . . .63
4. About the Keyboard modes . . . . . . . . . . . . . . . . . .64
Arranger, Organ, Guitar and Piano modes . . . . . . . . 64
Split and Whole modes . . . . . . . . . . . . . . . . . . . . . . . . 65
Using the SPLIT Keyboard Mode . . . . . . . . . . . . . . . . . . . . .65
Using WHOLE mode . . . . . . . . . . . . . . . . . . . . . . . . . . . . . . .65
Switching parts on and off . . . . . . . . . . . . . . . . . . . . . . . . .65
5. Using the performance functions . . . . . . . . . . . . .66
Pitch Bend and Modulation . . . . . . . . . . . . . . . . . . . . 66
Transposition. . . . . . . . . . . . . . . . . . . . . . . . . . . . . . . . . 66
Setting the transposition interval via the display . . . . . .67
Global Transpose . . . . . . . . . . . . . . . . . . . . . . . . . . . . . . . . . .67
Octave. . . . . . . . . . . . . . . . . . . . . . . . . . . . . . . . . . . . . . . 67
Key Touch (velocity sensitivity) . . . . . . . . . . . . . . . . . 68
Master Tune. . . . . . . . . . . . . . . . . . . . . . . . . . . . . . . . . . 69
Aftertouch . . . . . . . . . . . . . . . . . . . . . . . . . . . . . . . . . . . 70
ASSIGN SW buttons . . . . . . . . . . . . . . . . . . . . . . . . . . . 71
Using the D Beam Controller . . . . . . . . . . . . . . . . . . . 72
Using optional footswitches. . . . . . . . . . . . . . . . . . . . 75
FC7 PEDAL. . . . . . . . . . . . . . . . . . . . . . . . . . . . . . . . . . . . . . . .75
Hold Footswitch (Sustain) . . . . . . . . . . . . . . . . . . . . . . . . . .76
Foot Switch. . . . . . . . . . . . . . . . . . . . . . . . . . . . . . . . . . . . . . .77
Expression (Foot Pedal). . . . . . . . . . . . . . . . . . . . . . . . . . . . .78
Scale Tuning . . . . . . . . . . . . . . . . . . . . . . . . . . . . . . . . . 79
Metronome . . . . . . . . . . . . . . . . . . . . . . . . . . . . . . . . . . 81
6. Additional Arranger/Style functions . . . . . . . . . . .82
Playback functions (Style Control) . . . . . . . . . . . . . . 82
Starting a Music Style. . . . . . . . . . . . . . . . . . . . . . . . . . . . . .82
Stopping Style playback . . . . . . . . . . . . . . . . . . . . . . . . . . . .82
About Sync Start & Stop . . . . . . . . . . . . . . . . . . . . . . . . . . .83
Selecting other Style divisions . . . . . . . . . . . . . . . . . . 83
Other ways of selecting Arranger patterns . . . . . . . . . . . .83
Bass Inversion. . . . . . . . . . . . . . . . . . . . . . . . . . . . . . . . . . . . .83
Melody Intelligence . . . . . . . . . . . . . . . . . . . . . . . . . . . 84
Linking MELODY INTELL type selection to the Styles
(Style Melody Intell Link) . . . . . . . . . . . . . . . . . . . . . . . . . .85
r
8
Page 9

E-80 Music Workstation
r
Contents
Using the Style Cover function. . . . . . . . . . . . . . . . . . 85
Freeze Data. . . . . . . . . . . . . . . . . . . . . . . . . . . . . . . . . . . . . . . 86
Saving a Style with a COVER alteration . . . . . . . . . . . . . . 86
One Touch. . . . . . . . . . . . . . . . . . . . . . . . . . . . . . . . . . . . 87
Ignoring certain One Touch settings (Hold) . . . . . . . . . . .87
Programming your own One Touch settings (WRITE). . . 87
More refined Arranger settings . . . . . . . . . . . . . . . . . 88
Chord recognition area (ZONE). . . . . . . . . . . . . . . . . . . . . . 88
Arranger Type (chord mode) . . . . . . . . . . . . . . . . . . . . . . . .89
Arranger Hold . . . . . . . . . . . . . . . . . . . . . . . . . . . . . . . . . . . . 89
Intro & Ending Alteration . . . . . . . . . . . . . . . . . . . . . . . . . . 89
Dynamic Arranger. . . . . . . . . . . . . . . . . . . . . . . . . . . . . . . . . 89
Tempo-related settings (Arranger Options) . . . . . . . 90
Style Tempo . . . . . . . . . . . . . . . . . . . . . . . . . . . . . . . . . . . . . .90
TEMPO CHANGE (RITARD and ACCELER). . . . . . . . . . . . . . 91
Working with ‘external’ Styles . . . . . . . . . . . . . . . . . . 92
Using the CUSTOM memories . . . . . . . . . . . . . . . . . . . . . . . 92
Programming CUSTOM assignments . . . . . . . . . . . . . . . . . 92
Disk User. . . . . . . . . . . . . . . . . . . . . . . . . . . . . . . . . . . . . . . . . 94
Style Finder: quickly locating Styles. . . . . . . . . . . . . . 95
Quick location of the Style you need. . . . . . . . . . . . . . . . .95
Editing the Style Finder information . . . . . . . . . . . . . . . . .96
7. Advanced Keyboard part functions . . . . . . . . . . . 99
Upper 3 Split . . . . . . . . . . . . . . . . . . . . . . . . . . . . . . . . . 99
Dynamic Split. . . . . . . . . . . . . . . . . . . . . . . . . . . . . . . . . 99
Tuning Upper2: Coarse Tune and Fine Tune . . . . . . 100
Portamento for UP1 and UP2 . . . . . . . . . . . . . . . . . . 101
Portamento Time. . . . . . . . . . . . . . . . . . . . . . . . . . . . . . . . .101
Portamento Mode: Mono/Poly . . . . . . . . . . . . . . . . . . . . .102
Lower Hold . . . . . . . . . . . . . . . . . . . . . . . . . . . . . . . . . . 102
Tone Edit: editing Keyboard parts . . . . . . . . . . . . . . 103
8. Using the mixer functions & effects . . . . . . . . . 105
Mixing Keyboard parts . . . . . . . . . . . . . . . . . . . . . . . .106
Volume and status of the Style parts . . . . . . . . . . . 107
Editing the Keyboard effects processors . . . . . . . . . 108
Reverb for Keyboard parts. . . . . . . . . . . . . . . . . . . . . . . . .108
Chorus for Keyboard parts. . . . . . . . . . . . . . . . . . . . . . . . .110
Using the multi-effects processor of the Keyboard
parts (MULTI FX) . . . . . . . . . . . . . . . . . . . . . . . . . . . . . 111
Selecting another MFX type and editing it. . . . . . . . . . .112
Linking Multi-FX type selection to the Upper1 part
(Upper 1 M-FX Link) . . . . . . . . . . . . . . . . . . . . . . . . . . . . .112
Equalizers for the Keyboard parts . . . . . . . . . . . . . . 113
Using the Keyboard Mastering Tools . . . . . . . . . . . . 114
Equalizer . . . . . . . . . . . . . . . . . . . . . . . . . . . . . . . . . . . . . . . . 114
Compressor . . . . . . . . . . . . . . . . . . . . . . . . . . . . . . . . . . . . .115
Effects for Songs and Styles . . . . . . . . . . . . . . . . . . . 116
Reverb for Style/Song instruments . . . . . . . . . . . . . . . . .116
Chorus for Style/Song instruments . . . . . . . . . . . . . . . . .116
Using the multi-effects processors of the Style and Song
instruments. . . . . . . . . . . . . . . . . . . . . . . . . . . . . . . . . . . . .117
Using the Style/Song Mastering Tools. . . . . . . . . . . 118
Equalizer . . . . . . . . . . . . . . . . . . . . . . . . . . . . . . . . . . . . . . . . 118
Compressor . . . . . . . . . . . . . . . . . . . . . . . . . . . . . . . . . . . . .118
Using the audio inputs. . . . . . . . . . . . . . . . . . . . . . . . 119
Using the Speaker Modeling settings . . . . . . . . . . . 120
Mixing Vocal Harmonist signals . . . . . . . . . . . . . . . .121
Reverb, Delay and Chorus effects. . . . . . . . . . . . . . . . . . .122
9. Working with User Programs . . . . . . . . . . . . . . . 125
Saving your settings to a User Program . . . . . . . . . 125
Selecting User Programs . . . . . . . . . . . . . . . . . . . . . . 126
Default. . . . . . . . . . . . . . . . . . . . . . . . . . . . . . . . . . . . . . . . . 126
Choosing User Programs manually. . . . . . . . . . . . . . . . . 127
Selecting User Programs with [DOWN][UP]. . . . . . . . . . 127
Working with the User Program Finder. . . . . . . . . . . . . 127
Quick location of the User Program you need . . . . . . . 128
Selectively loading User Program settings
(User Program Hold) . . . . . . . . . . . . . . . . . . . . . . . . . . . . 129
Bypassing the AUTO FILL function (Fill In On
User Program Change) . . . . . . . . . . . . . . . . . . . . . . . . . . 130
Automatic functions for User Programs. . . . . . . . . 130
Song Link. . . . . . . . . . . . . . . . . . . . . . . . . . . . . . . . . . . . . . . 130
Linking a MIDI Set to a User Program . . . . . . . . . . . . . . 131
TXT/BMP Link . . . . . . . . . . . . . . . . . . . . . . . . . . . . . . . . . . . 132
User Program Recall . . . . . . . . . . . . . . . . . . . . . . . . . . . . . 133
Editing User Program Finder information . . . . . . . 133
Editing the User Program Finder information . . . . . . . 134
Editing an Index. . . . . . . . . . . . . . . . . . . . . . . . . . . . . . . . . 135
Music Assistant functions . . . . . . . . . . . . . . . . . . . . . 137
Creating new Music Assistant registrations . . . . . . . . . 137
Editing Music Assistant registrations . . . . . . . . . . . . . . . 138
Saving a Music Assistant entry . . . . . . . . . . . . . . . . . . . . 138
10. Song and Style Makeup Tools . . . . . . . . . . . . . . . 140
Mixing Song or Style parts . . . . . . . . . . . . . . . . . . . . 140
Using the Makeup Tools . . . . . . . . . . . . . . . . . . . . . . 141
General procedure. . . . . . . . . . . . . . . . . . . . . . . . . . . . . . . 141
PALETTE . . . . . . . . . . . . . . . . . . . . . . . . . . . . . . . . . . . . . . . . 142
SOUND EDIT for sounds . . . . . . . . . . . . . . . . . . . . . . . . . . 144
SOUND EDIT for Drum Sets . . . . . . . . . . . . . . . . . . . . . . . 145
DRUM INSTR EDIT . . . . . . . . . . . . . . . . . . . . . . . . . . . . . . . 145
COMMON . . . . . . . . . . . . . . . . . . . . . . . . . . . . . . . . . . . . . . 147
Before saving your settings . . . . . . . . . . . . . . . . . . . 148
Saving your modified song or Style . . . . . . . . . . . . 148
11. Editing the Vocal Harmonist parts . . . . . . . . . . . 150
Singer settings . . . . . . . . . . . . . . . . . . . . . . . . . . . . . . 150
Voice-FX settings . . . . . . . . . . . . . . . . . . . . . . . . . . . . 151
Auto Pitch settings. . . . . . . . . . . . . . . . . . . . . . . . . . . 152
Vocoder settings . . . . . . . . . . . . . . . . . . . . . . . . . . . . . 153
Small settings . . . . . . . . . . . . . . . . . . . . . . . . . . . . . . . 154
Ensemble settings. . . . . . . . . . . . . . . . . . . . . . . . . . . . 155
12. More refined song functions . . . . . . . . . . . . . . . .157
Using the Fade-In/Out function. . . . . . . . . . . . . . . . 157
Programming MARK & JUMP locations . . . . . . . . . 158
Working with the Song Finder . . . . . . . . . . . . . . . . . 159
Locating files with the Song Finder . . . . . . . . . . . . . . . . 159
Editing the Song Finder information . . . . . . . . . . . . . . . 160
Editing an Index. . . . . . . . . . . . . . . . . . . . . . . . . . . . . . . . . 162
Play List function . . . . . . . . . . . . . . . . . . . . . . . . . . . . 164
Programming Play Lists . . . . . . . . . . . . . . . . . . . . . . . . . . 164
Editing Play Lists . . . . . . . . . . . . . . . . . . . . . . . . . . . . . . . . 165
Using Play Lists. . . . . . . . . . . . . . . . . . . . . . . . . . . . . . . . . . 167
Managing Play Lists. . . . . . . . . . . . . . . . . . . . . . . . . . . . . . 167
13. Editing Lyrics . . . . . . . . . . . . . . . . . . . . . . . . . . . . .169
Adding Lyrics to a song . . . . . . . . . . . . . . . . . . . . . . . 169
Exporting Lyrics data as text file . . . . . . . . . . . . . . . 171
14. Using the 16-track Sequencer . . . . . . . . . . . . . . .173
About the sequencer’s main page . . . . . . . . . . . . . . 173
General considerations . . . . . . . . . . . . . . . . . . . . . . . 173
Example 1: Recording a song from scratch . . . . . . 174
Preparations . . . . . . . . . . . . . . . . . . . . . . . . . . . . . . . . . . . . 175
9
Page 10

E-80 Music Workstation
Contents
Example 2: Adding tracks . . . . . . . . . . . . . . . . . . . . .177
Saving your song. . . . . . . . . . . . . . . . . . . . . . . . . . . . . . . . .178
Editing 16-track songs . . . . . . . . . . . . . . . . . . . . . . . . 179
Easy editing and useful functions . . . . . . . . . . . . . . . . . . 179
Editing one or several tracks (TRACK EDIT). . . . . . . . . . .179
Editing song data using Microscope Edit . . . . . . . . 193
General notes about MICRO EDIT. . . . . . . . . . . . . . . . . . .194
Editing events . . . . . . . . . . . . . . . . . . . . . . . . . . . . . . . . . . .195
Other edit operations . . . . . . . . . . . . . . . . . . . . . . . . . . . . .195
Style Converter . . . . . . . . . . . . . . . . . . . . . . . . . . . . . . 197
General considerations. . . . . . . . . . . . . . . . . . . . . . . . . . . .197
Using the Style Converter . . . . . . . . . . . . . . . . . . . . . . . . .198
Auditioning the tracks . . . . . . . . . . . . . . . . . . . . . . . . . . . .198
15. Programming Styles (Style Composer) . . . . . . . . 201
Concept. . . . . . . . . . . . . . . . . . . . . . . . . . . . . . . . . . . . . 201
Recording Styles from scratch . . . . . . . . . . . . . . . . . 202
Starting the Style Composer. . . . . . . . . . . . . . . . . . . . . . .202
Clearing the RAM memory (Initialize Style) . . . . . . . . . .202
Getting ready for the first track . . . . . . . . . . . . . . . . . . . . 203
Recording . . . . . . . . . . . . . . . . . . . . . . . . . . . . . . . . . . . . . . . 206
Auditioning your Style and adding more tracks . . 206
Saving your Style . . . . . . . . . . . . . . . . . . . . . . . . . . . . . . . . 207
Recording other tracks and divisions . . . . . . . . . . . . . . .207
Muting tracks while recording others . . . . . . . . . . . . . . . 207
Remarks . . . . . . . . . . . . . . . . . . . . . . . . . . . . . . . . . . . . . . . .207
Using existing Styles. . . . . . . . . . . . . . . . . . . . . . . . . . 208
Starting with all tracks of an existing Style . . . . . . . . . .208
Copying individual Style tracks. . . . . . . . . . . . . . . . . . . . .209
Editing Styles on the fly via additional recordings 210
Adding notes in real-time . . . . . . . . . . . . . . . . . . . . . . . . .210
Adding controller data in real-time. . . . . . . . . . . . . . . . . 210
Adding or changing settings of existing parts. . . . . . . .210
Expression, Panpot, Reverb, Chorus. . . . . . . . . . . . . . . . .211
Changing the preset tempo . . . . . . . . . . . . . . . . . . . . . . .212
Style Track Edit functions . . . . . . . . . . . . . . . . . . . . . 212
Editing individual Style events (Style Micro Edit) . 220
General notes about STYLE MICRO EDIT . . . . . . . . . . . . .220
Editing events . . . . . . . . . . . . . . . . . . . . . . . . . . . . . . . . . . .222
Other edit operations . . . . . . . . . . . . . . . . . . . . . . . . . . . . .223
16. Disk/Media functions . . . . . . . . . . . . . . . . . . . . . . 225
The how-to’s . . . . . . . . . . . . . . . . . . . . . . . . . . . . . . . . 225
Loading data . . . . . . . . . . . . . . . . . . . . . . . . . . . . . . . . 226
Saving data . . . . . . . . . . . . . . . . . . . . . . . . . . . . . . . . .226
Rename functions. . . . . . . . . . . . . . . . . . . . . . . . . . . . 228
Delete . . . . . . . . . . . . . . . . . . . . . . . . . . . . . . . . . . . . . . 229
Copy. . . . . . . . . . . . . . . . . . . . . . . . . . . . . . . . . . . . . . . . 230
Format. . . . . . . . . . . . . . . . . . . . . . . . . . . . . . . . . . . . . . 231
Import User Program function . . . . . . . . . . . . . . . . .232
17. Archiving data using a computer (USB) . . . . . . . 234
Backing up all of the E-80’s data . . . . . . . . . . . . . . . . . . . 236
Just in case… . . . . . . . . . . . . . . . . . . . . . . . . . . . . . . . . . . . .236
18. MIDI . . . . . . . . . . . . . . . . . . . . . . . . . . . . . . . . . . . . 237
The how-to’s . . . . . . . . . . . . . . . . . . . . . . . . . . . . . . . . 237
Accessing the MIDI functions . . . . . . . . . . . . . . . . . . . . . .237
Working with presets . . . . . . . . . . . . . . . . . . . . . . . . . . . . .238
Editing procedure . . . . . . . . . . . . . . . . . . . . . . . . . . . . . . . .238
Editing MIDI parameters . . . . . . . . . . . . . . . . . . . . . . 239
Keyboard, Style, Song parts. . . . . . . . . . . . . . . . . . . . . . . . 239
MIDI System parameters . . . . . . . . . . . . . . . . . . . . . . . . . .240
MIDI Sets . . . . . . . . . . . . . . . . . . . . . . . . . . . . . . . . . . . 243
Writing a MIDI Set. . . . . . . . . . . . . . . . . . . . . . . . . . . . . . . 243
Using MIDI Sets . . . . . . . . . . . . . . . . . . . . . . . . . . . . . . . . . 243
MIDI Set selection at power-on . . . . . . . . . . . . . . . . . . . 244
19. Miscellaneous. . . . . . . . . . . . . . . . . . . . . . . . . . . . .245
Using V-LINK . . . . . . . . . . . . . . . . . . . . . . . . . . . . . . . . 245
General settings . . . . . . . . . . . . . . . . . . . . . . . . . . . . . 246
Song/Arranger Start Priority . . . . . . . . . . . . . . . . . . . . . . 246
Touch Screen Beep . . . . . . . . . . . . . . . . . . . . . . . . . . . . . . 247
Flashing Exit . . . . . . . . . . . . . . . . . . . . . . . . . . . . . . . . . . . . 247
Flashing Metronome . . . . . . . . . . . . . . . . . . . . . . . . . . . . . 247
Info. . . . . . . . . . . . . . . . . . . . . . . . . . . . . . . . . . . . . . . . . . . . 247
Initializing the E-80 (Factory Reset). . . . . . . . . . . . . . . . 247
20. Specifications. . . . . . . . . . . . . . . . . . . . . . . . . . . . .248
21. Appendix. . . . . . . . . . . . . . . . . . . . . . . . . . . . . . . . .250
Installing wave expansion boards . . . . . . . . . . . . . . 250
Accessing the ‘Patches’ of SRX-series expansion
boards via MIDI . . . . . . . . . . . . . . . . . . . . . . . . . . . . . 251
MFX and IFX types and parameters . . . . . . . . . . . . . 252
22. MIDI Implementation Chart . . . . . . . . . . . . . . . . .272
23. Chord Intelligence . . . . . . . . . . . . . . . . . . . . . . . . .273
Index . . . . . . . . . . . . . . . . . . . . . . . . . . . . . . . . . . . .275
r
10
Page 11

E-80 Music Workstation
Important notes
In addition to the items listed under “Using the unit safely” on p. 6, please read and observe the following:
r
Power supply
• Do not use this instrument on the same power circuit with any
device that will generate line noise (such as an electric motor or
variable lighting system).
• Before connecting the E-80 to other devices, turn off the power to
all units. This will help prevent malfunctions and/or damage to
speakers or other devices.
• Although the LCD and LEDs are switched off when the POWER
switch is switched off, this does not mean that the unit has been
completely disconnected from the source of power. If you need to
turn off the power completely, first turn off the POWER switch,
then unplug the power cord from the power outlet. For this reason, the outlet into which you choose to connect the power cord’s
plug should be one that is within easy reach and readily accessible.
Placement
• Using the E-80 near power amplifiers (or other equipment containing large power transformers) may induce hum. To alleviate
the problem, change the orientation of this instrument or move it
further away from the source of interference.
• This instrument may interfere with radio and television reception.
Do not use it in the vicinity of such receivers.
• Observe the following when using the unit’s floppy disk drive. For
further details, refer to “Before using floppy disks (handling the
floppy disk drive)”.
• Do not place the unit near devices that produce a strong mag-
netic field (e.g., loudspeakers).
• Install the E-80 on a solid, level surface.
• Do not move the unit or subject it to vibration while the drive is
operating.
• Do not expose the E-80 to direct sunlight, place it near devices
that radiate heat, leave it inside an enclosed vehicle or otherwise
subject it to temperature extremes. Excessive heat can deform or
discolor the E-80.
• To avoid possible breakdown, do not use the E-80 in a wet area,
such as an area exposed to rain or other moisture.
• Do not allow objects to remain on the keyboard. This can be the
cause of malfunction, such as keys ceasing to produce sound.
Maintenance
• For everyday cleaning wipe the E-80 with a soft, dry cloth or one
that has been slightly dampened with water. To remove stubborn
dirt, use a mild, non-abrasive detergent. Afterwards, be sure to
wipe the instrument thoroughly with a soft, dry cloth.
• Never use benzene, thinner, alcohol or solvents of any kind, to
avoid the possibility of discoloration and/or deformation.
Repairs and data
• Please be aware that all data contained in the instrument’s memory may be lost when it is sent for repairs. In certain cases (such as
when circuitry related to memory itself is out of order), we regret
that it may not be possible to restore the data. Roland assumes no
liability concerning such loss of data.
Additional precautions
• Please be aware that the memory contents can be irretrievably lost
as a result of a malfunction or the improper operation of the
instrument.
• Use a reasonable amount of care when using the E-80’s buttons,
other controls and jacks/connectors. Rough handling can lead to
malfunctions.
• Never strike or apply strong pressure to the display.
• When connecting/disconnecting cables, grasp the connector
itself—never pull on the cable. This way you will avoid causing
shorts or damage to the cable’s internal elements.
• A small amount of heat will radiate from the E-80 during normal
operation. This is perfectly normal.
• To avoid disturbing your neighbors, try to keep the E-80’s volume
at reasonable levels. You may prefer to use headphones, so you do
not need to be concerned about those around you (especially late
at night).
• When you need to transport the E-80, package it in the box
(including padding) that it came in. Otherwise, you will need to use
equivalent packaging materials or a flightcase.
• Use only the specified expression pedal (EV-5, EV-7; sold separately). By connecting any other expression pedals, you risk causing malfunction and/or damage to the E-80.
About the touch screen
• Wipe off stains on the touch screen using ethanol, but do not
allow the ethanol to soak into the joint of the upper fume and the
bottom glass, for it may otherwise cause peeling or malfunction.
Do not use organic solvents or detergents other than ethyl alcohol
(ethanol).
Before using floppy disks (handling the floppy
disk drive)
• Install the E-80 on a solid, level surface in an area free from vibration. If the unit must be installed at an angle, be sure the installation does not exceed the permissible range: upward, 2°; downward, 18°.
• Avoid using the E-80 immediately after it has been moved to a
location with a level of humidity that is greatly different than its
former location. Rapid changes in the environment can cause condensation to form inside the drive, which will adversely affect the
operation of the drive and/or damage floppy disks. When the unit
has been moved, allow it to become accustomed to the new environment (allow a few hours) before operating it.
• To insert a disk, push it gently but firmly into the drive—it will click
into place. To remove a disk, press the EJECT button firmly. Do not
use excessive force to remove a disk which is lodged in the drive.
• Never attempt to remove a floppy disk from the drive while the
drive is operating (the indicator is lit); damage could result to both
the disk and the drive.
• Remove any disk from the drive before powering up or down.
• To prevent damage to the disk drive’s heads, always try to hold the
floppy disk in a level position (not tilted in any direction) while
inserting it into the drive. Push it in firmly, but gently. Never use
excessive force.
• To avoid the risk of malfunction and/or damage, insert only floppy
disks into the disk drive. Never insert any other type of disk. Avoid
getting paper clips, coins or any other foreign objects inside the
drive.
Handling floppy disks
• Floppy disks contain a plastic disk with a thin magnetic coating.
Microscopic precision is required to enable storage of large
amounts of data on such a small surface area. To preserve their
integrity, please observe the following when handling floppy disks:
• Never touch the magnetic medium inside the disk.
• Do not use or store floppy disks in dirty or dusty areas.
11
Page 12
E-80 Music Workstation
Important notes
• Do not subject floppy disks to temperature extremes (e.g., direct
sunlight in an enclosed vehicle). Recommended temperature
range: 10°~50°C (50°~122°F).
• Do not expose floppy disks to strong magnetic fields, such as
those generated by loudspeakers.
• Floppy disks have a “WRITE” tab which can protect the disk from
accidental erasure. It is recommended that the tab be kept in
the PROTECT position and moved to the WRITE position only
when you wish to write new data onto the disk.
Rear side of the disk
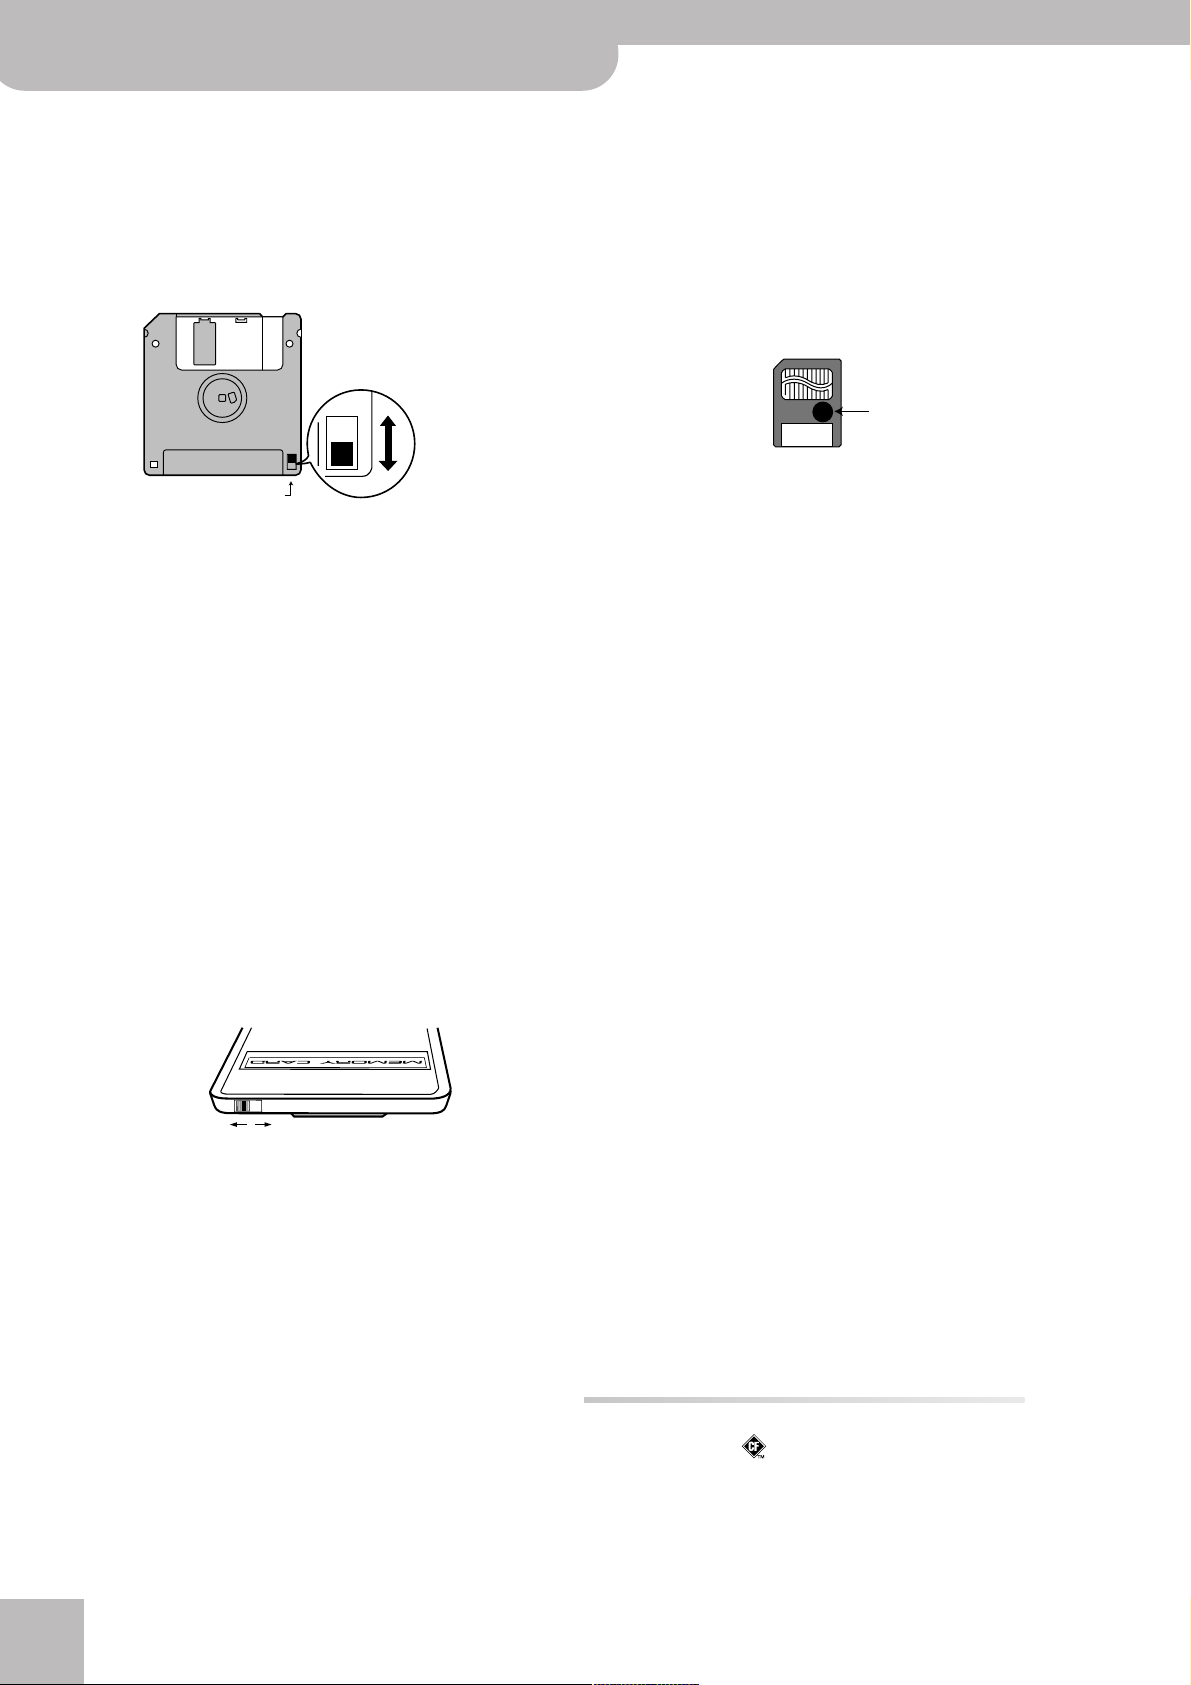
WRITE
(you can save data to the disk)
Protect tab
• Disks containing important performance data for this instrument should always be locked (have their write protect tab slid
to the PROTECT position) before you insert them into the drive
of another device.
• The identification label should be firmly affixed to the disk. If
the label comes loose while the disk is in the drive, it may be
difficult to remove the disk.
• Put the disk back into its case for storage.
PROTECT
(you cannot save data)
Memory Backup
• If the power to this unit is not switched on for an extended period
of time, the contents of memory will be lost and the unit will
revert to its factory defaults. To avoid the loss of important data
that has been placed in memory, a backup of your data should be
periodically created (see p. 234).
Before using memory cards
• Some data cards are equipped with a PROTECT switch, which when
turned on protects your data from accidental erasure. (The E-80
also has such a switch.) It is recommended that the switch be kept
at the ON position and switched to OFF only at the times you wish
to write new data onto the card.
On Off
• This unit’s memory card slot accepts CompactFlash and SmartMedia™ (3.3V) memory cards. Microdrive storage media are compatible. (You need a commercially available adapter plug for
SmartMedia™ cards.)
• Carefully insert the memory Card all the way in—until it is firmly in
place.
• Never touch the terminals of the memory card. Also, avoid getting
the terminals dirty.
• CompactFlash and SmartMedia (3.3V) cards are constructed using
precision components. Handle the cards carefully, paying particular note to the following.
• To prevent damage to the cards from static electricity, be sure
to discharge any static electricity from your own body before
handling the cards.
• Do not touch or allow metal to come into contact with the con-
tact portion of the cards.
• Do not bend, drop or subject cards to strong shock or vibration.
• Do not keep cards in direct sunlight, in closed vehicles or other
such locations (storage temperature: –25~85°C).
r
• Do not allow cards to become wet.
• Do not disassemble or modify the cards.
• Never remove the memory card or turn off the power while an
operation –such as reading or writing data or formatting– is being
performed on the memory card. Doing so can destroy the data on
the memory card and/or render the memory card itself unusable.
• If you affix the write-protect label to the write-protect area of a
SmartMedia™ card, you will not be able to format the card or write
data to it. If you wish to format the card or write data to it, do so
without the label affixed. For details on the write-protect sticker,
refer to the owner’s manual for your memory card.
• If you attempt to format a card or write data to it when the writeprotect label is affixed, an error message will appear. In that case,
either insert another card or remove the write-protect label.
• At power-on, do not remove/insert a card while the E-80 is updating its internal data (wait until the messages “Song database
checking…” and “User Program database checking…” have disappeared).
• Never turn on the power when a memory card is inserted partway
into the slot. Doing so will damage the data in internal memory.
Memory cards usable with the E-80
• The E-80 can use commercially available CompactFlash and SmartMedia memory cards. You can purchase such cards at a computer
shop or digital camera dealer.
• Memory cards you purchase must meet the following conditions.
• Power supply voltage: 3.3V
• Capacity: 4, 8, 16, 32, 64, 128, 256, 512MB, 1GB, 2GB, 4GB (2GB
and 4GB only with Microdrive)
• The E-80 cannot use cards of types other than the above.
Electromagnetic radiations
• Electromagnetic radiations may cause a deterioration of audio
performances. Such possible deterioration consists in an audio signal being emitted. On ceasing the electromagnetic noise, the emission of the audio signal will simultaneously stop.
Liability and copyright
• Unauthorized recording, distribution, sale, lending, public performance, broadcasting or the like in whole or in part, of a work
(musical composition, video, broadcast, public performance or the
like) whose copyright is held by a third party is prohibited by law.
• Do not use this unit for purposes that could infringe on a copyright held by a third party. Roland assumes no responsibility whatsoever with regard to any infringements of third-party copyrights
arising through your use of this unit.
• SmartMedia is a trademark of Toshiba Corp.
• Compact Flash and are trademarks of SanDisk Corporation
and licensed by CompactFlash association. Roland Corporation is
an authorized licensee of the CompactFlash™ and CF logo trademarks.
• All product names mentioned in this document are trademarks or
registered trademarks of their respective owners.
12
Page 13
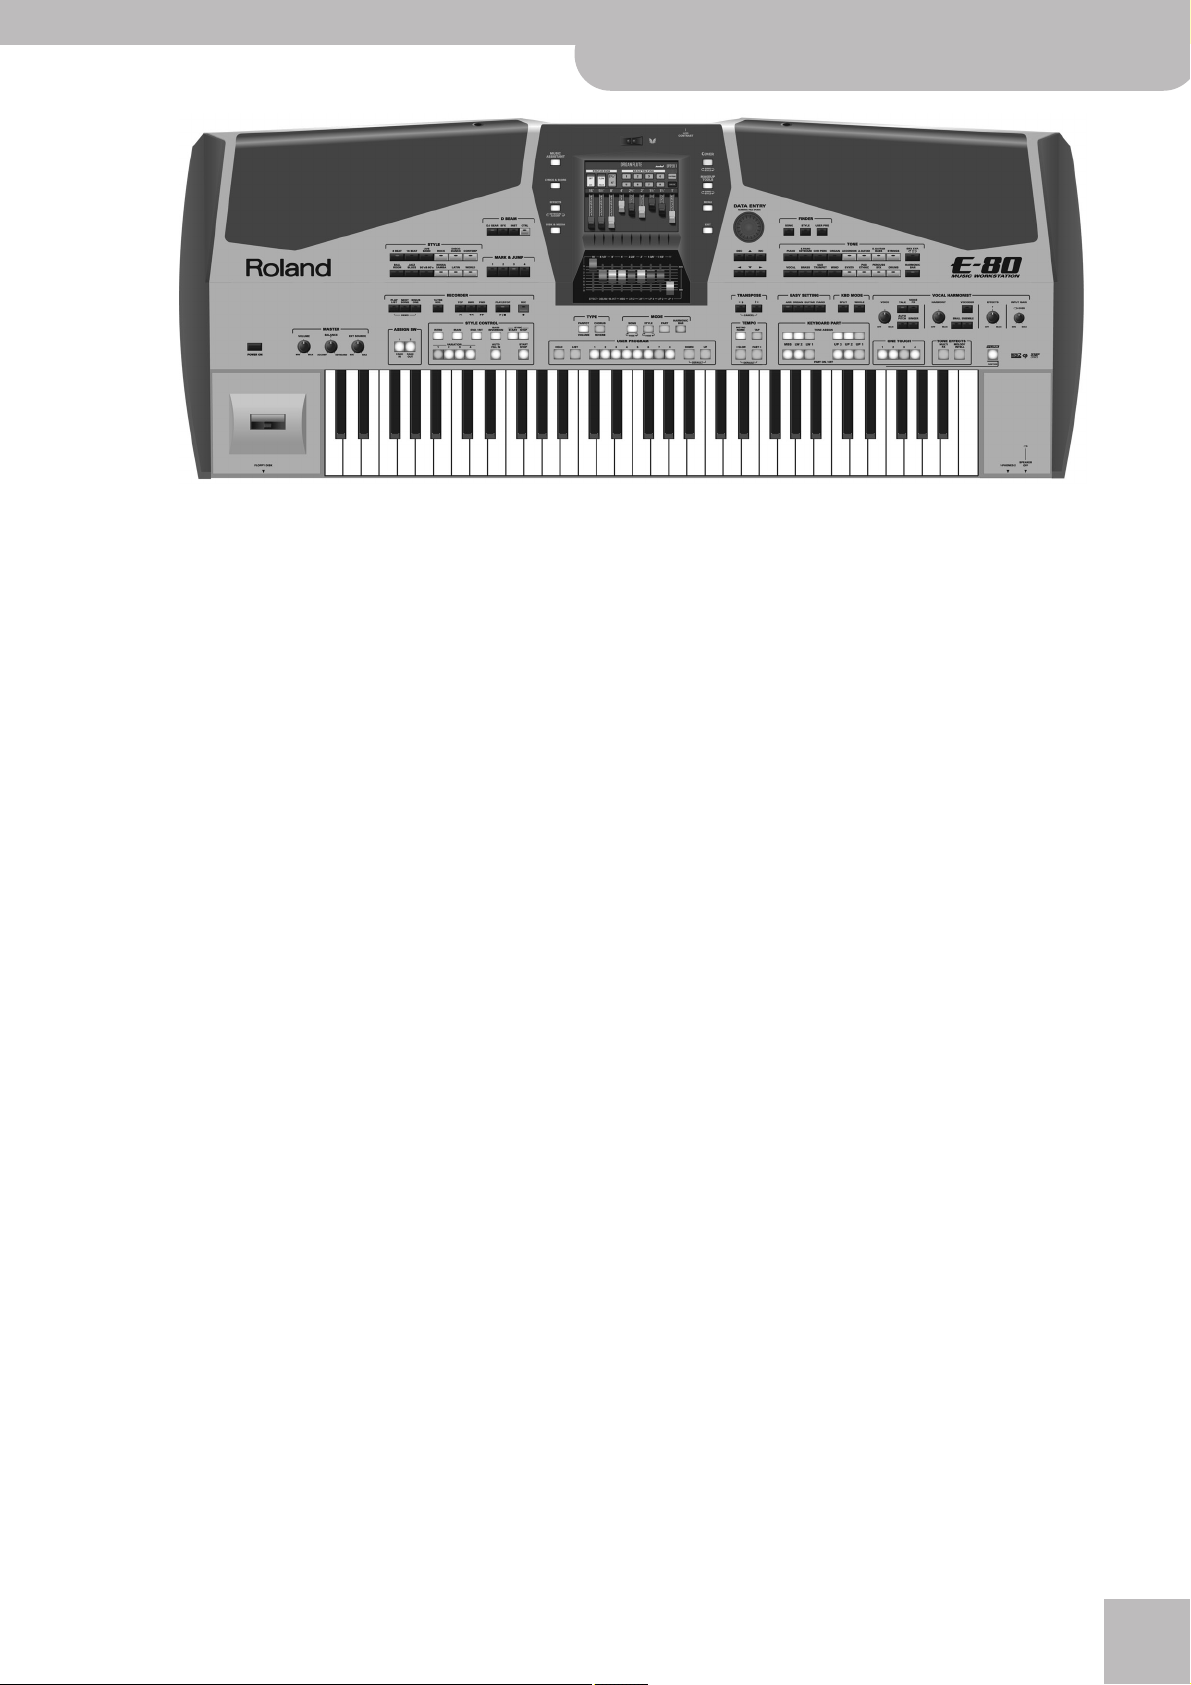
1. Panel descriptions
Front panel
Note: You can press and hold most buttons to jump to an associated display page.
E-80 Music Workstation
r
Front panel
A
POWER ON button
Press this button to switch the E-80 on and off. If you
need to turn off the power completely, first turn off
the power switch, then unplug the power cord from
the wall outlet. Refer to “Switching the E-80 on/off”
on p. 21.
B
MASTER VOLUME knob
Use this knob to set the E-80’s global output volume
(all sections). The setting of this knob also determines
the volume in the headphones you may have connected.
C
BALANCE knob
This knob allows you to set the balance between the
Arranger or song parts (“ACCOMP”) and the solo
sounds (“KEYBOARD”).
D
EXT SOURCE knob
Use this knob to set the volume of an audio source (a
synthesizer, MP3 player, etc.) connected to the
EXTERNAL SOURCE sockets on the E-80’s rear panel.
E
STYLE section
These buttons allow you to select one of the twelve
Music Style families. The button of the selected family lights.
D BEAM buttons
F
These buttons below it allow you to assign the
desired function to the D Beam controller (O). See
p. 72.
MARK JUMP section
G
These buttons ([1]~[4]) allow you to jump to one of
four stored locations inside the currently selected
song. You can program the desired locations for
songs that do not yet contain them.
RECORDER section
H
[PLAY¥LIST] button: Press this button to access the
display where you can select a list of songs to be
played back, edit existing lists, program new ones,
etc. When the indicator of this button lights, [|√], [º],
[‰], [PLAY÷STOP¥®÷ª] are used to control playback of
the current song. Hold down [PLAY¥LIST] while pressing [MINUS¥ONE] to select the demo mode.
[NEXT¥SONG] button: You can already load a new
song while the current Standard MIDI File is still playing. If you want the Recorder to start playback of the
newly selected song automatically, press this button.
If the [PLAY¥LIST] button lights, this button allows
you to select the next song of the selected List.
[MINUS¥ONE] button: Press this button to switch off
the part you want to play (or sing) yourself. The part
to be muted is selectable (page 45).
[16-TRK¥SEQ.] button: Press this button to access the
E-80’s sequencer (MIDI recorder). This sequencer goes
way beyond anything you may know from previous
Roland arranger instruments (see p. 173).
[|√], [º], [‰], [PLAY÷STOP¥®÷ª]: These buttons allow
you to return to the beginning of the current song,
“rewind” or “fast-forward” in one-measure steps and
to start and stop playback of the selected song.
Press the [REC¥∏] button to record a new song (see
p. 60).
I
ASSIGN SW section
[ASSIGN¥SW¥1] and [ASSIGN¥SW¥2] are assignable
buttons. You can use them to directly access frequently used functions that are only available via the
function menu. The ASSIGN SW assignments belong
to the settings that can be written to a User Program.
13
Page 14
E-80 Music Workstation
Panel descriptions
If you don’t change their assignment, they can be
used to trigger the FADE IN and FADE OUT functions.
K
DISK & MEDIA button
Press this button if you wish to save/load data from
the internal memory, a floppy disk or PCMCIA card.
You will also find data management functions here,
like deleting files, formatting floppies or cards, etc.
(page 225).
L
EFFECTS button
This button provides access to the display pages
where you can set the effects parameters of the
E-80’s parts. Press it once to select the KEYBOARD
effects, and twice for the STYLE & SONG effects.
M
LYRICS & SCORE button
Press this button if you want the lyrics contained in
the songs to appear in the display. At the same time,
the chords of the notes played by the song parts will
also be displayed. This, however, is information that is
“extracted” (derived) in realtime by the E-80. This
function can even display the notes of the selected
part as a score. This button also provides access to
the VIEWER function (see p. 56).
N
MUSIC ASSISTANT button
Press this button to access the MUSIC ASSISTANT
environment where you can select Music Style registrations for a given song you want to play. You can
also program your own Music Assistant registrations.
D Beam controller
O
This controller allows you to influence the timbre of
the notes you play, to control song playback and to
create some unique effects. All you need to do is
move your hand up/down or left/right above the two
“eyes”.
J
STYLE CONTROL section
Use these buttons to select the desired Music Style
pattern and to start/stop Music Style playback (see
p. 25).
The D BEAM buttons F allow you to assign the
desired function to the D Beam controller. See p. 72.
LCD CONTRAST knob
P
Use this knob to adjust the display’s contrast if it is
difficult to read. The display itself is a touch screen
and therefore needs to be clear at all times (so that
you know what you are doing).
Note: The display may take some time to warm up. That is why
you may have to change the contrast several times after powering on.
Q
COVER button
This button provides access to pre-programmed templates that allow you to quickly modify a song’s or
Music Style’s character. Press it once or twice to
select the Song or Style level. See pages 44 and 85.
R
MAKEUP TOOLS button
Press this button to modify the settings of the current song or Music Style, if the pre-programmed
Cover settings do not provide what you’re looking
for. See page 140.
S
MENU button
Press this button to call up a menu that provides
access to more in-depth E-80 functions you may only
wish to set from time to time.
EXIT button
T
Press this button to return to the previously selected
display page or the E-80’s main page.
r
14
Page 15
U
V W
U
Assignable sliders
These sliders can be used as virtual harmonic bars
(when the [HARMONIC¥BAR] button lights). In that
case, refer to the footage indications above the sliders for their specific function (page 33).
Note: The HARMONIC BAR function is only available for the
following parts: UP1, LW1 and MBS.
V
TYPE buttons
The TYPE buttons are used to select the parameter
that can be changed using the sliders (stereo position
or volume, reverb or chorus).
W
MODE buttons
These four buttons allow you to specify the part
group whose settings you want to change: [SONG]
(Recorder parts), [STYLE] (Arranger parts), [PART]
(Keyboard parts), and [HARMONIC¥BAR].
X
E-80 Music Workstation
X
USER PROGRAM section
These buttons allow you to select the desired User
Program (registration memory). Press the [LIST] button to call up the display page where you can select
the desired User Program and save your current
panel settings to a User Program. You can also select
the previous ([DOWN]) or next ([UP]) User Program.
By pressing these two buttons simultaneously, you
leave the User Program environment.
The [HOLD] button allows you to ignore several settings of subsequently loaded User Programs (see
p. 129).
r
Front panel
Y
Y
DATA ENTRY section
The dial can be used to set the value of the parameter
field that is currently highlighted. Turn it to scroll
through the available settings. You can also press it
to call up a numeric key pad that allows you to enter
the desired value by pressing the corresponding fields
in the display.
To change the selected value in small steps, press
[DEC] (lower value) or [INC] (higher value). The
[ß][†][®][√] buttons are used to select a parameter for
editing (something you can also do by pressing the
corresponding display field).
While the main page is displayed, the [DATA÷ENTRY]
dial and [DEC]/[INC] buttons also allow you to set the
tempo.
Z
Note: You can press and hold most buttons to jump
to an associated display page.
a
Z
FINDER section
Press one of these buttons to quickly locate songs
([SONG]), Music Styles ([STYLE]) or User Programs
([USER¥PRG]) in the internal memory, on floppy disk
or an external memory card. See pages 42, 95 and
127.
a
TONE section
The TONE buttons allow you to select one of 16 internal Tone families. You can then use the display to
specify the desired sound within that family.
The [SRX¥EXPANSION] button is only available after
you install one or two optional wave expansion
boards into the E-80. After doing so, you can alternate between the first (“A”) and the second (“B”)
board by pressing this button repeatedly.
15
Page 16
E-80 Music Workstation
Panel descriptions
Press the [HARMONIC¥BAR] button to activate the
“Harmonic Bar” section whose sound can be set using
the assignable sliders (U) that double as virtual harmonic bars.
c
gfhij
b
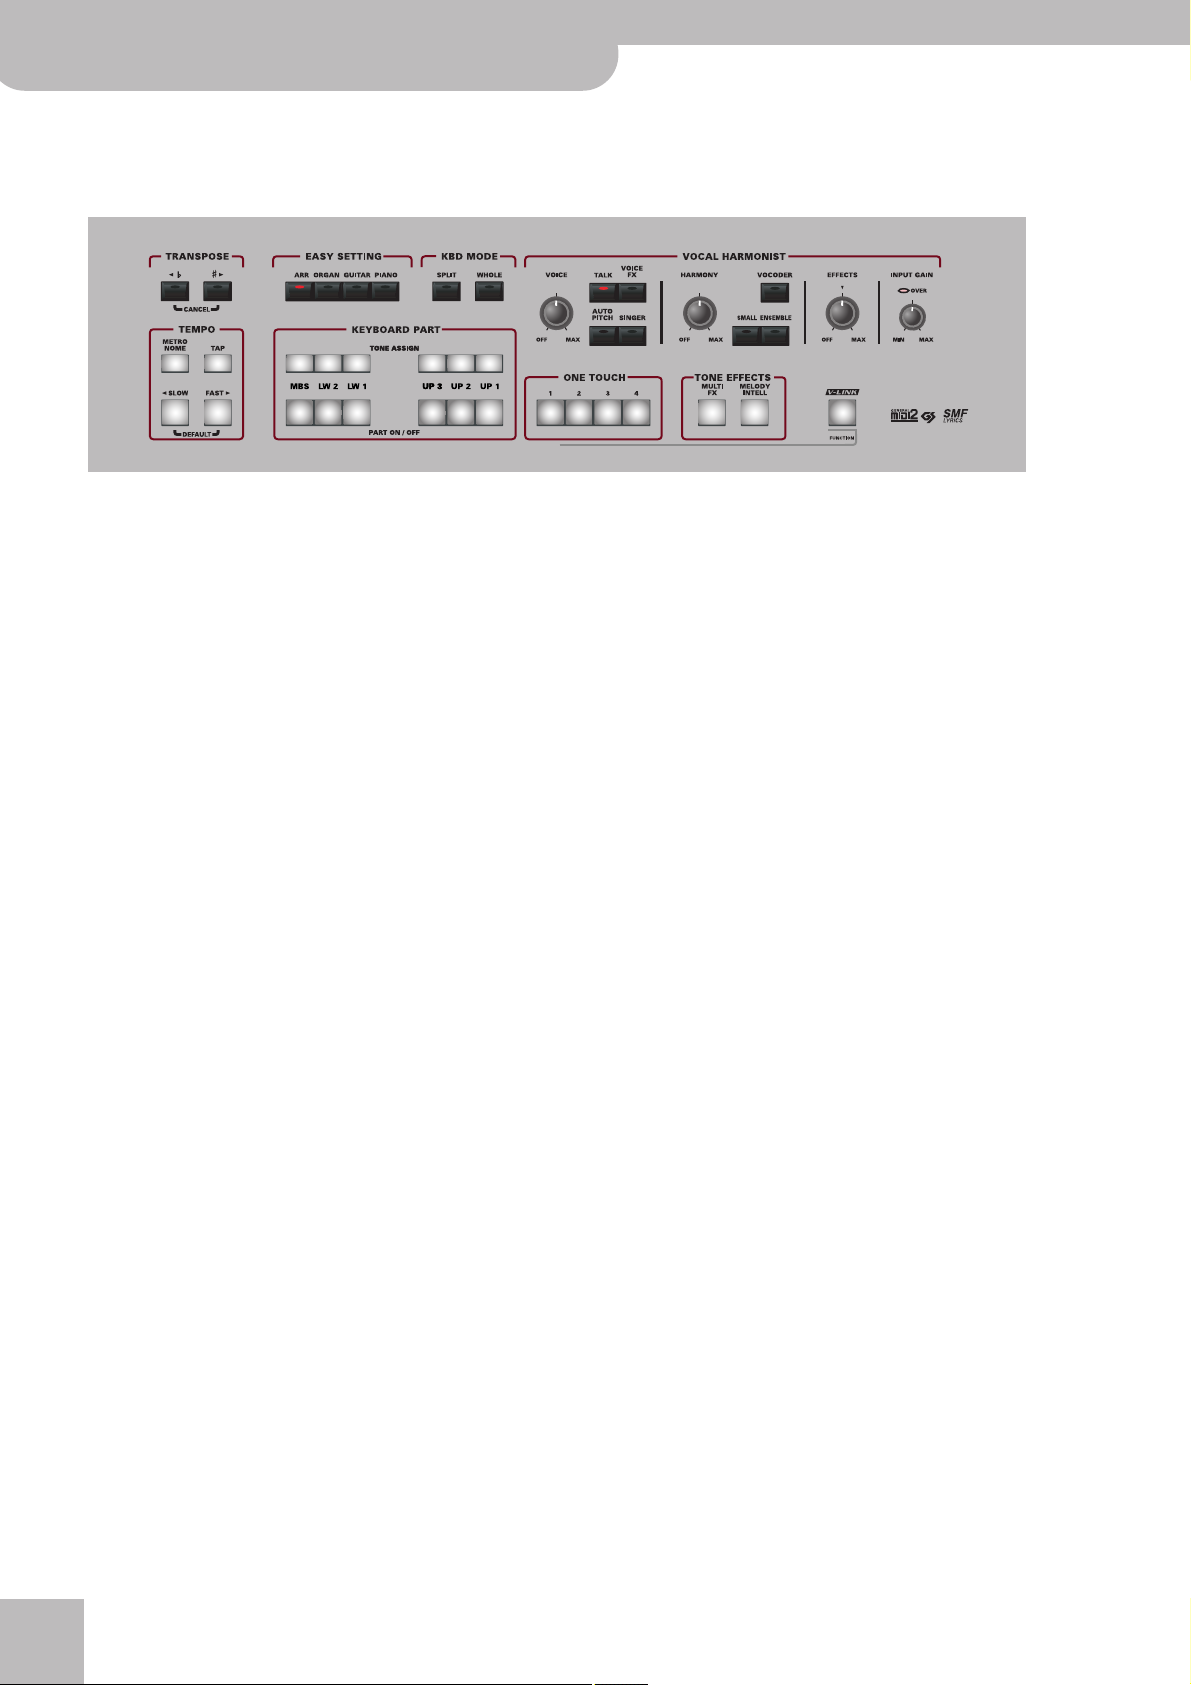
TRANSPOSE section
These buttons allow you to transpose the E-80 up
([]) or down ([ƒ]) in semitone steps. You can also
specify which parts are to be transposed (page 66).
If neither button lights, no manual transposition is
used.
c
EASY SETTING section
This key pad allows you to reconfigure the E-80 by
pressing just one button: [ARR] (use the Arranger in
split mode), [ORGAN] (the name says it all), [GUITAR]
(select the E-80’s Guitar Mode, p. 36), and [PIANO]
(assign a piano sound to the entire keyboard). See
also page 64.
d
KBD MODE section
Press the [SPLIT] button if you want to play different
sounds with your left and right hands (page 64). (It is
even possible to add a second split point, see
page 99.)
Press the [WHOLE] button to assign one or several
sounds to the entire keyboard (without a split). See
page 64.
e
VOCAL HARMONIST section
The buttons and knobs in this section are used to set
the Vocal Harmonist function, the microphone level
and the effects applied to the signals received via the
Vocal Harmonist MIC INPUT socket. See page 46.
f
TEMPO section
[METRONOME] button: Press this button to switch
the internal metronome on or off.
The remaining buttons allow you to set the tempo of
the metronome, the Arranger or the recorder/
sequencer.
dbe
g
KEYBOARD PART section
The TONE ASSIGN buttons are used to specify the
Keyboard part you wish to assign a different sound to
page 29. “Keyboard parts” are the parts you can play
yourself. The E-80 contains many other parts that are
played “automatically” by the Arranger or Recorder.
The PART ON/OFF buttons allow you to switch the
desired Keyboard parts on and off.
h
ONE TOUCH section
These buttons allow you to select the desired One
Touch memory. There are four memories per Music
Style. They work a lot like the User Programs, because
they assign different sounds and effects settings to
the Keyboards parts and carry out some other
changes. See page 87.
i
TONE EFFECTS section
Press the [MULTI¥FX] button to add a different effect
to the Keyboard parts (page 111). (This processor is
also available for the D Beam and the MELODY INTELL
parts.)
Press the [MELODY¥INTELLIGENCE] button (so that it
lights) to add an automatic counter-melody (second
and third voice) to your solos or melodies (see p. 84).
j
V-LINK button
Press this button to take advantage of the E-80’s VLINK functionality for controlling video material via
certain performance functions and the right-most
keys on the E-80’s keyboard. By using V-LINK-compatible video equipment, visual effects can be easily
linked to and made part of the expressive elements of
a performance. By connecting the E-80 to an
optional Edirol DV-7PR or V-4, you can switch images
in synchronization with music or use the E-80’s performance functions or right-most keys to switch
clips, control playback speed, etc.
r
16
Page 17
l mkn
k
BENDER/MODULATION lever
When pushed towards the back of the E-80, this lever
will add modulation to the notes of the Keyboard
parts you are playing at that time. Move it to the left
or right to temporarily lower or increase the pitch of
the Keyboard part notes you are playing. For the
HARMONIC BAR sounds and the sounds of the TONE
[ORGAN] family, you can use the Modulation axis to
alternate between the fast and slow Rotary speeds.
l
Floppy disk drive
This is where you can insert 2DD or 2HD floppy disks
for external storage of your Music Styles, Recorder
songs and MIDI Sets. Press the eject button to
remove the disk from the drive.
Note: Do not remove the floppy disk while the E-80 accesses
the disk (to load/save data, etc.). Doing so may damage both
the floppy disk and the drive’s head.
E-80 Music Workstation
m
PHONES 1 & 2 sockets
This is where you can connect two pairs of optional
headphones (Roland RH-25, RH-50, RH-200 or
RH-300).
n
SPEAKER OFF switch
This switch allows you to switch off the internal
speakers, in which case the indicator lights. That may
prove handy when the E-80 is connected to an external sound system and should not use its internal
amplification system.
Note that connecting a pair of headphones has the
same effect as activating [SPEAKER¥OFF].
r
Front panel
17
Page 18

E-80 Music Workstation
Panel descriptions
Rear panel
(left side)
ABCD E F G IH
A
FC7 PEDAL socket
This is where you connect an optional FC-7 footswitch unit that allows you to start, stop and select
Style divisions by foot. The functions of this foot
switch unit are programmable (and apply to the
entire E-80).
B
PEDAL HOLD socket
An optional DP-2, DP-6, or BOSS FS-5U footswitch
connected to this socket can be used for holding the
Keyboard-part notes. (The Melody Intell part can also
be sustained in this way.) This function is also
referred to as “Sustain” or “Damper”.
C
PEDAL SWITCH socket
Connecting an optional DP-2, DP-6 or FS-5U to this
socket allows you to control an assignable function
by foot.
D
PEDAL EXPRESSION socket
Connect an optional EV-5, EV-7 or BOSS FV-300L
expression pedal to this socket to control the volume
of one or several parts or another parameter by foot.
E
MIDI THRU/OUT/IN sockets
These sockets allow you to connect the E-80 to external MIDI devices for a variety of applications: receiving song data in realtime from an external sequencer,
transmitting your playing (and the data of the song
you are playing back) to an external sequencer, using
the E-80 as master keyboard in your MIDI setup, etc.
Note: The MIDI functions can be accessed via the E-80’s Menu
(page 237). Frequently used MIDI settings can be written and
recalled as “MIDI Sets”.
F
USB port
The USB port can be used for archiving purposes and
MIDI data transfer from/to a computer.
G
PCMCIA slot
This is where you can insert a memory card (PCMCIA,
CompactFlash, SmartMedia™ or Microdrive). Memory
cards that are not PCMCIA cards can only be inserted
if you use an appropriate adapter (available at your
computer store). See also the precautions on p. 12.
H
Internal memory protect switch
This switch allows you to lock ( , protect) and
unlock ( ) the internal memory. See page 21.
I
VIDEO OUTPUT socket
Connect this socket to the appropriate input of your
TV or monitor. In that case, the lyrics of songs that
contain such information and the note information
extracted in realtime (page 53) will be displayed on
screen even if the [LYRICS&SCORE] button does not
light (in which case the lyrics, chords and notes no
longer appear in the E-80’s display). The VIEWER
information (see p. 56) can also be transmitted to the
external screen.
Note: The signal format (PAL or NTSC) can be set via a MENU
function.
(right side)
JK L M N
J
METRONOME LEVEL knob and OUT socket
The E-80’s metronome signals can be transmitted to
the METRONOME OUT socket. You can connect headphones (Roland RH-300, RH-200, RH-50 or RH-25)
to this socket. This is useful for a drummer, for example (as “Click Track”). Use the METRONOME [LEVEL]
knob to set the metronome volume in the headphones.
EXTERNAL SOURCE/AUDIO IN L/R sockets
K
This is where you can connect the audio outputs of
an external signal source (CD/MP3 player, synthesizer, etc.). If the source has 1/4” outputs, you either
r
18
need adapter plugs (1/4”‰ RCA/Cinch) or Roland
PJ-1M cables. These inputs are only suitable for linelevel signals.
Note that they are stereo (with a left and right channel). If you only connect one cable to “L” (or “R”), the
signal is only audible on the left (or right) channel.
The volume of the signal received via these inputs
can be set with the D EXT SOURCE knob.
L
VOCAL HARMONIST section
[INPUT] switch: If you connect a microphone to the
INPUT socket, set this switch to “MIC”. To try out the
Vocal Harmonist function for other signals (guitar,
external synthesizers & modules, CDs, MDs, etc.), set
this switch to “LINE”.
Page 19

E-80 Music Workstation
r
Front panel
Note: For the “LINE” setting to work with electric guitars or
basses, you need to connect such instruments to an effects
pedal or rack effect (in bypass mode) and connect the effect’s
output to the INPUT socket.
INPUT socket: This is where you can to connect an
optional microphone (like a Roland DR-10 or DR-20)
or other external signal source you wish to process
using the E-80’s Vocal Harmonist facility. This is a
combo socket to which you can connect either a balanced XLR or unbalanced 1/4” jack. (The socket does
not provide phantom power.)
Note: The INPUT socket is mono.
M
OUTPUT MAIN R & L/MONO sockets
These sockets need to be connected to an external
amplifier, mixing consoles, etc. There is a switch that
allows you to switch off the E-80’s internal speakers
when using these sockets. See n above.
Note: If you can/want to use only one channel on your external amplifier, connect the L/MONO socket to its input. For optimum sound quality, we recommend working in stereo, though.
N
AC socket
This is where you need to connect the supplied power
cord.
19
Page 20

E-80 Music Workstation
Setting up and demo songs
2. Setting up and demo songs
You must be dying to try out your new E-80 to see what it is capable of. We’ll get to that in a minute. But first we need
to connect it.
Connections
The E-80 contains internal speakers. You therefore don’t need to connect it to an external amplifier (Roland’s KC series,
for example). But you can also use optional headphones (Roland RH-25, RH-50, RH-200 or RH-300, for example).
Be sure to switch off both the E-80 and the external devices you want to connect before making or breaking audio and/
or MIDI connections. If you do not have access to the sound system of the venue where you are performing, ask the local
engineer to set the volume to the minimum level.
Mixing console, keyboard amplifier,
active speakers
Dynamic microphone (select “MIC”)
Other signal source (select “LINE”)
[Microphone: DR-10 or DR-20]
*Connect the microphone using an
unbalanced mono 1/4” or a balanced XLR jack.
Expression pedal
(EV-5, EV-7)
Roland
To wall outlet
R, L/MONO
AC
MAIN
VOCAL
HARMONIST
INPUT
CD/MP3 player, etc.
Stereo headphones
EXTERNAL
SOURCE
METRONOME
EXPRESSION
OUT
PEDAL
PEDAL PEDAL
SWITCH
HOLD
Footswitches
(DP-2, DP-6, or
BOSS FS-5U)
Note: Try to use dynamic microphones whenever possible. You can also connect a condenser microphone, however, provided you use a DI box
(with power supply).
Note: Except for the power cable, all other items shown above are optional. See your Roland dealer for details.
r
20
(RH-25, RH-50, RH-200 or RH-300)
Stereo headphones
Page 21
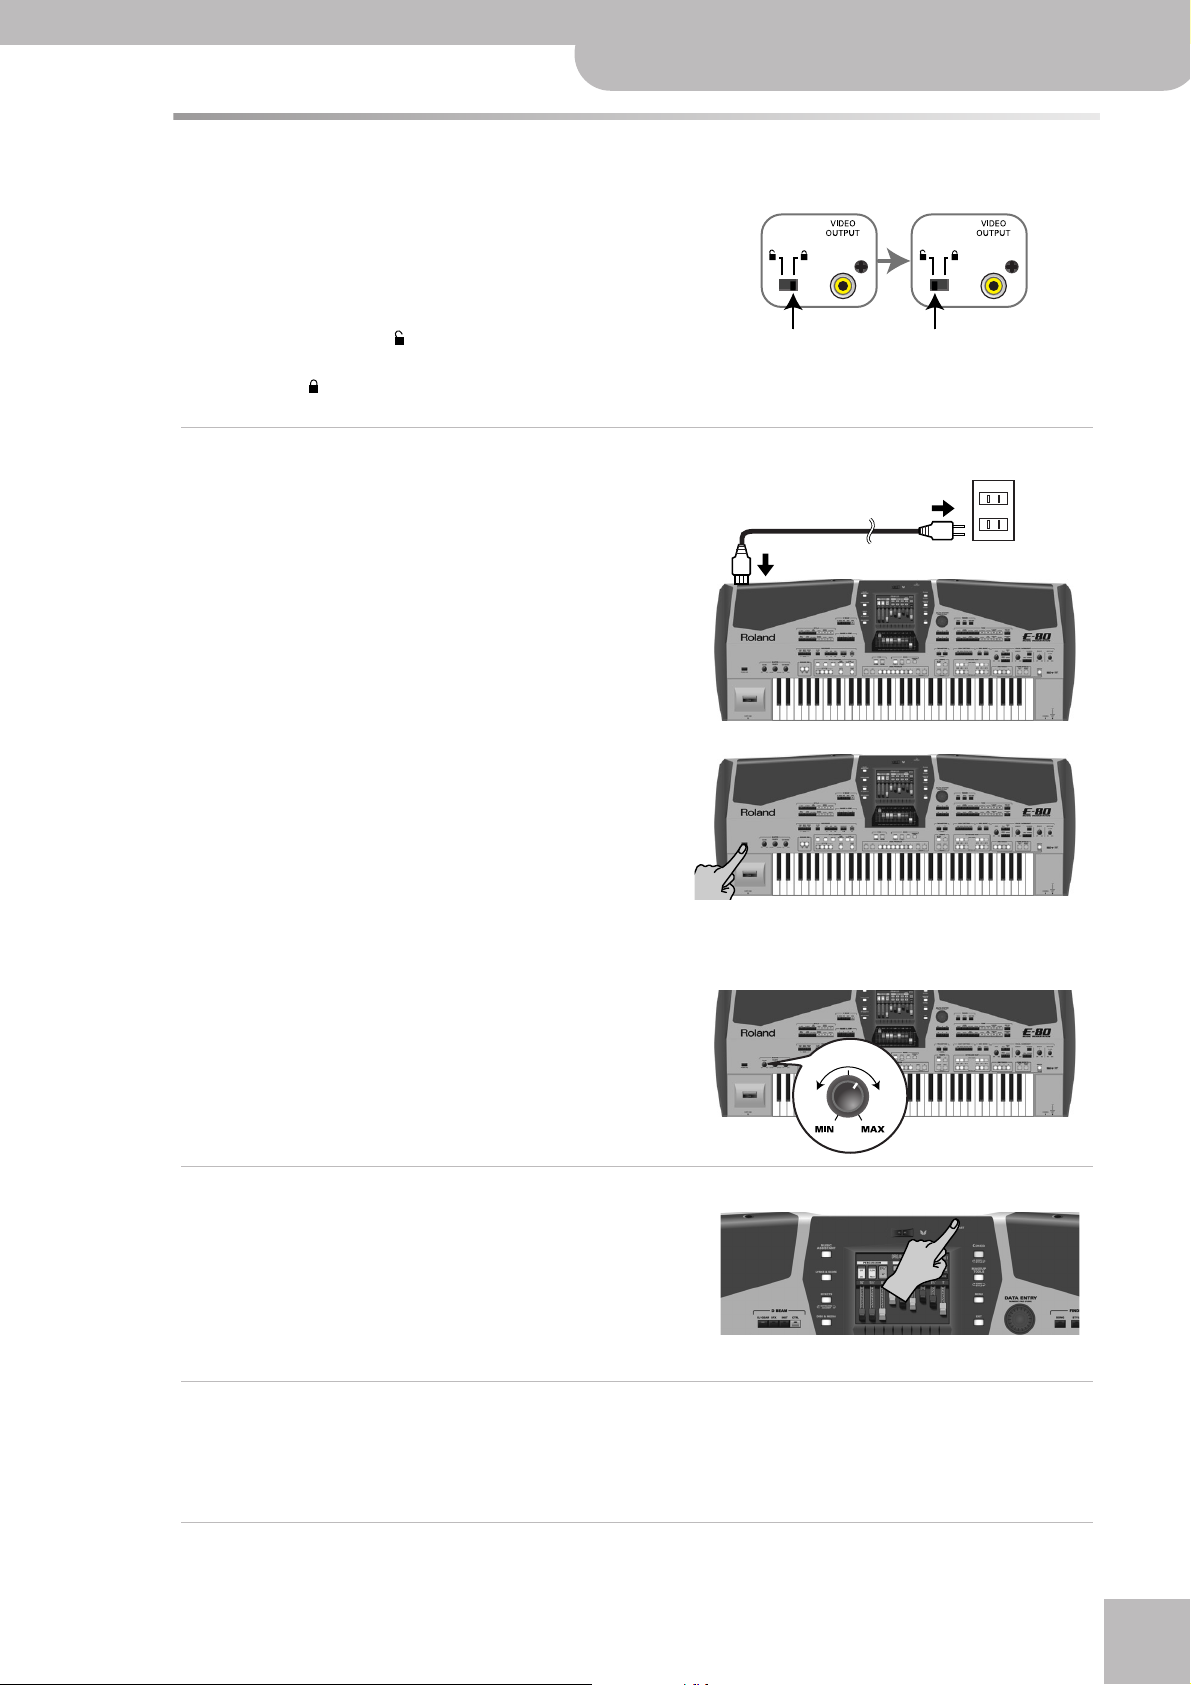
Switching the E-80 on/off
After connecting the E-80 to the other devices, proceed as follows:
Internal Memory Protect
After unpacking your E-80 –and before switching it on– you
need to defeat the protection of its internal memory (a solidstate hard disk) if you intend to save data in the internal
memory.
• Slide the switch to the “ ” position to unlock the memory.
(To once again lock the internal memory, slide the switch
back to the “ ” position.)
Switching on the E-80
(1) Insert the included power cable into the AC inlet and
then plug it into an electrical outlet.
E-80 Music Workstation
r
Front panel
(2) Press the E-80’s
left.
(3) If you connected the E-80 to a mixing console, switch it on now.
(4) Switch on the amplifier, your active speakers or the keyboard amplifier(s).
(5) Use the MASTER
put volume.
[POWER¥ON]
[VOLUME]
button located at the far
knob to set the E-80’s out-
Setting the display contrast
The information in the LCD display may be difficult to view
after turning on your E-80 or after extended use. Your
viewing angle or the current lighting conditions can also
affect the appearance of the display.
In such cases, use the
the display to adjust the contrast.
[LCD¥CONTRAST]
knob to the left of
VOLUME
Switching off the E-80
(1) Switch off all external devices.
(2) Use the E-80’s
Note:
If you need to turn off the power completely, first turn off the POWER switch, then unplug the power cord from the power outlet.
Note:
Be sure to wait 2~3 seconds before switching the E-80 back on.
[POWER≈ON]
button to switch it off.
21
Page 22
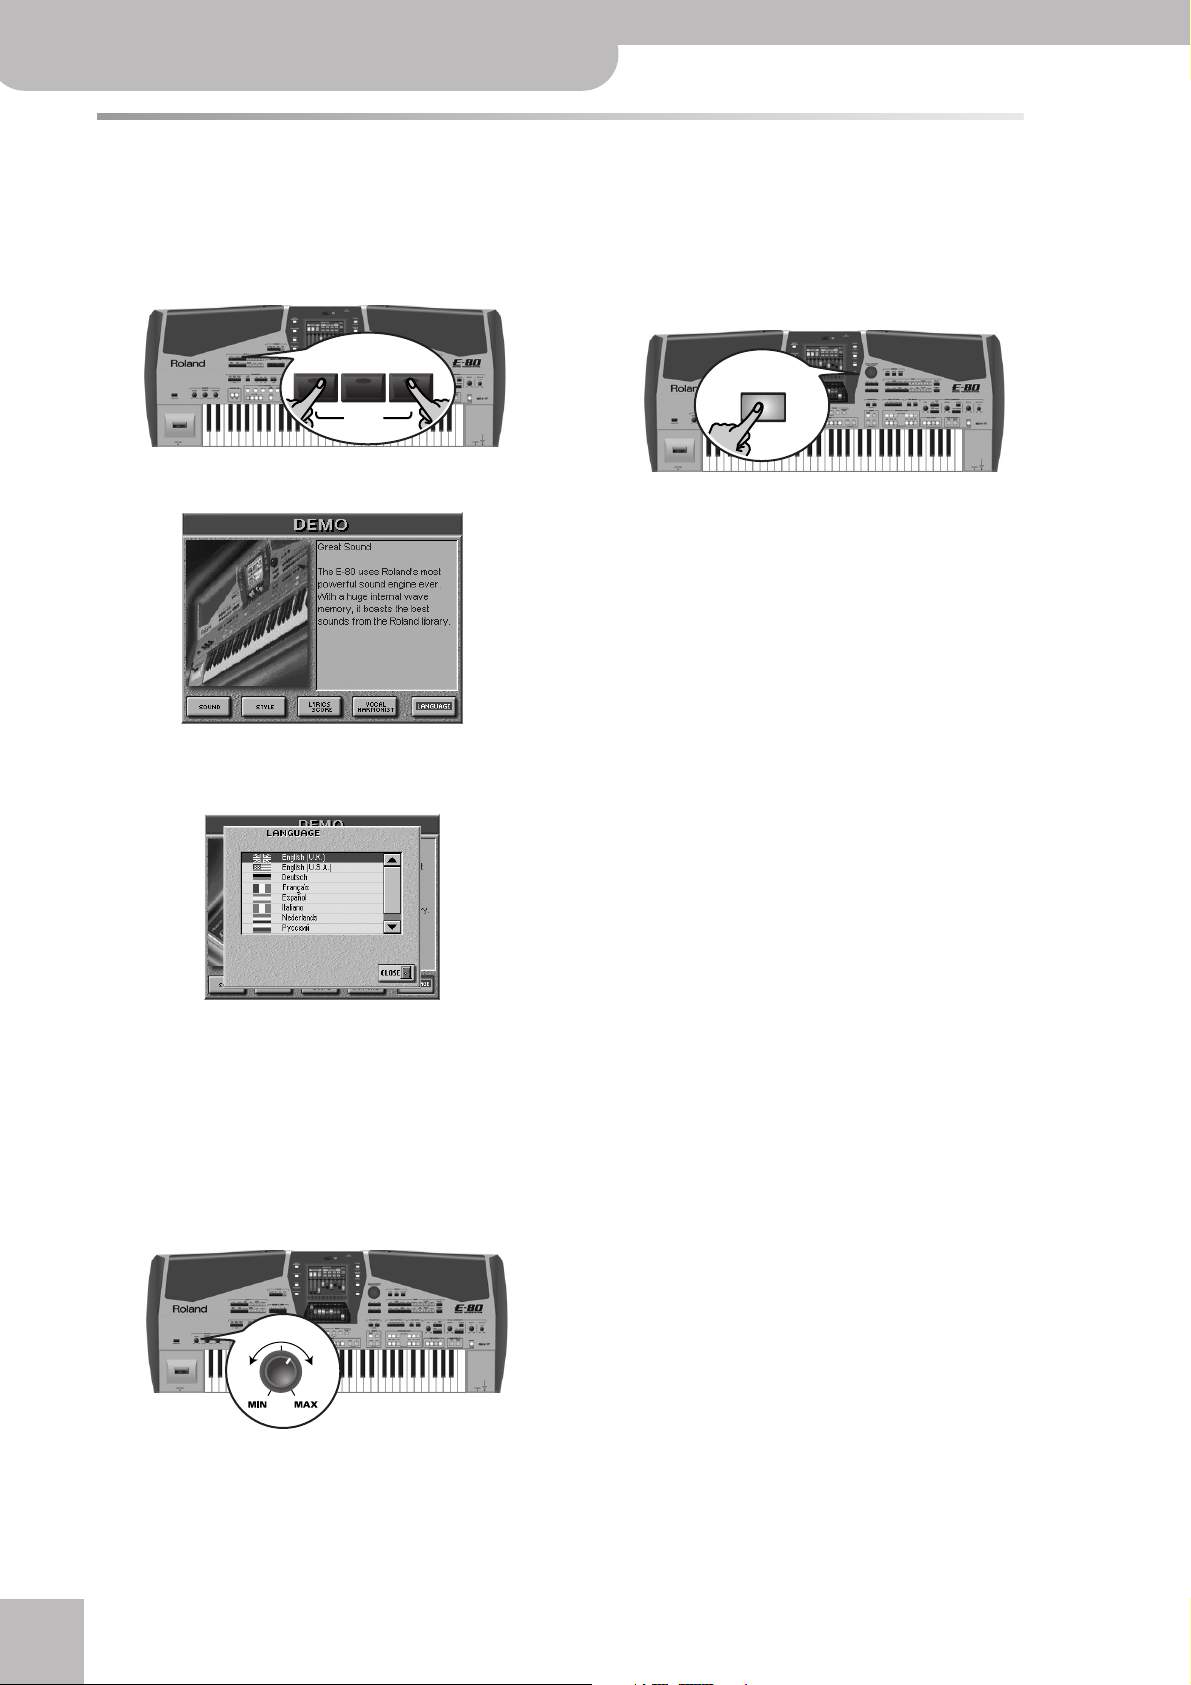
E-80 Music Workstation
Setting up and demo songs
Interactive demo of the E-80
Your E-80 contains an interactive demo that introduces all of its highlights. It might be a good idea to try it out now. The
demo is self-explanatory, so we’ll just show you how to start and stop it.
(1) Simultaneously press the [PLAY¥LIST] and
[MINUS¥ONE] buttons.
PLAY
NEXT
SONG
DEMO
MINUS
ONE
LIST
The display changes to:
(2) If necessary, press the [LANGUAGE] field and select
the language for this interactive demo function.
(5) To stop the demo and leave the E-80’s Demo func-
tion, press the RECORDER [PLAY÷STOP¥®÷ª] or the
[EXIT] button.
EXIT
(Press [CLOSE] if you didn’t mean to select this page.
The current language selection will not change.)
(3) Press the field that provides access to the desired
demo function.
There are 12 sound demo songs, 12 Style demo songs,
1 lyrics & score demo and one Vocal Harmonist
demo.
(4) If you can barely hear the music, set the [VOLUME]
knob (far left, MASTER section) to a higher level.
VOLUME
r
22
Page 23
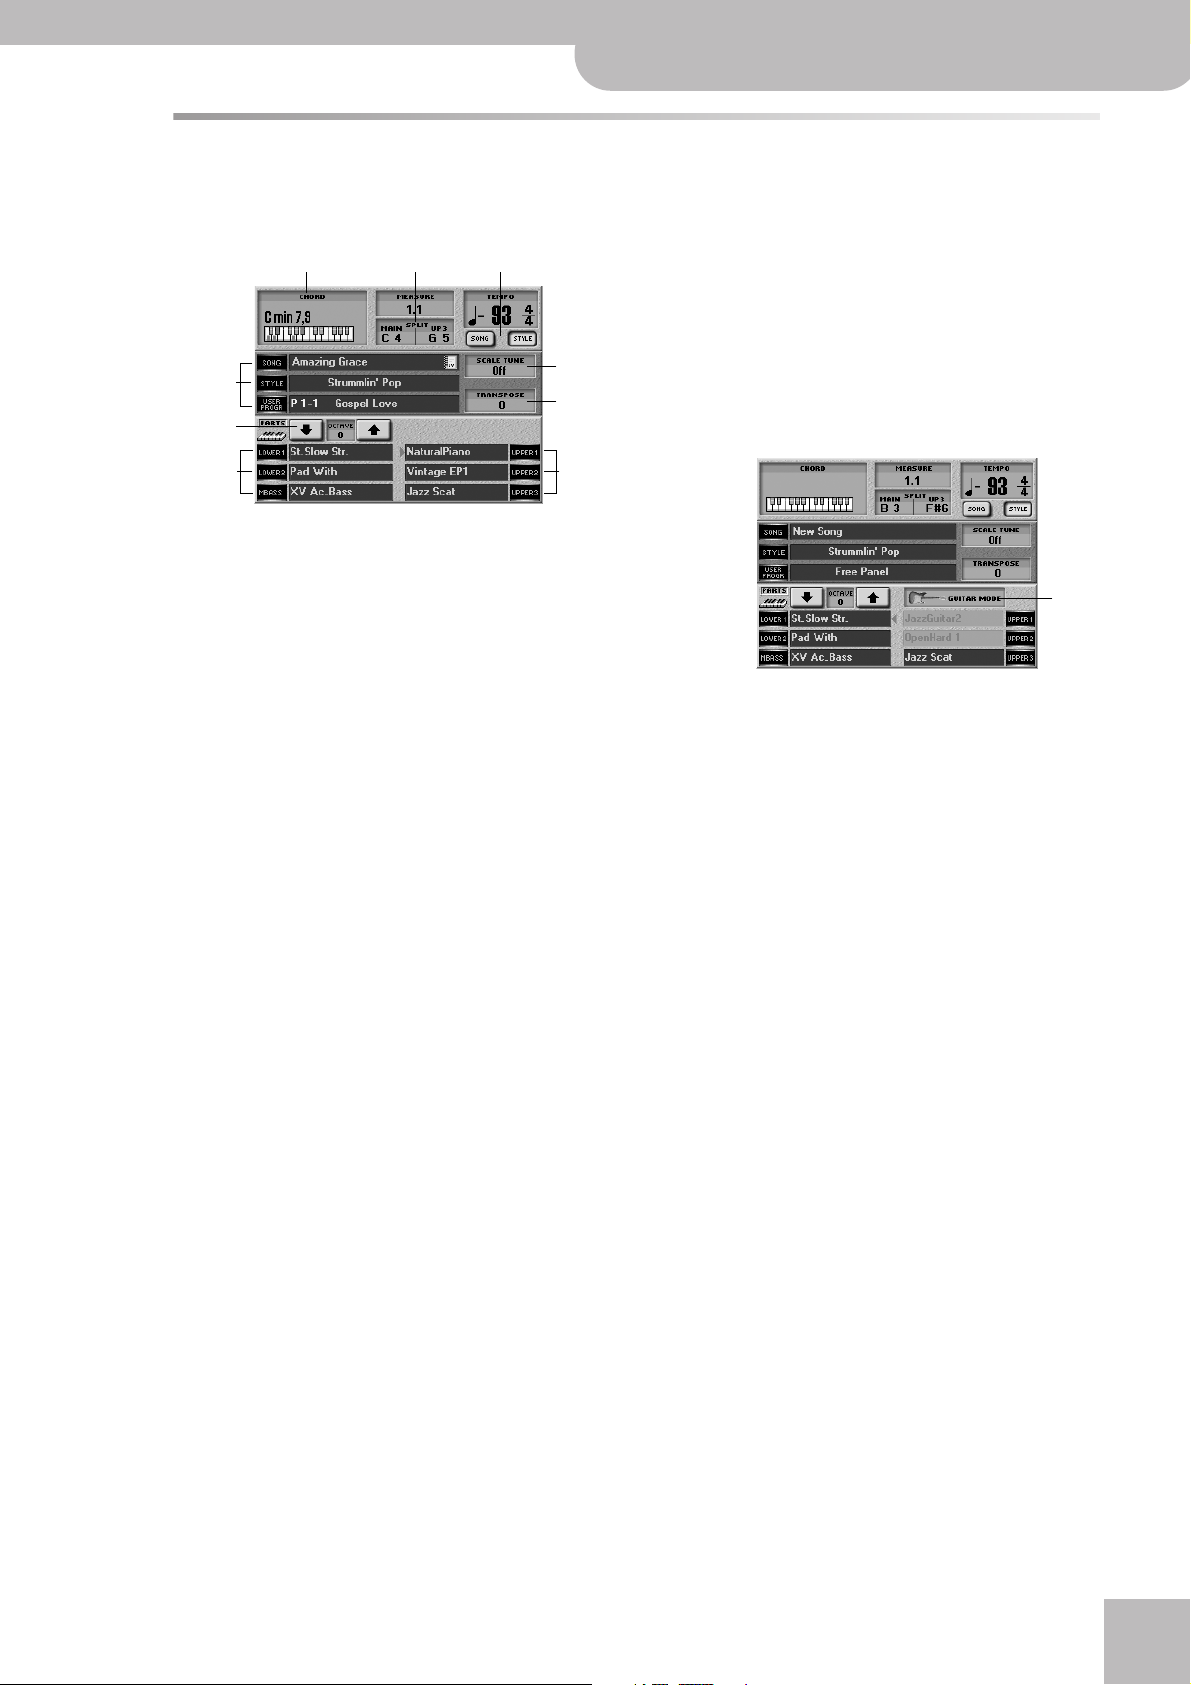
The main page
When you leave Demo mode (or any other display page)
or if you do not change any of the E-80’s settings, the
display looks more or less as follows:
A BC
G
D
H
E
F F
The information shown here depends on the E-80’s
current settings, the data you loaded, etc., but the
above illustration should be fairly close to what you
see on your instrument.
Unlike on previous Roland arranger instruments,
almost all information displayed is assigned to fields
you can press to jump to a different page, set a
parameter or select a parameter for editing.
Pressing field A, for instance, takes you to the
ARRANGER SETTING page. Press B if you want to
change the split point settings.
The [SONG] and [STYLE] buttons C look different and
therefore also behave differently: press one of them
to select the section whose tempo should be displayed. (You can change the tempo value of the
selected section using the [√SLOW][FAST®] and [TAP]
buttons after stopping playback.) They do not allow
you to switch from Style to Song mode, however,
because that is handled automatically – depending
on whether the [PLAY÷STOP¥®÷ª] or [START÷STOP]
button currently lights. By pressing the TEMPO display field, you jump to the “ARRANGER SETTINGSARRANGER OPTIONS” page.
Note: While on the main page, you can also set the tempo
using the [DATA÷ENTRY] dial and the [DEC]/[INC] buttons.
E-80 Music Workstation
The SCALE TUNE field G takes you to a page where
yo can change the tuning of the E-80’s notes (so as
to be able to use Arabic scales, for example).
The TRANSPOSE field H, finally, calls up the display
page where you can transpose one, several or all sections (this depends on the mode you select on that
page). This field duplicates the function of the
TRANSPOSE buttons.
When the E-80’s Guitar mode is on, the display looks
as follows:
Pressing the I field takes you to the GUITAR MODE
page. Note that this field can either contain an electric guitar or an acoustic one to indicate the kind of
instrument you selected.
This field duplicates the function of the EASY SETTING [GUITAR] buttons.
As you see, there is a lot you can control without
having to wade through endless menus.
Note: If the main page does not appear automatically, you can
return to it by pressing the [EXIT] button once or several times.
r
Front panel
I
The fields indicated by D take you to a page where
you can select songs (SONG), Music Styles (STYLE) or
User Programs (USER PROG). These fields have the
same functions as the buttons of the same name in
the FINDER pad.
The OCTAVE button icons E allow you to shift the
tuning of the currently selected Keyboard part (indicated by a red arrow). To select a Keyboard part, press
its TONE ASSIGN button.
The remaining fields F allow you to select the Keyboard part you wish to assign another sound to and
recalls the TONE SELECT page. They duplicate the
functions of the (KEYBOARD PART) TONE ASSIGN
buttons.
23
Page 24
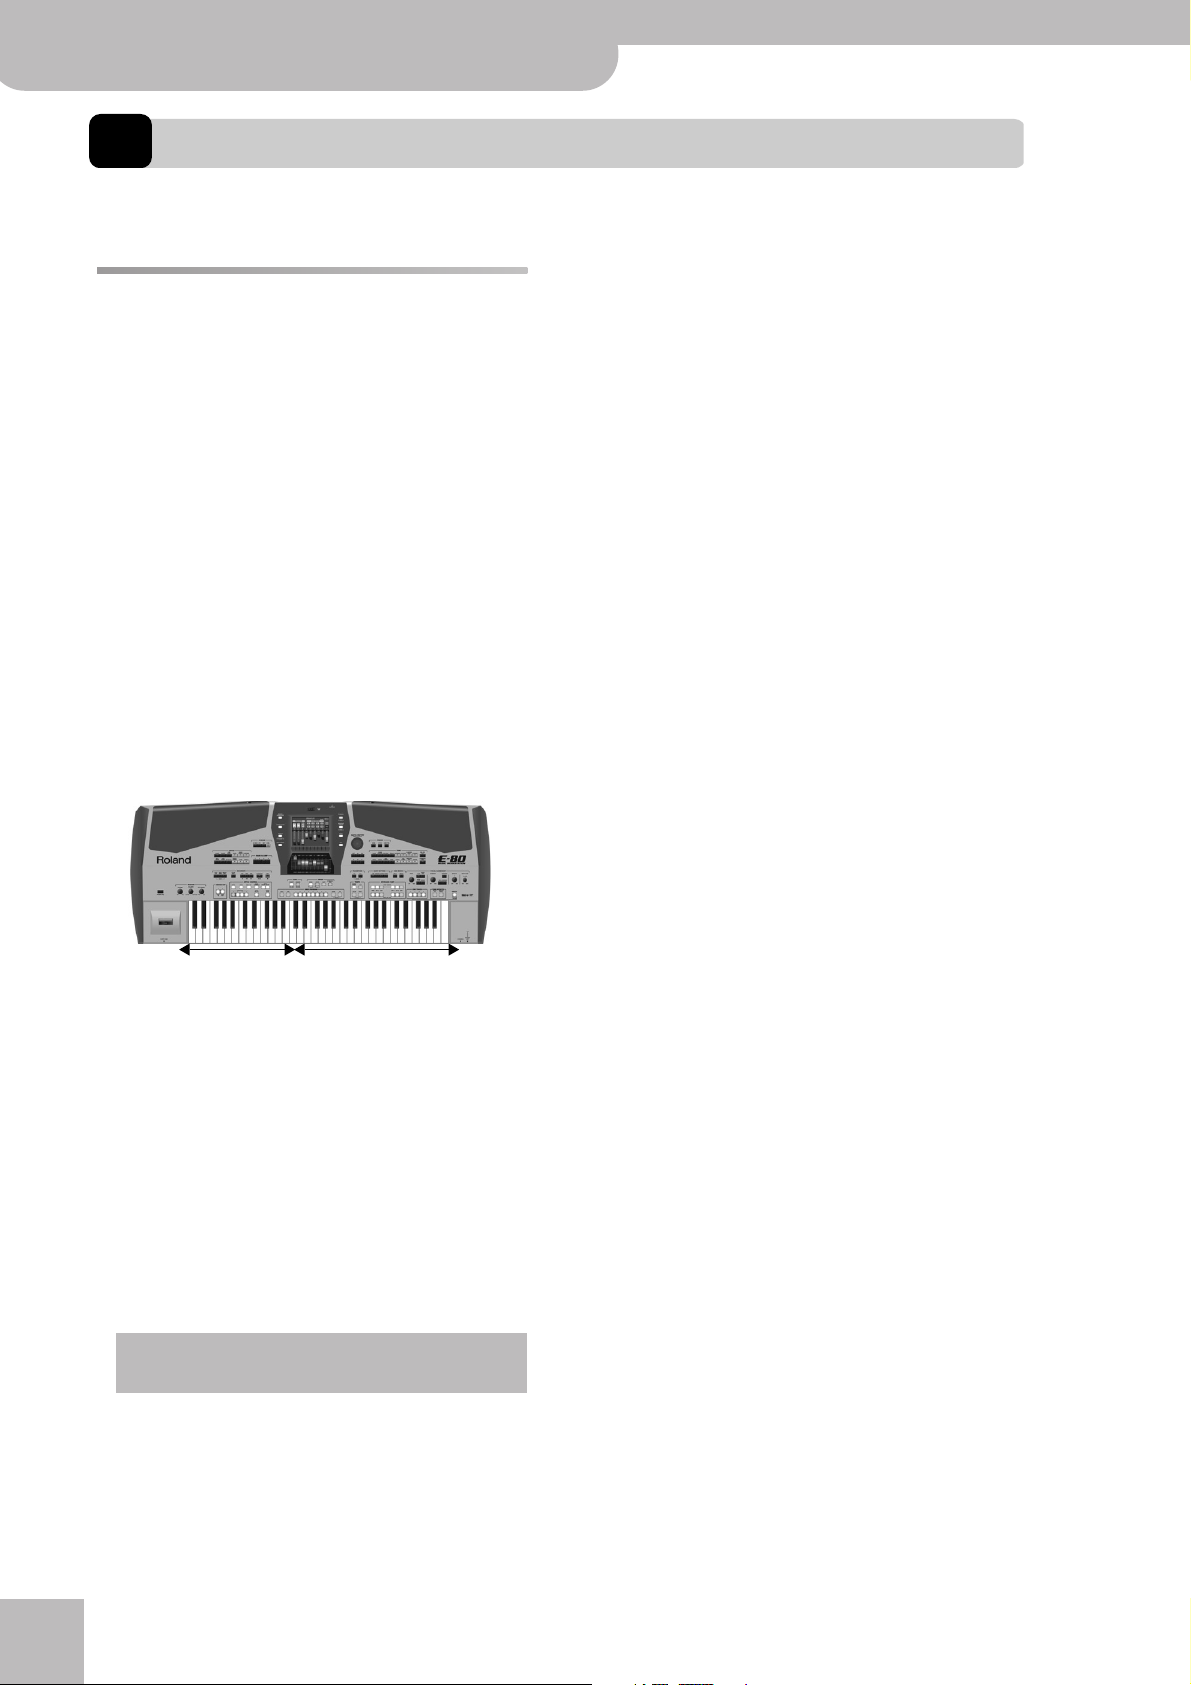
E-80 Music Workstation
Quick Start
3. Quick Start
In this chapter, we will scratch the surface and walk you through the major functions.
C
Recorder section:
The general idea
Your E-80 is several instruments in one. There are
three main sections you can use for playing live.
A
Keyboard parts:
This section consists of parts you need to play via the
keyboard, hence the name “Keyboard”. The E-80 provides seven Keyboard parts, six of which can be used
simultaneously: UP1, UP2, UP3, LW1, LW2 and MBS.
“UP” stands for “Upper” and refers to the right half (if
there is a split). “LW” refers to “Lower” and thus to the
left half. “MBS” is short for “Manual Bass”, i.e. a
monophonic bass part whose notes depend on the
chords you play.
There is no Manual Drum part, because any of the
parts just mentioned can be used to play a Drum Set.
The seventh part, “MELODY INT”, is what computer
buffs would call a “cross-platform part”: it belongs to
the Keyboard section but it is in part controlled by
the Arranger. See “Melody Intelligence” on page 84.
B
Arranger/Style section:
That’s how it’s called on the front panel, so we’ll stick
to it. This section actually encompasses a 16-track
sequencer, a straightforward MIDI recording function
and a very sophisticated Standard MIDI File player
with a host of all realtime control functions.
Left hand:
Arranger control
The Arranger is your backing band. It plays an accompaniment (called Music Style). In a way, the Arranger
works like a drum machine because it uses accompaniment patterns.
Unlike a drum machine, however, you can easily
select the desired pattern while playing. So you do
not need to program the order in which you intend
to use the patterns. Furthermore, the Arranger not
only provides a rhythm section but also chords, guitar and synthesizer riffs and so on. The accompaniment can be transposed in realtime. All you have to
do is play a different chord (usually with your left
hand).
You can add vocals and harmonies to your music
using the Vocal Harmonist function (page 46).
Right hand: melody
(Keyboard parts)
r
24
Page 25
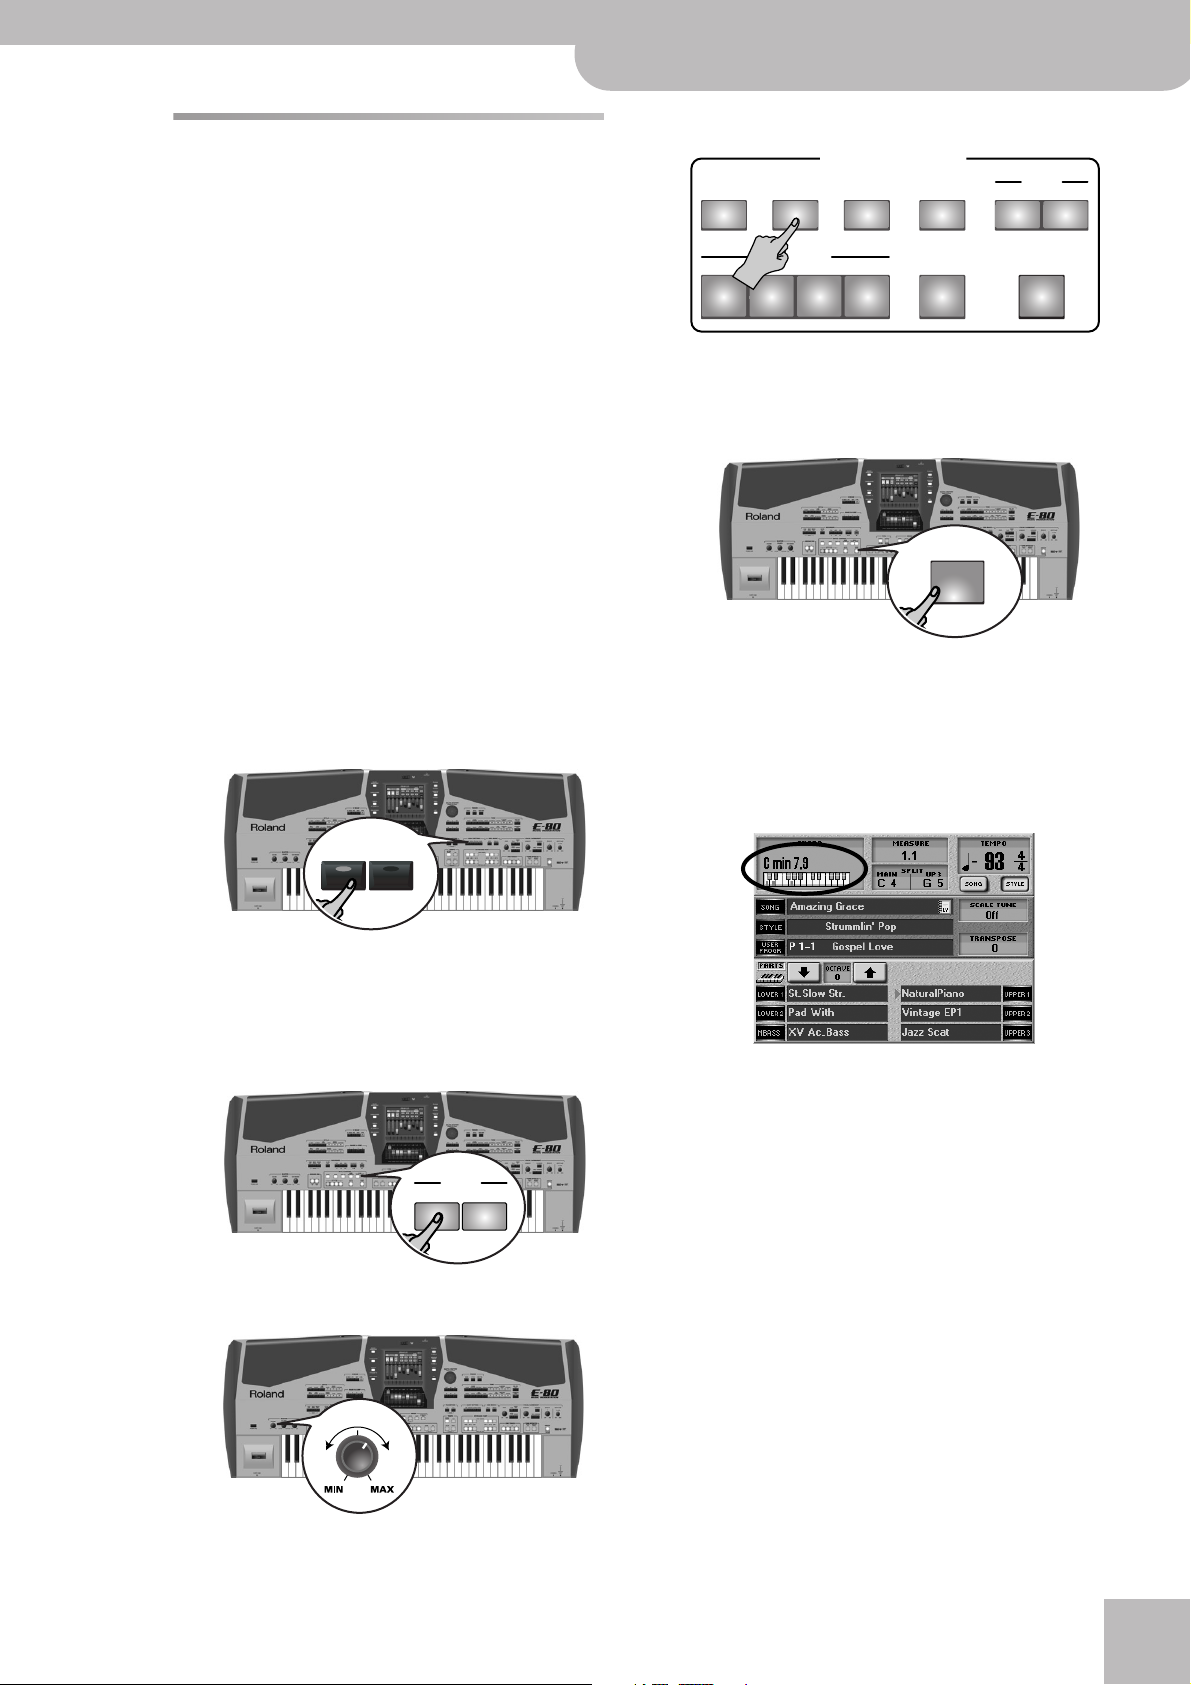
Playing to an automatic accompaniment
Let us begin with the automatic accompaniment function, which is called “Arranger” and often referred to as
“Style” in the display and on the front panel.
The Arranger is an interactive “playback sequencer” that
provides the accompaniments. These accompaniments
are called “Music Styles”, because the musical phrases
(“patterns”) they play concentrate on a given musical
genre (Rock, Pop, Dance, Waltz, etc.).
The Arranger allows you to transpose the melodic
accompaniment parts (bass, piano, guitar, etc.) simply
by playing chords. In most instances, you will probably
do so with your left hand. Each Music Style comprises
several patterns, so that you can vary the accompaniment by starting with an introduction, using a simple
accompaniment for the verses, a more elaborate one
for the choruses and by ending your songs with an
“Ending” pattern.
Let us first look at the most important aspects for operating the Arranger:
(1) Connect and switch on the E-80 (see pages 20 and
21).
(2) Press the EASY SETTING [ARR] button.
E-80 Music Workstation
Playing to an automatic accompaniment
r
(5) Press the [MAIN] button (it lights).
STYLE CONTROL
INTRO MAIN END/RIT START
VARIATION
12 3 4
BASS
INVERSION
AUTO
FILL IN
SYNC
START
STOP
STOP
(6) Play a chord in the left half of the keyboard (to the
left of the C key below the USER PROGRAM [LIST]
and [1] buttons), then press the STYLE CONTROL
[START÷STOP] button.
START
STOP
The [START÷STOP] button lights and the Arranger
starts playing the accompaniment of the currently
selected Music Style (called “Strummlin’Pop”).
The accompaniment pattern is sounded in the key
that corresponds to the note you played (C). The
name of the corresponding chord is displayed in the
upper left-hand corner of the display:
ARR ORGAN
The button’s indicator lights and the keyboard is split
into two halves. The left half can be used to play
chords, while you can play melodies in the right half.
(3) If the SYNC [START] button lights (which is proba-
bly the case), press it to switch it off.
SYNC
START STOP
(4) Set the [MASTER¥VOLUME] knob to a reasonable
level (e.g. about “1/4”).
VOLUME
Note: See “Song/Arranger Start Priority” on p. 246 if Arranger
playback does not start.
(7) Play another chord in the left half of the keyboard.
The same pattern is now played in that key. You don’t
even have to play full chords:
• For major chords, playing just the root note is
enough (e.g. “C” for C major, “A” for A major, etc.)
• For minor chords, playing the root note and the third
key to its right will do.
• For seventh chords, playing the root and the second
25
Page 26

E-80 Music Workstation
Quick Start
key to its left is enough.
C major C minor
Only the key that corresponds to
the chord's name.
C7
Root note + second key to the left.
Note: The function that takes care of this easy fingering is
called “INTELLIGENT” (page 89). See also p. 273 for a list of
other chords that can be played using this system (augmented,
diminished, etc.).
Root note + third key to the
right.
What you hear now is the “MAIN 1” pattern (the
[MAIN] and VARIATION [1] buttons light). This is the
simplest accompaniment of the selected Music Style.
Let’s listen to the accompaniment you could use for
your choruses:
(8) Press the VARIATION [2] button (the [MAIN] and [1]
buttons light and [2] flashes).
STYLE CONTROL
INTRO MAIN END/RIT START
VARIATION
12 3 4
BASS
INVERSION
AUTO
FILL IN
SYNC
START
STOP
STOP
At the end of the VARIATION [1] pattern, the VARIATION [2] button lights steadily and the Arranger plays
a different accompaniment.
(9) Now try out Variations 3 and 4.
Professional transitions: Fill In
So far, we have only used the main accompaniment
patterns (i.e. the phrases that are repeated over and
over until you stop the Arranger).
The various variations can be used for verses (1), second
verses (2), choruses (3 & 4) and other song parts.
Switching between these patterns is a matter of pressing the VARIATION [1]~[4] buttons. Yet, that produces
instant changes of the accompaniment, while “real”
musicians tend to “announce” new song parts by means
of roll in the drums or slightly different accompaniment
notes.
The E-80 allows you to make such “announcements” in
the following way:
(1) Start playback of the MAIN [1] pattern (see above).
(2) Play a chord in the left half of the keyboard.
(3) Press the [AUTO¥FILL¥IN] button (it lights).
STYLE CONTROL
INTRO MAIN END/RIT START
VARIATION
12 3 4
BASS
INVERSION
AUTO
FILL IN
SYNC
START
STOP
STOP
(4) Press a VARIATION [1]~[4] button to select another
MAIN pattern.
The [MAIN] button and the selected VARIATION [1]~[4]
button flash.
What happens now depends on when you press this
button:
• If you press it on any beat before the last of the current bar, the Arranger plays a Fill-In pattern that lasts
until the end of the current bar. It then changes to
the newly selected pattern (at which point [MAIN]
and the selected numeric VARIATION button light
steadily).
• If you press it on the last beat of the current bar, the
Fill-In will start on the next downbeat and last an
entire bar, after which the Arranger automatically
selects the new pattern.
If you press the same numeric button ([1]~[4]) again,
the Fill-In is played according to the above rules. But
when it finishes, the Arranger returns to the pattern
you had been using up to that point.
(5) Switch off the [AUTO¥FILL¥IN] button if you do not
want the next pattern change to be preceded by a
Fill-In.
Note: The length of a Fill-In can be halved. See “Half Bar on Fill
In/Main” on p. 71, 75 and 77.
Intro & Ending
Now that we’ve got the transitions covered, you may
start wondering how to create more professional intros
for your songs – and how to end them in style. That is
what the [INTRO] and [END/RIT] buttons are for.
While the MAIN patterns keep repeating the same
accompaniment until you select another one or until
you stop Arranger playback, Fill-Ins (see above), Intros
and Endings are played only once.
Once the INTRO pattern is finished, the Arranger automatically proceeds with the MAIN [1]~[4] pattern
(depending on which button flashes). At the end of the
Ending pattern, however, the Arranger stops.
(1) Stop Arranger playback by pressing the
[START÷STOP] button (it goes dark).
(2) Play a chord in the left half of the keyboard to
specify the key of the Intro pattern.
r
26
Page 27
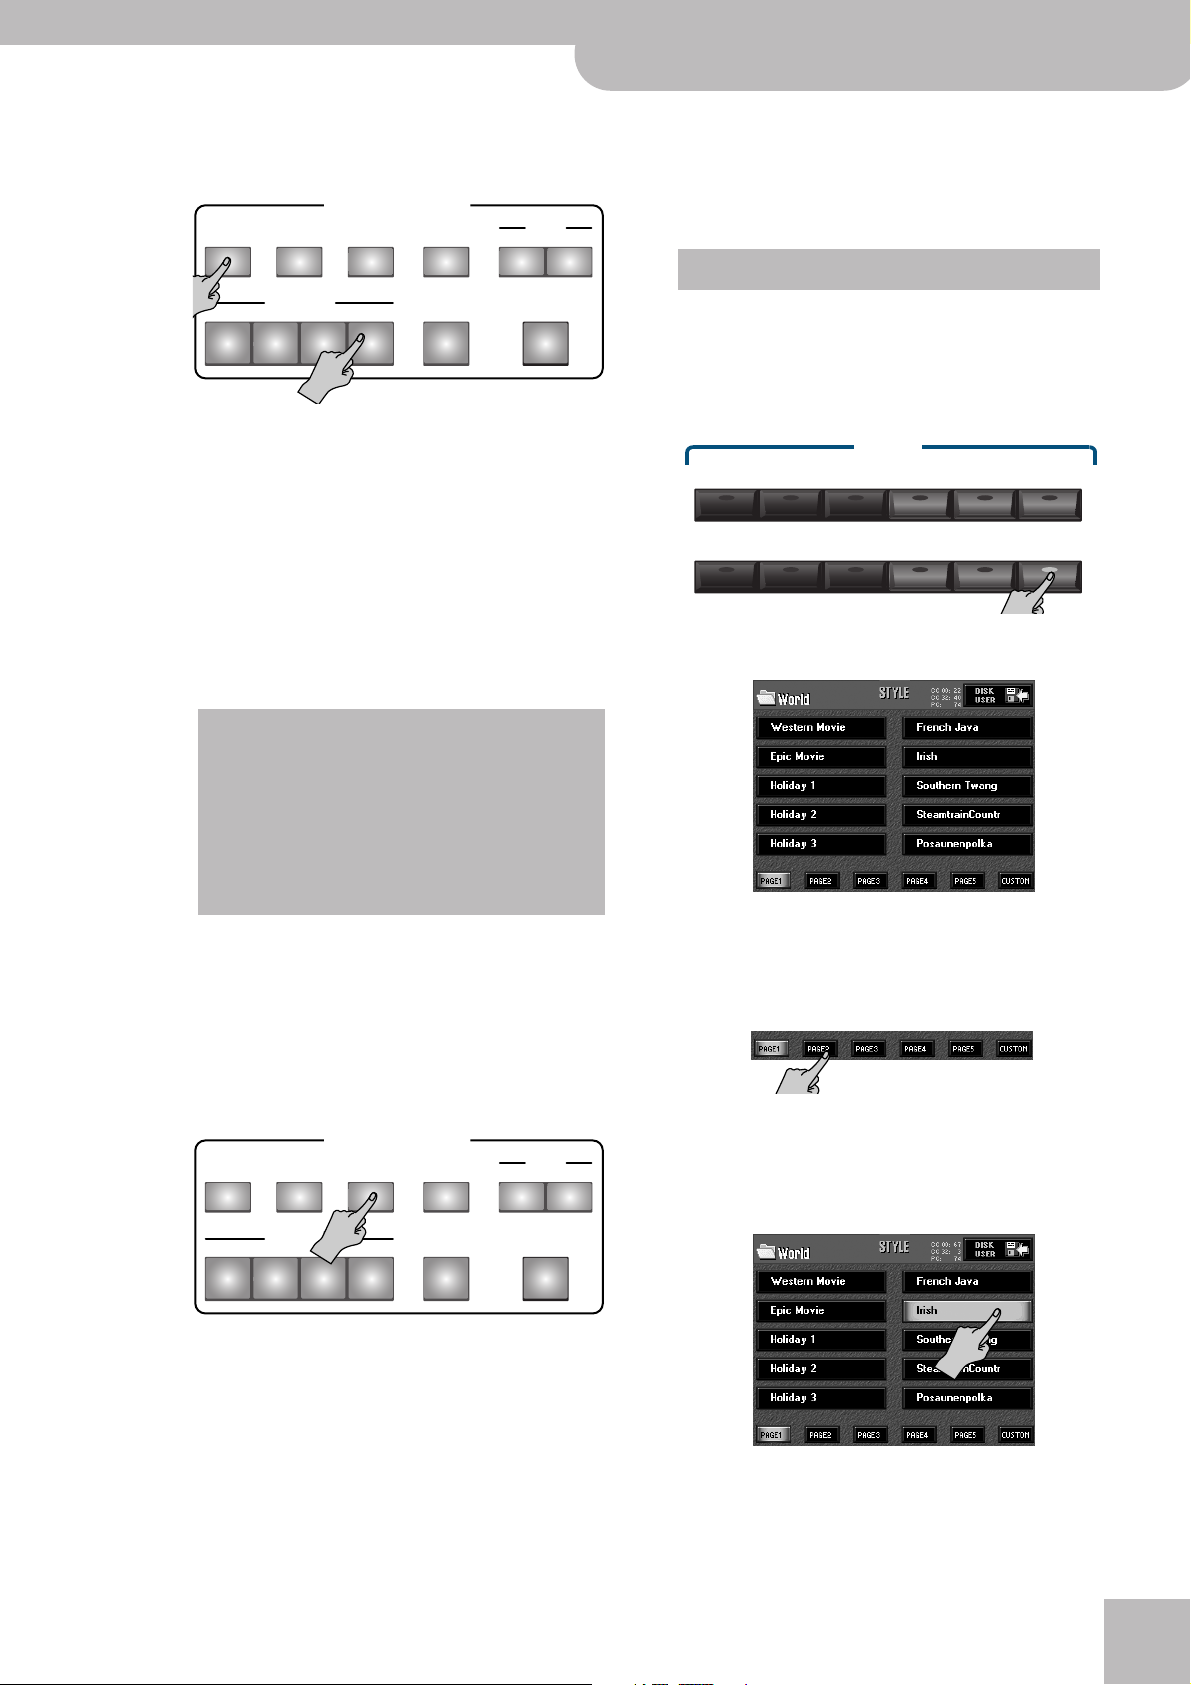
E-80 Music Workstation
r
Playing to an automatic accompaniment
(3) Press the [INTRO] and the numeric button [1]~[4]
that corresponds to the Intro pattern you want to
use.
STYLE CONTROL
INTRO MAIN END/RIT START
VARIATION
12 3 4
BASS
INVERSION
AUTO
FILL IN
SYNC
START
STOP
STOP
(4) Press the [START÷STOP] button to start Arranger
playback.
The Arranger plays the introduction of the currently
selected Music Style. The “MEASURE” field on the
main page now counts backwards (“–4”, “–3”, etc.) to
indicate the Intro’s duration. If you like, you can now
try out the remaining three Intro patterns by pressing
[INTRO] and [1]~[4]. The number refers to the degree
of complexity.
Note: Do not play while the Intro is running. Most Intro patterns indeed contain chord changes, so that playing different
chords may lead to highly annoying results.
Note: Here again, it would be wiser not to play chords while
the Ending phrase is running.
Note: See “Additional Arranger/Style functions” on p. 82 for
more Arranger functions.
Note: You can also select patterns via the Aftertouch function.
See p. 83.
Selecting Music Styles
So far, we have been using only one Music Style (the
one that is selected automatically at power-on). Here is
how to select a different accompaniment:
(1) Press a button of the STYLE pad to select a Music
Style family.
STYLE
LIVE
8 BEAT 16 BEAT ROCK
BALL
ROOM
JAZZ
BLUES
BAND
50's & 60's
BOSSA
SAMBA
The indicator of that button lights and the display
looks as follows:
DISCO
DANCE
CONTEMP
LATIN WORLD
During Arranger playback, the [START÷STOP] button
flashes red on the downbeat and green on the
remaining beats of the bars to indicate the tempo.
While the Arranger is stopped, this visual tempo
indication is provided by the [METRONOME] button
(that only flashes in red, though). See “Flashing Metronome” on p. 247 for how to switch that indication
off.
(5) Press one of the VARIATION [1]~[4] buttons to
select the pattern that should be played after the
Intro is finished (the button flashes).
By pressing [MAIN] at this stage, you leave the Intro
pattern on the next downbeat (i.e. before the Intro
phrase is finished).
(6) Wait until the selected MAIN pattern is playing,
then press the [END/RIT] button.
STYLE CONTROL
INTRO MAIN END/RIT START
VARIATION
12 3 4
BASS
INVERSION
AUTO
FILL IN
SYNC
START
STOP
STOP
The display shows a list of 10 Music Styles available
for the family you selected. If the name of the desired
Style is not displayed…
(2) Use the [PAGE¥1]~[PAGE¥5] fields to switch pages.
The number of pages depends on the selected family.
Some families have only one page, while others may
have two, three, four, or five.
(3) Press the field of the Music Style you want to use.
At the end of the current pattern cycle, the Arranger
starts playing the Ending pattern and then stops.
While the Ending phrase is playing, the “MEASURE”
field on the main page counts backwards (“–4”, “–3”,
etc.) to indicate the pattern’s duration.
Again, there are four Ending phrases to choose from.
If you don’t press a numeric button [1]~[4] after
switching on [END/RIT], the Arranger automatically
uses the ENDING phrase that corresponds to the
MAIN number you have been using up to that point.
If the Arranger is running while you select another
Style, the new Style starts on the next downbeat.
27
Page 28
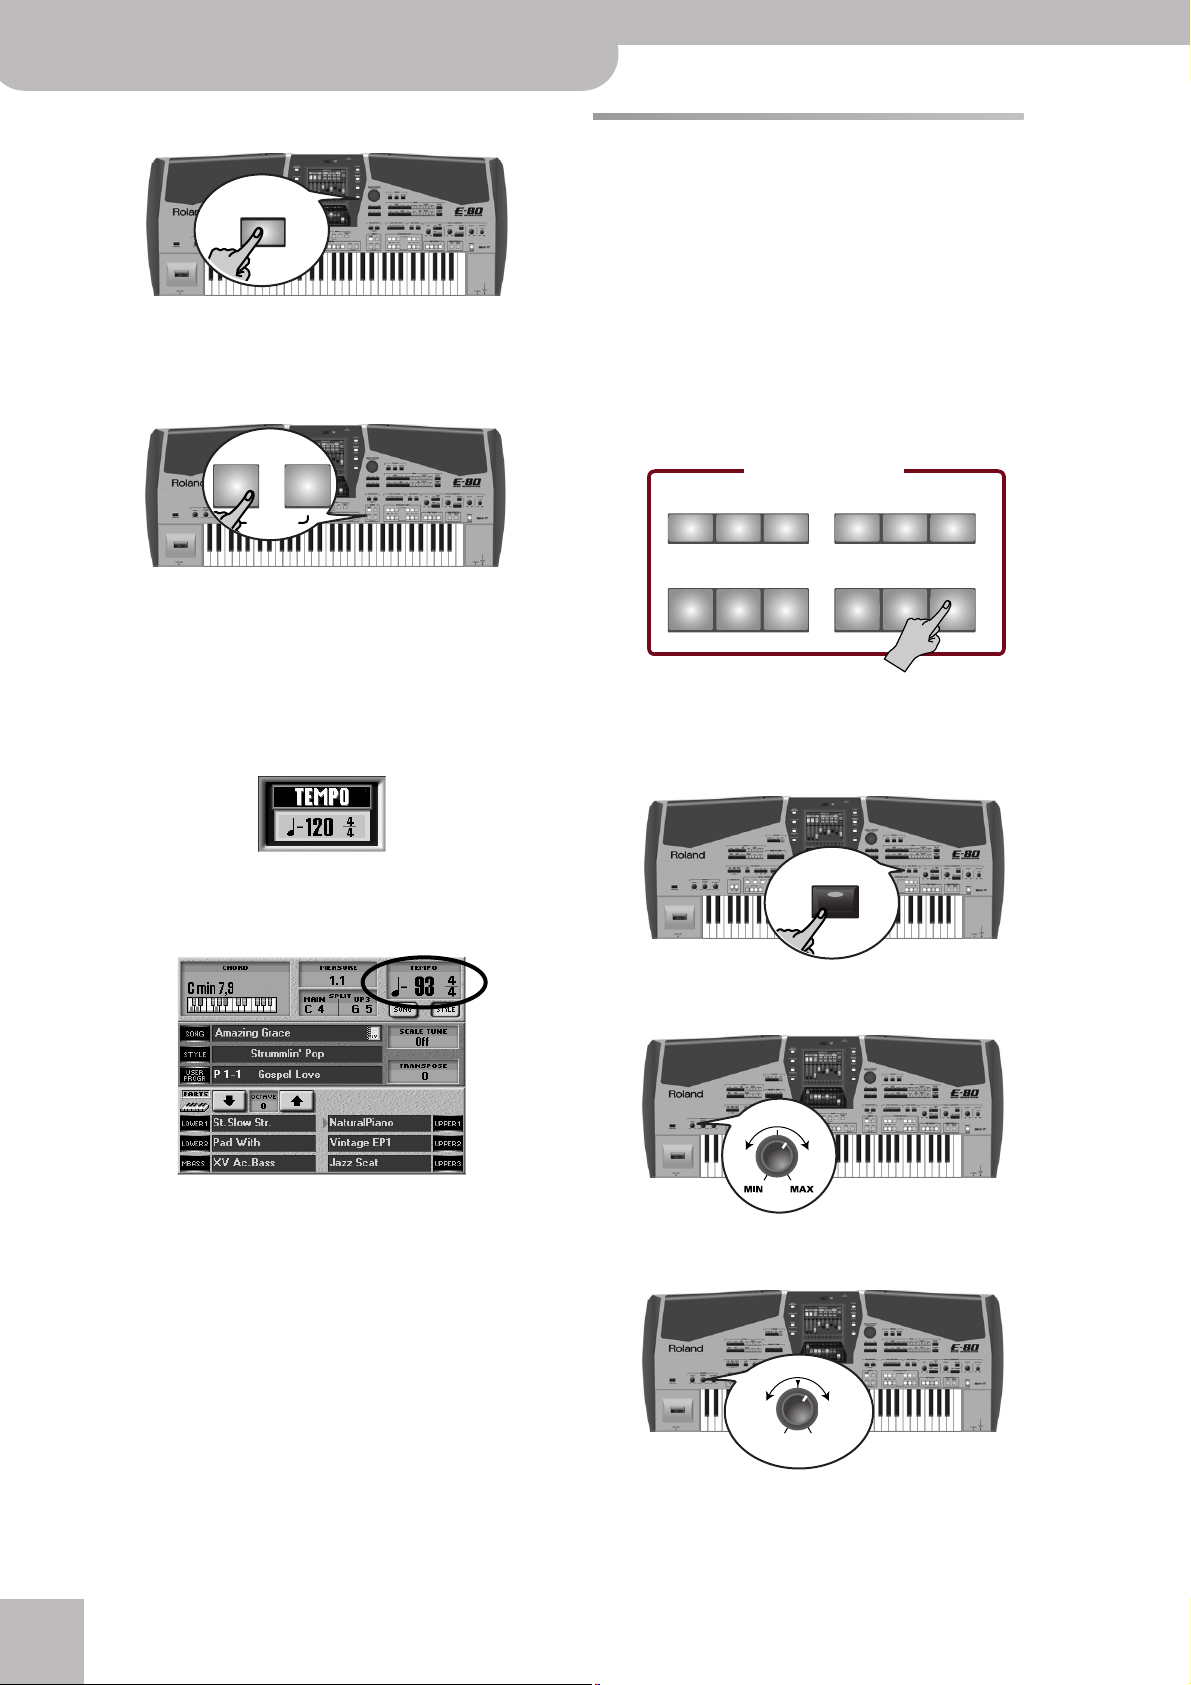
E-80 Music Workstation
Quick Start
(4) Press the [EXIT] button to return to the main page.
EXIT
Changing the tempo
If the accompaniment is too fast (or too slow), here is
how to change the Music Style tempo:
√
SLOW FAST
DEFAULT
®
Using the Keyboard parts
Your E-80 provides six “parts” that allow you to play
different sounds on the keyboard. These parts are
called “Keyboard parts”. Let’s add a live melody to the
accompaniment.
Playing with an Upper and/or Lower part
At power-on, the UP1 part is automatically switched on
and assigned to the entire keyboard. That is because the
E-80 starts up in EASY SETTING “PIANO” mode. The KBD
MODE [WHOLE] button also lights.
(1) Press the PART ON/OFF [UP1] button if it does not
light.
KEYBOARD PART
TONE ASSIGN
(1) Press [ôSLOW] to decrease the tempo in steps of
one unit.
(2) Press [FAST¥®] to increase the tempo in steps of one
unit.
On most pages where the tempo is not already displayed, the following popup window appears to confirm the value you have set:
You can also press the [TAP] button several times to
specify the desired tempo. The new tempo is displayed in the upper right-hand corner of the display:
MBS LW 2 LW 1
UP 3 UP 2 UP 1
PART ON/OFF
(2) Play a few notes on the keyboard.
The UP1 part’s sound is assigned to the entire keyboard. To assign it to the right half, press the KBD
MODE [SPLIT] button.
SPLIT
(3) Use the MASTER [VOLUME] knob to set the E-80’s
output volume.
VOLUME
The [METRONOME] button flashes red to indicate the
downbeat (while Arranger playback is stopped). See
“Flashing Metronome” on p. 247 for how to switch
that indication off.
If Arranger playback is running, the [START÷STOP]
button flashes red on the first and green on the other
beats of a bar.
(3) To quickly return to the default tempo, hold down
[√¥SLOW] and simultaneously press [FAST¥®].
r
28
(4) Use the [BALANCE] knob to set the balance
between the accompaniment and your live playing.
BALANCE
ACCOMP KEYBOARD
Page 29
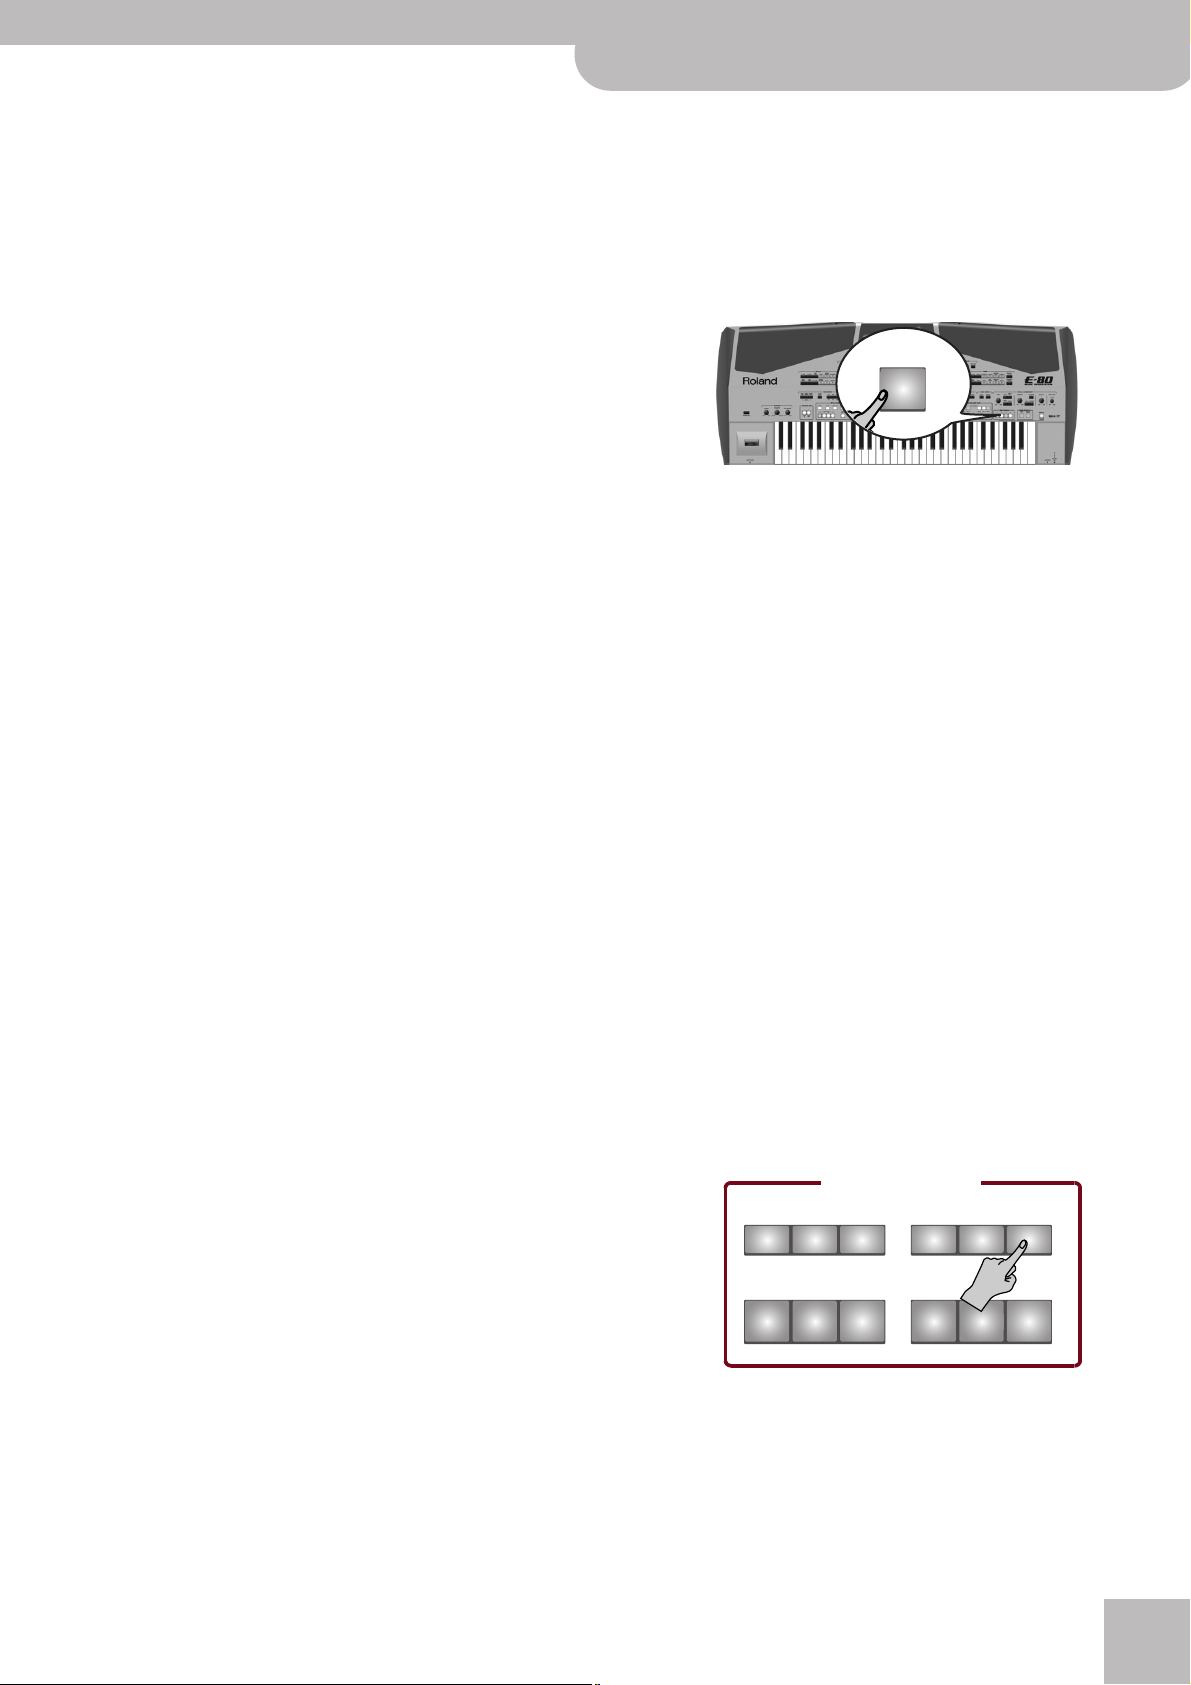
E-80 Music Workstation
Using the Keyboard parts
r
Turn it towards “KEYBOARD” if the notes you play
yourself are too soft. Turn it towards “ACCOMP” if
your playing is too loud with respect to the Arranger
(or song).
Note: See page 106 for how to set the balance between the
Keyboard parts.
(5) Press the PART ON/OFF buttons of other Keyboard
Parts you want to add (by “layering” them).
Alternating between sounds
The E-80 allows you to play several sounds simultaneously using the Keyboard parts. Other parts are
played by the Arranger/Styles and are called Style parts.
And finally, there are the Song parts that are controlled
by the Recorder function.
The Keyboard parts can be used together or to quickly
alternate between sounds.
Use the PART ON/OFF buttons to select the part(s) you
want to play.
You can play several sounds simultaneously (which is
called a “layer”), or via separate keyboard zones (“split”).
There is even a dynamic split function (see p. 99). Below
please find an explanation of the Keyboard parts.
(See p. 82 for the Style parts.)
• UP1 (Upper1): Upper1 is normally the main solo part
(and switched on automatically in Piano mode).
• UP2: The Upper2 part can be used as additional solo
part to be layered with the Upper1 part or as an
alternative melody sound. It provides two tuning
parameters (“Coarse” and “Fine”) Upper1 does not
have.
• UP3: The Upper3 part is yet another solo part that
can be added to UP1 and UP2. It can also be used in
an additional split combination (see p. 99).
• LW1 and LW2: The Lower1 and Lower2 parts can
either be used in the same way as the UP parts (in
WHOLE mode) or be assigned to the left half of the
keyboard (in SPLIT mode).
• MBS: In WHOLE mode, the MBS part is yet another
“normal” part. In SPLIT mode, it supplies a semi-automatic bass line to your left-hand notes if one of the
two LW parts is active. When neither LW button
lights, it behaves like any other Keyboard part.
Note: All Keyboard parts can be used to play drum sounds.
Unlike previous Roland arranger instruments, the E-80 no
longer provides a dedicated “Manual Drums” part.
• MELODY INTELL (Melody Intelligence): This part is
triggered by the Arranger and plays automatic harmonies that are added to the melody you play using
the UP1 part. You cannot play that part yourself. That
explains why its button not part of the KEYBOARD
PART section (it is one of the two TONE EFFECTS buttons). You can choose from among 18 harmony types
(page 84).
Selecting sounds for the Keyboard parts
■One Touch
The easiest way to select suitable Tones for the Keyboard parts while working with the Arranger is by
using the ONE TOUCH feature. The One Touch memories are in fact small User Programs. See p. 87 for
details.
(1) Press the desired ONE TOUCH button.
1
There are four One Touch memories per Music Style.
Their settings are included in the Style data themselves and can thus be copied to other E-80 units
simply by copying the Music Style files.
Note: One Touch memories usually switch on the SYNC START
function. If you don’t want the Arranger to start as soon as you
play a note or chord, switch off the [SYNC¥START] button.
(2) Select a Music Style (page 27) and start Arranger
playback by pressing the [START÷STOP] button.
Start playing to the accompaniment. You will notice
that the sounds of all Keyboard parts match the
mood of the selected Style.
(3) Select a different Style and again play a solo line.
The active Keyboard part (probably UP1) now uses a
different sound (even Keyboard parts that are off
change sounds).
(4) Press another ONE TOUCH button to use that reg-
istration.
(5) Press the same button again if you no longer need
the One Touch setting.
■Choosing sounds manually
The E-80 contains 1100 Tones (or sounds) and 54 Drum
Sets.
(1) Specify the part you wish to assign another sound
or Drum Set to:
• Press the TONE ASSIGN button of the desired part (so
that it lights).
KEYBOARD PART
TONE ASSIGN
MBS LW 2 LW 1
—or—
UP 3 UP 2 UP 1
PART ON/OFF
29
Page 30
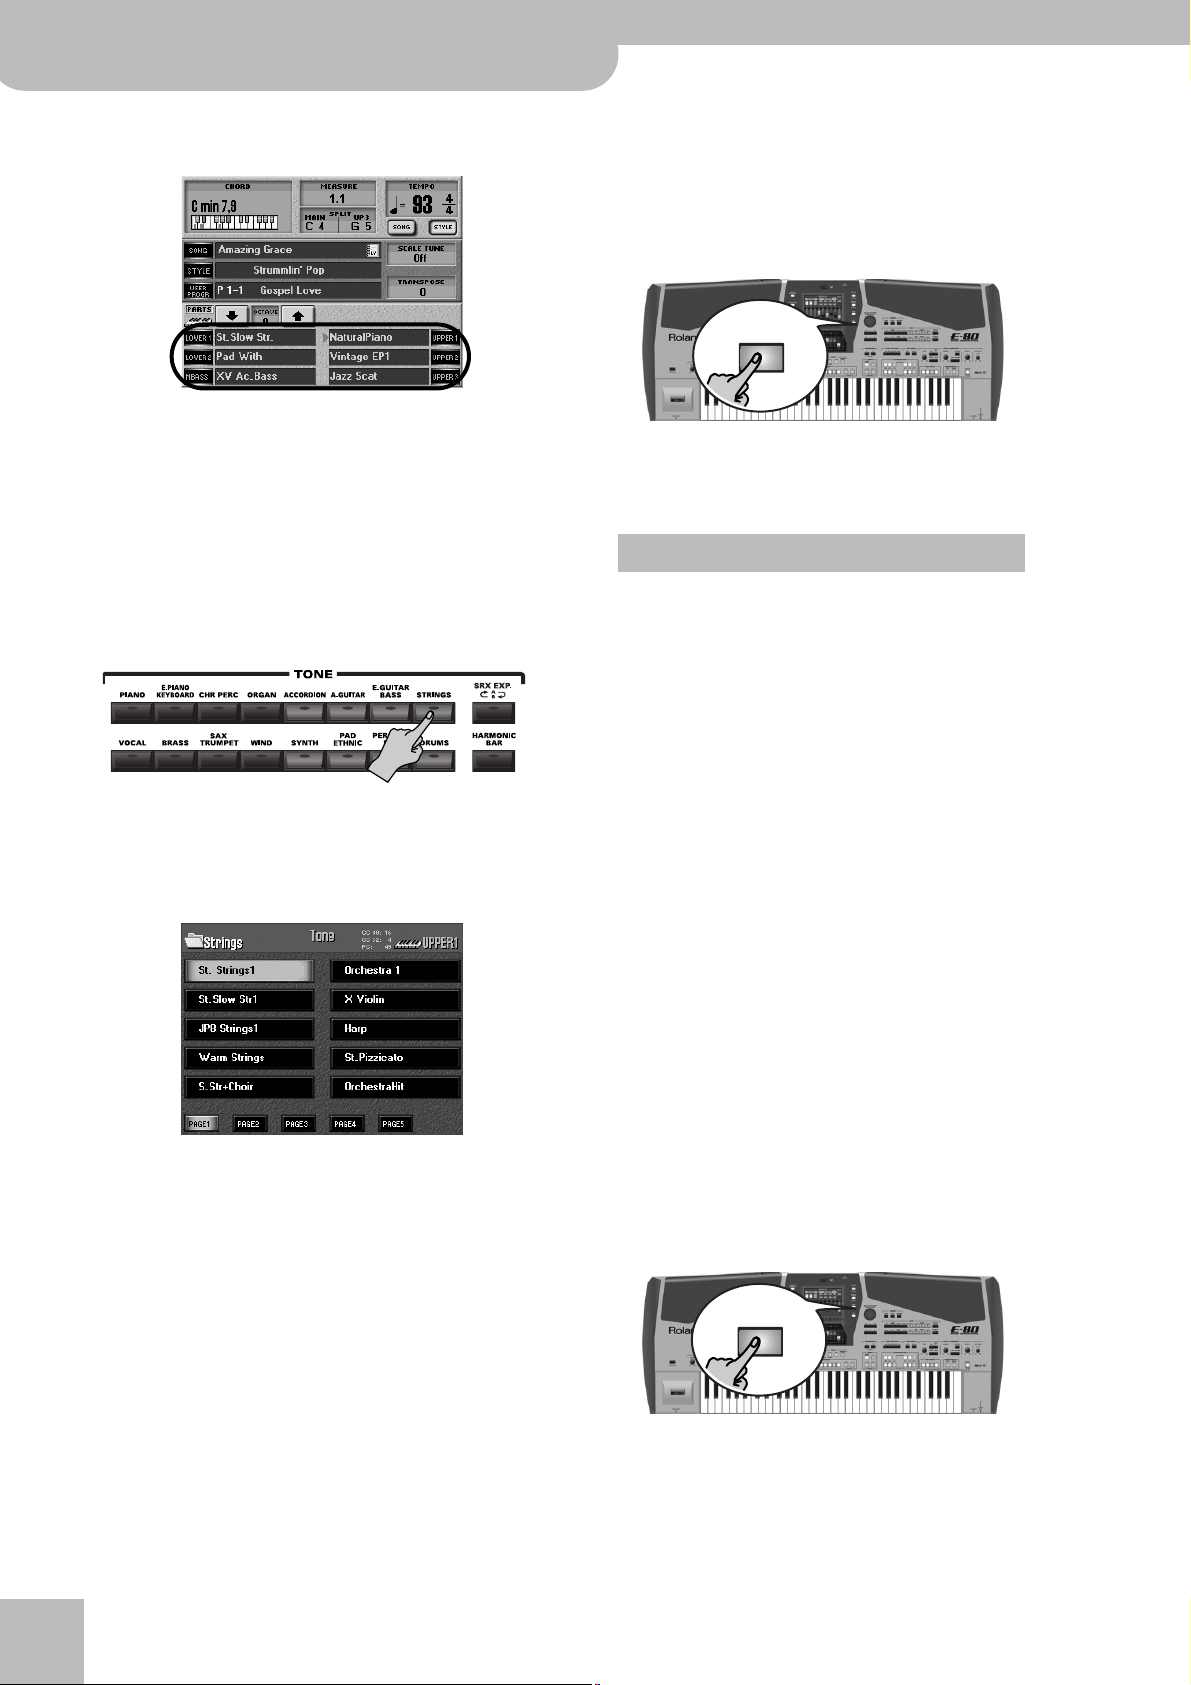
E-80 Music Workstation
Quick Start
• On the main page, press the row of the part you wish
to assign a different sound to.
In this case, the E-80 directly jumps to the TONE page
that contains the currently selected sound.
The red arrow indicates which part is active for Tone
selection (its TONE ASSIGN button also lights).
Note: It is also possible to select sounds for Keyboard parts
that are currently switched off. This allows you to prepare the
next sound(s) while still playing another Keyboard part.
(2) Press a TONE button to select a family and its
“best” sound (the sound already changes at this
stage).
See page 33 for the [HARMONIC¥BAR] sounds and
page 32 for the [SRX¥EXPANSION¥A÷B] button.
The display shows a list of Tones available in that
family:
The [˚] field is only displayed if there are more than
five pages. Other Tone families have fewer than five
pages. This depends entirely on the Tone family you
select.
(5) Press the field of the desired sound.
(6) Press the [EXIT] button to return to the main page.
EXIT
Next time you select this TONE family, the E-80 automatically jumps to the page that contains the last
sound you selected (and activates it).
About the E-80’s sounds
Try playing the Tones you select at different velocities
(strengths) to discover the rich nuances that can be
obtained. (See page 68 for details about how to set
the velocity sensitivity.)
There is a “JazzScat” sound (VOCAL family), for example, with three dynamic levels that allow you to
sound “Doo”, “Bub” or “Daow”, simply by hitting the
keys softer or harder. Various guitar Tones provide
hammering-on/bending sounds when you strike the
keys as hard as you can.
Transposing the keyboard to the lowest octave (using
the OCTAVE parameter) sometimes allows you to play
some typical noises (scraping over the strings, hitting
the body of an acoustic guitar, etc.).
Entries with an [EXP¥A] or [EXP¥B] icon to the right of
their name are sounds that reside on an SRX-series
expansion board you installed. Those sounds are
automatically assigned to the correct families (and
displayed on the last page of the selected family).
(3) Press the field of the desired sound. If you don’t
like it, press another field.
The last sound you select in each family is memorized
temporarily and will be recalled every time you press
the corresponding TONE button. (That selection can
then be changed by pressing another field.)
(4) If you are still not happy with the Tone, use the
[PAGE¥1]~[PAGE¥5] and [˚] fields to select the corresponding page (if available).
■Choosing the sound selection system (Sound Set
Mode)
The Roland engineers figured that you might feel
overwhelmed by the number of Tones available in
each TONE family. That is why the E-80 does not display all the sounds it contains when you switch it on
for the first time. This “restricted” display mode is
called “BEST SELECTION”. In this mode, only the “new”
sounds can be selected.
You may have grown fond of “older sounds” (from
the G and VA series) and wish to select them. In that
case, select “EXTENDED”:
(1) Press the [MENU] button.
MENU
r
30
Page 31

E-80 Music Workstation
C2
C3
IPopKik36
IPopCStk37st
IPopSn38st
IPopGstS39st
IPopSn40st
IPopTomLFl41
IPopHat1_42
IPopTomL43
IPopHat2_44
IPopTomMFl45
IPopHat3_46
IPopTomM47
IPopTomHFl48
IPopCyml2_52
IPopTomH50
(this is only an example)
Using the Keyboard parts
r
The display changes to:
(2) Press the [UTILITY] and the [STARTUP] field.
(3) Press either [BEST¥SELECTION] or [EXTENDED] to
make your choice.
This setting is memorized and used until you change
it again.
Drumming on the keyboard
The E-80 also allows you to play drums and percussion
on the keyboard. If you have ever worked with an older
Roland arranger instrument, you may remember that
there used to be a part called “M.Drums” for playing
percussion phrases. This part no longer exists, because
any of the following Keyboard parts can be used for
drumming: UP1, UP2, UP3, LW1, LW2 and MBS.
(1) Press the TONE ASSIGN button of the part you
want to assign a Drum Set to (the button lights).
(2) Press the TONE [DRUMS] button.
You may have to use the [PAGE¥1]~[PAGE¥5] buttons
to jump to the page that contains the desired Drum
Set. The [˚] field allows you to jump to additional
pages.
(4) Play a few notes on the keyboard.
Every key is assigned to a different drum/percussion
sound. Press the second “C” key from the left (C2) to
sound a bass drum (“Kick”) and the white key to its
right (D2) to play a snare sound. Then, try out the
other keys.
(5) Press the [EXIT] button to return to the main page.
EXIT
Entries with an [EXP¥A] or [EXP¥B] icon to the right of
their name refer to Drum Sets that reside on an SRXseries expansion board you installed.
(3) Press a field to select another Drum Set.
31
Page 32

E-80 Music Workstation
Quick Start
Selecting sounds from an SRX expansion board
The E-80 allows you to expand the number of sounds
by installing one or two optional SRX-series wave
expansion boards.
See “Installing wave expansion boards” on p. 250 for
how to install such a board. If your E-80 already contains such a board (because you asked your Roland
dealer to install it when you bought the E-80), proceed
as follows to select one of the “Expansion” Tones:
(1) Specify the part you wish to assign another sound
to:
• Press the TONE ASSIGN button of the desired part (so
that it lights).
KEYBOARD PART
TONE ASSIGN
MBS LW 2 LW 1
—or—
• On the main page, press the row of the part you wish
to assign a different Tone to.
The E-80 directly jumps to the TONE page that contains the currently selected sound.
The red arrow indicates which part is active for Tone
selection (its TONE ASSIGN button also lights).
(2) Press the [SRX¥EXPANSION¥A÷B] button.
UP 3 UP 2 UP 1
PART ON/OFF
The display now responds with a list of Tones available on the selected wave expansion board:
Note: The names of the Tones that are displayed depend on
the SRX expansion board you installed and the slot you
selected.
(3) Press the field of the sound you are interested in. If
you don’t like it, press another field.
Some boards contain loops (or grooves) whose tempo
is automatically synchronized to the Arranger or
song tempo.
(4) If you are still not happy with the Tone, use the
[PAGE¥1]~[PAGE¥5] and [˚] fields to select the corresponding page (if available).
(5) Press the field of the desired Tone.
Alternatively, you can proceed as follows:
• Use the list that came with the expansion board to
locate the number of the “Patch” you would like to
use. The name “Patch” is a concept found on Fantom
and other Roland synthesizers or modules. The E-80’s
equivalent is called “Tone”.
This also allows you to use “Rhythm Sets”, which are
the equivalent of “Drum Sets” on the E-80 (they are
usually located at the end of the list). You cannot,
however, select “Tones” or “Performances”.
Note: If you are using the leaflet supplied with the board to
locate sounds, please see the “Patch List” and “Rhythm Set Key
Assign” lists labeled “For RD-700…”.
• Press the [DATA÷ENTRY] dial. The display now
changes to:
Press it once to select the expansion board in slot “A”,
or twice to select the board in slot “B”. If your E-80
only contains one board, the other slot cannot be
selected. (It is perfectly possible to connect that
board to slot “B” and to leave slot “A” empty.)
r
32
• Press the [Drum¥Set] field if you want to use the
numeric pad for selecting Drum Sets (the board’s
“Rhythm Sets”). Otherwise, leave it off.
• Enter the number of the “Patch” (sound) you want to
use, then press the [ENTER] field.
If necessary, you can use the [Delete] field to correct
erroneous entries before pressing [ENTER].
Page 33

E-80 Music Workstation
Using the Harmonic Bars
r
The display now jumps to the page that contains the
sound whose number you entered.
Press the [CLOSE] field to leave the numeric pad
without selecting another sound.
(6) Press the [EXIT] button to return to the main page.
EXIT
Next time you select this TONE family, the E-80 automatically jumps to the page that contains the Tone
you selected last.
Using the Harmonic Bars
The E-80 contains a virtual organ that is based on
Roland’s Virtual ToneWheel technology found in
organs like the VK-8, VK-88, VK-7, VK-8M, etc. This section can be assigned to three Keyboard parts: UP1, LW1
and MBS. The remaining Keyboard parts cannot be
used as “virtual organ” (but they can trigger organ
sounds that are part of the “normal” Tones).
(1) Press the EASY SETTING [ORGAN] button.
ARR ORGAN
The button’s indicator lights and the following parts
are assigned to the keyboard: LOWER 1 (LW1) to the
left and UPPER 1 (UP1) to the right half.
Left hand:
LOWER 1
Both parts are assigned a HARMONIC BAR sound.
This is important to remember, because there are also
“sampled organ sounds” that do not provide timbre
control via the sliders.
Right hand:
UPPER 1
By pressing the EASY SETTING [ORGAN] button, you
also activate the MODE [HARMONIC¥BAR] button,
which means that the 9 sliders now act as harmonic
bars.
(2) Press the MODE [HARMONIC¥BAR] button.
This is optional if you want to confirm your settings
in the display and save your changes.
(3) Note the “UPPER 1” message in the upper right-
hand corner.
It means that by moving the sliders below the display,
you change the sound of the right-hand organ
(assigned to the UP1 part).
This information is confirmed by the TONE ASSIGN
[UP1] button (it lights).
(4) Play a few notes with your right hand and move
the sliders below the display to change the organ
registration.
The numbers appearing on the harmonic bars allow
you to rapidly set the bars to the desired value. If you
push a (virtual) harmonic bar inward until no number
is visible, its volume will be “0”, and no sound will be
heard. If you pull a harmonic bar all the way out, the
volume will be at the maximum.
Each harmonic bar is assigned to a sine wave (pure
tone) of a set pitch. By mixing these sine waves, you
can create a variety of organ sounds.
(5) If necessary, press the PERCUSSION fields (left side)
to switch the organ percussion on/off and change
its speed and timbre.
Note: While percussion is on, the 1’ pitch is not available.
(6) Play a few notes with your left hand.
33
Page 34

E-80 Music Workstation
Quick Start
The organ sound you hear now is assigned to the
LOWER 1 part. To change it, press the TONE ASSIGN
[LW1] button (or the MODE [HARMONIC¥BAR] button
below the sliders) and move the sliders.
LW 1
Of course, you can also change the PERCUSSION settings of the LW1 organ part.
(7) Press TONE ASSIGN [UP1] if you need to change the
UPPER 1 part’s registration again.
WARNING: The E-80’s assignable sliders are not
motorized. It is therefore very likely that their physical positions no longer correspond to what you see
(and hear) on the HARMONIC BARS “UPPER 1” page.
We recommend quickly moving a slider all the way
up or down before actually setting it to the desired
position.
If you only need one organ sound assigned to the
entire keyboard, press the KBD MODE [WHOLE] button (its indicator must light).
WHOLE
Press PART ON/OFF [LW1] to switch off the LOWER 1
part.
Note: You could connect a PK-5A MIDI pedal to the E-80’s
MIDI IN socket and use it to trigger the MBS (M. BASS) part.
See page 237 for the E-80’s MIDI functions.
Using effects
An organ sound without rotary speaker modulation is
only half an organ sound, right? So let’s have a look at
this and the other effects, because the E-80 provides a
lot more than just a convincing rotary effect.
(1) On the “HARMONIC BARS” page (UPPER 1,
LOWER 1 or M.BASS), press the [EFFECTS] field in
the upper left-hand corner.
These effects are shared by all three “organ sections”.
It therefore doesn’t matter on what page you press
the [EFFECTS] field.
If you like a registration…
You can save it to one of the eight memories: press the
[WRITE] field (it “lights”), then one of the numeric fields
[1]~[8].
Note: This only saves the registration of the currently selected
part. You will have to repeat this for the other sections if you
want to save their registrations too.
Press another numeric field to recall the settings
stored in that memory, in which case the sound
changes.
About the MANUAL field
The [MANUAL] field on the HARMONIC BARS page
allows you to change the organ sound so as to correspond to the current positions of the sliders. This will
change the sound. (After selecting another memory,
the physical slider positions usually no longer correspond to the sound you hear.)
Using just one organ sound and bass pedals
As stated earlier, pressing the EASY SETTING [ORGAN]
button creates a split that involves two organ sounds
(UP1 and LW1). This actually simulates a two-manual
instrument.
OVERDRIVE: This effect distorts the sound, giving it
an “edge” and making it suitable for hard rock and
similar musical genres. Press the [ON÷OFF] field to
switch this effect on or off. To change the setting,
press the display icon and rotate the [DATA÷ENTRY]
dial (or use the [DEC]/[INC] buttons).
LEAKAGE: On tone wheel organs, the sound of the
note that was pressed is slightly “contaminated” by
audio signals from tone wheels not related to that
note. Formerly, this was seen as a problem, but today
this idiosyncrasy is considered an important element
of the distinctive sound of a traditional instrument.
This parameter allows you to set the level of the
“noise”. To change the setting, press the display icon
and rotate the [DATA÷ENTRY] dial (or use the [DEC]/
[INC] buttons).
PERCUSSION: By selecting “HARD”, you strengthen
the percussion sound. That’s because the organ
sound specified with the harmonic bars becomes
softer. Conversely, you can select “SOFT”, in which
r
34
Page 35

E-80 Music Workstation
Using the Harmonic Bars
r
case the volume of the “real” organ sound is raised to
its normal level. Press the switch icon to select your
preferred setting.
ROTARY SOUND: This section contains an on/off
switch for activating or switching off the Rotary
effect. This effect simulates the typical sound modulation generated by a cabinet with rotating loudspeakers. You can also push the BENDER/MODULATION lever towards the rear of the E-80 to change
between the SLOW and FAST speeds of the Rotary
effect. (Or press the lever icon to alternate between
the SLOW and FAST rotation speeds.)
Note: The on/off function and alternation between the slow
and fast rotation speeds can be assigned to an ASSIGN SW
button (see p. 71) and/or to a footswitch (see p. 75).
VIBRATO/CHORUS: The vibrato effect cyclically modulates the pitch of organ sounds (which is not the
same as the Rotary effect). The chorus effect mixes
the normal sound of the organ with a sound to which
vibrato has been applied, adding richness and spaciousness to the sound.
Press the [ON÷OFF] field to switch this effect on or
off. To select another effect, press the display icon
and rotate the [DATA÷ENTRY] dial (or use the [DEC]/
[INC] buttons). The possibilities are:
● V-1, V-2, V-3—This applies vibrato (pitch modulation).
Increasing the value will produce a deeper effect.
● C-1, C-2, C-3—This applies chorus to add depth and
spaciousness to the sound. Increasing the value will produce a deeper effect.
(2) Press the [HARMONIC¥BAR] field to return to “HAR-
MONIC BARS” page.
(2) Press the chord field.
The display now changes to:
If your E-80 displays a different page, press the
[ARRANGER¥CHORD] field.
(3) Press the [OFF] field in the left column (it turns
blue).
(4) Switch off the [ARRANGER¥HOLD] button icon.
This means that the Arranger no longer “listens” to
the chords you play. All melodic parts of the accompaniment are muted. The drums, however, are still
available.
(5) Press the [START÷STOP] button to start Arranger
playback.
■Using a “beat box” with the organ
The only thing that may be missing now is a drum
accompaniment. Whenever you press the EASY SETTING
[ORGAN] button, the E-80’s chord recognition is automatically switched on, so that the Arranger plays entire
accompaniments (including melodic parts). If you only
need a drum accompaniment, here is how to proceed:
(1) Return to the main page by pressing the [EXIT] but-
ton.
EXIT
START
STOP
Play along using the organ sounds you selected (and
perhaps modified).
See page 27 for how to select another Music Style.
If the accompaniment is too fast (or too slow), here is
how to change the Music Style tempo:
(6) Press [ôSLOW] to decrease the tempo in steps of
one unit. Press [FAST¥®] to increase the tempo in
steps of one unit.
You can also press the [TAP] button several times in
the rhythm of the desired tempo.
(7) To quickly return to the default tempo, hold down
[√¥SLOW] and simultaneously press [FAST¥®].
(8) If necessary, use the VARIATION [1]~[4] buttons to
vary the drum accompaniment.
(9) Press [START÷STOP] again to stop your “beat box”.
35
Page 36

E-80 Music Workstation
Quick Start
Playing realistic guitar parts
(Guitar mode)
Your E-80 provides a Guitar mode that allows you to
play extremely realistic guitar parts via the keyboard.
As you will see, this mode relies on a special approach,
which is nevertheless very musical and surprisingly logical once you have come to grips with the underlying
principle.
When you activate the Guitar mode, the UP1 part acts
as main guitar, while the UP2 part is used as additional
guitar that doubles the notes of the main guitar part.
This means that, while the Guitar mode is active, UP1
and UP2 cannot be used for other melodic purposes.
Though, with a little practice, you can also use it in
realtime, the Guitar mode will prove invaluable for song
and Style recording.
(1) Press the EASY SETTING [GUITAR] button.
ORGAN GUITAR
Note: You can also select this page by pressing [MENU] button
‰ [GUITAR¥MODE]. In that case, you may need to switch the
Guitar mode on using the [Off/On] switch icon (see below).
The indicators of these two buttons light and the display changes to:
The UPPER1 field below “GUITAR MODE” shows the
name of the currently selected guitar sound. You
cannot select other guitar sounds for UPPER 1 simply
by pressing this field: press the “GUITAR MODE” field
to jump to the page shown above, then change the
settings you don’t like. (UPPER2’s guitar sound is
assigned automatically and can never be changed.)
First steps
(2) Press the [ELECTRIC] or [ACOUSTIC] switch icon to
specify whether you need an electric or an acoustic
guitar.
Your choice is reflected by the big guitar picture in
the upper right part of the display.
(3) Play a chord in the keyboard area called “CHORD”
in the display.
Play chords here
(You can release those keys right away if you like.)
Note: The keys in the “CHORD” area (unlike the ones of the
“ARPEGGIO” and “STRUMM” areas, see below) also trigger
other Keyboard parts you may have switched on. Depending
on the Keyboard parts you switch on, those keys may play the
MBS, LW2, LW1 (left half) and the UP3 part (right side, in the
Upper3 Split area). Even the Arranger’s chord recognition
remains active.
The notes you play in the “CHORD” area are not
played by the E-80’s Guitar section. They only specify
what you will hear when you…
(4) Press the first “C” key to the right of the “CHORD”
area.
Low E string
A string
D string
The [Off÷On] switch icon allows you switch the Guitar
mode on or off. If you selected this page by pressing
EASY SETTING [GUITAR], it is already set to on.
If you now return to the main page by pressing the
[EXIT] button, the display changes:
r
36
High E string
B string
G string
This sounds the note a guitarist would play on the
low E string. The key you are pressing now belongs to
the “ARPEGGIO” section.
(5) Now press the “D” to the right of the “C” you used
above.
This sounds the note a guitarist would play on the A
string.
(6) Continue with the “E”, “F”, “G” and “A” keys to
sound the remaining guitar notes for the chord
you specified.
Let us summarize all this: the six keys you have
pressed so far are assigned to the virtual guitar
strings. This allows you to play guitar arpeggios that
use the chord information you supplied in the
“CHORD” area. The exact phrasing of your arpeggios
depends on the order in which you press the keys.
Page 37

E-80 Music Workstation
Playing realistic guitar parts (Guitar mode)
r
If you start pressing these “string” keys right after
switching on the E-80 (and before specifying a
chord), the Guitar mode sounds the basic pitches of
the six strings (i.e. E-A-D-G-B-E). As soon as you play
a chord in the “CHORD” area, however, the E-80
memorizes and uses it until you play a different
chord.
(7) Play a different chord in the “CHORD” area and
again use the “string” keys (in the “ARPEGGIO”
area) to sound the constituent notes.
Additional ARPEGGIO functions
The keys indicated in the previous illustration correspond to the natural behavior of a guitar. But there are
other things you can do in the “ARPEGGIO” area (most
of these functions involve the black keys of the
“ARPEGGIO” area):
Lowest chord note
Strum down slow (6 strings)
Strum down slow (4 strings)
Root of the chord
Fifth of the chord
Lowest chord note
(1) Play a chord in the keyboard area called “CHORD”
in the display.
(2) Press one of the following keys to use the “effect”
assigned to it:
● Lowest chord note (B3 & F#4)—These keys allow you to
sound the lowest note of the chords you play in the
“CHORD” area. Here’s an example: if you play a “C” chord
using the C-E-G keys, this function sounds a C. If you
play that same chord using G-C-E, this function sounds
a G.
● Strum down slow (6 strings) (C#4)—This key causes all
six strings to sound more or less at the same time. Later
on, you will discover there is also a “fast” variety where
all strings are hit almost simultaneously. “Down”, by the
way, means that the simulated plectrum (or thumb/finger) moves from the upper part of the guitar (the low E
string) towards the floor.
● Strum down slow (4 strings) (Eb4)—This is similar to
the above, except that only four notes are played.
● Fifth of the chord (Ab4)—This key plays the fifth of the
last chord you specified (the G of a “C” chord, for example). Consider combining it with the next function for
popular guitar licks based on the alternation between
the root and the fifth. (You can also play them together,
of course.)
● Root of the chord (Bb4)—Unlike the B3 or the F#4, this
key always sounds the root note of the last chord you
specified, i.e. a C for a “C” chord, an E for an “E” chord,
etc.
Alternatively, you can select a User Program that
doesn’t use the Guitar mode (see p. 126).
Selecting guitar sounds
Now that you know how to use some of the Guitar
functions, let’s try these techniques with different
sounds. Additional playing techniques are discussed
under “Using the available STRUMM techniques” on
p. 38.
(1) Press the EASY SETTING [GUITAR] button.
Note: You can also select this page by pressing [MENU] button
‰ [GUITAR¥MODE]. In that case, you may need to switch the
Guitar mode on using the [Off/On] switch icon (see below).
The indicators of these two buttons light and the display changes to:
The [Off÷On] switch icon allows you switch the Guitar
mode on or off. If you selected this page by pressing
EASY SETTING [GUITAR], it is already set to on.
(2) Press the [ELECTRIC] or [ACOUSTIC] switch icon to
specify whether you need an electric or an acoustic
guitar.
This is an important choice to make, because it determines which guitar sounds can be selected (electric
or acoustic ones).
(3) Select the desired sound (see the upper left corner)
with the [DATA÷ENTRY] dial or the [DEC]/[INC] buttons.
The possibilities are:
ELECTRIC
01: Jazz Man
02: OpenHard 1
03: Dist FX
04: OpenHard 2
05: Overd FX
06: Strat Clean
07: CleanHalf
08: Distorsion
09: Warm Drv
10: Power
11: Dist Guitar
ACOUSTIC
01: Nylon
02: Steel 2
03: Steel 3
04: Steel 4
05: Steel 5
06: 12 Strings
07: Nyl + Steel
08: Nyl + Steel 2
Leaving the E-80’s Guitar mode
To leave the Guitar mode, press an EASY SETTING
([ARR], [ORGAN] or [PIANO]) or KBD MODE button
([SPLIT] or [WHOLE]), or the [Off÷On] switch icon on the
GUITAR MODE page (to select “Off”).
37
Page 38

E-80 Music Workstation
Quick Start
About the chord indications
The GUITAR MODE page contains a
“window” that shows you how the
chords you play on the keyboard are
transformed into guitar chords. The
small numbers refer to the lowest fret
being used. An “x” means that the string in question
doesn’t sound (guitarists sometimes use only four or
three strings for their chords). And finally: the strings
are shown from high E (top) to low E (bottom) – that’s
how guitar tablatures are usually printed. The guitar
neck has therefore been turned upside down.
Using the available STRUMM techniques
While the “ARPEGGIO” area essentially provides functions that allow you to “compose” your own guitar
parts in realtime, the “STRUMM” area contains a series
of presets for various strumming techniques. “Strumming”, as you may know, means that all guitar strings
are played more or less simultaneously using a plectrum or one’s fingers.
All functions discussed below use the chords you specify in the “CHORD” area (see above). Here are the keys
that make up the “STRUMM” section:
C5 F6
Play chords here Select strumming patterns
here
The keys to the right of the “STRUMM” area can be used
to play the UP3 part. This allows you to alternate
between a guitar part and another instrument. (The
LW1, LW2, and MBS parts can always be played via the
“CHORD” area. The only thing you need to do is to
switch them on.)
Note: As stated earlier, UP1 and UP2 are not available in Guitar
mode, because they are used as guitar parts.
Note: The E-80’s Arranger can also be used and controlled while
Guitar mode is active, so that the chords you play with your left
hand are used both by the E-80’s Arranger and its Guitar mode
functionality.
(1) Select the required guitar type (ELECTRIC or
ACOUSTIC) and the desired sound.
See “Selecting guitar sounds”.
(2) Play a chord in the keyboard area called “CHORD”
in the display.
(3) Press one of the following keys to specify how your
virtual guitar should be played.
The lowest “STRUMM” key is called “C5”, the black key
next to it “C#5”, etc.
Some of the keys mentioned below produce two
effects: one when you press (“e”) them, another
when you release (“a”) them. Entries without those
symbols are “one-way” and therefore only trigger an
effect when you press them.
● Down fast (C5)—This key causes all six strings to sound
at the same time. This is the fast version of the strumming pattern mentioned earlier. (The slow version can
also be played using the F#5 key.)
r
● e Down fast/a up fast (C#5)—Pressing this key trig-
gers a fast downward strum. “Down” means that the
simulated plectrum (or thumb/finger) moves from the
lowest to the highest string (i.e. towards the lower part
of the guitar). Releasing this key will trigger an upward
strum (in the opposite direction).
● Up fast (D5)—This key causes all six strings to sound at
the same time, this time from the highest to the lowest
string.
● e Down fast mute/a up fast (Eb5)—Here is another
downward strum that is muted almost instantly when
you press this key. Guitarists achieve this effect by putting their hand on all strings. When you release this key,
your virtual guitar plays an upward strum, which is not
muted.
● e Down fast/a up fast mute (E5)—This is the oppo-
site of the previous pattern: the upward strum is muted,
while the downward is not.
● Down fast mute (F5)—This key triggers a downward
strum that is muted almost instantly.
● Down slow (F#5)—This key yields the same effect as the
C#4 (in the “ARPEGGIO” area).
● Down fast mute + knock (G5)—Here is a more elabo-
rate technique, especially suited for acoustic guitars: a
downward strum that is muted almost instantly and
accompanied by a “knocking” sound.
● Up slow (Ab5)—This is a slow upward strum.
● Down slow mute (A5)—Here’s a slightly slower down-
ward strum that is muted.
● e Down fast 4/a up fast mute 4 (Bb5)—Here again is
a two-way technique. This one, however, only uses the
highest 4 strings.
● Power chords 3 (B5)—This pattern is intended for elec-
tric guitar sounds, usually also with some distortion.
Only the lowest 3 strings are “played”.
● Down fast 4 (C6)—Here’s another downward strum that
only uses the highest 4 strings.
● e Down fast 4/a up fast 4 (C#6)—Again a combined
strumming pattern. Here, too, only the highest 4 strings
are used.
● Up fast 4 (D6)—An upward strum based on 4 strings.
● e Down fast mute 4/a up fast 4 (Eb6)—Again 4 sim-
ulated strings that are strummed in two directions. The
downward strum is muted.
● e Down fast 4/a up fast mute 4 (E6)—This is the
opposite of the previous pattern: here, the fast upward
strum is muted.
● Down fast mute (F6)—And finally a “one-way” pattern
that produces a fast downward strum, which is muted.
Playing question and answer phrases
It is also possible to temporarily “remove” the Guitar
function from the keyboard and to play the UP3 in the
entire right half (i.e. to temporarily deactivate the
ARPEGGIO and STRUMM areas). After some practice,
this should allow you to alternate between a guitar and
another melodic instrument part.
(1) Use the PART ON/OFF buttons to switch on the
part you want to play instead of the Guitar section.
UP3 would be an obvious choice.
38
Page 39

E-80 Music Workstation
Playing realistic guitar parts (Guitar mode)
r
(2) While the Guitar mode is active, switch off the
PART ON/OFF [UP1] button.
KEYBOARD PART
TONE ASSIGN
MBS LW 2 LW 1
UP 3 UP 2 UP 1
PART ON/OFF
The EASY SETTING [GUITAR] indicator flashes to signal
that the Guitar mode is being bypassed.
(3) Play on the keyboard.
Now, the UP3 part sounds (UP1 and UP2 are not
available).
(4) Switch on the PART ON/OFF [UP1] button to restore
the E-80’s Guitar mode and play the next guitar
bit.
To leave the Guitar mode, press an EASY SETTING
([ARR], [ORGAN] or [PIANO]) or KBD MODE button
([SPLIT] or [WHOLE]), or the [Off÷On] switch icon on
the GUITAR MODE page (to select “Off”).
Alternatively, you can select a User Program that
doesn’t use the Guitar mode (see p. 126).
Guitar Mode Options
There are additional functions you can set to fine-tune
your virtual guitar’s behavior. Using the DOUBLING section, you can even add a second guitar sound.
(1) On the “GUITAR MODE” page, press the [OPTIONS]
field.
The display changes to:
(2) Press the switch icon of the parameter you want to
switch on or off. Use the [DATA÷ENTRY] dial (or
[DEC]/[INC] buttons) to set the STEREO WIDTH
parameter.
Here is what the parameters mean and do:
● RETRIGGER—This parameter allows you to specify
whether the arpeggio notes of the key(s) you are pressing in the “ARPEGGIO” or “STRUMM” area are replayed
again when you play another chord in the “CHORD” area.
This function is on by default.
● CHORD OFF MUTING—Switch this function on when
you want to mute the virtual guitar strings by releasing
all keys in the “CHORD” area. That way, your left hand
can be used for occasional “mute” instances whose
effect is similar to the one obtained with any of the
“mute” patterns in the “STRUMM” area.
● “V” NOISES—Guitar parts usually also contain gentle
squeaking and sliding noises. Use this function to add
such noises to your virtual guitar parts (or to switch
them off if you don’t like them).
● ADAPT CHORD—Switch this parameter on if your virtual
guitar should adapt its chord voicings to the inversions
you play in the “CHORD” area. As you know, each chord
can be played in a variety of ways on a keyboard and a
guitar. Though the Guitar mode always voices its chord
in a typical guitar fashion (even when this parameter is
off), you may need even more flexibility than this basic
system can provide. In that case, switch on this parameter and try out different inversions to discover how that
affects your guitar.
● AUTO SUSTAIN—When this function is on (default set-
ting), all guitar notes you trigger using the “ARPEGGIO”
keys have a longer decay. If you switch it off, the notes
are a lot shorter.
● HOLD PEDAL—This function only works if you connect
an optional DP-2, DP-6, or BOSS FS-5U footswitch to the
HOLD FOOTSWITCH socket. The pedal’s behavior depends
on whether [AUTO¥SUSTAIN] is on or off.
When [AUTO¥SUSTAIN] is on, while [HOLD¥PEDAL] is also
on, pressing the Hold pedal temporarily bypasses the
[AUTO¥SUSTAIN] setting, and thus causes the guitar
notes to have a short decay.
If [AUTO¥SUSTAIN] is off, while [HOLD¥PEDAL] is on,
pressing the Hold pedal temporarily produces a normal
Hold/damper effect.
Note: This Hold function is added to the one that allows
you to hold notes played by the active Keyboard parts (MBS,
LW2, LW1 and/or UP3), if they have been assigned to that
footswitch (see p. 76).
● DOUBLING—This section allows you to add a second
guitar to the main guitar part. That added guitar uses
the same sound as your main guitar. The purpose of this
added guitar is to create the impression that the guitar
part is played by two musicians.
● STEREO WIDTH—(0~50) This parameter allows you to
specify the distance between the two guitars in the stereo sound field. The higher the value, the further they
are panned to the left and right sides respectively.
● STRUMM UP—These button fields are mutually exclu-
sive and only apply to the two D notes of the STRUMMING section. “NOTE ON” means that the strum is played
when you press one of the two D keys. “NOTE OFF”
means that the strum sounds when you release one of
the D keys. This selection does not apply to the remaining STRUMMING keys.
(3) Press the [Back] field to return to the “GUITAR
MODE” page, or the [EXIT] button to return to the
main page.
Note: All GUITAR MODE settings can be written to a User Program and recalled at a later stage. See p. 125.
39
Page 40

E-80 Music Workstation
Quick Start
Working with the Music Assistant
The E-80’s Music Assistant is also related to the
Arranger/Style section. It is a collection of registrations
for given songs that select the most appropriate Music
Style and sounds for the Keyboard parts (along with a
whole bunch of other settings).
The E-80 ships with more than 650 pre-programmed
Music Assistant registrations and also allows you to
program new ones.
(1) Press the [MUSIC¥ASSISTANT] button.
MUSIC
ASSISTANT
The display now looks as follows:
• Press the [ARTIST] field to sort the Music Assistant
entries alphabetically by artist name. This reshuffles
the list.
The genre names (right column) disappear and are
replaced by the artists’ names, which are displayed in
alphabetical order.
• Press the field of the registration you want to use.
• Press the [START÷STOP] button to start playback of
the automatically selected Music Style.
Using the Finder
Yet another way of locating the desired registration
goes like this:
(1) On the “Music Assistant” page, press the [FINDER]
field.
(2) If the name of the registration you want to use is
already displayed, press its field.
The E-80 now recalls the settings for this registration.
(3) Press the [START÷STOP] button to start playback of
the automatically selected Style.
If the desired registration is not displayed…
• Press the [√][®] fields in the display or rotate the
[DATA÷ENTRY] dial to scroll through the list.
Pressing the [DATA÷ENTRY] dial will select the registration in the top line. (This only works if no registration has been selected yet.) If you select a registration
and then change any of its settings (like selecting
another sound, for example), pressing the
[DATA÷ENTRY] dial recalls the original Music Assistant settings.
You can also use the DATA ENTRY [ß][†] buttons to
select a registration among the ones that are currently visible in the display (the buttons don’t allow
you to change pages).
To save time…
There are other ways of locating the registration you
are after. As you see, there are three button icons:
[NAME], [ARTIST] and [GENRE].
• Press the [GENRE] field to sort the Music Assistant
entries alphabetically by musical genre. This reshuffles the list.
(2) Press [NAME] (registration name), [ARTIST] (artist
name) or [GENRE] (musical genre) to specify which
entry you want to look for.
(3) Enter only as many characters as you think are
necessary to find the registration you are after.
The character string you enter can be used in two
ways (see below).
• Use the [ø] and [˚] fields to select the position for
which you wish to enter a new character.
• Use the alphanumeric keypad to enter the desired
characters. This keypad works exactly like the keypad
of a cellphone: you may have to press an alphanumeric field several times to select the desired character or number.
Note: The Finder makes no distinction between upper- and
lower-case letters.
• The [Delete] field allows you to delete the selected
character. Press and hold it to clear all characters.
• Press [Space] to insert a blank (or the number “0”).
• If you forgot to insert a character, use [ø] or [˚] to
select the position where the missing character
should be inserted. Then press [Insert], followed by the
character you wish to insert.
• If you only want to enter numbers, activate the
[NUM¥LOCK] field.
(4) Decide how the Finder should look for the files:
• Press the [Alphabetic¥Order] field to search for all
entries that start with the characters you entered
(“BEA”, for example). Names that match the specified
criteria will be displayed at the top of the list.
r
40
Page 41

• Press the [Search≈Only] field to have the E-80 search
for names that contain the supplied information.
(This would allow you to also locate a file called
“Raggabeat” if you entered “BEA”.)
(5) Press the [FIND] field to start your search.
The display returns to the “Music Assistant” window
and displays the entries that correspond to your
search criteria.
Note: If no Music Assistant registrations were found, the following message appears and no entries are displayed (in which
case you need to press the [ARTIST] or [GENRE] field to display
all entries again):
(6) Press the field of the Music Assistant registration
you need and start playing.
Note: To return to the previous page without searching for
registrations, press the [Back] field.
Note: To once again display all file names after a search
(which causes only matching entries to be displayed), press one
of the alphabetical sort icons ([NAME], [ARTIST], [GENRE]) on
the “Music Assistant” page.
Note: See “Music Assistant Mark” on p. 134 and “Music Assistant functions” on p. 137 for how to create or edit Music Assistant data.
E-80 Music Workstation
Playing back songs (Standard MIDI Files)
r
Playing back songs (Standard MIDI
Files)
Your E-80 contains all kinds of functions for “customizing” the songs you play back via easy-to-use routines.
Let us first look at the playback functions proper.
(1) Press the FINDER [SONG] button.
SONG
You can also press the [SONG] field on the main page
to select songs.
The display changes to:
(2) If it isn’t already highlighted, press the
[INTERNAL≈MEMORY] field in the upper right corner.
The E-80 is shipped with a few example songs that
can be used here. This function is also available for
songs you record or save to the internal memory (or a
memory card).
The display shows a list of 5 songs (Standard MIDI
Files) in the internal memory. If you prefer to listen to
one of your own songs on floppy disk, insert it into
the drive and press the [FLOPPY] field.
To listen to a song on memory card, insert the card
and select [EXTERNAL¥MEMORY], then continue with
step (3).
(3) If the name of the song you want to listen to is
already displayed, press its line.
(4) To display the next 5 songs, press the [˚] field in the
lower right corner.
You can press this field as many times as necessary
(or until it is no longer displayed). You can also use
the [DATA÷ENTRY] dial or the [DEC]/[INC] buttons.
To return to a previous group of 5 songs, press [ø] (or
use the [DATA÷ENTRY] dial or the [DEC]/[INC] buttons).
41
Page 42

E-80 Music Workstation
Quick Start
Quick location of the song you need
There are several ways of quickly locating the song you
are after:
■Sorting files
Press the [SONG¥NAME], [ARTIST], [GENRE] or
[FILE¥NAME] field to sort the song files according to
artist names, kind of music (Genre) or file name
(which is usually rather incomprehensible). The right
column now contains the selected entry (only one of
them can be displayed along with the song name).
Continue with step (3) to select the song you want to
listen to.
■Using the Index function
After performing step (2), press the [INDEX] field in
the upper left corner.
The display changes to:
(5) Press one of the displayed field names to narrow
down your search to songs that belong to the
selected category (“Index”).
The display now returns to the page shown under
step (1) above. This time, however, only the songs
belonging to the selected Index are displayed.
(6) Continue with step (3) to select the song you want
to listen to.
Note: Press the [ALL] field to display all songs in the selected
memory.
• Press the [PLAY&SEARCH] field.
• As indicated in the display, play the main theme on
the keyboard. You can play in any key and the rhythm
doesn’t have to be perfect either (this function just
looks for intervals).
• If you played a wrong note, press
[DELETE≈LAST¥NOTE].
• To enter the entire line again, press [∫≈RESET] to erase
the previously entered notes, then play the phrase
again.
• After entering the melody, press the [FIND] field.
The display now returns to step (1) on page 41 and
shows the names of the songs that contain the melody you played.
• Press the field of the song you want to play back.
Note: If no songs were found, the following message appears
and no file names are displayed (in which case you need to
press the [SONG¥NAME], [ARTIST], [GENRE] or [FILE¥NAME] field
to display all songs again):
■Using Play & Search
If you only know the melody of the desired song,
press the [FINDER] field under step (1).
r
If the E-80 did find one or several matches, the
“FOUND” number will be smaller than the “GLOBAL”
number.
Starting playback
(7) To return to the main page, press [EXIT].
The “main page” is the E-80’s display page that provides a maximum of relevant information and allows
you to select (and change) items you may need during normal operation.
42
Page 43

E-80 Music Workstation
Playing back songs (Standard MIDI Files)
r
It also displays the name of the selected song, the
tempo and the current measure. You can press the
[SONG] button icon in the upper right-hand corner to
see the song’s tempo. (This value is automatically displayed when you start song playback.)
Note: If the message “Too many events” is displayed, the
selected song contains more data than can be handled and is
therefore not played back.
(8) Press the [PLAY÷STOP¥®÷ª] button.
PLAY/STOP
Playback of the selected song starts.
Note: See “Song/Arranger Start Priority” on p. 246 if playback
does not start.
(9) If necessary, use [√¥SLOW] and [FAST¥®] to change
the tempo.
You can also press the [TAP] button several times in
the rhythm of the desired tempo.
To quickly return to the default tempo, simultaneously press [√¥SLOW] and [FAST¥®].
(10) Use the MASTER [VOLUME] knob to set the E-80’s
output volume.
There are four MARK memories. For the factoryloaded songs, they correspond to:
1= verse, 2= chorus, 3= bridge, 4= ending
The advantage of these markers is that you can
return to the chorus, for example, if you notice that
the audience wants the song to last a little longer
than originally planned. Markers also allow you to
change the song structure in realtime (by starting
with the bridge, for example).
Note: If you press a MARK & JUMP button almost immediately
after starting song playback, the Recorder may suddenly stop
and the message “Song Scanning” may appear. This can be
solved by reducing the playback tempo so that the E-80 has
enough time to process all MIDI data contained in the song.
■Reset, rewind, fast-forward
You can also use the following buttons to jump to
different song locations.
TOP BWD FWD
[|√] TOP: allows you to return to the beginning of the
current song.
[º] BWD: allows you to rewind one measure at a
time. You can also press and hold this button to
rewind more rapidly.
[‰] FWD: allows you to fast-forward one measure at
a time. You can also press and hold this button to
advance more rapidly.
These buttons are available both during playback and
while playback is stopped.
VOLUME
You can also play to the music using the Keyboard
parts. If necessary, use the [BALANCE] knob to set the
desired balance.
Other practical playback functions
■MARK JUMP
The factory-loaded songs in the E-80’s internal memory contain four locations (“markers”) you can jump
to right away. For songs that do not yet contain
them, you can program these markers yourself. You
can also edit the locations of existing markers
(page 158).
• Use the MARK & JUMP [1]~[4] buttons to select the
position you want to jump to without stopping or
delaying playback (the indicator of the button you
pressed flashes). Such changes occur at the end of
the current measure (the indicator stops flashing and
lights), which makes more musical sense than jumping when you’re halfway into a measure.
■Next Song
While the current song is still running, you can
already select the next one to be played back. If you
want it to start automatically, proceed as follows:
• Press the [NEXT¥SONG] button.
NEXT
SONG
• Select the desired song using the Song Finder
(page 41).
• As soon as the current song finishes, the next one
starts automatically. There is thus no need to press
[PLAY÷STOP¥®÷ª] again. You could now already select
another song.
• Press the [NEXT≈SONG] button again to switch off
this function.
Note: Your E-80 also provides a PLAY LIST function for programming sequences of several songs (page 164).
43
Page 44

E-80 Music Workstation
Quick Start
■Player (Data Update and Quick Start)
(1) Press the [MENU] button.
MENU
The display changes to:
(2) Press the [UTILITY], then the [GLOBAL] field.
Using the Song Cover function
The COVER function provides “masks” that change the
instrumentation of the selected song (or Music Style).
Simply by selecting another preset, you can cause a
Viennese waltz to be played back by a heavy metal
band, etc. Even though the arrangement (rhythm, riffs)
does not change, the songs’ character can be modified
beyond recognition.
(1) Press the [COVER] button once or twice to select
the display page shown below.
(3) Use the button icon next to the [BWD÷FWD÷JUMP]
field to specify whether (on) or not (off) SysEx
messages contained in the song you play back are
updated while you fast-forward/rewind or use the
MARK JUMP buttons.
(4) Press the [SONG¥PLAY¥QUICK¥START] field and use
the [DATA÷ENTRY] dial to specify where and how
song playback should begin:
● FROM SECOND BAR—This function causes playback to
start from measure 2 of the selected Standard MIDI File.
This is often useful, because the first bar of most Standard MIDI Files contain SysEx and control change data
that “configure” the E-80’s sound source. Playing back
that measure on stage may lead to a rather long blank,
which you probably want to avoid.
● FROM FIRST NOTE—This is basically the same as the
above, except that playback is started on the first note of
the selected song.
● OFF—Playback starts at the very beginning of the song
file (and may thus contain a few silent bars).
● SONG/ARRANGER START PRIORITY—Allows you to
specify whether starting a song can (or cannot) interrupt
Arranger playback, and vice versa. See page 246 for
details.
(2) Select the parts whose instrumentation you want
to change:
Press the [ALL] field if all instruments should be
replaced.
Press the [DRUM] field if only the drum and percussion instruments should change.
Press the [BASS] field if you’re happy with everything
but the bass line’s sound.
(3) Press one of the six fields in the lower half of the
display to select another preset.
After selecting a preset, you can press [ORIGINAL]
(page 1) to return to the original orchestration.
(4) If none of the displayed presets appeal to you, use
the PAGE [ø][˚] fields at the right to jump to
another page with more presets.
(5) Try out various presets to see how (fast) this con-
cept works.
(6) If you like the new version better than the original
one, you can press the [SAVE] field to save the song
to the internal memory, a memory card or floppy
disk with this information (page 148).
Note: The COVER information is part of the data only the E-80
understands. You can still play back the newly saved version of
this song on another sequencer or SMF player, but the COVER
information will be ignored.
Note: You can also modify the COVER settings yourself (see
p. 141).
r
44
Page 45

E-80 Music Workstation
Playing back songs (Standard MIDI Files)
r
Minus One
“Minus One” means that (at least) one part of a song is
not played back. There are at least two applications for
this function:
• it allows you to play the muted parts yourself on the
keyboard;
• it allows you to sing without doubling by the song
(which may sound odd).
(1) Press the [MINUS≈ONE] button.
MINUS
ONE
The button’s indicator lights and the melody part
(track 4) is muted. If you want to mute other parts (or
use another preset), proceed as follows:
(2) Press and hold the [MINUS≈ONE] button.
• To save this customized “Minus” setting in the E-80’s
internal memory, press [CUSTOMIZE].
The [USER] field lights to indicate that your settings
are now being used.
(5) Press the [EXIT] button to return to the main page.
Your last preset selection (MELODY~USER) will be
used until you select another preset or until you
switch off your E-80.
(6) Press [MINUS≈ONE] again to switch off this func-
tion.
Note: You can also switch the Minus One function on/off
using an optional footswitch (page 76).
MINUS
ONE
The display changes to:
(3) Press one of the three “preset” fields to mute the
corresponding song parts:
Press [MELODY] to mute the melody (you will notice
that the [4] field also lights).
Press the [ACCOMP] field to mute everything except
the bass and drums.
Press the [DRUM&BASS] field to mute the bass and
drum parts ([2] and [10]).
Note: Even the “preset” fields can be used simultaneously. And
the part fields [1]~[16] can be added, too.
(4) To mute other parts “ad lib” (i.e. without taking
advantage of the presets):
• Press the [USER] field. This mutes only [4] (the melody).
• Switch off all parts you don’t want to hear by pressing the [1]~[3] and [5]~[16] fields. Indicator icons of
parts you need must light (the others must be dark).
By pressing one of these fields, you switch off the
active preset.
45
Page 46

E-80 Music Workstation
Quick Start
Vocal Harmonist function
The Vocal Harmonist is another highlight of your E-80.
In fact, it doesn’t just produce harmonies: it can also
transform your voice in various ways. More importantly, its sound quality surpasses by far anything you
may already have tried.
Setting up
Here’s what you need to do to take advantage of the
Vocal Harmonist function:
(1) Connect a dynamic microphone to the INPUT jack
on the E-80’s rear panel.
(5) Sing into the microphone and gradually increase
the [INPUT¥GAIN] setting.
Set it to the highest possible value, taking care to
avoid that the OVER indicator lights. It would be best
to sing at the level you will be using during your performances.
(6) If your singing is inaudible in the speakers con-
nected to the amp (or the headphones), turn the
[VOICE] knob towards the right (towards “MAX”).
Note: If a howling sound (a.k.a. “feedback”) is produced, your
microphone may be pointed at a speaker. Try orienting it differently or slightly reduce the [VOICE] setting.
(7) Use the [EFFECTS] knob to set the balance between
your original singing and the effects that are
added to your voice.
Set to “MIC”
Examples: Roland DR-10 or DR-20
(2) Set the [INPUT] switch to “MIC”.
You can also connect the (mono) output of other
instruments. In that case, you need to set the switch
to “LINE”.
Set to “LINE”
L/MONO
COMBINATION
VOLUME
PALETTE
12
1>Piano 1
EDIT UTILITY
SEQ CTRL
TRANSPOSEX-DUALDUALSPLIT
PALETTE
ON/OFF
SELECT
/
CANCELEXIT
KEYBOARD MODE ARPEGGIO
PART
TONE
PERFORM
271
38495
VARIATION
/TONE
Preset:001
DRUMENVELOPEFILTERVIBRATO TONE
UPPERLOWER
VALUE
USER
ENTER
/PRESET
EDIT
6
0
PERFORM
CONTROLKEYBOARDMIDI/TUNELEVEL/PAN
ARPEGGIO
ROM PLAY
/SYSTEM
/EFFECT
Synthesizer, sound module, etc.
(3) Set the [INPUT≈GAIN] knob on the front panel to
“MIN”.
EFFECTS
OFF MAX
Note: You can start song playback and sing to it. See “Playing
back songs (Standard MIDI Files)” on p. 41 and “Minus One” on
p. 45 for details.
Compressor, Gate and effects
Your E-80 provides a compressor effect you might
want to set up now. The compressor reduces volume
peaks and thus “levels out” differences in the microphone signal.
The gate effect, on the other hand can be used to
avoid that background noises cause the Vocal Harmonist, etc., to start working even though you are
not singing.
These two effects are located immediately behind the
MIC INPUT socket and thus applied to the microphone signal before it is processed by the Vocal Harmonist section.
(8) Press and hold the [SINGER] button to jump to the
following page:
INPUT GAIN
OVER
MIN MAX
(4) Press the [SINGER] button (it must light) and switch
off the [VOCODER], [SMALL] or [ENSEMBLE] button.
SINGER
r
46
Page 47

E-80 Music Workstation
Vocal Harmonist function
r
(9) Press the [VOCAL¥EFFECT] field.
(10) If you need the compressor, press the [COMPRESS]
field, so that it lights in blue.
(11) If you also want to use the gate, press the [GATE]
field (it must light in blue).
(12) Press the parameter field whose value you want to
edit and set the desired value with the
[DATA÷ENTRY] dial.
Note: Parameter fields can also be selected using the DATA
ENTRY [√][®][ß][†] buttons.
It is very important that you keep singing while setting the following parameters.
SUSTAIN LEV: Use this parameter to specify how fast
the compressor stops working once the microphone
level drops below the compressor’s threshold. This
should be set in such a way as to avoid unpleasant
level jumps between notes. Set it in combination with
the following parameters to obtain the best possible
result.
OUTPUT LEV: The compressor reduces the dynamics
(level differences) of your singing. This parameter
serves two purposes: it allows you to specify how
strongly your voice should be compressed and –as
you increase the value– it raises the compressor’s
output volume to make up for the resulting lower
level.
Note: The value “0” means that the compressor is not working.
THRESHOLD: This parameter allows you to set the
level the microphone signal must have in order to be
audible. Softer signals will be muted (suppressed) by
the gate.
(13) Press the [VOICE] field to jump to a page where you
can select different presets, etc. (see below).
(14) Press the [EXIT] button to return to the main page.
EXIT
Adding harmonies to your singing
Now that your microphone is up and running, let’s look
at the Harmonist effect proper.
The E-80 provides two harmony types: “Small” (1 or 2
additional voices) and “Ensemble” (3 or 4 additional
voices).
(1) Connect your microphone, press the [SINGER] but-
ton, set the desired [VOICE] level, and…
(2) …press the [SMALL] button (its indicator must
light).
SMALL
(3) Sing a few notes and listen to the harmonies pro-
duced.
(4) If the harmonies are too soft, turn the [HARMONY]
knob towards the right (towards “MAX”).
(5) To try out different harmonizations, press and hold
the [SMALL] button.
(6) Press the [MALE], [FEMALE] or [MIX] field to change
the “GENDER” (voice type) of the harmonies produced.
[MIX] adds both a male and a female voice. This also
changes the available preset options in the center of
the display. If, on the above page, you press GENDER
[FEMALE] for example, the display changes to:
(7) Press one of the preset fields ([BAHIA¥GIRLS], for
example) to select a different harmony type.
(8) Now press and hold the [ENSEMBLE] button (or
press the [ENSEMBLE] field in the display) and sing
again.
This sounds more like a choir, don’t you agree?
47
Page 48

E-80 Music Workstation
Quick Start
You already know what the [MALE], [FEMALE] and
[MIX] fields are for. The 10 preset fields in the middle
allow you to select different “voicings” and voice
characters for your choir.
(9) To sing again without automatic harmonies, press
the [SMALL] or [ENSEMBLE] button again (so that
neither of them lights).
Note: Obviously, you do not have to use a song as backing:
you can also play the accompaniment yourself or use the
Arranger. See page 28 and below.
Who specifies the harmonies?
Now that you know what the Vocal Harmonist does, let
us briefly look at how it does that. You may have
noticed the [HARMONY¥ASSIGN] field in the lower left
corner of the above display pages.
Its current (default) setting is “AUTO”. This means
that, during song or Arranger playback, the note
information contained in the song data (or played in
the chord recognition area of the keyboard) will be
used for specifying the pitches of the harmony notes
(“Auto Harmony”).
Note: If the song you are playing back contains a “Harmony
track”, the harmonies will be based on those notes. In all other
cases, the harmonies are generated in realtime.
If you stop song playback and play chords on the
keyboard, the note information thus generated is
used for the harmony pitches.
Use the [DATA÷ENTRY] dial to select another setting.
The possibilities are:
Auto The E-80 uses one of the following systems
(depending on what note information is available).
Keyboard
(All)
Keyboard
Left
Keyboard
Right
Song The note information contained in the song
Only notes played on the keyboard will be
used for specifying harmony pitches.
Only notes played to the left of the split point
(page 65) will be used for specifying harmony
pitches.
Only notes played to the right of the split
point (page 65) will be used for specifying
harmony pitches.
you are playing back is used.
Not convinced so far?
Just in case you are a little bit disappointed by the Vocal
Harmonist function, here are some tips (and a bonus):
●
Use it with song backing
The Harmonist sounds most convincing when used
during song playback. Please bear in mind that transforming your voice in realtime requires quite a few
calculations and that the human voice is one of the
most difficult “signal sources” to recreate with vary-
ing pitches. The Vocal Harmonist was fine-tuned to
blend in with Standard MIDI File playback and that’s
when it sounds most “real”. Try it out, it works!
■Check the following (Gender Voice Input)
(1) Press and hold the [SINGER] button (or press the
[VOICE] field in the display).
The display changes to:
(2) Press the [MALE] field if you’re a man or the
[FEMALE] field if you’re a woman.
This is an important clue for the Vocal Harmonist.
After selecting the correct setting, you may find that
the harmonies sound better.
And just in case, you wanted to sound like a somewhat worn-out opera singer…
(3) Press the [VIBRATO] field (indicator icon must
“light”).
Sing a few notes and note the vibrato. If the effect is
not strong enough…
(4) Press the [EDIT] field.
(5) Use the DATA ENTRY [√][®][ß][†] buttons to select
the parameter you wish to edit (or press its field)
and set the desired value with the [DATA÷ENTRY]
dial.
The [VIBRATO] button icon must be blue for the
effect to be noticeable.
Here’s what the parameters mean:
RATE: Sets the speed of the vibrato effect.
DEPTH: Allows you to set the vibrato intensity.
Vibrato is an effect that changes (“modulates”) the
pitch. The higher the DEPTH value, the more outspoken these periodic pitch changes will be.
RISE TIME: Allows you to set a swell for the vibrato
effect. This parameter specifies how long it takes
before the DEPTH value is reached – once the Delay
Time is up.
r
48
Page 49

E-80 Music Workstation
Vocal Harmonist function
r
DELAY TIME: Allows you to set a delay between the
moment you start singing and the moment the
vibrato effect kicks in.
(6) Press [EXIT] to leave this page (or [Back] to try out
other “Gender” settings).
Voice-FX
Ever wondered what your voice would sound like if you
were a woman (for men), man (for women), robot or
something else…? You’re about to find out:
(1) Press the [VOICE-FX] button.
VOICE
FX
(2) Sing into the microphone and listen to yourself.
(You may have to switch off the [SMALL] or
[ENSEMBLE] button if it lights to hear how this
function works.)
(3) Press and hold the [VOICE-FX] button. The display
now looks as follows:
Auto Pitch
Here’s another interesting effect that can either be
used as gimmick or to ensure that even the flattest of
renditions suddenly sounds in tune. Of course, the voice
will sound somewhat “artificial”, because the emphasis
is on tuning here. However, even if you just speak the
words of a song, it will be sung just the same.
(1) Press the [AUTO≈PITCH] button.
AUTO
PITCH
(2) Start song or Style playback and say something
into the microphone (don’t sing).
Sounds like a very popular effect, doesn’t it?
(3) Press and hold the [AUTO≈PITCH] button.
The display changes to:
(4) Press one of the twelve TYPE fields to try out other
possibilities.
(5) For added “strangeness” (or realism), you can press
the [VIBRATO] field (right).
(6) If you feel the general idea is OK, but would like to
fine-tune the effect, press the [EDIT] field at the
bottom edge of the display.
See page 151 for the Edit and Equalizer parameters.
Note: To keep your settings, you must write them to a User
Program.
Note: You can add the [SMALL] or [ENSEMBLE] harmonies to
this effect.
(7) Press the [EXIT] button to return to the main page.
EXIT
Let us begin with the most important parameter: the
notes that will be used by the AUTO PITCH function.
That is what you specify via the AUTO PITCH ASSIGN
fields.
(4) Set the TRACK value to select a song part.
The “4” setting usually corresponds to the melody
part of a Standard MIDI File and is thus the most
likely candidate, but feel free to select “1”~“3” or “5”~
“16” to use another part as melody.
If you want to play the melody yourself, press the
[LEFT] or [RIGHT] field (or both) and play the desired
notes, while you speak (or sing) into the microphone.
Note: Selecting LEFT and/or RIGHT will set the TRACK parameter to “Off”.
Use the OCTAVE parameter to shift the pitch of the
Auto Pitch notes up to 2 octaves up or down.
(5) Press the [VIBRATO] field to add some “wobble” to
the Auto Pitch sound.
This vibrato effect is not linked to the Voice-FX
vibrato and can thus be set separately (see below).
49
Page 50

E-80 Music Workstation
Quick Start
(6) For more refined control over the Auto Pitch voice,
press the [EDIT] field:
Though they are not linked to their namesakes on the
Voice-FX Edit page, most parameters on this page will
look familiar. Therefore, please see above for the
explanations of GENDER, VIBRATO RATE, DEPTH,
RISE TIME and DELAY TIME.
(7) Press the parameter field whose value you want to
edit and set the desired value with the
[DATA÷ENTRY] dial.
Note: Parameter fields can also be selected using the DATA
ENTRY [√][®][ß][†] buttons.
(8) Press the [PORTAMENTO] field to switch on this
effect.
“Portamento” means that the pitch doesn’t change in
clearly defined steps: it produces glides from one
note to the next.
[Portamento Time= 0] “Rough” pitch changes in semitone
steps (normal)
Using the Vocoder
A Vocoder is an effect that combines spoken words
with sounds, thus creating the impression that the
instrument that produces the sounds can talk.
(1) Press the [VOCODER] button (it must light).
VOCODER
This switches off the [SMALL] or [ENSEMBLE] button
if it was on, because the Vocoder cannot be used
simultaneously with the Harmonist function proper.
(2) Switch on the [SINGER] button.
(3) Stop song playback if it is running.
The Vocoder can also use a song part, but for this
demonstration, we’ll use the keyboard, because it will
help you understand how the Vocoder works.
Note: If you use the Vocoder along with the E-80’s Arranger,
you will probably have to play the melody yourself, because
the Arranger does not contain it (while a Standard MIDI File
does).
(4) Play a chord on the keyboard, hold those notes and
talk into the microphone.
The Vocoder only works if you (a) talk or sing and (b)
if there is a “musical sound” that can be processed.
Play various chords and listen to how that affects the
signal generated by the Vocoder.
Note: The Vocoder can produce four voices at once. Playing
more than four notes simultaneously is thus unnecessary.
Note: The Vocoder can be used alongside [SINGER], [VOICE–FX]
or [AUTO≈PITCH].
Again, there are several parameters for customizing
the Vocoder’s behavior:
(5) Press and hold the [VOCODER] button.
The display changes to:
[Portamento Time= 1~127] Pitch glides from one
Use the PORTAM TIME parameter to specify the
speed at which those glides are carried out (0~127).
The higher the value, the slower the transitions.
Note: To keep your settings, you must write them to a User
Program.
(9) Press [EXIT] to leave this page (or [Back] to modify
other “AUTO PITCH” settings).
note to the next
r
50
GENDER: These button icons (MALE, FEMALE, MIX)
allow you to change the timbre of the effect so as to
create a masculine, feminine or mixed character. The
GENDER choice determines which 8 preset settings
are available. There are thus 24 Vocoder presets (8 for
“Male”, 8 for “Female” and 8 for “Mix”).
The 8 fields in the middle (e.g. [OPERA], [MY¥VOICE],
etc.) specify the voice character. These presets are
based on the parameters you can change on the
“Edit” page.
Page 51

E-80 Music Workstation
Vocal Harmonist function
r
(6) Select the desired “TRACK” value with the
[DATA÷ENTRY] dial.
The VOCODER ASSIGN section’s current (default)
setting is “AUTO”. This means that song files indicated as “With MIDI Harmony for Your Vocal Harmony Processor” (with harmony note information on
track 5) automatically switch on the Vocoder. If you
like, you can still add additional chord information by
playing on the keyboard.
If you stop song playback and then play a chord on
the keyboard, the note information thus generated is
used.
If you are using a Standard MIDI File, set the TRACK
value to select a song part (“1”~”16”). As the melody
is usually monophonic (1 note at a time), “4” may not
be the best possible setting. Try to select a track that
plays several notes at a time.
If you want to play the melody yourself, press the
[LEFT] or [RIGHT] field (or both) and play the desired
notes, while you speak (or sing) into the microphone.
Note: See page 153 for the [EDIT] parameters.
Note: To keep your settings, you must write them to a User
Program.
(7) Press [EXIT] or [Back] to leave this page.
(3) Press and hold the [TALK] button.
The display changes to:
(4) Press the [MUSIC¥MUTE] field and set the desired
value with the [DATA÷ENTRY] dial.
The smaller the value, the softer the song’s and Keyboard parts’ volume will be. Select “0” if you do not
want the music to be any softer than it already is.
The [REVERB¥SEND] and [DELAY¥SEND] fields allow
you to add some reverb and/or delay to your voice.
While some reverb (values between “10” and “40”, for
example) could be useful, delay should probably only
be used as “effect”, because it tends to blur your
announcements.
Note: See page 121 for details about these effects.
Talk
The Talk function is meant for announcements between
songs: it switches off any other Vocal Harmonist effect
(Voice-FX, Auto Pitch, Singer, Vocoder, Small/Ensemble)
that may be on. Furthermore, it mutes the Vocal Harmonist’s effects processors (Reverb, Chorus, Delay, etc.).
You can, however, add some reverb and/or delay if you
like.
That way, your voice has its normal sound when you
wish or need to address your audience. The Talk function can even be set in such a way that the music (song)
is turned softer, but not muted altogether, while you
are talking.
(1) Press the [TALK] button and speak into the micro-
phone.
TALK
All Vocal Harmonist transformations are now muted.
This includes the [VOCODER], [SMALL] and
[ENSEMBLE] buttons.
(2) After your announcement, press the [TALK] button
again (to return to the previous “singer” settings)
and sing to the next song.
Automatic transposition (Singer Key)
‰ Only available for Standard MIDI File playback
Here’s yet another revolutionary function of your E-80:
based on information you select or input, it can change
the key of all songs you play back in realtime, thus
allowing you (or a guest singer) to sing all songs in a
comfortable range. This function is called “Singer Key”.
(1) For the sake of clarity, first select a song (see p. 41)
and press [PLAY÷STOP¥®÷ª] to start playback.
Pay attention to the song’s key.
(2) Press [PLAY÷STOP¥®÷ª] again to stop playback and
[TOP¥|√] to return to the beginning.
(3) Press the [MENU] button.
MENU
The display changes to:
Here’s what you need to do to change the level of the
background music and the amount of Reverb and/or
Delay that is added to your speaking voice.
Note: See page 121 for an in-depth discussion of the effects
settings.
51
Page 52

E-80 Music Workstation
Quick Start
(4) Press the [TUNING], then the [SINGER¥KEY] field.
This page contains three presets: [ORIGINAL] means
that the song is not transposed, while [MALE] and
[FEMALE] adapt the song’s key to the “typical” range
of a male or female voice.
(5) Press the [MALE] or [FEMALE] field (depending on
whether you’re a man or a woman).
(6) Press the [PLAY÷STOP¥®÷ª] button to start playback.
The song may now be playing in a different key. If it is
not, the melody falls within the “typical” range you
have just selected.
Note: This automatic transposition only works if track/MIDI
channel “4” of the song you play back contains the melody
part.
(7) Press [PLAY÷STOP¥®÷ª] again to stop playback and
[TOP¥|√] to return to the beginning.
That may still have been too high or too low for comfort… So here comes the best part:
(8) Press one of the USER PRESET fields and then
[EDIT].
Note: The [EDIT] field only appears after pressing one of the
USER PRESET fields. The latter are four memories where you
can store your own range settings.
(9) Press the [HIGHEST] field (if it is not already
selected).
(10) Sing the highest note you can muster effortlessly
(you can sing it several times).
If you connected a microphone, a [CAPTURE] field
appears. Press that field to confirm the note you
want the E-80 to recognize. (This field does not
appear if you enter the pitch via the keyboard.)
If you have no microphone handy, you can also play
this note on the keyboard.
The E-80 recognizes the pitch and displays the name
of the corresponding note.
(11) Press the [LOWEST] field and repeat step (10), tak-
ing care to sing your lowest possible note.
(12) Press [EXECUTE] to store these settings if you wish
to use them at a later stage.
The display briefly confirms that your settings have
been stored:
(13) Press the [Back] field to return to the previous
page.
(14) Press the [RENAME] field to assign a name to your
settings.
Entering names
(15) Use the [ø] and [˚] fields to select the position for
which you wish to enter a new character.
(16) Use the alphanumeric keypad in the right corner to
enter the desired characters.
This keypad works exactly like the keypad of a cellphone: you may have to press an alphanumeric field
several times to select the desired character or number.
• The [A/a] field allows you to switch between upper-
case and lowercase characters.
• The [Delete] field allows you to delete the character
indicated by the cursor. Press and hold it to clear all
characters.
• Press [Space] to insert a blank (or the number “0”).
• If you forgot to insert a character, use [ø] or [˚] to
select the position where the missing character
should be inserted. Then press [Insert], followed by the
character you wish to insert.
(17) If you’re happy with the name for your Singer Key
settings, press [EXECUTE].
r
52
Page 53

E-80 Music Workstation
Displaying Lyrics and chord information
r
The display briefly confirms that your name has been
stored:
(18) Press the [PLAY÷STOP¥®÷ª] button to start playback.
The song may now be playing in a different key. If it is
not, the melody falls within the range you set.
Note: For new songs you add to your repertoire, we recommend saving them once to the same memory location to speed
up the recognition process of the HIGHEST and LOWEST notes.
See page 227 for how to save songs.
Displaying Lyrics and chord
information
‰ Only available for Standard MIDI File playback
Your E-80 also allows you to view the lyrics (if available) –and even the notes– of the songs in the display.
The Lyrics function was provided to allow you to read
the words of the songs being played back in a karaoke
fashion: the words to sing are highlighted at the right
time. Note that this function is only available for Standard MIDI Files that contain Lyrics data. Ask your dealer
for details.
Apart from the Lyrics, the E-80 also displays the chords,
which may come in handy for a guitarist or bassist with
whom you are playing.
The chord information is usually not contained in a
song as such, but that’s no problem: the E-80 can “calculate” it in realtime and even display it a little ahead of
the “changes”. This also applies to the notes proper that
can be displayed in realtime.
(1) Select a song (page 41).
(2) Press the [LYRICS&SCORE] button.
LYRICS & SCORE
The display changes to:
(3) Start song playback.
The chord information appears at the bottom of the
screen.
Note: The chord information is calculated in real-time and
may not always be accurate. Also, with chords where the third
has been omitted, no information will be displayed (because it
is impossible to tell whether those are minor or major chords).
Note: You can also add Lyrics data to songs that do not yet
contain them. See page 169 for details.
(4) Press the [ZOOM¥+] button if the lyrics are difficult
to read.
Press [ZOOM¥–] to select the normal size again.
■Changing the color of the lyrics
Apart from enlarging the lyrics (see above), the E-80
also allows you to set the background color and the
color of the lyrics themselves if you don’t feel comfortable with the black-on-white system that is used
by default.
(1) Press the [OPTIONS] field on the page shown above.
(2) Proceed as follows:
• You may first want to try one of the COLOR PRESET
fields ([1]~[6]). If none of the factory settings is to
your liking (or if you want to make minor corrections)…
• …press one of the knobs (red, green or blue) in the
LYRICS column and use the [DATA÷ENTRY] dial to
increase or decrease the value.
The changes are reflected in the small display next to
the COLOR PRESET button icons.
The system used here corresponds to the RGB color
mixing system, whereby the value “255” for all three
knobs yields the color white (while “0” for all three
corresponds to black). If you have ever worked with a
graphic program, this concept may be familiar to you.
• Press one of the knobs (red, green or blue) in the
BACKGROUND column and use the [DATA÷ENTRY]
dial to increase or decrease the value.
53
Page 54

E-80 Music Workstation
Quick Start
(3) Press the [Back] field to return to the LYRICS page.
Using an external monitor
Your E-80 also provides a VIDEO OUTPUT socket you
can connect to the video input of a TV screen or monitor. That monitor (or screen) always displays the Lyrics
(if available), even if you –or the E-80– select(s) other
display pages. Scores, on the other hand, are never displayed by the external monitor.
(1) Connect the VIDEO OUTPUT socket to the video
input of the TV set or monitor.
(2) Switch on your TV set or monitor and start play-
back of a song with Lyrics.
If the lyrics and chords do not appear correctly on
the external screen, proceed as follows:
(3) Press the [LYRICS&SCORE] button.
(5) Press the [PAL] or [NTSC] field to select the desired
setting (or the one that works).
Note: If you work with a TV set, do not forget to select the
correct channel (“AV” or something to that effect, see the
manual that came with your set).
(6) Press the VIDEO OUT SOURCE [LYRICS] button icon
if you want the lyrics to be displayed on the external screen.
(7) Press the [EXIT] button to return to the main page.
EXIT
Displaying scores
‰ Only available for Standard MIDI File playback and
only in the E-80’s display.
If you don’t remember the notes of the song you are
about to play, you can ask the E-80 to display them onscreen:
(1) Select a song (page 41).
(2) Press the [LYRICS&SCORE] button.
LYRICS & SCORE
The display changes to:
(4) Press the [OPTIONS] field.
The display changes to:
LYRICS & SCORE
(3) Press the [SCORE] field if it doesn’t “light”.
The display changes to:
(4) Start song playback and watch the display.
(5) Press the [ZOOM¥+] button if the notes are difficult
to read.
Press [ZOOM¥–] to select the normal size again.
Now, maybe the way in which the notes are displayed
is not quite right. In that case…
r
54
Page 55

E-80 Music Workstation
Displaying Lyrics and chord information
r
(6) Press the [OPTIONS] button.
There are several things you can decide here:
• Do you want see the notes of one song part or of
two? If you only need one, activate [1¥STAFF]. To see
two parts, activate [2¥STAVES]. In the latter case, the
display changes to:
(7) Press [Back] to see the notes again.
If necessary, you can return to the OPTIONS page to
correct settings you don’t like after all.
• Select the track(s) whose notes should be displayed:
Press the (corresponding) [TRACK] field and use the
[DATA÷ENTRY] dial to select the track.
“STAFF 1” is the upper staff, “STAFF 2” the lower one.
• If you happen to know the key your song is in, press
the [KEY] field and use the [DATA÷ENTRY] dial to
select the correct setting.
This is only necessary to avoid that the score is cluttered up with accidentals (sharps and flats).
• Use the and fields to specify what clef should
be used for displaying the notes. Press whichever is
more convenient for you (this setting has no effect
on the octave the notes are actually played in – it is
only used for display purposes).
• Use the button icons in the PITCH row to specify how
the note names should be displayed next to the note
symbols:
[OFF] means that the note names are not displayed;
[A,B,C] refers to the Anglo-Saxon/German/Dutch sys-
tem; while [DO,RE,MI] corresponds to the French/Italian system.
• Use the button icons in the DRUM RANGE row to
specify which notes of the drum track (usually track
10) should be displayed. [FILTER] means that you will
only see the notes between note numbers 35 and 59.
[FULL], on the other hand, means that you will see all
drum notes.
This setting is only used if you set (one of) the TRACK
field(s) to “10” or number of a track that plays a drum
part. Most drum parts only trigger MIDI notes
between numbers 35 and 59.
55
Page 56

E-80 Music Workstation
Quick Start
Using the VIEWER function
The E-80 contains a VIEWER function you can use to
display text or pictures in the display and on an external screen.
The BMP function can be used to create the right mood
for the song you want to play (i.e. an exotic beach for a
samba, a motorbike for a metal song, etc.), or for
announcements, advertising, etc.
The TXT function, on the other hand is, akin to the
LYRICS function discussed above: it displays the text
you prepare on a computer, which could be the lyrics of
the songs you perform, or anything else you want to
tell your audience. That text is not synchronized, but
you can tell the E-80 to turn pages automatically at set
intervals, or assign that function to an optional footswitch or FC-7. You can use the DATA ENTRY [ß][†] buttons to turn pages. The [√][®] buttons allow you to
advance or go back line by line.
Working with picture files (BMP Import)
Here is how to “illustrate” your songs or performance
with bitmap picture files. You can use the PAGE
TURNER function for automatic changes at set intervals
(see below).
■Preparation
(1) Use a graphic program (like Paint®, Adobe Photo-
shop®, CorelDRAW®, etc.) to prepare the pictures
you want to use.
See the owner’s manual of the software you use for
details.
each file name should begin with at least one character and end with at least one number (before the
“.bmp” extension).
The characters specify the “group”, and the figures
the sequential order for the PAGE TURNER function.
To have three party pictures displayed sequentially,
for instance, name them “Party01.bmp”,
“Party02.bmp”, and “Party03.bmp”.
Be careful to avoid spelling mistakes: a file called
“Praty04” does not belong to the same group and
therefore ends the “Party” series. (The PAGE TURNER
would not proceed to “Party05.bmp, “Part06.bmp”,
etc.).
Also, be sure to use consecutive numbers. Any “gap”
will end the series.
Note: For public performances, be aware that commercial pictures, or pictures you download from the internet may be protected by a copyright. You may have to ask the photographer
or reseller for the permission to use them. Roland assumes no
responsibility whatsoever with regard to any infringements of
third-party copyrights arising through your use of this unit.
(3) Copy the file(s) to a memory card the E-80 can
read, a floppy disk or to the E-80’s internal memory (via USB, see page 234).
If you select a card or the internal memory as destination, be sure to copy the picture(s) to the “Text”
folder.
■Playback
(4) Insert the floppy disk or card into the E-80’s disk
drive or PCMCIA slot.
(5) Press the [LYRICS&SCORE] button.
Here are a few guidelines
• The size of your pictures must be 320 x 240 pixels.
Though you can use multiples of these values (e.g.
640 x 480), that usually produces files that are too
big for the E-80. Only pictures with a size up to
500KB can be used.
On the other hand, all pictures you import are scaled
to the 320 x 240 pixel format, which may lead to
funny/ugly distortions when your pictures are, say,
240 x 240 pixels. You can solve possible distortion
problems by providing a 320 x 240 background and
put the picture on top of it.
• Feel free to add text to your pictures (but be sure to
do so in your graphic software) for serious or funny
remarks, etc.
(2) Convert your picture to RGB colors and save it as
.bmp file (.jpg, .eps, etc. are not accepted).
The .bmp files may use 1 bit (but that’s black and
white) or 4~24 bits (see the manual of your graphic
software for details).
If you plan to use the PAGE TURNER function for
automated slideshows, name your files in such a way
that they can be selected in the correct sequence:
LYRICS & SCORE
(6) Press the [VIEWER] field if it doesn’t “light”.
The display changes to:
r
56
Page 57

E-80 Music Workstation
Using the VIEWER function
r
(7) Press the [OPTIONS] field.
(8) Press the “PAGE TURNER” display field and use the
[DATA÷ENTRY] dial or the [DEC]/[INC] buttons to set
the speed at which the pictures should change.
The setting range is 10~600 seconds. To switch off
the slideshow function, select “Off”. This setting can
also be changed after loading pictures.
Note: You can also switch pictures with an optional footswitch (page 78) or FC-7 (page 76).
(9) Press the VIDEO OUT SOURCE [VIEWER] button icon
if you want the picture(s) to be displayed on the
external screen.
Let us now select the (first) picture to be displayed:
(10) Press the [BMP¥IMPORT] field.
The display changes to:
The message means that the memory area reserved
for these data already contains something that will
be erased. Press [YES] to continue. This takes you back
to the “VIEWER” page where the selected picture is
displayed:
(Press [NO] to abort.)
The name of the selected BMP file appears in the
upper left corner. The “Auto” value indicates the
speed (10~600) at which pictures will be switched, or
“Off” (no automatic page turning). The PAGE TURNER
function starts at the picture you “imported” and
proceeds with all pictures that contain the same
characters (e.g. “Party”) but sequential numbers (“01,
“02, etc.). If you “import” the “Party02.bmp” file, the
PAGE TURNER first shows that picture, and then
moves on to “Party03.bmp” (“Party01.bmp” is
skipped).
The “Page xx/yy” field tells you which picture is currently selected and how many start with the same
characters.
(11) Select the memory area that contains the (first)
picture file you want to use: press
[INTERNAL¥MEMORY], [FLOPPY] or
[EXTERNAL¥MEMORY].
If you press [FLOPPY] or [EXTERNAL¥MEMORY], insert
the memory card or floppy disk with the desired file
into the slot (or drive).
(12) Select the picture file by pressing its field.
(13) Press the [EXECUTE] field.
In the following cases, the PAGE TURNER function
will not work (i.e. there will be no automatic switching):
• Files that only contain characters.
• Files that only contain numbers.
• Files that do contain characters and numbers but
whose names are “unique” (i.e. not shared by other
files with different numbers).
(14) If you set the PAGE TURNER function to “Off”:
Use the DATA ENTRY [ß][†] buttons to turn pages.
You can also turn pages with an optional footswitch (page 78) or FC-7 (page 76).
(15) Press the display to hide the the upper and lower
menu bars and select full-screen view.
The display then looks as follows:
57
Page 58

E-80 Music Workstation
Quick Start
The PAGE TURNER function and DATA ENTRY [ß][†]
buttons (or optional footswitch) remain active. Press
the display again to return to the view with the
upper and lower menu bars.
(16) Press the [EXIT] button to return to the main page.
EXIT
This switches off the VIEWER function.
Working with text files (TXT Import)
Here is how to use a text file with the lyrics of a song
you want to sing without synchronizing the text. This
function can also be used to display messages and
announcements on an external screen. You can use the
PAGE TURNER function to “turn pages” at set intervals
(see below). Here, the function only applies to the
selected text file, however: it doesn’t open subsequent
text files.
■Preparation
(1) Use a word processing program to prepare the text
file you want to use.
Line wrapping is taken care of by the E-80, so your
lines and paragraphs can be as long as you like. Be
sure to insert returns wherever you want to start a
new paragraph.
(2) Save it as a .txt file.
If you prepare your text file on a Mac® computer,
save it as “Text Only (MS-DOS)” (or “MS-DOS Text”)
from Microsoft® Word, etc. Otherwise, accents,
umlauts, etc., won’t be interpreted as they should.
You can import files with a size up to 50KB.
Note: Bold type, italics, underlining, etc., are not saved, nor
can they be read by the E-80.
(3) Copy the file(s) to a memory card the E-80 can
read, a floppy disk or the E-80’s internal memory
(via USB, see page 234).
If you select a card or the internal memory as destination, be sure to copy the file to the “Text” folder.
■Playback
(4) Insert the floppy disk or card into the E-80’s disk
drive or PCMCIA slot.
(5) Press the [LYRICS&SCORE] button.
LYRICS & SCORE
The display changes to:
(7) Press the [OPTIONS] field.
(8) Proceed as follows:
• You may first want to try one of the COLOR PRESET
fields ([1]~[6]). If none of the factory settings is to
your liking (or if you want to make minor corrections)…
• …press one of the knobs (red, green or blue) in the
TEXT column and use the [DATA÷ENTRY] dial to
increase or decrease the value.
The changes are reflected in the small display next to
the COLOR PRESET button icons.
The system used here corresponds to the RGB color
mixing system, whereby the value “255” for all three
knobs yields the color white (while “0” for all three
corresponds to black). If you have ever worked with a
graphic program, this concept may be familiar to you.
• Press one of the knobs (red, green or blue) in the
BACKGROUND column and use the [DATA÷ENTRY]
dial to increase or decrease the value.
(9) Press the “PAGE TURNER” display field and use the
[DATA÷ENTRY] dial or the [DEC]/[INC] buttons to set
the speed at which the pages should be turned.
The setting range is 10~600 seconds. To switch off
the automatic function, select “Off”. This setting can
also be changed after loading the text file.
You can use the DATA ENTRY [ß][†] buttons to turn
pages. The [√][®] buttons allow you to advance or go
back line by line. You can also turn pages with an
optional footswitch (page 78) or FC-7 (page 76).
(10) Press the VIDEO OUT SOURCE [VIEWER] button icon
if you want the text to be displayed on the external screen.
Let us now select the text file to be displayed:
(11) Press the [TXT¥IMPORT] field.
(6) Press the [VIEWER] field if it doesn’t “light”.
r
58
Page 59

E-80 Music Workstation
Using the VIEWER function
r
The display changes to:
(12) Select the memory area that contains the text file
you want to use: press [INTERNAL¥MEMORY],
[FLOPPY] or [EXTERNAL¥MEMORY].
If you press [FLOPPY] or [EXTERNAL¥MEMORY], insert
the memory card or floppy disk with the desired file
into the slot (or drive).
(13) Select the text file by pressing its field.
(14) Press the [EXECUTE] field.
The following message appears:
The display then looks as follows:
(16) Press the [EXIT] button to return to the main page.
EXIT
This switches off the VIEWER function.
It means that the memory area reserved for these
data already contains something that will be erased.
Press [YES] to continue. This takes you back to the
“VIEWER” page where the selected text is displayed:
(Press [NO] to abort.)
The name of the selected text file appears in the
upper left corner. The “Auto” value indicates the
speed (10~600) at which pages will be switched, or
“Off” (no automatic page turning). The PAGE TURNER
function starts on the first page and leafs through
the available pages (the number of pages depends on
the length of your text).
The “Page xx/yy” field tells you which page is currently selected and how many there are.
(15) Press the display to hide the the upper and lower
menu bars and select full-screen view.
59
Page 60

E-80 Music Workstation
Quick Start
Recording your music
You can record your music as “Songs” that can be
saved internally, to a memory card or a floppy disk.
Your singing using the Vocal Harmonist (page 46) is
not recorded.
There are two approaches for recording:
A
Recording everything at once
This is the easy approach: you press the [REC¥∏] button, you set the E-80 the way you want it to sound
(with or without Arranger, for example) and you start
playing.
B
Recording each track separately
This approach means that you first record a drum
part (for example), then a bass line, followed by a
piano part, etc. For this approach, you need to select
the 16-track Sequencer mode (see p. 173).
It is also possible to combine these two approaches
by first recording most of the parts using approach
(A) and then adding other (or replacing existing)
parts using approach (B).
Let us begin with the easier approach:
(5) Press the [START÷STOP] button to start recording.
START
STOP
Arranger playback and recording start.
Note: See page 81 for setting the Count-In function.
(6) Play the Arranger chords with your left hand and
the melody with your right.
Note: You can also use the E-80’s performance functions for
your melody playing. See page 66 for details.
(7) To stop recording, do one of the following:
• Press the [END/RIT] and a VARIATION [1]~[4] button.
The Arranger will play an ending phrase. When it is
finished, Arranger playback and recording stop.
• Press the [START÷STOP] button. This will stop
Arranger playback and recording.
• Press the [PLAY÷STOP¥®÷ª] button. This will stop
Arranger playback and recording.
Recording with Style backing
In this example, you will learn how to record your solo
playing and the Arranger’s accompaniment.
(1) Press the [REC¥∏] button (it flashes).
Note: Whenever you press the [REC¥∏] button and start
recording (see below), the song RAM memory is erased. Be sure
to save the current song data before recording a new song (see
p. 63).
(2) Press the EASY SETTING [ARR] button.
ARR ORGAN
(3) Select a Music Style (see p. 27) and a sound for
your right hand (see p. 29).
You can also press a ONE TOUCH button and select a
Style. In that case, there is no need to select a sound
for your right hand in step (3), because that is done
automatically. See also p. 29.
Switch on additional Keyboard parts by pressing their
PART ON/OFF buttons, if you want to double your
melody using one or several instruments. You can
even work with a second split (page 99).
Note: Rather than performing the above steps, you could
recall a User Program with the desired settings (page 126).
(4) If you want to start your song with an introduc-
tion, press the [INTRO] button and a VARIATION
button [1]~[4].
Listening to your song
You probably want to listen to your song now. If you
like it, be sure to save it (see “Saving your song” on
p. 63).
(8) Press the RECORDER [TOP¥|√] button.
TOP
This causes the Recorder to return to the beginning
of your new song.
(9) Press the [PLAY÷STOP¥®÷ª] button to start playback.
Note: See “Song/Arranger Start Priority” on p. 246 if playback
does not start.
(10) Press [PLAY÷STOP¥®÷ª] again to stop playback and
[TOP¥|√] to return to beginning of the song.
r
60
Page 61

E-80 Music Workstation
Recording your music
r
Recording without accompaniment
Let us now look at how to start recording without
automatic accompaniment. You can nevertheless start
the Arranger at a later stage (after your ad lib introduction, for example): it will play in sync with the song
tempo.
(1) Press the [REC¥∏] button (its indicator flashes).
REC
●
Note: Whenever you press the [REC¥∏] button and start
recording (see below), the song RAM memory is erased. Be sure
to save the current song data before recording a new song (see
p. 63).
(2) Press the EASY SETTING [PIANO] button.
GUITAR PIANO
(9) Press the [PLAY÷STOP¥®÷ª] button to stop record-
ing.
(10) See “Listening to your song”.
Adding more parts
Here is how to redo part of your recording (one part
you do not like) or to add additional parts to what has
already been recorded.
Let us first have a look at what has been recorded so far
– and where:
We started out with the Arranger, which means that
the following tracks may now contain data (not all
Styles use all 8 tracks the Arranger can play back simultaneously):
Arranger part Recorder track
ADR 10
ABS 2
ACC1 1
ACC2 3
ACC3 5
ACC4 7
ACC5 8
ACC6 9
To record a guitar part, activate the E-80’s Guitar
mode by pressing the EASY SETTING [GUITAR] button.
(3) Use the [√SLOW][FAST®] buttons, the [TAP] button
or (if the main page is displayed), the [DATA÷ENTRY]
dial to set the desired tempo.
(4) If you want to start Style playback at a later stage,
select a Style (see p. 27). Also select a sound for
your solo playing (see p. 29).
Note: Rather than performing the above steps, you could
recall a User Program with the desired settings (page 126).
(5) Press the [PLAY÷STOP¥®÷ª] button to start record-
ing.
PLAY/STOP
The Recorder now counts in one measure, after
which recording starts.
Note: See page 81 for setting the Count-In function.
(6) Start playing.
(7) To start Arranger playback, press the [START÷STOP]
button.
(8) If you want to stop Style playback before the end
of the song, press either the [END÷RIT] or the
[START÷STOP] button.
This will stop the Arranger, while recording goes on.
This allows you to improvise without accompaniment.
If you also recorded one or several Keyboard parts, their
data reside on the following tracks:
Keyboard part Recorder track
UP1 4
UP2 6
UP3 13
LW1 11
LW2 14
MBS 12
MELODY INT 15
VOCAL HARMONIST 16
UP1/2/3 and/or LW1/2 can also be used as additional
drum part if you assign them a Drum Set (TONE
[DRUMS] button).
For the following, we will assume that you recorded
the melody using the UP1 part (track 4) and that you
now want to add some chords using the LW1 part.
(1) Start by taking note of the track you wish to
(re)record.
See the tables above. For our example, we will use
track 11 (LW1).
(2) Press the RECORDER [16-TRK¥SEQ.] button.
16-TRK
SEQ.
61
Page 62

E-80 Music Workstation
Quick Start
You have just selected the more detailed recording
function (the “sequencer”). The display changes to:
The colored bars in the right part of the display indicate the tracks that already contain data.
(3) Press the RECORDER [REC¥∏] button.
REC
●
The display changes to:
(8) Press the RECORDER [TOP¥|√] button.
TOP
The sequencer returns to the beginning of the song
(measure “1”).
(9) Press the [PLAY÷STOP¥®÷ª] button.
The sequencer now counts in one measure, after
which recording starts.
Note: See page 81 for setting the Count-In function.
(10) Play the new part.
(11) Press the RECORDER [PLAY÷STOP¥®÷ª] button to
stop recording.
PLAY/STOP
(4) Press the [REC¥TRK] field and use the [DATA÷ENTRY]
dial or the [DEC]/[INC] buttons to select the track
you want to record to.
For our example, select “11”.
If necessary, press the [REC¥TYPE] field and use the
[DATA÷ENTRY] dial or the [DEC]/[INC] buttons to select
“LW1”. This allows you to use the LW1 part for playing an organ line (using the Harmonic Bars section)
or to record using a sound of an optional SRX-series
expansion board.
You can select sounds of an SRX-series expansion
board for any track you like. Some boards contain
loops (or grooves) whose tempo is automatically synchronized to the song tempo.
(5) Assign the desired sound to the track selected for
recording.
See “Selecting sounds for the Keyboard parts” on
p. 29. You can play on the keyboard to check whether
the sound matches the mood of the part you wish to
record.
(6) Specify what should be recorded by activating the
corresponding RECORDING SELECT button icons.
(7) For this example, switch on NOTE, CONTROL
CHANGE, PROGRAM CHANGE and PITCH BEND. See
page 177 for an explanation.
r
The display changes to:
The track that contains your new part is highlighted
(left column) for easy identification. That row also
contains a horizontal bar to signal that the track now
contains data.
(12) Listen to your song (page 60).
If you like it, save it, if you’re not happy with your
part, go back to “Adding more parts” on p. 61.
In step (3), however, press the [REC¥MODE] field and
use the [DATA÷ENTRY] dial or the [DEC]/[INC] buttons
to select “Replace”.
Note: See p. 179 if you want to change just single notes or
other aspects of your song (which is called “editing”).
62
Page 63

E-80 Music Workstation
Recording your music
r
Saving your song
A song you save to becomes a Standard MIDI File that
can be played back with the E-80, but also with any
other SMF-compatible sequencer.
There are two ways of saving new or edited songs:
• Via the [DISK¥&¥MEDIA] button and the related menu
(see p. 226).
• By pressing the [SAVE] field on the 16-track
Sequencer page.
Note: Whenever you leave the 16-track Sequencer page by
pressing the [EXIT] button, the display shows a “Song has been
changed…” message that asks you whether you want to save
your changes. Press the [YES] field and proceed.
Here, we will show you how to save your song using
the [SAVE] field.
(1) On the 16-track Sequencer page, press the [SAVE]
field.
The display now responds with:
(4) Enter the name:
• Move the cursor to the desired position using [ø] and
[˚].
• Enter the character for that position using the alphanumeric keypad. In many instances, you will have to
press a field several times to select the desired character.
• Use the [A/a] field to alternate between capitals and
small letters.
• Press the [Delete] field to delete the character indicated by the cursor. Press and hold it to clear all
characters.
• Press [Space] to insert a space.
• Press [Insert] to insert a character at the current position. All characters behind this position move one
position further to the right.
(5) Press the [FILE¥NAME] field and enter the file name.
Here, you can enter 18 characters. All characters will
be capitals.
(6) Press the [EXECUTE] field to save your song.
The display tells you that the data are being saved,
after which it returns to the “SAVE SONG” page.
(7) Press the [EXIT] button to return to the main page
or the RECORDER [16-TRK¥SEQ.] button to add even
more tracks.
(2) Specify where you want to save your song:
• Press the [INTERNAL¥MEMORY] field to select the
E-80’s internal memory as target (this is a 50MB storage area similar to a hard disk).
• Insert a floppy disk into the drive and press the
[FLOPPY] field.
• Press the [EXTERNAL¥MEMORY] field. This option is
only available if you insert a memory card into the
E-80’s PCMCIA slot.
If your floppy disk or memory card does not seem to
work, try formatting it, then try again. See “Format”
on p. 231.
Note: If you want to save the song under its current name or
the name assigned by default (“New Song”), you can skip steps
(4)~(5).
You need to give your song two names: a SONG
NAME and a FILE NAME. The FILE NAME is the name
the E-80 uses for locating the song. The SONG NAME,
on the other hand, is displayed in the Song Finder.
(3) Press the [SONG¥NAME] button icon.
63
Page 64

E-80 Music Workstation
About the Keyboard modes
4. About the Keyboard modes
The KBD MODE setting is the singlemost important parameter of your E-80 because it determines which parts (or Tones)
and sections are available. Though the EASY SETTING buttons set these parameters automatically, you should familiarize
yourself with the KBD MODE concept.
• SPLIT mode with the split point at the C4. The KBD
Arranger, Organ, Guitar and Piano modes
The E-80 has four major keyboard modes:
ARRANGER, ORGAN, GUITAR and PIANO. They can be
selected using the EASY SETTING buttons. The second
mode, ORGAN, configures the E-80 like a virtual
organ (page 33). The GUITAR mode transforms the
E-80 into a virtual guitar (see p. 36).
In many instances, pressing [ARR], [ORGAN],
[GUITAR], or [PIANO] provides a nice starting point
for further fine-tuning. Select ARR (or ORG) when
you need the automatic accompaniment function
and wish to activate its chord recognition in the left
half (see page 89 for details). Select PIANO to activate PIANO CHORD recognition.
MODE [SPLIT] button lights.
SPLIT
• Only the UP1 part is active in the right half of the
keyboard (see page 29 for an explanation of this concept).
• ZONE= LEFT (page 89).
• INTELLIGENT chord recognition (TYPE, page 88).
One button (here [ARR]) therefore allows you to prepare the main parameters for working with the automatic accompaniment (called “Arranger”).
Except for the addition of the LW1 part, the EASY
SETTING [ORGAN] button has the same effect.
Note: Pressing one of these buttons not only selects the
desired Keyboard Mode but also sets a series of other parameters. In some cases, the parts you may have been using up to
that point are suddenly muted. Another important aspect is
that the split point (see below) will be set to “C4” when you
press [ARR] or [ORGAN].
In ARRANGER mode, the keyboard is split into two
halves. The left half is used for playing chords that
the Arranger uses for transposing the Style patterns
in realtime. The right half, on the other hand, can be
used for adding a live melody to the Arranger’s automatic accompaniment. This melody can be played
using the Upper1 (UP1) part. Feel free to add other
parts for creating richer sounds. See p. 65.
Arranger control UP1
This setting is also used when you press the [ORGAN]
button. In addition, the E-80 switches on the LW1
part that can be played using your left hand:
In PIANO mode, the Upper1 part (UP1) is assigned to
the entire keyboard.
Upper 1 (UP1) using a piano sound
Later on, you will discover that this way of using the
keyboard is also called Whole and that you do not
need to work with a piano sound.
The settings affected by the EASY SETTING [PIANO]
button are:
• Whole mode with only UP1 active.
• The “Natural Piano” Tone is assigned to UP1.
• Arranger ZONE= WHOLE (page 89). Press the
[START÷STOP] button to start and stop the Arranger.
See page 27 for how to select internal Styles.
• Arranger TYPE= PIANO STYLE (page 89).
Arranger control
+ LW1
The settings affected by the EASY SETTING [ARR] button are:
r
64
UP1
Page 65

Split and Whole modes
Using the SPLIT Keyboard Mode
Split means that the keyboard is divided into two
halves. You can use the LW1, LW2 and MBS parts in the
left half and the UP1, UP2, UP3 parts in the right. (It is
also possible to use an additional split between UP1/
UP2 and UP3, see “Upper 3 Split” on p. 99.)
E-80 Music Workstation
Split and Whole modes
The display now looks more or less as follows:
r
LW1, LW2, MBS UP1, UP2, UP3
Here’s how to activate the SPLIT keyboard mode:
(1) Press the KBD MODE [SPLIT] button.
SPLIT
(2) Press the PART ON/OFF buttons of the parts (LW2,
LW1, etc.) you want to play via the keyboard and
switch off the parts you do not need.
If a part is on, its button lights.
Note: If you like, you can activate a Hold function for the
LW1/2 parts. That way, briefly pressing the notes to be played
by the LW1/2 parts is enough. The Arranger has a similar function (called ARR Hold). See also “Lower Hold” on p. 102.
Note: If none of the PART ON/OFF buttons lights, the notes
you play on the keyboard will not be audible. (It would, however, be possible to go on controlling the Arranger.)
Note: Your settings can be written to a User Program and
recalled at a later stage. See p. 125.
■Setting the split point
When the [SPLIT] button lights, the keyboard is split in
two halves. The split point is located at the C key
below the brown EFFECT slider. This key is called the
“C4”:
(2) Use the MAIN SPLIT [√][®] fields to select the new
split point.
The setting range is C#2~B6. The orange keys in the
display refer to the right half. As you can see, the
“SPLIT POINT” is the lowest note of the right half.
Note: Your settings can be written to a User Program and
recalled at a later stage. See p. 125.
Using WHOLE mode
Whole means that all keys trigger the same part(s).
There is thus no split. You can assign up to six parts
to the entire keyboard: MBS, LW1, LW2, UP3, UP2 and
UP1.
(1) Press the KBD MODE [WHOLE] button.
WHOLE
Switching parts on and off
(2) Press the PART ON/OFF buttons of the parts (MBS,
LW2, LW1, etc.) you want to play via the keyboard
and switch off the parts you do not need.
KEYBOARD PART
TONE ASSIGN
Arranger control UP1, UP2, UP3
This split point applies both to the chord recognition
area of the Arranger and the SPLIT keyboard mode.
There may be situations where the automatically
assigned range is not what you need. In that case,
you can change the split point:
(1) Press and hold the KBD MODE [SPLIT] button or the
SPLIT field in the display.
SPLIT
—OR—
MBS LW 2 LW 1
UP 3 UP 2 UP 1
PART ON/OFF
If a part is on, its button lights.
Note: If none of the PART ON/OFF buttons lights, the notes
you play on the keyboard will not be audible. (It would, however, be possible to go on controlling the Arranger.)
By the way: selecting WHOLE does not mean that the
Arranger is automatically switched off or can no
longer be used. See “Arranger Type (chord mode)” on
p. 89 for details.
Note: Your settings can be written to a User Program and
recalled at a later stage. See p. 125.
65
Page 66

E-80 Music Workstation
Using the performance functions
5. Using the performance functions
Let us now have a look at the E-80’s performance functions. Also called controllers, they allow you to add
expression to your playing, which is a very important
aspect for simulating glissando’s, bendings and other
changes that will make your melodies even more convincing.
Transposition
If you are used to playing a song in a particular key, the
Transpose function will help you go on playing in that
key while sounding in another one. That way, you can
accompany a singer or instrument without changing
your fingering.
Pitch Bend and Modulation
The BENDER/MODULATION lever to the left of the
E-80’s keyboard can be used to add two kinds of effects
to the Keyboard part notes (Upper, Lower, M.Bass). You
can even use these effects simultaneously if you like.
(1) Press the lever towards the rear of the E-80 to add
a vibrato effect (“wobble”) to the notes you are
playing.
MODULATION
Lowers the
pitch
BENDER
The Modulation axis can also be used for switching
between the slow and fast Rotary speeds for the
HARMONIC BAR sounds and [ORGAN] sounds (only
when the MFX uses a “Rotary” algorithm).
(2) Turn the lever to the left to temporarily lower the
pitch of the notes you are playing. Turn it to the
right to raise the pitch of your notes.
The Pitch Bend interval (“Range”) is preset to 2 semitones.
Note: Pitch Bend is not available for the Harmonic Bars.
(3) Release the lever if you no longer need the effect.
Raises the
pitch
(1) Press the TRANSPOSE [√≈ƒ] button to transpose the
E-80 down by up to 6 semitones.
(2) Press the TRANSPOSE [≈®] button to transpose the
E-80 up by up to 5 semitones.
Transposition never applies to a part that uses a
Drum Set (or the drum part of a song).
To transpose from the key of C to E, press [≈®] four
times. To transpose from C to G, press [√≈ƒ] five times.
To return to the original setting (no transposition),
simultaneously press [√≈ƒ] and [≈®].
As long as the interval is different from “0”, one of
these buttons lights to signal that the Transpose
function is active.
The transposition interval is indicated on the main
page:
r
66
The “–1” refers to a semitone decrease of the pitch, so
that you hear a “B” every time you play a “C”. It also
means that, rather than the “A” you press, you will
hear “G sharp” (or “A flat”). The above setting corresponds to pressing [√≈ƒ] once.
Note: Any interval you set here automatically resets (and thus
overrides) the SINGER KEY transposition (see p. 51). In fact, the
latter is first reset to ORIGINAL, after which the new transposition value is used.
Page 67

E-80 Music Workstation
r
Octave
Setting the transposition interval via the display
If you prefer to set the transposition interval via the
touch screen with a nice graphic, here is how to.
(1) Press and hold the TRANSPOSE [√≈ƒ] or [≈®] button,
or press the [TRANSPOSE] field on the main page.
You can also select this page by pressing the [MENU]
button‰ [TUNING] field‰ [TRANSPOSE] field.
(2) In the display, press the key that corresponds to
the note you would like to hear every time you
play a C.
Note: Selecting “0” means that the transposition is off. Your
setting can, however, be written to a User Program (page 125).
(3) Press the [KEYBOARD] and/or [SONG] field to switch
it on.
These fields allow you to specify which parts should
be affected by the Transpose setting:
[KEYBOARD]: The Keyboard parts are transposed.
Since the Arranger’s key depends on the notes you
play on the keyboard, the Arranger parts are also
transposed.
Note: Parts that play Drum Sets are never transposed.
[SONG]: During Recorder playback, only the song
parts are transposed.
Though it is perfectly possible to switch on both
options, at least one of them must be on. “KEYBOARD” could be useful for transposing only the Keyboard parts so that you can play to a song in “your”
key but sound in the song’s key.
Note: If you also want note messages received via MIDI to be
transposed, you must set “TRANSPOSE RX (On/Off)” on p. 242
to “ON”.
(4) Press the [EXIT] button to return to the main page.
Global Transpose
There is also a “master transpose control” that alters the
pitch of all sections of the E-80. Its value is added to
the current transposition interval (and the Singer Key
as well as User Program transposition) until you reset it
to “0” or until you switch off your E-80.
(1) Press the [MENU] button.
MENU
The display changes to:
(2) Press the [TUNING] field, followed by the
[MASTER¥TUNE] field.
(3) Use the [√≈ƒ] and [≈®] fields to transpose the E-80’s
pitch.
The setting range is –6~0~5 semitones. This setting
applies to all sections and all User Programs.
EXIT
Octave
The Octave function is another useful parameter that
allows you to change the pitch of the selected part in
octave steps (12 semitones at a time).
You could take advantage of this function for solo parts
where you need the UP1 and UP2 parts to trigger the
same Tone, while UP2 plays one octave above or below
UP1.
This probably only works when you use a Keyboard part
(MBS, LW2, LW1, UP3, UP2, UP1) in WHOLE Keyboard
Mode (page 65). Working in SPLIT mode indeed means
that you can only play the notes up to a certain point
(the split point). For the “noises”, you need to select the
67
Page 68

E-80 Music Workstation
Using the performance functions
setting “–3”. Note that this also means that you need to
play the “real” notes at the right end of the keyboard,
because the entire part/Tone is transposed down.
OCTAVE= 0
C2
OCTAVE= –1
C3
Key Touch (velocity sensitivity)
Of course, the E-80’s keyboard is also velocity sensitive.
This allows you to control the timbre and volume of the
Keyboard parts by varying the force with which you
strike the keys.
(1) Press the [MENU] button.
MENU
C2
C3
This parameter also comes in handy when you wish
to trigger Drum Set sounds that are not accessible via
the keyboard in its normal state. Remember that
there are 61 keys, while some Drum Sets provide
drum/percussion sounds for all 128 notes supported
by the MIDI standard.
Finally, you may need this parameter when you take
advantage of the UPPER 3 SPLIT function (see p. 99)
to avoid that the UP3 notes are way too high for
what you have in mind.
(1) Use the TONE ASSIGN buttons to select of the Key-
board part you wish to transpose in octave steps.
KEYBOARD PART
TONE ASSIGN
MBS LW 2 LW 1
UP 3 UP 2 UP 1
(2) If the main page is not displayed, press the [EXIT]
button several times until it appears.
(3) Use the OCTAVE [ß][†] fields to set the desired
interval (up to 4 octaves higher or lower).
(4) If necessary, repeat this with the remaining Key-
board parts.
r
The display changes to:
(2) Press the [SPLIT≈&≈TOUCH] field, followed by the
[KEY¥TOUCH] field.
(3) Press a field in the PARTS column to select the
Keyboard part whose velocity sensitivity you wish
to change.
(4) Press a field in the CURVE column to set the
desired velocity sensitivity:
[LOW]: Select this setting if you are used to playing
on an electronic organ or if you do not want velocity
changes to bring about major volume changes.
[MID]: Medium velocity sensitivity. The keyboard
responds to velocity changes, but the maximum volume can be obtained more easily than with “HIGH”.
(This is the default setting.)
[HIGH]: Select this setting for maximum expressiveness. Even small variations of the force with which
you strike a key produce audible changes. The tradeoff is, however, that you have to strike the keys
forcefully to achieve the maximum volume.
[FIXED]: Select this setting if all notes you play on the
keyboard should have the same velocity value. When
you press this icon, a display field appears next to it
68
Page 69

where you can set the velocity value to be used
instead of the continuous flux. Press that field and
use the [DATA÷ENTRY] dial or the [DEC]/[INC] buttons
to select the desired velocity value (1~127).
E-80 Music Workstation
r
Master Tune
Master Tune
This is not really a performance function, but it allows
you to tune your E-80 to acoustic instruments that
cannot be tuned.
(1) Press the [MENU] button.
MENU
Velocity switching (Min and Max)
You can also specify the smallest (MIN) and highest
(MAX) velocity values with which you can trigger the
selected part. This is probably only useful when applied
to two Keyboard parts. Do not change these values if
you have no intention of using a “complementary” part
because, otherwise, you may start wondering why the
LW1 part, for instance, only sounds at high or low
velocity values.
MIN and MAX can be used effectively for switching
between two Tones simply by striking the keys harder or
softer. Doing so allows you to alternate between two
sounds. Consider the following example:
Part Min Max Sound
UP1 1 105 Bandoneon 2
([ACCORDION], P1)
UP2 106 127 Folk Violin ([STRINGS], P2)
Both parts must be on. These settings allow you to
trigger the Bandoneon sound with velocity values
between 1 and 105 (low to relatively high velocity),
while velocity values above 106 only trigger the violin. Try it – it sounds spectacular.
There are countless other possibilities, such as using
MIN= 80/MAX= 127 for the MELODY INTELL part
(page 84), so that the automatic harmonies are only
added when you really want to hear them.
(5) Press the [EXIT] button to return to the main page.
The display changes to:
(2) Press the [TUNING] field, followed by the
[MASTER¥TUNE] field.
(3) Use the [DATA÷ENTRY] dial to set the desired tun-
ing.
The default value is “440.0”. You can return to this
value by pressing the [440.0Hz] field.
(4) Press the [EXIT] button to return to the main page.
See page 67 for the Global Transpose parameter.
EXIT
69
Page 70

E-80 Music Workstation
Using the performance functions
Aftertouch
The E-80 is equipped with an Aftertouch-sensitive keyboard. Like most instruments supporting Aftertouch, it
generates channel Aftertouch messages, which means
that one Aftertouch value will be transmitted by each
MIDI channel (or part).
Aftertouch is generated when you press a key even further down after playing a note. The effect obtained is
usually similar to the one you can achieve with the
BENDER/MODULATION lever: you can change the pitch,
modify the volume, intensify the modulation, etc.
In the E-80’s case, however, you can also control the
Arranger and even the Vocal Harmonist.
Aftertouch data are only received by the following
parts: Upper 1/2/3, Lower 1/2 and the Arranger.
(1) Press the [MENU] button.
MENU
The display changes to:
● Filter Up—The cutoff frequency of the Tone assigned to
the selected part can be raised (so that the sound
becomes brighter).
Note: Depending on the value you set for TVF Cutoff
(page 144), this parameter may have no audible effect. That
is also the case of Tones whose cutoff frequency is already
preset to the maximum value.
● Filter Down—The cutoff frequency of the Tone assigned
to the selected part can be lowered (so that the sound
becomes mellower).
Note: Depending on the value you set for TVF Cutoff
(page 144), this parameter may have no audible effect. That
is also the case of Tones whose cutoff frequency is already
preset to the minimum value.
● Modulation—Select this function if you want the After-
touch to duplicate the modulation function of the
BENDER/MODULATION lever.
● Pitch Up—By pressing a key even further down, you can
bend the notes up to two semi-tones up.
● Pitch Down—By pressing a key even further down, you
can bend the notes up to two semi-tones down.
● Volume Up—This setting allows you to increase the vol-
ume of the selected part using the Aftertouch.
● Volume Down—This setting allows you to decrease the
volume of the selected part using the Aftertouch.
Note: The Aftertouch settings apply to the Keyboard part in
question, so that selecting another sound for such a part
does not mean that the values will be reset to “0”.
■If you press ARRANG
You can also use the Aftertouch functionality for
controlling Arranger playback. If you press the
[ARRANG] field on the SPLIT & TOUCH/AFTER TOUCH
page, the display looks as follows:
(2) Press the [SPLIT&TOUCH] field, followed by the
[AFTER¥TOUCH] field.
(3) Press the field of the part whose Aftertouch
response you want to change (it “lights”).
(4) Press the field that corresponds to the function (or
parameter) that should be influenced by the Aftertouch:
Note: Aftertouch only works in one direction (i.e., it generates
either positive or negative values).
● Off—The part in question does not respond to After-
touch messages.
r
Note: Selecting “ARRANG” does not cancel the Aftertouch settings you may have made for the Keyboard parts.
Note: Even Aftertouch messages generated outside the chord
recognition area (see below) will trigger the selected switching
function.
● Off—The Arranger does not respond to Aftertouch mes-
sages.
● Fill Up—Triggers the Fill-In that takes you to the next
Variation (i.e. from MAIN “1” to “2”). You can use this
function up to three times to jump to the most complex
level (“Variation 4”). If you then use the Aftertouch
again, however, nothing happens. You cannot cycle back
to the lowest level (“Variation 1”).
● Fill Remain—This also starts a Fill-In but does not switch
to another MAIN pattern.
70
Page 71

E-80 Music Workstation
ASSIGN SW buttons
r
● Fill Down—Triggers the Fill-In that takes you to the pre-
vious Variation (i.e. from MAIN “2” to “1”). You can use
this function up to three times to jump to the simplest
level (“Variation 1”). If you then use the Aftertouch
again, however, nothing happens. You thus cannot cycle
back to the highest level (“Variation 4”).
● Variation Up—You can cause the Arranger to select the
next Style Variation (i.e. to go from MAIN “1” to “2”). You
can use this function up to three times to jump to the
most complex level (“Variation 4”).
● Variation Down—You can cause the Arranger to select
the preceding Style Variation (i.e. to go from MAIN “4” to
“3”). This time, however, no Fill-In is played before the
next Variation starts. You can use this function up to
three times to jump to the simplest level (“Variation 1”).
● Intro—The Aftertouch can be used to select the INTRO
pattern of the active Style. This selects the Intro of the
currently active Variation level (1~4).
● Ending—The Aftertouch can be used to select the END-
ING pattern of the active Style. This selects the Ending
phrase of the currently active Variation level (1~4).
(5) Press the [EXIT] button to return to the main page.
EXIT
ASSIGN SW buttons
The ASSIGN SW buttons [1] and [2] allow you to quickly
access a function you would normally have to select
via the display (which may involve several steps).
At first, ASSIGN SW [1] is used to start a Fade In, while
ASSIGN SW [2] starts a Fade Out. See page 157 for
details.
Holding [1] or [2] down for more than a second takes
you to a display page where you can assign other functions to these buttons. The ASSIGN SW functions can be
written to a User Program.
The “display” of the button you pressed and held
already “lights”.
(1) To assign a function to the other button, press its
“display”.
(2) Use the [DATA÷ENTRY] dial or the [DEC]/[INC] but-
tons to select one of the following functions:
● Off—The ASSIGN SW button in question has no function
at all.
● Rotary HB Slow/Fast—Allows you to select the slow or
fast speed of the Rotary effect. This only works if the
Harmonic Bars are being used by UP1, LW1 and/or MBS.
● Rotary HB On/Off—Allows you to switch the Rotary
effect on (first time) and off (second). This only works if
the Harmonic Bars are being used by UP1, LW1 and/or
MBS.
● Fade In—“Fade In” is a function you may want to use
occasionally. While it is being performed, the assigned
button ([1] or [2]) flashes. Fading in means that the volume of both the Arranger (Style) and Keyboard parts
gradually increases, giving the impression that you have
been playing for a long time before what you play
becomes audible. The volume is automatically set to zero
and then gradually increased to the value specified with
the MASTER [VOLUME] knob. When the Fade In is completed, the indicator of the ASSIGN SW button goes dark.
● Fade Out—“Fade Outs” are extremely popular in pop
music and the E-80 allows you to end a song just like the
original. To do so, press the assigned ASSIGN SW button
(it flashes). The volume then gradually decreases until it
reaches zero (indicator lights steadily).
● Scale Upper—Allows you to assign the selected Scale
Tune (see p. 79) setting to the three Upper parts.
● Scale Lower—Allows you to assign the selected Scale
Tune (see p. 79) setting to the Lower parts.
● Half Bar on Fill In/Main—The ASSIGN SW button allows
you to switch the Half Bar function on and off. Certain
pop songs in 4/4 contain bars that only last two beats.
The usual place for such a bar is between the first and
the second verse. Another favorite position for “halved”
bars is at the end of a chorus or the bridge. Your E-80
allows you to faithfully reproduce these “anomalies”
using this function. This does not change Style playback
right away. Only when a Fill-In starts will the Half Bar
function be activated and play half the number of beats
of the fill you selected.
● Arranger Hold—Allows you to switch the Arranger Hold
function on and off. See p. 89.
● Dynamic Arranger—Allows you to switch the Dynamic
Arranger function on and off. See page 89 for details.
● Arr Chord Off—Allows you to switch the Arranger’s
chord recognition off, in which case only the drum/percussion of the selected Style keeps playing (or can be
used). See page 88.
● Arranger RIT Tempo—Allows you to start the Arranger’s
RIT function (page 91).
● Arranger ACC Tempo—Allows you to start the
Arranger’s ACC function (page 91).
● Reset/Start—This function allows you have the Arranger
start on the first beat of the currently selected Style pattern when you press the ASSIGN SW button. Use it when
you are accompanying a singer or soloist whose timing is
a little shaky and suddenly notice that the Arranger lags
one or two beats behind the singer/soloist.
71
Page 72

E-80 Music Workstation
Using the performance functions
● Keyboard Exchange UP2/1—Allows you to switch off
the UP1 part and activate the UP2 part – and vice versa.
Note: If neither UP1 nor UP2 are on when you first press
the ASSIGN SW button, one of them is activated.
● Keyboard Exchange LW2/1—Allows you to switch off
the LW1 part and activate the LW2 – and vice versa.
Note: If neither LW1 nor LW2 are on when you first press
the ASSIGN SW button, one of them is activated.
● MBass/Keyboard Arranger—Allows you to set the
Arranger Chord parameter to “Off” (chord recognition as
well as ABS recognition off, see p. 89) and, at the same
time, select the SPLIT Keyboard mode and activate the
MBS part – and vice versa.
Note: Pressing the ASSIGN SW button you assign this function to does not mean that the Arranger stops. If you
switched on the Arr Hold function (page 89), the last recognized chord will go on sounding, so that your MBS part may
drown in the accompaniment. We therefore suggest you
assign the “Arranger Hold” function (see above) to the other
ASSIGN SW button and use it to switch off the Arranger
Hold function, so that the Arranger only plays the drum
pattern of the selected Style.
● Piano/Standard—By pressing the ASSIGN SW button,
you alternate between the Standard and Piano Style
Arranger Chord modes. When the former is selected, the
chord recognition area (page 89) is automatically set to
LEFT. When you switch to Piano Style, the chord recognition area is automatically set to WHOLE. Furthermore,
the Upper 1 part is activated (if it was off).
● Break Mute—This function can only be accessed via the
ASSIGN SW button you assign it to. When you press it,
Arranger playback is muted for the remainder of the current measure. This is great for rock’n’roll songs.
(3) Press the [EXIT] button to return to the main page.
EXIT
Using the D Beam Controller
The D Beam Controller allows you to control various
aspects of your performance or to add something to
the music, by moving your hand, head, etc., in the air.
You only need to make sure that you do so over the
two “eyes” and within a 40cm (±16”) range. Your
movements are translated into musical expression.
Let’s first try out the DJ GEAR functions.
(1) Press the D BEAM button that is assigned to the
function you wish to use (here the [DJ¥GEAR] button):
This switches on the D Beam controller, while the display changes to:
You can also select this page by pressing the [MENU]
button‰ [D¥BEAM] field‰ [DJ¥GEAR] field. But the
above method is a lot faster.
(2) Start playback of a Style (page 25) or song
(page 41).
(3) Move your hand towards and away from the D
Beam’s “eyes”.
r
72
What you hear now is the “VinylRPM” effect. Now
let’s do some scratching…
(4) Press the [SCRATCH] field.
(5) Again move your hand towards and away from the
D Beam.
Now you should hear a scratch sound.
Try out some other effects by pressing the
[SOUND¥EFX], [INSTRUMENTS] and [CONTROL] fields
and selecting one of the available options.
(6) Press the [EXIT] button to return to the main page.
Page 73

E-80 Music Workstation
Using the D Beam Controller
r
D Beam functions
The D Beam Controller has two sensors that detect
motion (such as your hand or body movements) in
front of it. These “sensed” positions are translated into
MIDI messages that can be assigned to a variety of
parameters.
(1) If you want to assign another function to the D
BEAM without actually selecting it, press and hold
the D BEAM button that is assigned to the function you wish to use.
If you also wish to switch this function on, briefly
press the corresponding button.
There are 4 groups (DJ GEAR, SOUND EFX, INSTRUM.
and CONTROLS).
(2) Press the field that corresponds to the desired
function (see below).
(3) Use the [DJ≈GEAR], [SOUND≈EFX], [INSTRUM] and
[CONTROLS] fields to select the remaining groups
and assign the desired function as well.
The assignments of all four groups (DJ GEAR, SOUND
EFX, INSTRUM, CONTROLS) will be written to a User
Program (one per group), so that you can also alternate between these groups while playing – and still
use your favorite settings.
Sound EFX
Here, you can select various “noises” to be added to
your music simply by moving your hand over the D
Beam. We will not try to describe them: just try them
out!
If necessary, use the [PAGE¥1]~[PAGE¥3] fields to go
to another page.
Instrum
In this case, the D Beam will play musical notes. The
pitch and chords of those patterns depend on the
notes you play on the keyboard. Please try out the
options on offer. It’s the quickest way to find out
how they sound and work.
DJ Gear
● Vinyl RPM—Allows you to simulate the sound you hear
when manually turning a vinyl record to locate (cue) the
position where you wish to start playback.
● Cutting—This is a very powerful filter effect that allows
you to suppress the high frequencies in a rhythmic way
(like a DJ does sometimes).
● TT Motor—Simulates the effect you hear when you sud-
denly stop a turntable: the playback speed decreases,
while the pitch drops and the sound becomes muffled.
● Scratching—The D Beam Controller can be used for add-
ing scratch noises. You know what that is, don’t you…?
● Tape Rewind—Allows you add the sound you hear when
you rewind a cassette tape without stopping playback
(the music plays backwards and at high speed).
If necessary, use the [PAGE¥1] and [PAGE¥2] fields to
switch pages.
Controls
The options on this page allow you to control one of
the E-80’s functions:
If necessary, use the [PAGE¥1]~[PAGE¥4] fields to go
to another page.
Note: If you plan to use the D Beam Controller while controlling the Arranger, it is probably a good idea to activate its Hold
function (page 89).
73
Page 74

E-80 Music Workstation
Using the performance functions
● Start/Stop—Depending on the current condition of the
Arranger (running or stopped), one move inside the D
Beam’s range stops (or starts) it. A second movement will
start (or stop) it again.
● Play/Stop—Depending on the current condition of the
Recorder (running or stopped), one move inside the D
Beam’s range stops (or starts) it. A second movement will
start (or stop) it again.
● Fade OUT—Fade Outs are extremely popular in pop
music and the E-80 allows you to end a song just like the
original. To do so, move your hand inside the D Beam’s
range. The volume then gradually decreases until it
reaches zero.
● Auto Fill—Allows you to switch the [AUTO¥FILL¥IN] but-
ton (and function) on and off.
● Fill Up—Triggers the Fill-In that takes you to the next
Variation (i.e. from MAIN “1” to “2”). You can use this
function up to three times to jump to the most complex
level (“Variation 4”). If you then use the D Beam again,
however, nothing happens. You thus cannot cycle back
to the lowest level (“Variation 1”).
● Fill Down—Triggers the Fill-In that takes you to the pre-
vious Variation (i.e. from MAIN “2” to “1”). You can use
this function up to three times to jump to the simplest
level (“Variation 1”). If you then use the D Beam again,
however, nothing happens. You thus cannot cycle back
to the highest level (“Variation 4”).
● ADrum On/Off—This setting allows you to switch the
Arranger’s ADrums part on and off using the D Beam
Controller. There are also combined on/off options (see
below).
● ABass On/Off—This setting allows you to switch the
ABass part on and off using the D Beam Controller.
● Accomp On/Off—This setting allows you to switch the
Accompaniment parts (ACC1~6) on and off using the D
Beam Controller.
● ABs+ADr On/Off—This setting allows you to use the D
Beam for switching on and off the ABass and ADrums
parts.
● ABs Acc On/Off—This setting allows you to use the D
Beam for switching on and off the ABass and ACC1~6
parts.
● ADr Acc On/Off—This setting allows you to use the D
Beam for switching on and off the ADrums and ACC1~6
parts.
● Tempo Up—Select this option to increase the current
Arranger or Recorder tempo. By moving your hand outside the D Beam’s range, you return to the previous
tempo value.
● Tempo Down—Select this option to decrease the cur-
rent Arranger or Recorder tempo. By moving your hand
outside the D Beam’s range, you return to the previous
tempo value.
Note: Options marked with a “º” only apply to the currently
active Keyboard parts.
● Pitch Upº—By moving your hand over the D Beam, you
can generate a value between “64” (no Pitch Bend) and
“127” (maximum upward bend). As soon as you move
your hand outside the D Beam’s reach (higher than
±40cm above the “eyes” or further to the left or right),
the value returns to “64” (no Pitch Bend). The maximum
bend interval is two semi-tones.
● Pitch Downº—By moving your hand over the D Beam,
you can generate a value between “64” (no Pitch Bend)
and “0” (maximum downward bend). As soon as you
move your hand outside the D Beam’s reach, the value
returns to “64” (no Pitch Bend).
● D Modulationº—Select this function if you want the D
Beam to duplicate the modulation function of the
Bender/Modulation lever.
● Cut&Reso Upº—(Only for Upper1, 2 and/or 3) By moving
your hand over the D Beam, you can vary the current TVF
Cutoff value (see also p. 144) of the Upper1/2/3 part. The
Resonance parameter will be set to “+63” (maximum),
while the Cutoff frequency can be controlled between
“0” (no change) and “+63” (maximum increase). This
allows you to create some nifty filter effects that are
particularly useful for Dance/Techno music. When you
move your hand outside the D Beam’s range, both Resonance and TVF Cutoff return to their original values
(“0”= no change).
Note: If TVF Cutoff is already set to “+63”, you cannot
increase it using the D Beam Controller. In that case, the following option is probably more useful. Also note that some
Tones already use the highest possible TVF Cutoff value by
default, in which case you cannot add more overtones (by
opening the filter even further).
● Cut&Reso Downº—(Only for Upper1, 2 and/or 3) By
moving your hand over the D Beam, you can vary the
current TVF Cutoff value (see also p. 144) of the Upper1/
2/3 part. The Resonance parameter will be set to “+63”
(maximum), while the Cutoff frequency can be controlled between “0” (no change) and “–64” (lowest possible TVF Cutoff setting). When you move your hand outside the D Beam’s range, both Resonance and TVF Cutoff
return to their original values (“0”= no change).
Note: The TVF Cutoff frequency cannot be lowered if TVF
Cutoff is already set to “–64”.
● Arpeggio Oct 1/2/3—By moving your hand over the D
Beam, you cause the D Beam part to play arpeggios (broken chords) based on the notes extracted from the current song. Depending on the setting you select here, the
notes will be arpeggiated over 1, 2 or 3 octaves.
Note: Do not forget to assign a suitable Tone to the LW2
part, which acts as “D Beam part”.
● Chord Oct 1/2/3—By holding your hand inside the D
Beam’s range, you cause the D Beam part to sound the
notes extracted from the current song. You could use
this function to add syncopated brass or guitar “hits” to
your melody. The velocity value used for playing these
notes is “100”. The number (1, 2 or 3) bears on the octave
of this “added chord”:
Ab5~G6. Move your hand outside the D Beam’s range to
stop the D Beam part from sounding the chord.
Note: Do not forget to assign a suitable Tone to the LW2
part, which acts as “D Beam part”.
● Minus One—By holding your hand inside the D Beam’s
range, you switch off the parts that can be muted with
the [MINUS¥ONE] button at that time (page 45).
● Rotary HB S/F—Allows you to select the slow or fast
speed of the Rotary effect for the Harmonic Bars.
1
= Ab3~G4, 2= Ab4~G5 and 3=
(4) Press the [EXIT] button to return to the main page.
r
74
Page 75

Using optional footswitches
FC7 PEDAL
The E-80 allows you to connect an optional FC-7 Foot
Controller to the FC7 PEDAL socket.
FC-7 PEDAL
HOLD SWITCH EXPRESSION
At first, the switches of this pedal board are assigned
Arranger control functions. You can, however, assign
other functions to these switches.
Note: The FC-7 assignments apply to the E-80 and are not written to individual User Programs. Selecting another User Program
is therefore not enough to reconfigure the FC-7. The assignments
can, however, be saved (along with all User Programs) using “Save
User Program Set” on p. 227.
(1) Press the [MENU] button.
MENU
The display changes to:
(2) Press the [FOOT¥CONTROLLER] field, followed by
the [FC-7] field.
Note: The assigned functions apply to the E-80 as a whole and
are not written to individual User Programs.
(3) Press the pedal field of the footswitch you wish to
assign another function to.
Example: to change the assignment of the second
pedal from the right, press the last-but-one pedal
field.
PEDAL
E-80 Music Workstation
Using optional footswitches
r
(4) Use the [DATA÷ENTRY] dial or the [DEC]/[INC] but-
tons to select the desired function:
● Start/Stop, Intro, Variat 1, Variat 2, Variat 3, Variat 4,
Ending—These are the default functions of the FC-7’s
footswitches (1~7). They duplicate the functions of the
STYLE CONTROL buttons.
● MBass/KBD Arranger—Allows you to set the Arranger
Chord parameter to “Off” (chord recognition as well as
ABS recognition off, see p. 89) and, at the same time,
select the SPLIT Keyboard mode and activate the MBS
part – and vice versa.
Note: Pressing the footswitch you assign this function to
does not mean that the Arranger stops. If you switched on
the Arr Hold function (page 89), the last recognized chord
will go on sounding, so that your MBS part may drown in
the accompaniment. We therefore suggest you assign the
“Arranger Hold” function to an ASSIGN SW button (or
another FC-7 footswitch) and use it to switch off the
Arranger Hold function, so that the Arranger only plays the
drum pattern of the selected Music Style.
● Piano/Standard—You can alternate between Standard
and Piano Style Arranger Chord modes. When the
former is selected, the chord recognition area (page 89)
is automatically set to “LEFT”. When you switch to Piano
Style, the chord recognition area is automatically set to
“WHOLE”. Furthermore, the KBD MODE [WHOLE] button
is switched on and the Upper 1 part is activated (if it was
off).
● Half Bar on Fill In—The assigned footswitch allows you
to switch the Half Bar function on and off. Certain pop
songs in 4/4 contain bars that only last two beats. The
usual place for such a bar is between the first and the
second verse. Another favorite position for “halved” bars
is at the end of a chorus or the bridge. This does not
change Style playback right away. Only when a Fill-In
starts will the Half Bar function be activated and play
half the number of beats of the fill you selected.
● Arr Chord Off—Allows you to switch the Arranger’s
chord recognition off, in which case only the drum/percussion of the selected Music Style keeps playing (or can
be used). See also (page 88).
● Arranger Hold—Allows you to switch the Arranger Hold
function on and off. See p. 89.
● Dynamic Arranger—Allows you to switch the Dynamic
Arranger function on and off. See page 89 for details.
● Arranger RIT Tempo, Arranger ACC Tempo—The
assigned footswitch performs the same function as the
RIT or ACC parameter (page 91).
● Arranger Default Tempo—The assigned FC-7 footswitch
allows you to reset the Arranger tempo to the preset
value (contained in the Music Style itself).
● Reset/Start Tempo—This function allows you to have
the Arranger start on the first beat of the currently
selected Music Style pattern when you press the
assigned footswitch. Use it when you are accompanying
a singer or soloist whose timing is a little shaky and suddenly notice that the Arranger lags one or two beats
behind the singer/soloist.
● Tap Tempo—Same function as the [TAP] button.
● Bass Inversion—Allows you to switch the Bass Inversion
function on and off (page 83).
● Melody Intelligent—Same function as the
[MELODY¥INTELL] button on the E-80’s front panel: it
allows you to switch Melody Intelligence on and off.
75
Page 76

E-80 Music Workstation
Using the performance functions
● Scale Upper/Scale Lower—Allows you to assign the
selected Scale Tune (see p. 79) setting to the three Upper
parts.
● Scale Lower—Allows you to assign the selected Scale
Tune (see p. 79) setting to the Lower parts.
● Keyboard Exchange UP2/1—Allows you to switch off
the UP1 part and activate the UP2 part – and vice versa.
Note: If neither UP1 nor UP2 are on when you first press
the footswitch, one of them is activated.
● Keyboard Exchange LW2/1—Allows you to switch off
the LW1 part and activate the LW2 – and vice versa.
Note: If neither LW1 nor LW2 are on when you first press
the footswitch, one of them is activated.
● Punch In/Out—The footswitch can be used to activate
and switch off punch in/out recording using the E-80’s
sequencer (page 176).
● Portamento—Switches the Portamento function
(page 101) on and off.
● Soft, Sostenuto, Hold—The assigned footswitch can be
used as a Soft, Sostenuto or Sustain (Hold pedal). Note
that “Hold” can also be controlled using a dedicated (but
optional) DP-2, DP-6, or BOSS FS-5U footswitch connected to the HOLD FOOTSWITCH socket.
● Hold Lower1—The footswitch does the same as the
LOWER 1 HOLD function (see also p. 102).
● Hold Lower2—The footswitch does the same as the
LOWER 2 HOLD function (see also p. 102).
● Hold Lower 1–2—The footswitch allows you to switch
the LOWER 1/2 HOLD functions on and off.
● Rotary HB Slow/Fast—Allows you to select the slow or
fast speed of the Rotary effect. This only works if the
Harmonic Bars are being used by UP1, LW1 and/or MBS.
● Rotary HB On/Off—Allows you to switch the Rotary
effect on (first time) and off (second). This only works if
the Harmonic Bars are being used by UP1, LW1 and/or
MBS.
● User Program Up, User Program Down—Allows you to
select the next (“Up”) or previous (“Down”) User Program.
● Play/Stop Song—Starts and stops the Recorder. Same
function as the [PLAY÷STOP¥®÷ª] button.
● Talk—The footswitch performs the same function as the
[TALK] button in the VOCAL HARMONIST section.
● Harmony On/Off—The footswitch allows you to switch
the currently selected HARMONY function ([VOCODER],
[SMALL] or [ENSEMBLE]) on and off. Select this function
if you want to switch the harmonies on for the choruses
and off for the verses (for example), while playing on the
keyboard.
● Minus One—The footswitch allows you to switch the
Minus-One function on and off. See page 45 for how to
select the option that will be used when the Minus-One
function is on.
● Break Mute—When you pess the footswitch, Arranger
playback is muted for the remainder of the current measure. This is great for rock’n’roll songs.
● Viewer Page Down, Viewer Page Up—Allows you to
select the previous (“Down”) or next (“Up”) TXT or BMP
“page” in the E-80’s internal memory. See page 56 for
details.
(5) Press the [EXIT] button to return to the main page.
r
Hold Footswitch (Sustain)
Also called “Sustain” or “Damper” pedal, the footswitch
you connect to the PEDAL HOLD socket allows you to
hold the notes you play on the keyboard in much the
same way as on an acoustic piano. Though you cannot
assign other functions to this footswitch, you can
decide when a given part should respond to these messages.
The Hold function is available for the following parts:
UP1/2/3, LW1/2 and M.Bass, on condition that you
select WHOLE keyboard mode. In SPLIT mode, the sustain pedal’s Hold function only works for the rightmost part. When UP1/2/3 are layered, the Hold effect
applies to those Upper parts. (This applies to the “Auto”
setting.)
You can also specify whether or not the Melody Intelligence function (MELODY INTELL) should respond to
Hold messages.
Note: Do not forget to connect an optional DP-2, DP-6 or BOSS
FS-5U footswitch to the HOLD FOOTSWITCH socket.
(1) Press the [MENU] button.
MENU
The display changes to:
(2) Press the [FOOT¥CONTROLLER] field, followed by
the [HOLD¥FOOTSW.] field.
(3) Use the PART fields to select the Keyboard part
whose HOLD setting you want to change.
(4) Use the [DATA÷ENTRY] dial or the [DEC]/[INC] but-
tons to select the function (“Hold Assign”).
“Auto” means that the part in question only responds
to Hold messages if it is assigned to the right half
(SPLIT) or the entire keyboard (WHOLE). “On” means
76
Page 77

E-80 Music Workstation
Using optional footswitches
r
that the part in question always responds to Hold
messages, even if it is assigned to the left half of the
keyboard. “Off”, finally, means that the part does not
respond to Hold messages.
(5) If necessary, press another PART field and change
the HOLD ASSIGN setting for the selected part.
(6) Press the [EXIT] button to return to the main page.
EXIT
Foot Switch
An optional DP-2, DP-6 or BOSS FS-5U footswitch connected to the PEDAL SWITCH socket can be used to perform various functions. If you do not change the factory setting, this footswitch allows you to start and
stop Arranger playback.
The default setting is “Start/Stop”, which allows you to
start and stop Arranger playback. Note also the Soft
and Sostenuto options as well as the possibility to
select one of several Hold functions. The footswitch can
only perform one function at a time, though.
(1) Press the [MENU] button.
MENU
The display changes to:
(2) Press the [FOOT¥CONTROLLER] field, followed by
the [FOOT¥SWITCH] field.
(3) Press the field that corresponds to the function
you wish to assign to the footswitch.
If necessary, use the [PAGE¥1]~[PAGE¥3] fields to go
to another page.
● Start/Stop—Starts and stops Arranger playback. Same
function as the [START÷STOP] button.
● Play/Stop—Starts and stops the Recorder and 16-track
sequencer. Same function as the [PLAY÷STOP¥®÷ª] button.
● Intro—Selects the Intro of the current Variation level
(1~4) during Arranger playback. Same function as
[INTRO].
● Ending—Selects the Ending of the current Variation
level (1~4) during Arranger playback.
● Variat 1~4—The footswitch can be used to switch to the
VARIATION level you select here. That Music Style pattern is used from the next downbeat onward.
● Bass Inversion—Allows you to switch the Bass Inversion
function on and off (page 83).
● Arr/M.Bass—Allows you to set the Arranger Chord
parameter to “Off” (chord recognition plus ABS recognition off, see p. 88) and, at the same time, activate the
KBD MODE [SPLIT] button and the MBS part – and vice
versa.
● Piano/Standard—You can alternate between Standard
and Piano Style Arranger Chord modes. When the
former is selected, the chord recognition area (page 89)
is automatically set to “LEFT”. When you switch to Piano
Style, the chord recognition area is automatically set to
“WHOLE”. Furthermore, the KBD MODE [WHOLE] button
is switched on and the Upper 1 part is activated (if it was
off).
● Half Bar on Fill In—The footswitch allows you to switch
the Half Bar function on and off. Certain pop songs in 4/
4 contain bars that only last two beats. The usual place
for such a bar is between the first and the second verse.
This does not change Style playback right away. Only
when a Fill-In starts will the Half Bar function be activated and play half the number of beats of the fill you
selected.
● Arranger Hold—Allows you to switch the Arranger Hold
function on and off. See p. 89.
● Dynamic Arranger—Allows you to switch the Dynamic
Arranger function on and off. See page 89 for details.
● Rotary HB S/F—Allows you to select the slow or fast
speed of the Rotary effect. This only works if the Harmonic Bars are being used by UP1, LW1 and/or MBS.
● Rotary HB On/Off—Allows you to switch the Rotary
effect on (first time) and off (second). This only works if
the Harmonic Bars are being used by UP1, LW1 and/or
MBS.
● Scale Upper—Allows you to assign the selected Scale
Tune (see p. 79) setting to the three Upper parts.
● Scale Lower—Allows you to assign the selected Scale
Tune (see p. 79) setting to the Lower parts.
● Arr Chord Off—Allows you to switch the Arranger’s
chord recognition off, in which case only the drum/percussion of the selected Music Style keeps playing (or can
be used). See also (page 88).
● User Prg Up, User Prg Down—Allows you to select the
next (“Up”) or previous (“Down”) User Program.
● Punch In/Out—The footswitch can be used to activate
and switch off punch in/out recording using the E-80’s
sequencer (page 176).
77
Page 78

E-80 Music Workstation
Using the performance functions
● Portamento—Switches the Portamento function
(page 101) on and off.
● Soft, Sostenuto, Hold—The footswitch can be used as a
Soft, Sostenuto or Sustain (Hold pedal). Note that “Hold”
can also be controlled using a dedicated (but optional)
DP-2, DP-6, or BOSS FS-5U footswitch connected to the
HOLD FOOTSWITCH socket.
● Hold Lower1—The footswitch does the same as the
LOWER 1 HOLD function (see also p. 102).
● Hold Lower2—The footswitch does the same as the
LOWER 2 HOLD function (see also p. 102).
● Hold Lower 1–2—The footswitch allows you to switch
the LOWER 1/2 HOLD functions on and off.
● Talk—The footswitch performs the same function as the
[TALK] button in the VOCAL HARMONIST section.
● Harmony On/Off—The footswitch allows you to switch
the currently selected HARMONY function ([VOCODER],
[SMALL] or [ENSEMBLE]) on and off. Select this function
if you want to switch the harmonies on for the choruses
and off for the verses (for example), while playing on the
keyboard.
● Minus One—The footswitch allows you to switch the
Minus-One function on and off. See page 45 for how to
select the option that will be used when the Minus-One
function is on.
● Keyboard Exchange UP2/1—Allows you to switch off
the UP1 part and activate the UP2 part – and vice versa.
Note: If neither UP1 nor UP2 are on when you first press
the footswitch, one of them is activated.
● Keyboard Exchange LW2/1—Allows you to switch off
the LW1 part and activate the LW2 part – and vice versa.
Note: If neither LW1 nor LW2 are on when you first press
the footswitch, one of them is activated.
● Break Mute—When you press the footswitch, Arranger
playback is muted for the remainder of the current measure. This is great for rock’n’roll songs.
● Reset/Start—This function allows you have the Arranger
start on the first beat of the currently selected Music
Style pattern when you press the footswitch. Use it
when you are accompanying a singer or soloist whose
timing is a little shaky and suddenly notice that the
Arranger lags one or two beats behind the singer/soloist.
● Viewer Page Down—Allows you to select the previous
TXT or BMP “page” in the E-80’s internal memory. See
page 56 for details.
● Viewer Page Up—Allows you to select the next TXT or
BMP “page” in the E-80’s internal memory. See page 56
for details.
(4) Press the [EXIT] button to return to the main page.
EXIT
Expression (Foot Pedal)
An optional EV-5, EV-7 or BOSS FV-300L expression
pedal connected to the FOOT PEDAL socket allows you
to control the volume of all parts by foot. You can
reverse the expression pedal’s effect and specify that
certain parts are not to be controlled by the expression
pedal.
(1) Press the [MENU] button.
MENU
The display changes to:
(2) Press the [FOOT¥CONTROLLER] field, followed by
the [FOOT¥PEDAL] field.
(3) Use the ARR PART and KBD PART fields to select
the Arranger or Keyboard part whose setting you
want to change.
(4) Press the [FOOT¥PEDAL¥ASSIGN] field and use the
[DATA÷ENTRY] dial or the [DEC]/[INC] buttons to
select “Expression”.
Select “Off” if the part in question should not
respond to movements of the expression pedal.
(5) Press the [UP] or [DOWN] field and use the
[DATA÷ENTRY] dial or the [DEC]/[INC] buttons to set
the value.
r
78
Page 79

You can also press the [DATA÷ENTRY] dial to call up
the on-screen NUMERIC PAD.
E-80 Music Workstation
r
Scale Tuning
Scale Tuning
Another useful function is called Scale Tuning. It allows
you to use oriental, Asian and other scales in much the
same way as on an oriental keyboard.
The E-80 contains three memories where you can store
your favorite tunings. These are three global memories
that apply to all User Programs.
(1) Press the [MENU] button.
Enter the value you want to use, then press the
[ENTER] field. If necessary, you can use the [Delete]
field to correct erroneous entries before pressing
[ENTER].
[UP] and [DOWN] refer to the volume that is used
when the expression pedal is depressed ([UP], highest
volume) or in the upright position ([DOWN], lowest
volume).
● UP/DOWN (0~127)—You do not need to specify “0” for
the DOWN position. Selecting any other value will
reduce the volume of the selected parts up to the
“DOWN” value. Likewise, you do not need to specify
“127” as maximum value (for “UP”).
Note: If you select “Expression”, the DOWN and UP values
represent MIDI Expression (CC11) values.
It is perfectly possible to set the DOWN value to “127”
and the UP value to “0”, so that the selected part only
sounds when the Expression pedal is in the upright
position. This can be used for some clever effects:
instead of alternating between UP1 and UP2 by varying your velocity (page 69), which requires a considerable amount of “striking precision”, you could
invert UP2’s response to the expression pedal, so that
UP1 does not sound when UP2 does and vice versa.
(6) Press the [EXIT] button to return to the main page.
MENU
The display changes to:
Note: Scale Tuning is not available for the Harmonic Bar
sounds.
(2) Press the [TUNING] field, followed by the
[SCALE¥TUNE] field.
EXIT
(3) Press a [MEMORY≈1]~[MEMORY≈3] field to select a
Scale Tune memory.
This will change the pitch of the following notes
(“–50” means that the note in question is tuned a
quarter tone down):
Memory 1 Memory 2 Memory 3
E (–50)
B (–50)
E (–50)
A (–50)
C# (–50)
F# (–50)
The pitch of the other notes is left unchanged. The
button icons corresponding to the notes whose pitch
is changed “light” for easy identification.
79
Page 80

E-80 Music Workstation
Using the performance functions
You will notice that every note can be selected only
once. That is because the value you specify applies to
all notes of the same name. If you change the tuning
of the “C”, that value is added to or subtracted from,
all Cs (C1, C2, C3, etc.).
If you now returned to the main page, you would
notice that the E-80 alerts you to the fact that the
Scale Tuning function has been switched on (“Off”,
“On”, “MEMORY 1~3”):
But let us not return to the main page just yet.
■Changing the pitch of other notes
Changing the pitch of other notes than the ones
already highlighted is a matter of pressing the
desired on-screen buttons in question. And defeating
the pitch change of a note whose button icon “lights”
is as easy as pressing that field again (the button icon
then goes dark).
Press all lit on-screen button icons to switch the
Scale Tuning function off again.
(6) Repeat steps (4) and (5) for the other notes whose
pitch you want to change.
Note: This pitch is only used when the corresponding button
icon lights. Do not forget to switch it on.
(7) Press the [UP¥PARTS] and/or [LW¥PARTS] field to
specify which Keyboard parts are affected by the
Scale Tune settings:
Upper 1/2/3 and/or Lower 1/2. It is perfectly possible
to switch on both fields. If neither of them lights, all
of the E-80’s parts will adopt the Scale Tune setting.
(8) Press the [STYLE¥PARTS] field if the parts played by
the Arranger should be affected by your Scale Tune
settings.
■Storing your new scale
If you think you’ll need that scale in the future, you
should memorize –or “WRITE”– it:
(9) Program the scale you wish to save by switching
the desired notes on or off (see above).
(10) Press the [WRITE] field in the upper left corner of
the display.
The display now looks as follows:
■Customizing the pitch changes
At first, pressing an on-screen button means that its
pitch is lowered by 50 cents (1/4 tone or “–50”). There
may be situations where you want to raise the pitch
of a note or select a different tuning:
(4) Press the value field of the note/key whose pitch
you want to change.
That field now “lights”. As stated earlier, the pitch of
all notes is at first set to “–50” (one quarter tone
down). You can, however, select any value between
“–64” (slightly lower than a quarter tone down) and
“63” (slightly higher than a quarter tone up).
(5) Use the [DATA÷ENTRY] dial or the [DEC]/[INC] but-
tons to set the desired pitch.
You can also press the [DATA÷ENTRY] dial and enter
the value using the on-screen numeric pad.
If you selected a [MEMORY] field, the “EDIT” message
is displayed to indicate that the stored settings have
changed.
r
(11) Press a [MEMORY≈1]~[MEMORY≈3] field to save
your settings in the corresponding Scale Tune
memory.
(12) Press the [EXIT] button to return to the main page.
80
Page 81

Metronome
The E-80 is equipped with a metronome that can be
used in various situations. To use the metronome, here
is what you need to do:
(1) Press the [METRONOME] button (so that it lights).
METRO
NOME
(2) Start Arranger or song playback and you will hear
the metronome.
(3) Press the [METRONOME] button again to switch off
the metronome.
Metronome settings
The E-80 also allows you to specify when and how the
metronome should sound:
(1) Press and hold the [METRONOME] button.
The display now looks as follows:
E-80 Music Workstation
Note: The Count-In function can be used independently of the
metronome. There is thus no need to activate the metronome
in order to hear the count-in.
r
Metronome
■MODE
Yet another option on the above display page is to
specify when the metronome should sound:
[ALWAYS]: The metronome even counts when playback is stopped. Press this field if you want to hear
the metronome at all times (which is probably only
useful when practising a new song).
[PLAY]: Press this field if the metronome should only
sound while the Arranger or Recorder is playing.
[REC]: Press this field if the metronome should only
sound during song or Style recording (see pages 173
and 201).
■METRONOME INTERNAL
The metronome signal is transmitted to the OUTPUT
MAIN, PHONES sockets, and the internal speakers.
The metronome signal is always sent to the E-80’s
METRONOME OUT socket (rear panel). You can connect headphones to this socket and set the metronome’s volume using the LEVEL knob. This option
may be useful as “click track” for a drummer.
(3) Press the [EXIT] button to return to the main page.
Note: When neither the Arranger nor the Recorder/16-track
sequencer is running, the [METRONOME] button flashes to
indicate the current tempo.
(2) Set the available parameters to your liking:
■VOLUME LEVEL
Press the [LOW], [MEDIUM] or [HIGH] field to specify
the metronome’s basic level. The default setting is
[MEDIUM]. You probably only need to change this
setting after switching [METRONOME¥INTERNAL] off.
See below.
■COUNT IN
This parameter allows you to switch the Count-In
function on (to “1 BAR” or “2 BAR”) or off. When on,
the metronome will count in the specified number of
measures (bars) before the Arranger starts playing.
Note: This count-in is also available when you are using the
Sync Start function. In that case, playing a chord means that
the Arranger only starts after 1 or 2 measures.
[OFF]: The count-in function is off.
[1¥BAR], [2¥BAR]: Whenever you start Arranger play-
back, the metronome counts in 1 or 2 bars before the
selected Style pattern starts playing.
EXIT
81
Page 82

E-80 Music Workstation
Additional Arranger/Style functions
6. Additional Arranger/Style functions
Before telling you even more about the Music Styles, allow us to explain the difference between Music Styles and the
Arranger. The Arranger is a kind of sequencer that plays back the accompaniments you select. Those accompaniments
are always related to a given musical genre (or “style”) and are therefore called “Styles”. The E-80’s accompaniments are
a lot more than just one pattern that goes on playing until you stop it: they comprise several patterns (or divisions).
Arranger parts
Each accompaniment (or Music Style) consists of up to
eight parts:
ADR: Accompaniment drums. This part takes care of the
rhythm section. It triggers the drum and percussion
sounds of the Drum Set assigned to the ADR part.
ABS: Accompaniment bass. This part plays the bass line
of the Music Style you select.
ACC1~ACC6: These are the melodic accompaniment
parts. Depending on the Music Style you selected, only
some of them actually play something, which can be
anything from a piano line, a guitar line, an organ line,
etc., to synthesizer chords. Not all ACC parts play
chords, though.
The ABS and ACC1~6 parts rely on the chord or note
information you play in the chord recognition area
(page 88), i.e. the keyboard zone you assign to the
Arranger.
Playback functions (Style Control)
Starting a Music Style
Music Styles can be started in several ways:
(1) Press the EASY SETTING [ARR] button (its indicator
lights).
• Press the [START÷STOP] button (it flashes) to start the
Arranger right away.
This starts Style playback with a musical introduction.
The length of the Intro depends on the Style you
select. At the end of the Intro, the Arranger switches
to the [MAIN] pattern you selected with one of the
VARIATION buttons.
STYLE CONTROL
INTRO MAIN END/RIT START
VARIATION
12 3 4
Note: The Intro is “renewable”, i.e. you can press the [INTRO]
button again while the Intro is playing. Doing so on the fourth
beat of the first Intro bar, for instance, will retrigger the beginning of the Intro in the second bar.
BASS
INVERSION
AUTO
FILL IN
SYNC
START
STOP
STOP
—or—
• Press the SYNC [START] button and play a chord (or
just one note in INTELLIGENT mode, see p. 89). In this
case, the Arranger starts as soon as you play a note or
chord in the chord recognition area (see p. 88).
Note: Do not play chord changes while the Intro is running.
Unlike the MAIN patterns, INTRO patterns usually contain
chord changes. Chord recognition is not deactivated during
Intro playback, so that the beginning of a song may jump from
one key to another in a rather unnatural way. Chord recognition during Intro (and Ending) playback can be switched off,
however (see “Intro & Ending Alteration” on page 89).
Note: You can also start and stop the Arranger with the D
Beam controller (page 74).
Note: See “Song/Arranger Start Priority” on p. 246 if Arranger
playback does not start.
If you start the Arranger without playing a chord in
the chord recognition area beforehand, you will only
hear the drums of the selected Style. In most cases,
however, the E-80 has already memorized a chord, so
that you will hear the full accompaniment.
—or—
• Stop playback of the current Style (see below), press
the [INTRO] button (so that it lights), one of the
VARIATION [1]~[4] buttons to select the “complexity”
of the introduction and then the [START÷STOP] button.
r
82
START
STOP
Stopping Style playback
There are three ways to stop Style playback:
• Press [START÷STOP] to stop playback right away.
—or—
• Press the [END/RIT] button (so that it lights) and one
of the VARIATION [1]~[4] buttons to activate the Ending function. The Ending (or coda) pattern will start
at the beginning of the next measure (next downbeat).
Note: Do not play chord changes while the Ending is running.
Unlike the MAIN accompaniments, ENDING patterns usually
contain chord changes. Chord recognition is not deactivated
during Ending playback, so that the ending of a song may
jump from one key to another in a rather unnatural way.
Chord recognition during Ending (and Intro) playback can be
switched off, however (see p. 89).
—or—
• Press SYNC [STOP] and release all keys in the chord
recognition area of the keyboard. The accompaniment stops immediately.
Page 83

E-80 Music Workstation
Selecting other Style divisions
r
There is no need to restart Style playback manually if
you also activate SYNC [START] (see above).
Note: You can also use a Fade-Out. See page 157 for details.
About Sync Start & Stop
If you’ve never used an arranger keyboard before, the
status of the SYNC [START] button is the single most
important function to look out for after switching on
your instrument. If it is on, playing just one note on the
keyboard may cause the Arranger to start playing when
you don’t want it to.
STYLE CONTROL
INTRO MAIN END/RIT START
VARIATION
12 3 4
BASS
INVERSION
AUTO
FILL IN
SYNC
START
STOP
STOP
Once you get to know the E-80 a little better, you will
appreciate this function, though.
SYNC START means that the Arranger starts as soon as
you play a note or chord in the chord recognition area
of the keyboard. (If the EASY SETTING [ARR] button
lights, this area is the left half of the keyboard. See
p. 88 for details.)
The E-80 also provides a SYNC STOP button. That function causes the Arranger to stop playback as soon as
you release all keys in the chord recognition area. This is
great for songs where you need breaks (i.e. one or several beats of silence).
Selecting other Style divisions
You can “professionalize” your performance with the
Arranger by selecting different accompaniment patterns.
Here’s a quick overview of how the E-80’s Music Styles
are structured:
MAIN VARIATION [1] The simplest of the four basic accom-
paniment patterns. This pattern is ideal
for the first verse of a song.
MAIN VARIATION [2] A slightly more complex pattern. Con-
sider using it for the second and third
verses.
MAIN VARIATION [3] This pattern could be used for the first
chorus(es).
MAIN VARIATION [4] This is the most complex accompani-
ment that could be used for the final
choruses and/or the bridge.
The numeric button you press flashes until the new
pattern is used (after which the button lights steadily).
You can use fill-ins (transitions) to go from one MAIN
VARIATION pattern to the next by switching on the
[AUTO¥FILL] button before pressing another (or the
lighting) MAIN VARIATION [1]~[4] button.
STYLE CONTROL
INTRO MAIN END/RIT START
VARIATION
12 3 4
BASS
INVERSION
AUTO
FILL IN
SYNC
START
STOP
STOP
The fill-in that is played between the current and the
next VARIATION pattern depends on where you come
from. Each transition from one VARIATION pattern to
another (e.g. from [1] to [2]) is different from the others
(from [2] to [3], from [3] to [4] and from [4] to [1]).
There are three Fill-Ins for the upward direction (“Up”)
and three for downward moves (“Dw”).
Note: You can also press [INTRO] in the middle of a performance.
In that case, the button flashes until the end of the current bar
and then lights on the next downbeat to indicate that the
Arranger is playing the introductory pattern.
Other ways of selecting Arranger patterns
You can also switch among Style patterns using the
aftertouch function, the ASSIGN SW buttons or a footswitch. Here are the pattern selection functions you
can assign:
Aftertouch Fill Up, Fill Down, Fill Remain, Variation Up,
Variation Down, Intro, Ending (page 70)
ASSIGN SW Half Bar on Fill In/Main (page 71)
D Beam Fill Up, Fill Down (page 74)
FC-7 PEDAL Start/Stop, Intro, Variat 1, Variat 2, Variat 3,
Variat 4, Ending (page 75)
Foot Switch Intro, Ending, Variat 1~4, Half Bar on Fill In
(page 77)
Note: Even aftertouch messages generated outside the chord
recognition area (see p. 88) trigger the selected switching function.
Bass Inversion
The Bass Inversion function allows you to change the
way the Arranger reads the chords you play.
If this function is off, the A.BASS part (ABS) plays the
root of the chords that feed the Arranger, while the
chords of the ACCOMP 1~6 parts are voiced in such a
way as to avoid semitone intervals (for complex chords)
that wouldn’t sound very nice.
Bass Inversion gives you more artistic license because
you specify the notes played by the ABS part. Switch on
Bass Inversion for songs that rely on bass rather than
on chord patterns (for example C – C/B – C/Bb, etc.).
83
Page 84

E-80 Music Workstation
Additional Arranger/Style functions
(1) Press the [BASS¥INVERSION] button (so that it
lights) to switch this function on.
STYLE CONTROL
INTRO MAIN END/RIT START
VARIATION
12 3 4
BASS
INVERSION
AUTO
FILL IN
SYNC
START
STOP
STOP
(2) Press it again to switch this function off again.
Note: You can also assign this function to an optional footswitch (page 77) or FC-7. See (page 75).
Melody Intelligence
The Arranger can add a counter-melody to the notes
you play. Those automatic harmonies are based on the
chords you play in the chord recognition area.
This counter-melody is played by the MELODY INTELL
part. There are 18 harmony types to choose from.
(1) Press the [MELODY¥INTELL] button (so that it
lights).
Type UP1 sound MEL INT sound
STRINGS Strings St Slow Str
CHOIR St. Choir Aahs St. Choir Aahs
BLOCK Vibraphone w Piano 1w
BIG BAND Trumpet St.Tenor Sax
COUNTRY Jazz Gt. JC Chorus Gt.
TRADITIONAL The Grand X —
BROADWAY Celesta Theater Org.
GOSPEL Trem. Organ St.Choir Aahs
ROMANCE Strings Nylon StrGt
LATIN The Grand X —
COUNTRY GUITAR Jazz Gt. Nylon StrGt
COUNTRY BALLAD The Grand X —
WALTZ ORGAN Theater Org. Trem.Organ
OCTAVE TYPE 1 The Grand X —
OCTAVE TYPE 2 The Grand X —
If a second sound is available (this depends on the
selected TYPE), the display looks as follows:
MELODY
INTELL
This adds a harmony to the notes you play. Do not
forget to switch on the UP1 part (page 65).
(2) To select another harmony type, press and hold the
[MELODY¥INTELL] button until the following page
appears:
(3) Press the field of the desired harmony type (TYPE).
Selecting a Harmony Type also means that the E-80
automatically assigns a suitable sound to the MELODY INTELL part (e.g. a trumpet and sax sounds for
Big Band, etc.). More specifically, the following
sounds are added to the UP1 part (which also plays
certain “intelligent” melody notes):
Type UP1 sound MEL INT sound
DUET Trumpet Brass 1
ORGAN Chorus Or Chorus Or
COMBO Clarinet Trombone
r
(4) If the desired option is not displayed, use the
[PAGE¥1]~[PAGE¥3] fields to select another page.
Note: For “Traditional”, “Latin”, “CntryBallad”, “OctaveType1”
and “OctaveType2”, only the UP1 part is used. All other Melody
Intelligence types use both the UP1 and the MELODY INTELL
part, however.
As shown in the table above, selecting a different
TYPE also means that the sound assigned to the UP1
part changes. Most TYPEs add a second sound to it
(called “2ND TONE”).
(5) Press the blue [2ND¥TONE] field and use the E-80’s
standard procedure to select a different sound for
the additional harmony notes.
Note: This function is not available for TYPEs that provide no
(“—”) MELODY INTELL sound.
Note: While the
panel is off, the 2ND TONE name appears on a gray background (if available). In this state, you cannot select a different
sound. Switch on the
function of the same name) if you need to select another
sound for 2ND TONE.
[MELODY¥INTELL] button on the front
[MELODY¥INTELL] button (and the
You can refine Melody Intelligence control by specifying what velocity value the UP1 notes must have in
order to trigger the MELODY INTEL part. This allows
you to leave the [MELODY¥INTELL] button on at all
times, while only adding harmonies to your solo playing during the choruses by hitting the keys a little
harder.
84
Page 85

(6) Use the [DATA÷ENTRY] dial or the [DEC]/[INC] but-
tons to set the desired “Threshold”.
You can also press the [DATA÷ENTRY] dial and enter
the value using the on-screen numeric pad.
The “Threshold” value represents the lowest velocity
value (between “1” and “127”) of the UP1 part that
triggers the MELODY INTELL part. If you don’t need
this switching function, select “Off”.
(7) Press the [EXIT] button to return to the main page.
(8) Press the [MELODY¥INTELL] button once again to
switch off this function.
Note: All MELODY INTELL settings can be written to a User
Program and recalled at a later stage. See p. 125.
Linking MELODY INTELL type selection to the
Styles (Style Melody Intell Link)
By default, the E-80 automatically loads the MELODY
INTELL type that is suited for the Styles you select. If
you don’t need this automatic selection, here is how to
switch it off:
(1) Press the [MENU] button.
E-80 Music Workstation
Using the Style Cover function
r
Using the Style Cover function
The COVER function provides “masks” that change the
instrumentation of the selected Style. Simply by selecting another preset, you can cause a Viennese waltz to
be played back by a heavy metal band, etc. Even though
the arrangement (rhythm, riffs) does not change, the
Style’s character can be modified beyond recognition.
(1) Press the [COVER] button once or twice to select
the display page shown below.
MENU
The display changes to:
(2) Press the [UTILITY], then the [GLOBAL] field.
(3) Press the [STYLE¥MELODY¥INT¥LINK] field to switch
it off. If it is on, the E-80 assigns a suitable
MELODY INTELLIGENCE type to each Style you
select.
(4) Press the [EXIT] button to return to the main page.
(2) Select the parts whose instrumentation you want
to change:
• Press the [ALL] field if all instruments should be
replaced.
• Press the [DRUM] field if only the drum and percus-
sion instruments should change.
• Press the [BASS] field if you’re happy with everything
but the bass line’s sound.
(3) Press one of the six fields in the lower half of the
display to select another preset.
Press [ORIGINAL] (page 1) to return to the original
orchestration.
(4) If none of the displayed presets appeal to you, use
the PAGE [ø][˚] fields at the right to jump to
another page with different presets.
(5) If you like the new version better than the original
one, press the [SAVE] field to save the Style to the
internal memory, a memory card or floppy disk (see
p. 86).
Note: The COVER information is part of the data only the E-80
understands.
Note: You can also modify the COVER settings yourself (see
p. 140).
85
Page 86

E-80 Music Workstation
Additional Arranger/Style functions
■Saved Version
The STYLE COVER page contains a [SAVED¥VERSION]
field that works as follows:
There can be three different versions of each Style.
[1] The original Style without COVER settings. This version
can be selected by pressing the [ORIGINAL] field on
page 1.
[2] The same Style that uses one of the COVER presets.
This version can be saved using the [SAVE] field. If you
save this version, the Style will use the COVER settings
whenever you select it using the standard procedure
(see p. 27) or the Style Finder (see p. 95).
[3] A Style saved with the [SAVE] field, which you recall
and then alter by selecting another COVER preset
(without saving this version).
In case [3], the [ORIGINAL] field on the STYLE COVER
page temporarily restores the original version with
no COVER data. To return to version [2] after selecting a different COVER preset, press the
[SAVED¥VERSION] field.
Note: Saving a Style with a COVER preset affects all User Programs that refer to this Style.
Freeze Data
Press this field to “commit” your orchestration changes
and change them to MIDI messages the Style Composer
(page 201) can read. Changes you don’t commit are
ignored by the Style Composer. Note that “freezing”
data is only necessary if you intend to edit a Style using
the Style Composer, or to ensure that the settings can
no longer be modified by accident.
The display changes to:
This page allows you to save the current Style to the
internal memory, a memory card or a floppy disk. It
will be saved along with the COVER settings you
selected.
(3) Press the [EXTERNAL¥MEMORY], [FLOPPY] or
[INTERNAL¥MEMORY] field to specify where you
want to save the Style.
(4) Enter the name for the file.
See page 52.
Note: The E-80 supports both upper- and lower-case letters
for file names. Choose whichever is more convenient (or
clearer).
(5) Press the [EXECUTE] field to save the data.
If the selected memory area already contains a Style
of that name, you are asked whether it is OK to overwrite it.
Saving a Style with a COVER alteration
As stated above, you can decide to change any Style on
a more or less permanent basis by saving it with the
selected COVER preset (or STYLE MAKEUP TOOLS settings, p. 140).
(1) On the STYLE COVER page, select the desired
COVER preset (see above).
(2) Press the [SAVE] field.
• Press the [YES] field to overwrite the file.
• Press the [NO] field to return to the SAVE STYLE page,
change the name, then press [EXECUTE] again.
The data are saved and a “Operation Successful” message confirms the end of the operation.
Note: To return to the Style’s original version, select it, press
the [ORIGINAL] field on the STYLE COVER page, then save it
again using the procedure described above.
Note: If you save a factory Style under a different name, you
can no longer select the new version using the STYLE buttons
(see p. 27). Such “customized” Styles can be assigned to a CUSTOM memory (see p. 92) or recalled using the Style Finder (see
p. 95).
r
86
Page 87

One Touch
You may find yourself using the One Touch function at
regular intervals, because it automates quite a few
tasks. The E-80’s One Touch memories are actually
“miniature User Programs” that go way beyond anything you may know from other arranger instruments.
(1) Press a ONE TOUCH button.
1
There are four One Touch memories per Music Style.
Their settings are included in the Style data themselves and can thus be copied to other E-80 units
simply by copying the Music Style files.
(2) Select a Style (page 27) and start Arranger play-
back (see p. 82).
(3) Play a melody to the accompaniment.
You will notice that the sound of the UP1 (or any
other Keyboard part) matches the style and mood of
the selected Style.
(4) Select a different Style and again play a solo line:
the active Keyboard parts now use different
sounds.
(5) Press another ONE TOUCH button.
(6) Press the same button again if you no longer need
the One Touch setting.
As you see, the One Touch memories apply to all Key-
board parts.
Note: If a One Touch memory is active while you recall a User
Program, the One Touch function is switched off.
■If you select a One Touch memory while another
one is already active
In that case, the E-80 immediately selects of the settings of that memory and thus changes the registration.
Ignoring certain One Touch settings (Hold)
The E-80 provides several “HOLD” options that allow
you to filter certain One Touch settings.
(1) Press and hold a ONE TOUCH [1]~[4] button.
The display changes to:
E-80 Music Workstation
r
One Touch
(2) Press the fields corresponding to the settings that
should not be loaded when you select another One
Touch memory or Music Style.
When you change a setting, the field of the last One
Touch memory you selected is indicated by means of
an asterisk (*). Button icons in the HOLD column
whose indicator lights refer to settings that are not
updated:
● TEMPO—The preset tempo of the selected Music Style.
● KBD PART—The current status of the Keyboard parts
(UP1/2/3, LW1/2 and MBS). The on/off status of the Keyboard parts can be saved to a One Touch memory. Furthermore, the Split and Upper 3 Split settings no longer
change.
● INTRO/ENDING—The INTRO or ENDING pattern is no
longer activated when you select Styles (even if its “on”
status has been saved to a One Touch registration).
● MAIN VAR—When you select another Style, the E-80 no
longer loads the memorized MAIN VARIATION [1]~[4]
pattern, but goes on using the last pattern you selected.
Press the [ALL] field to switch on all HOLD options.
Press [NONE] to switch all options off.
Note: The One Touch function is switched off whenever you
select a User Program.
Note: The SYNC [START] (page 83) and [INTRO] buttons are not
automatically switched on when you select a One Touch memory or Music Style while Arranger playback is stopped.
(3) Press the [EXIT] button to return to the main page.
EXIT
Programming your own One Touch settings
(WRITE)
The E-80 allows you to save your own ONE TOUCH settings for the selected Style. This may come in handy for
CUSTOM Styles (see page 92) for which there are no
“presets”.
These customized One Touch settings are stored within
the Styles themselves.
(1) Press and hold a ONE TOUCH [1]~[4] button.
The display changes to:
(2) Press the [WRITE] field (it lights in red).
(3) Press the [1]~[4] field that should contain your new
One Touch settings.
87
Page 88

E-80 Music Workstation
Additional Arranger/Style functions
The display now shows the following message:
The target One Touch memory you chose for writing
is automatically selected.
(4) Press the [EXIT] button to return to the main page.
More refined Arranger settings
Chord recognition area (ZONE)
Telling the E-80 that you want to use the Arranger is a
matter of pressing the EASY SETTING [ARR] button. In
that case, the key of the Style patterns is controlled by
the chords you play in the left half of the keyboard.
You can also tell the Arranger to scan another part of
the keyboard for usable chords. Though LEFT is probably the most popular setting, you can also select RIGHT
to have the Arranger scan the right half of the keyboard. Select WHOLE if the Arranger should scan the
entire keyboard. If you don’t want the Arranger to “listen” to the chords you play, choose OFF. In that case,
you will only hear the drum parts of the Music Styles
you select.
The range of the LEFT or RIGHT keyboard area depends
on the main split point (see “Setting the split point” on
page 65).
(1) On the main page, press the [CHORD] field.
You can also select this page by pressing [MENU] but-
ton‰ [ARRANGER¥SETTINGS]‰ [ARRANGER¥CHORD].
The display changes to:
(2) Press the ZONE [LEFT], [WHOLE], [RIGHT] or [OFF]
field to select the chord recognition area.
(3) Press the [EXIT] button to return to the main page.
Note: When you press the EASY SETTING [ARR] button, the
[LEFT] setting is selected.
Note: “OFF” can also be assigned to an ASSIGN SW button
(page 71) and an optional footswitch (page 75).
r
88
Page 89

E-80 Music Workstation
More refined Arranger settings
r
Arranger Type (chord mode)
Another important choice is how you want to transmit
note information to the Arranger.
(4) Press the [STANDARD], [PIANO¥STYLE],
[INTELLIGENT], or [EASY] field.
● STANDARD—This is the normal chord recognition mode.
The melodic accompaniment uses the notes you play in
the chord recognition area (“ZONE”). If you play only one
note in that area, the accompaniment plays only that
note, i.e. it assumes that you deliberately chose to omit
the third and fifth of your “chord”.
To have the Music Style sound a major, minor or seventh
chord, you only need to play three notes, by the way.
Other, more complex, chords require that you press four
keys.
● PIANO STYLE—This mode works as follows: the Arranger
decodes every chord you play – no matter where you
play it. Causing the Arranger to play another chord
requires that you play at least a triad (i.e. the three notes
that make up a major or minor chord). You can play
more than three chord notes but remember that two
notes won’t cause the Arranger to change the key.
Note: You can also select PIANO STYLE by pressing the EASY
SETTING [PIANO] button.
● INTELLIGENT—Select INTELLIGENT when you want the
Arranger to supply the missing notes of the chords you
play. See p. 273 for a chart of intelligent chords and the
way to play them. This is probably the mode you will
select most of the time.
● EASY—This is another “intelligent” chord fingering sys-
tem used on instruments by other manufacturers. It
works as follows:
Major chords Press the key that corresponds to the
chord’s fundamental.
Minor chords Fundamental + any black key to the
left of the fundamental.
Seventh chords Fundamental + any white key to the
left of the fundamental.
Minor seventh
chords
(5) Press the [EXIT] button to return to the main page.
Note: The choice you make here also affects the “Arpeggio
Oct” and “Chord Oct” options of the D Beam Controller. See
page 74.
Fundamental + any black key to the
left + any white key to the left.
(1) Select the ARRANGER SETTING page (see step (1) of
“Chord recognition area (ZONE)” on p. 88).
(2) Press the [ARRANGER¥HOLD] button icon to switch
the function off (dark) or on (lights).
(3) Press the [EXIT] button to return to the main page
or continue with the next step.
Intro & Ending Alteration
If the Intro and Ending patterns sound odd when you
start a song with a rather unusual chord (“Csus4”, for
instance), switch off the ALTERATION function. In that
case, the “special” chord is memorized, but the Intro or
Ending uses the normal chord progression (e.g. C, Am, F,
G). If this button icon is on, however, the chord progression of the selected Intro (or Ending) patterns is
adapted to the first chord you play – which may lead to
odd results.
If ALTERATION is off, the Arranger only switches to the
“special” chord once the Intro/Ending is finished.
(1) Select the ARRANGER CHORD page (see step (1) of
“Chord recognition area (ZONE)” on p. 88.
(2) Press the [INTRO¥ENDING¥ALTERATION] button icon
to switch that function off (dark) or on (lights).
(3) Press the [EXIT] button to return to the main page
or continue with the next step.
Dynamic Arranger
The DYNAMIC ARRANGER function allows you to control the volume and timbre of the Arranger parts via the
way you strike the keys in the chord recognition area
(velocity sensitivity).
(1) Select the ARRANGER CHORD page (see step (1) of
“Chord recognition area (ZONE)” on p. 88.
Arranger Hold
The ARRANGER HOLD function sustains the notes you
play in the chord recognition area (“ZONE”) until you
play other notes. This function is switched on by
default, so that you can briefly play the chord for a
given bar and then release all keys in the chord recognition area. If the [ARRANGER¥HOLD] icon indicator is
dark, the melodic accompaniment (bass and other
parts) stops as soon as you release all keys in the chord
recognition area (only the drums keep playing).
(2) Press the [DYNAMIC¥ARRANGER] button icon to
switch the Arranger’s velocity sensitivity off (dark)
or on (lights).
89
Page 90

E-80 Music Workstation
Additional Arranger/Style functions
This function only becomes meaningful if you also
specify how the various Arranger parts should
respond to your velocity.
(3) Press the [DYNAMIC¥EDIT] field.
The display changes to:
Tempo-related settings (Arranger Options)
The E-80 provides two parameters that allow you to
“play” with the Style tempo:
(1) Press the [MENU] button.
MENU
(4) Press the field of the Arranger part whose velocity
sensitivity you wish to change.
There are eight Arranger parts: A.DRUMS (the drums),
A.BASS (the bass) and ACCOMP 1~6 (the melodic
accompaniment parts).
(5) Set the desired value with the [DATA÷ENTRY] dial or
the [DEC]/[INC] buttons.
You can specify positive and negative sensitivity values. Positive values mean that the volume of the part
in question increases when you strike the chord recognition area keys harder, while negative values
mean that the volume of the selected Arranger part
increases as your velocity becomes softer.
You could use extreme positive/negative ACCOMP
pairs (i.e. “127” and “–127”) to alternate between
those two lines simply by varying your velocity. One
part would then only be audible when you strike the
keys softly, while the other would only be triggered
by high velocity values.
Choose “0” for parts whose volume should not be
affected by your velocity values.
(6) Press the [CLOSE] field to return to the ARRANGER
CHORD page.
(7) Press the [EXIT] button to return to the main page.
The display changes to:
(2) Press the [ARRANGER¥SETTING] field, followed by
the [ARRANGER¥OPTIONS] field.
Style Tempo
Let us briefly summarize everything that has already
been said about the tempo:
• Each Music Style has a preset tempo that is recalled
whenever you select that Style or when you take
advantage of the One Touch function (page 87). The
One Touch function, however, allows you to filter the
tempo setting (by activating [TEMPO], which means
that the preset tempo is no longer loaded automatically).
• On the other hand, you are free to change a Music
Style’s tempo any time. See “Changing the tempo” on
p. 28. That value can be written to a User Program
and will then be set every time you select that User
Program.
• The Style (and also song) tempo is displayed on the
main page.
r
90
Page 91

E-80 Music Workstation
r
Tempo-related settings (Arranger Options)
[PRESET], [AUTO] and [LOCK] allow you to specify
what happens when you select another Style:
If Arranger playback
is stopped when you
select another Style
PRESET The Style's preset tempo is loaded.
AUTO The Arranger loads
the preset tempo of
the new Style
LOCK The preset tempo of
the new Style is not
loaded. Instead, the
Style will be played at
the current tempo.
If the Arranger is running when you select
another Style
The new Style is
played back at the
tempo of the previous
Style.
TEMPO CHANGE (RITARD and ACCELER)
The ACCELER/RITARD parameter allows you to speed
up or slow down the Style tempo by the amount you
set here. To use these functions, you must assign
them to the ASSIGN SW buttons or an optional FC-7.
There are three Ritardando functions: one for all
Style patterns, one for Ending patterns and one for
Fill-Ins. They all use the TEMPO CHANGE settings on
the following page.
■Using the Ritardando/Accelerando functions
(4) For general applications (any Style division) pro-
ceed as follows:
• Assign the RITARD and/or ACCELER function.
ASSIGN SW buttons: “Arranger RIT Tempo” & “Arranger
ACC Tempo” on p. 71
FC-7 footswitches “Arranger RIT Tempo, Arranger ACC
Tempo” on p. 75
• Press the [START÷STOP] button to start Style play-
back.
• Press the assigned button or footswitch. By assigning
two controls, you can increase (ACC) and decrease
(RIT) the tempo.
(5) For Ritardandos that apply to Ending patterns pro-
ceed as follows:
• Press the [START÷STOP] button to start Style playback.
• Press the [END/RIT] button twice in succession (“double-click”).
STYLE CONTROL
INTRO MAIN END/RIT START
BASS
INVERSION
SYNC
STOP
(1) Press the field of the parameter whose value you
wish to change.
Parameter fields can also be selected using the DATA
ENTRY [√][®] buttons.
(2) Set the desired value with the [DATA÷ENTRY] dial or
the [DEC]/[INC] buttons.
● ACCELER/RITARD—Allows you to set the degree (ratio)
by which the tempo changes when the ACCELER or
RITARD function is triggered. Example: if the tempo is
currently q= 100, the value “20%” means that the
tempo drops to q= 80 or rises to q= 120.
(3) Press the first field (ACCELER/RITARD) and use the
[DATA÷ENTRY] dial or the [DEC]/[INC] buttons to
select the ratio by which the tempo should
increase/decrease.
● CPT (15~3825)—Use this parameter to specify how long
a Ritardando/Accelerando should take. In most cases,
480 CPT (i.e. one measure) is probably the most musical
choice.
VARIATION
12 3 4
AUTO
FILL IN
This selects an Ending pattern and slows down the
tempo according to the ACCELER/RITARD and CPT
settings. When the Ending phrase is finished (and
Arranger playback stops), the tempo is reset.
(6) For Fill Ritardando:
The FILL RIT function is suitable for ballads. It causes
the next Fill-In to slow down (“ritardando”).
• Switch on the [AUTO¥FILL-IN] button.
STYLE CONTROL
INTRO MAIN END/RIT START
VARIATION
12 3 4
BASS
INVERSION
AUTO
FILL IN
• Press the [MENU] button.
MENU
START
STOP
SYNC
START
STOP
STOP
91
Page 92

E-80 Music Workstation
Additional Arranger/Style functions
• Press the [ARRANGER¥SETTING] field, followed by the
[ARRANGER¥OPTIONS] field.
• Start Arranger playback and press the [FILL¥RIT] button icon to switch it on.
• Press the [MAIN] and a VARIATION [1]~[4] button.
The E-80 plays a Fill-In. The tempo slows down while
the fill is being played. At the end of the fill, the Style
returns to the previously set tempo (this is called “a
tempo”).
• Press the [HALF¥BAR] button icon to switch on the
Half Bar function. Certain pop songs in 4/4 contain
bars that only last two beats. The usual place for such
a bar is between the first and the second verse.
Another favorite position for “halved” bars is at the
end of a chorus or the bridge. Pressing this button
icon does not change Style playback right away. Only
when a Fill-In or another MAIN division starts will the
Half Bar function be activated and play half the
number of beats of the accompaniment pattern you
selected.
(7) Press the [EXIT] button to return to the main page.
Working with ‘external’ Styles
Using the CUSTOM memories
The E-80 provides 10 memories per family (i.e. 120 in
all) that refer to Styles in the internal memory (“INTERNAL MEMORY”) or on a memory card (“EXTERNAL
MEMORY”). These memories behave exactly like the factory memories.
In the case of a memory card, however, they only
“work” if the card in question has been inserted into the
PCMCIA slot. Thanks to the E-80’s powerful software,
loading a CUSTOM Style is as swift as working with the
factory Styles.
The Style referenced by the CUSTOM memory you select
is automatically loaded and copied to the Disk User
memory (see also p. 94). This is a RAM memory whose
contents are erased when you switch off the E-80 and
overwritten when you select another CUSTOM memory
(or use the Disk User function).
Here’s in a nutshell what happens when you select a
CUSTOM memory. (Even though the drawing may suggest that this takes quite some time, the E-80 performs
these steps in a split second.)
LIVE
BAND
PAGE 1
You select a CUSTOM
memory.
CUSTOM
Music Style
The E-80 looks up the name
of the referenced Style
The data are loaded from
card or the internal memory.
The Style can be played back.
When you unpack the E-80, the CUSTOM memories
are empty. So you first need to program your own
references to Styles.
DATA
DISK
USER
This memory contains the
Music Style data.
Programming CUSTOM assignments
The E-80 comes with several Style examples in internal
memory you could use to try out the following. Once
you start working with your E-80, you will probably
copy external Music Styles to the internal memory and
establish CUSTOM links to those.
r
92
Page 93

E-80 Music Workstation
Working with ‘external’ Styles
r
Note: Use the Copy function (see p. 97) to copy all Styles to the
same card (or the internal memory).
(1) Press a button of the STYLE pad to select a Music
Style family.
STYLE
LIVE
8 BEAT 16 BEAT ROCK
BALL
ROOM
JAZZ
BLUES
BAND
50's & 60's
BOSSA
SAMBA
DISCO
DANCE
CONTEMP
LATIN WORLD
Its indicator lights and the display looks as follows:
(2) Press the [CUSTOM] field.
(6) Press the field that contains the name of the Style
you want to assign to the selected CUSTOM memory.
If necessary, use the PAGE [ø][˚] fields or the
[DATA÷ENTRY] dial/the [DEC]/[INC] buttons to select
another group of 5 Styles.
Note: If you can’t seem to find the Style you wish to assign
and if you know it exists in the selected memory area, check
the “FOUND” value. It should indicate the same figure as the
“GLOBAL” entry. You can also use the Finder for locating the
desired Style. See p. 95 for details.
Note: It is perfectly possible to use “older” Styles with the
E-80. They are automatically converted to the new VARIATION
[1]~[4] system.
(7) Press the [GET¥IT] field.
The E-80 returns to the “STYLE” page. The name of
the selected Style appears in the field you selected
before pressing the [EDIT¥CUSTOM] button.
You could now program other assignments if you
wanted to.
Note: CUSTOM assignments are stored internally but they are
not part of the User Programs. Thus, you can “only” program
120 links in all (rather than 120 per User Program).
Note: CUSTOM settings reside in a global memory whose contents are saved together with all User Program Set data. Use
“Save User Program Set” on p. 227 for saving the settings.
(3) Press the field of the memory you wish to assign a
Style to.
(4) Press the [EDIT¥CUSTOM] field.
■Selecting CUSTOM Style memories
The Style names are important for locating the Styles.
If you change the name of a Music Style that is referenced by one of the CUSTOM memories, the E-80 no
longer finds it. Conversely, if you have two memory
cards that both contain a Style called “Reggae1”,
even inserting the “wrong” card would recall a
“Reggae1” Style – but it might be the wrong one (and
quite a few other CUSTOM memories might not recall
any Style at all, because the other names only exist
on the “other” card).
(1) Press a button of the STYLE pad to select a Music
Style family.
STYLE
LIVE
8 BEAT 16 BEAT ROCK
BALL
ROOM
JAZZ
BLUES
BAND
50's & 60's
BOSSA
SAMBA
DISCO
DANCE
CONTEMP
LATIN WORLD
Its indicator lights and the display looks as follows:
(5) Press the [INTERNAL¥MEMORY] or
[EXTERNAL¥MEMORY] field.
This is necessary to specify whether you want to link
a Style in the internal memory or on a card in the
PCMCIA slot.
93
Page 94

E-80 Music Workstation
Additional Arranger/Style functions
(2) Press the [CUSTOM] field.
(3) Press the field of the Music Style you want to use.
In some cases, an error message (“File not found”)
displayed at this point means that the card does not
contain the referenced file.
Note: If you do not want to use the Style after all, press [EXIT].
In that case, the E-80 keeps on using the last Style it did find.
Disk User
You can also load one Music Style directly into the
E-80’s Disk User memory and use it. You could take
advantage of this function whenever none of the CUSTOM memories refer to the Music Style you need for
playing a given piece. As its name implies, you can also
use this function for working with Styles on floppy disk.
Note: The Music Style in this memory is only available until you
switch off the E-80 or load another Style. Be aware that selecting
a CUSTOM memory also overwrites the last Disk User Style you
selected.
(1) If necessary, insert the memory card or floppy disk
with the desired Music Style into the slot or disk
drive.
(2) On the STYLE page (see above), press the
[DISK¥USER] field.
(4) Press the field that contains the name of the Style
you want to load.
(5) If the desired Style is not displayed, use [ø][˚] to
select another group of 5 Styles.
You can also use the [DATA÷ENTRY] dial and the
[DEC]/[INC] buttons for selecting other pages with dif-
ferent Music Styles.
Note: The E-80 contains a powerful search engine for quickly
locating the desired Music Style on a card or in the internal
memory (page 95). It is not available for Styles on floppy disk,
however.
The display page does not change when you select a
Style. This was done to allow you… to load another
Style.
(6) Start playing with the newly selected Style.
The selection of the DISK USER Style will be written
to a User Program (page 125). The User Program in
question refers to the name and memory area. Next
time you recall such a User Program, the E-80 will
therefore use the referenced Style.
If the Style in question cannot be found, an error
message appears and the E-80 goes on using the previously selected Style.
(7) Press the [EXIT] button to return the main page.
The name of the selected Style appears in the [STYLE]
field.
The display changes to:
(3) Press the [EXTERNAL¥MEMORY], [FLOPPY] or
[INTERNAL¥MEMORY] field to select the memory
area that contains the desired Style.
Note: It is perfectly possible to use “older” Styles with the
E-80. They are automatically converted to the new VARIATION
[1]~[4] system.
r
94
Page 95

Style Finder: quickly locating Styles
The E-80 allows you to have a great many Music Styles
handy: in its internal memory, on a memory card and
on floppy disks. For the internal memory and the memory card in the PCMCIA slot, there is a powerful Finder
function for quickly locating the Style you need. Here is
how to use this function:
(1) Press the FINDER [STYLE] button.
STYLE
The display changes to:
E-80 Music Workstation
Style Finder: quickly locating Styles
r
If you pressed the [FLOPPY] field, these options are
not available and the display looks as follows:
The information in these columns are supplied by a
special file in the internal memory or on a memory
card called “Database”.
You can also supply the above information for your
own Styles.
Note: Music Styles you load from floppy disk and then save
to a card or the internal memory are not automatically
modified to include this Database information. You need to
program it yourself. See “Rename” on page 97.
“FOUND”: found entries.
“GLOBAL”: total number of Styles in that memory area.
(2) Specify the memory area that contains the Style
you need: [EXTERNAL¥MEMORY], [FLOPPY] or
[INTERNAL¥MEMORY].
The E-80 is shipped with several Styles that reside in
its internal memory.
The display shows a list of 5 Styles in the selected
memory area (internal, memory card or floppy disk).
(3) If the name of the Style you want to use to is
already displayed, press its line.
In our example, “%Shuffle” has been selected.
(4) To display the next 5 Styles, press the PAGE [˚] field
in the lower right corner.
You can press this field as many times as necessary
(or until it is no longer displayed).
To return to a previous group of 5 Styles, press [ø].
You can also select the [DATA÷ENTRY] dial and the
[DEC]/[INC] buttons to switch pages.
Quick location of the Style you need
There are several ways of quickly locating the Style you
are after:
■Using the Index function
The highest hierarchical level of the Style Finder
database is called “Index”. All search operations apply
to the selected Index (and therefore not necessarily
to all files in the internal memory or on a memory
card).
• After performing step (2), press the [INDEX] field in
the upper left corner.
• Either press the field that corresponds to the desired
Style category or –if you’re not sure which category
the Style belongs to– press [ALL].
• Now return to the previous page by pressing [BACK].
The display returns to the page shown under step (1)
above. This time, however, only the Styles belonging
to the selected Index are displayed.
Continue with step (3) to select the Style you want to
use.
■Sorting files
Press the [COUNTRY], [GENRE] or [TEMPO] field to
sort the Music Style files according to country, kind
of music (Genre) or tempo value. The right column
now contains the selected entry (only one of them
can be displayed along with the Style name).
Continue with step (3) to select the Style you want to
use.
95
Page 96

E-80 Music Workstation
Additional Arranger/Style functions
■Searching for Music Styles
The powerful part starts as soon as you press the
[FINDER] field.
Decide what you want to look for
• Press the [STYLE¥NAME] field if you want the E-80 to
look for Style names, then enter the name (or part of
it).
• Press the [COUNTRY] field if you want to look for a
country, then enter the name (or part of it).
• Press the [GENRE] field to locate a specific genre
(Rock’n’Roll, 16-Beat, etc.), then enter the desired
characters.
• Press the [TEMPO] field and enter the tempo value
you are looking for.
Note: It would be a good idea to enter at least 2 characters,
possibly even 3 so as to narrow down your search to a “workable” size.
Note: If no Styles were found, the following message appears
and no file names are displayed (in which case you need to
press the [STYLE¥NAME], [COUNTRY], [GENRE] or [TEMPO] field
to display all entries again):
• Press the field of the Style you need and do your
thing.
If the E-80 did find one or several matches, the
“FOUND” number will be smaller than the “GLOBAL”
number.
Editing the Style Finder information
The Finder information is based on search criteria that
need to be added to Style files. By default, Style files do
not contain them.
Options
After pressing the FINDER [STYLE] button, the display
looks as follows:
Search the database
The next step is to decide how the Style Finder should
look for files:
• Press the [ALPHABETIC¥ORDER] field to search for all
entries that start with the characters you entered
(“BEA”, for example). Files that match the specified
criteria will be displayed at the top of the list.
The order depends on the button icon you activated
([STYLE¥NAME], [COUNTRY], [GENRE] or [TEMPO]).
• Press the [SEARCH¥ONLY] field to have the E-80
search the selected entry for files that contain the
supplied information. (This would allow you to also
locate a file called “Raggabeat” if you entered “BEA”.)
• See page 52 for how to enter characters.
• The [Delete] field allows you to delete the character
indicated by the cursor. Press and hold it to clear all
characters.
• To enter numbers without cycling through the char-
acters first, press the [NUM¥LOCK] field. After entering the numbers, switch it off if you need to enter
characters again.
• Press the [FIND] field to start your search.
The [OPTIONS] field in the lower left corner provides
access to a display page where you can add database
information. This also works for Styles that already
contain entries you wish to modify.
(1) First select the Style whose database information
you wish to change or edit by pressing its field.
(2) Press the [OPTIONS] field.
r
96
(3) Now do one of the following:
Page 97

E-80 Music Workstation
Style Finder: quickly locating Styles
r
■Rename
This function allows you to change (or supply) the
STYLE NAME, COUNTRY, and/or GENRE information
of the selected Style (the TEMPO value is fixed, but
could be changed using a STYLE COMPOSER function,
p. 212).
• Press the [STYLE¥NAME], [COUNTRY] or [GENRE] field
and enter the desired characters (see p. 52).
Note: If you select a Style on floppy disk, only the STYLE NAME
and FILE NAME can be edited.
• Press the [EXECUTE] field.
■Delete
This function allows you to delete the selected Style
from the internal memory, a memory card or floppy
disk. You should use this as sparsely as possible – and
probably never for the internal memory. Once a
Style is gone, there is indeed no way to restore it.
• Press the [DELETE] field. The following question is dis-
played:
[YES] deletes the Style file.
[NO] leaves the file intact and takes you back to the
initial Style Finder page with the Style list.
[Back] leaves the file intact and takes you back to the
STYLE LIST page.
■Copy
This function allows you to copy the selected Style to
another memory area.
Note: It is perfectly possible to use “older” Styles with the
E-80. They are automatically converted to the new VARIATION
[1]~[4] system.
Even though you can already select the files you wish
to copy on this page, there is no need to select a Style
prior to pressing the [OPTIONS] field on the STYLE
LIST page. Be aware, however, that the COPY page
only lists the Music Styles that match the last search
criteria you used for the STYLE FINDER.
On the other hand, if you only need to copy certain
Styles on memory card or in the internal memory
area, using the FINDER would be a good idea: it helps
you to avoid too many presses of the PAGE [ø] or [˚]
field. You can also use the [DATA÷ENTRY] dial and the
[DEC]/[INC] buttons.
• On the STYLE OPTIONS page, press the [COPY] field.
• Start by specifying the source that contains the
Style(s) you wish to copy: Press the [FROM] button
icon once or twice to select the memory area.
INT MEMORY: The E-80’s internal memory area.
FLOPPY DISK: The floppy disk in the E-80’s drive. Do
not forget to insert it before selecting
this option.
EXT MEMORY: The memory card in the E-80’s PCMCIA
slot. Do not forget to insert it into the
slot before selecting this option.
• Now specify the target you wish to copy the selected
Style(s) to: Press the [TO] button icon once or twice to
select the memory area.
• If the name of the Style you want to copy to is
already displayed, press its line.
You can also select several Styles. In our example,
“%Shuffle” and “%Slow Rock 2” have been selected.
To display the next 5 files, press the [˚] field in the
lower right corner or use the [DATA÷ENTRY] dial.
You can press the field as many times as necessary
(or until it is no longer displayed). To return to a previous group of 5 Styles, press [ø] or use the
[DATA÷ENTRY] dial.
To copy all Styles that are currently displayed (on all
available pages) from the FROM to the TO area, press
the [ALL¥FILES] field.
Note: If the target media (memory card or floppy disk) is not
formatted, a message will be displayed that allows you to format it before the Styles are copied.
(4) If you chose “EXT MEMORY” or “FLOPPY DISK” disk
for “TO”, disable the card’s/disk’s write protection
and insert it into the PCMCIA slot or disk drive.
To disable the write protection of a floppy disk, close
the “little window” (see p. 11). See the owner’s manual of the memory card for how to disable its write
protection.
(5) Press the [EXECUTE] field. (Press [Back] if you do not
want to proceed or to select other files.)
97
Page 98

E-80 Music Workstation
Additional Arranger/Style functions
You are asked whether it is OK to overwrite all files
on the destination media (“TO”) that have the same
file names as the files you are about to copy.
(6) Press the [YES] field if it is OK to overwrite files
with the same names on the destination media.
Press the [NO] field if files on the source (“FROM”)
media that have the same name as existing files on
the destination (“TO”) media should not be copied
(only files with “original” names will be copied in that
case).
The data are copied and a “Successful” message confirms the end of the operation.
(7) Press the [EXIT] button to return to the main page.
r
98
Page 99

7. Advanced Keyboard part functions
Upper 3 Split
On p. 65, you learned how to split the keyboard into a
left half with the LW1, LW2 and possibly also the MBS
part and a right half with the UP1, UP2 and/or UP3
part.
You can program an additional split between the UP1/
UP2 and the UP3 parts, which is great for playing question-and-answer types of melody lines with a brass
sound for Upper3, for example and a clarinet or flute
for Upper1. The possibilities are as follows:
See p. 29 for how to assign the desired sound to the
UP3 part.
Note:
UP3 SPLIT only works if the UP1 or UP2 part is active. It
is impossible to use an Upper 3 split without using the Upper1
or Upper2 part. If UP1/2/3 are off, the UPPER 3 SPLIT function
is not used.
If you don’t agree with this split point (G5), you can
change it to any note between the D2 and C7.
E-80 Music Workstation
r
Upper 3 Split
LW1 + LW2 (+ MBS)
LW1 + LW2 (+ MBS)
(+ Arranger control)
(+ Arranger control)
Upper 1 and/or
Upper 2
Upper 2
Upper3
The default split point is located at the G5 (lowest note
of the UP3 part).
Note:
This function is also available in WHOLE Keyboard Mode.
In effect, the E-80 allows you to play at least three
sounds assigned to three separate keyboard areas. On
top of that, you can select the Arranger’s chord recognition area, i.e. the notes that feed the Arranger
(page 88). Here is how to activate the UPPER 3 SPLIT
function:
(1) On the main page, press the
You can also select this page by pressing
[SPLIT&TOUCH]
field‰
[SPLIT]
[SPLIT¥POINT]
field.
[MENU]
field.
The display changes to:
‰
Possible range for UPPER 3 SPLIT
(3) Use the UPPER 3 SPLIT POINT
[ø][˚]
fields to set the
desired split point.
Note:
If you are satisfied with your split point, you should save
it to a User Program (see p. 125).
(4) Press the
[EXIT]
button to return to the main page.
The UPPER 3 SPLIT function can be cancelled in several ways:
• Press the
[UPPER¥3¥SPLIT]
field so that it “goes dark”.
• Switch off UP1 and/ or UP2.
• Switch off the UP3 part.
Dynamic Split
While the UP3 Split function provides a static split
between UP3 to the right and UP1 and/or the UP2 parts
to the left, there is a second way of playing two distinct
melody parts, whereby the highest (or lowest) note is
sounded by the UP1 part, while the other notes are
sounded by any other available Keyboard part(s).
This depends on whether you are currently in SPLIT
(UP2, UP3) or WHOLE mode (MBS, LW2, LW1, UP2, UP3).
When the UP3 Split function is on, this doesn’t concern
the UP3 part, which can still be played via its own zone
if required.
(1) Press the
(2) Press the
[KEYBOARD¥OPTIONS]
[MENU]
button.
[SPLIT&TOUCH]
field.
field, followed by the
(2) Press the
[UPPER¥3¥SPLIT]
field so that it “lights”.
The keyboard is split at the G5, with the UP1 and UP2
parts to the left (orange) and the UP3 part to the
right (blue) of this second split point.
99
Page 100

E-80 Music Workstation
Advanced Keyboard part functions
(3) Switch on the UP1 and UP2 parts (their PART ON/
OFF button must light).
(4) Press the [HIGH] or [LOW] field to switch it on.
Only one of these can be active at any one time. You
can, however, switch them both off. Here is what
“HIGH” and “LOW” mean:
● HIGH—If you select this mode and play just one note, it
is sounded by the UP1 part. If you keep holding that key
while pressing another (lower) key to its left, the highest
note is played by the UP1 part, while lower notes are
played by the remaining available Keyboard parts (in our
example, that would be UP2). This is perfect for situations where you need to play chords and a solo line
using different sounds. Something like this:
Played by the UP1 part
Played by the UP2 part (for example)
Tuning Upper2: Coarse Tune and Fine Tune
The UP2 part can be used as full-fledged solo or melody
sound or to “fatten” the sound of UP1 (or UP3).
To layer the UP1 (or UP3) and UP2 parts, you need to
switch them both on. See page 28 for details.
The following parameters allow you to transpose
(Coarse) or to detune (Fine) the Upper2 part relative to
the Upper1 (or Upper3) part.
You could use COARSE to program an interval of a fifth
(7 semitones) for UP2, which is especially effective for
brass sounds and guitar power chords.
Do not forget to activate both the UP1 (or UP3) and
UP2 parts when you want to take advantage of the
COARSE and FINE parameters. If only the UP2 part is
active, your solos may sound flat.
Note: In WHOLE mode, these parameters can also be used for
layer effects involving the UP2 (which is detuned) and the LW1
and/or LW2 parts (which are not detuned).
(1) Press the [MENU] button.
● LOW—This is the opposite of HIGH and can be used in
situations where the melody (or counter-melody) lies
above the notes you wish to hold.
Played by the UP2 part (for example)
Played by the UP1 part
(5) Press the [EXIT] button to return to the main page.
EXIT
MENU
The display changes to:
(2) Press the [SPLIT&TOUCH] field, followed by the
[KEYBOARD¥OPTIONS] field.
r
100
(3) Press the [COARSE¥TUNE] field if you want to
change the UP2 part’s pitch in semitone steps.
That field now “lights”.
(4) Set the desired value with the [DATA÷ENTRY] dial or
the [DEC]/[INC] buttons.
 Loading...