

Page 1
Owner’s Manual
r
Page 2
WARNING
– To reduce the risk of fire or electric shock, do not expose this device to rain or moisture.
This product complies with the requirements of European Directive EMC 2004/108/EC.
For EU countries
For EU Countries
For the USA
For the USA
FEDERAL COMMUNICATIONS COMMISSION
RADIO FREQUENCY INTERFERENCE STATEMENT
This equipment has been tested and found to comply with the limits for a Class B digital device, pursuant to Part 15 of the
FCC Rules. These limits are designed to provide reasonable protection against harmful interference in a residential
installation. This equipment generates, uses, and can radiate radio frequency energy and, if not installed and used in
accordance with the instructions, may cause harmful interference to radio communications. However, there is no guarantee
that interference will not occur in a particular installation. If this equipment does cause harmful interference to radio or
television reception, which can be determined by turning the equipment off and on, the user is encouraged to try to correct the
interference by one or more of the following measures:
— Reorient or relocate the receiving antenna.
— Increase the separation between the equipment and receiver.
— Connect the equipment into an outlet on a circuit different from that to which the receiver is connected.
— Consult the dealer or an experienced radio/TV technician for help.
This device complies with Part 15 of the FCC Rules. Operation is subject to the following two conditions:
(1) This device may not cause harmful interference, and
(2) This device must accept any interference received, including interference that may cause undesired operation.
Unauthorized changes or modification to this system can void the users authority to operate this equipment.
This equipment requires shielded interface cables in order to meet FCC class B Limit.
For Canada
For Canada
NOTICE
This Class B digital apparatus meets all requirements of the Canadian Interference-Causing Equipment Regulations.
AVIS
For C.A. US (Proposition 65
WARNING
This product contains chemicals known to cause cancer, birth defects and other reproductive harm, including lead.
For the UK
For the U.K.
IMPORTANT: THE WIRES IN THIS MAINS LEAD ARE COLOURED IN ACCORDANCE WITH THE FOLLOWING CODE.
BLUE:
BROWN:
As the colours of the wires in the mains lead of this apparatus may not correspond with the coloured markings identifying
the terminals in your plug, proceed as follows:
The wire which is coloured BLUE must be connected to the terminal which is marked with the letter N or coloured BLACK.
The wire which is coloured BROWN must be connected to the terminal which is marked with the letter L or coloured RED.
Under no circumstances must either of the above wires be connected to the earth terminal of a three pin plug.
NEUTRAL
LIVE
For the USA
For the USA
)
DECLARATION OF CONFORMITY
Compliance Information Statement
BK-7m
Backing Module
Page 3

r
Copyright © 2011 ROLAND EUROPE. All rights reserved. No part of this publication may be reproduced in any form without the written permission of Roland Europe S.p.a.
Roland is either a registered trademark or a trademark of Roland Corporation in the United States and/or other countries.
Owner’s Manual
Thank you and congratulations on your choice of the Roland BK-7m Backing Module.
To ensure that you obtain the maximum enjoyment and take full advantage of the BK-7m’s functionality, please read
this owner’s manual carefully.
ENGLISH ENGLISH
About this manual
You should first read the chapter “Before you start using the BK-7m” on p. 15. It explains how to connect the AC adaptor and turn on the power. This Owner’s Manual explains everything, from the BK-7m’s basic operations to more
advanced functions.
Conventions in this manual
In order to explain the operations as clearly as possible, this manual uses the following conventions:
•Text enclosed in square brackets [ ] indicates the name of a button or knob. Example: the [USER PROGRAM] button.
• Paragraphs that begin with “NOTE” are cautionary statements that you must read.
• Paragraphs that begin with “MEMO” contain useful information that may come in handy.
•The numbers of pages that you can turn to for additional or related information are given like this: (p. **).
The explanations in this manual include illustrations that depict what should typically be shown by the display. Note,
however, that your unit may incorporate a newer, enhanced version of the system (e.g., include newer sounds), so what
you actually see in the display may not always match what appears in the manual.
Before using this instrument, carefully read “Using the unit safely” on p. 4 and “Important notes” on p. 6. Those sections provide
information concerning the proper operation of the BK-7m. Additionally, in order to feel assured that you have gained a good
grasp of every feature provided by your new unit, the manual should be read in its entirety. The manual should be saved and kept
on hand as a convenient reference.
ENGLISH ENGLISH
Page 4

Backing Module
Using the unit safely
BK-7m
Used for instructions intended to alert
the user to the risk of death or severe
injury should the unit be used
improperly.
Used for instructions intended to alert
the user to the risk of injury or material
damage should the unit be used
improperly.
* Material damage refers to damage or
other adverse effects caused with
respect to the home and all its
furnishings, as well to domestic
animals or pets.
• Do not open (or modify in any way) the unit or its AC
adaptor.
.................................................................................................
• Do not attempt to repair the unit, or replace parts within
it (except when this manual provides specific instructions
directing you to do so). Refer all servicing to your retailer,
the nearest Roland Service Center, or an authorized Roland distributor, as listed on the “Information” page.
.................................................................................................
• Never install the unit in any of the following locations.
• Subject to temperature extremes (e.g., direct sunlight
in an enclosed vehicle, near a heating duct, on top of
heat-generating equipment); or are
• Damp (e.g., baths, washrooms, on wet floors); or are
• Exposed to steam or smoke; or are
• Subject to salt exposure; or are
• Humid; or are
• Exposed to rain; or are
• Dusty or sandy; or are
• Subject to high levels of vibration and shakiness.
.................................................................................................
•Make sure you always have the unit placed so it is level
and sure to remain stable. Never place it on stands that
could wobble, or on inclined surfaces.
.................................................................................................
• Be sure to use only the AC adaptor supplied with the
unit. Also, make sure the line voltage at the installation
matches the input voltage specified on the AC adaptor's
body. Other AC adaptors may use a different polarity, or
be designed for a different voltage, so their use could result in
damage, malfunction, or electric shock.
.................................................................................................
• Use only the supplied power-supply cord. Also, the supplied power cord must not be used with any other device.
.................................................................................................
• Do not excessively twist or bend the power cord, nor
place heavy objects on it. Doing so can damage the cord,
producing severed elements and short circuits. Damaged
cords are fire and shock hazards!
.................................................................................................
r
The symbol alerts the user to important instructions
or warnings.The specific meaning of the symbol is
determined by the design contained within the
triangle. In the case of the symbol at left, it is used for
general cautions, warnings, or alerts to danger.
The symbol alerts the user to items that must never
be carried out (are forbidden). The specific thing that
must not be done is indicated by the design contained
within the circle. In the case of the symbol at left, it
means that the unit must never be disassembled.
The ● symbol alerts the user to things that must be
carried out. The specific thing that must be done is
indicated by the design contained within the circle. In
the case of the symbol at left, it means that the powercord plug must be unplugged from the outlet.
• This unit, in combination with an amplifier and headphones or speakers, may be capable of producing sound
levels that could cause permanent hearing loss. Do not
operate for a long period of time at a high volume level, or at a
level that is uncomfortable. If you experience any hearing loss or
ringing in the ears, you should immediately stop using the unit,
and consult an audiologist.
................................................................................................
• Never allow foreign objects (e.g., flammable material,
coins, pins) or liquids (e.g., water or juice) to enter this
unit. Doing so may cause short circuits, faulty operation,
or other malfunctions.
................................................................................................
•Immediately turn the power off, remove the AC adaptor
from the outlet, and request servicing by your retailer,
the nearest Roland Service Center, or an authorized
Roland distributor, as listed on the “Information” page
when:
• The AC adaptor, the power-supply cord, or the plug has been
damaged; or
• If smoke or unusual odor occurs
• Objects have fallen into, or liquid has been spilled onto the unit;
or
• The unit has been exposed to rain (or otherwise has become
wet); or
• The unit does not appear to operate normally or exhibits a
marked change in performance.
................................................................................................
•In households with small children, an adult should provide supervision until the child is capable of following all
the rules essential for the safe operation of the unit.
................................................................................................
• Protect the unit from strong impact.
(Do not drop it!)
................................................................................................
4
Page 5
• Do not force the unit's power-supply cord to share an
outlet with an unreasonable number of other devices. Be
especially careful when using extension cords—the total
power used by all devices you have connected to the extension
cord's outlet must never exceed the power rating (watts/amperes)
for the extension cord. Excessive loads can cause the insulation on
the cord to heat up and eventually melt through.
.................................................................................................
• Before using the unit in a foreign country, consult with
your retailer, the nearest Roland Service Center, or an
authorized Roland distributor, as listed on the “Information” page.
.................................................................................................
• The unit and the AC adaptor should be located so their
location or position does not interfere with their proper
ventilation.
.................................................................................................
•Always grasp only the plug on the AC adaptor cord when
plugging into, or unplugging from, an outlet or this unit.
Backing Module BK-7m
Using the unit safely
r
.................................................................................................
• At regular intervals, you should unplug the AC adaptor
and clean it by using a dry cloth to wipe all dust and
other accumulations away from its prongs. Also, disconnect the power plug from the power outlet whenever the
unit is to remain unused for an extended period of time.
Any accumulation of dust between the power plug and the power
outlet can result in poor insulation and lead to fire.
.................................................................................................
• Try to prevent cords and cables from becoming entangled. Also, all cords and cables should be placed so they
are out of the reach of children.
.................................................................................................
• Never climb on top of, nor place heavy objects on the
unit.
.................................................................................................
• Never handle the AC adaptor or its plugs with wet hands
when plugging into, or unplugging from, an outlet or
this unit.
.................................................................................................
• Before moving the unit, disconnect the AC adaptor and
all cords coming from external devices.
.................................................................................................
• Before cleaning the unit, turn off the power and unplug
the AC adaptor from the outlet (see p. 20).
.................................................................................................
•Whenever you suspect the possibility of lightning in your
area, disconnect the AC adaptor from the outlet.
.................................................................................................
• Keep the included screw in a safe place out of children’s
reach, so there is no chance of it being swallowed accidentally.
.................................................................................................
5
Page 6

Backing Module
Important notes
BK-7m
1. Important notes
In addition to the items listed under “Using the unit safely” on p. 4, please read and observe the following:
Power supply
• Do not connect this unit to same electrical outlet that is being
used by an electrical appliance that is controlled by an inverter
(such as a refrigerator, washing machine, microwave oven, or air
conditioner), or that contains a motor. Depending on the way in
which the electrical appliance is used, power supply noise may
cause this unit to malfunction or may produce audible noise. If it is
not practical to use a separate electrical outlet, connect a power
supply noise filter between this unit and the electrical outlet.
• The AC adaptor will begin to generate heat after long hours of
consecutive use. This is normal, and is not a cause for concern.
• Before connecting this unit to other devices, turn off the power to
all units. This will help prevent malfunctions and/or damage to
speakers or other devices.
Placement
• Using the BK-7m near power amplifiers (or other equipment containing large power transformers) may induce hum. To alleviate
the problem, change the orientation of this instrument or move it
further away from the source of interference.
• This device may interfere with radio and television reception. Do
not use it in the vicinity of such receivers.
• Noise may be produced if wireless communications devices, such
as cell phones, are operated in the vicinity of this unit. Such noise
could occur when receiving or initiating a call, or while conversing.
Should you experience such problems, you should relocate such
wireless devices so they are at a greater distance from this unit, or
switch them off.
• Do not expose the unit to direct sunlight, place it near devices that
radiate heat, leave it inside an enclosed vehicle, or otherwise subject it to temperature extremes. Excessive heat can deform or discolor the unit.
•When moved from one location to another where the temperature
and/or humidity is very different, water droplets (condensation)
may form inside the BK-7m. Damage or malfunction may result if
you attempt to use the unit in this condition. Therefore, before
using the unit, you must allow it to stand for several hours, until
the condensation has completely evaporated.
• Depending on the material and temperature of the surface on
which you place the unit, its rubber feet may discolor or mar the
surface.
You can place a piece of felt or cloth under the rubber feet to prevent this from happening. If you do so, please make sure that the
unit will not slip or move accidentally.
• Avoid the use of insecticides, perfumes, alcohol, nail polish, spray
cans, etc., near the unit. Swiftly wipe away any liquid that spills on
the unit using a dry, soft cloth.
Maintenance
• For everyday cleaning wipe the unit with a soft, dry cloth or one
that has been slightly dampened with water. To remove stubborn
dirt, use a cloth impregnated with a mild, nonabrasive detergent.
Afterwards, be sure to wipe the unit thoroughly with a soft, dry
cloth.
• Never use benzene, thinner, alcohol or solvents of any kind, to
avoid the possibility of discoloration and/or deformation.
Additional precautions
• Unfortunately, it may be impossible to restore the contents of data
that was stored on a USB memory once it has been lost. Roland
Corporation assumes no liability concerning such loss of data.
• Use a reasonable amount of care when using the BK-7m’s buttons,
other controls and jacks/connectors. Rough handling can lead to
malfunctions.
• Never strike or apply strong pressure to the display.
•When connecting/disconnecting cables, grasp the connector
itself—never pull on the cable. This way you will avoid causing
shorts, or damage to the cable’s internal elements.
• To avoid disturbing your neighbors, try to keep the BK-7m’s volume at reasonable levels. You may prefer to use headphones, so
you do not need to be concerned about those around you (especially late at night).
•When you need to transport the unit, package it in the box
(including padding) that it came in, if possible. Otherwise, you will
need to use equivalent packaging materials.
• Use only the specified expression pedal (Roland EV-series, sold
separately) or pedal switch (Roland DP-series, BOSS FS-5U). By
connecting any other expression pedal or footswitch, you risk
causing malfunction and/or damage the unit.
• Some connection cables contain resistors. Do not use cables that
incorporate resistors for connecting to this unit. The use of such
cables can cause the sound level to be extremely low, or impossible
to hear. For information on cable specifications, contact the manufacturer of the cable.
Storage devices that can be connected to the
BK-7m’s USB MEMORY port
• The BK-7m allows you to connect commercially available USB
Flash memory. You can purchase such devices at a computer store,
a digital camera dealer, etc.
• Though external hard disks with a capacity in excess of 2TB can be
used, please bear in mind that the BK-7m can manage a maximum
of 2TB. (FAT-32 formatted storage devices can be used right away.)
• Use USB memory sold by Roland (M-UF-series). We cannot guarantee operation if any other USB memory is used.
Before using external USB storage devices
•When connecting a USB memory, firmly insert it all the way into
the EXTERNAL MEMORY port.
• Do not touch the pins of the EXTERNAL MEMORY port or allow
them to become dirty.
•While using an external USB memory, please observe the following
points when handling it:
• To prevent damage from static electrical charges, discharge any
static electricity that might be present in your body before handling a USB memory.
• Do not touch the terminals with your fingers or any metal
object.
• Do not bend or drop a USB memory, or subject it to strong
impact.
• Do not leave a USB memory in direct sunlight or in locations
such as a closed-up automobile.
• Do not allow a USB memory to become wet.
• Do not disassemble or modify your external USB memory.
•When connecting a USB memory, position it horizontally with the
BK-7m’s USB MEMORY port and insert it without using excessive
force. The USB MEMORY port may be damaged if you use excessive
force when inserting a USB memory.
• Do not insert anything other than a USB memory (e.g., wire, coins,
other types of device) into the USB MEMORY port. Doing so will
damage the BK-7m’s USB MEMORY port.
r
6
Page 7

• Do not apply excessive force to the connected USB memory or the
• GS ( ) is a registered trademark of Roland Corporation.
• Cakewalk is a registered trademark, and the SONAR and Cakewalk logos are trademarks of Cakewalk, Inc.
• Lexicon Pantheon is a trademark of Lexicon Pro, a Harman International Company.
•Microsoft and Windows are registered trademarks of Microsoft Corporation.
• The screen shots in this document are used in compliance with the guidelines of the Microsoft Corporation.
• Apple and Macintosh are registered trademarks of Apple Inc.
•Mac OS is a trademark of Apple Inc.
•All product names mentioned in this document are trademarks or registered trademarks of their respective owners.
•MPEG Layer-3 audio compression technology is licensed from Fraunhofer IIS Corporation and THOMSON Multimedia Corporation.
• Copyright © 2003 by Bitstream, Inc. All rights reserved. Bitstream Vera is a trademark of Bitstream, Inc.
• Copyright © 2011 BOSS CORPORATION. All rights reserved. No part of this publication may be reproduced in any form without the written permission of BOSS CORPORATION.
• MMP (Moore Microprocessor Portfolio) refers to a patent portfolio concerned with microprocessor architecture, which was developed by Technology Properties Limited (TPL). Roland has licensed this technology from the TPL group.
BK-7m’s USB MEMORY port.
• Never connect your USB memory to the BK-7m via a USB hub.
Liability and copyright
• Recording, duplication, distribution, sale, lease, performance, or
broadcast of copyrighted material (musical works, visual works,
broadcasts, live performances, etc.) belonging to a third party in
part or in whole without the permission of the copyright owner is
forbidden by law.
• Do not use this unit for purposes that could infringe on a copyright held by a third party. Roland assumes no responsibility whatsoever with regard to any infringements of third-party copyrights
arising through your use of this unit.
About audio files
• Audio files in the following formats can be played back:
•WAV format
• 16-bit linear
• Sampling rate of 44.1kHz
• Stereo/mono
•mp3 files:
•MPEG-1 Audio Layer 3
• Sampling frequency: 8/11.025/12/16/22.05/24/32/44.1/48kHz
•Bit rate: 32/40/48/56/64/80/96/112/128/160/192/224/256/
320kbps, VBR (variable bit rate)
Backing Module BK-7m
r
Important notes
Supported Standard MIDI Files
• Format 0/1
7
Page 8

Backing Module
Features
BK-7m
2. Features
The BK-7m is a professional backing module designed to provide everything the entertaining artist and serious amateur
musician needs on the stage, in the studio, or at home.
High-quality sounds
The best sounds generated by a top-level sound generator with 128-voice polyphony.
The BK-7m also contains two sounds that use
SuperNATURAL technology to realistically express the
sounds and simulate performance techniques of
these acoustic instruments.
Technology
SuperNATURAL is Roland’s proprietary sound-generation
technology that realistically reproduces the tonal changes
and performance techniques distinctive of an acoustic
instrument, allowing you to perform music that is natural
and richly expressive.
High-quality Music Styles
Your BK-7m comes loaded with over 400 impressive
accompaniment covering every musical genre. Each
Style comprises 4 Intros, 4 Main variations, 4 Endings,
3 “Up” and 3 “Down” Fill-Ins.
Four different settings for each Music Style (One
Touch)
Four different settings that assign the most suitable
tones, effects and other parameters to the real-time
parts depending on the Music Style you select.
USB-based Standard MIDI Files and Style player
The BK-7m plays Standard MIDI Files and Music
Styles directly from a connected USB memory.
16 Song parts
The BK-7m also provides 16 Song parts, which are
used for Standard MIDI File playback but can also be
controlled via MIDI (a computer connected to the
MIDI IN socket or the COMPUTER USB port). This
allows you to use the BK-7m as a 16-part multitimbral MIDI tone generator.
Cover function for Standard MIDI files and Music
Styles
Simply by selecting one of 30 presets, you can cause
a Viennese waltz to be played back by a heavy metal
band, etc. Even though the arrangement (rhythm,
riffs) does not change, the song’s character can be
changed beyond recognition.
Song and Style Makeup Tools for Standard MIDI
Files and Music Styles
These tools allow you to modify songs in no time
without knowing the MIDI commands normally used
to perform such changes.
Performance List function
This function allows you to save nearly all of the
BK-7m’s settings for each song and/or Music Style
you will be using during your performances. The list
that contains these settings can be saved to a USB
memory and loaded from there whenever the need
arises.
USB-based audio player and audio recorder
The BK-7m contains an audio player function that
allows you to play back mp3 and WAV files directly
from a connected USB memory.
The BK-7m also allows you to record your performances. The resulting WAV files (audio) can be played
back on the BK-7m itself.
Wizard connection
Simply following the instructions of the BK-7m’s
Wizard connection will allow you to connect the
BK-7m to an external MIDI controller (digital piano,
MIDI master keyboard, digital accordion, etc.) and to
start playing right away.
Four real-time parts
The BK-7m comes with four MIDI parts (Upper 1,
Upper 2, Lower, Manual Bass) that can be played in
real time—either together or in isolation.
16 NTA parts (Note-to-Arranger)
The BK-7m provides up to 16 MIDI parts dedicated to
Arranger control via MIDI (“Note-to-Arranger”).
Multi-effects for Music Styles or Standard MIDI
files and real-time parts
With a view to obtaining the highest possible sound
quality, the BK-7m contains three dedicated multieffects processors (MFX A, B, and C) for the Standard
MIDI Files and Music Styles you play back. In addition,
there is one MFX processor for the real-tim parts
(Upper 1, Upper 2, Lower, Manual Bass).
Composite Video Out
The BK-7m’s VIDEO OUTPUT socket can be connected
to an external screen, allowing your audience or fellow musicians to follow the lyrics and chord symbols
of the songs you perform.
…and so much more!
r
8
Page 9

Contents
Backing Module BK-7m
r
1. Important notes. . . . . . . . . . . . . . . . . . . . . . . . . . . . . 6
2. Features. . . . . . . . . . . . . . . . . . . . . . . . . . . . . . . . . . . . 8
3. Panel description . . . . . . . . . . . . . . . . . . . . . . . . . . .11
Front panel. . . . . . . . . . . . . . . . . . . . . . . . . . . . . . . . . . . . 11
Rear panel . . . . . . . . . . . . . . . . . . . . . . . . . . . . . . . . . . . . 13
4. Shortcut list . . . . . . . . . . . . . . . . . . . . . . . . . . . . . . . 14
5. Before you start using the BK-7m. . . . . . . . . . . . . 15
Connecting the AC adaptor . . . . . . . . . . . . . . . . . . . . . 15
Connecting the BK-7m to an amplifier, mixer, etc. . 15
Connecting a MIDI device. . . . . . . . . . . . . . . . . . . . . . . 16
Connecting the BK-7m to your computer . . . . . . . . . 17
If the computer doesn’t ‘see’ the BK-7m . . . . . . . . . . . . . 17
Connecting a television set. . . . . . . . . . . . . . . . . . . . . . 17
Connecting an optional footswitch, pedal or pedal
unit . . . . . . . . . . . . . . . . . . . . . . . . . . . . . . . . . . . . . . . . . . 17
Attaching the BK-7m to a stand . . . . . . . . . . . . . . . . . 18
Listening through headphones . . . . . . . . . . . . . . . . . . 19
Turning the power on/off . . . . . . . . . . . . . . . . . . . . . . . 19
Turning the power on. . . . . . . . . . . . . . . . . . . . . . . . . . . . . . 19
Turning the power off . . . . . . . . . . . . . . . . . . . . . . . . . . . . .20
Demo of the BK-7m. . . . . . . . . . . . . . . . . . . . . . . . . . . . 20
6. Basic operation of the BK-7m . . . . . . . . . . . . . . . . 21
About the display and cursor operation. . . . . . . . . . . 21
Main page. . . . . . . . . . . . . . . . . . . . . . . . . . . . . . . . . . . . . . . .21
Moving the cursor and setting parameter values . . . . . .21
Moving between windows. . . . . . . . . . . . . . . . . . . . . . . . . .21
7. Wizard Connection . . . . . . . . . . . . . . . . . . . . . . . . .22
Generic procedure . . . . . . . . . . . . . . . . . . . . . . . . . . . . . 22
Details about the ‘Wizard Connection’ categories . . 23
‘DIGITAL PIANO’ category . . . . . . . . . . . . . . . . . . . . . . . . . .23
‘ACCORDION’ category. . . . . . . . . . . . . . . . . . . . . . . . . . . . .23
‘MASTER KEYBOARD’ category . . . . . . . . . . . . . . . . . . . . . .24
‘GUITAR’ category . . . . . . . . . . . . . . . . . . . . . . . . . . . . . . . . .24
‘DIGITAL ORGAN’ category. . . . . . . . . . . . . . . . . . . . . . . . . .25
‘COMPUTER/SEQUENCER’ category . . . . . . . . . . . . . . . . . .25
8. Playing the BK-7m’s real-time parts . . . . . . . . . . .27
Switching real-time parts on and off . . . . . . . . . . . . .27
Selecting Tones for the real-time parts . . . . . . . . . . . 27
Selecting Tones using the [PART] button . . . . . . . . . . . . . 27
Using the [UP1], [UP2], [LWR] and [MBS] buttons to
select Tones . . . . . . . . . . . . . . . . . . . . . . . . . . . . . . . . . . . . . .28
Selecting a Tone on the main page . . . . . . . . . . . . . . . . . .28
Selecting SuperNATURAL sounds (UP1 part) . . . . . . . . . .29
9. Music Style functions . . . . . . . . . . . . . . . . . . . . . . . 30
Volume balance between the backing and the real-
time parts. . . . . . . . . . . . . . . . . . . . . . . . . . . . . . . . . . . . . 30
About the Music Styles . . . . . . . . . . . . . . . . . . . . . . . . . 30
Using Music Styles . . . . . . . . . . . . . . . . . . . . . . . . . . . . . 30
Selecting Music Styles . . . . . . . . . . . . . . . . . . . . . . . . . . 32
Playing back Music Styles . . . . . . . . . . . . . . . . . . . . . . .33
Using the ‘One Touch’ function . . . . . . . . . . . . . . . . . . 34
10. Using the BK-7m as a USB player . . . . . . . . . . . . . 35
Getting ready to use the BK-7m as a USB player. . . 35
File types the BK-7m can read and play back . . . . . . . . . 35
Selecting a song or Music Style on a USB memory. 35
Playing back a song or Music Style from a USB
memory . . . . . . . . . . . . . . . . . . . . . . . . . . . . . . . . . . . . . . 36
11. Other important functions . . . . . . . . . . . . . . . . . . . 37
Changing the key. . . . . . . . . . . . . . . . . . . . . . . . . . . . . . 37
Changing the octave. . . . . . . . . . . . . . . . . . . . . . . . . . . 37
Using ‘Track Mute’ and ‘Center Cancel’ . . . . . . . . . . . 38
Selecting the track(s) to mute for Music Styles or SMF
songs . . . . . . . . . . . . . . . . . . . . . . . . . . . . . . . . . . . . . . . . . . . 38
Using Split mode . . . . . . . . . . . . . . . . . . . . . . . . . . . . . . 39
Metronome . . . . . . . . . . . . . . . . . . . . . . . . . . . . . . . . . . . 40
12. Performance Lists . . . . . . . . . . . . . . . . . . . . . . . . . . 41
Performance/Music Assistant Info . . . . . . . . . . . . . . . 41
Loading a Performance/Music Assistant List. . . . . . . 41
Recalling a Performance/Music Assistant memory . 42
Quickly locating Performance memories. . . . . . . . . . 42
Saving your settings as a Performance . . . . . . . . . . . 43
Other Performance List functions. . . . . . . . . . . . . . . . 43
If you select ‘Edit’. . . . . . . . . . . . . . . . . . . . . . . . . . . . . . . . . 44
If you select ‘Rename’. . . . . . . . . . . . . . . . . . . . . . . . . . . . . 44
If you select ‘Delete’ . . . . . . . . . . . . . . . . . . . . . . . . . . . . . . 45
If you select ‘Make New’. . . . . . . . . . . . . . . . . . . . . . . . . . . 45
13. Recording your performance as audio data . . . . . 46
Recording . . . . . . . . . . . . . . . . . . . . . . . . . . . . . . . . . . . . 46
Listening to your recording . . . . . . . . . . . . . . . . . . . . . . . . 47
Saving your recording as an audio file . . . . . . . . . . . . . . 47
14. Cover functions for Music Styles and SMF songs 48
Using Music Style or SMF Covers . . . . . . . . . . . . . . . . 48
Saving your modified Music Style or SMF song . . . . 49
15. Menu options. . . . . . . . . . . . . . . . . . . . . . . . . . . . . . 50
General procedure. . . . . . . . . . . . . . . . . . . . . . . . . . . . . 50
‘Performance Edit’ parameters . . . . . . . . . . . . . . . . . . 50
‘Tone Part View’ parameters . . . . . . . . . . . . . . . . . . . . . . . 51
‘Tone Part Effects’ parameters. . . . . . . . . . . . . . . . . . . . . . 54
‘Style Parts’ parameters . . . . . . . . . . . . . . . . . . . . . . . . . . . 59
Split . . . . . . . . . . . . . . . . . . . . . . . . . . . . . . . . . . . . . . . . . . . . 59
Key . . . . . . . . . . . . . . . . . . . . . . . . . . . . . . . . . . . . . . . . . . . . . 59
‘Arranger Setting’ parameters . . . . . . . . . . . . . . . . . . . . . . 60
‘Melody Intelligent’ parameters . . . . . . . . . . . . . . . . . . . . 61
Save As Default . . . . . . . . . . . . . . . . . . . . . . . . . . . . . . . . . . 61
‘Global’ parameters . . . . . . . . . . . . . . . . . . . . . . . . . . . . 62
Save Global. . . . . . . . . . . . . . . . . . . . . . . . . . . . . . . . . . . . . . 65
MIDI parameters . . . . . . . . . . . . . . . . . . . . . . . . . . . . . . 66
Loading a MIDI Set . . . . . . . . . . . . . . . . . . . . . . . . . . . . . . . 66
Edit Style Parts. . . . . . . . . . . . . . . . . . . . . . . . . . . . . . . . . . . 66
Edit Song Parts. . . . . . . . . . . . . . . . . . . . . . . . . . . . . . . . . . . 67
Edit Tone Parts . . . . . . . . . . . . . . . . . . . . . . . . . . . . . . . . . . . 68
Edit System. . . . . . . . . . . . . . . . . . . . . . . . . . . . . . . . . . . . . . 68
Sync . . . . . . . . . . . . . . . . . . . . . . . . . . . . . . . . . . . . . . . . . . . . 68
Basic. . . . . . . . . . . . . . . . . . . . . . . . . . . . . . . . . . . . . . . . . . . . 69
Style . . . . . . . . . . . . . . . . . . . . . . . . . . . . . . . . . . . . . . . . . . . . 70
NTA. . . . . . . . . . . . . . . . . . . . . . . . . . . . . . . . . . . . . . . . . . . . . 70
Parameters . . . . . . . . . . . . . . . . . . . . . . . . . . . . . . . . . . . . . . 71
Save MIDI Set . . . . . . . . . . . . . . . . . . . . . . . . . . . . . . . . . . . . 71
9
Page 10

Backing Module BK-7m
Mastering Tools. . . . . . . . . . . . . . . . . . . . . . . . . . . . . . . . 71
SMF/Style Compressor . . . . . . . . . . . . . . . . . . . . . . . . . . . . .71
SMF/Style Equalizer . . . . . . . . . . . . . . . . . . . . . . . . . . . . . . .73
Tone/Part Compressor . . . . . . . . . . . . . . . . . . . . . . . . . . . . .74
Tone/Part Equalizer. . . . . . . . . . . . . . . . . . . . . . . . . . . . . . . .74
Makeup Tools (Style and SMF) . . . . . . . . . . . . . . . . . . . 75
Using the Makeup Tools. . . . . . . . . . . . . . . . . . . . . . . . . . . . 75
Common. . . . . . . . . . . . . . . . . . . . . . . . . . . . . . . . . . . . . . . . . 75
Instrument . . . . . . . . . . . . . . . . . . . . . . . . . . . . . . . . . . . . . . .76
Freeze Data. . . . . . . . . . . . . . . . . . . . . . . . . . . . . . . . . . . . . . . 81
Saving your new Music Style or song (SMF) version . . .81
V-LINK function . . . . . . . . . . . . . . . . . . . . . . . . . . . . . . . 82
Factory Reset. . . . . . . . . . . . . . . . . . . . . . . . . . . . . . . . . . 83
Formatting a USB memory . . . . . . . . . . . . . . . . . . . . . . 83
16. Using the BK-7m with SONAR LE . . . . . . . . . . . . . .84
Installing Sonar LE . . . . . . . . . . . . . . . . . . . . . . . . . . . . . 84
BK-7m instrument definitions . . . . . . . . . . . . . . . . . . . . . . 84
17. Troubleshooting . . . . . . . . . . . . . . . . . . . . . . . . . . . .85
18. ‘Wizard Connection’ settings. . . . . . . . . . . . . . . . . .87
19. Music Style list . . . . . . . . . . . . . . . . . . . . . . . . . . . . .88
Style division program change numbers. . . . . . . . . . . . . .90
Recalling a Performance memory from the loaded
Performance List via MIDI . . . . . . . . . . . . . . . . . . . . . . . . . 90
20. Tone List. . . . . . . . . . . . . . . . . . . . . . . . . . . . . . . . . . .91
21. Drum Sets . . . . . . . . . . . . . . . . . . . . . . . . . . . . . . . . .96
22. Specifications . . . . . . . . . . . . . . . . . . . . . . . . . . . . 104
23. MIDI Implementation Chart . . . . . . . . . . . . . . . . 106
24. MFX types and parameters . . . . . . . . . . . . . . . . . 107
r
10
Page 11
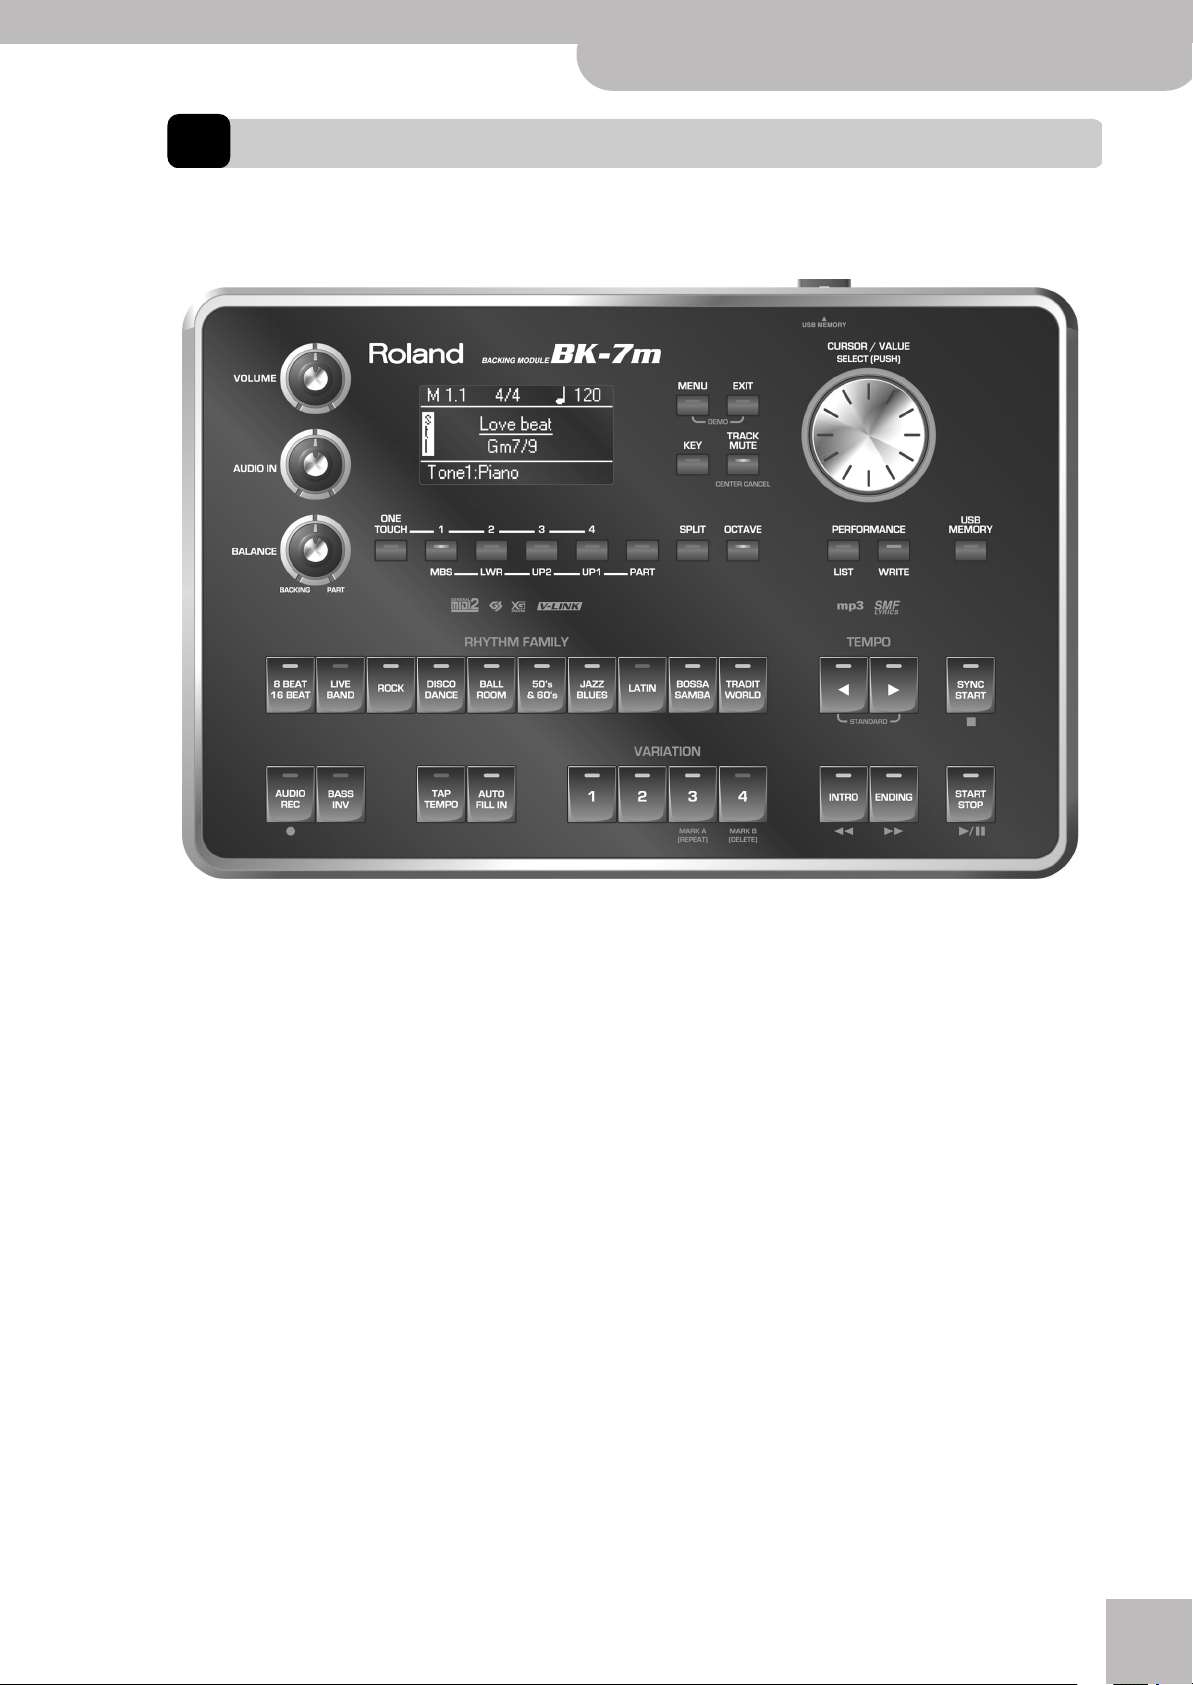
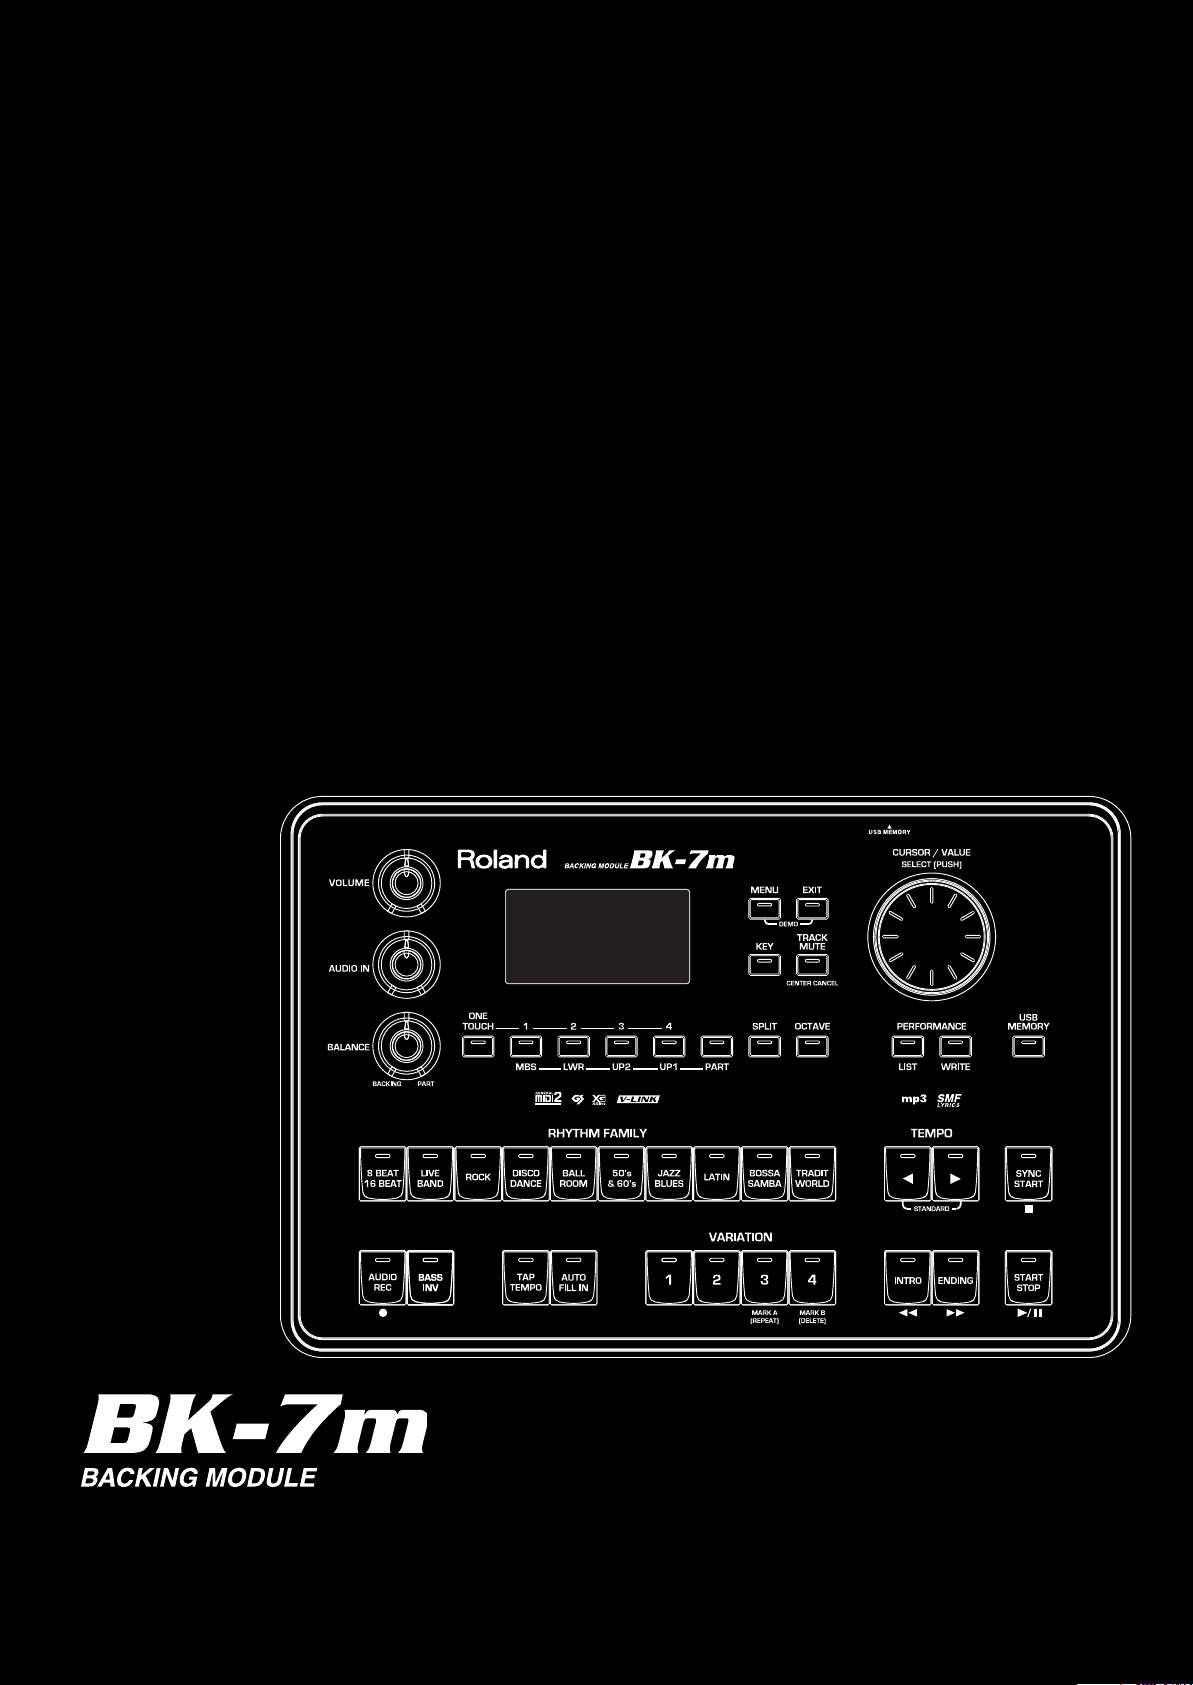
3. Panel description
Front panel
Backing Module BK-7m
Panel description
r
A
D
B
J
K
C
RST
UV WX Y Za b
A
VOLUME knob
Use this knob to set the BK-7m’s global output volume (all signals transmitted to the OUTPUT sockets).
The setting of this knob also determines the volume
in the headphones you may connect.
B
AUDIO IN knob
This knob allows you to set the input level of the signals received via the AUDIO INPUT jacks.
C
BALANCE knob
This knob allows you to set the balance between the
Music Styles and Songs (BACKING) and the real time
parts (PART).
D
Display
This display shows information related to your operation.
E
MENU button
This button allows you to open the BK-7m’s menu
page where you can view and select all available
functions. Press it together with the [EXIT] button to
listen to the BK-7m’s demo songs.
F
EXIT button
This button is used to return to a higher menu level.
Press and hold it to return to the BK-7m’s main display page.
E
G
MN OP Q
L
G
KEY button
This button calls up the BK-7m’s transposition function. Its settings can be applied to Music Styles, Songs
and the four real-time parts (UP1, UP2, LWR, MBS).
If the button’s indicator doesn’t light, the Music
Styles, Songs and the four real-time parts use their
normal pitch.
H
TRACK MUTE/CENTER CANCEL button
This button lets you mute the melody part of the
selected Standard MIDI File, or attenuate the vocal
part at the center of an audio file (WAV or mp3),
allowing you to sing or play that part yourself.
Pressing and holding this button calls up a display
page where you can select the Standard MIDI File
part(s) that you don’t want to hear.
I
CURSOR/VALUE dial
This dial can be used to move the cursor in the display, to select parameters and to set values. By pressing it, you can select items in the display (SELECT).
J
ONE TOUCH button
After pressing this button, you can use the [1], [2], [3]
and [4] buttons to select the desired One Touch
memory.
F
H
I
11
Page 12

Backing Module BK-7m
Panel description
K
1/2/3/4 & MBS/LWR/UP2/UP1 buttons
These buttons are used to either select a One Touch
memory (if [ONE TOUCH] lights) or to switch the realtime parts (Upper1, Upper2, Lower, Manual Bass) on
and off (if [PART] lights).
While the [PART] button lights, pressing and holding
one of these four buttons calls up a display page
where you can select another sound (“Tone”) for the
real-time part in question.
L
PART button
After pressing this button, you can use the [1/UP1],
[2/UP2], [3/LWR] and [4/MBS] buttons to switch the
corresponding real-time parts on and off (page 27).
M
SPLIT button
This button is used to activate Split mode. While its
indicator lights, notes played to the left of the C4 on
an external keyboard trigger the LWR, MBS and NTA
parts, if they are on. Notes to the right of the split
point, on the other hand, trigger the UP1 and UP2
parts. See “Using Split mode” on p. 39.
N
OCTAVE button
This button allows you to transpose the real-time
parts in octave steps (page 37).
O
PERFORMANCE LIST button
This button calls up the Performance List (page 41).
P
PERFORMANCE WRITE button
The main function of the button is to save Performance settings. Depending on the selected display
page, it can also be used to save Music Styles, and
songs.
Q
USB MEMORY button
Press this button to call up a list of the files stored on
the USB memory connected to the BK-7m‘s USB
MEMORY port.
R
RHYTHM FAMILY buttons
These buttons are used to select the family of the
next Music Style you want to use. Pressing one of
these buttons calls up a list of all Music Styles contained in the selected family.
S
TEMPO buttons
These buttons can be used to decrease or increase the
tempo of the currently selected Music Style or song.
Pressing them together recalls the Music Style’s or
song’s stored tempo value.
NOTE
You can also use the [TAP TEMPO] button W to set the
desired tempo.
T
SYNC START button
This buttons is used to activate or switch off the
BK-7m’s Sync Start function. If it is on, Music Style
playback can be started by simply playing a note or
chord on the external keyboard. See also page 31.
While a song file is selected, this button stops playback.
U
AUDIO REC button
This button is used to start audio recording of your
performance. This function records everything the
BK-7m transmits to its OUTPUT sockets (audio signals
you play back and audio versions of the MIDI parts
you control). See page 46.
V
BASS INV button
This button is used to switch the Bass Inversion function on and off (page 32).
W
TAP TEMPO button
Pressing this button several times allows you to
change the current Music Style’s or song’s tempo to
the value calculated from the speed at which the
button is pressed.
Pressing and holding this button calls up the BK-7m’s
“Metronome” page.
X
AUTO FILL IN button
This button is used to activate the Auto Fill-In function, which causes a transition to be played before
selecting the new Music Style Variation (which is
selected with the VARIATION buttons).
Y
VARIATION 1/2/3/4 buttons
These buttons are used to select a Music Style “Variation”, i.e. a simpler or more complex arrangement of
the selected Music Style.
Z
INTRO button
When you activate this button, Music Style playback
starts with a musical introduction whose complexity
depends on which VARIATION button currently lights
(there are four different introductions per Music
Style).
After selecting a song file, this button allows you to
rewind.
NOTE
You can also press this button during Music Style playback.
a
ENDING button
When you activate this button, Music Style stops
with a musical ending whose complexity depends on
which VARIATION button currently lights (there are
four different ending phrases per Music Style).
After selecting a song file, this button allows you to
fast-forward.
b
START/STOP button
This button allows you to start and stop Music Style
playback. If you select a song, it starts and temporarily stops (pause) song playback.
r
12
Page 13
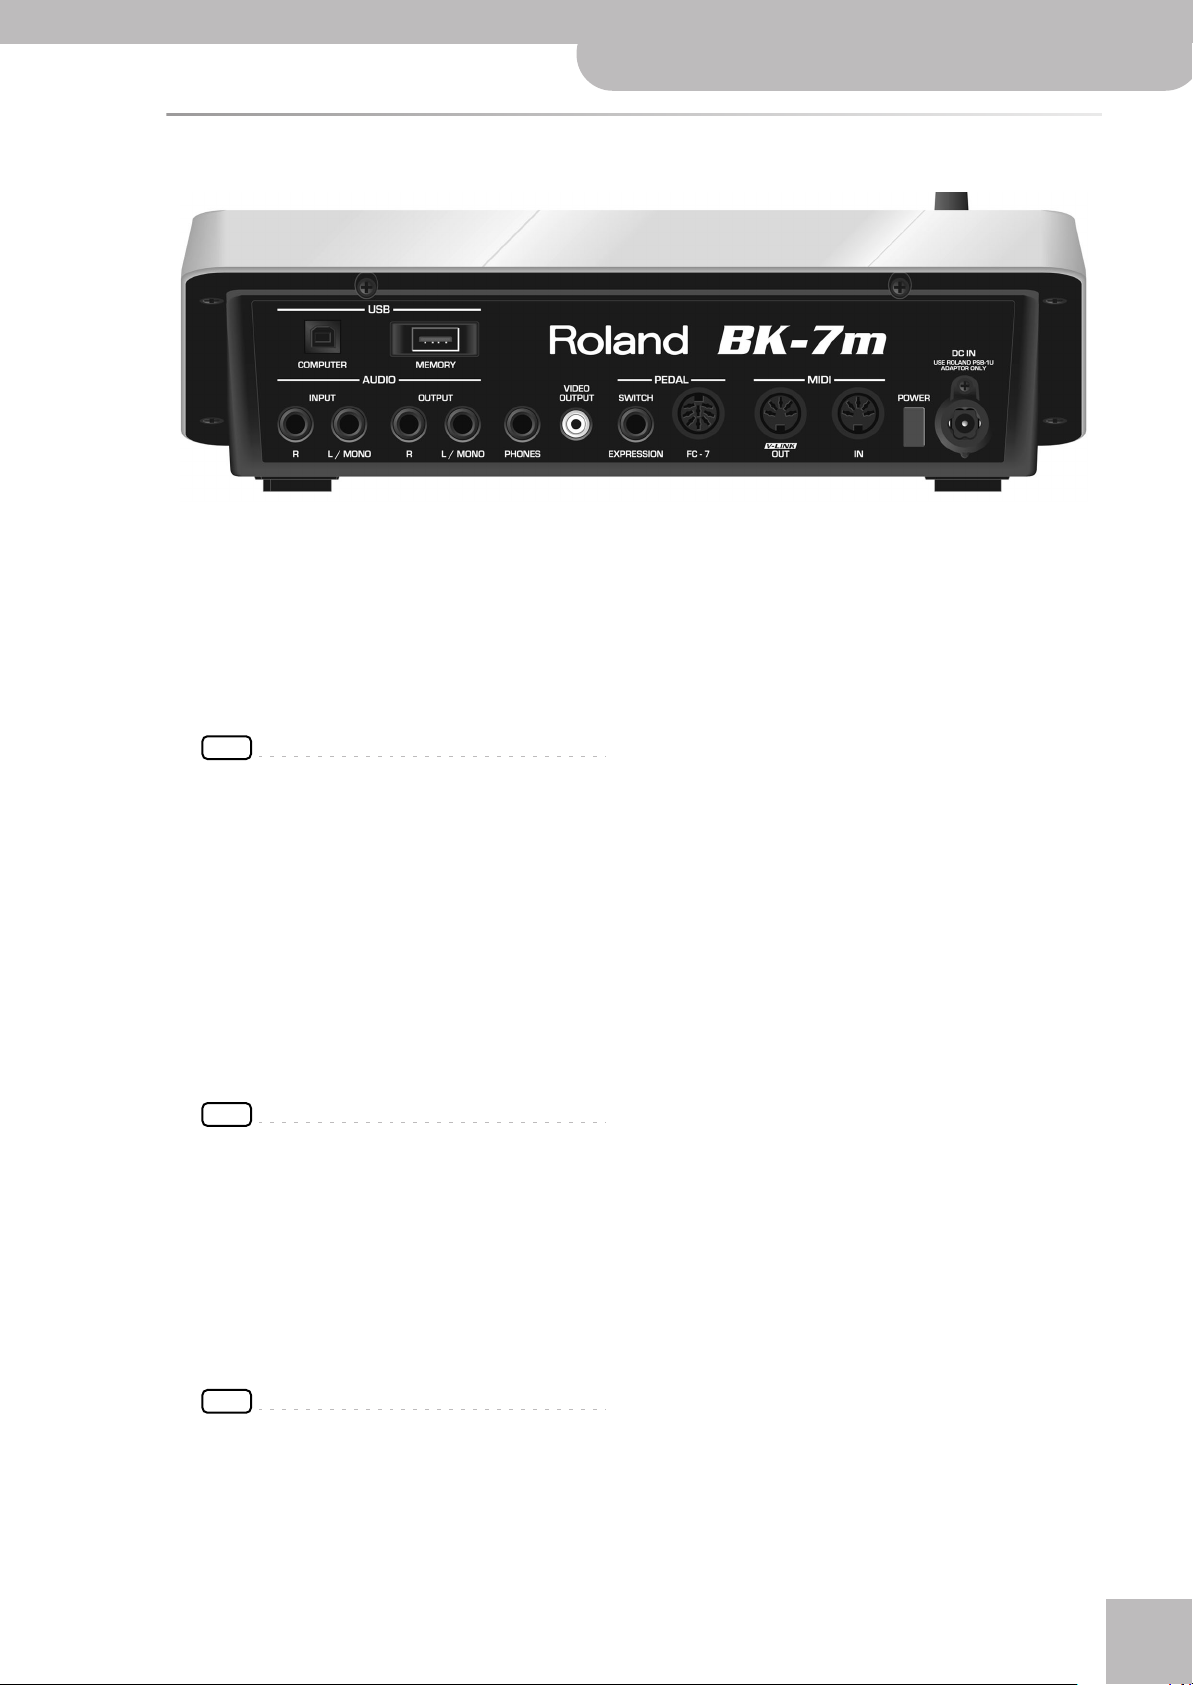
Rear panel
Backing Module BK-7m
r
Rear panel
AB
CD E
A
USB COMPUTER port
Use a USB cable to connect the BK-7m to your computer via this connector (page 17).
B
USB MEMORY port
Connect a optional USB memory here.
Note: Roland does not recommend using USB hubs, irrespective of whether they are active or passive. Please connect only one USB memory to this port.
NOTE
Use USB memory sold by Roland. We cannot guarantee
operation if any another USB memory is used.
C
AUDIO INPUT R & L/MONO sockets
These sockets allow you to connect the audio outputs
of an external signal source (CD/mp3 player, synthesizer, etc.).
(The [AUDIO IN] knob on the front panel allows you
to set the input level of the signals received via these
sockets.)
D
AUDIO OUTPUT R & L/MONO sockets
These sockets transmit all audio signals the BK-7m
generates as well as the signals you input to the
BK-7m.
FG H
G
PEDAL SWITCH/EXPRESSION socket
Connect a separately available pedal switch (Roland
DP-series), a separately available foot switch (BOSS
FS-5U) or a separately available expression pedal
(Roland EV-5) to this jack (page 17).
H
PEDAL FC-7 socket
This is where you connect an optional FC-7 pedal
unit. The functions of this unit are programmable on
the BK-7m. See “Pedal Controller FC-7” on p. 65.
I
MIDI IN & OUT sockets
You can connect MIDI devices to these sockets
(page 16).
J
POWER switch
Turns the power on/off (page 19).
K
DC IN socket
Connect the supplied AC adapter PSB-1U here
(page 15).
K
J
I
NOTE
If you can/want to use only one channel on your external
amplifier, connect the L/MONO socket to its input. For optimum sound quality, we recommend working in stereo,
though.
E
PHONES socket
This is where you can connect a pair of optional
headphones (Roland RH-series).
F
VIDEO OUTPUT socket
Connect this socket to the appropriate input of your
TV or external display.
NOTE
The signal format (PAL or NTSC) and aspect ratio selectable
(page 63).
13
Page 14
Backing Module BK-7m
Shortcut list
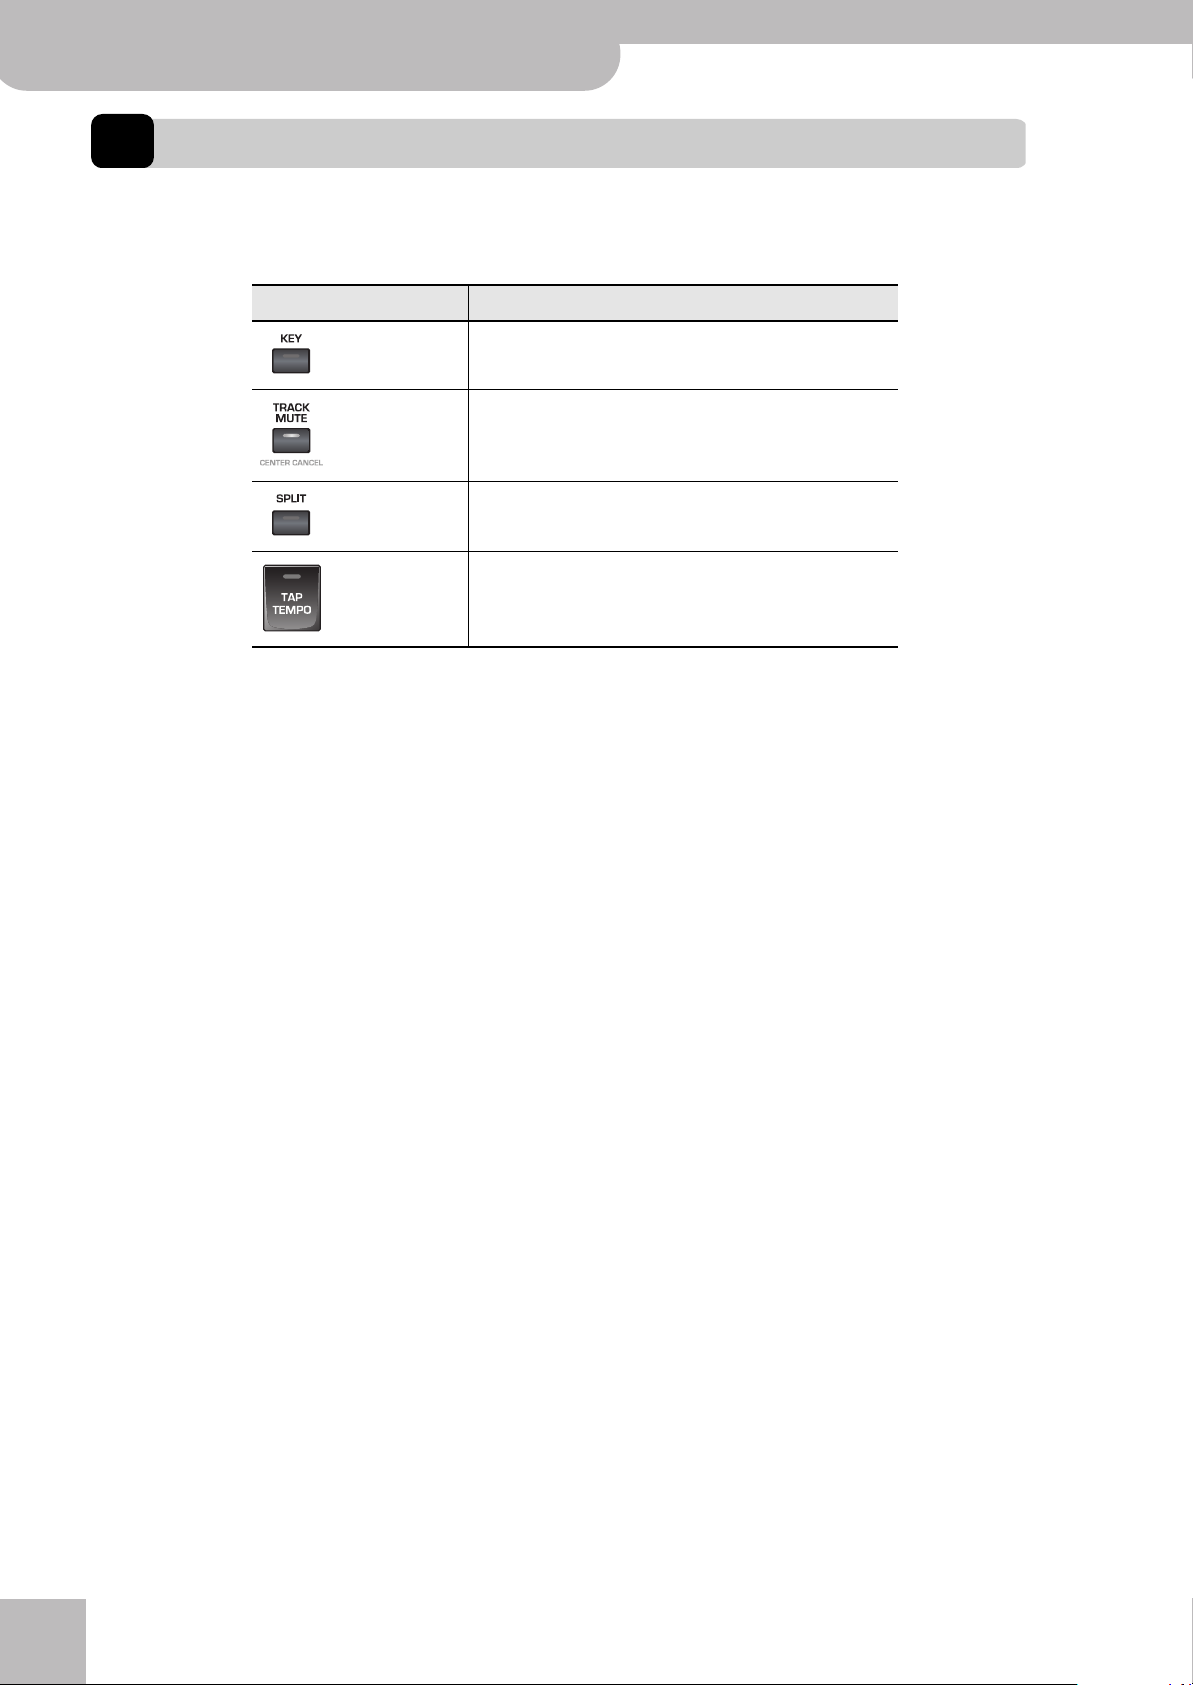
4. Shortcut list
Pressing and holding the following buttons allows you to directly jump to a related parameter page, which is faster than
selecting the page in question via the BK-7m’s menu
Press and hold Function
Transposition key default (“0”)
Open the “Style Track Mute” or “Song Track Mute” page
Open the “Split” page
Open the “Metronome” page
r
14
Page 15
5. Before you start using the BK-7m
Backing Module BK-7m
Before you start using the BK-7m
r
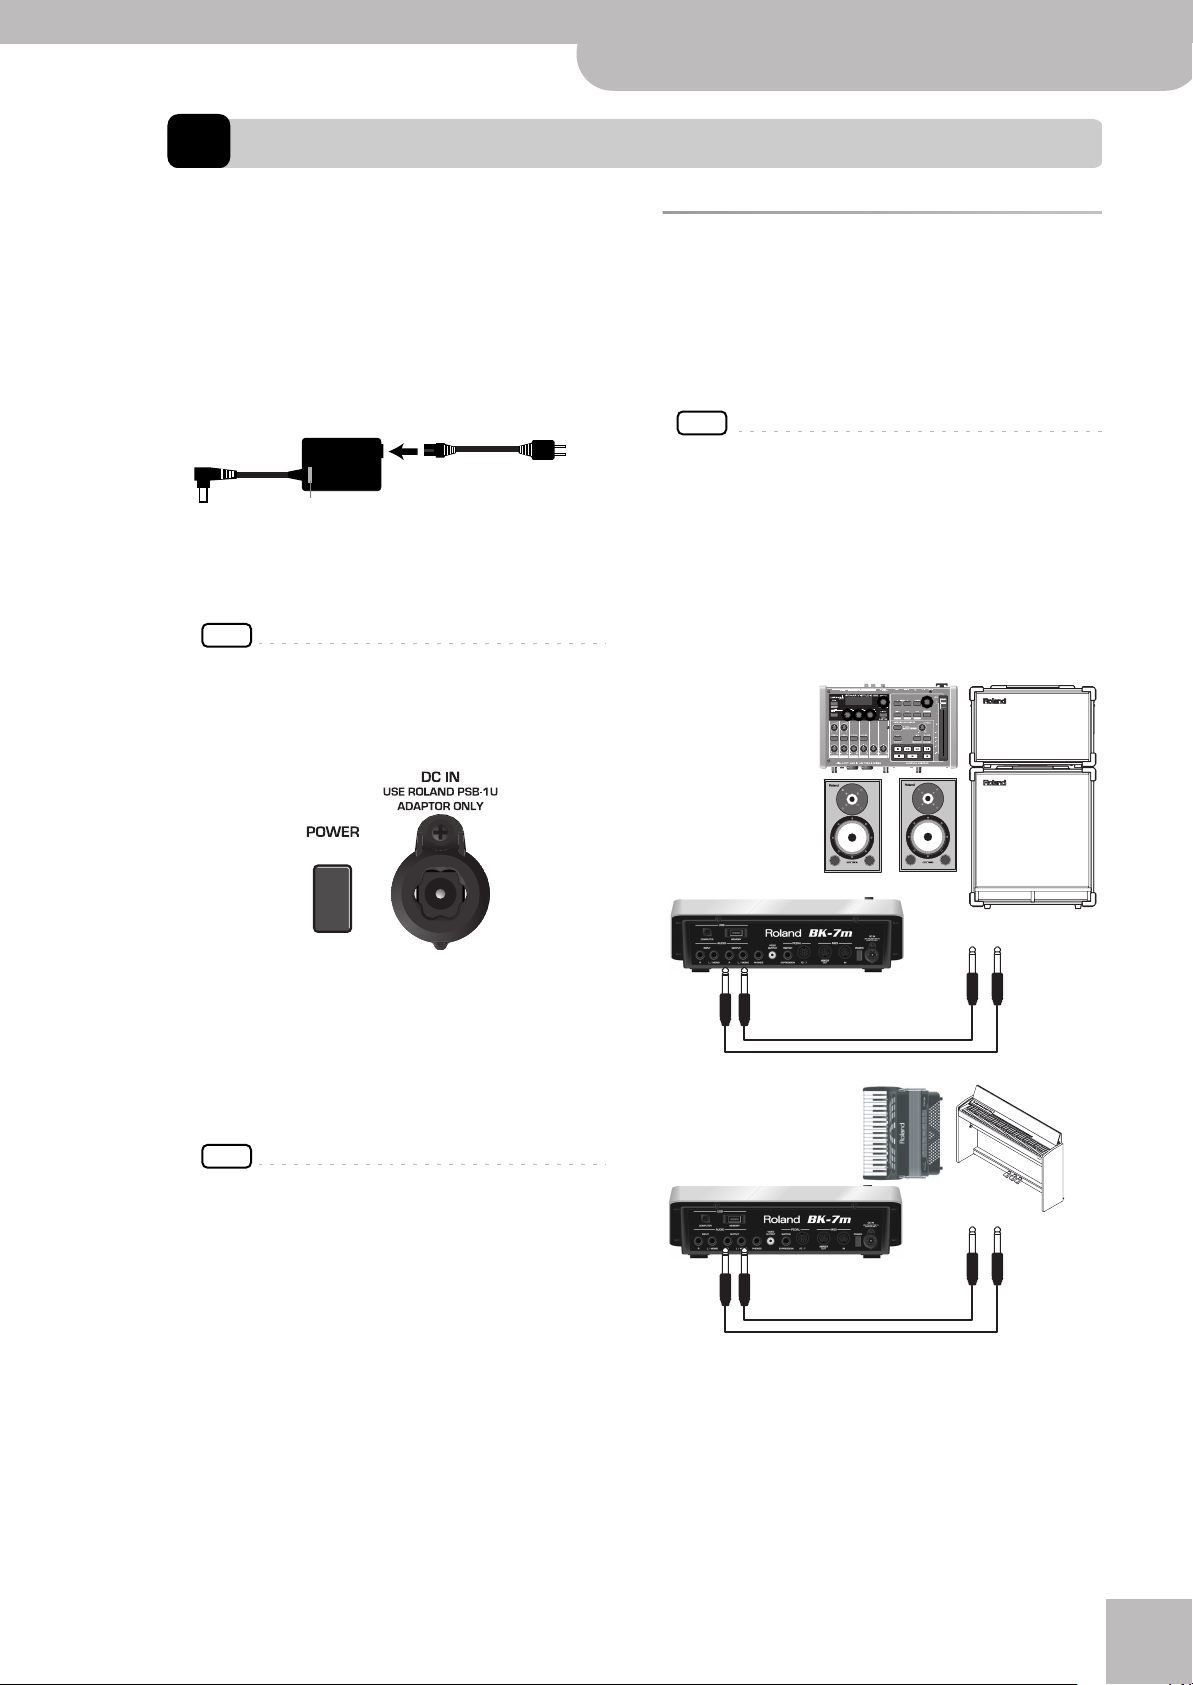
Connecting the AC adaptor
1.
Turn the [VOLUME] knob all the way to the
left to minimize the volume.
2.
Connect the included power cord to the AC
adapter.
The indicator will light once you plug the AC adaptor
into a wall outlet.
AC adapter Power cord
to an AC outlet
Indicator
Place the AC adapter so the side with the indicator
(see illustration) faces upwards and the side with textual information faces downwards.
NOTE
Depending on your region, the included power cord may
differ from the one shown above.
3.
Connect the AC adaptor to the BK-7m’s DC
IN jack.
BK-7m’s rear panel
Connecting the BK-7m to an
amplifier, mixer, etc.
You can also connect the BK-7m’s OUTPUT sockets to
the audio inputs of an external instrument (digital
piano, etc.), in which case you don’t need an external
amplifier.
NOTE
To prevent malfunction and/or damage to speakers or other
devices, always turn down the volume, and turn off the power
on all devices before making any connections.
1.
Switch off all devices.
2.
Connect the BK-7m’s OUTPUT jacks to the
inputs of your external device.
Connect the outputs of an external signal
source to the BK-7m’s INPUT sockets.
Connecting the BK-7m to an amplifier
4.
Plug the power cord into a power outlet.
Note: Be sure to use only the AC adapter supplied with the
unit (PSB-1U). Also, make sure the line voltage at the
installation matches the input voltage specified on the AC
adapter’s body. Other AC adapters may use a different
polarity, or be designed for a different voltage, so their use
could result in damage, malfunction, or electric shock.
NOTE
If you won’t be using the BK-7m for an extended period of
time, disconnect the power cord from the electrical outlet.
INPUT L + R
OUTPUT R + L/MONO
Connecting the BK-7m to the audio inputs of another instrument
INPUT
L + R
OUTPUT R + L/MONO
For the connection to an amplifier, please choose
unbalanced (mono) cables with 1/4” plugs at one end
(for the BK-7m). The connectors at the other end
need to match the input sockets of the device to
which you are connecting the BK-7m.
15
Page 16
Backing Module BK-7m
Before you start using the BK-7m
NOTE
When connection cables with resistors are used, the volume level of equipment connected to the audio inputs may
be low. If this happens, use connection cables that do not
contain resistors.
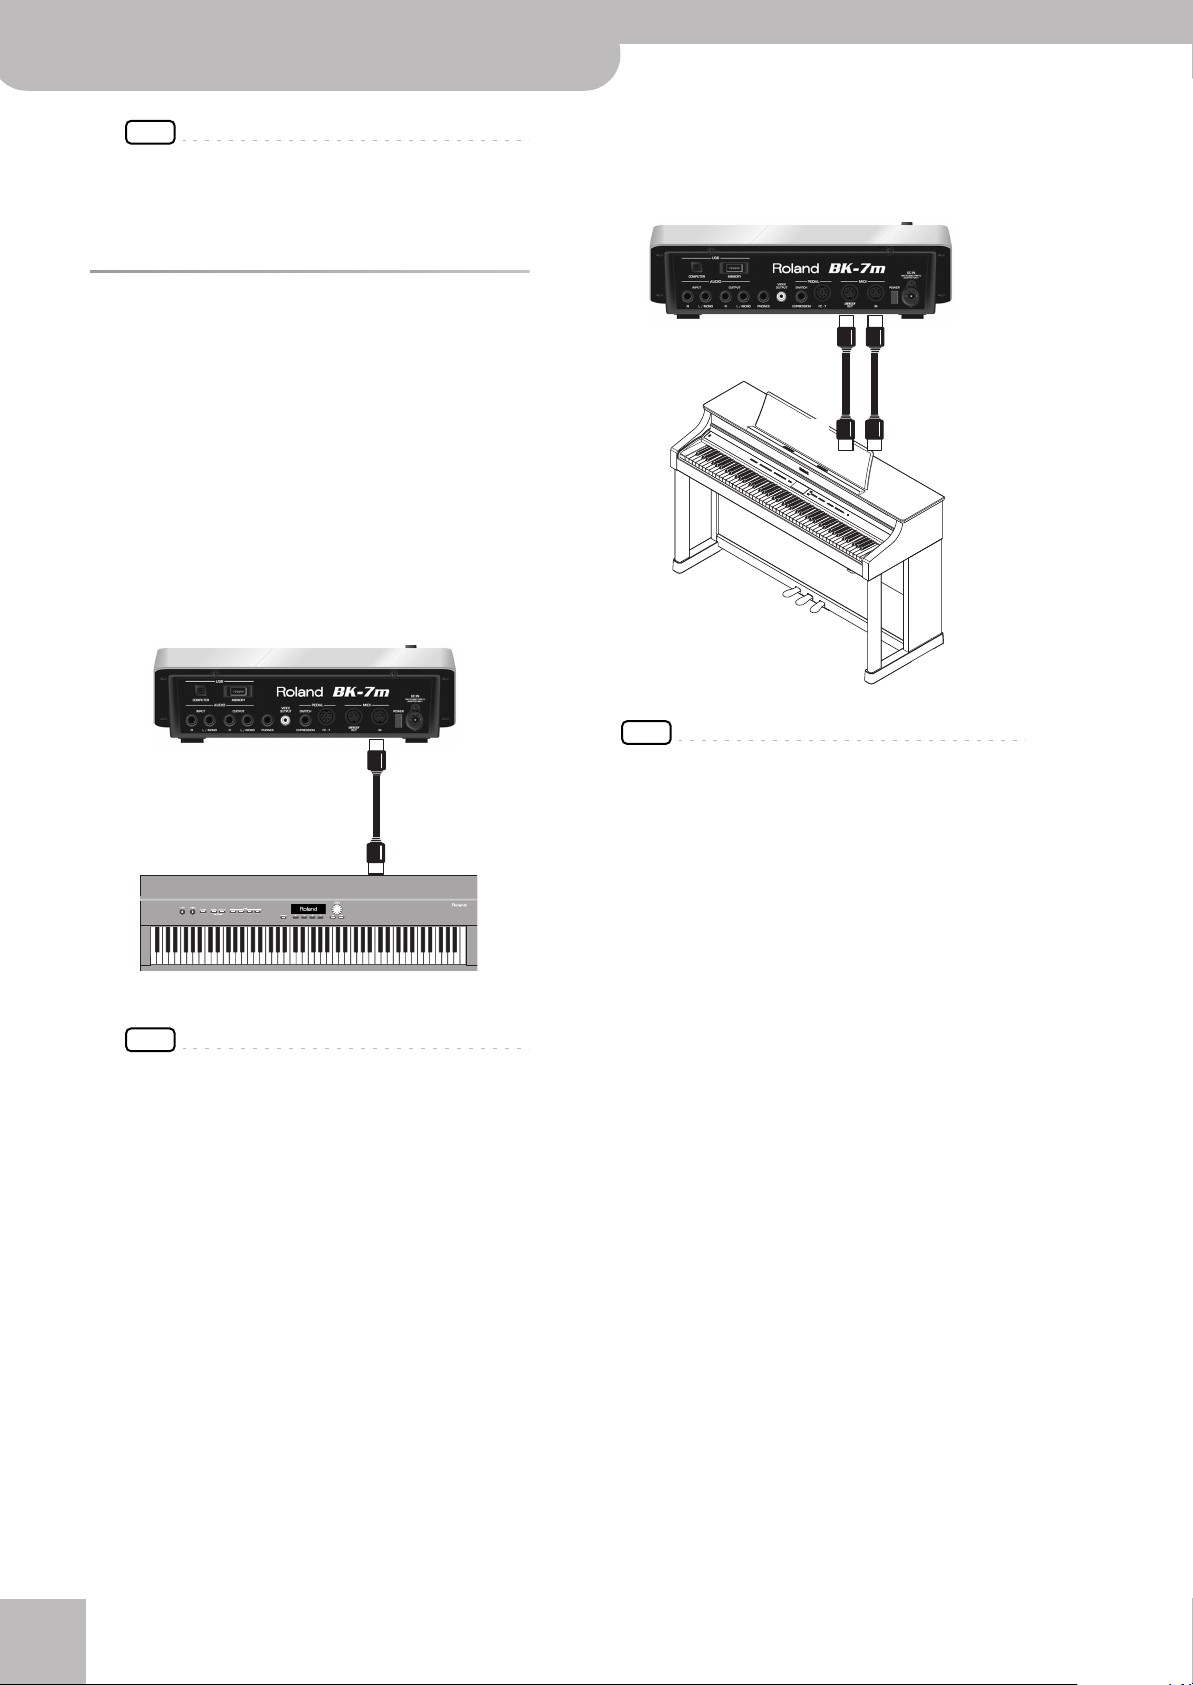
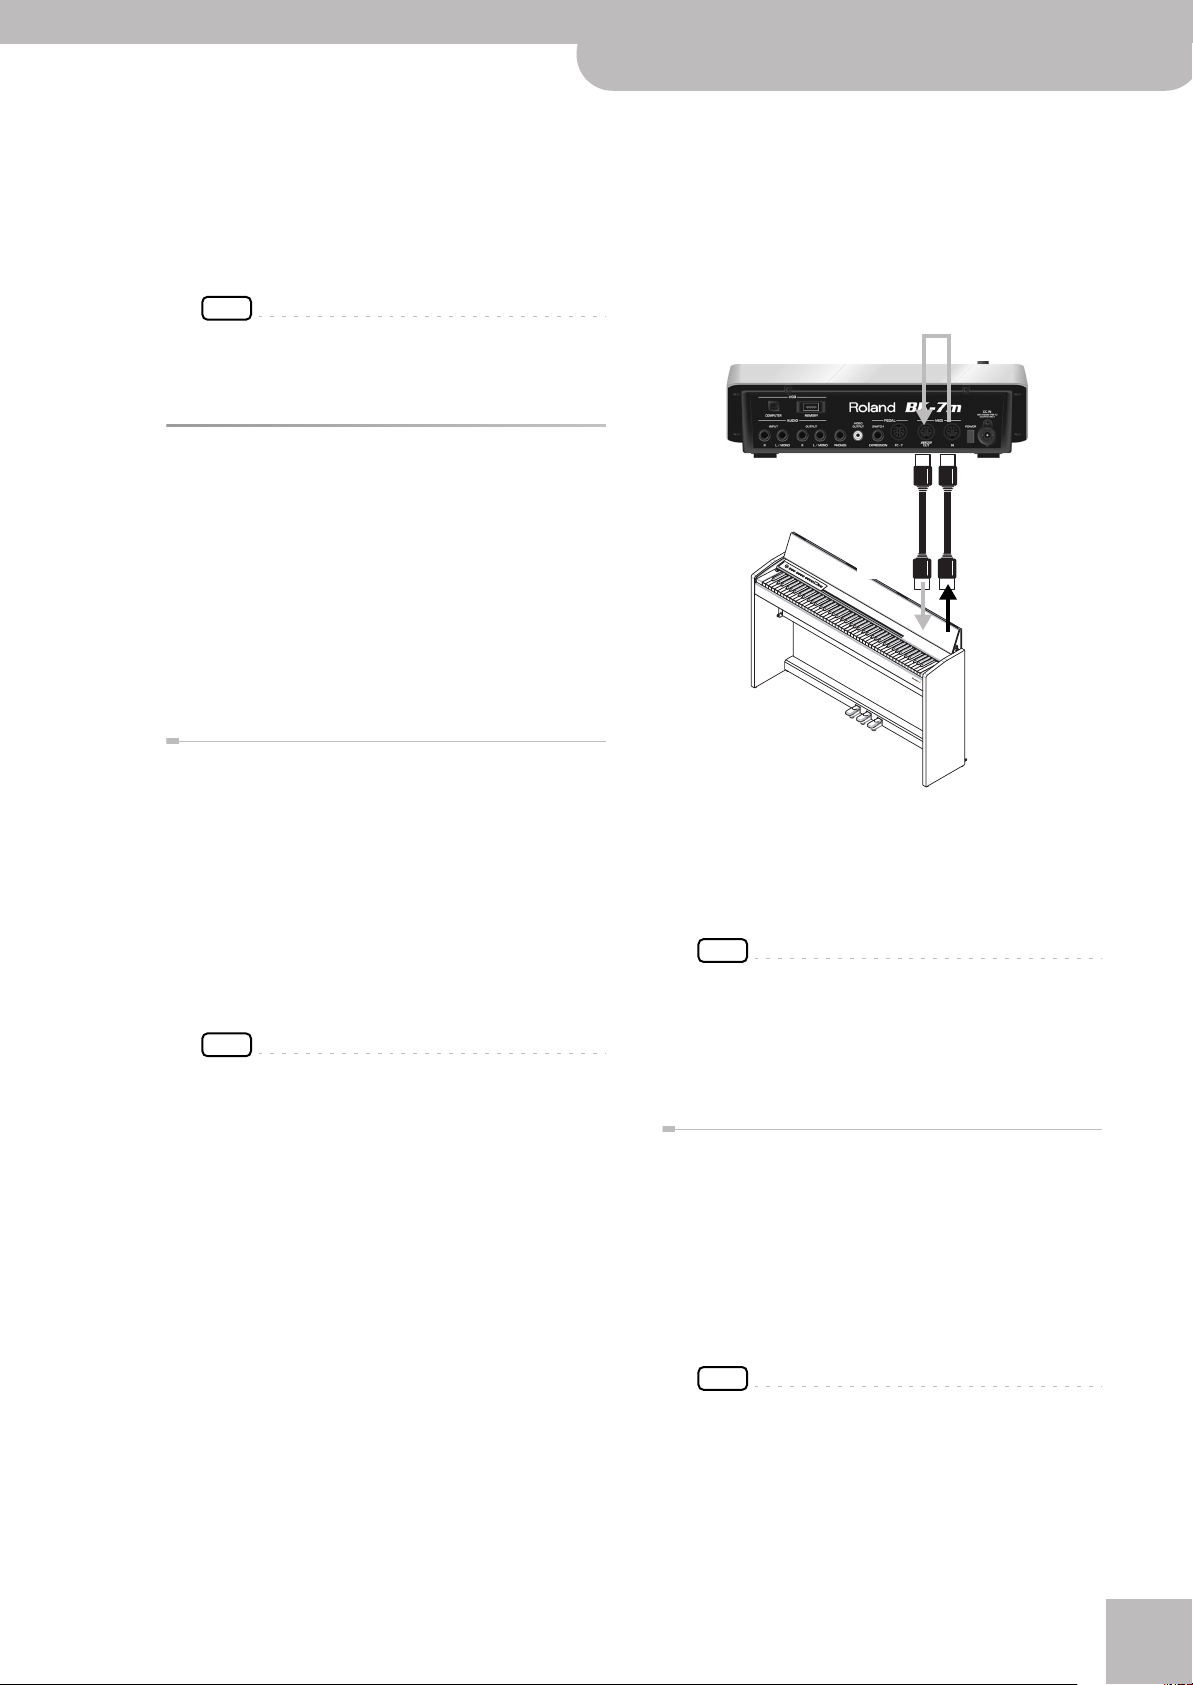
Connecting a MIDI device
To control the BK-7m using your digital piano, MIDI
accordion, etc., you need to connect it as follows:
1.
Turn the [VOLUME] knob all the way to the
left to minimize the volume.
2.
Use two MIDI cables (commercially available) to connect the BK-7m’s MIDI IN socket
to the MIDI OUT socket of the external MIDI
instrument.
To transmit MIDI data to an external device
(sequencer, computer, sound module, etc.), connect
the BK-7m’s MIDI OUT socket to the MIDI IN socket of
that device.
If you wish to use the BK-7m with a digital piano,
connect its MIDI OUT socket to the digital piano’s
MIDI IN socket, and its MIDI IN socket to the digital
piano’s MIDI OUT socket.
MIDI OUT
MIDI IN
MIDI-compatible digital piano, etc.
MIDI IN
MIDI OUT
MIDI IN
MIDI OUT
MIDI master keyboard, etc.
NOTE
Certain instruments, like an FR-3x V-Accordion, only have
one MIDI socket whose function (IN or OUT) needs to be set
with one of its MIDI parameters. To control the BK-7m
from such an instrument, you need to set the latter to
transmit MIDI messages (OUT).
NOTE
See “Wizard Connection” on p. 22 for how to ensure
that the BK-7m receives (the correct) MIDI messages.
r
16
Page 17

Backing Module BK-7m
Connecting the BK-7m to your computer
r
Connecting the BK-7m to your
computer
If you use a USB cable (commercially available) to connect the COMPUTER port located on the BK-7m’s rear
panel to the USB port of your computer, you’ll be able to
do the following things.
•Use the BK-7m as a sound module.
• By transferring MIDI data between the BK-7m and
your sequencer software, you’ll be able to enjoy a
wide range of possibilities for music production and
editing.
1.
Use a standard USB cable (A‰B-type connectors, commercially available) to connect
the BK-7m to your computer as shown
below.
USB cable
Computer
USB port
2.
Refer to the Roland website for system
requirements.
Roland website: http://www.roland.com/
As an alternative, you can connect the BK-7m’s MIDI
OUT and MIDI IN sockets to a MIDI interface and connect the latter to your computer.
Connecting a television set
Video cable
(Commercially available)
(Rear panel)
VIDEO OUTPUT
NOTE
Before you make connections to other devices, you must
turn down the volume of all devices and turn off their
power to prevent malfunctions or damage to your speakers.
1.
Switch off the BK-7m and the television set
you’ll be connecting.
2.
Connect the BK-7m to your television set.
Use a video cable (commercially available) to connect
the BK-7m’s VIDEO OUTPUT jack to the television set.
3.
Switch on the BK-7m (see p. 19).
4.
Switch on your television set.
5.
(As necessary) Specify the television output
format (see p. 63).
6.
Specify the aspect ratio for your television
set.
The aspect ratio is the proportional relationship
between the width and height of the screen. See
page 63.
Television
If the computer doesn’t ‘see’ the BK-7m
Normally, you don’t need to install a driver in order to
connect the BK-7m to your computer. However, if some
problem occurs, or if the performance is poor, using the
Roland original driver may solve the problem.
For details on downloading and installing the Roland
original driver, refer to the Roland website:
http://www.roland.com/
Specify the USB driver you want to use, and then install
the driver. For details, refer to “USB Driver” on p. 64.
■ Caution
•To avoid the risk of malfunction and/or damage to
external speakers, always turn the volume all the way
down and switch off the power on all devices before
you make any connections.
• Only MIDI data can be transmitted and received via
USB. Audio data for a song recorded on the BK-7m
cannot be transmitted or received.
• Switch on the power to the BK-7m before you start
up the MIDI application on your computer. Never
turn the BK-7m’s power on/off while your MIDI
application is running.
Connecting an optional footswitch, pedal or pedal unit
■ Footswitch or expression pedal
The BK-7m provides a PEDAL SWITCH/EXPRESSION
jack to which you can connect an optional footswitch (Roland DP-series or BOSS FS-5U) or an
expression pedal (Roland EV-series).
Optional footswitch
(Roland DP-series, BOSS FS-5U)
—or—
Optional expression pedal
(Roland EV-series)
If you connect a footswitch, you can select the function it should perform (page 64). By default, the footswitch will control the “Hold” function.
17
Page 18

Backing Module BK-7m
Before you start using the BK-7m
NOTE
Use only the specified expression pedal (Roland EV-series,
sold separately) or pedal switch (Roland DP-series, BOSS
FS-5U). By connecting any other expression pedal or footswitch, you risk causing malfunction and/or damage the
unit.
■ FC-7 pedal unit
You can also connect an optional FC-7 MIDI Foot
Controller to the PEDAL FC-7 socket.
Attaching the BK-7m to a stand
By using the separately sold PDS-10, you can attach the
BK-7m to a stand as shown in the illustration below.
NOTE
Use only the screws (M5x12) supplied with the BK-7m to
attach the unit to the Roland PDS-10 stand (sold separately).
Other screws or other usages of the screw holes may damage
the BK-7m.
NOTE
Never insert the screws supplied with the BK-7m without
attaching the BK-7m to the PDS-10 stand.
NOTE
When using the PDS-10, extend the legs to their maximum
spread. Do not allow the overall height including the BK-7m to
exceed 1 meter.
PSD-10 stand plate
BK-7m bottom plate
At first, the switches of this pedal board are assigned
Music Style control functions. You can, however,
assign other functions to these switches (page 65).
Note:
Be sure to use the screws supplied with the BK-7m.
The assembly (BK-7m and
PDS-10) should look as
shown to the right.
• See the PDS-10’s owner’s
manual for details about how
to attach the BK-7m to it.
•For this procedure, turn the
BK-7m upside-down, and
place a bunch of newspapers
or magazines under the four
corners or at both ends to
prevent damage to the buttons and controls.
Also, you should try to orient
the BK-7m so no buttons or
controls get damaged.
r
18
NOTE
When turning the BK-7m upside-down, handle with care
to avoid dropping it, or allowing it to fall or tip over.
Page 19
Backing Module BK-7m
Listening through headphones
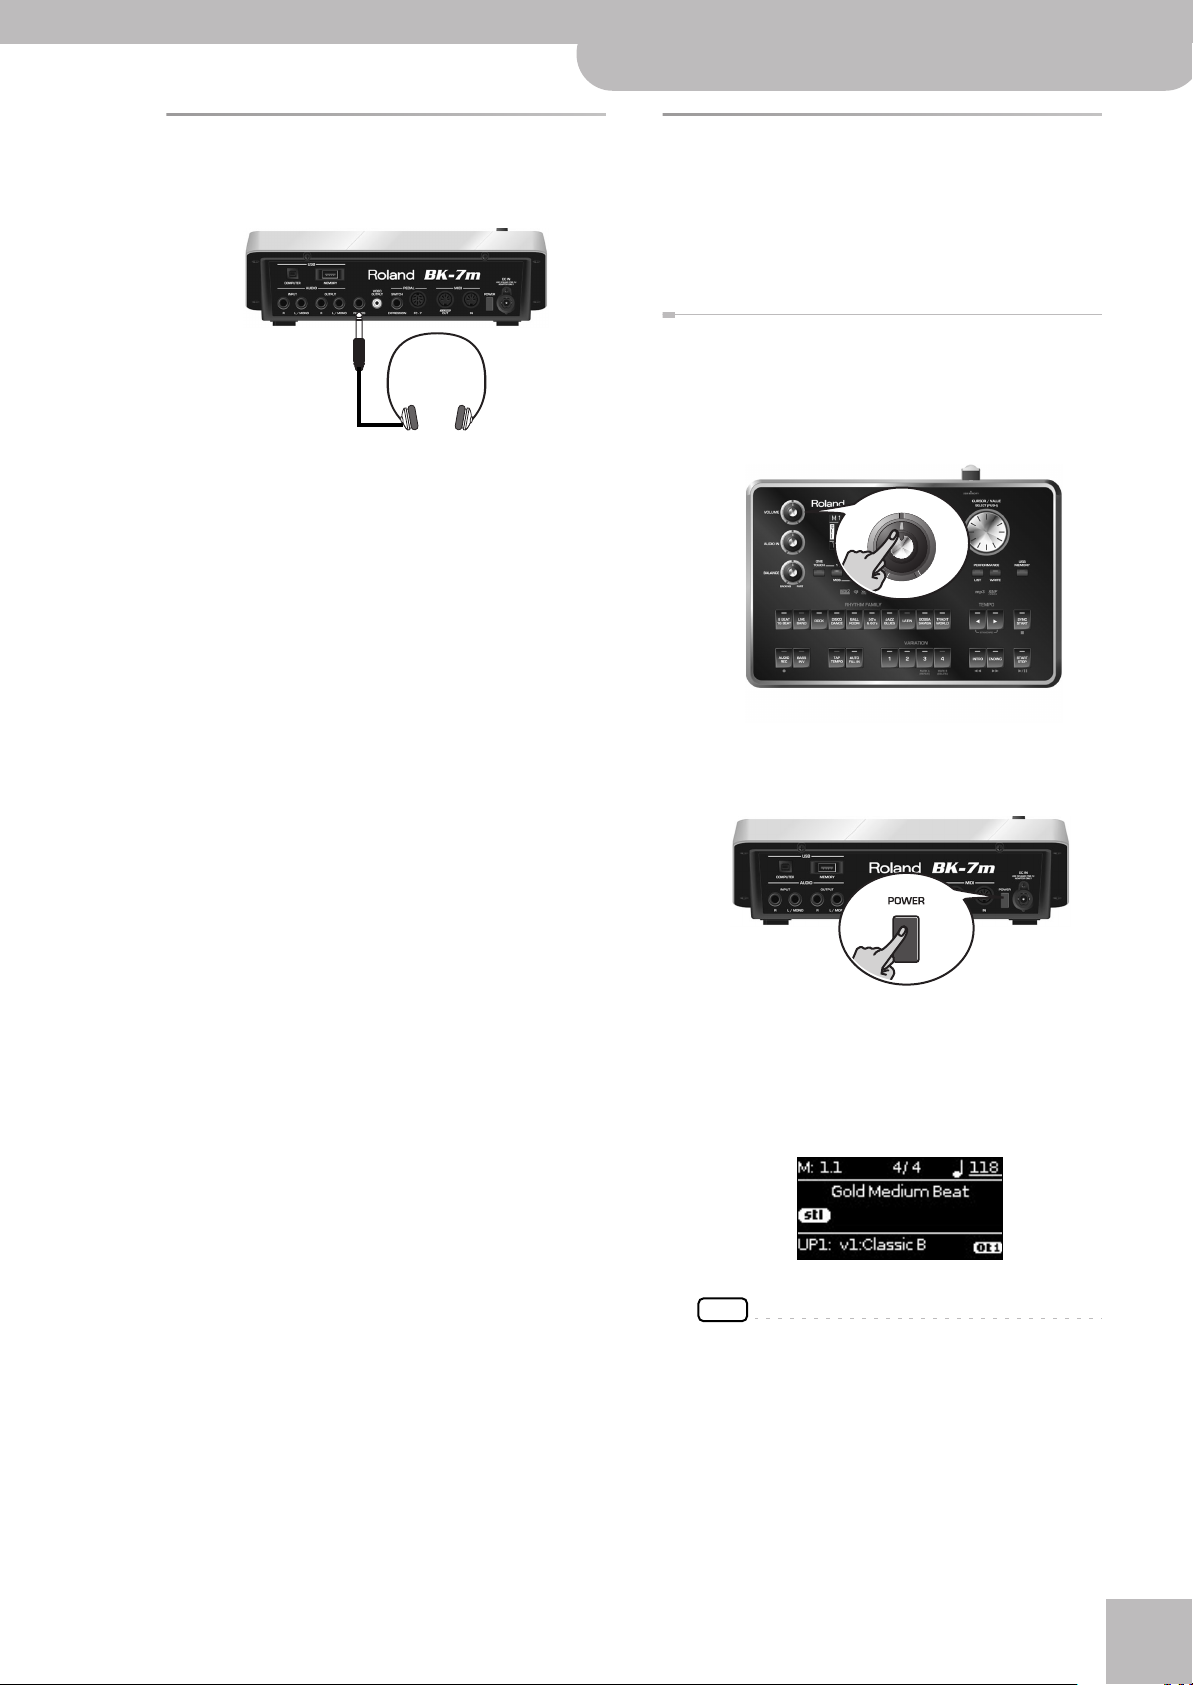
r
Listening through headphones
You can use headphones to enjoy the BK-7m without
disturbing those around you, such as at night.
1.
Plug the headphones into the PHONES
socket located on the BK-7m’s rear panel.
If you don’t want to disturb others, switch off the
external amplification system, because the BK-7m’s
OUTPUT sockets remain active even when you connect headphones.
2.
Use the BK-7m’s [VOLUME] knob to adjust
the headphone volume.
■ Cautions when using headphones
•To prevent damage to the cord’s internal conductors,
avoid rough handling. When using headphones,
mainly try to handle either the plug or the headset.
• Your headphones may be damaged if the volume of a
device is already turned up when you plug them in.
Minimize the volume before you plug in the headphones.
• Excessive input will not only damage your hearing,
but may also strain the headphones. Please enjoy
music at a reasonable volume.
•Use headphones fitted with a stereo 1/4” phone plug.
Turning the power on/off
Once the connections have been completed, turn on the
power to your various devices in the order specified. By
turning on devices in the wrong order, you risk causing
malfunction and/or damage to speakers and other
devices.
Turning the power on
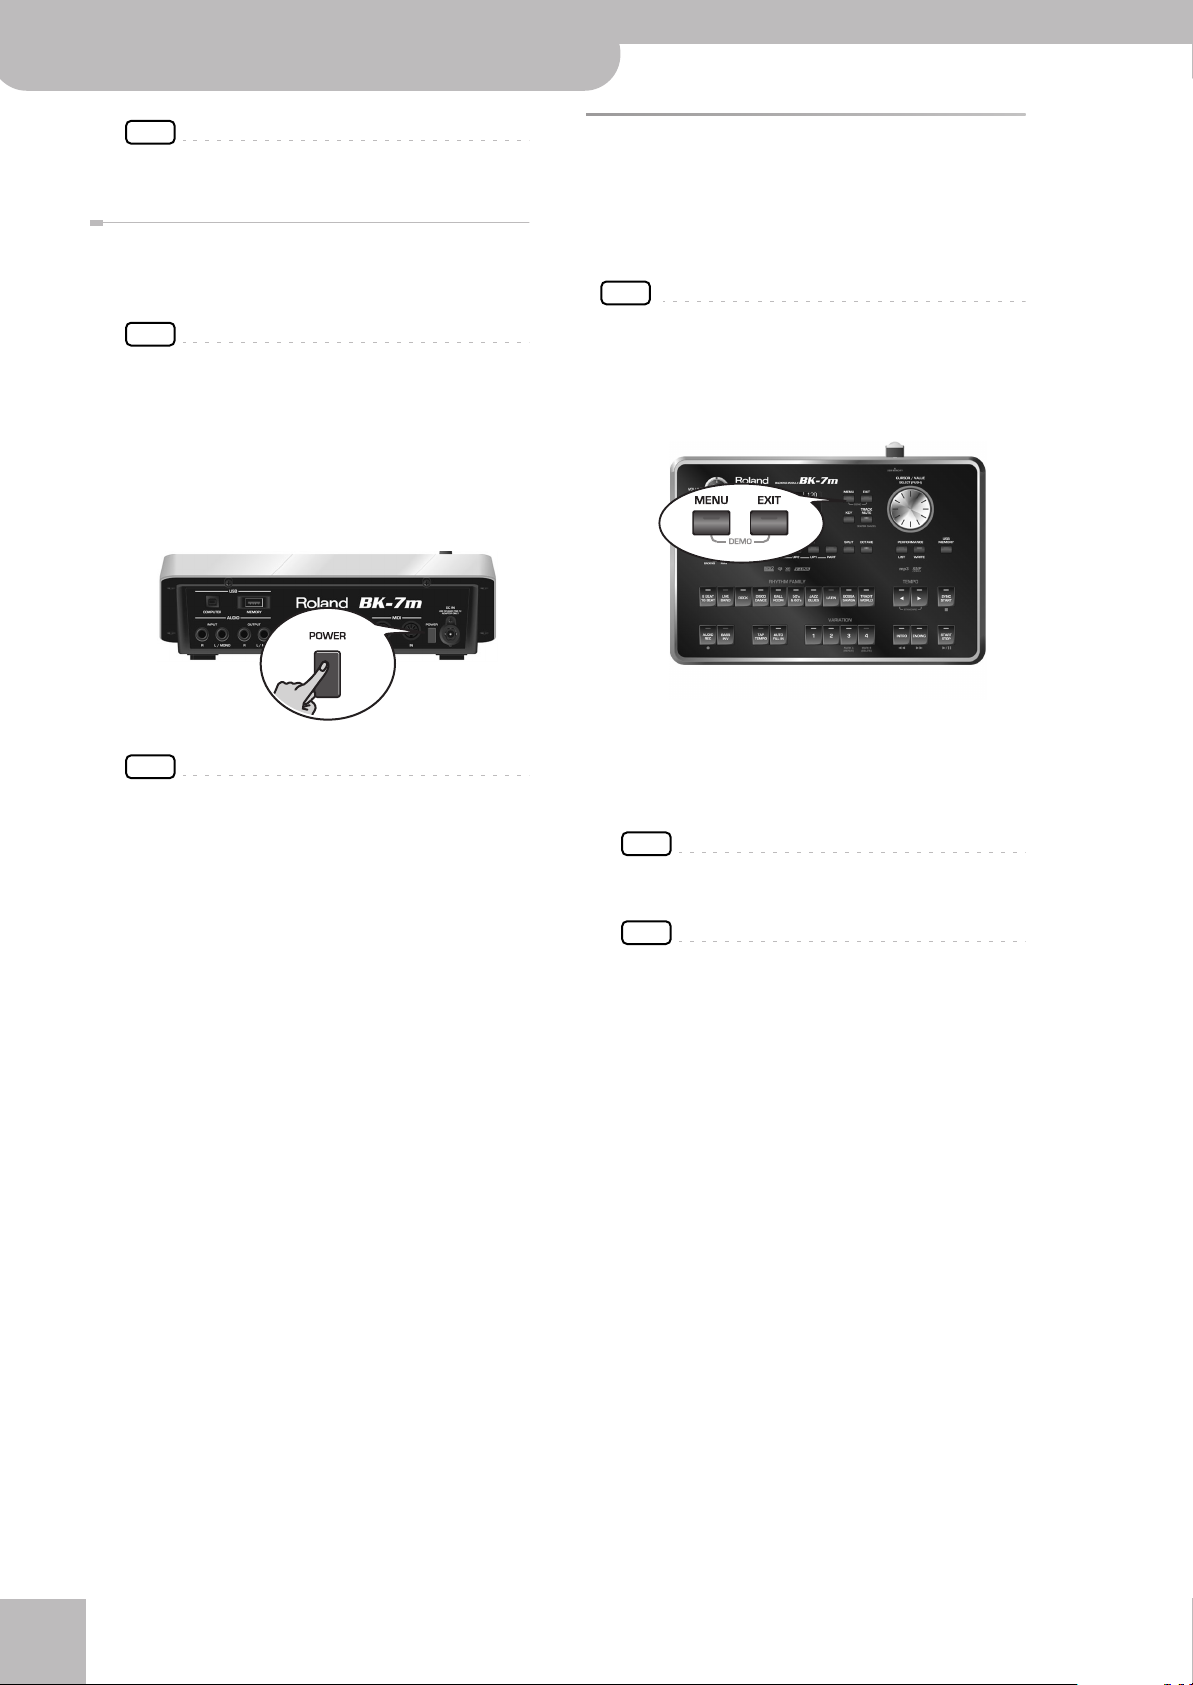
1.
Switch off the external amplification system.
2.
Turn the [VOLUME] knob all the way to the
left to minimize the volume.
VOLUME
3.
Press and hold the [POWER] switch until the
“Starting Up…” message appears in the display.
The power will turn on, an opening message will
appear in the BK-7m’s screen, and then the main
page will appear.
After a brief interval, the BK-7m will be ready to produce sound.
NOTE
This unit is equipped with a protection circuit. A brief interval (a few seconds) after power up is required before the
unit will operate normally.
4.
Switch on your amplification system or connect a pair of headphones (see p. 19).
5.
Use the [VOLUME] knob to adjust the volume.
19
Page 20
Backing Module BK-7m
Before you start using the BK-7m
NOTE
See “Wizard Connection” on p. 22 for how to ensure that
the BK-7m receives MIDI messages from an external device.
Turning the power off
1.
Turn the [VOLUME] knob all the way to the
left to minimize the volume.
NOTE
Never switch off the BK-7m while playback or recording is
running or while data are being read from, or written to, an
external USB memory.
2.
Switch off your external amplification system.
3.
Press the BK-7m’s [POWER] switch.
The display will go dark and the power will turn off.
Demo of the BK-7m
Your BK-7m contains a demo that introduces all of its
highlights. It might be a good idea to try it out now. The
demo is self-explanatory, so we’ll just show you how to
start and stop it.
NOTE
You will need to connect an external display to take advantage
of the BK-7m’s demo function. See “Connecting a television
set” on p. 17.
1.
Simultaneously press the [MENU] and [EXIT]
buttons.
NOTE
If you need to turn off the power completely, first turn off
the [POWER] switch, then unplug the power cord from the
power outlet. Refer to “Connecting the AC adaptor” on
p. 15.
The BK-7m plays back a few Music Styles and displays
a few pictures.
2.
Press the [EXIT] button to leave the demo
function.
NOTE
No data for the music that is played back will be output
from MIDI OUT.
NOTE
All rights reserved. Unauthorized use of this material for
purposes other than private, personal enjoyment is a violation of applicable laws.
r
20
Page 21
6. Basic operation of the BK-7m
Backing Module BK-7m
Basic operation of the BK-7m
r
About the display and cursor operation
This section introduces the information that appears on
the main page in the BK-7m’s display and how to navigate the menu.
Main page
Current measure Time signature
Selected file type:
.STL, .SMF, .WAV,
.mp3
Real-time part field: UP1,
UP2, LWR, MBS
Selected sound
Moving the cursor and setting parameter values
1.
Rotate the dial to move the cursor to the
parameter whose value you want to change.
Tempo setting
Cursor
Name of the
loaded file
One Touch indication
Moving between windows
Here is how to navigate the menu to select the setting
you want to change.
1.
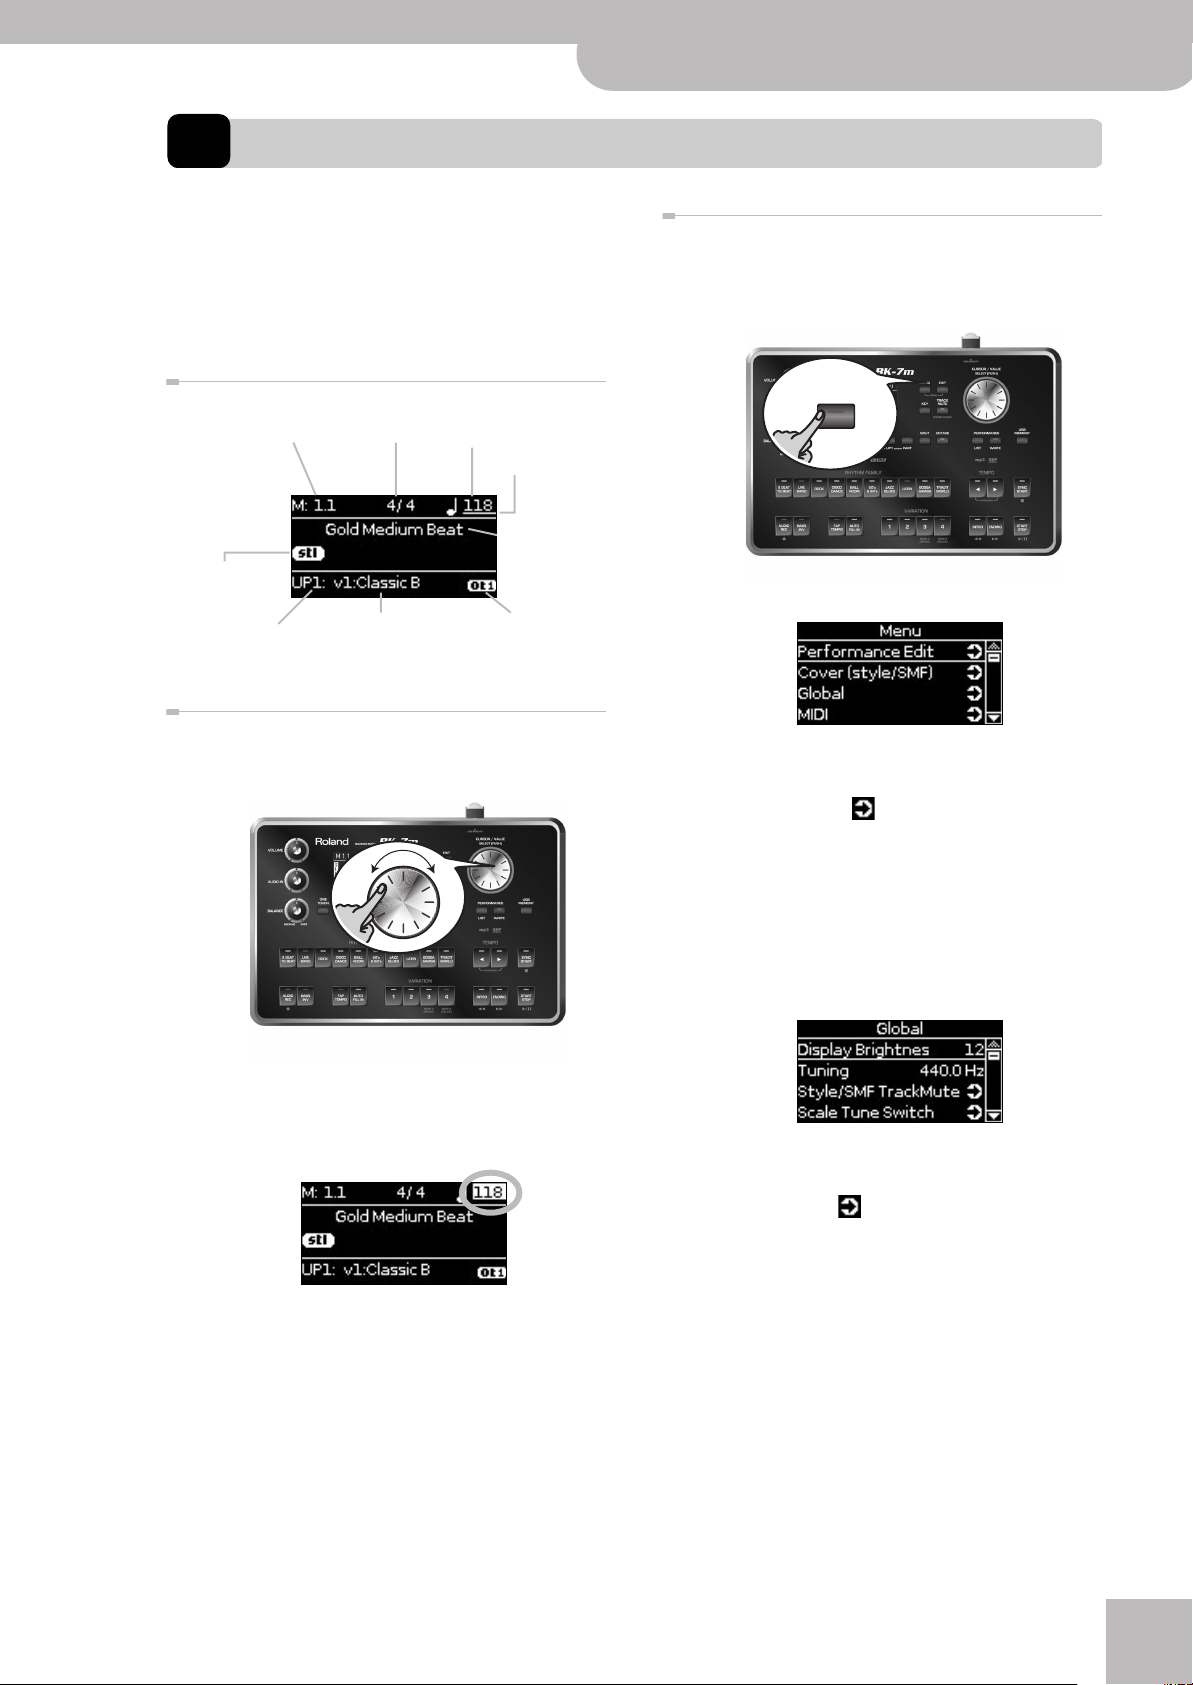
Press [MENU] button.
MENU
The display changes to:
This page allows you to select the function group
that contains the setting you want to change (indications followed by a “ ” symbol mean that you can
select other display pages).
2.
Rotate the [CURSOR÷VALUE] dial to select
the entry of the desired function group.
For this example, we will select “Global”.
3.
Press the [CURSOR÷VALUE] dial (“PUSH”) to
go to the “Global” function group.
The display changes to:
2.
Press the [CURSOR÷VALUE] dial to confirm
your selection.
The setting field of the selected parameter is displayed in reverse.
In our example, we want to change the tempo.
3.
Rotate the [CURSOR÷VALUE] dial to change
the value.
4.
Press and release the dial to confirm your
setting.
The parameter’s setting field once again appears on a
dark background and the [CURSOR÷VALUE] dial can
once again be used to select another parameter.
On this display page, “Display Brightness” and “Tuning” can be changed directly. The remaining entries
are followed by a “ ” symbol, meaning that they
provide access to additional display pages.
4.
Try to select other “Menu” functions by proceeding as follows:
(a) Press the [EXIT] button once to return to the
“Menu” page.
(b) Rotate the [CURSOR÷VALUE] dial to select an entry,
then press the dial to go to the corresponding
function group or setting.
(c) Press and hold the [EXIT] button to return to the
BK-7m’s main page.
The [EXIT] button stops flashing.
21
Page 22

Backing Module BK-7m
Wizard Connection
7. Wizard Connection
Your BK-7m contains a “Wizard Connection” that tells you step by step how to set up the BK-7m for MIDI communication. This wizard saves you a lot of time, which is why we recommend using it each time you connect a different MIDI
device to the BK-7m.
4.
Press the [CURSOR÷VALUE] dial to select the
Generic procedure
Usually, when you connect an external instrument
to the BK-7m’s MIDI IN socket, a display page
appears to signal that the “Wizard Connection”
function has detected a MIDI instrument and can
be used to make the desired MIDI settings.
If that message is not displayed, the external
instrument probably doesn’t transmit Active Sensing (FEH) messages. To start the BK-7m’s “Wizard
Connection” function, simply press any key on the
external instrument’s keyboard. Alternatively, you
can select the “Wizard Connection” function by
hand: [MENU] button ‰ “Wizard Connection”.
1.
Perform all required connections, taking
care to also connect a MIDI cable.
See “Connecting the BK-7m to an amplifier, mixer,
etc.” on p. 15 and “Connecting a MIDI device” on
p. 16.
NOTE
If you want to work with a Roland digital piano, we recommend also connecting the BK-7m’s MIDI OUT socket to the
digital piano’s MIDI IN socket. That way, your Roland piano
is automatically set to “Local Off”, which is usually more
convenient.
2.
Press the BK-7m’s [POWER] switch.
“Wizard Connection” function.
Press the [EXIT] button if you don’t need the “Wizard
Connection” function. In that case, the BK-7m goes
on using the last configuration you selected. If you
do not make any settings, this display page disappears automatically after 5 seconds.
5.
Rotate the [CURSOR÷VALUE] dial to select an
instrument category, then press the dial.
The following categories are available:
Category Explanation
DIGITAL PIANO Digital pianos made by Roland and
other manufacturers.
ACCORDION Roland V-Accordion and accordions
made by other manufacturers.
MASTER
KEYBOARD
GUITAR Guitar with MIDI interface (Roland
DIGITAL ORGAN Classic organs made by Roland/Rodg-
Master keyboards made by Roland/
Edirol and other manufacturers.
GI-20, etc.)
ers and other manufacturers.
Wait until the main page appears.
3.
Power on the external MIDI device (Digital
piano, V-Accordion, etc.).
If the MIDI connection between the external MIDI
device’s MIDI OUT socket and the BK-7m’s MIDI IN
socket is correct, a “MIDI Device Connected” page
appears to signal that the BK-7m has detected a MIDI
instrument.
r
22
COMPUTER/
SEQUENCER
6.
Depending on the category you select, the
The BK-7m acts as multitimbral tone
generator for a computer.
Wizard now asks you a series of questions.
Please follow the instructions shown in the display.
See “Details about the ‘Wizard Connection’ categories” on p. 23.
7.
At the end of the selected procedure, the
BK-7m asks you to save the settings.
8.
Press the [CURSOR÷VALUE] dial to save your
settings.
The display briefly confirms the operation and then
returns to the main page.
Page 23
Backing Module BK-7m
Details about the ‘Wizard Connection’ categories
r
Press the [EXIT] button if you prefer not to save these
settings. In that case, the BK-7m goes on using the
last configuration you selected.
The settings of the last MIDI Set you saved will be
loaded each time you switch on the BK-7m. There is
thus no need to use the “Wizard Connection” function as long as you don’t change your MIDI setup.
NOTE
In addition to the parameters that can be saved to the
“User1” MIDI Set, the “Wizard Connection” also saves other
settings. See page 87 for details.
Details about the ‘Wizard
Connection’ categories
Depending on the category and option inside that category, the BK-7m may ask you to play a few notes on the
external instrument. This allows it to automatically set
the correct MIDI channels and to make several other
useful settings.
See also “‘Wizard Connection’ MIDI channel settings” on
p. 26 for an overview of the other settings performed by
the “Wizard Connection” function.
•the digital piano is already on when you switch on
the BK-7m.
In “Soft Thru: Piano” mode, the BK-7m transmits the
note messages received via MIDI IN back to its MIDI
OUT socket. Those messages are then used to trigger
the digital piano’s tone generator. The piano’s “Local
Off” setting indeed means that its keyboard is no
longer connected to its internal tone generator.
Soft Thru: Piano
MIDI OUT
The keyboard’s messages are
returned to the piano.
MIDI IN
MIDI IN
MIDI OUT
What you play on the
keyboard is transmitted
to the BK-7m. The
piano’s tone generator
does not receive these
messages.
‘DIGITAL PIANO’ category
Select “ROLAND” for a digital piano made by Roland
that transmits on MIDI channel 1 by default.
•The only step will be “Wizard Settings will be
saved” (see step (7) above).
Select “OTHERS” if your digital piano transmits on a different MIDI channel. Here, there are two steps:
•“Play a note on piano keyboard” ‰ Press any key
on your digital piano.
•“Wizard Settings will be saved” (see step (7) above).
NOTE
If necessary, set the digital piano’s MIDI transmit and
receive channels to the same number.
•The digital piano can be used to play the BK-7m’s
real-time parts and to control the Arranger.
• Changing the status of the [SPLIT] button allows you
to alternate between two chord recognition modes:
“Pianist” ([SPLIT] button dark) and “Intelligent”
([SPLIT] button lights). See “Using Split mode” on
p. 39 for details.
• See page 27 for how to switch the real-time parts on
and off.
About ‘Soft Thru: Piano’
The “DIGITAL PIANO” settings automatically select the
“Soft Thru: Piano” setting, which means that the
BK-7m transmits a “Local Off” message to the piano
when you switch it on. This only works if the following conditions are met:
•the BK-7m’s MIDI OUT socket is connected to the
digital piano’s MIDI IN socket.
This connection is necessary to ensure that the digital
piano’s tone generator does not receive the chords
you play in the left half (while the [SPLIT] button
lights), because the chord notes are usually only used
to specify the arranger’s key.
NOTE
The digital piano’s “Local” parameter is not reset when you
disconnect the MIDI cables. You may have to do this manually (see the digital piano’s owner’s manual). In most
instances, however, switching the piano off and back on
will reset the piano’s “Local” parameter to “On”.
‘ACCORDION’ category
Select “V-ACCORDION” if you want to control the
BK-7m from a Roland FR-series instrument. Its treble,
orchestral, bass & chord, and (if available) Free Bass sections will trigger the UP1, UP2, LWR and MBS parts
respectively. The chords you play with the chord buttons
(left hand) are used to “feed” the BK-7m’s Arranger.
•The only step will be “Wizard Settings will be
saved” (see step (7) on page 22).
NOTE
The BK-7m’s wizard assumes that the FR-series accordion
uses the default MIDI channel numbers.
23
Page 24
Backing Module BK-7m
Wizard Connection
Select “OTHERS1” if you are using an accordion fitted
with a MIDI interface. Its treble, chord 1 and bass sections will trigger the UP1 (+ UP2), LWR and MBS parts
respectively. The chords you play with the chord buttons
(left hand) are used to “feed” the BK-7m’s Arranger.
Here, there are four steps:
•“Play a note on treble section” ‰ Press any key or
button of the treble keyboard.
•“Play a note on chord section” ‰ Press any chord
button (left -hand section).
•“Play a note on bass section” ‰ Press any bass but-
ton (left -hand section).
•“Wizard Settings will be saved” (see step (7) on
page 22).
NOTE
See page 27 for how to switch the real-time parts on and
off.
Select “OTHERS2” if you are using an accordion fitted
with a MIDI interface that transmits its MIDI messages
related to chords within one octave and “dim” chords
without the root note.
Here, there are four steps:
•“Play a note on treble section” ‰ Press any key or
button of the treble keyboard.
•“Play a note on chord section” ‰ Press any chord
button (left -hand section).
•“Play a note on bass section” ‰ Press any bass but-
ton (left -hand section).
•“Wizard Settings will be saved” (see step (7) on
page 22).
The “Wizard Connection” function sets the BK-7m’s
chord recognition to “Accordionist1” or
“Accordionist2” (irrespective of whether or not the
[SPLIT] button lights) and activates the “Split” and
“Arranger Type” filters of the “Performance Hold”
function to ensure that those settings don’t change
when you recall another Performance memory or
One Touch setting.
NOTE
Roland recommends leaving the [SPLIT] button off while
you are using an “ACCORDION” category setting.
‘MASTER KEYBOARD’ category
Select “ONE CHANNEL” if your MIDI master keyboard
only transmits on one MIDI channel. That MIDI channel
will be used to control the BK-7m’s real-time parts UP1,
UP2, LWR and MBS (only the ones whose button lights)
and to “feed” the Arranger with chord information.
Here, there are two steps:
•“Play a note on master keyboard” ‰ Press any key
on the external MIDI device.
•“Wizard Settings will be saved” (see step (7) on
page 22).
r
NOTE
The “Type” setting (page 60) depends on the status of the
[SPLIT] button: “Pianist” ([SPLIT] off) or “Intelligent” ([SPLIT]
on).
Select “MULTI CHANNEL” if your MIDI master keyboard
transmits on several MIDI channels simultaneously. The
MIDI channels for the UP1, UP2, LWR and MBS parts are
detected during the “Wizard” procedure. The chords you
play in the lower zone (LWR) of your master keyboard
are also used by the BK-7m’s Arranger.
Here, there are five steps:
•“Play a note on Upper 1 section” ‰ Press any key in
the highest (rightmost) zone to specify the MIDI
channel for the UP1 part.
•“Play a note on Upper 2 section” ‰ Press any key in
the second zone from the right to specify the MIDI
channel for the UP2 part.
•“Play a note on Lower section” ‰ Press any key in
the third zone from the right to specify the MIDI
channel for the LWR part.
•“Play a note on Bass section” ‰ Press any key in the
third zone from the right to specify the MIDI channel
for the MBS part.
•“Wizard Settings will be saved” (see step (7) on
page 22).
The “Wizard Connection” function sets the BK-7m’s
chord recognition to “Intelligent” (irrespective of
whether or not the [SPLIT] button lights) and activates the “Split” and “Arranger Type” filters of the
“Performance Hold” function to ensure that those
settings don’t change when you recall another Performance memory or One Touch setting.
NOTE
Roland recommends leaving the [SPLIT] button off while
you are using the “MULTI CHANNEL” setting.
‘GUITAR’ category
Select this category to control the BK-7m from a guitar
that is connected to a Roland guitar–MIDI interface (like
the GI-20).
Here, there are two steps:
•“Play a guitar string” ‰ Play a note on any string on
your guitar.
•“Wizard Settings will be saved” (see step (7) on
page 22).
NOTE
By default, some guitar–MIDI interfaces use separate MIDI
channels for each string. See the owner’s manual of your
interface for how to ensure that the same channel is used
for all strings.
An optional footswitch connected to the rear-panel
PEDAL SWITCH/EXPRESSION socket is automatically
assigned the “Chord Recognition OFF” function,
24
Page 25
Backing Module BK-7m
Details about the ‘Wizard Connection’ categories
r
allowing you to control which notes you play on your
guitar should be recognized by the BK-7m’s Arranger
(see p. 65).
The “Wizard Connection” function sets the BK-7m’s
chord recognition to “Guitarist” (irrespective of
whether or not the [SPLIT] button lights) and activates the “Split” and “Arranger Type” filters of the
“Performance Hold” function to ensure that those
settings don’t change when you recall another Performance memory or One Touch setting.
NOTE
Roland recommends leaving the [SPLIT] button off while
you are using this setting.
‘DIGITAL ORGAN’ category
Select “CHURCH ORGAN1” if your organ transmits on
MIDI channels 12, 13 and 14.
•The only step will be “Wizard Settings will be
saved” (see step (7) on page 22).
Select “CHURCH ORGAN2” if your organ transmits on
MIDI channels 1, 2 and 3.
•The only step will be “Wizard Settings will be
saved” (see step (7) on page 22).
The notes played on Manual II (Swell) and Manual I
(Great) as well as the bass pedal board control the
BK-7m’s real-time parts UP1, UP2, LWR and MBS. The
chords played on Manual I (Great) are also used by
the Arranger’s NTA section (for chord recognition).
The “Wizard Connection” function sets the BK-7m’s
chord recognition to “Intelligent” (irrespective of
whether or not the [SPLIT] button lights) and activates the “Split” and “Arranger Type” filters of the
“Performance Hold” function to ensure that those
settings don’t change when you recall another Performance memory or One Touch setting.
•“Wizard Settings will be saved” (see step (7) on
page 22).
The “Wizard Connection” function sets the BK-7m’s
chord recognition to “Intelligent” (irrespective of
whether or not the [SPLIT] button lights) and activates the “Split” and “Arranger Type” filters of the
“Performance Hold” function to ensure that those
settings don’t change when you recall another Performance memory or One Touch setting.
NOTE
Roland recommends leaving the [SPLIT] button off while
you are using the “MULTI CHANNEL” setting.
NOTE
Roland recommends leaving the [SPLIT] button off while
you are using one of these settings.
‘COMPUTER/SEQUENCER’ category
This “Wizard Connection” option configures the BK-7m
for use as a multitimbral sound module that is controlled by a software sequencer running on your computer.
•The only step will be “Wizard Settings will be
saved” (see step (7) on page 22).
NOTE
This option disables MIDI data reception by the BK-7m’s
Arranger and real-time parts, because all 16 MIDI channels are
already taken.
Select “ELECTRONIC ORGAN” if your organ transmits
on other MIDI channels than the ones selected for
“CHURCH ORGAN1” and “CHURCH ORGAN2”. In this
mode, the BK-7m’s wizard detects the MIDI channel
numbers to be assigned to UP1, UP2, LWR and MBS. The
chords you play on the lower manual (LWR) are also
used by the BK-7m’s Arranger.
Here, there are four steps:
•“Play a note on Upper section” ‰ Press any key on
the upper manual to specify the MIDI channel for the
UP1 and UP2 parts.
•“Play a note on Lower section” ‰ Press any key on
the lower manual to specify the MIDI channel for the
LWR part.
•“Play a note on Pedal section” ‰ Press any pedal-
board key to specify the MIDI channel for the MBS
part.
25
Page 26
Backing Module BK-7m
Wizard Connection
‘Wizard Connection’ MIDI channel settings
Category Type BK-7m’s real-time parts
DIGITAL PIANO ROLAND UP1, UP2, LWR, MBS, NTA (Note-to-Arranger) 1 Entire keyboard
OTHERS UP1, UP2, LWR, MBS, NTA (Note-to-Arranger) 1~16*
ACCORDION V-ACCORDION UP1 1 Treble
UP2 4 Orchestra
LWR + NTA (Note-to-Arranger) 3 Chords
MBS + NTA (Note-to-Arranger) 2 Bass/Free Bass
NTA (Note-to-Arranger) 5 Orchestral Bass
NTA (Note-to-Arranger) 6 Orchestral Chord
NTA (Note-to-Arranger) 7 Orchestral Free Bass
OTHERS1 or
OTHERS2
MASTER KEYBOARD ONE CHANNEL UP1, UP2, LWR, MBS, NTA (Note-to-Arranger) 1~16* Entire keyboard
MULTI
CHANNEL
UP1 + UP2 1~16* Treble
LWR + NTA (Note-to-Arranger) 1~16* Chord 1
MBS 1~16* Bass
UP1 1~16* Highest zone
UP2 1~16* Second zone from right
LWR + NTA (Note-to-Arranger) 1~16* Third zone from right
MIDI channel
Sections
Entire keyboard
MBS 1~16* Lowest zone
GUITAR UP1, UP2, LWR, MBS, NTA (Note-to-Arranger) 1~16* All notes
DIGITAL ORGAN CHURCH
ORGAN1
CHURCH
ORGAN2
ELECTRONIC
ORGAN
COMPUTER Song part 1~Song part 16 1~16 Recorder tracks 1~16
[*] The wizard detects the MIDI channel(s) on which the external instrument is transmitting and sets it/them automatically.
UP1 + UP2 13 Manual II (Swell)
LWR + NTA (Note-to-Arranger) 12 Manual I (Great)
MBS 14 Bass pedals
UP1 + UP2 2 Manual II (Swell)
LWR + NTA (Note-to-Arranger) 1 Manual I (Great)
MBS 3 Bass pedals
UP1 + UP2 1~16 Upper manual
LWR 1~16 Lower manual
MBS 1~16 Pedal section
r
26
Page 27
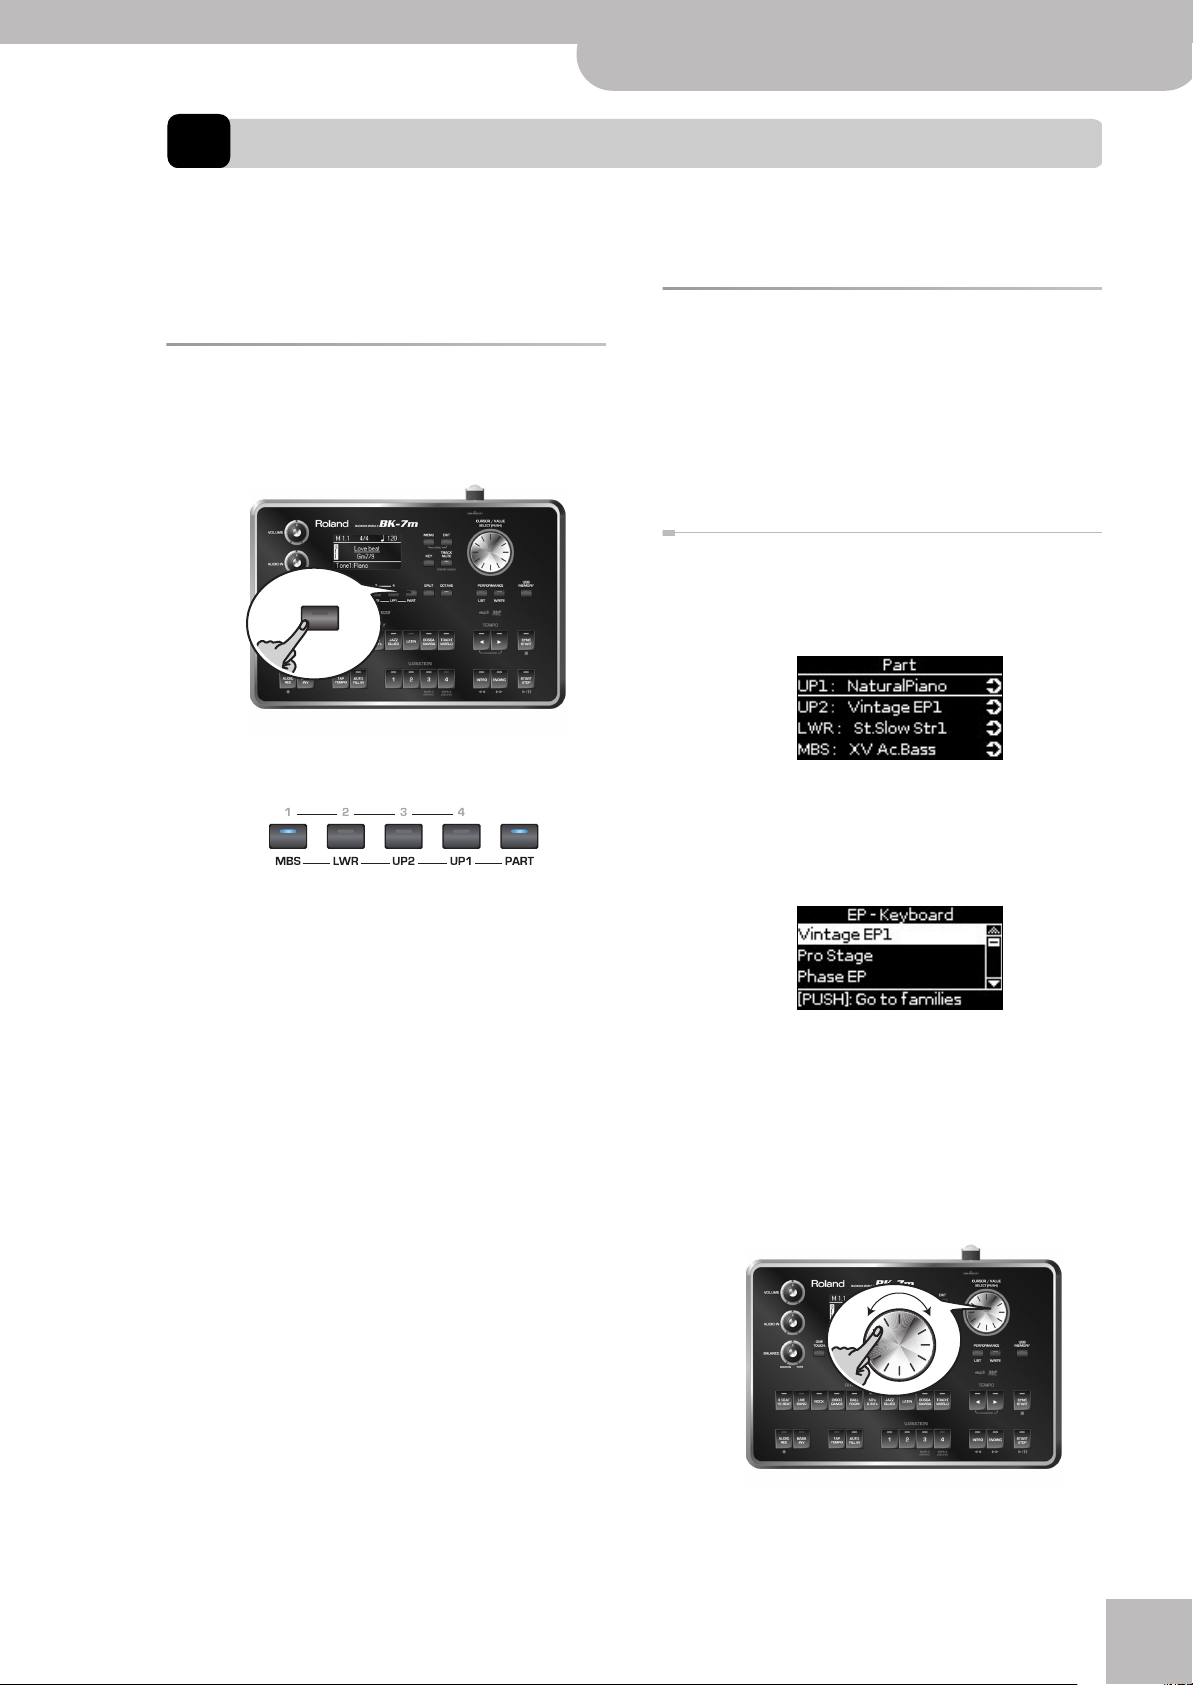
Backing Module BK-7m
Playing the BK-7m’s real-time parts
r
8. Playing the BK-7m’s real-time parts
Your BK-7m contains four real-time parts that can be controlled via MIDI: UP1, UP2, LWR and MBS. Feel free to use only
one of them at a time or to control them simultaneously. You can assign the desired sounds (or “Tones”) to each of these
parts.
See page 91 for a list of the available sounds.
Selecting Tones for the real-time parts
Switching real-time parts on and off
1.
Switch on the [PART] button (its indicator
lights).
PAR T
On the BK-7m, the sounds you can assign to the realtime parts are called “Tones”. The BK-7m allows you to
assign any of the available Tones to any of the four
real-time parts.
Tones can be selected in three ways:
Selecting Tones using the [PART] button
1.
Press the [PART] button.
The display now shows you which Tones are currently
assigned to the four real-time parts:
The [1], [2], [3] and [4] buttons are now used to
switch the real-time parts on and off:
While the [PART] indicator lights, the indicators of
the [1], [2], [3] and [4] buttons show which real-time
parts are currently active.
2.
Press the [1], [2], [3] or [4] button to switch
the corresponding part (MBS, LWR, UP2 or
UP1) on (indicator lights) or off (indicator
goes dark).
See “‘Wizard Connection’ MIDI channel settings” on
p. 26 for the MIDI channels the real-time parts
receive on. This obviously depends on the selected
category and option (see p. 22).
2.
Rotate the [CURSOR÷VALUE] dial to select
the real-time whose Tone assignment you
want to change.
3.
Press the dial to jump to the following page:
4.
If the Tone you need belongs to another
family (see p. 91), press the
[CURSOR÷VALUE] dial.
If the Tone is part of the currently selected family,
you can skip to step (6).
5.
Rotate the [CURSOR÷VALUE] dial to select
the desired family, then press the dial to
confirm your selection.
6.
Rotate the dial to select the desired Tone.
The names of the BK-7m’s SuperNATURAL sounds
start with an “N” (“N.Trombone” and “N.Tenor Sax”).
27
Page 28
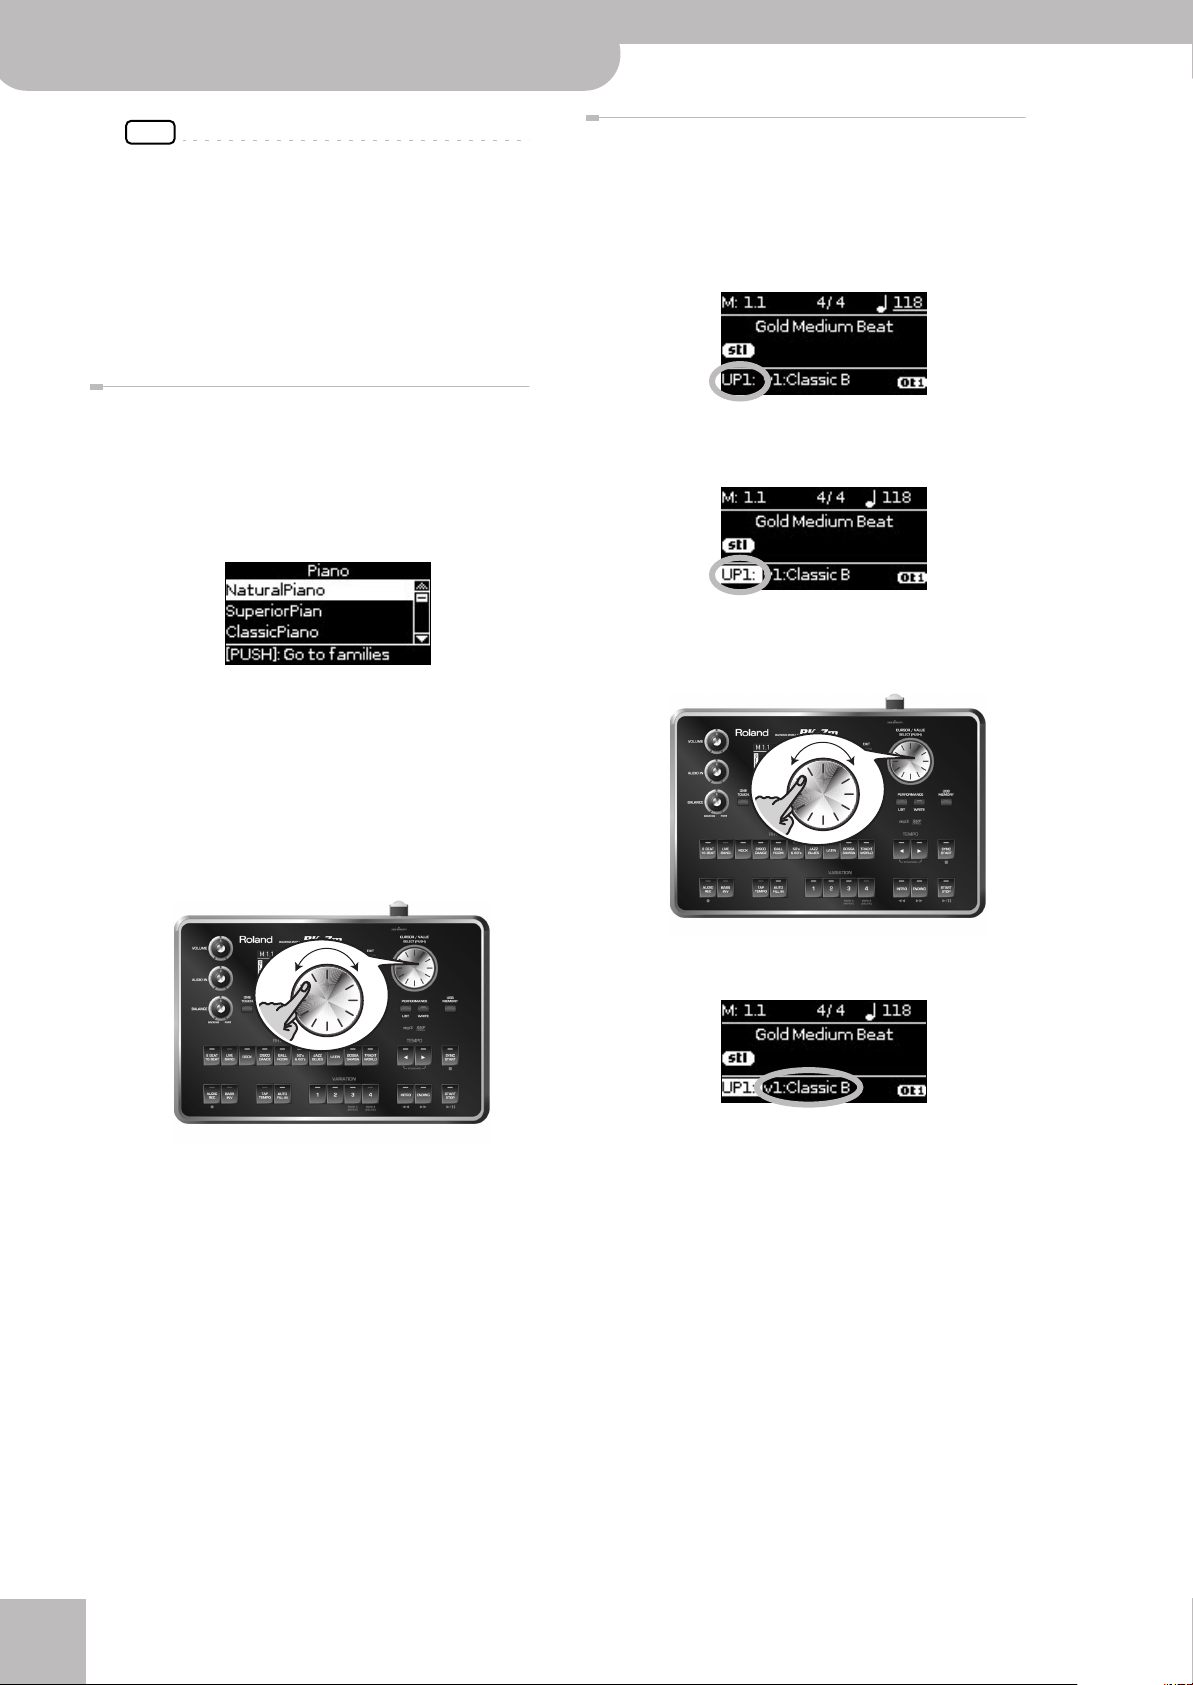
Backing Module BK-7m
Playing the BK-7m’s real-time parts
NOTE
The SuperNATURAL sounds can only be assigned to the UP1
part.
7.
Play a few notes on the external keyboard to
audition the sound.
If the part is active (see p. 27), you should now hear
the newly selected Tone.
8.
Press [EXIT] to leave the Tone selection
page.
Using the [UP1], [UP2], [LWR] and [MBS] buttons
to select Tones
1.
Press and hold the [UP1], [UP2], [LWR] or
[MBS] button.
The display now show a list of Tones where the currently selected sound is displayed in reverse:
2.
If the Tone you need belongs to another
family (see p. 91), press the
[CURSOR÷VALUE] dial.
If the Tone is part of the currently selected family,
you can skip to step (4).
3.
Rotate the [CURSOR÷VALUE] dial to select
the desired family, then press the dial to
confirm your selection.
Selecting a Tone on the main page
1.
If the main page is not displayed, press and
hold the [EXIT] button until it appears.
The name of one of the four real-time parts and the
sound assigned to it are shown in the bottom left
corner:
2.
Rotate the [CURSOR÷VALUE] dial to select
the part indication, then press the dial.
3.
Rotate the [CURSOR÷VALUE] dial to select
the real-time part whose Tone assignment
you want to change.
4.
Rotate the dial to select the desired Tone.
5.
Press [EXIT] to leave the Tone selection
page.
The name of the Tone currently used by this part is
displayed to its right.
4.
Rotate the [CURSOR÷VALUE] dial to move
the cursor towards the name of the Tone
currently assigned to the selected real-time
part.
5.
Press the dial.
6.
If the Tone you need belongs to another
family (see p. 91), press the
[CURSOR÷VALUE] dial.
If the Tone is part of the currently selected family,
you can skip to step (8).
r
28
Page 29
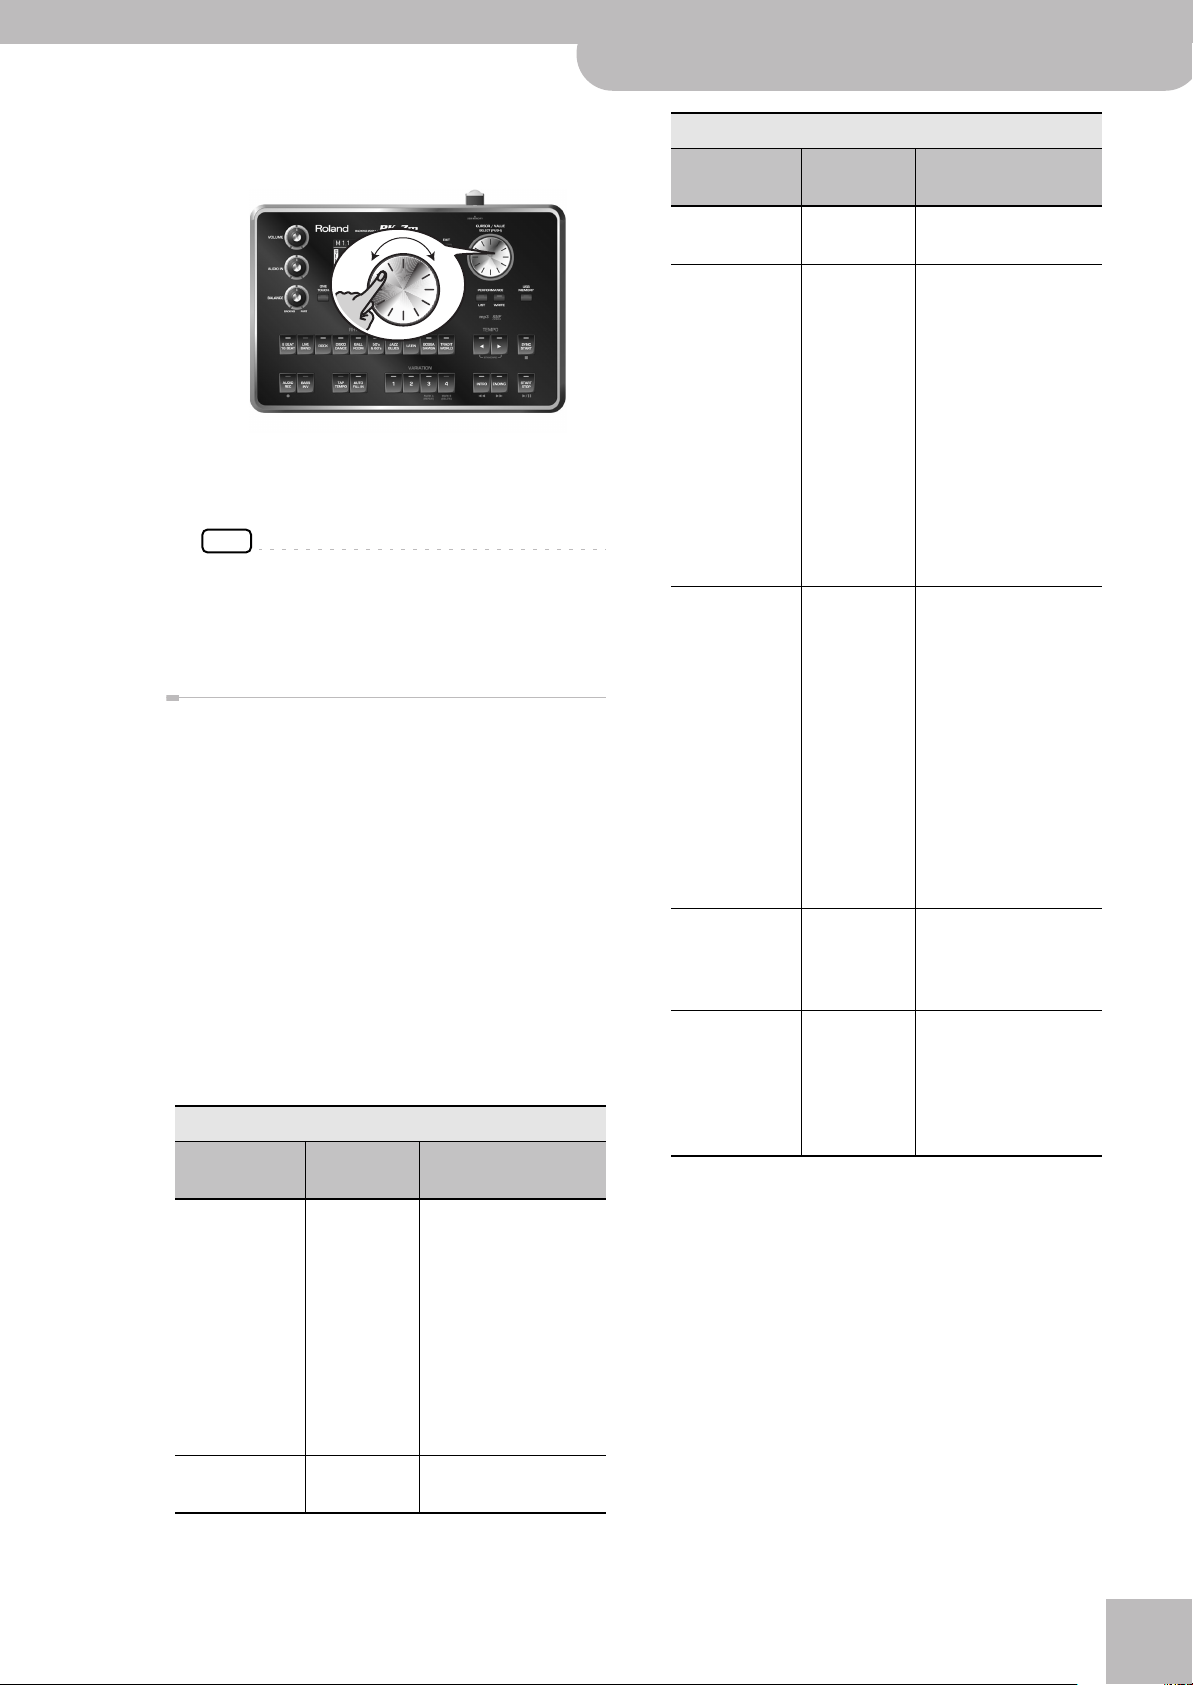
7.
Rotate the [CURSOR÷VALUE] dial to select
the desired family, then press the dial to
confirm your selection.
Parameter
Backing Module BK-7m
Selecting Tones for the real-time parts
Supernatural sound controls
Rx MIDI
Message
Explanation
r
8.
Rotate the dial to select the desired Tone.
9.
Press [EXIT] to leave the Tone selection
page.
NOTE
You can also select the BK-7m’s Tones via MIDI. Be aware,
however, that if the BK-7m receives a sound select cluster
(bank select + program change message) for which there is
no Tone, the display shows “---” instead of a Tone name
and the real-time part in question no longer sounds.
Selecting SuperNATURAL sounds (UP1 part)
The BK-7m contains two high-quality brass Tones based
on Roland’s SuperNATURAL technology. These are called
“N.Trombone” and “N.Tenor Sax”. See the “Tone List” on
p. 91.
Various expressive performance elements typical of
brass instruments were difficult to play on a keyboard,
but can now be reproduced without special operations
and played expressively with a realistic tone. If you play
legato, the sound changes smoothly between notes. If
you play staccato, the sound has a crisp attack.
If you play a note and then press a second key without
releasing the previous key, only the second note sounds
(monophonic). If, however, you press several keys simultaneously, the UP1 part plays chords (polyphonic).
Other parameters that can be controlled in realtime are:
Supernatural sound controls
Parameter
Rx MIDI
Message
Explanation
Noise Level CC 16
Default: 64
Play Stability CC 17
Default: 64
Growl Sens CC 18
Default: 0
(no growl)
Staccato CC 80
0~63: Normal,
64~127: Staccato
Fall CC81
0~63: Normal,
64~127: Fall
This adjusts the amount
of breath and keys noise.
Adjusts the accuracy of
the player.
Using values near 0, the
initial pitch at the beginning of each note will be
unstable. There will also
be a greater spread
between the timing of
each player’s notes.
Using values near 7F, the
pitch at the beginning of
each note and the timing
of the notes will both be
accurate.
Adjusts the amount of
growl for strongly played
notes.
Using values near 0, the
amount of growl at the
beginning of each note
will be minimal.
Using values near 7F, the
beginning of each note
will have the maximum
amount of growl. The
more strongly you play
the keyboard, the stronger this effect will be
If you set staccato, the
played notes result distinctly separate while
also short in length.
If you set Fall, the release
of sound will behave in
the manner distinctive of
brass instruments, meaning that the volume will
also decrease.
Discontinuous
pitch change
Dynamics Modulation Change the dynamic of
Pitch Bender The discontinuous pitch
change is typical of brass
instruments, instead of
the normal smooth pitch
change. When you apply
a downward bend, the
sound will behave in the
manner distinctive of
brass instruments, meaning that the volume will
also decrease.
played note.
29
Page 30
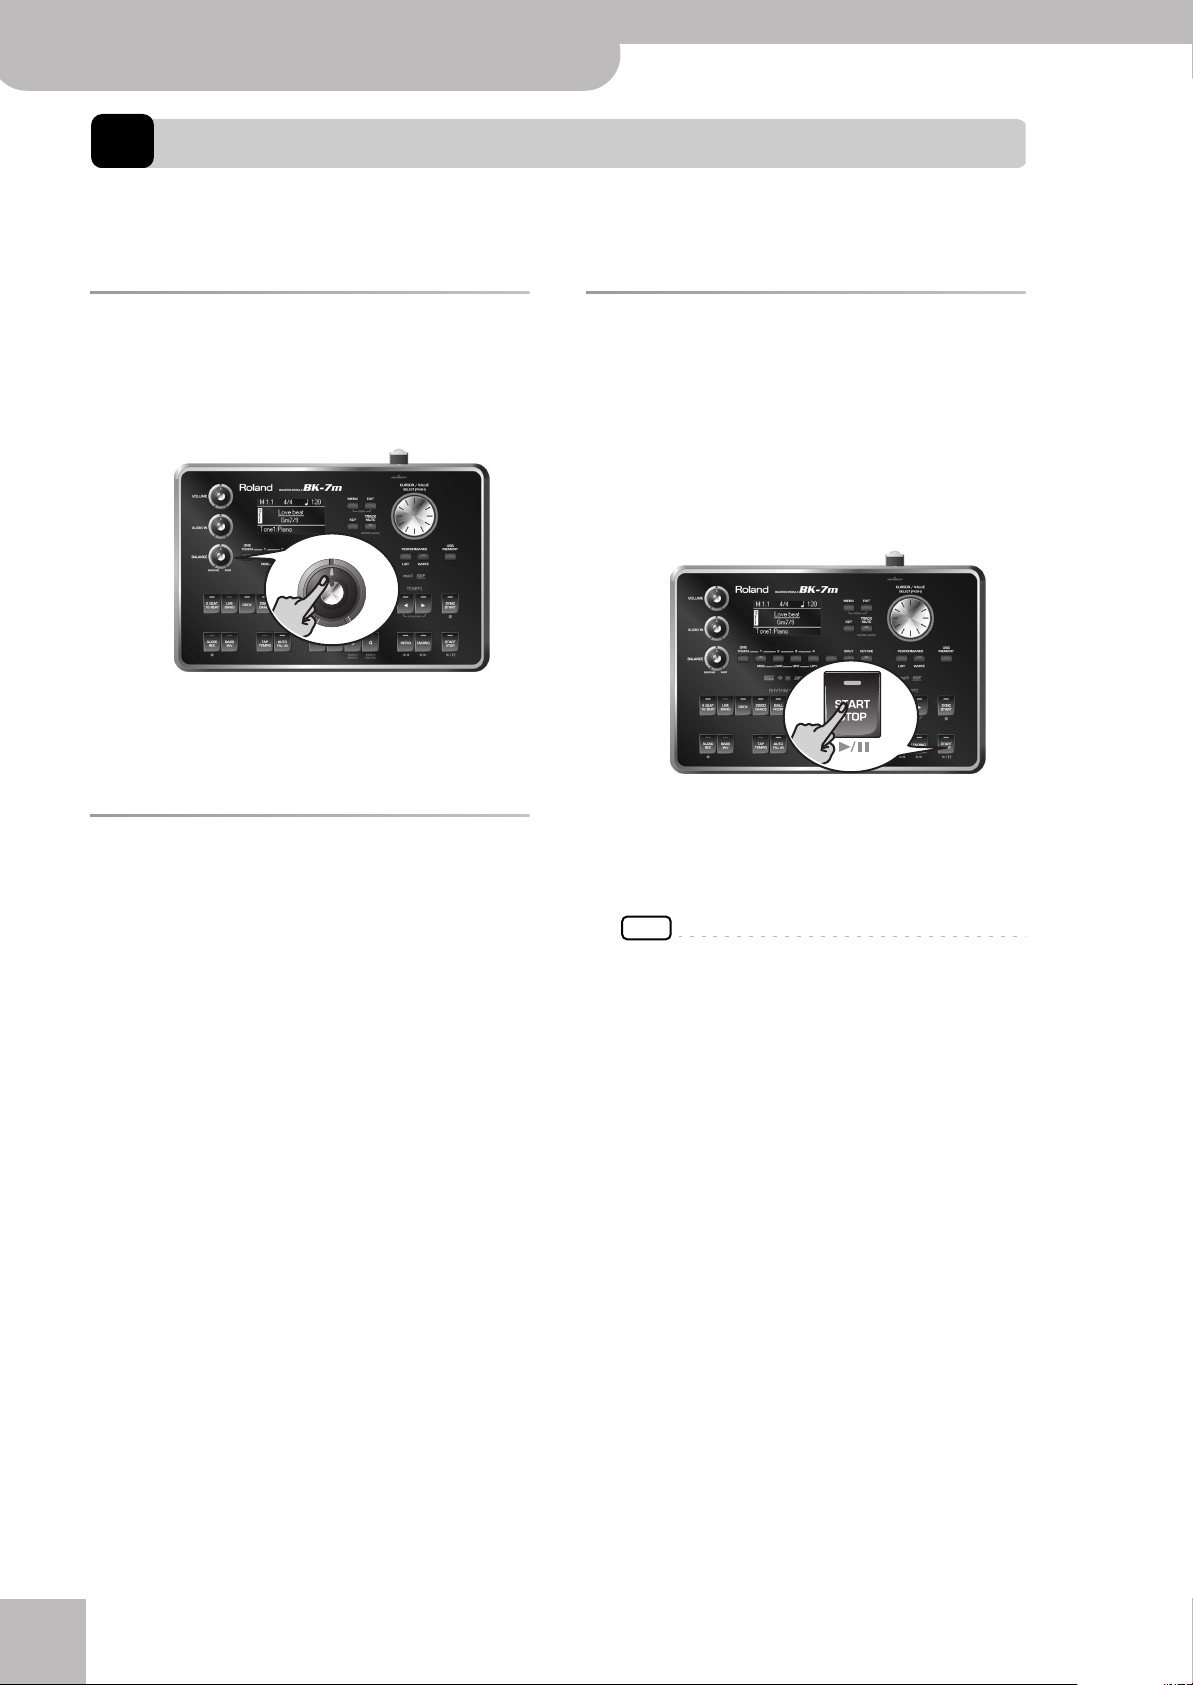
Backing Module BK-7m
Music Style functions
9. Music Style functions
The BK-7m contains a function that plays back automatic accompaniments called “Music Styles”. This section explains
how to take advantage of the BK-7m’s accompaniments.
Volume balance between the backing and the real-time parts
If the Music Style accompaniment is too loud or too soft
with respect to the real-time parts you are using, you
can change the balance with the [BALANCE] knob:
BALANCE
Turn it towards “PART” to make the accompaniment
softer, or towards “BACKING” if the real-time parts are
too loud with respect to the accompaniment.
About the Music Styles
The BK-7m can generate interactive accompaniments
based on the Music Style you select. Each Music Style is
a typical accompaniment for a given musical genre. The
BK-7m comes with 433 internal Music Styles divided
over 10 families (see the “RHYTHM FAMILY” section on
the front panel).
The melodic accompaniment parts of the selected Music
Styles follow the chords you play on the external MIDI
controller (keyboard, MIDI accordion, MIDI guitar, etc.).
The BK-7m uses special MIDI parts to receive this note
information: “NTA”, which is short for “Note-toArranger”. Your MIDI controller must therefore transmit
its note information for the accompaniment function
(Arranger) on a MIDI channel assigned to an NTA part.
Using Music Styles
The “interactive” aspect about the Music Styles is that
you can change the key of the accompaniment simply
by playing different notes or chord on your MIDI controller. Additionally, you can select different variations
(more or less complex arrangements) for the active
Music Style. The BK-7m provides several buttons for
this.
■ START/STOP
This button is used to start and stop Music Style playback. While a Music Style is running, the button’s
indicator flashes red on the first beat of each bar, and
green on the remaining beats.
NOTE
You can also start (and stop) Music Style playback simply
by playing on the external MIDI controller. See the next
function.
r
30
Page 31

Backing Module BK-7m
Using Music Styles
r
■ SYNC START
This button activates and switches off the “Sync
Start” or “Sync Start/Stop” function. Pressing it several times allows you to select one of the following
options:
Function
Sync Start Lights red Music Style playback can be
Sync Start/
Stop
— Dark Music Style playback needs to
[SYNC START]
indicator
Lights green Music Style playback can be
Explanation
started by playing a note or
chord on the MIDI controller.
Press [START/STOP] to stop
Music Style Playback.
started by playing a note or
chord on the MIDI controller.
Playback will stop when you
release all keys.
be started and stopped using
the [START/STOP] button.
VARIATION
[4] This is the most complex arrangement.
Explanation
Consider selecting it for the bridge or the
final chorus sections of a song.
Note that the VARIATION patterns are repeated
(played back in a loop) until select a different pattern
or stop Music Style playback.
■ INTRO
Selects an introduction, which is usually used at the
beginning of a song. You can, however, also select
this pattern for other song sections. The behavior of
the Intro pattern depends on when you press the
[INTRO] button:
[INTRO] Behavior
Pressed before
starting Music
Style playback
The indicator lights.
When you start Music Style playback,
the Arranger first plays a musical
introduction. (This pattern is played
back only once).
■ VARIATION [1], [2], [3], [4]
These buttons are used to select the complexity
(number of parts) of the Music Style’s arrangement:
VARIATION
[1] The simplest accompaniment pattern. A
[2] A slightly more complex pattern you may
[3] This pattern would be a good choice for
Explanation
goof choice for the first of the songs you
play.
want to use for subsequent verses.
the first chorus.
Pressed during
Music Style playback
The indicator flashes to signal that
the INTRO pattern will begin on the
next downbeat.
When the intro is finished, the BK-7m
returns to the previously selected
VARIATION pattern.
There are, in fact, four different INTRO patterns, that
can be selected using the VARIATION [1], [2], [3] and
[4] buttons. Again, the VARIATION buttons determine
the complexity of the arrangement.
31
Page 32

Backing Module BK-7m
Music Style functions
■ ENDING
This button allows you to end your songs with a suitable closing section if you don’t want to simply stop
Music Style playback. The behavior of the Ending pattern depends on when you press the [ENDING] button:
[ENDING] Behavior
Pressed before
starting Music
Style playback
Pressed during
Music Style playback
The indicator lights.
When you start Music Style playback,
the Arranger plays a musical ending.
At the end of the phrase, playback
stops.
The indicator flashes to signal that
the ENDING pattern will begin on the
next downbeat.
When the ending is finished, Music
Style playback stops.
■ AUTO FILL IN
When this button lights, the BK-7m plays a transition
before switching to the newly selected VARIATION
pattern. Example: if the VARIATION [1] pattern is running, pressing the [4] button will not switch to that
pattern right away—the BK-7m first plays a fill-in to
announce the new song section.
NOTE
The duration of the fill-ins (transitions) can be halved if you
like. See “Fill In Half Bar” on p. 60.
Selecting Music Styles
1.
Press a RHYTHM FAMILY button to select
the Music Style family.
There are four different ENDING patterns, that can be
selected using the VARIATION [1], [2], [3] and [4] buttons. Again, the VARIATION buttons determine the
complexity of the arrangement.
■ BASS INV
This button is used to switch the “Bass Inversion”
function on or off. While the button is dark, the
Music Style’s bass part always plays the fundamental
of your notes or chords. Example: if you play a chord
consisting of the notes C, E and G (which is recognized as a C major chord), the bass part plays a C.
If the [BASS INV] button lights, the Music Styles bass
part uses the lowest notes of the chords you play.
Example: if you play a chord consisting of the notes
E, G and C (still a C major chord), the bass part plays
an E. This function therefore gives you more artistic
licence.
The indicator of the button you press lights and the
display shows a list of the Music Styles that belong to
this family:
In the example shown above, we pressed the
[LIVE BAND] button.
2.
Rotate the [CURSOR÷VALUE] dial to select
the desired Music Style, then press the dial
to confirm your selection.
r
32
Page 33

Playing back Music Styles
Let us now take a closer look at the interactive aspects
of the BK-7m’s Music Styles and at how to use them.
1.
Connect your MIDI controller (see p. 16).
If necessary, follow the instructions of the “Wizard
Connection” function (see p. 22).
2.
Set the BK-7m’s [VOLUME] knob to a reasonable level (about 1/4).
VOLUME
Backing Module BK-7m
The main page displays the name of the last chord
the BK-7m recognized:
7.
Press the [START/STOP] button to start
Music Style playback.
Playing back Music Styles
r
3.
Set the [BALANCE] knob to the center position.
BALANCE
4.
Press the [INTRO] button (it lights) to start
Music Style playback with an introduction.
The [START/STOP] indicator lights and the BK-7m
starts playing back the introductory phrase.
8.
Play different chords on your MIDI controller and listen to the effect this has on the
Music Style.
9.
Switch on the [AUTO FILL IN] button (it
lights).
This means that when you select a different VARIATION pattern, the BK-7m will play a transition (fill-in)
before switching to the new pattern.
10.
Press a VARIATION [1], [2], [3] or [4] button
to select a more complex or a simpler
accompaniment.
5.
Press the VARIATION [1], [2], [3] or [4] button to select the complexity of the INTRO
pattern.
6.
Play a chord on your MIDI controller.
See “‘Wizard Connection’ MIDI channel settings” on
p. 26 for the MIDI channels assigned to the BK-7m’s
NTA parts. These parts analyze the chords that are
used to transpose the Music Style in real time.
• If you press it before the last beat of the current
measure, the fill-in starts immediately and lasts until
the end of the current measure, then the newly
selected VARIATION pattern is played back.
• If you press the desired VARIATION button on the last
beat of a bar, the fill-in starts at the next downbeat
and lasts an entire bar. Only then will the BK-7m
switch to the newly selected VARIATION pattern.
11.
If necessary, you can change the Music
Style’s tempo:
33
Page 34

Backing Module BK-7m
Music Style functions
•Press the TEMPO [√] or [®] button to decrease or
increase the tempo.
•Press the [TAP TEMPO] button at least three times at
the desired tempo.
Using the ‘One Touch’ function
The ONE TOUCH memories help you select Tones for the
real-time parts that match the atmosphere of the current Music Style. There are four such ONE TOUCH memories per Music Style.
1.
Select the desired Music Style.
See page 32.
2.
Switch on the [ONE TOUCH] button (its indicator lights).
The BK-7m calculates the intervals between your
presses and sets the corresponding tempo value.
NOTE
Simultaneously press the TEMPO [√] and [®] buttons
(“STANDARD”) to return to the Music Style’s preset tempo.
12.
Press the [ENDING] button to end Music
Style playback with a suitable closing section.
You could also stop playback simply by pressing the
[START/STOP] button or by releasing all keys on your
MIDI controller (see “Sync Start/Stop” on p. 31).
While Music Style or SMF song playback is stopped,
the [TAP TEMPO] button flashes in blue to indicate
the selected tempo.
The indicator of one of the four buttons to its right
lights to indicate which ONE TOUCH memory is currently selected.
3.
Press the ONE TOUCH [1], [2], [3] or [4] button.
The indicator of that button lights and the “OTC”
message as well as the number of the selected button
appear in the lower right corner of the display.
4.
Start playback of the Music Style.
See page 33.
5.
Play a melody on the connected MIDI controller.
See “‘Wizard Connection’ MIDI channel settings” on
p. 26 for the MIDI channels used by the BK-7m’s realtime parts.
6.
Now press another ONE TOUCH button than
the one that is currently active.
7.
Again play a melody on the external MIDI
controller.
The newly selected ONE TOUCH memory has recalled
a different sound for the melody part. Note that the
ONE TOUCH function also recalls other settings, like
the tempo, INTRO/ENDING, etc.
r
34
NOTE
The BK-7m has a function that allows you to exclude certain settings when a new ONE TOUCH memory is selected.
See “One Touch Hold” on p. 62.
Page 35

Backing Module BK-7m
Using the BK-7m as a USB player
r
10. Using the BK-7m as a USB player
This section explains how to playback MIDI (SMF) and audio songs stored on an optional USB memory. Note that it is also
possible to select Music Styles on that device and to use them in the same way as the internal Styles. New song and
Music Style files can be copied to the USB memory using your computer as you purchase them.
Getting ready to use the BK-7m as
a USB player
1.
On your computer, copy the new song and
Music Style files to an optional USB memory
(memory stick).
NOTE
Use USB memory sold by Roland (M-UF-series). We cannot
guarantee operation if any other USB memory is used.
2.
Connect the USB memory to your BK-7m.
NOTE
Carefully insert the optional USB memory all the way into
the port until it is firmly in place.
NOTE
The BK-7m supports USB memories with a capacity of up
to 2TB.
Selecting a song or Music Style on a USB memory
1.
Connect an optional USB memory to the
BK-7m.
After a few seconds, the display shows the contents
of the USB memory.
Press the [USB MEM] button if you inserted the USB
memory at an earlier stage and now want to return
to this display page.
The icons to the left of the file names indicate the file
type:
Icon Explanation
Music Style file
SMF file
Audio MP3 file
Audio WAV file
File types the BK-7m can read and play back
Extension Format
Music Styles .stl
Standard MIDI
Files (SMF)
Audio files
.mid 0 or 1
.kar
.mp3 • MPEG-1 Audio Layer 3
• Sampling frequency:
44.1kHz
• Bit rate: 32/40/48/56/
64/80/96/112/128/160/
192/224/256/320kbps,
VBR (variable bit rate)
.wav • 16-bit linear
• Sampling frequency:
44.1kHz
• Stereo/mono
Folder
2.
Rotate the [CURSOR÷VALUE] dial to select
the file you want to play back.
3.
Press the dial to load the file.
The [USB MEM] button now lights to indicate that
you selected a file on the USB memory.
If the file you need is located inside a folder, you
must first select that folder, press the
[CURSOR÷VALUE] dial to see its contents and then
select the file. If you opened a folder by mistake,
press the [EXIT] button to return to a higher level.
NOTE
Press and hold the [EXIT] button to return to the main
page.
35
Page 36

Backing Module BK-7m
Using the BK-7m as a USB player
Playing back a song or Music Style from a USB memory
If you selected a Music Style, see “Playing back Music
Styles” on p. 33, because operation is the same as for
internal Music Styles.
In the following, we will therefore only show you how to
play back song files located on a USB memory.
NOTE
The BK-7m has no internal memory where you could store
SMF or audio files.
1.
Select a song (SMF or audio file) on the USB
memory.
See page 35.
2.
Press the [START/STOP] button to start playback.
This button is also labeled [®÷π].
•Press the [TAP TEMPO] button at least three times at
the desired tempo. (This function is not available if
you selected an audio file (WAV or mp3.)
The BK-7m calculates the intervals between your
presses and sets the corresponding tempo value.
NOTE
Simultaneously press the TEMPO [√] and [®] buttons
(“STANDARD”) to return to the Music Style’s preset tempo.
4.
Press the [®÷π] button again to pause song
playback.
The [®÷π] button goes dark.
5.
Press [®÷π] yet again to resume playback.
6.
Press the [SYNC START] button (ª) to stop
playback
The [®÷π] button’s indicator lights and song playback
starts.
3.
If necessary, you can change the song’s
playback tempo:
•Press the TEMPO [√] or [®] button to decrease or
increase the tempo.
NOTE
If you set a tempo value close to the upper or lower limit
for an MP3 or WAV file, playback may sound a little
strange.
You can use the following buttons to control song
playback (see the gray legends):
Button Explanation
[®÷π] Starts or pauses song playback.
[ª] Stops song playback.
[º] Rewinds the song.
[‰] Fast-forwards the song.
r
36
Page 37

11. Other important functions
This section presents other important function you may need regularly.
(b) Rotate the dial to select the mode, then press the
Changing the key
This function allows you to transpose the BK-7m’s pitch
in semi-tone steps. Depending on the mode setting, this
transposition applies to all sections or just a specific
setting.
dial.
Mode Explanation
Song Only song playback is transposed.
Part Only the real-time parts are transposed.
Backing Module BK-7m
Other important functions
r
NOTE
If you choose to transpose the real-time parts, Music Style
playback is also transposed.
1.
Press [KEY] button.
KEY
The display changes to:
The current “Key” setting (transposition interval) is
displayed in the top line and already selected. The
mode setting appears below it.
2.
Rotate the [CURSOR÷VALUE] dial to select
the desired “Key” setting.
3.
Press the dial to confirm your setting.
“Key” setting
–6~0~+5 (semitone units)
If the “Key” setting differs from “0”, the [KEY] indicator lights.
NOTE
You can also change the key of audio signals received via
the AUDIO INPUT jacks (see “Audio in Transpose” on p. 64).
4.
If you also need to change the “Mode” setting:
(a) Select it by rotating the [CURSOR÷VALUE] dial,
then press the dial.
Song + Part Both song playback and the real-time
parts are transposed. Music Style playback
is also transposed.
Changing the octave
This function allows you to transpose the real-time
parts (UP1, UP2, LWR and MBS) up or down in octave
steps.
1.
Press the [OCTAVE] button.
OCTAVE
The display changes to:
The display show the current octave setting for all
four real-time parts.
2.
Use the [CURSOR÷VALUE] dial to select the
“Octave” parameter of the real-time part
whose setting you want to change.
3.
Press the dial, then rotate it to select the
desired setting.
“Octave” setting
–4~0~+4
37
Page 38

Backing Module BK-7m
Other important functions
Using ‘Track Mute’ and ‘Center Cancel’
You can use this function to mute tracks of Music Styles
or the melody part of the selected Standard MIDI File
(SMF). After selecting a WAV or mp3 audio file, you can
attenuate the vocal part at the center of the stereo
image (“Center Cancel”). The Mute function’s behavior
depends on the selected file type.
1.
Select a song (SMF or audio) or a Music
Style.
2.
Press the [START/STOP] button to start playback.
3.
Press the [TRACK MUTE] (CENTER CANCEL)
button (its indicator lights).
MELODY
MUTE
Selecting the track(s) to mute for Music Styles or SMF songs
The following procedure allows you to specify the track
of the selected Standard MIDI File that should be muted
when you switch on the [TRACK MUTE] button.
NOTE
This function is not available for audio files.
1.
Select a Music Style or an SMF song.
2.
Press and hold the [TRACK MUTE] (CENTER
CANCEL) button.
This function can also be selected using [MENU] button ‰ “Performance Edit” ‰ “Style/SMF Track Mute”.
Depending on the song file type, the display changes
to…
…or:
The “Track Mute” or “Center Cancel” function will
turn on. This depends on the file type you selected:
File Type Function Explanation
Music
Style
SMF Track Mute The specified Standard MIDI
Audio
(mp3,
wav)
NOTE
For some audio songs, the vocal sound may not be eliminated completely.
4.
Press the [TRACK MUTE] (CENTER CANCEL)
Track Mute The specified Music Style
track(s) is muted (Default:
AC1~AC4).
file track is muted (Default:
channel 4).
Center Cancel Sounds in the center (the
melodic portion of the
sound) will be minimized.
button again to make its indicator go dark.
This switches the “Track Mute” or “Center Cancel”
function back off.
When you start playback, you will notice that active
parts are indicated by moving bar graphs that simulate level meters. The bar graphs of muted parts do
not move.
3.
Rotate the [CURSOR÷VALUE] dial to move
the cursor to the track you want to mute.
The name of the Tone assigned to that track appears
in the upper right corner.
4.
Press the dial to highlight the corresponding
parameter.
5.
Rotate the dial to change the setting and
press it to confirm you setting.
The possibilities are:
Display indication
<no indication> The associated track is played back.
M The associated track is no longer
played back (muted).
6.
If you want to save your selection of the
track(s) that should be muted for any Music
Style or SMF file you play back, see “Save
Global” on p. 65.
r
38
Page 39

Backing Module BK-7m
LW2 MBS
+ Music Style control
UP1, UP2
MIDI OUT
MIDI IN
Using Split mode
r
When you start playback, you will notice that active
parts are indicated by moving bar graphs that simulate level meters. The bar graphs of muted parts do
not move.
7.
If there is no need to save your settings,
press and hold the [EXIT] button to return to
the main page.
Using Split mode
In Split mode, the BK-7m transmits note messages
below the split point to the MBS, LWR and NTA (Noteto-Arranger) parts. The note numbers above the split
point, however, are transmitted to the UP2 and UP1
parts.
This only works if your external MIDI controller transmits all note messages on the same MIDI channel and if
the BK-7m is set to receive on one MIDI channel only
(see “‘Wizard Connection’ MIDI channel settings” on
p. 26). Therefore, we suggest activating Split mode only
if you use a digital piano or a single-zone MIDI master
keyboard.
NOTE
In most cases, the default setting for the split point is note
number 60 (C4). When you select a “DIGITAL PIANO” option
(see p. 22), however, the split point is set to note number 54
(F#3). You can also change the split point to a different note
(see “Split Point” on p. 59).
1.
Press the [SPLIT] button (its indicator
lights).
the MBS and/or LWR parts (if they are active). Note
numbers above the split point can be used to play
melodies using the UP1 and/or UP2 part.
In Split mode, the “Type” parameter (see p. 60) is
automatically set to “Intelligent”.
NOTE
See page 27 for how to select the real-time parts you want
to use.
NOTE
You can activate a “Hold” function for the LWR part. See
“Lower Hold” on p. 59.
2.
Press the [SPLIT] button again.
The BK-7m leaves Split mode and the [SPLIT] indicator goes dark and chord recognition (see “Type” on
p. 60) is set to “Pianist”. This setting works as follows:
the Arranger decodes every chord you play – no matter where you play it. Causing the Arranger to play
another chord requires that you play at least a triad
(i.e. the three notes that make up a major or minor
chord). You can play more than three chord notes but
remember that two notes won’t cause the Arranger
to change the key.
SPLIT
The BK-7m is now in Split mode: note numbers below
the split point (see “Split” on p. 50) are used to transpose Music Styles playback in real-time and to play
39
Page 40

Backing Module BK-7m
Other important functions
Metronome
The BK-7m is equipped with a metronome that can be
used in various situations. To use the metronome, here
is what you need to do:
NOTE
While Music Style or SMF song playback is stopped, the
[TAP TEMPO] button flashes in blue to indicate the selected
tempo.
1.
Press and hold the [TAP TEMPO] button.
The display changes to:
Parameter Setting Explanation
Count In Off, 1bar, 2bar This parameter allows
you to switch the
Count-In function on
(“1 BAR” or “2 BAR”) or
off. When on, the metronome will count in
the specified number
of measures (bars)
before the Music Style
or SMF song starts
playing. (This setting is
not available for audio
songs.)
NOTE
You can also call up the “Metronome” page using [MENU]
button ‰ “Global” ‰ “Metronome”.
2.
Rotate the [CURSOR÷VALUE] dial to select
the “Metronome” field.
3.
Press the dial to highlight the setting.
4.
Rotate the dial to select “On”, then press the
dial.
The metronome starts counting.
NOTE
The metronome is not available while an audio song file
(mp3 or WAV) is selected.
The metronome parameters you can set are:
Parameter Setting Explanation
Metronome Off, On Select “On” to activate
the metronome.
Volume 0~127 Sets the metronome’s
level.
Time Signature 1~32/16, 8,
4, 2
Mode Always, Play Always: The metro-
Specifies the metronome’s time signature.
nome even counts
when playback is
stopped.
Play: The metronome
only sounds while the
Music Style or song is
playing.
r
40
Page 41

12. Performance Lists
Backing Module BK-7m
Performance Lists
r
Performance/Music Assistant Info
The “Performance List” is a list of up to 999 Performance
memories. Each Performance memory contains a reference to the desired Music Style or song and all settings
you want to load along with that Music Style or song
(see “‘Performance Edit’ parameters” on p. 50), including
settings like INTRO/ENDING status, selected VARIATION,
etc.
The Performance memories you create are saved to the
selected “Performance List”. This allows you to prepare
one set of Performance memories for weddings, another
for corporate events, a third for anniversaries, etc. Performance Lists always reside on a USB memory.
It is perfectly possible to program several Performance
memories for one song. Selecting a Performance memory is a lot faster than calling up one of the BK-7m’s
functions, modifying the settings, etc., while playing.
You could program one Performance memory for the
first part of a song, another for the bridge and a third
one for the closing section. Doing so allows you to “play”
with the effect settings of the various processors, for
example.
NOTE
The BK-7m is supplied with one Performance List called “Music
Assistant”. This list cannot be deleted or edited.
The display now shows all Performance Lists it found
on the USB memory. (The internal “Music Assistant”
list is always displayed in the top line.)
NOTE
If you already loaded a Performance List, the display immediately displays the Performance memories it contains. To
load a different Performance List from the USB memory,
press the PERFORMANCE [LIST] button again and proceed
with step (4) below.
NOTE
If the USB memory contains no Performance List files, or if
the memory is not connected (properly), the BK-7m only
displays the “Music Assistant” list.
4.
Rotate the [CURSOR÷VALUE] dial to select
the Performance List you want to use.
5.
Press the dial to confirm your selection.
(In our example, we selected the “Music Assistant”
list.) The display changes to:
Loading a Performance/Music Assistant List
1.
Switch on the BK-7m.
See page 19.
2.
Connect an optional USB memory to the
BK-7m.
This step is unnecessary if you want to use the “Music
Assistant” list, because that list resides in the BK-7m’s
internal memory.
3.
Press the PERFORMANCE [LIST] button.
PERFORMANCE
LIST
6.
If necessary, rotate the [CURSOR÷VALUE]
dial to select the “Load” option, then press
the dial.
The display shows the Performance memories to
which the selected list refers.
You can now select a Performance memory (see
below).
If you need to load another Performance List, press
the PERFORMANCE [LIST] button again.
41
Page 42

Backing Module BK-7m
Performance Lists
Recalling a Performance/Music Assistant memory
Here is how to select a Performance/Music Assistant
memory from the last list you loaded (see p. 41).
1.
If the display doesn’t yet show a list of Performance/Music Assistant memories, press
the PERFORMANCE [LIST] button.
In this example, we loaded the Music Assistant List.
2.
Rotate the [CURSOR÷VALUE] dial to select
the memory whose settings you want to use,
then press the dial to confirm your selection.
Quickly locating Performance memories
The BK-7m provides a function that allows you to
search the connected USB memory for Performance
memory files whose names start with a given letter. This
function is available even while the BK-7m is playing
back a song or Music Style, allowing you to prepare the
next Performance memory without keeping your audience waiting.
1.
While a list of Performance memories is displayed, press and hold the [PERFORMANCE
[LIST] button.
PERFORMANCE
LIST
The button’s indicator flashes and the cursor indicates the first Performance memory whose name
starts with the letter “A”.
The PERFORMANCE [LIST] button lights to signal that
the BK-7m is now using the settings of the selected
Performance memory. The name of that memory is
highlighted.
The selected memory also refers to a Music Style or
song, which can be started in the usual ways ([START/
STOP] button, [SYNC START], etc.).
During playback of that Style or song, you can
already select a new Performance/Music Assistant
memory.
3.
If you need to return to the main page,
press the [EXIT] button.
To return to the page that lists the memories, press
PERFORMANCE [LIST] again.
2.
Press the PERFORMANCE [LIST] button
again to select the first Performance memory name that starts with a “B”.
Repeat this operation for all subsequent letters (“C”,
“D”, “E”, etc.) until you have selected the one you
need.
3.
Rotate the [CURSOR÷VALUE] dial to select
the memory whose settings you want to use,
then press the dial to confirm your selection.
r
42
4.
Press and hold the PERFORMANCE [LIST]
button to leave this function.
Page 43

Saving your settings as a Performance
1.
Select a Music Style or song.
2.
Select all settings you would like to use for
this Music Style or song.
You can, for instance, assign the desired Tones to the
real-time parts, switch on the [INTRO] button, modify
the “Performance Edit” settings, etc.
3.
Press the [WRITE] button to jump to the
“Write Performance” page.
PERFORMANCE
WRITE
Backing Module BK-7m
Saving your settings as a Performance
7.
Press the [WRITE] button to save your set-
r
tings, thereby creating a new Performance
memory.
This memory is added at the end of the currently
selected Performance List (see “Loading a Performance/Music Assistant List” on p. 41).
NOTE
If you haven’t loaded any Performance List since switching
on the BK-7m, a new Performance List is created, and your
Performance memory becomes its first entry.
Other Performance List functions
1.
Connect a USB memory with at least one
Performance List to the BK-7m.
The [WRITE] indicator flashes and the display changes
to:
By default, the BK-7m assigns the name of the
selected Music Style or song to the Performance settings you are about to save. If you agree with that
name, proceed with step (7) below.
4.
Rotate the [CURSOR÷VALUE] dial to select
the desired character, then press the dial.
5.
Rotate the [CURSOR÷VALUE] dial to select
the next character position you want to
change, then press the dial.
2.
Press the PERFORMANCE [LIST] button.
The display now shows all Performance Lists on the
connected USB memory.
3.
Rotate the dial to select the desired Performance List, then press the dial to confirm
your selection.
The display now changes to a page with the following options:
Function Explanation
Load Loads the selected Performance/Music
Assistant List.
Edit*
Rename* Allows you to rename the selected Perfor-
Allows you to edit the selected Performance List (“Delete”, “Move”).
mance List.
6.
Repeat steps (4) and (5) to enter the
remaining characters.
NOTE
You can press the ONE TOUCH [1] button to delete the
selected character. The [2] button allows you to insert a
character.
Delete* Deletes the selected Performance List.
Make New Allows you to create a new (empty) Per-
formance List.
[*] Not available if you selected the Music Assistant List in step
(3) above.
4.
Rotate the dial to select the desired option,
then press the dial.
For a description of the “Load” option, see “Loading a
Performance/Music Assistant List” on p. 41.
43
Page 44

Backing Module BK-7m
Performance Lists
If you select ‘Edit’
The display shows all Performance memories to
which the selected List refers. The “Edit” option allows
you to do the following:
Operation Explanation
Delete Deletes the selected Performance memory
from the active list.
Move Allows you to change the order in which
the Performance memories appear in the
selected Performance List.
Save Allows you to save the edited list.
■ Delete operation
1.
Rotate the [CURSOR÷VALUE] dial to select
the Performance memory you want to
remove from the list.
2.
Press the dial to confirm your selection.
If you did not save the Performance List, the BK-7m
now signals that you need to save it to preserve your
changes.
9.
Rotate the dial to select “YES” to save your
changes to the USB memory (or “NO” if you
wish to keep the previous version).
10.
Press the dial to confirm your selection.
■ Move operation
1.
Rotate the [CURSOR÷VALUE] dial to select
the Performance memory you want to move
to a different position inside the list.
2.
Press the dial to confirm your selection.
3.
Rotate the [CURSOR÷VALUE] dial to select
“Delete”, then press the dial.
The display changes to:
4.
Rotate the dial to select “YES” to delete the
Performance memory (or “NO” if you wish to
keep it).
5.
Press the dial to confirm your selection.
The display briefly confirms that the Performance
memory has been deleted.
If you like, you can now select another Performance
memory you want to delete, press the
[CURSOR÷VALUE] dial to confirm and repeat from
step (3).
To save your edited Performance List, proceed with
step (6). If you don’t want to save it, skip to step (8).
Saving the edited Performance List
6.
Press the [CURSOR÷VALUE] dial.
7.
Rotate the [CURSOR÷VALUE] dial to select
“Save”, then press the dial again.
A message confirms that the data have been saved.
8.
Press the [EXIT] button to leave edit mode.
3.
Rotate the [CURSOR÷VALUE] dial to select
“Move”, then press the dial.
The display changes to:
4.
Rotate the dial to move the selected Performance memory to the desired position, then
press the dial.
You can now select another Performance memory
you want to move, press the [CURSOR÷VALUE] dial to
confirm and repeat from step (4).
See “Saving the edited Performance List” if you want
to save the edited list.
If you select ‘Rename’
The display changes to:
This page allows you to change the name of the
selected Performance List.
r
44
Page 45

1.
Rotate the [CURSOR÷VALUE] dial to select
the desired character, then press the dial.
You can press the ONE TOUCH [1] button to delete
the selected character. The [2] button allows you to
insert a character.
2.
Rotate the [CURSOR÷VALUE] dial to select
the next character position you want to
change, then press the dial.
3.
Repeat steps (1) and (2) above to complete
the name.
4.
Press the [WRITE] button to save the Performance List under the new name.
The display briefly confirms the operation and the
returns to the page with all Performance List files on
your USB memory.
If the USB memory already contains a file of the
name you have entered, the display asks you whether
it is OK to overwrite the other Performance List file.
In that case, select “YES” to replace the other Performance List file with the one whose name you
changed. (Select “NO” to return to the page where
you can change the name.)
Backing Module BK-7m
1.
Rotate the [CURSOR÷VALUE] dial to select
Other Performance List functions
the desired character, then press the dial.
You can press the ONE TOUCH [1] button to delete
the selected character. The [2] button allows you to
insert a character.
2.
Rotate the [CURSOR÷VALUE] dial to select
the next character position you want to
change, then press the dial.
3.
Repeat steps (1) and (2) above to complete
the name.
4.
Press the [WRITE] button to create the new
Performance List, which is currently empty.
If the USB memory already contains a file of the
name you have entered, the display asks you whether
it is OK to overwrite the other Performance List file.
In that case, select “YES” to replace the other Performance List file with the one you want to create.
(Select “NO” to return to the page where you can
change the name.)
NOTE
The new Performance List file is saved to the “My Performances” folder on the USB memory. If this folder doesn’t
yet exist, it will be created automatically.
r
If you select ‘Delete’
The display changes to:
This page allows you to delete the selected Performance List.
1.
Rotate the [CURSOR÷VALUE] dial to select
“YES”, then press the dial to delete the Performance List.
Select “NO” if you do not want to delete the Performance List after all.
The display briefly confirms that the selected Performance List has been deleted and then returns to the
page with all Performance List files on your USB
memory.
If you select ‘Make New’
The display changes to:
This page allows you to create a new Performance
List whose name is selected automatically by the
BK-7m. If you are happy with that name, proceed
with step (4) below. Otherwise…
45
Page 46

Backing Module BK-7m
Recording your performance as audio data
13. Recording your performance as audio data
Your BK-7m allows you to record everything it can transmit to its outputs, i.e. Music Style or song playback, your playing,
your singing, and any audio signal transmitted to the BK-7m. (The metronome signal is not recorded.)
Feel free to connect the master outputs of an external
mixing console to the BK-7m’s AUDIO INPUT sockets if
you want to record your band or the signals of an accordion, additional synthesizers, pianos, drum machines,
etc., as well.
The resulting audio file is stored in the WAV format (not
mp3), which allows you to burn your recordings onto a
CD using your computer.
NOTE
You will need a USB memory to record your performance.
Recording
NOTE
The following is based on the assumption that the “REC Audio
Sync” parameter (page 64) is active.
1.
Connect the USB memory to which you wish
to save the audio data.
NOTE
Use USB memory sold by Roland (M-UF-series). We cannot
guarantee operation if any other USB memory is used.
2.
Prepare everything you want to record:
• Select the Music Style or song you want to use as
accompaniment
• Set the levels and effects, etc.
3.
Set the desired balance between the Music
Style/song and the real-time parts using the
[BALANCE] knob.
You may also want to set the [AUDIO IN] knob.
4.
Press the [AUDIO REC] button (its indicator
flashes).
5.
Press the [START/STOP] button.
The indicators of the [AUDIO REC] and [START/STOP]
buttons light and the BK-7m starts playing back the
selected Music Style or song and recording. Everything you play (on a connected instrument) is
recorded.
6.
At the end of the song, press the
[AUDIO REC] or [START/STOP] button to stop
recording.
Music Style or song playback and recording stop. The
following message appears:
You can now…
(a) Save the song under a new name.
‰ “Saving your recording as an audio file”
(b) Save the song under the name suggested by the
BK-7m (“My recording001”).
‰Press the [WRITE] button. After a few seconds,
the display will return to the main page. In this
case, your audio file is saved in the “My Recordings” folder.
(c) Decide to discard your recording, because you are
unhappy with it.
‰ Press the [EXIT] button. The display changes to:
r
46
‰ Rotate the [CURSOR÷VALUE] dial to select “YES”,
then press the dial to erase your recording.
Note: Selecting “NO” here takes you back to the state
where you can choose between options (a) and (b).
Page 47

Backing Module BK-7m
r
Recording
Listening to your recording
If you selected (a) or (b) above, you can listen to your
recorded performance:
1.
Press the [START/STOP] button to start playback of your recording.
If your recording seems too loud or too soft, you may
want to change the setting of the “REC Audio Level”
parameter ([MENU] button ‰ “Global“‰ “Utility”‰
“REC Audio Level” on p. 64).
Note: The BK-7m provides a second recording mode that
allows you to start recording before the song you selected
([MENU] button
on p. 64
‰ “Global“‰ “Utility”‰ “REC Audio Sync”
).
Saving your recording as an audio file
When you stop recording (see above), the display shows
the following message:
If the USB memory already contains a file of that
name, you will be asked whether you want to overwrite it:
In this case, select “YES” by first rotating the
[CURSOR÷VALUE] dial and then pressing it to replace
the old file with the new one (the old file will be lost).
Otherwise, select “NO” to return to the page where
you can change the name, and enter a different
name, the press the [WRITE] button.
When you press the [WRITE] button, your audio file is
saved to the “My Recordings” folder on the USB
memory.
NOTE
The name suggestion displayed here depends on the first
recording. It will, however, be followed by an incremental
number.
1.
If you want to name your new song, proceed
with step (2).
If you are happy with the name suggested by the
BK-7m, simply press the [WRITE] button (see step (5)
below).
2.
Rotate the [CURSOR÷VALUE] dial to select a
different character, then press the dial to
confirm your selection.
3.
Rotate the [CURSOR÷VALUE] dial to select
the next character position you want to
change, then press the dial.
You can also press the ONE TOUCH [1] button to
delete the selected character, or the [2] button to
insert a character.
4.
Repeat steps (2) and (3) to complete the
name.
5.
Press the [WRITE] button (its indicator
flashes) to save your recording under the
new name and to return to the main page.
47
Page 48

Backing Module BK-7m
Cover functions for Music Styles and SMF songs
14. Cover functions for Music Styles and SMF songs
The Cover function allows you to change the orchestration of the selected Music Style or SMF song based on one of the
30 presets. The new version can be saved to a USB memory.
The display changes to:
Using Music Style or SMF Covers
‰ Not available for audio files.
The “SMF Cover” function provides “masks” that change
the instrumentation of the selected Music Style or song.
Simply by selecting another preset, you can cause a
Viennese waltz to be played back by a heavy metal band,
etc.
1.
Select the Music Style or SMF song you
want to modify.
See “Selecting a song or Music Style on a USB memory” on p. 35.
2.
Press the [START/STOP] button to start playback of that Music Style or song.
5.
Rotate the [CURSOR÷VALUE] dial to select
“Cover List”, then press the dial.
The display changes to…
This allows you to listen to the Music Style or song
before you start editing it. If you selected a Music
Style, remember to play a few chords on the external
MIDI controller. See also “Playing back a song or
Music Style from a USB memory” on p. 36.
3.
Press the [MENU] button.
MENU
The display changes to:
…or:
6.
Use the [CURSOR÷VALUE] dial to select one
of the 30 preset settings.
The names of the preset options already provide a
good indication of what to expect.
After selecting a preset, you can return to the original
orchestration (“Original”).
7.
Try out various presets to how (fast) this
concept works.
Presets
Original, Live Band, Pop1, Dance, Acoustic1, Ethnic, Hard
Rock, Pop2, Techno, Rock1, Oriental 1, A Cappella, Rock 2,
House, Classic, Vocal Pop, Oriental 2, Vocal Rock,
Acustic 2, Guitars, Jungle, Traditional, Celtic, Vocal Dance,
Funky, Brass Band, Hip Pop, Vocal Ac., New Age, Vocal Or.
8.
If you like the new version better than the
original one, you can save the Music Style or
song to the USB memory with this information (see below).
NOTE
The “Cover” information is part of the data only the BK-7m
understands. Other SMF players (or sequencer software)
ignore these settings.
4.
Rotate the [CURSOR÷VALUE] dial to select
“Cover (Style/SMF)“, the press the dial.
r
48
Page 49

Saving your modified Music Style or SMF song
1.
Select the desired “Cover” setting.
See “Using Music Style or SMF Covers” on p. 48.
2.
Press the [EXIT] button to return to the previous menu.
3.
Rotate the [CURSOR÷VALUE] dial to select
Save Cover, then press the dial.
The display shows the contents of the currently
selected folder on the USB memory.
4.
If necessary, rotate and press the
[CURSOR÷VALUE] dial to select a different
location (another folder).
Backing Module BK-7m
Saving your modified Music Style or SMF song
If the USB memory already contains a Music Style or
song file of that name, you will be asked whether you
want to overwrite it:
In this case, select “YES” using the [CURSOR÷VALUE]
dial to replace the old file with the new one (the old
file will be lost).
Otherwise, select “NO” to return to the “Save” page
and enter a different name.
r
5.
If necessary, press the [EXIT] button to
return to a higher folder level.
6.
Press the [WRITE] button (its indicator
flashes).
The display changes to:
The BK-7m automatically selects the name of the
selected Music Style or song. If you agree to save the
new version under that name, skip tp step (10).
7.
Rotate the [CURSOR÷VALUE] dial to select
the desired character, then press the dial to
edit it.
8.
Rotate the [CURSOR÷VALUE] dial to select
the character position you want to change,
then press the dial.
You can press the ONE TOUCH [1] button to delete
the selected character. The [2] button allows you to
insert a character.
9.
Repeat steps (7)~(8) to complete the name.
10.
Press the [WRITE] button to confirm your
desire to save the Music Style or song.
The display briefly confirms the operation and then
returns to the “Style Cover” page.
49
Page 50

Backing Module BK-7m
Menu options
15. Menu options
The BK-7m’s [MENU] button provides access to the available parameters and functions.
General procedure
1.
Press the [MENU] button (its indicator
lights).
The display changes to:
2.
Rotate the [CURSOR÷VALUE] dial to select
the desired function group.
The following function groups are available:
Function group Explanation
Performance
Edit
Cover (Style/
SMF)
Global This function group contains parame-
MIDI This function group allows you to edit
Wizard
Connection
Mastering Tools These functions allow you to set the
This function group allows you to
select different Tones and effects settings for the real-time parts, the
selected Music Style, to set the
Arranger’s behavior, the split point, etc.
All settings of this group can be saved
to a Performance memory. See “‘Performance Edit’ parameters”.
Allows you to change the orchestration
of the selected Music Style or song. See
page 48.
ters that apply to all sections of the
BK-7m (see p. 62).
the BK-7m’s MIDI parameters (see
p. 66).
The BK-7m contains a connection wizard that will help you configure the
BK-7m for use with your MIDI controller. See “Wizard Connection” on
p. 22 for details.
global compressor and equalizer (see
p. 71).
Function group Explanation
Makeup Tools These functions allow you to edit the
selected Music Style or SMF song in an
intuitive way, without caring too much
about the underlying MIDI parameters.
See page 75.
V-LINK V-LINK ( ) is a function that
allows music and images to be performed together using V-LINK-compatible devices connected to one
another via MIDI (see p. 82).
Factory Reset This command allows you to load the
BK-7m’s factory settings (see p. 83).
Format USB
Device
3.
Press the [CURSOR÷VALUE] dial to go to the
This command allows you to format an
optional USB memory (see p. 83).
display page where you can edit the parameters of the selected group, or to execute
the selected command.
‘Performance Edit’ parameters
The following parameters can be set for each Performance memory:
Parameter/Group Explanation
Tone Part View This is where you can edit settings
related to Tones. See page 51.
Tone Part Effects Contains the effects parameters for the
real-time parts (MBS, LWR, UP2, UP1).
See page 54.
Style Parts This group contains all parameters of the
Music Style parts. See page 59.
Split This parameter allows you to change the
split point, i.e. the separation between
the lower and upper keyboard zones. See
page 59.
Key Allows you to transpose the BK-7m in
semi-tone steps up or down. See
page 37.
This page can also be selected by pressing the [KEY] button.
Arranger Setting This function group allows you to specify
where and how the selected Music Style
should scan the incoming note messages
for chord information. See page 60.
Melody Intelligent Allows you to set the “Melody Intelli-
gence” function. See page 61.
r
50
Page 51

Backing Module BK-7m
‘Performance Edit’ parameters
r
Parameter/Group Explanation
Save As Default This function allows you to save all “Per-
formance Edit” settings as the new
defaults that will be loaded each time
you switch on the BK-7m.
‘Tone Part View’ parameters
This function group can be selected using [MENU] button ‰ “Performance Edit” ‰ “Tone Part View”.
1.
Use the [CURSOR÷VALUE] dial to select the
real-time part you want to edit (MBS, LWR,
UP2, UP1).
The display shows the settings for the selected realtime part.
2.
Use the dial to select and set the desired
parameter(s).
The following parameters are available:
Families
Allows you to select a different Tone family. See
page 91 for a list of available Tones and Drum Sets.
After selecting a new family, you can press the
[CURSOR÷VALUE] dial and then rotate it to select a
Tone from that family.
Reverb Send
Use this parameter to set the reverb send level (i.e.
the amount of effect that should be added).
Parameter Setting
Reverb Send 0~127
Chorus Send
Use this parameter to set the chorus send level (i.e.
the amount of effect that should be added).
Parameter Setting
Chorus Send 0~127
Panpot
Use this parameter to change the stereo placement
of the selected real-time part. “L63” means “hard left”
and “R63” represents “hard right”. Choose “0” if the
sound should be at the center of the stereo image.
Parameter Setting
Panpot L63~0~R63
EQ Part Edit
1.
If you also want to edit the parameters of
equalizer, you have to press
[CURSOR÷VALUE] dial to select the “EQ Edit
Part” page.
Parameter Explanation
Families The BK-7m’s Tones are grouped into 16
families: Piano, guitar, bass, strings, etc.
Tone
Allows you to select a different Tone within the
active Tone family. See page 91 for a list of available
Tones and Drum Sets.
While selecting a Tone, you can press the
[CURSOR÷VALUE] dial and then rotate it to select a
different family.
Parameter Explanation
Tone The number of Tones depends on the
selected family.
Volume
Adjusts the volume of the selected real-time part.
Selecting “0” means that the part is question is no
longer audible.
Parameter Setting
Volume 0~127
2.
Use the dial to select and set the desired
parameter(s).
The following parameters are available:
Parameter Setting range Explanation
Switch Off, On This parameter allows
you to switch the
equalizer on and off.
High Freq 1500Hz, 2000Hz,
3000Hz, 4000Hz,
6000Hz, 8000Hz,
12000Hz
High Gain –15~+15dB Use this parameter to
Mid Freq 200~8000Hz Allows you to set the
Allows you to set the
cutoff frequency of
the high band (this is
a shelving filter).
set the level of the
selected “High” frequency. Positive values boost (increase
the volume of) that
frequency band, negative values cut
(attenuate) it.
cutoff frequency of
the middle band (this
is a peaking filter).
51
Page 52

Backing Module BK-7m
Menu options
Parameter Setting range Explanation
Mid Gain –15~+15dB Use this parameter to
set the level of the
selected “Mid” frequency.
Mid Q 0.5, 1.0, 2.0, 4.0,
8.0
Low Freq 90, 150, 180, 300,
360, 600Hz
Low Gain –15~+15dB Use this parameter to
3.
Press the [EXIT] button to leave the “EQ Part
Use this parameter to
specify the width of
the “Mid Frequency”
band that you want to
boost or cut. Smaller
values mean that
neighboring frequencies above/below that
value are also
affected.
Allows you to set the
cutoff frequency of
the low band (this is a
shelving filter).
set the level of the
selected “Low” frequency.
Edit” page.
Mfx
The BK-7m contains one multi-effect processor
(“Mfx”) that can be used to process the desired realtine part(s). Select “Off” for parts that don’t need to
be processed by this Mfx.
Parameter Setting
Mfx Off, On
Expression Pedal
Select “Off” if you don’t need pedal expression for the
selected part. This means that the real-time part in
question no longer responds to an expression pedal
you may have connected to the SWITCH/EXPRESSION
socket.
Parameter Setting
Expression Pedal Off, On
Hold Pedal
This parameter allows you to specify whether and
how a hold/damper pedal you connect to the
SWITCH/EXPRESSION socket should respond to Hold
messages (CC64).
Parameter Setting
Hold Pedal Auto, On, Off
“Auto” means that the part in question only responds
to Hold messages if it is assigned to the right half
(Split) or the entire keyboard.
“On” means that the part in question always responds
to Hold messages, even if it is assigned to the left half
of the keyboard.
“Off”, finally, means that the part does not respond to
Hold messages.
Octave Shift
Allows you to transpose the selected real-time part in
octave steps.
Parameter Setting
Octave Shift –4~0~+4
Coarse Tune
Changes the pitch of the selected real-time part
semi-tone steps.
Parameter Setting
Coarse Tune –24~0~+24
Fine Tune
Changes the pitch of the selected part in steps of 1
cent (1/100 semi-tone).
Parameter Setting
Fine Tune –100~0~+100
Portamento Mode
You can to set the selected part to mono(phonic)
mode. “Mono” means that you can only play one
note at a time. You could select this mode to play a
trumpet or woodwind part in a more natural way.
“Poly”, on the other hand, means that you can play
chords using the selected part.
Parameter Setting
Portamento Mode Poly, Mono
Portamento Time
“Portamento” means that the pitch doesn’t change in
clearly defined steps: it produces glides from one
note to the next. Use the this parameter to specify
the speed at which those glides are carried out. The
higher the value, the slower the transitions.
Parameter Setting
Portamento Time 0~127
After Touch
The BK-7m receives MIDI aftertouch messages. You
can choose how you want the real-time parts to
respond to these messages.
Parameter Setting
After Touch Off, Filter Up, Filter Down, Modula-
tion, Pitch Up, Pitch Down, Volume
Up, Volume Dw
Off: The part in question does not respond to MIDI
aftertouch messages.
r
52
Page 53

Backing Module BK-7m
‘Performance Edit’ parameters
r
Filter Up: The cutoff frequency of the Tone assigned
to the selected part can be raised (so that the sound
becomes brighter).
Filter Down: The cutoff frequency of the Tone
assigned to the selected part can be lowered (so that
the sound becomes mellower).
NOTE
Depending on the value you set for “Cut Off”, the “Filter
Up” and “Down” parameters may have no audible effect.
That is also the case of Tones whose cutoff frequency is
already preset to the minimum value.
Modulation: Select this function if you want that an
MIDI Aftertouch message control the modulation.
Pitch Up: Select this function if you want MIDI aftertouch messages to move notes up to two semi-tones
up.
Pitch Down: Select this function if you want MIDI
aftertouch messages to move notes up to two semitones down.
Volume Up: This setting allows you to increase the
volume of the selected part using MIDI aftertouch
messages.
Volume Down: This setting allows you to decrease
the volume of the selected part using MIDI aftertouch messages.
Cut Off
This filter parameter allows you to make the selected
sound darker or brighter. Positive settings mean that
more overtones will be allowed to pass, so that the
sound becomes brighter. The further this value is set
in the negative direction, the fewer overtones will be
allowed to pass and the sound will become softer
(darker).
Setting
NOTE
For some sounds, positive (+) Cutoff settings will cause no
noticeable change because the preprogrammed Cutoff
parameter is already set to its maximum value.
Parameter Setting
Cut Off –64~+63
Characteristics of a low-pass filter
Frequency
Cutoff frequency
NOTE
For some sounds, negative (–) “Resonance” settings may
produce no noticeable change because the Resonance is
already set to the minimum value.
Parameter Setting
Resonance –64~+63
Attack (only for Tones)
This parameter adjusts the onset of the sound. Negative values speed up the attack, so that the sound
becomes more aggressive.
Parameter Setting
Attack –64~+63
Decay
This parameter adjusts the time over which the
sound’s volume and cutoff frequency fall from the
highest point of the attack down to the sustain level.
Parameter Setting
Decay –64~+63
NOTE
Percussive sounds usually have a sustain level of “0”. Piano
and guitar sounds are in this category. Holding the keys for
a long time will have little effect on the duration of the
notes you are playing, even if you select a high value here.
Release
This parameter adjusts the time over which the sound
will decay after the note is released until it is no
longer heard. The cutoff frequency will also fall
according to this setting.
Parameter Setting
Release –64~+63
Vibrato Rate
This parameter adjusts the speed of the pitch modulation. Positive (+) settings make the preset pitch
modulation faster and negative (–) settings make it
slower.
Parameter Setting
Vibrato Rate –64~+63
Vibrato Depth
This parameter adjusts the intensity of the pitch
modulation. Positive (+) settings mean that the
“wobble” becomes more prominent, while negative
(–) settings make it shallower.
Resonance
When the Resonance value is increased, the overtones in the area of the cutoff frequency will be
emphasized, creating a sound with a strong character.
Parameter Setting
Vibrato Depth –64~+63
53
Page 54

Backing Module BK-7m
Menu options
Vibrato Delay
This parameter adjusts the time required for the
vibrato effect to begin. Positive (+) settings increase
the time before vibrato will begin and negative settings shorten the time.
Parameter Setting
Vibrato Delay –64~+63
C1
The function of this parameter depends on the sound
you assigned to the selected part. It may influence
the filter and Resonance setting, switch between the
organ samples with the fast and slow Rotary modulation, etc.
Parameter Setting
C1 0~127
Key Range Lower, Key Range Upper
The “Key Range Lower” and “Key Range Upper”
parameters allow you to set the note range to be
received for the selected part.
Parameter Setting
Key Range Lower C1~G9
Key Range Upper C1~G9
‘Tone Part Effects’ parameters
This function group can be selected using [MENU] button ‰ “Performance Edit” ‰ “Tone Part Effects”.
1.
Use the [CURSOR÷VALUE] dial to select and
set the desired effects processor (Mfx,
Reverb, Chorus).
The display shows the settings for the selected realtime part.
The following parameters are available:
a) Mfx parameters
This function group can be selected using [MENU]
button ‰ “Performance Edit” ‰ “Tone Part Effects” ‰
“Mfx”.
Your BK-7m contains a multi-effects processor that
can be used for processing any real-time part you
like. See “Mfx” on p. 52. (There are also 3 Mfx processors for the Style/Song parts.)
Mfx Switch
Select “Off” if you don’t need the Mfx processor.
NOTE
The “Upper Range Lower” value cannot be higher than or
equal to “Key Range Upper” (and vice versa).
Parameter Setting
Mfx Switch Off, On
r
54
Page 55

Backing Module BK-7m
‘Performance Edit’ parameters
r
Mfx Type
The BK-7m provides 84 different multi-effects types,
some of which are combinations of two effects for
added flexibility. This parameter allows you to select
the desired type. The available types are:
1. Thru
2. Stereo EQ
3. Overdrive
4. Distortion
5. Phaser
6. Spectrum
7. Enhancer
8. Auto Wah
9. Rotary
10. Compressor
11. Limiter
12. Hexa-Chorus
13. Trem Chorus
14. Space-D
15. St. Chorus
16. St. Flanger
17. Step Flanger
18. St. Delay
19. Mod. Delay
20. 3 Tap Delay
21. 4 Tap Delay
22. Time Delay
23. 2 Pitch Shifter
24. FBK Pitch
25. Reverb
26. Gate Reverb
27. OD‰ Chorus
28. OD‰ Flanger
NOTE
29. OD‰ Delay
30. DST‰ Chorus
31. DST‰ Flanger
32. DST‰ Delay
33. EH‰ Chorus
34. EH‰ Flanger
35. EH‰ Delay
36. Chorus‰ DLY
37. Flanger‰ DLY
38. CHO‰ Flanger
39. CHO/DLY
40. Flanger/DLY
41. CHO/Flanger
42. Isolator
43. Low Boost
44. Super Filter
45. Step Filter
46. Humanizer
47. Speaker Sim
48. Step Phaser
49. MLT Phaser
50. Inf Phaser
51. Ring Modul
52. Step Ring
53. Tremolo
54. Auto Pan
55. Step Pan
56. Slicer
Some of the names shown above may be abbreviated in the
display.
57. VK Rotary
58. 3D Chorus
59. 3D Flanger
60. 3D Step Flgr
61. Band Chorus
62. Band Flanger
63. Band Step Flg
64. VS Overdrive
65. VS Distortion
66. GT Amp Simul
67. Gate
68. Long Delay
69. Serial Delay
70. MLT Tap DLY
71. Reverse DLY
72. Shuffle DLY
73. 3D Delay
74. Long Time DLY
75. Tape Echo
76. LoFi Noise
77. LoFi Comp
78. LoFi Radio
79. Telephone
80. Phonograph
81. Step Pitch
82. Sympa Reso
83. Vib-Od-Rotary
84. Center Canc
Mfx Edit
If you also want to edit the parameters of the
selected effect type, press the [CURSOR÷VALUE] dial
on the “Mfx” page to jump to the “Mfx Edit” page.
You can then use the [CURSOR÷VALUE] dial to edit
the available parameters.
See “MFX types and parameters” on p. 107 for the
parameters that are available for the selected Mfx
type.
The first two parameters for each Mfx type are “Cho-
rus Send” (0~127) and “Reverb Send” (0~127). They
allow you to specify whether—and to what
extent—the Mfx signal should be processed by the
Chorus and/or Reverb effect.
Reverb Type
This parameter allows you to select one of the twelve
effects types, two of which are actually delay effects.
1. SRV Room
2. SRV Hall
3. SRV Plate
4. GM2 Reverb
5. Room1
6. Room2
7. Stage1
8. Stage2
9. Hall1
10. Hall2
11. Delay
12. Pan Delay
Reverb Edit
If you also want to edit the parameters of the
selected effect type, press the [CURSOR÷VALUE] dial
to jump to the “Reverb Edit” page. You can then use
the [CURSOR÷VALUE] dial to edit the available parameters.
Parameters for the “1. SRV Room”, “2. SRV Hall”, “3.
SRV Plate” types:
Parameter Setting Explanation
Level 0~127 Output level of the
reverb signal.
Pre Delay 0.0~100.0 ms Adjusts the delay time
between the direct
sound until the reverb
sound is heard. This is
used to simulate the
distance between the
original signal and the
reflective surfaces.
Time 0~127 The duration of the
reverb signal. The
higher the value, the
“longer” the simulated
room becomes.
Size 1~8 Determines how the
later reverberations are
propagated, which
gives the listener
important clues about
the height of the simulated room.
High Cut 160~12500Hz,
Bypass
Adjusts the frequency
above which the highfrequency content of
the reverb will be
reduced. If you do not
want to attenuate the
high frequencies, set
this parameter to
BYPASS.
b) Reverb parameters
This function group can be selected using [MENU]
button ‰ “Performance Edit” ‰ “Tone Part Effects” ‰
“Reverb”.
Reverb switch
Select “Off” you don’t need any reverb effect.
Parameter Setting
Reverb Switch Off, On
Density 0~127 Density (number) of
the reflections.
55
Page 56

Backing Module BK-7m
Menu options
Parameter Setting Explanation
Diffusion 0~127 Adjusts the change in
density of the reverb
over time. The higher
the value, the more the
density increases with
time. (The effect of this
parameter is most
noticeable with long
reverb times.)
LF Damp Freq 50~4000Hz Adjusts the frequency
below which the lowfrequency content of
the reverb sound will
be reduced.
LF Damp Gain –36~0dB Adjusts the amount of
damping applied to the
frequency range
selected with “LF
Damp”. With a setting
of “0”, there will be no
reduction of the
reverb’s low-frequency content.
HF Damp Freq 4000~
12500Hz
Adjusts the frequency
above which the highfrequency content of
the reverb sound will
be reduced.
Parameter Setting Explanation
Time 0~127 Time length of rever-
beration.
Feedback 0~127 Adjusts the level of the
delay sound that is fed
back into the effect
when the “Character”
setting is “Delay” or
“Pan Delay”.
Parameters for the “5. Room1”~“12. Pan Delay”
types:
Parameter Setting Explanation
Level 0~127 Output level of the
reverb signal.
Time 0~127 Time length of rever-
beration
HF Damp 200~8000Hz,
Bypass
Feedback 0~127 Adjusts the amount of
Adjusts the frequency
above which the highfrequency content of
the reverb sound will
be cut. If you do not
want to cut the high
frequencies, set this
parameter to BYPASS.
delay feedback.
HF Damp Gain -36~0dB Adjusts the amount of
damping applied to the
frequency range
selected with “HF
Damp”. With a setting
of “0”, there will be no
reduction of the
reverb’s high-frequency content.
Parameters for the “4. GM2Reverb” type:
Parameter Setting Explanation
Level 0~127 Main Output level of
the reverb signal.
Character Room1,
Room2,
Room3, Hall1,
Hall2, Plate,
Delay, Pan
Delay
Pre LPF 0~7 Cuts the high fre-
Level 0~127 Output level of the
Type of reverb
quency range of the
sound coming into the
reverb. Higher values
will cut more of the
high frequencies.
reverb signal.
c) Chorus parameters
This function group can be selected using [MENU]
button ‰ “Performance Edit” ‰ “Tone Part Effects” ‰
“Chorus”.
Reverb switch
Select “Off” you don’t need any chorus effect.
Parameter Setting
Chorus Switch Off, On
Chorus Type
This parameter allows you to select one of the twelve
effects types, one of which is actually a delay effect.
1. Chorus1
2. Chorus2
3. Chorus3
4. Flanger
5. GM2Chorus
6. Delay
Chorus Edit
If you also want to edit the parameters of the
selected effect type, press the [CURSOR÷VALUE] dial
to jump to the “Chorus Edit” page. You can then use
the [CURSOR÷VALUE] dial to edit the available parameters.
Parameters for the “1. Chorus1”~“4. Flanger” types:
Parameter Setting Explanation
Level 0~127 Output level of the
reverb signal.
r
56
Page 57

Backing Module BK-7m
‘Performance Edit’ parameters
r
Parameter Setting Explanation
Output Select Main, Rev,
Main+Rev
Filter Type OFF, LPF, HPF This allows you to
Cutoff Freq 200~8000Hz Basic frequency of the
Pre Delay 0.0~100.0 ms Adjusts the delay time
Allows you to specify
where the processor’s
output signal should
go: to the OUTPUT
(“Main”), the Reverb
processor (“Rev”) or
both (“Main+Rev”). The
latter two options
mean that the chorus
signal is also processed by the reverb
effect you select.
specify whether or not
the incoming signal
should be filtered
before being processed by the chorus.
This may be helpful to
avoid a cluttered
sound image or to preserve the “punch” of
bass signals. Select
“OFF” if you don’t need
any filtering. “LPF” cuts
the frequency range
above the “Cutoff
Freq”. “HPF” cuts the
frequency range below
the “Cutoff Freq”.
filter. This has no
effect if you select
“OFF” as filter type.
from the direct sound
until the chorus sound
is heard.
Parameter Setting Explanation
Rate Hz 0.05~10.00Hz Specifies the modula-
tion speed. This can be
either a frequency (Hz)
or a note value,
depending on how you
Rate Note 1/64T, 1/64, 1/
32T, 1/32, 1/
16T, 1/32., 1/
16, 1/8T, 1/16.,
1/8, 1/4T, 1/8.,
1/4, 1/2 T, 1/4.,
1/2, 1/1 T, 1/2.,
1/1, 2/1 T, 1/1.,
2/1
Depth 0~127 This parameter sets the
Phase 0~180 deg Spatial spread of the
Feedback 0~127 This parameter sets the
set the “Rate Sync”
parameter above. “T”
means “triplet” and a
“.” refers to a dotted
note. “2/1” means that
each cycle takes two
measures/bars. The
advantage of working
with a note value is
that the chorus will
undulate in sync with
the current Arranger or
Recorder tempo.
depth at which the
chorus sound is modulated. Higher values
result in a more pronounced modulation.
sound (i.e. the “stereoness” of the effect).
level at which the chorus sound is re-input
(fed back) into the
chorus. By using Feedback, a denser Chorus
sound can be created.
Higher values result in
a greater feedback
level.
Rate Sync Hz, Note Use this parameter to
specify whether
(“Note”) or not (“Hz”)
the modulation rate
should be synchronized to the Arranger
or Recorder tempo.
Depending on your
choice, the setting
range of the following
parameter refers to a
speed (Hz) or a note
value.
Parameters for the “5. GM2Chorus” type:
Parameter Setting Explanation
Level 0~127 Main Output level of
the chorus signal.
Output Select Main, Rev,
Main+Rev
Allows you to specify
where the processor’s
output signal should
go: to the OUTPUT
(“Main”), the Reverb
processor (“Rev”) or
both (“Main+Rev”). The
latter two options
mean that the chorus
signal is also processed
by the reverb effect
you select.
57
Page 58

Backing Module BK-7m
Menu options
Parameter Setting Explanation
Pre LPF 0~7 Cuts the high fre-
quency range of the
sound coming into the
chorus. Higher values
will cut more of the
high frequencies.
Level 0~127 Output level of the
chorus signal.
Feedback 0~127 Adjusts the amount of
the chorus sound that
is fed back into the
effect.
Delay 0~127 Adjusts the delay time
from the direct sound
until the chorus sound
is heard.
Rate 0~127 This parameter sets the
speed (frequency) at
which the chorus
sound is modulated.
Higher values result in
faster modulation.
Parameter Setting Explanation
Output Select Main, Rev,
Main+Rev
L Delay Sync msec, Note Use this parameter to
Allows you to specify
where the processor’s
output signal should
go: to the OUTPUT
sockets (“Main”), the
Reverb processor
(“Rev”) or both
(“Main+Rev”). The latter two options mean
that the chorus signal
is also processed by the
reverb effect you
select.
specify whether
(“Note”) or not (“msec”)
the delay time should
be synchronized to the
tempo. Depending on
your choice, the setting range of the following parameter
refers to a time (msec)
or a note value.
Depth 0~127 This parameter sets the
depth at which the
chorus sound is modulated. Higher values
result in a more pronounced modulation.
Reverb Send 0~127 This parameter sets the
amount of chorus
sound that is sent to
the Reverb processor.
The value “127” effectively allows you to
connect the chorus and
reverb effects in series
(Chorus before Reverb).
If you do not want the
chorus signal to be
processed by the
Reverb effect, set this
value to “0”.
Parameters for the “6. Delay” type:
Parameter Setting Explanation
Level 0~127 Output level of the
chorus signal.
L Delay msec 0~1000ms Specifies the delay
time. This can be either
a time value (“msec”)
or a note value,
depending on how you
set the “Delay Sync”
parameter above. “T”
means “triplet” and a
L Delay Note 1/64T, 1/64,
1/32T, 1/32,
1/16T, 1/32.,
1/16, 1/8T,
1/16., 1/8,
1/4T, 1/8., 1/4,
1/2T, 1/4., 1/2,
1/1T, 1/2., 1/1,
2/1T, 1/1., 2/1
L Level 0~127 Volume of each delay
HF Damp 200~8000Hz,
Bypass
“.” refers to a dotted
note. “2/1” means that
each repetition comes
after two measures/
bars. The advantage of
working with a note
value is that the delay
effect always runs in
sync with the current
tempo.
line (there are three –
left, center and right).
Adjusts the frequency
above which sound fed
back to the effect will
be cut. If you do not
want to cut the high
frequencies, set this
parameter to BYPASS.
r
58
C Delay Sync See “L Delay Sync”
C Delay msec See “L Delay msec”
C Delay Note See “L Delay Note”
C Level See “L Level”
Page 59

Backing Module BK-7m
‘Performance Edit’ parameters
r
Parameter Setting Explanation
C Feedback –98~+98% Adjusts the proportion
of the delay sound that
is fed back into the
effect. Negative (–)
settings invert the
phase.
R Delay Sync See “L Delay Sync”
R Delay msec See “L Delay msec”
R Delay Note See “L Delay Note”
R Level See “L Level”
‘Style Parts’ parameters
This function group can be selected using [MENU] button ‰ “Performance Edit” ‰ “Style Parts”.
The parameters of this function group apply to the eight
Arranger parts (i.e. the parts used to play back the
selected Music Style).
1.
Use the [CURSOR÷VALUE] dial to select the
Music Style part you want to edit (ADrum,
ABass, Acc1, Acc2, Acc3, Acc4, Acc4, Acc5,
Acc6).
The display shows the settings for the selected part.
2.
Use the dial to select and set the desired
parameter(s)
The following parameters are available:
Exp. Pedal
Select “Off” if you don’t need pedal expression for the
selected part. This means that the Music Style part in
question no longer responds to an expression pedal
you may have connected to the SWITCH/EXPRESSION
socket.
Parameter Setting
Exp. Pedal Off, On
Exp. Pedal All Parts On
If you are not sure which Music Style parts still
receive expression messages, and if you want all to
receive them, you can select this field and press the
[CURSOR÷VALUE] dial.
Exp. Pedal All Parts Off
If you are not sure which Music Style parts still
receive expression messages, and if no Music Style
part should receive them, you can select this field
and press the [CURSOR÷VALUE] dial.
Split
This page allows you to set two keyboard-related
parameters. It can be selected using [MENU] button ‰
“Performance Edit” ‰ “Split”.
Split Point
The “Split Point” parameter allows you to set the split
point.
Parameter Setting
Mute
Allows you to mute the selected part, so that it is no
longer audible.
Parameter Setting
Mute Off, On
Solo
Allows you to solo the selected part, which means
that all other Music Style parts are switched off.
Parameter Explanation
Solo Off, On
Volume
Adjusts the volume of the selected Music Style part.
Selecting “0” means that the part is question is no
longer audible.
Parameter Setting
Volume 0~127
Split Point B1~B6
Lower Hold
This parameter allows you to set the Hold function
for the LWR part.
Parameter Setting
Lower Hold Off, On
If you set this parameter to “On”, the notes of the
LWR part go on sounding until you play other notes
in the left keyboard area. (This function is only available while the [SPLIT] button lights.)
If you select “Off”, the LWR part stops sounding as
soon as you release all keys in the left area.
Key
This function allows you to transpose the BK-7m’s pitch
in semi-tone steps. Depending on the mode setting, this
transposition applies to all sections or just a specific section. It can be selected using [MENU] button ‰ “Performance Edit” ‰ “Key” or by pressing the [KEY] button. See
“Changing the key” on p. 37.
59
Page 60

Backing Module BK-7m
Menu options
‘Arranger Setting’ parameters
This function group can be selected using [MENU] button ‰ “Performance Edit” ‰ “Arranger Setting”.
The parameters of this function group apply to the
Arranger as a whole and allow you to fine-tune its
behavior.
Arranger
Select “Off” if you only need the drum part of the
selected Music Style and no melodic accompaniment
parts (ABass, ACC1~6).
Parameter Setting
Arranger Off, On
Type
This parameter allows you to specify how the chords
received by the NTA parts are interpreted.
Parameter Setting
Type Standard, Pianist, Accordionist1,
Accordionist2, Guitarist, Intelligent, Easy
Seventh chords Fundamental + any white key to the
left of the fundamental.
Minor seventh
chords
Fundamental + any black key to the
left + any white key to the left.
Arranger Hold
Select “Off” if you want the accompaniment to stop
as soon as the notes received by the NTA parts are
released. This parameter is switched “On” by default.
Parameter Setting
Arranger Hold Off, On
Tempo
Each Music Style has a preset tempo that is recalled
when a Style is selected. This parameter allows you to
specify if and when the BK-7m should ignore the
preset tempo and go on using the tempo of the previously selected Music Style.
Parameter Setting
Tempo Preset, Auto, Lock
Here is what these three options mean:
Setting
Preset The Style's preset tempo is loaded.
Selecting a new Music Style
Playback is stopped Playback is running
NOTE
If the “Arr Type” parameter (page 63) is set to “On”, this
“Type” setting has no effect.
Standard: This is the normal chord recognition
mode.
Pianist: In this mode, the BK-7m only recognizes
chords that consist of at least three notes. Playing
only two notes will not cause the Music Style’s key to
change.
Guitarist: Select this setting if you are using a MIDI
guitar to control the BK-7m’s Arranger.
Intelligent: Select “Intelligent” when you want the
chord recognition to supply the missing notes of the
chords you play.
Accordionist1: Select this setting if you are using an
FR-x-series or MIDI-compatible accordion to control
the BK-7m’s Arranger.
Accordionist2: Select this setting if you are using a
MIDI-compatible accordion that transmits its chord
information within a single octave and “dim” chords
without the root note.
Easy: This is another “intelligent” chord fingering system. It works as follows:
Auto The BK-7m loads the
preset tempo of the
new Music Style
Lock The BK-7m doesn’t
load the preset
tempo of the new
Music Style. It is
played at the current tempo.
The BK-7m doesn’t
load the preset tempo
of the new Music Style.
The new Music Style is
played at the current
tempo.
Fill In Half Bar
When this parameter is “On” the length of the Fill-Ins,
which are played when the [AUTO FILL IN] button
lights, is halved.
Parameter Setting
Fill In Half Bar Off, On
Major chords Press the key that corresponds to the
Minor chords Fundamental + any black key to the
r
60
chord’s fundamental.
left of the fundamental.
Page 61

Backing Module BK-7m
‘Performance Edit’ parameters
r
‘Melody Intelligent’ parameters
This function group can be selected using [MENU] button ‰ “Performance Edit” ‰ “Melody Intelligent”.
The following parameters are available:
Switch
Select “On” if you want add a MELODY INTELL part.
This part is triggered by the chord recognition of the
NTA parts and plays automatic harmonies that are
added to the melody that you are playing using the
on UP1 part. You can choose from among 18 harmony types (see below).
Parameter Setting
Switch Off, On
NOTE
Do not forget to switch on the UP1 part (page 27).
Type
Allows you to select one of the 18 harmony types:
Save As Default
This function allows you to save the current “Performance Edit” settings as default settings. These settings are loaded each time you switch on the BK-7m.
1.
Rotate the [CURSOR÷VALUE] dial to select
“YES”, then press the dial to define the current settings as the default state.
The display shows a confirmation message.
If you don’t want to define the current settings as
the default state, rotate the [CURSOR÷VALUE] dial to
select “NO”, then press the dial. The BK-7m then
returns to the “Performance Edit” page.
Parameter Setting
Type 1:Duet, 2:Organ 3:Combo, 4:Strings,
5:Choir, 6:Block, 7:Big Band, 8:Country,
9:Traditional, 10:Brodway, 11:Gospel,
12:Romance, 13:Latin, 14:Country Guitar,
15:Country Ballad, 16:Waltz Organ,
17:Octave Type1, 18:Octave Type2
Intell Threshold
This value represents the lowest velocity value
(between “1” and “127”) of the UP1 part that triggers
the “Melody Intelligent” part. If you don’t need this
switching function, select “0”.
Parameter Setting
Intell Threshold 0~127
Level
Allows you to set the level of the Melody Intelligence
part to ensure that the harmonies blend in with the
rest.
Parameter Setting
Level 0~127
61
Page 62

Backing Module BK-7m
Menu options
‘Global’ parameters
The settings of the “Global” parameters can be saved to
the BK-7m’s global memory. If you don’t save them,
your changes are lost when you switch off the BK-7m.
See “Save Global” on p. 65 for how to save these settings.
Scale Tune
This parameter can be selected using [MENU] button
‰ “Global” ‰ “Scale Tune”.
Display Brightness
This parameter can be selected using [MENU] button
‰ “Global” ‰ “Display Brightness”.
It is used to change the brightness of the BK-7m’s
display in case you find it difficult to read.
Parameter Setting
Display Brightness 0~35
Tuning
This parameter can be selected using [MENU] button
‰ “Global” ‰ “Tuning”.
This parameter allows you to tune your BK-7m to
acoustic instruments that cannot be tuned. The
default is 440.0Hz.
This parameter allows you to change the tuning of all
notes of one octave, which may come in handy to
create oriental tunings.
Parameter Value Explanation
C~B
(each note can
be set individually)
One Touch Hold
This parameter can be selected using [MENU] button
‰ “Global” ‰ “One Touch Hold”.
-64~0~+63 Changes the pitch of
the notes C~B in steps
of 1 cent. The value
that you specify is
applied to all notes of
the same name. If you
change the tuning of
the “C”, that value is
added to, or subtracted
from, all Cs (C1, C2, C3,
etc.). (“–50” means that
the note in question is
tuned a quarter tone
down.)
Parameter Setting
Tuning 415.3~466.2Hz
Style/SMF TrackMute
See “Using ‘Track Mute’ and ‘Center Cancel’” on p. 38.
Scale Tune Switch
This parameter can be selected using [MENU] button
‰ “Global” ‰ “Scale Tune Switch”.
Parameter Value Explanation
Part Off, On Select “On” if the “Scale
Tune” settings (see below)
should apply to the realtime parts.
Style Off, On Select “On” if the “Scale
Tune” settings (see below)
should apply to the Music
Style parts.
The parameters on this page allow you to filter certain One Touch settings. Select “On” for the settings
you do not want to load along with the remaining
One Touch settings when you press a ONE TOUCH
button.
Parameter Setting
Tempo Off, On
Tone Part Off, On
Intro/Ending Off, On
Variation Off, On
Expression Pedal Off, On
Performance Hold
This page can be selected using [MENU] button ‰
“Global” ‰ “Performance Hold”.
r
62
Page 63

Backing Module BK-7m
‘Global’ parameters
r
The parameters on this page allow you to filter certain Performance settings. Select “On” for the settings you do not want to load along with the remaining settings when you select a Performance memory.
Parameter Setting
Tempo Off, On
Expression Pedal Off, On
Tone Off, On
Tone Part Off, On
Split Off, On
Lower Octave Off, On
Arr Type Off, On
Transpose Off, On
Bass Inversion Off, On
Metronome
These parameters can be selected using [MENU] button‰ “Global” ‰ “Metronome”. See “Metronome” on
p. 40.
Lyrics Settings
This page can be selected using [MENU] button ‰
“Global” ‰ “Settings”.
The following table shows the Video Settings parameters.
Parameter Setting Explanation
Background
Mode
Background
Colour
Highlight
Colour
Colour, Logo [Colour]: The back-
ground is empty but
uses the selected color
(see below).
[Logo]: The BK-7m’s
logo is shown as background
1~8 Choose the back-
ground color.
1~8 Choose the highlight
color.
Video Settings
These parameters can be selected using [MENU] button‰ “Global” ‰ “Video Settings”.
The following table shows the Video Setting parameters.
Parameter Setting Explanation
Video Mode PAL, NTSC Select the setting that
corresponds to the format used by the connected screen.
Aspect Ratio Full, Center Specify the appropri-
ate aspect ratio for the
screen you are using.
Row Displaying 2, 4 Allows you to specify
the number of lines to
be used for displaying
lyrics.
Chord View Off, On Select “On” of the
BK-7m should display
chord symbols along
with the lyrics.
Utility
The “Utility” parameters are found on the display
page that can be selected using [MENU] button‰
“Global” ‰ “Utility”.
NOTE
If you work with a TV set, do not forget to select the correct
channel (“AV” or something to that effect, see the manual
that came with your set).
63
Page 64

Backing Module BK-7m
Menu options
The following table shows the utility parameters.
Parameter Setting Explanation
Song Quick
Start
Perform Next
Song
REC Audio
Level
Off, 2nd bar,
1st note
Off, On At the end of the cur-
–24, –18, –12,
–6, +0 dB
Off: Playback starts at
the very beginning of
the song file (which
may contain a few
silent bars).
2nd bar: Causes playback to start from
measure 2 of the
selected Standard MIDI
File.
1st note: This is basically the same as the
above, except that
playback starts on the
first note of the
selected song.
rent song, the next
song in the Performance List starts automatically. If the
Performance List step
refers to a Music Style,
the Style in question is
loaded, but you will
need to start manually
by pressing the [START/
STOP] button.
Allows you to set the
recording level for
your own performances (see p. 46). The
setting of the [VOLUME] knob does not
affect the recording
level. (Default setting:
+0dB)
Parameter Setting Explanation
USB Driver Generic,
Original
Audio In Center
Canc
Audio in
Transpose
Auto Power Off Off, 240 min This parameter allows
Version Info n.nn Shows the version
Off, On Select “On” if the “Cen-
Off, On Select “On” if the
Generic: Choose this if
you want to use the
standard USB driver
that was included with
your computer. Normally, you should use
this mode.
Original: Choose this
if you want to use a
USB driver downloaded from the
Roland website
(www.roland.com).
ter Cancel” function
(see p. 38) should also
affect the signals
received via the AUDIO
INPUT sockets.
transposition setting
should also affect the
signals received via the
AUDIO INPUT sockets.
you to cause the
BK-7m to switch itself
off after 240 minutes
if you are not using it.
The default setting is
“Off”, meaning that the
BK-7m remains on
until you press the
[POWER] switch again.
number of the BK-7m’s
operating system.
REC Audio Sync Off, On Off: Choose this set-
r
64
ting when you want to
start recording before
starting Music Style or
song playback.
On: Choose this setting when you want to
be able to start recording simultaneously
with Music Style song
playback. When you
choose this setting,
pressing the [AUDIO
REC] button will stop
both playback and the
recorder.
Pedal
The “Footswitch” setting is found on the display page
that can be selected using [MENU] button‰ “Global”
‰ “Pedal”.
If you do not change the factory setting, the footswitch is assigned to the Start/Stop function.
The following table shows the functions you can
assign to the footswitch.
Function Explanation
Start/Stop Starts and stops Music Style or song
playback. Same function as the
[START/STOP] button.
Page 65

Backing Module BK-7m
‘Global’ parameters
r
Function Explanation
Intro
Ending
Variation1
Variation2
Variation3
Variation4
Bass Inversion
Arranger Hold Allows you to switch the Arranger
Arranger Chord
Off
Perf. Next
Perf. Prev
Portamento Switches the Portamento function
Hold
Soft
Sostenuto
Track Mute Same function as the [TRACK MUTE]
Same functions as the [INTRO],
[ENDING], [VARIATION1],
[VARIATION2], [VARIATION3],
[VARIATION4], [BASS INV], buttons.
See “Using Music Styles” on p. 30.
Hold function on and off. See
page 60.
Allows you to switch the Arranger’s
chord recognition off, in which case
only the drum/percussion playing.
Allows you to select the next or previous Performance.
on and off. See page 52.
The assigned footswitch can be used
as a Soft, Sostenuto or Sustain (Hold
pedal).
button.
Function Explanation
ChordRecOff While you are holding down the
footswitch, the BK-7m does not scan
the incoming note messages for
chord information. Those messages
are therefore only transmitted to the
active real-time parts (UP1, UP2,
LWR, MBS). Release the footswitch
to once again activate chord recognition.
Pedal Controller FC-7
This setting is found on the display page that can be
selected using [MENU] button‰ “Global” ‰ “Pedal
Controller FC-7”.
The following table shows the functions you can
assign to each of the FC-7’s footswitches.
FC-7 Switch Function
1
Break Mute When you press the footswitch,
Music Style playback is muted for
the remainder of the current measure.
Reset/Start This function allows you to have the
BK-7m start on the first beat of the
currently selected Music Style pattern when you press the assigned
footswitch. Use it when you are
accompanying a singer or soloist
whose timing is a little shaky and
suddenly notice that the playback
lags one or two beats behind the
singer/soloist.
AudioXfade The footswitch can be used to acti-
vate a crossfade between two files.
To make this work, select a different
song while the current song is being
played back and press the footswitch. The BK-7m creates a brief
blend between the current and the
next song. (This function is only
available between two audio songs.)
Fade Out This function gradually decreases
the volume until reaches zero. At
that time, song or Style playback
stops automatically.
2
3
4
5
6
7
Start/Stop, Intro, Ending, Variation1,
Variation2, Variation3, Variation4, Bass
Inversion, Arranger Hold, Arranger Chord
off, Perf. Next, Perf. Prev, Portamento,
Hold, Soft, Sostenuto, Track Mute, Break
mute, Reset/Start, AudioXfade, Fade Out,
ChordRecOff
See “Pedal” on p. 64 for an explanation of the available options.
Save Global
This function allows you to save all “Global” parameter
settings to ensure that they are loaded automatically
each time you switch the BK-7m on.
You can select this function using [MENU] button ‰
“Global” ‰ “Save Global”.
1.
Rotate the [CURSOR÷VALUE] dial to select
“YES”, then press the dial to define the current settings as the default state.
The display shows a confirmation message.
If you don’t want to define the current “Global” set-
tings as the default state, rotate the [CURSOR÷VALUE]
dial to select “NO”, then press the dial. The BK-7m
then returns to the “Performance Edit” page.
65
Page 66

Backing Module BK-7m
Menu options
MIDI parameters
This section discusses the BK-7m’s MIDI parameters and
the associated memories called “MIDI Sets”.
■ What’s MIDI
“MIDI” stands for “Musical Instrument Digital Interface.” It is a universal standard that allows performance data to be exchanged among electronic musical instruments and computers. The BK-7m provides
a MIDI IN and MIDI OUT socket so that performance
data can be received from other MIDI instruments. It
is also equipped with a COMPUTER port (USB) that
can receive and transmit MIDI data from a computer.
The MIDI parameters can be selected using [MENU]
button ‰ “MIDI”.
1.
Rotate the [CURSOR÷VALUE] dial to select
the “MIDI Set” field.
2.
Press the dial to edit the “MIDI Set” field.
The “MIDI Set” field is now displayed in reverse.
3.
Use the [CURSOR÷VALUE] dial to select the
MIDi Set “User1~8” you want to load, then
press the dial to confirm your selection.
The BK-7m loads the selected MIDI Set.
Edit Style Parts
The following parameters are located on the display
page that can be selected using [MENU] button‰
“MIDI” ‰ “Edit Style Parts”.
The BK-7m’s MIDI environment contains the following options:
MIDI parameter
group
MIDI Set Allows you to load a MIDI Set
Edit Style Parts Here, you can edit all MIDI parame-
Edit Song Parts Here, you can edit all MIDI parame-
Edit Tone Parts Here, you can edit all MIDI parame-
Edit System This groups contains all MIDI param-
Save MIDI Set This function allows you to save your
NOTE
We recommend using the wizard to quickly set up the
BK-7m for new MIDI controllers you may want to use. See
“Wizard Connection” on p. 22.
Explanation
“User1~8”. See below.
ters of the Music Style parts. See
below.
ters of the Song parts. See page 67.
ters related to the real-time parts
(UP1, UP2, LWR MBS). See page 68.
eters that apply to the BK-7m as a
whole. See page 68.
changes to a “User” memory for quick
recall. “Save MIDI Set” on p. 71.
NOTE
We recommend using the wizard to quickly set up the
BK-7m for new MIDI controllers you may want to use. See
“Wizard Connection” on p. 22. Only then should you
change the settings that are not suitable for your application.
1.
Use the [CURSOR÷VALUE] dial to select the
part you want to edit (ADrum, ABass, Acc1,
Acc2, Acc3, Acc4, Acc5, Acc6).
The display now shows the settings for the selected
part.
Tx
Select “On” if you want the selected part to transmit
MIDI data.
Parameter Setting
Tx Off, On
Tx Ch
Allows you to assign a MIDI transmit channel to the
selected part.
Parameter Setting
Tx Ch 1~16
Loading a MIDI Set
The BK-7m allows you to store and recall 8 different
MIDI configurations.
NOTE
Loading a MIDI Set only changes the MIDI settings and has no
effect on the remaining parameters that are also affected by
the “Wizard Connection” function (see p. 87).
r
66
Tx Shift
This parameter allows you to transpose the note
messages before they are transmitted to an external
MIDI instrument or computer. The maximum possible
transposition is four octaves up (+48) or down (–48).
Each step represents a semi-tone.
Parameter Setting
Tx Shift –48~0~+48
Page 67

Backing Module BK-7m
MIDI parameters
r
Tx Local
This is where you can disconnect the part from the
internal sound source (“Off”) – or re-establish that
connection (“On”).
Parameter Setting
Tx Local Off, On
Tx Event
The “TX Event” section provides a number of filters
that allow you to specify whether the messages in
question should be transmitted (Off) or not (On).
Filter Setting Explanation
Program
Change
Pitch Bender Off, On Select “On” to filter Pitch
Modulation Off, On Select “On” to filter Modu-
Volume Off, On Select “On” to filter Volume
Panpot Off, On Select “On” to filter Panpot
Off, On Select “On” to filter pro-
gram change and bank
select (CC00, CC32) messages.
Bend messages.
lation messages (CC01).
messages (CC07).
messages (CC10).
1.
Use the [CURSOR÷VALUE] dial to select the
part you want to edit (Part 1~16).
The display now shows the settings for the selected
part.
Rx
Select “On” if you want the selected part to receive
MIDI data.
Parameter Setting
Rx Off, On
Rx Ch
Allows you to assign a MIDI receive channel to the
selected part.
Parameter Setting
Rx Ch 1~16
Rx Shift
This parameter allows you to transpose the note
messages received from an external MIDI instrument
or computer. The maximum possible transposition is
four octaves up (+48) or down (–48). Each step represents a semi-tone.
Parameter Setting
Rx Shift –48~0~+48
Expression Off, On Select “On” to filter Expres-
sion messages (CC11).
Reverb Off, On Select “On” to filter Reverb
messages (CC91).
Chorus Off, On Select “On” to filter Chorus
messages (CC93).
Select All Off, On Select “On” to filter all MIDI
message listed above.
NOTE
We recommend using the wizard to quickly set up the
BK-7m for new MIDI controllers you may want to use. See
“Wizard Connection” on p. 22.
Edit Song Parts
The following parameters are located on the display
page that can be selected using [MENU] button‰
“MIDI” ‰ “Edit Song Parts”.
Rx Event
The “Rx Event” section provides a number of filters
that allow you to specify whether the messages in
question should be received (Off) or not (On).
Filter Setting Explanation
Program
Change
Pitch Bender Off, On Select “On” to filter Pitch
Modulation Off, On Select “On” to filter Modu-
Volume Off, On Select “On” to filter Volume
Panpot Off, On Select “On” to filter Panpot
Expression Off, On Select “On” to filter Expres-
Reverb Off, On Select “On” to filter Reverb
Off, On Select “On” to filter pro-
gram change and bank
select (CC00, CC32) messages.
Bend messages.
lation messages (CC01).
messages (CC07).
messages (CC10).
sion messages (CC11).
messages (CC91).
NOTE
We recommend using the wizard to quickly set up the
BK-7m for new MIDI controllers you may want to use. See
“Wizard Connection” on p. 22. Only then should you
change the settings that are not suitable for your application.
Chorus Off, On Select “On” to filter Chorus
messages (CC93).
Hold Off, On Select “On” to filter Hold
messages (CC64).
Sostenuto Off, On Select “On” to filter Soste-
nuto messages (CC66).
67
Page 68

Backing Module BK-7m
Menu options
Filter Setting Explanation
Soft Off, On Select “On” to filter Soft
messages (CC67).
Caf Off, On Select “On” to filter Caf-
Channel aftertouch.
RPN Off, On Select “On” to filter Regis-
tered parameter number
messages (CC100/101).
NRPN Off, On Select “On” to filter Non-
registered parameter number messages (CC98/99).
System
Exclusive
CC16 Off, On General purpose controller
Select All Off, On Select “On” to filter all MIDI
Off, On Select “On” to filter System
Exclusive messages.
that allows you to influence
the “C1” parameter (see
p. 54).
message listed above.
Tx, Tx Ch, Tx Shift, Tx Local, Tx Event
For the explanation of these parameters please refer
to “Rx Event” on p. 67.
Edit Tone Parts
The following parameters are located on the display
page that can be selected using [MENU] button‰
“MIDI” ‰ “Edit Tone Parts”.
NOTE
We recommend using the wizard to quickly set up the
BK-7m for new MIDI controllers you may want to use. See
“Wizard Connection” on p. 22. Only then should you
change the settings that are not suitable for your application.
1.
Use the [CURSOR÷VALUE] dial to select the
part you want to edit (MBS, LWR, UP2, UP1).
The display now shows the settings for the selected
part.
Edit System
The following parameters are located on the display
page that can be selected using [MENU] button‰
“MIDI” ‰ “Edit System”.
The “Edit System” group contains the following
parameters:
Edit System Explanation
Sync These parameters are used to synchronize
external MIDI devices. See below.
Basic The parameters of this group affect the
BK-7m’s Basic channel. The Basic channel
is used to receive and transmit Program
Change and Bank Select messages for
selecting Performances as well as for the
reception and transmission of other kinds
of messages that are not directly related
to a specific MIDI channel. See page 69.
Style The parameters of this group affect the
BK-7m’s Style channel. The Style channel
is used for receiving program change and
bank select messages that select Styles
and volume messages that change the
Style’s volume. See page 70.
NTA These parameters allow you to assign MIDI
channels to the BK-7m’s NTA parts (Noteto-Arranger). Only notes received on one
of these channels are considered chord
information that can be used to transpose
Music Style playback in real-time. See
page 70.
Parameters This group contains MIDI parameters that
are not related to the previous groups. See
page 71.
Sync
The following parameters are located on the display
page that can be selected using [MENU] button‰
“MIDI” ‰ “Edit System” ‰ “Sync”.
Rx, Rx Ch, Rx Shift, Rx Event
For the explanation of these parameters please refer
to “Edit Song Parts” on p. 67.
r
68
Page 69

Backing Module BK-7m
MIDI parameters
r
The “Sync” parameters allow you to specify whether
or not the BK-7m should send MIDI real-time messages when you start Style or song playback. This
allows you to synchronize external instruments or
(software) sequencers with your BK-7m.
Parameter Setting Explanation
Sync Rx Off, On This parameter is used
to specify whether
Music Style and song
playback should be
synchronized by an
external MIDI device.
Mode Internal, Auto,
MIDI, Remote
Stl Start/Stop TxOff, On If you activate this
Stl Clock Tx Off, On If you activate this
Internal: Song or Style
playback uses BK-7m
internal tempo.
Auto: A good setting
for remote control of
song or Style playback
(using a PK-5A
dynamic MIDI pedal
board, for example). If
the BK-7m receives a
MIDI Start message
(FA), it waits for Clock
messages that specify
the tempo. If those
Clock messages are not
received, the BK-7m
starts playback using
its internal tempo. If,
however, Clock messages (F8) follow after
the Start message, the
BK-7m uses the external tempo.
MIDI: Song or Style
playback can be
started or stopped
with MIDI real-time
messages (Start, Stop,
Clock) received from
an external clock
source.
Remote: Song or Style
playback waits for a
start message to start
playback at its own
tempo. When it
receives a stop message, playback stops.
External clock messages are ignored.
option, the BK-7m
sends start or stop
messages when you
start (or stop) Style
playback.
option the Style playback sends MIDI Clock
messages.
Parameter Setting Explanation
SMF Start/Stop TxOff, On Similar to “Stl Start/
Stop Tx” but for songs.
SMF Clock Tx Off, On Similar to “Stl Clock Tx”
but for songs.
SMF Pos Point TxOff, On If you switch this
parameter on, the song
playback sends Song
Position Pointer (SPP)
messages that indicate the current playback position.
Basic
The following parameters are located on the display
page that can be selected using [MENU] button‰
“MIDI” ‰ “Edit System” ‰ “Basic”.
The Basic channel is used to receive and transmit
Program Change and Bank Select messages for
selecting Performances, as well as for the reception
and transmission of other kinds of messages that are
not directly related to a specific MIDI channel.
NOTE
If you select another channel, messages intended for the
Basic parameters might also cause other parameters to
change when you don’t want them to.
The following parameters are available here:
Parameter Setting Explanation
Rx Off, On Switches the recep-
tion of MIDI messages
on the Basic channel
on or off.
Rx Channel 1~16 Use this parameter to
assign a MIDI transmit
channel to the “Basic”
channel.
Performance
PC Rx
Master Volume RxOff, On Allows you to enable
Off, On This parameter is used
to enable or disable the
reception of program
change and bank select
messages related to
Performance selection.
or disable the reception of Master Volume
messages that would
change the BK-7m’s
overall volume. This is
an exclusive message
common to all newer
MIDI devices.
69
Page 70

Backing Module BK-7m
Menu options
Parameter Setting Explanation
Tx Off, On Switches the transmis-
sion of MIDI messages
on the Basic channel
on or off.
Tx Channel 1~16 The channel used to
transmit MIDI messages.
Performance
PC Tx
Off, On This parameter is used
to enable or disable the
transmission of program change and bank
select messages related
to Performance selection
Style
The following parameters are located on the display
page that can be selected using [MENU] button‰
“MIDI” ‰ “Edit System” ‰ “Style”.
Parameter Setting Explanation
Style Volume RxOff, On Allows you to enable
or disable the reception of volume messages relating the
Style.
Style Pc Rx Off, On This parameter allows
you to enable or disable the reception of
program change and
bank select messages
for Style selection.
Tx Off, On Switches the transmis-
sion of MIDI messages
on the Style channel
on or off.
Tx Channel 1~16 The channel used to
transmit MIDI messages.
NTA
The following parameters are located on the display
page that can be selected using [MENU] button‰
“MIDI” ‰ “Edit System” ‰ “NTA”.
The Style channel is used for receiving program
change and bank select messages that select Styles
and volume messages that change the Style’s volume.
The MIDI address of a Music Style consists of three
elements: a CC00 number, a CC32 number and a program change number. The values assigned to CC00
and CC32 define the Style (see “Music Style list” on
p. 88), whereas the program change number defines
the Division (Intro, Ending, etc.). See “Style division
program change numbers” on p. 90.
Sending only a program change number selects
another Division of the currently active Style. Be
aware, however, that only sending CC00 and CC32
messages (without a program change) has no effect.
NOTE
When you select another Style on your BK-7m, it transmits
a CC00-CC32-PC cluster on the Style channel, which you
could record using an external sequencer.
Parameter Setting Explanation
Rx Off, On Switches the recep-
tion of MIDI messages
on the Style channel
on or off.
These parameters allow you to specify on which MIDI
channels the BK-7m should receive chord information used to change the Music Style’s key in real-time
(the notes in question are called “Note-to-Arranger”,
or “NTA” for short).
Parameter Setting Explanation
Channel Ch1~Ch16 MIDI channel
Rx Off, On This parameters allows
you to specify whether
(“On”) or not (“Off”) the
selected MIDI channel
should be used to
receive chord information.
Rx Octave –4~0~ 4 Use this parameter to
transpose the notes
received on the
selected MIDI channel
(“Ch”) in steps of one
octave.
Rx Channel 1~16 Use this parameter to
r
70
assign a MIDI receive
channel to the Style
section.
Page 71

Backing Module BK-7m
r
Mastering Tools
Parameters
The following parameters are located on the display
page that can be selected using [MENU] button‰
“MIDI” ‰ “Edit System” ‰ “Parameters”.
This page contains several parameters that are not
related to one another (the other MIDI pages always
concentrate on one aspect).
Parameter Setting Explanation
Rx Velocity On, 1~127 Allows you to switch
the reception (RX) of
velocity messages on
or off. If you don’t
need “On”, specify
which velocity value to
use instead of the continuous flux.
Rx Sysex Off, On Use this parameter to
specify whether the
BK-7m should receive
SysEx messages from
other devices.
Tx Sysex Off, On Use this parameter to
specify whether the
BK-7m should send
SysEx messages.
Tx Data Change Off, On This parameter allows
you to specify how the
original program
changes of the songs
you play back are
transmitted via MIDI.
The BK-7m may
change sound
addresses (usually
CC00 and CC32 values)
so as to play back all
songs with the best
possible quality. If you
switch this parameter
on, such real-time
transformations are
also transmitted via
MIDI. If you switch this
parameter off, the
original sound
addresses are transmitted to the receiving device. (But the
BK-7m’s tone generator continues to
“enhance” the songs
you play back.)
Parameter Setting Explanation
Soft Thru Off, Global,
Piano
Select “Global” if the
BK-7m should transmit
all MIDI messages it
receives (using its MIDI
OUT socket).
Select “Piano” if you
wish to connect the
BK-7m to a digital
piano.
Save MIDI Set
This function allows you to save your changes to a
“User” memory for quick recall.
This function can be selected using [MENU] button ‰
“MIDI” ‰ “Save MIDI Set”.
1.
Edit the desired MIDI parameters (“Edit
Style Parts”, “Edit Song Parts”, “Edit Tone
Parts”, “Edit System”).
2.
Rotate the [CURSOR÷VALUE] dial to select
the MIDI Set where you want to save your
settings (“User1”~ “User8”).
3.
Press [WRITE] button to confirm.
A confirmation message informs you that the MIDI
Set has been saved.
Mastering Tools
The BK-7m contains two effects processors that apply
to all real time parts and Style and Song parts.
These processors are collectively called the “Mastering
Tools”, because they allow you to perfect the signal mix
to adapt it to the sound system you are using.
The parameters discussed here can be selected using
[MENU] button ‰ “Mastering Tools”.
SMF/Style Compressor
This multi-band compressor/limiter allows you to process three frequency ranges separately. A compressor
reduces high levels (peaks) and boosts low levels,
smoothing out fluctuations in volume.
71
Page 72

Backing Module BK-7m
Menu options
To edit the SMF/Style Compressor parameters, use
[MENU] button ‰ “Mastering Tools” ‰ “SMF/Style Compressor”.
1.
Select an SMF song or a Music Style and
start playback.
2.
Set the “Switch” parameter to “On” to activate the compressor.
The compressor is now active and will affect SMF
song or Music Style playback. (Select “Off” to switch
the compressor back off.)
3.
Use the [CURSOR÷VALUE] dial to select the
“Preset” parameter, then press the dial.
4.
Rotate the [CURSOR÷VALUE] dial to select
one of the available presets, then press the
dial.
The available presets are:
1. Hard Comp
2. Soft Comp
3. Low Boost
5.
If none of the preset memories contains the
4. Mid Boost
5. High Boost
6. Standard
7. User
settings you need, use the [CURSOR÷VALUE]
dial to select and set the following parameters:
Parameter Setting Explanation
Level 0~127 Use this parameter to set
the compressor’s input level.
The higher the value, the
stronger the three frequency
bands are compressed.
The value you set here is
added to the “Level” settings
of the three bands. If you set
this parameter to “0”, the
compressor has no effect on
the output signal.
Gain –12~0~
12dB
High/Mid/Low: Because “Attack”, “Release”, “Threshold”,
“Ratio” and “Level” are the same for each band, we will
only discuss them once. As you see, each of the three frequency ranges has its own set of parameters that allow
you to specify their behavior.
Use this parameter to correct the level at the compressor’s outputs. If the
settings of the remaining
parameters lead to a significantly lower level, select a
positive value. If your settings lead to a significantly
higher level, select a negative value. “0” means that
the level is neither boosted
nor attenuated.
r
Parameter Setting Explanation
Attack 0~100ms Use this parameter to spec-
ify how fast the compressor
of the band in question
should start processing the
signal once the level of that
band exceeds the “Threshold” level. Choose a smaller
value if you prefer a compression similar to that of
FM radio stations. Higher
values may yield a “snappier” or “funkier” sound.
Release 50~
5000ms
Threshold –36~0dB This parameter allows you to
Ratio 1:1.0~
1:INF
Level –24~
+24dB
Split High 2000~
12000Hz
Split Low 80~800Hz
This parameter allows you to
specify how fast the compressor of the corresponding
band should stop working
when the signal level drops
below the “Threshold” value.
set the level the frequency
band (“High”, “Mid” or
“Low”) must reach to trigger
its compressor. The lower
the value, the more noticeable the compression will be.
Use this parameter to specify how strongly the level
should be reduced when the
band’s level exceeds the
“Threshold” level. “1:2.0”, for
example, means that level
values above the “Threshold”
level are halved. “1:INF” is
useful if you set “Threshold”
to “0dB” or thereabout. This
produces a limiter effect,
which means that no signal
level will ever exceed the
“Threshold” value. This may
help you protect the speakers of the PA system etc.
This parameter allows you to
establish the desired mix
among the three compressor
bands. Choose a negative
value to decrease the level,
or a positive one to increase
it. Choose “0” for a band
whose level is OK as is.
These two parameters specify the frequency where two
bands are separated. The
compressor has three bands,
and so there are two crossover frequencies you can
set: “High” between the
“Mid” and “High” ranges;
and “Low” between the
“Mid” and “Low” ranges.
72
Page 73

Backing Module BK-7m
r
Mastering Tools
Write User
This function allows you to save the settings you
made on the “SMF/Style Compressor” page.
1.
Rotate the [CURSOR÷VALUE] dial to select
“YES”, then press the dial to save the current settings.
The display shows a confirmation message.
If you don’t want to define the current settings as
the default state, rotate the [CURSOR÷VALUE] dial to
select “NO”, then press the dial. The BK-7m then
returns to the “SMF/Style Compressor” page.
NOTE
There is only one “User” memory for your own settings. By
saving new settings, you therefore overwrite the previous
ones.
NOTE
When you switch on the BK-7m, it automatically loads the
“User” settings.
SMF/Style Equalizer
To edit the SMF/Style Equalizer parameters, use [MENU]
button ‰ “Mastering Tools” ‰ “SMF/Style Equalizer”.
5.
If none of the preset memories contains the
settings you need, you can change the following parameters using the
[CURSOR÷VALUE] dial.
Parameter Setting range Explanation
Level 0~127 Use this parameter to set
the equalizer’s input
level. This may be necessary when the level of
the input signals is so
high that the sound distorts.
NOTE
Do not set this parameter to “0” if the equalizer is switched on,
because doing so
means that the SMF
song/Music Style is no
longer audible.
Gain –9~0~9dB Use this parameter to
correct the level at the
equalizer’s outputs. If
the settings of the
remaining parameters
lead to a significantly
lower level, select a positive value. If your settings lead to a
significantly higher level,
select a negative value.
“0” means that the level
is neither boosted nor
attenuated.
The equalizer has the same function as the TREBLE, MID
and BASS knobs on a mixer: it allows you to color the
sound, or to apply tonal corrections.
1.
Select an SMF song or a Music Style and
start playback.
2.
Set the “Switch” parameter to “On” to activate the equalizer.
The equalizer is now active and will affect SMF song
or Music Style playback. (Select “Off” to switch the
equalizer back off.)
3.
Use the [CURSOR÷VALUE] dial to select the
“Preset” parameter, then press the dial.
4.
Rotate the [CURSOR÷VALUE] dial to select
one of the available presets, then press the
dial.
The available presets are:
1. Flat
2. Rock
3. Pop
4. Jazz
5. Classic
6. Standard
7. User
High
Frequency
High Gain –15~15dB Use this parameter to set
Mid Frequency
Mid Q 0.5, 1, 2, 4, 8 Use this parameter to
2000~
12000Hz
200~8000Hz Allows you to set the
Allows you to set the
cutoff frequency of the
high band (this is a
shelving filter).
the level of the selected
“High” frequency. Positive values boost
(increase the volume of)
that frequency band,
negative values cut
(attenuate) it.
cutoff frequency of the
middle band (this is a
peaking filter).
specify the width of the
“Mid Frequency” band
that you want to boost
or cut. Smaller values
mean that neighboring
frequencies above/below
that value are also
affected.
73
Page 74

Backing Module BK-7m
Menu options
Parameter Setting range Explanation
Mid Gain –15~15dB Use this parameter to set
the level of the selected
“Mid” frequency.
1.
Rotate the [CURSOR÷VALUE] dial to select
“Write User”, then press the dial.
Low Frequency
Low Gain –15~15dB Use this parameter to set
Write User
This function allows you to save the settings you
made on the “SMF/Style Equalizer” page.
1.
Rotate the [CURSOR÷VALUE] dial to select
50, 80, 100,
150, 200, 250,
300, 400Hz
Allows you to set the
cutoff frequency of the
low band (this is a shelving filter).
the level of the selected
“Low” frequency.
“YES”, then press the dial to save the current settings.
The display shows a confirmation message.
If you don’t want to define the current settings as
the default state, rotate the [CURSOR÷VALUE] dial to
select “NO”, then press the dial. The BK-7m then
returns to the “SMF/Style Equalizer” page.
2.
Rotate the [CURSOR÷VALUE] dial to select
“YES”, then press the dial to save the current settings.
The display shows a confirmation message.
If you don’t want to define the current settings as
the default state, rotate the [CURSOR÷VALUE] dial to
select “NO”, then press the dial. The BK-7m then
returns to the “Tone/Part Compressor” page.
NOTE
There is only one “User” memory for your own settings. By
saving new settings, you therefore overwrite the previous
ones.
NOTE
When you switch on the BK-7m, it automatically loads the
“User” settings.
Tone/Part Equalizer
To edit the Tone/Part Equalizer parameters, use [MENU]
button ‰ “Mastering Tools” ‰ “Tone/Part Equalizer”.
NOTE
There is only one “User” memory for your own settings. By
saving new settings, you therefore overwrite the previous
ones.
NOTE
When you switch on the BK-7m, it automatically loads the
“User” settings.
Tone/Part Compressor
This multi-band compressor/limiter affects the real-time
parts. It allows you to process three frequency ranges
separately. A compressor reduces high levels (peaks) and
boosts low levels, smoothing out fluctuations in volume.
To edit the Tone/Part Compressor parameters, use
[MENU] button ‰ “Mastering Tools” ‰ “Tone/Part Compressor”.
See “SMF/Style Compressor” on p. 71 for an explanation of the available parameters.
■ Saving the compressor settings
To save the compressor settings and ensure that they
will be loaded each time you switch on the BK-7m:
The equalizer has the same function as the TREBLE,
MID and BASS knobs on a mixer: it allows you to
color the sound, or to apply tonal corrections. The
equalizer discussed here allows you to process the
real-time parts.
See “SMF/Style Equalizer” on p. 73 for an explanation
of the available parameters.
■ Saving the equalizer settings
To save the equalizer settings and ensure that they
will be loaded each time you switch on the BK-7m:
1.
Rotate the [CURSOR÷VALUE] dial to select
“Write User”, then press the dial.
2.
Rotate the [CURSOR÷VALUE] dial to select
“YES”, then press the dial to save the current settings.
The display shows a confirmation message.
r
74
Page 75

Backing Module BK-7m
Makeup Tools (Style and SMF)
r
If you don’t want to define the current settings as
the default state, rotate the [CURSOR÷VALUE] dial to
select “NO”, then press the dial. The BK-7m then
returns to the “Tone/Part Compressor” page.
NOTE
There is only one “User” memory for your own settings. By
saving new settings, you therefore overwrite the previous
ones.
NOTE
When you switch on the BK-7m, it automatically loads the
“User” settings.
Makeup Tools (Style and SMF)
These functions allows you to actually edit the selected
Music Style or SMF song (Standard MIDI File) without
paying too much attention to the underlying parameters.
NOTE
The “Style Makeup Tools” and “Song Makeup Tools” functions
cannot be used to edit Standard MIDI Files that use the XG
format.
This menu allows you to select the following entries:
Menu Option Explanation
Common Select this entry to change common
parameters that affect the Music Style or
song as a whole, like the reverb or chorus
effect, the tempo, etc.
Instrument Select this entry to change the instru-
ments used in the Music Style or song and
their parameters. See page 76.
Freeze Data Select this entry to “burn” your new set-
tings into the file. Doing so will allow you
to use your new version with any
sequencer (software) or compatible
Roland arranger instrument. See page 81.
Save Select this entry to save your song with
the “Song Makeup Tools” settings you
have made. See page 81.
Common
To edit the Common parameters, use [MENU] button ‰
“Makeup Tools” ‰ “Common”.
Using the Makeup Tools
1.
Select the Music Style or SMF song you wish
to modify (see p. 35).
You can also select an internal Music Style.
2.
Press the [START/STOP] button to start playback of the song or Music Style.
This allows you to listen to the song or Music Style
before you start editing it. If you selected a Music
Style, remember to play a chord on the external MIDI
controller. Press the [START/STOP] button again to
halt playback.
3.
Press the [MENU] button.
4.
Rotate the [CURSOR÷VALUE] dial to select
“Makeup Tools”, then press the dial.
If you selected a Music Style in step (1), the display
changes to:
If you selected an SMF song in step (1), the display
changes to:
The “Common” parameters on this page apply to the
entire song or Music Style.
1.
Rotate the [CURSOR÷VALUE] dial to select
the desired “Common” parameter, then
press the dial.
The following parameters are available:
Reverb Type: This parameter allows you to specify
what kind of reverb effect you need. The available
reverb types are:
Setting Meaning
Original This setting means that the song uses its own
(programmed) reverb settings.
Room1,
Room2,
Room3
These types simulate the reverb characteristics of a room. The higher the number (1, 2 or
3), the bigger the “room” becomes.
75
Page 76

Backing Module BK-7m
Menu options
Setting Meaning
Hall1,
Hall2
Plate This algorithm simulates the acoustics of a
Delay A delay effect (no reverb). Works a lot like an
Pan Delay This is a stereo version of the above delay
Chorus Type: Chorus broadens the spatial image of
the sound and creates a stereo impression. You can
choose from 8 types of chorus.
Setting Meaning
Original The song uses its own (programmed)
Chorus
1~4
Fbk Chorus This is a chorus with a flanger-like effect
These types simulate the reverb of a small (1)
or large (2) concert hall and thus sound much
“bigger” than the Room types above.
concert hall.
echo effect and thus repeats the sounds.
effect. It creates repetitions that alternate
between the left and right channels.
chorus settings.
These are conventional chorus effects
that add spaciousness and depth to the
sound.
and a soft sound.
NOTE
The changes you make using the procedure described
above can be “burned” into the Music Style song file using
the “Freeze Data” command (see p. 81). Doing so will allow
you to hear those changes on any sequencer (software)
you use. Changes you don’t “freeze” are nevertheless stored
when you save the edited Music Style song file—but only
the BK-7m can read them.
Instrument
To edit the Instrument parameters, use [MENU] button
‰ “Makeup Tools” ‰ “Instrument”.
The display now shows all instruments used by the
selected Music Style or SMF song.
1.
Rotate the [CURSOR÷VALUE] to select the
instrument you want to change, then press
the dial.
Flanger This is an effect that sounds somewhat
like a jet airplane taking off and landing.
ShortDly This is a full-fledged delay effect that
can be used instead of a chorus or
flanger. As you will see, there are a lot of
parameters you can program.
Short Dly FB This is a short delay with many repeats.
Reverb Level & Chorus Level: These parameters
allow you to modify the output level of the Reverb
(or Chorus) processor.
Style Volume/Song Volume: This parameter allows
you to set the overall volume of the selected Style or
song if you think it is too loud/soft.
Style Tempo/Song Tempo: Allows you to change the
Style’s or song’s tempo (q= 20~250).
Transpose: This parameter allows you to transpose all
song parts (except the drums) up to 12 semitones (1
octave) up or down. This value is written to the song
data and used every time you play back this song.
NOTE
This parameters is not available for Music Styles.
Undo Changes: Select this entry to cancel all “Style/
Song Makeup Tools” settings you have made and to
revert to the previously saved version.
2.
If you are satisfied with your changes and
wish to preserve them, save your Music
Style song to the USB memory.
See “Saving your new Music Style or song (SMF) version” on p. 81.
r
The display changes to:
The [MENU] button’s indicator flashes.
2.
Press the [MENU] button to jump to the
location where the instrument is used.
Playback starts automatically from that point.
3.
Rotate the [CURSOR÷VALUE] to select the
parameter you wish to edit, then press the
dial.
NOTE
The Style and Song Makeup Tools environments do not
support the BK-7m’s SuperNATURAL sounds, which can
therefore not be selected.
76
Page 77

Backing Module BK-7m
Makeup Tools (Style and SMF)
r
NOTE
If you select a Drum Set in step (1) above, the parameter
list looks slightly different than for instruments that do not
use a Drum Set. “Drum Sets” are special “Tones” that assign
different sounds to most keys/note numbers, allowing you
(and the BK-7m) to play realistic drum and percussion
parts.
In the following, “(T)” refers to parameters that are only
available for regular instruments (also called “Tones”),
while “(D)” refers to parameters that are only available for
Drum Sets.
The following parameters are available:
Families (T)
Allows you to select a different Tone family. See
page 91 for a list of available Tones and Drum Sets.
After selecting a new family, you can press the
[CURSOR÷VALUE] dial and then rotate it to select a
Tone from that family
Parameter Explanation
Families The BK-7m’s Tones are grouped into 15
families: piano, guitar, bass, strings, etc.
Perc Mute (D)
Suppresses (or adds) the percussion sounds used by
the drum part.
Parameter Value
Perc Mute Off, On
Volume
Adjusts the volume of the selected instrument. Negative values decrease the current volume, positive values increase it. (This is a relative setting that is added
to, or subtracted from, the original setting.)
Parameter Setting
Volume -127~0~+127
Reverb
Use this parameter to set the reverb send level. Negative values decrease the current reverb send level,
positive values increase it. (This is a relative setting
that is added to, or subtracted from, the original setting.)
Parameter Setting
Reverb -127~0~+127
Tone (T), Drum (D)
Allows you to select a different Tone within the
active Tone family. See page 91 for a list of available
Tones and Drum Sets.
While selecting a Tone, you can press the
[CURSOR÷VALUE] dial and then rotate it to select a
different family.
Parameter Explanation
Tone (T)
Drum (D)
The number of Tones depends on the
selected family.
Mute (T)/Drum Mute (D)
Switches the selected instrument off. The corresponding part is no longer played back. (This setting
only applies to the selected instrument and thus not
necessarily to the entire track.)
NOTE
In the case of the drums, you can mute two instrument
groups (“Drum Mute” and “Perc Mute”, see below) separately.
Parameter Setting
Mute (T)
Drum Mute (D)
Off, On
Solo
Switches off all instruments except the selected
instrument.
Parameter Setting
Solo Off, On
Chorus
Use this parameter to set the chorus send level. Negative values decrease the current chorus send level,
positive values increase it. (This is a relative setting
that is added to, or subtracted from, the original setting.)
Parameter Setting
Chorus -127~0~+127
Panpot
Use this parameter to change the stereo placement
of the selected instrument. “0” means “no change”,
negative (–) values shift the instrument towards the
left and positive (+) values shift it towards the right.
Parameter Setting
Panpot -127~0~+127
NOTE
In the case of Drum Sets, this setting applies to all drum/
percussion instruments. There is also a parameter that can
be set for specific drum instruments. See page 80.
Octave (T)
Use this parameter to transpose the selected instrument up or down by up to 4 octaves.
Parameter Setting
Octave -4~0~+4
Velocity
This parameter allows you to modify the velocity
range of the instrument in question. “0” means that
the recorded velocity values are left untouched, neg-
77
Page 78

Backing Module BK-7m
Menu options
ative values reduce all velocity values by the same
amount (leaving differences between notes intact),
while positive settings increase all velocity values.
Parameter Setting
Velocity -127~+127
Cut Off
This filter parameter allows you to make the selected
sound darker or brighter. Positive settings mean that
more overtones are allowed to pass, so that the
sound becomes brighter. The further this value is set
in the negative direction, the fewer overtones will be
allowed to pass and the sound will become softer
(darker).
Setting
Parameter Setting
Cut Off -127~+127
Characteristics of a low-pass filter
Frequency
Cutoff frequency
Decay (T)
This parameter adjusts the time over which the
sound’s volume and cutoff frequency fall from the
highest point of the attack down to the sustain level.
Parameter Setting
Decay -127~+127
NOTE
Percussive sounds usually have a sustain level of “0”. Piano
and guitar sounds are in this category. Holding the keys for
a long time will have little effect on the duration of the
notes you are playing, even if you select a high value here.
Release (T)
This parameter adjusts the time over which the sound
will decay after the note is released until it is no
longer heard. The cutoff frequency will also fall
according to this setting.
Parameter Setting
Release -127~+127
NOTE
Some sounds already contain natural (sampled) vibrato
whose depth or speed cannot be changed.
NOTE
For some sounds, positive (+) “Cut Off” settings will cause
no noticeable change because the preprogrammed “Cut
Off” parameter is already set to its maximum value.
Resonance
This is a parameter one invariably associates with a
synthesizer. When the “Resonance” value is increased,
the overtones in the area of the cutoff frequency will
be emphasized, creating a sound with a strong character.
Parameter Setting
Resonance -127~+127
NOTE
For some sounds, negative (–) “Resonance” settings may
produce no noticeable change because the resonance is
already set to the minimum value.
The following parameters allow you to set the
sound’s “envelope”. The envelope parameters affect
both the volume (TVA) and the filter (TVF). The cutoff
frequency will rise as the envelope rises and fall as
the envelope falls.
Attack (T)
This parameter adjusts the onset of the sound. Negative values speed up the attack, so that the sound
becomes more aggressive.
Parameter Setting
Use the following three parameters if you think the
instrument in question has too much (or could use a
little more) vibrato.
Vibrato Rate (T)
This parameter adjusts the speed of the pitch modulation. Positive (+) settings make the preset pitch
modulation faster, and negative (–) settings make it
slower.
Parameter Setting
Vibrato Rate -127~+127
Vibrato Depth (T)
This parameter adjusts the intensity of the pitch
modulation. Positive (+) settings mean that the
“wobble” becomes more prominent, while negative
(–) settings make it shallower.
Parameter Setting
Vibrato Depth -127~+127
Vibrato Delay (T)
This parameter adjusts the time required for the
vibrato effect to begin. Positive (+) settings increase
the time before vibrato will begin and negative settings (–) shorten the time.
Parameter Setting
Vibrato Delay -127~+127
Attack -127~+127
r
78
Page 79

Backing Module BK-7m
Makeup Tools (Style and SMF)
r
Mfx
The BK-7m contains three multi-effect processors
(“Mfx”), one reverb processor and one chorus processor that can be used to process Music Styles or Standard MIDI Files.
Select “Off” for instruments that don’t need to be
processed by any Mfx.
Parameter Setting
Mfx Off, A, B, C
NOTE
If you select “A”, “B” or “C”, additional parameters can be
edited (see below).
Mfx Type
Allows you to select the desired Mfx type, i.e. the kind
of effect you need. Each Mfx (“A”, “B” and “C”) can be
assigned to as many instruments as you like. Be
aware, however, that selecting a different type will
affect all instruments that use this Mfx processor. See
page 55 for a list of the available Mfx types.
NOTE
Each Mfx (“A”, “B” and “C”) can be assigned to as many
instruments as you like. Be aware, however, that selecting a
different type will affect all instruments that use this Mfx
processor.
Edit EQ
To edit the equalizer parameters, press the
[CURSOR÷VALUE] dial to jump to the “Edit EQ” page.
You can then use the [CURSOR÷VALUE] dial to edit
the available parameters:
Parameter Setting Explanation
Equalizer Off, On Activate this setting if
you want to change
the timbre of the
selected instrument.
This parameter duplicates the “Equalizer”
above and was added
for your convenience.
High Freq 1500 Hz, 2000
Hz, 3000 Hz,
4000 Hz, 6000
Hz, 8000 Hz,
12000 Hz
High Gain –15~+15 dB Use this parameter to
Allows you to set the
cutoff frequency of
the high band (this is a
shelving filter).
set the level of the
selected “High” frequency. Positive values boost (increase the
volume of) that frequency, negative values cut (attenuate) it.
NOTE
While the “Mfx” parameter is set to “Off”, you cannot select
a different type. In that case, the display will show the
message “---”.
Mfx Edit
If you also want to edit the parameters of the
selected effect type, press the [CURSOR÷VALUE] dial
to jump to the “Mfx Edit” page. You can then use the
[CURSOR÷VALUE] dial to edit the available parameters.
See “MFX types and parameters” on p. 107 for the
parameters that are available for the selected Mfx
type.
NOTE
While the “Mfx” parameter is set to “Off”, you cannot edit
the Mfx parameters. In that case, the display will show the
message “No Edit”.
Equalizer
Activate this setting if you want to change the timbre
of the selected instrument.
Parameter Setting
Equalizer Off, On
Mid Freq 200~8000 Hz Allows you to set the
cutoff frequency of
the middle band (this is
a peaking filter).
Mid Q 0.5, 1, 2, 4, 8 Use this parameter to
specify the width of
the “Mid Freq” band
that you want to boost
or cut. Smaller values
mean that neighboring
frequencies above/
below that value are
also affected.
Mid Gain –15~1+5 dB Use this parameter to
set the level of the
selected “Mid Freq”.
Positive values boost
(increase the volume
of) that frequency,
negative values cut
(attenuate) it.
Low Freq 90 Hz, 150 Hz,
180 Hz, 300
Hz, 360 Hz,
600 Hz
Allows you to set the
cutoff frequency of
the low band (this is a
shelving filter).
Low Gain –15~+15 dB Use this parameter to
set the level of the
selected “Low” frequency.
79
Page 80

Backing Module BK-7m
Menu options
Drum Instrument (D)
If you want to edit the settings for specific instruments of the selected Drum Set, press the
[CURSOR÷VALUE] dial to jump to the “Drum Instrument” page.
If you want to edit the settings for specific instruments of the selected Drum Set, press the
[CURSOR÷VALUE] dial to jump to the “Drum Instrument” page.
You can then use the [CURSOR÷VALUE] dial to edit
the available parameters.
Parameter Value Explanation
Instr. All Drum Set
Instruments
Parameters for the selected instrument
Mute Off, On Suppress (or add) the
Solo Off, On Switch off all instru-
Volume -127~+127 Use this parameter to
Reverb -127~+127 Use this parameter to
Chorus -127~+127 Use this parameter to
Panpot -127~+127 Use this parameter to
Select the drum instrument you want to edit.
selected instrument.
ments except the
selected instrument.
set the volume of the
selected drum instrument.
set the reverb send
level of the selected
drum instrument. The
effect itself can be
changed on the “Common” page.
set the chorus send
level of the selected
drum instrument. The
effect itself can be
changed on the “Common” page.
set the stereo placement of the selected
drum instrument. “0”
means “no change”,
negative values shift
the instrument
towards the left and
positive values shift it
towards the right.
Parameter Value Explanation
Velocity -127~+127 This parameter allows
you to modify the
velocity range of the
drum instrument in
question. “0” means
that the recorded values are left untouched,
a negative setting
reduces all velocity
values by the same
amount (leaving variations intact). A positive setting shifts all
velocity values in a
positive direction.
Pitch -127~+127 Use this parameter to
tune the selected drum
instrument higher or
lower. “0” means that
the pitch is left
unchanged.
Instr. Equalizer Global, Instr,
Off
Edit EQ (Press the
[CURSOR÷VAL
UE] dial)
Undo Changes (Press the
[CURSOR÷VAL
UE] dial)
4.
If you are satisfied with your changes and
Global: The drum
instrument uses the
equalizer settings of
the Drum Set it
belongs to.
Instr: The drum instrument uses its own
equalizer settings (see
below).
Off: The drum instrument is not equalized.
Provides access to the
EQ parameters of the
currently selected
drum instrument (if
“Instr. Equalizer” is set
to “Int”). See “Edit EQ”
on p. 79 for a description of the available
parameters.
This function allows
you to cancel the
“Drum Instrument (D)”
settings of the currently selected instrument and to revert to
the previously saved
version.
wish to preserve them, save your Music
Style song to the USB memory.
See “Saving your new Music Style or song (SMF) version” on p. 81.
r
80
Page 81

Backing Module BK-7m
Makeup Tools (Style and SMF)
r
NOTE
The changes you make using the procedure described
above can be “burned” into the Music Style song file using
the “Freeze Data” command (see p. 81). Doing so will allow
you to hear those changes on any sequencer (software)
you use. Changes you don’t “freeze” are nevertheless stored
when you save the edited Music Style song file—but only
the BK-7m can read them.
Freeze Data
To commit your settings, use [MENU] button ‰ “Makeup
Tools” ‰ “Freeze Data”.
Before saving your “made-up” song to a USB memory,
you can (but you don’t have to) “commit” your changes,
thereby turning them into “regular” Music Style or song
data.
This may come in handy if you also want to play back
your new Music Style song version on another arranger
instrument, sequencer or your computer. This operation
is unnecessary for files you only want to use with the
BK-7m or one of the models mentioned above.
Saving your new Music Style or song (SMF) version
1.
If you are happy with your changes and wish
to preserve them, select the “Save” parameter.
The display changes to:
4.
Rotate the [CURSOR÷VALUE] dial to select
the desired character.
5.
Press the [CURSOR÷VALUE] dial to confirm
your selection (the cursor changes to an
underscore).
6.
Rotate the [CURSOR÷VALUE] to select the
character position you want to change, then
press the dial.
7.
Repeat steps (4)~(6) to complete the name.
8.
Press the [WRITE] button to confirm your
desire to save the song.
The display briefly confirms the operation and then
returns to the “Style Makeup Tools” or “Song Makeup
Tools” page.
The display shows the location of the file you loaded
and subsequently edited.
NOTE
Even Music Styles or songs for which you did not perform
the “Freeze Data” command need to be saved using this
procedure if you want to keep the changes.
2.
Use the [CURSOR÷VALUE] dial to select a different location if you do not want to overwrite the original version.
3.
Press the [WRITE] button (it flashes).
PERFORMANCE
WRITE
If the USB memory already contains a Music Style or
song file of that name, you will be asked whether you
want to overwrite it:
In this case, select “YES” using the [CURSOR÷VALUE]
dial to replace the old file with the new one (the old
file will be lost).
Otherwise, select “NO” to return to the “Save” page
and enter a different name.
81
Page 82

Backing Module BK-7m
Menu options
V-LINK function
The BK-7m has a powerful new interface for realtime
audio-and-video integration. V-LINK ( ) is a
function that allows music and images to be performed
together. When V-Link compatible devices are connected via MIDI, you’ll be able to easily enjoy a variety
of visual effects that are linked to the expressive elements of your performance.
For example, if you use the BK-7m with the EDIROL
P-10, you’ll be able to use the various controls on the
BK-7m’s front panel to switch and control images on
the EDIROL P-10.
In order to enjoy V-LINK with the BK-7m and the
EDIROL P-10, you’ll need to make connections using a
MIDI cable (sold separately).
2.
Rotate the [CURSOR÷VALUE] dial to select
the “V-Link” entry, then press the
[CURSOR÷VALUE] dial.
3.
Use the following controls on the front
panel to control the Edirol P-10.
Operation V-LINK
Press [8 BEAT/
16 BEAT]
Press [LIVE BAND] Switch images
Switch images
(Clip 1)
(Clip 2)
MIDI
message
CF 00
CF 01
MIDI OUT
MIDI IN
Image output
Edirol P-10 Visual
Projector
NOTE
To prevent malfunction and speaker damage, you must minimize the volume on all equipment and turn off their power
before you make any connections.
1.
Press the [MENU] button.
MENU
Sampler
Press [ROCK] Switch images
(Clip 3)
Press
[DISCO DANCE]
Press [BALL ROOM] Switch images
Press [50’s & 60’s] Switch images
Press [JAZZ/BLUES] Switch images
Press [LATIN] Switch images
Press [BOSSA/
SAMBA]
Press [TRADIT/
WORLD]
Press [VARIATION 1]
‰ [CURSOR÷VALUE]
dial
Press [VARIATION 2]
‰ [CURSOR÷VALUE]
dial
Switch images
(Clip 4)
(Clip 5)
(Clip 6)
(Clip 7)
(Clip 8)
Switch images
(Clip 9)
Switch images
(Clip 10)
Control the image
(Bank Select 0~13)
Control the image
Color Cr Control
(0~127)
CF 02
CF 03
CF 04
CF 05
CF 06
CF 07
CF 08
CF 09
BF 00 00~13
BF 47 00~7F
The display changes to:
r
82
Press [VARIATION 3] Control the image
Playback Speed (0~
127)
NOTE
See the owner’s manual of the P-10 for the effects produced with these commands.
EF 00 00~
00 40~7F 7F
Page 83

Factory Reset
The following function allows you to recall the BK-7m’s
original factory settings. This has no effect on the data
stored on a USB memory.
1.
Press the [MENU] button.
MENU
The display changes to:
Backing Module BK-7m
2.
Press the [MENU] button.
MENU
3.
Rotate the [CURSOR÷VALUE] dial to select
the “Format USB Device” entry, then press
the [CURSOR÷VALUE] dial.
r
Factory Reset
2.
Rotate the [CURSOR÷VALUE] dial to select
the “Factory Reset” entry, then press the
[CURSOR÷VALUE] dial.
3.
Rotate the [CURSOR÷VALUE] dial to select
“YES”, then press the dial to load the factory
settings.
Select “NO” if you don’t want to delete the playlist
step after all.
A confirmation message informs you that the BK-7m
has been initialized.
Formatting a USB memory
This function allows you to format the connected USB
memory.
USB memories using the FAT-32 file system may not
need to be formatted. We nevertheless recommend formatting all new USB storage devices with the BK-7m.
IMPORTANT NOTE: Formatting a USB memory means
that all files (songs, Music Styles, etc.) it contains are
lost. Always check the contents of the memory before
deciding to format it.
1.
Connect the a USB storage you want to format device to the MEMORY port on the
BK-7m’s rear panel.
4.
Rotate the [CURSOR÷VALUE] dial to select
“YES”, then press the dial to format the USB
memory.
A confirmation message informs you that the USB
memory has been formatted.
■ The following folders are created on the USB
memory
Name Value
My Performances This folder is used to save Perfor-
mance Lists. (The contents of this
folder cannot be viewed by pressing
the [USB MEMORY] button. You need
to press the PERFORMANCE [LIST]
button gain access to the files it contains. The contents can be viewed on
a computer, however.)
My Recordings This folder is used to store your audio
recordings (see p. 46).
My Songs This folder can be used to save SMF
songs you edited with the “Cover”
(see p. 48) or “Makeup Tools” functions (see p. 75) functions.
My Styles This folder can be used to save Music
Styles you edited with the “Cover”
(see p. 48) or “Makeup Tools” functions (see p. 75) functions.
NOTE
We recommend copying the contents of your USB memory
to your computer before formatting it.
83
Page 84

Backing Module BK-7m
Using the BK-7m with SONAR LE
16. Using the BK-7m with SONAR LE
The BK-7m comes bundled with the Cakewalk SONAR LE software that runs on Windows computers. Installing this powerful software allows you to use the BK-7m as a versatile multitimbral sound module, adding top-notch sounds to your
PC-based music productions. You can create your own SMF music databases with SONAR LE, using the BK-7m as sound
module by connecting it to one of your computer’s USB ports. Once the SMF files are ready, you can play the back directly
on the BK-7m (without using SONAR LE).
Computer
NOTE
When using the BK-7m in this way, we recommend not
starting Music Style or Song playback on the BK-7m
itself and to only use it as a sound module.
USB port
NOTE
In order to perform the following procedure, you’ll need to log
onto Windows as a user whose account type is Administrator.
NOTE
Please do not connect any MIDI cable to the BK-7m’s
MIDI IN or MIDI OUT socket while it is connected to
your one of your computer’s USB ports.
To import the instrument definitions into SONAR LE,
please see SONAR LE’s help “Importing Instrument Definition”.
For any other information, please see SONAR LE’s help.
Installing Sonar LE
1.
Start your computer.
2.
Close any open programs you have running.
3.
Place the DVD-ROM in your DVD-ROM drive.
4.
Double-click the following icon in the folder
on the DVD-ROM to install:
[SONAR_LE] Folder -
5.
Follow the installation instruction on the
screen.
BK-7m instrument definitions
A special “BK-7m.ins” file with information about the
Tones and Drum Sets inside the BK-7m can be downloaded from Roland’s website: www.Roland.com. By
importing that file into SONAR LE, you can conveniently
select the BK-7m’s Tones and Drum Sets with your
mouse.
r
84
■ Getting Help
SONAR LE’s online help opens when you click the
Help button in the SONAR LE Toolbar. The help file
includes tabs for the index, the search page, and the
favorites page. Also, most dialog boxes and modules
have Help buttons that display help that is specific to
that particular dialog or module.
•Registration is required for continued use of the
product, and may be done by internet.
Instructions and Cakewalk’s privacy policy will be
detailed to you during launch of the product.
•In the “Product” column on the registration page,
you should select SONAR LE.
NOTE
Cakewalk is a registered trademark, and SONAR and Cakewalk logo are trademarks of Cakewalk, Inc.
Lexicon Pantheon is a trademark of Lexicon Pro, a Harman
International Company.
Copyright © 2011 BOSS CORPORATION
Page 85

Backing Module BK-7m
17. Troubleshooting
Symptom Action Page
r
Troubleshooting
Power does not turn on. Is the included AC adaptor/power cord correctly connected to an
AC outlet and to the BK-7m?
Do not use any AC adaptor or power cord other than the ones
included. Doing so will cause malfunctions.
No sound from the BK-7m. Did you connect the BK-7m to an external amplifier or mixing
console? And did you switch it on?
Could the [VOLUME] knob be turned down? Select a higher setting.
Are the MIDI and audio connections correct?
Please check the audio and MIDI connection
Can you hear sound through headphones?
If you can hear sound through headphones, it may be that the
connection cables are broken, or that your amp or speaker has
malfunctioned. Check the cables and your equipment once again.
Perhaps, the external MIDI controller transmits on a different MIDI
channel than the one the BK-7m expects. Start the wizard.
Could the part volume settings have been minimized?
Check the “Volume” setting of each part.
Could a MIDI message received from an external MIDI device (volume message or exclusive message) have lowered the volume?
The volume level of the instrument is too low
when it is connected to an amplifier.
Could you be using a connection cable that contains a resistor?
Use a connection cable that doesn’t contain a resistor.
15
15
—
15, 16
—
22
51, 59
69
—
The real-time parts (MBS, LWR, UP2, UP1) don’t
receive MIDI messages.
The pitch of the selected Style/Song is incorrect. Is the “Tuning” setting appropriate?
Can’t hear the vocal of an audio file (mp3 or WAV).
Can’t hear the melody of SMF files.
A “buzz” is heard from the external amplifier Is the external amplifier or other device used with the BK-7m con-
The pitch of the selected song is incorrect. Is the “Tuning” setting appropriate?
Can’t play an audio/mp3-format song Is the song in a format that the BK-7m is able to read? 35
Are the MIDI connections correct? Please check the MIDI connection
Does the button of the desired real-time part light. If not, switch it
on.
The real-time parts may be receiving on a MIDI channel on which
the MIDI controller doesn’t transmit. Correct the MIDI controller’s
transmit channel or use the BK-7m’s wizard.
Did you transpose the Style /Song? Also check the “Style Scale
Tune” and “Rx Shift” parameters.
If the [TRACK MUTE] (CENTER CANCEL) button is lit, the vocal
sound will be attenuated.
If the [TRACK MUTE] button is lit, the melody of the MIDI files will
be muted. Switch it off.
nected to a different AC power outlet?
Connect the amplifier or other device to the same AC outlet as the
BK-7m.
Did you transpose the song?
16
22
62
38
62
37
—
—
—
85
Page 86

Backing Module BK-7m
Troubleshooting
Symptom Action Page
No sound when a MIDI device is connected to
BK-7m.
After connecting the BK-7m’s COMPUTER port to
your computer, the BK-7m doesn’t receive MIDI
messages.
Unable to read from/write to USB memory. Are you using an (optional) Roland USB memory (M-UF series)?
Can’t save to USB memory. Could the USB memory be write protected? —
Audio recording won’t start or stops unexpectedly. Are you using an (optional) Roland USB memory (M-UF-series)?
Are all devices powered on?
Did you connect a MIDI cable
Did you select the correct MIDI channel? Please see “Wizard Con-
nection” on p. 22.
Is the appropriate “Rx” parameter active? If not, switch it on. —
The BK-7m may be receiving on a MIDI channel on which the MIDI
controller doesn’t transmit. Correct the MIDI controller’s transmit
channel or use the BK-7m’s wizard.
Reliable performance cannot be guaranteed if you use nonRoland USB memory products.
Check the format of your USB memory. The BK-7m can use USB
memory that has been formatted as FAT. If your USB memory was
formatted using any other method, please re-format it using the
BK-7m.
Is there sufficient free space on the USB memory? —
Reliable performance cannot be guaranteed if you use nonRoland USB memory products.
Is there sufficient free space on the USB memory? —
—
16
22
22
—
83
—
The external screen remains dark. Did you connect it to the VIDEO OUTPUT socket? 17
Did you switch on your TV or external screen—and did you select
the correct channel? See the TV’s or screen’s owners manual for
how to select the channel that corresponds to the video input to
which the BK-7m is connected.
Are you using a supported TV or monitor screen? —
Thin horizontal lines flicker in the television
screen.
Can’t see the edge of the image on the television
screen
Lyric display is wrong. For some types of music files, the lyrics may sometimes be dis-
Insufficient volume from a device connected to
the BK-7m’s AUDIO INPUT sockets.
The songs won’t play. The file type of the song is not one of the file types that the
Thin horizontal lines may flicker on the television screen, but this
is due to the television itself, and is not a malfunction of the
BK-7m.
In some cases, the edge of the image may not be visible on the
television screen, but this is due to the characteristics of the television and is not a malfunction on the BK-7m.
played incorrectly. Some words may be incorrectly shown outside
the screen display area.
Could you be using a connection cable that contains a built-in
resistor? Use a connection cable that does not contain a resistor.
Check the setting of the AUDIO IN knob and correct it, if necessary.
35
BK-7m can play.
—
—
—
—
—
—
No Performance Lists are displayed. The USB memory doesn’t contain any Performance List files. —
r
86
It may be that the song data is damaged. —
For some reason the USB memory is not recognized. —
Page 87

Backing Module BK-7m
r
‘Wizard Connection’ settings
18. ‘Wizard Connection’ settings
The “Wizard Connection” function (see p. 22) performs the following settings to ensure smooth communication with your
external MIDI controller:
External instrument Settings
Category Type Performance & Global Settings Other settings
Octave LWR: +1
DIGITAL PIANO
ACCORDION
MASTER KEYBOARD
Split Point: G3
ROLAND
Performance Hold
Lower Octave: On
Split: Off
Arr Type: Off
OTHERS
(See “Performance Hold” on p. 62)
Pedal: Perf. Next
(See “Pedal” on p. 64)
V-ACCORDION Octave LWR: +1
OTHERS1
Performance Hold
Lower Octave: On
Split: On
OTHERS2
Arr Type: On
Bass Inversion: On
(See “Performance Hold” on p. 62)
Split Point: C4
ONE CHANNEL
Performance Hold
Split: Off
Arr Type: Off
(See “Performance Hold” on p. 62)
Performance Hold
MULTI CHANNEL
Split: On
Arr Type: On
(See “Performance Hold” on p. 62)
Octave UP1: +1
[SPLIT] button off: Pianist
[SPLIT] button lit: Intelligent
(See “Type” on p. 60)
(See “Using Split mode” on p. 39)
MIDI
Soft Thru: Piano
(See “Parameters” on p. 71)
[SPLIT] button off: Accordionist1
[SPLIT] button lit: Accordionist1
(See “Type” on p. 60)
(See “Using Split mode” on p. 39)
[SPLIT] button off: Accordionist2
[SPLIT] button lit: Accordionist2
(See “Using Split mode” on p. 39)
[SPLIT] button off: Pianist
[SPLIT] button lit: Intelligent
(See “Type” on p. 60)
(See “Using Split mode” on p. 39)
[SPLIT] button off: Intelligent
[SPLIT] button lit: Intelligent
(See “Type” on p. 60)
(See “Using Split mode” on p. 39)
Performance Hold
Tone Part: On
Split: On
GUITAR
Arr Type: On
Bass Inversion: On
(See “Performance Hold” on p. 62)
One Touch Hold
[SPLIT] button off: Guitarist
[SPLIT] button lit: Guitarist
(See “Type” on p. 60)
(See “Using Split mode” on p. 39)
Tone Part: On
(See “One Touch Hold” on p. 62)
Pedal: Perf. ChordRec Off
(See “Pedal” on p. 64)
CHURCH ORGAN1 Performance Hold
Split: On
CHURCH ORGAN2
DIGITAL ORGAN
ELECTRONIC ORGAN
Arr Type: On
(See “Performance Hold” on p. 62)
Performance Hold
Split: On
Arr Type: On
(See “Performance Hold” on p. 62)
[SPLIT] button off: Standard
[SPLIT] button lit: Standard
(See “Type” on p. 60)
(See “Using Split mode” on p. 39)
Pedal: Perf. Next
(See “Pedal” on p. 64)
COMPUTER/SEQUENCER No Settings No Settings
87
Page 88

Backing Module BK-7m
Music Style list
19. Music Style list
8 BEAT/16 BEAT
01 Frank's Way
02 Easy Ballad
03 Lying Beat
04 Sky Beat
05 Home Beat
06 Slow Beat
07 Thick Beat
08 Due Beat
09 Acoustic Ballad
10 Adult Contemp
11 Contemp Country
12 Gold Slow Beat
13 Gold Medium Beat
14 Romantic Ballad
15 Angel Ballad
16 Sunshine Pop
17 Blue Pop
18 British Pop
19 Sister Pop
20 Euro Ballad
21 Love Beat
22 Fast Beat
23 So Easy
24 Easy Pop
25 Natural Pop
26 Easy Beat
27 70's Pop
28 Heart Beat
29 Night Pop
30 Happy Pop
31 Easy Groove
32 Sweet Beat
33 Groovy Pop
34 Warm Pop
35 Fast Pop
36 80's Pop
37 Sunny Pop
38 Color Beat
39 Half Beat
40 Folk Beat
41 Your Ballad
42 Power Ballad
43 Guitar Pop
44 Soft Beat
45 Trendy Beat
46 Full Pop
47 Morn Pop
48 Poppin'
49 Love Ballad
50 Guitar Serenade
51 Guitar Beat
52 Piano Ballad
53 Billy Beat
54 Breakin' Beat
55 Fancy Beat
56 US Country Pop
57 Gold Beat
58 Friendly Beat
59 Radio Pop
60 Midnight Ballad
61 Pop Ballad
62 Light Soul
63 Schlager Beat
64 Nice Groove
65 Cute Pop
66 Hip Beat
67 Smooth Beat
68 Smile Pop
69 Analog Beat
70 Moonlight Pop
r
CC00 CC32
6 117
6 118
6 119
6 120
6 121
6 122
6 123
6 124
6 125
6 126
6 127
71 0
71 1
6 115
6 109
6 114
6 110
6 111
6 113
680
690
683
684
692
693
682
6 106
689
694
16 21
685
6 100
6 101
6 105
697
686
6 102
6 104
695
679
646
647
648
649
650
651
652
653
654
655
426
425
7 114
7 115
7 116
7 117
7 118
7 102
7 101
435
434
787
541
792
795
789
788
793
796
794
71 Ballad Slow Rock
72 Lovely Ballad
73 Latin Beat
74 70's Groove
75 UK Pop
76 Contemp Beat
77 Simply Pop
78 Home Pop
79 Power Pop
80 Electro Beat
81 Groovin'
82 Pop Shuffle
83 Light Beat
84 US Shuffle
85 UK Shuffle
86 Shuffle Fusion
87 Fast Beat Guitar
88 Dream Ballad
LIVE BAND
01 Eric Beat
02 Strummin' Pop
03 The Unplugged
04 Amazing Gospel
05 Night Ballad
06 6_8 Ballad
07 6_8 Pop
08 Unplugged Pop
09 Unplugged Ballad
10 Cool Live Band
11 Acoustic Pop
12 Live Pop
13 Guitar Shuffle
14 Real Band
15 Cool Pop
16 Light Pop
17 Soul Pop
18 Bright Pop
ROCK
01 Green Rock
02 Spring Rock
03 Broken Beat
04 Straight Rock
05 Joe's Rock
06 Countdown Rock
07 Cool Shuffle
08 Breaky Rock
09 Dark Rock
10 JuliRock
11 LoveRock
12 Happy Beat
13 Bright Rock
14 Easy Rock
15 Electro Rock
16 New Metal
17 MunichRock
18 Schlager Rock
19 German90Pop
20 Simple Rock
21 Rock Beat
22 Soft Rock
23 Light Rock
24 Groovy Rock
25 Smooth Rock
26 Big Rock
27 Power Rock
28 Fire Rock
29 Fast Rock
30 Rock Shuffle
7 103
436
790
783
782
753
754
755
756
757
758
759
760
422
423
424
798
797
CC00 CC32
68 14
68 11
68 13
68 12
68 5
68 7
68 9
68 2
68 1
68 8
68 6
68 3
68 18
68 10
68 4
68 15
68 16
68 17
CC00 CC32
183
180
181
182
172
169
176
168
170
173
177
164
159
161
162
163
174
175
171
165
166
160
135
136
137
138
139
140
141
142
DISCO/DANCE
01 Beat Generation
02 Seventies
03 Volare Gipsy
04 Night'sDance
05 Hung Disco
06 Jamiro Dance
07 Just Disco
08 2000's Disco
09 Slow Disco
10 Gold Disco
11 Ladies Dance
12 UK Dance
13 Housing
14 Survive Disco
15 Dancin'
16 Earth Boogie
17 DJ Groove
18 Euro Dance
19 Dream Dance
20 Ibiza Dance
21 Ibiza Night
22 House Maillorca
23 Club House
24 DJ Techno
25 Hard Techno
26 80's Techno
27 Ballerman
28 Latin Dance
29 Gipsy Dance
30 Barry Dance
31 70's Disco
32 SchlagerShuffle
33 Schlagermichl
34 Reggaetone
35 Stadlschlager
36 70's Schlager
37 Alpenschlager
38 Schlag Disco Fox
39 AlpenParty
40 AlpenBallade
41 Disco Schlager
42 Latin Schlager
43 Dance Schlager
44 Happy Schlager
45 Party Schlager
46 Schlager Pop
47 Meneaito
48 Disco Gully
49 Latin Disco
50 Phunk Beat
51 Spear Beat
52 Baby Beat
53 Funky Groove
54 Downtown Funk
55 Wahoo Groove
56 Breath Rap
57 Cool Rap
58 Now Hip Hop
59 HipHop Beat
60 Hip'n Hop
61 Twostep
62 Contemporary Pop
63 Soul
64 Funky
65 Funky Pop
66 80's Groove
67 70's Beat
68 Smooth Contemp
69 Light Contemp
70 Acid Pop
CC00 CC32
22 46
27 25
70 2
22 44
70 1
22 15
22 16
27 24
27 23
27 9
27 10
27 12
22 17
22 18
22 28
22 26
22 27
22 19
66 60
66 61
66 62
66 63
66 64
66 57
66 58
66 59
66 56
66 65
66 28
66 32
66 27
66 21
66 26
66 34
66 33
66 5
66 3
66 6
66 12
66 10
66 9
66 7
66 8
66 2
548
22 39
61 7
66 13
66 4
66 30
66 29
812
66 31
66 22
66 25
66 35
66 24
66 23
546
547
545
544
543
542
22 38
66 11
292
28 21
28 22
28 19
88
Page 89

Backing Module BK-7m
r
Music Style list
71 Wave Jazz
BALL ROOM
01 Gold Wien Waltz
02 Wien Waltz
03 Vienne
04 Gold Slow Waltz
05 Slow Waltz
06 3_4 Boston
07 French Valse
08 It Valzer
09 Folk Valzer 1
10 Folk Valzer 2
11 Alpenwalzer
12 Polca Disco
13 It Polca
14 Polca 1
15 Polca 2
16 Manouche
17 Paso Doble
18 Paso Doble 2
19 Paso Doble 3
20 Gold Tango
21 Cool Tango
22 It Tango
23 Folk Tango 1
24 Folk Tango 2
25 Tango
26 Mazurca 1
27 Mazurca 2
28 Tarantella Disco
29 Tarantella
30 Gold Foxtrot
31 Gold Jive
32 Jive
33 Quick Step
34 Madison
35 It Fox
36 It Swing Fox
37 Fox Latino
38 Slow Fox
39 Gold Rhumba
40 Rhumba
41 Bolero
42 It Beguine
43 Romantic Beguine
44 Gold Cha Cha
45 Cha Cha
46 Simply Cha Cha
47 Cool Cha Cha
48 It Mambo
49 It Fast Mambo
50 It Cumbia
51 Simple Cumbia
52 It Hully Gully
53 It Meneito
54 It Bachata
55 Biguine
56 Gold Samba
57 Samba
58 Big Samba
59 Gold Bossa
60 Gold Euro March
61 Cool March
50’s & 60’s
01 Over Rockin'
02 Love Sl Rock
03 UK Rock'N
04 Baby Rock'N
05 Go! Rock'N
06 60's Rock'N
07 Good Rock'N
08 Blue Boogie
09 Fast Surf
10 Smooth Rock'N
28 20
CC00 CC32
17 55
17 38
17 46
17 56
17 39
17 44
17 45
17 57
17 42
17 43
17 49
19 33
19 34
19 25
19 26
69 4
40 4
40 5
40 6
26 17
26 15
26 18
26 13
26 14
26 12
17 40
17 41
53 7
53 6
34 14
7 119
69 1
69 2
69 3
50 88
50 89
50 90
50 81
23 13
23 11
55 2
39 27
39 26
24 17
24 14
24 13
24 15
38 14
38 15
46 5
46 4
22 50
22 48
22 49
39 20
27 26
27 21
27 22
22 47
20 24
20 23
CC00 CC32
556
557
551
10 39
536
537
10 24
538
534
10 22
11 Clock RocK'N
12 Brass Rock'N
13 Easy Slow Rock
14 50's Slow Rock
15 Oldies
16 Dream Slow Rock
17 Rock'N Slow
18 Go! Twist
19 Twist
20 50's Pop
21 Beach Surf
22 Romantic 6_8
23 Schlager 6_8
24 GermanOldie
25 Cool Slow Rock
26 Dixie
27 Combo boogie
28 Big Band Boogie
29 Charleston
30 Piano Rock'N
31 Piano Shuffle
32 Piano Ragtime
JAZZ/BLUES
01 BluEyesBand
02 OrganSwingMedium
03 Organ Jazz Fast
04 Gold Swing
05 Breezy Swing
06 Big Apple Band
07 Biggest Band
08 Bennys Big Band
09 Midnight SlSwing
10 Big Band Slow
11 Big Band Medium
12 Big Band Fast
13 Swing Medium
14 Modern Med Swing
15 Orchestra Swing
16 Strings Swing
17 Classic Big Band
18 Jazz Big Band
19 Swing Fast
20 Jz Guitar Swing
21 Gipsy Swing
22 Soft Ballad
23 Jazz Club
24 Medium Jazz
25 Smooth Med Swing
26 Scat Swing
27 Cool Swing
28 Bigger Band
29 Ensemble Swing
30 Combo Fast Swing
31 Slow Jz Waltz
32 Medium Jz Waltz
33 Piano Night
34 Piano Jazz
35 Jimmys Groove
36 Mustang Blues
37 Cool Soul
38 Fast Blues
39 Blues
40 R&B
41 Unplug Shuffle
42 Midnight Blues
LATIN
01 Carlos Beat
02 Orchestr Cha Cha
03 That's Mambo
04 Bachata
05 Go!Salsa
06 Cuba Salsa
07 Cool Merengue
08 Medium Gipsy
10 23
10 25
539
516
533
532
535
10 30
10 20
39 13
10 21
552
553
549
522
11 7
97
99
11 6
10 31
15 9
43 2
C00 C32
12 41
12 42
12 43
12 44
14 25
14 26
14 24
14 23
12 35
14 18
14 19
14 20
12 31
12 33
12 36
12 34
14 21
14 22
12 32
12 37
12 38
13 14
13 15
13 16
13 17
12 23
12 24
14 13
12 25
12 26
17 28
17 23
13 18
12 27
44 31
44 32
44 30
44 17
44 14
44 18
15 11
44 25
CC00 CC32
22 45
24 16
38 13
22 40
22 43
22 42
22 41
61 0
09 Fast Gipsy
10 Big Mambo
11 Mambo
12 Tradit Cha Cha
13 Dream Cha cha
14 Merengue
15 Fast Merengue
16 Oye Son
17 Son
18 Bomba
19 Tradit Rhumba
20 Acoustic Rhumba
21 Arg Tango
22 Salsa
23 Plena
24 Mariachi
25 Tradit Cumbia
26 Calypso
27 Limborock
BOSSA/SAMBA
01 Organ Bossa
02 Organ Samba
03 Orchestral Bossa
04 Jazz Bossa
05 Sunshine Bossa
06 Sweet Bossa
07 Club Bossa
08 Orchestral Samba
09 Acoustic Samba
10 Brazilian Samba
11 Sambalegre
12 Guitar Samba
13 Night Bossa
14 Fast Bossa
15 Guitar Bossa
16 Latin Fusion
17 Piano Latin
18 Jazz Latin
TRADIT WORLD
01 2000's Bolero
02 Country Flyer
03 Pop Gospel
04 Gospel Shuffle
05 Western Movie
06 Epic Movie
07 Holiday 1
08 Holiday 2
09 Holiday 3
10 French Java
11 Irish
12 Southern Twang
13 SteamtrainCountr
14 Posaunenpolka
15 German Polka
16 Schlagerwalzer
17 Posaunenwalzer
18 Orchestr Sl Fox
19 Pop Fox
20 Nice Fox
21 Fox Band
22 Slow Country
23 Country Ballad
24 Country Rock
25 Country Beat
26 Easy Country
27 Country Fox
28 Country Pop
29 Slow Polka
30 Austrian Polka
31 Austrian Waltz
32 Simple Sl Waltz
33 Orch Sl Waltz
34 Classic W'Waltz
35 Classic
61 1
38 6
38 9
24 7
24 9
59 6
59 4
45 1
45 2
25 9
23 6
23 12
26 6
25 7
38 10
17 27
46 2
35 4
35 3
CC00 CC32
22 46
27 25
70 2
22 44
70 1
22 15
22 16
27 24
27 23
27 9
27 10
27 12
22 17
22 18
22 28
22 26
22 27
22 19
CC00 CC32
55 3
16 26
44 33
44 34
438
437
19 30
550
12 39
17 52
67 3
19 32
16 25
19 31
19 29
17 51
17 50
50 84
50 86
50 83
50 87
16 20
16 19
16 15
16 16
16 17
50 82
50 85
19 28
19 27
17 47
18 10
18 11
17 24
540
89
Page 90

Backing Module BK-7m
Music Style list
36 6_8 March
37 US March
38 Orchestral Polka
39 Foxtrot
40 Beguine
41 Reggae
42 Island
43 Piano Waltz
44 Guitar Waltz
45 Country Swing
46 Orchestral Waltz
20 11
20 10
19 9
34 7
39 16
88
810
18 12
18 13
16 18
17 48
Style division program change numbers
The following program change
numbers allow you to select the
desired Music Style division via
MIDI. These messages need to be
transmitted on the BK-7m’s Style
channel (see “Style—Rx Channel”
on p. 70).
If you also need to select a different Music Style, be sure to insert
the corrseponding CC00 and CC32
bank select values (see “Music
Style list” on p. 88) before one of
the program changes numbers
shown below.
Music Style Divisions
Intro1
Intro2
Intro3
Intro4
Main 1
Main 2
Main 3
Main 4
Fill Down1
Fill Down2
Fill Down3
Fill Up1
Fill Up2
Fill Up3
Ending1
Ending2
Ending3
Ending4
PC
67
68
65
66
01
02
09
10
89
100
90
97
99
98
75
76
73
74
Recalling a Performance memory from the loaded Performance List via MIDI
The following bank select and program change messages allow you
to select the desired Performance
memory from the loaded Performance List. These MIDI messages
must be received on the BK-7m’s
Basic channel.
Basic structure
CC00 122 (Fixed value)
CC32 0~7 (Page value)
PC 1~128 (Value)
Here is how to calculate which
values to assign to the CC00, CC32
and PC messages:
CC00 122 (Fixed)
CC32 (Performance memory
number – 1) / 128
PC Performance memory num-
ber – (CC32 x 128)
For example, to recall Performance
memory number 280, you will
need to transmit:
CC00 122
CC32 (280 – 1) / 128 = 2
PC 280 – (2 x 128) = 24
Note: Be aware that the BK-7m
transmits its Performance memory
addresses based on the system
shown above.
E-Series Compatibility
Music Style Divisions
Intro
Fill in To Original
Fill in To Variation
Ending
Break Mute
r
90
PC
83
82
81
84
85
Page 91

20. Tone List
Backing Module BK-7m
r
Tone List
Piano
NaturalPiano
SuperiorPian
ClassicPiano
UprightPiano
Brite Piano
Piano+String
Piano+Choir
StackedPiano
Honky-tonk 1
RD Piano 1
Rock Piano
Dance Piano
Mild Piano
MonoAcPiano
European Pf
RD Piano 1 w
Honky-tonk 2
EP – Keyboard
Vintage EP1
Pro Stage
Phase EP
Vintage EP2
Stage
FM EPiano1
FM EPiano2
Wurly
Clav. 1
Harpsichord1
Tremolo EP
MIDI EPiano1
MIDI EPiano2
FM+SA EP
St.FM EP
EP Legend
EP Phase
Dist E.Piano
Phase Clav
JP8000 Clav.
St.Soft EP
E.Piano 1
E.Piano 2
Hard FM EP
Cho. E.Piano
EP Heaven
Reso Clav.
Coupled Hps.
Clav. 2
Analog Clav.
Harpsichord2
Harpsi.w
Chr Perc
Vibraphone
Marimba w
Glockenspiel
Celesta
Pop Celesta
Music Box 1
Carillon
Pop Vibe.
Tubular-bell
Vibraphone w
Music Box 2
Xylophone w
Church Bell
Balafon
Organ
B3 Sermon
Blues Perc
All Skate!
R&B B3
CC00 CC32 PC
040
47 4 0
041
140
141
24 4 0
26 4 0
47 4 2
043
042
241
80 4 1
240
45 4 0
16 4 0
842
843
CC00 CC32 PC
81 4 4
47 4 4
44 4 4
82 4 4
80 4 4
80 4 5
81 4 5
24 4 4
147
246
46 4 4
142
242
16 4 4
16 4 5
10 4 5
32 4 5
17 4 4
17 4 7
38 4 7
844
044
045
24 4 5
944
44 4 88
16 4 7
846
047
32 4 7
24 4 6
046
CC00 CC32 PC
0411
0412
049
048
148
0410
9414
1411
0414
8411
1410
0413
8414
17 4 12
CC00 CC32 PC
12 4 16
80 4 17
82 4 17
83 4 17
HeavyTraffic
Organ 3
Stevie's B3
Church Org.1
Organ Flute
Theater Org.
Dyno Rotary
Hang Twice
Felix Ballad
XV Organ
B3 Has Come
Org Jazz1 /9
Church Org.2
Reed Organ
Head Up B3
Organ 1
Ful Organ 1
60's Organ
Jazz Organ 1
Perc.Organ 1
Rock Organ
Rotary Org.S
Rotary Org.F
Church Org.3
Rotary Organ
L-Organ
Organ 2
Ful Organ 2
Jazz Organ 2
Perc.Organ 2
Chorus Or
Mellow 1
Cheese Organ
JazzOrgan RD
Ful Organ 3
Jazz Organ 3
Perc.Organ 3
Fire Perc
Organ 101
Br.Ballad B3
JX8 Organ
D-50 Organ
VS Organ
Trem. Organ
E.Organ 16+2
Organ Bass
Ful Organ 4
Jazz Organ 4
Puff Organ
Hybrid Organ
Full Perc
70's E.Organ
Farf Organ
Orient.Org.1
Orient.Org.2
Accordion
Acc. Master
Acc. Classic
Italian Folk
Fr. Musette
Steierische
Bandoneon 1
Bandoneon 2
Bandoneon 3
Mellow Harm
Hand Harm.
Accordion It
Accordion Fr
B.Harp Basic
B.Harp Suppl
CC00 CC32 PC
81418
0418
82416
0419
24419
33419
82418
85417
84417
80418
88417
83418
8419
0420
80416
0416
2416
16416
1417
32417
17418
16418
24418
16419
8418
47418
0417
3416
3417
33417
8417
83416
24416
81417
4416
4417
34417
86417
1416
81416
30416
25416
28416
8416
2417
40416
10416
5417
16420
27416
87417
32416
19416
116 4 16
116 4 20
CC00 CC32 PC
50421
51421
52421
53421
54421
8423
0423
52423
0422
51422
8421
0421
8422
9422
Soft Accord
Accordion 1
Accordion 2
JV.Accordion
OrientalAcc1
OrientalAcc2
OrientalAcc3
OrientalAcc4
A. Guitar
Nylon Gt.1
Nylon-str.Gt
Steel.Gt2
Steel.Gt4
Ac.Guitar1
2_Guitars
12 Strings
Nylon+Steel2
MandolinTrem
Banjo
Nylon Gt.2
Nylon+Steel1
Steel.Gt5
Ac.Guitar2
Steel.Gt1
Steel.Gt3
12Stringsoft
Requint Gt.2
Mandolin Tr.
Muted Banjo
Nylon Gt.o
Ac.Gtr.Hrm
Steel + Body
Atmosphere
HollowReleas
Nylon Harp
Steel.Gt6
Ac.Guitar3
Mandolin
Fl.Gtr 1
Fl.Gtr 2
Fl.GtrRoll
Steel-str.Gt
Requint Gt.1
Nylon+Steel3
Ukulele
Velo Harmnix
Gt.FretNoise
Atk Steel Gt
E. Guitar – Bass
Clean Solid
Warm Drive
Distortion
Clean Mute
Jazz Guitar1
Ulti Ac Bass
Picked Bass1
Fingered Bs1
Nu Slap Bs
RubberBass 2
Clean Elect.
Clean El Oct
Dynamic Mute
JC ChrusGt
Jazz Guitar2
XV Ac.Bass
Fretless Bs1
Mute Bass
Finger Slap
Slap Pop
Overdrive3
CC00 CC32 PC
25 4 21
64 4 21
16 4 21
69 4 21
65 4 21
66 4 21
67 4 21
68 4 21
CC00 CC32 PC
64 4 24
0424
64 4 25
69 4 25
48 4 25
66 4 25
8425
67 4 25
18 4 25
04105
32 4 24
9425
70 4 25
49 4 25
52 4 25
65 4 25
7425
52 4 24
18 2 25
14105
16 4 24
51 4 25
33 4 25
0499
4499
2499
32 4 25
50 4 25
16 4 25
48 4 24
49 4 24
51 4 24
0425
40 4 24
68 4 25
8424
24 4 24
04120
10 4 25
CC00 CC32 PC
69 4 27
65 4 29
64 4 30
67 4 28
62 4 26
0432
0434
0433
0436
16 4 39
64 4 27
65 4 27
66 4 27
9427
80 4 26
9432
0435
84 4 32
1433
1436
64 4 29
91
Page 92

Backing Module BK-7m
Tone List
Distort Gt1
Dist. Mute
Muted Over
PedalSteel
5String Bs
Picked Bass2
Slap Bass 1
XV Bass+Ride
Drum'n'Bass
Distort Gt2
LP OverDrv
RockRhythm2
Muted Gt. 2
Jazz Gt.
Picked Bass3
Slap Bass 2
Jazz Bass 1
Synth Bass 2
Picked Bass4
RockRhythm1
Muted Gt. 3
TC MutedGt
TC Clean
JGuitar Scat
Reso Slap
Bass Invader
Jazz Bass 2
Rock Bass
Fretless Bs2
Power Gt.2
Power Gt.3
Distort Gt3
Dist Rtm GTR
Muted Gt. 1
TB Saw Bass
MG Bass
Modular Bass
Seq Bass 1
SynthBass201
LP HalfDrv2
Mid Tone GTR
Clean Gt.
JC CleanGt
Mellow Gt.
RubberBass 1
u/i/e/o V/Sw
VocoBass
Heart Bass
Raver Bass 1
LP RearAtk
Clean Half
OpenHard 1
OpenHard 2
TC RearPk
Guitaron
Raver Bass 2
MG Blip Bs
SH101 Bass 1
JP-8 Bass
Chorus Gt
TC Cln ff
AtkCleanGt
Funk Pop
LP Rear
Chung Ruan
WireStr Bass
MG Oct Bass2
SH101 Bass 2
Smooth Bass
Overdrv Gt
Overdrive1
Overdrive2
More Drive
Dist.Fast
AcBass 1
CC00 CC32 PC
3430
64 4 28
68 4 28
8426
83 4 32
1434
0437
16 4 32
82 4 38
1430
9429
25 4 30
65 4 28
0426
2434
1437
2433
0439
3434
24 4 30
66 4 28
2428
19 4 27
81 4 26
8436
80 4 39
3433
4433
1435
65 4 30
66 4 30
0430
26 4 30
0428
81 4 38
4439
2439
3439
1439
11 4 29
23 4 27
0427
4427
1426
13 4 39
84 4 39
83 4 39
5433
81 4 39
22 4 27
1427
2427
3427
17 4 27
48 4 32
82 4 39
7439
17 4 39
4438
8427
18 4 27
5427
8428
21 4 27
24 4 27
11 4 39
6439
18 4 39
19 4 39
0429
1429
2429
3429
4430
45 4 32
r
AcBass 2
AcBass 3
SH101 Bass 3
RND Bass
Dazed Gtr
Attack Dist
LP Rear Pk
LP HalfDrv
LP Chorus
Rockabilly
AcousticBs
Bubble Bass
Sync Bass 1
Spike Bass
Power Gt.1
TCFrntPick
Funk Gt.
Dance Dst.Gt
Pulse Mix Bs
Seq Bass 2
3rd Bass
MG Oct Bass1
Mild Bass
Gt.Feedback2
Gt.Feedback1
Gt.Harmonics
Ac.Gt.Harmnx
Gt.Cut Noise
MG LightBass
DistSynBass
DistEnvBass
LightSynBass
PopSynthBass
Pick Scrape
Sync Bass 2
SH101 Bass 4
TeeBee V/Sw
Odd Bass
303Sqr.Rev
X Wire Bass
Bassic Needs
Fretless Bs3
Beef FM Bass
Muted PickBs
Wood+FlessBs
Fretless Bs4
Double Pick
Mr.Smooth
String Slap
E.Bass Harm.
SynthBass101
Synth Bass 1
JP-4 Bass
CS Bass
Tekno Bass
Reso SH Bass
Rubber303 Bs
TB303 Bass
TB303 DistBs
TB303 Sqr Bs
Clavi Bass
Jungle Bass
Square Bass
Wild Ac.Bs
Baby Bass
AttackFinger
Arpeggio Bs
AtkSineBass
OB sine Bass
303SqDistBs
Echo SynBass
Bass Slide1
Bass Slide2
DoubleSlide
CC00 CC32 PC
46432
47432
20439
26439
2430
5430
20427
10429
12429
1432
49432
28439
24439
21439
16430
16427
16428
11484
31439
33439
34439
35439
37439
9431
8430
0431
16431
14120
39439
40439
38439
45439
46439
64120
30439
47439
44438
15439
43438
10439
83438
2435
8439
8434
8435
3435
4434
5435
24120
24431
1438
0438
3438
2438
10438
16438
14438
9438
18438
17438
19438
21438
22438
8432
48433
6433
24438
34438
35438
41438
74102
54120
47 4 120
48 4 120
Strings
St.Strings 1
St.Slow Str1
JP8 Strings1
Warm Strings
Bright Str.3
Orchestra 1
X Violin
Harp
St.Pizzicato
OrchestraHit
SlowStrings1
Strings
Syn.Strings1
Syn.Strings2
Contrabass
Folk Violin
Viola
Timpani
St.Strings 2
Oct Strings1
St.Slow Str2
SlowStrings2
Syn.Strings5
ChamberStr
Str.+Flute
Strings+Horn
FolkViolinVb
St.Strings 3
SlowStrings3
JP8 Strings2
Air Strings
Orchestra 2
Slow Violin
Slow Tremolo
Cello
ContraBsSect
Cello sect.
Syn.Strings4
StraightStr.
JP Saw Str.
Orchestra 3
Violin Atk
Trem Str.St.
PizzicatoStr
Tremolo Orch
Oct Strings2
FilteredOrch
S.Str+Choir
JP Strings
OB Strings
Bright Str.2
Syn.Strings3
Bright Str.1
Harp&Strings
SuspenseStr
Legato Str.
Velo Strings
Viola Attack
Cello Attack
Strings Oct
Vcs&Cbs Pizz
Solo Pizz.
Solo Spic.
StringsSpic.
Harp St.
Uillean Harp
Synth Harp
Choir Str.
Mild Strings
60s Strings
High Strings
Tron Strings
Noiz Strings
JUNO Strings
DistStrings
CC00 CC32 PC
16 4 48
10 4 49
81 4 50
9449
5448
9448
80 4 40
0446
3445
0455
0449
0448
0450
0451
0443
116 4 40
0441
0447
17 4 48
32 4 48
11 4 49
1449
10 4 50
2448
13 4 48
12 4 48
116 4 39
18 4 48
2449
80 4 50
8451
8448
8440
8444
0442
34 4 48
3448
9450
10 4 51
4451
20 4 48
0440
0444
0445
10 4 48
33 4 48
3451
12 4 49
3450
1450
4448
8450
1448
1446
9444
8449
24 4 48
1441
1442
116 4 10
1445
8445
16 4 45
17 4 45
2446
8446
16 4 46
11 4 48
7448
40 4 48
16 4 50
24 4 50
25 4 50
2451
6451
92
Page 93

Backing Module BK-7m
r
Tone List
Vocal
Warm Voices
Syn Vox Pad
Fem Mm Srt
Rich Choir 1
St.ChoirAahs
Vox Pad
Jazz Scat
Choir Aahs
Melted Chr
ChorusLahs
ChorusAahs
Harpvox
Voice Oohs
Choir Hahs
LFO Vox
St.BoysChoir
VoiceAah Mal
Itopia
Humming
Silent Night
Melted Choir
Holy Voices
Solo Vox
JzVoiceBap
JzVoiceDow
Voice Dahs
JzVox Thum
JzVoiceDat
Vox Sweep
SynVox
SC Heaven
JX8P Vox
Syn.Voice 1
Syn.Voice 2
Tears Voices
VP330 Choir
Chorus Oohs2
Space Voice
Heaven II
Water Space
Cosmic Voice
Vocorderman
Horror Pad
Breath&Rise
Chorus Oohs1
VoiceLah Fem
ChorusLahFem
ChorusLuhFem
VoiceUuh Fem
Fem Lah&Lan
Brass
N.Trombone*
Ac.Brass
Brass Sforz.
2Tps+Tb
Henry IV
Tuba 1
French Horns
Jump Brass
Africa Brass
St.Orch Brs1
Octave Brass
FatPop Brass
Trombone 1
Tuba 2
Tuba + Horn
Warm Brass
MG Brass fst
MKS Brass
St. Brass ff
Horn + Orche
Tuba 3
Fr.Horn
Trombone 2
JUNO Brass
CC00 CC32 PC
82 4 94
0454
82 4 53
14 4 52
8452
83 4 94
6453
0452
33 4 52
24 4 52
32 4 52
3499
48 4 53
16 4 52
9485
13 4 52
36 4 53
3491
40 4 53
9454
9452
12 4 91
0485
10 4 53
11 4 53
8453
12 4 53
9453
2494
1454
2491
18 4 54
8454
10 4 54
12 4 94
16 4 54
3453
0491
1491
4491
8491
11 4 91
8494
11 4 94
0453
16 4 53
17 4 53
19 4 53
23 4 53
24 4 53
CC00 CC32 PC
89 64 57
80 4 61
81 4 61
43 4 61
47 4 63
0458
0460
5462
80 4 63
36 4 61
24 4 61
14 4 61
0457
1458
8458
2463
81 4 63
4462
3461
2460
47 4 58
1460
1457
1462
Fat SynBrass
Poly Brass
PowerBrass
Bright Tb
V Twin bones
Polka Tuba
Bs.Trombone
Synth Brass
Dual Horns
Pro Brass
Orch Brass
St.Orch Brs2
Brass + Reed
Folk Tuba
P5 Brass
Brass 1
2Tps+Tb+Sax
Brass 2
Brass 3
Fat + Reed
F.Horn Rip
Brass sfz 1
OB Brass
Sync Brass
Oct SynBrass
Euphonium
Bones Sect.
Quad Brass2
SH-5 Brass
Brass sfz 2
Brass Fall
Brass Oct
Wide FreHrns
F.Hrn Slow
Velo Brass 1
SoaringHorns
Quad Brass1
DeepSynBrass
Sax – Trumpet
N.Tenor Sax*
Tenor Sax
Baritone Sax
Bari & Tenor
MuteTrumpet1
FlugelHorn
Trumpet
BlowAltoVib
AltoSax Soft
Muted Tp 1
Romantc Tp
Trumpet2
Rom/Mar Tp
FolkTrumpVb
Soprano Exp.
Blowed Tenor
St.Tenor Sax
MariachiTp
Bright Tp.
Grow Sax
Folk A.Sax
Soprano Sax2
Folk A.SaxVb
Latin Tenor
Muted Tp 2
Tp Mar/Shk
Trumpet & Nz
MuteTrumpet2
TrumpetFall2
Super Tenor
Oriental SAX
AltoSax Exp.
TenorSaxFst
BreathyTn.
Warm Tp.1
Dark Trumpet
CC00 CC32 PC
5463
80462
47461
4457
2457
46458
8457
0462
9460
8462
33461
38461
25461
45458
0463
0461
44461
8461
9461
26461
24460
10461
9463
4463
16462
16457
2461
5461
3462
12461
16461
116 4 41
3460
8460
16463
46463
4461
6463
CC00 CC32 PC
89 64 66
0466
0467
8467
0459
8456
0456
50465
46465
48459
49456
48456
51456
18256
8464
46466
9466
50456
24456
9465
17265
0464
18265
44466
49459
52456
4456
2459
17461
47466
116 4 65
8465
50466
8466
25456
3456
Tp Shake
Atk Trumpet
FolkTrumpet
FolkAlto
Tenor Sax 1
Sax Section
AltoSax + Tp
Alto Sax
MuteTrumpet3
Muted Horns
Twin Tp.
Warm Tp.2
Wind
FluteVibAtk
JazzClariVib
FolkClarinet
Oboe
Piccolo 1
Bassoon
BottleBlow1
Whistle 1
Pan Flute1
English Horn
FlTraverso
SoftClarinet
FolkClarinVb
Oboe Exp.
BottleBlow2
Bs Clarinet
Whistle 2
Pan Flute2
Multi Wind
Flute Exp
Clarinet
Folk Clarin
Quad Wind
Recorder
The Bottle
Ocarina
TinWhistle2
Pipe & Reed
Flute 1
Flute 2
Tron Flute
Synth
Big Lead
Unison Saws
OB Saw
LM Square
CC Solo
Poly Saws
80's PolySyn
Super Poly
D-50 Fantasy
Twin Sine
Dual Sqr&Saw
Velo Lead
MG Square
Hollow Mini
Polysynth 1
X-hale
Phenomena
Poly Key
Saw Wave
Unison SawLd
MG SawLead 2
TB Lead
Fat GR Lead
Brightness
Bell Heaven
New Age Pad
Syn.Calliope
OB Stab
Big & Raw
P5 Sync Lead
CC00 CC32 PC
53 4 56
47 4 56
1456
51 4 65
45 4 66
17 4 65
16 4 65
0465
3459
8459
27 4 56
26 4 56
CC00 CC32 PC
52 4 73
50 4 71
51 4 71
0468
0472
0470
0476
0478
0475
0469
3473
52 4 71
17 2 71
8468
47 4 76
8471
1478
47 4 75
16 4 71
2473
0471
16 2 71
17 4 71
0474
46 4 76
0479
46 4 75
9473
0473
1473
51 4 73
CC00 CC32 PC
4481
46 4 90
26 4 81
6480
4480
83 4 90
1490
4490
43 4 88
11 4 80
23 4 80
5481
1480
2480
0490
81 4 94
80 4 86
82 4 90
0481
7483
39 4 81
1483
3484
04100
3488
2488
0482
24100
1487
16 4 84
93
Page 94

Backing Module BK-7m
Tone List
Acid Guitar
D-50 Fat Saw
Euro-Dance 2
Polysynth 2
LowBirds Pad
D-50 Retour
Fantasia 1
OB DoubleSaw
Rock Lead
Techno Saw
JP DoubleSaw
JP SuperSaw
CS Saw
MG Saw Lead
Ice Rain
Oct Saw Lead
Chiffer Lead
LM Pure Lead
Big Blue
Vibra Bells
JUNO Rave
LA Brass Ld
Big Fives
Goblin
SequenceSaw3
Octave Stack
Euro-Dance 1
Crispy Lead
LM Blow Lead
Xpressive
7th Atmos.
Galaxy Way
Rising OSC.
Noise Peaker
Raver Blade
Etherality
Reso Stack
Techno Stack
TwinOct.Rave
Happy Synth
ForwardSweep
ReverseSweep
Minor Rave
SuperSaws
Bamboo Hit
AuhAuh
Square Wave
Mellow FM
Shmoog
2600 Sine
KG Lead
OB Square
JP-8 Square
Dist Square
303SquarDst1
303SquarDst2
Pulse Lead
JP8 PulseLd1
JP8 PulseLd2
260RingLead
303DistLead
JP8000DistLd
HipHop Sq
Flux Pulse
Pulse Saw
GR-300 Saw
LA Saw
Doctor Solo
Fat Saw Lead
Saw Impulse
Strange Str.
FatSawLead
Waspy Synth
PM Lead
MG Saw
CC00 CC32 PC
10 4 84
11 4 81
81 4 87
2490
84101
54100
0488
12 4 81
18 4 84
47 4 81
13 4 81
15 4 81
30 4 81
31 4 81
0496
35 4 81
0483
8482
29 4 101
8498
3487
22 4 84
1486
04101
46 4 81
9490
80 4 87
84 4 87
9482
83 4 87
17 4 103
18 4 103
19 4 103
6491
82 4 87
54103
10 4 90
11 4 90
13 4 90
15 4 90
16 4 90
17 4 90
24 4 90
47 4 90
7491
10 4 91
0480
3480
5480
8480
10 4 80
17 4 80
18 4 80
19 4 80
20 4 80
21 4 80
24 4 80
26 4 80
28 4 80
29 4 80
30 4 80
31 4 80
33 4 80
35 4 80
2481
6481
7481
8481
9481
5496
6496
14 4 81
16 4 81
17 4 81
24 4 81
r
Crystal
Syn Mallet
P5 Saw Lead
Soft Crystal
Round Glock
Loud Glock
Natural Lead
Synchronized
SequenceSaw1
Digi Bells
SequenceSaw2
Reso Saw
Cheese Saw
Blow Bell
Choral Bells
Air Bells
Bell Harp
Gamelimba
Bottom Bell
Warm Atmos
FatSolo Lead
ForcefulLead
Oct.UnisonLd
Mad Lead
Vaporish
CrowdingLead
Space Org X
Double Sqr.
Chord maj7th
PureFlatLead
Short Chord
Charang
Wire Lead
ShortCircuit
FB.Charang
Brass Star
Mellow GR Ld
Org Bell
Goblinson
50's Sci-Fi
Abduction
Fat SyncLead
Auhbient
5th DecaSync
LFO Pad
Random Str
Dirty Sync
DualSyncLead
UFO FX
5th Saw Wave
FallinInsect
LFO Oct.Rave
5th Lead
Just Before
RandomEnding
JP 5th Saw
Random Sine
JP8000 5thFB
Noise&SawHit
Bass & Lead
Fat & Perky
DancingDrill
Dirty Stack
Static Hit
Delayed Lead
Acid Copter
Fantasia 2
Fantasia 3
Fantasia 4
260HarmPad
Music Bell
Pad – Ethnic
Pad With
LA Warm Pad
Attack! Pad
CC00 CC32 PC
0498
1498
33481
2498
3498
4498
36481
38481
40481
9498
41481
42481
43481
12498
16498
17498
18498
19498
23498
1499
4483
5483
6483
8483
80490
9483
81486
10483
82486
47483
83486
0484
1484
80455
2484
34100
5484
84100
14101
24101
34101
17484
44101
19484
54101
64101
20484
21484
14 4 101
0486
18 4 101
19 4 101
2486
20 4 101
22 4 101
5486
23 4 101
6486
25 4 101
0487
2487
27 4 101
28 4 101
30 4 101
7487
32 4 101
1488
4488
5488
7488
10498
CC00 CC32 PC
81489
82489
83489
Human Pad
OB Soft Pad
Sitar 1
NAY 1
Shakuhachi
Oud 1
Kawala 1
JP8 Hollow
JP Soft Pad
Warm Squ Pad
Warm JP STR
Square Pad
Tambra
Rabab
Shamisen
Kalimba
Sanza
Stacked Pad
Warm Pad
Thick Matrix
Big Panner
Reso Panner
Bagpipe
Gopichant
UillnPipe Or
Fiddle
Pungi
Sine Pad
Tamboura
Echo Drops
Rotary Strng
Stack Pad
Bozouki
Mizmar 1
Uillean Pipe
Sitar 2
Kanoun3 TrmV
Soundtrack
JP8Haunting
Metal Pad
Silky Pad 1
Echo Pan 1
Kawala 2
Di
KanounStereo
Zither
Hichiriki
Octave Pad
Sync Brs.Pad
Silky Pad 2
Star Dust
Mystic Pad
Pi Pa
Sitar/Drone
Sitar 3
Tsugaru
San Xian
Anklung Pad
Tine Pad
Hols Strings
Oct.PWM Pad
PWM Soft Pad
Koto
TinWhistle1
Syn Shamisen
TinWhtsle Nm
Gu Zheng
LFO Sweep
Ambient Pad
Saw Strings
JP8 Sqr Pad
SoftBellPad
Taisho Koto
Kanoon
Bodhran
Bodhran Mute
10 4 89
6489
04104
8472
0477
24 4 105
8475
44 4 91
13 4 89
46 4 91
47 4 89
45 4 91
84104
84105
04106
04108
84108
45 4 89
0489
1489
44102
54102
04109
16 4 105
11 4 109
04110
84111
5489
16 4 104
04102
3489
9489
24 4 25
24 4 111
94109
14104
60 4 107
0497
43 4 91
0493
94103
24102
9475
16 4 72
53 4 107
16 4 15
16 4 111
8489
11 4 89
11 4 103
34103
64103
32 4 105
44104
54104
14106
94105
3496
1493
4497
12 4 89
43 4 89
04107
24 4 75
84106
25 4 75
14107
44 4 89
6499
46 4 89
2492
1492
84107
16 4 107
94108
10 4 108
94
Page 95

Backing Module BK-7m
r
Tone List
Didgeridoo
Panner Pad
Bowed Glass
Special Rave
Halo Pad
Sweep Pad
Oud1 Tremolo
Oud+Strings
Kanoon+Choir
Oct Harp
ShakuBamboo
Ambient BPF
Converge
Warriors
Shwimmer
Celestial Pd
UillnPipe Nm
Er Hu
Gao Hu
Shanai 1
Shanai 2
Sweep Stack
Sweep Pipe
SawsSweep
Stray Pad
Clavi Pad
Suona 1
Suona 2
Tinkle Bell
Gender
Pemade
EP Pad
CP Pad
Ancestral
Prologue 1
Prologue 2
Yang Qin
Santur
Cimbalom
Dulcimer
Kanoun 3 St
HistoryWave
Echo Pan 2
Pan Sequence
Star Theme
Echo Bell
Kanoun1 TrmV
Kanoun2 TrmV
Kanoun 1
Kanoun 2
Kanoun 3
Panning Lead
D-Mention
Kanoun Trm
Kanoun 3 Oct
Kanoun Oct.
Kawala Oct.
Kawala Oct.V
Bozouki Trm
Bozouki TrmV
Rababa
Oud 2
Oud 3
Oud2 Tremolo
Oud1Trm VMix
Oud2Trm VMix
Oud Oct.
NAY 2
NAY Oct.
NAY Oct.VMix
Mizmar Trm
Mizmar 2
Mizmar Oct
Mizmar Trm V
Mizmar Dual
CC00 CC32 PC
84109
2493
0492
4493
0494
0495
40 4 105
28 4 105
19 4 107
24 4 107
47 4 77
2495
8495
4495
9495
10 4 95
10 4 109
84110
94110
04111
14111
13 4 95
12 4 95
47 4 95
15 4 95
8496
32 4 111
33 4 111
04112
94112
15 4 112
9496
11 4 96
1497
2497
3497
24 4 46
0415
8415
24 4 15
54 4 107
5497
34102
84102
04103
14102
58 4 107
59 4 107
50 4 107
51 4 107
52 4 107
10 4 102
80 4 94
57 4 107
56 4 107
55 4 107
10 4 75
11 4 75
25 4 25
26 4 25
10 4 110
25 4 105
26 4 105
41 4 105
42 4 105
43 4 105
27 4 105
10 4 72
11 4 72
12 4 72
28 4 111
25 4 111
27 4 111
29 4 111
26 4 111
Arghool
Percuss – SFX
Reverse Cym.
Woodblock
Taiko
Agogo
Steel Drums
Gun Shot
Telephone 1
Car-Stop
Helicopter
Seashore
Sine Perc.
Fl.Key Click
Cymbal Roll
Elec Perc
Horse-Gallop
Dog
Bird 1
Growl 1
Kitty
Jazz Tom
808 Tom
Melo. Tom 1
Breath Noise
Small Club
Explosion
Car-Engine
Seal
Rain
Thunder
Wind 1
Stream
Melo. Tom 2
Jungle SD
Bubble
Wind 2
Bird 2
DoorCreaking
Siren
Train
Jetplane
Starship
Burst Noise
Synth Drum
Car-Pass
Door
Telephone 2
Cricket
Rev.Snare
Rev.ConBD
Rev.Kick 1
White Noise
Winds Hit
Pink Noise
Scratch 1
TapeRewind
Growl 2
Rev.Tom
Trumpet Nz
Fancy Animal
Scratch 2
ScratchKey
Phono Noise
MC-500 Beep
HandClapMenu
909 HandClap
Finger Snaps
Voice ComeOn
Car-Crash
Calculating
Concert BD
Wind Chimes
Voice One
Voice Two
CC00 CC32 PC
32472
CC00 CC32 PC
04119
04115
04116
04113
04114
04127
04124
24125
04125
04122
10 4 118
14121
47 4 112
94118
24123
14123
04123
54123
44123
34117
84118
04117
04121
74126
34127
14125
84123
14122
24122
34122
44122
84117
18 4 117
54122
64122
34123
24124
54125
64125
74125
84125
94125
04118
34125
34124
14124
74122
84119
17 4 119
16 4 119
17 4 122
47 4 122
16 4 122
44124
94124
64123
25 4 119
94121
74123
74124
84124
10 4 124
11 4 124
40 4 115
32 4 115
24 4 115
23 4 126
44125
10 4 125
84116
54124
16 4 126
17 4 126
Voice Three
Voice Tah
Castanets
Tambourine
Perc. Bang
Burner
Glass & Glam
Ice Ring
Crack Bottle
Kajar
Small Taiko
Voice Aou
Voice Oou
Voice Hie
Pour Bottle
Open CD Tray
Audio Switch
Bounce
Key Typing
SL 1
SL 2
Kelontuk Sid
Car Engine
Car Horn
Boeeeen
R.Crossing
Compresser
Sword Boom!
Sword Cross
Stab! 1
Stab! 2
Applause 1
Laughing
Screaming
Punch
Atarigane
Heart Beat
Footsteps
Applause 2
ApplauseWave
Angklung
BabyLaughing
Voice Whey
Voice Kikit
Machine Gun
Lasergun
Bebarongan
Dholak
Eruption
Big Shot
Clap Hit
Stack Hit
Double Hit
Industry Hit
Strings Hit
Technorg Hit
Rave Hit
Bit Hit
Bam Hit
Philly Hit
Dist. Hit
Impact Hit
Euro Hit
Bass Hit
6th Hit
Techno Hit
Lo Fi Rave
Perc. Hit
Shock Wave
(*): These are SuperNATURAL Tones.
CC00 CC32 PC
18 4 126
19 4 126
84115
16 4 113
11 4 125
12 4 125
13 4 125
14 4 125
16 4 125
17 4 112
14116
24 4 126
25 4 126
26 4 126
17 4 125
19 4 125
20 4 125
18 4 116
21 4 125
22 4 125
23 4 125
20 4 112
24 4 125
25 4 125
26 4 125
27 4 125
28 4 125
29 4 125
30 4 125
31 4 125
32 4 125
04126
14126
24126
34126
84113
44126
54126
64126
84126
16 4 115
94126
20 4 126
22 4 126
14127
24127
25 4 116
27 4 116
44127
54127
27 4 55
25 4 55
10 4 55
26 4 55
24 4 55
22 4 55
23 4 55
20 4 55
19 4 55
9455
18 4 55
8455
3455
1455
2455
17 4 55
16 4 55
11 4 55
12 4 55
95
Page 96

Backing Module BK-7m
Drum Sets
21. Drum Sets
C–1 0
C0 12
C1 24
C2 36
C3 48
C4 60
C5 72
C6 84
C7 96
PC: 1 [CC32: 4]
STANDARD 1
Std.1 Kick1
Std.1 Kick2
1
Std.2 Kick1
2
3
Std2 Kick2
4
Kick 1
Kick 2
5
Jazz Kick 1
6
Jazz Kick 2
7
8
Room Kick 1
9
Room Kick 2
10
Power Kick1
11
Power Kick2
Elec Kick 2
Elec Kick 1
13
TR-808 Kick
14
15
TR-909 Kick
16
Dance Kick 2
Voice One
17
Voice Two
18
Voice Three
19
20
85Rm BsDrum1
21
85Rm BsDrum2
22
MC-500 Beep
23
MC-500 Beep
Concert Snr
Snare Roll
25
FingerSnaps2
26
27
High-Q
28
Slap
ScratchPush
29
ScratchPull
30
Sticks
31
32
SquareClick
33
Mtrnm.Click
34
Mtrnm. Bell
35
85St BsDrum1
85St BsDrum2
Side Stick
37
85St Snare2
38
39
909 HandClap
40
85St Snare1
Real Tom 6
41
Close HiHat2
42
Real Tom 6
43
44
Pedal HiHat2
45
Real Tom 4
46
Open HiHat2
47
Real Tom 4
Real Tom 1
Crash Cym.1
49
Real Tom 1
50
51
Ride Cymbal
52
ChinaCymbal
Ride Bell
53
Tambourine
54
Splash Cym.
55
56
Cowbell
57
Crash Cym.2
58
Vibraslap
59
Ride Cymbal
Bongo High
Bongo Lo
61
Mute H.Conga
62
63
Conga Hi Opn
64
Conga Lo Opn
High Timbale
65
Low Timbale
66
Agogo
67
68
Agogo
69
Cabasa
70
Maracas
71
ShrtWhistle
LongWhistle
Short Guiro
73
Long Guiro
74
75
Claves
76
Woodblock
Woodblock
77
Mute Cuica
78
Open Cuica
79
80
MuteTriangl
81
OpenTriangl
82
Shaker
83
Jingle Bell
Bell Tree
Castanets
85
Mute Surdo
86
87
Open Surdo
88
Applause 2
---
89
---
90
---
91
92
---
93
---
94
---
95
82Rm Snare2
82Rm Snare1
PC: 2 [CC32: 4]
STANDARD 2
Std.1 Kick1
Std.1 Kick2
Std.2 Kick1
Std2 Kick2
Kick 1
Kick 2
Jazz Kick 1
Jazz Kick 2
Room Kick 1
Room Kick 2
Power Kick1
Power Kick2
Elec Kick 2
Elec Kick 1
TR-808 Kick
TR-909 Kick
Dance Kick 2
Voice One
Voice Two
Voice Three
---
--MC-500 Beep
MC-500 Beep
Concert Snr
Snare Roll
Finger Snap
High-Q
Slap
ScratchPush
ScratchPull
Sticks
SquareClick
Mtrnm.Click
Mtrnm. Bell
Std2 Kick2
Std.2 Kick1
Side Stick
Std.2 Snare1
808clap
Std.2 Snare2
Real Tom 6
Jazz Clsd.HH
Real Tom 6
Pedal HiHat
Real Tom 4
Jazz Open HH
Real Tom 4
Real Tom 1
Crash Cym.1
Real Tom 1
Ride Cymbal
ChinaCymbal
Ride Bell
Tambourine
Splash Cym.
Cowbell
Crash Cym.2
Vibraslap
Ride Cymbal
Bongo High
Bongo Lo
Mute H.Conga
Conga Hi Opn
Conga Lo Opn
High Timbale
Low Timbale
Agogo
Agogo
Cabasa
Maracas
ShrtWhistle
LongWhistle
Short Guiro
Long Guiro
Claves
Woodblock
Woodblock
Mute Cuica
Open Cuica
MuteTriangl
OpenTriangl
Shaker
Jingle Bell
Bar Chimes
Castanets
Mute Surdo
Open Surdo
Applause 2
---
---
---
---
---
---
---
---
PC: 3 [CC32: 4]
STANDARD L/R
---
---
---
---
---
---
---
---
---
---
---
---
---
---
---
---
--Voice One
Voice Two
Voice Three
---
--MC-500 Beep
MC-500 Beep
Concert Snr
Snare Roll
FingerSnaps2
High-Q
Slap
ScratchPush
ScratchPull
Sticks
SquareClick
Mtrnm.Click
Mtrnm. Bell
85St BsDrum1
85St BsDrum2
Side Stick
85St Snare2
909 HandClap
85St Snare1
Real Tom 6
82StClsHatB
Real Tom 6
Pedal HiHat2
Real Tom 4
82StOpenHatB
Real Tom 4
Real Tom 1
Crash1c B
Real Tom 1
Ride__c B
ChinaCymbal
Ridbl_c B
Tambourine
Splash Cym.
Cowbell
Crash Cym.2
Vibraslap
Ride Cymbal
Bongo High
Bongo Lo
Mute H.Conga
Conga Hi Opn
Conga Lo Opn
High Timbale
Low Timbale
Agogo
Agogo
Cabasa
Maracas
ShrtWhistle
LongWhistle
Short Guiro
Long Guiro
Claves
Woodblock
Woodblock
Mute Cuica
Open Cuica
MuteTriangl
OpenTriangl
Shaker
Jingle Bell
Bell Tree
Castanets
Mute Surdo
Open Surdo
Applause 2
---
---
---
---
---
--85St BsDrum1
85St BsDrum2
PC: 7 [CC32: 4]
V-Pop1
HipHop BD1
Jazz Kick 1
Mex_Kik36
85Rm BsDrum1
85Rm BsDrum2
HipHop BD2
Techno BD1
JungleBD Set
HipHop BD1
909 Comp BD
85St BsDrum1
NewJzKik
NewRockKik
Cymbal Roll
NewRkCStk_2
82Rm Snare1
82Rm Snare2
85St Snare1
85St Snare2
NewJzSn2
NewJzSn1
NewR&BSn
NewRockSn2_2
NewRockSn1_2
IPopSn38_2
IPopGstS39_2
IPopSn38_2
FingerSnaps2
909 HandClap
808clap
Hand clap2
909 HandClap
IPopPHat32
GospelHClp1
IPopSRll30_1
IPopKik35
IPopKik36
IPopCStk37_1
IPopSn38_1
IPopGstS39_1
IPopSn40_1
IPopTomLFl41
IPopHat1_42
IPopTomL43
IPopHat2_44
IPopTomMFl45
IPopHat3_46
IPopTomM47
IPopTomHFl48
IPopCyml2_52
IPopTomH50
IPopRd1_51
IPopCym1_49
IPopRd2_55
Tambourine
Splash Cym.
ChaChaCBell
NewRkCrCym2
Vibraslap
NewRkRdCym1
NewHiBongo
NewLoBongo
NewCongaSlp
NewCongaOp
NewLoConga
NewTmblHi
NewTmblLo
Agogo
Agogo
NewShaker2
NewShaker1
ShrtWhistle
LongWhistle
NewQuide1
NewQuide2
NewClaves
Woodblock
Woodblock
Mute Cuica
Open Cuica
MuteTriangl
OpenTriangl
Shaker
Jingle Bell
Bell Tree
Castanets
Mute Surdo
Open Surdo
Cana
NewTmblHiFlm
NewTmblLoFlm
NewTmblPHS
NewShekere1
NewShekere2
NHBngoMute
NewLBngoMute
CajonHi
PC: 5 [CC32: 4]
V-R&B
HipHop BD1
Jazz Kick 1
Mex_Kik36
85Rm BsDrum1
85Rm BsDrum2
HipHop BD2
Techno BD1
JungleBD Set
HipHop BD1
909 Comp BD
85St BsDrum1
NewJzKik
NewRockKik
Cymbal Roll
NewRkCStk_2
82Rm Snare1
82Rm Snare2
85St Snare1
85St Snare2
NewJzSn2
NewJzSn1
NewR&BSn
NewRockSn2_2
NewRockSn1_2
IPopSn38_2
IPopGstS39_2
IPopSn38_2
FingerSnaps2
909 HandClap
808clap
Hand clap2
909 HandClap
IPopPHat32
GospelHClp1
IPopSRll30_2
IPopKik35
IPopKik36
IPopCStk37_2
NewR&BSn
NewR&BSnGst
IPopSn40_2
IPopTomLFl41
IPopHat1_42
IPopTomL43
IPopHat2_44
IPopTomMFl45
IPopHat3_46
IPopTomM47
IPopTomHFl48
IPopCym1_49
IPopTomH50
IPopRd1_51
IPopCyml2_52
IPopRd2_55
Tambourine
Splash Cym.
ChaChaCBell
NewRkCrCym2
Vibraslap
NewRkRdCym1
NewHiBongo
NewLoBongo
NewCongaSlp
NewCongaOp
NewLoConga
NewTmblHi
NewTmblLo
Agogo
Agogo
NewShaker2
NewShaker1
ShrtWhistle
LongWhistle
NewQuide1
NewQuide2
NewClaves
Woodblock
Woodblock
Mute Cuica
Open Cuica
MuteTriangl
OpenTriangl
Shaker
Jingle Bell
Bell Tree
Castanets
Mute Surdo
Open Surdo
Cana
NewTmblHiFlm
NewTmblLoFlm
NewTmblPHS
NewShekere1
NewShekere2
NHBngoMute
NewLBngoMute
CajonHi
PC: 6 [CC32: 4]
V-Fiesta
HipHop BD1
Jazz Kick 1
Mex_Kik36
85Rm BsDrum1
85Rm BsDrum2
HipHop BD2
Techno BD1
JungleBD Set
HipHop BD1
909 Comp BD
85St BsDrum1
NewJzKik
NewRockKik
Cymbal Roll
NewRkCStk_2
82Rm Snare1
82Rm Snare2
85St Snare1
85St Snare2
NewJzSn2
NewJzSn1
NewR&BSn
NewRockSn2_2
NewRockSn1_2
IPopSn38_2
IPopGstS39_2
IPopSn38_2
FingerSnaps2
909 HandClap
808clap
Hand clap2
909 HandClap
Mex_PHat32
GospelHClp1
Mex_SnrRol34
Mex_Kik35
Mex_Kik36
IPopCStk37_2
Mex_Snr38
Mex_GstS39
Mex_Snr40
IPopTomLFl41
Mex_Hat1_42
IPopTomL43
Mex_Hat2_44
IPopTomMFl45
Mex_Hat3_46
IPopTomM47
IPopTomHFl48
IPopCym1_49
IPopTomH50
IPopRd1_51
IPopCyml2_52
IPopRd2_55
Tambourine
Splash Cym.
ChaChaCBell
NewRkCrCym2
Vibraslap
NewRkRdCym1
NewHiBongo
NewLoBongo
NewCongaSlp
NewCongaOp
NewLoConga
NewTmblHi
NewTmblLo
Agogo
Agogo
NewShaker2
NewShaker1
ShrtWhistle
LongWhistle
NewQuide1
NewQuide2
NewClaves
Woodblock
Woodblock
Mute Cuica
Open Cuica
MuteTriangl
OpenTriangl
Shaker
Jingle Bell
Bell Tree
Castanets
Mute Surdo
Open Surdo
Cana
NewTmblHiFlm
NewTmblLoFlm
NewTmblPHS
NewShekere1
NewShekere2
NHBngoMute
NewLBngoMute
CajonHi
PC: 9 [CC32: 4]
ROOM
Std.1 Kick1
Std.1 Kick2
Std.2 Kick1
Std2 Kick2
Kick 1
Kick 2
Jazz Kick 1
Jazz Kick 2
Room Kick 1
Room Kick 2
Power Kick1
Power Kick2
Elec Kick 2
Elec Kick 1
TR-808 Kick
TR-909 Kick
Dance Kick 2
Voice One
Voice Two
Voice Three
85St BsDrum1
85St BsDrum2
MC-500 Beep
MC-500 Beep
Concert Snr
Snare Roll
Finger Snap
High-Q
Slap
ScratchPush
ScratchPull
Sticks
SquareClick
Mtrnm.Click
Mtrnm. Bell
85Rm BsDrum1
85Rm BsDrum2
Side Stick
82Rm Snare2
808clap
82Rm Snare1
Room Tom 5
Room Chh
Room Tom 5
Pedal HiHat
Room Tom 2
R8 Ohh2
Room Tom 2
Room Tom 2
Crash Cym.1
Room Tom 2
Ride Cymbal
ChinaCymbal
Ride Bell
Tambourine
Splash Cym.
Cowbell
Crash Cym.2
Vibraslap
Ride Cymbal
Bongo High
Bongo Lo
Mute H.Conga
Conga Hi Opn
Conga Lo Opn
High Timbale
Low Timbale
Agogo
Agogo
Cabasa
Maracas
ShrtWhistle
LongWhistle
Short Guiro
Long Guiro
Claves
Woodblock
Woodblock
Mute Cuica
Open Cuica
MuteTriangl
OpenTriangl
Shaker
Jingle Bell
Bell Tree
Castanets
Mute Surdo
Open Surdo
Applause 2
---
---
---
---
---
--85St Snare2
85St Snare1
PC: 10 [CC32: 4]
HIP HOP
Elec Kick 2
Elec Kick 1
CR78 BD 1
CR78 BD 2
TR-606 BD1
TR-707 BD
808 Kick
TR-808 Kick
808 BD
TR-909 Kick
Dance Kick 2
909 Comp BD
TR-909 BD2
HipHop BD2
JungleBD Set
Techno BD1
Bounce
Voice One
Voice Two
Voice Three
HipHop BD1
Std2 Kick2
MC-500 Beep
MC-500 Beep
Concert Snr
Snare Roll
FingerSnaps2
High-Q
Slap
Scrtch Push2
Scrtch Pull2
Sticks
SquareClick
Mtrnm.Click
Mtrnm. Bell
TR-909 BD2
909 Comp BD
808 Rimshot
Rap Snare
909 HandClap
House SD
Brush Tom
Room Chh
Brush Tom
Pedal HiHat
Brush Tom
R8 Ohh2
Brush Tom
Brush Tom
909 Crash
Brush Tom
Ride Cymbal
ReverseCymbl
Ride Bell
Shake Tamb
Splash Cym.
808cowbe
Crash Cym.2
Vibraslap
Ride Cymbal
Bongo High
Bongo Lo
Mute H.Conga
Conga Hi Opn
Conga Lo Opn
High Timbale
Low Timbale
Agogo
Agogo
Cabasa
808marac
ShrtWhistle
LongWhistle
Short Guiro
CR78 Guiro
808clave
Woodblock
Woodblock
Hoo
Hoo
MuteTriangl
OpenTriangl
626 Shaker
Jingle Bell
Bell Tree
Castanets
Mute Surdo
Open Surdo
Small Club
Rap Snare
Power Snare2
Noise Slap
85St Snare1
85St Snare2
82Rm Snare1
82Rm Snare2
Dance Snare1
PC: 11 [CC32: 4]
JUNGLE
Elec Kick 2
Elec Kick 1
CR78 BD 1
CR78 BD 2
TR-606 BD1
TR-707 BD
808 Kick
TR-808 Kick
808 BD
TR-909 Kick
Dance Kick 2
909 Comp BD
TR-909 BD2
HipHop BD2
JungleBD Set
Techno BD1
Bounce
Voice One
Voice Two
Voice Three
TR-909 BD2
909 Comp BD
MC-500 Beep
MC-500 Beep
Concert Snr
Snare Roll
FingerSnaps2
High-Q
Slap
Scrtch Push2
Scrtch Pull2
Sticks
SquareClick
Mtrnm.Click
Mtrnm. Bell
HipHop BD1
Std2 Kick2
Side Stick
Dance Snare1
HC2 Claps 2
House SD
909 Tom
606 CH
909 Tom
Jungle HH
909 Tom
606 HiHat Op
909 Tom
909 Tom
Jngl Crash
909 Tom
Ride Cymbal
ReverseCymbl
Ride Bell
Shake Tamb
Splash Cym.
808cowbe
Crash Cym.2
Vibraslap
Ride Cymbal
Bongo High
Bongo Lo
Mute H.Conga
Conga Hi Opn
Conga Lo Opn
High Timbale
Low Timbale
Agogo
Agogo
Cabasa
808marac
ShrtWhistle
LongWhistle
Short Guiro
CR78 Guiro
808clave
Woodblock
Woodblock
Hoo
Hoo
MuteTriangl
OpenTriangl
626 Shaker
Jingle Bell
Bell Tree
Castanets
Mute Surdo
Open Surdo
Small Club
Jngl BD Roll
Jngl SD Roll
66sn260
Dance Snare1
909 SD 1
Elec Snare 2
Dance Snare1
Rap Snare
PC: 12 [CC32: 4]
TECHNO
Elec Kick 2
Elec Kick 1
CR78 BD 1
CR78 BD 2
TR-606 BD1
TR-707 BD
808 Kick
TR-808 Kick
808 BD
TR-909 Kick
Dance Kick 2
909 Comp BD
TR-909 BD2
HipHop BD2
JungleBD Set
Techno BD1
Bounce
Voice One
Voice Two
Voice Three
HipHop BD2
TR-909 BD2
MC-500 Beep
MC-500 Beep
Concert Snr
Snare Roll
FingerSnaps2
High-Q
Slap
Scrtch Push2
Scrtch Pull2
Sticks
SquareClick
Mtrnm.Click
Mtrnm. Bell
Techno BD1
TR-909 BD2
808 Rimshot
Dance Snare1
707 Claps
909 SD 1
606 Dist.Tom
TR-707 HH-c
606 Dist.Tom
CR-78 chh
606 Dist.Tom
909 OH
606 Dist.Tom
606 Dist.Tom
909 Crash
606 Dist.Tom
Ride Cymbal
ReverseCymbl
Ride Bell
Shake Tamb
Splash Cym.
808cowbe
909 Crash
Vibraslap
Ride Cymbal
CR78 HiBongo
CR78 LoBongo
808 Conga
808 Conga
808 Conga
High Timbale
Low Timbale
Agogo
Agogo
Cabasa
808marac
ShrtWhistle
LongWhistle
Short Guiro
CR78 Guiro
808clave
Woodblock
Woodblock
Hoo
Hoo
MuteTriangl
OpenTriangl
626 Shaker
Jingle Bell
Bell Tree
Castanets
Mute Surdo
Open Surdo
Applause 2
Dance Snare1
Elec Snare 2
Dance Snare1
House SD
Rap Snare
House SD
Dance Snare1
Rap Snare
Page 97

Backing Module BK-7m
C2 36
38
40
41
43
45
47
37
39
42
44
46
C3 48
50
52
53
55
57
59
49
51
54
56
58
C4 60
62
64
65
67
69
71
61
63
66
68
70
C5 72
74
76
77
79
81
83
73
75
78
80
82
C6 84
C7 96
86
88
89
91
93
95
85
87
90
92
94
C0 12
14
16
17
19
21
23
13
15
18
20
22
C–1 0
2
4
5
7
9
11
1
3
6
8
10
C1 24
26
28
29
31
33
35
25
27
30
32
34
PC: 13 [CC32: 4]
ROOM L/R
---
---
---
---
---
---
---
---
---
---
---
---
---
---
---
---
--Voice One
Voice Two
Voice Three
---
--MC-500 Beep
MC-500 Beep
Concert Snr
Snare Roll
Finger Snap
High-Q
Slap
ScratchPush
ScratchPull
Sticks
SquareClick
Mtrnm.Click
Mtrnm. Bell
85Rm BsDrum1
85Rm BsDrum2
Side Stick
82Rm Snare2
808clap
82Rm Snare1
Room Tom 5
82RmClsHatB
Room Tom 5
Pedal HiHat
Room Tom 2
82RmOpenHatB
Room Tom 2
Room Tom 2
Crash1c B
Room Tom 2
Ride__c B
ChinaCymbal
Ridbl_c B
Tambourine
Splash Cym.
Cowbell
Crash Cym.2
Vibraslap
Ride Cymbal
Bongo High
Bongo Lo
Mute H.Conga
Conga Hi Opn
Conga Lo Opn
High Timbale
Low Timbale
Agogo
Agogo
Cabasa
Maracas
ShrtWhistle
LongWhistle
Short Guiro
Long Guiro
Claves
Woodblock
Woodblock
Mute Cuica
Open Cuica
MuteTriangl
OpenTriangl
Shaker
Jingle Bell
Bell Tree
Castanets
Mute Surdo
Open Surdo
Applause 2
---
---
---
---
---
--85Rm BsDrum1
85Rm BsDrum2
PC: 14 [CC32: 4]
HOUSE
Elec Kick 2
Elec Kick 1
CR78 BD 1
CR78 BD 2
TR-606 BD1
TR-707 BD
808 Kick
TR-808 Kick
808 BD
TR-909 Kick
Dance Kick 2
909 Comp BD
TR-909 BD2
HipHop BD2
JungleBD Set
Techno BD1
Bounce
Voice One
Voice Two
Voice Three
TR-909 BD2
Techno BD2
MC-500 Beep
MC-500 Beep
Concert Snr
Snare Roll
FingerSnaps2
High-Q
Slap
Scrtch Push2
Scrtch Pull2
Sticks
SquareClick
Mtrnm.Click
Mtrnm. Bell
HipHop BD2
TR-909 BD2
Side Stick
House SD
909 HandClap
Elec Snare 2
909 Tom
TR-707 HH-c
909 Tom
CR-78 chh
909 Tom
909 OH
909 Tom
909 Tom
909 Crash
909 Tom
909 Ride Cym
ReverseCymbl
Ride Bell
Shake Tamb
Splash Cym.
808cowbe
909 Crash
Vibraslap
Ride Cymbal
CR78 HiBongo
CR78 LoBongo
808 Conga
808 Conga
808 Conga
High Timbale
Low Timbale
Agogo
Agogo
Cabasa
808marac
ShrtWhistle
LongWhistle
Short Guiro
CR78 Guiro
808clave
Woodblock
Woodblock
Hoo
Hoo
MuteTriangl
OpenTriangl
626 Shaker
Jingle Bell
Bell Tree
Castanets
Mute Surdo
Open Surdo
Applause 2
66sn260
Dance Snare1
909 SD 1
Dance Snare1
Dance Snare1
Rap Snare
House SD
House SD
PC: 17 [CC32: 4]
POWER
Std.1 Kick1
Std.1 Kick2
Std.2 Kick1
Std2 Kick2
Kick 1
Kick 2
Jazz Kick 1
Jazz Kick 2
Room Kick 1
Room Kick 2
Power Kick1
Power Kick2
Elec Kick 2
Elec Kick 1
TR-808 Kick
TR-909 Kick
Dance Kick 2
Voice One
Voice Two
Voice Three
---
--MC-500 Beep
MC-500 Beep
Concert Snr
Snare Roll
FingerSnaps2
High-Q
Slap
ScratchPush
ScratchPull
Sticks
SquareClick
Mtrnm.Click
Mtrnm. Bell
Power Kick2
Power Kick1
Side Stick
Dance Snare1
808clap
Power Snare1
Rock Tom 4
Close HiHat2
Rock Tom 4
Pedal HiHat2
Rock Tom 4
Open HiHat2
Rock Tom 4
Rock Tom 1
Crash Cym.1
Rock Tom 1
Ride Cymbal
ChinaCymbal
Ride Bell
Tambourine
Splash Cym.
Cowbell
Crash Cym.2
Vibraslap
Ride Cymbal
Bongo High
Bongo Lo
Mute H.Conga
Conga Hi Opn
Conga Lo Opn
High Timbale
Low Timbale
Agogo
Agogo
Cabasa
Maracas
ShrtWhistle
LongWhistle
Short Guiro
Long Guiro
Claves
Woodblock
Woodblock
Mute Cuica
Open Cuica
MuteTriangl
OpenTriangl
Shaker
Jingle Bell
Bell Tree
Castanets
Mute Surdo
Open Surdo
Applause 2
---
---
---
---
---
---
---
---
PC: 20 [CC32: 4]
V-Rock1
HipHop BD1
Jazz Kick 1
Mex_Kik36
85Rm BsDrum1
85Rm BsDrum2
HipHop BD2
Techno BD1
JungleBD Set
HipHop BD1
909 Comp BD
85St BsDrum1
NewJzKik
NewRockKik
Cymbal Roll
NewRkCStk_2
82Rm Snare1
82Rm Snare2
85St Snare1
85St Snare2
NewJzSn2
NewJzSn1
NewR&BSn
IPopSn40_2
IPopSn38_2
IPopSn38_2
IPopGstS39_2
IPopSn40_2
FingerSnaps2
909 HandClap
808clap
Hand clap2
909 HandClap
NewRkHatPdl
GospelHClp1
NewRkSnRll
NewRockKik
NewRockKik
NewRkCStk_1
NewRockSn1_1
NewRkSnGst
NewRockSn2_1
NewRkTomL2Fl
NewRkHat1
NewRkTomL2
NewRkHat2
NewRkTomL1Fl
NewRkHat3
NewRkTomL1
NewRkTomMFl
NewRkCrCym1
NewRkTomM
NewRkRdCym1
NewRkCrCym2
NewRkRdCym2
Tambourine
NewRkCrCym3
ChaChaCBell
NewRkCrCym4
Vibraslap
IPopRd1_51
NewHiBongo
NewLoBongo
NewCongaSlp
NewCongaOp
NewLoConga
NewTmblHi
NewTmblLo
Agogo
Agogo
NewShaker2
NewShaker1
ShrtWhistle
LongWhistle
NewQuide1
NewQuide2
NewClaves
Woodblock
Woodblock
Mute Cuica
Open Cuica
MuteTriangl
OpenTriangl
Shaker
Jingle Bell
Bell Tree
Castanets
Mute Surdo
Open Surdo
Cana
NewTmblHiFlm
NewTmblLoFlm
NewTmblPHS
NewShekere1
NewShekere2
NHBngoMute
NewLBngoMute
CajonHi
PC: 19 [CC32: 4]
V-Rock2
HipHop BD1
Jazz Kick 1
Mex_Kik36
85Rm BsDrum1
85Rm BsDrum2
HipHop BD2
Techno BD1
JungleBD Set
HipHop BD1
909 Comp BD
85St BsDrum1
NewJzKik
NewRockKik
Cymbal Roll
NewRkCStk_2
82Rm Snare1
82Rm Snare2
85St Snare1
85St Snare2
NewJzSn2
NewJzSn1
NewR&BSn
IPopSn40_2
IPopSn38_2
IPopSn38_2
IPopGstS39_2
IPopSn38_2
FingerSnaps2
909 HandClap
808clap
Hand clap2
909 HandClap
NewRkHatPdl
GospelHClp1
NewRkSnRll
NewRockKik
NewRockKik
NewRkCStk_1
NewRockSn1_1
NewRkSnGst
NewRockSn2_1
NewRkTomL1Fl
NewRkHat1
NewRkTomL1
NewRkHat2
NewRkTomMFl
NewRkHat3
NewRkTomM
NewRkTomHiFl
NewRkCrCym1
NewRkTomHi
NewRkRdCym1
NewRkCrCym2
NewRkRdCym2
Tambourine
NewRkCrCym3
ChaChaCBell
NewRkCrCym4
Vibraslap
IPopRd1_51
NewHiBongo
NewLoBongo
NewCongaSlp
NewCongaOp
NewLoConga
NewTmblHi
NewTmblLo
Agogo
Agogo
NewShaker2
NewShaker1
ShrtWhistle
LongWhistle
NewQuide1
NewQuide2
NewClaves
Woodblock
Woodblock
Mute Cuica
Open Cuica
MuteTriangl
OpenTriangl
Shaker
Jingle Bell
Bell Tree
Castanets
Mute Surdo
Open Surdo
Cana
NewTmblHiFlm
NewTmblLoFlm
NewTmblPHS
NewShekere1
NewShekere2
NHBngoMute
NewLBngoMute
CajonHi
PC: 25 [CC32: 4]
ELECTRONIC
Elec Kick 2
Elec Kick 1
CR78 BD 1
CR78 BD 2
TR-606 BD1
TR-707 BD
808 Kick
TR-808 Kick
808 BD
TR-909 Kick
Dance Kick 2
909 Comp BD
TR-909 BD2
HipHop BD2
JungleBD Set
Techno BD1
Bounce
Voice One
Voice Two
Voice Three
---
--MC-500 Beep
MC-500 Beep
Concert Snr
Snare Roll
Finger Snap
High-Q
Slap
Scrtch Push2
Scrtch Pull2
Sticks
SquareClick
Mtrnm.Click
Mtrnm. Bell
Elec Kick 2
Elec Kick 1
Side Stick
Elec. Snare
808clap
Elec Snare 2
Synth Drum 2
Jazz Clsd.HH
Synth Drum 2
Pedal HiHat
Synth Drum 2
Jazz Open HH
Synth Drum 2
Synth Drum 2
Crash Cym.1
Synth Drum 2
Ride Cymbal
ReverseCymbl
Ride Bell
Tambourine
Splash Cym.
Cowbell
Crash Cym.2
Vibraslap
Ride Cymbal
Bongo High
Bongo Lo
Mute H.Conga
Conga Hi Opn
Conga Lo Opn
High Timbale
Low Timbale
Agogo
Agogo
Cabasa
Maracas
ShrtWhistle
LongWhistle
Short Guiro
Long Guiro
Claves
Woodblock
Woodblock
Mute Cuica
Open Cuica
MuteTriangl
OpenTriangl
Shaker
Jingle Bell
Bell Tree
Castanets
Mute Surdo
Open Surdo
Small Club
---
---
---
---
---
---
---
---
PC: 26 [CC32: 4]
TR-808
Elec Kick 2
Elec Kick 1
CR78 BD 1
CR78 BD 2
TR-606 BD1
TR-707 BD
808 Kick
TR-808 Kick
808 BD
TR-909 Kick
Dance Kick 2
909 Comp BD
TR-909 BD2
HipHop BD2
JungleBD Set
Techno BD1
Bounce
Voice One
Voice Two
Voice Three
---
--MC-500 Beep
MC-500 Beep
Concert Snr
Snare Roll
FingerSnaps2
High-Q
Slap
Scrtch Push2
Scrtch Pull2
Sticks
SquareClick
Mtrnm.Click
Mtrnm. Bell
808 BD
TR-808 Kick
808 Rimshot
808 Snare 1
808clap
TR-808 SD2
808 Tom 2
TR-808 CHH
808 Tom 2
808__chh
808 Tom 2
TR-808 OHH
808 Tom 2
808 Tom 2
808 Crash
808 Tom 2
606 Ride Cym
ChinaCymbal
Ride Bell
CR78 Tmb
Splash Cym.
808cowbe
909 Crash
Vibraslap
RideCym Edge
CR78 HiBongo
CR78 LoBongo
808 Conga
808 Conga
808 Conga
High Timbale
Low Timbale
Agogo
Agogo
Cabasa
808marac
ShrtWhistle
LongWhistle
Short Guiro
CR78 Guiro
808clave
Woodblock
Woodblock
Hoo
Hoo
MuteTriangl
OpenTriangl
626 Shaker
Jingle Bell
Bell Tree
Castanets
Mute Surdo
Open Surdo
Small Club
---
---
---
---
---
---
---
---
PC: 27 [CC32: 4]
DANCE
Elec Kick 2
Elec Kick 1
CR78 BD 1
CR78 BD 2
TR-606 BD1
TR-707 BD
808 Kick
TR-808 Kick
808 BD
TR-909 Kick
Dance Kick 2
909 Comp BD
TR-909 BD2
HipHop BD2
JungleBD Set
Techno BD1
Bounce
Voice One
Voice Two
Voice Three
HipHop BD2
TR-909 BD2
MC-500 Beep
MC-500 Beep
Concert Snr
Snare Roll
Finger Snap
High-Q
Slap
Scrtch Push2
Scrtch Pull2
Sticks
SquareClick
Mtrnm.Click
Mtrnm. Bell
TR-909 BD2
Techno BD2
Side Stick
Dance Snare1
909 HandClap
Power Snare1
Synth Drum 2
CR-78 chh
Synth Drum 2
808__chh
Synth Drum 2
CR-78 ohh
Synth Drum 2
Synth Drum 2
808 Crash
Synth Drum 2
606 Ride Cym
ReverseCymbl
Ride Bell
Shake Tamb
Splash Cym.
808cowbe
Crash Cym.2
Vibraslap
Ride Cymbal
Bongo High
Bongo Lo
Mute H.Conga
Conga Hi Opn
Conga Lo Opn
High Timbale
Low Timbale
Agogo
Agogo
Cabasa
Maracas
ShrtWhistle
LongWhistle
Short Guiro
Long Guiro
Claves
Woodblock
Woodblock
Hoo
Hoo
MuteTriangl
OpenTriangl
626 Shaker
Jingle Bell
Bell Tree
Castanets
Mute Surdo
Open Surdo
Small Club
66sn260
909 SD 1
Elec Snare 2
House SD
Rap Snare
House SD
Dance Snare1
Rap Snare
PC: 28 [CC32: 4]
CR-78
Elec Kick 2
Elec Kick 1
CR78 BD 1
CR78 BD 2
TR-606 BD1
TR-707 BD
808 Kick
TR-808 Kick
808 BD
TR-909 Kick
Dance Kick 2
909 Comp BD
TR-909 BD2
HipHop BD2
JungleBD Set
Techno BD1
Bounce
Voice One
Voice Two
Voice Three
---
--MC-500 Beep
MC-500 Beep
Concert Snr
Snare Roll
FingerSnaps2
High-Q
Slap
Scrtch Push2
Scrtch Pull2
Sticks
SquareClick
Mtrnm.Click
Mtrnm. Bell
CR78 BD 2
CR78 BD 1
CR78 Rim
CR78 SD 1
707 Claps
CR78 SD 2
78 TOM
CR-78 chh
78 TOM
606 CH
78 TOM
CR-78 ohh
78 TOM
78 TOM
808 Crash
78 TOM
606 Ride Cym
ChinaCymbal
Ride Bell
CR78 Tmb
Splash Cym.
CR78 Cow
909 Crash
Vibraslap
RideCym Edge
CR78 HiBongo
CR78 LoBongo
808 Conga
808 Conga
808 Conga
High Timbale
Low Timbale
Agogo
Agogo
Cabasa
CR78 Maracas
ShrtWhistle
LongWhistle
Short Guiro
CR78 Guiro
CR78 Clv
Woodblock
Woodblock
Hoo
Hoo
CR78 M.Beat
CR78 M.Beat
626 Shaker
Jingle Bell
Bell Tree
Castanets
Mute Surdo
Open Surdo
Small Club
---
---
---
---
---
---
---
---
PC: 29 [CC32: 4]
TR-606
Elec Kick 2
Elec Kick 1
CR78 BD 1
CR78 BD 2
TR-606 BD1
TR-707 BD
808 Kick
TR-808 Kick
808 BD
TR-909 Kick
Dance Kick 2
909 Comp BD
TR-909 BD2
HipHop BD2
JungleBD Set
Techno BD1
Bounce
Voice One
Voice Two
Voice Three
---
--MC-500 Beep
MC-500 Beep
Concert Snr
Snare Roll
FingerSnaps2
High-Q
Slap
Scrtch Push2
Scrtch Pull2
Sticks
SquareClick
Mtrnm.Click
Mtrnm. Bell
CR78 BD 2
TR-606 BD1
CR78 Rim
66sn160
707 Claps
66sn260
606 Tom
606 CH
606 Tom
606 CH
606 Tom
606 HiHat Op
606 Tom
606 Tom
808 Crash
606 Tom
606 Ride Cym
ChinaCymbal
Ride Bell
CR78 Tmb
Splash Cym.
CR78 Cow
909 Crash
Vibraslap
RideCym Edge
CR78 HiBongo
CR78 LoBongo
808 Conga
808 Conga
808 Conga
High Timbale
Low Timbale
Agogo
Agogo
Cabasa
CR78 Maracas
ShrtWhistle
LongWhistle
Short Guiro
CR78 Guiro
CR78 Clv
Woodblock
Woodblock
Hoo
Hoo
CR78 M.Beat
CR78 M.Beat
626 Shaker
Jingle Bell
Bell Tree
Castanets
Mute Surdo
Open Surdo
Small Club
---
---
---
---
---
---
---
---
r
Drum Sets
97
Page 98

Backing Module BK-7m
Drum Sets
(C7) (96)
C8 108
C9G9120
98
100
101
103
105
107
110
112
113
115
117
119
122
124
125
127
97
99
102
104
106
109
111
114
116
118
121
123
126
PC: 1 [CC32: 4]
STANDARD 1
82Rm Snare1
Std.1 Snare1
Std.1 Snare2
Std.2 Snare1
Std.2 Snare2
Tight Snare
Standard SN1
LD Snare M
LD Snare C
Jazz Snare 1
Jazz Snare 2
Room Snare 1
Room Snare 2
Dance Snare1
Power Snare1
Rev.Snare
Power Snare2
Elec Snare 1
Dance Snare2
Elec Snare 2
Elec. Snare
Elec Snare 3
TR-707 SD
808 Snare 1
808 Snare 2
909 Snare 1
909 Snare 2
Rap Snare
JungleSD1
House SD
House Snare
House SD
PC: 2 [CC32: 4]
STANDARD 2
--Std.1 Snare1
Std.1 Snare2
Std.2 Snare1
Std.2 Snare2
Tight Snare
Standard SN1
LD Snare M
LD Snare C
Jazz Snare 1
Jazz Snare 2
Room Snare 1
Room Snare 2
Dance Snare1
Power Snare1
Rev.Snare
Power Snare2
Elec Snare 1
Dance Snare2
Elec Snare 2
Elec. Snare
Elec Snare 3
TR-707 SD
808 Snare 1
808 Snare 2
909 Snare 1
909 Snare 2
Rap Snare
JungleSD1
House SD
House Snare
House SD
PC: 3 [CC32: 4]
STANDARD L/R
85St BsDrum2
Crash Cym.1
85St Snare2
Ride Cymbal
85St Snare1
Real Tom 6
Close HiHat2
Real Tom 4
Ride Bell
Real Tom 1
Open HiHat2
82StBsDrum1P
82StBsDrum2P
82JzCrsCym1P
82StSnare2P
Ride__c P
82St Snare1P
Real6_t P
82St ClsHatP
Real4_t P
Ridbl_c P
Real1_t P
82StOpenHatP
---
---
---
---
---
---
---
---
---
PC: 7 [CC32: 4]
V-Pop1
CajonHi
CajonHiFlm
CajonLo
CajonLoFlm
FlmncoHClp1
FlmncoHClp1
BongoCowBell
AfHey
MamboCowBell
MexFVox2
AfFoots
MexFVox1
MexMVox1
YodelFVox1
MexMVox2
YodelMVox1
MexMVox3
FlmncoFVox1
YodelFVox2
FlmncoFVox2
NewWhistle1
FlmncoFVox3
NewWhistle2
FlmncoMVox1
FlmncoMVox2
BrazilVox1
FlmncoMVox3
BrazilVox2
BrazilVox3
AfAahhh
p33137v
p33168v
PC: 5 [CC32: 4]
V-R&B
CajonHi
CajonHiFlm
CajonLo
CajonLoFlm
FlmncoHClp1
FlmncoHClp1
BongoCowBell
AfHey
MamboCowBell
MexFVox2
AfFoots
MexFVox1
MexMVox1
YodelFVox1
MexMVox2
YodelMVox1
MexMVox3
FlmncoFVox1
YodelFVox2
FlmncoFVox2
NewWhistle1
FlmncoFVox3
NewWhistle2
FlmncoMVox1
FlmncoMVox2
BrazilVox1
FlmncoMVox3
BrazilVox2
BrazilVox3
AfAahhh
p33137v
p33168v
PC: 6 [CC32: 4]
V-Fiesta
CajonHi
CajonHiFlm
CajonLo
CajonLoFlm
FlmncoHClp1
FlmncoHClp1
BongoCowBell
AfHey
MamboCowBell
MexFVox2
AfFoots
MexFVox1
MexMVox1
YodelFVox1
MexMVox2
YodelMVox1
MexMVox3
FlmncoFVox1
YodelFVox2
FlmncoFVox2
NewWhistle1
FlmncoFVox3
NewWhistle2
FlmncoMVox1
FlmncoMVox2
BrazilVox1
FlmncoMVox3
BrazilVox2
BrazilVox3
AfAahhh
p33137v
p33168v
PC: 9 [CC32: 4]
ROOM
85St Snare1
Std.1 Snare1
Std.1 Snare2
Std.2 Snare1
Std.2 Snare2
Tight Snare
Standard SN1
LD Snare M
LD Snare C
Jazz Snare 1
Jazz Snare 2
Room Snare 1
Room Snare 2
Dance Snare1
Power Snare1
Rev.Snare
Power Snare2
Elec Snare 1
Dance Snare2
Elec Snare 2
Elec. Snare
Elec Snare 3
TR-707 SD
808 Snare 1
808 Snare 2
909 Snare 1
909 Snare 2
Rap Snare
JungleSD1
House SD
House Snare
House SD
PC: 10 [CC32: 4]
HIP HOP
Dance Snare1
Techno Hit
Philly Hit
Shock Wave
Lo Fi Rave
Bam Hit
Bim Hit
TapeRewind
Phono Noise
Dance Snare1
Power Snare2
Elec Snare 1
Dance Snare2
Elec Snare 2
Elec. Snare
Elec Snare 3
66sn260
TR-707 SD
808 Snare 1
808 Snare 2
TR-808 SD2
909 Snare 1
909 Snare 2
909 SD 1
TR-909 SD2
Rap Snare
JungleSD1
House SD
House Snare
House SD
Voice Tah
Noise Slap
PC: 11 [CC32: 4]
JUNGLE
Rap Snare
Techno Hit
Philly Hit
Shock Wave
Lo Fi Rave
Bam Hit
Bim Hit
TapeRewind
Phono Noise
Dance Snare1
Power Snare2
Elec Snare 1
Dance Snare2
Elec Snare 2
Elec. Snare
Elec Snare 3
66sn260
TR-707 SD
808 Snare 1
808 Snare 2
TR-808 SD2
909 Snare 1
909 Snare 2
909 SD 1
TR-909 SD2
Rap Snare
JungleSD1
House SD
House Snare
House SD
Voice Tah
Noise Slap
PC: 12 [CC32: 4]
TECHNO
Rap Snare
Techno Hit
Philly Hit
Shock Wave
Lo Fi Rave
Bam Hit
Bim Hit
TapeRewind
Phono Noise
Dance Snare1
Power Snare2
Elec Snare 1
Dance Snare2
Elec Snare 2
Elec. Snare
Elec Snare 3
66sn260
TR-707 SD
808 Snare 1
808 Snare 2
TR-808 SD2
909 Snare 1
909 Snare 2
909 SD 1
TR-909 SD2
Rap Snare
JungleSD1
House SD
House Snare
House SD
Voice Tah
Noise Slap
(C7) (96)
C8 108
C9G9120
98
100
101
103
105
107
110
112
113
115
117
119
122
124
125
127
97
99
102
104
106
109
111
114
116
118
121
123
126
PC: 13 [CC32: 4]
ROOM L/R
85Rm BsDrum2
Crash Cym.1
82Rm Snare2
Ride Cymbal
82Rm Snare1
Room Tom 5
Room Chh
Room Tom 2
Ride Bell
Room Tom 2
R8 Ohh2
82RmBsDrum1P
82RmBsDrum2P
82JzCrsCym1P
82RmSnare2 P
Ride__c P
82RmSnare1P
Room Tom 5 P
82Rm ClsHatP
Room Tom 2 P
Ridbl_c P
Room Tom 2 P
82RmOpenHatP
---
---
---
---
---
---
---
---
---
PC: 14 [CC32: 4]
HOUSE
House SD
Techno Hit
Philly Hit
Shock Wave
Lo Fi Rave
Bam Hit
Bim Hit
TapeRewind
Phono Noise
Dance Snare1
Power Snare2
Elec Snare 1
Dance Snare2
Elec Snare 2
Elec. Snare
Elec Snare 3
66sn260
TR-707 SD
808 Snare 1
808 Snare 2
TR-808 SD2
909 Snare 1
909 Snare 2
909 SD 1
TR-909 SD2
Rap Snare
JungleSD1
House SD
House Snare
House SD
Voice Tah
Noise Slap
PC: 17 [CC32: 4]
POWER
--Std.1 Snare1
Std.1 Snare2
Std.2 Snare1
Std.2 Snare2
Tight Snare
Standard SN1
LD Snare M
LD Snare C
Jazz Snare 1
Jazz Snare 2
Room Snare 1
Room Snare 2
Dance Snare1
Power Snare1
Rev.Snare
Power Snare2
Elec Snare 1
Dance Snare2
Elec Snare 2
Elec. Snare
Elec Snare 3
TR-707 SD
808 Snare 1
808 Snare 2
909 Snare 1
909 Snare 2
Rap Snare
JungleSD1
House SD
House Snare
House SD
PC: 20 [CC32: 4]
V-Rock1
CajonHi
CajonHiFlm
CajonLo
CajonLoFlm
FlmncoHClp1
FlmncoHClp1
BongoCowBell
AfHey
MamboCowBell
MexFVox2
AfFoots
MexFVox1
MexMVox1
YodelFVox1
MexMVox2
YodelMVox1
MexMVox3
FlmncoFVox1
YodelFVox2
FlmncoFVox2
NewWhistle1
FlmncoFVox3
NewWhistle2
FlmncoMVox1
FlmncoMVox2
BrazilVox1
FlmncoMVox3
BrazilVox2
BrazilVox3
AfAahhh
p33137v
p33168v
PC: 19 [CC32: 4]
V-Rock2
CajonHi
CajonHiFlm
CajonLo
CajonLoFlm
FlmncoHClp1
FlmncoHClp1
BongoCowBell
AfHey
MamboCowBell
MexFVox2
AfFoots
MexFVox1
MexMVox1
YodelFVox1
MexMVox2
YodelMVox1
MexMVox3
FlmncoFVox1
YodelFVox2
FlmncoFVox2
NewWhistle1
FlmncoFVox3
NewWhistle2
FlmncoMVox1
FlmncoMVox2
BrazilVox1
FlmncoMVox3
BrazilVox2
BrazilVox3
AfAahhh
p33137v
p33168v
PC: 25 [CC32: 4]
ELECTRONIC
--Techno Hit
Philly Hit
Shock Wave
Lo Fi Rave
Bam Hit
Bim Hit
TapeRewind
Phono Noise
Dance Snare1
Power Snare2
Elec Snare 1
Dance Snare2
Elec Snare 2
Elec. Snare
Elec Snare 3
66sn260
TR-707 SD
808 Snare 1
808 Snare 2
TR-808 SD2
909 Snare 1
909 Snare 2
909 SD 1
TR-909 SD2
Rap Snare
JungleSD1
House SD
House Snare
House SD
Voice Tah
Noise Slap
PC: 26 [CC32: 4]
TR-808
--Techno Hit
Philly Hit
Shock Wave
Lo Fi Rave
Bam Hit
Bim Hit
TapeRewind
Phono Noise
Dance Snare1
Power Snare2
Elec Snare 1
Dance Snare2
Elec Snare 2
Elec. Snare
Elec Snare 3
66sn260
TR-707 SD
808 Snare 1
808 Snare 2
TR-808 SD2
909 Snare 1
909 Snare 2
909 SD 1
TR-909 SD2
Rap Snare
JungleSD1
House SD
House Snare
House SD
Voice Tah
Noise Slap
PC: 27 [CC32: 4]
DANCE
Rap Snare
Techno Hit
Philly Hit
Shock Wave
Lo Fi Rave
Bam Hit
Bim Hit
TapeRewind
Phono Noise
Dance Snare1
Power Snare2
Elec Snare 1
Dance Snare2
Elec Snare 2
Elec. Snare
Elec Snare 3
66sn260
TR-707 SD
808 Snare 1
808 Snare 2
TR-808 SD2
909 Snare 1
909 Snare 2
909 SD 1
TR-909 SD2
Rap Snare
JungleSD1
House SD
House Snare
House SD
Voice Tah
Noise Slap
PC: 28 [CC32: 4]
CR-78
--Techno Hit
Philly Hit
Shock Wave
Lo Fi Rave
Bam Hit
Bim Hit
TapeRewind
Phono Noise
Dance Snare1
Power Snare2
Elec Snare 1
Dance Snare2
Elec Snare 2
Elec. Snare
Elec Snare 3
66sn260
TR-707 SD
808 Snare 1
808 Snare 2
TR-808 SD2
909 Snare 1
909 Snare 2
909 SD 1
TR-909 SD2
Rap Snare
JungleSD1
House SD
House Snare
House SD
Voice Tah
Noise Slap
PC: 29 [CC32: 4]
TR-606
--Techno Hit
Philly Hit
Shock Wave
Lo Fi Rave
Bam Hit
Bim Hit
TapeRewind
Phono Noise
Dance Snare1
Power Snare2
Elec Snare 1
Dance Snare2
Elec Snare 2
Elec. Snare
Elec Snare 3
66sn260
TR-707 SD
808 Snare 1
808 Snare 2
TR-808 SD2
909 Snare 1
909 Snare 2
909 SD 1
TR-909 SD2
Rap Snare
JungleSD1
House SD
House Snare
House SD
Voice Tah
Noise Slap
r
98
Page 99

Backing Module BK-7m
C2 36
38
40
41
43
45
47
37
39
42
44
46
C3 48
50
52
53
55
57
59
49
51
54
56
58
C4 60
62
64
65
67
69
71
61
63
66
68
70
C5 72
74
76
77
79
81
83
73
75
78
80
82
C6 84
C7 96
86
88
89
91
93
95
85
87
90
92
94
C0 12
14
16
17
19
21
23
13
15
18
20
22
C–1 0
2
4
5
7
9
11
1
3
6
8
10
C1 24
26
28
29
31
33
35
25
27
30
32
34
PC: 30 [CC32: 4]
TR-707
Elec Kick 2
Elec Kick 1
CR78 BD 1
CR78 BD 2
TR-606 BD1
TR-707 BD
808 Kick
TR-808 Kick
808 BD
TR-909 Kick
Dance Kick 2
909 Comp BD
TR-909 BD2
HipHop BD2
JungleBD Set
Techno BD1
Bounce
Voice One
Voice Two
Voice Three
---
--MC-500 Beep
MC-500 Beep
Concert Snr
Snare Roll
FingerSnaps2
High-Q
Slap
Scrtch Push2
Scrtch Pull2
Sticks
SquareClick
Mtrnm.Click
Mtrnm. Bell
TR-707 BD 2
TR-707 BD
TR-707 Rim
TR-707 SD
707 Claps
TR-707 SD 2
TR-707 Tom
TR-707 HH-c
TR-707 Tom
TR-707 HH-c
TR-707 Tom
TR-707 OHH
TR-707 Tom
TR-707 Tom
909 Crash
TR-707 Tom
909 Ride Cym
ChinaCymbal
Ride Bell
344Tambourn
Splash Cym.
808cowbe
Crash Cym.2
Vibraslap
RideCym Edge
Bongo High
Bongo Lo
Mute H.Conga
Conga Hi Opn
Conga Lo Opn
High Timbale
Low Timbale
Agogo
Agogo
Cabasa
808marac
ShrtWhistle
LongWhistle
Short Guiro
Long Guiro
Claves
Woodblock
Woodblock
Hoo
Hoo
MuteTriangl
OpenTriangl
626 Shaker
Jingle Bell
Bell Tree
Castanets
Mute Surdo
Open Surdo
Small Club
---
---
---
---
---
---
---
---
PC: 31 [CC32: 4]
TR-909
Elec Kick 2
Elec Kick 1
CR78 BD 1
CR78 BD 2
TR-606 BD1
TR-707 BD
808 Kick
TR-808 Kick
808 BD
TR-909 Kick
Dance Kick 2
909 Comp BD
TR-909 BD2
HipHop BD2
JungleBD Set
Techno BD1
Bounce
Voice One
Voice Two
Voice Three
---
--MC-500 Beep
MC-500 Beep
Concert Snr
Snare Roll
FingerSnaps2
High-Q
Slap
Scrtch Push2
Scrtch Pull2
Sticks
SquareClick
Mtrnm.Click
Mtrnm. Bell
Techno BD2
TR-909 BD2
TR-909 Rim
909 SD 1
909 HandClap
TR-909 SD2
909 Tom
TR-707 HH-c
909 Tom
TR-707 HH-c
909 Tom
909 OH
909 Tom
909 Tom
909 Crash
909 Tom
909 Ride Cym
ChinaCymbal
Ride Bell
344Tambourn
Splash Cym.
808cowbe
Crash Cym.2
Vibraslap
RideCym Edge
Bongo High
Bongo Lo
Mute H.Conga
Conga Hi Opn
Conga Lo Opn
High Timbale
Low Timbale
Agogo
Agogo
Cabasa
808marac
ShrtWhistle
LongWhistle
Short Guiro
CR78 Guiro
808clave
Woodblock
Woodblock
Hoo
Hoo
MuteTriangl
OpenTriangl
626 Shaker
Jingle Bell
Bell Tree
Castanets
Mute Surdo
Open Surdo
Applause 2
---
---
---
---
---
---
---
---
PC: 33 [CC32: 4]
JAZZ
Std.1 Kick1
Std.1 Kick2
Std.2 Kick1
Std2 Kick2
Kick 1
Kick 2
Jazz Kick 1
Jazz Kick 2
Room Kick 1
Room Kick 2
Power Kick1
Power Kick2
Elec Kick 2
Elec Kick 1
TR-808 Kick
TR-909 Kick
Dance Kick 2
Voice One
Voice Two
Voice Three
82Br BsDrum1
82Br BsDrum2
MC-500 Beep
MC-500 Beep
Concert Snr
Snare Roll
Finger Snap
High-Q
Slap
ScratchPush
ScratchPull
Sticks
SquareClick
Mtrnm.Click
Mtrnm. Bell
82Jz BsDrum1
82Jz BsDrum2
Side Stick
82Jz Snare1
Hand clap2
82Jz Snare2
Real Tom 6
Jazz Clsd.HH
Real Tom 6
Pedal HiHat
Real Tom 4
Jazz Open HH
Real Tom 4
Real Tom 1
Crash Cym.1
Real Tom 1
Ride Cym IN
ChinaCymbal
Ride Bell
Tambourine
Splash Cym.
Cowbell
Crash Cym.2
Vibraslap
RideCym Edge
Bongo High
Bongo Lo
Mute H.Conga
Conga Hi Opn
Conga Lo Opn
High Timbale
Low Timbale
Agogo
Agogo
Cabasa
Maracas
ShrtWhistle
LongWhistle
Short Guiro
Long Guiro
Claves
Woodblock
Woodblock
Mute Cuica
Open Cuica
MuteTriangl
OpenTriangl
Shaker
Jingle Bell
Bell Tree
Castanets
Mute Surdo
Open Surdo
Applause
---
---
---
---
---
---
---
---
PC: 34 [CC32: 4]
JAZZ L/R
---
---
---
---
---
---
---
---
---
---
---
---
---
---
---
---
--Voice One
Voice Two
Voice Three
---
--MC-500 Beep
MC-500 Beep
Concert Snr
Snare Roll
Finger Snap
High-Q
Slap
ScratchPush
ScratchPull
Sticks
SquareClick
Mtrnm.Click
Mtrnm. Bell
82Jz BsDrum1
82Jz BsDrum2
Side Stick
82Jz Snare1
Hand clap2
82Jz Snare2
Real Tom 6
82JzClsHatB
Real Tom 6
Pedal HiHat
Real Tom 4
82JzOpenHatB
Real Tom 4
Real Tom 1
Crash1c B
Real Tom 1
Ride_i B
ChinaCymbal
Ridbl_c B
Tambourine
Splash Cym.
Cowbell
Crash Cym.2
Vibraslap
RideCym Edge
Bongo High
Bongo Lo
Mute H.Conga
Conga Hi Opn
Conga Lo Opn
High Timbale
Low Timbale
Agogo
Agogo
Cabasa
Maracas
ShrtWhistle
LongWhistle
Short Guiro
Long Guiro
Claves
Woodblock
Woodblock
Mute Cuica
Open Cuica
MuteTriangl
OpenTriangl
Shaker
Jingle Bell
Bell Tree
Castanets
Mute Surdo
Open Surdo
Applause
---
---
---
---
---
--82Jz BsDrum1
82Jz BsDrum2
PC: 41 [CC32: 4]
BRUSH
Std.1 Kick1
Std.1 Kick2
Std.2 Kick1
Std2 Kick2
Kick 1
Kick 2
Jazz Kick 1
Jazz Kick 2
Room Kick 1
Room Kick 2
Power Kick1
Power Kick2
Elec Kick 2
Elec Kick 1
TR-808 Kick
TR-909 Kick
Dance Kick 2
Voice One
Voice Two
Voice Three
---
--MC-500 Beep
MC-500 Beep
Concert Snr
Snare Roll
Finger Snap
High-Q
Slap
ScratchPush
ScratchPull
Sticks
SquareClick
Mtrnm.Click
Mtrnm. Bell
Jazz Kick 2
Jazz Kick 1
Side Stick
Brush Swirl
Brush Slap1
Brush Swirl
Lite Tom 4
Brs Chh
Lite Tom 4
Pedal HiHat
Lite Tom 4
Brush Ohh
Lite Tom 4
Lite Tom 4
Brush Crash
Lite Tom 4
Ride Cym IN
ChinaCymbal
Brush RideBL
Tambourine
Splash Cym.
Cowbell
Crash Cym.2
Vibraslap
RideCym Edge
Bongo High
Bongo Lo
Mute H.Conga
Conga Hi Opn
Conga Lo Opn
High Timbale
Low Timbale
Agogo
Agogo
Cabasa
Maracas
ShrtWhistle
LongWhistle
Short Guiro
Long Guiro
Claves
Woodblock
Woodblock
Mute Cuica
Open Cuica
MuteTriangl
OpenTriangl
Shaker
Jingle Bell
Bell Tree
Castanets
Mute Surdo
Open Surdo
Applause
---
---
---
---
---
---
---
---
PC: 42 [CC32: 4]
BRUSH 2
Std.1 Kick1
Std.1 Kick2
Std.2 Kick1
Std2 Kick2
Kick 1
Kick 2
Jazz Kick 1
Jazz Kick 2
Room Kick 1
Room Kick 2
Power Kick1
Power Kick2
Elec Kick 2
Elec Kick 1
TR-808 Kick
TR-909 Kick
Dance Kick 2
Voice One
Voice Two
Voice Three
82Jz BsDrum1
82Jz BsDrum2
MC-500 Beep
MC-500 Beep
Concert Snr
Snare Roll
Finger Snap
High-Q
Slap
ScratchPush
ScratchPull
Sticks
SquareClick
Mtrnm.Click
Mtrnm. Bell
82Br BsDrum1
82Br BsDrum2
Side Stick
82Br Snare1
82Br Snare2
Brush Swirl
Lite Tom 4
Brs Chh
Lite Tom 4
Pedal HiHat
Lite Tom 4
Brush Ohh
Lite Tom 4
Lite Tom 4
Brush Crash
Lite Tom 4
Ride Cym IN
ChinaCymbal
Brush RideBL
Tambourine
Splash Cym.
Cowbell
Crash Cym.2
Vibraslap
RideCym Edge
Bongo High
Bongo Lo
Mute H.Conga
Conga Hi Opn
Conga Lo Opn
High Timbale
Low Timbale
Agogo
Agogo
Cabasa
Maracas
ShrtWhistle
LongWhistle
Short Guiro
Long Guiro
Claves
Woodblock
Woodblock
Mute Cuica
Open Cuica
MuteTriangl
OpenTriangl
Shaker
Jingle Bell
Bell Tree
Castanets
Mute Surdo
Open Surdo
Applause
---
---
---
---
---
---
---
---
PC: 43 [CC32: 4]
BRUSH 2 L/R
---
---
---
---
---
---
---
---
---
---
---
---
---
---
---
---
--Voice One
Voice Two
Voice Three
---
--MC-500 Beep
MC-500 Beep
Concert Snr
Snare Roll
Finger Snap
High-Q
Slap
ScratchPush
ScratchPull
Sticks
SquareClick
Mtrnm.Click
Mtrnm. Bell
82Br BsDrum1
82Br BsDrum2
Side Stick
82Br Snare1
82Br Snare2
Brush Swirl
Lite Tom 4
82BrClsHatB
Lite Tom 4
Pedal HiHat
Lite Tom 4
82BrOpenHatB
Lite Tom 4
Lite Tom 4
82BrCrsCym1B
Lite Tom 4
82BrRdCymB
ChinaCymbal
82BrRdBellB
Tambourine
Splash Cym.
Cowbell
Crash Cym.2
Vibraslap
RideCym Edge
Bongo High
Bongo Lo
Mute H.Conga
Conga Hi Opn
Conga Lo Opn
High Timbale
Low Timbale
Agogo
Agogo
Cabasa
Maracas
ShrtWhistle
LongWhistle
Short Guiro
Long Guiro
Claves
Woodblock
Woodblock
Mute Cuica
Open Cuica
MuteTriangl
OpenTriangl
Shaker
Jingle Bell
Bell Tree
Castanets
Mute Surdo
Open Surdo
Applause
---
---
---
---
---
--82Br BsDrum1
82Br BsDrum2
PC: 44 [CC32: 4]
V-JazzBrush
HipHop BD1
Jazz Kick 1
Mex_Kik36
85Rm BsDrum1
85Rm BsDrum2
HipHop BD2
Techno BD1
JungleBD Set
HipHop BD1
909 Comp BD
85St BsDrum1
NewJzKik
NewRockKik
Cymbal Roll
NewRkCStk_2
82Rm Snare1
82Rm Snare2
85St Snare1
85St Snare2
NewJzSn2
NewJzSn1
NewR&BSn
IPopSn38_2
IPopSn40_2
IPopSn38_2
IPopGstS39_2
IPopSn38_2
FingerSnaps2
909 HandClap
808clap
Hand clap2
909 HandClap
NewJzHatPdl
GospelHClp1
IPopSRll30_1
NewJzKik
NewJzKik
NewJzSW1
NewJzSn1
NewJzSW2
NewJzSn2
NewJzTomLoFl
NewJzHat1
NewJzTomLo
NewJzHat2
NewJzTomMFl
NewJzHat3
NewRkTomMid
NewJzTomHiFl
NewJzCrCym1
NewJzTomHi
NewJzRide1
NewJzCrCym2
NewJzRide2
Tambourine
Splash Cym.
ChaChaCBell
NewJzCrCym1
Vibraslap
NewRkRdCym1
NewHiBongo
NewLoBongo
NewCongaSlp
NewCongaOp
NewLoConga
NewTmblHi
NewTmblLo
Agogo
Agogo
NewShaker2
NewShaker1
ShrtWhistle
LongWhistle
NewQuide1
NewQuide2
NewClaves
Woodblock
Woodblock
Mute Cuica
Open Cuica
MuteTriangl
OpenTriangl
Shaker
Jingle Bell
Bell Tree
Castanets
Mute Surdo
Open Surdo
Cana
NewTmblHiFlm
NewTmblLoFlm
NewTmblPHS
NewShekere1
NewShekere2
NHBngoMute
NewLBngoMute
CajonHi
PC: 49 [CC32: 4]
ORCHESTRA
Std.1 Kick1
Std.1 Kick2
Std.2 Kick1
Std2 Kick2
Kick 1
Kick 2
Jazz Kick 1
Jazz Kick 2
Room Kick 1
Room Kick 2
Power Kick1
Power Kick2
Elec Kick 2
Elec Kick 1
TR-808 Kick
TR-909 Kick
Dance Kick 2
Voice One
Voice Two
Voice Three
---
--MC-500 Beep
MC-500 Beep
Concert Snr
Snare Roll
Finger Snap
Jazz Clsd.HH
Pedal HiHat
Jazz Open HH
Ride Cymbal
Sticks
SquareClick
Mtrnm.Click
Mtrnm. Bell
Jazz Kick 1
Concert BD
Side Stick
Concert Snr
Castanets
Concert Snr
Timpani
Timpani
Timpani
Timpani
Timpani
Timpani
Timpani
Timpani
Timpani
Timpani
Timpani
Timpani
Timpani
Tambourine
Splash Cym.
Cowbell
Con.Cymbal2
Vibraslap
Concert Cym.
Bongo High
Bongo Lo
Mute H.Conga
Conga Hi Opn
Conga Lo Opn
High Timbale
Low Timbale
Agogo
Agogo
Cabasa
Maracas
ShrtWhistle
LongWhistle
Short Guiro
Long Guiro
Claves
Woodblock
Woodblock
Mute Cuica
Open Cuica
MuteTriangl
OpenTriangl
Shaker
Jingle Bell
Bell Tree
Castanets
Mute Surdo
Open Surdo
Applause
---
---
---
---
---
---
---
---
PC: 50 [CC32: 4]
ETHNIC
---
---
---
---
---
---
---
---
---
---
---
---
---
---
---
---
---
---
---
---
---
---
---
---
--Finger Snap
Tambourine
Castanets
Crash Cym.1
Snare Roll
Concert Snr
Concert Cym
Concert BD
Jingle Bell
Bell Tree
Bar Chimes
Wadaiko
Wadaiko Rim
Shimedaiko
Atarigane
Hyoushigi
Ohkawa
H kotsuzumi
L Kotsuzumi
Ban_Gu
Big Gong
Small Gong
Bend Gong
RAMA Cymbal
RAMA Cymbal
Gamelan Gong
Udo_Short
Udo_Long
Udo_slap
Bendir
Req_Dum
Req_tik
Tabla_Te
Tabla_Na
Tabla_Tun
Tabla_Ge
Tabla Ge Hi
Talking Drum
Bend tlk_drm
Caxixi
DJembe
Djembe_rim
Low Timbale
Timbl Paila
High Timbale
Cowbell
Bongo High
Bongo Lo
Mute H.Conga
Conga Hi Opn
Conga MtLow
Conga Slap
Conga Lo Opn
Conga Slide
Mut Pandiero
Opn Pandiero
Open Surdo
Mute Surdo
Tamborim
Agogo
Agogo
Shaker
Low Whistle
Low Whistle
Mute Cuica
Open Cuica
MuteTriangl
OpenTriangl
Short Guiro
Long Guiro
Cabasa Up
Cabasa Down
r
Drum Sets
99
Page 100

Backing Module BK-7m
Drum Sets
C–1 0
C0 12
C1 24
C2 36
C3 48
C4 60
C5 72
C6 84
C7 96
PC: 51 [CC32: 4]
KICK & SNARE
---
---
1
---
2
3
---
4
---
---
5
---
6
---
7
8
---
9
---
10
---
11
---
---
---
13
---
14
15
---
16
---
---
17
---
18
---
19
20
---
21
---
22
---
23
---
--CR78 BD 1
25
CR78 BD 2
26
27
TR-606 BD1
28
TR-707 BD
808 BD
29
909 Comp BD
30
TR-909 BD2
31
32
HipHop BD2
33
HipHop BD1
34
Jungle BD2
35
JungleBD Set
Techno BD2
Techno BD1
37
Mix Kick
38
39
Standard KK1
40
Std.1 Kick1
Std.1 Kick2
41
Std.2 Kick1
42
Std2 Kick2
43
44
Kick 1
45
Kick 2
46
Soft Kick
47
Jazz Kick 1
Jazz Kick 2
Concert BD
49
Room Kick 1
50
51
Room Kick 2
52
Power Kick1
Power Kick2
53
Elec Kick 2
54
Elec Kick 1
55
56
Elec. Kick
57
TR-808 Kick
58
TR-909 Kick
59
Dance Kick 2
Std.1 Snare1
Std.1 Snare2
61
Std.2 Snare1
62
63
Std.2 Snare2
64
Tight Snare
Concert Snr
65
Jazz Snare 1
66
Jazz Snare 2
67
68
Room Snare 1
69
Room Snare 2
70
Dance Snare1
71
Power Snare1
Rev.Snare
Power Snare2
73
Elec Snare 1
74
75
Dance Snare2
76
Elec Snare 2
House Snare
77
Elec. Snare
78
Elec Snare 3
79
80
808 Snare 1
81
808 Snare 2
82
909 Snare 1
83
909 Snare 2
Brush Swirl
Brush Tap
85
Brush Slap1
86
87
Brush Slap2
88
Brush Slap
Brush Swirl
89
Brush Swirl
90
Long Swirl
91
92
Standard SN1
93
LD Snare M
94
LD Snare C
95
Rap Snare
HipHop SD2
PC: 52 [CC32: 4]
KICK&SNARE 2
---
---
---
---
---
---
---
---
---
---
---
---
---
---
---
---
---
---
---
---
---
---
---
---
--CR78 BD 1
CR78 BD 2
TR-606 BD1
TR-707 BD
808 BD
909 Comp BD
TR-909 BD2
HipHop BD2
HipHop BD1
Jungle BD2
JungleBD Set
Techno BD2
Techno BD1
Mix Kick
Standard KK1
85St BsDrum1
85St BsDrum2
82Br BsDrum1
82Br BsDrum2
82Jz BsDrum1
82Jz BsDrum2
TR-909 BD2
909 Comp BD
ConcertBD Mt
Concert BD
85Rm BsDrum1
85Rm BsDrum2
HipHop BD1
Std2 Kick2
Jngl BD Roll
TR-909 BD2
Techno BD2
Techno BD1
HipHop BD2
TR-909 BD2
85St Snare2
85St Snare1
Std.2 Snare1
Std.2 Snare2
Tight Snare
Concert Snr
82Jz Snare1
82Jz Snare2
82Rm Snare2
82Rm Snare1
Rap Snare
House SD
Rev.Snare
Power Snare2
Elec Snare 1
Dance Snare1
Rap Snare
Dance Snare1
66sn260
909 SD 1
Elec Snare 2
Power Snare1
House SD
Jngl SD Roll
Brush Swirl
Brush Tap
82Br Snare1
82Br Snare2
Brush Slap
Brush Swirl
Brush Swirl
Long Swirl
Standard SN1
LD Snare M
LD Snare C
Rap Snare
HipHop SD2
PC: 53 [CC32: 4]
ASIA
---
---
---
---
---
---
---
---
---
---
---
---
---
---
---
---
---
---
---
---
---
---
---
---
--Gamelan Gong
Gamelan Gong
Gamelan Gong
Gamelan Gong
Gamelan Gong
Gamelan Gong
Gamelan Gong
Gamelan Gong
Gamelan Gong
Gamelan Gong
Gender
Gender
Gender
Gender
Gender
Bonang
Bonang
Bonang
Bonang
Bonang
RAMA Cymbal
RAMA Cymbal
Sagat R
Sagat L-c
Jaw Harp Wow
Wadaiko
Wadaiko Rim
Taiko
Shimedaiko
Atarigane
Hyoushigi
Ohkawa
H kotsuzumi
L Kotsuzumi
Yyoo Dude
Buk_f
Buk_r
Gengari_p
Gengari_m
Gengari_f
Gengari_m
Gengari S
Jang-Gu_c
Jang-Gu_k
Jang-Gu_r
Jing_p
Jing_f
Jing_m
Asian Gong 1
Big Gong
Small Gong
Pai Ban
Ban_Gu
tangu60
tanmt60
Bend Gong L
Bend Gong
Huyin Luo L
hynlo60
Huyin Luo Mt
Hu yin Luo H
Hynlo mute
naobo60
xaobo60
Dholak 1
Dholak 2
---
---
---
---
---
---
PC: 54 [CC32: 4]
CYMBAL&CLAPS
---
---
---
---
---
---
---
---
---
---
---
---
---
---
---
---
---
---
---
---
---
---
---
---
---
---
---
---
---
---
---
--rev.lvohh
Rev. LVCHH 1
Rev. LVCHH 2
Jungle HH
Close HiHat
Jazz Clsd.HH
Room Chh
Close HiHat1
Close HiHat2
TR-707 HH-c
606 CH
808__chh
TR-808 CHH
CR-78 chh
GS Pedal HH
Pedal HiHat
Pedal HiHat2
Half OpenHH1
Half OpenHH2
Open Hi Hat
Jazz Open HH
R8 Ohh2
Open HiHat2
909 OH
TR-707 OHH
606 HiHat Op
808__ohh
TR-808 OHH
CR-78 ohh
Crash Cym.1
Crash Cym.2
GS Crash
Brush Crash
Hard Crash
909 Crash
808 Crash
Crash Mute 1
Crash Mute 2
ReverseCymbl
Rev.Cymbal2
Reverse Cym.
rev.tra_crsm
Crash Cym.1
Splash Cym.
Ride Bell
Brush RideBL
Ride Cymbal
Ride Cymbal
Brush Ride
Ride Cym IN
Ride Cym IN
Ride Cym IN
RideCym Edge
RideCym Edge
RideCym Edge
606 Ride Cym
TR808 Ride
ChinaCymbal
Chaina Cym2
Hand Clap
Hand clap2
808clap
909 HandClap
HC2 Claps 2
707 Claps
PC: 55 [CC32: 4]
GAMELAN 1
---
---
---
---
---
---
---
---
---
---
---
---
---
---
---
---
---
---
---
---
---
---
---
---
---
---
---
---
---
---
---
---
---
---
---
--KendangWadon
KendangWadon
Bebarongan
Pelegongan
Kelontuk
Kelontuk Mt
Kelontuk Sid
Gong Wadon
Gong Lanang
Ceng Ceng
Kopyak Op
Kopyak Mt
Kajar
Kempur
Jegogan
Jegogan33up
Jegogan33dw
Jegogan33dw
Jegogan
Jublag
Jublag33up
Jublag33dw
Jublag33dw
Jublag
Penyacah33dw
Penyacah
Penyacah
Penyacah33up
Penyacah33dw
Penyacah33dw
Penyacah
Pemade33up
Pemade33dw
Pemade33dw
Pemade
Pemade
Pemade33up
Pemade33dw
Pemade33dw
Pemade
Pemade33up
Reyong33dw
Reyong33dw
Reyoung
Reyoung
Reyong33up
Reyong33dw
Reyong33dw
Reyoung
Reyoung
Reyong33up
Reyong33dw
Reyong33dw
---
---
---
---
---
---
---
---
PC: 56 [CC32: 4]
GAMELAN 2
---
---
---
---
---
---
---
---
---
---
---
---
---
---
---
---
---
---
---
---
---
---
---
---
---
---
---
---
---
---
---
---
---
---
---
--KendangWadon
KendangWadon
Bebarongan
Pelegongan
Kelontuk
Kelontuk Mt
Kelontuk Sid
Gong Wadon
Gong Lanang
Ceng Ceng
Kopyak Op
Kopyak Mt
Kajar
Kempur
Jegogan
Jegogan40up
Jegogan20dw
Jegogan20up
Jegogan40up
Jublag
Jublag40up
Jublag20dw
Jublag20up
Jublag40up
Penyacah20up
Penyacah40up
Penyacah
Penyacah40up
Penyacah20dw
Penyacah20up
Penyacah40up
Pemade40up
Pemade20dw
Pemade20up
Pemade20up
Pemade
Pemade40up
Pemade20dw
Pemade20up
Pemade20up
Pemade
Reyong20dw
Reyong20up
Reyong20up
Reyoung
Reyong40up
Reyong20dw
Reyong20up
Reyong40up
Reyoung
Reyong40up
Reyong20dw
Reyong20up
---
---
---
---
---
---
---
---
PC: 57 [CC32: 4]
SFX
---
---
---
---
---
---
---
---
---
---
---
---
---
---
---
---
---
---
---
---
--MC-500 Beep
MC-500 Beep
ytwn3.xtp
ytwn2.xtp
Guitar Slap
Chord Stroke
Chord Stroke
Biwa 3
Phono Noise
TapeRewind
Scrtch Push2
Scrtch Pull2
Gt.CutNoise2
Gt.CutNoise2
Dist.CutNoiz
Dist.CutNoiz
Bass Slide
Pick Scrape
High-Q
Slap
ScratchPush
ScratchPull
Sticks
SquareClick
Mtrnm.Click
Mtrnm. Bell
Gt.FretNoiz
Gt.CutNoise
Gt.CutNoise
String Slap
Fl.KeyClick
Laughing
Screaming
Punch
Heart Beat
Footsteps
Footsteps
Applause
Creaking
Door
Scratch
Wind Chimes
Car-Engine
Car-Stop
Car-Pass
Car-Crash
Siren
Train
Jetplane
Helicopter
Starship
Gun Shot
Machine Gun
Lasergun
Explosion
Dog
HorseGallop
Bird
Rain
Thunder
Wind
Seashore
Stream
Bubble
Kitty
Bird 2
Growl
Applause 2
Telephone 1
Telephone 2
Small Club
Small Club 2
ApplauseWave
Eruption
Big Shot
Perc. Bang
PC: 58 [CC32: 4]
RHYTHM FX
---
---
---
---
---
---
---
---
---
---
---
---
---
---
---
---
---
---
---
---
---
---
---
---
---
---
---
---
---
---
---
---
---
---
---
--Rev.Kick 1
Rev.ConBD
Rev.PowerK1
Rev.Elec.K1
Rev.Snare 1
Rev.Snare 2
Rev.Std1SD1
Rev.TightSD
Rev.DanceSD
Rev.808SD
Rev.Tom 1
Rev.Tom 2
Rev.Sticks
Rev.Slap
ReverseCymbl
Rev.Cymbal2
Rev.Open HH
Rev.RideCym.
Rev.CR-78OHH
Rev.Clsd.HH
Rev.BendGong
Rev.Belltree
Rev.Guiro
Rev.Bendir
Rev.GunShot
Rev.Scratch
Rev.Lasergun
Click
Tekno Thip
Pop Drop
Wood Slap
Dist.Kick
Syn.Drops
Rev.Hi-Q
ShrtWhistle
Ice Block
Digi Tambrn.
Alias
Mod.Bell
Tambourine
Metalic Perc
Velo FX Noiz
St.NoiseClap
Swish
Noise Slap
Voice 1
Voice Au
Hoo
Tape Stop 1
Tape Stop 2
Missile
Space Birds
FlyingMonstr
---
---
---
---
---
---
---
---
PC: 59 [CC32: 4]
RHYTHM FX 2
---
---
---
---
---
---
---
---
---
---
---
---
---
---
---
---
---
---
---
---
---
---
---
---
---
---
---
---
---
---
---
---
---
---
---
--rev.707bd
rev.909bd2
rev.hphp_bd1
rev.jgl_bd2
rev.tech_bd2
rev.606sn2
rev.cr78sd1
rev.cr78sd2
rev.jgl_sd2
rev.tech_sd2
rev.707sd
rev.606sn1
rev.909sd1
rev.hphp_sd2
rev.jgl_sd1
Rev House SD
Rev. LVCHH 1
rev.606htcl
rev.707chh
rev.808chh
rev.jgl_hh
rev.344tmb2
rev.344tmb3
rev.808ohh
rev.707ohh
rev.lvohh
rev.606cym
Rev. HynLuo
rev.707fx
Voice One
rev.one
Voice Two
rev.two
Voice Three
rev.three
Voice Tah
rev.tah
Voice 1
Voice Au
Voice Whey
Frog Vpoce
rev.yyooh
Douby
rev.douby
Baert
Baert
Bounce
rev.bounce
Dist Knock
ytwn3.xtp
xxx
Noise Attack
SpaceWorms
Emergency!
Calculating
SawLFOSaw
---
---
---
---
---
PC: 60 [CC32: 4]
RHYTHM FX 3
---
---
---
---
---
---
---
---
---
---
---
---
---
---
---
---
--R Bs Mute NZ
R Bs StQuail
R Bs Atk NZ
R ClnGtCutUp
R ClnGtCutDn
R ClnGtrMtUp
R ClnGtrMtDn
R DstGtCutUp
R DstGtCutDn
R DstGtrSgdn
R DstGtrMute
R SlGtrSdNz1
R SlGtrSdNz2
R SlGtrSdNz3
R SlGtrSdNz4
R SlGtrStkSD
R SlGtrStkU1
R SlGtrStkD1
R SlGtrStkU2
R SlGtrStkD2
R Tbone NZ
R Tpet NZ
R St BsDrum1
R St BsDrum2
R Rm BsDrum1
R Rm BsDrum2
R Jz BsDrum1
R Jz BsDrum2
R Br BsDrum1
R Br BsDrum2
rev.hphp_bd1
rev.707bd
rev.jgl_bd2
rev.707bd
Rev.Kick 1
rev.909bd2
rev.hphp_bd1
rev.909bd2
rev.tech_bd2
R St Snare2
R St Snare1
R Rm Snare2
R Rm Snare1
R Jz Snare1
R Jz Snare2
R Br Snare1
R Br Snare2
R Br Snare1
Rev.Snare 1
R St Snare2
rev.606sn2
R Rm Snare2
Rev House SD
rev.hphp_sd2
rev.606sn1
rev.hphp_sd2
R Jz Snare2
Rev.Snare 1
Rev.808SD
Rev House SD
Rev.Hi-Q
Rev.DanceSD
Rev.Tom 1
Rev.Tom 1
Rev.Tom 1
R 606 Tom
R Jngl Crash
Rev. LVCHH 1
Rev. LVCHH 1
Rev.CR-78OHH
Rev. LVCHH 1
R Stab! 1
R Bounce
R St Snare2
R Br Snare1
rev.hphp_sd2
Shaker
Rev.Slap
R Clap Hit
R Boeeeen
r
100
 Loading...