


JX-7091W
Issue 1 -6/19/13
These Instructions contain important information which will help you get best from your
equipment and ensure safe and correct assembly, use and maintenance.
If you need help or have damaged or missing parts, call the Customer Helpline: 0345 600 1714
http://www.argoshelpdesk.co.uk
Assembly & User’s Instructions- Please Keep for future reference
335/9071
Important –
Please read these instructions fully before assembly or use
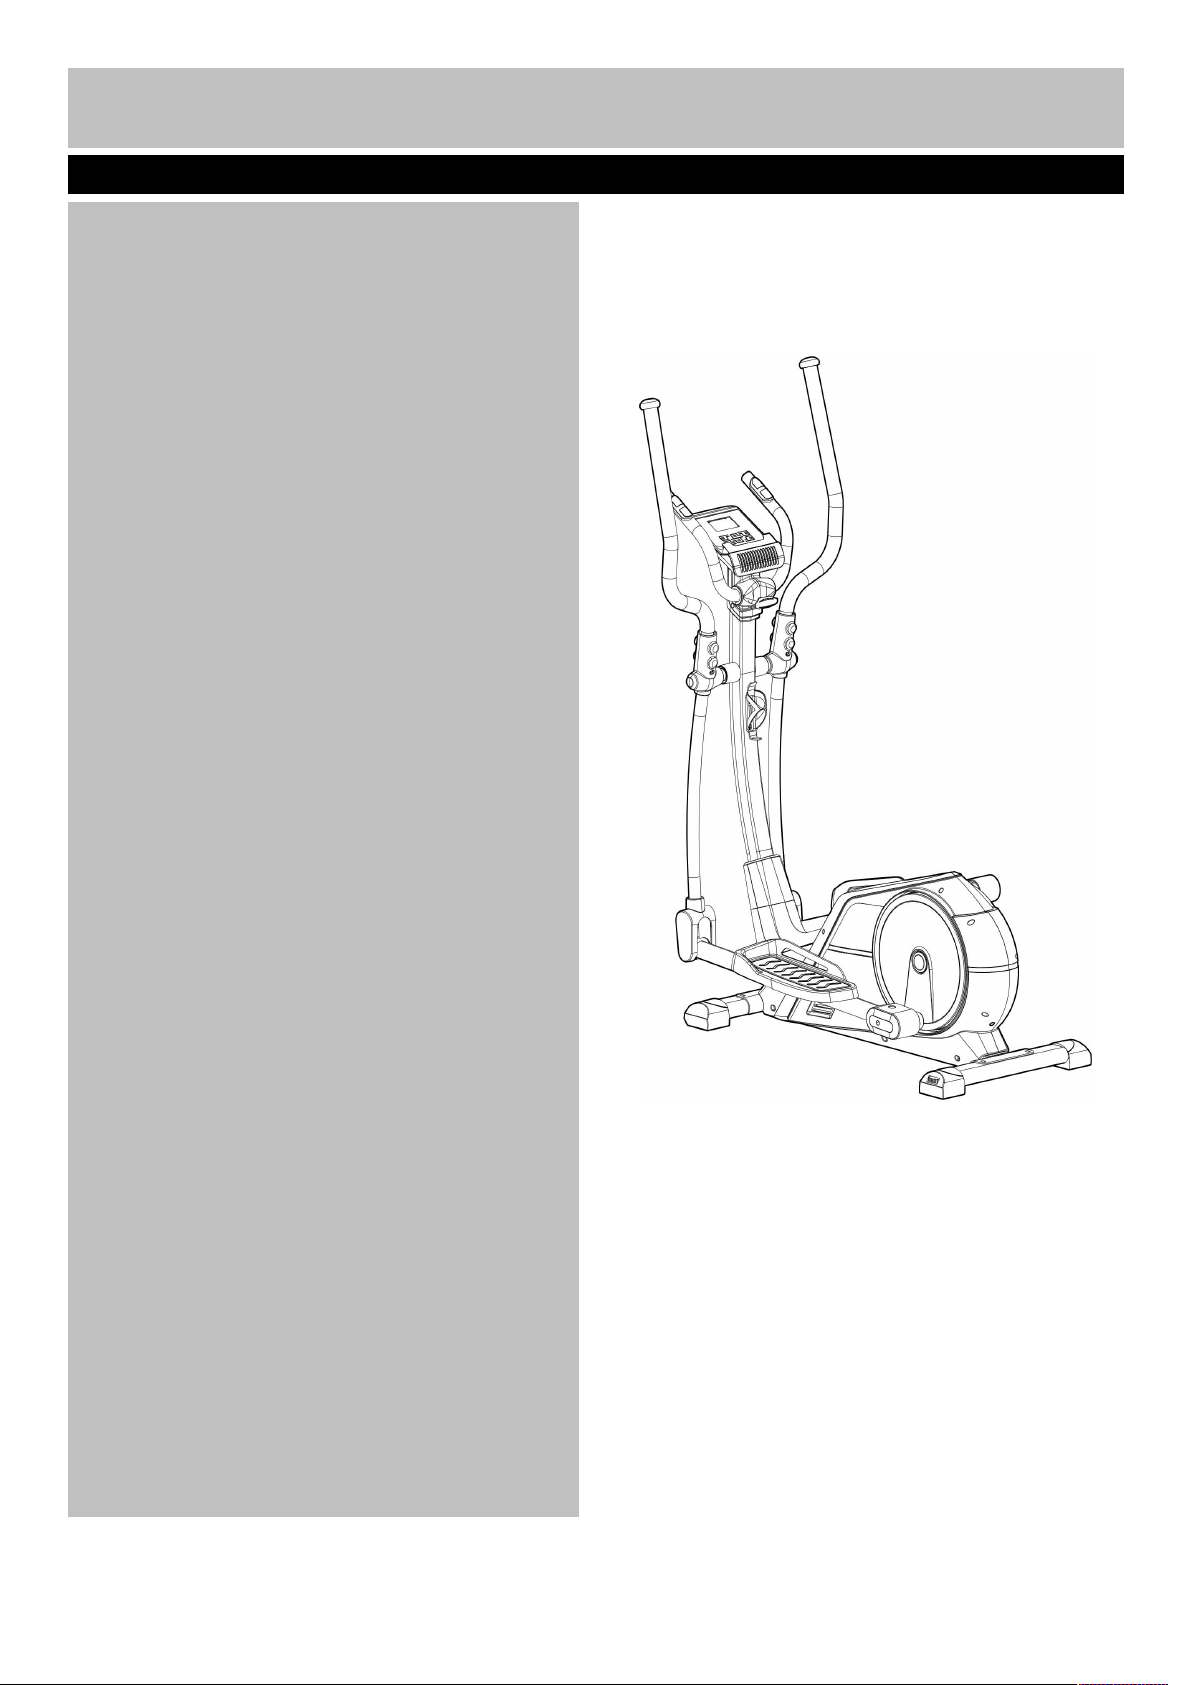
Roger Black Gold Cross Trainer
413/7089
Contents
Safety Information
2
Components - Parts
3
Components – Fixings
4
Assembly Instructions
5-11
Free area and training area
12
Computer Operation
13-21
Exercise Information
22
. Before Starting Exercise
22
. Muscle Chart
23
. Warning up & Cooling Down
24-25
Care and Maintenance
26
Exploded Parts Diagram
27
Parts List
28-29
Guarantee
1

Assembly
Using
To reduce the risk of serious injury, read the entire manual before you assemble or operate the Roger Black
Gold Cross Trainer. In particular, note the following safety precautions:
• Check you have all the components and tools listed
on pages 3 and 4.
• Remove all fittings from the plastic bags and
separate them into their groups.
• Keep children and animals away from the work
area, small parts can pose a choking hazard if
swallowed.
• Make sure you have enough space to layout the
parts before starting.
• The assembly of this equipment is best carried out
by 2 people.
• Assemble the item as close to its final position (in
the same room) as possible.
• This equipment must be built and used on a stable
and level surface.
• Dispose of all packaging carefully and responsibly.
• Do not use the equipment near water or outdoors.
• Keep children and pets away from the equipment
at all times. Do not leave children unattended in the
same room with the equipment.
• Before using the equipment to exercise, always
warm up and stretch.
•This product is intended for domestic use only.
• If the user experiences dizziness, nausea, chest
pain or any other abnormal symptoms STOP the
workout at once.
CONSULT A DOCTOR IMMEDIATELY
• Only one person at a time should use the
equipment.
• Keep hands away from all moving parts.
• Always wear appropriate workout clothing when
exercising. Do not wear loose flowing clothing that
could become caught in the equipment. Trainers
must also be wore when using the equipment.
• Use the equipment only for the intended use, as
described in this manual. Do not use attachments
not recommended by the manufacturer.
• Do not place any sharp objects on or near the
equipment.
• Disabled persons should not use the equipment
without a qualified person or doctor in attendance.
• Never operate or use the equipment if it is
damaged or not functioning properly.
• Examine the equipment frequently especially the
easily damaged parts. The safety level of the
equipment can only be maintained if it is examined
regularly. Replace any defective components
immediately. Do not use the equipment until it has
been repaired.
• Parents and others responsible for children must
be aware that playing on the equipment could be
dangerous and lead to possible injury. Children
must not be left unattended with the equipment.
• This product is suitable for a maximum user
weight of: 125kgs.
• Your product is intended for use in a clean and dry
environment. You should avoid storage in
excessively cold or damp places .
• This product conforms to: BS EN ISO 20957-1 and
BS EN 957-9. Class (H) - Home Use - Class (C).
• This exercise equipment has been designed and
manufactured to comply with the latest (BS EN 957)
British and European Safety Standards.
Warning: Before beginning any exercise programme, consult your doctor. This is especially
important for individuals over the age of 35 or persons with pre-existing health problems. You
MUST read all instructions before using any fitness equipment. Argos assumes no responsibility for
personal injury or property damage sustained by or through the use of this product.
Important –
Please read fully before assembly or use
Safety Information
2
Note: Please check carefully before contacting Argos regarding any missing components.
Total mass of the product is 43kg. Footprint of the product is 122.5 × 67.5 cm.
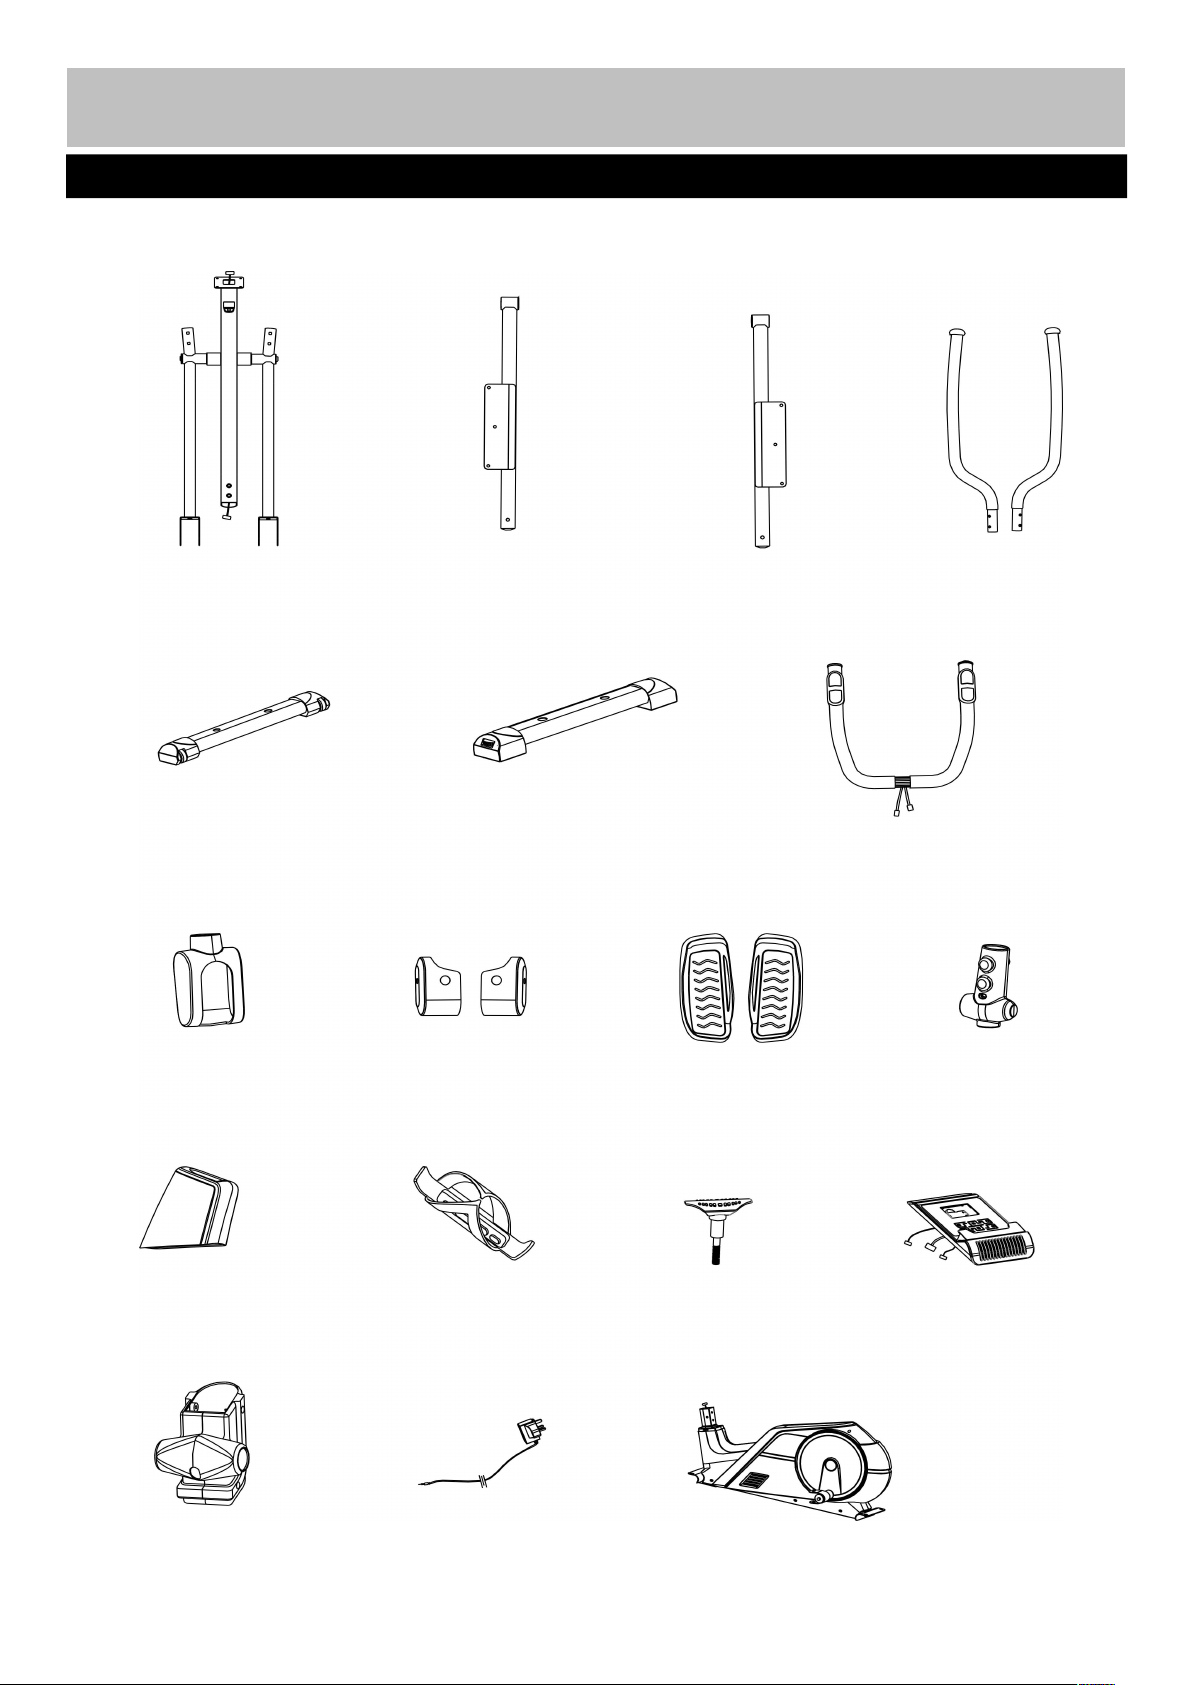
Components - Parts
If you have damaged or missing parts, please
call the Customer Helpline: 0345 600 1714
3
Please check you have all parts listed below
2. Left Footplate Bar
3. Right Footplate Bar
24/25. Handrail Bottom
Cover x 2
37. Front Post Cover
26/27. L&R Foot Bar Cover
32/33. L&R Footplate
35/36.Handrail
Front/Rear Cover x 2
43. Bottle Holder
48. M8 T-Shaped Knob
60. Computer
91/92. L&R Front Post Cover
93. Power Charge
1. Main Frame
11. Front Post
4. Front Stabilizer
8. Handles (L&R)
10. Fixed Handle
5. Rear Stabilizer

Note
:
Please check carefully before contacting Argos regarding any missing fixings.
Components – Fixings
Please check you have all the fixings listed below
4
818283
70
59
M10x69 Allen Bolt x 2
85
878079
75
747371
69
86
M8x87 Allen Bolt x 2
M8×42mm Hex Bolt x 4
Ø9×Ø22×R19mm Arc Washer x 4
Ø10mm Washer x 4
M10×20mm Allen Bolt x 4
Ø8mm Washer x 10
M10 Nut x 2
Ø9×Ø22×R30mm Arc Washer x 2
M8×15mm Allen Bolt x 12
ST4.2×15mm Philips Screw x 12
M8 Nut x 6
Ø8mm Spring Washer x 12
Plastic Ring x 2
Ø10mm Spring Washer x 4
Multi Wrench
6# Allen Key
5# Allen Key
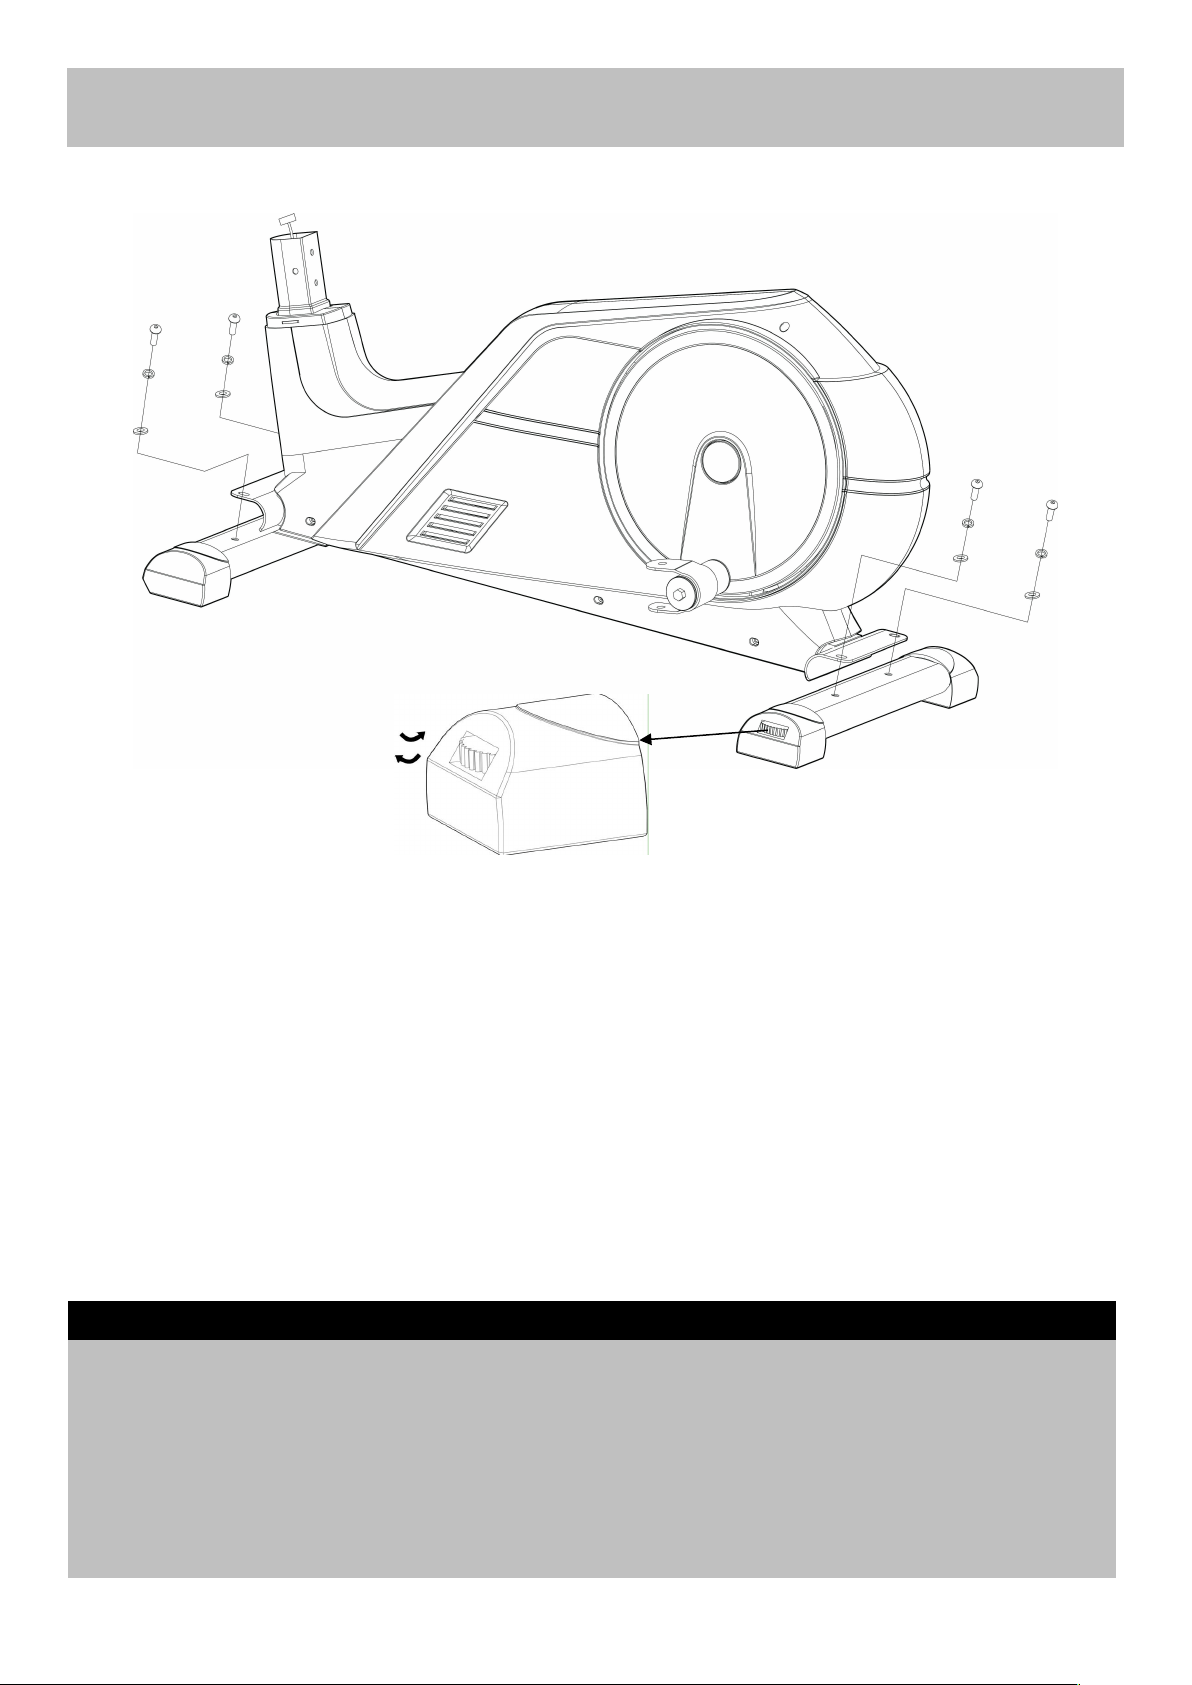
Assembly Instructions
a. Attach the Front Stabilizer (4) to the Main Frame (1) using 2 x M10x20mm Allen Bolts (80), 2 x 10mm
Washers (74) and 2x10mm Spring Washers (71).
b. Attach the Rear Stabilizer (5) to the Main Frame (1) using 2 x M10x20mm Allen Bolts (80), 2 x 10mm
Washers (74) and 2x10mm Spring Washers (71).
Note: The round gear on the Level Feet (22) can be rotated to ensure the cross trainer sit flat on the
ground as shown in the diagram. Turn it anti clockwise to increase height and turn it clockwise to
decrease height.
Step 1
5
4
80
80
71
71
74
74
1
80
80
71
71
74
74
5
Assembly Instructions
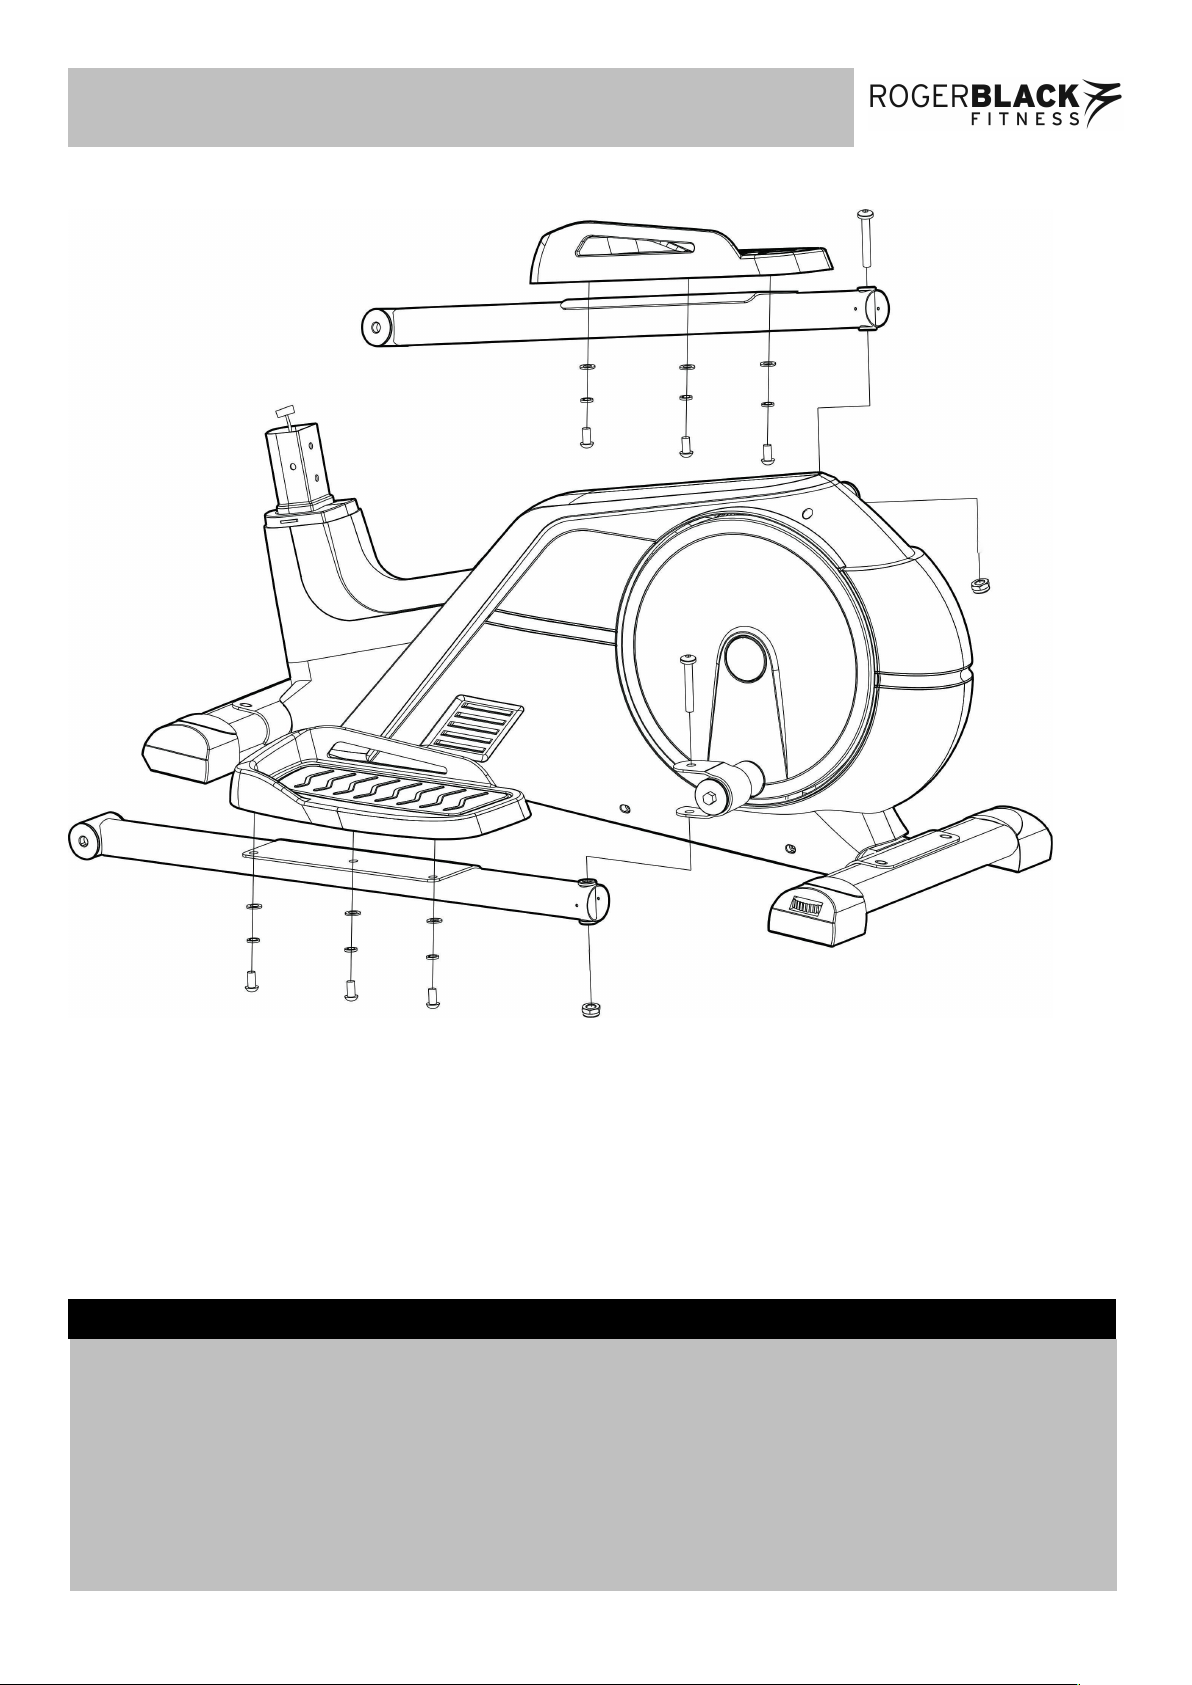
Step 2
a. Attach the Left Footplate (32) to the Left Footplate Bar (2) using 3 x M8×15mm Allen Bolts (79), 3 x
Ø8mm Spring Washers (73), 3 x Ø8mm Washers (75).
b. Attach the Right Footplate (33) to the Right Footplate Bar (3) using 3 x M8×15mm Allen Bolts(79), 3 x
Ø8mm Spring Washers (73), 3 x Ø8mm Washers (75).
c. Fix the Left & Right Footplate Bar (2, 3) to the Crank Connector (6) using 2 x Ø10×69mm Allen Bolts
(81), 2 x M10 Nuts (69).
6
757575
75
75
75
73
737373
73
73
797979
79
79
79
69
69
32
33
81
81
632
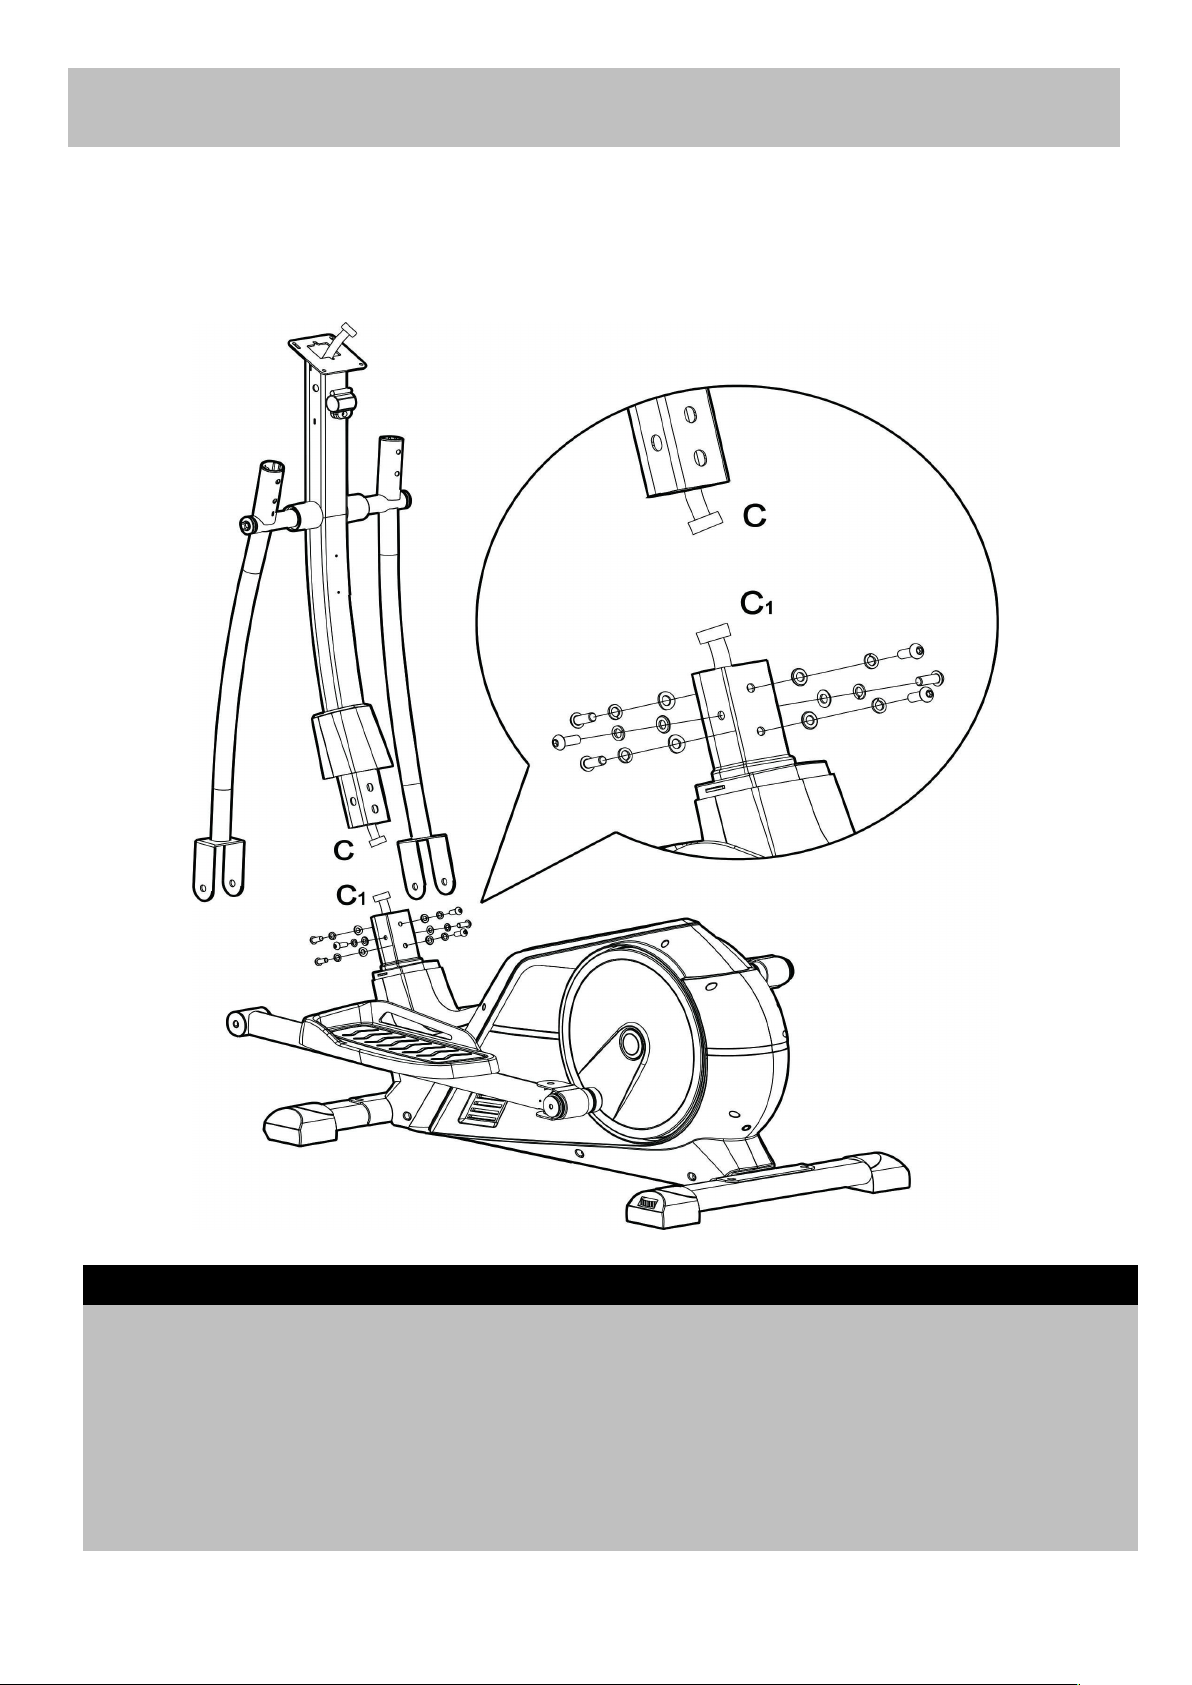
Assembly Instructions
a. Place the Front Post (11) through the Front Post Cover (37).
b. Connect the Wire (C) to the wire (C1).
c. Fix the Front Post (11) to the Main Frame (1) using 6 x M8×15mm Allen Bolts (79), 6 x Ø8mm Spring
Washers (73), 2 x Ø9xØ22×R30mm Arc Washers (85), 4 x Ø8mm Washers (75).
Step 3
7
11
79
73
85
79
79173
85
73
73
75
79
797975
37
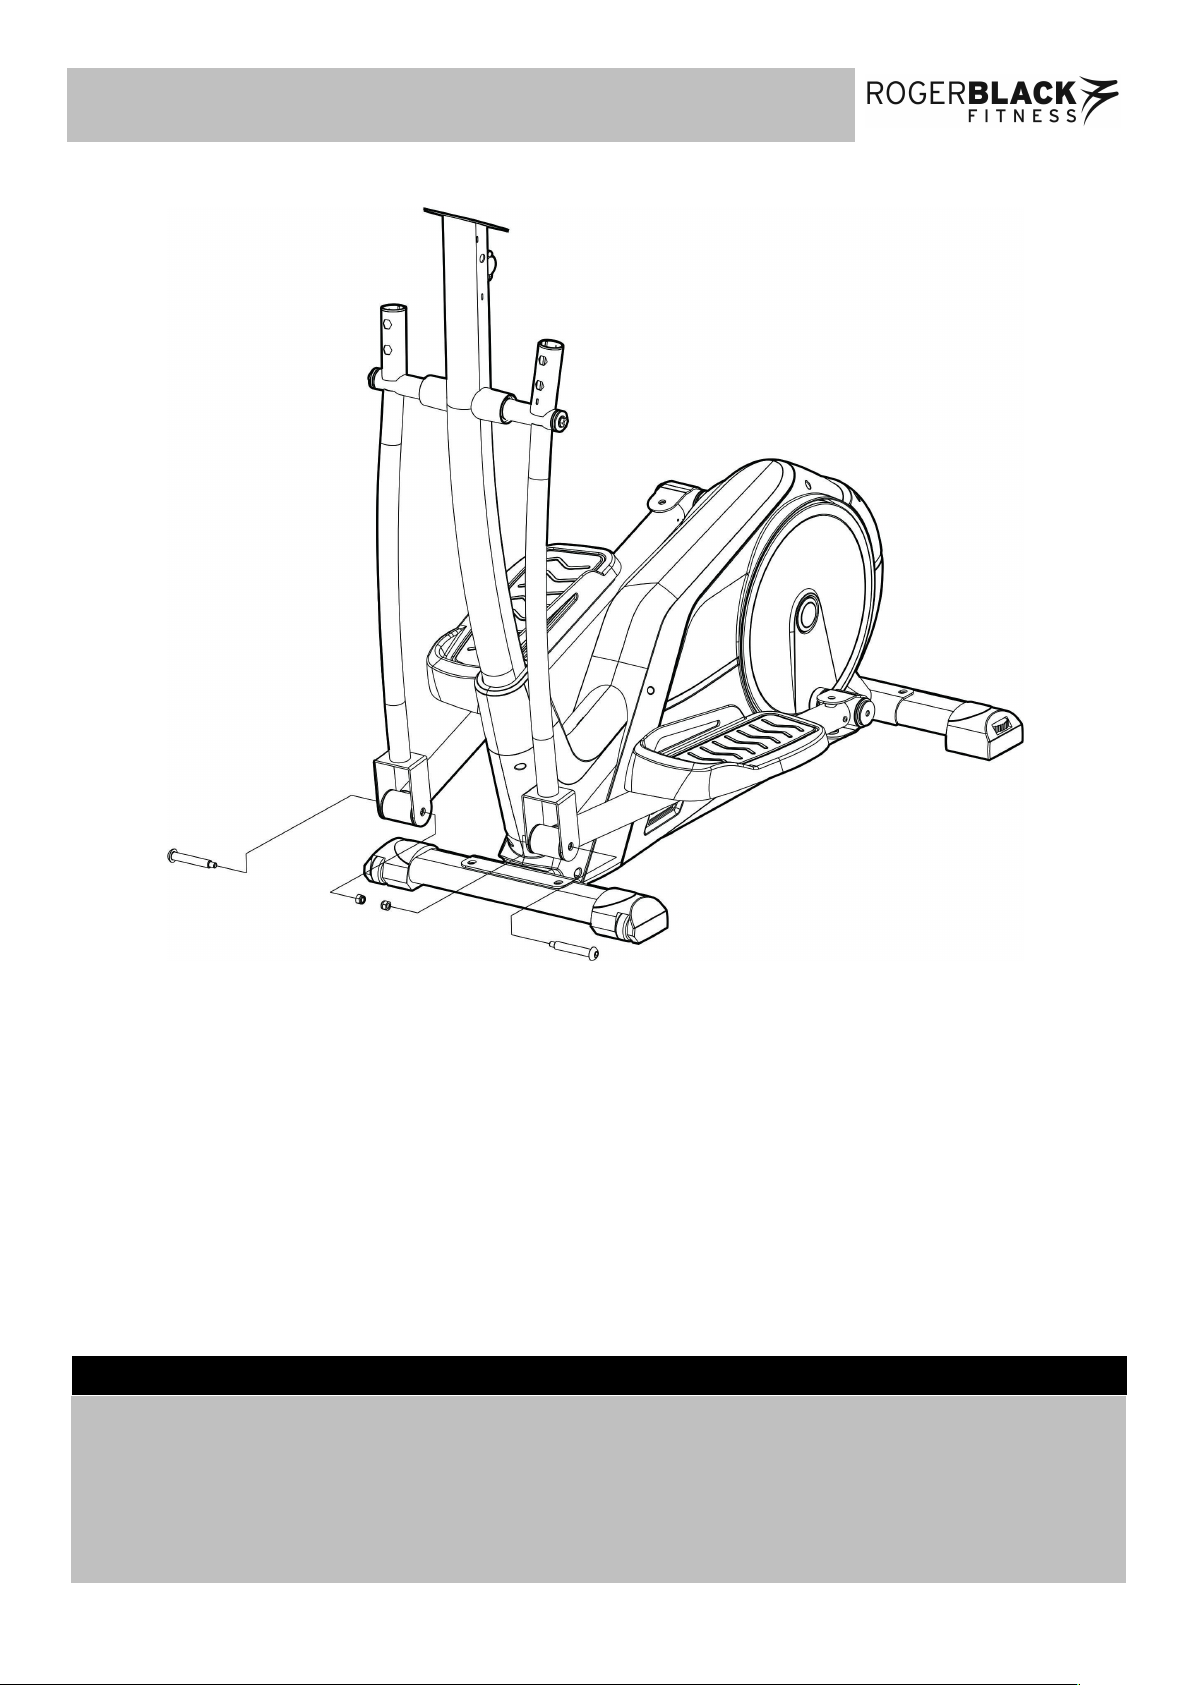
Assembly Instructions
a. Fix the Left Footplate Bar (2) to the Left Action Arm (12) using 1 x Ø11.5×67mm Allen Bolt (82), 1 x M8
Aircraft Nut (70).
b. Fix the Right Footplate Bar (3) to the Right Action Arm (13) using 1 x Ø11.5×67mm Allen Bolt (82), 1 x
M8 Aircraft Nut (70).
8
Step 4
13
82
12
70
70
82
2
3
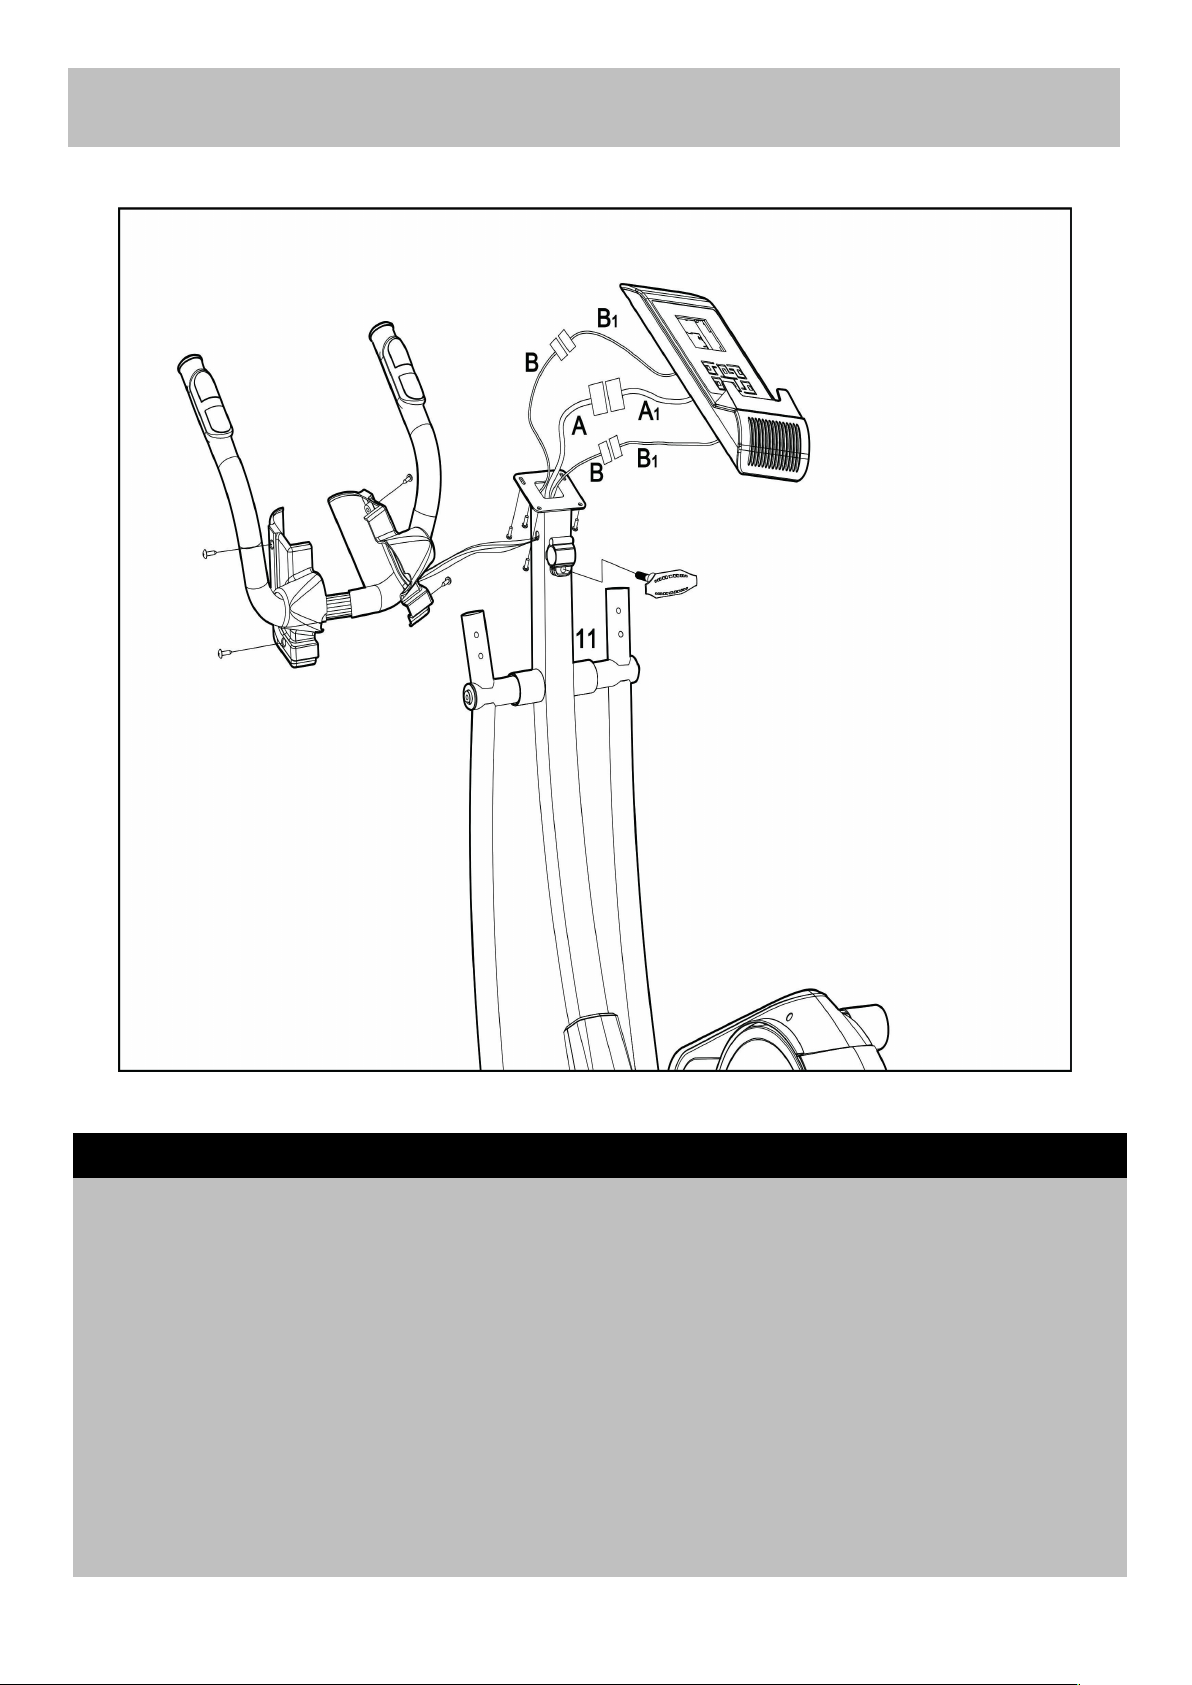
Step 5
a. Place the L&R Front Post Cover (91/92) through the Fixed Handle (10).
b. Thread the lead wire from the Fixed Handle (10) into the Front Post (11), and pull out from the top hole
of the Front Post (11).
c. Secure the Fixed Handle (10) to the Front Post (11) using M8 T-shaped Knob (48). Adjust the Fixed
Handle (10) to your desired position, then tighten with M8 T-shaped Knob (48).
d. Fix the Left Front Post Cover (91) and Right Front Post Cover (92) using 4 x ST4.2×15mm Philips
Screw (87).
e. Connect the wire A to A1, B to B1 and plug them into the top hole of the Front Post (11), then fix the
Console (60) to the Front Post (11) using 4 x M5x12mm Dome Head Philips Bolts (95). Please note
that the part (95) is pre-assembled.
Assembly Instructions
9
878710
87
87
92
609548
959591
 Loading...