

Page 1
CENTERLINE 2100 Low Voltage
Motor Control Centers
Instruction Manual
2100-xxx
Page 2
Important User Information
Solid state equipment has operational characteristics differing from those of electromechanical equipment. Safety Guidelines
for the Application, Installation and Maintenance of Solid State Controls (publication SGI-1.1
Rockwell Automation sales office or online at http://literature.rockwellautomation.com
between solid state equipment and hard-wired electromechanical devices. Because of this difference, and also because of the
wide variety of uses for solid state equipment, all persons responsible for applying this equipment must satisfy themselves
that each intended application of this equipment is acceptable.
In no event will Rockwell Automation, Inc. be responsible or liable for indirect or consequential damages resulting from the
use or application of this equipment.
The examples and diagrams in this manual are included solely for illustrative purposes. Because of the many variables and
requirements associated with any particular installation, Rockwell Automation, Inc. cannot assume responsibility or liability
for actual use based on the examples and diagrams.
No patent liability is assumed by Rockwell Automation, Inc. with respect to use of information, circuits, equipment, or
software described in this manual.
Reproduction of the contents of this manual, in whole or in part, without written permission of Rockwell Automation, Inc., is
prohibited.
Throughout this manual, when necessary, we use notes to make you aware of safety considerations.
available from your local
) describes some important differences
WARNING
Identifies information about practices or circumstances that can cause an explosion in a
hazardous environment, which may lead to personal injury or death, property damage, or
economic loss.
IMPORTANT
ATTENTION
Identifies information that is critical for successful application and understanding of the product.
Identifies information about practices or circumstances that can lead to personal injury or death,
property damage, or economic loss. Attentions help you identify a hazard, avoid a hazard, and
recognize the consequence
SHOCK HAZARD
Labels may be on or inside the equipment, for example, a drive or motor, to alert people that
dangerous voltage may be present.
BURN HAZARD
Labels may be on or inside the equipment, for example, a drive or motor, to alert people that
surfaces may reach dangerous temperatures.
CENTERLINE, CENTERLINE 2100, ArcShield, Allen-Bradley, Rockwell Automation, and TechConnect are trademarks of Rockwell Automation, Inc.
Trademarks not belonging to Rockwell Automation are property of their respective companies.
Page 3

Summary of Changes
The information below summarizes the changes to this manual since
the last printing.
To help you find new and updated information in this release of the
manual, we have included change bars as shown to the right of this
paragraph.
Topic Page
Addition of ArcShield Throughout document
Updated tech support contact information Throughout document
Updated product dimensions 26
Updated seismic information 37
Addition of temperature measurement
techniques for preventative maintenance
95
3Publication 2100-IN012C-EN-P - April 2009 3
Page 4

Summary of Changes
Notes:
4 Publication 2100-IN012C-EN-P - April 2009
Page 5

General Information
Table of Contents
Preface
Additional Resources. . . . . . . . . . . . . . . . . . . . . . . . . . . . . . . 9
Purchased Components and Additional Instruction Sheets. . . 10
Chapter 1
General Description . . . . . . . . . . . . . . . . . . . . . . . . . . . . . . 11
Nameplate Data . . . . . . . . . . . . . . . . . . . . . . . . . . . . . . . . . 13
MCC Sequence Numbering . . . . . . . . . . . . . . . . . . . . . . . . . 14
UL/CSA Marking . . . . . . . . . . . . . . . . . . . . . . . . . . . . . . . . . 15
Short-circuit Rating Label. . . . . . . . . . . . . . . . . . . . . . . . . . . 16
Series Number and Series ID as Manufactured in the
United States. . . . . . . . . . . . . . . . . . . . . . . . . . . . . . . . . . . . 17
Series Lettering - Units and Sections. . . . . . . . . . . . . . . . . . . 20
Receiving, Handling and Storage . . . . . . . . . . . . . . . . . . . . . 22
Receiving. . . . . . . . . . . . . . . . . . . . . . . . . . . . . . . . . . . . 22
Handling . . . . . . . . . . . . . . . . . . . . . . . . . . . . . . . . . . . . 23
Storage and Operation . . . . . . . . . . . . . . . . . . . . . . . . . . 24
Installation Procedures
Installing Conduit and Cable
Chapter 2
Location Planning . . . . . . . . . . . . . . . . . . . . . . . . . . . . . . . . 25
Height Considerations . . . . . . . . . . . . . . . . . . . . . . . . . . . . . 25
Securing an MCC . . . . . . . . . . . . . . . . . . . . . . . . . . . . . . . . 26
Seismic Requirements . . . . . . . . . . . . . . . . . . . . . . . . . . . . . 37
Joining & Splicing New MCCs . . . . . . . . . . . . . . . . . . . . . . . 38
Joining & Splicing Existing MCCs . . . . . . . . . . . . . . . . . . . . . 38
Installing and Joining Pull Boxes . . . . . . . . . . . . . . . . . . . . . 38
Joining and Splicing NEMA Type 12 MCCs . . . . . . . . . . . . . . 39
Joining & Splicing NEMA Type 3R and Type 4 MCCs . . . . . . 39
Bus Torque Specifications . . . . . . . . . . . . . . . . . . . . . . . . . . 40
Chapter 3
Installing Conduit . . . . . . . . . . . . . . . . . . . . . . . . . . . . . . . . 41
Bottom Entry Conduit . . . . . . . . . . . . . . . . . . . . . . . . . . 41
Top Entry Conduit . . . . . . . . . . . . . . . . . . . . . . . . . . . . . 41
Installing Cable . . . . . . . . . . . . . . . . . . . . . . . . . . . . . . . . . . 42
Lugs . . . . . . . . . . . . . . . . . . . . . . . . . . . . . . . . . . . . . . . 42
Incoming Line Compartment . . . . . . . . . . . . . . . . . . . . . 43
Main Disconnect . . . . . . . . . . . . . . . . . . . . . . . . . . . . . . 43
Cable Bracing . . . . . . . . . . . . . . . . . . . . . . . . . . . . . . . . 43
Incoming Line Brace . . . . . . . . . . . . . . . . . . . . . . . . . . . 45
Chapter 4
Installing and Removing Plug-in
Units
5Publication 2100-IN012C-EN-P - April 2009 5
Installing Plug-in Units . . . . . . . . . . . . . . . . . . . . . . . . . . . . 47
Remove a Plug-in Unit with a Vertical Operating Handle
from a Section . . . . . . . . . . . . . . . . . . . . . . . . . . . . . . . . . . 48
Page 6

Table of Contents
Arc Flash Protection Marking as
Required by the National
Electrical Code
Operator Handle and Unit
Interlock
Remove a Plug-in Unit with a Horizontal Operating Handle
from a Section . . . . . . . . . . . . . . . . . . . . . . . . . . . . . . . . . . 53
Remove the Support Pan. . . . . . . . . . . . . . . . . . . . . . . . . . . 57
Chapter 5
Flash Protection Marking Requirement . . . . . . . . . . . . . . . . . 59
110.16 Flash Protection . . . . . . . . . . . . . . . . . . . . . . . . . 59
Arc Flash Marking Clarification . . . . . . . . . . . . . . . . . . . . . . 60
Rockwell Automation Services . . . . . . . . . . . . . . . . . . . . . . . 60
Chapter 6
Defeating the Unit Door Interlock . . . . . . . . . . . . . . . . . . . . 61
Open the Door when the Operating Handle is in the
ON/I Position . . . . . . . . . . . . . . . . . . . . . . . . . . . . . . . . 61
Defeating the Unit Interlock Lever . . . . . . . . . . . . . . . . . . . . 63
Energize a Unit with the Unit Door Open . . . . . . . . . . . . 63
Locking Provisions . . . . . . . . . . . . . . . . . . . . . . . . . . . . . . . 64
Lock Vertical Operating Handles in the OFF/O Position . 64
Lock Horizontal Operating Handles in the OFF/O
Position. . . . . . . . . . . . . . . . . . . . . . . . . . . . . . . . . . . . . 65
Lock Units with Operating Handles in the ON/I Position . 66
Unit Interlocks. . . . . . . . . . . . . . . . . . . . . . . . . . . . . . . . 68
Final Check List Before Energizing
Energizing the Equipment
Maintenance
Maintenance After Fault Condition
Renewal Parts
Chapter 7
Introduction . . . . . . . . . . . . . . . . . . . . . . . . . . . . . . . . . . . . 73
Pre-Energizing Check Procedure . . . . . . . . . . . . . . . . . . . . . 73
Perform the Pre-energizing Check Procedure . . . . . . . . . . . . 74
Chapter 8
Energize the Equipment . . . . . . . . . . . . . . . . . . . . . . . . . . . 89
Chapter 9
Maintain the MCC . . . . . . . . . . . . . . . . . . . . . . . . . . . . . . . . 91
Disconnect the Switch and Contact Lubrication . . . . . . . . . . 94
Use Thermal Infrared or Other Temperature Measurement
Techniques for Preventive Maintenance . . . . . . . . . . . . . . . . 95
Inspect the Units for Signs of Overheating . . . . . . . . . . . 96
Chapter 10
Maintain the MCC After a Fault Condition . . . . . . . . . . . . . . 99
Chapter 11
Order Information. . . . . . . . . . . . . . . . . . . . . . . . . . . . . . . 101
6 Publication 2100-IN012C-EN-P - April 2009
Page 7

Parts Illustrations
Table of Contents
Chapter 12
Typical Section Construction . . . . . . . . . . . . . . . . . . . . . . . 103
Typical Construction of a Unit with a Vertical Operating
Handle . . . . . . . . . . . . . . . . . . . . . . . . . . . . . . . . . . . . . . . 104
Typical Construction of a Half Space Factor Unit with a
Horizontal Operating Handle and Door Mounted Pilot
Devices . . . . . . . . . . . . . . . . . . . . . . . . . . . . . . . . . . . . . . 105
Typical Construction of a Unit with a Horizontal Operating
Handle . . . . . . . . . . . . . . . . . . . . . . . . . . . . . . . . . . . . . . . 106
Index
Publication 2100-IN012C-EN-P - April 2009 7
Page 8

Table of Contents
8 Publication 2100-IN012C-EN-P - April 2009
Page 9

Preface
Additional Resources
The following publications supplement this manual. For more
information and further reference, please use these available
publications.
Publication Name Publication No.
Arc-Flash Resistant Low Voltage Motor Control Center Designs
White Paper
Power Factor Correction Capacitors for Bulletin 2100 MCC
Starter Units Application Techniques
CENTERLINE 2100 Motor Control Centers Joining and Splicing
Vertical Sections Instructions
CENTERLINE 2100 Motor Control Centers (MCC) Units with
Vertical Operating Handles Installation Instructions
CENTERLINE Motor Control Centers NEMA Type 12 Sealing
Instructions
Receiving, Handling, and Storing Motor Control Centers 2100-IN040
MCC Instantaneous Trip Motor Circuit Protectors (MCP) in
Combination NEMA Starter, Soft Starter (SMC), and Variable
Frequency AC Drive Units Technical Data
MCC Inverse Time Circuit Breakers in Combination NEMA
Starter, Soft Starter (SMC), and Variable Frequency AC Drive
Units Technical Data
CENTERLINE Motor Control Centers Power Fuses Product Data 2100-TD003
DeviceNet Motor Control Centers (MCC) Technical Data 2100-TD019
2100-AP003
2100-AT001
2100-IN010
2100-IN014
2100-IN037
2100-TD001
2100-TD002
CENTERLINE 2100 Motor Control Center End Closing Plates
Installation Instructions
CENTERLINE 2100 Motor Control Center (MCC) Units with
Horizontal Operating Handles Installation Instructions
CENTERLINE Motor Control Centers Mains and Incoming Lines
Reference Document Update
CENTERLINE Motor Control Centers Installing a Pull Box on a
Bulletin 2100 Vertical Section Instructions
Safety Guidelines for the Application, Installation, and
Maintenance of Solid-state Control
2100-IN069
2100-IN060
2100-TD018
2100-IN029
SGI-IN001
You can view or download publications at
http://literature.rockwellautomation.com
. To order paper copies of
technical documents, contact your local Rockwell Automation
distributor or sales representative.
9Publication 2100-IN012C-EN-P - April 2009 9
Page 10

Preface
The documents in the following table are referenced in this document
and can be obtained from their respective organizations.
Resource Website
National Electrical Manufacturer’s Association (NEMA)
• NEMA ICS 1-2000 Industrial Control and Systems: General
Requirements
• NEMA ICS 2.3-1995, Instructions for Handling, Operation and
Maintenance of Motor Control Centers Rated Not More Than
600V
National Fire Protection Association (NFPA)
• NFPA 70 - National Electrical Code
• NFPA 70A - Recommended Practice for Electrical Equipment
Maintenance
• NFPA 70E - Standard for Electrical Safety in the Workplace
Institute of Electrical and Electronic Engineers (IEEE)
IEEE standard C37.20.7 - IEEE Guide for Testing Metal-Enclosed
Switchgear Rated Up to 38 kV for Internal Arcing Faults
www.nema.org
www.nfpa.org
www.ieee.org
Purchased Components and
When equipment such as transformers, metering, PLCs, or drives are
supplied with the motor control center (MCC), specific manuals and
Additional Instruction
Sheets
data sheets are also supplied. These documents should be read and
understood before installing and operating the MCC. Refer to the unit
locations of these devices for their manuals and/or data sheets.
10 Publication 2100-IN012C-EN-P - April 2009
Page 11

General Information
Chapter
1
General Description
Allen-Bradley CENTERLINE Motor Control Centers (MCCs) consist of
one or more vertical sections containing electromagnetic and/or solid
state control devices that are prewired and tested within modular
(plug-in) or frame mounted (hard-wired) units.
CENTERLINE MCCs are designed in standard widths of 20 in.
(508 mm), 25 in. (635 mm), 30 in. (762 mm), 35 in. (789 mm), and
40 in. (1016 mm). The standard front-mounted depths of an MCC are
15 in. (381 mm) and 20 in. (508 mm), in addition back-to-back
mounted depths of 30 in. (762 mm) and 40 in. (1016 mm) are also
offered. The standard height of an MCC is 90 in. (2286 mm). A 70.5 in.
(1791 mm) high section is also available. All MCC sections are
supplied with top and bottom horizontal wireways. Sections which
are designed to accommodate plug-in units include a vertical
wireway. Each 90 in. (2286 mm) vertical section can accommodate up
to 6.0 space factors or 78 in. (1981 mm) for units.
Units (buckets) are designed in increments of 0.5 space factors. Each
0.5 space factor is approximately 6.5 in. (165.1 mm) high. Units are
designed as either removable (plug-in) or frame-mounted
(non-plug-in).
Individual units house a wide variety of power and logic devices.
Plug-in units are mounted on unit support pans within the section.
Stab assemblies located on the back of the unit plug onto the vertical
bus. A mechanical interlock prevents the unit door from being opened
when the disconnect is not in the OFF position. An additional
mechanical interlock prevents the unit from being plugged-in or
unplugged when the disconnect is not in the OFF position.
Line power is distributed throughout the MCC via an isolated bus
work structure. The main horizontal bus is located in the center of
each section. Standard, center-fed, 300 A rated vertical bus supplies
power to the individual units above and below the horizontal bus for
an effective 600 A capacity, allowing virtually unrestricted unit
arrangement. An optional 600 A vertical bus provides 1200 A effective
rating.
11Publication 2100-IN012C-EN-P - April 2009 11
Page 12

Chapter 1 General Information
The CENTERLINE MCC is also available with ArcShield. ArcShield
includes arc resistant features which are intended to help provide
enhanced protection to you during internal arcing faults (when
compared to MCCs which are only designed to meet UL 845
requirements). Arcing faults can be caused, for example, by accidental
touching, closing into faulted lines, or loose connections. Depending
on the application, ArcShield can provide up to Type 2 accessibility
per IEEE standard C37.20.7, which helps protect you when you are
located at the front, sides, and rear of the enclosure in the unlikely
event of an arcing fault.
A label on the MCC with ArcShield provides information in regard to
the accessibility level and arc fault ratings.
For more information about accessibility levels, performance, and
testing requirements, refer to IEEE standard C37.20.7, IEEE Guide for
Testing Metal-Enclosed Switchgear Rated up to 38 kV for Internal
Arcing Faults.
ArcShield provides a reinforced MCC structure and arc-containment
latches on all doors. To help protect you during an arc-fault,
arc-containment latches, when closed and latched properly, allow
pressure relief and help keep the doors from unlatching or detaching
from the structure.
12 Publication 2100-IN012C-EN-P - April 2009
Page 13
General Information Chapter 1
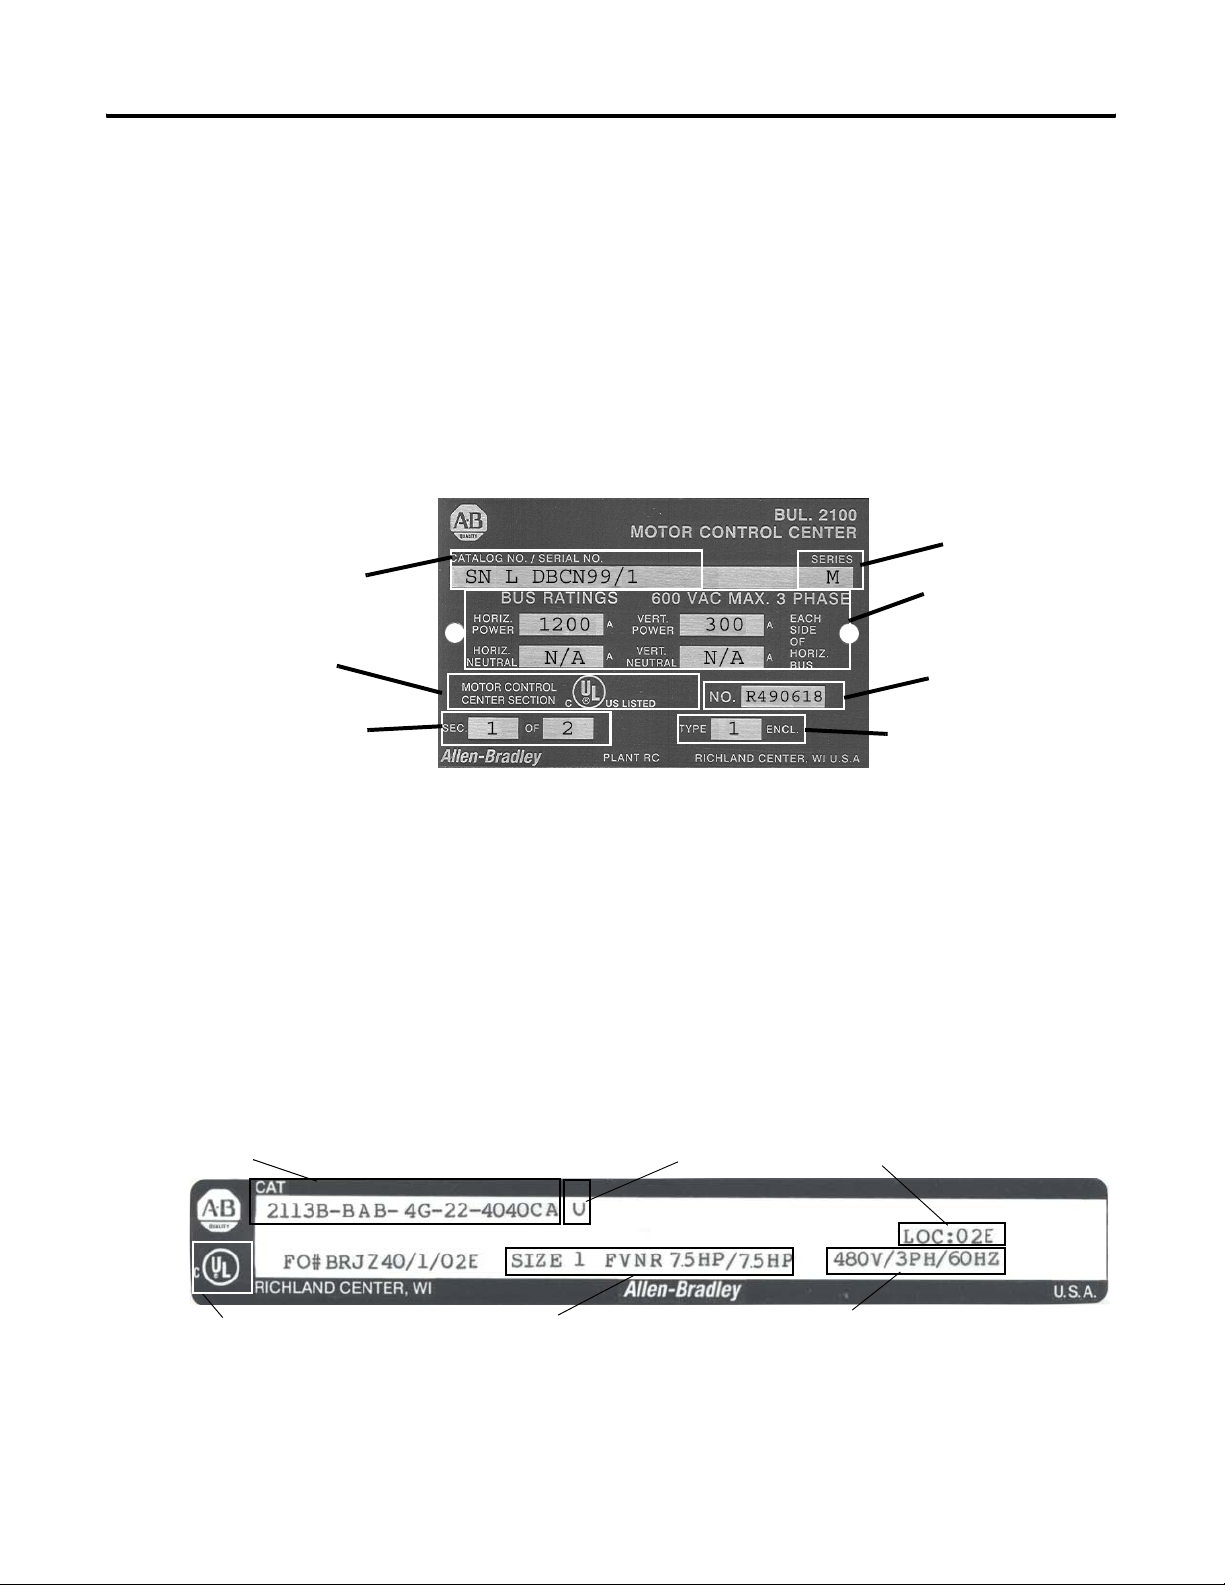
Nameplate Data
Catalog Number/Serial Number
UL and cUL Certification Marking
Section Number
Each MCC section has a nameplate located on the enclosure or
vertical wireway door. The nameplate includes:
• catalog number/serial number.
• series letter of section.
• bus bar voltage and current rating.
• section number.
• UL and cUL certification marking.
• UL registration number.
• enclosure type.
Section Nameplate
Series Letter of Section
Bus Bar Voltage
and Current Rating
UL Registration Number
Enclosure Type
Catalog Number / Serial Number
cUL Certification Marking
Each plug-in and frame mounted unit also has an identification label.
The unit label is located on the interior of the bottom plate of plug-in
units or on the interior right-hand side plate of the frame mounted
units. The unit label for each plug-in or frame mounted unit includes:
• catalog number/serial number.
• series letter of the unit.
• voltage rating.
• unit location.
• UL and cUL certification marking.
• device type and size.
Unit Label
Series Letter of Unit
Device Type and Size
Unit Location
Voltage Rating
The catalog number or serial number and series letter are required to
properly identify the equipment to sales or factory personnel.
Publication 2100-IN012C-EN-P - April 2009 13
Page 14
Chapter 1 General Information
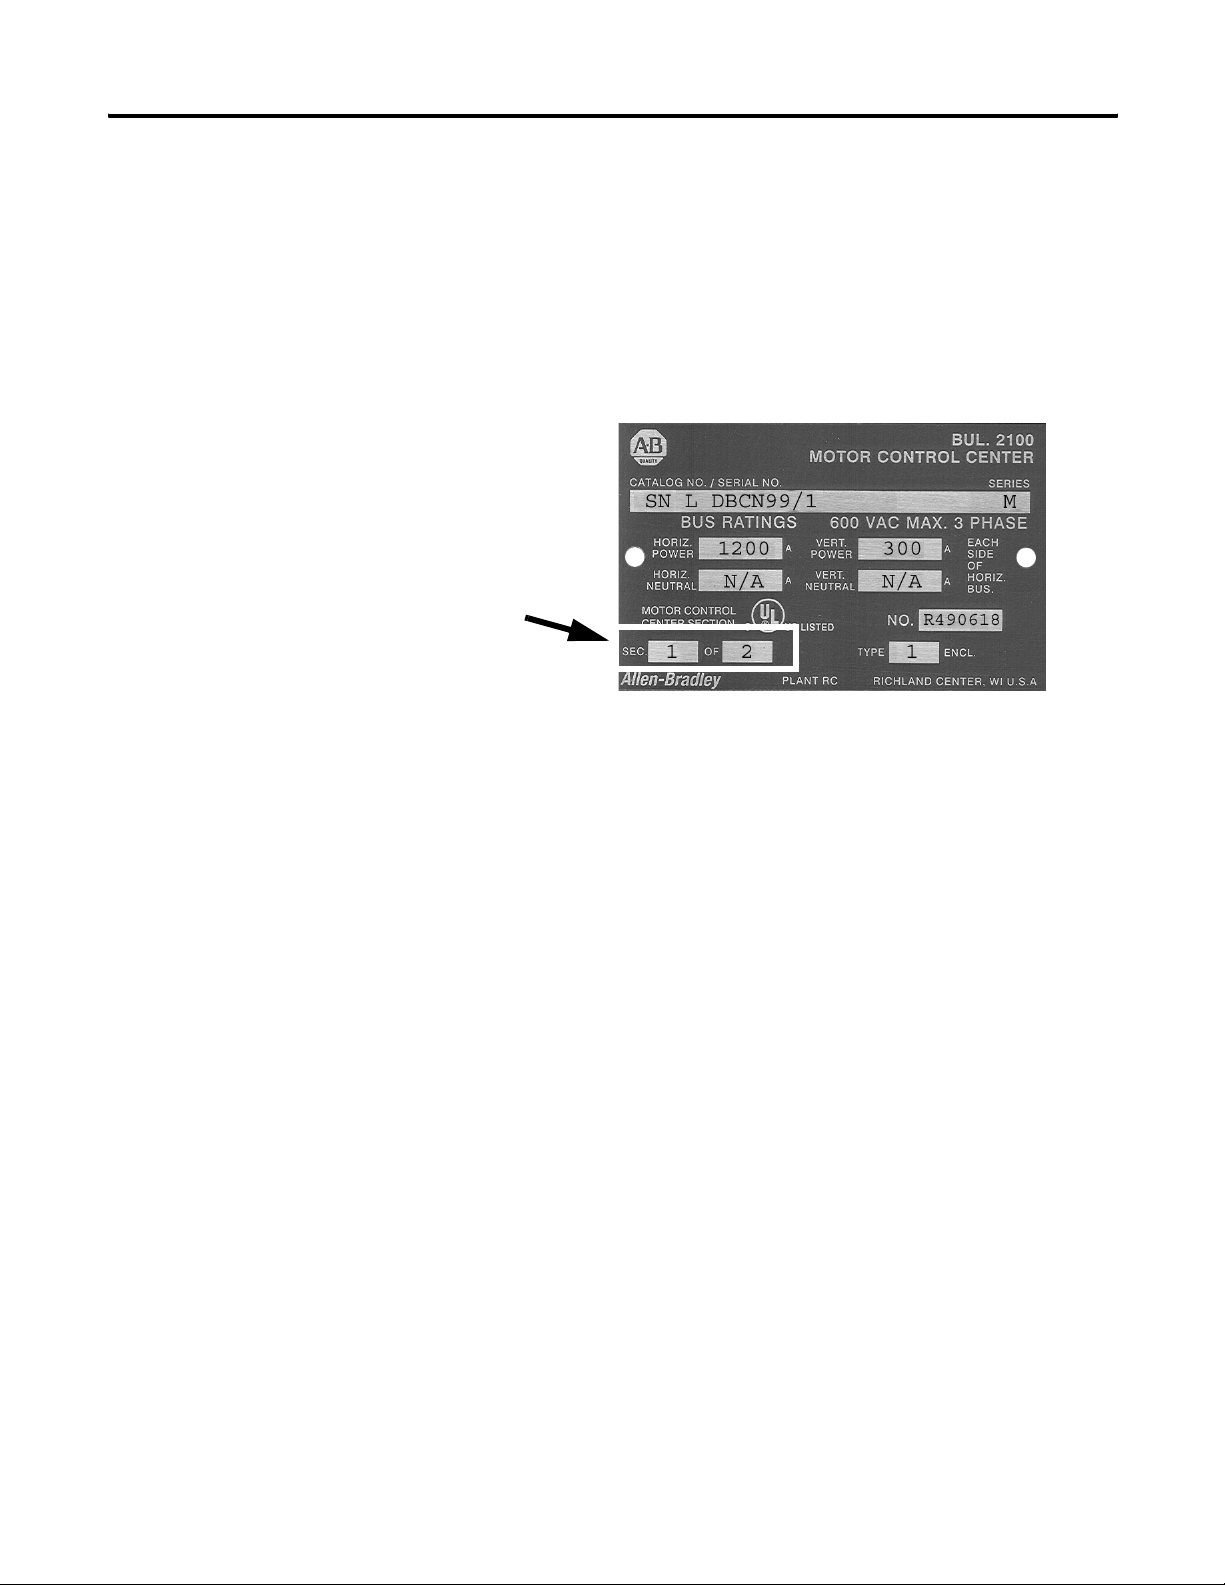
MCC Sequence Numbering
Identifies Vertical Section
Sequence Numbering
CENTERLINE MCCs are designed so functionality is not affected by the
section installation order, for example, vertical section-numbering
sequence order.
All MCC sections carry a serial plate, which identifies vertical section
sequence numbering. For example, MCC section 1 of 1, 1 of 5, and so
on.
Section Nameplate
Sections are numbered to match factory-supplied MCC elevation
drawings. Numbering each section helps installers and users easily
identify MCCs, sections, and units. If there are questions about section
numbering during field installation, inspection, or operation, the
following information can provide guidance on equipment
acceptability, listing, and certification.
CENTERLINE MCC sections can be installed or added as follows:
• In non-sequential order
• Addition of a single section (add-on section)
• Addition of multiple sections (add-on lineup of sections)
• Addition of single section or multiple section between MCC
sections
If sections are added to an existing lineup and not installed in
sequential order, the installation should not be considered a
misapplication or in conflict with Underwriter Laboratories (UL) listing
and Canadian Standards Association (CSA) certification.
The paramount criteria for additions of sections to existing MCCs is
matching the horizontal bus electrical and ingress protection
(enclosure type) ratings for the total MCC line up. For example, the
voltage, current rating, short circuit withstand, and NEMA enclosure
type (IP rating) for all sections must match.
14 Publication 2100-IN012C-EN-P - April 2009
Page 15

General Information Chapter 1
Non-sequential numbering may not create a functional or
listing/certification issue. However, MCCs should be installed in
sequential order. Installing MCCs in sequential order helps ensure
proper installation and ensures that factory-supplied documentation
matches the equipment.
You can rearrange MCC sections. However, if a section that uses a
right-hand side sheet with integral, internal mounting flanges is
located on the outside of a lineup, an additional closing kit plate is
required. Refer to CENTERLINE 2100 Motor Control Center End
Closing Plates Installation Instructions, publication 2100-IN069
that contain contain arc resistant features cannot use a section with
integral mounting flanges on the outside of a lineup.
. MCCs
UL/CSA Marking
CENTERLINE MCCs are listed by Underwriter’s Laboratories, Inc. (UL),
Standard for Safety UL 845, and certified by the Canadian Standards
Associate (CSA), Standard C22-2, No. 14.
Due to standards harmonization, a MCC may also carry the cUL
designation. cUL is comparable to CSA certification.
Vertical sections and units are labeled independently. It is possible to
have combinations of labeled and non-labeled sections and units in
the same MCC.
Vertical sections and structure options that are UL listed and CSA/cUL
certified are marked accordingly. All components in a UL or CSA listed
section must be UL listed and cUL/CSA certified. The UL and/or
CSA/cUL designation is an integral part of the section nameplate as
shown on page 14
Units and unit options that are UL listed and CSA/cUL certified are
marked accordingly. All options and components in a UL and/or
cUL/CSA listed unit must be UL listed or recognized and/or cUL/CSA
certified. The UL designation is located on the interior of the bottom
plate of plug-in units or on the interior right-hand side plate of frame
mounted units.
.
UL Label Designation for Units
Publication 2100-IN012C-EN-P - April 2009 15
Page 16

Chapter 1 General Information
Short-circuit Rating Label
MCC vertical sections that are UL listed and/or CSA/cUL certified will
carry a short-circuit rating label. The short-circuit rating label for a
vertical section is located on the inside of the vertical wireway door of
standard sections or on the interior right-hand side plate of a section
that contains a unit that occupies the full section and does not contain
a vertical wireway.
Short Circuit Label for Sections
MCC units that are UL listed and/or CSA/cUL certified will carry a
short-circuit rating label located on the bottom plate of plug-in units
or on interior right-hand side plate of frame mounted units.
Short Circuit Label for Units
16 Publication 2100-IN012C-EN-P - April 2009
Page 17
Series Number and Series
General Information Chapter 1
ID as Manufactured in the
United States
Sections
Series
Letter
Scope Description of Change Date
(1)
A
(1)
B
(1)
C
(1)
D
(1)
E
(1)
F
— Original design
All Changed terminal blocks
All Elimination of external mounting channels
All Reverse fed 2192 and 2193
All Redesign gasketing
All Modified top horizontal wireway pan to accept units with handle interlock in topmost space
factor
(1)
G
(1)
G
42K 42 k bracing-incorporates new bus support & cover
65K 65 k bracing-incorporates new bus support & cover
ATTENTION
Read tables through before adding new sections or units to an
existing CENTERLINE MCC.
Implemented in
the U.S.
February 1971
November 1976
June 1979
April 1981
October 1982
October 1983
January 1985
July 1985
H All New hinge design January 1986
J All Changed handle, operating mechanism, and circuit breaker to Cutler-Hammer series C, 150 A,
250 A, 400 A frame
October 1986
K All Changed to new unit grounding system May 1990
L All Changed to new 600 A...1200 A circuit breaker operating mechanism February 1996
M All Changed to serpentine DeviceNet cabling system May 2001
(1)
Replacement and renewal parts are no longer supported. For more information, contact Rockwell Automation LV MCC Technical Support at 1.440.646.5800 and follow the
prompts to Allen-Bradley>Low Voltage Motor Control Centers>Post Shipment Support.
2100 Units
Series
Letter
A
B
C
D
E
Scope Description of Change Date Implemented
in U.S.
(1)
(1)
(1)
(1)
(1)
— Original design
All sizes Changed terminal blocks
All sizes Changed handle mechanism to Cutler-Hammer MCPs
Size 5 Changed from ITE to A-B 400A disconnect
All sizes Changed from Bulletin 709 series K starters to Bulletin 500 line starters
February 1971
November 1976
June 1979
April 1981
April 1981
Publication 2100-IN012C-EN-P - April 2009 17
Page 18

Chapter 1 General Information
2100 Units
Series
Letter
(1)
F
(1)
G
(1)
H
(1)
J
K
L
M
N
P
Q
Scope Description of Change Date Implemented
in U.S.
All sizes Redesign of gasketing, wraparound and unit support pan for Bulletin 700 line
All sizes Redesign of gasketing, wraparound and unit support pan for Bulletin 500 line
All sizes Changed to new door, circuit breaker mechanism and control station
October 1982
October 1982
April 1984
Size 5 Changed to Bulletin 500 series L October 1984
Size 3 Changed to new PCP 100A disconnect December 1988
Size 6 Changed to Bulletin 500 series B starters October 1988
Size 1-5 CB
units and size
Changed handle, operating mechanism and circuit breaker to Cutler-Hammer series
C, 150 A, 250 A, 400 A frame October 1986
1-2 disc units
21A through
54A
All sizes Changed to new unit grounding system and 600 A, 800 A, 1200 A bolted pressure
All sizes Changed to PCP 200 A and 400 A disconnect, rerated vacuum Bulletin 2112 and
0.5 SF CB units
2103L, 2113,
Changed to Bulletin 100 line contactors in 21 A, 30 A, 45 A SMC units and original
design 24 A, 35 A, 54 A SMC units
switch
2113 and new pilot device offerings
External auxiliary on circuit breakers
November 1989
May 1990
January 1993
April 1994
2193
All sizes and
ratings
New disconnect external auxiliary contacts and new 600 A...1200 A circuit breaker
operating mechanism
May 1996
SMC units Redesign and upgrade of ratings for 24 A...500 A SMC-2 and SMC-PLUS units.
Original design of SMC Dialog Plus units
R
1200A 2193 Redesign of 1200A, 2193F and 2193M units November 1997
August 1997
800A 2193 Changed circuit breakers to MDL Frame November 1998
225A 2193F Changed circuit breakers from J Frame to F Frame October 1999
2000A 2193 Changed to flange mounted operating handle November 2000
T
U
All sizes Changed the Bulletin 800MR and Bulletin 800T-PS pilot devices to Bulletin 800Es November 2000
All 1.5 space
factor units
All except
2100-SD1
Changed unit bottom plate
Changed to new Bulletin 1497 control circuit transformer
November 2000
July 2001
2100-SD1 Changed smoke detector head and base components November 2001
18 Publication 2100-IN012C-EN-P - April 2009
Page 19

2100 Units
General Information Chapter 1
Series
Letter
Scope Description of Change Date Implemented
in U.S.
2162Q, 2163Q,
2164Q, 2165Q
2162R, 2163R,
2164R, 2165R
Redesign of 240-480V PowerFlex 70 and release of 600V PowerFlex 70
Original release of PowerFlex 700
April 2002
July 2002
2154H, 2155H Original release of SMC-3 November 2002
V
2154J, 2155J Original release of SMC Flex April 2004
2112, size 3, 4
and 5
Redesign to reduced space factor with Class J fuse clip
April 2004
2162T, 2163T Original release of PowerFlex 40 September 2004
2107, 2113,
size 3
Reduced space factor
April 2005
2162Q, 2163Q Reduced space factor, changed CCT with integral fuses April 2005
X
All sizes 800F pilot devices August 2005
2154J, 2155J,
Y
108 A and 135
Redesign to change units from frame mounted to plug-in
March 2006
A
(1)
Replacement and renewal parts are no longer supported. For more information contact, Rockwell Automation LV MCC Technical Support at 1.440.646.5800 and follow the
prompts to Allen-Bradley>Low Voltage Motor Control Centers>Post Shipment Support.
2400 Units
Series
Scope Description of Change Date
Letter
A — Original design June 1990
B 18A, 24A, 30A Changed to series B, Bulletin 194R, 30 A disconnect March 1992
C 18A, 24A, 30A Changed to three Bulletin 800E pilot devices on 0.5 space factor units July 1992
All sizes New disconnect external auxiliary contacts and new 600 A...1200 A circuit breaker
D
operating mechanism
16A-85A Original design of units with a Bulletin 100-C contactor September 1999
Implemented in
U.S.
February 1996
Publication 2100-IN012C-EN-P - April 2009 19
Page 20

Chapter 1 General Information
Series Lettering - Units and
When using sections in conjunction with units of different series
letters, consult the table below.
Sections
MCC Modifications for Unit and Structure Compatibility
If Mounted in
this Type of
(1),(2)
Section
NEMA Type 1
Series A...D
NEMA Type 1
Series E...J
(4)
NEMA Type 1
Series K or
later
NEMA Type 1
w/gasket or
Type 12
Series A...D
NEMA Type 1
w/gasket or
Type 12
Series E...J
(7)
NEMA Type 1
w/gasket or
Type 12
Series K or
later
Plug-in Units No
Space
Factor
1.0 or
(4)
larger
Series — 2100H-UAJ1 2100H-UA1
A-E
F-L
M or
later
(2)
N or
0.5
1.0 or
later
A-E
larger
F-L
M or
later
(2)
0.5
N or
later
1.0 or
A-L
larger
M or
later
1.0 or
A-E
larger
F-L
M or
later
(2)
0.5
N or
later
1.0 or
A-E
larger
F-L
M or
later
(2)
0.5
N or
later
1.0 or
A-L
larger
M or
later
Additional
Parts
Required
(4)
(4)
— ——
— ——
(6)
——— ——
(4)
(4)
—— ————
——— — — ——
(6)
(4)
(4)
(4)
—— ————
— ——
— ——
——— ——
(4)
(4)
—— ————
——— — — ——
(4)
—— ————
Requires
Style 1 Unit
Support Pan
——— — ———
——— — ———
——— — ———
——— — ———
——— — ———
——— — ———
——— — ———
——— — ———
Requires
Style 3 Unit
Support
Pan
2100H-UJ1
Requires
Style 3 Unit
Support Pan
w/ Bushing
2100H-USPA1
2100H-USPJ1
Requires
Alternate Top
Horizontal
Wireway Pan
2100H-NA4A1
2100H-NA4J1
2100H-NA4A2
2100H-NA4J2
(5)
(5)
(5)
(5)
Requires
Door
Gasketing
Kit
2100-GJ10 2100H-R1
Requires
Retrofit
Kit
2100H-R2
Requires
Ground
(3)
Bus Kit
2100H-GS1
———
——
(8)
(8)
——
—
(8)
(8)
20 Publication 2100-IN012C-EN-P - April 2009
Page 21

General Information Chapter 1
(1)
When installing unit in topmost location in vertical sections, care must be taken to comply with the National Electric Code 6.7 ft (2000 mm) unit handle-to-floor height
limitation. A unit operating handle extender (catalog number 2100-NE1) is available which provides 3 in. (76.2 mm) added height flexibility.
(2)
When CENTERLINE 2100, 0.5 space factor or Space Saving NEMA Starter plug-in units are ordered unassembled or ordered for existing sections, a centralized wiring
diagram holder kit (catalog number 2100H-WDH) should be ordered.
(3)
Permits installation of 0.5 space factor or Space Saving NEMA Starter plug-in units in existing series E...J CENTERLINE 2100 vertical sections.
(4)
Replacement and renewal parts are no longer supported. Contact Rockwell Automation LV MCC Technical Support at 1.440.646.5800 and follow the prompts to
Allen-Bradley>Low Voltage Motor Control Centers>Post Shipment Support.
(5)
Required only if series F or later, 1.0 space factor or larger CENTERLINE 2100 unit is installed in topmost location of series A...E vertical sections.
(6)
For more information regarding possible door hinge requirements, contact Rockwell Automation LV MCC Technical Support at 1.440.646.5800 and follow the prompts to
Allen-Bradley>Low Voltage Motor Control Centers>Post Shipment Support.
(7)
Series E...J sections cannot accommodate 0.5 space factor or Space Saving NEMA Starter plug-in units in bottom-most unit location.
(8)
A ground strap can be used to ground units rather then installing a ground bus. Refer to the CENTERLINE 2100 Motor Control Centers (MCC) Units with Vertical Operating
Handles Installation Instructions, publication 2100-IN014
.
Publication 2100-IN012C-EN-P - April 2009 21
Page 22
Chapter 1 General Information
Receiving, Handling and Storage
Refer to the following sections for information on receiving, handling,
and storage of MCC units.
Receiving
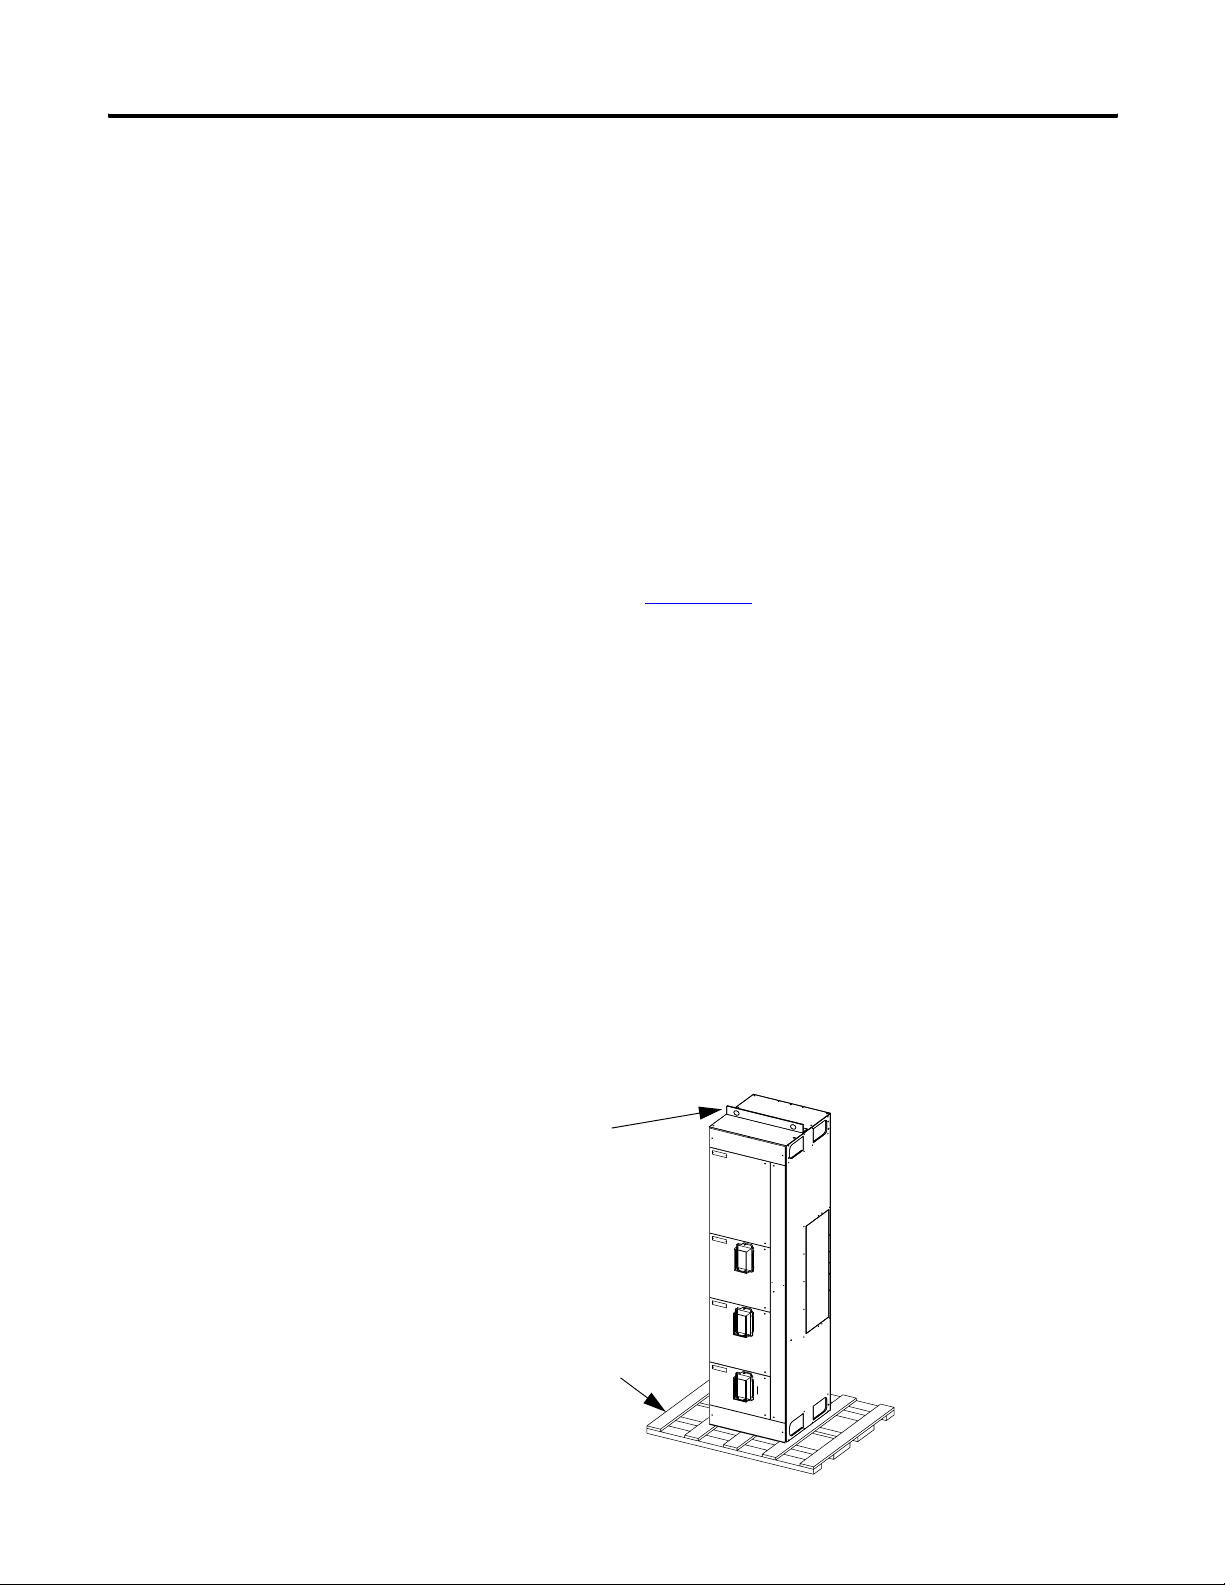
As standard, CENTERLINE MCCs are shipped upright in shipping
blocks of one to three front-mounted sections or two to six
back-to-back sections. Each shipping block of an MCC is provided
with a lifting angle. The lifting angle is optional on NEMA Type 3R
and Type 4 MCCs. Each vertical section in a shipping block is bolted
to the shipping skid and covered with clear plastic wrap. Equipment
that extends from the structures is also protected. Protection is for
upright shipping and is not waterproof or watertight. If necessary,
other types of packaging are available.
Refer to publication 2100-IN040
instructions. This publication is shipped with each MCC, attached to
the outside of the MCC within the layer of clear plastic wrap. For
additional information about the handling, installation, operation and
maintenance of MCCs rated more then not 600V, consult NEMA ICS
2.3-1995.
for receiving, handling, and storage
Export Packaging
A maximum of three vertical sections standing upright can be shipped
with export packaging together in one block. The MCC is bolted to a
skid and wrapped in poly wrap suitable for occasional water-spray; a
wooden frame and chipboard surround the sections. Export
packaging is not watertight, waterproof or intended for long-term
storage. Extended storage may require space heaters and other
considerations. Export packing adds extra weight and dimensions to
the shipping block.
Handling and Receiving MCCs
Lifting Angle
Shipping Skid
22 Publication 2100-IN012C-EN-P - April 2009
Page 23

General Information Chapter 1
Handling
Lifting with a forklift, overhead lifting, sling lifting, and pipe or rod
rolling are methods that can be used to handle vertical sections. See
the following tables for typical weights and dimensions for standard
20 in. (508 mm) wide and 15 in. (381 mm) or 20 in. (508 mm) deep
sections. For sizes not listed consult your local Rockwell Automation
Sales Office.
Shipping Weights and Dimensions - Standard Packaging
Standard
Packing
(1)
Front mounted
1-section block
Front mounted
2-section block
Front mounted
3-section block
Back-to-back
2-section block
Back-to-back
4-section block
Back-to-back
6-section block
(1)
Standard packing for shipments in the United States and Canada. The MCC shipping block is
mounted on a skid and covered in clear plastic wrap. This packaging is not watertight or waterproof.
Weight
kg (lb),
approx.
Height
in. (cm),
approx.
Depth
in. (cm),
approx.
Width
in. (cm),
approx.
227 (500) 96 (244) 36 (91) 43 (109)
454 (1000) 96 (244) 36 (91) 43 (109)
680 (1500) 96 (244) 36 (91) 63 (160)
454 (1000) 96 (244) 42 (107) 43 (109)
816 (1800) 96 (244) 42 (107) 43 (109)
998 (2200) 96 (244) 42 (107) 63 (160)
Publication 2100-IN012C-EN-P - April 2009 23
Page 24
Chapter 1 General Information
Shipping Weights and Dimensions - Export Packaging
Export Packing
(below deck)
Front mounted
1-section block
Front mounted
2-section block
Front mounted
3-section block
Back-to-back
2-section block
Back-to-back
4-section block
Back-to-back
6-section block
(1)
Export packing for below deck is required for all international shipments. The MCC shipping block is
mounted on a skid and covered in clear plastic wrap. This packaging is not watertight or waterproof.
Additional packing materials surround the shipping block. The export packing adds extra weight and
increases the dimension of the shipping block.
Weight
(1)
kg (lb),
approx.
295 (600) 99 (252) 37 (94) 44 (112)
522 (1150) 99 (252) 37 (94) 44 (112)
748 (1650) 99 (252) 37 (94) 64 (163)
544 (1200) 99 (252) 43 (109) 44 (112)
907 (2000) 99 (252) 43 (109) 44 (112)
1111 (2450) 99 (252) 43 (109) 64 (163)
Height
in. (cm),
approx.
Depth
in. (cm),
approx.
Width
in. (cm),
approx.
ATTENTION
MCCs are top and front heavy. To avoid personal injury or
structural damage, never attempt to lift or move the MCC by
any means other than the methods outlined in Receiving,
Handling and Storing Motor Control Centers, publication
2100-IN040
.
Storage and Operation
CENTERLINE MCCs conform to NEMA standard ICS 1-2000 for service
and storage conditions. All MCCs should operate in an ambient
temperature above 0
95% non-condensing humidity. If the equipment is stored, the ambient
temperature should remain above -30
o
(149
F). In addition, MCCs have an altitude class of 2 km (1 km for
MCCs that contain variable frequency drives). The altitude class of 2
km designates equipment for installation where the altitude does not
exceed 2000 m (6600 ft). For installation above 2000 m (6600 ft),
contact Rockwell Automation LV MCC Technical Support at
1.440.646.5800 and follow the prompts to Allen-Bradley>Low Voltage
Motor Control Centers>Post Shipment Support.
o
C (32 oF) but not exceeding 40 oC (104 oF) at
o
C (-22 oF) but not exceed 65 oC
24 Publication 2100-IN012C-EN-P - April 2009
Page 25
Installation Procedures
Chapter
2
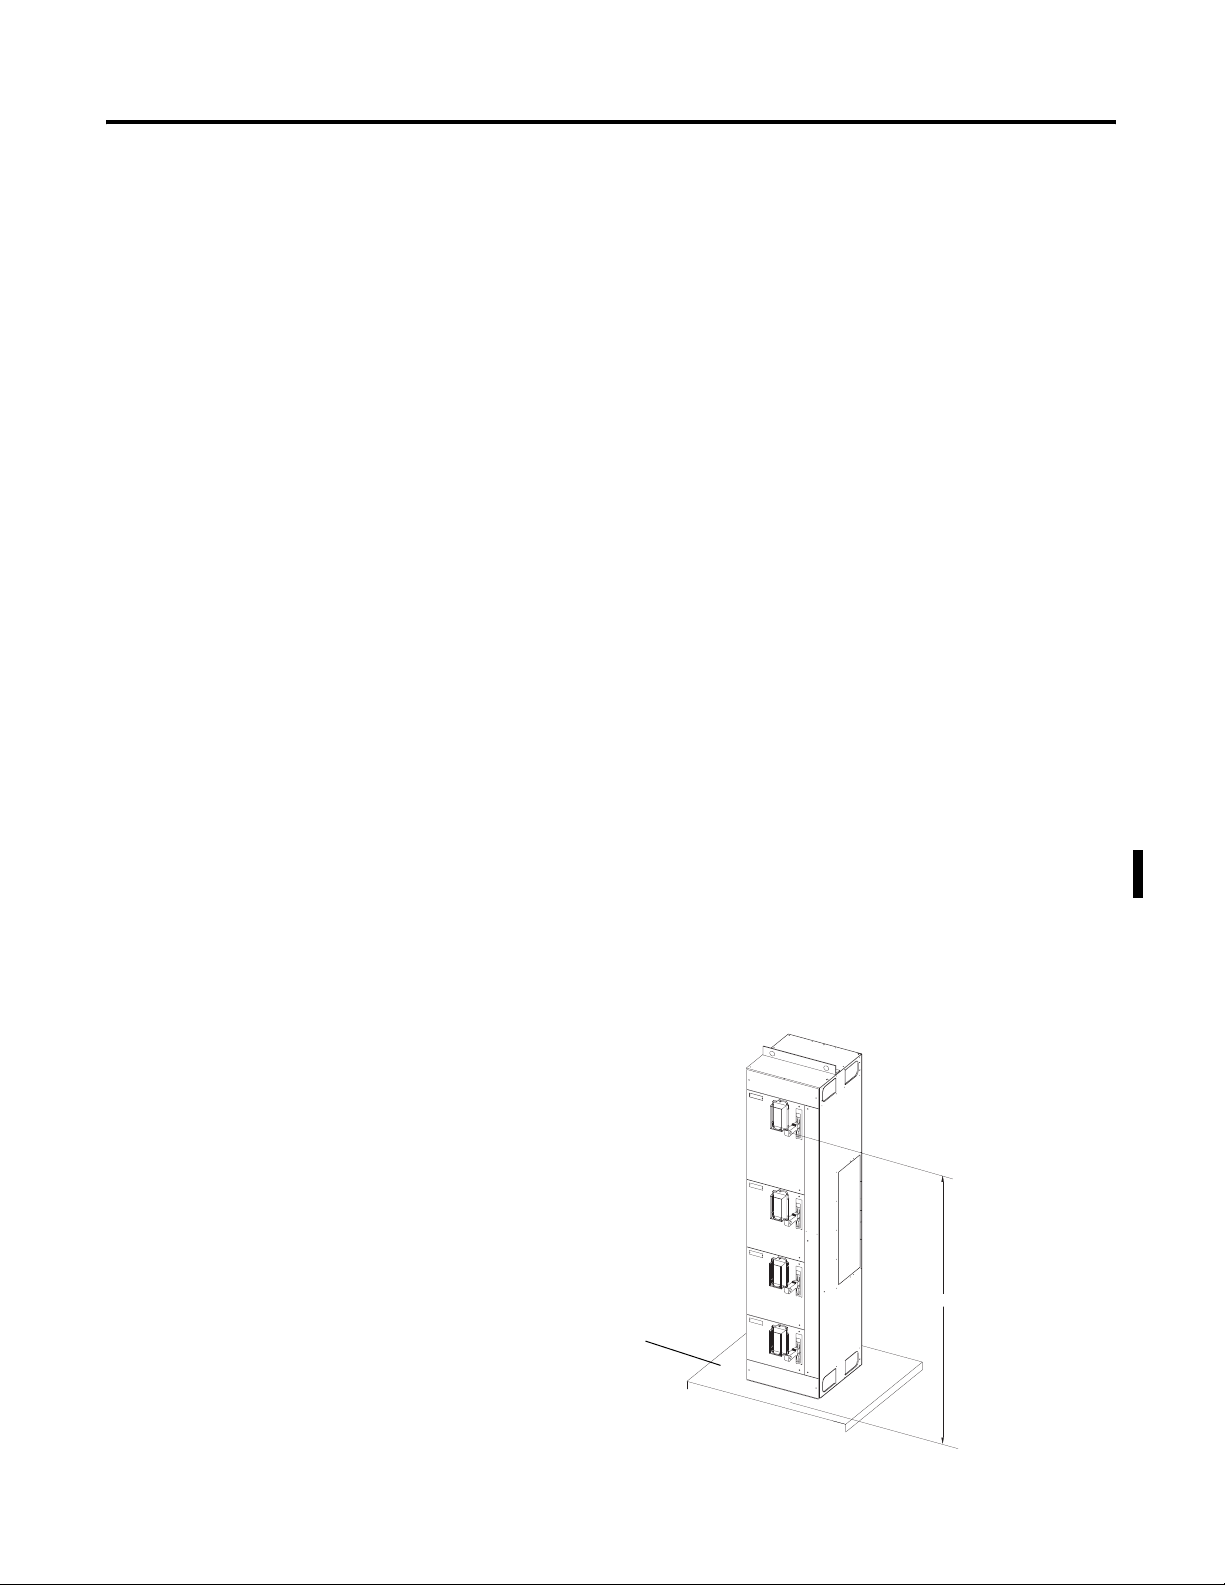
Location Planning
Height Considerations
When planning the location for your CENTERLINE MCC, consider the
following:
• Conduits
• Busways
• Overall height of installation area
• Alignment with other equipment
• Future needs
• Ambient temperature
The area must be level and the environment must be compatible with
the NEMA enclosure rating of the equipment
Documentation packages shipped with assembled MCCs include an
MCC elevation drawing and an MCC floor plan layout.
If the MCC is equipped with optional external mounting channels or is
mounted on a pad, the height from the floor to the center of the top
handles must be checked for compliance with NFPA 70 National
Electrical Code (NEC) Article 404.8 and UL Standard 845. If the
distance from the floor to the center of the highest handle is greater
then 6.7 ft (2042.16 mm) a unit operating handle extender should be
added (catalog number 2100H-NE1).
Height Planning Dimensions
Height of Handle
6.7 ft (2042.16 mm)
Maximum
Cement Pad
Floor Line
25Publication 2100-IN012C-EN-P - April 2009 25
Page 26
Chapter 2 Installation Procedures
Securing an MCC
Anchor bolts [1/2 in. (13 mm)] may be pre-located and embedded in
the foundation prior to installation. Two bolts per vertical section
fasten the MCC through its internal mounting angle to the foundation
[corner sections require three bolts and 40 in. (1016 mm) wide
sections require four bolts]. See the following illustrations and tables
for general dimensions. Dimensions matching your equipment can be
found on the elevation drawings shipped with your MCC.
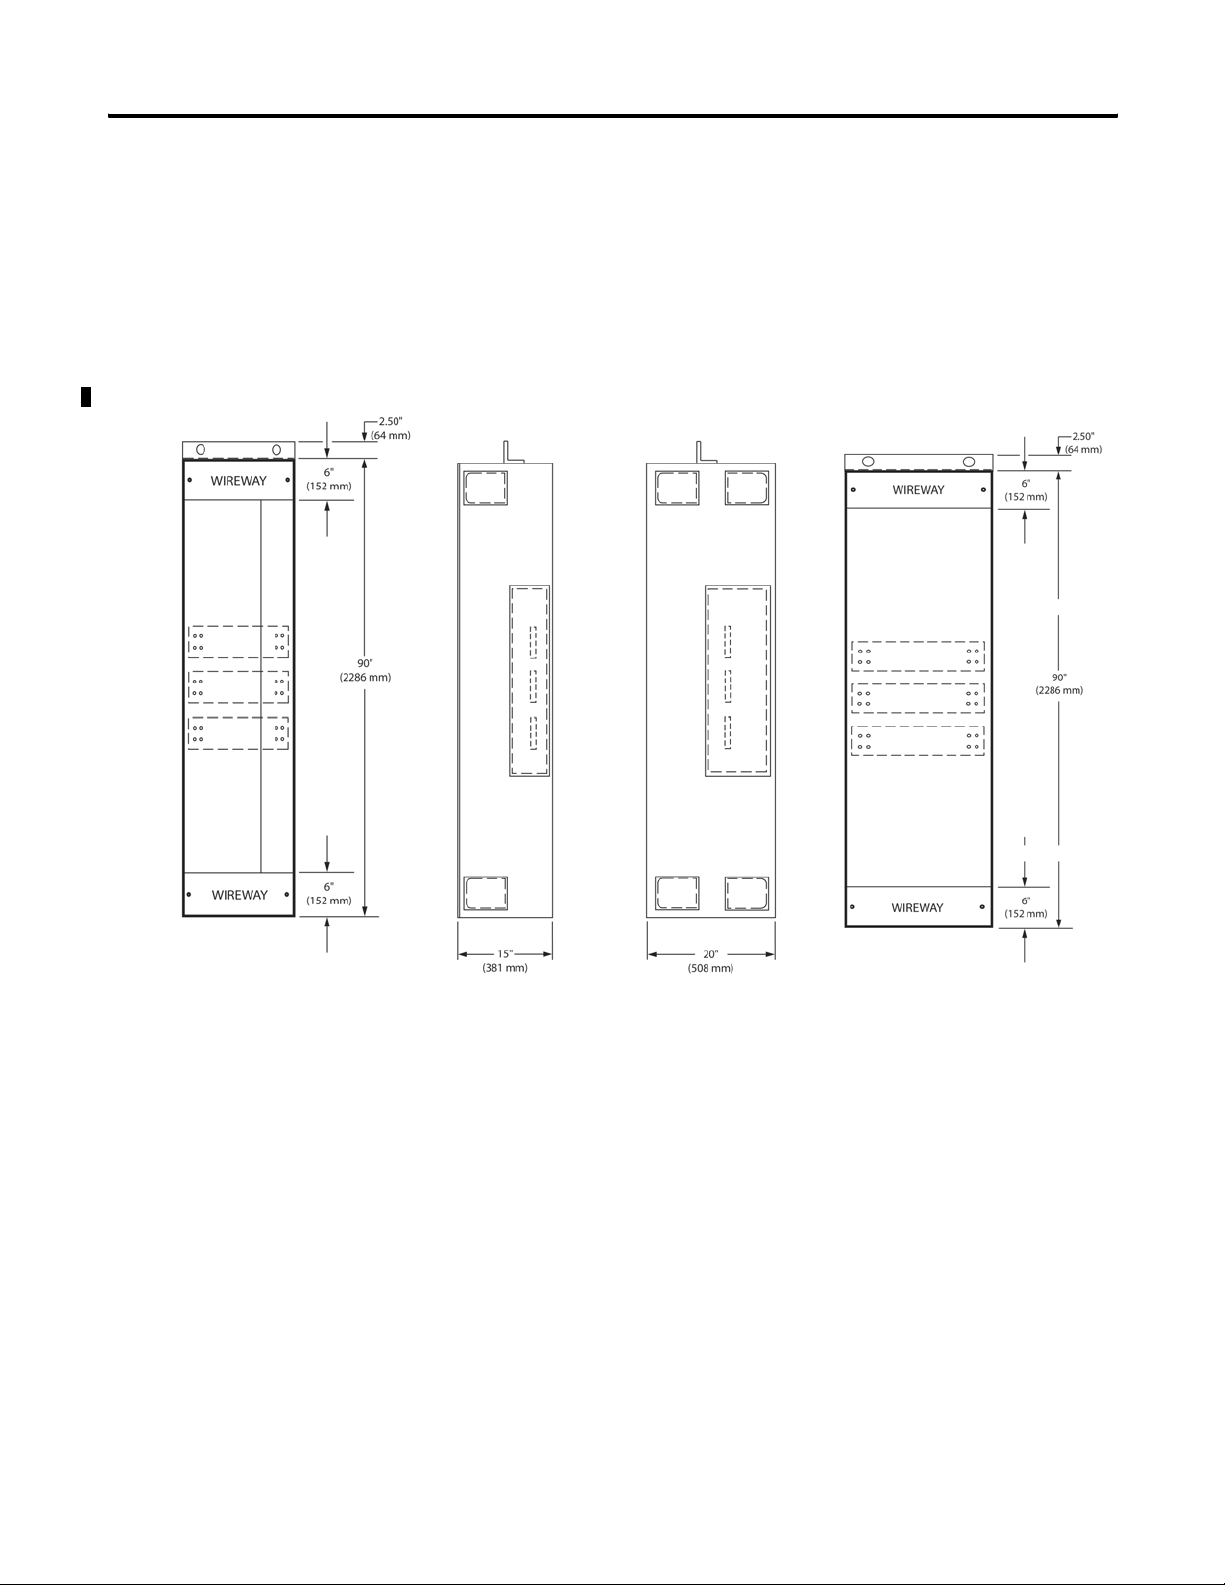
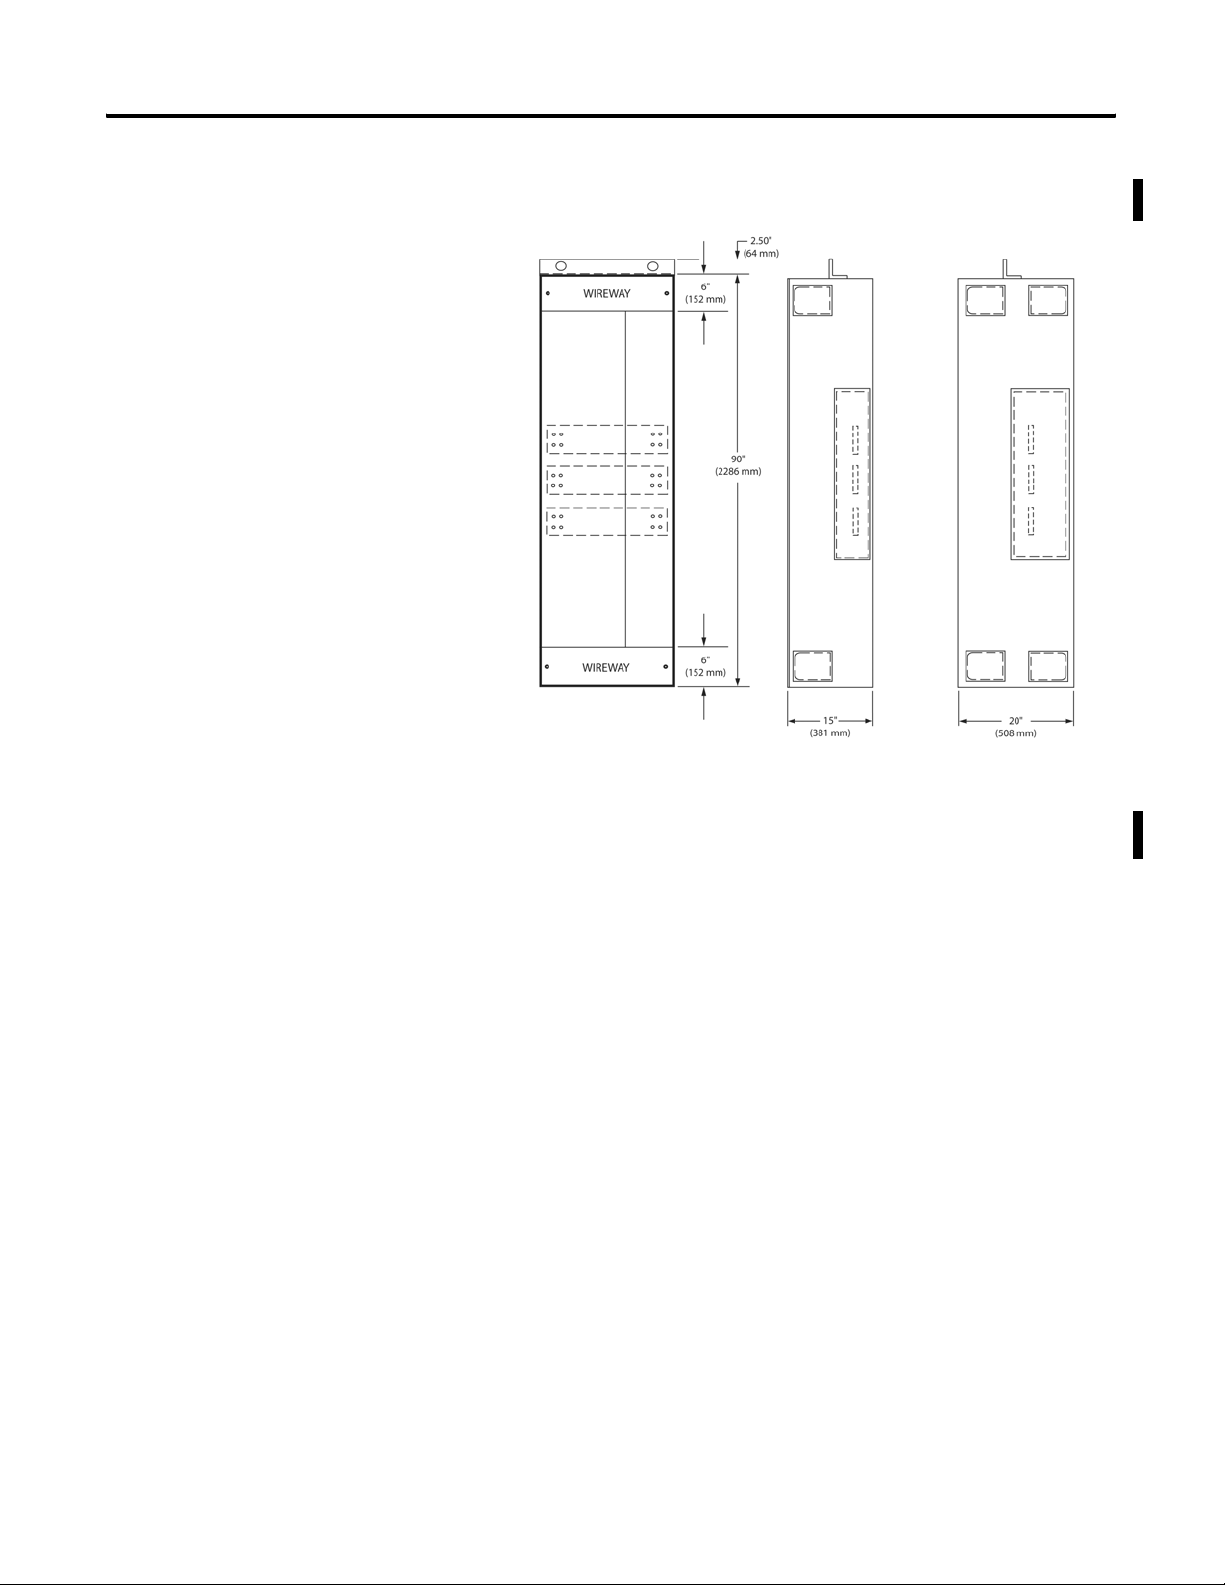
Mounting Dimensions for 15 in. and 20 in. Sections
26 Publication 2100-IN012C-EN-P - April 2009
Page 27
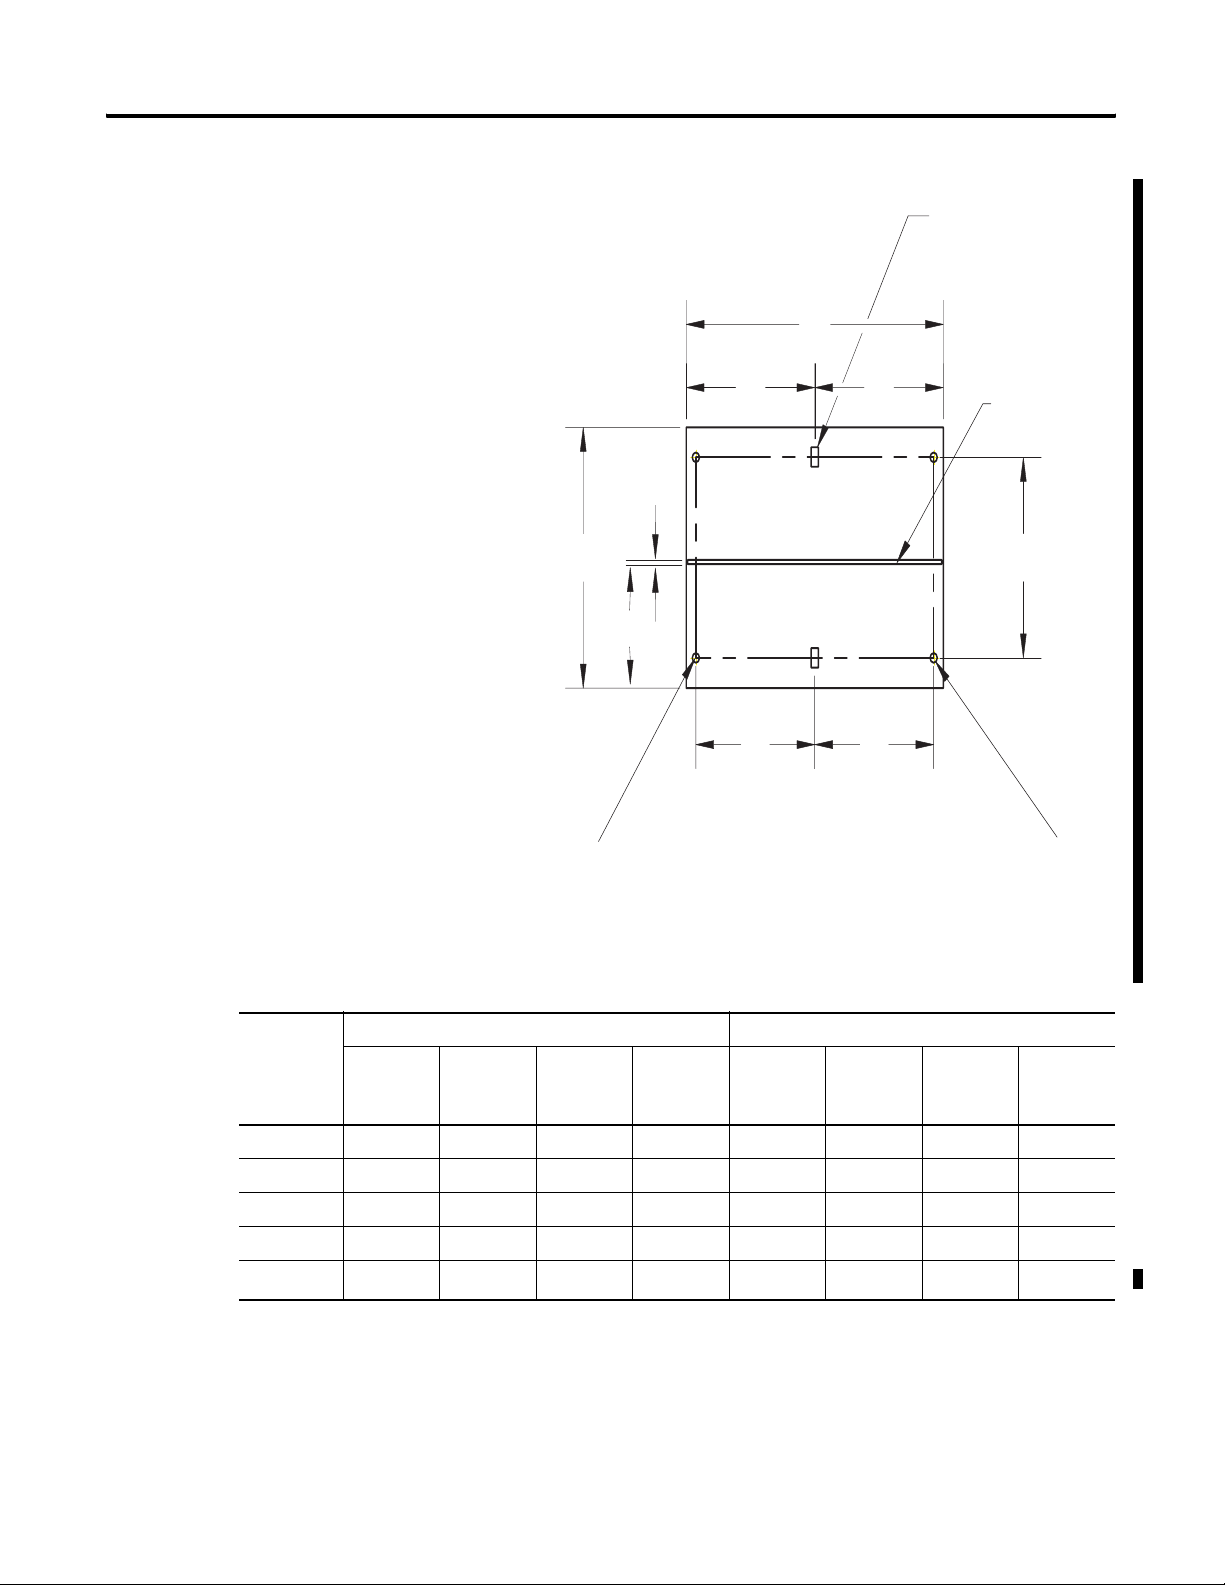
Installation Procedures Chapter 2
(2) Mounting Slots
0.56 in. x 1.13 in. in Slots
(14 mm x 29 mm) Slots
A
Standard Ground Bus
C
Rear
0.25 in.
(6.35 mm)
B
7.38 in.
(187 mm)
For seismic bolt-down applications: first
section of the MCC lineup.
D
Front
E
For seismic bolt-down applications: last section of
the MCC lineup, extra bolt-down locations (2 bolts).
D
E
The optional external mounting channels add 1.5 in. (38.1 mm) to the
height.
15 in. Deep 20 in. Deep
Dimensions
approx.
20 in.
Wide
in. (mm)
25 in.
Wide
in. (mm)
30 in.
Wide
in. (mm)
35 in.
Wide
in. (mm)
20 in.
Wide
in. (mm)
25 in.
Wide
in. (mm)
30 in.
Wide
in. (mm)
35 in.
Wide
in. (mm)
A 20.00 (508) 25.00 (635) 30.00 (762) 35.00 (889) 20.00 (508) 25.00 (635) 30.00 (762) 35.00 (889)
B 15.00 (381) 15.00 (381) 15.00 (381) 15.00 (381) 20.00 (508) 20.00 (508) 20.00 (508) 20.00 (508)
C 11.56 (294) 11.56 (294) 11.56 (294) 11.56 (294) 16.56 (421) 16.56 (421) 16.56 (421) 16.56 (421)
D 10.00 (254) 12.50 (318) 15.00 (381) 17.50 (445) 10.00 (254) 12.50 (318) 15.00 (381) 17.50 (445)
(1)
E
(1)
Applies to first and last sections that require seismic ratings.
Publication 2100-IN012C-EN-P - April 2009 27
9.13 (232) 9.13 (232) 9.13 (232) 9.13 (232) 14.13 (359) 14.13 (359) 14.13 (359) 14.13 (359)
Page 28
Chapter 2 Installation Procedures
Mounting Dimensions for 30 in. and 40 in. Deep Back-to-Back Section
Dimensions
approx.
7.38 in. (187 mm)
0.25 in. (6 mm)
B
0.25 in. (6 mm)
7.38 in. (187 mm)
20 in. Wide
in. (mm)
1.69 in. (43 mm)
C
3.19 in. (81 mm)
C
Front
Rear
Rear
Front
A
D
D
20 in. Deep 40 in. Deep
25 in.
Wide
in. (mm)
30 in. Wide
in. (mm)
35 in.
Wide
in. (mm)
20 in.
Wide
in. (mm)
25 in.
Wide
in. (mm)
(4) Mounting Slots
0.56 in. x 1.13 in. in Slots
(14 mm x 29 mm) Slots
Standard Ground Bus
30 in.
Wide
35 in. Wide
in. (mm)
in. (mm)
A 20.00 (508) 25.00 (635) 30.00 (762) 35.00 (889) 20.00 (508) 25.00 (635) 30.00 (762) 35.00 (889)
B 30.00 (762) 30.00 (762) 30.00 (762) 30.00 (762) 40.00 (1016) 40.00 (1016) 40.00 (1016) 40.00 (1016)
C 11.56 (294) 11.56 (294) 11.56 (294) 11.56 (294) 16.56 (421) 16.56 (421) 16.56 (421) 16.56 (421)
D 10.00 (254) 12.50 (318) 15.00 (381) 17.50 (445) 10.00 (254) 12.50 (318) 15.00 (381) 17.50 (445)
28 Publication 2100-IN012C-EN-P - April 2009
Page 29
Installation Procedures Chapter 2
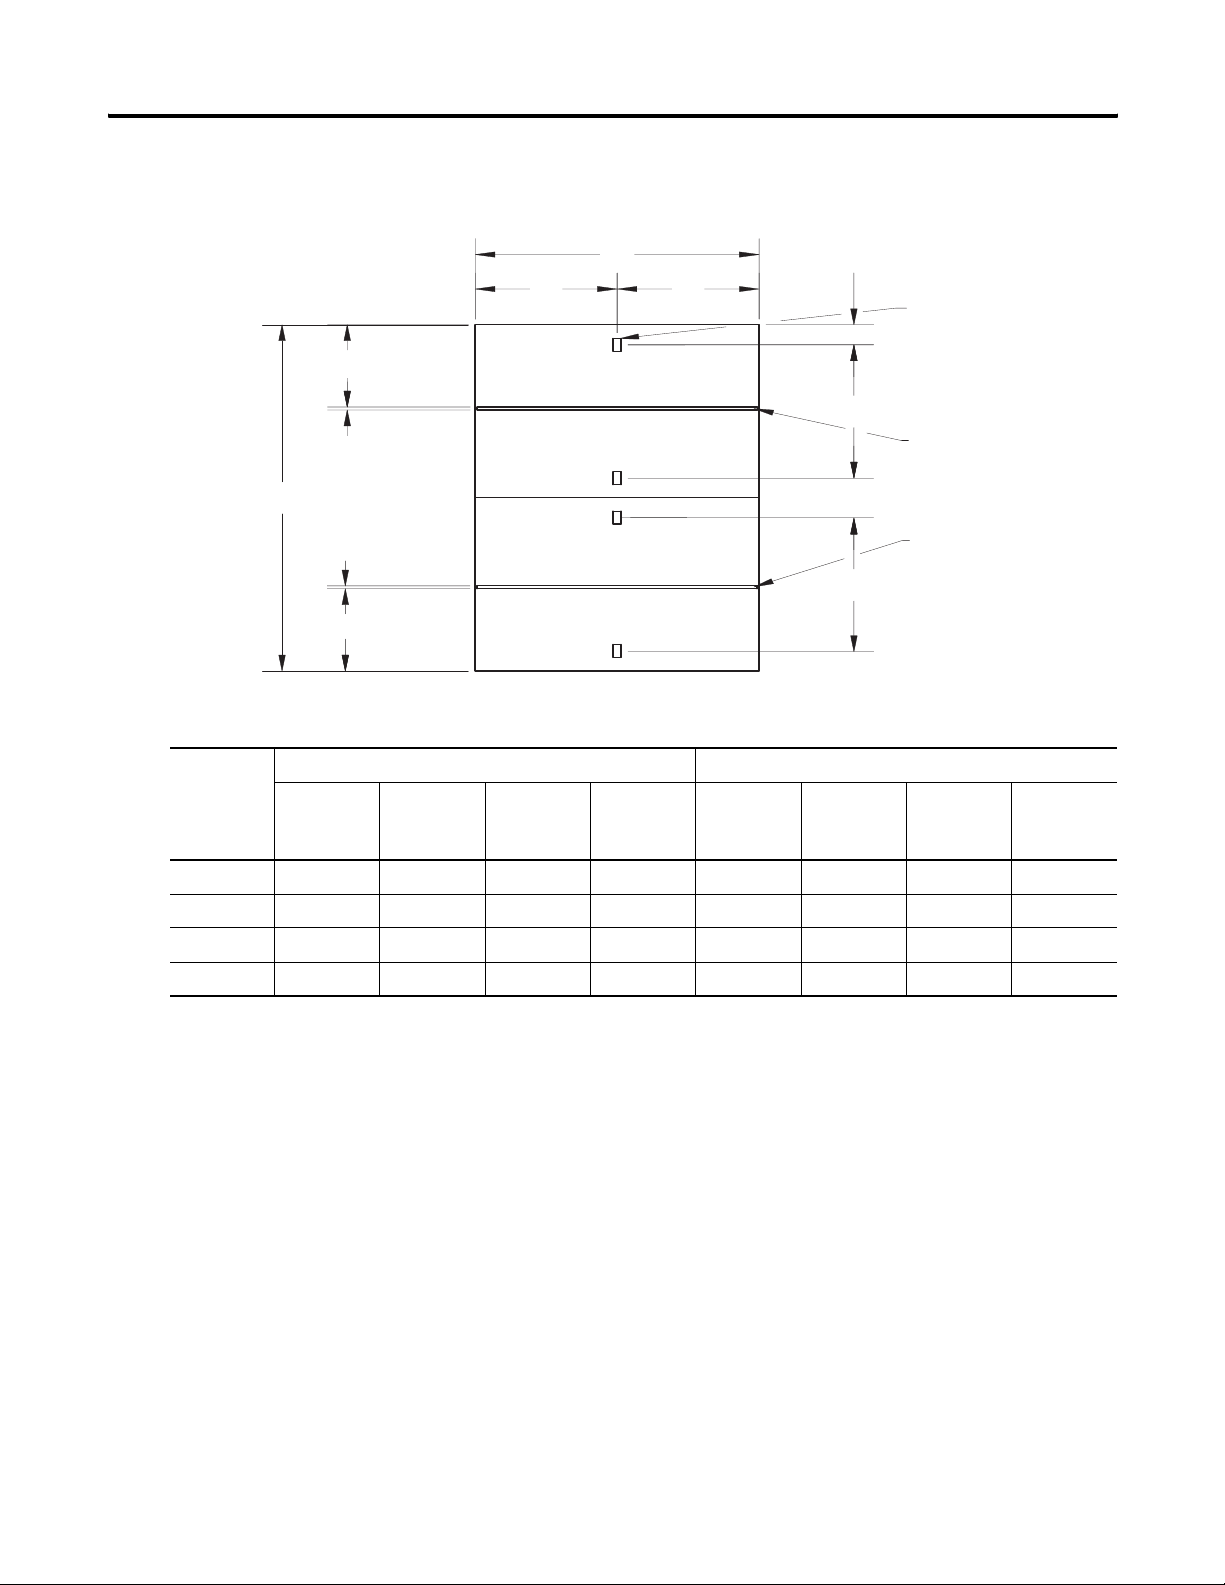
Mounting Dimensions for 25 in. Wide Section with 9 in. (228.6 mm) Wireway [90 in.
(2286 mm) high]
The optional external mounting channels add 1.5 in. (38.1 mm) to the
height.
Publication 2100-IN012C-EN-P - April 2009 29
Page 30

Chapter 2 Installation Procedures
Mounting Dimensions for 10 in. Wide Section with 10 in. (254 mm) Incoming Line
Section
A (L1)
A (L2)
A (L3)
7.5 in. (191 mm)
1.25 in. (32 mm)
10 in. (254 mm)
Power Wires
Section Depth
Dimension,
approx.
15 in. (381 mm) Deep
20 in. (508 mm) Deep
in. (mm
A 12.75 (324) 17.75 (451)
B 14.75 (375) 19.75 (502)
in. (mm
1.12 in. (28 mm)
A
B
30 Publication 2100-IN012C-EN-P - April 2009
Page 31

Installation Procedures Chapter 2
Mounting Dimensions for NEMA 3R and 4 Section [90 in. (2866 mm) high]
Publication 2100-IN012C-EN-P - April 2009 31
Page 32

Chapter 2 Installation Procedures
Mounting Dimensions for NEMA 3R and 4 Section
B
12.37 in.
(314 mm)
Ground Bus
0.25 in.
(6 mm)
14.06 in. (337 mm)
Rear
Interior Section
A
C
2.87 in. (73 mm)
16.56 in. (421 mm)
Front
(2) Mounting Holes
0.63 in. (16 mm) Diameter
If the optional non-removal lifting angle is supplied, add 3.63 in. (92.2
mm) to height.
Exterior Section Width
Dimension,
approx.
A 25.00 (635) 30.00 (762) 35.00 (889)
B 13.75 (349) 16.25 (413) 18.75 (476)
C 11.25 (286) 13.75 (349) 16.25 (413)
(1)
This measurement is the interior section width.
20 in. (508 mm)
(1)
Wide
in. (mm)
25 in. (635 mm)
(1)
Wide
in. (mm)
30 in. (762 mm)
(1)
Wide
in. (mm)
32 Publication 2100-IN012C-EN-P - April 2009
Page 33

Installation Procedures Chapter 2
Mounting Dimensions for 15 in. and 20 in. Deep Corner Section [90 in. (2866 mm)
high]
A
1.41 in. (36 mm)
A
B
B
(2) Mounting Slots
0.56 in. x 1.13 in. in Slots
(14 mm x 29 mm) Slots
D
0.25 in. (6 mm)
C
Ground Bus
1.41 in. (36 mm)
D
C
0.25 in. (6 mm)
(2) Mounting Holes
0.63 in. (16 mm) Diameter
The optional external mounting channels add 1.5 in. (38.1 mm) to the
height.
Dimension,
approx.
15 in. (381 mm) Deep
in. (mm)
A 25.13 (638) 30.13 (765)
B 12.63 (321) 15.13 (384)
C 16.81 (427) 21.81 (554)
Section Depth
20 in.(635 mm) Deep
in. (mm)
D 17.62 (448) 22.62 (575)
Publication 2100-IN012C-EN-P - April 2009 33
Page 34

Chapter 2 Installation Procedures
Mounting Dimensions for 15 in. and 20 in. Deep x 40 in. Wide Front-mounted
Section
The optional external mounting channels add 1.5 in. (38.1 mm) to the
height.
Section Width
Dimensions
approx.
20 in.
Wide
in. (mm)
25 in.
Wide
in. (mm)
30 in.
Wide
in. (mm)
A 17.25 (438) 22.25 (565) 27.25 (692) 32.25 (819) 37.25 (946)
B 16.50 (419) 21.50 (546) 26.50 (673) 31.50 (800) 36.50 (927)
C 5.25 (133) 7.75 (197) 10.25 (260) 12.75 (324) 15.25 (387)
(1)
When a horizontal bus or a disconnecting means (switch or circuit breaker) is specified, reduce
the ‘A’ dimension by 5 in. (127 mm).
34 Publication 2100-IN012C-EN-P - April 2009
(1)
35 in.
Wide
in. (mm)
40 in.
Wide
in. (mm)
Page 35

Installation Procedures Chapter 2
Mounting Dimensions for 15 in. and 20 in. Deep x 40 in. Wide Front-Mounted
Section
40.00 in. (1016 mm)
10.00 in. (254 mm)
10.00 in. (254 mm)
1.69 in. (43 mm)
0.25 in. (6 mm)
7.15 in. (102 mm)
Standard Ground Bus
Dimension,
approx.
A 15 (381) 20 (508)
B 11.56 (294) 16.56 (421)
20.00 in. (508 mm)
Section Depth
15 in. (381 mm) Deep
in. (mm)
Rear
Front
20 in. (508 mm) Deep
in. (mm)
B
(4) Mounting Slots
0.56 in. x 1.13 in. in Slots
(14 mm x 29 mm) Slots
A
Publication 2100-IN012C-EN-P - April 2009 35
Page 36

Chapter 2 Installation Procedures
Mounting Dimensions for 71 in. H (reduced height) MCC Sections
0.25 in. (6 mm)
A
D
C
B
70.48 in.
(1790.19 mm)
20 in.
(508 mm)
0.25 in. (6 mm)
70.48 in.
(1790.19 mm)
20 in.
(508 mm)
E
71 in. High Section
(1803.4 mm)
Section Depth
Dimension,
approx.
15 in. (381 mm) Deep
in. (mm)
20 in.(635 mm) Deep
in. (mm)
A 15.00 (380) 20.00 (508)
B 14.75 (374) 19.75 (500)
C 5.12 (130) 10.12 (256)
D 4 (101) 8 (203)
E — 4.40 (112)
36 Publication 2100-IN012C-EN-P - April 2009
Page 37

Installation Procedures Chapter 2
Seismic Requirements
To demonstrate the seismic withstand of various CENTERLINE MCCs
[20 in. deep (508 mm), 30 in. deep (762 mm) back-to-back, and 40 in.
deep (1016 mm) back-to-back], the MCC design construction has been
qualified by seismic calculations per the Uniform Building Code
(UBC). CENTERLINE 2100 MCC samples have been seismically
qualified by dynamic (triaxial multi-frequency testing) seismic tests per
IEEE 344 Seismic Test Standards. The results of the MCC seismic
testing demonstrated compliance with the 100% g level of Uniform
Building Code 1997 (UBC) zone 4 (the maximum UBC zone) and
100% g level of The International Building Code 2006 (IBC), for
example, the MCC structure, the MCC units, and the MCC components
or electrical functions were not compromised when subjected to a
UBC Zone 4 earthquake, or the IBC seismic event. Per the IEEE 344
standard, the equipment was under power and operated before,
during, and after the seismic tests.
IMPORTANT
Variable frequency drive units using ‘rollout’ drive
configurations are not seismically tested.
In order to obtain a UBC or IBC seismic withstandability, each
individual CENTERLINE 2100 MCC lineup (for example, both front
and back MCCs in ‘back-to-back applications), must be mounted on
an adequate seismic foundation and installed per the seismic
anchoring requirements as shown in the following illustrations.
In seismic application dimensions ‘E’ applies to the first and last
sections of the MCC lineup. See Mounting Dimensions for 15 in. and
20 in. Sections for dimensions.
Seismic Bolt Down Requirements
EERear
1
1
The hardware required is 1/2 in.-13 Grade 5 or HSL-3 M12 or better bolts embedded in the foundation.
1
FrontFirst Section Last Section
Second Section and
Additional Sections
MCC Lineup
1
Publication 2100-IN012C-EN-P - April 2009 37
Page 38

Chapter 2 Installation Procedures
Seismic Weld Down Requirements
0.25 in. (6 mm)
First Section Last Section
Rear
Second Section and
Additional Sections
Joining & Splicing New MCCs
1.50 in. (38 mm)
1.50 in.
(38 mm)
Rear
Front
1.50 in. (38 mm)
1.50 in. (38 mm)
MCC Lineup
Optional Location
for Rear Welds
Left-hand Side View
1.50 in. (38 mm)
Front
Floor Line
1.50 in.
(38 mm)
A main horizontal bus splice kit must be installed between shipping
blocks of new MCCs to connect the main horizontal bus. In addition,
the neutral bus splice kit (if required) and the ground bus splice kit
must be installed between shipping blocks. Refer to CENTERLINE
2100 Motor Control Centers Joining & Splicing Vertical Sections
Instructions, publication 2100-IN010
.
Joining & Splicing Existing
A main horizontal bus, a neutral bus (if required), and a ground bus
splice kit must be installed when adding to existing CENTERLINE
MCCs
MCCs. When adding to existing MCCs, you must identify the series of
the MCC that you will be adding to. If the existing MCC is series A or
B, you must consult MCC technical support at 1.440.646.5800 and
follow the prompts to Allen-Bradley>Low Voltage Motor Control
Centers>Post Shipment Support for joining and splicing procedures.
When the existing MCC is series C or later, refer to CENTERLINE 2100
Motor Control Centers Joining & Splicing Vertical Sections Instructions,
publication 2100-IN010
.
Be sure to also connect DeviceNet cables and other control cables as
required.
Installing and Joining Pull Boxes
38 Publication 2100-IN012C-EN-P - April 2009
When pull boxes are supplied with your MCC, refer to Installing a Pull
Box on a Bulletin 2100 Vertical Section, publication 2100-IN029
, for
installing and joining the pull box onto the vertical section.
Page 39

Installation Procedures Chapter 2
e
x
Joining and Splicing NEMA
NEMA Type 12 MCCs must be properly installed to prevent the ingress
of dust and dirt. Follow the caulking instructions in the NEMA Type 12
Type 12 MCCs
Sealing Instructions, publication 2100-IN037
12 MCC. Using caulk, close any mounting holes in the bottom plates
and bolt holes between shipping splits.
It is necessary that all door latches and wireway doors be fully latched
to prevent dust and dirt from entering the enclosure and to meet
NEMA Type 12 requirements.
Joining & Splicing NEMA
A main horizontal bus, a neutral bus (if required) and a ground bus
splice kit must be installed between the internal sections for new and
Type 3R and Type 4 MCCs
existing NEMA Type 3R and Type 4 MCCs. Refer to CENTERLINE 2100
Motor Control Centers Joining & Splicing Vertical Sections Instructions,
publication 2100-IN010
sections.
Joining Instructions for NEMA Type 3R and 4 Sections
Cabinet Spacer
(2) 0.25 in. (6 mm) x 0.50 in. (12.7 mm) Taptites
, supplied with the NEMA
, for splicing Type 3R and Type 4 internal
(2) wireway extensions required for 15 in. (381 mm) deep.
(2) wireway extensions required for 20 in. (508 mm) deep.
(1) 0.25 in. (6 mm) -20 x 0.70 in. (17.78 mm) taptite per wireway extension.
Remove right-hand driphood angle and
discard. Drill out (5) 0.172 in. (4.36
mm) diameter holes to 0.25 in. (6 mm)
diameter in driphood.
Remove the right-hand and
left-hand side plates before joining
sections. The gasket is across the
top of the driphood and down the
backplate on one of the adjoining
sections.
MCC MCC MCC
Gasket
Cabinet Spacer
(2) 0.25 in. (6 mm) x 0.50 in.
(12.7 mm) Taptites
Remove left-hand driphood angle and remount
after the adjacent driphood has been drilled out.
(2) 0.25 in. (6 mm) x 0.50 in. (12.7 mm) Taptit
Wireway Extensions
(2) or (4) 0.25 in. (6 mm) x 0.50 in.
(12.7 mm) Taptites
Gasket
Gasket
Cabinet Spacer
(2) 0.25 in. (6 mm)
0.50 in. (12.7 mm)
Taptites
Publication 2100-IN012C-EN-P - April 2009 39
Page 40

Chapter 2 Installation Procedures
Bus Torque Specifications
Tighten all bus splice connections with a torque wrench and socket at
intervals established by your maintenance policy. See Chapter 9
suggested maintenance. If a torque wrench is not available, tighten
until the conical spring washer is flat.
Torque values can be found on the information label on the interior of
the vertical wireway door or on the interior right-hand side plate of
frame mounted units.
for
40 Publication 2100-IN012C-EN-P - April 2009
Page 41

Installing Conduit and Cable
Chapter
3
Installing Conduit
When installing conduit, make sure it is installed according to local
codes - to assure water and moisture cannot enter or accumulate in
the MCC enclosure. Conduit must be installed so they are compatible
with the NEMA rating of the MCC. The conduit should be placed away
from the horizontal ground bus to avoid damage. We recommend that
the conduit be positioned to minimize cable bending and maintain
relative vertical alignment to incoming connections.
Bottom Entry Conduit
Follow this procedure if your conduit is entering from the bottom.
1. Prepare the installation site so the foundation is level.
2. Before the MCC is installed, place and stub up conduit
approximately 2 in. (51 mm) above floor level, making sure all
incoming conduit is clear of the horizontal ground bus.
For approximate section base dimensions and ground bus
locations, refer to Installation Procedures, Chapter 2
elevation and floor plan drawings shipped with MCC.
, or
For approximate bottom entry locations and wiring schemes for
main fusible disconnects, main circuit breakers, and incoming
line compartments, refer to Mains and Incoming Lines
Dimension Reference, publication 2100-TD018
.
Top Entry Conduit
Follow this procedure if your conduit is entering from the top.
1. After the MCC is in place, leveled, and the sections are joined
and spliced, bring conduit into the top of the incoming section.
For approximate top entry locations and wiring schemes for
main fusible disconnects, main circuit breakers and incoming
line compartments, refer to Mains and Incoming Lines
Dimension Reference, publication 2100-TD018
41Publication 2100-IN012C-EN-P - April 2009 41
.
Page 42

Chapter 3 Installing Conduit and Cable
2. Remove the lifting angle and top plate.
3. Modify the top plate for necessary conduit entries.
This method helps guard against metal chips falling into the
MCC, which can cause serious damage to the components.
4. Replace the top plate and lifting angle bolts to guard against
dust or dirt from entering the top horizontal wireway.
5. Make sure that all incoming conduit is clear of the horizontal
ground bus.
For approximate location of the horizontal ground bus mounted
in the top horizontal wireway, refer to Mains and Incoming
Lines Dimension Reference, publication 2100-TD018
For space availability for incoming cables, refer to the elevation
drawings shipped with assembled MCCs.
.
Installing Cable
Install the cable when the temperature is above freezing 0 °C (32 °F),
unless the cable is suitable for installation at temperatures below
freezing. This will help prevent cable insulation from cracking or
splitting.
MCCs are rated for use with 75 °C (167 °F) cable. Cable must be sized
by using a 75 °C (167 °F) column in NEC Table 310–16 (NEC 2005
Edition). The temperature rating of the lugs is not relevant.
ATTENTION
Properly connect all line and load cables to avoid a bolted fault
and equipment damage.
Lugs
Follow this procedure to install the lugs.
1. Verify the compatibility of wire size, type, and stranding versus
the power lugs furnished.
Use correct lugs in all applications.
2. Crimp compression lugs with manufacturer recommended tools.
42 Publication 2100-IN012C-EN-P - April 2009
Page 43

Installing Conduit and Cable Chapter 3
3. Use the MCC electrical schematics to verify field wiring
connection points.
Incoming Line Compartment
Top or bottom entry to the incoming line-section bus is straight
through to the connection terminals. The vertical bus provides pads
for the incoming lugs. The lug selection should be based on the size,
number, and type of conductor.
• Use of mechanical screw-type lugs is acceptable only when the
incoming lines’ available short-circuit current is 42,000 A rms
symmetrical or less.
• Use of crimp or compression type lugs is acceptable when the
incoming lines’ available short-circuit current does not exceed
100,000 A rms symmetrical.
Main Disconnect
Top entry is straight through to the line side of the main fusible
disconnect or main circuit breaker. For bottom entry, the connection
scheme varies depending on the rating of the main device. In some
cases, the bottom entry connects to the top or line side of the main
fusible disconnect or main circuit breaker. In other cases the
connection is reverse-fed, the bottom entry cables connect to the
bottom of the main fusible disconnect or main circuit breaker. For
further information refer to Mains and Incoming Lines Dimension
Reference, publication 2100-TD018
Mechanical screw-type lugs are supplied as standard with all main
fusible disconnects or main circuit breakers. Crimp or compression
lugs are optional.
.
Cable Bracing
The CENTERLINE MCC bus work system has been tested and is
qualified to withstand maximum short-circuit forces exceeding the
short-circuit withstand ratings for the MCC. Incoming line cables and
outgoing feeder cables also need to be supported to withstand the
same short-circuit forces. Follow NEC and local codes when bracing
incoming and outgoing cables. There are many sizes and types of
cables, as well as different means by which the cables can be
supported. Acceptable methods are shown on the following pages.
Publication 2100-IN012C-EN-P - April 2009 43
Page 44

Chapter 3 Installing Conduit and Cable
Securing Cables with Glass Tape
In this example, glass fiber-reinforced tape or glass filament tape is
used. The taping should be continuous from the point the cables enter
the MCC to the point the cables are terminated. It is important that
cables are wrapped several times for additional strength. Cable slack
should be drawn up during wrapping so that individual cables are
supported by the tape as a single mass.
Securing Cables with Glass Tape
Securing Cables with Nylon Rope
In this example, cables are lashed in a ‘figure 8’-type configuration by
using nylon rope. The rope lashing should be continuous from the
point the cables enter the MCC to the point the cables are terminated.
Other types of rope lashing may be acceptable. Cable slack should be
drawn up during wrapping so that individual cables are supported by
the rope as a single mass.
Securing Cables with Nylon Rope
44 Publication 2100-IN012C-EN-P - April 2009
Page 45

Installing Conduit and Cable Chapter 3
Securing Cables with Hardwood
In this example, a hardwood brace (maple hardwood) made for the
specific application is used. Holes are bored approximately the size of
the cable diameter. Several bolt holes are also bored the breadth of
the hardwood brace. The brace is cut in two pieces and is used as a
clamp to secure the cables. Through bolts are inserted into the brace
and tightened so that cables are held tightly in place.
Securing Cables with Hardwood
A second form of hardwood brace (not shown) is a yolk type in
which the cables are passed through. Holes should be small enough
to provide a snug fit for the cables. The connectors or lugs are
attached to the cables and cables are bolted to the terminals.
When using the hardwood bracing method and the short circuit
current is less then 42,000 A, cables should be braced every 12 in.
(305 mm). When the short circuit current is 42,000 A or greater, cables
should be braced every 6 in. (153 mm).
Incoming Line Brace
Allen-Bradley manufactures an incoming line brace similar to the
hardwood clamping-type brace. To order an incoming line brace,
contact your local Allen-Bradley sales office and reference assembly
number 40113–848.
IMPORTANT
Lugs should be installed so they are in line with each other and
proper spacing is used between phases. Hardware must be
torqued per the torque tables found on the enclosure door.
Publication 2100-IN012C-EN-P - April 2009 45
Page 46

Chapter 3 Installing Conduit and Cable
Notes:
46 Publication 2100-IN012C-EN-P - April 2009
Page 47

Chapter
Installing and Removing Plug-in Units
4
Installing Plug-in Units
ATTENTION
ATTENTION
ATTENTION
For unit installation, refer to CENTERLINE 2100 Motor Control Centers
(MCC) Units with Vertical Operating Handles Installation Instructions,
publication 2100-IN014
(MCC) Units with Horizontal Operating Handles Installation
Instructions, publication 2100-IN060
When installing or removing MCC units, when possible,
de-energize, lockout, and tag-out all sources of power to the
MCC. If the MCC units will be installed or removed with power
applied to the main power bus, follow established electrical
safety work practices. Refer to the NFPA 70E Standard for
Electrical Safety in the Workplace publication.
Review your company safety lockout and tag-out procedure.
De-energize all units before installing or removing.
All covers and doors must be in place before applying power to
the MCC. If units are removed, they must be replaced with the
appropriate items such as units, doors, and unit support pans.
, and CENTERLINE 2100 Motor Control Center
.
47Publication 2100-IN012C-EN-P - April 2009 47
Page 48

Chapter 4 Installing and Removing Plug-in Units
Remove a Plug-in Unit with a Vertical Operating Handle from a Section
1. Make sure the disconnect handle is in the OFF/O position.
2. For non-arc resistant units, turn the door latches 1/4 turn; for
units that are equipped with arc-resistant door latches, push in
the latch and rotate 1/4 turn.
Arc Containment Latch
3. Open the door completely.
48 Publication 2100-IN012C-EN-P - April 2009
Page 49

Installing and Removing Plug-in Units Chapter 4
.
TIP
It is not necessary to remove the unit door to remove a
unit from a section. However, steps a and b below may
still be necessary even when the door is not removed.
a. Remove the door-mounted devices and wiring, if necessary.
b. Remove the hinge pins by sliding upward with a flathead
screwdriver.
The control station can be hung on the front of the unit by using
square holes adjacent to the top unit latch.
Publication 2100-IN012C-EN-P - April 2009 49
Page 50

Chapter 4 Installing and Removing Plug-in Units
4. Swing the door to near closed position.
5. Lift the door outward to remove.
Wiring
Tunnel
6. Disengage the captive latches located at the front of the unit,
one at the top and one at the bottom of the unit.
Units that are 2.0 space factor and larger have two latches at the
top.
7. Detach the front portion of the pull-apart terminal blocks from
the unit base and place the wires and terminal blocks in line
with the wiring clearance tunnel.
8. Remove other cables or devices that would prevent the unit
from being withdrawn.
TIP
It is not necessary to place wires and terminal blocks into
the vertical wireway to remove a plug-in unit that includes
the wiring clearance tunnel.
50 Publication 2100-IN012C-EN-P - April 2009
Page 51

Installing and Removing Plug-in Units Chapter 4
.
9. Pull the unit forward (outward) approximately 3 in. (7.62 cm)
out of the MCC, using the handle provided at the lower left of
the unit and the tab in the upper right of the unit as finger holds.
You may need to reposition your hands as necessary to properly
support the unit while you are removing the unit from the MCC.
ATTENTION
Plug-in MCC units may be heavy or awkward to handle.
Use an assistant or a platform lift device if necessary to
help you handle the unit.
Publication 2100-IN012C-EN-P - April 2009 51
Page 52

Chapter 4 Installing and Removing Plug-in Units
For the CENTERLINE 2100 MCC units with arc-resistant door
latches, you may need to tilt the top of the unit slightly to the
rear to avoid interference with the top arc latch bracket before
removing the unit. If you do not have enough clearance, you
will need to loosen the latch bracket screw (approximately two
turns) to remove the unit.
Latch Bracket
Latch Bracket
TIP
For dual-mounted, fusible-feeder disconnect switch units,
you will need to remove the bottom arc latch bracket. You
can do this by first removing the unit located below the
dual disconnect unit.
10. Remove the unit from the MCC.
11. Carefully install protective caps or close manual shutters after
the unit is removed.
Automatic shutters will close as units are removed.
ATTENTION
All covers and doors must be in place before applying
power to the MCC. If units are removed, they must be
replaced with the appropriate items such as units,
doors, and unit support pans.
52 Publication 2100-IN012C-EN-P - April 2009
Page 53

Remove a Plug-in Unit with a Horizontal Operating Handle from a Section
Installing and Removing Plug-in Units Chapter 4
1. Make sure the disconnect handle is in the OFF/O position.
2. For non-arc resistant units, turn the door latch 1/4 turn; for units
that are equipped with arc-resistant door latches, push in the
latch and rotate 1/4 turn.
Arc Containment Latch
3. Open the door completely.
Publication 2100-IN012C-EN-P - April 2009 53
Page 54

Chapter 4 Installing and Removing Plug-in Units
.
TIP
It is not necessary to remove the unit door in order to
remove a unit from a section.
4. Remove the door-mounted devices and wiring, if necessary.
5. Remove the hinge pins by sliding upward with a flathead
screwdriver.
6. Swing the door to near closed position.
7. Lift the door outward to remove.
8. Detach the wiring/terminal block from the unit.
9. Place the wiring/terminal block in the vertical wireway to the
right of unit.
54 Publication 2100-IN012C-EN-P - April 2009
Page 55

Installing and Removing Plug-in Units Chapter 4
10. Push the latch mechanism to the left with your right hand.
11. Pull the unit forward (outward) approximately 3 in. (7.62 cm)
out of the MCC.
You may need to reposition your hands as necessary to properly
support the unit while you are removing the unit from the MCC.
For the CENTERLINE 2100 MCC units with arc-resistant door
latches, you will need to rotate the arc latch bracket 90
o
clockwise to avoid interference with the unit.
Arc Latch
Bracket
ATTENTION
Plug-in MCC units may be heavy or awkward to handle. Use an
assistant or a platform lift device if necessary to help you
handle the unit.
Publication 2100-IN012C-EN-P - April 2009 55
Page 56

Chapter 4 Installing and Removing Plug-in Units
12. Remove the unit from the MCC.
13. Carefully install protective caps or close the manual shutters
after unit is removed.
ATTENTION
All covers and doors must be in place before applying
power to the MCC. If units are removed, they must be
replaced with the appropriate items such as units, doors,
and unit support pans.
14. See the next section for additional information.
Automatic shutters will close as units are removed.
56 Publication 2100-IN012C-EN-P - April 2009
Page 57

Remove the Support Pan
Installing and Removing Plug-in Units Chapter 4
Plastic
Retaining
Clip
1. Pry the plastic retaining clip from the right-hand unit support by
using a screwdriver.
This is visible in the vertical wireway.
For CENTERLINE MCC units with arc resistant latches, the unit
support pan is secured to the right-hand unit support by the
screw that retains the arc latch bracket. In order to remove the
unit support pan, you must remove the arc latch bracket.
Arc Latch
Bracket
Publication 2100-IN012C-EN-P - April 2009 57
Page 58

Chapter 4 Installing and Removing Plug-in Units
2. Lift the right side of the support pan approximately 4 in.
(102 mm).
3. Pull the right side of the support pan forward to release from the
left rear slot on the structure.
4. Push back on the left side of the support pan until the support
pan is free from the structure.
Vertical sections may be supplied with plug-in stab opening
protective caps, manual shutters, or automatic shutters. Refer to
the next step if any of these options are supplied.
5. Carefully install the protective caps or close the manual shutters
after the unit is removed.
Automatic shutters will close as the units are removed.
ATTENTION
All covers and doors must be in place before applying power to
the MCC. If units are removed, they must be replaced with the
appropriate items such as units, doors, and unit support pans.
58 Publication 2100-IN012C-EN-P - April 2009
Page 59

Chapter
5
Arc Flash Protection Marking as Required by
the National Electrical Code
Flash Protection Marking Requirement
The flash protection marking requirement was initially established in
2000 by The National Fire Protection Association (NFPA 70E),
Standard for Electrical Safety Requirements for Employee Workplaces.
NFPA 70E applies to workers who install, maintain, or repair electrical
systems.
In 2002, NFPA 70, The National Electrical Code (NEC) added the
Article 110.16, and reinforced the flash protection marking of
equipment. The 2002 version of the article is stated below.
110.16 Flash Protection
Switchboards, panelboards, industrial control panels, and MCCs
that are in other than dwelling occupancies and are likely to
require examination, adjustment, servicing, or maintenance
while energized shall be field marked to warn qualified persons
of potential electric arc flash hazards. The marking shall be
located so as to be clearly visible to qualified persons before
examination, adjustment, servicing, or maintenance of the
equipment.
FPN No. 1: NFPA 70E-2000, Electrical Safety Requirements for
Employee Workplaces, provides assistance in determining
severity of potential exposure, planning safe work practices, and
selecting personal protective equipment.
FPN No. 2: ANSI Z535.4-1998, Product Safety Signs and Labels,
provides guidelines for the design of safety signs and labels for
application to products.
As Arc Flash Technology emerges, new developments have caused
changes to arc flash criteria. For example, in 2004, the NFPA 70E was
reissued in a completely new format along with changes reflecting
new developments. The NEC is revised every three years and the
NFPA 70E is revised every four years. The latest editions of the NEC
and NFPA 70E should be used in establishing potential electric arc
flash hazards and arc flash marking.
59Publication 2100-IN012C-EN-P - April 2009 59
Page 60

Chapter 5 Arc Flash Protection Marking as Required by the National Electrical Code
Arc Flash Marking Clarification
The flash protection marking per NEC Article 110.16 is a field marking
requirement and is to be applied by the MCC end-user for each
specific application. The marking is similar to other NEC marking
requirements, for example, voltage, voltage hazard labels, and circuits.
However, flash protection markings must be based on application
information and calculations from the installation site. The intent of
the marking is to identify the presence of a potential flash hazard and
to provide assistance in determining necessary protective clothing and
personal protective equipment (PPE) that should be worn by qualified
electrical persons when servicing electrical equipment. You must
establish field marking requirements based upon:
• the level of the on-site personnel safety training.
• the level of required clothing and required PPE.
• consistency for the level of marking of various equipment, for
example, switchboards, panelboards, industrial control panels,
and MCCs.
• the available flash energy on each piece of equipment. This
energy is determined from available fault current, arc flash
duration due to the type and degree of short circuit protection
equipment.
Rockwell Automation Services
Rockwell Automation understands the importance of you fulfilling the
field arc-flash hazard marking requirements as defined by Article
116.10 in the NEC. Rockwell Automation may assist you in
determining the necessary arc flash marking as required by NFPA 70E.
Rockwell Automation offers services that can provide assistance in the
following areas:
• Arc-flash hazard analysis
• Providing input on the specific Bulletin 2100 MCC design being
used
• The zone determination for the NFPA 70E Hazard/Risk levels
• Your required NEC field marking
For information regarding arc-flash hazard analysis, contact your local
Rockwell Automation sales office or distributor.
60 Publication 2100-IN012C-EN-P - April 2009
Page 61

Chapter
6
Operator Handle and Unit Interlock
The operator handle is an integral part of each MCC unit. Adjustment
of the handle is not required. The operator handle is interlocked with
each unit door as outlined by UL 845.
Defeating the Unit Door Interlock
Refer to the following information for defeating the unit door lock.
Open the Door when the Operating Handle is in the ON/I Position
ATTENTION
When the unit door is closed and the operator handle is in the ON/I
position, a defeater screw must be deliberately operated to open the
unit door (for example, opening the door of an energized unit).
The defeater screw is located just below (on units with a vertically
mounted operator handle) or just to the right (on units with a
horizontally mounted operator handle) of the pivot point of the
operator handle. To operate the defeater mechanism and defeat the
door interlock while the operator handle is in the ON/I position, use a
flat-head screwdriver to turn the defeater screw clockwise one-eighth
to one-quarter turn.
When working on or near energized electrical equipment,
follow established electrical safety-related work practices.
Refer to NFPA 70E Standard for Electrical Safety in the
Workplace.
61Publication 2100-IN012C-EN-P - April 2009 61
Page 62

Chapter 6 Operator Handle and Unit Interlock
ATTENTION
When working on or near energized electrical equipment,
follow established electrical safety-related work practices.
Refer to NFPA 70E Standard for Electrical Safety in the
Workplace.
Personal protective equipment (PPE) is not shown for clarity.
Operating Handle Defeater for Vertical Operator Handle
Operating Handle Defeater for Horizontal Operator Handle
62 Publication 2100-IN012C-EN-P - April 2009
Page 63

Operator Handle and Unit Interlock Chapter 6
Defeating the Unit Interlock
Refer to the following information for defeating the unit interlock
lever.
Lever
Energize a Unit with the Unit Door Open
When the unit door is open and the operator handle is in the OFF/O
position, the defeater lever must be deliberately lifted on the vertical
handles or pushed to the left for horizontal handles, to move the
operator handle to the ON/I position, and energize the unit.
Defeater Lever for Vertical Operator Handle
ATTENTION
When working on or near energized electrical equipment,
follow established electrical safety-related work practices.
Refer to NFPA 70E Standard for Electrical Safety in the
Workplace.
Personal protective equipment (PPE) is not shown for clarity.
Publication 2100-IN012C-EN-P - April 2009 63
Page 64

Chapter 6 Operator Handle and Unit Interlock
ATTENTION
When working on or near energized electrical equipment,
follow established electrical safety-related work practices.
Refer to NFPA 70E Standard for Electrical Safety in the
Workplace.
Personal protective equipment (PPE) is not shown for clarity.
Defeater Lever for Horizontal Operating Handle
Locking Provisions
Refer to the following sections for locking provisions.
Lock Vertical Operating Handles in the OFF/O Position
ATTENTION
To lock the small, medium, and large operator handle in the OFF/O
position, put the shackle of the lock through the opening in the
operator handle assembly. The opening can accommodate up to three
padlocks.
When working on or near energized electrical equipment,
follow established electrical safety-related work practices.
Refer to NFPA 70E Standard for Electrical Safety in the
Workplace.
64 Publication 2100-IN012C-EN-P - April 2009
Page 65

Operator Handle and Unit Interlock Chapter 6
Locking Vertical Handles in OFF/O Position
Small and Medium Vertical Handle Large Handle
Lock Horizontal Operating Handles in the OFF/O Position
Some units use a horizontal operating handle. The horizontal
operating handle can be locked in the OFF/O position by putting the
shackle of the lock through the open slotted area to the left of the
operator handle.
Locking a Horizontally Mounted Operating Handle in OFF/O Position
Publication 2100-IN012C-EN-P - April 2009 65
Page 66

Chapter 6 Operator Handle and Unit Interlock
Lock Units with Operating Handles in the ON/I Position
ATTENTION
Locking an operating handle in the ON/I position may be in
conflict with local codes and emergency shut down
requirements.
Follow this procedure to lock the operator handle in the ON/I
position.
1. Drill out the pre-located hole to 3/8 in. (9.5 mm) diameter
maximum.
2. Insert the shackle of the lock.
The following instructions assume that the handle is in the ON/I
position:
• For units with small handles, the pre-located hole is in the upper
portion of the operator handle assembly.
• For units with medium and large operator handles, the
pre-located hole is underneath the operator handle on the
handle assembly.
• For units with a horizontally mounted handle, the pre-located
hole is on the left-hand side of the handle assembly.
66 Publication 2100-IN012C-EN-P - April 2009
Page 67

Operator Handle and Unit Interlock Chapter 6
Locking Small Handle in ON/I POSITION, Vertical Operating Handle
Drill Out
Locking the Medium Handle in ON/I Position
Drill Out
Publication 2100-IN012C-EN-P - April 2009 67
Page 68

Chapter 6 Operator Handle and Unit Interlock
Locking Large Handle in ON/I Position
Drill OutDrill Out
Locking Horizontal Handle in ON/I Position
Drill Out
Unit Interlocks
A unit interlock is provided with each plug-in unit. Unit interlocks
prevent units from being removed from or inserted into a vertical
section when the operator handle is in the ON/I position.
Units can also be locked out with a padlock preventing installation of
the unit into a vertical section. The lockout feature of the unit
interlock can be used with the operator handle in the ON/I or OFF/O
position.
68 Publication 2100-IN012C-EN-P - April 2009
Page 69

Operator Handle and Unit Interlock Chapter 6
In this position, the unit is partially removed from the MCC and the
slot in the interlock plate is in line with the flange of the unit support
pan located above this unit. When the unit is locked in this position,
the unit power and ground stabs are disengaged. This position can be
used to prevent insertion of a unit into the MCC.
Unit Interlock to Prevent Insertion - Vertical Operating Handler
ATTENTION
When working on or near energized electrical equipment,
follow established electrical safety-related work practices.
Refer to NFPA 70E Standard for Electrical Safety in the
Workplace.
We recommend that maintenance performed on the MCC units
be performed away from the MCC in a suitable work area,
when possible.
Publication 2100-IN012C-EN-P - April 2009 69
Page 70

Chapter 6 Operator Handle and Unit Interlock
Unit Interlock to Prevent Insertion - Unit Completely Withdrawn
70 Publication 2100-IN012C-EN-P - April 2009
Page 71

Operator Handle and Unit Interlock Chapter 6
In this position, the unit is partially removed from the MCC and the
intermediate slot in the interlock plate is in line with the bushing
located in the unit support pan. When the unit is locked in this
position, the unit power and ground stabs are disengaged. This
position can be used to prevent insertion of a unit into the MCC.
Unit Interlock to Prevent Insertion - Horizontal Operating Handle
ATTENTION
When working on or near energized electrical equipment,
follow established electrical safety-related work practices.
Refer to NFPA 70E Standard for Electrical Safety in the
Workplace.
We recommend that maintenance performed on the MCC units
be performed away from the MCC in a suitable work area,
when possible.
Publication 2100-IN012C-EN-P - April 2009 71
Page 72

Chapter 6 Operator Handle and Unit Interlock
Unit Interlock to Prevent Insertion - Unit Completely Withdrawn
72 Publication 2100-IN012C-EN-P - April 2009
Page 73

Chapter
Final Check List Before Energizing
7
Introduction
This section provides guidance for the startup of a newly installed
MCC.
We recommend making an itemized list including:
• serial number.
• number of sections.
• number of units and their corresponding voltage.
• current ratings.
• horsepower ratings
• types of circuits.
• fuse sizes.
• circuit breaker ratings and trip settings.
• heater elements requirements.
• other important data.
The itemized list could be modeled after the MCC layout drawings
supplied with each MCC. This itemized list should be saved in a file
along with other data for the MCC such as, component manuals,
heater element instructions, MCC manuals, and wiring diagrams.
Blank sample forms are provided at the end of this chapter.
Pre-Energizing Check Procedure
73Publication 2100-IN012C-EN-P - April 2009 73
The following procedures should be executed by a ‘qualified person’
as defined by NEMA Standards Publication / No. ICS 2.3, Instructions
for the Handling, Installation, Operation and Maintenance of Motor
Control Centers, Section 1 as follows:
1.4 Qualified Person
For the purpose of this guide, a qualified person is one who is
familiar with the installation, construction and operation of the
equipment and the hazards involved. In addition, he or she has
the following qualifications:
1.4.1
Is trained and authorized to energize, de-energize, clear,
ground and tag circuits and equipment in accordance with
established safety practices.
Page 74

Chapter 7 Final Check List Before Energizing
Perform the Pre-energizing Check Procedure
1.4.2 Is trained in the proper care and usage of protective
equipment such as rubber gloves, hard hat, safety glasses or face
shields, flash clothing, etc., in accordance with established safety
practices.
ATTENTION
To ensure the safety of personnel performing the pre-energizing
check, make sure the MCC remote power sources are
disconnected and locked in the OFF/O position.
Using a voltmeter, verify that the MCC remote power sources
are disconnected.
ATTENTION
ATTENTION
Power factor correction capacitors (PFCCs) should be applied
correctly. For application instructions refer to
Correction Capacitors for Bulletin 2100 MCC Starter Units Application
Techniques,
publication 2100-AT001. When PFCCs are connected
Power Factor
to the motor circuit and the start-up procedure requires the
respective motors to be jogged, inched, or bumped (rotation
direction check), temporarily disconnect PFCCs. For more
information contact, Rockwell Automation LV MCC Technical
Support at 1.440.646.5800 and follow the prompts to
Allen-Bradley>Low Voltage Motor Control Centers>Post
Shipment Support.
Verify that motor acceleration times are within specific
application specifications.
Excessive starting currents and/or acceleration times may
cause inverse time circuit breakers, power fuses, overload
relays, and other components to overheat and/or shutdown
equipment.
1. Remove all blocks or temporary holding means used for
shipping all component devices in the MCC.
2. Inspect the enclosure and units for damage.
If structural damage is present, contact MCC technical support at
1.440.646.5800 and follow the prompts to Allen-Bradley>Low
Voltage Motor Control Centers>Post Shipment Support. If no
74 Publication 2100-IN012C-EN-P - April 2009
Page 75

Final Check List Before Energizing Chapter 7
structural damage is visible, the electrical spacings should be
intact. Refer to the tables starting on page 84
for the required
minimum electrical spacings.
3. Check and verify that the MCC is properly installed, as described
in Chapter 2
, and inspect and verify that it is level, supported,
and anchored.
4. Check the integrity of the bus splice connections.
Recommended torque values can be found on the information
label located on the interior of the vertical wireway door or on
the interior right-hand side plate of frame mounted units. See
Joining and Splicing Vertical Sections, publication 2100-IN010
,
for splicing information.
The factory-made power bus connections are tightened by a
computer-controlled torquing system. The following connections
do not require re-torquing:
• vertical to horizontal bus connections
• power conductor to horizontal bus connections.
These factory-made horizontal to vertical bus connections do
not require servicing for the life of the MCC.
5. Check and verify that all ground connections are made properly,
based on local standards.
If ground bus is not provided or has been removed, check that
the MCC sections are connected to provide a continuous ground
path.
6. Check the field wiring.
a. Check the field wiring for proper conductor sizing.
MCC field conductors should be sized by using the National
Electrical Code (NEC) 75 °C (167 °F) wire tables.
b. Removal of barrier or barriers may have been required for
field wiring. Check that all barriers and parts that may
have been removed during installation have been
reinstalled.
We recommend that a barrier checklist is developed including
such items as, unit location, and barrier location. This
checklist should be saved for future reference.
c. Check that all incoming and outgoing power wiring is secure
and braced to withstand the effects of a fault current as
detailed in Chapter 3
Publication 2100-IN012C-EN-P - April 2009 75
.
Page 76

Chapter 7 Final Check List Before Energizing
d. Check that conduit and cabling are well supported.
For incoming line compartments, 2.0 space factors, 26 in.
(660.4 mm) or less, the incoming cables should be firmly
secured halfway between the top of the section and the
incoming line compartment terminals. In a full section (6.0
space factor) incoming line compartments the cables should
be braced every 12 in. (305 mm); if the system’s available
short circuit current is above 42,000 A but less then 65,000 A
rms symmetrical. Above 65,000 A rms symmetrical available
current bracing should occur every 6.5 in. (165 mm). This
bracing is in accordance with the Underwriters Laboratories
(UL) listing and is necessary to withstand forces resulting from
high fault currents. For information on cable bracing methods,
see Chapter 3
of this publication.
e. Check the integrity of all field connections.
Recommended torque values not found on individual devices
can be found on the unit wiring diagrams.
f. Check field wired connections made to the MCC for
agreement with wiring diagrams and verify that proper
spacings between adjacent phases and/or phases to ground
are being used. Refer to page 84
for the minimum electrical
spacing requirements.
7. Check that the voltage and horsepower ratings on the motor
correspond with the MCC unit ratings.
8. Check that the overload relays or heater elements are selected,
installed and/or adjusted to relative full load current shown on
the motor rating nameplate.
9. For applications requiring power fuses, install the fuses in the
fusible switches in accordance with the NEC application
requirements.
Refer to CENTERLINE Motor Control Centers Power Fuses
Product Data,
publication 2100-TD003 for fuse information. Do
not apply grease or NO-OX-ID to fuse ferrules. All fuses
must be completely inserted in the fuse clips. Recommended
torque values for fuse clamp screws can be found on the unit
wiring diagram. Verify that all fuses fit each application.
10. For circuit breaker applications, verify that the circuit breakers
are in accordance with NEC application requirements, and have
correct ampacity and trip settings.
76 Publication 2100-IN012C-EN-P - April 2009
Page 77

Final Check List Before Energizing Chapter 7
Refer to MCC Instantaneous Trip Motor Circuit Protectors (MCP)
in Combination NEMA Starter, Soft Starter (SMC), and Variable
Frequency AC Drive Units Technical Data,
2100-TD001
, and MCC Inverse Time Circuit Breakers in
publication
Combination NEMA Starter, Soft Starter (SMC), and Variable
Frequency AC Drive Units Technical Data,
2100-TD002 for circuit
breaker information in MCC units.
IMPORTANT
High efficiency motors may have higher locked rotor and
inrush currents, therefore, higher magnetic trip settings
than those required equivalent standard motors may be
required.
11. Refer to the device instruction sheets or manuals supplied with
the MCC for specific start-up guidance. Component devices in
MCC units such as transfer switches, PFCCs, transducers, motor
protectors, line monitors, over and under-voltage relays, and
motor windings heaters may require unique start-up procedures.
Set and verify adjustable current, voltage, and other settings,
according to device instructions or wiring diagrams.
Allen-Bradley AC drives and soft starter units are shipped with
preset factory settings such as ramp speed, current limits, switch
positions, and readouts. Preset factory settings may not be
suitable for many applications. Refer to instruction manuals,
supplied with the MCC for specific startup guidance.
ATTENTION
Verify that the parameters of configurable devices, such
as drives, soft starters, and overload relays, are suitable
for the specific application and change them as needed
for the specific application.
12. Manually exercise all switches, control auxiliary switches, circuit
breakers, their respective operators, unit interlocks, trip
mechanisms (test by pushing the ‘Push to Trip’ button), and any
other operating mechanisms to verify proper operation.
13. Check timing relay settings as required.
14. Check the vents and fans.
a. Check all vents to ensure they are free from obstructions.
b. Check all fans, used for forced air cooling to ensure the shaft
rotates without obstructions.
c. Check that filters are in place and clean, and set up an
in-house program for scheduled cleaning or replacement.
Publication 2100-IN012C-EN-P - April 2009 77
Page 78

Chapter 7 Final Check List Before Energizing
If you have an MCC with arc-resistant design features, if a unit
has been provided with arc resistant baffles over door vents
and fans, these baffles must be fastened securely in place in
order to maintain the arc resistant capabilities of the MCC. Do
not install any type of filter in place of, or in addition to, the
arc resistant baffles.
ATTENTION
Current transformer secondaries should not be ‘open’. To
avoid possible injury and electrical shock to personnel,
do not energize a current transformer with its secondary
open.
15. Check all current transformers for proper polarity and ensure
their secondaries are not ‘open’, but are either connected to
their respective devices or ‘shorted.’
16. Recheck that all barriers and parts that may have been
removed during installation have been reinstalled. Refer to
the barrier checklist.
17. Before closing the enclosure and/or individual units, remove all
tools, metal chips, scrap wire and other debris from the MCC
interior.
If there is an accumulation of dust or dirt, clean out the MCC
using a brush, vacuum cleaner or clean, lint-free rag. Do not
use compressed air - it will redistribute contaminates on
other surfaces.
ATTENTION
When conducting an electrical insulation resistance
test, isolate equipment sensitive to high test voltages,
such as meters, solid state devices, motor winding
heaters, and capacitor units.
18. Conduct an electrical insulation resistance test to verify the MCC
wiring integrity.
Conduct this test using an insulation resistance tester (megger)
with a potential of 500...1000V. This megger test should be
conducted phase-to-phase, phase-to-ground, and when
applicable, phase-to-neutral on the MCC buswork. The test
should be conducted with all of the switches or circuit breakers
in the open or OFF/O positions. Typical insulation resistance
values are 50 MΩ or greater.
Next, check the field wiring; for example, motor cables and
incoming line cables. Insulation resistance values are affected by
78 Publication 2100-IN012C-EN-P - April 2009
Page 79

Final Check List Before Energizing Chapter 7
temperature, humidity, or dampness which may cause a
considerably lower insulation resistance reading. If the
insulation resistance values are below 1 MΩ (for example,
affected by dampness, temperature, or humidity) or the MCC has
been stored in a damp or humid area, we recommend that the
equipment be dried out. Dry out the motor cables by injecting a
low voltage current or by using space heaters.
Once the equipment is dry, repeat the insulation resistance test.
The minimum value for insulation resistance on a new
installation at startup or energizing is 1 MΩ. These readings may
be recorded in the Megger Reading Recording Table
. This table
allows for additional megger readings to be recorded during
regular maintenance periods.
19. Check that all unit latches are secure.
20. Close and latch all doors, making certain that no wires are
pinched.
21. Check that all section closing plates are in place.
Certain applications may have latch requirements different from those
provided. If you have questions regarding proper latching, contact
Rockwell Automation LV MCC Technical Support at 1.440.646.5800
and follow the prompts to Allen-Bradley>Low Voltage Motor Control
Centers>Post Shipment Support. Refer to the following illustrations for
various latch placements.
Publication 2100-IN012C-EN-P - April 2009 79
Page 80

Chapter 7 Final Check List Before Energizing
Vertical Wireway Door
0.5 Space Factor
1 Space Factor or Larger
Standard Latches Arc Resistant Latches
0.5 Space Factor and Units with Horizontal Disconnect Handles
Standard Latches Arc Resistant Latches
80 Publication 2100-IN012C-EN-P - April 2009
Page 81

1 Space Factor to 2.5
Space Factor
2.5 Space Factor or
Larger
Final Check List Before Energizing Chapter 7
1.0 Space Factor and Units with Vertical Disconnect Handles
An arc resistant latch is
used for the center latch
only for main incoming
power units.
Standard Latches Arc Resistant Latches
For most units, the center latch is a standard quarter-turn latch. For
some units a multi-turn latch is used. Torque the latch to 20 lb•in
+/- 2 lb•in.
Publication 2100-IN012C-EN-P - April 2009 81
Page 82

Chapter 7 Final Check List Before Energizing
6 Space Factor (full section) Units
An arc resistant latch is
used for the second and
fourth positions. Other
latches are standard
quarter turn.
Arc Resistant LatchesStandard Latches
When properly latched, the slots on all arc resistant latches are vertical
and the latch springs are compressed. The spacing of the spring coils
are decreased.
Spring Compression
Uncompressed Spring Compressed Spring
82 Publication 2100-IN012C-EN-P - April 2009
Page 83

Final Check List Before Energizing Chapter 7
ATTENTION
Arc resistant MCCs are provided with an insulating sheet for
each center-end closing plate. This insulation sheet must be in
place in order to maintain the arc resistant capabilities of the
MCC.
Arc Resistant MCC with Insulating Sheet (15 in. deep, right side visible)
Insulation Sheet
End Closing Plate
Publication 2100-IN012C-EN-P - April 2009 83
Page 84

Chapter 7 Final Check List Before Energizing
.
General Spacing Requirements for MCCs
(1) (2) (3)
Min Spacing, in. (mm)
Between Live Parts of Opposite Polarity Between Live Parts and
Grounded Metal Parts,
Through Air and Over
Voltage
SurfaceThrough Air Over Surface
125 or less 1/2 in. (12.7 mm) 3/4 in. (19.1 mm) 1/2 in. (12.7 mm)
126...250 3/4 in. (19.1 mm) 1.25 in. (31.8 mm) 1/2 in. (12.7 mm)
251...600 1 in. (25.4 mm) 2 in. (50.8 mm)
(1)
Reference Underwriters Laboratories, Inc. Standards for Motor Control Centers, UL 845, Tables 16.1 and 16.3.
(2)
Spacings at all horizontal and vertical buses, at incoming terminals, at the plug-in portion of all units and at feeder units
consisting of fusible disconnect switches or circuit breakers only, having other than horsepower ratings, shall be as
specified above. (See 17.2.2 from UL 345.)
(3)
An isolated dead metal part, such as a screw head or a washer, interposed between uninsulated live parts of opposite
polarity or between an uninsulated live part and grounded dead metal is considered to reduce the spacing by an
amount equal to the dimension of the interposed part along the path of measurement.
(4)
A through-air spacing of not less than 1/2 in. (12.7 mm) is acceptable at a circuit breaker or fusible disconnecting
means and between grounded dead metal and the neutral of a 277/480V, three-phase, four-wire MCC.
1 in. (25.4 mm)
(4)
Spacing Requirements within MCC Units
(1) (2) (3)
Min Spacing, mm (in.)
Between Uninsulated Live
Parts and the Walls of a
Metal Enclosure
(3)
, Including
Fittings for Conduit or
Armored Cable
Voltage
125 or less
Between Uninsulated Live Parts of Opposite
Polarity and Between an Uninsulated Live
Part and an Exposed or Uninsulated Dead
Metal Part other than the Enclosure
Through Air Over Surface Shortest Distance
1/8 in. (3.2 mm)
(2)
1/4 in. (6.4 mm) 1/2 in. (12.7 mm)
126...250 1/4 in. (6.4 mm) 3.8 in. (9.5 mm) 1/2 in. (12.7 mm)
251...600 3.8 in. (9.5 mm) 1/2 in. (12.7 mm) 1/2 in. (12.7 mm)
(1)
Reference Underwriters Laboratories, Inc. Standards for Motor Control Centers, UL 845, Tables 16.1 and 16.3.
(2)
The spacing between wiring terminals of opposite polarity shall not be less than 1/4 in. (6.4 mm) if the terminals are in the same
plane.
(3)
The enclosure refers to the section enclosure.
A metal piece attached to the enclosure is considered a part of the enclosure
for the purpose of this note if deformation of the enclosure is likely to
reduce the spacing between the metal piece and a live part.
84 Publication 2100-IN012C-EN-P - April 2009
Page 85

Sample MCC Layout Worksheet
Horizontal Wireway
Final Check List Before Energizing Chapter 7
Unit Data
1.0 S.F.
113 in.
(330 mm)
Horizontal Wireway
A
B
C
D
E
F
G
H
J
K
L
M
1A
1E
1G
Vertical Wireway
Location of Sample Units within above MCC Layout
2A
Full
Width
Section
Wiring
Unit Location
Cat. No.
Diagram
Size or Amp Rating
Description
Full Load Current
Horsepower
Overload or
Heater Elements
Kilowatts
Circuit Breaker Trip Setting
Power Fuse Rating
1A 2113B-EDB-48CA CSXXXXXXXX 4 FVNR 77 60 W73 — C —
1E 2112A-BDBD-24J-38-7FEC1A Y-XXXXXX 1 FVNR 4.8 3 7FECIA — — 10
1G 2100-NJ30 N/A — Blank — — — — — —
2A 2113B-2PAB-56WT Y-XXXXXX 450A FVNR(V) 364 250 W43 — 6 —
Publication 2100-IN012C-EN-P - April 2009 85
Page 86

Chapter 7 Final Check List Before Energizing
Unit Description
Unit Type Code Code Description
CN2DN ControlNet to DeviceNet
DNC DeviceNet Connector
DNPS DeviceNet Power Supply
EN2DN Ethernet ro DeviceNet
FCBX Insert with Circuit Breaker
FDSX Insert with Fusible Disconnect
FVLC Full Voltage Lighting Contactor
FVR Full Voltage Reversing
FVNR (V) Full Voltage Non-Reversing (Vacuum)
INSRT Unit Insert
LPAN Lighting Panel
(M)BPS MAIN Bolted Pressure Switch
(M)CB MAIN Circuit Breaker
(M)FDS MAIN Fusible Disconnect Switch
(M)LUG MAIN Line Lugs
METER Metering Unit
NCP Neutral Connection Plate
NLD ControlNet to DeviceNet
PLC Programmable Logic Controller
RVAT Reduced Voltage Autotransformer
SMC Solid State Motor Controller
SPD Surge Protection Device
TERM Terminal Unit
TS1W (R) Two-Speed One Winding (Reversing)
TS2W (R) Two-Speed Two Winding (Reversing)
VFD (VT) Variable Frequency Drive (Variable Torque)
VFD (CT) Variable Frequency Drive (Constant Torque)
VFDR Variable Frequency Drive Supplemental Unit
XFMR Transformer
86 Publication 2100-IN012C-EN-P - April 2009
Page 87

MCC Layout Worksheet
Final Check List Before Energizing Chapter 7
MCC Name / Number
Unit Data
Cat. No. Wiring Diagram
Unit Location
___________________________________________________________
Size or Ampere Rating
Description
Full Load Current
Horsepower
Overload or Heater Elements
Kilowatts
Circuit Breaker Trip Setting
Power Fuse Rating
Publication 2100-IN012C-EN-P - April 2009 87
Page 88

Chapter 7 Final Check List Before Energizing
Megger Reading Recording Table
MCC Name / Number
Circuit / Unit
Date
Name / Number
___________________________________________________________
Phase-to-Phase Phase-to-Ground Phase-to-Neutral
A - B B - C C - A A - Grd. B - Grd. C - Grd. A - Neut. B - Neut. C - Neut.
88 Publication 2100-IN012C-EN-P - April 2009
Page 89

Energizing the Equipment
Chapter
8
ATTENTION
ATTENTION
ATTENTION
This procedure is provided as a general guidance for energizing
a newly installed CENTERLINE MCC and should be used after
the Final Check procedure has been completed. See Final
Check List Before Energizing for more information.
Energizing a MCC for the first time is potentially dangerous.
Serious damage and or personal injury can result when power
is applied. Therefore, only qualified personnel should energize
the equipment.
When working on or near energized electrical equipment,
follow established electrical safety-related work practices.
Refer to NFPA 70E Standard for Electrical Safety in the
Workplace.
Energize the Equipment
89Publication 2100-IN012C-EN-P - April 2009 89
1. Review any additional instructions supplied for the proper
operation of special units such as variable frequency drives and
soft starters with appropriate and qualified personnel.
2. Check that there is no load on the MCC when it is energized.
3. De-energize all main and unit disconnect devices.
4. Check to see if any associated remote devices are de-energized.
5. Energize the MCC remote power source.
Page 90

Chapter 8 Energizing the Equipment
ATTENTION
Disconnecting device handles should be operated with a
firm, direct motion and should not be ‘teased’ into the
closed (ON/I) position.
6. Energize the main devices followed by the feeder devices and
the branch circuit devices.
Always energize from the source of the system, working towards
the loads.
7. After all of the disconnects have been closed, loads such as
lighting circuits, motor starters, and contactors may be
energized.
a. When power factor correction capacitors are energized with
the motor windings and the start-up procedure requires that
the respective motors be jogged or inched, temporarily
disconnect the power factor correction capacitors.
For more information on power factor capacitors and MCC
units, refer to the Power Factor Correction Capacitors for
Bulletin 2100 Motor Control Center Starter Units Application
Techniques, publication 2100-AT001
.
b. Verify that any acceleration times are within application
specifications.
Excessive starting currents and acceleration times may cause inverse
time circuit breakers, power fuses, overload relays, and other
components to overheat and shutdown the equipment.
90 Publication 2100-IN012C-EN-P - April 2009
Page 91

Chapter
9
Maintenance
A periodic maintenance program should be established for MCCs to
avoid unnecessary downtime. The frequency of service to MCCs will
depend upon the equipment usage and the environment in which it
operates. The following is a suggested checklist and can be used to
establish a maintenance program.
Maintain the MCC
ATTENTION
1. Inspect the MCCs once per year or per established maintenance
program.
2. Carefully inspect doors and enclosure sides for evidence of
excessive heat.
3. Check for moisture or any signs of dampness or drippings inside
the MCC.
IMPORTANT
a. Seal off conduit, cracks, and openings that have allowed
and/or could allow moisture to enter the MCC enclosure.
b. Dry or replace and clean insulating material that is damp or
wet or shows signs of moisture.
c. Check devices such as contactors, circuit breakers, disconnect
switches, relays, and push buttons for wetness or signs of
moisture, corrosion, or contamination.
d. Replace damaged or malfunctioning parts.
De-energize the MCC before servicing.
Condensation in conduit or dripping from an outside
source is a common cause of MCC failure. Eliminate any
source of moisture.
4. Check the integrity of bus splice connections.
Bus splices can be easily identified by the label located on the
interior of the vertical wireway door or on the interior right-hand
side plate of frame mounted units. Recommended torque values
91Publication 2100-IN012C-EN-P - April 2009 91
Page 92

Chapter 9 Maintenance
can be found on the information label located on the interior of
the vertical wireway door or on the interior right-hand side plate
of frame mounted units.
The factory-made power bus connections are tightened by a
computer-controlled torquing system. The following
connections do not require re-torquing, vertical to horizontal
bus connections and power conductor to horizontal bus
connections. These factory-made connections do not require
servicing for the life of the MCC.
5. Periodically clean or replace the air filters depending on the
environmental conditions.
6. Check for the proper function and freedom of movement (no
sticking or binding) for the disconnect handle operating and
defeater mechanisms.
7. Replace broken, deformed, malfunctioning, or badly worn parts
or assemblies.
8. Inspect unit bus-stab connections for wear or corrosion.
Wear and/or corrosion can increase resistance and cause an
increased temperature of the contact point, leading to failure.
Replace bus stabs if wear or corrosion is excessive. Lubricate
bus stabs with NO-OX-ID grease (catalog number 2100H-N18 or
2100H-N18T) before installing the unit into the section.
ATTENTION
When working on or near energized electrical
equipment, follow established electrical safety-related
work practices. Refer to NFPA 70E Standard for
Electrical Safety in the Workplace.
To prevent injury or death to personnel lubricating
disconnect switch contacts, make sure the MCC power
source(s) is disconnected and the respective
disconnect(s) is locked in the OFF/O position. For plug-in
units, remove the unit from the MCC.
To prevent personal injury or damage to equipment,
make sure that the unit handle operator is in the OFF/O
position before removing the unit.
9. Inspect current carrying parts such as fuse clips, knife blades of
disconnects, and line and load terminals of devices for
discoloration, corrosion, or other signs of wear or possible
failure.
92 Publication 2100-IN012C-EN-P - April 2009
Page 93

Maintenance Chapter 9
10. Check locking or interlocking devices for proper working
condition.
11. Adjust, repair, or replace any device if necessary.
12. Check power contacts for excessive wear and dirt accumulation
and vacuum or wipe contacts with a soft cloth to remove dirt as
needed.
Contacts are not harmed by discoloration and slight pitting.
Contacts should never be filed, as this could reduce the life of
the contacts. Contact spray cleaners should not be used, as they
cause sticking on magnetic pole faces or in operating
mechanisms, interfering with the electrical continuity of the
contacts. Contacts should be replaced only after the silver has
become badly worn. Always replace contacts in complete sets to
avoid misalignment and uneven contact pressure.
13. Check for loose wire connections on power and control circuit
terminals.
Loose connections can cause overheating, hot spots, or arcing
faults that could lead to equipment malfunction or failure.
Replace any damaged parts or wiring.
14. Check contactor and relay coils for evidence of overheating,
such as cracking, melting, or burning of insulation.
If there is evidence of overheating, the coil must be replaced.
When replacing a coil, check and correct the overvoltage or
undervoltage conditions that may have caused the coil failure.
Be sure to clean any residue of melted coil insulation from other
parts of the device and replace as necessary.
15. Check all pilot lights and replace lamps and damaged lenses as
necessary.
16. Check all fuses.
If replacing fuses, install the same type and rated fuse that was
originally furnished with the MCC.
17. Remove accumulated dust and dirt from structure and individual
units by vacuuming.
Do not use compressed air, as it may contain moisture and blow
debris within the enclosure.
Publication 2100-IN012C-EN-P - April 2009 93
Page 94

Chapter 9 Maintenance
Disconnect the Switch and Contact Lubrication
18. Refer to individual user policies, NFPA 70B, Recommended
Practice for Electrical Equipment Maintenance for MCC Servicing
Guidelines.
ATTENTION
Follow NFPA 70E safety guidelines when working on energized
equipment.
To prevent injury or death to personnel lubricating disconnect
switch contacts, make sure the MCC power source(s) is
disconnected and the respective disconnect(s) is locked in the
OFF/O position. For plug-in units, remove the unit from the
MCC.
To prevent personal injury or damage to equipment, make sure
that the unit handle operator is in the OFF/O position before
removing the unit.
If a switch that is used frequently becomes difficult to operate or is
located in a highly corrosive or caustic environment, it may require
lubrication. The lubricant to be used is NO-OX-ID Compound (catalog
number 2100H-N18 for a 1 pt can or catalog number 2100H-N18T for
a 1 oz tube). To obtain the lubricant, contact your local Rockwell
Automation Sales Office, distributor or Rockwell Automation.
1. Determine your unit type.
Plug-in Units
If a disconnect switch requires lubrication and is housed in a
plug-in unit, remove the plug-in unit from the MCC (For removal
of unit, refer to Chapter 4
Units, before lubricating the switch).
Frame Mounted Units
If a disconnect switch requires lubrication and is housed in a
frame mounted unit, turn off the power sources to the MCC so
the switch can be lubricated.
, Installing and Removing Plug-in
ATTENTION
94 Publication 2100-IN012C-EN-P - April 2009
To prevent injury or death to personnel lubricating
disconnect switch contacts, make sure that the MCC
remote power sources are disconnected and the
respective disconnects are locked in the OFF/O position.
Page 95

Maintenance Chapter 9
Save all parts for reinstallation.
2. Remove the line guard from the disconnect.
3. For access to the disconnect's stationary contacts, remove the arc
hood.
4. Generously apply the NO-OX-ID compound (sufficient enough
to cover with a noticeable film) to both sides of the movable
contact blades and to the adjacent insides stationary contacts
and the hinge.
If the unit requires lubrication because of corrosion (for example, a
sulfuric environment), replacing the unit disconnect may be required
to avoid overheating conditions. Lubrication may temporarily resolve
overheating, however replacing the disconnect switch would be the
ideal, long-term solution.
Use Thermal Infrared or Other Temperature Measurement Techniques for Preventive Maintenance
5. Reinstall the arc hood that was removed in step 3
6. Reinstall the line guard cover that was removed in step 2
7. If the lubricated disconnect switch is housed in a plug-in unit,
reinstall the unit.
For installation of unit, refer to Installing Units with Vertical
Operating Handles, publication 2100-IN014
ATTENTION
Temperature measuring techniques are often performed with
the units fully energized and the doors and covers open.
Use extreme caution when performing these measurements so
that energized parts are not shorted.
.
.
.
If care is not taken, electrical shock, severe injury or death will
result.
When working on or near energized electrical equipment,
follow established electrical safety-related work practices.
Refer to NFPA 70E Standard for Electrical Safety in the
Workplace.
Use the following procedure when using thermal infrared or other
temperature measurement techniques as part of a periodic
preventative maintenance program on CENTERLINE 2100 Low Voltage
MCCs.
Publication 2100-IN012C-EN-P - April 2009 95
Page 96

Chapter 9 Maintenance
Temperature Guidance
1. Use test equipment to determine the temperature differential
and the temperature rise of accessible components within the
unit.
2. Determine the services and repair recommendations based on
the temperature category in the following guidance chart.
Category Temperature
Differential
(1)
Temperature
(2)
Rise
Repair/Service
°C °F °C °F Service Interval Recommended Action
1 < 10° < 18° < 70° < 126° No service or repair required. See step 1 below.
2 10°...25° 18°...45° 70°...100° 126°...180° Service or repair the unit at next maintenance
See step 2 below.
schedule (not greater than six months but continue
monitoring as a part of preventive maintenance.)
3 25°...50° 45°...90° 100°...115° 180°...207° Service or repair the unit within the next two weeks
and monitor the unit at the next maintenance interval.
4 > 50° > 90° > 115° > 207° Shutdown the unit and repair. Verify that the
temperature is reduced after re-energization.
(1)
Temperature (measured or rise) differential between adjacent phases or like elements. Load between phases must be balanced with a normal variation not exceeding
seven percent.
(2)
Measured temperature less ambient.
Due to difficulty obtaining accurate infrared temperature measurements from highly reflective surfaces, we recommend using temperature differential readings in
determining the Service/Repair guidelines, for example, emissivity of tin or silver plated material.
Inspect the Units for Signs of Overheating
1. If there are no signs of overheating and thermal infrared tests
indicate service is not necessary, document the units as
acceptable.
Use this information for reviewing the mean time to
maintenance for preventative maintenance for the specific
facility.
ATTENTION
To service the units, make sure that the MCC remote
power sources are disconnected and that the respective
disconnects are locked in the OFF/O position.
96 Publication 2100-IN012C-EN-P - April 2009
Page 97

Maintenance Chapter 9
ATTENTION
If servicing a plug-in unit, remove it from the MCC to
facilitate servicing. Refer to Chapter 2
of this publication
for unit removal guidelines.
When plugging units back in, refer to
Motor Control Centers (MCC) Units with Vertical Operating
Handles Installation Instructions,
and
CENTERLINE 2100 Motor Control Center (MCC) Units
with Horizontal Operating Handles Installation Instructions,
CENTERLINE 2100
publication 2100-IN014,
publication 2100-IN060.
2. If there are no signs of overheating, but thermal infrared tests
indicate service is required, check the power connections for
proper torque.
a. On disconnect switches, service the knife blades with a
Scotch-Brite cleansing pad.
b. Remove all hardened grease.
Care should be taken not to distort the disconnect jaw
(stationary contact).
c. Lubricate with a fine film of NO-OX-ID (catalog number
2100H-N18 for a 0.47 L (1 pt) can, or catalog number
2100H-N18T for a 29.5 ml (1 oz) tube).
Should the disconnect be subject to environmental conditions
causing chronic tarnishing, it may be necessary to determine
if there is an incompatibility in the plating material, for
example, hydrogen sulfide and silver plating.
On fuses and fuse clips, service by polishing with a Scotch-Brite
cleansing pad. Do not lubricate the fuses or the fuse clips.
3. If overheating has occurred as indicated by severe tarnishing,
infrared test results, crystallization of insulation on conductors,
discoloration of the components, darkening of the molding
materials, brittle conductor insulation, or deformation and
melting of parts, replace the components that are suspect.
For more information contact, Rockwell Automation LV MCC
Technical Support at 1.440.646.5800 and follow the prompts to
Allen-Bradley>Low Voltage Motor Control Centers>Post Shipment
Support.
Publication 2100-IN012C-EN-P - April 2009 97
Page 98

Chapter 9 Maintenance
Notes:
98 Publication 2100-IN012C-EN-P - April 2009
Page 99

Maintain the MCC After a Fault Condition
Chapter
10
Maintenance After Fault Condition
ATTENTION
The opening of the short circuit protective device (such as fuses or
circuit breakers) in a properly coordinated motor branch circuit is an
indication of a fault condition in excess of operating overload and
must be corrected.
Make sure that the MCC remote power sources are
disconnected and that the respective disconnects are locked in
the OFF/O position.
Fault conditions can cause damage to control equipment. When a
fault occurs, follow this procedure.
1. De-energize the MCC.
2. Investigate the cause of the fault and inspect all equipment
thoroughly per NEMA Standards publication ICS 2.3-1995,
Instructions for the handling installation operator and
maintenance of MCCs not rated more than 600V, Section 11,
Maintenance after a Fault has Occurred.
3. Make necessary repairs to units, components and structures as
required, prior to reenergizing the equipment.
Be sure that replacement parts are suitably rated for the application.
An insulation resistance test (megger) may be required. Refer to
Chapter 7
.
99Publication 2100-IN012C-EN-P - April 2009 99
Page 100

Chapter 10 Maintenance After Fault Condition
Notes:
100 Publication 2100-IN012C-EN-P - April 2009
 Loading...