

Page 1

Data Highway Plus
Interface Module
(M/N 57C442)
Instruction Manual J2-3067-5
Page 2
The information in this user’s manual is subject to change without notice.
IBM is a registered trademark of International Business Machines
Corporation. Allen-Bradley, A-B, AutoMax, Data Highway Plus, PLC, PLC-2,
PLC-5, SLC, and Reliance are registered trademarks of Rockwell
Automation.
Multibus is a trademark of Intel Corporation.
Phoenix and Combicon are registered trademarks of Phoenix Contact Ltd.
ReSource is a trademark of Reliance Electric Company or its subsidiaries.
!
ATTENTION: Only qualified electrical personnel who are familiar
with the construction and operation of this equipment and the
hazards involved should install, adjust, operate, and/or service this
equipment. Read and understand this manual and other applicable
manuals in their entirety before proceeding. Failure to observe this
precaution could result in severe bodily injury or loss of life.
!
ATTENTION: The user is responsible for conforming with all
applicable local, national, and international codes. Wiring practices,
grounding, disconnects, and over-current protection are of particular
importance. Failure to observe this precaution could result in severe
bodily injury or loss of life.
!
ATTENTION: The user must provide an external, hardwired
emergency stop circuit outside the controller circuitry. This circuit
must disable the system in case of improper operation. Uncontrolled
machine operation may result if this procedure is not followed.
Failure to observe this precaution could result in bodily injury.
!
ATTENTION: Inserting or removing a module may result in
unexpected machine motion. Power to the machine should be
turned off before inserting or removing the module. Failure to
observe these precautions could result in bodily injury.
!
ATTENTION: This module contains static-sensitive
components. Careless handling can cause severe damage. Do not
touch the connectors on the back of the module. When not in use,
the module should be stored in an anti-static bag. The plastic cover
should not be removed. Failure to observe this precaution could
result in damage to or destruction of the equipment.
Page 3

Table of Contents
1.0 Introduction. . . . . . . . . . . . . . . . . . . . . . . . . . . . . . . . . . . . . . . . . 1-1
1.1 Additional Information . . . . . . . . . . . . . . . . . . . . . . . . . . . . . . 1-2
1.2 Related Hardware and Software . . . . . . . . . . . . . . . . . . . . . . 1-3
2.0 Mechanical/Electrical Description. . . . . . . . . . . . . . . . . . . . . . . 2-1
2.1 Mechanical Description . . . . . . . . . . . . . . . . . . . . . . . . . . . . . 2-1
2.2 Electrical Description. . . . . . . . . . . . . . . . . . . . . . . . . . . . . . . 2-3
3.0 Installation. . . . . . . . . . . . . . . . . . . . . . . . . . . . . . . . . . . . . . . . . . 3-1
3.1 Wiring . . . . . . . . . . . . . . . . . . . . . . . . . . . . . . . . . . . . . . . . . . 3-1
3.2 Initial Installation . . . . . . . . . . . . . . . . . . . . . . . . . . . . . . . . . . 3-1
3.3 Module Replacement . . . . . . . . . . . . . . . . . . . . . . . . . . . . . . 3-3
4.0 Programming . . . . . . . . . . . . . . . . . . . . . . . . . . . . . . . . . . . . . . . 4-1
4.1 Register Organization . . . . . . . . . . . . . . . . . . . . . . . . . . . . . . 4-1
4.1.1 Status and Control Registers . . . . . . . . . . . . . . . . . . . 4-2
4.1.2 Data Registers . . . . . . . . . . . . . . . . . . . . . . . . . . . . . . 4-3
4.1.3 Global Data Registers. . . . . . . . . . . . . . . . . . . . . . . . . 4-5
4.2 AutoMax Application Programming . . . . . . . . . . . . . . . . . . . 4-6
4.2.1 Variable Configuration. . . . . . . . . . . . . . . . . . . . . . . . . 4-6
4.2.2 Application Programming . . . . . . . . . . . . . . . . . . . . . . 4-8
4.2.3 Enabling the Data Highway Plus Interface Module. . . 4-9
4.2.4 Commands Initiated by the Data Highway Plu s
Interface Module. . . . . . . . . . . . . . . . . . . . . . . . . . . . . 4-10
4.2.5 Commands from Remote Stations . . . . . . . . . . . . . . 4-11
4.2.6 Off-link Routing Paths. . . . . . . . . . . . . . . . . . . . . . . . 4-13
4.2.6.1 Example of Bridging Two Data Highway Plus
Networks using 1785-- KA modules . . . . . . . . . . 4-13
4.2.6.2 Example of Bridging the DataHighway Plus
Link to a ControlNet Network. . . . . . . . . . . . . . . . 4-15
4.2.7 Programming Examples . . . . . . . . . . . . . . . . . . . . . . 4-16
5.0 Diagnostics and Troubleshooting. . . . . . . . . . . . . . . . . . . . . . . 5-1
5.1 The OK LED Is OFF . . . . . . . . . . . . . . . . . . . . . . . . . . . . . . . 5-1
5.2 Invalid Station Address . . . . . . . . . . . . . . . . . . . . . . . . . . . . . 5-1
5.3 Transmission Link Failures . . . . . . . . . . . . . . . . . . . . . . . . . . 5-1
5.3.1 Rack Failure . . . . . . . . . . . . . . . . . . . . . . . . . . . . . . . . 5-1
5.3.2 Remote Station and Link Failure. . . . . . . . . . . . . . . . . 5-2
5.4 Bus Error . . . . . . . . . . . . . . . . . . . . . . . . . . . . . . . . . . . . . . . 5-2
I
Page 4

Appendices
Appendix A
Technical Specifications . . . . . . . . . . . . . . . . . . . . . . . . . . . . . . . A-1
Appendix B
Module Block Diagram . . . . . . . . . . . . . . . . . . . . . . . . . . . . . . . . B-1
Appendix C
Network Connector Pin Assignments . . . . . . . . . . . . . . . . . . . . . C-1
Appendix D
Data Highway Plus Interface Module
7-Segment LED Error Codes. . . . . . . . . . . . . . . . . . . . . . . . . . . . D-1
Appendix E
GATEWAY_CMD_OK@ Status Codes . . . . . . . . . . . . . . . . . . . E-1
Appendix F
Mapping of Active Station List. . . . . . . . . . . . . . . . . . . . . . . . . . . F-1
Appendix G
Register Map for Diagnostic Counters . . . . . . . . . . . . . . . . . . . .G-1
Appendix H
Extended Status (EXT STS) Codes for Command 0F . . . . . . . . H-1
Appendix I
Converting A-B Register Numbers to AutoMax Register
and Bit Numbers for Monitoring. . . . . . . . . . . . . . . . . . . . . . . . . . .I-1
Appendix J
Recommendations For Reducing Noise
On The Cable System. . . . . . . . . . . . . . . . . . . . . . . . . . . . . . . . . J-1
II
Page 5

List of Figures
Figure 1.1 Connecting the AutoMax System to the
Data Highway Plus Network. . . . . . . . . . . . . . . . . . . . . 1-1
Figure 2.1 Data Highway Plus Interface Module Faceplate. . . . . . 2-2
Figure 4.1 Dual Port Memory Map. . . . . . . . . . . . . . . . . . . . . . . . . 4-1
Figure 4.2 Status and Control Register Assignments . . . . . . . . . . 4-2
Figure 4.2 Status and Control Register Assignments
(Continued) . . . . . . . . . . . . . . . . . . . . . . . . . . . . . . . . . 4-3
Figure 4.3 PLC-5 Data Image . . . . . . . . . . . . . . . . . . . . . . . . . . . . 4-3
Figure 4.3 PLC-5 Data Image (Continued) . . . . . . . . . . . . . . . . . . 4-4
Figure 4.4 Global Data Register Assignments. . . . . . . . . . . . . . . . 4-5
Figure 4.5 Commands Used with
GATEWAY_CMD_OK@ . . . . . . . . . . . . . . . . . . . . . . 4-10
Figure 4.6 PLC-5 Command Set . . . . . . . . . . . . . . . . . . . . . . . . . 4-11
Figure 4.7 Privileged Commands in the Basic
Command Set . . . . . . . . . . . . . . . . . . . . . . . . . . . . . . 4-12
Figure 4.8 Diagnostic Status Command Data . . . . . . . . . . . . . . . 4-12
Figure 4.9 Non-Privileged Commands in the Basic
Command Set . . . . . . . . . . . . . . . . . . . . . . . . . . . . . . 4-12
Figure 4.10 Off-link Message Routing Bytes . . . . . . . . . . . . . . . . . 4-13
III
Page 6

IV
Page 7
1.0 INTRODUCTION
The products described in this manual are manufactured or distributed
by RelianceElectric Industrial Company.
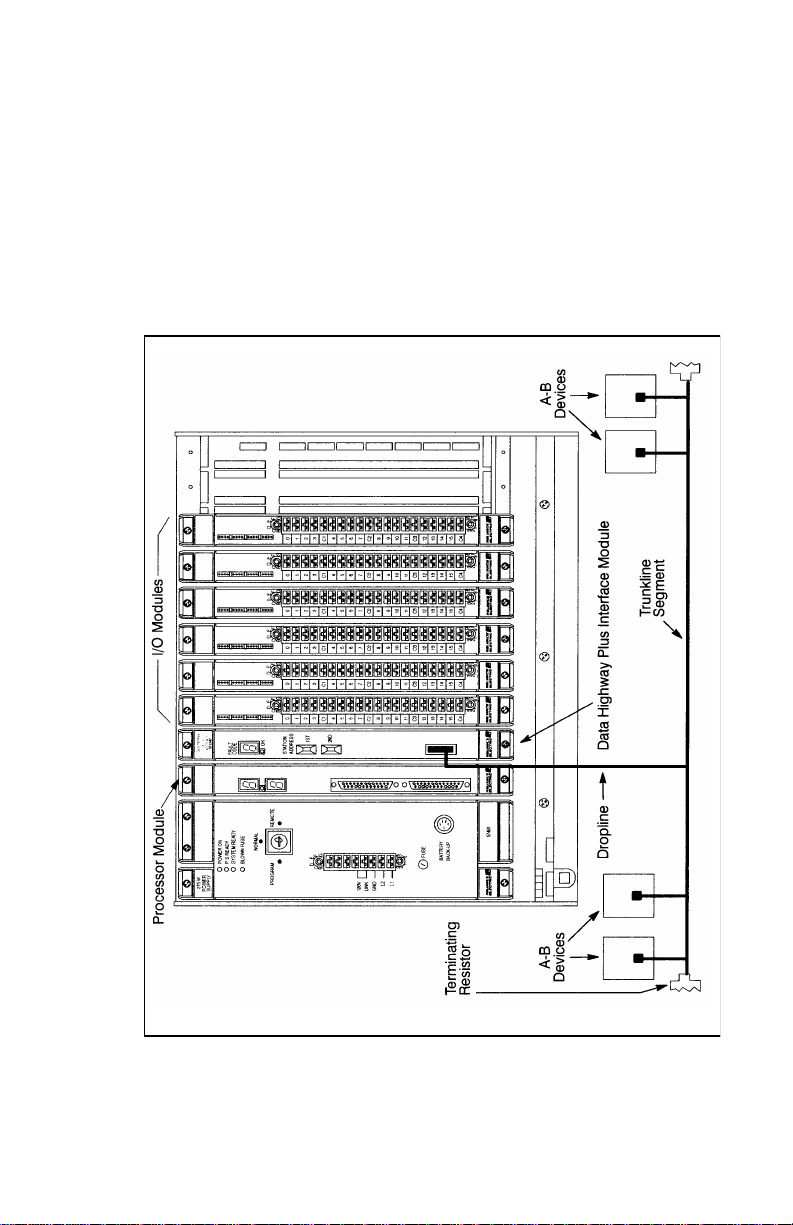
The Data Highway Plus Interface module (M/N 57C442) provides a
direct connection for the AutoMax system to the Allen-Bradley Data
Highway Plus network. The Data Highway Plus Interface module can be
placed in any slot in an AutoMax rack that contains at least one
AutoMax Processor, and can communicate with up to four AutoMax
Processors in that rack. The AutoMax rack containing the Data Highway
Plus Interface module appears as a single station on the Data Highway
Plus network. Figure 1.1 illustrates an AutoMax system connected to a
Data Highway Plus network.
Figure 1.1 – Connecting the AutoMax System to the Data Highway Plus Network
1-1
Page 8

Each AutoMax Processor has access to the look-alike PLC-5 or SLC
registers through the AutoMax rack backplane. The Data Highway Plus
Interface module transfers data between the PLC-5 look-alike image
and remote Allen-Bradley equipment using the Word Range Read,
Word Range Write, and Read-Modify-Write commands. The module is
capable of responding directly to these commands as well as typed
read and write commands from the PLC-5 command set and eight
other commands from the basic command set. These commands are
described in section 4.2. The individual command formats are
described in the various Allen-Bradley instruction manuals.
The remainder of this manual describes the functions and
specifications of the Data Highway Plus Interface module. It also
includes a detailed description of module installation and
troubleshooting procedures, as well as programming methods.
1.1 Additional lnformation
You must be familiar with all the instruction manuals that describe your
system configuration. This may include, but is not limited to, the
following:
• J-3636 COMMON MEMORY MODULE INSTRUCTION MANUAL
• J-3649 AutoMax CONFIGURATION TASK INSTRUCTION
• J-3650 AutoMax PROCESSOR MODULE INSTRUCTION
• J-3669 AutoMax POCKET REFERENCE
• J-3675 AutoMax ENHANCED BASIC LANGUAGE INSTRUCTION
• J-3676 AutoMax CONTROL BLOCK LANGUAGE INSTRUCTION
• J2-3093 AutoMax LADDER EDITOR INSTRUCTION MANUAL
• J2-3094 AutoMax ENHANCED LADDER LANGUAGE
• J-3677 AutoMax LADDER LOGIC LANGUAGE INSTRUCTION
• IEEE 518 GUIDE FOR THE INSTALLATION OF ELECTRICAL
• Your ReSource AutoMax PROGRAMMING EXECUTIVE
• 1770-6.5.16 Allen-Bradley Data Highway/Data Highway Plus/DH-
• Data Highway Cable Assembly and Instruction Manual
• Your personal computer and DOS operating system manuals
• Other instruction manuals applicable to your hardware
MANUAL
MANUAL
MANUAL
MANUAL
INSTRUCTION MANUAL
MANUAL
EQUIPMENT T O MINIMI ZE ELECTRI CAL NOI SE INPUTS
TO CONTROLLERS
INSTRUCTION MANUAL
485 Communication Protocol and Command Set
configuration
1-2
Page 9

1.2 Related Hardware and Software
M/N 57C442 contains one Data Highway Plus Interface module. The
module can be used with the following hardware and software:
1. M/N 57C430A, 57C431, 57C435 Automax Processor.
2. IBM -AT compatible computer running DOS version 3.1 or later.
3. M/N 61C127 RS-232C ReSource Interface cable. This cable is
used to connect the personal computer to the AutoMax Processor
module.
4. M/N 57C413 or 57C423 Common Memory module. This module is
used when there is more than one AutoMax Processor in a rack.
5. (various model numbers) ReSource AutoMax Programming
Executive software.
6. A-B Data Highway Plus cabling hardware.
The thick black bar shown on the right-hand margin of this page will be
used throughout this instruction manual to signify new or revised text or
figures.
1-3
Page 10

1-4
Page 11

2.0 MECHANICAL/ELECTRICAL DESCRIPTION
This section describes the mechanical and electrical characteristics of
the Data Highway Plus Interface module.
2.1 Mechanical Description
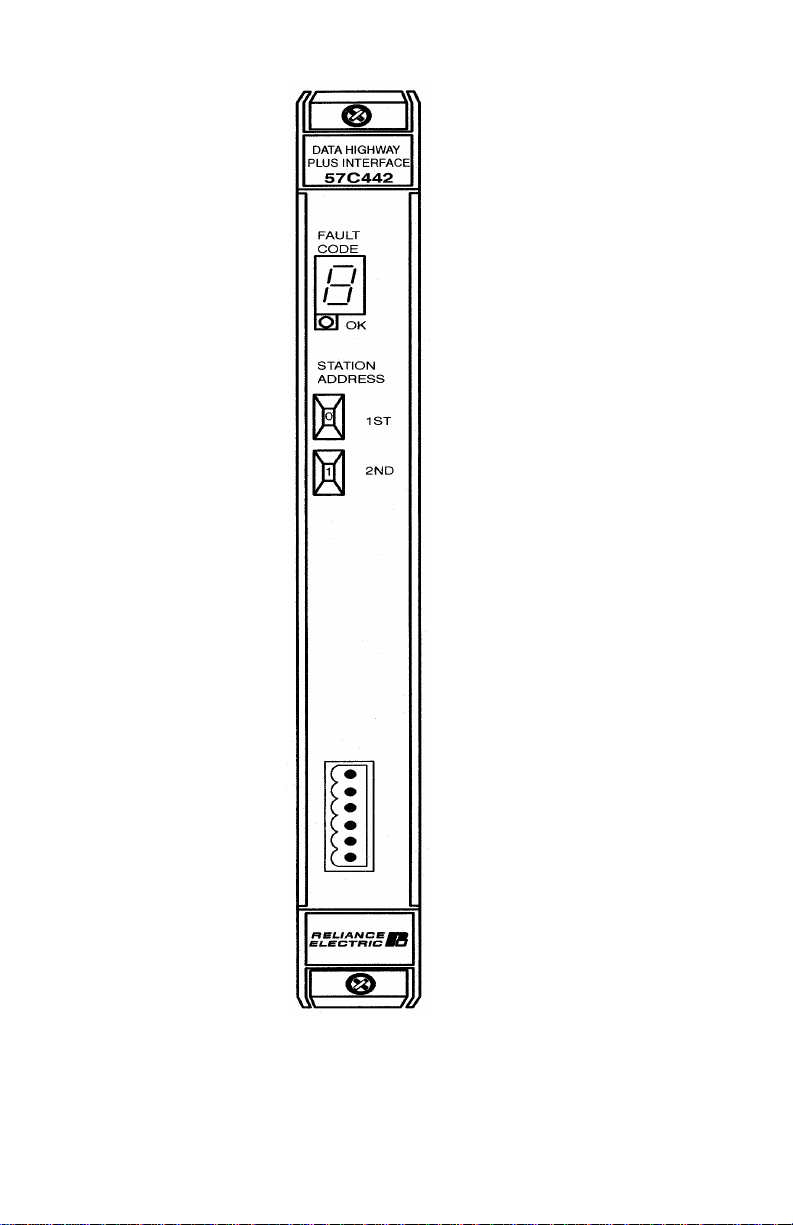
The Data Highway Plus Interface module is a printed circuit assembly
that plugs into the backplane of an AutoMax rack. The module consists
of a printed circuit board, faceplate, and protective enclosure. The
faceplate contains ejector tabs at the top and bottom to simplify
removing the module from the rack. See figure 2.1 for an illustration of
the module faceplate.
The 6-pin Phoenix Combicon connector on the faceplate is used to
make the connection to the Data Highway Plus network by means of a
standard twin-axial cable. Refer to Appendix C or to Data Highway Plus
documentation for the cable connections.
The two thumbwheel switches on the faceplate are used to set the
module’s stationnumber (in octal) on the Data Highway Plus network.
The upper thumbwheel switch represents the most significant digit; the
lower thumbwheel switch represents the least significant digit. If you set
the switches to invalid octal digits (8 or 9), the station number will not be
accepted and module error code ”6” will be displayed on the sevensegment LED.
For diagnostic purposes, the faceplate contains a seven-segment LED
which displays error codes. The error codes are defined in Appendix D.
A green status LED (labeled ”OK”) on the faceplate indicates when the
module is operational (ON) or when it should be replaced (OFF).
2-1
Page 12
2-2
Figure 2.2 – Data Highway Plus Interface Module Faceplate
Page 13

2.2 Electrical Description
The Data Highway Plus Interface module contains an 8 MHz
microprocessor that shares 32K of dual port memory with the AutoMax
rack backplane. This memory is accessible to both the on-board
microprocessor and AutoMax Processors in the rack. A block diagram
is shown in Appendix B. The module contains a watchdog timer which
is enabled when power is turned on to the module. The microprocessor
must reset the watchdog timer within a specified time or the
microprocessor will shut down and the status LED labeled ”OK” on the
faceplate will turn off.
At power-up, the on-board microprocessor runs diagnostics on the
microprocessor, EPROM, RAM and dual port memory, as well as
performing system-level diagnostics. As each test is run, a number is
written out to the seven-segment display. If there is a fault during these
tests, the microprocessor halts, the watchdog times out, and the sevensegment LED displays the code of the failed diagnostic. See Appendix
D for a list of error codes.
2-3
Page 14

2-4
Page 15
3.0 INSTALLATION
This section provides instructions on how to install the Data Highway
Plus Interface module.
3.1 Wiring
ATTENTION: The user is responsible for conforming with all
applicable local, national, and international codes. Wiring
practices, grounding, disconnects, and over-current protection
!
3.2 Initial Installation
!
are of particular importance. Failure to observe this precaution
could result in severe bodily injury or loss of life.
T o reduce the possibility of electri cal noise interfering with the operation
of the control system, exercise care when installing the wiring from the
control system to the external devices. For detailed recommendations
refer to IEEE 518.
Use the following procedure to install the module:
Step 1. Stop any application tasks that may be running.
ATTENTION: This equipment is at line voltage when AC
power is connected. Disconnect and lock out all ungrounded
conductors of the AC power line. Failure to observe these
precautions could result in severe bodily injury or loss of life.
ATTENTION: Inserting or removing a module may result in
unexpected machine motion. Power to the machine should be
turned off before inserting or removing the module. Failure to
!
!
observe these precautions could result in bodily injury.
Step 2. Turn off power to the rack. All power to the rack as well as all
power leading to the rack should be off.
ATTENTION: This module contains static-sensitive
components. Careless handling can cause severe damage. Do
not touch the connectors on the back of the module. When not
in use, the module should be stored in an anti-static bag. The
plastic cover should not be removed. Failure to observe this
precaution could result in damage to or destruction of the
equipment.
3-1
Page 16

Step 3. Take the module out of its shipping container. Take it out of
the anti-static bag, being careful not to touch the connectors
on the back of the module.
Step 4. Insert the module in the desired slot in the rack, making sure
it is well-seated in the rack. The module may reside in any
slot in the rack. Use a screwdriver to secure the module in the
rack.
Step 5. Set the station number of the Data Highway Plus Interface
module (in octal) using the two thumbwheel switches on the
module faceplate. The upper switch is the most significant
digit and the lower switch is the least significant digit. The
station number is read from the thumbwheel switches only at
power-up. Therefore, make sure each device on the network
has a unique station number (0--77 octal) before power is
applied. If more than one device on the network is given the
same station number, the module will not be able to
communicate and an error will be displayed.
Step 6. Connect the module to the Data Highway Plus network. Refer
to Appendix C for information on cabling and termination.
Step 7. Turn on power to the rack. An internal diagnostic routine is
automatically executed by the module. If an error is detected,
an error code is displayed on the seven-segment LED. If the
green status LED is OFF and no seven-segment error code is
displayed, a local watchdog failure has occurred. If a
diagnostic fault code other than “3”, “4”, “6”, “7”, or “C” is
displayed for more than 5 seconds, the Data Highway Plus
Interface module must be replaced.
If the thumbwheel switches are set to an invalid station
number, fault code “6” will be displayed on the sevensegment LED on the module faceplate after power-up. To
clear the invalid station number fault code, refer to section
5.2.
Step 8. After power-up diagnostics are complete, the green status
LED will go on. Verify the installation by monitoring registers
on the module. Refer to Appendix I.
3-2
Page 17
3.3 Module Replacement
Use the following procedure to replace the Data Highway Plus Interface
module:
Step 1. Stop any application tasks that may be running.
ATTENTION: his equipment is at line voltage when AC power
is connected. Disconnect and lock out all ungrounded conductors
of the AC power line. Failure to observe these precautions could
!
!
result in severe bodily injury or loss of life.
ATTENTION: Inserting or removing a module may result in
unexpected machine motion. Power to the machine should be
turned off before inserting or removing the module.Failure to
observe these precautions could result in bodily injury.
Step 2. Turn off power to the rack. All power to the rack as well as all
Step 3. Disconnect the cable from the module faceplate.
Step 4. Use a screwdriver to loosen the screws that hold the module
!
Step 5. T ake the new module out of it s shipping container. Take it out
Step 6. Insert the module in the rack, making sure that it is well-
Step 7. Set the station number of the new module to the same
Step 8. Attach the Data Highway Plus cable to the module faceplate.
Step 9. Turn on power to the rack.
Step 10. After power-up diagnostics are complete, the green status
power leading to the rack should be off.
in the rack. Take the module out of the slot in the rack.
ATTENTION: This module contains static-sensitive
components. Careless handling can cause severe damage. Do
not touch the connectors on the back of the module. When not
in use, the module should be stored in an anti-static bag. The
plastic cover should not be removed. Failure to observe this
precaution could result in damage to or destruction of the
equipment.
of the anti-static bag, being careful not to touch the
connectors on the back of the module.
seated in the rack.
number as the old module by using the two thumbwheel
switches on the module faceplate. The upper switch is the
most significant digit and the lower switch is the least
significant digit.
LED will go on. Verify the installation by monitoring registers
on the module. Refer to Appendix I.
3-3
Page 18

3-4
Page 19
4.0 PROGRAMMING
The Data Highway Plus network is a token-passing network, which
means that any device on the network can initiate communication with
any other device. Each node can also pass one word of global data with
the token. This global data is available to all other nodes on the
network.
Up to 64 devices can be connected directly to the network, with station
numbers ranging from 0 to 77 octal. Duplicate addresses are not
allowed. The network communication rate can be 57.6, 115.2, or 230.4
Kbaud, depending upon the user configuration.
This section describes how the data is organized in the module and
provides examples of how the module is accessed by the application
software. For more detailed information on programming, refer to the
AutoMax Programming Language manuals.
4.1 Register Organization
The Data Highway Plus Interface module contains dual-port memory
that can be accessed through the AutoMax rack backplane by
application tasks running on the AutoMax Processor as well as by the
microprocessor on the module. The memory organization is as shown
in the following diagram. The following sections describe the different
register areas in more detail.
Registers Description
0-3 Reserved
4-63 Status and control registers
64 – 1063 Binary file B3
1064 - 1087 Reserved
1088 - 2087 Binary file B4
2088 - 3087 Binary file B5
3088 - 3583 Reserved
3584 - 4095 Reserved
4096 – 4352 Global data registers
4353 - 4383 Reserved
4384 - 16383 Integer files N7 – N18
Figure 4.1 – Dual Port Memory Map
ATTENTION: Registers and bits in the data highway plus
interface module that are described as “read only” or for “system
use” only must not be written to by the user.Writing to these
!
registers and bits may result in improper system operation.
Failure to observe this precaution could result in bodily injury.
4-1
Page 20

4.1.1 Status and Control Registers
The status and control registers are described in figure 4.2. Registers
4-31 are read-write registers from the host (AutoMax Processor);
registers 32-63 are read-only.
R/W Reg# Description
R/W 4 Clear Diagnostic Counters. If this register is set to a non-zero
R/W 5 Module Control. When set to 1, bit 0 of this reg ister is used by the
R/W 6 Message Timeo ut (i n 100 ms ec. inc remen ts). The default value is
R/W 7 Data Highway Plus options. Bits in this register must be set
R/W 8-12 Station Name. The user can write a stati on name cons isting of up
R/W 22 Response Poll Period (in units of 1/8 second). This register is
value, the module software will clear the contents of the Data
Highway Plus diagnostic counters (registers 40-57). The module
software will then clear this register to indicate the counters have
been cleared. This register can be written to at any time.
user to enable the module. No communication can take place
until this bit is set. You should wait at least two seconds after
enabling the module before you send any messages on the
network. Bit 0 will be reset by the module on a hardware or
software reset. Bits 1-15 are reserved for future use.
150 (5 seconds). The value can range from 1 to 254. If a reply to
a message is not returned within this time period, the module will
return an error via the GATEWAY_ CMD_OK@ function. This
value can be changed at any time.
before you go on-line.
Use bits 0 and 1 to set the Data Highway Plus baud rate.
For this baud: Set:
57.6 Kbaud bit 0 to 0
bit 1 to 0
115.2 Kbaud bit 0 to1
bit 1 to 0
230.4 Baud bit 0 to 0
Bit 8 is used to enable transmission of this station ’ s global data. If
this bit is set to 1, the station’s global data is transmitted with the
token. The default is 0 (transmissi on of global dat a disabled). If bit
12 is set to 1, messages to stations which are off-line are not
transmitted on the network, but are returned immediately to the
module with an error code “17”. T hi s minimi z es dis r upti ons to the
network. The default for this bit is 0 (transmission to off-line
stations enabled), which is consistent with the operation of A-B
PLCs. In this case, the module will ret
urn error ”12” when a message is sent to an
off-line station.
The remaining bits are reserved for future use.
to eight ASCII characters plus a null terminator. If the name is
eight characters long, the terminator is not required. However, if
the name contains fewer than eight characters, the terminator
must be included. The default station name is “AutoMax.”
13-21 Not used.
used by the GATEWAY_CMD_OK@ function to compute the
time interval to poll for c ommand complete. The de fault value is 1,
which corresponds to a response polling period of 0.125 second.
23-31 Not used.
Figure 4.2 – Status and Control Register Assignments
4-2
Page 21

R/W Reg# Description
R/0 32 Data Highway Plus station a ddress (0-7 7 octal). The val ue comes
R/0 33 Data Highway Plus Extended Status (EXT STS) error code. Refer
R/0 34-37 Data Highway Plus active station list. This is an array of 64 bits
R/0 40-57 Data Highway Plus Diagnostics Counters. Refer to Appendix G.
R/0 61 Module Software Revision Level. A value of 100 indicates vers ion
R/0 62-63 Interface module ID (ASCII ’GTWY’)
from the thumbwheel switches on the faceplate and is updated
only on power-up. The module will not begin to communicate on
the network until the station address is properly set and bit 0 in
register 5 is set by the user. Note that the on-line Monitor function
in the AutoMax Programming Executive software will display the
station address in decimal or hexadecimal notation.
to Appendix H.
representing the status (1=active, O=inactive) of each station on
a Data Highway Plus network. Refer to Appendix F for
information on how this list is mapped to these registers. The
local station does not appear on this list.
38-39 Not used.
58-60 Not used.
1.00, and so on.
Figure 4.2 – Status and Control Register Assignments
4.1.2 Data Registers
The data image in the dual port memory appears as a subset of the
PLC-5 data table. The equivalent AutoMax and Modicon registers on
the module are shown in figure 4.3.
Multibus Access Data HighwayPlus
(AutoMax application tasks) Access
Read Only Binary file B3 Read/Write
Data Highway Plus
addresses B3:0 - B3:999
AutoMax Registers 64-1063
Read/Write Binary file B4 Read Only
Data Highway Plus
addresses B4:0 - B4:999
AutoMax Registers 1088-2087
Read/Write Binary file B5 Read/Write
Data Highway Plus
addresses B5:0- B5:999
AutoMax Registers 2088-3087
Command Buffer Area
AutoMax Registers 3584-4095
Global Registers Area
AutoMax Registers 4096-4352
Read/Write Integer file N7 Read/Write
Data Highway Plus
addresses N7;0 - N7:999
AutoMax Registers 4384-5383
Figure 4.3 – PLC-5 Data Image
4-3
Page 22

Read/Write Integer file N8 Read/Write
Data Highway Plus
addresses N8:0 - N8:999
AutoMax Registers 5384-6383
Read/Write Integer file N9 Read/Write
Data Highway Plus
addresses N9:0 - N9:999
AutoMax Registers 6384-7383
Use this file for communication
with a SLC 500 Processor
Read/Write Integer file N10 Read/Write
Data Highway Plus
addresses N10:0 - N10:999
AutoMax Registers 7384-8383
Read/Write Integer file N11 Read/Write
Data Highway Plus
addresses N11:0 - N11:999
AutoMax Registers 8384-9383
Read/Write Integer file N12 Read/Write
Data Highway Plus
addresses N12:0 - N12:999
AutoMax Registers 9384-10383
Read/Write Integer file N13 Read/Write
Data Highway Plus
addresses N13:0 - N13:999
AutoMax Registers 10384-11383
Read/Write Integer file N14 Read/Write
Data Highway Plus
addresses N14:0 - N14:999
AutoMax Registers 11384-12383
Read/Write Integer file N15 Read/Write
Data Highway Plus
addresses N15:0 - N15:999
AutoMax Registers 12384-13383
Read/Write Integer file N16 Read/Write
Data Highway Plus
addresses N16:0 - N16:999
AutoMax Registers 13384-14383
Read/Write Integer file N17 Read/Write
Data Highway Plus
addresses N17:0 - N17:999
AutoMax Registers 14384-15383
Read/Write Integer file N18 Read/Write
Data Highway Plus
addresses N18:0 – N18:999
AutoMax Registers 15384-16383
4-4
Figure 4.3 – PLC-5 Data Image
Page 23

Mapping is handled transparently by the Data Highway Plus Interface
module software. For example, if another node writes to this node at
address N7:0, the data is written starting at AutoMax register 4384, and
so on.
4.1.3 Global Data Registers
Registers 4096-4159 contain all of the global data that can exist on a
Data Highway Plus network. Each station is assigned one register.
Particular locations are meaningful only if the corresponding station is
writing global data. All registers are read only from the point of view of
the AutoMax Processor except for register 4352, which is read-write.
The global data update rate depends on the number of stations on the
network, whether the stations have global data transmission enabled,
and the communication traffic on the network.
Register Description Register Description
4096 Global data station 00 (00) 4130 Global data station 42 (34)
4097 Global data station 01 (01) 4131 Global data station 43 (35)
4098 Global data station 02 (02) 4132 Global data station 44 (36)
4099 Global data station 03 (03) 4133 Global data station 45 (37)
4100 Global data station 04 (04) 4134 Global data station 46 (38)
4101 Global data station 05 (05) 4135 Global data station 47 (39)
4102 Global data station 06 (06) 4136 Global data station 50 (40)
4103 Global data station 07 (07) 4137 Global data station 51 (41)
4104 Global data station 10 (08) 4138 Global data station 52 (42)
4105 Global data station 11 (09) 4139 Global data station 53 (43)
4106 Global data station 12 (10) 4140 Global data station 54 (44)
4107 Global data station 13 (11) 4141 Global data station 55 (45)
4108 Global data station 14 (12) 4142 Global data station 56 (46)
4109 Global data station 15 (13) 4143 Global data station 57 (47)
4110 Global data station 16 (14) 4144 Global data station 60 (48)
4111 Global data station 17 (15) 4145 Global data station 61 (49)
4112 Global data station 20 (16) 4146 Global data station 62 (50)
4113 Global data station 21 (17) 4147 Global data station 63 (51)
4114 Global data station 22 (18) 4148 Global data station 64 (52)
4115 Global data station 23 (19) 4149 Global data station 65 (53)
4116 Global data station 24 (20) 4150 Global data station 66 (54)
4117 Global data station 25 (21) 4151 Global data station 67 (55)
4118 Global data station 26 (22) 4152 Global data station 68 (56)
4119 Global data station 27 (23) 4153 Global data station 69 (57)
4120 Global data station 30 (24) 4154 Global data station 70 (58)
4121 Global data station 31 (25) 4155 Global data station 71 (59)
4122 Global data station 32 (26) 4156 Global data station 72 (60)
4123 Global data station 33 (27) 4157 Global data station 73 (61)
4124 Global data station 34 (28) 4158 Global data station 74 (62)
4125 Global data station 35 (29) 4159 Global data station 75 (63)
4126 Global data station 36 (30) 4160- Note used. Reserved for
4127 Global data station 37 (31) 4351 future use.
4128 Global data station 40 (32) 4352 This station’s global data.
4129 Global data station 41 (33)
Note that station numbers are inoctal with decimal equivalents in parentheses.
Figure 4.4 – Global Data Register Assignments
4-5
Page 24

Register 4352 is a Read/Write register from Multibus. T o transmit global
data, you must set bit 8 in the Data Highway Plus options register
(register 7) before you go on-line. The module will then pass the value
in register 4352 when it passes the token.
4.2 AutoMax Application Programming
The sections that follow describe how to configure registers in the Data
Highway Plus Interface module’s dual port memory and how to initiate
commands from the module. Link configuration and application
programming examples are provided.
4.2.1 Variable Configuration
AutoMax application tasks communicate with the Data Highway Plus
Interface module by referencing registers in the dual port memory.
These registers must first be configured using the AutoMax
Programming Executive software. In AutoMax Programming Executive
Version 3.0 and later, you define these registers using the Variable
Configurator. Specific screens are available for each module. If you are
using AutoMax Programming Executive Version 2.1 or earlier, you
define these registers using IODEF statements in the rack configuration
task. Note that ABDEF statements cannot be used with the Data
Highway Plus Interface Module.
4-6
Page 25

The format for the IODEF statement (used only in V2.1 and earlier) is
as follows:
nnnn lODEF variable name [SLOT=slot number, &
REGISTER=register number, BIT=bit number]
where:
nnnn = configuration task line number
variable_name = integer or boolean variable. Double integer
variables can beused but should be avoided because of the
possibility that all 32 bits will not transfer in one operation.
WARNING
IF YOU USE DOUBLE INTEGER VARIABLES IN THIS INSTANCE, YOU
MUST IMPLEMENT A SOFTWARE HANDSHAKE BETWEEN THE
TRANSMITTER AND RECEIVER TO ENSURE THAT BOTH THE LEAST
SIGNIFICANT AND MOST SIGNIFICANT 16 BITS HAVE BEEN
TRANSMITTED BEFORE THEY ARE READ BY THE RECEIVING
APPLICATION PROGRAM. FAILURE TO OBSERVE THIS PRECAUTION
COULD RESULT IN BODILY INJURY.
slot number = slot number of the Data Highway Plus Interface
module in the rack. This number may range from 0 to 15.
register number = Multibus register number on the Data Highway
Plus Interface module. Register numbers correspond to 16-bit
words on the module.
bit number = bit number of the I/O point in the register. Bit
numbers range from 0 to 15. Bit numbers are specified for boolean
variables only.
Any variables contained in the rack configuration are accessible by any
task on any AutoMax Processor in the rack. When AutoMax variables
are referenced in AutoMax tasks, the data is directly obtained from or
written to the register image on the module. The data storage for an
AutoMax variable mapped to an A-B
TM
register will always exist in the
Data Highway Plus module’s dual port memory.
The registers in the Data Highway Plus Interface module’s A-B register
image may be displayed using the AutoMax Programming Executive
Monitor I/O function. Refer to Appendix I for the method used to convert
A-8 register numbers so that they can be viewed using the monitor.
4-7
Page 26

4.2.2 Application Programming
Read and write commands from the Data Highway Plus Interface
module are initiated from a BASIC application task by executing the
GATEWAY_CMD_OK@ function:
GATEWAY_CMD_OK@(status%, cmd_code%, slave_drop%, &
where:
status is an integer variable representing the location where the
status resulting from the operation is stored. Refer to Appendix E for
a list of status values.
cmd_code is a variable name or expression of type integer
representing the Data Highway Plus command sent by the module.
The commands are described in section 4.2.4. Any other commands
result in a status of 1 (invalid operation) being returned.
slave_drop is variable name or expression of type integer containing
the destination station number (in decimal or hexadecimal). This is
the station number on your Data Highway Plus network. In the case
where off-link addressing is used, this is the address of the bridge
node on the local Data Highway Plus network. See section 4.2.6 for
more information.
slave_reg is a variable name or expression of type string that
specifies the starting register number on the target device. For
commands 3, 4 and 5, this is a logical address represented as an
ASCII string for PLC-3 and PLC-5 controllers. It can also be a 5-digit
octal number. For commands 1 and 2, this argument should be an
octal number. This field can also contain Data Highway Plus routing
information. Refer to section 4.2.6. For command 5 (Read-ModifyWrite), this argument can contain up to ten addresses separated by
commas. The address must exist at the target station.
master_var is a variable name or expression (usually via the BASIC
language VARPTR! function) of type double integer, representing
the physical address of the starting register on the Data Highway
Plus module to be read from/written to.
num_regs is a variable name or expression of type integer that
defines:
• for Word Range Read/Write (command 3 or 4), the number of
registers to be transferred, from 1 to 1000;
• for Read-Modify-Write (command 5), the number of addresses
to be written, in the range 1 to 10;
• for Unprotected Read/Write (command 1 or 2), the number of
registers to be transferred, from 1 to 100.
slave_reg$, master_var!, num_regs%)
4-8
The GATEWAY_CMD_OK@ function will be true if the command was
successfullycompleted. If the function is false, the returned status will
be an error code. See Appendix E for the error codes returned by the
GATEWAY_CMD_OK@ function.
Page 27

Multiple tasks can access the module. Note, however, that if more than
four tasks try to initiate messages at the same time, error code “22” will
be returned to the additional tasks attempting accesses.
4.2.3 Enabling the Data Highway Plus Interface
Module
The connection between the Data Highway Plus Interface module and
the Data Highway Plus network is configured through an AutoMax
BASIC task. The task must set the network baud rate and whether
global data for this node is enabled by setting the appropriate bits in
register 7. Values can also be set for message time-out (register 6)
response poll period (register 22), if desired. Note that values for
registers 6 and 22 can be set at any time. The final step required to put
the module on-line is to set bit 0 in register 5. Wait at least two seconds
after writing to this register before sending messages on the network.
If you are using AutoMax Programming Executive software version 2.1
or earlier, any required registers must be defined using lODEFs in the
configuration task. If you are using AutoMax Programming Executive
software version 3.0 or later, these registers are defined using the
Vari able Configurator within t he Programming Executive. The following
example illustrates one method of enabling the module.
Example 1:
In the configuration, define register 5, bit 0 as ENABLE@.
ENABLE@ [SLOT=4, REGISTER=5, BIT=O]
The application task would use the following statement to enable the
module:
10 ENABLE@=1 /! put module on-line
Example 2:
In the configuration, define the following registers:
ENABLE@ [SLOT=4, REGISTER=5, BIT=O]
TIMEOUT% [SLOT=4, REGISTER=6]
RESP_TIME% [SLOT=4, REGISTER=22J]
OPTIONS% [SLOT=4, REGISTER=7]
The application could enable the module as follows:
10 OPTIONS = 0 \! Baud rate = 57.6 kbd, no global &
data transmitted, transmit to &
vacant nodes enabled.
20 TIMEOUT% = 50 \! message timeout 5 seconds
30 RESP_TIME% = 2 \! GATEWAY CMD OK@should poll &
for response every 250 ms.
40 ENABLE@=1 \! put module on-line
50 DELAY 2 SECONDS
Example 3: Global Data
If an application is passing global data, it must enable global data and
write to the local global data register. In the configuration, define the
following registers:
ENABLE@[SLOT=4, REGISTER=5, BIT=O]
OPTIONS% [SLOT=4, REGISTER = 7]
GD%[SLOT=4, REGISTER = 4352]
and
4-9
Page 28

The application task could contain the following statements:
10 OPTIONS% = 256 \! enable global data, baud rate = &
15 GD% = 15 \! set global data
20 ENABLE% = 1 \! put module online
30 DELAY 2 SECONDS
57.6 Kbaud, transmit to vacant &
nodes enabled.
4.2.4 Commands Initiated by the Data Highway Plus
Interface Module
The commands described in figure 4.5 can be used by the AutoMax
Processor in the GATEWAY_CMD_OK@ function to initiate a
command on the Data Highway Plus Interface module. See section
4.2.2 for more information on the GATEWAY_CMD_OK@ function.
GATEWAY CMD OK@ Data Highway Plus
Command Code Desription Function
1 Unprotected Read CMD = 01, FNC = n/a
2 Unprotected Write CMD = 08, FNC = n/a
3 W ord Range Read CMD = OF, FNC = 01
4 Word Range Write CMD = OF, FNC = 00
5 Read-Modify-Write CMD = OF, FNC = 26
Figure 4.5 – Commands Used with GATEWAY_CMD_OK@
Commands 1 and 2 come from the basic command set and are
accepted by PLC-2,PLC-3, PLC-5 and SLC 500 processors. For PLC-2
controllers, addresses will be 5-digit octal numbers. For PLC-3 and
PLC-5 processors, compatibility files must exist. Refer to A-B
documentation for more information.
For communication with a SLC 500 processor, use only commands 1
and 2 and only file N9 for data transfers.
Command 1, Unprotected Read, transfers a block of data from the
target registers at the remote address to the specified AutoMax
registers on the Data Highway Plus Interface module. Data can be
transferred to any file in the PLC-5 data image area. The data is stored
in the specified registers on the Data Highway Plus Interface module. A
maximum of 100 registers can be transferred in a single request. The
transfer cannot cross file boundaries.
Command 2, Unprotected Write, transfers a block of data from the
specified AutoMax registers on the Data Highway Plus Interface
module to the target registers at the destination address. The data must
already exist in the registers on the Data Highway Plus Interface
module. Data can be transferred from any file in the PLC-5 data image
area. A maximum of 100 registers can be transferred in a single
request. The transfer cannot cross file boundaries.
Commands 3, 4 and 5 come from the PLC-5 command set. Commands
3 and 4 are accepted by PLC-3 and PLC-5 processors. Command 5 is
accepted only by PLC-5 processors. For commands
4-10
Page 29

3, 4, and 5, only logical addresses represented as ASCII strings are
supported.
Command 3, Word Range Read, transfers a block of data from the
target registers at the remote address to the specified AutoMax
registers on the Data Highway Plus Interface module. Data can be
transferred to any file in the PLC-5 data image area except the B4 file.
The data is stored in the specified registers on the Data Highway Plus
Interface module. A maximum of one file (1000 registers) can be
transferred in a single request. The transfer cannot cross file
boundaries
Command 4, Word Range Write, transfers a block of data from the
specified AutoMax registers on the Data Highway Plus Interface
module to the target registers at the destination address. The data must
already exist in the registers on the Data Highway Plus Interface
module. Data can be transferred from any file in the PLC-5 data image
area. The data is stored in the specified registers on the Data Highway
Plus Interface module. A maximum of one file (1000 registers) can be
transferred in a single request. The transfer cannot cross file
boundaries.
Command 5, Read-Modify-Write, sets or resets specified bits in
specified registers in the data table at the remote address. The data
(AND and OR masks) must already exist in the registers on the Data
Highway Plus Interface module. A maximum of ten registers can be
modified in a single request. The transfer cannot cross file boundaries.
Note: The A-B controller at the remote address may change the states
of the original bits in memory before this command (command 5) can
write the word back to memory. Therefore, some bits may
unintentionally be overwritten. To help prevent this, we suggest that
you use this command to write into the storage area of a programmable
controller’s data table, and have the controller read the word only, not
control it.
In cases where any of the commands above generates multiple
messages on the network, for example, reading or writing more
registers than can fit in one Data Highway Plus message, the module
takes care of formatting and generating the messages required. The
GATEWAY_CMD_OK@ command is complete when a reply is
received for the last message.
4.2.5 Commands from Remote Stations
The Data Highway Plus Interface module will respond to the following
incoming commands from remote stations:
Command Function Description
OF 68 Typed Read / Read Block
OF 67 Typed Write / Writ e Block
OF 01 Word Range Read / Read Block
OF 00 Word Range Write / Write Block
OF 26 Read-Modify-Write / Write Bit
OF 02 Bit Write
Figure 4.6 – PLC-5 Command Set
4-11
Page 30

For the commands shown in figure 4.6, both logical binary and logical
ASCII addresses are supported.
Command Function Description
06 07 Diagnostic Counters Reset
06 01 Diagnostic Read
06 03 Diagnostic Status
Figure 4.7 – Privileged Commands in the Basic Command Set
The Diagnostic Read command returns the values for counters as
shown in Appendix G. The Diagnostic Status command returns 17
bytes containing the following information:
Byte Value Meaning
1 FE Terminal
2 1B Terminal
3 A3 Module identifier
4 Active station list pointer low byte
5 Active station list pointer high byte
6 Diagnostic counters pointer low byte
7 Diagnostic counters pointer high byte
8 Reserved
9 Reserved
10-17 Terminal name (automatically padded with blanks)
Figure 4.8 – Diagnostic Status Command Data
Byte Value Meaning
02 n/a Protected Bit Write
00 n/a Protected Write
05 n/a Unprotected Bit Write
01 n/a Unprotected Read
08 n/a Unprotected Write
Figure 4.9 – Non-Privileged Commands in the Basic Command Set
4-12
The commands shown in figure 4.9 write directly to or read directly from
file N7 on the module. The address field is used as an offset into the
file. If the address does not exist, an error is returned.
Unprotected writes will be processed in the same manner as Protected
writes and will not be permitted to store data in the protected areas of
the PLC-5 image in the dual port memory.
Page 31

4.2.6 Off-link Routing Paths
This section describes using a Data Highway network as a bridge to link
two Data Highway Plus networks using A-B 1785-KA modules. If you
need information about other bridge networks, refer to A-8
documentation.
The routing information is added to the “slave_reg” parameter of the
GATEWAY_CMD_OK@ function. A leading exclamation mark (!) is
used to signify that routing information is included. The routing
information is added to the beginning of the string as hexadecimal
bytes separated by periods. See figure 4.10.
For a 1785-KA Data Highway bridge, the twelve routing bytes are:
Byte Value Meaning
1 LSAP 1 for a 1785-KA bridge
2 24h
3 DID_LO see below
4 DID_Hl see below
5 DNDE_LO see below
6 DNDE_Hl see below
7 LIFETIME 80h for a 1785-KA bridge
8 SID_LO see below
9 SID_Hl see below
10 SNDE_Hl see below
11 SNDE_LO see below
12 NSAP 0 for a 1785-KA bridge
Figure 4.10 – Off-link Message Routing Bytes
where:
DID is the destination node’s link ID; see A-B documentation. This is
0 for a 1785-KA bridge.
DNDE is the station address of the destination on the destination link.
For the Data Highway bridge, only the low byte is used. It consists of
the upper two bits of the Data Highway address of the remote bridge
1785-KA and the lower six bits of the Data Highway Plus address of
the final Data Highway Plus station.
SID is the link ID of the local network; see A-B documentation. T his is
0 for a 1785-KA bridge.
SNDE is the station address of this station on the local Data Highway
Plus network.
4.2.6.1 Example of Bridging Two Data Highway Plus Networks
using 1785-KA modules
In the following example, the Data Highway Plus Interface module is
station 24 octal on a Data Highway Plus network. The first 1785-KA
bridge module is at address 42 octal on the Data Highway Plus network
and 142 octal on the Data Highway network. The remote bridge module
is at station address 240 octal on the Data Highway network and 40
octal on the Data Highway Plus network. The final destination node is
at station address 4 on the remote Data Highway Plus network.
4-13
Page 32

05 REM The variables that follow define &
parameters for the &
GATEWAY CMD OK@ function
10 COMMON B3BASE%\! Represents the physical address of &
starting register on the Data Highway &
Plus module to be read from
20 LOCAL DST% \! The address of the bridge node on &
the local Data Highway Plus network
21 LOCAL STS% \! The location where the status &
resulting from the operation is stored
22 LOCAL SZE% \! The number of registers to be &
transferred
23 LOCAL CMD% \! The Data Highway Plus command &
sent by the module
30 DST% = 34
31 STS% = 0
32 SZE% = 100
33 CMD% = 3
40 IF NOT GATEWAY_CMD_ OK@( STS%, CMD%, DST%, &
“!01.24.00.00.84.00.80.00.00.14.00.00.N7:0”, &
VARPTR! (B3BASE%), SZE%) THEN 20000 \! process errors
In the example above, the routing bytes were determined as
follows.Recall that the last item in the actual ”slave_reg” parameter is
the destination file address.
Byte Value Meaning
1 LSAP 01 for a 1785-KA bridge
2 24h
3 DID_LO 00 for a 1785-KA bridge
4 DID_Hl 00 for a 1785-KA bridge
5 DNDE_LO 84h (see below)
6 DNDE_Hl 00 for a 1785-KA bridge
7 LIFETIME 80h for a1785-KA bridge
8 SID_LO 00 for a 1785-KA bridge
9 SID_HI 00 for a 1785-KA bridge
10 SNDE_HI
14h is the station number of the Data Highway
Plus module
11 SNDE_LO 00 for a 1785-KA bridge
12 NSAP 00 for a 1785-KA bridge
4-14
Page 33

Byte 5 in the routing path (DNDE_LO) is determined as follows:
The station address of the remote bridge is 240 octal (10100000).
The station address of the final Data Highway Plus station is 4
(00000100).
DNDE combines the upper two bits of the remote bridge station
address with the lower six bits of the final Data Highway Plus station
address (10000100). This is equivalent to 84h.
4.2.6.2 Example of Bridging the DH+ Link to a ControlNet Network
Using AutoMax and its 57C442 Data Highway Plus interface module to
send and receive data file values to a Control Net PLC5 through a
ControlLogix gateway. Knowledge Base Document 10628 defined the
network layout and network routing table set-ups. This document will
show the network and which parameters relate to the AutoMax.
Network Configuration
The 57C442 AutoMax Data Highway Plus module has the ability to
perform “Off-Link Routing”. This routing is used to move data from one
network to another network. This is covered as a separate subject in
the modules instruction manual. Twelve bytes of data are required in
order to program this function in the AutoMax. For the network
configuration shown above, they are:
4-15
Page 34

Byte Value Function
1 01h LS AP
2 24h Network Control Byte
3 07h Dest. Link ID - Lo
4 00h Dest. Link ID - Hi
5 01h Des t. Node Address - Lo
6 00h Des t. Node Address - Hi
7 80h Lifetime
8 05h Source Link ID – Lo
9 00h Source Link ID - Hi
10 07h Source Node Address - Lo
11 00h Source Node Address - Hi
12 00h NSAP
The Destination and Source Link ID’s and Node Addresses come from
the network configuration. The values for LSAP, Network Control Byte,
Lifetime and NSAP are constants. The twelve parameter values, in the
order shown are used with the AutoMax GATEWAY_CMD_OK@
function to program the AutoMax. They are the same for either writing
(CMD%=4) and reading (CMD%=3) data across the network.
An example of the GATEWAY _CMD_OK@ function is a basic task
which is used to either read or write to Integer file N7 in the PLCS/C
is:
NNNN IF NOT GATEWAY_CM D_OK@
(STS%, CMD%, DST%” !01,24,07,00,01,00,80,05,00,07,00.00,N7:00”,
Parameters STS%, CMD%, DST%, SZE% and N7BASE% are
discussed in the manual and are defined as LOCAL variables in the
basic task. NNNN is the line number for the function and XXXX is a line
number in the task where code to process errors is located.
VARPTR! (N7BASE%),SZE%) THEN XXXX
4-16
4.2.7 Programming Example
This section contains examples of initiating commands by using the
GATEWAY_CMD_OK@ function within an AutoMax task. In the
following examples, each register is defined in the configuration for the
rack as follows. For example,
B3BASE%[SLOT=4, REGISTER=64]
N7BASE%[SLOT=4, REGISTER=4384]
The statements above are used in the following examples. The
VARPTR! function is used to return a double integer value for the
address of the specified argument.
s
Page 35

Example 1: Command 3, Word Range Read
In the example below, the Data Highway Plus Interface module is
reading 100 words from file N7:0 in the PLC at station address 0. The
data read is stored in the local B3 file. The variable B3BASE% is
defined in the rack configuration.
10 COMMON B3BASE% \! Represents the physical address of &
the starting register on the &
Data Highway Plus module to be
read from
20 LOCAL DST% \! The address of the destination node&
on the local Data Highway Plus network
21 LOCAL STS% \! The location where the status
resulting from the operation is stored
22 LOCAL SZE% \! The number of registers to be &
transferred
23 LOCAL CMD% \! The Data Highway Plus command &
sent by the module
30 DST% = 0
31 STS% = 0
32 SZE% = 100
33 CMD% = 3
40 IF NOT GATEWAY_CMD_OK@(STS%, CMD%, DST%, “N7:0”, &
VARP TR!(B3BASE%), SZE%) THEN 20000 \! process errors &
at line 2000
Example 2: Command 4, Word Range Write
In the example below, the Data Highway Plus Interface module is
writing 100 words from the local N7 file to the file address N10:10 in the
PLC at station address 0. The variable N7BASE% is defined in the rack
configuration.
10 COMMON N7BASE%\! Represents the physical address of&
the starting register on the &
Data Highway Plus module to be &
written to
20 LOCAL DST% \! The address of the destination node
on the localData Highway Plus network
21 LOCAL STS% \! The location where the status &
resulting from the operation is stored
22 LOCAL SZE% \! The number of registers to be &
transferred
23 LOCAL CMD% \! The Data Highway Plus command sent
by The module
30 DST% = 0
31 STS% = 0
32 SZE% = 100
33 CMD% = 4
40 IF NOT GATEWAY_CMD_OK@(STS%, CMD%, DST%, “N10:10, &
VARP TR!(N7BASE%), SZE%) THEN 20000 \! process errors at&
line 20000
4-17
Page 36

Example 3: Command 5, Read-Modify-Write
In the example below, the Data Highway Plus Interface module writes
to three addresses in a PLC, N7:0, N7:2, and N7.4. The AND/OR mask
pairs are stored in three consecutive pairs of registers starting at
B3BASE%. The variable B3BASE% is defined in the rack configuration
10 COMMON B3BASE%\! Represents the physical address of &
the starting register on the &
Data Highway Plus module to be &
read from
20 LOCAL DST% \! The address of the destination node &
on the local Data Highway Plus network
21 LOCAL STS% \! The location where the status &
resulting from the operation is stored
22 LOCAL SZE% \! The number of registers to be &
transferred
23 LOCAL CMD% \! The Data Highway Plus command &
sent by the module
30 DST% = 0
31 STS% = 0
32 SZE% = 3
33 CMD% = 5
40 IF NOT GATEWAY_CMD_ OK@( STS%, CMD%, DST%, &
“N7:O,N7:2,N7:4”, VARPTR!(B3BASE%), SZE%) &
THEN 20000 \! process errors at line 20000
Example 4: Command 1, Unprotected Read
In the example below, the Data Highway Plus Interface module is
reading 100 words from address 2000 octal in the PLC at station
address 7. The data read is stored in the local 83 file; the variable
B3BASE% is defined in the rack configuration.
10 COMMON B3BASE%\! Represents the physical address of &
the starting register on the &
Data Highway Plus module to be &
read from
20 LOCAL DST% \! The address of the destination node &
on the local Data Highway Plus network
21 LOCAL STS% \! The location where the status &
resulting from the operation is stored
22 LOCAL SZE% \! The number of registers to be &
transferred
23 LOCAL CMD% \! The Data Highway Plus command &
sent by the module
30 DST% = 7
31 STS% = 0
32 SZE% = 100
33 CMD% = 1
40 IF NOT GATEWAY_CMD_ OK@( STS%, CMD%, DST%, “2000”,&
VARPTR! (B3BASE%), SZE%) THEN 20000 \! process errors &
at line 20000
4-18
Page 37

Example 5: Command 2, Unprotected Write
In the example below, the Data Highway Plus Interface module is
writing 100 words from the local N7 file to the file address 1234 octal in
the PLC at station address 7. The variable N7BASE% is defined in the
rack configuration.
10 COMMON N7BASE%\! Represents the physical address of &
the starting register on the &
Data Highway Plus module to be &
written to
20 LOCAL DST% \! The address of the destination node &
on the local Data Highway Plus network
21 LOCAL STS% \! The location where the status &
resulting from the operation is stored
22 LOCAL SZE% \! The number of registers to be &
transferred
23 LOCAL CMD% \! The Data Highway Plus command &
sent by the module
30 DST% = 7
31 STS% = 0
32 SZE% = 100
33 CMD% = 2
40 IF NOT GATEWAY_CMD_OK@(STS%, CMD%, DST%, “1234”,&
VARPTR! (N7BASE%), SZE%) THEN 20000 \! process errors&
at line 20000
4-19
Page 38

4-20
Page 39

5.0 DIAGNOSTICS AND TROUBLESHOOTING
This section describes how to troubleshoot the Data Highway Plus
Interface module. See Appendix D for a list of error codes that can be
displayed by the module. If the problem cannot be corrected using the
procedures below, the unit is not user-serviceable.
ATTENTION: Only qualified electrical personnel familiar with
the construction and operation of this equipment and the hazards
involved should install, adjust, operate or service this equipment.
!
5.1 The OK LED Is OFF
5.2 Invalid Station Address
Read and understand this manual and other applicable manuals
in their entirety before proceeding. Failure to observe this
precaution could result in severe bodily injury or loss of life.
Problem: The green status LED (labeled “OK”) on the Data Highway
Plus Interface module faceplate is off. The LED should be on when the
module has passed its internal diagnostics after power-up. If the green
OK status LED is off, and no error code is displayed, a local watchdog
failure has occurred. Try cycling power to the rack. If the OK status LED
remains off, replace the module.
Problem: Error code “3” or “6” appears on the Data Highway Plus
Interface module’s LED display at power-up. Error code “3” indicates a
duplicate station address. Error code “6” indicates an invalid station
address. To clear the error code, change the thumbwheel switch
settings and cycle power on the module.
5.3 Transmission Link Failures
Problem: Error codes “12”, “13”, “14”, “15”, or “17” are returned by the
GATEWAY_CMD_OK@ function. These error codes indicate various
network errors.
Verify that the cable connections to each device are secure. Check the
cable connection at the module faceplate and at the remote device.
Check the network cabling and
termination.
5.3.1 Rack Failure
If the AutoMax Processor in the rack that contains the Data Highway
Plus Interface module fails or issues a BOARD RESET command
(clears all outputs in the rack), the entire image in the Data Highway
Plus Interface module’s dual port memory is cleared. The module will
remain off-line for at least 1 second to allow application tasks to
recognize that the module went off-line.
5-1
Page 40

5.3.2 Remote Station and Link Failure
When the Data Highway Plus Interface module is not initiating
messages, but is simply responding to unsolicited commands from
remote stations, a failure in the remote stations cannot be detected by
the module itself except by monitoring the active station list
(registers 34-37).
When the module is initiating messages, a link failure is indicated by a
Response Timeout error.
5.4 Bus Error
Problem: Error codes “31” appears on a Processor module’s LED
display. This error indicates the system has a problem accessing a
module in the rack though the backplane bus. A bus error may be
caused by removal of a module, a module failure, or a rack backplane
failure.
Use the following procedure to isolate a bus error:
Step 1. Verify that all modules are in the correct slot.
Verify that the slot number being referenced in the application tasks
agrees with the slot number defined during configuration.
Step 2. Verify the station address is correct.
The thumbwheel switches used to set the station address can be
changed while the module is on-line without having any effect on the
system. On the next power up, if the thumbwheel switches define a
station that is valid, the Processor will accept it as a valid station.
Step 3. Verify that the application software is correct.
Verify that the application software is not attempting to write to READ
ONLY registers on the module.
Step 4. Verify that the hardware is working correctly.
5-2
ATTENTION: This equipment is at line voltage when AC
power is connected. Disconnect and lockout all ungrounded
conductors of the AC power line. Failure to observe this
!
precaution could result in severe bodily injury or loss of life.
Make certain that power is off before removing any module from the
rack. Systematically replace the Data Highway Plus Interface module,
the Processor module(s), and the rack/backplane, one at a time, with a
corresponding module or assembly known to be operating correctly.
After replacing each module or assembly, if the problem is not
corrected, replace the original item before going on to the next item.
Page 41

Appendix A
Technical Specifications
Ambient Conditions
• Storage Temperature: -40o C to 85o C
o
• Operating Temperature: 0
• Humidity: 5% to 95%, non-condensing
• Altitude: 1000 meter (3300 feet) without derating
Dimensions
• Height: 29.85 cm (11.75 inches )
• Width: 3.18 cm (1.25 inches )
• Depth: 18.73 cm (7.375 inches)
• Weight: 0.9 kg (2 pounds)
Maximum Power Dissipation
• 3.25 W
System Power Requirements:
• +5 VDC 650 mA
• +12 VDC (not used)
• -12 VDC (not used)
C to 60o C
A-1
Page 42

A-2
Page 43

Appendix B
Module Block Diagram
B-1
Page 44

B-2
Page 45

Appendix C
Network Connector Pin Assignments
This appendix assumes the network cable system has been installed using the
appropriate A-B Data Highway Plus instruction manual.
The faceplate of the Data Highway Plus Interface module contains a Phoenix
Combicon connector for connection to the Data Highway Plus network. Each
station is connected to the Data Highway Plus network trunk-line using a drop-line
constructed of Belden 9463 twin-axial cable (or equivalent).
The connector has 6 pins, which are numbered from the bottom. The bottom bin is
pin 1; the top pin is pin 6. Pin 1 is internally connected to 4, pin 2 to pin 5, and pin
3 to pin 6. Any connections to pins 1, 2 or 3 could also be made to 4, 5 or 6
respectively.
The CLEAR wire of the twin-axial cable should be connected to Pin 1 or 4 (bottom
pin or pin 4) of the Phoenix connector , the DRAIN (bare) wire to Pi n 2 or 5 and t he
BLUE wire to Pin 3 or 6. The color wire that is at the top on the three pin
connector on the A-B device is the color you connect to pin 1 on the connector on
the Data Highway Plus Interface module faceplate. See the figure below.
C-1
Page 46

C-2
Page 47

Appendix D
Data Highway Plus Interface Module
7-Segment LED Error Codes
The following error codes may be displayed on the 7-segment display.
.0 EPROM checksum failure
0 Gateway parameter error
.1 RAM checksum failure
1 Reply TNS error
.2 RAM AA failure
.3 RAM SS failure
3 Duplicate station detected
.4 RAM address line failure
4 Module not ready
.5 RAM address line clear failure
6 Invalid station address on thumbwheels
7 Module has not been enabled (register 5, bit 0)
.8 Data Highway Plus initialization failure
9 Module re-start in progress
.A Board Reset signal
.b Local watchdog failure
C Local port disconnected
.d AutoMax Processor watchdog failure
.E Power failure
.F Module failure
All errors except 3, 4, 6, 7, and C are fatal errors and indicate a malfunctioning
module.
D-1
Page 48

D-2
Page 49

Appendix E
GATEWAY _CMD_OK@ Status Codes
The following codes are written to the variable defined as the “status” parameter
in the GATEWAY _CMD_ OK@ function used to initiate Data Highway Plus
network data transfers from an AutoMax application task.
0 Operation successful
1 Invalid operation
3 Invalid length
4 Invalid offset
5 Invalid length + offset
6 Invalid destination (0-77 octal)
8 Invalid data type
9 Invalid route (equal to own address)
B Inconsistent response
C Module not enabled
20 Parameter specifying destination address is invalid
21 Data Highway Plus module not found or inaccessible
22 No available data path
Data Highway Plus Local and Remote Status (STS) error codes are written to the
upper byte. If the first digit is “1”, the STS code is local; if the first digit is “3”, the
STS code is remote.
11 Destination memory full, cannot accept command now
12 Destination did not acknowledge command
13 Network contention, possible duplicate station or bad cabling
14 Local Data Highway Plus port is disconnected, or no other station found
15 Timeout waiting for a reply message
16 Duplicate station detected
17 Station is off-line
18 Hardware fault
1D Transaction number mismatch
1E Duplicate transaction number
31 lllegal command or format
32 Host is malfunctioning and will not communicate
33 Remote station host is missing, disconnected, or shut down
34 Host could not complete function due to hardware fault
35 Addressing problem or memory protected rungs
36 Function disallowed due to command protection selection
37 A-B Processor is in program mode
38 Compatibility mode file missing or communication zone problem
39 Remote station cannot buffer command
3A (not used)
3B Remote station problem due to download
3C Cannot execute command due to active IPBs
3D not used)
3E (not used)
3F There is an error code in the Extended Status register
(register 33 on the Data Highway Plus Interface module).
See appendix H.
E-1
Page 50

E-2
Page 51

Appendix F
Mapping of Active Station List
The following table shows the mapping between active station addresses and the
status reported in registers 34-37.
Bit #
Register Byte
34
35
36
37
LO 70 60 50 40 30 20 10 00
HI 71 61 51 41 31 21 11 01
LO 72 62 52 42 32 22 12 02
HI 73 63 53 43 33 23 13 03
LO 74 64 54 44 34 24 14 04
HI 75 65 55 45 35 25 15 05
LO 76 66 56 46 36 26 16 06
HI 77 67 57 47 37 27 17 07
7654321 0
F-1
Page 52

F-2
Page 53

Appendix G
Register Map for Diagnostic Counters
This area contains statistics for the network as a whole and also for this station.
These values are returned to any remote station which requests them from this
station. This is also the format of data in counters returned from remote stations to
this station. These registers are read only.
Register Byte Meaning
40 LO Received ACK with bad CRC
41 LO Timeout expired with no ACKs received
42 LO NAK/illegal protocol operation received
43 LO NAK/no memory received
44 LO Received ACKJNAK too long
45 LO Token pass timeout
46 LO Claim token sequence entered
47 LO Bad CRC in received frame
48 LO NAK/bad LSAP sent
49 LO Received frame too small
50 LO Received a re-transmission of a frame
51 Message successfully sent
52 Message successfully received
53 Command successfully sent
54 Reply successfully received
55 Command successfully received
56 Reply successfully sent
57 LO Reply could not be sent
Hl (not used)
HI Transmit re-tries exhausted
HI NAK/bad LSA P received
Hl Received ACK/NAK too short
Hl Something other than ACK/NAK received
HI Token pass re-tries exhausted
HI Token claimed
HI NAK/illegal protocol operation sent
HI NAK/no memory sent
HI Received frame too long
HI Received frame aborted (line noise)
HI Number of active nodes
G-1
Page 54

G-2
Page 55

Appendix H
Extended Status (EXT STS) Codes for
Command 0F
If the value in the upper byte of the GATEWAY_CMD_OK@ “status” parameter
variable is 3F, then there is a value in the upper byte of the extended status
register (register 33 on the Data Highway Plus Interface module) which supplies
further information. The following table shows possible values for the extended
status error code.
0 (not used)
1 A field has an illegal value
2 Less levels specified in address than minimum for any address
3 More levels specified than system supports
4 Symbol not found
5 Symbol is of improper format
6 Address doesn’t point to something usable
7 File is wrong size
8 Cannot complete request; situation has changed since the start of
9 Data or file is too large
A Transaction size plus word address is too large
B Access denied, improper privilege
C Condition cannot be generated; resource is not available
D Condition already exists; resource is already available
E Command cannot be executed
F Histogram overflow
10 No access
11 Illegal data type
12 Invalid parameter or invalid data
13 Address reference exists to deleted area
14 Command execution failure for unknown reason; possible PLC-3
15 Data conversion error
16 Scanner not able to communicate with 1771 rack adapter
17 Adapter cannot communicate with module
18 1771 module response was not valid
19 Duplicated label
1A File is open; another node owns it
1B Another node is the program owner
1C-FF (not used)
the command
histogram overflow
H-1
Page 56

H-2
Page 57

Appendix I
Converting A-B Register Numbers
to AutoMax Register and Bit Numbers
for Monitoring
The A-B registers in the dual port memory of the Data Highway Plus Interface
module may be displayed using the Monitor I/O function in the AutoMax
Programming Executive. This appendix provides a method for converting the A-B
register number to a register number recognized by the Monitor I/O application.
The following table shows the correspondence between A-B register numbers and
AutoMax register numbers.
A-B File AutoMax
Address Register
B3:n 64 + n
B4:n 1088 + n
B5:n 2088 + n
N7:n 4384 + n
N8:n 5384 + n
N9:n 6384 + n
N10:n 7384 + n
N11:n 8384 + n
N12:n 9384 + n
N13:n 10384 + n
N14:n 11384 + n
N15:n 12384 + n
N16:n 13384 + n
N17:n 14384 + n
N18:n 15384 + n
I-1
Page 58

I-2
Page 59

Appendix J
Recommendations For Reducing Noise On
The Cable System
We recommend that all drive systems using 57C442 Data Highway Plus
Interface Modules and/or 57C443 AutoMax Allen-Bradley Remote I/O Scanner
Modules should be provided with 1770-SC station connectors installer per item 2
below. All drives which are connected using Data Highway Plus or Allen-Bradley
Remote I/O should include part number 43825-TC ferrite cores installed per item
3 below.
Installation recommendations:
1. When installing either the 57C442 or 57C443 module into the card rack,
make sure that its holddown screws are properly tightened at all times. The
basic design of the AutoMax has a floating ground on the backplane rather
than a solid DC ground like the PLC-5 does on its backplane. In AutoMax, it
has always been the case that the cards retaining screws have always had to
be tightened down tightly so that we could insure a good ground connection.
Also make sure that the AutoMax rack is properly grounded.
2. Always install an AB 1770-SC station connector box near the AutoMax rack
so that the drop cable from the AutoMax to the station connector box does
not exceed a length of 10 foot. Connect the drop cable and the trunkline
cables as specified in the installation manual for the station connector box.
This will result in the shield of the drop cable being isolated from the network
in the Station Connector box. Make sure that the station connector box is
grounded as specified. Follow the Installation Guideline documents that AB
has for Data Highway Plus and RIO networks as well as the Station
Connector Box. Guideline documents are AB publications 1770-2.20C for
the 1770-SC Station Connector Box, 1770-4.1 for Industrial Automation
Wiring and Grounding Guidelines and 1770-6.2.2 for Data Highway/Data
Highway Plus/Data Highway II/Data Highway-485 Cable.
3. Th e AB drives group recommends that a common mode choke be installed
at each drive. This common mode choke is a ferrite core, part number
165482. It is made by Dexter-Permag and is Dexter-Permag part number
43825-TC. The drives group recommends that 4 turns of the network cable
be dressed through this ferrite core.
Where poor installation and wiring practices are suspected and problems exist
after items 1, 2 and 3 have been implemented, additional ferrite beads, Fair-Rite
Products Corporation number 2643626502, as discussed in publication 1770-4.1,
can be added. In some cases, slowing the network speed down from 230 kbaud
to 115 kbaud has helped, as well.
J-1
Page 60

J-2
Page 61

Page 62

For additional information
1 Allen-Bradley Drive
Mayfield Heights, Ohio 44124 USA
Tel: (800) 241-2886 or (440) 646-3599
http://www.reliance.com/automax
Publication J2-3067-5 - June 2001
Copyright © 2002 Rockwell Automation, Inc.. All rights reser ved. Printed in U.S.A.
 Loading...