

Page 1

Allen-Bradley
Bulletin 5370
OCR2–PAKt
User
(Cat. No. 5370–OCR2)
Manual
Page 2

Important User Information
Because of the variety of uses for the products described in this
publication, those responsible for the application and use of this
control equipment must satisfy themselves that all necessary steps
have been taken to assure that each application and use meets all
performance and safety requirements, including any applicable laws,
regulations, codes and standards.
The illustrations, charts, sample programs and layout examples
shown in this guide are intended solely for purposes of example.
Since there are many variables and requirements associated with any
particular installation, Allen-Bradley does not assume responsibility
or liability (to include intellectual property liability) for actual use
based upon the examples shown in this publication.
Allen-Bradley publication SGI-1.1, Safety Guidelines for the
Application, Installation, and Maintenance of Solid-State Control
(available from your local Allen-Bradley office), describes some
important differences between solid-state equipment and
electromechanical devices that should be taken into consideration
when applying products such as those described in this publication.
Reproduction of the contents of this copyrighted publication, in
whole or in part, without written permission of Allen-Bradley
Company, Inc., is prohibited.
Throughout this manual we use notes to make you aware of safety
considerations:
ATTENTION: Identifies information about practices
or circumstances that can lead to personal injury or
!
Attention statements help you to:
death, property damage or economic loss.
• identify a hazard
• avoid the hazard
• recognize the consequences
Important: Identifies information that is critical for successful
application and understanding of the product.
Page 3

Table of Contents
OCR2-PAK
User Manual
Using this Manual
Introduction to OCR2-P AK
Chapter 1
Chapter Objectives 1–1. . . . . . . . . . . . . . . . . . . . . . . . . . . . . . . . . . . . . . . . . .
Overview of Manual 1–1. . . . . . . . . . . . . . . . . . . . . . . . . . . . . . . . . . . . . . . . . .
OCR2 P AK Definition 1–2. . . . . . . . . . . . . . . . . . . . . . . . . . . . . . . . . . . . . . . . .
Intended Audience 1–2. . . . . . . . . . . . . . . . . . . . . . . . . . . . . . . . . . . . . . . . . . .
Conventions 1–2. . . . . . . . . . . . . . . . . . . . . . . . . . . . . . . . . . . . . . . . . . . . . . .
Terminology 1–3. . . . . . . . . . . . . . . . . . . . . . . . . . . . . . . . . . . . . . . . . . . . . . .
Related Publications 1–3. . . . . . . . . . . . . . . . . . . . . . . . . . . . . . . . . . . . . . . . .
Chapter 2
Chapter Objectives 2–1. . . . . . . . . . . . . . . . . . . . . . . . . . . . . . . . . . . . . . . . . .
OCR2-P AK Description 2–1. . . . . . . . . . . . . . . . . . . . . . . . . . . . . . . . . . . . . . .
Font Training 2–3. . . . . . . . . . . . . . . . . . . . . . . . . . . . . . . . . . . . . . . . . . . . . . .
Multiple Strings 2–3. . . . . . . . . . . . . . . . . . . . . . . . . . . . . . . . . . . . . . . . . . . . .
Character Requirements 2–4. . . . . . . . . . . . . . . . . . . . . . . . . . . . . . . . . . . . . .
Character Orientation and Direction 2–4. . . . . . . . . . . . . . . . . . . . . . . . . . . . .
Character Height 2–4. . . . . . . . . . . . . . . . . . . . . . . . . . . . . . . . . . . . . . . . . .
Character and String Spacing 2–5. . . . . . . . . . . . . . . . . . . . . . . . . . . . . . . . .
Character Alignment 2–5. . . . . . . . . . . . . . . . . . . . . . . . . . . . . . . . . . . . . . .
Gray Spaces 2–7. . . . . . . . . . . . . . . . . . . . . . . . . . . . . . . . . . . . . . . . . . . . .
Character Rotation 2–7. . . . . . . . . . . . . . . . . . . . . . . . . . . . . . . . . . . . . . . . .
Character / Background Contrast 2–8. . . . . . . . . . . . . . . . . . . . . . . . . . . . . . . .
Ambiguous Characters 2–8. . . . . . . . . . . . . . . . . . . . . . . . . . . . . . . . . . . . . . . .
Character Quality 2–8. . . . . . . . . . . . . . . . . . . . . . . . . . . . . . . . . . . . . . . . . . . .
Other Character Restrictions 2–9. . . . . . . . . . . . . . . . . . . . . . . . . . . . . . . . . . .
OCR2-PAK Installation
Chapter 3
Chapter Objectives 3–1. . . . . . . . . . . . . . . . . . . . . . . . . . . . . . . . . . . . . . . . . .
OCR2-P AK Installation 3–1. . . . . . . . . . . . . . . . . . . . . . . . . . . . . . . . . . . . . . . .
Accessing OCR2-P AK 3–2. . . . . . . . . . . . . . . . . . . . . . . . . . . . . . . . . . . . . . . .
i
Page 4

Table of Contents
OCR2-PAK
User Manual
OCR Tool Configuration
OCR Tool Configuration
Chapter 4
Chapter Objectives 4–1. . . . . . . . . . . . . . . . . . . . . . . . . . . . . . . . . . . . . . . . . .
Procedure 4–1. . . . . . . . . . . . . . . . . . . . . . . . . . . . . . . . . . . . . . . . . . . . . . . . .
Adding an OCR Tool 4–2. . . . . . . . . . . . . . . . . . . . . . . . . . . . . . . . . . . . . . . . .
Editing an OCR Tool 4–4. . . . . . . . . . . . . . . . . . . . . . . . . . . . . . . . . . . . . . . . .
OCR Tool Edit Panel 4–5. . . . . . . . . . . . . . . . . . . . . . . . . . . . . . . . . . . . . . . . .
OCR Tool Edit Panel Components 4–5. . . . . . . . . . . . . . . . . . . . . . . . . . . . . .
OCR Tool Edit Panel Buttonss 4–8. . . . . . . . . . . . . . . . . . . . . . . . . . . . . . . .
Enter a Font Name 4–9. . . . . . . . . . . . . . . . . . . . . . . . . . . . . . . . . . . . . . . . . .
Position OCR Tool Window 4–10. . . . . . . . . . . . . . . . . . . . . . . . . . . . . . . . . . . . .
Set Threshold / Filter 4–11. . . . . . . . . . . . . . . . . . . . . . . . . . . . . . . . . . . . . . . . .
Set Character Size 4–12. . . . . . . . . . . . . . . . . . . . . . . . . . . . . . . . . . . . . . . . . . .
Select Operating Mode 4–15. . . . . . . . . . . . . . . . . . . . . . . . . . . . . . . . . . . . . . . .
Chapter 5
Chapter Objectives 5–1. . . . . . . . . . . . . . . . . . . . . . . . . . . . . . . . . . . . . . . . . .
OCR Fonts 5–1. . . . . . . . . . . . . . . . . . . . . . . . . . . . . . . . . . . . . . . . . . . . . . . .
Introduction to Teaching Characters 5–2. . . . . . . . . . . . . . . . . . . . . . . . . . . . . .
OCR Panels 5–3. . . . . . . . . . . . . . . . . . . . . . . . . . . . . . . . . . . . . . . . . . . . . . .
Edit Font Panel 5–3. . . . . . . . . . . . . . . . . . . . . . . . . . . . . . . . . . . . . . . . . . .
Define Character Panel 5–5. . . . . . . . . . . . . . . . . . . . . . . . . . . . . . . . . . . . .
Adding Characters to Fonts 5–8. . . . . . . . . . . . . . . . . . . . . . . . . . . . . . . . . . . .
Setting the Filter 5–11. . . . . . . . . . . . . . . . . . . . . . . . . . . . . . . . . . . . . . . . . . . .
Thinning 5–12. . . . . . . . . . . . . . . . . . . . . . . . . . . . . . . . . . . . . . . . . . . . . . . . . .
Editing Taught Patterns Manually 5–14. . . . . . . . . . . . . . . . . . . . . . . . . . . . . . . .
Testing Fonts 5–15. . . . . . . . . . . . . . . . . . . . . . . . . . . . . . . . . . . . . . . . . . . . . . .
Setting Correlation Threshold 5–17. . . . . . . . . . . . . . . . . . . . . . . . . . . . . . . . . . .
Defining Spacing 5–18. . . . . . . . . . . . . . . . . . . . . . . . . . . . . . . . . . . . . . . . . . . .
Character Spacing 5–18. . . . . . . . . . . . . . . . . . . . . . . . . . . . . . . . . . . . . . . . .
Gray Spaces 5–19. . . . . . . . . . . . . . . . . . . . . . . . . . . . . . . . . . . . . . . . . . . . .
Font Optimization 5–22. . . . . . . . . . . . . . . . . . . . . . . . . . . . . . . . . . . . . . . . . . .
Reducing Image Variations 5–22. . . . . . . . . . . . . . . . . . . . . . . . . . . . . . . . . . .
Handling Print Degradation 5–22. . . . . . . . . . . . . . . . . . . . . . . . . . . . . . . . . . .
Eliminating Confusion 5–25. . . . . . . . . . . . . . . . . . . . . . . . . . . . . . . . . . . . . .
Working With Font Files 5–27. . . . . . . . . . . . . . . . . . . . . . . . . . . . . . . . . . . . . . .
ii
Page 5

Table of Contents
OCR2-PAK
User Manual
Using Match Strings
Using Match Strings
Communications and
Results Processing
Chapter 6
Chapter Objectives 6–1. . . . . . . . . . . . . . . . . . . . . . . . . . . . . . . . . . . . . . . . . .
Match String Usage 6–1. . . . . . . . . . . . . . . . . . . . . . . . . . . . . . . . . . . . . . . . . .
Length of Match Strings 6–2. . . . . . . . . . . . . . . . . . . . . . . . . . . . . . . . . . . . .
Leading & Trailing Spaces 6–2. . . . . . . . . . . . . . . . . . . . . . . . . . . . . . . . . . .
Metacharacters 6–3. . . . . . . . . . . . . . . . . . . . . . . . . . . . . . . . . . . . . . . . . . . . .
Testing Match Strings 6–5. . . . . . . . . . . . . . . . . . . . . . . . . . . . . . . . . . . . . . . . .
Match String Examples 6–6. . . . . . . . . . . . . . . . . . . . . . . . . . . . . . . . . . . . . . .
Chapter 7
Chapter Objectives 7–1. . . . . . . . . . . . . . . . . . . . . . . . . . . . . . . . . . . . . . . . . .
Inspection Displays 7–1. . . . . . . . . . . . . . . . . . . . . . . . . . . . . . . . . . . . . . . . . .
On-Line Adjustment 7–3. . . . . . . . . . . . . . . . . . . . . . . . . . . . . . . . . . . . . . . . . .
Chapter 8
Chapter Objectives 8–1. . . . . . . . . . . . . . . . . . . . . . . . . . . . . . . . . . . . . . . . . .
OCR Inspection Results 8–1. . . . . . . . . . . . . . . . . . . . . . . . . . . . . . . . . . . . . . .
Communications Messages 8–3. . . . . . . . . . . . . . . . . . . . . . . . . . . . . . . . . . . .
Accessing OCR Results from Math Tools 8–3. . . . . . . . . . . . . . . . . . . . . . . . . . .
OCR Tool Adjustment 8–4. . . . . . . . . . . . . . . . . . . . . . . . . . . . . . . . . . . . . . . . .
Sending Match Strings with Backslashes 8–5. . . . . . . . . . . . . . . . . . . . . . . . . . .
Transferring Font Files 8–5. . . . . . . . . . . . . . . . . . . . . . . . . . . . . . . . . . . . . . . .
Status and Warning
Messages
Compensating for
Lighting Variations
Glossary
Index
Appendix A
Appendix B
Objectives B–1. . . . . . . . . . . . . . . . . . . . . . . . . . . . . . . . . . . . . . . . . . . . . . . . .
Using Image Processing B–1. . . . . . . . . . . . . . . . . . . . . . . . . . . . . . . . . . . . . .
Method 1 – Maximum Compensation B–1. . . . . . . . . . . . . . . . . . . . . . . . . . . .
Method 2 – Brightness Compensation with Maximum Speed B–5. . . . . . . . . . .
iii
Page 6

Chapter
Chapter Objectives
Overview of Manual
A–B
1
Using this Manual
Read this chapter to familiarize yourself with the rest of the manual.
You will learn about:
• Contents of this manual
• OCR2-PAK definition
• Intended audience
• Conventions used
• Terminology
• Related publications.
The following table describes the contents of each chapter in this manual.
Manual Contents
Chapter
1 Overview of this Manual
2 Introduction to OCR2-PAK
3 OCR2-PAK Installation
4 OCR Tool Configuration Describes how to setup an OCR tool.
5 Creating Inspection Fonts
6 Using OCV
7 Inspections
8 Communications and I/O
Title Purpose
Introduces you to the OCR2-PAK
software package and provides you with
a list of related documents and
conventions.
Describes key features, specifications,
restrictions, and other application
considerations.
Provides instructions for installing
OCR2-PAK.
Describes how to train OCR2-PAK to
recognize characters.
Describes how to configure and test
match strings for OCV.
Describes how to perform Test and
On-Line inspections.
Describes how to access OCR results
and perform configuration functions
through a CVIM2 communications port.
Glossary
Index
1–1
Page 7

Chapter 1
Using this Manual
OCR2 PAK Definition
Intended Audience
Conventions
OCR2-PAK (Catalog No. 5370-OCR2) is an enhancement to the CVIM2
(Catalog No. 5370-CVIM2) inspection tools that provides Optical Character
Recognition (OCR) and Optical Character Verification (OCV).
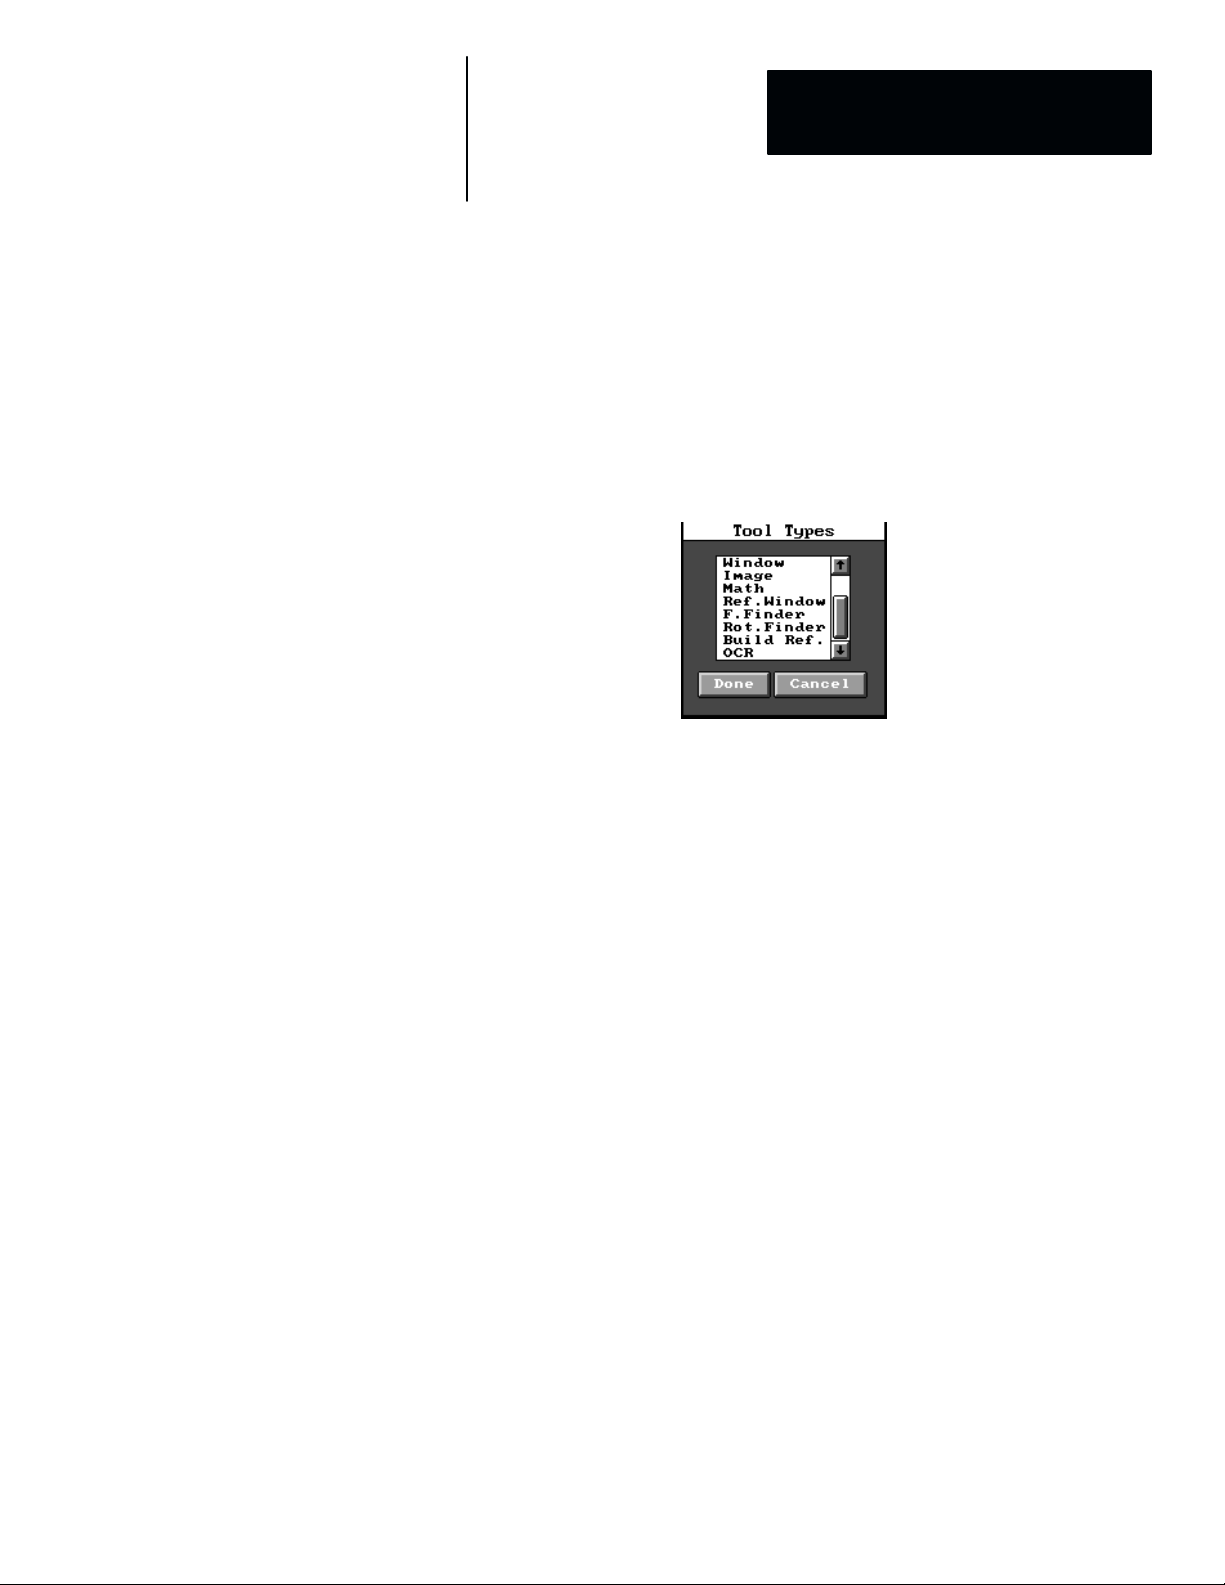
OCR2-PAK is installed in the CVIM2 using a memory card. With
OCR2-PAK installed, OCR is listed as an additional selection in the CVIM2
Tool Types panel. All parameters for an OCR window are configured
through popup menus using a light pen or mouse (trackball).
No special knowledge is required to use OCR2-PAK. However, you must
understand how to configure and operate the CVIM2. Refer to the user
manuals (see related publications, next page).
This manual uses the following conventions:
• “Mouse button” refers to the left mouse button.
• References to “Mouse” are synonymous with ”Light Pen” in this manual.
• If a menu command, button or check box is grayed out or shaded that
item is not available for use at that time.
• Click means to position the cursor in the specified area and press / release
the mouse button without moving the mouse.
• Choose means to perform a menu command or check a check box.
• Select means to highlight a selection from a list or series.
• Dragging or Drag (Mouse) is performed by pointing to an object,
pressing the mouse button and holding it down while moving the object.
• Dragging or Drag (Light Pen) is performed by positioning the light pen
tip over an item on the screen and pressing the tip against the screen until
a cross (+) symbol appears. Release the light pen tip from the screen,
then drag the item across the screen. Press and release the tip against the
screen when the item is at its final position.
• Toolset refers to a set of one or more tool types that are assembled to
perform an inspection. The CVIM2 system can run one configuration
(file) at one time, and that configuration file may contain up to six
toolsets, each of which can contain one or more tools.
• Tool refers to any of the tool types, such as “gage,” “window,” and so on.
In this context, the OCR tool is just one of the tool types that a toolset
may contain.
1–2
Page 8

Chapter 1
Using this Manual
Terminology
Related Publications
This manual contains some terms that you may not be familiar with.
Use the glossary at the back of this manual for assistance.
The following table lists related publications. We recommend that you read
the CVIM2 Reference Manual (Catalog No. 5370-801) before using the
OCR2 package.
Related Publications
Publication / Catalog
Number
5370-801 CVIM2 Reference Manual
5370-804 CVIM2 Communications Manual
Description
1–3
Page 9

Chapter
Chapter Objectives
OCR2-PAK Description
A–B
Introduction to OCR2-PAK
This chapter describes:
• OCR2-PAK
• Font training
• Verification
• Recognition
• Character requirements
• Ambiguous characters
Overview
2
OCR2-PAK is an enhancement to the CVIM2 that provides Optical Character
Recognition (OCR) and Optical Character Verification (OCV). After
OCR2-PAK is installed, OCR is listed as an option in the Tool Types panel.
An OCR Tool can be used in two ways:
• OCR mode reads characters within the tool’s processing window. It does
not use a match string to verify what text is present.
• OCV mode reads characters within the tool’s processing window, and
compares the text read to a match string entered by the user.
Both OCR and OCV have standard and strict operating modes. These modes
determine how the OCR2 package handles printed characters that correlate
with two or more different taught characters.
2–1
Page 10
Chapter 2
Introduction to OCR2-PAK
Tool Panels
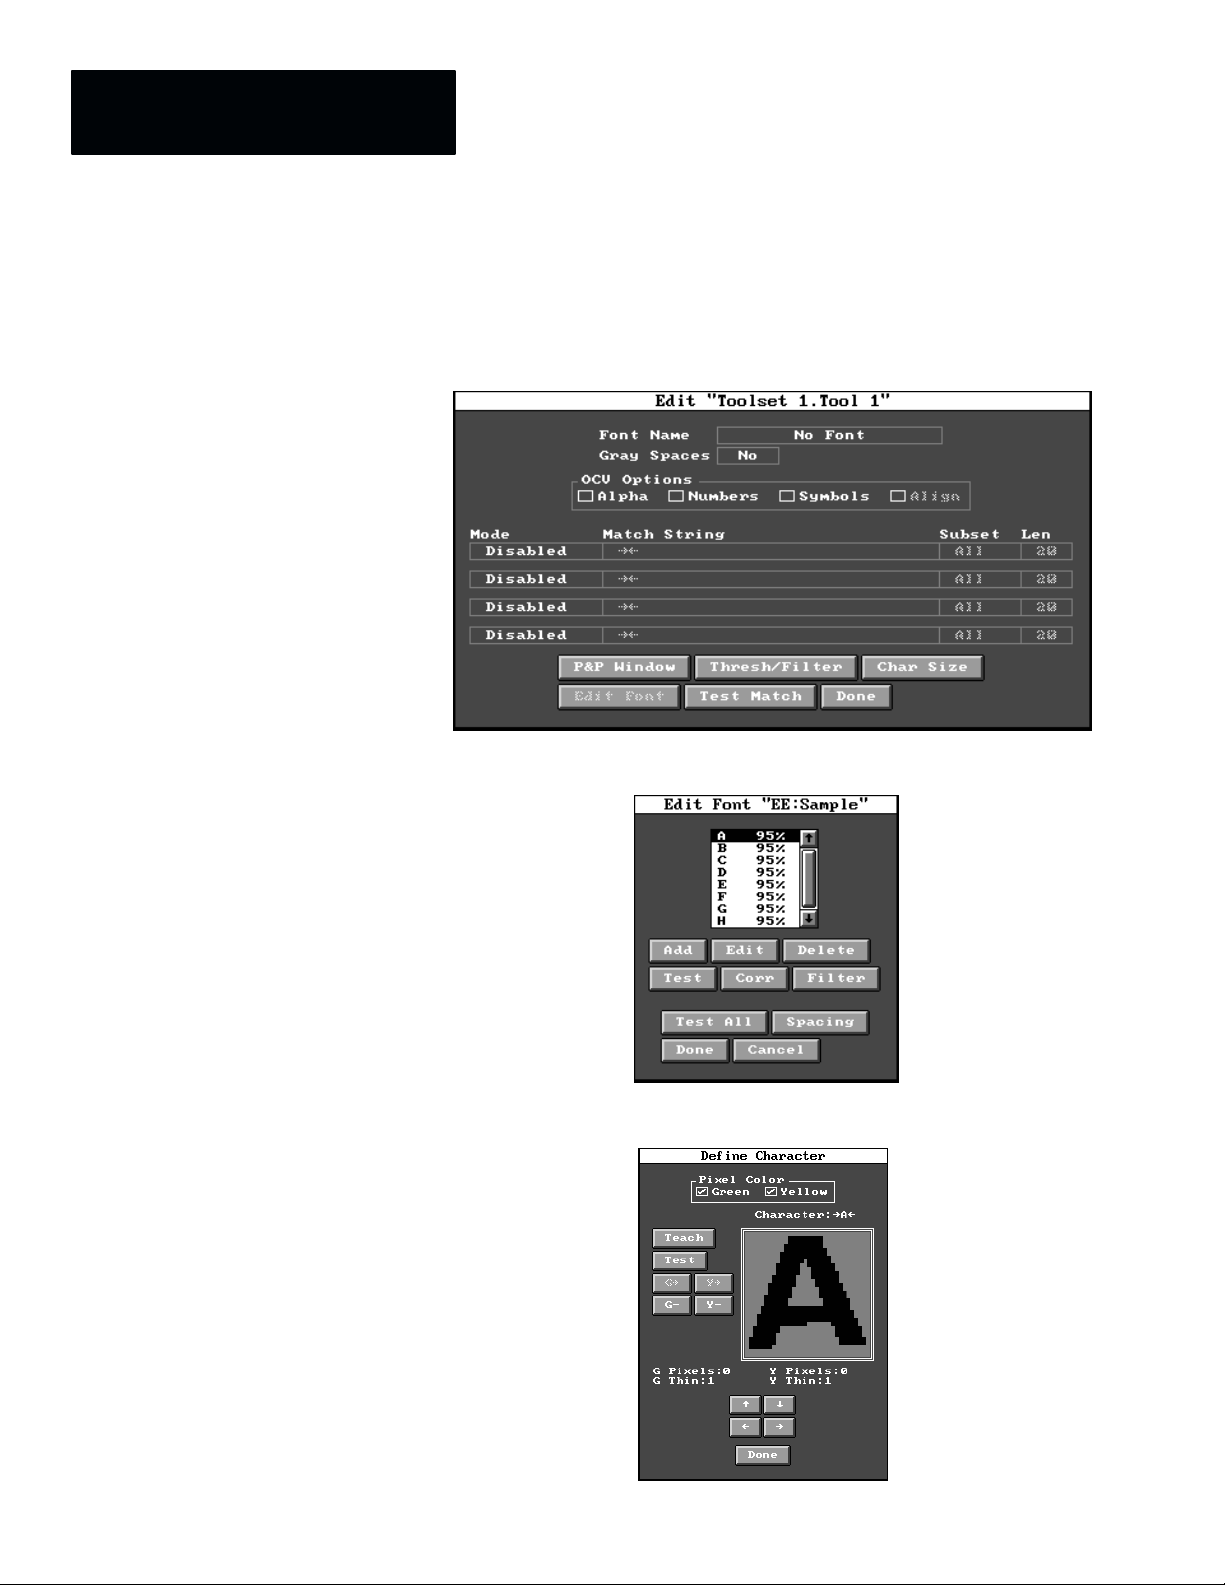
New tool panels are created when OCR2-PAK is installed. There are three
basic panels for OCR2-PAK:
Use the Edit OCR Tool Panel to configure an OCR Tool.
Use the Edit Font panel to add, remove, and test characters from a font list.
2–2
Use the Define Character panel to teach and test a single character.
Page 11
Chapter 2
Introduction to OCR2-PAK
Font Training
Multiple Strings
Setup of the OCR Tool for inspections requires that you teach or train the
CVIM2 to recognize your set of characters (font). This means that you can
train the OCR2 package to recognize just about any character.
When you train the system, all of the taught letters, numbers and symbols are
stored as a group called a font. Fonts can be copied, edited or deleted from a
font listing.
An OCR Tool can inspect up to 4 strings of up to 20 characters each. Each
string can have its own OCR or OCV operating parameters assigned.
OCR Tool Window
Net wt. 13oz 382g
Expiration Date 3/94
Code 123456 Lot #3
Made in USA
String #1 OCV Inspection
checks for presence of string.
String #2 OCR Inspection
reads expiration date.
String #3 OCR Inspection
reads code and lot number.
String #4 OCV Inspection
checks for presence of string.
2–3
Page 12
Chapter 2
Introduction to OCR2-PAK
Character Requirements
The following requirements must be met for character recognition.
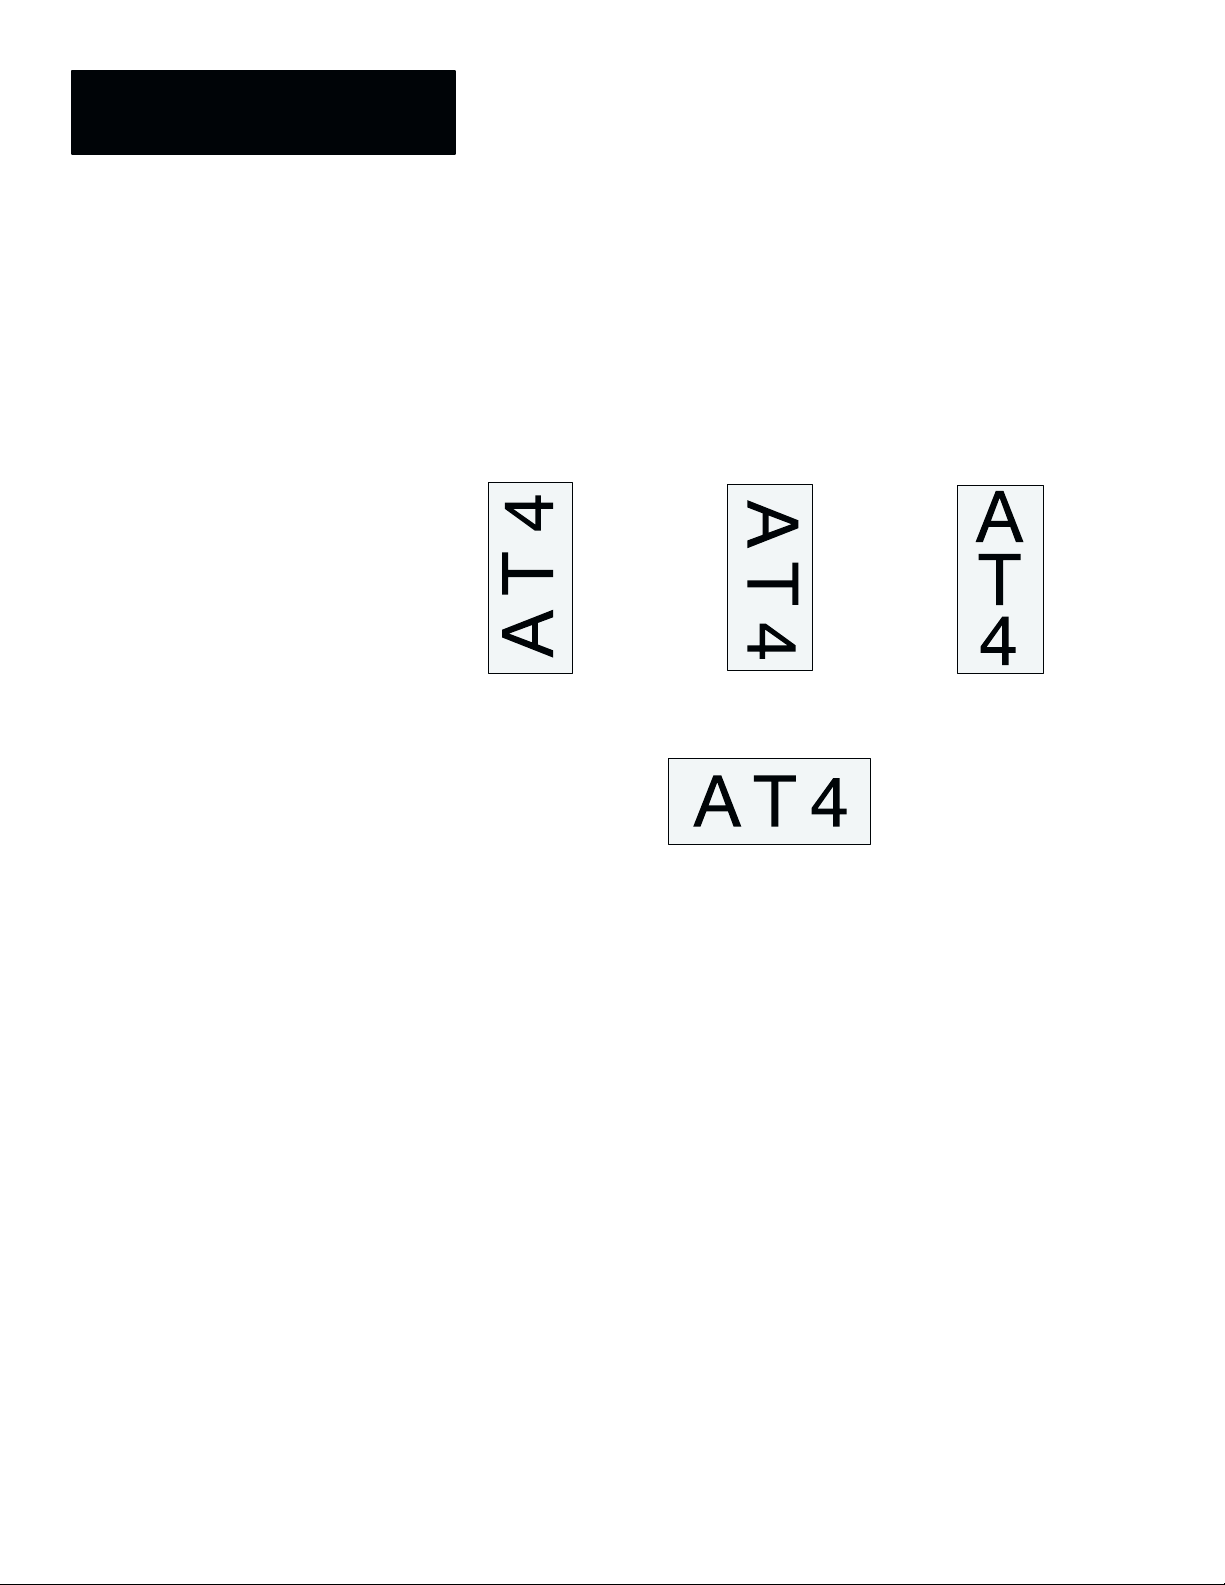
Character Orientation and Direction
The OCR Tool inspects only horizontal strings. If your characters are
rotated, you can use the Build Reference Tool as described in the CVIM2
Reference Manual to rotate the OCR Tool prior to inspection.
Vertical String
Bottom-to-Top Orientation
Tool must be Rotated -90_
Vertical String
Top-to-Bottom Orientation
Tool must be Rotated +90_
Non-Recognizable Orientation As Single String
Horizontal String
Note: The Non-recognizable example above could be inspected using 3
strings in one OCR Tool.
Character Height
It is recommended that the height of the characters in the inspected image
be at least 24 pixels. Although it is possible to read characters which are
smaller, the reliability of the inspection may be reduced. For best
reliability, the characters should be at least 32 pixels high. Characters may
be as tall as desired.
The inspected characters must be approximately the same height from
inspection to inspection, but the OCR Tool can be reconfigured to handle a
change in character size. If text appears in more than one size on a single
image, different OCR Tools, with different character sizes, must be used.
Thinning of the taught character may provide some tolerance to small
changes in size. If all of the inspected characters are increased or decreased
in size by the same amount, you can use the Rescale function to reconfigure
the tool to the new character height. This eliminates the need to re-teach a
font when the height of the inspected characters changes.
2–4
Page 13

Chapter 2
Introduction to OCR2-PAK
Character and String Spacing
When characters are taught, you use a Character Spacing box to set the
distance between the centers of characters, both horizontally and vertically.
No spacing between characters is required, however, characters should not
overlap.
A B C D
Character Spacing Box sets both
average distance between strings
and average distance between
characters.
The size of spaces between characters is defined by the Space Dimension
box. This is used to detect spaces between characters.
E F G H
A C D
Space Dimension box sets the
size of a space between adjacent
characters.
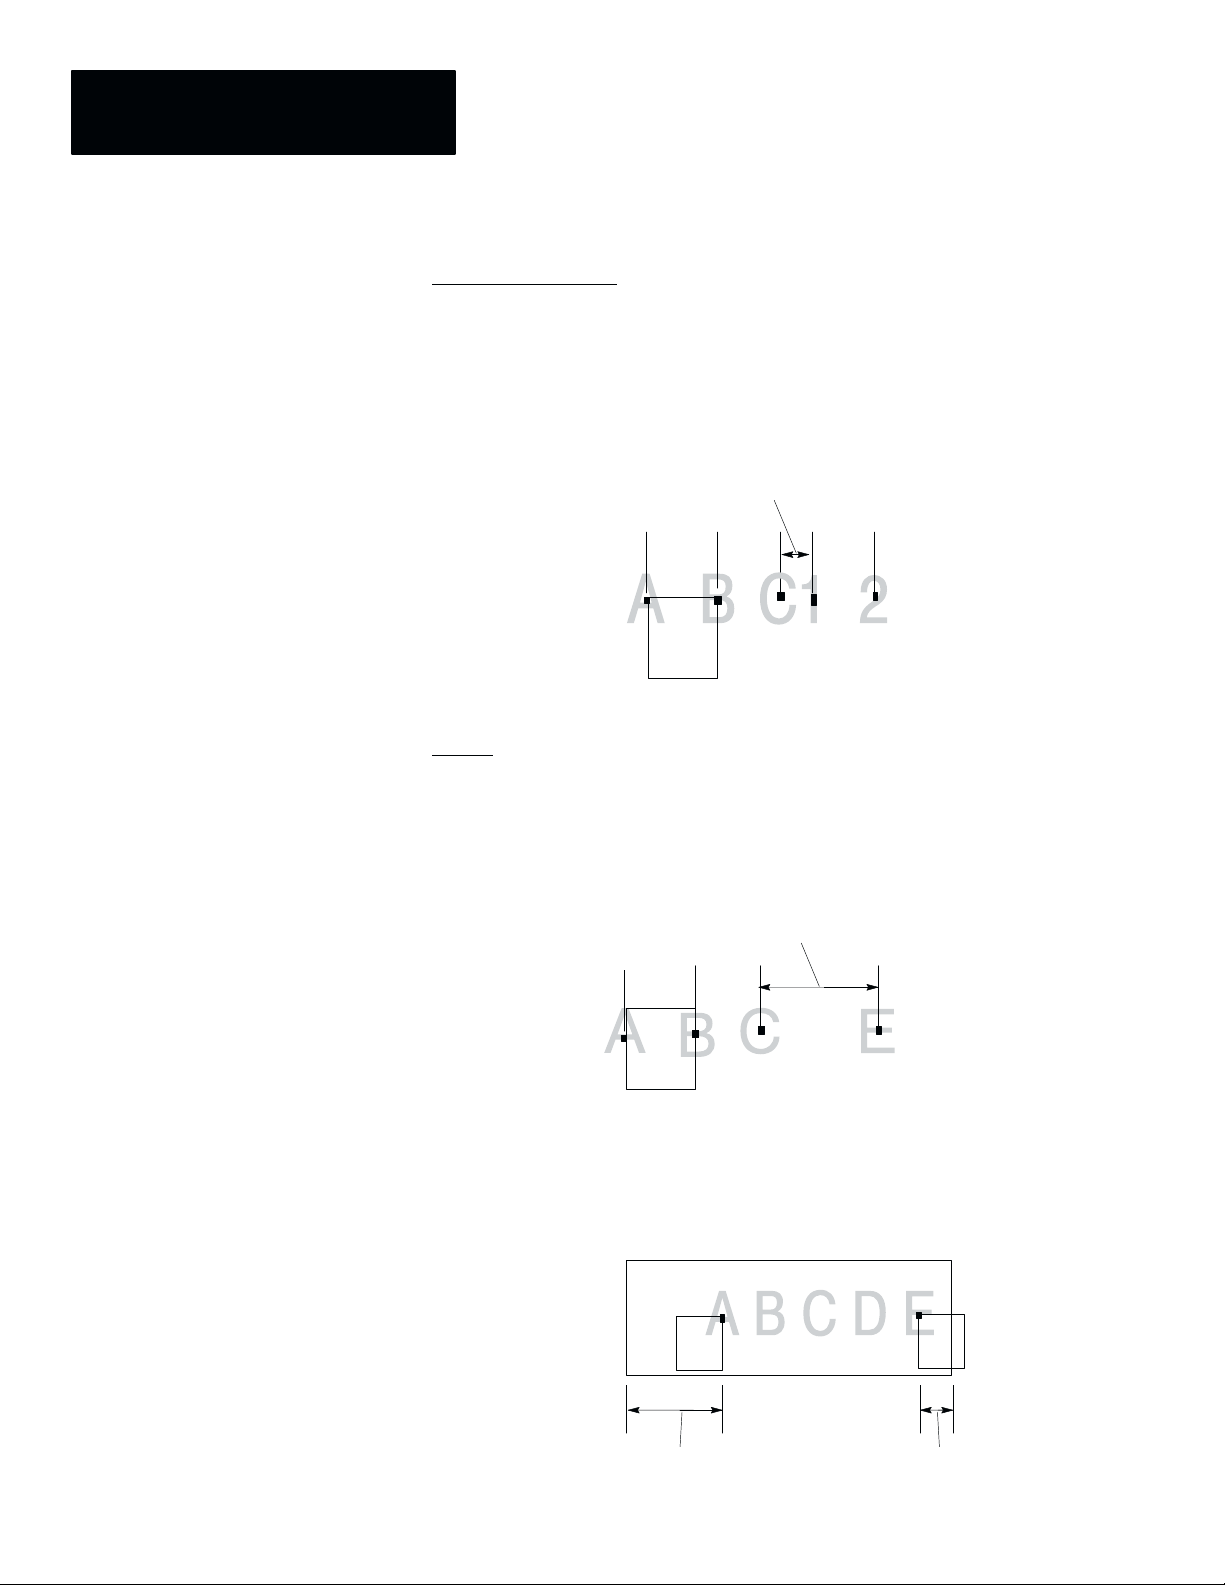
Character Alignment
Vertical Alignment
Characters within a string are considered part of the same string if the
vertical distance between adjacent correlation boxes is less than 1/2 the
height of the Character Spacing Box. If the distance is greater than 1/2 the
Character Spacing Box, the character is part of another string. For optimum
reliability, all of the characters in the string should be aligned vertically so
that at least 50% or more of the characters overlap.
Spacing is greater than 1/2 the height of
the character size box. This is seen as
2 separate strings: ABC F / DE.
Character
Spacing Box
E F G H
2–5
Page 14
Chapter 2
Introduction to OCR2-PAK
Character Separation
Characters are considered separate characters if the distance between the
1
correlation boxes is equal to or greater than
/2 the width of the Character
spacing box. If the distance between the correlation boxes of two characters
is less than 1/2 the width of the character spacing box, the OCR Tool will
treat the two characters as a single ”confusion character” and in most cases
the tool will fail.
Space is less than 1/2 Character Spacing
Box. The C and 1 will not be seen as
separate characters.
Character
Spacing Box
Spaces
When the distance between two printed characters is greater than the
Character Spacing plus 1/2 the Space Dimension, a space is inserted into the
read string.
Space is greater than the Character
Spacing plus 1/2 the Space Dimension.
A space will be inserted.
Character
Spacing Box
When the distance between the first or last characters and the left or right
window boundary respectively is greater than the Character Spacing plus 1/2
the Space Dimension, a space is inserted before or after the read string.
Tool Window
2–6
Spacing is greater than the Character
Spacing plus 1/2 the Space Dimension. A leading space will be inserted.
No space inserted.
Page 15
Chapter 2
Ñ
ÑÑÑ
ÑÑÑ
ÑÑÑ
ÑÑÑ
ÑÑÑ
Ñ
Introduction to OCR2-PAK
Gray Spaces
If the Gray Space option of the OCR Tool is enabled, each region of the
image where a space is detected will be examined to determine the
percentage of white pixels in the region. If the percentage exceeds a
user–defined value, the space is called a white space. Otherwise, it is
called a gray space, which indicates that it contains printing which is not
recognizable as a character.
If the space between the tool window and the character string is large
enough, the OCR Tool will also check for gray spaces in the regions
immediately to the left and right of a string of printed characters.
This enables the system to detect extra printing before or after the
inspected string.
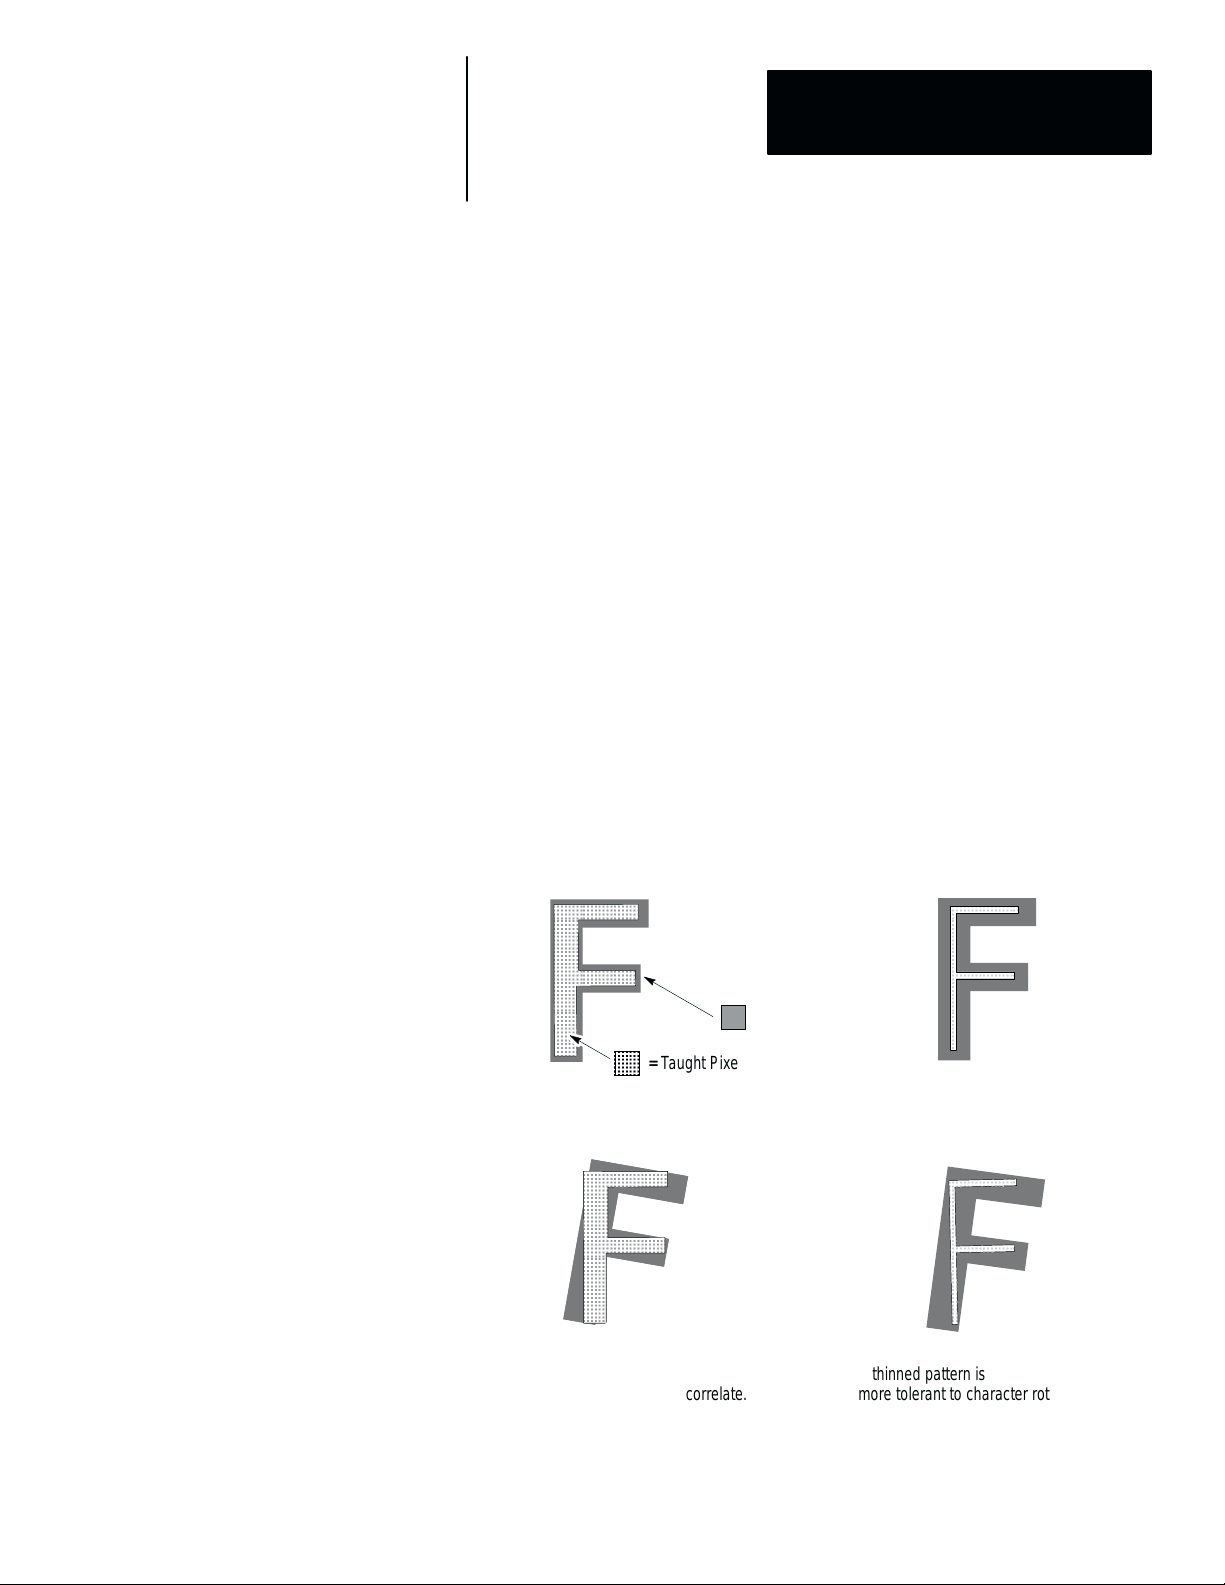
Character Rotation
If you expect the characters to rotate from inspection to inspection, you can
use reference tools to correct for character movement and rotation within the
field of view.
Some rotation may be acceptable without using a reference tool, if the
characters were taught using the Thinning option.
= Character
= Character
= Taught Pixel Pattern
= Taught Pixel Pattern
Original Taught Pattern Thinned Pattern
A rotated character with
un-thinned pattern may not correlate.
A thinned pattern is
more tolerant to character rotation.
2–7
Page 16

Chapter 2
Introduction to OCR2-PAK
Character / Background Contrast
Ambiguous Characters
The contrast between the inspected characters and the surrounding
background must be great enough so that, when configuring the OCR Tool, a
threshold can be set to effectively distinguish the inspected characters from
the background.
Good Contrast Poor Contrast
There are several valid characters that can confuse OCR systems. Some
numbers can be misread as letters and some letters can be read as numbers.
Misreads are more likely to occur when the print quality is poor. The most
ambiguous number and letter pairs are:
Number Letter
0
1
2
5
8
O
I
Z
S
B
Character Quality
To prevent confusion between these characters, we recommend that you:
• If possible, don’t use ambiguous characters in the same string.
• Use a different font. Some fonts have very little differences between
characters. For example, in the Courier font the lowercase L (l) and the
number (1) 1 are almost identical.
• Train the character templates carefully to reduce confusion between
similar characters.
The quality or clarity of the inspected characters affects the success of the
character recognition. Extra markings or breaks in characters can result in
failed or incorrect recognition of a character. You must determine if the
variation in characters is acceptable and adjust the taught font characters
accordingly.
2–8
Page 17

Chapter 2
Introduction to OCR2-PAK
Other Character Restrictions
The following are some additional OCR Tool restrictions. However, these
restrictions are unlikely to be encountered in most applications.
• There is a maximum of 4 ambiguous (confused) characters per character
location in a string.
• Maximum number of spaces = 32. This includes leading, internal, and
trailing spaces for all strings in the inspection window. Additional spaces
are ignored.
• Maximum number of character strings in the tool window = 4.
2–9
Page 18
Chapter
Chapter Objectives
OCR2-PAK Installation
A–B
3
OCR2-PAK Installation
This chapter describes:
• Installing OCR2-PAK
• Accessing the OCR Tool
OCR2-PAK is provided on a memory card. You can only install OCR2
software in a CVIM2 module having Rev. B01 firmware or later.
To install OCR2-PAK:
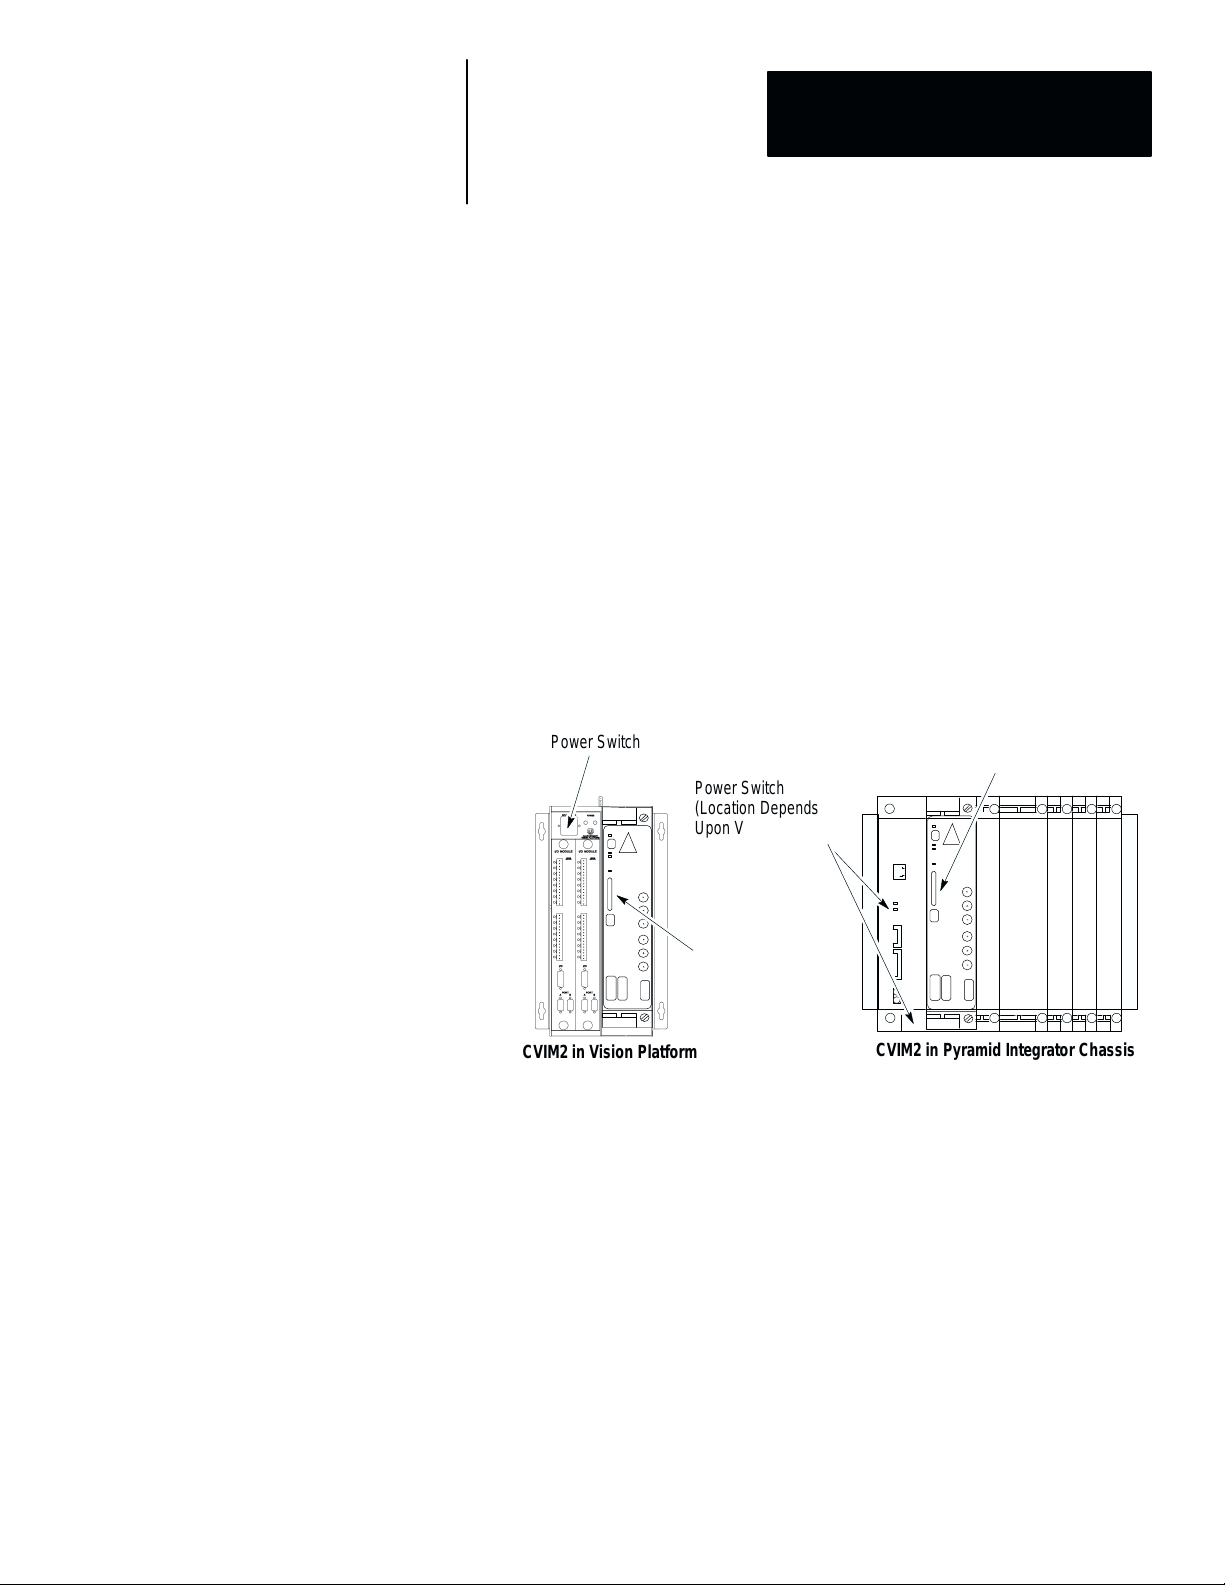
1. Remove power from the module by turning off the power to the Pyramid
Integrator or Vision Platform chassis.
Power Switch
Power Switch
(Location Depends
Upon Version)
Archive
Memory Slot
CVIM2 in Vision Platform
2. Insert the RAM card in the CVIM2 Archive Memory slot.
3. Apply power to the module by turning on the power switch.
4. The module will boot up and begin the package loading sequence.
CVIM2 in Pyramid Integrator Chassis
Archive
Memory Slot
3–1
Page 19
Chapter 3
OCR2-PAK Installation
5. While the package is being installed, you will see the following message:
Loading package MC:OCR2–B01
into
V1:OCR2–B01
6. When the Memory Active LED goes off and the screen displays the
CVIM2 power up message, the downloading is complete. Verify that the
power–up banner shows that OCR2–PAK has been installed.
On subsequent powerups, you are provided with the option to abort the
running of all installed packages:
6 seconds to package run
Accessing OCR2-PAK
Abort Package Run
If you abort the running of installed packages, the module will function as if
the packages were not installed.
Note: You only need to install the OCR2-PAK once. After installation,
OCR2-PAK remains installed for all subsequent powerups.
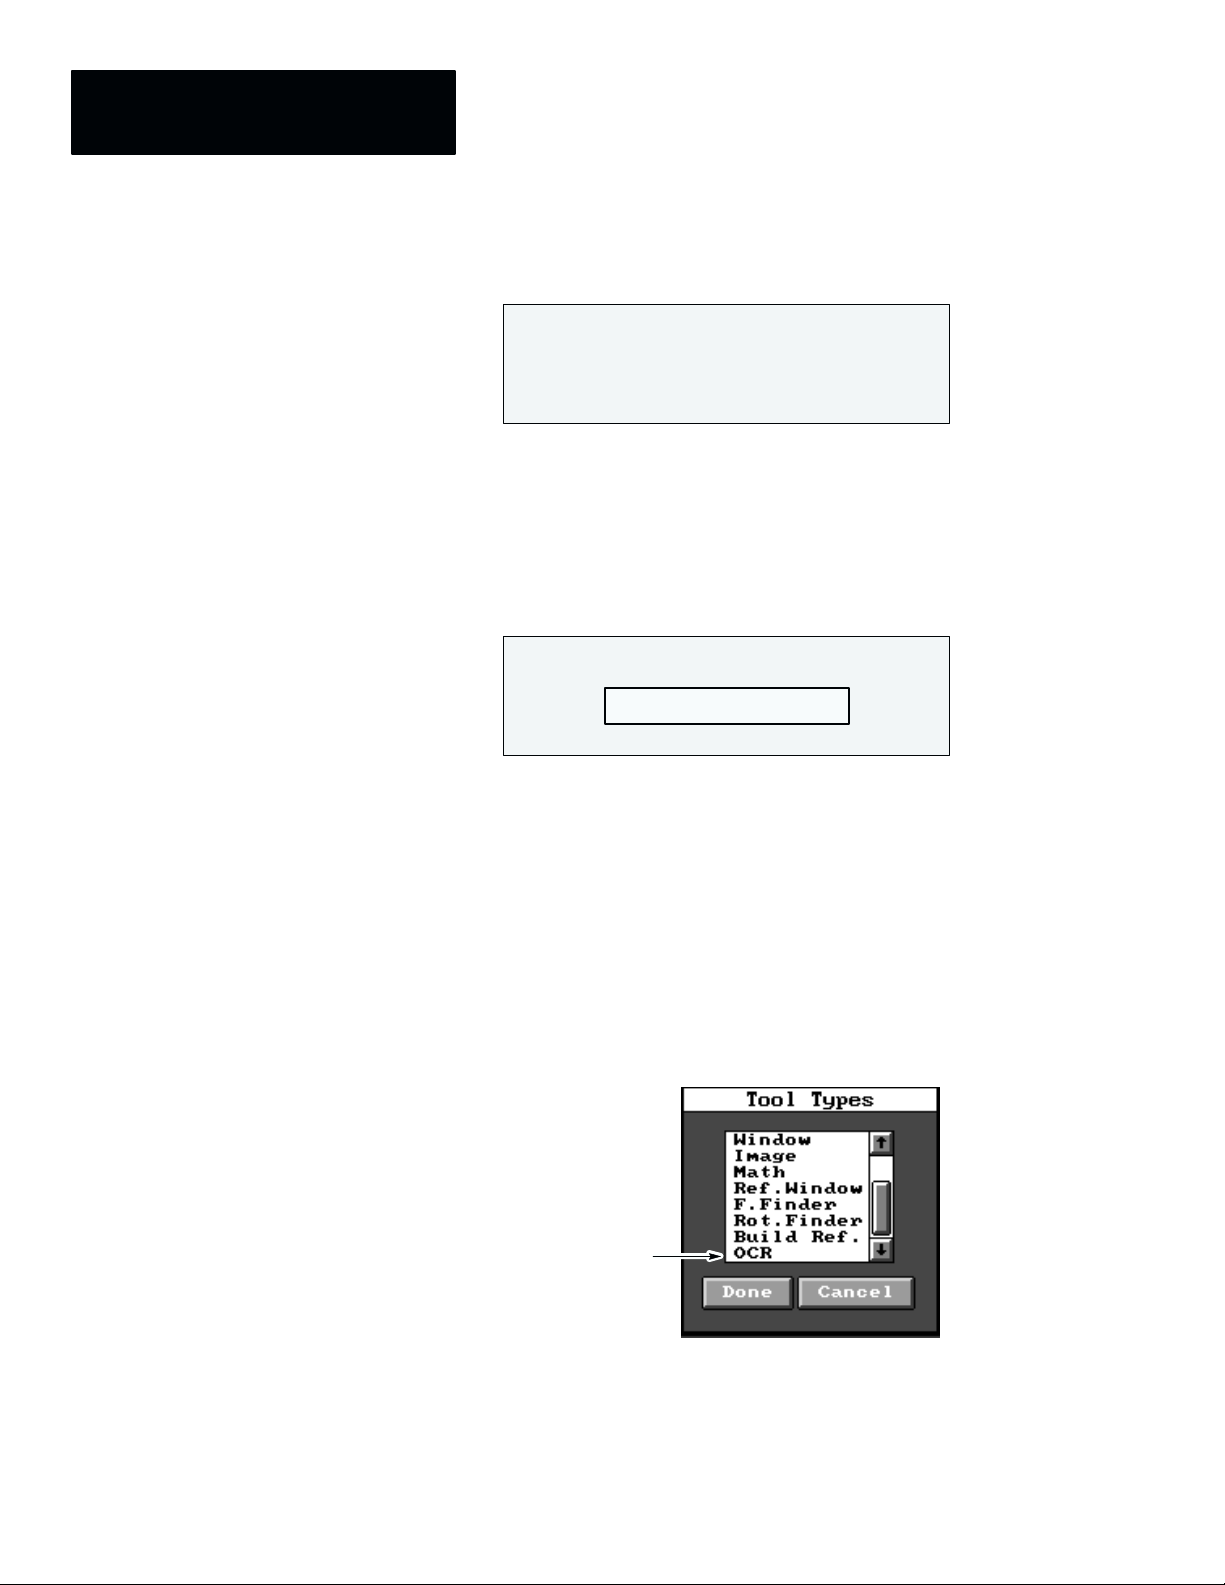
After OCR2-PAK is installed, OCR is listed as an option on the Tool Types
panel as shown below.
Select to Create
an OCR Tool
3–2
Page 20

Chapter
Chapter Objectives
Procedure
A–B
4
OCR Tool Configuration
This chapter describes how to:
• Create an OCR Tool
• Configure an OCR Tool
The steps for creating an OCR Tool are listed below. You must perform the
steps in the same sequence. If you are using Optical Character Verification
(OCV), refer also to Chapter 6.
1)Add an OCR Tool in the toolset.
2)Edit the OCR Tool configuration.
3) Enter a Font Name.
4)Position Tool Window.
5)Set Threshold/Filter.
6)Set Character Size.
7)Enter and Teach characters.
8)Test taught characters.
9)Select string modes.
10)Enter match strings for OCV mode.
11) Select OCV options if required.
Refer to this Chapter
Refer to Chapter 5
Refer to Chapter 6
4–1
Page 21
Chapter 4
OCR T ool Configuration
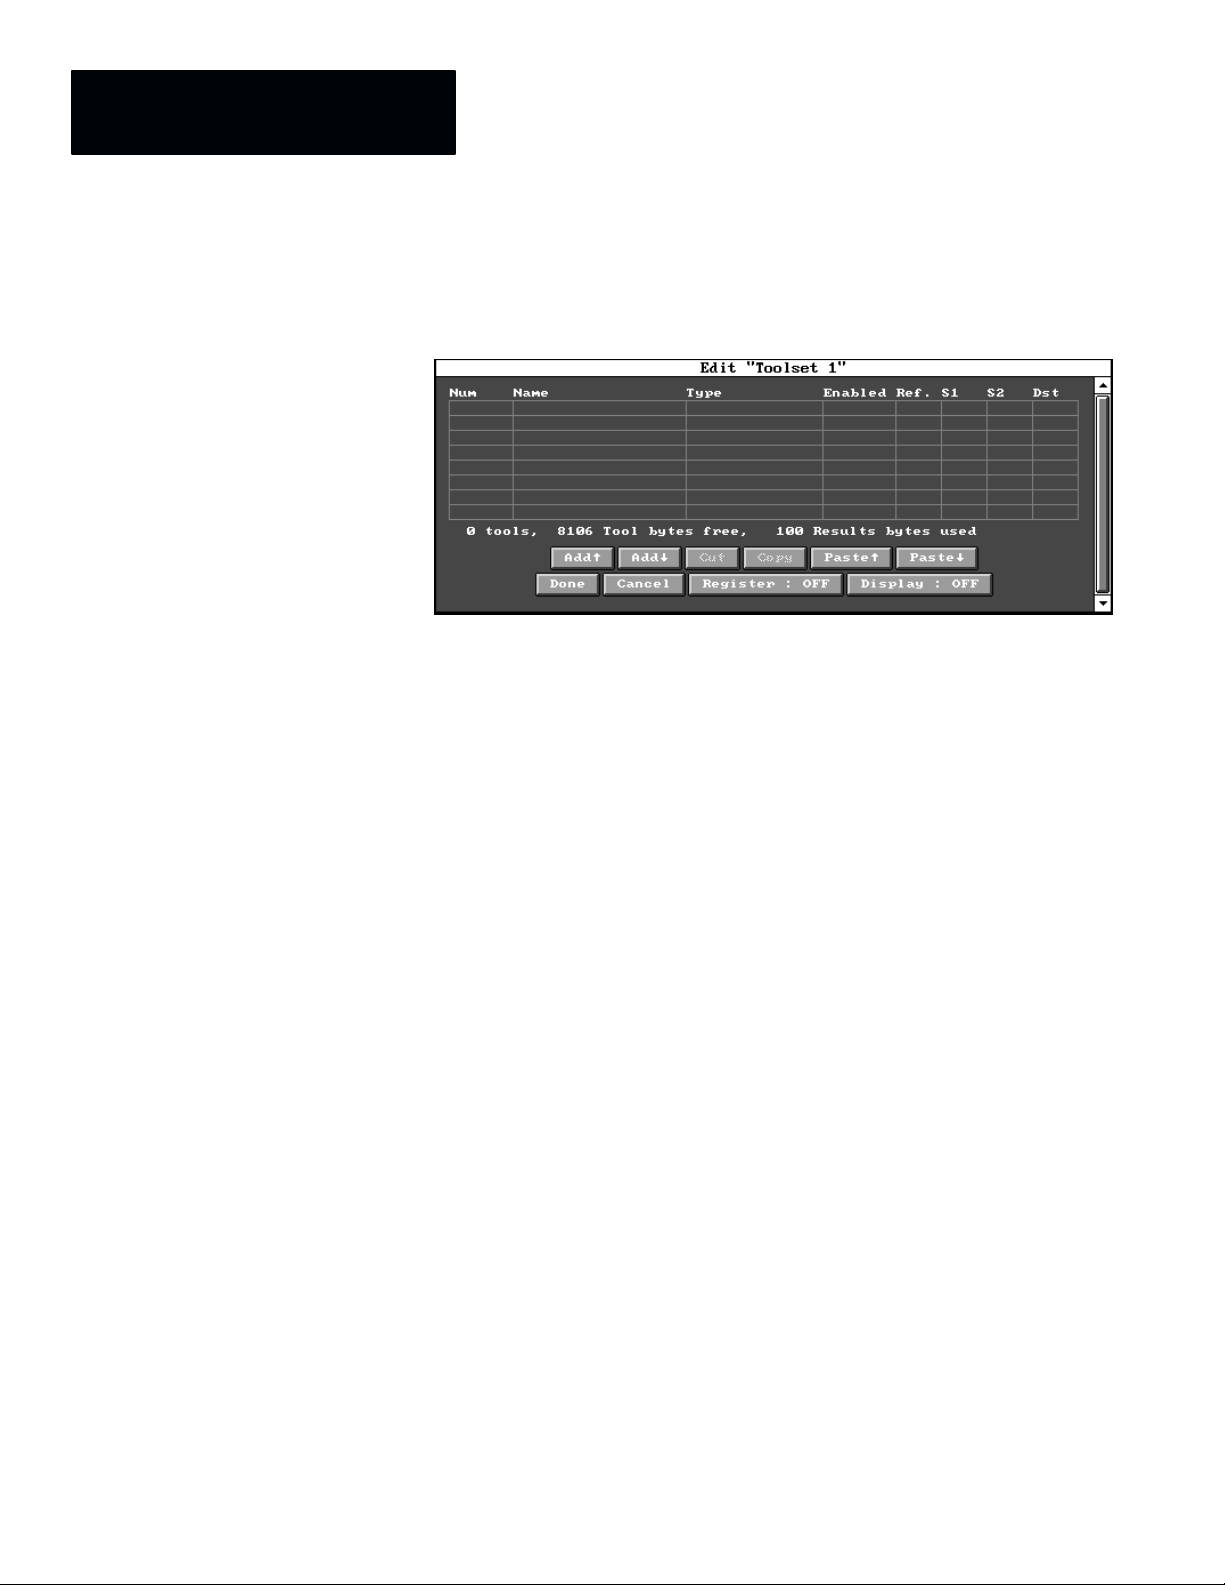
Adding an OCR Tool
To create an OCR Tool, choose Tools from the menu on the Toolset image
display panel. The following panel appears allowing you to add a new OCR
Tool or copy an existing one:
The following are brief descriptions of the Toolset Edit panel. Refer to the
CVIM2 Reference Manual (Catalog No. 5370-801) for detailed information
on editing a toolset.
Num
The sequence number of an inspection tool. it indicates the order in which
the CVIM2 system processes the tool number. The currently selected tool is
marked by an arrow.
4–2
Name
The inspection tool name. All tools are provided a default tool number such
as Tool 1. Clicking on the current name displays the keyboard for entering a
new name.
Type
The inspection tool type such as OCR. Clicking the tool type box for a tool
displays the edit panel for that tool.
Enabled
Indicates whether the tool is enabled, Yes or No. Yes is the default.
Ref
Use this field to select a reference tool for the purpose of providing shift
and/or rotation compensation for the selected inspection tool.
S1
use this field to select the primary image source for a tool from a camera
(such as C1) or from an image buffer (such as P1).
S2
Secondary image column is not applicable since OCR2 works with only one
image source.
Dst
Indicates the destination of the image. P1 is the default for an OCR Tool
indicating that the destination is a processed image.
Page 22
Chapter 4
OCR T ool Configuration
There are two ways to add tools to the Toolset:
• one way creates a new tool
• the other copies an existing tool which is modified
To create a new tool:
1. Choose either Add " or Add # button on the Toolset panel to add a tool
above or below the currently selected [!] tool.
The following panel appears with tool type selections.
2. From the list, select OCR. Click the Done button.
An OCR Tool is added to the list in the Toolset panel.
3. To edit tools, refer to next section Editing OCR Tools.
To copy an existing tool:
1. Select the OCR Tool to be copied by clicking the number using the
mouse. The selected tool is indicated by an arrow[!].
2. Choose the Copy button and then the Paste" or Paste# button to place
the copy OCR Tool before or after the the marked [!] tool.
3. The copied OCR Tool has the same attributes as the original tool.
4. To edit tools, refer to next section Editing an OCR Tool.
4–3
Page 23
Chapter 4
OCR T ool Configuration
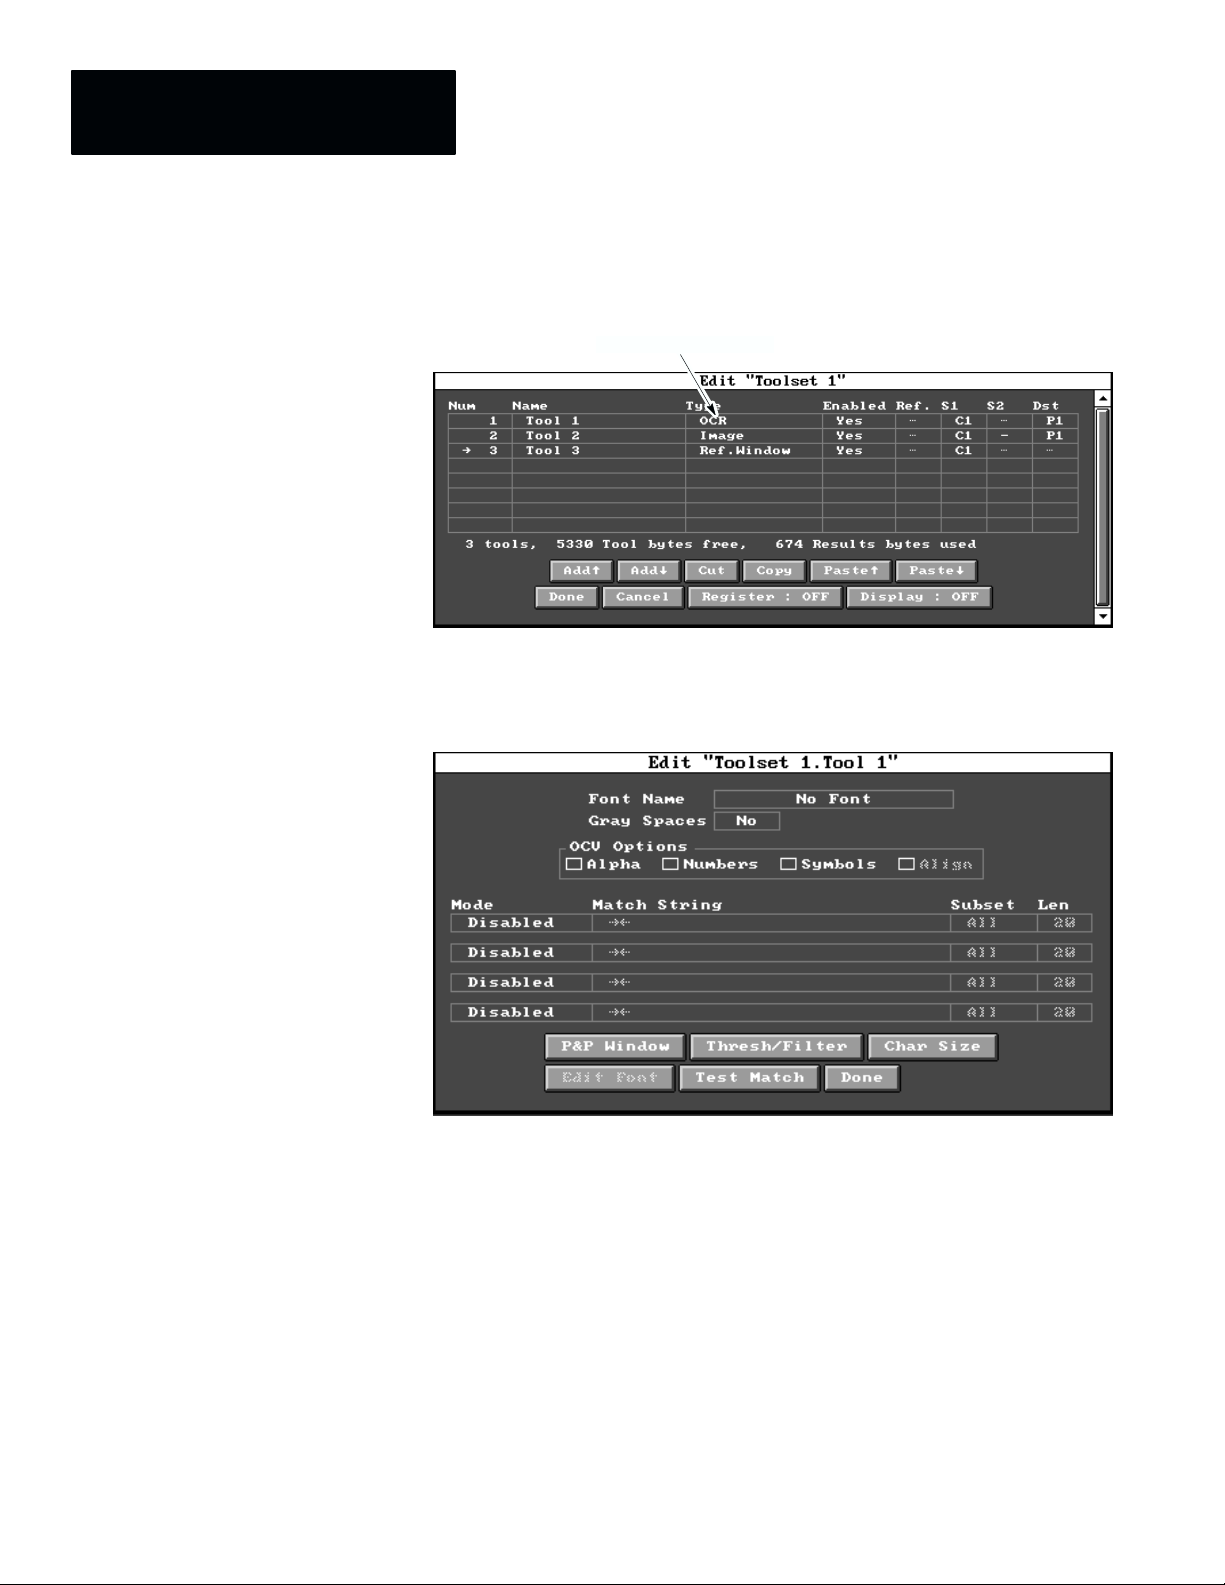
Editing an OCR Tool
To edit a new or existing OCR Tool, click OCR in the Type column of the
tool listed in the Toolset Edit panel.
Click here to edit a tool.
The following OCR Tool Edit panel is displayed showing the current
configuration of the OCR Tool being edited.
4–4
Page 24
Chapter 4
OCR T ool Configuration
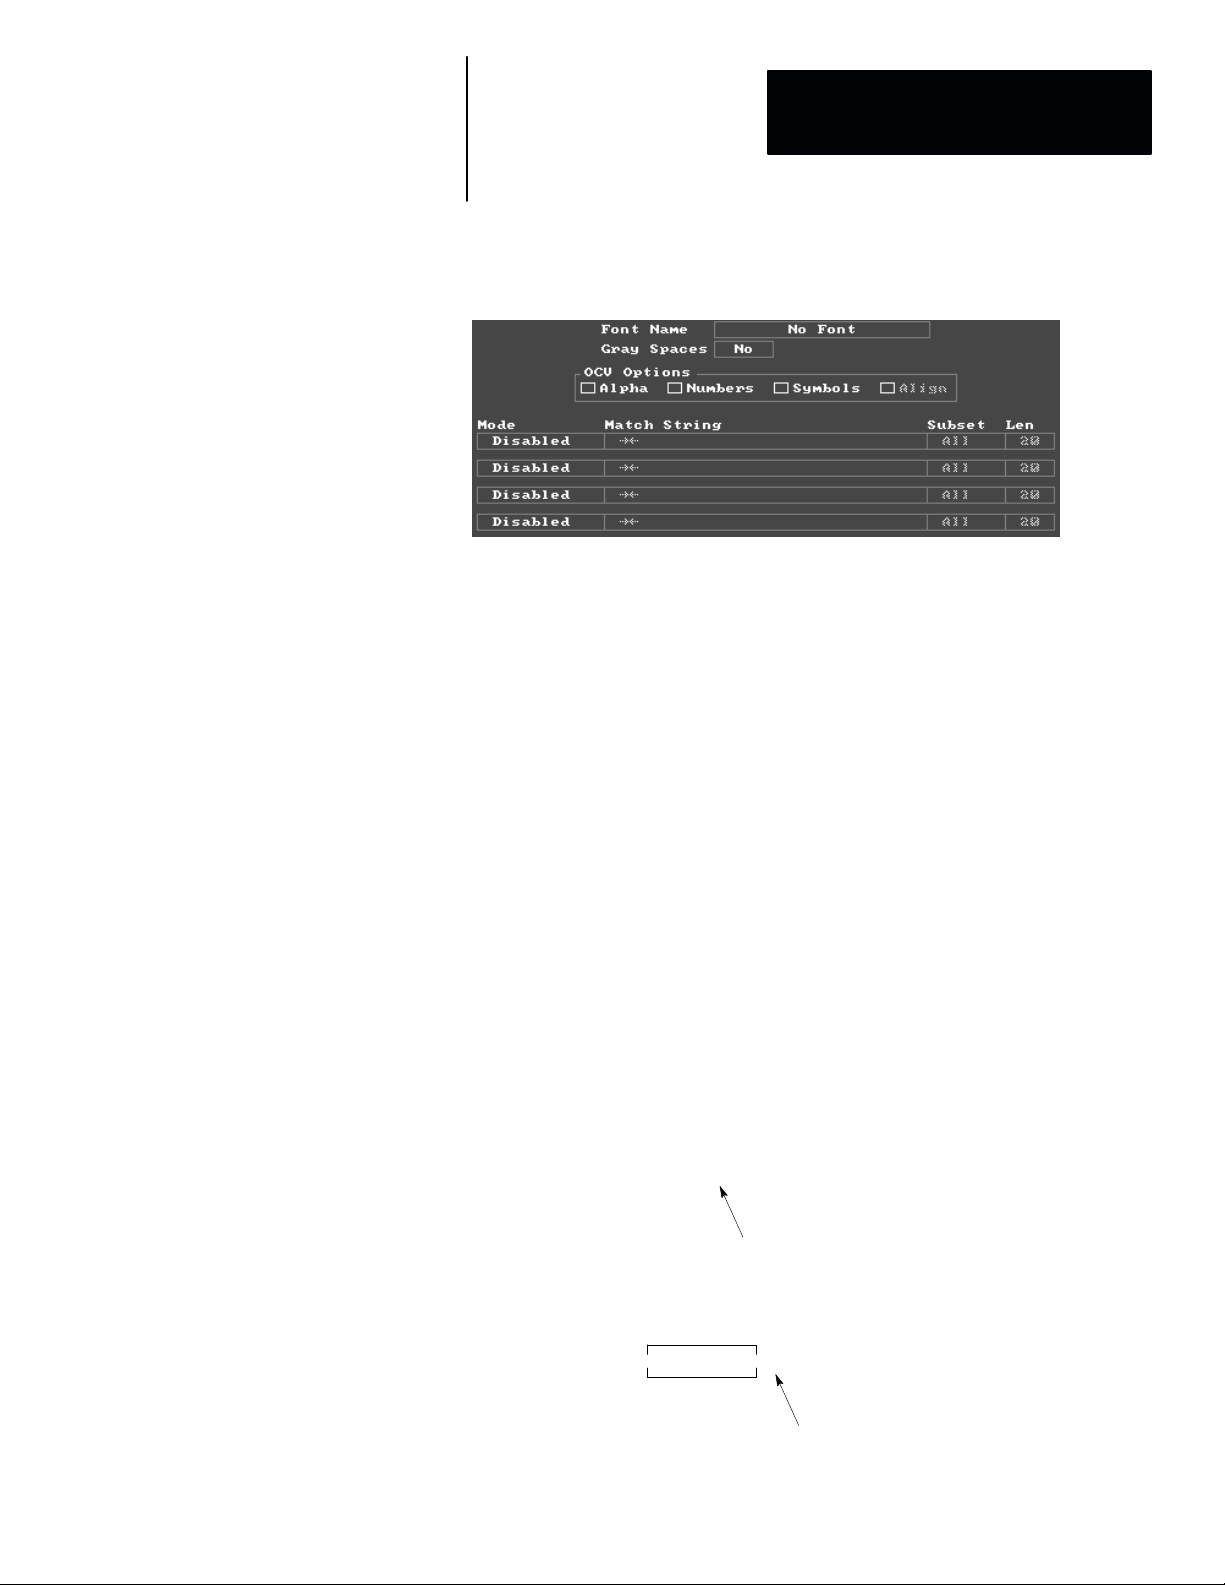
OCR Tool Edit Panel
OCR Tool Edit Panel Components
The following describe the components of an OCR Tool Edit panel.
Font Name
Indicates the currently active font. No Font appears in the box until a font is
taught and added. Clicking in the Font Name box displays the Font
Selection panel which allows you to select previously taught fonts or create a
new font.
Gray Spaces
A gray space is a space (leading, trailing , or between characters) that
contains a percentage of black pixels exceeding a preset limit. A white space
contains a lower percentage (usually 0%) of black pixels. The black pixel
limit is set using the Define Spacing function (see page 5–20).
If you select Yes for the Gray Space option, the OCR Tool will distinguish
between gray and white space. If you select No, all spaces are treated as
white space.
Below are examples of using the Gray Spaces option:
ABC - 123
Use gray space to detect a hyphen since
hyphens are very difficult to teach.
Match String
ABC 123 x
Use gray space to detect any marking
that trails the match string.
4–5
Page 25
Chapter 4
OCR T ool Configuration
OCV Options
The Alpha, Numeric and Symbols options allow you to check for characters
not contained in a match string, when using OCV mode. Otherwise the tool
will not search for characters which are not present in the match string, and
any other characters may be read as spaces.
Enabling these options will generally increase the inspection time of the tool.
With these options disabled, OCV is faster than OCR because it can verify a
string by processing only the characters contained in the match string instead
of processing all taught characters in the font. The Gray Space option is in
most cases a faster method of detecting extra characters not present in the
match string.
Clicking on a check box selects the item.
Alpha specifies alphabetical characters (A ! Z and a ! z)
✓
Numeric specifies numeric characters (0 ! 9)
✓
Symbols selects all characters other than alphabetical or numeric
✓
characters
Align
The Align option can be enabled only when the first string Mode is OCV.
When Align is selected, the tool ignores all strings before the first string is
matched. For example, you may want to match a string of characters that
will not always appear on the first line in your window. The Align option
allows you to ignore the characters on lines above the line that contains the
first match string:
ABCD
EFGH
IJKL
MNO
Inspection Window
ABCD is ignored.
Match strings are
aligned with first
match.
Note: Even with the Align option enabled, the number of lines of characters
in the OCR Tool window is still limited to 4.
Mode
Specifies one of four operating modes: OCR, OCR Strict, OCV, or OCV
Strict. A selection of Disabled indicates that the string is not inspected.
4–6
Refer to page 4–15 for a description of the operating modes.
Page 26

Chapter 4
OCR T ool Configuration
Match String
In OCV mode, the recognized characters are compared to Match Strings,
and the tool will fail if the strings do not match. If you select the match
string box with OCV mode selected, a keyboard will be displayed, allowing
you to enter a match string.
Metacharacters can be entered with the keyboard or by selecting the
metacharacter buttons at the top of the keyboard. The metacharacter buttons
include:
[A-Za-f] Any alpha
[0-9] Any number
? 0 or 1 occurrences of the preceding character
* 0 or more occurrences of the preceding character
+ 1 or more occurrences of the preceding character
| OR operation
Refer to Chapter 6 for a complete description of match strings and
metacharacters.
Subset
Subset allows you to inspect a portion of a string starting from the left or
right end. The following options are available:
• All
In this mode, all characters recognized (up to a maximum of 20) are
included in the read string.
• Left
When Left is selected and more than Len characters are recognized in a
single string, the read string will consist of the left-most Len characters
recognized.
• Right
When Right is selected and more than Len characters are recognized in a
single string, the read string will consist of the right-most Len characters
recognized.
Note: The maximum number of characters per line = 40. Any characters
over 40 per line are ignored.
Len
Applies to the Left and Right subset options. When a subset of a string is
selected you must enter the length of the subset.
4–7
Page 27

Chapter 4
OCR T ool Configuration
OCR Tool Edit Panel Buttons
The following are brief descriptions of the buttons on the OCR Tool Edit
panel. Each of these functions is described in detail in the applicable section.
P&P Window
Initiates the Pick and Place function, which can move and size the OCR
Tool’s processing window.
Thresh/Filter
Displays the Threshold / Filter panel used to adjust the high/low threshold
settings and the Morph 1 filter.
Char Size
Allows you to set the size of characters within the OCR window. The
character size must be set after the threshold/filter is set and before characters
are taught.
Edit Font
Displays the Edit Font panel that allows you to teach and test OCR
characters.
Test Match
Allows you to enter a string to be tested against the current match strings.
This is used to test the operation of match strings which contain
metacharacters. Refer to Chapter 6.
Done
Exits to the Edit Toolset panel.
4–8
Page 28
Chapter 4
OCR T ool Configuration
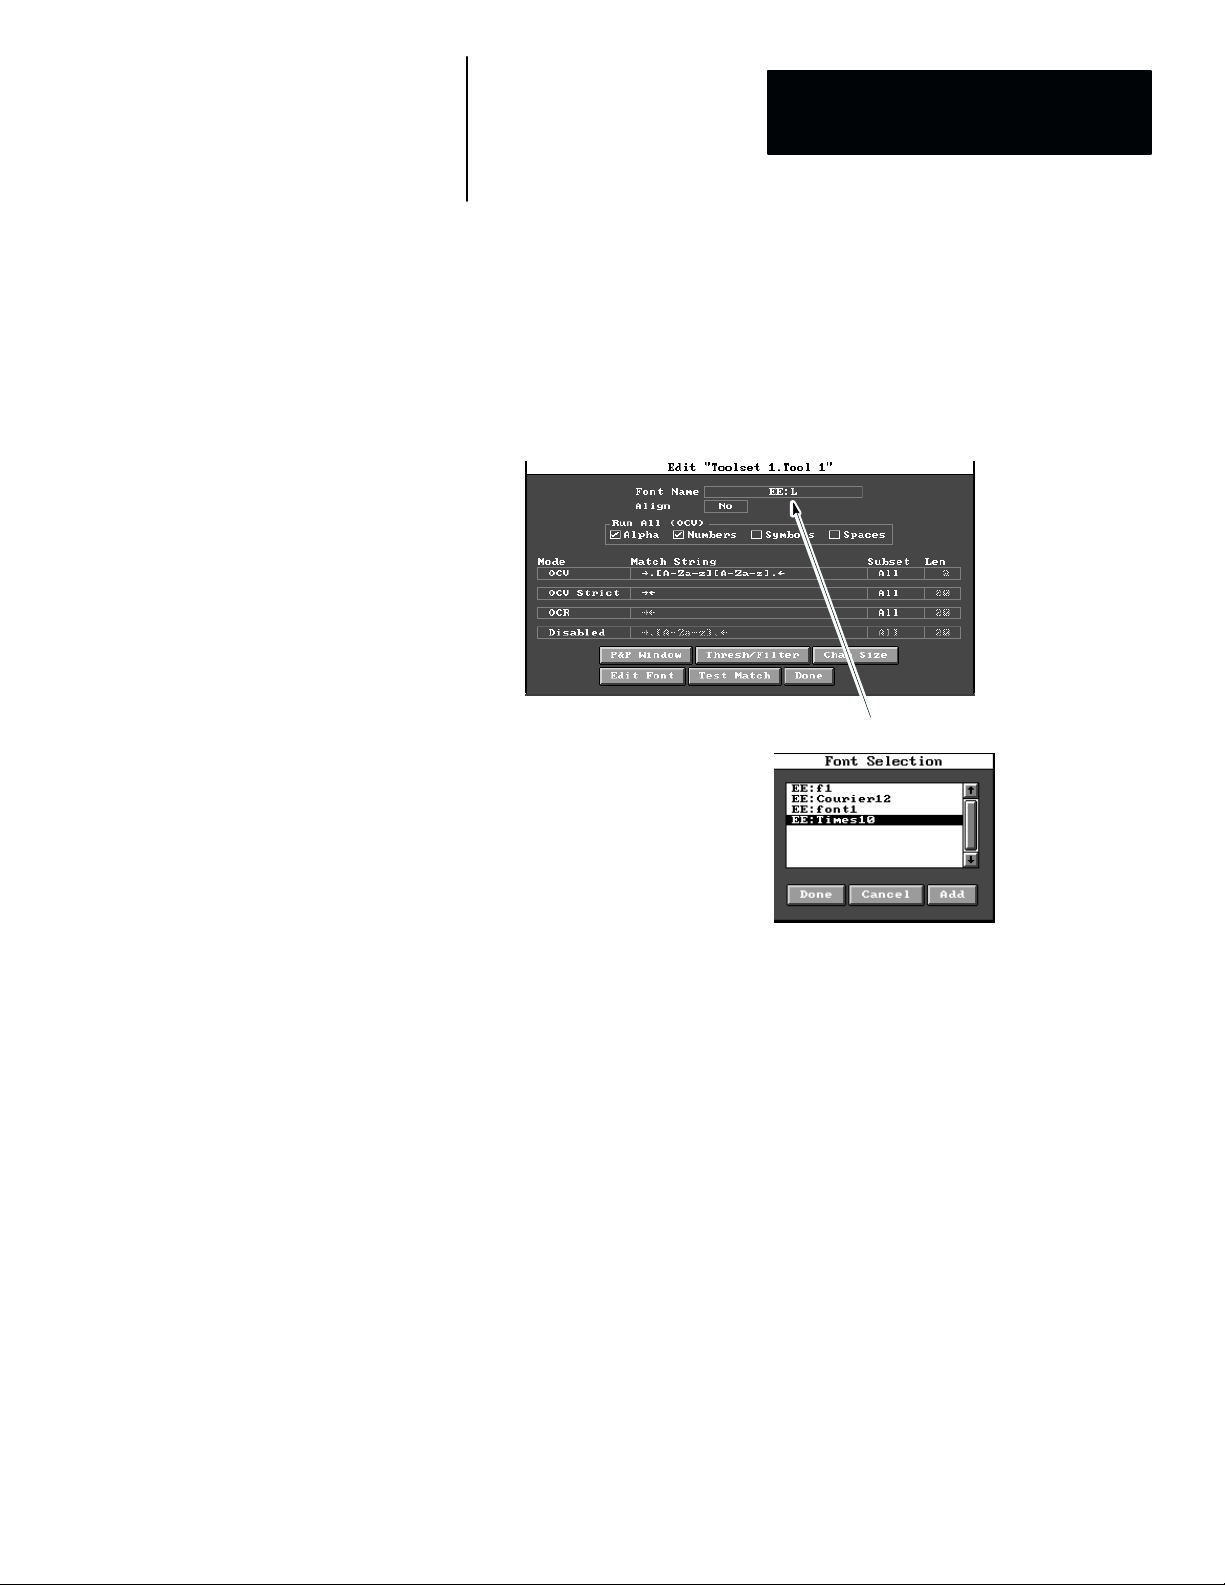
Enter a Font Name
A font is a collection of characters that have been taught and stored under a
font name.
To add a new font:
1. Click the in the Font Name box on the OCR Tool Edit panel
The Font Selection panel is displayed allowing you to add a font name.
OCR Tool Edit Panel
Click in Font Name box
Font Selection Panel
2. Click the Add button.
The keyboard is displayed allowing you to add a font name.
3. Enter a font name. A font name can be up to fifteen (15) characters, and
can consist of any alphanumeric character (A-Z, a-z, 0-9). Spaces are not
allowed. Also enter 3 character device type if not EE:. These 3
characters are in addition to the 15 for Font Name.
4. When completed select the Done button.
The entered name appears in the Font Name box. Any taught characters
will be saved under that Font Name. The font name appears as an option
in the Font Selection panel.
To add or edit characters in a font, refer to Chapter 5.
To delete a font:
Use the Filer function listed under the File menu. Refer to page 5–27
4–9
Page 29
Chapter 4
OCR T ool Configuration
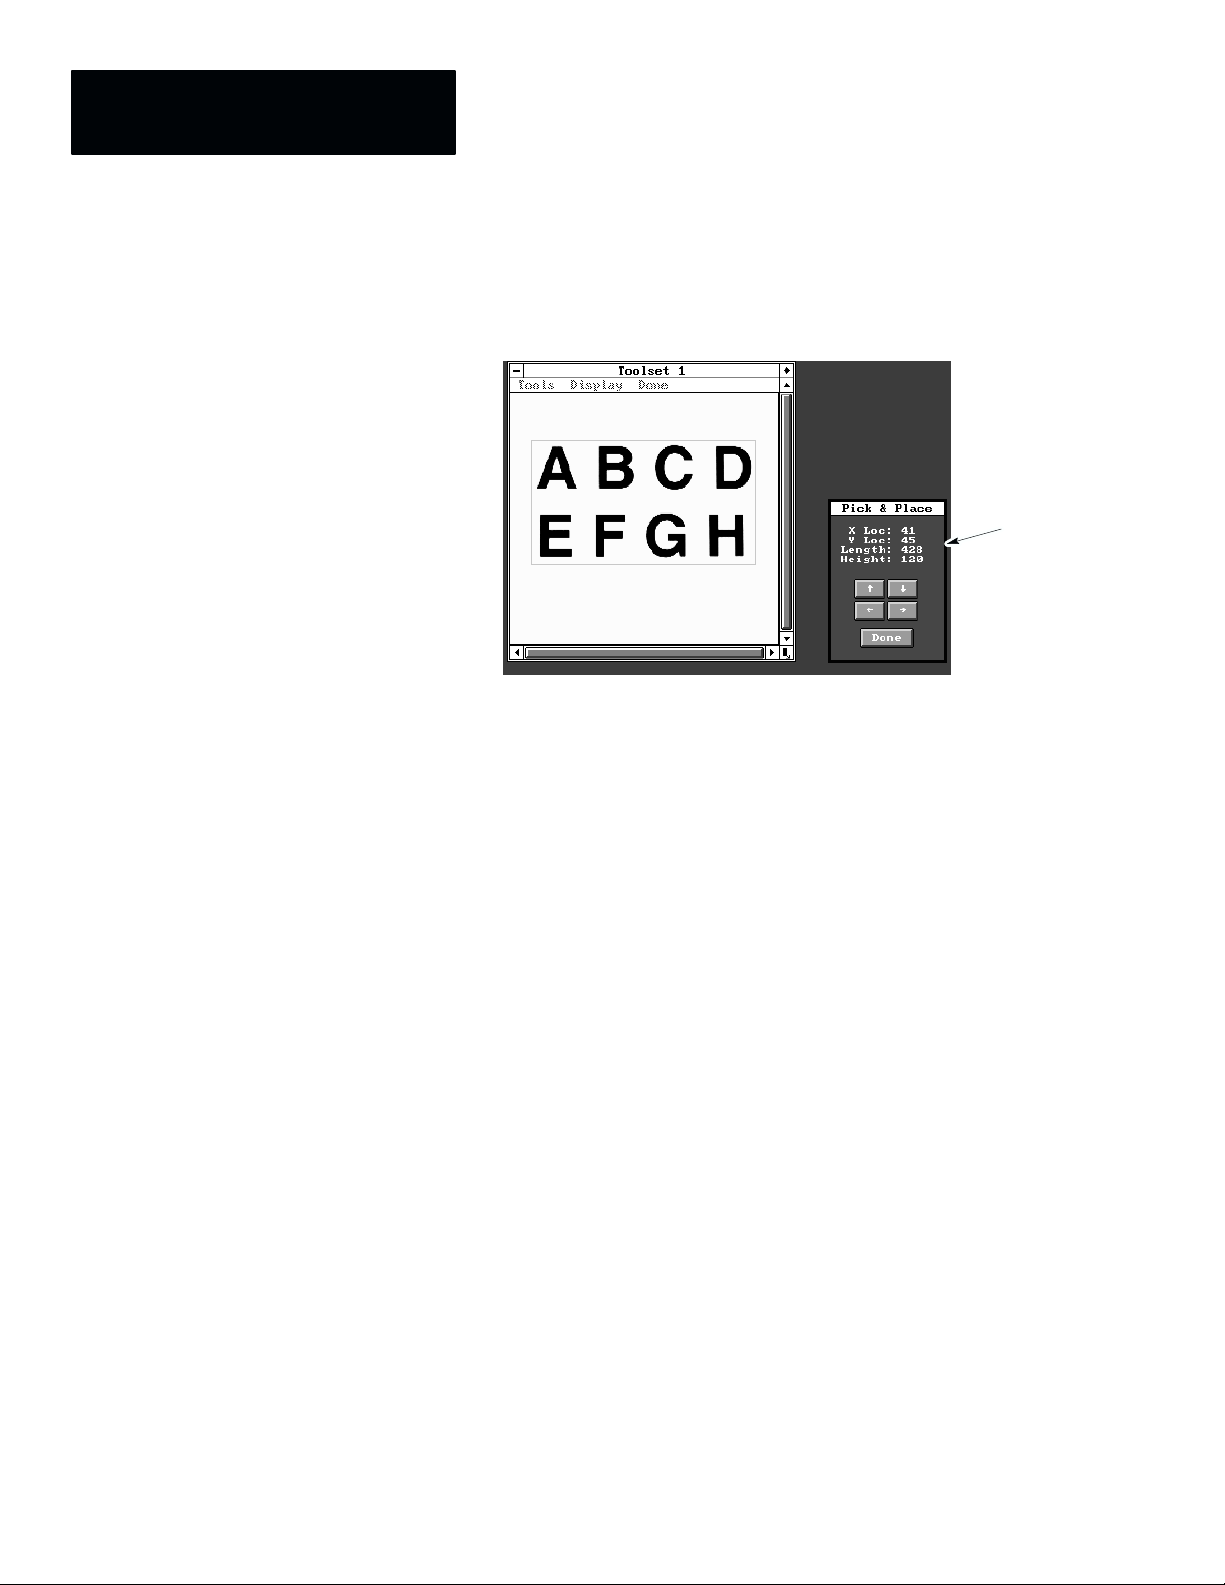
Position OCR Tool Window
This window defines the inspection area of a character string (strings). Move
and adjust the window by clicking the P & P Window button on the OCR
Edit panel and referring to the the following:
Pick & Place
Panel
To move the Pick & Place Window
Click and hold down the mouse button in the middle of the window.
Move the mouse while holding down the mouse button and drag the
window over the characters to be read.
To size the Pick & Place Window
Click the mouse button on the corner of the window and drag the mouse
until the window encloses all the characters to be read. You can also
size the window using the arrow keys on the Pick and Place panel.
Position the window around the strings to be read, allowing sufficient
extra room to accommodate the expected movement of the strings within
the field of view. You may want to provide space before and after the
strings for leading and trailing spaces. Refer to space descriptions on
page 2–6.
4–10
Page 30

Chapter 4
OCR T ool Configuration
Set Threshold / Filter
The Threshold / Filter function allows you to adjust the thresholds and
morphological filtering of the OCR Tool. Refer to the CVIM2 Reference
manual (Catalog No. 5370-801) for additional threshold information.
Image within Pick
& Place Window
Adjust Thresholds until
image sharpens.
If the characters to be read are dark printing on a light-colored background,
set the high threshold to its maximum value of 255, and adjust the low
threshold so that the characters are black and the background is white.
If the characters to be read are light printing on a dark-colored background,
set the low threshold to its minimum value of 0, and adjust the high threshold
so that the characters are displayed in black and the background is displayed
in white.
The Morph 1 button allows you to edit the Morph 1 filter settings, which can
sometimes be used to improve the quality of the image. In most applications,
the morphology filtering can be left in its default (Identity) state. Do not use
the Invert morphology operation, this interferes with the tool operation.
Refer to the CVIM2 Reference manual (Catalog No. 5370-801) for
information on setting morphology filters and on the Configuration Editor
display settings.
Note: The appearance of the thresholded image which is displayed can be
affected by the setting of the Character Size, and whether the Scale of the
image display panel has been set to 1 or To Fit in the Configuration Editor.
HINTS:
• Set the threshold before setting the OCR Tool’s Character Size.
• Try to obtain the best contrast between the characters and the background
without distorting the characters.
• Adjust the threshold so that you have a consistent ”stroke width” of
characters between the teaching and running OCR.
• A Light Probe can be used to reduce variation in image brightness. Refer
to the Camera section of the CVIM2 Reference Manual for more
information.
4–11
Page 31
Chapter 4
OCR T ool Configuration
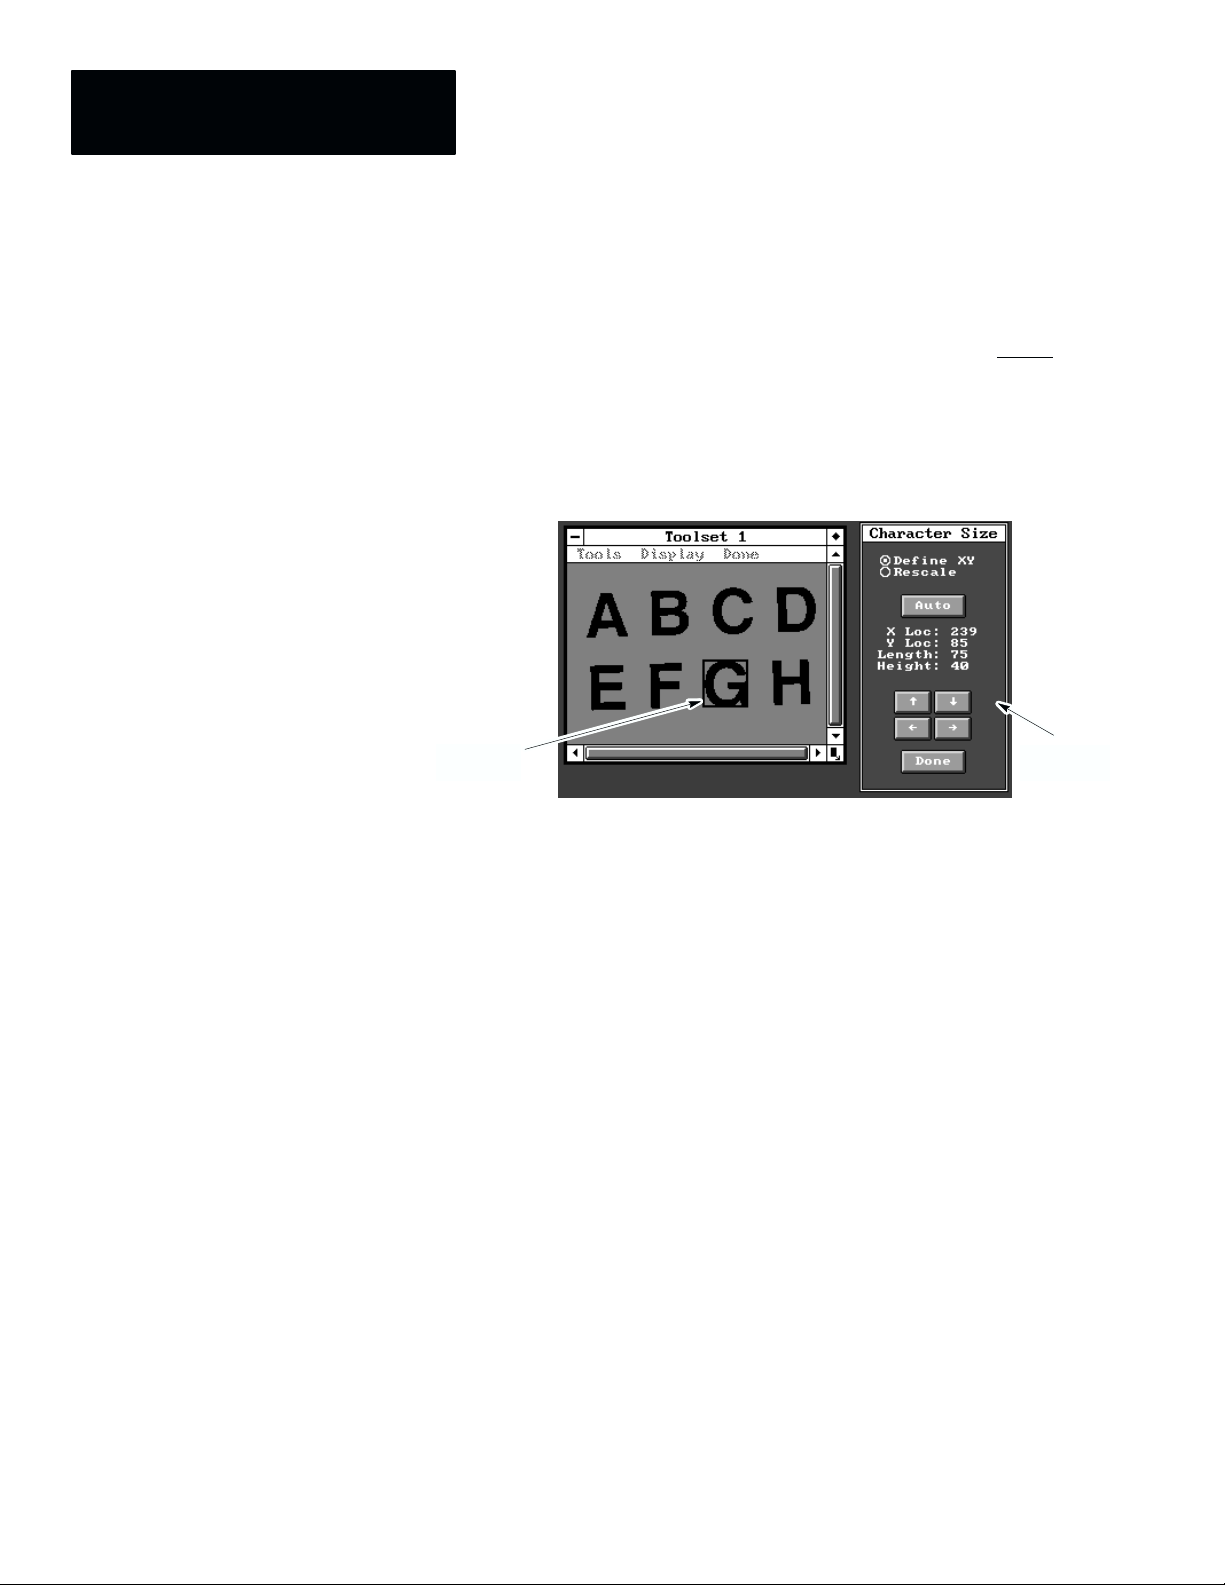
Set Character Size
The character size of an OCR Tool is used to determine the scale factor
used during the processing of the OCR Tool. The inspected image will be
scaled so that the characters become 32x32 pixels in size for image
processing purposes. You must correctly set the Character Size before
editing a new font.
Before setting the Character Size, adjust the Threshold so that the characters
appear black and the background appears white. Use the Character Size
panel to define the scale of the OCR Tool.
Character
Size Box
Character
Size Panel
When you select the Auto button, a Character Size box is automatically
placed around the character having the largest width. The Auto function
works only on black characters on a white background. The height of the
box will be the median height of the characters inside the window.
Note: The Auto function only processes the first 32 characters in the OCR
Tool window to determine the maximum width and median height.
4–12
Page 32

Chapter 4
OCR T ool Configuration
Rescale options affect both manual and automatic sizing:
Rescale
Select Rescale when Character Size is first set for a new font or when
adjustments are made such as a line changeover, where the character
size changes. If the Rescale option is shaded, you must add or select a
font in the OCR Tool Edit Panel first.
Rescale for a New Font
When Rescale is selected, both the X and Y scale factors are set and the
aspect ratio of X to Y (width to height) is stored with the font. The
largest character of the font should be present in the inspection window.
Rescale for an Existing Font
When Rescale is selected, the Character Size is set based upon the
height measurement only. The aspect ratio of X to Y (width to height)
remains unchanged for the font. The widest character does not have to
be in the OCR inspection window. This enables you to teach a font
off-line and then reconfigure the tool’s Character Size to match that of
the inspected characters.
Define XY
Select Define XY when the camera aspect ratio (horizontal / vertical
resolution) is changed for an existing font. When Define XY is
selected, both the X and Y scale factors are set. The largest character in
the font should be present in the OCR inspection window. Select
Rescale after setting the Character Size with the Define XY option.
This will store the aspect ratio with the font and set Rescale as the
default Character Size option.
4–13
Page 33

Chapter 4
OCR T ool Configuration
To set the character size:
1. Make sure that the largest character in the font is displayed within the
pick and place window.
2. Choose either Rescale or Define XY (see previous page)
3. Click the Auto button.
Note: Auto Character Size works with character sizes in the range of
11 to 127 pixels. If the message “No Suitable Characters Found For Auto
Char Size” is displayed, make sure that the characters in the source image
are within the height range of 11 to 127 pixels.
If the Character Size box is placed around the widest character, select
Done.
If the Character Size box is not satisfactory (it could happen when
characters are touching each other or too many characters are inside the
OCR window), you can manually adjust the Character Size box around
the widest character in the font. Drag the character size box or use the
arrow keys on the Character Size panel to move the box manually.
Important: Manually adjusting the Character Size box is not
recommended. If possible, always use the Auto button.
In some cases, it may be necessary to adjust the character size manually.
One example is when using dot-matrix characters, where the characters are
composed of many separate dots which do not touch. In this case, you must
manually place the character size box around the largest character.
Auto Character Size will not
work on this character.
HINTS:
• You should note that in some fonts there are differences in the heights of
letters and numbers. In addition, some lowercase letters may be taller
than some uppercase letters. Use the largest character from the tallest
class of characters to set the character height. Set the width using the
widest character (usually M or W).
• Let the system select the Character Size automatically when first
teaching the font for optimum results.
• The Character Size box should be tightly bound around the character
that has the largest width of the characters in a font for optimum results.
• The Threshold must be properly adjusted before using Character Size.
4–14
Page 34

Chapter 4
OCR T ool Configuration
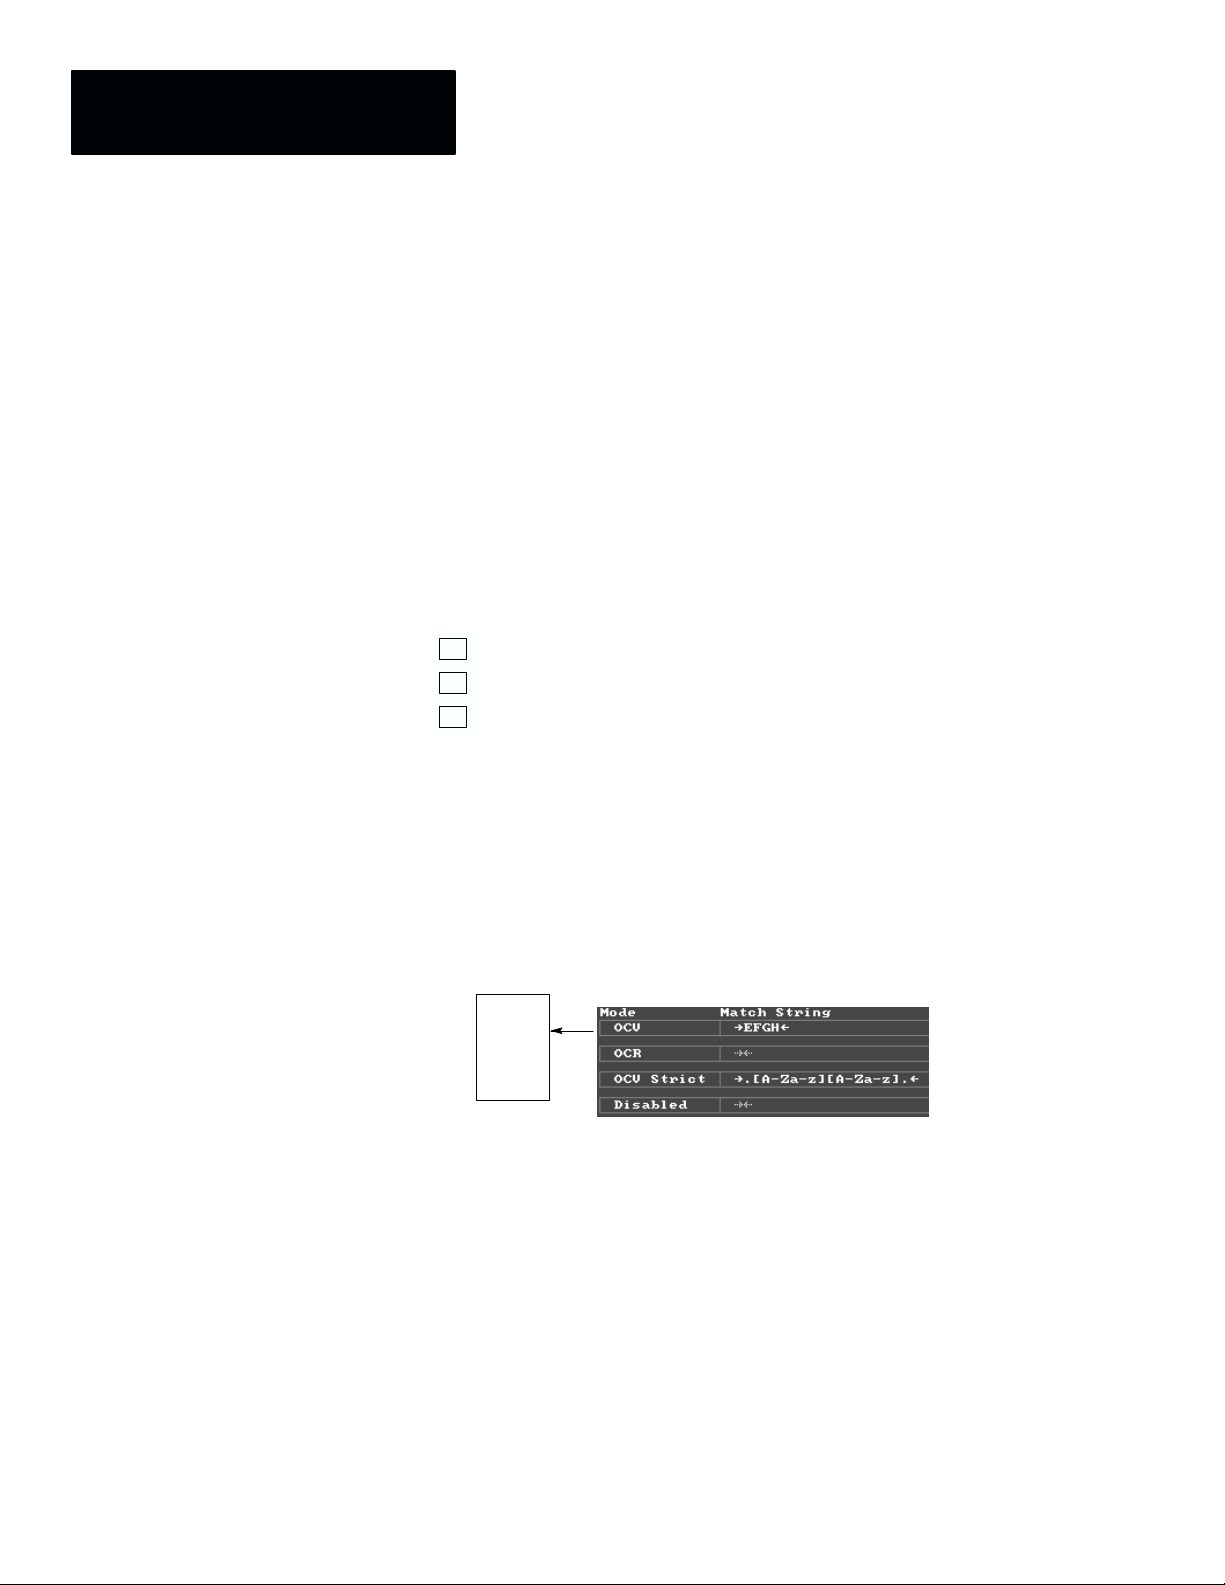
Select Operating Mode
Each string of the OCR Tool operates in one of four modes. Use the
following to determine the operating mode you require:
• Disabled indicates that the string is not used.
• OCR Strict is used to read text. The text is not tested against a match
string. When a printed character correlates with two or more taught
characters, a confusion character ”?” is inserted into the result string.
In OCR Strict mode, the string will pass if one or more characters are
recognized and will fail if no characters are recognized.
• OCR is used to read text. The text is not tested against a match string.
When a printed character correlates with two or more taught characters,
the character with the largest correlation area is inserted into the result
string. If a printed character correlates with more than 4 taught
characters, a confusion character ”?” is inserted into the result string.
In OCR mode, the string will pass if one or more characters are
recognized and will fail if no characters are recognized.
Taught Patterns
Correlation Areas
Inspected Character
Character is read as an 8
in OCR mode due to the
larger correlation area.
• OCV Strict compares an entered match string against inspected strings.
When a printed character correlates with two or more taught characters, a
confusion character ”?” is inserted into the result string. The presence of
a confusion character may not prevent a match, depending upon the use of
metacharacters. Refer to page 6–3 for metacharacter descriptions. In
OCV Strict mode, the inspected string will pass if it matches the user
defined match string and will fail otherwise.
4–15
Page 35

Chapter 4
OCR T ool Configuration
• OCV compares the entered match string against inspected strings. When
a printed character correlates with two or more (but not more than 4)
taught characters, the corresponding character from the match string will
be inserted into the result string. In OCV mode, the inspected string will
pass if it matches the user defined match string and will fail otherwise.
If a printed character correlates with more than 4 taught characters, a
confusion character ”?” is inserted into the result string. The presence of
a confusion character may not prevent a match, depending upon the use of
metacharacters. Refer to page 6–3 for metacharacter descriptions.
6 7 8 9
6 7 B/8 9
Confusion between B and 8
OCV mode will choose 8 since it was
in match string.
Match String
Inspection String
OCV mode will insert ? since neither B
or 3 were in match string at that position.
6 7 8 9 Match String
6 7 B/3 9
Confusion between B and 3
Inspection String
To change the operating mode:
1. Click the cursor in the Mode box for the tool being edited. This brings up
the Mode panel that allows you to choose the operating mode.
Click in Mode box
to display Mode panel.
4–16
Mode Panel
2. Select the appropriate mode.
3. Click the Done button.
Page 36

Chapter
Chapter Objectives
A–B
5
Creating and Editing Fonts
This chapter describes how to:
• Create and edit fonts
• Teach characters
• Test fonts
Important: Before teaching new characters, you should have set the
following as described in Chapter 4.
• Entered a Font Name
• OCR Tool Window
• Threshold/Filter
• Character Size
OCR Fonts
Each OCR Tool uses one OCR Font, which is a file of character patterns
used to perform OCR or OCV. Different OCR Tools can contain different
fonts, or they can share a single font if they are to inspect the same type
of text.
A font can contain any or all of the characters available on the pop-up
keyboard, except the space character, underscores and the question mark.
The size of the font file, and the amount of on-line memory used when the
font is loaded, depends on the number of characters trained. When the
CVIM2 system goes on-line, only those fonts currently used by OCR Tools
are loaded into memory.
Font files can be stored on any of the CVIM2 storage devices. Normally, a
font should be stored on the EE: device when it is first created. Once the
font is fully trained, it can be moved to another storage device such as V2:
which has a larger capacity. If a font file is moved to a different device, the
Font Name must be changed in all OCR Tools that use the font, to reflect the
new device name.
5–1
Page 37

Chapter 5
Creating and Editing Fonts
Introduction to Teaching Characters
Each character in a font is a 32x32 pattern of pixels, each of which can have
one of three states:
• Black - The corresponding part of the printed character is expected to be
black.
• White - The corresponding part of the printed character is expected to be
white.
• Don’t care - The corresponding part of the printed character can be either
black or white.
The Font Editor allows you to add character patterns to a font. After
obtaining an image of the characters to be taught, a character pattern is taught
by placing a box around the character, and using an automatic Teach
function. The character pattern can then be further refined by manually
adding or removing pixels, to maximize the distinction between different
characters that are similar in appearance.
5–2
Page 38

Chapter 5
Creating and Editing Fonts
OCR Panels
Edit Font Panel
Access the Edit Font panel by selecting the Edit Font button on the OCR
Tool Edit panel.
Current correlation
percentages for
Character List
Previously taught characters.
The scrolling list at the top of the panel shows the characters that are
currently in the font. Click on an existing character in the list to select it as
the current character. If this is a new font, the scrolling list will not contain
any characters.
each character. Default is 95%
The following are descriptions of the buttons on the Edit Font panel.
Add
Adds a new character to the font. Clicking this button displays a keyboard
for entering the character being taught.
Edit
Displays the Define Character panel for teaching, testing, and editing the
currently selected character.
Delete
Deletes the currently selected character.
5–3
Page 39

Chapter 5
Creating and Editing Fonts
Test
Test the currently selected character against printed characters within the
OCR Tool window. The location and correlation percentage of each
character that correlates is displayed.
Corr
Displays the Correlation panel, used to adjust the percentage of correlation
required between a printed character and a taught pattern in order for the
character to be recognized.
Filter
Displays the Morph 2 filter. This filter is applied after the Morph 1 filter
defined by the OCR Tool, and can sometimes be used to further refine the
image of a particular character. In most applications this filter should be left
at its default (Identity) setting.
Refer to the CVIM2 Reference Manual (Catalog No. 5370-801) for
information on setting morphology filters.
Test All
Tests all taught characters (within the current font) against printed characters
within the OCR Tool window. The location and correlation percentage of
each character that correlates is displayed.
Spacing
Displays the Define Spacing panel used to define the spacing between
characters.
Cancel
Exits to the the OCR Tool Edit panel without saving any changes.
Done
Saves changes to the font file and exits to the OCR Tool Edit panel.
If the memory device has insufficient space to save the font file or if some
other type of problem prevents the font file from being saved, a warning will
be displayed:
First press the OK button in the warning panel. The Save As panel will be
displayed:
5–4
At this point you have the following options:
• Select a different file and press Done to save.
• Press Other to enter a new device and file name. You may need to select
a device that has more available memory.
• Press Cancel to return to editing the font and possibly delete characters to
reduce the size of the file.
Page 40

Chapter 5
Creating and Editing Fonts
Define Character Panel
Access the Define Character panel by selecting the Edit button on the Edit
Font panel:
Pixel Color
Pixel Counts and
Current Thinning
Character Box
Positioning Buttons
Character Box
Green and Yellow
Pixel Thinning Buttons
When the Define Character panel is selected, the Character Box is displayed
in red, over the image display. Position this box over the printed character
that is to be used in teaching the current character pattern. The box size can
be reduced to exclude characters or noise around the character being taught.
Placing pixels within the character pattern
The Define Character panel shows an enlarged view of the portion of the
image contained within the Character Box. Pixels in the character pattern
are shown in yellow and green, where yellow indicates a pixel that is
expected to be white, and green indicates a pixel that is expected to be black.
The Teach function automatically places green and/or yellow pixels within
the character pattern. You can manually place or remove pixels by clicking
the mouse within the displayed character pattern, at the location where the
pixel is desired. The Pixel Color options (see below) determine what color
pixel will be placed.
5–5
Page 41

Chapter 5
Creating and Editing Fonts
The following are descriptions of the buttons on the Define Character panel.
Teach
Teaches the character pattern based on the image of the printed character
within the character box. Green and/or yellow pixels will be placed in the
character pattern, based on the setting of the Pixel Colors (see below).
The green and yellow pixels are placed by ”thinning” the image of the
printed character within the character box. The G+, G-, Y+ and Y- options
(see below) allow you to adjust the degree to which the image is thinned.
Thinning increases the tolerance of the system to variations around the edges
of the printed characters. See page 5–12 for a detailed description of the
thinning process.
Test
Tests the taught character pattern against the printed character(s) within the
OCR Tool window. The location and correlation percentage of each
character that correlates is displayed.
Characters that correlate at or above the set correlation percentage are shown
in green. These would be recognized by the OCR Tool.
Characters that correlate at or above 97.5% of the set correlation percentage
are shown in yellow. These would not be recognized by the OCR Tool,
however they are ”borderline” and minor changes to the image might cause
them to be recognized.
Characters that correlate at or above 95% of the set correlation percentage
are shown in red. These are also ”borderline” characters, but do not match as
closely as those shown in yellow.
Red Correlation
Score of 92%
Green Correlation
Score of 100%
Threshold for E set at 96%
Yellow Correlation
Score of 94%
5–6
Page 42

Chapter 5
Creating and Editing Fonts
Pixel Color
Pixel color affects the auto teach function, and also manual placement of
pixels within the character pattern.
AUTO MANUAL
Green Yellow
✓
Only places green pixels
in character.
Place green anywhere.
Green Yellow
Green Yellow
✓
Green Yellow
✓
✓
Places only yellow pixels
around character.
Places both green and
yellow pixels.
Clears all pixels in auto
teach mode.
Place yellow anywhere.
Place green in black.
Place yellow in white.
Erase individual pixels.
G -
Reduces the number of green pixels by increasing the G Thin value and
re-teaching the character. The G Thin value can be increased up to 5.
Y -
Reduces the number of yellow pixels by increasing the Y Thin value and
re-teaching the character. The Y Thin value can be increased up to 5.
G +
Increases the number of green pixels by decreasing the G Thin value and
re-teaching the character. The G Thin value can be decreased down to 1.
Y +
Increases the number of yellow pixels by decreasing the Y Thin value and
re-teaching the character. The Y Thin value can be decreased down to 1.
Arrow Keys
Use the arrow keys to make fine adjustments to the placement of the
character box.
Done
Exits to the Edit Font panel.
5–7
Page 43

Chapter 5
Creating and Editing Fonts
Adding Characters to Fonts
This section describes how to teach new characters in a font.
To Teach Characters:
1. Enter a font name, position the OCR Tool window, set the threshold, set
the character size, and set the OCR mode. See Chapter 4.
2. Choose the Edit Font button from the OCR Tool Edit panel.
The Edit Font panel appears allowing you to add a character to the
current font.
3. Choose the Add button from the Edit Font panel.
The Keyboard panel is displayed allowing you to enter the character to be
taught.
4. Enter the character and click the Enter button.
The new character is added to the character list is highlighted.
5–8
Page 44

Chapter 5
Creating and Editing Fonts
5. Teach the new character by clicking the Edit button on the Edit Font
panel.
The Define Character panel is displayed:
Character
Size Box
Character to
be Added
6. Make sure the Character box is placed over the character. Drag the box
using the mouse and use the arrow keys if fine adjustment is required.
7. Click the Teach button. The character pattern will be taught and
displayed in yellow and green.
Green Pixels
Yellow Pixels
8. At this point you may want to click the Y+, Y-, G+ and G- buttons to thin
characters. Refer to page 5–12 for a description of thinning.
5–9
Page 45

Chapter 5
Creating and Editing Fonts
9. You can modify the taught pattern by changing or adding green and
yellow pixels. Refer to Manually Editing Taught Characters on
page 5–14.
10. Select the Test button.
The correlation between the taught image and the characters within the
OCR Tool window are displayed. Refer to page 5–6 for a description of
correlation scores.
Character Identified
Correlation Bounding Box
Correlation Percentage
11. If the taught pattern correlates with printed characters other than the one
being taught, modify the character pattern and/or the character’s
correlation score. Refer to page 5–25 for a description of how to
eliminate these “confusion” characters.
12. Click the Done button to exit the Define Character panel.
13. Teach other characters by repeating steps 3-12.
5–10
Page 46

Chapter 5
Creating and Editing Fonts
Setting the Filter
This feature allows image enhancement to be applied to specific characters in
the font. A separate set of filter parameters is stored with each character in
the font. In most applications, the filtering should be left at its default
(Identity) setting.
To define a filter:
1. Select the character whose filtering parameters you wish to modify.
2. Click the Filter button on the Edit Font panel.
This displays the Filter panel.
3. Select Morph 2 to modify the filtering parameters for the character. Refer
to the CVIM2 Reference manual (Catalog No. 5370-801) for information
on setting morphology filters.
HINTS:
• Sometimes lighting conditions or part conditions cause some characters to
be wider or narrower than the others. The Filter can widen or narrow the
character so that it matches the norm of the other characters.
5–11
Page 47

Chapter 5
Creating and Editing Fonts
Thinning
Thinning is an erosion and reduction process that erases green and yellow
pixels from the edges of the taught character. Thinning is used only for font
teaching and editing.
When the Teach function is used, the green and yellow portions of the
character pattern are copied from the black and white portions of the printed
character image. They are then thinned down based on the G Thin and Y
Thin settings. These settings range from 1 (minimum thinning) to 5
(maximum thinning).
Thinning Buttons
Indicates level of thinning
and number of pixels each
color.
The images below show the effects of modifying the thinning parameters.
Original Taught Image
2 Levels Green Thin
No Yellow Thin
4 Levels Yellow Thin
No Green Thin
The currently selected thinning settings are stored in the font file, so they will
remain in effect whenever the Teach function is subsequently used for any
character in the font.
5–12
Page 48

Chapter 5
Creating and Editing Fonts
In the center of the Define Character panel, the following information is
displayed:
G Pixels
The number that appears after G Pixels is the number of green pixels in the
character pattern.
Y Pixels
The number that appears after Y Pixels is the number of yellow pixels in the
character pattern.
G Thin
Shows the current green thin setting. G+ reduces this by 1 and G- increases
this value by 1. The range of G Thin is 1-5.
Y Thin
Shows the current yellow thin setting. Y+ reduces this by 1 and Y- increases
this value by 1. The range of Y Thin is 1-5.
HINTS:
• The quality of the overall characters on the part may change over time.
If this is the case, the thinning can be changed and the characters
re-taught so that the system will be able to read characters at the
beginning of a run, as well as characters at the end of a run.
• Using a small number of pixels to represent a character will cause the
recognition to be very sensitive since each pixel is a larger % of the total.
• Using a large number of pixels to represent a character will cause the
recognition to be less sensitive to print quality changes.
5–13
Page 49

Chapter 5
Creating and Editing Fonts
Editing Taught Patterns Manually
You can modify a taught character by changing the green and yellow pixel
pattern manually.
To change taught pixel patterns:
1. Click the Edit button on the Edit Font panel.
The Define Character panel is displayed:
Green/Yellow
Check boxes
Current level
of thinning
2. Change individual pixel colors:
To add only green pixels, choose the Green check box and uncheck the
Yellow check box. Add green pixels by clicking the mouse button on the
character pattern.
To add only yellow pixels, choose the Yellow check box and uncheck the
Green check box. Add yellow pixels by clicking the mouse button on the
character pattern.
To delete green and yellow pixels, uncheck both the Green and
Yellow check boxes. Delete pixels by clicking on them with the mouse.
To add both green and yellow pixels, check both the Green and Yellow
check boxes. As you click the mouse, green or yellow pixels will be
entered depending on whether the mouse is on the character image (black
pixels) or on the character background (white pixels)
3. Click the Done button to exit to the Edit Font panel.
5–14
Page 50

Chapter 5
Creating and Editing Fonts
Testing Fonts
After you have taught individual characters in a font, you can test the font
against individual or groups of characters.
To Test a Font:
1. Return to the OCR Tool Edit panel and position the OCR Tool window
over the characters to be inspected.
Position window
over characters.
2. Click the Edit Font button on the OCR Tool Edit panel.
The Edit Font panel is displayed.
5–15
Page 51

Chapter 5
Creating and Editing Fonts
3. Click the Test All button on the Edit Font panel to test all taught
characters.
Or highlight the character to be tested and click the Test button on the
Edit Font panel.
The window shows the inspected characters and the characters that have
been identified. Each character that has been identified shows:
• Identified Character
• Correlation Bounding Box
• Correlation Percentage
Correlation Bounding Box
Correlation Percentage
Identified Character
4. If characters are identified incorrectly or not recognized, refer to Font
Optimization (page 5–16).
5–16
Page 52

Chapter 5
Creating and Editing Fonts
Setting Correlation Threshold
The Correlation is the percentage of the pixels required in the inspected
character to match the pixels in the taught character. If the percentage of the
inspected pixels is greater than or equal to the specified correlation
percentage, the inspected character is recognized. The higher the correlation
percentage, the closer the inspected character must match the taught
character to pass.
Clicking the Corr button on the Edit Font panel displays the Correlation
panel:
Drag arrow to change
percentage
To change the correlation percentage:
Drag the arrow up or down. Each time the correlation percentage is changed,
the Test function (See page 5–15) is performed and the characters that
correlate are displayed.
5–17
Page 53

Chapter 5
Creating and Editing Fonts
Defining Spacing
The Spacing settings determine how spaces between characters are handled.
The Character Spacing must be set to the average distance between the left
edges of two consecutive characters, and to the distance between lines of
characters. The Space Dimensions are used to detect spaces between
characters.
In general, the system measures distances ”between” characters as the
distance between their correlation boxes, which are near the center of the
characters.
Character Spacing
Character Spacing consists of 2 dimensions:
• Horizontal Character Spacing should be set to the horizontal distance
from the center of one character to the next.
The horizontal character spacing is used to handle spaces in the string of
read characters, as follows:
1. When the system detects two adjacent characters and the distance
between them is less than 1/2 the horizontal character spacing, the system
treats them as two confusion characters in the same location.
2. When the system detects two adjacent characters and the distance
between them is greater than 1/2 the horizontal character spacing but less
than the horizontal character spacing plus 1/2 the horizontal space
dimension, the system treats them as two consecutive characters with no
space character in between.
3. When the system detects two adjacent characters and the distance is
greater than the horizontal character spacing plus 1/2 the horizontal space
dimension, the system treats them as two characters with a space
character in between. Only a single space is inserted into the string of
read characters, no matter how far apart the characters are.
5–18
Page 54

Chapter 5
Creating and Editing Fonts
• Vertical Character Spacing should be set to the vertical distance from the
center of one line of characters to the center of the next line.
Characters below this line will
be considered part of the next string.
The vertical character spacing is used to separate the characters into
multiple lines, as follows:
1. When the system detects two characters and the vertical distance
between them is less than 1/2 the vertical character spacing, the system
treats them as belonging to the same string of characters.
2. When the system detects two characters and the vertical distance
between them is greater than 1/2 the vertical character spacing, the system
treats them as belonging to different strings of characters.
Gray Spaces
When Gray Spaces are enabled, the Space Dimensions are used as follows:
When the system detects a space between characters, it measures the
percentage of white pixels within a box located in the region of the space. If
this percentage is more than the Gray Space percentage, the system treats it
as a true ”white” space. Otherwise, it treats it as an unrecognized character,
or ”gray” space. In this case the gray space character “_” will be inserted
into the string of read characters.
5–19
Page 55

Chapter 5
Creating and Editing Fonts
To define spacing:
1. Click the Spacing button on the Edit Font panel.
This displays the Define Spacing panel.
Defines open spaces.
Defines normal spacing
between characters.
A B C D
2. Click the Space Dimensions button. This displays the Pick and Place
panel.
3. Pick and place the Space Dimensions box over an open space between
characters. The length and height must be between 8 and 64 pixels. The
default size is 20 x 20.
Move space size box
over large space between
characters.
5–20
4. After the space box is properly positioned, click the Done button.
Page 56

Chapter 5
Creating and Editing Fonts
5. Adjust the percentage of white required in a white space using the slider.
You can also change the percentage by clicking the % field and entering a
new value using the calculator.
If the Space Dimension box has a %
white pixels greater than the % white setting, this
value will display xx% White Space.
If the Space Dimension box has a %
white pixels less than the % white setting, this
value will display xx% Gray Space.
Slider
6. Click the Character Spacing button to set the horizontal and vertical
space between characters.
This displays the Pick and Place panel.
7. Move and size the character spacing box so that it is positioned as shown
below. The length and height must be between 8 and 64 pixels.
The default size is 28 x 28. If the lines of printed characters are more
than 64 pixels apart, set the height of the Character Spacing box to 64.
Move and adjust size
of character spacing box:
8. Click the Done button to exit define spacing function.
9. Return to the OCR Tool Edit Panel to see if the spaces are recognized
properly.
5–21
Page 57

Chapter 5
Creating and Editing Fonts
Font Optimization
The most important aspect of creating inspection fonts is font optimization,
where the patterns and settings of individual characters are adjusted for best
performance. The success of an OCR application depends on correctly
setting up the font to recognize characters despite image variations and print
degradation, and to eliminate confusion between different characters that are
similar in appearance. The following guidelines are intended to assist you in
setting up an OCR application.
Reducing Image Variations
Variations in the acquired image make it more difficult to accurately
recognize characters. The following types of image variation occur:
• Lighting variations
Variations in the lighting across the field of view should be minimized
through careful lighting design. Variations in brightness from one image
to the next, due to light source intensity variation, can be reduced by
using the light probe. Refer to the CVIM2 Reference Manual for a
description of light probe operation.
Important: Variations in brightness can also compensated for by using
the CVIM2 Image Tool to preprocess the image for the OCR Tool. Refer
to Appendix B for more information.
• Blurring due to motion
Blurring can cause the characters to become elongated in one direction.
This can be a problem particularly if the degree of blurring varies.
Blurring should be reduced or eliminated by using strobe lighting or
electronic shutter cameras.
5–22
Handling Print Degradation
Different printing processes introduce different forms of degradation or
variation into the printed characters. Some common printing problems are:
• Broken characters
When part of a character is missing, this reduces its degree of correlation
with the taught character pattern. Usually, characters that are partially
printed should be rejected. However, the system can be configured to
accept some degree of broken characters. This is accomplished by
adjusting the correlation percentage.
• Changes in character shape
Some printing processes introduce changes in the shape of the characters.
The system will recognize characters that vary in shape if there is a
sufficiently wide border of don’t-care pixels around the edge of the
character in the taught character pattern. If the variation in character
shape is extreme, the system will not be able to recognize the characters.
Page 58

Chapter 5
Creating and Editing Fonts
• Variations in print density
Changes in print density can reduce the contrast between characters and
the background. This is usually not a problem if sufficient contrast exists
in the first place, which can be achieved by ensuring that the lighting is
even across the field of view, and by adjusting the camera’s light
references.
Important: Variations in print density can also compensated for by using
the CVIM2 Image Tool to preprocess the image for the OCR Tool. Refer
to Appendix B for more information.
When the characters become darker or lighter, the characters in the
thresholded image tend to grow or shrink. The system will accommodate
this if there is a sufficiently wide border of don’t-care pixels around the
edge of the character in the taught character pattern.
• Size changes
Minor changes in character size can be accommodated by leaving a
sufficiently wide border of don’t-care pixels around the edge of the
character in the taught character pattern. Major changes in character size
require changing the character size of the OCR Tool using the Rescale
option, and cannot be accommodated from one image to the next.
• Smudges
Smudges appear as extra ink or dark material in the region of the
characters. Major smudges will be rejected, but the system can allow for
minor smudges if the character correlation percentage is reduced.
• Background contrast changes
Often when a product changeover occurs, the material on which the
characters are printed changes. If the change in contrast is too large, it
may be necessary to adjust the OCR Tool’s threshold. This can be
performed during a changeover, but not from one image to the next.
Important: Background contrast changes can also compensated for
using the CVIM2 Image Tool to preprocess the image for the OCR Tool.
Refer to Appendix B for more information.
5–23
Page 59

Chapter 5
Creating and Editing Fonts
If the OCR Tool fails to recognize a character:
When the system fails to recognize a printed character, it is because the
printed character differs substantially from the character used to teach the
character pattern. If this occurs, the following procedure should be followed:
1. Obtain a frozen image containing the character that is not recognized. If
the system is in run mode, exit run mode and enter setup mode.
2. Open the Toolset Edit panel and edit the OCR Tool.
3. Use the Threshold/Filter option to verify that the threshold is acceptable
for the image. If not, adjust the threshold so that the characters are well
separated from the background. If minor threshold adjustments are not
sufficient, it may be necessary to reduce the brightness variation of the
image.
4. Select the Character Size option, and verify that the character size is set
correctly for the characters. If not, adjust the character size (Refer to page
4–12 for a description of character size adjustment).
5. Select the Edit Font option and edit the character that is not recognized.
6. Use the Test option to determine whether the character correlates. If it
does not correlate at all, make sure that the character is not too close to
the edge of the OCR Tool’s processing window.
7. Place the character teach box around the printed character in the image.
Use the arrow buttons to finely adjust the position so that the character is
aligned as well as possible with the taught pattern.
8. Observe the areas where the printed character differs from the taught
pattern. Usually this will be around the edges of the character. By
placing more don’t-care pixels in this region, the system can be made
more tolerant of variations.
9. If the variation in the printed character is too great to accommodate by
adding additional don’t-care pixels to the taught character pattern, you
can make the system more tolerant of variations by decreasing the
correlation percentage of the taught character.
5–24
Page 60

Chapter 5
Creating and Editing Fonts
Eliminating Confusion
When a printed character correlates with two or more different taught
character patterns, it is called a confusion character. In general, confusion
between similar characters is reduced by placing more pixels in the areas of
the pattern where the characters differ, and fewer pixels in the areas of the
pattern where the characters are the same. This increases the significance of
the differences.
The following are some examples of pairs of characters that are sometimes
confused because they are similar in shape, and adjustments that may reduce
the confusion. In nearly all cases, large regions filled with yellow pixels
should first be thinned out, so that only the border remains.
• B and 8
Confusion can be reduced by placing more green pixels in the upper-left
and lower-left corners of the B, as well as in the left-center region. Place
more yellow pixels in the corresponding regions of the 8.
• C and O
Confusion can be reduced by placing more yellow pixels in the gap on the
right side of the C.
• E and F
These some times get confused because the lower bar of a printed E may
fall in a region of the F pattern where there are don’t-care pixels. Make
sure that the F pattern has sufficient yellow pixels along the bottom.
• I and B/D/E/F/H/K/L/M/N/P/R/T/U
In some fonts, the uppercase I is just a vertical line, which easily
correlates with parts of other characters containing vertical lines.
Confusion can be eliminated by placing sufficient yellow pixels to the
sides of the I pattern. It is also often necessary to increase the required
correlation percentage for the I character.
• O and Q
The difference between O and Q is very minor in some fonts. It is
generally necessary to place as many green pixels as possible in the serif
of the Q, while still allowing for some variation of the character border. It
is also often necessary to reduce the number of green pixels in the circular
portion of the O and Q.
• V and W
In some fonts, a printed W character may be incorrectly read as two V’s.
This problem can be eliminated by placing sufficient yellow pixels in the
upper-left and upper-right portions of the V pattern.
5–25
Page 61

Chapter 5
Creating and Editing Fonts
If a printed character correlates with two or more taught patterns:
When a printed character correlates with two or more taught patterns, it is
because the printed character is similar to other characters in the font. If this
occurs, the following procedure should be followed:
1. Obtain a frozen image containing the character that is confused. If the
system is in run mode, exit run mode and enter setup mode.
2. Open the Toolset Edit panel and edit the OCR Tool.
3. Use the Threshold/Filter option to verify that the threshold is acceptable
for the image. If not, adjust the threshold so that the characters are well
separated from the background. If minor threshold adjustments are not
sufficient, it may be necessary to reduce the brightness variation of the
image.
4. Select the Character Size option, and verify that the character size is set
correctly for the characters. If not, adjust the character size (Refer to page
4–12 for a description of character size adjustment).
5. Select the Edit Font option and use the Test All option to determine
which taught characters correlate with the printed character. If there are
too many correlations displayed in the same location, you must Test each
potential confusion character individually.
6. Edit the taught character that is confused with the printed character.
7. Place the character teach box around the printed character in the image.
Use the arrow buttons to finely adjust the position so that the character is
aligned as well as possible with the taught pattern.
8. Observe the regions of the taught character pattern that are the same as
the printed character. Place more don’t-care pixels in these regions
because they do not contribute information to help distinguish the
characters. This will increase the relative significance of the areas that
are different.
9. Observe the regions of the taught character pattern that contain don’t-care
pixels, where the shapes of the original characters are different. Add
additional green or yellow pixels in these regions to reduce the percentage
that will match the confusion character.
10.Again use the Test option to determine the effect of the changes you have
made to the taught character pattern. The correlation percentage should
be reduced. Repeat steps 8 and 9 to reduce the correlation as much as
possible.
5–26
Page 62

Chapter 5
Creating and Editing Fonts
When the Test option is used, characters which correlate at or above the set
correlation percentage are shown in green. Characters that correlate at or
above 97.5% of the set correlation percentage are shown in yellow, and
characters which correlate at or above 95% of the set correlation percentage
are shown in red.
When eliminating confusion, it is best to modify the character pattern so that
no correlations with confusion characters are displayed in green, yellow or
red when the Test option is used. It is in some cases acceptable to have some
red correlations displayed, as these are usually distinguishable from valid
correlations.
If you cannot eliminate yellow correlations with confusion characters by
modifying the template, they can be eliminated by increasing the character’s
correlation percentage. This may reduce the system’s tolerance of printing
variations however.
Working With Font Files
A font used by an OCR Tool is stored in a font file. After you create a font
file, you can copy, rename or delete it using the Filer. Refer to the CVIM2
Reference Manual for more information on the filer and on file device usage.
Storage of Font Files
Normally, font files are stored on the EE: device when they are first created.
This allows for easy modification of the file, because the EE: device can be
rewritten without the need for the Recycle operation. Other storage devices
such as V2: have a larger capacity than the EE: device, so it may be desirable
to move font files to V2: after they have been created and optimized.
Moving or Renaming Font Files
If a font file is moved to a different device, or if the file name is changed,
then all OCR Tools that use the font must be modified to reflect the new file
name.
Sharing Font Files
You can configure several OCR Tools to share the same font file simply by
giving them the same Font Name. This conserves on-line memory, file
storage space, and font teaching effort. Each tool can have a different
character size, threshold, etc.
5–27
Page 63

Chapter
Chapter Objectives
A–B
6
Using Match Strings
This chapter describes:
• Match string usage
• Metacharacters
• Testing match strings
• Example match strings
Important:
This chapter describes match strings of OCR Tools. These match strings
often contain spaces, they are represented by a square character: h
Match strings are displayed in the OCR Tool Edit panel and on the
string-entry keyboard delimited by arrows at the left and right ends.
Spaces are displayed on the CVIM2 screen as actual spaces rather than as the
character shown above.
Match String Usage
When Optical Character Verification (OCV or OCV Strict) mode is selected
for a given string, the OCR Tool compares the read text to a user-specified
match string. Match strings can be used in the following ways:
• Verify that the read text matches exactly
If no metacharacters are used, the text read by the OCR Tool must match
the match string exactly.
• Allow extra characters at the beginning or end
Metacharacters can be used to allow the tool to pass if extra characters
appear before or after the desired text.
• Verify that the read text matches one of several valid sequences
This can be used, for example, to verify that a 3-letter code represents a
valid month of the year.
• Verify that a particular type of character appears in a certain position
Metacharacters can be used, for example, to specify that a string must
consist of three digits followed by three letters.
6–1
Page 64

Chapter 6
Using Match Strings
Length of Match Strings
Although each string of an OCR Tool can only read up to 20 characters, its
match string may be up to 80 characters long. This allows for relatively
complex matching capability using metacharacters.
Leading & Trailing Spaces
If there is sufficient room within the OCR Tool’s processing window, the tool
will check for spaces in the regions immediately before and after each string,
and will add either a white space or gray space to the beginning and end of
the read text. If the characters which correlate are too close to the left and/or
right edges of the processing window, then no white or gray space will be
added to the beginning and/or end of the read text. See page 2–6
In some applications, an inspected character string would be acceptable
whether or not there was sufficient room to check for spaces before and after
the string. In this case, the match string should begin and end with the
sequence h? to indicate that a space is optional.
6–2
Page 65

Chapter 6
Using Match Strings
Metacharacters
The CVIM2 OCR package provides a complete set of special purpose
characters, called metacharacters, which you can use to construct match
strings. A metacharacter is used to match a sequence of one or more
characters which can vary from inspection to inspection.
A listing of valid metacharacters appears in the table below. Each appears
with a general explanation of its function and syntax. More detailed
examples of their use appear at the end of this chapter.
While the individual metacharacters perform easily understood actions,
combining and nesting them will quickly create extremely complex logical
expressions. Be sure to thoroughly test your expressions using the Test
Match function, to make certain your match strings perform as you expect
them to under the conditions you are liable to experience.
Metacharacters can be entered with the keyboard or by selecting the
metacharacter buttons above the keyboard. The metacharacter buttons
include:
[A-Za-f] Any alpha
[0-9] Any number
? 0 or 1 occurrences of the preceding character
* 0 or more occurrences of the preceding character
+ 1 or more occurrences of the preceding character
| OR operation
Table 6.A
Search Pattern Metacharacters - Wildcard
Character Description and Use
. The period represents any single character, and is used as a single-character
“wildcard”.
Table 6.B
Search Pattern Metacharacters - String Manipulation
Character Description and Use
Note: These metacharacters refer to the character, metacharacter, string, or
expression that immediately precedes them.
?
+
The question mark matches either no occurrence or one occurrence of what
precedes it. This metacharacter is used in a search string where the character may
not appear at all, or may appear once.
The plus sign matches one or more occurrences of what precedes it. This
metacharacter is used in a search string where the character will be present, but
you are unsure how many times it appears.
*
The asterisk matches none or more occurrences of what precedes it. This
metacharacter is used in a search string in cases where the character may not
appear, or may appear one or more times.
6–3
Page 66

Chapter 6
Using Match Strings
Table 6.C
Search Pattern Metacharacters - Logical Operators and Other Special Functions
Character Description and Use
[ ] Square brackets ( [ ] ) match any single character enclosed within the brackets. A
range of values can be represented within the brackets by separating the first and
last characters in the range by a hyphen. Square brackets must be used in pairs.
Note: The circumflex ( ^ ) can be used as the first character within the square
brackets to match any character which is not enclosed within the brackets.
Examples
[ABC] Matches “A”, “B”, or “C”
[L-P] Matches “L”, “M”, “N”, “O”, or “P”
[0-9] Matches “0”, “1”, “2”, “3”, “4”, “5”, “6”, “7”, “8”, or “9”
[^A-Z] Matches any character that is not upper case alphabetic
( ) Parentheses can be used in match strings to group characters and metacharacters
to form expressions. Parentheses must be used in pairs.
Example
(AB)+ The plus sign applies to the expression (AB). Strings that
would match this expression include: “AB”, “ABAB”, and “ABABAB”.
Note: Parentheses may be nested to form complex expressions.
| A vertical bar (the shifted “\” character on the keyboard) matches either the
character or expression on the left or right of the vertical bar. The vertical bar
should always appear within a set of parentheses.
Examples
(A | B) Matches “A” or “B”
(abc|123) Matches “abc” or “123”
\ The backslash indicates that the following character, which would normally be
interpreted as a metacharacter, should instead be interpreted as a literal ASCII
character.
Example
\+ The plus ( + ) will be interpreted as a plus rather than as a
metacharacter.
6–4
Page 67

Chapter 6
Using Match Strings
Testing Match Strings
After entering a match string, you can test it by entering a string of text to be
matched against the match string. This is particularly useful if you are using
metacharacters.
To test a character string:
1. Click the Test Match button on the OCR Tool Edit panel.
The test match keyboard appears:
Shows entered match string(s)
2. Enter the string you want to test using the keyboard.
3. Click the string you want to test against.
A message is displayed indicating whether or not the string matched.
Test String
Click string to
test against
Test Status
The String matched.
4. Press Enter to return to the OCR Tool Edit panel.
6–5
Page 68

Chapter 6
Using Match Strings
Match String Examples
The following are examples of match string operations. For each match
string in the left column, the center column shows examples of strings which
would match, and the right column shows examples of strings which would
not match.
This match string Matches this: But not this:
ABC ABC ABCD
hABC
ABCh
hABCh
A.C AAC
ABC
A7C
AhC
A_C
A?C
h?ABCh?
Serialh#[0-9]+ Serialh#1
X*$100 $100
ABC[01234][0-9][0-9] ABC123
ABC
hABC
ABCh
hABCh
Serialh#534
Serialh#884773883878
X$100
XXXXXXXXX$100
ABC495
ABC001
AC
ABCD
AXBC
ABCD
Serialh#53A
Serialh575
Serialh#
Y$100
XXXhXXX$100
$100XXX
ABC12
ABC558A
ABC834
ABCh159
6–6
(Loth)?157
(JAN|FEB|MAR|APR) JAN
10\.554 10.554
(P[0-9]h)*P7
h = space
157
Loth157
FEB
MAR
P7
P5hP6hP7
P1hP1hP3hP0hP5hP1hP7
Lot157
Batchh157
Loth158
JUN
JUL
AUG
10h554
10\.554
P6
P4hP5hP6
P6hP7hP8hP9
P13hP7
Page 69

Chapter
Chapter Objectives
Inspection Displays
A–B
7
On-Line Operation
This chapter describes:
• Inspection Displays of the OCR Tool
• On-line adjustment of the OCR Tool
Refer to the CVIM2 Reference Manual for a complete description of on-line
operation and displays. The following section describes the unique aspects
of OCR Tool displays.
The on-line tool display of the OCR Tool shows the strings which are read in
the upper-left corner of the processing window of the tool. Each string is
delimited by arrows, so that leading and trailing spaces are visible.
Shows the text read by the OCR tool
The position of each character’s correlation box (the location where the
character correlated) is indicated by a small square within the tool’s
processing window. The color of the tool will be green or red to indicate the
PASS or FAIL status of the tool.
7–1
Page 70
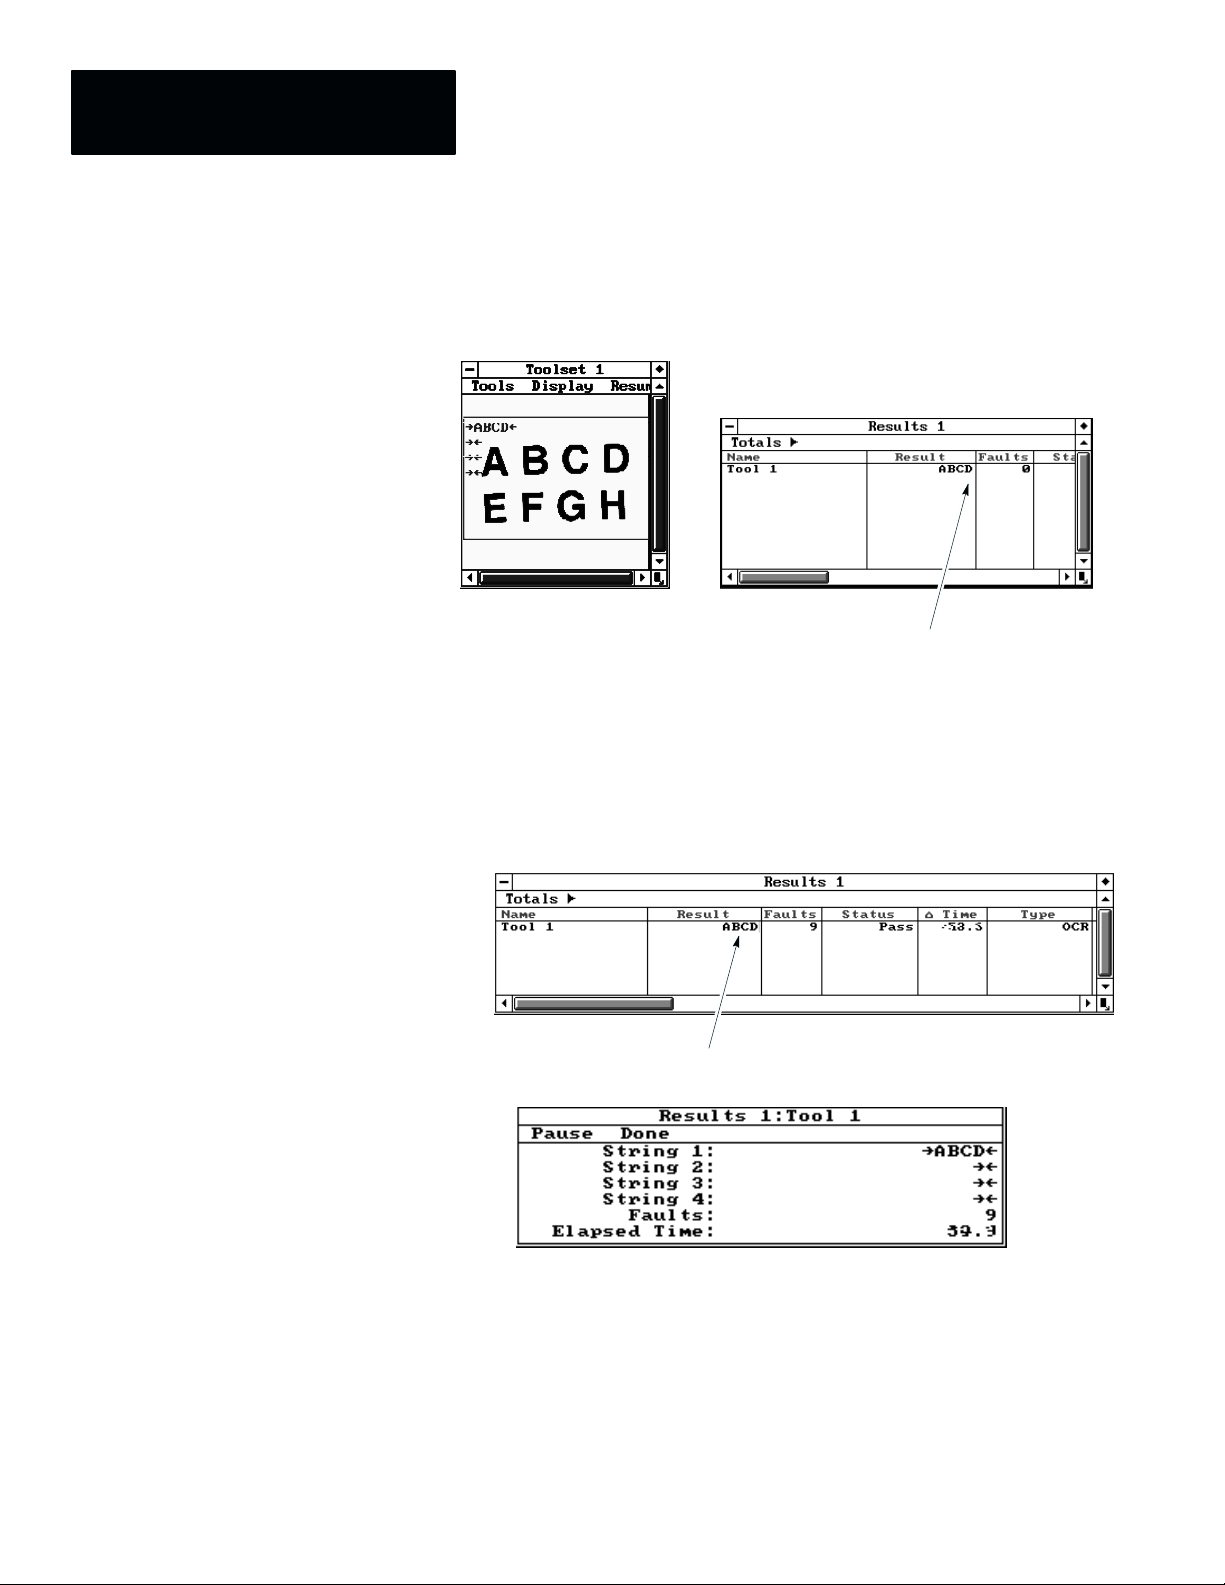
Chapter 7
On-Line Operation
In the toolset results panel, the first string read by the OCR Tool is shown in
the Result column. If the character string is more than 12 characters long,
only the first 12 characters are shown, followed by a tilde (
The Result field displays a tilde ~ if the
character string is more than 12 characters.
) character.
~
If you click on the OCR Tool Result, the detail panel for the OCR Tool will
be displayed. This shows the results of the individual strings read by the
tool, the number of faults (failures) the tool has recorded, and the inspection
time in milliseconds. Each of the four strings will be displayed in red in the
detail panel if it fails its match condition.
Result 1st String
Click here for Detail panel
7–2
Page 71

Chapter 7
On-Line Operation
On-Line Adjustment
To make adjustments to the inspection process while on-line:
1. Choose the Tools menu from the toolset image display panel.
This displays the Adjust Toolset panel.
Click here to display
Adjust OCR Tool panel.
2. Click in the type box for the OCR Tool on the Adjust Toolset panel to
bring up the Adjust OCR Tool panel.
When on-line, you can adjust the same options available during
configuration except:
• The Font cannot be changed or edited while on-line.
• Character Size cannot be adjusted.
• The size of the OCR Tool’s processing window cannot be increased.
• The Thresh/Filter settings of the tool can be adjusted, but no processed
image will be displayed.
3. Click the Done button on the Adjust OCR Tool panel. On the Adjust
Toolset panel, click the Save button to save your changes in the tools file,
then the Done button to apply the changes to the next inspection.
7–3
Page 72

Chapter
Chapter Objectives
A–B
8
Communications and Results Processing
This chapter describes how to:
• Access individual results of an OCR Tool
• Obtain OCR Tool inspection results through communications
• Access OCR Tool inspection results via Math tools
• Adjust OCR Tool parameters through communications
• Upload and download font files
For more information about CVIM2 communications and Math tools, refer to
the CVIM2 Reference Manual and the CVIM2 Communications Manual.
OCR Inspection Results
The OCR Tool makes its inspection results available to other components of
the CVIM2 system. This makes it possible to communicate OCR data to the
outside world, and to perform mathematical calculations on numeric values
read by OCR.
The following inspection results can be accessed by Math tools, and through
the CVIM2 serial ports, Remote I/O port, and discrete outputs:
• OCR Tool status (pass or fail)
• Status of individual strings (pass or fail)
• Text read in individual strings of an OCR Tool (not via discrete outputs)
8–1
Page 73

Chapter 8
Communications and Results Processing
The following table shows the inspection results available for an OCR Tool.
The Inspection Result names are used by the Math tool, Communications
Message Editor, and Discrete I/O Editor.
Inspection Result Definition & Usage Field Type
Pass 1 if the OCR Tool passes. 0 if the tool fails. Uword
Warn Always zero. Uword
Fail code:
0 = PASS
9472 = No binary correlator coprocessor installed
Fail
(Refer to CVIM2 Communications Manual Appendix C for additional
Fail codes which pertain to any CVIM2 tool).
String 1
Fail 1
String 2
Fail 2 Result string #2 Fail code (see Fail 1). Uword
String 3
Fail 3 Result string #3 Fail code (see Fail 1). Uword
String 4
Fail 4 Result string #4 Fail code (see Fail 1). Uword
Result string #1. String
Result string #1 Fail code:
Result string #2. String
Result string #3. String
Result string #4. String
9473 = No font assigned, or font could not be loaded
9474 = No characters present in the font
9475 = Match fail or no characters recognized
0 = PASS
9475 = Match fail or no characters recognized
Uword
Uword
String # and Fail # results are only available for a given string if the string’s Mode is not Disabled.
When accessing OCR data using the math tool, strings are converted to numbers. See Accessing OCR Re-
sults from Math Tools in this chapter for details.
If the tool’s fail code is anything other than this, it indicates an error condition in which the tool cannot be pro-
cessed. In this case, Fail 1 through Fail 4 are invalid, and usually set to zero.
8–2
Page 74

Chapter 8
Communications and Results Processing
Communications Messages
Communications messages are used to transmit inspection results via the
serial ports or Remote I/O port. Refer to the CVIM2 Communications
Reference Manual for a complete description of the Communication
Message Editor.
Any of the OCR Tool results shown in the preceding table can be used in a
communications message.
Note:
Each result field of a communication message contains Field (field width)
and Prec (precision) settings which determine how the result is formatted.
For numeric values, the precision specifies the number of digits past the
decimal point, and defaults to zero. When a String result is to be included in
a message, the precision must be set to the maximum number of characters
expected in the string. The field setting should be equal to or greater than the
precision.
Accessing OCR Results from
Math Tools
Set Prec to the same value as
Field for OCR Strings.
The Math tool can access any of the results of the OCR Tool. The numerical
Fail codes are simply accessed as numbers. When a Math tool accesses a
String result, the string is first converted to a number.
When a String result is converted to a number, only the left–most sequence
of digits (and an optional minus and decimal point) is converted. Any other
characters are ignored. For example:
This string result: Is converted to this value:
–123.78 –123.78
123ABC 123
–57.5x21.4 –57.5
Part 575 0
8–3
Page 75

Chapter 8
Communications and Results Processing
OCR Tool Adjustment
When the CVIM2 is on–line, parameters of the OCR Tool can be adjusted
through the serial and Remote I/O ports using the tooladj command.
tooladj ”Toolset 1.Lot ” ms1 ”Lot0123”
Command Token Data Sent
Refer to the CVIM2 Communications manual for information on using the
tooladj command.
You can adjust the following parameters of the OCR Tool.
Command Description Token Example
Tool Enable (Status = Y or N) E status tooladj ”Toolset 1.Tool 1” E Y
Absolute Position
(upper left corner of window)
Delta Position dp dx dy tooladj ”Toolset 1.Tool 1” dp 5 5
Threshold t hi lo tooladj ”Toolset 1.Tool 1” t 255 67
Delta Threshold dt dhigh dlow tooladj ”Toolset 1.Tool 1” dt 0 –3
Run Alpha (Status = Y or N) ra status tooladj ”Toolset 1.Tool 1” ra Y
Run Numbers (Status = Y or N) rn status tooladj ”Toolset 1.Tool 1” rn N
Run Symbols (Status = Y or N) rs status tooladj ”Toolset 1.Tool 1” rs Y
Run Spaces (Status = Y or N) rp status tooladj ”Toolset 1.Tool 1” rp Y
Align (Status = Y or N) a status tooladj ”Toolset 1.Tool 1” a Y
Mode of String #1 0 = Disabled
1 = OCR Strict
2 = OCR
Mode
3 = OCV Strict
4 = OCV
ap x y tooladj ”Toolset 1.Tool 1” ap 50 50
m1 mode tooladj ”Toolset 1.Tool 1” m1 0
8–4
Mode of String #2 0 = Disabled
1 = OCR Strict
2 = OCR
Mode
3 = OCV Strict
4 = OCV
Mode of String #3 0 = Disabled
1 = OCR Strict
2 = OCR
Mode
3 = OCV Strict
4 = OCV
Mode of String #4 0 = Disabled
1 = OCR Strict
Mode
Match String #1 ms1 string tooladj ”Toolset 1.Tool 1” ms1 ”Lot3”
Match String #2 ms2 string tooladj ”Toolset 1.Tool 1” ms2 ”DEC”
Match String #3 ms3 string tooladj ”Toolset 1.Tool 1” ms3 ”A”
Match String #4 ms4 string tooladj ”Toolset 1.Tool 1” ms4 ”Date”
2 = OCR
3 = OCV Strict
4 = OCV
m2 mode tooladj ”Toolset 1.Tool 1” m2 4
m3 mode tooladj ”Toolset 1.Tool 1” m3 2
m4 mode tooladj ”Toolset 1.Tool 1” m3 3
Page 76

Chapter 8
Communications and Results Processing
Sending Match Strings with Backslashes
Command Description
Subset #1 0 = All
1 = Left
2 = Right
Subset #2 0 = All
1 = Left
2 = Right
Subset #3 0 = All
1 = Left
2 = Right
Subset #4 0 = All
1 = Left
2 = Right
Length #1 l1 length tooladj ”Toolset 1.Tool 1” l1 10
Length #2 l2 length tooladj ”Toolset 1.Tool 1” l2 5
Length #3 l3 length tooladj ”Toolset 1.Tool 1” l3 9
Length #4 l4 length tooladj ”Toolset 1.Tool 1” l4 7
Token Example
s1 subset tooladj ”Toolset 1.Tool 1” s1 2
s2 subset tooladj ”Toolset 1.Tool 1” s2 0
s3 subset tooladj ”Toolset 1.Tool 1” s3 1
s4 subset tooladj ”Toolset 1.Tool 1” s4 2
When sending match strings with the tooladj command, the backslash (\) is a
special command character. To send a match string containing a backslash,
the command must have 2 consecutive backslashes.
Examples:
To set the first match string to ABC\?, you would use the following tooladj
command:
Transferring Font Files
tooladj ”Toolset1.Tool 2” ms1 ”ABC\\?”
To set the first match string to ABC\\, you would use the following tooladj
command:
tooladj ”Toolset1.Tool 2” ms1 ”ABC\\\\”
Font files can be transferred to and from remote devices via RS–232 or
Remote I/O. Refer to the CVIM2 Communications Reference Manual for a
complete description of file transfers.
Appendix E of the CVIM2 Communications Reference Manual lists the file
type codes used for standard file types of the CVIM2. OCR font files use the
file type code ’o’ (lowercase O).
Type Code File Type
o OCR Font file
When a new font file is transmitted to the CVIM2 while it is on–line, the font
file will not be used by any OCR Tools until the CVIM2 is taken off–line and
then back on–line again.
8–5
Page 77

Appendix
A–B
A
Status and Warning Messages
The following messages or codes may be displayed during OCR tool setup or
results display.
Status Code
(Hex) (Dec)
0x2500 9472 No Binary correlator not installed.
0x2501 9473 No No font defined. OCR Tool has no font assigned.
0x2502 9474 No No characters defined.
0x2503 9475 No Match string failed.
0x2504 9476 No Auto character sizing failed. Auto character size failed.
0x2505 9477 No Bad regular expression. Match string is illegal.
0x2506 9478 No No suitable characters.
0x2507 9479 No Font file revision error. Font file revision error.
0x2508 9480 No Font file read error. Font file cannot be opened for read.
0x2509 9481 No Font file write error. Font file cannot be written.
0x250A 9482 No Tool scales modified.
0x250B 9483 No
0x250C 9484 No OCR Tool installation error. OCR Tool installation error.
Fatal Text Conditions
Daughter board not installed or
incorrect version.
No characters are learned in this
font.
OCV match failed or no characters
recognized.
No suitable characters found for
auto character size.
Scale factors were limited to 1024
pixel limit.
Has the character size been
configured?
Character size has not yet been
configured.
A–1
Page 78

Appendix A
Status and Warning Messages
A–2
Page 79

Appendix A
Status and Error Messages
A–3
Page 80

Appendix
Objectives
Using Image Processing
A–B
B
Compensating for Lighting Variations
This appendix describes how to use CVIM2 Image Tools to compensate for
variations in lighting.
Variations in the lighting across the field of view or image to image
brightness variation can make it difficult to recognize characters. The effect
of these variations can be reduced by using the CVIM2 module Image Tools
to preprocess the image before recognizing the characters with the OCR
Tool. This appendix describes two methods that provide this type of
compensation. These methods also provide moderate compensation for
background color change and changes in print density.
Method 1 – Maximum Compensation
The maximum compensation for lighting variation is accomplished using
two Image Tools that compensate for changes in the angle and brightness of
the light:
• The first Image Tool filters out the characters to produce a brightness
reference image.
• The second Image Tool subtracts the brightness reference image from
the original camera image to produce a compensated image for the
OCR Tool.
Note: Refer to the CVIM2 Reference Manual (Publication No. 5370-801)
for more information on Image Tool operation.
B–1
Page 81

Appendix B
Compensating for Lighting Variations
To setup the Image Tools for maximum compensation:
1. Add tools to the toolset as shown below. Note the S1, S2, and Dst
settings.
2. Set Tool 1 as shown below. Use the P&P AOI 1 to position the window
around the character string(s) to be read.
3. Record the X, Y, Length, and Height of the Tool 1 window for later use.
X = _____
Y = _____
Length = _____
Height = _____
B–2
Page 82

Appendix B
Compensating for Lighting Variations
4. Select Thresh/Filter to setup the Morphology filters. Setup Morph 1 and
Morph 2 to perform a MAX operation as shown below:
Select All
Boxes for MAX.
5. Return to the Image Tool Edit panel.
6. Set the number of Morph Passes to the number that completely filters out
the characters in the window.
Note: Increasing Morph Passes also increases the processing time.
Morph Passes = 1
Morph Passes = 2
Morph Passes = 3
B–3
Page 83

Appendix B
Compensating for Lighting Variations
7. Setup Tool 2 as shown below:
8. Set the operation to S1-S2.
9. Use P&P AOI 1 to position AOI 1 to the same position as tool 1 (use
information obtained in step 3).
10. Use P&P AOI 2 to position AOI 2 to:
X = 0
Y = 0
Length = Tool 1 Length
Height = Tool 1 Height
11. Set the lookup table to Sign by selecting LUT in the Image Tool Edit
panel.
12. Tool 3 is an OCR Tool that uses the Tool 2 destination image. Setup the
OCR Tool as described in this manual. The character recognition will be
relatively insensitive to lighting variations.
B–4
Page 84

Appendix B
Compensating for Lighting Variations
Method 2 – Brightness Compensation with Maximum Speed
Method 2 provides compensation for an overall increase or decrease in
brightness with minimum impact to inspection speed. Method 2 can also
compensate for uneven horizontal lighting across the character string, such as
printing on round bottles. This method requires a window to be placed in an
area of the image that will always be white. As in Method 1, Method 2
requires two Image Tools to preprocess the image for the OCR Tool.
• The first Image Tool produces a background reference image.
• The second Image Tool subtracts the background reference image from
the original camera image to produce a compensated image for the OCR
Tool.
To setup Image Tools for brightness compensation with maximum speed:
1. Add tools to the toolset as shown below. Note the S1, S2, and Dst
settings.
2. Use the P&P AOI 1 to position the AOI 1 window in an area of the
image that will always be white (as shown below). The size of AOI 1 is
not important.
3. Set Tool 1 Shape to Quad.
B–5
Page 85

Appendix B
Compensating for Lighting Variations
4. Use the P&P Dest to position the destination window over the character
string(s) as shown below.
Destination Window
AOI 1 Window
5. Record the X, Y, Length, and Height of the destination window for
later use.
X = _____
Y = _____
Length = _____
Height = _____
6. Display Tool 2, it should appear as shown below:
7. Set the operation to S1-S2.
B–6
8. Use P&P AOI 1 to position AOI 1 to the same position as the Tool 1
Destination (use information obtained in step 5).
9. Use P&P AOI 2 to position AOI 2 to:
X = 0
Y = 0
Length = Tool 1 Length
Height = Tool 1 Height
Page 86

Appendix B
Compensating for Lighting Variations
10. Set the lookup table to Sign by selecting LUT in the Image Tool Edit
panel as shown below:
11. Tool 3 is an OCR Tool that uses the Tool 2 destination image. Setup the
OCR Tool as described in this manual. The character recognition will be
relatively insensitive to lighting variations.
B–7
Page 87

Glossary
A–B
A
Acquired Image
An image received from the camera. In general, the same as inspected
image.
B
Binary
Refers to an image whose pixels are either black or white.
Button
A button is an on screen interface feature that allows the operator to select or
activate the item specified on the button. The button is activated by placing
the cursor over the button and pressing the left mouse button.
C
Character
In general, a letter, number or symbol. In OCR, either a symbol which
appears in the inspected image (printed character) or a pattern stored in an
OCR font (taught character).
Character Pattern
A 32x32 matrix of pixels which describe the shape of a taught character.
Each pixel may represent black (displayed in green during font teaching),
white (displayed in yellow during font teaching), or don’t–care (displayed as
transparent during font teaching).
Character Recognition
Character recognition, in the image processing context, is the identification
of individual printed characters by a machine vision method.
Confusion Character
A printed character which correlates with more than one taught character.
Correlation
This is the process by which characters are recognized. A printed character
correlates if it is similar to a taught character pattern.
Correlation Box
A box which indicates the region over which a printed character correlates
with a taught character.
Correlation Percentage
This is the percentage of pixels in the printed characters that must match the
taught character in order for the character to be passed. The Correlation
Percentage can be set individually for each character in an OCR font, and the
default is 95%.
G–1
Page 88

Glossary
D
Default
Default refers to the original, or preset, parameter values that are used by the
system unless otherwise altered by the operator.
Don’t–Care
A pixel within a taught character pattern for which the corresponding pixel
of a printed character does not affect the correlation percentage.
Download
The process of sending a file from a remote device to the CVIM2 module.
F
Filtering
A method of enhancing an image, which can be used to remove noise or
improve the readability of characters.
Font
In typography, a particular style of characters. In OCR, a collection of taught
character patterns and associated parameters (also called OCR font).
Font File
A file on a CVIM2 module memory device in which a font is stored.
Font Name
The name of the font file used by an OCR Tool.
G
Grayscale
Refers to an image whose pixels can represent various shades of gray. In the
CVIM2 these pixels have values from 0 (dark) to 255 (light).
M
Match String
A sequence of characters, entered by the user, against which a string read by
the OCR Tool is compared.
G–2
Page 89

Glossary
O
Optical Character Recognition (OCR)
The process of optically reading printed characters, without testing the
characters against a match string. This is used when the goal is to determine
what printed characters are present.
OCR Font
See font.
Optical Character Verification (OCV)
The process of optically reading printed characters and testing the characters
against a match string. This is used when the goal is to determine whether
the printed characters match an expected pattern.
P
Pick & Place
The method of manually positioning a shape, such as a processing window,
on an image. This operation consists of picking part of the shape with the
mouse, dragging it to a new location, and placing it there.
Processing Window
The window used to define the region of the image which will be processed
by the OCR Tool.
Pixel
A pixel is a picture element. This term can be used to refer to one element of
an image, a dot on the CVIM2 module display screen, or one element of a
character pattern.
Printed Character
A character which appears in an acquired image.
S
String
In general, a sequence of characters. In OCR, this can refer to one line of
text read by an OCR Tool, a line of printed characters,
String Length (Len)
This is the maximum number of characters which will be read by one string
of an OCR Tool if the Subset option is set to Left or Right.
Subset
A means of truncating the string of read characters. The string can be
truncated from either the left or the right.
G–3
Page 90

Glossary
T
Taught Character
One element of an OCR font, consisting of a character pattern, a set of
filtering parameters, and a correlation percentage.
Thin
An operation which erodes and reduces the pixels of the image of a printed
character, for the purpose of teaching a character pattern.
Threshold
The process by which a grayscale image is converted into a binary image.
Also refers to the limit(s) which define the separation between black and
white. In the CVIM2 module, pixels in the grayscale image whose values
are less than the high threhsold and greater than the low threshold will
become white, and the rest will become black.
G–4
Page 91

Index
OCR2-PAK
User Manual
A
Accesing OCR-P AK, 3–2
Adding Characters, 5–8
Adding Pixels to Images, 5–14
Adjust Toolset Panel, 7–3
Align, 4–6
Ambiguous Characters, 2–8
Audience, Intended, 1–2
B
Backslashes, In tooladj Command, 8–5
Black Pixels, 5–2
Blurring, 5–22
Brightness Compensation, B–5
Broken Characters, 5–22
C
Changing Pixel Color, 5–14
Character
Alignment, 2–5
Ambiguous, 2–8
Direction, 2–4
Filter, 5–11
Height, 2–4
Orientation, 2–4
Quality , 2–8
Requirements, 2–4, 2–5, 2–7, 2–8
Rotation, 2–7
Separation, 2–6
Spacing, 2–5
Training, 2–1
Character /Background Contrast, 2–8
Character Size, 4–8, 4–12
Box, 4–12
Define XY, 4–13
Panel, 4–12
Rescale, 4–13
Setting, 4–14
Character Spacing, 5–18, 5–19
Character Spacing Box, 5–21
Characters, Ambiguous, 2–8
Commands, Tooladj, 8–4
Communication Messages, 8–3
Compensating for Lighting, B–1
Confusion Characters, Eliminating, 5–25
Contrast
Changes to, 5–23
Character, 2–8
Conventions, 1–2
Correlation, 5–17, 5–27
Adjusting, 5–17
Bounding Box, 5–10, 5–16
Percentage, 5–10, 5–16, 5–17
Scores, 5–17
Correlation Bounding Box, 5–10, 5–16
Correlation Panel, 5–4
Correlation Percentage, 5–10
CVIM2 module, 3–1
D
Define Character Panel, 2–2, 5–3, 5–9
Arrow Keys, 5–7
Done, 5–7
G+, 5–7
G–, 5–7, 5–13
Pixel Colors, 5–7
Teach, 5–6
Test, 5–6
Y+, 5–7
Y–, 5–7, 5–13
Define Spacing Panel, 5–18, 5–20
Character Spacing, 5–21
Space Dimensions, 5–20
Define XY, 4–13
Degraded Print, 5–22
Detail Panel, 7–2
Direction, Character, 2–4
Discrete I/O Communications, 8–1
Dot Matrix Characters, 4–14
I–1
Page 92

Index
OCR2-PAK
User Manual
E
Edit Font, 4–8
Edit Font Panel, 2–2, 5–3, 5–8
Add, 5–3
Cancel, 5–4
Correlation, 5–4
Done, 5–4
Edit, 5–3
Filter, 5–4
Spacing, 5–4
Test, 5–4
Test All, 5–4
Edit OCR Tool Panel, 2–2
Editing Taught Patterns, 5–14
Eliminating Confusion, 5–25
F
Field Width, 8–3
Filter, Character, 5–11
Filter / Threshold, 4–11
Font
Description, 5–1
Storing, 5–27
Training, 2–3
Font Files
Moving, 5–27
Renaming, 5–27
Sharing, 5–27
Storing, 5–27
Font Name, 4–5, 4–6
Adding, 4–9
Deleting, 3–1
Panel, 5–8
Font Optimization, 5–22
Font Selection, 4–9
Font Selection Panel, 4–5
Fonts
Testing, 5–15, 5–27
Transferring, 8–5
G
Gray Spaces, 2–7, 4–5, 5–19
Green Pixels, 5–13
H
Height, Character, 2–4
Horizontal Spacing, 5–18
I
Image Processing, B–1
Image Tools, B–2
Inspection Displays, 7–1
Inspection Results, 8–2
Intended Audience, 1–2
L
Leading Space, 2–6, 6–2
Length of Subset, 4–7
Light Probe, 5–22
Lighting Variation, Compensating for, B–1
Lighting Variations, 5–22
Logical Operations, 6–4
M
Manuals, 1–3
Match String, 4–7
Metacharacters, 6–4
Match Strings
Examples, 6–6
Length, 6–2
Logical Operations, 6–4
Metacharacters, 6–3
Spacing, 6–2
String Manipulation, 6–3
Testing, 6–5
Usage, 6–1
Wildcard Characters, 6–3
Math Tool, Accessing Data, 8–3
Messages
Communication, 8–3
Status and Warning, A–1
Metacharacters, 6–3
table summarizing, 6–3–6–7
Mode Panel, 4–16
Morphology Filter, 4–11, 5–4, 5–11
Multiple Strings, 2–3
I–2
Page 93

Index
OCR2-PAK
User Manual
O
OCR
Acessing Results, 8–2
Adding a Tool, 4–3
Changing Operating Modes, 4–16
Copying a Tool, 4–3
Creating a Tool, 4–1
Disable, 4–15
Editing a Tool, 4–4
OCR Mode, 4–15
OCR Strict Mode, 4–15
OCR Data, Accessing, 8–1, 8–3
OCR Tool Edit Panel, 4–4
Align, 4–6
Character Size, 4–8
Done, 4–8
Edit Font, 4–8
Font Name, 4–5, 4–6
Font Name Box, 4–9
Gray Spaces, 4–5
Length, 4–7
Match String, 4–7
Pick and Place Window, 4–8
Run, 4–6
Subset, 4–7
Test Match, 4–8
Threshold / Filter, 4–8
OCR–PAK
Description, 2–1
Descriptions, 2–2
Installation, 3–1, 3–2
Tool Panels, 2–2
OCV
OCR Strict Mode, 4–15
OCV Mode, 4–16
Overview, 6–1
On–Line Editing, 7–3
Operating Modes, 4–16
Optical Character Recognition (OCR), 2–1
Orientation, Character, 2–4
P
Panel, Detail, 7–2
Pick and Place Window, 4–8
Move, 4–10
Size, 4–10
Pixel
Color, 5–13
Colors, 5–7
Pixels, Color of, 5–2
Power Switch, 3–1
Precision, 8–3
Print Degradation, 5–22
Print Density, 5–23, B–1
Publications, Related, 1–3
Pyramid Integrator Platform, 3–1
Q
Quality , Character, 2–8
R
RAM Card, 3–1
Related Publications, 1–3
Remote I/O Communications, 8–1
Rescale, 4–13
Existing Fonts, 4–13
New Fonts, 4–13
Results Page
Display , 7–1
Icon, 7–1
Rotation, Character, 2–7
Run Check Boxes, 4–6
I–3
Page 94

Index
OCR2-PAK
User Manual
S
Separation, Character, 2–6
Smudges, 5–23
Software Setup, 2–1, 3–2
Space
Defining, 5–20
Definition, 2–6
Dimensions, 5–18
Gray , 2–7, 5–19
Horizontal, 5–18
Leading, 2–6, 6–2
Trailing, 2–6, 6–2
Vertical, 5–19
Spacing
Character, 2–5
String, 2–5
Specifications, B–1
Status Messages, A–1
String, Spacing, 2–5
String Manipulation, 6–3
Strings, Multiple, 2–3
Subset, 4–7
Define Character, 2–2, 5–3, 5–5, 5–9,
5–12
Define Spacing, 5–18
Edit Font, 2–2, 5–3
Edit OCR Tool, 2–2
Font Selection, 4–5, 4–9
Mode, 4–16
OCR Tool Edit, 4–4, 4–5, 4–8
Toolset, 4–2, 4–4
Tool Types, 3–2
Tooladj
Command Structure, 8–4, 8–5
Examples, 8–4, 8–5
Tools, editing while online, 7–3
Toolset Panel, 4–4
Dst, 4–2
Enabled, 4–2
Name, 4–2
Number, 4–2
Reference, 4–2
S1, 4–2
S2, 4–2
Type, 4–2
Trailing Space, 2–6, 6–2
Transferring Font Files, 8–5
T
Teaching Characters, 2–3, 5–8, 5–9
Terminology, 1–3
Test Inspections, 7–1
Test Match, 4–8
Testing Fonts, 5–10, 5–15, 5–27
Testing Match Strings, 6–5
Thin, 5–12
Thinning, 5–12
G+, 5–7
G–, 5–7, 5–13
Pixel Colors, 5–13
Y+, 5–7
Y–, 5–7, 5–13
Threshold, 4–11, 4–12
Threshold / Filter, 4–8, 4–11
Tool Panel
Adjust Toolset, 7–3
Correlation, 5–4
U
User Manuals, 1–3
V
Vertical Alignment, Character, 2–5
Vertical Spacing, 5–19
Vision Platform, 3–1
W
Warning Messages, A–1
White Pixels, 5–2
Wildcard Characters, 6–3
Y
Y ellow Pixels, 5–13
I–4
Page 95

Rockwell Automation helps its customers receive a superior return on their investment by bringing
together leading brands in industrial automation, creating a broad spectrum of easy-to-integrate
products. These are supported by local technical resources available worldwide, a global network
of system solutions providers, and the advanced technology resources of Rockwell.
Worldwide representation.
Argentina • Australia • Austria • Bahrain • Belgium • Bolivia • Brazil • Bulgaria • Canada • Chile • China, People’s Republic of • Colombia • Costa Rica • Croatia • Cyprus
Czech Republic • Denmark • Dominican Republic • Ecuador • Egypt • El Salvador • Finland • France • Germany • Ghana • Greece • Guatemala • Honduras • Hong Kong
Hungary • Iceland • India • Indonesia • Iran • Ireland • Israel • Italy • Jamaica • Japan • Jordan • Korea • Kuwait • Lebanon • Macau • Malaysia • Malta • Mexico • Morocco
The Netherlands • New Zealand • Nigeria • Norway • Oman • Pakistan • Panama • Peru • Philippines • Poland • Portugal • Puerto Rico • Qatar • Romania • Russia • Saudi
Arabia • Singapore • Slovakia • Slovenia • South Africa, Republic of • Spain • Sweden •Switzerland • Taiwan • Thailand • Trinidad • T unisia • Turkey • United Arab Emirates
United Kingdom • United States • Uruguay • Venezuela
Rockwell Automation Headquarters, 1201 South Second Street, Milwaukee, WI 53204-2496 USA, T el: (1) 414 382-2000 Fax: (1) 414 382-4444
Rockwell Automation European Headquarters, Avenue Hermann Debroux, 46, 1160 Brussels, Belgium, Tel: (32) 2 663 06 00, Fax: (32) 2 663 06 40
Rockwell Automation Asia Pacific Headquarters, 27/F Citicorp Centre, 18 Whitfield Road, Causeway Bay, Hong Kong, Tel: (852) 2887 4788, Fax: (852) 2508 1846
World Wide Web: http://www.ab.com
Publication 5370–820 – March 1994
Supersedes Publication 5370–820 Dated August 1993
Copyright 1994 Allen-Bradley Company, Inc. Printed in USA
Publication 5370–820 – March 1994
40064-012-01(B)
 Loading...