

Page 1

Bulletin 5370
Color CVIM
USER–PAK Option
(Catalog No. 5370–CUPK)
User Manual
ALLEN-BRADLEY
Page 2

ALLEN-BRADLEY
Important User Information
Solid state equipment has operational characteristics differing from those of
electromechanical equipment. “Application Considerations for Solid State
Controls” (Publication SGI-1.1) describes some important differences
between solid state equipment and hard–wired electromechanical devices.
Because of this difference, and also because of the wide variety of uses for
solid state equipment, all persons responsible for applying this equipment
must satisfy themselves that each intended application of this equipment is
acceptable.
In no event will the Allen-Bradley Company be responsible or liable for
indirect or consequential damages resulting from the use or application of
this equipment.
The examples and diagrams in this manual are included solely for illustrative
purposes. Because of the many variables and requirements associated with
any particular installation, the Allen-Bradley Company cannot assume
responsibility or liability for actual use based on the examples and diagrams.
No patent liability is assumed by Allen-Bradley Company with respect to use
of information, circuits, equipment, or software described in this manual.
Reproduction of the contents of this manual, in whole or in part, without
written permission of the Allen-Bradley Company is prohibited.
1992 Allen-Bradley Company, Inc.
Page 3

Table of Contents
USER–PAK Option
User Manual
Using This Manual
Introduction to the
USER-PAK Option
Installation
Chapter Objectives 1 – 1. . . . . . . . . . . . . . . . . . . . . . . . . . . . . . . . . . . . . . . . .
Manual Contents 1 – 1. . . . . . . . . . . . . . . . . . . . . . . . . . . . . . . . . . . . . . . . . .
Intended Audience 1 – 2. . . . . . . . . . . . . . . . . . . . . . . . . . . . . . . . . . . . . . . . .
Notice of Attention 1 – 2. . . . . . . . . . . . . . . . . . . . . . . . . . . . . . . . . . . . . . . .
Related Publications 1 – 2. . . . . . . . . . . . . . . . . . . . . . . . . . . . . . . . . . . . . . .
Trademarks 1 – 3. . . . . . . . . . . . . . . . . . . . . . . . . . . . . . . . . . . . . . . . . . . . . .
Chapter Objectives 2 – 1. . . . . . . . . . . . . . . . . . . . . . . . . . . . . . . . . . . . . . . . .
Security Levels 2 – 1. . . . . . . . . . . . . . . . . . . . . . . . . . . . . . . . . . . . . . . . . . .
Custom Menu Modifications 2 – 2. . . . . . . . . . . . . . . . . . . . . . . . . . . . . . . . .
Custom Serial Port Messages 2 – 4. . . . . . . . . . . . . . . . . . . . . . . . . . . . . . . .
Custom Runtime Displays 2 – 5. . . . . . . . . . . . . . . . . . . . . . . . . . . . . . . . . . .
Copy and Paste Functions 2 – 6. . . . . . . . . . . . . . . . . . . . . . . . . . . . . . . . . . .
Loading Color CVIM / USER-PAK Configurations 2 – 6. . . . . . . . . . . . . . .
Connect and Use a Mouse 2 – 6. . . . . . . . . . . . . . . . . . . . . . . . . . . . . . . . . . .
Chapter Objectives 3 – 1. . . . . . . . . . . . . . . . . . . . . . . . . . . . . . . . . . . . . . . . .
The Two USER-PAK Memory Cards 3 – 1. . . . . . . . . . . . . . . . . . . . . . . . . .
Installing the USER-PAK Option 3 – 1. . . . . . . . . . . . . . . . . . . . . . . . . . . . .
Using the Setup Card 3 – 3. . . . . . . . . . . . . . . . . . . . . . . . . . . . . . . . . . . . . . .
Accessing Setup Mode with USER-PAK Installed 3 – 4. . . . . . . . . . . . . . . .
Getting Started / Using the
Security Levels
Modifying the
Color CVIM Menus
Chapter Objectives 4 – 1. . . . . . . . . . . . . . . . . . . . . . . . . . . . . . . . . . . . . . . . .
Some Questions and Answers about System Security 4 – 1. . . . . . . . . . . . .
Accessing the Setup Mode 4 – 3. . . . . . . . . . . . . . . . . . . . . . . . . . . . . . . . . . .
Security Levels 4 – 4. . . . . . . . . . . . . . . . . . . . . . . . . . . . . . . . . . . . . . . . . . .
Security Level Indication 4 – 6. . . . . . . . . . . . . . . . . . . . . . . . . . . . . . . . .
Changing Passwords 4 – 6. . . . . . . . . . . . . . . . . . . . . . . . . . . . . . . . . . . . . . .
Setting Security ON / OFF 4 – 9. . . . . . . . . . . . . . . . . . . . . . . . . . . . . . . . . .
Lost Passwords – Using the Installation / Key Card 4 – 10. . . . . . . . . . . . . . .
Chapter Objectives 5 – 1. . . . . . . . . . . . . . . . . . . . . . . . . . . . . . . . . . . . . . . . .
Deletion 5 – 1. . . . . . . . . . . . . . . . . . . . . . . . . . . . . . . . . . . . . . . . . . . . . . . . .
Summary – Effects of Deletion 5 – 1. . . . . . . . . . . . . . . . . . . . . . . . . . . .
Deletion Procedure 5 – 2. . . . . . . . . . . . . . . . . . . . . . . . . . . . . . . . . . . . . .
Example – Menu Item Deletion 5 – 4. . . . . . . . . . . . . . . . . . . . . . . .
The Cascade Effect 5 – 5. . . . . . . . . . . . . . . . . . . . . . . . . . . . . . . . . . . . . .
Text Modification 5 – 6. . . . . . . . . . . . . . . . . . . . . . . . . . . . . . . . . . . . . . . . .
Searching for Text 5 – 6. . . . . . . . . . . . . . . . . . . . . . . . . . . . . . . . . . . . . .
Text String Search 5 – 7. . . . . . . . . . . . . . . . . . . . . . . . . . . . . . . . . .
i
Page 4

Table of Contents
Color USER–P AK Option
User Manual
Dictionary ID Search 5 – 9. . . . . . . . . . . . . . . . . . . . . . . . . . . . . . . .
Editing Text 5 – 10. . . . . . . . . . . . . . . . . . . . . . . . . . . . . . . . . . . . . . . . . . .
Examples of Modifying Text 5 – 14. . . . . . . . . . . . . . . . . . . . . . . . . . . . . .
Modifying Color Names 5 – 16. . . . . . . . . . . . . . . . . . . . . . . . . . . . . . . . . . . .
Archiving Menu Modifications 5 – 17. . . . . . . . . . . . . . . . . . . . . . . . . . . . . . .
Memory Requirement 5 – 17. . . . . . . . . . . . . . . . . . . . . . . . . . . . . . . . . . . . . .
Creating Custom Serial Port
Messages
Creating Custom Runtime
Displays
ii
Chapter Objectives 6 – 1. . . . . . . . . . . . . . . . . . . . . . . . . . . . . . . . . . . . . . . . .
Some Questions and Answers about Custom Serial Port Messages 6 – 1. . .
Creating Custom Serial Port Messages 6 – 2. . . . . . . . . . . . . . . . . . . . . . . . .
Example of a Serial Port Message String 6 – 2. . . . . . . . . . . . . . . . . . . . .
Basic Steps for Creating Custom Serial Port Messages 6 – 3. . . . . . . . . .
Defining Strings 6 – 4. . . . . . . . . . . . . . . . . . . . . . . . . . . . . . . . . . . . . . . .
Using Transmit Now 6 – 5. . . . . . . . . . . . . . . . . . . . . . . . . . . . . . . . .
Defining the Serial Port 6 – 6. . . . . . . . . . . . . . . . . . . . . . . . . . . . . . . . . . . . .
Erase Port Data 6 – 7. . . . . . . . . . . . . . . . . . . . . . . . . . . . . . . . . . . . .
Buffer: Wait / No Wait 6 – 7. . . . . . . . . . . . . . . . . . . . . . . . . . . . . . .
RS-232 Port Connections and Configuration 6 – 9. . . . . . . . . . . . . . . . . . . .
Selecting Serial Port Parameters 6 – 9. . . . . . . . . . . . . . . . . . . . . . . . . . .
Equipment Connections 6 – 10. . . . . . . . . . . . . . . . . . . . . . . . . . . . . . . . . .
Chapter Objectives 7 – 1. . . . . . . . . . . . . . . . . . . . . . . . . . . . . . . . . . . . . . . . .
Some Questions and Answers about Custom Runtime Displays 7 – 1. . . . .
Initial Setup: Selecting and Defining the Viewport 7 – 4. . . . . . . . . . . . . . .
Using the Define Viewport Menu 7 – 5. . . . . . . . . . . . . . . . . . . . . . . . . .
Selecting the Viewport Type 7 – 6. . . . . . . . . . . . . . . . . . . . . . . . . . .
Using Pick & Place 7 – 8. . . . . . . . . . . . . . . . . . . . . . . . . . . . . . . . . .
Selecting Border and Background Colors 7 – 10. . . . . . . . . . . . . . . .
Selecting Display Pages and Page Numbers 7 – 12. . . . . . . . . . . . . .
Erase Port Data 7 – 14. . . . . . . . . . . . . . . . . . . . . . . . . . . . . . . . . . . . .
Defining Text and Tool Viewport Contents 7 – 15. . . . . . . . . . . . . . . . . . . . . .
Using the Define String Menu 7 – 17. . . . . . . . . . . . . . . . . . . . . . . . . . . . .
Selecting String Direction 7 – 17. . . . . . . . . . . . . . . . . . . . . . . . . . . .
Selecting String Width 7 – 18. . . . . . . . . . . . . . . . . . . . . . . . . . . . . . .
Selecting String Color 7 – 19. . . . . . . . . . . . . . . . . . . . . . . . . . . . . . .
Using Pick & Place 7 – 20. . . . . . . . . . . . . . . . . . . . . . . . . . . . . . . . . .
Defining Graph Viewports 7 – 22. . . . . . . . . . . . . . . . . . . . . . . . . . . . . . . . . . .
Selecting the Variable 7 – 23. . . . . . . . . . . . . . . . . . . . . . . . . . . . . . . . . . . .
Defining the Variable 7 – 24. . . . . . . . . . . . . . . . . . . . . . . . . . . . . . . . . . . .
Setting the Style 7 – 25. . . . . . . . . . . . . . . . . . . . . . . . . . . . . . . . . . . .
Selecting Variable Color 7 – 26. . . . . . . . . . . . . . . . . . . . . . . . . . . . . .
Selecting the Variable Tool 7 – 26. . . . . . . . . . . . . . . . . . . . . . . . . . . .
Page 5

Table of Contents
USER–PAK Option
User Manual
Defining the Graph 7 – 27. . . . . . . . . . . . . . . . . . . . . . . . . . . . . . . . . . . . . .
Defining the Viewport Limits – Upper and Lower 7 – 28. . . . . . . . .
Defining the Event 7 – 30. . . . . . . . . . . . . . . . . . . . . . . . . . . . . . . . . .
The Copy and Paste Features 7 – 30. . . . . . . . . . . . . . . . . . . . . . . . . . . . . . . . .
Defining Strings for
Serial Ports and Viewports
Chapter Objectives 8 – 1. . . . . . . . . . . . . . . . . . . . . . . . . . . . . . . . . . . . . . . . .
Entering (or Modifying) String Text 8 – 1. . . . . . . . . . . . . . . . . . . . . . . . . . .
Valid Elements of String Text 8 – 3. . . . . . . . . . . . . . . . . . . . . . . . . . . . . . . .
Literal Text 8 – 3. . . . . . . . . . . . . . . . . . . . . . . . . . . . . . . . . . . . . . . . . . . .
Data Codes 8 – 4. . . . . . . . . . . . . . . . . . . . . . . . . . . . . . . . . . . . . . . . . . . .
Special Characters: N, /, %, # 8 – 8. . . . . . . . . . . . . . . . . . . . . . . . . . . . . .
The N (newline) character 8 – 8. . . . . . . . . . . . . . . . . . . . . . . . . . .
/ Character Code Indicator 8 – 9. . . . . . . . . . . . . . . . . . . . . . . . . . . .
% Formula Indicator 8 – 10. . . . . . . . . . . . . . . . . . . . . . . . . . . . . . . . .
Field Formatting Codes 8 – 12. . . . . . . . . . . . . . . . . . . . . . . . . . . . . . . . . .
Conditional Color-coding 8 – 15. . . . . . . . . . . . . . . . . . . . . . . . . . . . . . . . .
Extended Conditional Color-coding 8 – 15. . . . . . . . . . . . . . . . . . . . .
Draw Line Codes 8 – 16. . . . . . . . . . . . . . . . . . . . . . . . . . . . . . . . . . . . . . .
Cursor Positioning with Draw Line Codes 8 – 18. . . . . . . . . . . . . . . .
Using the * Symbol 8 – 19. . . . . . . . . . . . . . . . . . . . . . . . . . . . . . . . .
Plot Line Codes 8 – 20. . . . . . . . . . . . . . . . . . . . . . . . . . . . . . . . . . . . . . . .
Change Color Codes 8 – 20. . . . . . . . . . . . . . . . . . . . . . . . . . . . . . . . . . . . .
Summary of Codes and Indicators 8 – 22. . . . . . . . . . . . . . . . . . . . . . . . . .
Defining the Event 8 – 23. . . . . . . . . . . . . . . . . . . . . . . . . . . . . . . . . . . . . . . . .
Selecting the Event Source 8 – 24. . . . . . . . . . . . . . . . . . . . . . . . . . . . . . . .
Selecting the Source Condition 8 – 25. . . . . . . . . . . . . . . . . . . . . . . . . . . .
Selecting the Interval 8 – 26. . . . . . . . . . . . . . . . . . . . . . . . . . . . . . . . . . . .
Using Repeat String 8 – 28. . . . . . . . . . . . . . . . . . . . . . . . . . . . . . . . . . . . . . . .
Setting Repeat String Parameters 8 – 29. . . . . . . . . . . . . . . . . . . . . . . . . . .
Example of Using the Repeat String and Index Character 8 – 30. . . . . . . .
Using Math Formula Results for Repeat String parameters 8 – 32. . .
Custom Serial Port Message Example 8 – 33. . . . . . . . . . . . . . . . . . . . . . . . . .
Text and Tool Viewport Examples 8 – 36. . . . . . . . . . . . . . . . . . . . . . . . . . . .
Example 1 – Creating a Special Character 8 – 37. . . . . . . . . . . . . . . . . . . .
Example 2 – Using the Change Color Code 8 – 38. . . . . . . . . . . . . . . . . . .
Example 3 – Using the Draw Line Code 8 – 39. . . . . . . . . . . . . . . . . . . . .
Example 4 – Using Repeat String and # (Index) Character 8 – 40. . . . . . .
Setting the Repeat String Parameters 8 – 41. . . . . . . . . . . . . . . . . . . .
Example 5 – Using Data Codes and # (Index) Character 8 – 42. . . . . . . . .
Using the Repeat String and # (Index) Character with Statistics Codes
8 – 43
Example 6 – Conditionally Displaying a Text String 8 – 44. . . . . . . . . . . .
Example 7 – Using Formulas and Plot Line Codes 8 – 46. . . . . . . . . . . . .
iii
Page 6

Table of Contents
Color USER–P AK Option
User Manual
Using Copy and Paste
Loading Color CVIM /
USER–PAK Configurations
Connecting and Using
a Mouse
Character Codes
Chapter Objectives 9 – 1. . . . . . . . . . . . . . . . . . . . . . . . . . . . . . . . . . . . . . . . .
Using Copy and Paste 9 – 1. . . . . . . . . . . . . . . . . . . . . . . . . . . . . . . . . . . . . .
Example – Tool Copy and Paste 9 – 2. . . . . . . . . . . . . . . . . . . . . . . . . . .
Example – Viewport Copy and Paste 9 – 3. . . . . . . . . . . . . . . . . . . . . . . .
Example – String Copy and Paste 9 – 4. . . . . . . . . . . . . . . . . . . . . . . . . .
Chapter Objectives 10 – 1. . . . . . . . . . . . . . . . . . . . . . . . . . . . . . . . . . . . . . . . .
Loading Color CVIM / USER-PAK Configurations 10 – 1. . . . . . . . . . . . . . .
Checking Available Memory 10 – 4. . . . . . . . . . . . . . . . . . . . . . . . . . . . . . . . .
Objective A – 1. . . . . . . . . . . . . . . . . . . . . . . . . . . . . . . . . . . . . . . . . . . . . . . .
Hardware Requirements and Considerations A – 1. . . . . . . . . . . . . . . . . . . . .
Configuring the Color CVIM Module A – 1. . . . . . . . . . . . . . . . . . . . . . . . . .
Using a Mouse A – 2. . . . . . . . . . . . . . . . . . . . . . . . . . . . . . . . . . . . . . . . . . . .
Types of Mouse and Trackball Supported A – 3. . . . . . . . . . . . . . . . . . . .
Objective B – 1. . . . . . . . . . . . . . . . . . . . . . . . . . . . . . . . . . . . . . . . . . . . . . . .
ASCII Commands for the
USER–PAK Option
Index
List of Tables
iv
Objective C – 1. . . . . . . . . . . . . . . . . . . . . . . . . . . . . . . . . . . . . . . . . . . . . . . .
ASCII Commands C – 1. . . . . . . . . . . . . . . . . . . . . . . . . . . . . . . . . . . . . . . . .
Force Print Command C – 1. . . . . . . . . . . . . . . . . . . . . . . . . . . . . . . . . . .
Force Print for Viewport Strings C – 1. . . . . . . . . . . . . . . . . . . . . . .
Force Print for Serial Port Strings C – 2. . . . . . . . . . . . . . . . . . . . . .
Write String Data Command C – 2. . . . . . . . . . . . . . . . . . . . . . . . . . . . . .
Read String Data Command C – 3. . . . . . . . . . . . . . . . . . . . . . . . . . . . . . .
Suspend / Resume Serial Port Output Command C – 3. . . . . . . . . . . . . . .
Write Display Command (Enhancement) C – 4. . . . . . . . . . . . . . . . . . . . .
Table 1.A Chapter Descriptions 1 - 1.................................
Table 4.A Functions/Features at each Security Level 4 - 4...............
Table 8.A (pt. 1 of 3) Data Codes 8 - 5...............................
Table 8.A (pt. 2 of 3) Data Codes 8 - 6...............................
Table 8.A (pt. 3 of 3) Data Codes 8 - 7...............................
Table 8.B Color Codes for Strings 8 - 21...............................
Table 8.C Special Characters and Indicators for Defining Strings 8 - 22.....
Table B.A ASCII Control Codes (Serial Ports Only) * B - 1..............
Table B.B Character Codes (Serial Ports and Viewports) 1, 2, 3 B - 2......
Page 7

Table of Contents
USER–PAK Option
User Manual
List of Figures
Figure 2.1 Password entry keyboard 2 - 1............................
Figure 2.2 Trash can" icon 2 - 2...................................
Figure 2.3 Using the Change Text feature 2 - 3........................
Figure 2.4 Creating custom serial port messages 2 - 4..................
Figure 2.5 Example of a custom runtime displays 2 - 5.................
Figure 2.6 Copy and Paste boxes 2 - 6...............................
Figure 2.7 Loading Color CVIM / USERĆPAK configurations 2 - 6......
Figure 3.1 Inserting the USERĆPAK Installation / Key card 3 - 2.........
Figure 3.2 Password Entry keyboard 3 - 4............................
Figure 4.1 Password entry keyboard 4 - 3.............................
Figure 4.2 Password entry keyboard 4 - 7.............................
Figure 4.3 Setting Security ON/OFF 4 - 9............................
Figure 5.1 Items marked for deletion 5 - 4............................
Figure 5.2 Deleted items do not appear 5 - 5..........................
Figure 5.3 Example of the cascade" effect 5 - 5.......................
Figure 5.4 Using the Change Text feature 5 - 6.........................
Figure 5.5 Using the Text String search method 5 - 7....................
Figure 5.6 Accessing the Dictionary ID search method 5 - 9.............
Figure 5.7 Example: Using the Dictionary ID search method 5 - 10........
Figure 5.8 Editing text 5 - 11.........................................
Figure 5.9 Example: End of line character and up/down arrows 5 - 11.....
Figure 5.10 Example text modification 5 - 13...........................
Figure 5.11 Example: Modifying Units menu 5 - 15......................
Figure 5.12 Example: Units modification appears also in Learn box 5 - 16...
Figure 5.13 Example: Changing color name from the
Display Options menu. 5 - 17.....................................
Figure 6.1 Accessing the Config. Output menu 6 - 3....................
Figure 6.2 Selecting the string to be defined 6 - 4......................
Figure 6.3 Entering string text 6 - 4..................................
Figure 6.4 The Event menu 6 - 5....................................
Figure 6.5 Using the Transmit Now box 6 - 6..........................
Figure 6.6 Defining the serial port 6 - 6..............................
Figure 6.7 The Buffer box 6 - 8.....................................
Figure 6.8 Selecting the serial communication parameters 6 - 10..........
Figure 7.1 Example Custom Runtime Display 7 - 2....................
Figure 7.2 Example Custom Runtime Display 7 - 4....................
Figure 7.3 Example Custom Runtime Display 7 - 5....................
Figure 7.4 Example Text, Tool, and Graph viewports 7 - 6...............
Figure 7.5 Example Text, Tool, and Graph viewports 7 - 7...............
Figure 7.6 Activating the Pick & Place function 7 - 9...................
Figure 7.7 Example of placing the viewport 7 - 10......................
Figure 7.8 Example of viewport border and background colors 7 - 11......
Figure 7.9 Example of viewport border and background colors 7 - 11......
Figure 7.10 Example of viewport border and background colors 7 - 13.....
Figure 7.11 Example of viewport border and background colors 7 - 13.....
Figure 7.12 Example of viewport border and background colors 7 - 14.....
Figure 7.13 Example of viewport types and contents 7 - 15...............
Figure 7.14 Selecting the viewport string 7 - 16.........................
Figure 7.15 Selecting the viewport string 7 - 16.........................
v
Page 8

Table of Contents
Color USER–P AK Option
User Manual
Figure 7.16 Selecting the viewport string 7 - 17.........................
Figure 7.17 Selecting the string direction 7 - 18.........................
Figure 7.18 Selecting the string direction 7 - 19.........................
Figure 7.19 Selecting the string direction 7 - 20.........................
Figure 7.20 Placing the string 7 - 21..................................
Figure 7.21 Example Graph viewport 7 - 22............................
Figure 7.22 Selecting the variable 7 - 24...............................
Figure 7.23 Accessing the Define Graph Var. menu 7 - 24................
Figure 7.24 Selecting the variable style 7 - 25..........................
Figure 7.25 Examples of variable styles 7 - 26..........................
Figure 7.26 Selecting the variable color 7 - 26..........................
Figure 7.27 Selecting the variable color 7 - 27..........................
Figure 7.28 Accessing the Define Graph menu 7 - 28....................
Figure 7.29 Examples of different variable limits 7 - 29..................
Figure 7.30 Selecting the variable limits 7 - 29..........................
Figure 8.1 The string entry keyboard 8 - 1............................
Figure 8.2 String syntax messages 8 - 2...............................
Figure 8.3 Example of literal text entry 8 - 4..........................
Figure 8.4 The Event menu 8 - 23....................................
Figure 8.5 Using the calculator pad for selecting the event source 8 - 25....
Figure 8.6 Using the calculator pad for selecting the interval 8 - 27........
Figure 8.7 Setting Repeat String parameters 8 - 28......................
Figure 8.8 Using the calculator pad for selecting the
Repeat String parameters 8 - 30...................................
Figure 8.9 Example of selecting the Event parameters 8 - 35.............
Figure 8.10 Example of custom runtime displays (viewports) 8 - 36........
Figure 8.11 Example of special characters in a runtime display 8 - 37......
Figure 8.12 Example of string text used in
creating special characters in a viewport 8 - 37.......................
Figure 8.13 Example of changing colors in runtime displays 8 - 38.........
Figure 8.14 Example of drawing a line in a custom runtime display 8 - 39...
Figure 8.15 Example of using repeated strings in
custom runtime displays 8 - 40....................................
Figure 8.16 Example of setting the Repeat String parameters 8 - 41.......
Figure 8.17 Example of using data codes and index characters
in runtime displays 8 - 42.........................................
Figure 8.18 Example of custom runtime displays (viewports) 8 - 44........
Figure 8.19 Example of custom runtime displays (viewports) 8 - 45........
Figure 8.20 Example of custom runtime displays (viewports) 8 - 46........
Figure 9.1 The Copy and Paste boxes 9 - 1............................
Figure 9.2 The Copy and Paste boxes for a window 9 - 3................
Figure 9.3 Selecting the Paste destination 9 - 3........................
Figure 9.4 Copying the source viewport 9 - 4..........................
Figure 9.5 Copying the source string 9 - 5............................
Figure 10.1 The Load Config. (Int) menu 10 - 2........................
Figure 10.2 Checking available memory 10 - 4.........................
Figure A.1 Selecting the Mouse option A - 2..........................
vi
Page 9

Chapter
Chapter Objectives
A–B
1
Using This Manual
Contents
Chapter Objectives 1–1. . . . . . . . . . . . . . . . . . . . . . . . . . . . . . . . . . . . . . . .
Manual Contents 1–1. . . . . . . . . . . . . . . . . . . . . . . . . . . . . . . . . . . . . . . . . .
Intended Audience 1–2. . . . . . . . . . . . . . . . . . . . . . . . . . . . . . . . . . . . . . . .
Cautions 1–2. . . . . . . . . . . . . . . . . . . . . . . . . . . . . . . . . . . . . . . . . . . . . . . .
Related Publications 1–2. . . . . . . . . . . . . . . . . . . . . . . . . . . . . . . . . . . . . . .
Trademarks 1–3. . . . . . . . . . . . . . . . . . . . . . . . . . . . . . . . . . . . . . . . . . . . . .
The objectives of this chapter are to provide an overview of the manual
contents and organization, to describe the intended audience, and to list
related publications.
Manual Contents
The contents of this manual are briefly described in
Table 1.A
Chapter Descriptions
Chapter/
Appendix
1 Using This Manual Provides an overview of the manual.
2
3 Installation
4
5
6
7
8
9 Using Copy and Paste
10
A Connecting and Using a Mouse
Getting Started / Using
Modifying the Color CVIM
Creating Custom Serial Port
Creating Custom Runtime
Defining Strings for Serial
Loading Color CVIM /
USER–PAK Configurations
Title Description
Introduction to the
USER–PAK Option
Security Levels
Menus
Messages
Displays
Ports and Viewports
Previews the main features and capabilities of the
USER–PAK option.
Describes how to install the USER–PAK option into the
Color CVIM module, and discusses the use of the two
memory cards.
Describes how to access the setup mode, and how to set
up the different security levels.
Describes how to delete menu items, and how to modify
the text of menu items.
Describes how to create custom messages for
transmission through a serial port.
Describes how to create custom displays which appear
during runtime.
Describes how to enter string text, use valid string
elements, and set event and repetition parameters for
strings.
Describes how to use the Copy and Paste functions to
copy the settings from one tool to another of the same
type, copy one string to another, or copy one viewport or
serial port to another.
Describes how to load specific portions of Color CVIM
/ USER–PAK configurations.
Describes how to connect and use a mouse with the
Color CVIM screen menus.
Table 1.A below.
1 – 1
Page 10

Chapter 1
Using This Manual
Intended Audience
Chapter/
Appendix
Lists the ASCII characters and Color CVIM module
B Character Codes
C
Before using this manual, you should be familiar with the Color CVIM
module features and the procedures used in configuring the Color CVIM
module for operation.
ASCII Commands for the
USER–PAK Option
graphics characters that can be generated using the
character codes.
Describes the serial port ASCII commands which apply
specifically if the USER–PAK option is installed.
DescriptionTitle
• For information regarding the Color CVIM module, refer to the Color
CVIM User’s Reference Manual, Cat. No. 5370–ND009.
• If you plan to use the Color CVIM communications port (RS–232), refer
also to the Color CVIM Communications Manual, Cat. No. 5370–ND010.
• If you plan to use other software option packages along with the
USER–PAK option, refer to the user’s manuals for the respective software
package as necessary.
Notice of Attention
Related Publications
1 – 2
Notices of attention are included when the Color CVIM module or peripheral
equipment could be damaged if the listed procedure is not followed. The
following format is used:
ATTENTION: Identifies information about practices or
circumstances that can lead to personal injury or death, property
!
damage, or economic loss.
Attentions help you:
• identify a hazard
• avoid the hazard
• recognize the consequences
The following manuals are cited for reference in this manual:
• User’s Reference Manual, Bulletin 5370-CVIMC, Publication No.
5370–ND009, also referred to as the Color CVIM User’s Reference
Manual in this publication.
• Communications Manual, Bulletin 5370-Color CVIM, Publication No.
5370–ND010, also referred to as the Color CVIM Communications
Manual in this publication.
Page 11

Chapter 1
Using This Manual
• User’s Manual, Bulletin 5370-Color CVIM Module MATH-PAK Option,
Publication No. 5370–ND013, also referred to as the Color CVIM
MATH-PAK Option User’s Manual in this publication.
Trademarks
The following trademarks apply to products mentioned in this manual:
USER–PAK Option – Allen–Bradley Cat. No. 5370–CUPK
Color CVIM Module – Allen–Bradley Cat. No. 5370–CVIMC
MATH–PAK Option – Allen–Bradley Cat. No. 5370–CMPK
1 – 3
Page 12
Chapter
Chapter Objectives
A–B
2
Introduction to the USER-PAK Option
Contents
Chapter Objectives 2–1. . . . . . . . . . . . . . . . . . . . . . . . . . . . . . . . . . . . . . . .
Security Levels 2–1. . . . . . . . . . . . . . . . . . . . . . . . . . . . . . . . . . . . . . . . . . .
Custom Menu Modifications 2–2. . . . . . . . . . . . . . . . . . . . . . . . . . . . . . . . .
Custom Serial Port Messages 2–4. . . . . . . . . . . . . . . . . . . . . . . . . . . . . . . .
Custom Runtime Displays 2–5. . . . . . . . . . . . . . . . . . . . . . . . . . . . . . . . . . .
Copy and Paste Functions 2–6. . . . . . . . . . . . . . . . . . . . . . . . . . . . . . . . . .
Loading Color CVIM / USER-PAK Configurations 2–6. . . . . . . . . . . . . . . . .
Connect and Use a Mouse 2–6. . . . . . . . . . . . . . . . . . . . . . . . . . . . . . . . . . .
This chapter briefly describes the features and capabilities of the USER-PAK
option package.
Security Levels
When USER-PAK is installed in your Color CVIM module, access to the
setup mode can require the use of a password. The password is entered
through a pop-up keyboard which appears automatically when you attempt to
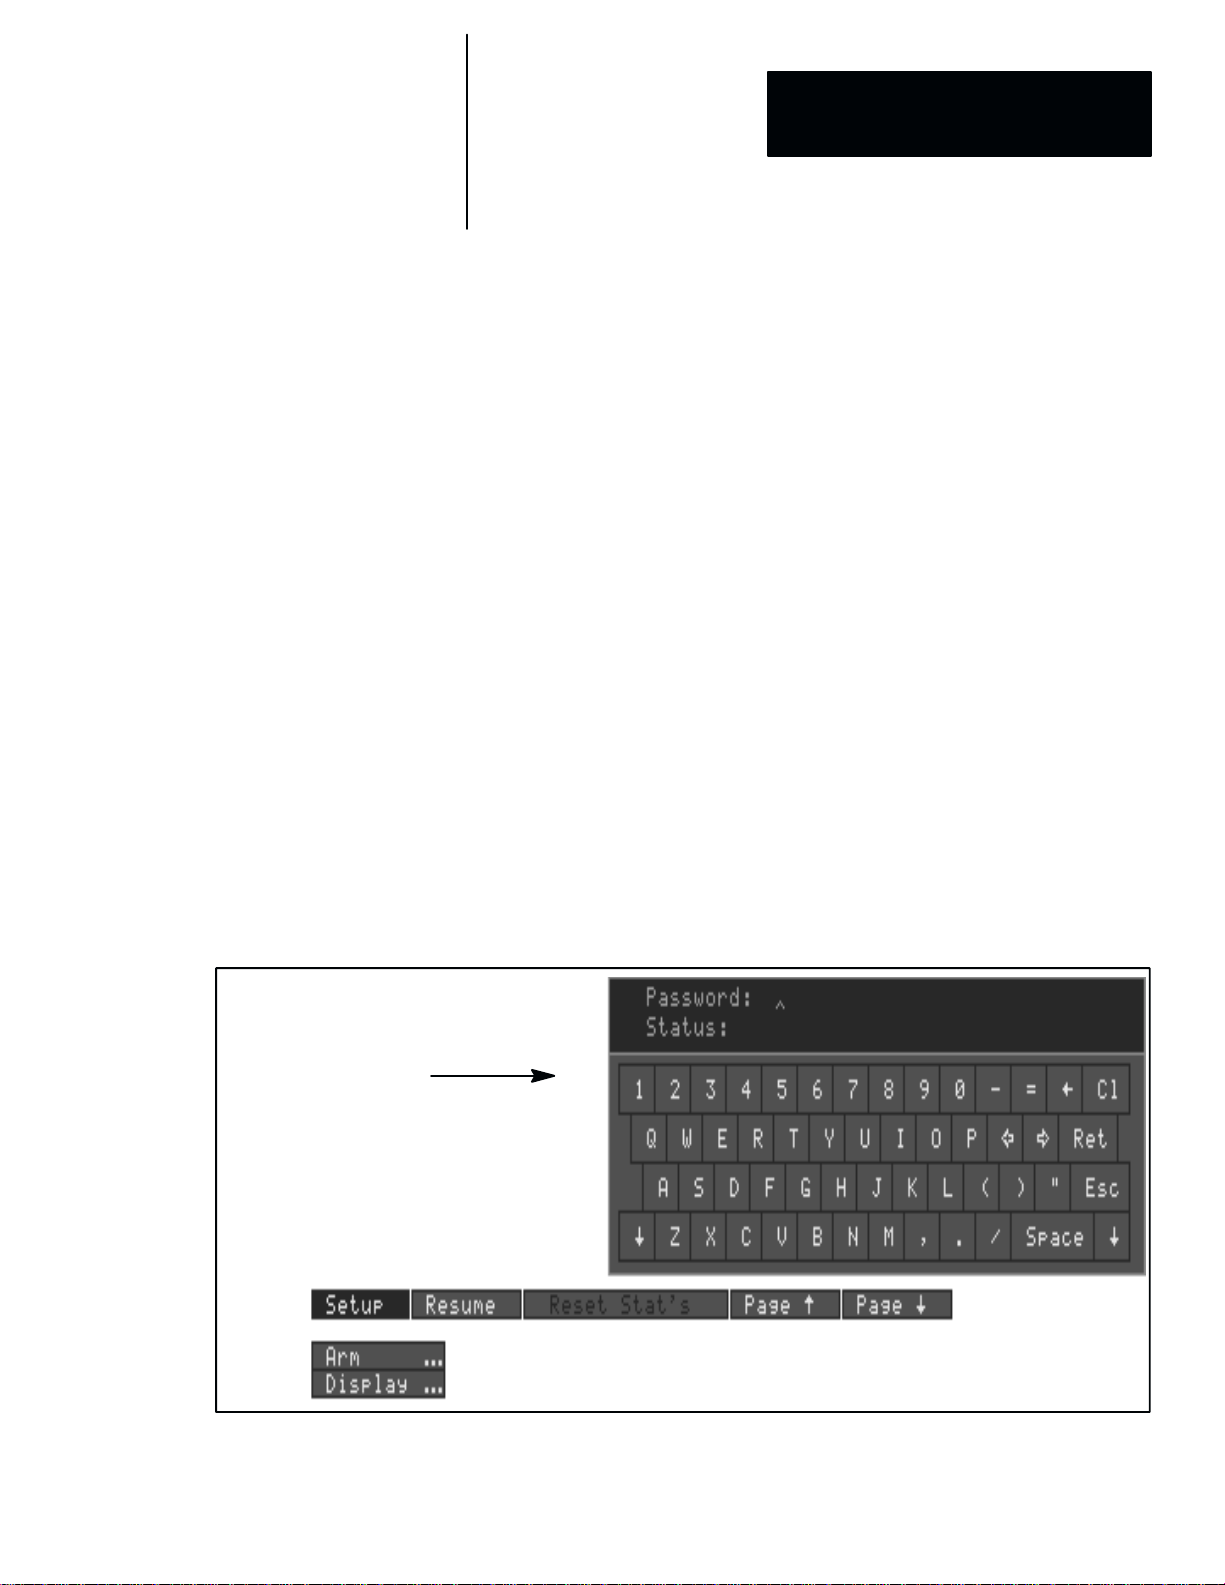
enter the setup mode (as shown in Figure 2.1).
Figure 2.1 Password entry keyboard
Password entry
keyboard
2 – 1
Page 13
Chapter 2
Introduction to the USER–PAK Option
The USER-PAK option enables access to four different levels of interaction;
we refer to these different levels as “security levels.” The different security
levels allow for implementation of a hierarchical system of access to, and
responsibility for the Color CVIM module setup.
Three security levels are defined within the setup mode, each allowing a
different level of interaction with Color CVIM / USER-PAK features:
• ADMINISTRATOR – Full access to Color CVIM / USER-PAK features.
• MANAGER – Mid-level access to Color CVIM / USER-PAK features.
• USER – Lower-level access to Color CVIM / USER-PAK features.
Access to the above security levels is controllable through the assignment
of a specific password for each level.
• RUNTIME – Access to Color CVIM runtime menus and displays does
not require a password – this RUNTIME level of interaction can be
considered as a fourth level of security.
Custom Menu Modifications
The USER-PAK option allows the ADMINISTRATOR to modify the Color
CVIM module user-interface in two ways – through deletion of menu items
from the Color CVIM pop-up menus, and/or modification of text.
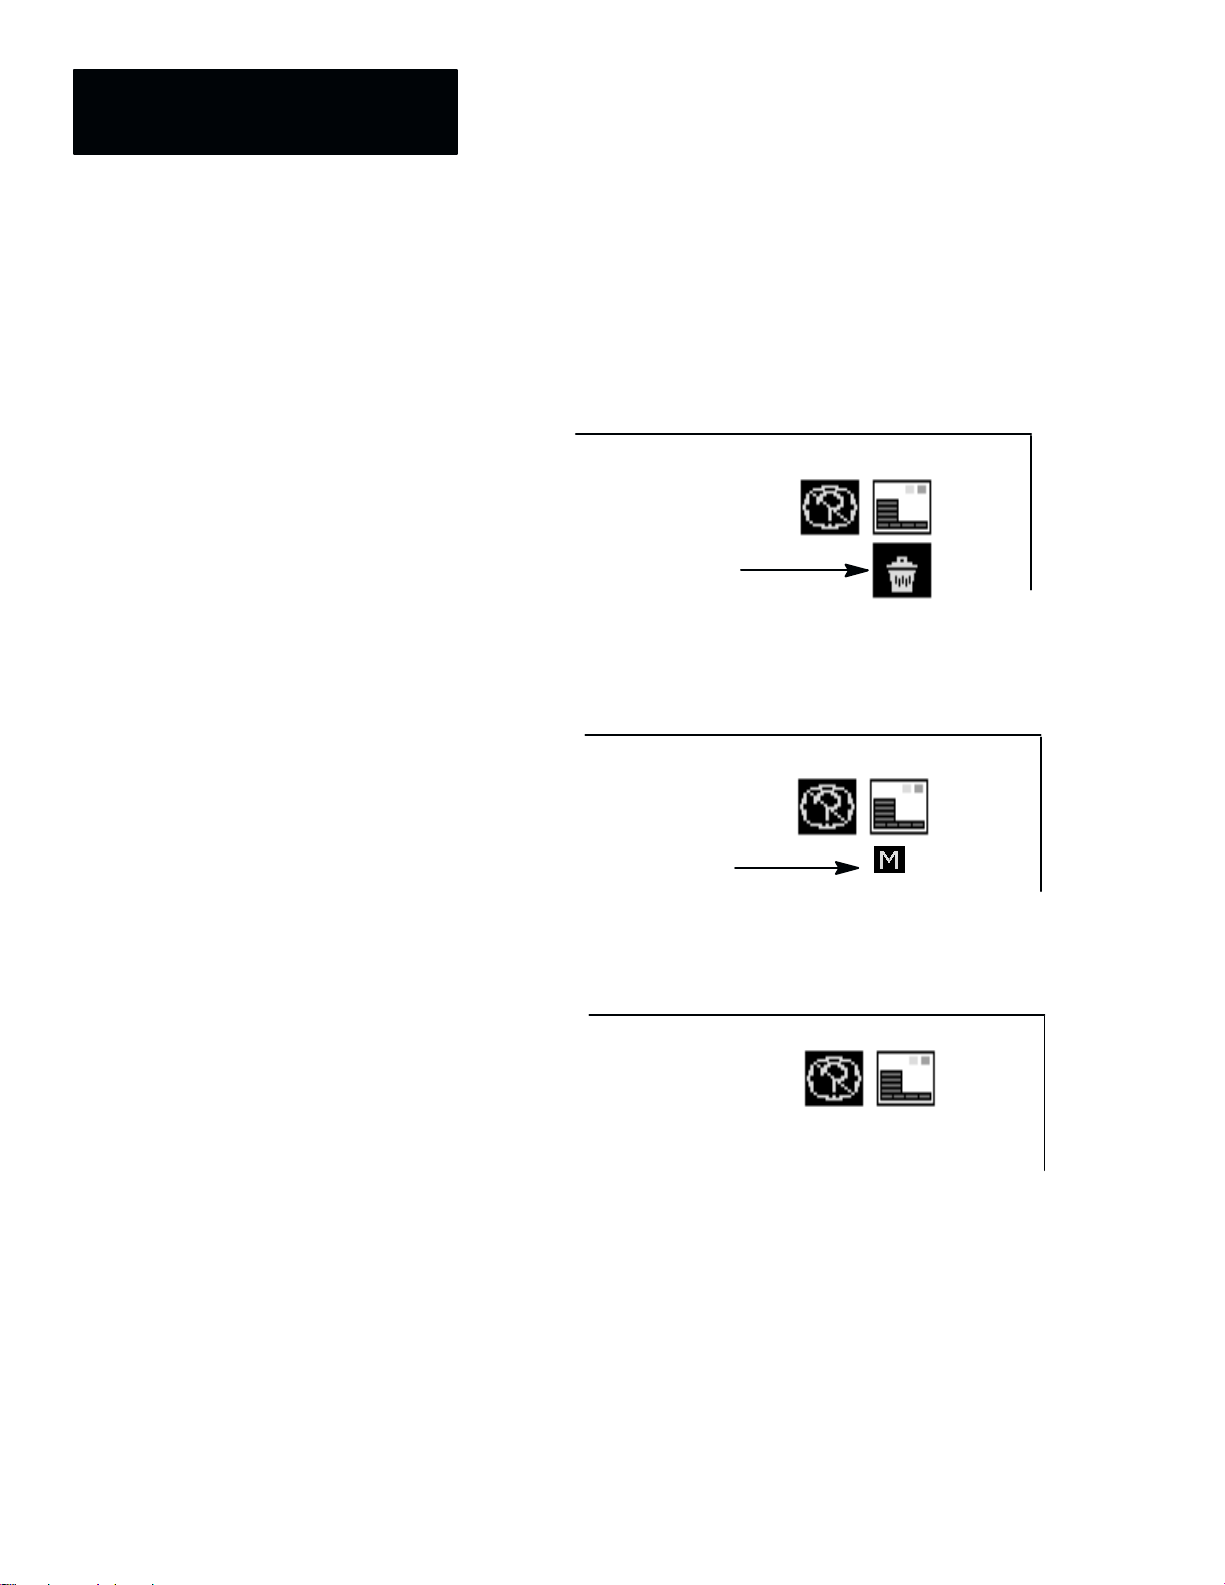
Deletion: A menu item is marked for deletion at the ADMINISTRATOR
level; menu items marked for deletion do not appear on the monitor screen at
the USER level. Any subsequent menu(s) that would have been accessible
through the use of the deleted menu item are unavailable as well.
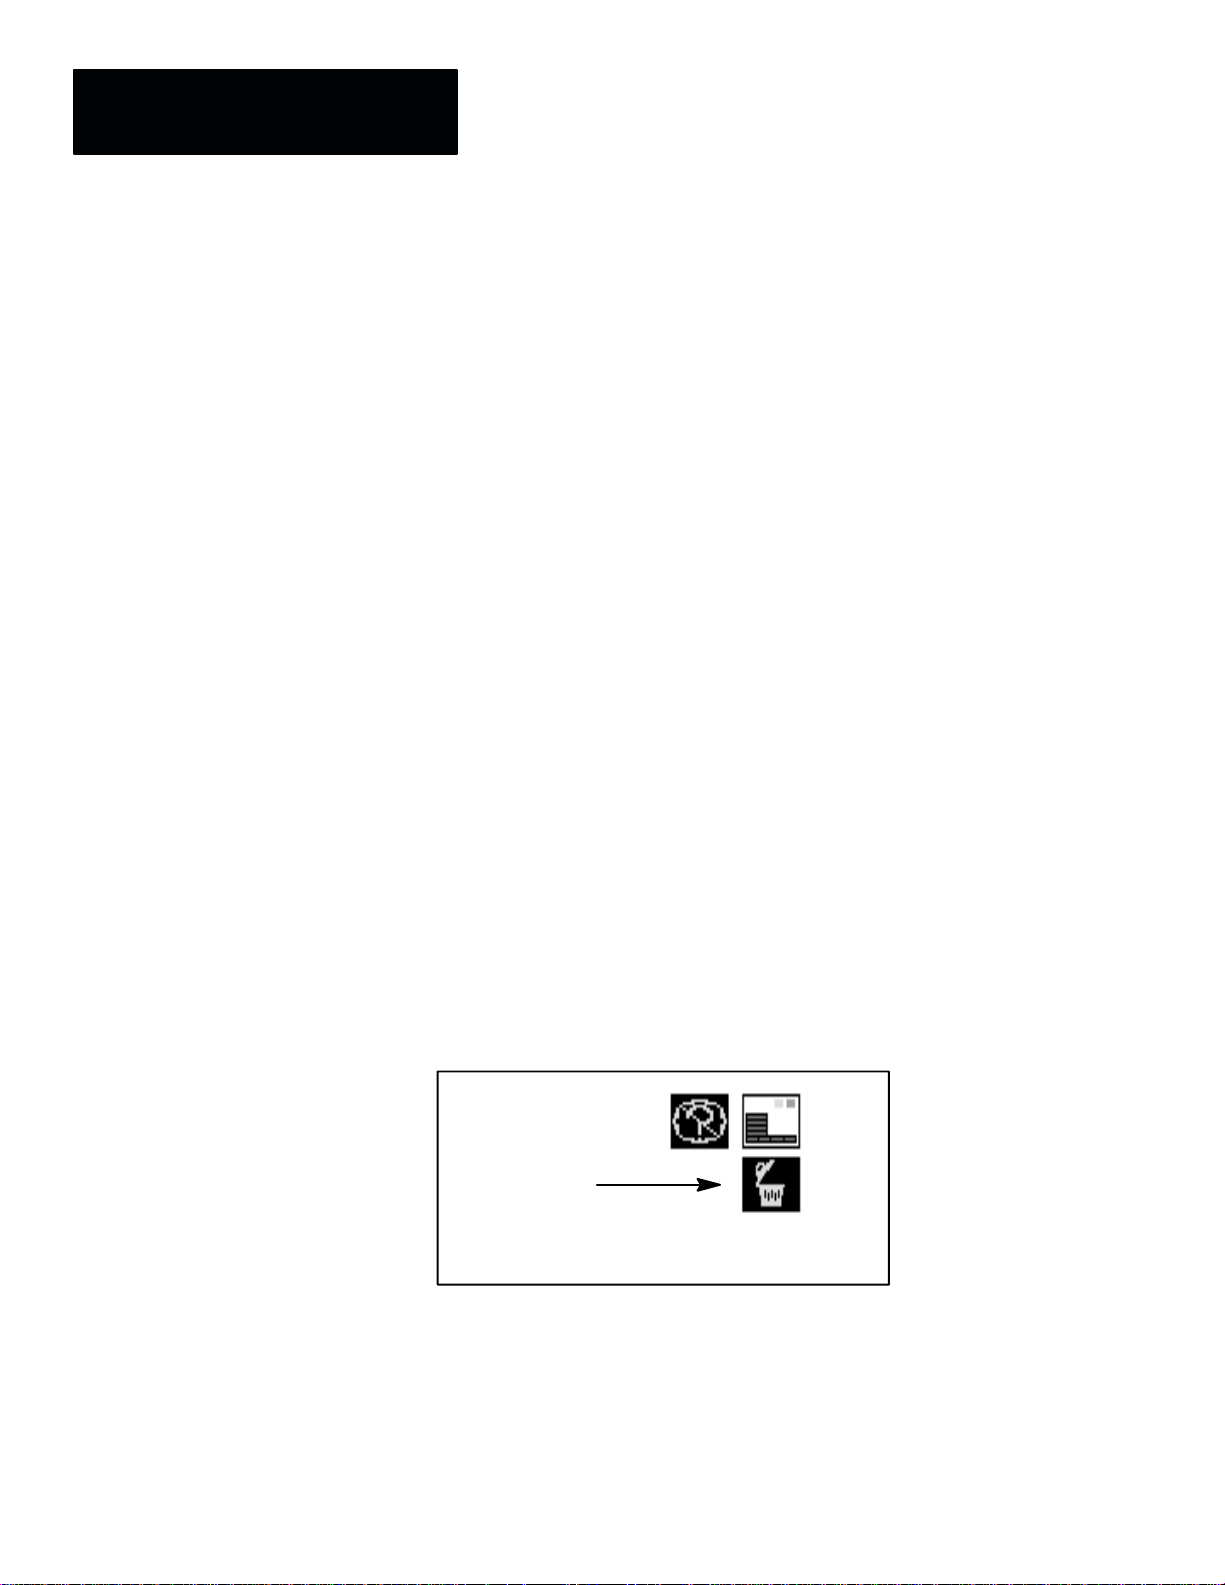
Figure 2.2 “Trash can” icon
“Trash can”
icon open
(icon is green when open)
Delete function
enabled
To enable the delete function, you pick the “trash can” icon, which appears at
the ADMINISTRATOR level; then you select or “mark” menu items for
deletion.
2 – 2
Page 14

Chapter 2
Introduction to the USER–PAK Option
Text Modification: The USER-PAK option enables the ADMINISTRATOR
to modify the text of menu items, and of onscreen messages such as the help
messages or the power-up title banner. To modify text, you use the Change
Text feature (accessed from the Envir/Cam menu).
Figure 2.3 Using the Change Text feature
2 – 3
Page 15
Chapter 2
Introduction to the USER–PAK Option
Custom Serial Port Messages
For communication between the Color CVIM module and a remote device,
the Color CVIM module has two serial ports. With the USER-PAK option
installed, you can create your own custom serial port messages for
transmission through the serial port. The messages consist of ASCII
characters. These messages can be transmitted automatically by the Color
CVIM module upon the occurrence of a specified “event” – they need not be
“solicited” (requested by command) by the connected device.
Figure 2.4 Creating custom serial port messages
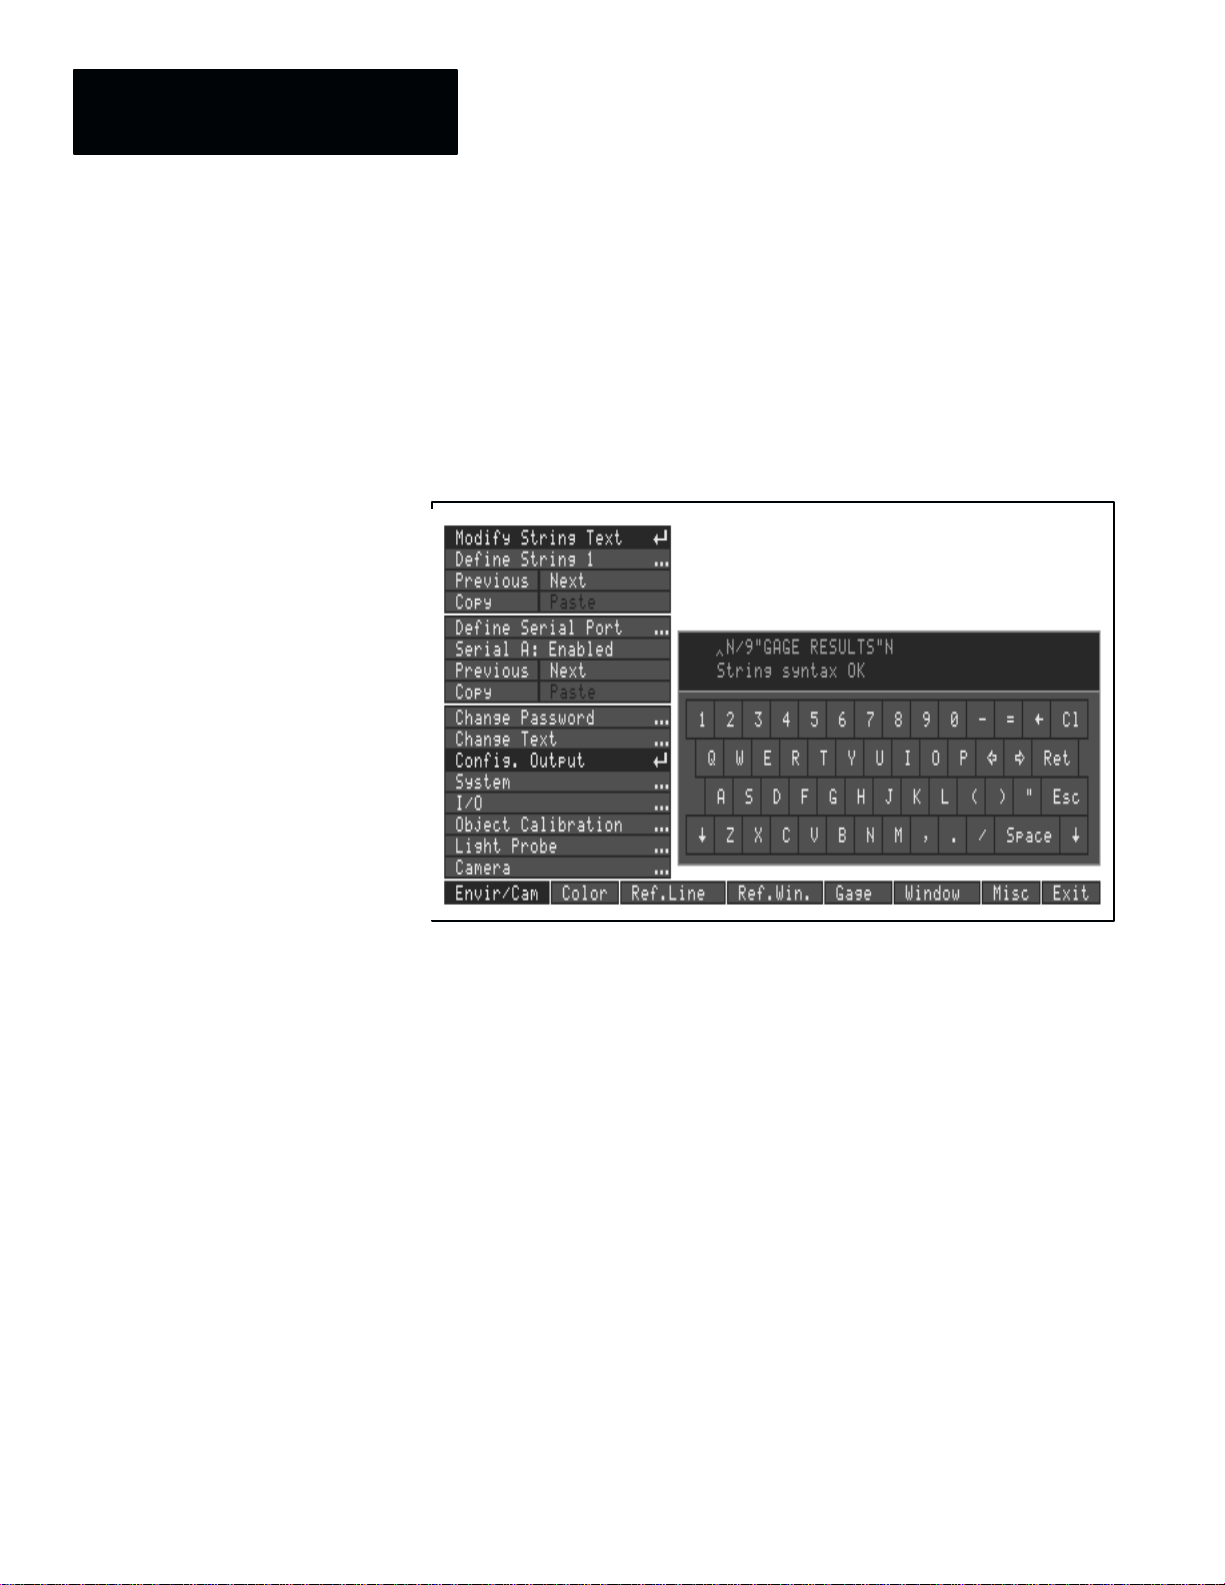
You create serial port messages using the Config. Output feature, which
becomes available on the Envir/Cam menu with the USER-PAK option
installed.
Within each message you can send literal text, results and other data on
specific tools, statistical data, and other information. You can also define the
conditions under which a serial message is transmitted – the message can be
sent after each inspection, or only upon certain conditions, such as the failure
of a specific tool, for instance.
2 – 4
Page 16
Chapter 2
Introduction to the USER–PAK Option
Custom Runtime Displays
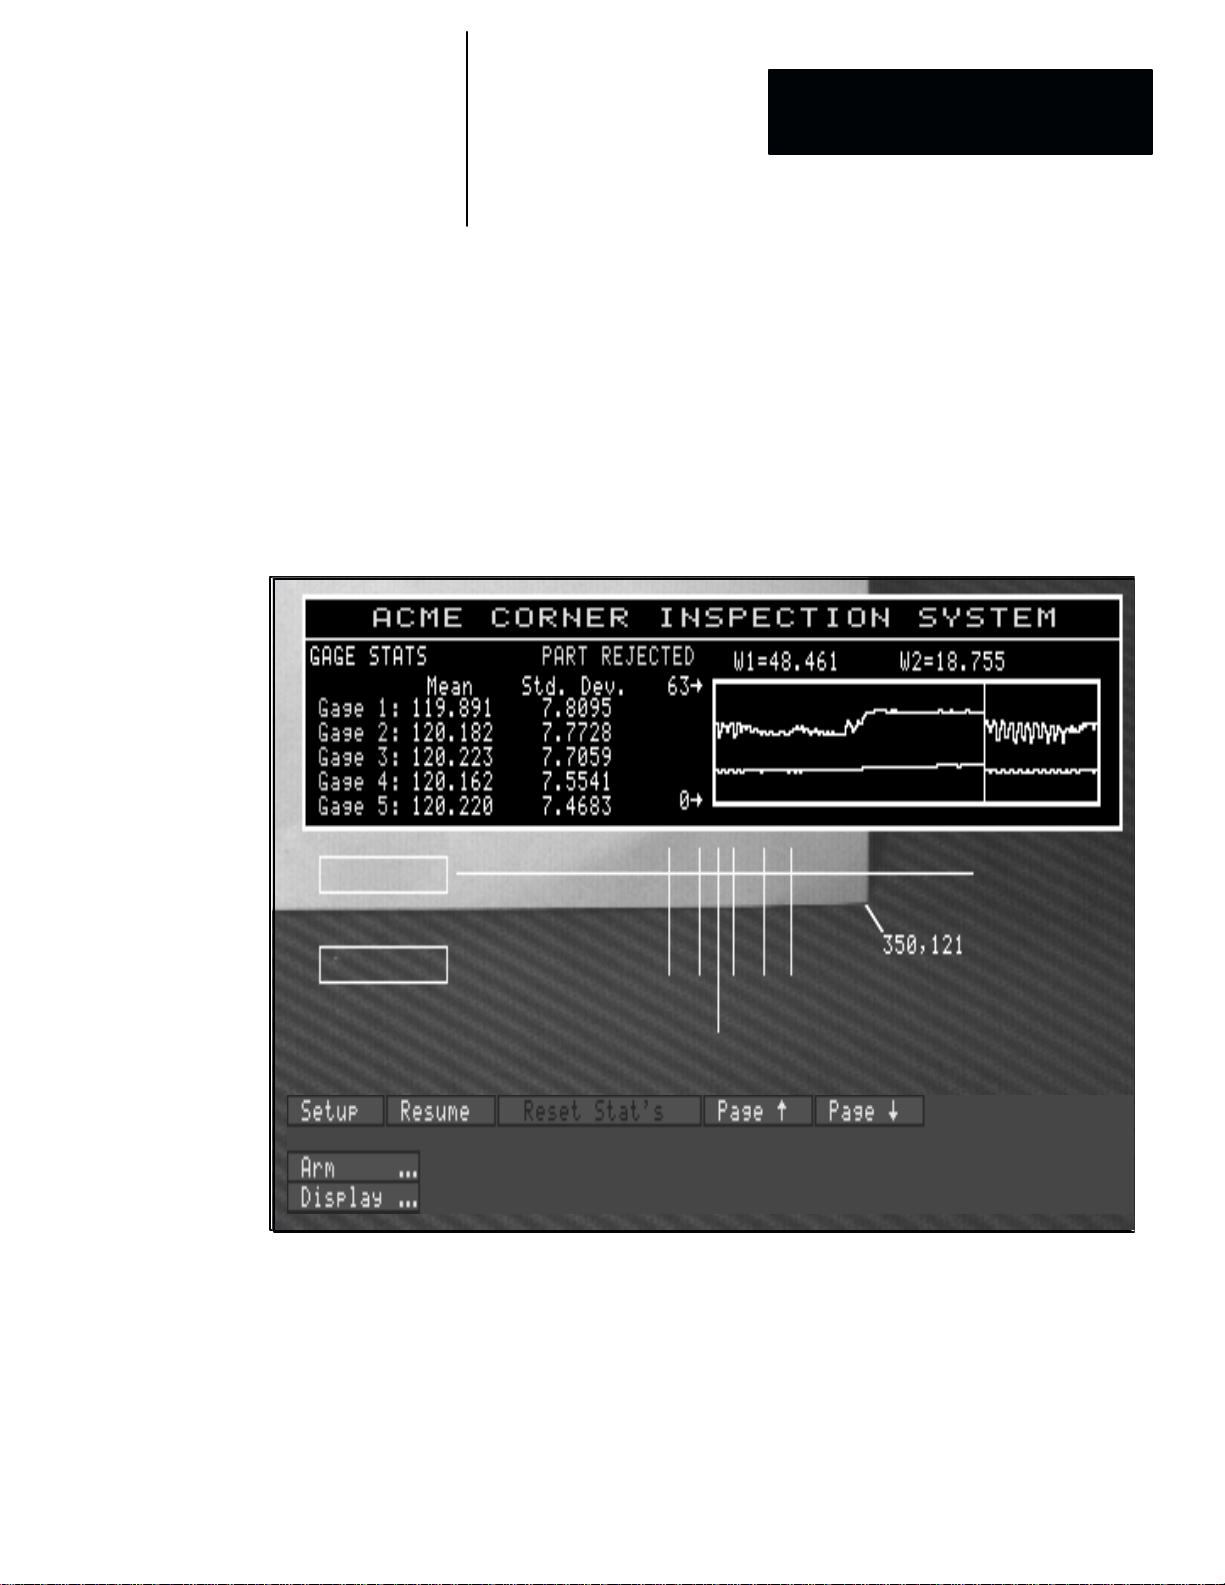
Runtime displays are those displays which appear on the monitor while the
Color CVIM is operating in run mode. You create custom runtime displays
by configuring “viewports,” using the Config. Output feature, which
becomes available on the Envir/Cam menu with the USER-PAK option
installed. You can select display borders and background color, and you
define the viewport contents. Viewports can contain text, numerical data,
line graphics, and real-time graphs. You also define the conditions under
which viewport contents are displayed – the contents can be displayed after
each inspection, or only upon certain conditions, such as the failure of a
specific tool, for instance.
Figure 2.5 Example of a custom runtime displays
2 – 5
Page 17
Chapter 2
Introduction to the USER–PAK Option
Copy and Paste Functions
Loading Color CVIM / USER-PAK Configurations
With the USER-PAK option installed, you can copy the settings from one
gage or window to another using the Copy and Paste menu items which are
part of the new USER-PAK menus, and which become part of the previous
Color CVIM gage and window menus. You can also copy the contents of
serial ports or viewports and their respective strings.
Figure 2.6 Copy and Paste boxes
Window menu
Copy and Paste
With USER-PAK installed, you can selectively load portions of the default
configuration or the internally stored configuration. This allows you, for
example, to load previously-stored user interface modifications, while
retaining a new Color CVIM inspection configuration.
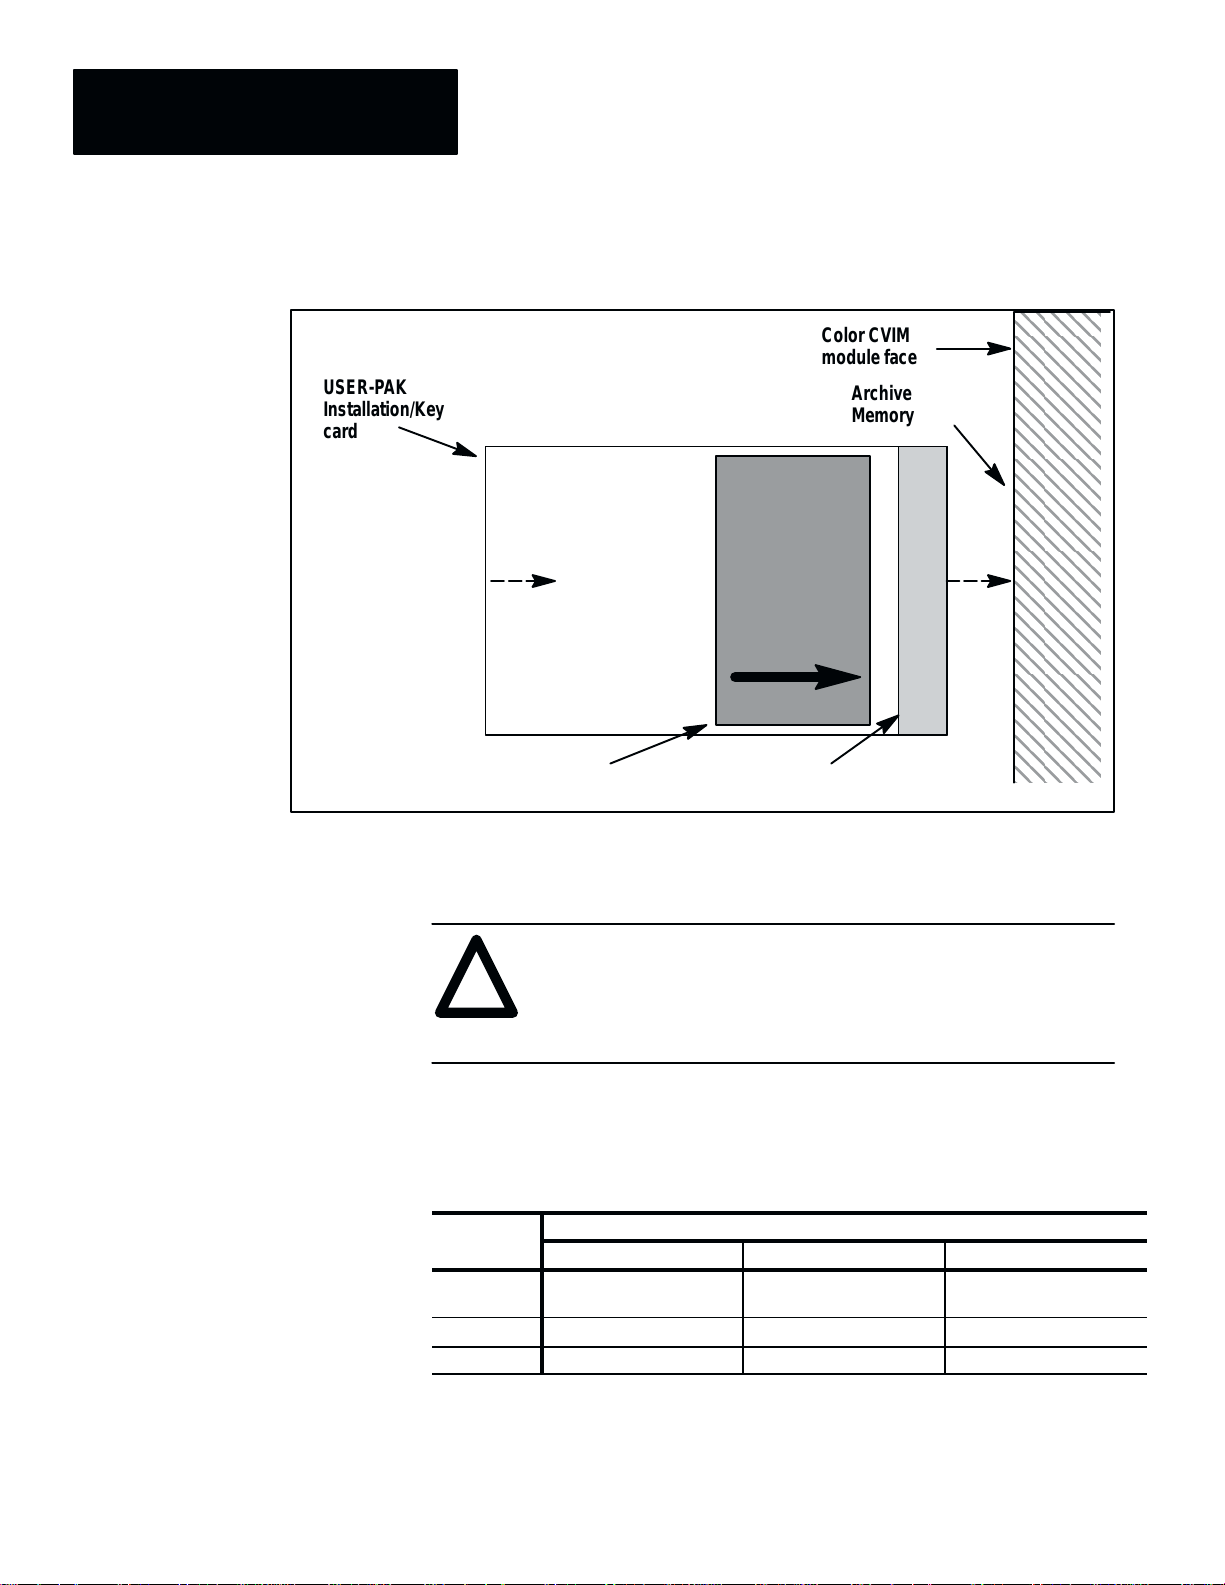
Figure 2.7 Loading Color CVIM / USER-P AK configurations
Archival menu
Load Config ( Int )
menu
2 – 6
Page 18

Chapter 2
Introduction to the USER–PAK Option
Connect and Use a Mouse
With the USER-PAK option installed, you can connect a mouse or trackball
to a Color CVIM serial port, and use the mouse to manipulate the Color
CVIM menus, instead of a light pen.
2 – 7
Page 19

Chapter
Chapter Objectives
A–B
3
Installation
Contents
Chapter Objectives 3–1. . . . . . . . . . . . . . . . . . . . . . . . . . . . . . . . . . . . . . . .
The T wo USER-PAK Memory Cards 3–1. . . . . . . . . . . . . . . . . . . . . . . . . . . .
Installing the USER-PAK Option 3–1. . . . . . . . . . . . . . . . . . . . . . . . . . . . . .
Using the Setup Card 3–3. . . . . . . . . . . . . . . . . . . . . . . . . . . . . . . . . . . . . .
Accessing Setup Mode with USER-PAK Installed 3–4. . . . . . . . . . . . . . . . .
This chapter describes how to install the USER-PAK option in the
Allen-Bradley 5370-CVIMC Color CVIM module, including the use of the
two memory cards on which the USER-PAK option software resides.
The Two USER-PAK Memory Cards
Installing the USER-PAK Option
The USER-PAK option is provided on two separate memory cards. These
two cards are labeled Installation / Key card and Setup card respectively.
The purpose of each card is described below:
• Installation / Key card – This card serves two purposes: Use this card to
install the USER-PAK option into the Color CVIM module; use this card
also to access the setup mode in the case of lost passwords.
Important: Because this card can be used to override the Color CVIM
system security (see Chapter 4), it is suggested that this card be kept in a
secure place when not in use, and that access to this card be allowed only
to the appropriate authorized personnel.
• Setup card – Insert this card into the Archive Memory slot after the
USER-PAK option has been installed. This card must remain in the
Archive Memory slot during setup mode in order to access most of the
USER-PAK option capabilities.
This section describes how to install the USER-PAK option. You need only
install the USER-PAK option once; once installed, the USER-PAK option
remains installed for all subsequent powerups.
To install the USER-PAK option in your Color CVIM module:
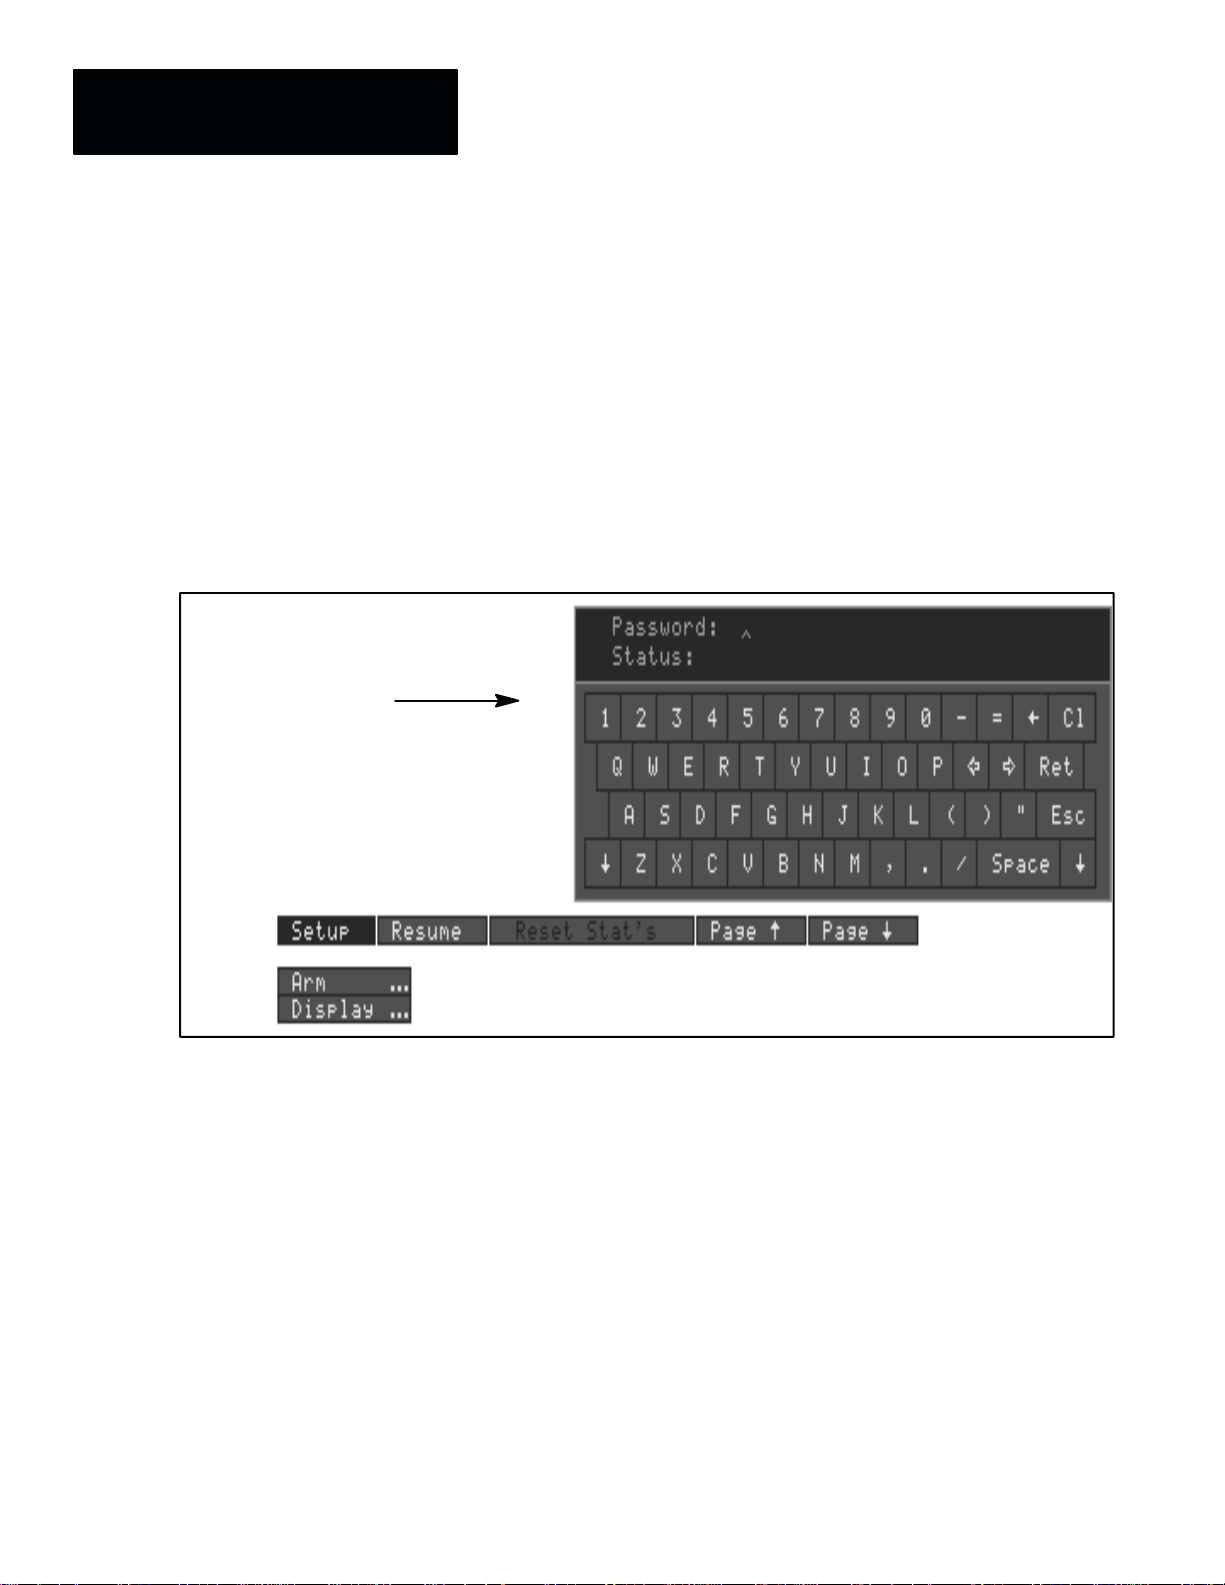
• Remove DC power from the Color CVIM module.
• Insert the Installation / Key card into the Archive Memory slot on the
Color CVIM module. Insert the end with the metal strip facing right (see
Figure 3.1, page 3 – 2):
3 – 1
Page 20
Chapter 3
Installation
USER-PAK
Installation/Key
card
Figure 3.1 Inserting the USER-P AK Installation / Key card
Color CVIM
module face
Archive
Memory slot
Card Label
Metal Strip
• Apply the power to the Color CVIM module; this starts the loading
sequence.
ATTENTION:
!
The top three LEDs on the Color CVIM module indicate the progress of
the three-phase loading process, as follows:
LEDs
Pass/Fail
Trigger 1 Green Green Off
Trigger 2 Off Green Green
Do not remove power to the Color CVIM module during
loading of the USER-PAK option. Doing so may damage the
Color CVIM module.
USER-PAK Loading Phase
1
Red-to-yellow-
to-green
2 3
Green
Red-to-yellow-
to-green
3 – 2
The loading process requires about 45 seconds, with each phase taking
about 15 seconds. When the loading process is complete, the Color
CVIM module begins its normal powerup sequence.
Page 21

Chapter 3
Installation
• Verify that the USER-PAK option is installed by checking the title banner
on the monitor after power-up; if the USER-PAK option is installed, there
is a message on the banner indicating the presence of the USER-PAK
option.
• Remove the Installation / Key card from the Archive Memory slot.
Card Security: Because the Installation / Key card can be used to
override the Color CVIM system security (see Chapter 4), it is suggested
that this card be kept in a secure place when not in use, and that access to
this card be allowed only to the appropriate authorized personnel.
Using the Setup Card
To access all of the USER-PAK features while in setup mode, the Setup card
must be inserted.
To insert the Setup card:
• Insert the Setup card into the Archive Memory slot on the Color CVIM
module with the card’s metal strip facing right.
• Leave the Setup card in the Archive Memory slot as required during your
configuration of the Color CVIM module.
Features for which Setup Card is not required: Most USER-PAK features
require the Setup card be inserted; the only features which do not require the
Setup card are Change Password (see Chapter 4), and the Copy and Paste
feature for tools (see Chapter 9). When the Setup card must be inserted to
access a feature, this is specifically stated as appropriate in this manual.
Removing the Setup Card: You may remove the Setup card from the Color
CVIM module at any time – except when the Memory Active LED on the
Color CVIM module is ON. The Memory Active LED goes ON during setup
mode when certain USER-PAK features are used.
ATTENTION:
!
Do not remove the Setup card from the Archive Memory slot
when the Memory Active LED on the Color CVIM module is
ON. Doing so will cause the Color CVIM module to shut
down, which will result in the loss of your working
configuration (the internally-stored configuration is not
effected).
Restarting the Color CVIM module: If the Color CVIM module operation
has shut down due to Setup card removal with the Memory Active LED ON,
restart the Color CVIM module when appropriate by cycling Color CVIM
module power off and on again.
3 – 3
Page 22
Chapter 3
Installation
Accessing Setup Mode with USER-PAK Installed
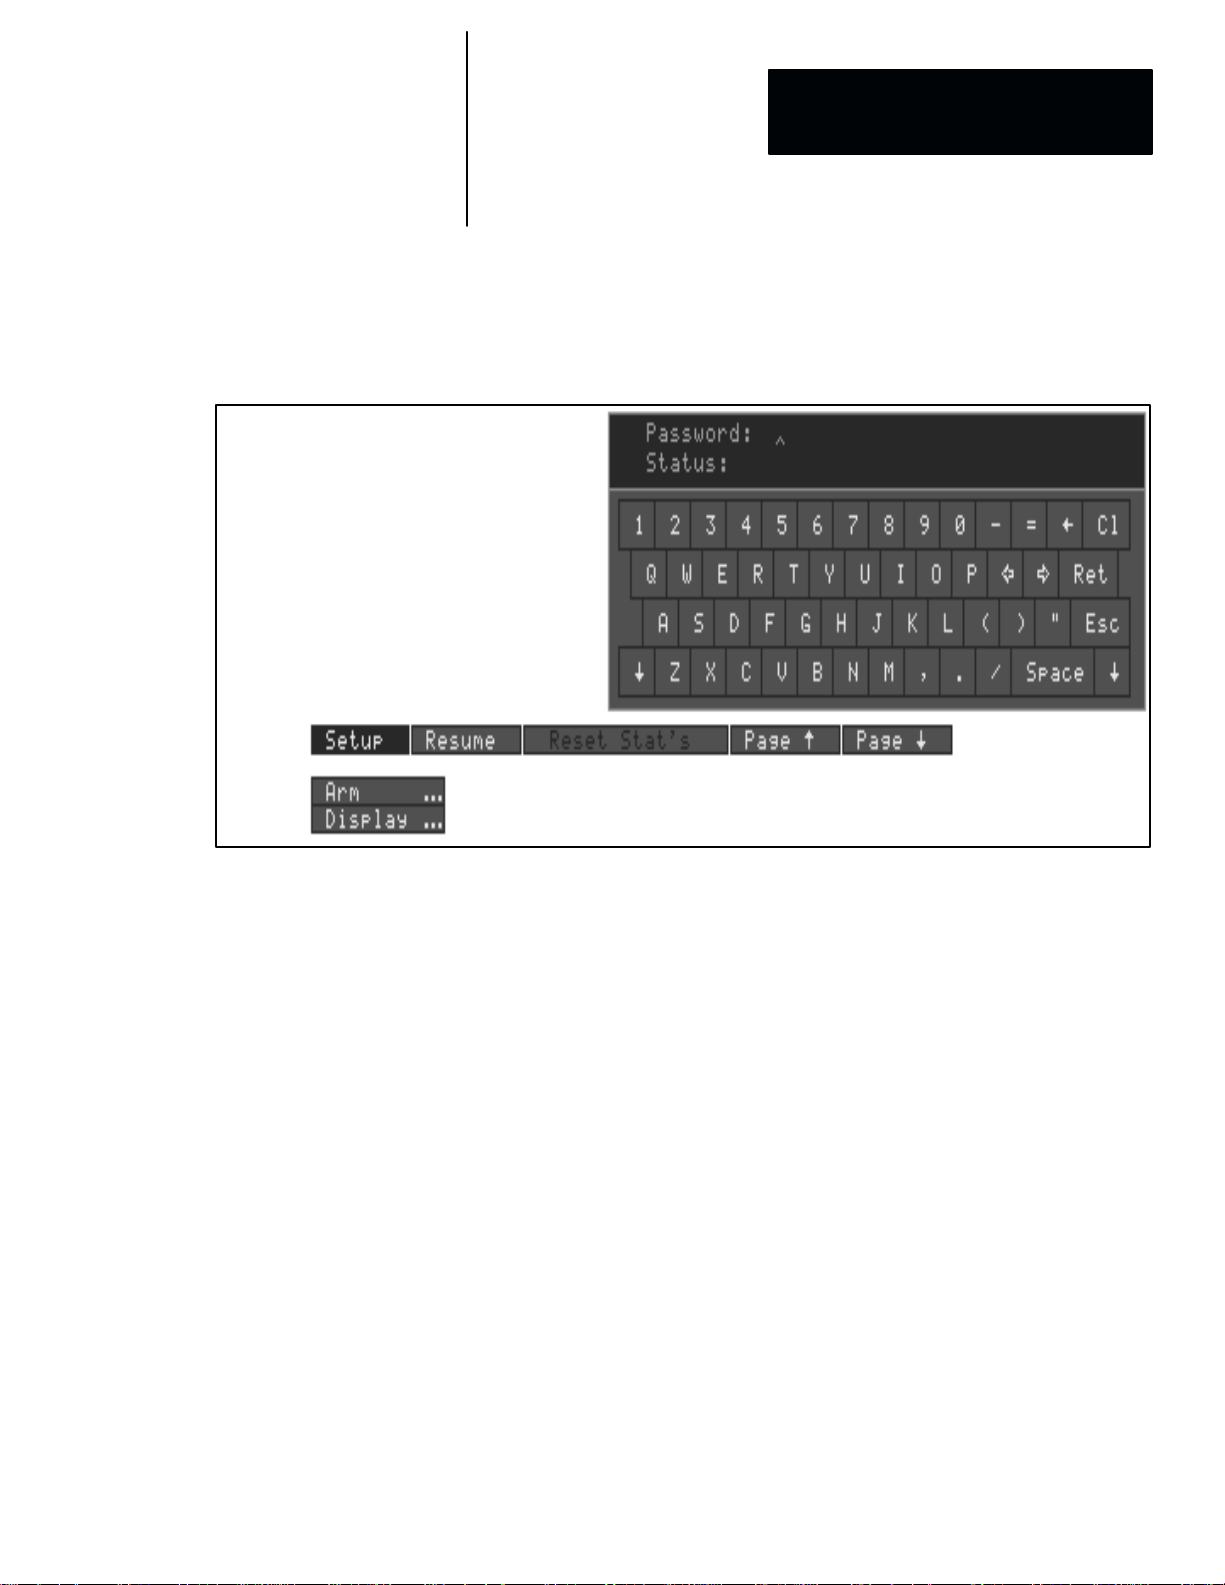
Password entry
keyboard
Upon installation of the USER-PAK option, access to the setup mode
requires the use of a password. The password is entered through a pop-up
keyboard which appears when you pick the Setup box, as shown in
Figure 3.2.
Figure 3.2 Password Entry keyboard
3 – 4
Note: The password requirement for entry can be disabled; see Chapter 4 for
more information on entering the setup mode.
Page 23

Chapter
Chapter Objectives
A–B
4
Getting Started / Using the Security Levels
Contents
Chapter Objectives 4–1. . . . . . . . . . . . . . . . . . . . . . . . . . . . . . . . . . . . . . . .
Some Questions and Answers about System Security 4–1. . . . . . . . . . . . .
Accessing the Setup Mode 4–3. . . . . . . . . . . . . . . . . . . . . . . . . . . . . . . . . .
Security Levels 4–4. . . . . . . . . . . . . . . . . . . . . . . . . . . . . . . . . . . . . . . . . . .
Changing Passwords 4–6. . . . . . . . . . . . . . . . . . . . . . . . . . . . . . . . . . . . . .
Setting Security ON/OFF 4–9. . . . . . . . . . . . . . . . . . . . . . . . . . . . . . . . . . . .
Lost Passwords – Using the Installation/Key Card 4–10. . . . . . . . . . . . . . . .
This chapter describes:
• How to enter the setup mode with the USER-PAK option installed.
• Each of the security levels.
• How to change passwords.
• How to enter setup mode using the Installation / Key Card.
Some Questions and Answers about System Security
This section introduces security by posing some questions and answers.
What type of system security does USER-PAK provide?
With the USER-PAK option installed, access to the setup mode requires a
password (unless security is turned OFF – see Setting Security ON/OFF in
this chapter). The password requirement can help provide assurance against
unauthorized modification of the Color CVIM configuration, and help
prevent unauthorized personnel from taking the Color CVIM module out of
run mode.
What are “security levels?”
The USER-PAK system security enables access to four different levels of
interaction; we refer to these different levels as “security levels.”
Three security levels are defined within the setup mode, each allowing a
different level of interaction with Color CVIM / USER-PAK features:
• ADMINISTRATOR – Full access to Color CVIM / USER-PAK features.
• MANAGER – Mid-level access to Color CVIM / USER-PAK features.
• USER – Lower-level access to Color CVIM / USER-PAK features.
Access to Color CVIM runtime menus and displays does not require a
password – this “runtime” level of interaction can be considered as a fourth
level of security.
4 – 1
Page 24

Chapter 4
Getting Started/Using the Security Levels
Why have different security levels available?
The different security levels allow for implementation of a hierarchical
system of access to and responsibility for the Color CVIM module setup.
For instance, a system “administrator” can be designated; this person would
have access to the ADMINISTRATOR level. The ADMINISTRATOR could
be responsible for creating restrictions to the menu items available at the user
level (through menu item deletion), for modifying menu item text, and for
maintenance and security of the passwords which allow access to the
different levels.
A “manager” can be designated, having access to the MANAGER level (that
is, having access to any deleted menus items). Designated “users” would
have access to the USER level; a “user” cannot, for example, modify menus,
change passwords, or set security ON or OFF. The “user” is able to use the
other USER-PAK and base Color CVIM module capabilities, except those
deleted from the menus at the system administrator level. Finally, at the
“runtime” level, only use of runtime menus and displays is available.
How do you enter a password for access to the setup mode?
You enter the password through the password keyboard; this keyboard
appears automatically when you select Setup on the runtime screen.
What happens if a password is lost?
Entry to the setup mode can be enabled through the use of the USER-PAK
Installation/Key card, should passwords be lost. See “Lost Passwords –
Using the Installation/Key Card” later in this chapter.
4 – 2
Page 25
Chapter 4
Getting Started/Using the Security Levels
Accessing the Setup Mode
After USER-PAK installation, accessing the setup mode requires entry of a
password (unless security has been turned off – see “Setting Security
ON/OFF” later in this chapter).
Figure 4.1 Password entry keyboard
To enter the setup mode from run mode or standby mode (see Figure 4.1,
page 4 – 3):
• Pick the Setup box on the runtime display, which causes the password
keyboard to appear.
• Enter the appropriate password on the keyboard, and then pick Ret.
Listed below are further considerations for accessing the setup mode:
First Time Entry – Default Password: For entering the setup mode the
first time after installing the USER-PAK option, the default 3-character
password is A-B.
The initial entry will access the ADMINISTRATOR level of the setup mode.
Non-unique passwords: If the same password is assigned for two or more
levels, the password will access the highest level for that password.
Case-sensitivity: Password entry is case-sensitive. Use the “shift” arrow key
(lower left/right corners) to access the lower-case keyboard if necessary.
Password Display: The characters you select will appear as asterisks to the
right of Password: in the keyboard display.
Incorrect password: If you have not entered the password correctly, the
Status: line in the keyboard will display Incorrect Password:
4 – 3
Page 26

Chapter 4
Getting Started/Using the Security Levels
If this happens, simply try entering the password again. You can try as many
times as is necessary to correctly enter the password.
Security Levels
No Keyboard – Setup Mode entered Directly:
If, when you pick the
Setup box, the Color CVIM module goes directly to setup mode, this
indicates Security has been turned OFF (see “Setting Security ON/OFF” later
in this chapter to display the password entry keyboard with security OFF).
When you enter the setup mode with USER-PAK installed, you enter one of
three security levels of the setup mode – ADMINISTRATOR, MANAGER,
or USER level (see “Accessing the Setup Mode” in this chapter). A fourth
security level is the “runtime” level – access to runtime menus and displays
during run mode – which does not require a password.
You cannot change your current security level directly within setup mode.
To change security levels, you must exit to run mode, then reenter setup
mode using the appropriate password for the security level you want to enter.
The different security levels each allow a different level of interaction with
the base Color CVIM module functions and USER-PAK functions.
Table 4.A, page 4 – 4, summarizes the features available at each level.
Table 4.A
Functions/Features at each Security Level
4 – 4
Functions/
Functions/
Features
Change Password
Set Security ON/OFF
Change Text
Menu Item Deletion
Access Deleted Menu Items
Define Serial Ports
Define Viewports
(Base Color CVIM) Setup Mode
All Runtime Menus/Displays
1
Menu item deletion can be used to selectively delete (deny access to) setup mode functions that are otherwise available at the USER level.
2
Availability of functions at USER level depends on which menu items are deleted.
Functions
Change Color Name
1
Administrator
n
n
n
n
n n
n n
n n
n n
n n n
n n
Security Level
Manager User Runtime
2
n
2
n
2
n
n
n
Page 27

Chapter 4
Getting Started/Using the Security Levels
As shown in Table 4.A, the ADMINISTRATOR level allows access to all the
USER-PAK option and base Color CVIM functions, including exclusive
access to the first four functions listed.
The ADMINISTRATOR for a given system can thus be assigned sole
responsibility for: creating restrictions to the menu items available at the
user level (through menu item deletion); for modifying menu item text; for
setting Security ON/OFF; and/or for assigning the passwords which allow
access to the different levels.
Note that the subset of features available at the MANAGER and USER
levels is identical, except that the MANAGER has access to menu items
which have been deleted, while the USER does not. Thus the degree of
difference in available features at these two levels, for a given system, is
determined by the ADMINISTRATOR (through menu item deletion).
4 – 5
Page 28
Chapter 4
Getting Started/Using the Security Levels
Security Level Indication
While in setup mode with the USER-PAK option installed, the icons in the
upper right corner of the screen indicate the current security level:
“Trash can” icon
(Administrator Level)
At the ADMINISTRATOR level, the trash can icon appears on the screen.
Changing Passwords
“M” icon
(Manager Level)
If you have entered the MANAGER level, the letter “M” is displayed.
If you have entered the USER level, no security-level icon is displayed.
This section describes the procedure for changing passwords. Passwords can
be changed at the ADMINISTRATOR level only.
4 – 6
Assigning unique passwords: In order to create the availability of access to
each of the different security levels, you must assign a unique password to
Page 29
Chapter 4
Getting Started/Using the Security Levels
each level. If the same password is assigned for two or more levels, the
password will access the highest level for that password.
For example, if a particular password is used for both the
ADMINISTRATOR and MANAGER levels, using that password will access
the ADMINISTRATOR level. This means, in this case, the MANAGER
level will not be accessible.
Default Password: When first installed, the USER-PAK option assigns the
default 3-character password A-B to all three security levels. Before you can
access each different security level, you must assign a unique password to
each level.
Note: It is suggested, for greater security, that the passwords be changed
as soon as possible upon installing the USER-PAK option.
Effect of Password Change: After changing a password, the new password
is immediately stored in non-volatile memory; the next time you want to
enter the setup mode at the security level for which you have just changed
the password, you must use the new password.
Security level selected
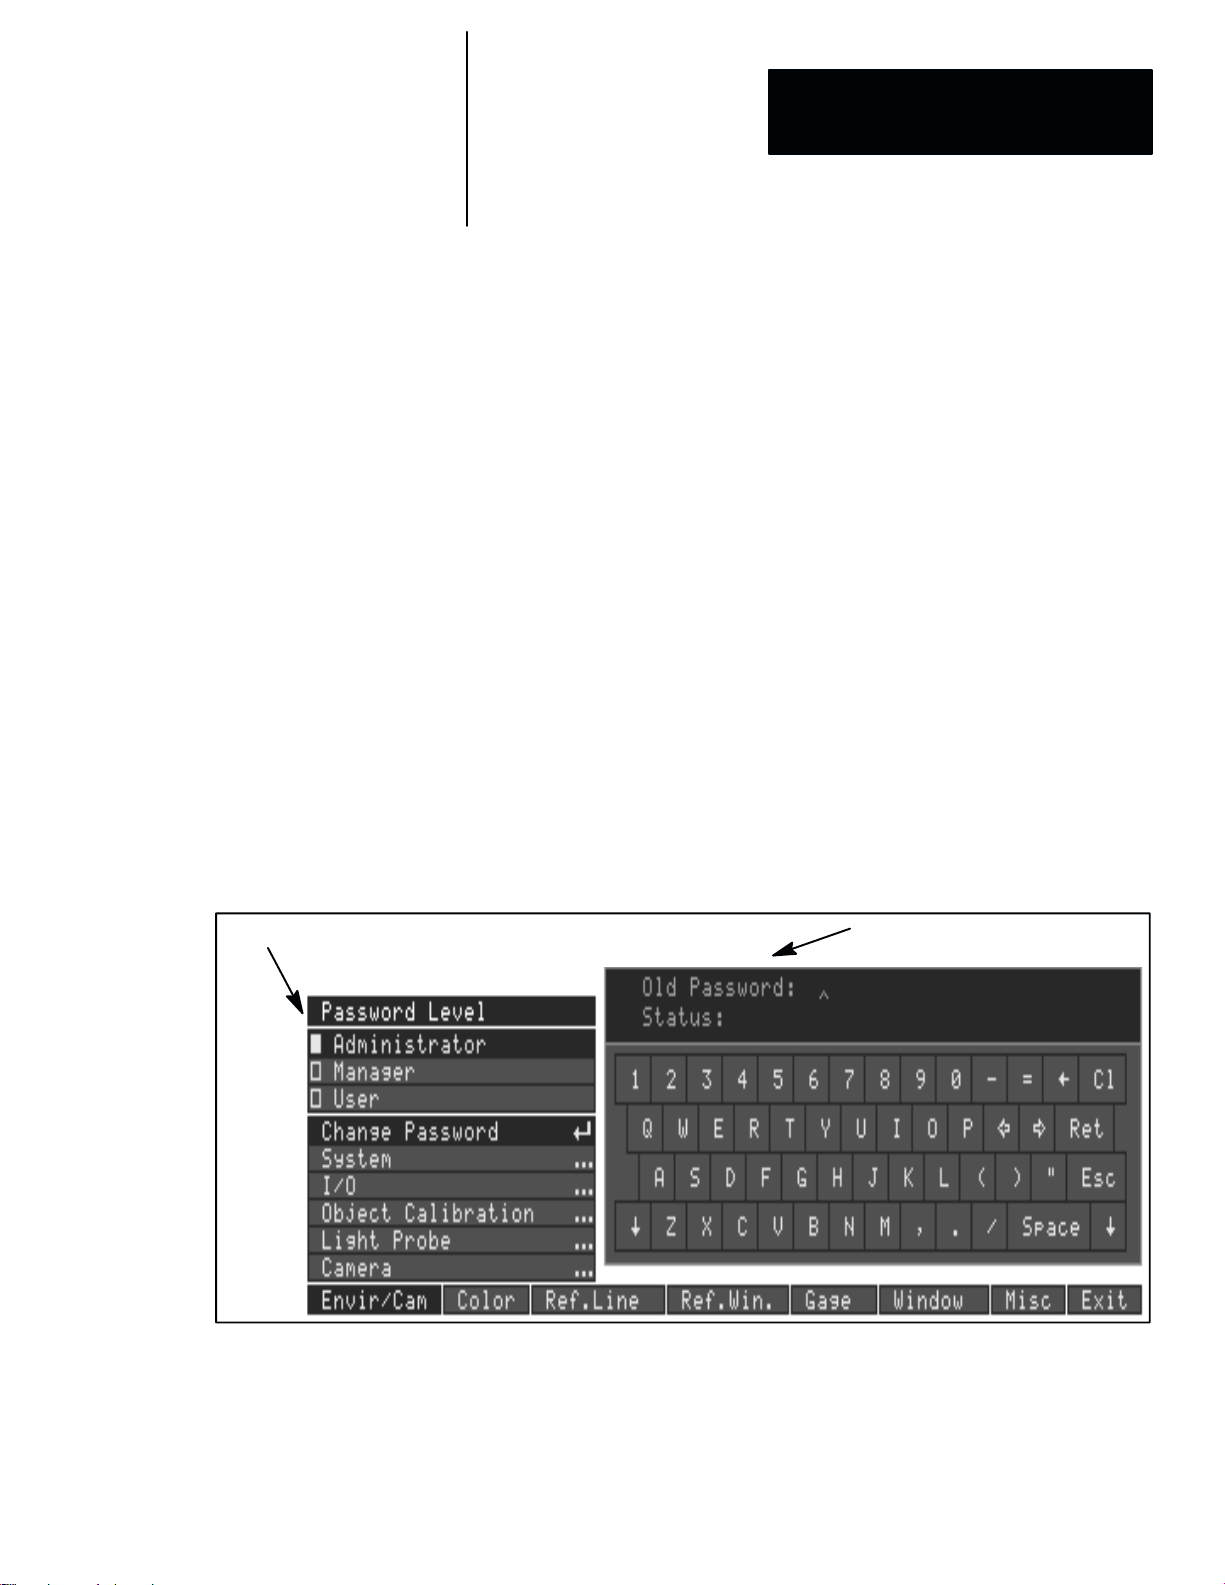
To change a password:
• Pick Envir/Cam → Change Password to access the Password Level
menu and display the keyboard (see Figure 4.2).
Figure 4.2 Password entry keyboard
Password keyboard
• Pick the security level box – Administrator, Manager, or User – for
which you are changing the password, on the Password Level menu.
• Enter the old (current) password for the selected level, or the
ADMINISTRATOR level password, using the password keyboard, and
then pick Ret. You will then be prompted for the new password.
4 – 7
Page 30
Chapter 4
Getting Started/Using the Security Levels
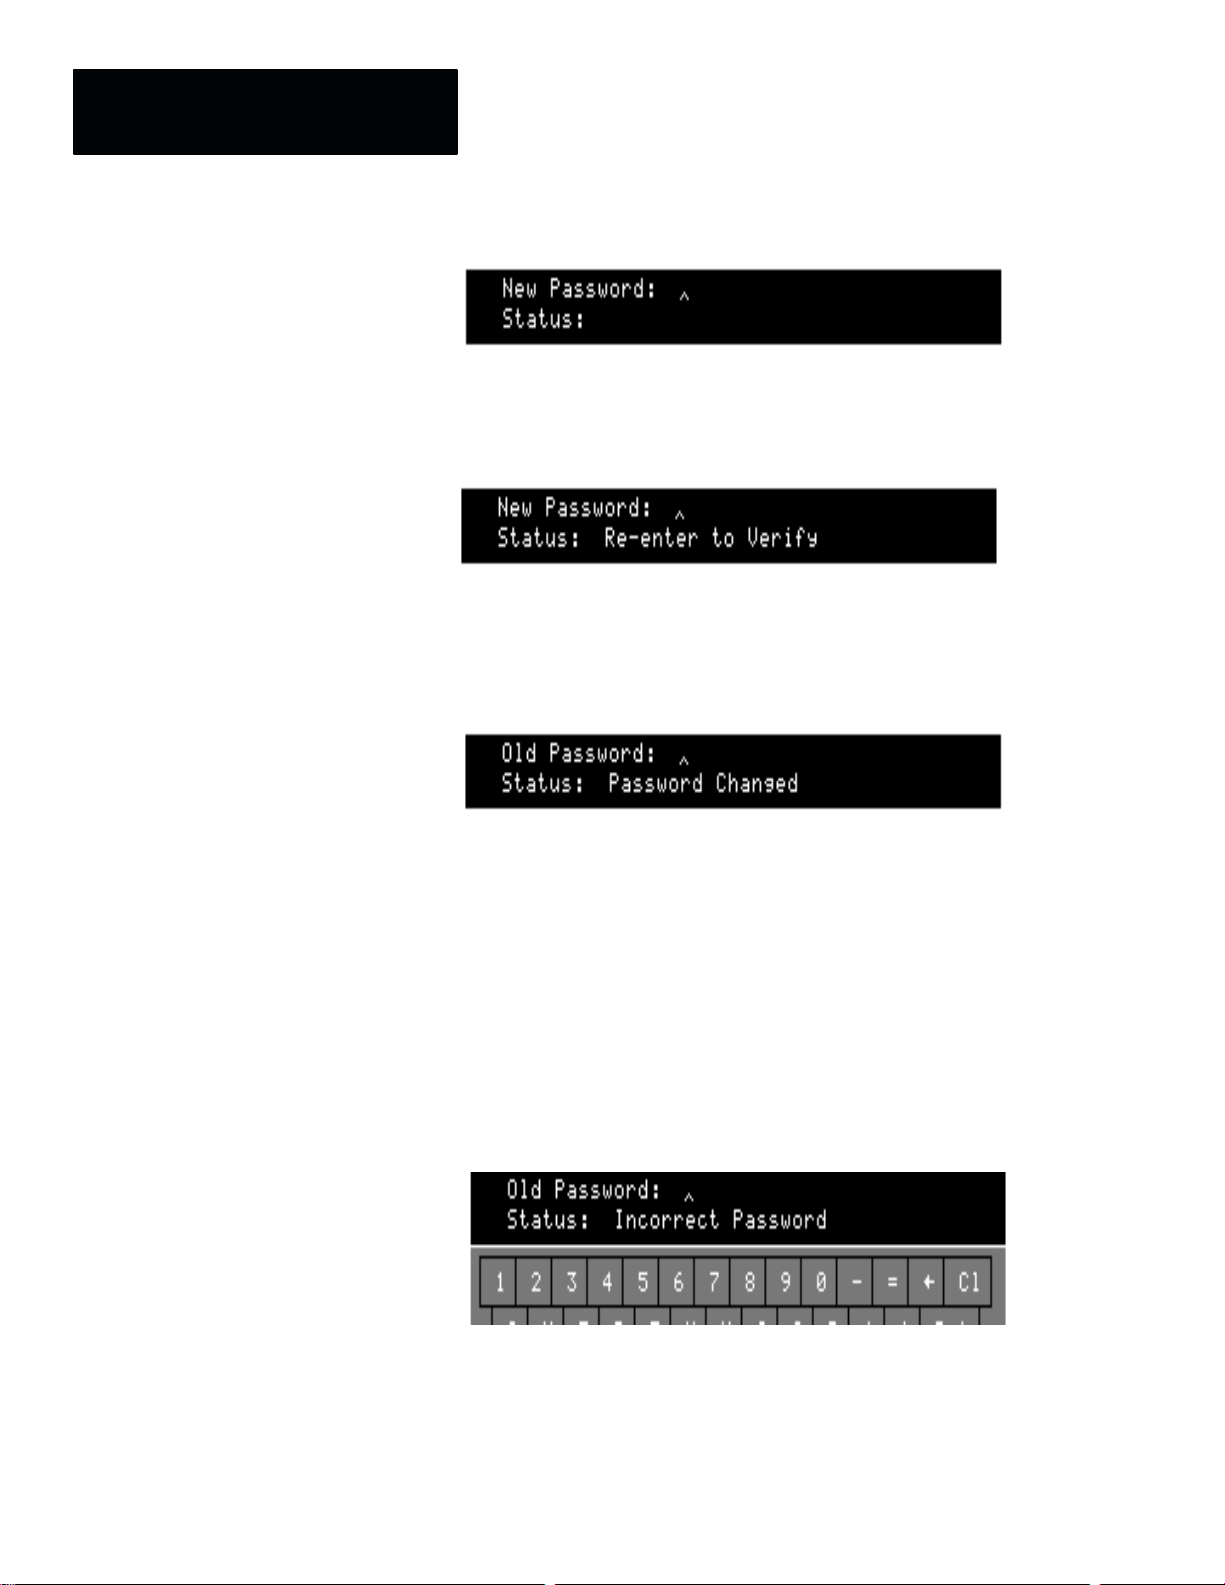
• Enter the new password, and pick the Ret key.
Once you enter the new password, the keyboard prompts you to reenter
the password in order to verify:
• Enter the new password again and pick the Ret key.
If the verification failed, go back to the “Enter the new password” step,
and repeat the procedure from that point. When verification is successful,
the Status: message indicates you have changed the password:
Listed below are further considerations for changing the password:
Case-sensitivity: Password entry is case-sensitive. Use the “shift” arrow key
(lower left/right corners) to access the lower-case keyboard if necessary.
Password Display: The characters you select will appear as asterisks to the
right of Password: in the keyboard display.
Password length / valid characters: You can enter from one to 16
characters (alphanumeric only) for the new password.
Incorrect password: If you have not entered the old password correctly, the
Status: line in the keyboard will display Incorrect Password:
If this happens, simply try entering the password again. You can try as many
times as is necessary to correctly enter the password.
4 – 8
Exit without changing: If you want to exit the procedure without changing
the password, pick the Esc key before completing the verification step.
Page 31

Chapter 4
Getting Started/Using the Security Levels
Setting Security ON / OFF
The USER-PAK option allows the ADMINISTRATOR to disable security
(that is, remove the password requirement) for entry into the setup mode.
Below are descriptions of the effects of having Security: ON (enabled) and
Security: OFF (disabled):
• Security: ON – A password is required for access to the setup mode.
Whenever you pick the Setup box, the password keyboard will appear
(see “Accessing the Setup Mode” in this chapter).
• Security: OFF – No password is required for entry to the setup mode.
When you pick the Setup box, the Color CVIM module goes directly to
setup mode.
Security Level accessed with Security OFF: With security OFF,
picking the Setup box accesses the USER level of the setup mode, unless
the USER level shares a common password with one or both of the other
levels. In this case, the security level entered will be the highest level
available through the common password.
Displaying password keyboard with Security OFF: In order to display
the password entry keyboard with security OFF, hold the tip of the light
pen down upon the Setup box until the keyboard appears (about two
seconds). If you are using a mouse, place the cursor over the Setup box,
and hold the left mouse button down until the keyboard appears.
To set Security to ON or OFF (available at ADMINISTRATOR level only):
Figure 4.3 Setting Security ON/OFF
Security box
Exit box
• Pick Exit box on the main menu to access the Exit menu.
• Pick the Security box to toggle the setting between ON and OFF.
Default Setting: The default setting is Security: ON.
4 – 9
Page 32

Chapter 4
Getting Started/Using the Security Levels
Lost Passwords – Using
the Installation / Key Card
The USER-PAK option provides a method to effectively override the
password security feature, and enter the setup mode at the
ADMINISTRATOR level. This is accomplished through the use of the
Installation / Key card. This “key” method of entry is especially important if
the password for the administrator level is lost or is otherwise unavailable.
To enter the setup mode using the Installation / Key card, complete these
steps:
• If the Color CVIM module is in setup mode, go to run mode.
• Insert the Installation / Key card into the Archive Memory slot on the
Color CVIM module.
• Pick the Setup box on the runtime menu to display the password entry
keyboard (Note: If Security has been set to OFF, hold the tip of the light
pen down upon the Setup box until the keyboard appears. If you are using
a mouse, place the cursor over the Setup box, and hold the left mouse
button until the keyboard appears).
• Enter the 3-character default password A-B on the password entry
keyboard, and pick the Ret key.
Changing passwords with the key card inserted: After entering the setup
mode at the ADMINISTRATOR level, it is possible to change the password
for the ADMINISTRATOR level – or any other level. While the Installation
/ Key card is inserted, the default password A-B can be used as the “old
password” when changing passwords (see “Changing Passwords” earlier in
this chapter).
4 – 10
Page 33

Chapter
Chapter Objectives
A–B
5
Modifying the Color CVIM Menus
Contents
Chapter Objectives 5–1. . . . . . . . . . . . . . . . . . . . . . . . . . . . . . . . . . . . . . . .
Deletion 5–1. . . . . . . . . . . . . . . . . . . . . . . . . . . . . . . . . . . . . . . . . . . . . . . .
T ext Modification 5–6. . . . . . . . . . . . . . . . . . . . . . . . . . . . . . . . . . . . . . . . . .
Modifying Color Names 5–16. . . . . . . . . . . . . . . . . . . . . . . . . . . . . . . . . . . . .
Archiving Menu Modifications 5–17. . . . . . . . . . . . . . . . . . . . . . . . . . . . . . . .
Memory Requirement 5–17. . . . . . . . . . . . . . . . . . . . . . . . . . . . . . . . . . . . . .
The USER-PAK option provides two different ways of modifying the Color
CVIM module menus. This chapter describes both how to:
• Delete items from Color CVIM module screens.
• Modify the text of the Color CVIM module’s menus and help messages.
Note: The above capabilities are available at the ADMINISTRATOR level
only.
Deletion
The USER-PAK option allows you to remove items from the Color CVIM
pop-up menus, and other onscreen features. By deleting items, the
ADMINISTRATOR can customize the USER level interface, limiting the
user’s access to a subset of Color CVIM module functions.
A menu item, or other interactive feature, is marked for deletion by the
ADMINISTRATOR; the marked item subsequently is not displayed on the
screen at the USER level. Any subsequent menu(s) that would have been
accessible through the use of a deleted menu item are unavailable as well.
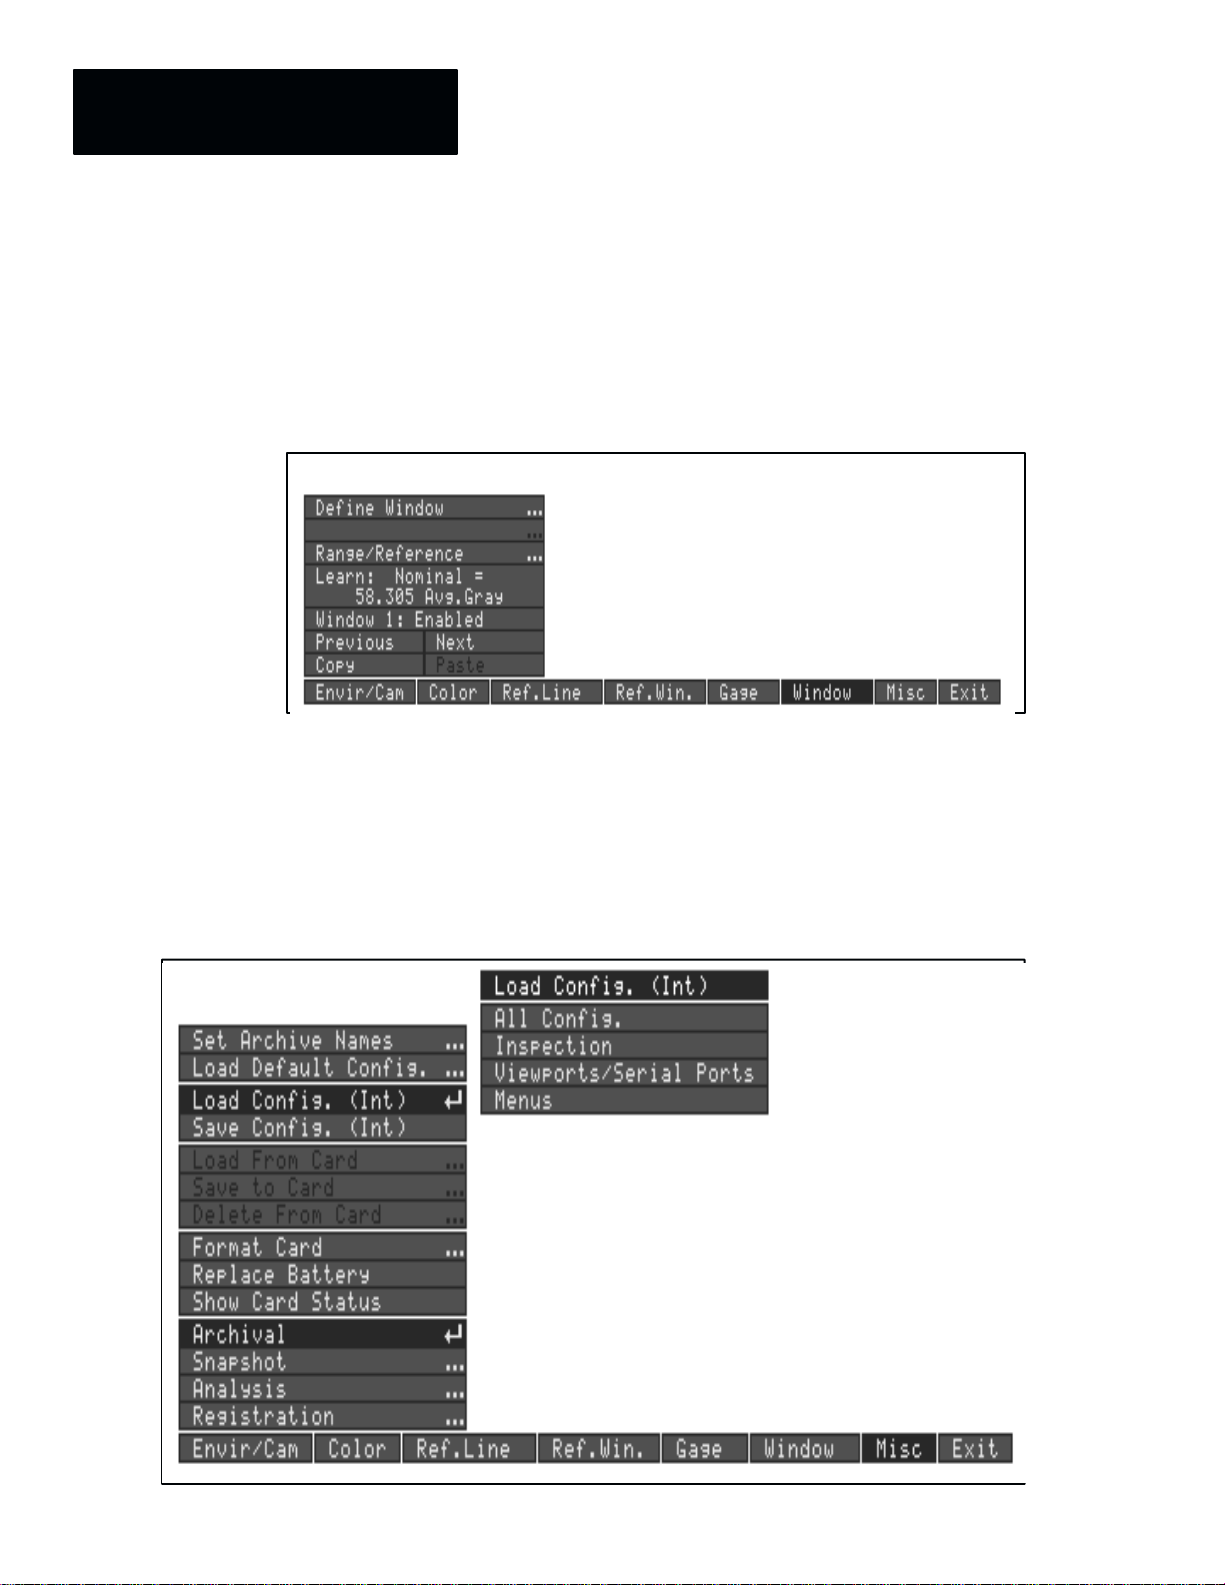
Summary – Effects of Deletion
Deletion affects functionality and appearance of the items differently at each
of the setup mode security levels:
• ADMINISTRATOR Level – Items can be marked for deletion at this
level only. Although items marked for deletion are altered in appearance
(an orange border is added), they retain normal functionality.
• MANAGER Level – Item deletion does not effect this level; that is, all
menu items are always available, and their appearance is unaltered,
regardless of menu deletions.
5 – 1
Page 34

Chapter 5
Modifying the Color CVIM Menus
• USER Level – Items marked for deletion do not appear onscreen at this
level, and thus are not available to the user.
Deletion Procedure
Marking an item for deletion involves just a few basic steps (the following
steps assume the ADMINISTRATOR level is accessed):
• Insert the Setup card into the Archive Memory slot on the Color CVIM
module.
• Access the appropriate menu(s) so the item to be deleted is currently
displayed on the monitor screen.
• Activate the delete function – pick the “trash can” icon so the top of the
“trash can” is open. This indicates the delete function is active.
“Trash can”
icon open
(icon is green when open)
Delete function
enabled
• Pick the item(s) to mark for deletion. Marked items are highlighted with
an orange border:
Menu Items Marked
for Deletion
• To unmark a marked item, pick the item again.
• To deactivate the menu delete function when finished, pick the “trash
can” icon so that it appears that the top of the “trash can” is closed.
5 – 2
Page 35

Chapter 5
Modifying the Color CVIM Menus
“Trash can”
icon closed
(icon is red when closed)
Delete function
disabled
Here are some additional considerations when marking items for deletion:
Paired Menu Items: Paired menu items occupying a single line, such as
Copy/Paste, and Previous/Next, should be deleted as a pair. Otherwise
menu items may overlap when displayed.
Range of Effect: If an item which is marked for deletion is part of a
menu which appears in more than one place, it is deleted from each menu
where it normally appears. For example, if you delete a color selection
item from the Color Selection menu for a string, the item is deleted from
any occurrence of the Color Selection menu – including Color
Selection for viewport border and background, and for Graph variables.
Other examples of menus which appear in more than one place include
the Range / Output menu, and the Threshold / Filter menu.
Menu Justification: When menu items are deleted from a menu, the
remaining items, when displayed, will be “justified,” or repositioned,
downward and to the left, as necessary, so that these remaining menu
items are contiguous.
Deletable Items: Almost any item can be deleted, including items such as
slide bar cursors (which appear when Threshold / Filter is selected, for
example), vernier arrows (used within the Pick & Place function), and
menu titles.
Non-Deletable Items: Certain menu and screen items can never be
deleted, because of the nature of their function. These items include:
– The help icon and menu-removal icon (the two icons in the upper right
corner of the monitor).
– The handles which appear on tools when Pick & Place is activated.
– The slide bar (which appears when Threshold / Filter is selected, for
example). However, the slide bar cursors can be deleted.
– The Exit box on the Main menu.
– The Runtime box on the Exit menu.
– The Goto Runmode box on the Runtime menu.
– The keyboard and calculator pad, and their keys.
Picking an item that cannot be deleted displays this message:
5 – 3
Page 36

Chapter 5
Modifying the Color CVIM Menus
Example – Menu Item Deletion
Several items on the Define Window menu are marked for deletion, as
shown below in Figure 5.1.
Figure 5.1 Items marked for deletion
“Trash can”
icon open
Menu Items Marked
for Deletion
As a result of the menu deletions marked in the example above, a shortened
version of the Define Window menu appears at the USER level (see
Figure 5.2):
5 – 4
Page 37

Figure 5.2 Deleted items do not appear
Chapter 5
Modifying the Color CVIM Menus
Define Window menu at the
User Level (deleted items do
not appear).
The Cascade Effect
If all items except one have been deleted from a menu, and the one
remaining menu item has a three dot leader, the “cascade effect” occurs at
the USER level.
The cascade effect is this: At the USER level, the subsequent menu or
function appears in place of the single menu item.
For example, if you delete all items from the Define Window menu, except
P&P Process Win. box, when you pick the Define Window box at the
USER level, the screen would look like this (see Figure 5.3):
Figure 5.3 Example of the “cascade” effect
(Define Window menu does
not appear at the User Level).
The P&P Process Win.
function is activated.
5 – 5
Page 38
Chapter 5
Modifying the Color CVIM Menus
As you can see, the Define Window menu does not appear. In this case,
since the P&P Process Win. box is the only item available on the Define
Window menu, picking the Define Window menu would activate the P&P
Process Win. function.
Text Modification
The USER-PAK option enables you to modify the text of menu items, and of
onscreen messages such as the help messages or the title banner.
Note: To modify text, you must be at the ADMINISTRATOR level.
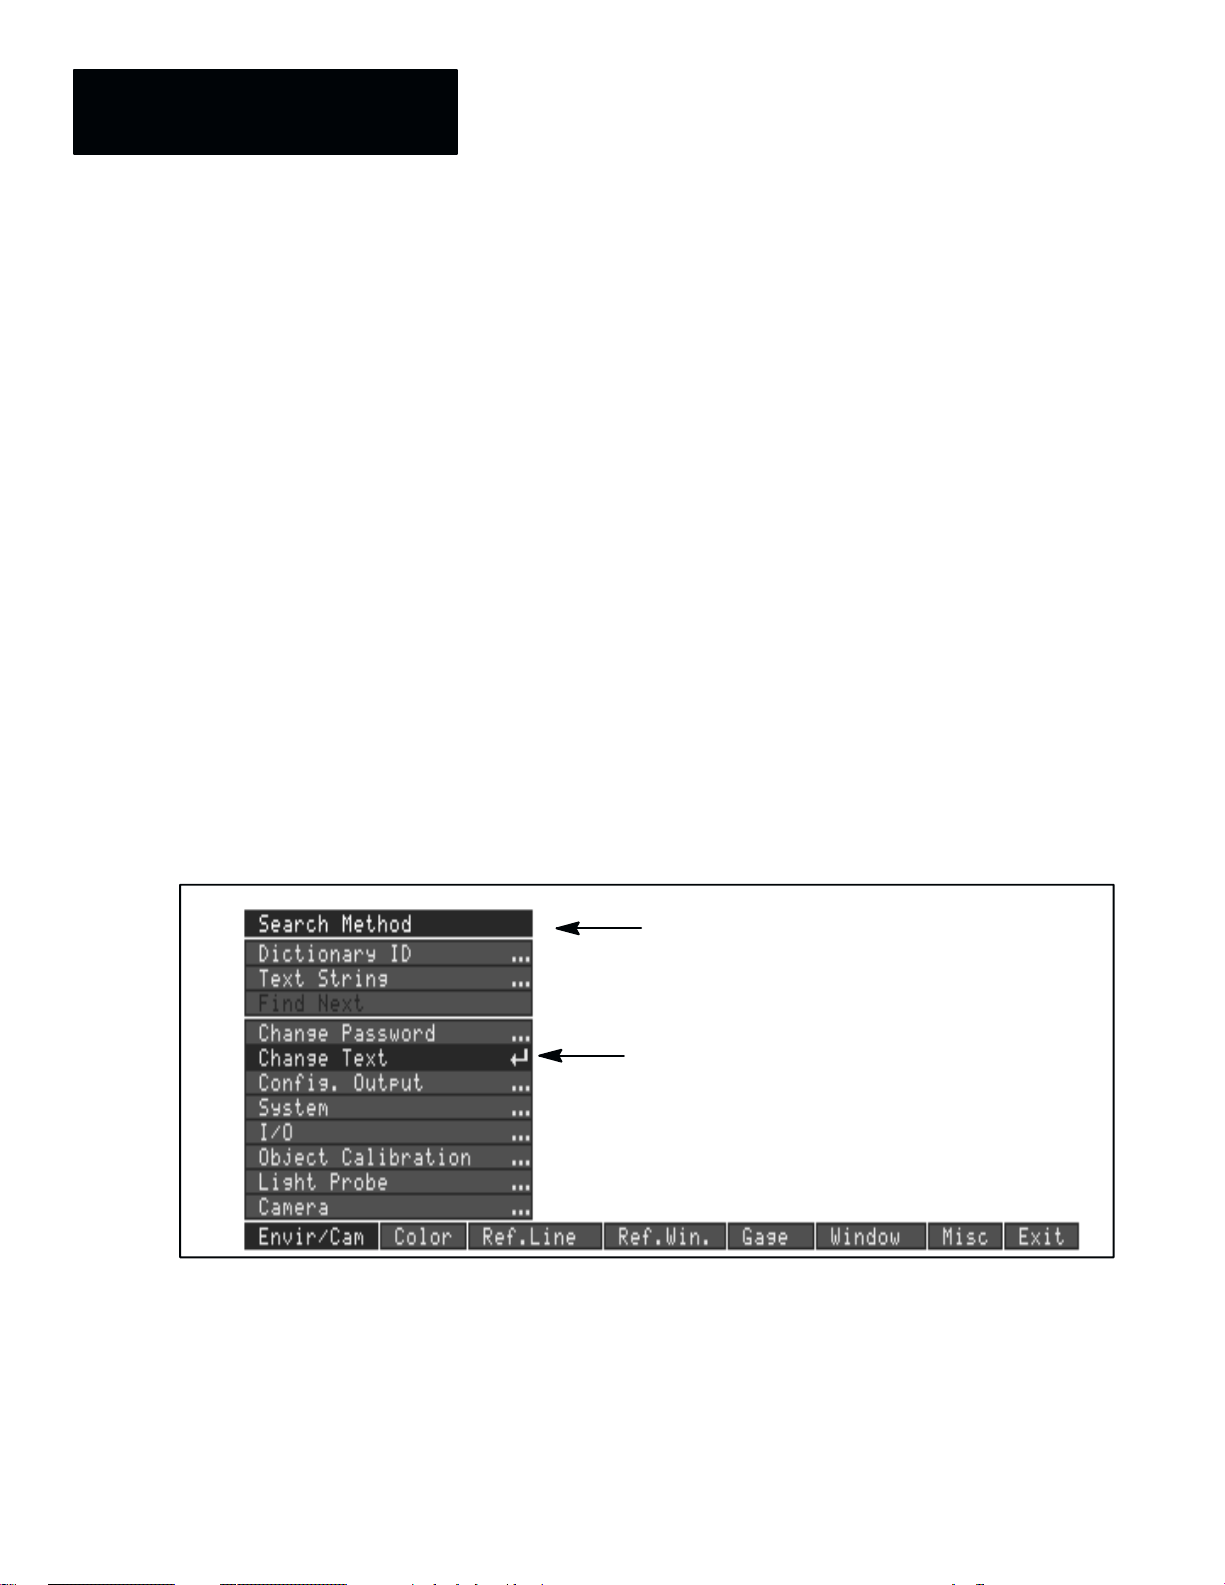
To modify text, you pick the Change Text item (on the Envir/Cam menu),
and then search for specific entries within Color CVIM text “dictionary.”
After locating an entry, you then edit the entry as necessary.
To begin to modify text (see Figure 5.4):
• Insert the Setup card into the Archive Memory slot.
• Pick the Envir/Cam box on the main menu.
• Pick the Change Text box. This displays the Search Method menu.
Figure 5.4 Using the Change Text feature
Search Method menu
5 – 6
Change Text box
Searching for Text
All text used in the Color CVIM module user interface (menu items, help
messages, etc.) is contained in a “dictionary” in Color CVIM memory;
individual entries are referenced by a “dictionary ID” number. Dictionary
entries include single-word terms (like “gage” or “window”), multiple-word
terms (“Define Gage”), and complete sentences (such as help messages).
Page 39

Chapter 5
Modifying the Color CVIM Menus
You can use either of two search methods for finding the entry you want to
modify:
• Dictionary ID – If you know the dictionary ID number of an entry you
want to edit, you can use the dictionary ID to find that entry.
• Text String – You use the Text String option just like the search feature
on a word processor. That is, you can enter a word, part of a word, or
multiple-word text string to search among the Color CVIM “dictionary”
of terms, in order to find a specific entry.
A third item on the Search Method menu, Find Next, is enabled after either
Dictionary ID or Text String is selected. The Find Next feature is discussed
where appropriate in each of the two search procedure sections.
Text String Search
To use the Text String method for accessing a dictionary entry to modify,
follow this procedure (see Figure 5.5):
• First, pick the Text String box on the Search Method menu to access
the Search Text: entry keyboard. The keyboard’s display area includes
two fields, Search Text: and Status.
Figure 5.5 Using the Text String search method
• Enter the text item, or a portion of the text item, that you want to modify,
on the keyboard. Your entry appears in the Search Text: field:
5 – 7
Page 40

Chapter 5
Modifying the Color CVIM Menus
• Pick the Ret key; the Color CVIM then searches the entries in its
dictionary, in numerical order, for the first entry containing the text string
you entered.
When you pick the Ret key, one of two results can occur:
(1) No dictionary entry is found to contain the text you entered; the
Status: box returns the message Sub-text Not Found. If this
happens, try entering a different string.
(2) A dictionary entry containing the search text is found; the text of
that dictionary entry appears in the New Text: field now located over
the keyboard. The dictionary ID number of the entry is listed in the
Status: field of the keyboard display (it is suggested that you record
this ID number; you can use it later to quickly access the specific
dictionary entry again, in case you want to edit it again).
5 – 8
• The dictionary entry that is found may not be the specific entry you want
to change. In this case, pick the Find Next: box to locate the next
dictionary entry containing the search text. Repeatedly pick the Find
Next: box until the desired entry is located.
• When the desired entry is listed in the New Text: field, edit the entry as
necessary (see “Editing Text” later in this chapter).
Here are some additional considerations when searching for text strings:
Case-Sensitivity: The search text is not case-sensitive.
Reenabling Find Next: The Find Next: box is disabled after a
dictionary entry is modified. To use the same search string again after
modifying an entry, you must reenter the search string, and pick Ret.
Page 41

Chapter 5
Modifying the Color CVIM Menus
Dictionary ID Search
To use the Dictionary ID method for accessing an entry to modify, follow
this general procedure:
• First, pick the Dictionary ID box on the Search Method menu to access
the ID entry keyboard. The keyboard’s display area includes two fields,
Dictionary ID: and Status:
• Enter the dictionary ID number of the entry you want to edit. Your entry
appears in the Dictionary ID: field in the keyboard display (see
Figure 5.6).
Figure 5.6 Accessing the Dictionary ID search method
• Pick the Ret key. One of two results can occur:
(1) If the dictionary ID number you entered is not defined, the Status:
field returns the message Invalid Dictionary ID. If this happens, try
entering a different dictionary ID number.
(2) If the dictionary ID number you entered is defined, the text of that
dictionary entry appears in the New Text: field now located over the
keyboard. The dictionary ID number of the entry is listed in the
Status: field of the keyboard display:
5 – 9
Page 42

Chapter 5
Modifying the Color CVIM Menus
• The New Text: entry listed may not be the specific entry you want to
change. If it is not, you can either:
(1) Enter a different dictionary ID number, or
(2) Pick the Find Next: box, which increments the dictionary ID
number, and displays the text string for that ID number. Repeat until
the specific entry you want to modify is located.
Figure 5.7 Example: Using the Dictionary ID search method
5 – 10
• When the New Text: entry listed is the entry you want to change, edit the
text as necessary (see “Editing Text” later in this chapter).
Reenabling Find Next: The Find Next: box is disabled after a
dictionary entry is modified. To use the Find Next box again, you must
enter a dictionary ID number again.
Editing Text
After you find the entry you want to modify (the entry is displayed in the
New Text: field), edit the entry text using the following keys:
Page 43

Figure 5.8 Editing text
Chapter 5
Modifying the Color CVIM Menus
Left / Right
Arrows
←→ Left/right arrows: Use to move cursor on the same line. For some
dictionary entries, such as help messages, all of a line cannot be
displayed at once, so you must use the right arrow initially to display
the remainder of the line.
Figure 5.9 Example: End of line character and up/down arrows
EOL Character
(displayed)
Up / Down
Arrows
EOL
Character
(keyboard)
↑↓ Up/down arrows: Use to jump from line to line when editing
multiple-line entries. In some dictionary entries, such as those which
store help messages or multiple-line menu entries, the text is stored on
multiple lines. An EOL character (↵ ) is present at the end of a line
whenever a subsequent line of text follows.
← Backspace: Use to delete the character to the left of the cursor.
Cl Clear: Use to delete the entire entry.
EOL End of Line: Use to start a new line of text (shown as EOL on the
keyboard, and as ↵ in the keyboard display area).
5 – 11
Page 44

Chapter 5
Modifying the Color CVIM Menus
Note: If you modify the text of a menu item which has multiple lines
(such as the runtime display options menu available during run mode),
use the EOL character to create enough lines to account for all the
lines in the menu item, in order to have the background color filled in
for all lines (even if some lines have no text).
For example, the All Tools menu item on the runtime menu contains
two lines. Within the All Tools dictionary entry, there is an EOL ( ↵ )
character after the word All which creates another line within the
dictionary entry. The diagram below shows the effect that removing
the EOL character would have on the displayed menu item:
With EOL
Character
Without
EOL
Character
Esc Escape: Use to abandon any changes you make. Pick the Esc key (or
pick any other menu item) before picking the Ret key.
When you have finished editing an entry: You have these options –
(1) Pick the Ret key; the dictionary entry is changed to the text you have
entered. The Status: field displays the message Dictionary Entry
Changed.
(2) Pick the Esc key to exit from the edit without changing the text. The
search string or dictionary ID is displayed. The entry will remain as
before editing.
5 – 12
To restore the original text to a modified entry: Locate the dictionary
entry you want to restore (if it is not currently displayed), using either search
method. When the desired entry appears in the New Text: field:
• Pick Cl, and then pick Ret. The Status: field displays the message –
Base Color CVIM Text Restored (if the text has not been previously
modified, the Status: field displays the message – Invalid Replacement
Text).
Page 45

Chapter 5
Modifying the Color CVIM Menus
To restore all the original menus and text, or load previously stored
modifications, see “Archiving Menu Modifications” later in this chapter.
Here are some additional considerations when editing text:
Multiple Menu Usage of a Dictionary Entry: In some cases, the same
dictionary entry is used in more than one menu. Modifying the entry will
affect all menus containing that entry.
For example if you modify the dictionary entry Gage to read Gauge, the
change is seen both on the main menu, and in the Gauge 1: Enabled box,
as shown in the diagram below, because both used the same dictionary entry.
Words Used in Multiple Entries: In some cases, a word may be used in
more than one dictionary entry. Thus, to modify all occurrences of that
word, you must modify each of the dictionary entries where it appears.
For example, if you modify the dictionary entry Gage to read Gauge, the
Define Gage box remains unchanged, as shown below, because it uses a
different dictionary entry (see Figure 5.10):
Figure 5.10 Example text modification
“Define Gage” is not affected by modification of the dictionary
entry “Gage” to read “Gauge.”
“Gauge” now appears in these two menu
items, both of which use the same dictionary
entry.
Maximum Size / Truncation: A text modification is truncated upon entry if
it exceeds the maximum size (four lines, 47 characters per line). Also, upon
display, a dictionary entry which is too long to fit into its respective display
area (such as a menu box) is truncated to fit the area.
Restricted Dictionary Entries: Certain dictionary entries cannot be
modified, because doing so would affect the functionality of the respective
menu item. If you locate a restricted dictionary entry, the Status message in
the keyboard display area shows this message: ID ## cannot be changed.
An example of a restricted entry is shown below:
5 – 13
Page 46

Chapter 5
Modifying the Color CVIM Menus
Other Restrictions: Menu items which are a part of installed software
options (other than the USER-PAK option) are not listed among the
dictionary entries, and will not be located when you search for text, nor will
the text in the title banner which identifies the Color CVIM module firmware
series and revision number, and the installed options. Thus these items
cannot be edited.
Examples of Modifying Text
Example 1: We want to change the runtime menu item Result Page to
Gage Result, a name which identifies the custom display we have created to
replace the Result Page display.
To do this:
• Pick Envir/Cam→ Change Text box to display the Search Method
menu.
• Pick the Text String box. This displays the keyboard.
• Using the keyboard, enter these characters: RESULT
and pick the Ret key. This locates the Result Page dictionary entry and
displays the first line:
• Pick Clr to clear the entry.
• Enter these characters: Gage (EOL)
(The EOL character is on the shift keyboard). The New Text area will be
empty at this point – this is because picking the EOL character creates a
blank second line, which is displayed in the New Text area.
5 – 14
• Enter these characters on the second line: _ Results (where _ is a
space character)
• To review the first line, use the ↑ arrow key on the shift keyboard:
Page 47

Chapter 5
Modifying the Color CVIM Menus
• Pick the Ret key. The Status: field displays the message Dictionary
Entry Changed.
Having changed the dictionary entry, when you next display the runtime
Display menu, the Result Page box will be changed to read Gage Results.
Example 2: We want to change the Envir/Cam→ System→ Units menu
item, CM, to MM to reflect the actual range of measurements in our
inspections (see Figure 5.11).
Figure 5.11 Example: Modifying Units menu
Change CM
to read MM
To do this:
• Pick Envir/Cam→ Change Text box to display the Search Method
menu.
• Pick the Text String box.
• Using the keyboard, enter the string CM and pick the Ret key.
This locates and displays the CM dictionary entry.
5 – 15
Page 48

Chapter 5
Modifying the Color CVIM Menus
• Edit the entry to read MM and pick the Ret key. The Status: field
displays the message Dictionary Entry Changed.
Having changed the dictionary entry, when you next display the
Envir/Cam→ System→ Units menu, the CM item will be changed to read
MM.
Note: The selected Units entry also appears in the Learn box on the
Gage menu, when you select Learn for a Gage set to Linear operation
(see Figure 5.12, page 5 – 16).
Figure 5.12 Example: Units modification appears also in Learn box
Modifying Color Names
MM (or other selected
unit) also appears
here
By default, the color CVIM Color menu describes each of 32 available colors
with a unique number (1 through 32). Modification of these color
descriptions can make your system easier to use. While it is possible to use
the procedure described above to modify the default color names to best
reflect your own installation, the Color CVIM USER–PAK offers an easier
way to perform this commonly required change.
Unlike the text editing tools described above, users at any security level can
use the following procedure to rename a color.
First, select Color from the Main Menu. Move through the list of colors by
selecting Previous or Next until the desired color name appears. If the color
is disabled, enable it by selecting it with the light pen.
5 – 16
Note: The first color modified directly from the Color menu must be
enabled in order to gain access to the Display Options→Modify Color
Name menu choices.
Page 49

Chapter 5
Modifying the Color CVIM Menus
Select Display Options→Modify Color Name to open the keyboard
display. Then edit the color name following the conventions described in
the proceeding section. The color name will change on the menu when you
press the Ret key. Refer to Figure 5.13 for an example.
You can change the names of other colors without closing the keyboard
display by selecting Previous or Next until the desired color name appears
in the Color menu. While the first color name you change must be enabled;
any number of subsequent colors can be renamed even when disabled.
Figure 5.13 Example: Changing color name from the Display Options menu.
Archiving Menu
Modifications
Memory Requirement
Menu modifications, if saved internally, can be accessed in a separate
configuration called the Menus configuration. This allows you to load
previously stored menu modifications specifically, while retaining other parts
of the configuration. To restore the original menus and text, you can load the
default Menus configuration from internal storage. See Chapter 10 for more
information regarding the saving and loading of configurations.
Menu item deletion and text modifications are stored in an area of Color
CVIM memory which has also been designated for other information, such
as configurable output (serial ports and viewports). If there is a shortage in
remaining allocated memory while attempting deletion and/or text editing,
the respective modification feature will not work.
To check the amount of allotted memory remaining, refer to “Checking
Available Memory” in Chapter 10.
5 – 17
Page 50

Chapter
Chapter Objectives
A–B
6
Creating Custom Serial Port Messages
Contents
Chapter Objectives 6–1. . . . . . . . . . . . . . . . . . . . . . . . . . . . . . . . . . . . . . . .
Some Questions and Answers about Custom Serial Port Messages 6–1. . .
Creating Custom Serial Port Messages 6–2. . . . . . . . . . . . . . . . . . . . . . . . .
Defining the Serial Port 6–6. . . . . . . . . . . . . . . . . . . . . . . . . . . . . . . . . . . . .
RS-232 Port Connections and Configuration 6–9. . . . . . . . . . . . . . . . . . . . .
This chapter describes how to use the Config. Output feature of the
USER-PAK option to create custom serial port messages, including how to:
• Select and define a serial port.
• Define serial port strings.
• Connect and configure the Color CVIM serial port for communication.
Some Questions and Answers about Custom Serial Port Messages
This section introduces custom serial port messages, by posing some
questions, and answering them.
What are custom serial port messages?
For communication between the Color CVIM module and a remote device,
the Color CVIM module has two serial ports. With the USER-PAK option
installed, you can create your own custom serial port messages for
transmission through a serial port. The messages consist of ASCII
characters.
What types of information can be sent?
Within each message you can send literal text, results and other data on
specific tools, statistical data, and other information.
How do you create custom serial port messages?
You create serial port messages using the Config. Output feature, which is
part of the Envir/Cam menu (when the USER-PAK option is installed).
The format of a message is defined by a “string.” The string consists of text
which specifies the format and content of the message, the condition under
which the message is transmitted, and repetition parameters, which can be
used to transmit the message multiple times for the same condition.
How do you determine when a custom serial port message is sent?
When defining a message string, you select the “event” which causes the
string to be sent. The string can be sent after each inspection, or only upon
certain conditions, such as the failure of a specific tool, for instance.
6 – 1
Page 51

Chapter 6
Creating Custom Serial Port Messages
How many strings can be defined?
The Color CVIM module can store up to 340 strings, depending on how
much of the Color CVIM module’s memory is used for other purposes.
Can the custom serial port messages coexist with the standard RS-232
port communications with a host device?
The custom serial port messages may interfere with the transmission of the
response to a command from an RS-232 device. For this reason, a command
is available which allows you to disable and enable the transmission of
custom serial port messages (see Appendix C).
Do you need to set up any Color CVIM module parameters when using
custom serial port messages?
Yes, you need to select ASCII protocol, and select the appropriate baud rate
for the RS-232 port you are using.
Creating Custom Serial
Port Messages
You create a custom serial port message by defining a “string” for a given
serial port. It is the content and definition of the string that determine what
information will be sent through the serial port, and when it will be sent.
Using the string entry keyboard, you enter specific “elements” – literal text,
and/or codes of various types – which result in the transmission of one or
more corresponding “fields” comprising the serial port message.
Also, aside from defining the string content, you must specify the “event” for
each string – that is, the circumstances under which the string is transmitted.
You can also utilize a string repetition feature to transmit a single message
multiple times for the same event.
Example of a Serial Port Message String
This section provides an example of a serial port message string, for the
purpose of demonstrating string text, and the resulting message content.
Assume the gage 1 result for an inspection is 25.3, and the string text is
“Gage 1 Result =” g1
6 – 2
where the g1 in the string text is a “data code” which represents the results
from gage 1. The message transmitted would be these ASCII characters –
Gage_1_Result_= _ _ _25.300 (where _ indicates a space character)
For a listing of the entire ASCII character set, refer to Appendix B.
Page 52

Chapter 6
Creating Custom Serial Port Messages
Basic Steps for Creating Custom Serial Port Messages
To create a custom serial port message:
• Insert the Setup card into the Archive Memory slot on the module.
• Pick Envir/Cam → Config. Output to display the Config. Output
menu; this may display a viewport (if a viewport is currently selected).
Figure 6.1 Accessing the Config. Output menu
Serial Port Selected
Config. Output box selected
• Select the specific serial port (A or B) you are going to use for
communication using the corresponding Previous/Next boxes.
Picking Next box repeatedly cycles though the selection of Viewports
1-40, then Serial Port A, Serial Port B, then Viewports 1-40, etc.
Picking the Previous box when Viewport 1 is displayed would select
Serial Port B; picking Previous again would select Serial Port A.
• Enable the selected port.
• Define one or more “strings” for the selected serial port:
– Select the string, using the corresponding Next/Previous boxes.
6 – 3
Page 53

Chapter 6
Creating Custom Serial Port Messages
Figure 6.2 Selecting the string to be defined
String 1 selected
Previous / Next boxes
– Pick the Enter String Text box to display the string entry keyboard.
Using the string entry keyboard, you enter specific string “elements”
– literal text, and/or codes of various types – for the string (see
Chapter 8 for more information on elements of string text).
Figure 6.3 Entering string text
Enter String Text box
String entry keyboard
6 – 4
Page 54

Chapter 6
Creating Custom Serial Port Messages
Defining Strings
Select the Define String box in order to access these features (see
Figure 6.4):
• Transmit Now – Select this item to immediately transmit the string over
the serial port.
• Event – Select this item to define the type of event that triggers the
transmission of the string. See Chapter 8 for more information.
Note: The Define String box is disabled until at least one character of string
text has been entered for the selected string (see Chapter 8 for information on
entering string text).
Figure 6.4 The Event menu
Event menu
For the settings in Figure 6.4, for example, the string would be
transmitted whenever the Master Range failed for a given inspection.
• Repeat String – Select this item to set up repeated transmission of a
string for a single event. See Chapter 8 for more information.
Using Transmit Now
You can cause the Color CVIM module to immediately transmit the string
through the serial port you are defining during set up mode. You can use this
feature during setup to test the results of your current string text entry, and to
test your serial port connections and configuration as well.
To transmit the currently selected string:
• Pick the Transmit Now box on the Define String menu.
6 – 5
Page 55

Chapter 6
Creating Custom Serial Port Messages
Figure 6.5 Using the Transmit Now box
Define String box
Transmit Now box
Defining the Serial Port
When you pick the Transmit Now box, the transmitted string will not
contain any results data, since no inspection has been completed. Therefore
any data fields in the transmitted string are filled with zeros (0). Also, the
string will be repeated according to the defined Repeat String parameters.
You can access two features regarding serial port definition by picking the
Define Serial Port box to display the Define Serial Port menu:
Figure 6.6 Defining the serial port
Serial Port A selected
6 – 6
Define Serial Port menu
Page 56

Chapter 6
Creating Custom Serial Port Messages
The Define Serial Port menu consists of two items:
• Erase Port Data
• Buffer: Wait/No Wait
Erase Port Data
Picking the Erase Port Data box permanently removes all defined strings
from the selected serial port.
Note: Do not pick this box if you value any portion of your serial port
strings or parameters.
The Erase Port Data function is useful if you want to clear all the contents
for a serial port, such as if you need to entirely redefine all strings, and not
merely edit them, or if the serial port messages are no longer useful for your
application, and you want to free up the Color CVIM module memory for
other uses.
To use the Erase Port Data function:
• Pick the Erase Port Data box. Picking the Erase Port Data box once
displays this warning message:
• To permanently remove the port data, pick the Erase Port Data box a
second time. If you do not want to erase the port data at this point, pick a
different menu item instead of the Erase Port Data box.
Buffer: Wait / No Wait
Use the Buffer box to select one of two options for transmission of serial
messages – Buffer: Wait and Buffer: No wait.
6 – 7
Page 57

Chapter 6
Creating Custom Serial Port Messages
Figure 6.7 The Buffer box
Buffer box
Picking the Buffer box toggles the setting between Buffer: Wait and Buffer:
No wait.
Buffer: Wait
The two Buffer box settings are described below:
• Buffer: Wait – With Buffer: Wait selected, the Color CVIM transmits
your custom serial port messages with priority over inspection triggers.
That is, if one or more inspection triggers are received while the Color
CVIM is waiting to transfer a serial port message to the buffer, the
received triggers are rejected while the Color CVIM completes the
message transmission. This is a concern mainly if the trigger rate is fast
enough, and the serial message transmissions are long enough, to cause
triggers to be rejected.
Note: When a trigger is rejected, the Trigger Missed bit is set, and the
missed trigger count is incremented. (see the chapter on remote I/O in the
Color CVIM Communications Manual for more information on discrete
bits).
An advantage to selecting Buffer: Wait is that the serial messages can be
as lengthy as the time between triggers permits, and as lengthy as Color
CVIM memory allows. A disadvantage is the possibility that, in some
cases, some triggers may not be processed.
6 – 8
Buffer: No wait
• Buffer: No wait – This is the default setting. With Buffer: No wait
selected, the processing of inspection triggers has priority over the serial
port message transmissions.
Page 58

Chapter 6
Creating Custom Serial Port Messages
The Buffer: No wait setting imposes a message size restriction. Due to
the size of the internal buffer, the combined length of all serial messages
to be transmitted for a single inspection must be no greater than 128
bytes; serial messages with a combined length greater than 128 bytes will
not be transmitted when Buffer: No wait is selected.
With Buffer: No wait selected, when a trigger is received, the Color
CVIM processes all of the strings defined for a serial port; if the content
of all serial messages to be transmitted does not fit into the buffer (either
the message is greater than 128 bytes, or the buffer is not completely
empty yet) the message is immediately discarded.
Note: The serial messages are always transmitted in full, or not at all – a
message is never partially transmitted.
The advantage to selecting Buffer: No wait is that no triggers are ever
rejected due to transmission of your custom serial port messages
(however, regardless of the Buffer: box setting, processing of serial port
strings does impact the Color CVIM inspection analysis time).
Disadvantages are that the total combined length of all serial messages to
be transmitted for a single inspection must be limited to 128 bytes or less,
and that, even if messages are so limited, some serial messages may not
be sent if the buffer has not had time to clear.
RS-232 Port Connections
and Configuration
If you discover that you are missing messages with Buffer: No wait
selected, try using a higher baud rate, and/or shortening the length of
transmitted messages (limiting total combined serial message length for
each inspection to 128 bytes maximum). If this does not bring the desired
results, you may then want to consider using the Buffer: Wait setting.
Before the Color CVIM module can communicate through the serial
(RS-232) port to another device, the Color CVIM module and the other
device must be connected through a suitable communication cable, and the
communications parameters for the serial ports of both devices must match.
Selecting Serial Port Parameters
In order to use a serial port for serial messages, you must configure the serial
port for ASCII protocol, and you must select the baud rate to match that of
the connected device.
To select port parameters, with the Main menu displayed:
• Pick the Envir/Cam → I/O boxes to open the I/O menu.
6 – 9
Page 59

Chapter 6
Creating Custom Serial Port Messages
• Pick the RS-232 A or RS-232 B box, as appropriate, to display the
Protocol and Baud Rate menus.
– Pick the ASCII box on the Protocol menu.
– Pick the appropriate baud rate on the Baud Rate menu to match the
baud rate of the connected device.
Figure 6.8 Selecting the serial communication parameters
ASCII protocol selected
Baud rate selected
Equipment Connections
The Color CVIM module serial ports are accessible through the I/O Interface
box – Catalog No. 2801-N27. To use an I/O interface box, you must connect
the box via cable to the MODULE I/O port on the Color CVIM module. To
link a device to a Color CVIM module serial port, you will need a suitable
communications cable. Refer to the Color CVIM Communications Manual
for more information regarding hardware connections for communications.
6 – 10
Page 60

Chapter
Chapter Objectives
A–B
7
Creating Custom Runtime Displays
Contents
Chapter Objectives 7–1. . . . . . . . . . . . . . . . . . . . . . . . . . . . . . . . . . . . . . . .
Some Questions and Answers about Custom Runtime Displays 7–1. . . . . .
Initial Setup: Selecting and Defining the Viewport 7–4. . . . . . . . . . . . . . . .
Defining Text and Tool Viewport Contents 7–14. . . . . . . . . . . . . . . . . . . . . . .
Defining Graph Viewports 7–22. . . . . . . . . . . . . . . . . . . . . . . . . . . . . . . . . . .
The Copy and Paste Features 7–29. . . . . . . . . . . . . . . . . . . . . . . . . . . . . . . .
The objective of this chapter is to describe how to use the Config. Output
feature of the USER-PAK option to create custom runtime displays by
defining Text, Tool, and/or Graph type viewports.
Some Questions and Answers about Custom Runtime Displays
This section introduces the capability of creating custom runtime displays, by
posing some questions about custom runtime displays, and answering them.
What are custom runtime displays?
Recall that runtime displays are those displays which appear on the monitor
while the Color CVIM is operating in run mode. A number of different types
of runtime displays already are used with the base Color CVIM software,
such as the Results Page, or the I/O Page (the subject of configuring the
available runtime displays is discussed in the Color CVIM User’s Manual).
With the USER-PAK option installed, you can create additional custom
runtime displays, such as the example display below.
7 – 1
Page 61

Chapter 7
Creating Custom Runtime Displays
Figure 7.1 Example Custom Runtime Display
How do you create custom runtime displays?
You create custom runtime displays using the Config. Output feature, which
becomes available on the Envir/Cam menu with the USER-PAK option
installed (Note: The Setup card must be inserted in the Color CVIM Archive
Memory slot prior to opening the Envir/Cam menu, to allow access to the
Config. Output feature).
With the Config. Output menus displayed, you select and configure runtime
displays, or “viewports,” as they are called on the Config. Output menu.
Viewports can include a bordered rectangular display area; you define the
dimensions for a viewport and position the viewport using a “pick & place”
capability, similar to that used in positioning inspection windows. You can
select display borders and background color (if applicable). Then you define
the viewport contents.
What types of viewports, or runtime displays, can be created?
You can create three different types of viewports – Text, Tool and Graph.
Within Text and Tool viewports, you can display text items, which might
include a term, such as “Gage Results,” or tool results, or other inspection
information. You define the Text and Tool viewport contents by defining
one or more viewport “strings.” Graph viewports depict real-time tracking
of the results of specified tools. You define Graph viewport contents by
defining up to three “variables.”
7 – 2
Page 62

Chapter 7
Creating Custom Runtime Displays
You can select specific colors for the contents in your displays, or you can
color code them based on corresponding tool results. There are many more
ways of further defining displays which afford a great variety of display
effects.
How do you determine when a viewport is displayed?
In defining a viewport, you also select the display page type and page
number of that viewport when it is displayed. You can define a viewport so
it replaces a normal runtime display. For example, you can assign a custom
display to Results Page 1. Then, when Results Page 1 is selected as the
current runtime display during run mode, your custom display appears,
replacing Results Page 1. You can place each viewport you define on any
number of different display pages, and you can place several viewports on
the same page.
How many custom runtime displays can be created?
You can define up to 40 different viewports, and up to 340 strings, depending
on how much of the Color CVIM module’s memory is used for other
purposes.
7 – 3
Page 63

Chapter 7
Creating Custom Runtime Displays
Initial Setup: Selecting and Defining the Viewport
This section describes the initial steps to use in defining a viewport. To
define a viewport:
• Insert the Setup card into the Archive Memory slot on the Color CVIM
module.
• Pick the Envir/Cam → Config. Output boxes to display the Config.
Output menu; this also displays the viewport, if a viewport is currently
selected (see Figure 7.2).
Figure 7.2 Example Custom Runtime Display
Viewport Border
Viewport 1 selected
Config. Output box selected
• Select the specific viewport you are going to define using the
corresponding Previous/Next boxes. The selected viewport appears on
the screen.
Picking the Next box repeatedly cycles though the selection of Viewports
1-40, then Serial Port A, Serial Port B, then Viewports 1-40, etc.
Picking and holding the Next or Previous box causes the Define
Viewport number to increment/decrement continually.
• Pick the Viewport: Disabled box to enable the viewport (the box
changes to read Viewport: Enabled).
Note: You can disable a viewport after defining it. The viewport must be
enabled in order to be active during the configuration during operation.
7 – 4
Page 64

Chapter 7
Creating Custom Runtime Displays
Tool Display Setting: With the Envir/Cam→ System→ Tool Display:
box set to ON, all viewports are displayed which have an assigned
display page and number in common with the currently selected viewport.
With Tool Display: box set to OFF, only the current viewport is
displayed (see “Selecting Display Pages and Page Numbers” in this
chapter).
• Pick the Define Viewport . . . box to access the Define Viewport menu
(see Figure 7.3).
Figure 7.3 Example Custom Runtime Display
Define Viewport box
Define Viewport menu
Using the Define Viewport Menu
With the Define Viewport menu displayed, you have access to the following
menu items:
• Type: Select the viewport type – Text, Tool, or Graph.
• Pick & Place: Adjust the viewport size and position. (Disabled if Tool
is the selected viewport type)
• Border:* Set the color of the viewport display border.
• Backg.:* Set the color of the viewport display background area.
• Display Pages: Select the type(s) of runtime display that will display
the viewport.
• Page #: Select the page number(s) of the runtime display(s) that will
display the viewport.
• Erase Port Data: Permanently remove the contents of the viewport.
7 – 5
Page 65

Chapter 7
Creating Custom Runtime Displays
Selecting the Viewport Type
Using the Type box on the Define Viewport menu, select one of three types
of viewport – Text, Tool, or Graph – which are briefly described below:
• Text – The Text viewport allows you to display literal text, or to display
tool results, or other data. Text viewport contents (defined by string text)
are positioned within the viewport area. The border, background, and
content colors are user-defined, as are the size and positioning of the
viewport. The positioning of the Text viewport is limited to the area
above the runtime menus.
Figure 7.4 Example T ext, Tool, and Graph viewports
7 – 6
Graph Viewport positioned within Text Viewport
Text Viewport
Tool Viewport String
• Tool – The Tool viewport is much like the Text type, in terms of content
– it can display literal text, tool results, or other data. The content is
defined just as it would be for a Text viewport. The main differences
between Text and Tool viewports are:
Tool viewports do not include a visibly bordered area – the Tool
viewport border is that of the entire monitor screen. The border and
background are always Clear.
Because the Tool viewport border is that of the entire monitor screen,
Tool viewport contents can be positioned anywhere on the screen.
Tool viewport contents are automatically cleared and redisplayed for
each inspection; this is not true for Text viewport contents. This
Page 66

Chapter 7
Creating Custom Runtime Displays
makes the Tool viewport type preferable if the viewport strings are
defined so that the displayed content can change in position each time
it is displayed.
Tool string color is limited to four choices; Text viewport strings can
be set to any of eight different choices of color.
Tool viewport contents are displayed “beneath” Text viewport
displays, and base Color CVIM runtime displays, if these displays
occupy the same screen.
• Graph – Graph viewports can be defined to depict real-time tracking of
the results of up to three specified tools. Graph viewport contents are
displayed in a bordered area, for which the border, background, and graph
colors are user-defined.
To select the viewport Type:
• Pick the Type box on the Define Viewport menu – picking the Type
box, you can select one of three settings – Text, Tool, and Graph.
Figure 7.5 Example T ext, Tool, and Graph viewports
Define Viewport box
Define Viewport menu
Type box
Note: Once you have defined a string for a Text or Tool viewport, you
must use the Erase Port Data function in order to change the type of the
viewport to Graph. Similarly, once you have defined a variable for a
Graph viewport, you must use the Erase Port Data function in order to
change the type of the viewport to Text or Tool.
7 – 7
Page 67

Chapter 7
Creating Custom Runtime Displays
Using Pick & Place
To position the viewport on the monitor, and thus determine where it is
displayed on the screen during runtime, you use the Pick & Place function
(Pick & Place is disabled for Tool viewports; the Tool viewport “border” is
the same as the monitor screen border).
The procedure for positioning viewports is identical to that for placing
windows – with Pick & Place selected, handles appear on the viewport
border and center. As with windows, you pick and “drag” the handles to
reshape and reposition the viewport (refer to the window placement
procedures in the Color CVIM User’s Reference Manual for more
information). You can size and position the viewport to create a full screen
display, or you can create a viewport covering only a particular portion of the
screen.
To activate the Pick & Place function:
• Pick the Pick & Place box on the Define Viewport menu. With Pick &
Place selected, the “handles” appear on the viewport border.
Note: Because much of the viewport frame is initially hidden by the
pop-up menus, you will probably have to pick the menu removal icon (in
the upper right corner of the screen) to make the menus transparent or
invisible for the purpose of positioning the viewport.
• Pick and “drag” the handles to reshape and reposition the viewport (refer
to the window placement procedures in the Color CVIM User’s Reference
Manual for more information).
7 – 8
Page 68

Figure 7.6 Activating the Pick & Place function
Viewport handles appear when
Pick & Place function is activated
Chapter 7
Creating Custom Runtime Displays
Menu Removal
icon
Transparent menus
Pick & Place box
For example, to place a viewport so it appears in the upper right quarter of
the screen during runtime, you would place it in that position during setup
(see Figure 7.7, page 7 – 10).
7 – 9
Page 69

Chapter 7
Creating Custom Runtime Displays
Figure 7.7 Example of placing the viewport
Viewport placed in
upper right corner
during setup.
Pick & Place box
Here are additional considerations when selecting and positioning viewports:
Position Limitation: The bottom portion of the screen (about 15% or so) is
reserved for the runtime menus, and you will not be able to drag a Text or
Graph viewport border into this region. However, Tool viewports
encompass the entire screen, and Tool viewport strings can be placed
anywhere on the screen, including the runtime menu area.
Multiple Viewports Displayed on the Same Screen: You can display more
than one viewport on the same runtime display page (see “Selecting Display
Pages and Page Numbers” in this chapter). In doing so, you would need to
strategically select the viewport number of each (see below), as well as set
the size and position of each viewport according to display requirements.
Viewport Numbering and Layering: Viewports are displayed in numerical
order. Thus, if one viewport is placed partially or completely within another,
the viewport with the higher number will be displayed on “top.”
7 – 10
Selecting Border and Background Colors
You further define appearance of the viewport (for either a Graph or Text
type) by selecting the border color, and the background color. You do this
using the Border and Backg. menu items, respectively.
Note: The Border and Backg. items are disabled for Tool viewports.
Page 70

Chapter 7
Creating Custom Runtime Displays
Figure 7.8 Example of viewport border and background colors
Border
Background
Display Contents
The procedures for selecting both the border and background colors are
identical:
Backg. box
• Pick the appropriate menu item (either Border or Backg.), which
displays a Color Selection menu.
• Pick a box on the Color Selection menu for the desired color.
Figure 7.9 Example of viewport border and background colors
Color Selection
menu
Here is an additional consideration when selecting border and background
colors:
Colors during setup: The selected border and background colors are not
apparent during setup; they appear only when the viewport is displayed
during runtime.
7 – 11
Page 71

Chapter 7
Creating Custom Runtime Displays
Selecting Display Pages and Page Numbers
Use the Display Pages and Page # items in combination to determine how
to access the viewport during runtime. You assign the viewport to the
display type(s) and the specific page number(s) during setup. Then, during
run mode, use the Display menu, and Page ↑ and Page ↓ boxes, on the run
mode screen to access the page type and number, and thus show the display.
For example, you can assign a viewport to Results Page 2. Then, during
run mode, you select the Display menu, pick Results Page, and use the
Page ↑ and/or Page ↓ boxes as necessary to display the viewport.
You can assign the viewport to several types of display, and to several
different pages of the selected display type(s). You can also assign more than
one viewport to the same display and page number(s).
To select the
Display Pages:
• Pick the Display Pages box on the Define Viewport menu to open the
Display Pages menu:
• Pick the appropriate box(es) on the Display Pages menu.
Here are additional considerations when selecting Display Pages:
Tool Display: During setup mode, all viewports which share a runtime
display page with the current viewport are displayed on screen, if the Tool
Display box on the System menu (accessed through the Envir/Cam
menu) is set to ON. Otherwise, only the currently selected viewport is
displayed.
Select at least one box: You must select at least one box to display the
viewport during run mode. The default is Image Only.
“Page” Displays: During run mode, any Text or Graph viewport
assigned to “Page” displays – that is, the I/O Page, the Result Page, or
Stat Page – replaces the respective display for the page(s) it is assigned
to. A viewport assigned to Image Only, Failed Tools, or All Tools
displays is placed over any displayed tools for the respective page(s).
7 – 12
Page 72

Display
Pages box
Chapter 7
Creating Custom Runtime Displays
Figure 7.10 Example of viewport border and background colors
Display Pages
menu
Selected
menu item
Page # box
To select the Page #:
• Pick the Page # box on the Define Viewport menu to open the Page
Numbers menu (see Figure 7.11).
• Pick the appropriate box(es) on the Page # menu.
Figure 7.11 Example of viewport border and background colors
Page Numbers
menu
Selected
menu item
Here are some additional considerations when selecting Page Numbers:
Select at least one box: You must select at least one box to display the
viewport during run mode. Selecting no page number box prevents the
viewport from being displayed at all.
Number of Pages Available: With the USER-PAK option installed, each
runtime display has eight different pages available.
7 – 13
Page 73

Chapter 7
Creating Custom Runtime Displays
Erase Port Data
Picking the Erase Port Data box permanently removes all defined strings
from the selected viewport, and also resets all the Define Viewport
parameters to default settings.
Note: Do not pick this box if you value any portion of your viewport
strings and current Define Viewport parameter settings.
The Erase Port Data function is useful if you want to clear all the contents
for a viewport, such as if you need to entirely redefine all strings and
settings, or if the viewport is no longer useful for your application, and you
want to free up the Color CVIM module memory for other purposes.
Figure 7.12 Example of viewport border and background colors
Erase Port Data box
To use the Erase Port Data function:
• Pick the Erase Port Data box. Picking the Erase Port Data box once
displays this warning message:
• To permanently remove the port data, pick the Erase Port Data box a
second time. If you do not want to erase the port data at this point, pick a
different menu item instead of the Erase Port Data box.
7 – 14
Page 74

Chapter 7
Creating Custom Runtime Displays
Defining Text and Tool Viewport Contents
Text Viewport
This section discusses how to define Text and Tool viewport contents – both
types are discussed together because the procedure for defining the contents
for the two types is identical.
Figure 7.13 Example of viewport types and contents
Text Viewport String
Graph Viewport
Tool Viewport String
The basic steps for defining viewport contents are described briefly below:
• Select the string you wish to define, using the Next or Previous box
(located beneath the Define String # box).
7 – 15
Page 75

Chapter 7
Creating Custom Runtime Displays
Figure 7.14 Selecting the viewport string
String 1 selected
Previous box
Next box
If you pick and hold the Next or Previous box, the string selection
increments continuously.
Note: All strings for a selected viewport are displayed on the screen.
The currently selected string is displayed in red, others are green.
Portions of red (current) and green (other) strings which overlap are
displayed in yellow.
• Enter or modify the string text for the selected string using the string
entry keyboard – this appears when you pick the Enter (or Modify)
String Text box. The string text not only includes string contents, but can
include codes for string positioning, string color, line drawing, and other
options (see Chapter 8 for more information on elements of string text).
Figure 7.15 Selecting the viewport string
Enter String Text box
String entry keyboard
7 – 16
• Using the Define String menu, define each string further (see the
following section).
Page 76

Chapter 7
Creating Custom Runtime Displays
Using the Define String Menu
To further define a string you are creating, select the Define String box to
display the Define String menu (see Figure 7.16, page 7–15).
Note: The Define String box is disabled until at least one character of string
text has been entered for the selected string (see Chapter 8 for information on
entering string text).
The Define String menu allows access to the following menu items:
• Repeat String: Select this item to enable and define automatic repeated
display of a string (refer to Chapter 8 for information on Repeat String).
• Dir: String Direction – Set to Right or Down.
• Width: String Width – Set to Single or Double.
• Color: Select the color of the string.
• Pick & Place: Position the string within the viewport.
• Event: Select this item to define the type of event that triggers the
display of the string being defined, such as the failure of a specific tool,
for example (refer to Chapter 8 for information on Event).
Figure 7.16 Selecting the viewport string
Define String box
Define String menu items
Selecting String Direction
You can further define appearance of the string by selecting the string
direction. You do this using the Dir menu item.
To set string direction:
7 – 17
Page 77

Chapter 7
Creating Custom Runtime Displays
• Pick the Dir box to toggle the selection between Right and Down.
Figure 7.17 Selecting the string direction
String displayed in
Dir box
(with Down
selected)
Down direction
Setting the Dir box to Down causes the characters of the string to be
displayed downward in a vertical column (as shown above), rather than
Right (across the screen from left to right), which is the default setting.
Selecting String Width
You further define appearance of the string by selecting the string width. To
change the width of the string:
• Pick the Width box to toggle the selection between Single and Double.
7 – 18
Page 78

Figure 7.18 Selecting the string direction
Chapter 7
Creating Custom Runtime Displays
Double Width
string
Single Width
string
Width box
Setting the Width box to Double causes the characters of the string to be
doubled in size when displayed. This is useful when you want certain strings
to be prominent, or if you need larger characters for better readability.
Selecting String Color
You further define appearance of the string by selecting the color. You do
this using the Color menu item.
To select the string color:
• Pick the Color box, which displays a Color Selection menu.
• Pick a box on the Color Selection menu for the desired color.
7 – 19
Page 79

Chapter 7
Creating Custom Runtime Displays
Color box
Figure 7.19 Selecting the string direction
Color Selection
menu
Here are additional considerations when selecting string colors:
Override for String Color: The string color can be changed using the
change color codes or conditional color indicator within the string text,
each of which will override the color selected through the Color
Selection menu (see “Change Color Codes” and “Conditional
Color-coding” in Chapter 8).
Tool Viewport Colors: The Color Selection menu for Tool viewport
strings (not shown) contains only 4 items – Green, Yellow, Red, and
Clear; Tool strings can only be displayed in these colors.
Selecting Clear: If you select Clear for the string color, the string will
not appear in the runtime display – however, any text previously
displayed in the same location will be erased.
Using Pick & Place
To position the string within the viewport, and thus determine where it is
displayed on the screen during runtime, you can use the Pick & Place
function on the Define String menu (you can also use the draw line or plot
line codes within the text string to place the string contents – see “Draw Line
Codes” and “Plot Line Codes” in Chapter 8). The procedure for positioning
strings is similar to that for placing windows or gages – except that, with
Pick & Place selected, only one handle appears; you pick the handle to
reposition the string within the viewport.
7 – 20
Page 80

Figure 7.20 Placing the string
Chapter 7
Creating Custom Runtime Displays
Handle appears when
Pick & Place function is activated
To activate the Pick & Place function:
• Pick the Pick & Place box on the Define String menu; a small
rectangular “handle” appears in the middle of the string.
• Pick and “drag” the string handle to reposition the string (refer to the pick
& place procedures in the Color CVIM User’s Manual for more
information).
Note: When using the Pick & Place item for a string within a Tool
viewport, you can position the string anywhere on the screen. However,
remember that Tool viewport strings are displayed beneath Text and
Graph viewports, and beneath base Color CVIM runtime menus and
displays; if a Tool string is defined to be displayed in the same location
and on the same display page as a Text or Graph viewport or a base
Color CVIM runtime display, the Tool string will not appear in the
display.
7 – 21
Page 81

Chapter 7
Creating Custom Runtime Displays
Defining Graph Viewports
This section discusses how to define Graph viewports. Graph viewports
provide the capability to display in real time, and in graph form, the results
from gages, windows, and/or formulas. Graph viewport contents are
displayed during run mode in a bordered area, for which the border,
background, and graph colors are user-defined.
For each Graph viewport you create, you can define up to three “variables,”
that is, three different graph lines. A “variable” represents the numerical
results of a specific gage, window or formula that you select. These results
are plotted in the Graph viewport within a range you define.
Figure 7.21 shows a typical example of a Graph viewport displayed during
run mode, which is shown plotting two variables (the results of windows 1
and 2, in this case) within the range of 0-63.
Figure 7.21 Example Graph viewport
Two variables being plotted
7 – 22
Graph Viewport
Current position indicator
Page 82

Chapter 7
Creating Custom Runtime Displays
When the Graph viewport is displayed during run mode, the defined
variables are plotted from left to right; plotted variables are either line or dot
style (as defined), and the leading edges of the plotted variables are
emphasized by the “current position indicator,” a vertical line spanning the
viewport. During run mode, the current position indicator moves from left to
right as the variables are plotted from left to right (Note: The plotting of
variables cannot be observed during setup mode).
The basic steps for defining a Graph viewport are as follows:
• Complete preliminary steps for defining a viewport. See “Initial Setup:
Selecting and Defining the Viewport,” near the beginning of this chapter,
for more information.
• Select which of three variables (1, 2, or 3) you wish to define, using the
Next or Previous box (located beneath the Define Graph box).
Remember that a variable is something that is tracked by the system, and
can be the result of a gage, a window, or a formula.
• Using the Define Graph Var. menu, define the variable:
– Enable the variable and set the graphing Style – Line or Dot.
– Select the variable tool – the specific gage, window, or formula
number whose results will be tracked by the graph viewport.
– Set the variable color (the color of the plotting in the Graph viewport
for the respective variable).
• Using the Define Graph menu, define the Event, or circumstances under
which the graph variable plottings are updated, and set the Upper and
Lower parameters for the range of the Graph viewport.
Selecting the Variable
You can define from one to three variables for the Graph viewport.
To select the variable you wish to define:
• Pick the Next or Previous box (located beneath the Define Variable
box).
7 – 23
Page 83

Chapter 7
Creating Custom Runtime Displays
Figure 7.22 Selecting the variable
Previous box
Defining the Variable
After selecting a specific variable, you next define the variable using the
Define Graph Var. menu.
To display the Define Graph Var. menu:
• Pick the Define Variable box.
Variable 1 selected
Next box
7 – 24
Figure 7.23 Accessing the Define Graph Var. menu
Define Variable box
Define Graph Var. menu
Page 84
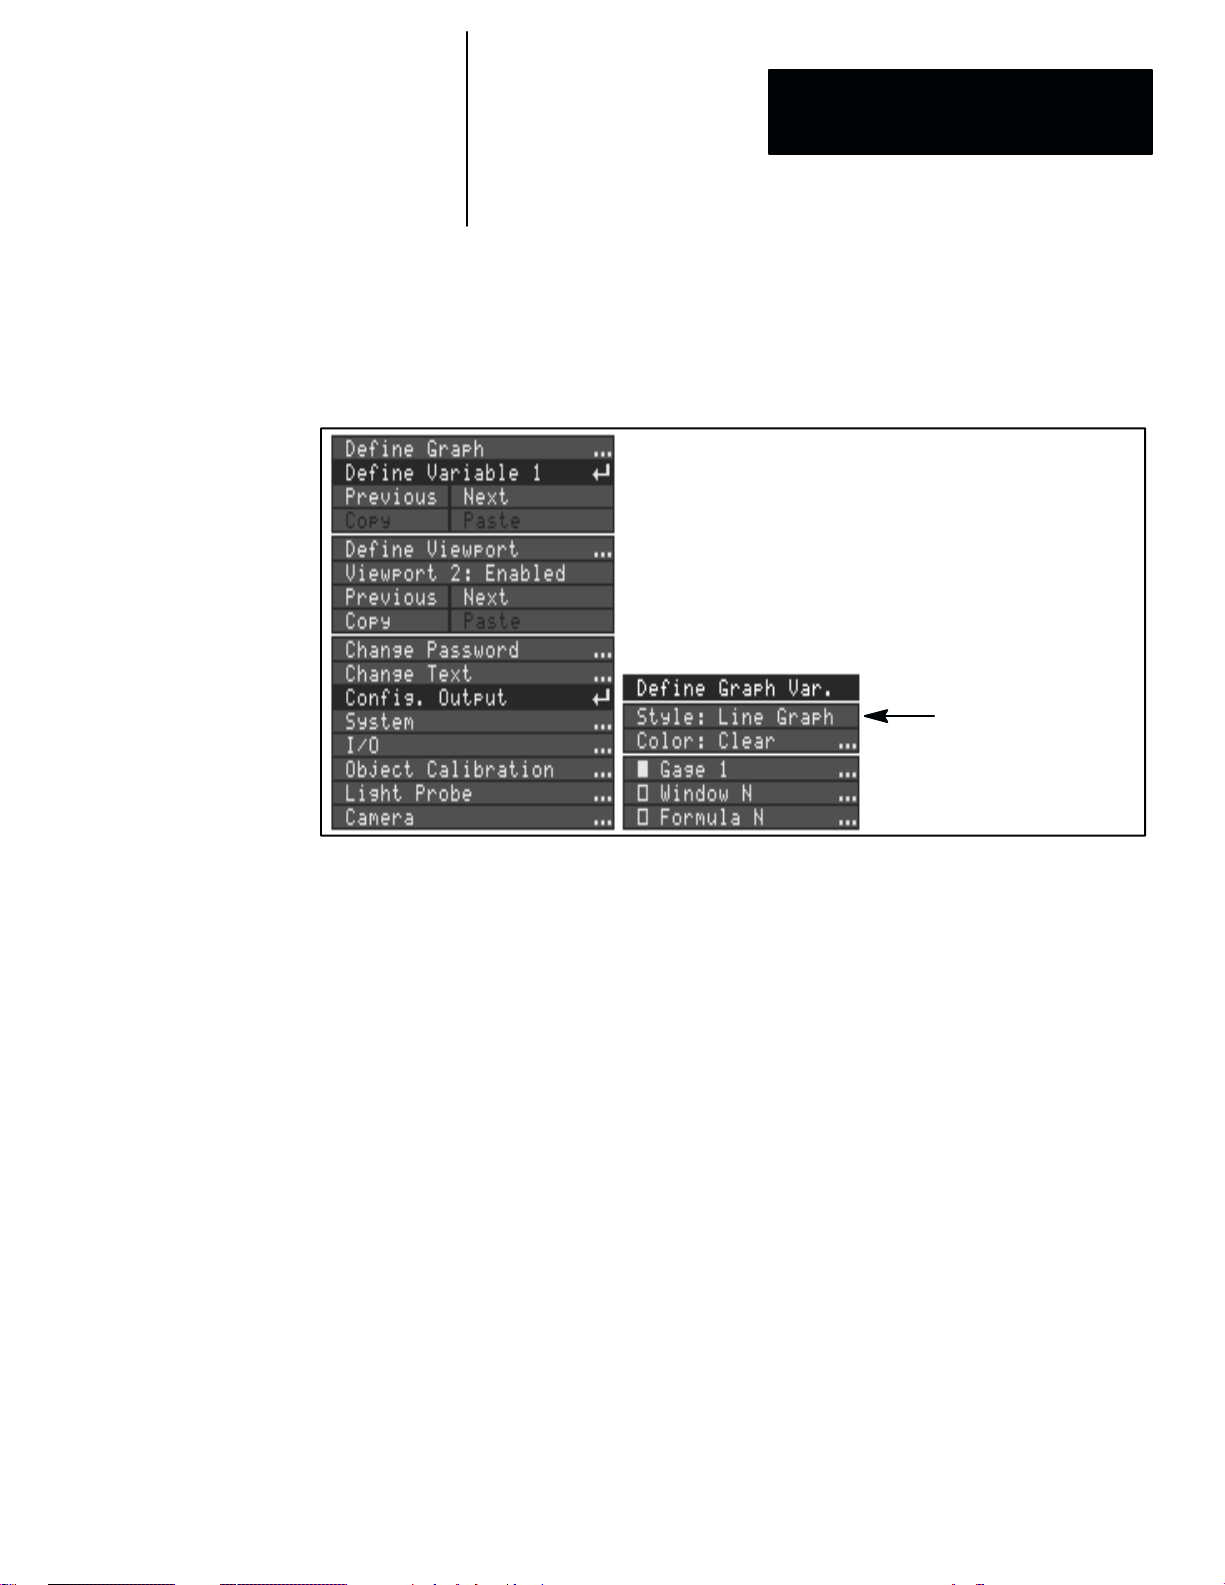
Chapter 7
Creating Custom Runtime Displays
Setting the Style
You pick the Style box to enable/disable the variable and the remainder of
the menu, and also to set the “style” of the variable.
Figure 7.24 Selecting the variable style
Style box, with
Line Graph selected
Note: When the Define Graph Var. menu is initially displayed, the Style
box is set to Disabled, and the remainder of the menu items are disabled.
The first step in defining the variable, then, is to set the Style box to a
setting other than Disabled (Dot or Line), which selects the style, enables
the variable, and also enables the rest of the Define Graph Var. menu.
Picking the Style box repeatedly cycles the box through three settings:
• Disabled – Disables the variable, as well as the remainder of the menu.
• Dot Graph – Plots the variable as a series of dots, one dot per result.
• Line Graph– Plots the variable as a continuous line.
Selecting either the Dot Graph or the Line Graph option automatically
enables the remainder of the Define Graph Var. menu. Figure 7.25 shows
examples of Line Graph and Dot Graph styles.
7 – 25
Page 85
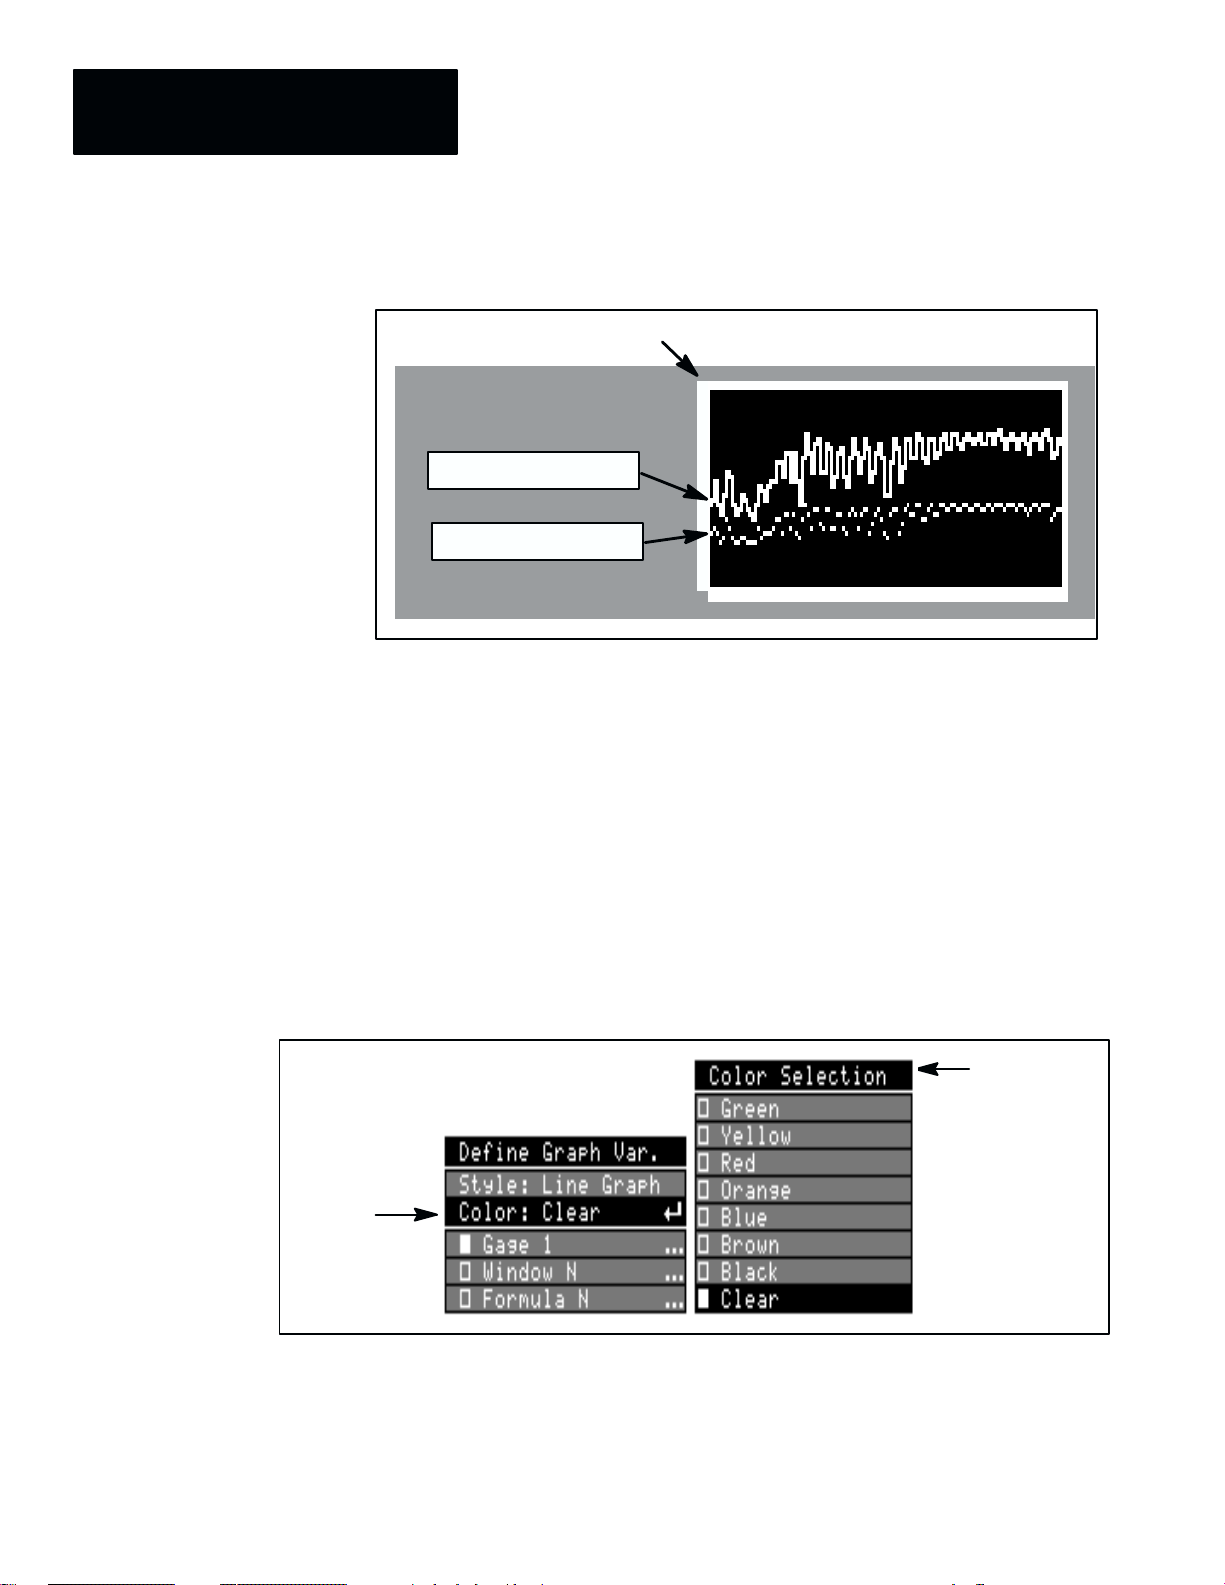
Chapter 7
Creating Custom Runtime Displays
Figure 7.25 Examples of variable styles
Graph Viewport
Example Line Graph
Example Dot Graph
Color box
Selecting Variable Color
You further define appearance of the variable by selecting the Color; this is
the color of the line or dot graph created during run time. To select the color
for a graph variable (Figure 7.26, page 7 – 26):
• Pick the Color menu item, which displays a Color Selection menu.
• Pick the box for the desired color.
Selecting Clear: If Clear is selected, the variable color will be green,
yellow, or red based on tool status – Pass, Warn, or Fail, respectively.
Figure 7.26 Selecting the variable color
Color Selection
menu
7 – 26
Selecting the Variable Tool
You must select the specific tool whose results are plotted in the Graph
viewport – either a gage, a window, or a formula.
Page 86

Chapter 7
Creating Custom Runtime Displays
To select a gage, window, or formula as the variable tool:
• Pick the appropriate box on the Define Graph Var. menu – Gage,
Window, or Formula. This causes the calculator keypad to appear.
• Use the calculator pad to enter the number for a specific gage, window, or
formula.
Note: You must have the MATH-PAK option (Cat. No. 5370-MPKC)
installed in order to successfully use any Formula selection.
Figure 7.27 Selecting the variable color
Calculator Pad
Window box
Value Out of Range: If you try to enter a number which is not valid,
such as window number 49 (there are only 48 windows), the calculator
pad will flash the message – Value Out of Range. If this happens, pick
an appropriate number, and then pick the Enter key again.
Graph
After defining the variables, you next define the graph, using the
Defining the
Define Graph menu. This menu appears when you pick the Define
Graph box.
Using the Define Graph menu, you can:
• Set the Upper and Lower limits of the Graph viewport (all variables will
then be plotted in the viewport relative to these limits).
• Define the Event, or circumstances under which the graph variable
plottings are updated.
To access the Define Graph menu:
• Pick the Define Graph box.
7 – 27
Page 87

Chapter 7
Creating Custom Runtime Displays
Figure 7.28 Accessing the Define Graph menu
Define Graph box
Define Graph menu
Upper limit box
Lower limit box
Upper limit
Lower limit
Defining the Viewport Limits – Upper and Lower
The Upper and Lower boxes on the Define Graph menu enable you to set
the range for the variables plotted within the viewport. The Upper limit sets
the maximum value that the viewport can plot, and corresponds to the top of
the Graph viewport. The Lower limit sets the minimum value the viewport
will plot, and corresponds to the bottom of the viewport.
As a rule of thumb, set the Upper and Lower limits just beyond the range of
expected results of the tools being plotted.
7 – 28
Page 88

Chapter 7
Creating Custom Runtime Displays
Figure 7.29 Examples of different variable limits
This viewport has a narrower
range between Upper and
Lower limits
This viewport has a wider
range between Upper and
Lower limits, and thus a less
dramatic display of results
Upper limit = 50
Lower limit = 20
Upper limit = 100
Lower limit = 0
Note these additional considerations when setting Upper and Lower limits:
• The limits you set are for the Graph viewport itself, and therefore
encompass all variables plotted in the viewport. You cannot set Upper
and Lower limits ranges for each variable individually. Therefore, be
sure to accommodate the results of all variables you are plotting when
setting the Upper and Lower limits.
• Results which go beyond the Upper limit are plotted along the top of the
viewport. Results which go beyond the Lower limit are plotted along the
bottom of the viewport.
To set either the Upper or Lower limit:
• Pick the Upper or Lower box, as appropriate, on the Define Graph
• Use the calculator pad to enter the range limit.
Figure 7.30 Selecting the variable limits
Upper box
menu, which causes the calculator pad to appear.
Calculator Pad
7 – 29
Page 89

Chapter 7
Creating Custom Runtime Displays
Valid Range: The valid range for the Upper and Lower limits are
–32767 to 32767, and the difference between the two limits must not
exceed 32767. If you try to enter a number which is not valid, such as a
Lower limit value which is higher than the current Upper limit, the
calculator pad will flash the message – Value Out of Range.
Defining the Event
For each Graph viewport you define, you must specify the Event. In
defining the event, you are defining the conditions which must be met, upon
completion of an inspection, in order for the Graph viewport variables to be
updated. You define the event using the Event menu. See Chapter 8 for
more information on setting the Event.
For example, the default setting specifies that the Graph viewport is always
updated upon completion of an inspection. You can define other conditions –
you can specify that the viewport is updated every 100 inspections, for
example.
The Event you define is in effect for all variables enabled for the Graph
viewport – you cannot specify an event for each variable individually.
Graph Plotting and the Inspection Rate: The Color CVIM module
inspection processing has priority over the plotting of variables. Therefore,
for faster trigger rates, the graph may not be updated for every inspection.
Changing Display Page during Runtime
When you access a display page which contains a graph during runtime, the
graph viewport position indicator starts at the left edge of the display, and
begins plotting results from left to right. When a graph is currently
displayed, and you change the display page, then return to the display page
with the graph, and the graph viewport position indicator starts over at the
left edge of the display; the previously graphed results are erased from the
screen.
The Copy and Paste
Features
7 – 30
The Config. Output menu contains two sets of Copy and Paste boxes
which can be used to copy the contents of one string to another string, or to
copy all strings and parameters from one viewport to another. Refer to
Chapter 9 for a description of these functions.
Page 90

Chapter
Chapter Objectives
A–B
8
Defining Strings for Serial Ports and Viewports
Contents
Chapter Objectives 8–1. . . . . . . . . . . . . . . . . . . . . . . . . . . . . . . . . . . . . . . .
Entering (or Modifying) String Text 8–1. . . . . . . . . . . . . . . . . . . . . . . . . . . .
Valid Elements of String Text 8–3. . . . . . . . . . . . . . . . . . . . . . . . . . . . . . . . .
Defining the Event 8–23. . . . . . . . . . . . . . . . . . . . . . . . . . . . . . . . . . . . . . . . .
Using Repeat String 8–28. . . . . . . . . . . . . . . . . . . . . . . . . . . . . . . . . . . . . . .
Custom Serial Port Message Example 8–33. . . . . . . . . . . . . . . . . . . . . . . . . .
T ext and Tool Viewport Examples 8–36. . . . . . . . . . . . . . . . . . . . . . . . . . . . .
The objective of this chapter is to describe how to define strings for serial
ports and viewports (Text and Tool types), including how to:
• Enter/modify string text.
• Use valid elements of string text.
• Define string parameters, such as the Event, and Repeat String.
Entering (or Modifying)
String Text
The contents of serial port messages and viewport displays are largely based
on the “string text” defined for one or more strings for the selected serial port
or viewport. You define strings using the Enter String Text feature on the
Config. Output menu, after selecting the serial port or viewport.
The steps for entering or modifying strings are basically the same for both
serial port strings and viewport strings:
• Select the string you wish to define, using the Next or Previous box
(located beneath the Define String # box).
• Pick the Enter (or Modify) String Text box. The string entry keyboard
appears (see Figure 8.1).
Figure 8.1 The string entry keyboard
Enter String Text box
String entry keyboard
8 – 1
Page 91

Chapter 8
Defining Strings for Serial Ports and Viewports
String syntax message
• Enter or modify the string text for the selected string using the string
entry keyboard. The characters you select appear in the keyboard display.
• Pick the Ret key when finished entering or modifying text, which enters
the string into memory.
String Syntax: When you pick the Ret key, the Color CVIM module
checks for syntax errors; one of two messages is displayed beneath the string
text (see Figure 8.2).
Figure 8.2 String syntax messages
Cursor
String text entry, as it is
displayed on the keyboard
String Syntax OK – the syntax of the string text is okay, and the string will
be transmitted (or displayed) as coded.
Syntax error at cursor pos. – If this message appears, the string text has at
least one syntax error – that is, one or more elements has not been entered
correctly. A syntax error will prevent the affected string element, and the
remainder of the string, from being transmitted (displayed). Check the string
text on the keyboard display; the cursor will be located at the point of the
first syntax error. Refer to the section “Valid Elements of String Text”
(beginning on page 8 – 3) to check your string, and make corrections as
necessary.
String Length: You can enter up to 40 characters in the string text.
Spacing: For readability, one or more spaces can be placed between
elements in the string text. Otherwise, spaces are not required unless
specifically called for in the format of an element.
Viewport string display: After entering text and picking the Ret key, the
string is displayed onscreen in the viewport (if the syntax is correct).
Viewport string colors: During setup, if you are defining several strings for
a viewport, all strings defined for that viewport are displayed on the screen.
The currently selected string is displayed in red. Other strings appear in
green. Should any part of the strings overlap, the overlapping portions will
be displayed in yellow.
8 – 2
Page 92

Chapter 8
Defining Strings for Serial Ports and Viewports
String Numerical Order: Strings within a given serial port or viewport are
processed for each inspection in numerical order, so that lower-numbered
strings are transmitted (displayed) before higher-numbered strings which are
transmitted (displayed) for the same inspection.
Valid Elements of String Text
The strings you create will consist of one or more elements; these elements
define the corresponding characters, data, and/or graphics (viewports only)
which will be present in the transmitted (displayed) messages. The different
elements you can use to create strings are listed below:
• Literal text
• Data codes
• Special characters:
– Newline character (N)
– Character code indicator (/)
– Index character (#)
– Formula Indicator (%)
• Field formatting codes
The following elements are valid for
viewport strings only:
• Conditional color codes • Plot line codes
• Draw line codes • Change color codes
Literal Text
Place quotation marks ( ” ” ) around characters that you want transmitted (or
displayed) literally.
For example, you can use a literal text field to identify the type of data to
follow. You can signify specific events, such as “PART REJECTED,” by
defining the Event for that string so the string is transmitted (or displayed)
only if the part is rejected (see “Defining the Event” in this chapter).
8 – 3
Page 93

Chapter 8
Defining Strings for Serial Ports and Viewports
Literal text entry,
as it is displayed
on the keyboard
String entry keyboard
Figure 8.3 Example of literal text entry
Quotation marks
You can enclose a number of spaces in quotes to provide spacing between
fields within the message, as shown below:
Spaces included in quotes
Data code
Valid Characters for Literal Text: Any character(s) that you enclose in
quotes will be sent as literal text, except the quotation mark ( ” ) character.
To transmit or display a quotation mark, use the / (character code) indicator
with a value of 34 (see also “/ Character Code Indicator” in this chapter).
Data Codes
Data codes are used to specify particular tool results or other types of data
obtained by the Color CVIM module during inspections. You specify the
types of data to be included in the string by entering a specific data code for
each.
For example, the data code g1 represents the result for gage 1, while g2
represents the result for gage 2.
8 – 4
Data codes
Case Sensitivity: The data codes are not case sensitive.
Table 8.A, beginning on page 8 – 5, provides descriptions of the data codes.
Page 94

Table 8.A (pt. 1 of 3)
Data Codes
Chapter 8
Defining Strings for Serial Ports and Viewports
Data Code➀ Subcodes (.s)➀
Gn.0 Gage measurement value (# of pixels, # of edges, etc.)
Gn.1 Pass/fail condition for warning range (1 = pass, 0 = fail).
Gn.2 Pass/fail condition for fault range (1 = pass, 0 = fail).
Gn.s
(n = 1 to 64)
(n = 1 to 64)
(s = 0 to 9)
(For Gages)
(For Gages)
Wn.s
(n = 1 to 48)
(s = 0 to 19)
(For Windows)
Gn.3
Gn.4
Gn.5
Gn.6
Gn.7 Fault range low.
Gn.8 Warning range high.
Gn.9 Warning range low.
Wn.0 Window measurement value (# of pixels, # of objects, etc.).
Wn.1 Pass/fail condition for warning range (1 = pass, 0 = fail).
Wn.2 Pass/fail condition for fault range (1 = pass, 0 = fail).
Wn.3 Number of faults detected.
Wn.4 Nominal value.
Wn.5 Fault range high.
Wn.6 Fault range low.
Wn.7 Warning range high.
Wn.8
Wn.9➁
Wn.10➁
Wn.11➁
Wn.12➁
Wn.13➁
Wn.14➁
Wn.15➁
Wn.16➁
Wn.17➁
Wn.18➁
Wn.19➁
➀The letter n = tool or formula number (as appropriate). The letter s = operand
subcode.
➁Window subcodes 9 to 19 pertain to the object counting operation only. The “first
counted object” is the object which, among those that satisfy the filter parameters, is
closest to the upper left corner of the window. If a filter parameter is not enabled for
the window, a result of –1000 is returned for that parameter.
Description of field
Second coordinate value (Y coordinate for X Position gage;
X coordinate for Y Position gage).
Number of faults detected.
Nominal value
Fault range high.
Warning range low.
Total number of objects counted before target filtering.
Perimeter value of first counted object.
Area value of first counted object.
X center value of first counted object.
Y center value of first counted object.
Inertial value of first counted object.
Theta value of first counted object.
Min radius value of first counted object.
Max radius value of first counted object.
H size value of first counted object.
L size value of first counted object.
8 – 5
Page 95

Chapter 8
Defining Strings for Serial Ports and Viewports
Table 8.A (pt. 2 of 3)
Data Codes
Data Code➀ Subcodes (.s)➀
RLn.0 X coordinate value of edge position on reference line.
RLn.s
(n = 1 to 3)
(s = 0 to 4)
(For Ref. Lines)
RWn.s
RWn.s
(n = 1 to 3)
(s = 0 to 16)
(For Ref.
Windows)
Sn.s➁
(n = 1 to 1 12)
(s = 0 to 4)
(s = 0 to 4)
(For Statistics)
RLn.1
RLn.2
RLn.3
RLn.4 Number of faults detected.
RWn.0 Cumulative position: X coordinate value.
RWn.1 Cumulative position: Y coordinate value.
RWn.2
RWn.3 Cumulative pass/fail condition (1 = pass, 0 = fail).
RWn.4 Active feature #1 position X coordinate value.
RWn.5 Active feature #1 position Y coordinate value.
RWn.6
RWn.7
RWn.8
RWn.9
RWn.10
RWn.11 Active feature #2 pass/fail condition (1 = pass, 0 = fail).
RWn.12 Active feature #3 position X coordinate value.
RWn.13 Active feature #3 position Y coordinate value.
RWn.14 Active feature #3 score value.
RWn.15 Active feature #3 pass/fail condition (1 = pass, 0 = fail).
RWn.16 Number of faults detected.
Sn.0 Formula/tool (n) statistics: number of samples.
Sn.1 Formula/tool (n) statistics: minimum reading value.
Sn.2
Sn.3
Sn.4 Formula/tool (n) statistics: standard deviation value.
➀The letter n = tool or formula number (as appropriate). The letter s = operand
subcode.
➁ Where n = 0 to 56, the letter n specifies the formula number, if the formula of that
number is enabled (the MA TH -PAK option package, Cat. No. 5370–CMPK, must be
installed to use formulas). Otherwise, the letter n specifies the tool number and
type, as follows:
For n = 1-8 – n specifies: windows 1-8, respectively.
For n = 9-16 – n specifies: gages 1-8, respectively.
For n = 17-24 – n specifies: windows 9-16.
For n = 25-32 – n specifies: gages 9-16.
For n = 33-40 – n specifies: windows 17-24.
For n = 41-56 – n specifies: gages 17-32.
Description of field
Y coordinate value of edge position on reference line.
Pass/fail condition for reference line (1 = pass, 0 = fail).
Theta from a reference line configured for “X–X then Y” or
“Y–Y then X” rotation compensation.
Cumulative angle (Q).
Active feature #1 score value.
Active feature #1 pass/fail condition (1 = pass, 0 = fail).
Active feature #2 position X coordinate value.
Active feature #2 position Y coordinate value.
Active feature #2 score value.
Formula/tool (n) statistics: maximum reading value.
Formula/tool (n) statistics: mean value.
8 – 6
Page 96

Table 8.A (pt. 3 of 3)
Data Codes
Chapter 8
Defining Strings for Serial Ports and Viewports
Data Code➀ Subcodes (.s)➀
M.0 The total triggers (includes missed triggers).
M.s
(s = 0 to 3)
(for Total Counts)
(for Total Counts)
L.s
(s = 0 to 20)
(For Light Probe)
Fn.s➁
(n = 1 to 56)
(s = 0 to 8)
(For Formulas)
(For Formulas)
M.1
M.2
M.3
L.0 Light probe brightness value for red channel.
L.1 Light probe brightness value for green channel.
L.2 Light probe brightness value for blue channel.
L.3 Pass/fail condition for warning range (1 = pass, 0 = fail).
L.4 Pass/fail condition for fault range (1 = pass, 0 = fail).
L.5 Number of faults detected.
L.6 Nominal value for red channel.
L.7 Fault range high for red channel.
L.8 Fault range low for red channel.
L.9
L.10
L.11 Nominal value for green channel.
L.12 Fault range high for green channel
L.13 Fault range low for green channel.
L.14 Warning range high for green channel.
L.15 Warning range low for green channel.
L.16 Nominal value for blue channel
L.17 Fault range high for blue channel.
L.18 Fault range low for blue channel.
L.19 Warning range high for blue channel.
L.20 Warning range low for blue channel.
Fn.0 Value of the formula (n) result.
Fn.1 Pass/fail condition for warning range (1 = pass, 0 = fail).
Fn.2 Pass/fail condition for fault range (1 = pass, 0 = fail).
Fn.3
Fn.4
Fn.5
Fn.6
Fn.7 Warning range high.
Fn.8 Warning range low
➀Where n = tool or formula number (as appropriate). The letter s = operand subcode.
➁The MATH-PAK option package (Cat. No. 5370–CMPK) must be installed, and
respective formulas enabled, in order for any of the “formula” codes to provide
formula data.
Description of field
The total missed triggers.
Number of master range faults.
The name of the configuration.
Warning range high for red channel.
Warning range low for red channel.
Total fault count for the formula.
Nominal value for the formula.
Fault range high.
Fault range low.
8 – 7
Page 97

Chapter 8
Defining Strings for Serial Ports and Viewports
Special Characters: N, /, %, #
These four characters have special functionality within the string text:
N – the newline character
/ – the character code indicator
% – the formula indicator
# – the index character
The N (newline) character
Serial Ports: Place the letter N (upper or lower case) in the string to
transmit both the ASCII carriage return [CR] and line feed [LF] characters.
This can be especially useful if the string is intended for printing.
Example: Assume – gage 1 result = 125, gage 2 result = 450
This string
transmits this:
G1 G2 _ _ _ _ _ _ 125 _ _ _ _ _ _ 450 (where “_” is a space).
G1 n G2 n _ _ _ _ _ _ 125 [CR] [LF]
_ _ _ _ _ _ 450 [CR] [LF]
Viewports – Lower Case n: Place the letter n (lower case) in the string to
cause the remainder of the string to be displayed on a “new line” beneath the
first part of the string. This case be useful in displaying columns of items.
Example: Assume – gage 1 result = 125, gage 2 result = 450
This code
displays this:
G1 G2 _ _ _ _ _ _ 125 _ _ _ _ _ _ 450 (where “_” is a space).
G1 n G2 _ _ _ _ _ _ 125
_ _ _ _ _ _ 450
Viewports – Upper Case N: The letter N (upper case) has the same effect
as the lower case letter n, with this addition:
8 – 8
If a string with the N (upper case) character at the end is used with the
Repeat String feature to display a column of items for an inspection, and
for one iteration of the repeated display, the string content is not displayed
(because the defined Event for that string did not occur), the N causes a
blank line to be inserted where the string would have appeared had it been
displayed. When the lower case n is used under these conditions, no
blank lines are displayed.
Page 98

Chapter 8
Defining Strings for Serial Ports and Viewports
/ Character Code Indicator
Serial Ports: You can transmit any character from the ASCII character set
by inserting the character code indicator, which takes this form:
/cc
where cc (character code) is a number from 0-255 which specifies the
character (see Appendix B for a listing of the available characters and their
codes).
Example – the number “9” represents the ASCII tab character:
This code
transmits this:
“Gage” /9 “Window” n Gage [ TAB ] Window [CR] [ LF]
Viewports: You can display any character from the Color CVIM character
set, including many characters not available through keyboard entry. You do
this by inserting the character code indicator, which takes this form:
/cc
where cc (character code) is a number from 0-255 which specifies the
character (see Appendix B for a listing of the available characters and their
codes).
Example – the number “173” represents the “→ ” character:
This code
displays this:
“63” /173 63→
Using # or %: You can insert the # (index character) or % (formula
indicator) after the /, in which case the character code value is determined by
the current index value, or designated formula value, respectively.
8 – 9
Page 99

Chapter 8
Defining Strings for Serial Ports and Viewports
% Formula Indicator
You can use the result from a formula for a character code, color code, or line
drawing parameter instead of entering a fixed numeric value. To do this,
enter the formula indicator in the place of the numeric value within the
respective code. The formula indicator takes this form:
% fn
where fn is a number from 1-56 which specifies the respective formula
result (you must have installed the MATH-PAK option, Cat. No.
5370–CMPK).
Note: The fractional portion of the formula result, if any, is ignored within
the context of this feature.
Serial Ports: You can use the formula indicator with the character code
indicator (see “/ Character Code Indicator”).
Example – Use formulas and formula indicators to transmit a window result
in 16-bit binary code.
Definition of formula 1: WIN1 / 256 (Window 1 results 256)
Definition of formula 1: WIN1 % 256 (Window 1 modulo 256)
For a window 1 result of 780:
Formula 1 = 3 (decimal portion disregarded)
Formula 2 = 12
This code
transmits these two bytes (shown in binary below):
/%1 /%2 0 0 0 0 0 0 1 1 0 0 0 0 1 1 0 0
Viewports: You can use the %fn code in your string text coding in a variety
of ways – as the numeric part of the character code (see “/ Character Code
Indicator”), as a parameter in drawing a line or placing text (see “Draw Line
Codes” and/or “Plot Line Codes”), or as a parameter for color coding (see
“Change Color Codes”). Refer also to “Text and Tool Viewport Examples”
for an example of using the formula indicator.
You can add the “–” (minus) sign as a prefix (as in –%5) to the formula
indicator, in order to use the negative of the specified formula result value
(this can be practical, for instance, if you are using a formula result as a
parameter in drawing or plotting a line).
8 – 10
# (Index) Character
The # (index) character is intended to be used along with the Repeat String
feature (see also Repeat String later in this chapter). When the # is placed
in the string text, the Color CVIM module replaces the # in the output with
the current index value.
Page 100

Chapter 8
Defining Strings for Serial Ports and Viewports
You can use the # (index) character in two ways:
• Place the # in the string to take the place of the tool number designation in
a data code – for example, G#, or W#.
• Place the # by itself in the string to transmit or display the current index
number.
You can, at your option, specify the format of the index “field” in the output.
You specify the index field format by including an optional formatting code
in parentheses immediately following the index character in the text string
you are defining (see “Field Format Codes”).
Using an Offset with the # (Index) Character – You can include an
“offset” with the index character, by placing either the “+” or “–” sign after
the “#,” followed by the offset value.
Example – We want to display the statistical mean for gages 1-8. To do this,
we would use the data code for statistical mean value, Sn.3, where n
represents the tool type and number. For this data code, the n values 9-16
indicate gages 1-8.
We could use the following string:
”
Gage” # ” Mean = ” S #+8 . 3 n
and use the Repeat String feature, with Start = 1, End = 8, Increment = 1.
In this string, the term # + 8 is used for the n value in the data code Sn.3:
Data code Sn.3
”Gage” # ” Mean = ” S #+8 . 3 n
where
n= #+8
When this string is repeated for index values from 1-8, the n value #+8
(current index value + 8) indexes through the values 9-16. In this way, eight
strings are displayed, which provide the mean values for gages 1-8:
Gage 1 Mean = 144.560
Gage 2 Mean = 222.666
8 – 11
 Loading...