

Page 1

Installation Instructions
DeviceNet Serial Interface Module
Catalog Number 1799-DASCII
Top ic Pa ge
Important User Information 2
Environment and Enclosure 3
Prevent Electrostatic Discharge 3
About the Module 4
Install the Module 5
Set the Node Address 5
Mount the Board 6
Product Dimensions 7
Set Up the DeviceNet I/O Connections 7
DeviceNet Wiring 10
Serial Port DB9 Wiring 10
Set Software Parameters + 12
Configuring the Parameters 19
Set Up the Serial Link 19
Receive Serial Data from the ASCII Device 21
Produce Received-serial Data onto DeviceNet Network 23
Set Up and Use Pad Mode (parameters 11 and 12) 24
Set Up and Use the Swap Bytes Mode (parameter 13) 25
Serial Status Byte Description and Transmission 27
Consume Data Assembly Formats from DeviceNet Master 28
Transmit Serial Data to the ASCII Device 30
Status Indicators 32
Specifications 33
Page 2
2 DeviceNet Serial Interface Module
Important User Information
Solid state equipment has operational characteristics differing from those of electromechanical equipment.
Safety Guidelines for the Application, Installation and Maintenance of Solid State Controls (Publication
SGI-1.1 available from your local Rockwell Automation sales office or online at
http://literature.rockwellautomation.com
equipment and hard-wired electromechanical devices. Because of this difference, and also because of the
wide variety of uses for solid state equipment, all persons responsible for applying this equipment must
satisfy themselves that each intended application of this equipment is acceptable.
In no event will Rockwell Automation, Inc. be responsible or liable for indirect or consequential damages
resulting from the use or application of this equipment.
The examples and diagrams in this manual are included solely for illustrative purposes. Because of the many
variables and requirements associated with any particular installation, Rockwell Automation, Inc. cannot
assume responsibility or liability for actual use based on the examples and diagrams.
No patent liability is assumed by Rockwell Automation, Inc. with respect to use of information, circuits,
equipment, or software described in this manual.
Reproduction of the contents of this manual, in whole or in part, without written permission of Rockwell
Automation, Inc., is prohibited.
Throughout this manual, when necessary, we use notes to make you aware of safety considerations.
) describes some important differences between solid state
WARNING
IMPORTANT
ATTENTION
SHOCK HAZARD
BURN HAZARD
Identifies information about practices or circumstances that can cause an explosion in
a hazardous environment, which may lead to personal injury or death, property
damage, or economic loss.
Identifies information that is critical for successful application and understanding of
the product.
Identifies information about practices or circumstances that can lead to personal injury
or death, property damage, or economic loss. Attentions help you identify a hazard,
avoid a hazard and recognize the consequences.
Labels may be on or inside the equipment (for example, drive or motor) to alert people
that dangerous voltage may be present.
Labels may be on or inside the equipment (for example, drive or motor) to alert people
that surfaces may reach dangerous temperatures.
Publication 1799-IN012B-EN-P - July 2008
Page 3
Environment and Enclosure
DeviceNet Serial Interface Module 3
ATTENTION
This equipment is intended for use in a Pollution Degree 2 industrial environment, in
overvoltage Category II applications (as defined in IEC publication 60664-1), at altitudes
up to 2000 m (6562 ft.) without derating.
This equipment is considered Group 1, Class A industrial equipment according to
IEC/CISPR Publication 11. Without appropriate precautions, there may be potential
difficulties ensuring electromagnetic compatibility in other environments due to
conducted as well as radiated disturbance.
This equipment is supplied as open type equipment. It must be mounted within an
enclosure that is suitably designed for those specific environmental conditions that will
be present and appropriately designed to prevent personal injury resulting from
accessibility to live parts. The interior of the enclosure must be accessible only by the use
of a tool. The enclosure must have suitable flame-retardant properties to prevent or
minimize the spread of flame, complying with a flame spread rating of 5VA, V2, V1, V0 (or
equivalent) if nonmetallic. Subsequent sections of this publication may contain additional
information regarding specific enclosure type ratings that are required to comply with
certain product safety certifications.
In addition to this publication, see:
• Industrial Automation Wiring and Grounding Guidelines, Allen-Bradley publication
1770-4.1, for additional installation requirements.
• NEMA Standards publication 250 and IEC publication 60529, as applicable, for
explanations of the degrees of protection provided by different types of enclosure.
Prevent Electrostatic Discharge
ATTENTION
This equipment is sensitive to electrostatic discharge, which can cause internal damage
and affect normal operation. Follow these guidelines when you handle this equipment:
• Touch a grounded object to discharge potential static.
• Wear an approved grounding wriststrap.
• Do not touch connectors or pins on component boards.
• Do not touch circuit components inside the equipment.
• Use a static-safe workstation, if available.
• Store the equipment in appropriate static-safe packaging when not in use.
ATTENTION
To comply with the CE Low Voltage Directive (LVD), the DeviceNet network must be
powered from a source compliant with Safety Extra Low Voltage (SELV) or Protected
Extra Low Voltage (PELV).
Publication 1799-IN012B-EN-P - July 2008
Page 4
4 DeviceNet Serial Interface Module
ATTENTION
To comply with UL restrictions, the DeviceNet network must be powered from a source
compliant with a Class 2 or UL Listed/recognized power supply with isolated outputs
limited to 200 volt-amperes in each ungrounded output line. This equipment and its
power source must be mounted in a suitable enclosure with proper spacings maintained.
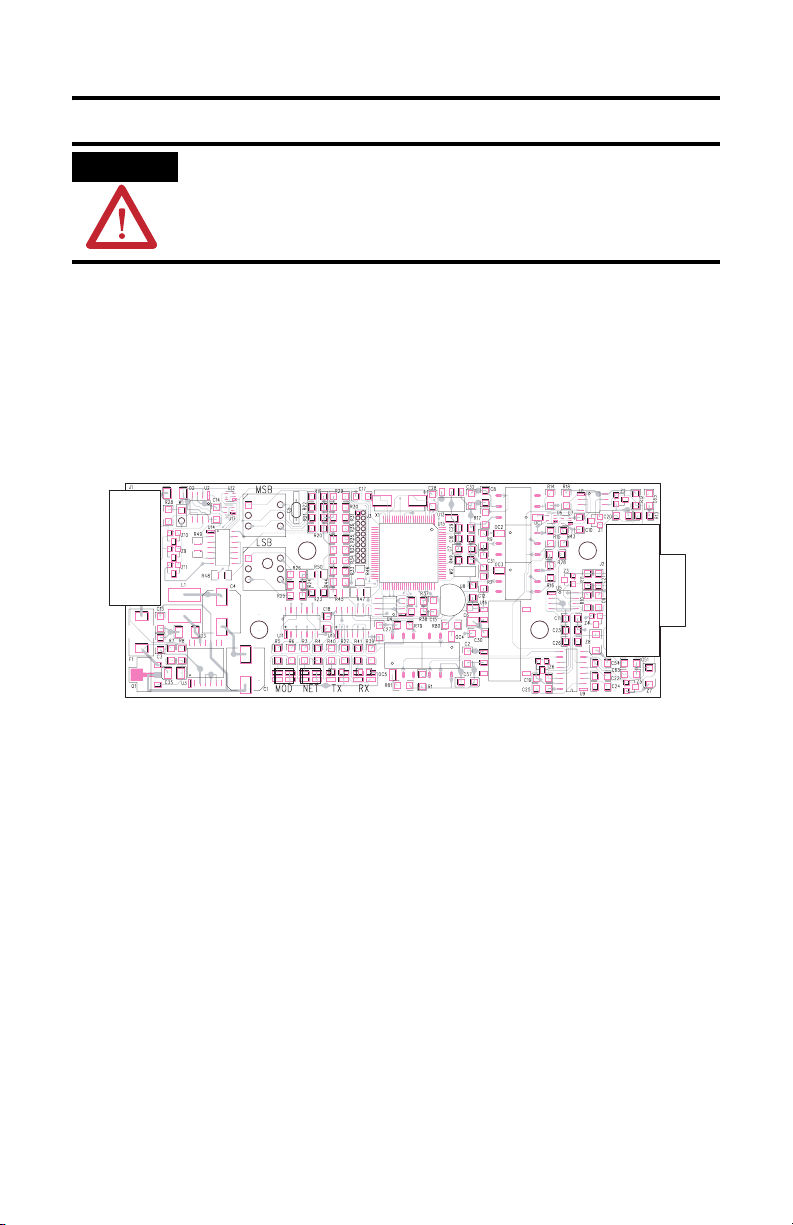
About the Module
The 1799-DASCII module provides DeviceNet system interoperability to one RS-232
or multiple RS-485 devices that do not have DeviceNet network capability. The
DeviceNet port (J1) provides power to the module and DeviceNet network
communication. The serial communication port (J2) is isolated from the DeviceNet
network and the module logic power.
J1
J2
44322
The 1799-DASCII module supports modes of data transfer of the serial buffer that
include the following:
• Polled I/O
• Change-of-State I/O
• Cyclic I/O
• Explicit Message
Publication 1799-IN012B-EN-P - July 2008
Page 5

DeviceNet Serial Interface Module 5
Mating connectors and mounting hardware are optional and must be ordered
separately. This table identifies these optional connectors and hardware.
Optional Connectors and Hardware
Option Catalog Number Supplier and Part Number
2 DIN-rail brackets (4 screws) 1799-BRKD N/A
5-position, open-style plug for DeviceNet
network (2 locking screws)
1799-DNETSCON
DeviceNet Buyer’s Guide at
http://www.odva.org
Your package contains:
• one 1799 I/O board.
• installation instructions.
Install the Module
Follow these steps to install the module.
1. Set the node address.
2. Mount the board by using brackets or mounting screws.
3. Connect serial communication cable (232 or 485) to DB9 connector.
4. Connect the DeviceNet network and DeviceNet power to the unit.
5. Configure the parameters.
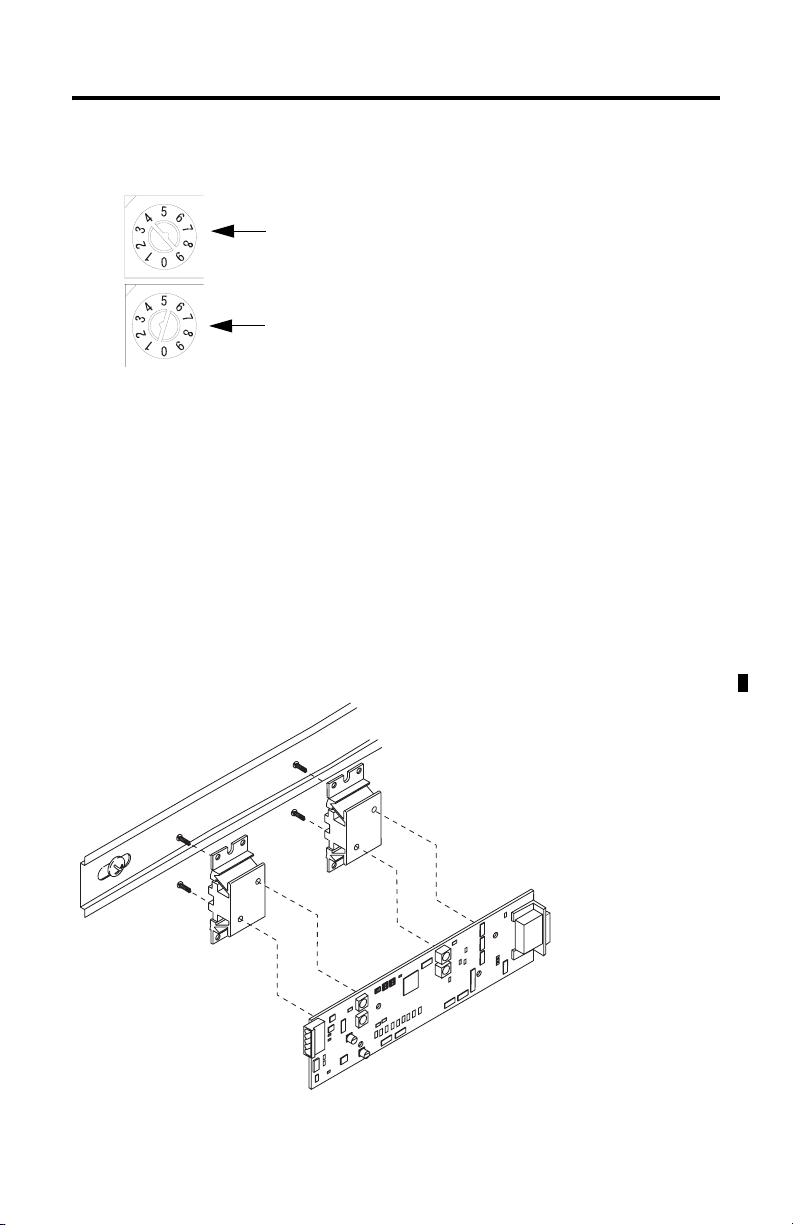
Set the Node Address
Valid node addresses are 00…63.
Set the node address by using the rotary switches or a DeviceNet configuration tool
such as RSNetWorx for DeviceNet software. The software has address control when
you set the switches to 64…99.
Each board is shipped with the node address set to 63 in the board’s memory;
rotary switches are shipped with the node address set to 99. The switches are near
the center of the board. The two switches are as follows:
• MSB (most significant bit)
• LSB (least significant bit)
Publication 1799-IN012B-EN-P - July 2008
Page 6
6 DeviceNet Serial Interface Module
To reset the node address, use a screwdriver to rotate the switches. Align the small
arrow on the switch with the number setting you wish to use.
MSB
The LSB and MSB switches are
shown in the 63 position.
LSB
42558
The rotary switches are read when you apply power to the board. The board uses
the last valid node address stored in board memory when you set the switches to
64…99. For example, the last setting in memory is 40. If you change the switch
setting to 68 and apply power to the board, the address defaults to 40.
The board is equipped with AutoBaud detect. With AutoBaud, the board detects
the communication rate on your DeviceNet network and automatically adjusts to
that rate. The board is shipped with AutoBaud enabled.
Mount the Board
You can mount the board to a DIN rail by using DIN-rail brackets (catalog
number 1799-BRKD) or to a mounting plate.
Publication 1799-IN012B-EN-P - July 2008
44623
Page 7
DeviceNet Serial Interface Module 7
You can also mount the board in an enclosure with pretapped holes to
accommodate M3 x 0.5 mm screws.
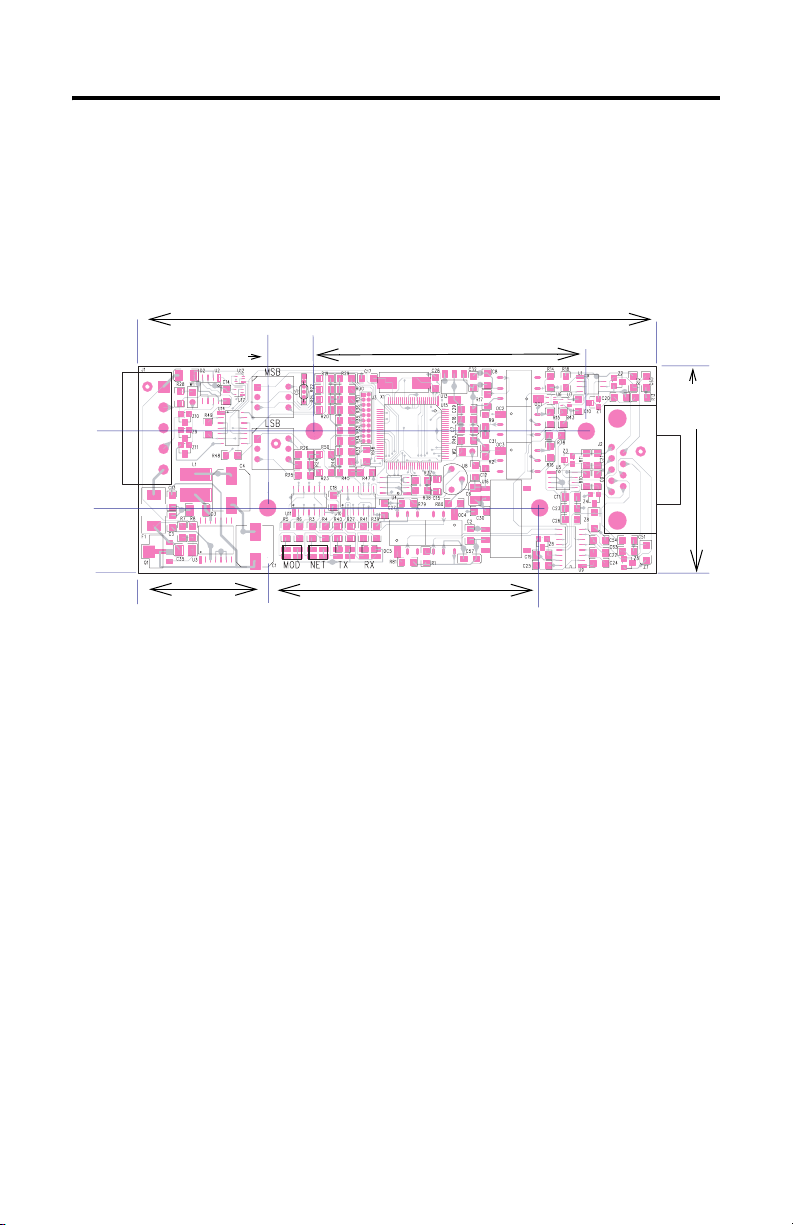
Product Dimensions
See the drawing that shows product dimensions.
Dimensions are in mm (in.).
mm
(in.)
18.8
(0.74)
16
(0.63)
11.43
(0.45)
127 (5.0)
67.3 (2.625)
50.8
(2.00)
31.75 (1.25)
67.3 (2.625)
44323
Set Up the DeviceNet I/O Connections
Set up the serial link before setting up the connection. To set up communication
with the network configuration tool, you typically need to know the connection
input and output sizes.
See Set Up the Serial Link on page 19 for instructions on setting up the serial
connection and receive and transmit sizes.
If you are using a network configuration tool with some type of scanner or
scanning software, the scanner must be directed to set up the connections. This
often requires some device information, such as input and output sizes. The input
and output sizes are computed from the transmit and receive sizes. These sizes are
defined in the parameter object of the device. The transmit size of the poll
connection is computed by adding 2 to the transmit buffer size on the 1799-DASCII
module. The transmit size for the change-of-state and cyclic connections are set to
0, because these connections do not initiate a transmission on the serial link. The
receive size of all three connections is computed by adding the number of option
bytes to the receive buffer size.
Publication 1799-IN012B-EN-P - July 2008
Page 8

8 DeviceNet Serial Interface Module
IMPORTANT
Remember to remap the data (if necessary) after setting the sizes, because
many configuration tools automatically unmap data when the connection sizes
change.
The 1799-DASCII module supports modes of data transfer of the serial buffer that
include the following:
• Polled I/O
• Change-of-state I/O
• Cyclic I/O
• Explicit Message
Polled I/O
The polled connection is the only way you can send serial output data to the I/O
and I/O devicce. The DeviceNet master initiates the polled connection transfer.
The master sends the 1799-DASCII module its serial output buffer with a record
number and length byte. The 1799-DASCII module monitors the record number for
a change. If the record number changes, the 1799-DASCII module transmits the
data buffer on its serial link. If the record number does not change, the device
does not transmit the data buffer.
After the device has transmitted its data out to the serial link, the 1799-DASCII
module takes any information that is stored in its current serial input buffer and
sends this data to the DeviceNet master. It sends all characters up to and including
the received delimiter, padding only if specified in the parameter object. When the
1799-DASCII module receives a new message with a delimiter or with an overflow
condition without a delimiter), the device increments the receive record, updates
the length byte, and copies the new information from the last receive delimiter into
the buffer. If an overflow occurs, the 1799-DASCII module indicates so in its
receive status bit. The receive status byte also reflects other errors in the device.
Cyclic I/O
The cyclic connection initiates a transmission every time the connection timer
expires. The cyclic connection can only send data from the 1799-DASCII module. If
you need to transmit on the I/O link, the polled connection is necessary. The
polled and cyclic connections can exist simultaneously. The manner in which
cyclic connection reports its data is the same as the polled connection. The cyclic
connections transmit buffer is the same as the polled connections transmit buffer,
so overflows and received delimiters act the same over any connection.
Publication 1799-IN012B-EN-P - July 2008
Page 9

DeviceNet Serial Interface Module 9
Change-of-State I/O
The change-of-state (COS) connection is the same as the cyclic connection except
that the COS connection also initiates a transfer on the receipt of the delimiter or an
overflow. The COS connection is mutually exclusive with the cyclic connection,
but can coexist with the polled connection. The COS connection operation is
useful in conserving bandwidth and provides the master with the most current data
as fast, or faster, than a poll connection. The COS connection automatically turns
on the COS mechanism when the connection is created.
Set Up the Connection Timer
The 1799-DASCII module sets the connection timer to the expected packet rate
(EPR), sometimes referred to as scan rate, value for the cyclic and polled
connection. It also uses this value in the connections to calculate the time the
device waits before signaling a timeout. If you are using a scanner or scanning
software, the EPR must be configured. The scanner configures the EPR in the
1799-DASCII module at the beginning of communication. Refer to the scanner
manual for how to configure the EPR.
IMPORTANT
The EPR can be set manually by performing a set (Service 10hex) on the
connection class (Class 5hex) attribute 9. The polled connection uses
instance 2. The COS and cyclic connections use instance 4. This must be done
after allocating the connection.
Serial Data Strings and the Scanner's I/O Rate
Serial gateways typically use more bandwidth on the DeviceNet bus than other
types of I/O devices. If long data strings are implemented and/or multiple devices
are on the DeviceNet network, make sure the scan rate is set accordingly.
Publication 1799-IN012B-EN-P - July 2008
Page 10
10 DeviceNet Serial Interface Module
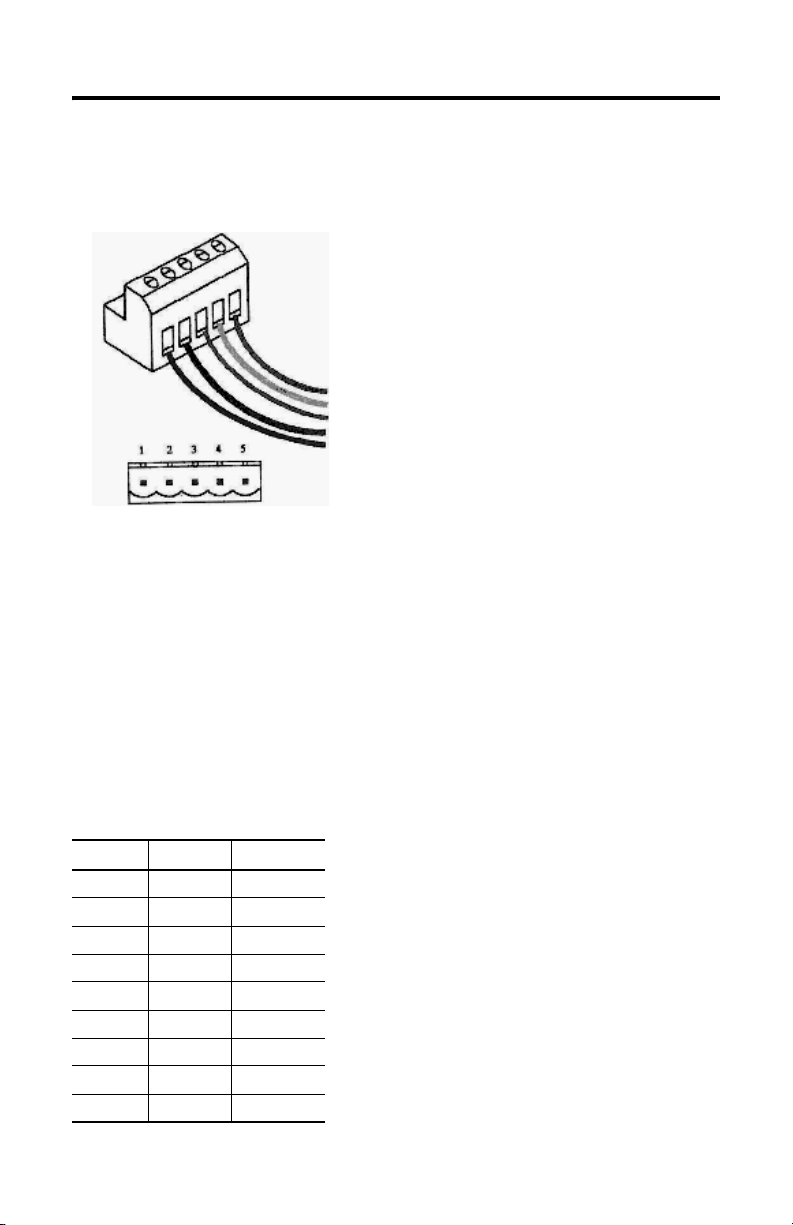
DeviceNet Wiring
DeviceNet wiring connections are made to the plug-in connector. The connector
plugs into connector J1 on the circuit board.
Network Connector (female contacts)
5 V+ Red
4 CAN_H White
3 Drain Bare
2 CAN_L Blue
1 V- Black
Network Connector (male contacts)
Serial Port DB9 Wiring
The module operates as an RS-232 or RS-485 device, depending on how the serial
communication lines are attached. For information about serial port connections,
see the DB9 9-Pin Connector Signal Assignments table and description. All signal
lines are isolated.
Serial Port Connection
The ASCII devices are connected to the 1799-DASCII module by using a three-wire
(or five-wire for RS232 hardware handshaking) communication cable.
DB9 9-Pin Connector Signal Assignments
Pin RS-232 RS-485
1 TRXD-
2RX
3TX
4
5 Common Common
6
7RTS
8CTS
9 TRXD+
Publication 1799-IN012B-EN-P - July 2008
Page 11

DeviceNet Serial Interface Module 11
RS-232 without Hardware Handshaking
Follow these steps to connect the RS-232 wiring without hardware handshaking.
1. Connect the receive wire to pin 2 (RXD).
2. Connect the transmit wire to pin 3 (TXD).
3. Connect common to pin 5 (common).
The channel automatically operates in RS-232 mode when these pins are
connected.
The RS-232 electrical interface uses a MAX232 transceiver or electrical equivalent.
IMPORTANT
All pins are active. Do not connect to other pins.
RS-232 with Hardware Handshaking
When implementing RTS/CTS handshaking, follow these steps to connect RS-232
wiring.
1. Connect receive to pin 2 (RXD).
2. Connect transmit to pin 3 (TXD).
3. Connect transmit/handshaking to pin 7 (RTS).
4. Connect receive/handshaking to pin 8 (CTS).
5. Connect common to pin 5 (Common).
The channel automatically operates in RS-232 mode when these pins are
connected.
IMPORTANT
All pins are active. Do not connect to other pins.
Publication 1799-IN012B-EN-P - July 2008
Page 12

12 DeviceNet Serial Interface Module
RS-485 Mode
To operate in RS-485 mode, follow these steps.
1. Connect TRXD+ to pin 9.
2. Connect TRXD- to pin 1.
3. Connect common to pin 5.
The channel automatically operates in RS-485 mode by connecting these
pins.
Set Software Parameters
The 1799-DASCII module is configured by using the EDS parameters as defined in
the EDS Parameters table.
EDS Parameters
Parameter # Access Description Parameter Choices Default
Setting
Serial Port Parameters
Serial port
character
framing
Serial port
comm speed
Serial port
handshaking
1 Get/Set Defines
number of
data bits, stop
bits, and
parity in data
character
frame.
2 Get/Set Defines baud
rate of serial
port.
3 Get/Set Enables
RTS/CTS
hardware
handshaking
on serial port.
0 = 7N2
1 = 7E1
2 = 7O1
3 = 8N1
4 = 8N2
0 = 9600
1 = 1200
2 = 2400
3 = 4800
0 = RTS/CTS disabled
1 = RTS/CTS enabled
5 = 8E1
6 = 8O1
7 = 7E2
8 = 7O2
4 = 19.2 k
5 = 38.4 k
6 = 57.6 k
7 = 115.2 k
8N1 3 USINT
9600
baud
Disabled 0 USINT
Publication 1799-IN012B-EN-P - July 2008
Default
Valu e
0USINT
Data
Ty pe
Page 13

DeviceNet Serial Interface Module 13
Parameter # Access Description Parameter Choices Default
Setting
Serial Port Receive from ASCII Device
Max
number of
receive
characters
Receive
Record
Start mode
Receive
start
delimiter
Receive
Record End
mode
Receive end
delimiter
4 Get/Set Max number of
characters the
module expects
to receive into
its ASCII port
from the serial
port.
5 Get/Set Determines
whether start
delimiter is
included with
the received
data.
6 Get/Set Character
identifies the
beginning of the
data string from
the ASCII device
when the length
is specified as 0.
7 Get/Set Selects whether
the End delimiter
is included with
the received
data.
8 Get/Set Character
identifies the
end of the data
string from the
ASCII device
when the length
is specified as 0.
1…250 20
characters
0 = No start delimiter
1 = Exclude start
delimiter
2 = Include start
delimiter
Any valid standard
ASCII character
(0…127 with 7-bit
data)
(0…255 with 8-bit
data)
0 = No end delimiter
1 = Exclude end
delimiter
2 = Include end
delimiter
Any valid standard
ASCII character
(0…127 with 7-bit
data)
(0…255 with 8-bit
data
No start
delimiter
Colon 0x3A USINT
Include
end
delimiter
Carriage
return
Default
Valu e
20 USINT
0USINT
2USINT
0D
hex
Data
Ty pe
USINT
Publication 1799-IN012B-EN-P - July 2008
Page 14

14 DeviceNet Serial Interface Module
Parameter # Access Description Parameter Choices Default
Setting
Receive
message
time-out
Receive
string data
type
Receive Pad
mode
Receive pad
character
Receive
Swap mode
9 Get/Set Number of ms to
wait for the next
character in the
string before
defining the
current message
complete and
marking it to
produce on the
DeviceNet
network.
10 Get/Set Defines the
format of the
data string sent
to the master.
11 Get/Set Indicates
whether to pad
the invalid data
region after the
delimiter with
the pad
character, or to
use variable
length ASCII
responses.
12 Get/Set The value to use
to pad the
invalid data
portion of the
poll response.
13 Get/Set If enabled, the
position of the
bytes in the
serial messages
is swapped
every 2, 3, or 4
bytes.
0 = Not active
1…65,635 =
milliseconds to wait f
0 = Array
1 = Short string
2 = String
0 = Pad mode
disabled
1 = Pad mode enabled
Any valid standard
ASCII character
0 = Disabled
1 = 16-bit Swap
Enabled
2 = 24-bit Swap
Enabled
3 = 32-bit Swap
Enabled
Not active 0 USINT
Short
string
Enabled 1 USINT
Null 0 USINT
Disabled 0 USINT
Default
Valu e
1USINT
Data
Ty pe
Publication 1799-IN012B-EN-P - July 2008
Page 15

DeviceNet Serial Interface Module 15
Parameter # Access Description Parameter Choices Default
Setting
DeviceNet
Handshake
mode
Gateway
produce
assembly
size
Receive
data string
Receive
data size
Receive
record
number
14 Get/Set If enabled,
master must
acknowledge it
is ready for next
new data before
1799-DASCII
module sends
the new data.
15 Get Total number of
I/O data bytes
that are sent to
the master from
the 1799-DASCII
module. This
should be the RX
size of your
scanner.
16 Get Serial data in the
receive buffer.
17 Get Number of
characters in the
Receive data
buffer.
18 Get/Set The Receive
Record Number
sent from the
master.
0 = Master/Slave
Handshake
1 = Auto Increment
(No handshake)
4…254 20 bytes of
Any data string Empty Null USINT
0…250 0 0 USINT
0…255 0 0 USINT
Auto
Increment
array data
and 4
header
bytes
Default
Valu e
1USINT
24 USINT
Data
Ty pe
Publication 1799-IN012B-EN-P - July 2008
Page 16

16 DeviceNet Serial Interface Module
Parameter # Access Description Parameter Choices Default
Setting
Serial Port Receive to ASCII Device
Max number
of transmit
characters
19 Get/Set Max number of
characters the
1799-DASCII
0…250 20 chars 20 USINT
module
expects to
transmit out its
serial port to
the serial
device.
Transmit End
Delimiter
mode
20 Get/Set Selects
whether the
End delimiter
is included
with the
0 = No end delimiter
1 = Exclude end
delimiter
2 = Include end
delimiter
Include 2 USINT
received data.
Transmit end
delimiter
character
21 Get/Set Character that
identifies the
end of the
transmit data
string from
DeviceNet to
the ASCII
Any valid standard
ASCII
character
(0…127 with 7-bit
data)
(0…255 with 8-bit
data)
Carriage
return
device when
the length is
specified as 0.
Default
Valu e
0D
hex
Data
Ty pe
USINT
Publication 1799-IN012B-EN-P - July 2008
Page 17

DeviceNet Serial Interface Module 17
Parameter # Access Description Parameter Choices Default
Setting
Gateway Consume on DeviceNet Network from Master
Consume
string data
type
Transmit
Swap mode
Gateway
consume
assembly
size
Parameter # Access Description Parameter
Serial Port Transmit/Explicit Messages from EDS Editor
Transmit
data string
Transmit
data length
22 Get/Set Defines the
format of the
data string
received from the
master.
23 Get/Set If enabled, the
position of the
bytes in the serial
messages is
swapped every 2
or 4 bytes.
24 Get Total number of
I/O data bytes
that are received
from the master.
This should be
the TX size of
your scanner.
25 Get/Set Serial data to be
sent to the serial
transmit buffer.
26 Get/Set Length of the
Transmit Serial
Data.
0 = Array
1 = Short string
2 = String
0 = Disabled
1 = 16-bit Swap
Enabled
2 = 24-bit Swap
Enabled
3 = 32-bit Swap
Enabled
4…254 20 bytes
Choices
ASCII block data Empty USINT
0…250 0 0 USINT
Short
string
Disabled 0 USINT
of array
data and
4 header
bytes
Default
Setting
Default
Valu e
1USINT
24 USINT
Default
Valu e
Data
Ty pe
Data
Ty pe
Publication 1799-IN012B-EN-P - July 2008
Page 18

18 DeviceNet Serial Interface Module
Parameter # Access Description Parameter
Choices
Transmit
record
number
Status 28 Get The Combined
Autobaud 29 Get/Set DeviceNet Baud
27 Get/Set The record
number of the
current transmit
data buffer.
status byte for
the Serial Port
Object. The
Receive Record
object and the
Transmit Record
object.
Rate
0…255 0 0 USINT
0 = fixed baud
rate
1 = Enable
Autobaud
Default
Setting
No status 0 USINT
Enable
Autobaud
Default
Valu e
1USINT
Data
Ty pe
Configuration Assembly
The 1799-DASCII module supports a configuration assembly as shown below. The
configuration assembly is accessed through the Assembly Object (Class 4) Instance
103. The configuration assembly data size is 22 bytes.
Byte Parameter Definition EDS Parameter
0 ASCII Serial Character Format 1
1 ASCII Serial Comm Speed 2
2 ASCII Hardware Handshake 3
3 ASCII Max Number of Receive Characters 4
4 ASCII Receive Record Start Mode 5
5 ASCII Receive Start Delimiter 6
6 ASCII Receive Record End Mode 7
7 ASCII Receive End Delimiter 8
8, 9 ASCII Receive Message Timeout 9
10 ASCII Receive String Data Type 10
11 ASCII Receive Pad Mode 11
12 ASCII Receive Pad Character 12
13 ASCII Receive Swap Mode 13
Publication 1799-IN012B-EN-P - July 2008
Page 19

DeviceNet Serial Interface Module 19
Byte Parameter Definition EDS Parameter
14 DeviceNet Handshake Mode 14
15 ASCII Receive Record Number 18
16 ASCII Max Number of Transmit Characters 19
17 ASCII Transmit End Delimiter Mode 20
18 ASCII Transmit End Delimiter Character 21
19 ASCII Consume String Data Type 22
20 ASCII Transmit Swap Mode 23
21 Autobaud 29
Configuring the Parameters
The 1799 I/O modules have parameters that are configurable through a DeviceNet
configuration tool, such as RSNetWorx for DeviceNet software. The DeviceNet
configuration tools require an electronic data sheet (EDS) for the 1799 I/O modules
to configure the module’s parameters. Find the EDS files at
http://www.rockwellautomation.com/support/
.
Set Up the Serial Link
Parameters 1, 2, and 3 let you define the serial link communication options.
See these parameters in the EDS Parameters table on page 12.
Publication 1799-IN012B-EN-P - July 2008
Page 20

20 DeviceNet Serial Interface Module
Parameter # Access Description Parameter Choices Default
Setting
Serial Port Parameters
1
Serial port
character
framing
Serial port
comm
speed
Serial port
handshaking
Get/Set Defines number
of data bits,
stop bits, and
parity in data
character
frame.
2
Get/Set Defines baud
rate of serial
port.
3
Get/Set Enables
RTS/CTS
hardware
handshaking on
serial port.
0 = 7N2
1 = 7E1
2 = 7O1
3 = 8N1
4 = 8N2
0 = 9600
1 = 1200
2 = 2400
3 = 4800
0 = RTS/CTS disabled
1 = RTS/CTS enabled
5 = 8E1
6 = 8O1
7 = 7E2
8 = 7O2
4 = 19.2 k
5 = 38.4 k
6 = 57.6 k
7 = 115.2 k
8N1 3 USINT
9600
baud
Disabled 0 USINT
Default
Valu e
0USINT
Data
Ty pe
Serial Character Framing (parameter 1)
This defines the number of data bits and stop bits used in each character's data
frame. It also defines the type of character frame parity used.
Serial Comm Speed (parameter 2)
This defines the baud rate options available on the serial port.
RTS/CTS Hardware Handshaking (parameter 3)
With an RS232 connection, the 1799-DASCII module supports hardware
handshaking for data exchange via RTS/CTS control lines on the DB9 connectors.
When used with an ASCII device that also supports hardware handshaking, the RTS
and CTS lines are used to meter data flow between the module and device and
prevent data buffer overflow. This option can be enabled and disabled via
software.
Publication 1799-IN012B-EN-P - July 2008
Page 21

DeviceNet Serial Interface Module 21
Receive Serial Data from the ASCII Device
The 1799-DASCII module receives a number of characters at its serial port and
transmits these to the DeviceNet master (produces on the DeviceNet network) via
the following:
• Polled I/O
• Change-of-state (COS)
• Cyclic
• Explicit Message
The received character string is captured when one of the following occurs:
• The specific number of bytes defined (max number of Receive characters) is received.
• The defined End-of-String Terminator character is detected.
• The specified non-zero time-out value (Message Time-out) is reached.
When any of these events occur, the 1799-DASCII module stores the received
message string in its internal buffer and transmits (produces) it onto the DeviceNet
network at the next opportunity.
Set Up the Receive-character Buffer Length (parameter 4)
The receive character buffer length is the number of characters that the
1799-DASCII module can receive from the serial device into its buffer at one time.
The length of the data string sent to the DeviceNet master is less than or equal to
this size, plus a 4-byte header.
When the 1799-DASCII module receives the character that fills the buffer, it sets the
nondelimited RECORD status flag and forces the data in the receive buffer to be
Publication 1799-IN012B-EN-P - July 2008
Page 22

22 DeviceNet Serial Interface Module
sent to the master. If the 1799-DASCII module receives a character while the buffer
is full, it internally generates an overflow error in the status byte.
The subsequent received characters are received into the buffer and handled as the
start of the next incoming message string.
ATTENTION
Incoming characters could be missed in the process of handling a string longer than the
defined max length.
This value can be set and retrieved by EDS parameter 4.
Set Up and Using Delimiter Operation (parameters 5, 6, 7, 8)
When receiving data strings from the serial device, the 1799-DASCII module can
take advantage of Start and Stop (End) delimiters. The Start Delimiter is the
start-of-string indicator and the End Delimiter is the end-of-string indicator. This lets
explicit control over which characters are sent to the master.
When Start Delimiter operation is selected, a character must be defined that
prompts the 1799-DASCII module to start storing the incoming data string. All
characters up to this Start Delimiter (after the previous message was completed) are
ignored. Once the Start Delimiter is received, all characters are stored until the End
Delimiter is received or the Max Receive Char Length is reached (or the RX
Time-out time is exceeded, if that option is selected). Once the End Delimiter is
reached, the data string is captured and prepared to send to the DeviceNet master.
If either delimiter is used, you can also elect whether to include those characters in
the string sent to the master. The Start Delimiter mode parameter is 5, the Delimiter
character is 6. The End Delimiter mode is parameter 7 and the End Delimiter
character is 8.
Rx Message Time-out (parameter 9)
The 1799-DASCII module has a receive time-out value configurable in 1 ms
increments. When this value is non-zero, the module's timeout counter resets on
the receipt of each new byte of data. If the timeout counter expires, the module
sets the nondelimited flag in the Status Byte and updates the Produce buffer with
the current data string.
Message Time-out Values
Value Time-out Action
0 Disabled
1…65,535 Time-out time in milliseconds (ms)
Publication 1799-IN012B-EN-P - July 2008
Page 23

DeviceNet Serial Interface Module 23
Produce Received-serial Data onto DeviceNet Network
Received-string Data Type (parameter 10)
The format of the data is Array, Short_String,
or String - sent to the DeviceNet master, as
shown below. Choose the one best suited for
your application and that modifies the format
of the data field.
The format of the data sent to the 1799-DASCII module is Array, Short_String, or
String. Choose the one best suited for your application and modifies the format of
the data field.
The Array data type has no length associated with it. It is equivalent to specifying a
length of zero by using a string or short_string data type.
The Short_String data type is the default data type of the device. This suffices for
most applications. The Short_String data type has only 1 byte of length, and the
rest of the data bytes are appended after the length.
The String data type has 2 bytes of length. The String data type is useful in talking
to programmable controllers or other devices that have a data file specifically made
to handle this data type. The length is Little Endian (low byte, high byte), and the
high order byte should be set to zero. The 1799-DASCII module only receives up
to 250 bytes of information, so the extra byte, although required for this data type,
is 0.
IMPORTANT
If the Short_String or String data type is used, the length is not sent to the
ASCII device.
Received-string Data DeviceNet Assembly Formats
The following tables define the format that the 1799-DASCII module produces on
DeviceNet network and sends to the DeviceNet master. In all cases, the size of the
assembly is equal to the length of the received ASCII string plus a 4-byte header.
Produce Data DeviceNet Format - Array String Type
Byte 1 Byte 2 Byte 3 Byte 4 Byte 5-X (250 bytes max)
Transaction ID Status byte Reserved Reserved ASCII data (including optional <terminator>.
Publication 1799-IN012B-EN-P - July 2008
Page 24

24 DeviceNet Serial Interface Module
Produce Data DeviceNet Format - String_String Type
Byte 1 Byte 2 Byte 3 Byte 4 Byte 5-X (250 bytes max)
Transaction ID Status byte Reserved Length ASCII data (including optional <terminator>.
Produce Data DeviceNet Format - String String Type
Byte 1 Byte 2 Byte 3 Byte 4 Byte 5-X (250 bytes max)
Transaction ID Status byte Length (low byte) Length (high byte) ASCII data (including optional
<terminator>.
Set Up and Use Pad Mode (parameters 11 and 12)
Pad mode operation is the method used by
the 1799-DASCII module to add extra
characters to the end of its received data
string (after the delimiter character) from the
external I/O device before sending the string
to the DeviceNet scanner (master) as an I/O Response. The quantity added is such
that the data string returned to the scanner is a constant length, and that length is
the number specified in the Receive Character Length parameter, plus any header
options. The quantity of pad characters sent can vary from message to message,
depending on the size of the incoming string.
Pad Mode Selection (parameter 11)
Pad mode is included for compatibility with scanners that cannot receive variable
length I/O messages. For such scanners, you must turn on Pad mode (a value of 1).
Turning Pad mode on does not harm scanners that do support variable length
receive messages. The default value for Pad mode is off. If the scanner does
support variable I/O messaging lengths, the Pad mode option can be set to off (a
value of 0) to conserve some network bandwidth.
The selection of Pad mode is valid only for the DeviceNet message that the
1799-DASCII produces. It has no effect on DeviceNet messages sent from the
scanner to the 1799-DASCII module. This value can be set and retrieved by using
the standard set and get services on Use parameter 11 of Table 4.
Pad Mode Character (parameter 12)
You can specify the character that Pad mode uses to pad the received serial data.
This can be set to any valid I/O value (0…127 in 7-bit modes, 0…255 in 8-bit
modes). This value can be set and retrieved by using the standard set/get services
on parameter 12. See the EDS Parameters table starting on page 12.
Publication 1799-IN012B-EN-P - July 2008
Page 25

DeviceNet Serial Interface Module 25
Set Up and Use the Swap Bytes Mode (parameter 13)
This option may be helpful if the 1799-DASCII module is connected to a DeviceNet
scanner that organizes the data string characters into data type elements that are
larger than 1 byte each. An example is the Allen-Bradley SLC 500 module. In such
cases, the bytes of the data in the master's memory organization can be reversed
from the order in which they are sent or received on the DeviceNet network and
the serial link to the ASCII device. This may cause anomalies in some cases.
The message received or desired "ABCDEFGH" string may appear in memory as
"BADCFEHG" for 2-byte word organization, and "DCBAHGFE" for 4-byte word
organization.
Transmit Byte Swapping
By setting parameter 23, the bytes from the master are swapped by the
1799-DASCII module before transmitting the string to the ASCII device.
Rules for Usage
The rules for usage are the following:
• This feature is set for transmit and receive independently.
• Byte swapping works better if the string length is an even multiple of the byte-swap size.
• If a delimiter is received, then all characters up to and including the defined delimiter are sent to the
DeviceNet master.
If Pad mode = 1, then the 1799-DASCII module fills the Poll Response data
with the Pad Char up to the defined size.
If Pad mode = 0, then the 1799-DASCII module sends only the data up to
and including the delimiter.
• If no delimiter is received, then the 1799-DASCII module receives up to
Max_Number_of_Receive_Chars, and sends this string to the DeviceNet network with an overflow
error.
It continues to receive and send strings of size
Max_Number_of_Receive_Chars, along with the overflow error, until a
delimiter is received. This could continue indefinitely if the I/O device does
not transmit the specified delimiter.
Master-Slave Handshake versus Immediate Mode (parameter 14)
If DeviceNet Master-Slave Handshake mode is selected, the DeviceNet master can
inhibit the 1799-DASCII module from sending new ASCII data until the master is
ready to receive and process the new data.
Publication 1799-IN012B-EN-P - July 2008
Page 26

26 DeviceNet Serial Interface Module
In this mode the two required for the complete transaction are the following:
• A "New Data Available" flag is set by the 1799-DASCII module in the status byte. This informs the
master that the 1799-DASCII module has received a new data string and is waiting for the OK to send
it.
• The first byte of the message the master sends to the 1799-DASCII module is the RX ID Record. By
setting the value of this byte to the value of the new record number pending, it indicates to the
1799-DASCII module that the master is ready to receive the new data.
The master monitors this new data flag and when the master is ready to receive
new serial data, it sets a new number in the new record number byte of the next
poll command message. This applies only to data being sent from the 1799-DASCII
module to the master.
The operation proceeds as follows.
1. The 1799-DASCII module receives a new data string.
2. The 1799-DASCII module sets the New Data flag in the Status byte of its next
produce message.
3. The master sends out messages to the 1799-DASCII module in the normal
fashion. If the master is not ready to receive new data, the New Record Data
byte remains set.
4. When the master is ready to receive the new data string, it changes the New
Record Data byte to any value different than what it had been sending.
5. The 1799-DASCII module sends the new data upon receipt of a record from
the master in which the New Record Data byte has been changed.
6. If the 1799-DASCII module receives an updated New Record Data byte and
has no new data, it sets the Handshake Error bit in its Produce Status byte.
In Immediate mode, this handshaking is not active and the 1799-DASCII module
sends new data as soon as it is received from the ASCII device with the new
Transaction ID. It is the master's responsibility to be ready to accept and process
the new data string when it is presented.
Identify the Scanner I/O Receive Size (parameter 15)
The 1799-DASCII module automatically calculates the number of bytes it sends the
DeviceNet master. Its value is determined by a combination of the incoming data
and the options you selected. Parameter 15 is a read-only value that defines the size
of the DeviceNet message to be sent by the 1799-DASCII module to the master.
Publication 1799-IN012B-EN-P - July 2008
Page 27

DeviceNet Serial Interface Module 27
IMPORTANT
If you are using a scanner that must receive a constant message length, set its
Rx (receive) value to this number of bytes.
Explicit Messages to Receive the Serial Data String (parameters 16, 17, 18)
Parameters 16, 17, and 18 contain the status of the most-recent incoming serial data
string. You can use the data to read the device's ASCII data via the Explicit
Messaging technique.
Parameter 16 holds the most recent received data.
Parameter 17 defines the size, in bytes, of the DeviceNet message to be sent by the
1799-DASCII module to the master.
Parameter 18 holds the record number of the data string in parameter 16 if the
Header option is selected.
Serial Status Byte Description and Transmission
The Serial Status byte is an OR'd bitfield of a number of status and exceptions flags.
Serial Status Byte
Bit Exception Description
0Tx I/O
overflow
1Rx I/O
overflow
2 Rx parity error The message has a parity error. One or more of the characters has a parity error.
3 Rx overrun
error
4 Rx framing
error
The transmit queue has overflowed resulting in a loss of data. The transmit I/O is full
of data waiting to be transmitted. Some of the data added has been lost. When
space becomes available in the TX I/O, this bit resets.
The receive queue has overflowed resulting in a loss of data. The receive I/O is full
of data waiting to be processed. A new character arrives before the buffer is
emptied, thus setting the overflow bit. The data character is lost. When space
becomes available in the RX I/O, this bit resets.
A byte that has not been read has been overwritten by another received byte,
resulting in data loss.
When the stop bit of a received character is a logic zero, a framing error occurs.
Publication 1799-IN012B-EN-P - July 2008
Page 28

28 DeviceNet Serial Interface Module
Serial Status Byte
Bit Exception Description
5 Nondelimited
string
6 Handshake
error
7 New data flag This bit is used only when the Master-Slave Handshake option is active. When the
Concerning transmitting serial data to an ASCII device, the 1799-DASCII module
transmits character strings to the serial device that it has received from the
DeviceNet master via the following:
• Poll I/O
• Explicit Message
The character string is transmitted when either of the following conditions occurs in
the data within the DeviceNet message data field:
• The specific number of bytes defined (Transmit Character Buffer Length) is received.
• The defined End-of-String Terminator character is detected.
When either of these events occurs, the 1799-DASCII module stores the DeviceNet
string data into its internal buffer and transmits it out its serial port.
To transmit data to the serial device, the data must first be sent to the 1799-DASCII
module and then the 1799-DASCII module must send the data to the serial device.
The set-up for transmitting from the master to the 1799-DASCII module are
discussed first.
The current message has filled the buffer without a termination character, and is
being transmitted in total. This is not an error. It is caused by characters filling, but
not overflowing the receive buffer. This causes the 1799-DASCII module to transmit
the characters to the master.
This error occurs in Master-Slave Handshake mode. It indicates that the master has
requested a new data record from the 1799-DASCII module, but the 1799-DASCII
module has not indicated new data is available to be sent.
1799-DASCII module receives a new data string into its serial port, it sets this flag in
its DeviceNet response message. The bit remains set for 1 produce message after
the master requests the new data. It resets.
Consume Data Assembly Formats from DeviceNet Master
The assembly format options of the data to be sent from the DeviceNet master to
the 1799-DASCII module are shown below. The one selected depends on the
application. Refer to Transmit String Data Type Formats (parameter 22).
Consume Data DeviceNet Format - Array Data Type
Byte 1 Byte 2 Byte 3 Byte 4 Byte 5-X (128 bytes max)
Rx ID Byte (Handshake
mode only)
Publication 1799-IN012B-EN-P - July 2008
Transaction ID
Byte
Reserved Reserved ASCII data (including optional
<terminator>.
Page 29

DeviceNet Serial Interface Module 29
Consume Data DeviceNet Format - Short_String Data Type
Byte 1 Byte 2 Byte 3 Byte 4 Byte 5-X (128 bytes max)
Rx ID Byte (Handshake
mode only)
Transaction ID
Byte
Reserved Length ASCII data (including optional
<terminator>.
Consume Data DeviceNet Assembly Format - String Data Type
Byte 1 Byte 2 Byte 3 Byte 4 Byte 5-X (max 128 bytes)
Rx ID Byte (Handshake
mode only)
Transaction ID
Byte
Length (low byte) Length (high byte) ASCII data (including optional
<terminator>.
Transmit String Data Type Formats (parameter 22)
This is the format of the data sent from the 1799-DASCII module - array,
short_string, or string - to the DeviceNet master. These are shown in the following
sections. Which one you pick depends on the application and modifies the format
of the data field. To change the string format, use parameter 22.
Set Up and Use the TX Byte Swap Mode (parameter 23)
This option is helpful if the 1799-DASCII module is connected to a DeviceNet
scanner that organizes the data string characters into data type elements that are
larger than 1 byte each. An example is an Allen-Bradley PLC, such as the SLC 500
controller. In such cases, the bytes of the data in the master's memory organization
can be reversed from the order in which they are sent or received on the DeviceNet
network and the serial link to the ASCII device. This may cause anomalies in some
cases.
Identify Scanner I/O Transmit Size (parameter 24)
The 1799-DASCII module automatically calculates the number of bytes it expects
from the DeviceNet master. Its value is determined by a combination of the
incoming data and the options selected. Parameter 24 is a read-only value that
defines the size of the DeviceNet message sent to the 1799-DASCII module from the
master.
IMPORTANT
Set the scanner’s produce size value to this number of bytes.
Publication 1799-IN012B-EN-P - July 2008
Page 30

30 DeviceNet Serial Interface Module
Transmit Serial Data to the ASCII Device
Read this section for information about transmitting serial data to the ASCII device.
Set Up the Transmit-character Buffer Length (parameter 19)
The Transmit-character buffer length is the number of characters that the
1799-DASCII module can receive in its transmit buffer from the DeviceNet system.
This size contributes to the I/O's Consume Size. This size can be found in the
Parameter object.
Set Up and Use the Transmit Delimiter (parameters 20 and 21)
The transmit delimiter is an end-of-string character that is used by the 1799-DASCII
module to determine how many bytes to transmit over the serial link to the
1799-DASCII device. This transmit delimiter is used if the Transmit Buffer Length
equals 0. If the buffer length is not 0, the 1799-DASCII module ignores the transmit
delimiter.
The 1799-DASCII module transmits up to and including the delimiter when the
above condition is met. The transmit delimiter can be set to any valid I/O character
that can be received over the link (parameter 21). Be careful not to set the
delimiter to a value outside of the valid range for the number of data bits. (Note
that a data bit size setting of 7 lets a delimiter range of 0…127 dec., 00…7Fhex). If
the delimiter is not valid, or the delimiter is never received, the device updates the
output buffer on detection of a buffer filled condition. These values can be set and
retrieved by using the standard set/get services in the Transmit Record Class 0x71.
Publication 1799-IN012B-EN-P - July 2008
Page 31

DeviceNet Serial Interface Module 31
Transmitting Serial Data
The length of the string set determines the use of a delimiter in transmitting data to
a serial device from the 1799-DASCII module.
If the string length is zero, or the data type is type Array, the following happens:
• The 1799-DASCII module receives data sent from the DeviceNet master and uses the End Delimiter to
determine how much data is sent to the serial device. The 1799-DASCII module computes the length
and stores this as the new length in the string attribute. (This does not appear if the data type is array.
You see the string truncated and the length is in the background.)
• If a delimiter is contained within the string, all characters in the data field up to and including the
defined delimiter are stored.
• If no delimiter is contained within the string, the 1799-DASCII module stores the data in the data field
received.
If the string length > 0 or the data type is String or Short_String, the following
happens:
• The 1799-DASCII receives data sent from the DeviceNet master, ignoring any embedded terminator. It
stores the number of characters defined in Max_Number_of_Transmit_Chars, or the total sent by the
master, whichever is less.
Now, the 1799-DASCII sends the data immediately if attribute X is set to 1. You can
cause this data to be transmitted by incrementing the record counter.
The following identifies which parameters transmit serial data to the ASCII device:
• Explicit Messages to Transmit Serial Data String
• Parameters 26, 27, and 28 can be used to set up the serial data string and send it to the ASCII device
via the Explicit Messaging technique
• Parameter 26 holds the data to be sent
• Parameter 27 defines the size, in bytes, of the DeviceNet message to be sent from the 1799-DASCII
module to the device
• Parameter 28 holds the record number of the data string in parameter 24 if the Header option is
selected. Changing the record causes the data in parameter 24 to be transmitted immediately from the
master to the 1799-DASCII module
Publication 1799-IN012B-EN-P - July 2008
Page 32

32 DeviceNet Serial Interface Module
Status Indicators
The 1799-DASCII module has two indicators that provide visual status information
about the module and the DeviceNet network. Refer to the Module Status and
Network Status tables to interpret the status indications.
Module Status Indicator (labeled MS)
Indicator Module Status Description
Off No power There is no power through the DeviceNet network.
Solid green Device operational 1799-DASCII module is operating normally.
Flashing green Device in standby 1799-DASCII module needs commissioning (for
Flashing red Minor fault Recoverable fault.
Solid red Unrecoverable fault Replace 1799-DASCII module.
Flashing red/green Device self-testing 1799-DASCII is in self-test mode.
Network Status Indicator (labeled NS)
Indicator Network Status Description
Off No power or not online 1799-DASCII module has no power, has not completed the
Solid green Online, connected 1799-DASCII module operating correctly.
Flashing green Online, not connected 1799-DASCII module is online but is not allocated to a master.
Flashing red Connection time-out One or more I/O connections are timed out.
Solid red Critical link failure 1799-DASCII module detected an error that makes it
example, attempting autobaud).
Dup_MAC_ID test, or needs commissioning.
incapable of communicating on the link (bus off or duplicate
MAC ID).
Serial Port Indicator (labeled TX and RX)
Indicator Serial Port Status Description
Off No data communication active 1799-DASCII module has no active data communication on
the data line.
On Data communication active 1799-DASCII module has active data communication on
The 1799-DASCII module has two RS-232 activity indicators: one for transmit (TX)
and one for receive (RX). Each of these indicators illuminates when data
communication is active on the respective data lines.
Publication 1799-IN012B-EN-P - July 2008
the data line.
Page 33

DeviceNet Serial Interface Module 33
Specifications
DeviceNet Serial Interface Module- 1799-DASCII
Attribute Value
Description Communication gateway between a serial-capable device over an RS-232 or RS-485
Device type Rockwell Miscellaneous, 115, 0x73 hex
Product code 220, 0xDChex
Vendor ID Allen-Bradley/Rockwell Automation
Device profile Identity Object 0x01
Product revision 1.01
DeviceNet Baud rate: autobaud operation and software selection
Serial port RS-232 and RS-485
Indicators DeviceNet network:
Isolation voltage 50V (continuous), Basic Insulation Type
Power 1.8 W: 75 mA @ 24V DC max
Enclosure type rating None (open-style)
Weight, approx. 34.6 g (1.22 oz)
interface and a DeviceNet network
Message Router Object 0x02
DeviceNet Object 0x03
Assembly Object 0x04
Connection Object 0x05
Parameter Object 0x0F
Acknowledge Handler 0x2B
Serial I/O Object 112, 0x70 (vendor-specific)
Transmit Serial Object 113, 0x71 (vendor-specific)
Receive Serial Object 114, 0x72 (vendor-specific)
Address selection: address number 0…63 with rotary switches
DeviceNet connection: 5-pin open connector
Baud rate: 1200, 2400, 4800, 9600, 19.2 k, 38.4 k, 57.6 k, 115.2 k
Parity: odd/even/none
Connector: - pin D-shell, 9-pin male D-shell
Module status - red/green
Network status - red/green
Serial port:
Transmit active - green
Receive active - green
Type tested at 1500V DC for 60 s, DeviceNet network to Serial, and Logic to
Communication ports
Publication 1799-IN012B-EN-P - July 2008
Page 34

34 DeviceNet Serial Interface Module
Environmental Specifications
Attribute Value
Temperature, operating IEC 60068-2-1 (Test Ad, Operating Cold),
IEC 60068-2-2 (Test Bd, Operating Dry Heat),
IEC 60068-2-14 (Test Nb, Operating Thermal Shock):
-20…70 °C (-4…158 °F)
Temperature, nonoperating IEC 60068-2-1 (Test Ab, Unpackaged Nonoperating Cold),
IEC 60068-2-2 (Test Bb, U npackaged Nonoperating Dry Heat),
IEC 60068-2-14 (Test Na, Unpackaged Nonoperating Thermal Shock):
-40…85 °C (-40…185 °F)
Relative humidity IEC 60068-2-30 (Test Db, Unpackaged Nonoperating Damp Heat):
5…95% noncondensing
Shock, operating IEC 60068-2-27 (Test Ea, Unpackaged Shock)
30 g peak acceleration
Shock, nonoperating IEC 60068-2-27 (Test Ea, Unpackaged Shock)
Vibration IEC 60068-2-6 (Test Fc, Operating)
ESD immunity IEC 61000-4-2:
Radiated RF immunity IEC 61000-4-3:
EFT/B immunity IEC 61000-4-4:
Surge transient immunity IEC 61000-4-5:
Conducted RF immunity IEC 61000-4-6:
Emissions CISPR 11
Wire Size
Wiring category
(1)
Use this Conductor Category information for planning conductor routing. Refer to Industrial Automation Wiring and
Grounding Guidelines, publication 1770-4.1.
(1)
50 g peak acceleration
5 g @ 10…500 Hz
8 kV indirect contact discharges
10V/m with 1 kHz sine-wave 80%AM from 30…2000 MHz
10V/m with 200 Hz 50% Pulse 100%AM at 900 MHz
10V/m with 200 Hz 50% Pulse 100%AM at 1890 MHz
3V/m with 1 kHz sine-wave 80%AM from 2000…2700 MHz
2 kV at 5 kHz on communication ports
+
2 kV line-earth (CM) on shielded ports
+
10V rms with 1 kHz sine-wave 80% AM from 150 kHz…80 MHz
Group 1, Class A
2
0.25...2.5 mm
(22...14 AWG) solid or stranded shielded copper wire
rated at 80 °C (176 °F) or higher. Refer to DeviceNet Media Design And
Installation Guide, publication DNET-UM072.
2 - on communication ports
Publication 1799-IN012B-EN-P - July 2008
Page 35

DeviceNet Serial Interface Module 35
Certifications
(1)
Certification
c-UL-us UL Recognized Component Industrial Control Equipment, certified for US and Canada.
CE European Union 2004/108/EC EMC Directive, compliant with:
C-Tick Australian Radiocommunications Act compliant with AS/NZS
ODVA ODVA conformance tested to DeviceNet specifications
(1)
See the Product Certification link at http:// www.ab.com for Declaration of Conformity, Certificates, and other certification
details.
Valu e
See UL File E65584.
EN 61326-1; Meas./Control/Lab., Industrial Requirements
EN 61000-6-2; Industrial Immunity
EN 61000-6-4; Industrial Emissions
EN 61131-2; Programmable Controllers (Clause 8, Zone A & B)
CISPR 11, Industrial Emissions
Publication 1799-IN012B-EN-P - July 2008
Page 36

Rockwell Automation Support
Rockwell Automation provides technical information on the Web to assist you in
using its products. At http://support.rockwellautomation.com
technical manuals, a knowledge base of FAQs, technical and application notes,
sample code and links to software service packs, and a MySupport feature that you
can customize to make the best use of these tools.
For an additional level of technical phone support for installation, configuration and
troubleshooting, we offer TechConnect support programs. For more information,
contact your local distributor or Rockwell Automation representative, or visit
http://support.rockwellautomation.com
.
Installation Assistance
If you experience a problem within the first 24 hours of installation, please review
the information that's contained in this manual. You can also contact a special
Customer Support number for initial help in getting your product up and running.
, you can find
United States 1.440.646.3434
Monday – Friday, 8 a.m. – 5 p.m. EST
Outside United
States
Please contact your local Rockwell Automation representative for any
technical support issues.
New Product Satisfaction Return
Rockwell Automation tests all of its products to ensure that they are fully
operational when shipped from the manufacturing facility. However, if your
product is not functioning and needs to be returned, follow these procedures.
United States Contact your distributor. You must provide a Customer Support case number
Outside United
States
Allen-Bradley, Rockwell Automation, RSNetWorx for DeviceNet, SLC 500, and TechConnect are trademarks of Rockwell
Automation, Inc.
Trademarks not belonging to Rockwell Automation are property of their respective companies.
(see phone number above to obtain one) to your distributor in order to
complete the return process.
Please contact your local Rockwell Automation representative for the return
procedure.
Publication 1799-IN012B-EN-P - July 2008 PN-29563
Supersedes Publication 1799-IN012A-EN-P - November 2007 Copyright © 2008 Rockwell Automation, Inc. All rights reserved. Printed in the U.S.A.
 Loading...