

Page 1

MagNA Pure Compact Instrument
Addendum 5 to Operator’s Manual, Version 1.3
Software Version 1.1 July 2016
For general laboratory use.
Page 2

Page 3
Updated Information about the MagNA Pure Compact System
Updated Information about the
MagNA Pure Compact System
Dear Valued User of the MagNA Pure Compact System,
Please be informed that Section III, Declaration of Conformity is replaced by the following
section:
Approvals
The MagNA Pure Compact System meets the requirements laid down in:
Directive 2014/30/EU of the European Parliament and Council of 26 February 2014 relating
to electromagnetic compatibility (EMC).
Directive 2014/35/EU of the European Parliament and Council of 26 February 2014 relating
to electrical equipment designed for use within certain voltage limits.
Compliance with the applicable directive(s) is provided by means of the Declaration of
Conformity.
The following marks demonstrate compliance:
Complies with the provisions of the applicable EU directives.
Issued by Underwriters Laboratories, Inc. (UL) for Canada and the US.
Equipment de Laboratoire /
Laboratory Equipment
‘Laboratory Equipment’ is the product identifier as shown on the type
plate.
MagNA Pure Compact Instrument – Addendum 5 to Operator’s Manual, Version 1.3
3
Page 4

If you have any questions regarding the MagNA Pure Compact System Instrument,
please contact your Roche Diagnostics representative.
Published by
Roche Diagnostics GmbH
Sandhofer Straße 116
68305 Mannheim
Germany
©
2013 Roche Diagnostics
0805521100110716
For general laboratory use.
MAGNA PURE, LIGHTCYCLER, AND TAQMAN are trademarks of Roche.
Page 5
MagNA Pure Compact Instrument
Addendum 4 to Operator’s Manual, Version 1.3
Software Version 1.1 November 2013
For general laboratory use.
Page 6

Page 7

Updated Information for the MagNA Pure Compact Instrument
Updated Information for the
MagNA Pure Compact Instrument
Dear Valued User of the MagNA Pure Compact Instrument,
This addendum is to inform you that the floppy disk drive for the MagNA Pure Compact
Instruments has been removed for serial numbers starting with MPCC1550.
If you have any questions regarding the MagNA Pure Compact System, please contact your
Roche Diagnostics representative. To call, write, fax, or email us, visit the Roche Applied
Science homepage at www.roche-applied-science.com and select your home country. Coun-
try-specific contact information will be displayed.
Addendum 4 to Operator’s Manual, Version 1.3
3
Page 8
Updated Information for the MagNA Pure Compact Instrument
Please note the following correction to the MagNA Pure Compact Operator’s Manual:
The floppy disk drive on the MagNA Pure Compact Instruments starting with serial number
MPCC1550 has been removed.
Old Version New Version without Floppy Disk Drive
4
MagNA Pure Compact Instrument
Page 9

Updated Information for the MagNA Pure Compact Instrument
The MagNA Pure Compact Operator’s Manual is corrected as shown below:
Section Current Version Changes
A 3.3.1
8 Disk Drive
(p 24)
A 3.3.4
Sides of the
Instrument
(p 29)
B 4
Data Transfer
to or from
the MagNA
Pure Compact
Instrument
(p 67)
8 Disk Drive
The disk drive allows the operator to
store the data generated as well as
transfer it easily to other instruments
or computers (e.g., for sample tracking,
documentation, or troubleshooting).
In addition, new MagNA Pure Compact
purification protocols can be uploaded
from commercially available disks.
9 USB Ports
There are two USB ports. USB 1 and
USB 2 ports can be used for any
accessories that are not included with
the MagNA Pure Compact Instrument.
The data from the result screen can be
saved to a disk. In future applications
with the LightCycler
®
System and the
COBAS TaqMan® 48 Analyzer, these
data files can be transferred to the
respective instruments.
Section 8 Disk Drive no longer valid.
9 USB Ports
There are two USB ports. USB 1 and
USB 2 ports can be used for any
accessories that are not included with
the MagNA Pure Compact Instrument.
A USB memory stick allows the
operator to store the data generated or
transfer it easily to other instruments
or computers (e.g., for sample tracking,
documentation, or troubleshooting).
In addition, new MagNA Pure Compact
purification protocols can be uploaded.
To save data from the result screen,
use a USB storage device.
Addendum 4 to Operator’s Manual, Version 1.3
5
Page 10

Updated Information for the MagNA Pure Compact Instrument
Section Current Version Changes
B 4.2
Upload of
New Updated
Purification
Protocols
(p 67)
As new or updated purification
protocols are created, they may be
added to the MagNA Pure
Compact Instrument via external data
carrier disks (e.g., software update
disk) during program startup.
Additional protocols will be available
for download from www. magnapure.
com. Follow the download instructions
on this webpage.
Update disks will automatically be
checked for viruses by the instrument
software.
Workflow:
1. MagNA Pure Compact Instrument
must be shut down.
2. Insert update disk.
3. Switch on instrument.
4. Software is automatically updated.
5. After Main Screen is displayed,
remove update disk.
6. Update complete.
7. The instrument is ready for use.
To upload new protocols, use a USB
storage device.
No longer valid.
Workflow:
1. MagNA Pure Compact Instrument
must be shut down.
2. Insert USB.
3. Switch on instrument.
4. Software is automatically updated.
5. After Main Screen is displayed, shut
down the MagNA Pure Compact
Software, remove USB, and start
the MagNA Pure Compact Software
again.
6. Update complete.
7. The instrument is ready for use.
C 5
Documentation
(p 97)
The result screen of the respective run
will be displayed and can be printed or
saved to a disk or LIMS.
To save data from the result screen,
use a USB storage device or save them
directly to a LIMS.
6
MagNA Pure Compact Instrument
Page 11

Page 12

Published by
Published by
Roche Diagnostics GmbH
Sandhofer Straße 116
68305 Mannheim
Germany
©
2013 Roche Diagnostics
1
1113
For general laboratory use.
MAGNA PURE, LIGHTCYCLER, AND TAQMAN are trademarks of Roche.
Page 13

MagNA Pure Compact Instrument
Addendum 3 to
Operator’s Manual, Version 1.3
Software Version 1.1 August 2012
For general laboratory use.
Page 14

Information regarding
MagNA Pure Compact Instrument
Dear Valued User of the MagNA Pure Compact Instrument,
Roche Diagnostics Ltd. has merged into Roche Diagnostics International Ltd and therefore
the company name has changed to
Roche Diagnostics International Ltd
In order to harmonize and improve our support, the legal manufacturer changes as follows:
Roche Diagnostics GmbH
Sandhofer Strasse 116
68305 Mannheim
Germany
If you have any further questions regarding this matter, please do not hesitate to contact your
Roche Diagnostics representative. To call, write, fax, or email us, visit the Roche Applied Science
home page, http://www.roche-applied-science.com and select your home country.
Country-specific contact information will be displayed.
The address of the legal manufacturer in section
“Prologue/Contact Addresses” changes as follows:
Old adress New adress
Roche Diagnostics Ltd.
Forrenstrasse
CH-6343 Rotkreuz
Switzerland
MAGNA PURE is a trademark of Roche.
Roche Diagnostics GmbH
Sandhofer Strasse 116
68305 Mannheim
Germany
06845070001 a 0812
For general laboratory use. ©2012 Roche Diagnostics.
All rights reserved.
Page 15

Information regarding the
MagNA Pure Compact Instrument
Operator’s Manual Version 1.3
Versatile Nucleic Acid Purification -
Smart. Small. Simple
Page 16
nd
MagNA Pure Compact Instrument Operator’s Manual - 2
Addendum
Dear valued user of the
MagNA Pure Compact Instrument,
With this document Roche Applied Science releases information on safety standards to provide a maximum of
health and environment assurance. Please read the following information carefully, which updates information
given in the MagNA Compact Instrument Operator’s Manual.
If you have any further questions regarding this matter, please do not hesitate to contact our Technical Services
Department at your best convenience. To call, write, fax, or email us, visit the Roche Applied Science home page,
http://www.roche-applied-science.com and select your home country. Country-specifi c contact information
will be displayed.
New Prologue Chapters:
Warnings and Precautions
In an emergency, immediately turn the power switch off and unplug the Instrument.
This Instrument is an electromechanical device, that could cause electrical shock or injury if not operated
according to the procedures in this Operator’s Manual.
Disposal Recommendations
All electrical and electronic products should be disposed off separately from the municipal waste system. Proper
disposal of your old appliance prevents potential negative consequences for the environment and human health.
The Instrument must be treated as biologically contaminated-hazardous waste. Decontamination
(i.e., a combination of processes, including cleaning, disinfection and/or sterilization) is required
before reuse, recycling, or disposal.
Dispose of the Instrument according to local and/or labor regulations.
For more information, contact your local Roche representative.
Components of your Control Unit, such as the computer, monitor, keyboard etc., which are marked
with the crossed-out wheeled bin symbol are covered by the European Directive 2002/96/EC on
waste electrical and electronic equipment (WEEE) of the European Parliament and the Council of
27 January 2003.
These items must be disposed of via designated collection facilities appointed by government or
local authorities.
For more information about disposal of your old product, please contact your city offi ce, waste
disposal service or your local Roche representative.
Constraint
It is left to the responsible laboratory organization to determine whether control unit components are
contaminated or not. If contaminated, treat in the same way as the Instrument.
2
Important Information regarding the MagNA Pure Compact Instrument Operator’s Manual
Page 17
MagNA Pure Compact Instrument Operator’s Manual - 2nd Addendum
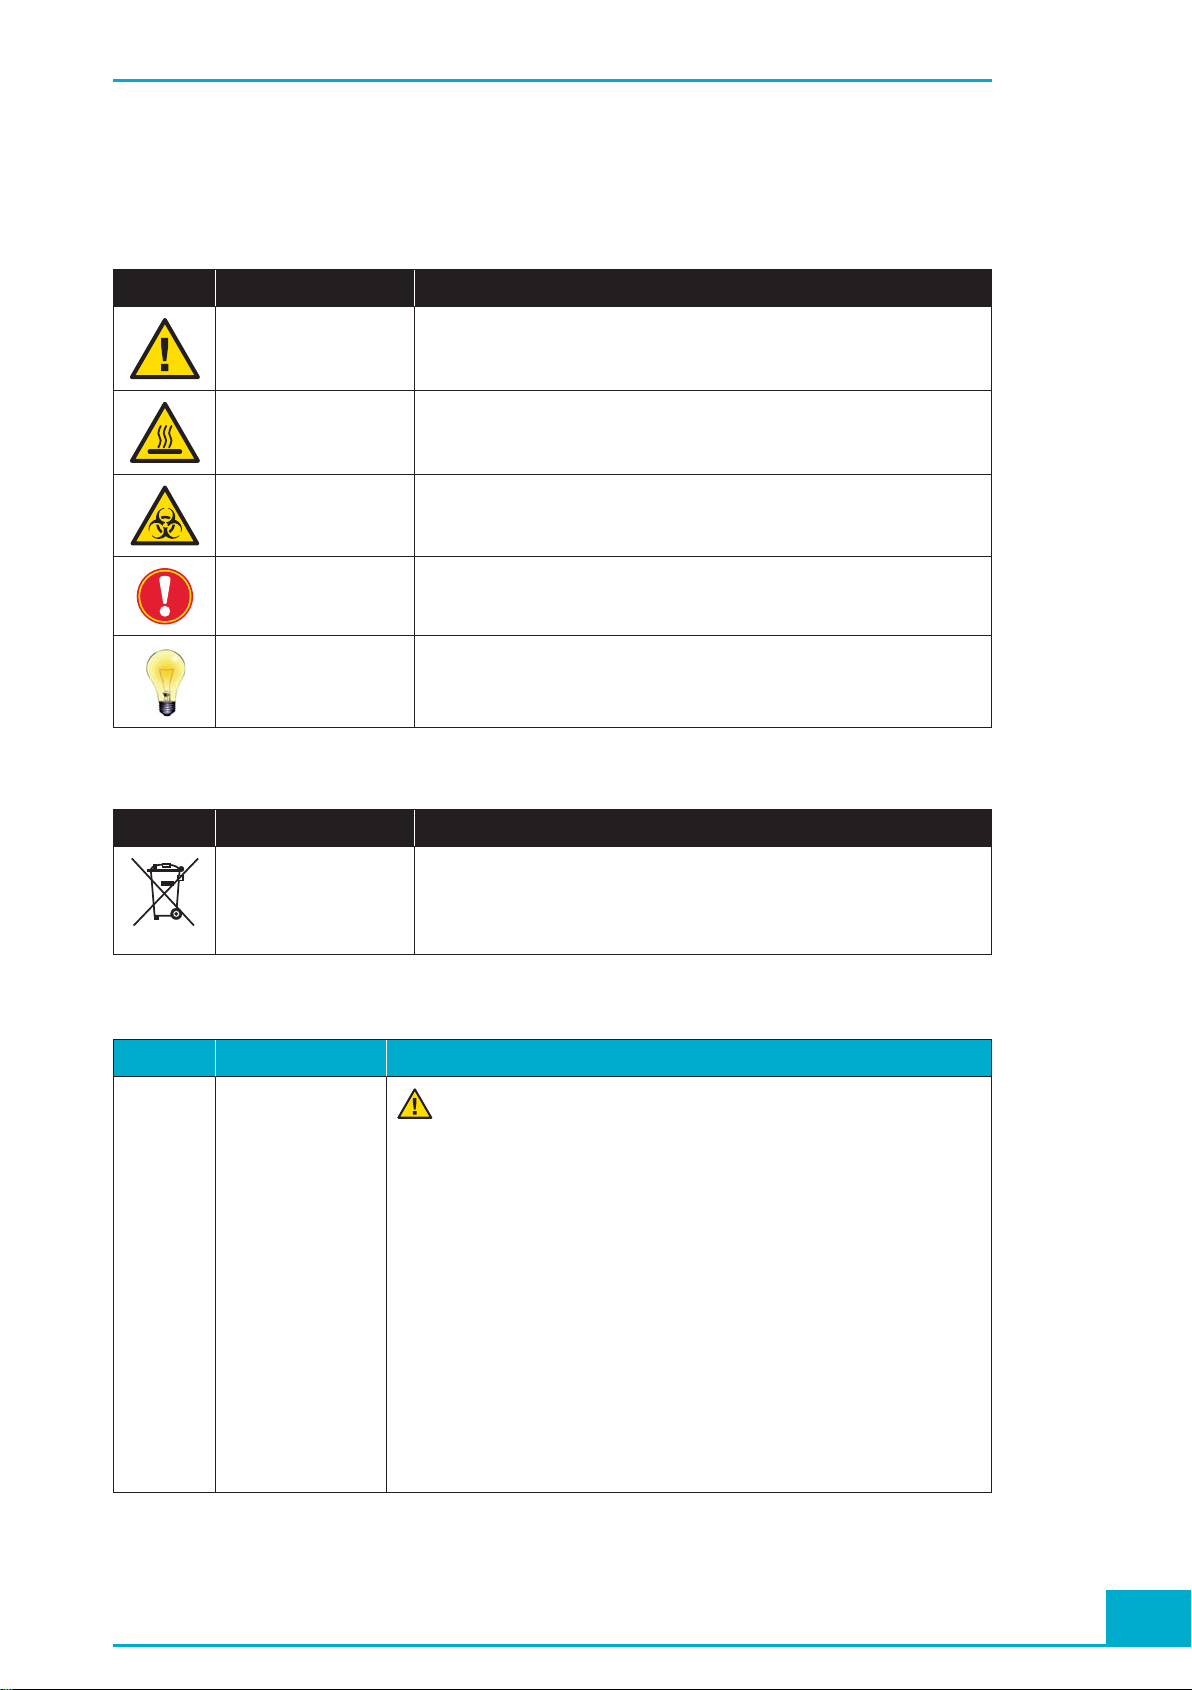
Symbols used in the Manual, page 8
Current Version
Symbol Heading Description
WARNING
RISK OF DANGER
HOT SURFACE This symbol is used to label potentially hot instrument surfaces.
BIOHAZARD This symbol is used to indicate that certain precautions must be taken
IMPORTANT NOTE This symbol is used to bring your attention to an important annotation.
INFORMATION NOTE Designates a note that provides additional information concerning the
This symbol is used to indicate that noncompliance with instructions or
procedures may lead to physical injury or even death or could cause
damage to the instrument.
when working with potentially infectious material.
current topic or procedure.
Additional Information:
Symbol Heading Description
WEE Electrical and electronic equipment marked with this symbol are covered
by the European directive WEEE.
The symbol denotes that the equipment must not be disposed off in the
municipal waste system.
General Information, page 11
Current Version Additional Information
Electrical
Safety
General Information:
Protection Class I
All peripheral devices that are connected to the MagNA Pure Compact
The MagNA Pure Compact Instrument is designed in accordance
with Protection Class I (IEC). The chassis/housing of the Instrument is connected to protection earth (PE) by means of a cable. For
protection against electrical shock hazards, the Instrument must be
directly connected to an approved power source, such as a three-wire
grounded receptacle for the 230V line. Where an ungrounded receptacle
is encountered, a qualifi ed electrician must replace it with a properly
(PE) grounded receptacle, in accordance with the local electrical code.
An extension must not be used. Any break in the electrical ground path,
whether inside or outside the Instrument, could create a hazardous
condition. Under no circumstances should the user attempt to modify
or deliberately defeat the safety features of this Instrument. If the power
cord becomes cracked, frayed, broken, or otherwise damaged, it must be
replaced immediately with the equivalent part from Roche Diagnostics.
Instrument must comply with safety standard IEC 60950 for information
technology equipment, or with IEC 61010-1, UL 61010-1 for laboratory
instruments.
Important Information regarding the MagNA Pure Compact Instrument Operator’s Manual
3
Page 18
MagNA Pure Compact Instrument Operator’s Manual - 2nd Addendum
Setup, page 16
Current Version Additional Information
Selecting a
Location
The MagNA Pure Compact Instrument requires
very little setup. Choose for the MagNA
Pure Compact Instrument a clean, dry, level,
stable surface within 3 m of a compatible
electrical outlet. To ensure proper ventilation,
leave 10 cm of space behind the instrument and
15 cm at each side of the instrument. No space is
needed at the back of the instrument.
Description of the Instrument, page 22
Current Version Additional Information
UV Light
Protection
The door permits a good view of the interior of
the instrument. During the decontamination
cycle, the door prevents escape of UV light from
the interior.
Description of the Instrument, page 29
To carry the instrument, place your hands under
the base of the instrument. For this purpose, the
instrument base plate provides four recessed
carrier grips. The weight of the MagNA Pure
Compact Instrument is approx. 60 kg, ensure that
enough manpower is available for transportation.
The Front Door is impervious to UV light from
inside the Instrument, in case the decontamination function is activated, but permits good view
to the inside of the Instrument. However do not
look at the UV source directly.
Locking of the door is controlled by the software.
Movement of the Robotic Arm is only possible
after the Instrument Door is closed and locked.
Current Version Additional Information
Socket
for power
cable
This is the plug-in for the power cable. There
are two power cables included in the instrument
package, one for US and one for German wall
outlets.
Performing a Purifi cation Run, page 43
Current Version Additional Information
For kit specifi c details regarding the handling of
Reagent Cartridges, please see the corresponding pack insert of the kit.
Cleaning, page 81
Current Version Additional Information
The surface of the MagNA Pure Compact
Instrument as well as removable internal parts
should be cleaned on a weekly basis with a lint
free cloth moistened with deonized water. If a
spill of reagents occurs, the instrument should
be cleaned with a 70% ethanol solution or any
acceptable PCR laboratory cleaner. Turn the
instrument power Off and disconnect or unplug
the power cord before cleaning the instrument.
Always connect the Instrument to a grounded
wall outlet.
Reagents might be fl ammable. For kit specifi c details regarding the handling of Reagent
Cartridges, please consult the package insert of
the respective reagent kit for further information.
Mixtures of water and ethanol, that contain
70% ethanol, are highly fl ammable.
4
Important Information regarding the MagNA Pure Compact Instrument Operator’s Manual
Page 19

Information regarding the
MagNA Pure Compact Software Update 1.1.2
Versatile Nucleic Acid Purification -
Smart. Small. Simple
Page 20

Information regarding the
MagNA Pure Compact Software Update 1.1.2
Please read the following information, which updates information given in the MagNA Pure
Compact Instrument Operator’s Manual!
Dear valued user of the MagNA Pure Compact Instrument,
In March 2009, Roche Applied Science introduced an updated version of the MagNA Pure
Compact Software: Version 1.1.2.
This latest version:
䉴 fi xes some bugs, found in previous versions
䉴 improves some of the text messages
䉴 updates the start up functions of the instrument, including the Plausibility Check
䉴 improves tip handling
䉴 includes updated and improved protocols; a list of installed protocols has also been
implemented in the Maintenance Menu
䉴 improves Sample Ordering
䉴 includes a Create Problem Report function
If you have any further questions regarding this matter, please do not hesitate to contact our
Technical Services Department at your best convenience. To call, write, fax, or email us, visit
the Roche Applied Science home page, http://www.roche-applied-science.com and select
your home country. Country-specifi c contact information will be displayed.
Information regarding the MagNA Pure Compact Software Update 1.1.2
2
Page 21

Important Information regarding the
MagNA Pure Compact Instrument
Operator’s Manual
Versatile Nucleic Acid Purification -
Smart. Small. Simple
Page 22

Prologue
Important Information regarding the MagNA
Pure Compact Instrument Operator’s Manual
Please read the following information, which updates information given in the MagNA Pure
Compact Instrument Operator’s Manual!
Prologue
Contact Addresses, page 5
Current Version Changes
Manufactured by Roche Instrument Center AG
Forrenstrasse
CH-6343 Rotkreuz
Switzerland
Marks of Conformity, page 6
Current Version Changes
The MagNA
Pure Compact
Instrument has
been investigated
according to:
CE – Testing
Information
EN 61326:1997 + A1:1998 + A2:2001
Class B (“Electrical equipment for
measurement, control and laboratory
use – EMC requirements”)
CAN/CSA C22.2 No. 1010.1-92 CAN/CSA C22.2 CSA C22.2.61010.1
The instrument conforms to following
directives as issued by the European
Union according to the Council Directive
89/336/EEC (Electromagnetic Compatibility)
and 73/23/EEC (Electrical equipment for
use within certain voltage limits).
Roche Diagnostics Ltd.
Forrenstrasse
CH-6343 Rotkreuz
Switzerland
EN 61326:2006
Class B (“Electrical equipment for
measurement, control and laboratory
use – EMC requirements”)
The instrument conforms to the
following directives as issued by
the European Union according to
the Council Directive 2004/108/EC
(Electromagnetic Compatibility) and
2006/95/EC (Electrical equipment for
use within certain voltage limits).
Please Note: the sentence “Equipment to be connected must fulfi ll the standards set by IEC 950
(Information security in technical equipment, including electronic business machines).”, should
be disregarded.
Important Information regarding the MagNA Pure Compact Instrument Operator’s Manual
4
Page 23

Chapter A
Chapter A:
2. Installation of the Instrument
2.4 Setup, page 16
Current Version Changes
2.4.1
Selecting a
Location
The MagNA Pure Compact Instrument
requires very little setup. Choose for
the MagNA Pure Compact Instrument
a clean, dry, level, stable surface within
3 m of a compatible electrical outlet.
To ensure proper ventilation, leave 10
cm of space behind the instrument and
15 cm at each side of the instrument.
No space is needed at the back of the
instrument.
3. Description of the Instrument
3.3.5 MagNA Pure Compact Accessories
7 Barcode Scanner – Scanner Specifi cations, page 33
Current Version Changes
Drop Resistance IEC 68-2-32 Test ED; withstands
repeated drops from 1.8 m onto a
concrete surface
The MagNA Pure Compact Instrument
requires very little setup. Choose for
the MagNA Pure Compact Instrument
a clean, dry, level, stable surface within
3 m of a compatible electrical outlet. To
ensure proper ventilation, leave 10 cm
of space behind the instrument and
15 cm at each side of the instrument.
DIN EN 60068-2-32 Test ED;
withstands repeated drops from 1.8 m
onto a concrete surface
Important Information regarding the MagNA Pure Compact Instrument Operator’s Manual
5
Page 24
Chapter B
Chapter B:
1. Handling the MagNA Pure Compact Software
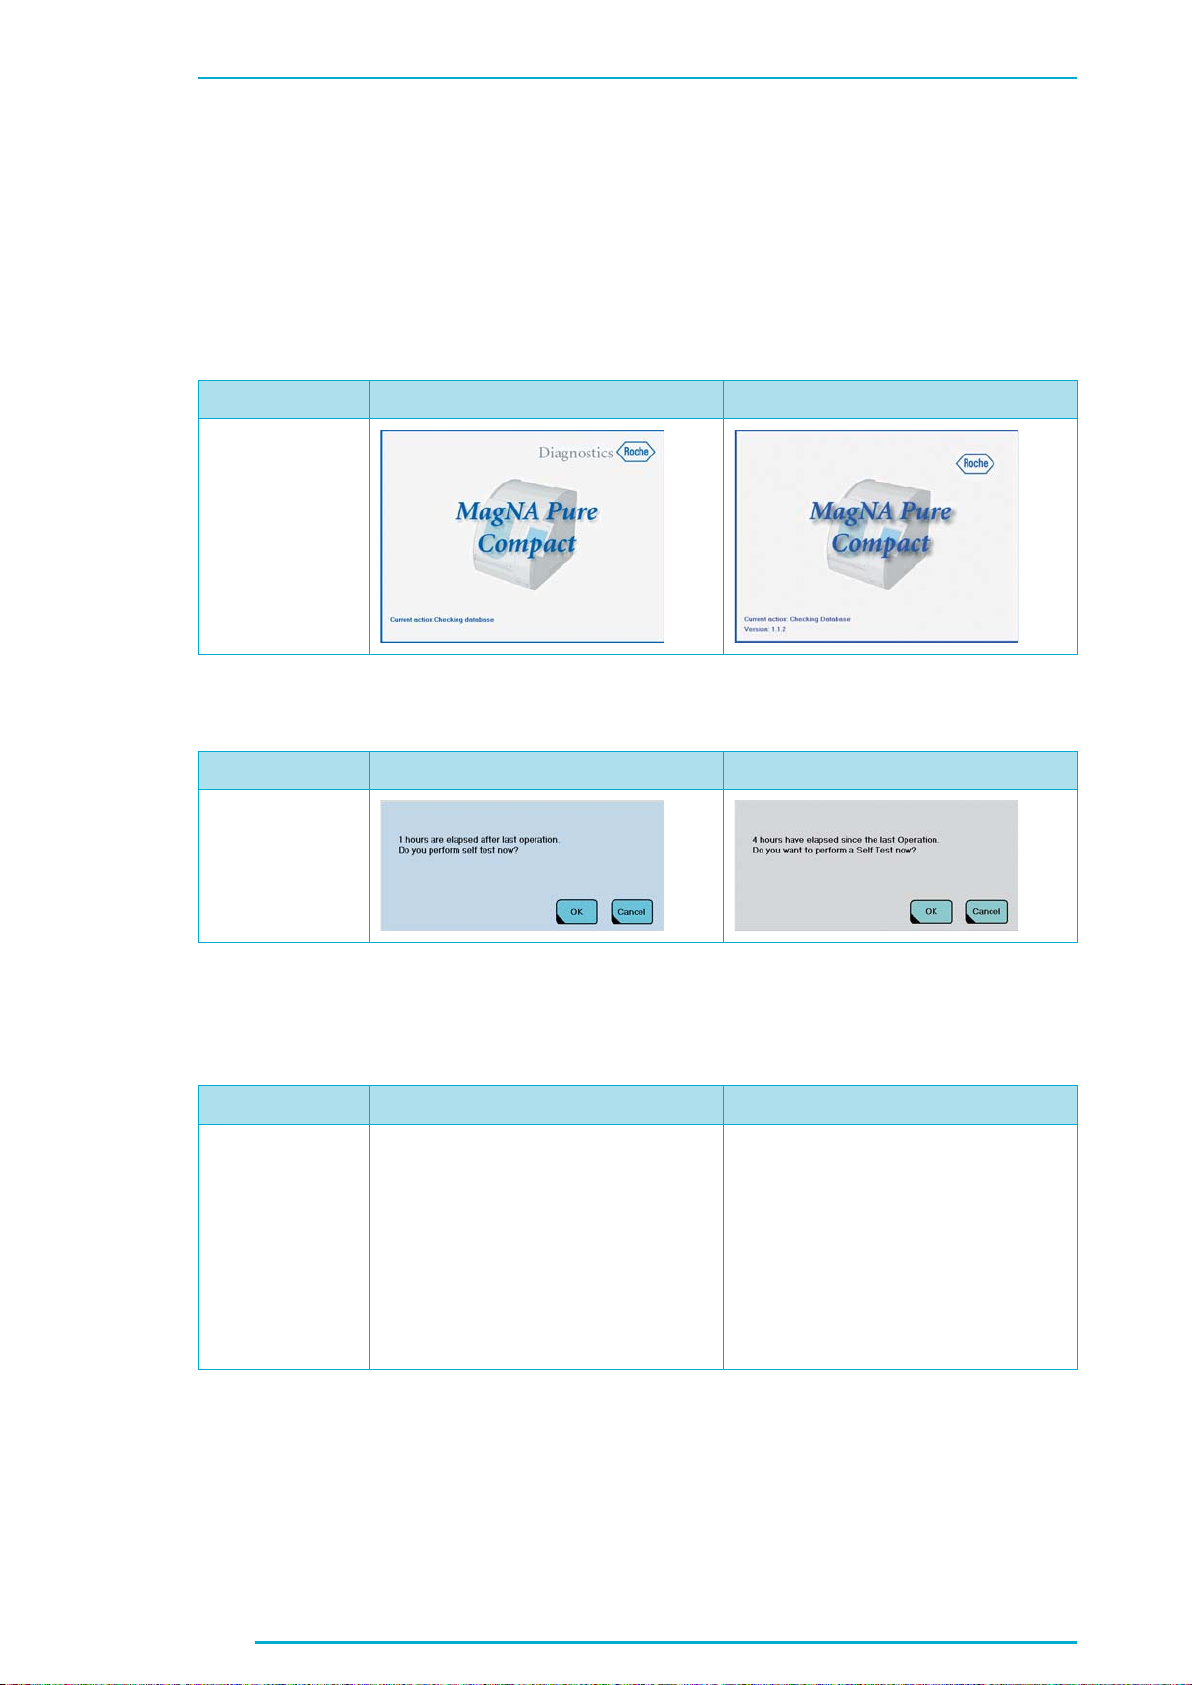
1.1 Starting the MagNA Pure Compact Instrument, page 37
Current Version Changes
New Screenshot
1.1 Starting the MagNA Pure Compact Instrument, page 38
Current Version Changes
New Screenshot
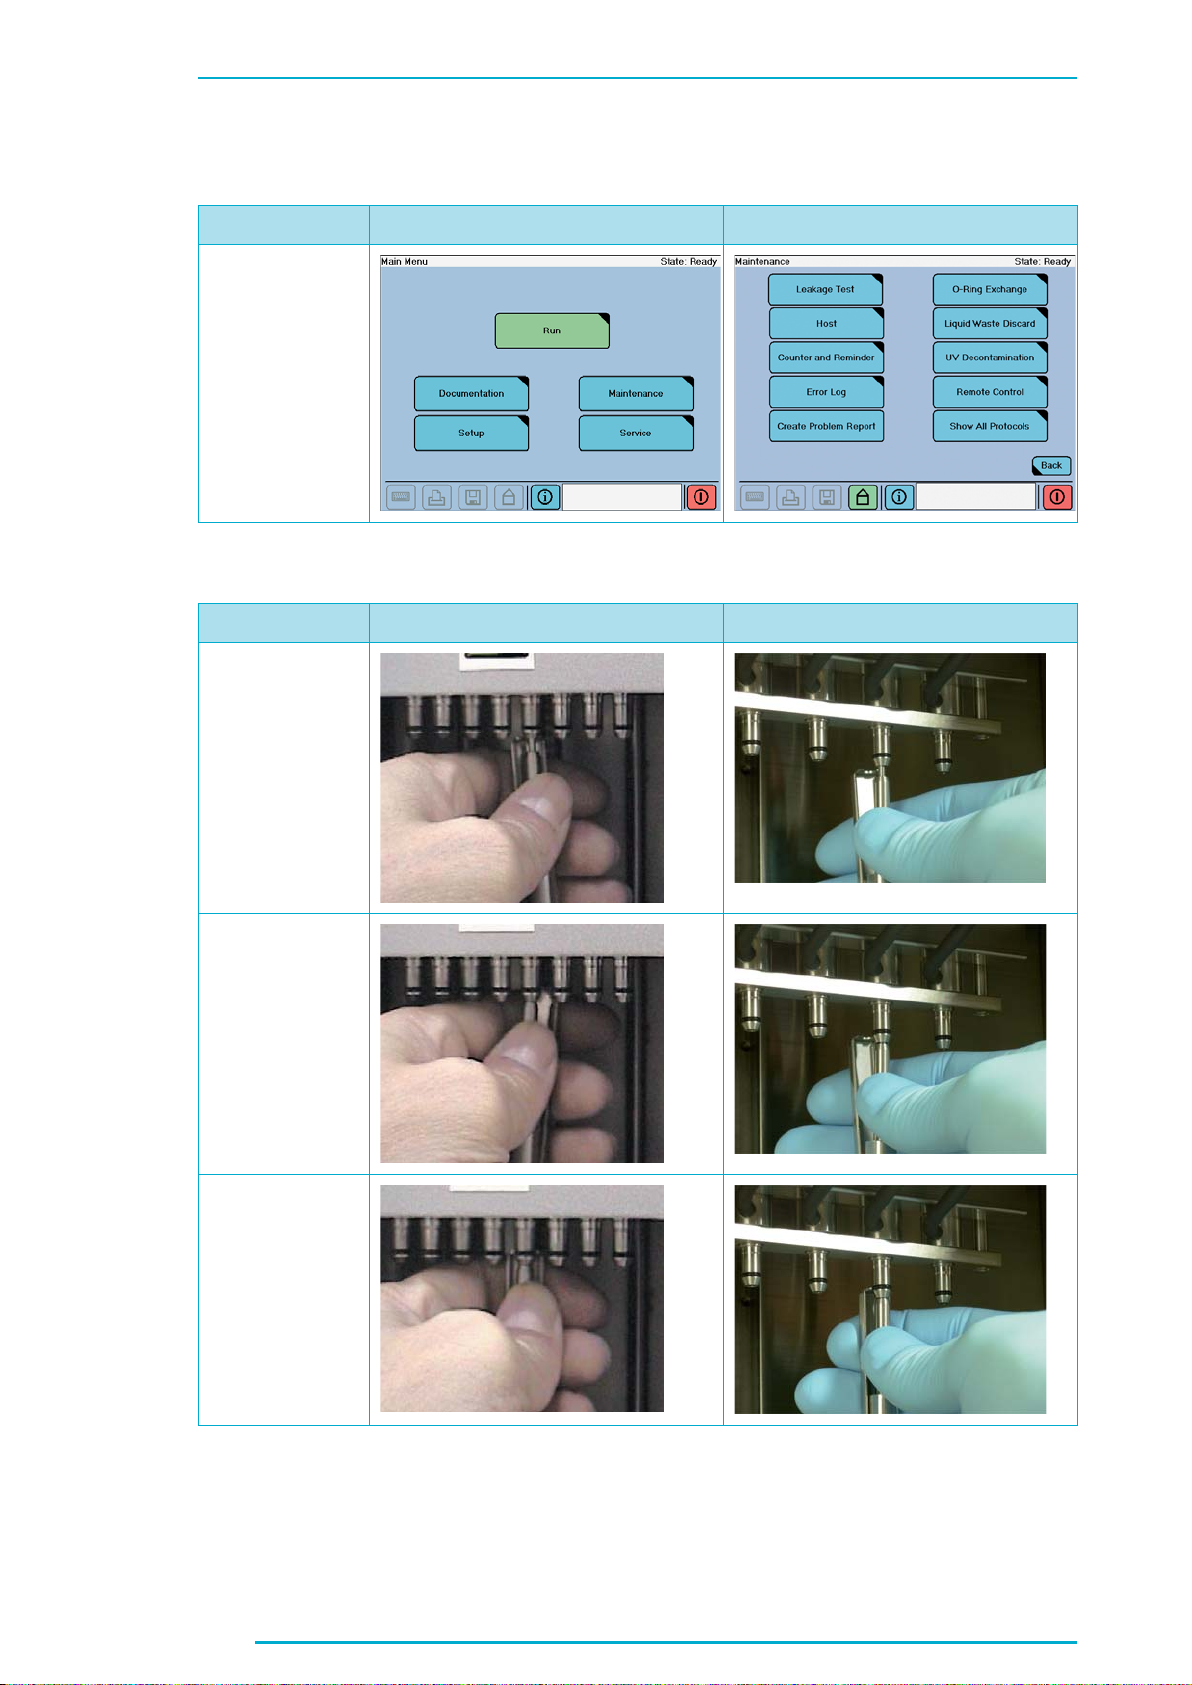
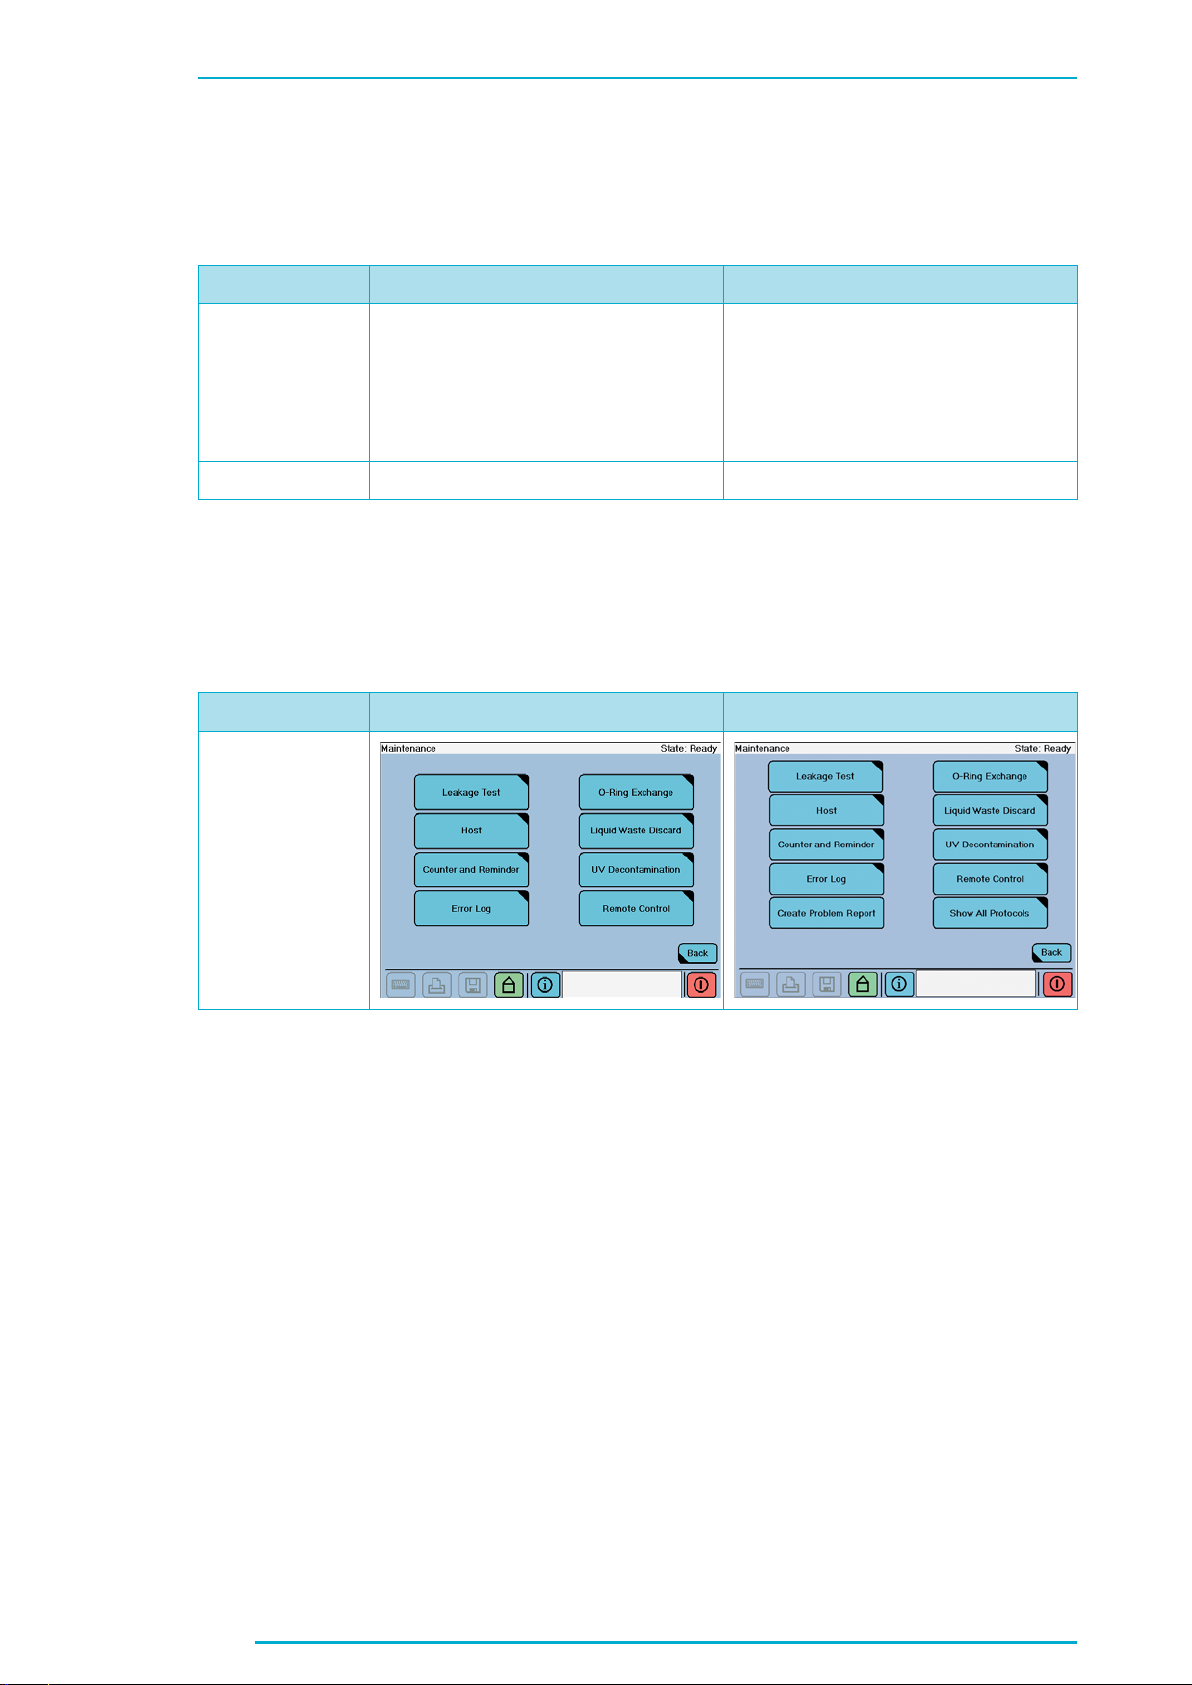
1.2 Overview of Main Menu Screen
Table 4: Overview of menu and submenu structure, page 41
Current Version Changes
Maintenance:
Detailed Actions
Maintaining:
Leakage Test
䉴
Counter and Reminder
䉴
Error Log
䉴
O-ring Exchange
䉴
Liquid Waste Discard
䉴
UV Decontamination
䉴
Maintaining:
Leakage Test
䉴
Counter and Reminder
䉴
Error Log
䉴
O-ring Exchange
䉴
Liquid Waste Discard
䉴
UV Decontamination
䉴
Create Problem Report
䉴
Important Information regarding the MagNA Pure Compact Instrument Operator’s Manual
6
Page 25

Chapter B
2. Performing a Purifi cation Run, page 45
Current Version Changes
For the MagNA
Pure Compact
RNA Isolation
Kit:
The selection of an appropriate
endogenous IC is of high importance
when developing a quantitative RTPCR assay. The IC is co-amplifi ed with
the target of interest and serves as a
control for several factors: differences
in initial template concentrations
between different samples, sample-tosample variations in the PCR, presence
of PCR inhibitors or the extent of any
RNA degradation. The advantage of
using an endogenous IC is that both
internal control mRNA and target
mRNA is extracted from cells or tissue
and reverse transcribed together.
Commonly used endogenous ICs
include so-called housekeeping gene
mRNAs. (Note that Roche Applied
Science offers several LightCycler®
Housekeeping Gene Sets for the
detection of human housekeeping
genes, incl. G6PDH, HPRT, ALAS,
and _2-microglobulin.) The level
of expression of an appropriate
endogenous IC should not vary
with the experimental conditions or
treatments to be compared.
The selection of an appropriate
endogenous IC is of high importance
when developing a quantitative RTPCR assay. The IC is co-amplifi ed with
the target of interest and serves as a
control for several factors: differences
in initial template concentrations
between different samples, sample-tosample variations in the PCR, presence
of PCR inhibitors or the extent of any
RNA degradation. The advantage of
using an endogenous IC is that both
internal control mRNA and target
mRNA is extracted from cells or tissue
and reverse transcribed together.
Commonly used endogenous ICs
include so-called housekeeping gene
mRNAs. The level of expression of an
appropriate endogenous IC should not
vary with the experimental conditions
or treatments to be compared.
Important Information regarding the MagNA Pure Compact Instrument Operator’s Manual
7
Page 26
Chapter C
Chapter C:
1. User Maintenance
1.1 Leakage Test, page 72
Current Version Changes
New Screenshot
1.1 Leakage Test, page 73
Current Version Changes
New Screenshot
New Screenshot
Important Information regarding the MagNA Pure Compact Instrument Operator’s Manual
8
Page 27
Chapter C
1.2.2 O-Ring Exchange, page 77
Current Version Changes
New Screenshot
1.2.2 O-Ring Exchange, page 78
Current Version Changes
New Pictures
New Pictures
New Pictures
Important Information regarding the MagNA Pure Compact Instrument Operator’s Manual
9
Page 28
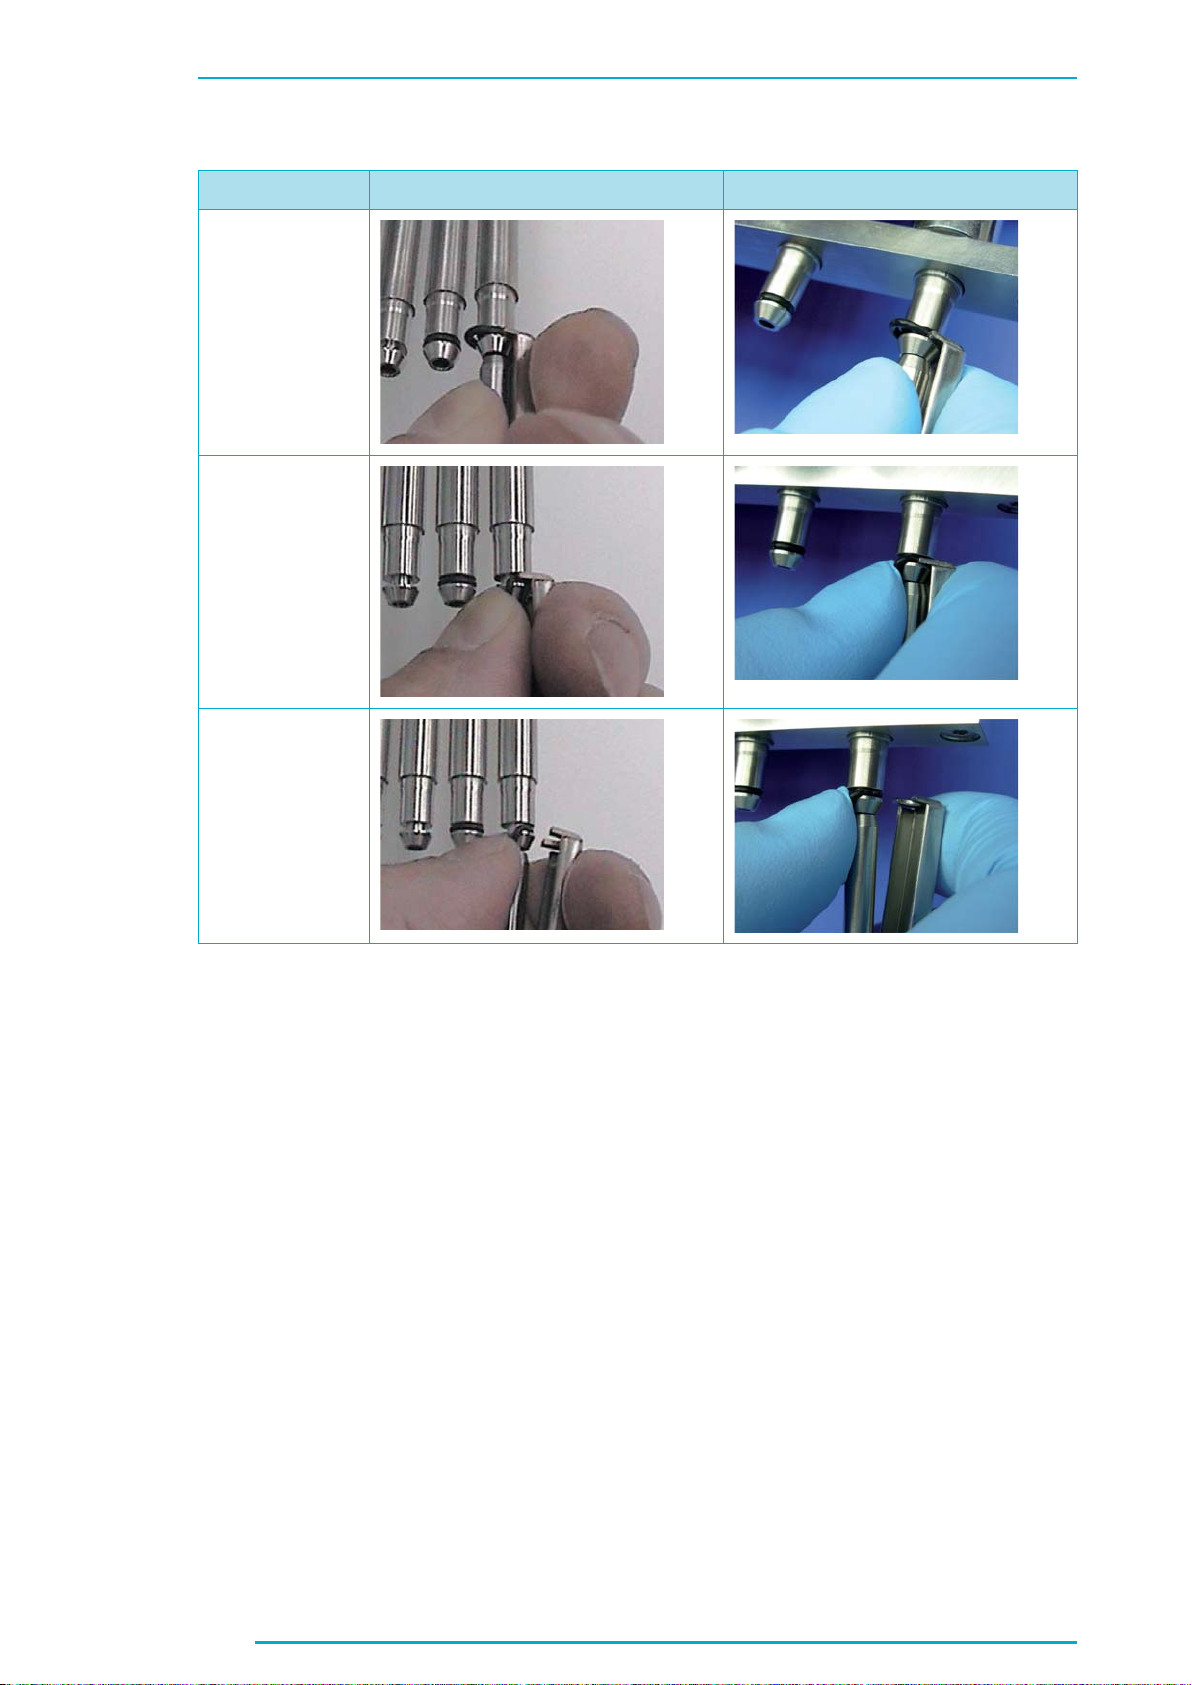
Chapter C
New Pictures
New Pictures
Current Version Changes
New Pictures
10
Important Information regarding the MagNA Pure Compact Instrument Operator’s Manual
Page 29

Chapter C
1.2.2 O-Ring Exchange, page 79
Current Version Changes
New Pictures
New Pictures
New Pictures
New Pictures
New Pictures
11
Important Information regarding the MagNA Pure Compact Instrument Operator’s Manual
Page 30
Chapter C
2. Service Maintenance, page 81
Current Version Changes
Note: Service Maintenance may only be
performed by a Roche Diagnostics
service engineer. Contact your local
Roche representant for maintenance
assistance and for more details on
country-specifi c service contracts.
2. Exchange: Hepa Filter HEPA Filter
Service Maintenance may only be performed by a Roche Diagnostics service
engineer. Contact your local Roche
representative for maintenance assistance and for more details on countryspecifi c service contracts.
3. Cleaning Instructions and UV Decontamination
3.2 UV Decontamination, page 85
Current Version Changes
New Screenshot
12
Important Information regarding the MagNA Pure Compact Instrument Operator’s Manual
Page 31

4. Error Codes and Trouble Shooting Guide
4.1 Error Log, page 86
Current Version Changes
Important Note: In case you want to trouble shoot
an error together with a local Roche
representant, have these informations
ready or make sure the remote service
option is enabled.
New Screenshot
In the event that you want to trouble
shoot an error, together with a local
Roche representative, have this
information ready, or ensure that the
remote service option is enabled.
13
Important Information regarding the MagNA Pure Compact Instrument Operator’s Manual
Page 32

Chapter C
6. Administrator Authorization, page 98
Current Version Changes
Your local Roche Diagnostics
representant will defi ne an
administrator authorization during
instrument installation. The
administrator rights are secured
with a password and enable to
defi ne additional operators. During
the administrator authorization the
password will be displayed hidden,
to guarantee confi dentiality. In case
you should forget the administrator
password, contact your local Roche
Diagnostics representant and you will
receive a new one.
Your local Roche Diagnostics
representative will defi ne an
administrator authorization during
installation of the Instrument. The
administrator rights are secured with
a password and enable the ability to
defi ne additional operators. During
the administrator authorization the
password will be displayed hidden,
to guarantee confi dentiality. In the
event that you forget the administrator
password, contact your local Roche
Diagnostics representative and you will
receive a new one.
14
Important Information regarding the MagNA Pure Compact Instrument Operator’s Manual
Page 33

Chapter C
7. Ordering Guide
7.1 Related Products, page 99
Current Version Changes
Recommended
Printer for Use
with the MagNA
Pure Compact
Instrument:
Hewlett Packard Laserjet 1015 Please contact your local Roche
representative for details.
For installation with the MagNA Pure
Compact Instrument, please contact
your local Roche representantative.
For installation with the MagNA Pure
Compact Instrument, please contact
your local Roche representative.
7.3 MagNA Pure Compact Accessories, page 100
Current Version Changes
Waste Tank 03 788 270 001 03 788 300 001
Drop Catcher 03 788 300 001 03 788 270 001
Trademarks MAGNA PURE, LIGHTCYCLER,
COBAS, and TAQMAN are trademarks
of Roche.
MAGNA PURE, LIGHTCYCLER, LC,
HYBPROBE, COBAS and TAQMAN are
trademarks of Roche.
15
Important Information regarding the MagNA Pure Compact Instrument Operator’s Manual
Page 34

Additional Information
Chapter C:
1. User Maintenance
1.3 Create a Problem Report
For troubleshooting by a Roche representative, error messages and confi guration fi les can be
exported to a Problem Report.
The Problem Report is a zipped fi le containing log, confi guration and version fi les.
To create a Problem Report:
Insert an empty USB Memory Stick on the right side of the Instrument. On the “Main Menu”
1
screen, press the ‘Maintenance’ button. Press the ‘Create Problem Report’ button and select “OK”
in the pop-up window.
The Problem Report is created and stored on the attached USB Memory Stick. A pop-up window
2
will open when the Problem Report has been saved.
1. User Maintenance
1.3 Show All Protocols
The “Show All Protocols” option lists all the protocols which are installed on the MagNA
Pure Compact Instrument.
To “Show All Protocols”
On the “Main Menu” screen, press the ‘Maintenance’ button. Select the “Show All Protocols”
1
button.
All protocols that are installed on the Instrument will be displayed, as shown in the screenshot
2
below.
16
Important Information regarding the MagNA Pure Compact Instrument Operator’s Manual
Page 35

MagNA Pure Compact Operator’s Manual
Instrument Version 1.0
Software Version 1.1
www.roche-applied-science.com
Page 36

Page 37

Table of Contents
Table of Contents
Prologue Page
Intended Use of the Instrument...................................................................................................................5
Contact Adresses....................................................................... .............................................................................5
Revision History.................................................................... ....................................................................................5
Marks of Conformity..............................................................................................................................................6
How to Use this Manual....... ................................................................................................................................7
Symbols used in the Manual...............................................................................................................................8
A General Overview Page
1. Specification of the Instrument.................................................................................................................11
1.1 General Information................................................................... ...........................................................................11
1.2 Operating Environment.......................................................................................................................................12
1.3 Operating Parameters........................................................ ..................................................................................12
2. Installation of the Instrument.....................................................................................................................13
2.1 Shipping....................................................................................................................................................................13
2.2 Unpacking................................................................................................................................................................13
2.3 Additional Items Required for Operation and Maintenance................................................................. 14
2.3.1 Operating Reagents......................................................................................................................................14
2.3.2 Maintenance Items......................................... ..............................................................................................15
2.4 Set-up........................................................................................................................................................................16
2.4.1 Selecting a Location.....................................................................................................................................16
2.4.2 Easy Teaching Procedure.............................. ..............................................................................................16
2.4.3 Software Setup...............................................................................................................................................17
3. Description of the Instrument....................................................................................................................21
3.1 General Description..............................................................................................................................................21
3.2 Function Principle..................................................................................................................................................21
3.3 Description of the Instrument...........................................................................................................................22
3.3.1 Front View of the Instrument.....................................................................................................................22
3.3.2 Detailed View..................................................................................................................................................25
3.3.3 Back View of the Instrument.....................................................................................................................27
3.3.4 Sides of the Instrument...............................................................................................................................28
3.3.5 MagNA Pure Compact Accessories.. ............................................................................. ........................30
3.3.6 Position and Meaning of Warning Labels............................................................................................34
1
Page 38

Table of Contents
Table of Contents
B How to Operate the MagNA Pure Compact Instrument Page
1. Handling the MagNA Pure Compact Software..................................................................................37
1.1 Starting the MagNA Pure Compact Instrument ...................... ..................................................................37
1.2 Overview of Main Menu Screen..................................................................................................................... 39
1.3 Flow Diagram for Preparation of a Purification Run................................................................................42
2. Performing a Purification Run.....................................................................................................................43
2.1 Purification..............................................................................................................................................................46
2.2 Liquid Waste Discard..........................................................................................................................................62
3. Use of Internal Controls................................................................................................................................66
3.1 Function of Internal Control................................... ...........................................................................................66
3.2 How to program the instrument for an internal control......................................................................... 66
4. Data Transfer to or from the MagNA Pure Compact Instrument............................................67
4.1 Data Transfer to other Instruments........ ............................................................................. ............................67
4.2 Upload of New or Updated Purification Protocols....................................................................................67
C Maintenance and Trouble Shooting Page
1. User Maintenance............................................................................................................................................ 71
1.1 Leakage Test ......................................................................................................................................................... 71
1.2 O-ring Maintenance.............................................................................................................................................75
1.2.1 Greasing the O-rings....................................................................................................................................75
1.2.2 O-ring Exchange................................................ ............................................................................................76
2. Service Maintenance......................................................................................................................................81
2.1 Counter and Reminder.................................................................................. ......................................................82
2.2 Remote Control and Host...................................................................................................................................82
3. Cleaning Instructions and UV Decontamination .............................................................................83
3.1 Cleaning....................................................................................................................................................................83
3.2 UV Decontamination............................................................................................................................................85
4. Error Codes and Trouble Shooting Gui de ............................................................................................ 86
4.1 Error Log....................................................................... ...........................................................................................86
4.2 Instrument Error Codes.......................................................................................................................................87
4.3 Trouble Shooting Guide...................................................................................................................................... 94
5. Documentation................................................................................................................................................... 96
6. Administrator Authorization....................................................................................................................... 98
7. Ordering Guide .................................................................................................................................................. 99
7.1 Related Products................................................................................................................................................. 99
7.2 MagNA Pure Compact System Products...................................................................................................100
7.3 MagNA Pure Compact Accessories............................................................................................................100
2
MagNA Pure Compact Operator’s Manual - Version 1.3
Page 39

Prologue
Page 40

4
MagNA Pure Compact Operator’s Manual - Version 1.3
Page 41

Intended Use of the Instrument
Contact Addresses
Prologue
Intended Use of the Instrument
The MagNA P ur e C ompact I nstrument is a r obotic w orkstation f or the aut o mat ed pr eparation of nucleic acids from a broad variety of sample materials (e.g., mammalian blood,
serum, plasma, or blood cells; cultured cells; tissue) with the assistance of specially
designed MagNA Pure Compact reagent kits. The isolated high-quality nucleic acids are
suitable for PCR and RT-PCR reactions on the LightCycler System, as well as on standard
block cyclers, and for many other downstream applications.
The instrument is intended for nucleic acid preparation in general laboratory use by
trained professionals.
Contact Addresses
Manufactured by Roche Instrument Center AG
Forrenstrasse
CH-6343 Rotkreuz
Switzerland
for Roche Diagnostics GmbH
Sandhofer Straße 116
D-68305 Mannheim
Germany
Distribution in USA Roche Diagnostics Corporation
9115 Hague Road
PO Box 50457
Indianapolis, IN 46250
USA
Revision History
Manual
Version
1.1 1.0 1.0 December 2003
1.2 1.0 1.1 August 2004
1.3 1.0 1.1 February 2006
Instrument
Version
Software
Version
Revision Date
Prologue
Copyright 2006, Roche Diagnostics GmbH. All rights reserved.
5
Page 42

Intended Use of the Instrument
Marks of Conformity
Marks of Conformity
The MagNA Pure Compact Instrument had been investigated according to:
䉴 IEC 61010-1, 2nd Edition ("Safety requirements for electrical equipment for
measurement, control and laboratory use; Part 1: General requirements")
䉴 EN 61326:1997 + A1:1998 + A2:2001 Class B ("Electrical equipment for measurement,
control and laboratory use - EMC requirements")
䉴 UL 61010A-1
䉴 CAN/CSA C22.2 No. 1010.1-92
The instrument has been manufactured and checked in accordance with all relevant
safety standards prior to leaving the factory. The instrument has been app ro v ed for use by
recognized testing institutions. This is confirmed by the following conformity symbols:
Acronym Test Symbol Testing Information
CE The instrument conforms to following directives as
CUL Certified by the Underwriters Laboratories Inc.
issued by the European Union according to the Council
Directive 89/336/EEC (Electromagnetic Compatibility)
and 73/23/EEC (Electrical equipment for use within
certain voltage limits).
Equipment to be connected must fulfill the standards set by IEC 950 (Informationsecurity in technical equipment, including electronic business machines).
Classification Note on Use with Infectious Material
The Instrument is classified as: 䉴 The Instrument may not be used to
analyze
䉴 Designed for stationary operation.
䉴 Intended f or worldwide use.
䉴 Intended for evaluating preprocessed
infectious materials unless
additional safety measures to ensure
safe sample handling are taken
beforehand.
biological material.
6
MagNA Pure Compact Operator’s Manual - Version 1.3
Page 43

How to Use this Manual
Important: Before operating the MagNA Pure Compact Instrument, be sure to read and
understand the warnings, cautions and safety requirements in this manual. Failure to
follow the instructions contained in this manual may hav e hazardous consequences.
Chapter A General Overview describes
䉴 contents of the MagNA Pure Compact system package
䉴 design of the instrument
䉴 accessories and disposable plastics required for instrument operation
䉴 isolation method of the MagNA Pure Compact Instrument
Intended Use of the Instrument
How to Use this Manual
Chapter B How To Operate the MagNA Pure Compact Instrument describes how to
䉴 use the MagNA Pure Compact Software
䉴 prepare the instrument for a purification run
䉴 perform a purification run
Chapter C Presents additional information on maintenance
of the instrument and troubleshooting
䉴 User Maintenance
䉴 Service Maintenance by the Roche service
䉴 Cleaning of the instrument
䉴 Troubleshooting
Prologue
7
Page 44

Intended Use of the Instrumentl
Symbols used in this Manual
Symbols used in this Manual
Symbol Heading Description
WARNING
RISK OF DANGER
HOT SURFACE This symbol is used to label potentially hot
BIOHAZARD This symbol is used to indicate that certain
IMPORTANT NOTE This symbol is used to bring your attention to
INFORMATION NOTE Designates a note that provides additional
This symbol is used to indicate that noncompliance with instructions or procedures
may lead to physical injury or even death or
could cause damage to the instrument.
instrument surfaces.
precautions must be taken when working with
potentially infectious material.
an important annotation.
information concerning the current topic or
procedure.
8
MagNA Pure Compact Operator’s Manual - Version 1.3
Page 45

General
Overview
Page 46

A
A
10
MagNA Pure Compact Operator’s Manual - Version 1.3
Page 47

Specifications of the Instrument
General Information
General Overview
1 Specifications of the Instrument
Do not use the equipment in a manner not specified by the manufacturer . Otherwise, the
protection provided by the equipment might be impaired.
1.1 General Information
Cat. No.
Dimensions
Weight
Power supply
Frequency 50/60 Hz +/- 5%
Power consumption
Fuses
Heat emission
Protection Class
Installation Category
Electromagnetic Emission:
Terminal disturbances voltage
Electromagnetic radiation
disturbances
03 731 146 001
W 540 mm; D 610 mm; H 570 mm
approx. 60 kg
100 - 240 V AC +/- 10%
Max. 400 VA
4.0 AT, 2 pieces
1440 kJ/h (max.)
860 kJ/h (average value during operation)
I
II
Class B
Class B
A
A
General Overview
11
Page 48

Specifications of the Instrument
Operating Environment
1.2 Operating Environment
A
A
Temperatures allowed during
transportation/storage/packaging
Temperatures allowed during
operation
Pollution Degree: 2
Maximum relative humidity
Altitude
1.3 Operating Parameters
Note: Exact values depend on the purification protocol used.
Processing capability
Processing time
Pipetting Accuracy
-25°C to +70°C
+18°C to +30°C
Indoor use
80% (for operating temperatures up to 31°C);
decreases linearly to 50% for operating
temperatures up to 40°C
up to 2000 m
1 to 8 samples per batch
20 to 45 min (depending on protocol)
25 µl to 100 µl: ⱕ5%
⬎100 µl ⱕ2%
Sample Volume
Elution Volume
Internal Control Volume
100 – 1000 µl
50 – 200 µl
5 – 20 µl
12
MagNA Pure Compact Operator’s Manual - Version 1.3
Page 49

Installation of the Instrument
Shipping
2 Installation of the Instrument
2.1 Shipping
The MagNA Pure Compact Instrument is shipped in a styrofoam container surrounded
by a cardboard box. Before opening it, inspect the container carefully for damage. Report
any damage to your local Roche Diagnostics office before accepting the unit.
2.2 Unpacking
Note: The following steps will be done by your local Roche Diagnostics representative.
Standard Component List
䉴 1 MagNA Pure Compact Instrument body
A
A
Individual parts:
䉴 1 Cartridge Rack
䉴 1 Tube Rack
䉴 1 Elution Tube Rack
䉴 1 Waste Tank
䉴 1 Drop Catcher
䉴 1 Drip Tray
䉴 1 Barcode Scanner and cable
䉴 US power cable
䉴 German power cable
䉴 1 package High Vacuum Grease
䉴 1 package O-rings (8 pieces)
䉴 2 fuses for line filter
䉴 Operator’s Manual
The MagNA Pure Compact Instrument is a standalone instrument, which needs no
additional computer. The computer is already included in the instrument housing and
and may be operated via a touch-screen.
General Overview
13
Page 50

Installation of the Instrument
Additional Required Items for Operation and Maintena nce
2.3 Additional Items Required for Operation and Maintenance
2.3.1 Operating Reagents
Before operating the MagNA Pure Compact Instrument for the first time, you must have
one of the following reagen t k its:
Cat. No. Purific ation Kit For Preparation Of
A
A
03 730 964 001 MagNA Pure Compact Nucleic
Acid Isolation Kit I
03 730 972 001 MagNA Pure Compact Nucleic
Acid Isolation Kit I - Large Volume
04 802 993 001 MagNA Pure Compact
RNA Isolation Kit
These three kits for the purification of genomic DNA, viral total nucleic acid (DNA and
RNA) or total RNA are currently available from Roche Diagnostics. The instrument software
already contains operating protocols that can be used with
Nucleic Acid Isolation Kits. Purification protocols for the MagNA Pure Compact RNA
Isolation Kit are available for download from http://www.roche-applied-science.com/sis/
magnapure/magna_compact_protocols.htm. Please contact your local Roche representative or visit www.magnapure.com for the latest information on additional purification
kits and protocols. See section 4.2 for details on how to install new purification protocols
into the MagNA Pure Compact software.
Each purification kit includes the reagents and disposables needed for a standard
purification run. If you need additional tubes, e.g. for an internal control or maintenance
activities (leakage test), you must order them from Sarstedt. (See the Appendix for
detailed ordering information.)
Genomic DNA from mammalian whole blood, plasma
and culture cells. Total nucleic acids from mammalian
plasma and whole blood.
Genomic DNA from mammalian whole blood,
plasma and culture cells. Total nucleic acids from
mammalian plasma and whole blood.
Total RNA from mammalian whole blood, blood cells,
cultured cells, and tissue.
the MagNA Pure Compact
Note: The actual amount of reagents and disposables may vary between the different
available MagNA Pure Compact purification kits.
Kit content:
䉴 Prefilled Reagent Cartridges (individually packed in a sealed foil pouch, with barcode)
䉴 Sample Tubes (35 tubes per package, 2.0 ml each, with stand, without barcode)
14
MagNA Pure Compact Operator’s Manual - Version 1.3
Page 51

Installation of the Instrument
Additional Required Items for Operation and Maintenance
Kit content:
䉴 Elution Tubes (35 tubes per package, 2.0 ml each, with stand, with barcode)
䉴 Caps for Elution Tubes (35 caps per caps)
䉴 Tip Trays (including Piercing Tool and tips). The tips are placed in the following order
into the Tip Tray: one Piercing Tool, one small tip, two large tips.
A
A
2.3.2 Maintenance Items
Cat. No. Purification Kit Contents
03 561 429 001 MagNA Pure LC O-Ring Maintenance Kit O-rings (12 x 8),
High Vacuum Grease (1)
03 753 166 001 MagNA Pure Compact Tip Tray Kit 10 Tip Trays
Note:
䉴 To ensure that they work correctly, you must grease the O-rings once per week (or
after every 20 purification runs). If the O-rings malfunction, the instrument nozzles
may leak. For details, please see the Maintenance section in Chapter C.
䉴 Perform a leakage test every two months (or after every 50 purifi cation runs) to deter-
mine whether the O-rings should be changed. For details please see the Maintenance
section in Chapter C.
There is an O-Ring Exchange Tool available, which simplifies the O-ring changing process. Please contact your local Roche Diagnostics representative if you need O-rings
changed or want one of these tools.
General Overview
15
Page 52

A
A
Installation of the Instrument
Setup
2.4 Setup
2.4.1 Selecting a Location
The MagNA Pure Compact Instrument requires very little setup. Choose for the MagNA
Pure Compact Instrument a clean, dry, level, stable surface within 3 m of a compatible
electrical outlet. To ensure proper ve ntilation, lea ve 10 cm of space behind the in strument
and 15 cm at each side of the instrument. No space is needed at the back of the instrument.
Protect the MagNA Pure Compact Instrument from heat and excessive sunlight and
always ventilate the r oom well. The instrument is for „indoor use only“ and should not be
operated in areas of excessive humidity or extremes of temperature. Do not use the
instrument where there is a risk of explosion.
2.4.2 Easy Teaching Procedure
The software has been preinstalled by the manufacturer. The installer (service user) must
perform an adjustment procedure, called Easy Teaching, before the instrument can be
used. Only a service operator, not a regular operator, can access the menu for the Easy
Teaching procedure. This is done by your local Roche Diagnostics representative.
Note: The Easy Teaching Procedure must be performed before the instrument will work
correctly. If the adjustment is not done pr operly, either the instrument could be damaged
or the instrument performance could be affected (e.g. pipetting accuracy, y ield in nucleic
acids, etc.).
16
MagNA Pure Compact Operator’s Manual - Version 1.3
Page 53

Installation of the Instrument
Setup
2.4.3 Software Setup
Either a service operator or a regular operator can access the menu for software setup.
This menu enables the operator to
䉴 set the time and date
䉴 preset the location (folder) where all generated data will be sav ed
䉴 enter a laboratory name
䉴 choose the types (and loudness) of alarm sounds the instrument will generate
䉴 manage the list of operators that have access to the instrument
䉴 specify the types of sample materials to be handled with the instrument
Note: The type of sample material used for a purification run can be selected later on
during Sample Ordering 2 (see chapter B for details). It is used for documentation purposes only and does not influence the purification protocol.
Action Software Screen
Turn on the MagNA Pure Compact Instrument by pressing the Power On button
1
on the front of the instrument.
During initialisation/self test of the system components the start-up screen
2
appears.
The MAIN MENU Screen appears
3
A
A
Touch the SETUP Button on the touch-screen
4
The SETUP Screen appears
5
Note: Touch the Back button
(at the lower right corner of the
SETUP Screen) to return to the
MAIN MENU Screen.
Touch the SETTINGS Button
6
The SETTINGS Screen appears.
7
Note: Touch the Back button (at the lower right corner of the SETTINGS Screen)
to return to the SETUP Screen without changing any of the current settings.
General Overview
17
Page 54

A
A
Installation of the Instrument
Setup
Action Software Screen
8
8a
Basic Settings
Program the actual time and date by pressing the buttons next to the time
and date displays. A pop up window opens to allow you to set the correct values.
Touch the Up and Down buttons (to the right of each number) to change the
values for hours and minutes (see figure). The Up button increases values
by one unit, the Down button decreases values by one unit. Touch the OK button
to confirm the changes and return to the SETTINGS Screen. Touch the Cancel
button to return to the Settings Screen without changing any settings.
Note: The hour setting uses a 24-hour clock, where 11:00 PM is hour 23, and
midnight is hour 0. The hour and minute values can be set independently; that is,
you can change from minute 59 to minute 0 (or vice versa) without causing the
hour setting to change.
8b
8c
Touch the Up and Down buttons (to the right of each number) to change the
values for year, month and day (see figure). The Up button increases values;
the Down button decreases values. Touch the OK button to confirm the changes
and return to the SETTINGS Screen. Touch the Cancel button to return to the
SETTINGS Screen without changing any settings.
Note: These values can be set independently . You can change from December to
January (or vice versa), without causing the year to change. Y ou can change from
day 30 (or 31) to day 1 (or vice versa) without causing the month to change.
To specify the default folder where all generated data will be saved, touch the
Folder field, then use the pop-up virtual keyboard to type the name of the folder
into the field .
18
MagNA Pure Compact Operator’s Manual - Version 1.3
Page 55

Action Software Screen
8d
To specify the default laboratory name that will be mentioned with all generated
data, touch the Laboratory Name field, then use the pop-up virtual keyboard to
type the laboratory name into the field.
Installation of the Instrument
Setup
8e
10
Alarm Settings
To specify the types of alarm that the instrument software should give, as well as
the loudness of each alarm, touch appropriate buttons on the "Acoustic Signals“
panel.
Note: You can choose to sound an alarm each time an error message is displayed
(Error), each time a button has been touched on the virtual keyboard (Keyboard),
and each time the purification run has ended (End of the run). If you don’t want
one of these alarms, just select for that particular alarm. For each alarm you
want, choose whether the alarm sound should be given at low, medium or high
volume.
Select Back to return to the Settings Menu without modification.
9
Select the Operator List button from the Setup menu.
A
A
General Overview
To enter a new operator type a new name into the entry field below the Operator
List and select the Add button.
Note: Only an administrator can define a new user. The administrator is asked for
his admin password when this button is used. If no administrator should be
defined, set the first time the Return key.
19
Page 56

A
A
Installation of the Instrument
Setup
Action Software Screen
11
Select the Material List button from the Setup menu.
To enter a new type of sample material type a new name into the entry field below
the material list.
12
Select the Add button to add the new name to the Material List.
The MagNA Pure Compact Instrument is now ready for use.
20
MagNA Pure Compact Operator’s Manual - Version 1.3
Page 57

Description of the Instrument
General Description
3 Description of the Instrument
3.1 General Description
The MagNA Pure Compact Instrument is a robotic workstation that can automatically
isolate nucleic acids from crude sample material. It is a compact benchtop instrument
with an integral touch-screen computer. The central processing unit of the instrument is
a robotic arm with an 8-nozzle pipette head. This pipette head can process 1–8 samples
per run. In addition, this pipette head has a specialized sensor unit, which can detect clots
in sample material and loss of reaction tips.
3.2 Function Principle
When it is purifying DNA, the basic operations of the instrument are:
A
A
General Overview
For details on the purification kits (provided in prefilled cartridges) please refer to their
pack inserts. All kit pack inserts can be obtained at the Roche home page: http://
www.roche-applied-science.com
21
Page 58

A
A
Description of the Instrument
Description of the Instrument
3.3 Description of the Instrument
3.3.1 Front View of the Instrument
1 Housing
Painted sheet metal housing contains the main body of the instrument and protects it
from electromagnetic influences, chemicals, and UV-light.
2 Front Door
The nozzle head can only be moved after the instrument door is closed and locked. This
door lock is controlled by the software. This prevents anyone from reaching inside the
instrument during the purification, which might lead to injuries.
The door permits a good view of the interior of the instrument. During the decontamination cycle, the door prevents escape of UV light from the interior. It also protects
reagents, disposable plastics and samples from environmental contamination.
The front door has to be opened to get access to the liquid waste tank and drip tray.
22
MagNA Pure Compact Operator’s Manual - Version 1.3
Page 59

Description of the Instrument
Description of the Instrument
3 Nozzle Head
The nozzle head moves over the processing stage up and down (vertically along the zaxis). It carries the pipetting unit, the sensor unit and the magnet unit. The pipetting unit
consists of 8 independent working air-filled plungers, each connected to a nozzle (1)
which takes up the Reaction Tip. The Reaction Tip (3) is held by the O-ring (2) on the
nozzle. A specially designed sensor unit checks all 8 channels indiviually for clots in the
sample material, correct position of the reagent cartridge and piercing tool, loss of reaction
tips, as well as for the presence of sample tube and internal co ntrol tube (if appropriate).
A
A
4 Processing Stage
The processing stage holds the cartridge rack with the reagent cartridges, the tip trays, the
tube rack with elution tube rack, the heating units and the waste tank. It moves back and
forth (horizontally along the y-axis), thereby moving the cartridge rack with the prefilled
reagent cartridges into position so they can be processed. It contains a loading mechanics
that lifts the cartridge rack to the top position for easy insertion and removal of the cartridge rack or the cartridges. The equipped cartr idge ra ck is then manually pushed down
to the low position of the loading mechanics inserting the respective cartridge wells into
the heating unit.
5 Touch-screen
From the touch-screen, you can operate all instrument features. E.g., you can program a
run, install a new protocol, maintain the instrument or search for accumulated data. You
can activate the functions on the touch-screen either with your fingertips or with a PDM
pencil.
General Overview
23
Page 60

A
A
Description of the Instrument
Description of the Instrument
6 Buttons for Setting Screen Contrast
By pressing the + and – buttons, you can set the brightness of the touch screen.
7 Status Indicator LEDs and Power On Button
The instrument is turned on pressing the "power on" button.
Three LEDs indicate the current status of the instrument:
䉴 The green LED of the "power on" button indicates that the instrument is powered on
䉴 the red "processing" LED indicates the status of processing
䉴 the yellow "run c ompleted" LED signalizes that the run is completed.
8 Disk Drive
The disk drive allows the operator to st ore the data generated as well as transfer it easily to
other instruments or computers, e.g for sample tracking, documentation or troubleshooting. In addition, new MagNA Pure Compact Purification protocols can be
uploaded from commercially available disks.
9 Barcode Scanner
The barcode scanner enables the use of barcodes to track samples through the entire
purification process as well as prior (sample preparation) and subsequent steps (e.g.
PCR, storage of the eluate). Moreover, when you scan the cartridge barcode, the touchscreen will display the name of the correct MagNA Pure Compact Purification Kit and
the instrument will automatically load the appropriat e purificatio n protocol.
24
MagNA Pure Compact Operator’s Manual - Version 1.3
Page 61

3.3.2 Detailed view
Description of the Instrument
Description of the Instrument
A
A
1 Nozzle Head
The nozzle head performs all pipetting steps. Its 8 nozzles can hold up to 8 reaction tips
per time. It also contains the tip-loss & clot-detection system (pressure sensor).
2 Magnet Unit
The magnet unit contains permanent magnets and can move forward and backward
from the rear of the chamber. For separation of magnetic beads from the buffers, the
magnetic plate moves closer to the reaction tips, thereby immobilizing the magnetic
beads on the inner surfaces of the reaction tips. The distance between magnet and reaction tips is controlled by the software. The magnet unit also holds the drop catcher .
General Overview
25
Page 62

A
A
Description of the Instrument
Description of the Instrument
3 Heating Block
The heating block has two independantly working units for two dedicated wells (for the
lysis and elution step) per one reagent cartridge. These wells are separated from each
other and from the wells with ambient temperature by a little distance.
4 Tip Rack
The tip rack holds up to 8 Tip Trays, each carrying 2 large tips, 1 small tip, and a disposable piercing tool, which pierces the aluminum foil on every cartridge well before purification starts. After it uses them, the instrument places the tips back into their original
positions on the tip tray for easy disposal.
5 Front Door
The front door can be opened for maintenance purposes or to remove the trays, the liquid waste tank, or the drip tray. It is opened by moving the lever at the right door side to
the left.
26
Instrument parts 6-11 are accessories and are described in detail under section 3.3.5
MagNA Pure Compact Accessories.
6 Drop Catcher
7 Cartridge Rack
8 Tube Rack
9 Elution Tube Rack
10 Waste Tank
11 Drip Tray
MagNA Pure Compact Operator’s Manual - Version 1.3
Page 63

Description of the Instrument
Description of the Instrument
3.3.3 Back View of the Instrument Description of Instrument Backmber Instrument Part Description
A
A
1 Exhaust fans with HEPA filter
The housing is cooled by air. The instrument has air inlets with dust filters on both sides
of the instrument. An exhaust fan expels this air from the back of the instrument through
a HEPA (glass fiber) filter.
Note: This HEPA filter retains some aerosols. However, the MagNA Pure Compact
Instrument is not guaranteed to be fully air-tight. Although the total air flow from the
platform goes through the HEPA filter , air does flo w unde r the platform as well as ov e r it.
Thus, there is a possibility that some of the air surrounding the platform will escape from
the instrument without HEPA filtration.
General Overview
27
Page 64

A
A
Description of the Instrument
Description of the Instrument
3.3.4 Sides of the Instrument
Description of Right Side of Instrument
1 Air Inlet
Air inlet for electronic compartment, with dust filter.
2 Air Outlet
Air outlet for electronic compartment.
3 Main Switch
Use the Main Switch t o turn the instrument on and off, e.g. in case of an emergency or if
the instrument is not in use for longer time periods. In routine daily use the instrument
should be turned off via the software button on the touch-screen as described in chapter B.
28
MagNA Pure Compact Operator’s Manual - Version 1.3
Page 65

Description of the Instrument
Description of the Instrument
4 Socket for power cable
This is the plug-in for the power cable. There are two power cables included in the
instrument package, one for US and one for German wall outlets.
5 Fuse
Next to the power inlet is a socket for the 2 main fuses. In case the fuses need to be
replaced, make sure to first unplug the instrument from electrical power. A set of spare
fuses is enclosed with the instrument.
6 Barcode Scanner port
The PS/2 port marked „Barcode Scanner“ is to be used for the barcode scanner.
7 Parallel Port
The parallel port is intended to be used for the connection with a local printer.
8 Serial Port (RS232)
The serial port might be used for additional external devices for LIMS.
9 USB Ports
There are two USB ports, USB 1 and USB 2 port, can be used for any accessories that are
not included with the MagNA Pure Compact Instrument.
Description of Left Side of Instrument
A
A
General Overview
1 Air Inlet
Air Inlet for the processing area with dust filter. Dust filters keep dust particles away fr om
the inside of the instrument. Air is expelled by a fan through the HEPA filter on the backside of the instrument.
29
Page 66

A
A
Description of the Instrument
Description of the Instrument
3.3.5 MagNA Pure Compact Accessories
All MagNA Pure Compact Accessories described below can be ordered separately. For
ordering information see chapter C, Orderi ng Guide.
1 Cartridge Rack
The cartridge stage holds the cartridge rack, where the individual prefilled reagent/processing cartridges (up to 8 per purification run) are inserted. The Cartridge Rack can be
equipped in and outside of the instrument.
2 Tube Rack
In row 1, the Tube Rack holds up to 8 sample tubes (capacity 2.0 ml), which are provided
with the purification kits. If you are running an Internal Control, you can purchase up to
8 additional sample tubes (capacity 2.0 or 1.5 ml) from Sarstedt and place them in row 2
(the Internal Control T ube Rack). (For details see the Related Products section in Chapter
C). In row 3, primary sample tubes (not provided) may be placed prior to starting the
purification process. To discriminate it from row 1 and 2 the positions of row 3 have a
wider diameter.
The rack has numbered positions (1-8) and can stand upright on e.g. a bench. The tubes
can be screwed down with one hand, as they are secured against turning by a mechanical
anti-twist device.
30
Note: To ensure correct pipetting, use only these recommended types of tubes for the
Internal Control: 2.0 ml Sarstedt Tubes (without cap: Sarstedt #72.608; with cap: Sarstedt
#72.693).
MagNA Pure Compact Operator’s Manual - Version 1.3
Page 67

Description of the Instrument
Description of the Instrument
3 Elution Tube Rack
The Tube Rack also contains a separate rack for elution tubes. The Elution Tube Rack will
sit on the tube rack, after both have been equipped. The two holes of the Elution Tube
Rack match with the two pins of the tube rack. After assembly the elution tube rack hides
the row for primary sample tubes. The elution tube rack holds up to 8 tubes (capacity 2.0
ml), each labelled with an individual barcode. These tubes are provided with the reagent
kits. The rack has numbered positions (1-8) and can stand upright on e.g. a bench.
A
A
4 Drip Tray
The Drip Tray keeps any accidentally spilled liquid away from the interior of the instrument housing, especially from the electrical components of the instrument which are
located below the Processing Stage. It can be removed for cleaning. (For details see the
Maintenance section in chapter C.) See chapter C for details on cleaning the drip tray.
General Overview
31
Page 68

A
A
Description of the Instrument
Description of the Instrument
5 Waste Tank
The instrument contains an integral waste tank, where liquid waste accumulates during
each purification run. It can hold all the liquid waste from one purification run.
Note: To avoid contamination, always remember to empty the waste tank after every
purification run. The tank is located beneath the tube racks, which must be removed
before you can reach the tank. The waste tank sensor will determine whether the tank is
inserted correctly or not. See chapter C for details on emptying the liquid waste tank.
6 Drop catcher
The drop catcher is carried by the upper side of the magnet unit and is placed directly
below the nozzle head each time it moves anywhere except from one well to the next. If a
drop should leave the pipet, it is caught by the drop catcher.
The drop catcher can be removed from its place for cleaning purposes. See chapter C for
details on possible causes and how to avoid.
7 Barcode Scanner
32
The barcode scanner is intended for protocol selection (automatically when the kit cartridge is scanned) and positive sample tracking.
MagNA Pure Compact Operator’s Manual - Version 1.3
Page 69

Scanner Specifications
Description of the Instrument
Description of the Instrument
Power Supply
Consumption
Max. Resolution
Scan Rate
Min. Print Contrast Ratio
Reading Angle
Reading Indicators
Readable Barcodes
Enhanced Features
Weight
Case Material
Cable Length
5 VDC ±5%
250 mA operating, 330 mA max.; 250 µA sleep mode
0.076 mm (3 mils)
270 scans/sec.
15%
Skew: ±80°, Pitch: 65°, Tilt ±35° (EAN13, M=0.8,
PCS=0.9)
Good Read LED, „green spot“ on the code, adjustable
tone „beeper“
2/5 family, Code 39 (plus Code 32, Cip 39), EAN/UPC,
EAN 128, Code 128, Code 93, CODABAR, TELEPE N,
PLESSEY, Code 49, Code MSI, Code Delta IBM, Code 11,
CODABLOCK, and Code 16K, PDF 417
Puzzle SolverTM, data editing and data concatenation
(approx.) 200 g
ABS and Polycarbonate
2 m (6.1 ft.) linear or coiled
A
A
Ambient Light Conditions
MTBF
Operating Temperatures
Storage Temperature
Humidity
Drop Resistance
ESD Protection
Environmental Protection
Up to 100.000 lux
>240,000 hours (MIL-HDBK-217F ground benign)
0 to 55 °C
-20 to 70 °C
90% non-condensing
IEC 68-2-32 Test ED; withstands repeated drops from
1.8 m onto a concrete surface
16 kV
IP30
General Overview
33
Page 70

A
A
Description of the Instrument
Description of the Instrument
3.3.6 Position and Meaning of Warning Labels
No. Symbol Location Meaning
Heating Block The hea ting block reaches temperaturs of 100°C. Do not touch the
1
Housing Biological hazardous material is processed inside the instrument.
2
Warning Read the Operator's Manual before using the instrument.
3
block during and directly after purification. If you touch the block,
it may burn you.
34
MagNA Pure Compact Operator’s Manual - Version 1.3
Page 71

How to Operate the
MagNA Pure Compact Instrument
Page 72

B
B
36
MagNA Pure Compact Operator’s Manual - Version 1.3
Page 73

Handling the MagNA Pure Compact Software
Starting the MagNA Pure Compact Instrument
How to Operate the MagNA Pure Compact Instrument
1. Handling the MagNA Pure Compact Software
Once the MagNA Pure Compact Instrument is turned on, the integral computer controls
all instrument operations. The instrument is operated by the touch-screen and the barcode scanner only. The menus on the instrument touch-screen will guide you through
instrument set up and operation.
Note: If you need additional information about a particular function, touch the Informa-
tion button to see a more complete description of the function.
B
B
1.1 Starting the MagNA Pure Compact Instrument
To start the MagNA Pure Compact Instrument,
push the Power On button on the front of the
instrument
Note: The Power On button is only used for start-
ing the instrument. To shut down the instrument,
always use the Exit button on the computer touchscreen. (See below for location of this button.)
On start up, the program displays a START UP
Screen while it loads the program and runs a start
up self-test. The startup usually takes about oneminute.
How to Operate the MagNA Pure Compact Instrument
37
Page 74

B
B
Handling the MagNA Pure Compact Software
Starting the MagNA Pure Compact Instrument
Table 1 below shows the systems examined during the self-test. If any test is not passed,
the screen will display an error message. (For an overview of error messages, please see
chapter C.)
Function Test
Instrument communication Check for correct communication between hardware and
software.
Door sensor Function te st of sensor for locked front door.
Magnetic sensor ON/OFF status must correspond to its position
Home sensor Function test of sensor for robotic arm in home position.
Waste tank sensor Check for presence of waste tank.
Housing fan sensor Check for presence of housing fan.
Table 1: Overview of self-test
Note: If the self-test is not passed and the remedy as described in the section about errors
and troubleshooting does not help, please contact your local Roche representative.
Note: Besides the start up self-test, the instrument
will automatically perform a self-test after a certain
period of instrument inactivity. You must confirm
execution of this self-test on a message window.
38
MagNA Pure Compact Operator’s Manual - Version 1.3
Page 75

Handling the MagNA Pure Compact Software
Overview on Main Menu Screen
1.2 Overview of Main Menu Screen
After the self-test is complete, the MAIN MENU screen appears (figure 1). From this
menu, you can easily access all the software submenus by touching the appropriate
buttons.
B
B
Figure 1: Parts of the Main Menu Screen
1. Title of current menu/submenu
The left portion of the title bar lists the name of the menu or submenu currently
displayed on the screen. Table 4 on page 41 shows an overview over menu and submenu
structures.
2. Global Action Buttons
Touching one of the global action buttons will activate/execute the corresponding function. Table 2 at the end of this section gives an overview of the function buttons.
Note: If a function button appears in the background (i.e., is displayed in the background
color), it cannot be activated at this time.
3. Display field for error codes/information
A short error code is displayed here, if an error occurs. For an overview about instrument
errors, please see chapter 4.2 Instrument Error Codes. An information window with a
long information message pops up, if the appropriate global action button is activated.
4. Button for Instrument Shutdown
Solely shut down the instrument by touching this button.
5. Buttons for Submenus
You can access any submenu by touching one of the submenu buttons on the MAIN
MENU screen. Table 4 at the end of this section describes the functions of the main menu
and submenus. An overview of the maintenance submenu is given in chapter C, sections
1 and 2.
6. Status Indicator
The right portion of the Title Bar shows the current status of the instrument. For a list of
possible statuses, see table 3 at the end of this section.
How to Operate the MagNA Pure Compact Instrument
39
Page 76

B
B
Handling the MagNA Pure Compact Software
Overview on Main Menu Screen
Symbol Name Function
Keyboard Brings up a virtual keyboard. Only active when a text box that allows typed entries is high-
lighted.
Regular set of symbols (mostly lower case) for virtual
keyboard (shift off):
Alternate set of symbols (mostly upper case) for virtual
keyboard (shift on):
Print Prints current screen information, if a printer is connected locally.
Save Saves current screen information to the folder defined in the Setup submenu.
Home Returns to main screen. Inactive during processes that cannot be interrupted (e.g.: purifi-
cation runs)
Information Errors, warnings and additional informations are
displayed in the display for error codes/information.
To obtain more detailed information about the current
software function or about the error history, select the
information button; a pop-up window will open.
According to the type of message displayed, the Information button changes its color:
Red Error Urgent information, act immediately.
40
Yellow Warning Information needs attention soon.
Green Information Supplementary information, instrument is running OK.
Exit Exits the software program and switches the instrument
off. When you touch this button, a dialog box will appear
to ask you to confirm the Shut Down command,
Table 2: Global action buttons
MagNA Pure Compact Operator’s Manual - Version 1.3
Page 77

Handling the MagNA Pure Compact Software
Overview on Main Menu Screen
State Description, instrument action
Ready Self-tests OK, instrument is ready for operation, maintenance,
or service functions.
Error Instrument is shut down by fatal error or awaiting user intervention
after error
Running Protocol is beeing processed
Run completed Run is completed, result screen is displayed.
Leaky If the last leakage test has not been successful (state remains until
next O-ring change or next successful leakage test). Performing a
purification run is not possible.
Table 3: Overview of Instrument Statuses
B
B
Submenu Function Described in Detailed Actions
Run Performing a purification run Chapter B Perform the sequence of steps on
the Sample Ordering Screens:
䉴 Operator Authorization
䉴 Sample Ordering 1
䉴 Sample Ordering 2
䉴 Sample Ordering 3
䉴 Sample Ordering 4 [available with IC]
䉴 Sample Ordering 5
䉴 Confirmation
Setup Setting basic information Chapter A Setting:
䉴 Time and Date
䉴 Operator administration
䉴 Laboratory name
䉴 Folder where results are saved
䉴 Sample material
Documentation Organizing
documentation
Maintenance Performing instrument
maintenance
Chapter B Documentation via:
䉴 Printouts
䉴 Saved result files
Chapter C Maintaining:
䉴 Leakage Test
䉴 Counter and Reminder
䉴 Error Log
䉴 O-ring Exchange
䉴 Liquid Waste Discard
䉴 UV Decon tamination
Service Performing specialized service
functions
Table 4: Overview of menu and submenu structure
How to Operate the MagNA Pure Compact Instrument
Not described in this
Operator’s Manual.
Used by Roche service operators only
41
Page 78

Handling the MagNA Pure Compact Software
General Workflow for Preparation of a Purification Run
1.3 Flow Diagram for Preparation of a Purification Run:
B
B
Workflow
Scan cartridge barcode
and insert cartridge
Selecting purification
protocol
Insert tip trays
Insert sample
[Insert tubes for
internal control]
Insert elution tubes
Run the purification
protocol
Use elution tubes for
downstream application
Liquid waste handling
Remove disposables
Clean
Instrument ready
for next isolation
42
MagNA Pure Compact Operator’s Manual - Version 1.3
Page 79

Performing a Purification Run
2. Performing a Purification Run
Do not use the equipment in a manner not specified by the manufacturer (see pages 11-
12). Otherwise, the protection provided by the equipment might be impaired.
For kit specific details regarding the handling of Reagent Cartridges, please see the
corresponding pack insert of the kit.
Warnings and Precautions when handling the Reagent Cartridges:
䉴 Wear pr otective disposable gloves, laboratory coats and eye protection when handling
samples and kit reagents, and follow usual safety precautions during handling. Avoid
contact of the reagents from the kit with skin, eyes, or mucous membranes. If contact
does occur, immediately wash with large amounts of water. Burns can occur if left
untreated. If reagents are spilled, dilute with water before wiping dry.
䉴 Handle each Reagent Cartridge prior to use as follows:
䊉 Always adapt the Reagent Cartridge to room temperature (30 min). If you use the
reagents at temperatures outside the recommended range, the kit may not work
well.
䊉 Check the cartridge sealing foil for any possible damage and the cartridge for
correct filling. Do not use a cartridge that does not appear as specified.
䊉 Always wear gloves when handling the MagNA Pure Compact reagent cartridge.
䊉 Hold the cartridge at the barcode imprinted area and the opposite side only.
䊉 Avoid touching the sealing foil covering the cartridge wells.
䊉 Avoid touching the two single open wells and do not use them as handles.
䊉 Mix the content of the cartridge wells by turning the whole cartridge upside down
several times.
䊉 Avoid any foam formation.
䊉 Let the fluid within the cartr idge wells settle again completely. If fluid or magnetic
glass particles remain under the sealing foil, knock the cartridge bottom gently on a
flat lab bench surface. Note: Small drops may remain at the sealing foil (up to 30 µl).
䉴 Wash hands thoroughly after handling samples and test reagents.
䉴 Do not eat, drink, or smoke in the laboratory work area and do not pipet by mouth.
䉴 Some buffers c on tain th e hazardous compounds guanidine thiocyanate and guanidine
hydrochloride. Do not allow reagents containing guanidine thiocyanate to contact
sodium hypochlorite (bleach) solution or acids. These mixtures produce a highly toxic
gas.
䉴 All mammalian (especially human) material and all resulting waste is potentially
infectious. Thoroughly clean and disinfect all work surfaces with disinfectants recommended by the local authorities.
䉴 Dispose of unused reagents and waste in accordance with country, federal, state, and
local regulations.
䉴 Material Safety Data Sheets (MSDS) are available upon request from the local Roche
office.
䉴 Use sterile, disposable, nuclease-free pipette tips to avoid microbial and nuclease con-
tamination.
䉴 Do not use sharp or pointed objects near the reagent cartridge in order to prevent
damage of the sealing foil and loss of reagent.
䉴 Do not use a kit after its expiration date.
B
B
How to Operate the MagNA Pure Compact Instrument
43
Page 80

Performing a Purification Run
Warnings and Precautions when handling the Tip Trays:
䉴 Check that piercing tool and reaction tips are placed correctly in the Tip Tr ays before
use.
䉴 Handle Tip Trays with care to prevent tips or piercing tool from falling out of the tray.
Should this happen, discard the respective tip tray and tips. Use the Tip Tr ay Kit to
replace missing Tip Trays.
Note: To ensure that you have entered all essential information before starting the purifi-
cation run, the software screens will guide you through the steps for programming a
purification run. At each screen, you must enter values in all para meter fields that are
marked with a "*“ and press all confirmation buttons that are marked with a "?“ before
you can go to the next screen. All fields that are not marked with a "*“ are for documentation only; you do not have to fill these in. Nevertheless, we recommend that you enter
values in these fields, since this information may later help with troubleshooting.
B
B
Controls
Always run appropriate controls with the samples, especially if you want to perform
quantification analyses of the eluted DNA samples (e.g., by LightCycler® 2.0 System PCR
assays). In order to control the complete process starting from sample preparation to
quantification analysis, perform the following controls:
䉴 Positiv e Control, by using a sample material positive for your target.
䉴 Negative Control, by using a sample material negative for your target.
䉴 Internal Cont rol, by adding a defined amount of a control template (e.g., plasmid
DNA) to all samples to be purified or by analyzing an endogenous nucleic acid
sequence present in all your samples.
For the MagNA Pure Compact Nucleic Acid Isolation Kit and MagNA Pure
Compact Nucleic Acid Isolation Kit - Large Volume:
The Internal Control (IC) is added prior to the purification step, then co-purified, and
amplified with your target of interest from the specimen in the same PCR reaction. The
IC concept is especially useful for enzyme-based amplification processes such as PCR,
because inhibitors present in th e puri fied sample materi al mig ht reduce eff iciency of the
PCR process. In addition, the Interna l Control is used to compensate for possible losses
of your target during purification.
For LightCycler® 2.0 System quantification assays use a synthetic double-stranded DNA
molecule with primer-binding sites identical to those of your target sequence, but having
a unique probe-binding region that differentiates the IC from the target-specific amplicon. Discriminate the signals derived from your target and the IC by performing a dualcolor HybProbe assay. For detailed information regarding the IC concept in combination
with the LightCycler® 2.0 System, read LightCycler® Technical Note 12/2000 “Absolute
Quantification with External Standards and an Internal Control” available at http://
www.lightcycler-online.com.
44
MagNA Pure Compact Operator’s Manual - Version 1.3
Page 81

Performing a Purification Run
For the MagNA Pure Compact RNA Isolation Kit:
The selection of an appropriate endogenous IC is of high importance when developing a
quantitative R T-PCR assay. The IC is co-amplified with the target of int er est and serves as
a control for several factors: differences in initial template concentrations between different samples, sample-to-sample variations in the PCR, presence of PCR inhibitors or the
extent of any RNA degradation. The advantage of using an endogenous IC is that both
internal control mRNA and target mRNA is extracted from cells or tissue and reverse
transcribed together. Commonly used endogenous ICs include so-called housekeeping
gene mRNAs. (Note that Roche Applied Science offers several LightCycler® Housekeeping Gene Sets for the detection of human housekeeping genes, incl. G6PDH, HPRT,
ALAS, and
should not vary with the experimental conditions or treatments to be compared.
2-microglobulin.) The level of expression of an appropriate endogenous IC
B
B
How to Operate the MagNA Pure Compact Instrument
45
Page 82

Performing a Purification Run
Purification
2.1 Purification
Action Handling Software programming
1
Performing a Purification Run
Purification
Please select the Run button from the Main
Menu Screen to get to the following screen.
B
B
B
2
The OPERATOR AUTHORIZATION Screen
appears. While at this screen, do the following:
a. Either accept the User name that appears in the
Operator field or select a different name from the
drop-down menu (accessed by touching the
Down button beside the field).
b. Enter the password
c. Cancel leeds back to the Main Menu.
d. Confirm your choices by touching the Next
button (which will be active only if the Operator
and Password fields are filled in and the password is correct).
Note: You cannot add new operator names
from this screen; these must be added from
the SETUP Screen (as described in chapter
A 3.4.3).
To change the password associated with a particular
operator name, touch the Change Password button. A
pop-up window will open to allow you to enter the
new password.
B
46
MagNA Pure Compact Operator’s Manual - Version 1.3
How to Operate the MagNA Pure Compact Instrument
47
Page 83

Performing a Purification Run
Purification
Action Handling Software programming
3
Performing a Purification Run
Purification
Open the front door of the MagNA Pure Compact Instrument and remove all the racks you will need for the run:
a. Cartridge Rack
Pull the handle towards you to lift the Processing Stage. Pull the stage towards the front of the instrument to
move the pin on the front of the stage to the top (wide part) of the keyhole in the Cartridge Rack. Now you can
remove the Cartridge Rack.
b. Tube Racks
Remove the Tube Rack (which also holds the Elution Tube Rack) and place it on the laboratory bench, so you
can easily insert the samples and (if appropriate) the internal controls according to the instructions that will
appear on the touch-screen.
B
B
4
SAMPLE ORDERING SCREEN 1 appears. While at
this screen, do either of the following:
䉴 Use the barcode scanner to scan the barcode of
the first prefilled Reagent Cartridge.
Note: In case you experience difficulties in scan-
ning the barcode:
• try to scan holding the barcode scanner in
different angles
• wipe the barcode surface carefully before
scanning
Result:
䉴 The instrument will display the name of the
appropriate purification kit.
䉴 On the overview diagram (upper left corner of
screen), cartridge position 1 (a) changes from the
background color to green (indicating position
1is "active“).
䉴 The scanned barcode (b) appears in the first text field (Cartridge ID 1).
Alternatively, you may use the virtual keyboard to
enter the barcode in the Cartridge ID field:
䉴 Touch the field to highlight it.
䉴 Type the Barcode number in the keyboard text
field.
䉴 Touch the Return key to transfer the number to
the Cartridge ID 1 field (on SAMPLE ORDERING
SCREEN 1).
B
B
48
MagNA Pure Compact Operator’s Manual - Version 1.3
How to Operate the MagNA Pure Compact Instrument
49
Page 84

Performing a Purification Run
Purification
Action Handling Software programming
5
Performing a Purification Run
Purification
For best results, grab the flap that is on the opposite end of the cartridge from the two isolated wells. Then, with the
two isolated wells pointing away from you, insert all the wells on the plastic cartridge into the holes in the cartridge
rack. Use the guide slots on the rack to help position the cartridge.
Note: Make sure the cartridge fits all the way into the rack. Do not simply lay the cartridge on top of the
rack, since, if it sticks up, it may move during the run and cause the instrument to malfunction.
B
B
B
B
6
7
If you are going to process more than one sample
during the current purification run:
Repeat the above cartridge identification and placement steps 4-5 for each prefilled cartridge until all
(up to 8) cartridges are recorded on screen and
inserted in the cartridge rack.
Result: On the overview diagram, the last added cartridge position will be green (a), and the previously
added positions will be dark blue (b). The name of
the appropriate purification kit will also be displayed
(c).
Note: It is not possible to enter barcodes of the same
type (catalogue number). Barcodes from identical or
expired cartridges are rejected.
When all cartridges have been programmed and
inserted into the cartridge rack, do the following:
䉴 Reinsert the Cartridge Rack into the MagNA Pure
Compact Instrument. To reinsert the Cartridge
Rack, fit the pin on the stage into the wide part of
the keyhole on the rack, then push the rack back,
which will also immobilize the pin in the narrow
part of the keyhole. Now you can lower the stage
by moving the handle away from you.
䉴 On SAMPLE ORDERING SCREEN 1, touch the
Cartridge Insertion confirmation button (a). After
you touch the confirmation button, the symbol on
the button changes from "?" to a checkmark.
䉴 The Next button (b) will now be active.
Touch this button to confirm the information on
this screen and go to the next programming
screen.
50
MagNA Pure Compact Operator’s Manual - Version 1.3
How to Operate the MagNA Pure Compact Instrument
51
Page 85

B
B
Performing a Purification Run
Purification
Action Handling Software programming
8
Performing a Purification Run
Purification
SAMPLE ORDERING SCREEN 2 appears. While at this screen, do the following:
䉴 In the Protocol field, either accept the protocol (from the last run) that appears in the field or select another puri-
fication protocol from the adjacent pull-down menu. (Touch the Down arrow to the right of the field to access
this menu.)
䉴 In the Sample Volume field, select a value from the adjacent pull-down menu.
䉴 In the Sampe Material field, select your sample
material from the adjacent pull-down menu.
䉴 In the Elution Volume field, select a volume from
the adjacent pull-down menu.
Note: For an overview about the possible
combinations of different sample and
elution volumes, please refer to the
respective pack insert of the purification kit.
Combining of non recommended volumes
may leed to suboptimal results (e.g.
processing performance, yield, etc.)
䉴 (optional) If you are using an internal control,
select a control volume from the pull-down menu
adjacent to the Internal Control Volume field:
You can choose between 5, 10, or 20 µl. Default
setting is None. Note, that some purification
protocols do not allow an optional internal
control.
.䉴 Insert the appropriate number of Tip Trays (one
per purification) in the instrument Tip Rack.
䉴 On SAMPLE ORDERING SCREEN 2, touch the
"Tip Trays inserted" confirmation button (1).
Result:
䉴 After you touch the "Tip Trays inserted" confirma-
tion button, the symbol on the button changes
from "?“ to a checkmark (2). Also, the reagent
layout diagram shows the tip trays inserted (in
dark blue).
䉴 The Next button will now be active. Touch
this button to confirm the information on this
screen and go to the next programming screen.
B
B
52
MagNA Pure Compact Operator’s Manual - Version 1.3
How to Operate the MagNA Pure Compact Instrument
53
Page 86

B
B
Performing a Purification Run
Purification
Action Handling Software programming
9
Do one of the following:
Performing a Purification Run
Purification
SAMPLE ORDERING SCREEN 3 appears. While at
this screen, do the following:
䉴 Pipet the correct type and amount of sample
material (as chosen on Sample Ordering Screen
2) into a sample tube (tube without barcode label,
from the reagent kit).
䉴 Identify the tube by attaching your own barcode
label or writing a number on the tube with a permanent marker.
䉴 Put the filled sample tube in position 1 on row 1
of the Tube Rack.
Note: It is recommended to use the
appropriate row in the tube rack for original
sample tubes, if suitable for these tubes
(e.g. max. 15 ml Falcon tubes).
䉴 On SAMPLE ORDERING SCREEN 3, touch Sample ID field 1. In that field, enter the ID of Sample 1 (i.e., the one
you just put in the rack) by either scanning the (self-attached) barcode or using the virtual keyboard to type the
ID number. (Touch the Keyboard button to access the keyboard.)
䉴 (optional) In the Comment field, you may enter
additional information about Sample 1. (Touch the
field to highlight it, then use the virtual keyboard.)
䉴 Repeat the above sample placement and
identification steps for each sample to be purified
(e.g., for Sample position 2, 3, …, 8).
Result: As you fill in the "Sample-ID" field for each
sample, the corresponding position in the reagent
layout will change from green (active) to dark blue
(installed in instrument).
B
B
If ... Then ...
You are not using internal
controls (i.e., you selected
a protocol with no internal
control on SAMPLE
ORDERING SCREEN 2)
(Action 8 above)
You are using internal
controls (i.e., you selected
a protocol with internal
control on SAMPLE
ORDERING SCREEN 2)
䉴 Insert the tube rack into the MagNA Pure
Compact Instrument.
䉴 Touch the "Samples inserted" confirmation
button (a).
䉴 The Next button (b) will now be active. Touch
this button to confirm the information on this
screen and go to the next programming
screen (SAMPLE ORDERING SCREEN 5).
䉴 Go to Action 11 below.
䉴 Touch the "Sample inserted" confirmation
button (a).
䉴 The Next button (b) will now be active. Touch
this button to confirm the information on this
screen and go to the next programming
screen (SAMPLE ORDERING SCREEN 4).
䉴 Go to Action 10 below.
54
MagNA Pure Compact Operator’s Manual - Version 1.3
How to Operate the MagNA Pure Compact Instrument
55
Page 87

B
B
Performing a Purification Run
Purification
Action Handling Software programming
10
11
Performing a Purification Run
Purification
SAMPLE ORDERING SCREEN 4 appears.
Note: This screen only appears and accepts informa-
tion about Internal Control Tubes if you selected a
protocol with internal controls on SAMPLE ORDERING SCREEN 2. (See Action 8 above). The program
will skip this screen if you selected a protocol with no
internal control.
Note: Pipette the lysed sample into the
Internal Control Tube before you place the
tube in the cartridge. It is essential for this
action to have an Internal Control Tube
inserted!
䉴 Pipet the proper amount of internal control (as
specified on Sample Ordering Screen 2) into one
of the Internal Control Tubes (not provided in kit;
for purchase information, see chapter C).
䉴 Identify the tube by attaching your own barcode label or writing an ID number on the tube with a permanent
marker.
䉴 Put the filled control tube in position 1 on row 2 of the Tube Rack.
䉴 On SAMPLE ORDERING SCREEN 4, touch IC Sample ID field 1. In that field, enter the ID of Control 1
(i.e., the one you just put in the rack) by either scanning the (self-attached) barcode or using the virtual
keyboard to type the ID number. (Touch the Keyboard button to access the keyboard.)
䉴 Repeat the above control placement and identification steps for each control used
(e.g., for Control position 2, 3, …, 8).
Result: As you fill in the "Internal Control ID" field for each control, the corresponding position in the reagent layout
will change from green (active) to dark blue (installed in instrument).
䉴 Insert the Tube Rack with sample and internal controls into the MagNA Pure Compact Instrument.
䉴 Touch the "IC Tubes inserted" confirmation button.
䉴 The Next button will now be active. Touch this button to confirm the information on this screen and go to
the next programming screen.
SAMPLE ORDERING SCREEN 5 appears. While at
this screen, do the following:
䉴 Put the appropriate number of Elution Tubes
(supplied in the purification kit, with barcode
labels) into the Elution Tube Rack.
Note: Elution Tubes will contain the final purified
nucleic acid after it is eluted from the magnetic beads
with elution buffer.
䉴 Either scan the barcode on each elution tube into
one Elution Tube ID field on SAMPLE ORDERING
SCREEN 5 or type the tube ID into the field
manually with the virtual keyboard.
For convenience you may insert all the
tubes in the rack, then scan all their barcodes into the ORDERING screen at the
same time (see picture). Alternatively, you
may scan the barcode from each tube first, then insert it into the rack.
Result: As you fill the Elution tube ID field for each elution tube, the corresponding position in the reagent layout will
change from green (active) to dark blue (installed in instrument).
䉴 Insert the filled Elution Tube Rack into the MagNA Pure Compact Instrument.
䉴 Touch the "Elution tubes inserted" confirmation button.
䉴 The Next button will now be active. Touch this button to confirm the information on this screen and go to
the next programming screen.
B
B
56
MagNA Pure Compact Operator’s Manual - Version 1.3
How to Operate the MagNA Pure Compact Instrument
57
Page 88

B
B
Performing a Purification Run
Purification
Action Handling Software programming
12
13
Performing a Purification Run
The CONFIRMATION Screen appears. While at this
screen, do the following:
䉴 Check the information display and:
- if the information is correct, confirm it by
touching the "Confirm Data" button, or
- if the information is not correct, touch the
Previous button as many times as
necessary to go back to one of the earlier screens
and change the erroneous information. Once the
information is correct, touch the Next button
(repeatedly) to return to the
CONFIRMATION screen, then touch the
"Confirm Data" button.
䉴 Make sure the Drop Catcher is present on the
Preparation Stage, then touch the "Drop Catcher
present" confirmation button.
䉴 Now the Start button will be active. Start the purification by touching this button.
The HEATING Screen will appear displaying the time
needed for heating of the heating units.
When heating is completed, the PROCESS Screen
will appear and remain throughout the entire
purification run.
䉴 As the run progresses, this screen will display the
actual step being performed and the time
remaining.
Note: If you need to interrupt the run before it is
complete, you can execute an emergency stop by
touching the Cancel button. (Before the instrument
actually stops the run, you will need to confirm the
request twice by replying to dialog boxes that
appear.)
䉴The instrument will sound an alarm when the run is
finished. (See Chapter A for information on setting
this alarm.).
Purification
B
B
58
MagNA Pure Compact Operator’s Manual - Version 1.3
How to Operate the MagNA Pure Compact Instrument
59
Page 89

B
B
Performing a Purification Run
Liquid Waste Discard
Action Handling Software programming
14
15
Performing a Purification Run
Liquid Waste Discard
After the purification run has ended, the RESULT
screen appears.
䉴 The RESULT screen shows the result of the
isolation process for each channel:
- The result will be PASS if the isolation run was
completed without any warning or error.
- The result will be FAIL if any interruption of the
process or error occurred during the run. For
each FAIL result, the result screen will show a
brief error or warning messages (in the scrollable
Result list or the Information text box) to help you
decide whether the error or warning can be
ignored.
Note: To investigate a potential error cause either
touch the Information button or use the Errorlog
function from the Maintenance menu.
䉴 To set up for the next run, you must empty liquid waste from the Drip Tray, then touch the Liquid Waste
confirmation button on the RESULT screen.
Note: See chapter C for details on discarding liquid waste.
You can print and/or save the result by touching the
appropriate function buttons (icons) at the bottom of
the RESULT Screen.
Note: If you touch the Save button, a pop-up window
will open to allow you to specify the export format
(plain text or XML) of the Result file. The export file is
saved to the Save Folder defined under basic software settings (see Chapter A, Software setup for
details). The file name is equal to the Run ID.
Take out the Elution Rack with the Elution Tubes for
further use.
Close the Elution Tubes with the screw caps provided.
Note: The tubes can be screwed down with one
hand, as they are secured against turning by a
mechanical anti-twist device.
B
B
60
16
MagNA Pure Compact Operator’s Manual - Version 1.3
Perform Liquid Waste Discard. Either discard all disposables containing liquid waste according to the relevant
country specific regulations. Or use the automated function, which is accessible
a. via the Liquid Waste Discard button displayed on the RESULT screen
b. via the Maintenance Menue as described on the following pages in chapter B. 2.2
How to Operate the MagNA Pure Compact Instrument
61
Page 90

B
B
Performing a Purification Run
Liquid Waste Discard
2.2 Liquid Waste Discard
Remove, empty and clean waste tank after each liquid waste discard.
Action Handling Software programming
1
Use the in-built liquid waste discard function of the
MagNA Pure Compact Instrument to collect the
reagents of one purification into the Waste Tank. Thereafter, you can discard the liquid waste following
relevant country-specific saftey rules. The instrument
will prompt the operator to empty the Waste Tank
after every purification run.
䉴 On the Main Menu Screen touch the Mainte-
nance button. The Maintenance screen appears.
䉴 Touch the Liquid Waste Discard button.
Result: The Waste Discard Confirmation screen
appears.
Performing a Purification Run
Liquid Waste Discard
B
B
2
3
䉴 Before performing the test, do the following in
the instrument:
- First, remove the Sample and Elution Tube
Racks.
- Make sure the Tip Trays are still inserted.
- Make sure the Waste Tank is empty (but still in
the instrument).
䉴 After you perform each of the actions in Step 2,
touch the appropriate button on the WASTE DISCARD CONFIRMATION Screen:
- Elution Rack removed confirmation button
- Tip Trays inserted confirmation button
- Waste Tank empty confirmation button
䉴 After you touch the three confirmation buttons,
the Start button will become active. Touch this
button to make the instrument start transferrring
liquid waste from the cartridges to the Waste
Ta nk .
62
MagNA Pure Compact Operator’s Manual - Version 1.3
How to Operate the MagNA Pure Compact Instrument
63
Page 91

Action Handling Software programming
4
After having touched the Start button,
䉴 the Nozzle Head will take up one tip from each
of the tip trays, aspirate the liquid from each
individual well in the cartridge, and ejects it into
the Waste Tank.
䉴 During the discard procedure, the screen will
display the time remaining in the procedure.
Note: You may interrupt the Liquid Waste Discard
procedure at any time by touching the Cancel button
B
B
5
䉴 After the Liquid Waste Discard procedure is com-
plete, the following message appears on the
screen:
Note: The MagNA Pure Compact
Instrument does not automatically check
the liquid level inside the waste tank.
Always ensure that there is enough volume
for uptake of liquid waste of one
purification run. If the Waste Tank is too full,
overflowing liquid will pour into the Drip
Tray. However, if the overflow is too great,
liquid waste will flow into into the
instrument housing and even onto the lab
bench. This will lead tp potential contamination and damage of the instrument.
Always empty the Waste Tank after each purification
run, when asked by the instrument’s software to do so, or the instrument might be severely damaged! Treat the
liquid waste as biohazardous material. Emtpy and clean waste tank as described in chapter C 3.1 Cleaning.
If the Waste Tank should overflow, it is essential to clean the instrument according to the local regulations.
䉴 Open the instrument's front door by moving the lever at the right door side to the left.
䉴 Remove the Waste Tank and empty.
䉴 After confirmation the Close button appears.
䉴 Touch the Close button to return to the MAIN MENU or MAINTENANCE Screen.
B
B
64
MagNA Pure Compact Operator’s Manual - Version 1.3
How to Operate the MagNA Pure Compact Instrument
65
Page 92

B
B
Internal Control
3. Use of Internal Controls
3.1 Function of Internal Control
If you are going to perform PCR on the purified nucleic acid and want to have an Internal
Control (IC) for that PCR, we recommend that you add the IC to the sample before you
purify it on the MagNA Pure Compact Instrument. Adding the IC at this stage allo ws you
not only to estimate the efficiency of the PCR, but also the efficiency of the purification.
Note: For your convenience, many of the LightCycler® reagent kits already contain such
an IC. (See the pack inserts of these reagent kits for details).
3.2 How to program the instrument for an internal control
The IC may be added to the run of the MagNA Pure Compact Instrument in either of two
ways:
Add the internal control directly to the sample:
1
When you program a run with an IC in the sample, do the following: On SAMPLE
ORDERIN G Screen 2, choose a protocol „without IC“ in the Protocol field and
specify „none“ in the Internal Control Volume field. In the Comment field, note
that IC was added directly to the sample.
Note: Do not use this method if the IC is naked DNA ( e.g. plasmid) or RNA,
because the control may be degraded by nucleases present in the sample.
Add the IC to one of the assigned IC positions in the Sample Tube Rack. Pipet the
2
IC (5, 10 or 20 µl) into a separate tube. (Use only the tubes specified in chapter C,
since only they meet the instrument specifications.) Place the control tube in the
IC row (row 2) of the Sample Tube Rack.
When you program the run with separate ICs, do the following: On SAMPLE
ORDERIN G Screen 2, choose the protocol „with IC“ in the Protocol field and specify the correct volume of IC in the Internal Control Volume field. The instrument
will automatically include the IC tubes in the purification process.
Note: The IC will be directly mixed with the Lyis Buffer at the beginning of the run
and will thus be protected from nucleases. Therefore, choose this method if your
control is naked DNA or RNA.
66
As soon as one of the samples within a purification run is using IC, an IC tube has to be
inserted in all channels that contain sample material (as indicated on the schematic on
the screen).
Note: If you program a run with an IC, but do not place any tubes in the IC positions of
the Sample Tube Rack, the instrument will pipet Lysis Buffer through the empty IC tube
postion directly onto the instrument stage. This spilled liquid may harm the operator as
well as the instrument. If this happens, you should immediately clean the instrument (as
described in chapter C) to prevent corrosion of the instrument stage. Always use gloves
when you touch the instrument or reagents, and observe the instructions on the Material
Safety Data Sheet that accompanies the reagents.
MagNA Pure Compact Operator’s Manual - Version 1.3
Page 93

Data Transfer from or to the MagNA Pure Compact Instrument
Data Transfer to other Instruments
4. Data Transfer to or from the MagNA Pure Compact Instrument
The data from the result screen can be saved to a disk. In future applications with the
LightCycler System and COBAS TaqMan 48 Analyzer these data files can be transferred to
the respective instruments.
4.1 Data Transfer to other Instruments
䉴 Data transfer to the LightCycler® System
You may create a text file of MagNA Pure Compact Run information and results that
may be used on the LightCycler® System.
Note: Details on the creation of this file are contained in a separate document.
䉴 Data transfer to COBAS TaqMan 48 Analyzer
You may create a text file of the purification run of the MagNA Pure Compact
Instrument containing information and results that may be used on the COBAS
TaqMan 48 Analyzer.
Note: Details on the creation of this file are contained in a separate document.
B
B
4.2 Upload of New or Updated Purification Protocols
As new or updated purification protocols are created, they may be added to the MagNA
Pure Compact Instrument via external data carrier disks (e.g. software update disk) during
program start up.
Additional protocols will be available for download from http://www. magnapure.com.
Follow the download instructions on this web site. Always save the downloaded protocol
files onto a newly formatted floppy disk.
Note:
䉴 Update disks will automatically be checked for viruses by the instrument software.
䉴 Each protocol file contains information on which reagent kits may be used with the
protocol. The instrument will use this information [kit name and kit number
(included as a barcode on kit cartridges)] to verify and decode the scanned cartridge
barcodes when you scan them into the SAMPLE ORDERING Screens. (See section B.2
for details.)
Workflow:
1. MagNA Pure Compact Instrument must be shut down.
2. Insert update disk.
3. Switch on instrument.
4. Software is automatically updated.
5. After Main Screen is displayed, remove update disk.
6. Update complete.
7. The instrument is ready for use.
How to Operate the MagNA Pure Compact Instrument
67
Page 94

B
B
68
MagNA Pure Compact Operator’s Manual - Version 1.3
Page 95

Maintenance and
Trouble Shooting
Page 96

C
C
70
MagNA Pure Compact Operator’s Manual - Version 1.3
Page 97

User Maintenance
Leakage Test
Maintenance and Trouble Shooting
1. User Maintenance
User Mainte nance c onsists besid e r egular cleaning mostly of a regular check of the Nozzle
Head function. Other regular activities for the operator are mentioned throughout this
manual. In order to check the proper function the following routine checks are recommended and explained in the course of this chapter.
Leakage Test: every 50 purification runs or every second month or if the
Nozzle Head seems to show leakage
O-ring maintenance: Greasing of O-rings: every 20 purification runs or once a week
Exchange of O-rings: If the Leakage Test indicates
It is recommended to start a ring-binder with the new instrument, where all operator
maintenance, cleaning and service engineer maintenance is documented. There should
be documented also regular checks of the system performance. If you need assistance in
creating such ring-binder, please contact your local Roche representative.
As well it is advisable to document there or in the MagNA Pure Software documentation
all operators and used reagent kit lot no.s in order to be able to perform an optimal trouble shooting, if needed.
1.1 Leakage Test
Purpose
The Leakage Test will detect any leakage of air into the reaction tips, which might eventually
lead to loss of liquid. If there is a leak, the most probable cause is deteriorated or damaged
O-rings (on the Nozzle Head).
Use
We recommend that you perform a Leakage Test after two months or after 50 purifications. You should also perform a Leakage Test any time you suspect that the pipet tips are
leaking.
Note: Although wear and tear-on the O-rings is related to the number of isolations per-
formed, it is also influenced by maintenance (e.g. if the O-rings are not greased often
enough) and environmental conditions (e.g. light, chemicals). Because of this, we recommend that you regularly test for leakage, even if the instrument is not used regularly.
C
C
Maintenance and Trouble Shooting
71
Page 98

User Maintenance
Leakage Test
After each Leakage Test, do one of the following:
C
C
If the Leakage Test shows
that the O-rings...
are leaking and need to be changed 䉴 change the O-rings (as described in Section
are O.K. do nothing now, but repeat the test after another two
Performing of the Leakage Test
Disposables needed:
Cat. No. Product Content
03 561 429 001 MagNA Pure LC O-Ring Maintenance Kit O-rings (12 x 8), Grease (1)
03 753 166 001 MagNA Pure Compact Tip Tray Kit 10 Tip Trays
Sarstedt Tubes as recommended in chapter C.5.1 Related Pro-
ducts
䉴 Launch the MagNA Pure Compact soft-
ware.
Then ...
C.1.2.2).
䉴 perform the Leakage Test again, to make sure the
new O-rings are working correctly.
months or 50 purification runs.
䉴 On the MAIN MENU Screen that
appears, touch the Maintenance button.
䉴 On the MAINTENANCE Screen that
appears, touch the Leakage Test button.
72
MagNA Pure Compact Operator’s Manual - Version 1.3
Page 99

䉴 Put 8 new Tip Tr ays (from the Roche Tip
Tray Kit) into the Tip Tray Rack.
䉴 Pipet 1 ml water into each of 8 Sarste dt
tubes, then insert the tubes into row 1
(Sample Tube row) of the Tube Rack.
䉴 Place 8 empty Sarstedt tubes into the Elu-
tion Tube Rack.
䉴 After doing each of the above steps, touch
the correct confirmation button on the
touch-screen:
• "Filled tubes in sample position" confirmation button
• "Empty tubes in elution position" confirmation button
• "Tip trays inserted" confirmation button
䉴 As you touch each confirmation button,
the "?" symbol on the button changes to a
checkmark.
User Maintenance
Leakage Test
䉴 After you touch the three buttons, the
Start Test button will become active.
Touch it to start the test.
As the instrument performs the Leakage Test
described below, the screen will display the
time remaining.
Note: To cancel the test at any time, touch
the Cancel button.
C
C
Maintenance and Trouble Shooting
73
Page 100

C
C
User Maintenance
Leakage Test
Instrument actions during the Leakage Test:
At the beginning of the test, the robotic arm picks up the tips and moves to the
1
Sample/Internal Control Tube Rack. The arm aspirates 1 ml of water plus an
additional 100 µl of air from the sample tubes.
The stage moves the empty Elution Tubes under the Nozzle Head.
2
The Nozzle Head moves to a position directly in front of the Magnetic Plate and
3
raises the nozzles until the water meniscuses in the Reaction Tips are even with
the upper rim of the Magnetic Plate.
The Nozzle Head holds this position for 10 min. While the Nozzle Head is holding
4
position, open the instrument door, so you can more easily observe the Nozzle
Head.
Watch the water level within the Reaction T ips. If the water level remains the same
5
in all tips, none of the tips is leaking. If you observe different water levels in different tips or drops of liquid falling into the sample tubes, one or more nozzles is
leaking. As a final check, visually inspect the empty Elution Tubes for liquid, as
well as the Nozzle Head. If there has been leakage, change the O-rings as
described in Section C.1.2.2.
Note: Some leakage can be tolerated. If, after 10 minutes, the difference in water
levels between tips is less than 4 mm, you do not need to change the O-rings.
After 10 min, close the instrument door.
6
Result: The instrument will eject the water back into the Sample Tubes and the
Reaction Tips are placed back in the Tip Tray.
After the Leakage Test is complete, the Leakage Test Result screen is displayed.
䉴Touch the appropriate button to
document the test results.
䉴T ouch the Close button to return
to the MAINTENANCE Screen.
Note: As soon as Leakage has been confirmed, the State indicator will permanently show
LEAKY until the O-rings are changed and No Leakage has been confirmed.
74
MagNA Pure Compact Operator’s Manual - Version 1.3
 Loading...