


 Loading...
cobas® 4800 System
Operator’s Manual
Software Version 2.1 for cobas® 4800 CT/NG Test

|
|
cobas® 4800 System |
|
|
CT/NG Test |
Document information |
|
|
|
|
|
Manual version |
Revision dates |
Main changes |
1.1 |
May 2014 |
Change to error messages and reagent loading positions. |
|
|
|
Table 1 |
Revision history |
|
Edition notice Every effort has been made to ensure that the information contained in this manual is accurate at the time of printing. Not all functionality described in this manual may be available to all users. Roche reserves the right to make any further required changes to software without prior notice. Such changes may not immediately be reflected in this document.
The screenshots in this publication have been added exclusively for the purpose of illustration. Configurable and variable data such as parameters, results, path names etc. visible therein must not be used for laboratory purposes.
Intended use This manual is for users of the cobas® 4800 CT/NG Test on the cobas® 4800 System.
Before using the test, it is important that the operator reads the cobas® 4800 System System Manual and this manual thoroughly.
U For additional information, refer to the test-specific package insert.
Copyright © 2014 Roche Diagnostics International Ltd. All rights reserved.
Trademarks The following trademarks are acknowledged:
COBAS, COBAS X, COBAS Z, and LIFE NEEDS ANSWERS are trademarks of Roche.
All other trademarks are the property of their respective owners.
Feedback Every effort has been made to ensure that this manual fulfils the intended purpose as mentioned above. All feedback on any aspect of this manual is welcome and will be considered during updates. Please contact your Roche representative, should you have any such feedback.
Instrument approvals This manual meets the European Standard EN ISO 18113-3.
Compliance is demonstrated by the following marks:
Complies with the IVD directive 98/79/EC.
Issued by Underwriters Laboratories, Inc. (UL) for Canada and the US.
C  US
US
Abbreviations The following abbreviations are used:
|
Abbreviation |
Definition |
|
PC |
PreservCyt® |
|
Table 2 |
Abbreviations |
Roche Diagnostics |
|
|
|
|
|
2 |
|
cobas® 4800 System, Operator’s Manual · Version 1.1 |
cobas® 4800 System
CT/NG Test
Contact addresses
Roche Molecular Systems, Inc.
1080 US Highway 202 South
Branchburg, NJ 08876
USA
Made in Switzerland
Roche Diagnostics GmbH
Sandhofer Strasse 116
68305 Mannheim
Germany
What is new in version 2.1
Workflow Recovery workflow run can be generated from a previously performed run within 24 hours. The PCR Only workflow has been renamed and improved to recovery workflow.
U For details, see About workflows (p. 10)
Result view notifications Icons help you identify if a result failed, is invalid, or has a flag. The result view also highlights cells with positive results.
U For details, see Results (p. 55)
Work orders The work order editor is now integrated into the software (sample editor). Barcodes are automatically scanned during loading and used to generate a work order.
U For details, see Sample editor (p. 51)
LIS You can see the LIS availability status and the transfer status. There is a status displayed of results sent to the LIS.
U For details, refer to the cobas® 4800 System System Manual.
Reports Reports have been improved. For example, better formatting, positive results are highlighted.
Reagent use optimization Allows multiples (up to 3) of 24 reagent kits for master mix reagent and Mn reagent to be loaded into the system.
U For details, see To load the reagent carrier (p. 33)
Unloading samples You have the option to automatically unload the samples after they are pipetted and before the run is over.
U For details, see To load samples (p. 23)
Tracking of used tip racks. To reduce tip waste, partially used tip racks can be used in next run on the same system. You can reuse partially used tip racks as long as enough tips are loaded. The software estimates how many tips are required for a run.
U For details, see Loading the consumables (p. 27)
Roche Diagnostics
cobas® 4800 System, Operator’s Manual · Version 1.1 |
3 |

cobas® 4800 System
CT/NG Test
Usability Improved test selection dialog and filtering options.
U For details, see To start a new run (p. 22)
U For details, see Filtering and sorting runs and results (p. 58)
Test types CT/NG cytology and CT/NG non-cytology workflows can both be run by selecting the CT/NG test.
Roche Diagnostics
4 cobas® 4800 System, Operator’s Manual · Version 1.1

cobas® 4800 System
CT/NG Test
Table of contents |
|
Overview.................................................................................................................................. |
7 |
General safety information............................................................................................. |
7 |
Overview of the test ......................................................................................................... |
7 |
About specimen types ..................................................................................................... |
7 |
About workflow types ..................................................................................................... |
8 |
About the test concept..................................................................................................... |
8 |
About subtests............................................................................................................ |
8 |
About reagents ................................................................................................................. |
9 |
Workflow .............................................................................................................................. |
10 |
About workflows............................................................................................................ |
10 |
Overview of full workflow ............................................................................................ |
11 |
Full workflow short guide....................................................................................... |
12 |
Overview of recovery workflow ................................................................................... |
14 |
Recovery workflow short guide ............................................................................. |
15 |
Operation .............................................................................................................................. |
18 |
Safety information ......................................................................................................... |
18 |
Performing a full workflow run ................................................................................... |
18 |
Performing startup procedures.............................................................................. |
18 |
Performing maintenance........................................................................................ |
21 |
Removing the samples and reagents from storage.............................................. |
21 |
Starting a new run.................................................................................................... |
22 |
Loading samples....................................................................................................... |
23 |
Confirming or creating a work order file............................................................. |
25 |
Loading the consumables ....................................................................................... |
27 |
Loading the reagents ............................................................................................... |
28 |
Starting the sample preparation run ..................................................................... |
34 |
Unloading the microwell plate............................................................................... |
36 |
Sealing the microwell plate..................................................................................... |
37 |
Removing used reagents, samples, and deepwell plate....................................... |
38 |
Starting amplification and detection run ............................................................. |
38 |
Reviewing and accepting results............................................................................ |
39 |
Sending results to LIS.............................................................................................. |
40 |
Unloading the analyzer........................................................................................... |
41 |
Performing shutdown procedure .......................................................................... |
41 |
Performing a recovery workflow run.......................................................................... |
42 |
Starting a recovery workflow run.......................................................................... |
43 |
Selecting the run to recover and adding new IDs ............................................... |
43 |
Printing the microwell plate layout....................................................................... |
44 |
Removing the deepwell plate ................................................................................. |
45 |
Setting up microwell plate ...................................................................................... |
45 |
Performing manual PCR setup.............................................................................. |
45 |
Sealing the microwell plate..................................................................................... |
46 |
Centrifuging the microwell plate........................................................................... |
47 |
Roche Diagnostics |
|
cobas® 4800 System, Operator’s Manual · Version 1.1 |
5 |

|
cobas® 4800 System |
|
CT/NG Test |
Starting amplification and detection run ............................................................. |
47 |
Reviewing and accepting results............................................................................ |
48 |
Sending results to LIS.............................................................................................. |
49 |
Unloading the analyzer........................................................................................... |
50 |
Performing shutdown procedure .......................................................................... |
50 |
Sample editor.................................................................................................................. |
51 |
About messages in the sample editor.................................................................... |
51 |
Using the sample editor to create a work order file............................................ |
52 |
Editing an existing work order file........................................................................ |
54 |
Loading a work order file ....................................................................................... |
55 |
Results.............................................................................................................................. |
55 |
Reviewing results ..................................................................................................... |
56 |
Grouping results ...................................................................................................... |
57 |
Searching results ...................................................................................................... |
57 |
Filtering and sorting runs and results................................................................... |
58 |
Accepting results...................................................................................................... |
58 |
Printing results......................................................................................................... |
58 |
Creating result filters............................................................................................... |
60 |
Aborting a run................................................................................................................ |
62 |
Configuration ....................................................................................................................... |
63 |
Changing your password .............................................................................................. |
63 |
Troubleshooting................................................................................................................... |
64 |
List of error messages .................................................................................................... |
64 |
List of result flags ........................................................................................................... |
67 |
Revisions................................................................................................................................ |
70 |
Roche Diagnostics
6 cobas® 4800 System, Operator’s Manual · Version 1.1

cobas® 4800 System |
Overview |
CT/NG Test |
General safety information |
Overview
General safety information
Test-specific safety information is contained in this manual. For general safety
information (e.g. safety classifications, safety precautions), read the cobas® 4800 System System Manual.
Overview of the test
The cobas® 4800 CT/NG Test is an in vitro nucleic acid amplification test for the qualitative detection of Chlamydia trachomatis (CT) and/or Neisseria gonorrhoeae (NG) in patient specimens.
The following sample carrier can be used for CT/NG testing: o PreservCyt® carrier with PreservCyt® primary containers
o24-position sample carrier with primary cobas® PCR Media tubes or secondary tubes
UFor more information about the test (e.g. minimum sample volumes), refer to the testspecific package insert.
About specimen types
The following specimen types are supported:
Test type |
|
Specimen type |
Abbreviation |
Carrier used |
|
CT/NG |
|
Swab |
- |
24-position sample carrier |
|
|
|
Urine |
- |
24-position sample carrier |
|
|
|
PreservCyt® |
PC |
o |
PreservCyt® carrier |
|
|
|
|
o |
(primary tubes) |
|
|
|
|
24-position sample |
|
|
|
|
|
|
carrier (secondary |
|
|
|
|
|
tubes) |
Table 3 |
Specimen types |
|
|
|
|
|
Incorrect results due to use of non-approved specimen types |
|
Supported specimen types may vary by region. Refer to the test-specific package insert for |
WARNING |
your region for supported specimen types. |
|
r Use only specimen types that are approved by Roche.
UFor details about the types of secondary tubes you can use, refer to the test-specific package insert.
Roche Diagnostics
cobas® 4800 System, Operator’s Manual · Version 1.1 |
7 |
Overview |
cobas® 4800 System |
About workflow types |
CT/NG Test |
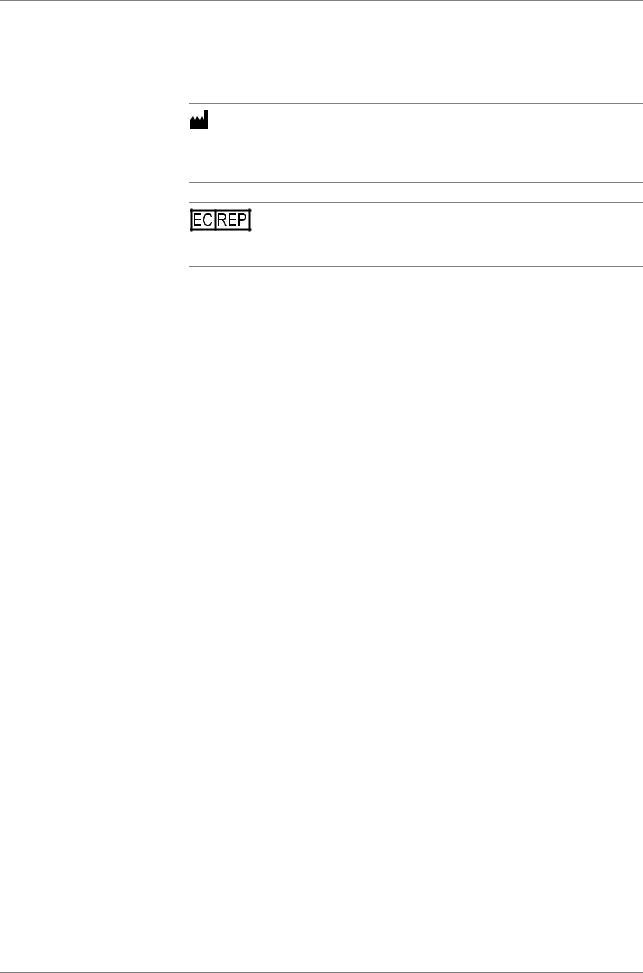
About workflow types
Two workflow types are supported. The workflow type has to be selected at the start of a new run.
Full workflow The full workflow covers sample preparation on the cobas x 480 instrument and amplification and detection on the cobas z 480 analyzer.
Recovery workflow The recovery workflow allows you to recover aborted runs which were pipetted correctly into the deepwell plate or microwell plate. For example, you drop the microwell plate while transferring it to the analyzer.
You manually pipette residual eluate from the deepwell plate into the new microwell plate and add new master mix reagent and Mn reagent.
To recover a run, the following criteria must be fulfilled:
o Instrument and analyzer are turned on and maintenance has been performed. o A full workflow run has been performed and the samples successfully prepared. o A full workflow run has been performed in the last 24 hours.
o A full workflow run has been aborted by a user (M2 flag) or the analyzer (Z1 flag).
The recovery workflow run is only validated to work with extract from an instrument.
U For stability of eluates, refer to the test-specific package insert.
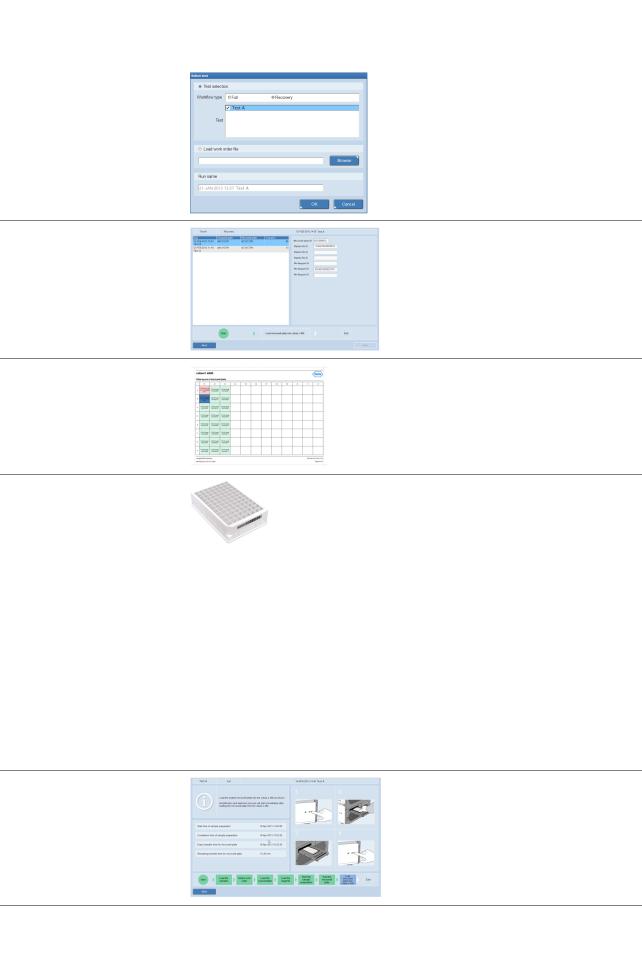
Figure 1 |
Workflow and test type selection at the start of a new run |
About the test concept
Tests are run in batches.
U For more details about batch sizes, throughput, or mixed batch runs, refer to the testspecific package insert.
About subtests
|
The analyzer can simultaneously detect signal from one or more detection channels, |
|
which makes it possible to obtain more information from a single reaction. This |
|
provides multiple subtests for each test type. |
|
Subtests can be ordered for each sample individually using the sample editor. |
|
U For information about the sample editor, see Sample editor (p. 51) |
Roche Diagnostics |
|
8 |
cobas® 4800 System, Operator’s Manual · Version 1.1 |

cobas® 4800 System |
|
|
Overview |
|
CT/NG Test |
|
|
About reagents |
|
|
The following subtests are available: |
|
||
|
|
|
|
|
|
Main test type |
|
Subtests |
Results |
|
CT/NG |
CT and NG in combination |
CT/NG |
|
|
|
|
|
|
|
|
|
CT only |
CT |
|
|
|
|
|
|
|
|
NG only |
NG |
|
|
|
|
|
|
Table 4 |
Subtests |
|
|
About reagents
Reagent kit sizes Individual reagent kits are available for the following run sizes:
|
o 10 runs with 24 samples (up to 22 patient specimens plus 2 controls) |
|
o 10 runs with 96 samples (up to 94 patient specimens plus 2 controls) |
|
|
NOTICE |
Kit size |
|
o Make sure that the kit size corresponds to the intended run size. Although not an |
|
optimal use of reagents, a 96 kit size can be used for a 24 run. |
|
o For the most efficient reagent utilization, it is advisable to maximize the number of |
|
patient specimens processed within a run. Remaining reagents cannot be used later |
|
for another run. |
|
|
Reagent handling Some reagents are poured into reagent reservoirs and then placed onto their dedicated positions on the reagent reservoir carriers.
Other reagents are ready to use. They are decapped and then placed onto their dedicated positions on the reagent carrier.
Reagent expiry time zone offset
The reagent expiry date is based on the Coordinated Universal Time (UTC). The local time
CAUTION for reagent expiry could be offset by plus or minus 12 hours, depending on the local time zone relative to UTC.
r Check the reagent expiry date and consider that it is based on UTC.
UFor instructions on handling and storage of reagents, refer to the test-specific package insert.
Controls Two external controls (positive control and negative control) are provided in a control kit. Controls are always processed on position A1 and B1 respectively of the deepwell and microwell plates.
All controls are homogeneous and do not require vortexing or shaking prior to loading on the instrument.
UFor instructions on handling and storage of controls, refer to the test-specific package insert.
Q Controls are loaded on the reagent carrier not the sample carrier.
Roche Diagnostics
cobas® 4800 System, Operator’s Manual · Version 1.1 |
9 |

Workflow |
cobas® 4800 System |
About workflows |
CT/NG Test |
Workflow
In this chapter the different workflows are described.
About workflows
The following workflow types are available.
Workflow Description Ordering
Full workflow |
|
Sample preparation and |
LIS or work order file |
(with or without LIS) |
amplification and detection |
|
|
Recovery workflow |
|
Manual PCR setup and |
- |
(with or without LIS) |
amplification and detection |
|
|
Table 5 |
Workflow types |
|
|
Roche Diagnostics
10 cobas® 4800 System, Operator’s Manual · Version 1.1

cobas® 4800 System |
Workflow |
CT/NG Test |
Overview of full workflow |
Overview of full workflow
The full workflow with and without LIS is shown below.
6DPSOH DQG UHDJHQW KDQGOLQJ DUHD |
|
6DPSOH SUHSDUDWLRQ FREDV |
|
FREDV VRIWZDUH |
|
$PSOLÀFDWLRQ 'HWHFWLRQ FREDV ] |
|
[ LQVWUXPHQW |
|
|
DQDO\]HU |
||
|
|
|
|
|
||
|
|
|
|
|
|
|
16WDUW XS WKH V\VWHP
23HUIRUP LQVWUXPHQW PDLQWHQDQFH
35HPRYH VDPSOHV DQG UHDJHQWV IURP VWRUDJH
 4 6WDUW QHZ UXQ
5/RDG VDPSOHV
6 :LWK /,6 FRQÀUP ZRUN RUGHU :LWKRXW /,6 FUHDWH ZRUN RUGHU
7/RDG FRQVXPDEOHV GHHSZHOO SODWH PLFURZHOO SODWH WLS UDFNV
8/RDG UHDJHQWV
9 6WDUW VDPSOH SUHSDUDWLRQ UXQ
108QORDG DQG VHDO PLFURZHOO SODWH
115HPRYH VDPSOHV XVHG UHDJHQWV GHHSZHOO SODWH
12 /RDG PLFURZHOO SODWH LQWR DQDO\]HU
13 5HYLHZ UHVXOWV
14 :LWK /,6 VHQG UHVXOWV WR /,6
15 8QORDG DQDO\]HU
Figure 2 |
Full workflow (with and without LIS) |
Roche Diagnostics
cobas® 4800 System, Operator’s Manual · Version 1.1 |
11 |
Workflow |
cobas® 4800 System |
Overview of full workflow
WARNING
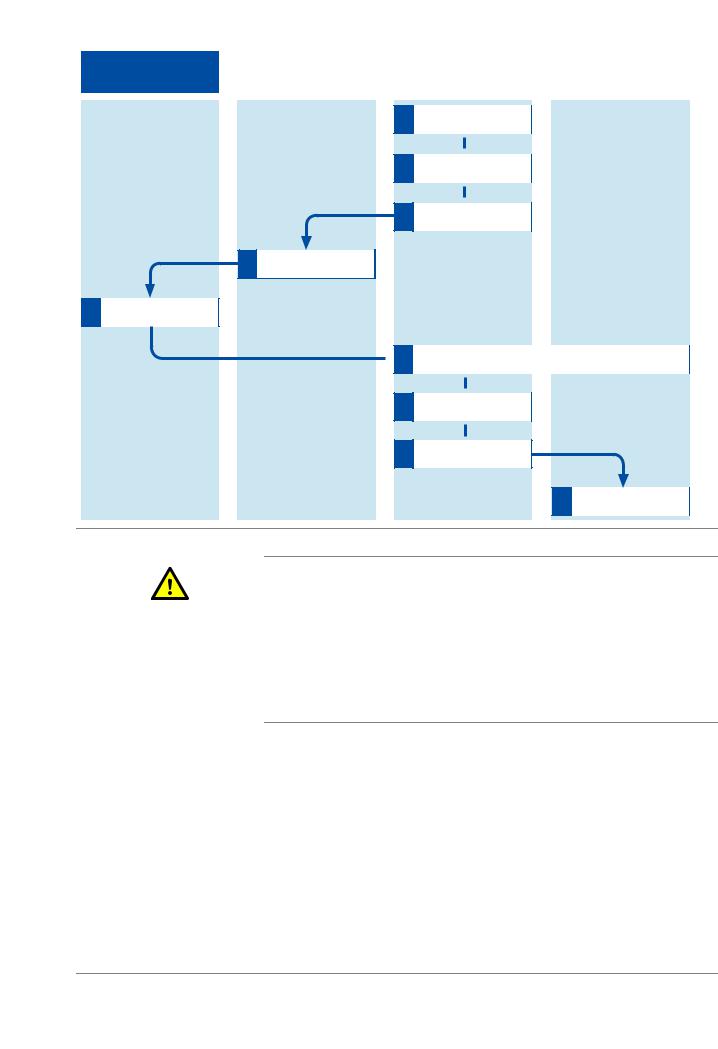
Full workflow short guide
Step
CT/NG Test
Infection by samples and associated materials due to inappropriate laboratory practices
Follow Good Laboratory Practices, especially when working with biohazardous material. If Good Laboratory Practices are not followed, contact with biohazardous material may occur, resulting in infection.
r Do not eat, drink, or smoke in laboratory work areas.
rWear lab gloves and lab coats whenever preparing consumables, reagents, samples, or when cleaning.
r Wear eye protection when handling samples. Wash hands thoroughly afterwards.
The following short guide is a summary of the workflow without details.
UFor a complete and detailed description of the workflow, see Performing a full workflow run (p. 18)
User action
1 Start up the system. |
Switch on the analyzer, heater/shaker unit, and |
|||
|
|
instrument |
|
|
|
|
1. |
Switch on the analyzer. |
|
|
|
2. |
Switch on heater/shaker unit. |
|
|
|
3. |
Switch on the instrument. |
|
|
|
Start up and log on to the software |
||
|
|
1. |
Switch on the monitor and control unit. |
|
|
|
2. |
Log on to the software. |
|
2 |
Perform instrument |
1. |
Choose Overview > System > cobas x 480 tab |
|
|
maintenance. |
|
and check maintenance status of the |
|
|
|
o |
instrument. |
|
|
|
If weekly maintenance is due, choose the |
||
|
|
o |
Perform weekly maintenance button. |
|
|
|
If daily maintenance is due, choose the Perform |
||
|
|
|
daily maintenance button. |
|
|
|
Follow the instructions displayed on the monitor. |
||
|
|
|||
3 Remove samples and reagents |
U For instructions on storage and handling of |
|||
|
from storage. |
|
reagents, samples and controls, refer to test- |
|
|
|
|
specific package insert. |
|
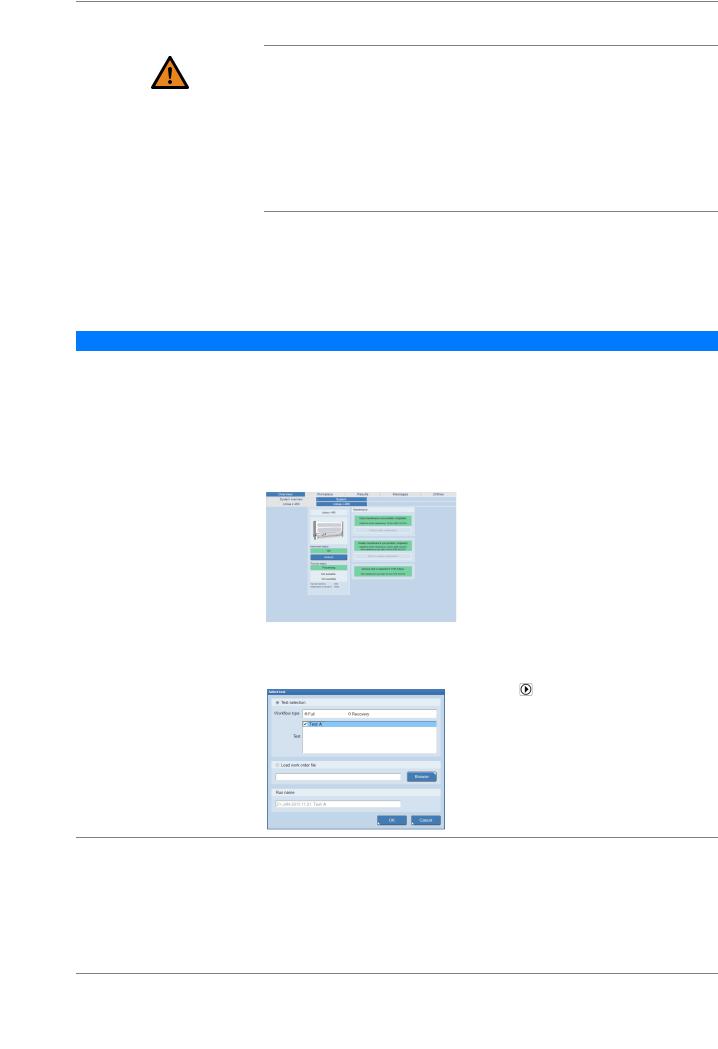
4 |
Start new run. |
1. |
Choose |
(New run). |
|
|
2. |
Select the Full option. |
|
|
|
3. |
Select the CT/NG check box. |
|
|
|
4. |
Optionally, type a run name. |
|
|
|
5. |
Choose the OK button. |
|
Table 6 |
Full workflow short guide (with or without LIS) |
Roche Diagnostics
12 cobas® 4800 System, Operator’s Manual · Version 1.1
cobas® 4800 System |
|
Workflow |
CT/NG Test |
|
Overview of full workflow |
|
|
|
Step |
User action |
|
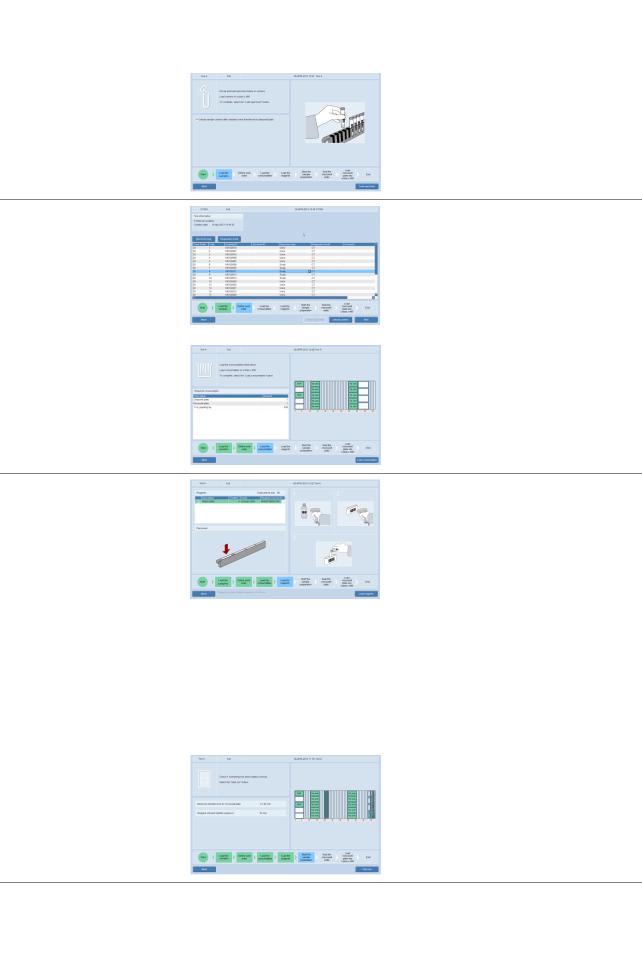
5 Load samples. |
1. |
Decap samples. |
|
2. |
Place samples on corresponding carrier. |
|
3. |
Insert sample carriers on autoload tray. |
|
4. |
Choose the Load specimen button. |
6 With LIS, confirm the work order |
With LIS: |
|
or |
1. |
Confirm the work order and choose the Next |
Without LIS, create the work |
|
button. |
order. |
or |
|
|
|
|
|
Without LIS: |
|
|
1. |
Define the type of specimen. |
|
2. |
Define the requested result. |
|
3. |
Choose the Next button. |
7 Load consumables. |
1. |
Place listed consumables on appropriate |
|
|
carriers. |
|
2. |
Insert carriers on autoload tray. |
|
3. |
Choose the Load consumables button. |
8 Load reagents. |
200 mL reagent reservoir carrier |
|
|
1. |
Load wash buffer reagent 200 mL on reagent |
|
|
reservoir carrier as indicated in the wizard |
|
|
(scan-scan-pour-place principle). |
|
2. |
Insert carrier on autoload tray. |
|
3. |
Choose the Load reagents button. |
|
50 mL reagent reservoir carrier |
|
|
1. |
Load reagents on 50 mL reagent reservoir |
|
|
carrier as indicated in the wizard (scan-scan- |
|
|
pour-place principle). |
|
2. |
Insert carrier on autoload tray. |
|
3. |
Choose the Load reagents button. |
|
Reagent carrier |
|
|
1. |
Open reagent vials and load them on reagent |
|
|
carrier as indicated in the wizard. |
|
2. |
Insert carrier on autoload tray. |
|
3. |
Choose the Load reagents button. |
9 Start sample preparation run. |
1. |
Choose the Start run button. |
|
|
The sample preparation starts. |
|
2. |
Check the timer in the wizard. |
Table 6 |
Full workflow short guide (with or without LIS) |
|
Roche Diagnostics |
|
|
|
|
|
cobas® 4800 System, Operator’s Manual · Version 1.1 |
13 |
|
Workflow |
cobas® 4800 System |
Overview of recovery workflow |
CT/NG Test |
|
|
Step |
User action |
|
|
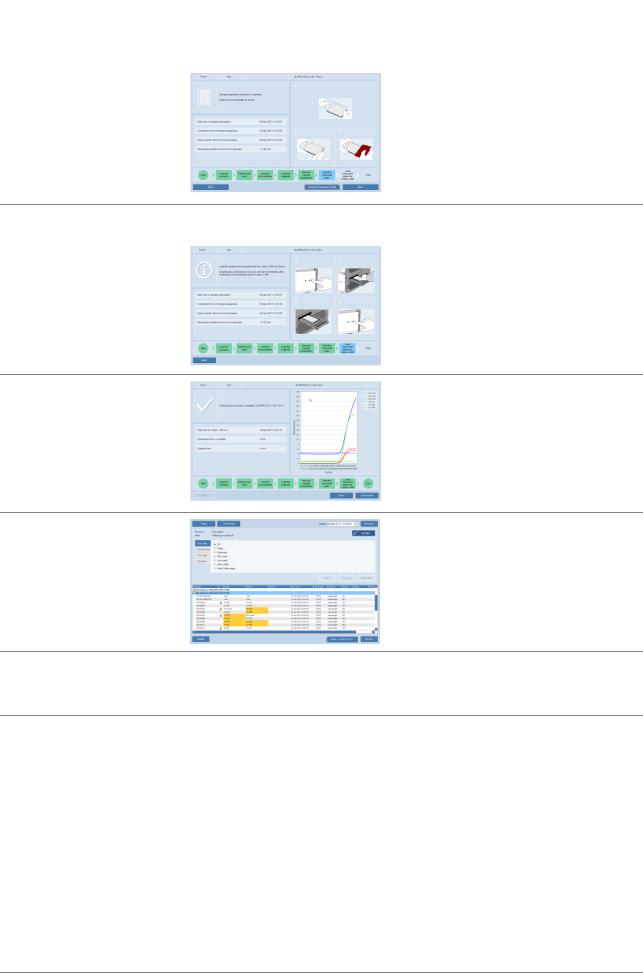
10 Unload and seal microwell plate.
1.To review the results of the sample preparation, choose the Sample Preparation results button.
2.Choose the Unload button.
3.Seal the microwell plate as indicated on screen.
4.Choose the Next button.
11 |
Remove used reagents, samples, |
1. |
Remove used reagents, samples, and deepwell |
|
and deepwell plate. |
|
plate from the instrument. |
12 |
Load microwell plate on to the |
1. |
Press the load button on the analyzer. |
|
analyzer. |
2. |
Place the sealed microwell plate into the |
|
|
|
microwell plate loader. |
|
|
3. |
Press the load button again. |
|
|
|
The amplification and detection run starts |
|
|
|
automatically. |
|
|
4. |
Check the timer in the wizard. |
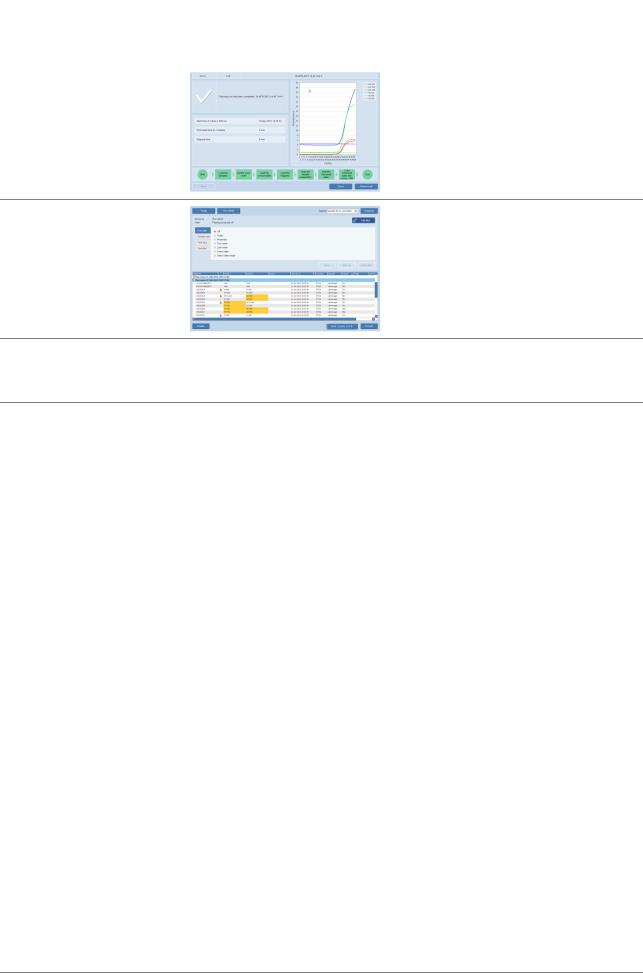
13 Review result and accept results.
1.Choose the Show result button.
2.Review and accept results in Results work area.
3.Select results and choose  (Print) to print the results report, if required.
14 With LIS, send the results to LIS.
Consider that depending on the configuration, all results are transferred to LIS or only accepted results are transferred to LIS. Control results are always uploaded to LIS.
1.Select a result or group of results and choose the
Send results to LIS button.
15Unload the microwell plate from the analyzer.
1.Unload the microwell plate from the analyzer as soon as is practical after the run has finished.
2.Discard the microwell plate according to the appropriate local regulations.
Table 6 |
Full workflow short guide (with or without LIS) |
Overview of recovery workflow
The recovery workflow allows you to recover failed runs where the sample has been successfully prepared. A run can only be recovered one time.
The recovery workflow is shown below.
Roche Diagnostics
14 cobas® 4800 System, Operator’s Manual · Version 1.1
cobas® 4800 System |
Workflow |
CT/NG Test |
Overview of recovery workflow |
Sample and reagent handling area
5Set up microwell plate
Sample preparation cobas |
|
cobas 4800 software |
|
$PSOLÀFDWLRQ 'HWHFWLRQ |
x 480 instrument |
|
|
cobas z 480 analyzer |
|
|
|
|
||
|
|
|
|
|
54 GRemovetdeepwelldeepewellplate plate
1Start recovery run
26HOHFW UXQ DQG DGG ,'V
3Print plate layout report
 6 Load microwell plate into analyzer
7Review results
8With LIS: send results to LIS
9Unload analyzer
Figure 3 Recovery workflow
|
Infection by samples and associated materials due to inappropriate laboratory |
|
|
practices |
|
CAUTION |
Follow Good Laboratory Practices, especially when working with biohazardous material. If |
|
Good Laboratory Practices are not followed, contact with biohazardous material may |
||
|
||
|
occur, resulting in infection. |
r Do not eat, drink, or smoke in laboratory work areas.
rWear lab gloves and lab coats whenever preparing consumables, reagents, samples, or when cleaning.
r Wear eye protection when handling samples. Wash hands thoroughly afterwards.
Recovery workflow short guide
The following short guide is a summary of the workflow without details.
UFor a complete and detailed description of the workflow, see Performing a recovery workflow run (p. 42)
Roche Diagnostics
cobas® 4800 System, Operator’s Manual · Version 1.1 |
15 |
Workflow |
cobas® 4800 System |
Overview of recovery workflow |
CT/NG Test |
|
|
Step |
User action |
|
|
1 Start a recovery workflow run.
1.Choose  (New run).
2.Select the Recovery option.
3.Select the CT/NG check box.
4.Optionally, type a run name.
5.Choose the OK button.
2Select the run to recover and add new IDs
1.Choose the run to recover.
2.In the Microwell plate ID field, scan the microwell plate barcode.
3.In the Master Mix ID field, scan the master mix reagent barcode.
4.In the Mn Reagent ID field, scan the Mn reagent barcode.
3 Print the microwell plate layout.
1.To print the work order file for microwell plate
setup, choose  (Print) from the global navigation bar.
2.In the software, choose the Next button.
4 Get the deepwell plate. |
1. |
Do one of the following: |
|
|
o If the deepwell plate has been unloaded by |
|
|
the instrument, remove it from the plate |
|
|
carrier, or |
|
|
o If the deepwell plate has been stored, get it |
|
|
from storage, or |
|
|
o If the deepwell plate has not been unloaded |
|
|
by the instrument, unload the deepwell |
|
|
plate manually. |
|
|
U For details how to unload the instrument |
|
|
manually, refer to the cobas® 4800 System |
|
|
System Manual. |
5 Set up the new microwell plate. |
1. |
Pipette the reagents and prepared specimens |
|
|
into the microwell plate in accordance with the |
|
|
microwell plate layout and the description in |
|
|
the test-specific package insert. |
|
2. |
Seal the microwell plate. |
|
3. |
If necessary, log back on to the software. |
|
4. |
In the software, choose the Next button. |
6Load microwell plate into the analyzer.
1.Press the load button on the analyzer.
2.Place the sealed microwell plate into the microwell plate loader.
3.Press the load button again.
The amplification and detection run starts automatically.
4.Check the timer in the wizard.
Table 7 |
Recovery workflow short guide |
Roche Diagnostics |
|
|
|
16 |
cobas® 4800 System, Operator’s Manual · Version 1.1 |
cobas® 4800 System |
Workflow |
CT/NG Test |
|
|
|
Step |
User action |
|
|
7 Review and accept results.
1.Choose the Show result button.
2.Review and accept results in Results work area.
3.Select results and choose  (Print) to print the results report, if required.
8 With LIS, send the results to LIS.
Consider that depending on the configuration, all results are transferred to LIS or only accepted results are transferred to LIS. Control results are always uploaded to LIS.
1.Select a result or group of results and choose the
Send results to LIS button.
9Unload the microwell plate from the analyzer.
1.Unload the microwell plate from the analyzer as soon as is practical after the run has finished.
2.Discard the microwell plate according to the appropriate local regulations.
Table 7 |
Recovery workflow short guide |
Roche Diagnostics
cobas® 4800 System, Operator’s Manual · Version 1.1 |
17 |

Operation |
cobas® 4800 System |
Safety information |
CT/NG Test |
Operation
In this chapter the operation of the system is described.
Safety information
Considerations before operation
Make sure that you have read and understood the chapter General safety information in the cobas® 4800 System System Manual. The following safety messages in particular are relevant:
rWarning messages:
o Loss of sight due to staring into the laser beam o Infection by samples and associated materials o Infection and injury due to sharp objects
o Infection by biohazardous waste
o Contamination of the environment by liquid waste and solid waste
rCaution messages:
o Personal injury due to contact with moving parts o Skin inflammation or injury caused by reagents o Personal injury due to hot surface
rSafety precautions:
o Operator qualification
rObserve the illustrated system safety labels from the cobas® 4800 System System Manual
Performing a full workflow run
The following procedures guide you through all required steps to perform a full workflow run with sample preparation on the instrument and amplification and detection on the analyzer. The procedures cover both working modes: with and without LIS. Steps that only apply to one working mode are indicated accordingly.
Performing startup procedures
NOTICE |
Instrument damage due to improper handling |
|
To prevent hardware damage, follow the steps in the exact order outlined when starting up |
|
the system. |
|
|
To start up the system, it is important that you perform the following steps in this exact order:
1.Switch on the analyzer.
2.Switch on the heater/shaker unit.
3.Switch on the instrument.
4.Start up the software.
Roche Diagnostics
18 cobas® 4800 System, Operator’s Manual · Version 1.1
cobas® 4800 System |
Operation |
CT/NG Test |
Performing a full workflow run |
|
P To switch on the analyzer |
|
1 Switch on the analyzer. The power switch is located at the back of the analyzer. |
|
The analyzer is powered on and initializes. |
A
A Power switch of the analyzer
Figure 4 |
Switching on the analyzer |
S
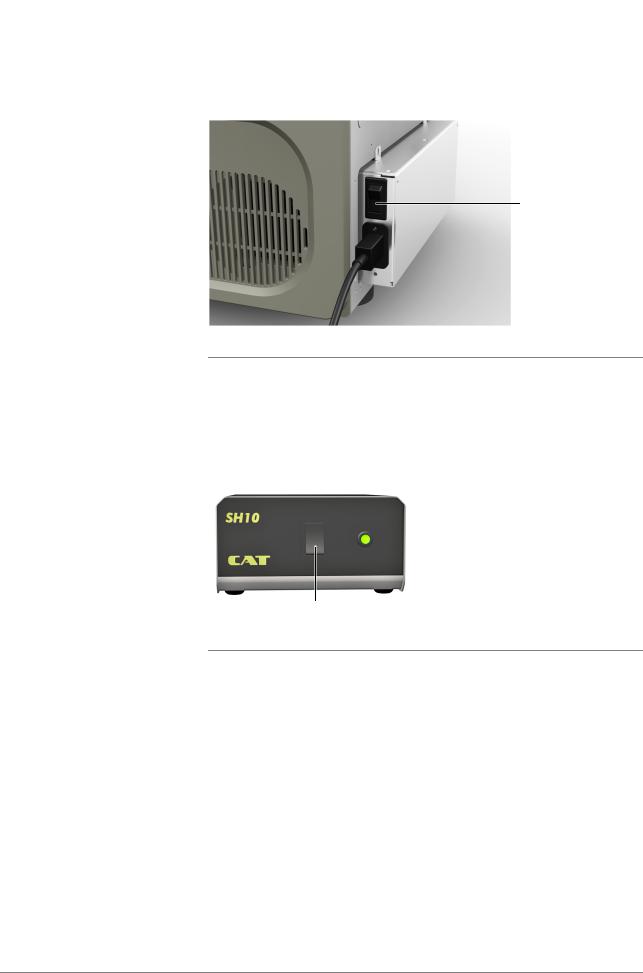
PTo switch on the heater/shaker unit
1Switch on the heater/shaker unit. The switch is located at the front of the heater/shaker controller box.
A
A Power switch of heater/shaker controller box
Figure 5 |
Switching on the heater/shaker unit |
S
Roche Diagnostics
cobas® 4800 System, Operator’s Manual · Version 1.1 |
19 |
Operation |
cobas® 4800 System |
Performing a full workflow run |
CT/NG Test |
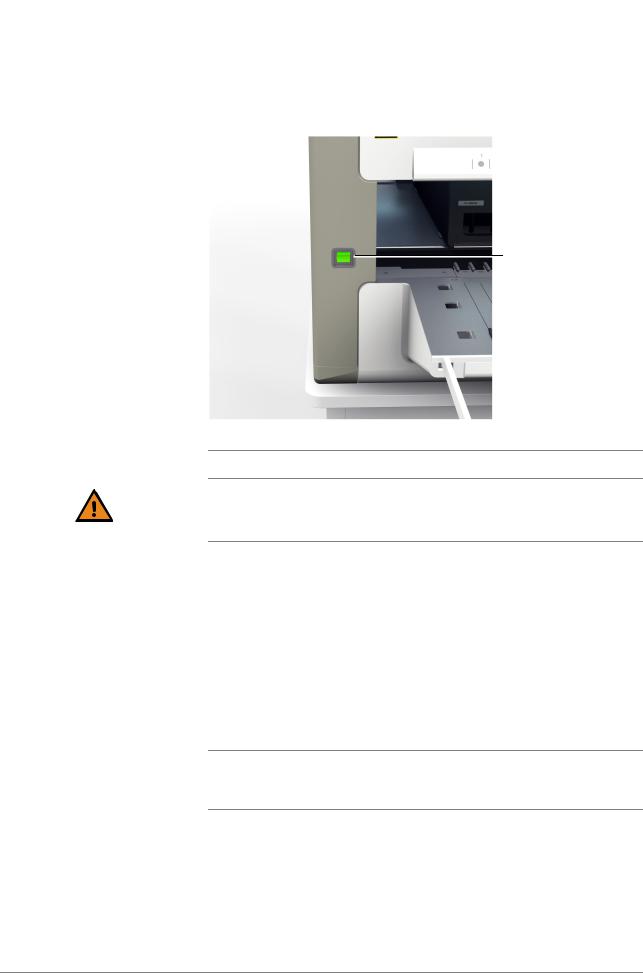
PTo switch on the instrument
1Switch on the instrument. The power switch is located at the front of the instrument.
The instrument is powered on and initializes.
A
A Power switch of the instrument
Figure 6 |
Switching on the instrument |
Delay of results due to improper handling
Turning the power of the instrument off during a run can lead to a sample rerun.
WARNING |
r Do not turn off the instrument power during a run. |
S
PTo start up and log on to the software
1Switch on the monitor and control unit.
After the Windows operating system starts, double-click the cobas 4800 v2.1 desktop icon to open the software.
The software displays the System overview tab.
2Choose  (Log on) to log on and enter your assigned user ID and password.
3Choose the OK button.
Qo The user ID is not case-sensitive.
o The password is case-sensitive. The password displays as asterisks when typed to maintain security.
S
Roche Diagnostics
20 cobas® 4800 System, Operator’s Manual · Version 1.1
cobas® 4800 System |
|
|
Operation |
CT/NG Test |
|
|
Performing a full workflow run |
Performing maintenance |
|
|
|
|
|
Periodic maintenance needs to be performed in order to ensure safe and reliable |
|
|
|
operation of the instrument. |
|
|
|
|
|
NOTICE |
|
Periodic maintenance |
|
|
|
o |
Performing daily and weekly maintenance is mandatory. A sample preparation run can |
|
|
|
only be started when maintenance is done. |
|
|
o |
If any parts of the instrument or carriers have become contaminated, the weekly |
|
|
|
maintenance procedure must be performed. |
|
|
o |
Counters are reset to twenty-four hours when daily maintenance is performed. If |
|
|
|
weekly maintenance is being performed, daily maintenance is not required on that day. |
|
|
|
|
|
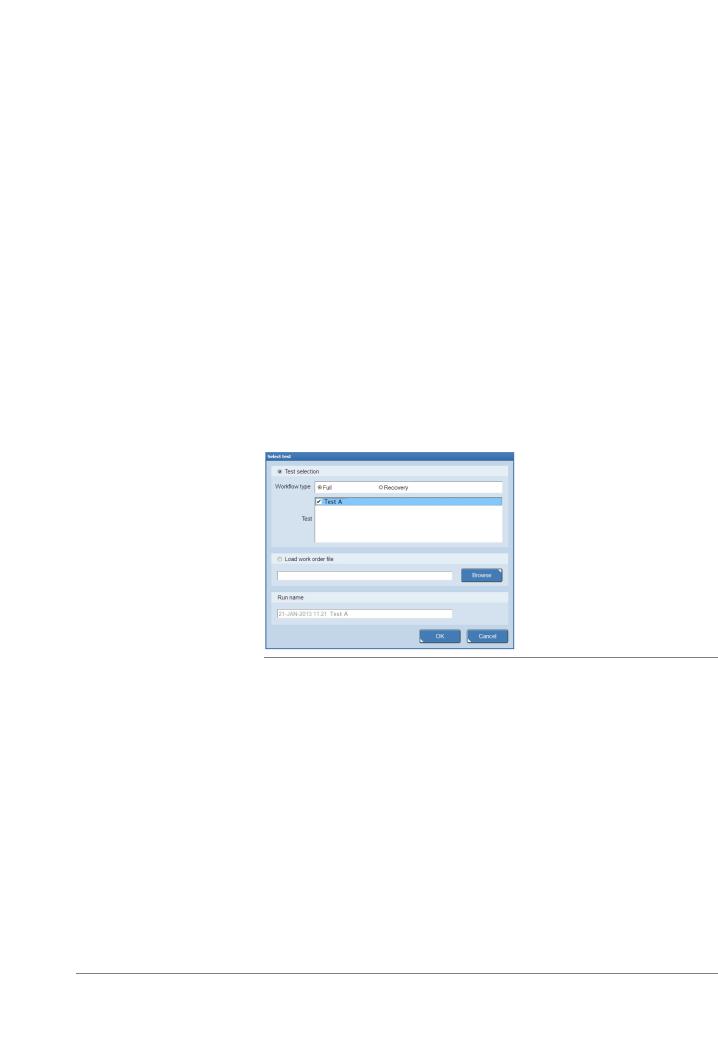
P To perform daily or weekly maintenance on the instrument |
||
|
1 |
To check the maintenance status, choose Overview > System > cobas x 480 tab. |
|
Figure 7 |
Checking the maintenance status |
2Do one of the following:
o If the weekly maintenance is due, choose the Perform weekly maintenance button and follow the instructions displayed on the monitor.
U For more details about weekly maintenance, refer to the cobas® 4800 System System Manual.
o If the daily maintenance is due, choose the Perform daily maintenance button and follow the instructions displayed on the monitor.
U For more details about daily maintenance, refer to the cobas® 4800 System System Manual.
S
Removing the samples and reagents from storage
The reagents that you need to perform the run depends on the run size.
UFor instructions on storage and handling of reagents, samples and controls, refer to testspecific package insert.
Roche Diagnostics
cobas® 4800 System, Operator’s Manual · Version 1.1 |
21 |
Loading...