

Page 1

®
cobas
Operator’s Manual
Software Version 2.1 for cobas® 4800
CT/NG Test
4800 System
Page 2
cobas® 4800 System
CUS
®
CT/NG Test
Document information
Manual version Revision dates Main changes
1.1 May 2014 Change to error messages and reagent loading positions.
Table 1 Revision history
Edition notice Every effort has been made to ensure that the information contained in this manual is
accurate at the time of printing. Not all functionality described in this manual may be
available to all users. Roche reserves the right to make any further required changes
to software without prior notice. Such changes may not immediately be reflected in
this document.
The screenshots in this publication have been added exclusively for the purpose of
illustration. Configurable and variable data such as parameters, results, path names
etc. visible therein must not be used for laboratory purposes.
Intended use
This manual is for users of the cobas® 4800 CT/NG Test on the cobas
Before using the test, it is important that the operator reads the cobas
System Manual and this manual thoroughly.
U
For additional information, refer to the test-specific package insert.
Copyright © 2014 Roche Diagnostics International Ltd. All rights reserved.
Trademarks The following trademarks are acknowledged:
COBAS, COBAS X, COBAS Z, and LIFE NEEDS ANSWERS are trademarks of
Roche.
All other trademarks are the property of their respective owners.
Feedback Every effort has been made to ensure that this manual fulfils the intended purpose as
mentioned above. All feedback on any aspect of this manual is welcome and will be
considered during updates. Please contact your Roche representative, should you
have any such feedback.
Instrument approvals This manual meets the European Standard EN ISO 18113-3.
Compliance is demonstrated by the following marks:
Complies with the IVD directive 98/79/EC.
®
4800 System.
®
4800 System
Roche Diagnostics
2 cobas® 4800 System, Operator’s Manual · Version 1.1
Issued by Underwriters Laboratories, Inc. (UL) for Canada and the US.
Abbreviations The following abbreviations are used:
Abbreviation Definition
PC
Table 2 Abbreviations
PreservCyt
®
Page 3

cobas® 4800 System
CT/NG Test
Contact addresses
What is new in version 2.1
Workflow Recovery workflow run can be generated from a previously performed run within 24
hours. The PCR Only workflow has been renamed and improved to recovery
workflow.
Roche Molecular Systems, Inc.
1080 US Highway 202 South
Branchburg, NJ 08876
USA
Made in Switzerland
Roche Diagnostics GmbH
Sandhofer Strasse 116
68305 Mannheim
Germany
U
For details, see About workflows (p. 10)
Result view notifications Icons help you identify if a result failed, is invalid, or has a flag. The result view also
highlights cells with positive results.
For details, see Results (p. 55)
U
Work orders The work order editor is now integrated into the software (sample editor). Barcodes
are automatically scanned during loading and used to generate a work order.
For details, see Sample editor (p. 51)
U
LIS You can see the LIS availability status and the transfer status. There is a status
displayed of results sent to the LIS.
For details, refer to the cobas® 4800 System System Manual.
U
Reports Reports have been improved. For example, better formatting, positive results are
highlighted.
Reagent use optimization Allows multiples (up to 3) of 24 reagent kits for master mix reagent and Mn reagent
to be loaded into the system.
U
For details, see To load the reagent carrier (p. 33)
Unloading samples You have the option to automatically unload the samples after they are pipetted and
before the run is over.
U
For details, see To load samples (p. 23)
Tracking of used tip racks. To reduce tip waste, partially used tip racks can be used in next run on the same
system. You can reuse partially used tip racks as long as enough tips are loaded. The
software estimates how many tips are required for a run.
U
For details, see Loading the consumables (p. 27)
Roche Diagnostics
cobas® 4800 System, Operator’s Manual · Version 1.1 3
Page 4

cobas® 4800 System
CT/NG Test
Usability Improved test selection dialog and filtering options.
For details, see To start a new run (p. 22)
U
U For details, see Filtering and sorting runs and results (p. 58)
Test types CT/NG cytology and CT/NG non-cytology workflows can both be run by selecting
the CT/NG test.
Roche Diagnostics
4 cobas® 4800 System, Operator’s Manual · Version 1.1
Page 5

cobas® 4800 System
Table of contents
CT/NG Test
Overview..................................................................................................................................7
General safety information.............................................................................................7
Overview of the test .........................................................................................................7
About specimen types .....................................................................................................7
About workflow types .....................................................................................................8
About the test concept.....................................................................................................8
About subtests............................................................................................................8
About reagents .................................................................................................................9
Workflow ..............................................................................................................................10
About workflows............................................................................................................10
Overview of full workflow ............................................................................................11
Full workflow short guide.......................................................................................12
Overview of recovery workflow...................................................................................14
Recovery workflow short guide .............................................................................15
Operation ..............................................................................................................................18
Safety information .........................................................................................................18
Performing a full workflow run...................................................................................18
Performing startup procedures..............................................................................18
Performing maintenance........................................................................................21
Removing the samples and reagents from storage..............................................21
Starting a new run....................................................................................................22
Loading samples.......................................................................................................23
Confirming or creating a work order file.............................................................25
Loading the consumables .......................................................................................27
Loading the reagents ...............................................................................................28
Starting the sample preparation run .....................................................................34
Unloading the microwell plate...............................................................................36
Sealing the microwell plate.....................................................................................37
Removing used reagents, samples, and deepwell plate.......................................38
Starting amplification and detection run .............................................................38
Reviewing and accepting results............................................................................39
Sending results to LIS..............................................................................................40
Unloading the analyzer...........................................................................................41
Performing shutdown procedure ..........................................................................41
Performing a recovery workflow run..........................................................................42
Starting a recovery workflow run ..........................................................................43
Selecting the run to recover and adding new IDs ...............................................43
Printing the microwell plate layout.......................................................................44
Removing the deepwell plate .................................................................................45
Setting up microwell plate......................................................................................45
Performing manual PCR setup..............................................................................45
Sealing the microwell plate.....................................................................................46
Centrifuging the microwell plate...........................................................................47
Roche Diagnostics
cobas® 4800 System, Operator’s Manual · Version 1.1 5
Page 6

cobas® 4800 System
CT/NG Test
Starting amplification and detection run .............................................................47
Reviewing and accepting results............................................................................48
Sending results to LIS..............................................................................................49
Unloading the analyzer...........................................................................................50
Performing shutdown procedure ..........................................................................50
Sample editor..................................................................................................................51
About messages in the sample editor....................................................................51
Using the sample editor to create a work order file............................................52
Editing an existing work order file........................................................................54
Loading a work order file .......................................................................................55
Results..............................................................................................................................55
Reviewing results .....................................................................................................56
Grouping results ......................................................................................................57
Searching results ......................................................................................................57
Filtering and sorting runs and results...................................................................58
Accepting results......................................................................................................58
Printing results.........................................................................................................58
Creating result filters...............................................................................................60
Aborting a run................................................................................................................62
Configuration .......................................................................................................................63
Changing your password ..............................................................................................63
Troubleshooting...................................................................................................................64
List of error messages ....................................................................................................64
List of result flags ...........................................................................................................67
Revisions................................................................................................................................70
Roche Diagnostics
6 cobas® 4800 System, Operator’s Manual · Version 1.1
Page 7
cobas® 4800 System Overview
CT/NG Test General safety information
Overview
General safety information
Test-specific safety information is contained in this manual. For general safety
®
4800
Overview of the test
information (e.g. safety classifications, safety precautions), read the cobas
System System Manual.
The cobas® 4800 CT/NG Test is an in vitro nucleic acid amplification test for the
qualitative detection of Chlamydia trachomatis (CT) and/or Neisseria gonorrhoeae
(NG) in patient specimens.
The following sample carrier can be used for CT/NG testing:
o PreservCyt® carrier with PreservCyt
®
primary containers
o 24-position sample carrier with primary cobas® PCR Media tubes or secondary
tubes
U
For more information about the test (e.g. minimum sample volumes), refer to the testspecific package insert.
About specimen types
WARNING
The following specimen types are supported:
Test type Specimen type Abbreviation Carrier used
CT/NG Swab - 24-position sample carrier
Urine - 24-position sample carrier
PreservCyt® PC
o PreservCyt® carrier
(primary tubes)
o 24-position sample
carrier (secondary
tubes)
Table 3 Specimen types
Incorrect results due to use of non-approved specimen types
Supported specimen types may vary by region. Refer to the test-specific package insert for
your region for supported specimen types.
r Use only specimen types that are approved by Roche.
U For details about the types of secondary tubes you can use, refer to the test-specific
package insert.
Roche Diagnostics
cobas® 4800 System, Operator’s Manual · Version 1.1 7
Page 8
Overview cobas® 4800 System
About workflow types CT/NG Test
About workflow types
Two workflow types are supported. The workflow type has to be selected at the start
of a new run.
Full workflow The full workflow covers sample preparation on the cobas x 480 instrument and
amplification and detection on the cobas z 480 analyzer.
Recovery workflow The recovery workflow allows you to recover aborted runs which were pipetted
correctly into the deepwell plate or microwell plate. For example, you drop the
microwell plate while transferring it to the analyzer.
You manually pipette residual eluate from the deepwell plate into the new microwell
plate and add new master mix reagent and Mn reagent.
To recover a run, the following criteria must be fulfilled:
o Instrument and analyzer are turned on and maintenance has been performed.
o A full workflow run has been performed and the samples successfully prepared.
o A full workflow run has been performed in the last 24 hours.
o A full workflow run has been aborted by a user (M2 flag) or the analyzer (Z1 flag).
About the test concept
The recovery workflow run is only validated to work with extract from an
instrument.
U
For stability of eluates, refer to the test-specific package insert.
Figure 1 Workflow and test type selection at the start of a new run
Tests are run in batches.
For more details about batch sizes, throughput, or mixed batch runs, refer to the test-
U
specific package insert.
About subtests
The analyzer can simultaneously detect signal from one or more detection channels,
which makes it possible to obtain more information from a single reaction. This
provides multiple subtests for each test type.
Subtests can be ordered for each sample individually using the sample editor.
U
For information about the sample editor, see Sample editor (p. 51)
Roche Diagnostics
8 cobas® 4800 System, Operator’s Manual · Version 1.1
Page 9
cobas® 4800 System Overview
CT/NG Test About reagents
The following subtests are available:
Main test type Subtests Results
CT/NG CT and NG in combination CT/NG
CT only CT
NG only NG
Table 4 Subtests
About reagents
Reagent kit sizes Individual reagent kits are available for the following run sizes:
o 10 runs with 24 samples (up to 22 patient specimens plus 2 controls)
o 10 runs with 96 samples (up to 94 patient specimens plus 2 controls)
NOTICE
Kit size
o Make sure that the kit size corresponds to the intended run size. Although not an
optimal use of reagents, a 96 kit size can be used for a 24 run.
o For the most efficient reagent utilization, it is advisable to maximize the number of
patient specimens processed within a run. Remaining reagents cannot be used later
for another run.
Reagent handling Some reagents are poured into reagent reservoirs and then placed onto their
dedicated positions on the reagent reservoir carriers.
Other reagents are ready to use. They are decapped and then placed onto their
dedicated positions on the reagent carrier.
Reagent expiry time zone offset
The reagent expiry date is based on the Coordinated Universal Time (UTC). The local time
CAUTION
for reagent expiry could be offset by plus or minus 12 hours, depending on the local time
zone relative to UTC.
r Check the reagent expiry date and consider that it is based on UTC.
U For instructions on handling and storage of reagents, refer to the test-specific package
insert.
Controls Two external controls (positive control and negative control) are provided in a
control kit. Controls are always processed on position A1 and B1 respectively of the
deepwell and microwell plates.
All controls are homogeneous and do not require vortexing or shaking prior to
loading on the instrument.
U
For instructions on handling and storage of controls, refer to the test-specific package
insert.
Controls are loaded on the reagent carrier not the sample carrier.
Q
Roche Diagnostics
cobas® 4800 System, Operator’s Manual · Version 1.1 9
Page 10

Workflow cobas® 4800 System
About workflows CT/NG Test
Workflow
In this chapter the different workflows are described.
About workflows
The following workflow types are available.
Workflow Description Ordering
Full workflow
(with or without LIS)
Recovery workflow
(with or without LIS)
Table 5 Workflow types
Sample preparation and
amplification and detection
Manual PCR setup and
amplification and detection
LIS or work order file
-
Roche Diagnostics
10 cobas® 4800 System, Operator’s Manual · Version 1.1
Page 11
cobas® 4800 System Workflow
$PSOLÀFDWLRQ'HWHFWLRQFREDV]
DQDO\]HU
6DPSOHSUHSDUDWLRQFREDV
[LQVWUXPHQW
6DPSOHDQGUHDJHQWKDQGOLQJDUHD FREDVVRIWZDUH
1
6WDUWXSWKHV\VWHP
2
3HUIRUPLQVWUXPHQWPDLQWHQDQFH
3
5HPRYHVDPSOHVDQG
UHDJHQWVIURPVWRUDJH
4
6WDUWQHZUXQ
5
/RDGVDPSOHV
7
/RDGFRQVXPDEOHVGHHSZHOOSODWHPLFURZHOOSODWHWLSUDFNV
8
/RDGUHDJHQWV
9
6WDUWVDPSOHSUHSDUDWLRQUXQ
10
8QORDGDQGVHDOPLFURZHOOSODWH
11
5HPRYHVDPSOHVXVHGUHDJHQWVGHHSZHOOSODWH
12
/RDGPLFURZHOOSODWHLQWRDQDO\]HU
13
5HYLHZUHVXOWV
14
:LWK/,6VHQGUHVXOWVWR/,6
15
8QORDGDQDO\]HU
:LWKRXW/,6FUHDWHZRUNRUGHU
6
:LWK/,6FRQÀUPZRUNRUGHU
CT/NG Test Overview of full workflow
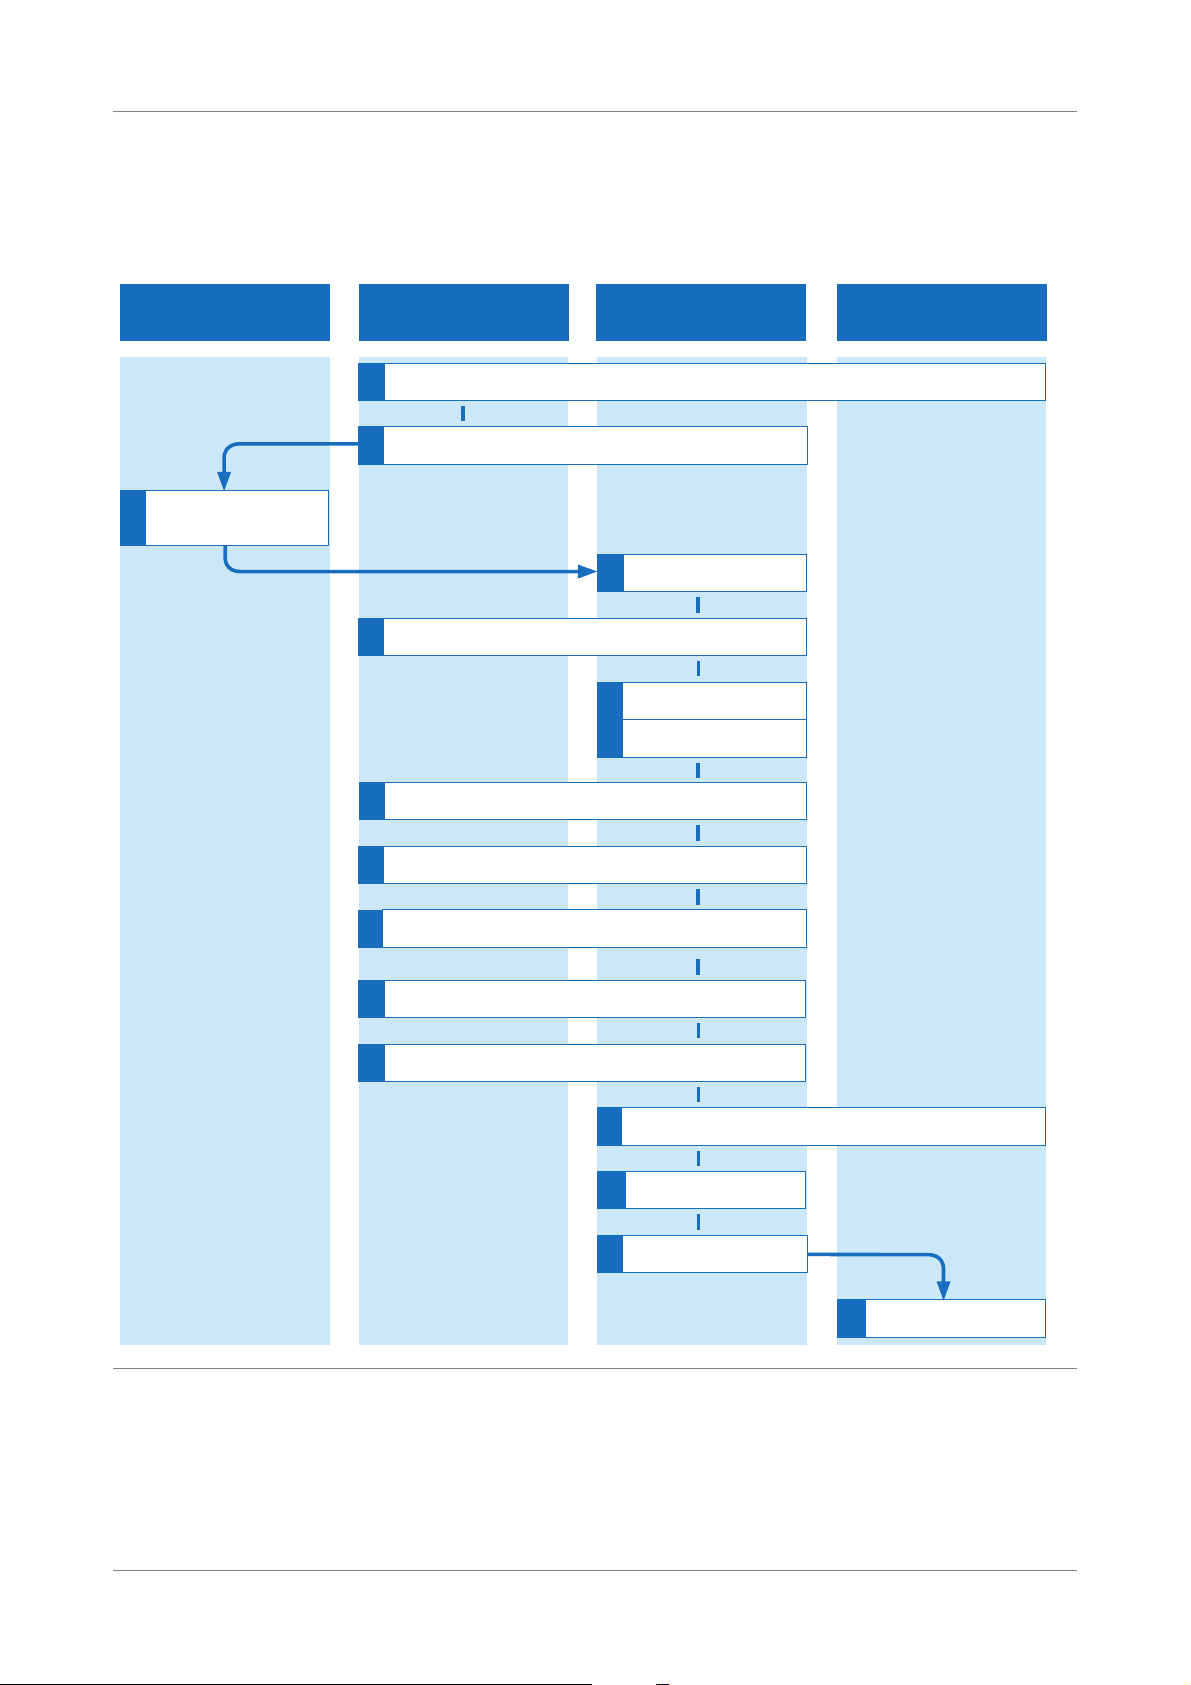
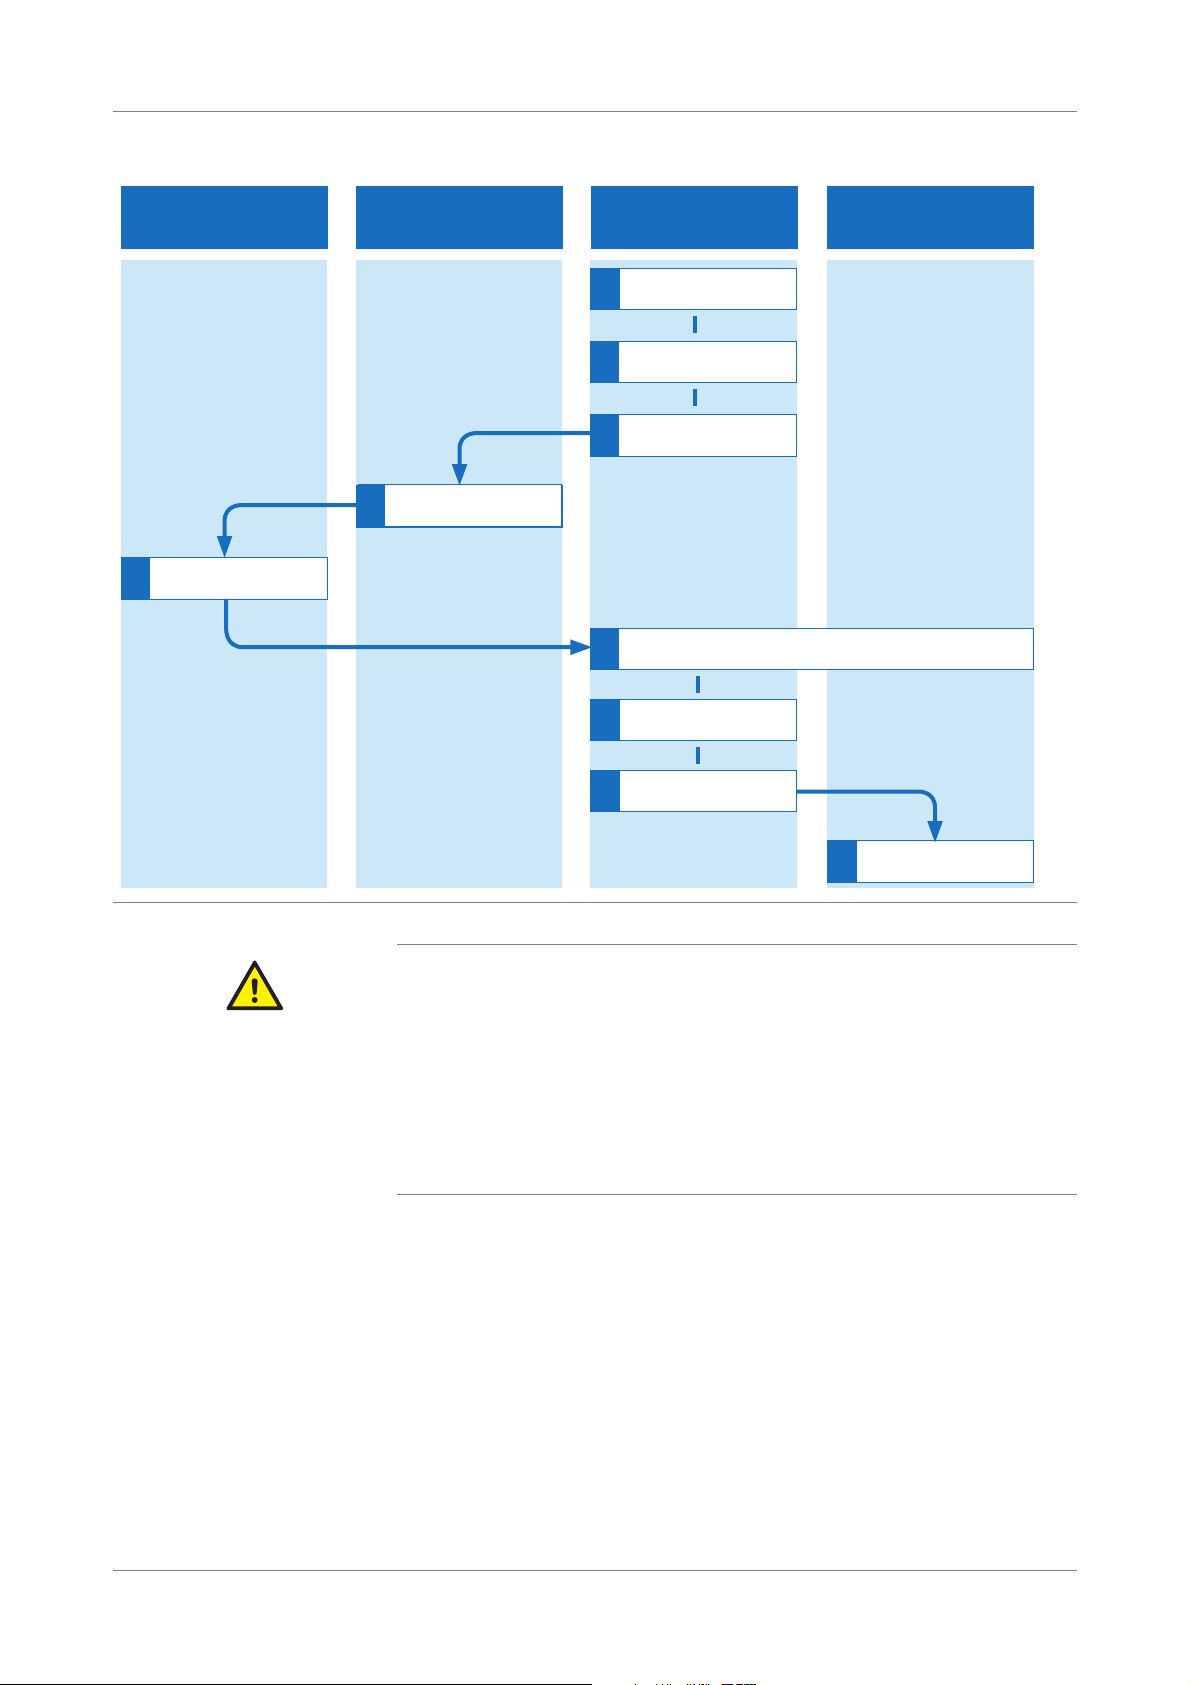
Overview of full workflow
The full workflow with and without LIS is shown below.
Figure 2 Full workflow (with and without LIS)
Roche Diagnostics
cobas® 4800 System, Operator’s Manual · Version 1.1 11
Page 12
Workflow cobas® 4800 System
Overview of full workflow CT/NG Test
Infection by samples and associated materials due to inappropriate laboratory
practices
WARNING
Follow Good Laboratory Practices, especially when working with biohazardous material. If
Good Laboratory Practices are not followed, contact with biohazardous material may
occur, resulting in infection.
r Do not eat, drink, or smoke in laboratory work areas.
r Wear lab gloves and lab coats whenever preparing consumables, reagents, samples, or
when cleaning.
r Wear eye protection when handling samples. Wash hands thoroughly afterwards.
Full workflow short guide
The following short guide is a summary of the workflow without details.
For a complete and detailed description of the workflow, see Performing a full workflow
U
run (p. 18)
Step User action
1
Start up the system. Switch on the analyzer, heater/shaker unit, and
instrument
1. Switch on the analyzer.
2. Switch on heater/shaker unit.
3. Switch on the instrument.
Start up and log on to the software
1. Switch on the monitor and control unit.
2. Log on to the software.
2
Perform instrument
maintenance.
1. Choose Overview > System > cobas x 480 tab
and check maintenance status of the
instrument.
o If weekly maintenance is due, choose the
Perform weekly maintenance button.
o If daily maintenance is due, choose the Perform
daily maintenance button.
Follow the instructions displayed on the monitor.
3
Remove samples and reagents
from storage.
4
Start new run. 1. Choose (New run).
Table 6 Full workflow short guide (with or without LIS)
Roche Diagnostics
12 cobas® 4800 System, Operator’s Manual · Version 1.1
U For instructions on storage and handling of
reagents, samples and controls, refer to testspecific package insert.
2. Select the Full option.
3. Select the CT/NG check box.
4. Optionally, type a run name.
5. Choose the OK button.
Page 13
cobas® 4800 System Workflow
CT/NG Test Overview of full workflow
Step User action
5
Load samples. 1. Decap samples.
2. Place samples on corresponding carrier.
3. Insert sample carriers on autoload tray.
4. Choose the Load specimen button.
6
With LIS, confirm the work order
or
Without LIS, create the work
order.
7
Load consumables. 1. Place listed consumables on appropriate
With LIS:
1. Confirm the work order and choose the Next
button.
or
Without LIS:
1. Define the type of specimen.
2. Define the requested result.
3. Choose the Next button.
carriers.
2. Insert carriers on autoload tray.
3. Choose the Load consumables button.
8
Load reagents. 200 mL reagent reservoir carrier
1. Load wash buffer reagent 200 mL on reagent
reservoir carrier as indicated in the wizard
(scan-scan-pour-place principle).
2. Insert carrier on autoload tray.
3. Choose the Load reagents button.
50 mL reagent reservoir carrier
1. Load reagents on 50 mL reagent reservoir
carrier as indicated in the wizard (scan-scanpour-place principle).
2. Insert carrier on autoload tray.
3. Choose the Load reagents button.
Reagent carrier
1. Open reagent vials and load them on reagent
carrier as indicated in the wizard.
2. Insert carrier on autoload tray.
3. Choose the Load reagents button.
9
Start sample preparation run. 1. Choose the Start run button.
The sample preparation starts.
2. Check the timer in the wizard.
Table 6 Full workflow short guide (with or without LIS)
Roche Diagnostics
cobas® 4800 System, Operator’s Manual · Version 1.1 13
Page 14
Workflow cobas® 4800 System
Overview of recovery workflow CT/NG Test
Step User action
10
Unload and seal microwell plate. 1. To review the results of the sample preparation,
choose the Sample Preparation results button.
2. Choose the Unload button.
3. Seal the microwell plate as indicated on screen.
4. Choose the Next button.
11
Remove used reagents, samples,
and deepwell plate.
12
Load microwell plate on to the
analyzer.
1. Remove used reagents, samples, and deepwell
plate from the instrument.
1. Press the load button on the analyzer.
2. Place the sealed microwell plate into the
microwell plate loader.
3. Press the load button again.
The amplification and detection run starts
automatically.
4. Check the timer in the wizard.
13
Review result and accept results. 1. Choose the Show result button.
2. Review and accept results in Results work area.
3. Select results and choose (Print) to print
the results report, if required.
14
With LIS, send the results to LIS. Consider that depending on the configuration, all
results are transferred to LIS or only accepted
results are transferred to LIS. Control results are
always uploaded to LIS.
1. Select a result or group of results and choose the
Send results to LIS button.
15
Unload the microwell plate from
the analyzer.
Table 6 Full workflow short guide (with or without LIS)
1. Unload the microwell plate from the analyzer as
soon as is practical after the run has finished.
2. Discard the microwell plate according to the
appropriate local regulations.
Overview of recovery workflow
The recovery workflow allows you to recover failed runs where the sample has been
successfully prepared. A run can only be recovered one time.
The recovery workflow is shown below.
Roche Diagnostics
14 cobas® 4800 System, Operator’s Manual · Version 1.1
Page 15
cobas® 4800 System Workflow
Sample preparation cobas
x 480 instrument
Sample and reagent handling
area
cobas 4800 software
$PSOLÀFDWLRQ'HWHFWLRQ
cobas z 480 analyzer
1
Start recovery run
5
Remove deepewell plate
6
Load microwell plate into analyzer
2
6HOHFWUXQDQGDGG,'V
3
Print plate layout report
4
Get deepwell plate
5
Set up microwell plate
7
Review results
9
Unload analyzer
8
With LIS: send results
to LIS
CT/NG Test Overview of recovery workflow
Figure 3 Recovery workflow
Recovery workflow short guide
CAUTION
Infection by samples and associated materials due to inappropriate laboratory
practices
Follow Good Laboratory Practices, especially when working with biohazardous material. If
Good Laboratory Practices are not followed, contact with biohazardous material may
occur, resulting in infection.
r Do not eat, drink, or smoke in laboratory work areas.
r Wear lab gloves and lab coats whenever preparing consumables, reagents, samples, or
when cleaning.
r Wear eye protection when handling samples. Wash hands thoroughly afterwards.
The following short guide is a summary of the workflow without details.
For a complete and detailed description of the workflow, see Performing a recovery
U
workflow run (p. 42)
Roche Diagnostics
cobas® 4800 System, Operator’s Manual · Version 1.1 15
Page 16
Workflow cobas® 4800 System
Overview of recovery workflow CT/NG Test
Step User action
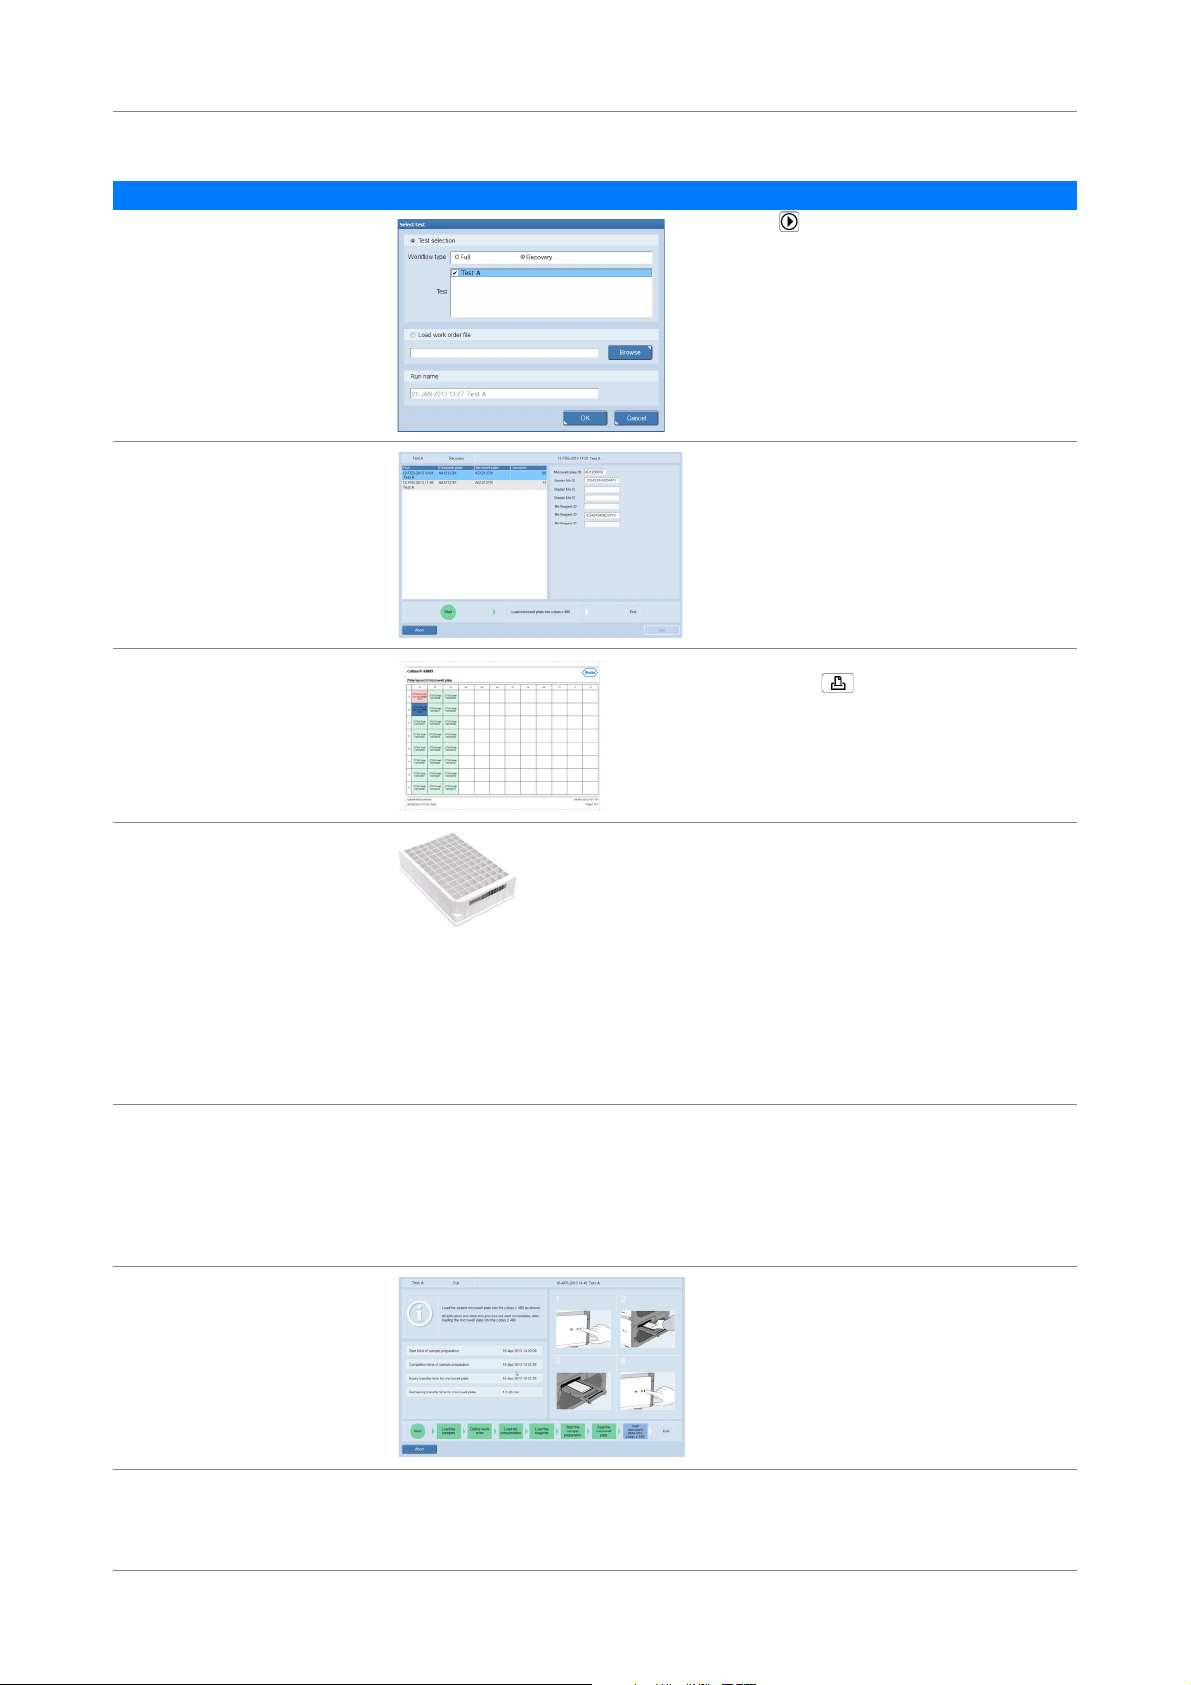
1
Start a recovery workflow run. 1. Choose (New run).
2. Select the Recovery option.
3. Select the CT/NG check box.
4. Optionally, type a run name.
5. Choose the OK button.
2
Select the run to recover and add
new IDs
3
Print the microwell plate layout. 1. To print the work order file for microwell plate
1. Choose the run to recover.
2. In the Microwell plate ID field, scan the
microwell plate barcode.
3. In the Master Mix ID field, scan the master mix
reagent barcode.
4. In the Mn Reagent ID field, scan the Mn
reagent barcode.
setup, choose (Print) from the global
navigation bar.
2. In the software, choose the Next button.
4
Get the deepwell plate.
1. Do one of the following:
o If the deepwell plate has been unloaded by
the instrument, remove it from the plate
carrier, or
o If the deepwell plate has been stored, get it
from storage, or
o If the deepwell plate has not been unloaded
by the instrument, unload the deepwell
plate manually.
U For details how to unload the instrument
manually, refer to the cobas
System Manual.
5
Set up the new microwell plate. 1. Pipette the reagents and prepared specimens
into the microwell plate in accordance with the
microwell plate layout and the description in
the test-specific package insert.
2. Seal the microwell plate.
3. If necessary, log back on to the software.
4. In the software, choose the Next button.
6
Load microwell plate into the
analyzer.
1. Press the load button on the analyzer.
2. Place the sealed microwell plate into the
microwell plate loader.
3. Press the load button again.
The amplification and detection run starts
automatically.
4. Check the timer in the wizard.
®
4800 System
Table 7 Recovery workflow short guide
Roche Diagnostics
16 cobas® 4800 System, Operator’s Manual · Version 1.1
Page 17
cobas® 4800 System Workflow
CT/NG Test
Step User action
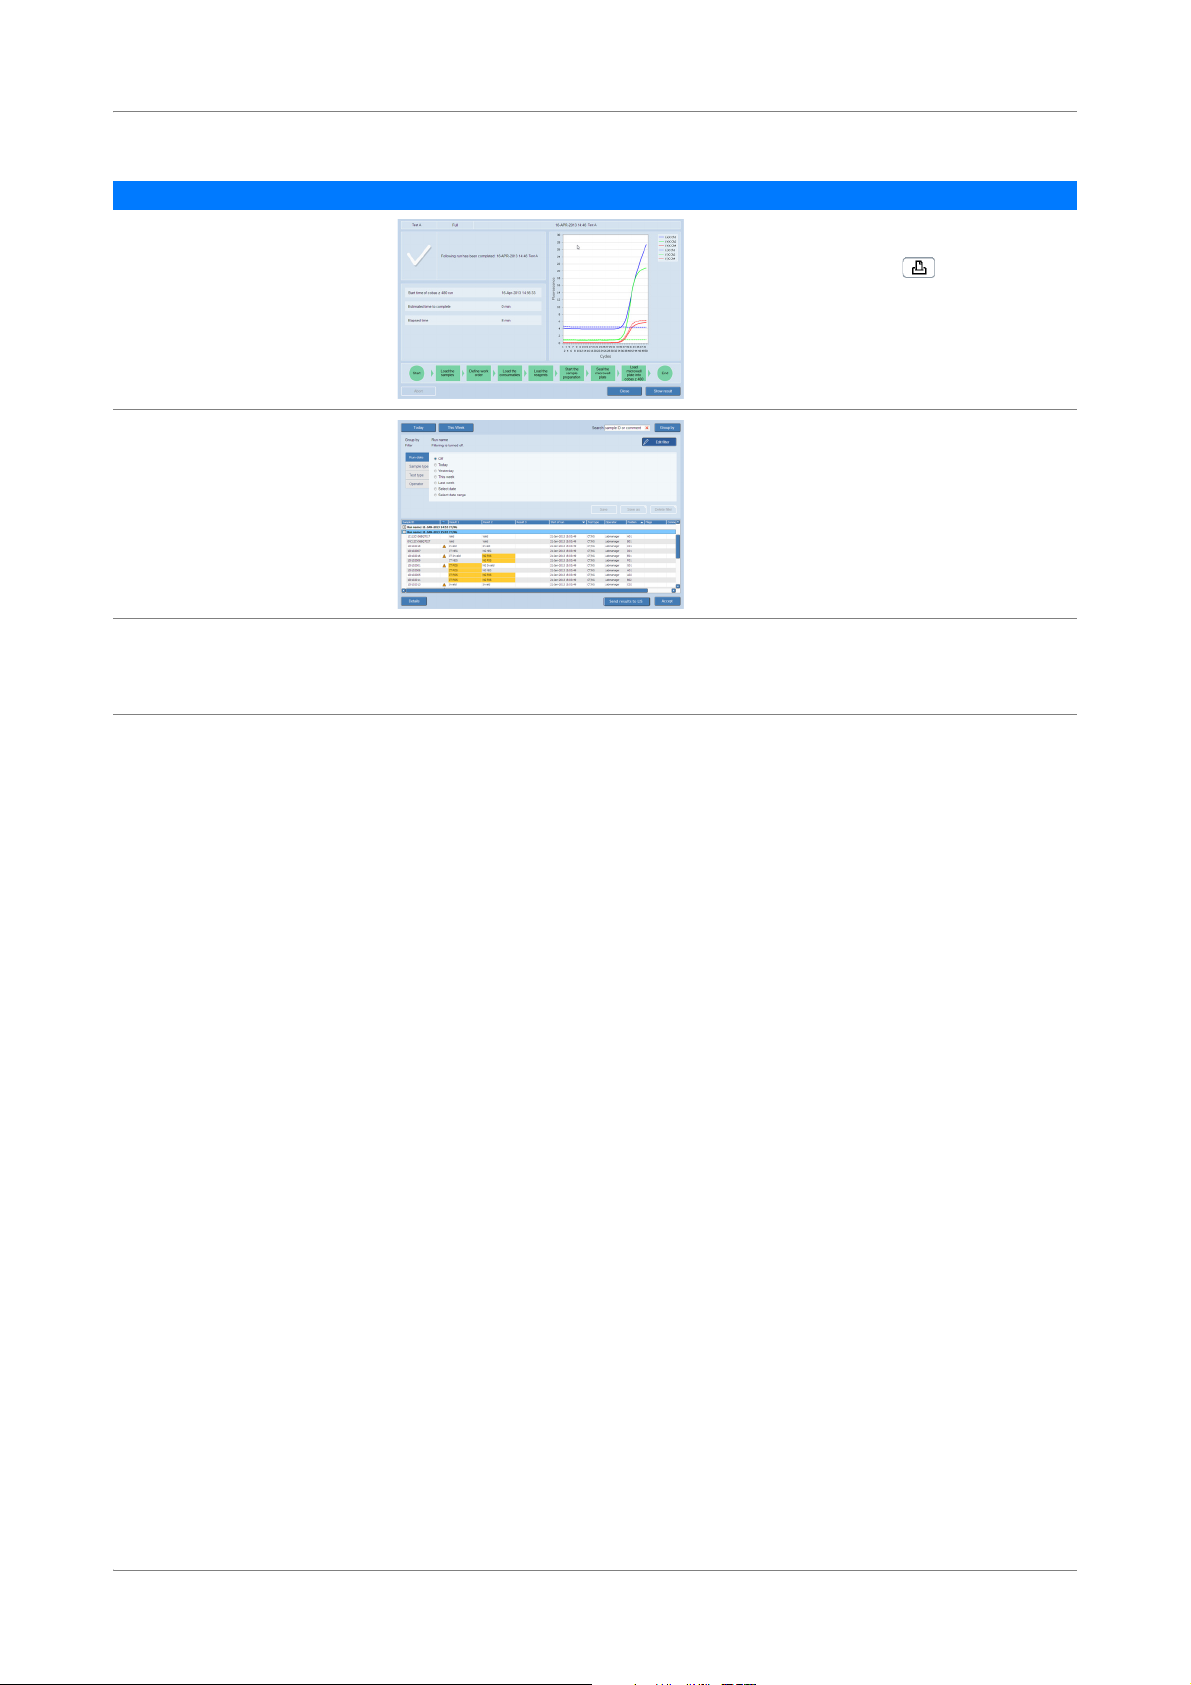
7
Review and accept results. 1. Choose the Show result button.
2. Review and accept results in Results work area.
3. Select results and choose (Print) to print
the results report, if required.
8
With LIS, send the results to LIS. Consider that depending on the configuration, all
results are transferred to LIS or only accepted
results are transferred to LIS. Control results are
always uploaded to LIS.
1. Select a result or group of results and choose the
Send results to LIS button.
9
Unload the microwell plate from
the analyzer.
Table 7 Recovery workflow short guide
1. Unload the microwell plate from the analyzer as
soon as is practical after the run has finished.
2. Discard the microwell plate according to the
appropriate local regulations.
Roche Diagnostics
cobas® 4800 System, Operator’s Manual · Version 1.1 17
Page 18

Operation cobas® 4800 System
Safety information CT/NG Test
Operation
In this chapter the operation of the system is described.
Safety information
Considerations before operation
Make sure that you have read and understood the chapter General safety information in
the cobas®4800 System System Manual. The following safety messages in particular are
relevant:
r Warning messages:
o Loss of sight due to staring into the laser beam
o Infection by samples and associated materials
o Infection and injury due to sharp objects
o Infection by biohazardous waste
o Contamination of the environment by liquid waste and solid waste
r Caution messages:
o Personal injury due to contact with moving parts
o Skin inflammation or injury caused by reagents
o Personal injury due to hot surface
r Safety precautions:
o Operator qualification
r Observe the illustrated system safety labels from the cobas
Manual
®
4800 System System
Performing a full workflow run
The following procedures guide you through all required steps to perform a full
workflow run with sample preparation on the instrument and amplification and
detection on the analyzer. The procedures cover both working modes: with and
without LIS. Steps that only apply to one working mode are indicated accordingly.
Performing startup procedures
NOTICE
Roche Diagnostics
18 cobas® 4800 System, Operator’s Manual · Version 1.1
Instrument damage due to improper handling
To prevent hardware damage, follow the steps in the exact order outlined when starting up
the system.
To start up the system, it is important that you perform the following steps in this
exact order:
1. Switch on the analyzer.
2. Switch on the heater/shaker unit.
3. Switch on the instrument.
4. Start up the software.
Page 19
cobas® 4800 System Operation
A
A
CT/NG Test Performing a full workflow run
P To switch on the analyzer
1
Switch on the analyzer. The power switch is located at the back of the analyzer.
The analyzer is powered on and initializes.
A Power switch of the analyzer
Figure 4 Switching on the analyzer
S
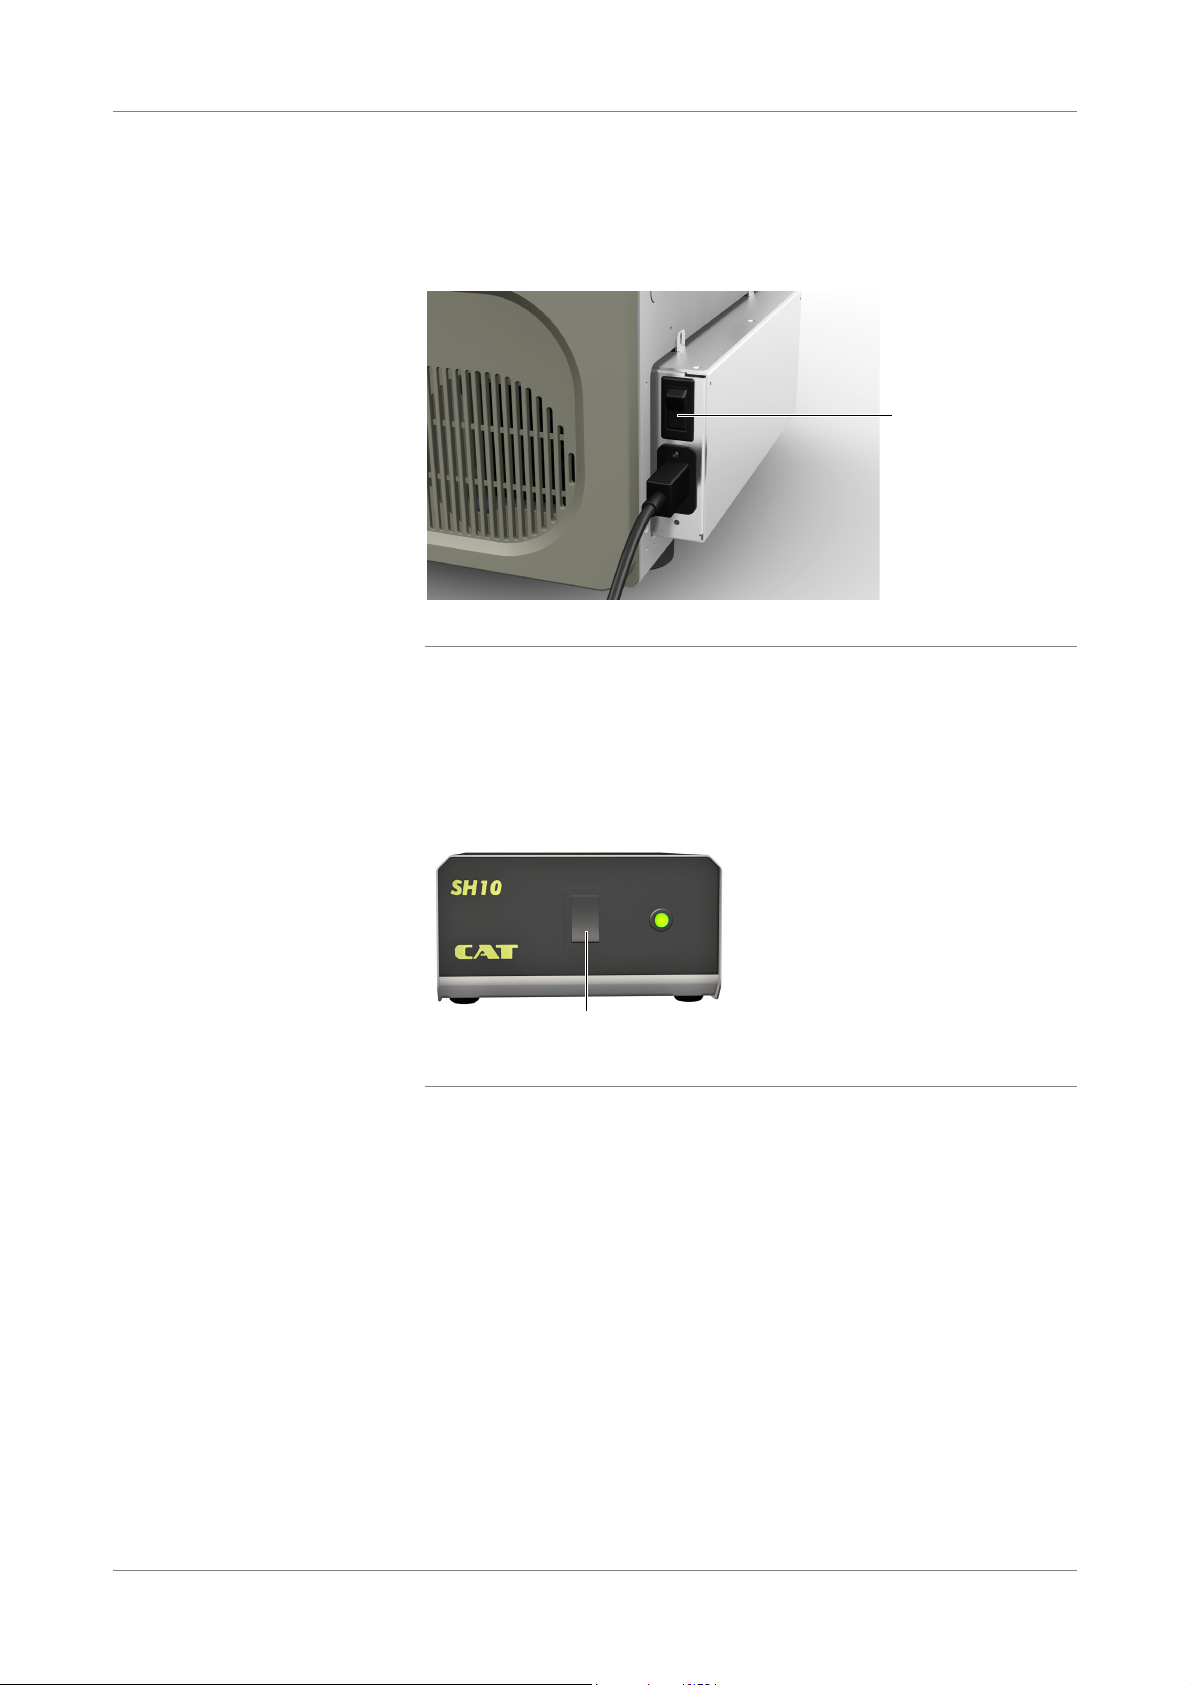
P To switch on the heater/shaker unit
1
Switch on the heater/shaker unit. The switch is located at the front of the
heater/shaker controller box.
A Power switch of heater/shaker controller box
Figure 5 Switching on the heater/shaker unit
S
Roche Diagnostics
cobas® 4800 System, Operator’s Manual · Version 1.1 19
Page 20
Operation cobas® 4800 System
A
Performing a full workflow run CT/NG Test
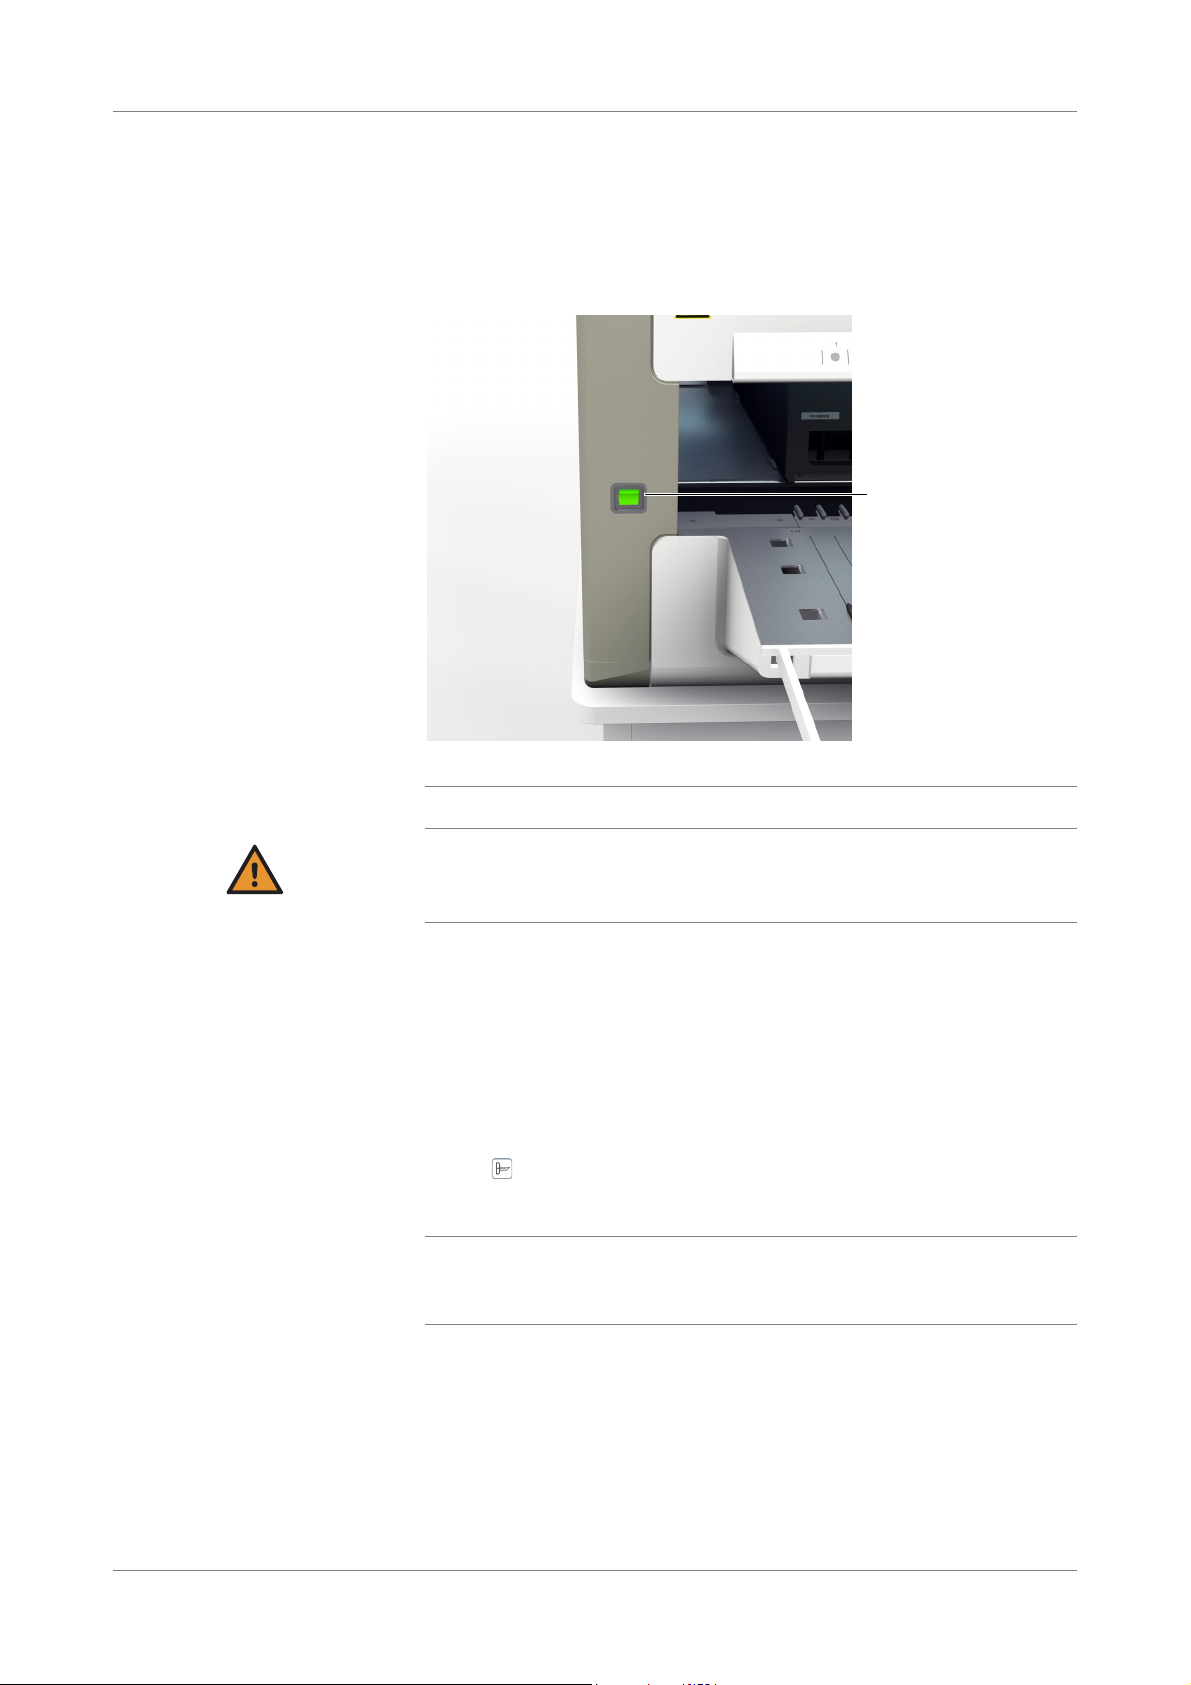
P To switch on the instrument
1
Switch on the instrument. The power switch is located at the front of the
instrument.
The instrument is powered on and initializes.
WARNING
A Power switch of the instrument
Figure 6 Switching on the instrument
Delay of results due to improper handling
Turning the power of the instrument off during a run can lead to a sample rerun.
r Do not turn off the instrument power during a run.
S
P To start up and log on to the software
1
Switch on the monitor and control unit.
After the Windows operating system starts, double-click the cobas 4800 v2.1
desktop icon to open the software.
The software displays the System overview tab.
2
Choose (Log on) to log on and enter your assigned user ID and password.
3
Choose the OK button.
Q
o The user ID is not case-sensitive.
o The password is case-sensitive. The password displays as asterisks when typed to
maintain security.
S
Roche Diagnostics
20 cobas® 4800 System, Operator’s Manual · Version 1.1
Page 21
cobas® 4800 System Operation
CT/NG Test Performing a full workflow run
Performing maintenance
Periodic maintenance needs to be performed in order to ensure safe and reliable
operation of the instrument.
NOTICE
Periodic maintenance
o Performing daily and weekly maintenance is mandatory. A sample preparation run can
only be started when maintenance is done.
o If any parts of the instrument or carriers have become contaminated, the weekly
maintenance procedure must be performed.
o Counters are reset to twenty-four hours when daily maintenance is performed. If
weekly maintenance is being performed, daily maintenance is not required on that day.
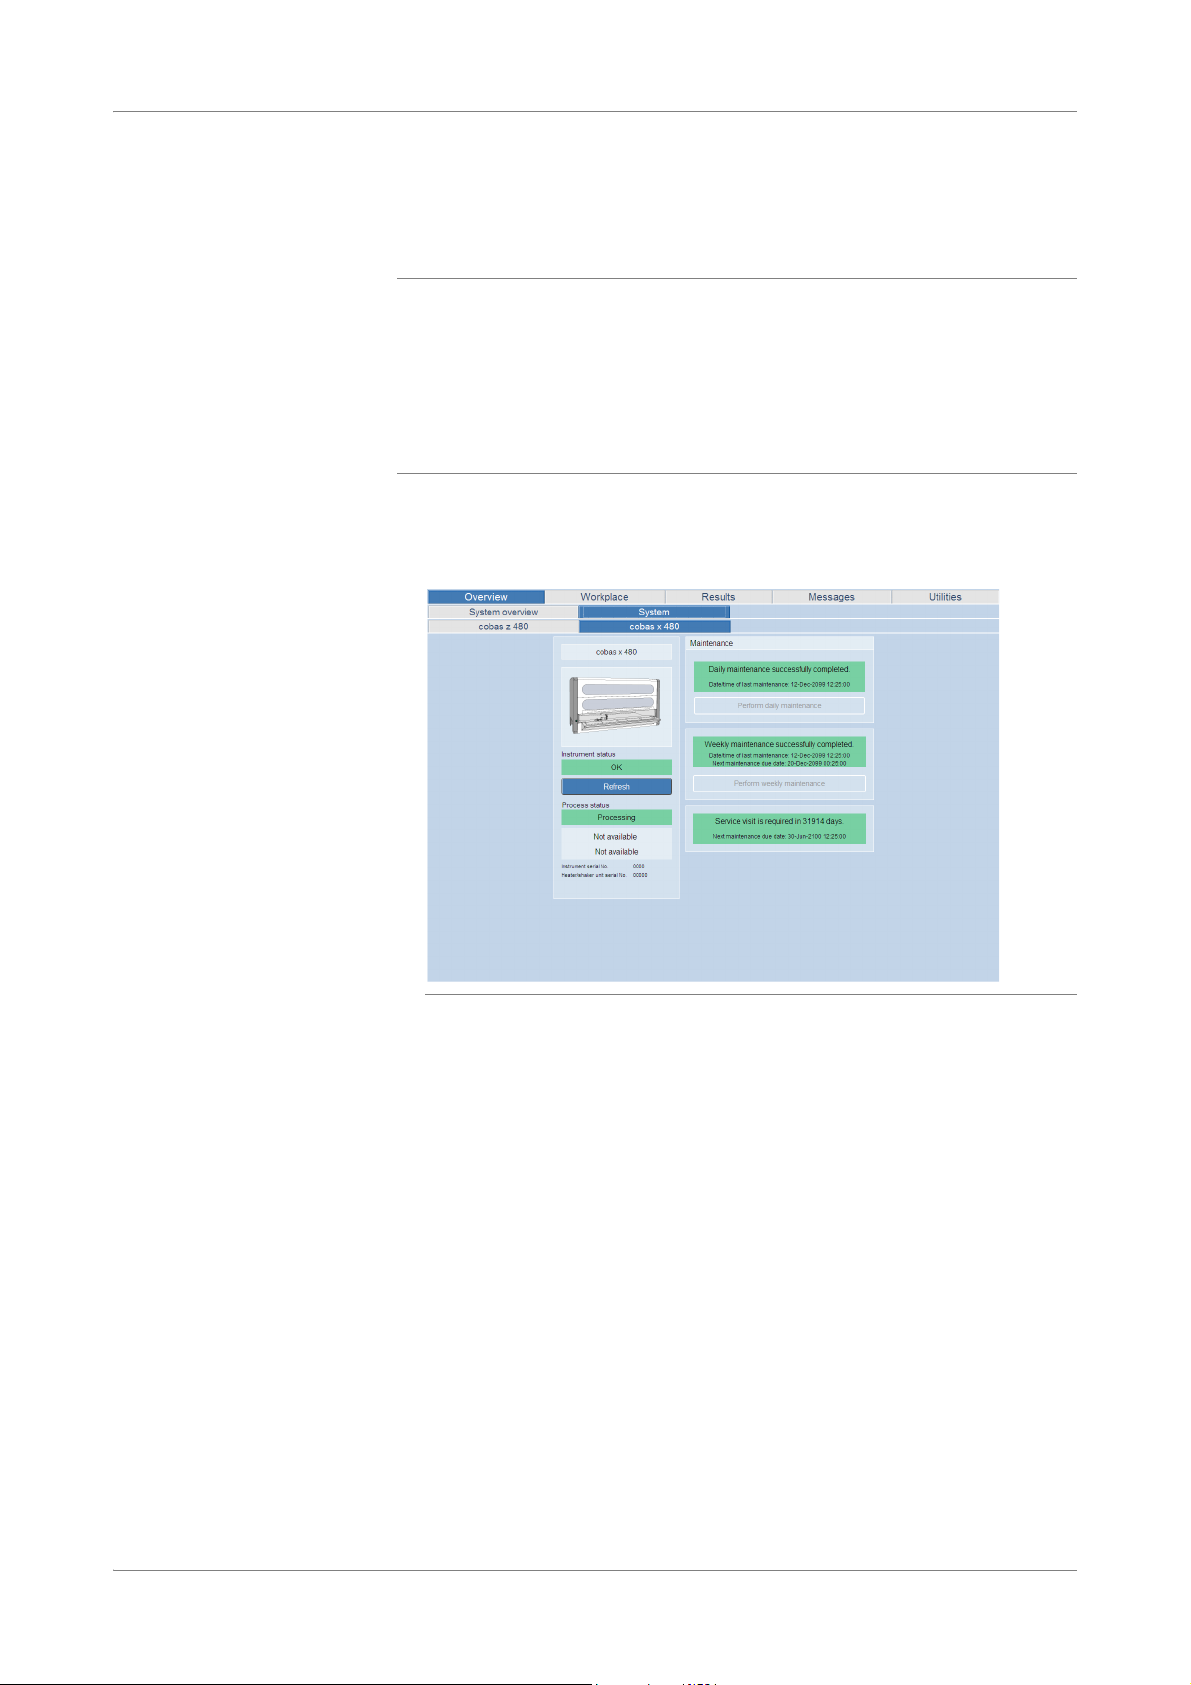
P To perform daily or weekly maintenance on the instrument
1
To check the maintenance status, choose Overview > System > cobas x 480 tab.
Figure 7 Checking the maintenance status
2
Do one of the following:
o If the weekly maintenance is due, choose the Perform weekly maintenance
button and follow the instructions displayed on the monitor.
U
For more details about weekly maintenance, refer to the cobas®4800 System System
Manual.
o If the daily maintenance is due, choose the Perform daily maintenance
button and follow the instructions displayed on the monitor.
For more details about daily maintenance, refer to the cobas®4800 System System
U
Manual.
S
Removing the samples and reagents from storage
The reagents that you need to perform the run depends on the run size.
U
For instructions on storage and handling of reagents, samples and controls, refer to testspecific package insert.
Roche Diagnostics
cobas® 4800 System, Operator’s Manual · Version 1.1 21
Page 22

Operation cobas® 4800 System
B
C
A
D
Performing a full workflow run CT/NG Test
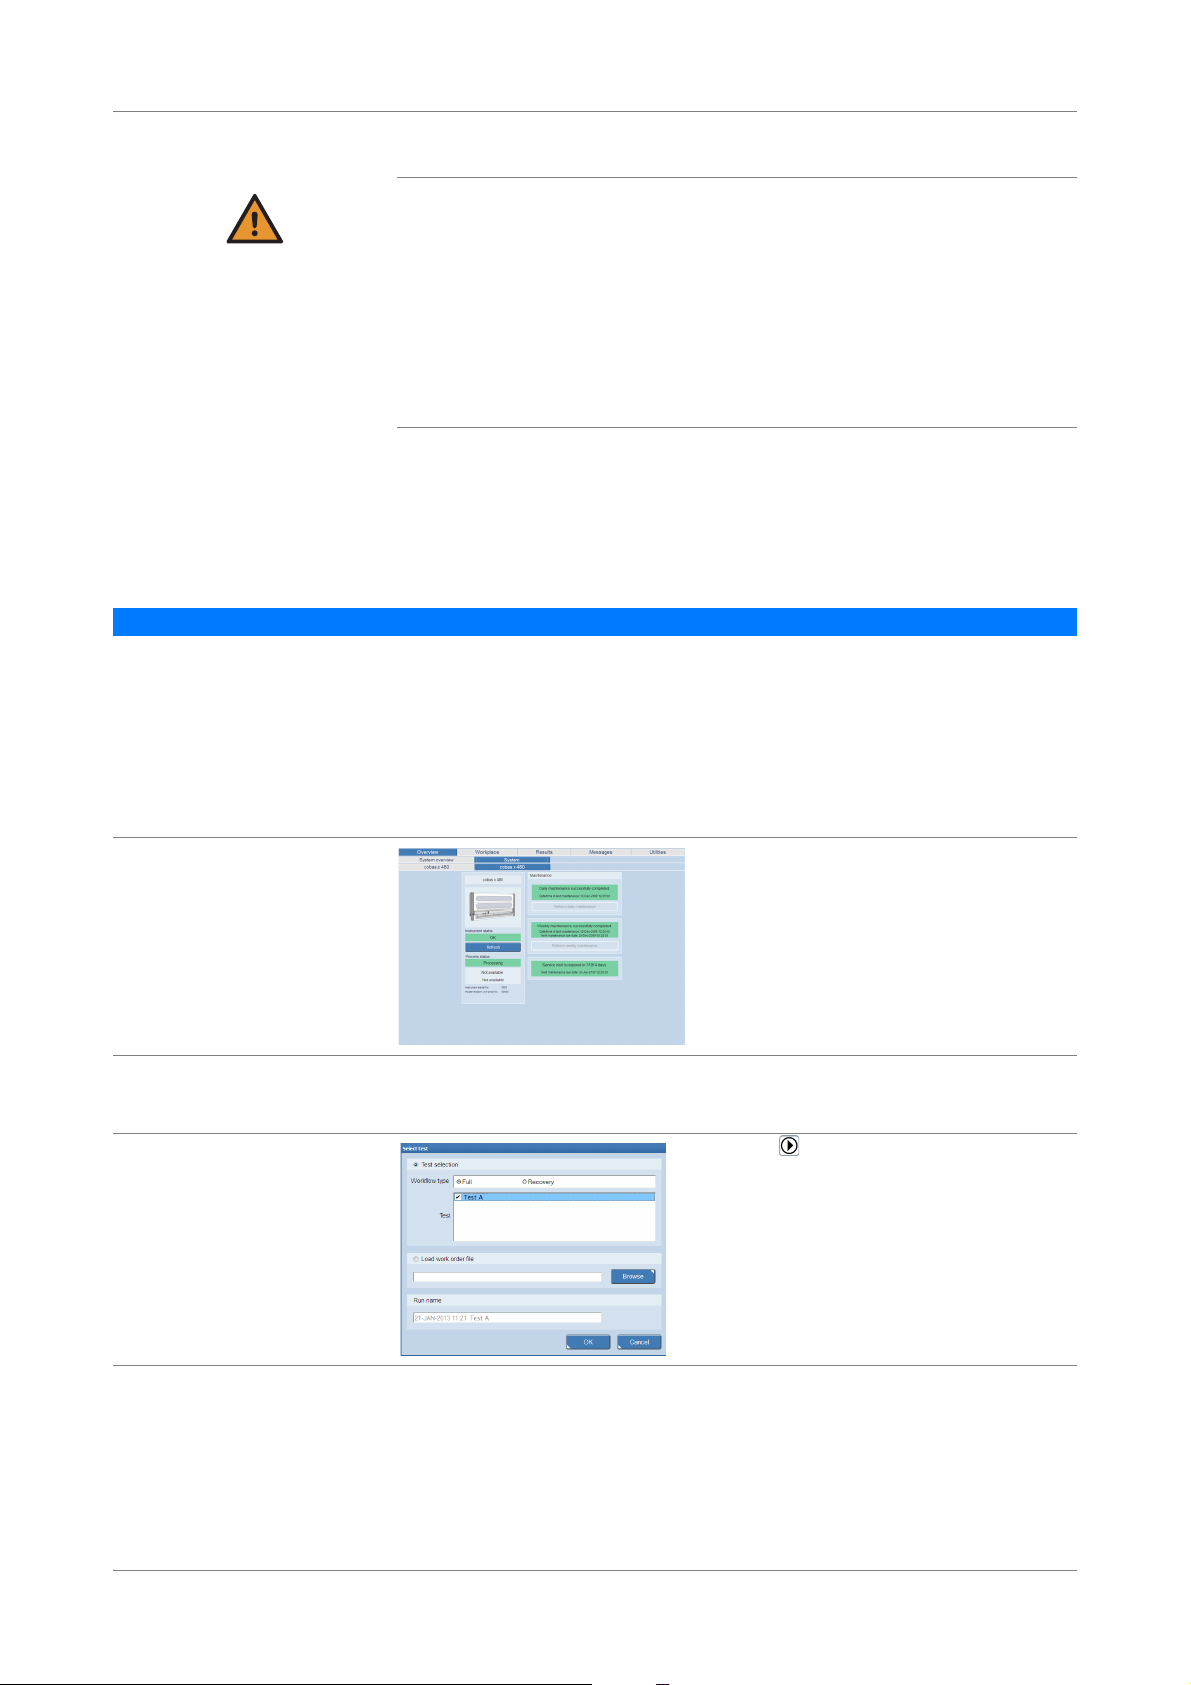
Starting a new run
A wizard guides you through the entire run, from sample preparation on the
instrument to amplification and detection on the analyzer.
Loss of reagents, samples, or consumables
Inappropriate user actions can cause loss of reagents, samples, or consumables.
r Do not disconnect the USB cable during a run. The run will be aborted immediately
r It is not possible to go back to a previous step in a run. To avoid losing reagents,
samples, or consumables, follow the guidelines outlined in this manual.
r If the instrument is installed on a bench top, a small solid waste bag is used. This solid
waste bag has a capacity for tips up to one full workflow run. Exchange the small solid
waste bag each time before starting a new run to avoid overfilling of the tip waste.
r You can use the sample editor to prepare one or more work order files before starting
a run, or to prepare a work order file for the next run while a run is still in progress.
U For details about replacing the small solid waste bag, refer to the cobas
System Manual.
Before starting a run, check the Overview > System > cobas z 480 tab if the Xenon
Q
lamp needs replacement. Replace the Xenon lamp, if required.
U For details about Xenon lamp replacement, refer to the cobas
Manual.
®
4800 System System
®
4800 System
P To start a new run
1
Choose (New run).
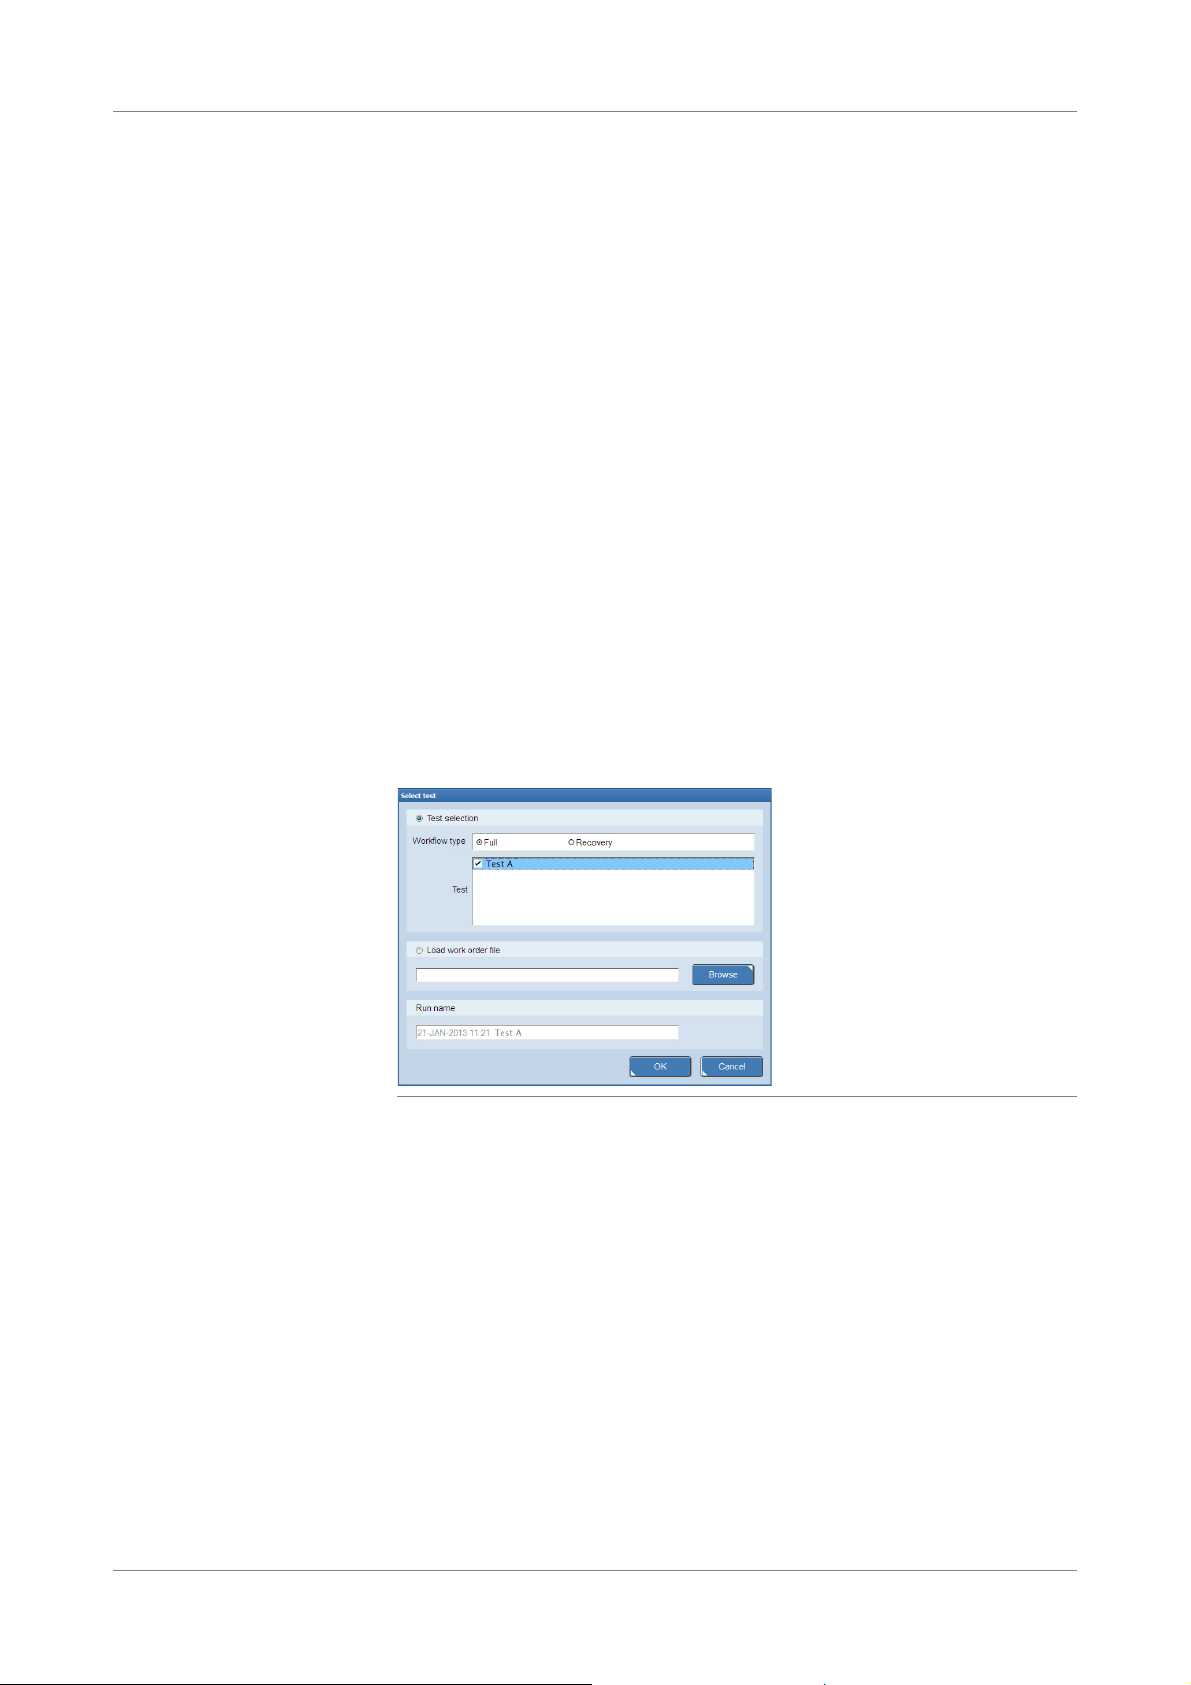
The Select test dialog box is displayed.
A Load a work order file. C Choose a test.
B Choose a Full workflow. D Browse for a work order file.
Figure 8 Select test dialog box
2
Select the Full option.
3
Select the CT/NG check box.
4
Optionally, enter a name for the run in the Run name field.
If you leave the field empty, the system generates a generic run name with the
date, time, and test name (e.g. "28-May-2013 11:57 AM Test A"). If you enter a
name for the run, the system adds a time stamp to the name.
Roche Diagnostics
22 cobas® 4800 System, Operator’s Manual · Version 1.1
Page 23

cobas® 4800 System Operation
CT/NG Test Performing a full workflow run
5
Choose the OK button.
The Workplace tab is displayed showing the wizard for the new run. The
instrument initializes. This can take some time.
S
Loading samples
Samples can be loaded in barcoded primary or secondary tubes.
Up to 94 patient specimens can be loaded for a single test run. Two positions on the
plates are reserved for controls. Controls are not loaded together with samples. They
are loaded onto the reagent carrier during reagent loading.
U
For a list of sample types, refer to the test-specific package insert.
U For more details about sample carriers, see About specimen types (p. 7)
o The sample editor and work order files are only used when the system is not connected
Q
to an LIS or if the LIS is not working.
o If an LIS is used, order information is loaded automatically from the LIS after samples
are loaded onto the instrument.
o If more specimens are loaded than requested in the work order file, you can define the
ordering for these samples in the sample editor.
o If a work order file and the loaded samples do not match, both the work order file and
the samples must be reloaded. It is not possible to choose another work order file and
leave the samples loaded.
o Samples can be loaded in any order as long as they match the set of samples listed in
the work order file.
o If you unload samples to correct a work order mismatch error, all carriers are unloaded.
If you unload samples to correct another type of error (e.g. barcode reading), only the
carrier with the error is unloaded.
o Do not load empty or capped sample tubes. If a hardware error occurs, manually
remove all carriers, and then restart the system.
o You cannot mix specimen type PreservCyt
the same run.
®
with specimen types Urine and/or Swab in
U For more information about barcodes and barcode character lengths, refer to the
cobas®4800 System System Manual.
Spillage and contamination due to overfilling sample tubes
Do not overfill sample tubes to avoid spillage and contamination during loading.
WARNING
r The maximum sample volume in the secondary tubes is 10 mL.
P To load samples
1
Decap the sample tubes or containers and place the samples on the appropriate
carrier. The sample barcodes must face to the right of the carrier.
Q
Roche Diagnostics
cobas® 4800 System, Operator’s Manual · Version 1.1 23
Make sure that the sample tubes or containers are seated correctly in the sample
carrier.
U For details about sample placement, refer to the cobas
®
4800 System System Manual.
Page 24

Operation cobas® 4800 System
C
BA
Performing a full workflow run CT/NG Test
2
Insert all sample carriers into their designated track positions on the autoload
tray. The correct loading position is indicated by blinking LEDs on the LED bar
above the autoload tray.
U
For details about carrier loading, refer to the cobas®4800 System System Manual.
A Sample carrier C Sample barcodes facing to the right
B Tracks 17 through 34 are reserved for
sample carriers
Figure 9 Loading samples
3
When you have placed all sample carriers on the indicated track positions on the
autoload tray, choose the Load specimen button.
Check that all sample carriers are placed correctly before loading the samples.
Q
Sample carriers i.e. samples, are automatically unloaded when pipetting is finished. If
you do not want this, clear the Unload sample carriers after samples were
transferred to deepwell plate check box.
Roche Diagnostics
24 cobas® 4800 System, Operator’s Manual · Version 1.1
Page 25

cobas® 4800 System Operation
A
A
B
CT/NG Test Performing a full workflow run
A When sample carriers are ready for loading, choose the Load specimen button.
Figure 10 Wizard > Load the samples
The sample carriers are loaded automatically onto the instrument. During
loading, the barcode reader scans the carrier barcode and the sample barcodes.
The scanned sample barcodes are displayed in the Sample ID column.
If the instrument is connected to an LIS, the orders are downloaded automatically
from the LIS after the samples are loaded.
4
Follow the instructions displayed on the monitor in case a sample barcode cannot
be read.
For details about barcode error handling, refer to cobas®4800 System System Manual.
U
S
Confirming or creating a work order file
Tips In the same run, you can select specimen types Swab and Urine. You cannot mix
samples of specimen type PreservCyt
To select a range of adjacent samples, use the Shift key.
To select several nonadjacent samples, use the Ctrl key.
A Defining multiple samples B Defining individual samples
Figure 11 Defining multiple or individual samples
®
with samples of a different specimen type.
Roche Diagnostics
cobas® 4800 System, Operator’s Manual · Version 1.1 25
Page 26

Operation cobas® 4800 System
B C D EA
F
Performing a full workflow run CT/NG Test
P To confirm or define the work order file
1
Do one of the following:
o If the instrument receives work orders from an LIS, check that the work order
is correct
or,
o If the instrument does not receive work orders from an LIS, define the type of
specimen and the requested result.
A Select one or more samples. D Displays the ID of the scanned sample.
B Defining the type of specimen. E If you are using LIS or you have loaded a
work order file, the sample IDs are displayed
under Received ID.
C Defining the result. F Confirm the work order.
Figure 12 Confirming or creating a work order file
2
Choose the Next button.
The work order file information is cross-checked against the loaded samples. Run
and test types, number of samples, sample types, and barcode IDs must match.
3
In case the work order file and the loaded samples do not match, follow the
instructions displayed on the monitor.
S
Roche Diagnostics
26 cobas® 4800 System, Operator’s Manual · Version 1.1
Page 27

cobas® 4800 System Operation
CT/NG Test Performing a full workflow run
Loading the consumables
One deepwell plate (1.6 mL), one microwell plate, and two tip rack carriers are used
for each run.
Delay of results due to insufficient pipetting tips/tip rack carriers
The total number of pipetting tips per run varies and depends on several criteria (test type,
WARNING
specimen type, run size, etc.) The instrument tracks tip usage from run to run. The
instrument checks if enough pipetting tips have been loaded to perform the run. If there
are not enough, a message is displayed. Partially used tip racks can be used in next run.
r To perform a run, you must load all the required tip rack carriers with enough tips into
the instrument. If you unload samples to correct a work order mismatch error, all
carriers are unloaded. If you unload samples to correct another type of error (e.g.
barcode reading), only the carrier with the error is unloaded.
Incorrect results due to improper loading of the microwell plate or deepwell plate
If the microwell plate or deepwell plate are sealed when placed on the instrument, the seal
WARNING
could be pierced during the run resulting in carryover.
r Do not seal the microwell plate or deepwell plate before loading the plate into the
instrument.
All consumables are barcoded and designed to be used only once. The software tracks the
Q
use of the consumables and rejects already used consumables.
P To load the consumables
1
Place the listed consumables (e.g. 1 mL pipetting tips) on the appropriate carrier.
The barcodes must face to the right of the carrier.
For details about carrier loading, refer to the cobas®4800 System System Manual.
U
2
Load all carriers into their designated track positions on the autoload tray. The
correct loading position is indicated by blinking LEDs on the LED bar above the
autoload tray.
Use the following tracks:
o Plate carrier: tracks 1 through 6
o Left tip rack carrier: tracks 11 through 16
o Right tip rack carrier: tracks 35 through 40
Roche Diagnostics
cobas® 4800 System, Operator’s Manual · Version 1.1 27
Page 28

Operation cobas® 4800 System
Performing a full workflow run CT/NG Test
3
When you have placed all carriers on the indicated track positions on the
autoload tray, choose the Load consumables button.
Check that all carriers are placed correctly before loading the consumables.
Figure 13 Loading consumables
The carriers are loaded automatically onto the instrument. During and after
loading, the barcode reader scans the carrier barcodes and the consumable
barcodes.
4
In case a consumables barcode cannot be read or a consumable is recognized as
already used, follow the instructions.
For details about barcode handling and inventory errors, refer to the cobas®4800
U
System System Manual.
After successful loading of consumables, the wizard asks for loading the reagents.
S
Loading the reagents
The reagent reservoirs are barcoded and need to be filled manually by the operator
(scan-scan-pour-place principle) for each run.
The reagent carrier holds the test-specific reagents for sample processing and PCR
setup.
The required reagents and controls are manually decapped and then placed onto
their dedicated positions on the reagent carrier. The reagent barcodes must face to
the right of the carrier.
Scan-scan-pour-place principle To minimize handling errors the reagent reservoirs are filled and placed using the
scan-scan-pour-place principle:
1. Scan the barcode of the required reagent using the hand-held barcode reader.
2. Scan the barcode of an unused reagent reservoir using the hand-held barcode
reader.
3. Pour the reagent in the scanned reagent reservoir.
4. Place the filled reagent reservoir onto the required position of the reagent
reservoir carrier as indicated in the wizard.
The reagent reservoirs are available in two sizes: 200 mL and 50 mL. The reagent
reservoir barcodes must face to the right of the carrier.
Roche Diagnostics
28 cobas® 4800 System, Operator’s Manual · Version 1.1
Page 29

cobas® 4800 System Operation
CT/NG Test Performing a full workflow run
Incorrect results or delay of results due to wrong placement of reagents
Each reagent has a specific position assigned to it on the carriers. Even though each
WARNING
reagent is uniquely identified by barcodes, it must be placed at the correct location,
otherwise an error message will be generated, and loading will not proceed.
There is a limited time (60 minutes) between scanning the reagents and initiating the
instrument run. The timer starts when the wash buffer reagent vial is scanned. The system
checks if the reagent onboard stability time is elapsed when the run is started.
All controls are homogeneous and do not require vortexing or shaking prior to loading on
the instrument.
r Always place the reagent reservoirs and the reagent vials in the indicated positions on
the carriers before starting a run.
U For instructions on handling and storage of reagents and controls, refer to test-specific
package insert.
Considerations before loading the reagents
r Consider the following:
o All reagents and reagent reservoirs are barcoded and designed to be used only
once. The software tracks the use of the reagents and reagent reservoirs and
rejects partially used reagents or previously used reagent reservoirs.
o An acoustic signal is issued and an error message is displayed in the alarm area
when the system does not accept a scanned reagent barcode.
o To minimize the risk of contamination, it is highly recommended to change lab
gloves between handling patient samples and loading reagents onto instrument.
o Make sure that the reagent kit size corresponds to the intended run size. Although
not an optimal use of reagents, a 96 kit size can be used for a run size of 72 or less.
o For the most efficient reagent utilization it is advisable to maximize the number of
patient specimens processed within a run. Remaining reagents cannot be used
later on in another run.
o The reagent inventory marks a reagent as used as soon as it is assigned to a
reservoir. From this time point on the reagent is dedicated to this run and cannot
be used later on another run even if the reagent is not used during the run.
U For instructions on storage and handling of reagents and controls, refer to the test-
specific package insert.
The following table shows an example of the reagent positions on the different
carriers. For the exact placement of reagents, refer to the color coded picture
displayed in the software.
Example of reagent loading for
Swab and Urine
Roche Diagnostics
cobas® 4800 System, Operator’s Manual · Version 1.1 29
Carrier type Position Reagents
200 mL reagent
reservoir carrier
50 mL reagent
reservoir carrier
Reagent carrier 1 through 14 Not used
Table 8 Placement of reagents (example for 24/96 batch size)
1 through 3 Not used
4 Wash buffer
1 through 3 Not used
4MGP
5Elution buffer
15 Internal control
16 Positive control
Page 30

Operation cobas® 4800 System
Performing a full workflow run CT/NG Test
Carrier type Position Reagents
17 Negative control
18 Control diluent
19 through 21 Not used
22 Master mix reagent (for 96-sample runs only)
23 Master mix reagent
24 Mn reagent
Table 8 Placement of reagents (example for 24/96 batch size)
Example of reagent loading for PC
Carrier type Position Reagents
200 mL reagent
reservoir carrier
50 mL reagent
reservoir carrier
Reagent carrier 1 through 12 Not used
Table 9 Placement of reagents (example for 24/96 batch size)
1 through 3 Not used
4 Wash buffer
1Not used
2SDS reagent
3 Lysis buffer
4MGP
5Elution buffer
13 Proteinase K reagent (for 96-sample runs only)
14 Proteinase K reagent
15 Internal control
16 Positive control
17 Negative control
18 through 21 Not used
22 Master mix reagent (for 96-sample runs only)
23 Master mix reagent
24 Mn reagent
P To load the reagents on the 200 mL reagent reservoir carrier
1
Scan the barcode of the wash buffer using the hand-held barcode reader.
The reagent in the list is highlighted in light green.
Scanning the barcode of the wash buffer starts the reagent onboard stability timer
in the software. The run must be started within 60 minutes.
2
Scan the barcode of an unused 200 mL reagent reservoir using the hand-held
barcode reader.
The reagent in the list is checked and highlighted in dark green.
Roche Diagnostics
30 cobas® 4800 System, Operator’s Manual · Version 1.1
Page 31

cobas® 4800 System Operation
A
CT/NG Test Performing a full workflow run
3
Pour the entire reagent vial in the scanned reagent reservoir.
Q
o It is advisable to pour the reagent into the reservoir in a lengthwise movement to
minimize the risk of splashing and resulting reagent loss.
o Do not pour reagents into reservoirs that are already placed onto a reagent rack.
Always follow the scan-scan-pour-place principle.
o Do not fill reagent reservoirs above the maximal fill height. A line within the reagent
reservoir indicates the maximal fill height.
o Handle filled reservoirs with particular care to avoid splashes and tipping over.
4
Place the filled reagent reservoir onto position 4 of the 200 mL reagent reservoir
carrier as indicated.
5
Insert the 200 mL reagent reservoir carrier into its designated track positions on
the autoload tray. The correct loading position is indicated by blinking LEDs on
the LED bar above the autoload tray.
Use the following tracks:
o 200 mL reagent reservoir carrier: tracks 48 through 49
6
When you have placed the 200 mL reagent reservoir carrier on the indicated track
positions on the autoload tray, choose the Load reagents button.
Check that the 200 mL reagent reservoir carrier is placed correctly before loading
it.
A When the carrier is ready for loading, choose the Load reagents button.
Figure 14 Load reagents
The 200 mL reagent reservoir carrier is loaded automatically onto the instrument.
During loading, the barcode reader scans the carrier barcode and the reagent
reservoir barcode.
Roche Diagnostics
cobas® 4800 System, Operator’s Manual · Version 1.1 31
Page 32

Operation cobas® 4800 System
Performing a full workflow run CT/NG Test
7
In case a barcode cannot be read or a reagent is recognized as already used, follow
the instructions displayed on the monitor.
For details about barcode handling and inventory errors, refer to the cobas®4800
U
System System Manual.
After successful loading, the wizard asks for loading the reagents for the 50 mL
reagent reservoirs.
S
P To load the reagents on the 50 mL reagent reservoir carrier
1
Scan the barcode of one of the reagents in the list using the hand-held barcode
reader.
The reagent in the list is highlighted in light green.
2
Scan the barcode of an unused 50 mL reagent reservoir using the hand-held
barcode reader.
The reagent in the list is checked and highlighted in dark green.
3
Pour the entire reagent vial in the scanned reagent reservoir.
Q
o It is advisable to pour the reagent into the reservoir in a lengthwise movement to
minimize the risk of splashing and resulting reagent loss.
o Do not pour reagents into reservoirs that are already placed onto a reagent rack.
Always follow the scan-scan-pour-place principle.
o Do not fill reagent reservoirs above the maximal fill height. A line within the reagent
reservoir indicates the maximal fill height.
o Handle filled reservoirs with particular care to avoid splashes and tipping over.
4
Place the filled reagent reservoir into the indicated position of the 50 mL reagent
reservoir carrier.
5
Repeat step 1 to 4 for all reagents in the list.
Roche Diagnostics
32 cobas® 4800 System, Operator’s Manual · Version 1.1
Page 33

cobas® 4800 System Operation
CT/NG Test Performing a full workflow run
6
Insert the 50 mL reagent reservoir carrier into its designated track position on the
autoload tray. The correct loading position is indicated by a blinking LED on the
LED bar above the autoload tray.
Use the following track:
o 50 mL reagent reservoir carrier: track 50
7
When you have placed the 50 mL reagent reservoir carrier on the indicated track
position on the autoload tray, choose the Load reagents button.
Check that the 50 mL reagent reservoir carrier is placed correctly before loading
it.
Figure 15 Loading reagents on the 50 mL reagent reservoir carrier
The 50 mL reagent reservoir carrier is loaded automatically onto the instrument.
During loading, the barcode reader scans the carrier barcode and the reagent
reservoir barcodes.
8
Follow the instructions in case a barcode cannot be read or a reagent is recognized
as already used.
For details about barcode handling and inventory errors, refer to the cobas®4800
U
System System Manual.
After successful loading, the wizard asks for loading the reagents for the reagent
carrier.
S
P To load the reagent carrier
1
Open the listed reagent vials and place them onto the indicated positions on the
reagent carrier.
To minimize reagent waste, the software displays the optimal reagent kit size
usage for the run. If the suggested kit size is not available, you can use the Change
kit size for function. Consider that using a larger kit size than required is not an
optimal use of reagents.
The reagent barcode must face to the right of the carrier.
Q
Roche Diagnostics
cobas® 4800 System, Operator’s Manual · Version 1.1 33
Open the reagent vials before placing them onto the reagent carrier to minimize the
risk of contamination.
Page 34

Operation cobas® 4800 System
Performing a full workflow run CT/NG Test
2
Insert the reagent carrier into its designated track on the autoload tray. The
correct track is indicated by a blinking LED on the LED bar above the autoload
tray.
Use the following track:
o reagent carrier: track 51
3
When you have placed the reagent carrier on the indicated track on the autoload
tray, choose the Load reagents button.
Check that the reagent carrier is placed correctly before loading it.
Q
The colors on reagent vials match the colors displayed on the software.
Figure 16 Loading reagents on the reagent carrier
The reagent carrier is loaded automatically onto the instrument. During loading,
the barcode reader scans the carrier barcode and the reagent vial barcodes.
4
In case a barcode cannot be read or a reagent is recognized as already used, follow
the instructions displayed on the monitor.
For details about barcode handling and inventory errors, refer to the cobas®4800
U
System System Manual.
After successful loading, the wizard shows the instrument deck. Loaded samples,
reagents and consumables are highlighted in green. The sample preparation
process is now ready to be started.
S
Starting the sample preparation run
The loading is now complete and the sample preparation is ready to be started. The
loaded instrument deck is shown with all loaded samples, reagents, and consumables
highlighted in green.
o The loaded reagents have limited onboard stability. Sample preparation should be
Q
started as soon as practical. This is especially important when maximum system
throughput is desired. The reagent onboard stability time is indicated on screen.
o Do not touch any carrier or remove a carrier after a run has started.
Roche Diagnostics
34 cobas® 4800 System, Operator’s Manual · Version 1.1
Page 35

cobas® 4800 System Operation
B
A
CT/NG Test Performing a full workflow run
Moving parts
r Never attempt to start and/or operate the instrument with the front cover open. Keep
hands away from all moving parts while the instrument is in use.
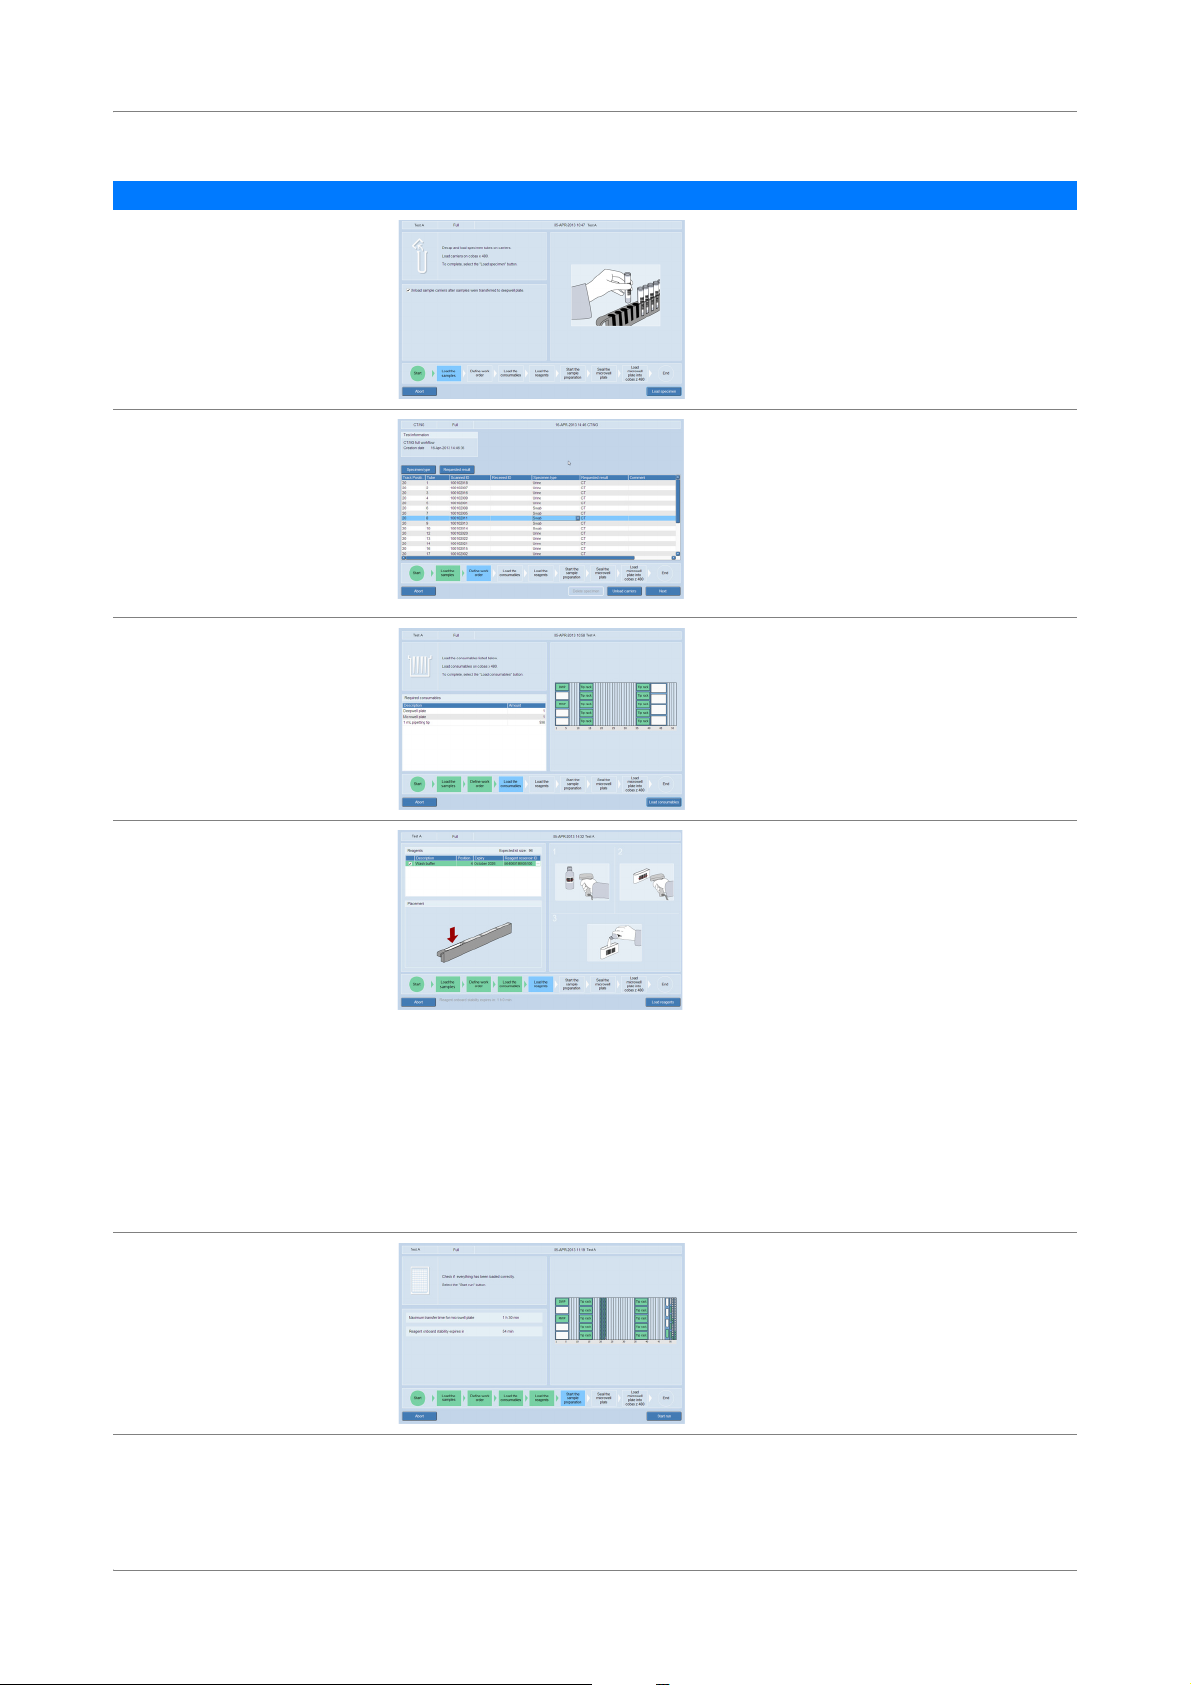
P To start the sample preparation run
1
Choose the Start run button.
The sample preparation is started. After starting the run, the estimated
completion time is indicated on the screen.
2
Check the timer in the wizard.
If the Unload sample carriers after samples were transferred to deepwell plate
check box was selected, the specimens will be unloaded after being pipetted into
the deepwell plate.
Q
o The indicated completion time is only an estimate.
o After sample preparation is completed, there is a limited time (90 minutes) before
the amplification and detection process must be started. A timer is displayed in the
Workplace tab.
A Onboard reagent expiry time B Start the run
Figure 17 Ready to start the run
After you start the run, an estimated time to complete the run is displayed.
Roche Diagnostics
cobas® 4800 System, Operator’s Manual · Version 1.1 35
Page 36
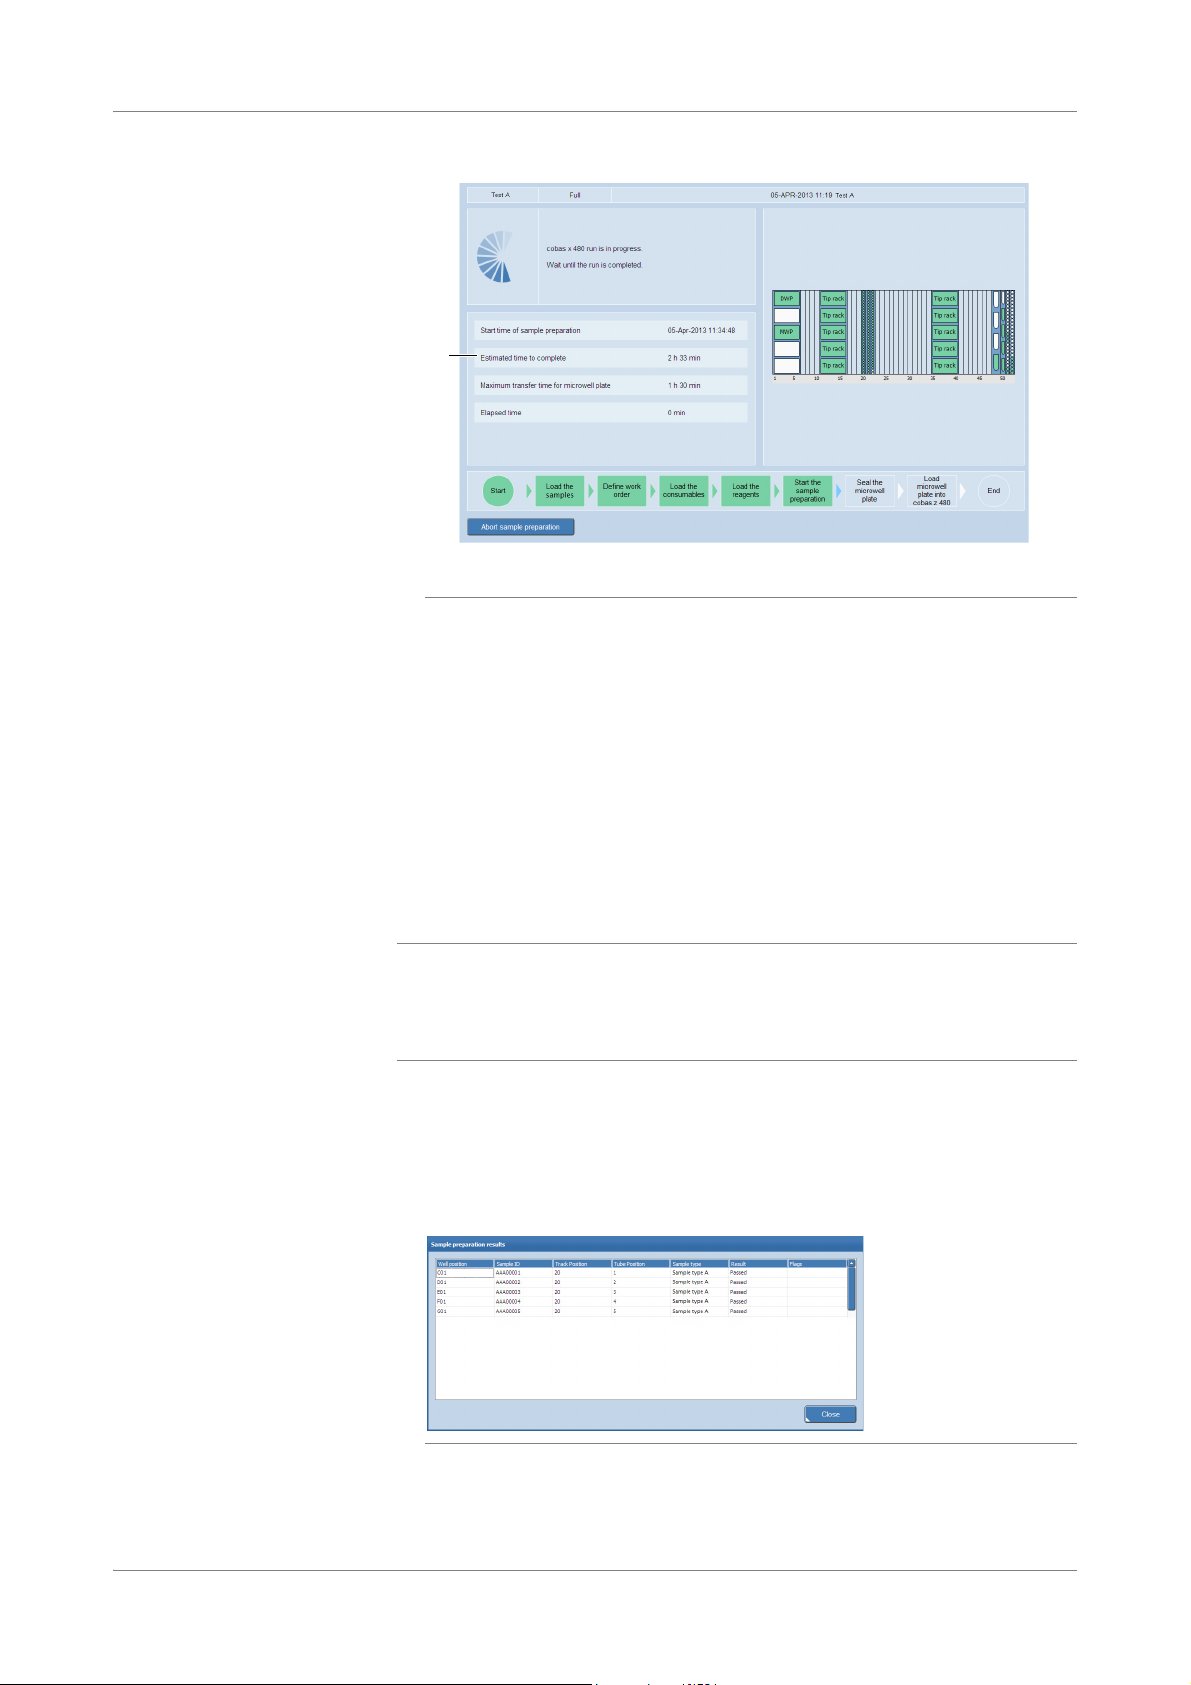
Operation cobas® 4800 System
A
Performing a full workflow run CT/NG Test
A Estimated completion time
Figure 18 Run in progress
S
Unloading the microwell plate
NOTICE
P To review the sample preparation results
After a successful sample preparation run, the Sample Preparation results button
and the Unload button become available.
After completion of the sample preparation the microwell plate is transported back to
the plate carrier. After unloading, the microwell plate must be sealed and then
manually transferred to the analyzer for amplification and detection.
The results of the prepared samples can be reviewed in the Sample preparation
results dialog box.
Failed sample due to pipetting error
If there is an error during pipetting, a sample can be skipped. This sample will be marked
as failed.
r Rerun the failed sample.
1
To review the results of the sample preparation, choose the Sample Preparation
results button.
The Sample preparation results dialog box is displayed.
Figure 19 Viewing the sample preparation results
Sample preparation results are printable intermediate results. They cannot be
saved or transmitted to the LIS.
Roche Diagnostics
36 cobas® 4800 System, Operator’s Manual · Version 1.1
Page 37

cobas® 4800 System Operation
CT/NG Test Performing a full workflow run
U For flagged sample preparation results, see List of result flags (p. 67)
2
To close the Sample preparation results dialog box, choose the Close button.
3
To print the results, close the Sample preparation results dialog box and choose
(Print).
4
To unload the plate carrier, choose the Unload button.
Sealing the microwell plate
CAUTION
Q
o Allow the instrument to unload all the carriers. Do not pull them out manually. This
would interrupt the unload process and crash the instrument.
o If the instrument encounters a problem during unloading an error message is
displayed. Confirm the error message.
o In some cases the instrument must be unloaded manually. After unloading, seal the
microwell plate and start the amplification and detection run on the analyzer. The
results will be flagged (X9 flag).
Q
The prepared samples with working master mix reagent have a limited stability. You
have 90 minutes between completion of the sample preparation and the start of the
amplification and detection run. The expiry time is indicated on the screen.
S
On the plate carrier seal the microwell plate properly with a sealing film. Sealing the
microwell plate is crucial to eliminate evaporation at high temperatures.
Incorrect results due to evaporation or contamination of samples and controls
r Make sure that microwell plate and sealing film are not expired.
r Follow the outlined procedure to seal the microwell plate to prevent leakage of the
sealing film or contamination of samples. Plate leakage can contaminate the analyzer.
If contamination is suspected, contact Roche Service.
r Examine the microwell plate after amplification and detection to ensure that no
leakage has occurred.
P To seal the microwell plate
1
Remove the protection layer from the sealing film.
Do not touch the film on the adhesive side and handle the film only at the sides.
2
Cover the microwell plate with the adhesive side of the sealing film.
3
Firmly press the sealing film to the plate surface using the sealing film applicator.
Q
Roche Diagnostics
cobas® 4800 System, Operator’s Manual · Version 1.1 37
To ensure a strong seal, use the provided sealing film applicator.
Page 38

Operation cobas® 4800 System
Performing a full workflow run CT/NG Test
4
Remove both ends of the sealing film alongside the perforation.
Do not lift the sealing film from the plate while tearing off the ends of the foil.
Figure 20 Sealing the microwell plate
5
In the software, choose the Next button.
The screen for loading the microwell plate onto the analyzer is displayed.
S
Removing used reagents, samples, and deepwell plate
To optimize throughput used reagents, samples and the deepwell plate can be
removed and the instrument can be prepared for the next run as soon as the
amplification and detection run on the analyzer has been started.
Starting amplification and detection run
The sealed microwell plate has to be manually transferred to the analyzer for
amplification and detection.
The amplification and detection will start immediately after loading.
o The prepared samples with working master mix reagent have a limited stability.
Q
Therefore, be sure not to wait too long before starting the amplification and detection
run. You have 90 minutes between completion of the sample preparation and the start
of the amplification and detection run. The expiry time is indicated on the screen.
o After starting amplification and detection on the analyzer the instrument is ready for
the next sample preparation run.
Roche Diagnostics
38 cobas® 4800 System, Operator’s Manual · Version 1.1
Page 39

cobas® 4800 System Operation
B
A
CT/NG Test Performing a full workflow run
P To load the prepared microwell plate into the analyzer
1
Press the load button on the analyzer.
A Load button B Microwell plate loader
Figure 21 Loading prepared microwell plate
The microwell plate loader opens.
2
Place the sealed microwell plate into the loading frame of the microwell plate
loader.
3
WARNING
4
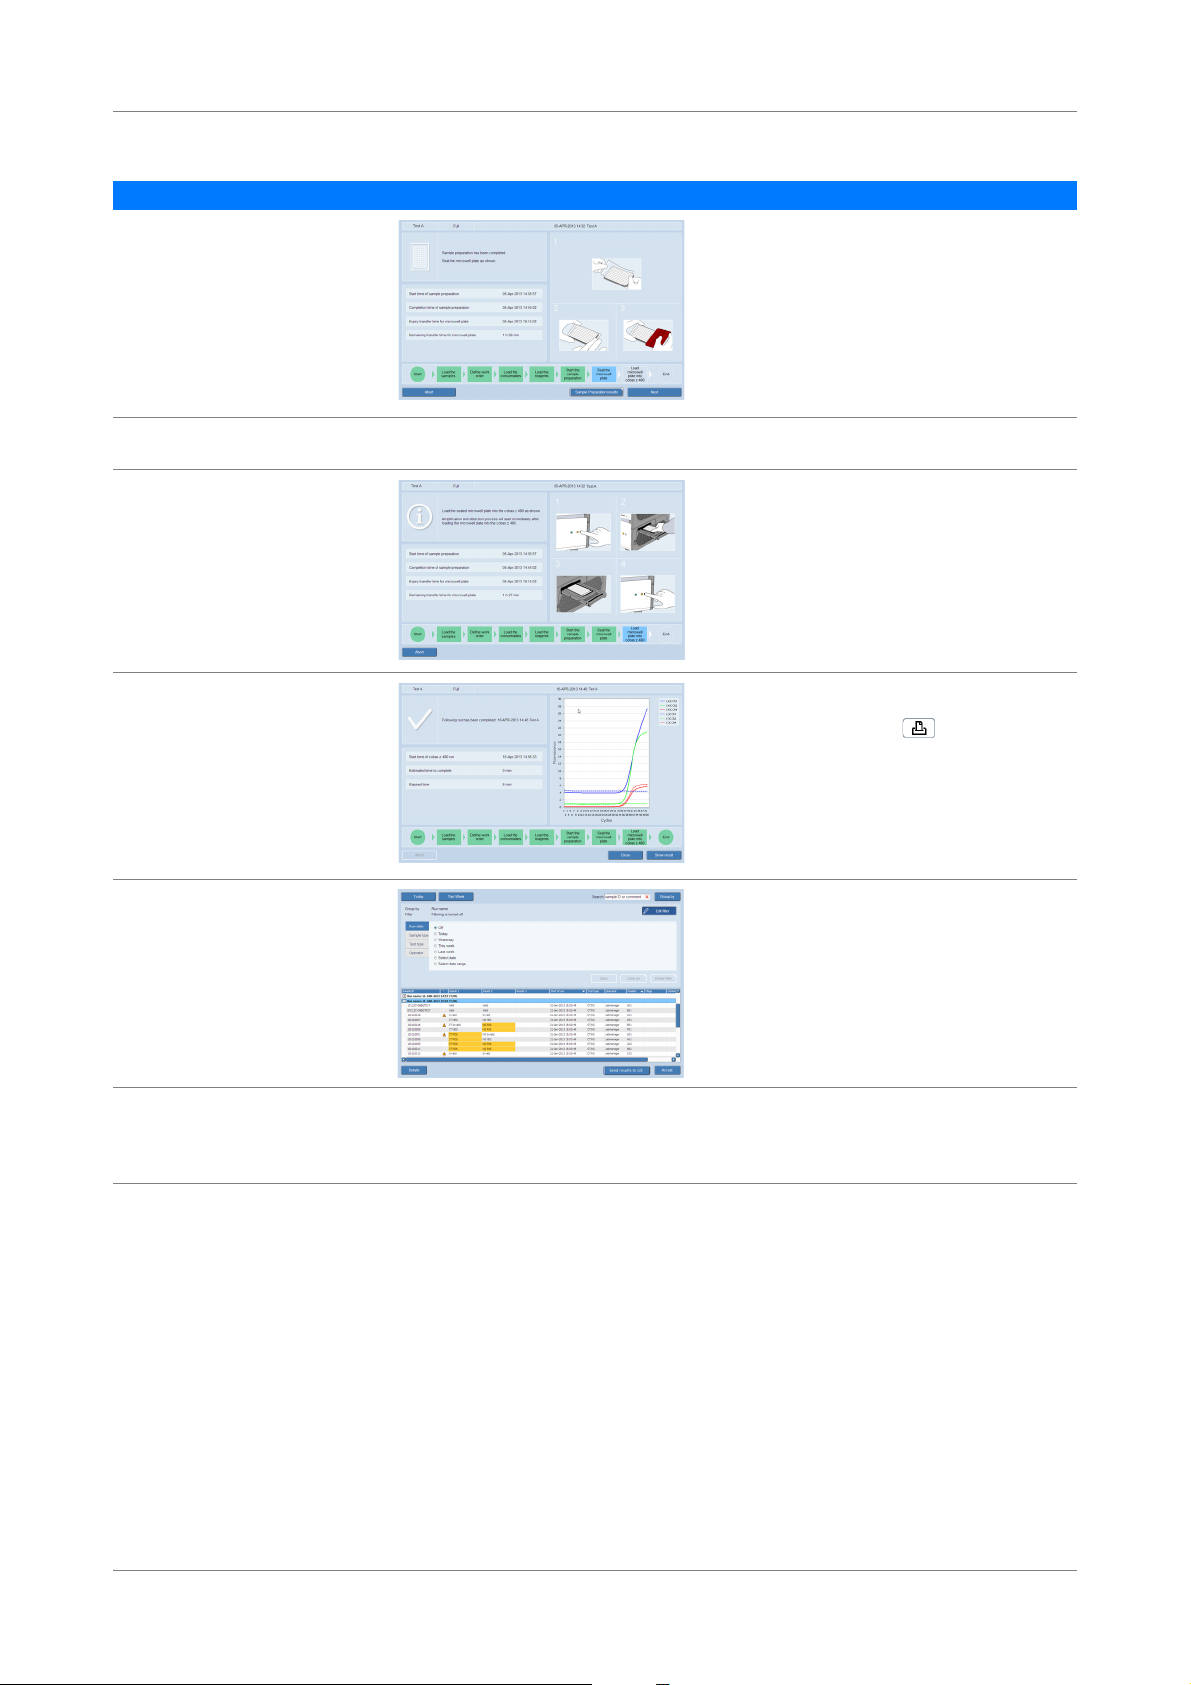
Reviewing and accepting results
Test results are displayed in the Results work area as soon as the analyzer has finished
amplification and detection.
Press the load button again to close the microwell plate loader.
The microwell plate loader is retracted. The run starts immediately.
Delay of results due to improper handling
Turning the power of the analyzer off during a run can lead to a sample rerun.
r Do not turn off the analyzer power during a run.
Check the timer in the wizard.
When the run is finished, in the software, the Show result button becomes
available.
S
Roche Diagnostics
cobas® 4800 System, Operator’s Manual · Version 1.1 39
Page 40

Operation cobas® 4800 System
A
B
Performing a full workflow run CT/NG Test
P To review and accept results
1
In the Workplace work area, choose the Show result button.
Sending results to LIS
A Fluorescence growth curves of the positive
(+) and negative (-) controls of all channels
Figure 22 Displaying results
BShow result button
The Results work area is displayed.
2
Review and accept results in the Results work area.
For details, see Accepting results (p. 58)
U
3
To print the results report, select results and choose (Print).
For details, see Printing results (p. 58)
U
S
After review, test results can be sent to the LIS.
o This step can be skipped if working without LIS.
Q
o Depending on the configuration, all results are transferred to LIS or only accepted
results are transferred to LIS. Control results are always uploaded to LIS.
o Unless the system is configured to send only accepted results to LIS, all results of the
run will be sent even if you only select one result in the run.
o If necessary, the displayed runs can be filtered and sorted.
o To select several nonadjacent results, use the Ctrl key. To select a range of adjacent
results, use the Shift key.
P To send results to the LIS
1
Choose the Results tab to display the Results work area.
2
If required, accept the results you want to send.
3
To send a complete run, select the run header of the run.
Roche Diagnostics
40 cobas® 4800 System, Operator’s Manual · Version 1.1
Page 41

cobas® 4800 System Operation
B
A
D
C
CT/NG Test Performing a full workflow run
4
Choose the Send results to LIS button.
After successfully sending results to the LIS, a status is displayed in the Result
sent column.
Unloading the analyzer
CAUTION
AResult sent column (must be selected in
the Column Chooser).
BConfirmed means that run was successfully
sent to LIS and LIS confirmed the result. This
will only be displayed if a certain protocol is
used by LIS.
Figure 23 Confirmation from LIS
Q
o Results sent to LIS are kept in the Results work area. They are not deleted from the
results database.
CSent means that LIS has not acknowledged
the results.
D Failed that the sending of results to LIS
failed.
S
Unload the microwell plate as soon as practical after the run has finished to prevent
plate leakage and contamination of the analyzer.
Risk of burns due to hot surfaces
r Before removing the microwell plate from the plate loader, wait for an appropriate time
to allow the plate loader and microwell plate to cool down. Be aware that the microwell
plate may have a temperature of 60 °C to 80 °C even if you have allowed the analyzer to
cool down after the run. Otherwise, there is a risk of burns when touching the plate
loader or microwell plate.
P To unload the analyzer
1
When the run has finished, open the microwell plate loader to remove the
microwell plate.
2
Examine the microwell plate after amplification and detection.
Incorrect results due to evaporation of samples or sample contamination
Plate leakage can lead to incorrect results or can contaminate the analyzer. If
CAUTION
contamination is suspected, contact Roche Service.
r Unload the microwell plate as soon as practical after the run has finished and
check the microwell plate for indications of leakage.
3
Discard the plate according to the appropriate local regulations.
S
Performing shutdown procedure
To shut down the system, the following steps need to be performed.
Roche Diagnostics
cobas® 4800 System, Operator’s Manual · Version 1.1 41
Page 42

Operation cobas® 4800 System
Performing a recovery workflow run CT/NG Test
P To shut down the system
1
Check that there are no remaining pipetting tips or teaching needles on the
pipetting head of the instrument. If there are pipetting tips or teaching needles on
the pipetting head, perform daily maintenance.
U
For details on daily maintenance, refer to the cobas®4800 System System Manual.
2
Shut down the system in the following order:
o Log off the software and switch off the control unit.
o Switch off the heater/shaker unit.
o Switch off the instrument.
o Switch off the analyzer.
S
Performing a recovery workflow run
The following procedures guide you through all required steps to perform a recovery
workflow run with amplification and detection on the analyzer.
The recovery workflow is intended for repeat amplification from the remaining
eluate in the deepwell plate.
For the recovery workflow, the microwell plate is manually prepared with working
master mix reagent, Mn reagent, and residual eluate from the deepwell plate.
Only specimens successfully processed on the instrument can be amplified/detected
using the recovery workflow.
The recovery workflow is valid for all specimen types.
Q
Pre-conditions o Instrument and analyzer are turned on and maintenance has been performed.
o A full workflow run has been performed and the samples successfully prepared.
o A full workflow run has been performed in the last 24 hours.
o A full workflow run has been aborted by a user (M2 flag) or the analyzer (Z1 flag).
Roche Diagnostics
42 cobas® 4800 System, Operator’s Manual · Version 1.1
Page 43

cobas® 4800 System Operation
A
B
CT/NG Test Performing a recovery workflow run
Starting a recovery workflow run
P To start a recovery workflow run
1
Choose (New run).
The Select test dialog box is displayed.
A Select the test. B Select the recovery workflow.
Figure 24 Select test dialog box
2
Select the Recovery option.
3
Select the CT/NG check box.
4
Optionally, type a run name.
5
Choose the OK button.
S
Selecting the run to recover and adding new IDs
The software displays all failed runs that were aborted by the user or analyzer within
the last 24 hours.
Select the run to recover and then add the ID of the new microwell plate, master mix
reagent, and Mn reagent.
If no hand-held barcode reader is available, you can enter the barcodes manually and
press the Enter key after entering each barcode.
Roche Diagnostics
cobas® 4800 System, Operator’s Manual · Version 1.1 43
Page 44

Operation cobas® 4800 System
Performing a recovery workflow run CT/NG Test
P To select a run to recover and add new IDs
1
From the list, select a run to recover.
Figure 25 Selecting a run to recover and entering new IDs
2
3
4
Printing the microwell plate layout
A printable report shows the microwell plate layout is displayed. Use this printout for
pipetting the reagents and prepared specimens into the microwell plate in the correct
way.
P To print the microwell plate layout
1
In the MWP ID field, scan the microwell plate barcode.
In the Master Mix ID field, scan the master mix reagent barcode. You may have
to scan more than one barcode.
In the Mn Reagent ID field, scan the Mn reagent barcode. You may have to scan
more than one barcode.
S
From the global action bar, choose (Print).
Figure 26 Recovery microwell plate layout
Roche Diagnostics
44 cobas® 4800 System, Operator’s Manual · Version 1.1
Page 45

cobas® 4800 System Operation
CT/NG Test Performing a recovery workflow run
2
In the software, choose the Next button.
S
Removing the deepwell plate
The deepwell plate has already been unloaded by the instrument at the end of a run or
must be manually unloaded.
P To remove the deepwell plate
1
Do one of the following:
o If the deepwell plate has been unloaded by the instrument, remove it from the
plate carrier
or,
o If the deepwell plate has been stored, get it from storage
or,
o If the deepwell plate has not been unloaded by the instrument, unload the
deepwell plate manually
U
For details how to unload the instrument manually, refer to the cobas®4800 System
System Manual.
S
Setting up microwell plate
NOTICE
Performing manual PCR setup
Q
Set up the microwell plate for the recovery workflow run in the following way:
1. Perform manual PCR setup according to the test-specific package insert.
2. Seal microwell plate.
3. Centrifuge microwell plate.
Analyzer damage due to use of non-Roche consumables
Use of non-Roche consumables may damage the analyzer or lead to incorrect results.
r Use only Roche consumables designed for use on the system. Use of non-Roche
consumables may damage the analyzer or lead to incorrect results.
r Only specimens successfully processed on the instrument can be amplified/detected
using the recovery workflow. Do not use extract from any other source.
The microwell plate is barcoded and designed to be used only once. The software
tracks the use of the plate and rejects previously used microwell plates.
o The prepared samples added to working master mix reagent have limited stability.
Amplification and detection should be started as soon as practical. Refer to the
appropriate test-specific package insert for exact timing window.
Incorrect results due to transferring the wrong sample volume
r Make sure to transfer the correct sample volume from the deepwell plate to the
WARNING
Roche Diagnostics
cobas® 4800 System, Operator’s Manual · Version 1.1 45
microwell plate as described in the test-specific package insert.
Page 46

Operation cobas® 4800 System
Performing a recovery workflow run CT/NG Test
Incorrect results due to incorrect transfer of eluate
There is no system surveillance for sample tracking between the deepwell plate and the
WARNING
microwell plate. You can print the microwell plate layout which includes the test name and
the barcode of the ordered sample.
r Ensure that the eluate is transferred correctly from the deepwell plate to the microwell
plate and that the work order file correctly reflects the plate layout.
P To perform a manual PCR setup
1
Perform manual PCR setup as described in the test-specific package insert.
S
Sealing the microwell plate
Seal the microwell plate properly with a sealing film. Sealing the microwell plate is
crucial to eliminate evaporation at high temperatures.
Incorrect results due to evaporation of samples or sample contamination
r Make sure that microwell plate and sealing film are not expired.
CAUTION
r Follow the outlined procedure to seal the microwell plate to prevent leakage of the
sealing film or contamination of samples. Plate leakage can contaminate the analyzer.
If contamination is suspected, contact Roche Service.
r Examine the microwell plate after amplification and detection. An indication of a leak is
if the sealing film is bent into the wells of the plate.
P To seal the microwell plate
1
Remove the protection layer from the sealing film.
Do not touch the film on the adhesive side and handle the film only at the sides.
2
Cover the microwell plate with the adhesive side of the sealing film.
3
Firmly press the sealing film to the plate surface using the sealing film applicator.
Q
To ensure a strong seal, use the provided sealing film applicator.
Roche Diagnostics
46 cobas® 4800 System, Operator’s Manual · Version 1.1
Page 47

cobas® 4800 System Operation
CT/NG Test Performing a recovery workflow run
4
Remove both ends of the sealing film alongside the perforation.
Do not lift the sealing film from the plate while tearing off the ends of the foil.
Figure 27 Sealing the microwell plate
5
In the software, choose the Next button.
The screen for loading the microwell plate onto the analyzer is displayed.
S
Centrifuging the microwell plate
After sealing, centrifuge the sealed microwell plate in a swing bucket centrifuge for at
least 5 seconds at 3000 rpm.
Starting amplification and detection run
The sealed microwell plate has to be manually transferred to the analyzer for
amplification and detection.
The amplification and detection will start immediately after loading.
o The prepared samples with working master mix reagent have a limited stability.
Q
Therefore, be sure not to wait too long before starting the amplification and detection
run. You have 90 minutes between completion of the sample preparation and the start
of the amplification and detection run. The expiry time is indicated on the screen.
o After starting amplification and detection on the analyzer the instrument is ready for
the next sample preparation run.
o Before starting a run, check the Overview > System > cobas z 480 tab if the Xenon
lamp needs replacement. Replace the Xenon lamp, if required.
U For details about Xenon lamp replacement, refer to the cobas
Manual.
®
4800 System System
Roche Diagnostics
cobas® 4800 System, Operator’s Manual · Version 1.1 47
Page 48

Operation cobas® 4800 System
B
A
Performing a recovery workflow run CT/NG Test
P To load the prepared microwell plate into the analyzer
1
Press the load button on the analyzer.
A Load button B Microwell plate loader
Figure 28 Loading prepared microwell plate
The microwell plate loader opens.
2
Place the sealed microwell plate into the loading frame of the microwell plate
loader.
3
WARNING
4
Reviewing and accepting results
Test results are displayed in the Results work area as soon as the analyzer has finished
amplification and detection.
NOTICE
Failed specimens in the recovery results
Press the load button again to close the microwell plate loader.
The microwell plate loader is retracted. The run starts immediately.
Delay of results due to improper handling
Turning the power of the analyzer off during a run can lead to a sample rerun.
r Do not turn off the analyzer power during a run.
Check the timer in the wizard.
When the run is finished, in the software, the Show result button becomes
available.
S
r Before starting a recovery run, check the sample preparation results for failed
specimens. Consider that failed specimens will show up as invalid in the recovery
results.
Roche Diagnostics
48 cobas® 4800 System, Operator’s Manual · Version 1.1
Page 49

cobas® 4800 System Operation
A
B
CT/NG Test Performing a recovery workflow run
P To review and accept results
1
In the Workplace work area, choose the Show result button.
Sending results to LIS
A Fluorescence growth curves of the positive
(+) and negative (-) controls of all channels.
Figure 29 Displaying results
BShow result button.
The Results work area is displayed.
2
Review and accept results in the Results work area.
For details, see Accepting results (p. 58)
U
3
To print the results report, select results and choose (Print).
For details, see Printing results (p. 58)
U
S
After review, test results can be sent to the LIS.
o This step can be skipped if working without LIS.
Q
o Depending on the configuration, all results are transferred to LIS or only accepted
results are transferred to LIS. Control results are always uploaded to LIS.
o Unless the system is configured to send only accepted results to LIS, all results of the
run will be sent even if you only select one result in the run.
o If necessary, the displayed runs can be filtered and sorted.
o To select several nonadjacent results, use the Ctrl key. To select a range of adjacent
results, use the Shift key.
P To send results to the LIS
1
Choose the Results tab to display the Results work area.
2
If required, accept the results you want to send.
3
To send a complete run, select the run header of the run.
Roche Diagnostics
cobas® 4800 System, Operator’s Manual · Version 1.1 49
Page 50

Operation cobas® 4800 System
B
A
D
C
Performing a recovery workflow run CT/NG Test
4
Choose the Send results to LIS button.
After successfully sending results to the LIS, a status is displayed in the Result
sent column.
Unloading the analyzer
CAUTION
AResult sent column (must be selected in
the Column Chooser).
BConfirmed means that run was successfully
sent to LIS and LIS confirmed the result. This
will only be displayed if a certain protocol is
used by LIS.
Figure 30 Confirmation from LIS
Q
o Results sent to LIS are kept in the Results work area. They are not deleted from the
results database.
CSent means that LIS has not acknowledged
the results.
D Failed that the sending of results to LIS
failed.
S
Unload the microwell plate as soon as practical after the run has finished to prevent
plate leakage and contamination of the analyzer.
Risk of burns due to hot surfaces
r Before removing the microwell plate from the plate loader, wait for an appropriate time
to allow the plate loader and microwell plate to cool down. Be aware that the microwell
plate may have a temperature of 60 °C to 80 °C even if you have allowed the analyzer to
cool down after the run. Otherwise, there is a risk of burns when touching the plate
loader or microwell plate.
P To unload the analyzer
1
When the run has finished, open the microwell plate loader to remove the
microwell plate.
2
Examine the microwell plate after amplification and detection.
Incorrect results due to evaporation of samples or sample contamination
Plate leakage can lead to incorrect results or can contaminate the analyzer. If
CAUTION
contamination is suspected, contact Roche Service.
r Unload the microwell plate as soon as practical after the run has finished and
check the microwell plate for indications of leakage.
3
Discard the plate according to the appropriate local regulations.
S
Performing shutdown procedure
To shut down the system, the following steps need to be performed.
Roche Diagnostics
50 cobas® 4800 System, Operator’s Manual · Version 1.1
Page 51

cobas® 4800 System Operation
CT/NG Test Sample editor
P To shut down the system
1
Check that there are no remaining pipetting tips or teaching needles on the
pipetting head of the instrument. If there are pipetting tips or teaching needles on
the pipetting head, perform daily maintenance.
U
For details on daily maintenance, refer to the cobas®4800 System System Manual.
2
Shut down the system in the following order:
o Log off the software and switch off the control unit.
o Switch off the heater/shaker unit.
o Switch off the instrument.
o Switch off the analyzer.
S
Sample editor
You can use the sample editor to prepare one or more work order files before starting
a run, or to prepare a work order file for the next run while a run is still in progress. A
work order file can be selected in the Select test dialog box.
The work order file is an XML-file that contains all orders for a single run on the
system. The work order file is loaded into the software at the beginning of a run. For
each run, the information in the work order file must match the loaded samples on
the system.
o If a work order file and the loaded samples do not match, you can unload the samples
Q
and replace them and reload. If you want to choose another work order file, you have
to abort and start a new run. It is not possible to choose another work order file and
leave the samples loaded.
o Samples can be loaded in any order as long as they match the set of samples listed in
the work order file. You can also load more samples than those defined in the work
order file and then define them in the sample editor.
o You can edit each order individually or edit multiple orders at the same time using the
Shift and/or Ctrl keys.
o You can edit a work order during a full workflow run in the wizard or before a full
workflow run in the sample editor.
About messages in the sample editor
If an error happens while creating a work order file, an error message is displayed.
As only one message can be displayed, the error message with the highest priority is
Q
shown.
Roche Diagnostics
cobas® 4800 System, Operator’s Manual · Version 1.1 51
Page 52

Operation cobas® 4800 System
A
Sample editor CT/NG Test
A Message originating from an error in the Sample ID column
Figure 31 Errors within the sample editor
Using the sample editor to create a work order file
Use the sample editor to create a work order file for the next run while a run is still in
progress. You can also use the sample editor to create one or more work order files
before starting a run.
P To create a work order file with the sample editor
1
In the global action bar, choose (Editor).
The Select test dialog box is displayed.
2
Select the Full option.
3
Select the CT/NG check box.
4
Choose the OK button.
Roche Diagnostics
52 cobas® 4800 System, Operator’s Manual · Version 1.1
Page 53

cobas® 4800 System Operation
A
B
C D
CT/NG Test Sample editor
5
From the sample editor, scan or enter the sample ID barcodes into the Sample ID
column.
A Select and scan the sample ID. C Select a type of specimen.
B Save the work order file. D Select a requested result.
Figure 32 Using the sample editor to create a work order file
6
Define the type of specimen and the requested result.
7
Choose the Save button and save the work order file.
The Save as dialog box is displayed. The default location is the one that is defined
in the Configuration tab (Utilities > Configuration > System settings).
S
Roche Diagnostics
cobas® 4800 System, Operator’s Manual · Version 1.1 53
Page 54

Operation cobas® 4800 System
A
B
C
Sample editor CT/NG Test
Editing an existing work order file
P To edit a work order file
1
In the global action bar, choose (Editor).
The Select test dialog box is displayed.
A Load a work order file. C Open the work order file in the sample
B Browse for a work order file.
Figure 33 Loading a work order file
2
Select the Load work order file option and then choose the Browse button.
3
From the Open dialog box, select and open a work order file.
4
From the Select test dialog box, choose the OK button.
5
From the sample editor, edit the work order file as required.
6
Save the work order file.
editor.
S
Roche Diagnostics
54 cobas® 4800 System, Operator’s Manual · Version 1.1
Page 55

cobas® 4800 System Operation
A
B
C
CT/NG Test Results
Loading a work order file
P To load a work order file
1
Choose (New run).
The Select test dialog box is displayed.
Results
WARNING
A Load a work order file. C Open the work order file in the sample
B Browse for a work order file.
Figure 34 Loading a work order file
2
Select the Load work order file option and then choose the Browse button.
3
From the Open dialog box, select and open a work order file. Optionally, after
editor.
loading the work order file, you can change the run name.
4
From the Select test dialog box, choose the OK button.
The work order is opened in the sample editor and you can perform a full
workflow run.
U
For more information about performing a full workflow run, see Performing a full
workflow run (p. 18)
S
The Results work area gives access to all runs and test results. Use the Results work
area to review, accept, print, and send results to LIS.
Delay of results due to reading the wrong result
If you do not read the result correctly and rerun the sample, the rerun could cause a delay.
r In the Results work area, icons help you identify if a result failed, is invalid, or has a
flag.
Icon Comment
Result is invalid with one or more flags or failed.
Result is valid and has one or more flags.
Roche Diagnostics
cobas® 4800 System, Operator’s Manual · Version 1.1 55
(blank) Result is valid or has no flags
Table 10 Result icons
Page 56

Operation cobas® 4800 System
A
B
C
D
H
G
FE
Results CT/NG Test
To help you easily identify a positive result, the result is highlighted.
Q
A Filter buttons. E Result icons.
B Run header. F Results. Depending on the test, more than
one result can be displayed.
C Test results of the selected run. GSearch field.
D Details area. H Result handling buttons.
Figure 35 Results work area
Reviewing results
The layout of the Results work area can be customized. Customization includes:
o Creating various filters.
o Sorting and grouping of runs and results.
o Changing the order of the columns and hiding selected columns.
o Customization of the result view in the Results work area does not influence result
Q
printouts. The details per result that are included in reports are independent of what is
displayed on screen.
o When a user customizes the view of the Results work area, the new view will be saved
for all users.
P To display results of selected runs and to review result details
1
To display the individual results of that run, choose the plus sign next to the run
header.
2
To display more information about a particular result, select the result you want
to review.
3
Choose the Details button.
The Details area is displayed.
4
Choose the Flags tab. Flags of the selected sample are displayed.
Roche Diagnostics
56 cobas® 4800 System, Operator’s Manual · Version 1.1
For information about flags, see List of result flags (p. 67).
U
Page 57

cobas® 4800 System Operation
CT/NG Test Results
5
Choose the Ct values tab. Review the results data.
For information about result interpretation, refer to the test-specific package insert.
U
6
Choose the Tracking info tab. Information about the selected sample is displayed
(e.g. if processes were successful, what instrument was used, start/end time).
S
Grouping results
The results can be grouped by the following criteria:
o Run name
o Start time of the run
o Test type
P To group the results
1
Choose the Group by button.
2
From the list, select a grouping criterion.
All results are grouped by the selected criterion.
Searching results
Figure 36 Grouping results
3
To display the runs in an ungrouped order, choose the Group by button and then
choose the Grouping is turned off button from the list.
S
Use the search function to search for sample IDs or comments within the results. The
search function searches the whole result database, not only the results that are
currently displayed.
Figure 37 Search function on the Results work area
The use of the following wildcards is possible:
o Use the question mark (?) as placeholder for a single character.
o Use the asterisk (*) as placeholder for a range of characters (e.g. searching for a
sample ID “AD2*” will find all sample IDs starting with “AD2”).
P To search for patient IDs or comments
1
Click into the Search field.
2
Type the search term into the field.
The result of the search is displayed automatically in the runs area.
If necessary, the displayed results can be filtered and sorted.
Roche Diagnostics
cobas® 4800 System, Operator’s Manual · Version 1.1 57
Page 58

Operation cobas® 4800 System
Results CT/NG Test
3
To remove the search term, choose next to the Search field.
All runs are displayed in the runs area once again, not only the results of the
search.
S
Filtering and sorting runs and results
Runs and results that are displayed in the Results work area can be filtered and
sorted.
U
For information about organizing and filtering lists, refer to the cobas®4800 System
System Manual.
Accepting results
P To accept results
1
To accept a complete run, select all results of the run you want to accept.
2
To accept only certain results, select the results you want to accept.
Printing results
o To select several nonadjacent results, use the Ctrl key.
o To select a range of adjacent results, use the Shift key.
3
Choose the Accept button.
In the Accepted by column, the user who accepted the results is displayed, for
example the laboratory manager.
U
For information about adding columns, refer to the cobas®4800 System System
Manual.
S
Before printing, a print preview is displayed. Use the File menu to specify the print
and export options and to print or export (PDF) the result report.
Figure 38 Print preview
Roche Diagnostics
58 cobas® 4800 System, Operator’s Manual · Version 1.1
Page 59

cobas® 4800 System Operation
CT/NG Test Results
The details per result that are included in the report are independent of what is displayed
Q
on screen. Structure and layout of reports cannot be changed by the user.
P To print the result report
1
To print complete runs, select the runs you want to print.
2
To print only certain results, select the results you want to print.
o To select several nonadjacent results, use the Ctrl key.
o To select a range of adjacent results, use the Shift key.
3
In the global action bar, choose (Print).
A print preview is displayed for each run that was selected.
4
In the File menu, define the printing options.
5
To print the result report, choose File > Print.
S
P To export the result report as a PDF file
1
To export a complete run, select the run you want to export.
2
To export only certain results, select the results you want to export.
o To select several nonadjacent results, use the Ctrl key.
o To select a range of adjacent results, use the Shift key.
3
In the global action bar, choose (Print).
A print preview is displayed for each run that was selected.
4
Choose File > Export Document.
A dialog box for defining the export options is displayed.
5
After specifying the export options, choose the OK button.
A dialog box for defining file name and path for storage is displayed.
6
Define the file name and path for storage.
7
Choose the Save button and confirm with the Yes button.
S
Roche Diagnostics
cobas® 4800 System, Operator’s Manual · Version 1.1 59
Page 60

Operation cobas® 4800 System
A
B
C
D
E
Results CT/NG Test
Creating result filters
A maximum of three additional result filters can be defined and saved. The filters will
appear as separate buttons above the filter information area. Per default, the filters
Today and This Week are available. The default filters cannot be changed nor
deleted. However, they can be used as a basis for a new filter, which has to be saved
with another name.
A Filter buttons. D Runs area.
B Filter information area. E Example of a customized filter.
C Filter definition area.
Figure 39 Filter definition area in the Results work area
P To create a new result filter
1
Choose the Edit filter button.
The filter definition area is displayed.
2
Choose the Run date button and select a run date or range.
To define a date range, select the start and end date in the calendar boxes.
3
Choose the Sample type button and select one or more sample types.
To include only positive controls into the filter, select the Positive control option.
To include only negative controls into the filter, select the Negative control
option.
To include only specimens into the filter, select the Specimen option.
To include only controls into the filter, select the Non-specimen option.
4
Roche Diagnostics
60 cobas® 4800 System, Operator’s Manual · Version 1.1
Choose the Test type button and select one or more test types.
Page 61

cobas® 4800 System Operation
CT/NG Test Results
5
Choose the Operator button. From the Operator drop-down list, choose a user.
6
Choose the Save as button.
A dialog box for defining the filter name is displayed.
7
Type a name for the filter into the box.
8
From the dialog box, choose the Save button.
The filter is displayed as a separate button above the filter information area. The
filter and grouping criteria of the new filter are displayed in the filter information
area.
S
P To change a result filter
1
Choose the filter button of the filter you want to change.
The selected filter button will change to a darker blue shade.
2
Change the filter criteria as described above.
3
Do one of the following:
o To save the changes, choose the Save button.
or,
o To save the filter under a new name, choose the Save as button.
S
P To delete a result filter
1
Choose the filter button of the filter you want to delete.
The selected filter button will change to a darker blue shade.
2
Choose the Delete filter button.
A confirmation dialog box is displayed.
3
To delete the filter, choose the Yes button.
The filter button will disappear from the filter area.
S
P To apply a filter to the results
1
Choose the filter button you want to apply.
The selected filter button will change to a darker blue shade. Only the results that
correspond to the selected filter will appear in the runs area.
Roche Diagnostics
cobas® 4800 System, Operator’s Manual · Version 1.1 61
Page 62

Operation cobas® 4800 System
Aborting a run CT/NG Test
2
If the filter definition area is still displayed, choose the Edit filter button. The
filter definition area will be closed.
Aborting a run
Q
Grouping of filtered results
The grouping of the filtered results can be changed anytime by choosing the Group by
button.
U For more information, see Grouping results (p. 57).
S
P To disable result filtering
1
Choose the filter button that is currently active. The filter button ceases to be
highlighted.
In the filter information area, a message is displayed to indicate that the filtering is
turned off. All results are displayed in the runs area once again.
2
If the filter definition area is still displayed, choose the Edit filter button. The
filter definition area will be closed.
S
P To abort a run
1
In the global action bar, choose the Abort button.
2
If more than one run is active, select the run you want to abort.
A confirmation dialog box is displayed.
3
Confirm the message.
4
In the wizard, choose the Unload button.
S
Roche Diagnostics
62 cobas® 4800 System, Operator’s Manual · Version 1.1
Page 63

cobas® 4800 System Configuration
CT/NG Test Changing your password
Configuration
The initial password is defined during the setup of a user account.
Changing your password
Any user can change their password. Laboratory managers can change the passwords
of all users. The password must follow the password rules that are defined in the
software.
P To change your password
1
Choose Utilities > Users > choose Change Password.
The Change password dialog box is displayed.
2
In the Old password field, type the current password.
3
In the New password field, type the new password.
4
In the Repeat new password field, type the new password again.
5
Choose the OK button.
S
Roche Diagnostics
cobas® 4800 System, Operator’s Manual · Version 1.1 63
Page 64

Troubleshooting cobas® 4800 System
List of error messages CT/NG Test
Troubleshooting
List of error messages
Error messages are displayed under Messages > Messages.
The source of a message is indicated in the message code as outlined in the following
table.
Message code Message source Example
6.2.5.10.xx Messages created by the system. 6.2.5.10.22
6.2.5.20.xx Messages created by the instrument or the analyzer. 6.2.5.20.13
6.2.5.30.xx Messages created by the test. 6.2.5.30.19
Table 11 Message source
The following table lists the messages as they are displayed in the software.
o If there is no user action stated in the message table or you need more information
Q
about a solution, call Roche Service.
o Placeholders are printed in {} (e.g. {0}, {1}).
ID Severity Message Solution / Comment
6.2.5.20.21 Error Processing on
cobas x 480 instrument was
aborted by the instrument.
6.2.5.20.22 Error An error occurred on
cobas x 480 instrument.
6.2.5.20.23 Error An error occurred on
cobas x 480 instrument.
6.2.5.20.24 Warning No connection to
cobas x 480 instrument.
Connection to
cobas x 480 instrument was lost
during the loading of
maintenance information.
6.2.5.20.25 Warning cobas x 480 instrument is not
available.
6.2.5.20.27 Error Specimens have been transferred
to the deepwell plate, but an error
occurred during unloading.
Table 12 System messages
Check the messages for further details.
Check the messages for further details.
The instrument is either not switched on, not
connected, or defective. Check connections between
instrument and control unit or switch on the
instrument. Then choose the Refresh button.
The instrument is either not switched on, not
connected, or defective. Check connections between
instrument and control unit or switch on the
instrument. Then choose the Refresh button.
The instrument is either not switched on, not
connected, or defective. Check connections between
instrument and control unit or switch on the
instrument. Then choose the Refresh button.
Unload the instrument manually after sample
preparation and transfer the microwell plate to the
analyzer. For details how to unload the instrument
manually, refer to the cobas
Manual.
®
4800 System System
Roche Diagnostics
64 cobas® 4800 System, Operator’s Manual · Version 1.1
Page 65

cobas® 4800 System Troubleshooting
CT/NG Test List of error messages
ID Severity Message Solution / Comment
6.2.5.20.28 Error Error occurred during the
unloading of sample carriers.
Unload sample carriers manually.
Microwell plate can be transferred
to cobas z 480.
6.2.5.10.10 Warning Suboptimal monitor resolution
has been detected. Optimal
resolution is 1280 x 1024.
6.2.5.10.11 Error Raw data file is corrupted. Contact Roche Service.
6.2.5.10.12 Warning Run cannot be recovered. There are many reasons, why a run cannot be
6.2.5.10.17 Warning Purge and archive of data was
aborted due to insufficient space
on backup drive.
6.2.5.10.18 Warning Purging and archiving data
cannot be completed.
6.2.5.10.19 Warning Purge and archive could not
create folder.
6.2.5.10.21 Warning On hard disk {0}, {1} of {2} are free
(hard disk {3}% full).
6.2.5.10.22 Error On hard disk {0}, {1} of {2} are free
(hard disk {3}% full).
6.2.5.10.23 Warning No analysis package installed. Contact Roche Service.
6.2.5.10.26 Error Not enough free space on hard
disk or database available to start a
new run.
6.2.5.10.27 Error Sending test results to LIS failed. Check communication to LIS. If the connection to
6.2.5.10.28 Error The last database backup has
failed.
Job Name: {0} Run date:
{1}Additional Information: {2}
6.2.5.10.29 Error No database backup has been run. Contact system administrator.
6.2.5.10.30 Warning The connection to LIS has been
lost.
6.2.5.10.31 Warning The connection to LIS has been
lost. Therefore no run can be
started.
6.2.5.10.32 Warning Cannot start a new run while
maintenance is required for the
{0}.
6.2.5.10.33 Warning Cannot start a new run when the
{0} instrument is not available.
6.2.5.10.34 Warning Results could not be fully loaded To load the results again, change the current filter by
Table 12 System messages
Roche Diagnostics
cobas® 4800 System, Operator’s Manual · Version 1.1 65
During the unloading of sample carriers, an error
occurred. Unload sample carriers manually and
transfer the microwell plate to the
cobas z 480 analyzer.
Current screen resolution is not the recommended
one. Change screen resolution to 1280 x 1024.
recovered. A run can be recovered only one time. If
the run is older than 24 hours, the run cannot be
recovered.
Archive and delete old data from backup drive.
Contact Roche Service.
Contact Roche Service.
Archive and delete old data.
Archive and delete old data.
Clean up hard disc D:\ manually by deleting files that
are no longer needed. If unclear, contact Roche
Service.
the LIS does not work, contact the local IT support to
find out if there is a problem with the LIS. If the
problem cannot be solved, contact Roche Service.
Contact system administrator.
Check communication to LIS. If the connection to
the LIS does not work, contact the local IT support to
find out if there is a problem with the LIS. If the
problem cannot be solved, contact Roche Service.
Check communication to LIS. If the connection to
the LIS does not work, contact the local IT support to
find out if there is a problem with the LIS. If the
problem cannot be solved, contact Roche Service.
Before starting a new run, go to the Overview tab and
perform all the required maintenance actions.
Go to the Overview tab and check the status of the
cobas z 480 analyzer and cobas x 480 instrument.
choosing another filter or edit the current filter.
Page 66

Troubleshooting cobas® 4800 System
List of error messages CT/NG Test
ID Severity Message Solution / Comment
6.2.5.20.30 Error Current optical filters are not
supported on analyzer: {0}.
6.2.5.20.31 Error Analyzer {0} block is not
supported.
6.2.5.20.32 Error An error occurred on the
analyzer.
Optical filters need to be exchanged. Contact Roche
Service.
The analyzer needs to be updated. Contact Roche
Service.
Unexpected error occurred during processing.
Restarting the analyzer may solve the problem. If the
error persists, contact Roche Service.
6.2.5.20.33 Error cobas 4800 software does not
support IC software version {1} on
The analyzer needs to be updated. Contact Roche
Service.
the "{0}.
6.2.5.20.34 Warning Connection to the following
analyzer has been lost: {0}.
The analyzer is not switched on, not connected, or
defective. Check connections between analyzer and
control unit or switch on the analyzer. Then choose
the Refresh button.
6.2.5.20.35 Error An error occurred on the
analyzer.
The following analyzer error occurred: {0}. The run
was aborted. Restart the analyzer. If the error persists,
contact Roche Service.
6.2.5.20.36 Warning The maintenance for the cobas z
480 is required in order to
Exchange the Xenon lamp and check the
cobas z 480 analyzer before continuing.
perform new runs
6.2.5.30.80 Warning Wrong MWP loaded in
instrument: {0}. Expected MWP:
{1}.
6.2.5.30.81 Warning MWP was used in a previous run.
Please exchange MWP.
Mismatch occurred between loaded and expected
microwell plate. Load the microwell plate {1} into the
analyzer.
The microwell plate was previously used. A
microwell plate may only be used once.
6.2.5.30.82 Error MWP barcode could not be read. The barcode could not be read. Contact Roche
Service.
6.2.5.30.83 Error Algorithm definition file cannot
be loaded.
6.2.5.30.84 Error Algorithm definition file is
missing.
The following algorithm definition file failed data
consistency check: {0}. Contact Roche Service.
The following algorithm definition file is missing:
{0}. Contact Roche Service.
6.2.5.30.85 Error Wrong algorithm version. Algorithm file {0} has version {1}. This version does
not match the required version {2}. Contact Roche
Service.
6.2.5.30.86 Error Run template data file is
corrupted.
6.2.5.30.87 Error Calculation parameter file cannot
be loaded.
6.2.5.30.88 Error An unknown error occurred. The
run was aborted.
The following run template data file failed data
consistency check: {0}. Contact Roche Service.
The following calculation parameter file failed data
consistency check: {0}. Contact Roche Service.
An unknown error occurred during processing. The
run was aborted and all results flagged. The error
was: ‘{0}: {1}’. Restart the software. If the problem
persists, contact Roche Service.
6.2.5.30.89 Error Calculation parameter file is
missing.
6.2.5.30.97 Warning The specimens were transferred to
the DWP, but an error occurred
during the unloading.
The following calculation parameter file is missing:
{0}. Contact Roche Service.
Unload the instrument manually after sample
preparation and transfer the microwell plate to the
analyzer.
U For details how to unload the instrument
manually, refer to the cobas
System Manual.
Table 12 System messages
®
4800 System
Roche Diagnostics
66 cobas® 4800 System, Operator’s Manual · Version 1.1
Page 67

cobas® 4800 System Troubleshooting
CT/NG Test List of result flags
ID Severity Message Solution / Comment
6.2.5.30.98 Error The transfer time for the MWP
has expired.
6.2.5.30.99 Error Onboard expiration time has been
reached.
6.2.5.90.01 Warning Barcode {0} is invalid. Please use a valid reagent or consumable.
6.2.5.90.02 Warning Reagent kit size does not match. Expected kit size is 96. Using reagents from a 24 kit is
6.2.5.90.03 Warning Barcode {0} identifies an object
not requested here.
6.2.5.90.04 Warning Barcode {0} is already used before. The scanned barcode has already been used in this or
6.2.5.90.05 Warning The reagent {0} has been expired
at {1}.
6.2.5.90.06 Warning Barcode {0} is already used in this
run.
6.2.5.90.07 Warning The specimen with the barcode
'{0}' was rejected by LIS. Please
unload and remove the specimen
from the carrier.
6.2.5.90.08 Warning Connection to the Com Server
while requesting the barcode '{0}'
failed.
Table 12 System messages
Repeat the run.
Repeat the run.
not sufficient for this run. Use reagents from a 96 kit.
Scanned barcode does not match. The barcode of
samples, reagents, reservoirs, or consumables
required in this step. Check to ensure that the correct
ones are used.
in a previous run. Use new reagents, reservoirs, and
consumables.
It is not allowed to use expired reagents. Use reagents
that are not expired.
The scanned barcode has already been used in this or
in a previous run. Use new reagents, reservoirs, and
consumables.
Unload the sample carrier, remove the specimen, and
reload the sample carrier.
Check the LIS configuration settings and the message
details.
List of result flags
You can find result flags under the Results tab. The source of a flag is indicated in the
flag code as outlined in the following table.
Flag code starts with Flag source Example
M Multiple or other reasons M6
R Result interpretation R20
X Instrument X2
Z Analyzer Z1
Table 13 Flag source
The following table lists all result flags of the system that are user relevant.
Flag code Severity Description Recommended action
M1 Error Error: Software error occurred. For more
information refer to alarm messages and
log files.
M2 Information Information: Run was aborted by the
user.
M5 Information Information: Results come from a
recovery workflow.
Table 14 List of system flags
Refer to alarm messages and log files. If this does not help,
contact Roche Service.
None. Flag is for information only
None. Flag is information only.
Roche Diagnostics
cobas® 4800 System, Operator’s Manual · Version 1.1 67
Page 68

Troubleshooting cobas® 4800 System
List of result flags CT/NG Test
Flag code Severity Description Recommended action
M6 Information Information: Communication with cobas
z 480 was lost. Run was recovered after
the communication was re-established.
M10 Information Information: Run was rescued by the
None. Flag is information only.
U For details, refer to the cobas
Manual.
None. Flag is information only.
®
4800 System System
software after cobas x 480 processing was
completed.
R20 Warning Positive control is invalid. Positive control values were out of range.
1. Repeat entire run with fresh reagents.
2. If the problem persists, contact Roche Service.
R21 Warning Negative control is invalid. Negative control values were out of range.
To avoid carryover, use good laboratory practice.
1. Repeat entire run with fresh reagents.
2. If the problem persists, contact Roche Service.
X1 Error Error: Error occurred on cobas x 480.
Sample or test was not processed.
An error occurred on the instrument.
1. Check if instrument deck is contaminated or if there are
lost tips on the instrument deck.
U For details how to unload the instrument
manually, refer to the cobas®4800 System System
Manual.
2. Contact Roche Service.
X2 Information Information: Specimen barcode was
entered manually.
X3 Error Error: Clot was detected. Sample was not
processed.
X4 Error Error: Pipetting error occurred. Sample
was not processed.
X5 Error Error: Reagent onboard stability expired.
Run was aborted.
X6 Error Error: Microwell plate was not transferred
in time. Run was aborted.
X7 Error Error: Pipetting error occurred. Test was
aborted.
X8 Error Error: Mechanical error in pipetting
channel occurred. Sample was not
processed.
X9 Warning Warning: An error occurred during
unloading the cobas x 480.
X10 Error Error: Insufficient number of tips was
loaded. Run was aborted.
Table 14 List of system flags
Roche Diagnostics
68 cobas® 4800 System, Operator’s Manual · Version 1.1
None. Flag is for information only.
Make sure the samples were handled according to the
instructions in the test-specific package insert.
1. Check the sample for clots.
2. If a collection device is present, remove it from the
sample tube.
3. Rerun the sample.
Insufficient sample volume or mechanical error during
pipetting is the most likely reason.
1. Make sure that there is enough sample volume.
2. If a collection device is present, remove it from the
sample vial.
3. Check whether the tip eject plate is placed correctly.
4. Rerun the sample.
Repeat the entire run with fresh reagents.
1. If the pre-conditions can be met, you could use the
recovery workflow.
2. Repeat the entire run with fresh reagents.
Controls could not be processed due to pipetting error in
the reagents. Repeat the test with fresh reagents.
1. Perform daily maintenance.
2. Rerun the sample.
3. If the problem persists, contact Roche Service.
1. Manually unload the instrument.
2. Check the instrument for damages and restart the
instrument.
3. Continue the run on the analyzer.
Repeat entire run with fresh reagents.
Page 69

cobas® 4800 System Troubleshooting
CT/NG Test
Flag code Severity Description Recommended action
X11 Error Error: Cover of cobas x 480 was opened
or a carrier was manually removed during
a run. Run was aborted.
X12 Information Information: Reagent vial barcode or
reservoir barcode was entered manually.
Z1 Error Error: Error occurred on cobas z 480. Run
was aborted.
Table 14 List of system flags
Repeat entire run with fresh reagents.
None. Flag is for information only.
Contact Roche Service.
Roche Diagnostics
cobas® 4800 System, Operator’s Manual · Version 1.1 69
Page 70

Revisions cobas® 4800 System
CT/NG Test
Revisions
Roche Diagnostics
70 cobas® 4800 System, Operator’s Manual · Version 1.1
 Loading...