

Page 1
POINT OF CARE
TESTING
®
CoaguChek XS Pro
Operator’s Manual
For meters shipped before January 2013
Page 2

Manual version Revision date Changes
Version 1.0 2009-09 New document
Version 2.0 2010-04 Update cleaning/disinfection, minor revisions
Version 2.1 2016-08 Revised to add Rx only statement.
Page 3

US Supplement
US Supplement
The contents of this document, including all graphics and photographs, are the property of
Roche. No part of this document may be reproduced or transmitted in any form or by any means,
electronic or mechanical, for any purpose, without the express written permission of Roche.
Every effort has been made to ensure that the information contained in this manual is accurate at
the time of printing. Not all functionality described in this manual may be available to all users.
Roche Diagnostics reserves the right to make any further required changes to software without
prior notice. Such changes may not immediately be reflected in this document.
Any screenshots in this publication have been added exclusively for the purpose of illustration.
Configurable and variable data such as parameters, results, path names etc. visible therein must
not be used for laboratory purposes.
This document is intended for the US market only. For Prescription Use Only.
This manual was created by Roche Diagnostics GmbH (operator manual content) and Roche
Diagnostics Engineering Operations Department (US Supplement). Direct questions or concerns
regarding the contents of this document to:
Roche Diagnostics
Engineering Operations Department
9115 Hague Road
P.O. Box 50457
Indianapolis, IN 46250-0457
USA
COAGUCHEK is a trademark of Roche. All other product names and trademarks are the property
of their respective owners.
© 2010-2016, Roche Diagnostics. All rights reserved.
US Order Number: 08103089001
Distribution in USA by: Roche Diagnostics, Indianapolis, IN
This document is available on the CoaguChek website at www.coaguchek-usa.com and the
Roche Diagnostics USA website at https://usdiagnostics.roche.com.
3
Page 4

US Supplement
Warranty
CoaguChek XS Pro Meter Limited (1 Year) Warranty
ROCHE DIAGNOSTICS warrants, to the original purchaser only, that the meter shall be free from all
defects in material and workmanship for a period of one year from the date of purchase. Purchaser’s
sole and exclusive remedy, with respect to the CoaguChek XS Pro meter and parts thereof, shall be
the repair and/or replacement of the meter or parts at the option of Roche Diagnostics.
THE ABOVE WARRANTY IS EXCLUSIVE OF ALL OTHER WARRANTIES, AND ROCHE DIAGNOSTICS
MAKES NO OTHER WARRANTIES, EXPRESS OR IMPLIED, INCLUDING WITHOUT LIMITATION THE
IMPLIED WARRANTY OF MERCHANTABILITY OR FITNESS FOR A PARTICULAR PURPOSE. IN NO
EVENT SHALL ROCHE DIAGNOSTICS BE LIABLE TO THE PURCHASER OR ANY OTHER PERSON
FOR ANY INCIDENTAL, CONSEQUENTIAL, INDIRECT, SPECIAL OR PUNITIVE DAMAGES ARISING
FROM OR IN ANY WAY CONNECTED WITH THE PURCHASE OR USE OF THE METER. NO
WARRANTY OF MERCHANTABILITY OR FITNESS FOR A PARTICULAR PURPOSE, IF ANY IS
IMPLIED FROM THE SALE OF THE COAGUCHEK XS PRO METER. NO WARRANTY, EXPRESS OR
IMPLIED (IF ANY), SHALL EXTEND FOR A LONGER DURATION THAN THE DURATION OF THE
EXPRESS WARRANTY STATED ABOVE.
The foregoing warranty shall not apply to a meter which is damaged by accident or subject to
alteration, misuse, tampering, and/or abuse, including the use of Dispatch
show damage or misuse will be handled in accordance with Roche Diagnostic’s non-warranty
service policy. The warranty of the repaired/replacement meter will expire on the date of the original
warranty expiration or ninety (90) days after shipment of a replacement system, whichever period is
longer.
®
products. Meters which
Information about the Software License
This product incorporates software that is under license from GPL. The source code for this
software can be requested on a usual data exchange medium from the following address:
Roche Diagnostics GmbH, Sandhofer Str. 116, D-68305 Mannheim.
You may read the software license agreement on the CoaguChek XS Pro Policies and Procedures
Manual CD.
4
Page 5

®
CoaguChek XS Pro
Operator’s Manual
Version 2.1
For meters shipped before January 2013
©2010-2016 Roche Diagnostics. All rights reserved 0 8103089001 (01) 2016-08 USA
Page 6
©2010-2016, Roche Diagnostics
The contents of this document, including all graphics, are the property of Roche Diagnostics.
Information in this document is subject to change without notice. Roche Diagnostics shall not be
liable for technical or editorial errors or omissions contained herein. No part of this document
may be reproduced or transmitted in any form or by any means, electronic or mechanical, for any
purpose, without the express written permission of Roche Diagnostics.
Please send questions or comments about this manual to your local Roche representative.
ACCU-CHEK, COAGUCHEK and SAFE-T-PRO are trademarks of Roche.
All other trademarks are the property of their respective owners.
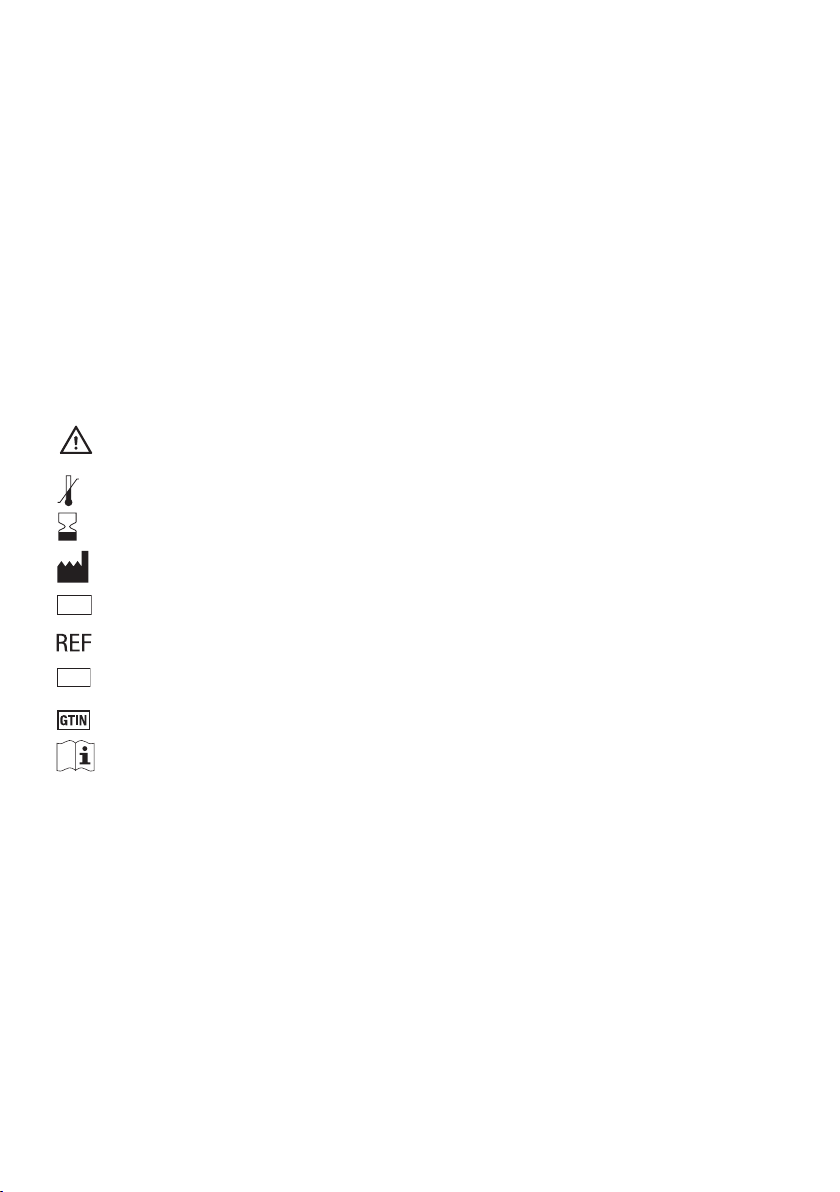
On the packaging and on the identification plate of the instrument you may encounter the
following symbols, shown here with their meaning:
Caution (consult accompanying documents). Refer to safety-related notes in the
manual accompanying this instrument.
Temperature limitation (Store at)
Use by
Manufacturer
LOT
Batch code/ Lot number
Catalog number
IVD
In vitro diagnostic medical device
Global Trade Item Number
Consult instructions for use
Rx only For prescription use only
6
Page 7

1 Introduction 11
Before you start.........................................................................................................................................
Intended use ...................................................................................................................................... 11
Important information regarding use ....................................................................................... 11
If you need help................................................................................................................................ 11
What can the system do for you? .............................................................................................. 12
Test principle ..................................................................................................................................... 12
Safety information and additional information ............................................................................. 13
Safety Information............................................................................................................................ 14
Disposal of the System................................................................................................................... 14
General Care...................................................................................................................................... 15
Laser Scanner.................................................................................................................................... 15
Electromagnetic Interference ...................................................................................................... 15
Touchscreen....................................................................................................................................... 15
Operating conditions ...................................................................................................................... 16
Quality control ................................................................................................................................... 17
2 The CoaguChek XS Pro Meter 18
Overview of the meter elements
Buttons and icons overview ................................................................................................................. 20
Power supply.............................................................................................................................................. 23
3 Putting the Meter into Operation 24
Inserting the batteries
Powering the meter on and off........................................................................................................... 26
............................................................................................................................ 25
......................................................................................................... 19
11
7
Page 8

4 Meter Setup 27
Note on presentation of screen elements in this manual
Settings summary ................................................................................................................................... 28
Screen setup .............................................................................................................................................. 32
Contrast................................................................................................................................................ 32
Result Units ........................................................................................................................................ 33
Language Selection......................................................................................................................... 35
Setting the date................................................................................................................................. 36
Setting the time................................................................................................................................. 38
Setting the display options for date and time ....................................................................... 40
Options setup ........................................................................................................................................... 42
Sort......................................................................................................................................................... 42
Beeper .................................................................................................................................................. 44
Auto Off................................................................................................................................................ 47
Computer............................................................................................................................................. 49
ID setup........................................................................................................................................................ 51
System Administrator (Admin.)................................................................................................... 53
Operator .............................................................................................................................................. 59
Patient................................................................................................................................................... 60
Lockouts setup.......................................................................................................................................... 63
Operator lockout............................................................................................................................... 64
QC (quality control) lockout......................................................................................................... 67
5 Testing a Capillary Blood Sample 69
Important notes
Getting a good capillary blood sample .................................................................................... 70
Getting a good result from venous whole blood.................................................................. 71
Preparing to test ....................................................................................................................................... 72
Test strip code chip ......................................................................................................................... 73
Inserting the code chip .................................................................................................................. 73
Powering on the meter................................................................................................................... 75
Performing a test...................................................................................................................................... 78
Adding comments............................................................................................................................ 87
......................................................................................................................................... 69
................................................. 27
6 Quality Control 89
Preparing to run a liquid quality control test
Performing a liquid quality control test............................................................................................ 92
7 Review Results 99
Viewing test results
Display patient result memory.................................................................................................. 102
Display QC (quality control) result memory........................................................................ 103
8
.............................................................................................................................. 100
................................................................................. 90
Page 9

8 Extended Functionalities 105
Data handling
Computer (Setup option) ........................................................................................................... 105
Operator lists................................................................................................................................... 106
Patient lists ...................................................................................................................................... 107
Barcode scanner ........................................................................................................................... 108
Stored test results and comments.......................................................................................... 108
9 Cleaning and Disinfecting the Meter 109
Recommended cleaning/disinfecting solutions
Cleaning/disinfecting the exterior (meter housing)................................................................. 110
Cleaning/disinfecting the test strip guide ................................................................................... 111
Cleaning the scanner window.......................................................................................................... 112
10 Troubleshooting 113
Error messages after powering on the meter
Error messages when preparing to test ....................................................................................... 115
Error messages during or after blood application ................................................................... 116
Other error messages.......................................................................................................................... 118
11 General Product Specifications 121
Technical data
Sample material............................................................................................................................. 121
Storage and transport conditions ........................................................................................... 122
Further Information .............................................................................................................................. 122
Ordering .......................................................................................................................................... 122
Reagents and solutions .............................................................................................................. 122
Product limitations........................................................................................................................ 122
Information about software licenses .................................................................................... 123
Repairs .............................................................................................................................................. 123
Contact Roche................................................................................................................................ 123
......................................................................................................................................... 105
........................................................................ 109
........................................................................... 114
........................................................................................................................................ 121
12 Warranty 124
13 Appendix 125
Contact Roche
Alphabetical Index 133
...................................................................................................................................... 125
9
Page 10

This page intentionally left blank.
10
Page 11

Introduction
1 Introduction
Before you start
Intended use
®
The CoaguChek XS
quantitatively determines prothrombin time (“PT”), using capillary blood or whole blood from a
vein (nonanticoagulated venous whole blood). It is indicated for use by healthcare professionals.
The system is ideally suited to monitor coagulation values in people who are taking oral anticoagulation medication (vitamin K antagonists, VKAs).
Important information regarding use
Read this operator's manual, as well as the package inserts for all relevant consumables, before
using the system for the first time.
You must configure the CoaguChek XS Pro meter according to your needs before initial use. Refer
to chapter 4, Meter Setup. Be sure to read the Safety information and additional information section in this chapter before operating the system.
Note: Before you use the meter for the first time ( after you have first inserted the batteries),
you must set the date and time correctly to allow you to perform measurements properly.
Each time you replace the batteries you need to check (and, if necessary adjust) the date
and time.
Pro system (CoaguChek XS Pro meter and CoaguChek XS PT Test strips)
If you need help
Information about using the system, the screen menus, and performing a test can be found in this
manual.
When error messages appear on the screen, refer to chapter 10, Troubleshooting.
For all questions about the CoaguChek XS Pro system that are not answered in this manual,
contact your Roche representative. In order to expedite troubleshooting, please have ready your
CoaguChek XS Pro meter, its serial number, this manual, and all related consumables when you
call.
11
Page 12

Introduction
What can the system do for you?
The CoaguChek XS Pro system makes coagula
tion testing easy. You only need to insert the code
chip, power the meter on, insert the test strip, and apply a small blood sample. The blood mixes
with the reagents on the test strip, and the meter determines when the blood clots. The meter
displays the results in about one minute. After the measurement, the meter automatically stores
the test result, together with date/time and patient ID (and operator ID, if that option is enabled)
to memory.
The CoaguChek XS Pro meter displays test results in units equivalent to laboratory plasma measurements. Results may be displayed in three ways:
■ International Normalized Ratio (INR)
■ combination of INR/seconds, or
■ combination of INR/%Quick
INR is a standardized measurement of the rate at which blood clots. A low INR can indicate an
increased risk of blood clots, while an elevated INR can indicate increased risk of bleeding.
The meter guides you through the test, step by step, using icons and instructions on the display.
Each box of test strips has its own code chip that you insert into the meter. This code chip contains lot-specific information about its test strips, such as the expiration date and calibration
data. Optional liquid controls for the system are also available.
The CoaguChek XS Pro meter has the ability to connect to a data management system (DMS)
through the Handheld Base Unit from Roche (available separately). The CoaguChek XS Pro
meter supports data exchange via the POCT1A standard. Data management systems may have
the ability to expand the security features of the meter, such as enabling operator lockouts. Data
management systems may also enable data transfer to an LIS or HIS. Refer to the manuals of the
Handheld Base Unit and of your DMS for technical details.
Test principle
The CoaguChek XS PT Test contains a lyophilized reagent. The reactive components of this
reagent consist of thromboplastin and a peptide substrate. When a sample is applied, thromboplastin activates coagulation, which leads to the formation of thrombin. At the same time the
meter starts to measure the time. The enzyme thrombin cleaves the peptide substrate, generating
an electrochemical signal. Depending on the time elapsed when it first appears, this signal is
then converted by means of an algorithm into customary coagulation units (INR, %Quick, seconds) and the result is displayed.
12
Page 13
Introduction
Safety information and additional information
This section explains how safety-related messages and information related to the proper
handling of the system are presented in the CoaguChek XS Pro Operator’s Manual. Read these
passages carefully.
The safety alert symbol by itself (without a signal word) is used to promote awareness to hazards which are generic or to direct the reader to
related safety information
Indicates a hazardous situation which, if not avoided, could result in
WARNING
CAUTION
death or serious injury.
Indicates a hazardous situation which, if not avoided, could result in
minor or moderate injury.
NOTICE
Indicates a hazardous situation which, if not avoided, may result in
damage to the system.
Important information that is not safety relevant is presented against a colored background
(without a symbol). Here you will find additional information on correct use of the meter or
useful tips.
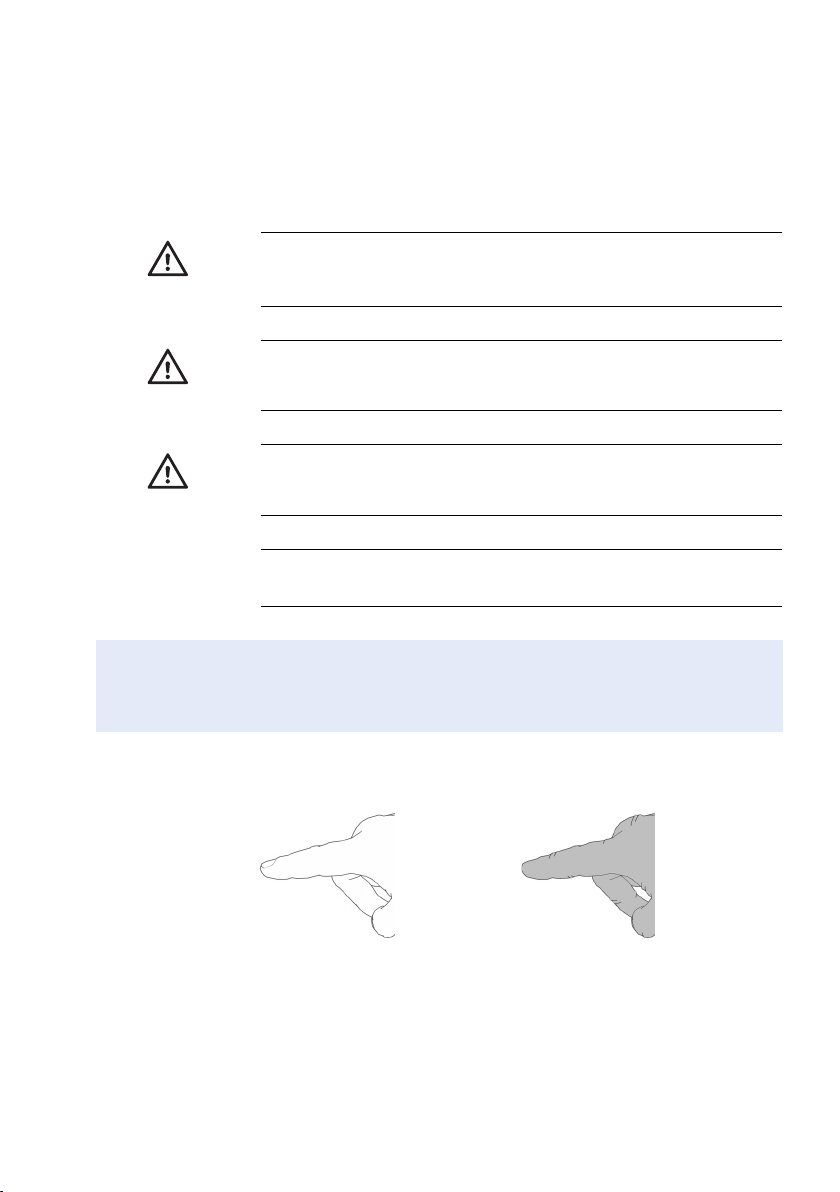
Illustrations in this manual show two different kinds of hands:
Hand without glove Hand with glove
13
Page 14

Introduction
Safety Information
Operator qualification
Only trained healthcare professionals ma
Pro system. Operators must have received comprehensive instruction in
the operation, quality control, and care of the CoaguChek XS Pro system.
Protection against infection
There is a potential risk of infection. Healthcare professionals using the
WARNING
CoaguChek XS Pro system must be aware that any object coming into
contact with human blood is a potential source of infection. Healthcare
professionals must also be aware that any cross-contamination is a
potential source of infection for patients.
■ Use gloves.
■ Use a separate lancet / separate lancing device for each patient.
■ Dispose of used lancets in a sturdy sharps container with lid.
■ Dispose of used test strips according to your institution’s infection
■ Follow all health and safety regulations in force locally.
Disposal of the System
y operate the CoaguChek XS
control policy.
14
WARNING
WARNING
Infection by a potentially biohazardous instrument
The CoaguChek XS Pro system or its components must be treated as
potentially biohazardous waste. Decontamination (i.e., a combination of
processes including cleaning, disinfection and/or sterilization) is
required before reuse, recycling, or disposal.
Dispose of the system or its components according to the appropriate
local regulations.
Exploding batteries
Do not throw used batteries into an open fire. They may explode.
Disposal of used batteries
Do not dispose of the batteries with normal domestic waste. Dispose of
used batteries in an environmentally responsible manner and in accordance with applicable local regulations and directives. Contact your local
council/local authority or the manufacturer of the used batteries for
advice on correct disposal.
Page 15
General Care
Introduction
NOTICE
Clean the meter only with the solutions recommended (see page 109).
Using other solutions may result in incorrect operation and possible
system failure. Do not let cleaning solution enter the instrument. Make
sure that the meter is thoroughly dried after cleaning or disinfecting.
Laser Scanner
The built-in barcode scanner emits a laser beam when activ
ated.
The built-in barcode scanner is a Class 1 laser, according to EN 60825-1:2007.
A barcode does not need to be present for the laser scanner to become
active. Do not stare directly into the laser beam.
WARNING
Electromagnetic Interference
Do not use the meter near strong electromagnetic fields, which could
interfere with the proper operation of the meter.
Touchscreen
NOTICE
Use only your finger (even when wearing gloves) or special pens
■
designed for use with touchscreens to touch the screen elements.
Using pointed or sharp-edged objects can damage the touchscreen.
■ Avoid prolonged exposure to direct sunlight. Direct sunlight may
reduce the life expectancy and functionality of the display.
15
Page 16

Introduction
Operating conditions
o ensure that the meter functions properly, please observe the following guidelines:
T
■ Only use the meter at a room temperature between 15 °C and 32 °C (59 °F and 90 °F).
■ Only use the meter at a relative humidity between 10% and 85% (no condensation).
■ When operating the meter using the power supply unit, use only a voltage of 100 V to
240 V (± 10%) , 50/60 Hz.
■ When testing, place the meter on a level, vibration-free surface, or hold it so it is roughly
horizontal.
16
Page 17

Introduction
Quality control
The meter has a number of built-in quality
■ A check of the electronic components and functions every time the meter is powered on.
■ A check of the test strip temperature while a test is in progress.
■ A check of the expiration date and lot information on the test strip based on the code chip
-control functions:
data.
■ A two-level, on-board quality control test and patient result determination within a single
test chamber.
Roche Diagnostics has available optional liquid quality controls for the CoaguChek XS Pro
system. These controls are provided to assist with meeting regulatory compliance requirements
as applicable to your facility.
17
Page 18
The CoaguChek XS Pro Meter
2 The CoaguChek XS Pro Meter
B
C
D
A
E
G
F
18
H K L
I J
Page 19

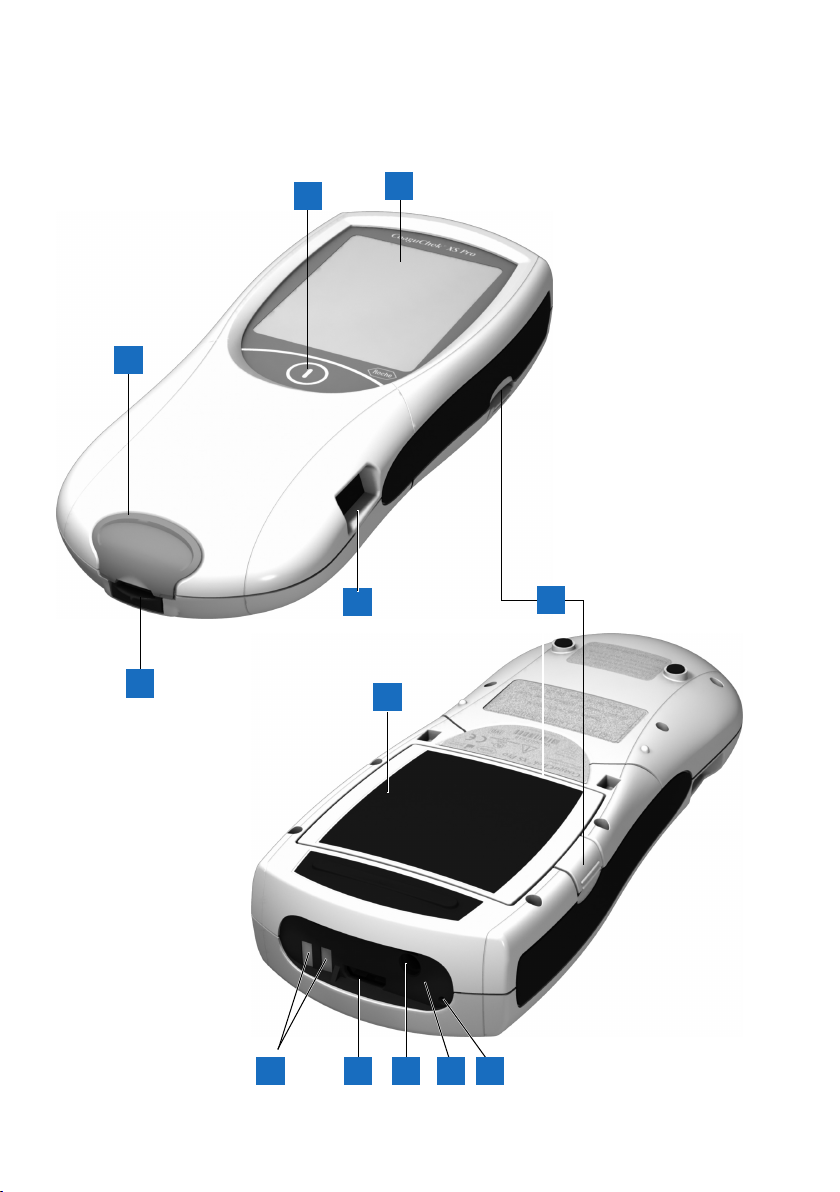
Overview of the meter elements
The CoaguChek XS Pro Meter
A Touchscreen
Shows test results, information, icons, and
results recalled from memory. To select an
option, simply touch the button lightly.
B On/Off button
Press and hold this button to pow
meter on or off.
C Test strip guide cover
Remove this cover to clean the test strip
guide (if it has become soiled, e.g., with
blood).
D Test strip guide
Inser
t the test strip here.
E Barcode scanner (Laser)
The integra
operator and patient IDs into the meter.
F Tab for battery compartment cover
ted barcode scanner can read
er the
G Battery compartment cover
vers the battery compartment
Co
(4 standard AA alkali-manganese
batteries or a rechargeable battery pack
(optional)).
H Charging terminals
Used for pow
the battery pack, when the meter is
docked in the (optional) Handheld Base
Unit.
I Code chip slot
Inser
t the code chip here.
J Connection socket for power adapter
Plug in the pow
K Infrared interface
vered by the semi-transparent panel)
(Co
Supports data communication.
L Reset button
Use this button to reset the meter in case
of software or power-up errors.
er supply and/or charging
er adapter here.
19
Page 20
The CoaguChek XS Pro Meter
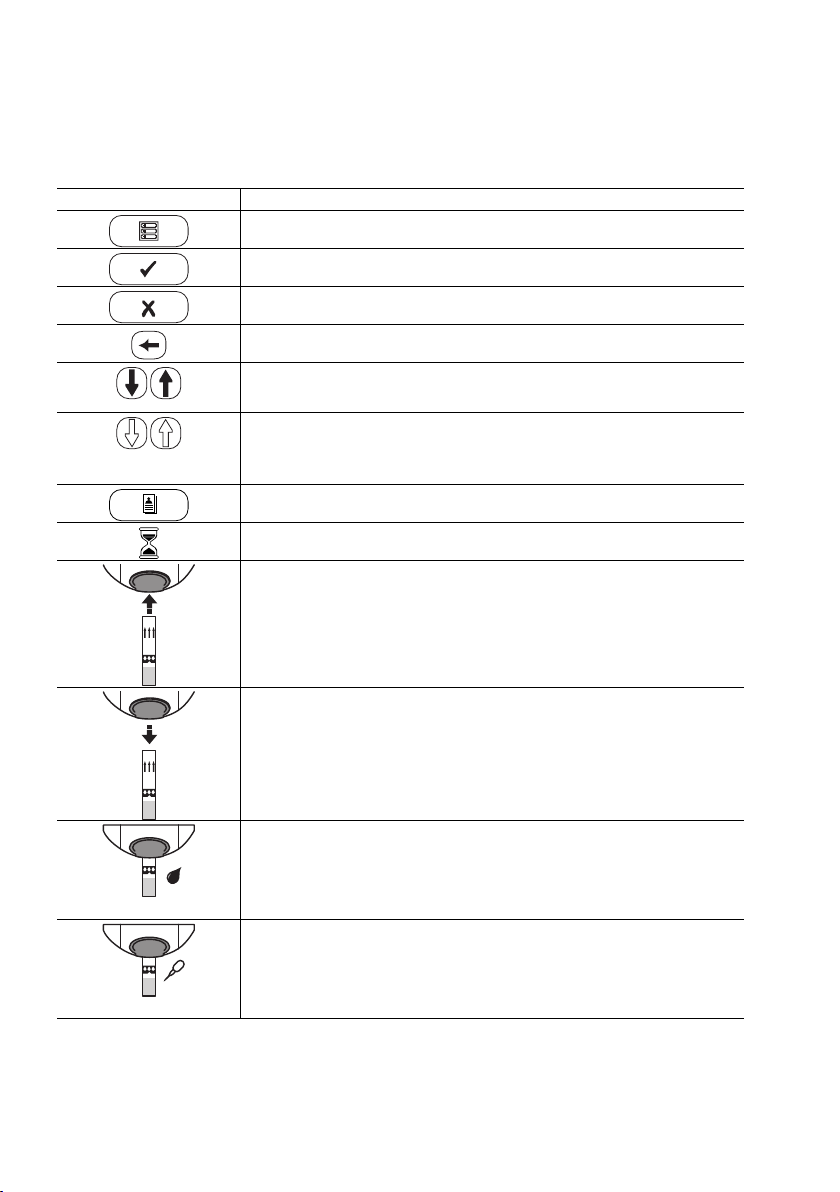
Buttons and icons overview
The buttons and icons that appear during normal operation are shown here, along with their
respective meanings.
Icon Meaning
Go to Main Menu
OK; save setting
Cancel; discard setting
Return (to previous menu)
Reduce/increase the value displayed
Move screen contents
Inactive button:
Value cannot be further decreased/increased or:
End of list in this direction is reached
List of tests of a specific patient
Operator must wait until the meter has completed an action.
Insert test strip
20
Remove test strip
Apply sample (the time left to apply sample is counted down in the
display)
180 SEC
Apply liquid control (QC) sample (the time left to apply sample is
counted down in the display)
180 SEC
Page 21

Icon Meaning
t the test strip code chip
Inser
The CoaguChek XS Pro Meter
QC
%Q
Sec
INR
QC
Insert the QC code chip
Automatic quality control completed successfully
Results are displayed as a Quick percentage value
Results are displayed in seconds
Results are displayed in INR units
Result in the chosen unit of measure is above the measuring range.
Result in the chosen unit of measure is below the measuring range.
Quality control: Result is above the specified range
Quality control: Result is below the specified range
Battery status:
• When the batteries still have their full charge, all segments are lit.
• Individual segments disappear one by one as the batteries
become weaker.
• When there is no segment remaining, you can no longer perform
a test. You can, however, still access the meter's memory.
Operation with power supply adapter
am
pm
Time between midnight and noon (in 12-hour time format)
Time between noon and midnight (in 12-hour time format)
Room or meter temperature is outside the acceptable range
The test strip guide cover is open
Communication is taking place via the infrared interface
21
Page 22

The CoaguChek XS Pro Meter
Error messages and the description of the icons linked to them are pro
Troubleshooting chapter of this manual.
Icon Meaning
Reports a warning message
Reports an error (see: Troubleshooting)
Reports a serious error (see: Troubleshooting)
vided in the
22
Page 23
The CoaguChek XS Pro Meter
Power supply
The CoaguChek XS Pro meter can operate with either the power adapter provided, batteries, or a
special rechargeable battery pack (optional). The CoaguChek XS Pro meter uses four standard
type AA alkaline batteries. You should insert the batteries or the optional rechargeable battery
pack even when you use the power adapter. This ensures that you will not lose the date and time
settings if the power goes out.
To save power, the CoaguChek XS Pro meter has the option to automatically power itself off
based on your setup selections, unless a button has been pressed or a new test strip has been
inserted. The default setting is set to 5 minutes. When the meter powers itself off, all results
obtained up to that point remain in memory and the settings will still be there when you power
the meter back on. (Refer to Auto Off on page 47.)
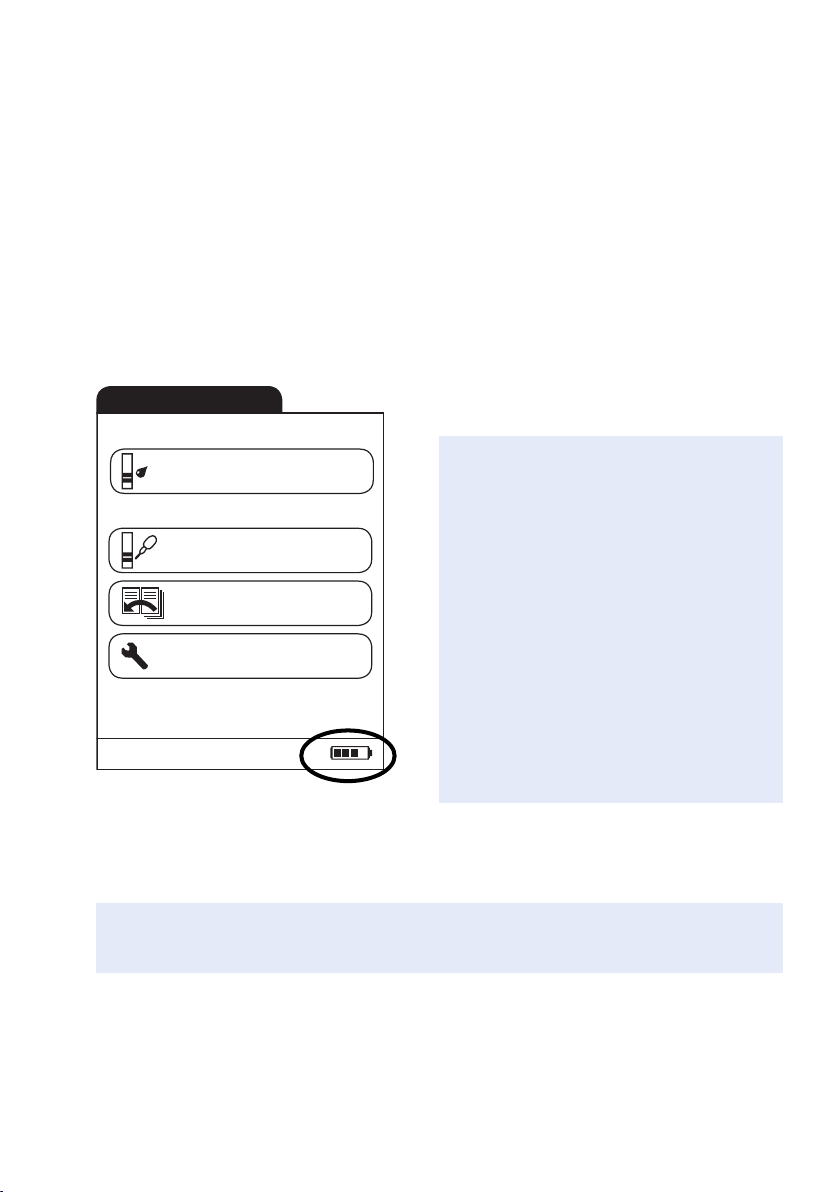
Main Menu
Patient Test
Control Test
Review Results
09:15 am
During battery operation, the meter always
displays the battery power level.
When replacing the batteries you must insert
the new batteries within ten (10) minutes of
removing the old ones to keep the date and
time settings. If you take longer than this, you
must re-enter the date and time.
To make sure that you do not lose your date
and time settings, connect the power supply
unit while you change the batteries.
Setup
03/16/2010
The meter retains results in memory even when no batteries are inserted. All settings other than
date and time (deleted after 10 minutes without power) are retained as well.
Dispose of used batteries in an environmentally responsible manner and in accordance with
applicable local regulations and directives.
23
Page 24

Putting the Meter into Operation
3 Putting the Meter into Operation
Before using the meter for the first time, perform the following steps:
1 Insert batteries and/or connect the power supply unit
2 Set the current date and time
3 Enter the settings of choice (language, unit of measure, user administration if applicable,
etc.)
Instead of batteries, you can use a special rechargeable battery pack. If you choose this option,
order the pack separately from Roche Diagnostics. To recharge, connect the power adapter to
the CoaguChek XS Pro meter or to the optional Handheld Base Unit (HBU) and dock the
meter.
The meter’s battery power level indicator is designed for use with either standard, nonrechargeable AA batteries or the dedicated Roche handheld battery pack. We do not recommend the use of off-the-shelf rechargeable batteries in AA format. These have lower voltages
than standard AA batteries or the special Roche handheld battery pack. This can lead to incorrect battery power level indications on the meter.
24
Page 25
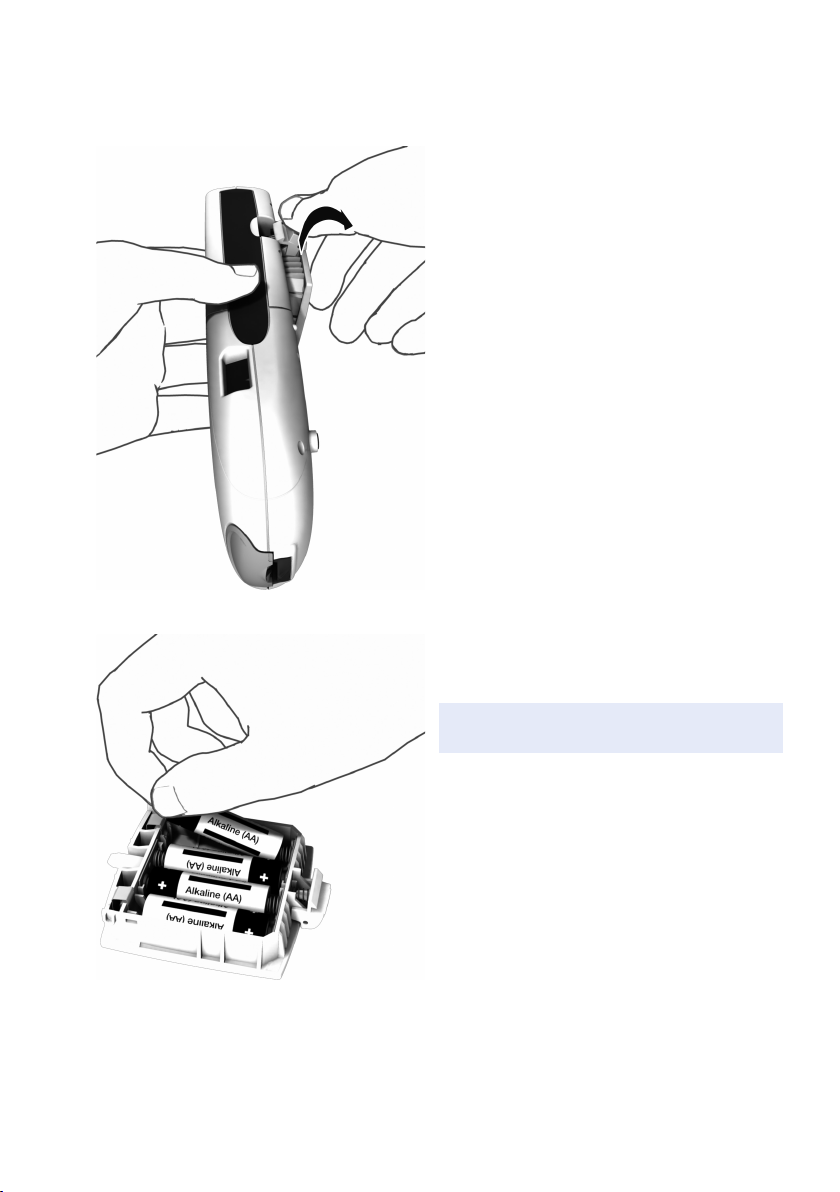
Inserting the batteries
Putting the Meter into Operation
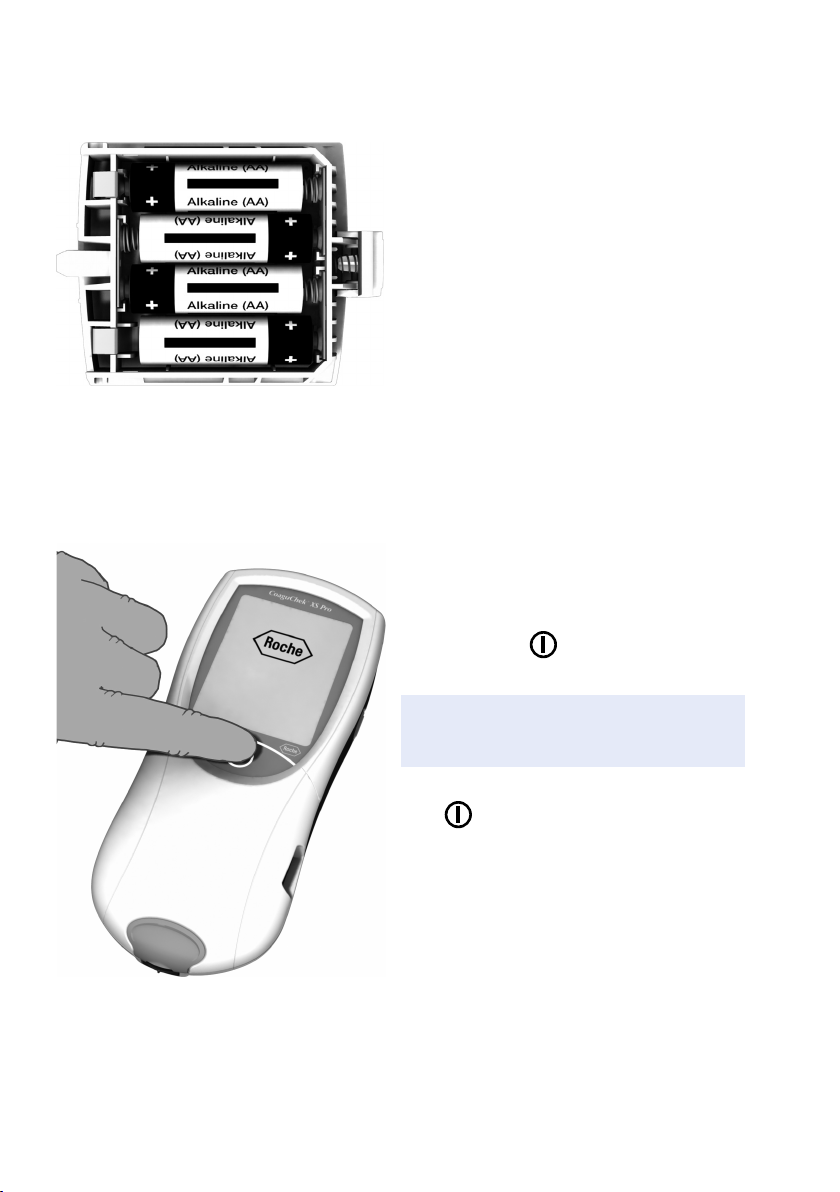
1 With the meter powered off, press the
battery compartment cover release tab
and slide the cover off.
2 Insert the four batteries in the battery
compartment as indicated.
The batteries should last about 80 tests,
depending on the type of battery used.
25
Page 26
Putting the Meter into Operation
Powering the meter on and off
3 Slide the battery compartment back onto
the meter and close it.
The meter powers itself on after the
batteries have been inserted.
1 Place the meter on a level, vibration-free
surface, or hold it in your hand so it is
roughly horizontal.
2 Power the meter on by pressing and
holding the button for approximately
1 second.
26
You can also power on the meter directly by
inserting a test strip or connecting the power
adapter.
3 To power the meter off after use, press the
button for approximately 2 seconds.
Page 27
Meter Setup
4 Meter Setup
Note on presentation of screen elements in this manual
Buttons are screen prompts that cause something to happen when touched. The names of all
buttons are either shown as bold text or as the icon used on the button (e.g., for OK ).
Other screen elements (e.g., Menu titles) are written in italics. These screen elements are not
active.
If you have not set the date and time (after powering on for the first time or because the batteries were removed from the meter for more than 10 minutes), you cannot perform a test. In
that case powering on the meter takes you immediately to the Setup mode, where you must
set the date and time (see page 36 and following).
After date and time have been set, the meter automatically moves to the Main Menu, where
you can start a test or enter more settings.
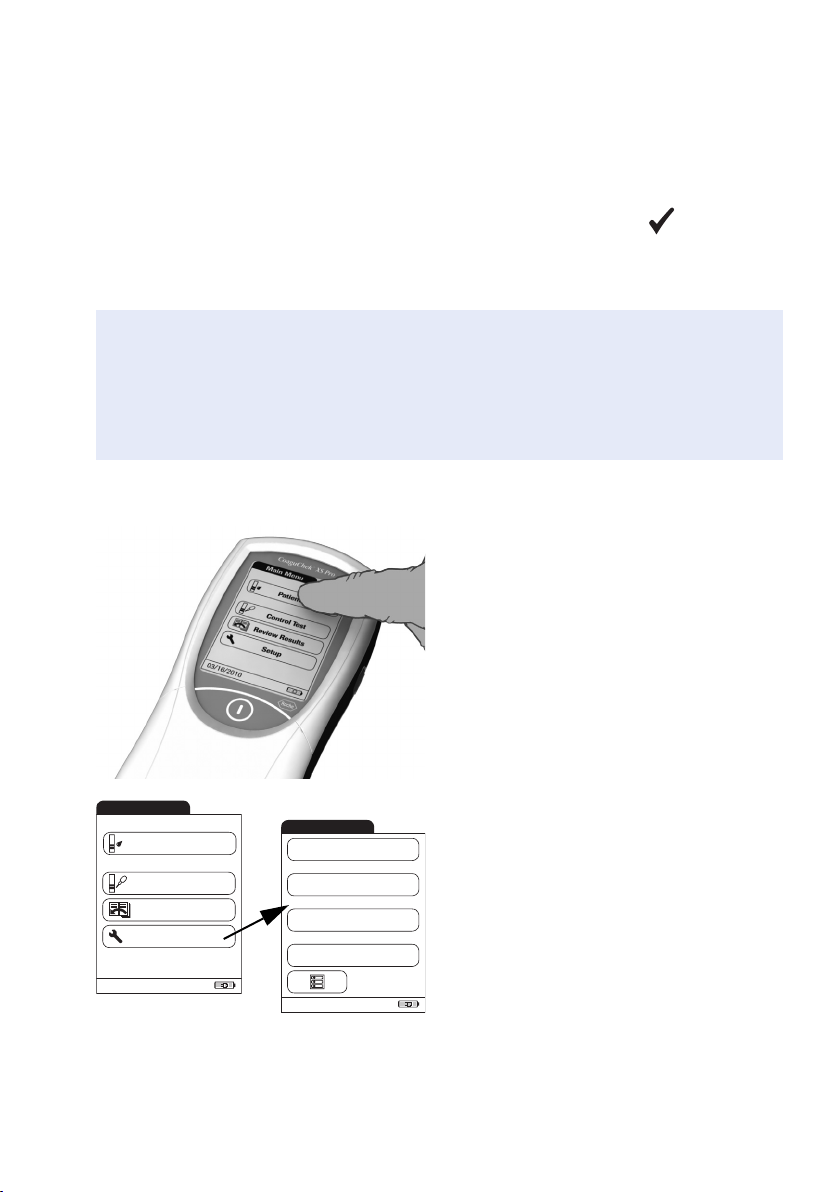
You can open any displayed function by
touching (or tapping) the button for it with
your finger (or a special pen for this purpose).
“Tap” means: Touch the button, then remove
your finger from the touchscreen. The next
screen appears once you remove your finger.
Main Menu
03/16/20
Patient Test
Control Test
Review Results
Setup
10
09:15 am
Setup Menu
03/16/20
Screen
Options
ID Setup
Lockouts
10
09:15 am
If the meter did not automatically enter the
Setup mode (e.g., after the batteries were
replaced), you can open the Setup menu from
the Main Menu.
1 Touch Setup to open the meter settings.
2 Select the group of settings of choice (see
the Settings summary following this
section.).
27
Page 28
Meter Setup
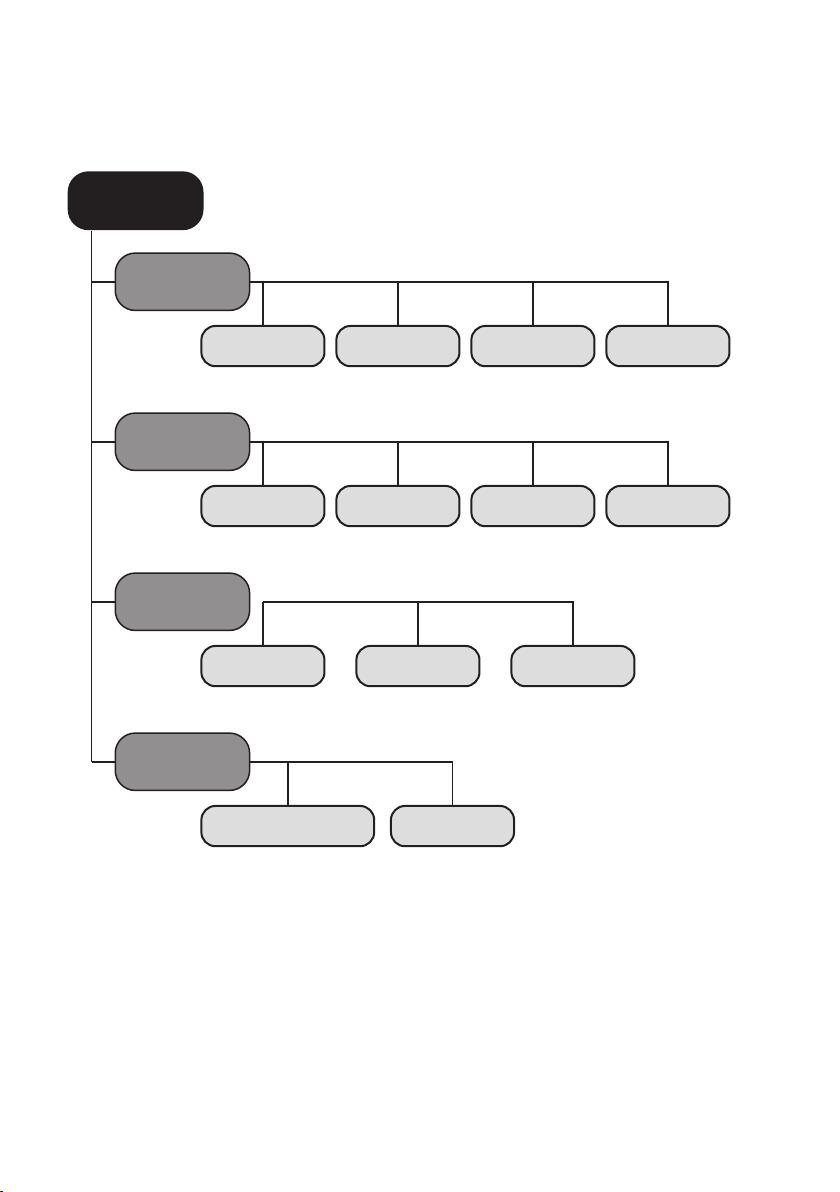
Settings summary
The diagram below shows all of the setup areas that can be accessed on the meter.
Setup
Screen
LanguageUnitsContrast Date/Time
Options
Auto OffBeeperSort Computer
ID Setup
28
PatientAdmin. Operator
Lockouts
QC LockoutOperator Lockout
Page 29

Group Subgroup Setting Values *
Screen
Contrast 0 – 10 (5 *)
Result Units INR *
INR/SEC
INR/%Q
Language Selection Dansk
Deutsch
English *
Español
Français
Italiano
Nederlands
Norsk
Português
Svenska
Date/Time Date 01/01/2005 *
Time 12:00 am *
Date formats DD.MM.YYYY (16.09.2009)
MM/DD/YYYY (09/16/2009) *
YYYY-MM-DD (2009-09-16)
Time formats 24-hour time format (24h)
12-hour time format (12h), with
am/pm *
Meter Setup
* Default settings are labelled with an asterisk (*).
29
Page 30

Meter Setup
Group Subgroup Setting Values *
Options
Sort Date/Time *
Beeper
Auto Off [minutes] Off
Computer Active
Beeper Off
Key Click Off *
Patient ID number
Low
Medium *
High
On
1 … (5*) … 10
15
20
25
30
40
50
60
Inactive *
* Default settings are labelled with an asterisk (*).
30
Page 31

Group Subgroup Setting Values *
ID Setup
Lockouts
Admin. (Administrator) Blank (Off) *
Operator (Operator List is optional) Active
Inactive *
Patient No *
Optional
Required
Operator Lockout (only if the Operator
option is set to Active and an operator list
is available)
QC Lockout
New code Yes
General No *
Off *
Weekly
Monthly
Every 3 months
Every 6 months
Yearly
No *
Daily
Weekly
Monthly
Meter Setup
* Default settings are labelled with an asterisk (*).
31
Page 32

Meter Setup
Screen setup
The Screen setup area contains the options for changing the display.
Contrast
Use the Contrast menu to adjust the display to your ambient light conditions and make it easier
to read.
Main Menu
03/16/20
Patient Test
Control Test
Review Results
Setup
10
09:15 am
Setup Menu
03/16/20
Screen
Options
ID Setup
Lockouts
10
09:15 am
Screen
Contrast
Result Units
Language Selection
Date / Time
03/16/20
10
Screen
Contrast
Result Units
Language Selection
09:15 am
09:15 am
1 From the Main Menu, touch Setup to
open the meter settings.
2 From the Setup Menu, touch Screen.
3 From the Screen menu, touch Contrast.
If a button is grayed out, this means the
function is not available.
32
Date / Time
03/16/2010
Page 33

4 Touch or to change the contrast
in a range from 0 to 10.
Contrast
Contrast (0-10):
09:15 am
■ Contrast “0” makes the display very dark.
■ Contrast “10” makes the display very light.
5 Touch to save this setting, or:
5
Touch to exit this menu without
saving any changes.
The display automatically returns to the
03/16/20
10
previous screen.
Result Units
Use this setting to select the unit(s) of measure to be displa
yed with the results.
Meter Setup
Main Menu
03/16/20
Patient Test
Control Test
Review Results
Setup
10
03/16/20
09:15 am
Setup Menu
Screen
Options
ID Setup
Lockouts
10
09:15 am
Screen
Contrast
Result Units
Language Selection
Date / Time
10
03/16/20
1 From the Main Menu, touch Setup to
open the meter settings.
2 From the Setup Menu, touch Screen.
3 From the Screen menu, touch Result
Units.
09:15 am
33
Page 34

Meter Setup
The current unit of measure setting is highlighted (white type on a black background).
You can select either:
■ INR
■ INR and seconds
■ INR and Quick value in %
03/16/20
Units
INR
INR/SEC
INR/
10
%Q
09:15 am
4 Touch the button to select the unit of
measure of choice. Your selection is now
highlighted.
5 Touch to save this setting, or:
Touch to exit this menu without
saving any changes.
The display automatically returns to the
previous screen.
34
Page 35

Language Selection
Use this setting to select the language for all displa
ys (that contain text).
Meter Setup
Main Menu
03/16/20
Patient Test
Control Test
Review Results
Setup
10
03/16/20
03/16/20
09:15 am
Setup Menu
Language
Dansk
Deutsch
English
Español
rançais
F
Screen
Options
ID Setup
Lockouts
10
10
09:15 am
Screen
Contrast
Result Units
Language Selection
Date / Time
10
03/16/20
09:15 am
09:15 am
1 From the Main Menu, touch Setup to
open the meter settings.
2 From the Setup Menu, touch Screen.
3 From the Screen menu, touch Language
Selection.
The current language setting is highlighted
(white type on a black background). You can
select either:
■ Dansk
■ Deutsch
■ English
■ Español
■ Français
■ Italiano
■ Nederlands
■ Norsk
■ Português
■ Svenska
4 Touch or to display the language
of choice on the screen.
If the arrow is just an outline , you
have reached the end of the list in the
repective direction.
5 Touch the button to select the language of
choice. Your selection is now highlighted.
6 Touch to save this setting, or:
Touch to exit this menu without
saving any changes.
The display automatically returns to the
previous screen.
35
Page 36

Meter Setup
Setting the date
ou power on the meter for the first time (or after a long period without power), the input
When y
field for the date automatically appears first. The date (and time) must be entered before the
meter can be used further. If at a later time a date adjustment is needed, go to the Setup menu,
then select the menu of choice.
Both Date and Time display formats are controlled by the Format options you select (see
page 40). Options shown in the Date and Time menus may vary depending on the chosen
formats. You can choose between the following display formats:
■ Date: Day.Month.Year, e.g., 16.09.2009
■ Date: Month/Day/Year, e.g., 09/16/2009
■ Date: Year-Month-Day, e.g., 2009-09-16
■ Time: 24H or 12H
Main Menu
03/16/20
Patient Test
Control Test
Review Results
Setup
10
09:15 am
Setup Menu
03/16/20
Screen
Options
ID Setup
Lockouts
10
09:15 am
Screen
Contrast
Result Units
Language Selection
Date / Time
10
03/16/20
1 From the Main Menu, touch Setup to
open the meter settings.
2 From the Setup Menu, touch Screen.
3 From the Screen menu, touch Date/Time.
09:15 am
36
Page 37

Meter Setup
Date/Time
03/16/20
Set Date
Set Time
Format
10
09:15 am
Date
Year:
Month:
Day:
03/16/2010
2010
4 From the Da
te/Time menu, touch Set
Date.
09:15 am
5 Touch and to set the year, then
the month, then the day.
6 Touch to save this setting, or:
1
Touch to exit this menu without
1
saving any changes.
The display automatically returns to the
previous screen.
If this setup menu appeared automatically
after powering the meter on, you must
touch to complete the first date
setting.
7 Touch to return to the Screen menu.
37
Page 38

Meter Setup
Setting the time
ou power on the meter for the first time (or after a long period without power), this Setup
When y
menu appears automatically after you set the date. If at a later time a time adjustment is needed,
go to the Setup menu, then select the menu of choice.
Main Menu
03/16/20
Patient Test
Control Test
Review Results
Setup
10
09:15 am
Setup Menu
03/16/20
Screen
Options
ID Setup
Lockouts
10
09:15 am
Screen
Contrast
Result Units
Language Selection
Date / Time
10
03/16/20
1 From the Main Menu, touch Setup to
open the meter settings.
2 From the Setup Menu, touch Screen.
3 From the Screen menu, touch Date/Time.
09:15 am
38
Page 39

Meter Setup
Date/Time
03/16/20
Set Date
Set Time
Format
10
09:15 am
Time
Hour:
Minute:
03/16/2010
9
59
AM PM
09:15 am
4 From the Da
te/Time menu, touch Set
Time.
5 Touch and to set the hours, then
the minutes.
6 Touch to save this setting, or:
Touch to exit this menu without
saving any changes.
The display automatically returns to the
previous screen.
If this setup menu appeared automatically
after powering the meter on, you must
touch to complete the first time
setting.
7 Touch to return to the Screen menu.
39
Page 40

Meter Setup
Setting the display options for date and time
our preferred format for the date and time display.
Select y
Main Menu
03/16/20
Patient Test
Control Test
Review Results
Setup
10
09:15 am
Setup Menu
03/16/20
Screen
Options
ID Setup
Lockouts
10
09:15 am
Screen
Contrast
Result Units
Language Selection
Date / Time
10
03/16/20
1 From the Main Menu, touch Setup to
open the meter settings.
2 From the Setup Menu, touch Screen.
3 From the Screen menu, touch Date/Time.
09:15 am
40
Page 41

Meter Setup
Date/Time
03/16/20
Set Date
Set Time
Format
10
09:15 am
Format 09:15 am
Date:
DD.MM.YYYY
MM/DD/YYYY
YYYY-MM-DD
Time:
03/16/2010
24H 12H
4 From the Da
te/Time menu screen, touch
Format.
The current settings are highlighted. You can
select one of the following display formats:
■ Date: DD.MM.YYYY (Day.Month.Year),
e.g., 16.09.2009
■ Date: MM/DD/YYYY (Month/Day/Year),
e.g., 09/16/2009
■ Date: YYYY-MM-DD (Year-Month-Day),
e.g., 2009-09-16
■ Time: 24H or 12H
5 Touch the button with the display format
of choice for date and time. Your selection
is now highlighted.
6 Touch to save this setting, or:
Touch to exit this menu without
saving any changes.
The display automatically returns to the
previous screen.
7 Touch to return to the Screen menu.
41
Page 42

Meter Setup
Options setup
Sort
Sort refers to the order in which measured and stored results are displayed when you use the
Review Results function of the CoaguChek XS Pro meter. You can display stored results
chronologically by date and time or by person, based on the Patient ID.
Main Menu
03/16/20
Patient Test
Control Test
Review Results
Setup
10
09:15 am
Setup Menu
03/16/20
Screen
Options
ID Setup
Lockouts
10
09:15 am
Options
03/16/20
1 From the Main Menu, touch Setup to
open the meter settings.
2 From the Setup Menu, touch Options.
3 From the Options menu, touch Sort.
09:15 am
Sort
Beeper
Auto Off
Computer
10
42
Page 43

Meter Setup
Sort By:
03/16/20
Sort
Date / Time
Patient ID
10
09:15 am
The current setting is highlighted. You may
select from the following sort options:
■ By Date/Time
■ By Patient ID
4 Touch the button to select the Sort by
option of choice. Your selection is now
highlighted.
5 Touch to save this setting, or:
Touch to exit this menu without
saving any changes.
The display automatically returns to the
previous screen.
43
Page 44

Meter Setup
Beeper
The CoaguChek XS Pro meter can displa
y information visually and alert you to special circum-
stances with a Beeper. When the Beeper is activated, the meter beeps when:
■ it is switched on
■ it detects a test strip
■ pre-heating of the test strip is complete and you need to apply a sample
■ it detects a sample
■ the test is completed and the results are displayed (a long beep)
■ an error occurs (three short beeps)
■ an external power supply unit is connected when the meter is on
■ a barcode is scanned
We recommend that you keep the Beeper activated at all times.
You can also activate a Key Click. When a Key Click is activated, the meter clicks briefly every
time a button is touched, facilitating the input of information.
44
Page 45

Meter Setup
Main Menu
03/16/20
Patient Test
Control Test
Review Results
Setup
10
03/16/20
09:15 am
Setup Menu
Screen
Options
ID Setup
Lockouts
10
09:15 am
03/16/20
Options
Computer
10
Sort
Beeper
Auto Off
09:15 am
1 From the Main Menu, touch Setup to
open the meter settings
..
2 From the Setup Menu, touch Options.
3 From the Options menu, touch Beeper.
45
Page 46

Meter Setup
Key Click:
Beeper
Off
Low
Medium
High
09:15 am
On Off
The current setting is highlighted. You may
select from the following options:
For the Beeper
■ Off
■ Low
■ Medium
■ High
03/16/20
10
For the Key Click
■ On
■ Off
4 Touch the button with the desired setting
for the Beeper, then touch the button with
the setting of choice for the Key Click.
Both selections are now highlighted.
5 Touch to save this setting, or:
Touch to exit this menu without
saving any changes.
The display automatically returns to the
previous screen.
46
Page 47

Meter Setup
Auto Off
ou can set up your CoaguChek XS Pro meter so that it powers itself off automatically if it has
Y
not been used (no buttons pressed or tests run) for a preselected time period. Use this feature to
save power and extend the life of the batteries.
Main Menu
03/16/20
Patient Test
Control Test
Review Results
Setup
10
03/16/20
09:15 am
Setup Menu
Screen
Options
ID Setup
Lockouts
10
09:15 am
03/16/20
Options
Computer
10
1 From the Main Menu, touch Setup to
open the meter settings.
2 From the Setup Menu, touch Options.
3 From the Options menu, touch Auto Off.
09:15 am
Sort
Beeper
Auto Off
Note: If the meter is connected to the power adapter or the Handheld Base Unit, the Auto
Off function has a different effect:
■ If Operator is set to Inactive, the meter switches to the Main Menu, once Auto Off is
triggered.
■ If Operator is set to Active, the meter switches to Operator Login, once Auto Off is
triggered.
For information on Operator ID, see Operator on page 59.
47
Page 48

Meter Setup
Auto Off
Minutes:
03/16/20
You may select from the following options:
09:15 am
■ Off (meter never powers itself off)
■ Time until meter powers itself off:
1…10, 15, 20, 25, 30, 40, 50, 60 minutes
5
4 Touch or to select the time of
choice in minutes or to switch the feature
off.
10
5 Touch to save this setting, or:
Touch to exit this menu without
saving any changes.
The display automatically returns to the
previous screen.
48
Page 49

Meter Setup
Computer
The CoaguChek XS Pro meter can connect with a computer or host system running appropria
te
software (that is, a DMS must be installed). To use this connectivity feature, however, you need
the optional Handheld Base Unit. The connection is established in two steps.
■ The meter connects to the Handheld Base Unit via infrared.
■ The Handheld Base Unit is either connected to a single computer (via USB) or to a
network/host system (via ethernet).
The option Computer (when activated) can be used together with a DMS to set up:
■ operator lists, or
■ patient lists (lists of patients to be tested)
This eliminates the need for manual entry of these data.
In addition, you can transfer test results stored in the meter to other systems for archiving or
further evaluation. The option Computer controls the meter’s ability to communicate with a
computer or a network.
Note: Extended data handling functionality is dependent on the capabilities of the
particular Data Management System (DMS) being used and may vary.
49
Page 50

Meter Setup
Main Menu
03/16/20
Patient Test
Control Test
Review Results
Setup
10
09:15 am
Setup Menu
03/16/20
Computer
03/16/20
Screen
Options
ID Setup
Lockouts
10
Active
Inactive
10
09:15 am
Options
03/16/20
09:15 am
Sort
Beeper
Auto Off
Computer
10
09:15 am
1 From the Main Menu, touch Setup to
open the meter settings
.
2 From the Setup Menu, touch Options.
3 From the Options menu, touch
Computer.
4 Touch the button with the setting of
choice for communication with the PC.
Your selection is now highlighted.
5 Touch to save this setting, or:
Touch to exit this menu without
saving any changes.
The display automatically returns to the
previous screen.
50
Page 51

Meter Setup
ID setup
Use the ID Setup menu to enter settings for user management and patient management. These
settings are optional and set to Off/Inactive by default; the meter can be operated without these
settings.
There are three types of identification used with the meter:
■ System Administrator: The Admin. (Administrator) has special rights to enter certain
meter settings and is the only one who can enter and change these settings. It is not
necessary for Admin. identification to be activated to use the CoaguChek XS Pro meter.
However, it might be desired or necessary, depending on the regulatory environment and
the site of use.
■ Operator: The Operator ID is assigned to persons who use the meter to run tests. If you
want to use Operator IDs, you have several options:
– You may use Operator IDs to restrict the use of the meter to qualified personnel or a
predefined group of users. In this case an operator list created externally must be transferred to the meter, enabling you to select an Operator ID when logging in. For more
details see Data handling, starting on page 105.
– You may use Operator IDs for informational purposes only, in order to assign stored
measurement results to the users who performed the test. In this case Operator IDs may
directly be entered on the meter (by keypad or scanner), with or without an operator list
being available.
■ Patient: The Patient ID is assigned to the person, whose test results are recorded. You
can either:
– block input of a unique Patient ID (in this case, every test is simply numbered in
consecutive order)
– allow a unique Patient ID as optional, or
– require a unique Patient ID for every test. Patient lists created externally can also be trans-
ferred to the meter, enabling you to select Patient IDs for a test from these lists. For more
details see Data handling, starting on page 105.
Operator IDs can be selected from a list (if available) or read by the barcode scanner on the side
of the meter. If passwords were created, they must be entered via the onscreen keypad.
Patient IDs can be entered by using the onscreen keypad or the barcode scanner on the side of
the meter.
51
Page 52

Meter Setup
ID Setup
03/16/20
Admin.
Operator
Patient
10
09:15 am
The buttons in the ID Setup menu show what
the current settings are (this is just an
example, the screen may look different on
your meter):
■ The standard display of the Admin.
button means the function is available but
not activated (a password for the system
administrator/supervisor has not been
assigned).
■ The standard display of the Operator
button means the Operator login is available but not activated.
■ When the Patient button is highlighted
(that is, when it has a black background)
this means the function is available and
activated (either as Optional or Required).
52
Page 53

Meter Setup
System Administrator (Admin.)
In the default setting
, the meter is not protected with an Admin. password, and all setup options
are accessible to every user. If you set up an Admin. password, the following setup areas are
automatically reserved only for the system administrator/supervisor (i.e., the person who knows
the password).
■ Screen: Result Units, Date/Time
■ Options: (connection to a) Computer
■ ID Setup (the entire area)
■ QC Lockout
■ Operator Lockout (only available in combination with a data management system)
When you enter an Admin. password, this password will have to be entered from this point
forward before any of the settings above can be changed. The Admin. password must also be
entered before you can delete or change the Admin. password itself. If you forget the Admin.
password, contact your Roche representative.
53
Page 54

Meter Setup
If an Admin. password has not been set
up yet:
Main Menu
03/16/20
Patient Test
Control Test
Review Results
Setup
10
09:15 am
Setup Menu
03/16/20
Screen
Options
ID Setup
Lockouts
10
09:15 am
ID Setup
03/16/20
1 From the Main Menu, touch Setup to
open the meter settings.
2 From the Setup Menu, touch ID Setup.
3 From the ID Setup menu , touch Admin.
09:15 am
Admin.
Operator
Patient
10
54
Page 55

Meter Setup
Admin.
09:15 am
***|
BCDE
A
FGHI J
KLMNO
PQRST
UVWX Y
Z 123
Admin.
09:15 am
|
1234
0
56789
ABC
4 Using the keypad displa
yed on the screen,
enter the Admin. password of choice.
The password can consist of up to 20
characters.
Pay close attention to the buttons you
press, because the characters are not
displayed on the screen. Asterisks are
displayed instead (as if entering a password on a computer).
5 Use to switch to input of numbers.
6 Use to switch back to input of text.
123
ABC
7 Use to backspace and correct a
mistake.
8 Touch to save this setting, or:
Touch to exit this menu without
saving any changes.
The display automatically returns to the
previous screen.
55
Page 56

Meter Setup
Repeat ID
09:15 am
***|
BCDE
A
FGHI J
KLMNO
PQRST
UVWX Y
Z 123
9 Enter the A
dmin. password again (the
keypad is automatically displayed again
on the screen) to confirm the first entry.
10 Touch to save this entry, (the Admin.
password is now set), or
Touch to exit this menu, the Admin.
password is not set and is therefore still
inactive.
The display automatically returns to the ID
Setup menu. After you exit the Setup
menu, only an authenticated administrator may further edit the setup areas as
listed before (see page 53).
56
Page 57

Meter Setup
Changing an existing Admin. password:
Main Menu
03/16/20
Patient Test
Control Test
Review Results
Setup
Setup Menu
10
03/16/20
09:15 am
09:15 am
Screen
Options
ID Setup
Lockouts
Admin.
***|
10
BCDE
A
FGHI J
KLMNO
PQRST
UVWX Y
Z 123
ID Setup
1 From the Main Menu, touch Setup to
open the meter settings.
2 From the Setup Menu, touch ID Setup.
3 Using the keypad displayed on the screen,
enter the valid Admin. password.
The ID Setup menu is displayed. The
Admin. button is highlighted, which
means an Admin. password is active.
4 Touch Admin.
5 Using the keypad displayed on the screen,
enter (and confirm) the new Admin. pass-
word of choice.
09:15 am
09:15 am
Admin.
03/16/20
Operator
Patient
10
57
Page 58

Meter Setup
Deactivating an existing Admin. password:
Main Menu
03/16/2010
ID Setup
Patient Test
Control Test
Review Results
Setup
Setup Menu
03/16/20
Admin.
Operator
09:15 am
Options
ID Setup
Lockouts
10
09:15 am
Screen
09:15 am
Admin.
***|
BCDE
A
FGHI J
KLMNO
PQRST
UVWX Y
Z 123
09:15 am
1 From the Main Menu, touch Setup to
open the meter settings.
2 From the Setup Menu, touch ID Setup.
3 Using the keypad displayed on the screen,
enter the valid Admin. password.
The ID Setup menu is displayed. The
Admin. button is highlighted, which
means an Admin. password is active.
4 Touch Admin.
5 Immediately touch to close the
keypad on the screen without entering a
password.
The Admin. password has been deleted
and therefore deactivated. The Admin.
button is no longer highlighted.
03/16/20
58
10
Patient
Admin.
09:15 am
|
BCDE
A
FGHI J
KLMNO
PQRST
UVWX Y
Z 123
Page 59

Meter Setup
Operator
If you want to create a list of Operator IDs from which you can select an operator, additional
software (a data management system) and the Handheld Base Unit are required (for more
details see Data handling, starting on page 105).
In the default setting
, the Operator login is not activated. You can either activate or deactivate
Operator login on the meter. If activated, an Operator has to log in before the Main Menu will be
displayed and measurements can be performed.
To activate Operator login:
Patient Test
Control Test
Review Results
Setup
09:15 am
Setup Menu
03/16/20
Screen
Options
ID Setup
Lockouts
10
09:15 am
ID Setup
03/16/20
1 From the Main Menu, touch Setup to
open the meter settings.
2 From the Setup Menu, touch ID Setup.
3 From the ID Setup menu, touch Operator.
09:15 am
Admin.
Operator
Patient
10
Main Menu
03/16/2010
Operator ID
03/16/2010
Active
Inactive
09:15 am
4 Touch the button with the setting of
choice for setting up the Operator login.
Your selection is now highlighted.
5 Touch to save this setting, or:
Touch to exit this menu without
saving any changes.
The display automatically returns to the
previous screen.
59
Page 60

Meter Setup
Patient
If you want to create a list of Patient IDs from which you can select a patient for testing, addi-
tional software (a data management system) and the Handheld Base Unit are required (see
page 105).
In the default setting
, input of Patient IDs is set to No. This means each test is simply assigned a
consecutive number. However, you can require that a Patient ID be entered or make it optional.
Patient Test
Control Test
Setup
10
09:15 am
Setup Menu
03/16/20
Screen
Options
ID Setup
Lockouts
10
09:15 am
ID Setup
03/16/20
1 From the Main Menu, touch Setup to
open the meter settings.
2 From the Setup Menu, touch ID Setup.
3 From the ID Setup menu, touch Patient.
09:15 am
Admin.
Operator
Patient
10
Main Menu
Review Results
03/16/20
60
Page 61

Meter Setup
Patient ID
03/16/2010
No
Optional
Required
09:15 am
ou may select from the following options:
Y
■ No (tests will be assigned numbers
automatically)
■ Optional (automatic numbering or
list/scan/manual input)
■ Required (list/scan/manual input)
4 Touch the button with the setting of
choice. Your selection is now highlighted.
5 Touch to save this setting, or:
Touch to exit this menu without
saving any changes.
The settings for the option No are now
completed. For the options Optional and
Required, continue by selecting the input
format.
61
Page 62

Meter Setup
Patient ID
Alphanumeric
Max. Length:
03/16/2010
Numeric
20
09:15 am
6 Select the form for input of the Pa
tient ID.
You may select from the following options:
■ Alphanumeric
text and numbers, e.g., “J. DOE 3378”
■ Numeric
numbers only, e.g., “3387”
■ Max. Length
Indicate the maximum number of characters (1 … 20) the Patient ID can have.
7 Touch the button with the format of
choice for the Patient ID. Your selection is
now highlighted.
8 Touch or to set the number of
characters (length) of choice.
9 Touch to save this setting, or:
Touch to exit this menu without
saving any changes.
The display automatically returns to the
previous screen.
62
Page 63

Meter Setup
Lockouts setup
The Lockouts menu contains the option for liquid quality control that require the operator to perform a liquid quality control test at specified intervals.
If the liquid quality control test is not performed correctly, or if the result is outside the target
value range, the meter is locked from further use. The Lockout also can be set up selectively for
individual operators.
A liquid quality control test must be completed successfully before the meter is available again
for testing (either by the operator or in general).
The option of setting up an Operator Lockout is available only when operator lists are created
on a data management system (DMS), stored in the meter, and Operator login is activated.
These lists are only available in connection with a data management system. For more details
see Data handling, starting on page 105.
63
Page 64

Meter Setup
Operator lockout
Optional liquid quality controls can be used to ensure tha
t an operator is performing tests prop-
erly on the CoaguChek XS Pro meter.
The Operator Lockout function constrains an operator, who has been set up in the list, to perform
these quality controls on a regular basis.
Main Menu
03/16/20
Patient Test
Control Test
Review Results
Setup
10
09:15 am
Setup Menu
03/16/20
Screen
Options
ID Setup
Lockouts
10
09:15 am
Lockouts
Operator Lockout
QC Lockout
10
03/16/20
09:15 am
1 From the Main Menu, touch Setup to
open the meter settings.
2 From the Setup Menu, touch Lockouts.
3 From the Lockouts menu, touch Operator
Lockout.
If this button is disabled (grayed out),
either no operators have been set up or
the Operator ID option has been deactivated.
The option of setting up an Operator Lock-
out is available only when operator lists are
created on the DMS. For more details see
Data handling, starting on page 105. If you
are not working with a DMS, only the
QC Lockout is available (see QC (quality
control) lockout on page 67).
64
Page 65

Meter Setup
Op. Lockout
Weekly
Monthly
Every 3 Months
Every 6 Months
03/16/20
10
Op. Lockout
Weekly
Monthly
Every 3 Months
Every 6 Months
Yearly
03/16/2010
09:15 am
No
4 Select the inter
mandatory
val of choice in which the
quality control tests must be
performed.
You may select from the following options:
■ No (deactivated)
■ Weekly
■ Monthly
■ Every 3 Months or Every 6 Months
■ Yearly
09:15 am
5 Touch and to display the option
of choice on the screen.
6 Touch the button to select the interval of
choice. Your selection is now highlighted.
7 Touch to save this setting, or:
Touch to exit this menu without
saving any changes.
65
Page 66

Meter Setup
Op. Lockout
Number of Levels
One Level
Two Levels
10
03/16/20
09:15 am
8 For ev
ery option except for No, you must
now indicate the number of levels in
which the quality control must be performed.
9 Touch to save this setting, or:
Touch to exit this menu without
saving any changes.
The display automatically returns to the
previous screen.
66
Page 67

Meter Setup
QC (quality control) lockout
The QC L
ockout ensures that the optional quality control tests are run on a regular basis. This is
independent of the operator, however. This option should be used if you work without operator lists. It is also possible to mandate Operator Lockouts and QC Lockouts in parallel. In addi-
tion to defining time intervals, QC Lockout can also be used to specify that a quality control test
must be carried out when a new test strip lot is used (New Code).
Main Menu
03/16/20
Patient Test
Control Test
Review Results
Setup
10
03/16/20
09:15 am
Setup Menu
Screen
Options
ID Setup
Lockouts
10
09:15 am
Lockouts
Operator Lockout
QC Lockout
10
03/16/20
1 From the Main Menu, touch Setup to
open the meter settings.
2 From the Setup Menu, touch Lockouts.
3 From the Lockouts menu, touch
QC Lockout.
09:15 am
67
Page 68

Meter Setup
QC Lockout
New Code
Weekly
Monthly
03/16/20
10
QC Lockout
Number of Levels
One Level
Two Levels
No
Daily
09:15 am
Yes No
09:15 am
4 Select the triggers
, based on lot and/or
time, for requiring a quality control test.
You may select from the following options:
■ New Code Yes/No (applies every time a
new test strip lot is used)
The general intervals are:
■ No
■ Daily
■ Weekly
■ Monthly
5 Touch the button with the option of choice
when changing the test strip lot.
6 Touch the button to select the interval of
choice. Your selection is now highlighted.
7 Touch to save this setting, or:
Touch to exit this menu without
saving any changes.
8 For every option except for No, you must
now indicate the number of levels in
which the quality control must be performed.
9 Touch to save this setting, or:
68
03/16/20
Touch to exit this menu without
saving any changes.
10
The display automatically returns to the
previous screen.
Page 69

Testing a Capillary Blood Sample
5 Testing a Capillary Blood Sample
What you need:
■ CoaguChek XS Pro meter
■ CoaguChek XS PT Test Strips and matching code chip
■ Lancing device approved for professional use (e.g., the Accu-Chek Safe-T-Pro Plus
lancing device or the CoaguChek Lancet)
■ CoaguChek Capillary tube/bulb (optional)
Do not use glass capillary tubes or capillary tubes that contain anticoagulants.
■ Cotton ball and alcohol wipe
Important notes
Always …
■ … close the strip container immediately after removing a test strip.
■ … operate the meter at an ambient temperature between 15 °C and 32 °C
(59 °F and 90 °F).
■ … place the meter on a level, stable surface (table) or hold it so it is roughly horizontal.
■ … follow the information on correct handling of test strips in the package insert.
■ … keep the test strip guide and housing clean. See also the chapter entitled Cleaning and
Disinfecting the Meter (starting on page 109).
Protection against infection:
When collecting samples always observe the general precautions and
guidelines relating to blood sampling (see page 14).
Dispose of all test strips used for patient testing in accordance with the
disposal policy of your laboratory or practice (see page 14)
69
Page 70

Testing a Capillary Blood Sample
er …
Nev
■ … store the meter at extreme temperatures (greater than 40 °C or 104 °F) while it is in
regular use.
■ … store the meter in damp or humid conditions without protection.
■ … remove or insert the code chip while the meter is performing a test.
■ … use the code chip from a pack of strips other than the one in use.
■ … touch or remove the test strip during a test.
■ … wait more than 15 seconds after lancing the fingertip before applying the blood.
■ … add more blood after the test has begun.
■ … perform a test with a drop of blood from a previous puncture.
■ … test a patient with wet hands (residues of water, sweat, or alcohol).
Accuracy/precision of measured results:
Failure to comply with the above may lead to inaccurate results. An
CAUTION
incorrect result may lead to an error in diagnosis, therefore posing
danger to the patient.
Getting a good capillary blood sample
To get a suitable drop of blood:
■ Warm the hand. Have the patient hold it under his or her arm or use a hand warmer. Wash
hands with soap and warm water. Dry thoroughly.
■ Have the patient let that arm hang down by his or her side before lancing a finger.
■ Massage the finger from its base.
Use these techniques until the fingertip has increased color.
■ Immediately after lancing, massage gently along the side of the finger to obtain a good
blood drop without pressing or squeezing too hard.
■ Apply the blood drop directly to the test strip immediately (within 15 seconds).
■ Optionally, you may use a CoaguChek Capillary tube/bulb to collect the fingerstick blood
sample.
When washing or disinfecting the patient's finger, allow it to dry thoroughly. Residues of water or disinfectant on the skin can dilute the drop of
CAUTION
blood and so produce false results.
70
Page 71

Testing a Capillary Blood Sample
Getting a good result from venous whole blood
tively to performing a test with capillary blood, you can also perform a test using venous
Alterna
whole blood. Note the following:
■ Use a simple plastic syringe to remove the blood sample. Do not use anticoagulants
(e.g., EDTA, citrate, flouride, oxalate, or heparin) to collect the blood sample.
■ Use a needle at least 23 G (approx. 0.65 mm) or larger in size.
■ Discard the first four drops of blood collected (within the first 10 seconds). Then imme-
diately apply one drop of blood (at least 8 μL) directly onto the target area of the test strip.
Ensure that no air bubbles are introduced into the sample.
Protection against infection
When collecting samples always observe the general precautions and
guidelines relating to blood sampling (see page 14).
Dispose of all test strips used for patient testing in accordance with the
disposal policy of your laboratory or practice (see page 14).
71
Page 72

Testing a Capillary Blood Sample
Preparing to test
1 Have the test strip container at hand.
2 Make sure that the code chip supplied
with these test strips is at hand.
72
Page 73

Testing a Capillary Blood Sample
est strip code chip
T
The code chip provides the meter with important information that it needs to perform the coagulation test. The chip contains information about the test method, the lot number, and the expiration date. The code chip is required, whenever a new test strip lot is used, so that the meter can
read and store the lot information about that particular lot of test strips.
The CoaguChek XS Pro meter stores the data from up to 60 code chips that have been inserted.
■ Do not forget to use the test strip code chip that is supplied with each pack of test strips
before you perform the first test with these strips. We recommend that you leave the code
chip in the meter to protect the electrical contacts in the meter from becoming dirty.
■ Each code chip belongs to a particular lot of test strips. Only remove the code chip when
you are testing with test strips taken from a new pack.
■ Protect the code chip from moisture and equipment that produces magnetic fields.
Inserting the code chip
1 Remove the old code chip, if one is
inserted in the meter.
73
Page 74

Testing a Capillary Blood Sample
2 Check that the number on the code chip
matches the number on the label of the
test strip container.
3 Slide the new code chip into the code chip
slot (as shown) until you feel it snap into
place.
If the code chip is missing or incorrectly inser
refer to the Troubleshooting section of this manual.
74
ted, error messages appear in the display (please
Page 75

Powering on the meter
Testing a Capillary Blood Sample
1 Place the meter on a level, vibration-free
surface, or hold it in your hand so it is
roughly horizontal.
2 Power the meter on by pressing and
holding the button for approximately
1 second.
You can also power on the meter directly by
inserting a test strip or connecting the power
adapter.
The next steps depend on whether you work
with the function Operator ID set to inactive or
active (see Data handling on page 105).
If the function Opera
Main Menu
Review Results
10
03/16/20
tor ID is inactive:
09:15 am
Patient Test
Control Test
Setup
3 Wait until the Main Menu is displayed.
75
Page 76

Testing a Capillary Blood Sample
If the function Opera
Operator
CoaguChek
03/16/2010
WARNING
tor ID is active:
09:15 am
Without operator list:
3 Touch Scan and hold the barcode approx.
XS Pro
10 cm (4 inches) from the built-in
scanner.
The meter beeps once the barcode has been
Scan
read successfully. The barcode information
appears in the operator ID field. The scanner
turns off after 10 seconds, if a barcode is not
scanned.
A barcode does not need to be present for the laser scanner to become
active. Do not stare directly into the laser beam.
76
Page 77

Testing a Capillary Blood Sample
Operator
Alan Smithee
Jane Brown
Ann Casey
Joe Dalton
03/16/20
Password
09:15 am
Scan
10
09:15 am
|
1234
0
56789
ABC
Main Menu
Review Results
03/16/20
09:15 am
Patient Test
Control Test
Setup
Logout
10
With operator list:
ait until the operator list is displayed.
3 W
4 Select the operator of choice by touching
the corresponding button.
5 Enter the (optional) password.
6 After you enter the password, touch
to log on. The Main Menu is displayed and
you can start the test.
7 When you touch , the operator pick
list is displayed again.
When the tests are completed or another
operator wants to perform additional tests,
touch Logout to log out (this button is available only when the Operator ID is activated).
The meter returns to the display of the operator pick list.
Note: Extended data handling functionality is dependent on the capabilities of the
particular Data Management System (DMS) being used and may vary. For more details see
Data handling, starting on page 105.
77
Page 78

Testing a Capillary Blood Sample
Performing a test
Main Menu
03/16/20
Main Menu
03/16/20
Patient Test
Control Test
Review Results
Setup
10
QC Lockout
Control Test
Review Results
Setup
Logout
10
09:15 am
09:15 am
1 Check the battery level. If there are no
bars left in the battery icon, you cannot
perform any tests.
2 Check that the date and time are correct.
Correct any wrong entries as described in
chapter 4, Meter Setup/Setting the date.
If a lockout (Operator or QC Lockout) is displayed instead of the Patient Test button, you
must run a liquid quality control test before
you can perform a patient test (refer to
chapter 6, Quality Control. When the meter is
in lockout status, a test cannot be performed.
The next steps depend on whether you work
with or without patient lists.
78
Page 79

Testing a Capillary Blood Sample
Without pa
tient list
Patient ID
|
BCDE
A
FGHI J
KLMNO
PQRST
UVWX Y
Z , 123
Scan
09:15 am
3 Touch Patient Test.
4 If the Patient ID option was chosen as
either Optional or Required when the
meter was set up (see Meter Setup/
Patient), you are prompted to enter a
Patient ID.
■ If Required, enter the Patient ID, then
touch to move to the next screen.
■ If Optional, ignore the prompt and touch
to move to the next screen. The meter
will assign the test a consecutive number.
■ If neither option was chosen, a screen
appears that prompts you to insert a test
strip.
■ Continue with Step 8.
79
Page 80

Testing a Capillary Blood Sample
tient list
With pa
5 Touch Patient Test.
PID01
PID02
PID03
PID04
PID05
New Scan
10
09:15 am
Patient ID
09:15 am
|
BCDE
A
FGHI J
KLMNO
PQRST
UVWX Y
Z , 123
Scan
6 Touch and to display the entry of
choice. Select the patient to be tested
from the list.
7 If the patient is not in the list, touch New
to create a new entry. You must now enter
a Patient ID.
Test
Smith, Henry
Jones, Walther
Hamilton, Fran
Miller, Ted
Reed, William
03/16/20
Note: Extended data handling functionality is dependent on the capabilities of the
particular Data Management System (DMS) being used and may vary. For more details see
Data handling, starting on page 105.
80
Page 81

WARNING
Testing a Capillary Blood Sample
tively, the Patient ID can also be
Alterna
entered via the built-in barcode scanner.
Touch Scan and scan the patient barcode
from a distance of approx. 10 cm (4 inches).
The meter beeps once the barcode has been
read successfully. The barcode information
appears in the patient ID field. The scanner
turns off after 10 seconds, if a barcode is not
scanned.
A barcode does not need to be present for the laser scanner to become
active. Do not stare directly at the laser beam.
81
Page 82

Testing a Capillary Blood Sample
Test
P-ID: PI D01
Smith, Henry
Op: Operator 1
Par: PT
184
09:15 am
8 The test strip icon prompts y
ou to insert a
test strip. Remove a test strip from its container and close the container again with
the stopper.
Exposure to external influences (such as
humidity) may deteriorate the test strips and
may lead to error messages. Therefore, always
close the strip container immediately after
removing a test strip.
9 Hold the test strip so the lettering
“CoaguChek XS PT” is facing upward.
10 Slide the test strip into the test strip guide
in the direction indicated by the arrows.
Slide the test strip in as far as it will go. A
beep indicates that the meter has
detected the test strip (provided the
beeper is enabled).
If you use a new test strip lot and have not
inserted the code chip yet, you must do so
now. Otherwise you cannot perform a test.
Depending on the setting, you may also
be required to run a liquid quality control
test at this point.
82
03/16/2010
Page 83

Testing a Capillary Blood Sample
Test
P-ID: PI D01
Smith, Henry
Op: Operator 1
Par: PT
03/16/20
10
Test
P-ID: PI D01
Smith, Henry
Op: Operator 1
Par: PT
180SEC
10
03/16/20
Code: 184
Code: 184
09:15 am
09:15 am
The hourglass icon shows tha
t the test strip is
warming up. When the warming-up process
is complete, a further beep (provided the
beeper is enabled) indicates that you can now
apply blood.
The blood drop icon flashes to indicate that
the meter is ready to perform the test and is
waiting for blood to be applied.
A 180 second countdown begins. You must
apply the drop of blood to the test strip before
the countdown ends. Otherwise you will
receive an error message.
83
Page 84

Testing a Capillary Blood Sample
Use only a lancing device that is approved for use by healthcare profession-
WARNING
als, such as the Accu-Chek Safe-T-Pro or Safe-T-Pro Plus lancing devices,
or the CoaguChek Lancets (professional-use lancets available only in the
United States). Follow the manufacturer’s instructions.
11 Now lance the side of a fingertip with the
lancing device.
We recommend obtaining the capillary blood
from the side of the fingertip as this causes
the least pain.
Massage the lanced finger gently until a drop
of blood is formed. Do not press or squeeze
the finger.
Apply the first drop of blood from the finger.
12 Apply the blood (8 μL) directly from the
finger to the semicircular, transparent
sample application area on top of the test
strip.
■ … or you can touch the blood drop
against the side of the sample application
area. The test strip draws up the blood by
capillary action.
During this process you must hold the
blood drop to the test strip until the flashing blood drop icon has disappeared and
the meter beeps (provided the beeper is
enabled).
■ … you can also apply the blood using the
optional CoaguChek capillary tube.
84
Apply the blood drop to the test strip within
15 seconds of lancing the fingertip. Applying
blood after this period of time may lead to an
erroneous result (as the coagulation process
would already have started).
Page 85

Testing a Capillary Blood Sample
When applied from above, the blood must cover the entire sample application area.
Code: 184
09:15 am
You hear a beep tone when you have applied
enough blood (provided the Beeper is
enabled). The blood drop symbol disappears
Test
P-ID: PI D01
Smith, Henry
Op: Operator 1
Par: PT
and the test starts.
10
03/16/20
Do not add more blood. Do not touch the test strip until the result is displayed. Failure to
comply with the above may lead to error messages.
85
Page 86

Testing a Capillary Blood Sample
Test
P-ID: PI D01
Smith, Henry
Op: Operator 1
Par: PT
QC
03/16/2010
Test
P-ID: PI D01
Smith, Henry
Op: Operator 1
Par: PT
03/16/2010 09:14 am
03/16/2010
Test
P-ID: PI D01
Smith, Henry
Op: Operator 1
Par: PT
03/16/2010 09:14 am
03/16/2010
Code: 184
Code: 184
2.5
21
Code: 184
> 8.0INR
09:15 am
09:15 am
INR
%Q
Comm.
09:15 am
Comm.
The meter performs an automa
tic quality control test on the test strip before it displays the
test result. “QC” appears in the display.
Following a successful outcome of the quality
control test, a checkmark appears after “QC.”
The result is displayed in the unit you chose
when setting up the meter. It is automatically
saved.
The valid measuring ranges for
CoaguChek XS PT test strips are:
■ INR: 0.8–8.0
■ %Q: 120–5
■ Sec: 9.6–96
Results that are outside the measuring range
are indicated by the symbols > (greater than)
or < (less than).
If a “c” is displayed along with the result:
This may occur if the hematocrit value is very
low or due to erroneous blood collection (e.g.,
wet hands). Repeat the measurement and
make sure that the patient's hands are dry. If
the message persists, perform a hematocrit
check.
86
When interpreting results, refer to the detailed
information on limitations and interferences
included in the limitations section of the test
strip package insert.
Page 87

Testing a Capillary Blood Sample
Adding comments
ou can add up to three comments to a test result. Comments can provide, for example, addi-
Y
tional information about the test conditions or the patient. A comment may be up to 20 characters in length. You can open the function for adding comments directly in the results screen. To
add comments:
If you want to add a comment, do not remove the test strip. Once the strip is removed, the
meter automatically returns to Main Menu and a comment can no longer be added.
Test
P-ID: PI D01
Smith, Henry
Op: Operator 1
Par: PT
03/16/2010 09:14 am
03/16/2010
Code: 184
2.5
21
03/16/2010
09:15 am
INR
%Q
Comm.
Comment
Asymptomatic
Cleaned Meter
Doctor Notified
Sick
Custom
09:15 am
Test
P-ID: PI D01
Smith, Henry
Op: Operator 1
Par: PT
03/16/2010 09:14 am
Doctor Notified
03/16/2010
Code: 184
2.5
21
Sick
Travel
1 In the Test screen, touch Comm..
2 Select the desired predefined comment(s)
from the display list (if configured) or
3 Touch Custom to enter your own custom
comment. Use the keypad (as with login)
to enter your comment.
4 Once you have selected the desired com-
ment(s), touch to return to the results
screen.
09:15 am
INR
%Q
Comm.
Test results are also saved when the meter is powered off in the results screen or
automatically powers off.
87
Page 88

Testing a Capillary Blood Sample
Remove
03/16/2010
09:15 am
Protection against infection
When collecting samples always observe the general precautions and
guidelines relating to blood sampling (see page 14).
Dispose of all test strips used for patient testing in accordance with the
disposal policy of your laboratory or practice (see see page 14).
fter the test result is displayed, touch
A
. You will be prompted to remove the
strip.
5 Remove the test strip from the meter.
6 Power the meter off.
7 Clean the meter if necessary (see
chapter 9, Cleaning and Disinfecting the
Meter).
88
Page 89

Quality Control
6 Quality Control
The CoaguChek XS Pro meter has a number of built-in quality control functions.
■ A check of the electronic components and functions every time the meter is powered on.
■ A check of the test strip temperature while a test is in progress.
■ A check of the expiration date and lot information on the test strip carried out by the code
chip.
■ A two-level, on-board quality control test and patient result determination within a single
test chamber.
Roche offers optional liquid quality controls for the CoaguChek XS Pro system. These controls
are provided to assist with regulatory compliance requirements as applicable to your facility.
To perform an optional liquid quality control test using control solutions, you need:
■ CoaguChek XS Pro meter
■ The test strip code chip supplied with the test strip container you are using. A code chip
is provided with every test strip pack.
■ Test strips that came with the code chip mentioned above
■ Bottles of CoaguChek XS PT Controls (not available in the United States) or CoaguChek
XS Pro PT Controls, diluent droppers, and the quality control code chip provided.
You can choose the frequency of liquid quality control tests in the meter setup. (Refer to the
chapter entitled Meter Setup/QC (quality control) lockout starting on page 67). If the control
results in the display are in the specified range, this confirms that the liquid control test was
performed correctly.
89
Page 90

Quality Control
Preparing to run a liquid quality control test
Prepare for a liquid quality control test in the same way you would prepare to perform a test with
a capillary blood sample. The only difference is the use of control solution instead of blood.
1 Have the test strip container at hand.
2 If you are using the test strip lot for the
first time, make sure that the code chip
that came with these test strips is at hand.
3 Make sure the bottle of freeze-dried
(lyophilized) control plasma and the dropper for making the control solution are at
hand. This bottle should remain refrigerated (not frozen) until use.
4 Make sure that the quality control code
chip that came with the control solution is
at hand.
5 Open the lid of the bottle and remove the
rubber cap.
6 Hold the dropper with the sealed dropper
neck pointing upward, then cut off the
end of the cap with scissors. Do not hold
the dropper close to your face.
To avoid loss of diluent, hold the dropper by the stem; do not squeeze the bulb of the dropper while cutting the tip.
90
Page 91

Quality Control
7 Apply gentle pressure to the reser
transfer the entire contents of the dropper
to the bottle. Make sure that the dropper
does not come into contact with the dried
control plasma.
8 Close the bottle again.
9 Make sure the dropper is at hand for the
next steps in the liquid quality control test.
10 Swirl the bottle using a circular motion to
completely dissolve all of the control
plasma inside. Do not shake the bottle
or turn it on its side. Doing so can cause
components in the control plasma to stick
to the sides of the bottle. Please refer to
the control solution package insert.
The control solution is now ready to be applied
to the test strip.
The control solutions may be reconstituted
(mixed) after removal from the refrigerator.
The resulting solution may be used up to 30
minutes after reconstitution.
voir to
91
Page 92

Quality Control
Performing a liquid quality control test
1 Place the meter on a level, vibration-free
2 Power the meter on by pressing and
You can also power on the meter directly by
inserting a test strip or connecting the power
adapter.
surface or hold it in your hand so it is
roughly horizontal.
holding the button for approximately
1 second.
92
Main Menu
03/16/20
Main Menu
03/16/2010
Patient Test
Control Test
Review Results
Setup
10
Patient Test
Control Test
Review Results
Setup
09:15 am
09:15 am
3 Wait until the Main Menu is displayed, or
log on as described on page 76.
4 Check the battery level. If there are no
bars left in the battery icon, you cannot
perform any more tests.
5 Check that the date and time are correct.
Correct any wrong entries as described in
the chapter entitled Meter Setup/Setting
the date.
Page 93

Main Menu
03/16/20
QC Lockout
Control Test
Review Results
Setup
Logout
10
09:15 am
ouch Control Test.
6 T
Quality Control
QC Test
Operator 1
09:15 am
7 The test strip icon prompts you to insert a
test strip. Remove a test strip from its container and close the container again with
the stopper.
8 Hold the test strip so the lettering with the
test name is facing upward.
9 Slide the test strip into the test strip guide
03/16/2010
in the direction indicated by the arrows.
Slide the test strip in as far as it will go. A
beep tone indicates that the meter has
detected the test strip (provided the
beeper is enabled).
Exposure to external influences (such as humidity) may deteriorate the test strips and may lead
to error messages. Therefore, always close the container immediately after removing a test
strip.
93
Page 94

Quality Control
QC Test
Op: Operator 1
184
03/16/20
10
QC Test
New
*
QC 248
QC 379
QC 462
QC 332
10
03/16/20
QC Test
Code: 184
Op: Operator 1
03/16/2010
Par: PT
QC
09:15 am
09:15 am
09:15 am
ou are using a new test strip lot and have
If y
not inserted the test strip code chip yet, you
must do so now. Otherwise you cannot perform a quality control test.
As with the test strips, a quality control code
chip is also provided with the control solutions. This chip informs the meter about the
acceptable ranges of results for that lot of
controls. The information on the code chip is
retained in the memory so you can use the
same control solutions at any time.
10 Select the code stored for your current
control solution, or touch New to use a
new control solution.
The first time you run a control, the meter
skips this QC Test screen option because
there are no code chip parameters in memory
yet. The next time you use the control, this
screen will display, offering you a pick of the
code(s) already stored as well as the option
New.
If you are using a new control solution, remove
the strip code chip from the meter and insert
the code chip that came with the control solution instead.
If the code chips get mixed up, check the
letter on the code chips to tell them apart: The
code number on the code chips that came
with the test strips starts with the letter S, and
the code number on the control solution code
chips starts with the letter C.
94
Page 95

Quality Control
QC Test
QC: 999
Code: 184
Op: Operator 1
Level 1
Level 2
03/16/20
10
QC Test
QC: 999
Code: 184
Op: Operator 1
10
03/16/20
QC Test
QC: 999
Code: 184
Op: Operator 1
180SEC
03/16/2010
Par: PT
Level: 1
Par: PT
Level: 1
Par: PT
09:15 am
09:15 am
09:15 am
11 Select the lev
el for this measurement.
The hourglass icon shows that the test strip is
warming up. When the warming-up process is
complete, a further beep (provided the beeper
is enabled) indicates that you can now apply
the control solution.
The dropper icon flashes to indicate that the
meter is ready to perform the test and is waiting for the sample to be applied.
At the same time a 180-second countdown
begins. You must apply the sample within this
time, otherwise you will receive an error
message.
95
Page 96

Quality Control
12 Using the dropper
contents of the bottle.
13 Apply a single drop of control solution
directly from the dropper to the semicircular, transparent sample application area
on top of the test strip. Do not add more
control solution.
, draw up the dissolved
96
Page 97

Quality Control
QC Test
QC: 999
Code: 184
Op: Operator 1
03/16/2010
QC Test
QC: 999
Code: 184
Op: Operator 1
03/16/2010 09:15 am
03/16/2010
QC Test
QC: 999
Code: 184
Op: Operator 1
03/16/2010 09:15 am
Level: 1
Par: PT
Level: 1
Par: PT
1.2 INR
(1.0 - 1.4 INR)
78 %Q
(53 - 99 %Q)
Level: 1
Par: PT
0.9 INR
(1.0 - 1.4 INR)
110 %Q
(53 - 99 %Q)
09:15 am
09:15 am
Comm.
09:15 am
ou hear a beep when you have applied
Y
enough control solution (provided the beeper
is enabled). The dropper icon disappears and
the test starts.
The result of the liquid quality control test is
displayed. It is automatically saved to memory.
The acceptable range of results for the liquid
control is displayed below the current result.
If a quality control test fails, an up arrow (too
high) or down arrow (too low) is displayed and
flashes.
Note: The arrow (next to the result) refers to
the INR result only.
03/16/2010
Comm.
If you have selected to display INR and
%Quick or INR and seconds, the (up or down)
arrow next to the result refers only to the INR
value.
97
Page 98

Quality Control
QC Comment
Acceptable Contr
Asymptomatic
Cleaned Meter
Doctor Notified
Custom
03/16/20
10
Remove
03/16/2010
09:15 am
ol
09:15 am
14 If you want to add a comment, touch
Comm.
15 Select the desired predefined comment(s)
from the pick list (if configured) or
16 Touch Custom to enter your own custom
comment. Use the keypad (as with login)
to enter your comment. A comment may
be up to 20 characters in length.
17 Once you have selected the desired com-
ment(s), touch to return to the results
screen.
After the test result is displayed, touch
. You will be prompted to remove the
strip.
18 Remove the test strip from the meter.
19 Power the meter off.
20 Remove the quality control code chip from
the meter and store it with the controls.
21 Clean the meter if this becomes necessary
(see chapter 9, Cleaning and Disinfecting
the Meter).
98
Dispose of controls and used test strips from control testing
dance with the disposal policy of your facility
. The control solution con-
in accor-
tains animal material, which should be considered as potentially
infectious.
Page 99

Review Results
7 Review Results
The CoaguChek XS Pro meter can save 1000 patient test results as well as 500 liquid quality
control tests to memory, together with respective time and date. In addition, up to 60 code chip
records (contents of test strip code chips and control solution code chips) are stored. If you are
using operator and/or patient lists, a maximum of 100 Operator and 200 Patient IDs is allowed.
If memory is full when you perform a test, the oldest result is automatically deleted. The
most recent result is always saved. This applies both to patient results and to quality control
tests. In order to avoid the loss of stored test results, you can archive this data using a data
management system and the optional Handheld Base Unit (see page 105).
99
Page 100

Review Results
Viewing test results
1 Place the meter on a level, vibration-free
surface, or hold it in your hand so it is
roughly horizontal.
2 Power the meter on by pressing and
holding the button for approximately
1 second.
To power the meter off after use, press the
button for approximately 2 seconds.
100
Main Menu
03/16/20
Patient Test
Control Test
Review Results
Setup
10
09:15 am
3 Wait until the main menu is displayed.
 Loading...