

Page 1
CoaguChek® Vantus
User’s Manual
Manual de usuario
Page 2

© 2018 Roche Diagnostics GmbH
The contents of this document, including all graphics, are the property of Roche Diagnostics. No
part of this document may be reproduced or transmitted in any form or by any means, electronic or
mechanical, for any purpose, without the express written permission of Roche Diagnostics. Roche
Diagnostics has made every reasonable effort to ensure that all the information contained in this
manual is correct at the time of printing. However, Roche Diagnostics reserves the right to make any
changes necessary without notice as part of ongoing product development.
Please send questions or comments about this manual to your local Roche representative.
COAGUCHEK and SOFTCLIX are trademarks of Roche.
CONTINUA, the CONTINUA Logos and CONTINUA CERTIFIED are trademarks, service marks, or
certication marks of the Continua Health Alliance. CONTINUA is a registered trademark in some,
but not all countries this product is distributed.
The Bluetooth® word mark and logos are registered trademarks owned by Bluetooth SIG, Inc. and any
use of such marks by Roche is under license. Other trademarks and product names are the property
of their respective owners.
Request additional copies of this document by sending an email to
indianapolis.rsn_documentation@roche.com. Request the document number VV-06652-01.
Revision History
Version Date Content
1.0 2018-01 New document
Page 3

Introduction
Before you start.....................................................................................................................................................................9
Intended use ...........................................................................................................................................................9
PT time ................................................................................................................................................................... 10
Self-testing ........................................................................................................................................................... 10
The CoaguChek Vantus System ...................................................................................................................................12
Test principle .......................................................................................................................................................14
Operating conditions ........................................................................................................................................16
Quality control .....................................................................................................................................................17
Important Safety Instructions and Additional Information ................................................................................ 18
The CoaguChek Vantus Meter .....................................................................................................................................20
Overview of the meter elements ..................................................................................................................20
Batteries ................................................................................................................................................................ 22
Starting Up
Inserting the batteries ...................................................................................................................................... 26
Initially setting up the meter ..........................................................................................................................29
Code chip ............................................................................................................................................................................. 34
Inserting the code chip ....................................................................................................................................35
Testing a Capillary Blood Sample
Important notes .................................................................................................................................................. 38
Getting a good capillary blood sample ......................................................................................................40
Preparing to test .................................................................................................................................................41
Performing a test ................................................................................................................................................ 42
Notes concerning the results display ......................................................................................................... 53
3
CoaguChek Vantus User’s Manual, version 1.0
Page 4

4
Reviewing and Handling Data
Reviewing test results ...................................................................................................................................................... 56
Displaying reports on the meter ..................................................................................................................................58
Displaying a Trend report ...............................................................................................................................59
Displaying a Target report ..............................................................................................................................62
Transferring data ............................................................................................................................................................... 64
Data transfer via USB .......................................................................................................................................65
Data transfer via Bluetooth ............................................................................................................................ 67
Displaying reports on a computer .............................................................................................................................. 69
Security settings in the Internet browser ..................................................................................................71
Virus scanner.......................................................................................................................................................71
Reports overview ................................................................................................................................................72
Time period ..........................................................................................................................................................73
Trend graph ..........................................................................................................................................................73
Target range display..........................................................................................................................................74
Target graph .........................................................................................................................................................74
List of results ....................................................................................................................................................... 75
Printing reports ................................................................................................................................................... 76
Using data in external applications ............................................................................................................. 77
CoaguChek Vantus User’s Manual, version 1.0
Page 5

Reminders and Meter Settings
Setting up reminders .......................................................................................................................................................79
New reminder .....................................................................................................................................................80
Editing or deleting a reminder ...................................................................................................................... 84
Meter settings .................................................................................................................................................................... 85
Settings overview ..............................................................................................................................................86
Language .............................................................................................................................................................. 88
Time & Date ......................................................................................................................................................... 89
Result Format ......................................................................................................................................................91
Set Targets ............................................................................................................................................................ 92
Beeper Volume ....................................................................................................................................................95
Display Brightness .............................................................................................................................................96
Button Click ......................................................................................................................................................... 97
Data Transfer .......................................................................................................................................................98
Cleaning and Disinfecting the Meter and the Lancing Device
Overview ..............................................................................................................................................................101
What is the difference between cleaning and disinfecting? ...........................................................102
When to clean and disinfect the meter and the lancing device ...................................................102
Approved cleaning and disinfecting product ........................................................................................103
Cleaning the meter housing ........................................................................................................................104
Cleaning the test strip guide and test strip guide cover ...................................................................106
Disinfecting the meter ...................................................................................................................................109
Disinfecting the test strip guide cover and test strip guide .............................................................110
Cleaning and Disinfecting the Lancing Device ...................................................................................................115
When to clean and disinfect the lancing device ..................................................................................115
What to clean and disinfect .........................................................................................................................117
How to clean and disinfect the lancing device ....................................................................................117
5
CoaguChek Vantus User’s Manual, version 1.0
Page 6

6
Other Functions and Troubleshooting
Other functions ................................................................................................................................................................119
About (manufacturing information and data encryption key) ........................................................120
Clear Memory ....................................................................................................................................................121
Meter Log ...........................................................................................................................................................123
Display Test ........................................................................................................................................................124
Firmware Update ..............................................................................................................................................125
Troubleshooting ...............................................................................................................................................................127
Errors and unusual behavior without error messages .......................................................................128
Symbols, Icons, Messages
Symbols on packaging and meter ............................................................................................................................129
Icons on the display .......................................................................................................................................................131
Messages ...........................................................................................................................................................................133
Reminders ...........................................................................................................................................................134
Information .........................................................................................................................................................136
Maintenance ......................................................................................................................................................138
Warnings .............................................................................................................................................................142
Error messages .................................................................................................................................................143
CoaguChek Vantus User’s Manual, version 1.0
Page 7

General Product Information
Ordering ..............................................................................................................................................................147
Product limitations ...........................................................................................................................................147
Operating conditions and technical data ...............................................................................................148
Sample material ................................................................................................................................................149
Storage and transport conditions ..............................................................................................................149
Disposal of the CoaguChek Vantus meter .............................................................................................150
For healthcare professionals .......................................................................................................................151
Disposal of used batteries ............................................................................................................................151
Repairs .................................................................................................................................................................151
Information service ..........................................................................................................................................152
Product Safety Information ..........................................................................................................................................153
Bluetooth Wireless Technology ..................................................................................................................153
Radio Frequency Communication .............................................................................................................154
Electromagnetic Compatibility ....................................................................................................................155
Index
7
CoaguChek Vantus User’s Manual, version 1.0
Page 8

8
This page intentionally left blank.
CoaguChek Vantus User’s Manual, version 1.0
Page 9

Before you start
Intended use
Introduction
The CoaguChek
INR (International Normalized Ratio) based
on a prothrombin time (PT) response to
monitor the effect of a therapy with vitamin
K antagonists by using the CoaguChek XS
PT Test strips. The CoaguChek Vantus System
uses fresh capillary whole blood from a nger
stick.
The system is intended for properly selected
and suitable trained users on the prescription
of the treating doctor.
Users should be stabilized on anticoagulation
with vitamin K antagonists for at least 6 weeks
prior to single patient self-testing with the
CoaguChek Vantus System.
The CoaguChek Vantus System is intended
for single patient self-testing only for adults,
age 22 years and older.
®
Vantus System measures an
®
9
Introduction
CoaguChek Vantus User’s Manual, version 1.0
Page 10

10
PT time
Self-testing
Introduction
A PT test is often called an INR test. The
International Normalized Ratio (INR) is a way
of standardizing the results of prothrombin
time tests because there are different test
methods. INR enables you and your doctor
to understand your coagulation results even
when they come from different labs using
different test methods.
If you self-test, you need to discuss your
therapy model with your healthcare
professional rst. Self-testing is not a
substitute for regular visits to your doctor.
Depending on the training you have received
and the instructions from your healthcare
professional, you might communicate your
results to a healthcare professional or clinic
toreceive the appropriate dose adjustment.
CoaguChek Vantus User’s Manual, version 1.0
Page 11

Self-monitoring of oral anti coagulation
therapy using coagulation values
determined with the CoaguChek Vantus
System may only be undertaken after
consultation with your doctor and
comprehensive instruction by a qualied
healthcare professional.
This manual contains all the information
you need to operate and care for the
CoaguChek Vantus System. Please read
this entire manual carefully before you
use the meter.
11
Introduction
CoaguChek Vantus User’s Manual, version 1.0
Page 12

12
The CoaguChek Vantus System
Introduction
The CoaguChek Vantus System makes
coagulation testing easy. The graphical user
interface of the CoaguChek Vantus meter
guides you through the test step by step.
The code chip accompanying the test strips
contains strip lot-specic information and the
expiry date for the test strips. You only need
to insert the code chip, turn the meter on,
insert the test strip, and apply a blood sample.
The CoaguChek Vantus meter measures your
coagulation time and displays the result. After
the test is completed, the meter automatically
saves the result to memory.
CoaguChek Vantus User’s Manual, version 1.0
Page 13

If you have any questions about the CoaguChek
Vantus meter, please contact CoaguChek
Technical Services at 1-800-428-4674. You
will nd further contact details on page 146.
Please note: Before you use the meter
for the rst time (i.e. after you have rst
inserted the batteries), you must set the
date and time correctly to allow you to carry
out measurements properly. Each time you
replace the batteries, you need to check
(and, if necessary, adjust) the date and
time.
Note on screenshots:
The test results and software and hardware
information shown in the screenshots in
this manual are for illustration purposes
only. The information displayed on your
meter may differ.
13
Introduction
CoaguChek Vantus User’s Manual, version 1.0
Page 14

14
Test principle
Introduction
The CoaguChek XS PT Test test strip
contains a lyophilized reagent (reagent
in dried form). The reactive components
of this reagent consist of thromboplastin
and a peptide substrate. When a sample is
applied, thromboplastin activates coagulation,
which leads to the formation of thrombin.
At the same time, the meter starts to
measure the time. The enzyme thrombin
cleaves the peptide substrate, generating an
electrochemical signal. Depending on the
time elapsed when it rst appears, this signal
is then converted by means of an algorithm
into an INR result.
CoaguChek Vantus User’s Manual, version 1.0
Page 15
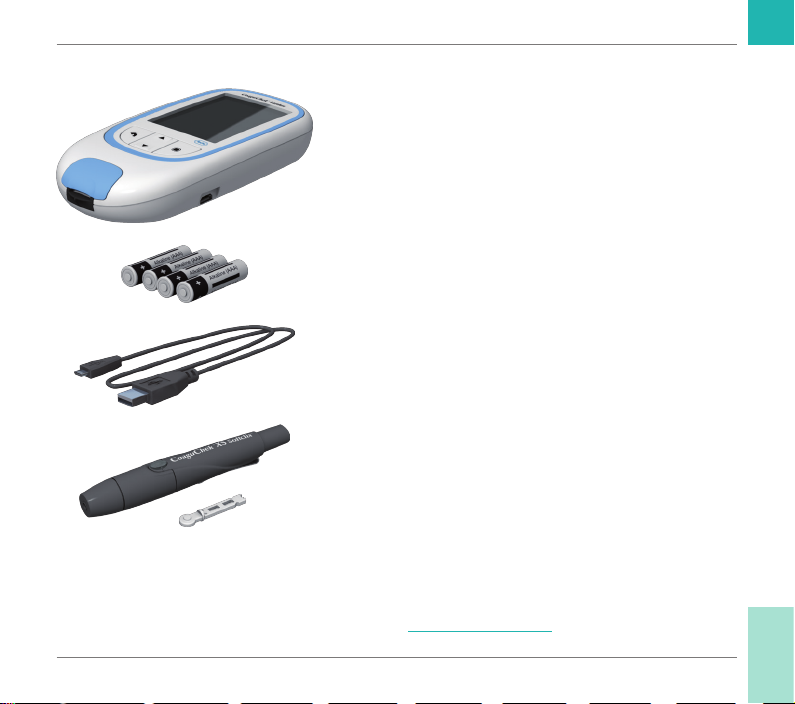
Contents of the pack
• CoaguChek Vantus meter
• 4 alkaline batteries, 1.5 V, type AAA
• USB cable
• CoaguChek XS Softclix lancing device with
• CoaguChek Softclix Lancet
• System carry-case (not shown here)
• User’s Manual (this document)
• Quick Reference Guide (not shown here)
1
(LR03)
instructions for use
15
Introduction
CoaguChek Vantus User’s Manual, version 1.0
1 also available as “alkaline-manganese dioxide batteries”
Page 16
16
Operating conditions
Introduction
To ensure that your CoaguChek Vantus
System functions properly, please observe the
following guidelines:
• Only use the meter at a temperature
between 59 °F and 90 °F.
• Only use the meter at a relative humidity
between 10% and 85%.
• When testing, place the meter on a level,
vibration-free surface or hold it so that it is
roughly horizontal.
• If the meter is to remain unused for a
longer period of time, keep it in the carrycase supplied.
• Use the meter only up to a maximum
altitude of 13120 feet.
Electromagnetic interference
Strong electromagnetic elds may interfere
with the proper operation of the meter. Do not
use the meter near strong electromagnetic
elds.
CoaguChek Vantus User’s Manual, version 1.0
Page 17

Quality control
The CoaguChek Vantus System has a number
of built-in quality control functions such as:
A check of the electronic components and
functions every time the meter is turned on.
A check of the test strip temperature while a
test is in progress.
A check of the expiry date and lot information
on the test strip.
A quality control function is incorporated into
the test strip. These on-board quality control
checks verify the test strip integrity.
17
Introduction
CoaguChek Vantus User’s Manual, version 1.0
Page 18
18
Important Safety Instructions and Additional Information
This section explains how safety-related
messages and information related to the
proper handling of the system are presented
in the CoaguChek Vantus User’s Manual.
Read these passages carefully.
The safety alert symbol alone (without a
signal word) promotes awareness to hazards
which are generic or directs the reader to
related safety information.
WARNING
Indicates a hazardous situation which, if
not avoided, could result in death or serious
injury.
CAUTION
Indicates a hazardous situation which, if not
avoided, could result in minor or moderate
injury.
Introduction
CoaguChek Vantus User’s Manual, version 1.0
Page 19
NOTICE
Indicates a hazardous situation which, if not
avoided, may result in damage to the system.
Important information that is not safety
relevant is presented against a colored
background (without a symbol). Here you
will nd additional information on correct
use of the meter or useful tips.
19
Introduction
CoaguChek Vantus User’s Manual, version 1.0
Page 20

20
The CoaguChek Vantus Meter
Overview of the meter elements
A
B
Introduction
E
Overview of the meter elements (front)
A Display
Shows menus, results, messages and
results recalled from memory.
B Back button
Exit the currently displayed menu.
C Up/down arrows button
C
D
F
Move or scroll up/down in a screen.
D Enter button (Power on)
Conrm the currently selected option or
perform a function. Also used to power the
meter on and off.
E Test strip guide cover
Remove this cover to clean the test strip
guide.
F Test strip guide
Insert the test strip here.
CoaguChek Vantus User’s Manual, version 1.0
Page 21
21
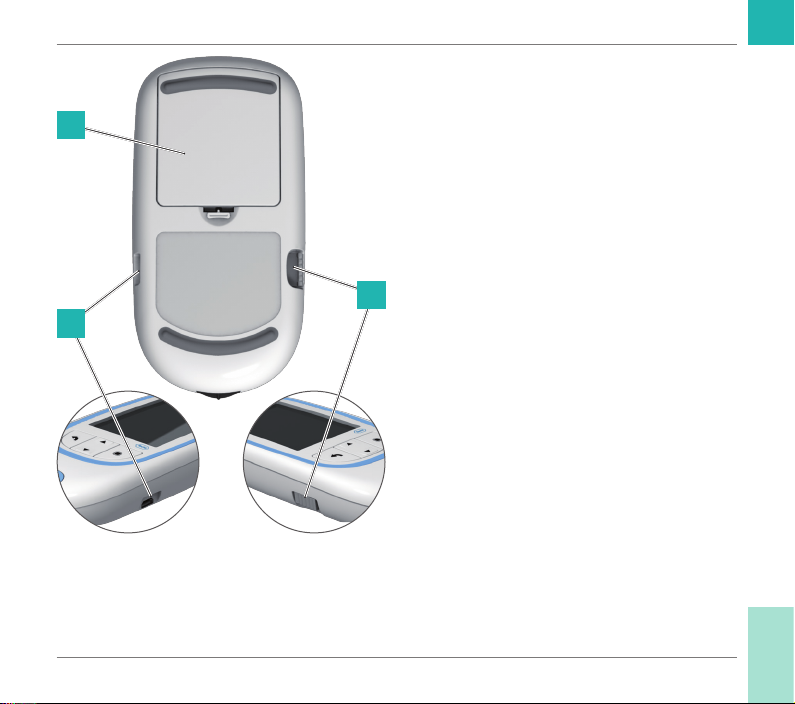
Overview of the meter elements (back and
sides)
G
I
G Battery compartment cover
Covers the battery compartment (four
1.5V alkaline batteries type AAA (LR03)).
H Code chip slot
Insert the code chip here.
I USB port
For wired communication and data
transfer to a computer.
H
Introduction
CoaguChek Vantus User’s Manual, version 1.0
Page 22

22
Batteries
Test
My Results
Reminders
Settings
Other
Main Menu
To save power, the CoaguChek Vantus meter
automatically turns itself off after 2 minutes
unless a button has been pressed or a new
test strip has been inserted. When the meter
turns itself off, all results obtained up to that
point remain in memory.
When the Main Menu screen is displayed,
the meter indicates the battery power level
on the top right of the display. The battery
symbol is divided into four segments which
correspond to the battery power level.
Replace batteries at latest when the ashing
red battery symbol or a corresponding
message appears.
Please be aware that battery life may be
affected by many factors, such as battery
type, quality, operating conditions (e.g.
ambient temperature), frequency of use,
and test duration.
05:03 PM
17 Sep 2018
Introduction
CoaguChek Vantus User’s Manual, version 1.0
Page 23
The meter retains all data in the memory, even
when no batteries are inserted. This includes,
in particular, your test results and all settings.
However, if the meter is without batteries for
more than 30 minutes, the current time (clock
time) and date may be lost. In this case, you
might have to re-enter the time and date
manually.
Think of the environment. Dispose of used
batteries sensibly.
WARNING
Do not throw batteries onto a re. They may
explode!
23
Introduction
CoaguChek Vantus User’s Manual, version 1.0
Page 24

24
Introduction
This page intentionally left blank.
CoaguChek Vantus User’s Manual, version 1.0
Page 25

Starting Up
Before using the meter for the rst time, carry
out the following steps:
• Insert the batteries
• Set the language
• Set the current date and time
• Insert the code chip (you can also carry
out this step immediately before testing)
25
Starting Up
CoaguChek Vantus User’s Manual, version 1.0
Page 26

26
Inserting the batteries
Starting Up
When replacing the batteries, you should
insert the new batteries within 30 minutes
of removing the old ones, to keep the date
and time settings. If you take longer, you
may have to re-enter the date and time.
Only use alkaline batteries 1.5V type AAA
1
(LR03).
With normal use, the batteries will last for
approximately 60 tests.
Roche recommends replacing used batteries
only with new high quality batteries and not
mixing different brands. Do not mix new
and already used batteries.
Think of the environment. Dispose of used
batteries sensibly.
1
1 also available as “alkaline-manganese dioxide batteries”
CoaguChek Vantus User’s Manual, version 1.0
Page 27

Use of rechargeable batteries is not
recommended. If you do use rechargeable
batteries, the following may happen:
• The number of tests that can be
performed per battery charge is much
lower than with alkaline batteries.
• Performing tests in a cold environment
may not be possible.
• The capacity remaining may not be
displayed correctly. If the meter displays
a Battery Low message, performing
further tests may be impossible. Replace
the batteries as soon as possible.
27
Starting Up
CoaguChek Vantus User’s Manual, version 1.0
Page 28
28
Starting Up
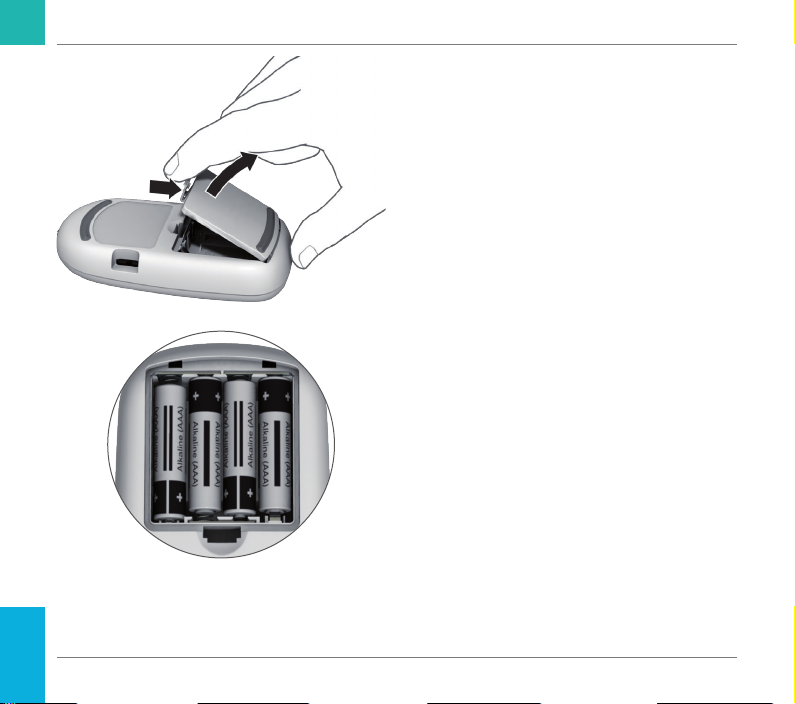
1 Turn the meter over.
2 Gently press the tab on the battery
compartment cover towards the top of the
meter and lift off the cover.
3 Insert the four batteries into the battery
compartment as indicated. Pay attention
to the positions of “+” (top of battery) and
“–” (at end).
4 Re-attach the cover. Close the battery
compartment by pushing the cover down
until the tab snaps into place.
CoaguChek Vantus User’s Manual, version 1.0
Page 29
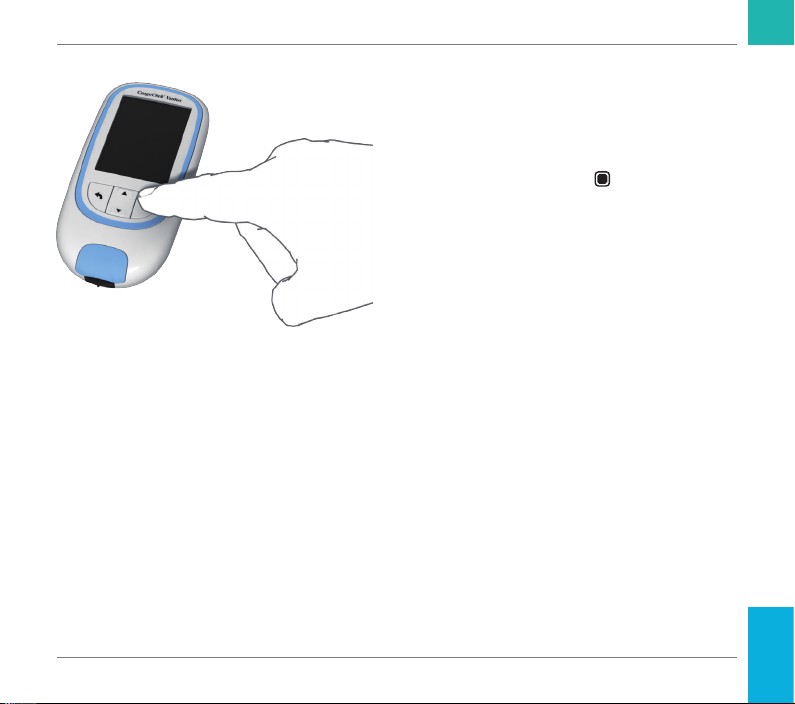
Initially setting up the meter
When you power on the meter for the very
rst time, you will automatically be guided
through the Language and Time & Date
setup.
1 Press the Enter button
meter on.
The meter automatically displays the
Language screen. A green dot indicates
which language is currently active.
to power the
29
Starting Up
CoaguChek Vantus User’s Manual, version 1.0
Page 30
30
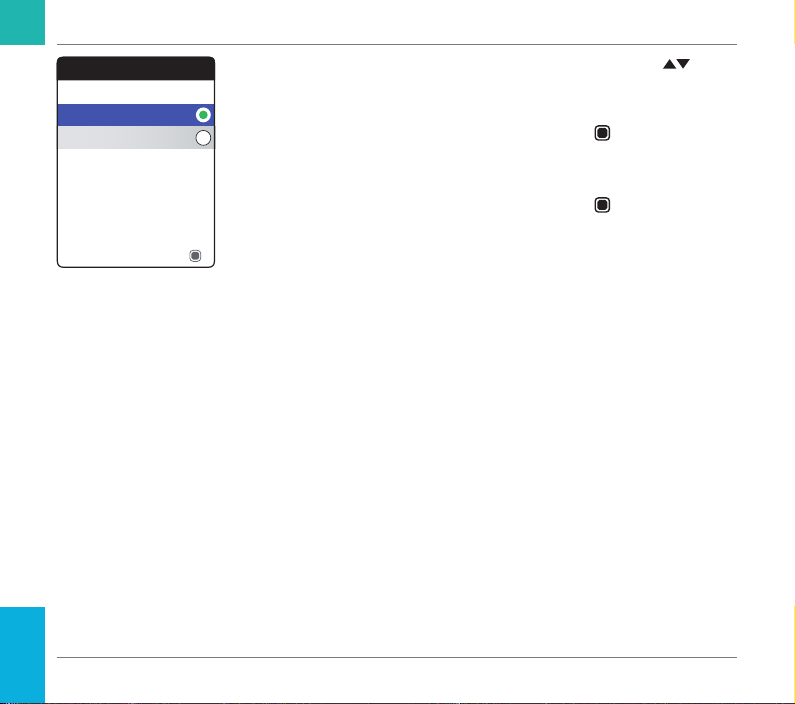
English
Español
Starting Up
Language
Save
2 Use the up/down arrows button to
select your preferred language. The newly
selected language is highlighted (blue).
3 Press the Enter button
to conrm the
selection, which is now indicated by the
green dot.
4 Press the Enter button
again to save the
selected language.
CoaguChek Vantus User’s Manual, version 1.0
Page 31

31
01
2018
12 hr Format
24 hr Format
Time & Date
45:
17Sep
Next
Time & Date
PM
Next
Time & Date
13
2018
45:
Next
The meter now displays the screen for setting
the time format.
5 Use the up/down arrows button
select the time format for the display
(24 hour or 12 hour am/pm). The newly
selected format is highlighted (blue).
6 Press the Enter button
selection, which is now indicated by the
green dot.
7 Press the Enter button
setting. The screen for setting the time and
date follows next.
All test results are saved together with time
and date. Analyzing stored test results or
17Sep
using reminders will only work with time
and date correctly set. Always check (and,
if necessary adjust) the time and date after
replacing the batteries.
Throughout this manual the 24hr format is
used on example screens.
to conrm the
again to save the
to
Starting Up
CoaguChek Vantus User’s Manual, version 1.0
Page 32

32
Starting Up
01
2018
Time & Date
45:
Next
8 Use the up/down arrows button to set
the current hour.
PM
Time & Date
9 Press the Enter button
hour. The next input eld (minutes) will be
to conrm the
highlighted.
17Sep
01
2018
PM
45:
17Sep
10 Proceed with setting the remaining elds
(year, month, day). The Enter button
always conrms a setting (and highlights
the subsequent eld, if available), the Back
button
allows you to jump back to the
previous eld.
Next
CoaguChek Vantus User’s Manual, version 1.0
Page 33

33
Test
My Results
Reminders
Settings
Other
05:03 PM
Main Menu
17 Sep 2018
The initial setup is now nished, and the meter
displays the Main Menu. For a complete
overview of setup options (including those
which are not part of the initial setup) see the
chapter Meter settings starting on page 85.
If you wish to power off the meter after setup:
11 Press and hold the Enter button
until
the meter powers off.
Starting Up
CoaguChek Vantus User’s Manual, version 1.0
Page 34

34
Starting Up
Code chip
The code chip provides the meter with
important information which it needs to
perform the coagulation test. The chip
contains information about the test method,
the lot number and the expiry date. The meter
is ready to use once the code chip has been
inserted.
If you use a new test strip lot and have not
inserted the corresponding code chip yet, you
must do so at latest after inserting the test
strip. Otherwise you cannot perform a test.
The meter displays the number of the code
chip belonging to the new test strip lot.
Once the code chip information has been
read by the meter, it will be stored for future
use. You may remove the code chip at this
point. Up to 5 code chip data sets can be
stored in the meter simultaneously.
Protect the code chip from moisture and
equipment which produces magnetic elds,
e.g. loudspeakers, induction stoves or other
electronic devices.
CoaguChek Vantus User’s Manual, version 1.0
Page 35

Inserting the code chip
1 Remove the old code chip if one is
inserted in the meter. Dispose of the old
code chip with your household waste.
2 Slide the new code chip into the slot on
the side of the meter as shown until you
feel it snap into place.
35
Starting Up
CoaguChek Vantus User’s Manual, version 1.0
Page 36

36
Starting Up
This page intentionally left blank.
CoaguChek Vantus User’s Manual, version 1.0
Page 37

Testing a Capillary Blood Sample
What you need
• CoaguChek Vantus meter
• The code chip already inserted in the
meter (each test strip container has its
own code chip)
• Test strips belonging to the code chip
mentioned above
• Lancing device (e.g. CoaguChek XS
Softclix)
• Lancet (e.g. CoaguChek Softclix Lancet)
• Lint-free cloth or paper tissue
37
Testing a Capillary Blood Sample
CoaguChek Vantus User’s Manual, version 1.0
Page 38

38
Important notes
Testing a Capillary Blood Sample
Always …
• close the container immediately after
removing a test strip.
• operate the meter at an ambient
temperature between 59 °F and 90 °F.
• place the meter on a level, stable surface
(table) or hold it so that it is roughly
horizontal.
• follow the information on correct handling
of test strips in the package insert.
• keep the test strip guide and housing
clean. Refer to the chapter Cleaning and
Disinfecting the Meter and the Lancing
Device.
CoaguChek Vantus User’s Manual, version 1.0
Page 39

Never …
• store the meter at extreme temperatures.
• store the meter in damp or humid
conditions without protection.
• remove or insert the code chip while the
meter is performing a test.
• touch or remove the test strip during a
test.
• wait more than 15 seconds after lancing
the ngertip before applying the blood.
• add more blood after the test has begun.
• perform a test with a drop of blood from a
previous puncture.
To avoid inaccurate results, make sure you
follow the above recommendations.
39
Testing a Capillary Blood Sample
CoaguChek Vantus User’s Manual, version 1.0
Page 40

40
Getting a good capillary blood sample
Testing a Capillary Blood Sample
To get a suitable drop of blood:
• Wash your hands in warm water and dry
thoroughly.
WARNING
Residues of water on the skin can dilute the
drop of blood and produce false results.
• Let your hand hang at your side before
lancing your nger.
• Immediately after lancing, massage gently
along the side of your nger to obtain
a sufciently large blood drop without
pressing or squeezing too hard.
CoaguChek Vantus User’s Manual, version 1.0
Page 41

Preparing to test
1 Have the test strip container to hand.
2 Make sure that the code chip belonging
to these test strips is available or the
information has previously been stored in
the meter.
3 Prepare the lancing device by inserting a
fresh lancet.
Do not lance your nger at this point. Wait
until step 10 on page 46 to do so.
41
Testing a Capillary Blood Sample
CoaguChek Vantus User’s Manual, version 1.0
Page 42

42
Performing a test
Testing a Capillary Blood Sample
1 Wash your hands with soap and warm
water. Dry them thoroughly.
WARNING
Residues of water on the skin can dilute the
drop of blood and produce false results.
2 Place the meter on a level, vibration-free
surface or hold it in your hand so that it is
roughly horizontal.
3 Power the meter on by pressing the Enter
button
test strip to power it on, which will put
the meter – after startup – into test mode
directly.
. Alternatively, you can insert a
CoaguChek Vantus User’s Manual, version 1.0
Page 43

CoaguChek
05:03 PM 17 Sep 2018
43
4 Check the battery level during startup (or
in the Main Menu afterwards).
If the meter displays a Battery Low
®
message, you can still perform up to 3 tests.
Replace the batteries as soon as possible.
5 Check that the time and date are correct.
If necessary, re-enter time and date (see
page 89).
If you have powered on the meter by inserting
a test strip, the meter will skip the following
steps 6 to 9 and proceed to the steps
described on page 45.
Main Menu
Test
My Results
Reminders
Settings
Other
6 After startup, Test is preselected and
highlighted. Press the Enter button
start the test.
to
05:03 PM
CoaguChek Vantus User’s Manual, version 1.0
17 Sep 2018
Testing a Capillary Blood Sample
Page 44

44
Testing a Capillary Blood Sample
The test strip symbol prompts you to insert a
test strip.
7 Remove a test strip from its container.
Immediately after removing a test strip,
close the container again with the stopper.
NOTICE
Exposure to external inuences (e.g. humidity)
may deteriorate the test strips and may lead
to error messages.
8 Hold the test strip so that the lettering, the
arrows and the blood drop symbols are
facing upward.
9 Slide the test strip into the test strip guide
in the direction indicated by the arrows.
Slide the test strip in as far as it will go.
Abeep tone indicates that the test strip
has been detected.
CoaguChek Vantus User’s Manual, version 1.0
Page 45

45
Test
Reading strip...
Insert code chip...
330
Test
Test
Test strip warming up...
seconds remaining...
Test
Apply blood
30
• The meter reads the strip information
(provided by the barcode on the test
strip) and checks if it matches code chip
information already stored in the meter.
• If you haven’t inserted the code chip yet
or in case of a mismatch, you will be
prompted to insert the correct code chip.
• When the test strip check has been
completed successfully, the meter
indicates that the test strip is warming up.
• Once the warming-up process is complete,
the meter displays the test strip and blood
drop symbols. These symbols and a beep
tone indicate that the meter is ready to
perform the test and is waiting for you to
apply blood.
At the same time, a 180-second countdown
begins. You must apply the drop of blood
to the test strip within this time, otherwise
you will receive an error message.
Testing a Capillary Blood Sample
CoaguChek Vantus User’s Manual, version 1.0
Page 46

46
Testing a Capillary Blood Sample
10 Now lance the side of a ngertip with the
lancing device.
We recommend obtaining the capillary
blood from the side of the ngertip as this
causes the least pain.
11 Massage the lanced nger until a drop of
blood is formed.
CAUTION
Do not press or squeeze the nger.
12 Apply the rst drop of blood from the
nger to the test strip.
CoaguChek Vantus User’s Manual, version 1.0
Page 47

13 Apply the blood directly from the nger by
touching the blood drop against the side
of the semicircular, transparent sample
application area of the test strip.
To prevent excess blood from reaching the
meter, apply blood via side-dosing directly
from ngertip.
Alternatively, you can apply the blood
directly from the nger to the center of the
semicircular, transparent sample application
area of the test strip. The test strip draws up
the blood by capillary action.
During this process you must hold the blood
drop to the test strip until the next screen
indicates that the blood has been applied
successfully.
CAUTION
Apply the blood drop to the test strip within
15 seconds of lancing the ngertip. Applying
blood after this period of time could falsify
the result, as the coagulation process could
already have begun.
47
Testing a Capillary Blood Sample
CoaguChek Vantus User’s Manual, version 1.0
Page 48

48
Test
Apply blood
Test
Blood applied
Quality check complete
Testing a Capillary Blood Sample
Test
Blood applied
Automated quality check...
Test
Measuring...
A beep tone indicates that you have applied
enough blood (if you have activated the
beeper function). The blood drop symbol
disappears and the test starts.
Do not add more blood. Do not touch the
test strip until the result is displayed.
The meter now performs an automatic quality
control check on the test strip. Following a
successful outcome of the quality control
check, the coagulation measurement starts.
The circular progress bar spins until the meter
has determined the result.
CoaguChek Vantus User’s Manual, version 1.0
Page 49

49
Test
05:03 PM 17 Sep 2018
2.8
Add Comment
Main Menu
INR
The result is displayed and automatically
saved to memory.
When interpreting your result, please also
read the test strip package insert carefully.
If a blue control bottle icon is displayed
along with the result:
This may occur if the hematocrit value
is very low or due to erroneous blood
collection (e.g., wet hands). Make sure
your hands are dry. Repeat the test. If the
message persists, please contact your
healthcare professional or seek immediate
medical attention.
If you wish, you can add up to six predened
comments to a test result. Comments can, for
example, provide additional information about
the test conditions or your general state of
health.
These comments can only be added
immediately after the test result is displayed
(before the meter is powered off); later editing
is not possible.
Testing a Capillary Blood Sample
CoaguChek Vantus User’s Manual, version 1.0
Page 50

50
Text
05:03 PM 17 Sep 2018
Add Comment
Main Menu
Testing a Capillary Blood Sample
Test
2.8
INR
Diet change
Illness
Medication change
Operation
Travel
Missed medication
Conrm
Test
Result: 2.8 INR
14 To add a comment, use the up/down
arrows button
to highlight Add
Comment.
15 Press the Enter button
to proceed to
the comment list.
16 Use the up/down arrows button
highlight the comment(s) you wish to add.
17 Press the Enter button
to conrm the
currently highlighted comment. A green
checkmark
appears behind each
selected comment.
18 Once you have selected the desired
comment(s), use the up/down arrows
button
19 Press the Enter button
to highlight Conrm.
to proceed to
the next step.
to
CoaguChek Vantus User’s Manual, version 1.0
Page 51

Text
Text
51
Test
Result: 2.8 INR
Diet change
Illness
Medication change
Operation
Travel
Missed medication
Conrm
Test
Result: 2.8 INR
Comments
Illness
Medication change
Edit Comment
Conrm
Test
05:03 PM 17 Sep 2018
INR2.8
Edit Comment
Main Menu
20 The next screen displays a list of all
previously selected comments. Check if
the list is correct, and use the up/down
arrows button
21 Press the Enter button
to highlight Conrm.
to save the
selected comments with the test result and
exit this menu.
The result screen now shows the Comment
symbol
. The test is completed.
Testing a Capillary Blood Sample
CoaguChek Vantus User’s Manual, version 1.0
Page 52

52
Testing a Capillary Blood Sample
22 Remove the test strip from the test strip
guide.
23 Press and hold the Enter button
the meter powers off.
24 Dispose of the used test strip with your
regular household waste.
WARNING
Dispose of used lancets carefully (e.g. use a
sturdy sharps container with lid) so that the
needles cannot cause injury to yourself or to
others.
until
CoaguChek Vantus User’s Manual, version 1.0
Page 53

Notes concerning the results display
Result ABOVE measuring range
Test
05:03 PM 17 Sep 2018
INR
2.8
Add Comment
Previous: 7 Sep 2018
2.7
Main Menu
INR
05:02 PM
Test
05:03 PM 17 Sep 2018
1.2
Result BELOW target range
Add Comment
Main Menu
INR
05:03 PM 17 Sep 2018
>
6.0
Test
INR
If you have activated the detailed result
format (as shown in the rst screen on the
left), values that are above the previously
measured test result are agged with an up
arrow. Results that are below the previously
measured test result are agged with a down
arrow.
• All values that lie within the set target
range are marked with a green bar.
• Values above or below the target range
are marked with a blue (above) or
yellow (below) bar plus a corresponding
explanatory text.
• Values above or below the measuring
range of the meter are marked with a
>(above) or < (below) symbol plus a
corresponding explanatory text.
For further information about setting the
result format or the target range, see Meter
settings starting on page 85.
53
CoaguChek Vantus User’s Manual, version 1.0
Add Comment
Main Menu
Testing a Capillary Blood Sample
Page 54

54
Testing a Capillary Blood Sample
The target range is the range that
you have agreed with your Healthcare
Professional. Your test result should fall
within the target range.
The measuring range refers to the
measuring range of the system itself and is
dened by the technical limits of the meter
and test strip.
The valid measuring ranges for CoaguChek
XS PT Test test strips are:
• INR: 0.8–6.0
If results outside the measuring range
are displayed, refer to the section Test
limitations and known interferences in the
package insert supplied with the test strips,
and repeat the test.
CoaguChek Vantus User’s Manual, version 1.0
Page 55

Reviewing and Handling Data
The CoaguChek Vantus meter lets you store,
review, and manage test results in several
ways:
• Store and review up to 400 test results
including additional information and
comments.
• Display result reports as graphics or tables
directly on the meter.
• Transfer data to a computer for immediate
evaluation, printout, and export
(embedded reports).
• Transfer data to a dedicated USB or
Bluetooth enabled device for medical
communication, e.g., to your physician or
healthcare provider (data transfer).
55
Reviewing and Handling Data
CoaguChek Vantus User’s Manual, version 1.0
Page 56

56
Text
Reviewing test results
Main Menu
Test
My Results
Reminders
Settings
Other
05:03 PM 17 Sep 2018
Reviewing and Handling Data
CoaguChek Vantus User’s Manual, version 1.0
My Results
Review Results
Trend
Target
Transfer Data
Reports
Review Results
19 Jul 2018 2.5 INR
12 Jul 2018 2.6 INR
05 Jul 2018 2.8 INR
29 Jun 2018 2.4 INR
22 Jun 2018 2.9 INR
15 Jun 2018 2.9 INR
1 Power the meter on by pressing the Enter
button
. Wait until the Main Menu is
displayed.
2 Use the up/down arrows button
select My Results.
3 Press the Enter button
Results menu.
4 Select Review Results and press the
Enter button
to display the results list.
All stored test results are displayed in a list
with the most recent at the top.
to
to open the My
Page 57

Text
57
Review Results
19 Jul 2018 2.5 INR
12 Jul 2018 2.6 INR
05 Jul 2018 2.8 INR
29 Jun 2018 2.4 INR
22 Jun 2018 2.9 INR
15 Jun 2018 2.9 INR
09:58 AM
2.6
Illness
Medication change
Review Results
12 Jul 2018
INR
5 Use the up/down arrows button to
scroll through the list.
6 Press the Enter button
to open the
details screen for a stored test result.
The test result will be displayed, along with
the comments (entered at the time the test
was performed)
7 Use the Back button
to return to the
results list.
Reviewing and Handling Data
CoaguChek Vantus User’s Manual, version 1.0
Page 58

58
Displaying reports on the meter
Reviewing and Handling Data
The CoaguChek Vantus meter offers two
report types, which can be displayed directly
on the meter:
• Trend:
a graphical or tabular report allowing a
linear, time-based analysis of stored test
results.
• Target:
a graphical or tabular report allowing a
statistical analysis of stored test results.
CoaguChek Vantus User’s Manual, version 1.0
Page 59

Displaying a Trend report
Text
Main Menu
Test
My Results
Reminders
Settings
Other
05:03 PM 17 Sep 2018
My Results
Review Results
Trend
Target
Transfer Data
Reports
Trend
90 Days
Average: 2.5 INR
INR
Time
Table
1 Power the meter on by pressing the Enter
button
. Wait until the Main Menu is
displayed.
2 Use the up/down arrows button
to
select My Results.
3 Press the Enter button
to open the My
Results menu.
4 Select Trend and press the Enter button
to display the report.
In the Trend menu, you have the option of
displaying an overview of your test results
either as a list or as a graph. All test results
stored for the period of time you select will
be displayed in the graph as linear values
(graph view) or as a list (table view).
59
Reviewing and Handling Data
CoaguChek Vantus User’s Manual, version 1.0
Page 60

60
Text
Text
Text
Trend
90 Days
Average: 2.5 INR
INR
Time
Table
Reviewing and Handling Data
Average: 2.5 INR
INR
19 Jul 2018
12 Jul 2018
05 Jul 2018
29 Jun 2018
22 Jun 2018
15 Jun 2018
Trend
90 Days
Time
Trend
Table
Graph
Graph view:
Each test result (represented by the
is plotted along the time axis according to the
time when the test was performed. All test
results are connected by a line.
The green shading behind the line shows the
INR target range valid at that point in time (if
set, otherwise not displayed).
Table view:
The test results are shown in a list. The oldest
date is shown at the bottom and the most
recent date at the top.
2.5 INR
2.6 INR
5 Use the up/down arrows button
2.8 INR
2.4 INR
2.9 INR
2.9 INR
select the time period you want. Starting
from your most recent test result, you can
choose a time period going back 60, 90,
120, or 180 days.
6 Press the Enter button
between graph and table display.
7 Press the Back button
My Results menu.
symbol)
to
to toggle
to return to the
CoaguChek Vantus User’s Manual, version 1.0
Page 61

Text
Text
Text
Text
61
Average: 2.5 INR
INR
19 Jul 2018
12 Jul 2018
05 Jul 2018
29 Jun 2019
22 Jun 2018
15 Jun 2018
Trend
90 Days
Time
Trend
Table
Graph
2.5 INR
2.6 INR
2.8 INR
2.4 INR
2.9 INR
2.9 INR
Trend
60 Days
No data in range
Trend
90 Days
Average: 2.5 INR
INR
Time
Table
OK
Test results above or below the
measuring range are marked accordingly. If
the selected period of time contains no test
results, no graph will be displayed.
Due to an incorrect time setting, a test result
may be stored with a date in the future.
The example on the lower left shows a test
performed after the date was inadvertently set
to the next year, and setting the date back to
the correct year afterwards.
These test results appear in red in the table
and are not displayed in the trend graph. As
there is no continuity between the test results
before and after this test, all previous results
(including this test) will not be displayed in
the trend curve.
Reviewing and Handling Data
CoaguChek Vantus User’s Manual, version 1.0
Page 62

62
Text
Displaying a Target report
Main Menu
Test
My Results
Reminders
Settings
Other
05:03 PM 17 Sep 2018
My Results
Review Results
Trend
Target
Transfer Data
Reports
Target
90 Days
Average: 2.5 INR
Above
Within
Below
The Target report is only available if you have
set and enabled an INR target range (see “Set
Targets” on page 92).
1 Power the meter on by pressing the Enter
button
. Wait until the Main Menu is
displayed.
2 Use the up/down arrows button
to
select My Results.
3 Press the Enter button
to open the My
Results menu.
4 Select Target and press the Enter button
to display the report.
Reviewing and Handling Data
CoaguChek Vantus User’s Manual, version 1.0
Table
Page 63

Text
Text
63
Target
90 Days
Average: 2.5 INR
Above
Within
Below
Table
Target
90 Days
Average: 2.5 INR
Above
Within
Below
12%
75%
13%
Graph
The percentage of values above, within and
below the set target range will be displayed
as a pie chart. The average (numerical) value
in the selected time period is also displayed.
If the selected period of time contains no test
results, no graph will be displayed.
5 Use the up/down arrows button
to select the time period you want to
evaluate. Starting from your most recent
test result, you can choose a time period
going back 60, 90, 120, or 180 days.
6 Press the Enter button
to toggle
between graphic and tabular display.
7 Press the Back button
to return to the
My Results menu.
Reviewing and Handling Data
CoaguChek Vantus User’s Manual, version 1.0
Page 64

64
Text
Transferring data
Transfer Data
Neither USB nor Bluetooth
selected. Check Settings.
Reviewing and Handling Data
Cancel
The CoaguChek Vantus meter can
communicate with a computer and/or other
devices either via USB or a wireless Bluetooth
connection. You can use this feature for the
following purposes:
• further evaluation of stored test results in
suitable computer applications
• data archiving
The preferred method (USB/Bluetooth) used
for data transfer has to be selected in the
meter settings before transferring data for
the rst time. Otherwise, a corresponding
message will be displayed.
Both methods will be described separately
on the following pages. If you are using a
Bluetooth connection, pairing has to be
completed during setup before you can
perform a data transfer (see “Data Transfer”
on page 98).
It is not possible to perform a test while a
USB cable is plugged in.
CoaguChek Vantus User’s Manual, version 1.0
Page 65

Data transfer via USB
Text
Test
My Results
Reminders
Settings
Other
05:03 PM 17 Sep 2018
Main Menu
Review Results
Trend
Target
Transfer Data
Reports
My Results
Transfer Data
Connect USB to
Meter & PC
1 Power the meter on by pressing the Enter
button
. Wait until the Main Menu is
displayed.
2 Use the up/down arrows button
to
select My Results.
3 Press the Enter button
to open the My
Results menu.
4 Select Transfer Data and press the Enter
button
to start the data transfer mode.
The meter now waits for a connection to be
established.
65
Reviewing and Handling Data
CoaguChek Vantus User’s Manual, version 1.0
Page 66

66
Text
Transfer Data
Transferring data...
Reviewing and Handling Data
Data Transfer
Data Transfer
Complete
To connect the meter to a computer, you will
need a suitable USB cable (included in the
kit). Connect the micro USB type B plug to
the meter (the USB port is located on the
right-hand side of the meter) and the USB
type A plug to the computer. In order to
transfer data, always connect the cable to the
meter rst and then to the computer.
Data transfer must be actively triggered
by the computer application or device app
used for reading the stored data.
When the connection has been established
and the download command has been
received, the meter informs you about the
progress.
To save battery power, remove the USB
cable after transferring the test results to
the PC.
CoaguChek Vantus User’s Manual, version 1.0
Page 67

Data transfer via Bluetooth
Text
Main Menu
Test
My Results
Reminders
Settings
Other
05:03 PM 17 Sep 2018
My Results
Review Results
Trend
Target
Transfer Data
Reports
Transfer Data
Activating Bluetooth
BT Smart
1 Power the meter on by pressing the Enter
button
. Wait until the Main Menu is
displayed.
2 Use the up/down arrows button
to
select My Results.
3 Press the Enter button
to open the My
Results menu.
4 Select Transfer Data and press the Enter
button
to start the data transfer mode.
The meter now waits for a connection to the
paired device to be established.
67
Reviewing and Handling Data
CoaguChek Vantus User’s Manual, version 1.0
Page 68

68
Text
Transfer Data
Transferring data...
Data Transfer
Data Transfer
Complete
Reviewing and Handling Data
When the connection has been established
and the download command has been sent,
the meter informs you about the progress.
Depending on the software you are using,
an information screen may appear after the
data transfer is complete. It may contain,
e.g., information about available software
updates or a change of settings applied to
the meter.
CoaguChek Vantus User’s Manual, version 1.0
Page 69

Displaying reports on a computer
Text
69
Main Menu
Test
My Results
Reminders
Settings
Other
Review Results
05:03 PM 17 Sep 2018
CoaguChek Vantus User’s Manual, version 1.0
Trend
Target
Transfer Data
Reports
My Results
Transfer Data
Connect USB to
Meter & PC
The reports displayed on the meter (see page
58) can also be displayed on a computer.
Opening these reports on an Internet browser
provides additional advantages like more
detailed information, the option to print, and
the ability to store results to le for further
evaluation. All report data is stored on and
retrieved from the meter. Reports can only be
provided via a USB connection. For displaying
reports:
1 Power the meter on by pressing the Enter
button
. Wait until the Main Menu is
displayed.
2 Use the up/down arrows button
to
select My Results.
3 Press the Enter button
to open the My
Results menu.
4 Select Reports and press the Enter button
.
Reviewing and Handling Data
Page 70

70
Text
Reports
Connected
Reviewing and Handling Data
5 Connect the meter to the computer via
USB cable.
The display shows “Connected” when the
connection has been established.
6 Open a window on your computer that
displays the contents of the meter (as a
removable disk drive).
7 Double click on START.HTM to open the
le in your standard Internet browser.
8 After you have nished using the
embedded reports, unplug the USB cable
from the meter and the computer.
When the meter is connected to a computer,
it will not be powered via the USB cable
and will not power off automatically. To save
battery power always remove the USB cable
when the connection is no longer in use.
CoaguChek Vantus User’s Manual, version 1.0
Page 71

Security settings in the Internet browser
Virus scanner
The settings of your Internet Browser may
affect your use of reports.
If you choose the security settings
appropriately (e.g. “Allow active content to run
les on My Computer” or similar), you can
work with reports without any restrictions.
WARNING
Make sure the computer system you are
using is free of malware (e.g. virus, trojan).
If using a compromised computer system,
the results displayed can be incomplete or
falsied.
If your virus scanner reports a threat after
connecting the CoaguChek Vantus meter to
the PC, you can instruct your virus scanner to
ignore this threat.
71
Reviewing and Handling Data
CoaguChek Vantus User’s Manual, version 1.0
Page 72

72
Reports overview
B
Reviewing and Handling Data
A report displayed in your Internet browser
A
contains the following elements:
A Report Header
Displays information about the meter
(like serial number, software version etc.),
allows you to set the Time Period for
statistics and the Target Range Display,
and contains buttons for printing and
saving the report to le.
B Report Content
The page body contains the Trend Graph,
the Target Graph, and a chronological list
of Results.
Language and your personal target range will
be displayed as set in the meter.
CoaguChek Vantus User’s Manual, version 1.0
Page 73

Time period
Trend graph
Starting from your most recent test result, you
can choose a Time Period going back 60, 90,
120, 180, or 365 days. This setting is applied
to both the Trend and Target graph.
All test results stored within a selected period
of time will be displayed in the chart as
linear values. Each test result (represented
by the
symbol) is plotted along the time
axis according to the time when the test was
performed. Test results above
the measuring range are marked accordingly.
All test results are connected by a line in
chronological order.
Vertical lines on the Trend graph mark the
beginning of each week.
or below
73
Reviewing and Handling Data
CoaguChek Vantus User’s Manual, version 1.0
Page 74

74
Target range display
Target graph
Reviewing and Handling Data
The green shading behind the line shows
the INR target range (if set, otherwise not
displayed). You may set the Target Range
Display to:
• Constant: the current target range set in
the meter is applied to all results in the
selected time period.
• Individual: the green bar shows the target
range valid at that point in time.
The percentage of values above, within and
below the set target range will be displayed
as a pie chart. The average (numerical) value
and the total number of results in that range
are also displayed.
Below the Target graph you will nd further
statistical information calculated from all
values within the selected time period.
CoaguChek Vantus User’s Manual, version 1.0
Page 75

List of results
All test results are listed in chronological
order, with the latest result on top. The list
contains the following columns:
• Date and Time
• PT Coagulation
The result value is shown. If the result is
outside the measuring range, either LOW
or HIGH will be shown.
• Target range
The target range valid at that point in time.
If the result is outside the target range
the cell is colored blue (above) or yellow
(below).
• Comments
• Transferred
The upload icon
has previously been transferred using
the “Transfer data” function of the meter.
Viewing a report on the computer as
described here does not constitute data
transfer and does not activate this indicator.
indicates that a result
75
Reviewing and Handling Data
CoaguChek Vantus User’s Manual, version 1.0
Page 76

76
Printing reports
Reviewing and Handling Data
All reports displayed on the screen can also
be printed out immediately.
In order to achieve the best results, use the
print button
use the the browser’s integrated print function.
1 Click the print button
header.
2 Select the desired printer from the print
dialog box, and adjust print parameters
as needed, depending on the available
options.
3 Start the printing process.
in the report header. Do not
in the report
CoaguChek Vantus User’s Manual, version 1.0
Page 77

Using data in external applications
For evaluating test results using other
software, you can save the data as a *.csv
le. The le extension CSV stands for Comma
Separated Values. These les can be used by
various applications, for example a text editor
or a spreadsheet application.
The *.csv le always contains all the test
results currently stored in your meter,
including test results that have already been
transferred during previous data transfers.
1 Click the Save le button
header.
2 Select the desired save options in the
following dialog box.
in the report
77
Reviewing and Handling Data
CoaguChek Vantus User’s Manual, version 1.0
Page 78

78
Reviewing and Handling Data
The saved le is handled by the system
like a download performed by the Internet
browser, and the corresponding settings
apply. This will, for example, determine if
the le is merely stored or directly opened
in an application. If saving the *.csv le
does not work as expected check the
relevant system and browser settings.
The saved *.csv le contains the following
information:
• Serial number of the meter
• Date and time of data download to the
computer (for creating this *.csv le)
• Date, time and value of each stored test
result
CoaguChek Vantus User’s Manual, version 1.0
Page 79

Setting up reminders
Reminders and Meter Settings
The CoaguChek Vantus meter lets you
set reminders that work just like an alarm
clock telling you it’s time for an action.
Beyond the abilities of an alarm clock, these
reminders also tell you which action you have
scheduled at that point in time. You may set
four different kinds of reminders:
• Test
• Medication
• Appointment
• Other
Each reminder can be scheduled as a single
reminder, or as a recurring reminder (daily, or
in 1-4 week intervals).
reminders
reminders
reminders
reminders
79
Reminders and Meter Settings
CoaguChek Vantus User’s Manual, version 1.0
Page 80

80
Text
New reminder
Main Menu
Test
My Results
Reminders
Settings
Other
05:03 PM 17 Sep 2018
Current Reminders
New
Reminders
Reminders
Select reminder type
01
45:
Once
To set a new reminder:
1 Power the meter on by pressing the Enter
button
. Wait until the Main Menu is
displayed.
2 Select Reminders and press the Enter
button
to open the corresponding
menu.
3 Select New and press the Enter button
to set up a new reminder.
The Reminders screen opens and displays
the options you can set:
• Type (default:
(Test))
• Interval (default: once)
• Time and date (default: current time on the
next day)
PM
2018
Reminders and Meter Settings
CoaguChek Vantus User’s Manual, version 1.0
17Sep
Next
Page 81

81
Reminders
Select reminder type
01
45:
2018
Once
PM
17Sep
Reminders
Select frequency
Next
01
Monday
45:
7 Days
Next
01
PM
Reminders
Set time
Monday
45:
7 Days
Next
4 Use the up/down arrows button to
set the desired type (test, medication,
appointment, other).
5 Press the Enter button
the selected type. The next reminder
parameter (frequency) will be highlighted.
6 Use the up/down arrows button
the desired interval (once, daily, every 7,
14, 21, or 28 days).
7 Press the Enter button
the selected interval. The next reminder
parameter (hour) will be highlighted.
8 Set the remaining time/date parameters,
always using the up/down arrows button
to set the parameters, and the Enter
button
to conrm and jump to the next
parameter.
PM
Depending on the chosen interval, there
will be different time/date parameters to
set.
to conrm
to set
to conrm
Reminders and Meter Settings
CoaguChek Vantus User’s Manual, version 1.0
Page 82

82
Reminders
Set day of week
7 Days
45:
Next
Marimba
Ascending
Bell
Timba
Doorbell
PM
Reminder Tones
Save
Reminder Volume
High
Medium
Low
Off
01
Monday
Reminders and Meter Settings
Next
After entering and conrming the day, you
are prompted to set the audio signal for the
reminder.
9 Use the up/down arrows button
to
select the desired Reminder Tone, which
may, for example, help you to distinguish
acoustically between reminder types.
Press the Enter button
to conrm
your selection. A green dot indicates the
selected tone.
10 Press the Enter button
again to save the
selection and proceed.
11 Select the desired Reminder Volume
and press the Enter button
to conrm
your selection. A green dot indicates the
selected volume.
12 Press the Enter button
to save the
reminder.
CoaguChek Vantus User’s Manual, version 1.0
Page 83

Text
83
Reminders
Current Reminders
05:30 PM, 17 Sep 2018
01:45 PM, Thu 7 Days
New
Edit / Delete
The newly set reminder is now shown in the
list of reminders. You can now
• set another New reminder
• Edit/Delete the existing reminder
• exit the Reminders menu with the Back
button
and return to the Main Menu.
Reminders and Meter Settings
CoaguChek Vantus User’s Manual, version 1.0
Page 84

84
Text
Text
Editing or deleting a reminder
Reminders
Current Reminders
05:30 PM, 17 Sep 2018
01:45 PM, Thu 7 Days
New
Edit / Delete
Reminders and Meter Settings
Edit Reminders
05:30 PM, 17 Sep 2018
01:45 PM, Thu 7 Days
Edit
Delete
To edit or delete a reminder:
1 Select Edit/Delete and press the Enter
button
to proceed.
2 Select the desired reminder and press the
Enter button
to conrm your selection.
A green dot indicates the selected
reminder.
3 Select Edit or Delete and press the Enter
button
to proceed.
If you have chosen to edit the reminder,
proceed as described in section “New
reminder”. If you have chosen to delete the
reminder, it will be deleted after conrmation.
The Edit/Delete button is only available
if there is at least one reminder listed. The
New button is only available if there are
fewer than four reminders listed.
CoaguChek Vantus User’s Manual, version 1.0
Page 85

Meter settings
Main Menu
Test
My Results
Reminders
Settings
Other
05:03 PM 17 Sep 2018
Settings
Language
Time & Date
Result Format
Set Targets
Beeper Volume
Display Brightness
The initial meter setup was completed after
you powered on the meter for the rst time.
Use the following descriptions to set options
that are not covered by the initial setup (e.g.,
the target range) or to edit settings already
made.
Always perform the following two steps
before selecting one of the options in the
Settings menu:
1 Power the meter on by pressing the Enter
button
. Wait until the Main Menu is
displayed.
2 Select Settings and press the Enter
button
to open the corresponding
menu.
85
Reminders and Meter Settings
CoaguChek Vantus User’s Manual, version 1.0
Page 86

86
Settings overview
Setting Options
Language • English*
Time & Date Time format • 24-hour format (24 hr)
Result Format • Simple*
Set Targets Time period
* Default settings are marked with an asterisk.
Reminders and Meter Settings
• Español
• Detailed
( statistics)
• 60 days*
• 90 days
• 120 days
• 180 days
• 12-hour format (12 hr) with a.m./p.m.*
• On
• Off*
• High value
• Low value
CoaguChek Vantus User’s Manual, version 1.0
Page 87

Setting Options
Beeper Volume • High*
• Medium
• Low
• Off
Display Brightness • High*
• Medium
• Low
Button Click • On*
• Off
Data Transfer • None*
• Bluetooth
• USB
* Default settings are marked with an asterisk.
87
Reminders and Meter Settings
CoaguChek Vantus User’s Manual, version 1.0
Page 88

88
Language
Settings
Language
Time & Date
Result Format
Set Targets
Beeper Volume
Display Brightness
Reminders and Meter Settings
Language
English
Español
Save
1 Select Language and press the Enter
button
to open the corresponding
menu.
A green dot indicates which language is
currently active.
2 Use the up/down arrows button
to
select your preferred language. The newly
selected language is highlighted (blue).
3 Press the Enter button
to conrm the
selection, which is now indicated by the
green dot.
4 Press the Enter button
again to save the
selected language.
5 On the following conrmation screen select
Conrm and press the Enter button
to
switch the meter to the selected language.
CoaguChek Vantus User’s Manual, version 1.0
Page 89

Time & Date
Settings
Language
Time & Date
Result Format
Set Targets
Beeper Volume
12 hr Format
Display Brightness
24 hr Format
Time & Date
01
2018
Time & Date
45:
Next
01
17Sep
Time & Date
Next
2018
PM
89
1 Select Time & Date and press the Enter
button
to open the corresponding
menu.
2 Use the up/down arrows button
to
select the time format for the display (24
hour or 12 hour am/pm).
3 Press the Enter button
to conrm and
save the setting. The screen for setting the
time and date follows next.
4 Use the up/down arrows button
to set
the current hour.
5 Press the Enter button
to conrm the
hour. The next input eld (minutes) will be
highlighted.
6 Proceed with setting the remaining elds
(year, month, day). The Enter button
always conrms a setting (and highlights
PM
45:
17Sep
the subsequent eld, if available). The
Back button
allows you to jump back to
the previous eld.
Reminders and Meter Settings
CoaguChek Vantus User’s Manual, version 1.0
Next
Page 90

90
Reminders and Meter Settings
In order to ensure a correct time and
date setting, the meter checks the date
for plausibility. The meter will display a
message in the following cases:
• the date you want to set precedes
the date of the most recently stored
measurement
• the date you want to set is six months
later than the last stored measurement
result
CoaguChek Vantus User’s Manual, version 1.0
Page 91

Result Format
Settings
Language
Time & Date
Result Format
Set Targets
Beeper Volume
Display Brightness
Simple
Detailed
Result Format
Save
Choose Detailed if you want to see your
current result compared with your previous
result on the same screen. An up arrow
indicates that your current result is higher,
and a down arrow indicates that it is lower
than your previous result (see page 53).
1 Select Result Format and press the Enter
button
to open the corresponding
menu.
The currently active result format is indicated
by a green dot on the right.
2 Use the up/down arrows button
to
select your preferred result format. The
newly selected format is highlighted
(blue).
3 Press the Enter button
to conrm the
selection, which is now indicated by the
green dot.
4 Press the Enter button
again to save the
selected result format.
91
Reminders and Meter Settings
CoaguChek Vantus User’s Manual, version 1.0
Page 92

92
Set Targets
Settings
Language
Time & Date
Result Format
Set Targets
Beeper Volume
Display Brightness
Reminders and Meter Settings
Time Period
180 Days
120 Days
90 Days
60 Days
Set Targets
Next
A target range denes the minimum and
maximum values which should be achieved
during therapy. Reports and statistics can
then include information about values within,
above or below this target range.
1 Select Set Targets and press the Enter
button
to open the corresponding
menu.
The currently selected time period, which will
be used as the default time period for reports
and statistics, is indicated by a green dot on
the right.
2 Select the desired time period.
3 Press the Enter button
to conrm
the selected time period, which is now
indicated by the green dot.
4 Press the Enter button
again to proceed
to the next step.
CoaguChek Vantus User’s Manual, version 1.0
Page 93

93
On
Off
Set Targets
Next
The current activation status is indicated by a
green dot on the right.
A newly set or edited target range is only
valid for tests performed after this setting
is made, and will not affect test results
already stored in memory.
5 Use the up/down arrows button
select On or Off.
6 Press the Enter button
selection, which is now indicated by the
green dot.
7 Press the Enter button
to the next step.
to conrm the
again to proceed
to
Reminders and Meter Settings
CoaguChek Vantus User’s Manual, version 1.0
Page 94

94
Set Targets
On
Off
Set Targets
High Value
3.2
Next
INR
Set Targets
Low Value
Next
1.8
Time Period 180 Days
High Value
Low Value
Reminders and Meter Settings
INR
Set Targets
Next
Save
3.2 INR
1.8 INR
If you have selected the option Off, the Set
Targets setup ends here. If you have selected
the option On, proceed as follows:
8 Use the up/down arrows button
to set
the desired high value.
9 Press the Enter button
to save the set
value.
10 Repeat the last steps to set the low value.
11 Press the Enter button
to save the
settings.
CoaguChek Vantus User’s Manual, version 1.0
Page 95

Beeper Volume
Settings
Time & Date
Result Format
Set Targets
Beeper Volume
Display Brightness
Button Click
Beeper Volume
High
Medium
Low
Off
Save
If the beeper is activated, the meter always
beeps when an action is taken, for example a
test strip is inserted or a sufcient sample has
been applied.
The beeper volume can be set or deactivated.
However, in case of an error the meter will
always beep for safety reasons, even if you
have set the beeper function to Off. To set the
beeper volume:
1 Select Beeper Volume and press the
Enter button
to open the corresponding
menu.
The currently set volume is indicated by a
green dot on the right.
2 Use the up/down arrows button
to
select the desired volume.
3 Press the Enter button
to conrm the
selection, which is now indicated by the
green dot.
4 Press the Enter button
again to save the
selected volume.
95
Reminders and Meter Settings
CoaguChek Vantus User’s Manual, version 1.0
Page 96

96
Text
Display Brightness
Settings
Result Format
Set Targets
Beeper Volume
Display Brightness
Button Click
Data Transfer
Reminders and Meter Settings
Display Brightness
High
Medium
Low
Save
1 Select Display Brightness and press the
Enter button
to open the corresponding
menu.
The currently set display brightness is
indicated by a green dot on the right.
2 Use the up/down arrows button
to
select the desired display brightness.
The display will temporarily switch to the
currently highlighted brightness.
3 Press the Enter button
to conrm the
selection, which is now indicated by the
green dot.
4 Press the Enter button
again to save the
selected display brightness.
To improve battery lifetime, choose a lower
display brightness setting.
CoaguChek Vantus User’s Manual, version 1.0
Page 97

Text
Button Click
Settings
Result Format
Set Targets
Beeper Volume
Display Brightness
Button Click
Data Transfer
97
The meter can be set to emit a click sound
whenever you press a button.
To set the button click:
1 Select Button Click and press the Enter
Button Click
On
Off
button
menu.
The current status is indicated by a green dot
on the right.
2 Use the up/down arrows button
to open the corresponding
to
select On or Off.
3 Press the Enter button
to conrm the
selection, which is now indicated by the
Save
green dot.
4 Press the Enter button
again to save the
selected status.
The setting of the beeper volume also applies
to the button click. If the beeper volume is set
to Off, the button click will also be muted.
Reminders and Meter Settings
CoaguChek Vantus User’s Manual, version 1.0
Page 98

98
Data Transfer
Settings
Result Format
Set Targets
Beeper Volume
Display Brightness
Button Click
Data Transfer
Reminders and Meter Settings
Data Transfer
None
Bluetooth
USB
Save
The CoaguChek Vantus meter can
communicate with a computer and/or other
devices via USB or a wireless Bluetooth
connection. Using the Data Transfer option
(see the chapter Transferring data starting on
page 64) enables the transfer mode (USB or
Bluetooth) preselected here.
To set up data transfer:
1 Select Data Transfer and press the Enter
button
to open the corresponding
menu.
The currently set transfer mode is indicated
by a green dot on the right.
2 Use the up/down arrows button
to
select the desired transfer mode.
3 Press the Enter button
to conrm the
selection, which is now indicated by the
green dot.
4 Press the Enter button
again to save the
selected transfer mode.
CoaguChek Vantus User’s Manual, version 1.0
Page 99

Text
Text
Text
99
Pairing
Activating Bluetooth
BT Smart
Pairing
Pairing in Progress
Pairing
Pairing Complete
My Smartphone
OK
If you have selected None or USB, the data
transfer setup ends here.
If you have selected Bluetooth, the meter
shows the screen “Activating Bluetooth”.
5 Start the Bluetooth scan on the device you
want to pair with and select “CoaguChek”.
When a connection has been established, the
meter continues the pairing process.
6 Press the Enter button
to conrm and
nish the pairing process.
The meter can be paired via Bluetooth with
one device at a time. This means that an
existing Bluetooth connection has to be
deleted before you can pair the meter with
another device.
Reminders and Meter Settings
CoaguChek Vantus User’s Manual, version 1.0
Page 100

100
Reminders and Meter Settings
This page intentionally left blank.
CoaguChek Vantus User’s Manual, version 1.0
 Loading...