

Page 1
ⴙ
ⴚ
CASY Model DT
Brief instruction V 1.0E
Operating instructions
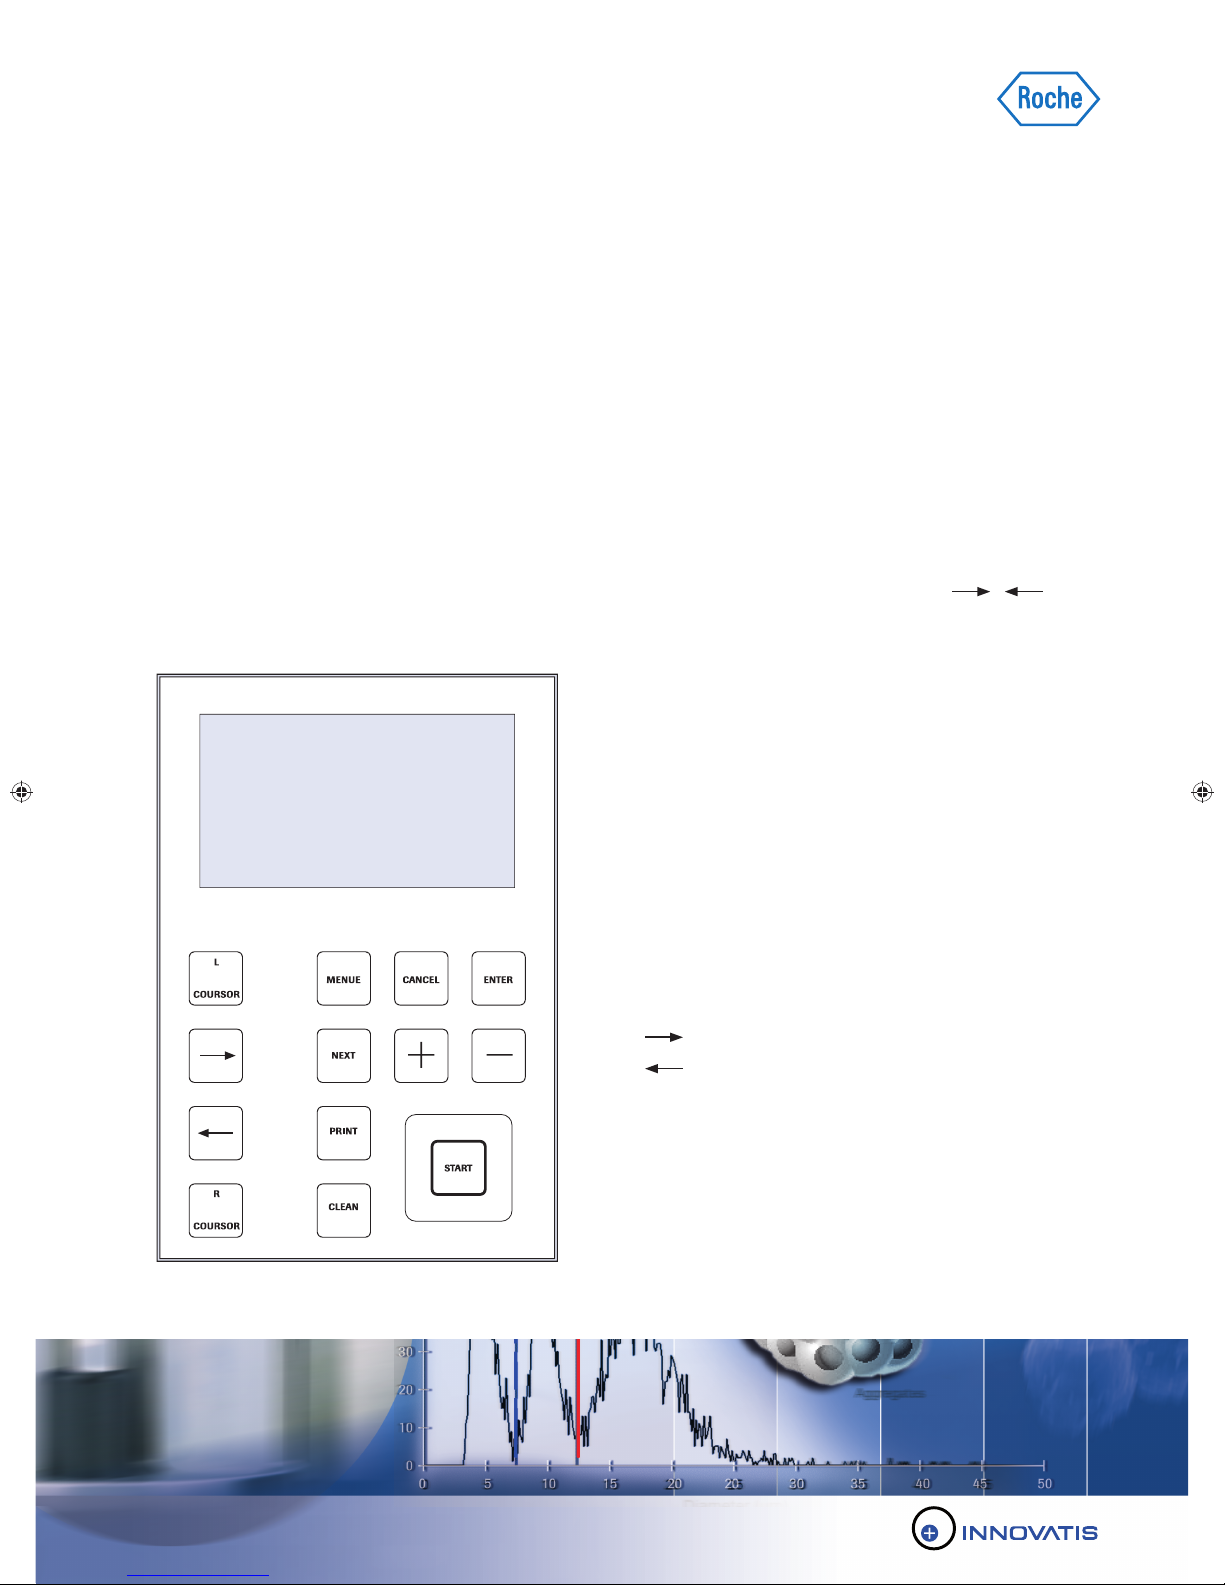
The power switch is positioned on the rear of the CASY
Model DT tower.
The top right-hand area of the control panel accommodates
the keys MENU, CANCEL, ENTER, NEXT, ⴙ, ⴚ used to
enter the measuring and output parameters.
Display
The bottom right-hand area accommodates the keys START,
CLEAN, PRINT. used to control the measuring stand and
output the results to the printer or external computer.
On the left are the keys L-CURSOR, , ,
R-CURSOR used to position the evaluation cursors.
Defi nition of key functions:
MENU: Starts the menu control.
CANCEL: Cancels a measurement or entry.
ENTER: Confi rms an entry.
NEXT: Continue to next number.
: Increases number/change selection.
: Increases number/change selection.
START: Starts a measurement.
CLEAN: Starts one or several cleaning cycles.
PRINT: Output to printer and/or serial interface.
L-CURSOR: Positions left cursor.
: Shifts cursor to the right.
: Shifts cursor to the left.
R-CURSOR: Positions right cursor.
Page 2
Preparing for a measurement
1.
Switch on your CASY Model DT (The green power switch is fi tted to the rear panel of CASY Model DT)
2. Replenish the storage container with clean CASY ton.
3. Empty the waste container.
After the system successfully performed the self test, press
the Menu button to open the Main Menu.
In general operation commands are written below the lower
line: Use the Menu Button to select an option and press
Enter to open the chosen option.
4. Select an appropriate setup or input the parameters manually.
Select an appropriate setup
The Select Setup option opens the SETUP SELECTION
screen.
Pressing the NEXT key selects a setup. You may select
only those setups that have been logged and tagged with *.
Pressing and holding down the NEXT key enables you to
move the selector mark backwards.
Main Menu DT-2AB-9999 15.04.2008 10:15
* Setup Selection
Edit Setup
Select Capillary
Set Date and Time
System Settings
Service Menu
USE MENU TO SELECT AND PRESS ENTER TO OPEN.
USE CANCEL TO LEAVE SCREEN.
SETUP SELECTION DT-2AB-9999 15.04.2008 10:15
Capillary: 150 μm
Setup No: 00 01 02 03 04 05 06 07 08 09
* *
10 11 12 13 14 15 16 17 18 19
USE NEXT TO SELECT SETUP AND PRESS ENTER TO LOAD.
USE CANCEL TO LEAVE SCREEN
Pressing ENTER displays the selected setup.
Press ENTER again to load the setup displayed.
If you do not wish to load the setup displayed, you can
return to Setup Selection by pressing CANCEL.
SETUP NUMBER: 00 NAME: Default
Capillary: 150 μm
Sample Volume: 1 x 200 μl
Dilution: 1.000e+00
Left Cursor: 3.3 μm
Right Cursor: 50.0 μm
Display Mode: Standard
Total Counts/ml: Off
Interface: Parallel
Print-Mode: Manual/PF On
USE ENTER TO LOAD SETUP.
USE CANCEL TO LEAVE SCREEN.
2
Page 3

ⴚ
Manual input of the parameters
Edit Setup opens the setup screen. When a setup screen is
opened, the input marker is located initially on the Dilution
input fi eld.
The current input position is indicated by a fl ashing, horizontal
line below the characters which can currently be changed.
From this point, you can use the MENU key to move forwards
or backwards between the input fi elds.
To move forwards, press the MENU key briefl y.
maker skips forward to the next
To move backwards, keep the
input marker reaches the position you require. Both methods
move you to the start or the end of the screen when the last
or the fi rst parameter respectively is reached.
When inputting numbers, you can move forwards from
number to number using the NEXT key.
To increase or decrease a number selected using NEXT,
use the ⴙ and ⴚ keys. For all other parameters, the ⴙ and
keys
can be used to select various pre-defi ned values.
This also
name.
You must save your entries if you want the settings to be
available next time you switch on CASY Model DT. To do
press ENTER and you will be forwarded to the Saving Setup
where the existing setups are listed. Use NEXT to
of the 20 setups and then press ENTER. The setup currently
loaded will be offered as a default setting. You may select setups that have already been saved and therefore tagged with *
and also unused setups. If you select a setup tagged with *, its
stored settings will be overwritten with your new settings. If you
select an unused setup, it will appear tagged with * and will
be available for selection next time Select Setup is opened.
applies for the individual characters of the setup
available input position.
MENU
key pressed until the
The input
this,
select one
SETUP NUMBER: 00 NAME: Default
Capillary: 150 μm
Sample Volume: 1 x 200 μl
Dilution:
Left Cursor: 3.3 μm
Right Cursor: 50.0 μm
Display Mode: Standard
Total Counts/ml: Off
Interface: Parallel
Print-Mode: Manual/PF On
USE MENU AND NEXT TO STEP. USE +/- TO EDIT. USE
CANCEL TO LEAVE SCREEN OR ENTER TO CONFIRM CHANGES
If you do not wish to save your settings, press CANCEL. The
new settings are used until you select an alternative setup
or switch off your CASY Model DT. They will then no longer
be available. As a setup name for unsaved settings, NOT
SAVED appears and the setup number is replaced by two
forward slashes //.
1.000e+00
5. Monitoring the background.
1
Load or create a setup with a dilution factor of 1 and cursor positions covering the entire size range (at delivery Setup No 00)
2
Place a CASY cup containing CASY ton below the measuring capillary.
3
Press and hold the CLEAN key down until the clean counter indicates 3. Releasing the key triggers three clean cycles.
4
Place a new CASY cup containing CASY ton below the measuring capillary.
5
Press the START key to initiate a measurement.
For the used 150 µm measuring capillary the background
should be <100 Counts/ml (in the entire size range offered).
If the background succeeds 100 Counts/ml, just measure
without running CLEAN in between. In general the use of
CASY ton fi ltered by a sterile fi lter with a pore size ≤ 1,2 µm
is recommended.
another CASY cup containing freshly fi ltered CASY ton
Nearly fault-free work is only ensured when a cleaning routine as described in the Operator Manual (5.1. Weekly cleaning
routine) is performed at least once a week!
3
Page 4

Measuring beads used by the 454 Sequencing System.
6. Setup selection
Load the appropriate setup in the Setup selection list
(as described in 4.) or if not already available create and save
a setup for the beads (as described in 4.) with the following
parameters:
7. Preparing samples.
Fill a
CASY cup with 10 ml CASY ton (for highest accuracy
ensure that exactly 10 ml CASY ton are pipetted into the
CASY cup).
Add 3 µl of the homogenized bead suspension to be examined
(for highest accuracy ensure that exactly 3 µl are pipetted into
the 10 ml CASY
ton).
SETUP NUMBER: 01 NAME: Beads
Capillary: 150 μm
Sample Volume: 3 x 400 μl
Dilution: 3.333e+03
Left Cursor: 15.00 μm
Right Cursor: 25.00 μm
Display Mode: Standard
Total Counts/ml: Off
Interface: Parallel
Print-Mode: Manual/PF On
USE MENU AND NEXT TO STEP. USE +/- TO EDIT. USE
CANCEL TO LEAVE SCREEN OR ENTER TO CONFIRM CHANGES
Secure the lid and mix the sample by tilting the CASY
cup
three times. Carefully avoid the formation of bubbles or
foam!
8. Measuring samples and displaying the measuring results
Rotate the recess in the sample platform until it points
for
wards and remove the CASY cup from below the
measuring capillary.
Place the sample to be measured below the measuring capillary
and ensure that the external platinum electrode is immersed
in the sample.
Rotate the sample platform further to the side.
9. Changing samples and fi nishing measurements
Provided you measure samples of the same type in a similar
concentration range, you do not necessarily have to fl ush
the system when samples are changed. If you expect larger
concentration differences or wish to perform measurements
with different sample types, before a new measurement, place
a CASY
cup containing freshly fi ltered CASY ton below the
measuring capillary and fl ush the system using the CLEAN
function.
Before switching off the CASY Model DT monitor again the
background (see 5.).
For life science research only. Not for use in diagnostic procedures.
CASY and 454 are trademarks of Roche.
Press START to perform a measurement using the current
parameters. CASY Model DT automatically works through all
the necessary steps. After a short time, the results for your
sample appears in the display.
Since the beads used by the 454 Sequencing System are in the
size range between 15 and 25 µm the parameter Counts/ml
15.0–25.0 µm: 1,140e+07 indicates the measured bead
concentration per ml in the bead suspension to be examined
(used in 7.).
SET: Beads-01 SN: DT-2XX-9999 CAP: 150 μm
DATE: 15.09.2009 SVOL: 3x 400 μl L.CURSOR: 15.0 μm
TIME: 10:15 DIL: 3.333E+03 R.CURSOR: 25.0 μm
Conc. Range: OK
Counts: 4533
Counts/ml 3.3 -15.0 μm: 1.127e+06
Counts/ml
15.0 -25.0 μm: 1.140e+07
Counts/ml 25.0 -100.0 μm: 3.684e+05
Published by
Roche Diagnostics GmbH
Roche Applied Science
68298 Mannheim
Germany
©
2009 Roche Diagnostics
All rights reserved.
1209
 Loading...