

Page 1
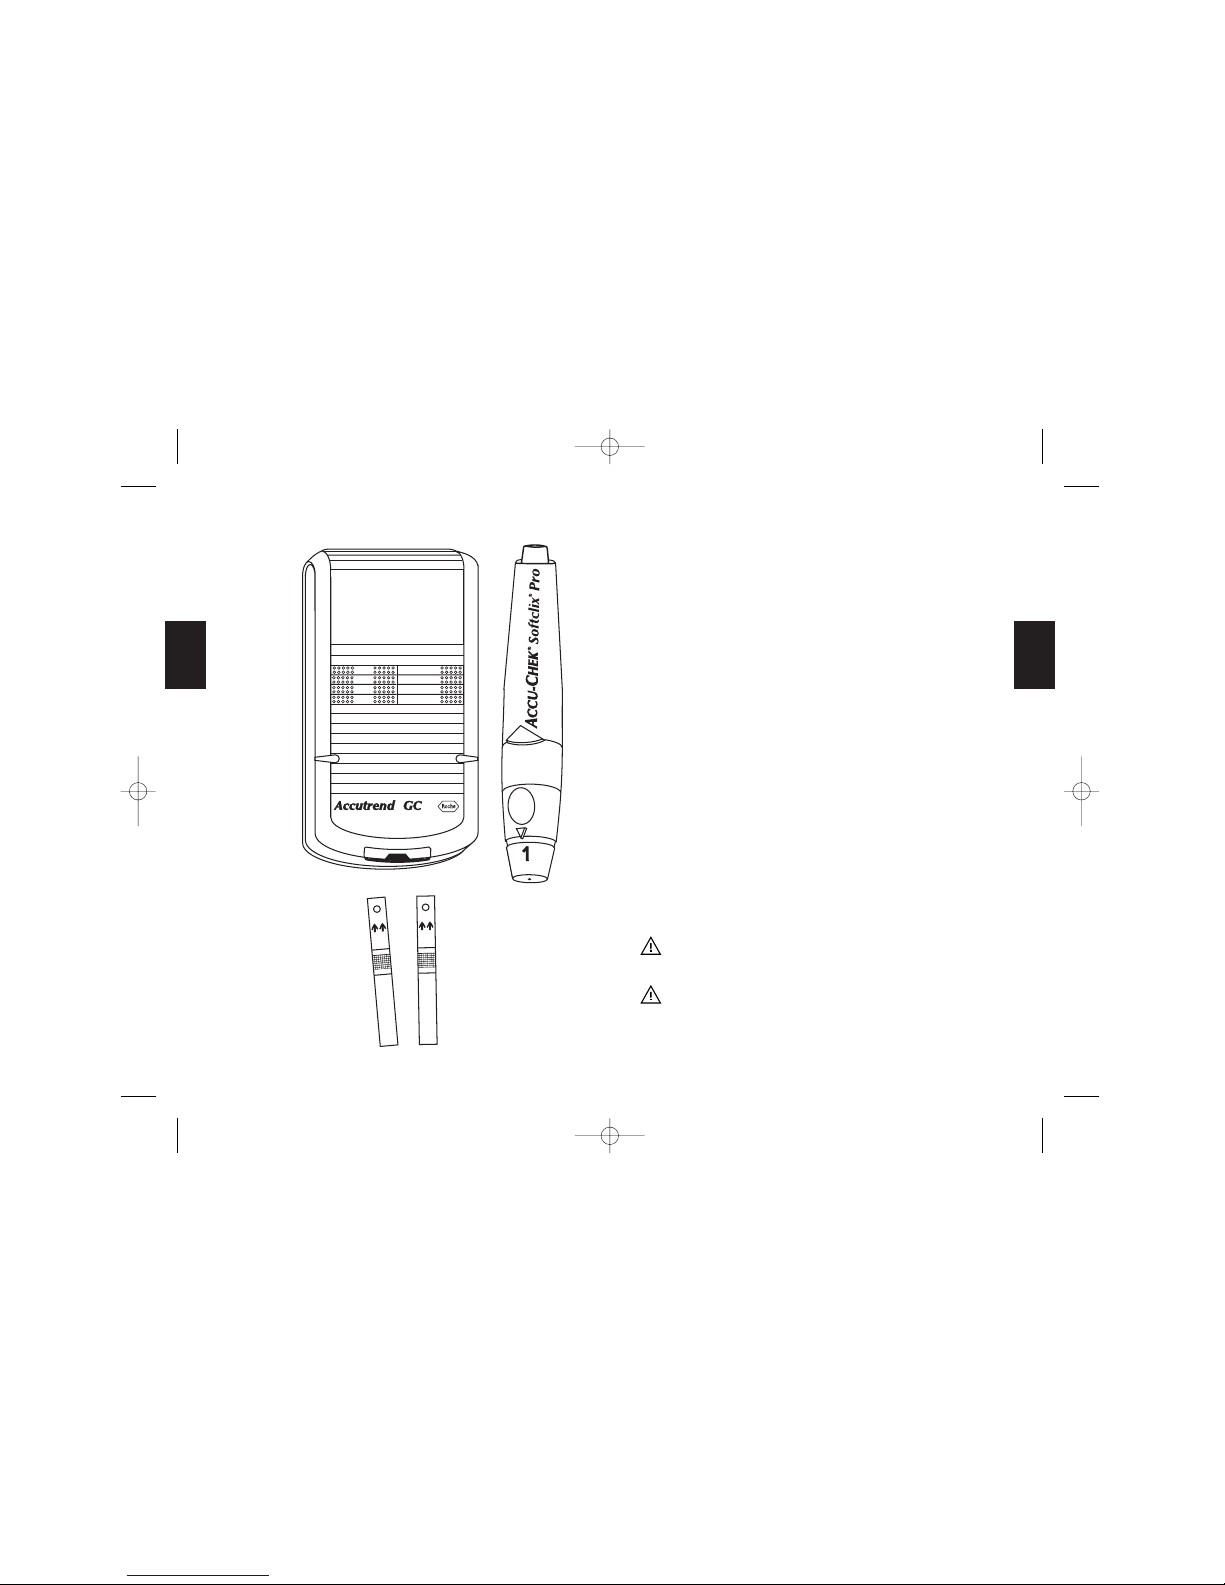
Illustrations of the meter are shown on the fold-out page
together with a description of the instrument components.
The abbreviations used by the Accutrend
®
GC are shown
below with their respective meanings:
CODE code number of the test strip batch in use
GLUC glucose = blood sugar
CHOL cholesterol
MEM memory
seT setting
am morning
pm afternoon
lo low, value below measurement range
hi high, value above measurement range
e, eee error
cl clear/delete
all all
on on
off off, outside range
Last updated: October 2000
Roche Diagnostics GmbH
D-68298 Mannheim
Germany
www.roche.com
Accutrend, Accu-Chek and
Softclix are trademarks of a
Member of the Roche Group.
0088
10/00-1432079(65)
User’s Manual
POINT OF CARE
TESTING
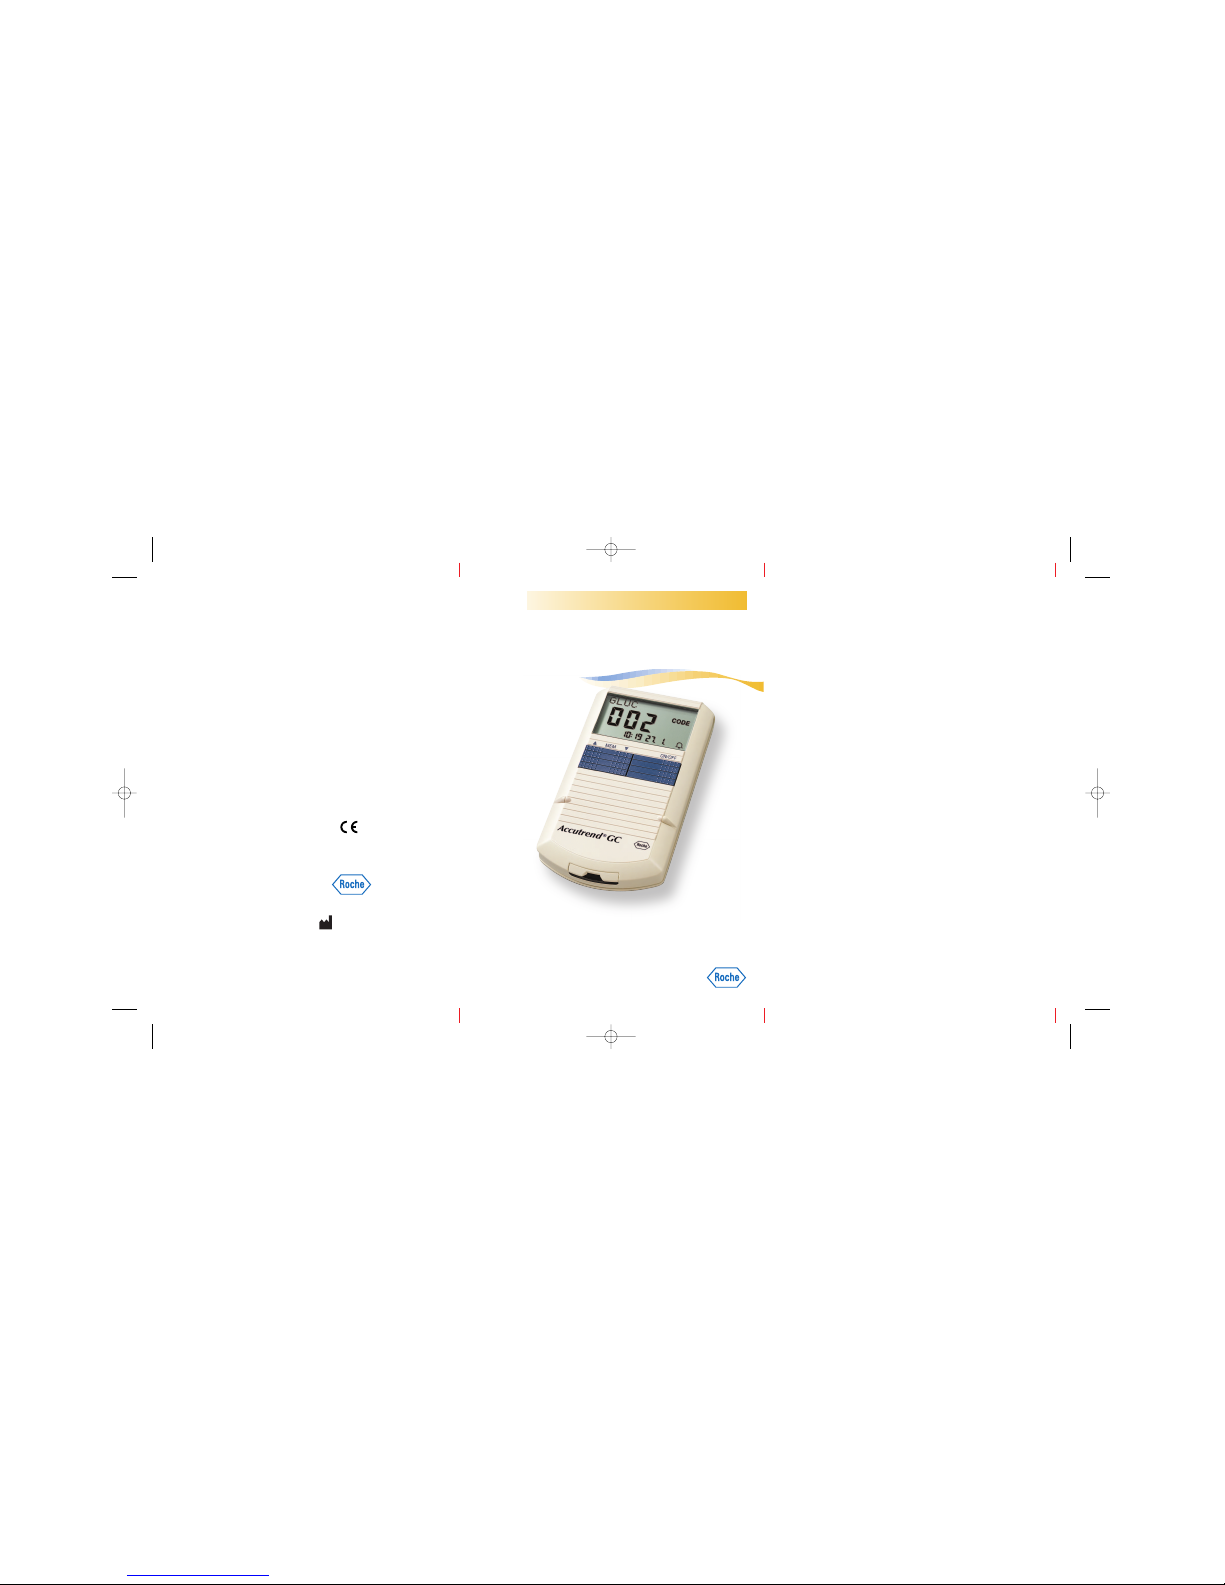
Accutrend®GC
011553 AccuGC GB_Umschlag 19.02.2002 11:12 Uhr Seite U1
Page 2

▲
▼
MEM ON/OFF
s
e
CODE
GLUC
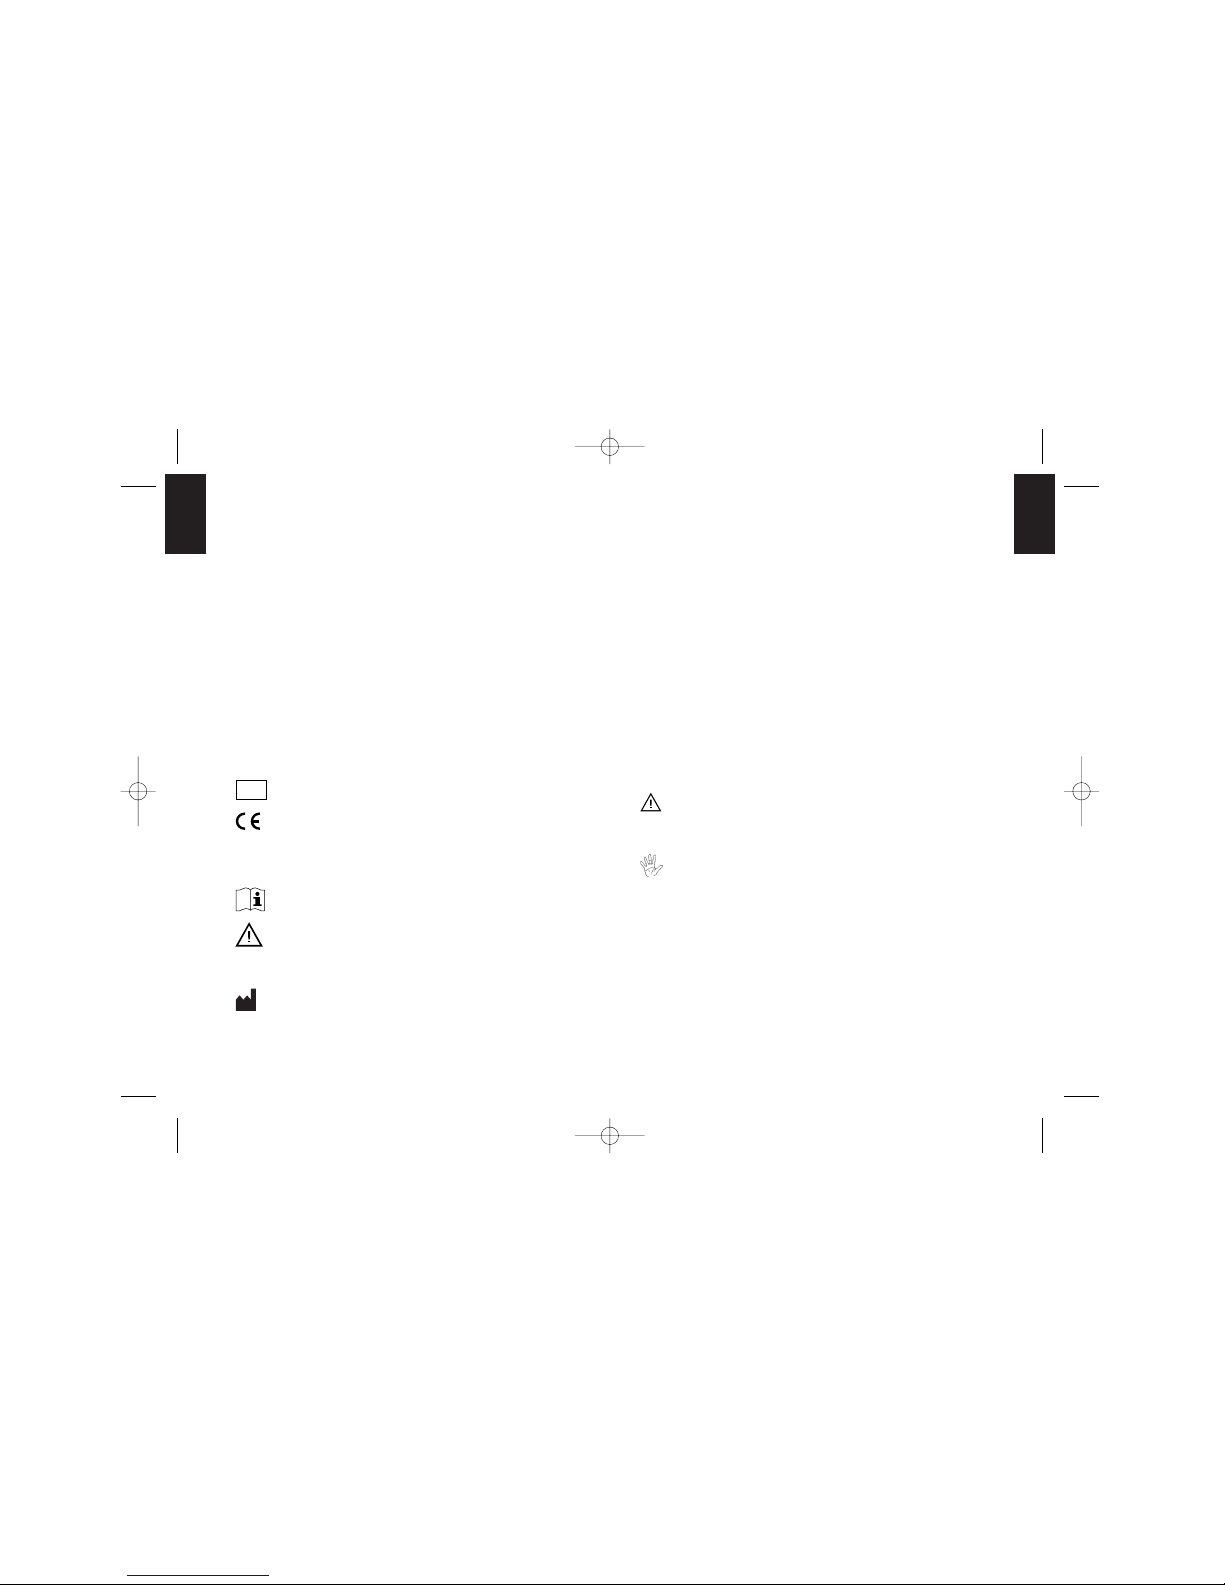
Instrument components and display
elements
All components and display elements are explained fully in
the manual. It is best to have your instrument next to you
while reading the manual and to try out each step as it is
described.
Back view
▲
▼
MEM ON/OFF
®
s
e
CODE
MEM LOW BA
T
mg/ dl
Accutrend® GC
Front view
Front view, open
D
A
B
C
F
E
J
K
H
L
G
011553 AccuGC GB_Umschlag 19.02.2002 11:12 Uhr Seite U4
Page 3

1
Description
●
A Display
All display elements are shown.
●
B Rocker button
The button
MEM has several functions.
●
C ON/OFF button
The right button switches the instrument on and off.
●
DFlap
Protects the optics.
●
E Measurement window
The measurement is carried out here.
●
F Slot for test strip
The test strip is inserted in the slot at the bottom of the
meter.
●
G Test strip guide
Holds the test strip in the correct position.
●
H Battery compartment lid
●
J Beeper button
●
K SET button for time and date
●
L Connector for data transmission
011553 AccuGC GB 19.02.2002 10:40 Uhr Seite 1
Page 4

2 3
Contents
1. Introduction 5
2. Using Accutrend
®
GC for the first time 7
2.1 Inserting/changing the batteries 7
2.2 Switching the meter on for the first time 9
2.3 Setting the time and date 13
2.4 Switching the beeper on and off 19
3. Performing a measurement with Accutrend
®
GC 21
3.1 Coding of the meter 21
3.2 Measuring glucose and cholesterol 29
3.2.1 Practising a measurement 29
3.2.2 Performing a measurement 29
3.3 Measurements on several people 41
4. Storing results in memory 47
4.1 Automatic storage of results 47
4.2 Retrieving results from memory 49
4.3 Deleting results from memory 53
5. Checking the performance of Accutrend
®
GC 59
5.1 Checking the measurement system 59
5.2 Cleaning the meter 71
5.3 Battery life and changing the batteries 75
5.4 Measurement and storage conditions 77
6. Troubleshooting 81
6.1 Error messages and important displays 81
6.2 Possible causes of errors 96
6.3 Roche Diagnostics service 97
7. Additional information for medical personnel
and laboratories 99
7.1 Measuring principle 99
7.2 Software 100
7.3 Downloading data to a PC 100
8. General information 101
8.1 Technical data 101
8.2 System components 103
8.3 Manufacturer’s warranty and guarantee 104
8.4 International addresses 105
9. Index 107
011553 AccuGC GB 19.02.2002 10:40 Uhr Seite 2
Page 5
1.
4 5
1. Introduction
Accutrend®GC is a modern, reliable, and easy-to-use instrument for the determination of two important blood parameters:
glucose and cholesterol. Using the proven test-strip principle,
Accutrend
®
GC allows rapid monitoring of these blood values.
Accutrend
®
GC is also suitable for self-testing. With Accutrend
®
Glucose you can determine your blood sugar in only 12
seconds and with Accutrend
®
Cholesterol you can determine
your cholesterol level in 180 seconds.
The instructions below take you step by step through the
meter’s operation, cleaning and care. Please take time to read
the instructions and practise using the instrument. Fold out the
page with the description of the instrument components. These
components, indicated by letters of the alphabet, are referred to
frequently in the text. The fold-out page is a helpful orientation.
Warning! You will find this sign when there is a poten-
tial danger to health, e.g. the danger that you
might calculate the insulin dose incorrectly.
Caution! You will find this sign when there is a dan-
ger that you might damage the device, e.g.
through improper cleaning.
Please read this manual carefully and completely
before performing the first measurement.
The packaging material, the identification plate on the instrument and the manual may contain the following symbols or
abbreviations:
For in vitro diagnostic use
This product fulfils the requirements of Directive
98/79/EC on in vitro diagnostic devices
Order/catalogue number
Please consult instructions for use
Caution (refer to accompanying documents).
Please refer to safety-related notes in the manual
accompanying this instrument
Manufactured by
0088
IVD
REF
011553 AccuGC GB 19.02.2002 10:40 Uhr Seite 4
Page 6
2.
6 7
2. Using Accutrend®GC for the first time
Accutrend®GC is supplied with a storage pouch, 3 batteries
and these operating instructions. If any of these items are
missing or damaged please contact your supplier.
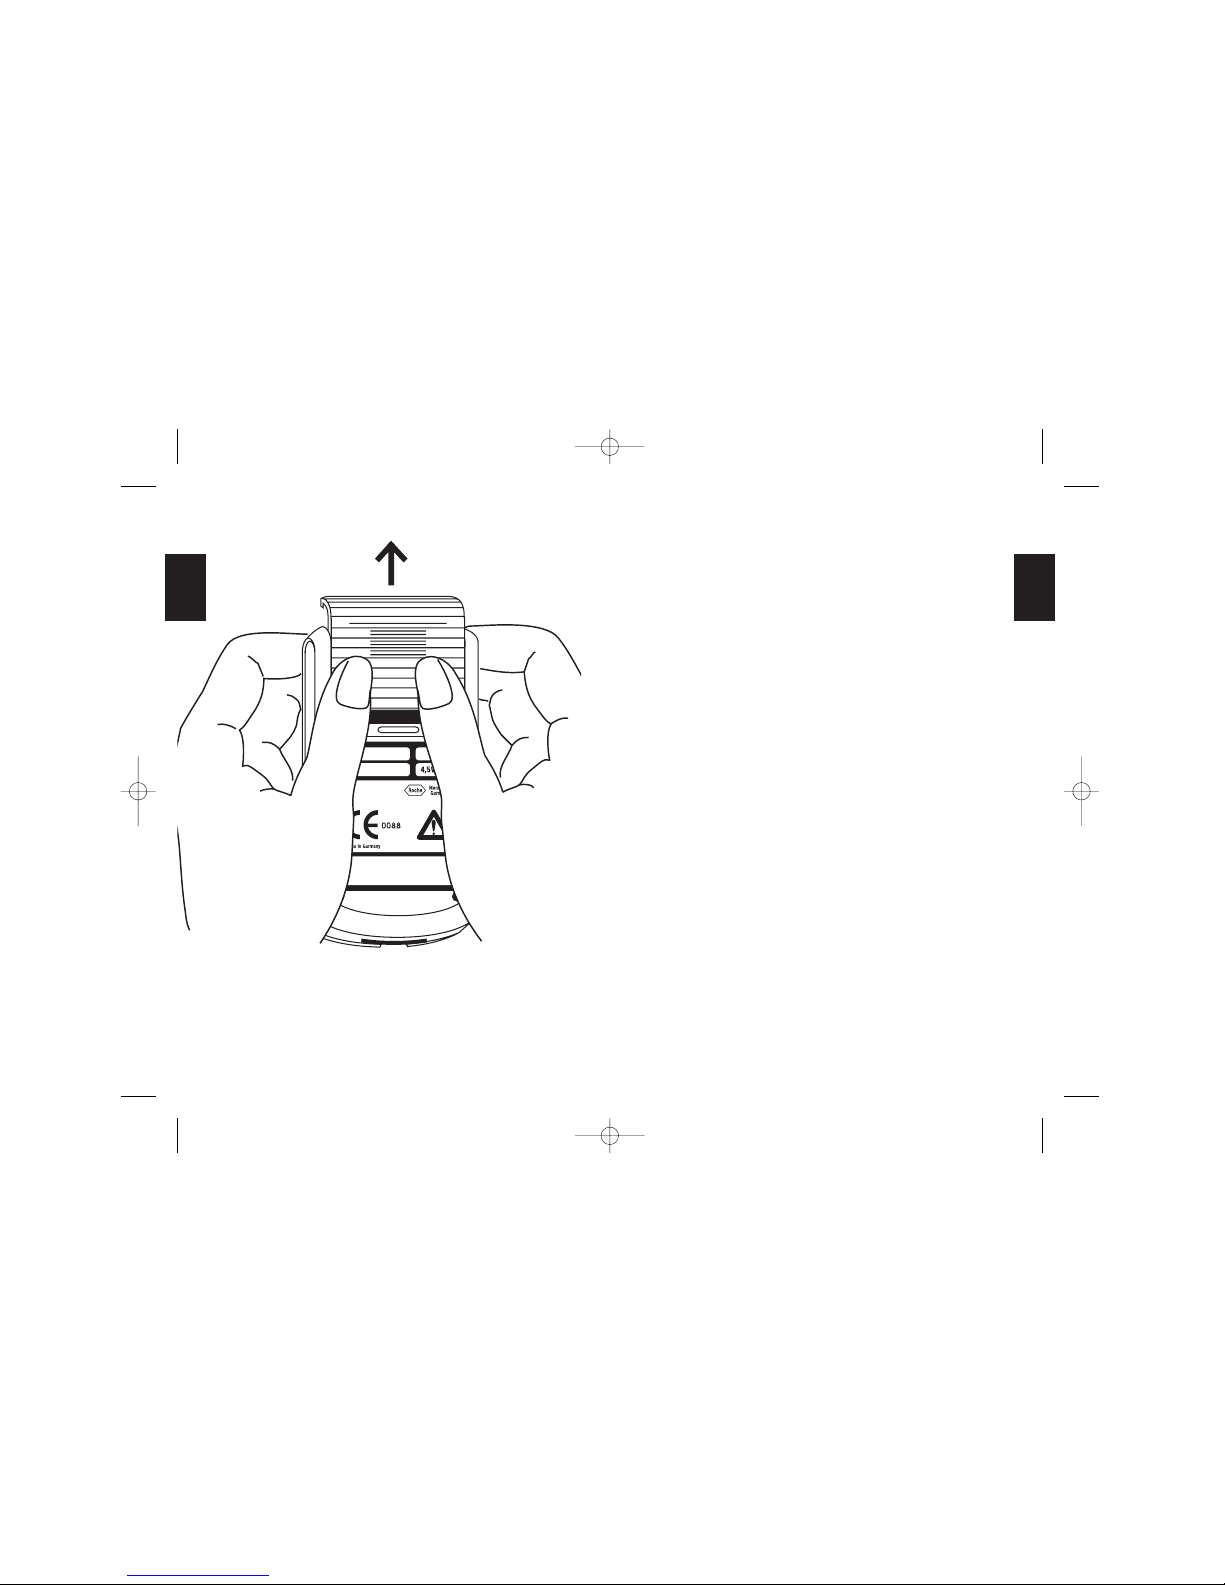
2.1 Inserting/changing the batteries
Accutrend
®
GC is supplied with three AAA alkaline manganese
batteries. The batteries must be inserted before using the
meter.
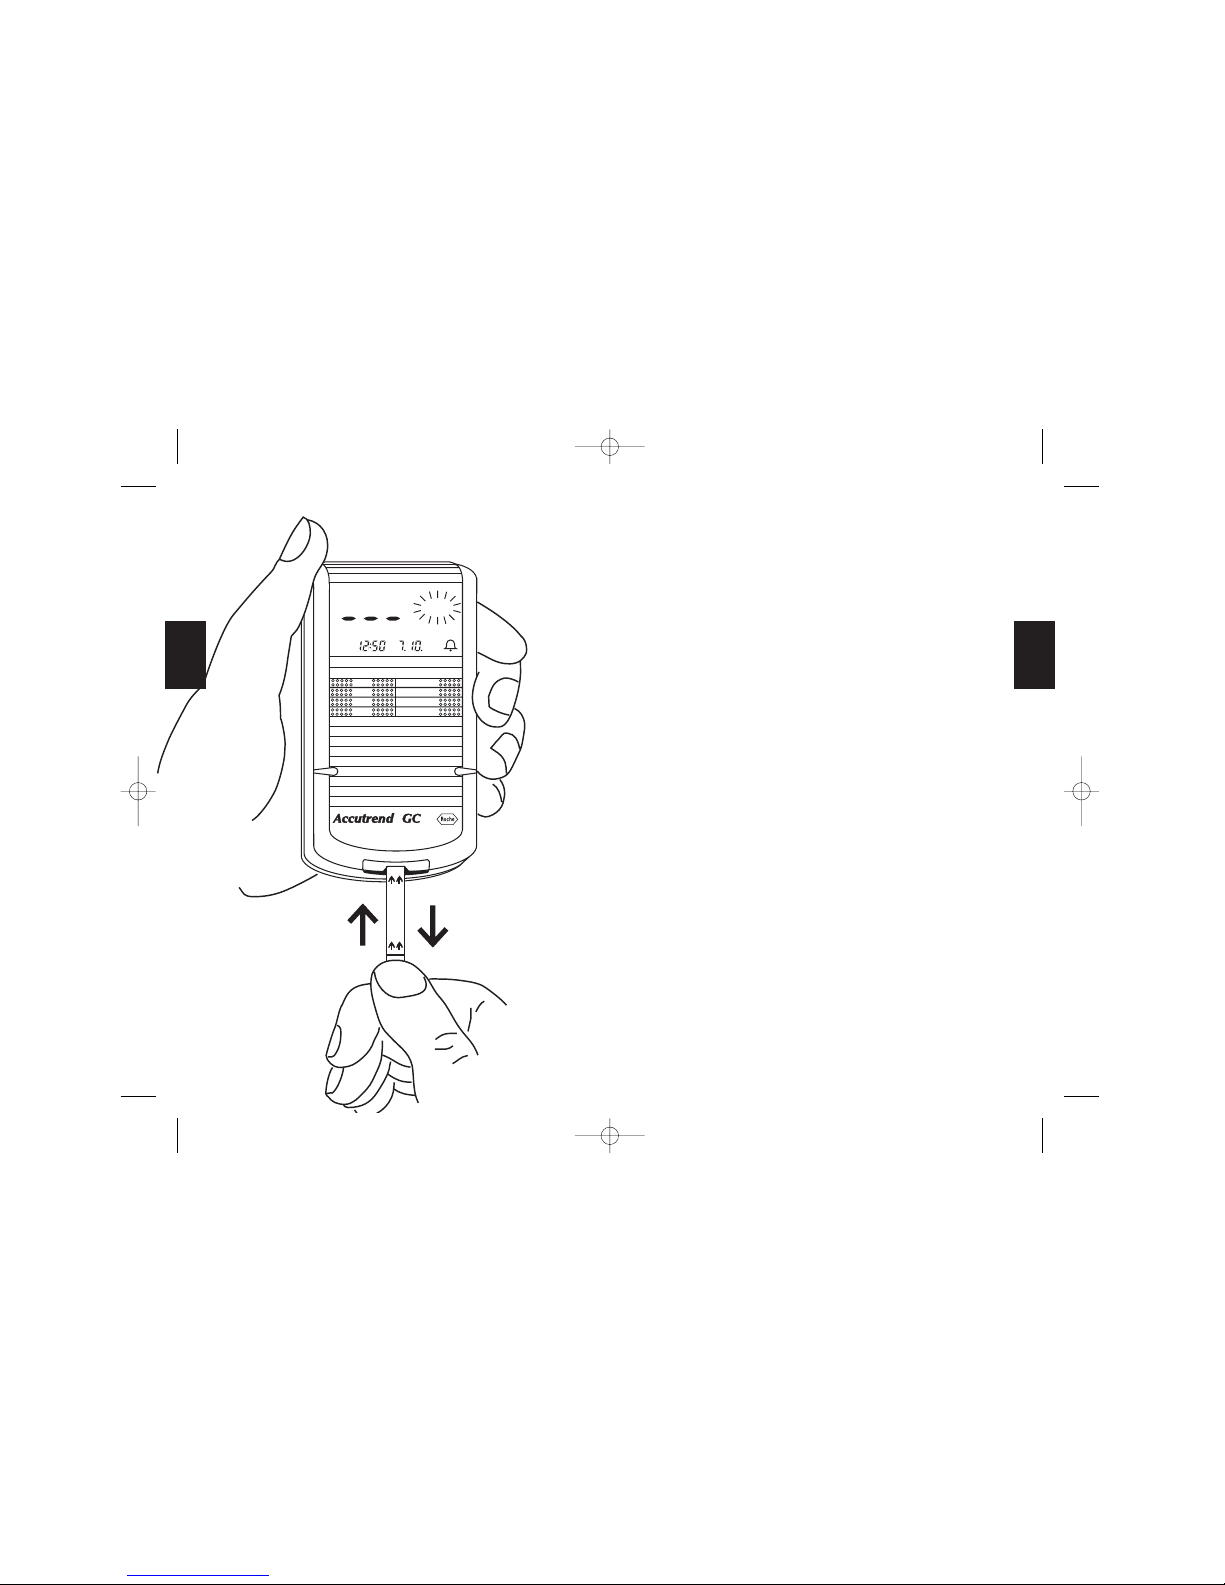
Procedure for inserting/changing the batteries:
Always switch off the Accutrend
®
GC before inserting
or changing the batteries. Then turn the meter over and
hold it with both hands.
Slide the battery compartment lid
●
H gently in the
direction of the arrow using both thumbs and remove.
Accutrend® GC
011553 AccuGC GB 19.02.2002 10:40 Uhr Seite 6
Page 7
2.
8 9
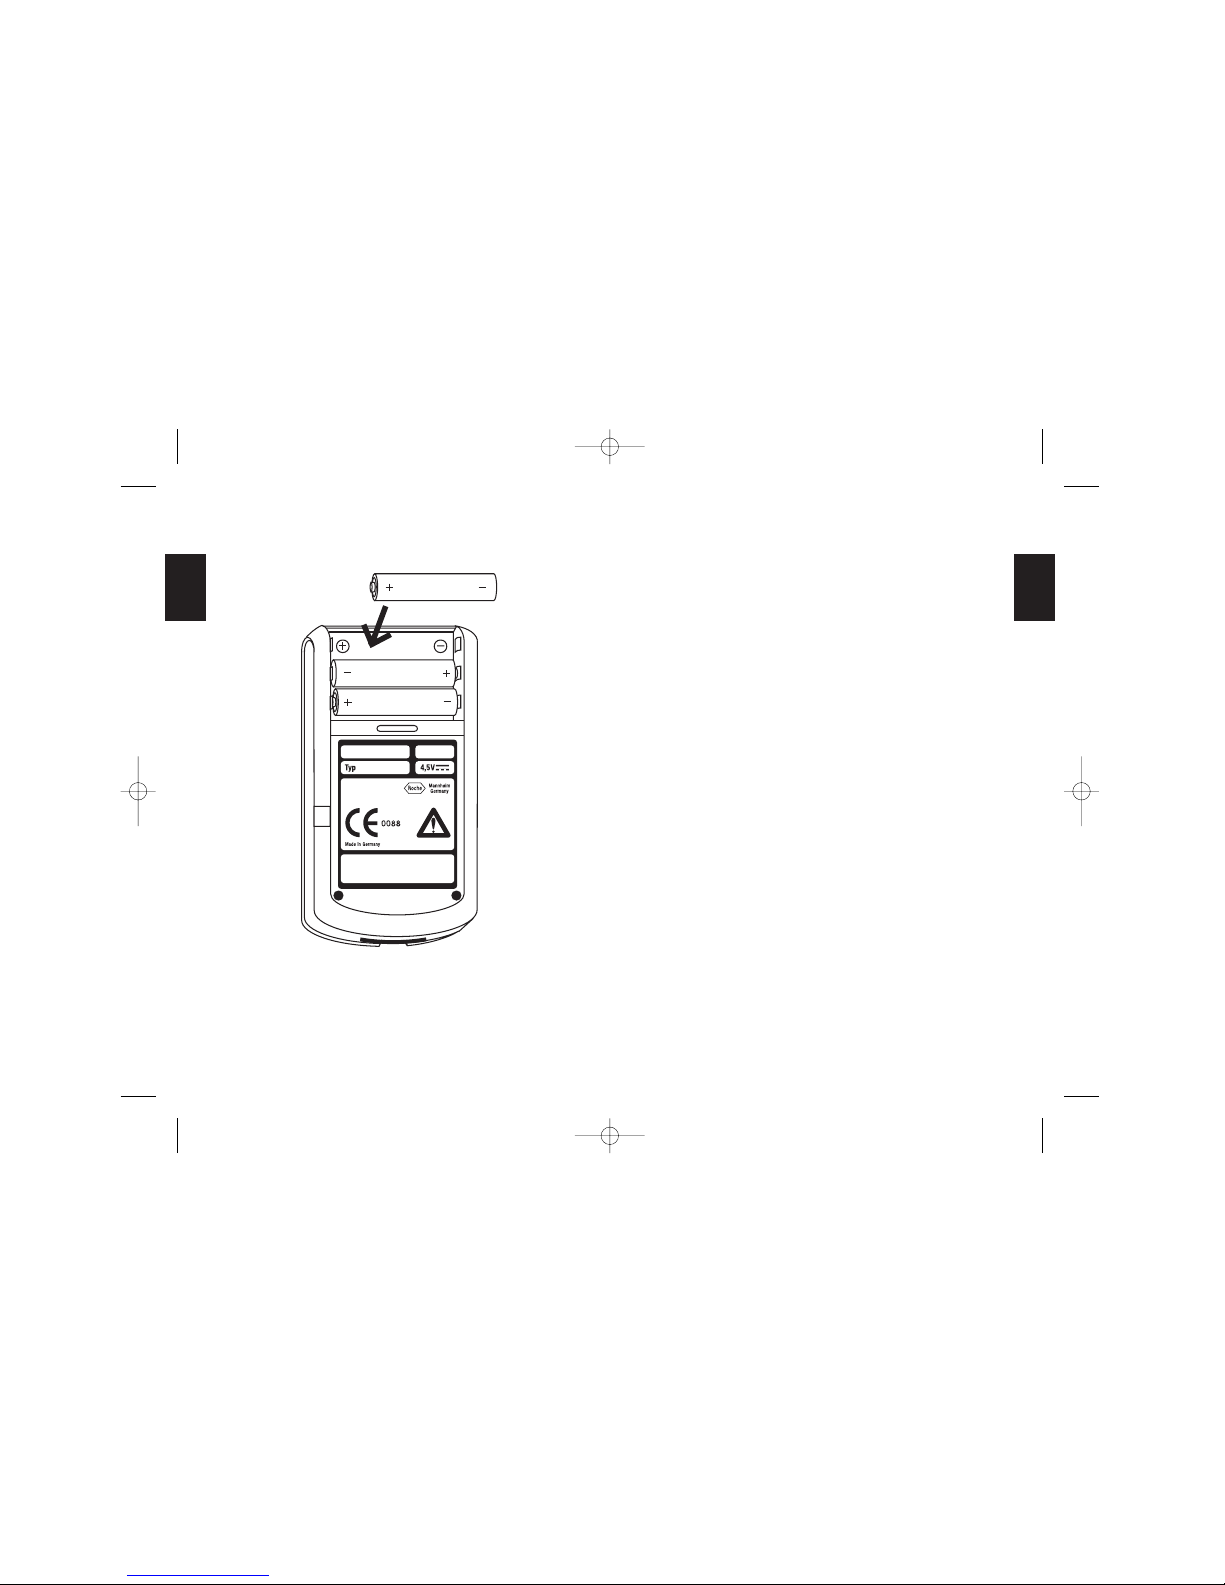
Take out old batteries if necessary.
Insert the new batteries, making sure that the terminals
are the right way round (shown by the
●●
+
symbols in the
battery compartment and on the battery).
Replace the battery compartment lid
●
H and slide it
closed until it locks into place.
Press the ON/OFF button
●
C to check that the batteries
have been inserted correctly. A function test lasting
2 seconds appears on the display (see Section 2.2).
Accutrend
®
GC switches off automatically after one minute if
none of the buttons have been pressed during this time.
2.2 Switching on the meter for the first time
After you have inserted the batteries, you can switch on the
meter using the ON/OFF switch
●
C . Immediately after switching on, the meter always performs an automatic function test
lasting about 2 seconds, checking all instrument functions and
display elements. No entries can be made during this test. The
automatic function test is performed every time the instrument
is switched on using the ON/OFF switch
●
C with the flap
closed.
When the Accutrend
®
GC is switched on for the first time, you
should check each display element during the function test. To
do this follow the instructions given below.
Accutrend® GC
011553 AccuGC GB 19.02.2002 10:40 Uhr Seite 8
Page 8
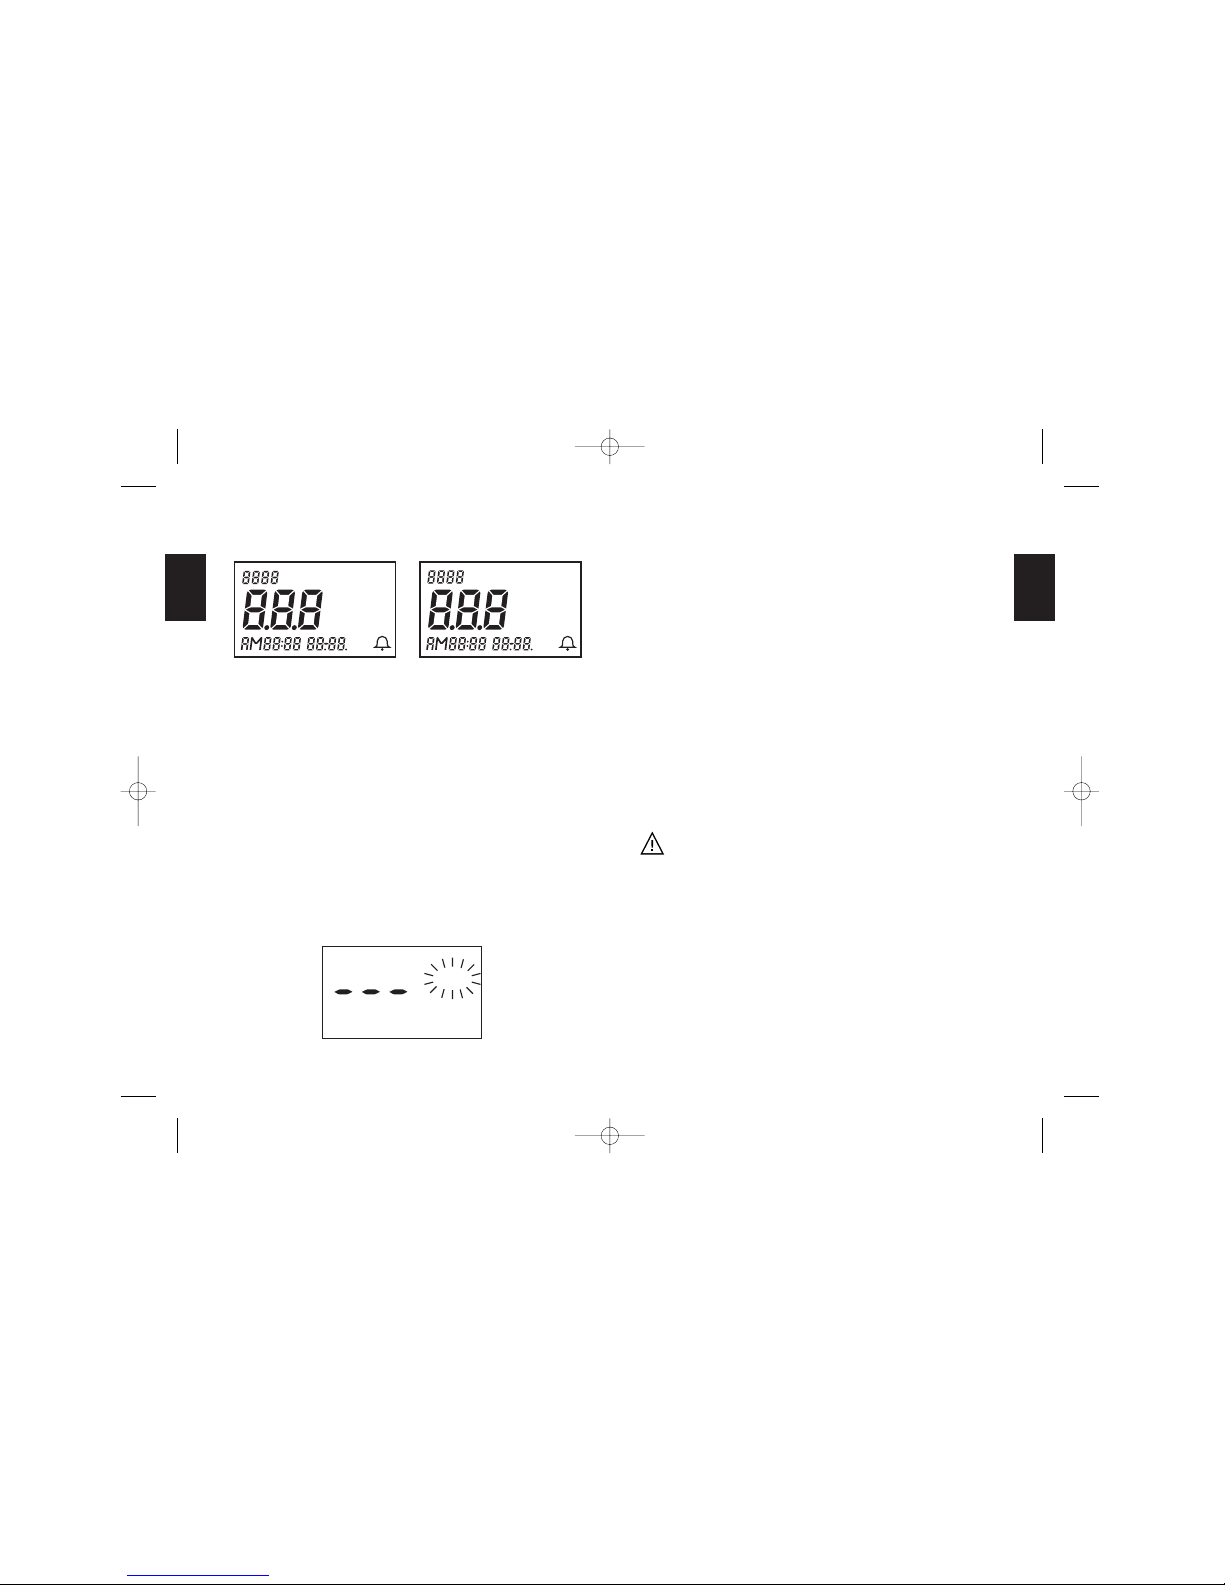
2.
10 11
Procedure for checking the display elements during the
function test
Before switching on the meter, open the flap
●
D by
gently pressing at the bottom edge. The respective
display elements will now remain displayed for a longer
time.
Check whether the units displayed are the ones
required. Depending on the version of the instrument
the display will show either mg/dl (milligrams per
decilitre) or mmol/l (millimoles per litre) If you are not
sure whether you require mg/dl or mmol/l please ask
your doctor.
If the unit you are familiar with does not appear in the
display, please ask your dealer to exchange the instrument.
Make sure that all three digits of the display appear as
888
. If any of the lines making up these digits are
missing, the values displayed later might be incorrect.
If at any time during the function test the display does
not correspond to either of the diagrams on the left,
please notify the Roche Diagnostics service (see pages
97 and 105).
Close flap
●
D again, exerting slight pressure.
When the function test is complete the word CODE flashes
and
---
is displayed.
s
e
CODE
MEM LOW BA
T
mg/ dl
s
e
CODE
m
mol
/ l
MEM LOW BAT
s
e
CODE
011553 AccuGC GB 19.02.2002 10:40 Uhr Seite 10
Page 9

2.
12 13
2.3 Setting the time and date
The time and date of the Accutrend
®
GC can be set and
changed. The time must also be changed from summer to winter time and vice versa, and 29 February must be entered in a
leap year. The buttons are recessed to protect them from being
pressed inadvertently. To operate these two buttons you can
use – for example – a ballpoint pen.
For your data to be stored with the important information “date
and time”, these must first be set correctly.
The time can be displayed in either the 12-hour or 24-hour format. If the 12-hour format is chosen, the time is displayed as
numbers from 1 to 12 with the addition of AM (before 12
noon) or PM (after 12 noon), e.g. PM 3:43.
If the 24-hour format is chosen, the time is displayed in numbers from 1 to 24, e.g. 15:43.
The default setting for Accutrend
®
GC is the 24-hour format.
The following instructions describe how to change it to the
12-hour format.
011553 AccuGC GB 19.02.2002 10:40 Uhr Seite 12
Page 10
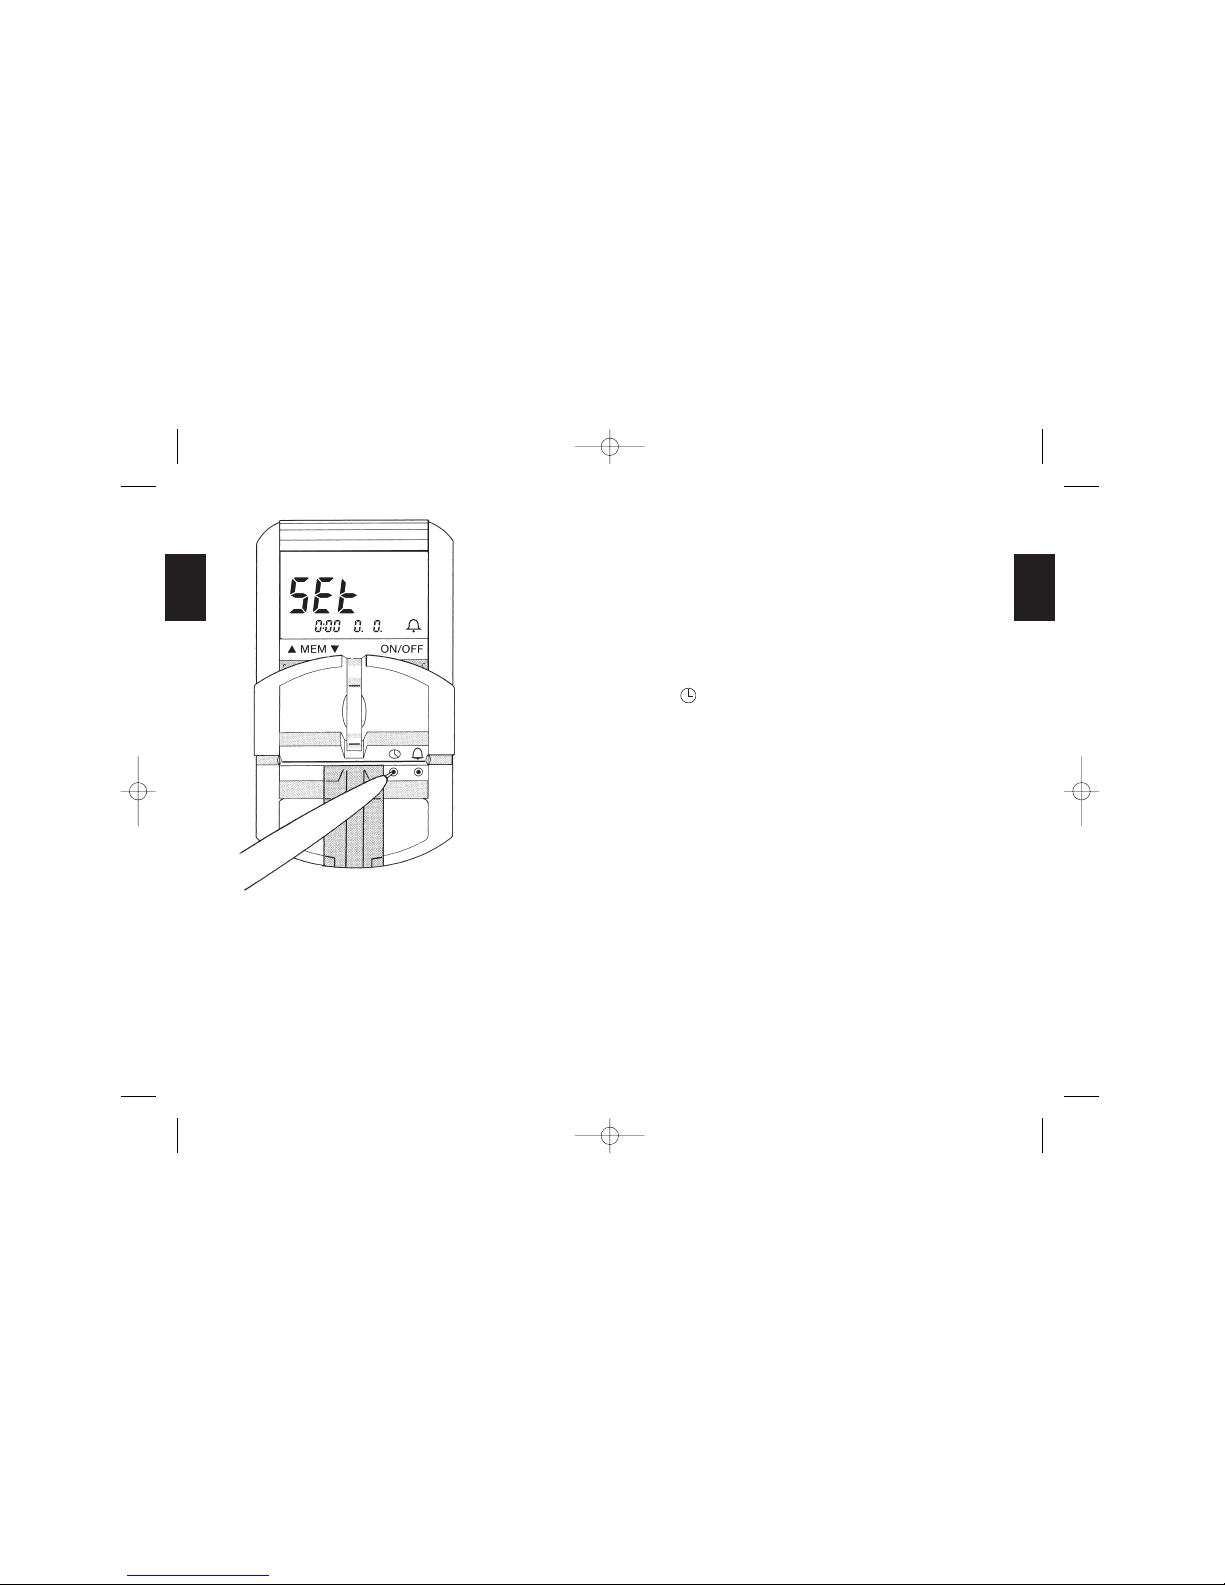
2.
14 15
Procedure for setting time and date
Switch the Accutrend
®
GC on using the ON/OFF button
●
C and wait until the function test is complete.
Open flap
●
D .
seT
appears on the display ●A .
Briefly press the SET button
●
K below the clock symbol
, using a ballpoint pen, for example. Time and date
begin to flash in the display.
To change the display from the 24-hour to the 12-hour
clock format gently lift up the flap
●
D and press the
rocker button
MEM
●
B . AM or PM appears on the
display.
011553 AccuGC GB 19.02.2002 10:40 Uhr Seite 14
Page 11
2.
16 17
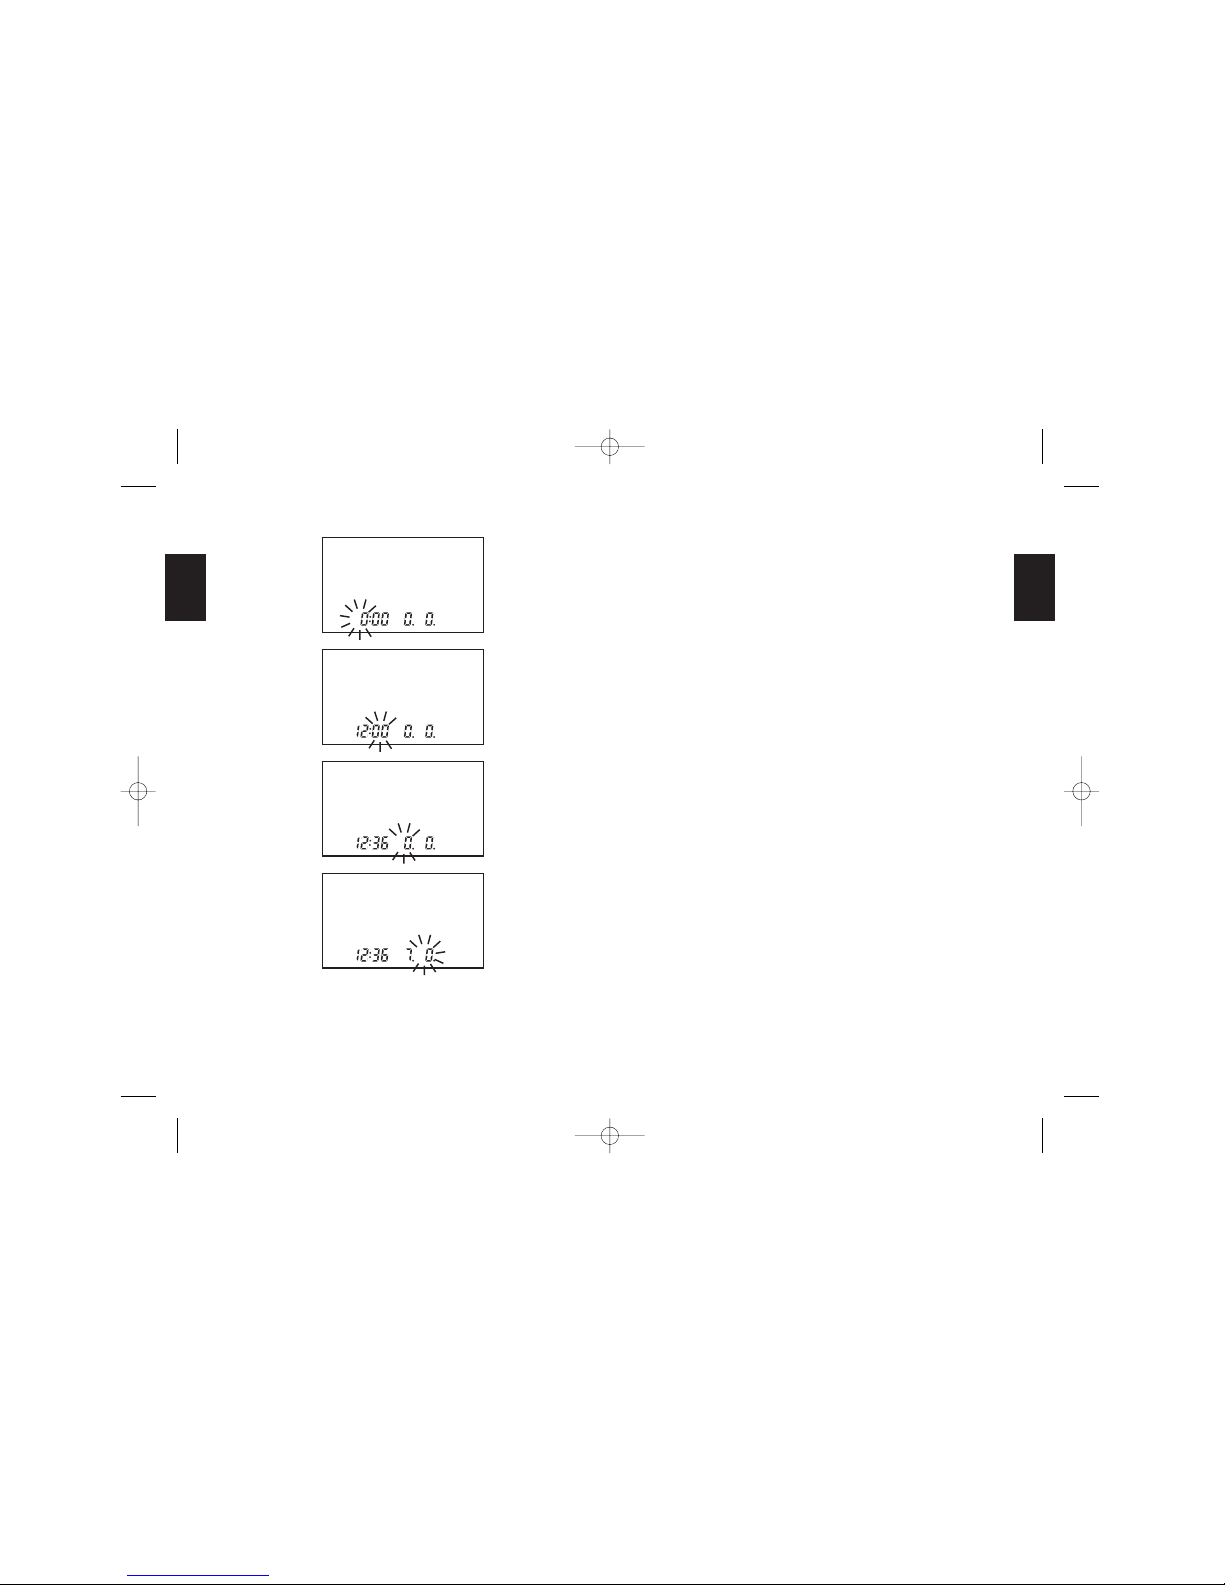
Press the SET button briefly. The hours flash on the
display.
Keep pressing
MEM
●
B until the desired hour is
displayed.
Press the SET button briefly. The minutes flash on the
display.
Keep pressing
MEM to set the minutes in the same
way as the hour.
Press the SET button briefly. The day flashes on the
display.
Keep pressing
MEM to set the day in the same way
as the hour.
Press the SET button briefly. The month flashes on the
display.
Keep pressing
MEM to set the month in the same
way as the hour.
Store the changes by closing flap
●
D or by pressing
the ON/OFF button
●
C . Your settings will be stored
automatically.
Leap year
In a leap year the date will not change automatically from
28.02 to 29.02 but to 01.03. In order to change the date,
proceed as described above.
The date will then change automatically from 29.02 to 01.03.
011553 AccuGC GB 19.02.2002 10:40 Uhr Seite 16
Page 12
2.
18 19
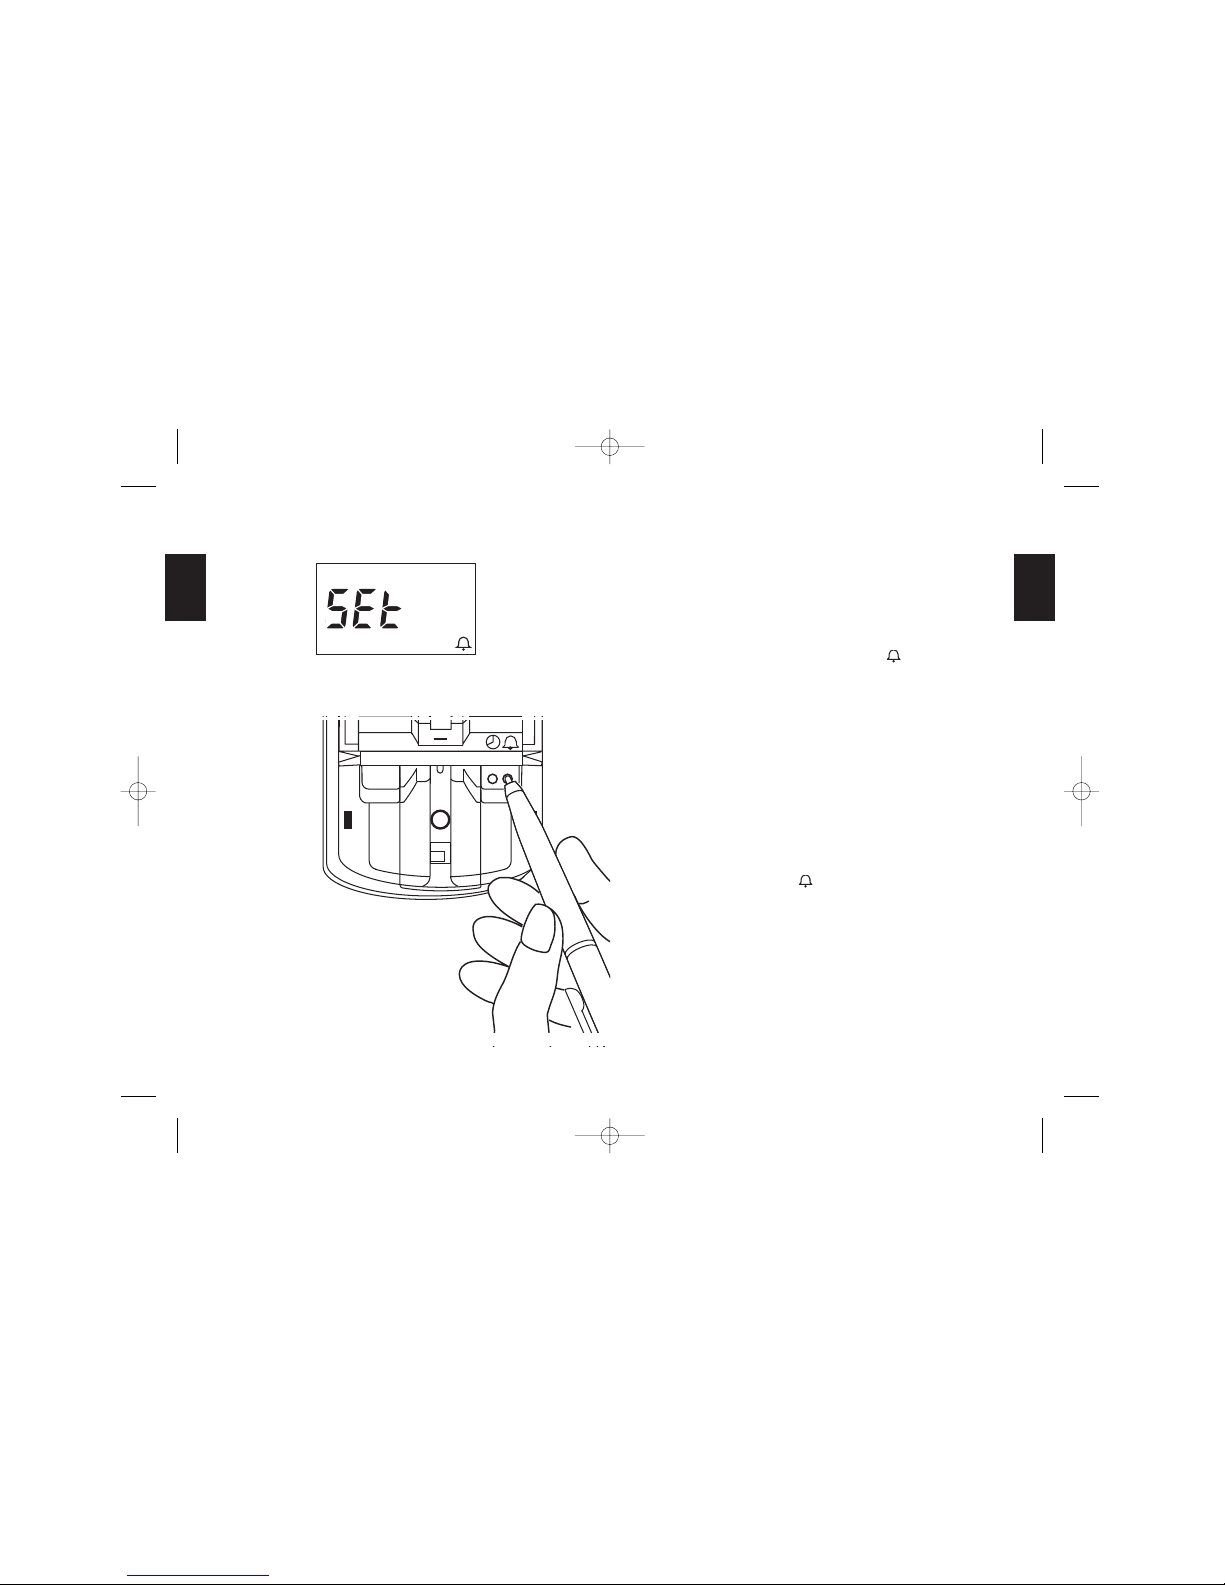
2.4 Switching the beeper on and off
The beeper signals provide useful support.
For example, Accutrend
®
GC uses one beep to confirm
successful coding and a series of beeps to indicate the
approaching end of a measurement.
If the beeper is switched on, the bell symbol appears to the
right of the date. We recommend leaving the beeper switched
on. However, if you find the sound annoying you can switch off
the beeper as follows.
Procedure for switching the beeper on and off
Switch on the meter with the ON/OFF button
●
C and
wait until the function test is complete.
Open flap
●
D .
seT
appears on the display ●A .
Press the beeper button
●
J briefly using a ballpoint
pen. The bell symbol disappears.
Close the flap.
Switch off the meter. The setting will be stored automatically.
You can switch the beeper back on again at any time by
following the procedure described above.
011553 AccuGC GB 19.02.2002 10:40 Uhr Seite 18
Page 13
3.
20 21
3. Performing a measurement with
Accutrend
®
GC
3.1 Coding of the meter
The properties of the test strips can vary slightly from pack to
pack. Accutrend
®
GC must therefore be adjusted to accommodate these differences. This adjustment is referred to as
coding.
It is performed with the help of code strips which enter the
specific characteristics of the respective Accutrend
®
Glucose
and Accutrend
®
Cholesterol strips used. Accutrend®GC must
be coded:
● After switching on for the first time, when no code number
is stored in the meter.
● Whenever a new pack of test strips is used. The instrument
is coded only for the pack from which you take the test
strips for the measurement of blood glucose or cholesterol.
Individually wrapped code strips are included in each pack
of strips.
CODE GLU
CODE GLU
CODE CHOL
CODE CHOL
011553 AccuGC GB 19.02.2002 10:40 Uhr Seite 20
Page 14
3.
22 23
During each measurement the coded meter performs the
essential checks automatically. Since each code strip and test
strip is characterized by a bar code on the back, the meter
recognizes whether a blood glucose (GLUC) or cholesterol
(CHOL) strip is being used. It then checks automatically
whether the code number on the inserted test strip is the same
as the code number it has stored. If the wrong test strip is
inadvertently used, the error message
e-1
appears.
TGLUCHOL
s
e
CODE
EV.
TGLUCHOL
s
e
CODE
EV.
2044277(60) V4
1
2
Glucose
mg/dl
Glucose
γλθκόζης
50
2,7
+
250
13,8
++
600
33,3
+++
0
0
neg.
mg/dl
mmol/l
Accutrend® mini
Accutrend
®
, GC, GCT, DM
Accutrend
®
alpha
ACCUTREND
®
mmol/l
Accutrend
®
Control G
REF 1443054
+30°C
+2°C
LOT
IVD
CODE/ΚΩ∆ΙΚΟΣ
50 TESTS / Μετρήσεις
50-90
156-224
2,8-5,0
8,7-12,4
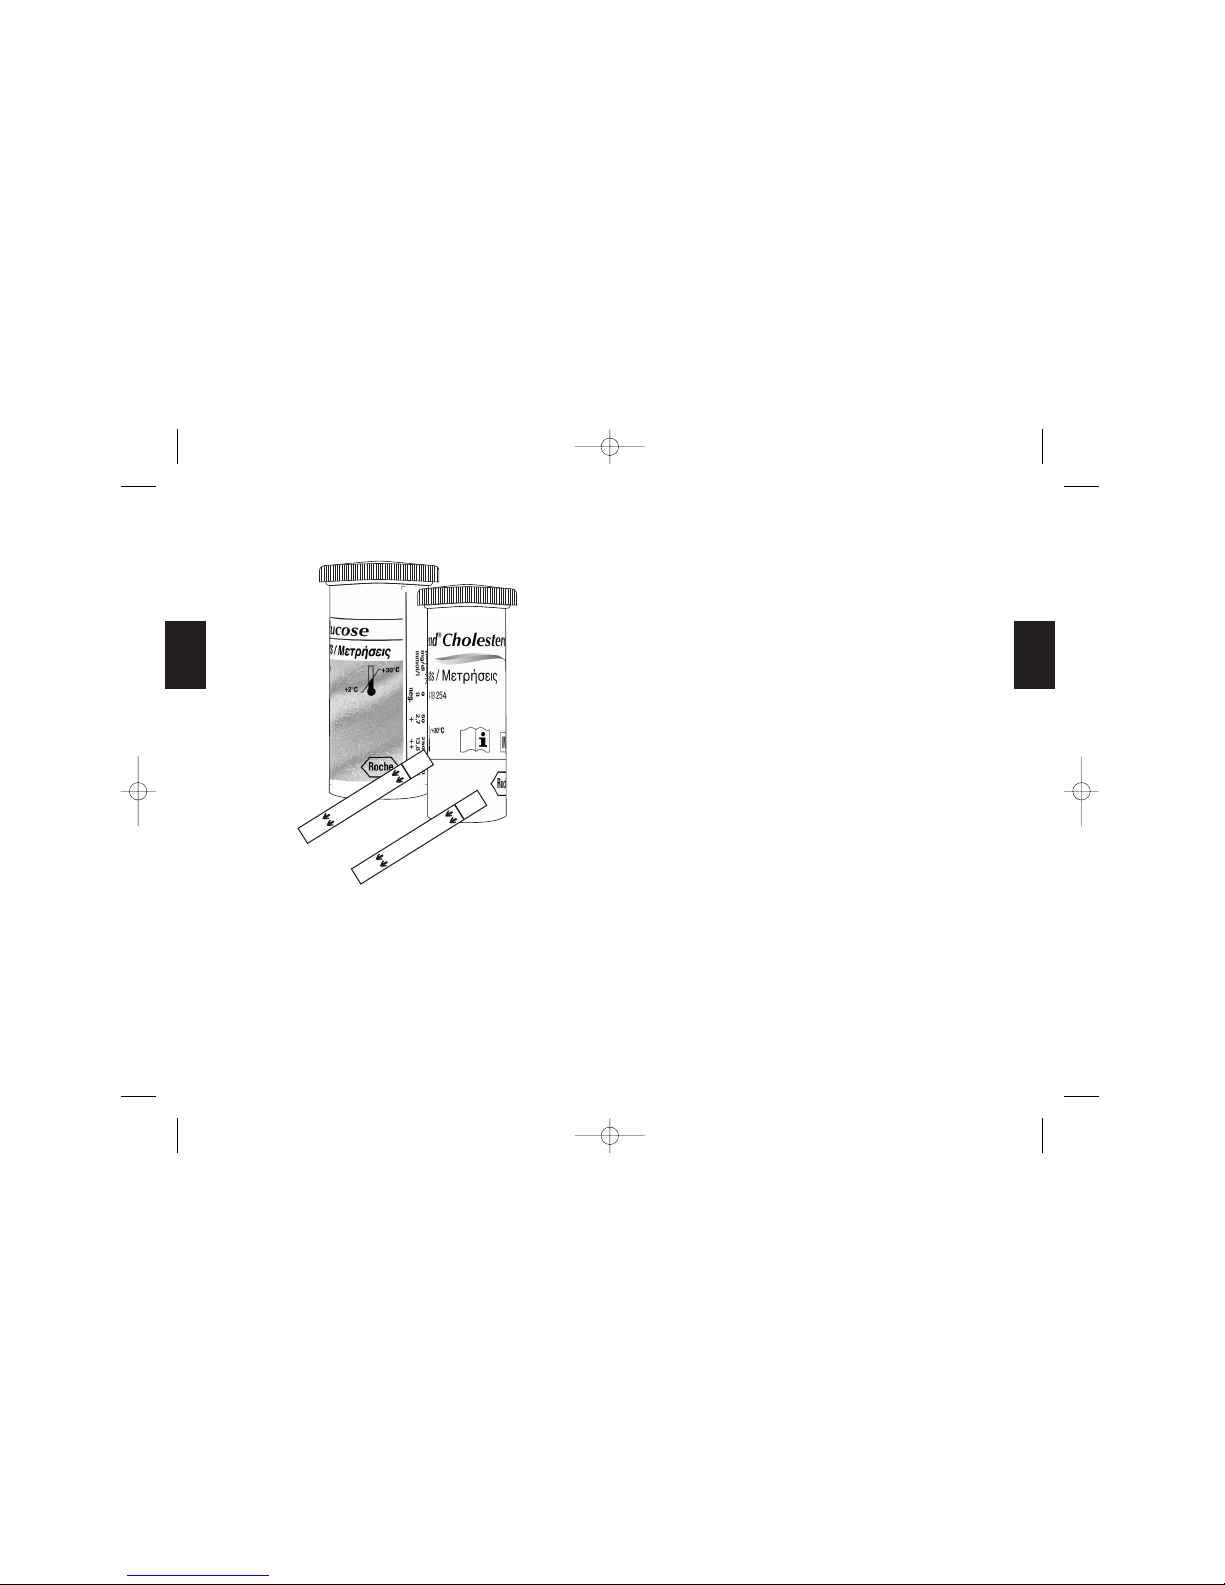
Accutrend® Cholesterol
3159728(60) V3
CODE
+2°C
+30°C
IVD
LOT
REF 1 418 254
5 Tests / Μετρήσεις
048
011553 AccuGC GB 19.02.2002 10:40 Uhr Seite 22
Page 15
3.
24 25
Procedure for coding Accutrend
®
GC
Switch on the meter. When the function test is complete
the word CODE flashes. If the instrument has not been
coded before, the display shows
---
. If it has been
coded previously, the “old” three-digit code is displayed.
Take the code strip out of the wrapping and hold it
between the thumb and forefinger with the arrows
pointing away from you. Be careful not to touch the
black horizontal line.
With the flap
●
D closed, insert the code strip into the
slot
●
F in one smooth, brisk movement as far as it will
go, then withdraw the strip immediately. If the beeper is
switched on, successful coding is acknowledged by a
beep. The display shows a three-digit code number. The
code has been read in and stored.
If the error message
e-2
or
e-3
appears, coding was
unsuccessful (see Section 6.1). In this case, repeat the coding
as follows: open flap, close flap, insert code strip and then
withdraw again immediately.
s
e
CODE
▲
▼
MEM ON/OFF
CODE
GLU
CODE
GLU
®
011553 AccuGC GB 19.02.2002 10:40 Uhr Seite 24
Page 16
3.
26 27
After coding a measurement can be carried out with any test
strip whose code number is stored in the meter. When the test
strip is inserted the display automatically switches to the correct symbol for the strip.
After coding do not throw away the test strip in case recoding
is necessary later on.
Store the code strip in its wrapping and not in the test
strip container because the print on the code strip may
impair test strip quality and lead to erroneous results.
s
e
CODE
GLUC
s
e
CODE
CHO
L
011553 AccuGC GB 19.02.2002 10:40 Uhr Seite 26
Page 17
3.
28 29
3.2 Measuring glucose and cholesterol
3.2.1 Practising measurement
If you have little or no experience of self-monitoring and want
to get used to using the meter and the test strips you can practise measuring without a blood sample. The procedure is identical to that for checking the performance of the meter; go to
Chapter 5.1 “Checking the Measurement System” and follow
the instructions given there.
3.2.2 Performing a measurement
To perform a measurement you require:
● The Accutrend
®
GC meter which you have already coded;
you have also set the time, date and beeper.
● Accutrend
®
test strips (Accutrend®Glucose for blood glu-
cose measurement; Accutrend
®
Cholesterol for determina-
tion of cholesterol).
● A lancing device (e.g. Accu-Chek
®
Softclix®Pro with
Accu-Chek
®
Softclix®Pro Lancet).
● Possibly alcohol wipes and cellulose pads.
Procedure
Carefully read the pack inserts that come with the test
strips and the lancing device.
Warning! If measurements are performed on several
persons there is a potential risk of infection (e.g. hepatitis, AIDS). Before using the meter for another person it
▲
▼
MEM ON/OFF
2
®
CHOL
CHOL
GLU
GLU
011553 AccuGC GB 19.02.2002 10:40 Uhr Seite 28
Page 18

3.
30 31
must be cleaned and disinfected each time (see Section 5). Please read the detailed description in Section
3.3 if you are performing measurements on several persons.
Users in the office and laboratory sector should note
that samples containing human material must be
handled as potentially infectious material. Please
observe the appropriate regulations and guidelines.
Wash and dry your hands thoroughly.
Prepare the lancing device.
Switch on the Accutrend
®
GC.
When the function test is complete GLUC or CHOL
appears – or GLUC and CHOL alternately if the meter
has been coded for both.
The corresponding code number, the time and the date
appear below. The word CODE flashes and the
Accutrend
®
GC is now ready for the measurement of
the coded parameters.
Take a test strip out of the test strip container. Close
the container immediately otherwise the desiccant in
the stopper will be exhausted and the test strips will
become unusable.
With flap
●
D closed, insert the strip into the slot ●F in
the direction of the arrow with the square yellow test
area facing upwards until the strip locks into place and
the inscription GLU or CHOL on the test strip is no
longer visible.
▲
▼
MEM ON/OFF
GLU
GLU
®
s
e
CODE
GLUC
011553 AccuGC GB 19.02.2002 10:40 Uhr Seite 30
Page 19

3.
32 33
Successful reading of the test strip code is indicated
by two beeps (one short, one long), if the beeper is
switched on, and by display of the test strip type: either
GLUC or CHOL. Then CODE stops flashing.
If the strip code has not been read in correctly, error
messages appear (e.g.
e-1, e-2
, or OFF). In this case,
consult Section 6.1 “Error messages” and follow the
instructions given there. If the inserted strip is not
shown correctly on the display (e.g. if GLUC is not displayed although you have inserted an Accutrend
®
Glu-
cose test strip), switch off the meter and start again.
Open the flap.
The measurement time in seconds flashes on the
display: 12 sec for GLUC, 180 sec for CHOL.
Rub and knead the side of a fingertip to facilitate the
withdrawal and application of blood.
Lance the massaged site with the lancing device.
With the test strip still in the meter, allow a hanging
drop of blood to form without applying too much pressure. For determination of cholesterol wipe off the first
drop of blood with a cellulose pad and use the second
drop of blood for the test. Carefully apply the drop of
blood to the yellow test area (pad) on the strip without
touching the test pad directly with the finger.
Incorrect
Test area on top of the strip incompletely
covered with blood.
Correct
Test area on top of the strip completely
covered with blood.
GLU
GLU
GLU
GLU
GLU
GLU
011553 AccuGC GB 19.02.2002 10:40 Uhr Seite 32
Page 20

3.
34 35
The test pad must be completely covered with
blood, otherwise the results obtained may be
incorrect (i.e. too low). If too little blood is
applied, do not try to spread it or apply a second
drop as this may also produce incorrect results.
Repeat the measurement with a fresh test strip.
Close the flap immediately after applying the drop of
blood. The display now counts down in seconds to
0
.
During the last four seconds a series of beeps is heard
(one beep per second), followed by a longer beep at the
end of the measurement. The measured value (in mg/dl
or mmol/l) appears on the display
●
A . The result is
stored.
Accutrend
®
GC measures values only within certain
ranges:
glucose 20–600 mg/dl (1.1–33.3 mmol/l)
cholesterol 150–300 mg/dl (3.88–7.76 mmol/l).
If the value obtained is above these ranges the meter
displays
hi
(= high), if the value obtained is below
these ranges the meter displays
lo
(= low).
The meter also displays
lo
when too little blood is
applied, i.e. if the yellow test pad is not completely
covered with blood. If this message appears, you should
therefore turn the test strip over and check whether the
round window on the back is uniformly coloured. If it is
only partly coloured, the measurement must be repeated with a new test strip.
011553 AccuGC GB 19.02.2002 10:40 Uhr Seite 34
Page 21

3.
36 37
The round test window must be completely covered
with blood, otherwise the results obtained may be
incorrect. This can lead to inappropriate treatment recommendations and thus endanger your health.
If other messages appear on the display, consult Section 6.1 “Error messages” and follow the instructions
given there.
Open the flap and take out the test strip.
Always open the flap before removing the test strip so
as to avoid soiling the instrument. The meter switches
off automatically after about 1 minute if no button has
been pressed or the flap has not been opened during
this time. If there is a test strip in the meter Accutrend
®
GC switches off after 2 minutes. The result is nevertheless stored.
For blood glucose measurements only: perform a
colour comparison to check plausibility.
a) Turn over the test strip
b) Compare the colour in the round window with the
colour scale on the label of the test strip container.
The colour in the round window must approximately
match the colour given for your result and the window must be uniformly coloured.
If the colours do not match, please carry out a performance check (Section 5.1).
Too little blood applied – the
round window is not uniformly coloured. Repeat
measurement with a new
test strip and application of
a larger drop of blood.
Sufficient blood applied –
the round window is
uniformly coloured
Back of test strip
Incorrect Correct
011553 AccuGC GB 19.02.2002 10:40 Uhr Seite 36
Page 22

3.
38 39
The colour comparison only serves as a plausibility check.
Treatment decisions should only be based on the result measured by the meter.
The blood glucose determination is part of the treatment
plan agreed on together with your doctor. You should
therefore follow the doctor’s treatment recommendations. If you receive unexpected or implausible results or
if the value shown does not reflect your subjective physical condition you should check the performance of the
meter (see Section 5.1). If this shows that the meter is
functioning properly, please consult your doctor for
advice.
Close the flap and switch off the meter.
The used test strips and other consumables (e.g. cleansing
pads, lancets) should be disposed of as household waste. In the
medical setting, e.g. laboratory or doctor’s surgery, the relevant
regulations or guidelines for the disposal of potentially infectious materials must be observed.
2044277(60) V4
1
2
Glucose
mg/dl
Glucose
γλθκόζης
50
2,7
+
250
13,8
++
600
33,3
+++
0
0
neg.
mg/dl
mmol/l
Accutrend® mini
Accutrend
®
, GC, GCT, DM
Accutrend
®
alpha
A
CCUTREND
®
mmol/l
Accutrend
®
Control G
REF 1443054
+30°C
+2°C
LOT
IVD
CODE/ΚΩ∆ΙΚΟΣ
50 TESTS / Μετρήσεις
50-90
156-224
2,8-5,0
8,7-12,4
011553 AccuGC GB 19.02.2002 10:40 Uhr Seite 38
Page 23

3.
40 41
3.3 Measurements on several people
If the Accutrend
®
GC is to be used in the medical sector for
measuring blood glucose and cholesterol in several different
persons, special measures must be observed. The blood must
be applied to the test strips outside the meter. This is very
important as otherwise the flap and test-strip guide may
become contaminated with blood residues and there is a risk
of infection.
In order to prevent infection (e.g. hepatitis or AIDS) it is
essential to observe the following points:
Only apply the blood outside the meter. Follow the
instructions in the section “Procedure for measurement
on several people” below.
Use a separate lancet and lancing device for each
person. We recommend using the Accu-Chek
®
Softclix
®
Pro lancing device and Accu-Chek®Softclix®Pro
Lancet, which were specially developed for this
purpose.
Disinfect the meter with 70% alcohol after each mea-
surement (see Section 5.2).
011553 AccuGC GB 19.02.2002 10:40 Uhr Seite 40
Page 24

3.
42 43
Procedure for measurement on several people
Begin as described in Section 3.2.
Open the flap.
After lancing the finger remove the test strip from the
open meter and place on a piece of clean, absorbent
material, e.g. paper towel. Then apply the drop of blood
as described.
Immediately re-insert the test strip and close the flap.
Continue as described in Section 3.2.
Repeat the described procedure for the next person to be tested, using a new piece of paper towel or similar absorbent
material.
If Accutrend
®
GC is used for performing measurements on several people and the blood is always applied to the strip using
an application device (e.g. capillary pipettes) the sample may
also be applied with the test strip in the instrument (see Section
3.2). In this case a new application device must be used for
each measurement.
GLU
GLU
GLU
GLU
▲
▼
MEM ON/OFF
Accutrend
®
GC
GC
011553 AccuGC GB 19.02.2002 10:40 Uhr Seite 42
Page 25

3.
44 45
Hospital and laboratory users should note that specimens containing human material are to be handled as
potentially infectious material. The relevant regulations
or guidelines applying to your institute or laboratory
should be observed.
The used test strips and consumables (e.g. lancets, swabs) are
to be disposed of as potentially infectious waste according to
the relevant regulations or guidelines applying to your institute
or laboratory.
011553 AccuGC GB 19.02.2002 10:40 Uhr Seite 44
Page 26

4.
46 47
4. Storing results in memory
4.1 Automatic storage of results
Accutrend
®
GC automatically stores the blood glucose and
cholesterol readings in separate directories. Safety warnings
such as
lo, hi
or
eee
are also stored. If the date and time
have been set (Section 2.3), these are displayed as additional
information with each individual value.
Accutrend
®
GC stores:
up to 50 blood glucose values in the GLUC directory,
up to 15 cholesterol values in the CHOL directory.
All values stored in the memory MEM can be retrieved or
deleted.
When you perform a measurement, the Accutrend
®
GC auto-
matically stores this latest result in the position
01
in the corresponding directory. The previous value is moved automatically to position
02
. Thus, the higher the number of the
memory position, the older the value occupying this position.
When all available memory positions are occupied, the next
measurement automatically leads to deletion of the oldest
value from the directory and the latest value is stored in
memory position
01
.
011553 AccuGC GB 19.02.2002 10:40 Uhr Seite 46
Page 27

4.
48 49
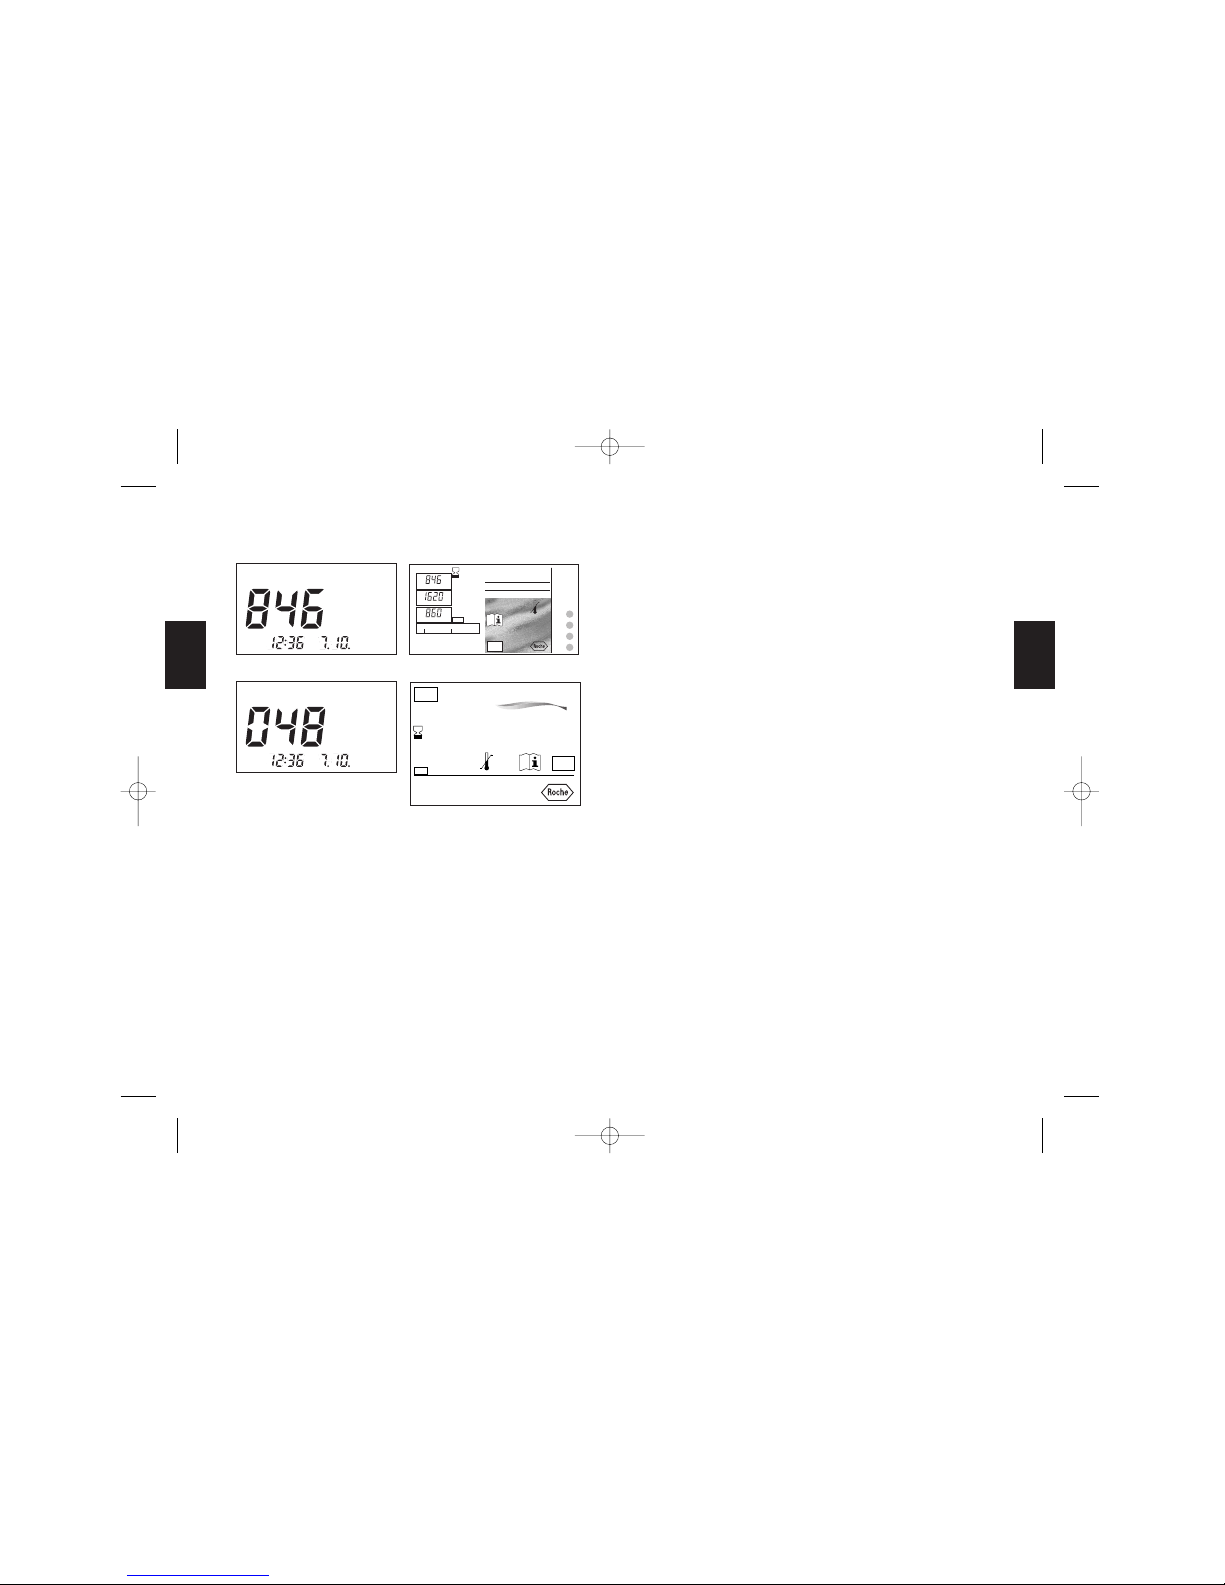
4.2 Retrieving results from memory
Switch on the meter and wait until the function test is
complete. As soon as CODE starts flashing in the
display
●
A , values can be retrieved from the memory.
Select the relevant directory by pressing
MEM
for glucose values or
MEM
for cholesterol values.
If no results have been stored, the display will show
00
. If 01is displayed this means that there is at least
1 value in the memory.
Release the MEM button. The last result stored will
appear on the display.
e.g.
e.g.
GLUCHO
L
s
e
CODE
CHO
L
s
e
CODE
MEM
011553 AccuGC GB 19.02.2002 10:40 Uhr Seite 48
Page 28

4.
50 51
To retrieve values stored earlier proceed as follows:
Press the button MEM
and hold it down to run
through all memory positions. When all positions have
been shown the display returns to
01
.
To count down from any value stored:
press the button MEM
.
To terminate the retrieval procedure press the ON/OFF
button
●
C .
e.g.
GLUC MEM
GLUC MEM
mg/ dl
GLUC MEM
MEM
011553 AccuGC GB 19.02.2002 10:40 Uhr Seite 50
Page 29

4.
52 53
4.3 Deleting results from memory
The automatically stored values can also be cleared from the
memory. You have the following possibilities:
a) clearing the most recent value stored
b) clearing all values stored in one directory.
Note that these two steps can only be performed one after the
other in the given order.
Clearing the most recent value stored
Switch off the meter. While holding down the MEM
button for the glucose values or the MEM button for
the cholesterol values, briefly press the ON/OFF button
●
C . Release the MEM button. MEM flashes in the dis-
play
●
A and
cl1
appears.
▲
▼
MEM ON/OFF
GLUC
MEM
®
011553 AccuGC GB 19.02.2002 10:40 Uhr Seite 52
Page 30

4.
54 55
Press the left side of the rocker button
MEM
●
B
and hold down for at least 3 seconds. If the button is
released earlier the clearing process will be interrupted.
If the beeper is switched on, a series of beeps is heard (one
beep per second). The most recent value measured flashes
during these 3 seconds until it is cleared and
000
appears in
the display
●
A .
Release the rocker button
MEM .
cl2
appears in
the display, indicating that all values in this directory
can be cleared.
To terminate the clearing procedure, briefly press the MEM
button or simply switch off the meter with the ON/OFF button
●
C .
GLUC MEM
mg/ dl
mg/ dl
GLUC MEM
mg/ dl
MEM
011553 AccuGC GB 19.02.2002 10:40 Uhr Seite 54
Page 31

4.
56 57
Clearing all the values stored in one directory
If the most recent value in a directory has been cleared,
it is then possible to clear all other values in this directory.
Press the button MEM
and hold down for at least
3 seconds.
If the beeper is switched on, a series of beeps is heard
(one beep per second). The word
all
flashes during
these three seconds until the entire contents of this
directory have been cleared and
000
appears in the
display.
Release the
MEM button. The code number and
CODE appear in the display.
MEM
GLUC MEM
mg/ dl
011553 AccuGC GB 19.02.2002 10:40 Uhr Seite 56
Page 32

5.
58 59
5. Checking the performance of
Accutrend
®
GC
5.1 Checking the measurement system
In order to obtain reliable results you must check the performance of your meter at certain times. A performance check
should be carried out:
once a week if you use the meter regularly and
frequently, e.g. for blood glucose self-monitoring,
whenever you start a new pack of test trips and there-
fore recode the meter (which can lead to a change in
the code),
whenever you have changed the batteries,
after cleaning the meter,
whenever you obtain a doubtful reading,
in the medical setting, according to the guidelines or
regulations for quality control measurements applying
in your surgery or laboratory.
You will need the following:
Accutrend
®
GC meter.
Accutrend
®
Glucose and Cholesterol test strips.
011553 AccuGC GB 19.02.2002 10:40 Uhr Seite 58
Page 33

5.
60 61
Control solution Accutrend
®
Control G and Accutrend
®
Control CH1.
Note:
The procedure for checking the measuring system is identical
to the procedure for practising how to perform a measurement. You can therefore practise performing a measurement
by following the steps described below for checking the
measuring system.
Procedure for the performance check
Carefully read the pack inserts accompanying the test
strips and control solution.
Switch on Accutrend
®
GC.
The meter first checks the electronics for about 2 seconds (as mentioned under 2.2) and then the word
GLUC or CHOL appears in the display. These different
blood components are also called “parameters”. The
corresponding code number, the time and the date
appear below the parameter name. The word CODE
flashes. Accutrend
®
GC is now ready to measure the
coded parameters.
Take a glucose test strip, for example, out of the test
strip container. Close the container again immediately.
▲
▼
MEM ON/OFF
GLU
GLU
®
s
e
CODE
GLUC
011553 AccuGC GB 19.02.2002 10:40 Uhr Seite 60
Page 34

5.
62 63
With the flap
●
D closed, insert the test strip into the
slot
●
F in the direction of the arrows. Make sure that
the strip is inserted as far as it will go and that the
word GLU on the strip can no longer be seen. When
the Accutrend
®
GC has successfully read the strip code
it emits one short and one long beep (if the beeper is
switched on) and GLUC for Accutrend
®
Glucose
appears on the display. CODE stops flashing.
If the test strip code is not read in correctly, error messages appear (e.g.
e-1, e-2
or OFF). Consult Section
6.1 and proceed according to the instructions given
there. If the inserted test strip is not shown correctly on
the display (e.g. if you have inserted an Accutrend
®
Glucose test strip but GLUC is not displayed), switch
off the meter and start again.
Open the flap
●
D .
The measurement time in seconds flashes in the
display.
Leave the test strip in the meter. Apply a large hanging
drop of control solution to the yellow test pad on the
strip without touching the strip directly with the bottle.
The test pad must be completely wetted with solution.
If the meter is used for several people, perform the
function check using the procedure described for measurement with blood (see Section 3.3).
▲
▼
MEM ON/OFF
Accutrend
®
GCGC
GLU
GLU
011553 AccuGC GB 19.02.2002 10:40 Uhr Seite 62
Page 35

5.
64 65
Close the flap immediately after application of the
control solution.
The display now counts down in seconds to
0
. During
the last four seconds a series of beeps is heard (one
beep per second) followed by a longer beep at the end
of the measurement. The measured value appears in
the display
●
A .
GLUCHO
L
mg/dl
TGLUCHOL
s
e
CODE
(( ))
()
()
()
()
011553 AccuGC GB 19.02.2002 10:40 Uhr Seite 64
Page 36

5.
66 67
Check whether the result displayed is within the speci-
fied range given on the label of the test strip container
or on a separate leaflet enclosed with the container.
If Accutrend
®
Control G 1 was used, for example, the
result must be within the range given in the first line
on the label (e.g. 50–90 mg/dl or 2.8–5.0 mmol/l). If
Accutrend
®
Control G 2 was used, the result must be
within the range given in the second line (e.g. 156–224
mg/dl or 8.7–12.4 mmol/l). Since the specified range
(confidence interval) may vary from pack to pack, it is
important to pay attention to any additional pack information.
Proceed in the same way for cholesterol.
If the measured value does not fall within the specified
range, repeat the performance check. If the result is
again outside the specified range, consult your nearest
Roche Diagnostics representative (for addresses see
page 105).
If the word OFF appears, please turn to Section 6.1
(“Error messages”) and proceed as instructed there.
Open the flap and slide out the test strip horizontally.
Hinweis / Note / Nota /
Remarque
/
Let op /
Avvertenza
/Anmärkning /
Bemærk
/
OBS! / Huomio /
ProsoxÆ
1
740
504 EM - SPV
V1/R1 (schwarz) - C 10
Ch.-B./Lot.: 247 052
Es gelten die unten aufgeführten Vertrauensbereiche nur
für die folgenden Accutrendn Control CH 1 Chargen:
The scattering ranges mentioned hereafter only apply for
the following Accutrendn Control CH 1 lot numbers:
Les intervalles de référence indiqués ci-après concernent
seulement les numéros de lot dAccutrendn Control CH 1
suivants:
Los intervalos de dispersión indicados abajo sólo valen
para los siguientes lotes de Accutrendn Control CH 1:
Os intervalos de referência abaixo indicados, apenas dizem
respeito aos seguintes lotes de Accutrendn Control CH 1.
Gli intervalli di riferimento riportati qui di seguito si
riferiscono esclusivamente alle soluzioni di controllo
Accutrendn Control CH 1 con i seguenti numeri di lotto:
De genoemde grens waarden gelden uitsluitend voor de
volgende Accutrendn Control CH 1 chargennummer:
De nedan angivna spridningsvärdena gäller endast för
Accutrendn Control CH 1 med lotnummer:
De enkelte områder nævnt herefter gælder kun for
følgende Accutrend Kontrol CH 1 lot numre:
Spredningsområdene som det henvises til heretter gjelder
kun for følgende Accutrend Control CH 1 lotnumre:
Jäljempänä mainitut viitealueet pätevät vain seuraaviin
Accutrendn Control CH 1-eränumeroihin:
Ta öria ajiopist¡aß poy anafärontai parakqtv
isxüoyn möno gia toyß ejÆß ariumoüß part¡dvn
tvn dialymqtvn Accutrendn Control CH 1:
Code Vertrauensbereiche Vertrauensbereiche
Kvdiköß Scattering ranges Scattering ranges
Intervalles de référence Intervalles de référence
Ranges di riferimento Ranges di riferimento
Intervalos de dispersión Intervalos de dispersión
Intervalos de referência Intervalos de referência
Gewijzigde grenswaardenGewijzigde grenswaarden
Spridningsområde Spridningsområde
Enkelte områder Enkelte områder
Spredningsområder Spredningsområder
Viitealueet Viitealueet
Öria ajiopist¡aß Öria ajiopist¡aß
Ch.-B./Lot.: mg/dl mmol/l
256 113 165222 4,265,74
256 500 165222 4,265,74
011553 AccuGC GB 19.02.2002 10:40 Uhr Seite 66
Page 37

5.
68 69
If you have performed the test with Accutrend
®
Glucose, carry out a colour comparison to check
plausibility:
a) turn over the test strip;
b) compare the colour in the round window with the
colour scale on the label. The colour in the round
window should approximately match the colour
shown for the result you have obtained.
Close the flap and turn off the meter.
The performance check can, of course, also be carried out as
described above with the control solution for cholesterol. In
this case no colour comparison is performed.
N.B.:
1. The instrument may switch itself off before you have inserted the test strip if no button has been pressed for about 60
seconds. If this happens, switch the Accutrend
®
GC back on
and start again.
2. You may have to clean Accutrend
®
GC after practising (for
example, if the measuring optics have become soiled).
In this case please refer to Section 5.2 and proceed as
described there.
2044277(60) V4
1
2
Glucose
mg/dl
Glucose
γλθκόζης
50
2,7
+
250
13,8
++
600
33,3
+++
0
0
neg.
mg/dl
mmol/l
Accutrend® mini
Accutrend
®
, GC, GCT, DM
Accutrend
®
alpha
A
CCUTREND
®
mmol/l
Accutrend
®
Control G
REF 1443054
+30°C
+2°C
LOT
IVD
CODE/ ΚΩ∆ΙΚΟΣ
50 TESTS / Μετρήσεις
50-90
156-224
2,8-5,0
8,7-12,4
011553 AccuGC GB 19.02.2002 10:40 Uhr Seite 68
Page 38

5.
70 71
5.2 Cleaning the meter
The essential prerequisite for accurate readings is cleanliness,
particularly in the area around the meter’s optics. The
Accutrend
®
GC should therefore be cleaned carefully and
regularly at least once a month. It should also be cleaned:
● as soon as the meter becomes dirty, paying particular
attention to the flap
●
D and to the test strip guide ●G ;
● if the control value is outside the specified range
(see Section 5.1);
● whenever you open a new pack of test strips;
● if someone else has used the meter.
Procedure for cleaning Accutrend
®
GC
Check that the meter is switched off.
Clean the outside with a damp lint-free cotton cloth.
Remove the test strip guide
●
G . To do this, open the
flap
●
D , push the black guide gently in the direction of
the display, lift up carefully and remove.
▲
▼
MEM ON/OFF
011553 AccuGC GB 19.02.2002 10:40 Uhr Seite 70
Page 39

5.
72 73
After removal from the meter, clean the test strip guide
with warm water and allow to dry completely.
Gently clean the inside of the flap
●
D and the entire
area around the measurement window
●
E , taking care
not to scratch the plastic. You should therefore use
only a soft, non-linting cotton cloth or cotton wool buds
for cleaning. These should only be damp so as to
ensure that no liquid can enter the meter.
If 70% ethyl alcohol is used for disinfection of meters
used in the medical sector, the alcohol should be
wiped off again immediately after application. Use only
70% ethyl alcohol for disinfection as other agents may
damage the plastic.
Now insert the completely dry test strip guide
●
G into
the meter and press down gently until it clicks into
place.
Make sure that the meter functions properly after
cleaning by performing a system check as described in
Section 5.1.
Make sure that the meter, particularly the measuring
window, is clean at all times as otherwise incorrect
results may be obtained.
011553 AccuGC GB 19.02.2002 10:40 Uhr Seite 72
Page 40

5.
74 75
5.3 Battery life and changing the batteries
Battery life
Normally at least 1000 measurements can be performed with a
fresh set of batteries. The system indicates that the batteries
are running low by continuing to display LOW BAT after the
function test. When this message appears it is still possible to
perform around 50 measurements before the meter can no
longer be switched on. If the power supply is interrupted for
too long, all data stored in the memory will be lost. You should
therefore change the batteries as soon as possible after LOW
BAT first appears.
Changing the batteries
Always change all three batteries at the same time. It is advisable to always have a complete set of three batteries in
reserve.
Use micro LR 03 type batteries (e.g. UCAR Micro 1.5 V AAA,
KODAK Micro or VARTA Micro AAA).
If the batteries are changed within 2 minutes no data will
be lost.
Hand in used batteries at collection points, or return them to
the shop for disposal.
Procedure for changing the batteries
Please proceed as described in Chapter 2.1
“Inserting/changing the batteries”.
011553 AccuGC GB 19.02.2002 10:40 Uhr Seite 74
Page 41

5.
76 77
5.4 Measurement and storage conditions
Please maintain the following conditions scrupulously every
time you perform a measurement. They are essential to ensure
precision and reliability of the measurements.
Temperature range for measurements
Accutrend
®
Glucose: +18°C to +32°C
Accutrend
®
Cholesterol: +18°C to +30°C
If a measurement is performed at a temperature outside the
ranges given above, the safety warning
TTT
flashes on the
display in alternation with the measured value.
The reading was obtained under temperature conditions outside the admissible range. It must therefore be
interpreted with particular caution and may only be
used for orientation.
Allow the meter and test strips to adjust slowly to room temperature. Never try to speed up the temperature adjustment by
placing on a radiator or in a refrigerator.
011553 AccuGC GB 19.02.2002 10:40 Uhr Seite 76
Page 42

5.
78 79
Storage conditions
Do not store the Accutrend
®
GC at temperatures below –25°C
or above +65°C.
Humidity
In the presence of high humidity or large temperature changes
condensation may form on the meter, e.g. when it is taken
from a cold to a warm environment. In such cases Accutrend
®
GC either switches itself off or cannot be switched on (see
Section 6.1).
Allow the meter to warm up or cool down slowly at room temperature.
Possible sources of interference
Interference, e.g. frequent display of the safety warning
eee
,
cannot be ruled out in the presence of strong magnetic fields
such as those induced by transmitters (CB radio devices,
radios, televisions), household electrical appliances (microwave ovens, high frequency equipment), and particularly
mobile telephones. It is advisable to keep the meter at least
two meters away from such equipment. If the error warning
continues to display after moving the meter to a different
place, please contact your nearest service centre. See Section
8.4 for addresses.
011553 AccuGC GB 19.02.2002 10:40 Uhr Seite 78
Page 43

6.
80 81
6. Troubleshooting
6.1 Error messages and important displays
Batteries have run out or have been incorrectly inserted.
Check the batteries (see Section 2).
Humidity is too high.
Move the meter to a dry environment and wait a
while before switching it on again.
The meter is defective.
Contact the Roche Diagnostics service centre.
No code stored.
Code the meter (see Section 3.1).
Display remains empty when
you switch on the instrument
Display window
011553 AccuGC GB 19.02.2002 10:40 Uhr Seite 80
Page 44

6.
82 83
Batteries are running low.
(Does not apply during the function test)
About 50 measurements are still possible after the
first appearance of LOW BAT.
Have new batteries ready. Always change all three
batteries at the same time (see Section 5.3).
It is either too cold or too warm for a measurement.
All chemical reactions are temperature-dependent.
The same applies to all test strips. The admissible
temperature range is +18°C to +32°C for
Accutrend
®
Glucose and +18°C to +30°C for
Accutrend
®
Cholesterol. Accutrend®GC offers an
additional safety warning: if a measurement is performed outside the above temperature ranges the
warning
TTT
flashes alternately with the result. The
reading may only be used for orientation.
Let the meter and test strips adjust slowly to room
temperature. Repeat the measurement within the
admissible temperature range (see Section 5.4).
s
e
CODE
GLUC MEM LOW BAT
s
e
CODE
GLUC
011553 AccuGC GB 19.02.2002 10:40 Uhr Seite 82
Page 45

6.
84 85
The code on the test strip does not match the code in the
meter.
Recode the meter with the code strip from the pack
of test strips you are using (see Section 3.1).
The test strip is not suitable for the meter.
(e.g. a BM-Lactate test strip was used)
Use only Accutrend
®
Glucose or Accutrend
®
Cholesterol test strips.
The reading in of the code has failed.
Repeat the coding procedure (see Section 3.1).
The test strip was not properly inserted.
Open the flap, take out the strip, close the flap and
insert the strip again.
The flap was open during measurement.
Repeat the entire measuring procedure with a new
test strip and with the flap closed (see Section 3.2).
011553 AccuGC GB 19.02.2002 10:40 Uhr Seite 84
Page 46

6.
86 87
The code strip is not suitable for the meter.
(e.g. a BM-Lactate code strip was inserted).
Use only Accutrend
®
Glucose or Accutrend
®
Cholesterol code strips.
A strong magnetic field is affecting the meter.
Move the meter to a different place
(see Section 5.4).
The optics are dirty or the meter is defective.
Clean the meter (see Section 5.2) and repeat the
measurement. If the problem persists, contact the
Roche Diagnostics service centre (see Section 6.3).
011553 AccuGC GB 19.02.2002 10:40 Uhr Seite 86
Page 47

6.
88 89
The value is below the Accutrend
®
GC measuring range.
GLUC blood glucose
below 20 mg/dl (1.1 mmol/l).
CHOL cholesterol
below 150 mg/dl (3.88 mmol/l).
The round window on the back of the strip is not
uniformly coloured.
(This display does not appear in every case).
Repeat the measurement using a fresh test strip and
a larger drop of blood.
The value is above the Accutrend
®
GC measuring range.
GLUC blood glucose
above 600 mg/dl (33.3 mmol/l).
CHOL cholesterol
above 300 mg/dl (7.76 mmol/l).
Measurement performed without a test strip.
Insert a test strip for measurement immediately after
applying the drop of blood.
GLUC
GLUC
011553 AccuGC GB 19.02.2002 10:40 Uhr Seite 88
Page 48

6.
90 91
The test strip has already been used.
Use a fresh test strip.
The test strip is too old or has been incorrectly stored.
Check the expiry date and storage conditions of the
test strips. Keep the test strip container tightly
closed at all times.
For Accutrend
®
Glucose only: check for discoloration of the unused strip by comparing the colour
of the round window on the back of the strip with
the colour scale on the label of the Accutrend
®
Glucose test strip container. The yellow colour of the
round window on the back of the strip should match
the yellow colour indicating “neg” on the label. If the
colour of the test window is darker, the test strip
may not be used.
The test strip guide is dirty.
Clean the guide carefully (see Section 5.2).
No blood was applied to the test strip.
Repeat the measurement applying a drop of blood
to the strip (see Section 3.2).
Too much ambient light.
Move the meter to a darker place.
011553 AccuGC GB 19.02.2002 10:40 Uhr Seite 90
Page 49

6.
92 93
If the message
TTT
is displayed alternately with the result, this
means that you have performed a measurement outside the
permissible temperature range.
Allow the meter and the test strips to adjust to
room temperature slowly. Never try to speed up the
temperature adjustment by placing on a radiator or
in the refrigerator.
Ready for deletion of the most recent result from memory.
Ready for deletion of all results from a directory.
GLUC
mg/ dl
011553 AccuGC GB 19.02.2002 10:40 Uhr Seite 92
Page 50

6.
94 95
All results will be deleted from the memory within three
seconds (unless the MEM
button is released earlier).
Ready for setting the date and time or the beeper.
011553 AccuGC GB 19.02.2002 10:40 Uhr Seite 94
Page 51

6.
96 97
6.2 Possible causes of errors
If the meter repeatedly displays error messages, or often gives
unexpected results, please check the following:
□
Have you checked the batteries?
□
Was the measurement performed according to the
instructions?
□
Have the test strips been stored and handled in
accordance with the package insert?
□
Has the shelf life of the test strips or the control solutions
expired?
□
Are the test strip guide and measurement window clean?
□
Were the test strips always from a pack whose code
number is displayed by the meter?
If you have checked these points and still obtain error
messages or doubtful values, please contact your dealer or
nearest service centre. See Section 8.4 for addresses.
6.3 Roche Diagnostics service
Advisory service: For all questions about what to do if
implausible values are obtained or if the meter is thought to be
defective, please contact our advisory service.
The staff there will try to help you solve the problem. A list of
Roche Diagnostics representatives in the different countries is
given in Section 8.4.
Repair service: Please note that any repairs or adjustments to
the meter, or any further modifications should only be carried
out by persons authorized by Roche Diagnostics.
If you suspect a fault in your meter you should first contact the
advisory service at your nearest Roche Diagnostics office. The
staff there will try to sort out the problem with you on the telephone.
In exceptional cases problems cannot be cleared up on the
telephone. If this is the case, you should send your Accutrend
®
GC meter to your nearest Roche Diagnostics office together
with the test strips used and – if the meter is still under guarantee – the warranty card.
011553 AccuGC GB 19.02.2002 10:40 Uhr Seite 96
Page 52

7.
98 99
7. Additional information for medical
personnel and laboratories
7.1 Measuring principle
An unused test strip is inserted into the meter. Light from an
LED (light emitting diode) is directed towards the test strip
from below and the blank value of the test strip determined by
measurement of the reflected light. Then a small drop of blood
is applied to the test area on the strip.
If the blood is to be applied outside the meter the procedure
described in Chapter 3.3 is used.
The constituent to be determined in the applied sample
undergoes an enzymatic reaction with formation of a dye, the
amount of dye formed increasing with the concentration of the
substance to be determined. After a certain period of time,
which is dependent on the test being performed, the meter
measures the colour intensity. This is done by directing light
from an LED towards the test area from below and measuring
the intensity of the reflected light with a detector.
For calculation of the result, the signal of the reflected light is
analyzed in relation to the initially measured blank value with
the help of the information programmed into the meter and the
information read into the meter from the code strip belonging
to the respective test strip pack.
The result is then displayed.
011553 AccuGC GB 19.02.2002 10:40 Uhr Seite 98
Page 53

8.
100 101
7.2 Software
Apart from the software programmed into the meter for performance and analysis of the test and the software for the
automatic checks performed by the meter, Accutrend
®
GC also
contains software that allows you to select and call up various
basic settings and recurring functions using the buttons on the
meter.
The individual steps for performing these operations are
described in the respective chapters. The information appearing on the display is also described or shown there.
7.3 Downloading data to a PC
Accutrend
®
GC allows transmission of the stored values to
suitable computer programs via an integrated serial interface.
●
L shows the position of the connector for data transmission.
With the help of this software, data can be exported from
Accutrend
®
GC and saved. For further information on this
please contact Roche Diagnostics.
8. General information
8.1 Technical data
Type: Accutrend
®
GC
Serial No.: See name plate
(on underside of instrument)
Measurement principle: Determination of glucose or
cholesterol in fresh capillary blood
by reflectance photometry.
Optical system: LED (657 nm)
Measurement range: Glucose 20–600 mg/dl
(1.1–33.3 mmol/l)
Cholesterol 150–300 mg/dl
(3.88–7.76 mmol/l)
Measurement time: Glucose 12 seconds
Cholesterol 180 seconds
Memory capacity: 50 blood glucose results
15 cholesterol results,
all values with time and date
Dimensions: 115 x 62 x 18.5 mm
Weight: Approx. 90 g (without batteries)
Display: Liquid crystal display
Automatic cut-off: After 2 minutes with test strip
inserted; after 1 minute if no
button was pressed and no test
strip has been inserted.
Data output: 3-pin connector, serial
Power supply: 3 x 1.5 V batteries type:
micro LR 03, e.g. UCAR Micro
1.5 V AAA, KODAK Micro or
VARTA Micro AAA.
011553 AccuGC GB 19.02.2002 10:40 Uhr Seite 100
Page 54

8.
102 103
8.2 System components
For measurement of blood glucose with Accutrend
®
GC use
only Accutrend
®
Glucose test strips. These are available in
different pack sizes. For further information please ask your
pharmacist or your Roche Diagnostics office.
For measurement of cholesterol with the Accutrend
®
GC use
only Accutrend
®
Cholesterol test strips.
For performance checks with control solutions use only
Accutrend
®
Control G and Accutrend®Control CH1.
Recommended lancing device: the Accu-Chek
®
Softclix
®
Pro lancing device with matching lancets Accu-Chek
®
Softclix®Pro Lancet, which are specially designed to make
blood collection virtually pain-free.
Battery life: At least 1000 measurements
Storage conditions: Temperature –25°C to +65°C
Relative humidity below 85%.
Disposal: The outer packaging can be
disposed of as household waste.
For disposal of the meter the relevant legal regulations should be
observed, after consultation of
your local community if applicable.
This product fulfils the requirements of Directive 98/79/EC on in
vitro diagnostic devices.
This Accutrend
®
GC meter has been designed and tested in
accordance with German standards for electronic instruments
(DIN, VDE, IEC). The meter left the factory in perfect compliance with the specified safety regulations. In order to preserve
this condition and to ensure reliable operation, the user must
observe the safety warnings in these operating instructions.
The manufacturer reserves the right to modify the system.
0088
011553 AccuGC GB 19.02.2002 10:40 Uhr Seite 102
Page 55

8.
104 105
8.3 Manufacturer’s warranty and guarantee
Manufacturer’s warranty: Roche Diagnostics guarantees the
proper functioning of your Accutrendd
®
GC to the extent
defined in the completed warranty card supplied with the
instrument, on completion and return of said warranty card.
For precise terms and conditions please see the warranty card.
This does not affect your statutory or other rights.
The warranty covers any material and manufacturing defects
that arise during proper use of the instrument and are discovered and reported within the warranty period. The warranty
does not cover any interference with the instrument or any
case of improper use or maintenance.
We undertake, at our discretion, to repair faulty components
free of charge or provide a fault-free replacement meter.
Statutory and other rights: The manufacturer’s warranty
given above is in addition to any statutory or other rights
granted through your dealings with the instrument supplier.
8.4 International addresses
Roche Diagnostics GmbH
D-68298 Mannheim
Germany
Tel.: +49 (6 21) 759 46 46
Roche Diagnostics Australia
Pty Ltd., 31 Victoria Avenue, Castle Hill, NSW 2154
AUSTRALIA
Extracare Enquiry line: 1800 251816
Roche Diagnostics
201 Boul. Armand-Frappier, H7V 4A2, Laval, Québec
CANADA
Tel. 1-800-363-5880 (hotline)
Roche Diagnostics N.Z.
Ltd, 15 Rakino Way, Box 62-089, Mt. Wellington
Auckland, NEW ZEALAND
Tel. 0800-802-299
Roche Diagnostics Ltd
Bell Lane, Lewes
East Sussex, BN7 1LG, UNITED KINGDOM
Freephone: 0800 701 000
Freephone Rep. of Ireland: 1800 709 600
011553 AccuGC GB 19.02.2002 10:40 Uhr Seite 104
Page 56

9.
106 107
9. Index
Page
Ambient temperature 77
Batteries 7, 75, 101
Beeper 19
Blood collection 31
Blood, application of 35, 43
Checking the measuring system 59
Cleaning the meter 71
Code strip 21, 25, 27
Coding 21
Cut-out time 69, 101
Data transfer 100
Date 13
Deletion of results 53
Disinfection 41, 73
Disposal 39, 102
Error messages 81ff.
Function test (display) 9
Humidity 79, 81
Instrument components fold-out section
Interface 100
Interference, causes of 79
Magnetic fields 79
Measurements on several persons 41
Measuring principle 99
Measuring range 35, 101
Measuring time 33
Memory capacity 47, 101
Roche Diagnostics K.K., Nippon Roche Building 6-1
Shiba 2-chome, 105-0014 Minato-ku, Tokyo, JAPAN
Roche Diagnostics Asia Pacific Pte. Ltd.
298, Tiong Bahru Road
#16-01-06 Tiong Bahru Plaza
Singapore 168730
Tel. +652727500
Roche Products (Pty) Ltd. South Africa
Diagnostics Division
9, Will Scarlet Road/Ferndale
P.O. Box 1927
Randburg 2125
South Africa
Tel. +27-11-8861300
Roche Diagnostics Sistemleri Ticaret A.S.
Gazeteciler Sitesi - Matbuat Sokak 3
80300 Esentepe - Istanbul
Turkey
Tel.: +90-212-213-3280
011553 AccuGC GB 19.02.2002 10:40 Uhr Seite 106
Page 57

9.
108 109
Page
Parameters 5, 61
Performance check 59ff.
Plausibility check 37, 69
Practising measurement 29ff, 59
Retrieval of results from memory 49ff.
Storage conditions 77
Switching on 9
Symbols 4, 5
Technical data 101-102
Test procedure 29ff.
Test strip 29, 103
Test window 37, 69
Time 13
Units of measurement 11
Warranty 104
011553 AccuGC GB 19.02.2002 10:40 Uhr Seite 108
Page 58

Warranty Card
Name
Street
City/post code
Telephone No.
Date Signature
Serial No.
Date of purchase
Stamp and signature of dealer
Accutrend
®
GC Warranty Card
To be completed by the dealer.
If the warranty card was not completed at the
time of purchase please keep the receipt and
submit together with the meter in the event of
claims.
On presentation of this card Accutrend
®
GC is
guaranteed by Roche Diagnostics GmbH for
twelve months fromthe date of purchase against
defects in materials or workmanship which occur
on proper use of the instrument and occur and
are reported during the warranty period. The
warranty ceases to apply if the instrument is
damaged by tampering, misuse or negligent
maintenance.
Our liability under this warranty is limited to the
repair of defective parts or to the provision – at
our option – of acorrectly functioning
replacement instrument.
This warranty is only valid if the date of pur-
chase, and the stamp and signature of the dealer
are entered on this card at the time of purchase
or if the original receipt is submitted.
The warranty period is not extended by any claim
made under this warranty.
011553 AccuGC GB_Garantie 19.02.2002 11:30 Uhr Seite 1
 Loading...