

Page 1
© 2015 Roche Diagnostics
User Guide
man_05957613001_E_en.indb 1 02.03.2015 10:43:47
The Bluetooth ® word mark and logos are registered
trademarks owned by Bluetooth SIG, Inc. and any use of such
marks by Roche is under license. Other trademarks and trade
names are those of their respective owners.
ACCU-CHEK, ACCU-CHEK SPIRIT COMBO, ACCU-CHEK AVIVA COMBO,
PERFORMA COMBO, ACCU-CHEK TENDERLINK,
ACCU-CHEK FLEXLINK, ACCU-CHEK RAPIDLINK,
ACCU-CHEK RAPID-D LINK and ACCU-CHEK ULTRAFLEX
are trademarks of Roche.
In Canada, distributed by:
Roche Health Solutions Inc.
Fishers, IN 46037, USA
Toll Free 1-800-280-7801
Roche Diagnostics GmbH
Sandhofer Strasse 116
68305 Mannheim, Germany
www.accu-chek.com
INSULIN PUMP
User Guide
en: 05957613001/E Last update: 12-2014 Master: 05184843001/K
Page 2
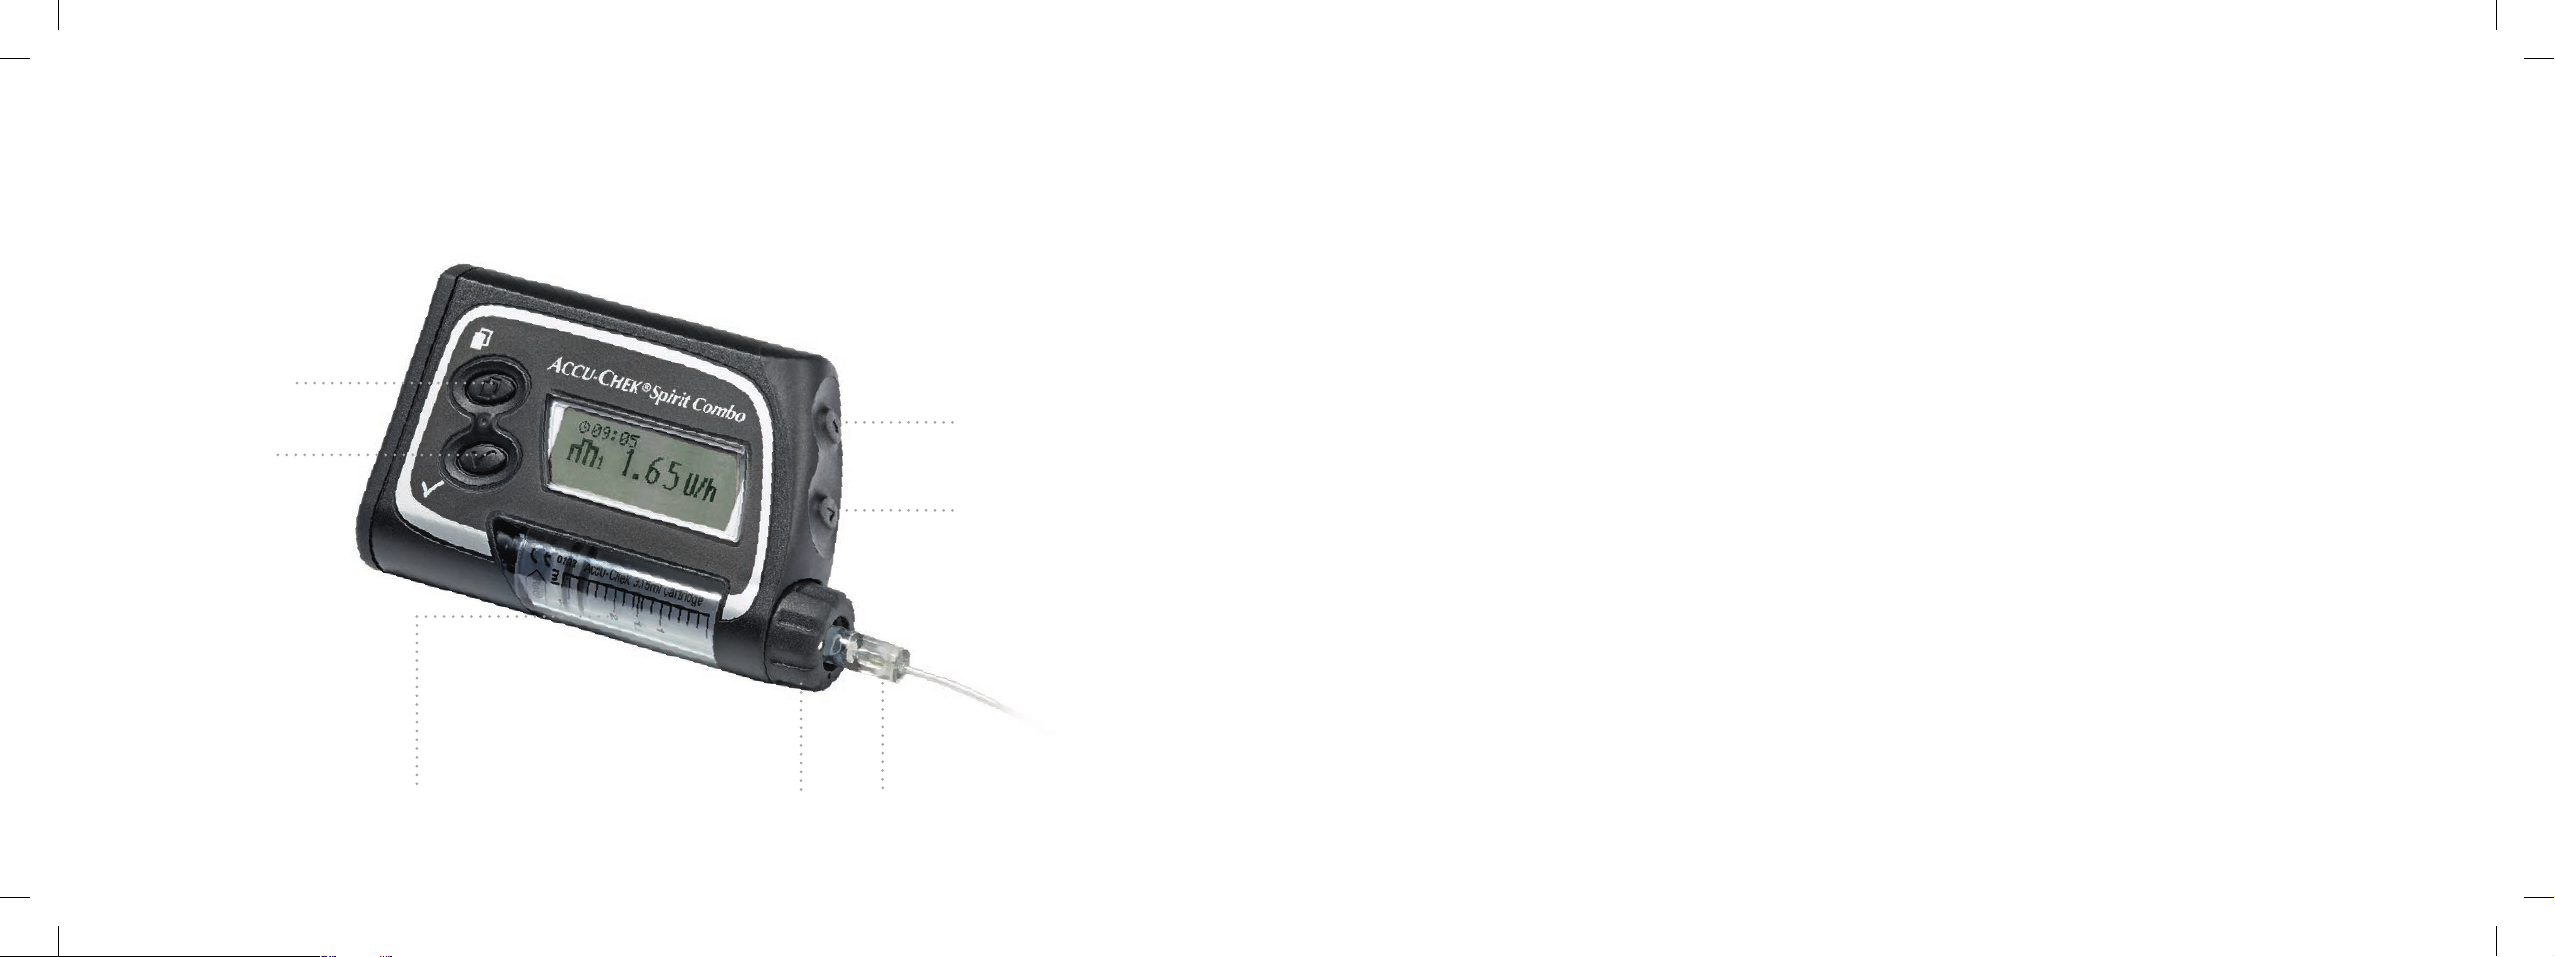
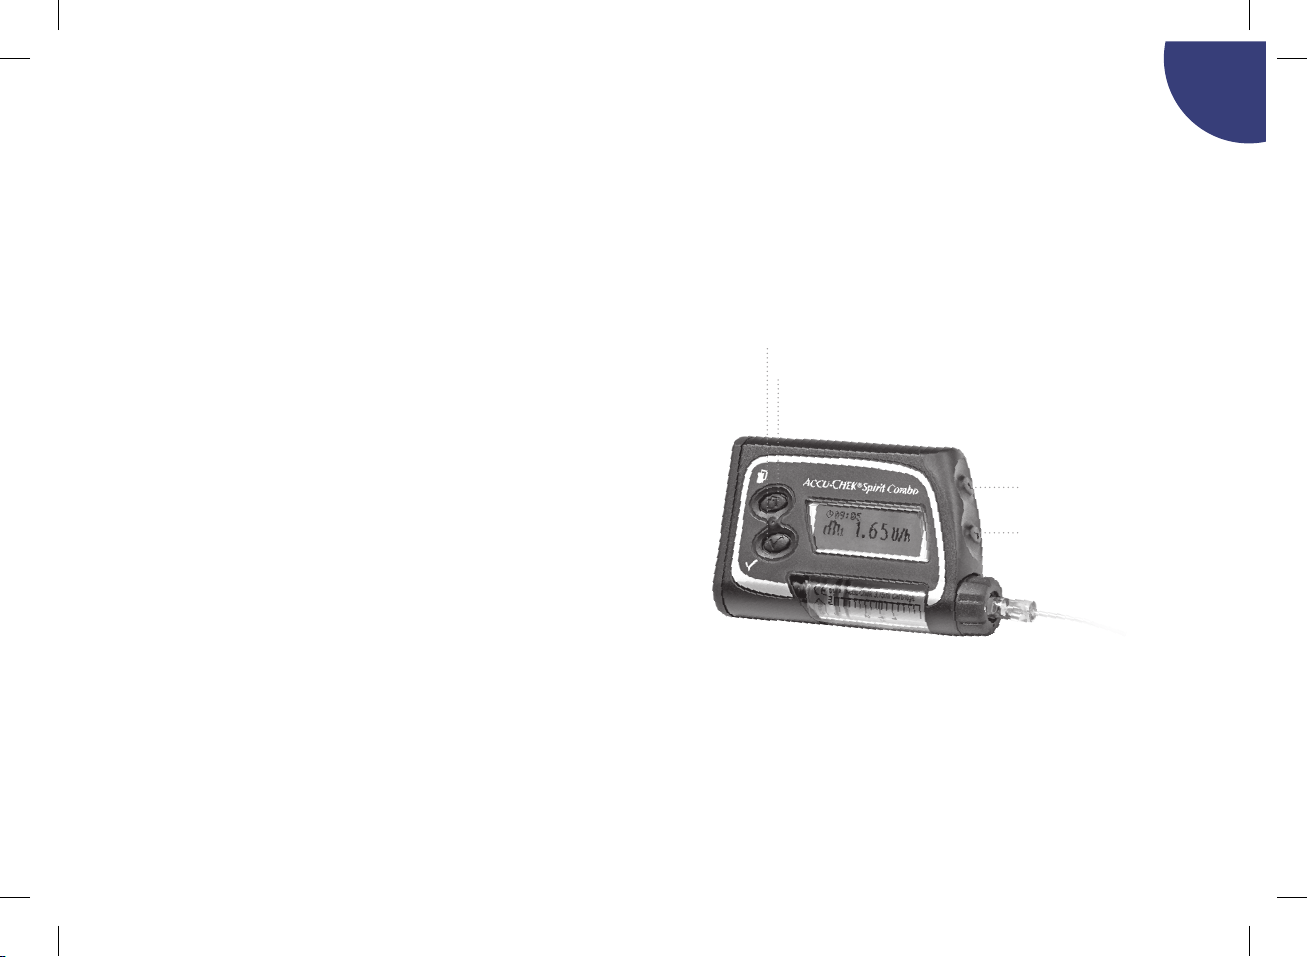
Your insulin pump
Your contact for assistance with and /or additional information about
your Accu-Chek Spirit Combo insulin pump:
d Menu key
f OK key
a Up key
s Down key
United Kingdom
Distributed in the United Kingdom by:
Roche Diabetes Care Limited
Charles Avenue, Burgess Hill
West Sussex, RH15 9RY, United Kingdom
Accu-Chek Pump Careline
UK Freephone number: 0800 731 22 91
ROI Freephone number: 1 800 88 23 51
1)
calls may be recorded for training purposes
burgesshill.insulinpumps@roche.com
www.accu-chek.co.uk
www.accu-chek.ie
Australia
Accu-Chek Enquiry Line: 1800 251 816
Pump Support: 1800 633 457
www.accu-chek.com.au
New Zealand
Accu-Chek Enquiry Line: 0800 80 22 99
Pump Hotline: 0800 696 696
www.accu-chek.co.nz
1)
:
South Africa
Accu-Chek Customer Care Centre:
080-DIABETES (Dial 080-34-22-38-37)
www.diabetes.co.za
India
Accu-Chek Customer Helpline: 1800 120 6020 (Toll-free)
www.accu-chek.in
Canada
Accu-Chek Pump Support: 1-800-688-4578 (toll free)
www.accu-chek.ca
Singapore
Accu-Chek ExtraCare line: 6272 9200
www.accu-chek.com.sg
Adapter
man_05957613001_E_en.indb 2 02.03.2015 10:43:47
Luer lock of infusion setCartridge compartment with cartridge
Page 3
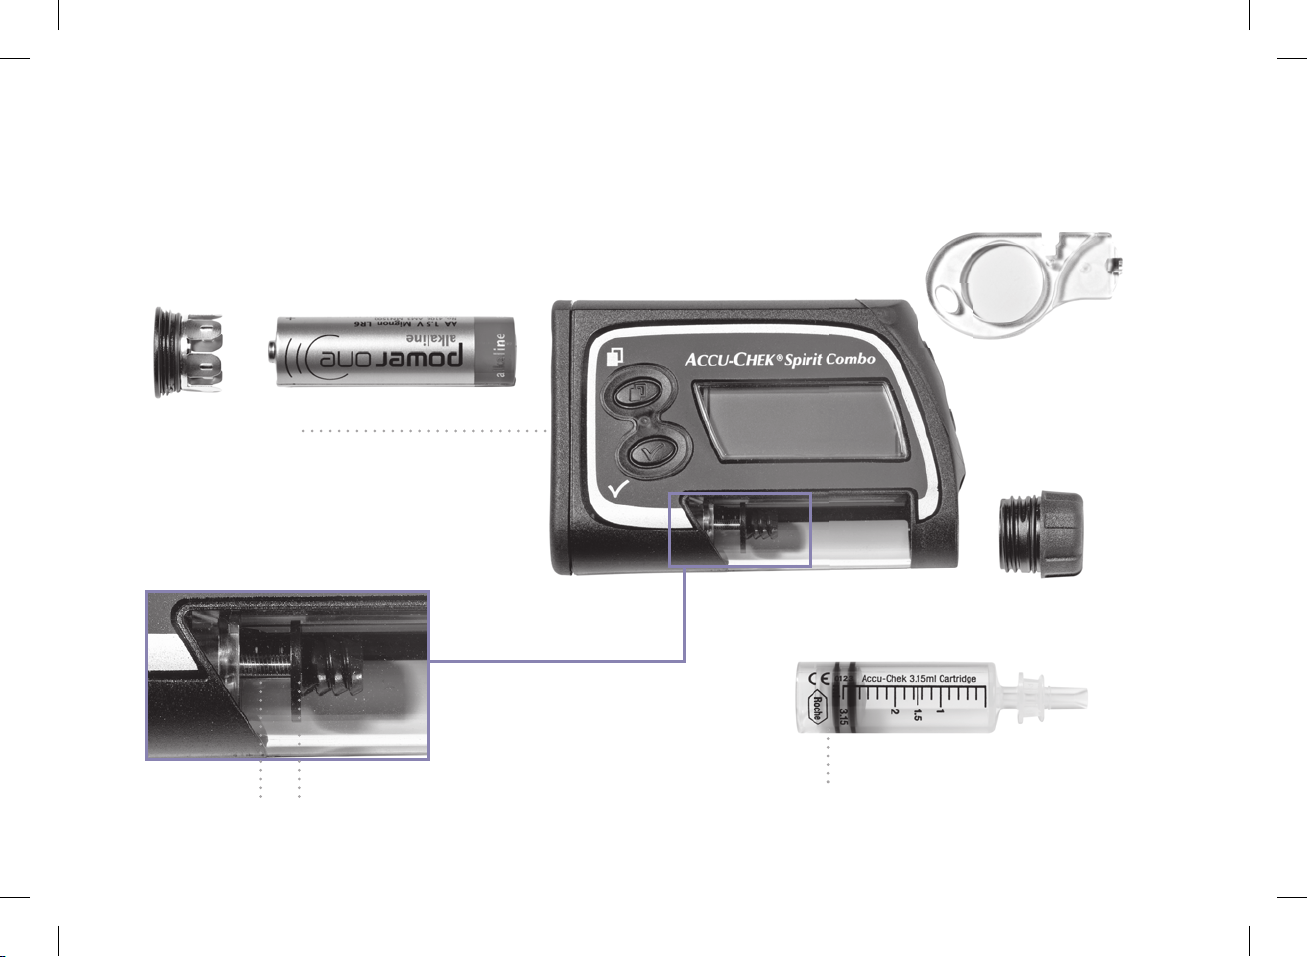
Pump details and accessories
Battery Battery cover
Infrared window
(next to Battery cover)
Battery key
Adapter
Cartridge Compartment
Cartridge
Cartridge plungerEnd platePiston rod
man_05957613001_E_en.indb 1 02.03.2015 10:43:49
Page 4
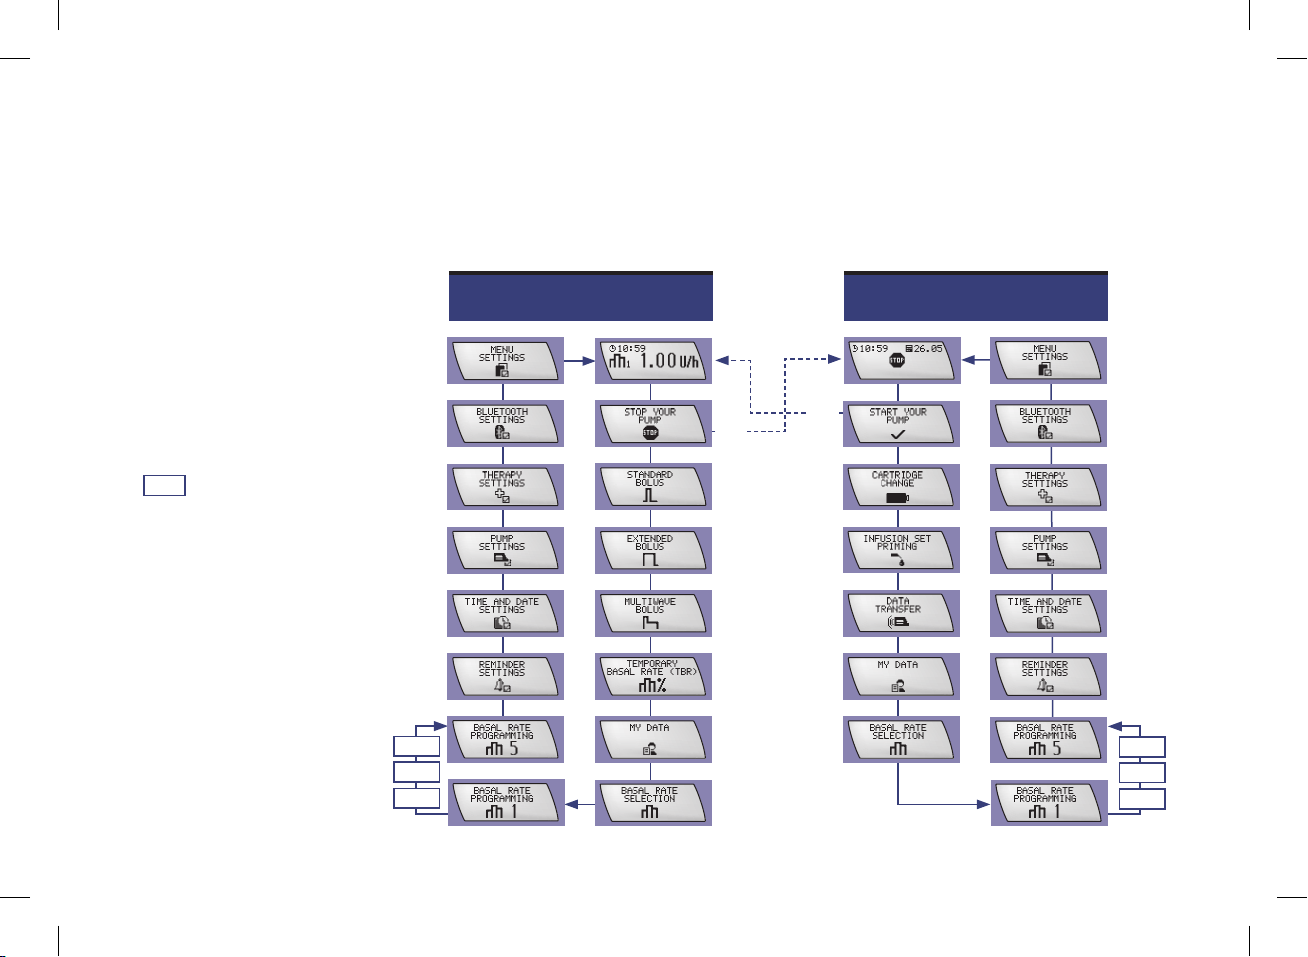
Overview of ADVANCED user menu
j Press d to move forwards
j Press d + a simultaneously
to move backwards
j Press f to select or save
j Press a to go up
j Press s to go down
BRP
= Basal Rate Prole 2–4
RUN
STOP
f
f
BRP 4
BRP 3
BRP 2
man_05957613001_E_en.indb 2 02.03.2015 10:43:51
BRP 4
BRP 3
BRP 2
Page 5
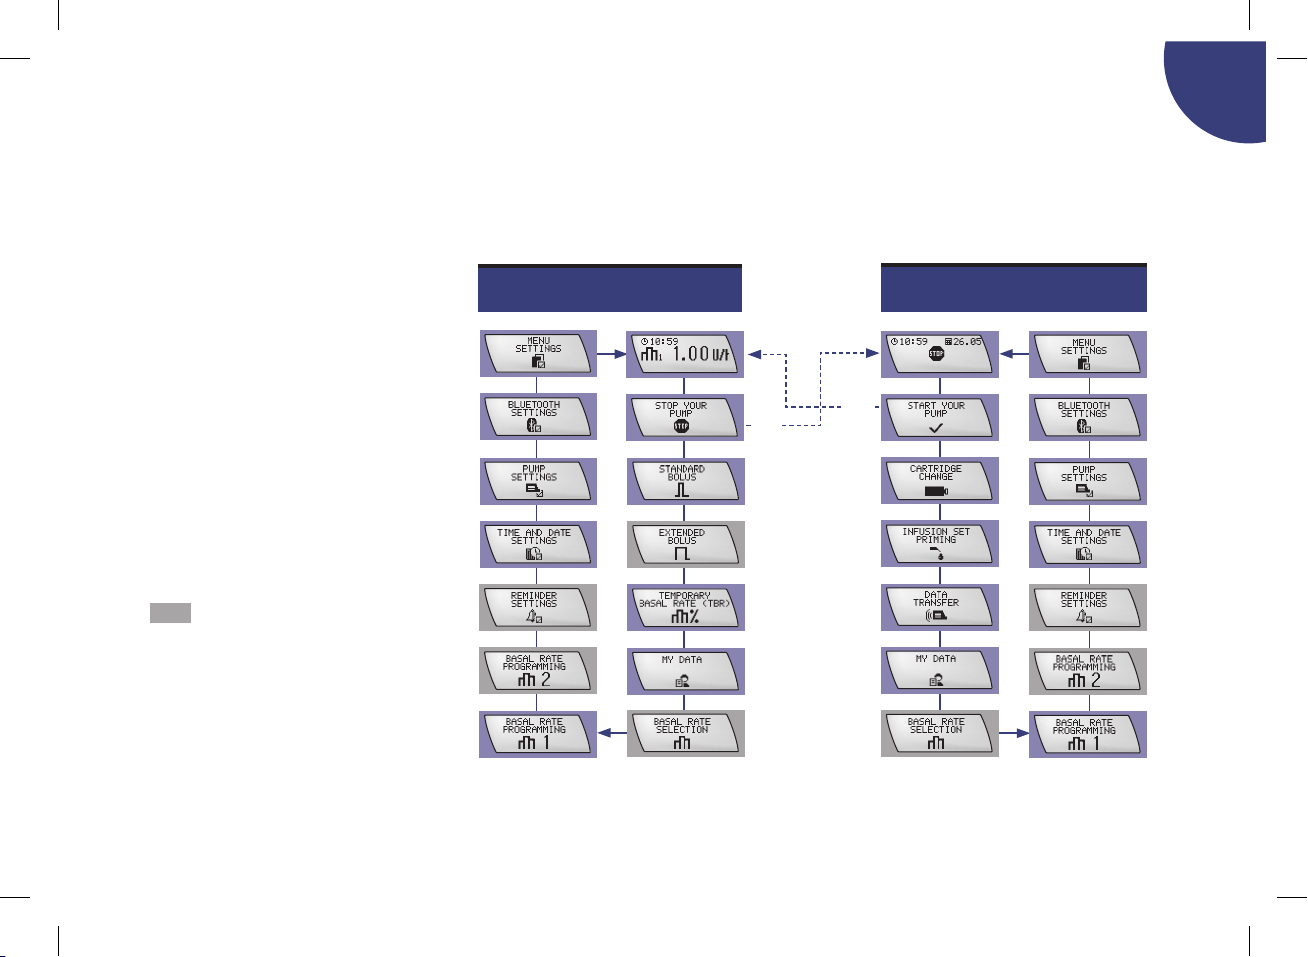
Overview of STANDARD and CUSTOM user menus
Accessible menus in CUSTOM user
menu can be selected using
Accu-Chek PC software (sold
separately).
j Press d to move forwards
j Press d + a simultaneously
to move backwards
j Press f to select or save
j Press a for up
j Press s for down
not accessible in STANDARD
=
user menu
RUN
STOP
f
f
man_05957613001_E_en.indb 3 02.03.2015 10:43:53
Page 6

Dear Accu-Chek Spirit Combo insulin pump user,
This User Guide is provided for you, as a diabetes patient, and for
healthcare professionals. It contains all the necessary information
for safe and efcient use of your Accu-Chek Spirit Combo insulin
pump. Regardless of your level of experience with pump therapy,
please read this document carefully before beginning insulin
pump therapy. Always refer to this document rst, when you
have questions about or have problems using your insulin pump.
If you cannot nd the solution to your problem in this document,
then we recommend that you contact your local pump support.
You will nd the address on the inside back cover of this manual.
Your Accu-Chek Spirit Combo insulin pump has been developed
exclusively for the continuous subcutaneous delivery of U100
short-acting insulin or fast-acting insulin analogue. Whether
insulin pump therapy is the appropriate way of treating your
diabetes must be decided by your healthcare professional.
The exact insulin type for the treatment of your insulin-dependent
diabetes mellitus will be prescribed by your doctor or healthcare
team. You should not begin pump therapy unless you have
attended the appropriate training course.
Do not use your pump for the delivery of medication other than
U100 short-acting regular human insulin or rapid-acting insulin
analogue.
Your Accu-Chek Spirit Combo insulin pump is a valuable medical
device. We strongly encourage you to add your insulin pump to
your home contents insurance policy to protect you in case of
accidental damage or loss. Ask your insurance agent for details.
man_05957613001_E_en.indb 4 02.03.2015 10:43:53
Page 7

About this User Guide
To ensure safe and convenient use of your new Accu-Chek
Spirit Combo insulin pump, some information in this User Guide
requires particular attention. This information is presented as
“Warning”, “Caution” or “Note”.
j A “Warning” informs you about risks to your health. Neglecting
this information may even lead to life-threatening situations in
some cases.
j A “Caution” informs you about risks to your device. Malfunction
or damage may result if you do not follow these instructions.
j A “Note” contains important information relating the efcient
and smooth operation of your new Accu-Chek Spirit Combo
insulin pump.
man_05957613001_E_en.indb 5 02.03.2015 10:43:53
Page 8

man_05957613001_E_en.indb 6 02.03.2015 10:43:53
Page 9

1 Understanding your new system 7
1.1 Overview 7
1.2 Display and sounds 9
1.3 Keys and key combinations 15
1.4 Accessories and disposables 19
1.5 Emergency kit 22
1.6 General safety information 23
2 Getting started 25
2.1 Before you begin 25
2.2 Inserting the battery 25
2.3 Start-up process 29
2.4 Setting the time and date 32
2.5 Your basal rate prole 35
2.6 Connecting the cartridge, adapter and infusion set 42
2.7 Inserting the cartridge 44
2.8 Priming the infusion set 49
2.9 Positioning the infusion set 52
2.10 Starting insulin delivery 55
2.11 Stopping insulin delivery 56
2.12 General safety information 57
3 Using your pump in daily life 61
3.1 Wearing your pump 61
3.2 Interruption of insulin pump therapy 64
3.3 Your insulin pump and water 67
3.4 Changing the infusion set 69
3.5 Changing the cartridge and infusion set 73
3.6 General safety information 76
4 Boluses and Temporary Basal Rates 77
4.1 Understanding boluses 77
4.2 Programming a Standard Bolus 78
4.3 Programming an Extended Bolus 84
4.4 Programming a Multiwave Bolus 89
4.5 Programming a Temporary Basal Rate (TBR) 93
4.6 General safety information 98
5 Personalizing your pump 99
5.1 Introduction 99
5.2 Selecting a user menu 101
5.3 STANDARD user menu 103
5.4 Viewing your pump data 105
5.5 Transferring your data to a computer 111
5.6 Pump settings 113
5.7 ADVANCED user menu 120
5.8 Basal rate proles 121
5.9 Setting a Reminder 124
5.10 Therapy settings 126
5.11 CUSTOM user menu 130
man_05957613001_E_en.indb 7 02.03.2015 10:43:53
Page 10

6 Using the Accu-Chek Spirit Combo insulin
pump with the Meter
6.1 Meter 133
6.2 Switching Bluetooth ® ON and OFF 135
6.3 Pairing your pump with the Meter 136
6.4 Troubleshooting the Bluetooth ® connection 139
133
7 Care and Maintenance 143
7.1 Inspecting your pump 143
7.2 Damage to your pump 145
7.3 Your insulin pump and water 146
7.4 Repair of your pump 148
7.5 Maintaining your pump 149
7.6 Storing your pump 150
7.7 Disposing of your pump 150
8 Warnings and Errors 151
8.1 Conrming a Warning or Error 152
8.2 List of Warnings 153
8.3 List of Errors 159
8.4 List of Reminders 170
Appendix A: Technical Data 175
Appendix B: Conguration parameters 189
Appendix C: Sterile products and accessories 192
Appendix D: Abbreviations 194
Appendix E: Beeps and melodies 195
Appendix F: Symbols 201
Appendix G: Warranty 207
Glossary 208
Index 213
Quick reference table for Errors, Warnings and Reminders 217
Reminder 219
Bluetooth ® registration 220
My notes 222
9 Troubleshooting 171
9.1 Therapy-related issues 172
man_05957613001_E_en.indb 8 02.03.2015 10:43:53
Page 11

1 Understanding your new system
1.1 Overview
1
Your Accu-Chek Spirit Combo insulin pump has many helpful
features that help to ensure safe and efcient pump therapy.
Note In this User Guide the term “Meter” always refers to the
Accu-Chek Aviva Combo Blood Glucose Meter or
Accu-Chek Performa Combo Blood Glucose Meter*.
1.1.1 Summary of features
Interaction with the Meter
The Accu-Chek Spirit Combo insulin pump is designed for use
with the Meter. This new product is an intelligent blood glucose
meter that can remote control the pump using Bluetooth
wireless technology.
* The Accu-Chek Performa Combo Blood Glucose Meter has not been licensed
for sale in Canada.
®
Three user menus
Your Accu-Chek Spirit Combo insulin pump has been designed to
adapt to your level of experience in pump therapy – whether you
are a beginner or an experienced pump user. Your pump “grows”
with you!
You can use one of 3 menus – STANDARD, ADVANCED or
CUSTOM – to access the functions and settings you will need
from day to day.
7
man_05957613001_E_en.indb 7 02.03.2015 10:43:54
Page 12

STANDARD This is the most basic menu – designed for
simplicity and comfort.
ADVANCED This menu helps you to adjust your therapy
to a wider range of situations.
Quick Bolus
You can program a Quick Bolus without looking at the display
screen and check that it is correctly programmed by counting the
beeps and vibrations. This is particularly useful when you want
to program the bolus discreetly in public.
CUSTOM The CUSTOM menu enables you to
ne-tune your pump according to your
personal needs and skill level.
See chapter 5 Personalizing your pump.
Five basal rate proles
You can choose from 5 basal rate proles, in line with your
different daily routines.
Four bolus types
Your Accu-Chek Spirit Combo insulin pump enables you to program
4 bolus types, each corresponding to different situations you
may encounter, and this provides you with a lot of exibility.
8
Dual signalling of Warnings and Errors
For your safety, Warnings and Errors are signalled using both
audible beeps and vibration of the pump. In addition, the beep
tones are fully adjustable – from silent to loud.
Data transfer
The infrared port on the bottom of your Accu-Chek Spirit Combo
insulin pump enables you to transfer information between your
pump and a personal computer or handheld device.
Rotating display
Your pump’s display can be rotated through 180 degrees, and
you can also adjust its contrast. Combined with the backlight,
these features make the display easier to read.
man_05957613001_E_en.indb 8 02.03.2015 10:43:54
Page 13

1
Reminder
As well as Warnings and Errors, your pump can signal Reminders. This works like an electronic alarm clock.
Choice of batteries
Your Accu-Chek Spirit Combo insulin pump can be powered by
either disposable or rechargeable batteries. (If you decide to use
rechargeable batteries, you will need a battery charger recommended by the battery manufacturer.)
Key Lock
The Key Lock feature allows you to lock all 4 keys on your pump
to prevent the accidental activation of functions. For example,
you can use Key Lock while you are asleep or when playing
sports.
1.2 Display and sounds
Your Accu-Chek Spirit Combo insulin pump has a Liquid Crystal
Display (LCD) screen. This display, together with the 4 keys,
enables you to program the pump. It also shows important
information about the status of your pump.
w WARNING
Changes in the status of your pump can be life-threatening. If
for any reason you cannot hear the audible signals or feel the
vibrations of your pump, looking at the display is the only way
that you will be aware of changes or malfunctions in your
pump.
9
man_05957613001_E_en.indb 9 02.03.2015 10:43:54
Page 14

1.2.1 Backlight
1.2.2 Rotating display
The backlight helps you to read the information on the display in
poorly-lit areas. You can turn on the backlight while in RUN or
STOP mode, or when navigating through the menus, by pressing
a.
The backlight turns on automatically when a Reminder, Warning
or Error message is displayed, and turns off automatically after
10 seconds if no further keys are pressed.
Tip: In poorly-lit areas, begin programming with the a.
Your pump’s display can be rotated through 180 degrees. See
section 5.6.4 Display orientation.
Note that when you rotate the display, the s and a key
functions are reversed.
c CAUTION
If incomplete characters, numbers or symbols appear on the
display, put your pump into STOP mode and remove the
battery for a few seconds. When you reinsert the battery, the
pump will perform a system check. If this does not resolve the
problem, put your pump into STOP mode and contact your
local pump support. For details see inside the back cover.
10
man_05957613001_E_en.indb 10 02.03.2015 10:43:54
Page 15

1
1.2.3 Display screens
The screens displayed by your pump relate to one of following
modes:
j RUN, STOP and Quick Info
j Information
j Function
j Set-up
The Information, Function and Set-up screens are all accessed
from the user menus. See section 5.2 Selecting a user menu.
Note To save battery life, the screen of your Accu-Chek
Spirit Combo insulin pump goes blank when you do not
press any key for more than 20 seconds. As long as
your pump is showing a blank screen, you have to press
any key before any other operation can be performed.
RUN screen
By default the screen is blank, to save energy, and becomes
blank again after 20 seconds. By pressing any key, the RUN
screen is displayed when the pump is in RUN mode. This means
that insulin is being delivered to your body according to the basal
rate you have programmed.
Time
Active basal rate prole
The above screen shows all the possible symbols, including the
current time, the current basal rate prole, and the current hourly
basal rate in units per hour.
Current hourly
basal rate
Key Lock locked
Pump timer
Cartridge low
Battery low
11
man_05957613001_E_en.indb 11 02.03.2015 10:43:54
Page 16
The RUN screen also displays Reminder information (such as
“cartridge low”) and special functions (such as Key Lock –
locked or unlocked) in the form of symbols. (See Appendix F:
Symbols)
Note After you program or review information, the pump
returns to the RUN screen.
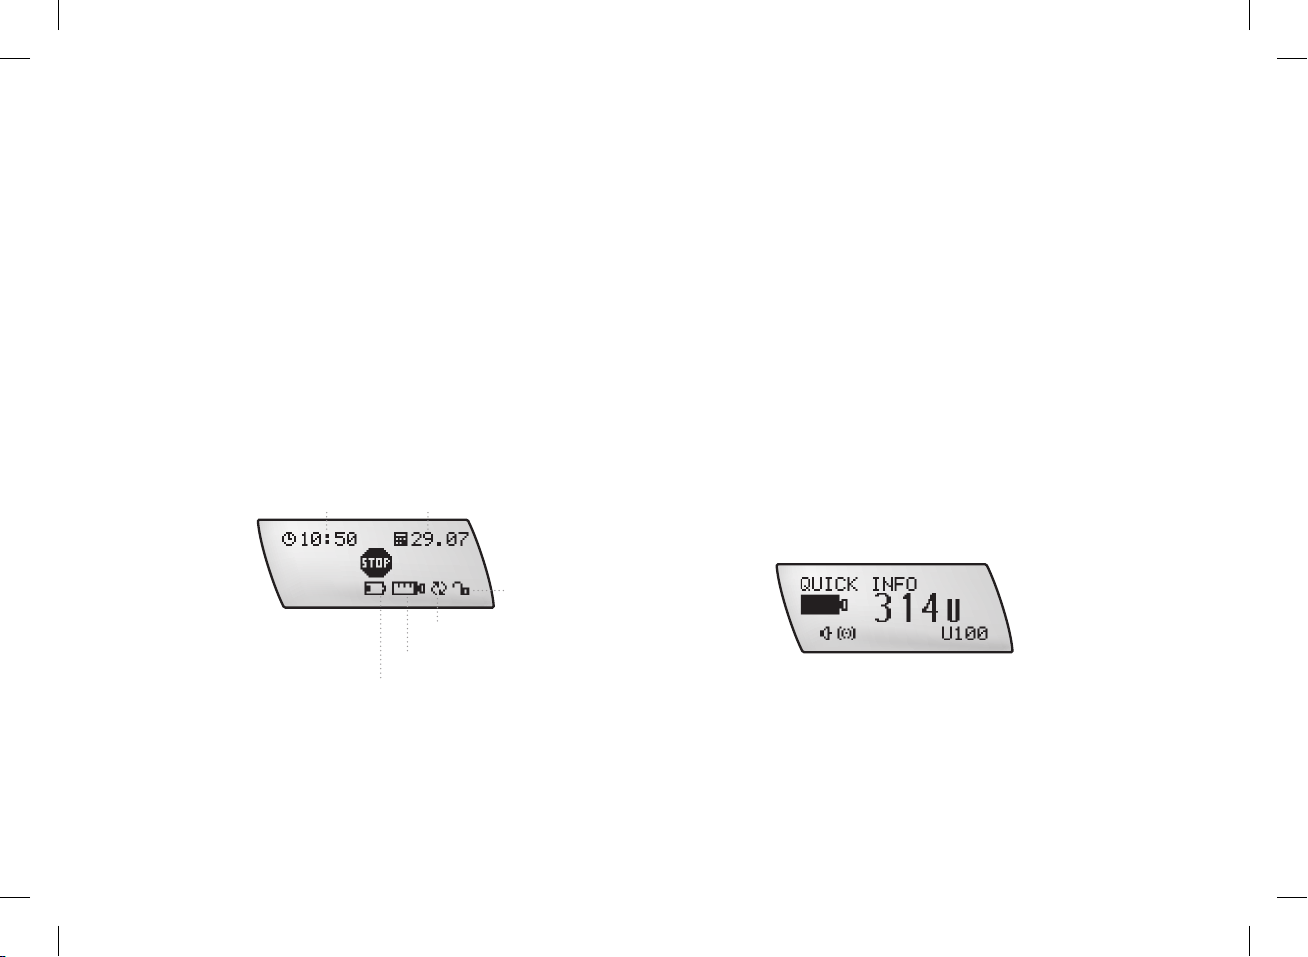
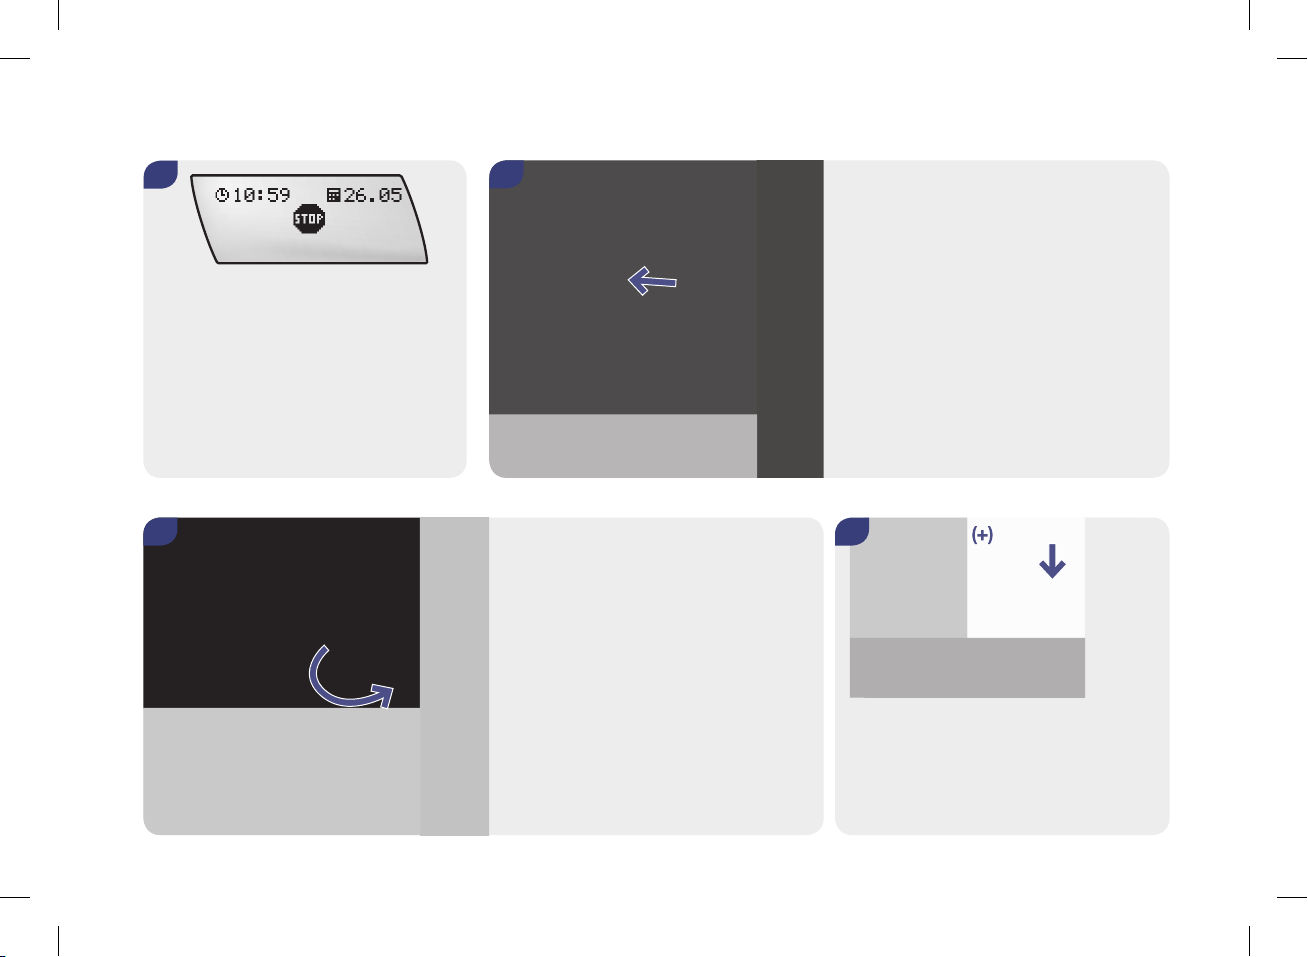
STOP screen
The STOP screen is displayed when the pump is in STOP mode.
This means that insulin is no longer being delivered to your body.
The STOP screen shows the current time and date, and the
STOP symbol.
Time
Date
Key Lock unlocked
Pump timer
Cartridge low
Battery low
The STOP screen also displays Reminder information (such as
“battery low”) and special functions (such as Key Lock – locked
or unlocked) in the form of symbols.
Your pump must be in STOP mode in the following situations:
You are
j programming specic functions
j changing the cartridge and / or the infusion set
j priming the infusion set
j transferring data to or from the pump
j changing the battery
QUICK INFO menu
You display the QUICK INFO screen by pressing the f key while
in RUN or STOP mode. The QUICK INFO screen shows the
remaining insulin content of the cartridge in units.
12
man_05957613001_E_en.indb 12 02.03.2015 10:43:54
Page 17
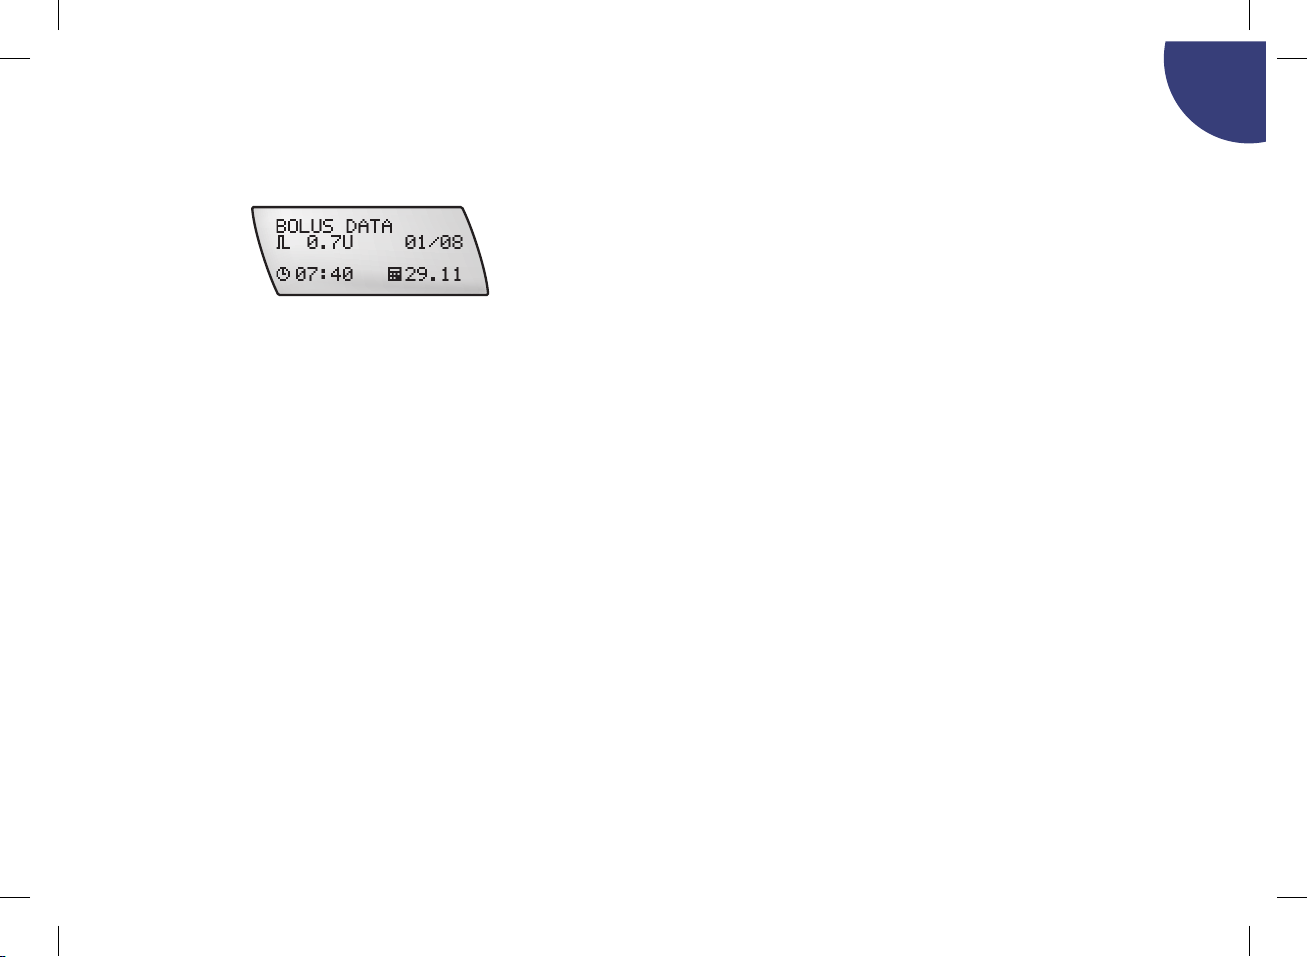
1
By pressing f again you enter the BOLUS DATA function. You
can view the last 30 boluses by pressing a or s.
You can leave the QUICK INFO screen either pressing f again
or pressing no key for 20 seconds.
Information, Function and Set-up screens
You access these screens when you program the pump, perform
a function, change a setting, or store or transfer information. You
can reach these screens from either the RUN or STOP screen.
1.2.4 Navigating through the screens
The following procedure explains how to navigate through
the screens. Think of these screens as menu choices. See
section 1.2.3 Display screens.
1. Press the d key to select a screen of your choice.
2. Press the d key again to see the next available choice in
the menu. (After you reach the last menu choice, you will
return to the rst menu choice.)
3. When you reach the screen of your choice, press the
f button.
The next set of screens are called Function screens, and all
relate to the choice you have just made. There may be one or
several Function screens.
4. Press the s or a key to increase or decrease the
displayed value, or press the d key again to move to the
next Function screen to make further changes. (After you
reach the last Function screen, you will return to the rst
Function screen.)
5. Press the f button to save your changes.
13
man_05957613001_E_en.indb 13 02.03.2015 10:43:54
Page 18

You can move backwards through the main menu screens by
pressing the d key and a key simultaneously.
In any sub-menu the same key combination will move you back
to the main menu screen.
Note Changes that you made in the sub-menu will not be
saved.
1.2.5 Status messages and alarm signals
Your Accu-Chek Spirit Combo insulin pump informs you of the
status of your pump using audible beeps, vibrations and
displayed messages. It is vital that you be able to hear and / or
feel the beeps and vibrations. Be aware that some carrying
pouches may hinder the perceptibility of the signals.
You can turn off either beeps or vibrations, but for your safety
you cannot turn off both at the same time for the initial alarm
signal.
See chapter 8 Warnings and Errors for a description of the full
range of Warnings and Errors.
STOP-Warning
The STOP-Warning is triggered when your pump switches from
RUN mode to STOP mode, or when a battery is inserted. The
pump emits 2 beeps and vibrates once every minute. This warns
you that insulin delivery has been interrupted.
14
man_05957613001_E_en.indb 14 02.03.2015 10:43:54
Page 19
1
To turn off the STOP-Warning, press either a or s for 3
seconds. You then hear a melody, con rming that the STOP-
Warning has been turned off. If you press the key too brie y, the
STOP-Warning will not be turned off.
Note For your safety, the volume of the STOP-Warning cannot
be changed. It is independent of the programmed beep
volume.
1.3 Keys and key combinations
You use the 4 keys on the Accu-Chek Spirit Combo insulin pump
to program functions, access information, and set up the pump.
Each time you press a key the pump will beep, unless
the beep tone is set OFF.
f OK key
d Menu key
a Up key
s Down key
15
man_05957613001_E_en.indb 15 02.03.2015 10:43:55
Page 20

The following table lists the keys and their functions.
Key Name Function
d Menu j Move through menus, function screens
and information screens
f OK j Select a menu
j Save changes and exit the function and
information screens
j View the QUICK INFO screen
a Up j Move forward in the information screens
j Increase a setting
j Turn on the backlight
j Program a Quick Bolus
j Cancel a Quick Bolus
j Turn off the STOP-Warning (press and
hold 3 sec. until you hear a melody)
Key Name Function
s Down j Move backward in the information
screens
j Decrease a setting
j Program a Quick Bolus
j Cancel a Quick Bolus
j Turn off the STOP-Warning (press and
hold 3 sec. until you hear a melody)
c CAUTION
Do not press the keys with a sharp or pointed item such as the
tip of your ngernail, as this could damage the casing of your
Accu-Chek Spirit Combo insulin pump. Instead, use the pad of
your ngertip to avoid puncturing the keys.
16
man_05957613001_E_en.indb 16 02.03.2015 10:43:55
Page 21

1
1.3.1 Combining keys
You can obtain additional functions by pressing 2 keys
simultaneously. In the following table, a plus symbol (+) indicates
that both buttons must be pressed at the same time.
Combination Function
d + a j Exits menus, function
screens and information
screens without saving your
changes.
j Moves you to a previous
menu.
d + s j Unlocks the keys. Press
and hold both buttons until
you hear 3 short beeps
(RUN mode) or 3 long beeps
(STOP mode).
a + s j Copies an hourly basal rate
to the following hour.
w WARNING
If the keys on your pump are not functioning properly,
disconnect your pump and contact your local pump support
(see inside back cover).
17
man_05957613001_E_en.indb 17 02.03.2015 10:43:55
Page 22

1.3.2 Scrolling
1.3.3 Locking the keys
To enter larger or smaller values, the a and s keys must
sometimes be pressed several times until the desired value is
shown, with each press of the key changing the gure by a small
increment. However, you can also press and hold the key
(scrolling function) to change the value faster. When programming boluses and hourly basal rates the increment of the value
change increases if you keep the a or s key pressed.
When you begin scrolling, the pump beeps once.
The Key Lock feature enables you to lock all 4 keys on your
Accu-Chek Spirit Combo insulin pump. This is a valuable safety
measure that prevents you from accidentally activating your
pump. For example, you can use Key Lock while you are asleep
or when playing sports.
You turn on the Key Lock function in the PUMP SETTINGS –
See section 5.6 Pump settings.
18
man_05957613001_E_en.indb 18 02.03.2015 10:43:55
Page 23

1
1.4 Accessories and disposables
High-quality sterile disposables and accessories are a vital
part of the Accu-Chek Spirit Combo insulin pump system, and
help to ensure safe pump therapy. Always follow the instructions
provided by your doctor or healthcare team – as well as the
printed instructions included with the product – relating to the
use of these items.
Note Use your insulin pump, sterile disposables and accesso-
ries for the rst time in the presence of your doctor or
healthcare team.
1.4.1 Sterile disposables
Each sterile disposable, such as cartridge or infusion set, should
be used only once, as re-using these products could lead to
infection or could damage your pump. Do not use a sterile
product if the package has been damaged or opened.
w WARNING
Your pump has been designed for use with U100 insulin. Only
use sterile disposables and accessories that are designed for
use with your Accu-Chek Spirit Combo insulin pump. The
correct functioning of your pump can only be guaranteed if you
use Accu-Chek brand sterile products and genuine Accu-Chek
Spirit Combo insulin pump accessories.
19
man_05957613001_E_en.indb 19 02.03.2015 10:43:55
Page 24

1.4.2 Adapter
vents
grip
seal
thread
Note It is essential to change the adapter at least every 2
months. You must also change the adapter if the seals
become worn, are lost, or if the vents are blocked.
1.4.3 Battery
Your pump requires one AA 1.5 V battery in order to function. Use
AA high-quality alkaline LR6 or lithium FR6 batteries that have a
minimum capacity of 2500 mAh. Do not use carbon zinc or nickel
cadmium (NiCd) batteries.
The adapter connects the cartridge to the infusion set, and also
keeps the cartridge compartment watertight with 2 seals, one
inside and one outside the adapter. It holds the cartridge in place
and prevents the entry of air bubbles. The 2 small vents on the
If you prefer, you can use rechargeable batteries – in this case,
use AA 1.2 V NiMH HR6 batteries with a minimum capacity of
2500 mAh. Always use a battery charger recommended by the
battery manufacturer. See Appendix A Technical Data p. 176.
adapter allow air pressure to be equalized inside and outside the
cartridge compartment. The adapter will not work properly if the
vents are blocked or dirty, or if the seals are missing.
20
man_05957613001_E_en.indb 20 02.03.2015 10:43:55
Page 25

1
c CAUTION
Use of batteries other than those recommended may signicantly reduce battery usage time. Such batteries may also
leak and corrode the battery contacts in your pump. They
could also lead to an electronic short circuit resulting in
dangerous heat development. The use of batteries not
supplied or recommended by Roche may void the warranty.
Before inserting rechargeable batteries make sure that they
are not damaged (e.g. damaged plastics isolation coating) or
leaking as damaged or leaking batteries could damage your
pump.
Note Always remember to remove the battery if your
Accu-Chek Spirit Combo insulin pump is not going to be
used for a long period, in order to conserve the battery.
Battery cover
The battery cover seals the battery compartment, and must be
changed at least every 2 months. You must remove and replace
the battery cover using the battery key – do not use knives,
screwdrivers or other sharp objects, as these may damage your
pump.
Battery key
The battery key tightens and loosens the battery cover. It is also
designed to loosen the luer-lock connection between the infusion
set and adapter if it cannot be loosened by hand, by using the
notch on the side. However, never use the battery key to attach
or tighten an infusion set. Using the battery key prevents
possible damage to the battery cover.
If you lose the battery key, or if it becomes cracked or worn, order
a replacement immediately, rather than using makeshift tools.
For a list of recommended accessories and disposables, see
Appendix C.
21
man_05957613001_E_en.indb 21 02.03.2015 10:43:55
Page 26

1.5 Emergency kit
It is highly recommended to keep accessories and disposables
with you in case of an emergency. This enables you to change
these items if necessary. Such an emergency kit should contain:
j An Accu-Chek infusion set
j A new AA alkaline or lithium battery
j An Accu-Chek Spirit 3.15 ml Cartridge System
j An insulin pen or syringe for alternative therapy
j A vial of insulin
j Treatment for low blood glucose levels
j Blood glucose monitoring equipment
(such as an Accu-Chek blood glucose meter)
j A disinfectant for skin
j A battery key
j A battery cover
j An adapter
w WARNING
Make sure that you have an alternative therapy plan, provided
by your healthcare professional. Use this plan whenever you
need to interrupt pump therapy.
22
man_05957613001_E_en.indb 22 02.03.2015 10:43:55
Page 27

1.6 General safety information
1
w WARNING
Always make sure to accurately program your personal settings
to avoid inappropriate insulin delivery. This phrase means that
either too much or too little insulin is delivered. Too much insulin
can lead to severe hypoglycaemia. Too little insulin can lead to
a life-threatening ketoacidosis.
w WARNING
Your insulin pump has not been tested with cardiac pacemakers.
For information about the safe use of your Accu-Chek
Spirit Combo insulin pump with a cardiac pacemaker, contact
the pacemaker manufacturer. For reference see Appendix A
Tables 201 – 205 .
c CAUTION
If you should drop your pump, immediately inspect it carefully
for damage. Do not use your Accu-Chek Spirit Combo insulin
pump if cracks or chips are visible – these may allow water,
dust, insulin or other foreign substances to enter the pump
and lead to malfunction.
23
man_05957613001_E_en.indb 23 02.03.2015 10:43:55
Page 28

24
man_05957613001_E_en.indb 24 02.03.2015 10:43:55
Page 29

2 Getting started
2
This chapter explains how to prepare your pump and begin
insulin pump therapy.
2.1 Before you begin
Successful insulin pump therapy requires you to check your
blood glucose levels frequently. It is therefore recommended that
you use an Accu-Chek blood glucose meter as often as directed
by your doctor or healthcare team (at least 4 times a day).
Your Accu-Chek Spirit Combo insulin pump has been designed
for use with the Meter. This intelligent blood glucose meter
enables communication with your pump using Bluetooth
wireless technology.
®
2.2 Inserting the battery
Your Accu-Chek Spirit Combo insulin pump turns on as soon as
you insert the battery. When you remove the battery, your pump
keeps track of the time and date for about one hour. Your insulin
pump settings (such as the hourly basal rates, bolus increment
and active user menu) and the event memory (bolus and alarm
history, history of daily insulin totals and Temporary Basal Rates)
are always saved, regardless of battery condition or the amount
of time your pump has been without a battery. See section
1.4.3 Battery for information on batteries (both disposable and
rechargeable types).
25
man_05957613001_E_en.indb 25 02.03.2015 10:43:55
Page 30
Procedure for inserting and changing the battery
1.
2.
Press d to move to the STOP YOUR
PUMP screen.
Press f to select. Your pump is now in
STOP mode and insulin delivery stops.
Remove or disconnect your infusion set
from the infusion site, to ensure that
there is no risk of accidental insulin
delivery.
3.
4.
Remove the battery cover.
Use the battery key to turn the battery
cover anti-clockwise. Make sure that the
opening of the battery compartment and
the seal are clean and undamaged.
Where appropriate, remove the old
battery.
Insert the battery, negative (–) end rst,
positive (+) end up, into the compartment.
26
man_05957613001_E_en.indb 26 02.03.2015 10:43:58
Page 31

2
5.
Place the cover on the positive end and
gently push the battery in, while turning
the cover clockwise to partially tighten it.
After inserting the battery, the pump begins its start-up process
(see section below).
In case the pump does not begin the start-up process after
inserting the battery, make sure that the battery is inserted
correctly (negative end rst).
6.
Use the battery key to fully tighten the
battery cover. You can verify that the
battery cover is correctly tightened by
checking that it is in line with the pump
casing. Do not over-tighten.
27
man_05957613001_E_en.indb 27 02.03.2015 10:43:59
Page 32

c CAUTION
To prevent water from entering the pump casing, only insert or
change the battery in a dry environment. Make sure that the
battery cover seal is not worn or missing, and that the battery
is correctly inserted.
Note If your pump was in RUN mode before you removed the
battery, the Error E8: POWER INTERRUPT will occur when
the new battery is inserted. Press f twice to conrm
and snooze the Error. Check the time and date and
correct them if necessary. Then put your pump into RUN
mode. See section 2.4 Setting the time and date.
28
man_05957613001_E_en.indb 28 02.03.2015 10:43:59
Page 33

2
2.3 Start-up process
Your pump runs a start-up process when you insert a battery or
when you change the cartridge. During this process, your pump
performs a series of internal tests.
When you … Then …
change only the
cartridge
the start-up process begins at the
SELF-TEST screen.
w WARNING
When you … Then …
change the battery the whole start-up process is
performed.
Start-up process sequence
1. 2. 3.
The software version screen appears. The Accu-Chek logo appears. The SELF-TEST screen appears.
Do not interrupt the start-up process by pressing keys or
otherwise handling the insulin pump. Interruption of the
process may lead to malfunction of your pump.
29
man_05957613001_E_en.indb 29 02.03.2015 10:44:00
Page 34

4. 5.
The BEEP TEST screen appears and your
pump beeps.
Listen for the beeps.
w WARNING
If you cannot hear the beeps from your
Accu-Chek Spirit Combo insulin pump,
you may not be notied of changes
within the pump in time to take action.
If you do not hear the beeps, stop
using the pump and contact your local
pump support. (See inside back cover)
The VIBRATION TEST screen appears and
your pump vibrates.
Check the vibrations.
w WARNING
If you cannot feel the vibrations, you
may not be notied of changes within
the pump in time to take action. If you
do not feel the vibrations, stop using
the pump and contact your local pump
support. (See inside back cover)
30
man_05957613001_E_en.indb 30 02.03.2015 10:44:00
6. 7.
The display then goes blank. Check that
the display is empty. (The backlight turns
on during this step.)
The display then shows a pattern. Check
that the pattern is even.
Page 35

8. 9. 10.
2
The display turns black. Check that the
display is completely black.
11.
The end of the start-up process is
signalled by a melody, and the pump
displays the STOP screen.
If your pump detects a Warning or an
Error during the start-up process, it
signals the Error or Warning at this point.
See section 8.3 List of Errors.
The STOP-Warning occurs every minute.
To turn the STOP-Warning off, press a
or s until you hear a melody and / or feel
a vibration.
When you use your pump for the rst
time or have not used it for a longer time,
you will be guided automatically to the
TIME AND DATE SETTINGS option after
step 10 (see next page).
After the self-test, press a or s to
select the type of battery you inserted.
Press f to save and exit.
c CAUTION
Make sure that you choose the correct
battery type. Otherwise you may not be
informed about a low battery in time.
31
man_05957613001_E_en.indb 31 02.03.2015 10:44:00
Page 36

2.4 Setting the time and date
It is essential to set the time and date correctly, because basal
rates and history information are stored on the basis of the time
and date set in the pump. When you travel across time zones,
make sure that the time and date are re-set correctly.
You can choose between American or European / Military time.
American European / Military
12-hour clock 24-hour clock
month / day / year day / month / year
w WARNING
Incorrect setting of the time and date can lead to incorrect
basal insulin delivery. Make sure that the time and date of
your pump are set correctly, to ensure correct delivery and
data memory. Do not make therapy decisions based on a
single result in the pump’s memory.
w WARNING
In addition, if you, your doctor, or healthcare team are
reviewing your data electronically, it is essential that you
synchronize the time and date of your pump with those of
your blood glucose meter, your personal computer or
handheld device. Otherwise, the resulting data might not be
meaningful. Check these devices regularly to ensure that the
settings remain synchronized.
32
man_05957613001_E_en.indb 32 02.03.2015 10:44:00
Page 37

Procedure for setting the time and date
1. 2. 3.
2
Press d to move to the TIME AND DATE
SETTINGS screen.
Press f to select.
4. 5. 6.
Press d to move to the YEAR screen.
Press a or s to set the year.
The HOUR screen is displayed.
Press a or s to set the hour.
Press d to move to the MONTH screen.
Press a or s to set the month.
Press d to move to the MINUTE screen.
Press a or s to set the minute.
Press d to move to the DAY screen.
Press a or s to set the day.
33
man_05957613001_E_en.indb 33 02.03.2015 10:44:00
Page 38

8.7.
Press d to move to the TIME FORMAT
screen.
Press a or s to set the time format.
34
Press d to move to the DATE FORMAT
screen.
Press a or s to set the date format.
Press f to save and exit.
man_05957613001_E_en.indb 34 02.03.2015 10:44:01
Page 39

2.5 Your basal rate prole
2
Your Accu-Chek Spirit Combo insulin pump must be programmed
with your personal settings before you begin pump therapy. Your
doctor or healthcare team can help you to understand how to use
the pump.
2.5.1 Programming your basal rate prole
Your Accu-Chek Spirit Combo insulin pump delivers insulin
according to the programmed hourly basal rate, 24 hours a day.
This ow of insulin, measured in international units per hour
(U / h), is called the basal rate prole and is calculated to meet
your basic insulin needs.
The pump can store up to 5 different basal rate proles to match
your changing insulin needs – for example: Monday to Friday,
Exercise Day or Sleeping Late Day.
Note For your safety and convenience during programming,
your Accu-Chek Spirit Combo insulin pump switches to
RUN or STOP screen if no key is pressed within 20 seconds. Any changes you have made before this “time-out”
occurs will not be saved.
An Accu-Chek Spirit Combo basal rate prole consists of up to
24 different hourly basal rates. Each hourly rate may be changed
independently. The total of all 24 basal rates in one basal rate
prole is called the (daily) basal rate total.
Example: Basal rate prole for 18 U / 24 hours
Insulin delivery
[U / h]
012345678910 11 12 13 14 15 16 17 18 19 20 21 22 23 24
Hourly basal rate
Time
35
man_05957613001_E_en.indb 35 02.03.2015 10:44:01
Page 40

Your basal rate prole should be reviewed:
j After any programming changes are made to your pump
j After a new battery is inserted
j After conrming the Error E7: ELECTRONIC ERROR.
Note Insulin delivery does not stop or pause during basal
rate programming.
Procedure for programming your basal rate prole
1. 2.
Press d to move to the BASAL R ATE
Press f to select.
3.
Press d to move to the rst hour.
PROGRAMMING 1 (2, 3, 4 or 5 accordingly) screen.
The daily BASAL RATE TOTAL is displayed.
This is always 00:00 – 01:00
(12 AM – 01 AM if the American time
format is used).
36
man_05957613001_E_en.indb 36 02.03.2015 10:44:01
Page 41

2
4.
Press a or s or scroll to set the
hourly basal rate given by your doctor or
healthcare team.
6.
Continue using d and a or s to set
the hourly basal rates for the remaining
hours. This allows you to program your
individual basal rate prole on an
hour-by-hour basis. Continue until all
24 hours are programmed.
Note The increments shown depend on
the programmed basal rate: it will
be
0.01 U from 0.05 U to 1.00 U,
0.05 U from 1.00 U to 10.0 U and
0.1 U from 10.0 U to 50.0 U
7.
Press f to conrm.
The new daily BASAL RATE TOTAL is
displayed.
5.
Press d to move to the next hour.
Press f to save the prole and exit.
37
man_05957613001_E_en.indb 37 02.03.2015 10:44:01
Page 42

Copying an hourly basal rate
If your basal rate is the same for multiple
hours in a row, you can save time by
copying an hourly basal rate to one or
more hours.
1.
Press d to move to the BASAL R ATE
PROGRAMMING 1 (2, 3, 4 or 5 accordingly) screen.
2.
Press f to select.
The daily BASAL RATE TOTAL is
displayed.
3.
4. 5.
If you want to copy the rate to multiple
hours, press a and s repeatedly or
press and hold a and s (scroll).
Press d to move to the hourly basal
Press a and s simultaneously.
rate you want to copy.
A special beep conrms that you are
pressing the keys correctly. The same
hourly basal rate is copied to the next
hour.
38
man_05957613001_E_en.indb 38 02.03.2015 10:44:01
Page 43

2
6.
Press f to conrm.
Check the new daily BASAL RATE TOTAL.
Press f to save and exit.
Note At any point in the programming of your basal rate, you have the following options
to exit.
If you want to … Then …
save the changes j Press f and check the new daily basal rate total.
j Press f again. Your pump returns to the RUN or STOP
screen.
undo the changes j Wait for your Accu-Chek Spirit Combo insulin pump to
return to the RUN or STOP screen, or
j Press d and a simultaneously (exit feature) to exit
the Function screen.
39
man_05957613001_E_en.indb 39 02.03.2015 10:44:02
Page 44

Selecting a basal rate prole
When you have programmed more than
one basal rate prole (ADVANCED or
CUSTOM MENU), you can select the
required prole.
1. 2.
Press d to move to the BASAL R ATE
SELECTION screen.
Press f to select.
The SELECT PROFILE for the current
basal rate prole is displayed.
3.
Press a or s to select a basal rate
prole.
The SELECT PROFILE screen and its daily
basal rate total appear accordingly.
40
man_05957613001_E_en.indb 40 02.03.2015 10:44:02
4.
Press f to select the displayed prole.
The new basal rate prole is active
immediately.
w WARNING
Make sure that you select an appropri-
ately programmed basal rate prole.
Otherwise there could be inappropriate
insulin delivery.
Page 45

2
Note When you change your user menu for example from
ADVANCED to STANDARD, your current basal rate prole
may not appear.
If the basal rate prole number(s) you want does not appear:
j Select the ADVANCED user menu, or
j Assign the basal rate prole to an available basal rate
prole number
A running Temporary Basal Rate increase or decrease
stays active, even if you change the basal rate prole on
your pump.
Basal rate and bolus
During normal use, your pump is in RUN mode and insulin is
continuously delivered to your body, according to the basal rate
prole you have programmed.
A bolus can be programmed as required. A bolus is the amount
of insulin delivered (in addition to the basal rate) to cover the
intake of food and to correct high blood glucose levels. The bolus
amount is determined by your doctor or healthcare team’s
guidelines and depends on your blood glucose level, your food
intake, and your activity level, as well as stress and illness. See
section 4.1 Understanding boluses.
41
man_05957613001_E_en.indb 41 02.03.2015 10:44:02
Page 46

2.6 Connecting the cartridge, adapter
and infusion set
Before you change the cartridge, adapter or infusion set,
check that your pump is in good working order.
See section 7.1.1 Checklist.
Insulin can ow uncontrolled from the cartridge or infusion set if
the cartridge plunger and the piston rod are not properly
connected and the pump is positioned at a higher level than the
infusion site. Prevent leakage of insulin by correctly inserting the
cartridge: move the piston rod to the correct position and twist
the adapter until the cartridge plunger is aligned with the end
plate of the piston rod. (See section 3.5 Changing the cartridge
and infusion set).
Have the following materials ready:
j A lled Accu-Chek Spirit 3.15 ml Cartridge System with a
luer-lock connection (for lling instructions see the instructions
for use provided with this product)
j An Accu-Chek Spirit Combo insulin pump adapter
j A new Accu-Chek infusion set
w WARNING
Ensure that the cartridge is at room temperature before use
to prevent from air bubbles.
42
man_05957613001_E_en.indb 42 02.03.2015 10:44:02
Page 47

Procedure to connect the cartridge, adapter and infusion set
2
1. 2.
Remove the protective cap from the
cartridge. (Do not touch the cartridge tip.)
4.
Hold the adapter and twist the infusion
set luer-lock connection by hand,
clockwise into the adapter. Do not
over-tighten.
Push the adapter all the way onto the
cartridge tip, to the stop.
w WARNING
To avoid leakage, tightly attach the infusion set to the
adapter. Turn the infusion set luer-lock connector until it
stops. Do not over-tighten or use any auxiliary tools, as this
may crack the infusion set luer-lock connector and result
in leakage of insulin.
3.
Carefully prepare a new Accu-Chek
infusion set, following the instructions
supplied for use.
43
man_05957613001_E_en.indb 43 02.03.2015 10:44:04
Page 48

2.7 Inserting the cartridge
Have the following materials ready:
j A lled Accu-Chek Spirit 3.15 ml Cartridge System with a
connected Accu-Chek Spirit Combo insulin pump adapter
j A new Accu-Chek infusion set
Procedure for inserting the cartridge
1. 2.
Press d to move to the STOP YOUR
PUMP screen.
Press f to select.
The pump displays the STOP screen, and
insulin delivery stops.
w WARNING
Do not use your pump for the delivery of medication other than
U100 short-acting regular human insulin or rapid-acting insulin
analogue.
3.
Disconnect the infusion set.
44
man_05957613001_E_en.indb 44 02.03.2015 10:44:05
Page 49

2
4.
Remove the cartridge, if necessary.
Unscrew carefully. Do not pull the
cartridge out until it is completely
unscrewed.
7.
The piston rod begins to return. Do not
touch or otherwise disturb the piston rod
while it is rewinding, as this could result
in damage to your pump.
5.
Press d to move to the CARTRIDGE
CHANGE screen.
Press f to select.
8.
When the piston rod has returned
completely, the CARTRIDGE VOLUME
screen displays the maximum volume,
315 U.
6.
Make sure your infusion set is disconnected and the cartridge has been
removed.
Press and hold f for 3 seconds, until
you hear a melody.
c CAUTION
Do not change the cartridge if the
cartridge compartment is not completely
dry. When the piston rod is rewinding,
insulin solution could enter your pump
and lead to malfunction. If necessary,
use a soft cloth to dry the compartment.
45
man_05957613001_E_en.indb 45 02.03.2015 10:44:06
Page 50

9.
10.
Hold your pump upright. Hold the new
see step 10
lled cartridge so that the connected
adapter and infusion set points upwards,
parallel, and close to the cartridge
compartment.
46
see step 11
Make sure that the top edge of the
threaded part of the adapter is level with
the top of the cartridge compartment.
12.11.
Press a or s to move the piston rod
forward until the end plate of the piston
rod is level with the bottom of the
cartridge plunger.
The CARTRIDGE VOLUME decreases
accordingly on the display.
Tip: To prevent air bubbles move the
piston rod to at least 310 Units.
man_05957613001_E_en.indb 46 02.03.2015 10:44:07
Page 51

13. 14.
Position your insulin pump upright (with
the adapter pointing upwards). Insert the
cartridge into the cartridge compartment.
Twist (do not push) the adapter clockwise
until it is correctly seated against the
cartridge compartment.
2
It is not necessary to apply pressure.
Do not over-tighten the adapter, other-
wise it will be dif cult to remove the
cartridge, adapter and cartridge plunger,
and could cause damage to your pump.
15.
The cartridge is correctly inserted when
the end plate of the piston rod is correctly
seated against the cartridge plunger.
man_05957613001_E_en.indb 47 02.03.2015 10:44:10
16.
If the end plate of the piston rod is not
correctly aligned with the cartridge
plunger, remove the cartridge from the
cartridge compartment and repeat steps
9 to 14.
17.
Check that the infusion set luer-lock
connector is still correctly connected to
the adapter. Tighten the infusion set
clockwise by hand until it sits tightly in
the adapter.
47
Page 52

18.
19.
See section 2.8 Priming the infusion set.
Start from step 4 in the Procedure for
priming the infusion set.
Press f after correctly inserting the
cartridge.
Your pump performs a self-test. See
section 2.3 Start-up process.
c CAUTION
If an empty cartridge is inserted into the pump (e.g. for training
purposes), the pump displays the programmed insulin deliveries
(infusion set priming, basal rate and bolus deliveries), even
though no insulin is being delivered due to the empty cartridge.
48
When the self-test process is nished,
the INFUSION SET PRIMING screen is
displayed.
man_05957613001_E_en.indb 48 02.03.2015 10:44:10
Page 53

2.8 Priming the infusion set
2
w WARNING
Never prime an infusion set that is connected to your body as
you risk uncontrolled insulin delivery into your body. Always
follow the instructions for the infusion set you are using.
The Accu-Chek Spirit Combo insulin pump stops priming at
25 units of insulin. If no insulin emerges from the needle or there
are air bubbles in the tubing after priming, repeat the priming
function until the infusion set is bubble-free and completely lled
with insulin. When insulin appears at the tip of the needle, press
f to stop priming. The amount of insulin used for priming is
not added to the pump’s history of daily insulin totals.
Your pump should be upright during priming, with the adapter
pointing upwards to help let air bubbles out of the cartridge and
infusion set.
w WARNING
Air bubbles in the cartridge and infusion set may result in the
infusion of air instead of insulin. If this happens, your body
will not receive the required amount of insulin. Remove
bubbles while lling the cartridge and priming the infusion
set, and without having the infusion set connected to your
body.
49
man_05957613001_E_en.indb 49 02.03.2015 10:44:10
Page 54

Procedure for priming the infusion set
1. 2. 3.
Press d to move to the STOP YOUR
PUMP screen.
Press f to select.
4.
Press d to move to the INFUSION SET
PRIMING screen.
Press f to select. The priming amount
of 25 units of insulin is shown on the
display.
50
The pump displays the STOP screen, and
insulin delivery stops.
5.
Make sure your infusion set is disconnected.
Press and hold f for 3 seconds, until
you hear a melody. The priming process
begins.
Prepare the tubing or cannula for priming
according to the infusion set’s instructions for use.
6.
To ensure that any air bubbles are
removed always hold your pump upright
and, gently tap it with the bottom in the
palm of your hand.
man_05957613001_E_en.indb 50 02.03.2015 10:44:11
Page 55

7.
A count-up is shown on the display. Your
pump stops priming after 25 units.
You can stop the priming process at any
time by pressing f.
2
The infusion set is properly primed when there are no air bubbles
visible in the tubing and a drop of insulin has come out of the
needle. When the priming process is complete, your pump
returns to STOP.
51
man_05957613001_E_en.indb 51 02.03.2015 10:44:11
Page 56

2.9 Positioning the infusion set
Always follow the instructions given to you by your doctor or
healthcare team and the instructions for the infusion set you
are using.
Change your infusion set as frequently as recommended by the
manufacturer.
2.9.1 Preparing the infusion site
Infusion site selection
Your doctor or healthcare team will help you choose your infusion
site areas according to a planned rotation pattern. Avoid your
waistline, bones, scar tissue, recent infusion sites, bruises and
sores. Choose an infusion site at least one inch (2.5 cm) away
from the navel and previous infusion sites.
Infusion site preparation
It is important to prepare the infusion site properly to reduce the
risks of infection. Your doctor or healthcare team will provide you
with infusion site preparation guidelines.
Have the following materials ready:
j Your Accu-Chek Spirit Combo insulin pump
j A disinfectant for your skin
j A new Accu-Chek infusion set
52
man_05957613001_E_en.indb 52 02.03.2015 10:44:11
Page 57

2.9.2 Inserting the cannula
2
1.
Make sure that your pump is properly
connected (including cartridge, adapter
and infusion set) and correctly programmed with your personal settings.
3.
Wash your hands thoroughly. Disinfect the infusion site and let it dry
4.
completely.
2.
Make sure your pump is in STOP mode.
5.
Insert the cannula of your Accu-Chek
infusion set according to the instructions.
53
man_05957613001_E_en.indb 53 02.03.2015 10:44:14
Page 58

Note If you use a soft-cannula type infusion set, you must
proceed with a bolus to ll the air space in the cannula
and headset, according to the instructions for the infusion
set you are using. Failure to do so could result
in missed insulin dosing. See section 4.2 Programming
a Standard Bolus.
w WARNING
Inspect your infusion site at least twice a day for irritation or
infection. Signs of infection may include, but are not limited
to: pain, lumps, redness, heat, or discharge.
If you see redness or swelling, change your infusion set and
infusion site immediately and contact your doctor or
healthcare team.
Change your infusion headset according to the instructions for
the infusion set you are using and your doctor or healthcare
team’s recommendations.
If you have read and followed all instructions, cautions, warnings
and notes found in this chapter, you should now be ready to
deliver insulin to your body using your Accu-Chek Spirit Combo
insulin pump.
54
man_05957613001_E_en.indb 54 02.03.2015 10:44:14
Page 59

2.10 Starting insulin delivery
Procedure for starting insulin delivery
1. 2. 3.
2
Your pump is in STOP mode. Press d to move to the START YOUR
PUMP screen.
man_05957613001_E_en.indb 55 02.03.2015 10:44:15
Press f to select. Your pump shows the
RUN screen.
Insulin delivery begins within 3 minutes.
55
Page 60

2.11 Stopping insulin delivery
For your safety, you must only perform certain functions and
actions when the pump is in STOP mode. These functions and
actions include:
j changing the cartridge
j connecting and disconnecting the adapter and / or infusion set
j priming the infusion set
j data transfer
Procedure to stop insulin delivery
1. 2.
Press d to move to the STOP YOUR
PUMP screen.
Press f to select. Your pump returns to
the STOP screen.
Your pump is now in STOP mode.
No insulin is being delivered.
c CAUTION
When your Accu-Chek Spirit Combo insulin pump is in STOP
mode, no insulin is delivered to your body. You must put your
pump into RUN mode to continue insulin delivery.
56
man_05957613001_E_en.indb 56 02.03.2015 10:44:15
Page 61

2.12 General safety information
2
STOP-Warning
The STOP-Warning is triggered when your pump switches from
RUN mode to STOP mode, or when a battery is inserted. The
pump emits 2 short beeps and vibrates once every minute. This
warns you that insulin delivery has been interrupted.
To turn off the STOP-Warning, press either a or s for 3
seconds. You then hear a melody and / or feel a vibration,
conrming that the STOP-Warning has been turned off.
If you press the key too briey, the STOP-Warning will not be
turned off.
Note For your safety, the volume of the STOP-Warning cannot
be changed. It is independent of the programmed beep
volume.
w WARNING
The cartridge and infusion set are sterile products intended
for single use only. Sterility is guaranteed for unopened
packaging up to the indicated expiry date. Do not use sterile
products if the packaging is damaged.
Do not re-use single-use materials because this might lead to
a malfunction of your Accu-Chek Spirit Combo insulin pump,
incorrect insulin delivery and / or infection. Always handle
these items with clean hands. Avoid any contact of the
infusion set and the connecting parts of your insulin pump
with antiseptics, antibiotic creams, soaps, perfumes,
deodorants, body lotions, or any other cosmetics. They may
contaminate these parts.
57
man_05957613001_E_en.indb 57 02.03.2015 10:44:15
Page 62

w WARNING
w WARNING
Always check your personal settings before using your new
pump, in order to avoid incorrect insulin delivery. Record your
personal settings from your current insulin pump, and ensure
that they are correctly programmed into your new Accu-Chek
Spirit Combo insulin pump. Incorrect programming of your
pump may cause incorrect insulin delivery.
Do not use the pump without knowing your personal settings.
If you are not sure about your settings or you are inexperienced, ask your doctor or healthcare team to set or check
them. Only change your settings after consulting your doctor
or healthcare team.
The support of a doctor or healthcare team is vital when
training on and using your Accu-Chek Spirit Combo insulin
pump. Regular visits to your doctor or healthcare team are also
essential during insulin pump therapy. Always carefully follow
instructions from the medical professionals responsible for your
care.
Note When an Extended Bolus, a Multiwave Bolus and / or a
Temporary Basal Rate (TBR) is / are active and you put
your pump into STOP mode, a Warning W6: TBR CANCELLED and / or a Warning W8: BOLUS CANCELLED
occur(s). Press f twice for each Warning to conrm and
turn them off. See section 8.2 List of Warnings.
58
man_05957613001_E_en.indb 58 02.03.2015 10:44:15
Page 63

Note Your pump cannot detect infusion set leakage. If you
detect any loss of insulin and all parts are correctly
tightened, immediately replace the leaking component.
Because insulin delivery has been interrupted, check your
blood glucose level and take appropriate action according
to your doctor’s or healthcare team’s instructions.
Note If the battery is too low, the start-up process may not be
able to complete. In this case, the pump beeps ve tones
and keeps restarting the process until you remove the
battery or until it is empty.
Note Check the amount of insulin remaining in the cartridge at
least once a day. If you press f from the RUN or STOP
screen, your pump displays the remaining cartridge
content in units.
Before going to sleep, make sure that:
j the cartridge contains enough insulin to last through
the night
j the time and date are set correctly
2
59
man_05957613001_E_en.indb 59 02.03.2015 10:44:15
Page 64

60
man_05957613001_E_en.indb 60 02.03.2015 10:44:15
Page 65

3 Using your pump in daily life
3
This chapter provides important guidelines on how to use your
pump safely from day to day.
3.1 Wearing your pump
Attach your pump safely to your body or clothes to prevent
damage. You can use one of our special carrying systems that
enable you to carry your pump on or under your clothes. Wear
your pump under your clothes or directly on your body to protect
it from hot, cold or wet weather.
c CAUTION
When wearing your pump, prevent any contact with objects that
could damage it or accidentally press its keys (e.g. key chains,
keys, pocket knives or coins).
3.1.1 When not to wear your pump
Electromagnetic elds and hazardous areas
w WARNING
Do not use your pump near electromagnetic elds such as
radar or antenna installations, high-voltage sources, X-Ray
sources, computer tomography, MRI, CAT scan, and all other
sources of electrical current, as they may cause your pump to
fail. Insulin delivery may stop and an Error E7: ELECTRONIC
ERROR may occur.
Always stop your pump, remove and leave it outside these
areas. See Appendix A: Technical Data for more information
about electromagnetic elds.
61
man_05957613001_E_en.indb 61 02.03.2015 10:44:15
Page 66

Your pump has been tested against, and complies with, the
regulations on electromagnetic interference. Security systems in
airports and anti-theft monitoring devices, such as those in
department stores, should not normally affect the functioning of
your pump.
Because there are so many devices, such as cellular phones,
that emit electromagnetic radiation, the effect of such devices on
your pump cannot be ruled out. It is therefore recommended to
keep your pump at least 4 inches (10 cm) away from these
devices while they are active.
Do not use your pump in hyperbaric chambers or in hazardous
areas, such as areas where ammable gases or vapours could
be present. This could cause an explosion.
Always stop and remove your pump before you enter these
areas. If you have questions, contact your local pump support
(see inside back cover).
Your pump is designed to work in normal barometric conditions
(from 500 to 1060 mbar).
3.1.2 Sport and exercise
Exercise is an important part of diabetes management. Your
Accu-Chek Spirit Combo insulin pump is designed to enable you
to safely perform a range of sporting activities while wearing
your pump. It is important that you protect your pump before you
begin exercise or sporting activities. Do not wear your pump
for sports that involve body contact such as boxing, football or
hockey, since rough contact could damage your pump.
Consult our sterile product brochures and accessories catalogue
for more information about carrying systems or contact your
local pump support (see inside back cover) for more information.
62
man_05957613001_E_en.indb 62 02.03.2015 10:44:15
Page 67

3
Note Rapid and extreme changes in air pressure, for example
in an air plane that is taking off or when practising sports
like hang-gliding, can inuence insulin delivery, especially
if there are air bubbles in the cartridge or tubing. This also
applies to rapid and extreme changes in temperature; for
example, when leaving a heated room and going outside
in cold weather.
We therefore recommend that you wear your pump close
to your body, remove any air bubbles from the cartridge
and tubing and also measure your blood sugar more
frequently in such situations.
3.1.3 Travelling with your pump
Ask your doctor or healthcare team about any special steps you
need to take before you travel. Take extra blood glucose testing
and pump supplies with you, and nd out where to obtain
supplies while you are travelling.
When you travel across time zones, make sure that the time and
date on your pump are set correctly to the local time.
If you have questions, contact your local pump support
(see inside back cover).
w WARNING
®
You must ensure that the Bluetooth
before boarding an aircraft, as emissions from your pump or
the Meter could interfere with the electronics systems of the
aircraft. See section 6.2 Switching Bluetooth ® ON and OFF.
function is switched off
63
man_05957613001_E_en.indb 63 02.03.2015 10:44:15
Page 68

3.2 Interruption of insulin pump
therapy
Consult with your doctor or healthcare team about when and for
how long your insulin pump therapy can be interrupted.
Measure your blood glucose level regularly during any insulin
delivery interruption. Use a syringe or insulin pen to inject insulin
according to the instructions of your doctor or healthcare team.
w WARNING
Because only fast- or rapid-acting insulin is used for insulin
pump therapy, only a small amount of insulin is stored in the
body. If insulin delivery is interrupted for any reason – such as:
j If you stop the pump
j There is a technical problem with the pump
j The cartridge is leaking and /or the infusion set is leaking
j There is an occlusion in the infusion set or in the headset
j The cannula has slipped out of the infusion site –
you must replace the missing insulin immediately.
64
man_05957613001_E_en.indb 64 02.03.2015 10:44:15
Page 69

3.2.1 Short interruptions
1. 2.
3
3.
Press d to move to the STOP YOUR
PUMP screen.
Resuming insulin delivery
Press f to put your pump in STOP
mode. Remove the infusion set or, when using a
disconnectable infusion set, disconnect
the transfer set from the headset and use
the protective covers that came with it.
1.
Reconnect your infusion set or insert a
new one and put your pump into RUN
mode.
Where appropriate, attach a new
Accu-Chek infusion set. (See section
3.4 Changing the infusion set).
Measure your blood glucose level within
2 hours of restarting pump therapy to
check the function of the system and to
ensure insulin delivery.
65
man_05957613001_E_en.indb 65 02.03.2015 10:44:17
Page 70

3.2.2 Long interruptions
When you need to interrupt your pump
therapy for more than one day, use the
following procedure.
1.
Put your pump into STOP mode.
4.3.
2.
Remove the cartridge, adapter, and
infusion set.
Reinsert the adapter.
Remove the battery and reinsert the
battery cover.
Store your pump properly.
See section 7. 6 Storing your pump.
66
man_05957613001_E_en.indb 66 02.03.2015 10:44:19
Page 71

3.3 Your insulin pump and water
3
c CAUTION
Before any contact with water, disconnect and take off your
Accu-Chek Spirit Combo insulin pump. Check your pump daily
to ensure that it is not chipped, cracked or damaged in any
way, and that the battery cover and the adapter are correctly
closed. Otherwise water, dust, insulin, or other substances
may enter your pump and lead to malfunction.
Disconnect and remove your pump before taking a bath, or going
into a whirlpool, shower or swimming pool. Avoid exposing your
pump to high humidity, such as in a sauna, as this could result in
damage. To make it easy to remove your pump, use disconnectable Accu-Chek infusion sets.
3.3.1 Accidental contact with water
Your Accu-Chek Spirit Combo insulin pump is protected against
brief accidental contact with water. Examples of accidental water
contact include:
j Rain
j Water splashes while you are cycling, jogging or hiking
j Accidental immersion in the sink, washbasin or bath
67
man_05957613001_E_en.indb 67 02.03.2015 10:44:19
Page 72

What to do after any water contact
Put your pump into STOP mode, disconnect the pump from your
body, and inspect it. Use a soft cloth to dry the outside of the
pump, and check the battery compartment and the cartridge
compartment for water. If the battery compartment or cartridge
compartment are wet, turn your pump upside down to let the
water run out and leave it to dry. Do not use warm air such as
a hair dryer to dry the pump, as this could damage the pump’s
housing. Do not reinsert the battery or the cartridge until the
compartments are completely dry. See section 7. 5 .1 Cleaning
your pump.
Other liquids
You do not need to worry about contact between your pump and
perspiration or saliva. You must however check your pump
immediately after contact with other liquids or chemicals such as:
j Cleaning solutions
j Alcohol
j Beverages
j Oil or fat
See section 7. 5 .1 Cleaning your pump.
c CAUTION
Avoid any contact between your Accu-Chek Spirit Combo
insulin pump, the infusion set, and the connecting parts of
your insulin pump with health and beauty products (for example:
antiseptics, antibiotic creams, soaps, perfumes, deodorants,
body lotions, or other cosmetics). These substances could
discolour your pump or fog the display.
68
man_05957613001_E_en.indb 68 02.03.2015 10:44:19
Page 73

3.4 Changing the infusion set
3
When you change the infusion set, keep the following information
in mind:
j Infusion sets are sterile products intended for single use only.
Sterility is guaranteed for unopened packaging up to the
indicated expiry date. Do not use sterile products if the
package is damaged.
j Correctly tighten the infusion set onto the adapter to avoid
leakage. Turn the infusion set luer-lock connector until it stops.
Do not turn it any further and do not use auxiliary tools, as this
may crack the infusion set luer-lock connector and result in
leakage.
j Your pump cannot detect infusion set leakage. You should
inspect all parts of your infusion set regularly during the day
and before you go to sleep. If there seems to be any loss of
insulin and all parts are correctly tightened, look for and
immediately replace a leaking component. Check your blood
glucose level immediately, as insulin delivery has been
interrupted. Take appropriate action according to your doctor’s
or healthcare team’s instructions.
j Always disconnect your infusion set before changing a
cartridge or priming the infusion set. Otherwise, you risk
uncontrolled insulin delivery into your body. Always follow the
instructions for the infusion set and cartridge system you are
using.
69
man_05957613001_E_en.indb 69 02.03.2015 10:44:19
Page 74

Procedure for changing the infusion set
Have the following materials ready:
j Your Accu-Chek Spirit Combo insulin
pump
j A disinfectant for your skin
j A new Accu-Chek infusion set
3.
Disconnect the transfer set from the
headset.
Make sure your pump is in STOP mode.
4.
Remove the infusion set from the adapter
and dispose of it correctly.
2.1.
Wash your hands thoroughly.
5.
Tip: The battery key has a notch that ts
all Accu-Chek infusion set luer-lock
connectors. You can use this to loosen
the luer-lock connector from the adapter
if it cannot be loosened by hand.
70
man_05957613001_E_en.indb 70 02.03.2015 10:44:21
Page 75

3
6.
Remove the used infusion headset and
dispose of it correctly.
9. 10. 11.
Prime the infusion set following the
instructions found in section 2.8 Priming
the infusion set. Prepare the infusion site and insert a new
7.
Carefully prepare a new Accu-Chek
infusion set for use.
infusion set following the instructions in
section 2.9 Positioning the infusion set.
8.
Screw the Accu-Chek infusion set
clockwise into the adapter.
Carefully tighten the luer-lock connector
by hand.
Put the pump in RUN mode. See
section 2.10 Starting insulin delivery.
71
man_05957613001_E_en.indb 71 02.03.2015 10:44:24
Page 76

Note If you use a soft-cannula type infusion set, you must
begin with a bolus to ll the air space in the cannula and
headset, according to the instructions for the infusion set
you are using. Failure to do so could result in inadequate
insulin dosing. See section 4.2 Programming a Standard
Bolus.
w WARNING
Inspect your infusion site at least twice each day for irritation
or infection. Signs of infection may include, but are not limited
to: pain, lumps, redness, heat, or discharge. If you see
redness or swelling, change the infusion headset and the
infusion site immediately and contact your doctor or
healthcare team.
Change the headset according to the instructions for the
infusion set you are using and your doctor or healthcare
team’s recommendations.
72
man_05957613001_E_en.indb 72 02.03.2015 10:44:24
Page 77

3.5 Changing the cartridge and
infusion set
Have the following materials ready:
j Your Accu-Chek Spirit Combo insulin pump
j A disinfectant for your skin
j A new Accu-Chek infusion set
j A lled Accu-Chek Spirit 3.15 ml Cartridge System
j A new adapter (this must be changed at least every
2 months)
Procedure for changing the cartridge and infusion set
2.1. 3.
Make sure your pump is in STOP mode.
3
Wash your hands thoroughly. Remove the transfer set from the
headset.
73
man_05957613001_E_en.indb 73 02.03.2015 10:44:26
Page 78

4 .
5.
Note Pulling the adapter from the pump
casing without completely
unscrewing it may result in the
plunger staying attached to the
piston rod. If this should happen,
please call your local pump
support (see inside back cover).
Hold your Accu-Chek Spirit Combo insulin
pump with the adapter pointing downwards.
6.
Remove the adapter and cartridge from
your pump by unscrewing the adapter
from the pump casing.
7.
Tip: The battery key has a notch that
Remove the transfer set from the adapter
and dispose of it correctly. Remove the cartridge from the adapter
ts all Accu-Chek infusion set luer-lock
connectors. You can use the battery
key to loosen the luer-lock connector
and dispose of the cartridge properly.
between your infusion set and adapter.
74
man_05957613001_E_en.indb 74 02.03.2015 10:44:29
Page 79

3
8.
Hold the adapter to the light to check for
signs of wear or dirt (especially on the
seals inside and outside of the adapter).
9.
If necessary, clean the adapter using
water and dry it. If it shows signs of wear
or dirt, replace it immediately.
10.
Insert a new cartridge and a new infusion
set. See section 2.7 Inserting the
cartridge.
75
man_05957613001_E_en.indb 75 02.03.2015 10:44:31
Page 80

3.6 General safety information
w WARNING
Always carry spare sterile products and accessories (infusion
set, insulin cartridge, batteries), an insulin pen/syringe, and
insulin. Without insulin, diabetic ketoacidosis may develop
and may require in-patient hospital treatment.
c CAUTION
Do not place your insulin pump in direct sunlight. Overheating
of the insulin and the pump must be avoided. Protect your
insulin pump from direct exposure to cold wind and temperatures over 104 °F (40 °C) and below 41 °F (5 °C). These
conditions may damage the insulin and the housing of your
insulin pump, and could also cause a malfunction of the
battery. See the instructions for the insulin you are using to
determine the acceptable temperature range.
Note Check the amount of insulin remaining in the cartridge at
least once a day. Press f from the RUN or STOP screen
to display the remaining cartridge content in units. Before
going to sleep, make sure that:
j The cartridge contains enough insulin to last through
the night
j The battery level is OK
j The time and date are set correctly
76
man_05957613001_E_en.indb 76 02.03.2015 10:44:31
Page 81

4 Boluses and Temporary Basal Rates
4
4.1 Understanding boluses
A bolus is the amount of insulin delivered (in addition to the basal
rate) to cover the intake of food and to correct high blood glucose
levels. The bolus type and amount is determined by your doctor
or healthcare team’s guidelines, your blood glucose level, your
food intake, your health condition, and your activity level.
Discuss the timing, the amount and type of bolus you need with
your doctor or healthcare team.
Your pump can deliver 3 types of bolus:
Standard Bolus fast delivery
Extended Bolus delivery over a programmed period
of time
Multiwave Bolus combines fast delivery with delivery
over a programmed period of time
77
man_05957613001_E_en.indb 77 02.03.2015 10:44:31
Page 82

4.2 Programming a Standard Bolus
There are 2 ways to program a Standard Bolus:
Quick Bolus Using a and s on your insulin
pump, with bolus increments
determined by the user
Note You can not program a new Standard Bolus as long as
one Standard Bolus, Quick Bolus or the immediate part of
a Multiwave Bolus is running.
Using Standard
Bolus menu
The bolus amount per delivery is limited to 50 units using U100
insulin.
After you program a Standard Bolus, there is a delay of 5 seconds
before bolus delivery starts. This delay allows you to cancel the
bolus by pressing the a or s key. The Warning W8: BOLUS
CANCELLED is displayed. Press f twice to conrm and turn off
the alert. See chapter 8 Warning W8: BOLUS CANCELLED.
78
Using d and f to enter the menu
and then a and s to program the
amount
man_05957613001_E_en.indb 78 02.03.2015 10:44:31
Page 83

4.2.1 Programming a Quick Bolus
4
The following process uses only the a and s keys. You can
start with either key. The recommended steps below are those
described with the rst key appearing without round brackets,
such as a. For the alternative step, press the key in the
parenthesis, such as (s).
Because your pump beeps and vibrates to guide you through the
programming steps, you can program the Quick Bolus without
Procedure for programming a Quick Bolus
1. 2.
From the RUN screen, press and hold s
(a) until you hear a beep sequence and
feel a vibration.
This activates the Quick Bolus function.
Press a (s) once for each increment
until the required bolus amount is
reached. You must not use the key you
pressed rst.
looking at the pump screen. After the bolus is programmed, you
can count the beeps and vibrations of your pump to check the
correct programming. For safety reason, you should also check
the display as long as you are less experienced with the pump.
The factory setting for the increment of the Quick Bolus is
0.5 units.
3.
With each pressing of the key, your pump
beeps and vibrates simultaneously; once
for each programmed bolus increment.
79
man_05957613001_E_en.indb 79 02.03.2015 10:44:32
Page 84

5.4.
The Standard Bolus symbol blinks for
5 seconds after the last press of a
(s), your pump con rms the total bolus
amount with one beep and vibration for
each bolus increment programmed.
5 seconds (the bolus delivery start delay).
w WARNING
The bolus increment that can be programmed into your
Accu-Chek Spirit Combo insulin pump determines the Quick
Bolus amount using the a and s keys of your insulin
pump.
Incorrect programming of the bolus increment may cause
inappropriate insulin delivery.
See section 5 .10.1 Adjusting the bolus increment.
6.
After the bolus delivery start delay, the
pump beeps 3 times and vibrates
and then begins to deliver the total bolus
amount programmed. A countdown of
the remaining bolus amount appears on
the display.
80
man_05957613001_E_en.indb 80 02.03.2015 10:44:32
Page 85

4.2.2 Cancelling a Quick Bolus
4
During programming
(the bolus amount
blinks):
During conrmation
(when the beeps and
vibrations occur), or
During start delay
(Standard Bolus symbol
blinks):
During bolus delivery
(countdown of bolus
amount):
Note Make sure that the cancellation was deliberate, and then program a new bolus, if required.
Press the s or a key you used to enter the Quick Bolus programming
option. This will reset the bolus amount to 0.0 units. You hear a melody.
If no new bolus is programmed, your pump returns to the RUN screen and
beeps 3 times and vibrates after 5 seconds.
Press s or a. You hear a melody. Your pump returns to the RUN screen.
A Warning W8: BOLUS CANCELLED occurs.
Press f twice to conrm and turn off the alert. See chapter 8 Warning W8:
BOLUS CANCELLED.
Press and hold s or a for 3 seconds until you hear a melody. A Warning
W8: BOLUS CANCELLED is displayed.
Press f twice to conrm and turn off the alert. See chapter 8 Warning W8:
BOLUS CANCELLED.
You can view the actual bolus amount delivered prior to the cancellation by
looking at the bolus history. See section 5.4 .1 Viewing your bolus history.
No bolus is delivered.
No bolus is delivered.
Bolus delivery is
interrupted.
81
man_05957613001_E_en.indb 81 02.03.2015 10:44:32
Page 86

4.2.3 Programming a Standard Bolus using Standard
bolus menu
Independent of the bolus increment setting, the bolus increments
for the menu-guided Standard Bolus are xed at 0.1 unit. You
can program this bolus in the STANDARD BOLUS screen by
holding the a or s key (scrolling) until the bolus amount is
displayed.
1.
Press d to move to the STANDARD
BOLUS screen.
2. 3.
Press f to select. The BOLUS AMOUNT
screen appears.
Press or scroll a to increase or s to
decrease the bolus amount.
4.
Press f to conrm the bolus amount.
The Standard Bolus symbol blinks for 5
seconds (the bolus delivery start delay).
82
man_05957613001_E_en.indb 82 02.03.2015 10:44:32
Page 87

After this bolus delivery start delay, your pump beeps 3 times
and vibrates and begins to deliver the total bolus amount
programmed. The countdown of the remaining bolus amount
appears on the display.
4.2.4 Cancelling a Standard Bolus
4
During programming
(the bolus amount
blinks):
During the start delay
(Standard Bolus symbol
blinks):
During bolus delivery
(countdown of bolus
amount):
man_05957613001_E_en.indb 83 02.03.2015 10:44:33
You have 3 options for cancelling during programming:
j If you do not press any key for 20 seconds after programming the bolus
amount, your pump returns to the RUN screen.
j Return to the Standard Bolus screen by pressing d + a simultaneously.
j Set the bolus amount to 0.0 units. Press f to exit.
Press d + a, s or a. You hear a melody. Your pump returns to the RUN
screen. A Warning W8: BOLUS CANCELLED occurs.
Press f twice to conrm and turn off the alert. See chapter 8 Warning W8:
BOLUS CANCELLED.
Press and hold s or a for 3 seconds until you hear a melody.
You can view the actual bolus amount delivered prior to the cancellation by
looking at the bolus history. See section 5.4 .1 Viewing your bolus history.
No bolus is delivered.
No bolus is delivered.
Bolus delivery is
interrupted.
83
Page 88

Cancellation during the start delay and during the bolus delivery
will cause a WARNING W8: BOLUS CANCELLED. Press f twice
to conrm and snooze the Warning. See chapter 8.
Note Make sure that the cancellation was deliberate and
program a new bolus, if needed.
4.3 Programming an Extended Bolus
The Extended Bolus option enables you to program a bolus to be
delivered over a period of time. This function is helpful during
long meals, dinners, or receptions, or when you have meals that
are digested slowly. The Extended Bolus may also be appropriate
for people who have gastroparesis (delayed digestion).
The duration of bolus delivery can be programmed in 15-minute
intervals up to 12 hours and begins immediately after conrmation. Throughout the bolus delivery, the remaining time and
amount of the Extended Bolus and the current hourly basal rate
are displayed in the RUN screen.
84
man_05957613001_E_en.indb 84 02.03.2015 10:44:33
Page 89

4
Tip: You can add a Standard or Quick Bolus to an ongoing
Extended Bolus. If you cancel the Standard Bolus, the Extended
Bolus continues to run.
During the delivery of an Extended Bolus, the programming of
another Extended Bolus or a Multiwave Bolus is blocked. If you
try to do this, you will receive the Error message: “Bolus
currently running”.
Procedure for programming an Extended Bolus
1. 2. 3.
Press d to move to the EXTENDED
BOLUS screen.
Press f to select. The BOLUS AMOUNT
screen appears.
If you want to program a different Extended Bolus, put the pump
in STOP mode to cancel the current bolus and to program a new
one.
Press a to increase or s to decrease
the bolus amount.
The duration of the last Extended Bolus
delivered appears.
85
man_05957613001_E_en.indb 85 02.03.2015 10:44:33
Page 90

4. 5.
Tip: Press d to switch between
programming the bolus amount and bolus
duration.
Press d to move to the BOLUS
DURATION screen.
Press a to increase or s to decrease
the bolus duration.
Note If a Temporary Basal Rate is active at the same time as
the Extended Bolus, the remaining time and amount of
the bolus and the amount of the increased or decreased
hourly basal rate are displayed in the RUN screen.
86
Press f to conrm the bolus amount
and duration. The pump returns to the
RUN screen. The bolus delivery begins
within the next 3 minutes.
man_05957613001_E_en.indb 86 02.03.2015 10:44:33
Page 91

4.3.1 Cancelling an Extended Bolus
4
During programming
(the bolus amount or
bolus duration blinks):
During bolus delivery j If the Extended Bolus delivery has begun, it can be cancelled by putting your
You can either:
j wait for your pump to return to the RUN screen.
j press d and a simultaneously to exit the Function screen.
j set the bolus amount to 0.0 units and press f.
pump into STOP mode. This cancels the bolus delivery and a Warning W8:
BOLUS CANCELLED is displayed. Press f twice to conrm and turn off the
alert. See chapter 8 Warning W8: BOLUS CANCELLED.
The bolus amount delivered up to the cancellation can be reviewed in the
BOLUS HISTORY screen. See section 5 .4.1 Viewing your bolus history.
No bolus is delivered.
Bolus delivery is
interrupted.
87
man_05957613001_E_en.indb 87 02.03.2015 10:44:33
Page 92

Note If a Temporary Basal Rate is active at the same time,
it is also cancelled when your pump is put into
STOP mode. A Warning W8: BOLUS CANCELLED and
a Warning W6: TBR CANCELLED are displayed.
Press f twice to conrm and turn off the rst Warning.
The second alert appears on the display. Press f twice
to conrm and turn off the second Warning. Both alerts
are recorded in the Warnings history.
See chapter 8 Warning W6: TBR CANCELLED and
Warning W8: BOLUS CANCELLED. Make sure that the
cancellation was deliberate and then program a new
Extended Bolus (and /or Temporary Basal Rate) if needed.
88
man_05957613001_E_en.indb 88 02.03.2015 10:44:33
Page 93

4.4 Programming a Multiwave Bolus
4
The Multiwave Bolus option is available in the ADVANCED user
menu. It is designed to better simulate the body’s insulin
delivery, and combines an immediate bolus delivery followed by
an Extended Bolus delivery. This option can be helpful when you
have meals that include both rapidly and slowly absorbed
carbohydrates.
The duration of bolus delivery can be programmed in 15-minute
intervals for up to 12 hours.
Note j The Multiwave Bolus is available only in the ADVANCED
user menu.
j You can add a Standard Bolus to an ongoing Multiwave
Bolus. If you cancel the Standard Bolus, the Multiwave
Bolus remains running.
j During the delivery of a Multiwave Bolus, the program-
ming of a second Multiwave Bolus or an Extended
Bolus is blocked. If you need a different Multiwave
Bolus, put your pump in STOP mode to cancel the
current bolus and program a new one.
When programming a Multiwave Bolus, make sure that you are
using the ADVANCED user menu and your pump is in RUN mode.
89
man_05957613001_E_en.indb 89 02.03.2015 10:44:33
Page 94

Procedure for programming a Multiwave Bolus
1. 2. 3.
Press d to move to the Multiwave Bolus
screen.
Note The rst time you press a,
the bolus duration of the last
Multiwave Bolus and a default
immediate bolus amount appear.
The latter increases or decreases
proportionally as you increase or
decrease the total bolus amount.
90
Press f to select. The BOLUS AMOUNT
screen appears.
4.
Press d to move to the IMMEDIATE
BOLUS screen.
Press a or s to correct and set the
immediate bolus amount.
Press a or s to increase or decrease
the total bolus amount.
5.
Press d to move to the BOLUS
DURATION screen.
Press a or s to correct and set the
Extended Bolus duration in increments of
15 minutes for up to 12 hours.
man_05957613001_E_en.indb 90 02.03.2015 10:44:33
Page 95

4
Tip: Press d to loop between program-
ming the total BOLUS AMOUNT, IMMEDIATE BOLUS and BOLUS DURATION.
8.
The pump beeps 3 times and vibrates.
The immediate bolus delivery begins. The
countdown of the remaining bolus
continues to appear on the display.
6.
Check the total and immediate bolus
amounts and the Extended Bolus duration
programmed on the screens.
Note If a Temporary Basal Rate is active
at the same time, the remaining
time and amount of the bolus and
the amount of the increased or
decreased hourly basal rate are
displayed on the RUN screen.
7.
Press f to conrm both bolus amounts
and the bolus duration. The Multiwave
Bolus symbol blinks for 5 seconds (bolus
delivery start delay).
91
man_05957613001_E_en.indb 91 02.03.2015 10:44:34
Page 96

4.4.1 Cancelling a Multiwave Bolus
During programming
(the bolus amount
blinks):
There are 3 ways to cancel a Multiwave Bolus during programming:
j Do not press any key for 20 seconds. The pump returns to the RUN screen.
j Return to the Multiwave Bolus screen by pressing d + a simultaneously.
j Set the total bolus amount to 0.0 units and press f.
During the start delay
(Multiwave symbol
j Press d + a, s or a. The pump beeps and vibrates. The pump
returns to the RUN screen.
blinks):
During immediate
bolus delivery
j You can cancel immediate delivery by pressing and holding s or a for
3 seconds until you hear a melody. This cancels the whole bolus (immediate
and Extended Bolus delivery).
During extended
delivery
j You can cancel the extended delivery by putting the pump in STOP mode.
This cancels the Extended Bolus.
Cancellation of the bolus during start delay, immediate bolus
delivery and extended delivery will cause a Warning W8: BOLUS
CANCELLED. Press f twice to conrm and turn off the alert.
See chapter 8 Warning W8: BOLUS CANCELLED.
No bolus is delivered.
No bolus is delivered.
Bolus delivery is
interrupted.
Bolus delivery is
interrupted.
You can review the actual bolus amount delivered before the
cancellation by looking at the bolus history. See section
5.4 .1 Viewing your bolus history.
92
man_05957613001_E_en.indb 92 02.03.2015 10:44:34
Page 97

4
Note If a Temporary Basal Rate is active at the same time, it is
also cancelled when your pump is put in STOP mode. The
Warning W8: BOLUS CANCELLED and a Warning W6: TBR
CANCELLED is displayed.
Press f twice to conrm and turn off the rst Warning.
The second Warning appears on the display. Press f
twice to conrm and turn off the second Warning. Both
Warnings are recorded in the alarm history. See chapter
8 Warning W6: TBR CANCELLED and Warning W8: BOLUS
CANCELLED. Make sure the cancellation was intended
and then program a new Multiwave Bolus (and / or
Temporary Basal Rate), if needed.
4.5 Programming a Temporary
Basal Rate (TBR)
Your pump allows you to temporarily increase or decrease your
basal rate. This enables you to match your changing insulin
needs due to increased or decreased activity level, illness, or
stress.
Typically, a basal rate is set to 100 %, but you can:
j Increase it to 250 % for up to 24 hours
j Decrease it to 0 % for up to 24 hours
When you increase or decrease your basal rate, each hourly
basal rate for the duration you program is increased or de-
creased. The characteristic shape of your basal rate prole
remains and does not become a at curve, if the change is larger
than 0 %. For 0 % the basal rate prole becomes a at line and
no insulin (except boluses) is delivered during the programmed
duration.
Discuss programming a Temporary Basal Rate with your doctor
or healthcare team.
93
man_05957613001_E_en.indb 93 02.03.2015 10:44:34
Page 98

Note A running Temporary Basal Rate increase or decrease
remains active, even if you have changed the basal rate
prole.
You can only program a Temporary Basal Rate when your pump
is in RUN mode.
Procedure for programming a Temporary Basal Rate
1. 2.
Note If no Temporary Basal Rate is
currently active, the percentage is
set to 100 %. If a Temporary Basal
Rate is active, its duration and
percentage appear on the RUN
Press d to move to the TEMPORARY
BASAL RATE (TBR) screen.
Press f to select. The TBR PERCENTAGE
screen appears.
screen.
94
man_05957613001_E_en.indb 94 02.03.2015 10:44:34
Page 99

4
3.
Press a or s to increase or decrease
the basal rate.
Tip: You can switch between programming the basal rate percentage and
duration by pressing d.
Tip: When you increase (or decrease) the
Temporary Basal Rate, the duration of
your previous Temporary Basal Rate
increase (or decrease) appears. However,
when you use your pump for the rst
time, a default value appears.
5.
Press f to save and exit.
The new Temporary Basal Rate is
immediately activated.
4.
Press d to move to the TBR DURATION
screen.
Press a or s to correct and set the
duration.
When a Temporary Basal Rate is active,
the pump emits a beep once every hour.
95
man_05957613001_E_en.indb 95 02.03.2015 10:44:34
Page 100

Note During Temporary Basal Rate delivery, the increase or
decrease in percentage, the increased or decreased
hourly basal rate (hourly basal rate plus TBR percentage),
and the remaining time are displayed in the RUN screen.
An arrow pointing upwards symbolizes a Temporary Basal
Rate increase; an arrow pointing downwards symbolizes a
Temporary Basal Rate decrease.
Note If an Extended Bolus or a Multiwave Bolus is active at the
same time, the remaining time and amount of the bolus
and the amount of the increased or decreased hourly
basal rate are displayed in the RUN screen.
Example: Extended Bolus running
Remaining duration
TBR OVER Alert
At the end of a Temporary Basal Rate, a Warning W7: TBR OVER
is displayed. Press f twice to conrm and turn off the
Warning. See chapter 8 Warning W7: TBR OVER.
Extended Bolus symbol
96
man_05957613001_E_en.indb 96 02.03.2015 10:44:34
 Loading...