

Page 1
ACCU-CHEK is a trademark of Roche.
Disetronic Medical Systems AG
CH-3401 Burgdorf, Switzerland
www.disetronic.com
INFUSION SET
04537220001/V02/06.06
Page 2
1 32
4 65
Page 3
שומיש תוארוה
Brugsanvisning
Kasutusjuhised
20
30
Upute za uporabu
38
Használati útmutató
46
Naudojimo instrukcijos
54
Lietošanas instrukcija
62
Instrucţiuni de utilizare
70
78
86
94
Инструкции по использованию 178
Návod na použív
Navodila za uporabo
Οδηγίες χρήσης 112
Uputstvo za upotrebu
Kullanım talimatları
104
122
130
138
146
154
162
170
anie 188
196
204
212
220
228
Page 4

Page 5
Instructions for use
Gebrauchsanweisung
Mode d’emploi
Istruzioni per l’uso
Instrucciones de uso
Gebruiksaanwijzing
Instruções de uso
Návod k použití
Instrukcja użytkowania
Bruksanvisning
Bruksanvisning
Käyttöohjeet
en
de
fr
it
es
nl
pt
cs
pl
sv
no
fi
3
Page 6
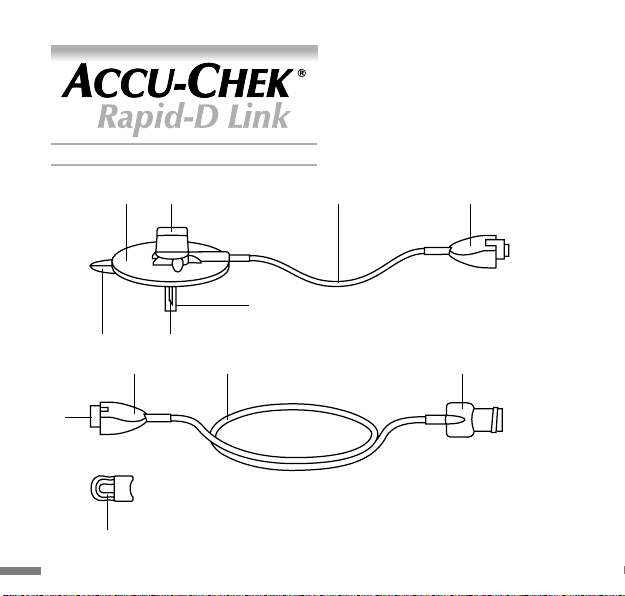
INFUSION SET
C GFE
B
D
A
JH
cannula
K
I
transfer set
L
protective cap
4
Page 7

Description
Accu-Chek Rapid-D Link is an infusion set for the subcutaneous infusion of insulin
administered with microdosage insulin pumps.
Contents of the cannula package
for the Accu-Chek Rapid-D Link
A steel cannula
B protective cover
C self-adhesive
D adhesive backing
E disc holder
F tubing
G connecting piece of cannula
Contents of the transfer set package
for the Accu-Chek Rapid-D Link
H connecting piece of transfer set
I connector needle
J tubing
K luer-lock
Contents of the protective cap package
for the Accu-Chek Rapid-D Link
L protective cap
en
5
Page 8
WARNINGS
Read the instructions carefully before use. It is recommended that you consult your insulin
pump manual for information regarding pump therapy.
For first time use, setup must be performed in the presence of a health care professional.
This device remains sterile until the package is opened or damaged. Do not use if the
•
sterile package has been opened or damaged.
Protect the product from excessive humidity, sunlight and heat. Store at room tem-
•
perature.
Before inserting the Accu-Chek Rapid-D Link, prepare the infusion site in accordance
•
with the instructions of your healthcare professional.
Discard the set after each use. Do not clean or re-sterilize.
•
The Accu-Chek Rapid-D Link is for subcutaneous use only.
•
Always tighten the luer-lock firmly into the pump adapter. If this is not done, danger of
•
leakage can result, due to a loose connection between the infusion set and the pump.
Avoid using any tools to screw the luer-lock connector into place. Otherwise damage
could result to the luer-lock connector.
Do not leave air bubbles in the Accu-Chek Rapid-D Link. Prime thoroughly
•
Never insert the Accu-Chek Rapid-D Link before priming, or attempt to release block-
•
ages while it is in use, otherwise there is a danger of an uncontrolled quantity of insulin
being infused into the body.
Never use a steel cannula for more than 48 hours (2 days). Never use the transfer set
•
for more than 6 days. When changing the cartridge, make sure that the transfer-set is
completely primed before connecting to the cannula.
6
Page 9

If the self-adhesive does not stick firmly to the skin, e.g. after a shower or in the case
•
of heavy sweating, affix the Accu-Chek Rapid-D Link with a transparent adhesive plaster. If the Accu-Chek Rapid-D Link has slipped out of the skin, use a new infusion set.
lf the infusion site becomes inflamed, replace your Accu-Chek Rapid-D Link and use a
•
new site.
Do not put disinfectants, perfumes, deodorants or insect repellent on your Accu-Chek
•
Rapid-D Link as these may affect the stability of the set.
Dispose of the infusion set safely, so that nobody can prick or injure themselves on it.
•
If you have to disconnect your Accu-Chek Rapid-D Link, pay particular attention to
•
hygiene and use the protective cap.
Avoid excessive stress on the infusion site and on the Accu-Chek Rapid-D Link. Pay at-
•
tention when carrying heavy weights.
Check blood glucose level 1–3 hours after inserting your Accu-Chek Rapid-D Link and
•
inspect the infusion site on a regular basis. Do not insert a new infusion set just prior
to bedtime. Check blood glucose frequently (check with your physician).
lf blood glucose level gets unexplainably too high, or an «occlusion» alarm occurs,
•
check for clogs and leaks. lf in doubt, change your Accu-Chek Rapid-D Link.
en
7
Page 10
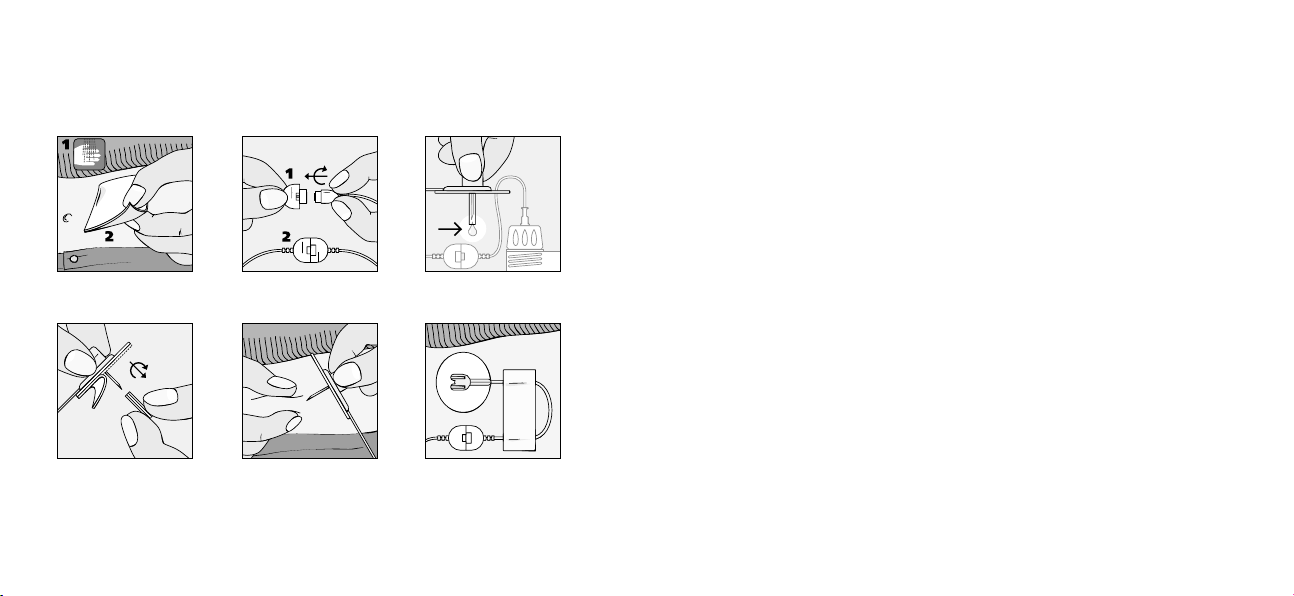
Insert Accu-Chek Rapid-D Link
Picture 1
Choose a site away from the waistline, bones, scar tissue, belly button and recently
used infusion sites. Clean hands and infusion site according to instructions from your
healthcare professional. Allow the injection site to dry before inserting the Accu-Chek
Rapid-D Link.
Picture 2
Remove the cannula and the transfer set from the sterile packaging. Hold the two halves
of the coupling so that they form a cross. Fit the parts directly into one another and connect them in place by turning for one quarter of a turn in a clockwise direction until they
click noticeably and audibly into place.
WARNING
If the two halves of the coupling do not click noticeably and audibly together, use a new
cannula and a new transfer set.
Picture 3
Screw the luer-lock (K) firmly into the screw thread of the pump adapter. Make sure
there is a cartridge containing sufficient insulin in the cartridge compartment. Place the
pump upright and fill the Accu-Chek Rapid-D Link in accordance with the pump manufacturer’s operating instructions. Prime the tubing (F, J) until the medication emerges at
the tip of the steel cannula (A). Do not leave air bubbles in either the cartridge or in the
tubing of the Accu-Chek Rapid-D Link.
8
Page 11

Fill volumes of the complete set:
30 cm/12” a
60 cm/24” a
80 cm/31” a
110 cm/43” a
Picture 4
Hold the Accu-Chek Rapid-D Link firmly between thumb and forefinger at the disc holder
(E). With the other hand, remove the adhesive backing (D) from the self-adhesive (C) and
twist the protective cover (B) off the steel cannula (A).
Picture 5
With your free hand, pinch together a bit of subcutaneous tissue at the disinfected site.
Insert the Accu-Chek Rapid-D Link under the skin at a perpendicular angle. Press the selfadhesive (C) firmly onto the skin in order to ensure secure seating of Accu-Chek Rapid-D
Link. Bend the disc holder (E) slightly sideways and remove it. In doing this, make sure that
the self-adhesive comes to lay flat on the skin.
pprox. 7 units U 100 insulin approx. 70 μl
pprox. 10 units U 100 insulin approx. 100 μl
pprox. 13 units U 100 insulin approx. 130 μl
pprox. 18 units U 100 insulin approx. 180 μl
WARNING
Change the head-set every 2 days (max. 48 hours). Otherwise you risk insulin resistance
or inflammation of the infusion site.
Never use the transfer-set for more than 6 days.
Picture 6
Form a loop to relieve stress and secure it into place with a strip of adhesive plaster. Start
distribution through the pump.
en
9
Page 12

Disconnect Accu-Chek Rapid-D Link
WARNING
Please consult with your health care professional on how to compensate for any missed
insulin while you are disconnected. Carefully monitor blood glucose level while disconnected from the pump and after you reconnect.
Step 1
Turn off the pump.
Step 2
Grasp the two halves of the coupling and turn for a quarter of a turn in an anticlockwise direction. Pull the two halves of the coupling away from each other, proceeding with
caution.
Step 3
Cover both halves of the coupling with the protective caps (L).
Reconnect Accu-Chek Rapid-D Link
Step 1
Remove the protective caps from the two halves of the coupling.
Step 2
Start distribution through the pump. Fill the transfer set until the medication starts trickling out of the tip of the connector needle (I).
10
Page 13

Step 3
Fit the two halves of the coupling together carefully and turn for one quarter of a turn in a
clockwise direction until they click audibly into place (see Picture 2).
en
Distributed in United Kingdom by:
Roche Diagnostics Ltd.
Bell Lane
Lewes
UK-East Sussex BN7 1LG
Phone +44 1273 480444
Fax +44 1273 480266
lewes.insulinpumps@roche.com
www.accu-chek.co.uk
Distributed in Australia by:
Roche Diagnostics Australia Pty. Ltd.
31 Victoria Avenue
AU-Castle Hill, NSW 2154
Phone +61 2 9846 0100 (Techn. Support)
1800 802 409 (Orders)
Fax 1800 066 598 (Orders)
sydney.accu-chekextra@roche.com
www.rochediagnostics.com.au
Distributed in New Zealand by:
Roche Diagnostics N.Z. Ltd
P.O. Box 62-089
15 Rakino Way
Mt. Wellington
NZ-Auckland
Phone +64 9 276 4157
Fax +64 9 276 8917
info@accu-chek.co.nz
www.accuchek.co.nz
Distributed in South Africa by:
Roche Products (Pty) Ltd.
Diagnostics Division
P.O. Box 1927, Randburg 2125
9 Will Scarlet Road
ZA-Randburg
South Africa
Phone +27 11 504 4600
Fax +27 11 781 0269
www.diabetes.co.za
11
Page 14

INFUSIONSSET
C GFE
B
D
A
JH
Kanüle
K
I
Schlauch
L
Schutzkappe
12
Page 15

Beschreibung
Das Accu-Chek Rapid-D Link Infusionsset dient zur subkutanen Infusion von Insulin,
welches mit Insulinpumpen verabreicht wird.
Inhalt der Kanülenpackung
für das Accu-Chek Rapid-D Link Infusionsset
A Stahlkanüle
B Schutzhülle
C Selbsthaftende Auflage
D Schutzfolie der selbsthaftenden Auflage
E Haltegriff der Kanüle
F Schlauch
G Kupplungsstück der Kanüle
Inhalt der Schlauchpackung
für das Accu-Chek Rapid-D Link Infusionsset
H Kupplungsstück des Schlauchs
I Verbindungsnadel
J Schlauch
K Luer-Anschluss
Inhalt der Schutzkappenpackung
für das Accu-Chek Rapid-D Link Infusionsset
L Schutzkappe
de
13
Page 16

WARNUNG
Lesen Sie die Anweisungen vor der Anwendung sorgfältig durch. Es wird empfohlen, in
der Gebrauchsanweisung der Insulinpumpe für Informationen über die Insulinpumpentherapie nachzuschlagen.
Die erste Anwendung des Accu-Chek Rapid-D Link Infusionssets sollte in Gegenwart eines
Arztes erfolgen.
Dieses Produkt ist nur bei ungeöffneter und unbeschädigter Verpackung steril.
•
Nicht verwenden, falls die Verpackung geöffnet oder beschädigt ist.
Packung vor Luftfeuchtigkeit, direkter Sonneneinstrahlung und Hitze schützen.
•
Bei Raumtemperatur lagern.
Die Einführungsstelle vor dem Einführen des Accu-Chek Rapid-D Link Infusionssets
•
gemäß den ärztlichen Anweisungen vorbereiten.
Nach einmaligem Gebrauch wegwerfen. Nicht reinigen oder erneut sterilisieren.
•
Das Accu-Chek Rapid-D Link Infusionsset ist nur für die subkutane Anwendung.
•
Schrauben Sie den Luer-Anschluss immer fest in den Adapter der Insulinpumpe.
•
Ansonsten besteht die Gefahr, dass aufgrund einer zu lockeren Verbindung zwischen
Infusionsset und Insulinpumpe Flüssigkeit austritt. Verwenden Sie keine Werkzeuge
zum Einschrauben des Luer-Anschlusses. Andernfalls könnte der Luer-Anschluss
beschädigt werden.
Im Accu-Chek Rapid-D Link Infusionsset dürfen sich keine Luftblasen befinden. Sorg-
•
fältig füllen.
Das Accu-Chek Rapid-D Link Infusionsset nie vor dem Füllen einführen oder versu-
•
chen, Verstopfungen während des Gebrauchs zu beseitigen. Andernfalls besteht die
Gefahr, dass eine unkontrollierte Menge Insulin injiziert wird.
14
Page 17

Stahlkanülen nie länger als 48 Stunden (2 Tage) verwenden. Den Schlauch nie länger
•
als 6 Tage verwenden. Stellen Sie nach dem Wechsel der Ampulle sicher, dass der
Schlauch vollständig gefüllt ist, bevor er an die Kanüle angeschlossen wird.
Wenn die selbsthaftende Auflage nicht fest auf der Haut klebt, z. B. nach einer Dusche
•
oder bei starkem Schwitzen, das Accu-Chek Rapid-D Link Infusionsset mit einem
transparenten Klebepflaster anbringen. Wenn das Accu-Chek Rapid-D Link Infusionsset versehentlich aus der Haut gezogen wird, ein neues Infusionsset verwenden.
Wenn sich die Einführungsstelle entzündet, umgehend das Accu-Chek Rapid-D Link
•
Infusionsset auswechseln und bis zur Heilung eine neue Einführungsstelle wählen.
Das Accu-Chek Rapid-D Link Infusionsset nicht mit Desinfektions- oder Hautpflege-
•
mittel, Parfüm, Deodorants oder Insektenschutzmittel in Kontakt bringen. Es könnte
dadurch beschädigt werden.
Das Infusionsset sicher entsorgen, so dass sich niemand daran verletzen kann.
•
Wenn Sie die Kanüle des Accu-Chek Rapid-D Link Infusionssets abkoppeln, vor allem
•
auf Hygiene achten und die Schutzkappe anbringen.
Übermäßige Belastung der Einführungsstelle und des Accu-Chek Rapid-D Link Infusi-
•
onssets vermeiden. Vorsicht beim Tragen von schweren Lasten.
1–3 Stunden nach Einführen des Accu-Chek Rapid-D Link Infusionssets den Blut-
•
zuckerspiegel prüfen und die Einführungsstelle mehrmals täglich kontrollieren. Das Infusionsset nicht unmittelbar vor dem Zubettgehen wechseln. Den Blutzuckerspiegel
regelmäßig messen (Absprache mit dem Arzt).
Falls der Blutzuckerspiegel aus unerklärlichem Grund zu hoch wird oder ein Verstop-
•
fungsalarm auftritt, prüfen Sie, ob eine Verstopfung oder undichte Stelle vorliegt.
Bei Zweifel verwenden Sie ein neues Accu-Chek Rapid-D Link Infusionsset.
de
15
Page 18

Anwendung des Accu-Chek Rapid-D Link Infusionssets
Bild 1
Eine Stelle am Körper wählen, die nicht auf Taillenhöhe, über Knochen, im Bereich von Narbengewebe, Bauchnabel oder einer zuvor benutzten Einführungsstelle liegt. Hände waschen und die Einführungsstelle gemäß den ärztlichen Anweisungen desinfizieren. Vor dem
Einführen des Accu-Chek Rapid-D Link Infusionssets die Einführungsstelle trocknen lassen.
Bild 2
Kanüle und Schlauch aus der sterilen Verpackung nehmen. Die beiden Kupplungshälften so halten, dass sie ein Kreuz bilden. Die Teile gerade ineinander stecken und durch
eine viertel Umdrehung im Uhrzeigersinn bis zum deutlich spür- und hörbaren Einrasten
koppeln.
WARNUNG
Wenn die beiden Kupplungshälften nicht spür- und hörbar einrasten, eine neue Kanüle
und einen neuen Schlauch verwenden.
Bild 3
Den Luer-Anschluss (K) fest in das Gewinde des Adapters der Insulinpumpe eindrehen.
Sicherstellen, dass eine Ampulle mit ausreichend Insulin in das Ampullenfach eingesetzt
ist. Die Insulinpumpe aufrecht stellen und das Accu-Chek Rapid-D Link Infusionsset gemäß der Gebrauchsanweisung des Insulinpumpenherstellers füllen. Die Schläuche (F, J)
füllen, bis Insulin an der Spitze der Stahlkanüle (A) austritt. Weder in der Ampulle noch im
Schlauch des Accu-Chek Rapid-D Link Infusionssets dürfen sich Luftblasen befinden.
16
Page 19

Füllvolumina des kompletten Infusionssets:
30 cm/12” ca. 7 Einheiten U 100 Insulin ca. 70 μl
60 cm/24” ca. 10 Einheiten U 100 Insulin ca. 100 μl
80 cm/31” ca. 13 Einheiten U 100 Insulin ca. 130 μl
110 cm/43” ca. 18 Einheiten U 100 Insulin ca. 180 μl
Bild 4
Das Accu-Chek Rapid-D Link Infusionsset mit dem Daumen und Zeigefinger der einen
Hand am Haltegriff der Kanüle (E) festhalten. Mit der anderen Hand erst die Schutzfolie (D)
der selbsthaftenden Auflage (C) abziehen und dann die Schutzhülle (B) der Stahlkanüle (A)
abdrehen.
Bild 5
Mit der freien Hand an der desinfizierten Einführungsstelle eine Hautfalte bilden. Das
Accu-Chek Rapid-D Link Infusionsset senkrecht unter die Haut stechen. Die selbsthaftende
Auflage (C) fest auf die Haut drücken, um einen sicheren Sitz des Accu-Chek Rapid-D Link
Infusionssets zu gewährleisten. Den Haltegriff der Kanüle (E) leicht seitwärts biegen und
abknipsen. Dabei darauf achten, dass die selbsthaftende Auflage flach auf der Haut
aufliegt.
WARNUNG
Die Kanüle alle 1–2 Tage wechseln (spätestens nach 48 Stunden). Andernfalls besteht die
Möglichkeit einer Insulinresistenz oder eines erhöhten Entzündungsrisikos der Einführungsstelle.
Den Schlauch nie länger als 6 Tage verwenden.
de
17
Page 20

Bild 6
Eine Entlastungsschleife bilden und mit Klebepflaster fixieren. Die Infusion mit der Insulinpumpe starten.
Abkoppeln des Accu-Chek Rapid-D Link Infusionssets
WARNUNG
Bitte besprechen Sie mit Ihrem Arzt, wie Sie eine Unterversorgung mit Insulin ausgleichen
können, wenn Sie nicht an der Insulinpumpe angeschlossen sind. Überwachen Sie
während dieser Zeit und nach erneutem Anschließen der Insulinpumpe sorgfältig den
Blutzuckerspiegel.
Schritt 1
Insulinpumpe ausschalten.
Schritt 2
Die beiden Kupplungshälften fassen und eine viertel Umdrehung entgegen dem Uhrzeigersinn drehen. Vorsichtig die beiden Kupplungshälften voneinander trennen.
Schritt 3
An beiden Kupplungshälften eine Schutzkappe (L) anbringen.
Erneutes Anschließen des Accu-Chek Rapid-D Link Infusionssets
Schritt 1
Die Schutzkappen von den beiden Kupplungshälften abnehmen.
18
Page 21

Schritt 2
Die Infusion mit der Insulinpumpe starten. Den Schlauch füllen, bis das Insulin an der
Spitze der Verbindungsnadel (I) austritt.
Schritt 3
Die beiden Kupplungshälften vorsichtig ineinander stecken und durch eine viertel Umdrehung im Uhrzeigersinn bis zum deutlich spür- und hörbaren Einrasten koppeln (siehe
Bild 2).
Abnehmen des Accu-Chek Rapid-D Link Infusionssets
Die selbsthaftende Auflage (C) vorsichtig zur Mitte hin von der Haut abziehen und gemeinsam mit der Stahlkanüle (A) senkrecht herausziehen.
de
Vertrieb Schweiz:
Roche Diagnostics (Schweiz) AG
Diabetes Care
Industriestrasse 7
CH-6343 Rotkreuz
Accu-Chek Hotline 0800 11 00 11
Fax +41 41 799 65 14
diabetesservice.ch@roche.com
www.roche-diagnostics.ch
Vertrieb Deutschland:
Roche Diagnostics GmbH
Sandhofer Straße 116
D-68305 Mannheim
Kundenservice Tel. 0180 2 000 412
www.accu-chek.de
Vertrieb Österreich:
Roche Diagnostics GmbH
Engelhorngasse 3
A-1211 Wien
Telefon +43 1 27787-596
Fax +43 1 27787-609
accu-chek.austria@roche.com
www.accu-chek.at
19
Page 22

Keep dry
ביטרהל ןיא
Vor Feuchtigkeit schützen
Garder à l’abri de l’humidité
Mantenere asciutto
Proteger de la humedad
Niet blootstellen aan vocht
Mantenha seco.
Skladujte v suchém prostředí
Chronić przed wilgocią
Förvara torrt
Oppbevares tørt
Suojeltava kosteudelta
Opbevares tørt
∆ιατηρείτε στεγνό
236
Hoida kuivana
Čuvati na suhom.
Tartsa szárazon
Laikyti sausoje vietoje
Uzglabājiet sausumā.
A se feri de umezeală
Беречь от влаги
Udržiavajte s suchu.
Hranite na suhem
Čuvajte na suvom
Kuru yerde saklayın
Page 23

Do not use if package is damaged
המוגפ הזיראב שמתשהל ןיא
Nicht verwenden, falls die Verpackung
beschädigt ist
Ne pas utiliser si l’emballage est
endommagé
Non usare se la confezione è danneggiata
No utilizar si el embalaje está dañado
Niet gebruiken als de verpakking
beschadigd is
Não o utilize caso a embalagem esteja
danificada
V případě poškozeného obalu výrobek
nepoužívejte
Nie stosować, jeżeli opakowanie jest
uszkodzone
Får ej användas om förpackningen är
skadad
Bruk ikke hvis emballasjen er skadet
Älä käytä, jos pakkaus on vaurioitunut
Må ikke anvendes, hvis emballagen er
beskadiget
Μη χρησιµοποιείτε το σετ έγχυσης εάν
η συσκευασία έχει υποστεί ζηµιά
Mitte kasutada, kui pakend on
kahjustatud
Ne koristiti ako je pakiranje oštećeno.
Ne használja, ha sérült a csomagolás
Nenaudoti, jei pakuotė pažeista
Nelietojiet, ja iepakojums ir bojāts.
Nu folosiţi dacă pachetul este deteriorat
Не использовать при поврежденной
упаковке
V prípade poškodenia súpravu
nepoužívajte.
Ne uporabljajte, če je ovojnina
poškodovana
Nemojte koristiti set ako je pakovanje
oštećeno
Paketi bozulmuşsa kullanmayın
237
Page 24

Consult instructions for use
שומיש תוארוה האר
Gebrauchsanweisung beachten
Consulter le mode d’emploi
Consultare le istruzioni per l’uso
Leer las instrucciones de uso
Raadpleeg de gebruiksaanwijzing
Consulte as instruções de uso
Prostudujte si návod k použití
Przed użyciem przeczytać instrukcję
użytkowania
Läs i bruksanvisningen
Les bruksanvisningen
Lue käyttöohjeet
Læs brugsanvisningen
Συµβουλευτείτε τις οδηγίες χρήσης
238
Enne kasutust lugege juhiseid
Prije uporabe pročitajte upute
Tekintse meg a használati útmutatót
Vadovaukitės naudojimo instrukcijomis
Skatiet lietošanas instrukciju.
Consultaţi instrucţiunile de utilizare
См. инструкции по использованию
Pozrite si návod na použitie.
Upoštevajte navodila za uporabo
Pročitajte uputstvo za upotrebu
Kullanım talimatlarına başvurun
Page 25

Use by
דע שומישל
Verwendbar bis
Utiliser avant
Data di scadenza
Fecha de caducidad
Vervaldatum
Usado por
Spotřebujte do
Data ważności
Använd senast
Brukes før
Viimeinen käyttöpäivämäärä
Anvendes inden
Ηµεροµηνία λήξης
Kasutada kuni
Upotrijebiti do
Szavatossági idő
Naudoti iki
Izlietot līdz
Folosiţi până la data de
Использовать до
Použite do
Uporabno do
Upotrebljivo do
Son kullanma tarihi
239
Page 26

Do not re-use
רזוח
Nicht zur Wiederverwendung
Ne pas réutiliser
Non riutilizzare
No reutilizar
Uitsluitend bestemd voor eenmalig gebruik
Não reutilize
Nepoužívejte opakovaně
Nie stosować wielokrotnie
Får ej återanvändas
Bare til engangsbruk
Kertakäyttöinen
Må ikke genbruges
Το προϊόν είναι µίας χρήσης
240
Mitte kasutada korduvalt
Nije za višekratnu uporabu
Ne próbálja újrahasználni!
Nenaudoti pakartotinai
Nelietojiet atkārtoti.
Nu refolosiţi
Не использовать повторно
Iba na jedno použitie.
Za enkratno uporabo
Nemojte ponovo koristiti
Tekrar kullanmayın
Page 27

Lot number
הווצא רפסמ
Chargennummer
Numéro de lot
Numero di lotto
Número de lote
Chargenummer
Número do lote
Číslo šarže
Numer partii
Lotnummer
Lotnummer
Eränumero
Lot-nummer
Αριθµός παρτίδας
Partiinumber
Broj serije
Sorozatszám
Serijos numeris
Sērijas numurs
Număr lot
Номер партии
Číslo šarže
Serijska številka
Broj serije
Parti numarası
241
Page 28

Reference number
סוחיי רפסמ
Artikelnummer
Numéro de référence
Codice articolo
Número de artículo
Referentienummer
Número de referência
Referenční číslo
Numer referencyjny
Referensnummer
Referansenummer
Tuotenumero
Katalognummer
Αριθµός αναφοράς
242
Viitenumber
Referentni broj
Hivatkozási szám
Identifikavimo numeris
Atsauces numurs
Număr de referinţă
Регистрационный номер
Referenčné číslo
Kataloška številka
Referentni broj
Referans numarası
Page 29

Keep away from heat
םוחמ קחרה
Vor Wärme schützen
Garder à l’abri de la chaleur
Tenere lontano da fonti di calore
Proteger del calor
Tegen hitte en zonlicht beschermen
Manter longe do calor
Nevystavujte nadměrnému teplu
Chronić przed wysoką temperaturą
Får ej förvaras varmt
Beskyttes mot varme
Varjeltava kuumuudelta
Tåler ikke varme
Φυλάσσεται µακριά από θερµότητα
Kaitske kuumuse eest
Čuvati podalje od izvora topline
Tartsa hőtől távol
Laikyti vėsioje vietoje
Neuzglabājiet karstumā.
A se feri de căldură
Беречь от тепла
Chráňte pred teplom.
Varovati pred vročino
Čuvajte od toplote
Isıdan uzak tutun
243
Page 30

244
ןרצי
Manufacturer
Hersteller
Fabricant
Produttore
Fabricante
Fabrikant
Fabricante
Výrobce
Producent
Tillverkare
Produsent
Valmistaja
Producent
Κατασκευαστής
Tootja
Proizvođač
Gyártó
Gamintojas
Ražotājs
Producător
Изготовитель
Výrobca
Proizvajalec
Proizvođač
Üretici
Page 31

Date of manufacture
רוציי ךיראת
Herstellungsdatum
Date de fabrication
Data di produzione
Fecha de fabricación
Productiedatum
Data de fabricação
Datum výroby
Data produkcji
Tillverkningsdatum
Produksjonsdato
Valmistuspäivämäärä
Fremstillingsdato
Ηµεροµηνία κατασκευής
Tootmiskuupäev
Datum proizvodnje
Gyártási idő
Pagaminimo data
Ražošanas datums
Data fabricaţiei
Дата изготовления
Dátum výroby
Datum izdelave
Datum proizvodnje
Üretim tarihi
245
Page 32

246
ינגוריפ אל
Non Pyrogenic
Pyrogenfrei
Apyrogène
Non pirogeno
Apirógeno
Pyrogeenvrij
Não pirogênico
Apyrogenní
Niepirogenny
Pyrogenfri
Pyrogenfri
Pyrogeeniton
Pyrogenfri
Μη πυρετογόνο
Mittepürogeenne
Apirogeno
Nem pirogén
Nedegu
Nepirogēns
Apirogen
Апирогенный
Apyrogénne.
Apirogeno
Apirogeno
Pirojenik değildir
Page 33

Sterilized using Ethylene Oxide
דיסקוא ןליתא םע אטוחמ
Sterilisiert mit Ethylenoxid
Stérilisé à l’oxyde d’éthylène
Sterilizzato con ossido di etilene
Esterilizado con óxido de etileno
Gesteriliseerd met ethyleenoxide
Esterilizado com o uso de óxido de etileno
Sterilizováno etylenoxidem
Sterylizowane tlenkiem etylenu
Steriliseras med etylenoxid
Sterilisert med etylenoksid
Steriloitu etyleenioksidilla
Steriliseret med ethylenoxid
Αποστειρώθηκε µε αιθυλενοξείδιο
Steriliseeritud etüleenoksiidiga
Sterilizirano etilen-oksidom
Etilén-oxiddal sterilizálva
Sterilizuotas etileno oksido dujomis
Sterilizēts ar etilēna oksīdu.
Sterilizat cu oxid de etilenă
Стерилизовано с использованием
этиленоксида
Sterilizované etylénoxidom.
Sterilizirano z etilen oksidom
Sterilizovano etilen oksidom
Etilen Oksit kullanılarak strelize edilir
247
 Loading...