

Roche Accu-Chek Mobile operation manual
C
© 2015 Roche Diabetes Care
ACCU-CHEK, ACCU-CHEK MOBILE, ACCU-CHEK SMART PIX,
ACCU-CHEK 360° and FASTCLIX are trademarks of Roche.
CONTINUA, the CONTINUA logos and CONTINUA CERTIFIED are trademarks,
service marks, or certification marks of the Continua Health Alliance.
CONTINUA is a registered trademark in some, but not all countries in which
this product is distributed.
The USB-IF Logos are trademarks of Universal Serial Bus Implementers
Forum, Inc.
Roche Diabetes Care GmbH
M
Sandhofer Strasse 116
68305 Mannheim, Germany
www.accu-chek.com
07438877001(01) – 2015-05 M_Version02_Rev3
User’s Manual
and Quick Start Guide
Blood Glucose Monitoring System
IMPORTANT INFORMATION FOR PERFORMING A BLOOD GLUCOSE TEST
W
An incorrectly performed blood glucose test may lead to incorrect test results which can cause the wrong therapy recommendation to be made and thus produce serious
1
2
3
IMMEDIATELY!
4
adverse health eects. Therefore, follow these instructions carefully to perform a blood glucose test correctly.
Do Do not
Wash your hands with warm water and soap and
rinse well. Dry your hands thoroughly with a clean
towel before obtaining blood.
Always use a small, fresh and well-formed blood
drop.
Touch the test area gently and steadily when applying
the blood drop. Apply the blood drop to the centre of
the test area.
Apply the blood drop to the test area immediately
after you have obtained the blood drop. Remove your
finger from the test area when the beep tone sounds
and Test in progress is displayed. Note: You can only
hear the beep tones when they are turned on. See
Setting tones in the User’s Manual.
DO NOT WAIT!
Do not perform a blood
glucose test if your fingers
are unwashed, soiled or
sticky (for example, due to
food or drink residue).
Do not perform a blood
glucose test with a smeared
or spread blood drop. Do not
smear the blood drop on the
test area.
Do not press the test area
and the finger together.
Avoid trembling or shaky
movements.
Do not wait before applying
the blood drop to the test
area. Do not continue to hold
your finger on the test area
after the beep tone sounds
and Test in progress is
displayed.
An incorrectly performed blood
glucose test may lead to falsely
elevated blood glucose results
and thereby delivery of an
inappropriately high insulin
amount. Falsely elevated test
results are caused by the
following:
• Fingers are unwashed, soiled
or sticky.
• If the blood drop spreads on
the finger or if the blood drop
becomes smeared on the test
area, the risk of contamination
of the test area increases (for
example, due to food or drink
residue on the finger).
• The test area is pressed
against the finger.
• Trembling or shaky
movements during the blood
glucose test.
• The blood glucose test is not
performed immediately or the
finger stays on the test area
for too long. Pay attention to
the beep tone. The beep tone
helps you to obtain a reliable
test result.
Why
Quick Start Guide
Start Here
1
9
2
3
4
5
6
7
8
1 Release button (priming
and pricking)
2 Power and enter button
3 Down/Up buttons
4 Window showing number
of available lancets
5 Lever for loading a new
lancet
6 Rotatable cap for setting
the penetration depth
7 Tip cover, closed (below
right: open)
0
e
q
w
8 Test area (at the tip of the
cassette ready for a test)
9 Lancet drum
0 Slide button to release
the finger pricker
q Slide button to open the
cassette compartment
cover
w Tip cover
e Test cassette
W
The Accu-Chek Mobile
meter and Accu-Chek
FastClix finger pricker are
intended for patient selfmonitoring by an
individual person only.
They must not be used to
test blood glucose from
more than one person as
they do not incorporate any
features to guard against
cross-infection. The meter
and the finger pricker are
not to be shared between
family members or used by
healthcare professionals to
obtain blood or test blood
glucose from more than one
person.
This Quick Start Guide does
not replace the detailed
User’s Manual for your
Accu-Chek Mobile blood
glucose monitoring system.
Be sure to comply with the
safety information in the
User’s Manual and in the
package insert of the test
cassette.

1. Starting to use the blood glucose monitoring system 2. Preparing the finger pricker 3. Performing a blood glucose test Customer Support and Service Centre
Haende_waschen
1
Open the test cassette box at
the perforation. Take out the
2
Remove the new test cassette
from the plastic container.
plastic container.
4
Push the slide button for the
cassette compartment cover
upwards in the direction of the
arrow.
5
Insert the test cassette in the
meter. Press the cassette
compartment cover closed.
Close the tip cover.
7 8 9
3
Open the tip cover.
6
Pull the protective strip of the
batteries backwards out of the
meter. Remove the protective
film from the display.
1
Remove the cap from the finger
pricker.
The lancet drum is properly
inserted when it is completely
inside the finger pricker and
only the front edge protrudes.
4 5
2
Insert the new lancet drum,
white end first.
3
Place the cap back on again.
The cap is on correctly when it
is pushed back as far as it will
go, and you hear and feel it
click into place.
B
• 1
A
Do not remove the lancet drum
until all 6lancets have been
used.
H
The cap can only be easily
placed on up to the stop
position when the lancet drum
is completely inside the finger
pricker. Do not use force to
place the cap on. This might
damage the cap and finger
pricker. Instead, correct the
position of the lancet drum.
Before you perform a blood
1 2
glucose test: Observe the
important instructions on
performing a blood glucose test.
Wash your hands with warm
water and soap and rinse well.
Open the tip cover. Press the finger pricker firmly
against the selected puncture
site.
6
7
Dry your hands thoroughly with
a clean towel before you obtain
blood.
53 4
Press the release button all the
way down.
8
Australia
Accu-Chek Enquiry Line: 1800 251 816
Pump Support: 1800 633 457
www.accu-chek.com.au
Singapore
Accu-Chek ExtraCare line: 6272 9200
www.accu-chek.com.sg
United Kingdom
Roche Diabetes Care Limited
Charles Avenue, Burgess Hill
West Sussex, RH15 9RY, United Kingdom
Accu-Chek Customer Careline
1)
UK Freephone number: 0800 701 000
ROI Freephone number: 1 800 709 600
1)
calls may be recorded for training purposes
www.accu-chek.co.uk
www.accu-chek.ie
Last update: 2015-02
C
Press for about 2seconds
until the meter turns on.
Use
to select a language
(highlighted in yellow).
.
Press
Press
© 2015 Roche Diabetes Care
.
Rotate the cap until the desired
penetration depth lines up with
the indicator.
Tip: When obtaining blood, start
with a medium penetration
depth, such as 3.
Loading a new lancet: Prepare
the finger pricker for obtaining
blood again.
1
Push the lever
in direction A
and then back again in
directionB.
Touch the centre of the test
area gently and steadily with
the blood drop.
Take your finger away from the
test area as soon as Test in
progress appears on the screen.
Testing is complete after
approximately 5seconds. Read
the test result and close the tip
cover.
ACCU-CHEK, ACCU-CHEK MOBILE and
FASTCLIX are trademarks of Roche.
Roche Diabetes Care GmbH
M
Sandhofer Strasse 116
68305 Mannheim, Germany
www.accu-chek.com
tear here
07438877001(01) – 2015-05 M_Version02_Rev3

User’s Manual
Blood Glucose Monitoring System

These instructions for use feature the following 3 symbols:
W
This symbol indicates a possible risk of injury
or of damage to your own health or to the
health of others.
H
This symbol draws attention to actions that could
result in damage to the meter, the test
cassette or the finger pricker.
i
This symbol draws your attention to important
information.
W
Keep the blood glucose monitoring system and
all its components away from children under the
age of 3 years. There is a risk of suocation if
small parts (e.g. covers, caps or similar objects)
are swallowed.
Last update: 2015-02
2
Intended use
Accu-Chek Mobile blood glucose meter
Meter for quantitative determination of blood glucose values in fresh capillary blood using
Accu-Chek Mobile test cassettes.
Suitable for self-testing only.
W
• The Accu-Chek Mobile meter and Accu-Chek FastClix finger pricker are intended for patient
self-monitoring by an individual person only.
They must not be used to test blood glucose from more than one person as they do not incorporate
any features to guard against cross-infection. The meter and the finger pricker are not to be shared
between family members or used by healthcare professionals to obtain blood or test blood glucose
from more than one person. This meter and finger pricker are therefore not suitable for professional
use in healthcare facilities and institutions.
• Visually impaired people must be assisted by a sighted person when performing a blood glucose
test.
Accu-Chek FastClix finger pricker
Finger pricker with adjustable penetration depth for obtaining capillary blood from the fingertip with
Accu-Chek FastClix lancet drums and, when a special AST cap is used, also from alternative sites
(AST = alternative site testing), such as the palm.
W
The Accu-Chek FastClix finger pricker is intended for personal use only!
It may only be used by one and the same person for obtaining blood.
There is a risk of infections being transmitted if the finger pricker is used by other people, even by
family members, or if healthcare professionals use this finger pricker to obtain blood from dierent
people. This finger pricker is therefore not suitable for professional use in healthcare facilities and
institutions.
3

Contents
Intended use � � � � � � � � � � � � � � � � � � � � � � � � � � � � � � � � � � � � � � � � � � � � � � � � � � � � � � � � � � � � � � � � 3
The major features � � � � � � � � � � � � � � � � � � � � � � � � � � � � � � � � � � � � � � � � � � � � � � � � � � � � � � � � � � � 5
About this User’s Manual � � � � � � � � � � � � � � � � � � � � � � � � � � � � � � � � � � � � � � � � � � � � � � � � � � � � � � � 6
1 Getting to know your meter and finger pricker ������������������������������������7
2 Steps before testing �������������������������������������������������������14
3 Preparing the finger pricker �������������������������������������������������21
4 Performing a blood glucose test ����������������������������������������������27
5 Selecting settings ���������������������������������������������������������45
6 Using the meter as a diary ��������������������������������������������������64
7 Analysing test results on the PC ����������������������������������������������70
8 Acoustic mode �����������������������������������������������������������89
9 Checking the meter ��������������������������������������������������������94
10 Tools menu �������������������������������������������������������������101
11 Cleaning the blood glucose monitoring system ���������������������������������107
12 Changing the batteries ����������������������������������������������������114
13 Testing and storage conditions ����������������������������������������������117
14 Messages and problems ���������������������������������������������������120
15 Discarding the blood glucose monitoring system ��������������������������������129
16 Technical data �����������������������������������������������������������130
17 System components ������������������������������������������������������133
18 Customer Support and Service Centre ����������������������������������������134
19 Index ������������������������������������������������������������������135
20 Explanation of symbols ����������������������������������������������������138
21 Appendix ���������������������������������������������������������������140
4

The major features
• Test cassette instead of test strips
50 test areas on a continuous tape
• Test
Test starts by opening the tip cover
• Measuring time
About 5seconds for a test, depending on the
blood glucose concentration
• Docked finger pricker
Use the finger pricker in its docked or undocked
state
• Finger pricker with lancet supply
6sterile lancets in a lancet drum
• Automatic coding
Meter is automatically coded
• Control over amount of blood
Meter detects the amount of blood that is
necessary
• Luminous display
Yellow display on black background
• Text-supported operation
Meter takes you through all operation steps
• Menu-driven operation
Menu-driven settings and functions
• Reminder
A total of 7 reminders and 4 test reminders
• Target range for test results
Personal target range for blood glucose values
• Flagging of results
Flagging results with symbols
• Memory
2,000 memory locations available
• Data analysis on a PC
Display and analysis of data on a PC
• Data transfer
USB port for data transfer
• Error messages
Displays an error code and a message
5

About this User’s Manual
Read this User’s Manual carefully and completely before testing blood glucose for the first time. If you
have any questions, contact the customer support and service centre (see page134).
These instructions for use provide you with the information you need to operate and care for your meter
and finger pricker, and for troubleshooting. Be sure to operate the meter and the finger pricker correctly
as well as to observe the operating instructions.
Note: All dates, times or results displayed on the screens in this User’s Manual are intended only as
examples. Results are displayed in the unit mmol/L, dates in the format Day.Month.Year and times in
24-hour format.
You can only hear the beep tones of the meter when they are turned on and the volume level is not set to
1 (Mute). This User’s Manual presumes that the beep tones are turned on (see Setting tones page49).
All instructions appear as shown in the example below.
1
CLICK
Press the cassette
compartment cover closed.
The cassette compartment cover
must close with an audible
CLICK.
6
Title bar of the illustration with
number or illustration title
Illustration of the instructions
Instructions (bluefont)
Information on instructions
(blackfont)

Getting to know your meter and finger pricker
Getting to know your meter and finger pricker
Overview of meter
1
2
1
9
7
8
3
4
5
6
0
q
w
e
r
7

1
1 Battery door (above right: open)
2 Batteries (see page114 and page130 for
3 Display
4 Finger pricker (docked)
5 Power and enter button
6 Down/Up buttons
7 Tip cover, closed (below right: open)
8 Test area (at the tip of the cassette, ready for
Getting to know your meter and finger pricker
information on possible battery types)
atest)
Overview of finger pricker
t
s
a
p
z
u
i
o
9 USB port – interface to be used for data
analysis on a computer (below left: open USB
port)
0 Type plate
q Slide button to release the finger pricker
w Slide button to open the cassette compartment
cover
e Cassette compartment cover (below right:
open)
r Test cassette (in place in the meter)
t Release button (priming and pricking)
z Lever for loading a new lancet
u Lancet drum containing 6 lancets
i Numerical values for penetration depths
(11 settings)
o Rotatable cap for setting the penetration depth
p Pin-hole opening for lancet
a Penetration depth indicator
s Window showing number of available lancets
8

Getting to know your meter and finger pricker
1
Using the buttons and menus
This chapter tells you how to use the buttons to operate the meter and navigate through the menus, how
the menus are structured and what the dierent symbols in them mean.
Meter buttons
Button Name Symbol Function
This button allows you to:
• Turn the meter on or o; to do so, press and hold
Power button,
enter button
the button (for approx. 2seconds)
• Execute the command displayed on the screen
above the button (press and release the button
only)
Example: The
the option highlighted in the menu.
command selects
1
2
Down button
Up button
This button 1 allows you to:
• Navigate down in a menu or list
• Decrease numerical values
This button 2 allows you to:
• Navigate up in a menu or list
• Increase numerical values
9
1
Menu structure of the meter
Getting to know your meter and finger pricker
0
9
8
7
6
1
2
345
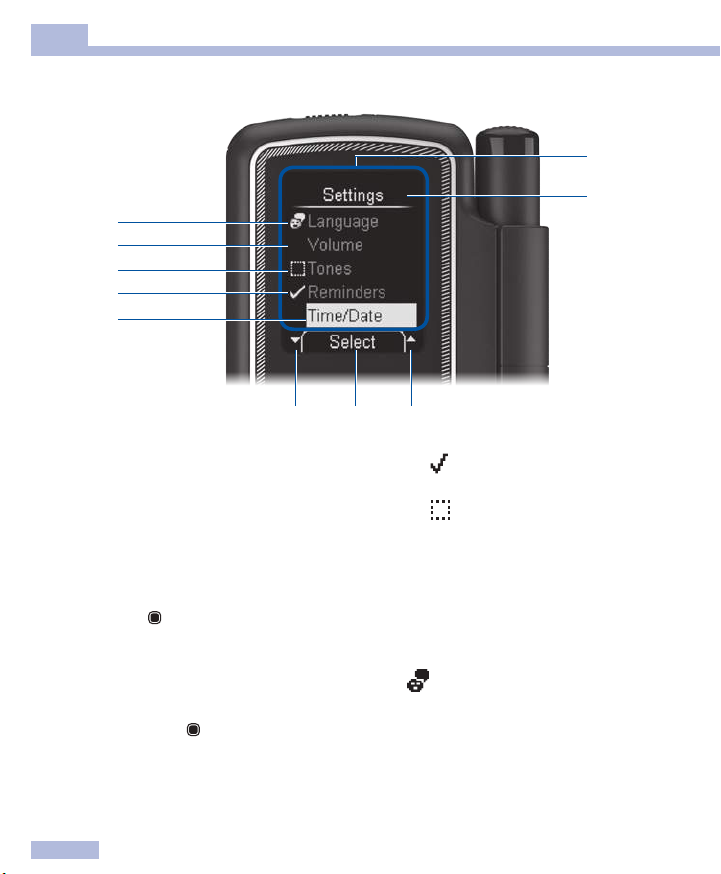
1 Menu
Title of a screen or menu
2
(for example, Settings)
3 The symbol means that there are more
options listed above the first visible option.
4
The command displayed here
(for example,
you press the
shown depends on the current screen.
5 The symbol means that there are more
options listed below the last visible option.
6 A selected option is highlighted with a yellow
bar. If you press the
be selected.
Select
) will be executed when
button. The command that is
button, this option will
10
7 The
8 The
9 Unselected option in the menu.
0 The options in the main menu and the
symbol indicates that the function
(for example, Reminders) is on.
symbol indicates that the function
(for example, Tones) is o.
Language option in the Settings menu have
asymbol on their left-hand side to identify the
menu item should the language accidentally
change to one that you do not understand
for Language for example).
(
Operation
Getting to know your meter and finger pricker
1
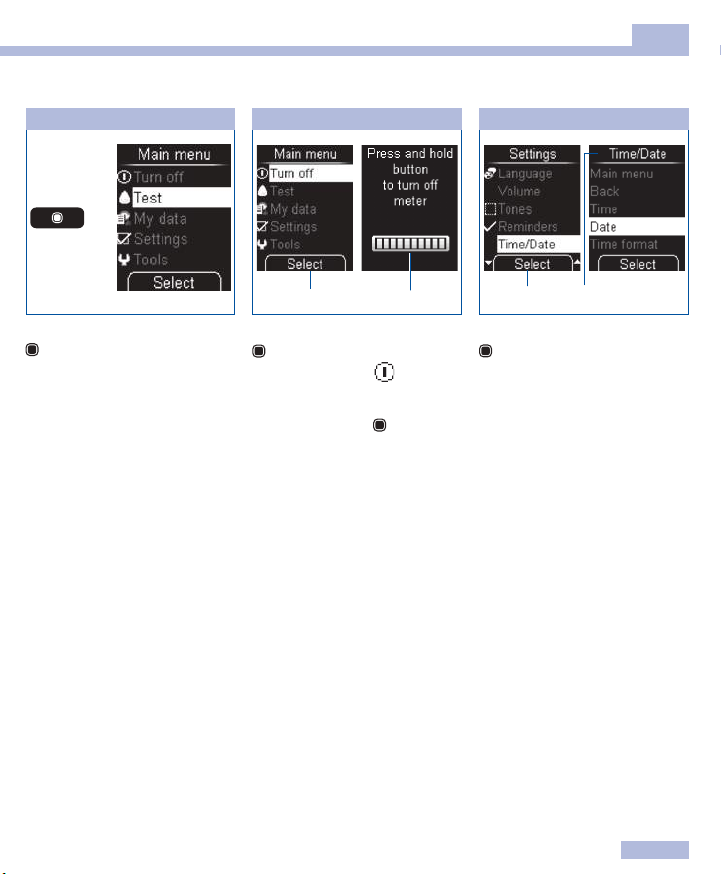
Turning the meter on
1
Pressing and holding the button
(for approx. 2seconds) 1
turns the meter on.
After the display check, the
meter first displays the number
of tests still available on the test
cassette and then opens the
main menu.
Turning the meter o
2
Select 2 (press and release the
button) selects the highlighted
Turn o command (
Or
Press and hold the
all bars on the screen are filled
(approx. 2seconds) 3.
The meter turns o after
displaying the number of tests
still available.
3
).
button until
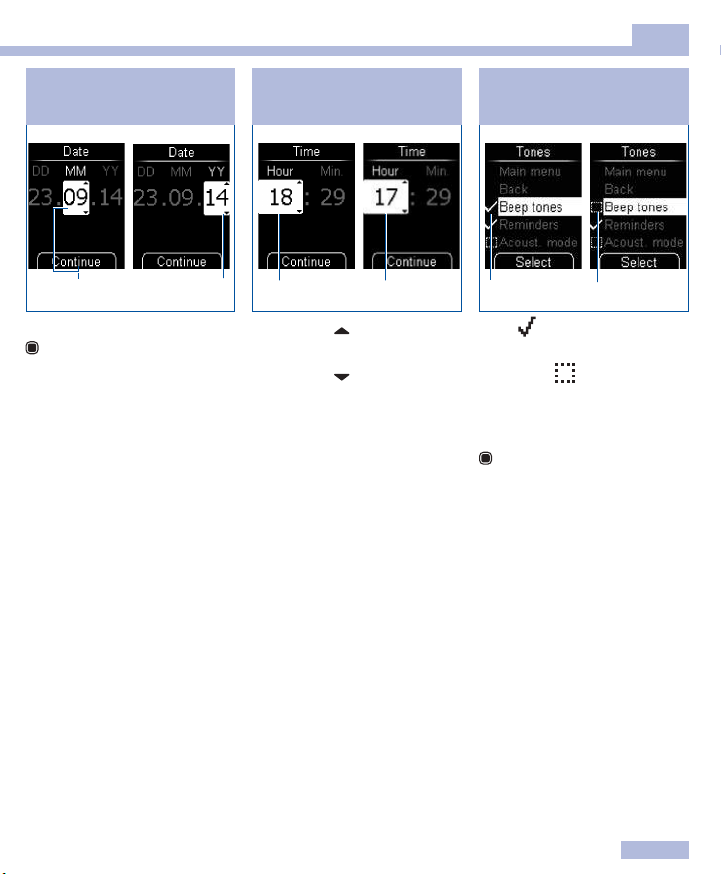
Opening the menu
4
5
Select 4 (press and release the
button) selects the highlighted
Time/Date option from the
Settings menu. The Time/Date
menu opens 5.
11

1
Getting to know your meter and finger pricker
Returning to a higher-level menu
6
7
Back 6 (press and release the
button) opens the higher-level
menu 7 of the currently
displayed menu.
Confirming settings or operations
8
9
Confirm ( ) 8 is highlighted.
OK 9 (press and release the
button) confirms the setting
you made.
Cancelling settings or operations
0 q
( ) Cancel is highlighted.
OK 0 (press and release the
button) cancels the setting you
made.
Cancel q (press and release the
button) cancels the operation
(data transfer).
12
Getting to know your meter and finger pricker
1
Navigating between input fields
w
Continue (press and release the
button) switches from month
w to year e.
Changing numerical values
e
r t
Pressing the button r
increases the numerical value.
Pressing the
decreases the numerical value.
Pressing the button once
increases or decreases the
number by 1. If you press and
hold the button, the number
continues to count until you
release the button.
button t
Turning functions on or o
z
A tick z in front of an option
means that the function is on.
A checkbox
option means that the function is
o.
Select (press and release the
button) sets (= on) or removes
(= o) the tick.
u
u in front of an
13

2
Steps before testing
Steps before testing
Checking the unit of measurement
Blood glucose results can be displayed in two dierent units of measurement (mg/dL or mmol/L).
Consequently, there are two dierent versions of the same meter. Check that your meter displays the unit
of measurement you are accustomed to. You can find the unit of measurement 1 that your meter
displays on the type plate on the back of your meter. If you do not know which unit of measurement is
correct for you, ask your healthcare professional.
W
The unit of measurement that your meter displays cannot be changed. If the wrong unit of
measurement is printed on the type plate, contact the customer support and service centre (see
page134). Using the wrong unit of measurement may cause misinterpretation of your test results and
can cause the wrong therapy recommendation to be made, and thus produce serious adverse health
eects.
Type plate
14
mmol/L
1

Steps before testing
Inserting the first test cassette
Before using your new meter for the first time, you must insert a test cassette.
Insert the very first test cassette in the meter before you remove the protective strip from the batteries
and start using the meter.
W
• Read the test cassette package insert. It contains further important information, for example, on
storage and possible causes of incorrect test results.
• If the plastic container or the foil cover of the test cassette is damaged, you must not use the test
cassette. Otherwise, there is a risk that you might obtain incorrect test results. Incorrect test results
can cause the wrong therapy recommendation to be made and thus produce serious adverse health
eects.
• Only open the plastic container when you want to insert the test cassette in the meter. The unopened
plastic container protects the test cassette against damage and moisture.
i
A table is printed on the test cassette box which shows the permitted results for control tests (checking
the meter with glucose control solution). The meter automatically checks whether the result of a control
test is correct (see page 98). If you want to check the control result yourself as well, you can do this
with this table. Keep the test cassette box in case you need it for this purpose. Note that the table only
applies to test cassettes in this box. For test cassettes from other boxes, other tables apply.
2
15

2
Steps before testing
21
3
Open the test cassette box at the
perforation. Take out the plastic
container.
4
Turn the meter over so that the
back is facing upwards.
16
Remove the test cassette from
the plastic container.
5
Push the slide button for the
cassette compartment cover
upwards in the direction of the
arrow.
The cassette compartment cover
opens.
Open the tip cover.
6
Insert the test cassette in the
meter with the silver side facing
upwards.
Steps before testing
7
8
CLICK
9
2
Close the cassette compartment
cover.
cover closed.
Close the tip cover.Press the cassette compartment
The cassette compartment cover
must close with an audible
CLICK.
17

2
Steps before testing
Validity of the test cassette
The validity of the test cassette depends on the use by period and the use by date.
Use by period: The period in which the test cassette must be used up after the foil cover of the plastic
container was opened. The use by period in days is printed on the box and in the package insert of the
test cassette next to the
Use by date: Date until which a test cassette sealed in the plastic container is valid. The use by date is
shown on the box of the test cassette or foil cover next to the symbol
If either of the two dates – use by period or use by date – is exceeded, you will not be able to perform
any more tests with this test cassette.
If you start a test and the validity of the test cassette will soon expire or has already expired, a message
appears to inform you.
The first message appears 10days before the validity expires, the others follow 5, 2 and 1day(s) before
expiry (see Error messages page124).
If the validity of the test cassette has expired, a message appears (see Error messages page124).
symbol.
.
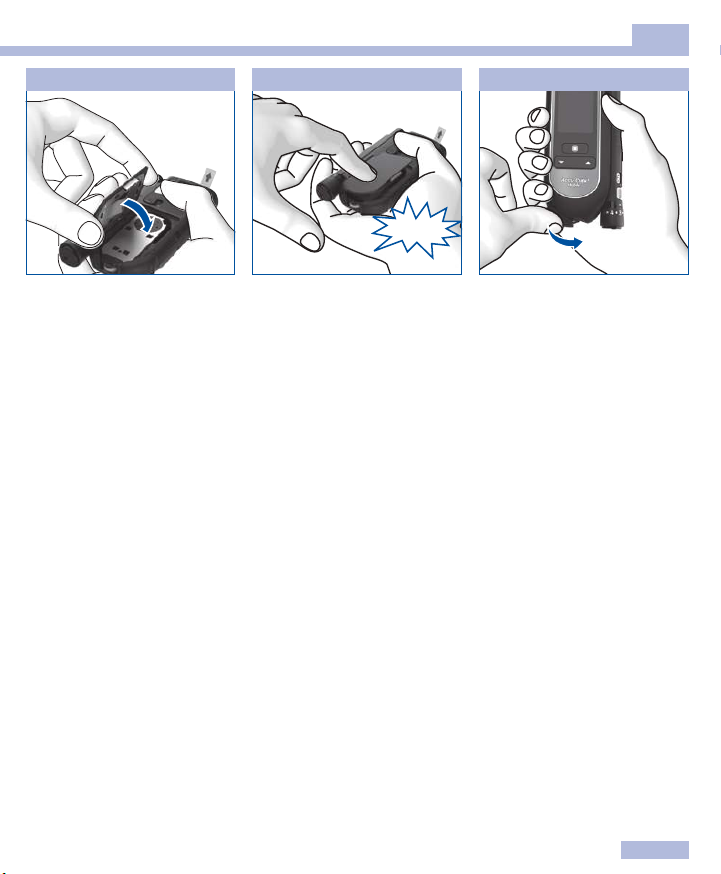
Removing protective film and strip
The meter display is covered with a protective film and the meter’s battery contacts with a protective
strip.
1
2
Remove the protective film from
the display.
18
Pull the protective strip of the
batteries backwards out of the
meter.

Steps before testing
2
Setting the language
The meter automatically prompts you to set the language the first time you turn it on. When you turn the
meter on for the first time, the language selection menu is automatically displayed. You can either select
the default language or replace it with a dierent language.
1
Use to select a language.
to select the desired
Press
language.
The meter displays the language
you have selected.
2
Press to confirm the selected
language.
The meter then runs a display
check.
i
If you selected the wrong
language by mistake you can
change this setting later (see
Making settings page47).
The Language menu is marked
with the symbol
.
19

2
Steps before testing
3
1
W
If there are irregularities in the
checkerboard pattern, results
might not be displayed
correctly. In this case, contact
the customer support and
service centre (see page 134).
4
Check if there are any
irregularities in the checkerboard
pattern 1 (see Performing a
display check page101).
The meter automatically exits the
display check after about
2seconds.
20
The meter displays the number
of tests in the test cassette that
are still available.
Afterwards the main menu is
shown.
Now you can decide what you
want to do (for example, turn the
meter o, perform a blood
glucose test or make settings).

Preparing the finger pricker
Preparing the finger pricker
You can use the finger pricker to obtain blood from a fingertip. You can set the penetration depth to
11 dierent levels to suit the individual texture of your skin.
You insert a new lancet drum with 6 sterile lancets into the finger pricker. You can obtain blood with a
sterile lancet 6 times before the lancet drum needs changing.
You can use the finger pricker either docked on to the meter or separately from the meter.
You can also use the finger pricker to obtain blood from other (alternative) sites. For this purpose, you
need a special AST cap, which enables you to obtain capillary blood from alternative sites.
If you would like to order an AST cap, contact the customer support and service centre (see page 134).
W
• The Accu-Chek Mobile meter and Accu-Chek FastClix finger pricker are intended for patient
self-monitoring by an individual person only.
They must not be used to test blood glucose from more than one person as they do not incorporate
any features to guard against cross-infection. The meter and the finger pricker are not to be shared
between family members or used by healthcare professionals to obtain blood or test blood glucose
from more than one person. This meter and finger pricker are therefore not suitable for professional
use in healthcare facilities and institutions.
• Wear and tear of the materials can lead to malfunction of the device. In extreme cases a lancet can
protrude from the cap so that injury cannot be completely ruled out. You should therefore handle the
finger pricker with particular care once a lancet drum has been inserted.
H
• Only use the Accu-Chek FastClix finger pricker with Accu-Chek FastClix lancet drums. Using any
other lancets or lancet drums may severely damage the finger pricker or impair its function.
• A used Accu-Chek FastClix lancet drum has a built-in locking mechanism. You cannot reinsert a
lancet drum that has already been removed. Used lancet drums must not be reused.
3
21

3
Take a new lancet drum 1.
You can recognise used lancet
drums by the red stripe 2.
Preparing the finger pricker
1
• 1
2
2
Remove the cap from the finger
pricker.
W
You must not insert the lancet
drum into the finger pricker
and simultaneously press the
release button or hold the
finger pricker with the release
button resting on a surface
such as a table top. This could
release a lancet and
inadvertently cause injury.
3
Insert the new lancet drum,
white end first.
The lancet drum is properly
inserted when it is completely
inside the finger pricker and only
the front edge protrudes.
22
4
Place the cap back on again.
The cap is on correctly when it is
pushed back as far as it will go,
and you hear and feel it click into
place.
H
The cap can only be easily
placed on up to the stop
position when the lancet drum
is completely inside the finger
pricker. Do not use force to
push the cap on. This could
damage the cap and finger
pricker. Instead, correct the
position of the lancet drum.
Preparing the finger pricker
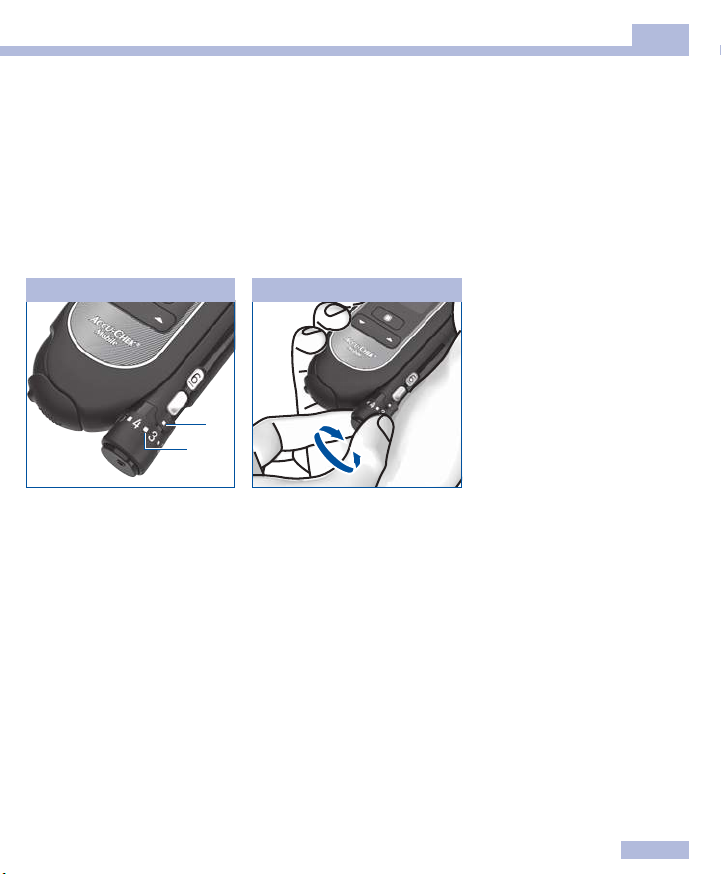
3
Setting the penetration depth
You can set the penetration depth of the lancet to 11 dierent levels. The levels are divided into 6 halfsettings and 5 whole settings (0.5–5.5, 0.5 is the lowest, 5.5 is the highest). Set the penetration depth
suitable for you. This allows virtually pain-free collection of blood and control over the amount of blood
needed. The penetration depth indicator on the finger pricker (silver square) indicates the current
penetration depth setting. The higher the number, the greater the penetration depth. The half-settings are
located between the numbers.
If you have no experience with using this finger pricker, we recommend a medium penetration depth
setting such as 3.
Settings
• 1
• 2
1
= penetration depth indicator
2
= half-setting
Rotate the cap until the desired
penetration depth is level with
the indicator.
23

3
Preparing the finger pricker
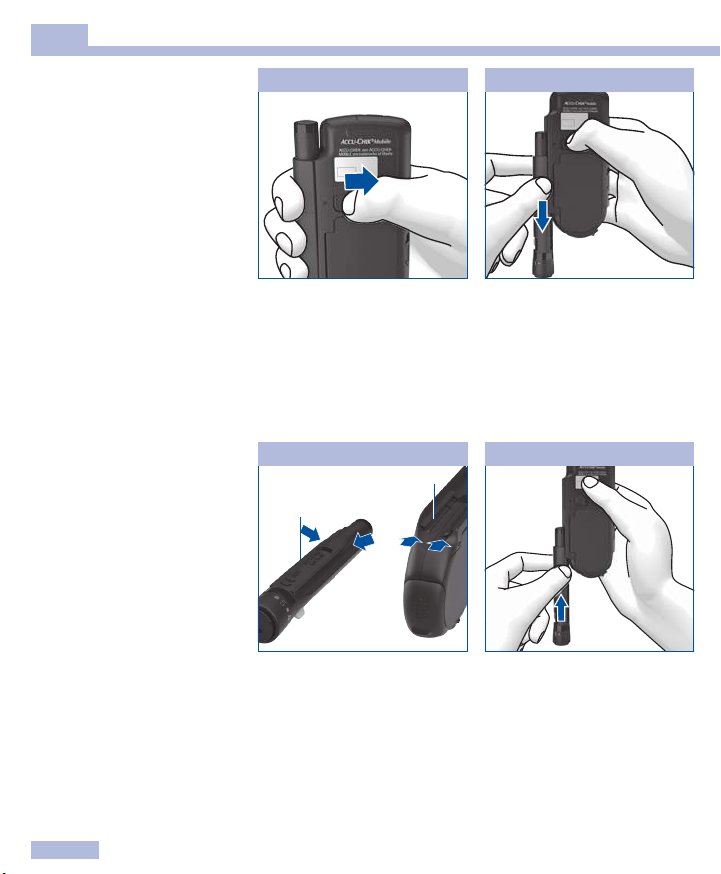
Loading a new lancet
When you have inserted a new lancet drum, a new lancet is automatically ready for use.
If you have already used the finger pricker to obtain blood, you will need a new lancet the next time you
obtain blood. The following steps show you how to load a new lancet:
1
• 1
B
A
1
Push the lever
and then back again in direction
B.
in direction A
2
• 2
The window 2 on the side of the
finger pricker now shows one
less available lancet (for
example, 5 instead of previously
6).
H
If the number 1 appears in the
window showing the number of
available lancets
1 will be blocked by a locking
mechanism. Do not force the
lever beyond this locking
mechanism as this will damage
the finger pricker. Instead,
replace the lancet drum with a
new one.
2
, the lever
24

Preparing the finger pricker
3
Replacing the lancet drum
When you have used the sixth and last lancet, the number 1 appears in the window on the finger pricker.
Replace the lancet drum with a new one.
H
A used lancet drum has a built-in locking mechanism and cannot be reused.
i
Used lancet drums can be disposed of in household waste if no other regulations apply locally.
1
Remove the cap from the finger
pricker.
2
Pull the lancet drum out of the
finger pricker.
3
Insert a new lancet drum, white
end first.
Place the cap back on again.
Keep in mind the information on
page 22.
25
3
Preparing the finger pricker
Undocking the finger
pricker
1
2
Docking the finger pricker
26
Push the slide button for the
finger pricker in the direction of
the arrow as far as it will go.
Hold the slide button in that
position.
1
• 2
• 1
When docking the finger pricker,
the tracks of the finger pricker
1 and those of the meter 2
must interlock.
Slide the finger pricker out in the
direction of the arrow.
2
Slide the finger pricker along the
side of the meter in the direction
of the arrow until it slots into
place.

Performing a blood glucose test
4
Performing a blood glucose test
Once you have inserted a lancet drum into the finger pricker and set the penetration depth, you can start
to perform a blood glucose test.
W
Important information for performing a blood glucose test
Performing a blood glucose test incorrectly may lead to incorrect test results which can cause the
wrong therapy recommendation to be made and thus produce serious adverse health eects.
Therefore, follow these instructions carefully to perform a blood glucose test correctly.
W
Visually impaired people must be assisted by a sighted person when applying a blood drop.
If you are using the acoustic mode: Pay attention to the beep tones. Read the Acoustic mode chapter
carefully (see page89).
i
When the meter prompts you to apply a blood drop, you have about 2minutes to apply blood to the test
area. If you do not apply blood during this time, the meter turns itself o and the test area will be lost.
27

4
Performing a blood glucose test
1
2
3
Do
Wash your hands with warm
water and soap and rinse well.
Dry your hands thoroughly with a
clean towel before obtaining
blood.
Always use a small, fresh and
well-formed blood drop.
Touch the test area gently and
steadily when applying the blood
drop. Apply the blood drop to the
centre of the test area.
28
4
IMMEDIATELY!
Apply the blood drop to the test
area immediately after you have
obtained the blood drop. Remove
your finger from the test area
when the beep tone sounds and
Test in progress is displayed.
Note: You can only hear the beep
tones when they are turned on.
See Setting tones page49.
 Loading...