

Roche Accu-Chek Complete Owner's Booklet
®
Owner’s Booklet


Dear ACCU-CHEK System Owner,
Thank you for choosing the ACCU-CHEK Complete system!
Congratulations on your decision to take control of your diabetes. We’ve designed your new
ACCU-CHEK Complete system with comfort, convenience, and control in mind – to help make
living with diabetes a little easier.
This booklet will help you get the most from your ACCU-CHEK Complete system. We also invite
you to visit www.accu-chek.com to find out about services, tools, and information that can help
you manage your diabetes.
To start testing quickly, you can also refer to the First Time Guide or the Quick Reference Guide.
If you have questions, we’re here to help. Just call the ACCU-CHEK Customer Care service center
toll-free at 1-800-858-8072. We offer assistance 24 hours a day, 365 days a year, in Spanish
and many other languages.
Thanks again for choosing an ACCU-CHEK system.

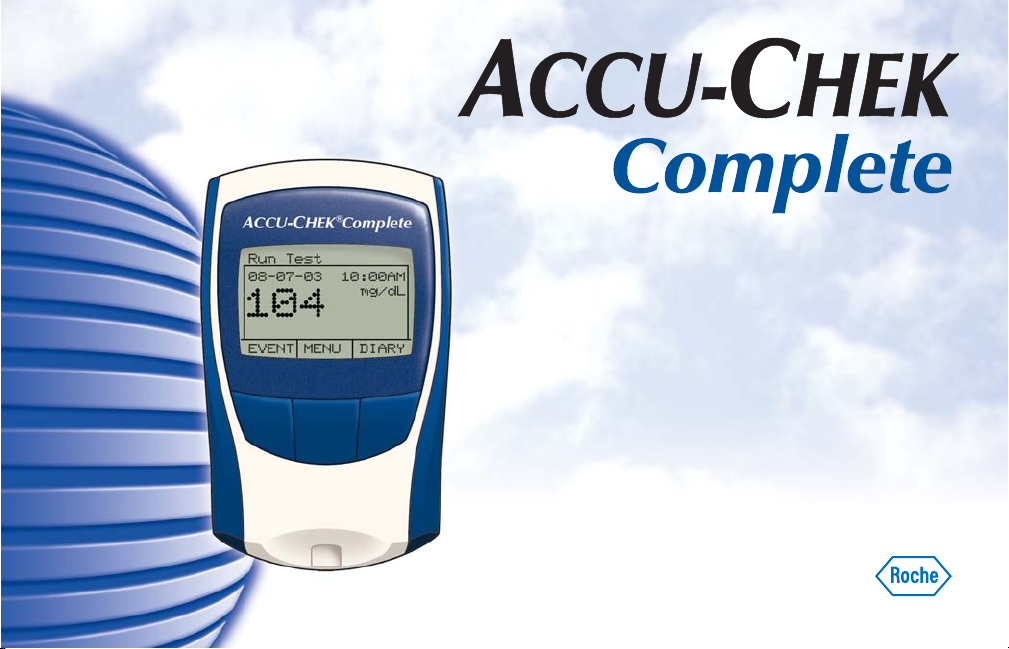
The ACCU-CHEK Complete System*
Your new ACCU-CHEK Complete meter and accessories work together to measure the amount of sugar
(glucose) in your blood to help you and your doctor control your diabetes. The system includes:
• ACCU-CHEK Complete Meter
• Batteries
• Code Key
*Items may be sold separately.
Why Regular Blood Sugar Testing Is Important
Checking your blood sugar can make a big difference in how well you can manage your diabetes on a daily
basis. We’ve made it as simple and comfortable as possible. ACCU-CHEK meters are easy to use, and you can
adjust the ACCU-CHEK Softclix lancet device to make testing more comfortable.
Need Help?
Just call the ACCU-CHEK Customer Care sevice center, 24 hours a day, 365 days a year, at 1-800-858-8072.
You can also visit www.accu-chek.com for diabetes management tools and product demonstrations.
To make sure you receive the best customer service possible and news about product updates,
please complete and mail your warranty card.
• ACCU-CHEK Comfort Curve Control Solution*
• ACCU-CHEK Comfort Curve Test Strips*
• ACCU-CHEK Softclix Lancet Device*
• ACCU-CHEK Softclix Lancets*
ACCU-CHEK Customer Care Service Center 1-800-858-8072
2

Important Information About Your New Meter
• Your blood glucose meter is designed and approved for testing fresh capillary whole blood samples
(like blood taken from fingertips) outside the body (
diabetes.
• Be sure to use only ACCU-CHEK Comfort Curve test strips or ACCU-CHEK Advantage test strips with the meter.
Other test strips may produce inaccurate results.
• Do the control checks explained in this booklet to make sure your system is working properly.
• Carefully dispose of used test strips and lancets.
in vitro
diagnostic use). It should not be used to diagnose
Health-Related Information
• Being severely dehydrated or losing a lot of water may give you false (low) test results. If you think you’re
suffering from dehydration, call your doctor right away.
• If you have followed all the instructions in this booklet and still have symptoms that don’t seem to match your
test results – or if you have questions – talk to your doctor.
3
ACCU-CHEK Customer Care Service Center 1-800-858-8072

Contents
Chapter 1: Understanding Your New System ..........................................................................8
Installing (or Changing) the Batteries ..................................................................................11
Setting the Time and Date .................................................................................................13
Coding the Meter ................................................................................................................14
Using Your Test Strips .........................................................................................................15
Chapter 2: Control Testing .....................................................................................................17
Why Run Control Tests ........................................................................................................17
About the Control Solution ..................................................................................................17
Running a Control Test ........................................................................................................18
Understanding Control Test Results .....................................................................................21
Chapter 3: Testing Your Blood Sugar .....................................................................................23
Preparing the Lancet Device ...............................................................................................23
Running a Blood Sugar Test ................................................................................................25
Recording Your Results .......................................................................................................27
Storing Your Supplies .........................................................................................................27
Proper Testing Conditions ...................................................................................................28
Using ACCU-CHEK Comfort Curve Test Strips ...............................................................16
Using ACCU-CHEK Advantage Test Strips .....................................................................16
Contents ACCU-CHEK Customer Care Service Center 1-800-858-8072
4

Understanding Your Test Results .........................................................................................28
Symptoms of High or Low Blood Sugar...............................................................................29
Unusual Test Results...........................................................................................................29
Adding Test Result Information............................................................................................30
Diary Information ................................................................................................................31
Chapter 4: Using Your Meter’s Memory .................................................................................33
Reviewing Memory Information ..........................................................................................34
Reviewing Averages.....................................................................................................35
Reviewing Glucose Ranges ..........................................................................................36
Reviewing Trends.........................................................................................................37
Reviewing Graphs ........................................................................................................38
Reviewing Glucose Results ..........................................................................................39
Reviewing Diary Records .............................................................................................39
Reviewing Number of Hypo Records ............................................................................40
Reviewing Ketone Results............................................................................................41
Reviewing A1c Test Results..........................................................................................42
Reviewing Pump Profile Settings..................................................................................43
Downloading Your Meter to a Computer ..............................................................................44
Chapter 5: Setting Your Meter Options...................................................................................45
Set Options Menu ...............................................................................................................45
Contents ACCU-CHEK Customer Care Service Center 1-800-858-8072
5

Meter Options ..............................................................................................................46
Insulin Options .............................................................................................................48
Insulin Pump Setting....................................................................................................50
Glucose Range Settings ...............................................................................................51
Time Block Settings .....................................................................................................52
Diary Default Settings ..................................................................................................54
Country Options ...........................................................................................................56
Chapter 6: Adding and Changing Information in Memory ...................................................58
Enter/Edit Menu Options .....................................................................................................58
Changing Diary Information..........................................................................................60
Changing Insulin Information........................................................................................62
Changing Insulin Pump Information..............................................................................64
Changing Carbohydrate Information .............................................................................68
Changing Event Marker Information .............................................................................70
Changing Exercise Information.....................................................................................74
Changing Ketone Information .......................................................................................76
Changing A1c Information ............................................................................................78
Chapter 7: Maintenance and Troubleshooting.......................................................................80
Cleaning Your Meter............................................................................................................80
Maintenance and Testing ....................................................................................................81
Contents ACCU-CHEK Customer Care Service Center 1-800-858-8072
6

Cleaning Your Lancet Device ...............................................................................................81
Checking the Batteries........................................................................................................82
Screen Messages and Troubleshooting ...............................................................................83
Chapter 8: Technical Information ..........................................................................................88
Product Limitations.............................................................................................................88
Specifications .....................................................................................................................88
Product Safety Information..................................................................................................89
Warranty.............................................................................................................................90
Money-Back Guarantee ......................................................................................................91
Additional Supplies .............................................................................................................94
Information for Professional Caregivers...............................................................................95
Index ..................................................................................................................................96
Contents ACCU-CHEK Customer Care Service Center 1-800-858-8072
7
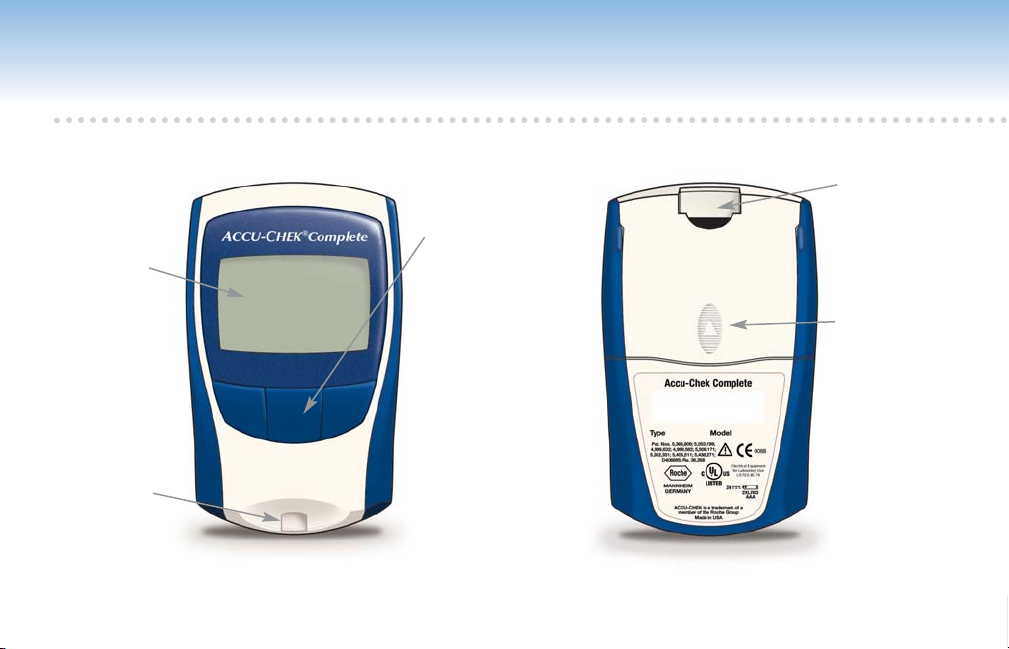
Chapter 1: Understanding Your New System*
*Items may be sold separately.
Display –
Shows blood
sugar results,
messages, and
results stored in
memory.
Test Strip Slot –
Insert test strip
here.
Buttons – The
function of each
button is shown
on the screen
above the button
and it may
change as the
screen changes.
Pressing any
button turns on
the meter.
8 Chapter 1: Underst
Code Key Slot –
Insert code key
through this
opening.
Battery Cover –
Slide cover off to
replace batteries.
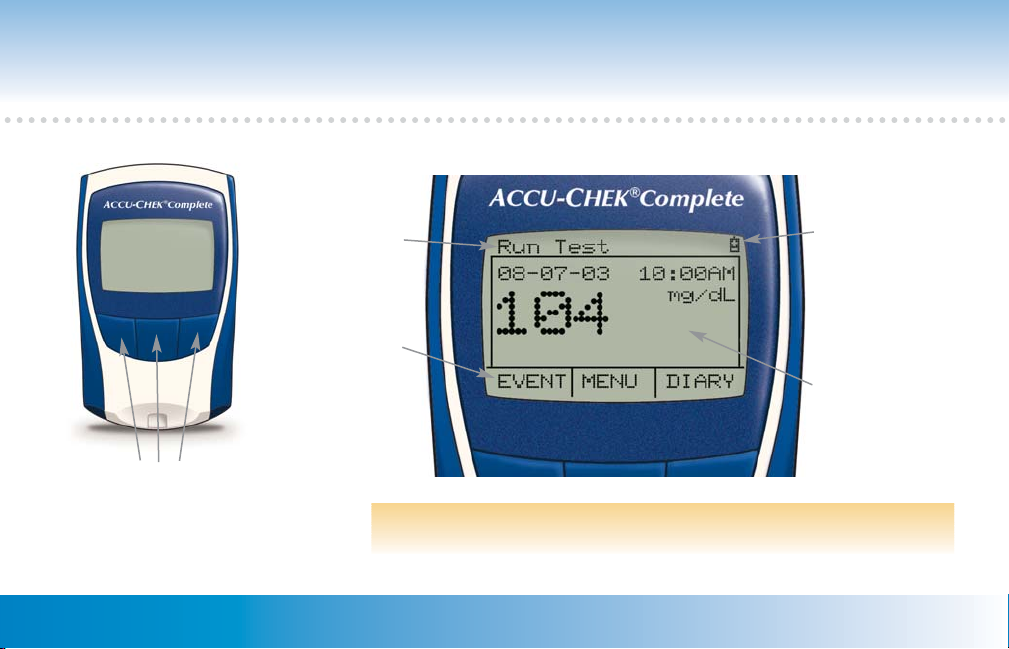
EXAMPLE
Title – Screen
name appears
at the top of
the display.
Function –
What each
button does in
this screen.
Buttons – The function of each button
will always be displayed on the screen
directly above the button. The functions
of the buttons will change depending
on the screen displayed.
At any time, you can press the left and right buttons at the same time
to return to the off function of the Main Menu.
Warning
Symbols –
Explained in
the trouble shooting section
on page 83.
Message Area –
Menu choices,
test results,
directions, and
messages.
Chapter 1: Understanding Your New System 9 ACCU-CHEK Customer Care Service Center 1-800-858-8072
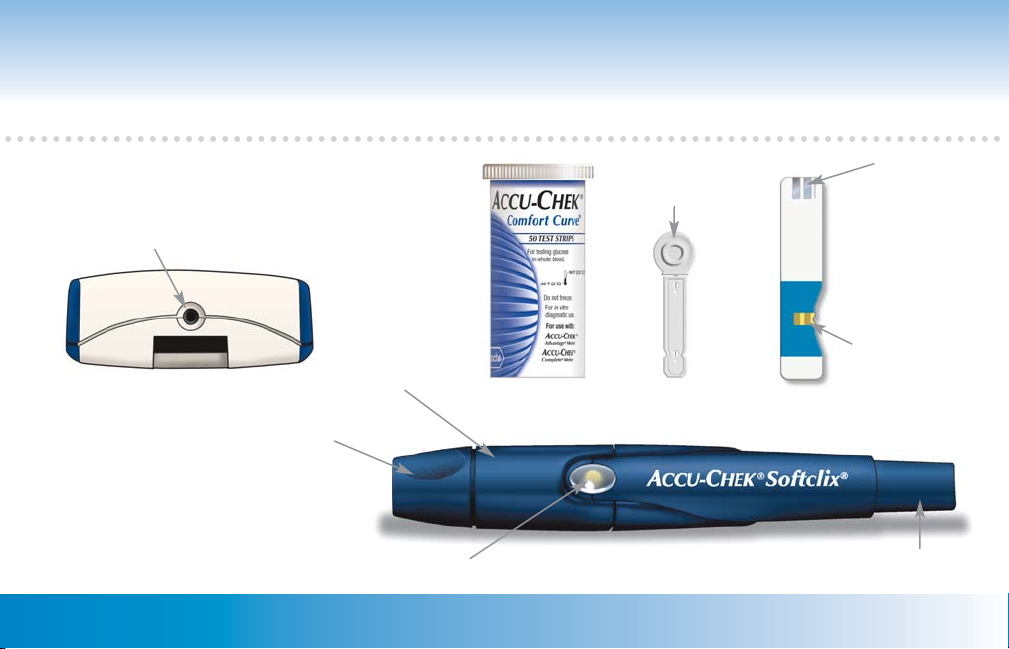
Data Port –
Data Port –
Used to transfer data
Used to transfer data
from the meter to a
from the meter to a
computer.
computer.
Ejector
Protective
Cover
Electrodes
(silver-colored bars)
Yellow
Window
Cap with Comfort Dial
Depth Selection
Test Strip Vial
Release Button
10Chapter 1: Understanding Your New System ACCU-CHEK Customer Care Service Center 1-800-858-8072 Chapter 1: Underst
Lancet
Lancet Device
Test Strip
Plunger
Installing (or Changing) the Batteries
1. Slide the battery cover off the back of the meter.
2. Insert the batteries on top of the strips with the + and - ends matching
the marks in the battery compartment.
3. Slide the battery cover back in place.
11ce Center 1-800-858-8072 Chapter 1: Understanding Your New System ACCU-CHEK Customer Care Service Center 1-800-858-8072
If you are replacing batteries, wait
40 seconds to turn on the meter.

Notes:
• The meter uses two AAA batteries. It’s best to use long-lasting
alkaline batteries and to keep an extra pair on hand.
Always replace both batteries at the same time and with the
•
same brand.
• After you change the batteries, you will have to confirm the time
and date, but all test results stay in memory with their time
and date.
• If there is no strip in the meter, it turns off automatically after three
minutes of not being used. When this happens, test results are still
saved in memory.
3
• The battery symbol means the
batteries are low and should be
changed soon.
• The error message “
Replace
Battery” means the batteries are
almost out of power and must be
changed to do a blood test.
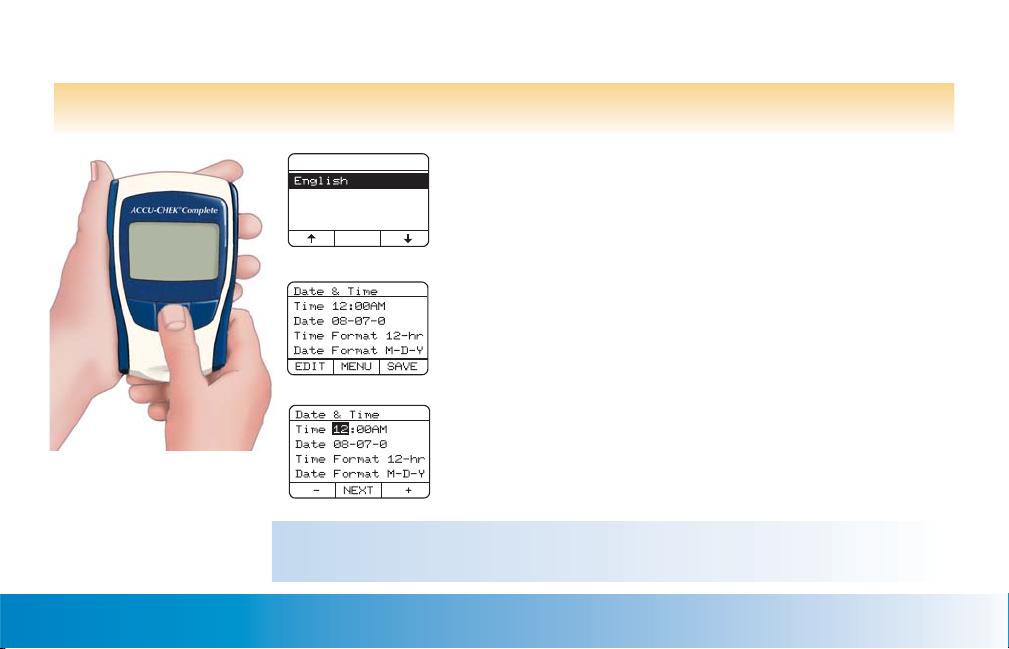
Setting the Time and Date
Setting time and date is important if you use the meter’s memory or connect to a computer.
!
▲
Chapter 1: Understanding Your New System ACCU-CHEK Customer Care Service Center 1-800-858-8072ce Center 1-800-858-8072 13
Select Language
Español
Français
Deutsch
ENTER
3
3
Note: After you change the batteries, the Date and Time screen is automatically
displayed. Press SAVE to confirm, or EDIT to change the time and date.
1. Press any button to turn on the meter. If you are turning
the meter on for the first time, press or to
highlight the desired language, then press ENTER.
2. Press or to highlight More, then press ENTER.
3. Press or to highlight Set Date and Time, then
press ENTER.
4. Press EDIT. The hour is highlighted.
Press + or - to set the hour.
5. Press NEXT. The minutes are highlighted.
Press + or - to set the minutes.
6. Repeat step 5 to change AM/PM, date, time format
(12- or 24-hour) and date format.
7. Press SAVE to keep settings or EDIT to change them.

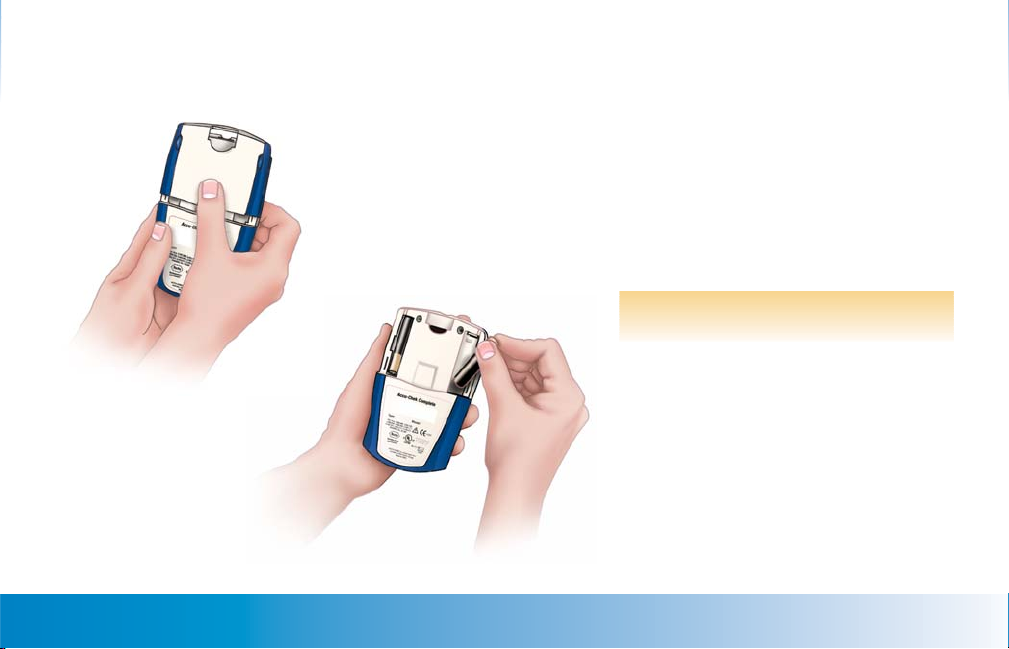
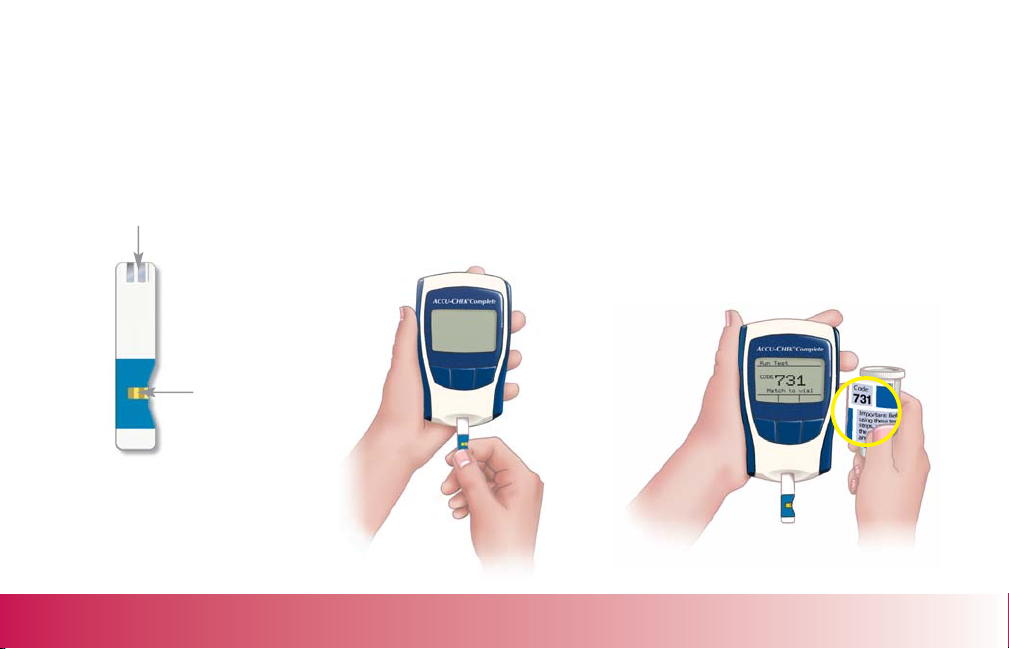
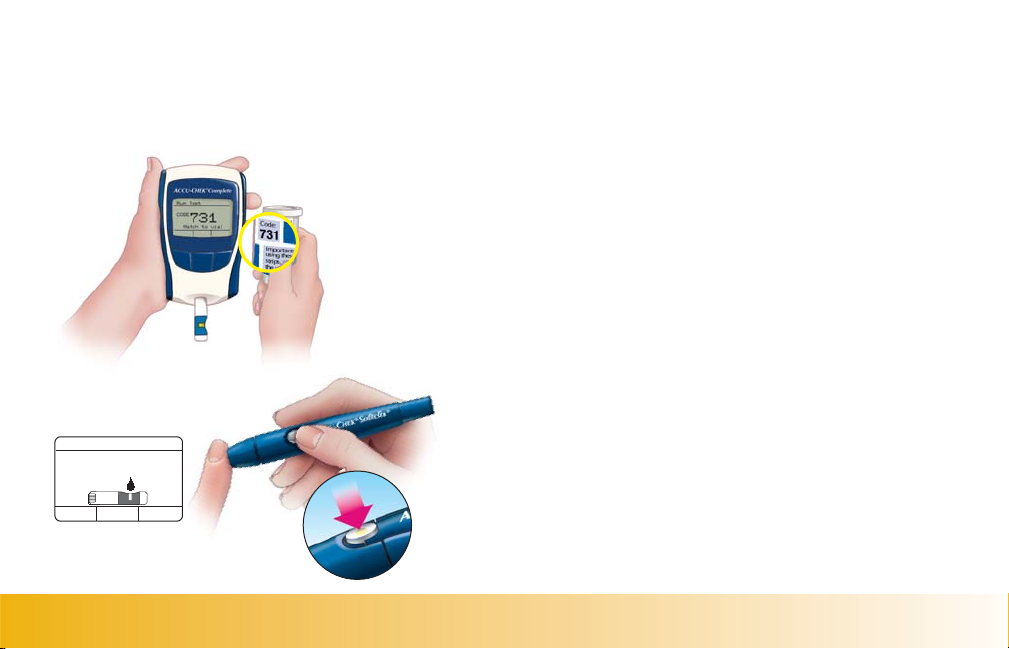
Coding the Meter
1. With the meter off, slide the
code key into the code key
slot. It should easily snap into
place.
2. Press any button to turn on
the meter. The Main Menu
appears with Run Glucose
Test highlighted.
3. Press ENTER. Make sure the
code on the display matches
the code on the test strip vial.
4. Press OFF to turn the meter
off. Throw away the old
code key.
Change the code key every time you open a new box of test strips.
!
▲
Chapter 1: Understanding Your New System ACCU-CHEK Customer Care Service Center 1-800-858-8072
Notes:
• If the message “Code Key
Missing. . .” appears on the
display, turn off the meter, make
sure the code key is all the way
in, then turn on the meter again.
• Don’t force the code key into the
meter; it only goes in one way –
numbers out and ridges up.
• If the code number on the display
does not match the code number
on the test strip vial, call the
ACCU-CHEK Customer Care
service center at
1-800-858-8072.

Using Your Test Strips
You may use either ACCU-CHEK Comfort Curve or ACCU-CHEK Advantage test strips with this meter.
ACCU-CHEK Comfort Curve test strips are recommended because they’re faster and require less blood than
easier
ACCU-CHEK Advantage test strips. This means
and more
convenient testing
for you.
• For accurate results, use only approved test strips.
• Replace the code key and run a control test every
time you get a new box of test strips.
• Store test strips in their original vial.
• Close the vial cap tightly immediately after
removing a test strip.
Never store test strips in areas of high heat and moisture, such as the kitchen, bathroom
!
▲
or laundry room – heat and moisture can damage them.
• After you take a test strip out of the vial, be sure
to use it within three minutes.
• Note the expiration “Use By” date on the test strip
vial. Throw test strips away after that date.
• Store your test strips and meter in a cool, dry
place. Refer to the test strip package insert for
more information.
Do not store test strips in a refrigerator.
15Chapter 1: Understanding Your New System ACCU-CHEK Customer Care Service Center 1-800-858-8072
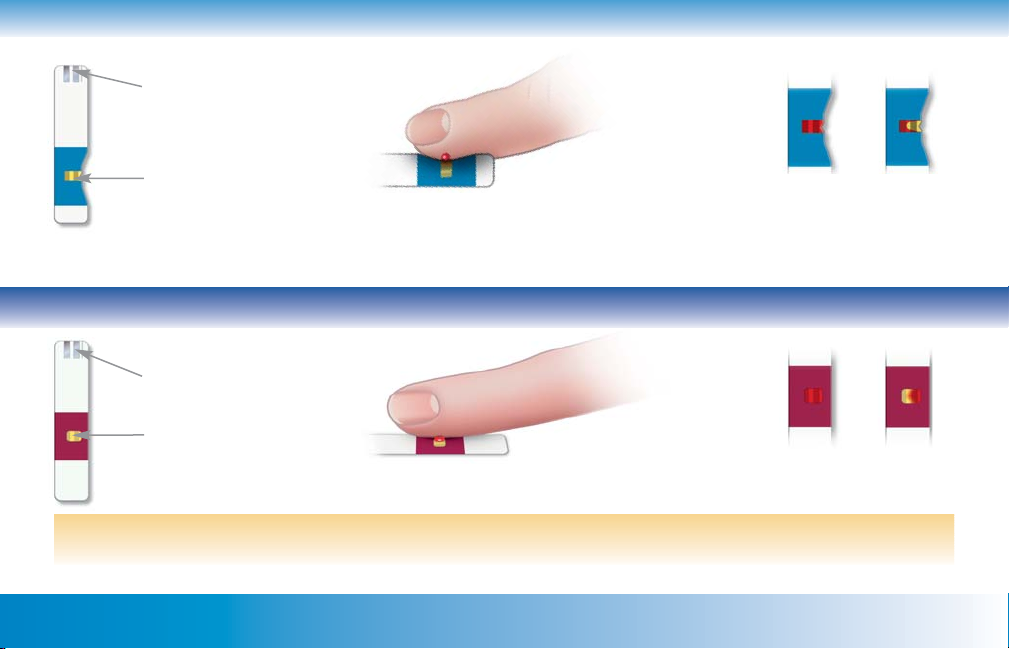
Using ACCU-CHEK Comfort Curve Test Strips
Electrodes (silvercolored bars)
Yellow window
Touch and hold a drop to the edge –
not the top – of the yellow window.
This owner’s booklet will help you learn to test with ACCU-CHEK Comfort Curve test strips.
YES NO
Fill the yellow window
completely.
Using ACCU-CHEK Advantage Test Strips
YES NO
Electrodes (silvercolored bars)
Yellow window
!
▲
Touch and hold a drop to the top –
not the edge – of the yellow window
Be sure to carefully read all the information that comes with the test strips.
16
16Chapter 1: Understanding Your New System ACCU-CHEK Customer Care Service Center 1-800-858-8072
Fill the yellow window
completely.

Chapter 2: Control Testing
Why Run Control Tests
Control tests ensure that both the meter and the test strips are working properly and giving reliable results.
You should run a control test when:
• The meter is new
• You open a new box of test strips
• You leave the cap off of the test strip vial
• You want to check the performance of the meter
and test strips
• You drop the meter
• Your test results don’t agree with the way you feel
• You want to make sure you’re performing tests
correctly
About the Control Solution
• Make sure you use the control solution that
matches your test strips (for example, ACCU-CHEK
Comfort Curve control solution (blue liquid) with
ACCU-CHEK Comfort Curve test strips).
• When you first open the bottle, write the date on
the label – the control solution is good for three
months from that date or until the expiration date
on the bottle, whichever comes first.
Chapter 2: Control Testing ACCU-CHEK Customer Care Service Center 1-800-858-8072
• Never use control solution that has expired.
• Control solution can stain clothes. If you spill it,
wash your clothes with soap and water.
• Always close the control solution bottle tightly.
• Store at room temperature. See your test strip
package insert for more information.
Do not freeze.
17
Run Te
08-07-
59
EVENT
Running a Control Test
For control testing, you’ll need your meter, a test strip, the bottle of
control solution, and a napkin or paper towel.
Electrodes
(silver-colored bars)
1. Insert the end of the test strip with the silver-colored bars into the meter,
with the yellow window facing up. The meter turns on automatically.
2. Make sure the code on the meter matches the code on the test strip vial.
Yellow
Window
Test Strip
Chapter 2: Control Testing ACCU-CHEK Customer Care Service Center 1-800-858-8072 Chapter 2: Control
18

3. Briefly roll the bottle of control solution, open it, squeeze one drop onto
a paper towel, and wipe the tip of the bottle clean.
4. Touch and hold one drop of control solution to the edge of the yellow
window. When the test is done, the meter displays the test result.
5. Check that the Level 1 result is within the Level 1 range on the
test strip vial.
Run Test
08-07-03 10:00AM
59
MENU
mg/dL
DIARYEVENT
ExampleExample
Level 1 (LO) 42–72
Level 2 (HI) 290–328
Range (mg/dL)
Example
If the result is not within
the acceptable range, see
Understanding Control
Test Results on page 21.
6. Press EVENT, then take the test strip out and discard it.
Make sure you press EVENT before you take the strip out and
while the test result is still displayed on the screen.
Chapter 2: Control Testing ACCU-CHEK Customer Care Service Center 1-800-858-8072
19

Enter Events
Run Tes
08-07-0
59
M
EVENT
08-07-03 10:00AM
No Event
No Event
EDIT BACK SAVE
7. Press EDIT, then press + or - until L1 Control is displayed in the highlighted area.
If you are using L2 Control Solution, keep pressing + or - until L2 Control Solution
is displayed.
8. Press NEXT four times, then press SAVE.
Enter Events
08-07-03 10:00AM
L1 Control
No Event
- NEXT +
At the Edit/Enter menu, press or to highlight OFF, then turn off the meter.
Level 2 Testing
Level 1 testing is all you need to do most of the time. If you think your meter or test strips may not be
working correctly, you may also want to do a Level 2 test. Simply repeat steps 3 through 6, using Level 2
control solution.
If you do not have Level 2 control solution, you may purchase control solutions at your local pharmacy.
Chapter 2: Control Testing ACCU-CHEK Customer Care Service Center 1-800-858-8072
20

Understanding Control Test Results
The label on your test strip vial shows the acceptable ranges for
Range (mg/dL)
Level 1 (LO) 42–72
Level 2 (HI) 290–328
Level 1 and Level 2 test solutions. Your control test results should
be within the listed range. Make sure you compare the result to the
range for the level of control solution you used (Level 1 or Level 2).
Example
When a control test result is within the acceptable range,
your test strips and meter are working properly.
Run Test
08-07-03 10:00AM
59
MENU
mg/dL
DIARYEVENT
ExampleExample
Chapter 2: Control Testing ACCU-CHEK Customer Care Service Center 1-800-858-8072
21

When a control test isn’t within the acceptable range, there could be several reasons.
Follow these steps to find out why:
Troubleshooting Checks
1.
Check the expiration dates of the test strips
and control solutions.
2.
Make sure the caps were tight on the test
strip vial and control solution bottles.
3.
Check if the code on the meter matches the
code on the test strip vial.
4.
Make sure you followed all the testing steps.
5.
Make sure the temperature was within the
appropriate range for running a test.
6. If none of the above apply. . .
Chapter 2: Control Testing ACCU-CHEK Customer Care Service Center 1-800-858-8072
Action
Replace solution or strips that have expired or
solution you opened more than three months ago.
If either has been open for a while, replace the
test strips or control solution.
If not, recode the meter (see page 14).
Reread pages 18-20 and test again or ask your
healthcare provider for help.
Refer to the test strip package insert for the
appropriate temperature range and repeat the test.
Repeat the control test with a new test strip.
If the result still isn’t within the acceptable
range, contact the ACCU-CHEK Customer Care
service center at 1-800-858-8072.
22
Chapter 3: Testing Your Blood Sugar
Preparing the Lancet Device
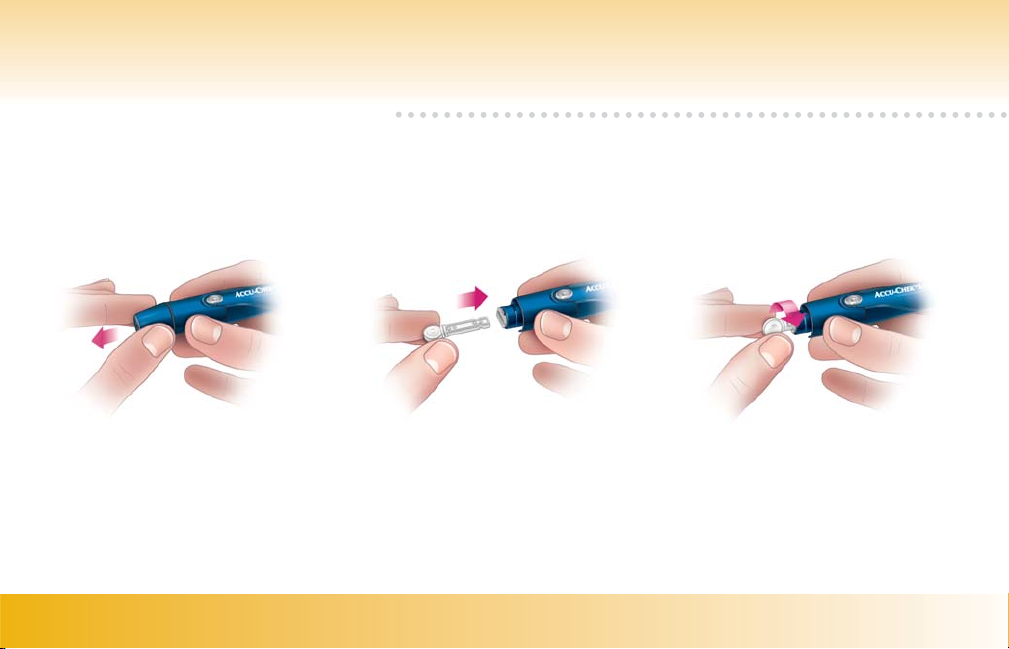
1. Pull off the cap. 2. Insert a lancet until it clicks.
Note: You can refer to the First Time Guide or the Quick Reference Guide for a simple testing summary.
Chapter 3: Testing Your Blood Sugar ACCU-CHEK Customer Care Service Center 1-800-858-8072
23
3. Twist off the lancet’s
protective cover.
4. Snap the cap back on after
lining up the notches. The
cap easily snaps into
place.
5. Twist the cap to set the lancet
depth. Start at 2 or 3. For
tougher skin dial to a higher
number.
6. Press the plunger (like a pen) until it
clicks. The release button turns
yellow when the device is ready.
Set aside until later in the test.
Release
button
Notes:
• The best depth setting is the lowest number that lets you get enough
blood for a test. Try different settings to find the one that’s right for you.
• Always use a new lancet for every test.
• To reduce the risk of infection, never share your lancet device
with anyone.
Chapter 3: Testing Your Blood Sugar ACCU-CHEK Customer Care Service Center 1-800-858-8072
24
Running a Blood Sugar Test
Before running your first test, make sure you set up your meter properly and run a control test.
See Chapters 1 and 2 for details.
1. Wash and dry your hands.
2. Take one test strip from the vial. Close the vial cap tightly.
3. Insert the end of the test strip with the silver-colored
bars into the meter, with the yellow window facing up.
The meter turns on automatically.
If you prefer, you may first press any button to turn on the
meter. Press ENTER to select Run a Glucose Test, then
insert the strip and continue with Step 4.
Run Test
Apply blood
OFF MENU
4. Make sure the code on the meter matches the code on the
test strip vial.
5. When you see the flashing blood drop, hold the lancet
device against the side of your fingertip and press the
release button.
Chapter 3: Testing Your Blood Sugar ACCU-CHEK Customer Care Service Center 1-800-858-8072
25
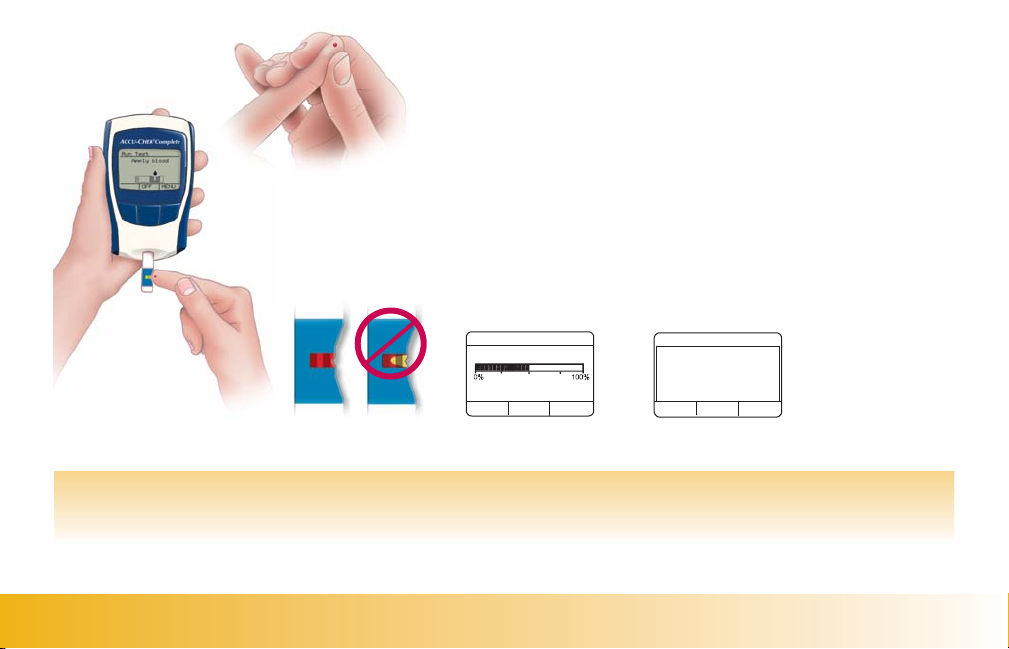
6. Gently squeeze your fingertip until you get a drop of blood.
7. Touch and hold the blood drop to the edge – not the top –
of the yellow window. Make sure the yellow window fills
completely. If you still see yellow, apply another drop of
blood within 15 seconds or start over with a new test strip.
8. After you apply blood to the strip, a status bar will appear
to show you how much of the test is complete, then the
test result will appear.
NOYES
Testing
% Complete
(Tip of the Day)
Run Test
08-07-03 10:00AM
104
EVENT MENU DIARY
mg/dL
ExampleExample
If you want to add Diary Information or Event Markers to the result, press EVENT or DIARY before
you take the strip out of the meter.
See pages 60 and 70 for more information on Diary Information and Event Markers.
Chapter 3: Testing Your Blood Sugar ACCU-CHEK Customer Care Service Center 1-800-858-8072
26

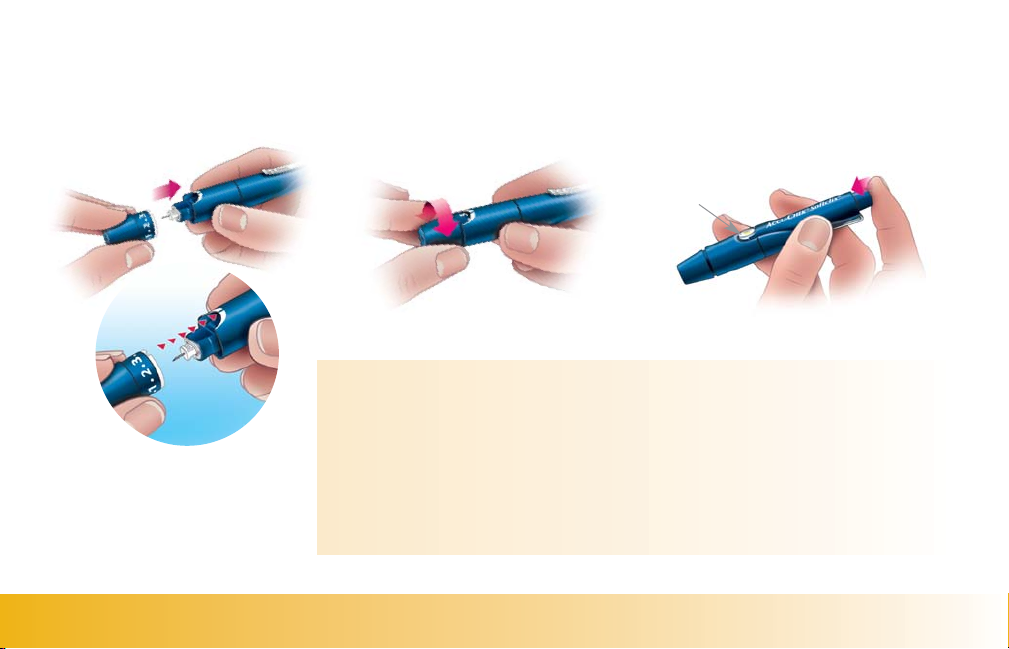
9. To remove the lancet, take off the lancet device cap and point the lancet end away
from yourself.
10. Slide out the ejector to discharge the lancet into a puncture-proof container.
For more information about your test results, see page 28.
Recording Your Results
Always record your blood sugar results after testing. This helps you and your healthcare professional find
patterns in your blood sugar results. This information helps you better manage your diabetes, reducing your
chances for complications. Record your results in the self-test diary included in your kit or on your computer.
Storing Your Supplies
Make sure you close the test strip vial and control solution bottles tightly after each use.
You can keep all your testing supplies in the carrying case. Store the carrying case (and everything in it)
where it won’t be exposed to heat or moisture. Your bedroom may be a good place.
Never store test strips in areas of high heat and moisture, such as the kitchen,
!
▲
bathroom or laundry room – heat and moisture can damage them.
Chapter 3: Testing Your Blood Sugar ACCU-CHEK Customer Care Service Center 1-800-858-8072
27

Proper Testing Conditions
• The temperature range must be within the appropriate range for running a test for accurate results. Refer
to the test strip package insert for the appropriate temperature range. At temperatures outside this range,
the results are displayed with a thermometer symbol.
• Humidity must be below 85% so that moisture doesn’t condense on or inside the meter. If it does, let the
meter return to room temperature and thoroughly dry before turning it on.
Understanding Your Test Results
Normal Blood Sugar Ranges
The normal fasting blood glucose range for an adult without diabetes is 74–106 mg/dL.
Two hours after meals, the blood glucose range for an adult without diabetes is less than 140 mg/dL.
For people with diabetes: Please consult your doctor for the blood glucose range appropriate for you.
1
2
Chapter 3: Testing Your Blood Sugar ACCU-CHEK Customer Care Service Center 1-800-858-8072
28
 Loading...