

Page 1

Placeholder for
3 EAN128
Placeholder for
2D Barcode
(created by Canon)
User’s Manual
(created by Seal)
The Bluetooth® word mark and logos are registered
trademarks owned by Bluetooth SIG, Inc. and any use of such
marks by Roche is under license. All other product names and
trademarks are the property of their respective owners.
ACCU-CHEK, ACCU-CHEK INSIGHT, ACCU-CHEK FLEXLINK,
ACCU-CHEK RAPIDLINK and ACCU-CHEK TENDERLINK
are trademarks of Roche. © 2 011 Roche
Roche Diagnostics GmbH
Sandhofer Strasse 116
68305 Mannheim, Germany
www.accu-chek.com
Accu-Chek® Insight Insulin Pump
00 04 801118 5/C Status: 05-2013
Page 2

Your insulin pump
Display (Screen)
Note
Your contact for assistance with and additional information about
your Accu-Chek Insight insulin pump*:
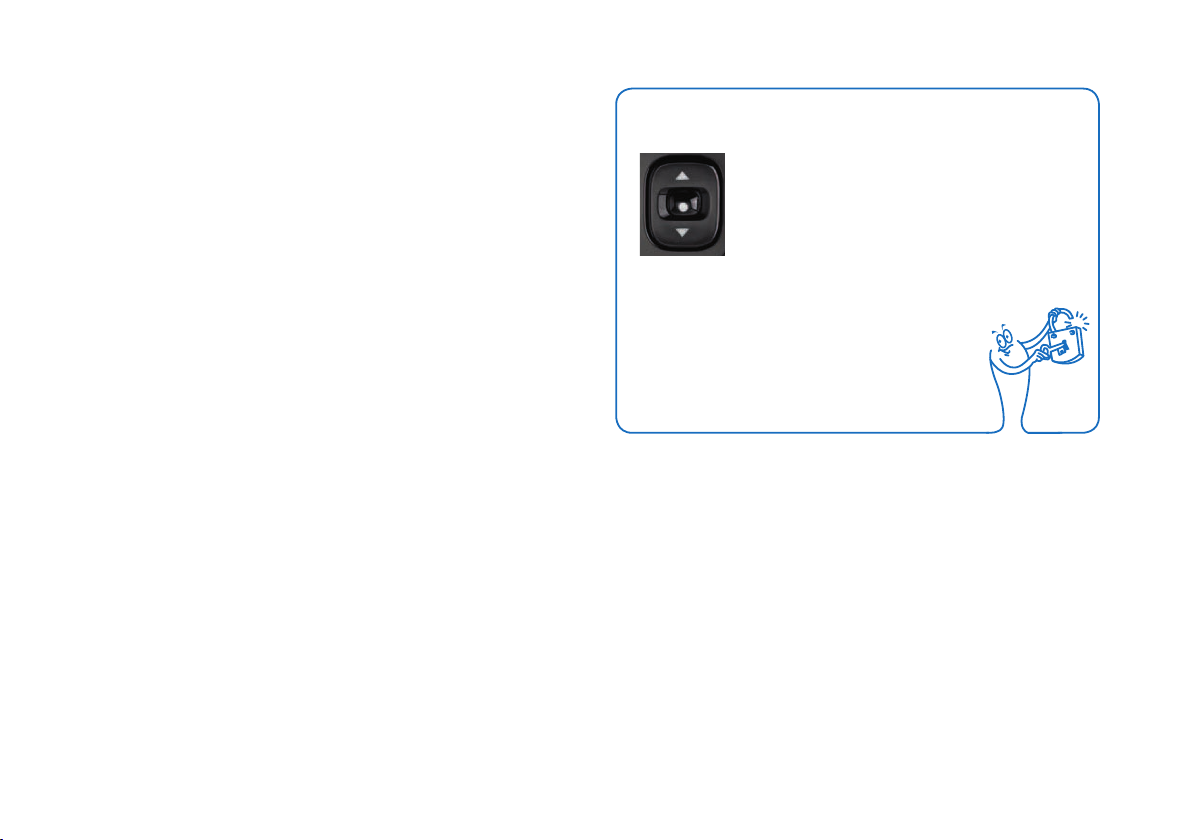
q (Quick Bolus) Keys
x (Up) Key
o (OK) Key
z (Down) Key
l Zoom Key
If you do not press o, x or z key for more than 30 seconds, these keys will be locked.
Press x and then z, or z and then x, to unlock the keys to continue the programming.
* Please be aware that the Customer Service Center in your country of residence may only provide support in the corresponding ocial language(s).
Page 3
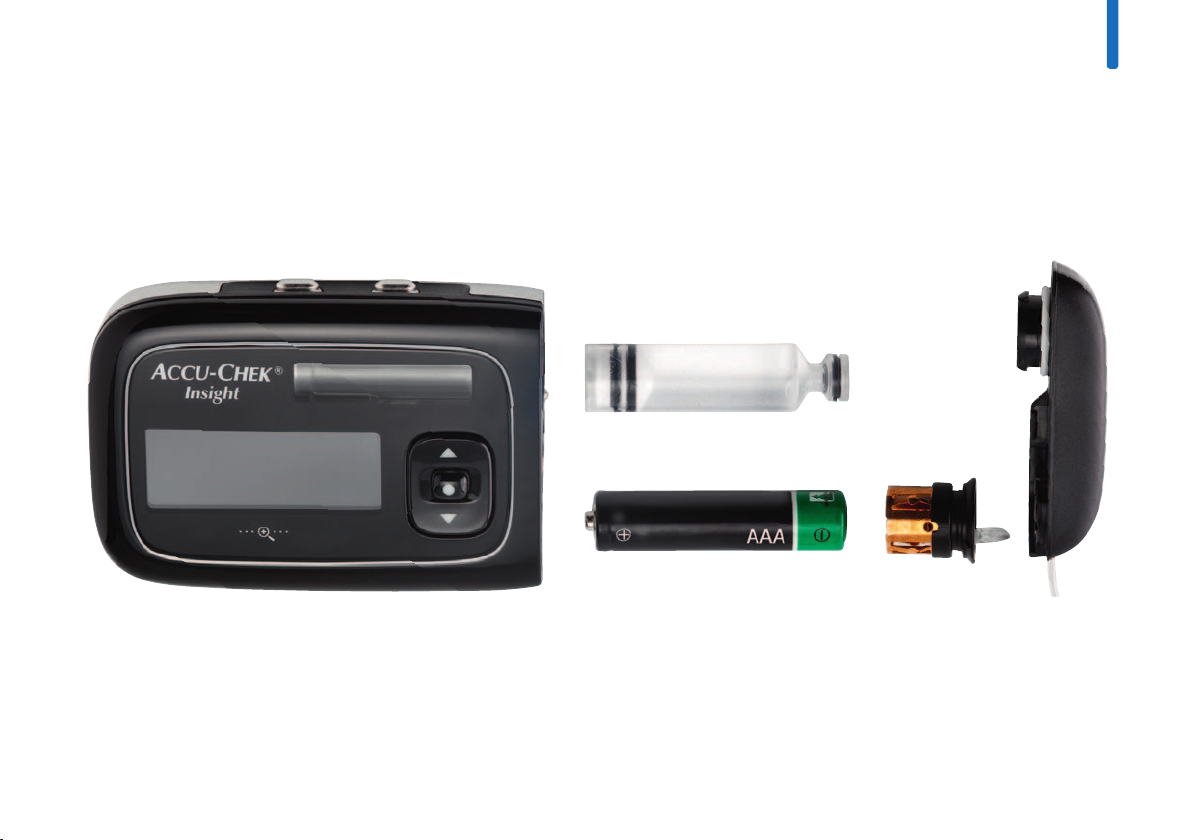
Pump details and accessories
Cartridge
Pump
Battery
Battery cover
Adapter & tubing
Page 4

Page 5

Dear Accu-Chek Insight insulin pump user,
This User Guide is provided for you, as a person with diabetes,
parent or caregiver for a person with diabetes and for healthcare
professionals. It contains all the information you need for the safe
and ecient use of your new Accu-Chek Insight insulin pump.
Regardless of your level of experience with pump therapy, please
read this manual carefully before using your pump. This manual
should be your first source of information for any questions or
problems you may have when you use your insulin pump. If you
cannot find the answer in these pages, we recommend that you
contact your local pump support (see inside back cover). Your
Accu-Chek Insight insulin pump is intended for the subcutaneous
continuous delivery of U100 insulin, at set and variable rates, for
the management of diabetes mellitus.
Whether insulin pump therapy is the appropriate way of
treating your diabetes mellitus must be decided by your
healthcare professional.
You should not begin pump therapy unless you have attended the
required training course.
The exact insulin type for the treatment of your insulin-dependent
diabetes mellitus will be prescribed by your healthcare
professional.
Do not use your insulin pump for the delivery of medication
other than U100 short-acting regular human insulin or
rapid-acting insulin analogue.
Also consult the instructions coming with your insulin and
infusion set.
Page 6

About this User Guide
To ensure the safe and convenient use of your Accu-Chek Insight
insulin pump, this User Guide includes the following features for
quick and easy navigation:
w WARNING
A Warning is a safety information that requires your careful
attention and informs you about risks to your health.
Neglecting this information may lead to life-threatening
situations.
Note
A Note contains important information relating to the
ecient and smooth operation of your
Accu-Chek Insight insulin pump.
Example
An Example shows you how a feature could be used in an
everyday life situation. Please note that medical- or
therapy-related details are provided for illustration
purposes only, and are not intended to match your
personal medical needs. Always discuss your personal
therapy requirements with your healthcare professional.
Page 7

Note
The illustrations in this book may dier
slightly from the design of your actual
device.
Sections highlighted in blue refer to features that are part of the
basic training lesson. It is highly recommended that you read
these sections carefully before you start using the pump.
Sections highlighted in purple refer to features that are part of
the optional training lesson. It is highly recommended that you
read these sections carefully before you start using the according
feature.
Page 8

Page 9

1 Pump features 1
1.1 Navigating through the menus 6
2 Starting your pump 13
2.1 Inserting the battery 14
2.2 Program Basal Profile 1 23
2.3 Inserting a new cartridge 26
2.4 Filling the infusion set tubing and cannula 30
3 Using your pump in daily life 35
3.1 Wearing your pump 35
3.2 Stopping and starting your pump 39
3.3 Your insulin pump and water 43
3.4 Changing the transfer set (adapter and tubing) 45
3.5 Quick info screens 49
3.6 General safety information 51
4 Administering boluses 53
4.1 Standard Bolus 53
4.2 Quick Bolus 55
4.3 Cancelling a bolus 58
4.4 Extended Bolus 60
4.5 Multiwave Bolus 63
5 Basal profile options 67
5.1 Temporary Basal Rate (TBR) 68
5.2 Additional Basal profiles 72
5.3 Activating a Basal profile 75
6 Viewing your data 77
6.1 Event data 80
6.2 Bolus data 80
6.3 TBR data 81
6.4 Daily totals 81
6.5 Pump timer 82
6.6 Version 82
7 Modes for dierent life situations 83
8 Personalising your pump 87
8.1 Using reminders 89
8.2 Communicating with other devices 94
8.3 Device settings 102
8.4 Therapy settings 115
8.5 Setting the time and date 127
Page 10

9 Maintaining your pump 131
9.1 Inspecting your pump 131
9.2 Damage to your pump 132
9.3 Repair of your pump 132
9.4 Maintaining your pump 133
9.5 Storing your pump 134
9.6 Disposing of your pump 135
10 Responding to a pump message 137
10.1 List of Reminders 140
10.2 List of Warnings 142
10.3 List of Maintenance messages 144
10.4 List of Errors 147
Appendix A: Technical Data 151
Appendix B: Configuration parameters 166
Appendix C: Abbreviations 170
Appendix D: Icons and Symbols 172
Appendix F: Details on User Profiles 180
Appendix G: List of Accessories 187
Glossary 188
Index 195
Appendix E: Warranty 179
Page 11

1 Pump features
1
Guided handling sequences (Wizards)
Pump therapy sometimes involves complex steps. For several
functions which need to be performed in a specific order, your
pump oers pre-programmed Wizards to guide you through the
process.
You will find Wizards to help you with:
j Inserting a new cartridge
j Filling the infusion set
j Inserting a new battery
j Pairing
j Bluetooth
®
wireless communication
3 basic modes
RUN mode: When working normally, your pump is in RUN mode.
In this mode your pump is delivering insulin to your body in terms
of the basal rate, boluses and Temporary Basal Rates (TBR).
PAUSE mode: When you remove the battery or cartridge while
your pump is in RUN mode, or after some Maintenance
messages, your pump switches to PAUSE mode. The insulin
delivery stops automatically and restarts as soon as you confirm
the respective messages and insert a new battery or cartridge
where required. Current Temporary Basal Rates and boluses will
continue.
STOP mode: When the pump is in PAUSE mode for more than
15 minutes, it switches to STOP mode. The Pump stopped screen
appears and the pump stops completely and cancels all current
Temporary Basal Rates and boluses. From STOP mode, you have
to restart your pump from the main Menu and program your
Temporary Basal Rates and boluses again. See chapter3.2,
page39. If you want to stop your pump for any reason, you can
also switch it to STOP mode using the main Menu.
1
Page 12

Adjust the display to suit your needs
User profiles for special situations
You can adjust the brightness of your pump’s full colour display
to best suit your needs. You can also change its background
colour to your personal preference. Rotating the display allows
you to read it from an awkward angle (for example, when the
pump is attached to your belt). See chapter8.3.5, page112,
Adjusting the display.
Enlarge the display texts for better readability
Using the Zoom key you can enlarge the size of the display text
for better readability. See chapter1.1.4, page12, Zoom mode.
With the User profile Expressive enabled, the scrolling functions
of the pump are disabled so that all values can only be
programmed in distinct increments. Additionally, sound patterns
will help you verify that you programmed a value correctly. This
may be helpful if you have impaired eyesight. For more
information, please contact your local pump support (see inside
back cover).
With the User profile Diminished enabled, all acoustic signals will
occur one octave lower. This may be helpful if you have impaired
hearing. See chapter8.3.2, page108, User profile.
Lock the keys against accidental pressing
The Key lock disengages your pump’s keys so they cannot be
pressed accidentally when you wear your pump under clothing.
The Key lock is engaged by default. Quickly press x and then z,
or z and then x to unlock the keys. See chapter8.3.3, page109.
2
Page 13

1
Use a standard, easy-to-purchase battery
The power source for your new pump is readily available. To
power up your pump, all you need is a standard AAA, 1.5 V
lithium (FR03) or alkaline (LR03) battery.
Set hourly basal rates from 0.02 to 25 U/h
You can program individual hourly basal rates for every hour of
the day in up to 24 time blocks from 15 minutes to 24 hours. The
hourly basal rate can be set low as 0.02 up to 25 U/h. Remember
that your basalrate profile should always be provided by, or
discussed with, your healthcare professional.
Program up to 5 dierent Basal profiles
You can define up to 5 Basal profiles, each aligned with a
dierent daily routine. For example, you can create one profile for
work days and one for weekends. See chapter5, page67, Basal
profile options.
Use self- or pre-filled cartridges
Your usual insulin works with the 2 ml Accu-Chek Insight insulin
pump cartridge. The Accu-Chek Insight insulin pump cartridge
filling system allows you to automatically fill the cartridges from
vials.
You can also use the pre-filled 1.6 ml NovoRapid
(please check the availability in your country at
www.novonordisk.com or ask your local pump support).
Detect occlusions
Your pump detects any blockage in the infusion set that could
prevent insulin delivery. You will be prompted with an appropriate
Maintenance message. However, the pump cannot detect when
the infusion set is leaking or where the cannula has slipped out
of the infusion site.
®
PumpCart®
3
Page 14

2 options to deliver a Standard Bolus
Use a delay (lag time) before the bolus delivery
To program and deliver a Standard Bolus, you have 2 options:
either walk through the menus or use the Quick Bolus feature
that allows you to program a Standard Bolus in distinct
increments without even looking at the display. See chapter4.1,
page53, Standard Bolus. See chapter4.2, page55, Quick Bolus.
Adjustable bolus speed
You can adjust the delivery speed of the boluses. This is very
helpful if you have high bolus amounts that cause insulin to leak
from your skin after delivery or if you experience pain during the
bolus delivery. See chapter8.4.2, page118, Bolus settings.
In some situations (e.g. gastroparesis), it might be helpful to start
a bolus after you start eating. With the lag setting you can specify
a delay between programming a bolus and the actual beginning
of the bolus delivery. Discuss using the lag setting with your
healthcare team. See chapter8.4.2, page118, Bolus settings.
Extended Bolus
For situations that require delivery of bolus insulin over a period
of time instead of all at once, you can use an Extended Bolus.
The Extended Bolus amount is delivered over a period of time
that you can adjust as necessary. This can be especially helpful
when you eat slowly digestible foods or attend long-lasting
buets. See chapter4.4, page60, Extended Bolus.
4
Page 15

1
Multiwave Bolus
In situations where you eat meals containing both slow- and
fast-acting carbohydrates, you might consider having a fast and
a long bolus together. The Multiwave Bolus combines a Standard
and an Extended Bolus, providing both an immediate and a
long-acting part. This could also be a good option when you plan
to eat slow-acting carbohydrates and need to correct an elevated
blood glucose level at the same time. See chapter4.5, page63,
Multiwave Bolus.
Dierent modes for dierent life situations
Your pump oers a range of modes to fit a variety of life
situations.
For example:
j During meetings your pump can be switched to the Quiet
mode. At night it can delay non-critical Warning messages to a
specified wake-up time
j In Flight mode your pump automatically shuts down the
Bluetooth wireless communication
Customisable reminders for missed bolus, change infusion
set, deliver bolus, and alarm clock
Many aspects of your diabetes management require regular
attention and action. Your pump can assist you with a set of
reminders that help you remember:
j To deliver a bolus
j To change the infusion set
j To check when you might have missed a bolus
You can even program alarm clocks for your personal
convenience. See chapter8.1, page89, Using reminders.
See chapter7, page83, Modes for dierent life situations.
5
Page 16

1.1 Navigating through the menus
q (Quick Bolus) Keys
Display (Screen)
x (Up) Key
o (OK) Key
z (Down) Key
l Zoom Key
6
Page 17

1
Key Function
j Moves to the next menu level
o
q
x
z
j Confirms a setting
j Starts a function
In most situations the 2 q keys have an
identical function and can be used
alternatively:
j Moves to previous entry field (back)
j Cancels a setting
j Stops a function
j Starts the Quick Bolus programming
j Sets the Quick Bolus amount
j Cancels a bolus
j Moves to the status screen (double click)
j Stops the repetitive STOP mode warning
j Moves you up in a menu screen
j Increases a setting
j Function to access quick info screen
j Moves you down in a menu screen
j Decreases a setting
j Function to access quick info screen
Key Function
l
In many cases the screen gives you additional information about
using the keys.
j Enlarges the characters on the display
j Reduces enlarged characters on the display
x and then z
or
z and then x
j When pressed in quick succession will
disengage the key lock
7
Page 18
1.1.1 Navigating through the screens
This chapter describes in general how to navigate through the
screen and use your pump’s functions.
1 2
From the Status screen, press o.
The main Menu screen appears.
8
Press x or z to move to the desired
submenu.
Press o to enter the highlighted menu.
3
The x and z keys move the blue bar
(cursor) up and down in the menu.
Page 19
1
4
When the blue bar highlights the menu
item of your choice, press o to enter
the next menu level.
7
If you need to go back to the previous
level and cancel a function, press q.
However, when you do this any settings
you made will not be saved.
5
When a specific setting is highlighted and
shown with small Up and Down arrows,
the x and z keys will increase and
decrease the value.
Note
Single pressing of the x or z changes the value by
increment, while pressing and holding x
or z changes the value rapidly
(“scrolling”).
6
To confirm a value, press the o key.
After you complete the setting, press o
again to confirm and start the function.
9
Page 20
1.1.2 Understanding the screen
In the main menu you will find the
following functions:
Bolus
Basal
Stop pump
Start pump
Pump data
Modes
Settings
Cartridge and infusion set
Home
A scroll bar on the right indicates when
there are more items available than
currently visible on the screen.
10
In each menu you can use the Home
function to return to the Status screen:
Press z to move to Home.
Press o to select.
If several steps are part of a sequence
(Wizard), numbers in the upper right
corner of the screen indicate how many
steps still need to be completed.
Page 21
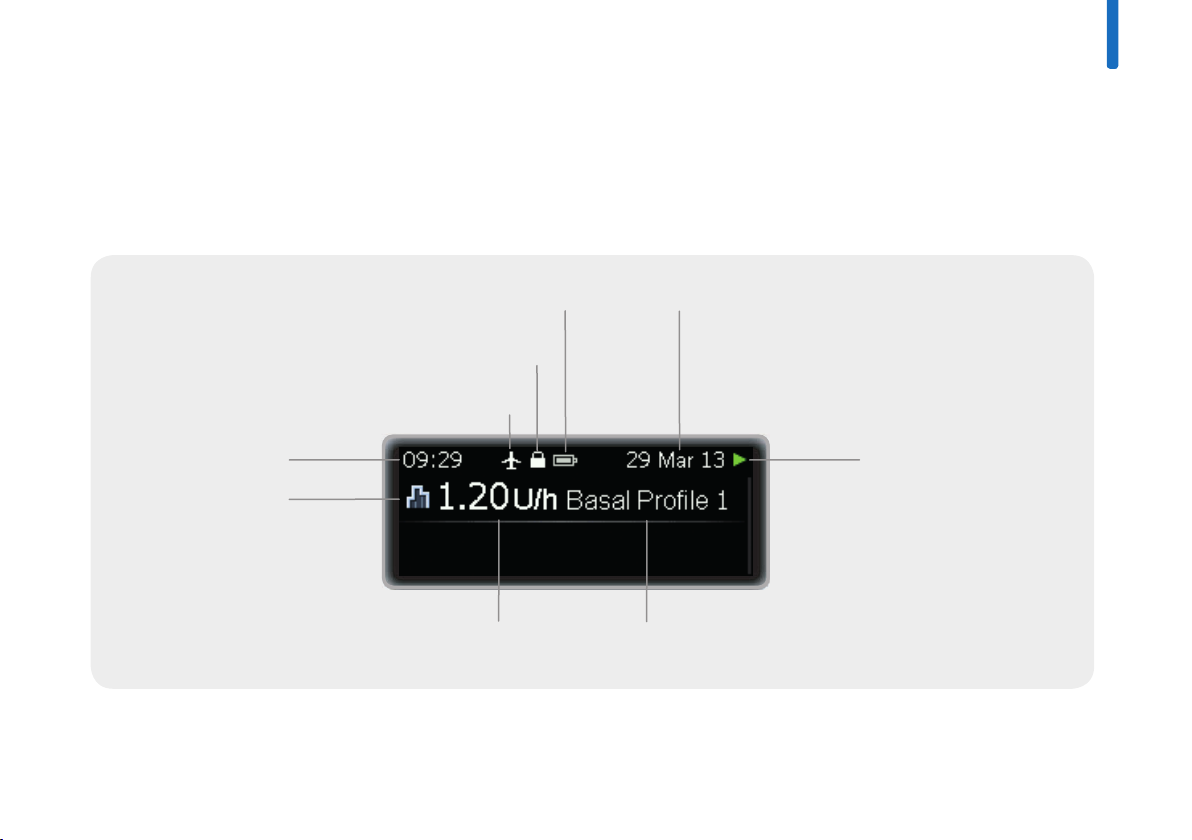
1.1.3 Status screen
The Status screen shows the current state of your pump. For
example you can see whether your pump is in RUN, STOP or
PAUSE mode and if boluses or Temporary Basal Rates are
currently running.
Battery status Current date
Key lock active
Flight mode
1
Current time
Basal rate icon
Active Basal profileCurrent hourly basal rate
You can review the complete list of display icons in Appendix D: Icons and Symbols, page172.
Status icon
11
Page 22
1.1.4 The screen design
You can choose between dierent designs for your pump’s
screen. By default the pump will use the dark background colour
and normal font size.
Background colour dark
12
You will learn how to personalise the screen design in the
chapter about Settings. See chapter8.3.5, page112, Adjusting the
display.
Background colour light Zoom mode
With the Background colour light the
screen will show black characters on
white background.
When you press l for 1 second, the
characters on the screen will be enlarged.
When you press l for 1 second again,
the characters will be shown in normal
size again.
With the Background colour dark the
screen will show white characters on
black background.
Note
In Zoom mode not all screen
content may be visible.
The l is illuminated as long as
the Zoom mode is
switched on.
Page 23

2 Starting your pump
2
This chapter explains how to prepare your new insulin pump and
begin pump therapy.
Before you can start your pump, you need to:
j Insert the battery
j Set the time and date
j Program at least one basal profile
j Insert the cartridge
j Connect the infusion set’s tubing with the adapter to the pump
and fill it with insulin
j Connect the tubing to the infusion set’s head set and fill the
head set with insulin (prime the infusion set)
Remember that successful pump therapy requires you to check
your blood glucose level frequently. It is therefore recommended
that you use a blood glucose meter as often as instructed by your
doctor or healthcare team (at least 4 times a day).
13
Page 24

2.1 Inserting the battery
Your Accu-Chek Insight insulin pump requires a 1.5 V AAA
alkaline (LR03) or lithium (FR03) battery.
Your pump turns on as soon as you insert the battery.
When you remove the battery, your pump stores the time and
date for about 10 hours.
When you remove the battery while your pump is delivering
insulin (RUN mode), the insulin delivery stops automatically
(PAUSE mode) and restarts as soon as you insert a new battery.
After a confirmation, Temporary Basal Rates and boluses that are
currently running will continue. The pump will emit a beep every
8 seconds as long as the battery is removed while the pump is in
PAUSE mode.
However, the pump stops completely and cancels Temporary
Basal Rates and boluses when it is without a battery for more
than 15 minutes (STOP mode). Once you have replaced the
battery, you then have to restart it from the main Menu screen
and program any Temporary Basal Rates and boluses again. See
chapter3.2, page39.
Your insulin pump settings (such as the basal rates and bolus
increment) and event memory (bolus and alarm history, history of
daily insulin totals and Temporary Basal Rates) are always saved,
regardless of battery condition or the amount of time your pump
has been without power.
To ensure your pump remains watertight the battery
compartment cover needs to be changed every 3 months.
Appendix G: List of Accessories, page187.
Do not use rechargeable or carbon zink batteries. These as
well as very old batteries may leak and corrode the battery
contacts in your pump. This could lead to an electronic short
circuit resulting in dangerous heat development up to 60 °C
(140 °F).
Before inserting batteries make sure that they are not damaged
(e.g. damaged plastics isolation coating) or leaking as damaged
or leaking batteries could damage your pump.
14
Page 25
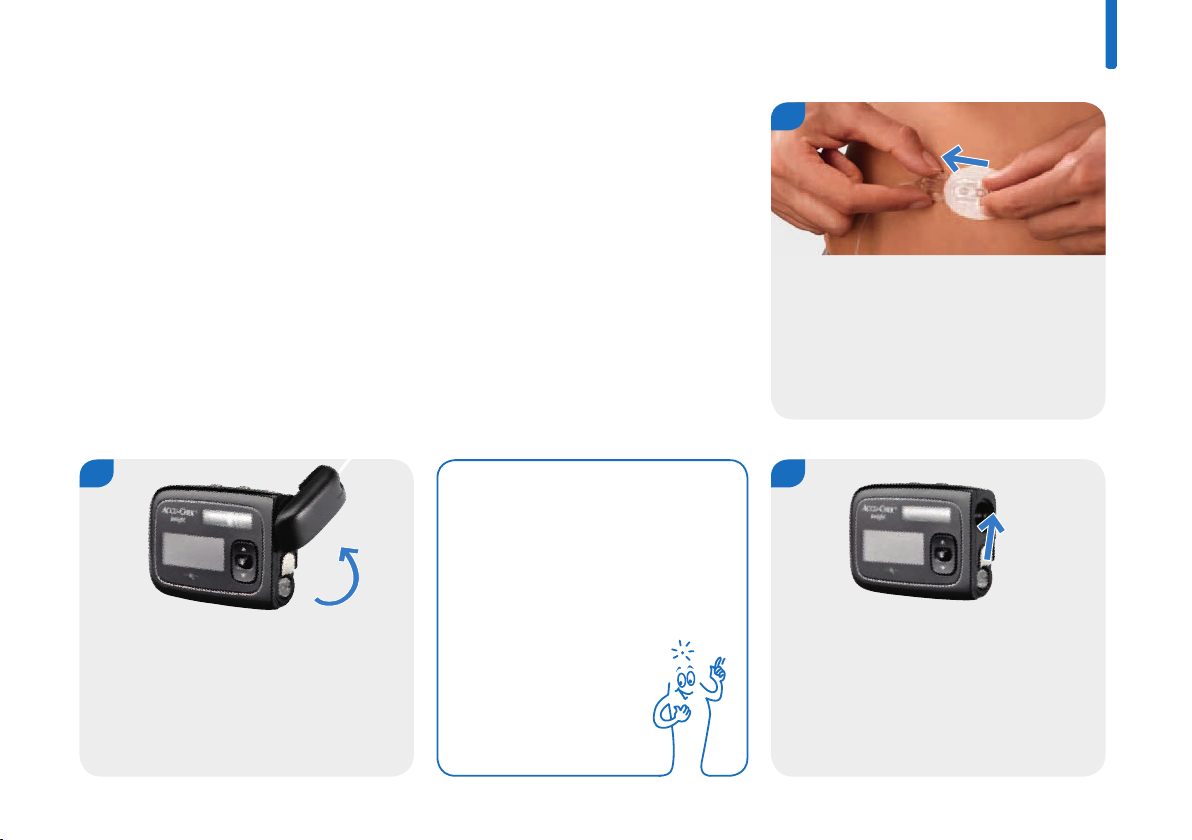
Insert the battery
Ensure that no dirt or dust can enter the battery compartment
while changing or inserting the battery. When you start your
pump for the first time, begin with step 6.
2
1
To avoid accidental insulin delivery,
ensure that the infusion set is not
connected to your body.
2
120°
Turn the adapter anti-clockwise to a 120°
position.
3
Note
You can change the battery
without removing the adapter if
you turn the adapter to only 90°.
Push the battery cover release in the
direction of the arrow (towards the
cartridge compartment).
15
Page 26
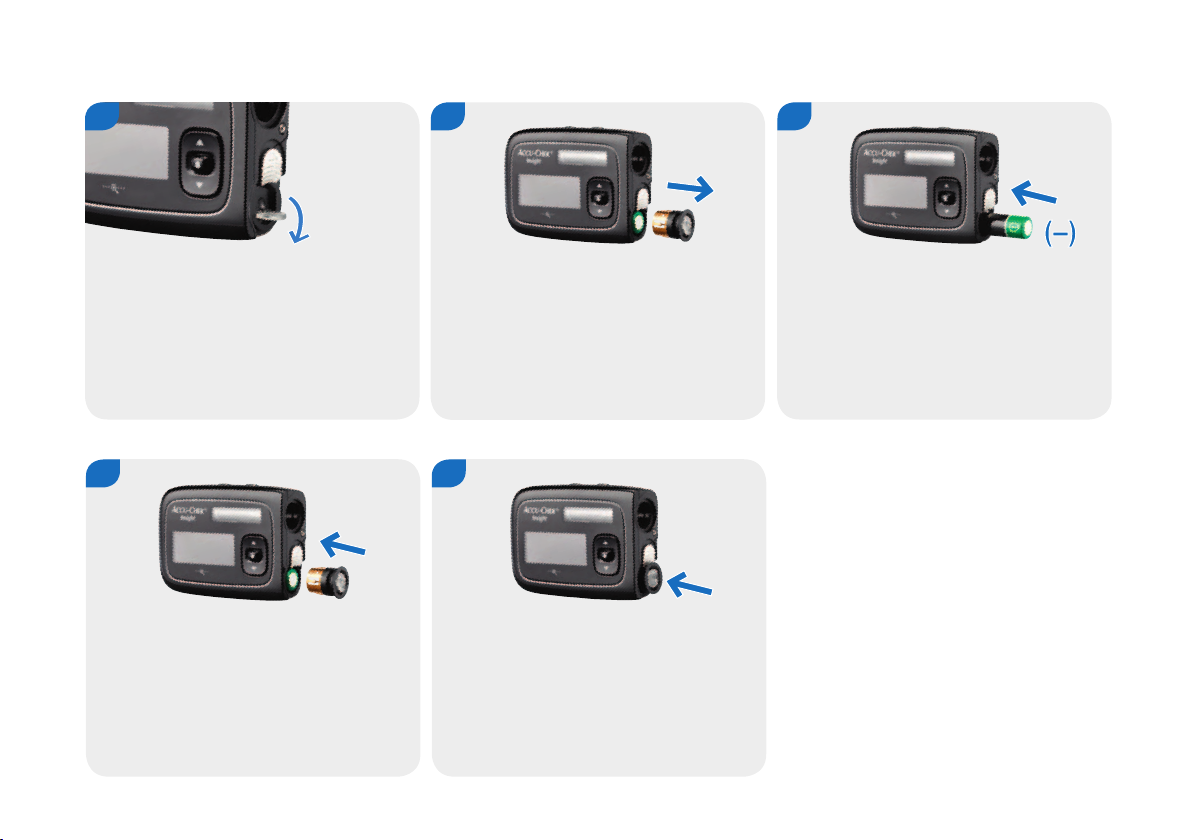
4 6
5
16
You can use the flip up handle to easily
remove the battery cover.
7 8
Place the battery cover on top of the
battery.
Remove the battery cover and the old
battery.
Push the battery cover all the way into the
battery compartment until you hear the
release click.
Insert the new battery into the battery
compartment, positive end first, negative
end pointing out.
Page 27

After you insert the battery the pump begins its start-up process.
If the pump does not begin the start-up process after the battery
is inserted, make sure that the battery is inserted correctly
(positive end first).
The first time you insert a battery or after the pump has been
without battery for more than 10 hours, the Setup Wizard
launches to help you program your pump’s initial settings, such
as the time and date.
2
17
Page 28
Start-up process and Setup Wizard
After you insert a new battery, your pump immediately performs
a self-test. Check the display and the beeps and vibrations to be
sure that your pump is working properly.
If anything in the self-test does not seem to work properly
contact your local pump support.
The start-up process is dierent when you:
j Start your pump for the first time
j Start your pump after it has been out of power for more than
10 hours
j Insert a new battery while the pump is in RUN mode
You will learn more about this in the following chapter.
Note
If you do not press o, x or z key for
more than 30 seconds, these keys will be
locked.
Press x and then z, or z and then x, to
unlock the keys to continue the programming.
You can adjust the time before the Key
lock engages. See chapter8.3.3, page109.
18
Page 29

Self-test sequence
1 2
2
3
After the battery cover is closed, the
Pump self-test starts automatically.
4
The display turns blue. Make sure that the
area is completely blue.
The display turns red. Make sure that the
area is completely red.
5
The display turns black. Make sure that
the area is completely black.
The display turns green. Make sure that
the area is completely green.
19
Page 30
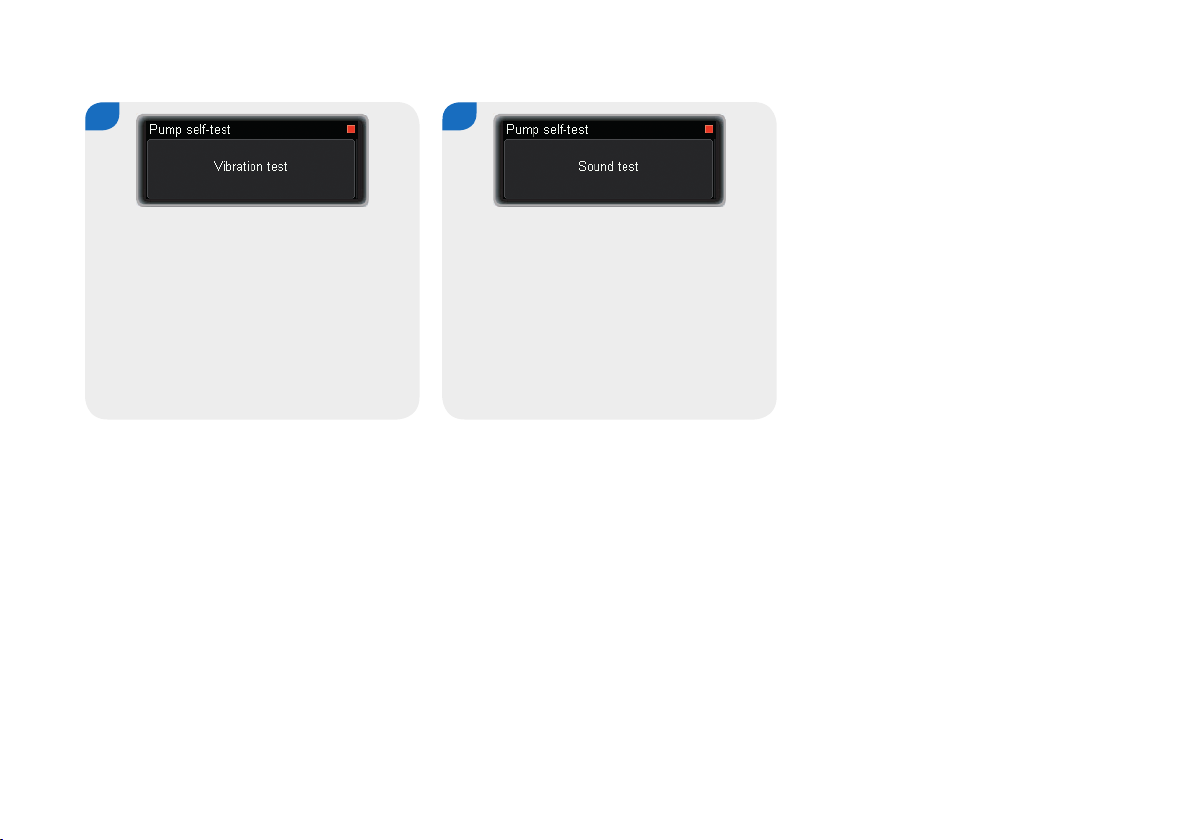
6
7
20
The Vibration test screen appears and the
pump vibrates. Make sure you can feel
the vibration.
If this is the first time you have started your pump, or if it has
been without power for over 10 hours, the Setup Wizard guides
you through the time and date setting steps. Otherwise, the
start-up process continues with step 6 on the next page.
The Sound test screen appears and the
pump emits a series of beeps. Make sure
you can hear them.
Page 31

Set the time, date and battery type
1 2
2
3
The Set hour screen appears.
Press x or z to set the hour.
Press o to go set minutes.
4
The Set month screen appears.
Press x or z to set the month.
Press o to go set day.
The Set minute screen appears.
Press x or z to set the minutes.
Press o to go set year.
5
The Set day screen appears.
Press x or z to set the day.
Press o to confirm.
The Set year screen appears.
Press x or z to set the year.
Press o to go set month.
6
The Battery type screen appears.
Press x or z to move to the battery type
of the inserted battery.
Press o to select.
21
Page 32

7
8
22
The Start insulin delivery? screen
appears.
Press q to select no.
Before using your pump, you must program at least one basal
profile. Continue with programming Basal Profile 1 on the next
page.
If there is already a programmed basal profile you can simply
select yes.
The Pump stopped screen appears.
Page 33

2.2 Program Basal Profile 1
2
Your pump delivers a continuous stream of insulin to cover your
basic insulin need. This is called your basal rate profile. You can
program it in time blocks with dierent hourly basal rates to
cover your varying basal insulin requirement throughout the day.
By default your pump shows 24 time blocks, one for each hour of
the day. By changing the End time you can program a varying
number of time blocks (1 to 24) with a minimum duration of
15minuntes and a maximum duration of 24 hours, if needed.
The total of all time blocks is called a basal profile or basal rate
profile. Make sure that you have programmed an hourly basal
rate for all 24 hours of the day.
Your personal settings for the basal profile should be provided by
your healthcare professional.
Example: Basal Profile for 18 U / 24 hours
Insulin delivery
[U / h]
012345678910 11 12 13 14 15 16 17 18 19 20 21 22 23 24
Hourly basal rate
Time
23
Page 34

1 2
3
24
From the Status screen, press o.
4
The Program Basal Profile screen
appears.
Press o to select Basal Profile 1.
The main Menu appears.
Press z to move to Basal.
Press o to select.
The Basal Profile 1 screen appears. The
Start time is always midnight. The End of
the first time block is highlighted.
Press x or z to set the time.
Press o.
The Basal menu appears.
Press z to move to Program Basal
Profile.
Press o to select.
65
The hourly basal rate of the first time
block is highlighted and the next time
block appears.
Press x or z to set the hourly basal rate.
Press o.
Page 35

2
7
The End of the second time block is
highlighted.
Continue programming the End time and
hourly basal rate for the total of 24 hours.
10
The Pump stopped screen appears.
The next step is to insert the cartridge.
Continue with chapter2.3, page26.
8
After you have programmed an hourly
basal rate for all 24 hours, press o.
Note
If necessary, you can press q to go
back to a previous field.
9
The Basal Profile daily total screen for the
Basal Profile 1 appears. Make sure the
daily total matches your therapy
requirement.
Press o to confirm.
25
Page 36

2.3 Inserting a new cartridge
Before starting your insulin pump for the first time you must
insert a new cartridge.
When the insulin in your cartridge is running low, you will be
prompted with a Warning W31: Cartridge low, which means that
there is only a specified number of insulin units left. You can
adjust the Cartridge warning level in the Therapy settings. When
the cartridge is completely empty, your pump sends a
Maintenance message M21: Cartridge empty and you must
change the cartridge immediately.
Insert the cartridge
1 2
Have the following materials ready:
j An Accu-Chek Insight insulin pump cartridge (self-filled) or a
NovoRapid
j A new Accu-Chek Insight infusion set
Note
Ensure the cartridge and insulin are at
room temperature.
®
PumpCart® (pre-filled)
3
26
From the Status screen, press o.
The main Menu appears.
Press z to move to Cartridge and
infusion set.
Press o to select.
The Cartridge and infusion set menu
appears.
Press o to select Change cartridge.
Page 37

2
4 5
The Change cartridge screen appears.
7 8
Remove the cartridge.
Turn the adapter anti-clockwise.
Press o to confirm that you have
removed the adapter and the cartridge.
The pump automatically starts rewinding
the piston rod.
6
When you reach an angle of about 120°,
remove the adapter.
9
When the pump finishes rewinding, you
are prompted to insert the new cartridge
and connect the adapter.
27
Page 38

10 11
12
28
Insert the new cartridge – plunger first –
into the cartridge compartment.
13
Turn the adapter clockwise all the way to
the stop.
Replace the adapter on the bayonet
socket of the cartridge compartment
(about 120° angle).
14
The adapter is correctly positioned when
it is aligned with the pump’s housing.
Press o to confirm.
Make sure you correctly insert the nose of
the adapter into the notches of the
pump’s housing.
15
The Cartridge type screen appears.
Press x or z to move to the appropriate
cartridge type.
Press o to select.
Page 39

2
16
You are prompted to disconnect the
infusion set from your body
Press o to confirm.
19
After the self-test, the pump returns to
the Cartridge and infusion set menu. Fill
tubing is selected by default. Continue
with the next chapter.
17 18
The pump detects the position of the
plunger in the cartridge.
Dispose of the used cartridge according to local regulations
w WARNING
If an empty cartridge is inserted into the pump (e.g. for
training purposes), the pump displays the programmed insulin
deliveries (infusion set priming, basal rate and bolus
deliveries), even though no insulin is being delivered due to
the empty cartridge.
The pump then performs a self-test. See
chapter2.1, page1419.
29
Page 40

2.4 Filling the infusion set tubing and
cannula
After you connect the adapter of a new infusion set, it is essential
that you fill the infusion set tubing with insulin. Make sure it is
free of air bubbles.
30
w WARNING
Never fill an infusion set that is connected to your body, as
you risk uncontrolled insulin delivery. Always follow the
instructions for use for the infusion set you are using.
w WARNING
Air bubbles in the cartridge and infusion set may result in the
infusion of air instead of insulin. If this happens, your body will
not receive the required amount of insulin. Remove bubbles
when you fill the cartridge and the infusion set, while the
infusion set is disconnected from your body.
By default, the pump stops filling at 14 units of insulin. If no
insulin emerges from the connector, or if there are air bubbles in
the tubing after filling, repeat the filling process until the infusion
set is bubble-free and completely filled with insulin. When insulin
appears at the tip of the connector, press q to stop filling. The
amount of insulin used for filling is not added to the pump’s
history of daily insulin totals. You will learn how to adjust the fill
amount in the chapter about Settings. See chapter8.4.3, page125.
Page 41

Fill the infusion set tubing
Hold your pump upright during filling, such that the adapter
points upwards to help release any remaining air bubbles from
the cartridge and tubing.
If you just inserted a new cartridge, start with step 2.
2
1 2
In the main Menu, press z to move to
Cartridge and infusion set.
Press o to select.
The Cartridge and infusion set menu
appears.
Press z to move to Fill tubing.
Press o to select.
3
The Fill tubing screen appears. Make sure
the infusion set is not connected to your
body.
Press o to confirm.
31
Page 42

4 5
6
32
The pump automatically starts to fill the
tubing.
You can now insert the cannula into your body. Carefully read
and follow the instructions that came with your infusion set. You
need to fill the head set and cannula with insulin before you start
your pump. See the next chapter (Filling the cannula).
See chapter8.4.3, page125 if you need to adjust the tubing or
cannula fill amount.
Your pump stops filling at 14 units.
You can stop the filling process at any
time by pressing q.
When the filling is completed, the pump
switches to the Cartridge and infusion set
menu. Fill cannula is selected by default.
Page 43

Fill the cannula
By default the fill amount is set to 0.7 units. It is possible to
adjust this fill amount. See chapter8.4.3, page125.
2
1 2
After filling the tubing, your pump
switches to the Cartridge and infusion set
menu. Fill cannula is selected by default.
Press o to select Fill cannula.
3
The Fill cannula screen appears.
Attach the connector of the tubing to the
head set.
Press o to confirm.
33
Page 44

4 5
34
The pump automatically starts to fill the
cannula.
Note
If you do not want to start the insulin delivery now for any
reason, press q to select no.
When the filling is completed, the Start
insulin delivery? screen appears.
Press o to select yes.
Page 45

3 Using your pump in daily life
3.1 Wearing your pump
Attach your pump safely to your body or clothes to prevent
damage. You can do this with one of our special carrying
systems. In cold weather wear your pump under your clothes or
directly on your body.
w WARNING
Make sure that the infusion set is never kinked nor
compressed. Otherwise the insulin cannot flow freely, which
could result in under or over delivery of insulin.
3
Note
When wearing your pump, prevent any contact with
objects in your pockets, such as key chains, keys, pocket
knives or coins. These could damage the
pump or accidentally press its keys.
3.1.1 When and when not to wear your pump
There are a few situations where it is recommended that you
take o your pump, because your pump could be damaged or
other risks could arise. Take o your pump in these situations
and change to alternative therapy if needed. Examples of such
situations are listed on the following pages.
35
Page 46

Electromagnetic fields and hazardous areas
w WARNING
Do not use your pump near electromagnetic fields such as
radar or antenna installations, high-voltage sources, X-Ray
sources, computer tomography, CAT scan and MRI. These and
all other sources of electrical current may cause your pump to
fail. Insulin delivery may stop and the Error E7 occurs.
Always stop your pump, remove it from your body, and leave
it outside these areas. See Appendix A: Technical Data, page151
for more information about electromagnetic fields.
Your pump has been tested against, and complies with, the
regulations on electromagnetic interference. Security systems in
airports and anti-theft monitoring devices, such as those in
department stores, should not aect the functioning of your
pump.
There are many devices that emit electromagnetic radiation, for
example mobile phones. It cannot be completely ruled out that
one of such devices could aect your pump. It is therefore
recommended that you keep your pump at least 10 cm
(4 inches) away from these devices while they are active.
36
Page 47

Barometric pressure
Your pump is designed to work in normal barometric conditions
(from 550 to 1060 mbar).
Do not use your pump in hyperbaric chambers, or in hazardous
areas where, for example, flammable gases or vapors could be
present. This could cause an explosion.
Always stop and disconnect your pump from your body before
you enter hazardous areas. For more information, contact your
local pump support (see inside back cover).
3
Note
Rapid and extreme changes in air pressure or temperature
can influence insulin delivery, especially if there are air
bubbles in the cartridge or tubing.
Such changes could occur when you are, for example:
j in an airplane without pressure balance during takeo
j when practicing sports like hang-gliding
j leaving a heated room and going outside in cold
weather.
Wear your pump close to your body, remove any air
bubbles from the cartridge and tubing and measure your
blood glucose more frequently in such situations.
Where in doubt, take o the pump and change to
alternative therapy method.
37
Page 48

Sport and exercise
Travelling with your pump
You can wear your pump while performing a range of sporting
activities. However, it is important that you protect your pump
before you begin exercise or sporting activities. Do not wear your
pump when practicing sports that involve high-impact body
contact such as boxing, football, or hockey. Rough contact could
damage your pump.
Consult our accessories catalogue for more information about
carrying systems, or contact your local pump support (see inside
back cover).
Before travelling, ask your doctor or healthcare team about any
special steps you need to take. Take extra blood glucose testing
and pump supplies with you, and find out where to obtain
supplies while you are travelling.
For more information, contact your local pump support (see
inside back cover).
38
Page 49

3
3.2 Stopping and starting your pump
You should discuss with your doctor or healthcare team about
when and for how long insulin delivery may be interrupted.
Check your blood glucose level regularly during any insulin
interruption. If necessary, use a syringe or insulin pen to inject
insulin according to the instructions of your doctor or healthcare
team.
w WARNING
Check your blood glucose level and replace the missing
insulin immediately if your insulin delivery is interrupted for
any reason, for example:
j You stop the pump
j There is a technical problem with the pump
j The cartridge and / or the infusion set is leaking
j There is an occlusion in the infusion set or in the head set
j The cannula has slipped out of the infusion site
39
Page 50

Stop your pump
1 2
3
40
From the Status screen, press o.
STOP Warning
As long as the pump is in STOP mode, it will emit a beep every
minute to remind you that no insulin is being delivered.
The main Menu screen appears.
Press z to move to Stop pump.
Press o to select.
The Pump stopped screen appears. You
can now disconnect the infusion set from
your body and take o your pump.
Note
You can suppress this STOP warning by
pressing q for 3 seconds.
Page 51

Start your pump
Make sure your infusion set is completely filled with insulin and
free of air bubbles. Connect the infusion set to your body
according to the instructions that came with it.
3
1 2
From the Pump stopped screen, press
o.
The main Menu screen appears.
Press z to move to Start pump.
Press o to select.
3
The RUN screen appears and the pump
starts to deliver insulin.
41
Page 52

Long interruptions
Use the following procedure if you need to interrupt your pump
therapy for more than one day.
1 2
Switch your pump to STOP mode. See
chapter3.2, page39.
Disconnect the infusion set from your
body.
Remove the adapter, cartridge and
battery from the pump. See chapter2,
page13.
Make sure you store your pump properly.
See chapter9.5, page134.
42
Page 53

3
3.3 Your insulin pump and water
Your pump is waterproof according to the IPX8 standard. That
means you may wear it while showering, bathing and swimming.
However, since the adapter of the infusion set is not watertight,
water may enter the cartridge compartment. If water does enter
the cartridge compartment, you must then remove the cartridge
and dry the cartridge compartment as described in the next
section. You must not dive deeper than 1.3 meters when wearing
your pump.
However, if your pump has been dropped, it may no longer be
waterproof due to hairline cracks. Therefore it is highly
recommended that you no longer wear it while swimming,
bathing, or showering.
When water has entered the cartridge or battery
compartment
Water may enter into the cartridge compartment through the
adapter if the pump has been immersed in water. If water has
entered the cartridge or battery compartment, put your pump into
STOP mode and disconnect the pump from your body. Use a soft
cloth to dry the outside of the pump, turn your pump upside
down to let the water run out, and leave it to dry. Do not use
warm air such as a hair dryer or microwave to dry the pump as
this could damage the pump's housing. Make sure that the
cartridge and battery compartment is completely dry before
reinserting the cartridge or battery. Please make sure that you
use a new battery cover.
43
Page 54

Contact with other liquids
You do not need to worry about contact between your pump and
perspiration or saliva. However, you must check your pump
immediately after contact with other liquids or chemicals, such
as:
j Cleaning solutions
j Drinks
j Oil or fat
Avoid any contact between the pump and infusion set with health
and beauty products (for example; antiseptics, antibiotic creams,
soaps, perfumes, deodorants, body lotions, or other cosmetics).
These substances could discolour your pump or fog the display.
44
Page 55

3
3.4 Changing the transfer set (adapter
and tubing)
Change the transfer set (adapter and tubing):
j As directed by the instructions accompanying the infusion set
j When the infusion site shows signs of irritation or infection
j If the pump displays Maintenance M24: Occlusion
j If you think that there might be an occlusion in the tubing (even
without an alarm)
j Every time you change the cartridge
Note
You can also review how to change the
cartridge. See chapter2.3, page26
Your pump cannot detect infusion set leakage. Inspect all parts of
your infusion set regularly during the day and before you go to
sleep. If there seems to be any loss of insulin and all parts are
correctly tightened, look for and immediately replace any leaking
component. Check your blood glucose level immediately, as
insulin delivery has been interrupted. Take appropriate action
according to your doctor’s or healthcare team’s instructions.
Always disconnect your infusion set before changing a cartridge
or filling the infusion set. Otherwise, you risk uncontrolled insulin
delivery into your body. Always follow the instructions for the
infusion set and cartridge you are using.
45
Page 56

Change the transfer set (adapter and tubing)
Note
Disconnect and remove the infusion set’s head set and
insert a new one at a new site as described in the infusion
set’s instructions.
w WARNING
Inspect your infusion site at least twice each day for irritation
or infection. Signs of infection may include, but are not limited
to: pain, lumps, redness, heat, or discharge. If you see
redness or swelling, change the infusion set’s head set and
the infusion site immediately and contact your doctor or
healthcare team.
Change the head set according to the instructions for the
infusion set you are using and your doctor’s or healthcare
team’s recommendations.
46
1 2
Turn the adapter with the tubing anticlockwise.
When you reach an angle of about 120°,
remove the adapter with the cartridge.
3
The Rewind piston rod? screen appears.
Press o to select yes.
Page 57

3
4
The pump automatically starts rewinding
the piston rod.
7
Replace the adapter on the bayonet
socket of the cartridge compartment
(about 120° angle).
5
When the pump finishes rewinding, you
are instructed to insert the new cartridge
and connect the adapter.
8
Make sure you correctly insert the nose of
the adapter into the notches of the
pump’s housing.
6
Insert the cartridge – plunger first – into
the cartridge compartment.
9
Turn the adapter clockwise all the way to
the stop.
47
Page 58

10
11
12
48
The adapter is correctly positioned when
it is aligned with the pump’s housing.
Press o to confirm.
13 14
The pump automatically detects the
position of the plunger in the cartridge.
The Cartridge type screen appears.
Press x or z to move to the cartridge
type.
Press o to select.
The pump then performs a self-test. See
chapter2.1, page19.
Disconnect the infusion set if not already
disconnected.
Press o to confirm.
15
After the self-test, the pump returns to
the Cartridge and infusion set menu. Fill
tubing is selected by default. See
chapter2.4, page30.
Page 59

3
3.5 Quick info screens
The Quick info screens allow you to quickly access important
information about the status of your pump and recent therapy
events.
1 2
From the Status screen, press z.
The Cartridge and battery screen appears.
Press z.
The sequence of Quick info screens includes information about:
j Current insulin amount in your cartridge and energy status of
your battery
j Last bolus
j Total daily dose of insulin
j Last safety event (Error, Maintenance message or Warning
message)
j Current time and date
3
The Last Bolus screen appears.
Press z.
Press x if you want to go back.
Press x if you want to go back.
49
Page 60

4 5
6
50
The Total daily dose screen appears.
Press z.
Press x if you want to go back.
The Last message screen appears.
Press z.
Press x if you want to go back.
The Time and date screen appears.
Press z to return to the Status screen.
Press x if you want to go back.
Page 61

3.6 General safety information
w WARNING
Do not place your insulin pump in direct sunlight. Overheating
of the insulin and the pump must be avoided. Protect your
insulin pump from direct exposure to cold wind and
temperatures over 40 °C (105 °F) and below 5 °C (41 °F).
Furthermore avoid direct contact between your pump and
your body while you are suering from fever. These conditions
may damage the insulin and the housing of your insulin pump
and could also cause a malfunction of the battery. See the
instructions for the insulin you are using to determine the
acceptable temperature range.
3
Note
Check the amount of insulin remaining in the cartridge at
least once a day. Press z from the Status screen to
display the remaining cartridge content in units. Before
going to sleep, make sure that:
j The pump is in RUN mode
j The cartridge contains enough insulin to last through
the night
j The battery level is OK
j The time and date are set correctly
j The display is working properly
51
Page 62

52
Page 63

4 Administering boluses
4.1 Standard Bolus
The Standard Bolus delivers the programmed insulin dose all at
once. This bolus can be helpful for foods that are digested
quickly, such as cake or bread. The Standard Bolus is also the
best option for correcting high blood glucose levels. If necessary,
you can adjust the speed of the bolus delivery. See chapter8.4.2,
page118.
Program a Standard Bolus
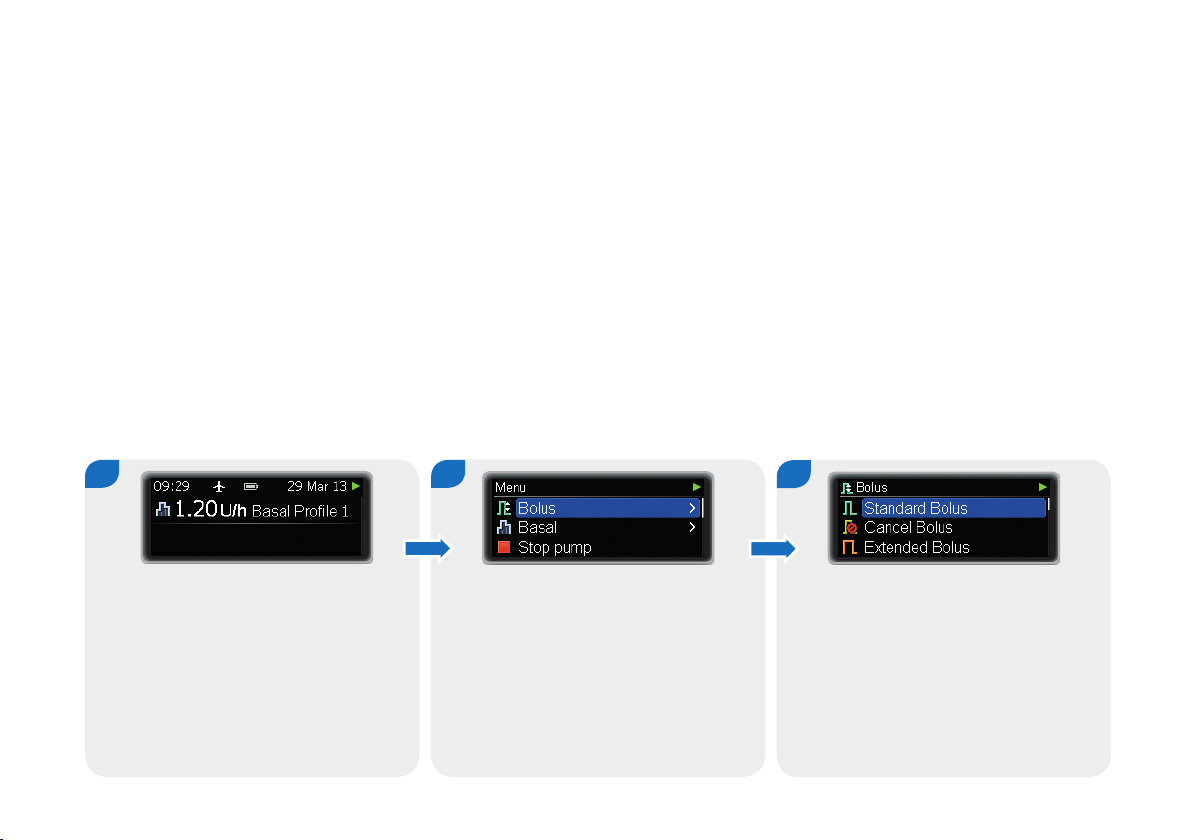
1 2
4
3
From the Status screen, press o.
The main Menu screen appears.
Press o to select Bolus.
The Bolus menu appears.
Press o to select Standard Bolus.
53
Page 64

4
5 6
54
The Standard Bolus screen appears with
the immediate bolus amount highlighted.
7
Your pump returns to the Status screen
showing a progress bar for the remaining
bolus amount.
Press x or z to set the immediate Bolus
amount.
Press o to confirm.
Note
You can cancel the bolus during delivery
by pressing q for 3 seconds.
The Bolus to deliver screen appears for
5 seconds.
If necessary, you can press q and
program a new bolus amount.
Page 65

4
4.2 Quick Bolus
As with the Standard Bolus, the Quick Bolus delivers the
programmed insulin dose all at once. However, you do not need
to switch to the main Menu screen to set up a Quick Bolus. In
fact, with experience you will be able to program this bolus type
without even looking at the display.
This bolus type lets you discreetly deliver a bolus while your
pump is hidden in your clothing. However, it is only possible to
program the bolus amount in distinct increments. The default
setting for this increment is 0.5 units, which means you can set
the bolus amount to 0.5, 1.0, 1.5 units, and so on. If needed, you
can change the increment to 0.1, 0.2, 1.0 or 2.0 units in the
Therapy Settings. See chapter8.4.2, page118.
w WARNING
Make sure that you know and use the correct bolus
increment. Using the incorrect bolus increment will deliver the
wrong insulin dose.
And as with the Standard Bolus, this bolus is suitable for meals
that contain mainly fast digestible carbohydrates as well as for
the correction of high blood glucose levels.
If necessary, you can adjust the speed of the bolus delivery. See
chapter8.4.2, page118.
55
Page 66

Program a Quick Bolus
1 2
The Quick Bolus screen appears with the
bolus amount highlighted.
In RUN mode, press and hold one of the
q keys until you hear a beep and feel a
vibration (about 3 seconds).
3 4
Press the other q key once for each
increment until the required bolus amount
is reached.
56
Each time you press the key, your pump
beeps and vibrates simultaneously – once
for each programmed bolus increment.
5 seconds after your final key press, your
pump confirms the bolus amount with
one beep and vibration for each bolus
increment programmed.
Page 67

4
5
The pump displays the Bolus to deliver
screen for another 5 seconds.
Note
You can cancel the bolus while the Bolus
to deliver screen is displayed or during
delivery by pressing q for 3 seconds.
6
Your pump returns to the Status screen
showing a progress bar for the remaining
bolus amount.
57
Page 68

4.3 Cancelling a bolus
4.3.2 Cancelling boluses during delivery
4.3.1 Cancelling a bolus during programming
Standard, Extended and Multiwave Bolus
While programming, press q to go back and program a new
value.
Quick bolus
During confirmation or as long as the Bolus to deliver screen is
displayed press q to cancel the bolus completely.
The bolus delivery stops completely and your pump displays a
Warning W38: Bolus cancelled.
During delivery of a Standard, Quick or the immediate part of a
Multiwave Bolus press q for 3 seconds to cancel the bolus.
The bolus delivery stops completely and your pump displays a
Warning W38: Bolus cancelled.
q
58
Page 69

4.3.3 Cancelling a bolus using the Cancel Bolus menu
1 2
4
3
From the Status screen, press o. The main Menu screen appears.
Press o to select Bolus.
4
The Cancel Bolus screen appears.
5
If more than one bolus is currently
running, press x or z to move to the
bolus you want to cancel.
Press o to confirm.
The Bolus menu appears.
Press z to move to Cancel Bolus.
Press o to select.
6
A Warning W38: Bolus cancelled appears.
Press o to mute the Warning.
Press o again to confirm.
59
Page 70

4.4 Extended Bolus
An Extended Bolus delivers your programmed insulin dose over a
specified period of time.
This bolus type can be helpful for meals that are slowly
digestible, for example, foods with complex carbohydrates or
foods that are high in fat.
The duration of the bolus delivery can be programmed in
15-minute intervals for up to 24 hours, and begins immediately
after you confirm the bolus. Throughout the bolus delivery, your
pump displays the remaining time and amount of the Extended
Bolus in the RUN screen.
You can add a Standard or Quick Bolus to an ongoing Extended
Bolus and one additional Extended or Multiwave Bolus.
Example
Ian Insight is planning to eat a pizza. He knows it contains
a lot of fat and slowly digestible carbohydrates, and few
fast-acting carbohydrates. Therefore, he programs an
Extended Bolus for his pizza.
60
Page 71

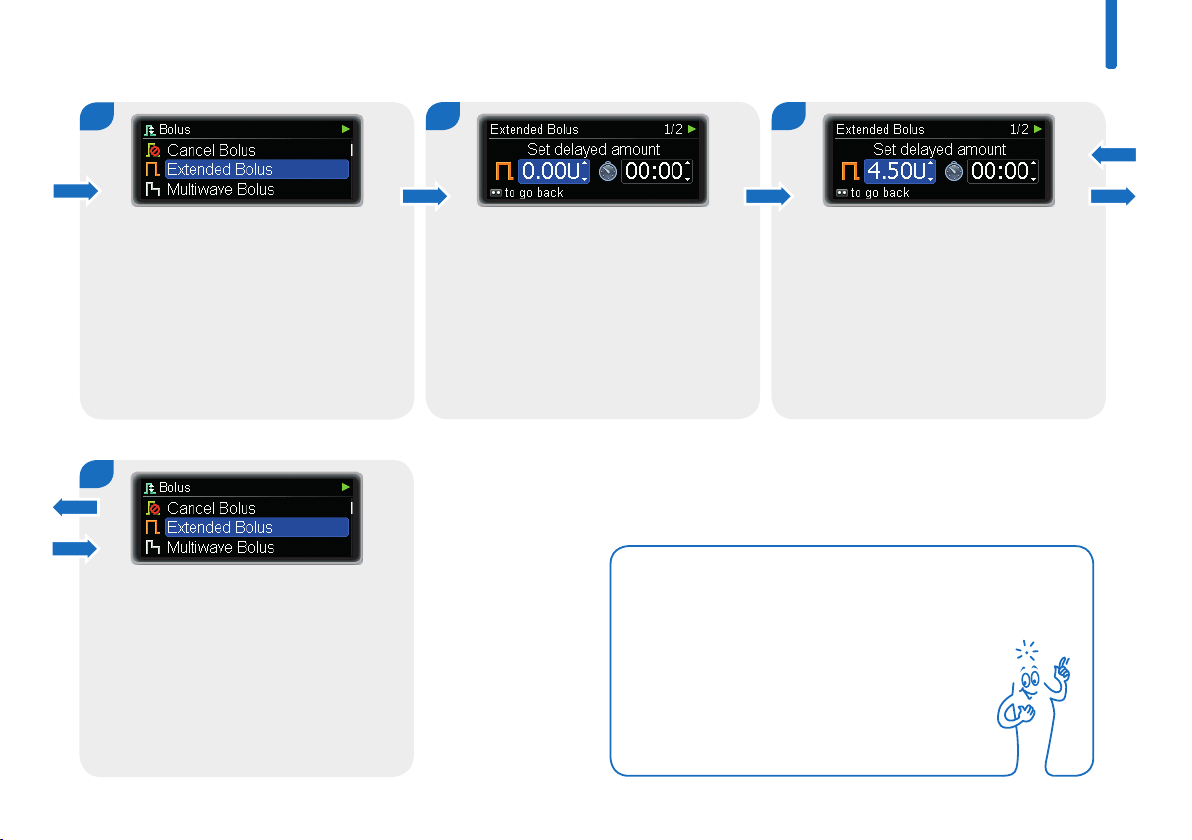
Program an Extended Bolus
1 2
4
3
From the Status screen, press o.
4
The Extended Bolus screen appears with
the delayed bolus amount highlighted.
The main Menu screen appears.
Press o to select Bolus.
5 6
Press x or z to set the delayed bolus
amount.
Press o.
The Bolus menu appears.
Press z to move to Extended Bolus.
Press o to select.
The bolus duration is highlighted.
The duration of your last Extended Bolus
is given as a default.
61
Page 72

7 8
62
Press x or z to set the duration.
Press o to confirm.
Your pump returns to the Status screen,
showing a progress bar of the remaining
bolus amount and duration, in addition to
the hourly basal rate.
Page 73

4
4.5 Multiwave Bolus
The Multiwave Bolus combines a Standard Bolus with an
Extended Bolus; one part of the bolus amount is delivered
immediately while the other is delivered over a specified period
of time.
This bolus can be helpful when you eat meals that contain both
fast and slowly digestible carbohydrates or long meals with
several courses. You can also use this bolus type when you are
planning to eat slowly digestible carbohydrates but have an
elevated blood glucose level before the meal. You program the
immediate part of the bolus for the correction of the blood
glucose level and the extended part for the carbohydrates.
The duration of the delayed Bolus delivery can be programmed in
15-minute intervals for up to 24 hours, and begins immediately
after you confirm the bolus. Throughout the bolus delivery, your
pump displays the remaining time and amount of the bolus in the
Status screen.
You can add a Standard or Quick Bolus to an ongoing Multiwave
Bolus, and one additional Extended or Multiwave Bolus.
Example
Ian Insight is invited to dinner. He will have pastry as a
starter and steak with potatoes as his main course. In
addition, his blood glucose level is slightly out of the
target range before the meal. He programs a Multiwave
Bolus of 15 units in total: an immediate dose of 5 units for
the starter and the correction of his high blood glucose
level, and 10 units over a period of 3 hours.
63
Page 74

Program a Multiwave Bolus
1 2
3
64
From the Status screen, press o.
4
The Multiwave Bolus screen appears with
the immediate amount field highlighted.
The main Menu screen appears.
Press o to select Bolus.
5
Press x or z to set the immediate bolus
amount.
Press o.
The Bolus menu appears.
Press z to move to Multiwave Bolus.
Press o to select.
6
The delayed amount field is highlighted.
Press x or z to set the delayed bolus
amount.
Press o.
Page 75

4
7
The duration of the delayed bolus is
highlighted.
The duration of your last Multiwave Bolus
is given as a default.
10
Your pump displays the Status screen,
showing the units and a progress bar of
the remaining bolus amount and duration
of the delayed bolus in addition to the
hourly basal rate.
8
Press x or z to set the duration.
Press o to confirm.
Note
You can cancel the bolus during delivery of the immediate
part by pressing q for 3 seconds.
You can also cancel the Extended Bolus
part if necessary. See chapter4.3, page58.
9
The Bolus to deliver screen appears,
displaying the insulin units that are still to
be delivered for the immediate bolus.
If necessary, you can press q and
program the bolus anew.
65
Page 76

66
Page 77

5 Basal profile options
In this chapter you will learn how to adjust your basal insulin
supply to dierent life situations:
j Temporary Basal Rates help you to adjust your basal rate to
short term changes of your basal insulin requirement like for
example when your are ill or when you are playing sports.
j You can also program additional Basal profiles to meet your
insulin need for dierent daily routines; for example, working
days versus weekends.
j Once programmed you can activate the dierent Basal profiles
when needed with a few key presses.
5
67
Page 78

5.1 Temporary Basal Rate (TBR)
Using the Temporary Basal Rate (TBR), you can increase or
decrease your current basal rate profile on a percentage basis for
a specified period of time. This helps you adjust your basal
insulin dose in situations where your insulin need has temporarily
changed. For example, when you are playing sports you might
need less insulin, and when you are ill you might need more
insulin. Discuss the use of Temporary Basal Rates with your
doctor or healthcare team.
Your current basal rate profile represents 100 %. When you
increase or decrease the basal rate with a TBR, the shape of your
profile does not change, but each hourly basal rate is either
increased or decreased by the percentage that you program. You
can activate only 1 TBR at a time, between 0 and 250 % in
15-minute intervals for up to 24 hours.
Example
Ian Insight is planning to play tennis for 1 hour. He knows
that his body needs 40 % less insulin during this kind of
activity and for another 2 hours while recovering. He
programs a TBR of 60 % for the next 3 hours.
Note
Setting a TBR does not aect any boluses
you have set up.
68
Page 79

Program a Temporary Basal Rate
1 2
5
3
From the Status screen, press o.
4
The Temporary Basal Rate menu appears.
Press o to select Basic TBR.
The main Menu screen appears.
Press z to move to Basal.
Press o to select.
5
The Basic TBR screen appears with the
TBR percentage highlighted.
Press x or z to set the TBR percentage.
Press o.
The Basal menu appears.
Press o to select Temporary Basal
Rate.
6
The TBR duration is highlighted.
Press x or z to set the duration.
Press o to confirm.
69
Page 80

7
The Status screen appears, showing the
percentage and the remaining duration of
the TBR in addition to the modified hourly
basal rate.
When the duration of the TBR has expired, your pump sends a
Reminder R7: TBR completed.
70
Page 81

Cancel a TBR
1 2
5
3
From the Status screen, press o.
4
The Temporary Basal Rate menu appears.
Press z to move to Cancel TBR.
Press o to select.
The main Menu screen appears.
Press z to move to Basal.
Press o to select.
5
The Cancel TBR screen appears.
Press o to confirm.
The Basal menu appears.
Press o to select Temporary Basal
Rate.
6
A Warning W36: TBR cancelled appears to
confirm the cancellation was intended.
Press o twice to mute and confirm the
warning.
71
Page 82

5.2 Additional Basal profiles
As well as your initial basal profile you may want to use other
Basal Profiles for dierent daily routines.
You can program up to 5 dierent basal profiles. Discuss using
dierent Basal Profile with your doctor or healthcare team.
Example
Ian Insight is a construction worker and from Monday to
Friday he is on his feet from early morning until knockingo time. On the weekend, he likes to sleep in late and
reading books for hours. After discussing his varying daily
routines with his doctor, Ian Insight programmed Basal
Profile 1 for working days. He also programmed Basal
Profile 2 that provides more basal insulin for Saturdays
and Sundays.
72
Page 83

Program Basal Profile 2 (3, 4, or 5)
1 2
5
3
From the Status screen, press o.
4 5
The Program Basal Profile screen
appears.
Press x or z to move to Basal Profile 2
(3, 4, or 5) .
Press o to select.
The main Menu appears.
Press z to move to Basal.
Press o to select.
The Basal Profile 2 (3, 4, or 5) screen
appears. The End of the first time block is
highlighted.
Press x or z to set the time.
Press o.
The Basal menu appears.
Press z to move to Program Basal
Profile.
Press o to select.
6
The hourly basal rate for the first time
block is highligted.
Press x or z to set the hourly basal rate.
Press o.
73
Page 84

7
8
9
74
The End time of the second time block is
highlighted.
10
The Status screen appears.
Continue programming the End times and
hourly basal rates for all time blocks.
After you have programmed an hourly
basal rate for all 24 hours press o.
The Basal Profile daily total screen for the
Basal Profile 2 (3, 4, or 5). Make sure the
daily total matches your therapy
requirement.
Press o to confirm.
Note
You can now activate this Basal
profile using the Activate Basal
Profile menu.
Page 85

5.3 Activating a Basal profile
Activate Basal Profile 2 (1, 3, 4, 5)
1 2
5
Example
Ian Insight is planning a lazy weekend with sleeping late
in the morning and relaxing for hours. On Friday night,
when he returns from work, he switches from Basal
Profile 1 that is for working days to Basal Profile 2 that
matches his weekend habits.
3
From the Status screen, press o.
The main Menu screen appears.
Press z to move to Basal.
Press o to select.
The Basal menu appears.
Press z to move to Activate Basal Profile.
Press o to select.
75
Page 86

4
5
6
76
The Activate Basal Profile screen appears.
Press x or z to move to Basal Profile 2
(1, 3, 4, or 5).
Press o to select.
The Basal Profile 2 (1, 3, 4, or 5)
summary screen appears. Make sure you
selected the correct profile.
Press o.
The Status screen appears. The new
Basal profile is active immediately.
Page 87

6 Viewing your data
Your insulin pump stores up to 9000 pump events (Maintenance
messages, Warnings and Errors, programming operations and
insulin delivery records). This data corresponds to about the last
6 months of use, and can be accessed on a personal computer
using appropriate Accu-Chek software products.
6
77
Page 88

The following data can be reviewed directly on your insulin
pump:
78
Event data
Bolus data Last 90 boluses.
Temporary Basal
Rate data
Daily insulin totals
Pump timer
Pump timer
(loan pumps)
Version Version of your pump’s software.
Last 90 Maintenance messages,
Warnings, and Errors.
Last 90 increases and decreases
in basal rate.
Last 90 daily totals of insulin
delivered.
Remaining time in days until the
Roche warranty expires.
Remaining time in days until the
pump timer expires.
Page 89

Viewing your data
1 2
6
3
From the Status screen, press o.
4
The relevant data screen appears starting
with the most recent entry.
Press z to view older entries.
Press x to move back to younger results.
The main Menu screen appears.
Press z to move to Pump data.
Press o to select.
Press q to go back to the Pump data
menu screen or press q twice to return
to the Status screen.
The Pump data menu appears.
Press x or z to move to Event data,
Bolus data, TBR data, Daily totals, Pump
timer or Version as needed.
Press o to select.
79
Page 90

6.1 Event data
6.2 Bolus data
80
The Event data screen allows you to view up to the last
90 Maintenance messages, Warnings, and Errors starting with
the most recent entry.
Each Event data screen displays:
j Type and number of the Maintenance message, Warning, or
Error (for example, Warning: W32)
j The text of the Maintenance message, Warning or Error (for
example, Battery low)
j Time
j Date
Event data screen Bolus data screen
Event type
and number
Time Date
Event text
The Bolus data screen allows you to view up to the last 90 bolus
deliveries starting with the most recent entry.
Each Bolus data screen displays:
j Immediate bolus amount (only Quick, Standard, or Multiwave
Bolus)
j Delayed bolus amount (only Extended or Multiwave Bolus)
j Bolus duration (only Extended or Multiwave Bolus)
j End time
j End date
Immediate
bolus amount
Bolus
duration
End time End date
Delayed bolus amount
Page 91

6
6.3 TBR data
The TBR data screen allows you to view up to the last
90 Temporary Basal Rates (TBR), starting with the most recent
entry.
Each TBR data screen displays:
j TBR in percentage
j TBR duration
j End time
j End date
TBR
percentage
TBR duration
6.4 Daily totals
The Daily totals screen allows you to view up to the last 90 daily
totals of insulin delivered (from midnight to midnight; including
basal rate, plus boluses), starting with the most recent entry.
Each screen displays:
j Daily total of insulin delivered as boluses
j Daily total of insulin delivered as basal rate
j Daily total of insulin delivered
j Date
Daily totals screenTBR data screen
Total basal
Total boluses
Daily total
End time End date
Date
81
Page 92

6.5 Pump timer
6.6 Version
The Pump timer screen shows the time until the warranty for
your pump expires.
For loan pumps, a pump timer limits the operating time. When
you begin using the pump, the timer starts the countdown of the
number of remaining days. Before the pump timer expires, a
Warning W39: Loantime Warning will remind you that the
operating life of the pump is coming to an end, so that you can
take appropriate action in good time. When the timer expires, the
Maintenance message M25: Loantime over occurs, and your
pump goes into STOP mode. It can no longer be put into RUN
mode.
Pump timer screen Version screen
For reference purposes, you can view the software version that is
active on your pump.
82
Page 93

7 Modes for dierent life situations
7
The dierent modes on your pump help you to adjust the signals
and other functions of your pump to dierent situations. By
default your pump will be in the Normal mode. In this chapter,
you will learn how to switch from one mode to another.
You will learn how to program a mode to best suit your
preferences in the chapter about Settings. See chapter8.3.1,
page103.
You have 4 dierent signal modes:
Normal
Vibrate Set the signal to vibrate only
Quiet
Loud
Set the signal that you prefer in most of
your everyday life situations
Set the signal to not disturb for example
during meetings
Set the signal to be audible in a loud
environment
Signal suspension
You can set the signal to not disturb while sleeping. (Warnings
can be suspended until your usual wake-up time.) This function
is available in all 4 signal modes.
Flight mode
The Flight mode will not change the signal but will switch o the
Bluetooth function of your pump. You need this mode when you
travel by airplane, where you are not allowed to use Bluetooth
communication.
83
Page 94

Change the Signal mode
1 2
3
84
From the Status screen, press o.
4
The Signal mode screen appears.
Press x or z to move to Normal, Vibrate,
Quiet or Loud.
Press o to select.
The main Menu appears.
Press z to move to Modes.
Press o to select.
The pump returns to the Status screen and the new mode is
active immediately. You can learn how to adjust the Signal
modes to your personal needs in the chapter about Settings. See
chapter8.3.1, page103.
The Modes menu appears.
Press o to select Signal mode.
Page 95

Switch the Flight mode on or o
1 2
7
3
From the Status screen press o.
4
The Flight mode screen appears.
Press x or z to move to On or O as
needed.
Press o to select.
The main Menu appears.
Press z to move to Modes.
Press o to select.
The pump returns to the Status screen. The Flight mode is active
immediately and Bluetooth communication is switched o. In the
Status screen the airplane icon appears.
The Modes menu appears.
Press z to move to Flight mode.
Press o to select.
85
Page 96

86
Page 97

8 Personalising your pump
Your pump oers a wide range of options to adjust it to your
individual therapy requirements and personal preferences.
You can make adjustments to:
8
Reminders
Communication
Device settings
Therapy settings
Time and date
Help you to remember the tasks of your
diabetes management.
With the communication settings, you
can manage the interfaces of your
pump to other devices.
There are a wide range of options to
adapt your pump to your personal
preferences to best match your
day-to-day needs.
Help you to optimally adjust your pump
to your personal therapy requirements.
Ensure that your insulin supply is
always on time.
87
Page 98

Enter the Settings
1 2
3
88
From the Status screen, press o.
The main Menu screen appears.
Press z to move to Settings.
Press o to select.
The Settings menu appears.
Press x or z to move to Reminders,
Communication, Device settings, Therapy
settings or Time and date as needed.
Page 99

8
8.1 Using reminders
To help you remember all the tasks that are related to the
management of your diabetes, your pump oers a variety of
Reminders.
Each reminder can be set to O, Once or Repeat. When set to
Once, the reminder will only sound on the specified day. When
set to Repeat, the reminder will sound each day at the same
time.
You can use the following options:
Reminds you to deliver a bolus at a
Deliver Bolus
Missed Bolus
Alarm clock
Infusion set
change
specified time. You can program up to 5
deliver bolus reminders.
This reminder occurs if no bolus was
delivered within 2 hours prior to the
programmed time. You can program up to
5 missed bolus reminders.
Sounds at specified time. You can
program up to 5 alarm clocks.
Reminds you to change the infusion set
after a specified number of days.
89
Page 100

Set a Deliver Bolus reminder, Missed Bolus reminder or Alarm clock
1 2
3
90
In the Settings menu press x or z to
move to Reminders.
Press o to select.
4
The Reminder 1 (2, 3, 4, or 5) screen
appears with the hours highlighted.
Press x or z to set the hour.
Press o.
The Reminders menu appears.
Press x or z to move to Deliver Bolus,
Missed Bolus or Alarm clock as needed.
Press o to select.
5
The minutes are highlighted.
Press x or z to set the minutes.
Press o.
The Deliver Bolus, Missed Bolus or Alarm
clock screen appears.
Press x or z to move to Reminder 1
(2, 3, 4, or 5).
Press o to select.
6
The Reminder 1 (2, 3, 4, or 5) Tone
screen appears.
Press x or z to move to Tone 1 to 10 as
needed.
Press o.
 Loading...