

Page 1
User’s Manual
Blood Glucose Meter
52759_07398883001_MANUAL_EN.indb 1 10/13/15 11:53 AM
Page 2

52759_07398883001_MANUAL_EN.indb 2 10/13/15 11:53 AM
Page 3

Contents
Introduction ............................................................................................................................3
Chapter 1: Your New System ..................................................................................................5
Chapter 2: Blood Glucose Tests .............................................................................................13
Chapter 3: Control Tests ........................................................................................................25
Chapter 4: Meter Settings .....................................................................................................31
Chapter 5: Review Your Data.................................................................................................53
Chapter 6: Wireless Communication and Meter Pairing .........................................................71
Chapter 7: Meter Maintenance and Troubleshooting .............................................................85
Chapter 8: Technical Information ..........................................................................................97
Chapter 9: Guarantee .......................................................................................................... 103
Index ..................................................................................................................................105
52759_07398883001_MANUAL_EN.indb 1 10/13/15 11:53 AM
Page 4

52759_07398883001_MANUAL_EN.indb 2 10/13/15 11:53 AM
Page 5

3
Introduction
The Accu-Chek Guide System
The Accu-Chek Guide test strips with the Accu-Chek Guide meter are intended to quantitatively measure
glucose in fresh capillary whole blood from the finger, palm, forearm, and upper arm as an aid in
monitoring the eectiveness of glucose control.
The Accu-Chek Guide test strips with the Accu-Chek Guide meter are intended for in vitro diagnostic
self-testing by people with diabetes.
The Accu-Chek Guide test strips with the Accu-Chek Guide meter are intended for in vitro diagnostic use
by healthcare professionals in clinical settings. Venous, arterial, and neonatal blood testing is limited to
healthcare professional use.
This system is not for use in diagnosis of diabetes mellitus, nor for testing neonate cord blood samples.
Suitable for self-testing
The system includes:
Accu-Chek Guide meter with batteries, Accu-Chek Guide test strips,* and Accu-Chek Guide control
solutions*.
*Some items may not be included in the kit. They are a separate purchase.
wWARNING
• Choking hazard. Small parts. Keep away from children under the age of 3years.
• Any object coming into contact with human blood is a potential source of infection (see: Clinical
and Laboratory Standards Institute: Protection of Laboratory Workers from Occupationally
Acquired Infections; Approved Guideline – Third Edition; CLSI document M29-A3, 2005).
Introduction
52759_07398883001_MANUAL_EN.indb 3 10/13/15 11:53 AM
Page 6

4
Introduction
Why Regular Blood Glucose Testing Is Important
Testing your blood glucose regularly can make a big dierence in how you manage your diabetes every
day. We have made it as simple as possible.
Important Information About Your New Meter
• The meter may prompt you to choose a language and the time format (12-hour or 24-hour clock) the
first time you turn it on.
• Check the time and date on the meter before you begin testing. Adjust the time and date if necessary.
• Sample data screens are shown throughout the manual. Your data will dier.
• If you follow the steps in this manual but still have symptoms that do not seem to match your test
results, or if you have questions, talk to your healthcare professional.
52759_07398883001_MANUAL_EN.indb 4 10/13/15 11:53 AM
Page 7
5
Your New System
1
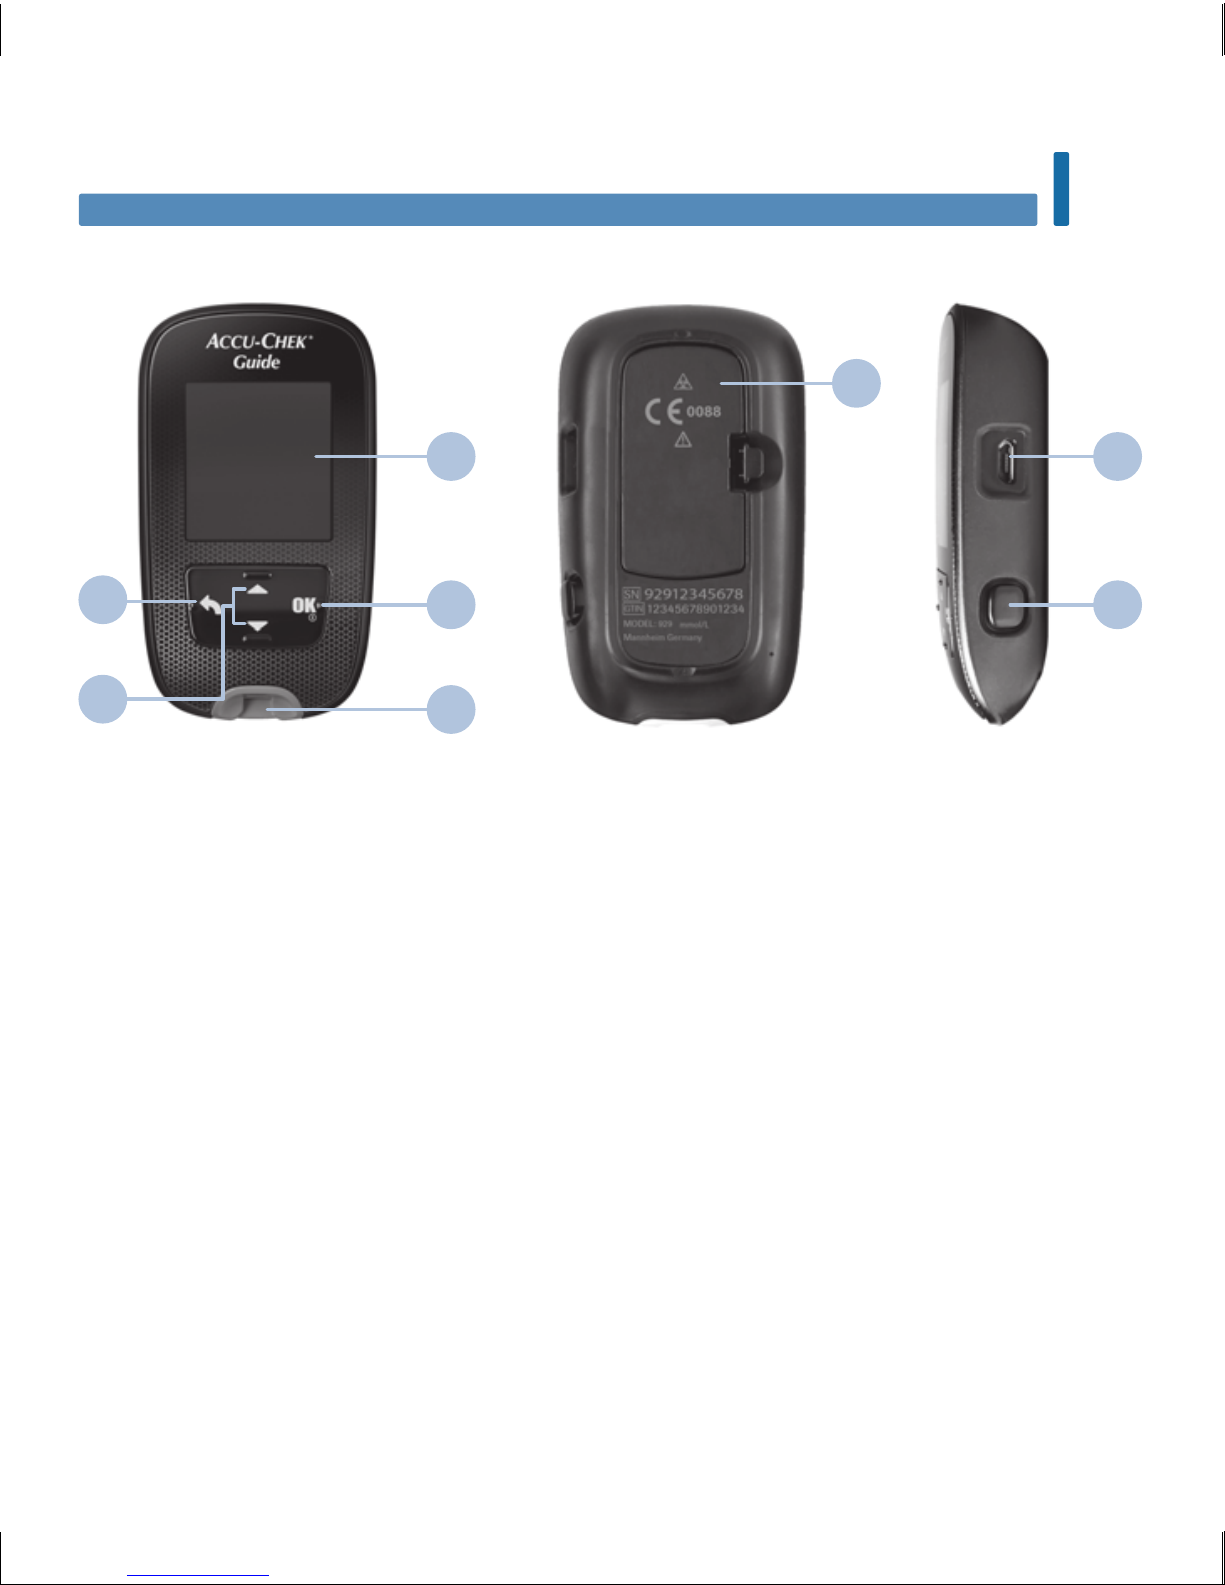
1. Display
Shows results, messages, and test
results stored in memory.
2. Back Button
Returns to a previous display or field.
3. Up Arrow and Down Arrow Buttons
Press to move between menu options
or to increase or decrease numbers.
4. Power/Set/OK Button
Turns meter on or o and sets options.
5. Test Strip Slot with Light
Insert test strip here.
6. Battery Door
Flip open to replace batteries.
7. Micro USB Port
Transfers data from the meter to a computer
(PC).
8. Test Strip Ejector
Press to remove test strip.
The Accu-Chek Guide Meter
Front View
2
Chapter 1: Your New System
Back View
Side View
3
1
6
7
84
5
52759_07398883001_MANUAL_EN.indb 5 10/13/15 11:53 AM
Page 8

6
Your New System
1
9. Test Strip Container*
10. Metallic End
Insert this end into meter.
11. Yellow Edge
Touch blood drop or control solution here.
12. Control Solution Bottle*
13. Batteries
14. USB Cable*
Connects the meter to a PC.
* Some items may not be included in the kit.
They are a separate purchase.
(for example)
Test Strip
9
10
11
12
14
13
52759_07398883001_MANUAL_EN.indb 6 10/13/15 11:53 AM
Page 9

7
Your New System
1
Button Functions
Here are the functions of the back, arrow, and Power/Set/OK buttons on the meter. These functions are
used throughout this manual. See the chapter Meter Settings for specific instructions on setting up the
meter.
Button Function
Back Button
Return to the previous display.
Return to the previous field.
Up Arrow and Down
Arrow Buttons
Navigate up and down in a menu.
Increase or decrease a number.
Power/Set/OK Button
Press briefly to turn the meter on.
Press and hold to turn the meter o.
Press to select an option.
Press to move to the next field or display.
Press to save an option.
With the meter o, press and hold to check the meter display.
52759_07398883001_MANUAL_EN.indb 7 10/13/15 11:53 AM
Page 10
8
Your New System
1
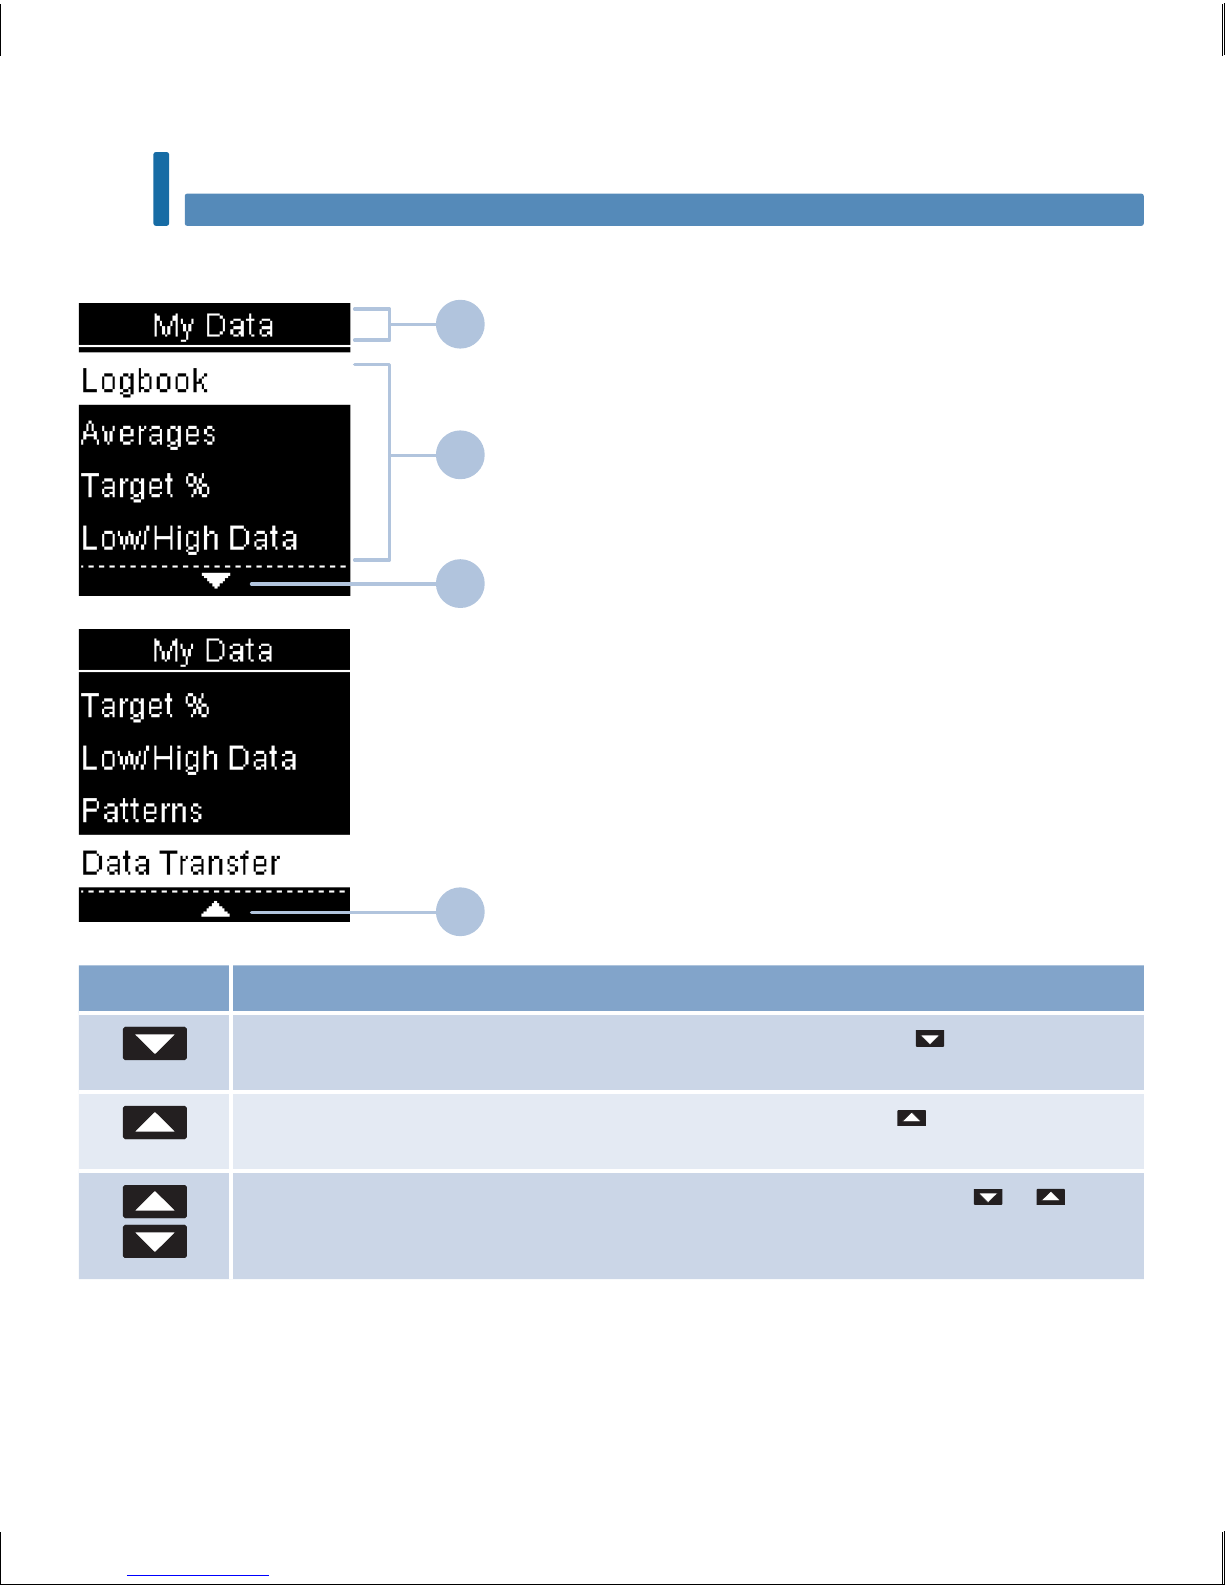
Meter Menus
1 Title of display or menu
2 Menu options
3 Scroll down
4 Scroll up
Display Description
There are more menu options listed beneath the last option. Press on the meter to
view the options.
There are more menu options listed above the first option. Press on the meter to
view the options.
There are more menu options listed above and below the options. Press or on
the meter to view the options.
1
2
3
4
52759_07398883001_MANUAL_EN.indb 8 10/13/15 11:53 AM
Page 11
9
Your New System
1
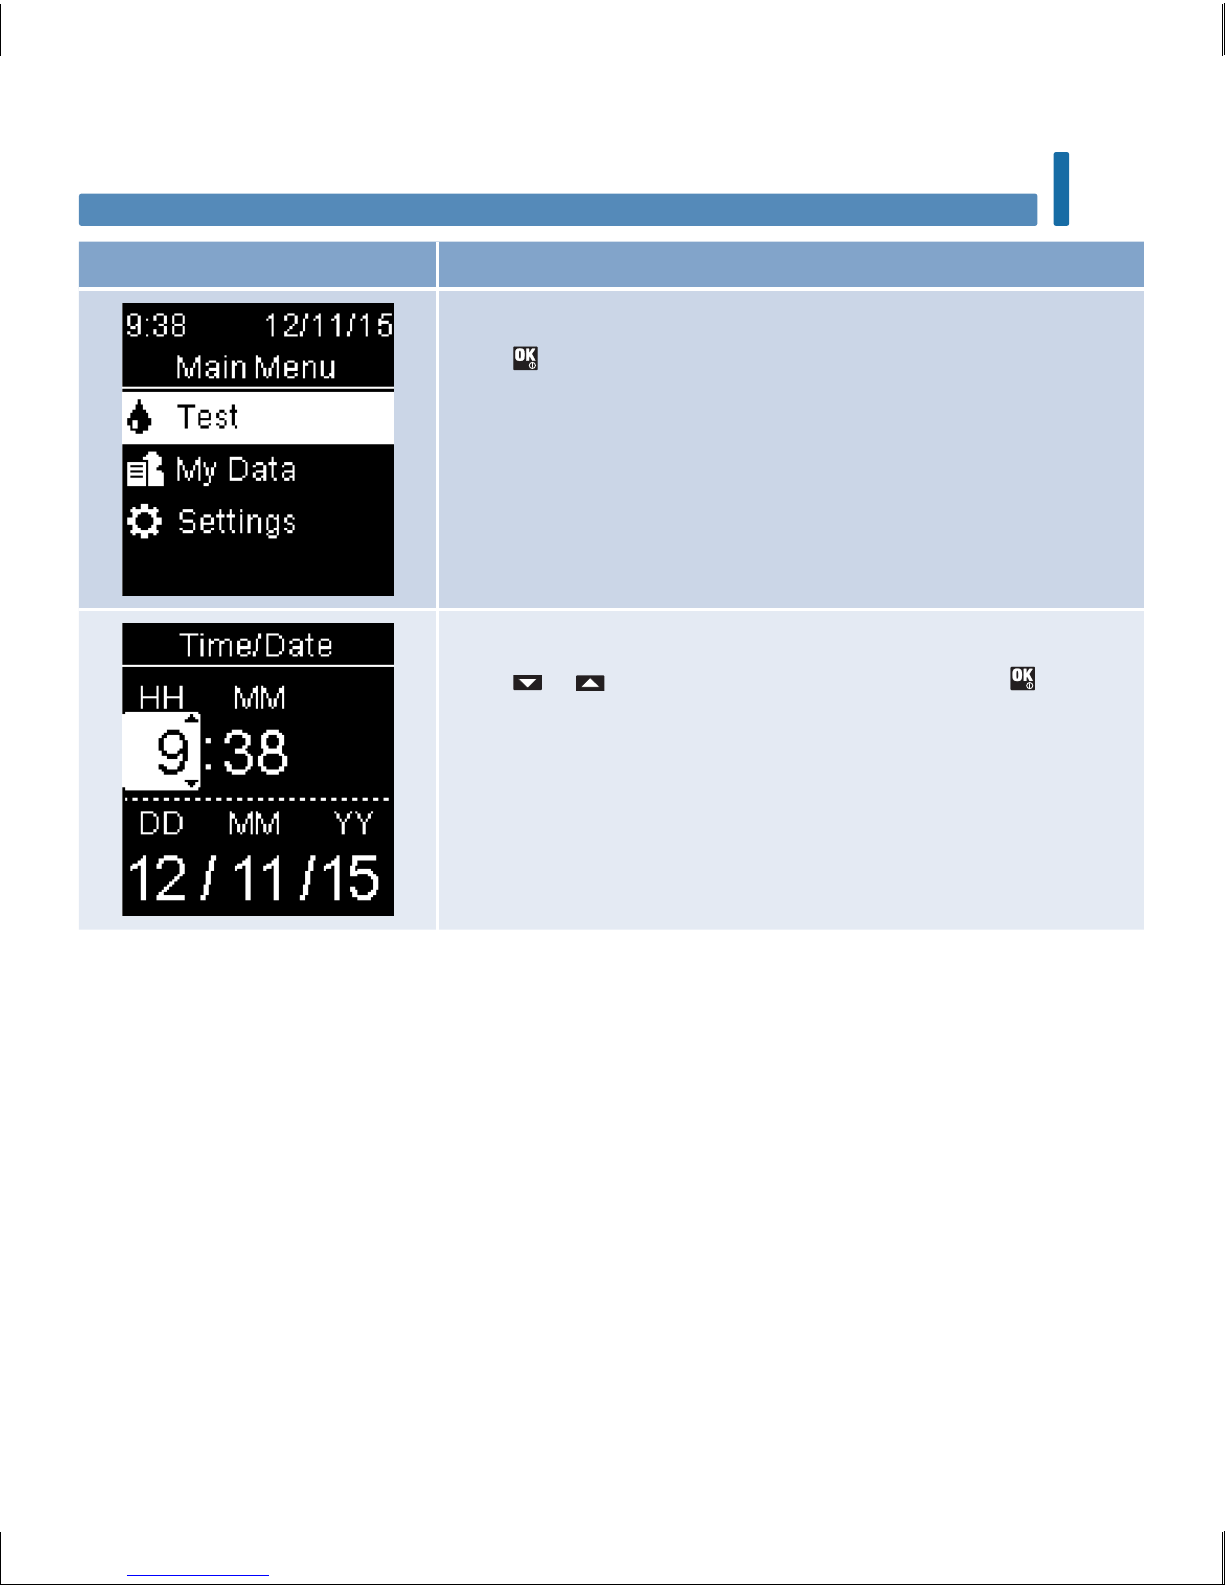
Display Description
Highlighted option (Test)
Press
to enter the Test menu.
Highlighted field (Hour)
Press
or to increase or decrease the hour. Press to set
the hour and move to the minutes field.
52759_07398883001_MANUAL_EN.indb 9 10/13/15 11:53 AM
Page 12
10
Your New System
1
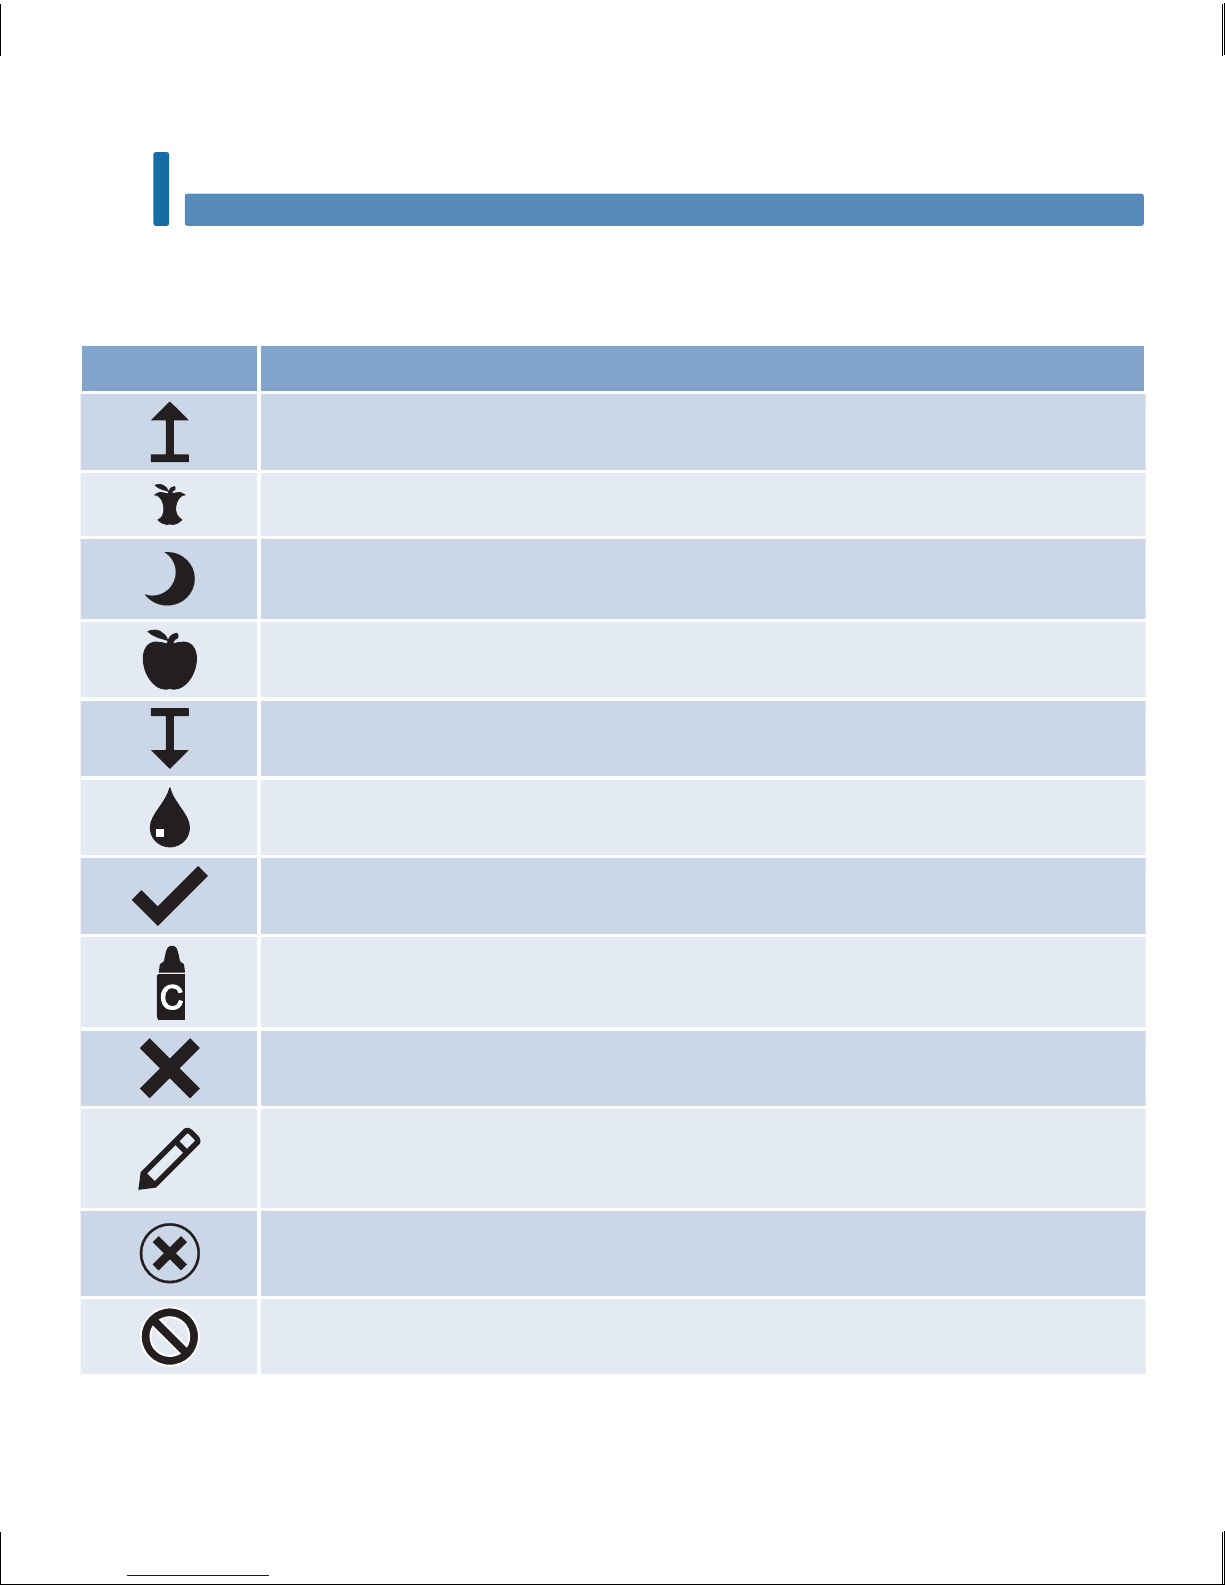
Symbols
Here is a list of the symbols on the meter display.
Symbols Description
Above target range
After meal
Bedtime
Before meal
Below target range
Blood glucose test
Checkmark / Control test OK / Selected option or setting
Control bottle
Control test not OK
Edit
Error
Fasting
52759_07398883001_MANUAL_EN.indb 10 10/13/15 11:53 AM
Page 13
11
Your New System
1
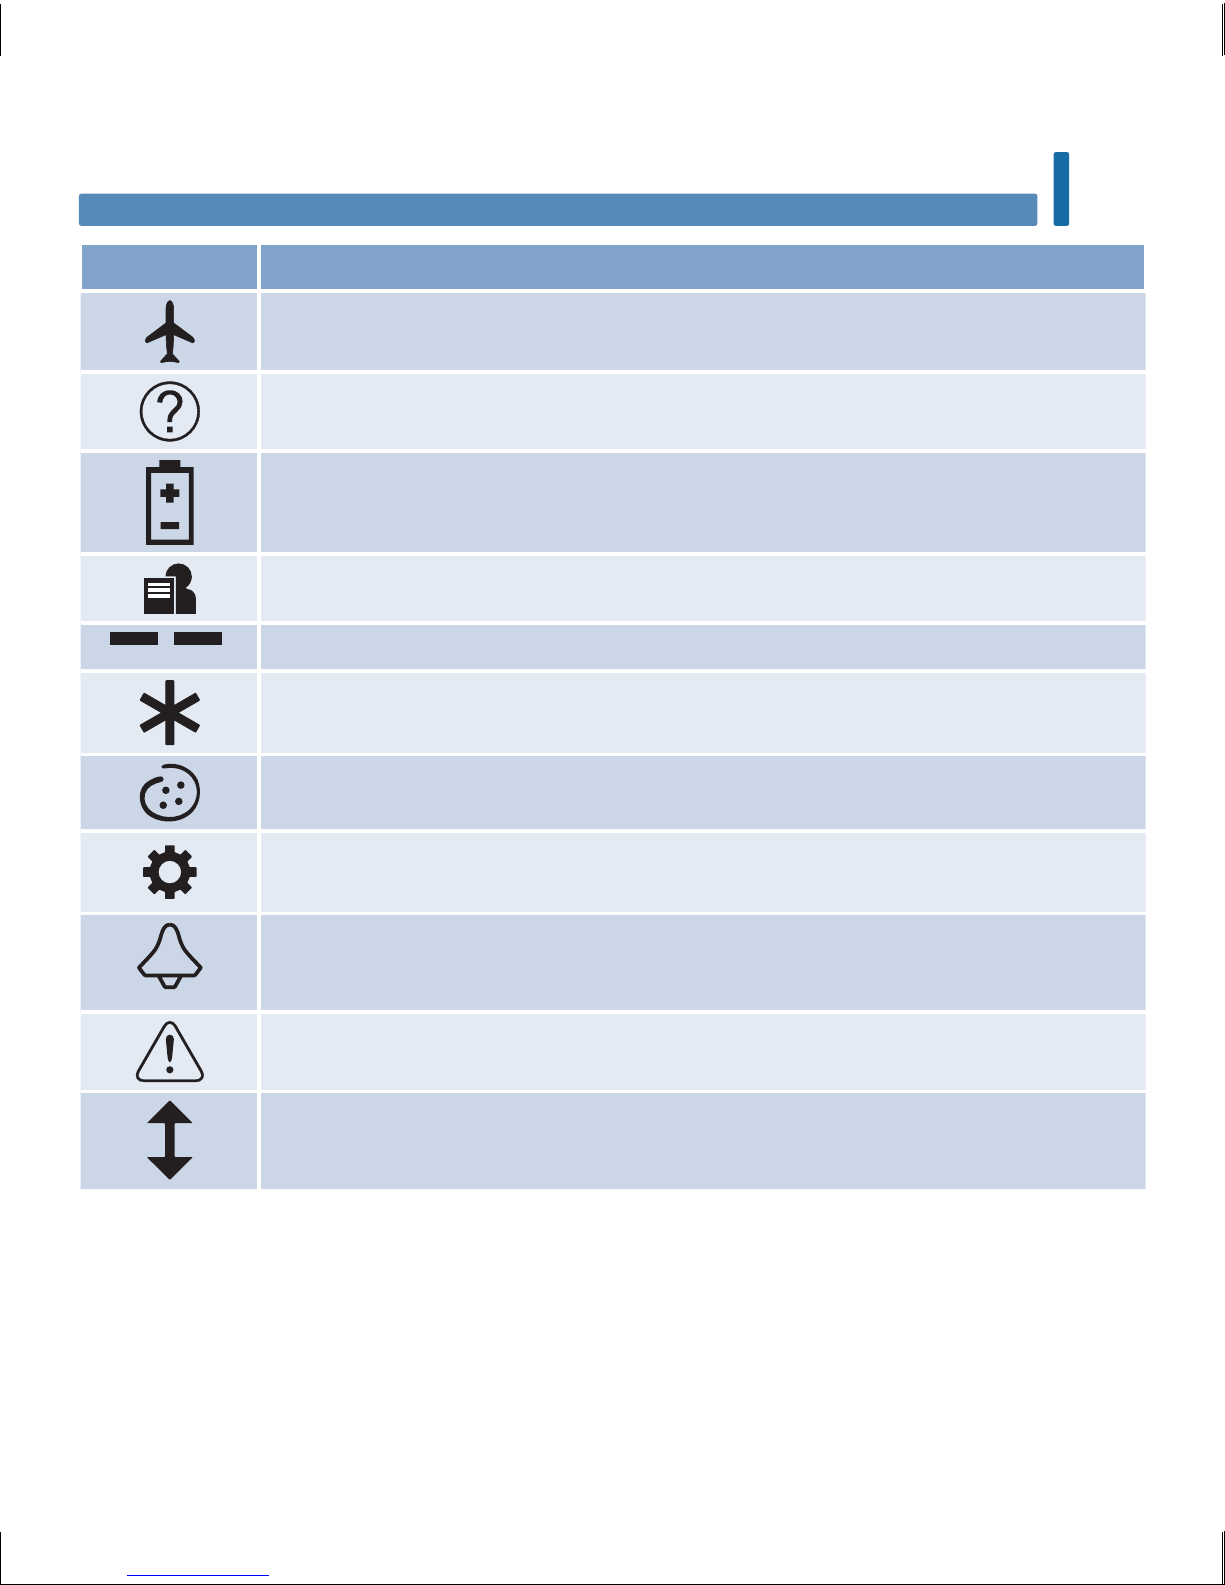
Symbols Description
Flight mode
Help
Low battery
My data
No comment
Other
Overall
Settings
Test reminder
Warning
Within target range
52759_07398883001_MANUAL_EN.indb 11 10/13/15 11:53 AM
Page 14
12
Your New System
1
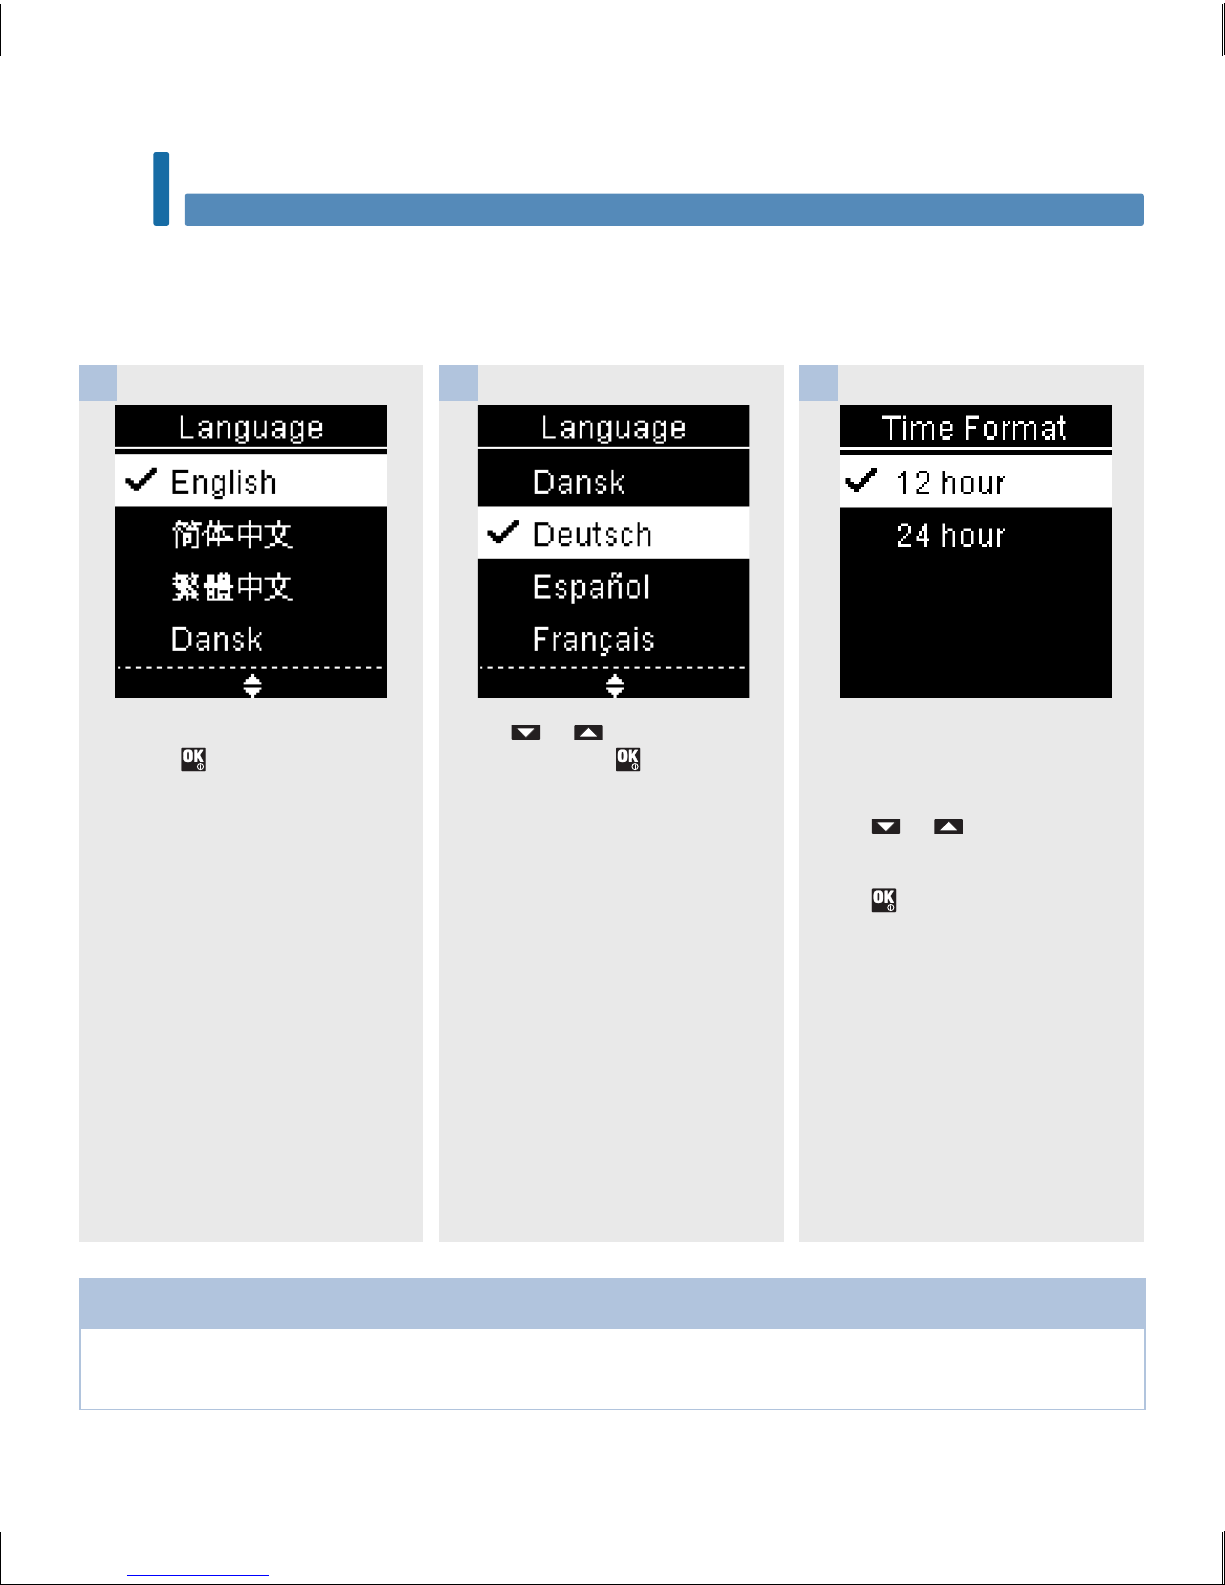
Setting the Language and Time Format
The meter may prompt you to choose a language and time format (12-hour or 24-hour clock) the first
time you turn it on.
Turn the meter on by briefly
pressing . Language
appears.
1
Press or to highlight the
language. Press to set the
desired language and return to
Main Menu.
If the meter prompts you to
set the time format:
Time Format appears.
Press or to highlight 12
hour (am/pm) or 24 hour.
Press
to set the option and
return to Main Menu.
2 3
NOTE
If you select the wrong language and cannot correct it, contact Roche.
52759_07398883001_MANUAL_EN.indb 12 10/13/15 11:53 AM
Page 15
13
Blood Glucose Tests
2
wWARNING
Blood glucose results can be displayed in either mg/dL or mmol/L. The back label of the meter shows
the unit of measurement. If the meter shows the wrong unit, contact Roche. If you do not know which
unit of measurement is correct for you, contact your healthcare professional. Using the wrong unit of
measurement may cause misinterpretation of your actual blood glucose level and may lead to
improper therapy.
mg/dL or mmol/L is printed here
52759_07398883001_MANUAL_EN.indb 13 10/13/15 11:53 AM
Page 16
14
Blood Glucose Tests
2
Using the Accu-Chek Guide System
• Use only Accu-Chek Guide test strips.
• Use the test strip immediately after removing it from the test strip container.
• Do not apply blood or control solution to the test strip before inserting it into the meter.
• Close the test strip container tightly immediately after removing a test strip to protect the test strips from
humidity.
• Store the unused test strips in their original test strip container with the cap closed.
• Check the use by date on the test strip container. Do not use the test strips after that date.
• Store the test strip container and meter in a cool, dry place such as a bedroom.
• Refer to the test strip package insert for test strip storage and system operating conditions.
wWARNING
Do not store test strips in high heat and moisture areas (bathroom or kitchen)! Heat and moisture can
damage test strips.
Performing a Blood Glucose Test with Blood from Your Fingertip
NOTE
• Before you perform your first blood glucose test, set up the meter correctly.
• You need the meter, a test strip, and a lancing device with a lancet inserted to perform a blood
glucose test.
• A blood glucose test cannot be performed while the meter is connected to a PC with a USB cable.
• There are 2ways to start a blood glucose test.
• Insert a test strip into the meter.
• Turn the meter on by briefly pressing
. Select Test > .
52759_07398883001_MANUAL_EN.indb 14 10/13/15 11:53 AM
Page 17
15
Blood Glucose Tests
2
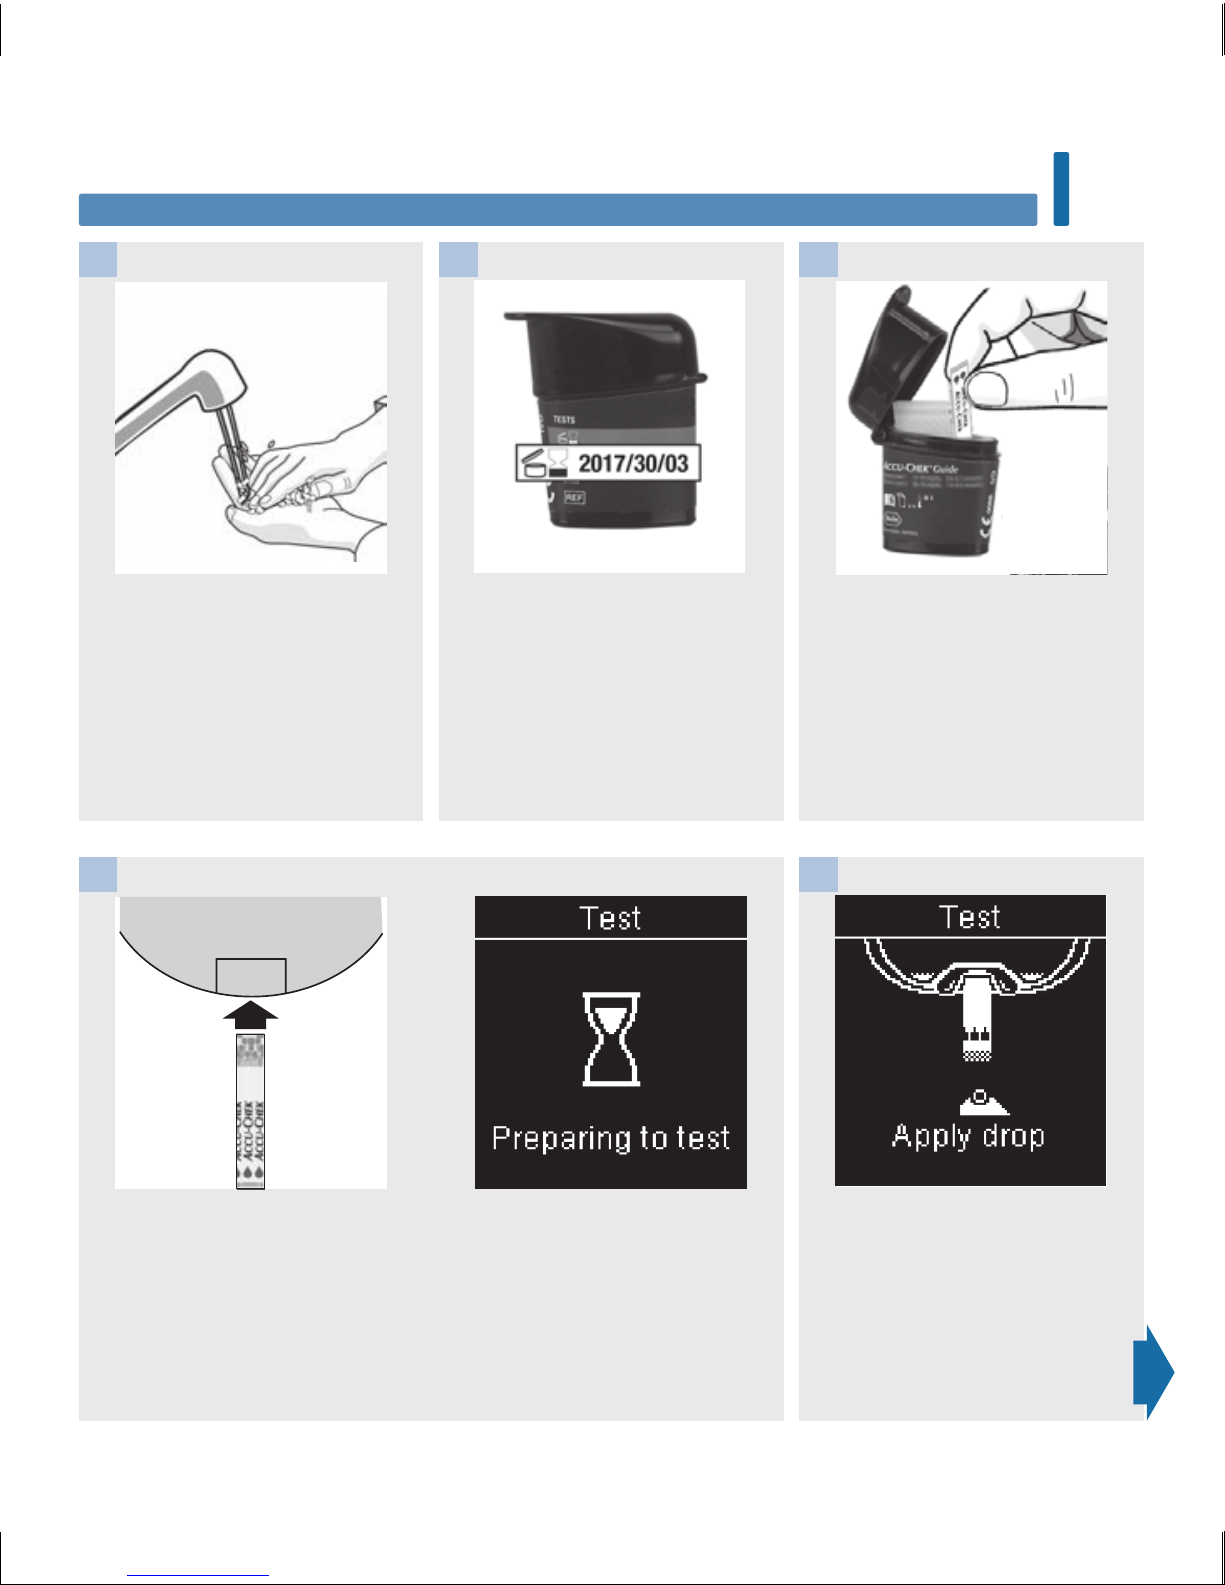
Wash your hands with warm
soapy water and dry thoroughly.
Prepare the lancing device.
1
Check the use by date on the
test strip container.
Do not use test strips past the
use by date.
Remove a test strip from the
test strip container.
Close the cap tightly.
2 3
Insert the metallic end of the
test strip into the meter.
The meter turns on. Preparing
to test appears.
4
When Apply drop appears,
perform a fingerstick with the
lancing device.
5
52759_07398883001_MANUAL_EN.indb 15 10/13/15 11:53 AM
Page 18
16
Blood Glucose Tests
2
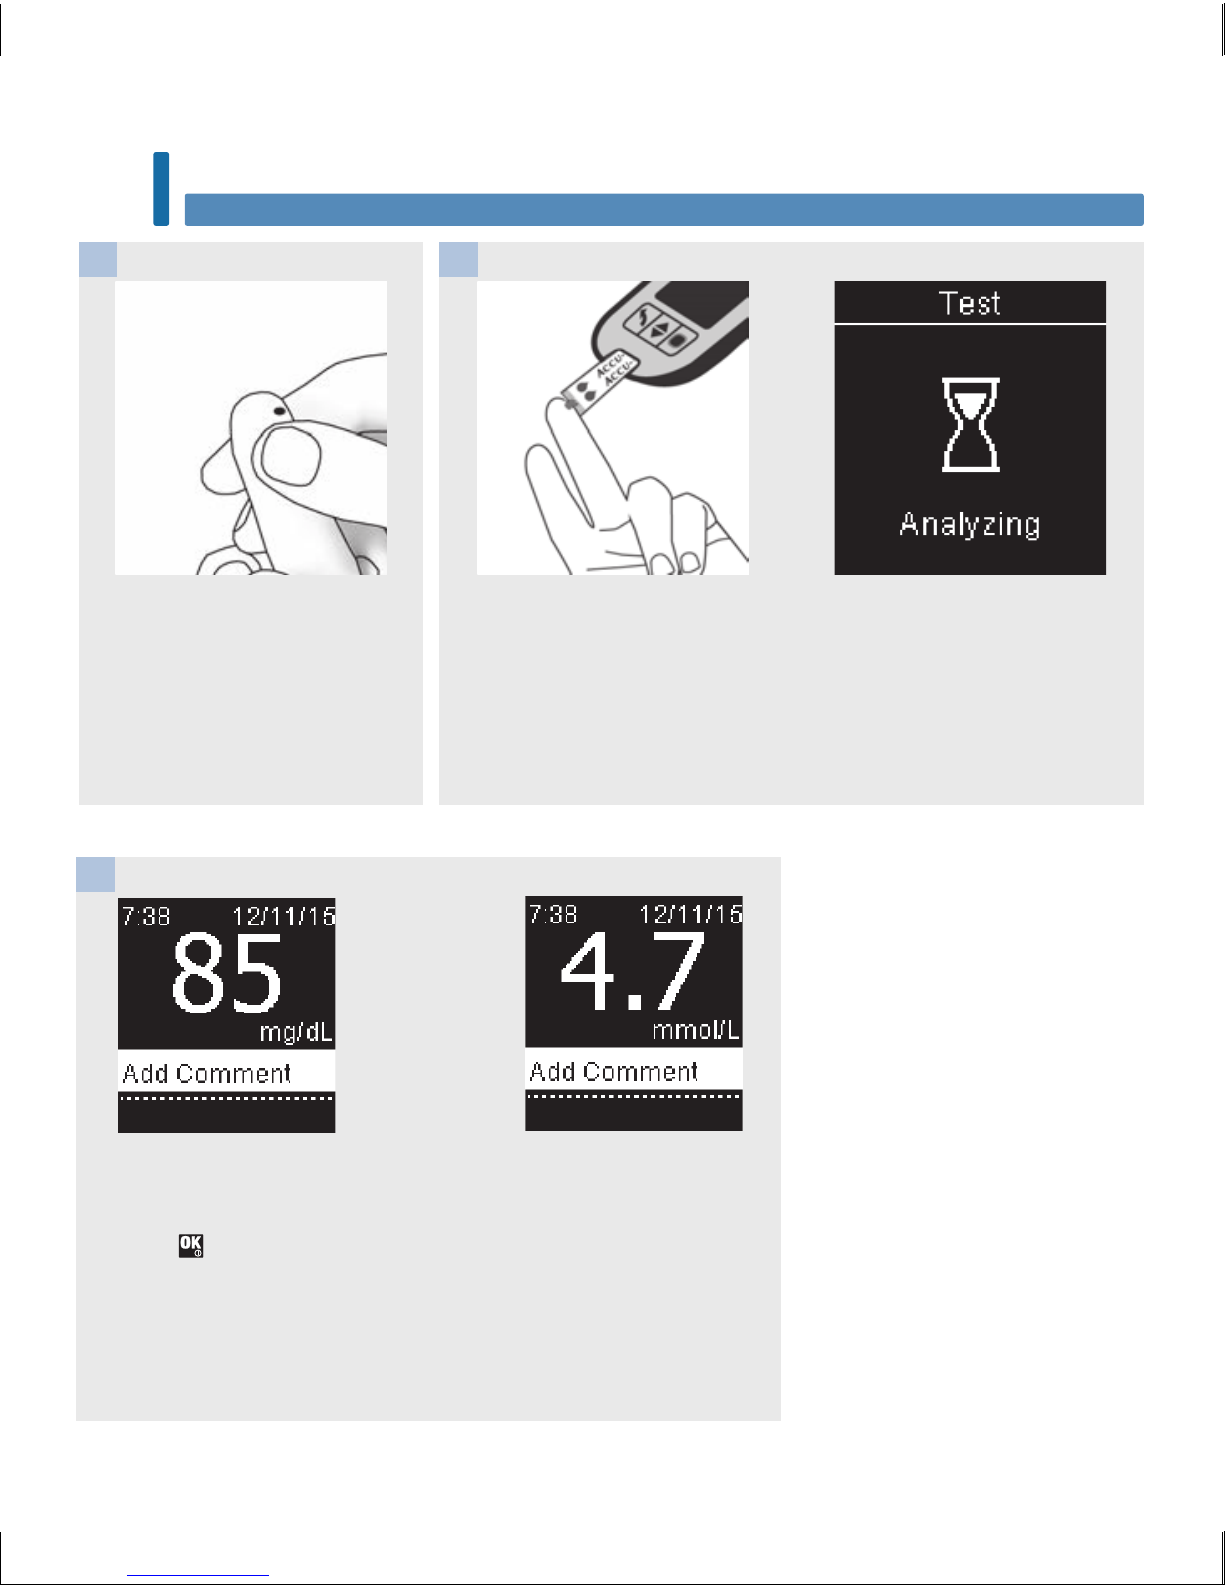
Gently squeeze your finger to
assist the blood flow. This helps
you get a blood drop.
6
Touch the yellow edge of the
test strip to the blood drop. Do
not put blood on top of the test
strip.
Analyzing appears when there
is enough blood in the test
strip.
7
The test result appears on the display.
You have the option of adding a comment to the test result by
pressing
OR proceed to Step11 to complete the test.
8
or
52759_07398883001_MANUAL_EN.indb 16 10/13/15 11:53 AM
Page 19
17
Blood Glucose Tests
2
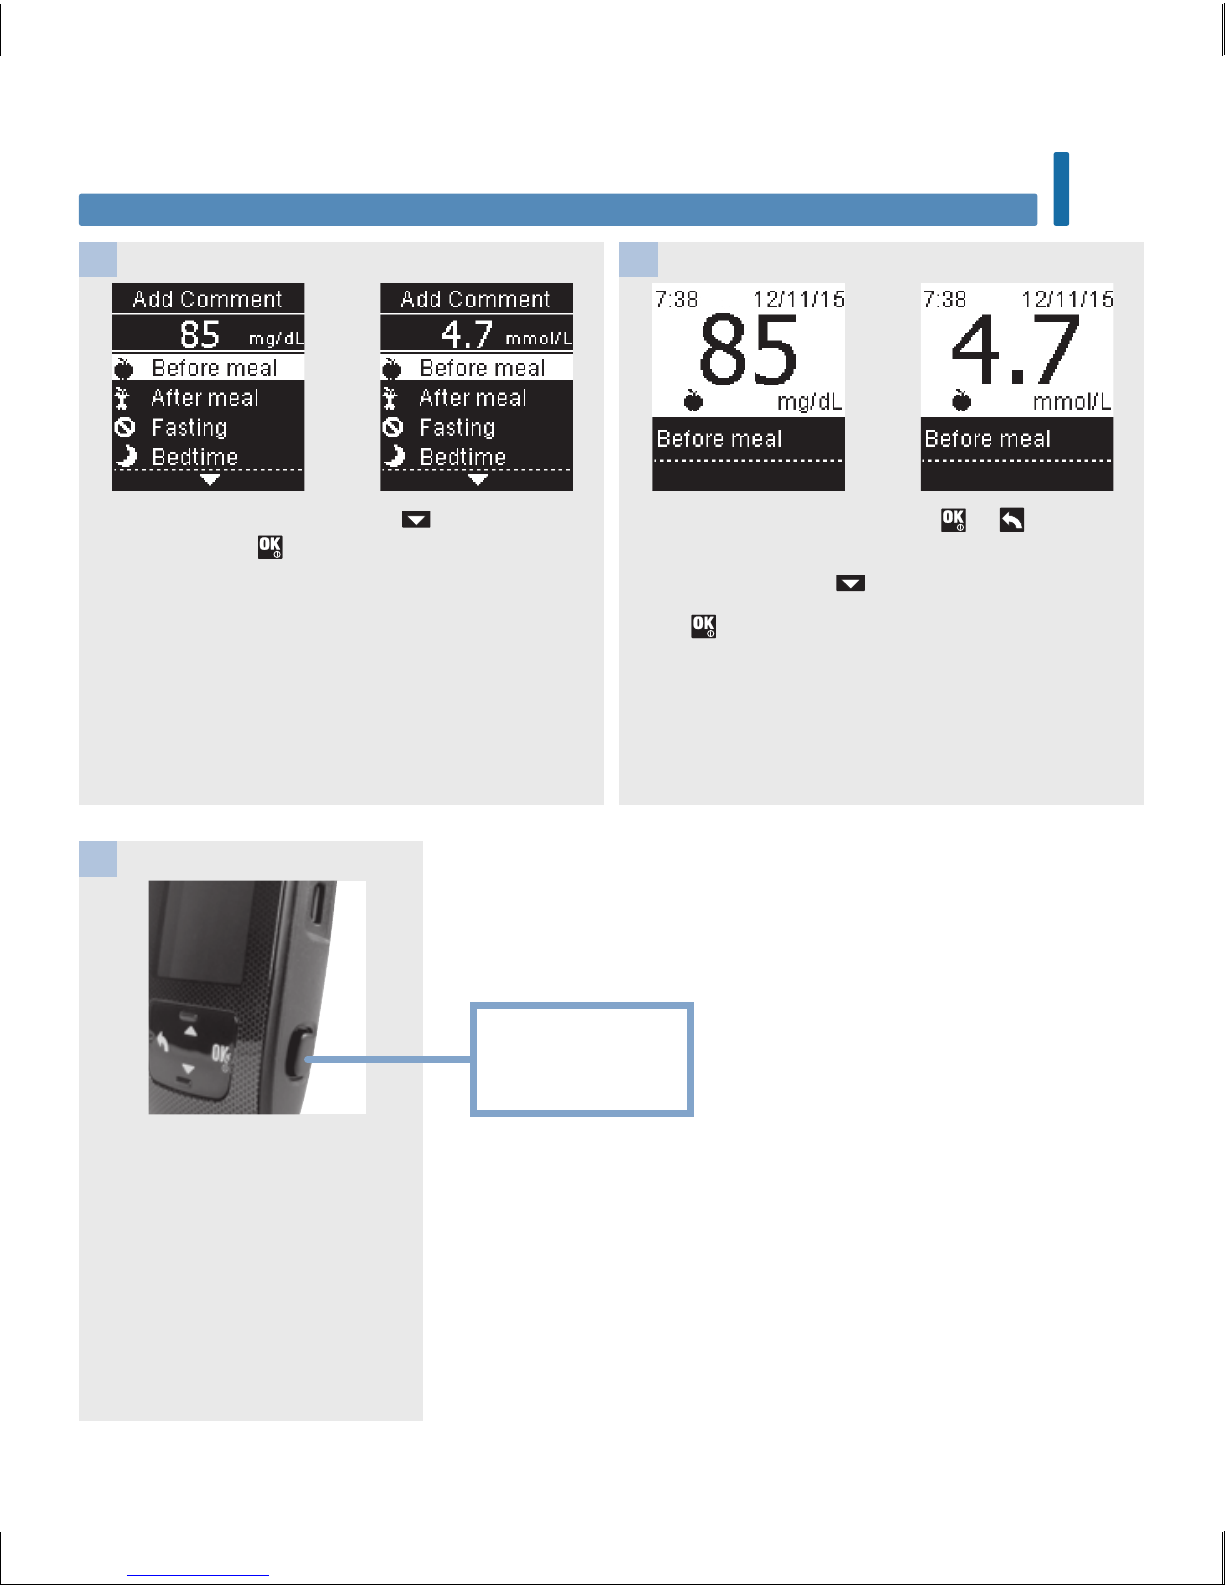
Add Comment appears. Press to highlight a
comment. Press to set the comment for the
test result. See the Adding Comments to Blood
Glucose Results section of this chapter for
details.
The final result appears. Press or to set the
comment and return to Main Menu. Or to change
the comment, press to select the comment.
Press
to return to Add Comment.
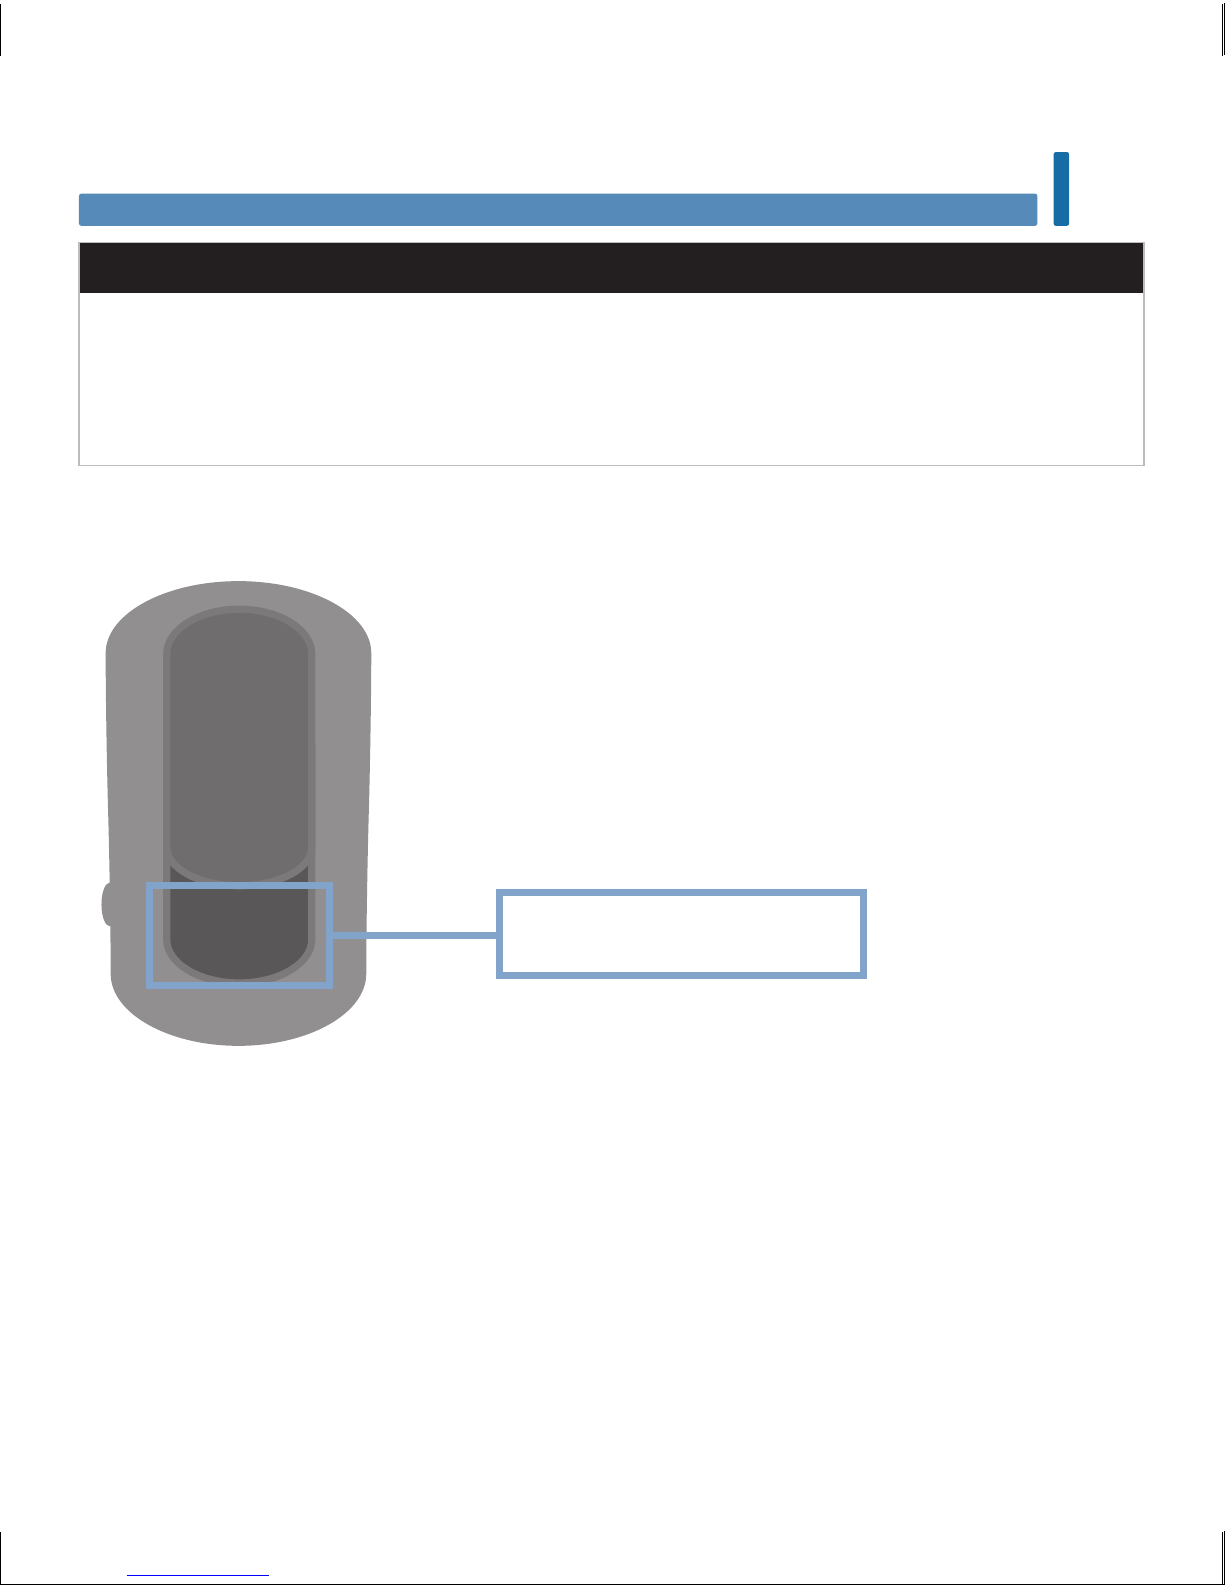
9 10
Remove and discard the used
test strip by pulling the test
strip out of the meter or by
pushing the test strip ejector on
the side of the meter.
or or
11
Press here to eject
test strip
52759_07398883001_MANUAL_EN.indb 17 10/13/15 11:53 AM
Page 20
18
Blood Glucose Tests
2
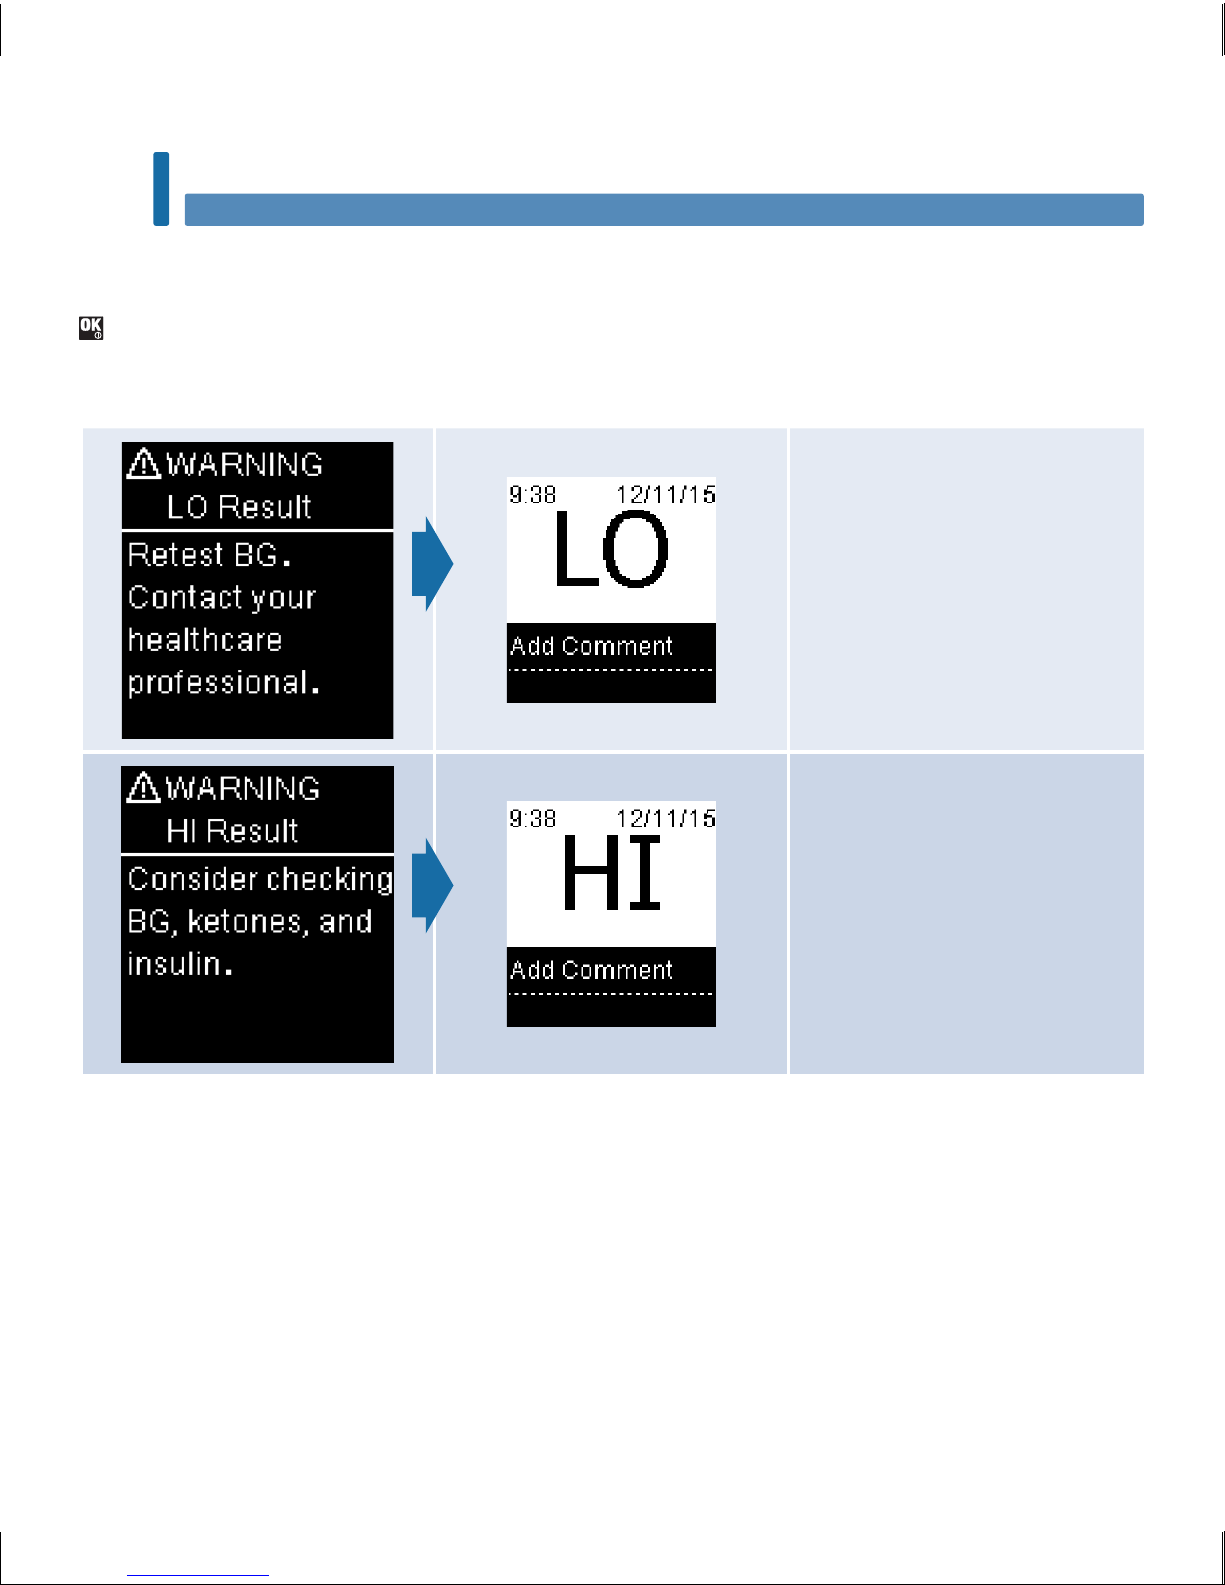
Blood glucose may be lower
than the measurement range of
the system. See the Unusual
Blood Glucose Results section
of this chapter.
Blood glucose may be higher
than the measurement range of
the system. See the Unusual
Blood Glucose Results section
of this chapter.
Blood Glucose Warnings
If your blood glucose result is outside the measurement range of the meter, a warning is displayed. Press
to acknowledge the LO or HI warning, OR the meter automatically moves to the LO or HI result display.
52759_07398883001_MANUAL_EN.indb 18 10/13/15 11:53 AM
Page 21
19
Blood Glucose Tests
2
Adding Comments to Blood Glucose Results
NOTE
Analyzing your blood glucose results stored in the meter is an eective way for you and your
healthcare professional to determine how well you are controlling your diabetes. This analysis is a
valuable tool for making improvements to your diabetes management. Use care when adding
comments to blood glucose results. Incorrect comments can cause inaccurate patterns to be detected
by the meter when Patterns is On.
Overview
It is very important to have the correct time and date set in the meter. Having the correct time and date
setting helps ensure accurate interpretation of information by you and your healthcare professional.
• You may add comments to blood glucose results to help you and your healthcare professional analyze
patterns detected by the meter (see the Patterns section in the chapter Meter Settings for details).
• If Patterns is set to On, once a pattern is detected you may NOT change the comment attached to a
blood glucose result (see the Patterns section in the chapter Meter Settings for details).
• Adding a comment saves the comment and the symbol with the blood glucose results.
52759_07398883001_MANUAL_EN.indb 19 10/13/15 11:53 AM
Page 22
20
Blood Glucose Tests
2
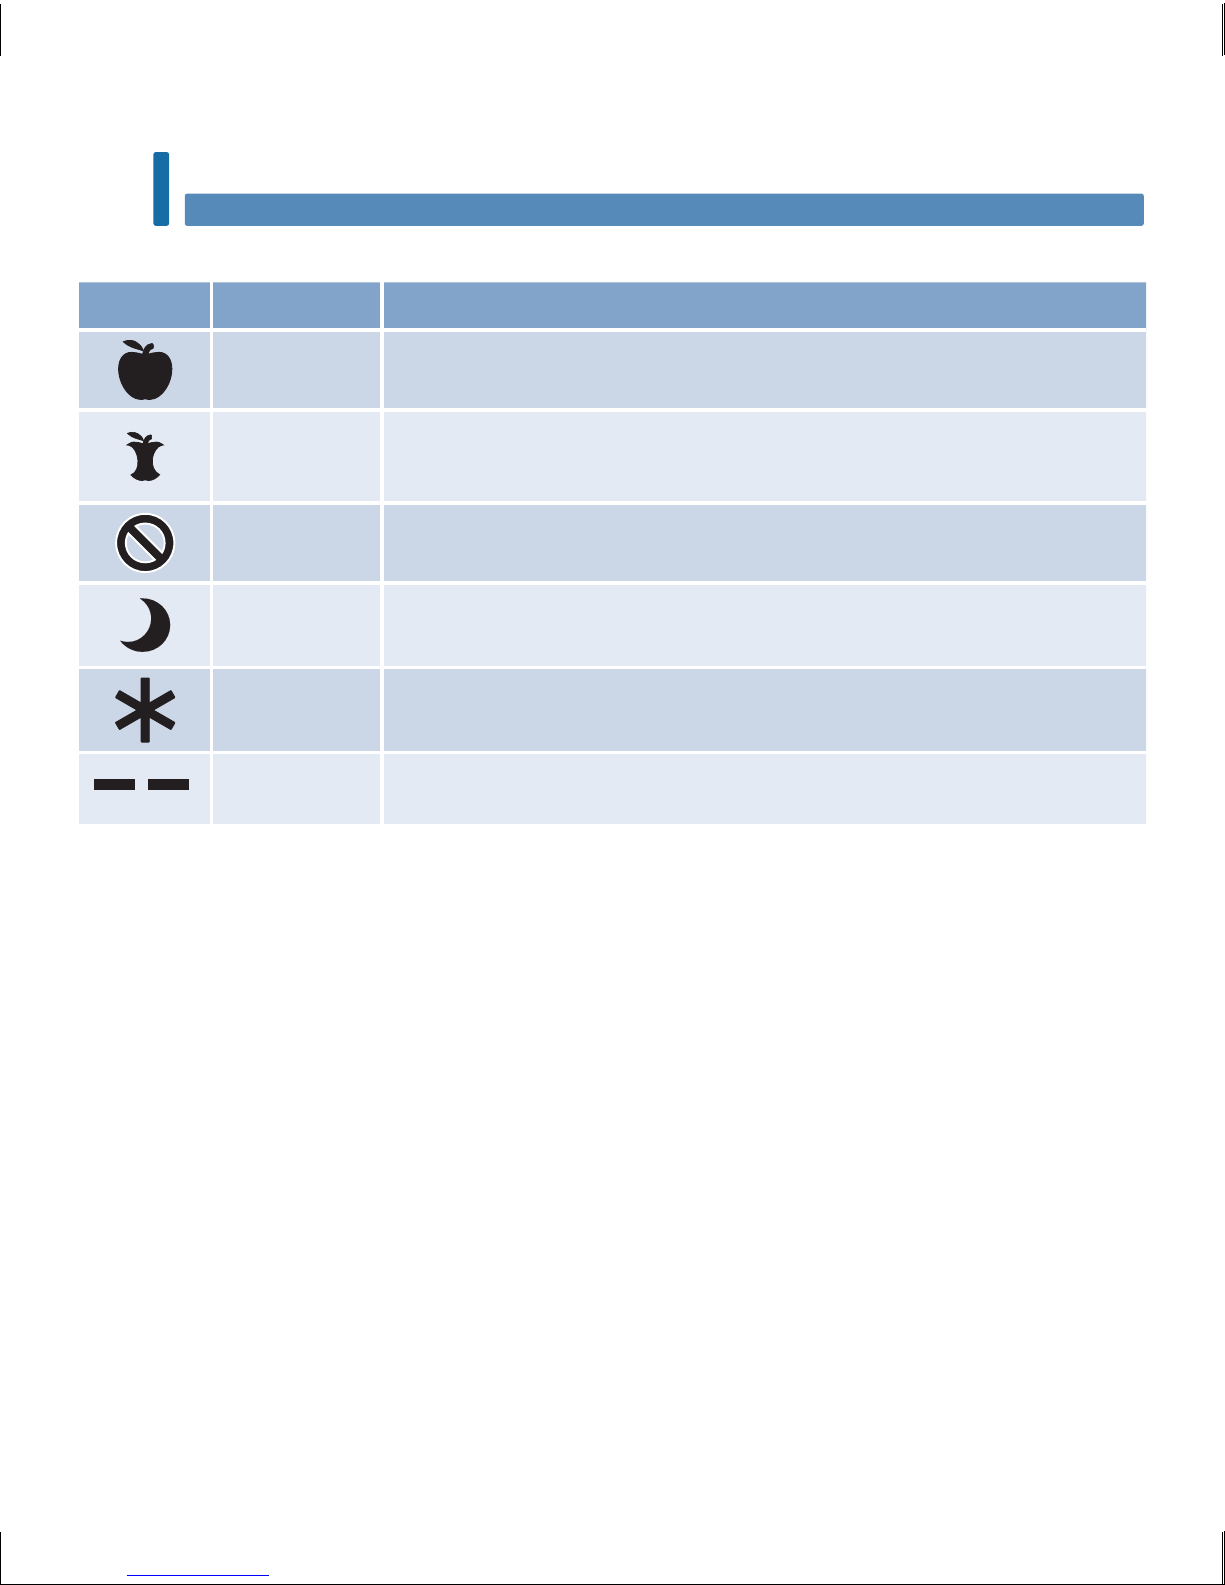
Here is a list of comment symbols that can be added to a blood glucose result.
Symbols Name Description
Before meal If Patterns is On, select Before breakfast, lunch, dinner, or snack (see the
following page for adding comments with Patterns On).
After meal If Patterns is On, select After breakfast, lunch, dinner, or snack (see the
following page for adding comments with Patterns On).
Fasting Select Fasting for no caloric intake for at least 8 hours.*
Bedtime
Other
comment
You can use this comment to mark an event such as an AST result or
exercise.
No entry 1. You do not want to add a comment.
2. You want to remove a comment for the current blood glucose result.
* American Diabetes Association: Standards of Medical Care in Diabetes-2013.
52759_07398883001_MANUAL_EN.indb 20 10/13/15 11:53 AM
Page 23
21
Blood Glucose Tests
2
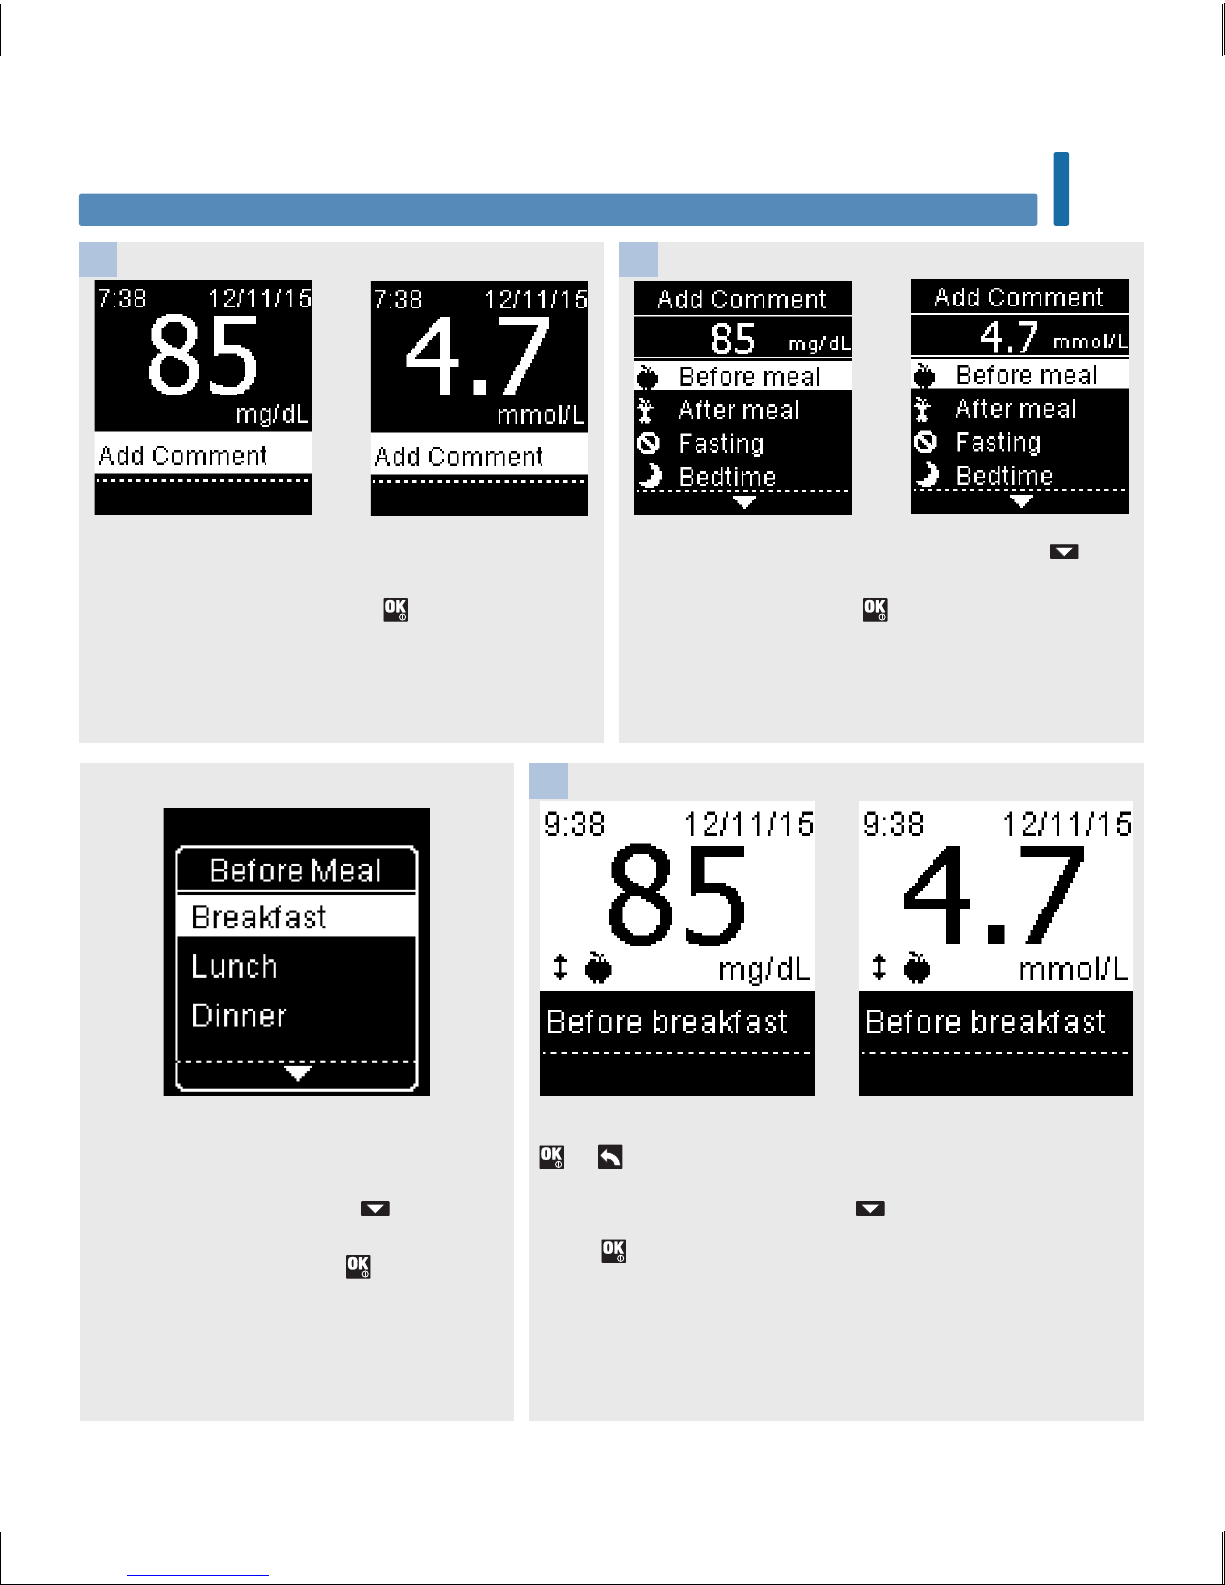
The final result appears with the comment symbol. Press
or to set the comment and return to Main Menu.
To change the comment, press
to select the comment.
Press
to return to Add Comment.
After performing a blood glucose test, the test
result is displayed on the screen with Add
Comment highlighted. Press to add a
comment.
The Add Comment menu appears. Press to
highlight the desired comment (the example here
is Before meal). Press to select the comment.
1 2
If Patterns is On:
If Patterns is on and you select Before
meal or After meal, press
to select a
specific meal (Breakfast, Lunch,
Dinner, or Snack). Press to set the
selected meal for the test result.
3
or
or
or
52759_07398883001_MANUAL_EN.indb 21 10/13/15 11:53 AM
Page 24

22
Blood Glucose Tests
2
Performing a Blood Glucose Test with Blood from Your Palm, Forearm, or Upper
Arm (Alternative Site Testing)
You have the option of obtaining a blood sample from other sites on your body besides the fingertip.
Alternative sites include the palm, forearm, and upper arm.
Blood obtained from the fingertip and palm can be used at any time to perform a blood glucose test.
If blood from the forearm or upper arm is used, there are certain times when testing is not appropriate.
This is because your blood glucose level changes faster in your fingertip and palm than in the forearm
and upper arm. These dierences may cause you to misinterpret your actual blood glucose level, leading
to improper therapy and potential adverse health eects.
Read the next section before you try testing from the forearm or upper arm.
You may perform a forearm or
upper arm test
• immediately before a meal.
• while fasting.
You may NOT perform a
forearm or upper arm test
• up to 2hours following a meal, when blood glucose values can rise
quickly.
• after injecting bolus insulin, when blood glucose values can
decrease rapidly.
• after exercise.
• if you are sick.
• if you think your blood glucose is low (hypoglycemia).
• if you sometimes do not notice when your blood glucose is low.
wWARNING
Do not use alternative site testing to calibrate a continuous glucose monitoring system or to make
insulin dosing calculations.
If you are interested in AST, talk to your healthcare professional first.
To obtain an AST cap and detailed AST instructions, contact Roche.
52759_07398883001_MANUAL_EN.indb 22 10/13/15 11:53 AM
Page 25
23
Blood Glucose Tests
2
Unusual Blood Glucose Results
If your blood glucose result does not match how you feel, check this list to help solve the problem.
Troubleshooting Checks Action
Were the test strips expired? Discard the test strips if they are past the use by
date. Repeat the blood glucose test with an
unexpired test strip.
Was the cap on the test strip container always
closed tightly?
Replace the test strips if you think the test strip
container was uncapped for some time. Repeat
the blood glucose test.
Was the test strip used immediately after it was
removed from the test strip container?
Repeat the blood glucose test with a new test
strip.
Were the test strips stored in a cool, dry place? Repeat the blood glucose test with a properly
stored test strip.
Did you follow the directions? See the chapter Blood Glucose Tests and repeat
the blood glucose test. Contact Roche if you still
have problems.
Are the meter and test strips working properly? Perform a control test. See the chapter Control
Tests for instructions.
Are you still unsure of the problem? Contact Roche.
52759_07398883001_MANUAL_EN.indb 23 10/13/15 11:53 AM
Page 26

24
Blood Glucose Tests
2
Symptoms of Low or High Blood Glucose
Being aware of the symptoms of low or high blood glucose can help you understand your test results and
decide what to do if they seem unusual.
Low blood glucose (hypoglycemia): Symptoms of hypoglycemia may include, but are not limited to,
anxiety, shakiness, sweating, headache, increased hunger, dizziness, pale skin color, sudden change in
mood or irritability, fatigue, diculty concentrating, clumsiness, palpitations, and/or confusion.
High blood glucose (hyperglycemia): Symptoms of hyperglycemia may include, but are not limited to,
increased thirst, frequent urination, blurred vision, drowsiness, and/or unexplained weight loss.
wWARNING
If you are experiencing any of these symptoms, or other unusual symptoms, test your blood glucose
from the fingertip or palm. If your blood glucose result is displayed as LO or HI, contact your healthcare
professional immediately.
52759_07398883001_MANUAL_EN.indb 24 10/13/15 11:53 AM
Page 27

25
Control Tests
3
When to Perform a Control Test
Performing a control test lets you know the meter and test strips are working properly. You should
perform a control test when:
• you open a new test strip box.
• you left the test strip container open.
• you think the test strips are damaged.
• you want to check the meter and test strips.
• the test strips were stored in extreme temperatures, humidity, or both.
• you dropped the meter.
• your test result does not match how you feel.
• you want to check if you are performing the test correctly.
About the Control Solutions
• Use only Accu-Chek Guide control solutions.
• Close the control solution bottle tightly after use.
• Write the date you open the control solution bottle on the bottle label. The control solution must be
discarded 3months from the date the control solution bottle was opened (discard date) or on the
use by date on the bottle label, whichever comes first.
• Do not use control solution that is past the use by or discard date.
• Refer to the control solution package insert for control solution storage conditions.
• The meter automatically recognizes the dierence between the control solution and blood.
• The control results are not displayed in memory.
• The control solution can stain fabric. Remove stains by washing with soap and water.
Chapter 3: Control Tests
52759_07398883001_MANUAL_EN.indb 25 10/13/15 11:53 AM
Page 28
26
Control Tests
3
Performing a Control Test
You need the meter, a test strip, and control solution Level 1 or Level 2.
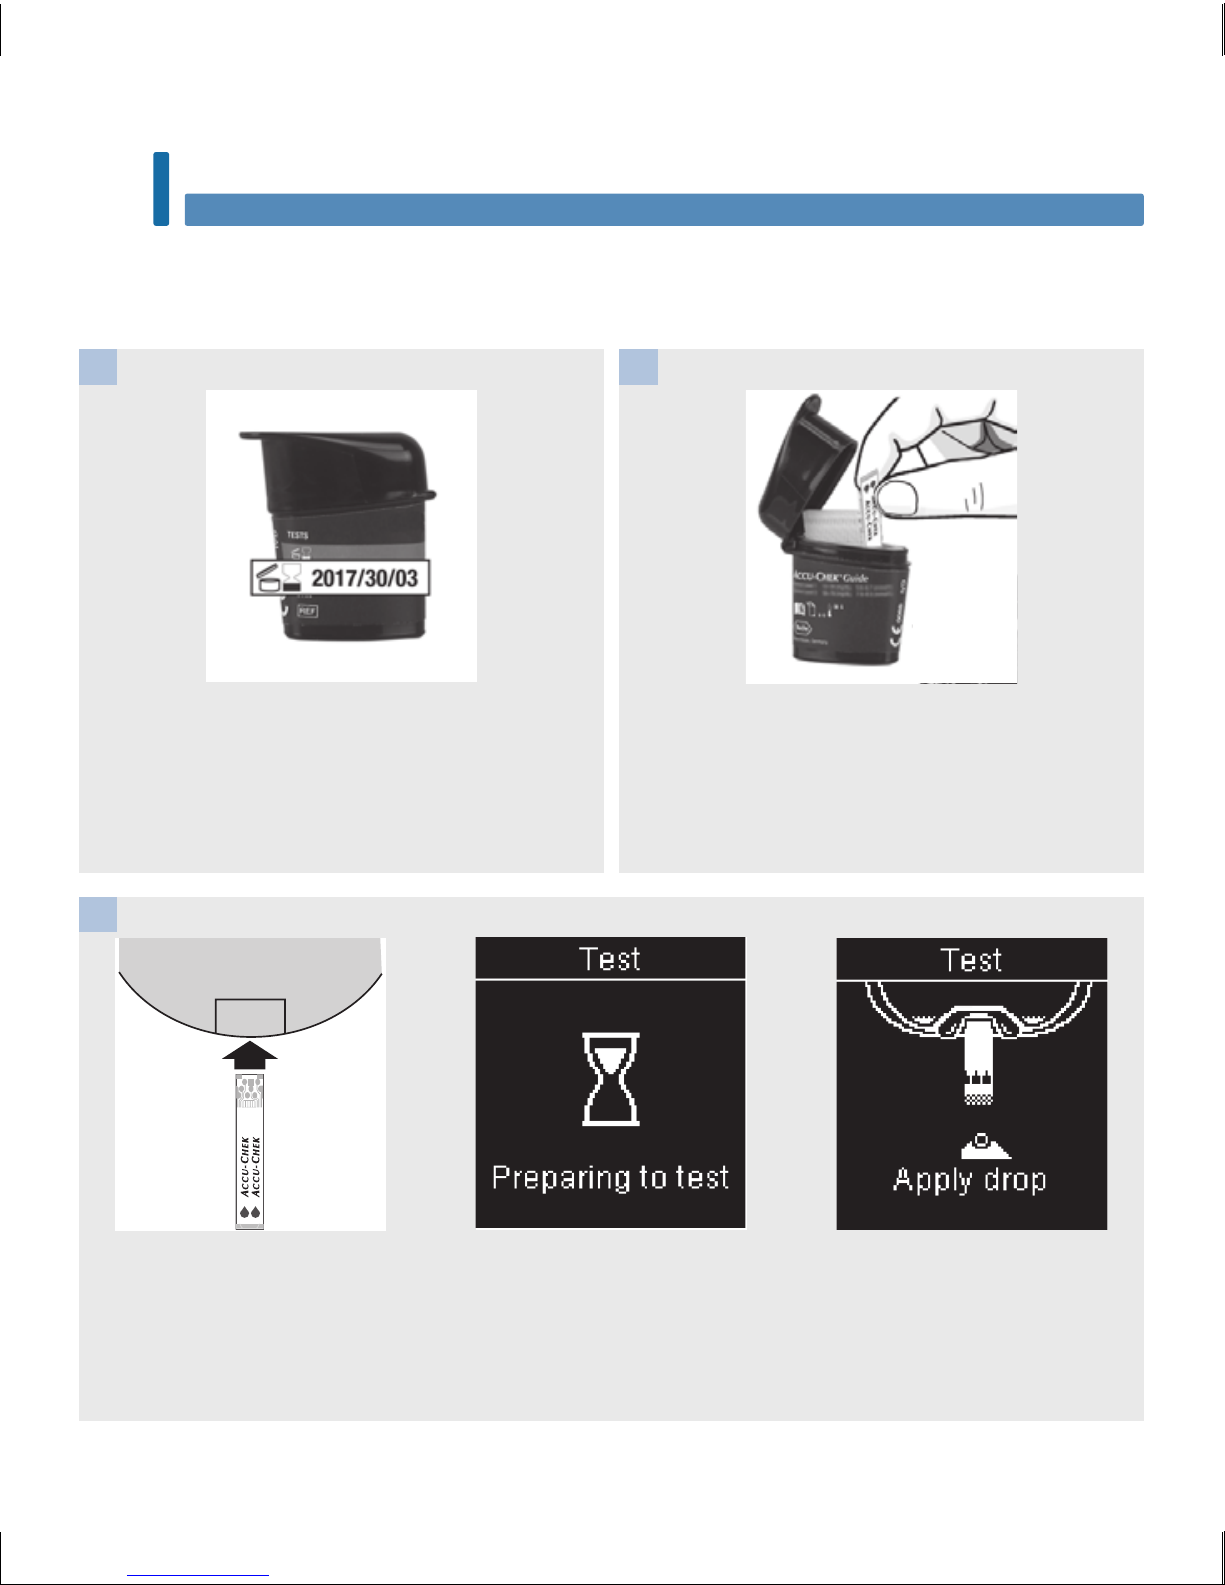
Check the use by date on the test strip container.
Do not use test strips past the use by date.
Remove a test strip from the test strip container.
Close the cap tightly.
1 2
Insert the metallic end of the
test strip into the meter. Place
the meter on a flat surface.
The meter turns on. Preparing
to test appears.
Apply drop appears.
3
52759_07398883001_MANUAL_EN.indb 26 10/13/15 11:53 AM
Page 29

27
Control Tests
3
Select the control solution to test. You will enter
the level later in the test.
4
Remove the bottle cap. Wipe the tip of the bottle
with a tissue. Squeeze the bottle until a tiny drop
forms at the tip.
5
Touch the drop to the yellow
edge of the test strip. Do not
put control solution on top of
the test strip.
Analyzing appears when there
is enough control solution in
the test strip.
6
52759_07398883001_MANUAL_EN.indb 27 10/13/15 11:53 AM
Page 30
28
Control Tests
3
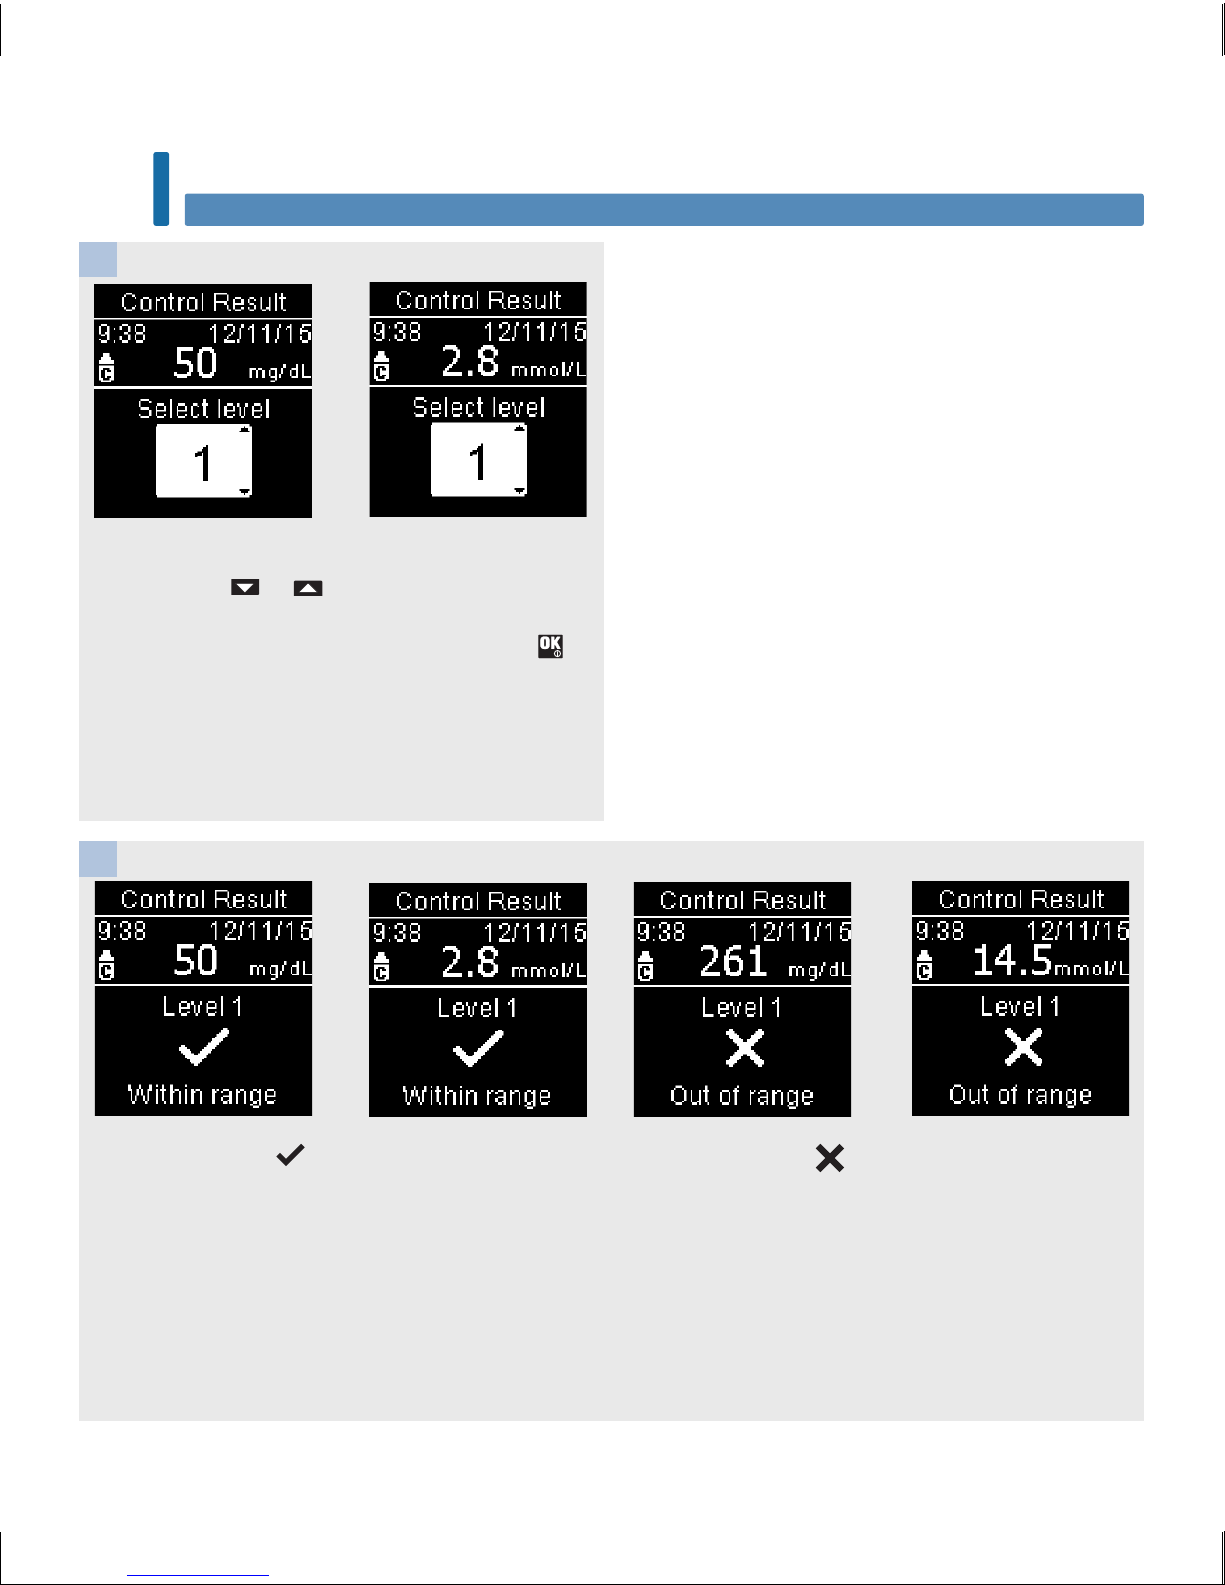
Control Result and the control bottle symbol
appear. Press or to select the control level
you tested. If you do not select a level, the control
result is saved without a control level. Press .
7
Within range and appear if the control result
is within range.
Out of range and
appear if the control result
is out of range.
8
or
or
or
52759_07398883001_MANUAL_EN.indb 28 10/13/15 11:53 AM
Page 31

29
Control Tests
3
Wipe the tip of the bottle with a
tissue. Cap the bottle tightly.
Remove and discard the used
test strip.
9
NOTE
The meter turns o 90seconds after a successful test or 15seconds after the test strip is removed,
provided no other action is taken.
52759_07398883001_MANUAL_EN.indb 29 10/13/15 11:53 AM
Page 32

30
Control Tests
3
Understanding Out-of-Range Control Results
wWARNING
The control ranges are printed on the test strip container label. If the control result is out of range,
check this list to help solve the problem.
Troubleshooting Checks Action
Were the test strips or control solutions expired? Discard the test strips or control solution if either is
past the use by date. If the control solution was
opened more than 3months ago, discard it. Repeat
the control test with an unexpired test strip and an
unexpired control solution.
Did you wipe the tip of the control solution bottle
before use?
Wipe the tip of the bottle with a tissue. Repeat the
control test with a new test strip and a fresh drop of
control solution.
Were the caps on the test strip container and the
control solution bottle always closed tightly?
Replace the test strips or control solution if you think
either was uncapped for some time. Repeat the
control test.
Was the test strip used immediately after it was
removed from the test strip container?
Repeat the control test with a new test strip and a
fresh drop of control solution.
Were the test strips and control solutions stored in a
cool, dry place?
Repeat the control test with a properly stored test
strip or control solution.
Did you follow the directions? Read the chapter Control Tests and repeat the
control test.
Did you choose the correct control solution level,
either 1 or 2, when you performed the control test?
If you chose the wrong control solution level, you can
still compare the control result to the range printed
on the test strip container.
Are you still unsure of the problem? Contact Roche.
52759_07398883001_MANUAL_EN.indb 30 10/13/15 11:53 AM
Page 33

31
Meter Settings
4
Overview
You can adjust the following settings in the meter for your personal preferences. Refer to the sections
later in this chapter for details and how to set the options.
Setting Options Function
Time/Date Time / Date Set the time and date.
Beeper On / O Select On or O.
Wireless Select wireless communication settings. See the chapter Wireless Communication
and Meter Pairing.
52759_07398883001_MANUAL_EN.indb 31 10/13/15 11:53 AM
Page 34

32
Meter Settings
4
Setting Options Function
Target Ranges O / Single Range / 2 Ranges Select the blood glucose target range
appropriate for you.
NOTE
Consult your healthcare professional for
the appropriate target range for you.
O – no target range arrow symbols
appear with blood glucose result. Patterns
is O (see the Patterns section of this
chapter for details).
70–160mg/dL (pre-set target range)
3.9–8.9mmol/L (pre-set target range)
Single Range – blood glucose results are
marked as above, within, or below range
based on the single target range set in the
meter.
Before Meal Range
70–110mg/dL (pre-set target range)
3.9–6.1mmol/L (pre-set target range)
After Meal Range
70–160mg/dL (pre-set target range)
3.9–8.9mmol/L (pre-set target range)
2 Ranges – set Before Meal and After Meal
ranges. Blood glucose results are marked
as above, within, or below range based on
the 2 target ranges (Before Meal and After
Meal) set in the meter.
Patterns On / O On – a pattern is detected when 2
below-target or 3 above-target test results
with the same comment are detected
within a 7-day period.
Reminders On / O / Edit time On – set up to 4 reminders per day to
remind you to test.
52759_07398883001_MANUAL_EN.indb 32 10/13/15 11:53 AM
Page 35

33
Meter Settings
4
Setting Options Function
Post Meal On / O / Edit time On – reminds you to perform an after meal
blood glucose test.
Last Result On / O Select whether the previous blood glucose
result (within the past 24hours) appears
with the current blood glucose result.
On – the previous blood glucose result
appears with the current blood glucose
result.
O – only the current blood glucose result
appears.
Language Select the language for the meter.
Time Format 12 hour / 24 hour Select the clock format for the meter.
52759_07398883001_MANUAL_EN.indb 33 10/13/15 11:53 AM
Page 36

34
Meter Settings
4
Turn the meter on by briefly
pressing . From Main Menu,
press to highlight Settings.
Press .
1
Time/Date is highlighted.
Press .
2
Press or to adjust each
field. Press to set and move
to the next field. Set am or pm
if necessary.
Press
to save and return to
the previous menu.
3
Time/Date
Time/Date
52759_07398883001_MANUAL_EN.indb 34 10/13/15 11:53 AM
Page 37

35
Meter Settings
4
The beeper prompts you:
• when a test strip is inserted.
• to apply blood or control solution to the test strip.
• when enough blood or control solution is drawn into the test strip.
• when the blood glucose or control test is complete.
• when the meter is turned on.
• when a button is pressed.
• when it is time to perform a test (if Reminders or Post Meal reminders are On).
• when the batteries are inserted.
• when there are no stored blood glucose results or there is an invalid record in the logbook.
• when there are no errors in the error log.
• if an error occurred (even if the beeper is o, it still beeps for an error).
Turn the meter on by briefly
pressing . From Main Menu,
press to highlight Settings.
Press .
1
Press to highlight Beeper.
Press .
2
Press or to highlight On
or Off. Press to move to
the option.
Press
to set the option and
return to the previous menu.
3
Beeper
Beeper
52759_07398883001_MANUAL_EN.indb 35 10/13/15 11:53 AM
Page 38

36
Meter Settings
4
Target Ranges
Your healthcare professional can tell you what blood glucose range is appropriate for you. It is very
important to stay within your target range.
Target Ranges can be set from a lower limit of 50–100mg/dL (2.8–5.5mmol/L) to an upper limit of
101–200 mg/dL (5.6–11.1mmol/L).
Options Function
O Arrow symbols for above, within, or below target ranges do not appear with the blood
glucose results.
Single Range Set lower limit and upper limit for the Target Range.
You will be prompted to turn on Patterns if desired (see the Patterns section of this
chapter for details).
2 Ranges Set lower limits and upper limits for Before meal and After meal target ranges.
You must mark your blood glucose results with a comment for the meter to detect
above, within, or below Before Meal or After Meal test results (see the Adding
Comments to Blood Glucose Results section in the chapter Blood Glucose Tests for
details).
You will be prompted to turn on Patterns if desired (see the Patterns section of this
chapter for details).
When Target Ranges is On, the following symbols appear with blood glucose results.
Symbol Meaning
The blood glucose result is below the target range.
The blood glucose result is within the target range.
The blood glucose result is above the target range.
Target Ranges
52759_07398883001_MANUAL_EN.indb 36 10/13/15 11:53 AM
Page 39

37
Meter Settings
4
Target Ranges is highlighted.
Press .
3
Turn the meter on by briefly
pressing . From Main Menu,
press to highlight Settings.
Press .
1
Press to highlight More
Options. Press .
2
wWARNING
This function is no substitute for hypoglycemia training by your healthcare professional.
Target Ranges
52759_07398883001_MANUAL_EN.indb 37 10/13/15 11:53 AM
Page 40

38
Meter Settings
4
The appears next to the
option you selected.
Press
to return to the
previous menu.
6
The meter may prompt you to turn on Patterns.
Press
or to highlight Yes or No.
Press
to set the option and return to the previous menu (see the
Patterns section of this chapter for details).
Target Ranges
Press or to adjust the lower limit of the Before Meal target
range. Press to set and move to the next field.
Continue to set the upper limit for the Before Meal range and the
upper and lower limits for the After Meal target range. Press
.
Press or to highlight Off,
Single Range, or 2 Ranges.
Press to select an option (the
example here is 2 Ranges).
54
or
52759_07398883001_MANUAL_EN.indb 38 10/13/15 11:53 AM
Page 41

39
Meter Settings
4
NOTE
Analyzing your blood glucose results stored in the meter is an eective way for you and your
healthcare professional to determine how well you are controlling your diabetes. This analysis is a
valuable tool for making improvements to your diabetes management. Use care when adding
comments to blood glucose results. Incorrect comments can cause inaccurate patterns to be detected
by the meter if Patterns is On.
Patterns
A Pattern is detected by the meter when 2below-target (Low Pattern) or 3above-target (High Pattern)
test results with the same comment are detected within a 7-day period.
• The meter does NOT detect a pattern for the “other” comment added to blood glucose results.
• It is very important to have the correct time and date set in the meter. Having the correct time and date
setting helps ensure accurate interpretation of information by you and your healthcare professional.
• Only blood glucose results marked with comments will be included in Patterns. If LO or HI test results
are marked with comments, the results become part of Patterns (see the chapter Blood Glucose Tests
for more details).
• Target Ranges must be set in the meter to use Patterns. If Target Ranges is not set, the meter prompts
you to set them.
Patterns
52759_07398883001_MANUAL_EN.indb 39 10/13/15 11:53 AM
Page 42

40
Meter Settings
4
Press to highlight More
Options. Press .
2
Press to highlight Patterns.
Press .
3
Turn the meter on by briefly
pressing . From Main Menu,
press to highlight Settings.
Press .
1
Patterns
52759_07398883001_MANUAL_EN.indb 40 10/13/15 11:53 AM
Page 43

41
Meter Settings
4
Patterns
This message appears if
Target Ranges is O:
Press to highlight Yes. Press
.
(To turn Patterns O, select No.
Press
to return to Patterns.)
Target Ranges appears on the
display (see the Target Ranges
section of this chapter for
details on setting target
ranges).
Press to highlight On. Press
to move to the option.
Press .
4
52759_07398883001_MANUAL_EN.indb 41 10/13/15 11:53 AM
Page 44

42
Meter Settings
4
If Patterns is On and a new
pattern is detected with a blood
glucose result, a message
appears on the display.
or
Press
to select Details to
view the blood glucose results
that make up that pattern.
Press
to highlight View
Later.
Press
to return to the
previous screen.
Patterns
52759_07398883001_MANUAL_EN.indb 42 10/13/15 11:53 AM
Page 45

43
Meter Settings
4
Reminders
You can set up to 4general test Reminders per day to remind you to test. A series of beeps sound
and is displayed for Reminders set in the meter.
Reminders:
• turn o by inserting a test strip or pressing any button.
• are postponed until the next test reminder if a test was performed within 15minutes of a test
reminder.
• do not appear/beep if the meter is on at the test reminder time (including when meter is
connected to a USB cable).
• do not appear/beep if the meter is connected and communicating to a Continua Certified
®
manager.
• do not beep if the meter’s beeper is set to o.
• do not appear/beep if the batteries need to be replaced.
Set Reminders
• Reminder times are pre-set in the meter for 8:00, 12:00, 18:00, and 22:00. You may change
reminder times by following the instructions below.
• If a general test Reminder is set for the same time as a Post Meal reminder, the Post Meal
reminder will appear/beep instead of the general Reminder (see the Post Meal Reminders
section of this chapter for details).
Reminders
52759_07398883001_MANUAL_EN.indb 43 10/13/15 11:53 AM
Page 46

44
Meter Settings
4
Pre-set reminder times appear on the display.
Press to highlight a Reminder time. Press .
4
Reminders
Turn the meter on by briefly pressing . From
Main Menu, press to highlight Settings. Press
.
Press to highlight More Options. Press .
Press or to highlight Reminders. Press .
1 2
3
52759_07398883001_MANUAL_EN.indb 44 10/13/15 11:53 AM
Page 47

45
Meter Settings
4
To change the Reminder time
shown:
Press
to highlight Edit time.
Press .
Press
or to adjust each
field. Press to move to the
next field. Press to return to
the previous menu.
A indicates the Reminder is set for the time
shown and automatically set to On. To turn the
reminder off, press to highlight Off.
Press
to return to Reminders.
The pre-set reminder time
appears. Press or to
select On or Off. Press to
move to the option.
Reminders
The reminder time appears.
Press
to continue to set additional reminders
or press to return to More Options.
6 7
5
52759_07398883001_MANUAL_EN.indb 45 10/13/15 11:53 AM
Page 48

46
Meter Settings
4
Post Meal Reminders
Post Meal Reminders
Post Meal reminders can be set to remind you to test again later when you add a Before Meal comment
to a blood glucose result. When a reminder occurs, a series of beeps sound and is displayed.
Post Meal reminders:
• turn o by inserting a test strip or pressing any button.
• are postponed until the next reminder if a test was performed within 15minutes of a test reminder.
• do not appear/beep if the meter is on at the test reminder time (including when meter is connected to a
USB cable).
• do not appear/beep if the meter is connected and communicating to a Continua Certified
®
manager.
• do not beep if the meter’s beeper is set to o.
• do not appear/beep if the batteries need to be replaced.
Set Post Meal Reminders
• Adding a Before Meal comment to a blood glucose result sets a Post Meal reminder in the meter.
• Marking blood glucose results with a Post Meal comment provides more information about your test
results to help you and your healthcare professional in the management of your diabetes.
• Talk with your healthcare professional to determine your Post Meal test time.
• Select 1hour, 1.5hours, or 2hours for Post Meal reminders to occur.
52759_07398883001_MANUAL_EN.indb 46 10/13/15 11:53 AM
Page 49

47
Meter Settings
4
Post Meal Reminders
Turn the meter on by briefly
pressing . From Main Menu,
press to highlight Settings.
Press .
Press to highlight More
Options. Press .
Press to highlight Post
Meal. Press .
1 2 3
52759_07398883001_MANUAL_EN.indb 47 10/13/15 11:53 AM
Page 50

48
Meter Settings
4
Press or to highlight On.
Press to move to the
option.
Press to highlight Edit time.
Press .
Press or to highlight
1hour, 1.5hours, or 2hours
after a meal for Post Meal
reminders to occur.
Press
to move to the
option.
Press
to set and return to
the previous menu.
4 5 6
Post Meal Reminders
52759_07398883001_MANUAL_EN.indb 48 10/13/15 11:53 AM
Page 51

49
Meter Settings
4
Turn the meter on by briefly
pressing . From Main Menu,
press to highlight Settings.
Press .
O – only the current blood glucose result 1 appears.
On – the previous blood glucose result
2 appears with the current
blood glucose result.
1
2
1
Last Result
or
Select whether the previous blood glucose result appears with the current blood glucose result. Test
results older than 24hours do not appear.
Last Result
52759_07398883001_MANUAL_EN.indb 49 10/13/15 11:53 AM
Page 52

50
Meter Settings
4
Press to highlight More
Options. Press .
Press to highlight Last
Result. Press .
2 3
Press or to highlight On
or Off. Press to move to
the option.
Press
to set the option and
return to the previous menu.
4
Last Result
52759_07398883001_MANUAL_EN.indb 50 10/13/15 11:53 AM
Page 53

51
Meter Settings
4
Language
Choose the language that appears on the meter.
Turn the meter on by briefly
pressing . From Main Menu,
press to highlight Settings.
Press .
Press to highlight More
Options. Press .
Press to highlight
Language. Press .
1 2 3
Press or to highlight the desired language. Press to move
to the option.
Press
to set the language and return to the previous menu.
4
Language
52759_07398883001_MANUAL_EN.indb 51 10/13/15 11:53 AM
Page 54

52
Meter Settings
4
Time Format
Choose the time format (12-hour or 24-hour clock) that appears on the meter.
Turn the meter on by briefly
pressing . From Main Menu,
press to highlight Settings.
Press .
Press to highlight More
Options. Press .
Press to highlight Time
Format. Press .
1 2 3
Press or to highlight 12hour (am/pm) or 24hour. Press
to move to the option.
Press
to set the time format and return to the previous menu.
4
Time Format
52759_07398883001_MANUAL_EN.indb 52 10/13/15 11:53 AM
Page 55

53
Review Your Data
5
Overview
• Blood glucose results are stored from the newest to the oldest.
• The meter automatically stores up to 720blood glucose results in memory with the time and
date of the test and any test result comments.
• Once 720blood glucose results are in memory, adding a new blood glucose result deletes the
oldest blood glucose result.
• Only test results that have been marked with a fasting, before meal, after meal, or bedtime
comment are included in the average for that comment.
• All test results are included in the overall 7, 14, 30, and 90-day averages regardless of what
comment is added.
• Control results are stored in memory but cannot be reviewed on the meter. To view stored control
results, transfer them to a compatible software application.
• Control results are not included in the averages or blood glucose reports.
• Once 32control results are in memory, adding a new control result deletes the oldest control
result.
wWARNING
Do not change your therapy based on an individual test result in memory. Talk to your
healthcare professional before changing therapy based on test results in memory.
52759_07398883001_MANUAL_EN.indb 53 10/13/15 11:53 AM
Page 56

54
Review Your Data
5
Turn the meter on by briefly
pressing . From Main Menu,
press to highlight My Data.
Press .
1
Logbook is highlighted.
Press .
2
Press or to scroll through Logbook.
The most recent test result
1.
The 2nd most recent test result
2.
3
2
or
Logbook
Logbook
1
52759_07398883001_MANUAL_EN.indb 54 10/13/15 11:53 AM
Page 57

55
Review Your Data
5
4
To view details about a test result, press or to highlight the test result. Press . Test result
details shown below only appear if Target Ranges is On or comments were added to a test result.
The most recent test result.
The 2nd most recent test result.
1 2
or
or
Logbook
52759_07398883001_MANUAL_EN.indb 55 10/13/15 11:53 AM
Page 58

56
Review Your Data
5
Press to highlight a category
(the example here is Overall).
Press .
3
Press to highlight a time
period (the example here is
90 days). Press .
4
Turn the meter on by briefly
pressing . From Main Menu,
press to highlight My Data.
Press .
1
Press to highlight Averages.
Press .
2
Press to return to the previous menu if you want to review a
different time period OR press or to move through different
averages.
5
or
Averages
Averages
52759_07398883001_MANUAL_EN.indb 56 10/13/15 11:53 AM
Page 59

57
Review Your Data
5
Target Percent (%)
Target Percent (%) allows you to view the percentage of your Overall, Before meal, After meal, Fasting, and
Bedtime blood glucose results that are above, within, or below your target ranges.
• Target % results can be viewed for 7, 14, 30, or 90-day time periods.
• Target Ranges must be set in the meter to review Target % results.
Turn the meter on by briefly
pressing . From Main Menu,
press to highlight My Data.
Press .
1
Press to highlight Target %.
Press .
2
Press to highlight a category
(the example here is Before
meal). Press to select the
option.
3
Target Percent (%)
52759_07398883001_MANUAL_EN.indb 57 10/13/15 11:53 AM
Page 60

58
Review Your Data
5
Press to highlight a time
period (the example here is
90 days). Press .
4
The Target % appears (for the
Before meal example). The
number of total tests included
in the Target % appears at the
bottom of the display.
Press
to return to the
previous menu.
5
Target Percent (%)
52759_07398883001_MANUAL_EN.indb 58 10/13/15 11:53 AM
Page 61

59
Review Your Data
5
NOTE
Analyzing your blood glucose results stored in the meter is an eective way for you and your
healthcare professional to determine how well you are controlling your diabetes. This analysis is a
valuable tool for making improvements to your diabetes management. Use care when adding
comments to blood glucose results. Incorrect comments can cause inaccurate patterns to be detected
in the meter if Patterns is On.
Low/High Data
Your healthcare professional can tell you what blood glucose range is appropriate for you. It is very
important to stay within your target range.
• Target Ranges must be set in the meter to track Low/High Data test results (see the Target Ranges
section in the chapter Meter Settings for details).
• Low BG or High BG Data includes only results that fall above or below the target ranges set in the meter.
• Low BG or High BG Data is tracked in the meter for 30 days.
Low/High Data
52759_07398883001_MANUAL_EN.indb 59 10/13/15 11:53 AM
Page 62

60
Review Your Data
5
Low/High Data
You can select Low BG and High BG results for Overall, Before meal, After meal, Fasting, or Bedtime blood
glucose results.
Symbol Name Description
Overall Includes low and high blood glucose results based on
Target Ranges set in the meter.
Before meal You may view low or high test results marked with a Before
Meal comment for Overall, Before breakfast, Before lunch,
Before dinner, and Before snack blood glucose results.*
After meal You may view low or high test results marked with an After
Meal comment for Overall, After breakfast, After lunch, After
dinner, and After snack blood glucose results.*
Fasting Includes low or high fasting blood glucose results marked
as Fasting in comments.
Bedtime Includes low or high bedtime blood glucose results marked
as Bedtime in comments.
* Test results for Before and After specific meals are only available if Patterns is set to On.
52759_07398883001_MANUAL_EN.indb 60 10/13/15 11:53 AM
Page 63

61
Review Your Data
5
Low/High Data
Turn the meter on by briefly pressing . From
Main Menu, press to highlight My Data.
Press .
1
Press to highlight Low/High Data. Press .
2
If Target Ranges is set to On:
Press
to select Low or High BG Data (the
example here is High BG Data). Press .
If target ranges have NOT been On within the
last 30 days:
This message appears on the meter (to turn on
Target Ranges see the Target Ranges section in
the chapter Meter Settings for details).
3
or
52759_07398883001_MANUAL_EN.indb 61 10/13/15 11:53 AM
Page 64

62
Review Your Data
5
Low/High Data
Press to highlight a category (the example
here is Before meal). Press .
If results with detailed meal comments are
saved in the Logbook:
The meter may prompt you to select detailed
categories to view. Press
to highlight a
category (the example here is Before breakfast).
Press .
4
The selected data appears (the example here is High BG data). Press to scroll through the test
results.
Press
to return to the previous menu.
5
or
52759_07398883001_MANUAL_EN.indb 62 10/13/15 11:53 AM
Page 65

63
Review Your Data
5
Patterns
NOTE
Analyzing your blood glucose results stored in the meter is an eective way for you and your
healthcare professional to determine how well you are controlling your diabetes. This analysis is a
valuable tool for making improvements to your diabetes management. Use care when adding
comments to blood glucose results. Incorrect comments can cause inaccurate patterns to be detected
in the meter if Patterns is On.
Patterns
• Patterns displays only active Low Patterns or High Patterns based on comments added to blood glucose
results within the last 7days.
• A Pattern is generated when 2below-target or 3above-target test results with the same comment are
detected within a 7-day period.
Patterns may be viewed on the meter in 3 ways:
when a Patterns option is
displayed at the bottom of
Main Menu.
from My Data on Main Menu. if a New pattern detected
message appears on the
display when performing a
blood glucose test.
or or
52759_07398883001_MANUAL_EN.indb 63 10/13/15 11:53 AM
Page 66

64
Review Your Data
5
Patterns
Patterns High and low patterns have been detected Patterns may include the
following blood glucose
results marked with
comments:
Before breakfast, After
breakfast, Before lunch, After
lunch, Before dinner, After
dinner, Before snack, After
snack, Fasting, or Bedtime
(see the Adding Comments
to Blood Glucose Results
section in the chapter Blood
Glucose Tests).
High Pattern(s) One or more high patterns have been detected
Low Pattern(s) One or more low patterns have been detected
No Patterns No active pattern based on results from last 7days
Blank Patterns feature is set to O
Patterns detected by the meter may be displayed on the Main Menu as:
52759_07398883001_MANUAL_EN.indb 64 10/13/15 11:53 AM
Page 67

65
Review Your Data
5
Patterns
Press to scroll through test
results.
Press
to return to the
previous menu.
4
or
Turn the meter on by briefly
pressing . From Main Menu,
press to highlight the
Patterns option at the bottom of
the screen (the example here is
Patterns). Press .
Press to highlight a category
to review (the example here is
Before breakfast). Press .
1
3
Press or to highlight Low
Patterns or High Patterns (the
example here is Low Patterns).
Press to select the option.
2
52759_07398883001_MANUAL_EN.indb 65 10/13/15 11:53 AM
Page 68

66
Review Your Data
5
Data Transfer Using Wireless
Turn the meter on by briefly
pressing . From Main Menu,
press to highlight My Data.
Press .
1
Press to highlight Data
Transfer. Press .
Press to select Wireless.
Press .
2 3
Data Transfer Using Wireless
This feature allows you to transfer data wirelessly from your meter to another device.
52759_07398883001_MANUAL_EN.indb 66 10/13/15 11:53 AM
Page 69

67
Review Your Data
5
Data Transfer Using Wireless
If a device has not been paired with your
meter:
The meter prompts you to pair a device to the
meter (see the First-Time Pairing section in the
chapter Wireless Communication and Meter
Pairing for details).
If the meter has already been paired with at
least one device:
Press
or to choose a wireless device for
data transfer.
The meter transfers the data to the device.
4
5
or
52759_07398883001_MANUAL_EN.indb 67 10/13/15 11:53 AM
Page 70

68
Review Your Data
5
Data Transfer Using USB Cable
Start the software for data
analysis and initiate a data
transfer.
Data Transfer Using USB Cable
This feature allows you to transfer data from your meter to special software for diabetes management on
a PC using a USB cable.
Plug the small end of the USB
cable into the meter.
1
Plug the large end of the USB
cable into a USB port on the PC.
If the meter is o, it turns on.
2 3
52759_07398883001_MANUAL_EN.indb 68 10/13/15 11:53 AM
Page 71

69
Review Your Data
5
The meter transfers the data to the software.
4
Data Transfer Using USB Cable
52759_07398883001_MANUAL_EN.indb 69 10/13/15 11:53 AM
Page 72

70
Review Your Data
5
52759_07398883001_MANUAL_EN.indb 70 10/13/15 11:53 AM
Page 73

71
Wireless Communication and Meter Pairing
6
Overview
You can wirelessly and automatically synchronize your diabetes information with a mobile device. The
process of creating a connection between the meter and the other device is called pairing. You need an
application on your mobile device that can accept the meter’s data.
Setting Options Function
Flight Mode On / O Select whether wireless communication is available.
On – wireless communication is not available.
O – wireless communication is available.
Default Device List of devices paired
with the meter
If more than 1device is paired, select the device with
which the Auto-Send and Sync Time features will
communicate.
Auto-Send On / O Select whether data is automatically sent to the
default paired device after each test.
On – data is automatically sent to the default paired
device.
O – data is not automatically sent to the default
paired device.
Chapter 6: Wireless Communication and Meter Pairing
52759_07398883001_MANUAL_EN.indb 71 10/13/15 11:53 AM
Page 74

72
Wireless Communication and Meter Pairing
6
Setting Options Function
Sync Time On / O Select whether to synchronize the time and date to
the default paired device.
On – the time and date on the meter synchronize to
the time and date on the default paired device.
O – the time and date on the meter do not
synchronize to the time and date on the default
paired device.
Pairing Pair Device / Delete
Pairing
Select whether to pair a device or to delete a paired
device.
52759_07398883001_MANUAL_EN.indb 72 10/13/15 11:53 AM
Page 75

73
Wireless Communication and Meter Pairing
6
First-Time Pairing
The steps below are for first-time pairing.
Up to 5devices can be paired with the meter at any time.
Each device must be paired with the meter one at a time.
The meter and the device to be paired should be within 1meter of each other.
Prepare the device for pairing.
Refer to the device’s
instructions for information
about pairing.
1
Turn the meter on by briefly
pressing . From Main Menu,
press to highlight Settings.
Press .
2
Press to highlight Wireless.
Press .
3
First Time Pairing
52759_07398883001_MANUAL_EN.indb 73 10/13/15 11:53 AM
Page 76

74
Wireless Communication and Meter Pairing
6
Pair Device appears. To pair a device, press
to highlight Yes. Press .
4
The meter displays its code.
5
The mobile device displays a list of found devices,
including the meter. Select the meter from the
list. When prompted, enter the code displayed on
the meter from Step5 into the device to be
paired.
6
When pairing is complete, and the name of
the paired device appear.
Press
to return to the previous menu.
7
First-Time Pairing
52759_07398883001_MANUAL_EN.indb 74 10/13/15 11:53 AM
Page 77

75
Wireless Communication and Meter Pairing
6
Main Menu with meter in Flight
Mode.
Flight Mode
Select whether wireless communication is available or not. When Flight Mode is on, appears in the
title bar and wireless communication is not available.
Turn the meter on by briefly
pressing . From Main Menu,
press to highlight Settings.
Press .
1
Press to highlight Wireless.
Press .
2
Flight Mode is highlighted.
Press .
3
Press or to highlight On or Off. Press to move to the
option.
Press
to set the option and return to the previous menu.
4
Flight Mode
52759_07398883001_MANUAL_EN.indb 75 10/13/15 11:53 AM
Page 78

76
Wireless Communication and Meter Pairing
6
Default Device
If more than 1device is paired, select the default paired device for the Auto-Send and Sync Time features.
Turn the meter on by briefly pressing . From
Main Menu, press to highlight Settings.
Press .
1
Press to highlight Wireless. Press .
2
Press to highlight Default
Device. Press .
A list of paired devices appears.
Press to highlight the device you want as the default device.
Press
to move to the option.
Press
to set the option and return to the previous menu.
3
4
Default Device
52759_07398883001_MANUAL_EN.indb 76 10/13/15 11:53 AM
Page 79

77
Wireless Communication and Meter Pairing
6
Auto-Send
Select whether data is automatically sent to the default paired device after each test.
Turn the meter on by briefly pressing . From
Main Menu, press to highlight Settings.
Press .
1
Press to highlight Wireless. Press .
2
Press to highlight
Auto-Send. Press .
3
Press or to highlight On or Off. Press to move to the
option.
Press
to set the option and return to the previous menu.
4
Auto-Send
52759_07398883001_MANUAL_EN.indb 77 10/13/15 11:53 AM
Page 80

78
Wireless Communication and Meter Pairing
6
Sync Time
Select whether to synchronize the time and date to the default paired device.
Turn the meter on by briefly pressing . From
Main Menu, press to highlight Settings.
Press .
1
Press to highlight Wireless. Press .
2
Press to highlight Sync
Time. Press .
3
Press or to highlight On or Off. Press to move to the
option.
Press
to set the option and return to the previous menu.
4
Sync Time
52759_07398883001_MANUAL_EN.indb 78 10/13/15 11:53 AM
Page 81

79
Wireless Communication and Meter Pairing
6
Pairing Additional Devices
This procedure is to add another paired device (assumes there is already 1paired device).
You can pair 5devices.
If you have 5paired devices, you must delete a pairing before you can add another device.
The device you choose remains the default until you change it.
Turn the meter on by briefly
pressing . From Main Menu,
press to highlight Settings.
Press .
1
Press to highlight Wireless.
Press .
2
Press to highlight Pairing.
Press .
3
Pairing Additional Devices
52759_07398883001_MANUAL_EN.indb 79 10/13/15 11:53 AM
Page 82

80
Wireless Communication and Meter Pairing
6
Press or to highlight Pair
Device. Press .
If there are less than 5paired
devices:
Pair Device appears. Proceed
to Step5.
If there are already 5paired
devices:
Maximum paired devices
appears. You must delete a
paired device before you can
proceed to Step5. Press
or
to select Yes. Press .
Press
or to highlight the
device to delete. Press .
Proceed to Step5.
4
Prepare the other device for
pairing. Refer to the other
device’s instructions for
information about pairing.
5
The meter displays its code.
6
The mobile device displays a
list of found devices, including
the meter. Select the meter
from the list. When prompted,
enter the code displayed on the
meter from Step6 into the
device to be paired.
7
Pairing Additional Devices
52759_07398883001_MANUAL_EN.indb 80 10/13/15 11:53 AM
Page 83

81
Wireless Communication and Meter Pairing
6
If there is more than 1paired device, the meter asks if you want
the new device to be the default device. Press or to highlight
No or Yes.
Press
to set the option and return to Pairing.
Press
to return to the previous menu.
9
When pairing is complete,
and the name of the paired
device appear. Press .
8
Pairing Additional Devices
52759_07398883001_MANUAL_EN.indb 81 10/13/15 11:53 AM
Page 84

82
Wireless Communication and Meter Pairing
6
Delete Pairing
This procedure is to delete a paired device (assumes there is at least 1paired device).
You can pair 5devices. If you have 5paired devices, you must delete a pairing before you pair to another
device.
The device you choose remains the default until you change it.
Turn the meter on by briefly
pressing . From Main Menu,
press to highlight Settings.
Press .
1
Press to highlight Wireless.
Press .
2
Press to highlight Pairing.
Press .
3
Delete Pairing
52759_07398883001_MANUAL_EN.indb 82 10/13/15 11:53 AM
Page 85

83
Wireless Communication and Meter Pairing
6
Press or to highlight
Delete Pairing. Press .
4
Press or to highlight the
device to delete. Press to set
the option.
5
Delete Pairing
52759_07398883001_MANUAL_EN.indb 83 10/13/15 11:53 AM
Page 86

84
Wireless Communication and Meter Pairing
6
If the selected device is not
the default device:
The pairing is deleted. The
name of the deleted device and
appear.
If the selected device is the
default device:
The meter prompts you to
select a new default device. If
there is only 1device
remaining, it becomes the
default device. The list of
paired devices appears.
Highlight the new default
device and press
. The name
of the deleted device and
appear, along with the new
default device.
6
Delete Pairing
52759_07398883001_MANUAL_EN.indb 84 10/13/15 11:53 AM
Page 87

85
Meter Maintenance and Troubleshooting
7
Meter Maintenance
The meter automatically tests its own systems every time you turn it on and lets you know if something
is wrong. See the Error Messages section of this chapter.
If you drop the meter or think the results are not accurate, contact Roche.
Open the battery door on the
back of the meter by pushing
the tab in the direction of the
arrow and pulling the door up.
1
Release the old batteries by
pressing the button. Remove
the old batteries.
2
Slide the new batteries under
the black tabs and button,
with the (+)side facing up. Put
the battery door back in place
and snap it closed.
3
NOTE
• The meter uses two 3-volt lithium batteries, coin cell typeCR2032. This type of battery can be found
in many stores. It is a good idea to have spare batteries available.
• Always replace both batteries at the same time and with the same brand.
• The logbook data is saved when you replace the batteries.
Changing the Batteries
Press
52759_07398883001_MANUAL_EN.indb 85 10/13/15 11:53 AM
Page 88

86
Meter Maintenance and Troubleshooting
7
Cleaning the Meter
Keep the meter free of dust. If you need to clean or disinfect it, follow these guidelines carefully to help
you get the best performance possible.
wWARNING
• Do not allow liquid to enter any openings in the meter.
• Do not spray a cleaning solution directly onto the meter.
• Do not immerse the meter in liquid.
Make sure the meter is turned
o.
1
Gently wipe the meter’s surface with a soft cloth slightly dampened
(wring out any excess liquid) with one of these cleaning solutions:
• 70% isopropyl alcohol
• Mild dishwashing liquid mixed with water
• 10% household bleach solution (1part bleach plus 9parts water)
made the same day
2
52759_07398883001_MANUAL_EN.indb 86 10/13/15 11:53 AM
Page 89

87
Meter Maintenance and Troubleshooting
7
The meter is connected to a PC
and a test cannot be
performed.
EITHER remove the USB cable
and perform a test OR remove
the test strip and start a data
transfer.
The meter will not turn on or
the display is blank.
• Batteries are dead.
Insert new batteries.
• Display is damaged. / Meter
is defective.
Contact Roche.
• Extreme temperatures.
Move the meter to a more
temperate area.
The connection between the
meter and PC was lost.
Disconnect and reconnect the
USB cable and retry the
connection. Contact Roche if
the connection is lost again.
Error Messages
wWARNING
• Never make therapy decisions based on an error message.
• If you have any concerns or see any other error message, contact Roche.
52759_07398883001_MANUAL_EN.indb 87 10/13/15 11:53 AM
Page 90

88
Meter Maintenance and Troubleshooting
7
There is no connection
between the meter and PC.
Connect the USB cable and
retry the connection.
Blood glucose results were not
transferred to a paired device.
Make sure the paired device is
within range of the meter and
turned on.
Data could not be transferred
from the meter to the PC.
Check the PC or USB cable.
Data cannot be sent to a paired
device because the meter is in
Flight Mode.
Retry the data transfer when
the meter is not in Flight Mode.
One or more blood glucose
results are excluded from the
selected averages because the
results are invalid or outside
the system measurement
range.
One or more blood glucose
results are excluded from the
selected target % data because
the test results are invalid.
52759_07398883001_MANUAL_EN.indb 88 10/13/15 11:53 AM
Page 91

89
Meter Maintenance and Troubleshooting
7
One or more blood glucose
results are excluded from the
selected low/high data because
the test results are invalid.
The date entered is not valid.
Enter the correct date.
A meter setting was changed
while in Flight Mode.
The setting change will not
take eect until Flight Mode is
turned o.
Pairing to a device cannot be
performed while in Flight Mode.
Retry pairing when the meter is
not in Flight Mode.
The blood glucose result has
not been sent to the default
paired device. The transfer is
still pending.
Place meter and paired device
closer together.
The meter was unable to pair
with a device.
Retry the pairing.
52759_07398883001_MANUAL_EN.indb 89 10/13/15 11:53 AM
Page 92

90
Meter Maintenance and Troubleshooting
7
A meter or test strip error has occurred.
Repeat the blood glucose test.
If a second E-3 code appears, perform a control test with the
control solution and a new test strip.
• If the control result is within the acceptable range, review the
proper testing procedure and repeat the blood glucose test with
a new test strip.
• If the control result is not within the acceptable range, see the
Understanding Out-of-Range Control Results section in the
chapter Control Tests.
In rare cases, an E-3 error code may indicate that your blood
glucose is extremely high and above the system’s reading range.
If you do not feel like your blood glucose is extremely high, repeat
the blood glucose test. See the Unusual Blood Glucose Results
section in the chapter Blood Glucose Tests.If the E-3 code still
appears for your blood glucose test, contact your healthcare
professional immediately.
The test strip may be damaged,
not properly inserted, or was
previously used.
Remove and reinsert the test
strip or replace it if damaged or
previously used.
52759_07398883001_MANUAL_EN.indb 90 10/13/15 11:53 AM
Page 93

91
Meter Maintenance and Troubleshooting
7
Not enough blood or control
solution was drawn into the
test strip for measurement or
was applied after the test had
started.
Discard the test strip and
repeat the blood glucose or
control test.
Blood or control solution was
applied to the test strip before
Apply drop appeared.
Discard the test strip and
repeat the blood glucose or
control test.
An electronic error occurred.
Remove the batteries, press
and hold the Power/Set/OK
button for at least 2 seconds,
and reinsert the batteries.
Perform a blood glucose or
control test.
The temperature is above or below the proper
range for the system.
Refer to the test strip package insert for system
operating conditions. Move to an area with the
appropriate conditions and repeat the blood
glucose or control test. Do not artificially heat or
cool the meter.
The batteries are out of power.
Change the batteries now. If the message
reappears after the batteries have been replaced,
remove the batteries, press and hold the Power/
Set/OK button for at least 2 seconds, then
reinsert the batteries.
52759_07398883001_MANUAL_EN.indb 91 10/13/15 11:53 AM
Page 94

92
Meter Maintenance and Troubleshooting
7
The time and date setting may
be incorrect.
Make sure the time and date
are correct and adjust, if
necessary.
The test strip may be damaged.
Retest with a new test strip.
Your blood sample may contain
a high level of ascorbate.
Contact your healthcare
professional.
Fluid or foreign material may
be present in the test strip slot.
Remove and reinsert the test
strip or repeat the blood
glucose or control test with a
new test strip. If the problem
persists, contact Roche.
An electronic error has occurred.
Contact Roche.
52759_07398883001_MANUAL_EN.indb 92 10/13/15 11:53 AM
Page 95

93
Meter Maintenance and Troubleshooting
7
The meter time and date have
been changed to match the
paired device.
There are no results in the
Logbook.
There is an invalid result in the Logbook.
or
There are no test results in range for the selected
data.
52759_07398883001_MANUAL_EN.indb 93 10/13/15 11:53 AM
Page 96

94
Meter Maintenance and Troubleshooting
7
Target Ranges is O and there
are no results for the Target %
data stored in the meter.
Target Ranges is O and there
are no results for the low/high
data stored in the meter.
There are no results stored in the meter for the
selected data.
52759_07398883001_MANUAL_EN.indb 94 10/13/15 11:53 AM
Page 97

95
Meter Maintenance and Troubleshooting
7
Patterns is On but there are no
active patterns stored in the
meter.
Patterns is O.
Blood glucose may be higher
than the measurement range of
the system.
See the Unusual Blood
Glucose Results section in the
chapter Blood Glucose Tests.
Blood glucose may be lower
than the measurement range of
the system.
See the Unusual Blood
Glucose Results section in the
chapter Blood Glucose Tests.
52759_07398883001_MANUAL_EN.indb 95 10/13/15 11:53 AM
Page 98

96
Meter Maintenance and Troubleshooting
7
52759_07398883001_MANUAL_EN.indb 96 10/13/15 11:53 AM
Page 99

97
Technical Information
8
Product Limitations
See the literature packaged with the test strips and control solutions for the latest information on product
specifications and limitations.
Specifications
Blood volume
Sample type
Measuring time
Measurement range
Test strip storage conditions
System operating conditions
Refer to the test strip package insert.
Meter storage conditions Temperature: -25–70°C
Memory capacity 720blood glucose results and 32control results with time
and date
Automatic o 90seconds
Power supply Two3-volt lithium batteries (coin cell type CR2032)
Display LCD
Dimensions 80 × 47 × 20 mm (LWH)
Weight Approx. 40g (with batteries)
Construction Hand-held
Protection class III
Meter type The Accu-Chek Guide meter is suitable for continuous
operation.
Control solution storage conditions Refer to the control solution package insert.
Interfaces
USB: micro-B connector; Continua Certified® to a Continua
Certified manager.
Chapter 8: Technical Information
52759_07398883001_MANUAL_EN.indb 97 10/13/15 11:53 AM
Page 100

98
Technical Information
8
Electromagnetic Compatibility – This meter meets the electromagnetic immunity requirements as per
ENISO15197. The chosen basis for electrostatic discharge immunity testing was basic standard
IEC61000-4-2. In addition, the meter meets the electromagnetic emissions requirements as per
EN61326. The meter’s electromagnetic emission is thus low. Interference from the meter to other
electrically-driven equipment is not anticipated.
Performance Analysis – Refer to the test strip package insert.
Test Principle – Refer to the test strip package insert.
Declaration of Conformity – Roche hereby declares that the Accu-Chek Guide blood glucose meter
conforms with the basic requirements and other relevant regulations of the European Directive;
1999/5/EC. The conformity declaration may be found at the following Internet address:
http://declarations.accu-chek.com
Communication Protocol –
The Accu-Chek Guide blood glucose meter is Continua Certified. Continua
Certified signifies that this product complies with applicable IEEE 11073-10417 standards and that it
has been tested and certified against the 2014 Continua Design Guidelines which include the Blood
Glucose specification for Bluetooth Smart®, Bluetooth SIG, Glucose Profile, Version 1.0 and Bluetooth
SIG, Glucose Service, Version 1.0.
52759_07398883001_MANUAL_EN.indb 98 10/13/15 11:53 AM
 Loading...