

Page 1
Operating Manual
Model 16910
ID Plus Refrigerant Identier
Page 2

Page 3

Table of Contents
Safety Precautions . . . . . . . . . . . . . . . . . . . . . . . . . . . . . . . . . . . . . .2
Unit Description . . . . . . . . . . . . . . . . . . . . . . . . . . . . . . . . . . . . . . . .4
Hardware Descriptions . . . . . . . . . . . . . . . . . . . . . . . . . . . . . . . . . . .7
Operating Procedures . . . . . . . . . . . . . . . . . . . . . . . . . . . . . . . . . .10
Error Codes . . . . . . . . . . . . . . . . . . . . . . . . . . . . . . . . . . . . . . . . . .18
Maintenance . . . . . . . . . . . . . . . . . . . . . . . . . . . . . . . . . . . . . . . . .20
Replacement Parts . . . . . . . . . . . . . . . . . . . . . . . . . . . . . . . . . . . .22
Specications . . . . . . . . . . . . . . . . . . . . . . . . . . . . . . . . . . . . . . . . .23
Warranty. . . . . . . . . . . . . . . . . . . . . . . . . . . . . . . . . . . . . . . . . . . . .24
1
Page 4
Safety Precautions
WARNING : To prevent personal injury:
Study, understand, and follow all warnings in this manual before operating this
•
unit. If the operator cannot read these instructions, operating instructions and
safety precautions must be read and discussed in the operator’s native language.
— Si el operador no puede leer las instrucciones, las instrucciones de operación y
las precauciones de seguridad deberán leerse y comentarse en el idioma nativo
del operador.
—Sil’utilisateurnepeutlirelesinstructions,lesinstructionsetlesconsignesde
sécurité doivent lui être expliquées dans sa langue maternelle.
The Identier
•
to be potentially ammable.
Operate this unit with either R-12 or R-134a refrigerant. Cross-contamination
•
with other refrigerant types causes severe damage to the A/C system, to service
tools, and equipment. Do NOT attempt to adapt the unit for another refrigerant.
Do NOT mix refrigerant types through a system or in the same container.
DO NOT breathe refrigerant and lubricant vapor or mist. Exposure may irritate
•
eyes, nose, and throat. If accidental system discharge occurs, immediately
ventilate the work area. There must be adequate ventilation in the vehicle
servicing area.
gives an alarm (audible and visual) should a sample be determined
When testing vehicle air conditioning systems, the vehicle ignition and
•
compressor must be turned OFF. This action prevents EMI/RFI problems as well
as eliminates potential user hazards from moving parts of the vehicle.
The air detection sensor is a chemical fuel cell sensor that will eventually
•
expire. The user must replace the air detection sensor whenever the instrument
indicates as such. Failure to replace the air detection sensor will result in nonfunctionality of the instrument.
Wear eye and skin protection when working with refrigerants. Escaping
•
refrigerant vapors can freeze upon contact. Do NOT direct refrigerant escaping
from the sample hose toward exposed skin or toward the face.
To reduce the risk of electrical shock, do not open the instrument housing.
•
Do not use the instrument in wet or damp areas. Minimize the use of extension
cords.
2
Page 5

Safety Precautions
Caution : To prevent equipment damage,
Air Detection Warm-Up: For best accuracy in air detection only, allow the instrument an
•
additional 5-minute warm-up period after completion of the warm-up and calibration modes.
Allow the instrument to sit undisturbed for 5 minutes following the completion of the initial
calibration mode.
Refrigerant Blend: As of December, 1996, there are nine (9) EPA SNAP “acceptable for use”
•
refrigerants that are available and legal for use as R-12 substitutes. The Identier does not
identify any of the substitutes as pure R-12 or pure R-134a. Each of the nine blends has been
tested in the factory laboratory and none are able to “fool” the Identier. Should one of the
blends be encountered, the Identier fails the refrigerant and provides an analysis in terms
of percentage by weight concentrations of only R-12, R-134a, R-22, and hydrocarbons. Due
to cross-sensitivity issues of the blends on the sensing device, the resultant reading will not
be correct in the analyzed concentrations. However, the Identier never identies any of the
blends as pure R-12 or R-134a.
Sample Filter: Replace the sample lter on the instrument AS SOON AS RED SPOTS OR
•
DISCOLORATION APPEAR ON THE OUTSIDE DIAMETER OF THE WHITE ELEMENT. Failure
to correctly maintain and replace the sample lter will result in severe damage to the unit.
Sample Input: The instrument requires connection of the supplied sample hose to the
•
LOW-SIDE or VAPOR port of refrigerant storage cylinders or vehicle air conditioning
systems. Do NOT attempt to introduce liquid or samples that are heavily laden with oil into
the instrument. Do NOT connect the sample hose to the HIGH-SIDE or LIQUID PORT. Liquid
or oil laden samples cause severe damage to the instrument. ALWAYS verify the refrigerant
to be tested does not contain or will not emit heavy loads of oil or liquid.
Air Purge: Do NOT attempt to purge the detected air from refrigerant sources that are vapor
•
only. In order to purge air from refrigerant sources, there MUST be some quantity of liquid
refrigerant present to replace the volume of the air. Attempts to purge the air from vapor-only
sources will result in the loss of the entire refrigerant charge.
Inspect the sample hose before each use. Replace the hose if it appears cracked, frayed,
•
obstructed, or fouled with oil. Do NOT use hoses other than those supplied with the
instrument. The use of other hose types will introduce errors into the refrigerant analysis
and instrument calibration.
Do NOT open the instrument housing. There are no serviceable components internal to the
•
instrument, and opening the housing will void the warranty.
Place the Identier on a at and/or sturdy surface or utilize the housing hanging hook.
•
NEVER admit any sample into the instrument at pressures in excess of 300 psig.
•
Do not use the coupler supplied on the service end of the R-134a sample hose for any
•
application other than with the instrument. The coupler is modied, does not contain a check
valve, and is not suitable for any other refrigerant application.
Never obstruct the air intake, sample exhaust, or vent ports of the instrument during use.
•
3
Page 6

Unit Description
Contamination of refrigerants either in storage cylinders or vehicle air conditioning
systems can lead to component corrosion, elevated head pressures, and system failures
when used by unsuspecting technicians. The ability of the technician to determine
refrigerant type and purity is severely hampered by the presence of air when attempting
to use temperature-pressure relationships.
The development of various substitute refrigerants further complicates the ability of
technicians to determine refrigerant purity based upon temperature-pressure relationships.
The substitute refrigerant blends can also introduce a ammability hazard to the
refrigerant technician and the ultimate end-user of the vehicle air conditioning system.
Non-condensable gasses (NCG), which are mainly comprised of ambient air, commonly
contaminate refrigerant stores or systems. Contamination can be introduced into
refrigerant from sources such as leaking joints on vehicle air conditioning systems,
incorrect handling of transfer hoses, incorrect use of refrigerant recovery and recycling
equipment, or failure of such equipment. Ambient air contamination will lead to a number
of refrigerant system problems, including corrosion induced by moisture content of the
ambient air, increased compressor heat and wear due to increased head pressures, added
stress on system components due to increased head pressures, and reduction of system
efciency due to displacement of refrigerant by the ambient air or NCG.
The identier provides a fast, easy, and accurate means to determine refrigerant purity
in refrigerant storage cylinders or directly in vehicle air conditioning systems. It also
determines the need and controls the purging of ambient air-based NCG from refrigerant
storage vessels or vehicle air conditioning systems.
The instrument uses non-dispersive infrared (NDIR) technology to determine the
weight concentrations of refrigerant types R-12, R-134a, R-22, hydrocarbons, and air.
Refrigerant purity is automatically determined for refrigerants R-12 and R-134a by the
instrument to eliminate human error. Pure refrigerant is dened as a refrigerant mixture
that contains 98% by weight, or greater, of either R-12 or R-134a.
4
Page 7

Unit Description
The instrument provides the option to purge sample refrigerant sources of air
contamination down to levels set by the user. Air purging is completely automatic
and requires no intervention by the user other than telling the instrument to begin the
purging process.
The instrument is supplied complete with R-12 and R-134a sample hoses, an R-134a
adapter tting to permit sampling of ACME-ported cylinders, a purge vent hose, a power
cord, and all required plumbing housed within a rugged portable case.
Refrigerant Identication
Sample gas is admitted into the instrument through the supplied sample hose and
is presented to the sensing device. The instrument provides the user with direct
percent-by-weight concentrations of R-12, R-134a, R-22, and hydrocarbons. If the
sample is determined to be pure R-12 or pure R-134a, the instrument also provides a
direct readout of the weight percentage of air within the sample. Note that the instrument
does not consider air to be a contaminate, since it can be removed by refrigerant recycling
equipment or by the purging feature of the instrument itself. Since air is not considered a
contaminate, it is possible to read 100% R-12 plus 5% air. The instrument only considers
the weights of refrigerant contaminates in the total mixture.
The instrument interfaces with the user through the use of a 2-line, 16-character,
alphanumeric display, status indicator lamps, pushbutton communication switches, and
an alarm. Alarm indications are provided to alert the user of instrument fault conditions,
potentially ammable refrigerant presence, and contaminated refrigerant presence. Direct
percent-by-weight concentrations of sample refrigerant are provided on the display, as
well as user directions and prompts. A printer port is supplied with the instrument that
interfaces with most parallel port printers.
5
Page 8

Unit Description
Air-Radicator Purging
When a refrigerant source has been determined to be pure (at least 98% by weight of
either R-12 or R-134a), the instrument automatically offers the air purging feature to the
user, should there be any air contamination. Continuous monitoring of the venting gas
stream to determine exact air concentrations controls the purging feature. Purging limits
can be set by the user between 2%–9% by weight to tailor the purge to specic needs. The
instrument controls all functions of the purging feature with no intervention by the user
required to complete the procedure. The user can halt or cancel this procedure at any time.
Control of the purge operation is achieved through direct measurements of refrigerant
concentration and is not dependent upon temperature or pressure measurements.
Existing technology in the vehicle air conditioning market typically uses both pressure
and temperature measurements to determine air concentration and to control the
purging procedure. Pressure-temperature technology is susceptible to errors induced by
refrigerant contamination and difculties in obtaining precise temperature and pressure
measurements. This is due to the inability to account for rapid temperature and pressure
drops of the refrigerant during the purge procedure by temperature-pressure based
equipment or procedures. Temperature-pressure based technology commonly requires
the refrigerant source to come to a temperature-pressure equilibrium before purging can
begin. This process can take as long as eight to 24 hours.
With direct measurement of refrigerant concentrations, there is no need to wait for
a refrigerant source to reach a temperature and pressure equilibrium. Also, rapid
temperature and pressure changes during purging operations do not affect the
measurements.
6
Page 9

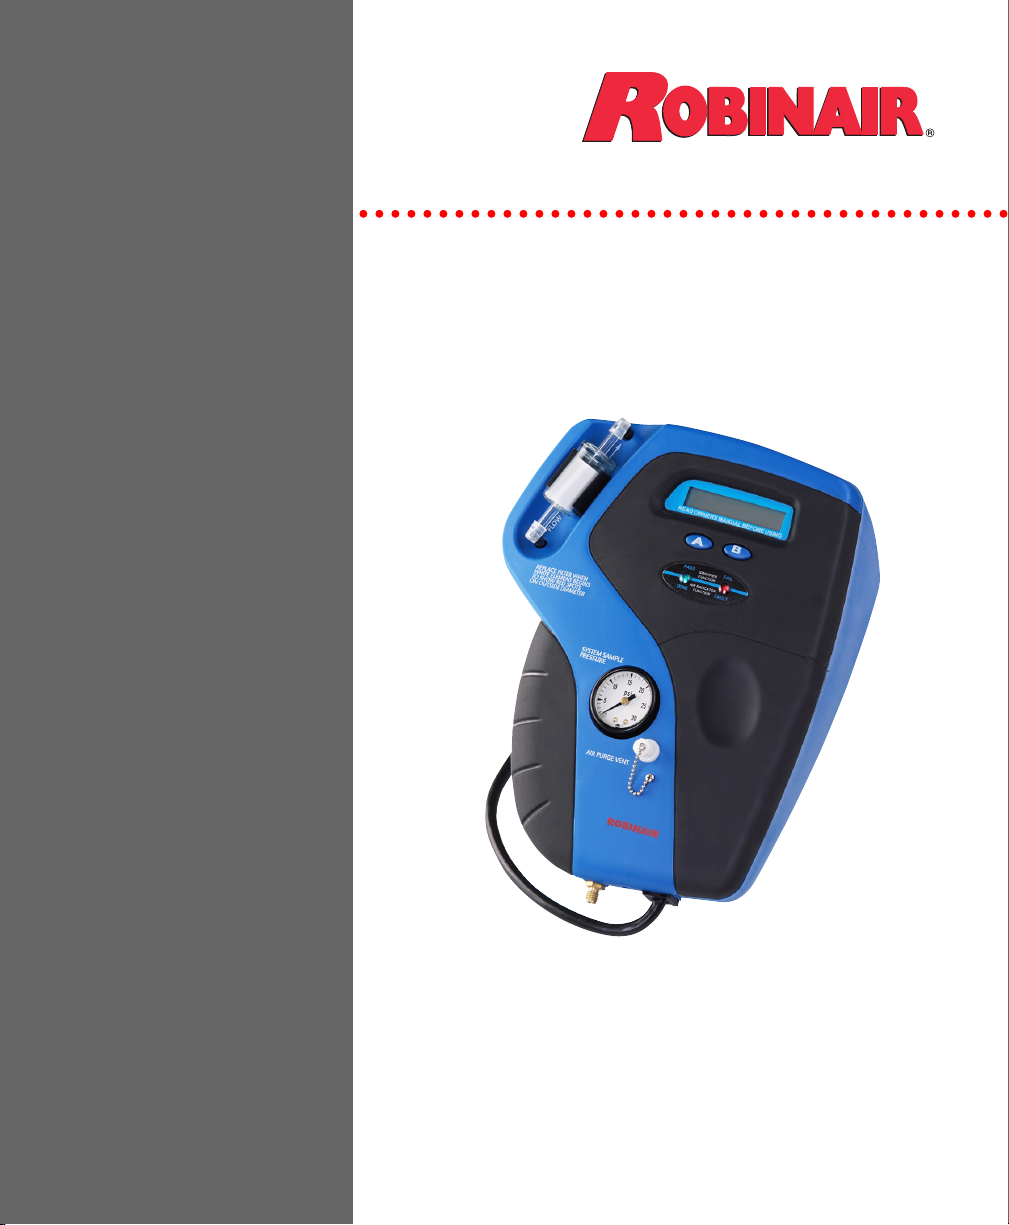
Hardware Descriptions
The Identier provides the user with a complete tool to identify refrigerant mixtures, and
rid the mixtures of air contamination, all housed in a portable, rugged carrying case.
Housing
The instrument is housed in a rugged, hand-held, injection-molded nylon case. The case
houses the sensing devices, the plumbing system, and the electronics of the instrument.
Power Cord
A nine-foot (2.75 meter), molded, three-prong, grounded, NEMA, power supply cord
is attached directly to the instrument. Different power cords may be supplied if the
instrument is to be used in areas outside North America.
Sample Filter
The sample lter provides retention of particulate and oil mist suspended within the
sample vapor. The lter is supplied with a red, maintenance-indicating dye. As soon as
red spots or discoloration begin to appear anywhere on the white outside diameter of the
lter element, THE FILTER MUST BE REPLACED. Failure to replace the lter when
indicated may lead to severe instrument damage not covered under warranty repairs.
Air Intake Port
The air intake port is located at the top of the instrument and provides the entry point for
ambient air into the instrument during calibration procedures. Never obstruct the port
during use of the instrument.
Sample Exhaust Port
The sample exhaust port, located on the bottom edge of the instrument, will emit spent
sample gasses. Keep this port clear and unobstructed during use.
Sample Inlet Port
The sample inlet port admits refrigerant vapor into the instrument through the connection
of the mating end of the sample hose.
System Pressure Gauge
The system pressure gauge indicates to the user the presence of a refrigerant sample ow
into the instrument.
7
Page 10

Hardware Descriptions
Purge Vent Port
The purge vent port emits a mixture of refrigerant vapor and air during
purging procedures. The port is supplied with a protective cap that must be
replaced with the purge vent hose during purging operations. The cap must
remain installed on the port during refrigerant identication procedures to
avoid excessive losses of refrigerant.
WARNING
Failure to correctly install the cap onto the purge vent port will result
in excessive loss of refrigerant during the refrigerant identication
procedure, which is a health hazard. The instrument ALWAYS performs
a refrigerant identication before permitting an air purge procedure.
Printer Port
The printer port is a 25-pin connector used to download results of sample analysis to a usersupplied printer through a user-supplied cable. The port supports most parallel port printers.
R-12 Sample Hose
The 6-foot (1.8 meter) R-12 sample hose is constructed of a nylon inner tube and a
polyurethane outer tube. The inner tube handles all refrigerant transfer and provides
containment up to 300 psig. The outer tube provides protection of the inner tube from
abrasion, nicking, cutting, etc. The hose is provided with an instrument inlet port mating
connector on one end and a 1/4 in. SAE internal are coupling.
R-134a Sample Hose
The 6-foot R-134a sample hose is constructed of a nylon inner tube and a polyurethane
outer tube. The inner tube handles all refrigerant transfer and provides containment up
to 300 psig. The outer tube provides protection of the inner tube from abrasion, nicking,
cutting, etc. The hose is provided with an instrument inlet port mating connector on one
end and an R-134a low-side coupler on the service end.
8
Page 11

Hardware Descriptions
Purge Vent Hose
The purge vent hose is a 6-foot length of neoprene tubing with a connector on one end
to mate with the purge vent port. The hose is used to direct venting refrigerant vapor and
air contamination away from the instrument and the ambient air inlet port. This process
ensures no calibration errors or faults occur during purging procedures.
R-134a Tank Adapter Fitting
The R-134a tank adapter tting provides the user with an adapter to allow connection of
the R-134a sample hose service end to an R-134a cylinder ACME port.
Control Panel
The control panel contains all the user interfaces to permit operation of the instrument:
Digital Display
A 2-line, 16-character, alphanumeric display is provided to inform the user of system
status, required actions, and prompts for specic inputs.
Pushbutton Switches
Two switches, labeled “A” and “B”, are provided for various functions. All inputs
from the user to the instrument are made using these switches. Use of the switches is
detailed on the instrument display.
LED Status Indicator Lamps
Red and green LEDs are provided to inform the user of system status at a glance or
to alert the user of required actions or conditions. The LEDs serve dual functions,
depending upon the instrument function:
• During refrigerant identication functions, as indicated by the IDENTIFIER
FUNCTION on the LED label, the green LED indicates refrigerant purity. The red
LED indicates refrigerant contamination or system faults.
• During air purging functions, as indicated by the AIR RADICATOR FUNCTION on
the LED label, the green LED indicates purge completion, and the red LED indicates
system fault.
Storage Case
The instrument is supplied with a portable, corrugated, storage case. The case houses the
instrument, the operating manual, and all associated accessories.
9
Page 12
Operating Procedures
Pre-Operation Procedure
1. Inspect the sample lter for signs of red spots or discoloration anywhere on the white
outside diameter of the lter element. If any red spots or discoloration are noticed,
REPLACE THE FILTER BEFORE USING THE INSTRUMENT.
CAUTION
When red spots or discoloration begin to appear on the white outside
diameter of the lter element, REPLACE THE FILTER. Failure to correctly
maintain the sample lter may result in severe instrument damage not
covered under warranty.
2. Select the R-12 or R-134a sample hose according to the application. Inspect the hose
for signs of wear, such as cracking, fraying, or kinks. Verify the hose is not obstructed
and no oil is present inside the hose. If the hose shows signs of wear, obstructions, or
oil, IT MUST BE REPLACED (or cleaned) BEFORE USING THE INSTRUMENT.
3. Install the sample hose onto the inlet port of the instrument. The hose connector needs
only to be ngertight to achieve a gas-tight seal.
4. Inspect the air intake port, the sample exhaust port, and the case vent ports of the
instrument to verify they are clear and unobstructed.
5. Verify the purge vent port cap is securely installed onto the port.
WARNING
Failure to correctly install the cap onto the purge vent port results
in excessive loss of refrigerant during the refrigerant identication
procedure, which is a health hazard. A refrigerant identication is
ALWAYS performed before an air purge procedure.
6. Inspect the sample port of the refrigerant storage cylinder or vehicle air conditioning
system to be tested. Verify the port is the LOW SIDE or VAPOR port.
10
Page 13

Operating Procedures
Refrigerant Identication Operational Procedure
1. Plug the power cord of the instrument into a suitable receptacle. Various parameters of
the instrument are displayed and the warm-up period begins.
2. The warm-up period lasts for 90 seconds. The display reads SYSTEM WARMING–
CHECK FILTER, which is a reminder to inspect the instrument's sample lter.
3. During the warm-up period, it is possible to print the results of the last refrigerant
identication run made prior to power-up of the instrument. To print the prior results,
connect a user-supplied cable and printer to the instrument printer port, and press the
“A” button. The prior results are downloaded to the printer.
4. During the warm-up period, enter the local elevation above sea level into the
instrument memory. The instrument is sensitive to elevation changes of 500 feet
(152 meters), and the local elevation must be entered into the instrument memory
upon initial use. After the local elevation has been entered into the instrument memory,
there is no need to enter it again unless the instrument is moved to a new elevation. To
enter the elevation into the instrument memory, follow the procedure presented by the
instrument display.
A. During the warm-up period, depress and hold the “A” and “B” buttons
simultaneously until the display reads USAGE ELEVATION, 400 FEET. This is the
factory setting of 400 ft. (122 meters) elevation.
B.
Use the “A” and “B” buttons to adjust the elevation to the nearest 100-foot
(30-meter) increment. Pushing the “A” button increases the elevation setting by
100-ft. increments. Pressing the “B” button decreases the elevation setting by 100-ft.
increments. The setting is adjustable from 0–9000 feet (0–2743 meters) and is
displayed while adjusting.
11
Page 14

Operating Procedures
C.
When the correct setting of local elevation has been achieved, allow the instrument to
sit for 20 seconds while not pushing either of the buttons. The instrument automatically
returns to the warm-up period, and the elevation setting is stored in memory.
5. After completion of the warm-up period, the instrument self-calibrates. Ambient
air is drawn in through the air intake port and is presented to the sensing device for
calibration. The calibration period runs for 20 seconds.
6. When the calibration period is completed, the instrument displays READY: CON.
HOSE, PRESS A TO START, and the green LED ashes. Connect the service end of
the sample hose to the low side or vapor port of the refrigerant storage vessel or vehicle
air conditioning system to be sampled. When the hose is secured into position, press
the “A” button of the instrument to start processing. NOTE: For correct operation, the
instrument pressure gauge should read at least 10 psig.
Tech Tip: To achieve the best air detection accuracy, allow the instrument to warm up
an additional 5 minutes before pressing the “A” button as stated in Step 5. This allows
additional warming and stabilization of the sensing device before sampling. During
the additional warm-up period, the instrument will “Time-Out” and display RECAL.
Disconnect the sample hose from the refrigerant source, and press the “A” button to
re-calibrate. Once re-calibration is complete, it is not necessary to repeat additional
warm-up periods as long as the instrument is not powered down between sample runs.
7. The instrument reads SAMPLING IN PROGRESS while a small refrigerant sample
is analyzed to determine the concentrations of R-12, R-134a, R-22, hydrocarbons, and
air. Once analysis is complete, the percentage of concentrations of R-12, R-134a, R-22,
and hydrocarbons is displayed. Press “A” to print the results, press “B” to exit (if there
is no air), or press “B” to continue the purge function if air is present.
12
Page 15

Operating Procedures
8. The instrument presents the results of the analysis as outlined below:
PASS R-134a: If the instrument has detected 98% by weight or greater concentration
of R-134a, the green PASS LED illuminates and the weight concentrations of R-12,
R-134a, R-22, hydrocarbons, and air are displayed. The display then prompts the user
to press “A” to print, or press “B” to continue. See Step 9.
PASS R-12: If the instrument has detected 98% by weight or greater concentration of
R-12, the green PASS LED illuminates and the weight concentrations of R-12, R-134a,
R-22, hydrocarbons, and air are displayed. The display then prompts the user to press
“A” to print, or press “B” to continue. See Step 9.
Refrigerant FAIL: If the weight concentration of either R-12 or R-134a is not at
least 98%, the instrument will sound the alarm horn ve times. The red FAIL LED
illuminates and the weight percentages of R-12, R-134a, R-22, and hydrocarbons are
displayed. Note the instrument does not permit purging procedures on contaminated
mixtures. The display prompts you to press “A” to print, or press “B” to exit.
Tech Tip: We suggest retesting a refrigerant source whenever a refrigerant FAIL occurs
to provide verication of initial results.
Hydrocarbon Alarm: If hydrocarbon concentrations are sensed to be 2% by weight
or greater, the instrument sounds the alarm horn 30 times, illuminates the red FAIL
LED, displays HYDROCARBONS HIGH, and displays the weight concentrations of
R-12, R-134a, R-22, and hydrocarbons. The display then prompts the user to press “A”
to print, or press “B” to exit.
WARNING
The occurrence of the hydrocarbon alarm alerts you to the presence
of potentially ammable refrigerant mixtures. YOU BEAR FULL
RESPONSIBILITY for the removal of the potentially hazardous mixture
from the instrument and any other attached equipment.
13
Page 16
Operating Procedures
9. You may now print the results of the analysis. Connect a user-supplied cable and
parallel printer to the printer port of the instrument. Turn on the printer, and press the
“A” button of the instrument. The results of the last analysis are downloaded to the
printer. Note: Should a printer not be readily available, the instrument stores the LAST
result only for printout during the next warm-up period, as described in Step 3.
If no printout is desired, press the “B” button. In the case of pure refrigerant, the
instrument reverts to the purge procedure should there be greater than 2% by weight
air concentrations. The instrument prompts you if an air purge is desired as described
in the Air Purge Operation Procedure. The instrument returns to a calibration mode
when the “B” button is pressed for refrigerants detected to be pure and have 2% or less
air contamination, or refrigerants detected to be contaminated.
Air Purging Operation Procedure
WARNING
Because leaks can develop in the sample hose connections or the
refrigerant source, causing a health hazard, do NOT allow the purging
feature to operate for extended periods, such as overnight, without
periodic inspection of the sample hose connections for leaks.
1. Whenever the instrument has determined that a refrigerant source is pure (98% by
weight or greater R-12 or R-134a), and the air concentration levels exceed 2%, you are
prompted if an air purge is desired. Press the “A” button to initiate the purge procedure,
or press the “B” button to cancel the purge procedure.
2. After the instrument is instructed to purge, the user has the option to adjust the purge
limit setting by pressing the “B” button. The purge limit setting is the level to which
the air is reduced by the instrument. The limit is adjustable by 0.1% increments from
2%–9%. To set the limit, press the “A” button to raise the limit or the “B” button
to lower the limit. When the desired setting is reached and is displayed, allow the
instrument to sit for 15 seconds without pressing any of the buttons. The instrument
automatically stores the setting and continues with the procedure.
14
Page 17

Operating Procedures
3. The instrument reads REMOVE PURGE CAP, CON. HOSE, PRS A. This message
instructs you to remove the cap installed on the purge vent port, and replace it with the
purge vent hose. Direct the free end of the hose away from the instrument so escaping
gasses are not directed back towards the instrument. When the hose is securely
connected, press the “A” button to continue.
4. The instrument reads NOW AIR IS XX.X% PURGING TO XX%. This message
indicates the purging procedure has begun and displays the purge limit setting.
NOTE: The purging procedure may be halted or cancelled at any time by pressing
and holding either the “A” or “B” buttons during the procedure. When either button
is pressed and held, the instrument displays PURGE STOPPED, PRESS A TO CONT.
B TO EXIT. To end the purge process, press the “B” button. To continue with the
purge procedure, press the “A” button. In either case, the instrument performs a
self-calibration and either continues with the purge procedure or prompts you for
another run. If the purge process has been stopped, and “B” was selected (exit purge
process), you must replace the cap on the purge port and disconnect the service end of
the sample hose.
Not Pure Alarm: If the instrument detects that the level of R-12 or R-134a is not at
least 98% by weight, an alarm sounds and the purging process is halted. If the alarm
sounds, press “B” to continue. The purge procedure is cancelled, and the instrument
reverts to self-calibration, ready for a new procedure.
Excessive Air Alarm: If air contamination is detected to be 25% by weight or greater,
an alarm sounds and you are asked if the purge procedure should continue. Press
the “A” button to re-calibrate and continue purging; press the “B” button to revert
to calibration and a new procedure. The excessive air alarm is included as a safety
measure to prevent high losses of refrigerant. The purging of air from such high levels
down to 2% requires high losses of refrigerant vapor.
15
Page 18

Operating Procedures
Time Out: To conserve refrigerant during a potentially long purging procedure, the
instrument automatically halts the operation after a time-out of 1-1/2 hours. You are
asked if the procedure is to continue. To restart the procedure, press the “A” button;
press the “B” button to end the session and return to calibration. Note that purge
duration in excess of 1-1/2 hours is unusual (assuming a 50 lb. cylinder or smaller
is being purged) and can be caused by high levels of air contamination, refrigerant
contamination other than R-12, R-134a, R-22, or hydrocarbons, or by absence of liquid
refrigerant in the refrigerant source.
Calibration: To keep the instrument at peak accuracy, an occasional self-calibration
is performed. The purge procedure is momentarily halted until completion of the
20-second self-calibration operation. The self-calibration automatically occurs after the
rst ve minutes of the purging procedure, and then at 10-minute intervals thereafter.
The calibration operation is fully automatic and requires no intervention.
Normal Purging Procedure: During the purging process, the instrument displays
NOW AIR IS XX.X% PURGING TO X.X%. Purge times vary with application and
are dependent upon headspace size in the source, amount of initial air contamination,
and the purge limit setting. Typically, it requires three minutes to purge an automotive
air conditioning system from 8% to 2% contamination levels. A typical 50 lb. storage
cylinder that is at least 50% liquid requires one hour to reduce the contamination levels
from 8% to 2 %. Observation of the instrument display reveals air contamination levels
may rise and fall during the purging procedure. This uctuation is normal and is the
result of air coming out of liquid solution and repeated refrigerant displacements of air.
5. When the purging procedure is complete, the instrument display reads DONE, AIR
IS X.X% PRESS B TO EXIT and the green LED ashes. Press the “B” button to exit
the purge operation and return to the calibration operation to be ready for another
refrigerant identication procedure. Replace the cap on the purge port, and disconnect
the service end of the sample hose BEFORE calibration occurs. If the instrument will
not be used again at this time, unplug the power cord to power down the instrument.
16
Page 19

Operating Procedures
Post-Operational Procedure
1. Unplug the instrument power cord.
2. Disconnect the sample hose from the inlet port of the instrument. Inspect the hose for
signs of wear, such as cracking, fraying, or kinks. Verify the hose is not obstructed, and
that no oil is present inside the hose. Store the inspected hose in the storage case. If
the hose shows signs of wear, obstruction, or oil, it MUST BE REPLACED BEFORE
USING THE INSTRUMENT AGAIN.
3. Disconnect the purge vent hose, if it is connected, and clean and stow it in the storage
case. Replace the cap onto the purge vent.
WARNING
ALWAYS replace the cap onto the purge vent port. Failure to replace the
cap can result in excessive refrigerant loss during the next use of the
instrument, which is a health hazard.
4. Inspect the sample lter for signs of red spots or discoloration on the white outside
diameter of the lter element. If any red spots or discoloration are noticed, REPLACE
THE FILTER BEFORE USING THE INSTRUMENT AGAIN.
CAUTION
When red spots or discoloration begin to appear on the white outside
diameter of the lter element, THE FILTER MUST BE REPLACED. Failure
to correctly maintain the sample lter may result in severe instrument
damage that is not covered under warranty repairs.
5. Using a moist cloth, clean the instrument of accumulated dirt, oil, grime, etc. Do
NOT USE SOLVENTS OR LIQUIDS TO CLEAN THIS INSTRUMENT. Stow the
instrument in the storage case.
17
Page 20

Error Codes
Error Codes and Corrective Actions
The instrument is supplied with self-diagnostic software to guide you through problems
that may occur in the eld. The software supples three codes that direct you toward
corrective measures. Should the corrective measures not clear the problem, contact
Technical Services for assistance.
ERR.1
Signies unstable readings due to inconsistent sample supply or interference from
strong electrical elds.
Corrective Action for Error 1:
1. If the error code occurs during a sampling mode, verify the sample hose is receiving a
sample of at least 9 psig. Also, verify the sample exhaust and air intake ports are clear
and not obstructed in any manner.
2. If this error occurs during a calibration mode, verify the purge vent hose is not directed
towards the instrument, and the air intake and sample exhaust ports are clear and not
obstructed.
3. The unit must be kept away from sources of strong electrical elds (such as large
compressors). Move the instrument 3 to 5 feet (1 to 1.5 meters) away from such
sources and try again.
4. If the instrument is being used in an environment outside the operating temperature
range of 39° F to 122° F (4° C to 50° C), allow the instrument an additional warm-up
period of 15 minutes after power-up before use.
5. To clear the error code, unplug the instrument. The error code will be cleared at the
next power-up.
18
Page 21

Error Codes
ERR.2
Signies internal sensor failure due to temperature extremes.
Corrective Action for Error 2:
1. Allow the unit to stabilize at room temperature for at least 30 minutes.
2. To clear the error code, unplug the instrument. The error code will be cleared at the
next power-up.
ERR.3
Signies a calibration fault.
Corrective Action for Error 3:
1. Verify the purge vent hose is not directed towards the instrument, and the air intake
port and the sample exhaust ports are not obstructed.
2. If the instrument is being used in small, closed areas, refrigerant vapors can build up
in the surrounding atmosphere. These vapors are drawn into the air intake port during
calibration and will cause a fault. Move the instrument to a location with fresh, ambient
air free of refrigerant vapors. Use the instrument in locations that provide adequate
ventilation to prevent the accumulation of refrigerant vapors.
3. To clear the error code, unplug the instrument. The error code will be cleared at the
next power-up.
19
Page 22

Maintenance
Sample Filter Replacement
Inspection Frequency: Inspect the sample lter before and after each use of the
instrument.
What to Look For: When inspecting the sample lter, look around the entire outside
diameter of the white lter element located inside of the plastic housing. Look for red
spots or the beginnings of discoloration on the white outside diameter of the element.
Do not look into the round ends of the white element for red spots or discoloration—
the round ends of the lter may always appear red. If red spots or discoloration are
discovered, the sample lter requires replacement to prevent the inux of particulate and
oil mists into the instrument.
Sample Filter Replacement Procedure:
1. Obtain replacement lter No. 16912.
2. Remove the existing lter from the retaining clip of the instrument by pulling
straight up and out.
3. Carefully remove the exible, black, rubber tubing connections from both ends of
the existing lter. Do NOT allow the tubes to slip back into the internal portion of
the case.
4. Discard the existing lter according to local, state, and federal requirements.
5. Install the tube ends onto the barbs of the replacement lter, aligning the ow arrow
of the lter with the ow arrow on the instrument.
6. CAREFULLY slide the tubing back into the internal portion of the instrument, and
seat the new lter into the retaining clip.
7. Inspect the sample hoses for signs of oil entrapment. Replacement of the sample
lter usually requires cleaning or replacement of the sample hoses.
20
Page 23

Maintenance
Sample Hose Inspection and Cleaning
Inspection Frequency: Inspect sample hoses before and after each use of the instrument
and after every replacement of the sample lter.
What to Look For: Inspect the inside diameter of the inner tube for signs of oil buildup,
dirt, obstructions, kinks, cuts, fraying, or any other signs of wear. Oil contamination can
be cleaned out of the sample hoses as directed below. Hoses that show signs of wear
should be replaced immediately to avoid danger of rupture or bursting.
Sample Hose Cleaning Procedure:
1. Remove the hose from the instrument and ush it with isopropyl alcohol or methanol
until the oil is thoroughly cleansed from the inner tube.
WARNING
To prevent personal injury, ush hoses away from sparks, open ames
or other ignition sources and in an area that is well ventilated.
2. Dry the hose by blowing clean, dry nitrogen or shop air through the inner hose, or by
allowing the hose to air-dry for several hours. Do not dry the hose with shop air that is
lubricated.
3. When the hose is completely dry, reinspect the hose for signs of wear, as described
above, and replace the hose if wear is evident.
21
Page 24
Replacement Parts
Replacement parts are available directly from Robinair distributors. To nd your nearest
distributor, look on our web site at www.robinair.com or call 1-800-822-5561.
Part Description Part No.
R-12 Sample Hose 19713
R-134a Sample Hose 19716
R-134a ACME Tank Adapter Fitting 19714
Replacement Sample Filter 16912
R-134a Low-Side Coupler* 19715
* The low-side coupler is a modied version of a standard coupler, does not contain a
check valve, and is not suitable for use in applications other than for the Refrigerant
Identier or the Deluxe Refrigerant Diagnostic Tool.
22
Page 25

Specications
Sample Parameters Vapor only, oil-free, 300 psig (2 MPa max.)
Detected Compounds R-12, R-134a, R-22, hydrocarbons, air
Sensor Technology Non-Dispersive Infrared (NDIR)
Refrigerant Sample Size 0.3 ounces (8.5 grams) per sample
Refrigerant Loss during Purge Operation Typically 0.4 ounces (11 grams) per minute of
purge time. Refrigerant loss is dependent upon
many factors, such as refrigerant source size,
refrigerant source head space, initial refrigerant
contamination, and nal purge limit setting.
Power
Operational Temperature 39° F – 122° F (4° C – 50° C)
SAE1771: If the refrigerant being tested is identied as contaminated, any visual percentages
displayed of CFC-12 (R-12) or HFC-134a (R-134a) outside the design-certied value is informa-
tional and may not be accurate.
SAE CERTIFICATION NOTE: This equipment has not been design-certied for contaminate
detection of R-124 or R142B.
Universal 110/220V AC, 50/60 Hz, 0.2 amps max.
23
Page 26

Warranty
This product is warranted to be free from defects in material and workmanship under
normal use and service for a period of one year after the sale of the product. Exceptions
to this policy will be individually identied. Sole obligation under this Warranty shall be
to repair or replace any defective product or parts thereof, which are returned to Seller’s
factory, transportation charges prepaid, within the period mentioned above, and which
upon examination are provided to Seller’s satisfaction to be defective.
The Warranty shall not apply to any product or part which has been subject to misuse,
negligence, or accident. The Seller shall not be responsible for any special or consequential damages, and the Warranty as set forth is in lieu of all other warranties either
expressed or implied. However, Seller makes no warranty of merchantability in respect
to any products for any particular purpose other than that stated in this literature, and
any applicable manufacturer’s shop or service manuals referred to therein, including any
subsequent service bulletins.
24
Page 27

Page 28
Visit our web site
at
www.robinair.com
%
or
call our Toll-Free
Technical Support Line at
800-822-5561
in the continental U.S. or Canada.
In all other locations, contact your local distributor. To help
us serve you better, be prepared to provide the model
number, serial number, and date of purchase.
To validate the warranty, complete the warranty card
supplied, and return it within ten days from date of purchase.
Due to ongoing product improvements, we reserve the right
to change design, specications, and materials without notice.
655 Eisenhower Drive
Owatonna, MN 55060 USA
Technical Services: 1-800-822-5561
Customer Service: 1-800-533-6127
122727 Rev. D July 22, 2013 © Bosch Automotive Service Solutions
Fax: 1-866-259-1241
Fax: 1-800-322-2890
www.robinair. com
 Loading...