


RD-1
Gemini 1
FM /DAB digital radio
with
ROBERTS
Sound for Generations
Please read this manual before use

Contents
Controls ............................................................................... 2-4
Battery operation .................................................................... 5
Using the AC adaptor ............................................................ 4
Operating your radio - DAB ................................................ 6-7
Secondary services - DAB ..................................................... 8
Display modes - DAB ............................................................ 8
Using your radios Pause Plus feature - DAB........................ 9
Pause Plus - rewind - DAB................................................... 10
Pause Plus - record (internal memory) - DAB .................... 11
Pause Plus - play (internal memory) - DAB ........................ 11
Pause Plus - record (SD card) - DAB .................................. 12
Pause Plus - play (SD card) - DAB...................................... 12
Pause Plus - storage settings - DAB ..............................13-16
Record Timer - DAB ....................................................... 17-19
SD Card format - DAB .................................................... 20-21
Programme type - DAB ....................................................... 22
Favourites - DAB .................................................................. 23
Manual tuning - DAB ............................................................ 24
Service status - DAB ....................................................... 25-26
Dynamic Range Control (DRC) settings - DAB .................. 27
Tuning range - DAB ............................................................. 28
Digital output - DAB ............................................................. 29
Radio Data Interface (RDI) output - DAB ........................... 30
Audio outputs ....................................................................... 31
Audio 2 setup - DAB ............................................................ 31
Operating your radio autosearch - FM................................ 32
Operating your radio manual tune - FM .............................. 33
Presetting stations - DAB & FM............................................ 34
Recalling preset stations - DAB & FM ................................. 34
Clock settings .................................................................. 35-37
Alarms .................................................................................. 38
Buzzer alarm .................................................................. 38-39
Radio alarm .................................................................... 40-42
Snooze function ................................................................... 43
Sleep timer ...................................................................... 43-44
Display settings .................................................................... 45
Display settings - Display saving ........................................ 45
Display settings - Display backlight .................................... 46
Display settings - Contrast................................................... 47
Keypress settings - Timeout ................................................ 48
Keypress settings - KeyBeep............................................... 49
Factory default...................................................................... 50
Headphone socket............................................................... 51
General ................................................................................. 52
Circuit features ..................................................................... 52
Guarantee ............................................................................ 54
1
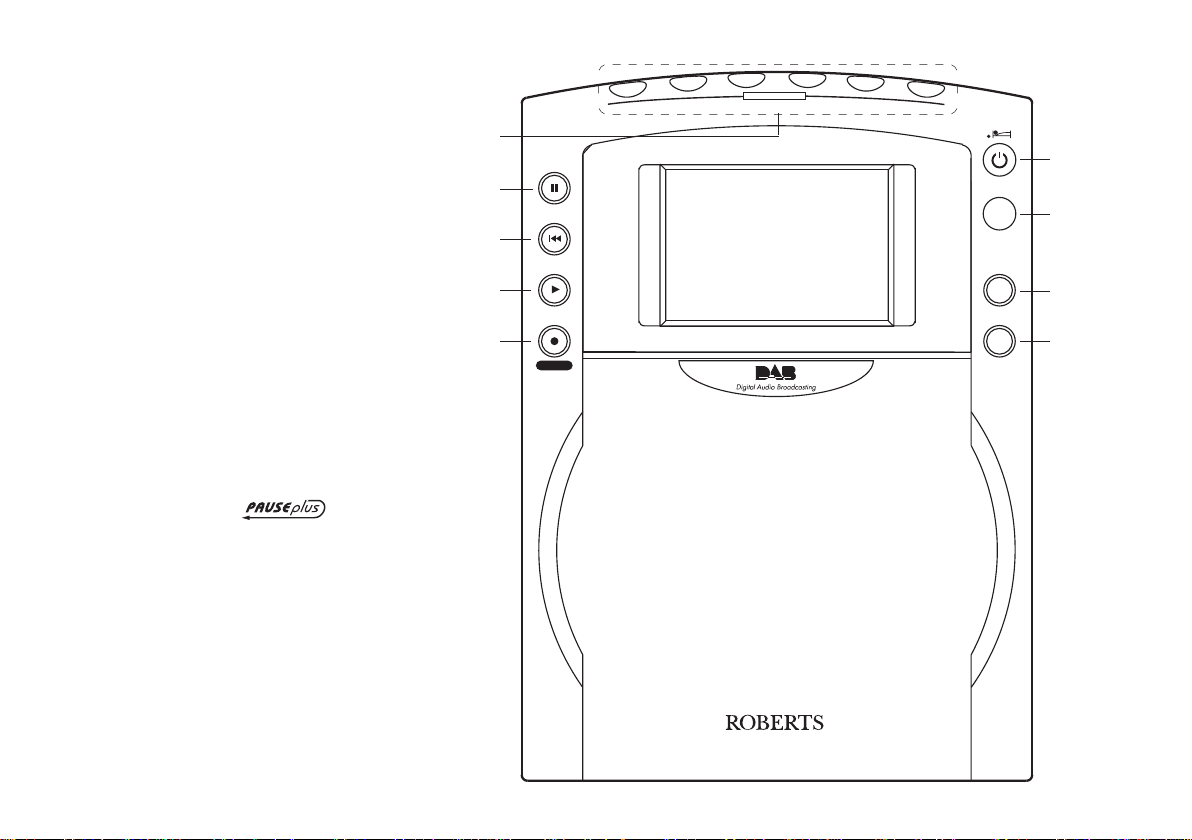
Controls
3
1
2
Station Presets
4
5
6
(Front)
1. Record button
2. Play button
3. Rewind button
4. button
5. Preset buttons
6. On/Off and sleep button
7. Band button
8. Display button
9. Set-up button
5
Pause
4
Rewind
Band
6
7
3
Play
2
stop
RD-1
1
Record
FM/DAB Digital Radio
Display
8
Set-up
9
If you need any further advice, please call our Technical Helpline on :020 8758 0338 (Mon-Fri)
2
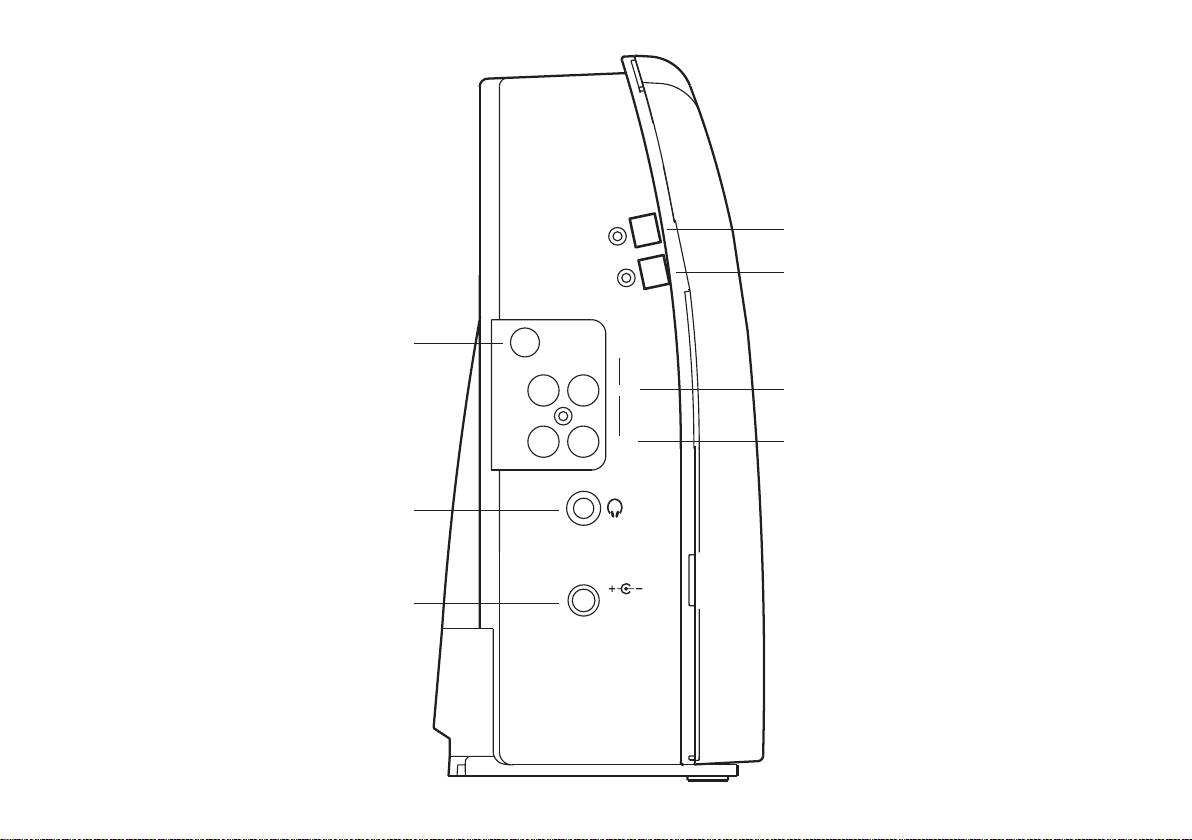
Controls (Left side)
RDI
Digital Audio
Out
12
13
9. DC input socket
10. Headphone socket
11. Telescopic aerial
12. RDI output socket
13. Digital audio output socket
14. Analogue audio 2 output socket
15. Analogue audio 1 output socket
3
11
10
RIGHT
Analogue
Audio Out
2
1
DC IN
9~12V 2A
14
15
Aerial
LEFT
9

Controls (Right side)
21
20
19
TUNING
Press
to select
VOLUME
18
TREBLE
17
BASS
16
If you need any further advice, please call our Technical Helpline on :020 8758 0338 (Mon-Fri)
Max
Min
16. Bass control
17. Treble control
18. Volume control
22
19. Tuning control
20. SD card socket
21. Lock Switch
22. Battery compartment
4
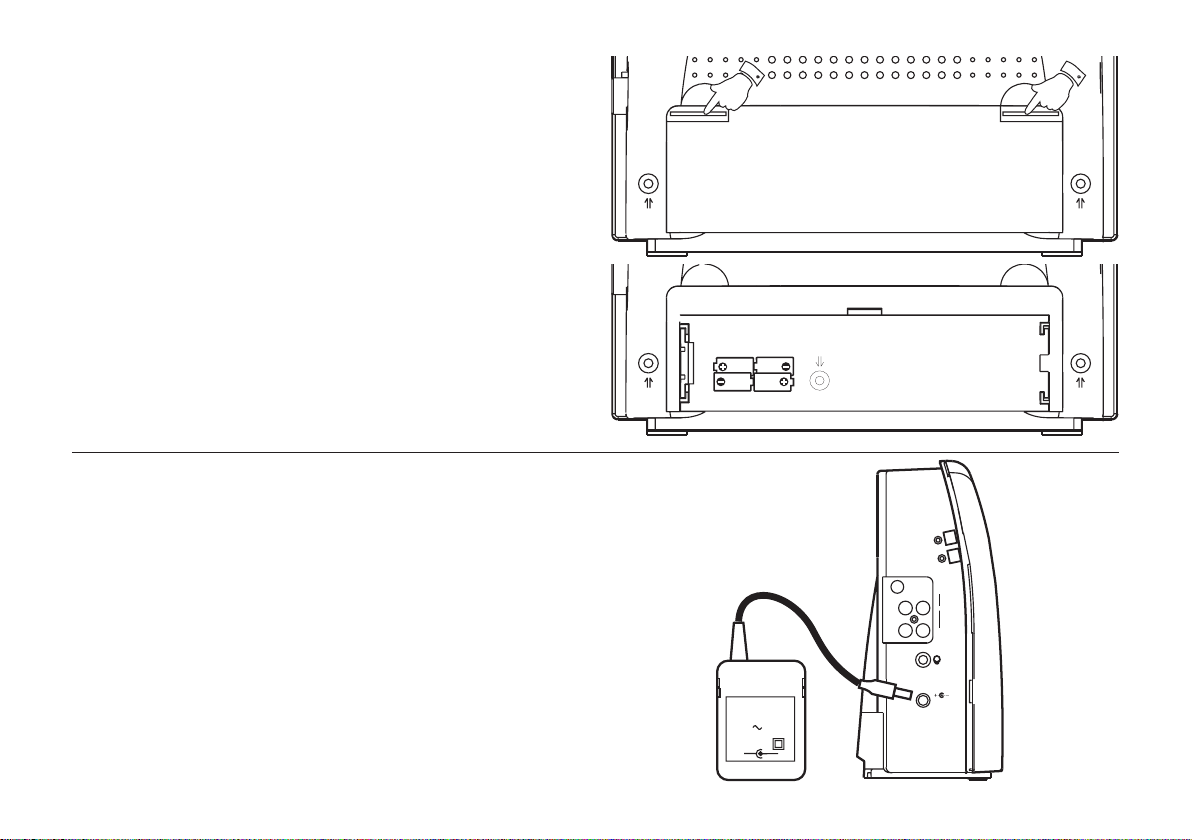
Battery operation
1. Remove the Battery cover on the rear of the unit by pushing the
catches as shown.
2. Insert four LR20 (D size) batteries into the spaces in the compartment. Take care to ensure all batteries are inserted with the correct
polarity as shown inside the battery compartment. Replace the
battery cover.
3. Reduced power, distortion and a ‘stuttering’ sound are all signs that
the batteries may need replacing.
4. If the radio is not to be used for any extended period of time it is
recommended that the batteries are removed from the radio.
Battery life
Using the AC adaptor
1
BATTERIES:
4x 1.5vSiz e D / UM-1 / R20
1
1. Place your radio on a flat surface.
2. Insert the adaptor plug into the DC socket located on the left side of
your radio.
3. Plug the adaptor into a standard 13 amp mains socket outlet.
Whenever the adaptor is used the batteries are automatically
disconnected.
The AC adaptor should be disconnected from the mains supply and
the radio when not in use.
We would recommend for economy that your radio is used
via the AC adaptor whenever possible with battery operation
for occasional or stand-by use only.
5
ROBERTS
230V 50Hz
+
RDI
DigitalAudio
Out
Analogue
Aerial
AudioOut
LEFT
RIGHT
2
1
DC IN
9~12V 2A
-
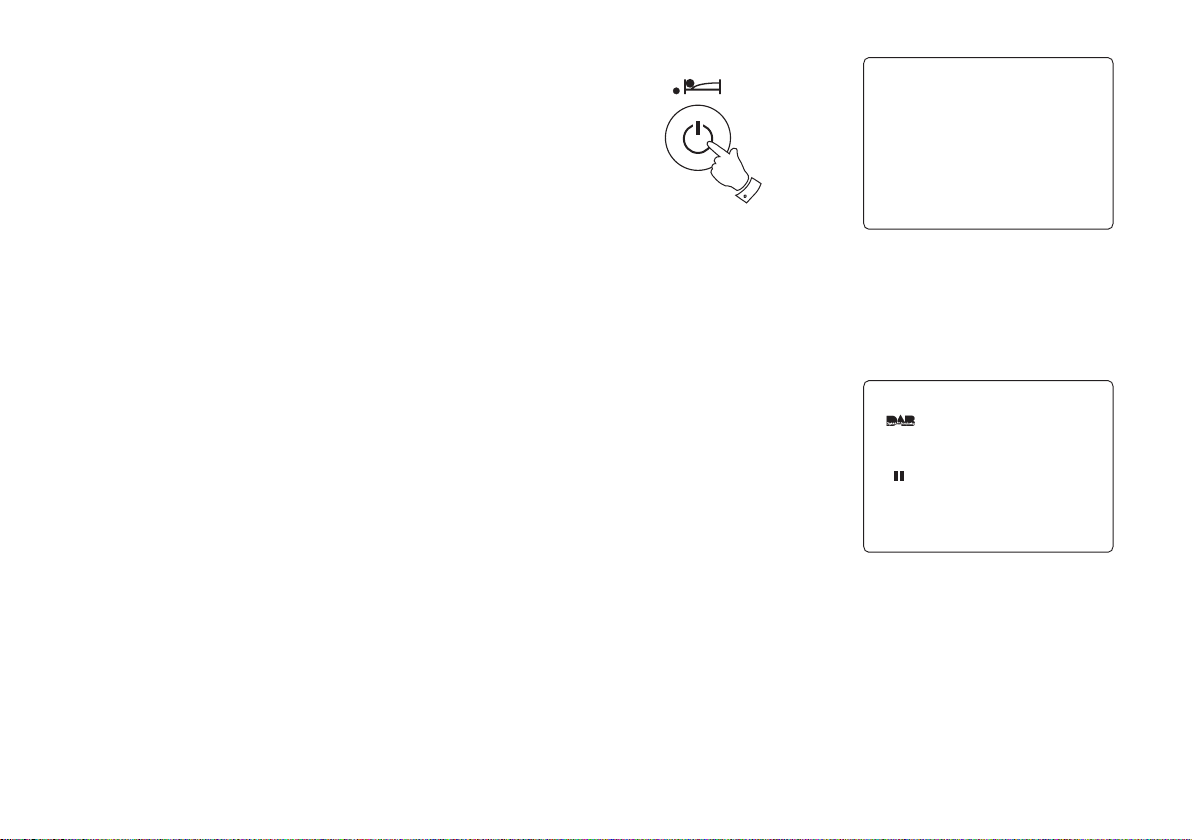
Operating your radio - DAB
12:00
Wednesday
06-March-2002
DAB Auto Tune
0% 100%
Scanning 11d
Services Found :20
1. Fully extend the telescopic aerial.
2. Press the On/Off button to switch on your radio. If this is the first
time the radio is used the display will show DAB Auto Tune and a
quick scan of UK Band III DAB channels will be carried out.
If the radio has been used before the last used station will be
selected.
4. During Auto Tune as each group of stations is detected the bottom
line of the display will show the number of stations found. The
display will also show a bargraph indicating progress of the
Autotune.
5. When the Auto Tune is complete the first station (in numeric-alpha
order 0...9...A....Z) will be selected.
6. If the station list is still empty after the DAB Auto Tune your radio will
display No DAB Service.
7. If no signals are found it may be necessary to relocate your radio
to a position giving better reception.
If you need any further advice, please call our Technical Helpline on :020 8758 0338 (Mon-Fri)
2
6
Operating your radio - DAB
1Xtra - BBC
1Xtra - BBC
AbracaDabra
BBC Radio 1
BBC Radio 2
BBC Radio 3
AUTO
BBC Radio 1
The Radio 1 Breakfast Show
with Chris Moyles
- the studio webcam is at
www.bbc.co.uk/radio1
09:05 18-May-2004
AUTO
1Xtra - BBC
1Xtra - BBC
AbracaDabra
BBC Radio 1
AUTO
All
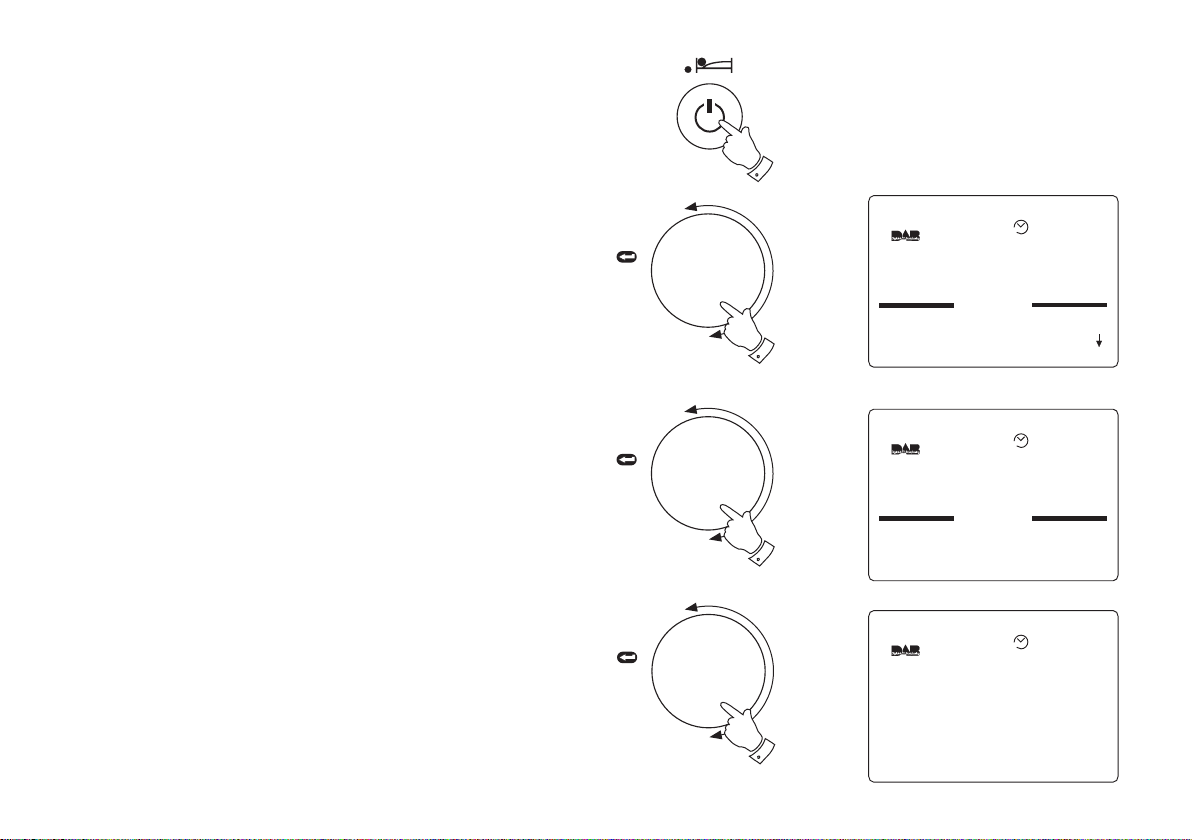
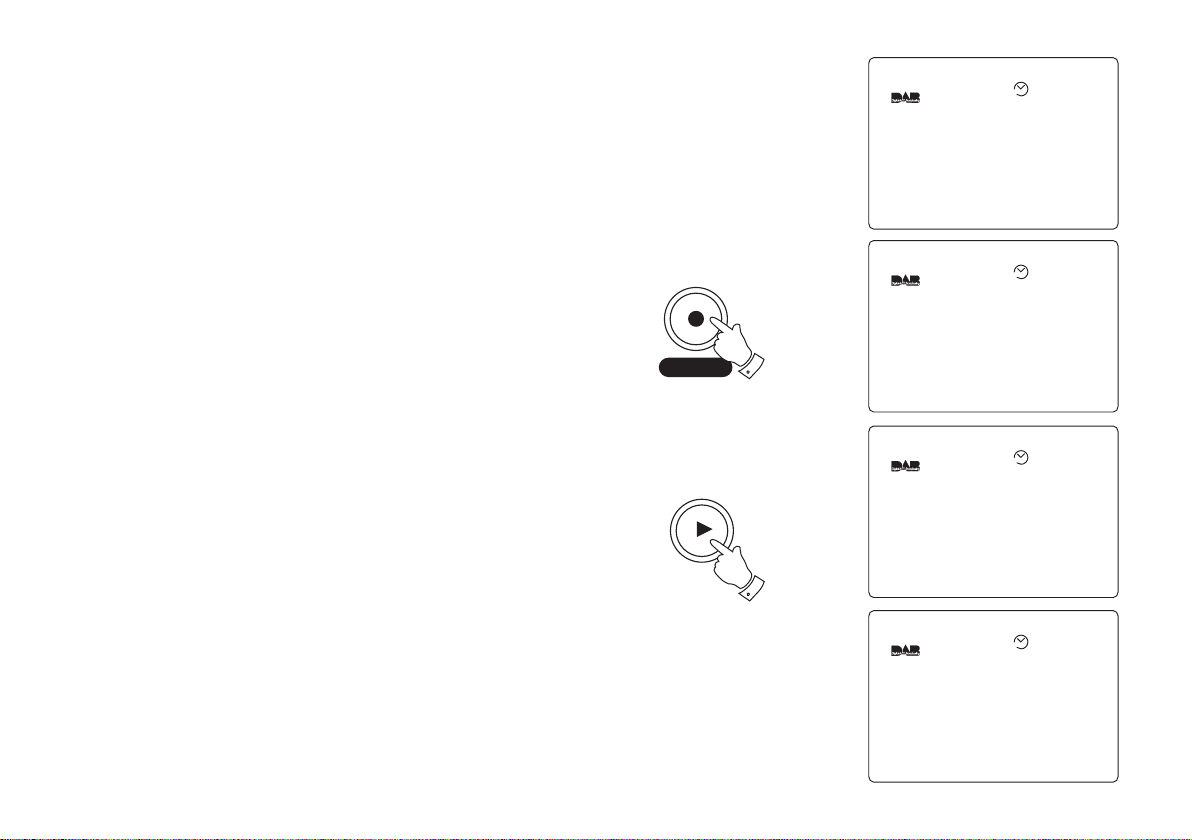
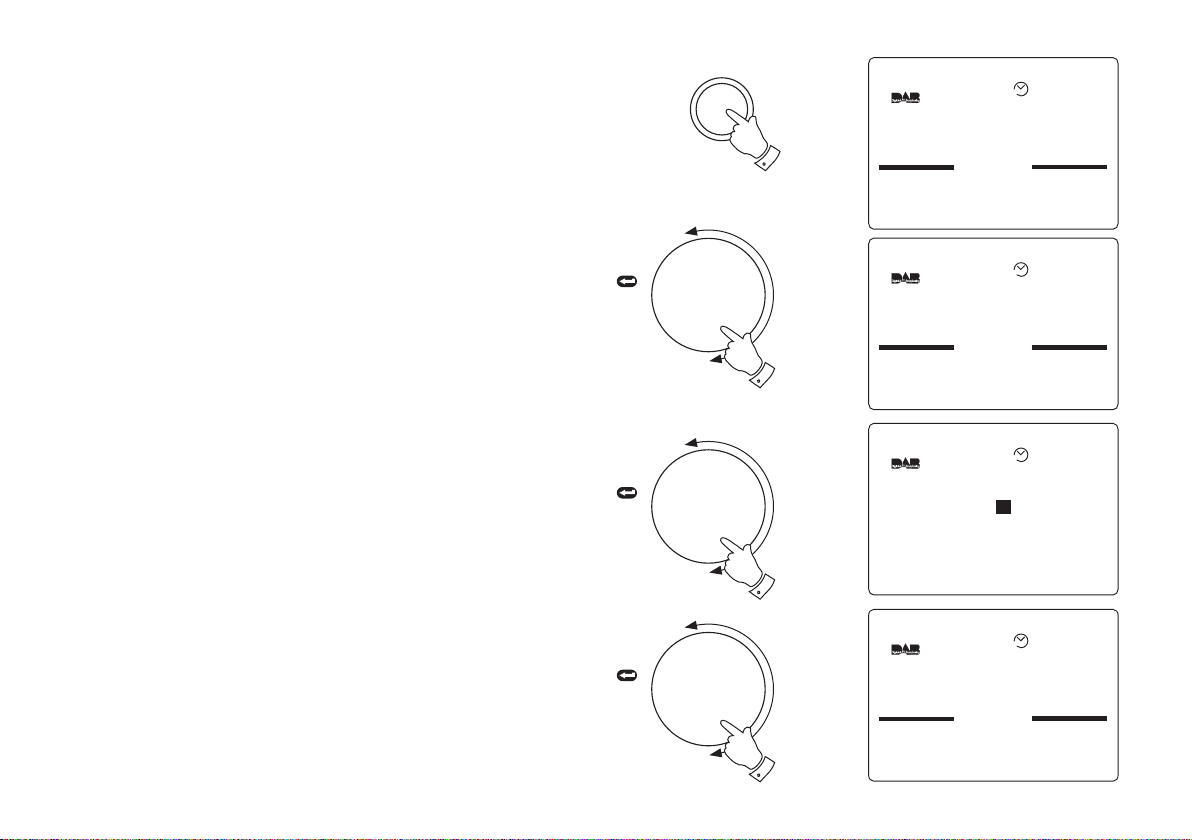
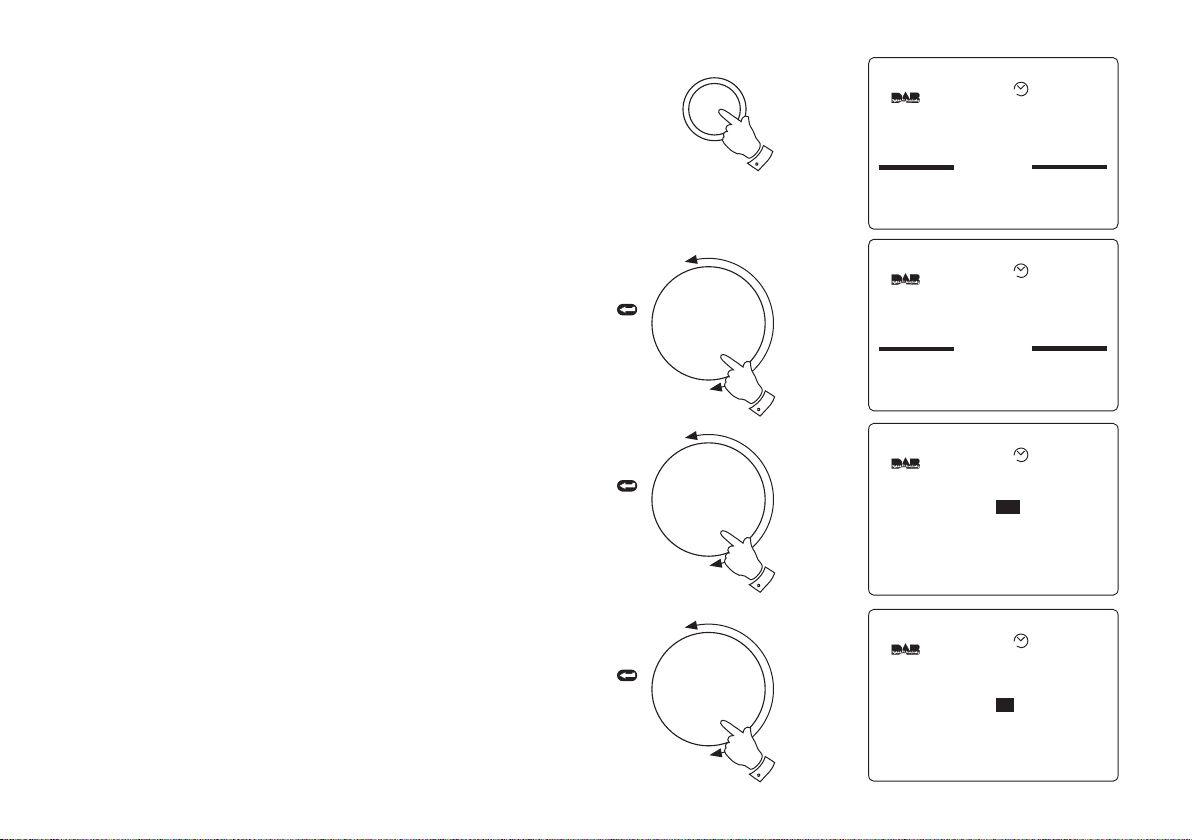
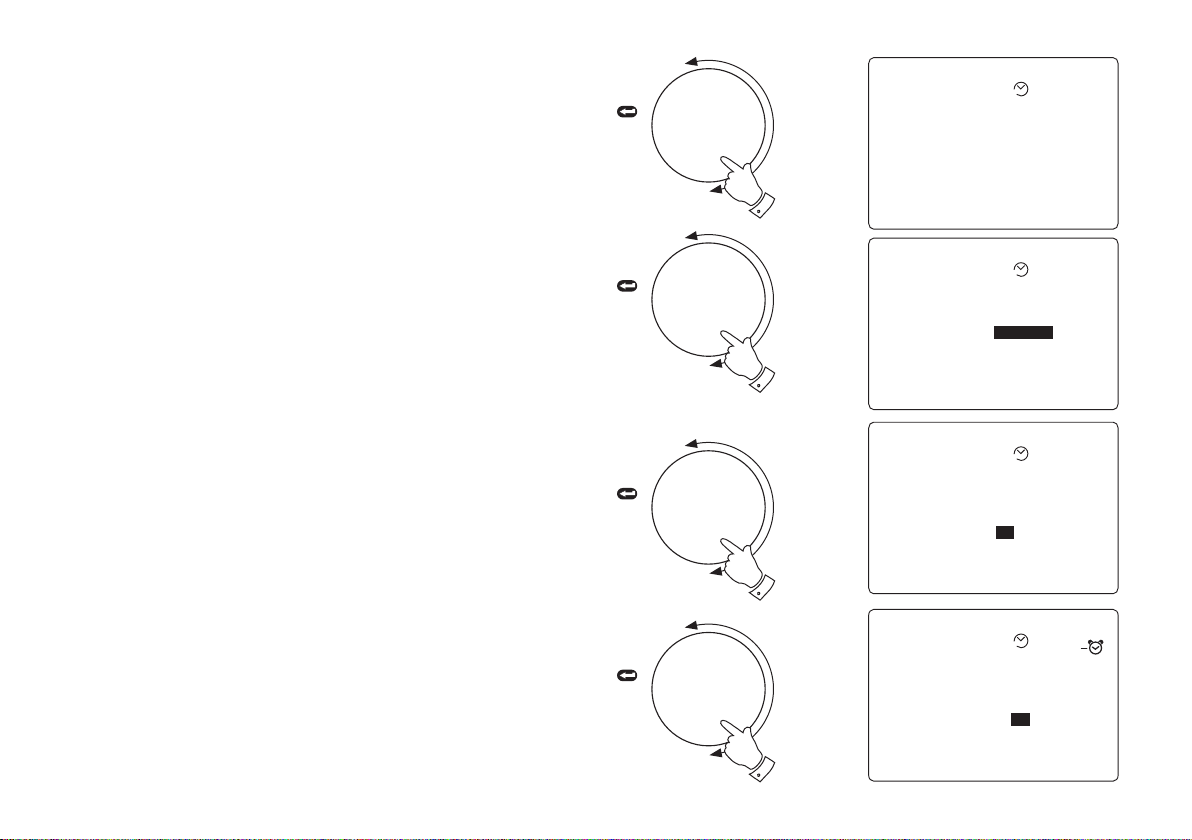
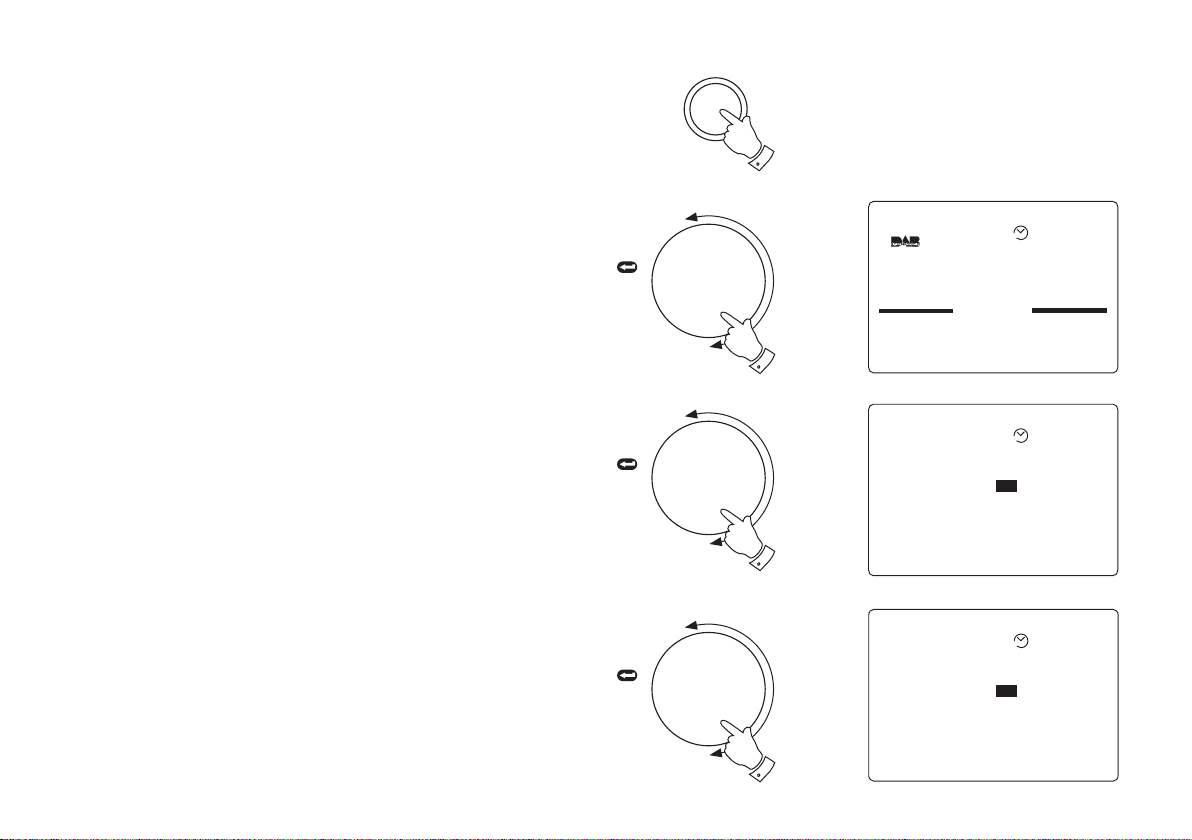
1. Fully extend the telescopic aerial.
2. Press the On/Off button to switch on your radio.
3. Rotate the Tuning control until the station list appears.
4. Continue to rotate the Tuning control until the required station
appears between the two black bars on the display.
5. Press in and release the Tuning control to select the station. The
required station will be selected and after a few seconds the
Dynamic Label System text (DLS) will appear on the display.
6. Adjust the Volume, Bass and Treble controls to the required
settings.
Note: To return to normal station mode from station list
without selecting a station press and release the Display
button.
TUNING
Press
to select
TUNING
Press
to select
TUNING
Press
to select
2
3
4
7
5

BBC Radio 1
Pop Music
BBC National DAB
Signal:
Battery:
09:05 18-May-2004
I I I I I I I
I I I I I I I I I I I I I I I I I I
I I I I I I I
I I I I I I I I I I I I I I I I I I
AUTO
BBC Radio 1
The Radio 1 Breakfast Show
with Chris Moyles
- the studio webcam is at
www.bbc.co.uk/radio1
09:05 18-May-2004
AUTO
Secondary services - DAB
BBC Radio 4
Rumpole or the Bailey
Coming next - Life Death and
Sex with Mike and Sue
09:45 25-May-2004
AUTO
Secondary
Daily Service
09:45 25-May-2004
AUTO
1. Certain radio stations have one or more secondary services
associated with them. If a station has a secondary service the top
line of the display will show Secondary. To select the secondary
service Press in and release the Tuning control.
2. To change back to the primary service Press in and release the
Tuning control.
Display modes - DAB
Your radio has two display modes - normal mode shows Station name
and information text (DLS) - extended mode shows extra information
such as Programme type, Multiplex name, Signal strength and Battery
level.
1. Press the Display button to change display mode
TUNING
Press
to select
TUNING
Press
to select
1
2
Display
1
2. Press the Display button to change back to original display mode.
If you need any further advice, please call our Technical Helpline on :020 8758 0338 (Mon-Fri)
Display
2
8
Using your radio's Pause Plus feature - DAB
BBC Radio 1
Paused From : 10:10
For : 01:15 (15:00)
Available : 13:45
10:10 18-May-2004
AUTO
BBC Radio 1
Rewind : 01:15
Available : 13:45 (15:00)
10:10 18-May-2004
AUTO
Rewind
BBC Radio 1
The Radio 1 Breakfast Show
with Chris Moyles
- the studio webcam is at
www.bbc.co.uk/radio1
09:05 18-May-2004
AUTO
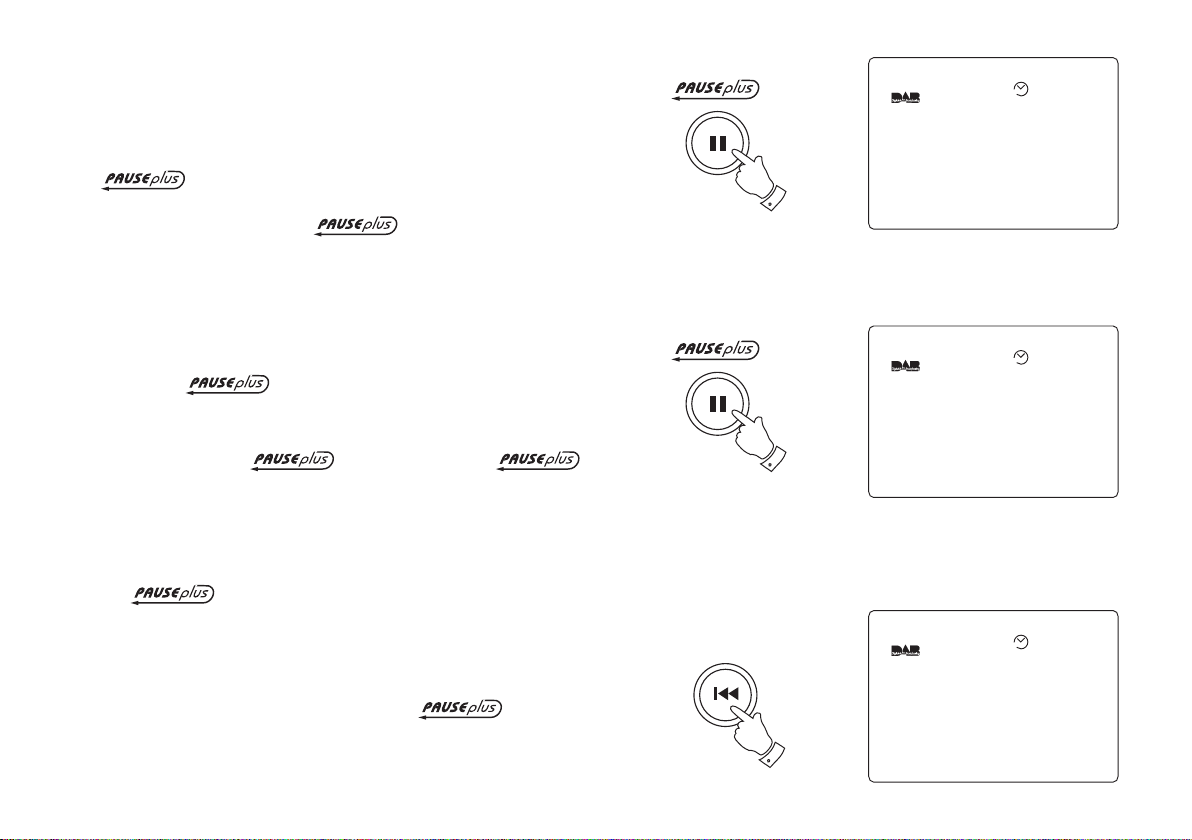
How many times has your favourite radio station been interrupted
by that phone call from a double glazing firm or someone selling that
must have item? Sound familiar? Now with a single press of the
button you can put your favourite station on hold while
you answer that important call. After the call or other important task
is finished simply press the button to return to your
favourite station exactly where you left off so that you never miss
a single word.
Radio stations can effectively be put on hold for typically 15 minutes
but can be up to 30 minutes depending on the DAB storage settings
(see page 13)
Note the feature only operates on the DAB
waveband.
1
1. To place your radio in mode simply press the
button, the sound from the loudspeaker will be muted. The display
will show the time station was paused, duration of pause and
remaining pause time available.
2. To return to the radio station that you were listening to simply press
the button and your radio will continue playing from
where you left off. The display will show the amount by which you
are behind real time together with the remaining pause time.
3. To return to real time press and release the Rewind button, the
9
display will return to previous mode prior to operation.
2
3
Pause Plus Rewind - DAB
Rewind
BBC 7
Rewind : 01:15
Available : 13:45 (15:00)
11:01 18-May-2004
AUTO
BBC 7
The Brighton Mystery
Journalist Polly solves murder
mysteries with the help of a
mystery Man in a tea room
11:10 18-May-2004
AUTO
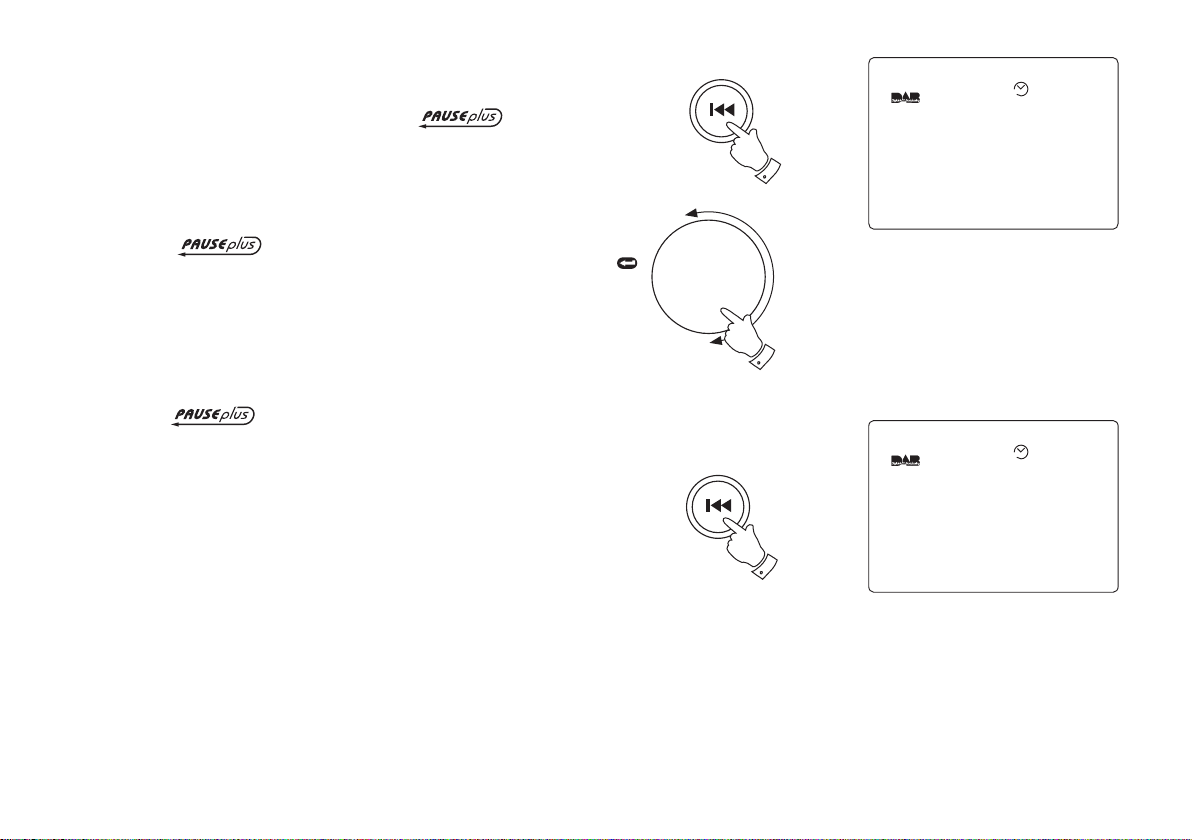
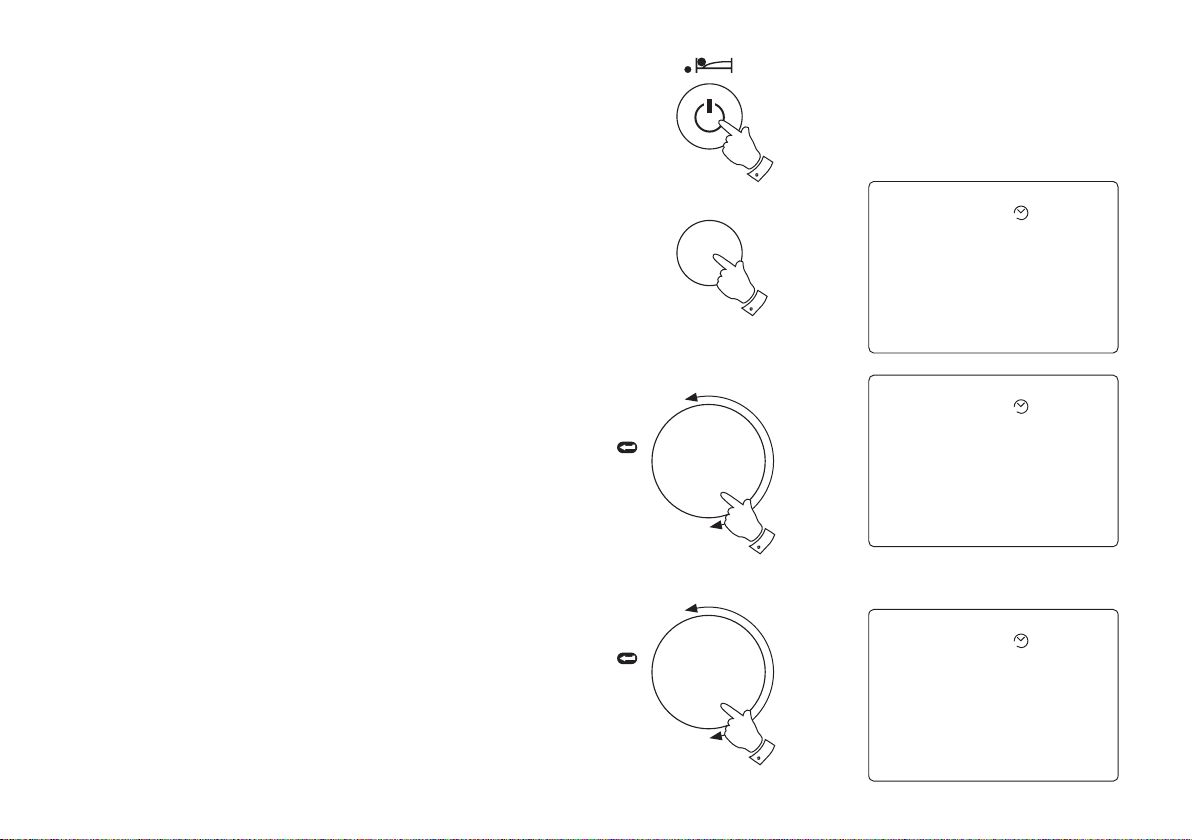
1. As soon as you switch on your radio the feature is
working silently in the background so, say for example, you want
to hear a news item again press the Rewind button and rotate the
tuning control clockwise to scroll back to the item you wish to listen.
The display will show the amount of time you have scrolled back
together with the maximum time you can rewind back to.
Note the rewind memory only starts when your
radio is switched on.
2. To return to real time press the Rewind button.
3. Rewind memory is typically 15 minutes but can be up to 30 minutes
depending on the DAB storage settings (see page 13)
Note the rewind feature only operates on the DAB
waveband.
TUNING
Press
to select
1
1
Rewind
2
If you need any further advice, please call our Technical Helpline on :020 8758 0338 (Mon-Fri)
10
Pause Plus Record (internal memory) - DAB
Record
Recording
BBC 7
Recording 0:01:00
Rec Available 0:51:00
13:57 18-May-2004
AUTO
BBC 7
Rumpole or the Bailey
Coming next - Life Death and
Sex with Mike and Sue
13:58 18-May-2004
AUTO
Warning
End of File
14:57 18-May-2004
AUTO
Playback
BBC 7
Playback 0:01:00
Duration 0:30:00
14:06 18-May-2004
AUTO
Record
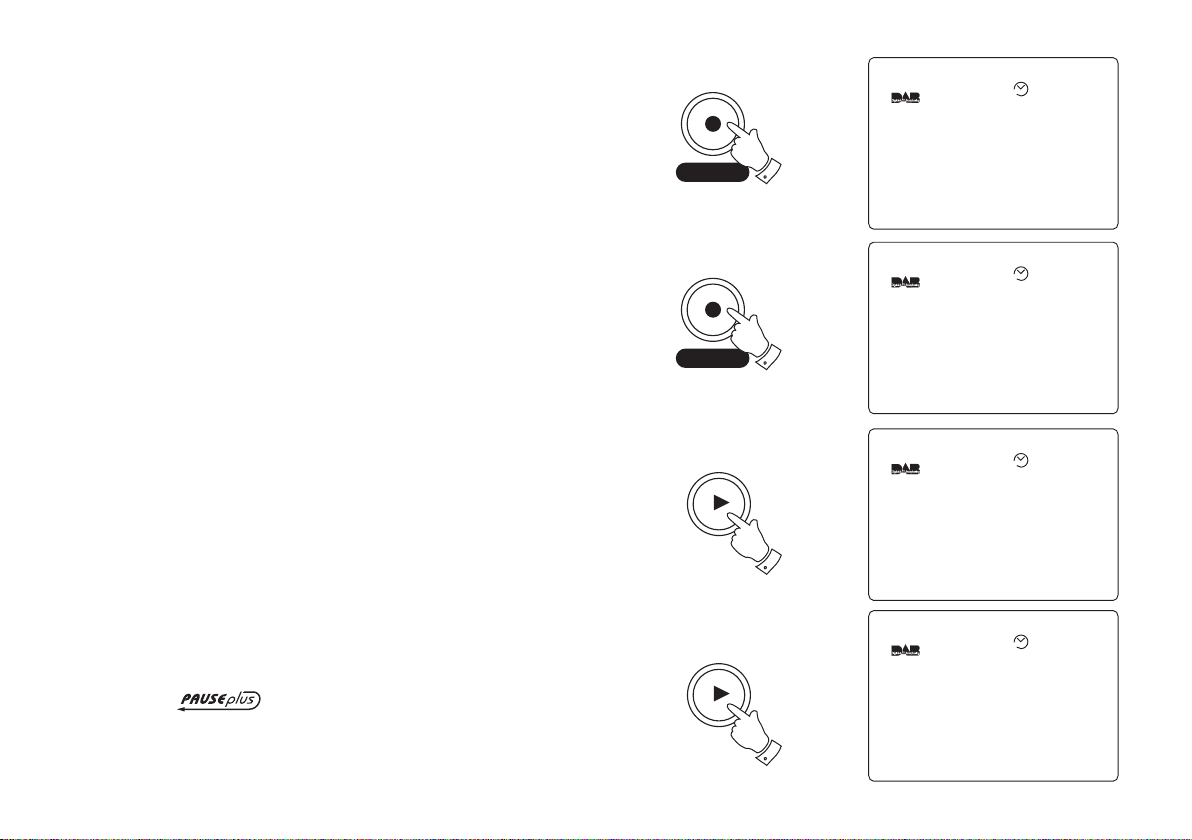
1. Your radio can record to its internal memory for typically 30 minutes
but can be up to 1 hour depending on DAB storage settings (see page
13) and the programme you are listening to.
2. Press and hold in the Record button until the display shows
Recording.
3. The display will show the recording duration together with the
remaining record time available.
2
4. Press the Record button to stop the recording.
Note: If the SD card becomes full during the recording the
display will show Memory Full. Press the Record button to
stop the recording and press again to return to normal
mode.
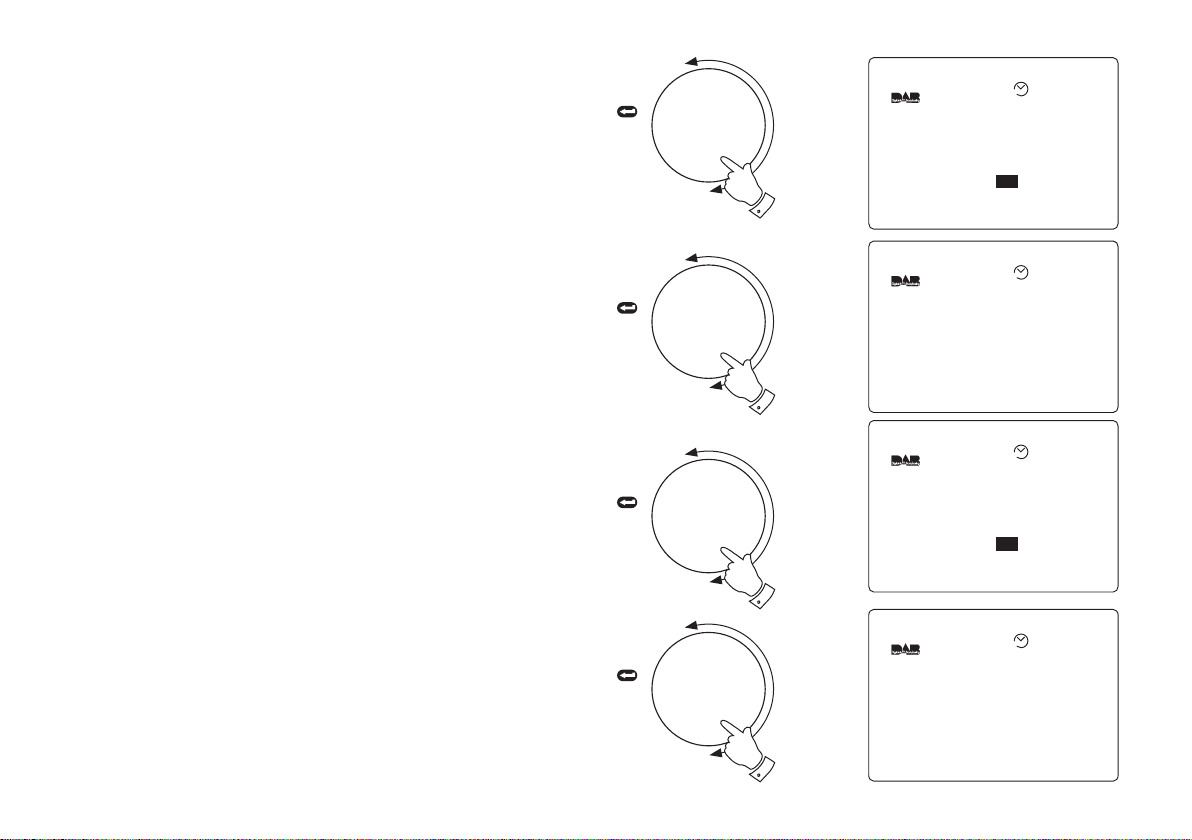
Pause Plus - play (internal memory)
1. Press the Play button to commence playback of a previous
recording.
2. When the playback has finished the display will show Warning End
of File.
3. Press the Play button twice, after a few seconds your radio will
return to normal radio mode.
Note the record/play internal memory is cleared
when changing band or switching off your radio
11
4
Play
1
Play
3
Pause Plus - record (SD card)
Information
SDCard Inserted
14:46 18-May-2004
AUTO
Recording
BBC Radio 5 Live
Recording 0:01:00
Rec Available 0:52:00
14:50 18-May-2004
AUTO
Playback
BBC Radio 5 Live
Playback 0:01:00
Duration 0:59:00
14:56 18-May-2004
AUTO
Warning
End of File
14:57 18-May-2004
AUTO
Your radio is supplied with a 32MB SD card which will give typically 30
minutes record time but can be over 1 hour depending on program type.
1. Insert the SD card into the slot located on the top right side of your
radio. The display will show SDCard Inserted.
2. Press and hold in the Record button until the display shows
Recording.
3. The display will show the recording duration together with the
remaining record time available.
4. Press the Record button to stop the recording.
Note: Record function is provided for personal use only
2
Record
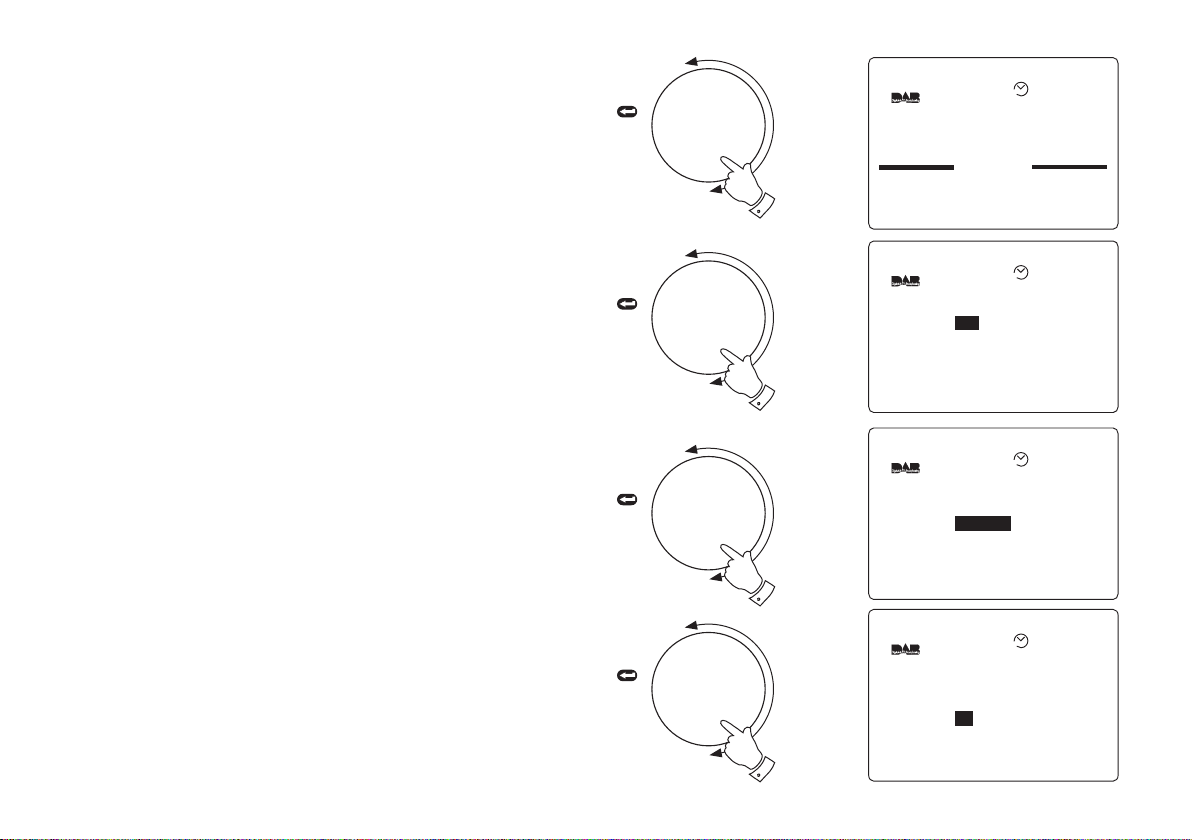
Pause Plus - play (SD card)
1. Ensure that an SD card is inserted into the slot located on the top
right side of your radio. The display will show SDCard Inserted.
2. Press the Play button to commence playback of previous recording.
3. When the playback has finished the display will show Warning End
of File.
4. Press the Play button twice, after a few seconds your radio will
return to normal radio mode.
If you need any further advice, please call our Technical Helpline on :020 8758 0338 (Mon-Fri)
Play
2
12
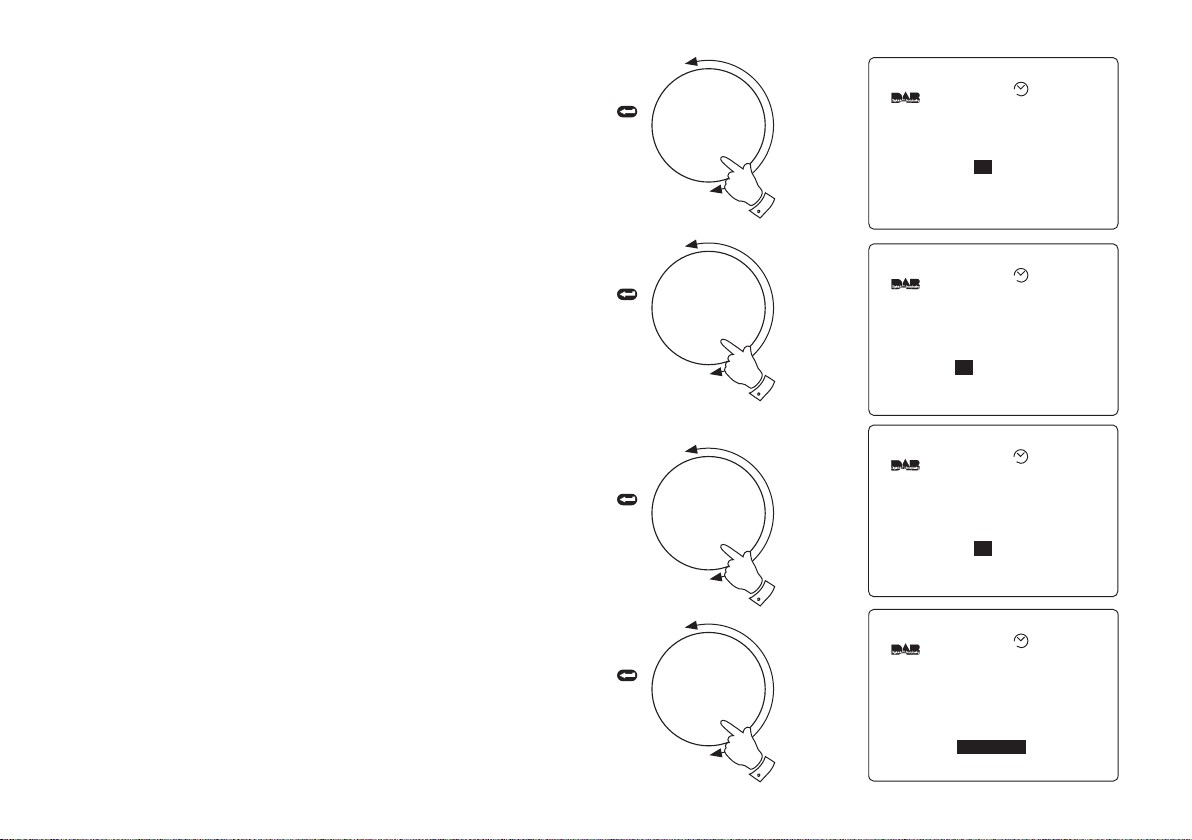
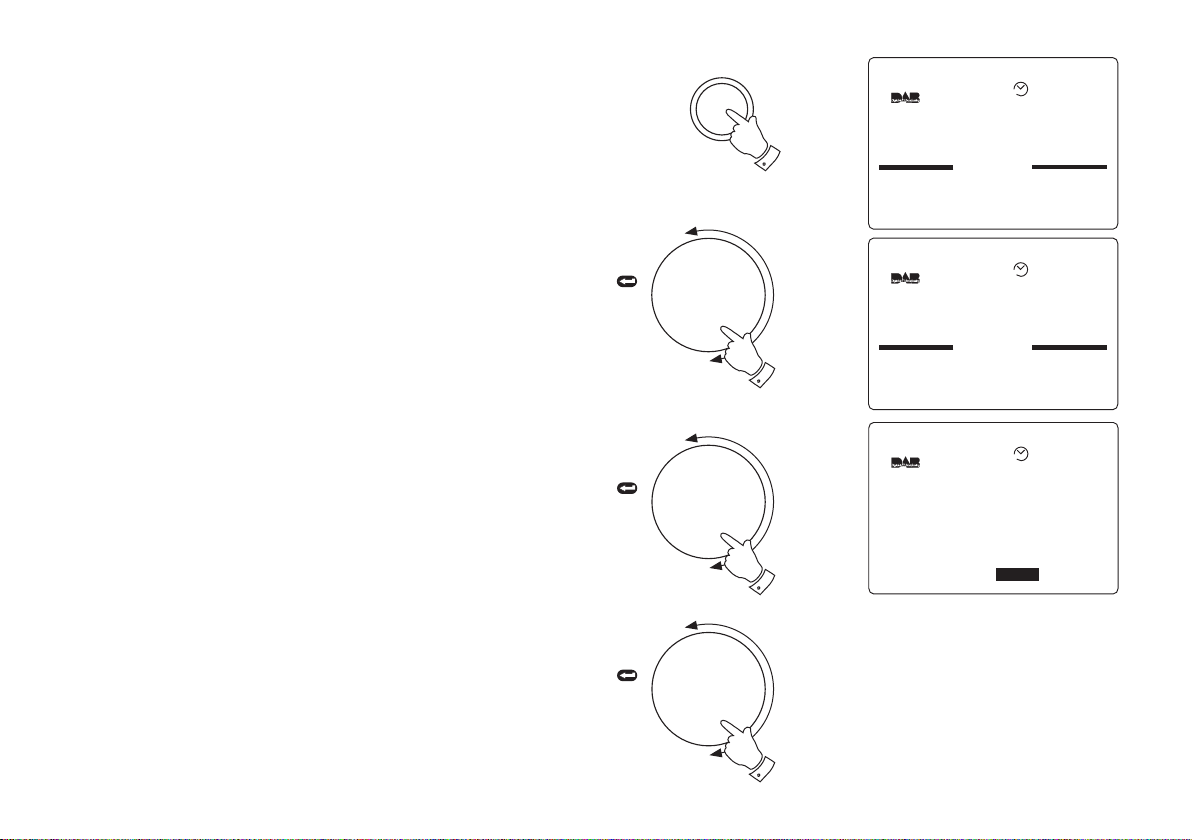
Pause Plus storage settings - DAB
Set-Up
Record Timer
Clock
DAB
Display
Sleep
12:22 16-May-2004
AUTO
Set-Up
Buzzer Alarm
Radio Alarm
Record Timer
12:22 16-May-2004
AUTO
DAB
Programme Type All
Favourites Yes
DRC Enable 0
Tuning Range 11B-12D
Manual Tune ...
More...
AUTO
DAB
Audio 2
Optical output No
RDI Enable No
Storage On
Storage Control ...
Service Status ...
...
AUTO
Your radio's Pause Plus internal storage can be allocated to either Pause/
Rewind or to Record. By default the settings are 50% Pause/Rewind and
50% Record.
The default settings are allocated so as to allow typically 15 minutes
Pause/Rewind and 15 minutes Record but can be up to 30 minutes for
each depending on storage settings, station type and programme
content.
Changing the settings to 95% Record (the maximum) will give a record
time of typically 30 minutes but can be up to 1 hour depending on station
and programme content.
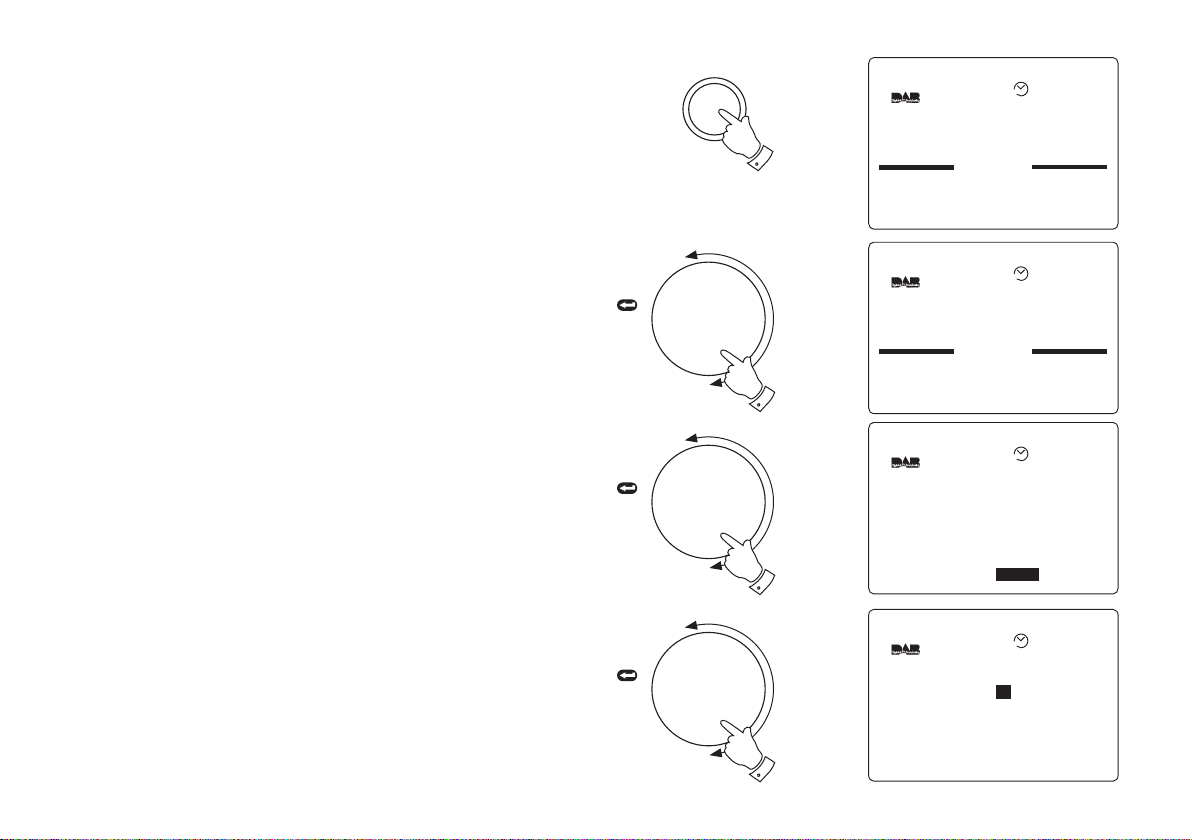
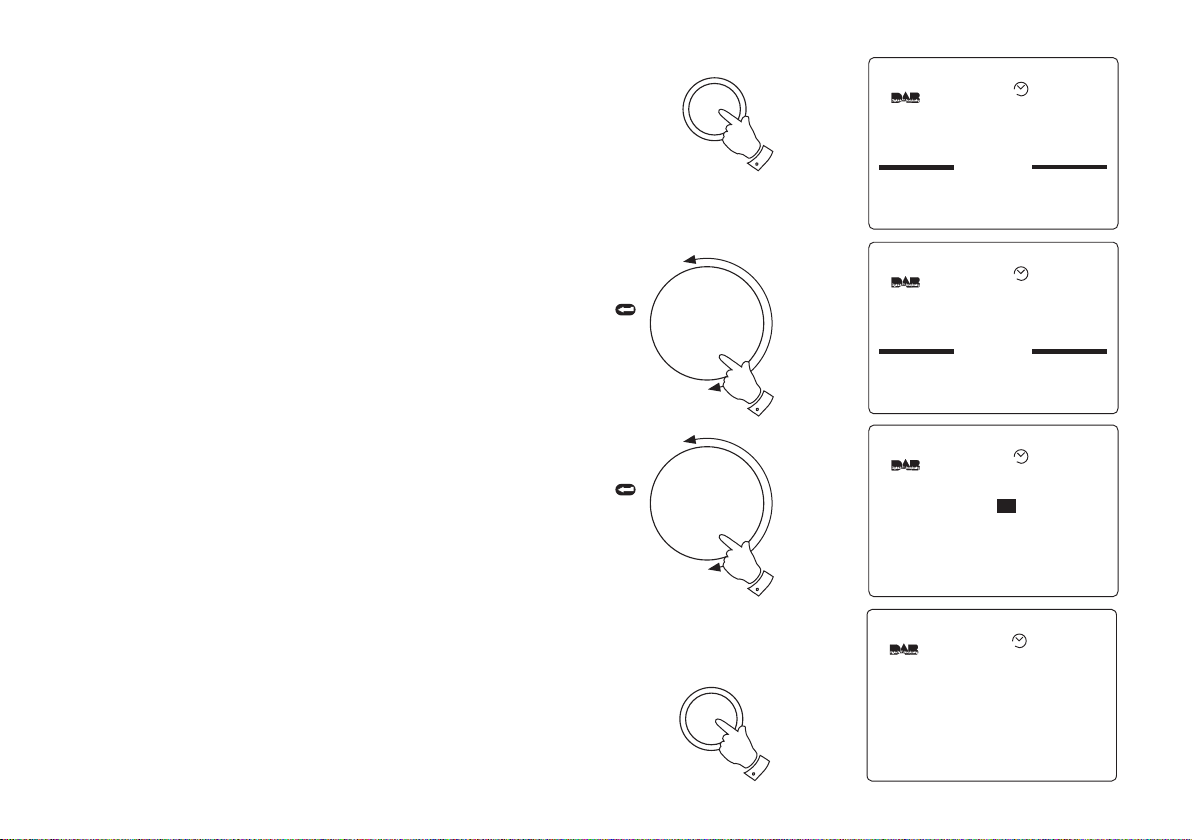
1. Press the Setup button to enter the Setup menu.
TUNING
Press
to select
Set-up
1
2. Rotate the Tuning control until the DAB section appears between
the two black lines on the display.
3. Press in and release the Tuning control to select the DAB section.
4. Rotate the Tuning control anti-clockwise until More... is high-
lighted on the display.
5. Press in and release the Tuning control to select the More..
section.
13
TUNING
Press
to select
TUNING
Press
to select
2
4
5
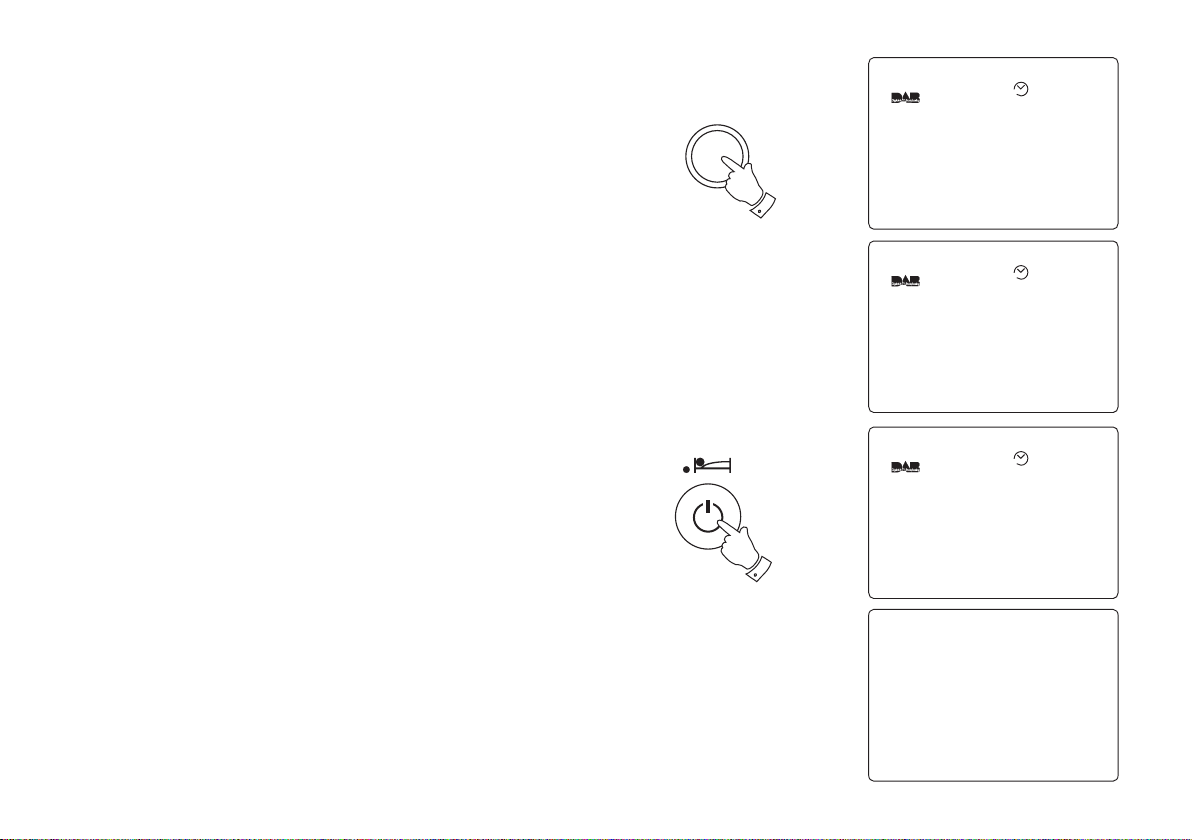
Pause Plus storage settings - DAB (cont.)
DAB
Audio 2 ...
Optical output No
RDI Enable No
Storage On
Storage Control
Service Status ...
...
AUTO
Storage Control
Rewind
ecord 50%
SDCard Format ...
I I I I I I I I I I I I I I 50%
R I I I I I I I I I I I I I I
I I I I I I I I I I I I I I
I I I I I I I I I I I I I I
AUTO
Storage Control
Rewind
ecord
SDCard Format ...
I
I I I I I I I I I I I I I I
5%
R I I I I I I I I I I I I I 95%
I
I I I I I I I I I I I I I I I I I I I I I I I I I I I
AUTO
BBC 7
Rumpole or the Bailey
Coming next - Life Death and
Sex with Mike and Sue
13:58 18-May-2004
AUTO
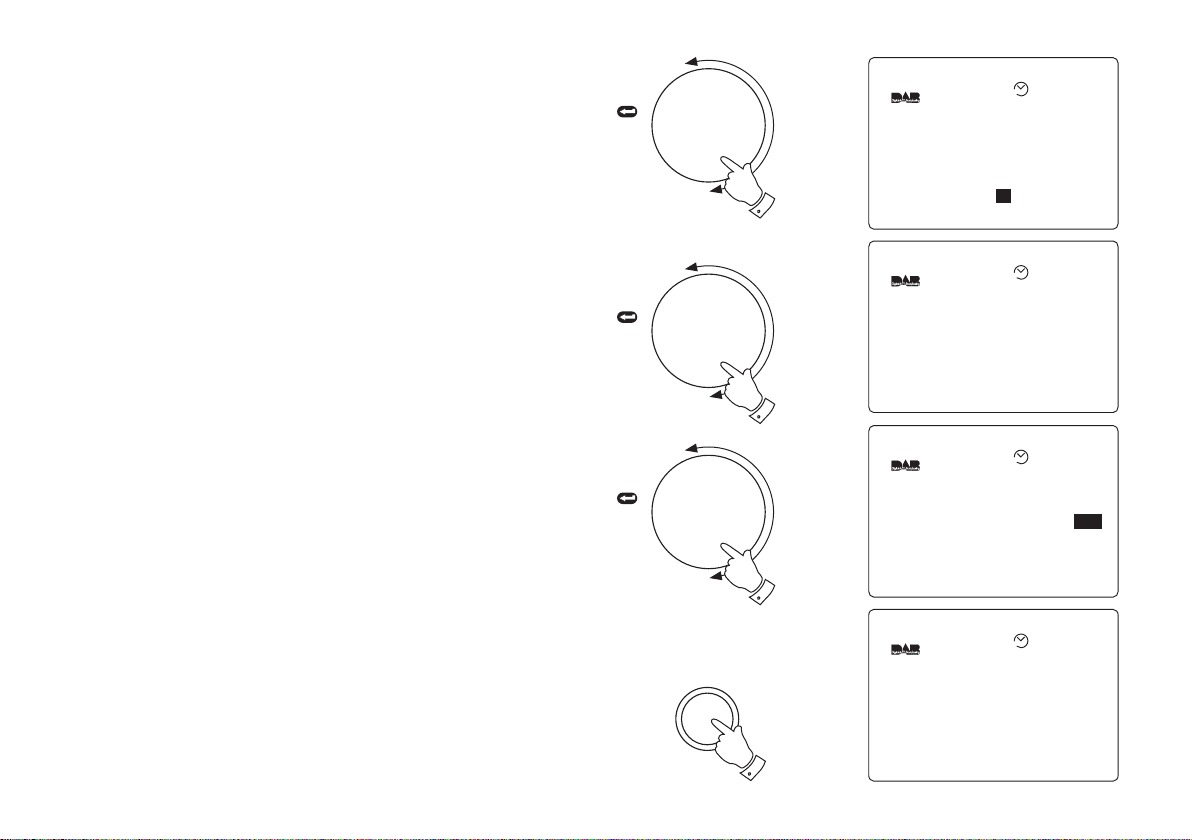
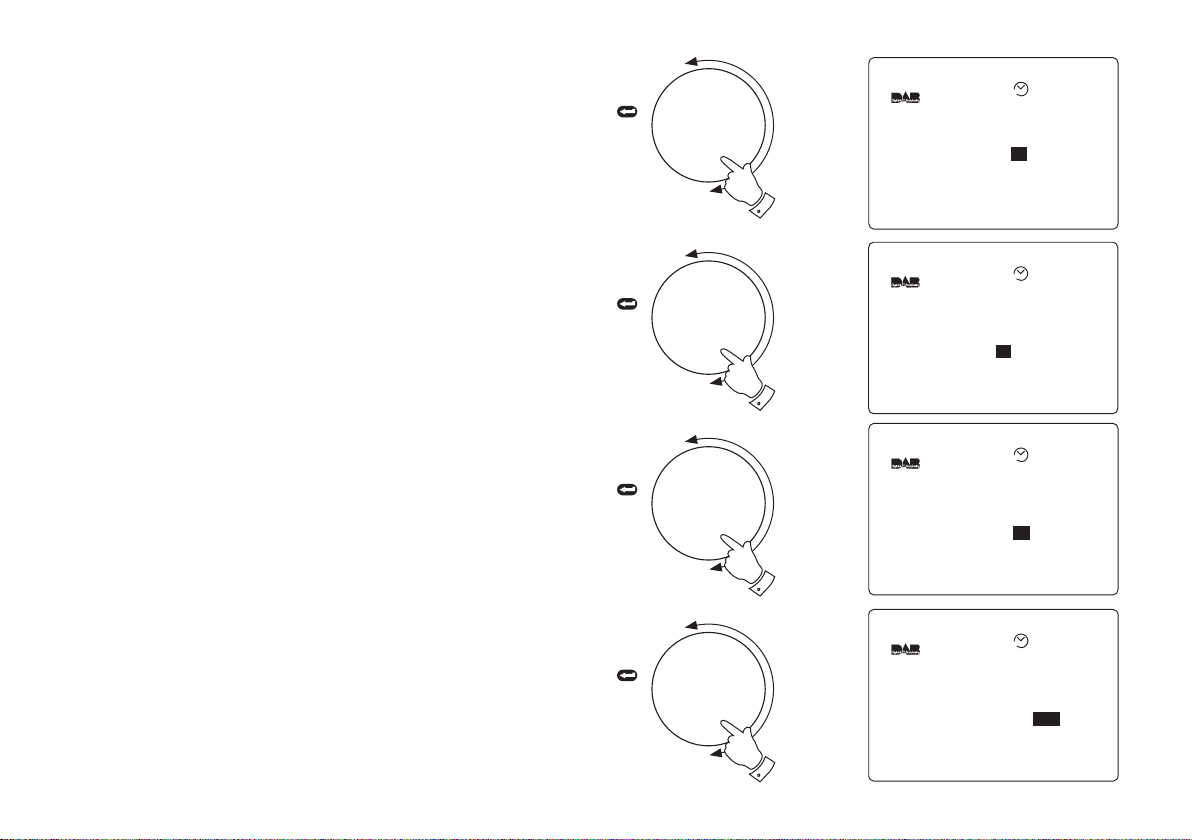
6. Rotate the Tuning control until the highlight appears on the
Storage Control line.
TUNING
Press
to select
7. Press in and release the Tuning control to select the Storage
Control section.
8. Rotate the Tuning control until the highlight appears on either the
Rewind or Record storage settings line.
9. Press in and release the Tuning control to select the required
storage setting and rotate the Tuning control to adjust the setting.
10. Press in and release the Tuning control to store the change.
11. Repeatedly press and release the Setup button until the display
returns to show normal station mode.
If you need any further advice, please call our Technical Helpline on :020 8758 0338 (Mon-Fri)
TUNING
Press
to select
TUNING
Press
to select
6
7
9
Set-up
11
14
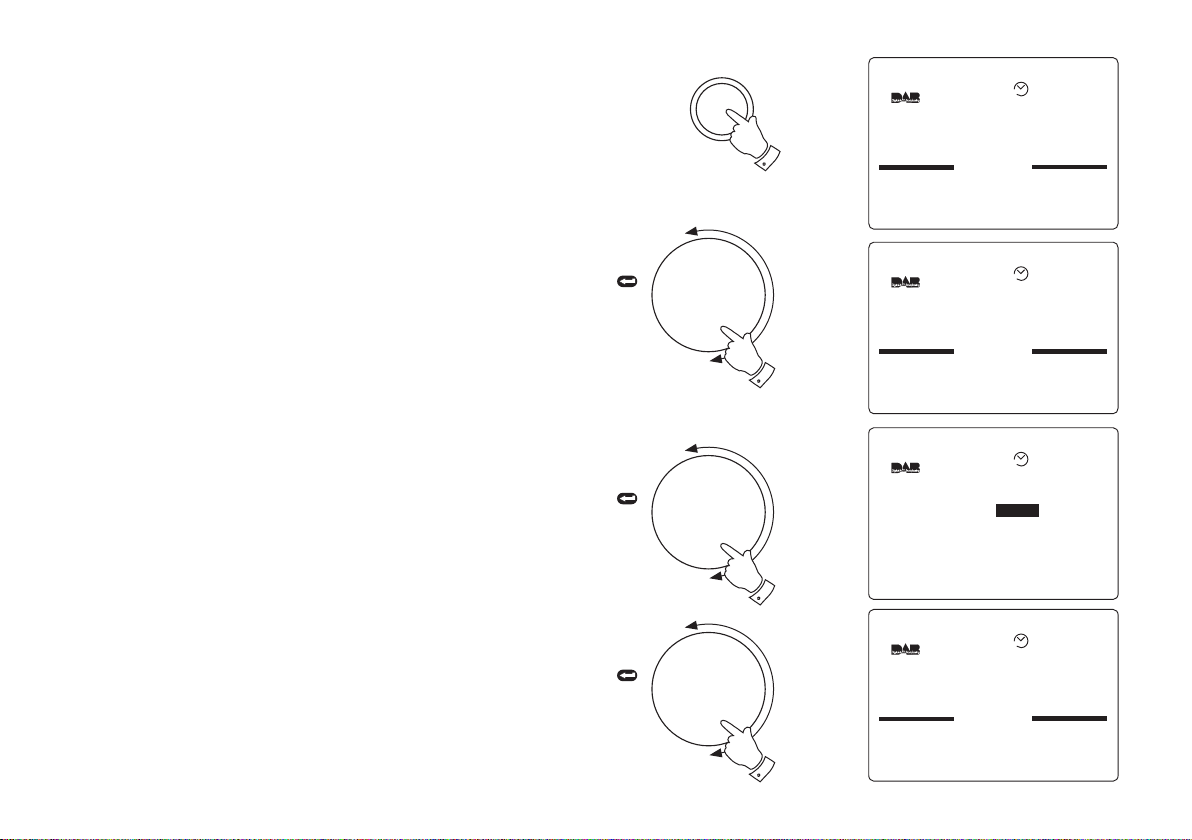
Pause Plus Storage settings - DAB (cont.)
Set-Up
Record Timer
Clock
DAB
Display
Sleep
AUTO
Set-Up
Buzzer Alarm
Radio Alarm
Record Timer
AUTO
DAB
Programme Type All
Favourites Yes
DRC Enable 0
Tuning Range 11B-12D
Manual Tune ...
More...
AUTO
DAB
Audio 2
Optical output No
RDI Enable No
Storage On
Storage Control ...
Service Status ...
...
AUTO
Your radio has three settings for Pause Plus storage. The settings are
Off, On and On with AC. With the Pause Plus storage Off the battery
life will be extended (typically 25 hours).
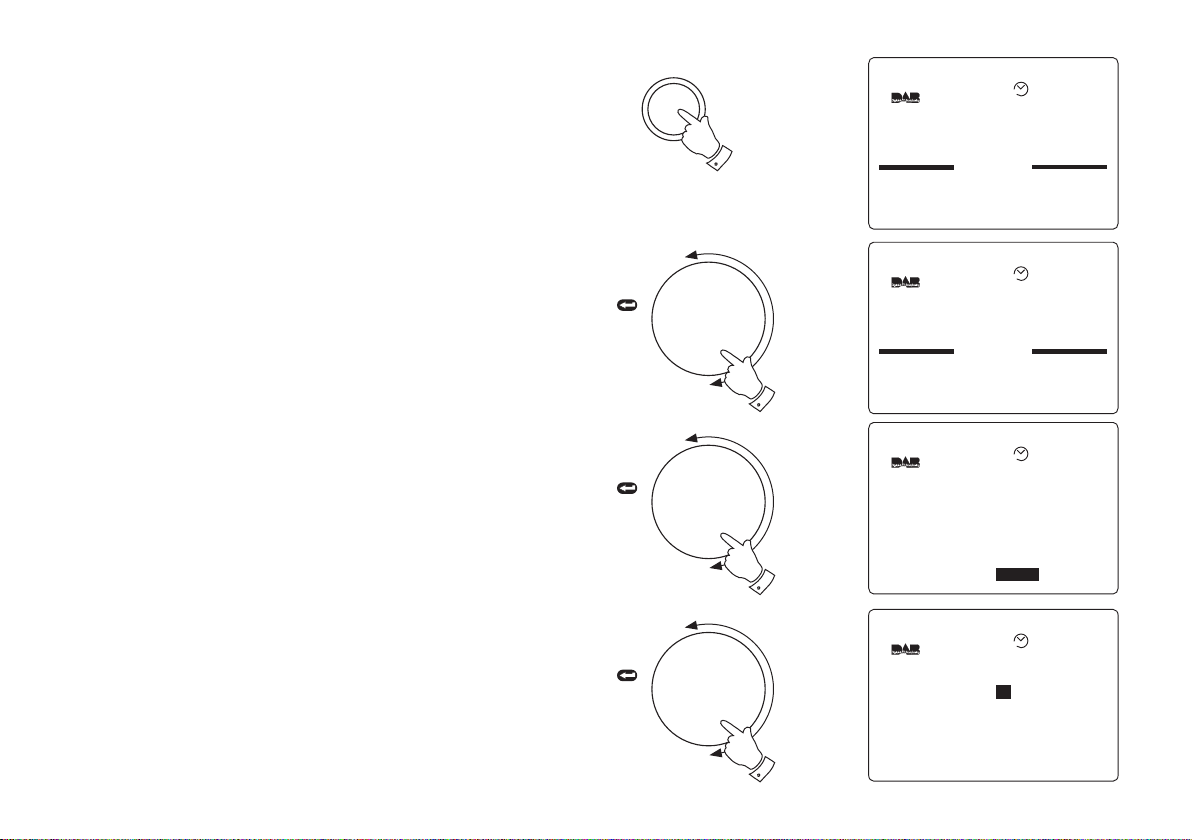
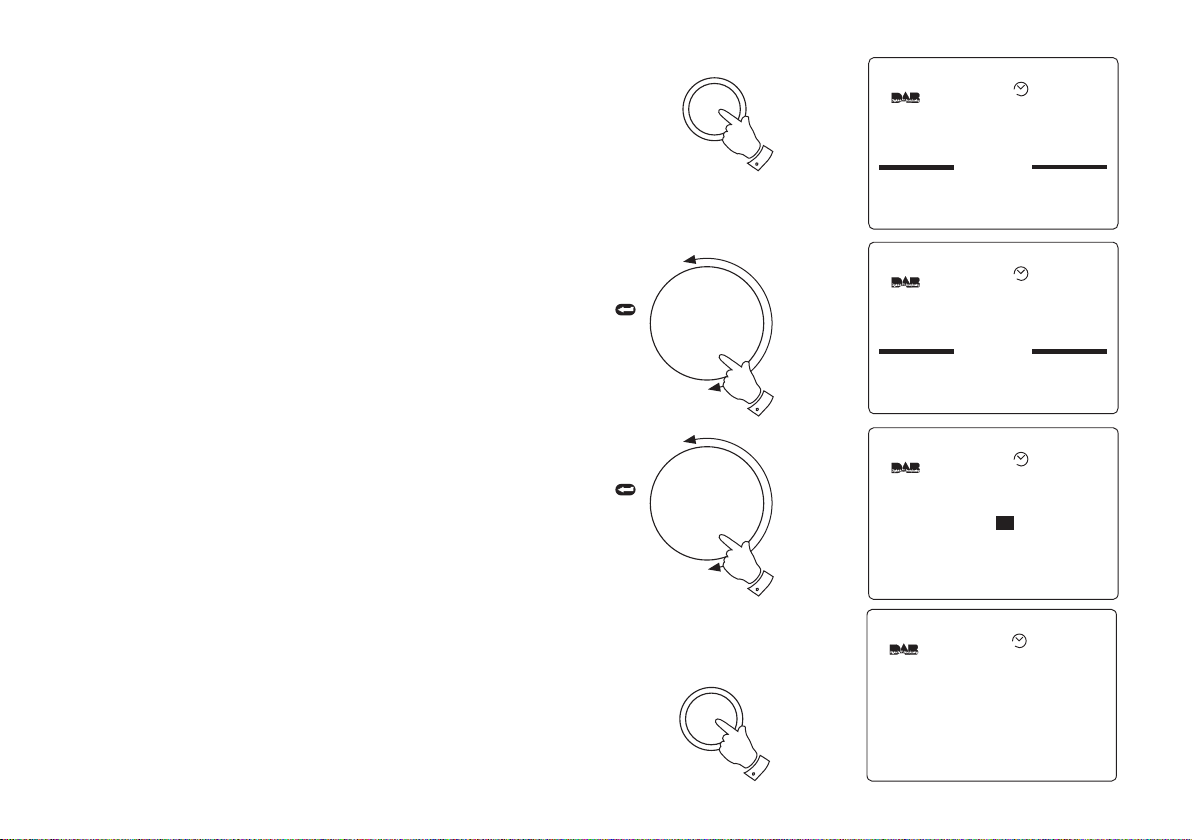
1. Press the Setup button to enter the Setup menu.
2. Rotate the Tuning control until the DAB section appears between
the two black lines on the display.
Set-up
1
TUNING
3. Press in and release the Tuning control to select the DAB section.
4. Rotate the Tuning control until More... is highlighted on the display.
5. Press in and release the Tuning control to select the More..
section.
15
Press
to select
TUNING
Press
to select
TUNING
Press
to select
2
4
5
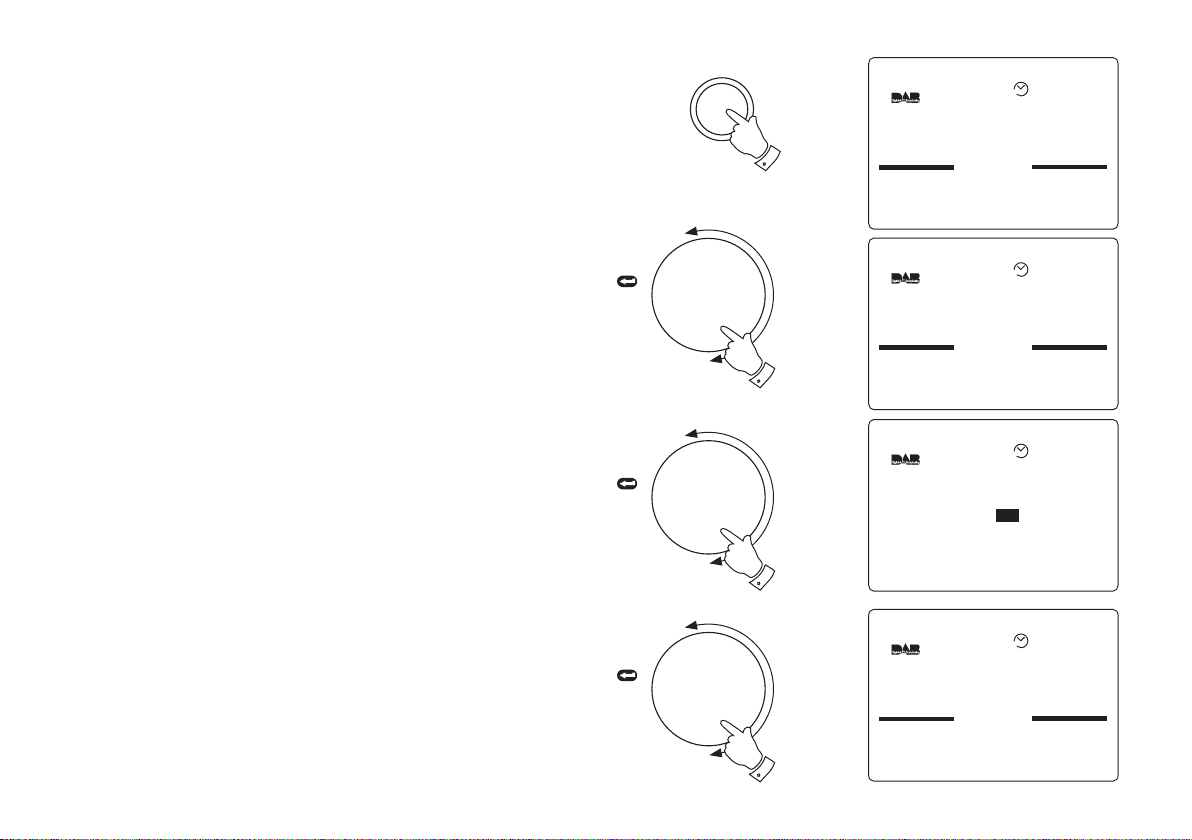
Pause Plus Storage settings - DAB (cont.)
Audio 2 ...
Optical output No
RDI Enable No
Storage
Storage Control ...
Service Status ...
Off
DAB
AUTO
Audio 2 ...
Optical output No
RDI Enable No
Storage
Storage Control ...
Service Status ...
On
DAB
AUTO
Audio 2 ...
Optical output No
RDI Enable No
Storage Off
Storage Control ...
Service Status ...
DAB
AUTO
Audio 2 ...
Optical output No
RDI Enable No
Storage On
Storage Control ...
Service Status ...
DAB
AUTO
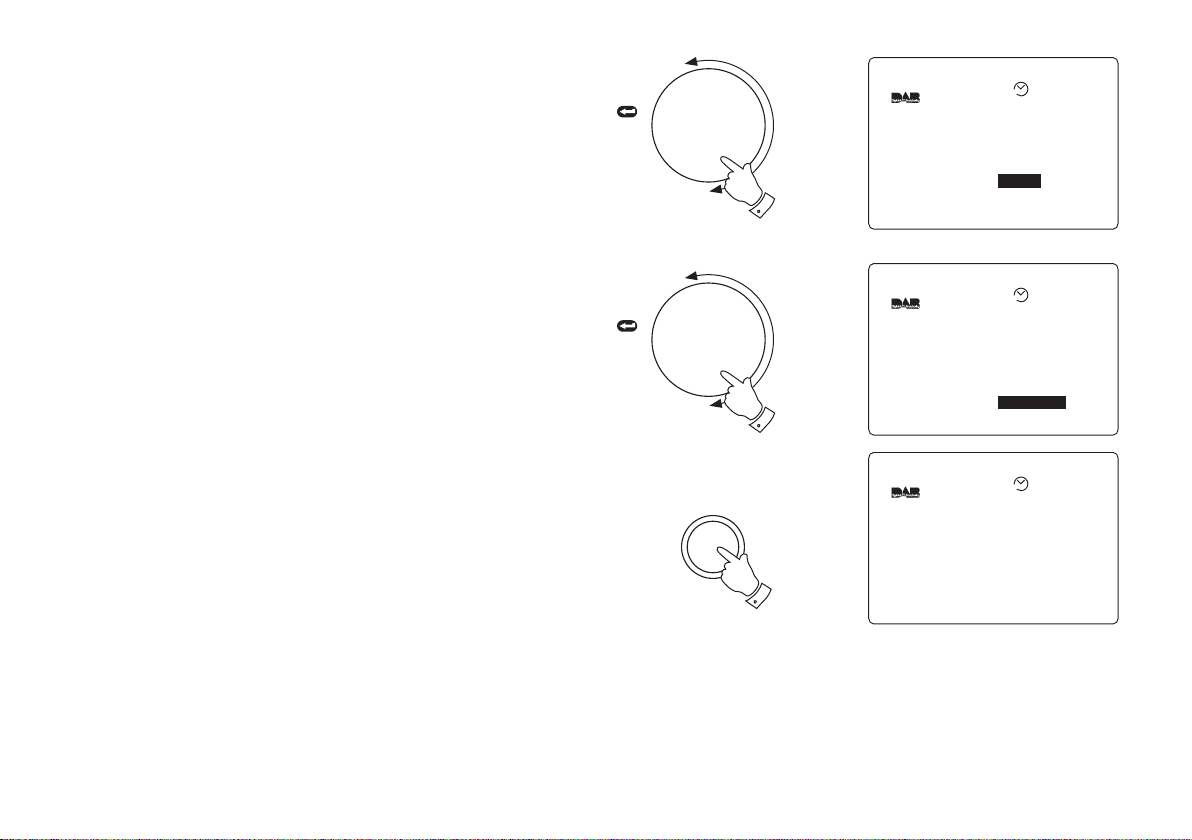
6. Rotate the Tuning control until the highlight appears on the
Storage line.
TUNING
Press
to select
7. Press in and release the Tuning control to select the Storage
section.
8. Rotate the Tuning control to change the Storage to the required
setting e.g.. On, Off or On with AC.
9. Press in and release the Tuning control to store the change.
10. Repeatedly press and release the Setup button until the display
returns to show normal station mode
If you need any further advice, please call our Technical Helpline on :020 8758 0338 (Mon-Fri)
6
TUNING
Press
to select
7
TUNING
Press
to select
8
TUNING
Press
to select
9
16
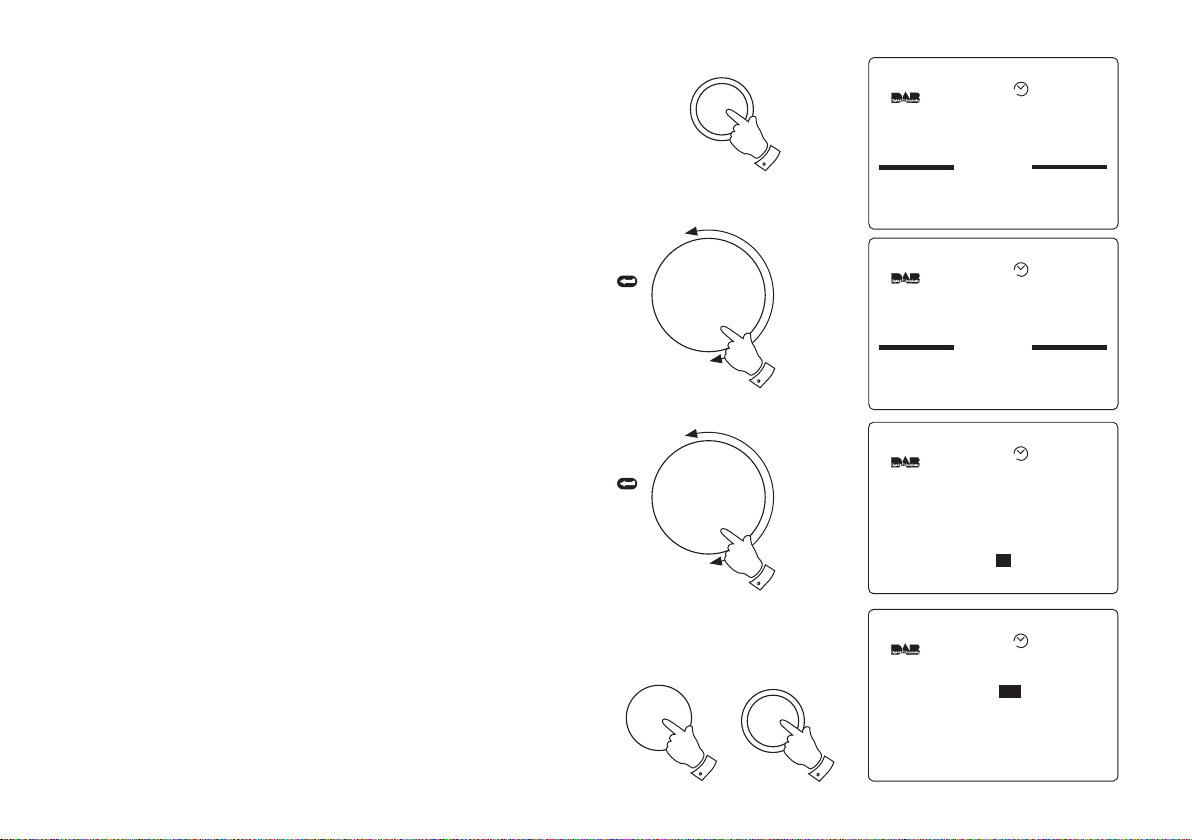
Record Timer - DAB
Set-Up
Radio Alarm
Record Timer
Clock
DAB
AUTO
Record Timer
Timer
Days SMTWTFS
Start 00:00
Stop 00:00
Station AbracaDABra
Off
AUTO
Record Timer
Timer
Days
Start 00:00
Stop 00:00
Station AbracaDABra
Off
SMTWTFS
AUTO
Record Timer
Timer
Days
Start :00
Stop 00:00
Station AbracaDABra
Off
SMTWTFS
00
AUTO
Note: Timer record is only available on DAB via SD card and is
provided for personal use only.
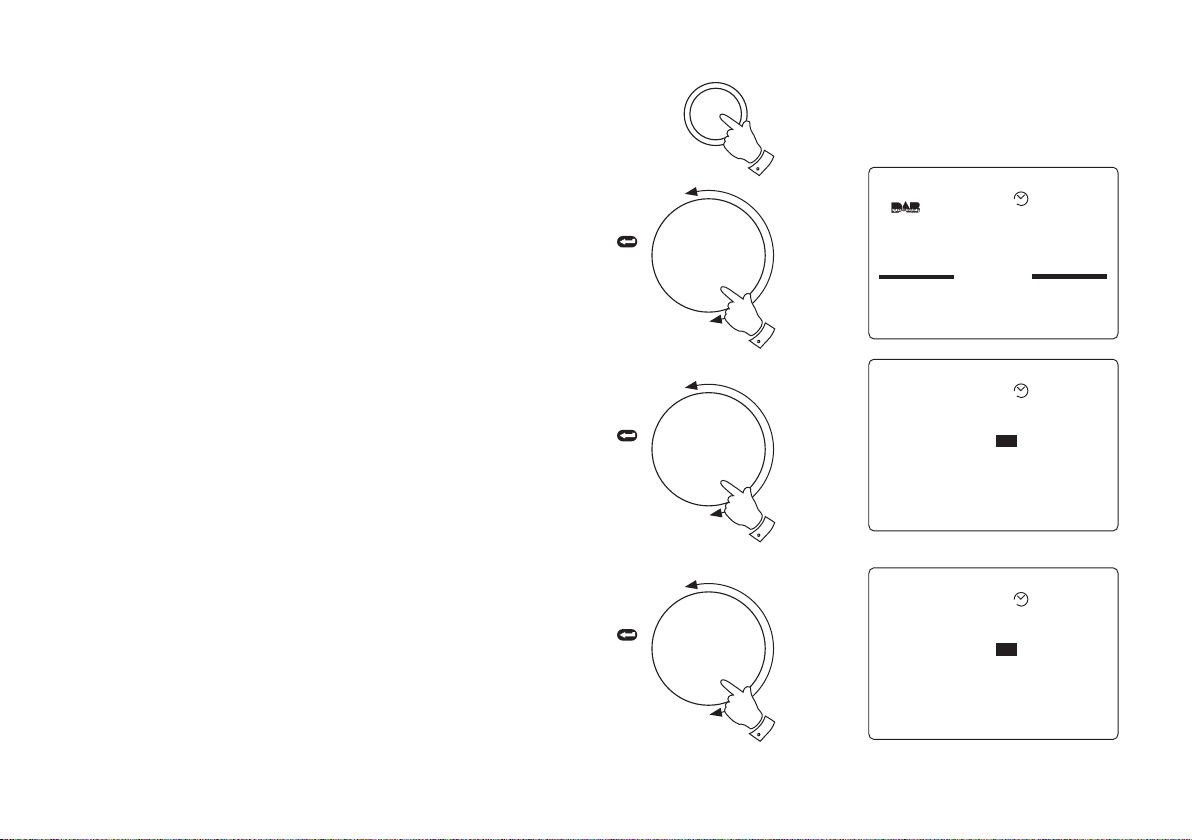
1. Press the Setup button to enter Setup mode.
2. Rotate the Tuning control until the Record Timer section appears
between the two black lines on the display.
TUNING
Press
to select
2
3. Press in and release the Tuning control to select the Record
Timer section.
4. Press in and release the Tuning control to enter adjustment mode.
Rotate the Tuning control to set record timer to On. Press in and
release the Tuning control to confirm the selection.
5. Rotate the Tuning control until Days line is highlighted in the display
(default is all days active)
6. Press in and release the Tuning Control to confirm selection.
Rotate the Tuning control to select the required Day (see note on
page 19)
7. Press in and release the Tuning control to confirm the selections.
8. Rotate the Tuning control until the Start line is highlighted in the
display.
9. Press in and release the Tuning Control to select. Rotate the
17
Tuning control to select required hour.
continued on next page
TUNING
Press
to select
TUNING
Press
to select
TUNING
Press
to select
4
5
9
Record Timer - DAB cont.
Record Timer
Timer
Days
Start 00:
Stop 00:00
Station AbracaDABra
Off
SMTWTFS
00
AUTO
Record Timer
Timer
Days
Start 00:00
Stop :00
Station AbracaDABra
Off
SMTWTFS
00
AUTO
Record Timer
Timer
Days
Start 00:00
Stop 00:
Station AbracaDABra
Off
SMTWTFS
00
AUTO
Record Timer
Timer
Days
Start 00:00
Stop 00:00
Station
On
SMTWTFS
AbracaDABra
AUTO
10. Press in and release the Tuning control to confirm selection.
Rotate the Tuning control to select the required minute.
TUNING
Press
to select
11. Press in and release the Tuning control to confirm the selection.
12. Rotate the Tuning control until the Stop line is highlighted in the
display.
13. Press in and release the Tuning control to select. Rotate the
Tuning control to select required hour.
14. Press in and release the Tuning control to confirm selection.
Rotate the Tuning control to select the required minute.
15. Press in and release the Tuning control to confirm the selection.
16. Rotate the Tuning control until the Station line is highlighted in the
display.
17. Press in and release the Tuning control to confirm the selection.
18. Rotate the Tuning control to select the required station.
19. Press in and release the Tuning control to confirm the selection.
If you need any further advice, please call our Technical Helpline on :020 8758 0338 (Mon-Fri)
continued on next page
TUNING
Press
to select
TUNING
Press
to select
TUNING
Press
to select
10
12
14
17
18
Record Timer - DAB cont.
Information
SDCard Inserted
14:46 18-May-2004
AUTO
WARNING
Record Timer Set
Insert SDCard!
AUTO
13:00
Tuesday
25-May-2004
Record Timer Set
Mains Connected
BBC 7
Rumpole or the Bailey
Coming next - Life Death and
Sex with Mike and Sue
13:58 18-May-2004
AUTO
20. Repeatedly press and release the Setup button until the display
returns to show normal station mode.
21. Insert SD card with sufficient capacity for required recording
(approx. 32MB per 30 mins at 128 kbits/sec - 1hour at 64 kbits/sec)
the display will show SD card Inserted.
22. Press the On/Off button to switch off your radio. If no SD card is
inserted the warning message Warning Record Timer Set Insert
SDCard! will appear.
23. Your radio will switch on at the selected time and record the chosen
program. The loudspeaker will be muted during the Timed recording.
The loudspeaker may be un-muted by pressing the Pause Plus
button.
Note: If record timer is set to record on more than one day
of the week it will be necessary to change the SD card after
each days recording otherwise the recording will be
overwritten. The filing system on your RD-1 only allows one
recording per SD card regardless of recording length.
Set-up
20
22
19
SD Card Format - DAB
Set-Up
Buzzer Alarm
Radio Alarm
Record Timer
AUTO
Set-Up
Record Timer
Clock
DAB
Display
Sleep
AUTO
DAB
Programme Type All
Favourites Yes
DRC Enable 0
Tuning Range 11B-12D
Manual Tune ...
More...
AUTO
This formats your SD card erasing any previously recorded files. It also
allows an SD card formatted on another device to be re-formatted for
use on your radio.
1. Insert an SD card into the slot. Press the Setup button to enter the
Setup menu.
Set-up
1
2. Rotate the Tuning control until the DAB section appears between
the two black lines on the display.
3. Press in and release the Tuning control to select the DAB section.
4. Rotate the Tuning control until More... is highlighted on the display.
5. Press in and release the Tuning control to select the More...
section.
If you need any further advice, please call our Technical Helpline on :020 8758 0338 (Mon-Fri)
continued on next page
TUNING
Press
to select
TUNING
Press
to select
TUNING
Press
to select
2
4
5
20

SD Card Format - DAB cont.
DAB
Audio 2 ...
Optical output No
RDI Enable No
Storage On
Storage Control
Service Status ...
...
AUTO
Storage Control
Rewind
ecord 50%
SDCard Format
I I I I I I I I I I I I I I
I I I I I I I I I I I I I I
50%
R
...
I I I I I I I I I I I I I I
I I I I I I I I I I I I I I
AUTO
SDCard Format
Are You Sure? [ Yes ]
AUTO
Information
SDCard Formatted
17:48 1st-June-2004
AUTO
6. Rotate the Tuning control until the highlight appears on the
Storage Control line.
TUNING
Press
to select
7. Press in and release the Tuning control to select the Storage
Control section.
8. Rotate the Tuning control until the highlight appears on the
SDCard Format line.
9. Press in and release the Tuning control to enter adjust mode.
10. Rotate the Tuning control to select Yes.
11. Press in and release the Tuning control to confirm the selection.
After a few seconds the display will show Information SDCard
Formatted.
12. Repeatedly press and release the Setup button until the display
returns to show normal station mode.
21
TUNING
Press
to select
TUNING
Press
to select
TUNING
Press
to select
6
8
10
11
Programme Type - DAB
Set-Up
Buzzer Alarm
Radio Alarm
Record Timer
AUTO
Set-Up
Record Timer
Clock
DAB
Display
Sleep
AUTO
DAB
Programme Type
Favourites Yes
DRC Enable 0
Tuning Range 11B-12D
Manual Tune ...
More...
All
AUTO
Prog Type
All
News
Current Affairs
AUTO
Your radio can be set so that only one particular type of programme
appears in the station list e.g. Rock, Pop, Classic, etc. The default setting
is All.
1. Press the Setup button to enter Setup menu.
Set-up
1
2. Rotate the Tuning control until the DAB section appears between
the two black lines on the display. Press in and release the Tuning
control to confirm the selection
3. Rotate the Tuning control until the Programme Type line is
highlighted in the display.
4. Press in and release the Tuning control to enter adjustment mode.
5. Rotate the Tuning control to select just one programme type
setting e.g. All, Rock, Pop, Classic, etc..
6. Press in and release the Tuning control to confirm the selection.
7. Repeatedly press and release the Setup button until the display
returns to show normal station mode.
8. When you next enter tuning list mode only the station type as
selected will be shown.
If you need any further advice, please call our Technical Helpline on :020 8758 0338 (Mon-Fri)
TUNING
Press
to select
TUNING
Press
to select
TUNING
Press
to select
2
3
5
22
Favourites - DAB
Set-Up
Buzzer Alarm
Radio Alarm
Record Timer
AUTO
Set-Up
Record Timer
Clock
DAB
Display
Sleep
AUTO
DAB
Programme Type All
Favourites
DRC Enable 0
Tuning Range 11B-12D
Manual Tune ...
More...
Yes
AUTO
PrimeTime Radio
Gaydar Radio
Saga Radio
AbracaDabra
BBC Radio 1
BBC Radio 2
Y
Y
AUTO
When this setting is switched on the most listened to stations will move
to the top of the station list and be marked with the symbol.
1. Press the Setup button to enter Setup menu.
2. Rotate the Tuning control until the DAB section appears between
the two black lines on the display. Press in and release the Tuning
control to confirm the selection
3. Rotate the Tuning control until the Favourites line is highlighted in
the display.
4. Press in and release the Tuning control to enter adjustment mode.
5. Rotate the Tuning control to select required favourites setting e.g.
Yes or No.
6. Press in and release the Tuning control to confirm the selection.
TUNING
Press
to select
TUNING
Press
to select
Set-up
1
2
7. Repeatedly press and release the Setup button until the display
returns to show normal station mode.
8. After a period of time the most listened to stations will move up to
the top of the station list and be marked with the symbol..
23
TUNING
Press
to select
5
6
Manual Tuning - DAB
Set-Up
Buzzer Alarm
Radio Alarm
Record Timer
AUTO
Set-Up
Record Timer
Clock
DAB
Display
Sleep
AUTO
DAB
Programme Type All
Favourites Yes
DRC Enable 0
Tuning Range 11B-12D
Manual Tune
More...
...
AUTO
DAB
T-D AB
Service Up Band
Service Down Display
Digital 1 Network
Classic FM
11D
AUTO
Manual tuning allows you to tune directly to the various DAB Band III
channels. UK DAB stations are located in the range 11B to 12D.
1. Press the Setup button to enter Setup menu.
2. Rotate the Tuning control until the DAB section appears between
the two black lines on the display. Press in and release the Tuning
control to confirm the selection
3. Rotate the Tuning control until the Manual Tune line is highlighted
in the display. Press in and release the Tuning control to confirm
the selection
4. Rotate the Tuning control until the T-DAB line is highlighted in the
display.
5. Press in and release the Tuning control to enter adjustment mode.
6. Rotate the Tuning control to select required DAB channel. Press
in and release the Tuning control to confirm the selection.
7. Press either the Band or Display buttons to select the stations
contained within the Multiplex for the selected DAB channel.
TUNING
Press
to select
TUNING
Press
to select
Set-up
1
2
5
8. Repeatedly press and release the Setup button until the display
returns to show normal station mode.
9. The current station will remain selected.
If you need any further advice, please call our Technical Helpline on :020 8758 0338 (Mon-Fri)
Band
Display
66
24

Set-Up
Buzzer Alarm
Radio Alarm
Record Timer
AUTO
Set-Up
Record Timer
Clock
DAB
Display
Sleep
AUTO
DAB
Programme Type All
Favourites Yes
DRC Enable 0
Tuning Range 11B-12D
Manual Tune ...
More...
AUTO
DAB
Audio 2
Optical output No
RDI Enable No
Storage On
Storage Control ...
Service Status ...
...
AUTO
Service Status - DAB
This display gives extended information about the currently selected
station.
1. Press the Setup button to enter the Setup menu.
2. Rotate the Tuning control until the DAB section appears between
the two black lines on the display.
Set-up
1
TUNING
3. Press in and release the Tuning control to select the DAB section.
4. Rotate the Tuning control until More... is highlighted on the display.
5. Press in and release the Tuning control to select the More..
section.
25
continued on next page
Press
to select
TUNING
Press
to select
TUNING
Press
to select
2
4
5

Service Status cont.
DAB
Audio 2 ...
Optical output Yes
RDI Enable No
Storage On
Storage Control ...
Service Status ...
AUTO
Service Status
BBC National DAB
Stereo
T-DAB Allocation 12B
Frequency 225.648MHz
DAB Mode 1
Bit Rate 192 kbits/sec
AUTO
BBC 7
The Brighton Mystery
Journalist Polly solves murder
mysteries with the help of a
mystery Man in a tea room
11:10 18-May-2004
AUTO
6. Rotate the Tuning control until the highlight appears on the Service
Status line.
TUNING
Press
to select
7. Press in and release the Tuning control to select the Service
Status.
8. The display will show Multiplex name, Mono/Stereo mode, T-DAB
channel number, Frequency, DAB mode and Bit Rate.
9. Repeatedly press and release the Setup button until the display
returns to show normal station mode.
If you need any further advice, please call our Technical Helpline on :020 8758 0338 (Mon-Fri)
TUNING
Press
to select
6
7
Set-up
9
26

Dynamic Range Control (DRC) settings - DAB
Set-Up
Buzzer Alarm
Radio Alarm
Record Timer
AUTO
Set-Up
Record Timer
Clock
DAB
Display
Sleep
AUTO
DAB
Programme Type All
Favourites Yes
DRC Enable
Tuning Range 11B-12D
Manual Tune ...
More...
0
AUTO
BBC 7
The Brighton Mystery
Journalist Polly solves murder
mysteries with the help of a
mystery Man in a tea room
11:10 18-May-2004
AUTO
DRC can make quieter sounds easier to hear when your radio is used
in a noisy environment. Currently only BBC Radio 3 broadcasts a DRC
level.
1. Press the Setup button to enter Setup menu.
Set-up
1
2. Rotate the Tuning control until the DAB section appears between
the two black lines on the display. Press in and release the Tuning
control to confirm the selection
3. Rotate the Tuning control until the DRC Enable line is highlighted
in the display.
4. Press in and release the Tuning control to enter adjustment mode.
5. Rotate the Tuning control to select required DRC setting (default
is 0) :-
DRC 0 DRC is switched off . Broadcast DRC level will be ignored.
DRC 1/2 DRC level is set to 1/2 that sent by broadcaster.
DRC 1 DRC is set as sent by broadcaster.
6. Press in and release the Tuning control to confirm the selection.
7. Repeatedly press and release the Setup button until the display
returns to show normal station mode.
27
TUNING
Press
to select
TUNING
Press
to select
2
5
Set-up
7

Tuning range - DAB
Set-Up
Buzzer Alarm
Radio Alarm
Record Timer
AUTO
Set-Up
Record Timer
Clock
DAB
Display
Sleep
AUTO
DAB
Programme Type All
Favourites Yes
DRC Enable 0
Tuning Range -12D
Manual Tune ...
More...
11B
AUTO
BBC 7
The Brighton Mystery
Journalist Polly solves murder
mysteries with the help of a
mystery Man in a tea room
11:10 18-May-2004
AUTO
Note: Changes to these settings should only be made if radio is
to be used outside of UK.
Should you take your radio to another country which also has Band III
DAB broadcasts it may be necessary to change the default tuning range.
Your RD-1 will tune across the full DAB Band III range.
Set-up
1
1. Press the Setup button to enter Setup menu.
2. Rotate the Tuning control until the DAB section appears between
the two black lines on the display. Press in and release the Tuning
control to confirm the selection
3. Rotate the Tuning control until the Tuning Range line is highlighted
in the display.
4. Press in and release the Tuning control to enter adjustment mode.
5. Rotate the Tuning control to select required lower channel. Press
in and release the Tuning control to confirm the selection.
6. Rotate the Tuning control to select required upper channel. Press
in and release the Tuning control to confirm the selection.
7. Repeatedly press and release the Setup button until the display
returns to show normal station mode.
8. When you next perform an Auto Scan your radio will scan using the
If you need any further advice, please call our Technical Helpline on :020 8758 0338 (Mon-Fri)
new tuning range selected.
TUNING
Press
to select
TUNING
Press
to select
2
5
Set-up
7
28

Digital output - DAB
Set-Up
Buzzer Alarm
Radio Alarm
Record Timer
AUTO
Set-Up
Record Timer
Clock
DAB
Display
Sleep
AUTO
DAB
Audio 2 ...
Digital output Yes
RDI Enable
Storage On
Storage Control ...
Service Status ...
No
AUTO
BBC 7
The Brighton Mystery
Journalist Polly solves murder
mysteries with the help of a
mystery Man in a tea room
11:10 18-May-2004
AUTO
Your radio is equipped with a digital optical output (TosLink) socket
which can be used to connect your radio to a Hi-Fi or mini disc for
playback or external recording.
The default setting for the Digital Output is Off (so as to conserve battery
life). To switch On the Digital Output proceed as follows:-
Set-up
1
1. Press the Setup button to enter Setup menu.
2. Rotate the Tuning control until the DAB section appears between
the two black lines on the display. Press in and release the Tuning
control to confirm the selection
3. Rotate the Tuning control until the More... line is highlighted in the
display. Press in and release the Tuning control to confirm the
selection
4. Rotate the Tuning control until the Digital Output line is highlighted
in the display.
5. Press in and release the Tuning control to enter adjustment mode.
6. Rotate the Tuning control to select required setting (Yes or No)
Press in and release the Tuning control to confirm the selection.
7. Repeatedly press and release the Setup button until the display
returns to show normal station mode.
Note: when the digital output is switched On Audio 2 will
always be the same as Audio 1.
29
TUNING
Press
to select
TUNING
Press
to select
2
4
Set-up
7

Radio Data Interface (RDI) output - DAB
Set-Up
Buzzer Alarm
Radio Alarm
Record Timer
AUTO
Set-Up
Record Timer
Clock
DAB
Display
Sleep
AUTO
BBC 7
The Brighton Mystery
Journalist Polly solves murder
mysteries with the help of a
mystery Man in a tea room
11:10 18-May-2004
AUTO
DAB
Audio 2 ...
Optical output Yes
RDI Enable
Storage On
Storage Control ...
Service Status ...
No
AUTO
Your radio is equipped with an RDI optical output socket (TosLink) which
can be used to connect your radio to an external data decoder.
The default setting for the RDI optical output is Off (so as to conserve
battery life). To switch on the Digital Output proceed as follows:-
Set-up
1
1. Press the Setup button to enter Setup menu.
2. Rotate the Tuning control until the DAB section appears between
the two black lines on the display. Press in and release the Tuning
control to confirm the selection
3. Rotate the Tuning control until the More... line is highlighted in the
display. Press in and release the Tuning control to confirm the
selection
4. Rotate the Tuning control until the RDI Enable line is highlighted
in the display.
5. Press in and release the Tuning control to enter adjustment mode.
6. Rotate the Tuning control to select required setting (Yes or No)
Press in and release the Tuning control to confirm the selection.
7. Repeatedly press and release the Setup button until the display
returns to show normal station mode.
If you need any further advice, please call our Technical Helpline on :020 8758 0338 (Mon-Fri)
TUNING
Press
to select
TUNING
Press
to select
2
4
Set-up
7
30
Audio outputs (analogue)
Set-Up
Buzzer Alarm
Radio Alarm
Record Timer
AUTO
Set-Up
Record Timer
Clock
DAB
Display
Sleep
AUTO
DAB
Audio 2 Output
Show Audio2 No
...
AUTO
Audio 2
Classic FM
TalkSPORT
Virgin Radio
AUTO
Your radio has two analogue audio outputs:- Audio 1 outputs to your
radio's loudspeaker and to Audio output socket 1. Audio 2 outputs to
Audio output socket 2 and can be set to output a different station from
Audio 1 providing it is within the same multiplex.
Audio 2 setup - DAB
1. Press the Setup button to enter Setup menu.
2. Rotate the Tuning control until the DAB section appears between
the two black lines on the display. Press in and release the Tuning
control to confirm the selection
3. Rotate the Tuning control until the More... line is highlighted in the
display. Press in and release the Tuning control to confirm the
selection
4. Rotate the Tuning control until the Audio 2 line is highlighted in the
display.
TUNING
Press
to select
TUNING
Press
to select
Set-up
1
2
5. Press in and release the Tuning control to enter station list/select
mode.
6. Rotate the Tuning control to select required DAB channel. Press
in and release the Tuning control to confirm the selection.
7. The station selected will be output to Audio output socket 2.
8. Repeatedly press and release the Setup button until the display
returns to show normal station mode.
31
4
TUNING
Press
to select
6
Operating your radio - FM auto search
... ...
10:02 24-MAY-2004
87.50MHz
AUTO
Auto Search
10:02 24-MAY-2004
87.50MHz
AUTO
Auto Search
10:02 24-MAY-2004
91.30MHz
AUTO
1. Fully extend the telescopic aerial.
2. Press the On/Off button to switch on your radio.
3. Press the Band button to select the FM band
4. Press in and release the Tuning control the display will show Auto
Search
5. Rotate the Tuning control a few clicks clockwise to search up in
frequency or rotate the Tuning control a few clicks anti-clockwise to search down in frequency.
6. Your radio will scan the FM waveband, stopping each time it finds
a station of sufficient strength.
7. To search for additional stations repeat the above procedure.
8. Adjust the Volume , Bass and Treble controls to the required
settings.
TUNING
Press
to select
TUNING
Press
to select
2
Band
3
4
If you need any further advice, please call our Technical Helpline on :020 8758 0338 (Mon-Fri)
5
32
Operating your radio - FM manual tune
... ...
10:02 24-MAY-2004
87.50MHz
AUTO
10:02 24-MAY-2004
93.50MHz
AUTO
1. Fully extend the telescopic aerial.
2. Press the On/Off button to switch on your radio.
3. Press the Band button to select the FM band
4. Rotate the Tuning control a clockwise to tune up in frequency or
rotate the Tuning control anti-clockwise to tune down in frequency.
5. Adjust the Volume, Bass and Treble controls to the required
settings.
TUNING
Press
to select
2
Band
3
4
33
Presetting stations - DAB and FM
BBC Radio 3
Stored
17:48
BBC Radio 3
Radio 3 Lunchtime Concert Pianist Rolf Hind performs
music by Debussy, Simon Holt,
Karen Tanaka & Messiaen
13:24 02-June-2004
AUTO
There are 6 memory presets for each of the 2 wavebands.
1. Press the On/Off button switch on the radio.
2. Tune to the required station as previously described.
3. Press and hold down the required Preset button until the display
shows Stored. The station will be stored under the chosen preset
button. Repeat this procedure for the remaining presets.
4. Stations stored in preset memories may be overwritten by following
the above procedure.
Recalling a preset station - DAB and FM
1. Press the On/Off button to switch on the radio.
2. Select the required waveband by pressing the Band button.
3. Momentarily press the required Preset button, your radio will tune
to the station stored in preset memory.
2
3
3
If you need any further advice, please call our Technical Helpline on :020 8758 0338 (Mon-Fri)
34
Clock settings
Set-Up
Buzzer Alarm
Radio Alarm
Record Timer
AUTO
Set-Up
Radio Alarm
Record Timer
Clock
DAB
Display
AUTO
Clock
DAB Auto Set
Time Set Auto
Date Set Auto
24-Hour Format 24 Hour
Mode dd-mmm-yyy
Yes
AUTO
Clock
DAB Auto Set No
Time Set [ 57 ]
Date Set 01-Jun-2004
24-Hour Format 24 Hour
Mode dd-mmm-yyy
08:
AUTO
Your radio's clock and date is by default automatically set when first
tuned to a DAB station. The clock format (12/24hrs) and date format (ddmmm-yyyy) may also be changed to suit your preferences.
1. Press the Setup button to enter Setup menu.
2. Rotate the Tuning control until the Clock section appears between
the two black lines on the display. Press in and release the Tuning
control to confirm the selection
3. Rotate the Tuning control until the DAB Auto Set line is highlighted
in the display.
4. Press in and release the Tuning control to enter adjustment mode.
Rotate the Tuning control to select the required DAB Auto Set
setting (Yes or No)
TUNING
Press
to select
TUNING
Set-up
1
2
5. Press in and release the Tuning control to confirm the selection.
6. Rotate the Tuning control until the Time Set line is highlighted in
the display.
7. Press in and release the Tuning Control to select. Rotate the
Tuning control to select required hour.
35
continued on next page
Press
to select
TUNING
Press
to select
4
6
Clock settings cont.
Clock
DAB Auto Set No
Time Set [ 08 ]
Date Set 01-Jun-2004
24-Hour Format 24 Hour
Mode dd-mmm-yyy
:57
AUTO
Clock
DAB Auto Set No
Time Set 08:57
Date Set [ -Jun-2004 ]
24-Hour Format 24 Hour
Mode dd-mmm-yyy
01
AUTO
Clock
DAB Auto Set No
Time Set 08:57
Date Set [ 01- -2004 ]
24-Hour Format 24 Hour
Mode dd-mmm-yyy
Jun
AUTO
Clock
DAB Auto Set No
Time Set 08:57
Date Set [ 01-Jun- ]
24-Hour Format 24 Hour
Mode dd-mmm-yyy
2004
AUTO
8. Press in and release the Tuning control to confirm the selection.
Rotate the Tuning control to select the required minute.
TUNING
Press
to select
9. Press in and release the Tuning control to confirm the selection.
10. Rotate the Tuning control until the Date Set line is highlighted in
the display.
11. Press in and release the Tuning Control to select. Rotate the
Tuning control to select required Day.
12. Press in and release the Tuning control to confirm the selection.
13. Rotate the Tuning control to select required Month. Press in and
release the Tuning control to confirm the selection.
14. Rotate the Tuning control to select required Year. Press in and
release the Tuning control to confirm the selection.
If you need any further advice, please call our Technical Helpline on :020 8758 0338 (Mon-Fri)
continued on next page
TUNING
Press
to select
TUNING
Press
to select
TUNING
Press
to select
8
10
13
14
36
Clock cont.
Clock
DAB Auto Set No
Time Set 08:57
Date Set 01-Jun-2004
24-Hour Format
Mode dd-mmm-yyy
24 Hour
AUTO
BBC 7
The Brighton Mystery
Journalist Polly solves murder
mysteries with the help of a
mystery Man in a tea room
11:10 18-May-2004
AUTO
Clock
DAB Auto Set No
Time Set 08:57
Date Set 01-Jun-2004
24-Hour Format 24 Hour
Mode dd-mmm-yyy
AUTO
15. Rotate the Tuning control until the 24-Hour Format line is high-
lighted in the display. Press in and release the Tuning control to
enter adjustment mode (default is 24 hours)
TUNING
Press
to select
16. Rotate the Tuning control to select 12 or 24 hour format. Press
in and release the Tuning control to confirm the selection.
17. Rotate the Tuning control until the Mode line is highlighted in the
display. Press in and release the Tuning control to enter adjust-
ment mode.
18. Rotate the Tuning control to select required dd-mm-yyyy format.
Press in and release the Tuning control to confirm the selection
(default dd-mm-yyyy)
19. Repeatedly press and release the Setup button until the display
returns to show normal station mode.
37
TUNING
Press
to select
15
18
Set-up
19
Alarms
Set-Up
Buzzer Alarm
Radio Alarm
Record Timer
AUTO
Alarm
Days SMTWTFS
Time Set 00:00
Off
Buzzer Alarm
AUTO
Alarm
Days SMTWTFS
Time Set 00:00
On
Buzzer Alarm
AUTO
Your radio has two alarms - buzzer and radio. Both alarms have a
Humane wake system whereby the alarms start at a low level and
gradually work up to a high level.
The radio alarm can be set so that you can wake to your favourite station
on either of the two wavebands.
Note: Alarm time format (12 or 24 hour) is dependent on the
clock settings made on page 37 (default is 24 hour)
TUNING
Press
to select
Set-up
1
Buzzer Alarm
1. Press the Setup button to enter setup mode.
2. Press in and release the Tuning control to select Buzzer Alarm.
3. Rotate the Tuning control until Alarm line is highlighted in the
display.
4. Press in and release the Tuning Control to select. Rotate the
Tuning control to select Alarm On.
If you need any further advice, please call our Technical Helpline on :020 8758 0338 (Mon-Fri)
continued on next page
TUNING
Press
to select
TUNING
Press
to select
2
3
4
38
Buzzer Alarm cont.
Alarm
Days
Time Set 00:00
On
SMTWTFS
Buzzer Alarm
AUTO
Alarm
Days SMTWTFS
Time Set 00:00
On
Buzzer Alarm
AUTO
Alarm
Days SMTWTFS
Time Set 00On:00
Buzzer Alarm
AUTO
ALARM
Alarm
Days SMTWTFS
Time Set 00On00:
Buzzer Alarm
AUTO
5. Press in and release the Tuning control to confirm selection
6. Rotate the Tuning control until Days line is highlighted in the
display. (default is all days active)
7. Press in and release the Tuning Control to select. Rotate the
Tuning control to select required days.
TUNING
Press
to select
TUNING
5
8. Press in and release the Tuning control to confirm the selections.
9. Rotate the Tuning control until the Time Set line is highlighted in
the display.
10. Press in and release the Tuning Control to select. Rotate the
Tuning control to select required hour.
11. Press in and release the Tuning control to confirm the selection.
Rotate the Tuning control to select the required minute.
12. Press in and release the Tuning control to confirm the selection.
13. Repeatedly press and release the Setup button until the display
returns to show normal station mode.
14. The Buzzer Alarm active symbol will appear in the display.
15. Press the On/Off button to switch off your radio. The alarm will
sound on the selected days at the preset time.
39
Press
to select
TUNING
Press
to select
TUNING
Press
to select
6
10
11
Radio Alarm
Set-Up
Buzzer Alarm
Radio Alarm
Record Timer
Clock
AUTO
Alarm
Days SMTWTFS
Time Set 00:00
Mode Current
Station Current
Off
Radio Alarm
AUTO
Radio Alarm
AUTO
Alarm
Days SMTWTFS
Time Set 00:00
Mode Current
Station Current
On
Note: Alarm time format (12 or 24 hour) is dependent on the
clock settings made on page 37 (default is 24 hour)
1. Press the Setup button to enter Setup mode.
Set-up
1
2. Rotate the Tuning control until Radio Alarm line appears between
the two black bars on the display
3. Press in and release the Tuning control to select Radio Alarm.
4. Rotate the Tuning control until Alarm line is highlighted in the
display.
5. Press in and release the Tuning Control to select. Rotate the
Tuning control to select Alarm On.
If you need any further advice, please call our Technical Helpline on :020 8758 0338 (Mon-Fri)
TUNING
Press
to select
TUNING
Press
to select
TUNING
Press
to select
2
4
5
40

Radio Alarm cont.
Radio Alarm
AUTO
Alarm On
Days SMTWTFS
Time Set 00:00
Mode Current
Station Current
Radio Alarm
AUTO
Alarm On
Days
Time Set 00:00
Mode Current
Station Current
SMTWTFS
Radio Alarm
AUTO
Alarm On
Days
Time Set 00
Mode Current
Station Current
SMTWTFS
00:
Radio Alarm
AUTO
Alarm On
Days
Time Set 00
Mode Current
Station Current
SMTWTFS
:00
6. Press in and release the Tuning control to confirm selection
7. Rotate the Tuning control until Days line is highlighted in the
display. (default is all days active)
8. Press in and release the Tuning Control to select. Rotate the
Tuning control to select required days.
9. Press in and release the Tuning control to confirm the selections.
10. Rotate the Tuning control until the Time Set line is highlighted in
the display.
11. Press in and release the Tuning Control to select. Rotate the
Tuning control to select required hour.
12. Press in and release the Tuning control to confirm selection.
Rotate the Tuning control to select the required minute.
TUNING
Press
to select
TUNING
Press
to select
TUNING
Press
to select
6
7
13. Press in and release the Tuning control to confirm the selection.
41
continued on next page
TUNING
Press
to select
11
12

Radio Alarm cont.
Radio Alarm
AUTO
Alarm On
Days
Time Set 00
Mode
Station Current
SMTWTFS
:00
Current
BBC Radio 1
The Radio 1 Breakfast Show
with Chris Moyles
- the studio webcam is at
www.bbc.co.uk/radio1
09:05 18-May-2004
AUTO
Radio Alarm
AUTO
Alarm On
Days
Time Set 00
Mode
Station Current
SMTWTFS
:00
Current
ALARM
14. Rotate the Tuning control until Mode line is highlighted in the
display (default is Current)
TUNING
Press
to select
15. Press in and release the Tuning Control to select. Rotate the
Tuning control to select required mode - choose from Current,
FM or DAB.
If Current is selected the current Band and station will be used for
radio alarm
16. Press in and release the Tuning control to confirm the selection.
17. Further options are available to allow a different band and station
to be selected for radio alarm.
18. Repeatedly press and release the Setup button until the display
returns to show normal station mode.
19. The Radio alarm active symbol will appear in the display.
20. Press the On/Off button to switch off your radio. The alarm will
sound on the selected days at the preset time.
If you need any further advice, please call our Technical Helpline on :020 8758 0338 (Mon-Fri)
14
Set-up
18
19
42

Snooze function
Set-Up
Buzzer Alarm
Radio Alarm
Record Timer
12:22 16-May-2004
AUTO
Set-Up
DAB
Display
Sleep
KeyPress
Factory Defaults
AUTO
Sleep
Sleep :00 10
AUTO
Sleep
Sleep [ : ]00 10
AUTO
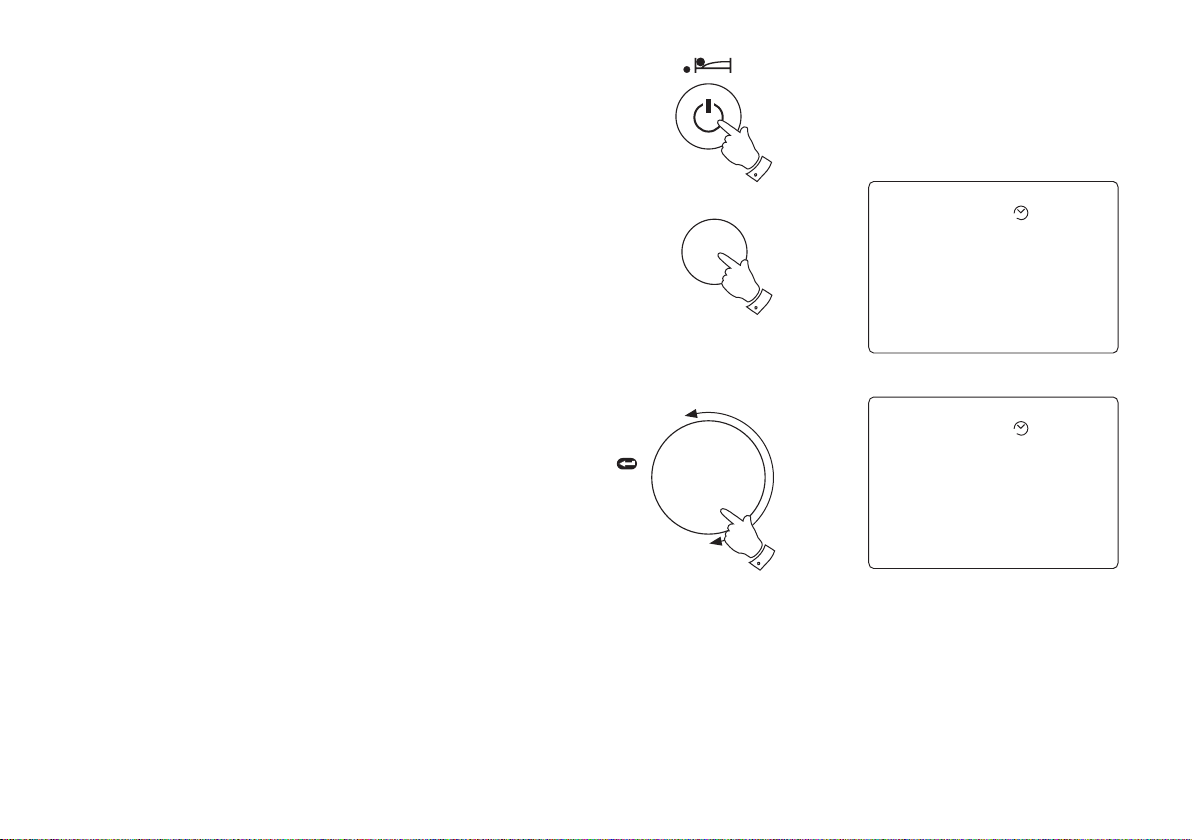
1. The radio or buzzer alarm can be silenced for 5 minutes by pressing
Any button (except On/Off). This sequence can be repeated
during the 60 minutes alarm period.
Sleep timer
Your radio can be set to turn off after a preset time has elapsed.
Set-up
1
TUNING
1. Press the Setup button to enter Set-up mode.
2. Rotate the Tuning control until the Sleep section appears between the two black lines on the display.
3. Press in and release the Tuning control to select the Sleep
section.
4. Press in and release the Tuning control to enter adjustment mode.
43
continued on next page
Press
to select
TUNING
Press
to select
TUNING
Press
to select
2
3
4

Sleep timer cont.
Sleep
Sleep [ : ]00 30
AUTO
Sleep
Sleep :00 30
AUTO
BBC 7
Rumpole or the Bailey
Coming next - Life Death and
Sex with Mike and Sue
13:58 18-May-2004
AUTO
BBC 7
Rumpole or the Bailey
Coming next - Life Death and
Sex with Mike and Sue
13:58 18-May-2004
AUTO
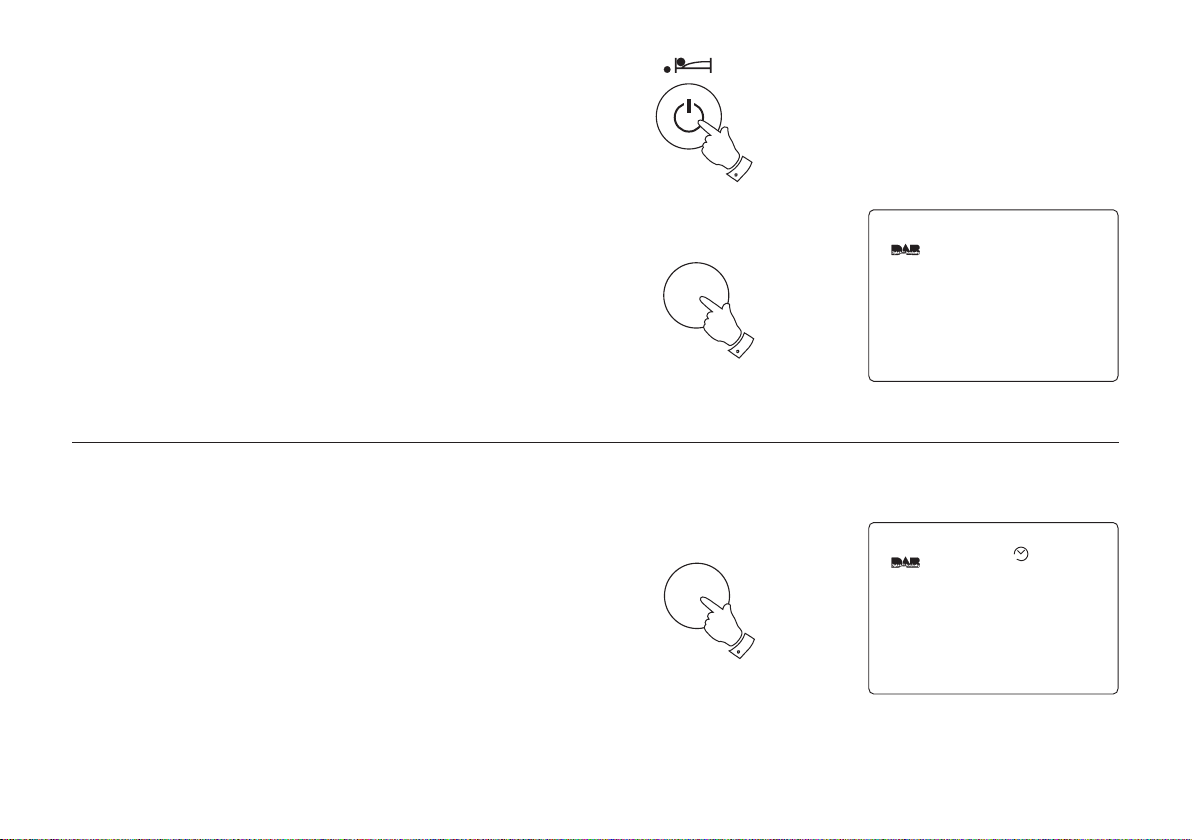
5. Rotate the Tuning control to set the Sleep time (max 1 hour 30
minutes in 5 minute steps). This now becomes new default sleep
time.
TUNING
Press
to select
6. Press in and release the Tuning control to confirm the selection.
7. Repeatedly press and release the Setup button until the display
returns to show normal station mode.
8. Whilst your radio is switched on the Sleep timer may be activated
by pressing and holding down the On/Off button until the sleep
symbol appears in the display. Your radio will switch off after
the preset sleep time has elapsed.
Note: Once the default sleep time is set the sleep timer may
be activated by pressing and holding in the On/Off button
until the symbol appears in the display. It is not
necessary to go through the sleep time setup again.
If you need any further advice, please call our Technical Helpline on :020 8758 0338 (Mon-Fri)
TUNING
Press
to select
5
6
Set-up
7
8
44

Display settings
Set-Up
Buzzer Alarm
Radio Alarm
Record Timer
AUTO
Set-Up
Clock
DAB
Display
Sleep
Keypress
AUTO
Display
Display Saving
Backlight On With AC
Contrast 12
No
AUTO
BBC Radio 1
The Radio 1 Breakfast Show
with Chris Moyles
- the studio webcam is at
www.bbc.co.uk/radio1
09:05 18-May-2004
AUTO
Your radio has three user configurable display settings:-
Display settings - Display saving
Enables screen to be blanked when radio is switched off i.e. no Clock/
Date display.
Set-up
1
1. Press the Setup button to enter Setup menu.
2. Rotate the Tuning control until the Display section appears
between the two black lines on the display. Press in and release the
Tuning control to confirm the selection
3. Rotate the Tuning control until the Display Saving line is high-
lighted in the display.
4. Press in and release the Tuning control to enter adjustment mode.
Rotate the Tuning control to select Display Saving Yes or No.
5. Press in and release the Tuning control to confirm the selection.
6. Repeatedly press and release the Setup button until the display
returns to show normal station mode.
45
TUNING
Press
to select
TUNING
Press
to select
2
4
Set-up
6

Display settings - Backlight
Set-Up
Buzzer Alarm
Radio Alarm
Record Timer
AUTO
Set-Up
Clock
DAB
Display
Sleep
Keypress
AUTO
Display
Display Saving
Backlight
Contrast 12
No
On With AC
AUTO
BBC 7
The Brighton Mystery
Journalist Polly solves murder
mysteries with the help of a
mystery Man in a tea room
11:10 18-May-2004
AUTO
This can be set to Off (always off), On (always on), On with AC (on when
using AC adaptor) or Keypress (backlight switches on for 12 seconds
following any key press).
Note: If backlight is set to On (always on) battery life will be
reduced.
Set-up
1
1. Press the Setup button to enter Setup menu.
2. Rotate the Tuning control until the Display section appears
between the two black lines on the display. Press in and release the
Tuning control to confirm the selection
3. Rotate the Tuning control until the Backlight line is highlighted in
the display.
4. Press in and release the Tuning control to enter adjustment mode.
Rotate the Tuning control to select required backlight mode e.g.
On, Off, On with AC or Keypress.
5. Press in and release the Tuning control to confirm the selection.
6. Repeatedly press and release the Setup button until the display
returns to show normal station mode.
If you need any further advice, please call our Technical Helpline on :020 8758 0338 (Mon-Fri)
TUNING
Press
to select
TUNING
Press
to select
2
4
Set-up
6
46

Display settings - Contrast
Set-Up
Buzzer Alarm
Radio Alarm
Record Timer
AUTO
Set-Up
Clock
DAB
Display
Sleep
Keypress
AUTO
BBC 7
The Brighton Mystery
Journalist Polly solves murder
mysteries with the help of a
mystery Man in a tea room
11:10 18-May-2004
AUTO
Display
Display Saving
Backlight On With AC
Contrast
No
12
AUTO
This can be changed to suit lighting conditions (default setting is 12)
1. Press the Setup button to enter Setup menu.
2. Rotate the Tuning control until the Display section appears
between the two black lines on the display. Press in and release the
Tuning control to confirm the selection
3. Rotate the Tuning control until the Contrast line is highlighted in
the display.
TUNING
Press
to select
Set-up
1
4. Press in and release the Tuning control to enter adjustment mode.
Rotate the Tuning control to select required contrast level.
5. Press in and release the Tuning control to confirm the selection.
6. Repeatedly press and release the Setup button until the display
returns to show normal station mode.
47
TUNING
Press
to select
2
4
Set-up
6
KeyPress settings - Timeout
Set-Up
Buzzer Alarm
Radio Alarm
Record Timer
AUTO
BBC 7
The Brighton Mystery
Journalist Polly solves murder
mysteries with the help of a
mystery Man in a tea room
11:10 18-May-2004
AUTO
Set-Up
Display
Sleep
Keypress
Factory Default
AUTO
Keypress
Timeout
KeyBeep No
No
AUTO
The tuning display screen can be set to have a Timeout e.g. if no
keypress within 5 seconds display will revert to previous screen.
1. Press the Setup button to enter Setup menu.
2. Rotate the Tuning control until the KeyPress section appears
between the two black lines on the display. Press in and release the
Tuning control to confirm the selection
Set-up
1
TUNING
3. Rotate the Tuning control until the Timeout line is highlighted in the
display.
4. Press in and release the Tuning control to enter adjustment mode.
Rotate the Tuning control to select required Timeout setting (Yes
or No)
5. Press in and release the Tuning control to confirm the selection.
6. Repeatedly press and release the Setup button until the display
returns to show normal station mode.
If you need any further advice, please call our Technical Helpline on :020 8758 0338 (Mon-Fri)
Press
to select
TUNING
Press
to select
2
4
Set-up
6
48
KeyPress settings - KeyBeep
Set-Up
Buzzer Alarm
Radio Alarm
Record Timer
AUTO
BBC 7
The Brighton Mystery
Journalist Polly solves murder
mysteries with the help of a
mystery Man in a tea room
11:10 18-May-2004
AUTO
Set-Up
Display
Sleep
Keypress
Factory Default
AUTO
Keypress
Timeout No
KeyBeep No
AUTO
Your radio can be set to provide an audible beep each time a key is
pressed.
1. Press the Setup button to enter Setup menu.
2. Rotate the Tuning control until the KeyPress section appears
between the two black lines on the display. Press in and release the
Tuning control to confirm the selection
Set-up
1
TUNING
3. Rotate the Tuning control until the KeyBeep line is highlighted in
the display.
4. Press in and release the Tuning control to enter adjustment mode.
Rotate the Tuning control to select required KeyBeep setting (Yes
or No)
5. Press in and release the Tuning control to confirm the selection.
6. Repeatedly press and release the Setup button until the display
returns to show normal station mode.
49
Press
to select
TUNING
Press
to select
2
4
Set-up
6

Factory default
Set-Up
Buzzer Alarm
Radio Alarm
Record Timer
AUTO
Set-Up
Sleep
KeyPress
Factory Default
AUTO
Factory Default
Return all user settings to
their factory default values
Are You Sure ? [ Yes ]
SA-01S
18:21 1st June 2004
AUTO
DAB Auto Tune
0% 100%
Scanning 11d
Services Found :20
This setting clears all station presets, service list and returns all variable
settings to their factory defaults.
1. Press the Setup button to enter Setup menu.
2. Rotate the Tuning control until the Factory Default line is high-
lighted in the display. Press in and release the Tuning control to
enter adjustment mode.
3. Rotate the Tuning control to select Yes. Press in and release the
Tuning control to confirm the selection.
4. The display will blank and after a few seconds your radio will enter
DAB Auto Tune.
TUNING
Press
to select
TUNING
Press
to select
Set-up
1
2
4
If you need any further advice, please call our Technical Helpline on :020 8758 0338 (Mon-Fri)
50

Headphone socket
Information
FM:Mono
17:48 1st-June-2004
Information
FM:Stereo
17:48 1st-June-2004
1. A 3.5mm Headphone Socket located on the left side of your radio
is provided for use with either headphones or an earpiece. Inserting
a plug automatically mutes the internal loudspeaker.
2. On the FM band if a station being received is weak some hiss may
be audible. To reduce the hiss press and hold in the Tuning control
until the display shows Information FM: Mono your radio will switch
to mono mode.
RDI
DigitalAudio
Out
Analogue
Aerial
AudioOut
LEFT
RIGHT
2
1
3. To return to stereo mode press and hold in the Tuning control until
the display shows Information FM:Stereo your radio will switch
back to stereo mode.
Note: Stereo is only available when using earphone/headphones
51
TUNING
Press
to select
TUNING
Press
to select
DC IN
9~12V 2A
2
3

General
Do not allow this radio to be exposed to water, steam or sand. Do not
leave your radio where excessive heat could cause damage. It is
recommended that the DAB band be used wherever possible as better
results in terms of quality and freedom from interference will usually be
obtained than on the FM band.
Specifications
AC 230V 50Hz via adaptor.
Batteries 4 x IEC size LR20 (D size)
Battery Life Approx. 25hrs of listening when used for 4
hours a day at normal volume using alkaline
batteries. (PausePlus storage and Backlight off)
Frequency Coverage
FM 87.5 - 108MHz
DAB 174.928 - 239.200MHz
If you need any further advice, please call our Technical Helpline on :020 8758 0338 (Mon-Fri)
Circuit Features
Loudspeaker 100mm diameter 4ohms
Output Power 1.8 Watts
Headphone socket 3.5mm dia stereo
Audio 1 output 2 x RCA
Audio 2 output 2 x RCA
Optical output TosLink
Aerial System FM Telescopic aerial
DAB Telescopic aerial
52

53

Guarantee
This instrument is guaranteed for twelve months from the date of delivery to the original owner against failure due to faulty workmanship or component
breakdown, subject to the procedure stated below. Should any component or part fail during this guarantee period it will be repaired or replaced free
of charge.
The guarantee does not cover:
1. Damage resulting from incorrect use.
2. Consequential damage.
3. Receivers with removed or defaced serial numbers.
N.B. Damaged or broken telescopic aerials will not be replaced under guarantee.
Procedure:
Any claim under this guarantee should be made through the dealer from whom the instrument was purchased. It is likely that your Roberts' dealer
will be able to attend to any defect quickly and efficiently, but should it be necessary the dealer will return the instrument to the company’s service
department for attention. In the event that it is not possible to return the instrument to the Roberts' dealer from whom it was purchased, please contact
Roberts Radio Technical Services at the address shown on the rear of this manual.
If you need any further advice, please call our Technical Helpline on :020 8758 0338 (Mon-Fri)
54

Issue 1
ROBERTS RADIO TECHNICAL SERVICES
97-99 Worton Road
Isleworth Middlesex
TW7 6EG
Technical Helpline :- 020 8758 0338 (Mon-Fri during office hours)
 Loading...