

Page 1

www.roadstar.com
I-RX16BT
Internet Radio Adaptor
User manual
Bedienungsanleitung
Manuel d’instructions
Manuale d’istruzioni
Manual de instrucciones
Gebruiksaanwijzing
Page 2

INDEX
English Page 1
Deutsch Seite 9
Français Page 19
Italiano Pagina 29
Español Página 37
Nederlands Pagina 47
Your new unit was manufactured and assem-
bled under strict ROADSTAR quality control.
Thank-you for purchasing our product for your
music enjoyment. Before operating the unit,
please read this instruction manual carefully.
Keep it also handy for further future referen-
ces.
Votre nouvel appareil a été fabriqué et monté
en étant soumis aux nombreaux tests ROADSTAR. Nous espérons que cet appareil vous
donnera entière satisfaction. Avant de vous
adonner à ces activités, veuillez lire attentivement ce manuel d’instructions. Conservez-le à
portée de main à fin de référence ultérieure.
Vuestro nuevo sistema ha sido construido
según las normas estrictas de control de calidad ROADSTAR. Le felicitamos y le damos
las gracias por su elección de este aparado.
Por favor leer el manual antes de poner en
funcionamiento el equipo y guardar esta documentación en case de que se necesite nuevamente.
Ihr neues Gerät wurde unter Beachtung der
strengen ROADSTAR Qualitätsvorschriften gefertigt. Wir danken Ihnen für den Kauf unseres
Produktes und wünschen Ihnen optimalen Hörgenuss. Bitte lesen Sie diese Bedienungsanleitung durch, und heben Sie sie auf, um jederzeit
darin nachschlagen zu können.
Il vostro nuovo apparecchio é stato prodotto ed
assemblato sotto lo stretto controllo di qualità
ROADSTAR. Vi ringraziamo di aver acquistato
un nostro prodotto per il vostro piacere d’ascolto. Prima di procedere all'utilizzo dell'apparecchio, leggete attentamente il manuale d’istruzioni e tenetelo sempre a portata di mano per futuri
riferimenti.
Seu novo aparelho foi construido e montado sob
o estrito controle de qualidade da ROADSTAR.
Agradecemos por ter comprado nosso produto
para a sua diversão. Antes de usar esta unidade
é necessário ler com atençâo este manual de
instruções pare que possa ser usada apropriadamente; mantenha o manual ao seu alcance
para outras informações.
Page 3
I-RX16BT
FRONT
REAR
REMOTE CONTROL
Page 4

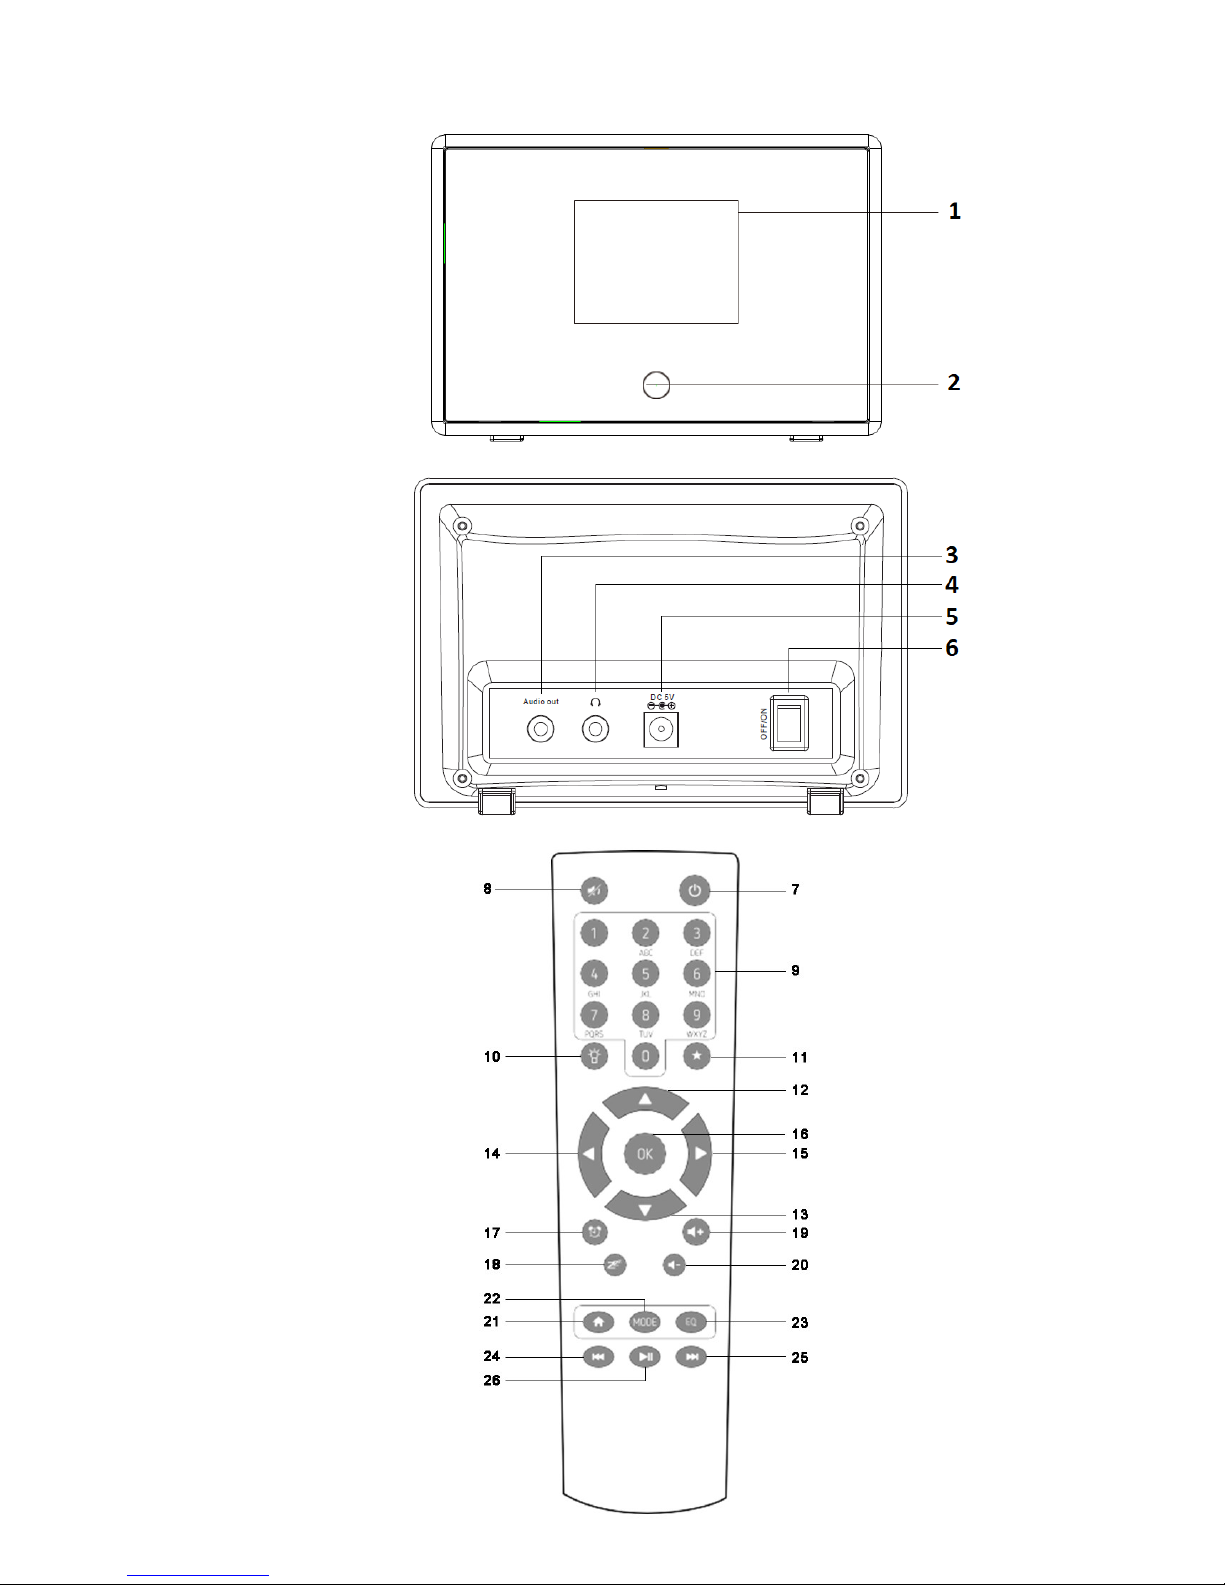
1 English
LOCATION OF CONTROLS
1. LCD DISPLAY
2. INFRARED SENSOR
3. 3.5 mm Jack AUDIO OUT SOCKET
4. 3.5 mm Jack HEADPHONES OUT SOCKET
5. DC POWER SOCKET (5V)
6. POWER ON / OFF SWITCH
REMOTE CONTROL
7. POWER ON/OFF
8. MUTE
9. FAVORITE STATION KEY / INPUT LETTERS AND NUMBERS
Key“0”―― 0,'DEL'
Key“1”―― '1'->'@'->' '(space)->'!'-> “ (double quotes)->'#'->'$'->'%'->'&'-> '(single
quotes)->'('->')'->'*'->'+'->','->'-'->'.'->'/'->':'->';'->'<'->'='->'>'->'?'->'['->'\'-
>']'->'^'->'_'->'`'->'{'->'|'->'}'->'~'
Key “2”―― 2,A,B,C,a,b,c
Key“3”―― 3,D,E,F,d,e,f
Key“4”―― 4,G,H,I,g,h,i
Key“5”―― 5,J,K,L,j,k,l
Key“6”―― 6,M,N,O,m,n,o
Key“7”―― 7,P,Q,R,S,p,q,r,s
Key“8”―― 8,T,U,V,t,u,v
Key“9”―― 9,W,X,Y,Z,w,x,y,z
10. DIMMER (DISPLAY BRIGHTNESS)
11. FAVORITE BUTTON
12. CURSOR UP
13. CURSOR DOWN
14. CURSOR LEFT / BACK
15. CURSOR RIGHT
16. OK (CONFIRMATION BUTTON)
17. ALARM BUTTON
18. SLEEP TIMER
19. VOLUME +
20. VOLUME -
21. MAIN MENU
22. MODE
23. EQUALIZER (FOR HEADPHONES ONLY)
24. PREVIOUS SONG / PREVIOUS RADIO CHANNEL
25. NEXT SONG / NEXT RADIO CHANNEL
26. PLAY / PAUSE
Page 5

2 English
BEFORE YOU START
Please ensure the following is ready:
You have a broadband internet connection;
A wireless (Wi-Fi) broadband router is connected to the internet. The radio sup-
ports Wireless B, G and N connection (Wireless N router can also be used with
the setting on B or G);
You know the Wired Equivalent Privacy (WEP) or Wi-Fi Protected Access (WPA)
data encryption code / password. You need to key in the correct code when the
radio is connected to the wireless router for network connection. If you do not
know the code/password, please contact the person /technician who set up the
router/network for you.
PRECAUTIONS
The radio should not be used in a high temperature / high humidity en-
vironment over prolonged periods of time as this may damage the unit.
Keep the radio away from liquids as it may get damaged. Please switch off
the radio immediately if water or liquids is spilled into the radio. Consult
with the shop you bought this radio for any question.
Avoid using or storing the unit in dusty or sandy environment
Do not open and repair the radio by yourself.
Use only the AC / DC Adaptor supplied with the radio. Connecting a power
supply with a different rating will cause permanent damage to the radio and
may be hazardous.
Clean only with dry cloth.
SWITCHING ON THE RADIO (FIRST SETTING)
1. Plug the connector pin of the AC / DC adaptor into the DC jack of the unit (5).
2. Connect the other end of the adaptor to the wall socket.
Caution: Use only the adaptor supplied. Connecting an adaptor with differ
ent rating will cause permanent damage to the radio and may be hazardous.
3. Connect your external powered speaker to Audio-Out jack on the radio (3).
4. Switch the radio on using the Power on / off switch (6).
The display will light up and show “WELCOME”.
5. Select the language with up/down cursors (12/13).
The radio will ask if you want to “Check Network” when power on.
6. Radio will ask if you want to “Configure Network”
If you chose to configure network now, please follow next steps, otherwise you
can configure it later.
7. The radio will check for networks.
8. Select your network with up/down cursors (12/13).
9. Insert the password:
Press repeatedly letters and numbers (9) or up/down cursors (12/13) to en-
ter a character.
Move to next or previous character with left/right cursors (14/15).
Confirm with “OK” (16).
Page 6

3 English
CONNECTING TO THE WI-FI NETWORK
1. Enter the Configuration menu.
2. Enter the Network menu.
3. Select Wireless Network Configuration.
4. Select your network with up/down cursors (12/13).
5. Insert the password:
Press repeatedly letters and numbers (9) or up/down cursors (12/13) to en-
ter a character.
Move to next or previous character with left/right cursors (14/15).
Confirm with “OK” (16).
INTERNET RADIO
Choose 'Internet Radio' from the menu, you can see different functions as below:
My Favorite: List of favorite stations which have been assigned to the pre-
sets.
Radio Station / Music: To select desired radio station by Genre or Location.
Local Radio: Quick access to the radio station located in your area.
Remark: You can set other region as local radio.
History: Shows the radio stations that you have listened in the past.
Service:
Search Radio Stations: You can search your desired radio station.
Add new Radio Station: If you cannot find the desired station from the Radio
station list and you have the URL address, you can input the link here and
add to your favorite list.
To start listen the worldwide radio stations, select “Radio Station/Music”
SET PRESETS
1. While you are playing the favorite station, press and hold (around 3 sec.) the
favorite button (11) until a screen with “Add to My Favorite” appear.
2. Select the position where you want to save the station with up/down cursors
(12/13).
3. Confirm with “OK” (16).
EDIT PRESET
You can edit your Favorite list with the following options:
1. Press the favorite button (11) to enter the Preset station list.
2. Choose the radio station that you want to edit.
3. Press right cursor (15) to enter to the edit menu.
4. Choose the desired action from the following:
Delete – To delete the selected station
Shift up/down – To shift the selected station on the list.
Rename – To rename the selected station
5. Confirm with “OK” (16).
RECALL PRESET
1. Press Favorite Button (11) to recall the favorite list.
2. Select desired station with up/down cursors (12/13).
3. Confirm with “OK” (16).
Page 7

4 English
BLUETOOTH OPERATION
1. Switch the mode to Bluetooth on the Radio with left / right cursors (14/15).
2. Connect your Bluetooth portable device to the ID Bluetooth tagged “I-RX16BT” ;
3. You can now transfer the music to the “I-RX16BT” .
Note: Music control (play, pause, etc) must be done from your ext. device.
VOLUME CONTROL (FOR HEADPHONES ONLY)
To adjust the volume for the external powered speaker, please use the volume control
on the powered speaker unit.
The buttons on the remote control (19/20) are to adjust the volume for earphone only.
DLNA
The Internet radio can play music stream from DLNA compatible device, provided that
the Internet radio and other DLNA devices are under the same Wi-Fi network.
The radio will appear as “AirMusic” when you try to search it on other devices. If you
want to change other name from AirMusic, go to Configuration and DLNA setup to
make the change.
MEDIA CENTER
UPNP (UNIVERSAL PLUG AND PLAY)
You can stream music from the Networked device which supports UPnP function to
the radio to play.
For instance, most of the latest computer supports UPnP, and you can stream music
from Windows Media Player application on the computer and listen on your radio.
Remark: Please make sure your computer is on the same Wi-Fi network as the
radio.
The latest Windows Media Player may be downloaded from Microsoft's website
and install by following the instructions detailed in its installation wizard.
Once installed, Windows Media Player will create a library from all the media files
available to it on your PC.
WINDOWS XP / WINDOWS MEDIA 11
1. To add new media files to the library, select' File > Add to Library…>
Advanced Options', Click 'Add' and choose the files you wish to add
and click' OK'.
2. Now you need to connect your Internet radio to Windows Media Player
11 and configure it to allow the radio to access your media library. In order to this, you will need to do the following:
On the radio, go to the main menu and select <Media Centre>
<UPnP>.
It will scan for all available UPnP servers. Note, this may take a
few seconds for the radio to complete its scan and before the
scan has completed, the radio will display '[Empty]'. The radio
will continue to display '[Empty]' if no UPnP servers and found.
After a successful scan. Select your UPnP server, by rotating
the dial if there is more than one UPnP server, and then press
Page 8

5 English
SELECT.
3. Your PC will now prompt you that a device has attempted to connect to
your UPnP server. In order to allow the radio to have access to the media
files, you will need to click the 'Library' tab from Windows Media Player 11
and select the <Media Sharing> item to open the 'Media Sharing' window.
4. From the 'Media Sharing' windows, the radio will be listed as an unknown
device. Click on the unknown device listed, then click the 'Allow' button and
then click 'OK'.
WINDOWS 7 / WINDOWS MEDIA PLAYER 12
1. If you are using WMP 12, simply go to <File> and choose <Open> to retrieve
the music files you would like to add to library.
2. Windows 7 or above requires the PC to be set as Home network and also
with the Homegroup enabled to allow devices to access/ play the media files
on your Windows Media Player. Please find the steps below:
a. Go to “Control Panel” and select “Network and Internet”.
b. Choose “Homegroup”.
c. Select “Network location”.
d. Choose “home Network”.
e. Select “Create a Homegroup”.
f. Launch the Windows Media Player, select “Stream” and choose
“Automatically allow devices to play my media” from the drop down list.
You can now enjoy the music streaming from windows media player.
MUSIC STREAMING VIA UPNP
1. On the main menu, select “Media Centre” and choose “UPnP”.
It may take a few seconds for the radio to complete the scan for available
UPnP servers. If no UPnP servers are found, it will show “Empty List”.
2. After a successful scan is done, select your UPnP server.
The radio will show the media categories available from the UPnP server,
e.g. 'Music', 'Playlists' etc.
3. Choose the media files that you wish to play.
INFORMATION CENTER
WEATHER INFORMATION
To view the weather forecast all over the world and choose the desired region to
display on Standby. To activate this feature, choose the desired region then press
right cursor (15), choose “add to standby display” and confirm with “OK” (16).
“Current Date & Time” and “Current Weather” will display every 10 seconds alternately in standby mode. You can press left / right cursors (14/15) to display the
previous / next day weather forecast.
Remark: Weather may have deviation to the actual, it is for reference only.
FINANCIAL INFORMATION
To get the information of Stock Market all over the world.
Remark: Info may have deviation to the actual, is for reference only.
SYSTEM INFORMATION
To view the information of the radio such as the Version of the software, etc.
Page 9

6 English
CONFIGURATION
TIME DISPLAY: Set the Standby clock mode as Clock Radio or Internet Radio
MANAGE MY MEDIAU: You can create a favorite station list by operating on PC.
1. On your computer, go to http://www.mediayou.net/web/index.php, this is the radio
portal used on your radio. Register as member by selecting “Join now”.
2. Log In to the portal
3. From the menu on the left side of the portal select “Device”
4. On the Radio adaptor
Go to “information Center”.
Select “System Information”.
Select “Wireless Info” and note the MAC Address.
5. On your PC write the name of your device and write the MAC Address into the
“Serial Number” space.
6. Confirm by clicking “Add”.
7. Now you can organize your own favorite stations or add any new station which is
currently not found on the station list. After the work is done, follow the steps below
to sync the changes to the radio:
On your Internet Radio Adaptor go to “Configuration”
Select “Manage my MediaU”
Choose “Enable” and confirm with “OK” (16) (if this option was already
“Enabled”, “Disable” and then “Enable” it again).
Then you will see “Manage My mediaU” appear on the main menu.
NETWORK:
Wireless Network Configuration: To Scan for wireless network and list out.
Wireless Network ( WPS PBC): To Use WPS function. You can set the wireless
without enter any password for Wi-Fi protected if your router has this function.
Manual Configuration: To Set the DHCP on or off, and enter the SSID as you
known, or delete the connected Wi-Fi.
Check Network when Power On: Enable / disable “Check Net. when Power On”.
DATE & TIME:
Set Date and Time: To choose between “ Auto Detect” or “Manual Setup” the
Currently Date & Time.
Time Format setting: To choose Time format setting (12hours / 24hours).
Date Format setting: To chose date format setting.
ALARM CLOCK:
Alarm 1 / 2: To select your favorite Alarm settings (2 available alarms).
NAP Alarm: To set a short time alarm. You can select the time from 5 minutes up
to 120 minutes. No Snooze function available for the NAP alarm.
Remark: The NAP Alarm is with beeping sound only.
Alarm Volume: To set the alarm sound level with left / right cursors (14/15)
When the Alarm comes on, press any key except “Power” button, to enter the
“Snooze” mode or press “Power” button (7) to cancel the alarm sounds again 5
minutes later.
Remark: You can select any internet radio station as Alarm tone from the favorite station. If internet station doesn't work in 1 minute, it will auto set into beeping
Page 10

7 English
sound.
TIMER: Use up/down and left/right cursors (12/13 and 14/15) to adjust the time then
confirm with “OK” (16) and the timer will start.
To pause the timer, press “OK”, to resume it, press “OK” again.
To cancel the timer, press and hold “OK” button until “00:00” appears, then
press “OK” to exit.
LANGUAGE: Choose between 17 available languages available.
DIMMER: To adjust the backlight of the LCD with below settings:
Power Saving: Set a down level when there is no operation after 15 seconds.
Turn on: The backlight will not dim down even there is no operation. You can
adjust the backlight leve you want.
DISPLAY: To choose the display mode between “color” or “monocrome”.
POWER MANAGEMENT: To set the auto-standby time if there is no internet signal
received in order to save power. The default setting is 30 minutes (the radio will go into Standby after 30 minutes when the radio does not receive any internet signal).
SLEEP TIMER: To set the timer to put the radio on standby after certain time elapsed,
from 15 minutes to 180 minutes with the step of every 15 minute.
You can also set this timer by pressing repeatedly the “Sleep Timer” button (18) from
the remote control (you will see the sleep timer on the top right corner of the display).
BUFFER: To select your preferred buffering time.
WEATHER: To set the display of weather forecast on the standby mode and the tem-
perature units. You can select Weather Display On/Off and Location.
Temperature units are Celsius (°C) and Fehrenheit (°F).
LOCAL RADIO SETUP:
The radio will detect your local area stations automatically and under “Internet radio” you will find all the “Local Radio”.
If you would like to change the Local area stations to other countries, you can
choose “Manual setup” to make the change.
PLAYBACK SETUP: To set the playback mode as Off, Repeat one / all and Shuffle.
DLNA SETUP: When the radio is connected by other DLNA devices, the default
name is “AirMusic”. You can change it as you desire.
Please note: The DLNA feature is compatible and works with corresponding
third party Android APPs. Apple devices are not supported.
EQUALIZER: Equalizer function (for headphones listening only).
RESUME WHEN POWER ON: To set to ON or OFF of “ Resume When Power On”.
SOFTWARE UPDATE: Upgrade information will pop up on the display when there
is upgrade available on the server.
RESET TO DEFAULT: To set all the settings back to default settings.
Please note: all the Station presets, Settings and configuration will be
lost after you have performed the “Factory Reset”.
Page 11
8 English
TECHNICAL SPECIFICATIONS
Power
Power Voltage: AC 230V ~ 50Hz.
Power Input: DC 5 V = 1A.
General
Wireless Network: IEEE802.11b/g/n.
Security Protocol: WEP / WPA / WPA2.
Audio Sockets: 3.5mm jack audio out;
3.5mm jack headphones out.
BT Maximum radiated Power: 2.5 mW (4 dBm).
Specifications and design are subject to possible modifications without notice due to
improvement.
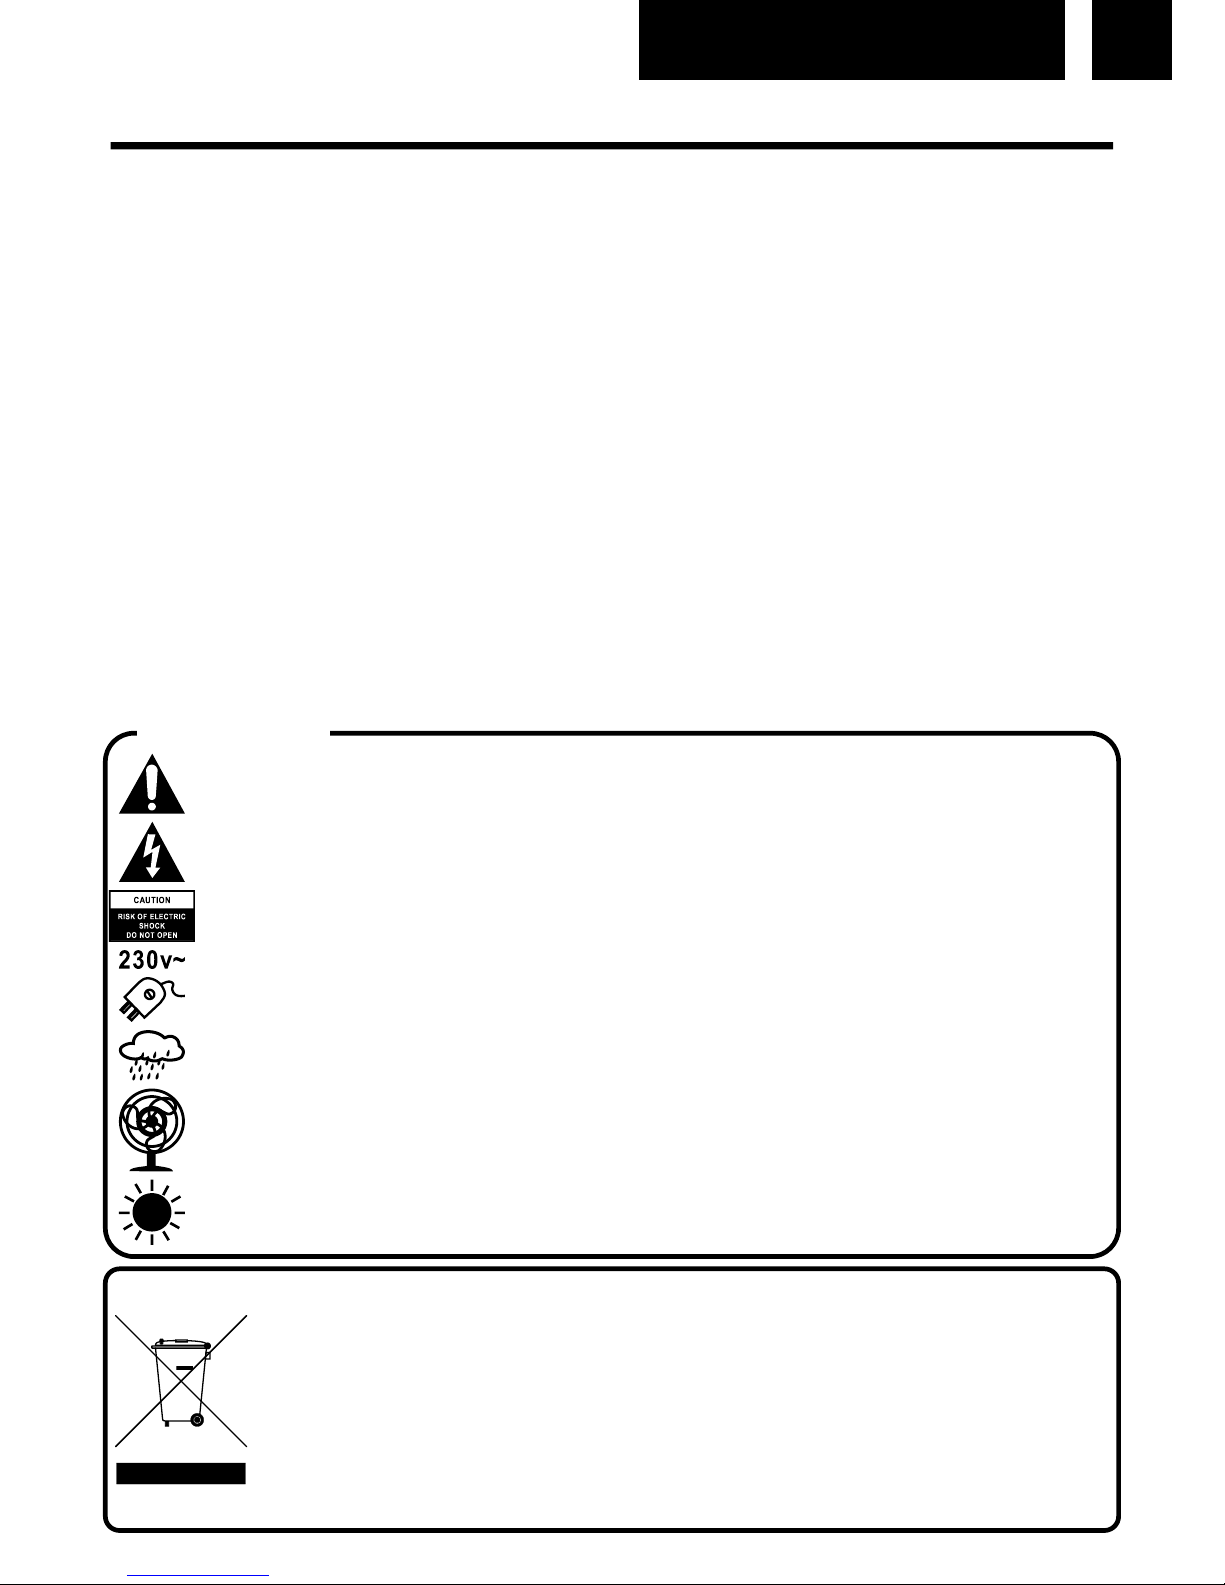
This marking shown on the product or its literature, indicates that it should not be disposed with
other household wastes at the end of its working life. To prevent possible harm to the environment
or human health from uncontrolled waste disposal, please separate this from other types of wastes
and recycle it responsibly to promote the sustainable reuse of material resources. Household users
should contact the retailer where they purchased this product, or their local government office, for
details of where and how they can take this item for environmentally safe recycling. Business users
should contact their supplier and check the terms and conditions of the purchase contract. This product should not be mixed with other commercial wastes for disposal.
CORRECT DISPOSAL OF THIS PRODUCT
(Waste Electrical & Electronic Equipment)
WARNINGS
The exclamation point within the triangle is a warning sign alerting the user of important instructions accompanying the product.
The lightening flash with arrowhead symbol within the triangle is a warning sign alerting the user
of “dangerous voltage” inside the unit.
To reduce the risk of electric shock, do not remove the cover. No user serviceable parts inside
the unit. Refer all servicing to qualified personnel.
This unit operates on 230V ~ 50Hz. If the unit is not used for a long period of time, remove the
plug from the AC mains.
Ensure all connections are properly made before operating the unit.
This unit must not be exposed to moisture or rain.
This unit should be positioned so that it is properly ventilated. Avoid placing it, for example, close
to curtains, on the carpet or in a built-in installation such as a bookcase.
Do not expose this unit to direct sunlight or heat radiating sources.
Page 12

9 Deutsch
ORT DER BEDIENELEMENTE
1. LCD ANZEIGE
2. INFRAROTSENSOR
3. 3.5 mm Jack AUDIO AUSGANG
4. 3.5 mm Jack KOPFHÖRER AUSGANG
5. DC BUCHSE (5V)
6. POWER EIN / AUS
FERNBEDIENUNG
7. POWER EIN/AUS
8. STUMMSCHALTUNG
9. TASTE LIEBLINGSSENDER/GEBEN SIE BUCHSTABEN UND ZIFFERN EIN
“0”―― 0,'DEL'
“1”―― '1'->'@'->' '(raum)->'!'-> “ ->'#'->'$'->'%'->'&'-> '->'('->')'->'*'->'+'->','->'-'->'.'->'/'-
>':'->';'->'<'->'='->'>'->'?'->'['->'\'-
>']'->'^'->'_'->'`'->'{'->'|'->'}'->'~'
“2”―― 2,A,B,C,a,b,c
“3”―― 3,D,E,F,d,e,f
“4”―― 4,G,H,I,g,h,i
“5”―― 5,J,K,L,j,k,l
“6”―― 6,M,N,O,m,n,o
“7”―― 7,P,Q,R,S,p,q,r,s
“8”―― 8,T,U,V,t,u,v
“9”―― 9,W,X,Y,Z,w,x,y,z
10. HELLIGKEITSREGLER (HELLIGKEIT DER ANZEIGE)
11. FAVORITENTASTE
12. CURSOR NACH OBEN
13. CURSOR NACH UNTEN
14. CURSOR LINKS/ZURÜCK
15. CURSOR NACH RECHTS
16. OK (BESTÄTIGUNGSTASTE)
17. ALARM-TASTE
18. SLEEP-TIMER
19. LAUTSTÄRKE + (NUR FÜR KOPFHÖRER)
20. LAUTSTÄRKE - (NUR FÜR KOPFHÖRER)
21. HAUPTMENÜ
22. MODUS
23. EQUALIZER (NUR FÜR KOPFHÖRER)
24. VORHERIGER SONG/VORHERIGER RADIOSENDER
25. NÄCHSTER SONG/NÄCHSTER RADIOSENDER
26. PLAY/PAUSE
Page 13

10 Deutsch
BEVOR SIE BEGINNEN
Bitte stellen Sie sicher, dass folgende Voraussetzungen erfüllt sind:
Sie verfügen über eine Breitband-Internetverbindung;
Ein Wireless- (WLAN)- Breitband-Router ist mit dem Internet verbun-
den. Das Radio unterstützt Wireless B, G und N (Wireless-N-Router
kann auch mit der Einstellung auf B oder G verwendet werden);
Sie kennen den Code bzw. das Passwort für die WEP-Verschlüsselung
(Wired Equivalent Privacy) oder die WPA- (Wi-Fi Protected Access)
Datenverschlüsselung. Sie müssen den richtigen Code eingeben,
wenn das Radio mit dem Wireless-Router für den Anschluss an ein
Netzwerk verbunden ist. Wenn Sie den Code/das Kennwort nicht wissen, wenden Sie sich bitte an die Person/den Techniker, die/der den
Router/das Netzwerk für Sie eingerichtet hat.
VORSICHTSMAßNAHMEN
Das Radio sollte nicht in einer Umgebung mit hohen Temperat. oder
hoher Luftfeuchtigkeit über einen längeren Zeitraum verwendet wer-
den, da das Gerät beschädigen kann.
Halten Sie das Radio von Flüssigkeiten fern, da diese es möglicher-
weise beschädigen könnten. Bitte schalten Sie das Radio sofort aus,
wenn Wasser oder Flüssigkeiten in das Gerät eingedrungen sind.
Wenden Sie sich bei Fragen an das Geschäft, in dem Sie das Radio
gekauft haben.
Benutzen oder Lagern Sie das Gerät nicht in staubiger oder sandiger
Umgebung.
Öffnen und reparieren Sie das Radio nicht selbst.
Verwenden Sie nur die angegebene Netzeingangsspannung für das
Aufladen des Akkus. Der Anschluss eines Netzteils mit einer anderen
Klassifizierung verursacht dauerhafte Schäden am Radio und kann gefährlich sein.
Reinigen Sie das Gerät nur mit einem trockenen Tuch.
Page 14

11 Deutsch
DAS RADIO EINSCHALTEN (ERSTE EINSTELLUNG)
1. Stecken Sie den Anschlussstift des AC/DC-Adapters in die DC-Buchse Gerät (5).
2. Schließen Sie das andere Ende des Adapters an eine Steckdose an.
Vorsicht: Verwenden Sie nur den mitgelieferten Adapter. Der Anschluss ei
nes Adapters mit einer anderen Klassifizierung kann gefährlich sein und dauer
hafte Schäden am Radio verursachen.
3. Schließen Sie Ihren extern mit Strom versorgten Lautsprecher an der Audio-OutBuchse des Radios an (3).
4. Schalten sie das Radio ein, indem Sie auf den Schalter Power ein/aus drücken
(6). Die Anzeige leuchtet und es erscheint die Nachricht „WELCOME“.
5. Wählen Sie die Sprache mit dem Cursor NACH OBEN / NACH UNTEN (12/13).
Das Radio wird Sie beim Einschalten fragen, ob Sie das „Netzwerk prüfen“
möchten.
6. Das Radio wird Sie fragen, ob Sie das „Netzwerk konfigurieren“ möchten.
Wenn Sie jetzt das Netzwerk konfigurieren möchten, befolgen Sie die nächsten
Schritte, ansonsten können Sie es später konfigurieren.
7. Das Radio wird nach Netzwerken suchen.
8. Wählen Sie Ihr Netzwerk mit dem Cursor NACH OBEN / NACH UNTEN (12/13).
9. Geben Sie das Passwort ein:
Drücken Sie wiederholt auf die Buchstaben und Zahlen (9) oder auf den
Cursor NACH OBEN / NACH UNTEN, (12/13), um ein Zeichen einzugeben.
Wechseln Sie zum nächsten oder vorherigen Zeichen mit dem Cursor
NACH LINKS / NACH RECHTS (14/15).
Bestätigen Sie mit „OK“ (16).
VERBINDUNG ZUM WI-FI-NETZWERK
1. Rufen Sie das Konfigurationsmenü auf.
2. Öffnen Sie das Menü „Netzwerk“.
3. Wählen Sie die drahtlose Netzwerkkonfiguration.
4. Wählen Sie Ihr Netzwerk mit dem Cursors NACH OBEN / NACH UNTEN (12/13).
5. Geben Sie das Passwort ein:
Drücken Sie wiederholt auf die Buchstaben und Zahlen (9) oder auf den
Cursor NACH OBEN / NACH UNTEN, (12/13) um ein Zeichen einzugeben.
Wechseln Sie zum nächsten oder vorherigen Zeichen mit dem Cursor
NACH LINKS / NACH RECHTS (14/15).
Bestätigen Sie mit „OK“ (16).
INTERNET RADIO
Favoritenliste: Ist eine Liste der bevorzugten, gespeicherten Radiosender.
Radiosender/Musik: Die Radiosender sind unterteilt in Top 20 weltweit,
Genre und Land. Wählen Sie eine Kategorie aus, um zu den Unterkategorien zu
gelangen und wählen Sie dann die Radiosender aus, die Sie hören möchten.
Lokalsender: Die Radiosender sind unterteilt nach dem Land/dem Ort, in
dem sie senden
Page 15

12 Deutsch
Verlauf: Die Liste der zehn zuletzt gehörten Radiosender.
Service:
Radiosender suchen: Geben Sie ein Schlüsselwort ein, nachdem der
Radiosender in der Liste gesucht werden soll.
Fügen Sie durch Hinzufügen der IP-Adresse neue Radiosender hinzu. Die
hinzugefügten Radiosender werden unter My Favorite (Favoriten) gespeichert.
FESTLEGEN VON VOREINSTELLUNGEN
1. Während der Wiedergabe Ihres Lieblingssenders drücken Sie für ca. 3 Sek. auf
die Favoritentaste (11), bis der Bildschirm mit der Meldung „Hinzufügen zu mei-
nen Favoriten“ angezeigt wird.
2. Wählen Sie mit dem Cursor NACH OBEN / NACH UNTEN (12/13) die Position
aus, wo Sie den Sender speichern möchten.
3. Bestätigen Sie die Eingabe mit „OK“ (16).
VOREINSTELLUNGEN BEARBEITEN
Sie können Ihre Favoritenliste mit den folgenden Optionen bearbeiten:
1. Drücken Sie auf die Favoritentaste (11), um die voreingestellte Senderliste aufzurufen.
2. Wählen Sie den Sender, den Sie bearbeiten möchten.
3. Drücken Sie auf den Cursor NACH RECHTS (15), um in das Menü Bearbeiten zu
gelangen.
4. Wählen Sie die gewünschte Aktion unter den folgenden Optionen aus:
Löschen, um den ausgewählten Sender zu löschen
Nach oben/nach unten verschieben, um den ausgewählten Sender auf der
Liste zu verschieben.
Umbenennen, um den ausgewählten Sender umzubennen
5. Bestätigen Sie die Auswahl mit „OK“ (16).
VOREINSTELLUNG WIEDERAUFRUFEN
1. Drücken Sie auf die Favoritentaste (11), um die Favoritenliste aufzurufen.
2. Wählen Sie Ihren gewünschten Sender mit dem Cursor NACH OBEN / NACH
UNTEN (12/13).
3. Bestätigen Sie mit „OK“ (16).
BLUETOOTH BETRIEB
1. Schalten Sie den Modus am Radio mit den Cursortasten links / rechts (14/15) auf
Bluetooth um.
2. Schalten Sie Bluetooth auf Ihrem Mobilgerät ein. Ihr Mobilgerät beginnt mit der
Suche nach Geräten.
3. Wählen Sie "I-RX16BT" aus der Liste. Sie können jetzt Musik von Ihrem Mobilgerät auf den Internet-Radioadapter streamen.
Hinweis: Die Musiksteuerung (Wiedergabe, Pause usw.) muss von Ihrem externen Gerät.
Page 16

13 Deutsch
LAUTSTÄRKEREGLER (NUR FÜR KOPFHÖRER)
Um die Lautstärke der externen Lautsprecher einzustellen, verwenden Sie bitte den
Lautstärkeregler am Lautsprecher.
Mit den Tasten auf der Fernbedienung (19/20) können Sie nur die Lautstärke der
Kopfhörer einstellen.
DLNA
Das Internet-Radio kann Musik-Streams von DLNA-kompatiblen Geräten wiedergegeben, vorausgesetzt, dass das Internet-Radio und andere DLNA-Geräten im gleichen Wi-Fi-Netzwerk sind.
Das Radio wird als „AirMusic“ angezeigt, wenn Sie es auf anderen Geräten suchen.
Wenn Sie einen anderen Namen als AirMusic verwenden möchten, klicken Sie auf
Konfiguration und DLNA-Setup, um die Änderung vorzunehmen.
MEDIA CENTER
UPNP (UNIVERSAL PLUG AND PLAY)
Sie können Musik von einem Gerät im Netzwerk streamen, das die UPnP-Funktion
zum Radio für die Wiedergabe unterstützt.
Beispielsweise unterstützen die meisten Computer der neuen Generation die UPnP-
Funktion, so dass Sie die Musik vom Windows Media Player auf dem Computer
streamen und diese auf dem Radio hören können.
Anmerkung: Bitte stellen Sie sicher, dass Ihr Computer mit dem gleichen Wi-FiNetzwerk wie das Radio verbunden ist.
Der neueste Windows Media Player kann von der Microsoft-Website heruntergeladen
und gemäß den Anweisungen des Installationsassistenten installiert werden.
Nach der Installation erstellt Windows Media Player eine Bibliothek aus allen verfügbaren Mediendateien auf Ihrem PC.
WINDOWS XP/WINDOWS MEDIA 11
1. Um neue Mediendateien der Bibliothek hinzuzufügen, wählen Sie „Datei > Zur
Mediathek hinzufügen ... >“, „Erweiterte Optionen“, und klicken Sie auf
„Hinzufügen“. Wählen Sie dann die Dateien, die Sie hinzufügen möchten und klicken Sie anschließend auf „OK“.
2. Jetzt müssen Sie Ihr Internetradio mit dem Windows Media Player 11 verbinden
und so konfigurieren, dass das Radio auf die Medienbibliothek zugreifen kann.
Hierzu müssen Sie Folgendes tun:
Rufen Sie auf dem Radio das Hauptmenü auf und wählen Sie <Media
Center> <UPnP >.
Es wird nach allen verfügbaren UPnP-Servern gesucht. Hinweis: Es kann
einige Sekunden dauern, bis das Radio den Scan abgeschlossen hat - und
bevor der Scan abgeschlossen ist, wird das Radio-Display '[Empty]‘ anzeigen. Das Radio wird weiterhin '[Empty]‘ anzeigen, falls kein UPnP-Server
gefunden wird.
Nach einem erfolgreichen Scan: Wählen Sie den UPnP-Server durch Dre-
hen des Reglers, wenn mehr als ein UPnP-Server vorhanden ist, und drücken Sie dann AUSWÄHLEN.
Page 17

14 Deutsch
3. Ihr PC wird Ihnen jetzt mitteilen, dass ein Gerät versucht hat, sich mit dem UPnP
-Server zu verbinden. Damit das Radio den Zugang zu den Mediendateien er-
hält, müssen Sie die Registerkarte „Medienbibliothek“ in Windows Media Player
11 <Media Sharing > wählen, um das Fenster „Media Sharing“ zu öffnen.
4. Im Fenster „Media Sharing“ wird das Radio als unbekanntes Gerät aufgeführt
werden. Klicken Sie auf das unbekannte Gerät und klicken Sie dann auf die
Schaltfläche „Zulassen“ und dann auf „OK“.
WINDOWS 7/WINDOWS MEDIA PLAYER 12
1. Wenn Sie WMP12 nutzen, gehen Sie einfach zu <Datei> und wählen Sie
<Öffnen>, um die Musikdateien zu erhalten, die Sie der Medienbibliothek hinzu-
fügen möchten.
2. Windows 7 oder höher erfordert, dass der PC als Heimnetzwerk eingerichtet wird
und dass Heimnetzgruppe aktiviert ist, damit Geräte auf Mediendateien Ihres
Windows Media Player zugreifen und sie wiedergeben können. Nachfolgend finden Sie die nötigen Schritte:
a. Gehen Sie zu „Systemsteuerung“ und wählen Sie „Netzwerk und Internet“.
b. Wählen Sie „Heimnetzgruppe“.
c. Wählen Sie „Netzwerk“.
d. Wählen Sie „Heimnetzwerk“.
e. Wählen Sie „Erstellen einer Heimnetzgruppe“.
f. Starten Sie den Windows Media Player, wählen Sie „Stream“ und dann
„Geräten automatisch die Wiedergabe meiner Medien erlauben“ in der
Dropdown-Liste.
Sie können jetzt das Musik-Streaming von Windows Media Player genießen.
STREAMING VON MUSIK ÜBER UPNP
1. Wählen Sie im Hauptmenü „Media Center“ und dann „UPnP“.
Es kann einige Sekunden dauern, bis das Radio die Suche nach verfügbaren
UPnP-Servern abgeschlossen hat. Wenn kein UPnP-Server gefunden wird, wird
„Empty List“ angezeigt.
2. Nach einer erfolgreichen Suche wählen Sie den UPnP-Server.
Das Radio zeigt die Medienkategorien des UPnP-Servers, wie z. B. „Musik“,
Wiedergabelisten“ usw.
3. Wählen Sie die Mediendateien, die Sie abspielen möchten.
INFORMATIONS-CENTER
WETTERINFORMATIONEN: Mit dieser Funktion können Sie sich die Wettervorher-
sage für die ganze Welt und für die gewünschte Region im Standby-Modus anzeigen
lassen. Um diese Funktion zu aktivieren, wählen Sie die gewünschte Region und drücken Sie dann die rechte Cursortaste (15), wählen Sie „Hinzufügen zur StandbyAnzeige„ und bestätigen Sie mit „OK“ (16). „Aktuelles Datum und Uhrzeit“ und
„Aktuelles Wetter“ werden alle 10 Sekunden in der Anzeige abwechselnd im Standby-
Modus angezeigt. Sie können den Cursor NACH LINKS / NACH RECHTS (14/15)
drücken, um die Wettervorhersage des vorherigen/nächsten Tages anzuzeigen.
Anmerkung: Das Wetter kann vom tatsächlichen Wert abweichen. Es ist nur ein
Beispiel.
WIRTSCHAFTSINFO: Anzeige des Aktienindexes
Page 18

15 Deutsch
SYSTEM INFORMATION: Anzeige detaillierter Infos über das Gerät und das verbun-
dene Netzwerk. Es wird ebenfalls die MACAdresse
angezeigt, die für die Registration einer My mediaU-Mitgliedschaft notwendig ist.
KONFIGURATION
ZEITANZEIGE: Analog/Digital
MY MEDIAU VERWALTEN: Sie können eine Favoritenliste auf dem PC erstellen.
1. Gehen Sie auf Ihrem Computer zu http://www.mediayou.net/web/index.php - das
ist das Radio-Portal Ihres Radios. Sie können sich als Mitglied registrieren, in-
dem Sie die Schaltfläche „Jetzt registrieren“ auswählen.
2. Melden Sie sich im Portal an.
3. Aus dem Menü auf der linken Seite des Portals wählen Sie „Gerät“.
4. Auf dem Radio-Adapter
klicken Sie auf "Information Center".
wählen Sie "System Information".
wählen Sie "Wireless Info" und notieren Sie sich die MAC-Adresse.
5. Schreiben Sie auf Ihrem PC den Namen Ihres Geräts und die MAC-Adresse in
das Feld „Seriennummer“.
6. Klicken Sie auf "Hinzufügen", um die Auswahl zu bestätigen.
7. Jetzt können Sie Ihre eigenen Lieblingssender verwalten oder eine neue, noch
fehlende Station hinzufügen. Führen Sie anschließend die folgenden Schritte
aus, um die Änderungen mit dem Radio zu synchronisieren:
Klicken Sie auf „Konfiguration“ auf Ihrem Internet-Radioadapter.
Wählen Sie „Manage My MediaU“.
Wählen Sie „Enable“ und bestätigen Sie mit „OK“ (16) (wenn diese Option
bereits aktiv ist, deaktivieren Sie sie und aktivieren Sie sie dann erneut).
Sie sehen dann, dass „Manage My mediaU“ im Hauptmenü angezeigt wird.
NETZWERK:
Funknetzwerkkonfiguration: WiFi-Netzwerk aktivieren/deaktivieren. Bei Aktivierung
eines WiFi- Netzwerkes wählt das System automatisch einen geeigneten AP aus. Ge-
ben Sie das WEP- bzw. WPA-Passwort ein, um sich mit dem Funknetzwerk zu verbinden.
Funknetzwerk (WPS-PBC): Wenn Sie einen Router mit WPS/QSS-Taste besitzen,
können Sie Ihre Netzwerkverbindung einfach mittels dieser WPS-Funktion konfigurieren. Nachdem Sie diese Funktion ausgewählt haben, drücken Sie innerhalb 120 s die
WPS/QSS-Taste Ihres Routers. Daraufhin wird die Verbindung zwischen Router und
Music Link automatisch konfiguriert.
Manuelle Konfiguration: Sie können zwischen DHCP (automatische IPadresszuweisun) oder manueller Eingabe der IP-Adresse für Ihr Funknetzwerk auswählen. Wenn Sie sich für die manuelle Konfiguration eines Kabelnetzwerkes
entschieden haben, dann sind nachstehende Informationen einzugeben: SSID (Name
des Zugriffspunktes), IP Address (IPAdresse), Subnet Mask (Netzwerkmaske), Default Gateway (Standardgateway), preferred DNS Server (primärer DNS-Server), alternate DNS Server (sekundärer DNS-Server).
Netzwerksuche beim Einschalten: Aktivieren/Deaktivieren des Funknetzwerkes.
Wenn Sie WiFi Network (Funknetzwerke) aktiviert haben, dann sucht das System
Page 19

16 Deutsch
automatisch nach verfügbaren Funknetzwerken. Wählen Sie anschließend das
gewünschte Funknetzwerk ausNetzwerk
DATUM UND ZEIT:
Einstellen des Datums und der Zeit.
Stellen Sie die Anzeige auf 12 Stunden oder 24 Stunden.
Stellen Sie das Datumsformat ein.
WECKER:
Alarm 1/2: Wählen Sie Ihre bevorzugten Einstellungen (2 verfügbare Alarmtö-
ne).
NAP-Alarm: Um einen kurzfristigen Alarm einzustellen, können Sie eine Zeit-
spanne von 5 Minuten bis zu 120 Minuten auswählen. Beim NAP-Alarm ist keine
Schlummerfunktion verfügbar.
Anmerkung: Der NAP-Alarm funktioniert nur mit Signalton.
Alarmlautstärke: Die Lautstärke des Alarmtons stellen Sie mit dem Cursor
NACH LINKS / NACH RECHTS (14/15) ein.
Wenn der Alarm ertönt, drücken Sie eine beliebige Taste außer der „Power“-Taste, um
den „Snooze“-Modus zu nutzen oder die „Power“-Taste (7), um zu verhindern, dass
der Alarm 5 Minuten später erneut ertönt.
Anmerkung: Sie können einen beliebigen Internet-Radiosender als Alarm-Ton von
den Lieblingssendern wählen. Wenn der Internetsender nicht innerhalb von 1 Minute
funktioniert, wird automatisch der Signalton eingestellt.
TIMER: Nutzen Sie den Cursor NACH OBEN / NACH UNTEN und den Cursor NACH
LINKS / NACH RECHTS (12/13 und 14/15), um die Zeit einzustellenund bestätigen
Sie mit „OK“ (16), um den Timer zu starten.
Um den Timer anzuhalten, drücken Sie auf „OK“; um den Timer weiterlau-
fen zu lassen, müssen Sie erneut auf „OK“ drücken.
Sie können den Timer abbrechen, indem Sie auf die Taste „OK“ drücken
und diese gedrückt halten, bis „00:00“ angezeigt wird. Um den Vorgang zu
beenden, drücken Sie noch einmal auf „OK.
SPRACHE: English/Deutsch/Espanol/Francais/Portugese/Nederlands/Italiano/
Pyccknn/Svenska/Norske/Dansk/Magyar/Cesky/Slovensky/Polski/Turkce/Suomi
DIMMER: Sie können die Hintergrundbeleuchtung des LCDs mit folgenden Einstel-
lungen anpassen:
Energiesparmodus: Wenn das Gerät für länger als 15 Sekunden nicht betä-
tigt wird, wird der Verbrauch um eine Stufe herabgesetzt.
Einschalten: Die Hintergrundbeleuchtung wird nicht ausgeblendet, selbst
wenn kein Betrieb stattfindet. Sie können den gewünschten Grad an Hintergrund-
beleuchtung einstellen.
ANZEIGE: Farbe / Monochrome
ENERGIEVERWALTUNG: Konfiguriert den automatischen Wechsel in den Standby-
Modus. Stellen Sie hier die Zeitdauer (5/15 30Minuten) ein, nach der das Radio automatisch in den Standby-Mode wechselt, wenn Sie es nicht bedienen. Wählen Sie
„Turn off” („Ausschalten“), um die Energiesparfunktion zu deaktivieren.
EINSCHLAFAUTOMATIK: Ausschalten oder Einstellen der Einschlafautomatik auf
Page 20

17 Deutsch
15/30/60/90/120/150/180 Minuten. Wenn Sie die Einschlafautomatik aktiviert haben,
erscheint in der oberen rechten Ecke ein Bettsymbol mit der Anzeige der noch verbleibenden Zeit, bis das Gerät in den Standby-Modus wechselt. Drücken Sie für die
Schnellwahl dieser Funktion die Sleep-Taste Ihrer Fernbedienung.
PUFFER: Stellen Sie hier die Pufferzeit (2/4/8 s) für die Musikwiedergabe ein.
WETTER: Die Wettervorhersage für den Standby-Modus aktivieren/deaktivieren. Wä-
hlen Sie Ihre bevorzugte Temperatureinheit (°F oder °C) aus und geben Sie anschließend Ihren Standort ein. Wenn Sie die Wettervorhersage aktiviert haben, dann
wechseln sich im Standby-Modus die Anzeige der Uhrzeit und die der Wettervorhersage ab (alle 10 Sekunden).
EINSTELLUNGEN LOKALRADIO: Unter Internet Radio (Internetradio) gibt es die
Verknüpfung Local Radio (Lokalradio), mit der Sie einfachen Zugriff auf die Radiosenderliste vor Ort haben. Sie können entweder manuell Ihren Standort eingeben oder
das System Ihren aktuellen Standort bestimmen lassen. Das System ermittelt Ihre
Position gemäß der IP-Adresse Ihres Einwahlnetzwerkes. Drücken Sie für die Direktwahl der lokalen Radiosenderliste Local Station (lokale Radiosender).
WIEDERGABEEINSTELLUNGEN: Wählen Sie den Wiedergabemodus Ihres Mediencenters - Off (Aus) (keinwiederholen oder Mischen), Repeat all (alles wiederholen), Repeat one (aktuellen Titel wiederholen) oder Shuffle (Mischen der Titel).
GERÄT: Der Standardname für DLNA lautet „AirMusic“. Sie können diesen Namen
für die DLNA-Einstellung des PCs oder Mobilgeräts ändern. Der QR-Code für das
Herunterladen und Installieren der Kontroll-App „AirMusic“.
EQUALIZER: Die Standardeinstellung des Equalizers ist Normal, jedoch kann sie
auf Flat (flach), Jazz, Rock, Soundtracks, Classical (klassisch), Pop oder News
(Nachrichten) geändert werden. Für das schnelle Wechseln zwischen den EQEinstellungen drücken Sie bitte die EQ-Taste auf Ihrer Fernbedienung.
FORTSETZEN, WENN EINGESCHALTET: Standardmäßig stellt das Gerät die Inter-
netradiowiedergabe automatisch wieder her, wenn Sie vor dem Ausschalten des Geräts entweder über das Internetradio oder das Mediencenter Medien wiedergegeben
haben. Wenn Sie diese Funktion ausschalten, startet das Gerät im Hauptmenü, wenn
Sie es wieder einschalten.
SOFTWAREAKTUALISIERUNG: Softwareupdate. Das System wird Sie informieren,
wenn eineaktualisierte Softwareversion auf dem Server verfügbar ist. Schließen
Sie das Gerät an eine stabile Stromversorgung an, bevor Sie mit der Softwareaktualisierung beginnen. Die Trennung vom Stromnetz kann während einer Softwareaktualisierung zur dauerhaften Beschädigung des Geräts führen.
AUF STANDARDEINSTELLUNG ZURÜCKSETZEN: Mit dieser Funktion können Sie
alle Einstellungen zurück auf die Standardeinstellungen setzen.
Bitte beachten Sie: Alle Senderspeicher, Einstellungen und Konfigurationen ge-
hen verloren, wenn Sie den „Factory Reset“" durchgeführt haben.
Page 21

18 Deutsch
Die Kennzeichnung auf dem Produkt bzw. auf der dazugehörigen Literatur gibt an, dass es nach seiner Leben-
sdauer nicht zusammen mit dem normalen HaushaltsmüIl entsorgt werden darf. Entsorgen Sie dieses Gerat
bitte getrennt von anderen Abfallen, um der Umwelt bzw. der menschl i chen Gesundhei t ni cht durch unkontrol
l i erte Mül l besei ti gung zu schaden. Recycel n Si e das Gerät, um di e nachhaltige Wiederverwertung von
stofflichen Ressourcen zu fördern. Private Nutzer sollten den Händler, bei dem das Produkt gekauft wurde, oder
die zuständigen Behörden kontaktieren, um in Erfahrung zu bringen, wie sie das Gerät auf umweltfreundliche
Weise recyceln können. Gewerbliche Nutzer sollten sich an Ihren Lieferanten wenden und die Bedingungen des
Verkaufsvertrags konsultieren. Dieses Produkt darf nicht zusammen mit anderem Gewerbemüll entsorgt werden.
KORREKTE ENTSORGUNG DIESES PRODUKTS
(Elektromüll)
SICHERHEITSHINWEISE
Das Ausrufszeichen im Dreieck weist den Benutzer auf wichtige Bedienungs- und Wartungsanweisungen (Service) in diesem Handbuch hin, die unbedingt zu befolgen sind.
Um die Gefahr elektrischer Schläge auszuschliessen, Gehäuse auf keinen Fall abnehmen.
Im Innem befinden sich keine vom Benutzer selbst instandsetz-baren Teile. Reparaturen dürfen
nur von einer autorisierten Fachwerkstatt durchgeführt werden.
Dieses Gerät ist für 230V ~ 50Hz Netzspannung ausgelegt. Bei längerer Nichtbenutzung des
Geräts ziehen Sie den Stecker aus der Steckdose.
Setzen Sie das Gerät weder Feuchtigkeit noch Regen aus.
Schalten Sie das System erst dann ein, wenn Sie alle Verbindungen genau geprüft haben.
Stellen Sie das Gerät so auf, dass immer eine ungestörte Frischluftzufuhr sichergestellt ist. Es ist
zum beispiel keinesfalls auf Teppiche und in der Nähe von Gardinen zu stellen oder in Bücherregale einzubauen.
Setzen Sie das Gerät weder direkter Sonneneinstrahlung noch Wärmequellen aus.
TECHNISCHE DATEN
Stromversorgung: AC 230V ~ 50Hz.
Leistungsaufnahme: DC 5 V = 1 A.
Allgemeine
Wireless Netzwerk: IEEE802.11b/g/n.
Sicherheitsprotokoll: WEP / WPA / WPA2.
Audio-ausgang: 3.5mm jack buchse.
Kopfhörer: 3.5mm jack buchse.
Maximale abgestrahlte Leistung: 2.5 mW (4 dBm). (Bluetooth).
Ausführung und Spezifikationen unterliegen unangekündigten Änderungen.
Page 22

19 Français
LOCATION OF CONTROLS
1. AFFICHAGE LCD
2. CAPTEUR INFRAROUGE
3. SORTIE AUDIO 3.5 mm Jack
4. SORTIE ÉCOUTEURS 3.5 mm Jack
5. FICHE DC (5V)
6. MARCHE - ARRÊT
TELECOMMANDE
7. MARCHE/ARRÊT
8. SOURDINE
9. TOUCHE DE LA STATION PRÉFÉRÉE / ENTREE DES LETTRES ET DES
CHIFFRES
“0”―― 0,'DEL'
“1”―― '1'->'@'->' '(raum)->'!'-> “ ->'#'->'$'->'%'->'&'-> '->'('->')'->'*'->'+'->','->'-'->'.'->'/'-
>':'->';'->'<'->'='->'>'->'?'->'['->'\'-
>']'->'^'->'_'->'`'->'{'->'|'->'}'->'~'
“2”―― 2,A,B,C,a,b,c
“3”―― 3,D,E,F,d,e,f
“4”―― 4,G,H,I,g,h,i
“5”―― 5,J,K,L,j,k,l
“6”―― 6,M,N,O,m,n,o
“7”―― 7,P,Q,R,S,p,q,r,s
“8”―― 8,T,U,V,t,u,v
“9”―― 9,W,X,Y,Z,w,x,y,z
10. VARIATEUR (LUMINOSITÉ DE L'ÉCRAN)
11. BOUTON FAVORIS
12. CURSEUR HAUT
13. CURSEUR BAS
14. CURSEUR GAUCHE / ARRIÈRE
15. CURSEUR DROIT
16. OK (BOUTON DE CONFIRMATION)
17. BOUTON D'ALARME
18. MINUTEUR DE MISE EN VEILLE
19. VOLUME + (POUR CASQUE SEULEMENT)
20. VOLUME - (POUR CASQUE SEULEMENT)
21. MENU PRINCIPAL
22. MODE
23. ÉGALISEUR (POUR CASQUE SEULEMENT)
24. CHANSON PRÉCÉDENTE / STATION DE RADIO PRÉCÉDENTE
25. CHANSON SUIVANTE / STATION DE RADIO SUIVANTE
26. PLAY / PAUSE
Page 23

20 Français
AVANT DE COMMENCER
Merci de vérifier que les éléments suivants sont disponibles :
Une connexion internet à haut débit;
Un routeur haut débit sans fil (Wi-Fi) est connecté à Internet. La radio
est compatible avec les connexions sans fil B, G et N (le routeur sans
fil N peut également être utilisé avec le réglage sur B ou G);
Les données WEP (Wired Equivalent Privacy) ou Wi-Fi Protected Ac-
cess (WPA) sont cryptées avec un code / mot de passe. Il est néces-
saire de saisir le bon code lorsque la radio est connectée au routeur
sans fil pour la connexion réseau. Dans le cas où le code d'accès/mot
de passe n'est pas connu, merci de contacter la personne/technicien
qui a configuré le routeur/réseau.
PRÉCAUTIONS
Il est déconseillé d'utiliser la radio dans un environnemen à haute tem-
pérature ou à humidité élevée durant des périodes prolongées, car ce-
la pourrait endommager l'appareil.
Tenir la radio à l'écart des liquides, car elle pourrait être endommagée.
Éteindre la radio immédiatement si de l'eau ou des liquides sont déversés dans la radio. Pour toute question, consulter le magasin où cette
radio été achetée.
Éviter d'utiliser ou d'entreposer la radio dans un environnement pous-
siéreux ou sablonneux.
Ne pas ouvrir et réparer la radio par soi-même.
N'utiliser que la tension d'alimentation spécifiée pour charger la batte-
rie. Le raccordement d'une alimentation électrique d'un voltage diffé-
rent causera des dommages permanents à la radio et peut être dangereux.
Nettoyer avec un chiffon sec uniquement.
Page 24

21 Français
MISE EN MARCHE DE LA RADIO (PREMIER RÉGLAGE)
1. Brancher la broche du connecteur de l'adaptateur AC / DC dans la prise DC de
l'appareil (5);
2. Raccorder l'autre extrémité de l'adaptateur à la prise murale;
Attention: Utiliser uniquement l'adaptateur fourni. Le fait de brancher un
adaptateur de calibre différent causera des dommages permanents à la radio et
pourrait être dangereux.
3. Raccorder le haut-parleur externe alimenté à la prise de sortie audio de la radio
(3);
4. Allumer la radio à l'aide de l'interrupteur Power on / off (6);
L'écran s'allume et affiche « WELCOME ».
5. Sélectionner la langue avec les curseurs haut/bas (12/13);
La radio demandera si l'on veut « Vérifier le réseau » à la mise sous tension.
6. La radio demandera si l'on veut « Configurer le réseau »;
Dans le cas où l'on choisit de configurer le réseau maintenant, suivre les étapes
suivantes, sinon il est possible de le configurer plus tard.
7. La radio recherchera les réseaux existants;
8. Sélectionner le réseau avec les curseurs haut/bas (12/13);
9. Insérer le mot de passe:
Appuyer plusieurs fois sur les lettres et les chiffres (9) ou sur les curseurs
haut/bas (12/13) pour entrer un caractère.
Passer au caractère suivant ou précédent avec les curseurs gauche/droite
(14/15).
Confirmer avec « OK » (16).
LA CONNEXION AU RÉSEAU WI-FI
1. Entrer dans le menu Configuration;
2. Entrer dans le menu Réseau;
3. Sélectionner Configuration du réseau sans fil;
4. Sélectionner le réseau avec les curseurs haut/bas (12/13);
5. Insérer le mot de passe:
Appuyer plusieurs fois sur les lettres et les chiffres (9) ou sur les curseurs
haut/bas (12/13) pour entrer un caractère.
Passer au caractère suivant ou précédent avec les curseurs gauche/droite
(14/15).
Confirmer avec « OK » (16).
Page 25

22 Français
INTERNET RADIO
Mes favoris: Liste de mes stations préréglées favorites
Station radio/Musique: Les station sont triées en catégories dans Global
Top 20, Genre et Pays/lieu (Australie, Canada, Royaume-Uni et États-Unis). Accédez-y pour explorer les sous-catégories et choisissez la station à écouter. Pour
chaque station, appuyez sur OK sur l'appareil ou Enter sur la télécommande
pour lire directement.
Radio locale: Les stations sont triées selon le lieu où l'appareil est utilisé.
Historique: Liste des dix stations écoutées récemment.
Service:
Recherche de stations de radio : saisissez votre mot-clé pour rechercher
une station de radio dans la liste.
Ajoutez une nouvelle station de radio en ajoutant une adresse IP, les sta-
tions ajoutées seront enregistrées dans Mes favoris.
DÉFINIR LES PRÉRÉGLAGES
1. Pendant que l'on écoute la station favorite, appuyer sur la touche favorite (11) et
la maintenir enfoncée (environ 3 secondes) jusqu'à ce qu'un écran avec
« Ajouter à mes favoris » apparaisse.
2. Sélectionner la position où l'on veut sauvegarder la station avec les curseurs
haut/bas (12/13).
3. Confirmer avec « OK » (16).
MODIFIER LE PRÉRÉGLAGE
Avec les options suivantes, il est possible de modifier la liste des favoris :
1. Appuyer sur la touche favorite (11) pour accéder à la liste des stations préré-
glées.
2. Choisir la station de radio que l'on veut éditer.
3. Appuyer sur le curseur droit (15) pour accéder au menu d'édition.
4. Sélectionner l'action désirée parmi les suivantes:
Supprimer: Pour supprimer la station sélectionnée.
Haut/Bas: Pour décaler la station sélectionnée dans la liste.
Renommer: Pour renommer la station sélectionnée.
5. Confirmer avec « OK » (16).
RAPPELER LE PRÉRÉGLAGE
1. Appuyer sur le bouton Favoris (11) pour rappeler la liste des favoris.
2. Sélectionner la station désirée avec les curseurs haut/bas (12/13).
3. Confirmer avec « OK » (16).
FONCTIONNEMENT BLUETOOTH
1. Sélectionnez le mode Bluetooth sur la radio avec les curseurs gauche / droite
(14/15).
2. Connectez votre appareil portable Bluetooth à l'identifiant Bluetooth "I-RX16BT";
3. Vous pouvez maintenant transférer la musique sur le "I-RX16BT".
Remarque: Le contrôle de la musique (lecture, pause, etc.) doit être effectué depuis votre dispositif externe.
Page 26

23 Français
CONTRÔLE DU VOLUME (POUR LES ÉCOUTEURS SEULEMENT)
Pour régler le volume du haut-parleur externe alimenté, utiliser la commande de volume du haut-parleur alimenté.
Les boutons de la télécommande (19/20) permettent de régler le volume uniquement
pour les écouteurs.
DLNA
La radio Internet peut lire la musique en continu à partir d'un appareil compatible
DLNA, à condition que la radio Internet et les autres appareils DLNA se trouvent sur
le même réseau Wi-Fi.
La radio apparaît comme « AirMusic » lorsque l'on essaie de la rechercher sur
d'autres appareils. Si par contre, on veut changer le nom « AirMusic », il suffit d'aller
dans Configuration et configuration DLNA pour effectuer le changement.
CENTRE DES MÉDIAS
UPNP (UNIVERSAL PLUG AND PLAY)
Il est possible de diffuser de la musique à partir de l'appareil en réseau qui prend
en charge la fonction UPnP vers la radio à écouter.
Par exemple, la plupart des ordinateurs les plus récents prennent en charge UPnP, et
il est possible de diffuser de la musique à partir de l'application Windows Media
Player sur l'ordinateur et de l'écouter à la radio.
Remarque : Merci de vérifier que l'ordinateur est sur le même réseau Wi-Fi que
la radio.
La dernière version de Windows Media Player peut être téléchargée à partir du site
Web de Microsoft et installée en suivant les instructions détaillées dans son assistant
d'installation.
Une fois installé, Windows Media Player créera une bibliothèque à partir de tous les
fichiers multimédias disponibles sur le PC.
WINDOWS XP / WINDOWS MEDIA 11
1. Pour ajouter de nouveaux fichiers multimédias à la bibliothèque, sélectionner
« Fichier > Ajouter à la bibliothèque...> Options avancées », cliquer sur
« Ajouter » et choisir les fichiers que l'on souhaite ajouter et cliquer sur « OK ».
2. Maintenant, il faut connecter la radio Internet à Windows Media Player 11 et la
configurer pour permettre à la radio d'accéder à la médiathèque. Pour ce faire, il
faudra faire ce qui suit :
Sur la radio, accéder au menu principal et sélectionner <Media Center>
<UPnP> <UPnP>.
Il recherchera tous les serveurs UPnP disponibles. Noter que cela peut
prendre quelques secondes pour que la radio termine son balayage et
qu'avant que le balayage soit terminé, la radio affichera « [Vide] ». La radio
continuera à afficher « [Vide] » si aucun serveur UPnP n'a été trouvé.
Après un balayage réussi. Sélectionner le serveur UPnP, en faisant tourner
le cadran s'il y a plus d'un serveur UPnP, puis appuyer sur SELECT.
3. Le PC va maintenant signaler qu'un appareil a tenté de se connecter au serveur
UPnP. Afin de permettre à la radio d'avoir accès aux fichiers multimédias, il faudra cliquer sur l'onglet « Bibliothèque » de Windows Media Player 11 et sélection-
Page 27

24 Français
ner l'élément <Media Sharing> pour ouvrir la fenêtre « Media Sharing ».
4. A partir des fenêtres « Partage des médias », la radio sera listée comme appareil
inconnu. Cliquer sur l'appareil inconnu listé, puis cliquer sur le bouton
«Autoriser » et puis cliquer sur « OK ».
WINDOWS 7 / WINDOWS MEDIA PLAYER 12
1. Dans le cas où on utilise WMP 12, il suffit d'aller dans <Fichier> et de choisir
<Ouvrir> pour récupérer les fichiers musicaux que l'on souhaite ajouter à la bibliothèque.
2. Windows 7 ou supérieur exige que le PC soit configuré comme réseau domes-
tique et que le groupe d'appartenance soit activé pour permettre aux appareils
d'accéder/de lire les fichiers multimédias sur le lecteur Windows Media Player.
Voici les étapes à suivre:
a. Aller dans « Panneau de configurat. » et sélectionner « Réseau et Internet ».
b. Sélectionner « Homegroup ».
c. Sélectionner « Emplacement réseau ».
d. Sélectionner « Réseau local ».
e. Sélectionner « Créer Homegroup ».
f. Lancer le lecteur Windows Media Player, sélectionner « Stream » et sélection-
ner « Autoriser automatiquement les appareils à lire mes médias » dans la
liste déroulante.
Il est maintenant possible de profiter de la musique en continu à partir du lecteur Win-
dows Media Player.
DIFFUSION DE MUSIQUE EN CONTINU VIA UPNP
1. Dans le menu principal, sélectionner « Media Centre » et choisir « UPnP ».
Il se peut que la radio mette quelques secondes pour terminer la recherche des
serveurs UPnP disponibles. Si aucun serveur UPnP n'est trouvé, il affichera alors
« Liste vide ».
2. Une fois l'analyse effectuée avec succès, sélectionner le serveur UPnP à utiliser.
La radio affichera les catégories de médias disponibles sur le serveur UPnP, par
exemple « Musique », « Listes de lecture », etc.
3. Sélectionner les fichiers multimédias que l'on souhaite écouter.
CENTRE D'INFORMATION
INFORMATION MÉTÉO: Pour visualiser les prévisions météorologiques dans le
monde entier et choisir la région désirée à afficher en mode veille. Pour activer cette
fonction, choisir la région désirée, puis appuyer sur le curseur droit (15), choisir
« ajouter à l'affichage de veille » et confirmer avec « OK » (16). « Date et heure du
jour » et « Météo du jour » s'affichent toutes les 10 secondes en alternance en mode
veille. Il est possible d'appuyer sur les curseurs gauche/droite (14/15) pour afficher la
météo du jour précédent/suivant.
Remarque : Il se peut que la météo diffère de la réalité, il s’agit uniquement
d’une référence.
INFORMATIONS FINANCIÈRES: Pour consulter les indices boursiers.
INFORMATIONS SYSTÈME: Consultez le détail des unités et la connexion de ré-
seau. Les informations incluent l'adresse MAC dont vous avez besoin pour vous inscrire sur my mediaU.
Page 28

25 Français
CONFIGURATION
AFFICHAGE DE L’HEURE: Analogique / numérique
GÉRER MES MÉDIASU : Il est possible de créer une liste de stations favorites en
utilisant un PC.
1. Sur l'ordinateur, aller à http://www.mediayou.net/web/index.php, c'est le portail
radio utilisé sur la radio. Pour s'inscrire en tant que membre, sélectionner
« Rejoindre maintenant ».
2. Se connecter au portail
3. Dans le menu à gauche du portail, sélectionner « Appareil ».
4. Sur l'adaptateur radio
Aller au « Centre d'information ».
Sélectionner « Informations système »
Sélectionner « Infos sans fil » et noter l'adresse MAC.
5. Sur le PC, écrire le nom de l'appareil et l'adresse MAC dans l'espace « Serial
Number ».
6. Confirmer en cliquant sur « Ajouter ».
7. Désormais, il est possible d'organiser ses propres stations préférées ou d'ajouter
une nouvelle station qui ne figure pas encore dans la liste des stations. Une fois
le travail terminé, suivre les étapes ci-dessous pour synchroniser les modifica-
tions apportées à la radio :
Sur l'adaptateur radio Internet, aller à « Configuration ».
Sélectionner « Gérer mon MediaU ».
Choisir « Activer » et confirmer avec « OK » (16) (si cette option était déjà
« Activé », « Désactiver » puis « Activer »).
Ensuite, dans le menu principal, apparaît « Gérer mes MediasU ».
RÉSEAU:
Wireless Network Configuration (Configuration du réseau sans fil) :
Activez/désactivez le réseau WiFi.Si vous activez le réseau Wi-Fi, le système
sélectionnera automatiquement l'AP requise. Saisissez le code WEP ou WPA
pour connecter le Wi-Fi.
Wireless Network (WPS PBC) [Réseau sans fil (WPS PBC)]: Si vous utilisez un
routeur avec le bouton WPS/QSS, vous pouvez configurer simplement la connexion
réseau grâce à la fonction WPS. Pour y accéder, appuyez sur le bouton WPS de
votre routeur dans les 120 secondes. La connexion entre le routeur et Music Link sera ensuite configurée automatiquement.
Configuration manuelle: Vous pouvez choisir DHPC (qui assigne l’IP automatiquement) ou saisir manuellement l’adresse IP pour une connexion de réseau sans fil.
Si vous sélectionnez le réglage manuel pour la connexion filaire, il faut saisir ce qui
suit : SSID (nom du point d'accès), adresse IP, masque de sous-réseau, passerelle
par défaut, serveur DNS préféré et serveur DNS alternatif.
Vérifier le réseau au démarrage: Activer/désactiver le réseau WiFi. Lorsque
vous activerez le réseau Wi-Fi, le système recherchera automatiquement l’AP disponible. Sélectionnez l’AP requise.
DATE ET HEURE: Réglage de la date et de l’heure.
ALARME:
Page 29

26 Français
Alarme 1 / 2: Pour sélectionner les réglages d'alarme préférés (2 alarmes dis-
ponibles).
Alarme NAP: Pour régler une alarme de courte durée. Il est possible de choi-
sir entre 5 minutes et 120 minutes. Pas de fonction Snooze disponible pour
l'alarme NAP.
Remarque: L'alarme NAP n'émet que des bips sonores.
Volume d'alarme: Régler le niveau sonore de l'alarme avec les curseurs
gauche/droite (14/15)
Lorsque l'alarme s'allume, appuyer sur n'importe quelle touche, sauf la touche
« Power », pour passer en mode « Snooze » ou appuyer sur la touche « Power » (7)
pour annuler les sons de l'alarme 5 minutes plus tard.
Remarque : Il est possible de sélectionner n'importe quelle station de radio Internet comme tonalité d'alarme à partir de la station favorite. Si la station Internet ne
fonctionne pas en 1 minute, elle se met automatiquement en bip sonore.
MINUTEUR : Avec les curseurs haut/bas et gauche/droite (12/13 et 14/15), régler
l'heure, puis confirmer avec « OK » (16) et le minuteur démarre.
Pour interrompre le minuteur, appuyer sur « OK », pour le reprendre, appuyer à
nouveau sur « OK ».
Pour annuler le minuteur, appuyer et maintenir le bouton « OK » jusqu'à ce que
« 00:00 » apparaisse, puis appuyer sur « OK » pour quitter.
LANGUE: English/Deutsch/Espanol/Francais/Portugese/Nederlands/Italiano/
Pyccknn/Svenska/Norske/Dansk/Magyar/Cesky/Slovensky/Polski/Turkce/Suomi
GRADATEUR DE LUMIÉRE: Régler le rétroéclairage de l'écran LCD avec les ré-
glages ci-dessous:
Économie d'énergie: Définir un niveau inférieur lorsqu'il n'y a pas de fonc-
tionnement après 15 secondes.
Allumer: Le rétroéclairage ne s'atténue pas, même s'il n'y a pas de ma-
nœuvre. Il est possible de régler le niveau de rétroéclairage désiré.
AFFICHAGE: Couleur / monochrome
GESTION D'ÉNERGIE:
Configurez la mise en veille automatique pendant l'affichage du menu et/ou en l'absence de signal Wi-Fi. Choisissez le minuteur de gestion d'alimentation (5/15/30min)
pour régler le délai de mise en veille automatique de la radio lorsque vous ne la commandez pas. Choisissez « Turn off » (désactiver) pour ignorer la fonction de gestion
d'alimentation.
MINUTEUR DE MISE EN VEILLE:
Pour désactiver ou régler le minuteur de mise en veille sur 15/30/60/90/120/150/180
minutes. Une fois que l'heure est réglée, il y aura une icône de lit avec les minutes
restantes en haut à droite et l'appareil passera en mode veille ensuite. Appuyez sur
Sleep sur la télécommande pour le raccourci de cette fonction.
MÉMOIRE TAMPON: Réglez la durée de mémoire tampon pour la lecture de musique sur 2/4/8 secondes.
MÉTÉO: Activez/désactivez les prévisions météorologiques pour l'affichage enveille.Choisissez votre unité de température préférée (°F ou °C) puis saisissez votre
Page 30

27 Français
emplacement. Quand les prévisions météorologiques sont activées, elles s’affichent
en alternance avec l'affichage de l’horloge sur l'écran de veille (toutes les 10 s).
INSTALLATION DE LA RADIO LOCALE: Il y a un raccourci Radio locale sous Radio
internet permettant d'accéder facilement à la liste des stations de votre emplacement.Vous pouvez configurer manuellement votre emplacement ou bien laisser le
système détecter automatiquement votre emplacement actuel. Le système détecte
l'emplacement d'après l'adresse IP du réseau auquel vous êtes connecté. Appuyez
sur Station locale pour accéder directement à la liste des stations de radio locales.
CONFIGURER LA LECTURE: Sélectionnez le mode de lecture ou le centre multimédia : Désactivé (ni répétition ni lecture aléatoire), Répéter tout, Répéter une piste ou
bien Lecture aléatoire.
DLNA: Le nom de l'appareil par défaut pour DLNA est « AirMusic ». Vous pouvez le
renommer pour la configuration DLNA sur un PC ou un mobile.Scannez le code QR
pour le téléchargement et installez l’appli de commande « AirMusic ».
ÉGALISEUR: L'égaliseur par défaut est Normal, vous pouvez le régler également
sur: Bémol, Jazz, Rock, Bande-son, Classique, Pop ou Infos. Appuyez sur EQ sur
la télécommande pour basculer rapidement entre les différents modes EQ.
REPRENDRE AU REDÉMARRAGE: Par défaut, le système reprend la lecture de radio internet si vous écoutiez la radio internet ou le centre multimédia avant d'éteindre
l'appareil. Si vous désactivez ce réglage, le système restera dans le menu d'accueil
au démarrage de l'appareil.
MISE À JOUR DU LOGICIEL: Mise à jour du logiciel S'il existe une mise à jour de la
version logicielle sur le serveur, alors le système vous avertira. Avant de démarrer
une mise à jour de logiciel, vérifiez que l'appareil est branché dans une prise électrique stable. Si l'alimentation est débranchée pendant une mise à jour du logiciel, cela peut endommager l'appareil de manière irréversible.
RÉINITIALISER LA VALEUR PAR DÉFAUT: Pour rétablir tous les paramètres par
défaut.
Attention: tous les préréglages, réglages et configurations des stations seront
perdus après avoir effectué la « réinitialisation d'usine ».
Page 31

28 Français
Ce symbole sur le produit ou sa documentation indique qu'il ne doit pas être éliminé en fin de vie avec
les autres déchets ménagers. L' élimination incontrôlée des déchetspouvant porter préjudice a l'environnement ou a la santé humaine, veuillez le séparer des autres types de déchets et le recycler defaçon
responsable. Vous favoriserez ainsi la réutilisation durable desressources matérielles. Les particuliers
sont invites a contacter le distributeur leur ayant vendu le produit ou a se renseigner auprès de leur mairie pour savoir ou et comment ils peuvent se débarrasser de ce produit afin qu'il soit recycle en respectant l'environnement. Les entreprises sont invitées a contacter leurs fournisseurs et aconsulter les conditions de leur contrat de vente. Ce produit ne doit pas être éliminé avec les autres déchets commerciaux.
COMMENT ÉLIMINER CE PRODUIT
(déchets d'équipements électriques et électroniques)
ATTENTION
Le symbole “point d’exclamation” à l’intérieur d’un triangle avertit l’utilisateur que d’importantes instructions d’utilisation et de maintenance sont contenues dans le mode d’emploi.
Le symbole “éclair” à l’intérieur d’un triangle sert à avertir l’utilisateur de la présence du courant à l’intérieur du l’appareil qui pourrait constituer un risque.
Afin de minimiser les risques, ne pas ouvrir le boîtier ni ôter le dos de l’appareil. En case de panne, faites
appel aux techniciens qualifiés pour les réparations. L’appareil ne renferme aucune pièce reparable par
l’utilisateur.
Cet appareil a été conçu pour une tension d’alimentation de 230V ~ 50Hz. Débranchez la prise de courant quand on prévoit de ne pas utiliser l’appareil pendant un certain temps.
Mettez l’appareil sous tension seulement après avoir vérifié que tous les raccordements soient corrects.
L’unité ne doit pas être exposée à l’humidité ou à la pluie.
L’appareil doit être gardé dans un endroit suffisamment ventilé. Ne le gardez jamais par exemple près
des rideaux, sur un tapis ou dans des meubles, tels qu’une bibliothèque.
L’unité ne doit pas être exposée à la lumière directe du soleil ou à des sources de chaleur.
CARACTERISTIQUES TECHNIQUES
Tension d’alimentation: AC 230V ~ 50Hz.
Tension d’entrée: DC 5V = 1 A.
Général
Réseau sans fil: IEEE802.11b/g/n.
Protocol de sécurité: WEP / WPA / WPA2.
Sortie audio: prise 3.5mm jack.
Sortie écouteur: prise 3.5mm jack.
Puissance maximale rayonnée: 2.5 mW (4 dBm). (Bluetooth).
Les spécifications peuvent êtres modifiées sans avis préalable.
Page 32

29 Italiano
POSIZIONE DEI CONTROLLI
1. DISPLAY LCD
2. SENSORE INFRAROSSI
3. USCITA AUDIO 3.5 mm Jack
4. USCITA CUFFIE 3.5 mm Jack
5. CONNETTORE ADATTATORE AC / DC (5V)
6. INTERRUTTORE PRINCIPALE ON / OFF
TELECOMANDO
7. ACCENSIONE/SPEGNIMENTO
8. MUTO
9. STAZIONI PREFERITE / TASTIERA ALFANUMERICA
“0”―― 0,'DEL'
“1”―― '1'->'@'->' '(spazio)->'!'-> “ ->'#'->'$'->'%'->'&'-> '->'('->')'->'*'->'+'->','->'-'->'.'-
>'/'->':'->';'->'<'->'='->'>'->'?'->'['->'\'-
>']'->'^'->'_'->'`'->'{'->'|'->'}'->'~'
“2”―― 2,A,B,C,a,b,c
“3”―― 3,D,E,F,d,e,f
“4”―― 4,G,H,I,g,h,i
“5”―― 5,J,K,L,j,k,l
“6”―― 6,M,N,O,m,n,o
“7”―― 7,P,Q,R,S,p,q,r,s
“8”―― 8,T,U,V,t,u,v
“9”―― 9,W,X,Y,Z,w,x,y,z
10. DIMMER (LUMINOSITÀ DISPLAY)
11. PREFERITI
12. CURSORE SU
13. CURSORE GIÙ
14. CURSORE SINISTRA / INDIETRO
15. CURSORE DESTRA
16. OK (CONFERMA)
17. SVEGLIA
18. TIMER SPEGNIMENTO
19. VOLUME + (PER USCITA CUFFIE)
20. VOLUME - (PER USCITA CUFFIE)
21. MENU
22. MODALITÀ
23. EQUALIZZATORE (PER USCITA CUFFIE)
24. STAZIONE PRECEDENTE
25. PROSSIMA STAZIONE
26. PLAY / PAUSA
Page 33

30 Italiano
PRIMA DELL’USO
Prima di utilizzare il prodotto accertarsi che:
Hai una connessione internet a banda larga;
Il tuo router a banda larga wireless (Wi-Fi) è connesso a Internet. La radio sup-
porta la connessione Wireless B, G e N (il router Wireless N può essere utilizzato
anche con l'impostazione B o G);
Conoscete la password di crittografia dei dati WEP (Wired Equivalent Privacy) o
WEP (Wi-Fi Protected Access). È necessario digitare la password quando la radio è connessa al router wireless per la connessione di rete. Se non conosci la
password, contatta il tecnico che ha configurato il router / la rete per te.
Precauzioni
La radio non deve venir usata in ambienti con alte temperature o alto tasso di
umidità per lunghi periodi, siccome questo può danneggiare la stessa.
Tenere la radio lontana da liquidi, siccome potrebbe venir danneggiata. Si prega
di spegnere immediatamente la radio nel caso in cui questa venga a contatto con
dei liquidi (dopodiché consultate il vostro rivenditore).
Evitare di usare o conservare la radio in ambient polverosi o sabbiosi.
Non aprire la radio. In caso di malfunzionamento rivolgersi a tecnici qualificati.
Usare unicamente un alimentatore con le specifiche descritte nel manual per
caricare la batteria integrate. Usare un alimentatore con differente voltaggio può
essere pericoloso e danneggiare la radio.
Pulire unicamente con un panno asciutto.
ACCENDER LA RADIO (PRIMA IMPOSTAZIONE)
1. Inserire la spina dell’adattatore AC / DC nell’apposito connettore (5);
2. Connettere il trasformatore alla presa 230V a muro;
Nota: Utilizzare solo l’adattatore fornito, in quento connettere un adattatore
con specifiche differenti può causare danni permanenti all’apparecchio e può es
sere pericoloso.
3. Connettere il Sistema audio all’uscita audio (3) dell’adattatore Internet Radio;
4. Accendere l’adattatore con il tasto di accensione (7).
Il display si illuminerà e mostrerà la scritta “WELCOME”;
5. Selezionare la lingua con I cursori su/giù (12/13).
La radio chiederà se si desidera “cercare reti” all’accensione;
6. Selezionare se si desidera configurare la rete subito o in seguito.
Se si sceglie di configurarla subito, seguire I prossimi punti, altrimenti è possibile
eseguire la configurazione in seguito;
7. La radio eseguirà la scansione delle reti Wireless disponibili;
8. Selezionare la propria rete con I cursori su e giù (12/13);
9. Inserire la password:
Premere ripetutamente I tasti della tastiera (9) o I cursori su/giù (12/13) per
immettere un carattere;
Per immettere un ulteriore carattere premere I cursori destra/sinistra
(14/15);
Confermare con “OK” (16) una volta che l’immissione è completata.
Page 34

31 Italiano
CONNESSIONE AD UNA RETE WI-FI
1. Entrare nel menu “Configurazioni”;
2. Entrare nel menu “Rete”;
3. Selezionare “Configurazione Rete Wireless”;
4. Selezionare la propria rete con I cursori su/giù (12/13);
5. Inserire la password:
Premere ripetutamente I tasti della tastiera (9) o I cursori su/giù (12/13) per
immettere un carattere;
Per immettere un ulteriore carattere premere I cursori destra/sinistra
(14/15);
Confermare con “OK” (16) una volta che l’immissione è completata.
INTERNET RADIO
Selezionare 'Radio Internet' dal menu, scegliere tra le varie opzioni:
I miei Preferiti: Elenco delle stazioni preferite che sono state memorizzate;
Stazione Radio / Musica: Per selezionare la stazione radio desiderata per
genere o posizione;
Radio locale: Accesso rapido alla stazione radio situata nella tua zona;
Nota: È possibile impostare un'altra regione come radio locale.
Cronologia: Mostra le stazioni radio che hai ascoltato in passato;
Servizio:
Cerca Stazione Radio: È possibile cercare la stazione radio desiderata;
Aggiungi nuova stazione radio: Se è impossibile trovare la stazione desider-
ata nell'elenco e disponi dell'indirizzo URL, puoi inserire qui il link e ag-
giungerla all'elenco dei preferiti.
Per avviare l'ascolto delle stazioni radio in tutto il mondo, selezionare "Stazione radio / musica".
STAZIONI PREFERITE
1. Mentre si sta ascoltando la stazione desiderata, tenere premuto (circa 3 secondi)
il pulsante dei preferiti (11) finché non viene visualizzata una schermata con
"Aggiungi ai miei Preferiti";
2. Selezionare la posizione in cui si desidera salvare la stazione con i cursori su/giù
(12/13);
3. Confermare con "OK" (16).
EDITA PREFERITI
Puoi modificare la tua lista dei preferiti con le seguenti opzioni:
1. Premere il pulsante dei preferiti (11) per accedere all'elenco delle
stazioni preimpostate;
2. Selezionare la stazione radio che si desidera modificare;
3. Premere il cursore destro (15) per accedere al menu di modifica;
4. Scegliere l'azione desiderata tra le seguenti:
Elimina: Per eliminare la stazione selezionata
Sposta su/giù: Per spostare la stazione selezionata nell'elenco.
Rinomina: Per rinominare la stazione selezionata
5. Confermare con "OK" (16).
Page 35

32 Italiano
ASCOLTARE UNA STAZIONE PREFERITA
1. Premere il pulsante dei Preferiti (11) per richiamare l'elenco;
2. Selezionare la stazione desiderata con i cursori su/giù (12/13);
3. Confermare con "OK" (16).
FUNZIONE BLUETOOTH
1. Selezionare la funzione “Bluetooth” dal menu principale;
2. Connettere il proprio dispositivo Bluetooth all’ID Bluetooth "I-RX16BT”;
3. Ora è possibile trasferire la musica al I-RX16BT.
Nota: Il controllo della musica (play, ecc) deve essere fatto sul dispositivo esterno.
CONTROLLO VOLUME (SOLO PER USCITA CUFFIE)
I pulsanti sul telecomando (19/20) servono per regolare il volume solo per le cuffie.
Per regolare il volume del Sistema audio esterno, utilizzare il controllo del volume su
questa.
DLNA
L’adattatore può riprodurre musica da un dispositivo compatibile DLNA, a condizione
che la radio Internet e altri dispositivi DLNA siano connessi alla stessa rete Wi-Fi.
Il nome di default della radio è "AirMusic". Se si desidera modificare il nome, entrare
nel menu Configurazione -> Configurazione DLNA per apportare la modifica.
CENTRO MULTIMEDIALE
UPNP (UNIVERSAL PLUG AND PLAY)
È possibile ascoltare musica in streaming dal dispositivo in rete che supporta la
funzione UPnP. Per esempio, la maggior parte dei computer più recenti supporta
UPnP e puoi ascoltare musica in streaming dall'applicazione Windows Media Player
del computer sulla radio.
Nota: assicurarsi che il computer sia sulla stessa rete Wi-Fi della radio.
L'ultima versione di Windows Media Player può essere scaricata dal sito Web di
Microsoft e installata seguendo le istruzioni dettagliate nella procedura guidata di
installazione.
Una volta installato, Windows Media Player creerà una libreria da tutti i file multimediali disponibili sul PC.
WINDOWS XP / WINDOWS MEDIA 11
1. Per aggiungere nuovi file multimediali alla libreria, selezionare "File>
Aggiungi alla libreria ...> Opzioni avanzate", fare clic su "Aggiungi" e
scegliere i file che si desidera aggiungere e fare clic su "OK".
2. Ora è necessario connettere la radio Internet a Windows Media Player
11 e configurarla per consentire alla radio di accedere alla libreria multi-
mediale. Per fare ciò, seguire I passi seguenti:
Nella radio, entrare nel menu principale e selezionare <Media
Center> <UPnP>.
La radio analizzerà tutti i server UPnP disponibili. Nota: potreb-
bero essere necessari alcuni secondi prima che la radio com-
pleti la scansione. Durante la scansione la radio visualizzerà
Page 36

33 Italiano
WINDOWS 7 / WINDOWS MEDIA PLAYER 12
1. Se si utilizza WMP 12, è sufficiente andare su <File> e selezionare <Apri>
per recuperare i file musicali che si desidera aggiungere alla libreria.
2. Windows 7 o versioni successive richiedono che il PC sia impostato come re-
te domestica e anche con il gruppo home abilitato per consentire ai dispositivi
di accedere / riprodurre i file multimediali su Windows Media Player. Si prega
di seguire i passaggi elencatidi seguito:
a. Dal "Pannello di controllo" del PC selezionare "Rete e Internet";
b. Scegliere "Gruppo Home";
c. Selezionare "Posizione di rete";
d. Scegliere "rete domestica";
e. Selezionare "Crea un gruppo Home";
f. Avviare Windows Media Player, selezionare "Stream" e scegliere "Consenti
auto ai dispositivi di riprodurre i miei file multimediali" dall'elenco a discesa .
Ora è possibile godersi la musica in streaming da Windows Media Player.
STREAMING MUSICA VIA UPNP
1. Nel menu principal della radio, selezionare "Media Center" e scegliere "UPnP";
Potrebbero essere necessari alcuni secondi prima che la radio completi la
scansione dei server UPnP disponibili. Se non vengono trovati server UPnP,
mostrerà "Lista vuota";
2. Al termine della scansione, selezionare il server UPnP.
La radio mostrerà le categorie multimediali disponibili dal server UPnP, ad es.
"Musica", "Playlist" ecc.
3. Scegli i file multimediali che desideri riprodurre.
CENTRO INFORMAZIONI
INFORMAZIONI METEO
Per visualizzare le previsioni del tempo in tutto il mondo e scegliere la regione
desiderata da visualizzare in Standby. Per attivare questa funzione, selezionare
la regione desiderata, quindi premere il cursore destro (15), scegliere "aggiungi
alla visualizzazione standby" e confermare con "OK" (16). "Ora e Data attuali" e
"Tempo attuale" verranno visualizzati ogni 10 secondi alternativamente in modalità standby. È possibile premere i cursori sinistra/destra (14/15) per visualizzare le previsioni del tempo del giorno precedente/successivo.
Nota: Il tempo può avere deviazioni rispetto al reale, è solo per riferimento.
INFORMAZIONI FINANZIARIE
Per ottenere le informazioni del mercato azionario in tutto il mondo.
Nota: L'info può avere deviazioni rispetto al reale, è solo per riferimento.
INFORMAZIONI DI SISTEMA
Per visualizzare le informazioni della radio come la versione del software, ecc.
CONFIGURAZIONI
VISUALIZZAZIONE DELL’ORA: Consente di impostare la modalità dell'orologio in
standby come Radiosveglia o Internet Radio.
GESTIONE “MY MEDIAU”: È possibile creare un elenco di stazioni preferite operando sul PC.
Page 37

34 Italiano
1. Dal computer, collegarsi al sito http://www.mediayou.net/web/index.php, (è il por-
tale usato dalla radio). Registrarsi come membro selezionando "Iscriviti ora";
2. Accedere al portale;
3. Dal menu sul lato sinistro del portale selezionare "Dispositivo";
4. Sull'adattatore radio
Entrare nel “Centro informazioni”;
Selezionare “Informazioni di sistema”;
Selezionare “Informazioni Wireless” e annotarsi il MAC Address.
5. Sul PC scrivere il nome del dispositivo e scrivere l'indirizzo MAC nello spazio
"Numero di serie";
6. Confermare facendo clic su "Aggiungi";
7. Ora puoi organizzare le tue stazioni preferite o aggiungere qualsiasi nuova sta-
zione che non si trova attualmente nell'elenco. Al termine del lavoro, segui i passaggi seguenti per sincronizzare le modifiche alla radio:
Nell’adattatore IR entrare in “Configurazioni”;
Selezionare “Gestione my MediaU”;
Selezionare “Abilita” e confermare con “OK” (16) (Se questa opzione era
già selezionata, selezionare “Disabilita” e quindi “Abilita” di nuovo);
Ora la voce “Gestione My mediaU” apparirà nel menu principale dell’adattatore IR.
RETE:
Configurazione rete wireless: per cercare la rete wireless ed elencare.
Rete wireless (WPS PBC): per utilizzare la funzione WPS. È possibile im-
postare il wireless senza inserire alcuna password per la protezione Wi-Fi se il
router ha questa funzione.
Configurazione manuale: per attivare o disattivare il DHCP e immettere l'SSID
come noto o eliminare il Wi-Fi connesso.
Controlla rete all'accensione: Abilita / disabilita "Verifica rete. quando si ac-
cende ".
DATA & ORA:
Imposta Data e Ora: Scegliere tra “ Configurazione manuale” e “Rilevazione
automatica”.
Formato Ora: Per scegliere il formato di visualizzazione dell’ora (12 / 24 ore).
Imposta formato Data: Per scegliere il formato di visualizzazione della data.
SVEGLIA:
Sveglia 1 / 2: Per impostare I dati delle due sveglie.
Allarme NAP: Per impostare un timer. È possibile selezionare da 5 fino a 120
minuti.
Nota: Il timer funziona solo con il segnale acustico.
Volume Allarme: Impostare il volume della sveglia (con i cursori sinistra/destra)
Quando la sveglia si accende, premere un tasto qualsiasi eccetto il pulsante
"accensione", per rimandare di 5 minuti la sveglia oppure premere il pulsante
"accensione" (7) per spegnere la sveglia.
Nota: È possibile selezionare qualsiasi stazione radio internet come tono di allarme. Se la stazione internet non funziona entro 1 minuto, verrà impostato automaticamente un segnale acustico come suono della svelia.
TIMER: Utilizzare i cursori su / giù e sinistra / destra (12/13 e 14/15) per regolare
Page 38

35 Italiano
l'ora, quindi confermare con "OK" (16) e il timer inizierà
Per mettere in pausa il timer, premere "OK", per riprenderlo, premere nuova-
mente "OK".
Per annullare il timer, premere e tenere premuto il pulsante "OK" fino a quando
appare "00:00", quindi premere "OK" per uscire
LINGUA: Scegliere tra 17 lingue disponibili.
DIMMER: Per scegliere le impostazioni dell’illuminazione del display:
Risparmio energia: Imposta un basso livello di luminosità quando non si ese-
gue nessuna operazione per 15 secondi.
Accendi: L’illuminazione non diminuirà anche se non viene eseguita nessuna
operazione.
DISPLAY: Per scegliere tra “colori” or “monocromatico”.
RISPARMIO ENERGIA: Per impostare l'orario di standby automatico se non viene ri-
cevuto alcun segnale Internet per risparmiare energia. L'impostazione predefinita è 30
minuti (la radio entrerà in standby dopo 30 minuti che la radio non riceve alcun segnale internet).
TIMER SPEGNIMENTO: Per impostare il timer di spegnimento dopo un determinato
intervallo di tempo, da 15 minuti a 180 minuti.
È possibile anche impostare questo timer premendo ripetutamente il pulsante "Timer
Spegnimento" (18) dal telecomando (verrà visualizzato il timer nell'angolo in alto a
destra del display.
BUFFER: Per impostare il tempo di aggiornamento.
METEO: Per impostare la visualizzazione delle previsioni del tempo sulla modalità
standby e le unità di temperatura. È possibile selezionare Visualizzazione/
disattivazione della temperatura e posizione.
Le unità di temperatura sono Celsius (° C) e Fehrenheit (° F).
CONFIGURAZIONE RADIO LOCALE: La radio rileva automaticamente le stazioni
locali e in "Internet radio" troverai tutte le "Radio locali".
Se si desidera modificare le stazioni locali in altri paesi, è possibile scegliere
"Impostazione manuale".
CONFIGURAZIONE RIPRODUZIONE: Per impostare la modalità di riproduzione su
Off, Ripeti uno / tutti.
CONFIGURAZIONE DLNA: Quando la radio è collegata ad altri dispositivi DLNA,
il nome predefinito è "AirMusic". Qui è possibile cambiarlo come si desidera.
Nota: La funzionalità DLNA è compatibile e funziona con le corrispondenti APP
Android di terze parti. I dispositivi Apple non sono supportati.
EQUALIZZATORE: Funzione equalizatore (solo per uscita cuffie).
RIPRENDI ALL’ACCENSIONE: Accendere/Spegnere “Riprendi all’accensione”.
AGGIORNAMENTO SOFTWARE: Le informazioni di aggiornamento appariranno
sul display quando è disponibile l'aggiornamento sul server.
RESET DI FABBRICA: Per ripristinare tutte le impostazioni predefinite.
Nota: tutte le preselezioni, le impostazioni e la configurazione della stazione an-
dranno perse dopo aver eseguito il Reset.
Page 39

36 Italiano
II marchio riportato sul prodotto e sulla sua documentazione indica che il prodotto non deve essere smaltito
can altri rifiuti domestici al termine del ciclo di vita. Per evitare eventuali danni all'ambiente o alla salute
causati dall'inopportuno smaltimento dei rifiuti, si invita l'utente a separare questo prodotto da altri tipi di
rifiuti e di riciclarlo in maniera responsabile per favorire il riutilizzo sostenibile delle risorse materiali. Gli
utenti domestici sono invitati a contattare il rivenditore presso il quale e stato acquistato il prodotto a l'ufficio
locale preposto per tutte le informazioni relative alla raccolta differenziata e al riciclaggio per questo tipo di
prodotto. Gli utenti aziendali sono invitati a contattare il proprio fornitore e verificare i termini e le condizioni
del contratto di acquisto. Questo prodotto non deve essere smaltito unitamente ad altri rifiuti commerciali.
CORRETTO SMALTIMENTO DEL PRODOTTO
(rifiuti elettrici ed elettronici)
ATTENZIONE
Il punto esclamativo all’interno di un triangolo avverte l’utente che il libretto d’istruzioni contiene delle
importanti istruzioni per l’uso e la manutenzione.
Il simbolo del fulmine all’interno di un triangolo avverte l’utente della presenza di una pericolosa tensione all’interno dell’apparecchio.
Per ridurre i rischi di scosse elettriche, non aprire l’apparecchio. L’apparecchio non contiene parti riparabili dall’utente. In caso di guasto fare appello a tecnici qualificati per le riparazioni.
Questo apparecchio è stato progettato per funzionare a 230V ~ 50Hz. Se non si intende utilizzare l’apparecchio per un lungo periodo di tempo, rimuovere la spina dalla presa di corrente.
Utilizzare l’apparecchio solo dopo aver verificato che tutte le connessioni siano state eseguite corretta-
mente.
Non esporre l’apparecchio alla pioggia o all’umidità.
Posizionare l’apparecchio in un luogo sufficientemente ventilato. Evitare di sistemarlo vicino a tende,
sul tappeto o all’interno di un mobile quale, ad esempio, una libreria.
Non esporre l’apparecchio alla luce diretta del sole o a fonti di calore.
SPECIFICHE TECNICHE
Alimentazione
Alimentazione: AC 230V ~ 50Hz.
Alimentazione d’igresso: DC 5 V = 1A.
Generali
Reti Wireless: IEEE802.11b/g/n.
Protocolli di sicurezza: WEP / WPA / WPA2.
Uscita audio: 3.5mm jack.
Uscita cuffie: 3.5mm jack.
Potenza massima irradiata (Bluetooth): 2.5 mW (4 dBm).
Le specifiche e il design sono soggetti a possibili modifiche senza preavviso a causa
di miglioramenti.
Page 40

37 Español
LOCALIZACIÓN DE LOS CONTROLES
1. PANTALLA LCD
2. SENSOR DEL MANDO A DISTANCIA
3. SALIDA AUDIO DE 3.5 mm Jack
4. SALIDA PARA AURICULARES 3.5 mm Jack
5. ENCHUFE CC (5V)
6. INTERRUPTOR DE ALIMENTACIÓN PRINCIPAL
MANDO A DISTANCIA
7. POWER ON/OFF
8. MUTE (SILENCIO)
9. EMISORA FAVORITA / INTRODUCIR LETRAS Y NÚMEROS
“0”―― 0,'DEL'
“1”―― '1'->'@'->' '(raum)->'!'-> “ ->'#'->'$'->'%'->'&'-> '->'('->')'->'*'->'+'->','->'-'->'.'->'/'-
>':'->';'->'<'->'='->'>'->'?'->'['->'\'-
>']'->'^'->'_'->'`'->'{'->'|'->'}'->'~'
“2”―― 2,A,B,C,a,b,c
“3”―― 3,D,E,F,d,e,f
“4”―― 4,G,H,I,g,h,i
“5”―― 5,J,K,L,j,k,l
“6”―― 6,M,N,O,m,n,o
“7”―― 7,P,Q,R,S,p,q,r,s
“8”―― 8,T,U,V,t,u,v
“9”―― 9,W,X,Y,Z,w,x,y,z
10. REGULADOR DE BRILLO (DE LA PANTALLA)
11. BOTÓN FAVORITOS
12. BOTÓN ARRIBA
13. BOTÓN ABAJO
14. BOTÓN IZQUIERDA / VOLVER
15. BOTÓN DERECHA
16. OK (BOTÓN DE CONFIRMACIÓN)
17. BOTÓN DE ALARMA
18. TEMPORIZADOR DE DESCONEXIÓN
19. VOLUMEN + (PARA AURICULARES SOLO)
20. VOLUMEN - (PARA AURICULARES SOLO)
21. MENÚ PRINCIPAL
22. MODO
23. ECUALIZADOR (PARA AURICULARES SOLO)
24. CANCIÓN ANTERIOR / EMISORA ANTERIOR
25. CANCIÓN SIGUIENTE / EMISORA SIGUIENTE
26. REPRODUCIR / PAUSA
Page 41

38 Español
ANTES DE COMENZAR
Asegúrese de que esté listo lo siguiente:
Tiene conexión a internet de banda ancha;
Tiene un router de banda ancha (Wi-Fi) conectado a internet. La radio
admite la conexión inalámbrica B, G y N (el router inalámbrico N
también se puede usar con la configuración en B o G);
Conoce el código de cifrado de datos /contraseña WEP o WPA. Debe
introducir el código correcto cuando la radio esté conectada al router
inalámbrico para la conexión de red. Si no conoce el código /
contraseña, comuníquese con la persona / técnico que configuró su
router.
PRECAUCIONES
La radio no debe usarse en ambientes a altas temperaturas o muy
húmedos durante períodos de tiempo prolongados ya que se podría
dañar el aparato.
Mantenga la radio alejada de líquidos ya que podría dañarse. Apague
la radio inmediatamente si le salpica agua o cualquier líquido. Para
cualquiera duda, consulte a la tienda donde haya comprado esta radio.
No utilice el aparato ni lo guarde en un lugar polvoriento o arenoso.
No abra ni trate de reparar la radio usted mismo/a.
Usar únicamente una fuente de alimentación del voltaje especificado
para cargar la batería. Conectar la radio a una fuente de alimentación
con un voltaje distinto la dañaría permanentemente y podría ser
peligroso.
Limpiar con un trapo seco únicamente.
Page 42

39 Español
ENCENDIDO DE LA RADIO (PRIMERA CONFIGURACIÓN)
1. Conecte la clavija del conector del adaptador de CA / CC a la toma de CC del
aparato (5).
2. Conecte el otro extremo del adaptador a la toma de corriente.
Precaución: Use solo el adaptador proporcionado. La conexión de un
adaptador con clasificación diferente dañará permanente la radio y puede ser
peligroso.
3. Conecte su altavoz con alimentación externa a la toma de salida de audio de la
radio (3).
4. Encienda la radio usando el botón Power on/off (6).
La pantalla se iluminará y aparecerá “WELCOME”.
5. Seleccione el idioma mediante los botones de flecha arriba/abajo (12/13).
Se le preguntará si desea “Comprobar la conexión de red” al encender.
6. A continuación se le preguntará si desea “Configurar la conexión de red”.
Si desea configurar la red ahora, siga los siguientes pasos, si no es así, podrá
configurarla más tarde.
7. La radio comprobará las redes.
8. Seleccione su red mediante los botones de flecha arriba/abajo (12/13).
9. Introduzca la contraseña:
Pulse repetidamente las letras y números (9) o botones arriba / abajo
(12/13) para introducir un carácter.
Pase al carácter siguiente o al anterior mediante los botones izquierda /
derecha (14/15).
Para confirmar, pulse “OK” (16).
CONNECTARSE A LA RED WIFI
1. Introduzca el menú de configuración.
2. Introduzca el menú de red.
3. Seleccione la configuración de red inalámbrica.
4. Seleccione su red mediante los botones de flecha arriba/abajo (12/13).
5. Introduzca la contraseña:
Pulse repetidamente las letras y números (9) o botones arriba / abajo
(12/13) para introducir un carácter.
Pase al carácter siguiente o al anterior mediante los botones izquierda /
derecha (14/15).
Para confirmar, pulse “OK” (16).
RADIO POR INTERNET
Mis favoritos: Lista de estaciones favoritas preseleccionadas
Emisora de radio/música: Las emisoras están clasificadas por Global Top
20 (Top 20 mundial), Genre (Género) y Country/Location (País/Ubicación, Australia, Canadá, Reino Unido, EE. UU.). Entre para ver las subcategorías y escoja
la emisora que desee escuchar. En cada emisora, pulse OK en la unidad o Enter
en el mando a distancia para reproducirla directamente
Radio local): Las emisoras están clasificadas según el país/ubicación en el
Page 43

40 Español
que se opera la unidad.
Historial: Lista de las diez emisoras escuchadas recientemente.
Servicio: Busque la emisora de radio. Introduzca una palabra clave para
buscar la emisora de radio en la lista. Añada una nueva radio añadiendo la dirección IP. Las emisoras añadidas se almacenarán en mis favoritos.
ESTABLECER OPCIONES PREDETERMINADAS
1. Mientras esté sintonizando su emisora favorita, pulse y mantenga pulsado (unos
3 segundos) el botón favoritos (11) hasta que aparezca una pantalla que diga
“Añadir a mis favoritos”.
2. Seleccione la posición donde desea guardar la emisora con los botones arriba /
abajo (12/13).
3. Confirme pulsando “OK” (16).
EDITAR OPCIONES PREDETERMINADAS
Puede editar la lista de favoritos a través de las siguientes opciones:
1. Pulse el botón favoritos (11) para introducir la lista de emisoras predeterminadas.
2. Elija la emisora que desee editar.
3. Pulse el botón derecha (15) para entrar en el menú de edición.
4. Elija la acción deseada entre las siguientes:
Eliminar: para eliminar la emisora seleccionada.
Desplazarse hacia arriba/abajo: para desplazar la emisora seleccionada
dentro de la lista.
Cambiar nombre: para cambiar el nombre de la emisora seleccionada.
5. Confirme pulsando “OK” (16).
RECUPERAR EMISORAS PRESINTONIZADAS
1. Pulse el botón favoritos (11) para recuperar la lista de favoritos.
2. Seleccione la emisora deseada mediante los botones de flecha arriba/abajo
(12/13).
3. Confirme pulsando “OK” (16).
OPERACIÓN BLUETOOTH
1. Cambie el modo a Bluetooth en la Radio con los cursores izquierdo / derecho
(14/15)
2. Conecte su dispositivo portátil Bluetooth a la ID Bluetooth etiquetada como "I-
RX16BT”;
3. Ahora puede transferir la música al I-RX16BT.
Nota: El control de la música (reproducción, pausa, etc.) debe realizarse desde
su dispositivo externo.
CONTROL DE VOLUMEN (PARA LOS AURICULARES SOLO)
Para ajustar el volumen del altavoz de alimentación externa, utilice el control de
volumen en el altavoz. Los botones del mando a distancia (19/20) son para ajustar el
volumen del auricular solo.
Page 44

41 Español
DLNA
La radio por Internet puede reproducir música desde un dispositivo compatible con
DLNA, siempre que la radio por Internet y otros dispositivos DLNA estén en la misma
red Wi-Fi.
La radio aparecerá como "AirMusic" cuando intente buscarla con otros dispositivos.
Si desea cambiar el nombre AirMusic por otro, vaya a Configuración y Configuración
de DLNA para realizar el cambio.
CENTRO MULTIMEDIA
UPNP (UNIVERSAL “PLUG AND PLAY”)
Puede reproducir música desde un dispositivo en red que admita la tecnología
UPnP. Por ejemplo, la mayoría de los ordenadores admite la tecnología UPnP, y
puede reproducir música desde la aplicación de Windows Media Player en el
ordenador y escuchar en su radio.
Nota: Asegúrese de que su ordenador esté conectado a la misma red wifi que la
radio. Puede descargar la versión más reciente de Windows Media Player desde la
página web de Microsoft e instalarla siguiendo las instrucciones detalladas del
asistente de instalación. Una vez instalado, Windows Media Player creará una
biblioteca a partir de todos los archivos multimedia disponibles en su PC.
WINDOWS XP / WINDOWS MEDIA 11
1. Para añadir archivos multimedia a la biblioteca, seleccione' Archivo >
Añadir a la Biblioteca…> Opciones avanzadas', Haga clic en 'Añadir' y
seleccione los archivos que desee añadir y haga clic en 'OK'.
2. Ahora debe conectar su radio por internet a Windows Media Player 11 y configu-
rarla de manera que pueda acceder a su biblioteca de archivos multimedia. Para
hacer esto, deberá seguir los siguientes pasos:
En la radio, vaya al menú principal y seleccione <Centro Multimedia>
<UPnP>.
Buscará todos los servidores UPnP disponibles. Tenga en cuenta que la
radio puede tardar unos segundos en completar la búsqueda y antes de
finalizar, aparecerá en la pantalla de la radio '[Empty]’ (vacío). La radio
continuará mostrando '[Empty]’ si no encuentra servidores de UPnP.
Si la búsqueda tiene éxito. Seleccione su servidor UPnP girando el dial si
hay más de un servidor UPnP, y a continuación, pulse SELECCIONAR.
3. Su PC le avisará de que un dispositivo ha intentado conectarse a su servidor
UPnP. Para permitir que la radio tenga acceso a los archivos multimedia, haga
clic en la pestaña 'Biblioteca' de Windows Media Player 11 y seleccione <Uso
compartido de archivos multimedia> para abrir la ventana 'Uso compartido de
archivos multimedia'.
4. Desde las ventanas de ‘Uso compartido de archivos multimedia’, la radio
aparecerá como dispositivo desconocido en la lista. Haga clic en el dispositivo
desconocido en la lista, a continuación, haga clic en el botón ‘Permitir’ y, a
continuación, pulse ‘OK’.
WINDOWS 7 / WINDOWS MEDIA PLAYER 12
1. Si usted está usando WMP 12, simplemente tendrá que ir a <Archivo> y
Page 45

42 Español
seleccionar <Abrir> para recuperar los archivos de música que desee
añadir a la biblioteca.
2. Windows 7 o superior requiere que su PC esté configurado como Red do-
méstica y también que tenga Grupo Hogar habilitado para permitir
que los dispositivos accedan/ reproduzcan los archivos multimedia de su
Windows Media Player. A continuación describimos los pasos a seguir:
a. Vaya a “Panel de control” y seleccione “Redes e Internet”.
b. Elija “Grupo Hogar”.
c. Seleccione “Ubicación de red”.
d. Elija “Red doméstica”.
e. Seleccione “Crear un Grupo Hogar”.
f. Ejecute Windows Media Player, seleccione “Reproducir” y elija “Permitir que
los dispositivos reproduzcan mis archivos multimedia automáticamente” en
la lista desplegable.
Ahora puede disfrutar de la música emitida desde el reproductor de Window Media.
REPRODUCIÓN DE MÚSICA A TRAVÉS DE UPNP
1. En el menú principal, seleccione “Centro Multimedia” y elija “UPnP”.
La radio puede tardar unos segundos en completar la búsqueda de servi
dores UPnP disponibles. Si no encuentra servidores UPnP disponibles,
aparecerá el mensaje “Lista vacía”.
2. Si la búsqueda tiene éxito, seleccione su servidor UPnP.
La radio mostrará las categorías multimedia disponibles en el servidor
UPnP, por ejemplo, 'Música', 'Listas de reproducción' etc.
3. Elija los archivos multimedia que desee reproducir.
CENTRO DE INFORMACIÓN
INFORMACIÓN DEL TIEMPO: Para ver el pronóstico del tiempo en cualquier lugar
del mundo, puede elegir la zona deseada a mostrar en modo Espera. Para activar
esta función, elija la zona deseada y, a continuación, pulse el botón de derecha (15),
elija “añadir a la pantalla de espera” y confirme pulsando “OK” (16). La “Fecha y hora
actual” y el “Tiempo actual” aparecerán en la pantalla cada 10 segundos alternativamente en modo espera. Puede pulsar los botones izquierda / derecha (14/15) para
mostrar el pronóstico del tiempo del día anterior / siguiente.
Observación: El tiempo podría ser diferente al real, es solo una referencia
INFORMACIÓN FINANCIERA: Ver el índice bursátil.
INFORMACIÓN DEL SISTEMA: Ver información sobre la unidad y la conexión de
red. La información incluye la dirección MAC que debe introducir cuando se registre
en My mediaU.
CONFIGURACIÓN
MOSTRAR HORA: analógica / digital
GESTIONAR MIS ARCHIVOS MEDIAU Puede crear una lista de emisoras favoritas
en su PC.
1. En su ordenador, vaya a http://www.mediayou.net/web/index.php, este es
el portal de radiodifusión que usa su radio. Regístrese como miembro
Page 46

43 Español
seleccionando “Registrarse ahora”.
2. Inicie sesión en el portal.
3. Del menú que aparece a la derecha del portal seleccione “Dispositivo”.
4. En el adaptador de radio:
Vaya a “Centro de información”.
Seleccione “Información del sistema”.
Seleccione “Información sobre la red inalámbrica” y anote la dirección
MAC (Media Access Control: control de acceso al medio).
5. En su PC escriba el nombre de su dispositivo y escriba la dirección MAC
en el espacio “Nombre de serie”.
6. Confirme haciendo clic en “Añadir.
7. Ahora puede organizar sus propias emisoras favoritas o añadir una
nueva emisora que no se encuentre en la lista de emisoras actual. Una
vez organice sus emisoras, siga los siguientes pasos para sincronizar los
cambios en la radio:
Vaya a “Configuración” en su adaptador de radio por internet.
Seleccione “Gestionar mis archivos MediaU”
Elija “Habilitar” y confirme pulsando “OK” (16) (si esta opción ya estaba
“Habilitada”, “Desactivar” y, a continuación, pulse “Habilitar” de nuevo).
En su menú principal aparecerà “Gestionar mis archivos MediaU”.
RED:
Configuración de red inalámbrica: Activa/Desactiva la red Wi-Fi. Al activar la
red Wi-Fi, el sistema seleccionará automáticamente el PA necesario. Introduzca el
código WEP o WPA para conectarse a la red Wi-Fi.
Red inalámbrica, WPS PBC: Si está utilizando un router con botón WPS/QSS,
puede establecer la conexión fácilmente con la función WPS. Para acceder, pulse
el botón WPS de su router antes de que transcurran 120 segundos. La conexión
entre el router y el enlace de música se configurará automáticamente.
Configuración manual: Puede escoger DHPC (cuya dirección IP se asigna
automátic.) o introducir la dirección IP de forma manual para la conexión de red. Al
seleccionar el ajuste manual para la conexión por cable, deberá introducir los siguientes datos: SSID (nombre del punto de acceso), dirección IP, máscara de subred, pasarela predeterminada, servidor DNS preferido, servidor DNS alternativo.
Comprobar la red al encenderse: Activar/desactivar la red WiFi. Cuando active la
red WiFi, el sistema buscará automáticamente el PA disponible. Seleccione el PA
necesario.
FECHA Y HORA:
Ajustar la fecha y la hora
Establezca el formato de visualización de la hora como 12 Hour (12 horas) o 24
Hour (24 horas)
Ajuste el formato de fecha (AAAA/MM/DD-DD/MM/AAAA-MM/DD/AAAA)
RELOJ DESPERTADOR:
Alarma 1 / 2: Para seleccionar los ajustes de alarma que desee (2 alarmas
disponibles).
Alarma en modo siesta: Para establecer una alarma para un periodo de
tiempo corto. Puede seleccionar un periodo de tiempo de entre 5 y 120 minutos.
Page 47

44 Español
No se dispone de función Snooze (repetición) en la alarma en modo siesta.
Nota: La alarma en modo siesta solo funciona con sonido tipo pitido.
Volumen de la alarma: Para ajustar el nivel de volumen de la alarma pulse los
botones izquierda / derecha (14/15)
Cuando suene la alarma, pulse cualquier botón excepto el botón “Power”, para
activar el modo “Snooze” o pulse el botón “Power” (7) para cancelar que la alarma
suene de nuevo 5 minutos más tarde.
Nota: Puede seleccionar cualquier emisora de radio por internet como sintonía
de alarma desde la emisora favorita. Si la emisora de radio no suena en 1 minuto,
sonará automáticamente el sonido tipo pitido.
TEMPORIZADOR: Pulse los botones arriba / abajo y izquierda / derecha (12/13 y
14/15) para ajustar la hora y, a continuación, pulse “OK” (16) para confirmar y se
iniciará el temporizador.
Para pausar el temporizador, pulse “OK”, para reanudarlo, pulse “OK” de
nuevo.
Para cancelar el temporizador, pulse y mantenga pulsado el botón “OK” hasta
que aparezca en la pantalla “00:00”, a continuación, pulse “OK” para salir.
IDIOMA: English/Deutsch/Espanol/Francais/Portugese/Nederlands/Italiano/Pyccknn/
Svenska/Norske/Dansk/Magyar/Cesky/Slovensky/Polski/Turkce/Suomi
REGULADOR DE BRILLO: Para configurar la luz de fondo de la pantalla LCD
existen los siguientes ajustes:
Ahorro de energía: Se establece un nivel bajo de brillo cuando no se realizan
operaciones transcurridos 15 segundos.
Encendido: La luz de fondo no se atenuará aunque no haya operación.
Puede ajustar la intensidad de la luz de fondo si lo desea.
PANTALLA: Color/monocromático
GESTIÓN DE ENERGÍA: Aquí se configura la activación automática del modo de es-
pera mientras está en el menú y/o sin señal Wi-Fi. Seleccione el temporizador para la
gestión de energía (5/15/30 minutos) para determinar el tiempo tras el cual la radio
pasará al modo de espera cuando no la esté controlando. Seleccione “Turn
off” (Desactivar) para ignorar la función de gestión de energía.
TEMPORIZADOR DE APAGADO AUTOMÁTICO: Desactive o ajuste el temporiza-
dor de reposo en 15/30/60/90/120/150/180 minutos. Una vez ajustado el tiempo,
aparecerá un icono de cama con los minutos restantes en la esquina superior derecha y el dispositivo pasará entonces a modo de espera. Pulse Sleep (Reposo) en el
mando a distancia para acceder directamente a esta función.
MEMORIA INTERMEDIA: Configura el tiempo de memoria intermedia (búfer) de la
música en reproducción, 2/4/8 segundos.
TIEMPO: Activa/desactiva el pronóstico meteorológico en la pantalla de espera. Elija
su unidad de temperatura preferida (°F o °C) y, después, introduzca su ubicación.
Una vez activada, se mostrará el pronóstico meteorológico en alternancia con el reloj
en la pantalla de espera (cada 10 s).
Page 48

45 Español
CONFIGURACIÓN DE RADIO LOCAL: Hay un acceso directo a Local Radio (Radio
local) en Internet Radio (Radio por Internet), de forma que puede acceder fácilmente
a la lista de emisoras de su ubicación. Puede seleccionar Manual Setup
(Configuración manual) para configurar su ubicación o Auto Detect (Detección
automática) para que su sistema detecte la ubicación actual. El sistema detecta la
ubicación en función de la dirección IP de la red a la que esté conectado. Pulse Local
Station (Emisora local) para acceder directamente a esta lista de radios locales.
CONFIGURACIÓN DE REPRODUCCIÓN: Seleccione el modo de reproducción del
centro multimedia entre Off (Desactivado - no repetir ni reproducción aleatoria), Repeat all (Repetir todo), Repeat one (Repetir uno), o Shuffle (Aleatorio).
DLNA: El nombre del dispositivo predeterminado de DLNA es “AirMusic”. Puede
renombrarlo para configurar el DLNA en el PC o en el móvil. Utilice el código QR para
descargar e instalar la aplicación de control “AirMusic”.
ECUALIZADOR: La configuración predeterminada del ecualizador es Normal. Es po-
sible cambiarla a Flat (Plana), Jazz, Rock, Soundtracks (Bandas sonoras), Classical
(Clásica), Pop, o News (Noticias). Pulse EQ (Ecualizador) en el mando a distancia
para alternar entre los diferentes modos de ecualización.
REANUDAR AL ENCENDERSE: El sistema reanudará por defecto la reproducción
de radio por Internet si antes de apagar la unidad estaba escuchando la radio por In-
ternet o el centro multimedia. Si desactiva este ajuste, el sistema permanecerá en el
menú principal al encender la unidad.
ACTUALIZAR SOFTWARE: Actualización del Software. Si hay una actualización de
la versión de software en el servidor, el sistema le notificará. Antes de iniciar la actualización del software, asegúrese de que la unidad esté conectada a una fuente de
alimentación eléctrica estable. Si se desconecta la alimentación durante la actualización del software, podría dañar permanentemente la unidad.
RESTABLECER LOS AJUSTES PREDETERMINADOS: Para restaurar todos los
ajustes predeterminados de nuevo.
Atención: Perderá todas las emisoras presintonizadas, los ajustes y la
configuración si realiza un “Restablecimiento a los ajustes de fábrica”.
Page 49

46 Español
La presencia de esta marca en el producto o en el materiál informativo que lo acompaña, indica que al finali-
zar su vida útil no deberá eliminarse junto con otros residuos domésticos. Para evitar los posi bl es daños al
medi o ambi ente o a l a sal ud humane que representa la eliminación incontrolada de residuos, separe este
producto de otros tipos de residuos y reciclelo correctamente para promover la reutilización sostenible de recursos materiales. Los usuarios particulares pueden contactar con el establecimiento donde adqui ri eron el
producto, o con l as autori dades l ocal es pertinentes, para informarse sobre cómo y dónde pueden lIevario
para que sea sometido a un reciclaje ecológico y seguro. Los usuarios comerciales pueden contactar con su
proveedor y consultar las condiciones del contrato de compra. Este produco no debe eliminarse mezclado con
otros residuos comerciales.
ELIMINACIÓN CORRECTA DE ESTE PRODUCTO
(material electrico y electrónico de descarte)
ATTENTIÓN
El símbolo de exclamación dentro un triángulo tiene el objeto de advertir al usuario de la presencia de
instrucciones importantes de funcionamiento y mantenimiento en la documentación adjunta con el equipo.
El símbolo del rayo con punta de flecha dentro de un triángulo adverte al usuario de la presencia de tensiones peligrosas en el equipo.
Para reducir los riesgos de descargas eléctricas, no retire la cubierta. La unidad no hay en su enterior
componentes que pueda manipular el usuario. Encargue su reparación a personal cualificado.
Esta unidad funciona con 230V ~ 50Hz. Cuando el equipo vaya a estar un tiempo prolongado sin utilizarse, desenchufar el cable de alimentación.
No conecte la unidad hasta que no se hayan efectuado todas las otras conexiones.
La unidad no debería ser expuesta a lluvia o humedad.
La unidad se debe instalar de forma que su posición no le impida tener ventilación adecuada. Por ejemplo, el equipo no se debe colocar cerca de cortinas o sobre el tapete, ni en una instalación como puede
ser un armario.
La unidad no debería ser expuesta a la luz solar directa ni a fuentes emisora de calor.
ESPECIFICACIONES TÉCNICAS
Fuente de alimentacion: CA 230V ~ 50Hz.
Alimentacion CC 5V = 1A.
General
Redes inalámbricas: IEEE802.11b / g / n.
Protocolos de seguridad: WEP / WPA / WPA2.
Entrada Audio: 3.5mm jack.
Salida Auriculares: 3.5mm jack.
Potencia máxima radiada (Bluetooth): 2.5 mW (4 dBm).
Las características tecnicas estan sujetas a cambios sin aviso previo.
Page 50

47 Nederlands
LOCATION OF CONTROLS
1. LCD DISPLAY
2. INFRAROOD SENSOR
3. 3.5 mm Jack AUDIO-UITGANG
4. 3.5 mm Jack KOPTELEFOÔN-UITGANG
5. DC NETSTROOM STEKKER(5V)
6. AAN / UIT
AFSTANDSBEDIENING
7. POWER ON/OFF
8. GELUID UITSCHAKELEN
9. KNOP FAVORIETE STATIONS/VOER LETTERS EN CIJFERS IN
“0”―― 0,'DEL'
“1”―― '1'->'@'->' '(raum)->'!'-> “ ->'#'->'$'->'%'->'&'-> '->'('->')'->'*'->'+'->','->'-'->'.'->'/'-
>':'->';'->'<'->'='->'>'->'?'->'['->'\'-
>']'->'^'->'_'->'`'->'{'->'|'->'}'->'~'
“2”―― 2,A,B,C,a,b,c
“3”―― 3,D,E,F,d,e,f
“4”―― 4,G,H,I,g,h,i
“5”―― 5,J,K,L,j,k,l
“6”―― 6,M,N,O,m,n,o
“7”―― 7,P,Q,R,S,p,q,r,s
“8”―― 8,T,U,V,t,u,v
“9”―― 9,W,X,Y,Z,w,x,y,z
10. DIMMER (HELDERHEID VAN HET DISPLAY)
11. FAVORIETEN-KNOP
12. CURSOR OMHOOG
13. CURSOR OMLAAG
14. CURSOR LINKS/TERUG
15. CURSOR RECHTS
16. OK (BEVESTIGINGSKNOP)
17. ALARMKNOP
18. SLAAPSTANDTIMER
19. VOLUME + (ALLEEN VOOR HOOFDTELEFOON)
20. VOLUME - (ALLEEN VOOR HOOFDTELEFOON)
21. HOOFDMENU
22. MODUS
23. EQUALIZER (ALLEEN VOOR HOOFDTELEFOON)
24. VORIGE NUMMER/VORIGE RADIOKANAAL
25. VOLGEND NUMMER/VOLGEND RADIOKANAAL
26. PLAY/PAUSE
Page 51

48 Nederlands
VOORDAT U BEGINT
Zorg ervoor dat u aan de volgende voorwaarden voldoet:
U hebt een breedband internetverbinding;
De Wi-Fi breedbandrouter is verbonden met internet. De radio
ondersteunt Wireless B-, G- en N-verbindingen (Wireless N-router kan
ook worden gebruikt met de instelling op B of G);
U kent het Wired Equivalent Privacy (WEP) of Wi-Fi Protected Access
(WPA) -coderingscode/wachtwoord. U moet de juiste code invoeren als
de radio is verbonden met de draadloze router voor een
netwerkverbinding. Als u de code/het wachtwoord niet kent, neemt u
contact op met de persoon / technicus die de router/het netwerk voor u
heeft opgezet.
VOORZORGSMAATREGELEN
De radio mag niet gedurende langere tijd worden gebruikt in een
omgeving met hoge temperaturen of hoge luchtvochtigheid, dit kan het
apparaat beschadigen.
Houd de radio uit de buurt van vloeistoffen omdat deze kan worden
beschadigd. Schakel de radio onmiddellijk uit als er water of
vloeistoffen in worden gemorst. Raadpleeg de winkel waar u deze
radio hebt gekocht als u vragen hebt.
Gebruik of bewaar het apparaat niet in een stoffige of zanderige
omgeving.
Open en repareer de radio niet zelf.
Gebruik alleen het opgegeven voedingsvoltage om de batterij op te
laden. Het aansluiten van een voeding met een andere classificatie zal
permanente schade aan de radio veroorzaken en kan gevaarlijk
opleveren.
Uitsluitend met een droge doek reinigen.
Page 52

49 Nederlands
RADIO INSCHAKELEN (EERSTE INSTELLING)
1. Steek de connectoren van de AC / DC-adapter in de DC-aansluiting van de
eenheid (5).
2. Sluit het andere uiteinde van de adapter aan op het stopcontact.
Waarschuwing: Gebruik alleen de meegeleverde adapter. Het aansluiten
van een adapter met een afwijkende classificatie veroorzaakt permanente
schade aan de radio en kan gevaarlijk zijn.
3. Sluit uw externe luidspreker aan op de Audio-Out-aansluiting op de radio (3).
4. Schakel de radio in met de Aan/Uit-schakelaar (6).
Het display licht op en toont WELCOME.
5. Selecteer de taal met cursor omhoog/omlaag (12/13).
De radio zal vragen of u naar Netwerk Controleren wanneer het apparaat wordt
ingeschakeld.
6. Radio vraagt of u het Netwerk wilt Configureren
Als u ervoor kiest om het netwerk meteen te configureren, volgt u de volgende
stappen, anders kunt u dit later doen.
7. De radio zoekt naar netwerken.
8. Selecteer uw netwerk met cursors omhoog/omlaag (12/13).
9. Voer het wachtwoord in:
Druk herhaaldelijk op letters en cijfers (9) of op cursisten omhoog/omlaag
(12/13) om een teken in te voeren.
Ga naar het volgende of vorige teken met links/rechts cursors (14/15).
Bevestig met OK (16).
VERBINDING MAKEN MET HET WIFI-NETWERK
1. Ga naar het configuratiemenu.
2. Ga naar het netwerkmenu.
3. Selecteer draadloze netwerkconfiguratie.
4. Selecteer uw netwerk met cursors omhoog/omlaag (12/13).
5. Voer het wachtwoord in:
Druk herhaaldelijk op letters en cijfers (9) of op cursisten omhoog/omlaag
(12/13) om een teken in te voeren.
Ga naar het volgende of vorige teken met links/rechts cursors (14/15).
Bevestig met OK (16).
INTERNETRADIO
Mijn favorieten: Lijst van uw favoriete, opgeslagen stationsgeheugens.
Radiostation/Muziek: Stations zijn ingedeeld op Global Top 20, Genre en
Country/Location (Land/Locatie) Australië, Canada, Verenigd Koninkrijk, V.S.).
Kies er een om de subcategorieën te openen en kies de zender om naar te luis-
teren. Voor elk station, druk op OK op het apparaat of op Enter op de afstandsbediening om direct af te spelen.
Lokale radio: Stations zijn ingedeeld op het land/de locatie waar het appa-
raat wordt gebruikt.
Geschiedenis: Lijst van de tien laatst beluisterde stations.
Page 53

50 Nederlands
Service: Naar een radiostation zoeken, voer een trefwoord in om naar een
radiostation in de lijst te zoeken. Een nieuw station toevoegen door een IP-adres
in te voeren; toegevoegde stations worden opgeslagen in “My Favorite” (Mijn favorieten).
PRESETS INSTELLEN
1. Terwijl u de favoriete zender aan het spelen bent, houdt u (ongeveer 3 sec.) De
favorietenknop (11) ingedrukt totdat een scherm met Aan mijn favorieten
toevoegen verschijnt.
2. Selecteer de positie waar u het station wilt opslaan met de cursor omhoog/
omlaag (12/13).
3. Bevestig met OK (16).
PRESETS BEWERKEN
U kunt uw favorietenlijst bewerken met de volgende opties:
1. Druk op de favorietentoets (11) om de lijst met voorkeuzestations te openen.
2. Kies het radiostation dat u wilt bewerken.
3. Druk op de rechtercursor (15) om naar het bewerkingsmenu te gaan.
4. Selecteer naar weens een van de volgende acties:
Verwijderen: om het geselecteerde station te verwijderen
Verplaats omhoog/omlaag: om het geselecteerde station in de lijst te
verplaatsen.
Hernoemen: Om de geselecteerde zender een nieuwe naam te geven
5. Bevestig met OK (16)
PRESET OPROEPEN
1. Druk op de favorietentoets (11) om de favorietenlijst op te roepen.
2. Selecteer de gewenste zender met cursors omhoog/omlaag (12/13).
3. Bevestig met OK (16).
BLUETOOTH BEDIENING
1. Schakel de modus naar Bluetooth op de radio met links / rechts cursors (14/15);
2. Verbind uw Bluet-apparaat met de ID Bluetooth die is gelabeld als "I-RX16BT”;
3. U kunt nu de muziek overbrengen naar de I-RX16BT.
Let op: Muziekbesturing (afspelen, pauz., enz.) Moet vanaf uw ext. apparaat
worden uitgevoerd.
VOLUMEREGELING (ALLEEN VOOR HOOFDTELEFOONS)
Gebruik de volumeregelaar op de actieve luidspreker-eenheid om het volume voor de
luidspreker met externe voeding aan te passen. De knoppen op de afstandsbediening
(19/20) dienen om het volume alleen voor de hoofdtelefoon aan te passen.
Page 54

51 Nederlands
DLNA
De internetradio kan een muziekstream afspelen vanaf een dlna-compatibel
apparaat, op voorwaarde dat de internetradio en andere dlna-apparaten zich binnen
hetzelfde Wi-Fi-netwerk bevinden.
Voor het geval u de radio op andere apparaten wilt opzoeken: deze wordt
weergegeven als AirMusic. Als u de naam AirMusic wilt veranderen, gaat u naar
Configuratie en Dlna-instellingen om de wijziging aan te brengen.
MEDIACENTER
UPNP (UNIVERSAL PLUG AND PLAY)
U kunt muziek streamen vanaf het netwerkapparaat dat UPnP ondersteunt en over
de radio afspelen.
Vrijwel alle nieuwere computers ondersteunen bijvoorbeeld UPnP en u kunt muziek
streamen vanuit de Windows Media Player-toepassing op de computer en via uw
radio afspelen.
Let op: Zorg ervoor dat uw computer zich op hetzelfde Wi-Fi-netwerk als de radio
bevindt. De nieuwste Windows Media Player kan bij Microsoft worden gedownload en
worden geïnstalleerd. Volg hiervoor de desbetreffende instructies binnen de installatie
-wizard. Na de installatie maakt Windows Media Player een bibliotheek met alle
mediabestanden die er op uw pc voor beschikbaar zijn.
WINDOWS XP / WINDOWS MEDIA 11
1. Om nieuwe mediabestanden aan de bibliotheek toe te voegen, selecteert u
Bestand> Toevoegen aan bibliotheek ...> Geavanceerde opties. Dan klikt u op
Toevoegen en kiest u de bestanden die u wilt toevoegen en klikt u op OK.
2. Verbind vervolgens uw internetradio met Windows Media Player 11 en
configureer deze om de radio toegang tot uw mediabibliotheek te geven. Dit
doet u als volgt:
Ga op de radio naar het hoofdmenu en selecteer <Media Center> <UPnP>.
De radio zoekt naar alle beschikbare UPnP-servers. Houd er rekening mee dat het enkele
seconden kan duren voordat de radio het scannen voltooid heeft
en dat de radio tot dan [Leeg] weergeeft. De radio blijft [Leeg]
weergeven als er geen UPnP-servers zijn en gevonden.
Na een geslaagde scan. Selecteer uw UPnP-server door aan de draaiknop te
draaien als er meer dan één UPnP-server is en druk vervolgens
op SELECTEER.
3. Uw pc vraagt nu of er een apparaat geprobeerd heeft verbinding te maken
met uw UPnP-server. Om de radio toegang te geven tot de
mediabestanden, moet u op het tabblad 'Bibliotheek' klikken in Windows
Media Player 11 en het item Media delen selecteren om het venster Media
delen te openen.
4. Vanuit het venster 'Media delen' wordt de radio weergegeven als een
onbekend apparaat. Klik op het onbekende apparaat in de lijst en klik
vervolgens op de knop 'Toestaan' en klik vervolgens op 'OK'.
WINDOWS 7 / WINDOWS MEDIA PLAYER 12
1. Als u WMP 12 gebruikt, gaat u naar Bestand en kiest u Openen om de
Page 55

52 Nederlands
muziekbestanden op te halen die u aan de bibliotheek wilt toevoegen.
2. Windows 7 of hoger vereist dat de pc wordt ingesteld als Thuisnetwerk en ook
dat de Thuisgroep is ingeschakeld om apparaten toegang te geven tot de
mediabestanden op uw Windows Media Player cq. deze af te spelen. Dit doet u
als volgt:
a. Ga naar Configuratiescherm en selecteer Netwerk en internet.
b. Kies Thuisgroep.
c. Selecteer Netwerklocatie.
d. Kies Thuisnetwerk.
e. Selecteer Een Thuisgroep maken.
f. Start de Windows Media Player, selecteer Stream en kies in de
vervolgkeuzelijst Apparaten automatisch toestaan mijn media te spelen.
U kunt nu uw muziek laten streamen via Windows Media Player.
MUZIEKSTREAMING VIA UPNP:
1. Selecteer Media Center in het hoofdmenu en kies UPnP.
Het kan enkele seconden duren voordat de radio de scan voor beschikbare
UPnP-servers voltooit. Als er geen UPnP-servers worden gevonden, wordt Lege
lijst weergegeven.
2. Nadat een geslaagde scan is voltooid, selecteert u uw UPnP-server.
De radio geeft de mediacategorieën weer die vanaf de UPnP-server beschikbaar
zijn, bijvoorbeeld 'Muziek', 'afspeellijsten' enzovoorts.
3. Kies de mediabestanden die u wilt afspelen.
INFORMATIECENTRUM
WEERINFORMATIE: Om de weersvoorspelling over de hele wereld te bekijken en de
gewenste regio te kiezen die op stand-by wordt weergegeven. Om deze functie te
activeren, kiest u het gewenste gebied en drukt u vervolgens op de rechter cursor
(15), kiest u Aan stand-by display toevoegen en bevestigt u dit met OK (16). Huidige
datum en tijd en Huidig weer worden om de 10 seconden afwisselend weergegeven
in de standby-modus. U kunt op de linker/rechter cursortoetsen (14/15) drukken om
de weersvoorspelling van de vorige/volgende dag weer te geven.
Let op: Het weer kan afwijken van het werkelijke, het is uitsluitend de
verwachting.
FINANCIËLE INFORMATIE: De koersindex bekijken
SYSTEEMINFORMATIE: Details van apparaten en van het verbonden netwerk
bekijken. De informatie omvat het MAC-adres dat u dient in te vullen bij de registratie
van het my mediaU-lidmaatschap
Page 56

53 Nederlands
CONFIGURATIE
TIJDWEERGAVE: Analoog / Digitaal
MIJN MEDIAU BEHEREN: Via de pc kunt u een lijst met favoriete zenders
samenstellen.
1. \Ga op uw computer naar http://www.mediayou.net/web/index.php. Dit is het
radioportaal dat op uw radio wordt gebruikt. Registreer als lid door naar
Registreren te gaan
2. Meld u aan bij het portaal
3. Selecteer Apparaat in het menu aan de linkerkant van de portaal
4. Op de radio-adapter
Ga naar Informatiecentrum.
Selecteer Systeeminformatie.
Selecteer Wireless Info en noteer het MAC-adres.
5. Noteer op uw pc de naam van uw apparaat en schrijf het vul in het veld
serienummer uw MAC-adres in.
6. Bevestig door op Toevoegen te klikken.
7. Nu kunt u uw eigen favoriete stations organiseren of een nieuw station
toevoegen dat op een gegeven moment niet in de zenderlijst wordt gevonden.
Nadat het werk is gedaan, volgt u de onderstaande stappen om de wijzigingen
aan de radio te synchroniseren:
Ga op uw internetradio-adapter naar Configuratie
Selecteer Mijn MediaU beheren
Kies Inschakelen en bevestig met OK (16) (als deze optie al is
Ingeschakeld: Uitschakelen en vervolgens weer Activeren).
In het hoofdmenu wordt Manage My mediaU weergegeven.
NETWERK
Draadloze netwerkconfiguratie: Het WiFi-netwerk inschakelen/uitschakelen.
Wanneer u het WiFi-netwerk inschakeld, zal het systeem automatisch het vereiste toegangspunt selecteren. Voer de WEP- of WPA-code in om met wifi te
verbinden.
Draadloos netwerk (WPS PBC): Als u gebruik maakt van een router met een
WPS/QSS-knop, kunt u de netwerkverbinding eenvoudig instellen via de WPSfunctie. Stel het in door binnen 120 seconden op de WPS-knop te drukken. De
verbinding tussen de router en Music Link zal vervolgens automatisch worden
geconfigureerd.
Handmatige configuratie: U kunt kiezen voor DHPC (die automatisch een IP
toewijst) of voor het handmatig invoeren van een IP-adres voor de draadloze netwerkverbinding. Wanneer u kiest het draadnetwerk handmatig in te stellen, dient
u het volgende in te voeren: SSID (naam van toegangspunt), IP-adres, subnet
mask, standaard gateway, gewenste DNS-server, alternatieve DNS-server.
Controleer netwerk bij het inschakelen: In-/uitschakelen wifi-netwerk. Wan-
neer u het wifi-netwerk inschakelt, zal het systeem automatisch naar de beschikbare AP zoeken. Selecteer uw gewenste AP.
DATUM & TIJD:
Datum en tijd instellen
Page 57

54 Nederlands
Stel de tijdweergave in per 12 Hour (12 uur) of 24 Hour (24 uur)
Stel het datumformaat in (JJJJ/MM/DD-DD/MM/JJJJ-MM/DD/JJJJ)
WEKKER:
Alarm 1 / 2: Om uw favoriete alarminstellingen te selecteren (2 beschikbare
alarmen).
NAP Alarm: Om een korte tijdalarm in te stellen. U kunt tussen 5 minuten en
120 minuten instellen. Geen snooze-functie beschikbaar voor het NAP-alarm.
Opmerking: Het NAP-alarm biedt alleen een pieptoon.
Alarmvolume: Stel het geluidsniveau voor het alarm in met links/ echts
cursors (14/15)
Wanneer het alarm aan gaat, drukt u op een willekeurige knop behalve de knop Aan/
Uit om de Snooze-modus in te schakelen of drukt u op de knop Aan/Uit (7) om het
alarm te annuleren dat anders 5 minuten afgaat.
Let op: Als alarmtoon kunt u uit favoriete zender elk internet-radiozender
selecteren. Als het internetstation niet binnen 1 minuut werkt, wordt automatisch de
pieptoon ingesteld.
TIMER: Gebruik de cursors omhoog / omlaag en links / rechts (12/13 en 14/15) om
de tijd in te stellen en bevestig vervolgens met OK (16) en de timer start.
Om de timer te pauzeren, drukt u op OK, om het te hervatten, drukt u
nogmaals op OK.
Om de timer te annuleren, houdt u de knop OK ingedrukt tot 00:00 verschijnt.
Vervolgens drukt u op OK om af te sluiten.
TAAL: English/Deutsch/Espanol/Francais/Portugese/Nederlands/Italiano/Pyccknn/
Svenska/Norske/Dansk/Magyar/Cesky/Slovensky/Polski/Turkce/Suomi
DIMMER: De achtergrondverlichting van het LCD-scherm aanpassen met
onderstaande instellingen:
Energiebesparing: Stel een lager niveau in als er na 15 seconden geen
handeling is.
Aanzetten: De achtergrondverlichting dimt niet, ook als er geen bewerking
plaatsvindt. U kunt de achtergrondverlichting aanpassen die u wilt.
SCHERM: Kleur/zwart-wit
VOEDINGSBEHEER: Configureer om automatisch in stand-by te gaan als u in het
menu bent of/en zonder wifi-signaal. Kies de tijdklok van de energie-manager
(5/15/30 minuten) om de tijd van de radio in te stellen, voordat hij automatisch in
stand-by modus schakelt wanneer u hem niet bedient. Kies "Turn off" (Uitschakelen)
om de energie-management-functie te negeren.
SLAAPTIJDKLOK: Schakel deze optie uit of stel de slaaptimer in op
15/30/60/90/120/150/180 minuten. Nadat de tijd eenmaal is ingesteld, zal er
rechtsboven in de hoek een slaapicoontje verschijnen met de resterende minuten; het
apparaat zal na deze tijd op stand-by schakelen. Druk op Sleep op de afstandsbe-
diening als sneltoets voor deze functie.
BUFFER: Configureer de buffertijd van het afspelen van muziek in 2/4/8 seconden.
HET WEER: Activeer/deactiveer de weersvoorspelling voor de weergave in stand-by.
Selecteer de gewenste temperatuureenheid (°F of °C) en voer vervolgens uw locatie
is. Wanneer geactiveerd, worden de weersvoorspelling en klokweergave afwisselend
Page 58

55 Nederlands
op het stand-by scherm getoond (elk 10 seconden.
LOKALE RADIO INSTELLEN: Er is een snelkoppeling met de naam “Local Ra-
dio” (Lokale radio) onder Internet Radio, zodat u eenvoudig de stationslijst kunt openen van uw locatie. U kunt uw locatie handmatig instellen (Manual Setup) of het systeem uw huidige locatie automatisch laten waarnemen (Auto Detect). Het systeem
detecteert de locatie op basis van het IP-adres van uw aangesloten netwerk. Druk op
“Local Station” (Lokaal station) om deze lokale radiolijst direct te openen.
AFSPELEN INSTELLEN: Selecteer de afspeelmodus van het mediacentrum - Uit
(geen herhaling of shuffle), Alles herhalen, Eén herhalen of Shuffle.
DLNA: De standaard apparaatnaamr voor DLNA is “AirMusic”. Ukunt een andere
naam toewijzen voor de DLNA-instelling op de PC of mobiele telefoon. De QR-code
voor download en installatie van de app “AirMusic”.
EQUALIZER: De standaard equalizer is Normal (Normaal), u kunt dit veranderen in
Flat (Vlak), Jazz, Rock, Soundtracks, Classical (Klassiek), Pop of News (Nieuws).
Druk op de sneltoets EQ op de afstandsbediening te wisselen tussen de EQmogelijkheden.
HERVATTEN BIJ INSCHAKELEN: Het systeem zal standaard het afspelen van de
internetradio hervatten als u naar de internetradio of het mediacentrum luisterde wanneer u het apparaat uitschakelt. Als u deze instelling uitschakelt, zal het systeem in
het hoofdmenu blijven wanneer u het apparaat inschakelt.
SOFTWARE-UPDATE: Software-update. Het systeem zal u informeren wanneer er
een bijgewerkte softwareversie beschikbaar is op de server. Voordat u een softwareupgrade start, dient u ervoor te zorgen dat het apparaat is aangesloten op een stabiele netvoeding. Als de voeding tijdens een software-update wordt onderbroken, dan
kan het apparaat permanent worden beschadigd.
STANDAARDINSTELLINGEN TERUGZETTEN: Om alle instellingen terug te zetten
naar de standaardinstellingen.
Let op: alle voorkeuzezenders, instellingen en configuratie gaan verloren nadat
u de Factory Reset hebt uitgevoerd.
Page 59

56 Nederlands
Dit symbool dat staat weergegeven op het product en in de documentatie ervan, duidt erop dat het product niet
kan worden weggegooid met het gewone huisvuil aan het einde van de levensduur. Om schade aan het milieu
of aan de gezondheid door ongepaste afvalverwijdering te voorkomen, dient de gebruiker dit product te scheiden van andere soorten afval op verantwoorde wijze ter bevordering van duurzaam hergebruik van de materiële hulpbronnen. De thuisgebruiker dient contact op te nemen met de verkoper van het apparaat of met de
lokale gemeente voor informatie met betrekking tot het scheiden en recyclen van dit type product. Zakelijke
gebruikers dienen contact op te nemen met hun leverancier en de algemene voorwaarden van de verkoopovereenkomst te raadplegen. Dit product dient niet te worden gemengd met ander bedrijfsafval voor de verwijdering.
CORRECTE AFVALVERWERKING VAN HET PRODUCT
(elektrisch en elektronisch afval)
WAARSCHUWING
Het uitroepteken in een gelijkzijdige driehoek is bedoeld om de gebruiker erop attent te maken dat de
gebruikershandleiding belangrijke instructies bevat voor het gebruik en het onderhoud.
De bliksemschicht in een gelijkzijdige driehoek is bedoeld om de gebruiker te waarschuwen voor de
aanwezigheid van gevaarlijke spanning binnen in het apparaat.
Om het risico op elektrische schokken te reduceren, dient het apparaat niet te worden geopend. Het
apparaat bevat geen onderdelen die gerepareerd kunnen worden door de gebruiker. In het geval van
een defect dient contact opgenomen te worden met een gekwalificeerde technicus voor de reparatie.
Dit apparaat is ontworpen om te werken op 230v~ 50Hz. Als het apparaat voor een langere tijd niet gebruikt gaat worden, dient de stekker uit het stopcontact te worden gehaald.
Stel het apparaat niet bloot aan regen of vocht.
Gebruik het apparaat uitsluitend nadat is gecontroleerd dat alle aansluitingen correct zijn uitgevoerd.
Plaats het apparaat op een voldoende geventileerde plek. Plaats het apparaat niet in de buurt van gordijnen, op het tapijt of in in een stuk meubilair, zoals bijvoorbeeld een boekenkast.
Stel het apparaat niet bloot aan direct zonlicht of aan warmtebronnen.
TECHNISCHE SPECIFICATIES
Stroomvoorziening: AC 230V ~ 50Hz.
DC 5V = 1A.
Algemeen
Draadloze netwerken: IEEE802.11b / g / n.
Beveiligingsprotocollen: WEP / WPA / WPA2
Audio-Uitgang: 3.5mm jack plug.
Koptelefoon-Uitgang: 3.5mm jack plug.
Maximaal uitgestraald vermogen 2.5 mW (4 dBm). (Bluetooth).
Kenmerken zijn zonder voorafgaande kennisgeving onderhevig aan veranderingen.
Page 60

Hereby, Roadstar Management SA declares that the radio equipment type IRX16BT is in compliance with Directive 2014/53/EU.
The full text of the EU declaration of conformity is available at the following internet address:
http://roadstar.com/images/ce/I-RX16BT.pdf
or by scanning the following QR Code.
Roadstar Management SA erklärt hiermit, dass das Funkgerät vom Typ IRX16BT der Richtlinie 2014/53 / EU entspricht.
Der vollständige Text der EU-Konformitätserklärung ist unter der folgenden Internetadresse verfügbar:
http://roadstar.com/images/ce/I-RX16BT.pdf
oder durch Scannen des folgenden QR-Codes.
Nous, soussignés Roadstar Management SA, déclarons que l’équipement radio
de type I-RX16BT est conforme aux exigences de la directive 2014/53/EU.
Le texte complet de cette déclaration de conformité EU est disponible à
l’adresse internet suivante:
http://roadstar.com/images/ce/I-RX16BT.pdf
ou en scannant le code QR suivant.
Con la presente, Roadstar Management SA dichiara che l'apparecchiatura radio
del tipo I-RX16BT è conforme alla Direttiva 2014/53 / UE.
Il testo completo della dichiarazione di conformità UE è disponibile al seguente
indirizzo Internet:
http://roadstar.com/images/ce/I-RX16BT.pdf
o eseguendo la scansione del seguente codice QR.
Por la presente, Roadstar Management SA declara que el equipo de radio tipo I
-RX16BT cumple con la Directiva 2014/53 / EU.
El texto completo de la declaración de conformidad UE está disponible en la
siguiente dirección de Internet:
http://roadstar.com/images/ce/I-RX16BT.pdf
o escaneando el siguiente código QR.
Wij, ondergetekende Roadstar Management SA, verklaren dat radioapparatuur
van het type I-RX16BT voldoet aan de vereisten van Richtlijn 2014/53 / EU.
De volledige tekst van deze EU-conformiteitsverklaring is beschikbaar op het
volgende internetadres:
http://roadstar.com/images/ce/I-RX16BT.pdf
of door de volgende QR-code te scannen.
Page 61

Page 62

is a registered Trademark of Roadstar S.A. - Switzerland. All rights reserved.
Roadstar Management SA, via Passeggiata 7 CH 6883 Novazzano (Switzerland)
VER.1
06.2018
 Loading...