

Page 1

HRA-1500MP
User manual
Bedienungsanleitung
Manuel d’instructions
Manuale d’istruzioni
Manual de instrucciones
Manual de instruções
Gebruiksaanwijzing
Návod k použití
Návod na použitie
www.roadstar.com
Page 2

INDEX
English Page 1
Deutsch Seite 5
Français Page 9
Italiano Pagina 13
Español Página 17
Português Página 21
Nederlands Pagina 25
Čeština Strana 29
Slovenský Strana 33
Your new unit was manufactured and assem-
bled under strict ROADSTAR quality control.
Thank-you for purchasing our product for
your music enjoyment. Before operating the
unit, please read this instruction manual carefully. Keep it also handy for further future
references.
Votre nouvel appareil a été fabriqué et monté
en étant soumis aux nombreaux tests ROADSTAR. Nous espérons que cet appareil vous
donnera entière satisfaction. Avant de vous
adonner à ces activités, veuillez lire attentivement ce manuel d’instructions. Conservez-le
à portée de main à fin de référence ultérieure.
Vuestro nuevo sistema ha sido construido
según las normas estrictas de control de calidad ROADSTAR. Le felicitamos y le damos
las gracias por su elección de este aparado.
Por favor leer el manual antes de poner en
funcionamiento el equipo y guardar esta documentación en case de que se necesite
nuevamente.
Ihr neues Gerät wurde unter Beachtung der
strengen ROADSTAR Qualitätsvorschriften gefertigt. Wir danken Ihnen für den Kauf unseres
Produktes und wünschen Ihnen optimalen Hörgenuss. Bitte lesen Sie diese Bedienungsanleitung durch, und heben Sie sie auf, um jederzeit
darin nachschlagen zu können.
Il vostro nuovo apparecchio é stato prodotto ed
assemblato sotto lo stretto controllo di qualità
ROADSTAR. Vi ringraziamo di aver acquistato
un nostro prodotto per il vostro piacere d’ascolto. Prima di procedere all'utilizzo dell'apparec-
chio, leggete attentamente il manuale d’istru-
zioni e tenetelo sempre a portata di mano per
futuri riferimenti.
Seu novo aparelho foi construido e montado
sob o estrito controle de qualidade da ROADSTAR. Agradecemos por ter comprado nosso
produto para a sua diversão. Antes de usar
esta unidade é necessário ler com atençâo
este manual de instruções pare que possa ser
usada apropriadamente; mantenha o manual
ao seu alcance para outras informações.
Page 3

Page 4
HRA-1500MP
1
3
4
2
8 7
10
9
11
5
6
12
13
14
15
16
17
18
19
Page 5
20 21
3
REMOTE
16
24
14
18
4
17
25
15
19
22 23
Page 6

1 English
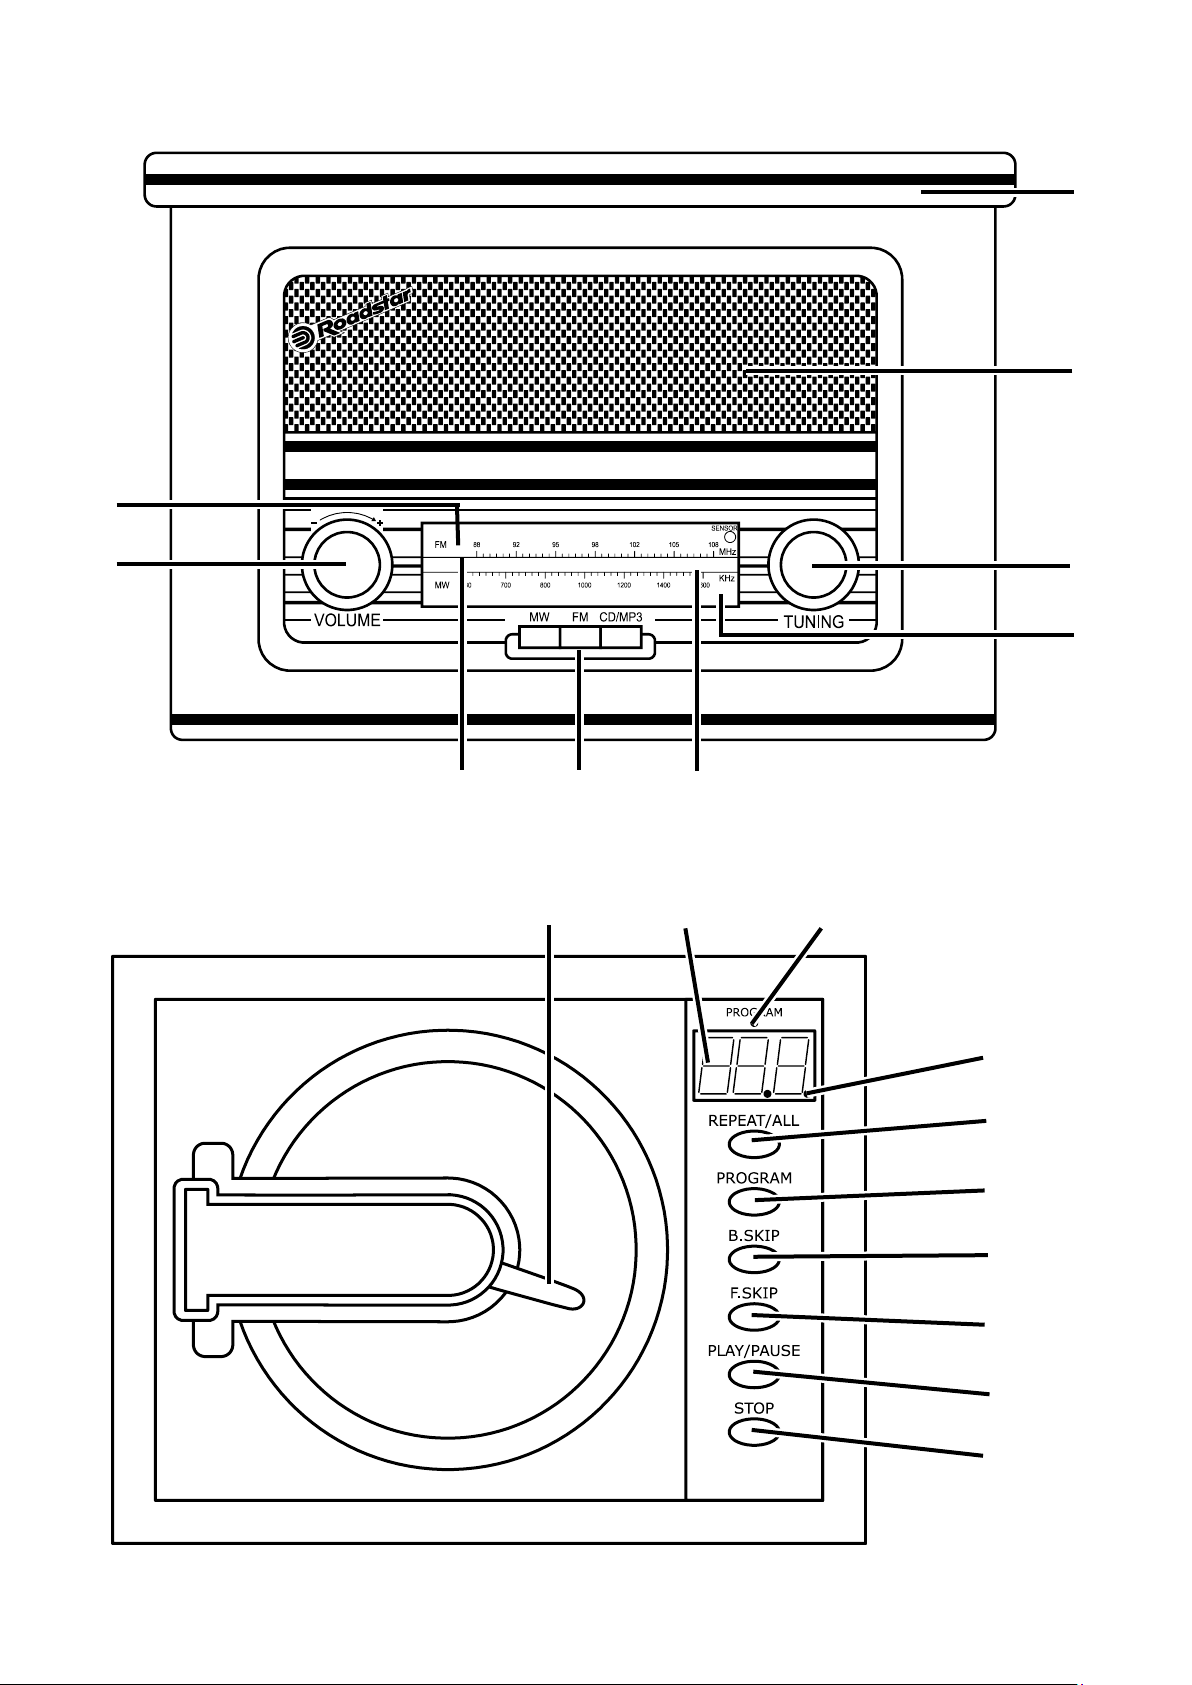
LOCATION OF CONTROLS
1. FM STEREO INDICATOR
2. VOLUME CONTROL
3. CD/MP3 DOOR
4. SPEAKERS
5. TUNING CONTROL
6. DIAL SCALE (MW/FM)
7. FM BAND DIAL SCALE
8. FUNCTION SELECTOR (MW/FM/CD-MP3)
9. AM BAND DIAL SCALE
10. CD CLUMPER
11. CD/MP3 LED DISPLAY
12. PROGRAM INDICATOR
13. PLAY/PAUSE INDICATOR
14. REPEAT BUTTON
15. PROGRAM BUTTON
16. CD/MP3 BACKWARD SKIP BUTTON
17. CD/MP3 FORWARD SKIP BUTTON
18. PLAY/PAUSE BUTTON
19. STOP BUTTON
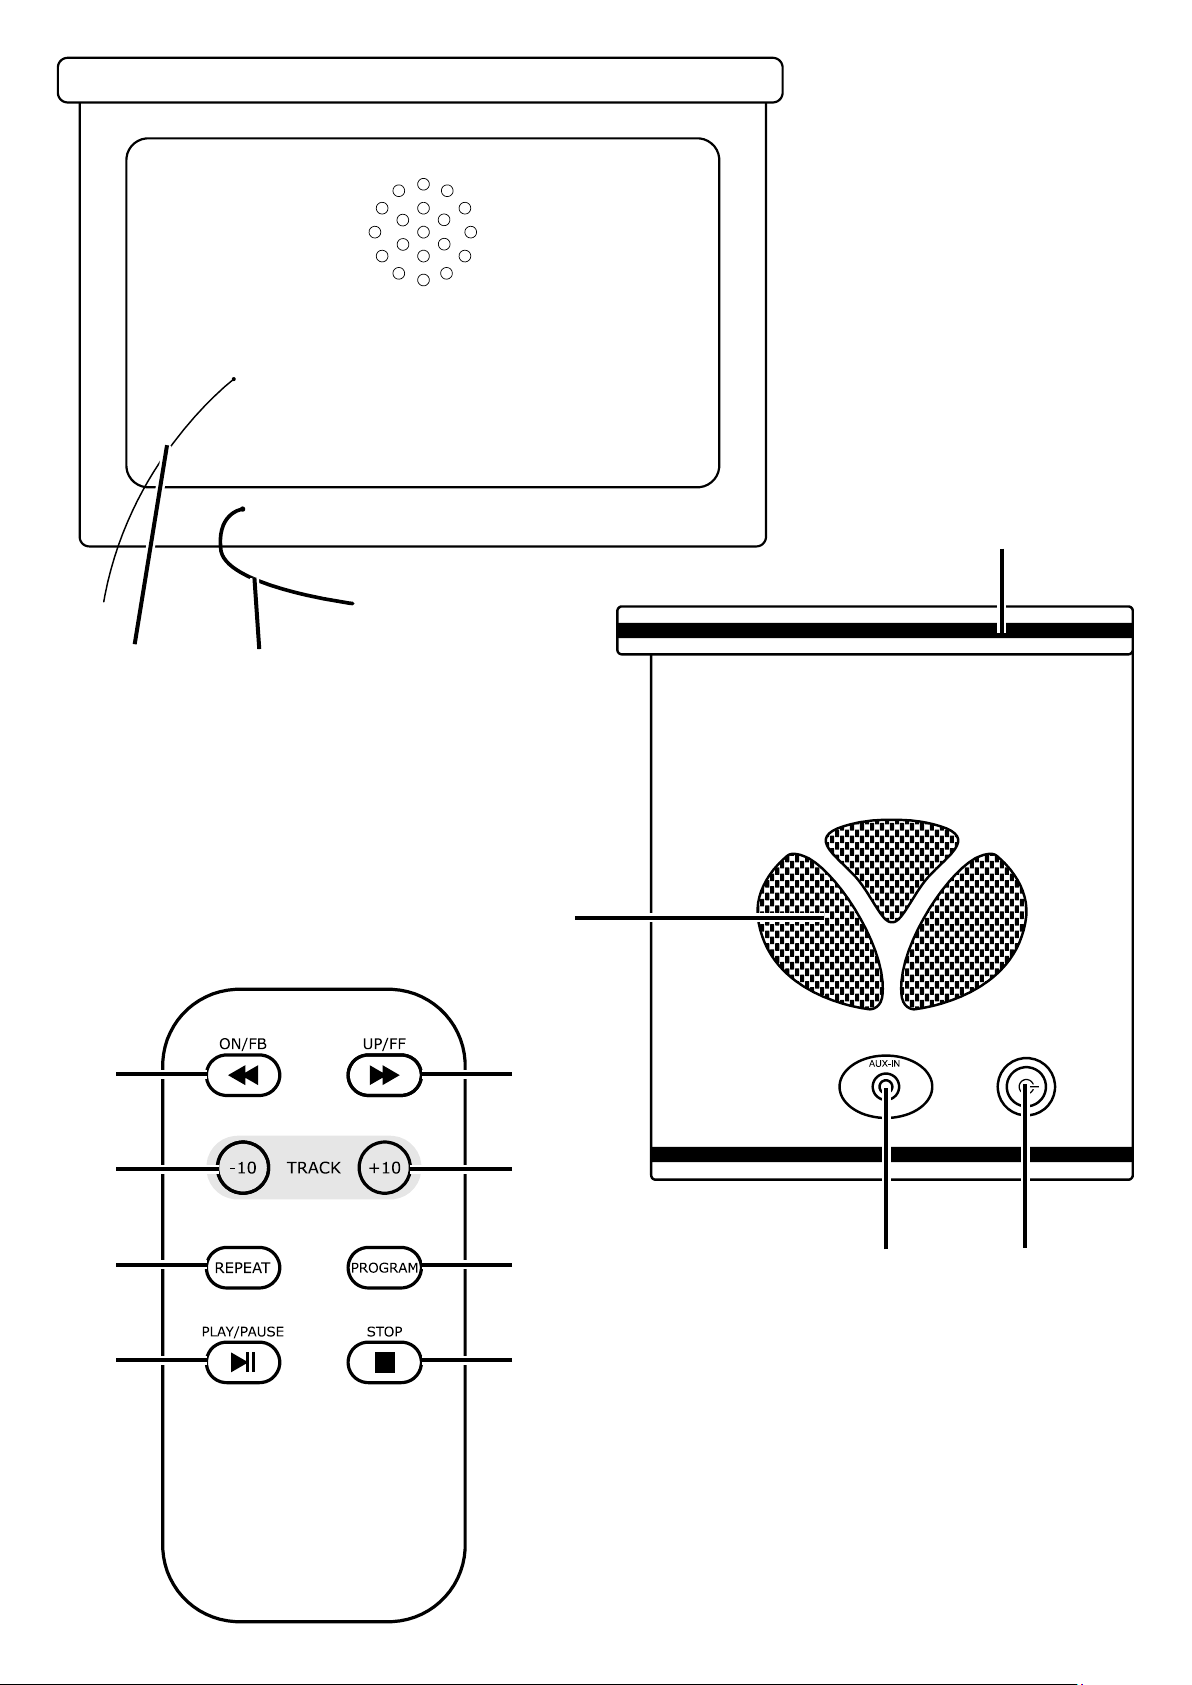
20. FM ANTENNA
21. AC POWER CORD
22. AUX-IN INPUT
23. ON / OFF POWER BUTTON
24. -10 TRACK SKIP
25. + 10 TRACK SKIP
RADIO OPERATION
1. To switch ON, press the POWER button for 1 second.
2. Select the desired frequency band with the Function/Band Selector (8).
3. Tune to the desired radio station by turning the Tuning control (5).
4. Adjust the Volume control to the desired level.
5. To turn OFF the radio, press the POWER button for three seconds.
6. If the Radio station stop transmitting, the unit switch OFF itself after 15 minu-
tes.
Antenna
For FM reception there is a built-in FM antenna wire at the rear of the unit. Move
the wire around to obtain the best reception.
For MW reception the signals are picked up through a built-in ferrite antenna.
Your may have to orient the unit to obtain the best reception.
Page 7

COMPACT DISC OPERATION
Loading and Unloading Compact Discs
1. Set the Function Selector (8) to the CD Position.
2. Open the CD Door (3).
3. When the door has opened, remove a disc from its case and place it carefully
in the compartment with the label side facing up. Locate 3” discs, on the central spindle in the compartment.
PLAY BACK
1. Load a CD into the disc compartment, and close the compartment.
2. Press the Play/Pause button (18). The Play/Pause indicator will light up and
disc play will begin from the start of the first track of the disc.
3. At the end of the disc, the unit will switch to stop mode and the play indicator
will go out.
4. To stop CD play. Press the Stop Button (19). Disc play will stop, the Play indi-
cator will go off, and the display will show the total number of tracks on the
CD.
5. To temporarily stop disc play (pause mode), press the Pause Button (18).
Disc play will stop at the current play position. The track number indicator will
begin to flash.
6. To resume disc play, press the Play Button again. The Play indicator will light
up.
Notes: If the disc is deeply scratched, or too dirty, disc play may not start.
If an improperly centred disc is played, noise can be heard in the mechanism.
The use of such discs should be avoided.
Starting disc play from the beginning of a particular track
Press the Forward or Reverse Skip Track Buttons (16) to select the desired
track. The number of the selected track will be shown on the CD display (11).
Press the Play/Pause Button (18) to start play.
To skip to the next track
1. To skip to the beginning of next track 5 while track 4 is playing.
2. Press the Skip Forward (17) Skip Track Button once to skip to the beginning
of next track.
3. Continuously pressing the Forward Skip Track Button until the desired trade
is reached.
4. Once the beginning of the last track is reached the CD player will not advan-
ce any further.
To skip back to the previous track on a disc
1. To skip back to the beginning of current track. Press the skip Backward (16)
once.
2. To skip back to the beginning of previous track.
3. Press the skip backward (16) Skip Track Button twice.
2 English
Page 8

3 English
4. Continuously pressing the Reverse (16) Skip Track Button makes the CD
player skip back through the disc track by track. Once the beginning of the
first track is reached, the CD player will not go back any further.
Manual Search
During playback, pressing the Forward or Reverse Skip / Search buttons will
cause the player to scan through the current track. At the end of a track the
player will skip to the next track and continue scanning. At the beginning of a
track the player will skip to the previous track and continue scanning.
When the player reaches the end of the final track, or the beginning of the first
track, it will stop scanning.
PROGRAMMED DISC PLAY
It is not possible to enter programs during disc play. Press the Stop button (13)
first, then follow the instructions below.
1. Press the PROGRAM button (15). “01” will flash on the LED display and the
Program Indicator (12) will light up.
2. Press the Forward and Reverse Skip Track buttons to select the track to be
stored in position1.
3. Press the PROGRAM button (15). The first program selection is now stored
in the program memory 1.
4. Select the next track to be programmed using the Forward and Reverse Skip
Track (16/17) buttons. Press the PROGRAM button (15) to store this track.
5. Continue entering tracks in this way until all the desired tracks are stored (up
to a limit of 20).
6. When the PROGRAM button (15) is pressed to store the 20th track, the di-
splay will return to the 1st program location. Press the PROGRAM button
(15) to step through the program locations.
Listening to Programmed Tracks
Press the Play Pause button (18). Disc play will start at the beginning of the first
programmed track.
To Clear The Program Memory
If the disc is playing, press the Stop button (19) to stop the disc. Switch the
Function (8) selector to MW or FM to clear the Program.
REPEAT DISC PLAY
During playback, repeatedly press REPEAT BUTTON (14) on the remote control
to select:
Repeat1: The current track is played repeatedly.
RepeatAll: All tracks are played repeatedly.
Normal mode: The tracks are played in classic order.
Page 9

AUX IN FUNCTION
This unit provides an auxiliary audio input jack for connecting external audio device like MP3 players, CD players and allow playback of your external source
through the system speakers.
1. Use an audio cable (not included) with 3.5 mm stereo plugs on each end of
the cable.
2. Plug one end into the AUX-IN jack on the main unit and plug the other end of
the cable into the LINE OUT or HEADPHONE Jack of your external audio device.
3. Turn ON the unit and your external audio device.
4. Start to play the external device (see the user manual of the external device).
SPECIFICATIONS
Power Supply AC: 230V ~ 50Hz
FM: 88 - 108MHz
MW: 540 - 1600kHz
Specifications and the design are subject to possible modifications without notice
due to improvement.
4 English
WARNINGS
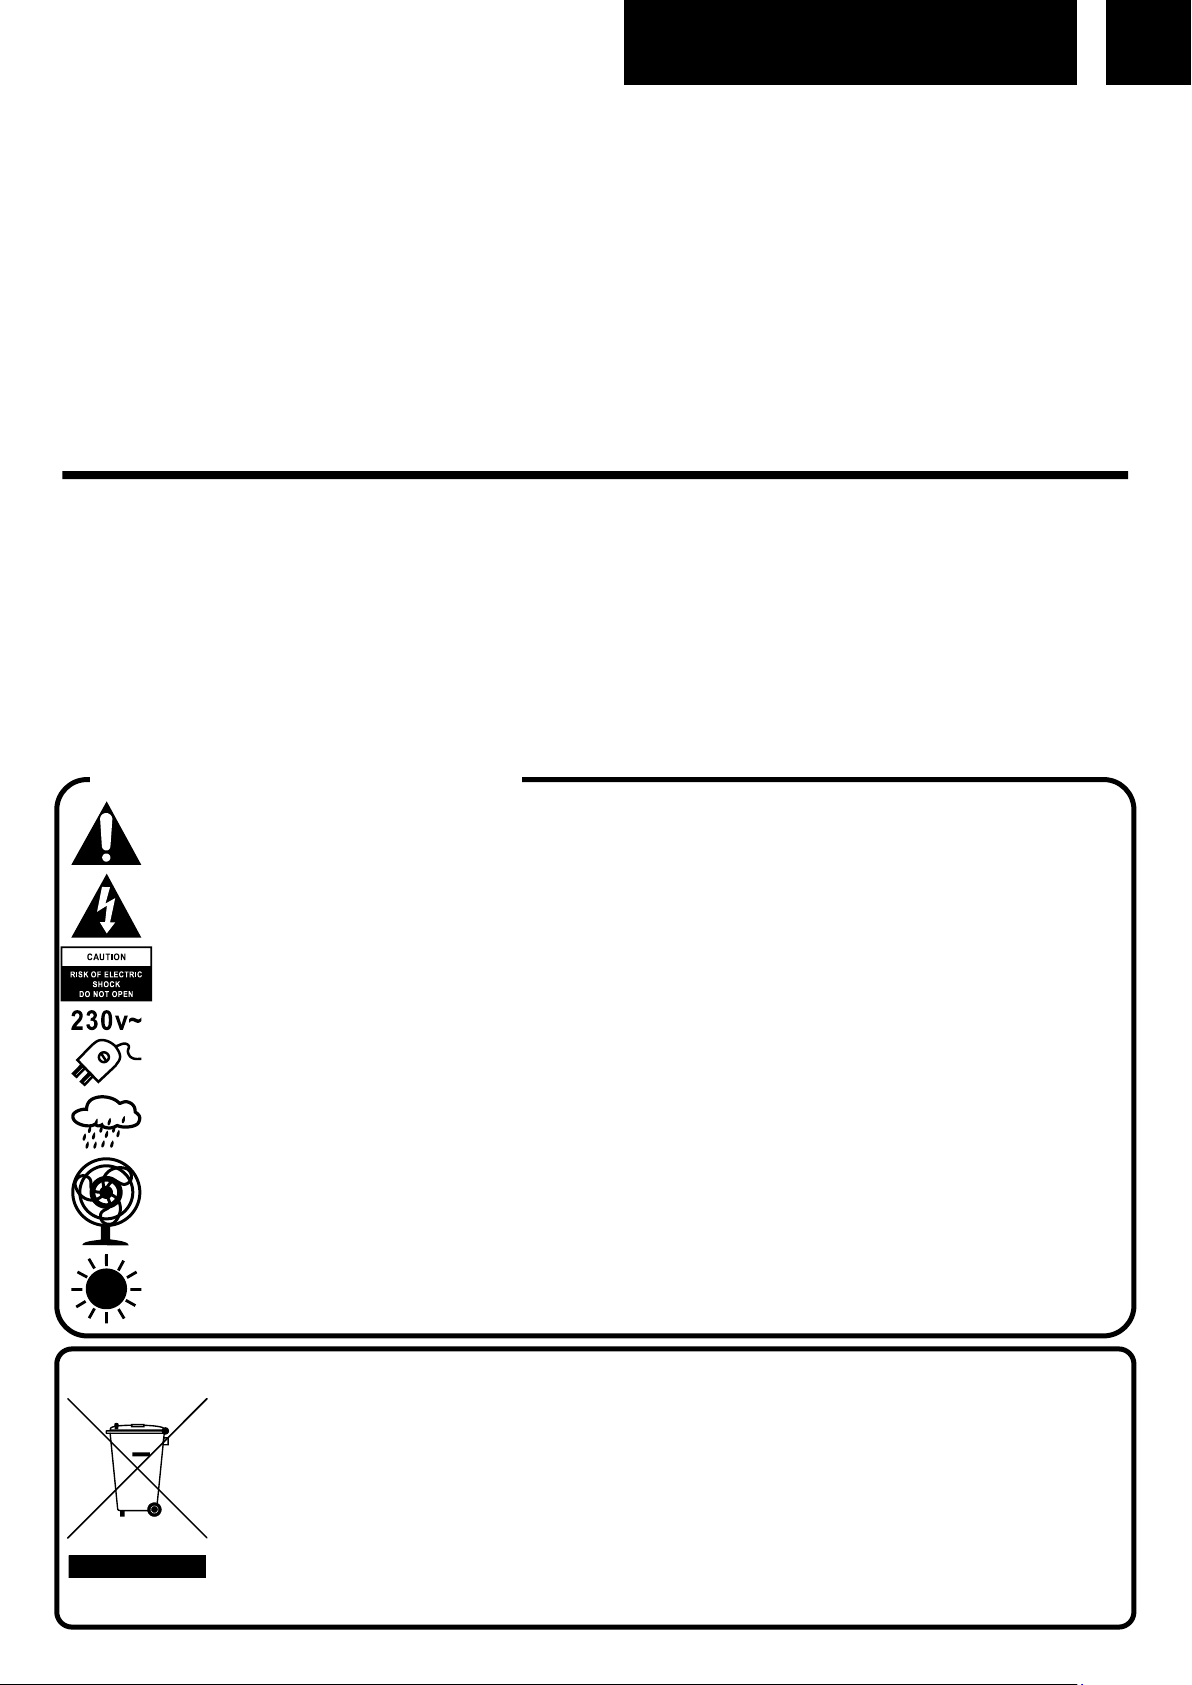
The exclamation point within the triangle is a warning sign alerting the user of important instructions accompanying the product.
The lightening flash with arrowhead symbol within the triangle is a warning sign alerting the
user of “dangerous voltage” inside the unit.
To reduce the risk of electric shock, do not remove the cover. No user serviceable parts inside the unit. Refer all servicing to qualified personnel.
This unit operates on 230V ~ 50Hz. If the unit is not used for a long period of time, remove
the plug from the AC mains.
Ensure all connections are properly made before operating the unit.
This unit must not be exposed to moisture or rain.
This unit should be positioned so that it is properly ventilated. Avoid placing it, for example,
close to curtains, on the carpet or in a built-in installation such as a bookcase.
Do not expose this unit to direct sunlight or heat radiating sources.
CORRECT DISPOSAL OF THIS PRODUCT
(Waste Electrical & Electronic Equipment)
This marking shown on the product or its literature, indicates that it should not be disposed with
other household wastes at the end of its working life. To prevent possible harm to the environment or human health from uncontrolled waste disposal, please separate this from other types of
wastes and recycle it responsibly to promote the sustainable reuse of material resources. Household users should contact the retailer where they purchased this product, or their local government office, for details of where and how they can take this item for environmentally safe recycling. Business users should contact their supplier and check the terms and conditions of the purchase contract. This product should not be mixed with other commercial wastes for disposal.
Page 10

5 Deutsch
LAGE DER BEDIENUNGSELEMENTE
1. UKW STEREO-ANZEIGE
2. LAUTSTÄRKE-REGLER
3. CD-FACH-ABDECKUNG
4. LAUTSPRECHER
5. ABSTIMM-KNOPF
6. RADIO-ABSTIMM-ANZEIGE (MW/FM)
7. FREQUENZANZEIGE FM (UKW)
8. FUNKTIONS-WAHLSCHALTER (MW/FM/CD)
9. FREQUENZANZEIGE MW
10. CD/MP3 DECKEL
11. SKIP CD UP/DOWN-ANZEIGE IM DISPLAY
12. PROGRAMM-ANZEIGE
13. CD-STOP-ANZEIGE IM DISPLAY
14. WIEDERHOL-TASTE
15. PROGRAMM-TASTE
16. CD RÜCKWÄRTS-TASTE
17. CD VORWÄRTS -TASTE
18. CD-WIEDERGABE/PAUSE-TASTE
19. LED-DISPLAY
20. UKW-ANTENNE
21. AC KABEL
22. AUX-IN-BUCHSE
23. ON/OFF-SCHALTER
24. SKIP -10
25. SKIP +10
RUNDFUNKEMPFANG
1. Drücken Sie den POWER Schalter 1 Sekunde.
2. Wählen Sie das gewünschte Frequenzband mit dem Funktion/
Bandwahlschalter (12).
3. Stimmen Sie die gewünschte Radiostation mit dem Abstimmregler (16) ab.
4. Stellen Sie mit dem Lautstärkeregler den gewünschten Lautstärkepegel ein.
5. Um das Radio auszuschalten, drücken Sie den POWER Schalter 3 Sekunden.
Antenne
1. Für den UKW-Empfang befindet sich auf der Rückseite des Gerätes ein eingebauter UKW-Antennendraht.
2. Für den MW-Empfang werden die Signale über eine eingebaute Ferritantenne
empfangen.
3. Sie brauchen das Gerät nur auszurichten, bis der beste Empfang erreicht
wird.
Page 11

ZUM UMGANG MIT DEN COMPACT DISCS
1. Stellen Sie den Funktionswahlschalter (12) auf CD.
2. Öffnen Sie das CD-Fach (15).
3. Wenn die Klappe geöffnet ist, nehmen Sie eine Disc aus ihrer Schutzhülle und
legen Sie sie vorsichtig mit der beschrifteten Seite nach oben ins Fach ein.
Legen Sie 3"- Discs auf die mittlere Spindel im Fach.
DISC-WIEDERGABE
1. Öffnen Sie das CD-Fach (15), um es zu öffnen und legen Sie eine CD ein.
Schließen Sie das CD-Fach.
2. Drücken Sie die Wiedergabe/Pause-Taste (7). Die Wiedergabe der Disc be-
ginnt mit dem ersten Titel der Disc.
3. Am Ende der Disc schaltet das Gerät in den Stop-Modus.
4. Drücken Sie die Stop-Taste (5). Die Disc stoppt, und auf dem Display wird die
Gesamtanzahl der Titel angezeigt.
5. Um die CD zeitweilig zu stoppen (Pause-Modus), drücken Sie die Wiedergabe/Pause-Taste. Die Disc stoppt an der gerade wiedergegebenen Stelle.
6. Um die Wiedergabe fortzusetzen, drücken Sie erneut die Wiedergabe/Pause-
Taste.
Hinweise: Wenn die Disc stark zerkratzt oder zu schmutzig ist, könnte die
Wiedergabe nicht starten. Wird eine nicht richtig zentrierte CD abgespielt,
könnten Geräusche im Mechanismus zu hören sein. Vermeiden Sie es, solche
Discs zu verwenden.
Starten der Disc-Wiedergabe vom Anfang eines bestimmten Titels
Drücken Sie die Skiptaste Vorwärts oder Rückwärts (9), um den gewünschten Titel zu wählen. Die Nummer des gewählten Titels wird auf dem CD-Display (4) angezeigt. Drücken Sie die Wiedergabe/Pause-Taste (7), um die Wiedergabe zu
starten.
Zum nächsten Titel springen
1. Um an den Anfang des nächsten Titels zu springen.
2. Drücken Sie die Skiptaste Vorwärts (10) einmal, um an den Anfang des näch-
sten Titels zu springen.
3. Drücken Sie die Skiptaste Vorwärts ununterbrochen, bis der gewünschte Titel
erreicht ist. Wenn der Anfang des letzten Titels erreicht ist, springt der CDSpieler nicht weiter.
Zum vorherigen Titel zurückspringen
1. Um an den Anfang des laufenden Titels zurückzuspringen, drücken Sie die
Skiptaste Rückwärts (9) einmal.
2. Durch wiederholtes Drücken der Skiptaste Rückwärts (9) springt der CDSpieler rückwärts durch die ganze CD, von einem Titel zum anderen. Wenn
der Anfang des ersten Titels erreicht ist, springt der CD-Spieler nicht weiter.
6 Deutsch
Page 12

7 Deutsch
Manueller Suchlauf
Wenn Sie während der Wiedergabe die Skiptaste Vorwärts oder die Skiptaste
Rückwärts gedrückt halten, tastet der CD-Spieler den gerade wiedergegebenen
Titel ab. Am Ende eines Titels springt der CD-Spieler zum nächsten Titel und setzt das Abtasten fort. Am Anfang eines Titels springt der CD-Spieler zum vorherigen Titel und setzt das Abtasten fort. Wenn der CD-Spieler das Ende des letzten
Titels oder den Anfang des ersten Titels erreicht hat, stoppt er.
PROGRAMMIERTE DISC-WIEDERGABE
Es ist nicht möglich, Programme während der Disc-Wiedergabe einzugeben.
Drücken Sie zuerst die Stop-Taste (5) und befolgen Sie dann die untenstehenden
Anweisungen.
1. Drücken Sie die PROGRAM-Taste (3). “01”-Anzeige blinkt auf dem Display (5)
und die Programm-Anzeige (8) leuchtet auf.
2. Drücken Sie die Skiptaste Vorwärts und Rückwärts (10/9), um den Titel zu
wählen, der auf Speicherplatz 1 gespeichert werden soll.
3. Drücken Sie die PROGRAM-Taste (3). Die erste Programmwahl befindet sich
nun im Programmspeicher.
4. Wählen Sie mit den Skiptaste Vorwärts und Rückwärts (10/9) den nächsten
Titel, der programmiert werden soll.
5. Drücken Sie die PROGRAM-Taste (3), um diesen Titel zu speichern.
6. Auf diese Weise können Sie alle gewünschten Titel (bis zu 20) speichern.
Wenn Sie die PROGRAM -Taste (3) drücken, um den 20.Titel zu speichern,
kehrt das Display zum ersten Speicherplatz zurück. Drücken Sie die PROGRAM-Taste (3), um die Speicherplätze einzusehen.
WIEDERGABE DER PROGRAMMIERTEN TITEL
Drücken Sie die Wiedergabe/Pause-Taste (7). Die Disc-Wiedergabe startet vom
ersten programmierten Titel.
LÖSCHEN DES PROGRAMMSPEICHERS
1. Wenn die Disc gerade wiedergegeben wird, drücken Sie die Stop-Taste (6),
um die Wiedergabe zu stoppen.
2. Stellen Sie den Funktionswahlschalter (10) auf MW oder FM, um das Pro-
gramm zu löschen.
WIEDERHOLTE DISC-WIEDERGABE
Drücken Sie die während der Wiedergabe die Wiederhol-Taste (2):
Repeat1: Der aktuelle Titel wird wiederholt abgespielt.
RepeatAll: Alle Titel werden wiederholt abgespielt.
Normal-Modus: Die Titel werden in der klassischen Reihenfolge abgespielt.
AUX-FUNKTION (13)
Dieses Gerät bietet einen zusätzlichen Audioeingang zum Anschluss externer Audiogeräte wie MP3-Player, CD-Player und ermöglicht die Wiedergabe aus Ihrer
Page 13
externen Quelle über die Lautsprecher der Anlage.
1. Verwenden Sie ein Audiokabel (nicht im Lieferumfang enthalten) mit 3,5 mm
Stereo-Klinkensteckern an beiden Enden des Kabels.
2. Stecken Sie ein Ende in die AUX IN-Buchse am Hauptgerät und das andere
Ende des Kabels in den Ausgang oder die Kopfhörerbuchse Ihres externen
Audiogeräts.
3. Schalten Sie das Gerät und Ihr externes Audiogerät EIN.
4. Beginnen Sie, das externe Gerät abzuspielen (siehe Benutzerhandbuch des
externen Gerätes).
TECHNISCHE DATEN
Netzbetrieb (AC) 230V ~ 50Hz
UKW: 88 - 108MHz
MW: 540 - 1600kHz
Hinweis: Auf Grund ständiger Verbesserungen bleibt die Änderung der technischen Daten und des Designs ohne Vorankündigung vorbehalten.
8 Deutsch
SICHERHEITSHINWEISE
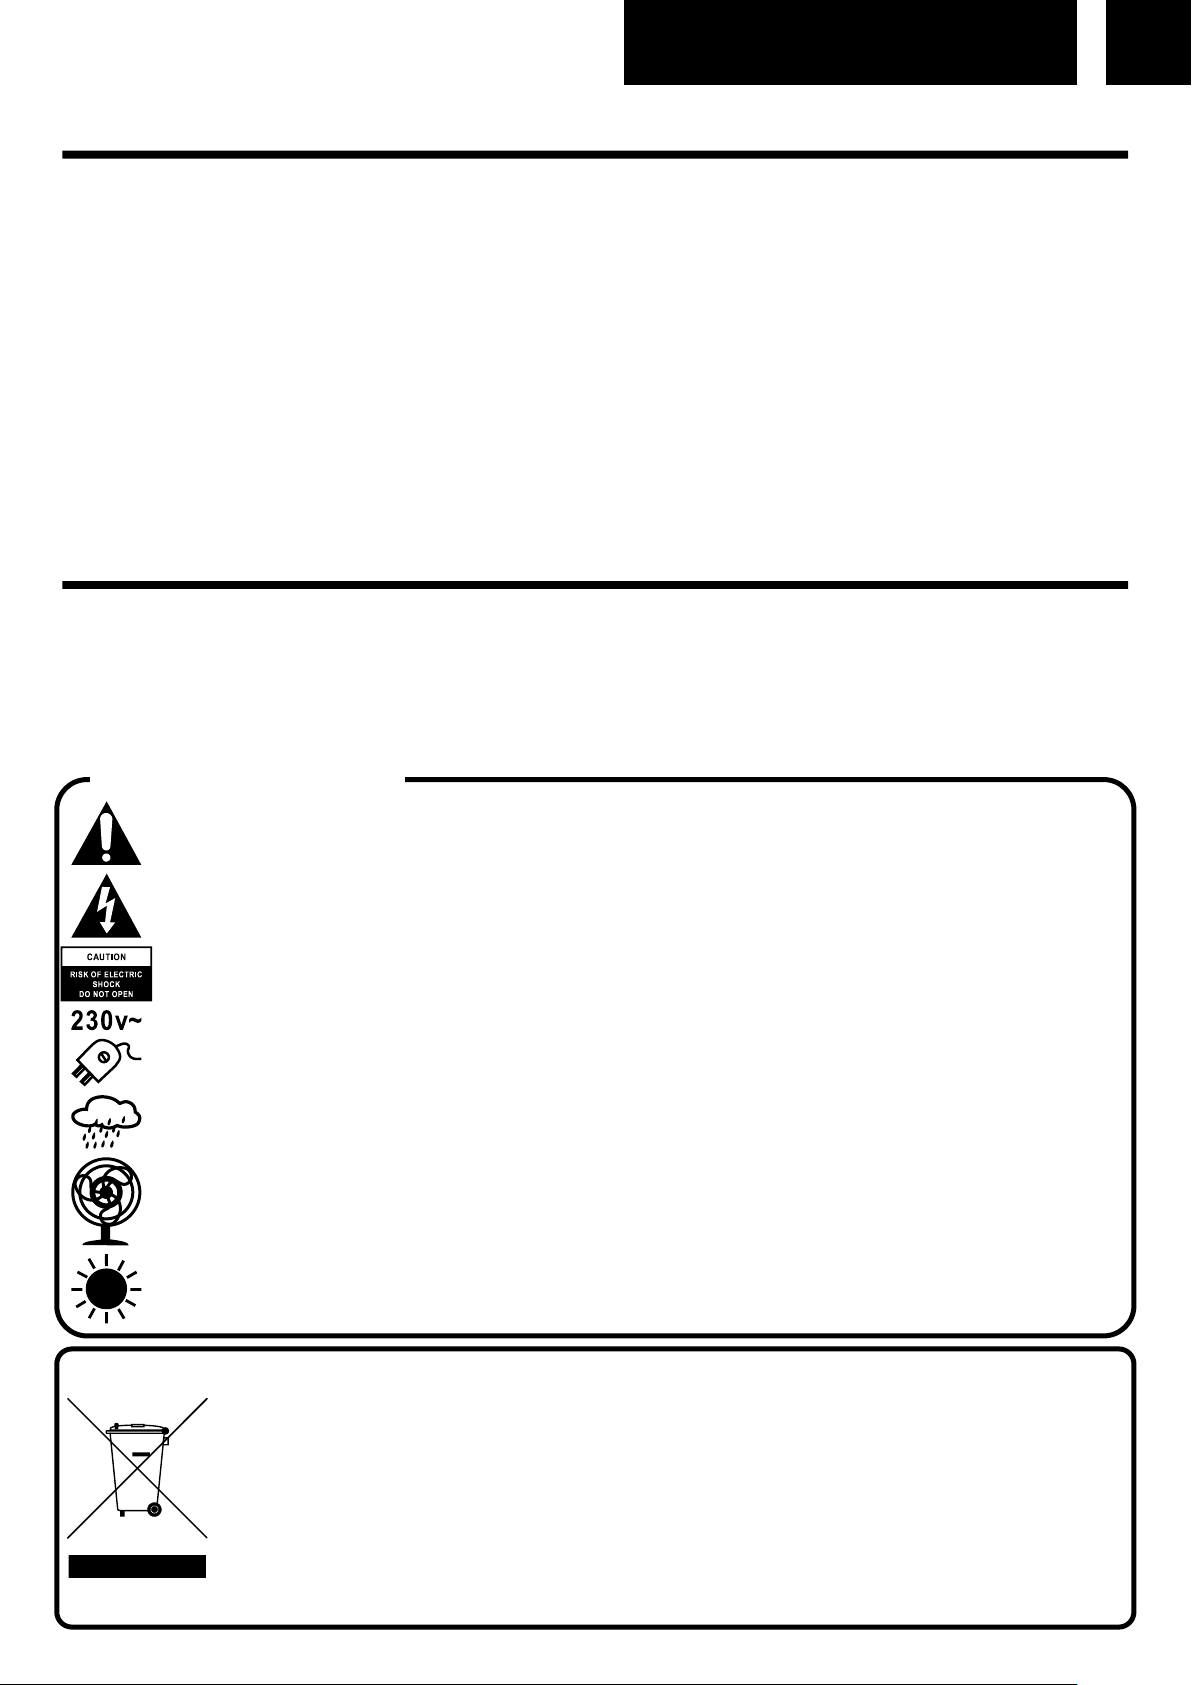
Das Ausrufszeichen im Dreieck weist den Benutzer auf wichtige Bedienungs- und Wartungsanweisungen (Service) in diesem Handbuch hin, die unbedingt zu befolgen sind.
Um die Gefahr elektrischer Schläge auszuschliessen, Gehäuse auf keinen Fall abnehmen.
Im Innem befinden sich keine vom Benutzer selbst instandsetz-baren Teile. Reparaturen dürfen nur von einer autorisierten Fachwerkstatt durchgeführt werden.
Dieses Gerät ist für 230V ~ 50Hz Netzspannung ausgelegt. Bei längerer Nichtbenutzung des
Geräts ziehen Sie den Stecker aus der Steckdose.
Setzen Sie das Gerät weder Feuchtigkeit noch Regen aus.
Schalten Sie das System erst dann ein, wenn Sie alle Verbindungen genau geprüft haben.
Stellen Sie das Gerät so auf, dass immer eine ungestörte Frischluftzufuhr sichergestellt ist.
Es ist zum beispiel keinesfalls auf Teppiche und in der Nähe von Gardinen zu stellen oder in
Bücherregale einzubauen.
Setzen Sie das Gerät weder direkter Sonneneinstrahlung noch Wärmequellen aus.
KORREKTE ENTSORGUNG DIESES PRODUKTS
(Elektromüll)
Die Kennzeichnung auf dem Produkt bzw. auf der dazugehörigen Literatur gibt an, dass es nach seiner Lebensdauer nicht zusammen mit dem normalen HaushaltsmüIl entsorgt werden darf. Entsorgen Sie dieses
Gerat bitte getrennt von anderen Abfallen, um der Umwelt bzw. der menschl i chen Gesundhei t ni cht durch
unkontrol l i erte Mül l besei ti gung zu schaden. Recycel n Si e das Gerät, um di e nachhaltige Wiederverwertung von stofflichen Ressourcen zu fördern. Private Nutzer sollten den Händler, bei dem das Produkt
gekauft wurde, oder die zuständigen Behörden kontaktieren, um in Erfahrung zu bringen, wie sie das Gerät
auf umweltfreundliche Weise recyceln können. Gewerbliche Nutzer sollten sich an Ihren Lieferanten wenden
und die Bedingungen des Verkaufsvertrags konsultieren. Dieses Produkt darf nicht zusammen mit anderem
Gewerbemüll entsorgt werden.
Page 14

9 Français
POSITIONNEMENT DES COMMANDES
1. INDICATEUR FM STEREO
2. RÉGLAGE DU VOLUME
3. RÉCEPTACLE CD
4. HAUT-PARLEUR
5. RÉGLAGE D’ACCORD
6. AFFICHEUR SYNTONIE RADIO (MW/FM)
7. INDICATEUR FM
8. SÉLECTEUR DE FONCTION (MW/FM/CD-MP3)
9. INDICATEUR AM
10. MÉCANISME-SOUTIENS DISQUE
11. TOUCHE SKIP UP / DOWN CD/MP3
12. INDICATEUR DE PROGRAMME
13. TOUCHE D’ARRET
14. TOUCHE DE REPETITION
15. TOUCHE DE PROGRAMME
16. CD/MP3, TOUCHE DE SAUT DES PISTES EN ARRIÈRE
17. CD/MP3, TOUCHE DE SAUT DES PISTES EN AVANT
18. TOUCHE DE LECTURE / PAUSE
19. AFFICHEUR LED
20. ANTENNE FM
21. CORDON D’ALIMENTATION CA
22. ENTRÉE CASQUES
23. SÉLECTEUR ON/OFF
24. SAUTE TRACE -10
25. SAUTE TRACE +10
ECOUTE DE LA RADIO
1. Renfoncée pendant 1 seconde le Sélecteur POWER.
2. Choisir la bande de fréquence souhaitée avec le Sélecteur Fonction/Bandes
(8)
3. A l’aide du Sélecteur de Recherche des Stations (5), intercepter la station
émettrice souhaitée.
4. Régler le Sélecteur de ON/OFF / Volume pour obtenir le niveau de son sou-
haité.
5. Pour éteindre la radio, reinfoncée le Sélecteur POWER spour 3 soconde.
Antenne
Pour la réception en FM il y a une antenne FM incorporée dont le câble est
placé au dos de l’appareil.
Pour la réception en MW les signaux sont interceptés par une antenne en fer-
rite incorporée. Pour que la réception soit la meilleure possible, il faut orienter
l’appareil.
Page 15

10 Français
FONCTIONNEMENT DU LECTEUR CD
1. Placer le Sélecteur de Fonction (8) sur la Position CD.
2. Ouvrez le compartiment CD (3).
3. Une fois le couvercle ouvert, sortir un disque de son coffret et le mettre en
place avec attention dans le compartiment, avec l’étiquette vers le haut. Les
disques de 3" doivent être placés au centre sur l’axe du compartiment.
ECOUTE DU DISQUE
1. Soulever le couvercle dans le coin à droite du compartiment du disque et in-
sérer un CD.
2. Appuyer sur la Touche de Lecture / Pause (18). La lecture du disque com-
mence à partir du début de la première piste du disque.
3. A la fin du disque, l'appareil se met sur le mode d'Arrêt.
4. Appuyer sur la Touche d'Arrêt (19). La lecture du disque s'arrête et le nom-
bre total des pistes du CD apparaît sur la fenêtre d'affichage.
5. Pour arrêter momentanément la lecture du disque (mode attente), appuyer
sur la Touche de Lecture / Attente (18). La lecture s'arrête à la position de
lecture en cours.
6. Pour reprendre la lecture, appuyer à nouveau sur la même Touche.
Remarques: Il est possible que le lecteur ne démarre pas si le disque est
très rayé ou trop sale. Si on utilise un disque qui n'est pas bien en axe, il est
possible d'entendre du bruit dans le mécanisme. Eviter l'utilisation de tels disques.
Commencer la lecture du disque par une piste particulière
1. Appuyer sur les Touches de Saut des Pistes en Avant ou en Arrière pour
sélectionner la piste souhaitée. Le numéro de la piste sélectionnée est montrée sur l’afficheur CD.
2. Appuyer sur la Touche de Lecture / Attente (18) pour commencer la lecture.
Pour sauter à la piste suivante
1. Pour sauter au début de la piste suivante.
2. Appuyer une fois sur la Touche de Saut en Avant (17) pour sauter au début
de la piste suivante.
3. Appuyer en continu sur la Touche de Saut en Avant jusqu’à ce que l’on at-
teigne la piste souhaitée. Une fois que le début de la dernière piste est atteint, le lecteur CD n’avance plus.
Pour sauter à la piste précédente
1. Pour sauter en arrière au début de la piste en cours de lecture. Appuyer une
fois sur la Touche de Saut en Arrière (16).
2. Pour sauter en arrière au début de la piste précédente. Appuyer deux fois
sur la Touche de Saut en Arrière (16). Appuyer en continu sur la Touche de
Saut en Arrière (16) et le lecteur CD saute en arrière, piste par piste, à travers le disque. Une fois que le début de la première piste est atteint, le lec-
Page 16

11 Français
teur CD ne saute plus en arrière.
Recherche manuelle
Si pendant la lecture les touches de Saute / Recherche en avant ou en arrière
sont appuyées, le lecteur explorera la piste en cours de lecture. A la fin d’une
piste le lecteur saute à la piste suivante et l’exploration continue. Au début d’une piste le lecteur saute à la piste précédente et après continue l’exploration.
Quand le lecteur arrive à la fin de la dernière piste ou au début de la première,
l’exploration s’arrête.
PROGRAMMATION DES SEQUENCES DU DISQUE
Il n’est pas possible de faire une programmation si le lecteur est en marche.
Avant tout il faut appuyer sur la touche d’Arrêt (19) et suivre alors les instruc-
tions indiquées ci-dessous:
1. Appuyer sur la touche de PROGRAM (3). L’indicateur de “01” clignote sur
l’afficheuret l’indicateur de PROGRAMME (12) s’allume.
2. Appuyer sur les touches de Saut en Avant et Saut en arrière (16/17) pour
sélectionner la piste que l’on veut mémoriser à la position “1”.
3. Appuyer sur la touche de PROGRAM (3). La première sélection program-
mée est alors rangée dans la mémoire de programmation.
4. Sélectionner la piste suivante que l’on veut programmer en utilisant les tou-
che de Saut en Avant et en Arrière (16/17).
5. Appuyer sur la touche de PROGRAM (3) pour mettre en mémoire cette pi-
ste.
6. Continuer à mémoriser les pistes de cette manière jusqu’à ce que toutes les
pistes souhaitées aient été mémorisées (la limite est de 20pistes).
7. Quand l’on appuie sur la touche de PROGRAM (3) pour mémoriser la 20è-
me piste, l’afficheur revient à la 1ère position de programmation. Appuyer
sur la touche de PROGRAM (3) pour avancer à travers les positions de programmation.
ECOUTE DES PISTES PROGRAMMEES
Appuyer sur la Touche de Lecture/Attente (18). La lecture du disque commence
au début de la première piste programmée.
EFFACEMENT DE LA MEMOIRE DE PROGRAMMATION
Pendant la lecture, appuyer sur la touche d’Arrêt (12) pour arrêter le disque.
Sélectionner MW ou FM pour effacer la Programmation.
LECTURE REPETEE
Pendant la lecture, appuyez plusieurs fois Touche de REPETITION (14) pour
sélectionner:
Repeat1: La piste en cours est lu en boucle.
RepeatAll: Toutes les pistes seront lues en continu.
Mode Normal: Les pistes seront lues dans un ordre classique.
Page 17

12 Français
FONCTION AUX IN
Cette unité est équipée d'un 3,5 mm entrée AUX permet de connecter des périphériques audio externes et écouter de la musique à travers les haut-parleurs
de cet appareil.
1. Utilisez un câble audio avec les fiches de 3,5 mm sur les deux extrémités du
câble.
2. Branchez une extrémité dans la sortie audio de l'appareil externe et l'autre
extrémité à l'entrée AUX de cet appareil.
3. Mettez cet appareil et le périphérique externe.
4. A commencé à jouer de la musique à partir du périphérique externe (voir le
mode d'emploi de l'appareil).
CARACTERISTIQUES TECHNIQUES
Alimentation Electrique CA: 230V ~ 50Hz
FM: 88 - 108 MHz
MW: 540 - 1600 MHz
ATTENTION
Le symbole “point d’exclamation” à l’intérieur d’un triangle avertit l’utilisateur que d’importantes instructions d’utilisation et de maintenance sont contenues dans le mode d’emploi.
Le symbole “éclair” à l’intérieur d’un triangle sert à avertir l’utilisateur de la présence du courant à l’intérieur du l’appareil qui pourrait constituer un risque.
Afin de minimiser les risques, ne pas ouvrir le boîtier ni ôter le dos de l’appareil. En case de panne,
faites appel aux techniciens qualifiés pour les réparations. L’appareil ne renferme aucune pièce reparable par l’utilisateur.
Cet appareil a été conçu pour une tension d’alimentation de 230V ~ 50Hz. Débranchez la prise de courant quand on prévoit de ne pas utiliser l’appareil pendant un certain temps.
Mettez l’appareil sous tension seulement après avoir vérifié que tous les raccordements soient corrects.
L’unité ne doit pas être exposée à l’humidité ou à la pluie.
L’appareil doit être gardé dans un endroit suffisamment ventilé. Ne le gardez jamais par exemple près
des rideaux, sur un tapis ou dans des meubles, tels qu’une bibliothèque.
L’unité ne doit pas être exposée à la lumière directe du soleil ou à des sources de chaleur.
COMMENT ÉLIMINER CE PRODUIT
(déchets d'équipements électriques et électroniques)
Ce symbole sur le produit ou sa documentation indique qu'il ne doit pas être éliminé en fin de vie avec
les autres déchets ménagers. L' élimination incontrôlée des déchetspouvant porter préjudice a l'environnement ou a la santé humaine, veuillez le séparer des autres types de déchets et le recycler defaçon
responsable. Vous favoriserez ainsi la réutilisation durable desressources matérielles. Les particuliers
sont invites a contacter le distributeur leur ayant vendu le produit ou a se renseigner auprès de leur mairie pour savoir ou et comment ils peuvent se débarrasser de ce produit afin qu'il soit recycle en respectant l'environnement. Les entreprises sont invitées a contacter leurs fournisseurs et aconsulter les conditions de leur contrat de vente. Ce produit ne doit pas être éliminé avec les autres déchets commerciaux.
Page 18

13 Italiano
LOCALIZZAZIONE DEI CONTROLLI
1. INDICATORE FM STEREO
2. CONTROLLO VOLUME
3. COMPARTIMENTO CD/MP3
4. ALTOPARLANTE
5. MANOPOLA SINTONIA
6. SCALA SINTONIA RADIO (MW/FM)
7. SCALA SINTONIA FM
8. SELETTORE FUNZIONE (MW/FM/CD-MP3)
9. SCALA SINTONIA AM
10. MECCANISMO ALLOGGIAMENTO CD
11. LED INDICATORE CD/MP3
12. INDICATORE DI PROGRAMMA
13. TASTO ARRESTO LETTURA CD/MP3
14. TASTO REPEAT (RIPETIZIONE)
15. TASTO PROGRAMMA
16. TASTO SALTO BRANO AVANTI CD/MP3
17. TASTO SALTO BRANO INDIETRO CD/MP3
18. TASTO LETTURA/PAUSA CD/MP3
19. TASTO STOP
20. ANTENNA FM
21. CAVO ALIMENTAZIONE AC
22. INGRESSO AUX-IN
23. TASTO ACCENSIONE / SPEGNIMENTO
24. TASTO AVANZAMENTO TRACCE -10
25. TASTO AVANZAMENTO TRACCE +10
UTILIZZO DELLA RADIO
1. Premere il tasto 1 secondo per accendere l’ apparecchio.
2. Selezionare la banda di frequenza desiderata con il Selettore Funzione/
Banda (8).
3. Sintonizzare la stazione radio desiderata girando il controllo Sintonia
(5).
4. Regolare il controllo Volume al livello desiderato.
5. Per spegnere la radio, premere il tasto POWER 3 secondi.
Antenna
Per una ricezione in FM si trova incorporata un’antenna a filo sul retro
dell’apparecchio.
Estendere l’antenna fino a raggiungere la migliore ricezione.
Per una ricezione in MW i segnali verranno raccolti attraverso l’antenna
Page 19

14 Italiano
in ferrite incorporata.
Dovrà orientare l’apparecchio fino a raggiungere la migliore ricezione.
UTILIZZO CD
1. Regolare il Selettore Funzione (8) sulla posizione CD/MP3.
2. Aprire il compartimento CD (3).
3. Quando il compartimento sarà aperto, rimuovere un disco dalla custo-
dia e posizionarlo accuratamente nel compartimento con il lato dell’etichetta rivolto verso l’alto. Posizionare il CD sul perno centrale del compartimento.
LETTURA DEL DISCO
1. Aprire il compartimento CD (3) per aprirlo e inserire un CD. Richiudere il
compartimento CD.
2. Premere il tasto Lettura/Pausa (18). La lettura del disco inizierà dal pri-
mo brano del disco.
3. Alla fine del disco, l'apparecchio attiverà la modalità d'arresto.
4. Premere il tasto Arresto (19). La lettura del disco si fermerà e il display
mostrerà il numero totale dei brani del CD.
5. Per fermare temporaneamente la lettura del disco, (modalità pausa),
premere il tasto Lettura/Pausa (18). La lettura del disco si fermerà sulla
posizione di lettura corrente.
6. Per riprendere la lettura del disco, premere il tasto Lettura/Pausa nuo-
vamente.
Note: Se il disco è molto graffiato o molto sporco, la lettura del disco
potrebbe non iniziare. Se si sta leggendo un disco che è stato caricato in
modo improprio, si potrebbero ascoltare rumori nel meccanismo. L'utilizzo
di dischi come questi dovrebbe essere evitato.
Iniziare la lettura del disco dall’inizio di un brano particolare
Premere i Tasti Salto Brano Avanti o Indietro (16/17) per selezionare il brano desiderato. Il numero del brano selezionato apparirà sul display CD.
Premere il Tasto Lettura/ Pausa (18) per iniziare la lettura.
Salto in avanti per andare al prossimo brano
1. Per andare all’inizio del brano successivo.
2. Premere il Tasto Salto Brano Avanti (17) una volta per andare all’inizio
del brano successivo. Premere in continuazione il Tasto Salto Brano
Avanti fino a quando il brano desiderato venga raggiunto. Una volta che
l’inizio dell’ultimo brano viene raggiunto il lettore CD non avanzerà ulteriormente.
Page 20

15 Italiano
Ricerca manuale
Durante la lettura, mantenendo premuti i tasti Salto Avanti o Salto Indietro
causerà che il lettore CD scandisca il brano corrente. Alla fine di un brano il
lettore CD andrà al brano successivo e continuerà la scansione. All’inizio di
un brano il lettore andrà al brano precedente e continuerà la scansione.
Quando il lettore CD raggiungerà la fine dell’ultimo brano, o l’inizio del primo brano, si fermerà la scansione.
PROGRAMMAZIONE LETTURA DISCO
Non è possibile memorizzare programmi durante la lettura del disco. Per
primo, premere il Tasto Arresto (19), dunque seguire le istruzione che se-
guono:
1. Premere il Tasto PROGRAM (3) . Lampeggerà “01” sul display e l’indi-
catore di Programma si accenderà (12).
2. Premere i Tasto Salto Brano Avanti o Indietro (11) per selezionare il bra-
no da essere memorizzato nella posizione 1.
3. Premere il Tasto PROGRAM (3). La prima selezione del programma ora
sarà memorizzata nella memoria 1 del programma e lampeggerà “01”
sul display si accende l’indicatore PROGRAM (12).
4. Selezionare il prossimo brano da essere programmato usando i Tasti
Salto Brano Avanti o Indietro (16/17).
5. Premere il Tasto PROGRAM (3) per memorizzare questo brano.
6. Continuare a memorizzare brani in questo modo fino a quando tutti i
brani desiderati vengano memorizzati (fino a un limite di 20). Quando il
Tasto PROGRAM (3) viene premuto per memorizzare il brano 20, il display ritornerà alla prima posizione del programma. Premere il Tasto
PROGRAM (3) per muoversi attraverso le posizioni del programma.
Ascolto Brani Programmati
Premere il tasto Lettura/Pausa (18), La lettura del disco inizierà dall’inizio
del primo brano programmato.
Per Cancellare il Programma Memorizzato
Se il disco è in lettura, premere il tasto Arresto (19) per fermare il disco.
Selezionare la funzione MW o FM per cancellare il Programma.
LETTURA RIPETUTA DISCO
Durante la riproduzione, premere ripetutamente il TASTO RIPETIZIONE
(14) per selezionare:
Repeat1: La traccia corrente sarà riprodotta continuamente.
RepeatAll: Tutte le tracce saranno riprodotte continuamente.
Normal mode: Le tracce saranno riprodotte in ordine classico.
Page 21

16 Italiano
FUNZIONE AUX IN
Questa unità è dotata di un ingresso AUX da 3,5 mm che consente di connettere dispositivi audio esterni e riprodurre la musica tramite le casse di
questa unità.
Utilizzare un cavo audio con degli spinotti da 3,5 mm su entrambi gli
estremi del cavo.
Connettere un'estremità nell'uscita audio del dispositivo esterno e l'altra
estremità nell'ingresso AUX di questa unità.
Accendere questa unità e il dispositivo esterno.
Iniziare a riprodurre musica dal dispositivo esterno (vedi manuale d'uso
del dispositivo).
SPECIFICHE TECNICHE
AC: 230V ~ 50 Hz
FM: 88 - 108 MHz
MW: 540 - 1600 kHz
ATTENZIONE
Il punto esclamativo all’interno di un triangolo avverte l’utente che il libretto d’istruzioni contiene delle importanti istruzioni per l’uso e la manutenzione.
Il simbolo del fulmine all’interno di un triangolo avverte l’utente della presenza di una pericolosa
tensione all’interno dell’apparecchio.
Per ridurre i rischi di scosse elettriche, non aprire l’apparecchio. L’apparecchio non contiene parti
riparabili dall’utente. In caso di guasto fare appello a tecnici qualificati per le riparazioni.
Questo apparecchio è stato progettato per funzionare a 230V ~ 50Hz. Se non si intende utilizzare
l’apparecchio per un lungo periodo di tempo, rimuovere la spina dalla presa di corrente.
Utilizzare l’apparecchio solo dopo aver verificato che tutte le connessioni siano state eseguite correttamente.
Non esporre l’apparecchio alla pioggia o all’umidità.
Posizionare l’apparecchio in un luogo sufficientemente ventilato. Evitare di sistemarlo vicino a tende, sul tappeto o all’interno di un mobile quale, ad esempio, una libreria.
Non esporre l’apparecchio alla luce diretta del sole o a fonti di calore.
CORRETTO SMALTIMENTO DEL PRODOTTO
(rifiuti elettrici ed elettronici)
II marchio riportato sul prodotto e sulla sua documentazione indica che il prodotto non deve essere smaltito can altri rifiuti domestici al termine del ciclo di vita. Per evitare eventuali danni all'ambiente o alla salute causati dall'inopportuno smaltimento dei rifiuti, si invita l'utente a separare questo prodotto da altri tipi
di rifiuti e di riciclarlo in maniera responsabile per favorire il riutilizzo sostenibile delle risorse materiali. Gli
utenti domestici sono invitati a contattare il rivenditore presso il quale e stato acquistato il prodotto a l'ufficio locale preposto per tutte le informazioni relative alla raccolta differenziata e al riciclaggio per questo
tipo di prodotto. Gli utenti aziendali sono invitati a contattare il proprio fornitore e verificare i termini e le
condizioni del contratto di acquisto. Questo prodotto non deve essere smaltito unitamente ad altri rifiuti
commerciali.
Page 22

17 Español
LOCALIZACIÓN DE LOS CONTROLES
1. INDICADOR FM STEREO
2. CONTROL VOLUMEN
3. COMPARTIMENTO CD
4. ALTAVOZ
5. MANDO SINTONIZACIÓN
6. PANTALLA FRECUENCIA RADIO (MW/FM)
7. ESCALA SINTONÍA RADIO FM
8. SELECTOR FUNCIÓN (MW/FM/CD)
9. ESCALA SINTONÍA RADIO AM
10. MECANISMO RESPALDO CD
11. BOTÓN SKIP UP/DOWN CD
12. INDICADOR PROGRAM
13. BOTÓN PARADA CD
14. BOTÓN REPEAT (REPETICIÓN)
15. BOTÓN PROGRAM
16. BOTÓN SALTO MELODÍA HACIA ATRÁS CD
17. BOTÓN SALTO MELODÍA HACIA ADELANTE CD
18. BOTÓN LECTURA/PAUSA CD
19. DISPLAY LED
20. ANTENA FM
21. CABLE DE ALIMENTACIÓN
22. AUX-IN
23. SELECTOR ON / OFF
24. SALTO CANCIONES -10
25. SALTO CANCIONES +10
USO DE LA RADIO
1. Para apagar la radio, pulse el botón de encendido durante 1 segundo.
2. Seleccionar la banda de frecuencia deseada con el Selector Foncion/Banda
(3).
3. Sintonizar la estación radio deseada girando el control Sintonización (8).
4. Regular el control Volumen al nivel deseado.
5. Para apagar la radio, pulse el botón POWER a 3 segundos
Antena
Para la recepción FM, se encuentra incorporada en la parte posterior del aparato
el hilo de la antena FM.
Para una recepción en OM las señales serán recogidos a través de la antena de
barra de ferrita incorporada. Tendrá que orientar el aparato hasta alcanzar la mejor recepción.
USO CD/MP3
1. Colocar el Selector Función (8) en la posición CD.
2. Abrir el compartimento CD (3)
Page 23

18 Español
3. Cuando el compartimento estará abierto, extraer un disco del estuche y colo-
carlo cuidadosamente en el compartimento con el lado de la etiqueta dirigido
hacia arriba. Colocar los discos de 3” sobre el eje central del compartimento.
LECTURA DEL DISCO
1. Abrir el compartimento CD/MP3 e introducir un disco. Volver a cerrar el com-
partimento CD/MP3.
2. Pulsar el botón Lectura/Pausa (18). La lectura del disco iniciará desde la pri-
mera melodía del disco. Una melodía podrá ser seleccionada usando uno de
los botones Salto CD ( 9 & 10).
3. Si esta operación se efectúa antes de pulsar el botón Lectura/Pausa, la lectura
del disco iniciará desde la melodía seleccionada cuando se pulsará el botón
Lectura/Pausa. Al final del disco, el aparato activará la modalidad de parada.
4. Pulsar el botón Parada (19). La lectura del disco se detendrá y la pantalla mo-
strará el número total de las melodías del disco.
5. Para detener temporalmente la lectura del disco, (modalidad pausa), pulsar el
botón Lectura/Pausa (18). La lectura del disco se detendrá en la posición de
lectura corriente.
6. Para reanudar la lectura del disco, pulsar el botón Lectura/Pausa nuevamente.
Notas: Si el disco está muy rayado o muy sucio, la lectura del disco podría
no iniciar. Si se está leyendo un disco que ha sido cargado incorrectamente, se
podrían escuchar ruidos en el mecanismo. El uso de estos tipos de discos tiene
que ser evitado.
Inicio de la lectura del disco desde el inicio de una melodía particular
Pulsar los Botones Salto Melodía Hacia Adelante o Hacia Atrás (16/17) para seleccionar la melodía deseada. El número de la melodía seleccionada aparecerá sobre la pantalla del CD. Pulsar el Botón Lectura/Pausa (18) para iniciar la lectura.
Salto a la próxima melodía
1. Para ir al inicio de la melodía sucesiva.
2. Pulsar el Botón Salto Melodía Hacia Adelante (17) una vez para ir al inicio de la
melodía sucesiva. Pulsar continuamente el Botón Salto Melodía Hacia Adelante hasta cuando la melodía deseada haya sido localizada. Una vez que se alcance el inicio de la última melodía el lector CD no avanzará ulteriormente.
Salto hacia atrás para ir a la melodía precedente de un disco
1. Para regresar al inicio de la melodía en lectura. Pulsar el botón Salto Hacia
Atrás (16) una vez.
2. Para saltar hacia atrás e ir al inicio de la melodía precedente. Pulsar el botón
Salto Hacia Atrás (16) dos veces. Pulsando el botón Salto Hacia Atrás hará
que el lector CD salte hacia atrás melodía por melodía todo el disco. Una vez
que se alcance el inicio de la primera melodía, el lector CD no saltará hacia
atrás ulteriormente.
Búsqueda manual
1. Durante la lectura, pulsado los Botones Búsqueda Hacia Adelante o Búsqueda
Page 24

19 Español
Hacia
2. Atrás causará que el lector CD lea brevemente la melodía en lectura. Al final
de una melodía el lector irá a la próxima melodía y continuará la lectura breve.
Al inicio de una melodía el lector irá a la melodía anterior y continuará la lectura breve.
3. Cuando el lector alcanzará el final de la última melodía, o el inicio de la primera
melodía, este detendrá la lectura breve.
PROGRAMACION LECTURA CD/MP3
No es posible memorizar programas durante la lectura del disco. Antes de todo,
pulsar el Botón Parada (19), luego seguir las instrucciones que siguen:
1. Pulsar el Botón PROGRAM (3) . El indicador de Programa relampagueará.
2. Pulsar el Botón Salto Melodía Hacia Adelante o Hacia Atrás (16/17) para selec-
cionar la melodía por programar en la posición 1.
3. Pulsar el Botón PROGRAM (3). La primera selección del programa ahora esta-
rá memorizada en la memoria 1 del programa. “Pr” relampagueará y el indicador de PROGRAMA (12) se iluminará.
4. Seleccionar la próxima melodía por programar usando los Botones Salto Me-
lodía Hacia Adelante o Hacia Atrás (16/17).
5. Pulsar el Botón PROGRAM (3) para memorizar esta melodía.
6. Continuar la memorización de melodías en este modo hasta cuando todas la
melodías deseadas se memoricen (hasta un límite de 20). Cuando el Botón
PROGRAM (3) se pulsa para memorizar la melodía 20, la pantalla regresará a
la primera posición del programa.
7. Pulsar el Botón PROGRAM (3) para moverse a través de las posiciones del
programa.
Audición Melodías Programadas
Pulsar el botón Lectura/Pausa (18). La lectura del disco iniciará desde el inicio de
la primera melodía programada.
Para Borrar el Programa Memorizado
Si el disco está en lectura, pulsar el botón Parada (19) para detener el disco. Selecionar MW o FM para borrar el programa.
LECTURA REPETIDA DEL DISCO
Durante la reproducción, pulse el botón de repetición (14) para seleccionar:
REPEAT1: La pista actual se reproducirá repetidamente.
RepeatAll: Todas las pistas se reproducirá continuamente.
Modo normal: Las pistas se reproducirán en un orden clásico.
ENTRADA AUX
Esta unidad está equipada con un 3,5 mm de entrada AUX permite conectar dispositivos externos de audio y reproducir música a través de los altavoces de esta
unidad.
Page 25

20 Español
1. Utilice un cable de audio con los conectores de 3,5 mm en ambos extremos del
cable.
2. Conecte un extremo a la salida de audio del dispositivo externo y el otro extre-
mo a la toma AUX de esta unidad.
3. Encienda esta unidad y el dispositivo externo.
4. Iniciado la reproducción de música desde el dispositivo externo (consulte el
manual del usuario del dispositivo).
ESPECIFICACIONES TÉCNICAS
CA: 230V ~ 50 Hz
FM: 88 - 108 MHz
OM: 540 - 1600 kHz
Nota: Especificaciones y diseño sujetos a posibles modificaciones sin pre-
vio aviso.
ATTENTIÓN
El símbolo de exclamación dentro un triángulo tiene el objeto de advertir al usuario de la presencia de
instrucciones importantes de funcionamiento y mantenimiento en la documentación adjunta con el
equipo.
El símbolo del rayo con punta de flecha dentro de un triángulo adverte al usuario de la presencia de
tensiones peligrosas en el equipo.
Para reducir los riesgos de descargas eléctricas, no retire la cubierta. La unidad no hay en su enterior
componentes que pueda manipular el usuario. Encargue su reparación a personal cualificado.
Esta unidad funciona con 230V ~ 50Hz. Cuando el equipo vaya a estar un tiempo prolongado sin utilizarse, desenchufar el cable de alimentación.
No conecte la unidad hasta que no se hayan efectuado todas las otras conexiones.
La unidad no debería ser expuesta a lluvia o humedad.
La unidad se debe instalar de forma que su posición no le impida tener ventilación adecuada. Por
ejemplo, el equipo no se debe colocar cerca de cortinas o sobre el tapete, ni en una instalación como
puede ser un armario.
La unidad no debería ser expuesta a la luz solar directa ni a fuentes emisora de calor.
ELIMINACIÓN CORRECTA DE ESTE PRODUCTO
(material electrico y electrónico de descarte)
La presencia de esta marca en el producto o en el materiál informativo que lo acompaña, indica que al
finalizar su vida útil no deberá eliminarse junto con otros residuos domésticos. Para evitar los posi bl es
daños al medi o ambi ente o a l a sal ud humane que representa la eliminación incontrolada de residuos,
separe este producto de otros tipos de residuos y reciclelo correctamente para promover la reutilización
sostenible de recursos materiales. Los usuarios particulares pueden contactar con el establecimiento
donde adqui ri eron el producto, o con l as autori dades l ocal es pertinentes, para informarse sobre
cómo y dónde pueden lIevario para que sea sometido a un reciclaje ecológico y seguro. Los usuarios
comerciales pueden contactar con su proveedor y consultar las condiciones del contrato de compra.
Este produco no debe eliminarse mezclado con otros residuos comerciales.
Page 26

21 Português
LOCALIZAÇÃO DOS CONTROLES
1. INDICADOR FM STEREO
2. CONTROLO DO VOLUME
3. COMPARTIMENTO CD
4. ALTIFALANTE
5. MANDO SINTONIA
6. VISOR FREQUENCIA RADIO (MW/FM)
7. SELECTOR ON/OFF
8. SELECTOR FUNÇÃO (MW/FM/CD)
9. SALTO DE BRANO -10
10. MECANISMO DE CD/MP3
11. TECLA SKIP UP / DOWN CD
12. INDICADOR PROGRAM
13. TECLA PARAR CD
14. TECLA REPEAT
15. TECLA PROGRAM
16. TECLA CD AVANÇO
17. TECLA CD RETROCESSO
18. TECLA TOCAR/PAUSA CD
19. VISOR LED
20. ANTENA FM
21. CABO DE CORRENTE ALTERNADA
22. AUX-IN
23. SELECTOR ON / OFF
24. SALTO CANCIONES -10
25. SALTO CANCIONES +10
OUVINDO O RÁDIO
1. Selecione a onda desejada com o seletor Função (8).
2. Sintonize a estação desejada com o controle de sintonia (5).
3. Ajuste o volume em sua intensidade desejada.
4. Para desligar o rádio, pressione o botão POWER para 3s egundos.
Antena
Para recepção em FM, existe uma antena telescópica na parte posterior
da unidade.
Para recepção de ondas médias, os sinais são captados através de uma
antena interna de ferrite. Poderá ser necessário mover a unidade para se
obter a melhor sintonia.
Page 27

22 Português
TOCAR COMPACT DISCS
1. Posicione o seletor de função (8) na posição CD.
2. Abra o compartimento CD (3).
3. Quando o compartimento é aberto, removê-lo do estojo e posicioná-lo
delicadamente com a etiqueta voltada para cima.
LECTURA DEL DISCO
1. Abra o compartimento CD (3) e introducir un disco.
2. Volver a cerrar el compartimento CD.
3. Pressionar a tecla Play/Pausa (18), e o disco começará a tocar, do pri-
meiro trecho em diante.
4. No final da escuta, o disco entra na modalidade stop.
5. Teclar Stop (19). O disco se interrompe e no display aparecerá o núme-
ro total de trechos.
6. Para interrompê-lo temporariamente, pressionar Play/Pausa (18).
7. O disco se interrompe na mesma posição.
Notas: se o cd está muito arranhado, ou muito sujo, o disco não irá
tocar. Se um disco impróprio é inserido, poderá causar rumores ao mecanismo. O uso destes discos podem ser evitados.
Iniciando o disco com um trecho particular
Teclar Avanço (17) ou Retrocesso (16), para selecionar o trecho desejado.
O número de trechos selecionados, aparecerão no display. Teclar Play/
Pausa (18) para iniciar a música.
PARA AVANÇAR AO TRECHO SUCESSIVO
1. Para saltar para o início do trecho seguinte.
2. Teclar Avanço (17) uma vez, para ir para o início do trecho seguinte.
Pressionando continuamente , até encontrar o trecho desejado. O apa-
relho CD começará a tocar do início da música selecionada. Se o trecho anterior é o escolhido, o aparelho não irá avançar mais.
PARA RETORNAR AO TRECHO ANTERIOR DO DISCO
1. Para retornar ao início do trecho corrente, teclar Salto Retrocesso (16)
uma vez.
2. Para retornar ao início do trecho anterior, teclar Salto Retrocesso (16)
duas vezes. A continuação desta tecla, faz com que o CD toque música
por música. Uma vez o trecho desejado, é encontrado, o aparelho não
retorna a outros trechos.
Page 28

23 Português
PROGRAMAÇÃO PARA TOCAR DISCOS
Não é possível guardar programações na memória enquanto estiver a tocar um disco. Prima em primeiro lugar a tecla para Parar (19), em seguida
realize as seguintes operações:
1. Prima a tecla Programa (3). A indicação “01” piscará no Visor LED e o
indicador PROGRAM se iluminará.
2. Prima a tecla Salto Faixa à frente ou atrás (16/17) para seleccionar a
faixa a ser guardada na posição 1 da memória.
3. Prima a tecla Programa (3). A primeira selecção do programa será
então guardada na memória do programa.
4. Seleccione a próxima faixa a ser programada mediante as Teclas Salto
Faixa à frente ou atrás (16/17).
5. Prima a tecla Programa (3) para guardar esta faixa na memória.
6. Continue a memorizar faixas desta maneira até ter guardado todas as
faixas desejadas na memória (até 20 no máximo).
7. Prima a tecla Programa (3) para percorrer as posições do programa.
8. Se desejar acrescentar uma faixa ao programa, prima a tecla Programa
(3) até a última faixa programada ser apresentada no visor. Prima a te-
cla Programa (3) novamente. Prima em seguida as teclas Salto Faixa à
frente ou atrás (16/17) até a faixa desejada ser mostrada no visor, prima então a tecla Programa (3). A faixa acrescentada será guardada na
memória como a última faixa do programa.
Observações: Se a tecla Tocar/Pausa (18) for premida antes da tecla
Programa (3) para guardar uma faixa na memória, esta faixa não será programada e o disco começará a tocar a partir da primeira faixa seleccionada. É possível seleccionar para tocar mais de uma vez qualquer faixa.
Ouvir Faixas Programadas
Prima a tecla Tocar/Pausa (18), o disco começará a tocar o começo da primeira faixa programada.
Para Cancelar o Programa Memorizado
Se o disco estiver a tocar, prima a tecla Parar (13) para o disco parar. Pri-
ma a tecla Função e seleccionar MW o FM para cancelar o Programa.
TOCAR REPETIDAMENTE CD
Durante a reprodução, pressione o botão de soneca (14) para selecionar:
REPEAT1: A faixa atual é reproduzida repetidamente.
RepeatAll: Todas as faixas são reproduzidas repetidamente.
Modo Normal: As faixas são reproduzidas em uma ordem clássica.
Page 29

24 Português
ENTRADA AUX IN (22)
Esta unidade está equipada com um 3,5 milímetros de entrada AUX permite conectar dispositivos externos de áudio e reproduzir música através dos
altifalantes desta unidade.
1. Use um cabo de áudio com 3,5 milímetros conectores em ambas as ex-
tremidades do cabo.
2. Conecte uma extremidade à saída de áudio do dispositivo externo e a
outra extremidade à tomada AUX nesta unidade.
3. Ligue esta unidade e o dispositivo externo.
4. Começou a tocar música a partir do dispositivo externo (consulte o ma-
nual do usuário do dispositivo).
ESPECIFICAÇÕES
AC: 230V ~ 50 Hz
FM: 88 - 108MHz
MW: 540 - 1600kHz
ATENÇÃO
O ponto de exclamação dentro de um triângulo avisa o utilizador que no livrete de instruções há importantes informações para a utilização e a manutenção.
O símbolo com o raio dentro de um triângulo avisa o utilizador que há tensão perigosa no
interior do aparelho.
Para reduzir o risco de choque eléctrico, não abra o aparelho. O aparelho não contém
peças que podem ser reparadas pelo utilizador. Em caso de defeitos, para a reparação,
contacte um técnico qualificado.
Este aparelho foi projectado para funcionar com 230 V. ~ 50 Hz. Se o aparelho não for
utilizado durante muito tempo, tire a ficha eléctrica da tomada de corrente.
Não exponha o aparelho à chuva nem à humidade.
Coloque o aparelho num local suficientemente ventilado. Evite colocá-lo perto de cortinas,
em cima de alcatifas ou dentro de quaisquer móveis como por exemplo uma estante.
Não exponha o aparelho directamente à luz do sol nem a fontes de calor.
ELIMINAÇAO CORRECTA DESTE PRODUTO
(Resíduo de Equipamentas Eléctricos e Electrónicos)
Esta marca, apresentada no produto ou na sua literatura indica que ele não deverá ser eliminado juntamente com os residuos domésticos indiferenciados no final do seu periodo de vida útil. Para impedir danos ao
ambiente e á saúde humana causados pela eliminação incontrolada de resíduos deverá separar este equipamento de outros tipos de residuos e reciclá-lo de forma responsável, para promover uma reutilização sustentável dos recursos materiais. Os utilizadores domesticos deverão contactar ou o estabelecimento onde
adquiriram este produto ou as entidades oficiais locais para obterem informaçães sobre onde e de que forma podem levar este produto para permitir efectuar uma reciclagem segura em termos ambientais. Os utilizadores profissionais deverão contactar o seu fornecedor e consultar os termos e condições do contrato de
compra. Este produto não devera ser misturado com outros residuos comerciais para eliminação.
Page 30

25 Nederlands
PLAATS VAN BESTURINGSELEMENTEN
1. INDICATOR FM STEREO
2. VOLUME-REGELAAR
3. CD/MP3 COMPARTIMENT
4. LUIDSPREKER
5. TUNING-KNOP
6. TUNING RADIO (MW/FM)
7. TUNING FM
8. FUNCTIE-KEUZESCHAKELAAR (MW/FM/CD-MP3)
9. TUNING AM
10. CD-DOCKINGMECHANISME
11. LED-INDICATOR CD/MP3
12. PROGRAMMA-INDICATOR
13. STOP-KNOP AFSPELEN CD/M P3
14. REPEAT-KNOP (HERHALEN)
15. PROGRAMMA-KNOP
16. TRACK OVERSLAAN/VOORUITSPOELEN-KNOP CD/MP3
17. TRACK OVERSLAAN/ACHTERUITSPOELEN-KNOP CD/MP3
18. AFSPELEN/PAUZE-KNOP CD/MP3
19. STOP-KNOP
20. FM-ANTENNE
21. AC-VOEDINGSKABEL
22. INGANG AUX-IN
23. AAN/UIT-KNOP
24. VOLGENDE TRACK-KNOP -10
25. VOLGENDE TRACK-KNOP +10
OVER DE RADIO
1. Druk de knop 1 seconde in om het apparaat in te schakelen.
2. Selecteer de gewenste bandbreedte met de Functie/Bandbreedte-
keuzeschakelaar (8).
3. Stem af op het gewenste station door aan de Tuning-regelaar (5) te draaien.
4. Stem het Volume af op het gewenste niveau.
5. Houd de POWER-knop 3 seconden ingedrukt om de radio uit te schakelen.
Antenne
Er bevindt zich een ingebouwde draadantenne aan de achterzijde van het appa-
raat voor de FM-ontvangst. Schuif de antenne uit totdat u de beste ontvangst bereikt.
Voor de MW-ontvangst zullen de signalen worden opgevangen met behulp van
de ingebouwde ferrietantenne. Richt het apparaat totdat u de beste ontvangst
bereikt.
Page 31

26 Nederlands
CD’S GEBRUIKEN
1. Stel de Functie-keuzeschakelaar (8) af op CD/MP3.
2. Open het CD-compartiment (3).
3. Verwijder, als het compartiment open is, een cd uit de cd-hoes en plaats deze
nauwkeurig met de labelkant naar boven in het compartiment. Plaats de CD op
de centrale pin van het compartiment.
AFSPELEN VAN DE CD
1. Open het CD-compartiment (3) en plaats een CD. Sluit het CD-compartiment.
2. Druk op de Afspelen/Pauze-knop (18). Het afspelen van de cd begint bij het
eerste nummer van de cd.
3. Aan het einde van de cd activeert het apparaat de stop-modus.
4. Druk op de Stop-knop (19). Het afspelen van de CD stopt en de display geeft
het totaal aantal tracks van de CD weer.
5. Druk op de Afspelen/Pauze-knop (18) om het afspelen tijdelijk te stoppen
(pauze-stand). Het afspelen van de CD stopt op de huidige afspeelpositie.
6. Druk opnieuw op de Afspelen/Pauze-knop om het afspelen van de CD te her-
vatten.
Opmerking: Als de cd erg gekrast of vuil is, kan het afspelen mogelijk niet
beginnen. Als er een niet correct geladen cd wordt afgespeeld, kan er lawaai in het
mechanisme worden gehoord. Het gebruik van dergelijke cd’s moet worden vermeden.
Afspelen van de CD beginnen bij een specifiek nummer
1. Druk op de Track Overslaan/Vooruitspoelen- of Achteruitspoelen-knop (16/17)
om de gewenste track te sele cteren.
2. Het nummer van de geselecteerde track verschijnt op de CD-display. Druk op
de Afspelen/Pauze-knop (18) om het afspelen te starten.
Vooruit overslaan om naar de volgende track te gaan
1. Om naar het begin van de volgende track te gaan.
2. Druk eenmaal op de Track overslaan/Vooruitspoelen-knop (17) om naar het be-
gin van de volgende track te gaan. Druk herhaaldelijk op de Track overslaan/
Vooruitspoelen-knop totdat de gewenste track wordt bereikt. Als het begin van
de laatste track wordt bereikt, zal de cd-speler niet verder vooruit overslaan.
Achteruit overslaan om naar de vorige track te gaan
1. Druk eenmaal op de Track overslaan/Achteruitspoelen-knop (16) om terug te
gaan naar het begin van de huidige Track.
2. Druk tweemaal op de Track overslaan/Achteruitspoelen-knop (16) om terug te
gaan naar het begin van de vorige track. Door herhaaldelijk op de Track overslaan/Achteruitspoelen-knop (16) te drukken, springt de CD-speler track voor
track terug langs de hele cd. Als het begin van de eerste track wordt bereikt, zal
de CD-speler niet verder achteruit overslaan.
Page 32

27 Nederlands
Handmatig zoeken
1. Door tijdens het afspelen de Track overslaan/Vooruitspoelen en Track over-
slaan/Achteruitspoelen-knop ingedrukt te houden, scant de CD-speler de huidi-
ge track. Aan het einde van een track gaat de CD-speler over naar de volgende
track en gaat door met scannen. Aan het begin van een track gaat de speler
naar de vorige track en gaat verder met scannen.
2. Als de CD-speler het einde van de laatste track, of het begin van de eerste
track bereikt, stopt het met scannen.
CD’S AFSPELEN PROGRAMMEREN
Het is niet mogelijk om programma’s op te slaan tijdens het afspelen van de cd.
Druk eerst op de Stop-knop (19) en volg daarna de volgende instructies op:
1. Druk op de PROGRAM-knop (3). Op de display gaat “01” knipperen en de pro-
gramma-indicator (12) word ingeschakeld.
2. Druk op de Track overslaan/.Vooruitspoelen- of Achteruitspoelen-knop (11) om
de track te selecteren die u op positie 1 wenst op te slaan.
3. Druk op de PROGRAM-knop (3). De eerste selectie van het programma wordt
opgeslagen onder geheugen 1 van het programma. Op de display gaat “01”
knipperen en de PROGRAM-indicator (12) wordt ingeschakeld.
4. Selecteer de volgende track die u wenst te programmeren door de Track overslaan/Vooruitspoelen- of Achteruitspoelen-knop (16/17) te gebruiken.
5. Druk op de PROGRAM-knop (3) om deze track op te slaan.
6. Ga op deze manier door met het opslaan van de tracks totdat alle gewenste
tracks zijn opgeslagen (maximaal 20). Als de PROGRAM-knop (3) wordt inge-
drukt om track 20 op te slaan, keert de display terug naar de eerste geprogram-
meerde track. Druk de PROGRAM-knop (3) in om de geprogrammeerde tracks
te doorlopen.
Geprogrammeerde tracks afspelen
Druk op de Afspelen/Pauze-knop (18). Het afspelen van de cd start begint met de
eerst geprogrammeerde track.
Het opgeslagen programma wissen
Druk tijdens het afspelen van de cd op de Stop-knop (19) om de cd te stoppen. Selecteer de MW of FM-functie om het programma te wissen.
CD AFSPELEN HERHALEN
Tijdens het afspelen drukt u herhaaldelijk op de REPEAT-KNOP (14) om het vol-
gende in te stellen:
Repeat1: Het huidige nummer wordt herhaald.
RepeatAll: Alle nummers worden herhaald.
Normal mode: De tracks worden afgespeeld in klassieke volgorde.
Page 33
28 Nederlands
AUX-IN FUNCTIE
Dit apparaat biedt ook een aanvullende audio-jackingang om externe apparaten
zoals MP3-spelers of CD-spelers te kunnen aansluiten en door de systeemluidsprekers te kunnen afspelen.
1. Gebruik een audiosnoer (niet inbegrepen) met 3,5 mm stereostekkers aan bei-
de kanten van het snoer.
2. Steek de ene kant van de kabel in de AUX-IN-ingang van het apparaat en de
andere kant in de LINE OUT of HEADPHONE-uitgang van uw externe audioapparaat.
3. Zet het apparaat en uw externe audioapparaat aan.
4. Start met afspelen vanaf het externe apparaat (zie de handleiding van het ex-
terne apparaat).
TECHNISCHE SPECIFICATIES
AC: 230V ~ 50 Hz
FM: 88 - 108 MHz
MW: 540 - 1600 kHz
WAARSCHUWING
Het uitroepteken in een gelijkzijdige driehoek is bedoeld om de gebruiker erop attent te maken dat de
gebruikershandleiding belangrijke instructies bevat voor het gebruik en het onderhoud.
De bliksemschicht in een gelijkzijdige driehoek is bedoeld om de gebruiker te waarschuwen voor de
aanwezigheid van gevaarlijke spanning binnen in het apparaat.
Om het risico op elektrische schokken te reduceren, dient het apparaat niet te worden geopend. Het
apparaat bevat geen onderdelen die gerepareerd kunnen worden door de gebruiker. In het geval van
een defect dient contact opgenomen te worden met een gekwalificeerde technicus voor de reparatie.
Dit apparaat is ontworpen om te werken op 230v~ 50Hz. Als het apparaat voor een langere tijd niet
gebruikt gaat worden, dient de stekker uit het stopcontact te worden gehaald.
Stel het apparaat niet bloot aan regen of vocht.
Gebruik het apparaat uitsluitend nadat is gecontroleerd dat alle aansluitingen correct zijn uitgevoerd.
Plaats het apparaat op een voldoende geventileerde plek. Plaats het apparaat niet in de buurt van
gordijnen, op het tapijt of in in een stuk meubilair, zoals bijvoorbeeld een boekenkast.
Stel het apparaat niet bloot aan direct zonlicht of aan warmtebronnen.
CORRECTE AFVALVERWERKING VAN HET PRODUCT
(elektrisch en elektronisch afval)
Dit symbool dat staat weergegeven op het product en in de documentatie ervan, duidt erop dat het product
niet kan worden weggegooid met het gewone huisvuil aan het einde van de levensduur. Om schade aan het
milieu of aan de gezondheid door ongepaste afvalverwijdering te voorkomen, dient de gebruiker dit product
te scheiden van andere soorten afval op verantwoorde wijze ter bevordering van duurzaam hergebruik van
de materiële hulpbronnen. De thuisgebruiker dient contact op te nemen met de verkoper van het apparaat of
met de lokale gemeente voor informatie met betrekking tot het scheiden en recyclen van dit type product.
Zakelijke gebruikers dienen contact op te nemen met hun leverancier en de algemene voorwaarden van de
verkoopovereenkomst te raadplegen. Dit product dient niet te worden gemengd met ander bedrijfsafval voor
de verwijdering.
Page 34

29 Čeština
POPIS PŘÍSTROJE
1. Kontrolní svítilna FM STEREO – svítí po naladění stereofonního vysílače FM.
2. Regulátor hlasitosti VOLUME kombinovaný s přepínačem ON/OFF pro
zapnutí / vypnutí přístroje.
3. Kryt prostoru pro CD.
4. Reproduktory.
5. Tlačítko ladění TUNING.
6. Stupnice ladění s ukazatelem.
7. FM Ladění stupnice
8. Přepínač FUNCTION pro výběr provozního režimu přístroje (MW pro příjem
AM rozhlasu, FM pro příjem FM rozhlasu, CD pro přehrání CD).
9. Ladění v pásmu AM
10. Mechanismus bydlení CD
11. LED displej přehrávače CD.
12. Kontrolní svítilna PROGRAM svítí v průběhu používání funkce tlačítka PRO-
GRAM.
13. Kontrolní svítilna CD PLAY/PAUSE – v průběhu přehrávání CD trvale svítí, po
přerušení přehrávání CD bliká.
14. Tlačítko REPEAT pro výběr režimu opakovaného přehrávání disku.
15. Tlačítko PROGRAM pro naprogramování skladeb z disku pro jejich přehrání v
pořadí požadovaném uživatelem.
16. Tlačítko CD SKIP FORWARD pro přeskok na začátky skladeb na disku vpřed
(opakovaným stlačováním) popř. Pro vyhledání požadovaného místa v záznamu na disku vpřed (trvalým stlačením).
17. Tlačítko CD SKIP BACKWARD pro přeskok na začátky skladeb na disku vzad
(opakovaným stlačováním) popř. Pro vyhledání požadovaného místa v záznamu na disku vzad (trvalým stlačením).
18. Tlačítko CD PLAY/PAUSE pro zahájení / přerušení přehrávání CD.
19. Tlačítko CD STOP pro ukončení přehrávání disku.
20. Drátová FM anténa.
21. Síťový kabel.
22. Konektor PHONES pro připojení stereofonních sluchátek (nutno dokoupit).
23. zapnutí / vypnutí klíče
24. Advance Klíčové stopy -10
25. Advance Klíč stopy +10
PŘÍJEM ROZHLASU
1. Pro zapnutí přístroje stiskněte tlačítko POWER a podržte po dobu 1 vteřiny.
2. Přepínačem FUNCTION vyberte požadované rozhlasové pásmo (MW pásmo
středních vln) nebo FM).
3. Knoflíkem ladění TUNING nalaďte požadovaný vysílač.
4. Upravte si hlasitost na požadovanou úroveň pomocí ovladače VOLUME
5. Pokud chcete rádio vypnout podržte tlačítko POWER 3 vteřiny.
Page 35

30 Čeština
Pro optimální příjem požadovaného vysílače
V rozhlasovém pásmu FM vyhledejte vhodnou polohu drátové FM antény.
V rozhlasovém pásmu MW je pro optimální příjem požadovaného vysílače nu-
tné nasměrování (natočení) celého přístroje.
POUŽITÍ PŘEHRÁVAČE CD
1. Zapněte přístroj a potom přepněte přepínač FUNCTION do polohy CD.
2. Zvedněte kryt prostoru pro disk.
3. Do prostoru pro disk opatrně vložte disk etiketou nahoru (stranou se zázna-
mem dolů), disk o průměru 8 cm vložte na vřeteno v prostoru pro disk. Potom
zatlačením rukou uzavřete kryt prostoru pro disk.
4. Po vložení disku do přehrávače se disk v přehrávači začne otáčet a po vyhod-
nocení disku bude na displeji zobrazen údaj označující celkový počet skladeb
na vloženém disku, bezprostředně poté bude (u většiny disků) zahájeno přehrávání.
Přehrání disku
1. Do přehrávače vložte disk a uzavřete kryt prostoru pro disk.
2. Pokud nebude přehrávání disku zahájeno automaticky stlačte tlačítko CD
PLAY/PAUSE - bude zahájeno přehrávání disku počínaje skladbou č. 1. Po
jejím přehrání budou postupně přehrány všechny následující skladby z CD,
přehráním poslední skladby v záznamu na disku bude přehrávání disku
ukončeno. V průběhu přehrávání je na displeji zobrazeno číslo přehrávané
skladby a na přístroji svítí kontrolní svítilna přehrávání disku CD PLAY/
PAUSE.
3. Nastavte požadovanou hlasitost.
4. Přerušení přehrávání stlačením tlačítka CD PLAY/PAUSE, na displeji začne
blikat číslo přehrávané skladby, současně bude na přístroji blikat svítilna CD
PLAY/PAUSE. Pokračování v přerušeném přehrávání dalším stlačením tlačítka CD PLAY/PAUSE.
5. Ukončení přehrávání CD (možné kdykoliv) stlačením tlačítka CD STOP, na di-
spleji bude zobrazen údaj označující celkový počet skladeb v záznamu na CD
a na přístroji zhasne kontrolní svítilna CD PLAY/PAUSE.
Zahájení přehrávání disku počínaje požadovanou skladbou
1. U přehrávače v režimu „Stop“ zobrazte na displeji opakovaným stlačováním
tlačítka CD SKIP FORWARD nebo REVERSE číslo skladby, počínaje kterou
požadujete zahájení přehrávání disku.
2. Stlačte tlačítko CD PLAY/PAUSE – bude zahájeno přehrávání disku počínaje
specifikovanou skladbou, po jejím přehrání budou postupně přehrány všechny
následující skladby z disku, přehráním poslední skladby bude přehrávání disku ukončeno.
Přeskok na začátky skladeb v záznamu na CD
V průběhu přehrávání krátce stlačte tlačítko CD SKIP FORWARD - přehrávač
přeskočí na začátek následující skladby a zahájí její přehrávání. Opakovaným
Page 36

31 Čeština
stlačováním tlačítka postupný přeskok na začátky následujících skladeb. Číslo
vybrané skladby bude zobrazeno na displeji přístroje.
Krátkým stlačením tlačítka CD SKIP REVERSE přehrávač přeskočí na začátek
aktuálně přehrávané skladby a zahájí její přehrávání. Opakovaným stlačováním
tlačítka postupný přeskok na začátky předcházejících skladeb na CD.
Vyhledání požadovaného místa v záznamu na disku
Pro vyhledání požadovaného místa v záznamu na disku (odposlechem při
poněkud zvýšené rychlosti přehrávání a poněkud snížené hlasitosti) stlačte a
přidržte v průběhu přehrávání stlačeno tlačítko CD SKIP REVERSE - pro
vyhledávání vzad nebo tlačítko CD SKIP FORWARD – pro vyhledávání vpřed.
Dosažením konce poslední skladby nebo začátku první skladby v záznamu na
disku (podle použitého směru vyhledávání) bude vyhledávání ukončeno.
Po vyhledání požadovaného místa v záznamu uvolněte stlačené tlačítko – z
vyhledaného místa bude přehrávání disku pokračovat.
Přehrání skladeb z CD v pořadí naprogramovaném uživatelem
Přehrávač umožňuje přehrání až 20 skladeb z disku v pořadí naprogramovaném
uživatelem. Programování skladeb je možné pouze u přehrávače v režimu
„Stop“ (není přehráván disk). Pro sestavení programu pro přehrání skladeb z disku v požadovaném pořadí stlačte tlačítko CD STOP a pokračujte podle
následujících pokynů:
1. Stlačte tlačítko PROGRAM – na displeji se rozsvítí údaj 01 a na přístroji se
rozsvítí kontrolní svítilna CD PROGRAM.
2. Tlačítky CD SKIP FORWARD nebo BACKWARD vyberte skladbu, kterou
chcete vložit do programu.
3. Potvrďte stlačením tlačítka PROGRAM – na displeji se rozsvítí údaj 02.
4. Opakováním kroků č. 2 a 3 vložte do programu požadované skladby.
5. Pro kontrolu pořadí skladeb v programu opakovaně stlačujte tlačítko PRO-
GRAM – na displeji budou postupně zobrazována čísla skladeb v pořadí, v jakém byly vloženy do programu.
6. Pro přehrání naprogramovaných skladeb stlačte tlačítko CD PLAY/PAUSE –
skladby budou přehrány v pořadí, v jakém byly vloženy do programu. Přehráním poslední naprogramované skladby bude přehrávání ukončeno, program
však zůstane uložen v paměti.
7. Pro ukončení přehrávání naprogramovaných skladeb před přehráním poslední
naprogramované skladby stlačte tlačítko CD STOP.
8. Pro výmaz programu stlačte u přehrávače v režimu „Stop“ tlačítko CD STOP
(v průběhu přehrávání naprogramovaných skladeb je pro výmaz programu
tlačítko nutno stlačit dvakrát).
Opakované přehrávání
1. Pro opakované přehrávání aktuálně přehrávané skladby stlačte v průběhu
jejího přehrávání tlačítko REPEAT - na přístroji začne blikat kontrolní svítilna
REPEAT.
2. Pro opakované přehrávání disku je v průběhu přehrávání tlačítko REPEAT nu-
Page 37

32 Čeština
tno stlačit dvakrát – na přístroji se trvale rozsvítí kontrolní svítilna REPEAT.
3. Pro zrušení opakovaného přehrávání zhasněte opakovaným stlačováním
tlačítka REPEAT kontrolní svítilnu REPEAT.
POUŽITÍ SLUCHÁTEK
Do zásuvky PHONES vložte konektor kabelu stereofonních sluchátek
(stereofonní jack o průměru 3,5 mm). Budou tak umlčeny reproduktory a zvuk
bude reprodukován pouze sluchátky.
Použijte sluchátka o impedanci 8 ohmů nebo vyšší.
Nepoužívejte sluchátka delší dobu s velkou nastavenou hlasitostí – dlou-
hodobým používáním sluchátek s velkou nastavenou hlasitostí riziko trvalého
poškození sluchu.
TECHNICKÉ ÚDAJE
Napájení: 230 V - 50 Hz
MW: 540 - 1 600 kHz
FM: 88 – 108 MHz
UPOZORNĚNÍ
Vykřičník uvnitř trojúhelníka na zadní straně skříňky přístroje upozorňuje uživatele na důležité pokyny pro obsluhu a ošetřování přístroje, uvedené v jeho doprovodné dokumentaci. čeština
Symbol blesku uvnitř trojúhelníka na zadní straně skříňky přístroje upozorňuje uživatele na existenci životu nebezpečného napětí na některých dílech uvnitř skříňky přístroje.
Nevyjímejte přístroj ze skříňky – riziko úrazu elektrickým proudem. Uvnitř skříňky nejsou díly, které by mohl opravit nebo seřídit jeho uživatel bez odpovídajícího vybavení a kvalifikace. Bude-li přístroj vyžadovat seřízení nebo
opravu kontaktujte odborný servis. Zásahem do přístroje v době platnosti záruky se vystavujete riziku ztráty
event. záručních plnění.
Přístroj je konstruován pro napájení střídavým napětím 230 V / 50 Hz z elektrické sítě. Pokud nebudete přístroj
delší dobu používat odpojte jej od elektrické sítě vyjmutím vidlice síťového kabelu přístroje ze síťové zásuvky.
Chraňte přístroj před zmoknutím, postříkáním nebo politím jakoukoliv kapalinou.
Vypnutím přístroje není přístroj odpojen od elektrické sítě. Pro odpojení přístroje od elektrické sítě vyjměte vidlici
síťového kabelu přístroje ze síťové zásuvky. Před zapnutím přístroje překontrolujte všechna připojení k přístroji.
Okolo přístroje ponechejte na všech stranách dostatečný volný prostor, nutný pro cirkulaci vzduchu okolo přístroje. Je tak odváděno teplo vznikající během jeho provozu.
Neumísťujte přístroj na přímém slunci nebo v blízkosti zdrojů tepla. Vysokými teplotami je významně zkracována
životnost elektronických dílů přístroje.
POKYNY PRO SPRÁVNOU LIKVIDACI VÝROBKU
(likvidaci použitých elektrických a elektronických zařízení)
Tento symbol na výrobku, jeho příslušenství nebo obalu označuje, že při pozdější likvidaci výrobku (z
jakýchkoliv důvodů) nesmí být s výrobkem zacházeno jako s domovním odpadem. Výrobek zlikvidujte
jeho předáním na sběrné místo pro likvidaci použitých elektrických a elektronických zařízení šetrnou
k životnímu prostředí. Zajištěním jejich správné likvidace zabráníte vzniku potenciálních rizik pro životní
prostředí a lidské zdraví, která by mohla vzniknout nesprávným zacházením s odpady. Kromě toho recyklace odpadových materiálů napomáhá udržení přírodních zdrojů surovin pro příští generace. Podrobné informace k likvidaci tohoto výrobku šetrné k životnímu prostředí získáte u pracovníka ochrany
životního prostředí místního (městského nebo obvodního) úřadu nebo v prodejně, ve které jste výrobek
zakoupili.
Page 38

33 Slovenský
POPIS PRÍSTROJA
Kontrolné osvetlenie FM STEREO – svieti po naladení stereofónneho vysielača FM.
Regulátor hlasitosti VOLUME kombinovaný s prepínačom ON/OFF pre zapnutie /
vypnutie prístroja.
Kryt priestoru pre CD.
Reproduktory.
Tlačidlo ladenia TUNING.
Stupnica ladenia s ukazovateľom.
FM Ladenie stupnice
Prepínač FUNCTION pre výber prevádzkového režimu prístroja (MW pre príjem AM
rozhlasu, FM pre príjem FM rozhlasu, CD pre prehranie CD).
Ladenie v pásme AM
Mechanizmus bývanie CD
LED displej prehrávača CD.
Kontrolné osvetlenie PROGRAM svieti v priebehu používania funkcie tlačidla PROGRAM.
Kontrolné osvetlenie CD PLAY/PAUSE – v priebehu prehrávania CD trvale svieti, po
prerušení prehrávania CD bliká.
Tlačidlo REPEAT pre výber režimu opakovaného prehrávania disku.
Tlačidlo PROGRAM pre naprogramovanie skladieb z disku pre ich prehranie v poradí
požadovanom užívateľom.
Tlačidlo CD SKIP FORWARD pre preskok na začiatky skladieb na disku vpred
(opakovaným stláčaním) príp. pre vyhľadanie požadovaného miesta v zázname na disku vpred (trvalým stlačením).
Tlačidlo CD SKIP BACKWARD pre preskok na začiatky skladieb na disku vzad
(opakovaným stláčaním) príp. pre vyhľadanie požadovaného miesta v zázname na di-
sku vzad (trvalým stlačením).
Tlačidlo CD PLAY/PAUSE pre zahájenie / prerušenie prehrávania CD.
Tlačidlo CD STOP pre ukončenie prehrávania disku.
Drôtová FM anténa.
Sieťový kábel.
Konektor PHONES pre pripojenie stereofónnych slúchadiel (nutné dokúpiť).
zapnutie / vypnutie kľúče
Advance Kľúčové stopy -10
Advance Kľúč stopy +10
PRÍJEM ROZHLASU
1. Pre zapnutie prístroja otočte gombíkom regulátora hlasitosti VOLUME kombino-
vaným s prepínačom ON/OFF pre zapnutie / vypnutie prístroja po smere pohybu
hodinových ručičiek – po počuteľnom prekonaní odporu aretácie bude prístroj
zapnutý a na prednom paneli prístroja sa rozsvieti kontrolné osvetlenie zapnutím
prístroja. Ďaľším otáčaním gombíkom nastavte požadovanú hlasitosť.
2. Prepínačom FUNCTION vyberte požadované rozhlasové pásmo (MW pásmo
stredných vĺn) alebo FM).
3. Gombíkom ladenia TUNING nalaďte požadovaný vysielač.
4. Pre ukončenie príjmu rozhlasu a vypnutie prístroja otáčajte regulátorom hlasitosti
proti smeru pohybu hodinových ručičiek – po počuteľnom prekonaní odporu
aretácie bude prístroj vypnutý.
Page 39

34 Slovenský
Pre optimálny príjem požadovaného vysielača
V rozhlasovom pásme FM vyhľadajte vhodnú polohu drôtovej FM antény.
V rozhlasovom pásme MW je pre optimálny príjem požadovaného vysielača nutné
nasmerovanie (natočenie) celého prístroja.
POUŽITIE PREHRÁVAČA CD
1. Zapnite prístroj a potom prepnite prepínač FUNCTION do polohy CD.
2. Zdvihnite kryt priestoru pre disk.
3. Do priestoru pre disk opatrne vložte disk etiketou nahor (stranou so záznamom dolu), disk s priemerom 8 cm vložte na vreteno v priestoru pre disk. Potom zatlačením
rukou uzavrite kryt priestoru pre disk. Po vložení disku do prehrávača sa disk
v prehrávači začne otáčať a po vyhodnotení disku bude na displeji zobrazený údaj
označujúci celkový počet skladieb na vloženom disku, bezprostredne potom bude
(u väčšiny diskov) zahájené prehrávanie.
Upozornenie
Pozor na vniknutie cudzích predmetov do priestoru pre disk – môžu prehrávač
poškodiť.
Kryt priestoru pre disk otvárajte iba na dobu potrebnú pre vloženie a vybratie disku.
Zabránite tak event. znečisteniu snímacieho systému prehrávača prachom a inými
nečistotami.
V jedinom okamihu smie byť v prehrávači vložený iba jeden disk.
Prehranie disku
1. Do prehrávača vložte disk a uzavrite kryt priestoru pre disk.
2. Pokiaľ nebude prehrávanie disku zahájené automaticky stlačte tlačidlo CD PLAY/
PAUSE - bude zahájené prehrávanie disku počínajúc skladbou č. 1. Po jej prehraní
budú postupne prehrané všetky nasledujúce skladby z CD, prehraním poslednej
skladby v zázname na disku bude prehrávanie disku ukončené. V priebehu prehrávania je na displeji zobrazené číslo prehrávanej skladby a na prístroji svieti kontrolné osvetlenie prehrávania disku CD PLAY/PAUSE.
3. Nastavte požadovanú hlasitosť.
4. Prerušenie prehrávania stlačením tlačidla CD PLAY/PAUSE, na displeji začne blikať číslo prehrávanej skladby, súčastne bude na prístroji blikať osvetlenie CD
PLAY/PAUSE. Pokračovanie v prerušenom prehrávaní ďaľším stlačením tlačidla
CD PLAY/PAUSE.
5. Ukončenie prehrávania CD (možné kedykoľvek) stlačením tlačidla CD STOP, na
displeji bude zobrazený údaj označujúci celkový počet skladieb v zázname na CD a
na prístroji zhasne kontrolné osvetlenie CD PLAY/PAUSE.
Zahájenie prehrávania disku počínajúc požadovanou skladbou
1. U prehrávača v režime „Stop“ zobrazte na displeji opakovaným stláčaním tlačidla
CD SKIP FORWARD alebo REVERSE číslo skladby, počínajúc ktorou požadujete
zahájenie prehrávania disku.
2. Stlačte tlačidlo CD PLAY/PAUSE – bude zahájené prehrávanie disku počínajúc
špecifikovanou skladbou, po jej prehraní budú postupne prehrané všetky nasledujúce skladby z disku, prehraním poslednej skladby bude prehrávanie disku
ukončené.
Page 40

35 Slovenský
Preskok na začiatky skladieb v zázname na CD
V priebehu prehrávania krátko stlačte tlačidlo CD SKIP FORWARD - prehrávač
preskočí na začiatok nasledujúcej skladby a zaháji jej prehrávanie. Opakovaným
stláčaním tlačidla postupný preskok na začiatky nasledujúcich skladieb. Číslo vybranej skladby bude zobrazené na displeji prístroja.
Krátkym stlačením tlačidla CD SKIP REVERSE prehrávač preskočí na začiatok ak-
tuálne prehrávanej skladby a zaháji jej prehrávanie. Opakovaným stláčaním tlačidla
postupný preskok na začiatky predchádzajúcich skladieb na CD.
Vyhľadanie požadovaného miesta v zázname na disku
Pre vyhľadanie požadovaného miesta v zázname na disku (odposluchom pri o niečo
zvýšenej rýchlosti prehrávania a o niečo zníženej hlasitosti) stlačte a pridržte
v priebehu prehrávania stlačené tlačidlo CD SKIP REVERSE - pre vyhľadávanie
vzad alebo tlačidlo CD SKIP FORWARD – pre vyhľadávanie vpred.
Dosiahnutím konca poslednej skladby alebo začiatku prvej skladby v zázname na di-
sku (podľa použitého smeru vyhľadávanie) bude vyhľadávanie ukončené.
Po vyhľadaní požadovaného miesta v zázname uvoľnite stlačené tlačidlo –
z vyhľadaného miesta bude prehrávanie disku pokračovať.
Prehranie skladieb z CD v poradí naprogramovanom užívateľom
Prehrávač umožňuje prehranie až 20 skladieb z disku v poradí naprogramovanom
užívateľom. Programovanie skladieb je možné len u prehrávača v režime „Stop“ (nie je
prehrávaný disk). Pre zostavenie programu pre prehranie skladieb z disku
v požadovanom poradí stlačte tlačidlo CD STOP (<) a pokračujte podľa nasledujúcich
pokynov:
1. Stlačte tlačidlo PROGRAM – na displeji sa rozsvieti údaj 01 a na prístroji sa
rozsvieti kontrolné osvetlenie CD PROGRAM.
2. Tlačidlami CD SKIP FORWARD alebo BACKWARD vyberte skladbu, ktorú chcete
vložiť do programu.
3. Potvrďte stlačením tlačidla PROGRAM – na displeji sa rozsvieti údaj 02.
4. Opakovaním krokov č. 2 a 3 vložte do programu požadované skladby.
5. Pre kontrolu poradia skladieb v programe opakovane stláčajte tlačidlo PROGRAM
– na displeji budú postupne zobrazované čísla skladieb v poradí, v akom boli vložené do programu.
6. Pre prehranie naprogramovaných skladieb stlačte tlačidlo CD PLAY/PAUSE –
skladby budú prehrané v poradí, v akom boli vložené do programu. Prehraním poslednej naprogramovanej skladby bude prehrávanie ukončené, program však zostane uložený v pamäti.
7. Pre ukončenie prehrávania naprogramovaných skladieb pred prehraním poslednej
naprogramovanej skladby stlačte tlačidlo CD STOP.
8. Pre výmaz programu stlačte u prehrávača v režime „Stop“ tlačidlo CD STOP (v
priebehu prehrávania naprogramovaných skladieb je pre výmaz programu tlačidlo
nutné stlačiť dvakrát).
Opakované prehrávanie
1. Pre opakované prehrávanie aktuálne prehrávanej skladby stlačte v priebehu jej
prehrávania tlačidlo REPEAT - na prístroji začne blikať kontrolné osvetlenie REPEAT.
2. Pre opakované prehrávanie disku je v priebehu prehrávania tlačidlo REPEAT nutné
Page 41

36 Slovenský
stlačiť dvakrát – na prístroji sa trvale rozsvieti kontrolné osvetlenie REPEAT.
3. Pre zrušenie opakovaného prehrávania zhasnite opakovaným stláčaním tlačidla
REPEAT kontrolné osvetlenie REPEAT.
POUŽITIE SLÚCHADIEL
Do zásuvky PHONES vložte konektor káblu stereofónnych slúchadiel (stereofónny
jack s priemerom 3,5 mm). Budú tak umlčané reproduktory a zvuk bude reprodukovaný len slúchadlami.
Použite slúchadlá o impedancii 8 ohmov alebo vyššej.
Nepoužívajte slúchadlá dlhšiu dobu s veľkou nastavenou hlasitosťou – dlhodobým
používaním slúchadiel s veľkou nastavenou hlasitosťou riziko trvalého poškodenia
sluchu.
TECHNICKÉ ÚDAJE
Napájanie 230 V - 50 Hz
MW: 540 - 1 600 kHz
FM: 88 – 108 MHz
Zmeny designu a technických údajov vyhradené bez predchádzajúceho oznámenia.
OPOZORILO
Výkričník vo vnútri trojuholníka na skrinke prístroja upozorňuje užívateľa na existenciu dôležitých pokynov pre jeho obsluhu uvedených v návode.
Symbol blesku vo vnútri trojuholníka upozorňuje užívateľa na nebezpečné napätie na niektorých dieloch vo vnútri skrinky prístroja.
Nevyberajte prístroj zo skrinky - riziko úrazu elektrickým prúdom. Vo vnútri skrinky prístroja nie sú diely ktoré by mohol opraviť alebo nastaviť jeho užívateľ bez zodpovedajúceho vybavenia a kvalifikácie.
Ak bude prístroj vyžadovať nastavenie alebo opravu kontaktujte odborný servis. Zásahom do prístroja
v dobe platnosti záruky sa vystavujete riziku straty príp. záručných plnení.
Chráňte prístroj pred zmoknutím, postriekaním alebo poliatím akoukoľvek kvapalinou - riziko úrazu
lektrickým prúdom. Nepoužívajte prístroj mimo miestnosti.
Pre odpojenie prístroja od elektrickej siete vyberte vidlicu sieťového kábla prístroja zo sieťovej
zásuvky.
Prístroj umiestenie na dobre vetranom mieste. Nezakrývajte vetracie otvory skrinky prístroja - riziko
jeho prehriatia a poškodenia.
Chráňte prístroj pred priamym slnkom, neumiestňujte prístroj v blízkosti zdrojov tepla. Vysokými teplotami je výrazne skracovaná životnosť elektronických komponentov prístroja.
POKYNY PRE SPRÁVNU LIKVIDÁCIU VÝROBKU
(likvidácii použitých elektrických a elektronických zariadení)
Tento symbol na výrobku, jeho príslušenstve alebo obale označuje, že pri naskoršej likvidácii výrobku (z
akýchkoľvek dôvodov) nesmie byť s výrobkom zachádzané ako s domácim odpadom. Výrobok zlikvidujte
jeho odovzdaním na zberné miesto pre likvidáciu použitých elektrických a elektronických zariadení šetrnú
k životnému prostrediu. Zaistením ich správnej likvidácie zabránite vzniku potenciálnych rizík pre životné
prostredie a ľudské zdravie, ktorá by mohla vzniknúť nesprávnym zachádzaním s odpadmi. Okrem toho
recyklácia odpadových materiálov napomáha udržaniu prírodných zdrojov surovín pre budúce generácie.
Podrobné informácie k likvidácii tohto výrobku šetrné k životnému prostrediu získate u pracovníka ochrany životného prostredia miestneho (mestského alebo obvodného) úradu alebo v predajni, v ktorej ste
výrobok zakúpili.
Page 42

VER.1
Roadstar Management SA, via Passeggiata 7 CH 6883 Novazzano (Switzerland)
is a registered Trademark of Roadstar S.A. - Switzerland. All rights reserved.
 Loading...