

Page 1

is a registered Trademark of Roadstar S.A. - Switzerland All rights reserved
www.roadstar.com
HIF-1999D+BT
Instruction manual
Bedienungsanleitung
Manuel d’instructions
Manuale d’istruzioni
Manual de instrucciones
Gebruiksaanwijzing
Page 2
INDEX
English Page 1
Deutsch Seite 15
Francais Page 29
Italiano Pagina 43
Español Página 57
Nederlands Pagina 71
Your new unit was manufactured and assembled
under strict ROADSTAR quality control. Thankyou for purchasing our product for your music
enjoyment. Before operating the unit, please read
this instruction manual carefully. Keep it also
handy for further future references.
Votre nouvel appareil a été fabriqué et monté en
étant soumis aux nombreaux tests ROADSTAR.
Nous espérons que cet appareil vous donnera
entière satisfaction. Avant de vous adonner à ces
activités, veuillez lire attentivement ce manuel
d’instructions. Conservez-le à portée de main à fin
de référence ultérieure.
Vuestro nuevo sistema ha sido construido según
las normas estrictas de control de calidad ROADSTAR. Le felicitamos y le damos las gracias por
su elección de este aparado. Por favor leer el
manual antes de poner en funcionamiento el
equipo y guardar esta documentación en case de
que se necesite nuevamente.
Ihr neues Gerät wurde unter Beachtung der stren-
gen ROADSTAR-Qualitätsvorschriften gefertigt.
Wir danken Ihnen für den Kauf unseres Produktes
und wünschen Ihnen optimalen Hörgenuss. Bitte
lesen Sie diese Bedienungsanleitung durch, und
heben Sie sie auf, um jederzeit darin nachschlagen zu können.
Il vostro nuovo apparecchio é stato prodotto ed
assemblato sotto lo stretto controllo di qualità
ROADSTAR. Vi ringraziamo di aver acquistato un
nostro prodotto per il vostro piacere d’ascolto.
Prima di procedere all'utilizzo dell'apparecchio,
leggete attentamente il manuale d’istruzioni e
tenetelo sempre a portata di mano per futuri riferimenti.
HIF-1999D+BT
Info Station Scrolling Texts
DAB STEREO
Radio Name
MENU INFO SCAN PRESET EQ
13
15 6 9 10 2 26 4 5 3 11
7 19 32 33 34 18 31 21
17
14
12
16
22
24
25
23 25
24
28
29
RECORD
FUNCTION
VOL-
P.MODE
VOL+
SKIP-
PLAY/
PAUSE/
ENTER
SKIP+
-10
STOP
+10
INFO
PRESET
SCAN
PROG.
DELETE
EQ
MUTE
44
42
37
40
42
41
48
45
49
51
36
35
48
39
38
43
52
46
50
1
8
30
27
REMOTE CONTROL
TURNTABLE
FRONT PANEL
REAR VIEW
Page 3
English English 1 2
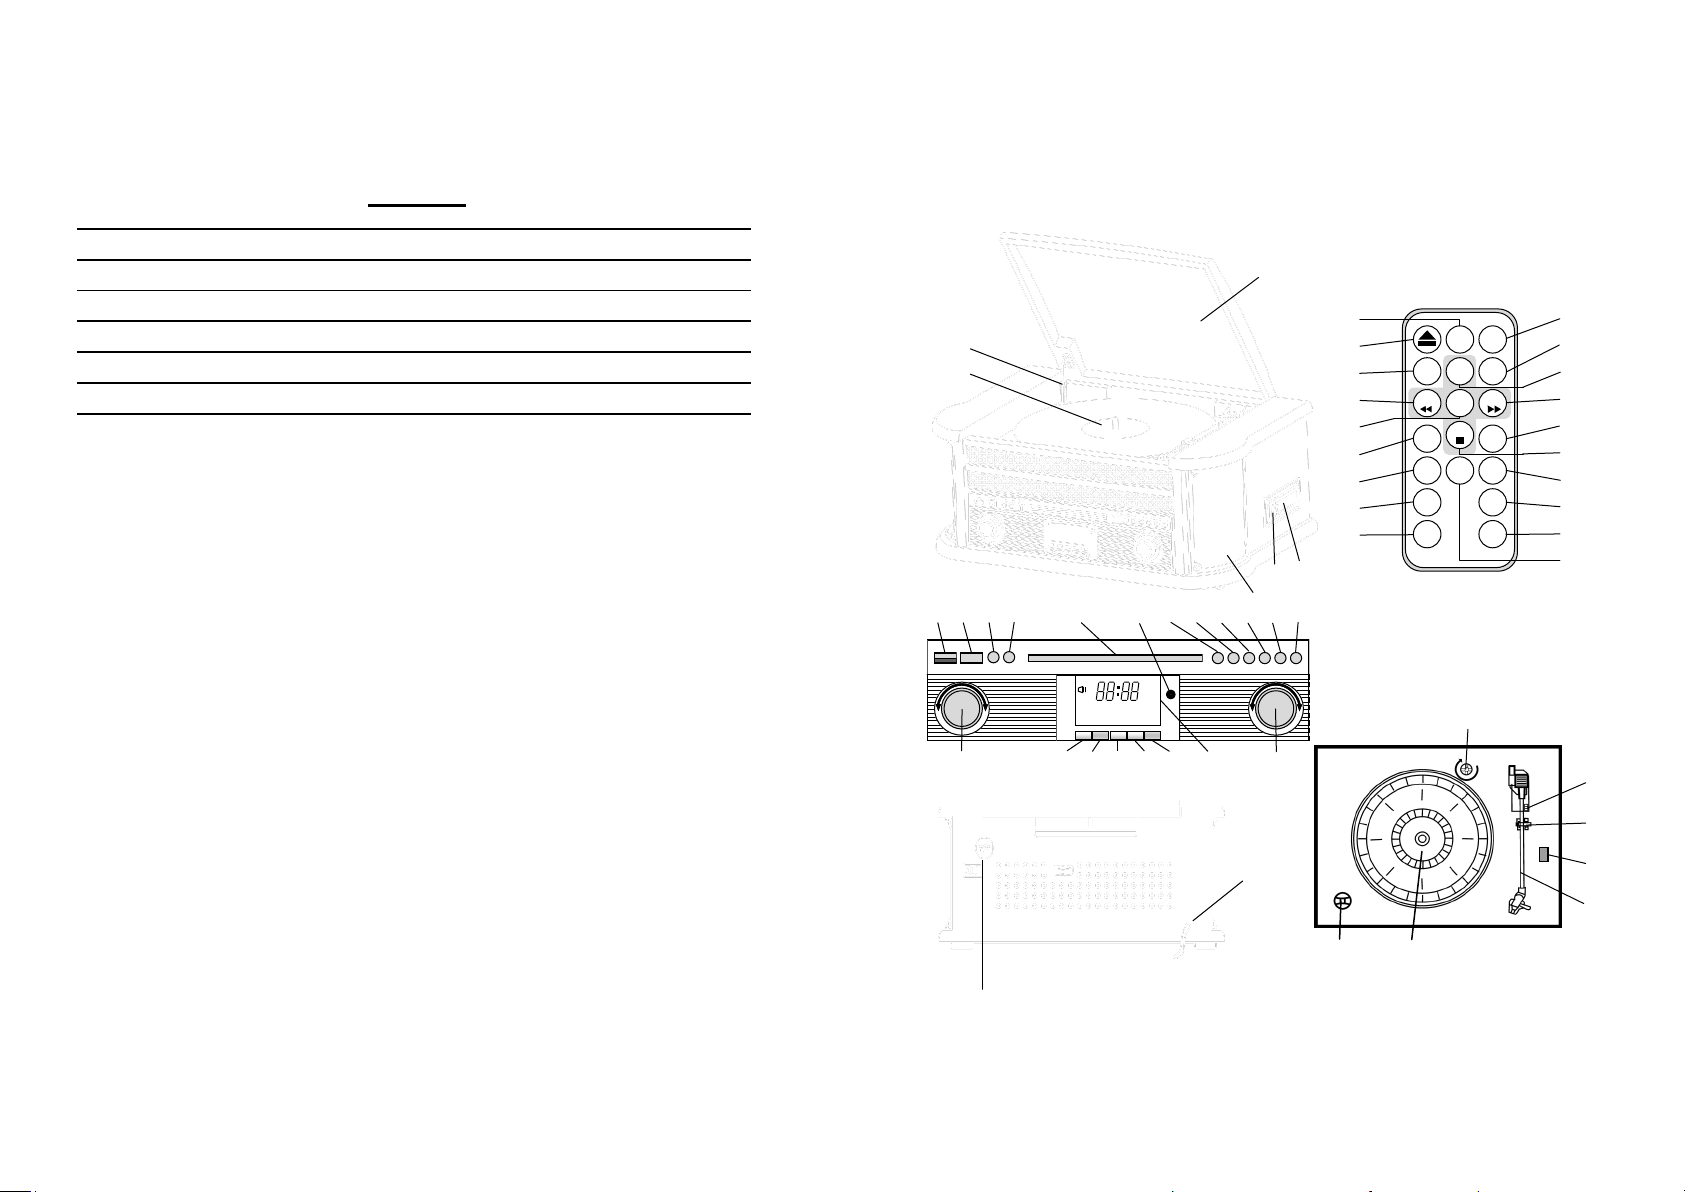
LOCATION OF CONTROLS
1. DUST COVER
2. CD PLAY / PAUSE BUTTON
3. CD SKIP UP BUTTON
4. CD SKIP DOWN BUTTON
5. PLAY MODE BUTTON
6. FUNCTION BUTTON (FM/BLUETOOTH/CD/USB/PHONO/TAPE)
7. VOLUME KNOB
8. REMOTE SENSOR
9. RECORD BUTTON
10. CD DOOR
11. CD DOOR OPEN / CLOSE BUTTON
12. COVER MECHANISM
13. USB SOCKET
14. TURNTABLE
15. POWER ON / OFF
16. CUE LEVER
17. CASSETTE MECHANISM
18. LCD DISPLAY
19. MENU BUTTON
20. DIAL SCALE
21. TUNING / ENTER KNOB
22. ARM LOCK
23. SPINDLE ADAPTOR
24. 33/45/78 RPM SPEED SELECTOR
25. PICK-UP HOLDER
26. STOP BUTTON
27. SPEAKERS
28. FM / DAB ANTENNA
29. AC CORD
30. TAPE STOP / EJECT BUTTON
31. INFO BUTTON
WARNINGS
The exclamation point within the triangle is a warning sign alerting
the user of important instructions accompanying the product.
The lightening flash with arrowhead symbol within the triangle is a
warning sign alerting the user of “dangerous voltage” inside the unit.
To reduce the risk of electric shock, do not remove the cover. No
user serviceable parts inside the unit. Refer all servicing to qualified personnel.
This unit operates on 230V ~ 50Hz. If the unit is not used for a
long period of time, remove the plug from the AC mains.
Ensure all connections are properly made before operating the
unit.
This unit must not be exposed to moisture or rain.
This unit should be positioned so that it is properly ventilated. Avoid placing it, for example, close to curtains, on the carpet or in a
built-in installation such as a bookcase.
Do not expose this unit to direct sunlight or heat radiating sources.
Page 4
English English 3 4
32. SCAN BUTTON
33. PRESET BUTTON
34. EQUALIZER BUTTON
REMOTE CONTROL
35. OPEN / CLOSE CD DOOR
36. REC: in CD/RADIO/PHONO/CASSETTE mode, press to active recor-
ding function.
37. PLAYBACK MODE BUTTON
38. PLAY/PAUSE: in CD/USB mode, press once to start playback. Press
again to enter pause mode.
39. SKIP/SEARCH BACKWARD: press once to skip to previous
track.press & hold for search backward.
40. SKIP/SEARCH FORWARD: press once to skip to next track, press &
hold for search forward.
41. STOP BUTTON
42. 10+ Track Button
43. 10- TRACK BUTTON
44. FUNCTION BUTTON to select CD/USB/DAB/FM/TAPE/PHONO.
45. DELETE BUTTON
46. PROGRAM: in CD/USB mode, press to active programming function.
47. VOLUME + BUTTON
48. VOLUME - BUTTON
49. MUTE BUTTON
50. EQUALISER BUTTON
51. PRESET BUTTON
52. INFO BUTTON
REMOTE BATTERY INSTALLATION
The infrared remote control requires 2 pcs CR-2025 (3V) Lithium Battery
size battery for operation.
CONNECTING TO POWER
Before switching on make sure that the voltage of your electricity supply is
the same as that indicated on the rating plate.
For your own safety read the following instructions carefully before attempting to connect this unit to the mains.
Press the POWER button (15) 1 second to turn ON the unit. Press and
hold the POWER button during 3 seconds to turn OFF the unit. When no
sound is produced, the unit will switch OFF automatically after 15 minutes.
MAINS (AC) OPERATION
This unit is designed to operate on AC 110
-240V 50Hz current only. Connecting it to
other power sources may damage the unit.
Caution: to prevent electric shock discon-
nect from the mains before removing
cover. No user serviceable parts inside.
Refer servicing to qualified service personnel. Remove the stereo carefully from the
box, retaining the packaging for future use.
Connect the plug to a mains power inlet 110 - 240V AC ~ 50 Hz.
SETTING THE DISPLAY MENU LANGUAGE
Operation
1. Switch ON the POWER ON/OFF BUTTON (15). The Display (18) will
light up.
2. Press the MENU BUTTON (19) then turn the TUNING/ENTER KNOB
(21) until select “SYSTEM”.
3. Turn the TUNING/ENTER KNOB (21) until select LANGUAGE, then
press the TUNING/ENTER KNOB (21) to confirm.
4. Turn the TUNING/ENTER KNOB (21) until selected the desired language, then press the same TUNING/ENTER KNOB (21) to confirm.
Page 5

English English 5 6
SETTING THE DISPLAY TIME AND DATE
Operation
1. Switch ON the POWER ON/OFF BUTTON (15). The Display (18) will
light up.
2. Press the MENU BUTTON (19) then turn the TUNING/ENTER KNOB
(21) until select the “SYSTEM”.
3. Turn the TUNING/ENTER KNOB (21) until select TIME, then press the
TUNING/ENTER KNOB (21) to confirm.
4. Turn the TUNING/ENTER KNOB (21) and select SET 12/24 HOURS.
Press the TUNING/ENTER KNOB (21) to confirm.
5. Repeat the above operation 2-4 and select one of the following options: SET TIME/DATE or AUTO UPDATE.
6. If selected SET TIME/DATE, use the TUNING/ENTER KNOB (21) to
set Hour & Minutes, then press the TUNING/ENTER KNOB (21) to
confirm the operation.
7. To set the Auto-Updating, follow the above procedure 2-6 and select
AUTO UPDATE. From this menu, move the TUNING/ENTER KNOB
(21) to select one of the following options: FROM ANY / FROM DAB /
FROM FM / NO UPDATE.
The operation is complete and the display show the DATE and TIME.
FM RADIO OPERATION
ANTENNA
For FM and DAB reception there is a built-in rod antenna (28) at the rear
of the unit. Extend the antenna and move around to obtain the best reception signal.
Operation
1. Switch ON the POWER ON/OFF BUTTON (15). The Display (18) will
light up.
2. Press sequentially the FUNCTION BUTTON (6) to select the FM Radio.
MANUAL TUNING
Tune to the desired radio station by turning the TUNING/ENTER KNOB
(21).
AUTOMATIC TUNING
1. During FM working mode, press the MENU BUTTON (19), then turn
the TUNING/ENTER KNOB (21) until select the “SCAN SETTING”.
2. Move again TUNING/ENTER KNOB (21) and select the option between ALL STATIONS and STRONG STATIONS ONLY. Press the
TUNING/ENTER KNOB (21) to confirm.
3. Press the SCAN BUTTON (32) and the unit will scan all of the FM stations.
RADIO DATA SYSTEM INFORMATIONS
During FM working mode, press the INFO BUTTON (31) to display the
following informations: PROGRAM TYPE/PROGRAM NO/AUDIO
BITRATE/TIME/DATE.
FM & FM-Stereo Reception
Stereo reception is possible when the tuned FM station is broadcasting
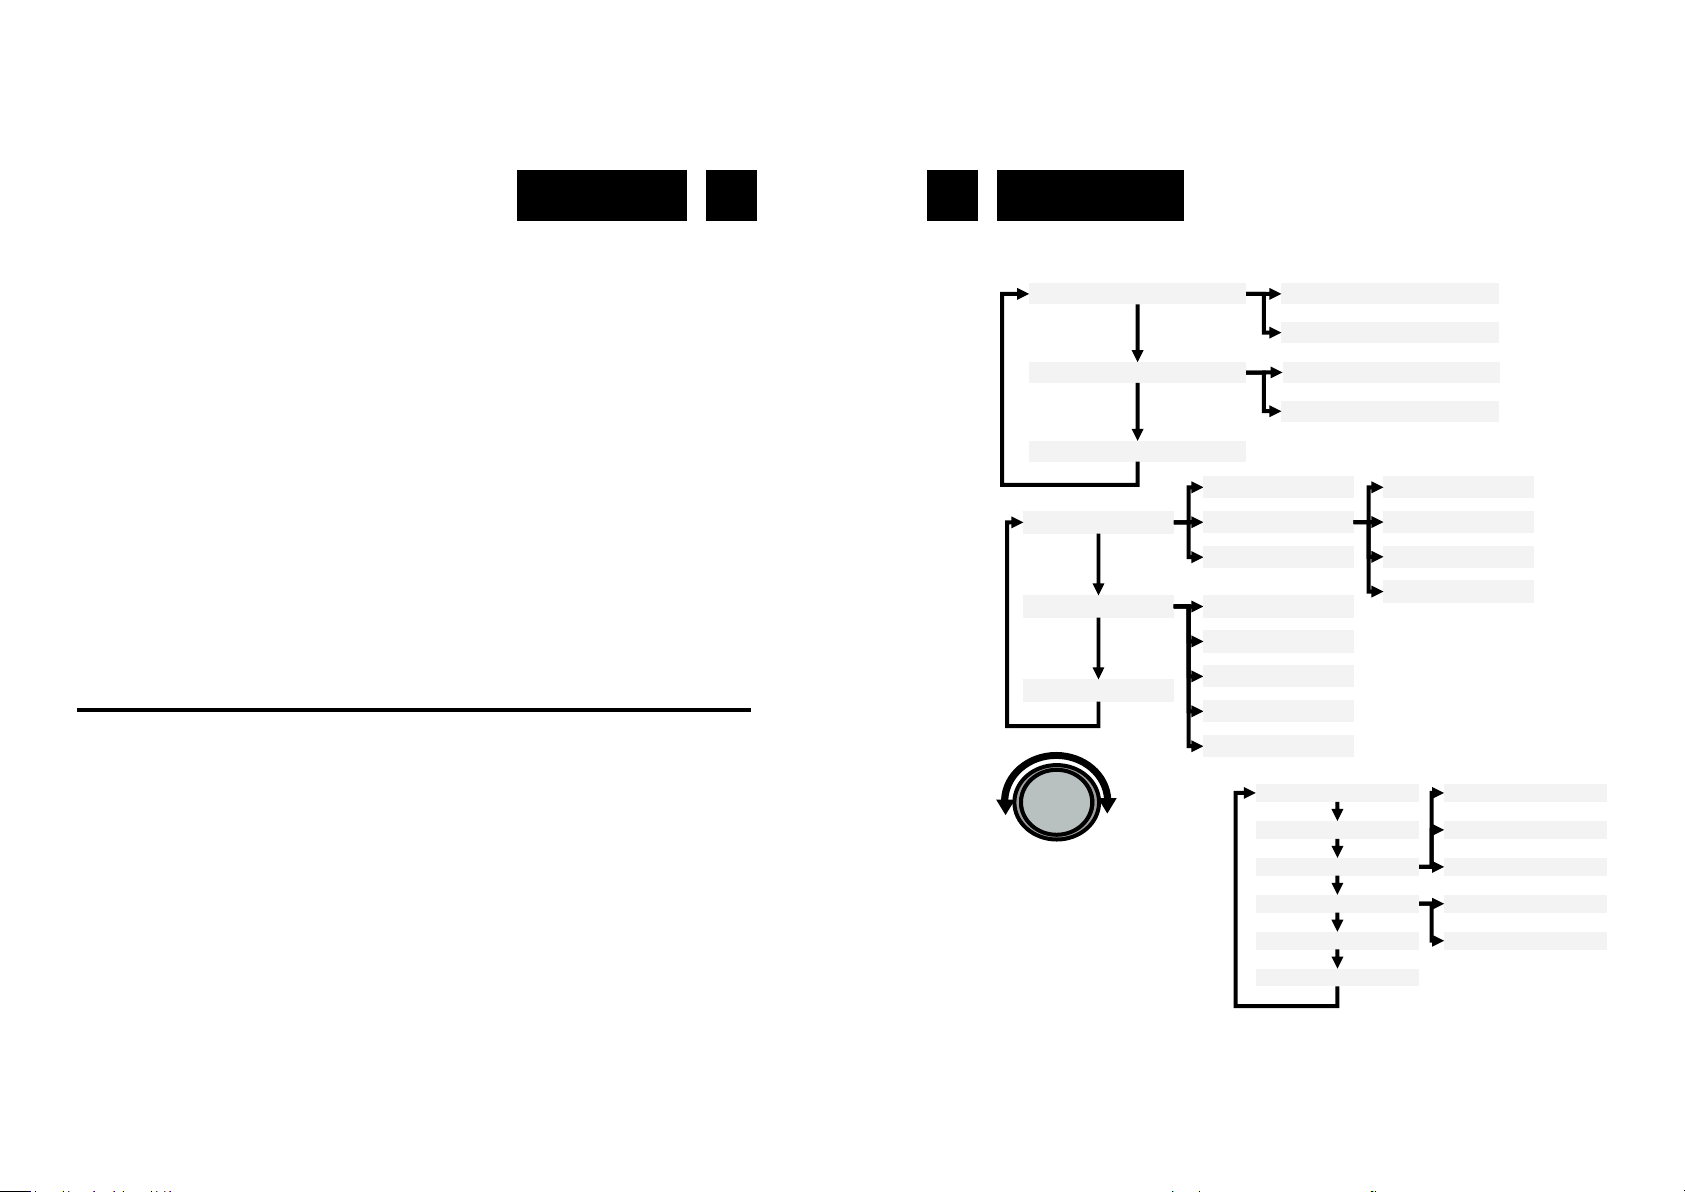
TUNER/ENTER
Turn left & right to move inside of
Display menu, then push the same
knob to confirm each function.
TIME
LANGUAGE
SW VERSION
FROM FM
FROM ANY
FROM DAB
AUTO UPDATE
SET 12/24 HOURS
ENGLISH
NEDERLANDS
SET TIME/DATE
NORK
SWENSKA
DEUTSCH
NO UPDATE
TUNER/ENTER
Page 6
English English 7 8
in stereo.
Press the MENU BUTTON (19) until select “AUDIO SETTING”, then
press the TUNING/ENTER KNOB (21) and turn again the TUNING/
ENTER KNOB (21) to select between FORCED MONO or STEREO
ALLOWED.
DAB OPERATION
1. Press sequencially the FUNCTION BUTTON (6) to select DAB mode.
2. Extend the DAB antenna at the back of the unit.
AUTOMATIC TUNING
1. Press the MENU BUTTON (19), then move the TUNING/ENTER
KNOB (21) to select FULL SCAN.
2. Press the TUNING/ENTER KNOB (21) to start searching the DAB /
DAB+ station.
MANUAL TUNING
1. Press the MENU BUTTON (19), then move the TUNING/ENTER
KNOB (21) to select MANUAL TUNE.
2. Turn the TUNING/ENTER KNOB (21) to tune manually the desired
station.
3. When tuned a DAB stereo station, the “stereo” will show on the LCD.
4. During DAB reception, press the INFO BUTTON (31) to see the infor-
mation of the playing DAB station on the display, i.e Program Type /
Program No. / Frenquency Range / Signal Strength / Time / Date.
PRESET MEMORY DAB / DAB+
1. When selected the desired station, press and hold the PRESET BUTTON (33) for 2 seconds.
2. The display show “Preset Store 1: (Empty)”. Turn the TUNING/ENTER
KNOB (21) to select the desired preset number, then press the
TUNING/ENTER KNOB (21) to store the station.
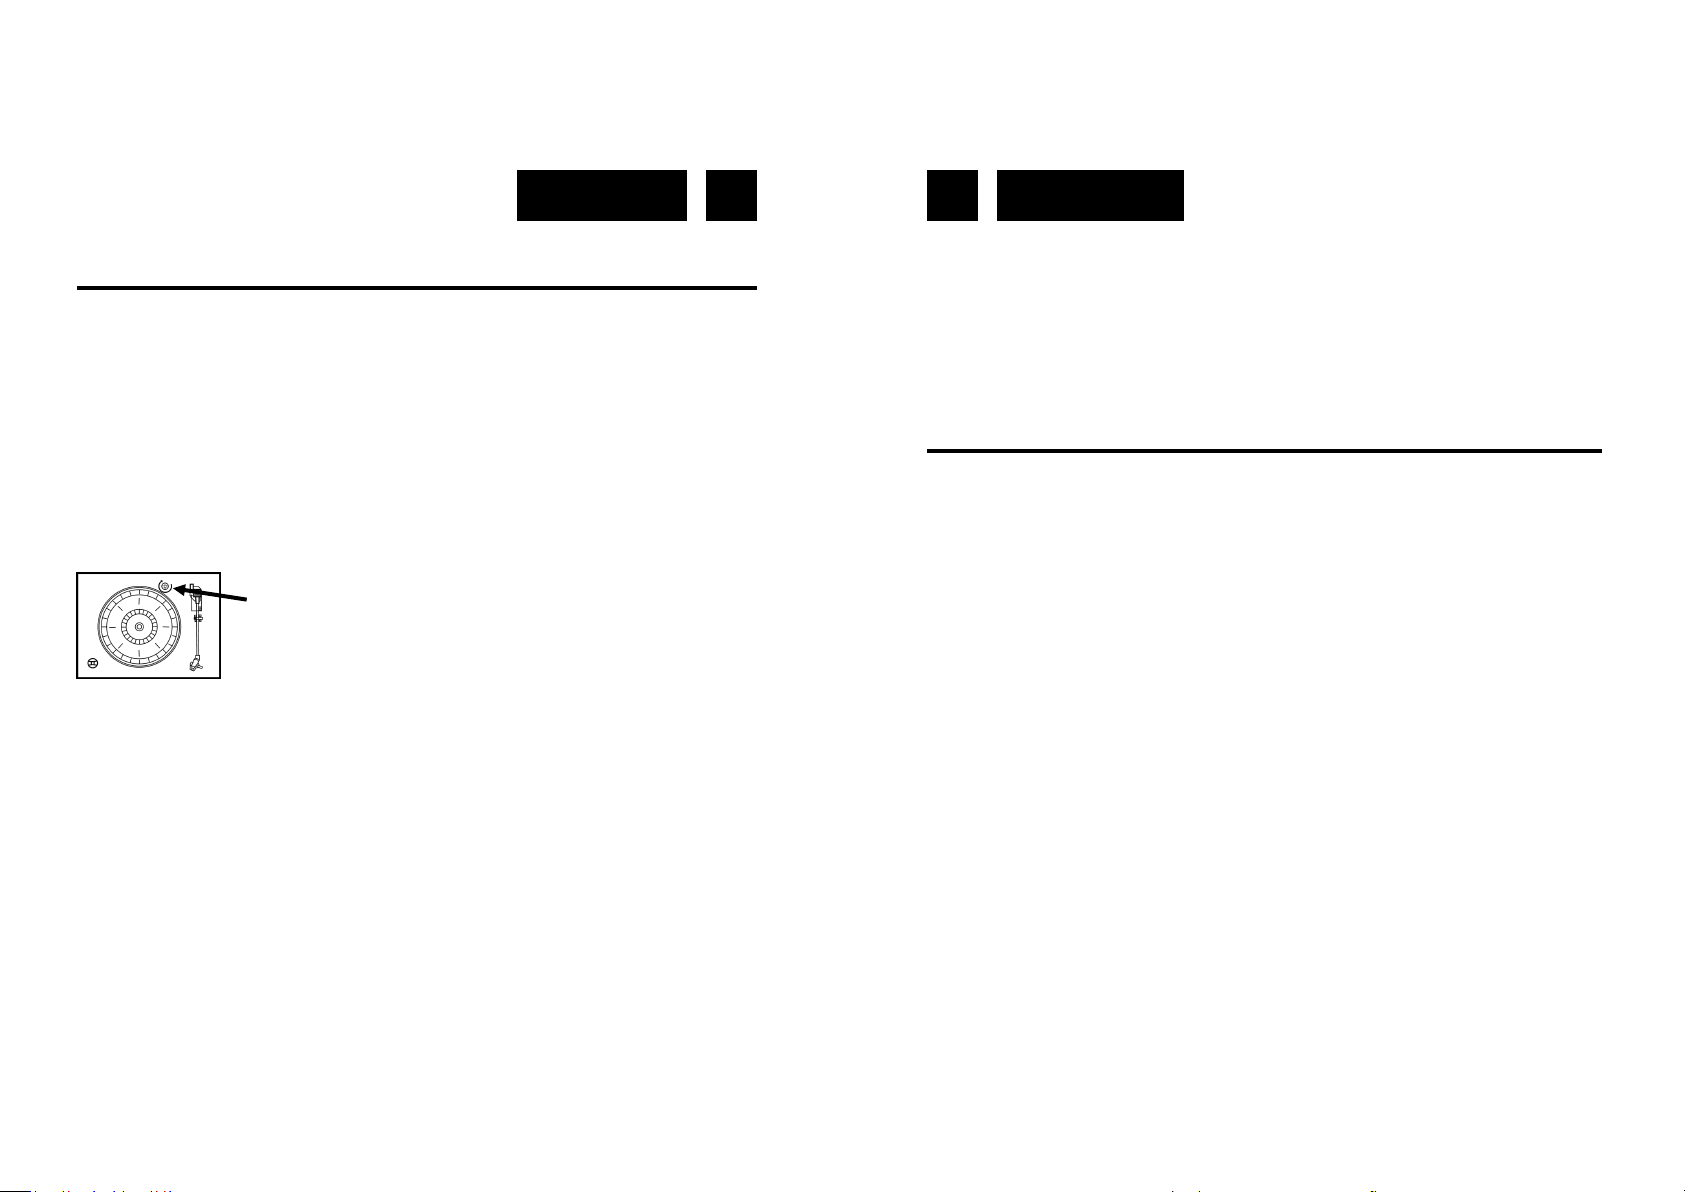
TURNTABLE OPERATION
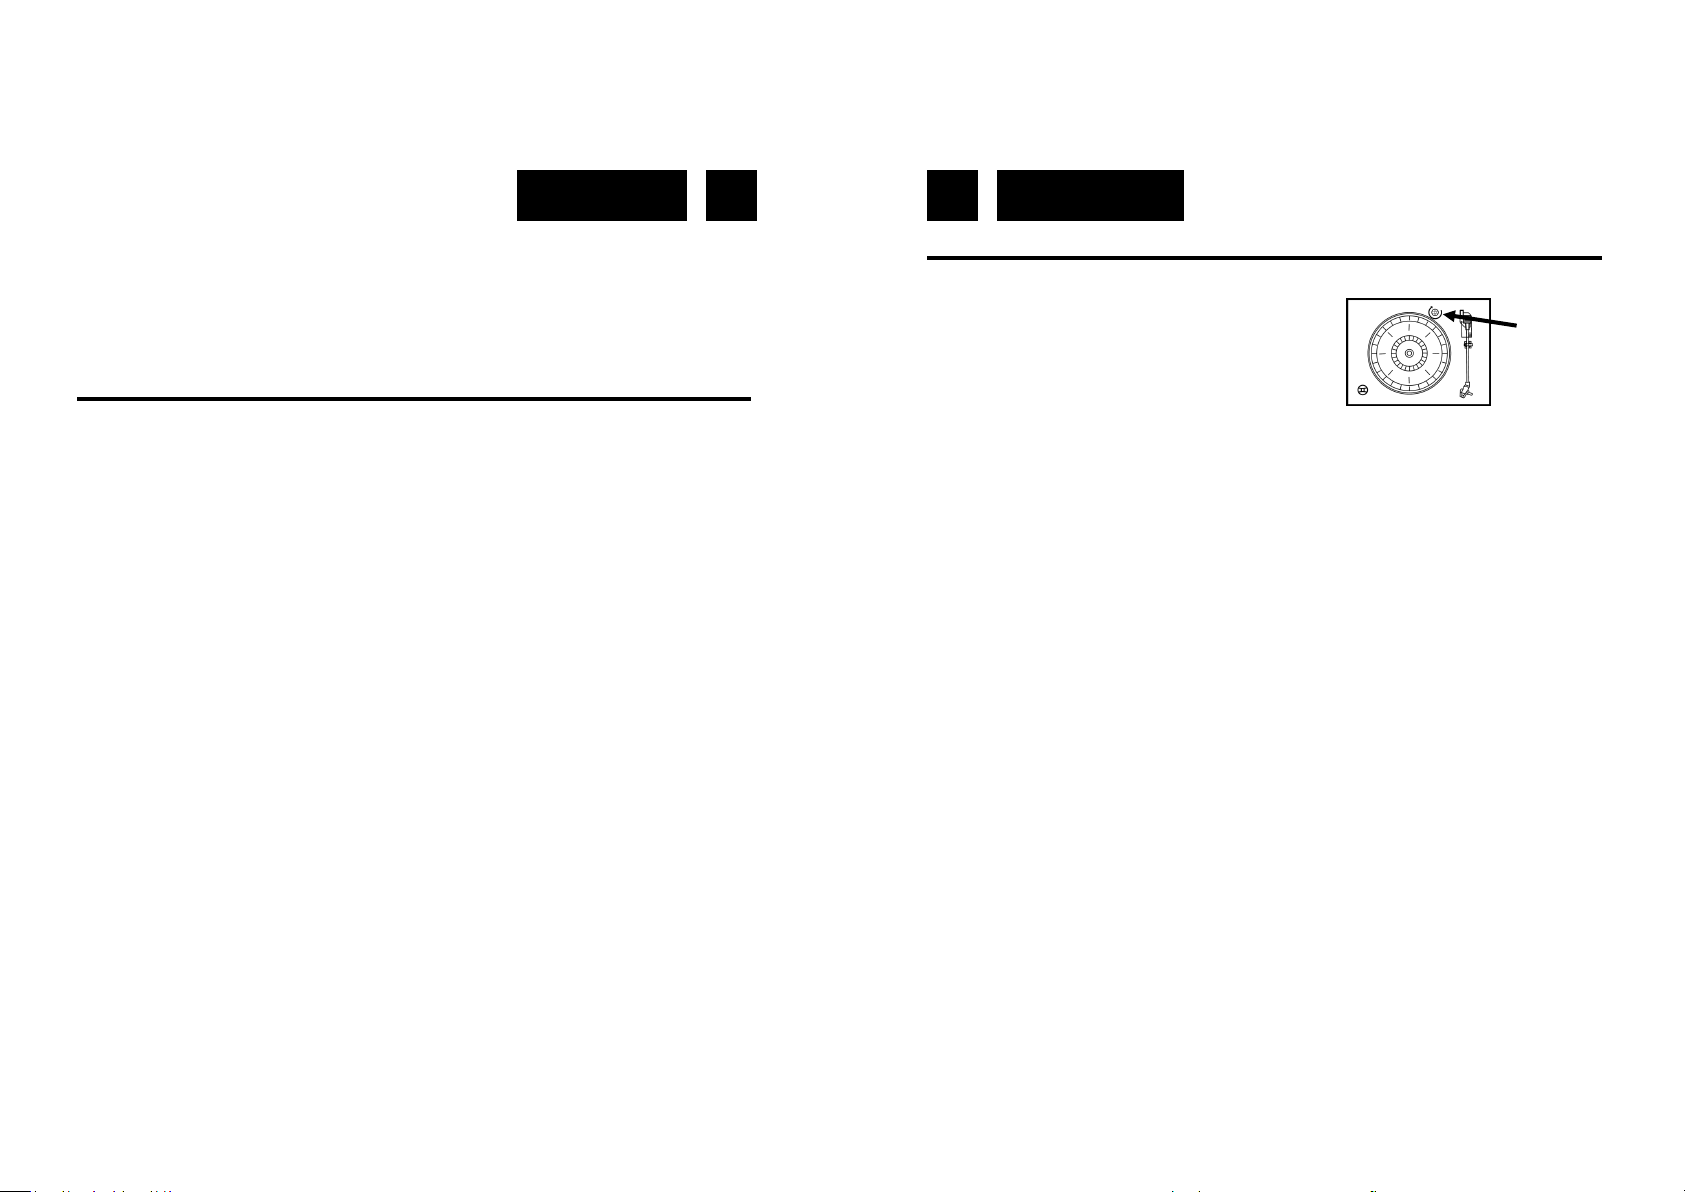
VERY IMPORTANT!
To prevent damages from transportation, a
transit screw is located at the upper right side
of the turntable platform. Before start playing,
use a screwdriver and turn the transit screw
in clockwise direction (screw going down)
completely. In case of transportation, remember to clock again this screw
in counter-clockwise direction to prevent damages.
Preparation
1. Open the Record Player Cover.
2. Release the Tonearm Clamp, and remove the stylus protector.
Listening to Records
1. Press the FUNCTION BUTTON (6) to select the TURNTABLE function.
2. Place a record on the turntable, over the central spindle. Place the EP
adapter over the central spindle when playing 17cm EP records.
3. Set the Speed Selector (24) to 33/78 or 45 rpm according to the record.
4. Release the tonearm clamp, and remove the protective cap from the
stylus.
5. Lift the Tonearm with the Tonearm Lift Lever.
6. Move the tonearm to the beginning of the record, or to the start of a
particular track.
TRANSIT
SCREW
Lock Lever Stylus Cover
Page 7
English English 9 10
7. Gently lower the tone arm onto the record with the Tonearm Lift lever
to start playing.
8. When the record is finished the tonearm will automatically stop and
return automatically to the rest. To stop manually, lift the tonearm from
the record and return it to the rest.
Notes: Do not stop or turn the platter manually. Moving or jarring the turntable without securing the Tonearm clamp could result in damage to the
Tonearm. Replace the protective cap on the stylus when not in use.
PLAYING COMPACT DISC
To start
1. Press FUNCTION BUTTON (6) to select “CD“ mode.
2. Press “open/close” button (11) to open the cd door (10).
3. Place a cd with the printed side facing up inside the tray & then close
the co door.
4. Focus search is performing, the first track will start playback.
5. To interrupt, press the STOP BUTTON (26) once, the total number of
tracks compare on the lcd display (18). Press again PLAY/PAUSE
BUTTON (2) to resume normal playback.
Skip/search mode (skip/search up / skip/search down)
During play or pause mode, if SKIP UP BUTTON (3) is pressed. it will
go to next track and display the track no. and then remain the play or
pause mode.
During play or pause mode, if SKIP DOWN BUTTON (4) is pressed. it
will go back to the beginning of the track, original track number is
display and remain the play or pause mode.
After step 2, press SKIP DOWN BUTTON (4) again will go to the pre-
vious track and remain the play or pause mode.
If press and hold the SKIP UP BUTTON (3)/SKIP DOWN BUTTON (4)
during cd/mp3 playabck, the playing track will go fast forward or ba-
ckward until the button being released.
To skip 10 tracks UP or DOWN press the TRACK +10 or TRACK -10
button on Remote Control.
REPEAT/RANDOM MODE
Press the PLAY MODE BUTTON (5) to activate this function. All the tracks
can be played in difference mode as follow:
Repeat play: you can listen the desired tracks or folder repeatedly by
this function.
Random play: you can listen all the tracks or folder in a random order
by this function
CD DISC PROGRAMMING
Up to 99 tacks can be programmed for mp3 (20 in CD) and play in any
order. before use, be sure the system is at stop mode before programming:
1. In cd mode and stop the cd playback.
2. Press the PROGRAM BUTTON (46), “P“ will appear on lcd display
(18). Moreover, it will indicate program no. and digits for track no. to be
programmed.
3. Select a desired track by pressing SKIP UP/DOWN BUTTONS (3)/(4).
4. Press the PROGRAM BUTTON (46) to store the trace into memory.
5. Repeat steps 3 and 4 to enter additional tracks into the memory if ne-
cessary.
6. When all the desired tracks have been programmed, press PLAY/
PAUSE BUTTON (2) to play the disc in assigned order.
7. To cancel the programmed file, press STOP BUTTON (26).
PLAYBACK OF MP3/WMA SONG VIA USB STORAGE MEDIA
The system is able to decode and playback all mp3 /wma file which stored
in the memory media with usb connecting port.
Page 8

English English 11 12
1. Press FUNCTION BUTTON (6) to select “USB“ mode.
2. Plug-in the usb plug with the face up & make sure it going into comple-
tely.
3. The system will start reading the storage media automatically after
connecting, and lcd display (18) will show the total number of mp3/
wma files
4. Repeat the same playback procedure as playing cd/mp3 disc as above.
REMARKS:
The system can detect and read the file under mp3 and wma format
only though the usb port.
If connect the system to mp3 player via the usb socket, due to varian-
ces in mp3 encoding format, some mp3 player may not be able to play
via the usb socket. this is not a maul-function of the system.
Connecting the usb upside down or backwards could damage the au-
dio system or the storage media (usb thumb drive). Check to be sure
the direction is correct before connection.
LISTENING TO TAPE
1. Set the FUNCTION BUTTON (6) to “TAPE“ mode. The system will
start playback automatically after inserting the cassette tape.
2. Press CASSETTE STOP/EJ BUTTON (30) half inwards during
playback mode. The tape will wind forward.
3. Slightly press the CASSETTE STOP/EJ BUTTON (30) again to resume playback.
4. Press the CASSETTE STOP/EJ BUTTON (30) completely inwards and
the cassette tape will be ejected through the CASSETTE DOOR (17).
BLUETOOTH OPERATION
1. Press the BT button, the BT indicator will light up.
2. Select from your portable device (Smartphone, Tablet...) the ID Blueto-
oth tagged as “CBT”, then confirm connection.
3. Now you can transfer the music to the HIF-1999D+BT and all operations can only be operated from your mobile device.
ENCODING FROM RADIO
Plug USB Disk into USB socket. During FM playing mode, press the RE-
CORD BUTTON (9) one time, the “USB” on the display will flash after 5
seconds and the recording is starting. Press the PLAY/PAUSE BUTTON
(2) one time to stop the recording and “USB” will not flash; press the
PLAY/PAUSE BUTTON (2) again to resume to record and “USB” will flash
again.
ENCODING FROM CD
Plug USB Disk into USB socket. During CD playing mode, press the RECORD BUTTON (9) one time, “REC-1” will show on the display: press the
RECORD BUTTON (9) secondly to record the playing track; or press the
SKIP UP BUTTON (3) one time to choose to record whole file in the CD
and “REC-A” will show on the display.
ENCODING FROM CD-MP3
Plug USB Disk into USB socket.
During MP3 playing mode press the RE-
CORD BUTTON (9)
one time, “REC-1” will show on the display; then press
the RECORD BUTTON (9) secondly to confirm, “REC”” will flash and
start to record after 5
seconds;
or press the SKIP UP BUTTON (3) one
time to choose to record all the file in the playing folder and “REC-F” will
show on the display; or press the SKIP UP BUTTON (3) twice to record
the file in the whole playing MP3 disc and “REC-A” will show on the
display.
ENCODING FROM CASSETTE
Plug USB Disk into USB socket. During TAPE playing mode, press the
RECORD BUTTON (9)
one time, “USB” will show on the display, then
press the RECORD BUTTON (9) secondly to confirm, “USB” will flash and
Page 9
English English 13 14
start to record after 5 seconds; press PLAY/PAUSE BUTTON (2) one time
to stop the recording and “USB” will not flash; press PLAY/PAUSE BUTTON (2) button again to resume to record and “USB” will flash again.
ENCODING FROM PHONO
Plug USB Disk into USB socket. During PHONO playing mode, press RE-
CORD BUTTON (9) one time, “USB” will show on the display, then press
the RECORD BUTTON (9) twice to confirm, “USB” will flash and start to
record after 5 seconds; press PLAY/PAUSE BUTTON (2) one time to
stop the recording and “USB” will not flash; press PLAY/PAUSE BUTTON
(2) again to resume to record and “USB” will flash again.
ENCODING FROM BLUETOOTH
Plug USB Disk into USB socket. During BLUETOOTH playing mode,
press the RECORD BUTTON (9) one time, “USB” will show on the display,
then press the RECORD BUTTON (9) secondly to confirm, “USB” will
flash and start to record after 5 second’ s; press the PLAY/PAUSE BUT-
TON (2) one time to stop the recording and “USB ” will not flash; press the
PLAY/PAUSE BUTTON (2) again to resume to resord and “USB” will not
flash again.
NOTE: Press the STOP button to stop recording when you finish recording.
DELETE USB
1. During USB mode, press DELETE BUTTON (45) one time,“ DEL-1”
will show on the display. You can delete the playing track.
2. Press SKIP UP BUTTON (3). The playing file and “DEL-F” will show on
the display. You can delete the current playing folder.
3. Press SKIP UP BUTTON (3). “DEL-A” will show on the display. You
can delete all of the tracks into the playing USB.
4. Finally press DELETE BUTTON (45) again once confirmed to choose
“DEL-1”, “DEL-F” or “DEL-A”.
MUTE / EQ OPERATION
During playing mode, press the MUTE BUTTON (49) one time, the sound
will not be heard from the speakers and “MUTE ON” will show on the
display; press the MUTE BUTTON (49) or rotate the VOLUME KNOB (7)
to cancel mute function and the sound can be heard again from the speakers.
During playing mode, press the EQ BUTTON (34) to choose from different
sound effect among FLAT/ POP/ CLASSIC/ ROCK/ JAZZ.
SPECIFICATIONS
AC: 110-240V ~ 50Hz
FM: 87.5 - 108MHz
DAB Band: BAND III
Design and specifications are subject to change without notice.
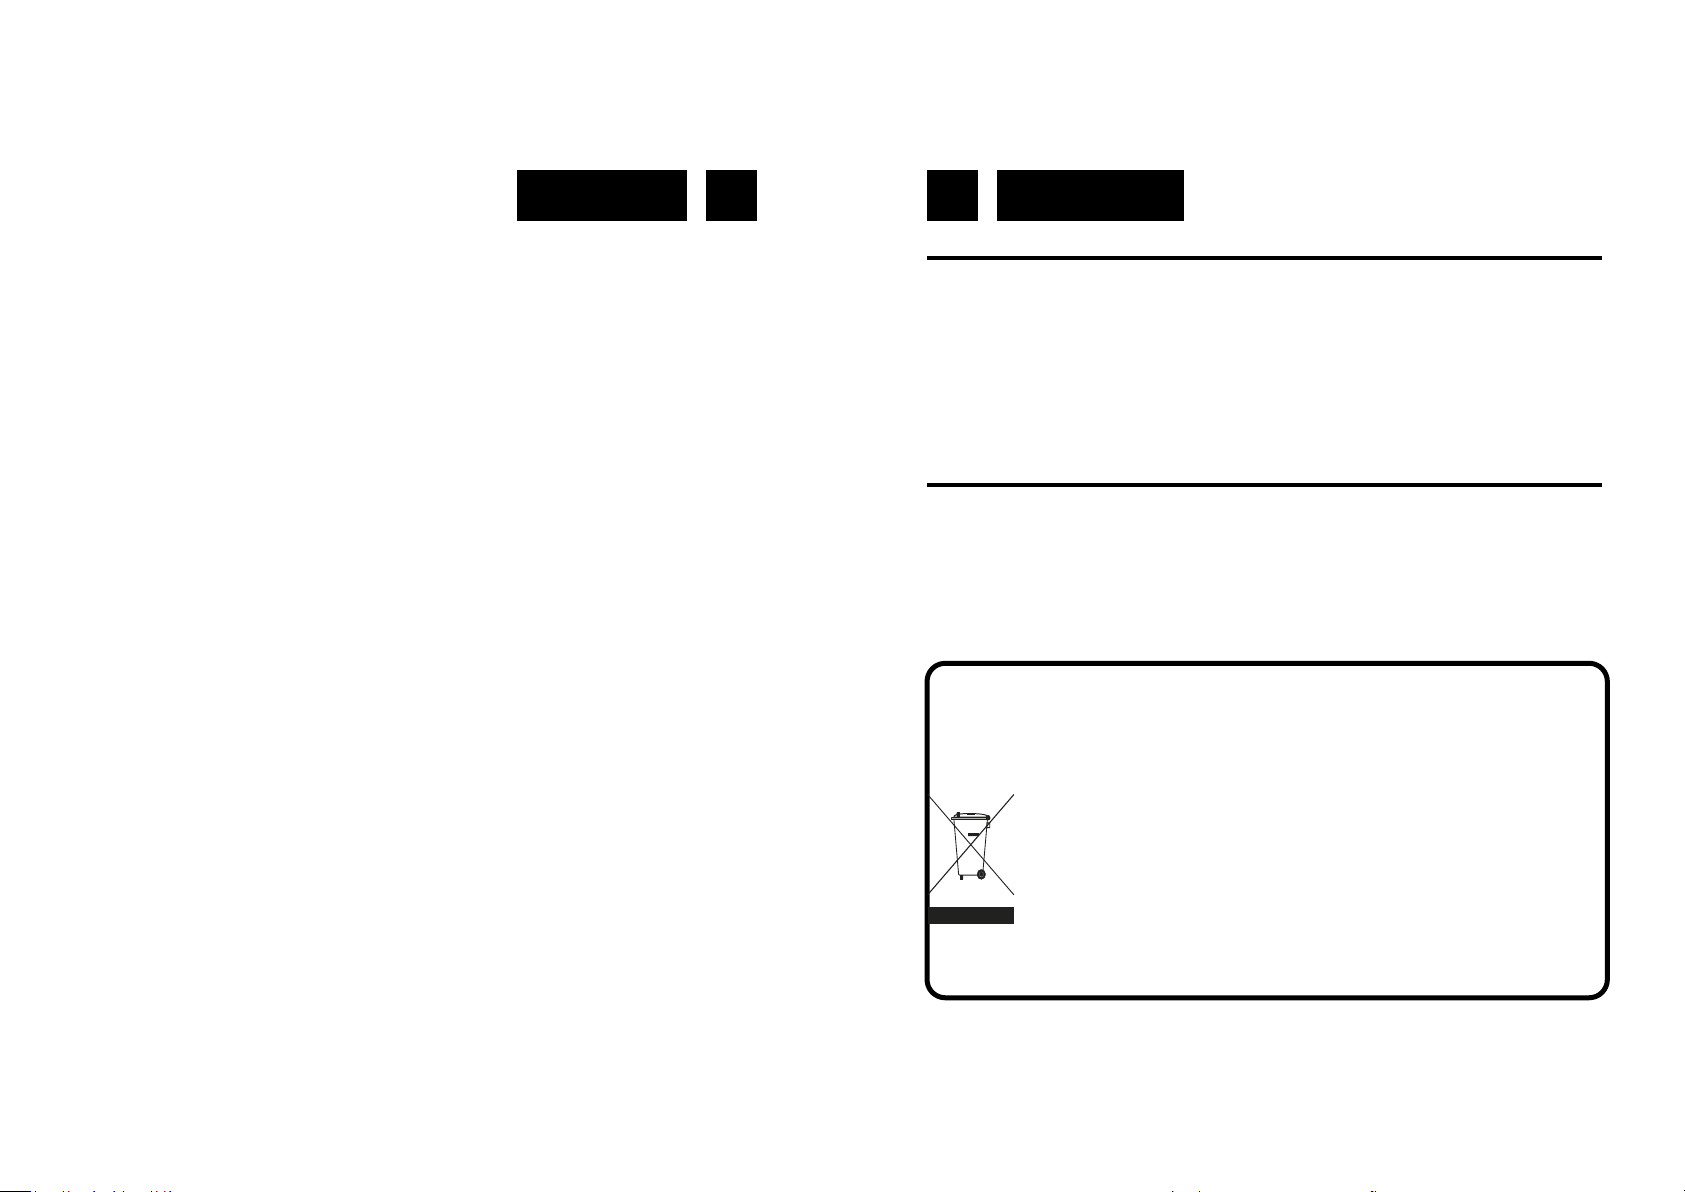
This marking shown on the product or its literature, indicates that it should not be
disposed with other household wastes at the end of its working life. To prevent
possible harm to the environment or human health from uncontrolled waste disposal, please separate this from other types of wastes and recycle it responsibly to promote the sustainable reuse of material resources. Househol d users
shoul d contact ei ther the retai l er where they purchased this product, or their
local government office, for details of where and how they can take this item for
environmentally safe recycling. Business users should contact their supplier and
check the terms and conditions of the purchase contract. This product should not
be mixed with other commercial wastes for disposal.
Correct Disposal of This Product
(Waste Electrical & Electronic Equipment)
Page 10

Deutsch Deutsch 15 16
LAGE DER BEDIENUNGSELEMENTE
1. SCHUTZDECKEL
2. TASTE CD PLAY/PAUSE/STOP
3. TASTE CD SKIP UP
4. TASTE CD SKIP DOWN
5. TASTE PLAY MODE
6. FUNKTION-TASTE
7. LAUTSTÄRKEREGLER
8. FERNBEDIENUNGSSENSOR
9. TASTE RECORD
10. CD-FACH
11. TASTE OPEN/CLOSE
12. TASTE MW RADIO
13. USB-PORT
14. TASTE UKW RADIO
15. POWER ON/OFF SCHALTER
16. TONARM-HABEL
17. POWER-LED-ANZEIGE
18. LCD-DISPLAY
19. LED-ANZEIGE FÜR FM-STEREO
20. RADIO DIAL SCALE
21. TUNING-REGLER
22. TONARM-SCHLOSS
23. SINGLE-ADAPTER
24. GESCHWINDIGKEITSWAHLSCHALTER 33/45 U/MIN
25. TONARMABLAGE
26. TASTE STOP
27. LAUTSPRECHER (L/R)
28. FM-ANTENNE
29. WECHSELSTROMKABEL
30. KASSETTE STOP / AUSWERFEN
31. INFO-TASTE
32. SCAN-TASTE
33. PRESET-TASTE
34. EQUAALIZER-TASTE
SICHERHEITSHINWEISE
Das Ausrufszeichen im Dreieck weist den Benutzer auf wichtige Bedienungs- und Wartungsanweisungen (Service) in
diesem Handbuch hin, die unbedingt zu befolgen sind.
Um die Gefahr elektrischer Schläge auszuschliessen, Gehäuse auf keinen Fall abnehmen.
Im Innem befinden sich keine vom Benutzer selbst instandsetz-baren Teile. Reparaturen dürfen nur von einer autorisierten Fachwerkstatt durchgeführt werden.
Dieses Gerät ist für 230V ~ 50Hz Netzspannung ausgelegt.
Bei längerer Nichtbenutzung des Geräts ziehen Sie den
Stecker aus der Steckdose.
Setzen Sie das Gerät weder Feuchtigkeit noch Regen aus.
Schalten Sie das System erst dann ein, wenn Sie alle Verbindungen genau geprüft haben.
Stellen Sie das Gerät so auf, dass immer eine ungestörte
Frischluftzufuhr sichergestellt ist. Es ist zum beispiel keinesfalls auf Teppiche und in der Nähe von Gardinen zu stellen
oder in Bücherregale einzubauen.
Setzen Sie das Gerät weder direkter Sonneneinstrahlung
noch Wärmequellen aus.
Page 11
Deutsch Deutsch 17 18
FERNBEDIENUNG
35. CD TASTE OPEN/CLOSE-TASTE
36. ENKODIERUNG-TASTE: im CD/Phono/Kassette/Bluetooth-Modus zur Akti-
vierung der Aufzeichnungsfunktion.
37. WIEDERGABEMODUS-TASTE
38. PLAY / PAUSE-TASTE
39. SKIP UP-TASTE (TITEL SPRUNG ZURÜCK)
40. SKIP UP+ TASTE (TITEL SPRUNG VORWÄRTS)
41. STOP-TASTE
42. +10 SKIP-TASTE
43. -10 SKIP-TASTE
44. FUNKTION-TASTE
45. LÖSCHEN-TASTE
46. PROGRAM-TASTE
47. TASTE LAUTSTÄRKE+
48. TASTE LAUTSTÄRKE-
49. STUMM-TASTE
50. EQUALIZER-TASTE
51. PRESET-TASTE
52. INFO-TASTE
BATTERIE
Die Infrarot-Fernbedienung erfordert zum Betrieb zwei Batterien vom Typ CR-
2025.
NETZANSCHLUSS
Bevor Sie das Gerät einschalten, vergewissern Sie sich, daß Ihre örtliche Netzspannung mit der auf dem Typenschild angegebenen Spannung übereinstimmt.
Zu Ihrer eigenen Sicherheit lesen Sie sorgfältig die folgende Bedienungsanleitung, bevor Sie das Gerät ans Netz anschließen.
Schließen Sie das AC-Netzkabel an Ihr ACHaushaltstromnetz an Drücken Sie die
POWER-Taste 1 Sekunde, um das Gerät einzuschalten. Drücken und halten Sie die
POWER-Taste 3 Sekunden zum Ausschalten
des Gerät. Wenn kein Klang erzeugt wird, wird
das Gerät automatisch nach 15 Minuten
ausgeschalten.
NETZBETRIEB (AC)
Dieses Gerät funktioniert nur mit einer Spannung von AC 110-240V 50Hz. Wird
das Gerät an andere Stromquellen angeschlossen, könnte es Schaden nehmen.
Vorsicht: Um elektrischen Schlägen vorzubeugen, trennen Sie das Gerät vom
Netz ab, bevor Sie den Deckel entfernen. Verwenden sie keine nutzbaren inneren Teile. Für die Wartung wenden Sie sich an qualifiziertes Kundendienstpersonal.
RUNDFUNKEMPFANG
Antenne
Für den UKW / DAB-Empfang befindet sich auf der Rückseite des Gerätes ein
eingebauter UKW / DAB-Antennendraht (28). Bewegen Sie den Draht hin und
her, bis der beste Empfang erreicht wird.
EINSTELLUNG DER AUTOMATISCHEN UHRZEITAKTUALISIERUNG
1. Drücken Sie im FM- oder DAB-Modus die Taste MENU, um das System durch
Drehen des Knopfes TUNING/ENTER zu wählen, und drücken Sie ihn, um Ein-
Page 12
Deutsch Deutsch 19 20
gabe in das System zu bestätigen.
2. Drehen Sie den Knopf TUNING/ENTER, um die Einstellung TIME zu wählen,
und drücken Sie ihn, um in das Menü für TIME zu gelangen, ‘TIME’ ‘Set Time/
Date’ wird auf dem Bildschirm angezeigt.
3. Die Menüpunkte ‘Set Time/Date’: ‘Auto update’ ‘Set 12/24 Hour’ werden nach-
einander auf dem Bildschirm angezeigt, wenn Sie den Knopf TUNING/ENTER
drehen.
4.‘Auto update’ nach Bestätigung: ‘No update’ / ‘Update from Any’ / ‘Update from
DAB ‘ und ‘Update from FM’ wird nacheinander auf dem Bildschirm angezeigt,
wenn Sie den Knopf TUNING/ENTER drehen. Sie könnenden gewünschten Aktualisierungsmodus wählen, indem Sie TUNING/ENTER zur Bestätigung drücken.
5. ‘Set 12/24 Hour’ nach Bestätigung: ‘Set 12 Hour’ ‘Set 24 Hour’ wird auf dem
Bildschirm angezeigt.
6. Bestätigen Sie 12 oder 24 Stundenanzeige, um mit Einstellen der Zeit anzu-
fangen, ‘Set Time’ / ‘Hour/ Minute’ ‘AM’ oder ‘PM’ wird auf dem Bildschirm ange-
zeigt. Drehen und drücken Sie TUNING /ENTER zur Einstellung.
7. Zeiteinstellung ist abgeschlossen und beginnen Sie mit der Einstellung des
Datums. ‘Set Date’’1-1-2009 wird auf dem Bildschirm angezeigt. Drehen und
drücken Sie TUNING/ENTER zur Einstellung.
EINSTELLEN DER SPRACHE
Drücken Sie im FM- oder DAB-Modus die Taste MENU, um LANGUAGE durch
Drehen von TUNING/ENTER von SYSTEM zu wählen; Sie haben die Auswahl
aus GERMAN –ENGLISH- DUTCH – NORWEGIAN – SWEDISH. Während des
Empfangs von RDS-Sendern, aktualisiert der Player automatisch die Zeit, stan-
dardmäßig ist ‘Update from any’ eingestellt. Dies kann manuell gelöscht werden.
Drücken Sie im DAB- oder UKW-Modus einmal auf die MENU-Taste, drehen Sie
TUNER UP/DN, um ‘system’ auszuwählen; drücken Sie einmal auf VOLUME/
ENTER und drehen Sie dann TUNER UP/DN, um TIME auszuwählen; drücken
Sie auf VOLUME/ENTER, um zu bestätigen und drehen Sie dann TUNER UP/
DN, um ‘Auto update’ auszuwählen; drücken Sie auf VOLUME/ENTER, auf dem
Display wird ‘Update from any’ angezeigt; drehen Sie TUNER UP/DN, um
‘Update from DAB’, ‘Update from FM’ oder ‘No update’ auszuwählen; drücken
Sie auf VOLUME/ENTER, um den gewünschten Aktualisierungsmodus zu
bestätigen. Wenn Sie ‘No update’ wählen, wird die Zeit nicht aktualisiert, auch
wenn Sie DAB- oder UKW-RDS-Sender empfangen.
Drehen Sie links oder rechts,
Wählen Sie das gewünschte
Display-Menü durch Drücken
des gleichen Knopfes, um die
gewünschte Funktion zu bestätigen.
VOLLSTÄNDIGER
MANUELL EINSTELLEN
DRC
SENDERREIHENFOLGE
LEEREN NEIN/JA
HAUPTMENÜ
HOCH
TIEF
AUS
ALPHANUMERISCH
ENSEMBLE
SUCHLAUF-EINSTELLUNG
AUDIO-EINSTELLUNG
HAUPTMENÜ
NUR KRÄFTIGE SENDER
ALLE SENDER
NUR MONO
SEREO MÖGLICH
UHRZEIT
SPRACHE
SW-VERSION
VON FM
UPDATE ALLE
VON DAB
AUTOM. UPDATE
12/24 STD. EINSTELLEN
ENGLISH
NEDERLANDS
ZEIT/DATUM EINSTELLEN
NORK
SWENSKA
DEUTSCH
KEIN UPDATE
TUNER/ENTER
Page 13
Deutsch Deutsch 21 22
7. Am Ende der Platte, heben Sie den Tonarm und bringen Sie es zum Rest.
8. Wenn Sie die Platte während der Wiedergabe stoppen wollen, den Tonarm
von der Platte heben und zur Ruhe zurückbringen.
Hinweise: Drehen oder stoppen Sie den Plattenteller nicht manuell. Wenn Sie
den Plattenteller bewegen oder anstossen, ohne den Tonarm mit der Klemme
gesichert zu haben, konnte der Tonarm beschädigt werden Stecken Sie die
Schutzkappe auf die Wiedergabenadel, wenn das Gerät nicht benutzt wird.
WIEDERGABE EINER CD
Erste Schritte
1. Drücken Sie die Funktion Taste um in den CD Modus zu gelangen.
2. Öffnen Sie das CD-Fach (11) mittels der Taste „open/close” (10).
3. Legen Sie eine CD mit der bedruckten Seite nach oben in das CD-Fach und
schließen Sie dieses wieder.
4. Die CD wird daraufhin eingelesen, und erste Track beginnt Playback.
5. Starten Sie die Wiedergabe mittels der Taste CD (2) ein mal; der erste Track
wird nun abgespielt. Zum Unterbrechen der Wiedergabe drücken Sie ein
weiteres Mal auf die PLAY / PAUSE (2). Die Spielzeit hält nun an. Betätigen
Sie die Taste erneut, um die normale Wiedergabe fortzusetzen.
Skip und Suchfunktion
Wenn Sie während der Wiedergabe oder Pause auf die SKIP + drücken,
springt das Gerät zum nächsten Track, zeigt die entsprechende Tracknummer an und bleibt dann im Wiedergabe- bzw. Pausenmodus.
Wird während der Wiedergabe oder Pause die SKIP- (4) betätigt, springt das
Gerät zum Anfang des aktuellen Tracks zurück, zeigt die aktuelle Tracknummer an und bleibt dann im Wiedergabe- bzw. Pausenmodus.
1. Wenn Sie im Anschluss an Schritt 2 erneut auf die TASTE PLAY MODE (5)
drücken, wird der vorangehende Track aufgerufen und das Gerät bleibt dann
im Wiedergabe- bzw. Pausenmodus.
Halten Sie die SKIP + / SKIP - während der CD/MP3-Wiedergabe gedrückt,
erfolgt der schnelle Vor- bzw. Rücklauf, bis Sie die Taste wieder loslassen.
Drüken Sie die Taste +10 oder -10 vom fernbedienung zu springen die track.
.
PLATTENSPIELERBETRIEB
Vorbereitung
Öffnen Sie die Abdeckung.
Schrauben Sie die zwei TRANSIT-SCHRAUBEN ab, indem Sie eine Münze benutzen. Entfernen Sie die Tonarmklemme und nehmen Lösen Sie die Tonarmsi-
cherung und entfernen die Schutzkappe.
Plattenspielerbetrieb
1. Legen Sie eine Schallplatte auf die mittlere Spindel des Plattentellers. Legen
Sie den EP-Adapter auf die mittlere Spindel, wenn Sie 17 cm EP-Platten abspielen.
2. Stellen Sie die Drehzahl-Wahlschalter (24) auf 33/78 oder 45 U./Min., entsprechend der Schallplatte.
3. Entriegeln Sie die Tonarm-Klemme und entfernen Sie die Schutzklappe von
der Wiedergabenadel.
4. Heben Sie den Tonarm mit dem Tonarm-Hebel an.
5. Bewegen Sie den Tonam an den Anfang der Plane oder eines bestimmten
Titels.
6. Senken Sie den Tonarm vorsichtig mit dem Tonarm-Hebel auf die Platte, um
die Wiedergabe zu starten.
TRANSIT
SCREW
Page 14

Deutsch Deutsch 23 24
der Fernbedienung ein zweites Mal gedrückt wird, werden alle Tracks im aktuellen Ordner der USB- oder MP3-Disk wiederholt und das Symbol
‘FOLDER’ wird auf dem Display angezeigt.
3) Wenn die Taste PLAY.MODE am Gerät oder die Taste P.MODE MENU an
der Fernbedienung ein drittes Mal gedrückt wird, werden alle Tracks auf der USB
- oder MP3-Disk wiederholt und das Symbol ‘ ALL ’ wird auf dem Display ange-
zeigt.
4) Wenn Sie die Taste PLAY.MODE zum vierten Mal oder die Taste RANDOM
auf der Fernbedienung drücken, tritt das Gerät in den Modus RANDOM
(Zufallswiedergabe) ein und ‘RDM’ wird auf dem Bildschirm angezeigt. Drücken
Sie die Taste SKIP- oder SKIP+, um Spuren zufällig zu wählen. Drücken Sie die
STOP-Taste, um die Wiedergabe zu beenden.
ANMERKUNG:
Uber den USB-Port kann das System nur Dateien im MP3- und WMA-Format
erfassen und einlesen.
Wird das System über den USB-Port an einen MP3-Player angeschlossen,
kann es bei einigen MP3-Playern passieren, dass aufgrund von Unterschieden im MP3-Kodierformat die Wiedergabe über den USB-Port nicht möglich
ist. Hierbei handelt es sich nicht um eine Fehlfunktion des Systems.
Werden Speichermedien falsch angeschlossen, können Schäden am Audio-
system oder an den Speichermedien (USB) entstehen. Achten Sie daher bitte
unbedingt darauf, dass Sie Speichermedien stets richtig herum einstecken.
HINWEIS: Sie können insgesamt 99 MP3-Tracks und 20 CD-Tracks
speichern . ‘PROGFULL’ wird auf dem Display angezeigt, wenn 99
MP3-Tracks oder 20 CD-Tracks gespeichert sind.
USB-BETRIEB
1) Drücken Sie Funktionstaste, um in den USB-Modus zu schalten.
2) Stecken Sie ein USB-Gerät in den USB-Anschluss. Der Player beginnt mit
dem ersten Lied auf dem USB-Gerät.
3) Das MP3-Symbol erscheint, wenn ein MP3 Track gefunden wird.
4) Die Funktionen PLAY/PAUSE,DN/F.R/UP/F.F und STOP sind identisch wie
beim CD-Wiedergabemodus.
WIEDERHOLUNG, INTRO UND ZUFALLSWIEDERGABE
Drücken Sie die Taste Play Mode (5) vor oder während der Wiedergabe mehrfach, um den gewünschten Wiedergabemodus für einen Track, einen Ordner
(nur bei MP3) oder alle Tracks auszuwählen:
Wiederholung: Mittels dieser Funktion können Sie die gewünschten Tracks
oder einen Ordner wiederholt anhören.
Zufallswiedergabe: Diese Funktion ermöglicht die Zufallswiedergabe aller
Tracks oder eines bestimmten Ordners.
DIE SPEICHERFUNTKION IM CD/MP3-MODUS
1) Drücken Sie im CD-Modus auf die Taste PLAY.MODE auf dem Gerät oder auf
die PROGRM-Taste auf der Fernbedienung, um in den Programmiermodus zu
schalten; das Display zeigt ’MEM’ ‘DISC’ ‘T00’ ‘PO1’ an. Drücken Sie auf SKIPoder SKIP+ , um den gewünschten Track auszuwählen und zum Bestätigen auf
die PLAY.MODE oder PROGRAM-Taste.
2) Drücken Sie auf die Tasten PLAY.MODE oder PROGRAM, um den nächsten
Track zu programmieren. Wiederholen Sie diesen Vorgang, um die gesamte
Trackabfolge zu programmieren. 3) Wiederholen Sie die Schritte 1 und 2, um
weiter zu programmieren.
4) Im MP3-Modus bei CD-/USB-Betrieb funktioniert der Einstellvorgang des MP3
-Speichers gleich wie der oben beschriebene Einstellvorgang des CD-Speichers.
5) Drücken Sie auf PLAY/PAUSE, um die gespeicherten Tracks abzuspielen;
drücken Sie auf SKIP- oder SKIP+, um in der gespeicherten Abfolge einen Track
auszuwählen.
6) Drücken Sie zweimal auf STOP, um den Programmiermodus zu ve rlassen.
Das gesamte gespeicherte Programm wird gelöscht.
DIE FUNKTION WIEDERHOLEN/ZUFALL IM CD-/MP3-MODUS (BEI CD-/USB
-BETRIEB)
1) Wenn Sie die Taste PLAY.MODE am Gerät oder die Taste P.MODE MENU
auf der Fernbedienung drücken, wird der aktuelle Track wiederholt und das Symbol ‘⌒’ wird auf dem Display angezeigt.
2) Wenn die Taste PLAY.MODE am Gerät oder die Taste P.MODE MENU an
Page 15

Deutsch Deutsch 25 26
RADIO-AUFNAHME
Stecken Sie den USB-Stick in den USB-Anschluss. Drücken Sie im UKW-Modus
einmal auf RECORD; nach 5 Sekunden blinkt ‘USB’ auf dem Display und die
Aufnahme beginnt. Drücken Sie auf STOP, um die Aufnahme zu beenden.
Hinweis: Wenn Sie im Aufnahmemodus einmal auf PLAY. MODE drücken, wird
die Aufnahme gestoppt und ‘USB’ blinkt nicht mehr.
Wenn Sie erneut auf PLAY.MODE drücken, wird die Aufnahme wieder gestartet
und ‘USB’ blinkt wieder.
CD-AUFNAHME
Stecken Sie den USB-Stick in den USB-Anschluss. Drücken Sie während des
CD-Modus einmal auf RECORD.
Das Display zeigt ‘REC-1’ um zu bestätigen, dass die Aufnahme des spielenden
Tracks gewählt wurde. Drücken Sie einmal auf UP/F.F<SKIP+> um den gesamten Inhalt der CD aufzunehmen; das Display zeigt ‘REC-F’ an.
3) Drehen Sie den Knopf TUNING/ENTER, um DAB-Sender manuell zu wählen.
Wählen Sie den gewünschten DAB-Sender und drücken Sie die Taste TUNING/
ENTER, um die Wiedergabe zu bestätigen.
Wenn Sie einen DAB-Stereosender wählen, wird ‘stereo’ auf dem Display ange-
zeigt.
4) Drücken Sie auf INFO, um Informationen wie Programm typ / Programm-
Nummer / Frequenzbereich / Signalstärke / Zeit / Datum etc. zu sehen. Drehen
Sie den TUNING/ENTER-Drehregler, um den gewünschten Radiosender einzustellen und drücken Sie dann TUNING/ENTER, um zu bestätigen.
Wenn Sie einen DAB-Stereosender einstellen, zeigt das Display ‘STEREO’ an.
DIE SPEICHERFUNTKION IM DAB-/UKW-MODUS
1) Wählen Sie im DAB-/UKW-Modus den gewünschten Radiosender aus. Halten
Sie die PRESET-Taste 2 Sekunden lang gedrückt; das Display zeigt ‘Preset Store 1:(Empty)’ an; drücken Sie auf den TUNING/ENTER-Drehregler, um zu bestä-
tigen; das Display zeigt ‘Preset 1 Stored’ an.
2) Drehen Sie den TUNING/ENTER-Regler oder drücken Sie auf die SKIP+/--
Taste auf der Fernbedienung, um die Programmierung des gewünschten Radio-
KASSETTEN BETRIEB
Hinweis: Vergewissern Sie sich, bevor Sie eine Kassette einlegen, dass das
Band nicht so lose ist, dass es sich im Mechanismus verheddern könnte. Lesen
Sie im Abschnitt PFLEGE UND WARTUNG nach, wie man mit losen Bändern
umgeht.
1) Drücken Sie auf POWER, um das Gerät einzuschalten.
2) Drücken Sie auf FUNCTION, um in den TAPE-Modus zu schalten.
3) Legen Sie Ihre Kassette in das Kassettenfach auf der rechten Seite des Gerä-
tes ein, wie in der Zeichnung gezeigt; dabei sollte die Seite, die Sie abspielen
möchten, nach oben zeigen und die offene Seite nach rechts.
4) Sobald die Kassette eingelegt ist, beginnt die Wiedergabe.
5) Stellen Sie den VOLUME -Regler auf die gewünschte Stärke ein.
CD-BETRIEB
1) Schalten Sie das Gerät EIN und drücken Sie FUNCTION, um in den CD-
Modus zu gelangen.
2) Drücken Sie auf OPEN/CLOSE (35), um die CD-Lade zu öffnen.
3) Legen Sie die Disk (Gerät ist MP3-kompatibel) so in die CD-Lade, dass die
Beschriftung oben ist.
4) Drücken Sie erneut auf OPEN/CLOSE (35), um die CD-Lade zu schließen.
Die Disk dreht sich einige Sekunden im Player, während dieser die Disk liest;
dann hört die Disk auf zu drehen und der erste Track wird abgespielt.
5) Das MP3-Symbol erscheint, wenn MP3 Tracks gefunden werden. Wenn kei-
ne MP3-Datei auf der Disk gefunden wird, wird kein Symbol angezeigt.
BLUETOOTH BETRIEB
1. Schalten Sie das Gerät ein und drücken Sie auf die FUNCTION-Taste, um in
den BLUETOOTH-Modus zu schalten.
2. Wählen Sie auf ihrem Mobilgerät (Smartphone, Tablet, ...), die Bluetooth-ID,
die mit ‘DBT’ gekennzeichnet ist und bestätigen Sie die Verbindung.
3. Jetzt können Sie die Musik nach HIF-1999D+BT übertragen und das Gerät
kann nur von Ihrem Mobilgerät aus betrieben wer den.
Page 16

Deutsch Deutsch 27 28
3) Wiederholen Sie die oben genannten Schritte 1 – 2, um 10 DAB-Sender oder
10 UKW-Sender zu programmieren.
4) Drücken Sie einmal auf PRESET, um die gespeicherten Sender abzuspielen.
Drehen Sie den TUNER/ENTER-Regler oder drücken Sie auf die SKIP+/--Taste
auf der Fernbedienung, um die gewünschten gespeicherten Sender auszuwählen.
STUMM-/EQ-BETRIEB
Wenn Sie im Wiedergabemodus einmal auf die MUTE-Taste drücken, ist aus
den Lautsprechern kein Ton zu hören und das Display zeigt ‘MUTE ON’ an;
wenn Sie erneut auf MUTE oder auf Volume+/- oder EQ drücken,
wird die Stummfunktion abgeschaltet und aus den Lautsprechern sind wieder
Töne zu hören.
Drücken Sie im Wiedergabemodus auf die EQ-Taste , um verschiedene Klangeffekte auszuwählen. Sie können wählen zwischen POP/CLASSIC/ROCK/JAZZ/
FLAT.
WICHTIG!
Es besteht die Möglichkeit, dass bei manchen Platten das Gerät zu früh oder gar
nicht stoppt, was leider mit verschiedenen Standards der Plattenindustrie zu tun
hat. Sollten Sie solch einen Vorfall haben, möchten wir Ihnen die Möglichkeit
geben, die Abschaltung des Plattenspielers gemäß Ihrer Platte zu justieren. Sie
benötigen hierbei einen Kreuzschraubendreher. Entfernen Sie die PVC Platte
“NO OPEN” auf der Rückseite des Geräts und stellen die Schraube wie folgt ein:
Wenn der Plattenspieler zu früh abschaltet und der Tonarm zurückfährt, drehen
Sie vorsichtig die Schraube 45° im Uhrzeigersinn. Überprüfen Sie die Einstellung
mit einer Platte. Sollte der Plattenspieler erneut zu früh abschalten wiederholen
Sie den o.g. Schritt, bis der Plattenspieler mit Ihrer Platte einjustiert ist.
Wenn der Plattenspieler sich nicht automatisch nachdem Ende des letztem Titels
abschaltet, drehen Sie vorsichtig die Schraube 45° gegen den Uhrzeigersinn.
Überprüfen Sie die Einstellung mit einer Platte. Sollte der Plattenspieler erneut
nicht abschalten, wiederholen Sie den o.g. Schritt, bis der Plattenspieler sich
automatisch abschaltet.
Die Kennzeichnung auf dem Produkt bzw. auf der dazugehörigen Literatur gibt
an, dass es nach seiner Lebensdauer nicht zusammen mit dem normalen HaushaltsmüIl entsorgt werden darf. Entsorgen Sie dieses Gerat bitte getrennt von
anderen Abfallen, um der Umwelt bzw. der menschl i chen Gesundhei t ni cht
durch unkontrol l i erte Mül l besei ti gung zu schaden. Recycel n Si e das Gerät,
um di e nachhaltige Wiederverwertung von stofflichen Ressourcen zu fördern.
Private Nutzer sollten den Händler, bei dem das Produkt gekauft wurde, oder die
zuständigen Behörden kontaktieren, um in Erfahrung zu bringen, wie sie das
Gerät auf umweltfreundliche Weise recyceln können. Gewerbliche Nutzer sollten
sich an Ihren Lieferanten wenden und die Bedingungen des Verkaufsvertrags
konsultieren. Dieses Produkt darf nicht zusammen mit anderem Gewerbemüll
entsorgt werden.
Korrekte Entsorgung dieses Produkts
(Elektromüll)
TECHNISCHE DATEN
Netzbetrieb (AC): 110-240V ~ 50Hz
UKW: 87,5 - 108 MHz
DAB: Band III
Auf Grund ständiger Verbesserungen bleibt die Änderung der technischen Daten und des Designs ohne Vorankündigung vorbehalten.
Page 17

Français Français 29 30
POSITIONNEMENT DES COMMANDES
1. COUVERCLE DE PROTECTION
2. TOUCHE CD PLAY/PAUSE
3. TOUCHE CD SKIP UP
4. TOUCHE CD SKIP DOWN
5. TOUCHE MODALITÉ REPRODUCTION (REPEAT/RANDOM)
6. TOUCHE FONCTIONNE
7. CONTROLLE VOLUME
8. CAPTEUR INFRAROUGE
9. TOUCHE RECORD
10. COMPARTIMENT CD
11. TOUCHE D’OUVERTURE DU COMPARTIMENT CD
12. TOUCHE BANDE MW
13. PRISE USB
14. TOUCHE BANDE FM
15. BOUTON D'ALIMENTATION
16. LÈVE SOULÈVEMENT BRAS TOURNE-DISQUES
17. LED D’ALIMENTATION
18. ÉCRAN LCD
19. BOUTON MENU
20. SCALE DE SYNTONIE
21. BOUTON DE SYNTONISATION
22. BLOQUE BRAS TOURNE-DISQUES
23. ADAPTATEUR BROCHE TOURNEDISQUE
24. SÉLECTEUR DE VITESSE 78/33/45 TR/MIN
25. SUPPORT DE LA TÊTE DE LECTURE
26. TOUCHE STOP
27. HAUT-PARLEURS (D/G)
28. ANTENNE FM
29. CORDON AC
30. TOUCHE CASSETTE STOP / EJECT
31. TOUCHE INFO
32. TOUCHE SCAN
33. TOUCHE PRESET
34. TOUCHE EQ
ATTENTION
Le symbole “point d’exclamation” à l’intérieur d’un triangle
avertit l’utilisateur que d’importantes instructions d’utilisation
et de maintenance sont contenues dans le mode d’emploi.
Le symbole “éclair” à l’intérieur d’un triangle sert à avertir
l’utilisateur de la présence du courant à l’intérieur du
l’appareil qui pourrait constituer un risque.
Afin de minimiser les risques, ne pas ouvrir le boîtier ni ôter
le dos de l’appareil. En case de panne, faites appel aux techniciens qualifiés pour les réparations. L’appareil ne renferme aucune pièce reparable par l’utilisateur.
Cet appareil a été conçu pour une tension d’alimentation de
230V ~ 50Hz. Débranchez la prise de courant quand on
prévoit de ne pas utiliser l’appareil pendant un certain
temps.
Mettez l’appareil sous tension seulement après avoir vérifié
que tous les raccordements soient corrects.
L’unité ne doit pas être exposée à l’humidité ou à la pluie.
L’appareil doit être gardé dans un endroit suffisamment
ventilé. Ne le gardez jamais par exemple près des rideaux,
sur un tapis ou dans des meubles, tels qu’une bibliothèque.
L’unité ne doit pas être exposée à la lumière directe du so-
leil ou à des sources de chaleur.
Page 18

Français Français 31 32
TÉLÉCOMMANDE
35. TOUCHE OUVERTURE GUICHET CD
36. TOUCHE ENREGISTREMENT
37. TOUCHE PLAY MODE
38. TOUCHE PLAY/PAUSE
39. TOUCHE SAUTE TRACE EN ARRIÈRE
40. TOUCHE SAUTE TRACE AVANT
41. TOUCHE STOP
42. TOUCHE SAUTE TRACE AVANT +10
43. TOUCHE SAUTE TRACE EN ARRIÈRE -10
44. TOUCHE FUNCTION
45. TOUCHE DELETE
46. TOUCHE PROGRAMMATION
47. TOUCHE VOLUME +
48. TOUCHE VOLUME -
49. TOUCHE MUTE
50. TOUCHE EQ
51. TOUCHE PRESET
52. TOUCHE INFO
INSTALLATION DES PILES
La télécommande nécessite 1 pile CR-2025.
BRANCHEMENT A LA SOURCE D’ALIMENTATION
Avant l’utilisation, vérifier que la tension électrique de votre source
d’alimentation corresponde à celle indiquée sur la plaque des caractéristiques
techniques de l’appareil.Avant de brancher l’appareil au réseau, il faut lire atten-
tivement les instructions suivantes pour des raisons de sécurité.
Appuyez sur le bouton POWER pendant 1 seconde pour mettre l'appareil en
marche. Appuyez et maintenez enfoncé le bouton POWER pendant 3 secondes
pour éteindre l'appareil. L’appareil s’éteint de lui-même après environ 15 minu-
tes si aucun son n’est produit.
UTILISATION DU RESEAU (CA)
L’appareil est conçu pour fonctionner sur une tension de CA 230V, 50Hz seulement. S’il est branché à d’autres sources d’alimentation cela peut endommager
l’appareil.
Danger: pour éviter tout risque de décharge
électrique, débrancher l’appareil avant
d’enlever la protection. A l’intérieur il n’y a pas
de parties utilisables. S’adresser au personnel
qualifié pour toute opération d’entretien.
Enlever le stéréo de son emballage avec at-
tention et garder la boîte en cas d’utilisation
future.
Brancher le cordon d’alimentation CA à votre
prise murale CA et alimenter le réseau. S’assurer que la tension est compatible,
110-240V 50 Hz.
CHOISIR LA LANGUE DU MENU DE PARAMÈTRAGE
1. Activez le bouton le BOUTON D’ALIMENTATION (15). L’écran (18) va
s’allumer.
2. Appuyez sur le BOUTON MENU (19) et faites ensuite tourner le BOUTON
DE SYNTONISATION (21) jusqu’à sélectionner “SYSTEM”.
3. Faites tourner le BOUTON DE SYNTONISATION (21) jusqu’à sélectionner
“LANGUAGE” et poussez alors sur le bouton le BOUTON DE SYNTONISA-
TION (21) pour confirmer.
4. Faites tourner le BOUTON DE SYNTONISATION (21) jusqu’à sélectionner
la langue de votre choix et poussez ensuite sur le BOUTON DE SYNTONISATION (21) pour confirmer.
REGLER LA DATE ET L’HEURE DE L’ECRAN
1. Activez le bouton le BOUTON D’ALIMENTATION (15). L’écran (18) va
s’allumer.
2. Appuyez sur le BOUTON MENU (19) et faites ensuite tourner le BOUTON
DE SYNTONISATION (21) jusqu’à sélectionner “SYSTEM”.
Page 19

Français Français 33 34
3. Faites tourner le BOUTON DE SYNTONISATION (21) jusqu’à sélectionner
“TIME” et poussez alors sur le bouton le BOUTON DE SYNTONISATION
(21) pour confirmer.
4. Faites tourner le BOUTON DE SYNTONISATION (21) jusqu’à sélectionner
“SET 12/24 HOURS” et poussez ensuite sur le BOUTON DE SYNTONISA-
TION (21) pour confirmer.
5. Répétez les étapes 2-4 et sélectionnez l’une des options suivantes: SET
TIME/DATE ou SET AUTO UPDATE.
6. Si vous avez opté pour SET TIME/DATE, utilisez le BOUTON DE SYNTONISATION (21) pour paramétrer les heures et les minutes et poussez ensuite sur le BOUTON DE SYNTONISATION (21) pour valider votre choix.
7. Pour lancer la mise à jour automatique, suivez les étapes 2-6 ci-dessus et
sélectionnez SET AUTO UPDATE.
Le paramétrage est terminé et l’écran affiche la DATE et l’HEURE.
SELECTION RADIO FM
1. Activez le bouton le BOUTON D’ALIMENTATION (15). L’écran (18) va
s’allumer.
2. Appuyez séquentiellement sur la TOUCHE FONCTIONNE (6) pour sélectionner la radio FM.
REGLAGE MANUEL
Optez pour la station radio de votre choix en faisant tourner le BOUTON DE
SYNTONISATION (21).
REGLAGE AUTOMATIQUE
1. Appuyez sur le BOUTON MENU (19) et faites ensuite tourner le BOUTON
DE SYNTONISATION (21) jusqu’à sélectionner “SCAN SETTINGS”.
2. Faites tourner à nouveau le BOUTON DE SYNTONISATION (21) et choisis-
sez “ALL STATIONS” ou “STRONG STATIONS ONLY”. Poussez sur le
BOUTON DE SYNTONISATION (21) pour confirmer.
3. Appuyez sur la TOUCHE SCAN (32) et le dispositif scannera toutes les stations FM.
INFORMATIONS DU SYSTEM DE DONNEES RADIO
En mode FM, poussez sur la TOUCHE INFO (31) pour afficher les informations
suivantes : TYPE DE PROGRAMME/NUMERO DE PROGRAMME/BITRATE
AUDIO/HEURE/DATE.
STEREO / MONO
1. Appuyez sur le BOUTON MENU (19) et faites ensuite tourner le BOUTON
DE SYNTONISATION (21) jusqu’à sélectionner “AUDIO SETTING”. Pous-
sez sur le BOUTON DE SYNTONISATION (21) pour confirmer.
2. Faites tourner à nouveau le BOUTON DE SYNTONISATION (21) et choisis-
sez “STEREO ALLOWED” ou “FORCED MONO” . Poussez sur le BOUTON
DE SYNTONISATION (21) pour confirmer.
OPÉRATIONS DAB
1. Appuyez séquentiellement sur la TOUCHE FONCTIONNE (6) pour sélectionner la radio DAB.
ECOUTE DE LA RADIO
Antenne
Pour la réception en FM il y a une antenne FM incorporée (28) dont le câble est
placé à l’arrière de l’appareil. Orienter le câble de manière à ce que la qualité de
la réception soit la meilleure possible.
TUNER/ENTER
Tournez gauche et droite pour naviguer dans le menu, presse pour
confirmer chaque fonction.
SW VERSION
TIME
FROM FM
FROM ANY
FROM DAB
AUTO UPDATE
SET 12/24 HOURS
ENGLISH
NEDERLANDS
SET TIME/DATE
NORK
SWENSKA
DEUTSCH
LANGUAGE
NO UPDATE
TUNER/ENTER
Page 20

Français Français 35 36
Préparation
1. Ouvrir le couvercle de la platine Tournedisques.
2. Ouvrir le couvercle du tourne-disques. Relâcher le crochet du bras de lecture.
3. Dévisser la vigne de sûreté-transport poste
sur le côté du supérieur du tourne-disques.
4. Débloquer le blocage du bras et enlever la protection de la pointe.
Ecoute des Disques
1. Appuyez séquentiellement sur la TOUCHE FONCTIONNE (6) pour sélec-
tionner le mode “PHONO”.
2. Placer un disque sur la platine, au-dessus de l'axe central. Placer l'adaptateur EP au-dessus de l'axe central quand on veut ecouter des disques EP
17cm.
3. Placer le bouton de sélection de la vitesse (24) sur 33, 78 ou 45 tours/
minute, selon le disque.
4. Dégager le bras de lecture de son agrafe, et enlever le capuchon de protection de la pointe de lecture.
5. Soulever le bras de lecture à l'aide de la manette de levée du bras de lecture.
6. Placer le bras de lecture au début du disque ou au début d'une piste précise.
7. Baisser doucement le bras de lecture sur le disque à l'aide de la manette de
levée du bras de lecture pour commencer la lecture de la piste.
8. A la fin du disque la platine s'arrête. Lever le bras de lecture et posez-le sur
le support.
9. Pour arrêter le disque pendant la lecture, soulever le bras de lecture du disque et posez-le sur le support.
2. Déployez l’antenne DAB à l’arrière de l’appareil.
REGLAGE AUTOMATIQUE
1. Appuyez sur le BOUTON MENU (19) et faites ensuite tourner le BOUTON
DE SYNTONISATION (21) jusqu’à sélectionner “FULL SCAN”.
2. Appuyez sur le BOUTON DE SYNTONISATION (21) pour commencer à
chercher les stations DAB / DAB+.
REGLAGE MANUEL
1. Appuyez sur le BOUTON MENU (19) et faites ensuite tourner le BOUTON
DE SYNTONISATION (21) jusqu’à sélectionner “MANUAL TUNE”.
2. Faites tourner le BOUTON DE SYNTONISATION (21) pour vous positionner
manuellement sur la station souhaitée.
3. Si vous êtes connecté à une station DAB stéréo, la mention « stéréo »
s’affichera sur le LCD.
4. En mode DAB, appuyez sur la TOUCHE INFO (31) pour afficher sur l’écran
les informations de la station DAB en lecture: TYPE DE PROGRAMME/
NUMERO DE PROGRAMME/BITRATE AUDIO/HEURE/DATE.
MEMOIRE DAB / DAB+
1. Quand vous avez sélectionné la station de votre choix, appuyez et maintenez la TOUCHE PRESET (33) pendant 2 secondes.
2. L’écran affiche la mention “Preset Store 1: (Empty)”. Faites tourner le BOU-
TON DE SYNTONISATION (21) pour sélectionner le numéro de réglage
souhaité et appuyez ensuite sur le BOUTON DE SYNTONISATION (21)
pour enregistrer la station.
TOURNE-DISQUES
TRES IMPORTANT !
Pour éviter les dégâts dus au transport, l’appareil dispose d’une vis de transit
située du côté supérieur droit de la platine. Avant d’enclencher l’appareil, faites
tourner entièrement la vis de transit dans le sens horaire à l’aide d’un tournevis
(vissez vers le bas). Si vous devez déplacer l’appareil, n’oubliez pas de revisser
la vis dans le sens antihoraire pour éviter les dégâts.
TRANSIT
SCREW
Lock Lever Stylus Cover
Page 21

Français Français 37 38
Remarques: Ne pas faire tourner et ne pas arrêter le disque manuellement.
Faire tourner ou heurter la platine tourne-disques sans avoir fixé l'agrafe au
bras de lecture peut causer des dommages au bras de lecture. Remettre le capuchon de protection sur la pointe de lecture quand l'appareil n'est pas utilisé.
LECTURE D’UN DISQUE COMPACT
Pour commencer
1. Appuyez séquentiellement sur la TOUCHE FONCTIONNE (6) pour sélectionner le mode CD.
2. Appuyez sur touche “open/close” (11) pour ouvrir le compartiment CD.
3. Insérez un CD avec la face imprimée orientée vers le haut et refermez le
compartiment CD.
4. Le CD est chargé et l’écran LCD (18) affiche le nombre total de pistes et la
durée totale de lecture.
5. Appuyez sur la TOUCHE PLAY/PAUSE (2) pour lancer la lecture de la première piste.
6. Pour interrompre la lecture, appuyez une fois sur la TOUCHE PLAY/PAUSE
(2), le minuteur indiquant la durée de lecture va s’arrêter et clignotera sur
l’écran LCD (18). Appuyez de nouveau sur la touche pour revenir en mode
de lecture normale.
7. En mode lecture, si vous restez appuyés sur la TOUCHE PLAY/PAUSE (2)
pendant plus de 2 secondes, le système entrera en mode stop.
Mode saut de piste/recherche avant ou arrière (skip/search up / skip/
search down)
En mode lecture ou pause, si vous appuyez sur la TOUCHE SKIP UP (3),
l’appareil passera à la piste suivante, affichera le numéro de la piste et re-
stera en mode lecture ou pause.
En mode lecture ou pause, si vous appuyez sur la TOUCHE SKIP DOWN
(4), l’appareil reviendra au début de la piste en cours, affichera le numéro de
la piste initiale et restera en mode lecture ou pause.
Après l’étape 2, en appuyant de nouveau sur la TOUCHE SKIP UP (3),
l’appareil reviendra à la piste précédente et restera en mode lecture ou pau-
se.
Si en mode lecture de CD/MP3 vous restez appuyés sur la TOUCHE SKIP
UP (3), la fonction avance rapide ou retour rapide sera activée. Pour la désactiver, il suffit de relâcher la touche.
Appuyez sur la touche +10 ou -10 (telecommande) pour avance rapide des
10 pistes.
MODE RÉPÉTER/LECTURE ALÉATOIRE
En appuyant sur la TOUCHE PLAY MODE (5) avant ou pendant la lecture, il est
possible de répéter la lecture d’une piste, d’un dossier (MP3 uniquement) ou de
toutes les pistes. Chaque pression change la modalité de lecture comme suit:
Répéter la lecture (Repeat play): cette fonction permet de répéter la lecture
des pistes ou des dossiers désirés.
Lecture aléatoire (random play): cette fonction permet d’activer la lecture
aléatoire de toutes les pistes ou des pistes d’un dossier.
PROGRAMMATION D’UN CD
Il est possible de programmer jusqu’à 20 pistes pour la lecture d’un CD ou 99
de fichiers MP3 dans un ordre quelconque. Avant de procéder à la programmation, assurez-vous que le système se trouve en mode stop:
1. Activez le mode CD/USB et interrompez la lecture du CD.
2. Appuyez sur la TOUCHE PROGRAMMATION (46), “ P “ s’affiche sur
l’écran LCD (18). Le numéro de programme et les numéros de piste pour la
programmation seront également visibles.
3. Sélectionnez une piste désirée en appuyant sur la TOUCHE SKIP UP (3)/
TOUCHE SKIP DOWN (4).
4. Appuyez sur TOUCHE PROGRAMMATION (46) pour mettre la piste en
mémoire.
5. Si nécessaire, répétez les étapes 3 et 4 pour mettre en mémoire des pistes
supplémentaires.
6. Lorsque toutes les pistes ont été programmées, appuyez sur la TOUCHE
PLAY/PAUSE (2) pour lire le disque dans l’ordre paramétré.
7. Pour effacer le fichier programmé, appuyez sur la TOUCHE STOP (26).
Page 22

Français Français 39 40
LECTURE DE PISTES MP3/WMA PAR L’INTERMÉDIAIRE D’UN USB
Le système est en mesure de décoder et de lire tous les fichiers MP3 /WMA
sauvegardés dans le dispositif de stockage grâce à la connexion au port USB.
1. Appuyez séquentiellement sur la TOUCHE FONCTIONNE (6) pour sélectionner le mode “USB”.
2. Insérez à fond le dispositif USB, bien droite et sans la plier, en suivant la
direction de la flèche reportée.
3. Le système commencera à lire automatiquement le dispositif de stockage
après la connexion, l’écran LCD (18) affichera le nombre total de fichiers
MP3/WMA.
4. Répétez la même procédure de lecture, décrite ci-dessus, que pour le disque CD/MP3.
Note: Le fait de connecter le dispositif USB dans le mauvais sens pourrait endommager le système ou le support de stockage (USB). Vérifiez le sens avant
d’effectuer le branchement.
COMMANDES
1. Appuyez séquentiellement sur la TOUCHE FONCTIONNE (6) pour sélec-
tionner le mode “TAPE”. L’appareil commencera la lecture automatique-
ment après que la cassette a été insérée.
2. Appuyer à moitié sur la touche “BOBINAGE EN AVANT/EJECTION CASSETTE“ (33) pendant la lecture. La bande sera bobiné à haute vitesse.
3. Appuyer légèrement sur la touche “BOBINAGE EN AVANT/EJECTION
CASSETTE“ (33) pour retourner à la lecture normale.
4. Appuyer à fond sur la touche “BOBINAGE EN AVANT/EJECTION CASSETTE“ (33) et la cassette sera éjectée.
FONCTIONNEMENT DU BLUETOOTH
1. Appuyez séquentiellement sur la TOUCHE FONCTIONNE (6) pour sélec-
tionner le mode “BLUETOOTH”.
2. Sélectionnez à partir de votre appareil mobile (smartphone, tablette ...), le
Bluetooth ID étiqueté comme "CBT", puis confirmer la connexion.
3. Maintenant, vous pouvez transférer de lamusique à la HIF-1999D+BT et
toutes les opérations ne peut être utilisé à partir de votre appareil mobile.
ENCODAGE D’UN CD/DISQUE 45/33/78 TOURS EN FICHIER MP3
Le système est en mesure d’encoder un CD normal ou un disque 45/33/78
tours au format MP3 et de l’enregistrer dans le dispositif de stockage par
l’intermédiaire de la connexion au port USB.
ENREGISTREMENT DEPUIS UNE CASSETTE
Branchez le support USB dans la prise USB. En mode CASSETTE, appuyez
une fois sur la TOUCHE RECORD (9): la mention “USB” s’affichera à l’écran.
Poussez une seconde fois sur la TOUCHE RECORD (9) pour confirmer: la
mention “USB” clignotera et l’enregistrement commencera après 5 secondes.
Appuyez une fois sur la TOUCHE PLAY/PAUSE (2) pour arrêter
l’enregistrement et la mention “USB” ne clignotera pas. Poussez à nouveau sur
la TOUCHE PLAY/PAUSE (2) pour reprendre l’enregistrement et la mention
“USB” clignotera à nouveau.
ENREGISTREMENT DEPUIS LA RADIO FM
Branchez le support USB dans la prise USB. En mode FM, appuyez une fois
sur la TOUCHE RECORD (9): la mention “USB” s’affichera à l’écran. Poussez
une seconde fois sur la TOUCHE RECORD (9) pour confirmer: la mention
“USB” clignotera et l’enregistrement commencera après 5 secondes. Appuyez
une fois sur la TOUCHE PLAY/PAUSE (2) pour arrêter l’enregistrement et la
mention “USB” ne clignotera pas. Poussez à nouveau sur la TOUCHE PLAY/
PAUSE (2) pour reprendre l’enregistrement et la mention “USB” clignotera à
nouveau.
ENREGISTREMENT DEPUIS UN TOURNE-DISQUE
Branchez le support USB dans la prise USB. En mode PHONO, appuyez une
fois sur la TOUCHE RECORD (9): la mention “USB” s’affichera à l’écran. Pous-
sez une seconde fois sur la TOUCHE RECORD (9) pour confirmer: la mention
“USB” clignotera et l’enregistrement commencera après 5 secondes. Appuyez
une fois sur la TOUCHE PLAY/PAUSE (2) pour arrêter l’enregistrement et la
mention “USB” ne clignotera pas. Poussez à nouveau sur la TOUCHE PLAY/
Page 23

Français Français 41 42
PAUSE (2) pour reprendre l’enregistrement et la mention “USB” clignotera à
nouveau.
ENREGISTREMENT DEPUIS UN PÉRIPHÉRIQUE BLUETOOTH
Branchez le support USB dans la prise USB. En mode BLUETOOTH, appuyez
une fois sur la TOUCHE RECORD (9): la mention “USB” s’affichera à l’écran.
Poussez une seconde fois sur la TOUCHE RECORD (9) pour confirmer: la
mention “USB” clignotera et l’enregistrement commencera après 5 secondes.
Appuyez une fois sur la TOUCHE PLAY/PAUSE (2) pour arrêter
l’enregistrement et la mention “USB” ne clignotera pas. Poussez à nouveau sur
la TOUCHE PLAY/PAUSE (2) pour reprendre l’enregistrement et la mention
“USB” clignotera à nouveau.
ENREGISTREMENT DEPUIS UN SUPPORT CD-MP3
Branchez le support USB dans la prise USB. En mode CD, appuyez une fois
sur la TOUCHE RECORD (9) : la mention “REC-1” s’affichera à l’écran. Pous-
sez alors une seconde fois sur la TOUCHE RECORD (9) pour confirmer: la
mention “REC” clignotera et l’enregistrement commencera après 5 secondes.
Appuyez une fois sur la TOUCHE SKIP UP (3) pour enregistrer le disque en
lecture en entier : la mention “REC-A” s’affichera sur l’écran. Poussez alors une
seconde fois sur la TOUCHE RECORD (9) pour confirmer.
ENREGISTREMENT DEPUIS UN SUPPORT CD-MP3
Branchez le support USB dans la prise USB. En mode MP3, appuyez une fois
sur la TOUCHE RECORD (9) : la mention “REC-1” s’affichera à l’écran. Pous-
sez alors une seconde fois sur la TOUCHE RECORD (9) pour confirmer: la
mention “REC” clignotera et l’enregistrement commencera après 5 secondes.
Appuyez une fois sur la TOUCHE SKIP UP (3) pour enregistrer tous les fichiers
présents dans le dossier : la mention “REC-F” s’affichera à l’écran.
Appuyez deux fois sur la TOUCHE SKIP UP (3) pour enregistrer le disque MP3
en lecture en entier : la mention “REC-A” s’affichera sur l’écran.
Poussez alors une seconde fois sur la TOUCHE RECORD (9) pour confirmer.
NOTE: Appuyez sur la TOUCHE STOP (26) pour arrêter l’enregistrement lor-
sque vous aurez fini.
SUPPRIMER UN USB
1. En mode USB, appuyez une fois sur TOUCHE DELETE (45) et la mention
“DEL-1” s’affichera à l’écran. Vous pouvez supprimer la piste en lecture.
2. Poussez sur la TOUCHE SKIP UP (3). La piste en lecture ainsi que la men-
tion “DEL-F” apparaîtront à l’écran. Vous pouvez supprimer le dossier en
lecture.
3. Appuyez sur la TOUCHE SKIP UP (3) et la mention “DEL-A” s’affichera à
l’écran. Vous pouvez effacer toutes les pistes de l’USB en lecture.
4. Pour finir, appuyez à nouveau une fois sur la TOUCHE DELETE (45) après
la confirmation pour choisir entre “DEL-1”, “DEL-F” ou “DEL-A”.
MUTE ET EQ
Lors de la lecture, appuyez une fois sur la TOUCHE MUTE (49) : le son des
baffles sera désormais muet et la mention “MUTE ON” s’affichera à l’écran. Ap-
puyez sur la TOUCHE MUTE (49) ou faites tourner le CONTROLLE VOLUME
(7) pour annuler la fonction Mute et le son sortira à nouveau des baffles.
Lors de la lecture, appuyez sur la TOUCHE EQ (34) pour choisir des effets sonores différents.: FLAT / POP / CLASSIC / ROCK / JAZZ.
CARACTERISTIQUES TECHNIQUES
AC: 110-240V ~ 50Hz
FM: 87,5 - 108 MHz
DAB: BAND III
Caractéristiques sujets à modifications sans avis préalable.
Ce symbole sur le produit ou sa documentation indique qu'il ne doit pas être éliminé en fin de vie avec les
autres déchets ménagers. L' élimination incontrôlée des déchetspouvant porter préjudice a l'environnement ou a la santé humaine, veuillez le séparer des autres types de déchets et le recycler defaçon responsable. Vous favoriserez ainsi la réutilisation durable desressources matérielles. Les particuliers sont
invites a contacter le distributeur leur ayant vendu le produit ou a se renseigner auprès de leur mairie
pour savoir ou et comment ils peuvent se débarrasser de ce produit afin qu'il soit recycle en respectant
l'environnement. Les entreprises sont invitées a contacter leurs fournisseurs et aconsulter les conditions
de leur contrat de vente. Ce produit ne doit pas être éliminé avec les autres déchets commerciaux.
Comment éliminer ce produit
(déchets d'équipements électriques et électroniques)
Page 24

Italiano Italiano 43 44
LOCALIZZAZIONE DEI CONTROLLI
1. COPERCHIO DI PROTEZIONE
2. TASTO CD PLAY/PAUSE
3. TASTO SALTO TRACCIA AVANTI
4. TASTO SALTO TRACCIA INDIETRO
5. TASTO MODALITA PLAYBACK
6. TASTO FUNZIONE
7. MANOPOLA VOLUME
8. SENSORE TELECOMANDO
9. TASTO RECORD
10. VASSOIO CD
11. TASTO DI APERTURA / CHIUSURA CD
12. TASTO BANDA MW
13. PRESA USB
14. TASTO BANDA FM
15. TASTO ACCENSIONE / SPEGNIMENTO
16. LEVA SOLLEVAMENTO BRACCIO GIRADISCHI
17. LED DI ALIMENTAZIONE
18. DISPLAY LCD
19. TASTO MENU
20. SCALA SINTONIA
21. MANOPOLA DI SINTONIA
22. BLOCCO BRACCIO GIRADISCHI
23. ADATTATORE DISCHI 45/33 GIRI
24. SELETTORE DI VELOCITÀ 33/45/78 GIRI/MIN
25. SOSTEGNO DELLA PUNTINA
26. TASTO STOP
27. ALTOPARLANTI
28. ANTENNA FM / DAB
29. CAVO ALIMENTAZIONE AC-230V
30. TASTO CASSETTE STOP / ESTRAI
31. TASTO INFO
32. TASTO SCAN
33. TASTO PRESET
ATTENZIONE
Il punto esclamativo all’interno di un triangolo avverte l’utente che il
libretto d’istruzioni contiene delle importanti istruzioni per l’uso e la
manutenzione.
Il simbolo del fulmine all’interno di un triangolo avverte l’utente
della presenza di una pericolosa tensione all’interno
Per ridurre i rischi di scosse elettriche, non aprire l’apparecchio.
L’apparecchio non contiene parti riparabili dall’utente. In caso di
guasto fare appello a tecnici qualificati per le riparazioni.
Questo apparecchio è stato progettato per funzionare a 230V ~
50Hz. Se non si intende utilizzare l’apparecchio per un lungo perio-
do di tempo, rimuovere la spina dalla presa di corrente.
Utilizzare l’apparecchio solo dopo aver verificato che tutte le con-
nessioni siano state eseguite correttamente.
Non esporre l’apparecchio alla pioggia o all’umidità.
Posizionare l’apparecchio in un luogo sufficientemente ventilato.
Evitare di sistemarlo vicino a tende, sul tappeto o all’interno di un
mobile quale, ad esempio, una libreria.
Non esporre l’apparecchio alla luce diretta del sole o a fonti di ca-
lore.
II marchio riportato sul prodotto e sulla sua documentazione indica che il prodotto non deve
essere smaltito can altri rifiuti domestici al termine del ciclo di vita. Per evitare eventuali
danni all'ambiente o alla salute causati dall'inopportuno smaltimento dei rifiuti, si invita l'utente a separare questo prodotto da altri tipi di rifiuti e di riciclarlo in maniera responsabile
per favorire il riutilizzo sostenibile delle risorse materiali. Gli utenti domestici sono invitati a
contattare il rivenditore presso il quale e stato acquistato il prodotto a l'ufficio locale preposto
per tutte le informazioni relative alla raccolta differenziata e al riciclaggio per questo tipo di
prodotto. Gli utenti aziendali sono invitati a contattare il proprio fornitore e verificare i termini
e le condizioni del contratto di acquisto. Questo prodotto non deve essere smaltito unitamente ad altri rifiuti commerciali.
Corretto smaltimento del prodotto (rifiuti elettrici ed elettronici)
Page 25

Italiano Italiano 45 46
34. TASTO EQUALIZZATORE
TELECOMANDO
35. APERTURA / CHIUSURA CD
36. REGISTRAZIONE: in modalità CD/RADIO/CASSETTA/GIRADISCHI pre-
mere per attivare la registrazione.
37. TASTO MODALITÀ DI RIPRODUZIONE
38. PLAY / PAUSE: in modalità CD/USB premere per iniziare la riproduzione,
premere di nuovo per mettere in pausa.
39. SALTO TRACCIA INDIETRO: premere una volta per riprodurre la traccia
precedente, tenere premuto per scorrere indietro la traccia.
40. SALTO TRACCIA AVANTI: premere una volta per riprodurre la traccia
successiva, tenere premuto per scorrere avanti la traccia.
41. TASTO STOP
42. AVANZAMENTO TRACCIA +10
43. SALTO INDIETRO TRACCIA -10
44. TASTO FUNZIONE: per scegliere tra CD/USB/DAB/FM/TAPE/PHONO
45. TASTO CANCELLAZIONE
46. TASTO PROGRAMMAZIONE: in modalità CD/USB premere per iniziare
la programmazione delle tracce.
47. TASTO VOLUME +
48. TASTO VOLUME -
49. TASTO MUTO
50. TASTO EQUALIZZATORE
51. TASTO PRESET
52. TASTO INFORMAZIONI
INSTALLAZIONE DELLE BATTERIE
Il telecomando necessita di 1 batteria
del tipo CR-2025.
COLLEGAMENTO ALLA FONTE DI ALIMENTAZIONE
Prima di accendere l’apparecchio assicurarsi che il voltaggio locale sia lo
stesso di quello indicato sulla targhetta dei dati di funzionamento.
Per la vostra propria sicurezza leggere le seguenti istruzioni accuratamente
prima di cercare di collegare questo apparecchio alla presa di corrente.
premere il pulsante di accensione per 1 secondo per accendere l' apparecchio. Premere e tenere premuto il pulsante di accensione per 3 secondi per
spegnere. Quando ha finito di riprodurre una canzone, se nessuno spegnere
l'apparecchio lo stesso si spegne automaticamente dopo 15 minuti.
FUNZIONAMENTO AC
Questo apparecchio è stato progettato per
funzionare solo con una fonte di alimentazione di AC 110-240V 50Hz. Il collegamento ad
un atro tipo di fonte di alimentazione potrebbe danneggiare l’apparecchio.
Attenzione: Per prevenire le scariche elettriche, scollegare la spina prima di rimuovere il
coperchio.
Rimuovere accuratamente l’apparecchio
dalla scatola, conservare l’imballaggio per un
futuro uso. Leggere accuratamente queste istruzioni prima dell’uso.
Collegare il cavo elettrico alla presa di corrente AC. Controllare che la vostra
fonte di alimentazione sia di 110-240V, 50 Hz.
SETTARE LA LINGUA DEI MENU
1. Premere il TASTO ON/OFF (15). Il display (18) si illuminerà.
2. Premere il TASTO MENU (19) poi ruotare la MANOPOLA DI SINTONIA
(21) fino a selezionare “SYSTEM”.
3. Ruotare la MANOPOLA DI SINTONIA (21) fino a selezionare
“LANGUAGE”, premere la MANOPOLA DI SINTONIA (21) per conferma-
re.
4. Ruotare la MANOPOLA DI SINTONIA (21) fino a selezionare la lingua
desiderata, poi premere la MANOPOLA DI SINTONIA (21) per confermare.
Page 26

Italiano Italiano 47 48
SETTARE LA DATA E L’ORA
1. Premere il TASTO ON/OFF (15). Il display (18) si illuminerà.
2. Premere il TASTO MENU (19) poi ruotare la MANOPOLA DI SINTONIA
(21) fino a selezionare “SYSTEM”.
3. Ruotare la MANOPOLA DI SINTONIA (21) fino a selezionare “TIME”,
premere la MANOPOLA DI SINTONIA (21) per confermare.
4. Ruotare la MANOPOLA DI SINTONIA (21) e selezionare “SET 12/24
HOURS”, premere la MANOPOLA DI SINTONIA (21) per confermare.
5. Ripetere le operazioni precedenti da 2 a 4 per scegliere le seguenti opzioni.
6. Se selezionate “SET TIME/DATE”, ruotare la MANOPOLA DI SINTONIA
(21) per impostare le ore e i minuti, poi premere la MANOPOLA DI SIN-
TONIA (21) per confermare l’operazione.
7. Se selezionate “SET AUTO UPDATE”, ruotare la MANOPOLA DI SINTONIA (21) per selezionare la fonte di aggiornamento dell’ora tra le seguenti
opzioni: QUALSIASI (ANY), DAB, FM, NO UPDATE (l’orario non si ag-
giornerà automaticamente).
L’operazione sarà completata e il display mostrerà la data e l’ora.
UTILIZZO DELLA RADIO
ANTENNA
Per la ricezione in FM, si trova incorporata sul lato posteriore dell’apparecchio
un’antenna a filo (28). Muovere il filo fino a raggiungere la migliore ricezione.
OPERAZIONI
1. Premere il TASTO ON/OFF (15). Il display (18) si illuminerà.
2. Premere sequenzialmente il TASTO FUNZIONE (6) fino a selezionare
“FM RADIO”.
SINCRONIZZAZIONE MANUALE
Scegliere la stazione desiderata ruotando la MANOPOLA DI SINTONIA (21).
SINCRONIZZAZIONE AUTOMATICA
1. In modalità FM, premere il il TASTO MENU (19), poi ruotare la MANO-
POLA DI SINTONIA (21) fino a selezionare “SCAN SETTINGS”.
2. Ruotare nuovamente la MANOPOLA DI SINTONIA (21) e selezionare
un’opzione tra “ALL STATIONS” (ricerca di tutte le stazioni) e “STRONG
STATIONS ONLY” (solo le stazioni più forti). Premere la MANOPOLA DI
SINTONIA (21) per confermare.
3. Premere il TASTO SCAN (32) e l’unità memorizzerà tutte le stazioni FM.
INFORMAZIONI RDS (Radio Data System)
Nella modalità di riproduzione FM, premere il TASTO INFO (31) per visualizzare le seguenti informazioni: Tipo di programma, Numero del programma,
Bitrate audio, orario, data.
RICEZIONE FM & FM STEREO
La ricezione stereo FM è possibile quando la stazione trasmette in modalità
stereo.
1. Premere il TASTO MENU (19) poi ruotare la MANOPOLA DI SINTONIA
(21) fino a selezionare “AUDIO SETTING”. Premere la MANOPOLA DI
SINTONIA (21) per confermare.
2. Ruotare la MANOPOLA DI SINTONIA (21) per selezionare tra le opzioni
TUNER/ENTER
Ruotare a destra e sinistra per
muoversi all’interno del menu,
premere per confermare ogni funzione.
TIME
LANGUAGE
SW VERSION
FROM FM
FROM ANY
FROM DAB
AUTO UPDATE
SET 12/24 HOURS
ENGLISH
NEDERLANDS
SET TIME/DATE
NORK
SWENSKA
DEUTSCH
NO UPDATE
TUNER/ENTER
Page 27

Italiano Italiano 49 50
GIRADISCHI
MOLTO IMPORTANTE!
Per evitare danni durante il trasporto, una vite è
posta nell’angolo in alto a destra del giradischi.
Prima di iniziare a utilizzare il giradischi utilizzare
un cacciavite e svitare completamente la vite in
senso orario. In caso di trasporto ricordarsi di riavvitare la vite in senso antiorario per evitare danni.
Preparazione
1. Aprire il coperchio del giradischi. Rilasciare il gancetto del braccio di lettura.
2. Svitare la vite di sicurezza-trasporto posta sul lato superiore del giradischi.
3. Sbloccare il bloccaggio del braccetto e rimuovere la protezione della puntina.
Ascolto dei dischi
1. Premere il TASTO FUNZIONE (6) fino a selezionare la modalità
“PHONO”.
2. Posizionare un disco sul giradischi, sul perno centrale. Posizionare l'adattatore EP sul perno centrale quando si ascoltino dischi EP di 17 cm (45
giri).
3. Regolare il SELETTORE DI VELOCITÀ (24) su 33 / 45 o 78 giri, a seconda del disco utilizzato.
4. Rilasciare la chiusura del braccio della testina di lettura, e rimuovere il
cappuccio di protezione dalla puntina.
“FORCED MONO” (solo modalità MONO) e “STEREO ALLOWED” (se
disponibile si avvierà la riproduzione STEREO).
OPERAZIONI DAB
1. Premere sequenzialmente il TASTO FUNZIONE (6) fino a selezionare
“DAB”.
2. Estendere l’antenna DAB sul retro dell’unità.
SINCRONIZZAZIONE AUTOMATICA
1. Premere il TASTO MENU (19), poi ruotare la MANOPOLA DI SINTONIA
(21) fino a selezionare “FULL SCAN”.
2. Premere la MANOPOLA DI SINTONIA (21) per iniziare la ricerca di sta-
zioni DAB/DAB+.
SINCRONIZZAZIONE MANUALE
1. Premere il TASTO MENU (19), poi ruotare la MANOPOLA DI SINTONIA
(21) fino a selezionare “MANUAL TUNE”.
2. Ruotare la MANOPOLA DI SINTONIA (21) per selezionare manualmente
la stazione desiderata.
3. Durante la ricezione di una stazione DAB stereo, sarà visualizzata la
scritta “STEREO” sullo schermo LCD.
4. Durante la ricezione DAB, premere il TASTO INFO (31) per visualizzare
le informazioni della stazione selezionata: Tipo di programma, Numero
del programma, Range delle frequenze, Potenza del segnale, Orario,
Data.
MEMORIZZAZIONE DAB / DAB+
1. Una volta selezionata la stazione desiderata, premere e tenere premuto il
TASTO PRESET (33) per due secondi.
2. Il display mostrerà “Preset Store 1: (Empty)”. Ruotare la MANOPOLA DI
SINTONIA (21) per selezionare il numero di memoria desiderato per le
stazione, poi premere la MANOPOLA DI SINTONIA (21) per confermare.
TRANSIT
SCREW
Lock Lever Stylus Cover
Page 28

Italiano Italiano 51 52
5. Sollevare il braccio di lettura con la levetta del braccio.
6. Posizionare il braccio di lettura sull'inizio del disco, o sull'inizio di un brano
particolare.
7. Abbassare con delicatezza il braccio sul disco con la levetta del braccio
per iniziare la lettura.
8. Quando il disco giunge alla fine, il giradischi si fermerà. Alzare il braccio
di lettura e riportarlo sull’appoggio. Per fermare il disco durante la lettura,
alzare il braccio di lettura e riportarlo sull’appoggio. Il giradischi si ferme-
rà.
Note: Non girare il piatto manualmente. Muovere o scuotere il giradischi senza la protezione della puntina e della chiusura del braccio di lettura lo potrebbe danneggiare. Mettere il cappuccio di protezione sulla puntina quando non
verrà utilizzata.
RIPRODUZIONE DI UN COMPACT DISC
Per iniziare
1. Premere il TASTO FUNZIONE (6) per selezionare la modalità “CD”.
2. Premere il TASTO APRI/CHIUDI CD (11) per aprire il VASSOIO CD (10).
3. Inserire un CD con il lato stampato rivolto verso l’alto e chiudere il vasso-
io.
4. Il disco viene caricato e il display LCD (18) visualizza il numero totale delle tracce e il tempo di riproduzione totale. Il disco inizierà la riproduzione.
5. Per interrompere la riproduzione, premere una volta il TASTO STOP (26),
il numero dei brani comparirà sul display LCD (18). Premere nuovamente
il TASTO PLAY/PAUSE (2) per tornare alla riproduzione normale.
Modalità salto/ricerca avanti o indietro (skip/search up / skip/search
down)
1. In modalità riproduzione o pausa, se il TASTO SKIP+ (3) viene premuto,
l’unità passerà alla traccia seguente e visualizzerà il numero della traccia
e manterrà la modalità riproduzione o pausa.
2. In modalità riproduzione o pausa, se il TASTO SKIP- (4) viene premuto, il
lettore torna all’inizio della traccia, visualizzerà il numero della traccia ori-
ginale e manterrà la modalità riproduzione o pausa.
3. Dopo il punto 2, premendo di nuovo il TASTO SKIP- (4), l’unità torna alla
traccia precedente, ma rimane in modalità riproduzione o pausa.
4. Durante la riproduzione di un CD/MP3, per attivare la funzione avanzamento veloce o ritorno veloce mantenere premuto il tasto il TASTO
SKIP+ (3)/il TASTO SKIP- (4). Per disattivarla, basta smettere di premere
il tasto.
5. Per avanzare di 10 brani alla volta, premere il tasto +10 o -10 dal telecomando.
MODALITÀ RIPETZIONE / RIPRODUZIONE CASUALE
Premendo il TASTO MODALITÀ RIPRODUZIONE (5) prima o durante la riproduzione è possibile ripetere una singola traccia, una cartella (MP3 solamente) o tutte le tracce. Ogni pressione cambia la modalità di riproduzione
come segue:
Ripeti riproduzione (Repeat play): è possibile ascoltare le tracce o le car-
telle desiderate ripetutamente tramite questa funzione.
Riproduzione casuale (Random play): questa funzione permette di ascol-
tare tutte le tracce o una cartella in sequenza casuale.
PROGRAMMAZIONE DI UN CD
È possibile programmare fino a 20 tracce per la riproduzione di un CD o 99 di
un file MP3 in qualsiasi ordine. Prima della programmazione, assicurarsi che
il sistema sia in modalità arresto (stop):
1. Configurare il lettore in modalità CD/USB e interrompere la riproduzione
del CD.
2. Premere il TASTO PROGRAMMAZIONE (46), “P” comparirà sul display
LCD (18). Saranno inoltre visibili anche il numero di programma e i numeri di traccia per la programmazione.
3. Selezionare la traccia desiderata premendo i tasti SKIP UP (3) o SKIP
DOWN (4).
4. Premere il TASTO PROGRAMMAZIONE (46) per memorizzare la traccia.
5. Ripetere i punti 3 e 4 per entrare tracce addizionali nella memoria, se
necessario.
Page 29

Italiano Italiano 53 54
6. Quando tutte le tracce sono state programmate, premere il TASTO PLAY/
PAUSE (2) per riprodurre il disco nell’ordine assegnato.
7. Per cancellare il file programmato, premere il TASTO STOP (26).
RIPRODUZIONE DI TRACCE MP3/WMA TRAMITE SUPPORTO USB
Il sistema è capace di decodificare e riprodurre tutti i file MP3 /WMA memorizzati nel supporto di memorizzazione attraverso il collegamento alla porta
USB.
1. Premere il TASTO FUNZIONE (6) per selezionare la modalità “USB”.
2. Collegare il supporto USB facendo attenzione che esso entri completa-
mente.
3. Dopo il collegamento, il sistema inizia automaticamente la riproduzione
del dispositivo di memorizzazione, e il display LCD (18) visualizza il numero totale di file MP3/WMA.
4. Ripetere la stessa procedura di riproduzione del disco CD/MP3, come
riportato sopra.
NOTE:
Il sistema è in grado di rilevare e riprodurre file in formato MP3 e WMA
solo tramite porta USB.
Se il sistema viene collegato a un lettore MP3 tramite presa USB, a causa
delle variazioni nel formato di codifica MP3, alcuni lettori MP3 potrebbero
non essere capaci di riprodurre i file tramite la presa USB. Questo non
rappresenta un malfunzionamento del sistema.
Collegare il dispositivo USB al contrario potrebbe danneggiare il sistema
audio o il dispositivo di memorizzazione. Verificare che la direzione sia
corretta prima di procedere al collegamento.
FUNZIONE CASSETTA
1. Premere il TASTO FUNZIONE (6) per selezionare la modalità “TAPE”.
2. L’apparecchio inizierà la riproduzione del nastro automaticamente una
volta inserita la cassetta.
3. Premere il tasto AVANTI VELOCE/ESPULSIONE CASSETTA (33) fino a
metà durante la lettura. Il nastro avvolgerà in avanti velocemente.
4. Ripremere leggermente il tasto (33) per tornare alla lettura normale.
5. Premere il tasto AVANTI VELOCE/ESPULSIONE CASSETTA (33) com-
pletamente (a fondo) e la cassetta sarà espulsa.
FUNZIONE BLUETOOTH
1. Premere il TASTO FUNZIONE (6) per selezionare “BLUETOOTH”.
2. Selezionare dal proprio dispositivo portatile (smartphone, tablet ...) il
Bluetooth ID categoria "CBT", quindi confermare la connessione.
3. Ora è possibile trasferire la musica al di HIF-1999D+BT e tutte le operazioni possono essere azionati solo dal tuo dispositivo mobile.
CODIFICA DI UN CD / CASSETTA O DISCO 78/33/45 GIRI IN FILE MP3
Il sistema può CODIFICARE un CD normale, una cassetta o un disco in vinile
in formato MP3, una stazione FM o DAB, o un brano Bluetooth e registrarlo
nel supporto di memorizzazione tramite il collegamento alla porta USB.
CODIFICARE DALLA RADIO
Inserire un supporto USB nella PRESA USB (13). Durante la riproduzione di
una stazione FM, premere il TASTO RECORD (9) una volta. Sul display lam-
peggerà la scritta “USB” per 5 secondi e la registrazione inizierà. Premere il
TASTO PLAY/PAUSE (2) una volta per interrompere la registrazione. La
scritta “USB” sul display smetterà di lampeggiare. Premere il TASTO PLAY/
PAUSE (2) di nuovo per continuare la registrazione. La scritta “USB” ripren-
derà a lampeggiare.
CODIFICARE UN CD
Inserire un supporto USB nella PRESA USB (13). Durante la riproduzione di
un CD, premere il TASTO RECORD (9) una volta. Sul display lampeggerà la
scritta “REC-1”. Premere il TASTO RECORD (9) di nuovo per registrare la
traccia corrente. In alternativa premere il TASTO SKIP+ (3) una volta per scegliere di registrare tutto il contenuto del CD e sul display comparirà la scritta
“REC-A”.
Page 30

Italiano Italiano 55 56
CODIFICARE UN CD-MP3
Inserire un supporto USB nella PRESA USB (13). Durante la riproduzione di
un CD, premere il TASTO RECORD (9) una volta. Sul display lampeggerà la
scritta “REC-1”. Premere il TASTO RECORD (9) di nuovo per registrare la
traccia corrente. In alternativa premere il TASTO SKIP+ (3) di nuovo per scegliere di registrare tutto il contenuto della cartella corrente e sul display com-
parirà la scritta “REC-F”. Premere il TASTO SKIP+ (3) di nuovo per scegliere
di registrare tutto il contenuto del CD sul display comparirà la scritta “REC-A”.
CODIFICARE UNA CASSETTA
Inserire un supporto USB nella PRESA USB (13). Durante la riproduzione di
una cassetta, premere il TASTO RECORD (9) una volta. Sul display lampeg-
gerà la scritta “USB” per 5 secondi e la registrazione inizierà. Premere il TA-
STO PLAY/PAUSE (2) una volta per interrompere la registrazione. La scritta
“USB” sul display smetterà di lampeggiare. Premere il TASTO PLAY/PAUSE
(2) di nuovo per continuare la registrazione. La scritta “USB” riprenderà a
lampeggiare.
CODIFICARE UN DISCO
Inserire un supporto USB nella PRESA USB (13). Durante la riproduzione di
un vinile, premere il TASTO RECORD (9) una volta. Sul display lampeggerà
la scritta “USB” per 5 secondi e la registrazione inizierà. Premere il TASTO
PLAY/PAUSE (2) una volta per interrompere la registrazione. La scritta “USB”
sul display smetterà di lampeggiare. Premere il TASTO PLAY/PAUSE (2) di
nuovo per continuare la registrazione. La scritta “USB” riprenderà a lampeg-
giare.
CODIFICARE DAL BLUETOOTH
Inserire un supporto USB nella PRESA USB (13). Durante la riproduzione di
un brano da un dispositivo Bluetooth, premere il TASTO RECORD (9) una
volta. Sul display lampeggerà la scritta “USB” per 5 secondi e la registrazione
inizierà. Premere il TASTO PLAY/PAUSE (2) una volta per interrompere la
registrazione. La scritta “USB” sul display smetterà di lampeggiare. Premere il
TASTO PLAY/PAUSE (2) di nuovo per continuare la registrazione. La scritta
“USB” riprenderà a lampeggiare.
NOTA: Premere il TASTO STOP (26) per terminare la registrazione.
CANCELLARE BRANI DAL SUPPORTO USB
1. Nella modalità “USB” premere il TASTO CANCELLA (45) del telecomando una volta. Il display mostrerà la scritta “DEL-1”. Si potrà cancellare la
traccia in riproduzione.
2. Premere il TASTO SKIP+ (3), il display mostrerà la scritta “DEL-F”. Si
potrà cancellare tutta la cartella corrente.
3. Premere il TASTO SKIP+ (3) di nuovo, il display mostrerà la scritta “DELA”. Si potrà cancellare tutto il contenuto del supporto USB.
4. Una volta scelta l’operazione di cancellazione tra le tre opzioni “DEL-1”,
“DEL-F” e “DEL-A”, premere il TASTO CANCELLA (45) dal telecomando
per confermare.
OPERAZIONI MUTO ED EQUALIZZATORE
Durante la riproduzione da qualsiasi dispositivo premere il TASTO MUTO
(49) una volta. Nessun suono sarà più riprodotto dalle casse e sul display
sarà visualizzata la scritta “MUTE ON”. Premere di nuovo il TASTO MUTO
(49) dal telecomando oppure ruotare la MANOPOLA VOLUME (7) per ritorna-
re alla normale riproduzione.
Durante la riproduzione premere il TASTO EQUALIZZATORE (34) sequenzialmente per selezionare diverse impostazioni della riproduzione, tra FLAT/
POP/CLASSIC/ROCK/JAZZ.
SPECIFICHE TECNICHE
Alimentazione AC: 110-240V ~ 50 Hz
FM: 87.5 - 108 MHz
DAB: BANDA III
Le caratteristiche sono soggette a variazioni senza preavviso.
Page 31

Español Español 57 58
LOCALIZACIÓN DE LOS CONTROLES
1. CUBIERTA ANTIPOLVO
2. BOTÓN PLAY/PAUSE (REPRODUCCIÓN/PAUSA) DE CD
3. BOTÓN SKIP UP (SALTAR ARRIBA) DE CD/USB
4. BOTÓN SKIP DOWN (SALTAR ABAJO) DE CD/USB
5. BOTÓN REPEATRANDOM (REPETICIÓN/ALEATORIO) CD/USB
6. BOTÓN FUNCIÓN
7. MANDO VOLUME
8. SENSOR REMOTO
9. BOTÓN RECORD (GRABACIÓN)
10. TAPA DEL CD
11. BOTÓN OPEN (APERTURA) DE TAPA DEL CD
12. BOTÓN BANDA RADIO MW
13. PUERTO USB
14. BOTÓN BANDA RADIO FM
15. BOTÓN ON/OFF
16. QUITA LEVANTAMIENTO BRAZO TOCADISCOS
17. INDICADOR LED DE ENCENDIDO
18. PANTALLA LCD
19. BOTÓN MENU
20. ESCALA SINTONÍA RADIO
21. MANDO DE SINTONIZACIÓN
22. PARO BRAZO TOCADISCOS
23. ADAPTADOR DE EJE TOCADISCOS (33/78)
24. SELECTOR DE VELOCIDAD A 78/33/45 RPM
25. PORTACABEZAL
26. BOTÓN STOP
27. ALTAVOZ (I/D)
28. ANTENA FM
29. CABLE DE CA
30. BOTÓN CASETA STOP / EJ
31. BOTÓN INFO
32. BOTÓN SCAN
ATTENTIÓN
El símbolo de exclamación dentro un triángulo tiene el objeto de advertir al
usuario de la presencia de instrucciones importantes de funcionamiento y
mantenimiento en la documentación adjunta con el equipo.
El símbolo del rayo con punta de flecha dentro de un triángulo adverte al
Para reducir los riesgos de descargas eléctricas, no retire la cubierta. La
unidad no hay en su enterior componentes que pueda manipular el usuario. Encargue su reparación a personal cualificado.
Esta unidad funciona con 230V ~ 50Hz. Cuando el equipo vaya a estar un
tiempo prolongado sin utilizarse, desenchufar el cable de alimentación.
No conecte la unidad hasta que no se hayan efectuado todas las otras
conexiones.
La unidad no debería ser expuesta a lluvia o humedad.
La unidad se debe instalar de forma que su posición no le impida tener
ventilación adecuada. Por ejemplo, el equipo no se debe colocar cerca de
cortinas o sobre el tapete, ni en una instalación como puede ser un armario.
La unidad no debería ser expuesta a la luz solar directa ni a fuentes emisora de calor.
La presencia de esta marca en el producto o en el materiál informativo que lo acompaña, indica que al finalizar
su vida útil no deberá eliminarse junto con otros residuos domésticos. Para evitar los posi bl es daños al medi
o ambi ente o a l a sal ud humane que representa la eliminación incontrolada de residuos, separe este producto de otros tipos de residuos y reciclelo correctamente para promover la reutilización sostenible de recursos
materiales. Los usuarios particulares pueden contactar con el establecimiento donde adqui ri eron el producto,
o con l as autori dades l ocal es pertinentes, para informarse sobre cómo y dónde pueden lIevario para que
sea sometido a un reciclaje ecológico y seguro. Los usuarios comerciales pueden contactar con su proveedor
y consultar las condiciones del contrato de compra. Este produco no debe eliminarse mezclado con otros
residuos comerciales.
Eliminación correcta de este producto
(material electrico y electrónico de descarte)
Page 32

Español Español 59 60
CONEXIÓN A LA FUENTE DE ALIMENTACIÓN
Antes de activar el aparato asegurarse de que el voltaje local corresponda al
voltaje indicado en la placa de los datos de funcionamiento.
Para su propia seguridad leer las siguientes instrucciones con cuidado antes
de conectar este aparato a la toma de corriente.
pulse el botón de encendido durante 1 segundo para encender la unidad.
Mantenga pulsado el botón de encendido durante 3 segundos para apagar.
Cuando terminó de tocar una canción, apague la unidad si no la misma se
apagará automáticamente después de 15 minutos
FUNCIONAMIENTO CON AC
Este aparato ha sido diseñado para que
funcione con una fuente de alimentación de
CA 110-240V, 50Hz. La conexión a otro tipo
de fuente de alimentación podría dañar el
aparato.
Atención: Para prevenir las descargas eléctricas desconectar la clavija antes de remover la tapa. No emplear las partes utilizables en el interior.
Extraer con cuidado el aparato de la caja, conservar el embalaje para un
eventual uso futuro.
ELEGIR EL IDIOMA DEL MENÚ
1. Pulse el BOTÓN ON/OFF (15). La pantalla (18) luces.
2. Pulse el BOTÓN MENU (19). Girar el MANDO DE SINTONIZACIÓN (21)
para seleleccionar “SYSTEM”.
3. Girar el MANDO DE SINTONIZACIÓN (21) para seleleccionar
“LANGUAGE”, pulse el MANDO DE SINTONIZACIÓN (21) para confir-
mar.
4. Girar el MANDO DE SINTONIZACIÓN (21) para seleccionar el idioma
deseado, pulse el MANDO DE SINTONIZACIÓN (21) para confirmar.
33. BOTÓN PRESET
34. BOTÓN IGUALADA
MANDO A DISTANCIA
35. APERTURA / CIERRE CD
36. REC: en modo CD/USB/BLUETOOTH/PHONO/CASSETTE presione
para activar el registro.
37. BOTÓN MODO DE REPRODUCCIÒN
38. BOTÓN PLAY/PAUSE: en el modo de CD/USB, pulse para iniciar la re-
producción, pulse de nuevo para hacer una pausa.
39. BOTÓN SKIP+: Presione una vez para reproducir la pista anterior, pulse
y mantenga pulsado para desplazarse hacia atrás la pista.
40. BOTÓN SKIP-: Presione una vez para reproducir la pista siguiente, pulse y mantenga pulsado para desplazarse hacia adelante de la pista.
41. BOTÓN STOP
42. BOTÓN 10+
43. BOTÓN 10-
44. BOTÓN FUNCIÒN
45. BOTÓN CANCELAR
46. BOTÓN PROGRAM
47. BOTÓN VOLUMEN+
48. BOTÓN VOLUMEN-
49. BOTÓN MUTE
50. BOTÓN IGUALADA
51. BOTÓN PRESET
52. BOTÓN INFORMACIÒN
INSTALACIÓN DE LAS PILAS
El transmisor infrarrojo requiere la utilización de dos pilas de tamaño CR-
2025.
Page 33

Español Español 61 62
USO DE LA RADIO
1. Pulse el BOTÓN ON/OFF (15). La pantalla (18) luces.
2. Pulse el BOTÓN FUNCIÓN (6) secuencialmente para seleccionar “FM
RADIO”.
Antena
Para la recepción en FM / DAB se encuentra incorporada una antena a hilo
FM (28) en la parte posterior del aparato. Mover el hilo hasta cuando se alcance la mejor recepción.
Sincronización manual
Seleccione la emisora deseada girando el MANDO DE SINTONIZACIÓN
(21).
Sincronización automática
1. Pulse el BOTÓN MENU (19). Girar el MANDO DE SINTONIZACIÓN (21)
para seleleccionar “SCAN SETTING”.
2. Girar el MANDO DE SINTONIZACIÓN (21) para seleleccionar “ALL
STATIONS” o “STRONG STATIONS ONLY”. Pulse el MANDO DE SIN-
TONIZACIÓN (21) para confirmar.
3. Pulse el BOTÓN SCAN (32) y la unidad encontrará todas las emisoras
de FM.
Información RDS (Radio Data System)
Pulse el BOTÓN INFO (31) para mostrar la siguiente información: tipo de
programa, número de programa, audio bitrate, la hora, la fecha.
Recepción FM Estéreo y Mono
Recepción de FM estéreo es posible cuando la estación está transmitiendo
en estéreo.
1. Pulse el BOTÓN MENU (19). Girar el MANDO DE SINTONIZACIÓN (21)
para seleleccionar “AUDIO SETTING”.
2. Girar el MANDO DE SINTONIZACIÓN (21) para seleleccionar “FORCED
CONFIGURAR LA FECHA Y HORA
1. Pulse el BOTÓN ON/OFF (15). La pantalla (18) luces.
2. Pulse el BOTÓN MENU (19). Girar el MANDO DE SINTONIZACIÓN (21)
para seleleccionar “SYSTEM”.
3. Girar el MANDO DE SINTONIZACIÓN (21) para seleleccionar “TIME”,
pulse el MANDO DE SINTONIZACIÓN (21) para confirmar.
4. Girar el MANDO DE SINTONIZACIÓN (21) para seleleccionar “SET
12/24 HOURS”, pulse el MANDO DE SINTONIZACIÓN (21) para confir-
mar.
5. Repita los pasos 2-4 para seleccionar las siguientes opciones: “SET
TIME/DATE” o “AUTO UPDATE”.
6. Si ha seleccionado “SET TIME/DATE”, girar el MANDO DE SINTONIZA-
CIÓN (21) para ajustar las horas y los minutos. Pulse el MANDO DE
SINTONIZACIÓN (21) para confirmar.
7. Si ha seleccionado “AUTO UPDATE”, girar el MANDO DE SINTONIZA-
CIÓN (21) para seleccionar el modo del tiempo de actualización: NINGUNA, DAB, FM, NO UPDATE.
La transacción se ha completado y la pantalla mostrará la fecha y la hora.
TUNER/ENTER
Turn left & right to move inside of
Display menu, then push the same
knob to confirm each function.
TIME
LANGUAGE
SW VERSION
FROM FM
FROM ANY
FROM DAB
AUTO UPDATE
SET 12/24 HOURS
ENGLISH
NEDERLANDS
SET TIME/DATE
NORK
SWENSKA
DEUTSCH
NO UPDATE
TUNER/ENTER
Page 34

Español Español 63 64
TOCADISCOS
MUY IMPORTANTE!
Para evitar daños durante el transporte, un tornillo se coloca en la parte superior derecha de la
mesa giratoria. Antes de empezar a utilizar la
plataforma giratoria y utilizar un destornillador
para desenroscar el tornillo en sentido horario. En el caso del transporte recuerde apretar el tornillo hacia la izquierda para evitar daños
Preparación
1. Abrir la tapa del tocadiscos.Liberar el cierre del brazo de lectura.
2. Destornillar la vid de seguridad-transporte apuesta sobre el extenso su-
perior del tocadiscos.
3. Desbloquear el bloqueo del brazo y remover la protección de la chinche.
Audición de los discos
1. Pulse el BOTÓN FUNCIÓN (6) secuencialmente para seleccionar
“PHONO”.
2. Colocar un disco sobre el tocadiscos, sobre el eje central. Colocar el
adaptador EP sobre el eje central cuando se escuchen discos EP de 17
cm (45 RPM).
3. Colocar el Selector Velocidad (24) en 33, 78 o 45 RPM segun el disco
utilizado.
4. Soltar el cierre del brazo de lectura, y extraer la tapa de protección de la
aguja.
5. Levantar el brazo de lectura con la palanca levantadora del brazo de
MONO” o “STEREO ALLOWED”. Pulse el MANDO DE SINTONIZA-
CIÓN (21) para confirmar.
OPERACIONES DAB
1. Pulse el BOTÓN FUNCIÓN (6) secuencialmente para seleccionar “DAB
MODE”.
2. Extienda la antena DAB en la parte posterior.
Sincronización automática
1. Pulse el BOTÓN MENU (19). Girar el MANDO DE SINTONIZACIÓN (21)
para seleleccionar “FULL SCAN”.
2. Pulse el MANDO DE SINTONIZACIÓN (21) y la unidad encontrará todas
las emisoras DAB.
Sincronización automática
1. Pulse el BOTÓN MENU (19). Girar el MANDO DE SINTONIZACIÓN (21)
para seleleccionar “MANUAL TUNE”.
2. Girar el MANDO DE SINTONIZACIÓN (21) para seleleccionar las emisoras DAB.
3. Durante la recepción DAB en estéreo, se mostrará "STEREO" en la pantalla LCD.
4. Durante la recepción DAB, pulse el el BOTÓN INFO (31) para mostrar la
información de la emisora seleccionada: tipo de programa, número de
programa, Rango de frecuencia, intensidad de la señal, Tiempo, Fecha.
Retenciòn DAB
1. Después de seleccionar la estación deseada, mantenga presionado el
BOTÓN PRESET (33) durante dos segundos.
2. La pantalla mostrará "Preset 1: (Empty) ". Gire el MANDO DE SINTONIZACIÓN (21) para seleccionar el número de memoria deseado para la
estación, a continuación, pulse el MANDO DE SINTONIZACIÓN (21)
para confirmar.
TRANSIT
SCREW
Lock Lever Stylus Cover
Page 35

Español Español 65 66
ción o pausa, el reproductor volverá al principio de la pista, mostrará el
número de pista inicial y continuará en el modo de reproducción o pausa.
Para acceder a la pista anterior y continuar en el modo de reproducción o
pausa, vuelva a pulsar el BOTÓN SKIP DOWN (4) una vez realizado el
paso 2.
Al pulsar y mantener pulsado el BOTÓN SKIP UP (3)/BOTÓN SKIP
DOWN (4) durante la reproducción de un cd/mp3, la pista que se está
reproduciendo entrará en avance rápido o retroceso rápido hasta que se
deje de presionar el botón.
MODO DE REPETICIÓN/ALEATORIO
Al pulsar el BOTÓN REPEATRANDOM (5) antes o en el transcurso de la
reproducción, pueden reproducirse en los modos siguientes una sola pista,
una única carpeta (sólo para MP3) o todas las pistas:
Repetir reproducción: esta función permite escuchar las pistas o la carpe-
ta deseadas de manera repetida.
Reproducir aleatorio: esta función permite escuchar todas las pistas o
seleccionar las carpetas en orden aleatorio.
PROGRAMACIÓN DEL DISCO DE CD
Es posible programar un orden de reproducción para un máximo de 20 pistas de un CD o 99 de MP3. Antes de utilizar esta función, asegúrese de
que el sistema se encuentra en el modo de parada.
1. Fije el modo de CD/USB y detenga la reproducción del CD.
2. Pulse el BOTÓN PROGRAM (46). La pantalla LCD mostrará la indica-
ción P (18). También indicará el número de programa y los dígitos disponibles para el número de pista que se programará.
3. Seleccione una pista con los botones skip o (saltar hacia delante/hacia
atrás) (3).
4. Pulse el BOTÓN PROGRAM (46) para almacenar el registro en la memoria.
5. Si desea introducir otras pistas en la memoria, repita los pasos 3 y 4.
6. Una vez programadas todas las pistas deseadas, pulse el BOTÓN
lectura.
6. Colocar el brazo de lectura en el inicio del disco, o en el inicio de una
melodía particular.
7. Bajar con delicadeza el brazo sobre el disco con la palanca levantadora
del brazo de lectura para iniciar la lectura.
8. Cuando la lectura del disco finalizará el tocadiscos se para. Retornar el
brazo al apoyo. Para detener el disco durante la lectura, alce el brazo de
lectura y devuélvalo al apoyo.
Notas: No girar el Plato manualmente. Mover o sacudir el tocadiscos sin la
protección del cierre del brazo de lectura podría dañar el brazo de lectura.Colocar la tapa de protección sobre la aguja cuando no se utilizará .
REPRODUCCIÓN DE UN CD
Primeros pasos
1. Pulse el BOTÓN FUNCIÓN (6) secuencialmente para seleccionar “CD”.
2. Pulse el botón OPEN/CLOSE (abrir/cerrar) (11) para abrir la tapa del CD
(10).
3. Coloque en la bandeja un CD con el lado impreso hacia arriba y cierre la
tapa del CD.
4. Se ejecutará la búsqueda en el soporte. La pantalla LCD (18) mostrará
el número total de pistas y el tiempo de reproducción total.
5. Pulse el BOTÓN PLAY/PAUSE (2) para iniciar la reproducción desde la
primera pista.
6. Para interrumpir la reproducción, vuelva a pulsar el BOTÓN STOP (26).
El tiempo de reproducción se congelará y la pantalla LCD parpadeará
(18). Pulse una vez más el botón para reanudar la reproducción normal.
Modo de salto/búsqueda (saltar/buscar hacia delante y saltar/buscar
hacia atrás)
Al pulsar el BOTÓN SKIP UP (3) estando en el modo de reproducción o
pausa, el reproductor saltará a la pista siguiente, mostrará el número de
pista y continuará en el modo de reproducción o pausa.
Al pulsar el BOTÓN SKIP DOWN (4) estando en el modo de reproduc-
Page 36

Español Español 67 68
FUNCIÓN CASETE
1. Pulse el BOTÓN FUNCIÓN (6) secuencialmente para seleccionar
“TAPE”. El aparato iniciará automáticamente la reproducción de la cinta
una vez insertado el casete.
2. Pulsar el botón AVANCE RAPIDO/EXPULSION (33) hasta mitad durante
la lectura. La cinta avancerá hacia adelante velozmente.
3. Pulsar ligeramente de nuevo el botón para volver a la lectura normal.
4. Pulsar el botón AVANCE RAPIDO/EXPULSION (33) completamente, a
fondo, y el casete será expulsado.
OPERACIÓN BLUETOOTH
1. Pulse el BOTÓN FUNCIÓN (6) secuencialmente para seleccionar
“BLUETOOTH”.
2. Selección de su dispositivo portátil (Smartphone, Tablet ...) el Bluetooth
ID etiquetado como "CBT", a continuación, confirme la conexión.
3. Ahora usted puede transferir la música a la HIF-1999D+BT y todas las
operaciones sólo se pueden operar desde su dispositivo móvil.
CODIFICACIÓN DE AUDIO/CD EN ARCHIVOS DE MP3
El sistema puede CODIFICAR un CD normal o GIRATORIO a formato MP3
y grabar en dispositivos de memoria a través del puerto de conexión USB.
CODIFICACIÓN DE RADIO
Inserte un dispositivo de memoria USB en el PUERTO USB (13). Durante la
reproducción de una emisora de FM, pulse el BOTÓN REC (9) una vez. La
pantalla mostrará "USB" durante 5 segundos y se iniciará la grabación. Pulse el BOTÓN PLAY/PAUSE (2) una vez para detener la grabación. "USB"
en el parpadeo parada pantalla. Presione el BOTÓN PLAY/PAUSE (2) de
nuevo para continuar la grabación. "USB" está parpadeando.
CODIFICACIÓN DE CASETE
Inserte un dispositivo de memoria USB en el PUERTO USB (13). Durante la
PLAY/PAUSE (2) del CD para reproducir el disco en el orden determinado.
7. Para cancelar la reproducción del archivo programado, pulse el BOTÓN
STOP (26).
REPRODUCCIÓN DE UNA CANCIÓN DE MP3/WMA MEDIANTE UNA
CONEXIÓN DE DISPOSITIVO DE ALMACENAMIENTO USB
El sistema puede descodificar y reproducir todos los archivos MP3/WMA
almacenados en el dispositivo de memoria a través de un puerto de conexión USB.
1. Pulse el BOTÓN FUNCIÓN (6) secuencialmente para seleccionar
“USB”.
2. Conecte el dispositivo USB con la parte superior hacia arriba, comprobando que está totalmente introducido. No doble el dispositivo al introducirlo.
3. El sistema comenzará la lectura del soporte de almacenamiento automáticamente tras su conexión. La pantalla LCD (18) mostrará el número
total de archivos MP3/WMA y de carpetas detectado.
4. Repita el procedimiento de reproducción de los discos de CD/MP3 indicado anteriormente.
5.
Observaciones
El sistema sólo puede detectar y leer los archivos en formato mp3 y wma
a través del puerto USB.
Al conectar el sistema al reproductor de MP3 a través del puerto USB, es
posible que, debido a diferencias del formato de codificación de MP3,
algunos lectores no puedan reproducir la música contenida. Esto no se
debe a un fallo de funcionamiento del sistema.
Al conectar el USB hacia abajo o hacia detrás podría dañarse el sistema
de audio o el dispositivo de almacenamiento (unidad de almacenamiento
USB . Compruebe la dirección del dispositivo antes de realizar la conexión.
Page 37

Español Español 69 70
"REC-F". Pulse el botón el BOTÓN SKIP UP (3) de nuevo para elegir grabar
todo el contenido del CD y la pantalla mostrará "REC-A".
NOTA: Pulse el BOTÓN STOP (26) para detener la grabación.
QUITAR CANCIONES DE SOPORTE USB
1. En la prensa "USB" pulse el BOTÓN CANCELAR (45) en el control remoto una vez. La pantalla mostrará "DEL-1". Usted puede eliminar la
pista que se está reproduciendo.
2. Pulse el BOTÓN SKIP UP (3), la pantalla mostrará "DEL-F". Usted puede eliminar toda la carpeta actual.
3. Pulse el BOTÓN SKIP UP (3) de nuevo, la pantalla mostrará "DEL-A".
Usted puede eliminar todos los contenidos en el USB.
4. Una vez que haya elegido la operación de borrado entre las tres opciones "DEL-1", "DEL-F" y "DEL-A", pulse el BOTÓN CANCELAR (45) en
el control remoto para confirmar.
MUDO / IGUALADA
Durante la reproducción desde cualquier dispositivo el BOTÓN MUTE (49)
pulse una vez. No hay sonido se reproducirá en los altavoces y la pantalla
mostrará "MUTE ON". el BOTÓN MUTE (49) pulse de nuevo el mando a
distancia o gire el MANDO VOLUME (7) para volver a la reproducción normal.
Durante la reproducción, pulse el BOTÓN IGUALADA (34) secuencialmente
para seleccionar varios ajustes para la reproducción, como PLANA/POP/
CLÁSICO/ROCK/JAZZ.
ESPECIFICACIONES TÉCNICAS
CA: 110-240V ~ 50 Hz
FM: 87,5 - 108 MHz
OM: BAND III
Especificaciones y diseño sujetos a posibles modificaciones sin previo aviso.
reproducción de una Casete, pulse el BOTÓN REC (9) una vez. La pantalla
mostrará "USB" durante 5 segundos y se iniciará la grabación. Pulse el BOTÓN PLAY/PAUSE (2) una vez para detener la grabación. "USB" en el parpadeo parada pantalla. Presione el BOTÓN PLAY/PAUSE (2) de nuevo para
continuar la grabación. "USB" está parpadeando.
CODIFICACIÓN DE TOCADISCO
Inserte un dispositivo de memoria USB en el PUERTO USB (13). Durante la
reproducción de un tocadisco, pulse el BOTÓN REC (9) una vez. La pantalla
mostrará "USB" durante 5 segundos y se iniciará la grabación. Pulse el BOTÓN PLAY/PAUSE (2) una vez para detener la grabación. "USB" en el parpadeo parada pantalla. Presione el BOTÓN PLAY/PAUSE (2) de nuevo para
continuar la grabación. "USB" está parpadeando.
CODIFICACIÓN DE BLUETOOTH
Inserte un dispositivo de memoria USB en el PUERTO USB (13). Durante la
reproducción de un dispositivo bluetooth, pulse el BOTÓN REC (9) una vez.
La pantalla mostrará "USB" durante 5 segundos y se iniciará la grabación.
Pulse el BOTÓN PLAY/PAUSE (2) una vez para detener la grabación.
"USB" en el parpadeo parada pantalla. Presione el BOTÓN PLAY/PAUSE
(2) de nuevo para continuar la grabación. "USB" está parpadeando.
CODIFICACIÓN DE CD
Inserte un dispositivo de memoria USB en el PUERTO USB (13). Durante la
reproducción de un CD, presione el BOTÓN REC (9) una vez. La pantalla
parpadeará "REC-1". Pulse el botón el BOTÓN SKIP UP (3) de nuevo para
elegir grabar todo el contenido del CD y la pantalla mostrará "REC-A".
CODIFICACIÓN DE CD-MP3
Inserte un dispositivo de memoria USB en el PUERTO USB (13). Durante la
reproducción de un CD, presione el BOTÓN REC (9) una vez. La pantalla
parpadeará "REC-1". Presione el BOTÓN REC (9) de nuevo para grabar la
pista actual. Alternativamente, pulse el BOTÓN SKIP UP (3) de nuevo para
elegir grabar todo el contenido de la carpeta actual y la pantalla mostrará
Page 38

Nederlands Nederlands 71 72
LOCATIE VAN DE BESTURINGSELEMENTEN
1. BESCHERMKAP
2. CD PLAY/PAUSE KNOP
3. VOLGENDE KNOP
4. VORIGE KNOP
5. AFSPEELMODUS KNOP
6. FUNCTIE KNOP
7. VOLUME KNOP
8. SENSOR VOOR AFSTANDSBEDIENING
9. RECORD KNOP
10. CD LADE
11. OPENEN/SLUITEN CD LADE KNOP
12. MW BAND KNOP
13. USB AANSLUITING
14. FM BAND KNOP
15. AAN/UIT KNOP
16. HENDEL VOOR OPHEFFEN ARM PLATENSPELER
17. LED VERMOGENINDICATOR
18. LCD DISPLAY
19. MENU KNOP
20. AFSTEMSCHAAL
21. AFSTEMKNOP
22. VERGRENDELING ARM PLATENSPELER
23. ADAPTER 45/33 TOEREN PLATEN
24. SNELHEIDSREGELAAR 33/45/78 TOEREN/MIN
25. NAALDDRAGER
26. STOP KNOP
27. LUIDSPREKERS
28. FM / DAB ANTENNE
29. VOEDINGSKABEL AC-230V/50Hz
30. CASSETTE STOP / UITWERPEN KNOP
31. INFORMATIE KNOP
32. SCAN KNOP
WARNINGS
Het uitroepteken in een gelijkzijdige driehoek is bedoeld om de
gebruiker erop attent te maken dat de gebruikershandleiding belangrijke instructies bevat voor het gebruik en het onderhoud.
De bliksemschicht in een gelijkzijdige driehoek is bedoeld om de
gebruiker te waarschuwen voor de aanwezigheid van gevaarlijke
spanning binnen in het apparaat.
Om het risico op elektrische schokken te reduceren, dient het apparaat niet te worden geopend. Het apparaat bevat geen onderdelen
die gerepareerd kunnen worden door de gebruiker. In het geval van
een defect dient contact opgenomen te worden met een gekwalificeerde technicus voor de reparatie.
Dit apparaat is ontworpen om te werken op 230V ~ 230v~ 50Hz.
Als het apparaat voor een langere tijd niet gebruikt gaat worden,
dient de stekker uit het stopcontact te worden gehaald.
Stel het apparaat niet bloot aan regen of vocht.
Gebruik het apparaat uitsluitend nadat is gecontroleerd dat alle
aansluitingen correct zijn uitgevoerd.
Plaats het apparaat op een voldoende geventileerde plek. Plaats
het apparaat niet in de buurt van gordijnen, op het tapijt of in in
een stuk meubilair, zoals bijvoorbeeld een boekenkast.
Stel het apparaat niet bloot aan direct zonlicht of aan warmtebron-
Dit symbool dat staat weergegeven op het product en in de documentatie ervan, duidt erop dat het product niet
kan worden weggegooid met het gewone huisvuil aan het einde van de levensduur. Om schade aan het milieu
of aan de gezondheid door ongepaste afvalverwijdering te voorkomen, dient de gebruiker dit product te scheiden van andere soorten afval op verantwoorde wijze ter bevordering van duurzaam hergebruik van de materiële hulpbronnen. De thuisgebruiker dient contact op te nemen met de verkoper van het apparaat of met de
lokale gemeente voor informatie met betrekking tot het scheiden en recyclen van dit type product. Zakelijke
gebruikers dienen contact op te nemen met hun leverancier en de algemene voorwaarden van de verkoopovereenkomst te raadplegen. Dit product dient niet te worden gemengd met ander bedrijfsafval voor de verwijdering.
Correcte afvalverwerking van het product
(elektrisch en elektronisch afval)
Page 39

Nederlands Nederlands 73 74
gedurende 3 seconden om het apparaat uit te schakelen. Als er geen geluid
wordt geproduceerd, wordt het apparaat automatisch na 15 minuten uitgeschakeld.
WERKING OP AC
Dit apparaat is ontworpen om uitsluitend te
werken op een AC 230 V 50Hz voedingsbron. De verbinding met een ander type
voedingsbron kan leiden tot schade aan het
apparaat.
Let op Om elektrische schokken te voorkomen, dient de stekker uit het stopcontact te
worden getrokken alvorens de kap te verwijderen. Laat het onderhoud uitvoeren door
gekwalificeerd personeel van een servicecentrum. Stel het apparaat niet bloot aan regen en vocht.
Hoofdvoedingsbron: uitsluitend AC 110-240V / 50Hz - AC Dit symbool wijst
erop dat dit apparaat dubbel is geïsoleerd. Er is geen aardverbinding vereist.
DE TAAL VAN HET SCHERMMENU INSTELLEN
1. Druk op on AAN/UIT KNOP (15). Het Scherm (18) zal nu oplichten.
2. Druk op MENU KNOP (19) en draai AFSTEMKNOP (21) tot u
“SYSTEEM” kan selecteren.
3. Draai AFSTEMKNOP (21) tot u “TALEN” kan selecteren, druk vervol-
gens op de AFSTEMKNOP (21) om te bevestigen.
4. Draai AFSTEMKNOP (21) tot u de gewenste taal heeft geselecteerd,
druk vervolgens op AFSTEMKNOP (21) om te bevestigen.
DE TIJD EN DATUM OP HET SCHERM INSTELLEN
1. Druk op on AAN/UIT KNOP (15). Het Scherm (18) zal nu oplichten.
2. Druk op MENU KNOP (19) en draai AFSTEMKNOP (21) tot u
“SYSTEEM” kan selecteren.
33. PRESET KNOP
34. EQUALIZER KNOP
35.
AFSTANDSBEDIENING
35. OPENEN / SLUITEN CD LADE
36. REGISTRATIE
37. AFSPEELMODUS KNOB
38. PLAY / PAUSE KNOB
39. VORIGE TRACK
40. VOLGENDE TRACK
41. STOP KNOP
42. VOLGENDE TRACK +10
43. VORIGE TRACK -10
44. FUNCTIE KNOP
45. ANNULERINGSKNOP
46. PROGRAMMERINGSKNOP
47. VOLUME + KNOP
48. VOLUME - KNOP
49. DEMPEN KNOP
50. EQUALIZER KNOP
51. PRESET KNOP
52. INFORMATIE KNOP
PLAATSEN VAN DE BATTERIJEN
De afstandsbediening werkt op 1 type CR-2025 batterij.
VERBINDING MET DE VOEDINGSBRON
Alvorens het apparaat in te schakelen, dient er te worden gecontroleerd dat
de lokale spanning overeenkomt met de gegevens die staan aangegeven op
het typeplaatje. Voor uw eigen veiligheid dient u de volgende instructies goed te lezen, alvorens het apparaat te verbinden met het stopcontact.
Druk op de POWER-knop gedurende 1
seconde om het apparaat in te schakelen. Houd de POWER-knop ingedrukt
Page 40

Nederlands Nederlands 75 76
FM radiowerking
1. Druk op on AAN/UIT KNOP (15). Het Scherm (18) zal nu oplichten.
2. Druk achtereenvolgens op FUNCTIE KNOP (6) om de FM radio te selec-
teren.
Manueel afstemmen
Stem af op de gewenste radiozender aan de hand van AFSTEMKNOP (21).
Automatisch afstemmen
1. Druk op MENU KNOP (19) en draai AFSTEMKNOP (21) tot u
“SCANINSTELLING” kan selecteren.
2. Gebruik opnieuw AFSTEMKNOP (21) en kies tussen “ALLE STATIONS”
of “ALLEEN STERKTE STATIONS”. Druk op de AFSTEMKNOP (21) om
te bevestigen.
3. Druk op SCAN KNOP (32) en het toestel zal alle FM zenders scannen.
RDS (Radio Data System) informatie
In de FM-stand, druk op INFORMATIE KNOP (31) voor de volgende informatie: PROGRAMMA TYPE/PROGRAMMA NEEN/AUDIO BITRATE/TIJD/
DATUM.
FM & FM Stereo
1. Druk op MENU KNOP (19) en draai AFSTEMKNOP (21) tot u “AUDIOINSTELLING” kan selecteren.
2. Gebruik opnieuw AFSTEMKNOP (21) en kies tussen “ALLEEN MONO”
of “STEREO TOEGESTAAN”. Druk op de AFSTEMKNOP (21) om te
bevestigen.
DAB-WERKING
1. Druk op de FUNCTIE KNOP (6) om de DAB-modus te selecteren.
2. Open de DAB-antenne aan de achterkant van het toestel.
3. Draai AFSTEMKNOP (21) tot u “TIJD” kan selecteren, druk vervolgens
op de AFSTEMKNOP (21) om te bevestigen.
4. Draai AFSTEMKNOP (21) tot u “12/24 UUR INSTELLEN” kan selecte-
ren, druk vervolgens op de AFSTEMKNOP (21) om te bevestigen.
5. Herhaal de stappen 2-4 van hierboven en kies één van de volgende opties: “TIJD/DATUM INSTELLEN” of “AUTOM. BIJWERK”.
6. Indien u “TIJD/DATUM INSTELLEN” heeft gekozen, gebruik AFSTEM-
KNOP (21) om Uur & Minuten in te stellen, druk vervolgens op AFSTEMKNOP (21) om te bevestigen.
7. Voor Auto Update, volg de stappen 2-6 hierboven en kies “AUTOM. BI-
JWERK”.
De instelling is uitgevoerd en op het scherm staat de DATUM en TIJD.
TIJD
TALEN
SW-VERSIE
VAN FM
UPDATE ALLEN
VAN DAB
AUTOM. BIJWERK
12/24 UUR INSTELLEN
ENGLISH
NEDERLANDS
TIJD/DATUM INSTELLEN
NORK
SWENSKA
DEUTSCH
GEEN UPDATE
TUNER/ENTER
Ga naar links en rechts om het menu te navigeren, druk om elke functie te bevestigen.
TUNER/ENTER
GEBRUIK VAN DE RADIO
Antenne
Voor de FM ontvangst is er aan de achterkant van het apparaat een draadantenne (28) geïntegreerd. Beweeg de draad om de beste ontvangst te
bereiken.
Page 41

Nederlands Nederlands 77 78
Voorbereiding
1. Open de kap van de platenspeler. Maak het haakje van de afspeelarm
los.
2. Draai de veiligheid-overbrengingsschroef, die zich bovenop de platenspeler bevindt, los.
Een plaat afspelen
1. Druk op de FUNCTIE KNOP (6) op PHONO.
2. Plaats een plaat op de centrale as van de platenspeler. Plaats de EP-
adapter op de centrale as bij het beluisteren van EP’s van 17 cm (45
toeren).
3. Stel de snelheidsschakelaar (24) af op 33/45 of op 78 toeren, in overeenkomst met de plaat die wordt afgespeeld.
4. Geef de sluiting van de arm van de leeskop vrij en verwijder de beschermkap van de naald.
5. Hef de afspeelarm op met de hendel van de arm.
6. Plaats de afspeelarm aan het begin van de plaat of aan het begin van
een bepaalde track.
7. Laat de arm uiterst voorzichtig op de plaat zakken met de hendel van de
arm om te beginnen met het afspelen.
8. Als de plaat het einde heeft bereikt, zal de platenspeler automatisch
stoppen. Hef de afspeelarm op en plaats deze op de steun.
9. Om de plaat te stoppen tijdens het afspelen, dient de afspeelarm te worden opgeheven en op de steun te worden geplaatst. De platenspeler zal
automatisch stoppen.
AUTOMATISCH AFSTEMMEN
1. Druk op MENU KNOP (19) en draai AFSTEMKNOP (21) tot u
“VOLLEDIGE SCAN” kan selecteren.
2. Druk op AFSTEMKNOP (21) om de DAB/DAB+-zender te beginnen zoeken.
MANUEEL AFSTEMMEN
1. Druk op MENU KNOP (19) en draai AFSTEMKNOP (21) tot u “HANDM.
AFSTMMN.” kan selecteren.
2. Draai de AFSTEMKNOP (21) om manueel af te stemmen op de gewenste zender.
3. Indien u hebt afgestemd op een DAB-stereozender, zal “STEREO” ver-
schijnen op het Lcd-scherm.
4. Bij DAB-ontvangst, druk op INFORMATIE KNOP (31) voor informatie op
het scherm over de DAB-zender die speelt: PROGRAMMA TYPE/
PROGRAMMA NEEN/AUDIO BITRATE/TIJD/DATUM..
DAB/DAB+-GEHEUGEN VOORAF INSTELLEN
1. Indien u de gewenste zender heeft gekozen, houd PRESET KNOP (33)
gedurende 2 seconden ingedrukt.
2. Op het scherm verschijnt nu “PS”. Draai AFSTEMKNOP (21) om het ge-
wenste opslagnummer te kiezen, druk vervolgens op AFSTEMKNOP
(21) om de zender op te slaan.
PLATENSPELER
HEEL BELANGRIJK!
Om schade bij transport te voorkomen, is er een
transportschroef voorzien rechts bovenaan aan
het draaibare deel. Alvorens u begint af te spelen,
draai de schroef met een schroevendraaier volledig in wijzerzin (schroef gaat neerwaarts). Vergeet niet om bij transport de schroef opnieuw tegen de wijzerzin te schroeven
om schade te voorkomen.
Lock Lever Stylus Cover
TRANSIT
SCREW
Page 42

Nederlands Nederlands 79 80
AFSPEELMODUS/WILLEKEURIG AFSPELEN
Door op de AFSPEELMODUS KNOP (5) te drukken voor of tijdens het afspelen, is het mogelijk om een enkele track, een folder (uitsluitend MP3) of
alle tracks te herhalen. Met elke druk op de knop wordt de afspeelmodus als
volgt gewijzigd:
Het is mogelijk om tracks of folders herhaaldelijk te beluisteren met be-
hulp van deze functie.
Met deze functie is het mogelijk om alle tracks of een folder in willekeuri-
ge volgorde te beluisteren.
PROGRAMMERING VAN EEN CD
Het is mogelijk om tot 20 tracks te programmeren bij het afspelen van een
Cd of 99 tracks bij een MP3 bestand in elke gewenste volgorde. Voor de
programmering dient er te worden gecontroleerd dat het apparaat zich in de
stopmodus bevindt:
1. Configureer het afspeelapparaat naar de CD/USB modus en onderbreek
het afspelen van de Cd.
2. Nadat er op de PROGRAMMERINGSKNOP (46) wordt gedrukt, zal “ P “
verschijnen op de LCD display (18). Daarnaast worden ook het programmanummer en de te programmeren tracknummers weergegeven.
3. Selecteer de gewenste track door op de knoppen VOLGENDE KNOP
(3)/VORIGE KNOP (4) te drukken.
4. Druk op de knop PROGRAMMERINGSKNOP (46) om de track op te
slaan.
5. Herhaal de stappen 3 en 4 om meerdere tracks op te slaan in het geheugen, indien gewenst.
6. Druk op de PROGRAMMERINGSKNOP (46) als alle tracks zijn geprogrammeerd, om de Cd in de ingestelde volgorde af te spelen.
7. Om het geprogrammeerde bestand te annuleren, dient er op de STOP
KNOP (26) te worden gedrukt.
Opmerking: De plaat niet handmatig draaien. Het verplaatsen of schudden
van de platenspeler zonder de beschermkap van de punt en de sluiting van
de afspeelarm, kan leiden tot schade aan het apparaat. Plaats de beschermkap op de punt, wanneer deze niet in gebruik is.
EEN CD AFSPELEN
Om te starten
1. Druk op de FUNCTIE KNOP (6) om de CD/USB-modus te selecteren.
2. Druk op de knop “OPEN/CLOSE” (11) om de Cd lade te openen (10).
3. Voer een Cd in met de bedrukte zijde naar boven gericht en sluit de lade.
4. De Cd wordt geladen en de LCD display (18) geeft het totale aantal
tracks en de totale afspeelduur weer. De Cd wordt afgespeeld.
5. Om het afspelen te onderbreken, dient er eenmaal op de ‘STOP’ knop
(32) te worden gedrukt. Het aantal tracks verschijnt op de LCD display.
Druk nogmaals op de PLAY/PAUSE knop (2) om terug te keren naar de
normale afspeelmodus.
Overslaan/zoeken omhoog of omlaag (skip/search up / skip/search
down)
Als er op de ‘VOLGENDE KNOP (3) wordt gedrukt in de afspeelmodus of
pauzemodus, gaat het apparaat naar de volgende track en geeft het
nummer van de track weer; de afspeelmodus of pauzemodus blijft behouden.
Als er op de VORIGE KNOP (4) knop wordt gedrukt in de afspeelmodus
of pauzemodus, gaat het apparaat naar het begin van de track en geeft
het oorspronkelijke nummer van de track weer; de afspeelmodus of pauzemodus blijft behouden.
Door na stap 2 opnieuw op de VORIGE KNOP (4) te drukken, gaat het
apparaat naar de vorige track, maar blijft in de afspeelmodus of pauzemodus.
Tijdens het afspelen van een CD/MP3 bestand dient de ‘VOLGENDE
KNOP (3)/VORIGE KNOP (4) te worden ingedrukt om de snel vooruit of
snel achteruit functie te activeren. Om deze functie te deactiveren, dient
deze knop te worden losgelaten.
Page 43

Nederlands Nederlands 81 82
DE WERKING VAN BLUETOOTH
1. Druk op de FUNCTIE KNOP (6) om de BLUETOOTH-modus te selecteren.
2. Kies uit uw draagbare apparaat (smartphone, tablet ...) de ID Bluetooth
tagged als "CBT", bevestig verbinding.
3. Nu kunt u de muziek naar de HIF-1999D+BT en alle operaties kunnen
alleen worden bediend vanaf uw mobiele apparaat.
CD / CASSETTEBANDJE OF 78/33/45 TOEREN PLAAT NAAR EEN MP3
BESTAND
Het apparaat kan normale Cd, cassettebandje of vinylplaat CODEREN naar
MP3 formaat, en dit opslaan op het opslagmedium dat is verbonden met de
USB poort.
VAN EEN CASSETTE CODEREN
Sluit het USB-station aan in de USB-poort. In de TAPE-stand, druk één keer
op RECORD KNOP (9), nu verschijnt “USB” op het scherm, druk vervolgens
nogmaals op RECORD KNOP (9) om te bevestigen, nu knippert “USB” en
zal het beginnen opnemen na 5 seconden; druk één keer op PLAY/PAUSE
KNOP (2) om de opname te stoppen en “USB” zal niet meer knipperen; druk
nogmaals op PLAY/PAUSE KNOP (2) om verder te gaan met de opname en
“USB” zal opnieuw knipperen.
VAN EEN PHONO CODEREN
Sluit het USB-station aan in de USB-poort. In de PHONO-stand, druk één
keer op RECORD KNOP (9), nu verschijnt “USB” op het scherm, druk ver-
volgens nogmaals op RECORD KNOP (9) om te bevestigen, nu knippert
“USB” en zal het beginnen opnemen na 5 seconden; druk één keer op
PLAY/PAUSE KNOP (2) om de opname te stoppen en “USB” zal niet meer
knipperen; druk nogmaals op PLAY/PAUSE KNOP (2) om verder te gaan
met de opname en “USB” zal opnieuw knipperen.
MP3/WMA BESTANDEN AFSPELEN VIA USB
Het apparaat is in staat om alle opgeslagen MP3/WMA bestanden te decoderen en af te spelen door de USB te verbinden met de USB poort.
1. Selecteer de USB modus met behulp van de FUNCTIE KNOP (6).
2. Na het maken van de verbinding begint het apparaat automatisch met
het afspelen van het opslagmedium, en op de LCD display (18) wordt het
totaal aantal MP3/WMA bestanden weergegeven.
3. Herhaal dezelfde afspeelprocedure als die van de CD/MP3 CD, zoals
hierboven vermeld.
OPMERKING
Het apparaat is uitsluitend in staat om MP3 en WMA bestanden weer te
geven en af te spelen wanneer dit via de USB poort gebeurt.
Als het apparaat wordt verbonden met een MP3 speler via de USB aan-
sluiting, kunnen sommige MP3 spelers de bestanden niet afspelen via de
USB aansluiting door variaties in het MP3 coderingsformaat. Dit is geen
defect van het apparaat.
Verbind de USB en let erop dat deze volledig wordt ingevoerd. Het verke-
erd invoeren van de USB kan leiden tot schade aan het geluidssysteem
of het opslagmedium. Controleer op de correcte richting alvorens de verbinding tot stand te brengen.
CASSETTEBANDJES AFSPELEN
1. Druk de FUNCTIE KNOP (6) naar de “TAPE“ modus.
2. Het apparaat begint automatisch met het afspelen van het cassetteban-
dje op het moment dat het bandje is ingevoerd.
3. Druk de PRESET KNOP (33) half in tijdens het afspelen. Druk vervolgens zacht op deze knop (33) om normaal afspelen te hervatten.
4. Druk de PRESET KNOP (33) volledig in, waarna de cassette zal worden
uitgeworpen.
Page 44

Nederlands Nederlands 83 84
Druk nogmaals op VOLGENDE KNOP (3) om de hele MP3-schijf die speelt
op te nemen en dan verschijnt “REC-A” op het scherm.
Aantekening: Druk op STOP KNOP (26) om de opname te stoppen wanneer u klaar bent met opnemen.
USB VERWIJDEREN
1. In de USB-stand, druk één keer op ANNULERINGSKNOP (45), nu ver-
schijnt “ DEL-1” op het scherm. U kan nu het nummer dat afspeelt verwi-
jderen.
2. Druk op VOLGENDE KNOP (3). Op het scherm verschijnen nu het bestand dat aan het afspelen is en “DEL-F”. U kan nu de map die aan het
afspelen is verwijderen.
3. Druk op VOLGENDE KNOP (3). “DEL-A” verschijnt nu op het scherm. U
kan nu alle nummers van de USB die afspeelt verwijderen.
4. Druk ten laatste nogmaals op ANNULERINGSKNOP (45) wanneer u
gekozen heeft voor “DEL-1”, “DEL-F” of “DEL-A”.
MUTE / EQ WERKING
In afspeelstand, druk één keer op DEMPEN KNOP (49), er komt nu geen
geluid uit de luidsprekers en op het scherm verschijnt “MUTE ON”; druk op
DEMPEN KNOP (49) of draai VOLUME KNOP (7) om de mutefunctie uit te
schakelen en het geluid komt opnieuw uit de luidsprekers.
In de afspeelstand, druk op EQUALIZER KNOP (34) om uit verschillende
geluidseffecten te kiezen: FLAT/POP/CLASSIC/ROCK/JAZZ.
TECHNISCHE SPECIFICATIES
AC: 110/230V ~ 50 Hz
Frequentiebereik FM Radio: 87,5- 108 MHz
DAB band: BAND III
De specificaties zijn onderhevig aan wijzigingen zonder waarschuwing vooraf.
VAN EEN BLUETOOTH CODEREN
Sluit het USB-station aan in de USB-poort. In de BLUETOOTH-stand, druk
één keer op RECORD KNOP (9), nu verschijnt “USB” op het scherm, druk
vervolgens nogmaals op RECORD KNOP (9) om te bevestigen, nu knippert
“USB” en zal het beginnen opnemen na 5 seconden; druk één keer op
PLAY/PAUSE KNOP (2) om de opname te stoppen en “USB” zal niet meer
knipperen; druk nogmaals op PLAY/PAUSE KNOP (2) om verder te gaan
met de opname en “USB” zal opnieuw knipperen.
VAN EEN RADIO CODEREN
Sluit het USB-station aan in de USB-poort. In de FM/DAB-stand, druk één
keer op RECORD KNOP (9), nu verschijnt “USB” op het scherm, druk ver-
volgens nogmaals op RECORD KNOP (9) om te bevestigen, nu knippert
“USB” en zal het beginnen opnemen na 5 seconden; druk één keer op
PLAY/PAUSE KNOP (2) om de opname te stoppen en “USB” zal niet meer
knipperen; druk nogmaals op PLAY/PAUSE KNOP (2) om verder te gaan
met de opname en “USB” zal opnieuw knipperen.
VAN EEN CD CODEREN
In de MP3-afspeelstand, druk één keer op RECORD KNOP (9), nu verschijnt
“REC-1” op het scherm; druk vervolgens een tweede maal op RECORD
KNOP (9) om te bevestigen, nu knippert “REC” en zal het na 5 seconden
beginnen met de opname.
Druk nogmaals op VOLGENDE KNOP (3) om de hele CD die speelt op te
nemen en dan verschijnt “REC-A” op het scherm.
VAN EEN CD-MP3 CODEREN
In de MP3-afspeelstand, druk één keer op RECORD KNOP (9), nu verschijnt
“REC-1” op het scherm; druk vervolgens een tweede maal op RECORD
KNOP (9) om te bevestigen, nu knippert “REC” en zal het na 5 seconden
beginnen met de opname.
Druk één keer op VOLGENDE KNOP (3) om het hele bestand uit de afspe-
lende map op te nemen en dan verschijnt “REC-F” op het scherm.
 Loading...