


INSTALLATION
instructions
for single TILT FORWARD 42 Mikuni Carburetor kit
www.riveraengineering.com
12450 Whittier Blvd, Whittier, CA 90602 (562) 907-2600 fax (562) 907-2606


 SINGLE CARB INSTRUCTIONS
SAFETY PROCEDURES
NOTES, CAUTIONS & WARNINGS
Instructions in this manual preceded by these words are very important.
NOTE
Means information that can make a job easier.
CAUTION
Means there is the possibility of damage to the vehicle.
WARNING
Means there is the possibility of personal injury to yourself or others.
Read the installation instructions thoroughly prior to the installation of this Rivera-Mikuni carb kit. All procedures should be followed exactly as described in this manual, paying particular attention to the following:
WARNING
1.THIS CARBURETOR REQUIRES THE USE OF PULL OPEN / PULL CLOSED THROTTLE CABLES to insure closing of the throttle valve (slide). The high vacuum nature of this carb, or dirt dirt ingested into the carburetor when running without an air filter, may prevent the throttle valve from closing promptly and or completely.
2.Install the THROTTLE CABLES SO THEY
ARE ROUTED FREELY (WITHOUT SHARP BENDS) BETWEEN THE THROTTLE TWIST GRIP & THE CARBURETOR. The throttle cables should not be pinched by the installed fuel tank, and they should not be pinched, pulled or restricted by the motorcycle body work and/or the front fork assembly when it is turned through the full range of motion.
2
3. GASOLINE IS EXTREMELY FLAMMABLE & GASOLINE VAPORS ARE EXPLOSIVE. Before installing or servicing your Rivera carb kit, always follow these fire safety procedures:
Make sure the work area is well ventilated and free from open flame or sparks, i.e., appliances with pilot lights, such as water heaters, clothes dryers or space heaters, etc.
Before removing the motorcycle gas tank, be sure the fuel petcock is in the "OFF" position and the cross-over fuel line is well clamped. Clean up any fuel spills immediately.
4. Never look directly into the bores of the carburetors while the motor is running as injury may result from backfires.
CAUTION
A moderate degree of mechanical skill is required to properly install this single-carb kit. If after reading these instructions you have any doubts about your ability to correctly install it we recommend that you have a professional install it for you. If you install the kit yourself we recommend that you also use the applicable maintenance manual for your motorcycle for reference.
TYPICAL TOOLS REQUIRED
These tools are required to remove the stock carburetor and install the high performance Rivera single carburetor kit.
1.Allen wrenches, 1/8", 5/32", 1/4" & 5/16"
2.Standard wrenches, 1/2", 9/16"
3.Diagonal cutters (dikes)
5. Slotted and #2 Phillips screwdrivers
5.Rivera Blue Thread lock or equivalent
6.T25 TORX, '96-'98 models only
7.Maintenance Manual (for your model)

 SINGLE CARB INSTRUCTIONS
DISASSEMBLY
1.Disconnect the negative (-) battery terminal.
2.Turn the fuel petcock to the "OFF" position.
3.Remove the gas tank from the motorcycle, or elevate the rear of the tank for better access to the intake manifold.
4.Completely remove the OEM or existing air cleaner assembly.
6.Disconnect the vacuum hoses and fuel hose from the carburetor.
7.Remove the carburetor assembly (and choke cable assembly) from the motorcycle. The throttle cable adjusters must be slackened to allow the cables to be disconnected from the carburetor. The Rivera single-carb MIkuni kit is designed to operate with standard 1990 & later HarleyDavidson OEM throttle cables.
8.Remove the intake manifold and clamps; these parts will not be reused.
INSTALLATION
1.INTAKE MANIFOLD
A.Attach the Rivera intake manifold using the enclosed clamps and seals. The rear cylinder clamp is marked with "R" and the front with "F". Place the clamps and seals onto the manifold and loosely attach the manifold to the cylinder heads using the stock bolts.
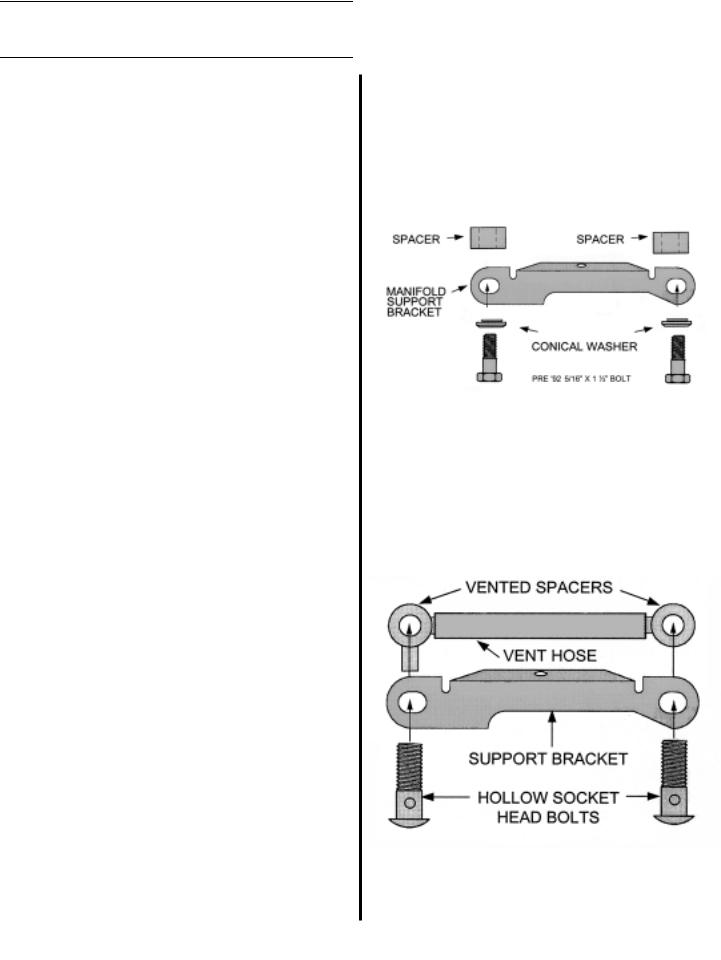
B.Attach the Rivera manifold support bracket to the cylinders in the appropriate method for your type engine:
SUPPORT BRACKET ATTACHMENT
FOR PRE '92 MODELS
Pre '92 engines use 2ea. 5/16" X 11/2" bolts, 2ea. conical washer, & 2ea. 1/2" long spacers with 5/16" holes from this kit.
TOP View
SUPPORT BRACKET ATTACHMENT
FOR '92 & LATER MODELS
"92 & later engines; use 2ea. 1/2" hollow socket head bolts, and 2ea. 1/2" long vented spacers. Install the vented spacers as illustrated with the enclosed 5/16" ID hose. (Twin Cam uses 3/8” hollow bolts.)
3
 Loading...